

Page 1
14
13
15 16
12
24
23
17
18
19
2
1
3
4
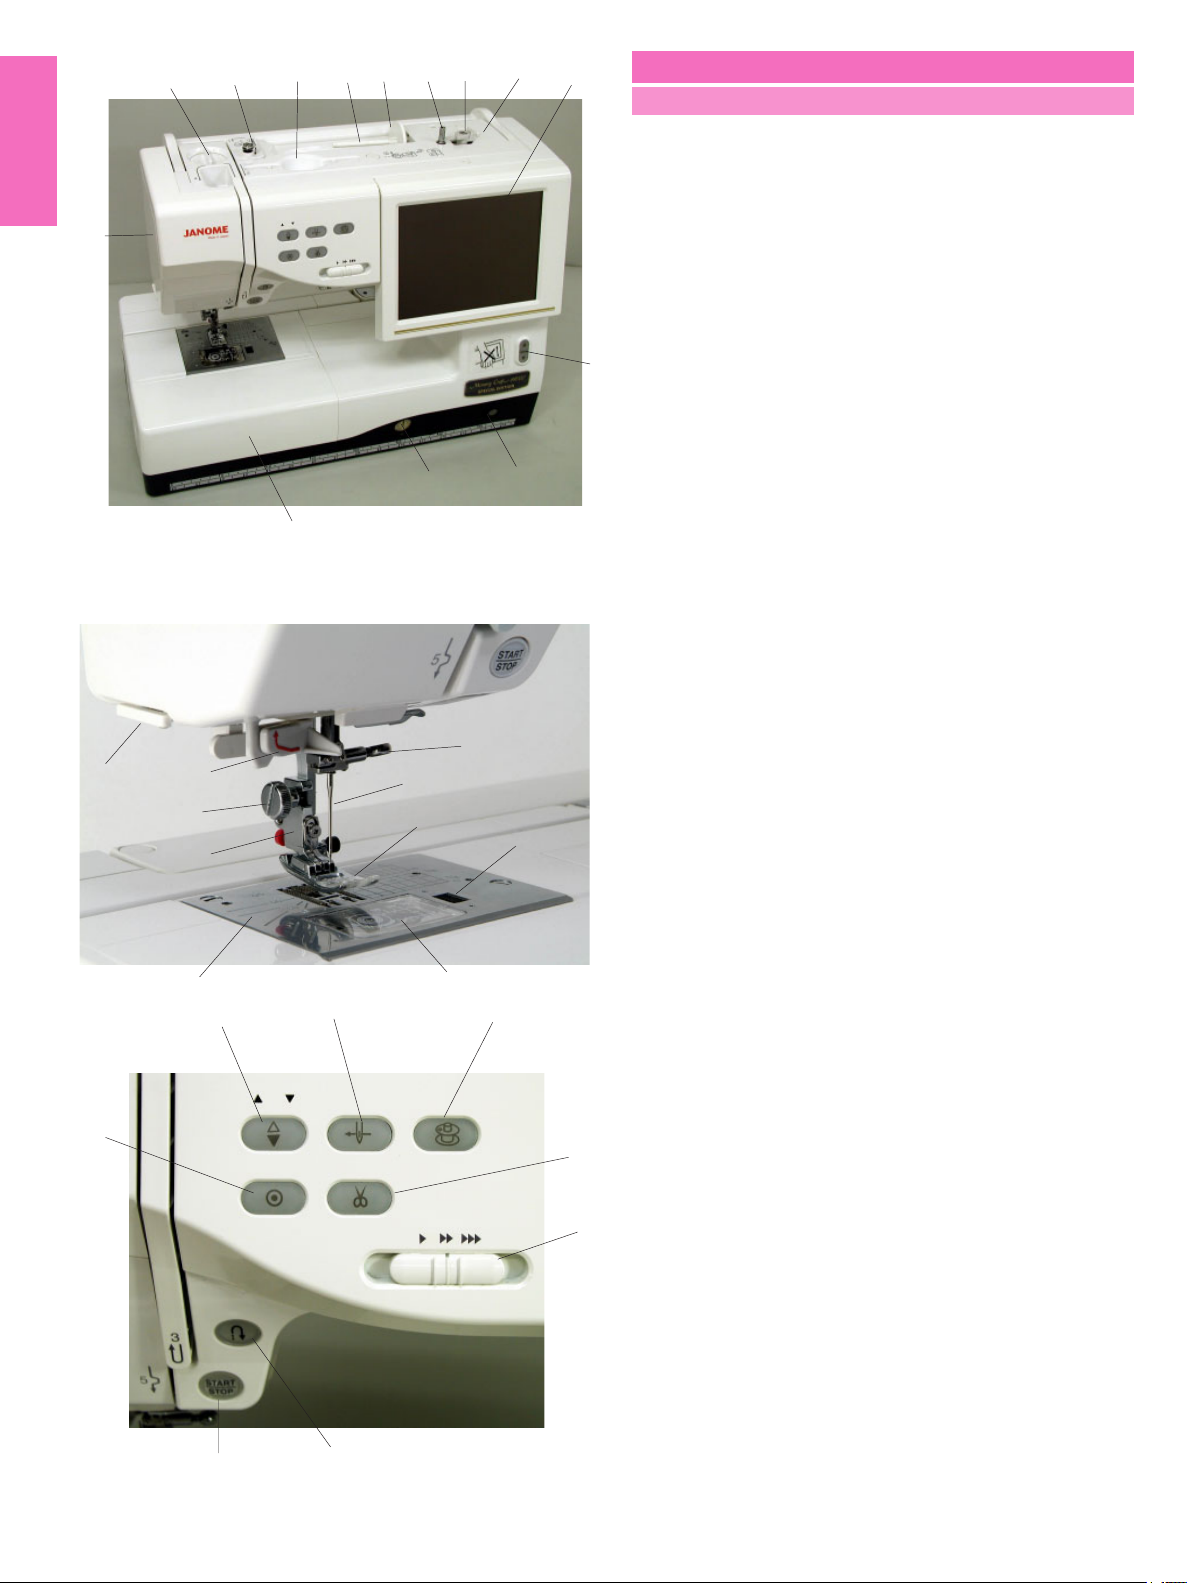
GETTING READY TO SEW
Names of Parts
1 Bobbin winder spindle
2 Bobbin winder stopper
3 Bobbin thread cutter
4 Visual touch screen
5 Screen up/down button
6 Knee lifter socket
7 Feed balancing dial
8 Extension table (accessory storage)
9 Hook cover release button
5
10 Hook cover plate
11 Needle plate
12 Automatic needle threader
13 Thread cutter/holder
7
8
21
22
6
20
9
14 Face plate
15 Foot pressure dial
16 Bobbin winding thread guide
17 Stylus holder (for the touch panel stylus)
18 Spool pin
19 Spool holder
20 Needle clamp screw
21 Needle
22 Zigzag foot A
23 Foot holder
24 Thumbscrew
25 Auto needle threader button
26 Bobbin winding button
27 Thread cutter button
28 Speed control slider
29 Start/stop button
30 Reverse button
31 Auto-lock button
32 Needle up/down button
31
11
32
29
25
30
10
26
27
28
2
Page 2
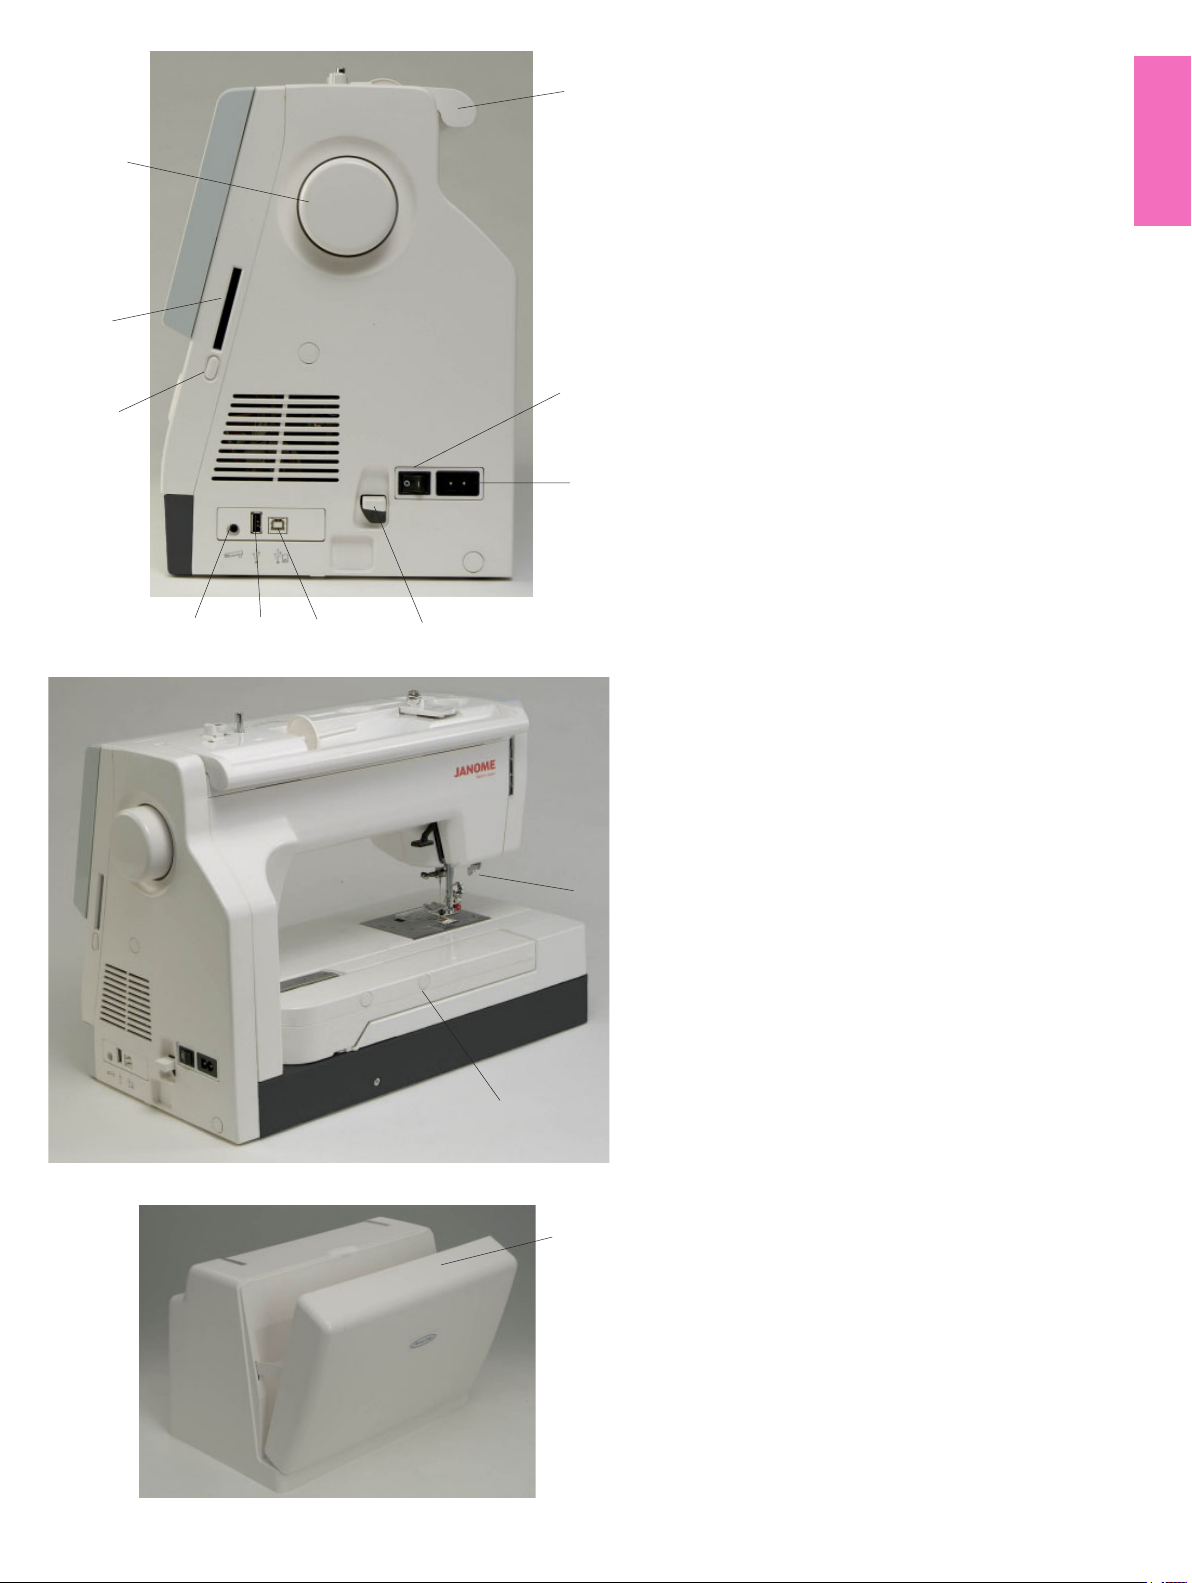
10
9
1 Carrying handle
1
2 Power switch
3 Machine socket
4 Carriage release lever
5 USB port (for direct PC link)
6 USB port (for CD-ROM drive/USB memory key)
7 Foot control jack
8 Card ejecting button
9 Card slot
10 Hand wheel
11 Buttonhole lever
2
8
12 Retractable carriage arm
13 Hard cover (accessory storage)
3
567
4
11
12
13
3
Page 3
1
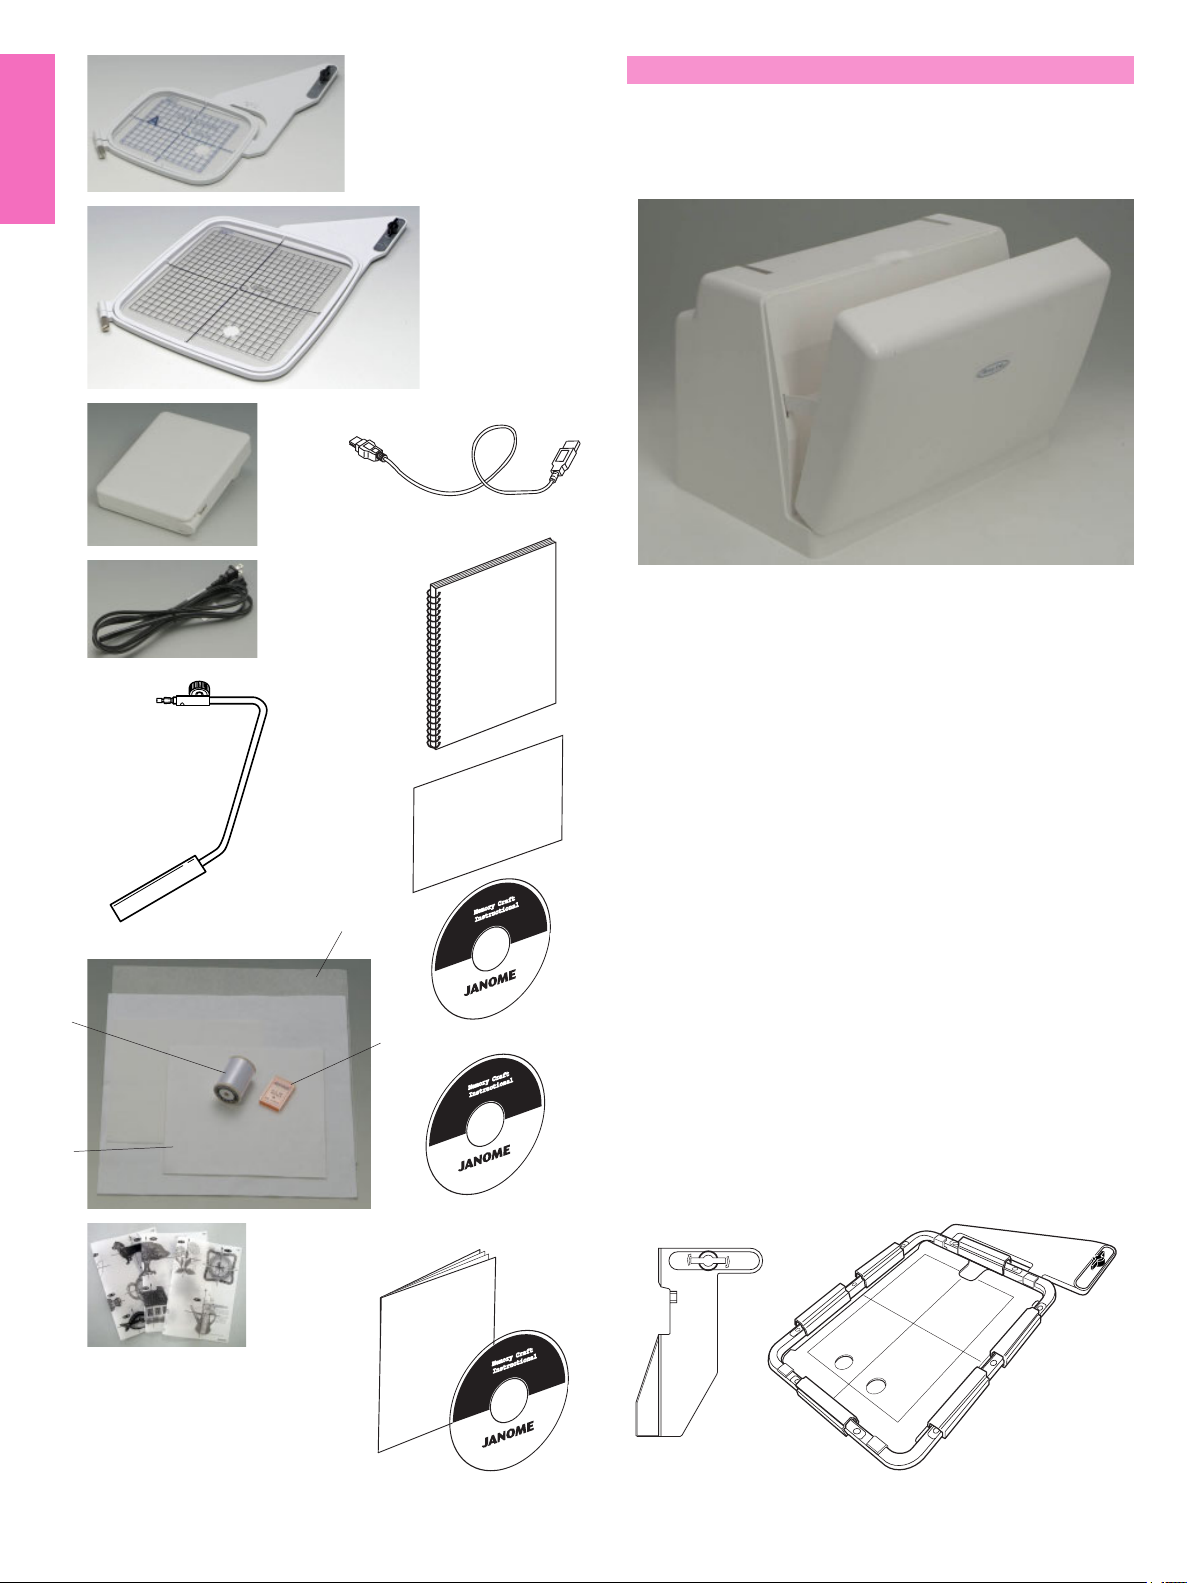
Standard Accessories and Storage
The embroidery hoops, foot control, power supply cord,
knee lifter etc. can be conveniently stored in the hard cover.
2
3
11
4
12
1 Embroidery hoop-ST (with template)
2 Embroidery hoop-SQ (with template)
3 Foot control
5
4 Power supply cord
5 Knee lifter
6 Set of red tip needles
13
7 Bobbin thread for embroidery
8 Felts
9 Stabilizers
10 Template sheets for built-in embroidery designs
9
14
11 USB cable
12 Instruction book
13 Key icon reference chart
7
6
14 Instructional movie DVD
15 Handbook CD-ROM
16 MC11K Tools CD-ROM (with instruction booklet)
15
17 Cloth guide
18 Embroidery hoop-AQ (with template and clamps)
8
10
17
18
16
4
Page 4
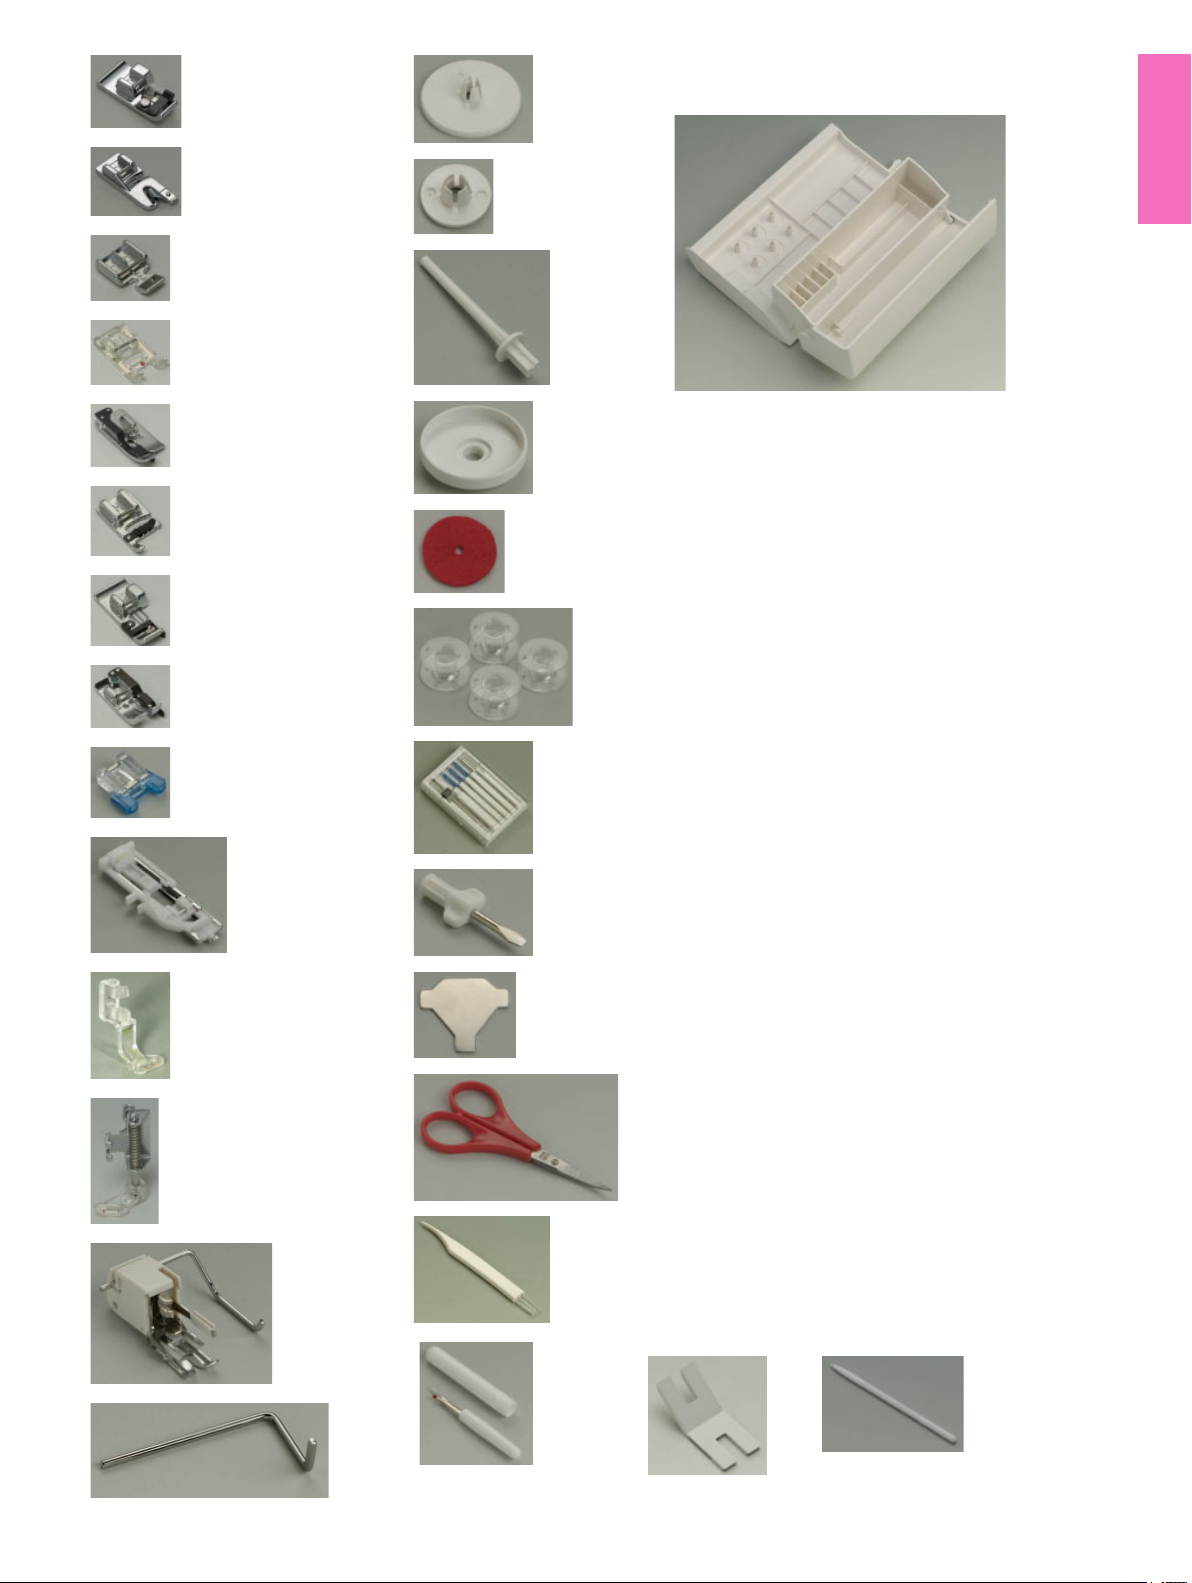
1
15
The extension table provides a handy compartment for
storing various accessories.
11
13
2
3
4
5
6
7
8
9
10
12
16
17
20
18
19
21
22
23
24
25
1 Overcasting foot C
2 Rolled hem foot D
3 Zipper foot E
4 Satin stitch foot F
5 Blind hemming foot G
6 Cording foot H
7 Overedge foot M
8 1/4” seam foot O
9 Button sewing foot T
10 Automatic buttonhole foot R
11 Embroidery foot P
12 Darning foot P-2
13 Even feed foot with quilting bar
14 Quilting guide bar
15 Spool holder (large)
16 Spool holder (small)
17 Extra spool pin
18 Spool supporter
19 Felt cushion
20 Bobbins
21 Set of needles
22 Screwdriver
23 Screwdriver key
24 Scissors
25 Lint brush
26 Seam ripper (Buttonhole opener)
27 Button shank plate
28 Touch panel stylus
14
26
27
5
28
Page 5

Extension Table
The extension table provides an extended sewing area
and can be removed for free arm sewing.
1 Extension table
To detach:
Draw the table out to the left.
To attach:
Slide the table on the base and push the table to the
1
right.
Free arm sewing
Free-arm sewing is used for stitching sleeves, waist-
bands, pant legs or any other tubular garments.
It is also useful for darning socks or mending knees or
elbows.
For free arm sewing
1 Return the carriage to the home position (refer to
page 67).
2 Turn the power switch off.
3 Remove the extension table.
4 Hook your finger on the bottom of the fillet and draw
the fillet out to the left.
3
2 Fillet
For flat bed sewing
1 Return the carriage to the home position.
2 Turn the power switch off.
3 Insert the fillet and slide it to the right, between the
free arm and carriage base.
4 Attach the extension table.
3 Carriage base
4
4 Free arm
NOTE:
2
Do not pull or push the carriage base.
6
Page 6
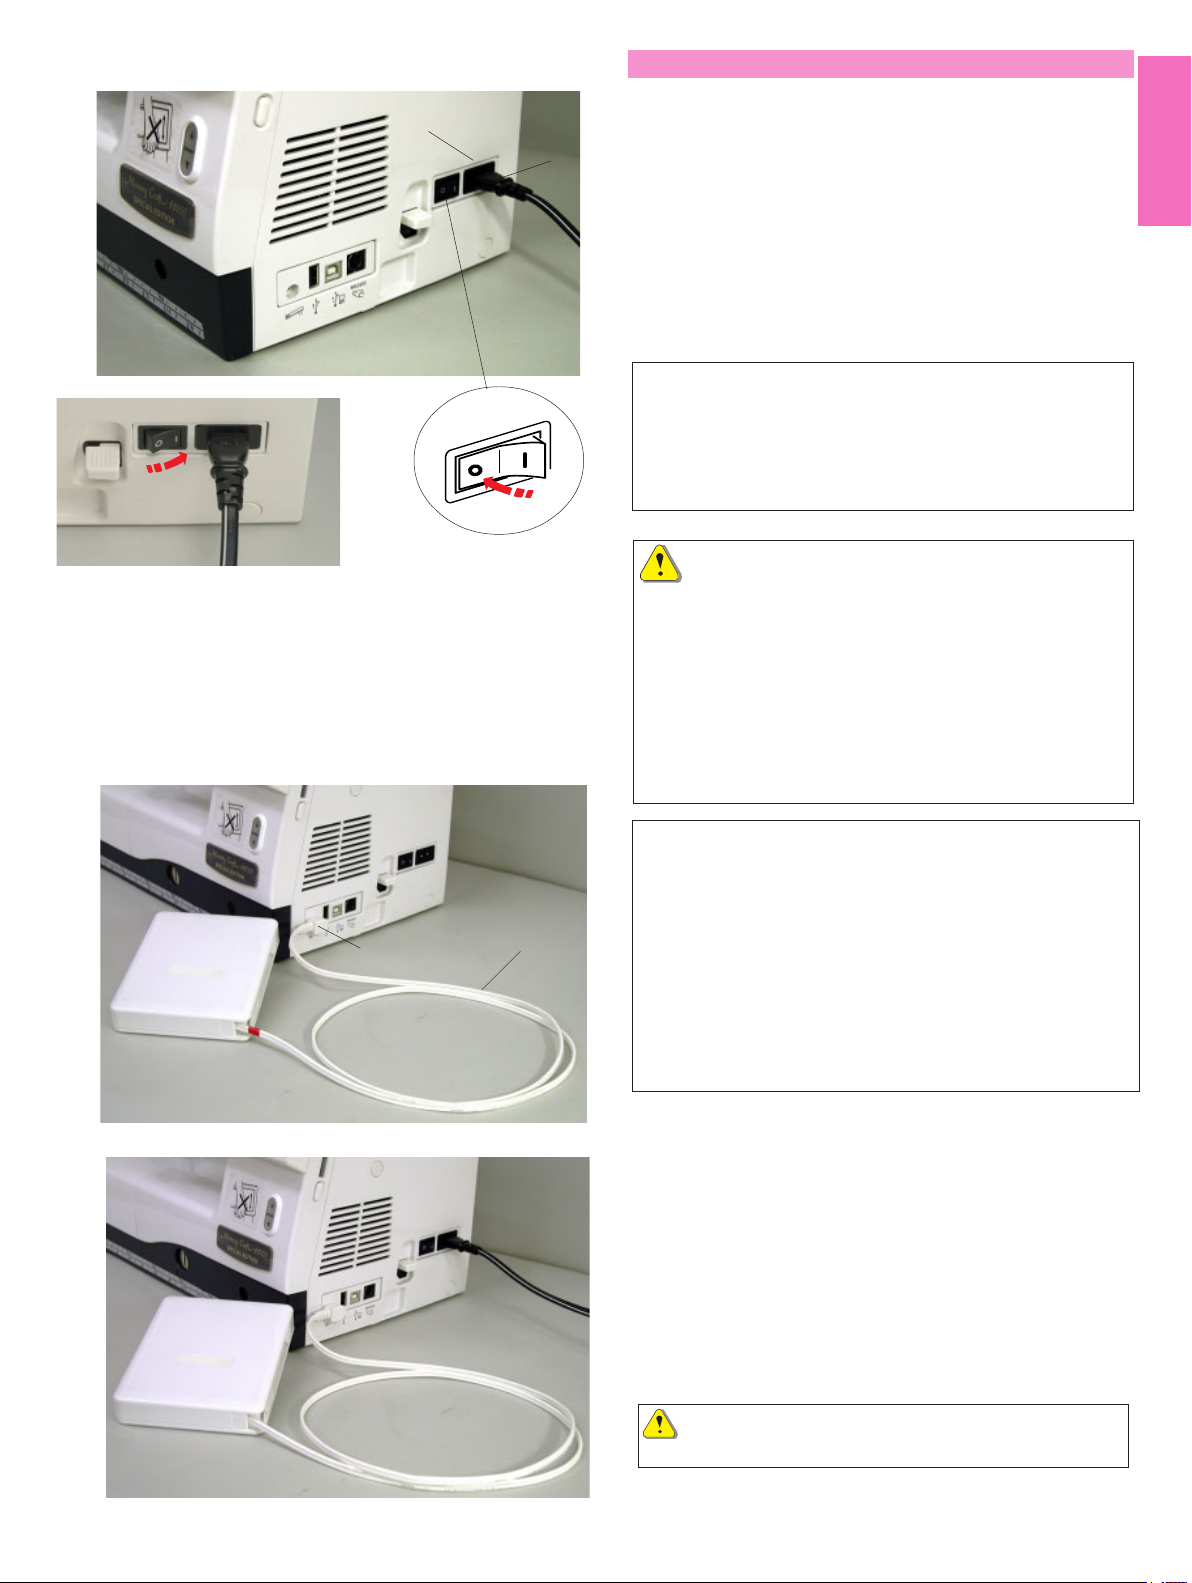
Connecting the Power Supply
3
2
1
First mak sure the power switch is off and then insert
the foot control plug into the jack on the machine if you
wish to use foot control.
Insert the machine plug of the power supply cord into
the machine socket.
Insert the power supply plug into the wall outlet, and
turn the power switch on.
1 Power switch
2 Machine plug
3 Machine socket
NOTES:
Make sure to use the power supply cord that came with
the machine.
If you turn off the power switch, wait for 5 seconds
before turning it on again.
The foot control cannot be used in the embroidery mode.
WARNING:
While in operation, always keep your eyes on the
sewing area, and do not touch any moving parts such
as the thread take-up lever, handwheel or needle.
Always turn off the power switch and unplug the
machine from the power supply:
- when leaving the machine unattended.
- when attaching or removing parts.
- when cleaning the machine.
Do not place anything on the Foot Control.
Operating Instructions:
The symbol “O” on a switch indicates the “off” position
of the switch.
2
1
For the U.S.A. and Canada only
Polarized plug (one blade wider than the other):
To reduce the risk of electric shock, this plug is intended
to fit in a polarized outlet only one way. If it does not fit
fully in the outlet, reverse the plug. If it still does not fit,
contact a qualified electrician to install the proper outlet.
Do not modify the plug in any way.
If you wish to use the foot control, pull out the cord from
the foot control and insert the pin connector into the
jack on the machine.
1 Foot control cord
2 Pin connector
Insert the machine plug of the power supply cord into
the machine socket.
Insert the power supply plug into the wall outlet, and
turn the power switch on.
CAUTION:
Do not pull the foot control cord beyond the red mark.
7
Page 7
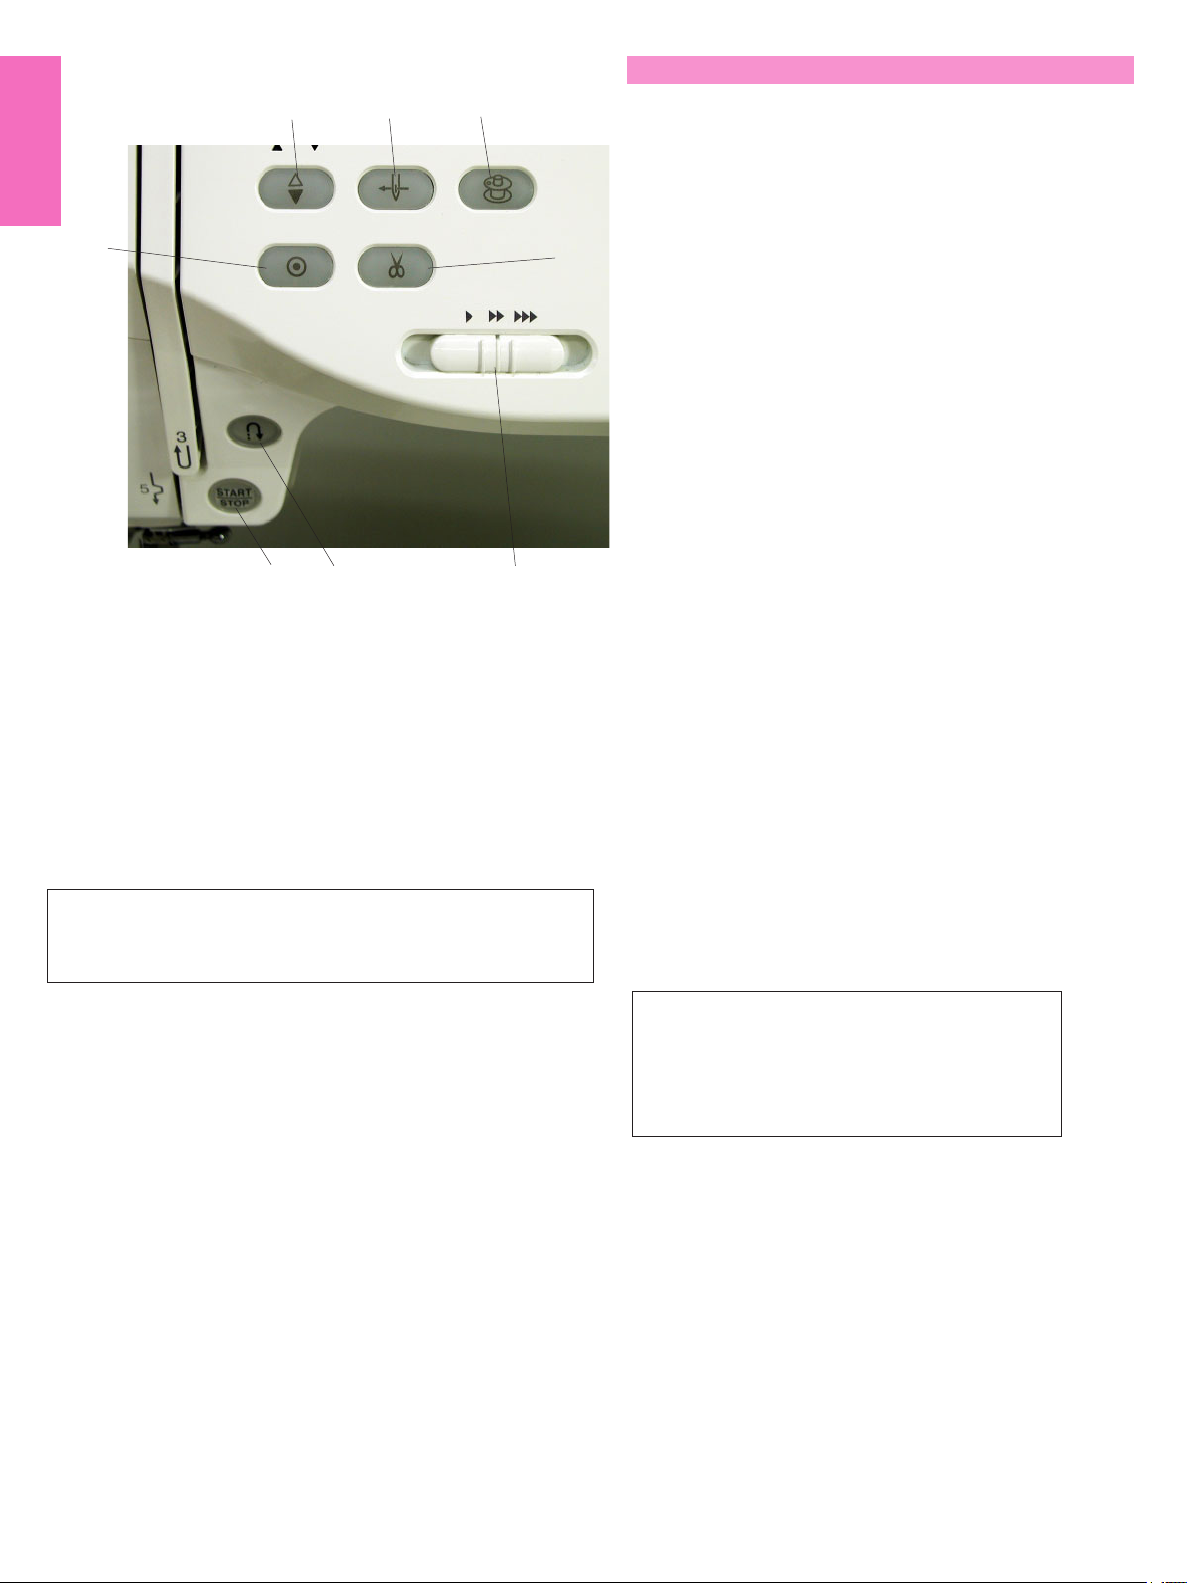
Machine Operating Buttons
3
6
4
12
7
8
5
1 Start/stop button
Press this button to start or stop the machine. This button
can be used either in the ordinary sewing mode or
embroidery mode. In the ordinary sewing mode, the machine
starts running slowly for the first few stitches, it then runs at
the speed set by the speed control slider. The machine runs
slowly as long as this button is pressed.
The button will turn red when the machine is running, and
green, that it has been stopped.
NOTE:
The start/stop button cannot be used in the ordinary sewing
mode when the foot control is connected to the machine.
4 Auto-lock button
When sewing stitch pattern U1, U2, U8 or U9, the
machine will immediately sew locking stitches and
automatically stop when the auto-lock button is
pressed.
When sewing all other stitches, the machine will sew
to the end of the current pattern, sew locking stitches
and stop automatically.
The machine will trim the threads automatically after
locking the stitch when the auto thread cutting is
enabled (refer to page 22).
5 Speed control slider
This slider will set the maximum sewing speed in the
ordinary sewing mode (refer to page 9).
6 Auto needle threader button
Press this button and follow the step-by-step
instruction displayed on the visual touch screen to
thread the needle.
Refer to page 13.
7 Bobbin winding button
Press this button to wind the bobbin.
Refer to page 10.
8 Thread cutter button
Press this button after finishing sewing and the
machine will trim the threads automatically.
Refer to page 28.
2 Reverse button
When sewing stitch pattern U1, U2, U8 or U9, the machine
will sew in reverse as long as the reverse button is pressed.
If the stitch pattern U1, U2, U8 or U9 has been selected and
the foot control is not connected, the machine will start
sewing in reverse as long as the reverse button is pressed.
If you press the reverse button when sewing any other
stitches, the machine will immediately sew locking stitches
and automatically stop.
3 Needle up/down button
Press this button to bring the needle bar up or down.
NOTES:
The thread cutter button does not function:
- soon after turning on the power.
- when the presser foot is in the up position.
- when being pressed 4 times in a row.
8
Page 8
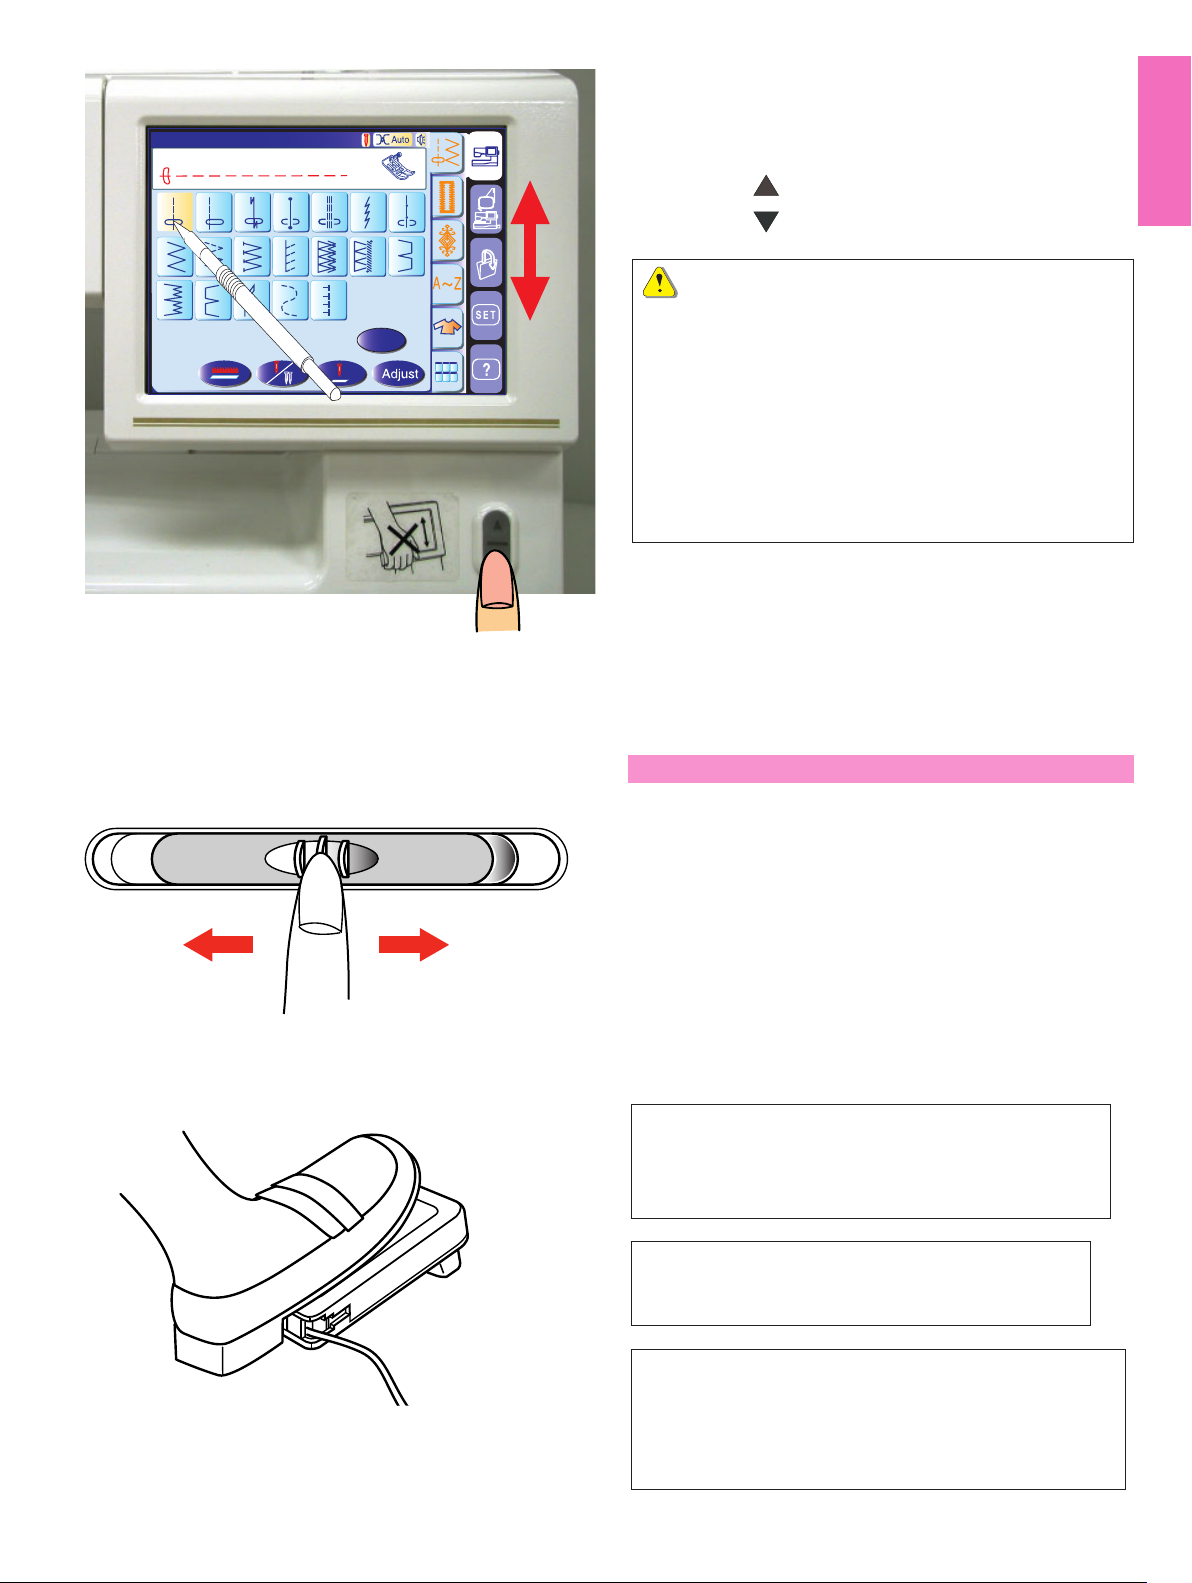
Utility(U)
Straight Stitch
Screen up/down button
The visual touch screen can be raised to open (clear)
the space for handling fabrics etc.
A
1
2
4
3
5
7
6
Pressing the button raises the screen, while
pressing the button lowers the screen.
8
9
10
11
15
16
17
13
12
1918
14
CAUTION:
Be sure to store the visual touch screen in the lowest
B
position before carrying or storing the machine to
prevent the screen from damage by impact.
Do not force to move the visual touch screen by hand.
Do not press the surface of the visual touch screen
with hard or sharp objects like pencils, screwdrivers or
the like. Use the touch panel stylus to press the visual
touch screen.
Controlling Sewing Speed
Speed control slider
You can limit the maximum sewing speed with the
speed control slider according to your sewing needs.
To increase the sewing speed, move the slider to the right.
To decrease the sewing speed, move the slider to the left.
Foot control
Pressing on the foot control can vary sewing speed.
The harder you press the foot control, the faster the
machine runs.
NOTE:
The machine runs at the maximum speed set by the
speed control slider when the foot control is fully
depressed.
Operating Instructions:
Foot controller Model 21371 is for use with sewing
machine model MC 11000.
NOTE:
This machine is equipped with an automatic shutdown
safety feature to prevent overheating whenever the
machine is running overloaded. Follow the safety
instructions that appear on the visual touch screen.
9
Page 9
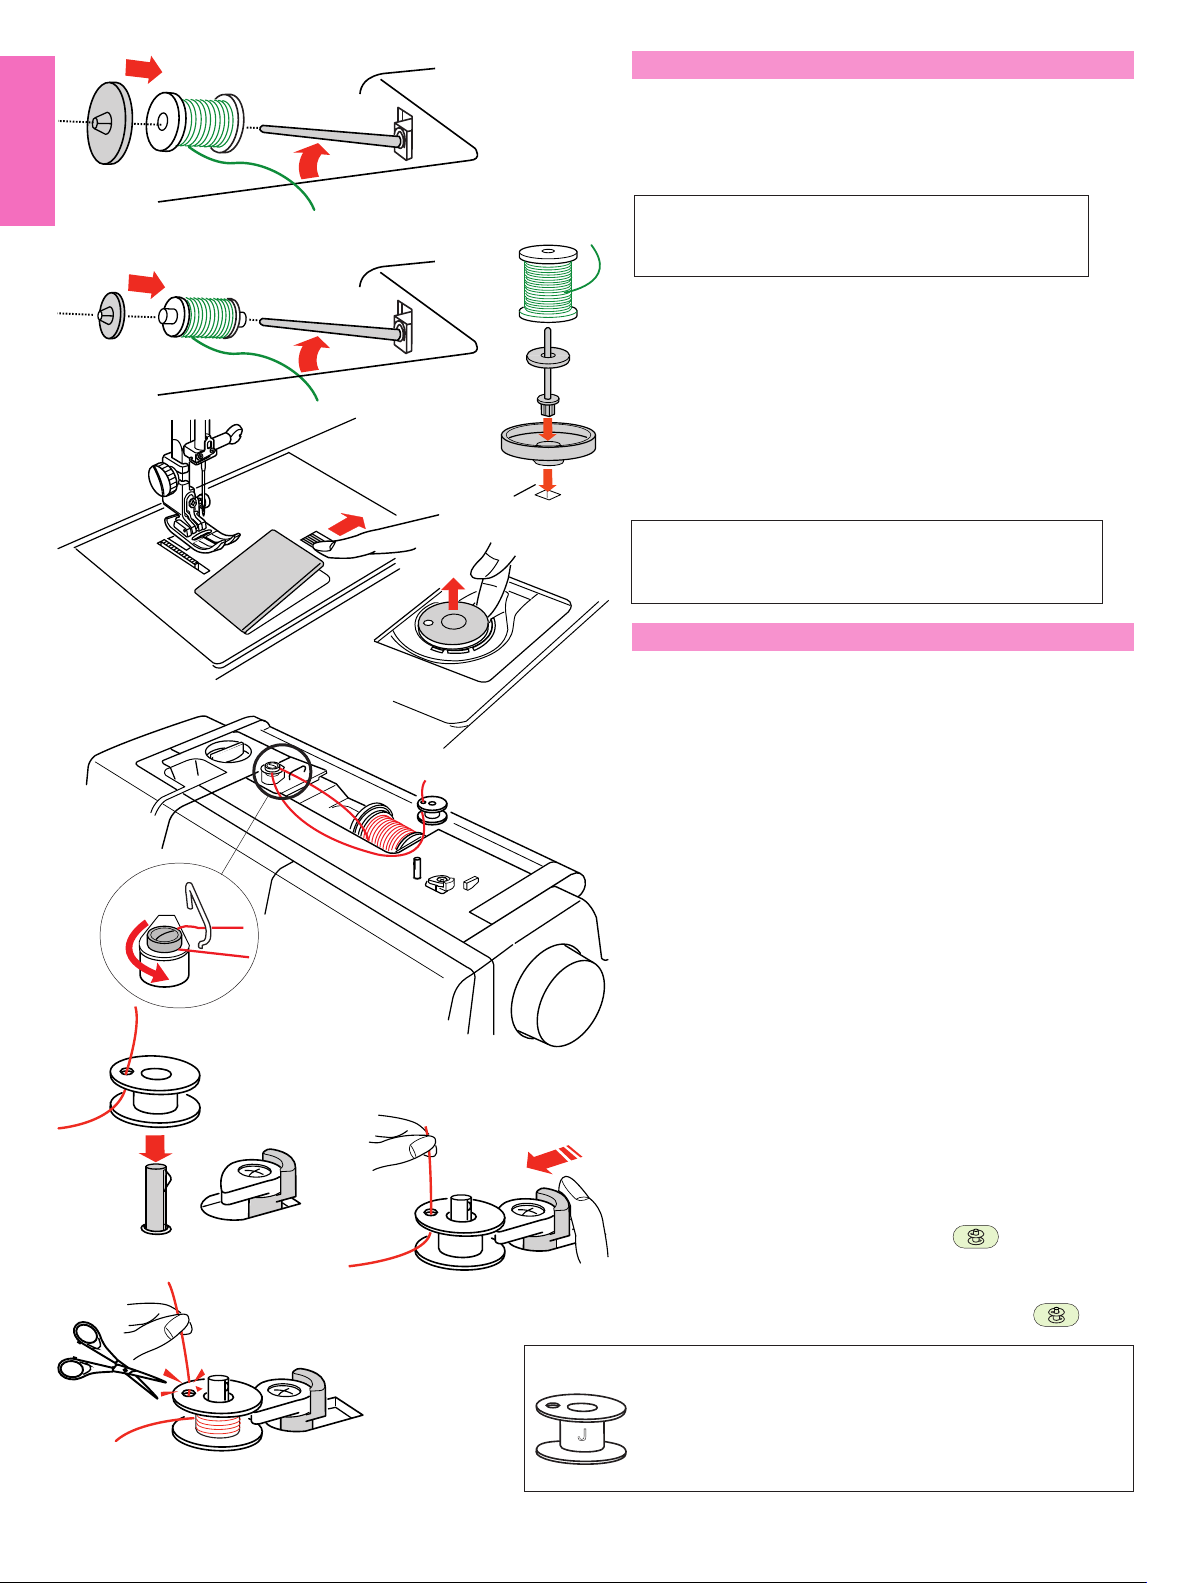
Setting the Spool of Thread
Lift up the spool pin. Place the spool of thread on the
spool pin with the thread coming off the spool as
shown. Attach the large spool holder, and press it firmly
against the spool of thread.
NOTE:
Use the small spool holder to hold narrow or small
spools of thread.
Extra spool pin
Use the extra spool pin when you need to wind a
bobbin without unthreading the machine while working
on a sewing project.
Insert the extra spool pin into the spool supporter and
then into the hole beside the horizontal spool pin.
1
2
Place the felt cushion on the spool pin and place a
spool of thread on it as shown.
NOTE:
The extra spool pin is also used for twin needle
sewing.
Winding the Bobbin
This machine has an exclusive motor for bobbin
winding, which allows you to wind the bobbin while
stitching.
1 Slide the hook cover release button to the right, and
remove the hook cover plate.
2 Lift out the bobbin from the bobbin holder.
3
3 Pull the thread from the spool and pass the thread
through the thread guide.
Draw the thread around and under the bobbin
winding tension disk.
4
5
6
4 Pass the thread through the hole in the bobbin from
the inside to the outside.
5 Put the bobbin on the bobbin winder spindle.
Push the bobbin winder stopper to the left.
6 Hold the free end of the thread in your hand and
press the bobbin winding button .
Press the bobbin winding button again to stop the
bobbin when it has wound several layers, and cut
the thread close to the hole in the bobbin .
NOTE:
10
Use the Janome plastic bobbins for horizontal hook
(marked with “J”). Using other bobbins, such as
prewound paper bobbins, may cause stitching problem
or damage to the bobbin case.
Page 10

7
7 Press the bobbin winding button again .
When the bobbin is fully wound, the bobbin winder
stopper returns to the original position and the
machine will stop automatically.
Cut the thread with the thread cutter.
1
2
3
(A)
4
Inserting the Bobbin
1 Place the bobbin in the bobbin holder with the thread
running off counterclockwise.
2 Guide the thread into the front notch (A) on the
bobbin holder.
3 Draw the thread to the left, sliding it between the
tension spring blades.
4 Continue to draw the thread lightly until the thread
slips into the side notch (B).
(B)
5
5 Pull out about 10 cm (4") of thread to the rear.
Reattach the hook cover plate.
NOTE:
A threading chart is shown on the hook cover plate for
your reference.
11
Page 11

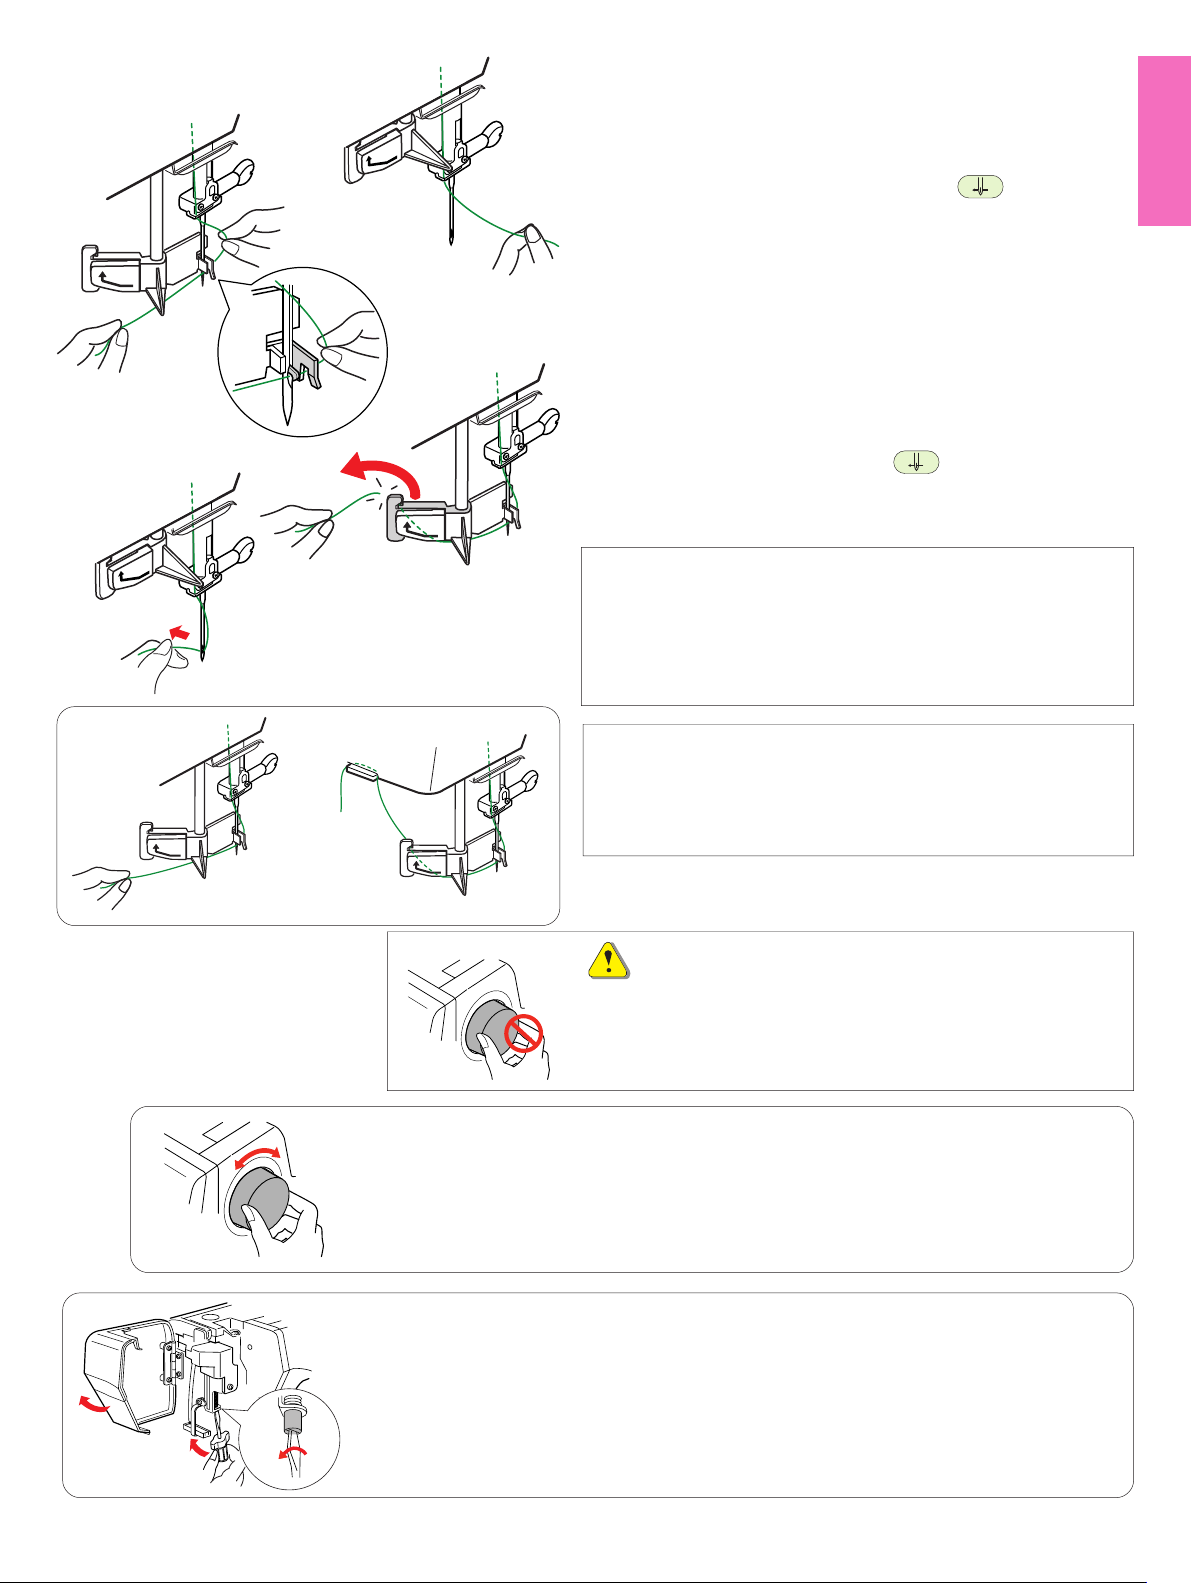
Threading the Machine
Raise the presser foot. Press the needle up/down
button twice to raise the needle.
Turn the power switch off.
1 Draw the thread from the spool. Hold the thread with
1
both hands and pass the thread under the thread
guide plate. Tug the thread until it snaps.
2
2 Draw the thread down along the right channel and
around the bottom of the guide plate.
3 Pull the thread up along the left channel to the
3
4
thread take-up lever.
4 Firmly draw the thread up to the take-up lever and
down into its eye from the right to the left, while
holding the thread at the spool.
5
5 Then pull the thread down along the left channel
and through the lower thread guide.
6 Slide the thread behind the needle bar thread guide
on the left.
6
7 Thread the needle with the automatic needle
threader (refer to the next page).
7
12
Page 12
1
Using the Automatic Needle Threader
Turn the power switch on and lower the presser foot.
2
1 Hold the end of the needle thread gently.
2 Press the auto needle threader button . The threader
lowers automatically and the hook comes out through
the needle eye from behind it.
3 Pull the thread down around the thread guide, then
pass the thread from the right and under the hook as
shown.
4
3
5
4 Draw the thread to the left and slip it into the slit of the
thread holder from the bottom and cut the thread with
the thread cutter as shown.
5 Press the auto threader button again. The threader
goes up automatically and pulls the thread out through
the needle eye. Pull the loop of thread to the back.
NOTES:
The automatic needle threader works well on the needles
Nos. 11-14, sewing threads Nos. 50-90 and Janome
embroidery threads.
Thick threads, Nos. 20 and 30, are not suitable for the
automatic needle threader.
NOTES:
You may need to hold the thread end with your hand when
threading certain kinds of threads.
When threading monofilament thread, hang the thread end
on the thread holder on the face plate.
CAUTION:
Do not turn the handwheel while the automatic needle
threader is in the lowered position to prevent it from
damage. Do not touch the automatic needle threader while it
is moving.
If the automatic needle threader is locked by turning the handwheel accidentally,
release it as follows:
Carefully turn the handwheel to move the needle up or down a little, so that it frees the
automatic needle threader.
Press the auto needle threader button to restore the automatic needle threader to the
up position.
If the automatic needle threader will not return to the up position by pressing the auto
needle threader button, correct it as follows:
1. Turn the power switch off.
2. Open the face plate.
3. Turn the threader shaft counterclockwise to release the hook from the needle eye.
4. Turn the power switch on and the automatic needle threader will return to the up
position.
5. Close the face plate.
13
Page 13

Drawing Up the Bobbin Thread
1
2
3
1 Raise the presser foot lifter.
2 Hold the needle thread with your finger and press
the up/down needle button twice to pick up the
bobbin thread.
3 Draw up the needle thread to bring up a loop of the
bobbin thread.
4
4 Slide 10 cm (4") of both threads to the back under
the presser foot.
14
Page 14
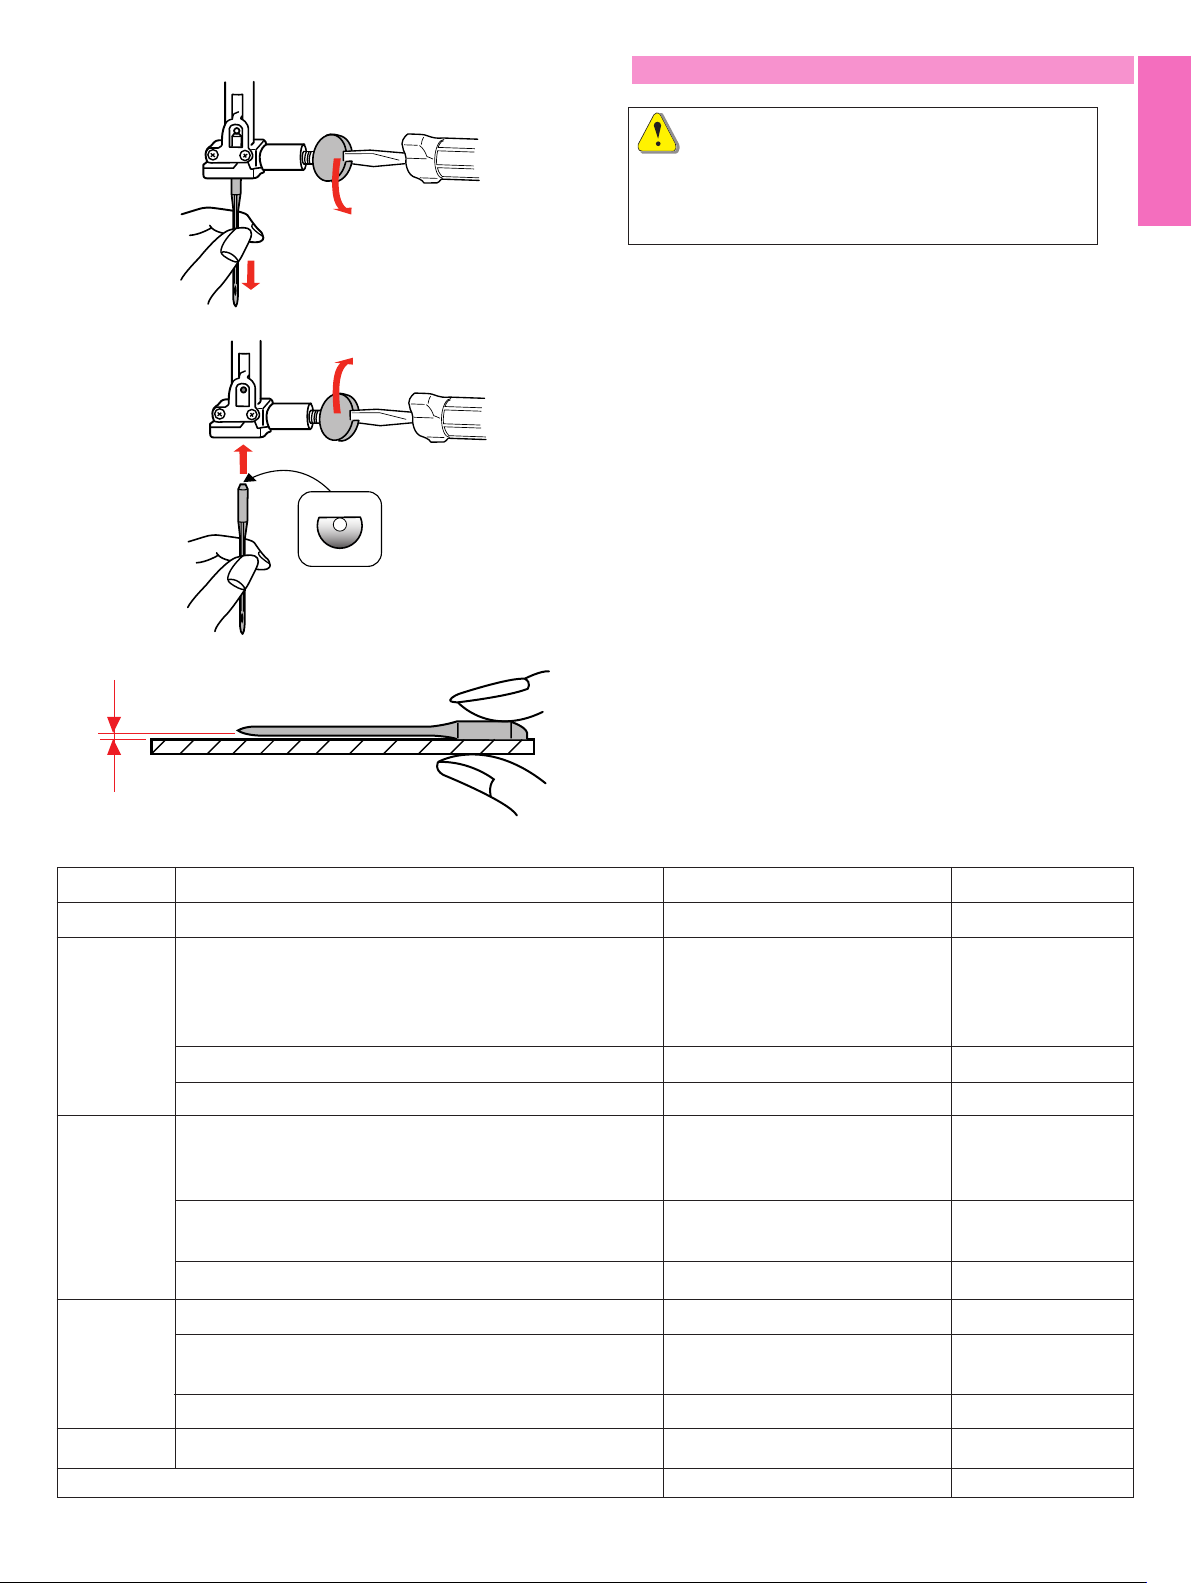
Changing Needles
CAUTION:
Always make sure to turn the power switch off and
disconnect the machine from power supply before
changing the needle.
Raise the needle by pressing the up/down needle
button and lower the presser foot.
Turn the power switch off.
Loosen the needle clamp screw by turning it counter-
clockwise.
Remove the needle from the clamp.
Insert a new needle into the needle clamp with the flat
side of the needle to the rear.
When inserting the needle into the needle clamp, push
it up against the stopper pin and tighten the needle
clamp screw firmly with a screwdriver.
Fabrics and needle chart
Weight
Very Light
Light
Medium
Fabric
Chiffon, Georgette, Fine Lace, Organdy Net, Tulle
Batiste, Voile, Lawn, Pure Silk, Crepe de Chine, Sheer
Crepe, Chambray, Handkerchief Linen, Gingham,
Challis, Percale, Wool Crepe, Peau de Soie, Taffeta,
Satin, Silk Surah, Satin-backed Crepe, Qiana
Single Knits, Jersey, Swim wear, and Tricot
Leather Suede
Flannel, Velour, Velvet, Muslin, Velveteen, Poplin,
Corduroy, Broadcloth, Linen, Chintz, Gabardine, Felt,
Terry, Burlap, Quilted Fabrics
Double Knits, (synthetic and natural) Stretch Velour,
Stretch Terry, Sweater Knits
Leather, Vinyl, Suede
To check needle straightness, place the flat side of the
needle onto something flat (a needle plate, glass etc.)
The gap between the needle and the flat surface should
be consistent.
Never use a blunt needle.
Type of Needle
Universal, Ball Point
Blue Tipped Needle
Universal
Blue Tipped Needle, Ball Point
Wedge Point Leather Needle
Universal
Ball Point
Wedge Point Leather Needle
Needle Size
9 (65)
11 (75)
11 (75), 12 (80)
11 (75)
11 (75)
14 (90)
14 (90)
14 (90)
Heavy
Very Heavy
Denim, Sailcloth, Ticking
Double Faced Wool, Heavy Coating, Fake Fur,
Drapery Fabrics
Leather, Suede
Canvas, Duck, Upholstery Fabrics
Topstitching for Special Finish
15
Denim Needle
Universal
Wedge Point Leather Needle
Universal
Topstitching Needle
16 (100)
16 (100)
16 (100), 18 (110)
16 (100)
14 (90)
Page 15
Raising and Lowering the Presser Foot
The presser foot lifter raises and lowers the presser
foot.
1 Presser foot lifter
1
You can raise the presser foot about 6 mm (1/4")
higher than the normal up position by exerting more
pressure when lifting the presser foot lifter. This helps
you to place the layers of thick fabrics or embroidery
hoops under the foot.
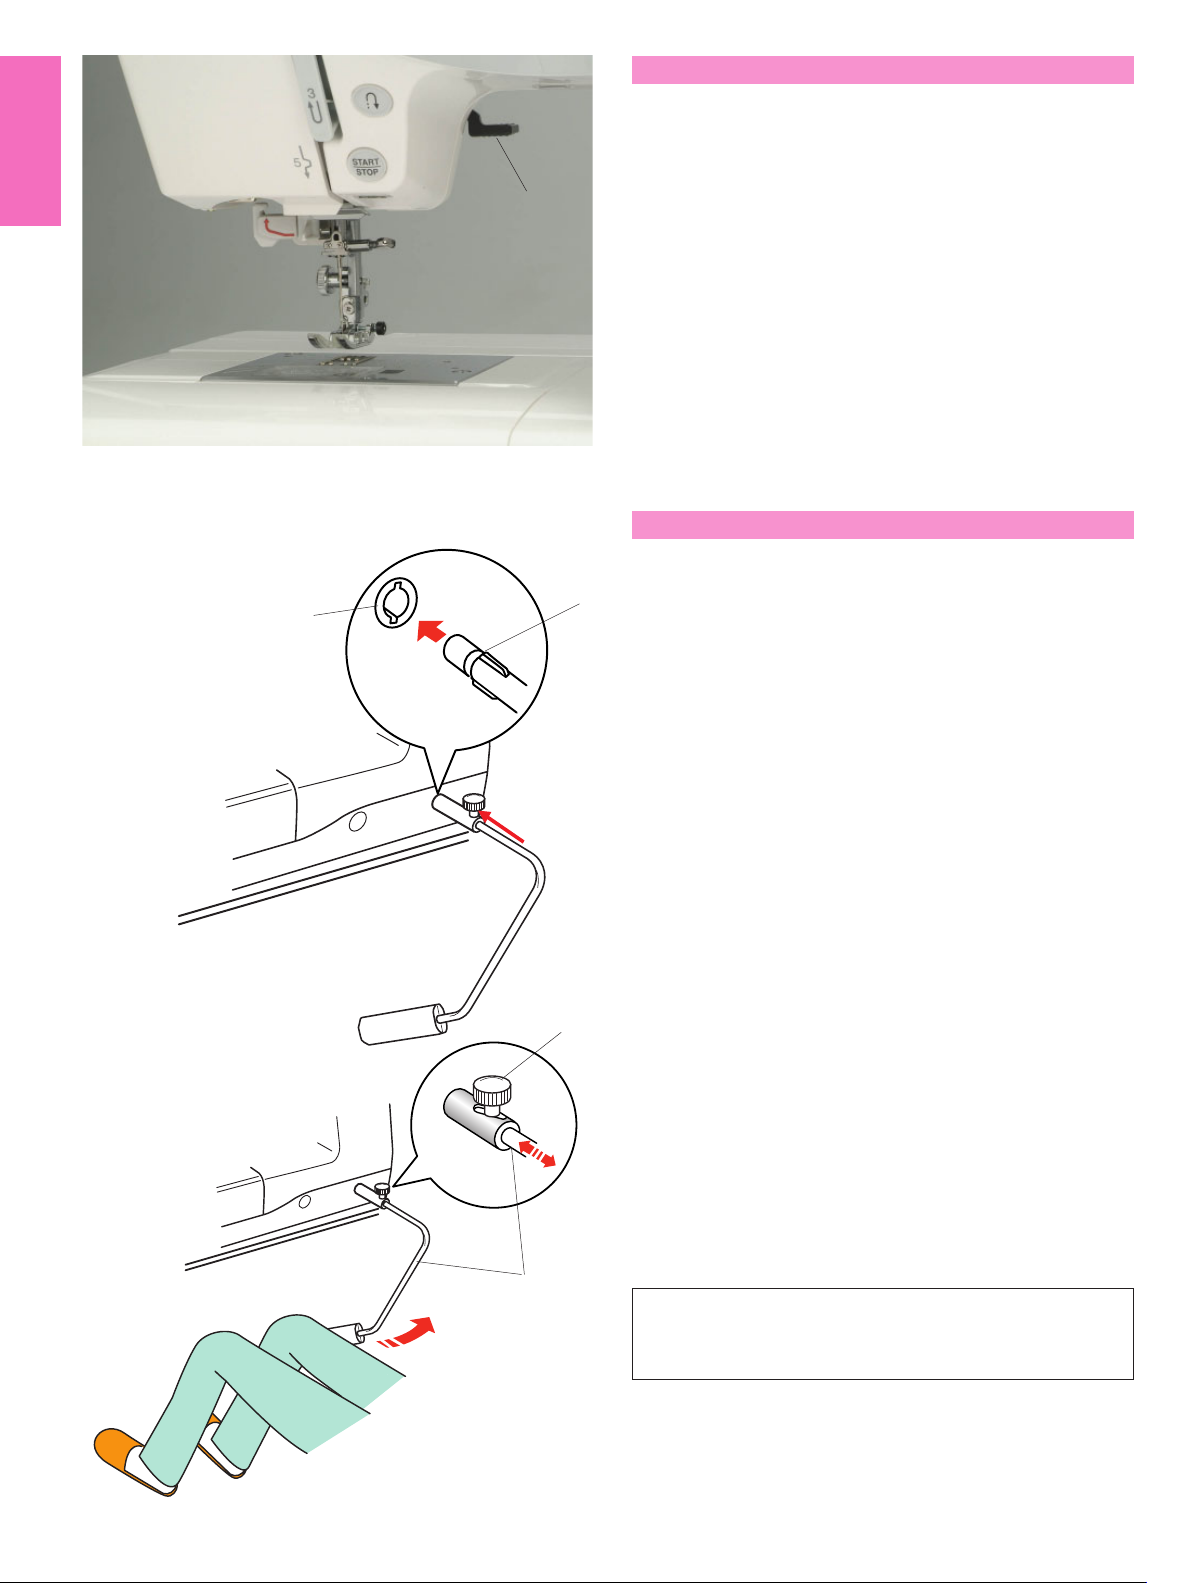
Knee Lifter
The knee lifter is extremely helpful when sewing
patchwork, quilting etc, since it allows you to handle
1
2
the fabric while your knee controls the presser foot.
Attaching the knee lifter
Match the ribs on the knee lifter with the notches in the
knee lifter socket and insert the knee lifter.
1 Knee lifter
2 Knee lifter socket
Adjusting the knee lifter
The angle of knee lifter can be adjusted to fit your
knee.
Loosen the setscrew and slide the angle bar in or out
to adjust the angle of the knee lifter.
3
4
Tighten the setscrew to secure the angle bar.
3 Setscrew
4 Angle bar
Using the knee lifter
Push the knee lifter with your knee to easily move the
presser foot up and down.
You can control how high the foot rises by the amount
of knee pressure you exert.
NOTE:
Do not touch the knee lifter while stitching, otherwise
the fabric will not be fed smoothly.
16
Page 16
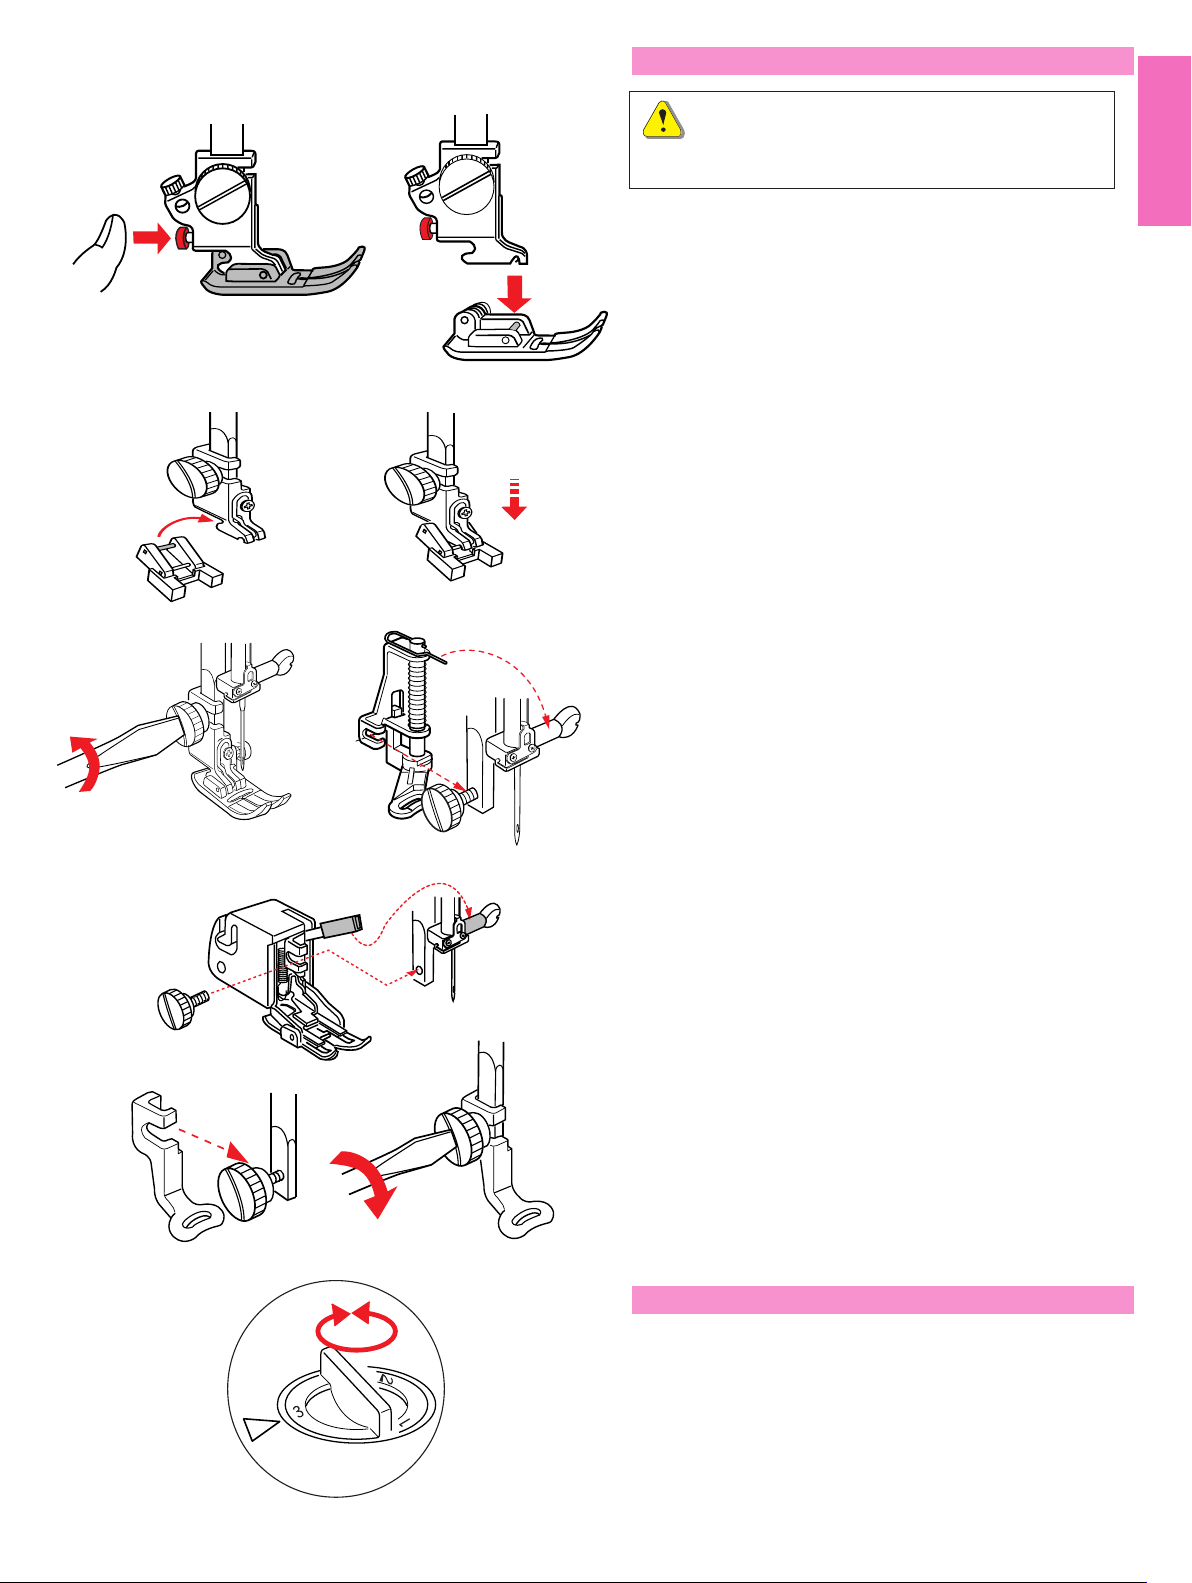
Removing and Attaching the Presser Foot
WARNING:
Turn the power switch off before changing the presser
foot.
Removing the presser foot
Raise the needle to its highest position and raise the
presser foot lifter.
Press the red button on the back of the foot holder.
The presser foot will drop off.
Attaching the presser foot
Place the presser foot you wish to use so that the pin
on the foot lies just under the groove of the foot holder.
Lower the presser bar to lock the foot in place.
Button sewing foot T
Insert the rear pin on the foot into the groove of the foot
holder.
Gently lower the presser bar while holding the foot with
your fingers.
Darning foot P-2
Loosen the thumbscrew and remove the foot holder.
Attach the darning foot P-2 to the presser bar putting
the pin on the needle clamp screw.
Tighten the thumbscrew firmly with the screwdriver.
Even feed foot
Loosen the thumbscrew and remove the foot holder.
Attach the even feed foot to the presser bar with the
lever over the needle clamp screw and secure it with
the thumbscrew.
Embroidery foot P
Loosen the thumbscrew and remove the foot holder.
Attach embroidery foot P to the presser bar from be-
hind.
Tighten the thumbscrew securely with the screwdriver.
Adjusting the Foot Pressure
The foot pressure control dial should be set at “3” for
regular sewing.
Reduce the pressure to “2” for appliqué, cutwork, drawn
work, basting and embroidery.
Set the dial at “1” when sewing extra fine fabrics.
17
Page 17
Utility(U)
Straight Stitch
1
2
8
9
10
Mode Selection
A
4
12
5
13
3
11
7
6
14
When you turn on the power switch, the visual touch
screen will show the opening “welcome” window, then
the ordinary sewing mode will appear after a few
seconds.
The machine will be set for straight stitch sewing.
15
16
17
1918
NOTE:
After turning on the power, it takes several seconds for
the pattern selection window to be displayed on the
B
visual touch screen.
(This is the required boot up time and is not a defect.)
Mode selection keys
1 Ordinary sewing mode key
Press this key to enter the ordinary sewing mode.
2 Embroidery mode key
A
4
5
7
6
1
2
1
14
13
12
3
198
4
B
Press this key to enter the embroidery mode.
3 Open file key
Press this key to open files such as programmed stitch
patterns and embroidery designs you have saved.
4 Set mode key
Press this key to enter the setting mode. In this mode,
you can customize the machine settings to your prefer-
ence. The machine settings for ordinary sewing, em-
broidery, language selection and common settings are
5
available in this mode.
5 Help movie key
Press this key to view the on-screen movie on the
essential operations.
CAUTION:
Do not press the surface of the visual touch screen with
hard or sharp objects like pencils, screwdrivers or the like.
18
Page 18
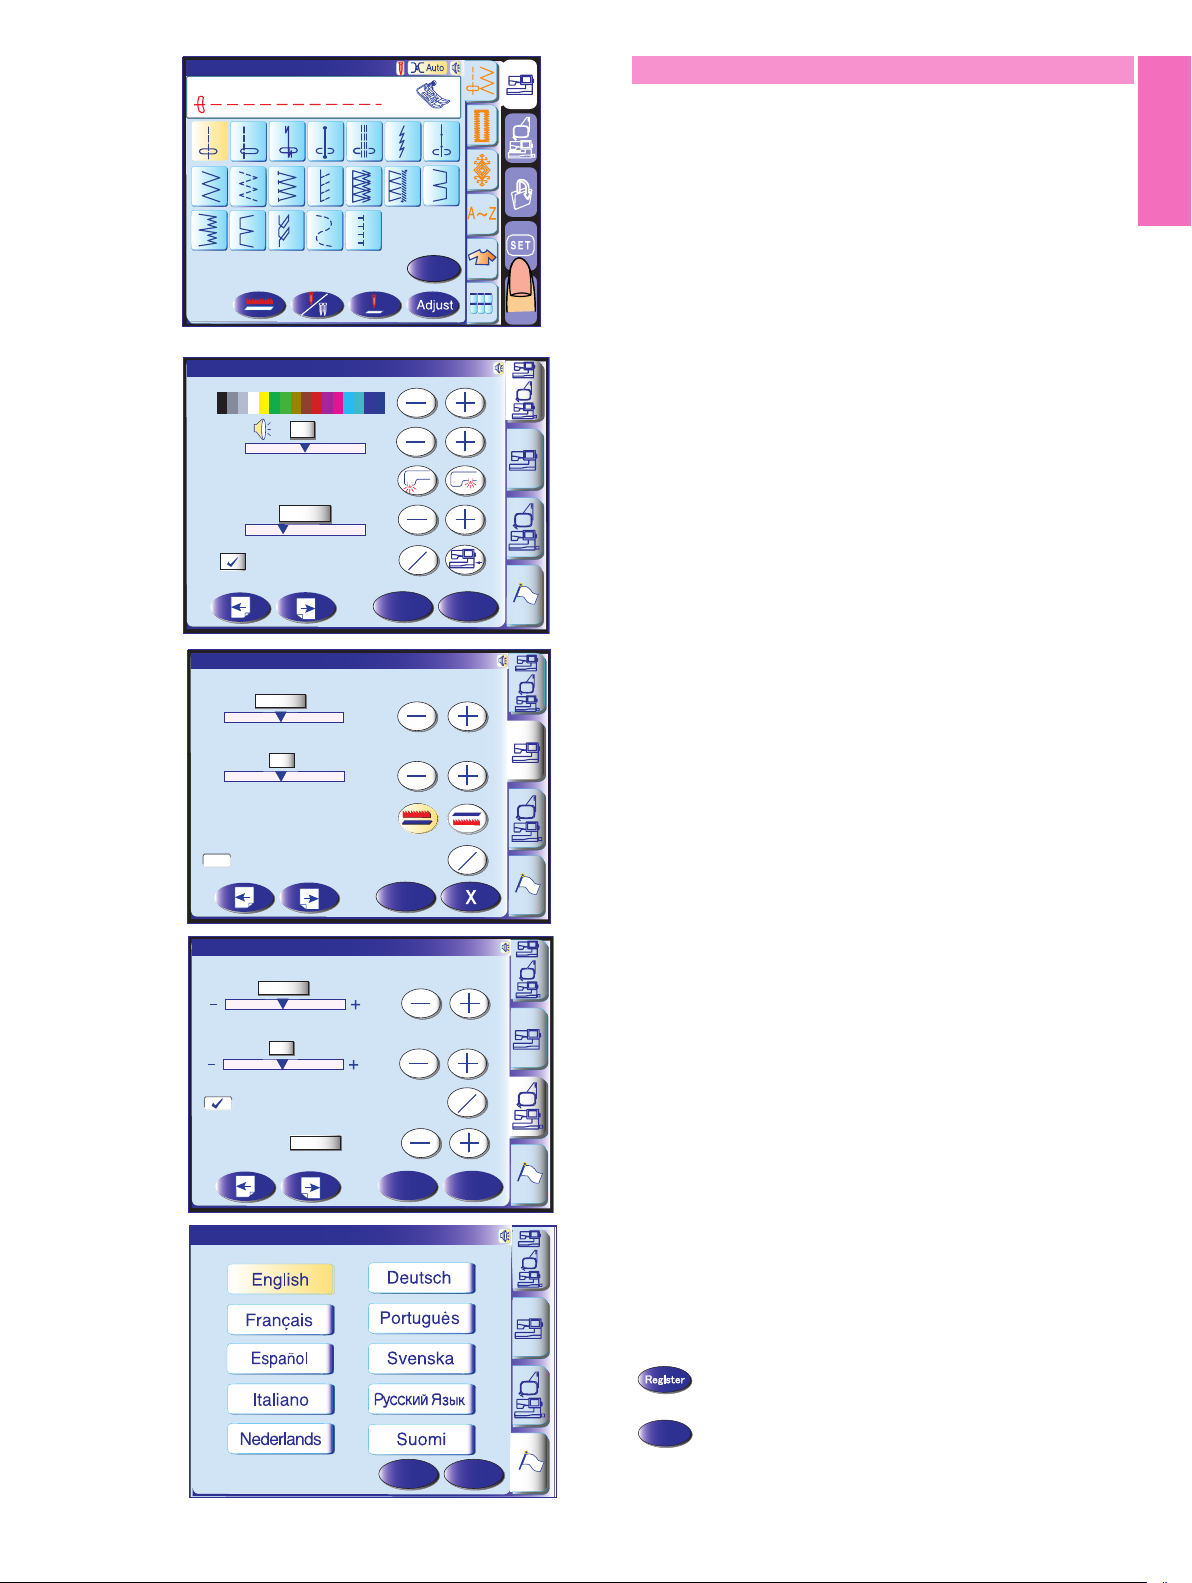
SET1
Register
10 mim
5
X
Utility(U)
Straight Stitch
1
8
15
16
A
Machine Settings
2
9
4
3
10
17
5
12
11
1918
7
6
13
14
B
Set mode key
When you press the set mode key, you can customize
the machine settings.
Press one of the 4 setting mode keys to select the
mode to customize.
SET1
1
SET1
2
-
Remaining Bobbin Thread
-
SET1
3
Screen Contrast
5
-
Sewing Light
Eco Mode
10 mim
-
Screen Saver
Auto Tension
Auto
+
2
+
Feed Dog
Thread Cut after Auto-Lock
Auto Tension
Auto
+
+
Register
Register
1 Common setting mode
In this mode, the machine settings or function for both
ordinary sewing and embroidery can be customized or
executed.
on
off
X
2 Ordinary sewing setting mode
In this mode, the machine settings or function for
ordinary sewing can be customized or executed.
on
off
3 Embroidery setting mode
In this mode, the machine settings or function for
embroidery can be customized or executed.
Remaining Bobbin Thread
Grid Line
Grid Size
4
Language
2
10mm
Language Selection
Register
Register
on
off
X
4 Language selection mode (Flag mode)
In this mode, you can select one of 10 languages for
the messages displayed on the screen.
Registering the custom settings
After customizing the settings, press the register key
to enable the new settings.
To cancel the changes to the settings, press the exit key
and the setting mode window will close.
X
19
Page 19
SET1
SET1
Register
10 mim
5
1
Screen Contrast
Common settings
2
-
3
-
4
5
5
Sewing Light
Eco Mode
10 mim
Screen Saver
+
+
Register
on
off
X
The contrast of the visual touch screen can be adjusted
with “+” or “–“ key.
2 Sound
The buzzer sound can be adjusted with the “+” or “–“
key. To mute the buzzer, set the value to “0”.
3 Sewing light options
The dual sewing lights can be turned on or off
individually.
4 Eco mode
The sewing lights will turn off, and the visual touch
screen will display go dark if you have not used the
machine for a while. Touching the screen will turn on
the lights and screen.
The eco mode timer can be set from 1 to 30 minutes by
pressing the “+” or “–“ key.
1 Screen contrast
5 Screen saver
Press the on/off key to check the box. so the
screen will show the screen saver instead of entering
the eco mode.
You can also create your original screen saver for the
MC 11000 with the Screen Saver tool.
Save the data in an ATA PC card or USB memory key,
and insert it into the port of the MC 11000.
Press the import key to import the screen saver
from the ATA PC card or USB memory key.
NOTES:
The Screen Saver Tool is available in the MC11K Tools
CD-ROM included in the standard accessories.
For instructions on installation and operation of the
software, refer to the separate instruction booklet.
20
Page 20
SET2
SET2
Register
Yes
Yes
Yes
Yes
Yes
mm
inch
1
inch/mm
mm
1 Inch/mm options
You can set your machine's measuring unit to either
inch or millimeter by pressing the “inch” or “mm” key.
2
3
Touch Screen Calibration
Format
Built-in Memory
ATA PC Card
Yes
Yes
Yes
The default unit setting is millimeter.
4
(A)
USB Memory
Reset all to defaults
Touch Screen Calibration
PRESS MARK (+).
Format Memory?
All the stored data will be erased.
(B)
Built-in
Yes
Yes
Register
Touch Screen Calibration
END
X
X
2 Touch screen calibration
If you think the touch panel keys are out of alignment,
you can correct it in the key position adjustment
window.
When you press the key, window (A) will be shown.
With your finger, press the black cross as it appears in
order. When you press the last black cross, the window
(B) will be shown. The window will close and go back to
the original screen with the new setting being
registered.
3 Formatting the memory
If the internal memory, ATA PC card or USB memory
key does not function due to damage to the memory
bank, you need to re-enable it by formatting the
memory.
4 Resetting all to default
Press the yes key to reset all the parameters to the
original values (factory settings).
21
Page 21
SET1
1
2
3
Auto Tension
Auto
-
Remaining Bobbin Thread
2
-
Feed Dog
+
+
Ordinary sewing mode settings
1 Auto thread tension
The auto thread tension level can be adjusted with the
“+” or “–“ key.
2 Low bobbin thread warning
The low bobbin thread warning level can be adjusted
with the “+” or “–“ key.
4
Thread Cut after Auto-Lock
Register
on
off
3 Drop feed option
This option allows you to sew the decorative stitches
with the feed dog lowered. Press the drop feed key
to lower the feed dog. When you start the machine, the
warning message will appear to advise you to raise the
feed dog, however you can continue sewing with the
feed dog lowered.
To raise the feed dog, return to the ordinary sewing
setting mode and press the raise feed dog key
then press the register key.
4 Auto thread cutting
In the following cases, the machine will trim the threads
and stop automatically, if you check the box by pressing
the “on/off” key .
1. Pressing the auto lock button
2. The auto lock stitch is programmed.
5
3. Sewing monogram
4. Sewing the pictograph patterns
6
7
Favorite Stitch
Adjustment
Resume Mode
5 Color options
Press the key to select one of the 3 colors for the
pattern selection keys, which will display in the color
shown.
To change the screen background color, press the
key to open the custom color window.
To select the hue, press one of the 24 color tiles.
To change the shade of the selected color, press and
drag the slider up or down.
Resume last pattern?
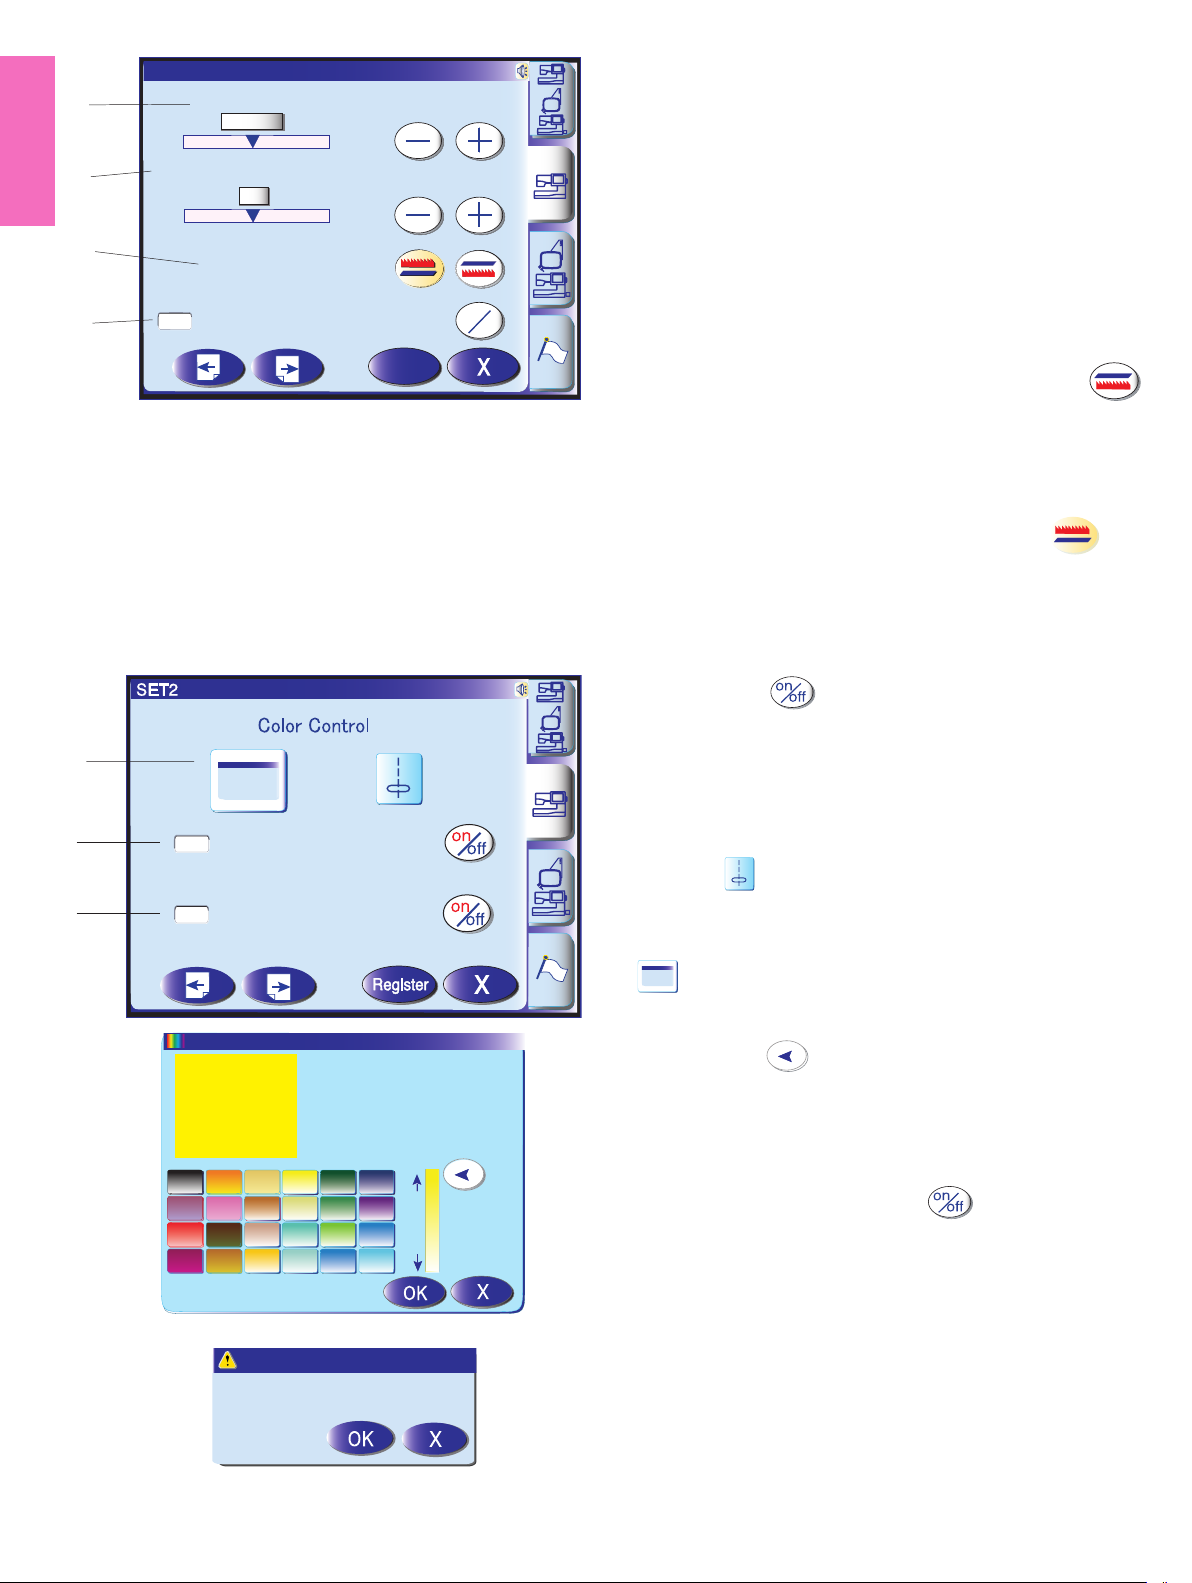
6 Favorite stitch adjustment on/off
If you wish to save the altered settings for the utility
stitches for future use, press the key to check the
box on.
7 Resume Mode
When Resume Mode is enabled, the last pattern
sewn before turning the power off will be resumed
when the power is turned on again.
To enable Resume Mode, press the on/off key to
check the box on.
When you turn the power on, the confirmation
window will open.
Press the OK key to resume the last sewn pattern.
22
Page 22
SET1
1
Auto Tension
Auto
Embroidery mode settings
1 Auto thread tension
The auto thread tension level can be adjusted with
2
Remaining Bobbin Thread
2
the “+” or “–“ key.
2 Low bobbin thread warning
The low bobbin thread warning level can be adjusted
3
4
Grid Line
Grid Size
10mm
Register
on
off
X
with the “+” or “–“ key.
3 Grid on/off
To show the grid, press the on/off key to check the box.
To hide the grid, press the on/off key again to uncheck
the box.
4 Grid size
The grid size can be changed by pressing the “+” or
“–“ key.
5
5 Embroidery maximum speed
The maximum embroidery sewing speed can be
changed from 400 to 800 spm in 100 spm intervals by
pressing the “+” or “–“ key or with the speed control
6
Rayon 40
Polyneon 40
Poly Sheen
slider.
Press the speed control slider key if you wish to
change the embroidery sewing speed with the speed
Polyester 40
Rayon 40
control slider. The speed can also be changed while the
machine is running.
NOTE:
Reduce the sewing speed when sewing patterns with
narrow zigzag stitches that tend to distort at high speed.
6 Thread selection
There are five brands of embroidery thread to choose
7
from. Press the key of the thread you wish to use. The
color code of the selected brand will be shown on the
color/part key along with the name of the color.
8
7 Auto thread cutting
The machine will trim the threads automatically when it
stops for changing the thread to the next color.
Select “Stop” to turn off auto thread cutting.
8 Jump thread cutting
Press the “–” or “+” key to set the minimum length of
jump thread to be cut. The machine will automatically
cut jump threads longer than the length selected.
To turn this function off, press the “+” key until “OFF” is
indicated.
NOTE:
This function is disabled when a design pattern for the
hoop FA is selected.
23
Page 23
9
10
Resume Mode
9 Color options
Press the key to select one of the 3 colors for the
pattern selection keys, which will display in the color
shown.
To change the screen background color, press the
key to open the custom color window.
Refer to page 22.
10 Resume Mode
When Resume Mode is enabled, the last stitch sewn
before turning the power off will be resumed when the
power is turned on again.
To enable Resume Mode, press the on/off key to check
the box on.
When you turn the power on, the confirmation window
will open.
Press the OK key to resume the last stitch of the sewn
pattern.
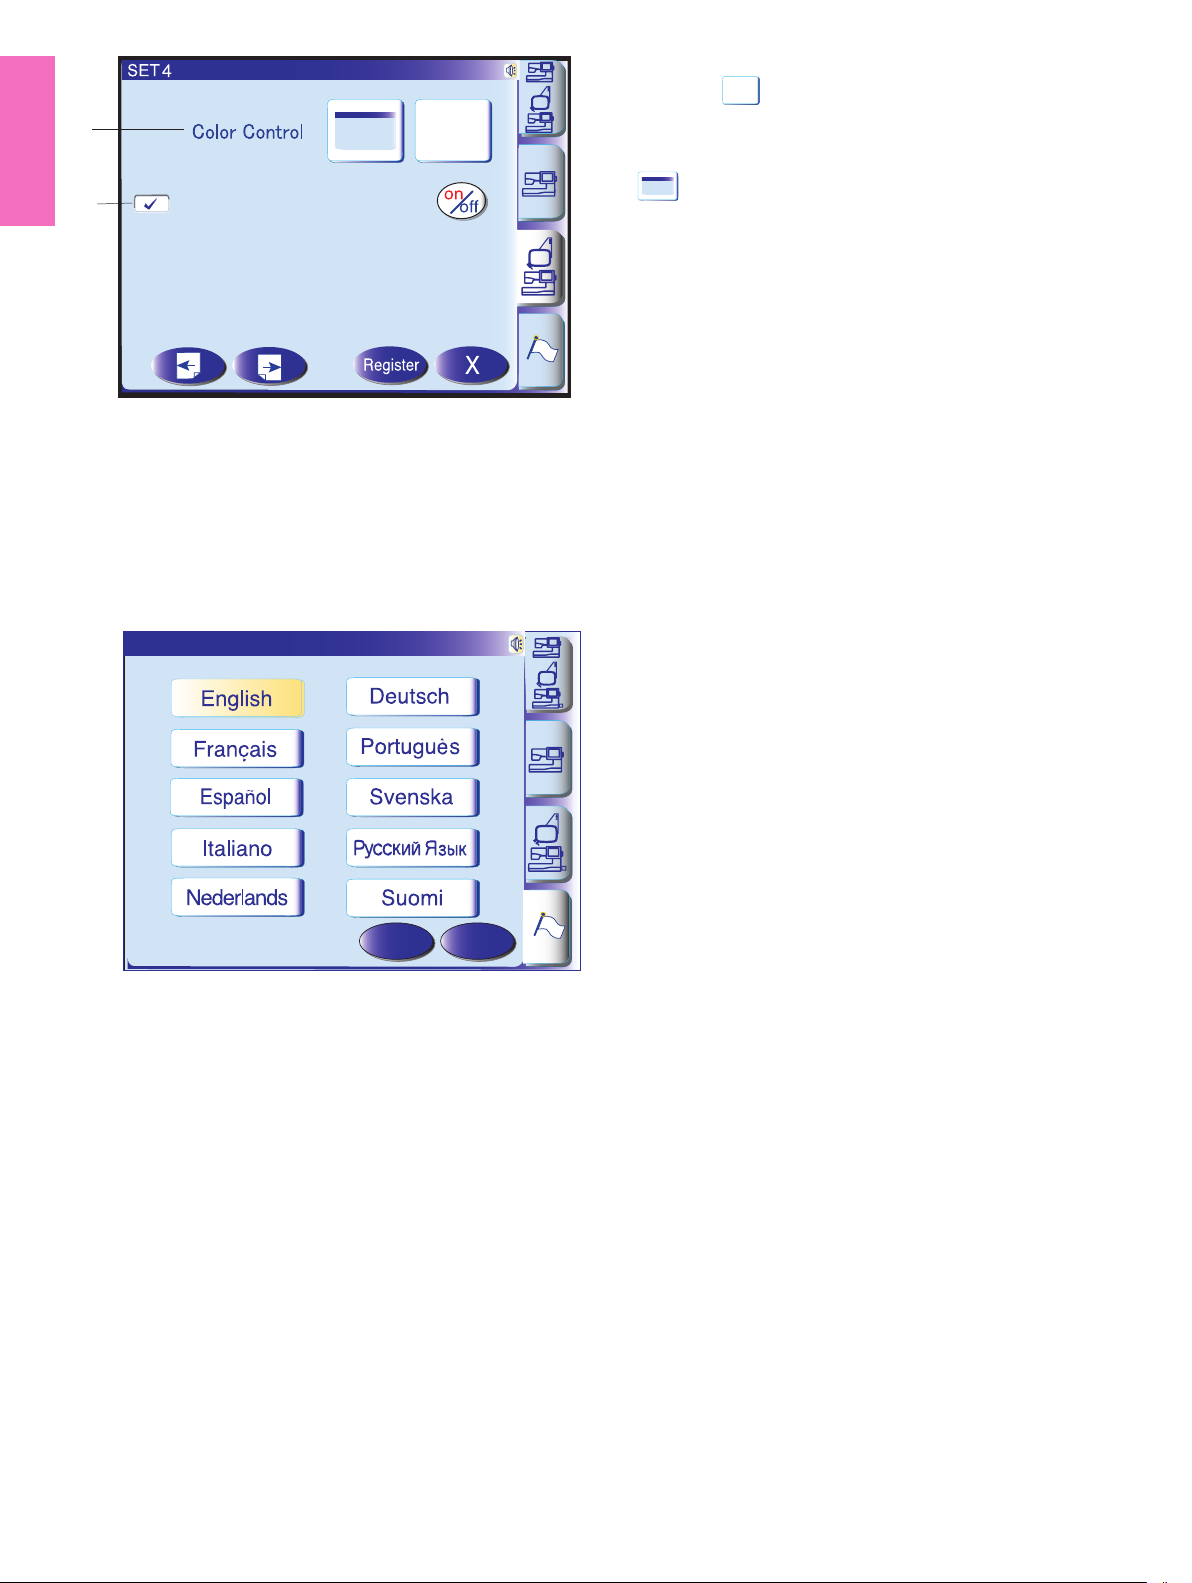
Language
1
2
3
4
5
Language Selection
6
7
8
9
10
Register
Language Selection (Flag mode)
You can select one of the following 10 languages by
pressing the corresponding key.
1 English 2 French 3 Spanish
4 Italian 5 Dutch 6 German
7 Portuguese 8 Swedish 9 Russian
10 Finnish
X
24
Page 24
?
㻃㻃
Winding the bobbin
㻃㻃㻃
Threading the machine
㻃㻃㻃
Auto Needle Threader
Sensor Buttonholes
㻃㻃
Adjusting patterns
Changing needles
㻃㻃
Embroidery settings
Auto Needle Threader
Auto Needle Threader
Winding the bobbin
㻃㻃
Sensor Buttonholes
㻃
Embroidery settings
㻃㻃
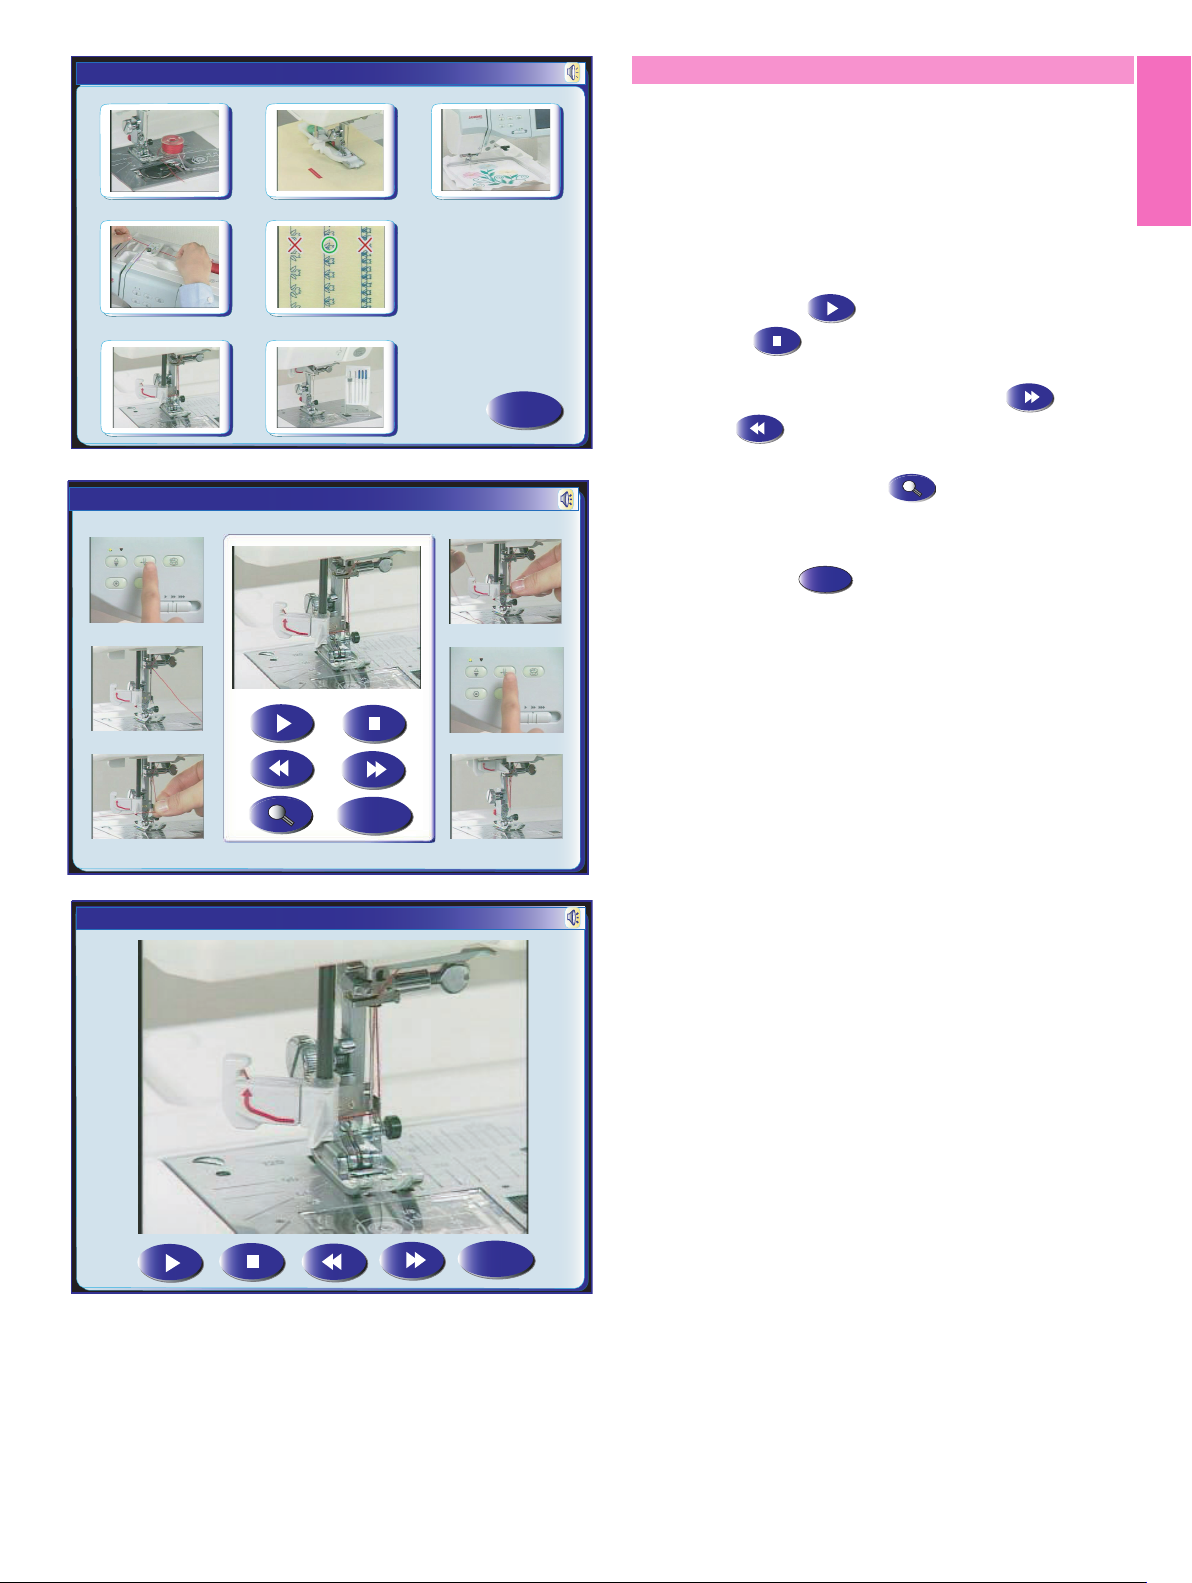
On-screen Help Movie
Press the help key to open the help movie menu.
You can view 7 topics of essential operations of the
machine.
Threading the machine
㻃㻃㻃
Auto Needle Threader
㻃㻃㻃
Auto Needle Threader
1
2
3
Adjusting patterns
㻃㻃
Changing needles
㻃
Select the help topic you wish to view by pressing the
thumbnail, and the movie window will open.
Press the play key to start the movie and press
the stop key to stop playing.
You can search the movie in forward or reverse
X
direction by pressing the fast forward key or
rewind key .
Pressing the full screen key enlarges the movie
4
5
6
window to full screen.
Press the exit key to close the current window.
X
Auto Needle Threader
X
X
25
Page 25
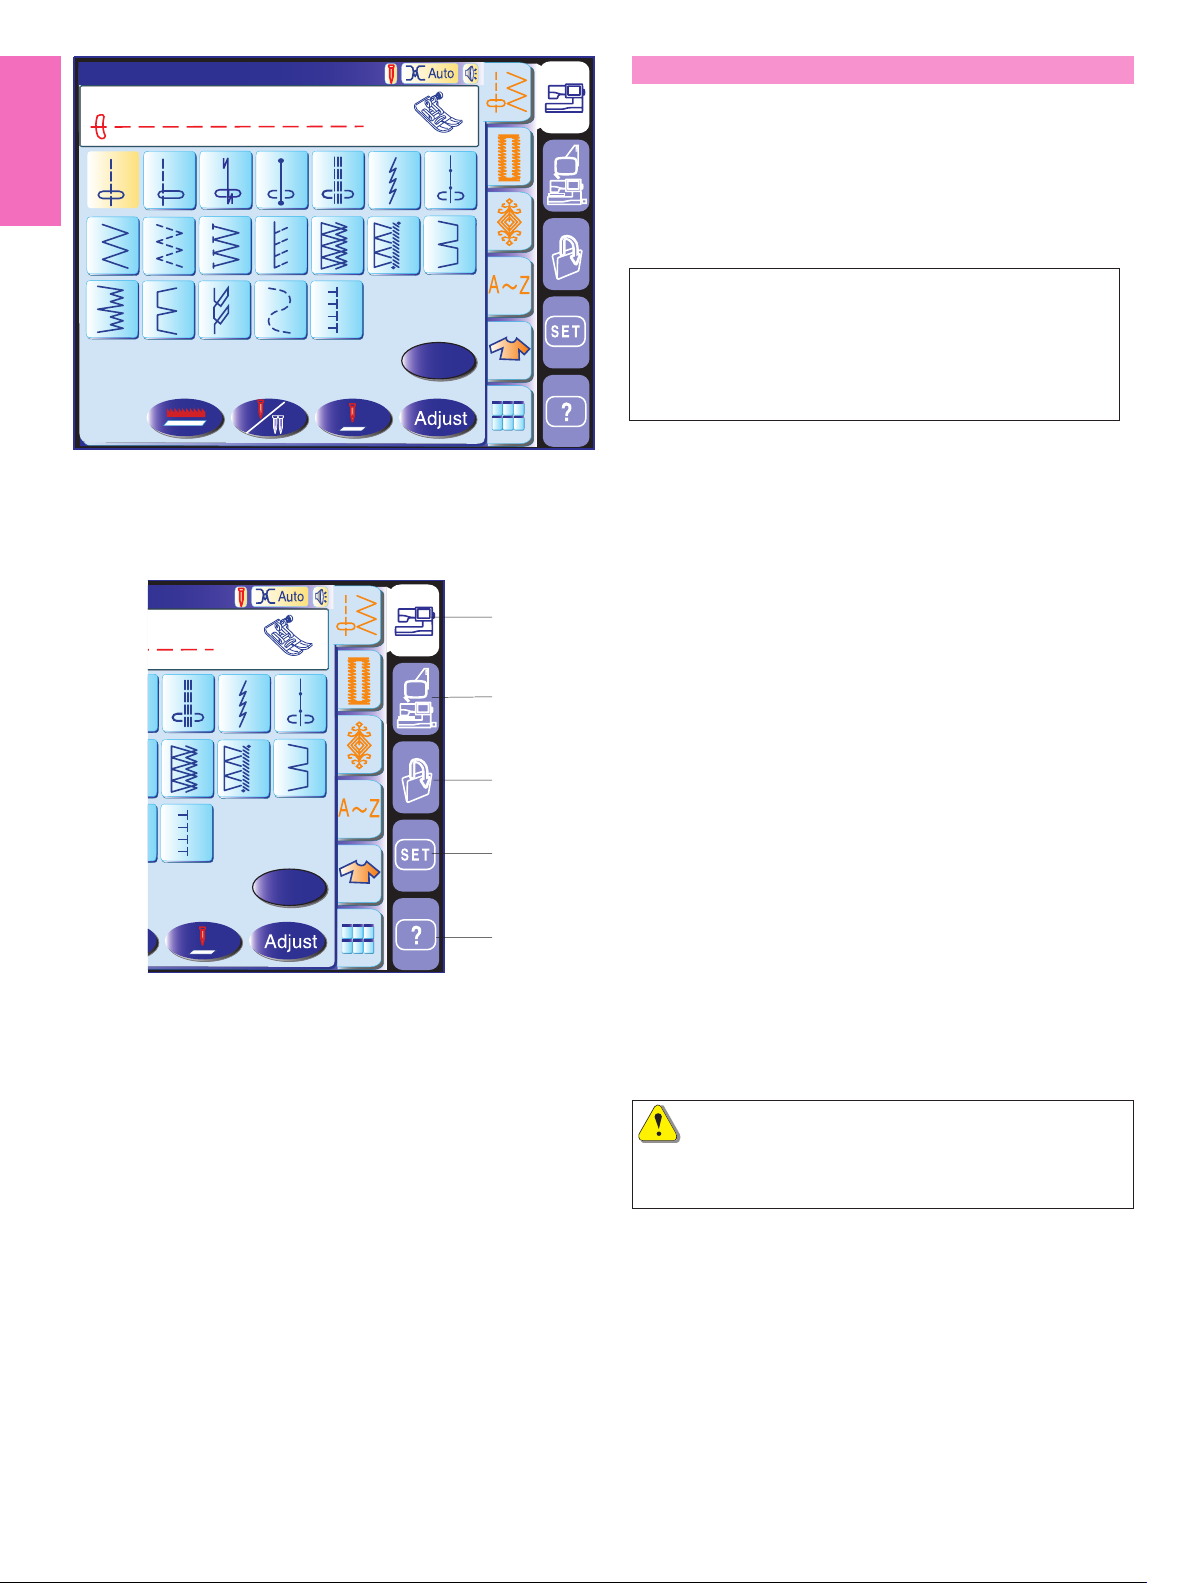
L.S
L.S
1
Utility(U)
Straight Stitch
ORDINARY SEWING MODE
A
1
2
4
3
5
7
6
The stitches in the ordinary sewing mode are
classified into 6 groups.
Press one of the tabs to select the group.
8
9
10
11
15
16
17
13
12
14
1918
B
23
Buttonholes(B)
Sensor BH
Pull down BH Lever.
2
1
Auto
9
8
15 16
17 18 19 20 21
5
3
10
B
6
4
13
11
12
4
Monogram
Block
A B C D E F G H
IJKLMNOP
QRSTUVWX
YZ . & 01
2 4567893
M
1/3
L
A
a
S
6
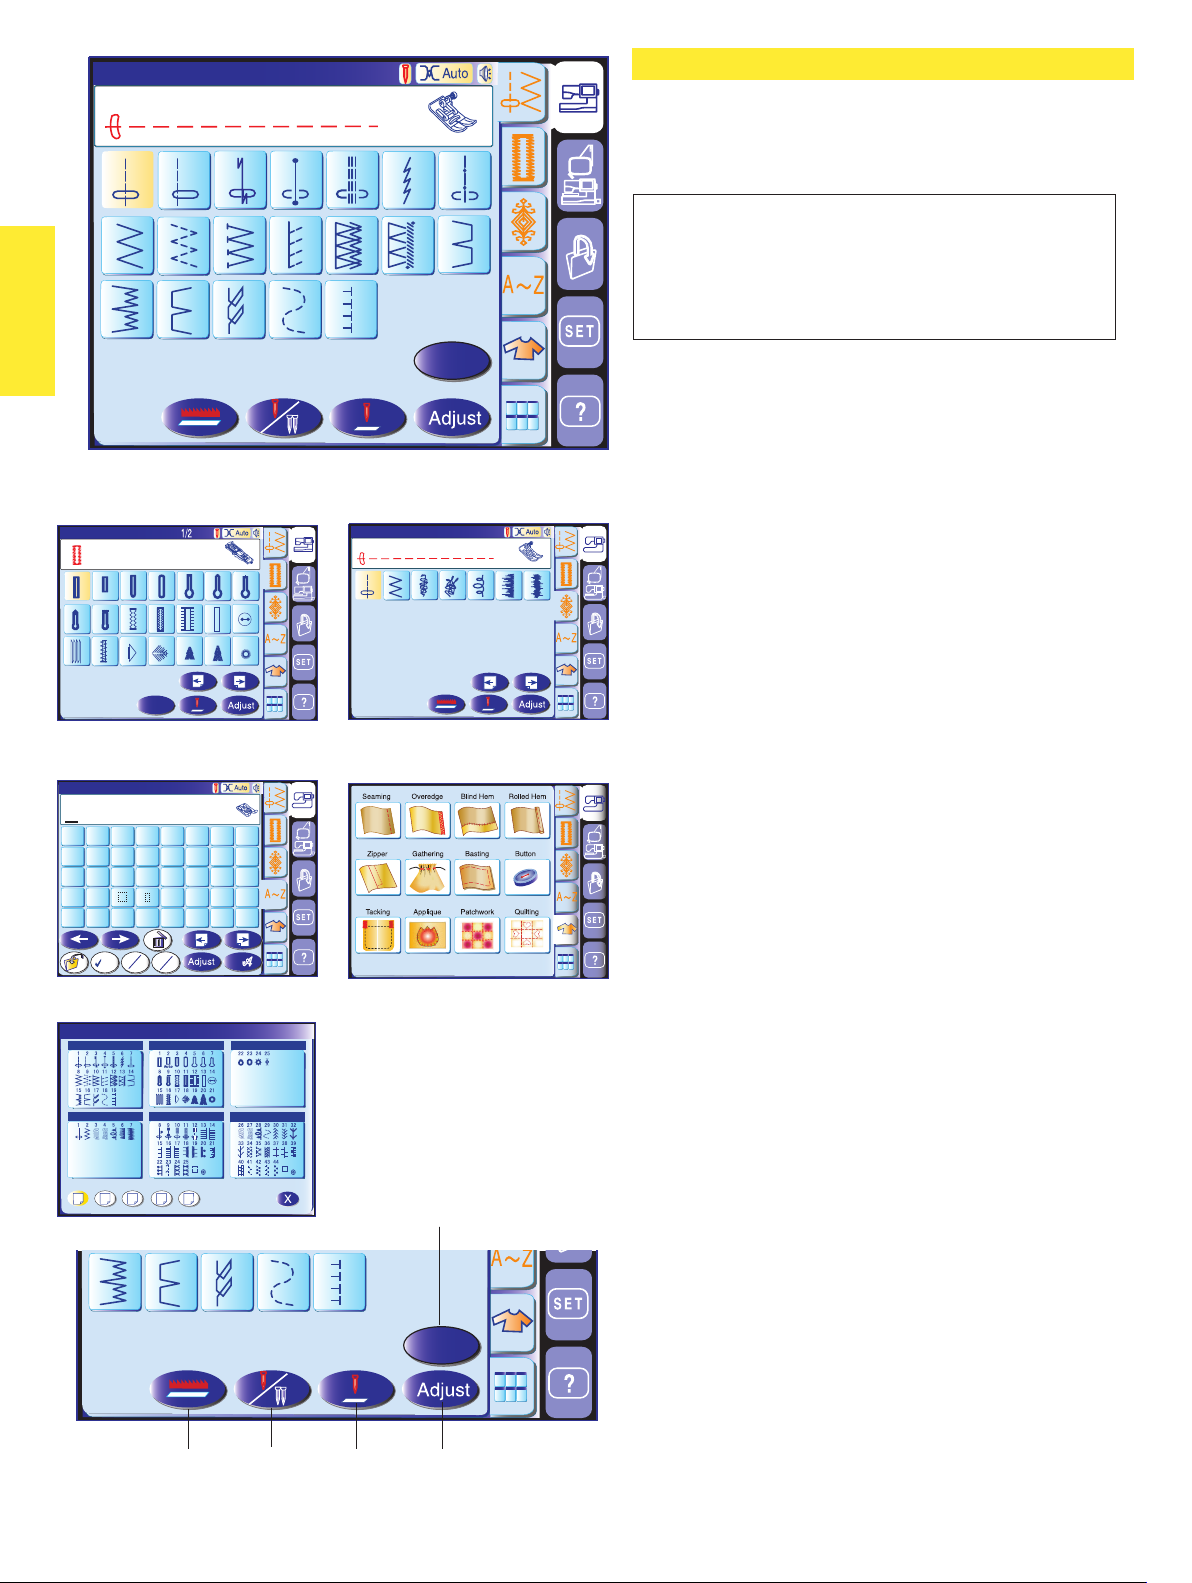
Quick Reference
Utility(U)
1 2 3
Buttonholes(B)
R
7
14
F
A
Auto
Buttonholes(B)
Quilting(Q)
Straight Stitch
1
2
5
1/5
1/5
43
A
7
5
6
NOTE:
In this manual, pattern number refers t the initial for
each group or category.
For example pattern #15 in the buttonholes and
specialty stitches is refered as pattern B15.
1 Utility stitches (U)
You can select utility stitches for seaming, overcasting,
blind hemming, basting and shell tucking.
2 Buttonholes and specialty stitches (B)
There are various styles of buttonholes, button sewing
stitch, darning, tacking, fly stitches and eyelets
available in this section.
3 Decorative stitches
This group consists of 5 categories, i.e. (Q) patchwork/
quilting, (H) heirloom stitches/cross stitches,
(S) decorative satin stitches, (D) decorative stitches and
(P) pictograph stitches.
These stitches and patterns are programmable.
4 Monogramming
You can sew letterings as well as combinations of
characters and symbol patterns.
5 Sewing applications
You can select the proper stitch for a specific sewing
project and fabric type from the designated applications
in this group.
Quilting(Q)
Quilting(Q)
1 2 3 4 5
4
15
5
Quilting(Q)
16 17 1918
1
23
6 Quick menu (Quick reference)
6
You can select the desired stitch from the categorized
stitch list. You can jump to the desired page of the menu
by pressing the page key (see page 62).
5
Function keys
1 Drop feed key: To drop or raise the feed dogs.
2 Twin needle key: To set the stitch width for twin
needle sewing. The key will be grayed out if the
selected stitch is not suitable for twin needle sewing.
B
3 Needle position key: To set the needle position to
stop, up or down when the machine stops.
4 Adjust key: To open the manual setting window for
altering the stitch settings.
5 Start over key: To sew again from the first stitch of
4
26
the pattern.
Page 26

Utility(U)
Straight Stitch
Utility Stitches
A
1
2
4
3
5
7
6
Straight stitches
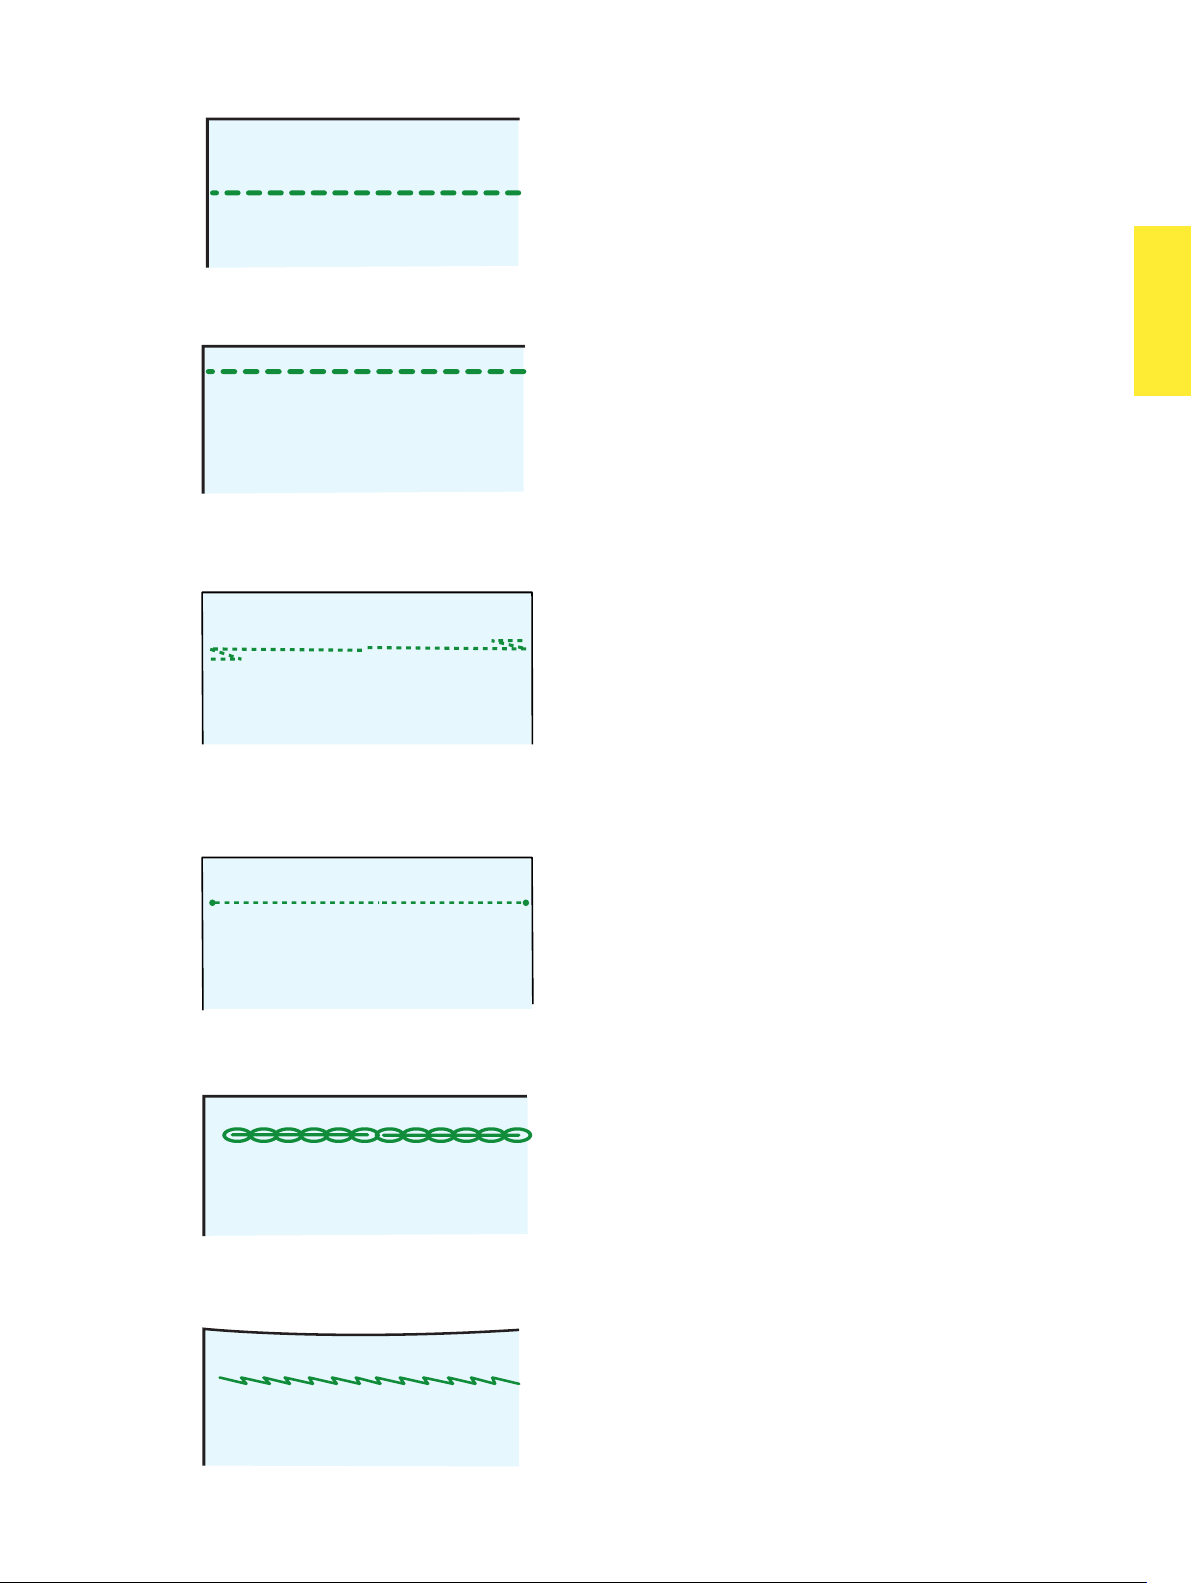
Patterns U1 to U6 are straight stitches for seaming.
8
9
10
11
15
16
17
13
12
1918
14
Press the pattern selection key of the desired stitch.
Starting to sew
Raise the presser foot and position the fabric next to a
seam guideline on the needle plate. Lower the needle
B
to the point where you want to start.
Pull the needle and bobbin threads towards the rear.
Press the start/stop button or foot control. Gently guide
the fabric along the seam guideline letting the fabric
feed naturally.
Sewing from the edge of thick fabric
The black button on the zigzag foot locks the foot in the
horizontal position.
This is helpful when you start sewing at the extreme
edge of thick fabrics or sewing across a hem.
Lower the needle into the fabric at the point where you
wish to start sewing.
Lower the foot while pushing in the black button. The
foot will be locked in the horizontal position to avoid
slipping.
Changing sewing direction:
Stop the machine and bring the needle down into the
fabrics by pressing the needle up/down button.
Raise the presser foot.
Pivot the fabric around the needle to change the sewing
direction as desired.
Lower the presser foot and start sewing in a new
direction.
27
Page 27

Securing seams
For fastening the ends of seams, press the reverse
button and sew several reverse stitches.
The machine sews in reverse as long as you press and
hold the reverse button.
Press the reverse button once when sewing the
lock-a-matic stitch (pattern U3) or locking stitch (pattern
U4) and the machine will lock the stitches off and stop
automatically.
Cutting threads
After finishing sewing, press the thread cutter button
to cut the threads.
NOTES:
The thread cutter button does not function when the
presser foot is raised.
To start the next seam, it is recommended to bring the
bobbin thread up and pull both needle and bobbin
threads to the back under the presser foot.
Use the thread cutter on the face plate to cut
specialized or thick threads if the auto thread cutter
does not work well.
To use the thread cutter on the face plate, remove the
fabric and draw it to the back.
Pull the treads up and slip them between the thread
cutter and face plate from behind.
Pull the threads toward you to cut.
Using the seam guide lines
The seam guides on the needle plate and hook cover
help you measure seam allowance.
NOTE:
The numbers on the needle plate indicate the distance
from the center needle position in millimeters and
inches.
Angle scale on the needle plate
You can easily seam patchwork pieces at the desired
angle without marking by using the unique angle scales
on the needle plate.
The angle scales are marked at 45, 60, 90 and 120
degrees.
28
Page 28
U1
Variety of straight stitches
U1 Straight stitch in center needle position
Use this stitch for seaming, zipper sewing, rolled
hemming etc.
U2
U3
U4
U2 Straight stitch in left needle position
Use this stitch to seam fabrics close to the edge.
U3 Lock-a-matic stitch
Use this stitch to secure the beginning and the end of a
seam with backstitching.
When you reach the end of the seam, press the reverse
button once.
The machine will sew four reverse stitches, four forward
stitches, and then stop sewing automatically.
U4 Locking stitch
This unique stitch is used where an invisible locking
stitch is needed.
Lower the needle close to the front edge of the fabric.
The machine will sew several locking stitches in place
and continue sewing forward.
When you press the reverse button at the end of the
seam, the machine will sew several locking stitches in
place, then stop sewing automatically.
U5
U6
U5 Triple stretch stitch
This strong, durable stitch is recommended for areas
where both elasticity and strength are needed to ensure
comfort and durability.
Use it to reinforce areas such as crotch and armhole
seams.
Also use it when constructing items such as backpacks
for extra strength.
U6 Stretch stitch
This is a narrow stretch stitch designed to eliminate
puckering on knit fabrics and bias seams, while
permitting the seam to be pressed completely open flat.
29
Page 29
Utility(U)
Straight Stitch
1
2
Manual stitch settings
A
4
3
5
7
6
When you press the adjust key, the screen shows the
manual setting window.
8
9
10
11
13
12
14
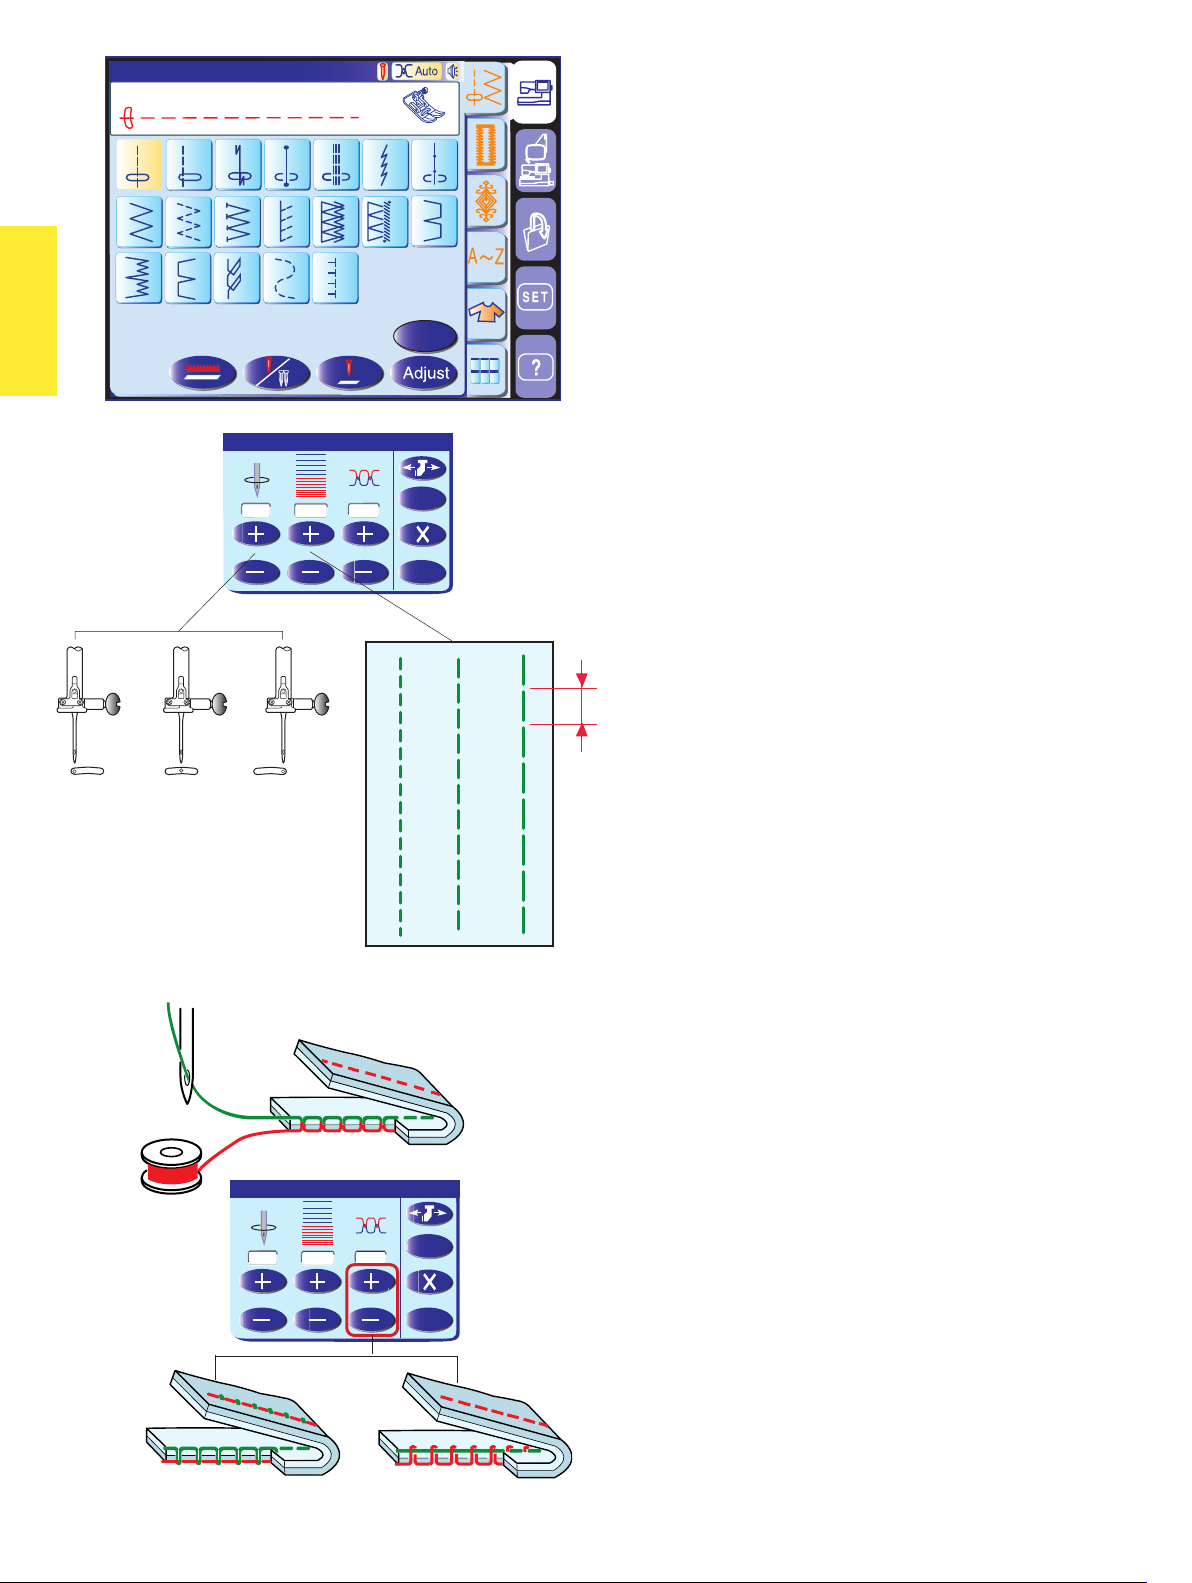
You can alter the needle drop position of the straight
stitches, stitch length and needle thread tension.
15
16
17
1918
B
Adjust
Press the “+” key to move the needle drop position to
the right.
Press the “–” key to move the needle drop position to
the left.
Press the “+” or “–“ key in the middle to alter the stitch
length.
3.5
2.20
4.2
Default
OK
0.0
3.5
Adjust
7.0
3.5
2.20
4.2
This machine is equipped with automatic thread tension
control, however you may need to manually adjust the
tension balance depending on the sewing condition, or
you can fine-tune the thread tension to suit your prefer-
ence.
Press the “+” key to increase the tension.
Press the “–” key to decease the tension.
Default
OK
30
Page 30
Utility(U)
Zigzag Stitch
1
8
15
3
2
910
16
17
A
4
6
5
7
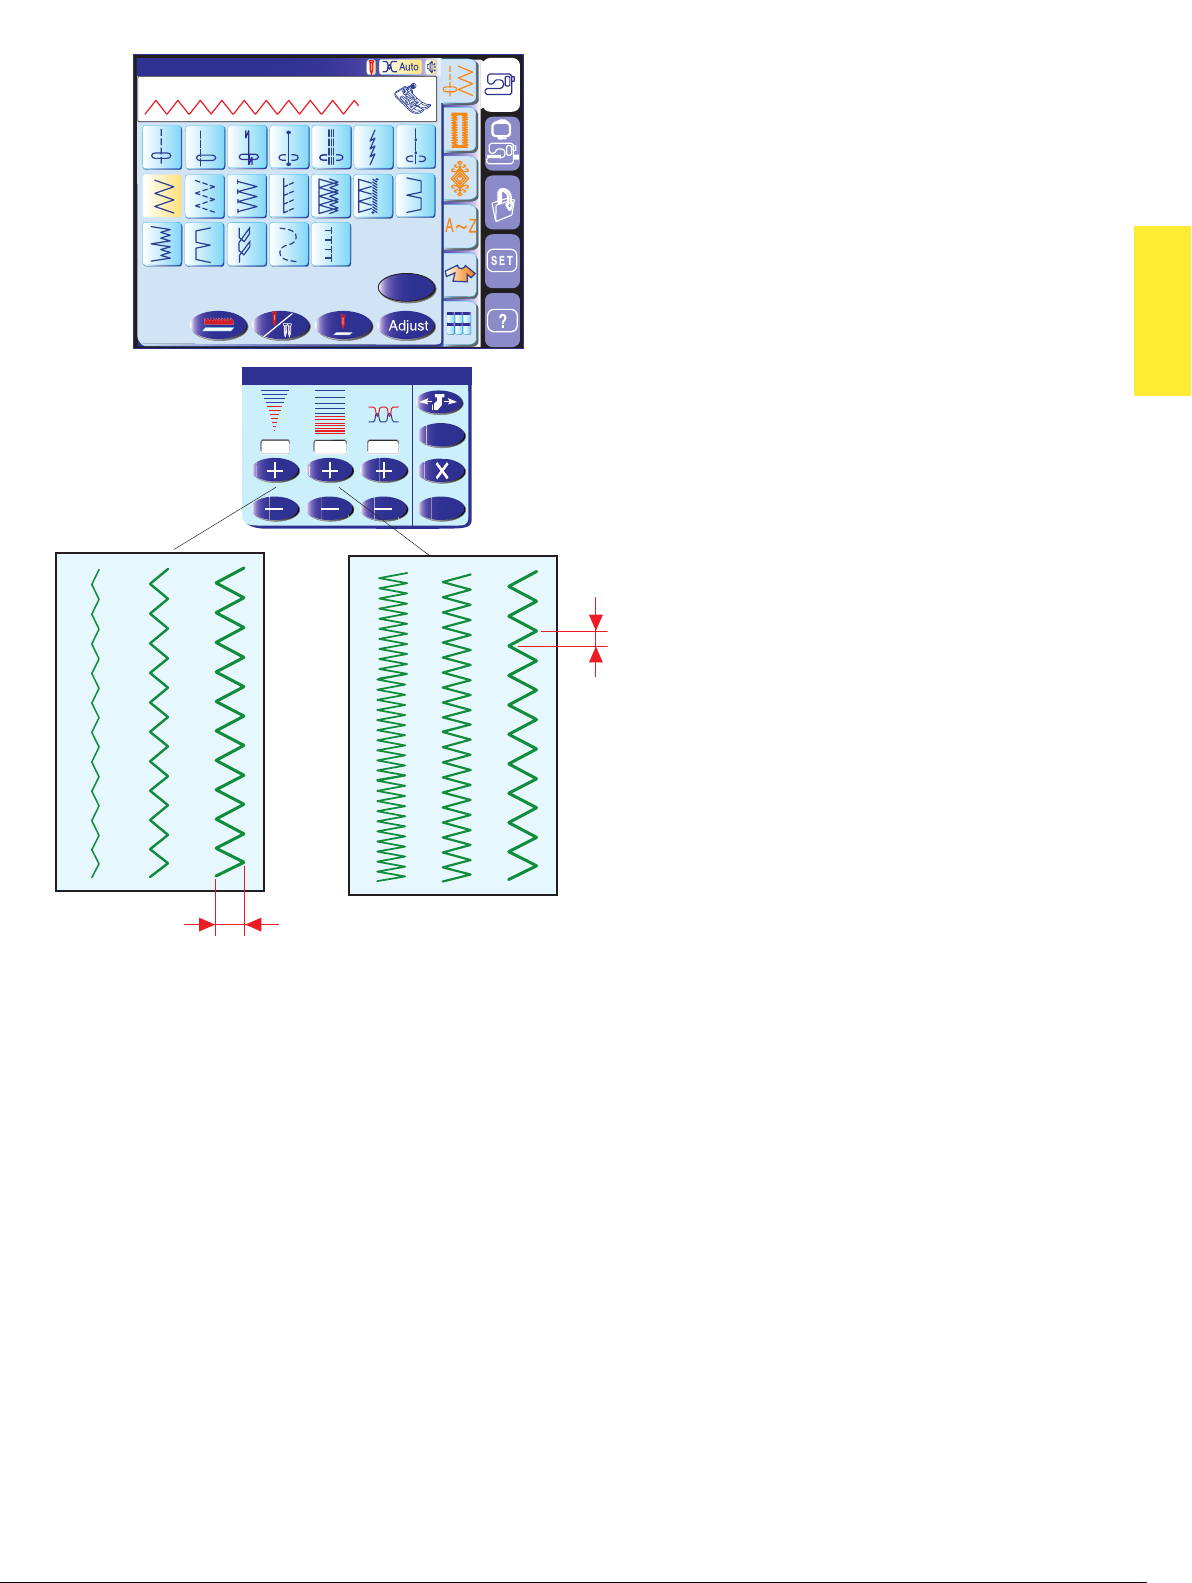
Zigzag stitches are used for various sewing needs
including overcasting. These stitches can be used on
most woven fabrics
Zigzag stitches
11
1918
14
A dense zigzag stitch can also be used for appliqué.
13
12
B
Adjust
5.0
1.50
3.0
Default
OK
Manual stitch settings
When you press the adjust key, the screen shows the
manual setting window.
You can alter the stitch width (or needle drop position of
the straight stitches), stitch length and needle thread
tension.
Press the “+” or “–“ key below the property that you
wish to change.
31
Page 31

Adjust
3.5
Utility(U)
Straight Stitch
1
8
15
2.20
4.2
4
Cloth Guide
CAUTION:
Always provide sufficient space to the left of the
3
1
2
A
2
9
16
3
10
17
Default
OK
4
5
12
11
1918
7
6
13
14
B
15
mm
40302010
mm
Default
OK
machine when using the cloth guide.
Do not use the cloth guide when the buttonhole foot R
is attached.
If you wish to use the optional clothsetter table with the
cloth guide, attach the extension table to prevent the
carriage from hitting the table.
Attaching the cloth guide
Insert the pins on the cloth guide into the carriage
holes. Turn the attaching knob clockwise to secure the
cloth guide.
Remove the fillet if necessary.
1 Pins
2 Cloth Guide
3 Carriage Holes
4 Attaching knob
Setting the cloth guide position
Press the adjust key to open the manual setting
window.
Press the cloth guide key.
The visual touch screen will show a warning message.
Press the OK key.
The cloth guide adjustment window will open.
Press the “+” or “–” key to move the cloth guide to the
desired position.
The cloth guide position is indicated on the scale bar
and the distance from the center needle drop position
is indicated by millimeter or inch.
Press the OK key to register the setting and close the
cloth guide adjustment window.
Default
NOTE:
The machine will not run if the cloth guide adjustment
window is open.
Press the default key to return the cloth guide to the
2
mm
40302010
mm
default position (15 mm or 5/8”).
Make sure to return the carriage to the stored position
by pressing the cloth guide storage key and
remove the cloth guide after sewing is finished.
OK
Overcasting with the Cloth Guide
Select pattern U10 and use the overedge foot C.
Set the cloth guide position at 2 mm (1/16˝) and sew.
32
Page 32

U10
U9
U11
Variety of overcasting stitches
U9 Multiple zigzag stitch (tricot stitch): Zigzag foot A
This stitch is used to finish a raw edge of synthetics and
other stretch fabrics that tend to pucker.
Sew along the fabric edge leaving an adequate seam
allowance. After sewing, trim off the seam allowance
closer to the stitches.
U10 Overcasting stitch: Overedge foot C
This stitch can be used to simultaneously seam and
overcast edges of fabrics.
Use this stitch when you do not need to open seams
flat.
Place the fabric edge next to the guide of the foot and
then sew.
U11 Knit stitch: Zigzag foot A
This stitch is recommended for sewing such fabrics as
synthetic knits and stretch velour as it provides the
greatest amount of elasticity and strength.
Sew along the fabric edge leaving an adequate seam
allowance.
After sewing, trim the seam allowance close to the
stitches.
U12
U13
U12 Double overedge stitch: Overedge foot C
This stitch is excellent for fabrics that tend to fray
extensively such as linens and gabardines.
Two rows of zigzag stitches are simultaneously sewn
over the edge to insure that the fabric will not ravel.
U13 Overlock stitch: Overcasting foot M
This stitch finishes the edges of fabric similar to a
commercial overlocking machine for a professional
look. The stitch width cannot be adjusted.
CAUTION:
When you use overedge foot C or overcasting foot M,
you must set the zigzag width at 5.0 or wider to prevent
the needle from hitting the foot wires.
33
Page 33

Utility(U)
Blind Hem
1
Blind hemming
G
2
3
5
4
7
6
Select pattern U14 for woven fabrics or pattern U15 for
stretch fabrics.
15
8
(A)
9
10
16
17
12
11
1918
14
13
NOTE:
The stitch width of patterns U14 and U15 cannot
be changed, but the needle drop position will move.
B
1 cm
(B)
0.5 cm
How to fold the fabric
Fold the fabric to form a hem leaving a 0.5 cm (1/4”)
allowance as shown.
(A) Medium to heavy fabrics: The raw edge should be
overcasted.
(B) Fine fabrics: Fold the raw edge 1 cm (1/2”).
To sew
Position the fabric so that the fold comes to the left side
of the guide on the foot. Lower the presser foot.
Adjust the position of the needle drop if necessary.
Sew guiding the fold along the guide.
After sewing is finished, open the fabric flat.
The seam on the right side of the fabric is almost
invisible.
0.5 cm
Adjust
0.60
2.00
3.4
Default
OK
Adjusting the needle drop position
Press the adjust key to open the manual setting
window.
Press the “+” key to move the needle drop positions to
the left.
Press the “–“ key to move the needle drop positions to
the right.
Press the OK key to register the settings.
The needle should just pierce the folded edge when it
comes over to the left side.
NOTE:
The needle drop position will move, while the stitch
width remains consistent.
34
Page 34

Utility(U)
Knit Stitch
1
Visible hemming
F
2
3
5
4
7
6
Select pattern U17.
8
9
10
15
16
17
12
11
1918
14
13
B
Fold and press a single hem. Place the fabric with the
right side up.
Sew along the fold at the desired depth.
Trim the excess on the wrong side.
35
Page 35

Buttonholes and Specialty Stitches
Variety of buttonholes
B1
B2
B3
B4
B5
B6
AUTO
B1 Sensor (Square) buttonhole
This square buttonhole is widely used on medium to heavy weight fabrics. The
buttonhole size is automatically determined by placing a button in the foot.
B2 Auto (Square) buttonhole
This is also a square buttonhole similar to the sensor square buttonhole, but you can
manually set the buttonhole size and you memorize the size to sew buttonholes of
the same size.
B3 Round end buttonhole
This buttonhole is used on fine to medium weight fabrics especially for blouses and
children's clothes.
B4 Fine fabric buttonhole
This buttonhole is rounded at both ends and is used on fine, delicate fabrics such as
fine silk.
B5 Keyhole buttonhole
The keyhole buttonhole is widely used on medium to heavy weight fabrics. It is also
suitable for larger and thicker buttons.
B6 Rounded keyhole buttonhole
This buttonhole is used for thicker buttons on medium weight fabrics.
B7
B8
B9
B10
B11
B12
B13
B7 Tailored buttonhole
This buttonhole is durable and used for thick buttons and heavy fabrics.
B8 Keyhole buttonhole (tapered reinforced end)
This buttonhole is used for tailored clothing, woven cloth etc.
B9 Keyhole buttonhole (heavy reinforced end)
This buttonhole is used for tailored clothing, jackets, particularly men's wear, woven
cloth etc.
B10 Stretch buttonhole
This buttonhole can be used on stretch fabrics. It can also be used as a decorative
buttonhole.
B11 Knit Buttonhole
This buttonhole is suitable for knit fabrics. It can also be used as a decorative buttonhole.
B12 Antique buttonhole
This buttonhole looks like the heirloom stitch. It has an attractive handmade appearance and makes a nice decorative buttonhole.
B13 Welted buttonhole
This is a template pattern for the hand sewn welted (bound) buttonhole.
NOTE:
B3-B13 are sensor buttonholes and the sewing procedure is the same as B1.
36
Page 36

Buttonholes(B)
Sensor BH
Pull down BH Lever.
2
1
Auto
9
8
15 16
R
5
3
4
11
10
17 18 19 20 21
6
13
12
B
Sensor (Square) buttonhole
7
14
Select pattern B1.
To sew
1 Attach the automatic buttonhole foot R snapping the
pin into the groove of the foot holder. Raise the
presser foot.
2 Pull the button holder to the rear, and place the
button in it. Push it tightly against the button.
1
2
NOTES:
The buttonhole size is automatically set by placing a
button into the button holder in the rear of the automatic
buttonhole foot R.
The button holder of the foot takes a button size of up to
2.5 cm (1") in diameter.
If the button is extremely thick, make a test buttonhole
3
on an extra piece of the fabric. If it is difficult to fit the
button through the test buttonhole, you can lengthen the
4
buttonhole by pulling the button holder back a little. The
length of the buttonhole will be increased.
3 Pull the buttonhole lever down as far as it will go.
4 Press the start/stop button to sew the buttonhole.
Step-1
Step-2 Step-3
NOTE:
A warning message will appear and the machine will
stop automatically if you start to sew a buttonhole
without pulling down the buttonhole lever.
Press the exit key and pull down the buttonhole lever to
5
restart.
Pull down BH Lever.
X
6
No gap
5 When buttonhole sewing is finished, push the
buttonhole lever up as far as it will go.
6 Remove the fabric and place a pin just below the
bartack at each end to prevent accidentally cutting
threads. Cut the opening with the seam ripper. Use
an eyelet puncher to open a keyhole buttonhole.
NOTE:
Make sure there is no gap between the slider and front
stopper, otherwise the left and right lengths will be
different.
37
Page 37

Buttonholes(B)
Auto BH
Pull Button Holder firml
2
1
Auto
9
8
15 16
Step 1
Sew to length required,
then press " ".
y.
3
10
17 18 19 20 21
5
4
11
12
R
6
13
B
Automatic (square) buttonhole
Select pattern B2.
7
Pull the button holder all the way out.
Mark the buttonhole position on the fabric. Insert the
14
fabric under the foot. Press the up/down needle button
twice. Remove the fabric to the left to draw the needle
thread through the hole of the foot.
Place the garment under the foot, and lower the needle
at the starting point.
Then lower the automatic buttonhole foot R.
NOTES:
You do not need to pull down the buttonhole lever.
If you wish to change the buttonhole width and stitch
density press the adjust key.
If you wish to sew a buttonhole longer than the size
permitted by the automatic buttonhole foot R, use satin
stitch foot F.
Step-1
Sew the left side up to the required length of buttonhole
and stop the machine. Then press the reverse button.
Step-2
R
Start sewing again, and the machine sews back with a
straight stitch.
Stop the machine when you reach the starting point.
Then press the reverse button.
Step 2
Sew up to start position,
then press " ".
Step 3
Sew to the end,
then press " ".
Step 4
Machine stops when
BH is completed.
Restart for the same size.
Different size
R
Step-3
Start sewing again, and the machine sews the front
bartack and right side of the buttonhole.
Stop the machine when you reach the ending point.
Then press the reverse button.
R
Step-4
Start sewing again, and machine sews the back bartack
and locking stitches then stops automatically.
After sewing is finished, a message will appear.
R
To make the next buttonhole, position the fabric and
start sewing again. The message dilsappears and the
machine will sew another buttonhole identical to the first
one then stop automatically.
To sew the next button hole in a different size press the
exit key .
X
NOTE:
To cut the buttonhole opening, refer to the instructions
on the previous page.
38
Page 38

Corded buttonhole
To sew a corded buttonhole, follow the same
procedure as for the sensor buttonhole; refer to the
instructions on page 37.
Select the pattern B1.
With the Automatic buttonhole foot R raised, hook the
2
1
filler cord on the spur on the back of the buttonhole
foot.
Bring the ends of cord toward you under the
buttonhole foot clearing the front end.
Hook the ends of the filler cord into the forks on the
front of the automatic buttonhole foot R to hold them
tight.
1 Spur
2 Forks
Lower the needle into the garment where the
buttonhole will start and lower the foot.
Press the start/stop button or foot control to sew the
buttonhole.
Each side of the buttonhole and the bartacks will be
sewn over the cord. The machine stops automatically
when finished.
Adjust
5.0
0.45
3.4
Default
OK
Remove the fabric from the machine and cut the
sewing threads only.
Pull the left end of the filler cord to tighten.
Cut the filler cord as close to the buttonhole as possible.
NOTES:
Set the stitch width in accordance with the thickness
of the cord used.
Cut the filler cord if it is stitched to the fabric and cannot
be pulled, cut the filler cord at both ends.
To cut the buttonhole opening, refer to the instructions
on page 37.
Manual settings
Altering buttonhole width
Press the adjust key and the manual setting window
will open.
Press the “+” key to increase the buttonhole width.
Press the “–“ key to decrease the buttonhole width.
Press the OK key to register the settings.
Altering buttonhole stitch density
Press the “+” key to make the buttonhole stitches less
dense.
Press the “–“ key to make the buttonhole stitches
denser.
39
Page 39

Buttonholes(B)
X
Darning
Sew to length required,
then press " ".
2
1
Auto
9
8
R
5
6
3
4
7
The MC 11000 automatically darns rips and holes.
Large and small holes can be mended quickly and
easily with this unique stitch.
Darning
11
10
13
12
14
15 16
2
17 18 19 20 21
B
1
3
Select pattern B15.
1. Attach the automatic buttonhole foot R and pull the
button holder all the way out.
To sew
2. Depress the foot control and sew to the required
length, then press the reverse button. The darning
length has now been determined.
Depress the foot control and continue sewing until
the machine stops automatically.
3. Sew another layer of darning over the first layer, at a
right angle to it.
Adjust
1
5.0
Restart for the same size.
Different size
9
4.2
Default
OK
2 cm
(+)
0.7 cm
(–)
NOTE:
The maximum length of darning is 2 cm (3/4”) and the
maximum width is 0.7 cm (1/4”).
To sew the same size darning
Simply depress the foot control to sew another darning
in the same size.
To sew the next darn in a different size, press the exit
key.
To adjust the evenness of darning stitches:
You can correct the unevenness of darning by pressing
the “–“ or”+” key.
If the left corner is lower than the right side, press the
key to correct it, and vice versa.
40
Page 40

Buttonholes(B)
X
Tacking
Sew to length required,
then press " ".
2
1
Auto
9
8
F
5
6
3
4
11
10
12
7
13
14
Tacking is used to reinforce pockets, crotches and belt
carriers where extra strength is needed.
Select pattern B16 and attach the satin stitch foot F.
Tacking
15 16
17 18 19 20 21
B
To sew
Depress the foot control and sew to the required length,
then press the reverse button. The tacking length has
now been determined.
Restart for the same size.
Different size
1.5 cm
NOTE:
The maximum length of tacking is 1.5 cm (5/8”).
To sew the same size tack
To sew another tack in the same size, simply depress
the foot control until the machine stops automatically.
To sew the next tack in a different size, press the exit
key.
41
Page 41

Buttonholes(B)
Tacking
2
1
Auto
9
8
F
5
6
3
4
11
10
12
7
13
14
The fly stitch is a triangle tacking stitch for use at a
zipper fly bottom and side pockets of men's pants.
Attach the satin stitch foot F.
Fly stitches (B19, B20)
15 16
17 18 19 20 21
B
To sew:
Place the garment under the foot and lower the needle
at the bottom of the zipper fly.
Sew the stitch until the machine stops automatically.
Buttonholes(B)
Eyelet
2
1
Auto
9
8
15 16
5
3
4
11
10
17 18 19 20 21
6
13
12
B
F
7
14
Adjust
S2
2.6
Eyelet
The Eyelet is used for belt holes etc.
Select pattern B21-25 and attach the satin stitch foot F.
Depress the foot control to sew. The machine will stop
automatically when completed.
Open the eyelet with an awl, puncher or pointed
scissors.
To correct the shape of an eyelet:
If the eyelet is open, press the “–“ key.
If the eyelet overlaps, press the “+” key.
Default
OK
42
Page 42

Twin Needle Sewing
Some of the utility stitches and decorative stitches can
be sewn with a twin needle.
CAUTIONS:
Turn the power switch off before changing the needle.
Use the twin needle included in the standard
accessories.
NOTE:
When you sew patterns with the twin needle, test the
stitches first before you sew.
Use the zigzag foot A or satin stitch foot F for twin
needle sewing.
Insert the extra spool pin and spool supporter. Then put
a felt cushion and spool on it.
Draw both threads from the spools and pass them
through the threading points from 1 to 5.
Make sure that the two strands of thread from the
spools do not get tangled.
Pictograph(P)
Decorative
1
8
15
16
2
9
10
17 18 19
NOTES:
Make sure each thread winds off from the spools as
shown.
1/2
F
5
4
3
11
6
7
13
12
14
Threading from points 1 to 5 is the same as for a single
needle.
Slip one of the threads through the needle bar thread
guide on the left, and the other one on the right.
Thread the needles from the front to back.
NOTES:
The Automatic needle threader cannot be used for the
twin needle.
When changing the sewing direction, raise the needle
and turn the fabric.
Select the pattern then press the twin needle key.
If the selected pattern is not suitable for twin needle
sewing, the twin needle key will gray out and be
disabled.
After twin needle sewing is finished, press the twin
needle key and the warning message will appear.
Press the OK key and replace the twin needle with a
single needle.
43
Page 43

Decorative Stitches
The patterns in this section are programmable and you
can make a pattern combination.
Patchwork and quilting stitches (Q)
Stitches in this group are for patchwork, quilting and
appliqué.
NOTE:
Patterns Q1 to Q7 are not programmable.
Satin(S)
Decorative
1
8
15
2
9
16
1/3
1/2
4
3
11
10
17 18 19
X1
Heirloom stitches (H)
This group provides the heirloom stitches and cross
stitches for craft sewing and home décor.
Decorative satin stitches (S)
F
5
6
7
13
12
14
The stitches in this group can be elongated up to 5
times their original length while the stitch density
remains the same.
To elongate the stitch, press the adjust key to open the
manual setting window.
Press the “+” key to increase the elongation ratio or
press the “–“ key to decrease the elongation ratio.
The stitch density and width can also be altered.
X2
X3
X4
X5
Press the OK key to register the elongation ratio.
Decorative stitches (D)
Some utility stitches are included as programmable
stitches in this group. The number beside the stitch
image on the straight stitch key indicates stitch counts
of a programmable unit.
Pictograph stitches (P)
There are 24 stitch patterns of seasonal motifs and
cute designs for embellishing children’s wear.
44
Page 44

Cording
Use the cording foot H to sew over one or three strands
of cording.
Knitting yarns, embroidery flosses, lace threads and
fine wool tarns can be used for cording.
Attach the cording foot H.
Select pattern S2 for three strands cording.
NOTE:
Pattern U9 (multiple zigzagg stitch) can also be used.
Insert three strands of cording under the spring on the
foot. Make sure to pass each strand separately under
the spring.
1 Spring
1
Pull 10 cm (4”) of strands under the foot and to the rear.
The grooves on the bottom of the foot will hold cordings
in place while stitching over the cordings.
Sew carefully over the cordings while guiding the
strands parallel and even.
For a single strand cording, insert a strand into the
center groove on the foot.
Select pattern U8 (zigzag stitch) and adjust the stitch
width in accordance to the thickness of the cording.
45
Page 45

Quilting(Q)
Straight Stitch
1
2
43
1/5
Patchwork and Quilting (Q)
A
5
7
6
Stitches in this group are for patchwork and quilting.
Patterns Q1 to Q7 on the first page are special stitches
for quilting, grouped together to make use of the drop
feed option.
The drop feed key is displayed in the pattern selection
window, in place of the programming related keys.
Using the quilting guide bar
The quilting guide bar is helpful when sewing parallel,
evenly spaced rows of stitching.
Two kinds of quilting guide bars are included in the
standard accessories, one for use with the zigzag foot
and the other is for even feed foot.
To attach the quilting guide bar for the zigzag foot:
Loosen the screw on the back of the foot holder and
insert the quilting bar into the hole of the foot holder.
Set the quilting guide bar at the desired spacing, and
retighten the screw.
Sew rows of stitching while tracing the previous row of
stitching with the quilting guide bar.
To attach the quilting guide bar for the even feed
foot:
Push the quilting bar down into the slot on the plastic
cover of the even feed foot.
Shift the quilting guide bar at the desired spacing.
Sew rows of stitching while tracing the previous row of
stitching with the quilting guide bar.
Hand-look quilt stitches
Patterns Q63 to Q67 are special stitches for quilting
F
which look like hand sewn stitches.
Use a transparent nylon thread for the needle and ordinary
sewing thread for the bobbin.
The bobbin thread is pulled up on the right side of the
fabric and the stitches will look as if sewn by hand.
46
Page 46

Programming Pattern Combinations
Function keys
1 Program key
Press this key to program pattern combinations. When
you press this key, the cursor keys, delete key, memory
check key and save file key will be displayed.
2 Cursor keys
Press the cursor keys to move the cursor to the right or
left. Use these keys to select a pattern to delete or
adjust.
3 Delete key
F
2
Press this key to delete the selected pattern.
4 Mirror image key
Press this key to program a mirror image of the
selected pattern.
5 Page keys
Press key to view the previous page.
Press key to view the next page.
M
67
1
3
M
ABCDEFGHIJKLMNO
1
1/1
6 Save file key
5
4
Press this key to save the programmed pattern
combination.
7 Memory check key/Start over key
Press this key to review the programmed patterns.
This key will change to the start over key after
starting the machine.
Pressing the start over key allows you to sew the
programmed patterns from the beginning.
B
X
47
Page 47

Satin(S)
Locking Stitch
2
1
9
8
1/2
F
5
4
3
6
7
Programming the auto lock stitch
The auto lock stitch can be programmed at the end
of the pattern combination.
This stitch is included on each of the programmable
11
10
13
12
14
stitch pages.
15
16
17 18 19
Press the auto lock stitch after programming the
pattern combination.
The machine will sew the patterns and lock the stitch at
M
the end of the combination then stop automatically.
NOTE:
If the auto thread cutting is enabled in the ordinary
sewing mode setting, the machine will trim the threads
after the auto lock stitch (refer to page 22).
Programming French Knot
F
Example: Expanding the space between French Knots
Press the program key.
Select the pattern D13 (French Knot).
Select the pattern D1. Two counts of straight stitch will
be inserted.
Select the pattern D13.
Select the pattern D2. Three counts of straight stitch
will be inserted.
M
Start to sew. The machine will sew the programmed
French Knots repeatedly.
48
Page 48

1
Satin(S) 1/2
Decorative
3
2
1
9
8
15
16
10
17 18 19
M
3
Satin(S) 1/2
Decorative
3
2
1
9
8
10
Editing the stitch pattern combination
F
Example: To program the combination of patterns S19,
D61 and mirror image of S19
5
4
11
4
11
6
7
13
12
14
2
Decorative(D)
Decorative
58
55
62
69 70
F
5
6
7
13
12
14
57
56
64
63
71
M
59
65
66
72
73
F
60
61
67
68
1 Open the satin stitch page and press
the program key. Select pattern S19.
2 Open page 4 of the decorative
stitch page. Select pattern D64.
3 Open the satin stitch page again.
Press the mirror image key and
select pattern S19.
15
16
17 18 19
M
5
Satin(S) 1/2
Decorative
3
2
1
9
8
15
16
M
10
17 18 19
4
Satin(S) 1/2
Decorative
5
4
3
2
1
9
8
15
16
F
5
4
11
6
7
13
12
14
M
11
10
17 18 19
12
F
6
7
13
14
Editing the stitch pattern combination
Example: To replace pattern D64 of the
above example with pattern D51
4 Press the cursor key to move the
cursor under pattern D64.
5 Press the delete key and pattern
D64 will be deleted.
6
Decorative(D) 3/8
Decorative
36
F
38
37
39
41
40
42
6 Open the page 3 of the decorative
stitch page. Select the pattern D51.
Pattern D51 will be inserted
44
51
45
52 53 54
43
50
46
48
47
49
before the cursor.
Save File
Location :
New
A1
A10
A11
A2
A3
Rename
Built-in
A4
A5
A6
A7
A8
0.6/3MB
Built-in
AT A
Card
USB
Memory
M
1/2
Saving the pattern combination
Pressing the save file key opens the save file
window to allow you to save the programmed pattern
combination as a file.
To open the saved file, press the open file key.
NOTE:
X
Refer to pages 86, 87 for detailed instructions.
49
Page 49

Monogram
Block
1/3
Monogramming
F
You can combine letters and symbols for
monogramming.
A B C D E F G H
IJKLMNOP
QRSTUVWX
YZ . &01
2 4567893
M
L
6
A
S
a
7
A
1 Font key
Pressing this key opens the font selection window. You
can select one of the 3 fonts and symbol marks.
2 Upper/lower case key
You can select upper or lower case letters by pressing
this key.
3 Letter size key
By pressing this key, the size of the letter will change
to approximately 2/3 of the full size letter. If you press it
again, the letter will go back to the original size.
4 Memory check key
8
Pressing the memory check key will display the
entire pattern combination.
After starting the machine, the key will change to the
start over key .
B
M
M
5
4
L
3
S
A
a
A
12
5 Save file key
You can save the monogramming or text as a file.
6 Cursor keys
These keys are for editing your monogram.
Press the left arrow key to move the cursor to the left.
Press the right arrow key to move the cursor to the
right.
7 Delete key
Press this key to delete the character or symbol with
the cursor under it.
8 Page keys
Press key to view the previous page.
Press key to view the next page.
Punctuation marks and diacritics are available on the
subsequent pages.
50
Page 50

Monogram
Symbol
Programming a monogram
F
1
Simply enter the characters to program a monogram.
Example: “ Café” in Block style
L
2
M
Monogram
Block
A
a
S
A
1/3
A B C D E F G H
IJKLMNOP
QRSTUVWX
3
Monogram
Block
1/3
a b c d e f g h
ij klmnop
qr st uvwx
4
Monogram
Block
3/3
Block
Symbol
F
Script
Broadway
1 Press the font key and select the symbols.
Select “ ”.
2 Press the font key and select Block style.
F
Enter “C”.
3 Press the letter case key to switch to the lower case.
Enter “a” and “f”.
4 Press the next page key twice. Enter “é”
F
5
6
7
Monogram
Symbol
Symbol
Monogram
Symbol
Symbol
Monogram
Symbol
Symbol
Editing the monogram
Example: to replace “ ” of the above example with
“ ”.
F
5 Press the left cursor key to move the cursor under
“ ”.
6 Press the delete key and “ ” will be deleted.
F
7 Press the font key and select the symbols.
Enter “ ” and it will be inserted before “C”.
Saving the monogram
F
Pressing the save file key opens the save file
window to allow you to save the monogram as a file.
To open the saved file, press the open file key.
NOTE:
Refer to page 96 for detailed instructions.
51
Page 51

Sewing Applications
Sewing applications are unique feature that provides
you with 12 useful sewing applications.
When you press the sewing applications key, you will
be able to choose the right stitch and its appropriate
setting for your fabric and sewing project.
The machine will automatically set up for the selected
project.
There are 12 applications that you can choose from the
menu.
1 Seaming 2 Overedge
3 Blind Hem 4 Rolled Hem
5 Zipper Sewing 6 Gathering
7 Basting 8 Button Sewing
9 Tacking 10 Appliqué
11 Patchwork 12 Quilting
NOTE:
Do not press the sewing applications key while
programming a pattern combination, otherwise the
programmed pattern combination will be cleared.
12 3 4
5
6
7
8
3.5
9101112
Blanket Stitch
Zigzag Stitch
M
Zigzag Stitch
1.80
52
Page 52

Rolled hemming
This section provides two options for rolled hemming,
one with straight stitch and the other with zigzag stitch.
Attach the rolled hem foot D.
Fold the fabric edge twice to form a hem, 0.3 cm (1/8”)
wide and 5 cm (2”) long then press.
Place the fabric aligning the hem edge with the guide of
the foot.
Lower the foot and sew several stitches slowly while
pulling on the threads to assist feeding the fabric.
Stop the machine and lower the needle into the fabric.
Raise the foot and insert the folded portion of the fabric
into the curl of the foot.
Lower the foot and sew while lifting the edge of the
fabric to keep it feeding into the curl smoothly and
evenly.
53
Page 53

Zipper sewing
This section provides 2 options of zipper sewing, one
for lapped zipper and the other for concealed zipper.
Zipper1
Straight Stitch
Sew left side
Sew right side
(A) (B)
Opening size
E
Zipper size
Lapped zipper sewing
Press the lapped zipper icon and the zipper sewing
window will open.
(A) To sew the left side of the zipper, attach zipper
foot E with the pin on the right-hand side.
(B) To sew the right side of the zipper, attach zipper
foot E with the pin on the left-hand side.
Fabric preparation
Add 1 cm (3/8˝) to the zipper size.
This is the overall opening size.
Right side of
fabric
1
1 cm
Basting
Reverse stitch
2 cm
Place the right sides of the fabric togather and sew to
the end of the opening with a 2 cm (13/16˝) seam
allowance.
Reverse stitch to lock the seam.
Manually increase the stitch length to 5.0 and baste the
zipper opening with the thread tension loosened.
To sew
1. Fold back the left seam allowance. Turn the right
seam allowance under to form a 0.2 to 0.3 cm (1/8˝)
fold. Place the zipper teeth next to the fold and pin
in place.
Set the stitch length and thread tension back to the
default.
54
Page 54

2. Attach zipper foot E with the pin on the right hand
side. Lower the foot onto the topside at the bottom of
2
the zipper so that the needle pierces the fabric next
to the fold and the zipper tape. Sew along the zipper
guiding the zipper teeth along the bottom edge of the
foot.
3
3. Sew through all layers next to the fold.
Stop 5 cm (2˝) before zipper foot E reaches the slider
on the zipper tape.
Lower the needle slightly into the fabric.
Raise the foot and open the zipper. Lower the foot
and stitch the remainder of the seam.
5 cm
4. Close the zipper and spread the fabric open flat with
the right side of the fabric facing up. Baste the
4
5
1 cm
opened fabric and zipper tape together.
5. Attach the zipper foot E to the left pin.
Backstitch across the end of opening to 1 cm (3/8˝).
Stitch through the garment and zipper tape, guiding
the zipper teeth along the bottom edge on the foot.
Stop about 5 cm (2˝) from the top of the zipper.
Lower the needle into the fabric, raise the foot,
remove the basting stitches and open the zipper.
6. Lower the foot and stitch the remainder of the seam
6
55
making sure the fold is even.
Page 55

Concealed zipper sewing
NOTE:
You need the optional concealed zipper foot (part
number 200-333-001), available from Janome dealers.
Zipper2
Lock-a-Matic
Press
" "
Lock-a-Matic
Stitching tape
Right side of fabric
Lock-a-Matic
at end of seam.
Basting
Stitching tape
Opening size
Right of teeth
Left of teeth
0.3 cm
2 cm
Press the concealed zipper icon and the window will
A
show the step-by-step icon keys.
Press each icon key as you go through the sewing
process and the machine will automatically set up for
each step of sewing and the required foot will be shown
on the screen.
2 cm
Fabric preparation
Provide a concealed zipper 2 cm (3/4”) longer than the
opening size.
Attach the zigzag foot A. Place the right sides of the
fabric togather and sew to the end of the opening with
a 2 cm (13/16˝) seam allowance. Press the reverse
button to lock the seams.
Press the basting icon key and baste the opening
0.3 cm (1/8”) inside of the seam line.
Basting
Place the right zipper teeth next to the fold and pin it in
place.
Fold up the left seam allowance to the bodice. Open the
zipper and put it on the right seam allowance with the
back side up.
56
Page 56

Right of teeth
1
1 Press the right of teeth icon key and attach the
concealed zipper foot (optional item).
Raise the zipper teeth on the right and lower the foot
so the left groove of the foot catches the zipper
teeth.
Stitch through the zipper tape and fabric up to the
end of the opening. Reverse the stitches to secure
the seam.
To sew
Stitching tape
2
2 Press the stitching tape icon key. Raise the foot and
open the zipper. Attach the zipper foot E with the left
side of the pin.
Turn and fold the bodice to the right. Seam along the
edge of the left zipper tape and reverse the stitches
2 cm (3/4”) before the zipper bottom.
Stitching tape
3
3 Press the second stitching tape icon key.Raise the
foot and reattach it with the right side of the pin.
Turn and fold the bodice to the left. Seamalong the
edge of the left zipper tape and reverse the stitches
2 cm (3/4”) before the zipper bottom.
2 cm
Left of teeth
4
4 Press the left of teeth icon key. Raise the foot and
replace it with the concealed zipper foot.
Remove the basting stitches and open the zipper
completely.
Raise the zipper teeth on the left and lower the foot
so the right groove of the foot catches the zipper
teeth.
Stitch through the zipper tape and fabric up to the
end of the opening. Reverse the stitches to secure
the seam.
5
5 Slide up the stopper to 0.3 cm below the end of the
opening and fasten the stopper with pliers.
57
Page 57

Gathering
In addition to the regular gathering stitch, this section
offers you a special stitch for easing sleeve tops.
Easing a sleeve top
Sew a pair of lines, 1/8” (3 mm) apart, along the edge
of the sleeve top. Pull the bobbin threads to contract
the sleeve top carefully, matching it with the armhole
size.
Make sure not to make gathers in the sleeve top.
Basting (Auto)
This stitch is used for basting zipper tape or fitting of
garments.
Sew in the same way as that of straight stitch sewing.
Basting (Manual/Quilting)
Attach the darning foot P-2.
When the basting is selected, the feed dog will be
automatically lowered.
NOTE:
Refer to page 17 for how to attach the darning foot P-2.
To sew
Hold the fabric taut and depress the foot control.
The machine will take one stitch and stop
automatically.
Slide the fabric back for the next stitch.
58
Page 58

Button Sewing
Button sewing
Use the button sewing foot T and reduce the foot
pressure.
When attaching a button to a thick fabric, you need to
make a shank by using the button shank plate.
3.5
The feed dog will be automatically lowered when
selecting the button sewing section.
Attach the button sewing foot T (refer to page 17) and
set the foot pressure dial at “2”.
Place a button on the fabric and lower the needle into
the left hole of the button by turning the handwheel with
your hand.
Lower the foot to hold the button in place, aligning the
direction of the button.
Raise the needle by turning the handwheel until the
needle bar swings to the right.
Press the “+” or “–” key so the needle enters into the
right hole of the button.
Lower the needle into the fabric and push the button
shank plate into between the button and fabric.
Start sewing and continue until the machine stops
automatically.
Remove the fabric from the machine.
Pull the needle thread at the end of stitching to bring the
bobbin thread up to the right side of the fabric.
Draw the both threads between the button and fabric.
Wind the threads to form a shank and knot them
together.
59
Page 59

Applique
Cornering for applique
You can select the normal start over or cornering
start over for applique stitches.
Cornering start over is very helpful when sewing an
applique with sharp corners.
Blanket Stitch
Zigzag Stitch
M
Zigzag Stitch
Press the cornering key and the start over
B
key will change to the cornering start over key.
The machine stops with the needle in the down
position so you can pivot the fabric to change the
sewing direction.
Press the cornering start over key before
sewing in the new direction. The machine will sew the
stitch pattern from the beginning without locking
stitches.
If you select normal start over, the machine will sew
the stitch pattern with locking stitches at the beginning.
Patchwork
Patchwork piecing
There are 3 stitches for seaming patchwork pieces in
this section.
The default stitch length is set at 1.8 mm, ideal for
patchwork piecing, but you can fine tune the stitch
length by pressing the “+” or “-“ key.
Same size
Different size
120
90
60
45
1.80
OK
Attach 1/4” seam foot O, which helps you to keep a
constant 1/4” (6 mm) seam allowance.
Put 2 pieces of fabric with right sides together.
Place the patchwork pieces under the foot so that the
edge of the fabric matches the guide on the presser
foot.
When you stop the machine, a message will appear.
Press OK key and the seam length is memorized to
sew another piece in the same length.
Press key to sew in a different size.
X
You can seam patchwork pieces at the desired angle
without marking, by using the angle scale on the
needle plate.
60
Page 60

Quilting
Clasp stitch
You can secure multi-layers of fabric and batting using
the clasp stitch.
Attach the satin stitch foot F.
The machine will automatically stop after sewing one
cycle of the stitch.
Free quilting
Attach the darning foot P-2 (refer to page 17).
To Sew
Lower the foot, then guide the fabric with your hands to
stitch along the pattern marked on the fabric.
61
Page 61

L.S
Quick Reference
L.S
Utility(U)
Auto
1 2 3
Buttonholes(B)
Buttonholes(B)
1/5
Quick Menu (Quick Reference)
The quick menu window shows at-a-glance lists of
stitches by category, from which you can select the
desired stitch quickly and easily.
Quilting(Q)
Quilting(Q)
1 2 3 4 5
Quick Reference
Applications
4
25
5
Quilting(Q)
Auto
6
5/5
You can jump to the desired page of the menu by
pressing one of the page keys.
Each page covers the following groups:
Page 1: Utility (U)
Buttonholes (B) 1, 2
Quilting (Q) 1-3
Page 2: Quilting (Q) 4, 5
Heirloom (H) 1-3
Satin (S) 1
Page 3: Satin (S) 2
Decorative (D) 1-5
Page 4: Decorative (D) 6-8
Pictograph (P) 1, 2
Monogram
2 3 4 5
1
Page 5: Sewing Applications
62
Page 62

(+)
(–)
Correcting Deformed Stitch Patterns
The sewing results of the stretch stitch patterns may
vary depending upon the sewing conditions, such as
sewing speed, type of the fabric, number of layers etc.
Always make test sewing on a scrap piece of the fabric
that you wish to use.
If decorative stitch patterns, letters, numbers or the
manual buttonhole stitch are deformed, correct them
with the feed balancing dial.
NOTE:
In normal sewing, set the feed balancing dial to the
neutral position, i.e. the groove on the dial is centered
with the standard setting mark.
Decorative stretch stitch patterns
If the pattern is compressed, turn the dial in the
direction of “+”.
If the pattern is drawn out, turn the dial in the direction
of “–”.
(+)
(+)
(–)
(–)
Letters and numbers
If the pattern is compressed, turn the dial in the
direction of “+”.
If the pattern is drawn out, turn the dial in the direction
of “–”.
Stitch balance of the stretch buttonhole (B10)
The stitch balance of the right and left rows of the
stretch buttonhole may vary depending on conditions of
sewing. If the stitches are not balanced, correct the
unevenness with the feed balancing dial.
If the right row is denser, turn the dial in the direction
of “+”.
If the left row is denser, turn the dial in the direction
of “–”.
NOTE:
Return the feed balancing dial to its neutral position
when the sewing is finished.
63
Page 63

EMBROIDERY MODE
5
2
4
1
3
Embroidery Hoops
Embroidery hoop ST:
This is the standard size hoop, with a 12.6 cm (5”) by
11 cm (4-3/8”) embroidery area for sewing the built-in
embroidery designs etc.
1 Outer hoop
2 Inner hoop
3 Attaching knob
4 Hoop tightening screw
9
5 Template
STARTING POINT FOR MONOGRAMMING
8
STARTING POINT
A
6
6 Indicates the embroidery boundary for built-in
designs, PC Design Card Nos. 1001 and up
7 Starting point for built-in designs
8 Starting point for monogram in horizontal
orientation
Template for embroidery hoop ST
7
9 Starting point for monogram in vertical
orientation
1
5
3
Embroidery hoop SQ:
This is the large-size hoop, with a 20 cm (8”) by 20 cm
(8”) embroidery area for sewing large-size designs and
combined designs.
1 Outer hoop
2 Inner hoop
3 Attaching knob
4 Hoop tightening screw
5 Template
4
2
Template for embroidery hoop SQ
6 Starting point for built-in designs
6
STARTING POINT
7
7 Indentations for positioning the template
NOTE:
The four indentations on the template do not correspond
with the reference lines.
NOTE:
Refer to page 91 for the instructions on hoop AQ.
64
Page 64

Stabilizers
To obtain the best quality embroidery, it is important to
use stabilizers.
Usage:
The stabilizer should be attached to the wrong side of
fabric.
More than one layer may be required.
For firm fabrics, you may place a thin paper under the
fabric.
The non-adhesive type should be used when embroidering fabric, which cannot be ironed or for sections, which
are difficult to iron.
Cut the stabilizer larger than the embroidery hoop and
set it on the hoop so that the entire piece is fastened with
the hoop to prevent looseness of the fabric.
Attaching the stabilizer
Place the wrong side of fabric and the glossy side of the
stabilizer together. Fold up a corner of the stabilizer and
fuse it with an iron.
Types of the stabilizers
Type
Tear-away
Iron-on
Cut-away
Water soluble
Sticky
Usage
Stable woven fabrics
Knits and all kinds of unstable fabrics
Knits and all kinds of unstable fabrics
Cutwork or lace embroidery
Right side of looped fabrics such as towel to avoid loops
coming through the embroidery
Securing a small fabric or work that cannot be secured in the
hoop
Velvet and other napped fabric that would be permanently
marked by the hoop
NOTES:
Fold up a corner of the stabilizer, to make it easier to peel
off the excess stabilizer after stitching.
Ironing temperatures vary depending on kind of adhesive
type stabilizer.
Property
Made from a fiber that will tear easily.
Adhesive type to be fused with an iron.
Non-woven fabric that does not tear.
A thin film that will dissolves in water.
Sticky paper
1
2
3
Foot Pressure
Set the foot pressure dial at “2” for embroidery.
Needles
Use the blue tipped needle (for fine to medium weight
fabrics) or red tipped needle (for medium to heavy weight
fabrics).
65
Page 65

Setting the Fabric in an Embroidery Hoop
1
Mark the Centerlines on the right side of the fabric with
tailor's chalk.
1 Fabric
2 Centerlines
2
5
4
Loosen the hoop tightening screw on the outer hoop.
Lay the inner hoop and template on the fabric, matching
the centerlines.
3 Hoop tightening screw
4 Inner hoop
5 Template
6 Outer hoop
NOTES:
When placing the fabric on the embroidery hoop, place
the outer hoop on a flat surface.
For thin and stretchy fabrics, use an adhesive type
stabilizer (iron-on type) on the wrong side of the fabric.
More than one layer may be required.
6
3
Push them into the outer hoop.
Tighten the screw on the outer hoop to stretch the
fabric. Make sure that the fabric is stretched drum-tight
in the hoop.
Remove the template.
NOTE:
Refer to page 91 for instructions on hoop AQ.
66
Page 66

Keep hands clea
Carriage will now move to set position.
r.
Setting the Embroidery Carriage Arm
Turn the power switch on and raise the presser foot.
Press down and hold the carriage release lever and
swing out the carriage arm until it is fully extended.
Release the carriage release lever.
Press the embroidery mode key.
The visual touch screen will show a warning
message.
Press the OK key.
The carriage will move to the position for setting the
hoop.
NOTE:
Be sure to set the carriage arm in the extended position
before pressing the embroidery mode key.
CAUTION:
Do not push or lift the carriage once it is set in the
extended position to prevent it from being damaged.
67
Page 67

Attaching the Embroidery Hoop to the Machine
1
2
Turn the attaching knob so it is parallel with the carriage
arm, and set the hoop on the carriage.
3
Attach the hoop by fitting the pins into the carriage
holes.
1 Attaching Knob
2 Pins
3 Carriage Holes
Turn the attaching knob clockwise to secure the hoop
CAUTION:
Do not attach the hoop unless the carriage arm is in the
setting position.
Always provide sufficient clearance for the embroidery
carriage behind your machine before starting
embroidery.
Never try to move the carriage with hand or touch the
carriage while it is moving.
Make sure to return the carriage to the stored position
before turning the power off.
START
STOP
NOTE:
Refer to pages 88 to 93 for the instructions on hoop AQ.
Thread Holder
To avoid sewing on the needle thread, place the thread
end on the thread holder.
Pass the needle thread through the hole in the
embroidery foot and draw it up to the thread holder.
Hang the thread on the thread holder from the front to
back.
68
Page 68

Emerald Green 250
1
18 min
7,013 ST 70x79mm
6 Colors
600 spm
Detaching the Hoop from the Carriage
Press the ordinary sewing tab.
Remove the hoop from the carriage.
The visual touch screen will show the warning
message.
Press the OK key and the carriage will move to the
home position
!
Please remove hoop.
Carriage will now move to home position.
Return to ordinary sewing.
Unsaved design(s) will be erased.
The visual touch screen will show the ordinary sewing
mode.
X
Retract the carriage in the stored position.
CAUTION:
Do not return the carriage with the hoop attached.
69
Page 69

1
1
1
1/22
Mode Selection
Press the embroidery mode key to enter the embroidery
mode. The following 5 categories are available in the
embroidery mode.
Press the next page key to view the next page.
Press the previous page key to view the previous
page.
1 Built-in designs
2
The visual touch screen shows the built-in design
window when the embroidery mode key is pressed.
The Memory Craft 11000 provides 170 ready to sew
built-in embroidery designs.
2 Monogramming
Press the monogramming key to open the monogramming
window. You can sew monograms in 12 different fonts,
plus border designs and stitch patterns similar to the
1001
3
㻔
ST: 126x110mm
㻕
1/3
㻖㻗
ordinary sewing (refer to page 74).
Quick Reference
4
ST:126x1110mm 1
ST:126x1110mm 4 ST:126x1110mm 5
1 2 3 4
5
ST:126x1
10mm 2
1/4
10mm 3
ST:126x1
SQ:200x200mm 6
A〜Z
3 PC Design card
Press the PC design card tab to open the designs from
㻧
the PC Design cards (optional items).
4 Quick design menu
You can select the desired embroidery design from the
categorized design lists.
5 Editing
In the Editing window, you can modify and combine
patterns to create original designs.
D
A
70
Page 70

Emerald Green 250
1
1
18 min
7,013 ST 70x79mm
6 Colors
600 spm
START
STOP
Built-in Designs
Press the Built-in Design Tab.
Press the pattern selection key to select the desired
pattern.
The embroidery screen will appear.
Adjust the hoop position with the jog keys so that the
needle drop position comes right above the center of
the reference lines on the fabric.
1 Jog keys
2 Needle drop position
3 Centerlines
2
3
Emerald Green 250
1
18 min
7,013 ST 70x79mm
3
2
4
5
1 Exit key
Press this key to return to the pattern selection window.
2 Stitch preview key
Press this key to show the stitched image of the
selected design
1
3 Color/section key
Press this key to show the complete image of the
6 Colors
600 spm
Ready to Sew
Powder Blue 229
1
2/6
17 min
7,013 ST 70x79mm
2
6 Colors
600 spm
Auto
selected design or partial image of each color sections.
To view the next color section, press the next page
key. Press the previous page key to view the
previous color section.
The machine will automatically stop sewing (and trim
the threads if the auto thread cutting is activated) when
Jog /ST
X
one part of the embroidery design is finished.
Change the thread and start sewing again.
01 : Emerald Green 250
02 : Powder Blue 229
03 : Coral 234
04 : Mustard 270
05 : Honey Dew 273
06 : Sunflower 239
Sewing the specific color/section by skipping
You can sew only the specific color sections of the
design by pressing the next page key until the
desired section is displayed.
4 Color list key
Press this key to display a list of thread colors employed
in the selected design.
5 Hoop standby/exit key
Press this key to open a menu of choice for moving the
hoop. Press the key to move the carriage back to
the home position and turn to the ordinary sewing
mode, or press one of the keys to move the
carriage to a standby position.
71
Page 71

Completed
㻧㼈㼉㼄㼘㼏㼗
Emerald Green 250
Stitch Counter
00000
2
1
1
ST:126x110mm
18 min
7,013 ST 70x79mm
3
2
6 Colors
600 spm
START
STOP
Auto
1 Trace key
You can check the size of the sewing area by tracing the
design outline without stitching or with basting stitches.
When you press the tracing key, the tracing option window will
open. Press the key to start tracing without stitching,
or press the key to open the confirmation window for
tracing with basting stitches.
Press the OK key to start tracing with basting stitches.
The carriage will returned to the starting position after
tracing.
NOTES:
4
Bring the bobbin thread up before tracing with basting
stitches.
The machine will baste around the embroidery area with a
5 mm allowance when “tracing with basting stitch” is
selected.
However, an allowance will be null If the pattern spreads
over the maximum limit of embroidery area.
2 Stitch back/forward keys
When embroidery sewing has started, the screen will
indicate the current stitch count. The jog keys will
disappear and the stitch back/forward keys will be shown
instead. You can use these keys to move the embroidery
hoop to where the thread has broken or run out.
Press the “–” key to move the hoop back to a previous
sewing point.
Press the “+” key to move the hoop ahead. The hoop will
move one stitch each time the key is pressed. Hold down
the key to travel faster and jump 10 or 100 stitches at a
time
ST:126x110mm
1
3
5
2.6
+
-
18 min
Default
X
OK
2
6 Colors
Auto
7,013 ST 70x79mm
3 Jog/ST key
Press this key to switch the jog keys to the stitch back/
forward keys or vice versa.
To use the jog keys after sewing has started, stop the
machine and return the stitch counter to zero by pressing
the stitch back key.
4 Tension adjust key
When pressing this key the thread tension adjust window
will open. You can adjust the auto thread tension level by
pressing the “+” or “–“ key. Press the default key to
return the tension setting to the default.
5 Tension adjust window
Screen Information
Beside the design image, the approximate sewing time in
minutes, number of colors, design size and the hoop that
should be used for the selected design are shown.
2
1 Sewing time in minutes
2 Number of colors
4
3 Total stitch count of the design
4 Design size
㻧㼈㼉㼄㼘㼏㼗
72
Page 72

Emerald Green 250
1
18 min
7,013 ST 70x79mm
6 Colors
600 spm
START
STOP
Starting to Sew Embroidery
Press the Pattern Selection key to select the desired
pattern.
Lower the presser foot.
Press the start/stop button and sew 5 to 6 stitches.
Press the start/stop button again to stop the machine.
Raise the presser foot, cut the loose thread close to
the beginning of the starting point and lower the
presser foot.
1 Loose thread
Press the start/stop button to start sewing again.
The machine will stop (and trim the threads if the auto
thread cutting is activated) automatically when the first
1
color section is finished.
Change the thread and sew the next section.
Sewing results
The embroidery pattern is sewn against the centerlines
2
on the fabric as shown.
2 Centerlines on the Fabric
NOTE:
The embroidery stitch pattern position against the
centerlines is indicated on the template sheets.
73
Page 73

1
A
Gothic
1
Bauhaus
5
First Grade
9
Border
13
Script
2
Galant
6
Jupiter
10 11
Normal Sew
14
2
Cheltenham
3
Typist
7
2 Letters
Hollowblock
4
Brush
8
Letters
3
12
X
Monogramming
Press the monogram key to open the monogram
window.
In the monogram window, you can program words by
pressing the alphabet keys directly.
After you press an alphabet key, the letter is
memorized and the cursor is moved to the right.
1 Cursor
NOTE:
Use the standard hoop ST for monogramming.
Font selection
You can change the type of font for monogramming by
pressing the font key.
The font selection window will open.
2 Font key
To select the desired font, press one of the following
options:
1 Gothic font
2 Script font
3 Cheltenham font
4 Hollowblock font (upper case only)
5 Bauhaus font
6 Galant font
7 Typist font
8 Brush font
9 First grade font
10 Jupiter font (upper case only)
11 2-Letter
12 3-Letter
13 Border patterns
14 Normal sew patterns (patterns similar to ordinary
stitches)
74
Page 74

12
1 Cursor key
Press these keys to move the cursor to the left or right.
2 Delete key
Press this key to delete the character above the cursor.
3 Page keys
Press these keys to view the next page or previous
page. The European accented letters are available on
the next page.
4 Save file key
Pressing this key opens the file save window and allows
you to save the text or monogram as a file.
5 Lettering orientation key
Pressing this key will select the horizontal or vertical
orientation alternately.
6 Letter size key
3
You can select the following 3 letter sizes by pressing
this key.
L (Large): 30 mm
M (Medium): 20 mm
S (Small): 10 mm
7 Letter case key
Pressing this key changes the letter case, upper case
4
5
67
8
or lower case.
8 OK key
Pressing this confirms your entry and opens the
embroidery screen.
75
Page 75

Programming a monogram
Example: Programming “R&B” in Gothic style font.
Gothic(1/4)
ST:126x110mm
A Z
1. Press the letter size key and select large size.
㻯
㻰
㻶
2. Enter “R”, the cursor shifts to the right and “R” is
automatically memorized.
㻯
3. Press the letter size key and select medium
㻰
㻶
size.
4. Enter “&”, the cursor shifts to the right and “&” is
automatically memorized.
㻯
5. Press the letter size key and select large size.
㻰
㻶
6. Enter “B”, the cursor shifts to the right and “B” is
automatically memorized.
Ready to Sew
Black 002
ST:126x110mm
6 min
1,462 ST 66x30mm
Color
Change
ABC ABC
3-D
Jog / ST
START
STOP
2
1 Color
600 spm
ABC
Auto
7. Press the OK key.
8. The screen will change to the Embroidery screen.
9. Press the start/stop button to start sewing the
monogram. The machine will stop automatically
after sewing finished.
NOTE:
Use the jog keys to adjust the position of the hoop to
match the reference lines.
76
Page 76

Ready to Sew
ST:126x110mm
6 min
1,462 ST 66x30mm
Color
Change
Auto
2
1 Color
600 spm
Placement of monogramming
You can select one of the 3 placements of
monogram: left justify, center justify and right justify.
Black 002
ABC ABC
ABC
3-D
Jog / ST
1 Left Justify
1
ABC
Press the key to start sewing from the left end
reference line on the template.
2 Center Justify
2
Press the key to sew in the center of the hoop.
ABC
3 Right Justify
3
㻖
ABC
Press the key to sew from the right end reference
line on the template.
ABC
ABC
ABC
㻖
Ready to Sew
Black 002
ST:126x110mm
6 min
1,462 ST 66x30mm
Color
Change
ABC ABC
3-D
Jog / ST
2
1 Color
600 spm
ABC
Auto
Color change
You can sew a multi-colored monogram by changing
the thread color of each letter if you press the color
1
change key before sewing.
The machine will stop automatically when each letter
has been sewn.
Change the thread to the next color and start sewing
again.
1 Color change key
77
Page 77

2 Letters
ST:126x110mm
2- Letter monogram
Example: 2-Letter in an octagon
2 Letters
L
M
A
S
ST:126x110mm
A Z
Press the font key.
Select 2-letter.
Select the octagon.
a
Enter “A”.
Enter “B”.
A Z
Ready to Sew
Black 002
L
M
S
A
a
ST:126x110mm
8 min
1,986 ST 54x62mm
Jog / ST
2
1 Color
600 spm
X
Auto
Press the OK key and the screen will change to the
embroidery screen.
Press the start/stop button to start sewing.
The machine will stop automatically when the mono-
gram is completed.
NOTES:
The 3-letter monogram will be sewn in the same way as
the 2-letter monogram.
The starting position for the 2-letter and 3-letter
monogram is in the center of the hoop.
78
Page 78

㻗
㻤㻥
㻤㻥
Gothic(1/4)
㻗
㻤㻥
㻤㻥
㻤
㻰
㻵
㻷
ST:126x110mm
㻤㻥
Editing a monogram
㻤
㻥 㻦 㻧 㻨 㻩 㻪 㻫
㻬㻭㻮㻯㻰㻱㻲㻳
㻴㻵㻶㻷㻸㻹㻺㻻
㻼㻽
㻕㻗
㻤㻥
㻤㻥
㻯
㻰
㻶
㻑㻉㻓㻔
㻘 㻙 㻚 㻛㻜㻖
㻤
㻤
㼄
㻲㻮
A〜Z
㻧
Deleting a character
Enter “M”, “A”, “R” and “T”.
Press the cursor key to shift the cursor under “R” to
delete.
Press the delete key and letter “R” will be deleted.
Gothic(1/4)
㻨
㻰
㻤
㻷
㻤
㻥 㻦 㻧 㻨 㻩 㻪 㻫
ST:126x110mm
㻤㻥
㻬㻭㻮㻯㻰㻱㻲㻳
㻴㻵㻶㻷㻸㻹㻺㻻
㻼㻽
㻕㻗
㻑㻉㻓㻔
㻘 㻙 㻚 㻛㻜㻖
Inserting a character
Press the cursor key to shift the cursor under “A”.
Enter “E”.
The letter “E” will be inserted before “A”.
A〜Z
㻧
㻤㻥
㻤㻥
㻯
㻤
㻰
㻶
㻤
㼄
㻲㻮
79
Page 79

Gothic(1/4)
ST:126x110mm
Monogramming in arc
You can make a monogram in an upper or lower arc.
Edit
ST:126x110mm
A Z
Enter the characters and press the OK key.
The embroidery screen will appear. Press the edit
key to enter the editing mode. Move the letters to the
center.
B
C
A
X
Press the arc key to open the arc layout window.
1 Upward arrow key
1
Press this key to make a lower arc.
2 Downward arrow key
2
Press this key to make an upper arc.
3 Outward double-head arrow key
3
4
Press this key to enlarge an arc.
4 Inward double-head arrow key
Press this key to shrink an arc.
80
Page 80

Edit
ST:126x110mm
Press the downward arrow key to make an upper arc.
Each time you press the arrow key the arc will be
deeper.
B
C
A
Pressing the arrow key in the opposite direction
makes the arc shallower.
NOTE:
X
The curvature will change when the downward or
upward arrow key is pressed, but the arc length will
remain the same.
Edit
Ready to Sew
Black 002
ST:126x110mm
ST:126x110mm
5 min
1,542 ST 125x52mm
3-D
B
A
X
2
1 Color
600 spm
C
Auto
Press the double-head arrow key to adjust the size of
the arc.
Move the arc to the desired position by pressing the
layout keys or dragging the arc with your fingertip.
After choosing the shape of the arc, press the OK
key in the arc layout window to define it.
Press the OK key in the editing window and the
design will be shown on the embroidery screen
Jog / ST
X
81
Page 81

Editing Mode
In the editing mode, you can edit and combine designs
to create your original embroidery.
Press the editing mode key to open the editing window.
A
Selecting the hoop
You need to select the appropriate hoop before editing
the designs.
Press the hoop selection key and the hoop selection
window will open.
Select one of the following hoops and press the OK key.
- Embroidery hoop ST: 126 mm by 110 mm
- Embroidery hoop SQ: 200 mm by 200 mm
- Embroidery hoop AQ: 140 mm by 200 mm (exclusively
for AcuFil Quilting, see pages 88-93)
- Free-arm hoop FA: 50 mm by 50 mm (optional item)
- Embroidery hoop MA: 200 mm by 280 mm (optional
item)
- Embroidery hoop RE: 140 mm by 200 mm (optional
item)
- Embroidery hoop HH: 100 mm by 90 mm (optional
item)
Designs
A
ST: 126x110mm
4/22
A Z
The editing window will open in the selected hoop size.
NOTE:
To select the embroidery hoop HH, first you need to
select the hoop RE.
Please refer to the instruction sheet of the Hat Hoop for
how to use it.
Opening the embroidery designs
You can open the built-in designs, monogram, and
designs from the optional PC cards, CD-ROM drive and
USB memory key in the editing window.
To import design patterns into the editing window, select
the desired pattern in the pattern selection window.
The screen will return to the editing window with the
selected pattern displayed in the editing window
82
Page 82

Edit
SQ:200x200mm
Selecting the pattern to edit
To select the pattern to edit, press the pattern image in
the editing window.
A Z
B
C
A
The selected pattern will be framed.
X
Edit
SQ:200x200mm
Moving a pattern
To move the embroidery pattern in the editing window,
press and drag the pattern to a desired location with
your fingertip.
A Z
NOTE:
B
C
A
Do not drag the pattern on the screen with a sharp
pointed object.
You can move the selected pattern also by pressing
the layout keys.
Press the layout keys to move the pattern to the
X
desired position in the editing window.
The carriage will not move when you press the layout
1
keys since the pattern position will move relatively to
the hoop, not to the machine.
1 Layout key
Edit
SQ:200x200mm
Duplicating a pattern
Press the duplicate key to make a copy of the
selected pattern.
A Z
NOTE:
The original pattern will be superimposed with a
B
C
A
duplicate. Move the duplicate to show the original
pattern.
X
83
Page 83

Edit
SQ:200x200mm
Edit
SQ:200x200mm
Deleting the pattern
Edit
45
SQ:200x200mm
45
A Z
B
C
A
X
Edit
A Z
B
C
A
SQ:200x200mm
A Z
B
C
A
X
A Z
B
C
A
Select the design to delete.
Press the delete key to delete the selected
pattern.
Rotating the pattern
Press the rotate key to open the rotation
option window.
Press the keys to rotate the selected
45 45
pattern 45 degrees clockwise or counterclockwise.
X
X
Press the key to rotate the selected
11
pattern one degree clockwise or counterclockwise.
Press the OK key to confirm the rotation.
Edit
Edit
11
SQ:200x200mm
A Z
B
C
A
X
SQ:200x200mm
A Z
B
C
A
X
Edit
Edit
SQ:200x200mm
SQ:200x200mm
Flipping a pattern
Press the flip key to open the flip option
A Z
B
C
A
window.
Press one of the flip keys to flip the
selected pattern horizontally or vertically.
Press the OK key to confirm the flipping.
X
Resizing a pattern
When you press the resize key , the resize
A Z
B
C
A
window will open.
You can change the size of embroidery pattern
from 80% to 120% of the original pattern size. The
size will change 1 % each time you press the plus
or minus key. To change the size quickly, press
X
and hold the “+” or “–” key.
Press the “+” key to enlarge the size of the pattern.
Press the “–“ key to reduce the size of the pattern.
84
When you press the OK key, the embroidery
pattern in the new size will appear in the editing
window.
When you press the exit key, the embroidery
pattern size will not change and the resize window
will close.
Page 84

SQ:200x200mm
Zooming in the editing window
Press the zoom-in key to get the zoom-in view of
the editing window. Pressing the zoom-in key again will
B
B
C
A
A
further enlarge the view.
1 Zoom-in key
To scroll the window, press the scroll key and drag
1
the window in the desired direction. Press the scroll key
again to cancel the scroll command.
2 Scroll key
Edit
SQ:200x200mm
SQ:200x200mm
Press the exit key to return to the original
X
window.
B
B
C
A
A
2
Customizing the display color
The background color of the editing screen and section
color of the design image can be changed to your
A Z
B
C
A
preference.
You can simulate the colors of the actual fabric and threads
on the screen by customizing the colors of the design
image or editing window.
Peacock Green 251
Default
Press the custom color key and the custom color
X
1/5
window will open.
Press the color/part key to select the editing
window or design image to change the color.
If you wish to change the thread color, select the color
section of the design you wish to change by pressing the
page keys .
Name
To select the hue, press one of 24 color tiles.
To change shade of the selected color, press and drag
the slider up or down.
You can assign the name to the customized color for the
color section by pressing the name key .
Name
The assigned name will be displayed instead of the name
and code of the thread color in the embroidery window.
85
Page 85

1
Designs
A
ST: 126x110mm
2
4/22
Edit
SQ:200x200mm
Combining the patterns (creating a square frame)
1 Select pattern ST41.
A Z
A Z
B
C
A
2 Press the editing key.
Select the hoop SQ.
Press the layout key to move the design down and to
the right.
X
Press the duplicate key.
3
Edit
SQ:200x200mm
4
Edit
SQ:200x200mm
3 Press the horizontal flip key.
A Z
B
C
A
A Z
B
C
A
Press the layout key to move the duplicate to the left.
Press the duplicate key.
4 Press the vertical flip key.
Press the layout key to move the duplicate up.
X
X
Press the duplicate key.
Press the horizontal flip key.
Edit
SQ:200x200mm
Press the layout key to move the duplicate to the
right.
NOTE:
If you press the grouping key , you can move
the combined patterns as a single group.
5
Edit
SQ:200x200mm
A Z
5 Press the color grouping key to unite the
color sections of the same color.
The color grouping window will open.
6
Peacock Green 251
40 min
13,844 ST 159x148mm
1/5
B
C
A
6 Press the OK key and the embroidery window for the
combined patterns will open.
X
NOTE:
5 Colors
600 spm
Press the exit key to return to the previous screen
without grouping the color.
NOTE:
The starting point of the edited design is always in the
center of the hoop.
NOTE:
START
STOP
Patterns with a custom color cannot be grouped.
86
Page 86

12
Using a template pattern to create the pattern chain
1 Select built-in pattern Template 5.
Press the editing key.
2 The editing window with the selected pattern will
open
3
4
56
7, 8
3 Select pattern FA20. A design image will appear in
the editing window.
4 Drag the pattern to the bottom corner of the
backdrop.
Press the duplicate key.
5 Lay the duplicate along the backdrop.
6 Repeat the above steps to form a heart-shape with a
series of patterns.
7 Press the color grouping key to unite the
color sections of the same color.
8 Press the OK key.
The “Ready to Sew” screen will open.
9
Tangerine 274
24 min
7,296 ST 184x163mm
2/3
10
3 Colors
600 spm
9 Press the next section key to skip the template
pattern.
10 Press the Start/Stop button to sew.
NOTE:
Patterns template 1 to 14 are used as backdrops for
the chain of the patterns.
The template patterns can be resized from 50% to
150 % of the original size.
87
Page 87

Step 1
7-10 cm
(3” to 4”)
7-10 cm
(3” to 4”)
Stipple Quilting with the Hoop AQ
AcuFil quilting
AcuFil quilting is a method for filling a large size quilt with
the AcuFil design patterns (embroidery stippling patterns)
using the hoop AQ.
Some ready to sew AcuFil design patterns (AQ-1 to 4)
and element patterns (SP-1 to 20) for making your original
design are included as the built-in designs.
Step 2
AcuFil designs 20/22
[ mm ]
166
92%
125
104%
Step 4
Press here
to save for printing
via MC11K tools
Step 3
STIPPLE.jef+
125mm
104%
166mm
92%
Step 5
Study and follow the steps below when stippling a large
size quilt.
Step 1
Prepare quilt layers and measure the size of the
embroidery area to be stippled. Leave a 7-10 cm (3” to 4”)
allowance around the embroidery area (see page 91).
Step 2
Select an AcuFil design pattern from the built-in designs or
create your original pattern by combining the element
patterns.
Step-3
Calculate the optimum pattern size for your quilt and adjust
the pattern size automatically by using the AcuFil calculator
(see page 89).
-1-
Step 4
Save the adjusted AcuFil design pattern and print template
sheets using AcuFil Print Tool (included in MC11K Tools).
Step 5
Mark the centerlines and the up mark on the quilt top and
place the template sheets to check the arrangement of the
AcuFil design patterns.
Mark the reference lines for the first pattern in the center of
the quilt.
Step 6
Step 8
Step 7
Step-6
Position the quilt layers on the hoop AQ using the AcuFil
template as a reference and set the quilt layers to the
hoop with the magnetic clamps (see page 91).
Step 7
Attach the hoop AQ to the machine and sew the pattern.
Sew the center section first, then the neighboring sections
one by one outward.
Step 8
Remove the hoop AQ from the machine and remove the
magnetic clamps. Move the quilt layers to the next position
to sew and set the quilt layers with the magnetic clamps.
Sew the next pattern and repeat this step until the quilt is
completely filled with the AcuFil design patterns (see page
92).
88
Page 88

AcuFil designs 20/22
Calculating the optimum pattern size
Select the desired AcuFil design pattern and a window for
selecting the single pattern adjustment or the AcuFil
Calculator will open.
Press the general arrangement key to open the AcuFil
Calculator for calculating and adjusting the general
arrangement.
Enter the size of the embroidery area to be stippled.
The embroidery area should be smaller than the overall
size of the quilt since a 7-10 cm (3”-4”) allowance around
the area is necessary to fasten the quilt layers to the hoop.
Press the or key to select the width or length.
Press the OK key to calculate the optimum size of the
design pattern.
166
1000
125
[ mm ]
[ mm ]
1000x500mm
498
1000x500mm
[ mm ]
166
92%
8
104%
3
92%
8
104%
3
92%
Press here
to save for printing
via MC11K tools
The adjusted overall size and the number of patterns to fill
the embroidery area will be shown.
Adjust the number of patterns by pressing the “+” or “–” key
if necessary.
Press the key to view the distance between the
centers of the neighboring patterns.
To return to the previous display, press the key.
Press the OK key and the confirmation window will open.
Check the size and stitch image of the stippling pattern and
press the file save key to save the adjusted design pattern
(see page 94) for printing the template sheet (see the
instructions for AcuFil Print Tool).
125
104%
89
Page 89

Creating original AcuFil design patterns
You can create your own AcuFil design patterns by
combining the element patterns in the editing mode.
Press the editing mode key to enter the editing mode.
A
Press the hoop selection key and the hoop selection
window will open.
Select the hoop AQ and press the OK key.
The editing window for the hoop AQ will open.
The thick grey lines indicate boundaries of base areas for
the AcuFil design pattern.
There are 4 base areas as shown, which are used as the
divisors when calculating an optimum pattern size.
120x 180 mm
(4.7x7.1 in)
60x180 mm
(2.4x7.1 in)
120x90 mm
(4.7x3.5 in)
60x90 mm
(2.4x3.5 in)
Select the desired element patterns (Stippling Parts 1 to
20) and arrange them to fill up the desired base area
completely.
You may duplicate a 60x90 mm pattern and combine them
to make a larger pattern.
NOTE:
Leave an outer margin (grey area) when laying out
element patterns since the AcuFil Calculator will adjust the
pattern size to 90-110% of the original size.
Press the OK key if the layout and arrangement are
satisfactory.
Press the key to open the AcuFil Calculator window.
Enter the size of the embroidery area to be stippled.
Calculate the size and save the adjusted pattern to print
the template sheet (see the previous page).
90
Page 90

3
4
4
1
5
7 to 10 cm
(3” to 4”)
2
7
Embroidery hoop AQ
The hoop AQ (AcuFill Quilting) is uniquely designed for
stipple quilting with the AcuFil design patterns.
1 Outer hoop
2 Attaching knob
3 AcuFil template
4 Magnetic clamps
CAUTION:
The magnetic clamp can damage items such as credit
cards, floppy disks etc.
6
Do not use the magnetic clamp near person(s) wearing a
pacemaker or other medical inplant which may be affected
by the strong magnetic field.
There is no inner hoop but the quilt layers are held in the
hoop by means of the magnetic clamps.
AcuFil template
5 Centerlines for AcuFil design pattern
6 Maximum area of embroidery
7 Arrow mark
Preparing quilt layers
7 to 10 cm
(3” to 4”)
Prepare a quilt top, base fabric and batting.
Lightweight battings for machine quilting are recommended.
Add a 7-10 cm (3” to 4”) outer margin to the embroidery
area when deciding the overall quilt size.
Pin or baste all layers together.
Print the template sheets and general arrangement with
AcuFil Print Tool.
Mark the centerlines on the quilt top and mark an arrow
head to indicate orientation.
Place the template sheets on the quilt to check the general
arrangement.
Mark reference lines for the first section on the quilt top in
the center.
Sew the center section first, then neighboring sections one
by one outward.
Setting quilt layers in the hoop AQ
Position the quilt layers on the hoop AQ. Place the AcuFil
template (with the arrow mark facing up) on the quilt and
adjust the position of the quilt aligning the reference lines.
Set the quilt layers in the hoop by pressing down the AcuFil
template. While pressing the AcuFil template close to the
outer frame, snap the magnetic clamps onto the hoop to
fasten the quilt layers to the hoop. Remove pins and
basting stitches from the hooped area.
Attaching the hoop AQ to the machine
Select the AcuFil design pattern adjusted and saved in
step 4 and press OK key.
Attach the hoop AQ after the carriage has moved to the
starting position.
You may need to roll the quilt layers to prevent the free
ends of the quilt from obstructing the movement of the
carriage.
91
Page 91

Stipple quilting with the Acufil design patterns
First sew the center-most pattern of the quilt.
Remove the hoop AQ and quilt layers after the first section
is finished.
NOTE:
To remove the magnetic clamp, tilt and roll it off the frame.
Place the template sheet on the next section to sew and
adjust the position of the template sheet by aligning it with
the first pattern sewn.
Mark the reference lines for the second section.
Set the quilt layers in the hoop AQ and remove pins and
basting stitches from the hooped area.
Attach it to the machine (see the previous page).
NOTE:
Provide a wide space around the machine.
Prevent the free end of the quilt layers from hanging down
from the sewing surface. The use of the optional
clothsetter table is recommended.
Adjust Design Dimensions
60mm
100%
90mm
100%
7
4
1
0
9
8
56
2
3
Sew the second section. Repeat this step until the entire
area is filled with the stippling pattern.
If you need to sew the quilt upside down, flip the design
pattern in the editing mode after setting the hoop.
If the outer edges of each section do not align with each
otherdue to shrinkage, adjust the pattern size of the outermost section.
To adjust the pattern size, select the current pattern again
and press the key to open the single pattern adjusting
window.
Select the dimension or percentage, and press the “+” or
“–” key to adjust the pattern size.
Press the OK key and sew the design pattern in the
adjusted size.
CAUTION:
Make sure the hoop AQ is removed from the carriage
before to the home position. Otherwise the magnetic
clamps may hit the embroidery foot.
NOTE:
For the needle thread, the following brands are
recommended:
• Robison Cotton (50 weight)
• Coats Cotton
• Madeira Polyester (No. 120)
• Sulky Cotton (30 weight)
Reduce the sewing speed for a better result.
92
Page 92

Option 1
Stippling designs 17/22
1
234
Stippling Designs
Built-in designs SD-1 to SD-24 are 120x120 mm sized
stippling designs.
The hoop AQ is recommended for sewing these patterns.
5678
Option 2
Stippling designs 17/22
1
5678
234
There are 3 options of design patterns available when
selecting a design pattern.
Press the desired option key before selecting the design
pattern.
Option 1: Motif with stippling and square frame
Option 2: Motif with stippling, without the frame
Option 3: Motif only
NOTE:
The designs SD-1 to 24 are in conventional embroidery
stitch data not supported by the AcuFil Calculator.
To combine or link these designs, use the template sheets
included in the standard accessories.
If you open these designs in the editing mode, there will be
blank spaces above and below the design.
Option 3
Stippling designs 17/22
1
5678
234
93
Page 93

FILE MANAGEMENT
Saving and Opening a File
Saving a file
The original embroidery design created in the editing
mode or programmed pattern combination in the
ordinary sewing mode can be saved as a file in the
built-in memory, ATA PC card (optional item), USB
memory key (optional item) or the PC connected with a
USB cable (in embroidery mode only).
When you press the save file key , the folder
labeled “Embf” (in the embroidery mode) or “Ordf” (in
the ordinary sewing mode) will be displayed on the
screen.
Press the icon of the desired folder to select.
The save file window will open. The file name will be
automatically assigned starting from M_001.... in
order.
NEW
Press the OK key and the file will be saved in the
selected folder.
To return to the previous screen press the exit key .
X
Creating a new folder
You can create your own folder and assign the desired
name to it.
Press the new folder key and the keyboard
New
window will open to allow you to assign the desired
name to the new folder.
Enter the folder name and press the OK key.
A new folder with the assigned name will be displayed
in the folder list window.
94
Page 94

Changing the name of the folder or file
To change the folder or file name, press the rename
Rename
key and select the folder or file you wish to
change its name.
NEW
The same filename exits,
overwrite it?
Short of memory space,
the file cannot be saved.
The keyboard window will open.
Enter a new name and press the OK key.
NOTES:
Only 8 characters can be entered.
Press the delete key to delete the last character.
When you attempt to save a file with the name
already exists, the confirmation message will appear.
X
Press the OK key to overwrite the existing file.
Press the exit key if you do not wish to
X
overwrite it.
When the memory is full, the warning message will
appear. Press the OK key, and delete the file or folder
X
that you do not need.
Deleting the file or folder
You can delete the folder or file no longer you need.
Press the delete key then select the folder or file to
delete.
The confirmation window will appear. Press the OK key
to delete the selected folder or file.
Are you sure you want to delete this folder?
X
NOTE:
The folders and files in the CD-ROM, PC Design card or
PC connected to the MC 11000 cannot be deleted.
CAUTION:
Do not turn the power off, eject the card or remove the
USB memory key while a warning message has been
displayed on the screen.
Otherwise the saved data will be lost or the memory
will be damaged.
95
Page 95

1/22
Opening the file
To open the saved files, press the open file key and the
open file window will open.
Select the folder location, either in the built-in memory,
ATA PC card, USB memory key, CD-ROM drive
(in embroidery mode only) or the PC connected with a
USB cable (in embroidery mode only).
Open the folder that contains the file you wish to open
by pressing the folder icon.
The file list of the selected folder will be displayed.
Press the next page key to view the remaining files.
Press the file icon and the screen will display the ready
to sew window of the saved design or programmed
pattern combination.
NOTES:
The USB memory keys (optional item) are available from
computer shops and camera shops.
The CD-ROM drive (optional item) is available from the
authorized dealers.
96
Page 96

Direct PC-Link
Connecting the machine and PC
The MC 11000 can be connected to the PC with the USB
cable included in the standard accessories.
You need to install the USB driver for the MC 11000 and
the PC Folder Tool on your computer.
The USB driver and PC Folder Tool are available in the
MC11K Tools CD-ROM included in standard accessories.
The PC Folder Tool allows you to transfer the data
bilaterally between the machine and PC.
NOTE:
Refer to the instruction booklet of the MC11K Tools
CD-ROM for more details.
Start up the MC 11000 and PC, and insert the type “A”
USB connector into the PC.
Insert the type “B” connector into the MC 11000.
Edit
Open File
Location :
Embf
PC
Built-in
A
AT A
Card
USB
memory
CD
ROM
PC
Press the PC-link tab to establish the communication
between the MC 11000 and PC.
Now, you can save and open the files, or transfer the data
between the MC 11000 and PC.
CAUTION:
Do not turn the power off or disconnect the USB cable
while the data transfer is in progress.
Otherwise the data will be lost or the memory
will be damaged.
97
Page 97

1
OPTIONAL ITEMS
PC Design Cards
You can import attractive embroidery designs from the
3
optional PC Design cards.
Inserting the PC Design card
Insert the PC Design card into the slot with the front
side of card facing to you.
Push the card until it clicks, then the eject button will
pop out.
2
1 Front side of card (Marked with a triangle)
When the card is properly set, the red bar on the eject
button will pop up.
2 Eject button
3 Red bar
Ejecting the PC card
Press the eject button to eject the PC card.
Take out the PC Card from the machine.
1001
NOTE:
When turning the power switch on with the PC card
inserted, it will take sometime to start up the machine.
ST: 126x110mm
㻔
㻕
㻖㻗
1/3
Importing embroidery designs from a PC Design
card.
Press the card tub in the embroidery mode.
The pattern selection window of the PC Design card will
A〜Z
open.
Press the next page key to view the rest of the card
㻧
contents.
Press the icon key of the design you wish to import.
NOTE:
You cannot access PC Design cards from the open file
mode.
CAUTION:
Do not turn the power off, eject the card or remove the
USB memory key while a warning message has been
displayed on the screen.
Otherwise the saved data will be lost or the memory
will be damaged.
98
Page 98

ATA PC card
The MC 11000 is compatible with the ATA PC card,
4
which can be used to save files and transfer the data
between the MC 11000 and your PC.
The ATA PC card consists from an adapter and
CompactFlash available from computer shops and
camera shops.
Insert an ATA PC card into the card slot of the machine.
Press the open file key and the open fie window will
open.
Press the ATA card tab and the folder list will be
displayed on the screen.
Press the desired folder icon to open.
1/2
Select the desired pattern by pressing the pattern icon.
CAUTION:
Do not turn the power off, eject the card or remove the
USB memory key while a warning message has been
displayed on the screen.
Otherwise the saved data will be lost or the memory
will be damaged.
99
Page 99

A
Edit
CD
PC
ROM
Open File
Open File
Location :
Embf
FLOWER
USB Memory Keys
The USB memory keys can be used to save the stitch
data and transfer the embroidery designs between the
MC 11000 and your PC.
The USB memory key are available from camera
shops, PC supplies stores etc. in various forms.
Insert the USB memory key into the type “A” USB port on
the MC 11000.
Press the open file key and the open file window will
open.
㻔
USB Memory
0.1/497MB
Built-in
A
AT A
Card
USB
memory
CD
ROM
PC
Press the USB memory tab and the folder list will be
displayed on the screen.
Press the desired folder icon to open.
Select the desired pattern by pressing the pattern icon.
㻃
NOTE:
To insert or remove the USB memory, insert or pull it
straight.
Embf
M_001 M_002
Rename
ST:126x110mm
D
M_003
㻻
CAUTION:
Do not turn the power off, eject the card or remove the
1/2
USB memory key while a warning message has been
displayed on the screen.
Otherwise the saved data will be lost or the memory
will be damaged.
㻻
100
Page 100

CD-ROM Drive
NOTE:
Do not use any other CD drive than the Janome
exclusive CD-ROM drive, which is available from
authorized dealers.
Insert the mini USB connector into the USB port on the
back of the CD-ROM drive.
Plug the USB connector into the USB port on the MC
11000. The CD-ROM drive does not need external power
since it is supplied from the MC 11000 via the USB cable.
Turn on the MC 11000 and press the open file key.
The open file window will open.
Press the CD ROM tab and select the folder that contains
embroidery design data in the Jef format.
1/12
Select the desired pattern by pressing the pattern icon.
NOTES:
The hoop size of the design will be indicated on the
upper left corner of the pattern icon key.
101
 Loading...