


INSTRUCTIONS

RIDER
español 15 english 21 français 27 deutsch 33 italiano 39
português 45 nederlands 51 norsk 57 svenska 63 pусский 69 dansk 75 polski 81 slovenščina 87 slovensko 93 český 99 magyar 105
2
1 |
2 |
figures
3

3 |
4 |
4 |

5 |
6 |
“CLACK” |
|
|
figures |
|
5 |
7 |
7.a |
6 |
|
8 |
8.a |

 PRO-FIX
figures
7

9 |
10 |
|
11 |
8 |
|

12 |
12.a |
figures |
9 |
13 |
14 |
13.a |
|
10
15 |
16 |
figures |
11 |

17 |
17.a |
GO |
|
STOP |
|
18 |
12 |
19 |
HARD |
19.a |
SOFT 


20 |
21 |
|
figures |
|
13 |

RIDER
14

INDICE
Advertencias
1.MONTAJE Y DESMONTAJE DE LAS RUEDAS
2.PLEGADO Y DESPLEGADO
3.SISTEMA PRO-FIX
4.MONTAJE Y DESMONTAJE DE LA HAMACA
5.AJUSTE DEL ÁNGULO DE LA HAMAQUITA
6.USO DEL APOYABRAZOS DE SEGURIDAD
7.EMPLEO DE CAPOTA
8.AJUSTE DEL MANILLAR
9.AJUSTE DEL REPOSAPIÉS
10.USO DEL CINTURÓN
11.USO DEL FRENO DEL ESTACIONAMIENTO
12.REGULACIÓN DE LA DUREZA DE LA SUSPENSIÓN
13.BROQUEO DE LAS RUEDAS DELANTERAS
14.MANTENIMIENTO
15.CONJUNTO DE LLUVIA
18
18
18
19
19
19
19
19
19
20
20
20
20
20
20
español
15

RIDER
16
ADVERTENCIAS
Leer estas instrucciones detenidamente antes de usarlo y conservarlas para referencia futura. La seguridad del niño puede verse afectada si no se siguen estas instrucciones. Este vehículo es para niños desde 6 meses y hasta 15 kg. Apto para niños menores de 6 meses únicamente con accesorios aprobados por JANÉ.
Guarde este libro de instrucciones para futuras consultas.
ADVERTENCIA: Puede ser peligroso dejar al niño sin vigilancia.
ADVERTENCIA: Asegurarse de que todos los dispositivos de cierre están engranados antes del uso.
ADVERTENCIA: Usar un arnés tan pronto como el niño se pueda sentar por sí mismo.
ADVERTENCIA: Este asiento no es adecuado para niños menores de 6 meses.
ADVERTENCIA: Cualquier carga sujeta al manillar afecta a la estabilidad del cochecito/silla.
ADVERTENCIA: No utilice nunca la tira entrepiernas sin el cinturón abdominal.
ADVERTENCIA: Comprobar que los dispositivos de sujeción del capazo y del asiento están correctamente activados antes de su uso.
ADVERTENCIA: Este producto no es adecuado para correr o patinar.
La masa máxima permitida de la cestilla portaobjetos nunca puede superar lo indicado en la cestilla (4 kg).
Este cochecito sólo puede ser usado por un niño.
No utilice nunca accesorios que no hayan sido aprobados por JANÉ, S.A.
Los dos puntos de fijación laterales del asiento pueden ser utilizados para la fijación de un arnés suplementario (ver apartado (15).

ADVERTENCIA: El niño debe mantenerse alejado de partes móviles cuando estas están siendo manipuladas por el adulto responsable. La aparición de puntos de corte y compresión y atrapamientos son inevitables durante estas operaciones.
ADVERTENCIA: Es imprescindible asegurarse que el niño se mantiene alejado de la silla durante las acciones de plegado y desplegado. La aparición de puntos de corte y compresión y atrapamientos son inevitables durante estas operaciones.
ADVERTENCIA: Nunca deje al niño en el cochecito a la hora de subir o bajar escaleras o al viajar en algún medio de transporte.
ADVERTENCIA: Nunca permita que el niño se ponga de pie en el reposapiés o estribo.
ADVERTENCIA: No colocar peso encima de la capota.
ADVERTENCIA: Una vez accionado el freno asegúrese de que el cochecito ha quedado correctamente frenado. Puede ser necesario rodar ligeramente el cochecito para que el freno engrane de manera óptima.
español
17
RIDER
18
1.- MONTAJE Y DESMONTAJE DE LAS RUEDAS
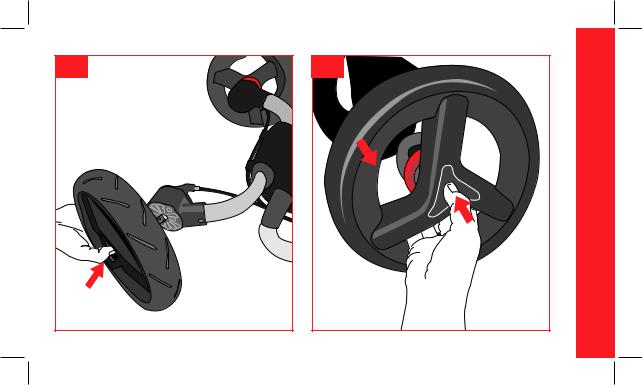
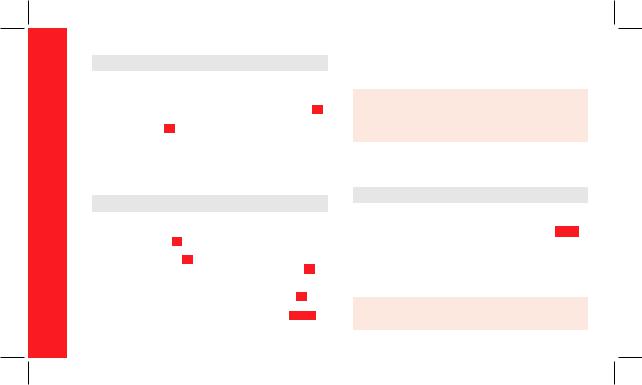
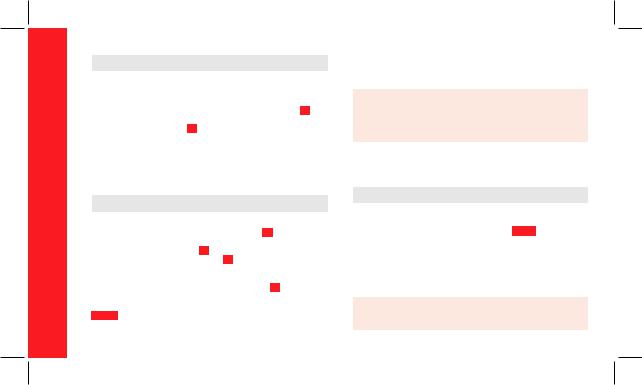
Antes de usar por primera vez la silla RIDER es necesario montar las ruedas traseras. Para montar las ruedas presione el botón central de la misma e introduzca el eje en el portarruedas trasera y empuje hasta que note que encaja firmemente. 1 Si necesita desmontar las ruedas, presione el botón central y extraiga la misma. 2
esté mirando hacia el frente, obteniendo así un plegado mucho más compacto.
ADVERTENCIA: Es imprescindible asegurarse que el niño se mantiene alejado de la silla durante las acciones de plegado y desplegado. La aparición de puntos de corte y compresión y atrapamientos son inevitables durante estas operaciones.
2.- PLEGADO Y DESPLEGADO
Para desplegar su RIDER, pise suavemente sobre la lija situada en la parte posterior para incoroporar el cochecito y facilitar así la manipulación. 3 A continuación sujete el manillar con una mano mientras pisa el pedal de bloqueo situado en la parte inferior derecha. 4 Tire del manillar y complete el desplegado hasta que quede bloqueado y oiga un “clack”. 5
Para plegar su RIDER coloque la hamaca en la posición de plegado (P) (véase AJUSTE DEL ANGULO DEL ASIENTO). 6
A continuación tire de los dos gatillos laterales y empuje el manillar hacia delante hasta completar el plegado. 7 - 7.a
Es conveniente que cuando pliegue el cochecito la hamaca
3.- SISTEMA PRO-FIX
El chasis de su cochecito incluye el sistema PRO-FIX, preparado para incorporar las siguientes elementos de seguridad para auto: Micro, Transporter, Matrix Light y Strata. 8-8.a
El sistema PRO-FIX le facilitará el acople y la extracción de estos accesorios al chasis, de un modo rápido, fácil y seguro, quedando éstos anclados al chasis. Para ello siga detenidamente las instrucciones de estos accesorios.
ADVERTENCIA: Es imprescindible desmontar la hamaca del cochecito para poder acoplar cualquier accesorio de auto.
4.- MONTAJE Y DESMONTAJE DE LA HAMACA
Su RIDER está equipado con el sistema pro-fix. Con este sistema, la hamaquita RIDER puede acoplarse perfectamente al chasis. Además puede colocar la hamaca mirando hacia usted o hacia delante, por trarase de una hamaca reversible. 8 - 8.a Para desenganchar la hamaquita, tire simultáneamente de las palancas de desbloqueo situadas a ambos lados de la propia hamaquita. Puede colocar la hamaca mirando hacia usted o hacia delante, por tratarse de una hamaca reversible. 9
5.- AJUSTE DEL ÁNGULO DE LA HAMAQUITA
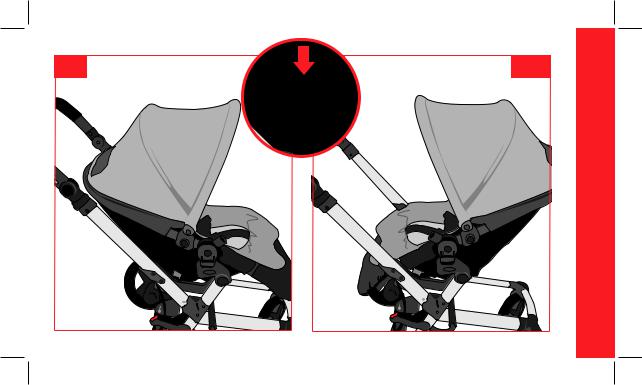
Puede reclinar la hamaca respecto al suelo, para transportar a su bebé en la posición más cómoda posible en cada momento. Tire de la palanca situada en la parte superior de la hamaca y ajuste la inclinación a una de las 3 posiciones posibles. 10
ATENCIÓN: La posición P es solamente para facilitar el plegado , no está permitido utilizarla para el transporte de su bebé. 11
6.- USO DEL APOYABRAZOS DE SEGURIDAD
El apoyabrazos de seguridad está diseñado para encajar en los alojamientos dispuestos en la hamaquita.
Si lo desea puede liberar un lado solamente y el apoyabrazos quedará totalmente articulado por el otro extremo.
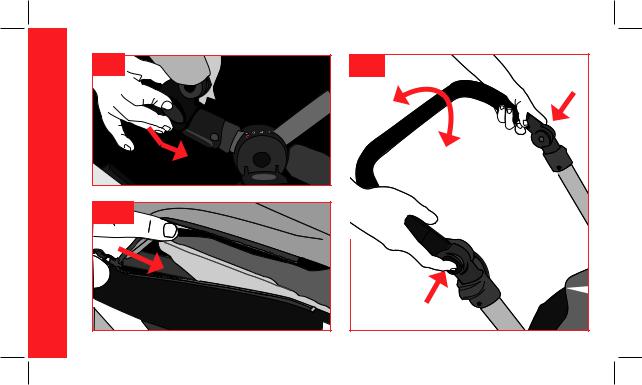
Existen unos botones en la parte inferior para este fin. 12 -12a
ATENCIÓN: El niño debe mantenerse alejado de partes móviles cuando estas están siendo manipuladas por el adulto responsable. La aparición de puntos de corte y compresión y atrapamientos son inevitables durante estas operaciones.
7.- EMPLEO DE LA CAPOTA
Para asegurar la capota en el marco de la hamaquita, deslícela desde arriba hasta los correspondientes alojamientos situados en la parte central. Use la cremallera que lleva la capota para unirla al marco. 13 -13a
Siga el procedimiento a la inversa para liberarla.
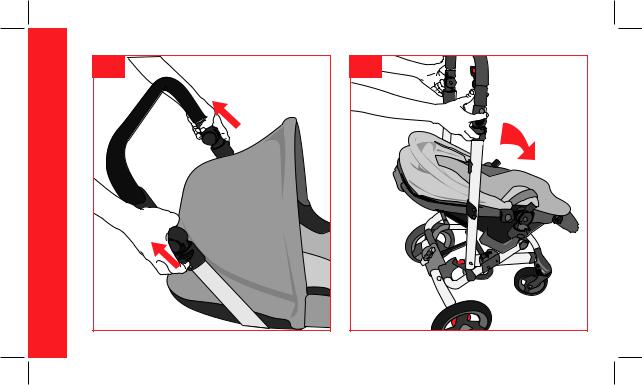
8.- AJUSTE DEL MANILLAR
El manillar puede ajustarse en 7 posiciones distintas. Pulse simúltaneamente los botones situados a ambos lados del manillar. 14
español
19
RIDER
20
9.- CINTURÓN DE SEGURIDAD
Su cochecito dispone de un arnés de seguridad para que su hijo este seguro en todo momento. Ajuste el cinturón al niño siempre que use el cochecito. 15
10.- AJUSTE DEL REPOSAPIÉS
Puede ajustar el reposapiés en 5 posiciones. Presione simultáneamente los dos botones con el dedo pulgar situados en la parte interior de la hamaquita. 16
11.- USO DEL FRENO DE ESTACIONAMIENTO
FRENAR: Accione la palanca hacia abajo. 17 DESFRENAR: Accione la palanca hacia arriba. 17.a
Para ajustar el freno:
En caso de necesitar un ajuste más preciso siga las indicaciones de la figura. 18
ATENCIÓN: Una vez accionado el freno asegúrese de que el cochecito ha quedado correctamente frenado. Puede ser necesario rodar ligeramente el cochecito para que el freno engrane de manera óptima.
12.- REGULACIÓN DE LA DUREZA DE LA SUSPENSIÓN
Para aumentar la dureza gire la palanca en el sentido de las agujas del reloj. 19
Para disminuirla gire en sentido contrario a las agujas el reloj. 19.a
13.- BLOQUEO DE LAS RUEDAS DELANTERAS
Para bloquear las ruedas delanteras, pulse el botón ubicado detrás de cada portaruedas delantero. 20
14.- MANTENIMIENTO
No exponga el tapizado al sol durante largos periodos.
Lave las partes de plástico con agua templada y jabón, secando posteriormente todos los componentes concienzudamente.
15.- PROTECTOR DE LLUVIA
El protector de lluvia de su RIDER es muy sencillo de colocar, sólo tiene que cubrir la hamaca y ajustar los enganches al chasis para sujetarla. Ésta tiene una pequeña ventana que se puede enrollar y fijar con velcros para que el niño pueda investigar lo que le rodea con total libertad. 21
TABLE OF CONTENTS
Warnings
1.FITTING AND REMOVING THE WHEELS
2.FOLDING AND UNFOLDING
3.PRO-FIX SYSTEM
4.FITTING AND REMOVING THE HAMMOCK
5.ADJUSTING THE ANGLE OF THE HAMMOCK
6.USING THE SAFETY ARMREST
7.USING THE HOOD
8.ADJUSTING THE HANDLEBAR
9.ADJUSTING THE FOOTREST
10.USING THE SEAT BELT
11.USING THE PARKING BRAKE
12.ADJUSTING THE STRENGTH OF THE SUSPENSION
13.LOCKING THE FRONT WHEELS
14.MAINTENANCE
15.RAIN COVER
24
24
24
24
25
25
25
25
25
25
26
26
26
26
26
26
english
21

RIDER
WARNING
Read these instructions carefully before use and keep them for future reference. Your child’s safety may be affected if you do not follow these instructions.
This vehicle is intended for children from 6 months and up to 15 kg.
Suitable for children under 6 months old only with accessories approved by JANÉ.
Keep this instruction book for future reference.
WARNING: It may be dangerous to leave your child unattended. WARNING: Ensure that all the locking devices are engaged before use.
WARNING: Use a harness as soon as your child can sit unaided.
WARNING: This seat is not suitable for children under 6 months.
WARNING: Any load hanging from the handlebar will affect the stability of the pushchair.
ADVERTENCIA: No utilice nunca la tira entrepiernas sin el WARNING: Always use the crotch strap in combination with the waist belt.
WARNING: Check that the pram body or seat unit attachment devices are correctly engaged before use.
WARNING: This seat is not suitable for running or skating.
The maximum amount carried in the basket must never exceed the weight indicated on the basket (4 kg).
This pushchair may only be used by a child.
Never use accessories that have not been approved by JANÉ, S.A.
The two side fastening points of the seat can be used to fasten a supplementary harness (see section (15).
22

WARNING: The child should be kept away from the mobile parts when the responsible adult is handling these. The appearance of cutting, compression and pinch points are inevitable during these operations.
WARNING: It is important to make sure that the child is kept away from the pushchair while it is being folded or unfolded. The appearance of cutting, compression and pinch points are inevitable during these operations.
WARNING: Never leave the child in the pushchair when going up or down stairs or when travelling in any mode of transport.
WARNING: Never allow the child to stand up on the footrest or footboard.
WARNING: Do not put weight on top of the hood.
WARNING: When the brake is on make sure that the pushchair has braked correctly. It may be necessary to push the pushchair slightly for the brake to be fully activated.
english
23
RIDER
1.- FITTING AND REMOVING THE WHEELS
Before using the RIDER pushchair for the first time it is necessary to fit the rear wheels. To fit the wheels press the button on the middle of the wheel and insert the axle into the rear wheel bearer and push until it slots firmly into place. 1
If you need to remove the wheels, press the central button and take the wheel off. 2
When folding the pushchair it is useful to place the hammock facing forwards as this makes it fold up more compactly.
WARNING: You must make sure that the child is kept away from the pushchair while it is being folded or unfolded. During these operations the appearance of sharp points and compression areas are inevitable.
2.- FOLDING AND UNFOLDING
To unfold your RIDER, lightly press the bar on the back to tilt the buggy and make it easier to manoeuvre. 3 Then hold the handlebar with one hand while you press the locking pedal at the bottom on the right. 4 Pull the handlebar and unfold until it clicks and locks into place. 5
To fold your RIDER place the hammock in the folding position
(P) (see ADJUSTING THE ANGLE OF THE SEAT). 6
Then pull the two slide catches on the sides and push the handlebar forwards until the pushchair is completely folded. 7 – 7.a
3.- PRO-FIX SYSTEM
The chassis of your pushchair includes the PRO-FIX system, ready to incorporate the following auto safety elements: Micro, Transporter, Matrix Light and Strata. 8-8.a The PRO-FIX system makes it easier to attach and remove these accessories to and from the chassis, securing them to the chassis in a quick, simple and safe way. To do this follow the instructions for these accessories carefully.
WARNING: It is necessary to remove the hammock from the pushchair to attach any of the auto accessories.
24

4.- FITTING AND REMOVING THE HAMMOCK
Your RIDER is fitted with the pro-fix system. With this system, the RIDER hammock can be attached perfectly to the chassis. What’s more, the hammock is reversible so it can be positioned facing you or facing forwards. 8 - 8 To take the hammock off, simultaneously pull the unlocking levers situated on both sides of the hammock. Because it is a reversible hammock it can be fitted facing you or facing forwards. 9
5.- ADJUSTING THE ANGLE OF THE HAMMOCK
The hammock can be reclined so your baby can travel in the most comfortable position possible at all times. Pull the lever on the upper part of the hammock and tilt it to one of the 3 possible positions. 10
WARNING: Position P is only to be used when folding the pushchair, you must not use this position when your baby is in the hammock. 11
6.- USING THE SAFETY ARMREST
The safety armrest is designed to fit into the slots on the hammock.
If required it is possible to release one side of the armrest and it will still be completely articulated by the other side. There are buttons on the lower part to do this. 12 -12a
WARNING: The child should be kept away from the mobile parts when the responsible adult is handling these. The appearance of cutting, compression and pinch points are inevitable during these operations.
7.- USING THE HOOD
To fasten the hood onto the frame of the hammock, slide it from the top down to the corresponding slots on the central part. Use the zip on the hood to attach it to the frame. 13 -13a
Follow the same steps in reverse order to take the hood off.
8.- ADJUSTING THE HANDLEBAR
The handlebar can be set to 7 different positions. Simultaneously press the buttons on both sides of the handlebar. 14
english
25
RIDER
26
9.- SEAT BELT
Your pushchair has a safety harness to keep your child safe at all times. Fit the belt onto the child whenever he is using the pushchair. 15
10.- ADJUSTING THE FOOTREST
The footrest can be adjusted to 5 different positions. Use your thumb to simultaneously press the two buttons on the lower part of the hammock. 16
11.- USING THE PARKING BRAKE
PUTTING THE BRAKE ON: Push the lever downwards. 17 TAKING THE BRAKE OFF: Pull the lever upwards. 17.a
To adjust the brake:
If you need a more precise adjustment follow the indications in figure. 18
WARNING: When the brake is on make sure that the pushchair has braked correctly. It may be necessary to push the pushchair slightly for the brake to be fully activated.
12.- ADJUSTING THE STRENGTH OF THE SUSPENSION
To increase the strength turn the lever clockwise. 19 To reduce it turn the lever anti-clockwise. 19.a
13.- LOCKING THE FRONT WHEELS
To lock the front wheels, press the button situated behind each front wheel bearer. 20
14.- MAINTENANCE
Do not expose the upholstery to the sun for prolonged periods of time. Wash the plastic parts with soap and warm water, then dry all the parts thoroughly.
15.- RAIN COVER
The rain cover of your RIDER is very easy to fit, simply cover the hammock and fit the hooks onto the chassis to secure it. The rain cover has a small window which can be rolled up and held with Velcro so the child is free to investigate his surroundings. 21
TABLE OF CONTENTS
Avertissements
1 . MONTAGE ET DÉMONTAGE DES ROUES
2 . PLIAGE ET DÉPLIAGE
3. SYSTÈME PRO-FIX
4. MONTAGE ET DÉMONTAGE DU HAMAC
5. RÉGLAGE DE L’ANGLE D’INCLINAISON DU HAMAC
6. UTILISATION DU GARDE-CORPS
7. UTILISATION DE LA CAPOTE
8. RÉGLAGE DU GUIDON
9. RÉGLAGE DU REPOSE-JAMBES
10. UTILISATION DE LA CEINTURE
11. UTILISATION DU FREIN DE STATIONNEMENT
12. RÉGLAGE FERMETÉ DE LA SUSPENSION
13. BLOCAGE DES ROUES AVANT
14. ENTRETIEN
15. HABILLAGE DE PLUIE
30
30
30
31
31
31
31
31
31
32
32
32
32
32
32
français
27

RIDER
AVERTISSEMENT
Lire ces instructions avec attention avant utilisation et les conserver pour les besoins futurs. Si vous ne respectiez pas ces instructions, la sécurité de votre enfant pourrait en être affectée.
Ce véhicule est conçu pour des enfants âgés de 6 mois à 15 kg. Utilisable pour des enfants de moins de 6 mois uniquement avec des accessoires approuves par JANÉ.
Conservez ce manuel d’instructions pour toutes consultations ultérieures.
AVERTISSEMENT: Il peut être dangereux de laisser votre enfant sans surveillance.
AVERTISSEMENT: S’assurer que tous les dispositifs de verrouillage sont correctement enclenchés avant utilisation. AVERTISSEMENT: Utiliser un harnais dès que l’enfant peut tenir assis seul.
AVERTISSEMENT: Ce siège ne convient pas à des enfants de moins de 6 mois.
AVERTISSEMENT: Le fait d’accrocher au poussoir une charge influe sur la stabilité du landau/de la poussette. AVERTISSEMENT: Ne jamais utiliser l’entrejambe sans la ceinture de maintien.
AVERTISSEMENT: Vérifier que les dispositifs de fixation de la nacelle ou du siège soient correctement enclenchés avant usage.
AVERTISSEMENT: Ne pas utiliser ce produit en faisant du jogging ou des promenades en rollers.
Le poids maximum autorisé dans le filet du panier ne doit pas être supérieur à celui qui est indiqué dans le filet (4 kg). Cette poussette ne peut être utilisée que par un enfant. N’utilisez jamais des accessoires qui n’ont pas été approuvés par JANE, S.A.
Les deux points de fixation latéraux du siège peuvent être utilisés pour fixer un harnais supplémentaire (voir chapitre 15).
28

AVERTISSEMENT: L’enfant doit se tenir éloigné des parties mobiles lorsque celles-ci sont manipulées par un adulte responsable. Il y a des risques de coupures, de compression, de se trouver coincé qui sont inévitables lors de ces opérations.
AVERTISSEMENT: Il est indispensable de vérifier que l’enfant se tient bien éloigné de la poussette lors du pliage ou du dépliage de cette dernière. Il y a des risques de coupures, de compression, de se trouver coincé qui sont inévitables lors de ces opérations.
AVERTISSEMENT: Ne laissez jamais l’enfant dans la poussette au moment de monter ou descendre des escaliers ou lors d’un voyage dans un moyen de transport, quel qu’il soit.
AVERTISSEMENT: Ne permettez jamais à l’enfant de se tenir debout sur le repose-pieds ou sur le marchepied.
AVERTISSEMENT: Ne pas poser quoique ce soit sur la capote.
AVERTISSEMENT: Une fois le frein activé vérifiez que la poussette est correctement stoppée. Il peut être nécessaire de roder légèrement la poussette afin de pouvoir enclencher le frein de façon optimale.
français
29
RIDER
30
1. – MONTAGE ET DÉMONTAGE DES ROUES
Avant d’utiliser pour la première fois la poussette RIDER, il faut monter les roues arrière. Pour monter les roues, appuyez sur le bouton central de la roue et introduisez l’essieu dans le porte-roue arrière, puis poussez à fond pour l’emboiter fermement. 1
Si vous avez besoin de démonter les roues, appuyez sur le bouton central et démontez la roue. 2
2.- PLIAGE ET DÉPLIAGE
Pour déplier votre RIDER, appuyez doucement avec votre pied sur la barre située sur la partie postérieure de la poussette et faciliter ainsi sa manipulation. 3
Ensuite, tenez le guidon avec une main tout en appuyant avec le pied sur la pédale de blocage situé sur la partie inférieure de droite. 4 Tirez sur le guidon et terminez de déplier la poussette jusqu’à ce qu’elle soit bloquée et que vous entendiez un « click ». 5
Pour plier votre RIDER installez le hamac en position de pliage
(P) (voir RÉGLAGE INCLINAISON DU HAMAC). 6 Puis, tirez sur les deux gâchettes latérales et poussez le guidon vers l’avant jusqu’à ce que la poussette soit totalement pliée. 7- 7.a
Lorsque vous pliez la poussette le hamac doit être dans le sens de la marche, vous obtiendrez ainsi un pliage beaucoup plus compact.
AVERTISSEMENT: Il est indispensable de s’assurer que l’enfant se tient bien éloigné de la poussette pendant le pliage et le dépliage. Lors de ces opérations il y a inévitablement un risque de se couper, de se coincer ou de se pincer.
3.- SYSTÈME PRO-FIX
Le châssis de votre poussette inclut le système PRO-FIX, il peut recevoir les différents éléments conçus pour l’automobile:
Micro, Transporter, Matrix Light et Strata. 8-8.a . Le système PRO-FIX vous facilitera la fixation et le déblocage de ces éléments sur le châssis, d’une façon rapide, simple et fiable, ces derniers restant ancrés sur le châssis. Pour cela, suivez scrupuleusement les instructions de ces éléments.
AVERTISSEMENT: Il faut impérativement démonter le hamac de la poussette pour pouvoir installer un élément spécialement adapté à l’automobile.
 Loading...