


INSTRUCTIONS

MUUM
español 15 english 23 français 31 deutsch 39 italiano 47
português 55 nederlands 63 norsk 71
svenska 79 pусский 87
dansk 95 polski 103 slovenščina 111 slovensko 119
český 127 magyar 135
2

1 |
2 |
|
figures |
|
3 |
3 |
4 |
INSTRUCCIONS |
|
4 |
|

5 |
5a |
|
figures |
|
5 |
6 |
7 |
INSTRUCCIONS |
|
6 |
|
8 |
9 |
|
figures |
|
7 |

10 |
1 |
11 |
|
|
|
INSTRUCCIONS |
2 |
|
|
|
|
|
|
11b |
8 |
|
|

12 |
13 |
figures |
9 |
14 |
INSTRUCCIONS |
10 |
14.a |
15 |
15.a |
figures |
11 |

16 |
INSTRUCCIONS |
12 |
17 |

|
|
|
|
|
|
|
|
|
|
|
|
|
|
|
|
|
|
|
|
|
|
|
|
|
|
|
|
|
|
|
|
|
|
|
|
|
|
|
|
|
|
|
|
|
|
|
|
|
|
|
|
|
|
|
|
|
|
|
18 |
|
|
|
|
|
|
18.a |
|
|
|
|
19 |
|
|
|
|
|
|
|
|
|
|
|
|
|||
|
|
|
|
|
|
|
|
|
|
|
|
|
|
|
|
|
|
|
|
|
|
|
|
|
|
|
|
|
figures
13

MUUM
14

INDICE
Advertencias
1.MONTAJE Y DESMONTAJE DE LAS RUEDAS
2.PLEGADO Y DESPLEGADO
3.SISTEMA PRO-FIX
4.MONTAJE Y DESMONTAJE DE LA HAMACA
5.AJUSTE DEL ÁNGULO DEL RESPALDO
6.USO DEL PROTECTOR DE SEGURIDAD
7.EMPLEO DE CAPOTA
8.AJUSTE DEL MANILLAR
9.CINTURÓN DE SEGURIDAD
10.AJUSTE DEL RODAPIÉS
11.USO DEL FRENO DEL ESTACIONAMIENTO
12.BLOQUEO DE LAS RUEDAS DELANTERAS
13.MANTENIMIENTO
14.CONJUNTO DE LLUVIA
INFORMACIÓN SOBRE LA GARANTÍA
17
17
18
18
18
18
19
19
19
19
19
20
20
20
21
español
15

MUUM
16
ADVERTENCIAS
Importante – Guardar estas instrucciones para consultas futuras.
ADVERTENCIA: No dejar nunca al niño desatendido. ADVERTENCIA: Asegurarse de que todos los dispositivos de cierre están engranados antes del uso. ADVERTENCIA: Para evitar lesiones, asegúrese de que el niño se mantiene alejado durante el desplegado y el plegado de este producto.
ADVERTENCIA: No permita que el niño juegue con este producto.
ADVERTENCIA: Este asiento no es adecuado para niños menores de 6 meses.
ADVERTENCIA: Usar siempre el sistema de retención. ADVERTENCIA: Comprobar que los dispositivos de sujeción del capazo, del asiento o de la silla de coche están correctamente engranados antes del uso. ADVERTENCIA: Este producto no es adecuado para correr o patinar.
Este vehículo es para niños desde 6 meses y hasta 15 kg. Apto para niños menores de 6 meses únicamente con accesorios aprobados por JANÉ.
El dispositivo de estacionamiento debe activarse al colocar y retirar a los niños del vehículo.
Cualquier carga fijada al manillar y/o a la parte trasera del respaldo y/o a los laterales del vehículo afecta a la estabilidad de éste.
Este vehículo ha sido diseñado para un único niño, no utilizarlo con más niños a la vez.
No deben utilizarse accesorios no aprobados por JANÉ. Para las sillas de coche usadas junto con un chasis, este vehículo no reemplaza una cuna o cama. Si el niño necesita dormir, debería colocarse en un capazo, una cuna o una cama adecuados.
Solo deben utilizarse los repuestos suministrados o recomendados por JANÉ.
La masa máxima permitida de la cestilla portaobjetos nunca puede superar lo indicado en la cestilla (4 kg).

1.- MONTAJE Y DESMONTAJE DE LAS RUEDAS
Antes de usar por primera vez la silla MUUM es necesario montar las ruedas traseras. Para montar las ruedas presione el botón central de la misma e introduzca el eje en el porta ruedas trasero y empuje hasta que note que encaja firmemente. 
Si necesita desmontar las ruedas, mantenga presionado el botón central y extraiga la misma.
2.- PLEGADO Y DESPLEGADO
Para desplegar su MUUM, ajuste la inclinación del manillar presionando los botones laterales y girando hasta que quede recto.
Libere el cierre de goma elástico y déjelo fijado en el manillar. 
A continuación suba el manillar y complete el desplegado hasta que quede bloqueado y oiga un “clack”.
Tire hacia arriba la palanca trasera del respaldo mientras lo empuja hacia atrás, hasta que quede en posición vertical.  Ajuste la inclinación de la empuñadura a la altura deseada.
  Ajuste el reposapiés a la posición deseada, apretando el botón mientras mueve el reposapiés hacia abajo.
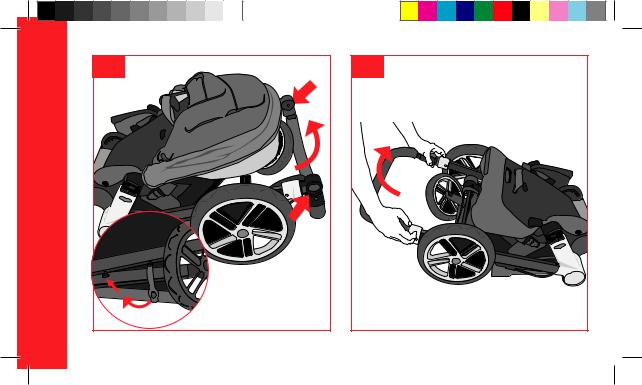
Para plegar su MUUM la posición óptima de la hamaca es en el sentido contrario de la marcha.
Recline el respaldo y el reposapiés acercándolos entre si.  Quite cualquier objeto de la cestilla que pueda obstruir el cierre de la silla, y libere el bloqueo de la dirección de las ruedas delanteras.
A continuación igual que en el desplegado, presione el botón de la mano derecha y tire de los dos gatillos laterales empujando el manillar hacia atrás.
Levantar ligeramente el cochecito desde la asa situada en la parte inferior del asiento.
Juntar las patas hasta completar el plegado, y finalmente gire el manillar. 11-12
Mantenga el chasis plegado y utilice el cierre de goma. También es posible plegar el cochecito con la hamaca montada en el sentido de la marcha. En este caso, recline el respaldo hacia atrás hasta la penúltima posición, y siga los mismos pasos anteriores.
De esta forma la asa por la cual debe cogerse está situada en el tubo central del chasis. 
ATENCIÓN: Utilice las asas tal como indica la figura (11-11b) a la hora de plegar el cochecito. Sujetando el chasis por alguna otra parte, corre el riesgo de dañarse la mano durante el plegado.
ADVERTENCIA: Es imprescindible asegurarse que el niño se mantiene alejado de la silla durante las acciones de plegado y desplegado. La aparición de puntos de corte y compresión y atrapamientos son inevitables durante estas operaciones.
español
17

MUUM
3.- SISTEMA PRO-FIX
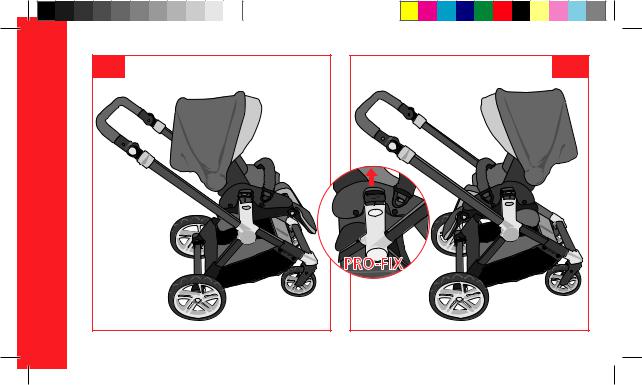
El chasis de su cochecito incluye el sistema PRO-FIX, preparado para incorporar los siguientes elementos de seguridad para auto: Rebel, Micro y Matrix Light. 14-14a
El sistema PRO-FIX le facilitará el acople y la extracción de estos accesorios al chasis, de un modo rápido, fácil y seguro, quedando éstos anclados al chasis. Para ello siga detenidamente las instrucciones de estos accesorios.
ADVERTENCIA: Es imprescindible desmontar la hamaca del cochecito para poder acoplar cualquier accesorio de auto.
4.- MONTAJE Y DESMONTAJE DE LA HAMACA
El sistema pro-fix permite acoplar perfectamente la hamaquita MUUM al chasis. Al ser reversible puede colocar la hamaca mirando hacia usted cuando el niño es más pequeño o hacia delante a medida que crezca. Asegúrese que la hamaca ha quedado bien sujeta al chasis tirando ligeramente de ella hacia arriba. 14-14a
Para desengancharla accione simultáneamente hacia arriba las palancas de desbloqueo situadas a ambos lados de la hamaquita. 
5.- AJUSTE DEL ÁNGULO DE LA RESPALDO
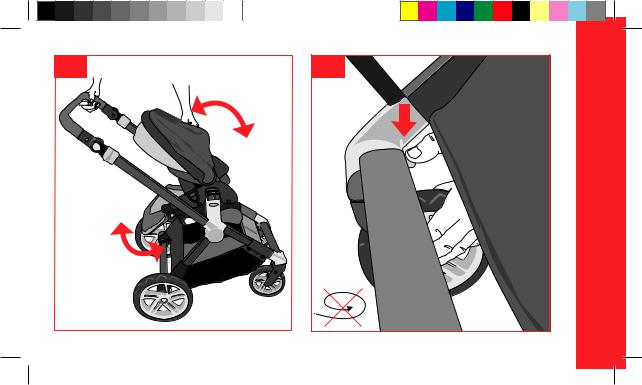
Con el objetivo de proporcionarle el mayor confort al niño en cada momento, el respaldo tiene un sistema de reclinado. Accione el tirador situado en la parte superior trasera del respaldo y ajuste la inclinación a una de las 3 posiciones posibles. 
6.- USO DEL PROTECTOR DE SEGURIDAD
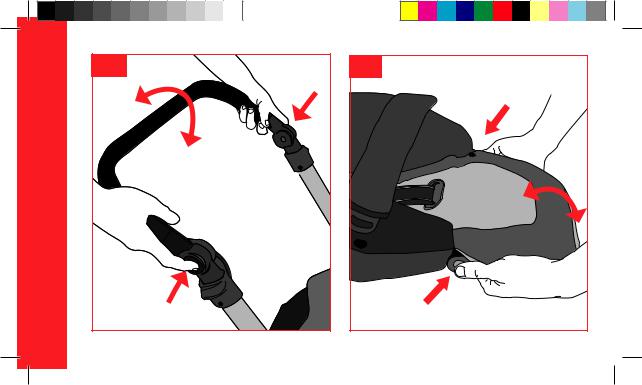
El apoyabrazos de seguridad está diseñado para encajar en los alojamientos dispuestos en la hamaquita. Si lo desea puede liberar un lado solamente presionando los botones laterales y el protector quedará totalmente articulado por el otro extremo. 15 -15a
ATENCIÓN: El niño debe mantenerse alejado de partes móviles cuando estas están siendo manipuladas por el adulto responsable. La aparición de puntos de corte y compresión y atrapamiento son inevitables durante estas operaciones.
18
7.- EMPLEO DE LA CAPOTA
Sitúe la capota entre los tubos del manillar y los laterales del respaldo por debajo de las orejas laterales. Insertar la capota haciendo deslizar la pieza de anclaje sobre la guía que encontrará en el lateral respaldo hasta que note un “click”.  Una vez puesta la capota se puede graduar su posición moviendo los arquillos según la inclinación del respaldo.
8.- AJUSTE DEL MANILLAR
El manillar puede ajustarse en 7 posiciones distintas. Pulse simultáneamente los botones situados a ambos lados del manillar.
9.- CINTURÓN DE SEGURIDAD
Su cochecito dispone de un arnés de seguridad para que su hijo este seguro en todo momento. Ajuste el cinturón al niño siempre que use el cochecito. 
10.- AJUSTE DEL REPOSAPIÉS
Puede ajustar el reposapiés en 5 posiciones. Pulse simultáneamente los dos botones situados en la parte exterior de la hamaquita para girarlo hacia abajo.
Para moverlo hacia arriba no hace falta pulsar el botón, simplemente tire del reposapiés. 
11.- USO DEL FRENO DE ESTACIONAMIENTO
FRENAR: Empujar la palanca a la derecha del manillar hacia abajo para activar el freno de estacionamiento de su silla.  DESFRENAR: Apretar el botón de desbloqueo y mover la palanca a la derecha del manillar hacia arriba para desactivar el freno de estacionamiento.
ATENCIÓN: Una vez accionado el freno asegúrese de que el cochecito ha quedado correctamente frenado. Puede ser necesario rodar ligeramente el cochecito para que el freno engrane de manera óptima.
español
19

MUUM
12.- BLOQUEO DE LAS RUEDAS DELANTERAS
Su cochecito dispone de ruedas delanteras giratorias direccionales, con la posibilidad de bloquear la dirección.
Para bloquearlas, pulse hacia abajo el botón ubicado detrás de cada porta ruedas delantero. 
Para desbloquear la dirección, pulse el botón en el sentido contrario.
13.- MANTENIMIENTO
No exponga el tapizado al sol durante largos períodos.
Lave las partes de plástico con agua templada y jabón, secando posteriormente todos los componentes concienzudamente. El tapizado puede desmontarse para ser lavado.
Compruebe regularmente los frenos, arneses y fijaciones que pudieran sufrir algún daño por el uso.
Tanto para su seguridad como para la buena conservación de este producto, es importante que haga una revisión periódica en cualquiera de nuestros talleres oficiales.
14.- PROTECTOR DE LLUVIA
El protector de lluvia de su MUUM es muy sencillo de colocar, sólo tiene que cubrir la hamaca y ajustar los enganches al chasis para sujetarla.
Ésta tiene una pequeña ventana que se puede enrollar y fijar con velcros para que el niño pueda investigar lo que le rodea con total libertad.
20
INFORMACIÓN SOBRE LA GARANTÍA
Este artículo dispone de garantía según lo estipulado en la ley 23 / 2003 de 10 de julio. Conservar la factura de compra, es imprescindible su presentación en la tienda donde adquirío el producto para justificar su validez ante cualquier reclamación.
Quedan excluídos de la presente garantía aquellos defectos o averías producidas por un uso inadecuado del artículo o el incumplimiento de las normas de seguridad y mantenimiento descritas en las hojas de instrucciones y en las etiquetas de lavado, así como los elementos de desgaste por uso normal y manejo diario.
La etiqueta que contiene el número de chasis de su modelo, no debe ser arrancada bajo ningún concepto, contiene información importante.
Atención:
Para obtener la máxima seguridad y atención sobre su nuevo JANÉ, es muy importante que rellene la tarjeta de registro que encontrará en la página www.jane.es
El registro le permitirá informarse, si es necesario, de la evolución y mantenimiento de su producto. También, siempre que lo desee, le podremos informar de nuevos modelos o noticias que consideremos pueden ser de su interés.
español
21

MUUM
22
TABLE OF CONTENTS
Warning
1.FITTING AND REMOVING THE WHEELS
2.FOLDING AND UNFOLDING
3.PRO-FIX SYSTEM
4.FITTING AND REMOVING THE HAMMOCK
5.ADJUSTING THE ANGLE OF THE BACKREST
6.USING THE SAFETY ARMREST
7.USING THE HOOD
8.ADJUSTING THE HANDLEBAR
9.SEAT BELT
10.ADJUSTING THE FOOTREST
11.USING THE PARKING BRAKE
12.LOCKING THE FRONT WHEELS
13.MAINTENANCE
14.RAIN COVER
INFORMATION ABOUT THE GUARANTEE
25
25
26
26
26
26
27
27
27
27
27
28
28
28
29
english
23

MUUM
24
WARNING
Important – Keep these instructions for future reference. WARNING Never leave your child unattended. WARNING Ensure that all the locking devices are engaged before use.
WARNING To avoid injury ensure that your child is kept away when unfolding and folding this product. WARNING Do not let your child play with this product WARNING This seat unit is not suitable for children under 6 months.
WARNING Always use the restraint system.
WARNING Check that the pram body or seat unit or car seat attachment devices are correctly engaged before use. WARNING This product is not suitable for running or skating.
This vehicle is intended for children from 6 months and up to 15 kg.
Suitable for children under 6 months old only with accessories approved by JANÉ.
The parking device shall be engaged when placing and removing the children.
Any load attached to the handle and/or on the back of the backrest and/or on the sides of the vehicle will affect the stability of the vehicle.
This vehicle has been designed to be used by one child. Do not use it with more children at the same time. Never use accessories that have not been approved by JANÉ, S.A.
For car seats used in conjunction with a chassis, this vehicle does not replace a cot or a bed. Should your child need to sleep, then it should be placed in a suitable pram body, cot or bed.
Only replacement parts supplied or recommended by JANÉ shall be used.
The maximum amount carried in the basket must never exceed the weight indicated on the basket (4 kg).
1.- FITTING AND REMOVING THE WHEELS
Before using the MUUM pushchair for the first time it is necessary to fit the rear wheels. To fit the wheels press the button on the middle of the wheel and insert the axle into the rear wheel bearer and push until it slots firmly into place. 
If you need to remove the wheels, press the central button and take the wheel off. 
2.- FOLDING AND UNFOLDING
To unfold the MUUM, adjust the tilt of the handlebar by pressing the side buttons and turning until it is straight. Release the elastic band and leave it fastened on the handlebar. 
Next, raise the handlebar and complete the unfolding action until it is locked in place and you hear it click.
Pull the lever on the back of the backrest upwards while pushing the backrest backwards, until it is upright. Adjust the tilt of the handles to reach the required height.
 Adjust the footrest to the required position by pressing the button while pushing the footrest downwards.
To fold the MUUM it is best to position the hammock facing backwards.
Lower the backrest and the footrest bringing them closer together.
Take anything out of the basket that could obstruct the folding of the pushchair, and take the steering lock off the front wheels.
Then, as with the unfolding instructions, press the button on the right hand side and pull the two side catches pushing the handlebar backwards. 
Lift the pushchair gently by the handle on the bottom of the seat.
Bring the pushchair legs together until it is fully folded, and then turn the handlebar. 11-12
Hold the chassis closed and use the rubber fastener.
It is also possible to fold the pushchair with the hammock facing forwards. In this case, lower the backrest to the penultimate position and then follow the same steps as above. This means that the carry handle is on the central tube of the chassis. 
WARNING: Use the handles as shown in figure (11-11b) when folding the pushchair. If you hold the chassis by any other part you could hurt your hand in the folding process.
WARNING: You must make sure that the child is kept away from the pushchair while it is being folded or unfolded. During these operations the appearance of sharp points and compression areas are inevitable.
english
25
MUUM
26
3.- PRO-FIX SYSTEM
The chassis of your pushchair includes the PRO-FIX system, ready to incorporate the following auto safety elements: Rebel, Micro and Matrix Light. 14-14.a The PRO-FIX system makes it easier to attach and remove these accessories to and from the chassis, securing them to the chassis in a quick, simple and safe way. To do this follow the instructions for these accessories carefully.
WARNING: It is necessary to remove the hammock from the pushchair to attach any of the auto accessories.
4.- FITTING AND REMOVING THE HAMMOCK
The pro-fix system lets you easily attach the MUUM hammock to the chassis. As it is reversible the hammock can be positioned facing you while the child is very small or facing forwards as the child grows. Make sure that the hammock is securely fastened onto the chassis by pulling it gently upwards. 14-14a
To remove the hammock, simultaneously pull the unlocking levers upwards that are situated on both sides of the hammock. 
5.- ADJUSTING THE ANGLE OF THE BACKREST
To provide the baby with maximum comfort at all times, the backrest has a reclining system. Pull the catch on the rear upper part of the backrest to adjust it to one of the 3 reclining positions possible. 
6.- USING THE SAFETY ARMREST
The safety armrest is designed to fit into the slots on the hammock. If required you can release just one side by pressing the side buttons and the armrest will be fully articulated by the other end. 15 -15a
WARNING: The child should be kept away from the mobile parts when the responsible adult is handling these. The appearance of cutting, compression and pinch points are inevitable during these operations.

7.- USING THE HOOD
Position the hood between the tubes of the handlebar and the sides of the backrest below the ear flaps. Insert the hood sliding the fastening piece along the guide on the side of the backrest until it clicks into place. 
Once the hood is attached its position can be adjusted by moving the arcs to suit the tilt of the backrest.
8.- ADJUSTING THE HANDLEBAR
The handlebar can be set to 7 different positions. Simultaneously press the buttons on both sides of the handlebar. 
9.- SEAT BELT
Your pushchair has a safety harness to keep your child safe at all times. Fit the belt onto the child whenever he is using the pushchair.
10.- ADJUSTING THE FOOTREST
The footrest can be adjusted to 5 different positions. Simultaneously press the two buttons on the outer part of the hammock to turn it downwards.
To move it upwards it is not necessary to press the button, simply pull the footrest to the required position.
11.- USING THE PARKING BRAKE
PUTTING THE BRAKE ON: Push the operating lever on the right of the handlebar down to activate the parking brake of your stroller.
TAKING THE BRAKE OFF: Press the release button and move the operating lever on the right of the handle bar upward to release the parking brake.
WARNING: When the brake is on make sure that the pushchair has braked correctly. It may be necessary to push the pushchair slightly for the brake to be fully activated.
english
27

MUUM
12.- LOCKING THE FRONT WHEELS
Your pushchair has front swivel wheels or the steering can be locked if required.
To lock the wheels, press the button behind each front wheel bearer downwards.
To unlock the steering, push the button upwards.
13.- MAINTENANCE
Do not expose the cover to sunlight for long periods.
Wash the plastic parts with warm water and soap and carefully dry all the components after.
The cover can be removed for washing.
Regularly check the brakes, harnesses and fastening elements that may suffer wear and tear through use.
For your safety and the good conservation of this product, it is important to bring it to one of our official workshops for regular inspections.
14.- RAIN COVER
The rain cover of your MUUM is very easy to fit, simply cover the hammock and fit the hooks onto the chassis to secure it. The rain cover has a small window which can be rolled up and held with Velcro so the child is free to investigate his surroundings.
28

INFORMATION ABOUT THE GUARANTEE
This article comes with a guarantee in accordance with the provisions of law 23 / 2003 of 10th July. Keep your receipt as proof of purchase, it is essential to present the receipt in the shop where you bought the product to confirm validity of the guarantee in the event of any problems.
This guarantee excludes any defects or breakages caused by inappropriate use of the article or inobservance of the safety and maintenance rules listed in the instruction pages and on the care labels, as well as faults caused by wear and tear through normal use and daily handling.
The label displaying the chassis number of the model should never be taken off, it contains important information.
Notice:
For the maximum safety and care of your new JANÉ product, it is very important that you complete the registration card found on the web page www.jane.es
This registration means we can inform you, if necessary, of the evolution and maintenance of your product. Additionally, if you would like, we can also inform you about new models or news that we think may be useful for you.
english
29
MUUM
30
 Loading...