

Page 1
INSTRUCTIONS
Page 2

NANUQ TWIN
2
español
english
français
deutsch
italiano
português
nederlands
norsk
svenska
pусский
dansk
polski
slovenščina
slovensko
český
magyar
15
21
27
33
39
45
51
57
63
69
75
81
87
93
99
105
Page 3
1.1 1.2
figures
3
Page 4
1.3 2
4
Page 5
3.23.164
figures
5
Page 6

4B
Page 7
5
6
figures
A
7
Page 8
7
8.1
A
8
Page 9
8.2 91010.2
figures
9
Page 10
10.1
Page 11

10.410.3
figures
11
Page 12
12
10.5
11
Page 13

12
figures
13
Page 14

NANUQ TWIN
14
Page 15

INDICE
Advertencias
1.- PARA DESPLEGAR EL COCHECITO
2.- RUEDAS GIRATORIAS
3.- USO DEL FRENO DE ESTACIONAMIENTO
4.- CINTURÓN DE SEGURIDAD
5.- AJUSTE DE LA ALTURA DE LA EMPUÑADURA
6.- GRADUACIÓN DEL RESPALDO
7.- AJUSTE DEL REPOSAPIÉS
8.- PLEGADO DEL COCHECITO
9.- TRANSPORTE
10.- EMPLEO DE LA CAPOTA
11.- USO DEL CABALLETE
12.- PROTECTOR DE LLUVIA
13.- MANTENIMIENTO
16-17
18
18
18
18
18
18
18
19
19
19
19
19
19
español
15
Page 16

ADVERTENCIAS
ADVERTENCIAS
IMPORTANTE – Guardar estas instrucciones
para consultas futuras.
ADVERTENCIA: No dejar nunca al niño
desatendido.
ADVERTENCIA: Asegurarse de que todos
los dispositivos de cierre están engranados
antes del uso.
NANUQ TWIN
ADVERTENCIA: Para evitar lesiones,
asegúrese de que el niño se mantiene
alejado durante el desplegado y el plegado
16
de este producto.
ADVERTENCIA: No permita que el niño
juegue con este producto.
ADVERTENCIA: Usar siempre el sistema de
retención.
ADVERTENCIA: Comprobar que los
dispositivos de sujeción del capazo,
del asiento o de la silla de coche están
correctamente engranados antes del uso.
ADVERTENCIA: Este producto no es
adecuado para correr o patinar.
Este vehículo es para niños desde 0 meses
y hasta 15 kg.
Page 17

Se recomienda el uso en la posición mas
reclinada desde el nacimiento hasta los 6
meses.
El dispositivo de estacionamiento debe
activarse al colocar y retirar a los niños del
vehículo.
Cualquier carga fijada al manillar y/o a la
parte trasera del respaldo y/o a los laterales
del vehículo afecta a la estabilidad de éste.
Este vehiculo ha sido diseñado para uno
o dos niños, no utilizarlo con mas de dos
niños a la vez.
No deben utilizarse accesorios no
aprobados por JANÉ.
Solo deben utilizarse los repuestos
suministrados o recomendados por JANÉ.
La masa máxima permitida de la cestilla
portaobjetos nunca puede superar lo
indicado en la cestilla (4 kg).
español
17
Page 18

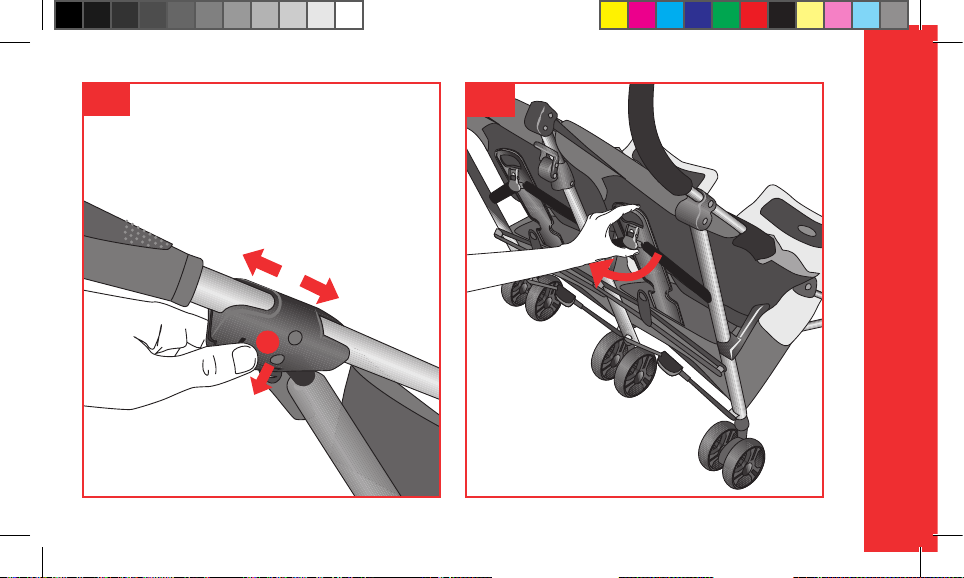
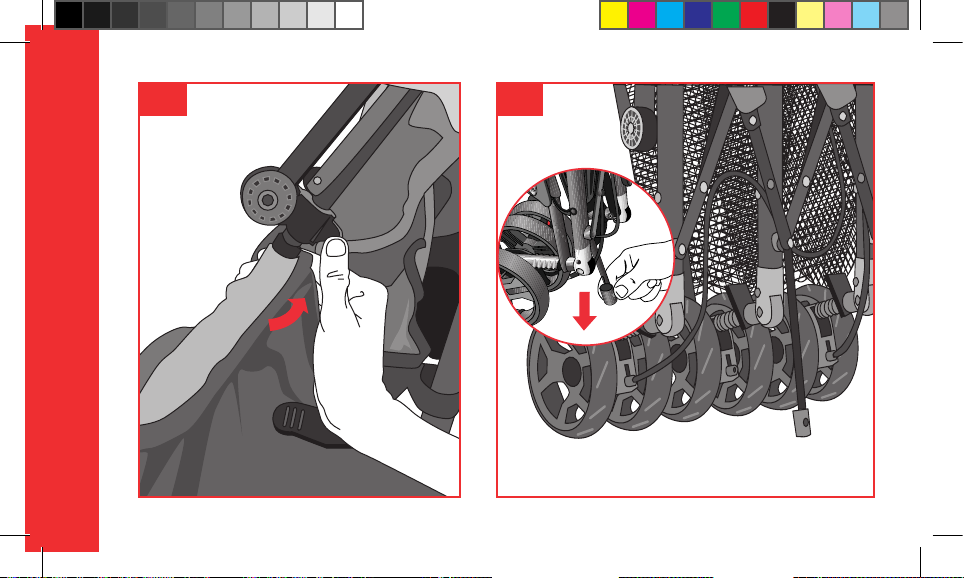
1.- PARA DESPLEGAR EL COCHECITO
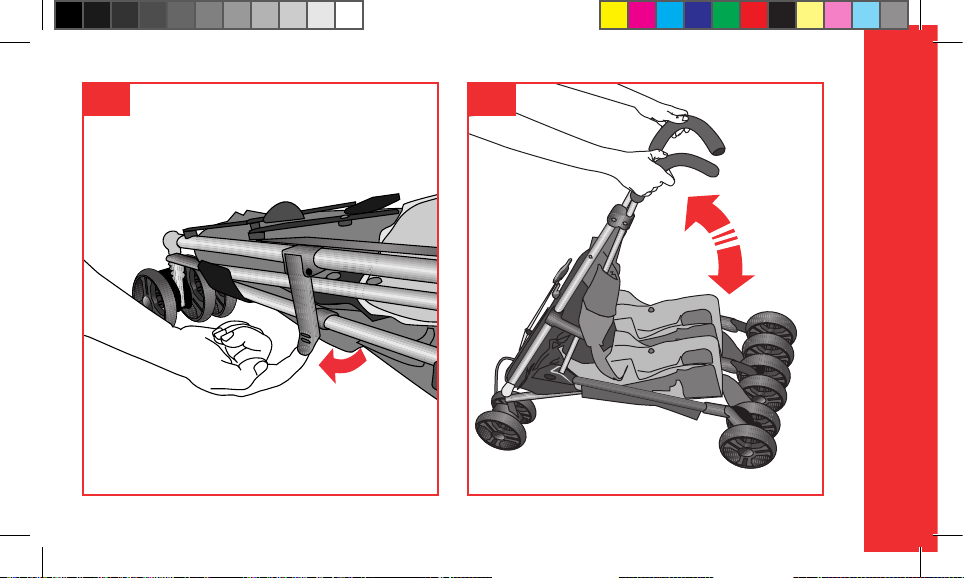
Libere las palancas situadas en los laterales. 1.1
Tire del manillar hacia arriba desplegando la silla. 1.2
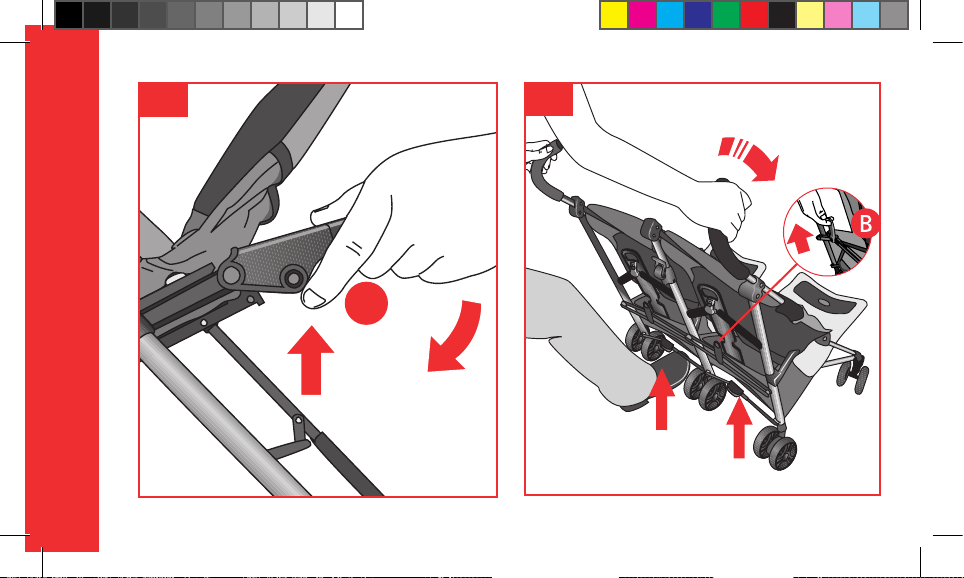
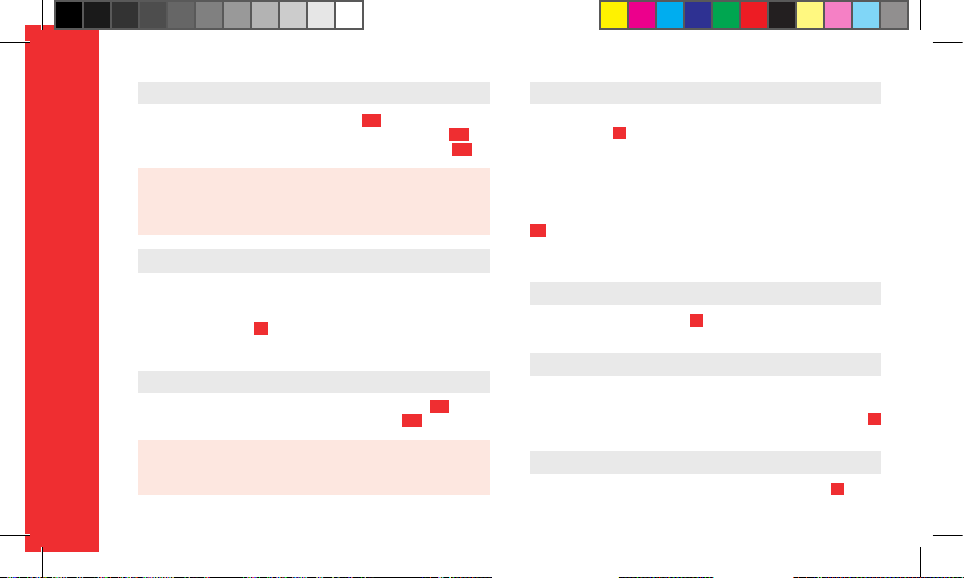
Finalme nte pise los pedales po steriores co mo ilustra la figu ra.
1.3
ADVERTENCIA: Es imprescindible asegurarse que el niño se mantiene alejado de la silla durante las acciones de plegado y desplegado.
ADVERTENCIA: La aparición de puntos de corte y compresión y
atrapamientos son inevitables durante estas operaciones.
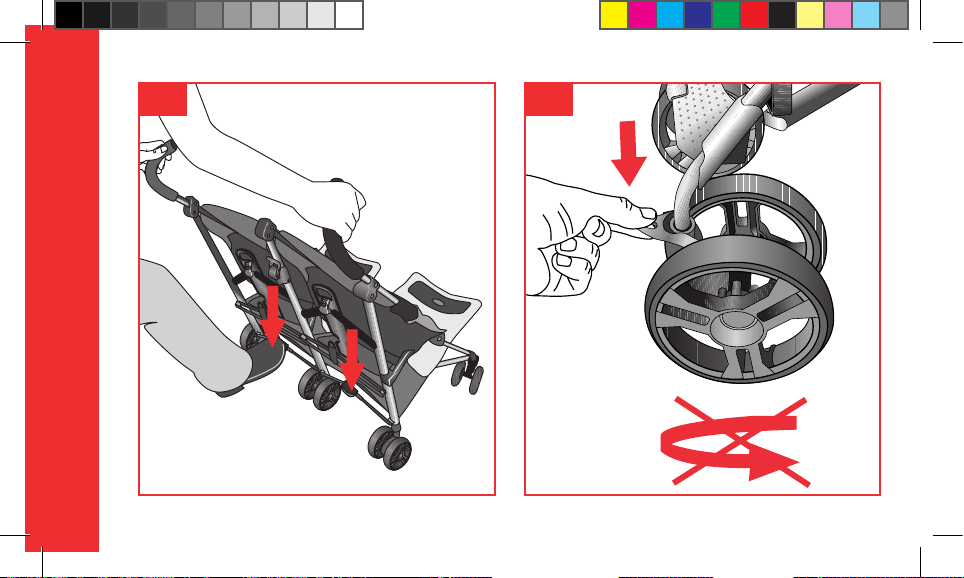
2.- RUEDAS GIRATORIAS
Su coche cito dispone d e ruedas dela nteras girator ias direccio nales, con la posibilidad de bloquear la dirección.
Para bloquearlas, pulse hacia abajo el botón ubicado en de
cada porta ruedas delantero. 2
Para desbloquear la dirección, pulse el botón en el sentido
contrario.
NANUQ TWIN
18
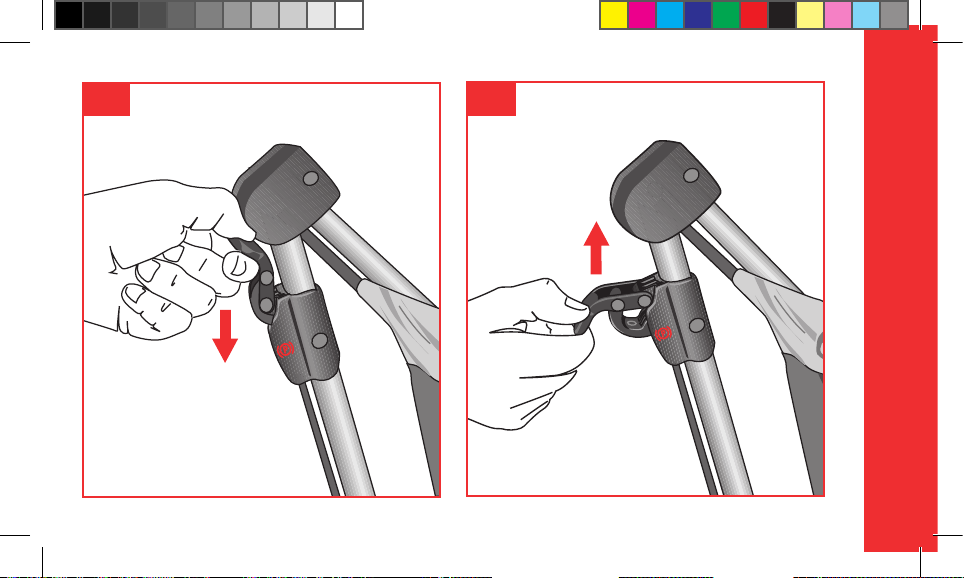
3.- USO DEL FRENO DE ESTACIONAMIENTO
FRENAR: Accione la palanca hacia abajo. 3 .1
DESFRENAR: Accione la palanca hacia arriba. 3.2 1.2
ADVERTENCIA: Una vez accionado el freno asegúrese de que el
cochecito ha quedado correctamente frenado. Puede ser necesario rodar ligeramente el cochecito para que el freno engrane
de manera óptima.
4.- CINTURÓN DE SEGURIDAD
Ajuste los cinturones a los niños siempre que use el cochecito. 4
Los dos puntos de fi jación laterale s de los asientos puede n ser
utilizados para la fijación de un arnés suplementario.
Su cochecito está homologado para bebés recién nacidos.
Para adaptar los cinturones a su bebé (cuando sea menor de
6 meses) pase las cintas de hombros por los ojales inferiores y
una los protectores de hombros mediante los velcros.
4B A partir de los 6 mes es de edad puede pasar los cintu rones
por los ojales que sean más cómodos para el niño.
5.- AJUSTE DE LA ALTURA DE LA EMPUÑADURA
Para regularlo pulse el botón A. 5
6.- GR ADUACIÓN DEL RESPALDO
Su silla dispone de 4 posiciones. Tire de las palancas situadas en
la parte superior trasera de los respaldos y ajuste la inclinación
en la posición deseada. 6
7.- AJUSTE DEL REPOSAPIÉS
Dispone de dos posiciones. Para bajar presione A. 7
Page 19

8.- PLEGADO DEL COCHECITO
Para plegar la silla accione los pedales posteriores hacia arriba (A) y a continuación libere el seguro manual (B) , acompañando el plegado hasta el final. 8 .1
Procure presionar ligeramente la silla una vez plegada para
asegurarse de que el seguro lateral queda accionado. 8.2
ADVERTENCIA: Es imprescindible asegurarse que el niño se
mantiene alejado de la silla durante las acciones de plegado y
desplegado.
ADVERTENCIA: La aparición de puntos de corte y compresión y
atrapamiento son inevitables durante estas operaciones.
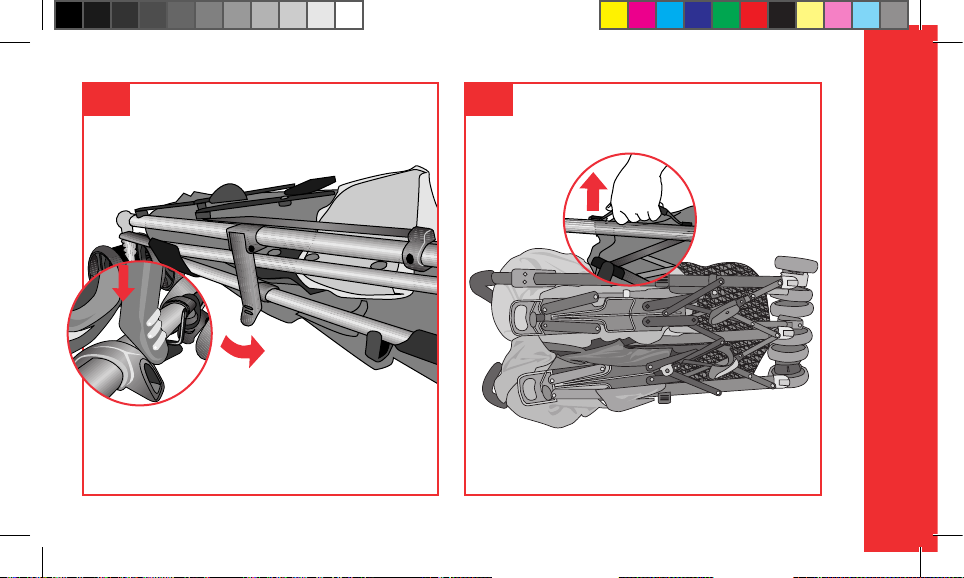
9.- TRANSPORTE
El chasis incorpora un asa para su fácil transporte. 9
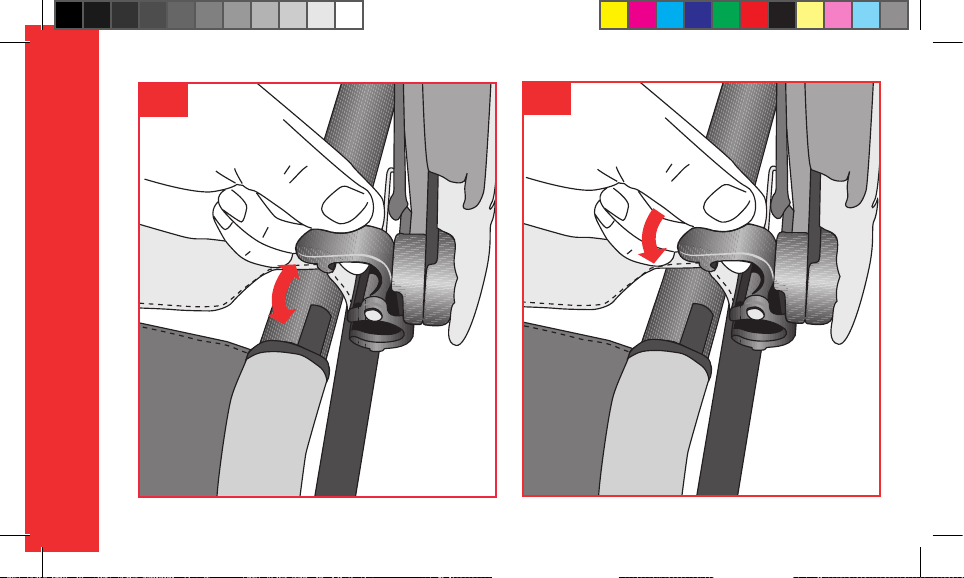
10.- EMPLEO DE LA CAPOTA
Sitúe las capotas sobre los tubos laterales del manillar en la
parte superior del tapizado. 10.1
Ajuste las pinzas por la parte posterior hasta que oiga un
“cl ack”. 10. 2
En los tubos centrales ajuste la pinza hasta que oiga un
“cl ack”. 10. 3
Deslice el terminal de la otra capota por la guía para juntarlas. 10.4
Una vez puesta la capota se puede graduar su posición moviendo los arquillos según la inclinación del respaldo. Para
quitarlas siga los pasos a la inversa. 10.5
11.- USO DEL CABALLETE
Su silla NANUQ TWIN dispone de caballete.
Para desplegarlo tire del tapón situado en la parte inferior
central de la silla. Empújelo para adentro para plegarlo. 11
12.- PROTECTOR DE LLUVIA
Ajuste los dos broches inferiores y los velcros traseros del
protec tor de lluvia. 12
13.- MANTENIMIENTO
No exponga el tapizado al sol durante largos períodos.
Lave la s partes de plá stico con agua te mplada y jabón , secando
posteriormente todos los componentes concienzudamente.
El tapizado puede desmontarse para ser lavado.
Compruebe regularmente los frenos, arneses y fijaciones que
pudieran sufrir algún daño por el uso.
Tanto para su seguridad como para la buena conservación de
este producto, es importante que haga una revisión periódica en cualquiera de nuestros talleres oficiales.
español
19
Page 20

INFORMACIÓN SOBRE LA GARANTÍA
Este ar tículo dispone de garantía según lo estipulado en la ley
23 / 2003 de 10 de julio. Conservar la factura de compra, es
imprescindible su presentación en la tienda donde adquirío el
produ cto para justificar su validez ante cualquier re clamación.
Quedan excluídos de la pres ente garantía aquellos defectos
o averías producidas por un uso inadecuado del artículo o el
incumplimiento de las normas de seguridad y mantenimien to descritas en las hojas de instru ccione s y en las etiquetas de
lavado, así como los elementos de desgaste por uso normal y
manejo diario.
La etiqueta que contiene el número de chasis de su modelo,
no debe ser arrancada bajo ningún concepto, contiene información importante.
Atención:
Para obtener la máxima seguridad y atención sobre su nuevo
JANÉ, es muy im portante que rellene la tarjet a de re gistr o que
encontrará en la página www.jane.es
NANUQ TWIN
El registro le permitirá informarse, si es necesario, de la evolución y mantenimiento de su producto. También, siempre que
lo desee, le podremos informar de nuevos modelos o noticias
que consideremos pueden ser de su interés .
20
Page 21

TABLE OF CONTENTS
Warnings
1.- UNFOLDING THE PUSHCHAIR
2.- SWIVEL WHEELS
3.- USING THE PARKING BRAKE
4.- SEAT BELT
5.- ADJUSTING THE HEIGHT OF THE HANDLE
6.- ADJUSTING THE BACKREST
7.- ADJUSTING THE FOOTREST
8.- FOLDING THE PUSHCHAIR
9.- CARRYING
10.- USING THE HOOD
11.- USING THE STAND
12.- RAIN COVER
13.- MAINTENANCE
22-23
24
24
24
24
24
24
24
25
25
25
25
25
25
english
21
Page 22

WARNING
WARNING
IMPORTANT – Keep these instructions for
future reference.
WARNING: Never leave your child
unattended.
WARNING: Ensure that all the locking
devices are engaged before use.
WARNING: To avoid injury ensure that your
NANUQ TWIN
child is kept away when unfolding and
folding this product.
WARNING: Do not let your child play with
22
this product
WARNING: Always use the restraint system.
WARNING: Check that the pram body or
seat unit or car seat attachment devices are
correctly engaged before use.
WARNING: This product is not suitable for
running or skating.
This vehicle is intended for children from 0
months and up to 15 kg.
From birth until 6 months old babies the
most reclined position is recommended.
The parking device shall be engaged when
placing and removing the children.
Page 23

Any load attached to the handle and/or
on the back of the backrest and/or on the
sides of the vehicle will affect the stability
of the vehicle.
This vehicle has been designed to be used
by one or two children. Do not use it with
more children at the same time.
Never use accessories that have not been
approved by JANÉ, S.A.
Only replacement parts supplied or
recommended by JANÉ shall be used.
The maximum amount carried in the basket
must never exceed the weight indicated on
the basket (4 kg).
english
23
Page 24
1.- UNFOLDING THE PUSHCHAIR
Release the levers found on the sides. 1.1
Pull the handlebar upwards unfolding the pushchair. 1.2
Lastly, press the back pedals down as shown in figure. 1.3
WARNING: It is important to make sure that the child is kept
away from the pushchair while it is being folded or unfolded.
WARNING: The appearance of cutting, compression and pinch
points are inevitable during these operations.
2.- SWIVEL WHEELS
Your pushchair has front swivel wheels or the s teering can be
locked if required.
To lock the wheels, press the button behind each front wheel
bearer downwards. 2
To unlock the steering, push the but ton upwards.
NANUQ TWIN
24
3.- USING THE PARKING BRAKE
PUTTING THE BRAKE ON: Push the lever downwards . 3.1
TAKING THE BRAKE OFF: Pull the lever upwards.
WARNING: When the brake is on make sure that the pushchair
has braked correc tly. It may be necessary to push the pushchair
slightly for the brake to be fully activated.
3.2
4.- SEAT BELT
Adjust the seat belts to fit the children whenever they use
the pushchair. 4
The two side fastening points of the seat s can be used to attach an additional harness.
Your pushchair is approved for new born babies. To fit the
belts on your baby when he is under 6 months old, pass the
should er straps thro ugh the lower ho les and faste n the shoulder protector pads using the Velcro.
4B When your child is over 6 months old, pass the straps
through the holes that are most comfortable for the child.
5.- ADJUSTING THE HEIGHT OF THE HANDLE
To adjust it press button A . 5
6.- ADJUSTING THE BACKREST
Your pushchair has 4 possible positions. Your pushchair has
4 positions. Pull the levers found on the top rear part of the
backrests and adjust the pushchair to the required position. 6
7.- ADJUSTING THE FOOTREST
There are two possible positions. To lower it, press A. 7
Page 25

8.- FOLDING THE PUSHCHAIR
To fold the pushchair, push the rear pedals upwards (A) and
then release the catch with your hand (B), and fold the pushchair completely. 8.1
Press the pushchair lightly when it is folded to ensure that
the side safety catch is activated. 8.2
WARNING: It is important to make sure that the child is kept
away from the pushchair while it is being folded or unfolded.
WARNING: The appearance of cutting, compression and pinch
points are inevitable during these operations.
9.- CARRYING
The chassis has a handle incorporated for easy carrying. 9
10.- USING THE HOOD
Place the hoods o n the side tubes of the handlebar on th e top
part of the upholster y. 10.1
Fit the clips on the back part until they click into place. 10.2
Fit the clip on the central tubes until it clicks into place. 10.3
Slide the end of the other hood along the guide to bring
them together. 10.4
Once the hood is in place the position may be adjusted by
moving the spoke arch to suit the position of the backres t.
To remove the hoods, follow the same steps in reverse order.
10.5
11.- USING THE STAND
Your NANUQ T WIN pushchair is fitted with a stand.
To unfold the stand pull the cap found on the middle lower
part of the pushchair. Push it in to fold it again. 11
12.- RAIN COVER
Fit the two lower clasps and the rear Velcro strips of the rain
cov er. 12
13.- MAINTENANCE
Do not expose the cover to sunlight for long periods.
Wash the plastic p arts with war m water and soap and caref ully
dry all the components after.
The cover can be removed for washing.
Regularly check the brakes, harnesses and fastening elements
that may suffer wear and tear through use.
For your safety and the good conservation of this product, it
is important to bring it to one of our official workshops for
regular inspections.
english
25
Page 26

INFORMATION ABOUT THE GUARANTEE
This article comes with a guarantee in accordance with the
provisions of law 23 / 2003 of 10th July. Keep your receipt as
proof of purchase, it is essential to present the receipt in the
shop where you bought the product to confirm validity of the
guarantee in the event of any problems.
This guarantee excludes any defects or breakages caused by
inappropriate use of the article or inobservance of the safety
and maintenance rules listed in the ins truc tion pages and
on the care labels, as well as faults caused by wear and tear
through normal use and daily handling.
The label displaying the chassis number of the model should
never be taken off, it contains important information.
Notice:
For the maximum safet y and care of your new JANÉ product,
it is ver y important that you complete the registration card
found on the web page w w w.jane.es
NANUQ TWIN
This registration means we can inform yo u, if ne ces sar y, of the
evolution and maintenance of your produc t. Additionally, if
you would like, we can also inform you about new models or
news that we think may be useful for you.
26
Page 27

INDEX
Avertissements
1.- POUR DÉPLIER LA POUSSETTE
2.- ROUES PIVOTANTES
3.- UTILISATION DU FREIN DE STATIONNEMENT
4.- CEINTURE DE SÉCURITÉ
5.- RÉGLAGE DE LA HAUTEUR DES POIGNÉES
6.- RÉGLAGE DU DOSSIER
7.- RÉGLAGE DU REPOSE-JAMBES
8.- PLIAGE DE LA POUSSETTE
9.- TRANSPORT
10.- UTILISATION DE LA CAPOTE
11.- UTILISATION DE LA BÉQUILLE
12.- HABILLAGE DE PLUIE
13.- ENTRETIEN
28-29
30
30
30
30
30
30
30
31
31
31
31
31
31
français
27
Page 28

AVERTISSEMENTS
AVERTISSEMENT
IMPORTANT – Conserver ces instructions
pour consultation ultérieure.
AVERTISSEMENT: Ne jamais laisser votre
enfant sans surveillance.
AVERTISSEMENT: S’assurer que tous les
dispositifs de verrouillage sont enclenchés
avant utilisation.
NANUQ TWIN
AVERTISSEMENT: Pour éviter toute
blessure, maintenir votre enfant à l’écart
28
lors du dépliage et du pliage du produit.
AVERTISSEMENT: Ne pas laisser votre
enfant jouer avec ce produit.
AVERTISSEMENT: Toujours utiliser le
système de retenue.
AVERTISSEMENT: Vérifier que les
dispositifs de fixation de la nacelle, du
siège ou du siège-auto sont correctement
enclenchés avant utilisation.
AVERTISSEMENT: Ce produit ne convient
pas pour faire du jogging ou des
promenades en rollers.
Ce véhicule est conçu pour des enfants
âgés de 0 mois à 15 kg.
Page 29

De la naissance et jusqu’à 6 mois, on
recommande l’utilisation de la position la
plus inclinée.
Le dispositif de stationnement doit être
activé pour installer ou retirer les enfants
du véhicule.
Une charge quelconque suspendue au
guidon, et/ou à la partie arrière du dossier,
et/ou sur les côtés latéraux du véhicule
peut affecter la stabilité de ce dernier.
Ce véhicule a été conçu pour un ou deux
enfants, ne pas l’utiliser avec plus de deux
enfants à la fois.
N’utilisez jamais des accessoires qui n’ont
pas été approuvés par JANE, S.A.
On doit utiliser uniquement les pièces de
rechange fournies ou recommandées par
JANE.
Le poids maximum autorisé dans le filet du
panier ne doit pas être supérieur à celui
qui est indiqué dans le filet (4 kg).
français
29
Page 30
1.- POUR DÉPLIER LA POUSSETTE
Libérez les manettes situées sur les côtés latéraux. 1 .1
Tirez le guidon vers le haut en dépliant la poussette. 1.2
Finalement, appuyez avec le pied sur les pédales postérieures. 1.3
AVERTISSEMENT: Il est indispensable de vérifier que l’enfant se
tient bien éloigné de la pousset te lors du pliage ou du dépliage
de cette dernière.
AVERTISSEMENT: Il y a des risques de coupures, de compression,
de se trouver coincé qui sont inévitables lors de ces opérations.
2.- ROUES PIVOTANTES
Votre poussette dispose de roues avant pivotantes avec blocage directionnel, permettant de bloquer la direction.
Pour les bloquer, poussez vers le bas le bouton situé derrière
chaque bloc-roues avant. 2
Pour débloquer la direc tion, poussez le bouton dans le sens
contraire.
NANUQ TWIN
30
3.- UTILISATION DU FREIN DE STATIONNEMENT
ACTIVER LE FREIN: Baissez la manette.
DÉSACTIVER LE FREIN : Relevez la manette.
AVERTISSEMENT: Une fois le frein ac tivé vérifiez que la pouss ette est
correc tement stoppée. Il peut être nécessaire de roder légèrement
la poussette afin de pouvoir enclencher le frein de façon optimale.
3.1
3.2
4.- CEINTURE DE SÉCURITÉ
Ajustez les ceintures aux enfant s dès que vous utilisez la
poussette. 4
Les deux points de fixation latéraux des sièges peuvent être
utilisés pour la fixation d’un harnais supplémentaire.
Votre poussette est homologuée pour les nouveaux nés.
Pour adapter les ceintures à votre bébé lor squ’il aura moins
de 6 mois, faites passer les sangles des épaules par les fentes
inférieures et fixez les protections matelassées à l’aide des
velcros.
4B À partir de l’âge de 6 mois vous pouvez faire passer les
ceintures par les fentes qui sont les plus confortables pour
l’enfant.
5.- RÉGLAGE DE LA HAUTEUR DES P OIGNÉES
Pour les régler, appuyez sur le bouton A. 5
6.- RÉGLAGE DU DOSSIER
Votre poussette dispose de 4 positions. Tirez sur les manettes
situées sur la partie arrière supérieure des dossiers et ajus tez
l’inclinaison dans la position désirée. 6
7.- RÉGLAGE DU REPOSE-JAMBES
Possède deux positions. Pour le baisser, appuyez A. 7
Page 31

8.- PLIAGE DE L A POUSSETTE
Pour plier la poussette, actionnez les pédales postérieures
vers le haut (A) , puis libérez le verrou manuel (B) et accompagnez le mouvement de pliage jusqu’à la fin. 8 .1
Une fois la poussette pliée appuyez légèrement dessus pour
vérifier que le verrou latéral est bien mis en place. 8.2
AVERTISSEMENT: Il est indispensable de vérifier que l’enfant se
tient bien éloigné de la pousset te lors du pliage ou du dépliage
de cette dernière.
AVERTISSEMENT: Il y a des risques de coupures, de compression,
de se trouver coincé qui sont inévitables lors de ces opérations.
9.- TRANSPORT
Le châssis possède une poignée incorporée pour faciliter son
transport. 9
10.- UTILISATION DE LA CAPOTE
Placez les capotes sur les tubes des montants latéraux du guidon sur la partie supérieure de la housse. 10.1
Ajustez les pinces sur la partie postérieure jusqu’à entendre
un “clack”. 10.2
Sur les tubes des montants centraux ajustez la pince jusqu’à
ce que vous entendiez un “clack”. 10.3
Faites glisser l’extrémité de l’autre capote par le guide pour
les rassembler. 10.4
Une fois la capote installée on peut ajuster sa position en
bougeant les arceaux selon l’inclinaison du dossier. Pour les
enlever, suivez les étapes en sens inverse. 10.5
11.- UTILISATION DE LA BÉQUILLE
Votre poussette NANUQ TWIN dispose d’une béquille.
Pour la déplier, tirez sur le bouchon situé sur la partie inférieure centrale de la poussette. Poussez-la vers l’intérieur
pour la plier. 11
12.- HABILL AGE DE PLUIE
Ajustez les deux agrafes du bas et les velcros arrière de
l’habillage de pluie. 12
13.- ENTRETIEN
Ne pas exposer le revêtement au soleil pendant de longues
périodes.
Laver les parties en plastique avec de l’eau tiède et du savon,
en séchant ensuite tous les composants consciencieusement.
Le revêtement peut se démonter pour être lavé.
Vérifiez régulièrement les freins, harnais et fixations pouvant
s’abîmer à l’usage.
Pour votre sécurité comme pour la bonne conservation de ce
produit, il est très important que vous effectuiez un contrôle
périodique dans un de nos ateliers.
français
31
Page 32

INFORMATIONS SUR LA GARANTIE
Cet article dispose d’une garantie comme stipulé dans la loi
23 / 2003 du 10 juillet 2003. Conser ver le ticket de caisse, sa
présentation dans le magasin où vous avez acquis le produit
est indispensable p our jus tifier toute réclamation.
Sont exclues de la présente garantie les défectuosités et les
pannes dues à une utilisation inadéquate du produit, ou liés
à un manquement aux normes de sécurité ou d’entretien
décrites dans les pages d’instructions et sur les étiquettes de
lavage, de même que les éléments usés par une utilisation
normale et journalière.
L’étiquette qui contient le numéro du châssis de votre modèle, ne doit être arrachée sous aucun prétexte, elle contient
des informations très importantes .
Attention:
Pour obtenir un maximum de sécurité et d’attentions, il est
NANUQ TWIN
très important que vous remplissiez la carte d’enregistrement que vous trouverez sur la page w ww.jane.es
L’enregistrement vous permettra de vous informer, si né cessaire, sur l’évolution et l’entretien de votre produit. De
même, si vous le souhaitez, nous pourrons vous informer
sur les nouveaux modèles et les informations pouvant vous
32
intéresser.
Page 33

INHALTSVERZEICHNIS
Anmerkungen
1.- ZUM AUSKLAPPEN DES KINDERWAGENS
2.- DREHBARE RÄDER
3.- GEBRAUCH DER FESTSTELLBREMSE
4.- SICHERHEITSGURT
5.- EINSTELLUNG DER GRIFFHÖHE
6.- EINSTELLUNG DER RÜCKENLEHNE
7.- EINSTELLUNG DER FUSSSTÜTZE
8.- ZUSAMMENKLAPPEN DES KINDERWAGENS
9.- TRANSPORT
10.- GEBRAUCH DER HAUBE
11.- GEBRAUCH DES STÄNDERS
12.- REGENSCHUTZ
13.- UNTERHALT
34-35
36
36
36
36
36
36
36
37
37
37
37
37
37
deutsch
33
Page 34

WARNUNG
WARNUNG
WICHTIG — Anleitung für spätere
Rückfragen aufbewahren.
WARNUNG: Lassen Sie Ihr Kind nie
unbeaufsichtigt.
WARNUNG: Vergewissern Sie sich vor
Gebrauch, dass alle Verriegelungen
geschlossen sind.
WARNUNG: Vergewissern Sie sich,
NANUQ TWIN
dass Ihr Kind beim Aufklappen und
Zusammenklappen des Wagens außer
Reichweite ist, um Verletzungen zu
34
vermeiden.
WARNUNG: Lassen Sie Ihr Kind nicht mit
dem Wagen spielen.
WARNUNG: Verwenden Sie immer das
Rückhaltesystem.
WARNUNG: Es ist zu überprüfen, dass der
Kinderwagenaufsatz oder die Sitzeinheit
oder der Autokindersitz vor Gebrauch
korrekt eingerastet ist.
WARNUNG: Dieses Produkt ist nicht zum
Joggen oder Skaten geeignet.
Dieser Wagen ist für Kinder ab einem Alter
von 0 Monaten und mit einem Gewicht bis
15 kg bestimmt.
Page 35

Ab Geburt bis 6 Monate wird der Gebrauch
der am weitesten zurückgelehnten Position
empfohlen.
Die Feststellvorrichtung muss beim
Hineinsetzen und Herausnehmen der Kinder
aus dem Fahrzeug aktiviert werden.
Jede am Lenker und/oder auf der Rückseite
der Rückenlehne und/oder an den Seiten
des Fahrzeugs befestigte Last beeinträchtigt
seine Stabilität.
Dieses Fahrzeug wurde für ein oder zwei
Kind entworfen und darf nicht gleichzeitig
für mehr als zwei Kinder verwendet werden.
Verwenden Sie nie Zubehöre, die von
JANÉ, S.A. nicht genehmigt worden sind.
Es dürfen nur von JANÉ gelieferte oder
empfohlene Ersatzteile verwendet werden.
Das zugelassene Höchstgewicht des
Tragekorbs für Gegenstände darf nie
das dort angegebene Gewicht (4 kg)
übersteigen.
deutsch
35
Page 36

1.- ZUM AUSKLAPPEN DES KINDERWAGENS
Lösen Sie die sich an den Seiten befindenden Hebel. 1.1
Ziehen Sie den Lenker nach oben, bis der Buggy aufgeklappt
ist. 1. 2
Zuletz t treten Sie auf die Pedalen auf der Rückseite, wie auf
der Abbildung gezeigt. 1.3
WARNUNG: Es ist unerlässlich, sicherzustellen, dass das Kind vom
Sitz beim Auf- und Zuklappen entfernt gehalten wird.
WARNUNG: Das Auftre ten von Schnit t-, Druck und Quetsch stellen
und ist bei diesen Operationen unumgänglich.
2.- DREHBARE RÄDER
Ihr Buggy verfügt über dreh- und lenkbare Vorderräder mit
Lenkarretierung.
Drücken Sie den sich hinter jedem Vorderradhalter befindenden Knopf nach unten, um sie festzustellen. 2
Zur Entriegelung der Lenkung müssen Sie den Knopf in die
entgegengesetzte Richtung drücken.
NANUQ TWIN
36
3.- GEBRAUCH DER FESTSTELLBREMSE
BREMSEN: Drücken Sie den Hebel nach unten.
BREMSE LÖSEN: Drücken Sie den Hebel nach oben.
WARNUNG: Nachdem die Bremse betätigt wurde, überprüfen,
dass der Wagen korrekt gebrems t ist.
Es könnte erforderlich sein, den Wagen leicht zu drehen, damit
die Bremse optimal greif t.
3.1
3.2
4.- SICHERHEITSGURT
Passen Sie die Gurte den Kindern an, wenn Sie den Buggy benutzen. 4
Die beid en seitliche n Befestigun gspunkte d er Sitze können zu r
Befestigung eines Zusatzgurtes verwendet werden. Ihr Buggy
ist für Säuglinge zugelassen. Zur Anpassung der Gur te an Babys unter 6 Monaten führen Sie die Schultergurtbänder bitte
durch di e unteren Öff nungen und ver binden die Sch utzpolste r
für die Schultern mithilfe der Klettvorrichtung.
4B Ab einem Alter von 6 Monaten kann man die Gurtbänder
durch die oberen Öffnungen führen; das ist dann bequemer
für das Kind.
5.- EINSTELLUNG DER GRIFFHÖHE
Drüfcken Sie zu seiner Einstellung auf den Knopf A. 5
6.- EINSTELLUNG DER RÜCKENLEHNE
Der Buggy ist 4 -fach verstellbar. Ziehen Sie an den sich im oberen Teil auf der Rückseite der Rückenlehnen befindenden Hebeln und stellen Sie die Neigung in die gewünschte Position
ein. 6
7.- EINSTELLUNG DER FUSSSTÜTZE
Sie besitzt zwei Positionen.
Zum Herunterklappen der Fußstütze drücken Sie auf A. 7
Page 37

8.- ZUSAMMENKLAPPEN DES KINDERWAGENS
Zum Zusammenklappen des Buggys müssen Sie die Pedalen
auf der Rückseite nach oben drücken (A) und danach die
Handsicherung lösen (B) und das Zusammenklappen bis zum
Schluss begleiten. 8 .1
Drücken Sie leicht auf den Kinderwagen, sobald er zusammengeklappt ist, um sicherzustellen, dass die Seitensicherung betätigt bleibt. 8.2
WARNUNG: Es ist unerlässlich, sicherzustellen, dass das Kind vom
Sitz beim Auf- und Zuklappen entfernt gehalten wird.
WARNUNG: Das Auftre ten von Schnit t-, Druck und Quetsch stellen
und ist bei diesen Operationen unumgänglich.
9.- TRANSPORT
Am Fahrgestell befindet sich ein Tragegriff für seinen leichten
Tran spor t. 9
10.- GEBRAUCH DER HAUBE
Bringen Sie die Hauben auf den Seitenrohren des Lenkers im
oberen Teil des Bezuges an. 10.1
Stellen Sie die Arretierungen auf der Rück seite ein, bis Sie ein
Klicken hören. 10. 2
Stellen Sie die Arretierung in den Mittelrohren ein, bis Sie ein
Klicken hören. 10. 3
Schieben Sie das Ende der anderen Haube durch die Führung,
um sie zu verbinden. 10.4
Sobald die Haube angebracht ist, kann ihre Position durch
Bewegen der kleinen Bögen je nach Neigung der Rückenlehne verstellt werden. Um sie zu entfernen, müssen Sie die
Schritte in umgekehrter Reihenfolge befolgen. 10.5
11.- GEBRAUCH DES STÄNDERS
Der NANUQ TWIN Buggy verfügt über einen Ständer.
Um ihn auszuklappen, müssen Sie die sich im unteren Teil in
der Mitte des Buggys befindende Verschlusskappe abziehen.
Zum Zusammenklappen müssen Sie ihn nach innen drücken. 11
12.- REGENSCHUTZ
Stellen Sie die beiden unteren Druckver schlüsse und die hinteren Klettverschlüsse des Regenschutzes ein. 12
13.- UNTERHALT
Polstereinlage nicht übermäßig lange einer direkten Sonneneinstrahlung aussetzen.
Plastikteile mit lauwarmem Wasser und Seife reinigen. Anschließend alle Bauteile sorgfältig trocknen.
Zum Waschen kann die Polstereinlage herausgenommen werden.
Überprüfen Sie regelmäßig die Bremsen, die Hosenträgergurte und die Befestigungen, die aufgrund der Benutzung Schäden erleiden können.
Sowohl zu Ihrer Sicherheit als auch zur guten Konservierung
des Produktes ist es wichtig, eine regelmäßige Überprüfung
in einer unserer of fiziellen Werkstätten vornehmen zu lassen.
deutsch
37
Page 38

INFORMATIONEN ZUR GARANTIE
Dies er Ar tikel hat Gara nt ie lau t de n Bestimm un gen de s Gesetzes 23 /2003 vom 10. Juli 20 03. Bewahren Sie diese Einkaufsrechnung auf. Ihre Vorlage in dem Laden, wo Sie das Produkt
erworben haben, ist unumgänglich, um ihre Gültigkeit bei
jeder Reklamation zu beweisen.
Jene Mängel oder Schäden, die durch unsachgemäßen Gebrauch des Artikels oder Nichteinhaltung der in der Bedie nungsanleitung und auf den Pflegeetiketten beschriebenen
Sicherheits- und Wartungsvorschriften verursacht wurden,
sind von der vorliegenden Garantie ausgeschlossen, ebenso
wie die Verschleißteile durch normalen Gebrauch und täglichen Umgang.
Das Etikett, das die Fahrgestellnummer Ihres Modells enthält ,
darf unter keinen Umständen abgerissen werden, denn es
enthält wichtige Informationen.
Achtung:
Um ma xim ale Sicher hei t und Bet reu ung für Ihre n neuen JANÉ
NANUQ TWIN
zu erhalten, ist es sehr wichtig, dass Sie die Registrierungskarte, die Sie auf der Webseite ww w.jane.es finden, ausfüllen.
Die Registrierung wird Ihnen ermöglichen, falls notwendig,
sich üb er die En twic klung und Pfl eg e Ih re s Pr od uk te s zu info rmieren. Ebenso können wir Sie, wenn Sie es wünschen, über
die neues ten Modelle oder Nachrichten, die unserer Ansicht
38
nach für Sie von Interesse sind, informieren.
Page 39

INDICE
Avvertenze
1.- PER APRIRE IL PASSEGGINO
2.- RUOTE GIREVOLI
3.- USO DEL FRENO DI STAZIONAMENTO
4.- CINTURA DI SICUREZZA
5.- REGOLAZIONE DELL’ALTEZZA DELL’IMPUGNATURA
6.- INCLINAZIONE DELLO SCHIENALE
7.- GRADUAZIONE DEL POGGIAPIEDI
8.- CHIUSURA DEL PASSEGGINO
9.- TRASPORTO
10.- USO DELLA CAPOTTINA
11.- USO DEL CAVALLETTO
12.- PARAPIOGGIA
13.- MANUTENZIONE
40-41
42
42
42
42
42
42
42
43
43
43
43
43
43
italiano
39
Page 40

AVVERTENZA
AVVERTENZE
IMPORTANTE – Conservare le presenti
istruzioni per consultazioni future.
AVVERTENZA: non lasciare mai il bambino
privo di vigilanza.
AVVERTENZA: assicurarsi che tutti i
dispositivi di chiusura siano inseriti prima
dell’uso.
NANUQ TWIN
AVVERTENZA: per evitare lesioni,
assicurarsi che il bambino sia lontano
durante l’apertura e la chiusura di questo
40
prodotto.
AVVERTENZA: non consentire al bambino
di giocare con questo prodotto.
AVVERTENZA: usare sempre il sistema di
trattenuta.
AVVERTENZA: verificare che i dispositivi
di trattenuta del portabebè, della seduta
o del seggiolino auto siano correttamente
inseriti prima dell’uso.
AVVERTENZA: questo prodotto non è
adatto per correre o pattinare.
Questo veicolo è destinato a bambini dai 0
mesi e fino a 15 kg.
Page 41

Si raccomanda l’uso nella posizione più
reclinata dalla nascita fino ai 6 mesi.
Non utilizzare accessori non approvati da
JANÉ.
Il dispositivo di stazionamento deve essere
attivato quando si posiziona e si ritira il
bambino dal veicolo.
Qualunque carico fissato al manubrio e/o
alla parte posteriore dello schienale e/o
ai lati del prodotto ne compromette la
stabilità.
Questo veicolo è stato progettato per
trasportare uno o due bambini alla volta.
Non utilizzarlo con più di due bambini
contemporaneamente.
Non utilizzare mai pezzi di ricambio non
approvati da JANÉ, S.A.
Il peso massimo consentito per il cestino
portaoggetti non può mai superare quello
indicato sul cestino stesso (4 kg).
italiano
41
Page 42

1.- PER APRIRE IL PASSEGG INO
Staccare le chiusure che si trovano sui lati. 1.1
Tirare il manubrio verso l’alto per aprire il passeggino. 1.2
Infine premere i pedali posteriori come indicato nella figura. 1.3
AVVERTENZA: È imprescindibile assicurarsi che il bambino venga tenuto lontano dal passeggino durante le azioni di chiusura
e apertura.
AVVERTENZA: L’apparizione di punti di taglio, compressione e intrappolamento sono inevitabili durante queste operazioni.
2.- RUOTE GIREVOLI
Il passeggino è dotato di ruote anteriori girevoli direzionali,
con la possibilità di bloccare la direzione.
Per bloccarle, spingere verso il basso il bottone che si trova
dietro ciascun porta ruota anteriore. 2
Per sbloccare la direzione, spingere il bottone in senso contrario.
NANUQ TWIN
42
3.- USO DEL FRENO DI STAZIONAMENTO
FRENARE: Spingere la leva verso il basso.
DISINSERIRE IL FRENO : Portare la leva verso l’alto.
AVVERTENZA: Una volta azionato il freno assicurarsi che il passeggino sia rimasto frenato correttamente. Potrebbe essere necessario ruotare leggermente il passeggino affinché il freno ingrani
in maniera ottima.
3.1
3.2
4.- CINTUR A DI SICUREZZA
Regolare le cinture ai bambini ogni volta che si usa il passeggino. 4
I due punti di fissaggio laterali delle sedute possono essere
utilizzati per il fissaggio di un’imbragatura di sicurezza supplementare.
Il passeggino è omologato per neonati. Per adat tare l’imbragatura al bambino di età inferiore ai 6 mesi, far passare le
cinture pettorali attraverso gli occhielli inferiori e unire gli
spallacci tramite i velcri.
4B A partire dai 6 mesi d’età, è possibile far passare le cinture
attraverso gli occhielli più comodi per il bambino.
5.- REGOLAZIONE DELL’ALTEZZA DELL’IMPUGNATURA
Per regolarla premete il bottone A. 5
6.- INCLINAZIONE DELLO SCHIENALE
Il pass eggino dispo ne di 4 posizioni. Tirare le leve che si trovano
nella parte superiore posteriore degli schienali e regolare l’inclinazione nella posizione desiderata. 6
7.- GRADUAZIONE DEL POGGIAPIEDI
Dispone di due posizioni. Per abbassare premere A. 7
Page 43

8.- CHIUSURA DEL PASSEGGINO
Per piegare il passeggino sollevare i pedali posteriori (A) e
sganciare la sicura manuale (B) accompagnando la chiusura
fino alla fine. 8.1
Cerca te di premere le ggermente il passeg gino una volta ch iuso per assicurarvi che la sicura laterale sia azionata. 8.2
AVVERTENZA: È imprescindibile assicurarsi che il bambino venga tenuto lontano dal passeggino durante le azioni di chiusura
e apertura.
AVVERTENZA: L’apparizione di punti di taglio, compressione e intrappolamento sono inevitabili durante queste operazioni.
9.- TRASPORTO
Il chassis è dotato di un manico che ne permet te il facile
trasporto. 9
10.- USO DELLA CAPOTTINA
Posizionare le capottine sui tubi laterali del manubrio nella
parte superiore del rivestimento. 10.1
Regolare le pinze nella parte posteriore fino a sentire un
“cl ic”. 10.2
Regolare la pinza sui tubi centrali fino a sentire un “clic”. 10.3
Far scivolare la par te finale dell’altra capot tina lungo la gui da
per unirle. 10.4
Una volta inserita la capottina è possibile regolarne la posizione muovendo gli archetti secondo l’inclinazione dello
schienale. Per toglierle seguire lo stesso procedimento in ordine inverso. 10.5
11.- USO DEL CAVALLET TO
Il passeggio NANUQ T WIN dispone di cavalletto.
Per aprirlo tirare il tappo che si trova nella parte inferiore
centrale del passeggino. Spingerlo verso l’interno per chiuderlo. 11
12.- PARAPIOGGIA
Aggiustate i due fermi inferiori e i velcri posteriori del parapioggia. 12
13.- MANUTENZIONE
Non esporre il rivestimento ai raggi solari per intervalli lunghi.
Lavare le parti di plastica con acqua insaponata, poi asciugare
scrupolosamente tutti gli elementi.
Il rivestimento può essere tolto e lavato.
Controllare regolarmente i freni, le cinture e le chiusure che
possano subire un deterioramento dovuto all’uso.
È importante sottoporre il prodot to a una revisione periodica in uno qualunque dei nostri centri ufficiali, sia per la sua
sicurezza che per la buona conservazione del prodotto stesso.
italiano
43
Page 44

INFORMAZIONI SULLA GARANZIA
Questo articolo è completo di garanzia, secondo quanto stabilito dalla le gge 23 del 10 luglio 2003. Conser vare lo scontrino d ’acquisto, poiché in caso di reclami sarà necess ario presentarlo al negozio dove è stato acquistato il prodotto per
dimostrare la validità della garanzia.
Sono esclusi dalla presente garanzi a i difetti o le ava rie dovu ti a un u so non adeguato del prodotto o al mancato compimento delle norme di sicurezza e manutenzione descritte nei
libret ti di istruzioni e sulle etichette per il lavaggio. Lo stesso
vale per i danni dov ut i all’usura in cas o di utilizzo pro lung at o.
L’etichetta che contiene il numero di telaio del modello non
deve essere rimossa in nessun caso, dato che contiene informazioni importanti.
Attenzione:
Per garantire la massima sicurezza e consulenza riguardo il
suo nuovo JA NÉ, è molto importante compilare il modulo di
NANUQ TWIN
registrazione che troverà sul sito w ww.jane.es
La registrazione le cons entirà di essere informato, se è necessario, riguardo l’evoluzione e la manutenzione del suo prodotto. Inoltre, sempre se lo desidera, la potremo informare
su i nu ovi mod el li o alt re nov ità che rit eniam o di suo in te res se.
44
Page 45

INDICE
Advertências
1.- PARA DESDOBRAR O CARRINHO
2.- RODAS GIRATÓRIAS
3.- USO DO TRAVÃO DE ESTACIONAMENTO
4.- CINTO DE SEGURANÇA
5.- REGULAÇÃO DA ALTURA DA PEGA
6.- GRADUAÇÃO DO ENCOSTO
7.- GRADUAÇÃO DO REPOUSA-PÉS
8.- DOBRAGEM DO CARRINHO
9.- TRANSPORTE
10.- EMPREGO DA CAPOTA
11.- USO DO CAVALETE
12.- PROTECTOR DE CHUVA
13.- MANUTENÇÃO
46-47
48
48
48
48
48
48
48
49
49
49
49
49
49
português
45
Page 46

AVISO
ADVERTÊNCIAS
IMPORTANTE – Guarde estas informações
para futuras consultas.
AVISO: Não deixar nunca a criança
sozinha.
AVISO: Assegure-se de que todos os
dispositivos de fecho estão engrenados
antes do uso.
NANUQ TWIN
AVISO: Para evitar lesões, assegure-se de
que a criança se mantém afastada durante
a desdobragem e a dobragem deste
46
produto.
AVISO: Não permita que a criança brinque
com este produto.
AVISO: Usar sempre o sistema de retenção.
AVISO: Comprovar se os dispositivos
de sujeição da alcofa, do assento ou da
cadeira de automóvel estão corretamente
engrenados antes do uso.
AVISO: Este produto não é adequado para
correr ou patinar.
Este veículo é para crianças a partir dos 0
meses e até 15 kg.
Recomenda-se o uso na posição mais
Page 47

inclinada desde o nascimento até aos
6 meses.
O dispositivo de estacionamento deve ser
ativado ao colocar e ao retirar as crianças
do veículo.
Qualquer carga fixada ao guiador e/ou à
parte traseira do encosto e/ou às laterais
do veículo afeta a estabilidade do mesmo.
Este veículo foi desenhado para uma ou
duas crianças, não devendo ser usado com
mais de duas crianças ao mesmo tempo.
Não devem ser usados acessórios não
aprovados pela JANÉ.
Não utilize nunca peças de substituição
que não tenham sida aprovadas pela
JANÉ, S.A.
A massa máxima permitida da cesta portaobjetos nunca pode superar o indicado na
cesta (4 kg).
português
47
Page 48

1.- PARA DESDOBRAR O CARRINHO
Liber te as alavancas situadas nas laterais. 1.1
Puxe pelo guiador para cima desdobrando a cadeira. 1.2
Finalmente pise os pedais posteriores como ilustra a figura.
1.3
AVISO: É imprescindível assegurar-se que a criança se mantém
afastada da cadeira durante as acções de dobragem e desdobragem.
AVISO: A aparição de pontos de cor te e compressão e entalamentos é inevitável durante estas operações.
2.- RODAS GIR ATÓRIAS
O seu carrinho dispõe de rodas dianteiras giratórias direccionais, com a possibilidade de bloquear a direcção.
Para as bloquear, pressione para baixo o botão situado em
cada porta rodas dianteiro. 2
Para desbloquear a direcção, pressione o botão no sentido
contrário.
NANUQ TWIN
48
3.- USO DO TRAVÃO DE ESTACIONAMENTO
TRAVAR: Accione a alavanca para baixo.
DESTR AVAR: Accione a alavanca para cima.
AVISO: Uma vez accionado o travão, certifique-se que o carrinho
ficou correctamente t ravado. Pode ser neces sário fazer roda r ligeiramente o carrinho para que o travão engrene de forma óptima.
3.1
3.2
4.- CINTO DE SEGURANÇA
Ajuste os cintos às crianças sempre que use o carrinho. 4
Os dois p ontos de fixação laterais dos assentos p odem ser utilizados para a fixação de um arnês suplementar.
O seu carrinho está homologado para bebés recém-nascidos.
Para adaptar os cintos ao seu bebé quando seja menor que 6
meses, passando os cintos de ombros pelos olhais inferiores e
unindo os protectores de ombros com os velcros.
4B A partir dos 6 meses de idade pode passar os cintos pelos
olhais que sejam mais cómodos para a criança.
5.- REGULAÇÃO DA ALTURA DA PEGA
Para regular prima o botão A . 5
6.- GR ADUAÇÃO DO ENCOSTO
A sua cadeira dispõe de 4 posições. Puxe pelas alavancas situadas na par te superior traseira dos encostos e ajuste a inclinação
na posição pretendida. 6
7.- GRADUAÇÃO DO REPOUSA-PÉS
Dispõe de duas posições. Para baixar pressione A. 7
Page 49

8.- DOBRAGEM DO CARRINHO
Para dobrar a cadeira accione os pedais pos teriores para cima
(A) e de seguida liberte o seguro manual ( B), acompanhando
a dobragem até ao final. 8.1
Procure pressionar ligeiramente o carrinho uma vez dobrado
para se assegurar de que o seguro lateral fica accionado. 8.2
AVISO: É imprescindível assegurar-se que a criança se mantém
afastada da cadeira durante as acções de dobragem e desdobragem.
AVISO: A aparição de pontos de cor te e compressão e entalamentos é inevitável durante estas operações.
9.- TRANSPORTE
O chassis incorpora uma pega para o seu fácil transporte. 9
10.- EMPREGO DA CAPOTA
Coloque as capotas sobre os tubos laterais do guiador na parte superior do revestimento. 10.1
Ajuste as pinças pela parte posterior até ouvir um “clack”.
10.2
Nos tubos centrais ajuste a pinça até ouvir um “clack”. 10.3
Deslize o terminal da outra capota pela guia para as juntar.
10.4
Uma vez colocada a capota é possível regular a sua posição
movendo os arcos segundo a inclinação do encosto. Para retirar siga os passos de forma inversa. 10.5
11.- USO DO CAVALETE
A sua cadeira NANUQ TWIN dispõe de cavalete.
Para desdobrar o mesmo puxe pelo tampão situado na parte
inferior central da cadeira. Empurre para dentro para dobrar.
11
12.- PROTECTOR DE CHUVA
Ajuste os dois fechos inferiores e os velcros traseiros do protector de chuva. 12
13.- MANUTENÇÃO
Não deixe o forro exposto ao sol durante períodos prolongados.
Lave as partes de plástico com água tépida e sabão e seque bem
todos os componentes.
O forro pode ser desmontado para lavagem.
Verifique regularmente o s travões, arne ses e fixações que possa
sofrer algum dano pelo uso.
Tanto para sua segurança como para a boa conser vação destes produ to, é importante que faça uma revisão periódica em
qualquer uma das nossas oficinas oficiais.
português
49
Page 50

INFORMAÇÃO SOBRE GARANTIA
Este artigo dispõe de uma garantia segundo o estipulado na
lei 23 / 2003 de 10 de julho. Conserve a fatura de compra,
pois é imprescindível a sua apresentação na loja onde adquiriu o produto para justificar a sua validade perante qualquer
reclamação.
Ficam excluídos da presente garantia os defeitos ou avarias
prod uzidas pelo uso inadequado do artigo ou p elo incumprimento das normas de segurança e manutenção descritas nas
folhas de instruções e nas etiquetas de lavagem, assim como
os elementos de desgaste por uso normal e manuseamento
diário.
A etiqueta que contém o número de chassis do seu modelo,
não deve ser removida sob nenhum pretexto pois contém informação importante.
Atenção:
Para obter a máxima segurança e apoio sobre o seu novo
NANUQ TWIN
JANÉ, é muito importante que preencha o cartão de registo
que encontrará na página ww w.jane.es
O registo permite informar-se, se necess ário, sobre a evolução e manut en çã o do seu pro du to. Tamb ém, se mp re que pre tenda, pod emos enviar-lh e inform ação so bre os novos mode los ou no ticia s que consi de re mos poss am ser do seu int er es se .
50
Page 51

INHOUDSOPGAVE
Waarschuwingen
1.- UITKLAPPEN VAN DE BUGGY
2.- DRAAIWIELEN
3.- GEBRUIK VAN DE PARKEERREM
4.- VEILIGHEIDSRIEM
5.- HOOGEVERSTELLING VAN DE HANDVATEN
6.- VERSTELLING VAN DE RUGLEUNING
7.- VERSTELLING VAN DE VOETSTEUN
8.- INKLAPPEN VAN DE BUGGY
9.- VERVOER
10.- GEBRUIK VAN DE ZONNEKAP
11.- GEBRUIK VAN DE STANDAARD
12.- REGENHOES
13.- ONDERHOUD
52-53
54
54
54
54
54
54
54
55
55
55
55
55
55
nederlands
51
Page 52

WAARSCHUWING
WAARSCHUWINGEN
BELANGRIJK – Bewaar deze
gebruiksaanwijzing voor eventuele
raadpleging in de toekomst.
WAARSCHUWING: Laat het kind nooit
zonder toezicht achter.
WAARSCHUWING: Zorg ervoor dat alle
sluitingen voor gebruik vastzitten.
NANUQ TWIN
WAARSCHUWING: Om letsels te vermijden
moet u ervoor zorgen dat het kind uit de
buurt blijft wanneer u dit product uit- en
52
inklapt.
WAARSCHUWING: Laat het kind niet met
dit product spelen.
WAARSCHUWING: Gebruik altijd het tuigje.
WAARSCHUWING: Controleer voor gebruik
of de bevestigingen van de reiswieg, van
het kinderzitje of van het autostoeltje goed
vastzitten.
WAARSCHUWING: Dit product is niet
geschikt om ermee te rennen of skaten.
Deze wagen is bestemd voor kinderen vanaf
0 maanden en tot een gewicht van 15 kg.
Vanaf de geboorte tot de leeftijd van 6
Page 53

maanden wordt het gebruik in de laagste
stand aanbevolen.
Er mogen geen niet door JANÉ goedgekeurde
accessoires worden gebruikt.
De parkeerinrichting dient te worden
geactiveerd wanneer de kinderen in de
wagen worden gezet en eruit worden
gehaald.
Elke last die aan de duwstang en/of aan
de achterkant van de rugleuning en/of de
zijkanten van de wagen worden bevestigd,
tast de stabiliteit ervan aan.
Deze wagen is ontworpen voor één of twee
kinderen. Gebruik hem niet voor meer dan
twee kinderen tegelijk.
Gebruik nooit reserveonderdelen die niet
door JANÉ, S.A. zijn goedgekeurd.
De maximaal toegestane massa van het
boodschappenmandje mag nooit meer
dan het op het mandje aangeduide
gewicht zijn (4 kg).
nederlands
53
Page 54

1.- UITKLAPPEN VAN DE BUGGY
Maak de hendels aan de zijkanten los . 1.1
Trek de duwstang omhoog en klap de buggy uit. 1.2
Trap tenslotte de achterpedalen in zoals wordt weergegeven
in de afbeelding. 1.3
WAARSCHUW ING: U dient erop toe te zien dat het kind verwijderd
blijft van de wandelwagen wanneer deze wordt in- en uitgeklapt.
WAARSCHUWING: Bij het verrichten van deze handelingen is het
onvermijdelijk dat er snij- en samendrukkingspunten zijn en dingen vastgeklemd kunnen komen te zitten.
2.- DR AAIWIELEN
Uw wandelwagen is aan de voorkant uitgerust met richtbare
draaiwielen die vergrendeld kunnen worden.
Druk om ze te vergrendelen de knop achter elk van de voorwielhouders omlaag. 2
Om de sturing te ontgrendelen de knop in tegengestelde
richting drukken.
NANUQ TWIN
54
3.- GEBRUIK VAN DE PARKEERREM
REMMEN : Druk de hendel omlaag.
ONTGRENDELEN: Druk de hendel omhoog.
WAARSCHUWING: Zorg er na het inschakelen van de rem voor
dat de wandelwagen goed is afgeremd. Het kan nodig zijn om de
wandelwagen iets te verplaatsen zodat de rem optimaal koppelt.
3.1
3.2
4.- VEILIGHEIDSRIEM
Pas telkens wanneer u de buggy gebruikt de veiligheidsriemen aan de kinderen aan. 4
De twee bevestigingspunten aan de zijkant van de zittingen
kunnen worden gebruikt voor de bevestiging van een extra
tuigje.
Uw wandelwagen is gehomologeerd voor pasgeboren baby’s. Om de riemen aan uw baby aan te passen wanneer hij
jonger dan 6 maanden is, dienen de schouderbanden door
de onderste ringetjes te worden gehaald en de schouderbeschermers door middel van klit tenband aan elkaar te worden
vastgemaakt.
4B Vanaf de leef tijd van 6 maanden kunt u de riemen door
de ringetjes halen die het comfor tabelst voor het kind zijn.
5.- HOOGEVERSTELLING VAN DE HANDVATEN
Om de hoogte te verstellen op knop A drukken. 5
6.- VERSTELLING VAN DE RUGLEUNING
Deze buggy beschikt over 4 standen. Trek aan de hendels boven aan de achterkant van de rugleuningen en zet deze in de
gewenste stand. 6
7.- VERSTELLING VAN DE VOETSTEUN
Deze beschikt over twee standen. Druk A in om de voetsteun
omlaag te brengen. 7
Page 55

8.- INKLAPPEN VAN DE BUGGY
Om de buggy in te klappen de achterpedalen omhoog drukken (A) en vervolgens de handbeveiliging (B) losmaken. Klap
de buggy geheel in 8.1
Probeer het stoeltje voorzichtig aan te drukken nadat de
buggy is ingeklapt om er voor te zorgen dat de zijbeveiliging
sluit. 8.2
WAARSCHUWING: U dient erop toe te zien dat het kind verwijderd blijft van de wandelwagen wanneer deze wordt in- en uitgeklapt.
WAARSCHUWING: Bij het verrichten van deze handelingen is het
onvermijdelijk dat er snij- en samendrukkingspunten zijn en dingen vastgeklemd kunnen komen te zitten.
9.- VERVOER
De chassis is voorzien van een handvat voor vervoersgemak. 9
10.- GEBRUIK VAN DE ZONNEKAP
Breng de kappen op de buizen van de duwstang aan de bo venkant van de bekleding aan. 10 .1
Stel de beugels aan de achterkant af totdat een klik te horen
is. 10.2
Stel de beugel op de middelste buizen af totdat een klik te
horen is. 10.3
Schuif de klem van de andere kap door de geleider om ze
samen te voegen.
Zodra de kap is geplaatst kan de stand ervan worden vers teld
door de staafjes al naargelang de stand van de rugleuning te
verplaatsen. Volg de stappen in omgekeerde volgorde om ze
weer te verwijderen. 10.5
11.- GEBRUIK VAN DE STANDAARD
Uw NANUQ TWIN is uitgerust met een standaard.
Trek voor het uitklappen er van aan de dop in het midden van
de onderkant van de buggy. Druk de standaard naar binnen
om hem weer in te klappen. 11
12.- REGENHOES
Maak de twee sluitingen aan de onderkant en de klittenbanden aan de achterkant van de regenhoes vast. 12
13.- ONDERHOUD
Stel de bekleding niet langdurig bloot aan de zon.
Was de plastic delen met lauw water en zeep en maak daarna
alle onderdelen zorgvuldig droog.
De bekleding kan worden losgehaald om gewassen te worden.
Controleer regelmatig de remmen, tuigjes en bevestigingen
op schade of slijtage door gebruik.
Het is zowel voor uw veiligheid als voor het goede behoud van
dit product belangrijk dat u het regelmatig na laat kijke n in een
van onze officiële werkplaat sen.
nederlands
55
Page 56

INFORMATIE OVER DE GARANTIE
Dit artikel heef t een garantie zoals bepaald in de wet 23/2003
van 10 juli. Bewaar de aankoopbon. Deze moet in de winkel
waar u het product heef t gekocht worden getoond om bij
klachten de geldigheid ervan te rechtvaardigen.
Defec ten en storingen veroorzaakt door onjuist gebruik van
het artikel of de niet-naleving van de onderhouds- en veiligheidsnormen die in de instructiebladen en de wasetiketten
staan vermeld, alsmede elementen die door normaal gebruik
en dagelijkse hantering verslijten, vallen buiten deze garantie.
Het etiket met het chassisnummer van uw model mag onder
geen beding worden verwijderd, want het bevat belangrijke
informatie.
Opgelet:
Voor de maximale veiligheid en zorg ten aanzien van uw
nieuwe JANÉ product is het erg belangrijk dat u de registratiekaar t invult die op de website w ww.jane.es is te vinden.
NANUQ TWIN
Met de registratie kunt u zo nodig informatie inwinnen over
de ontw ikke ling en het on de rho ud van uw pro duc t. Oo k ku nnen wij u desgewenst informatie verstrekken over nieuwe
modellen of nieuw s waarvan wij denken dat het interessant
voor u kan zijn.
56
Page 57

INNHOLDSFORTEGNELSE
Merknader
1.- SLIK ÅPNER DU VOGNA
2.- DREIBARE HJUL
3.- BRUK AV PARKERINGSBREMSEN
4.- SIKKERHETSSELE
5.- REGULERING AV HÅNDTAKETS HØYDE
6.- REGULERING AV RYGGSTØTTEN
7.- REGULERING AV BEINBRETTET
8.- SAMMENFOLDING AV VOGNA
9.- TRANSPORT
10.- BRUK AV KALESJEN
11.- BRUK AV STØTTEN
12.- REGNOVERTREKK
13.- VEDLIKEHOLD
58-59
60
60
60
60
60
60
60
61
61
61
61
61
61
norsk
57
Page 58

ADVARSEL
ADVARSLER
VIKTIG – Ta vare på disse instruksene til
senere bruk.
ADVARSEL: La aldri barnet være uten
oppsyn.
ADVARSEL: Forsikre deg om at alle
låsemekanismer er koplet til før bruk.
ADVARSEL: For å unngå skader, forsikre
NANUQ TWIN
deg om at barnet ikke er i nærheten når
dette produktet legges sammen og slås ut.
ADVARSEL: Ikke tillat at barnet leker med
58
dette produktet.
ADVARSEL: Bruk alltid festesystemet.
ADVARSEL: Kontroller at festemekanismene
til bagen, setet eller stolen er riktig koplet til
før bruk.
ADVARSEL: Dette produktet er ikke egnet
for løping eller bruk med rulleskøyter.
Dette kjøretøyet er for barn fra 0 måneder
og opp til 15 kg.
Det anbefales å bruke den mest horisontale
innstillingen fra barnet er nyfødt til det er 6
måneder gammelt.
Parkeringsmekanismen må aktiveres når
barna settes eller tas ut fra kjøretøyet.
Page 59

Enhver last som festes til håndtaket og/eller
ryggstøttens bakside og/eller på sidene av
kjøretøyet vil påvirke dennes stabilitet.
Dette kjøretøyet er laget for ett eller to
barn, ikke bruk det med mer enn to barn
samtidig.
Man må ikke bruke tilleggsutstyr som ikke
er godkjent av JANÉ.
Bruk aldri reservedeler som ikke er blitt
godkjent av JANÉ, S.A.
Den høyest tillatte vekten i bærenettet må
aldri være høyere enn det som er oppgitt på
nettet (4 kg).
norsk
59
Page 60

1.- SLIK ÅPNER DU VOGNA
Løsne klemmene på begge sider. 1.1
Trekk sky vehåndtaket slik at du åpner vogna. 1.2
Til slut t skal du tråkke på de bakre pedalene slik det fremgår
av illustrasjonen. 1.3
ADVARSEL: Det er viktig å kontrollere at barnet holder seg unna
vogna mens du folder den sammen eller åpner den.
ADVARSEL: Under disse handlingene kommer nødvendigvis skjære- og klemmepunkter til syne.
2.- DREIBARE HJUL
Vognen er utstyrt med dreibare framhjul med selvst yring, og
har muligheten til å blokkere styringen.
Trykk knappen som finnes bak holderne til framhjulene ned
for å blokkere framhjulene i kjøreretningen. 2
Skyv knappen i motsatt retning for å oppheve blokkeringen
av styringen.
NANUQ TWIN
60
3.- BRUK AV PARKERINGSBREMSEN
SLIK BREMSER DU: Skyv spaken nedover.
SLIK OPPHEVER DU BREMSEN: Skyv spaken oppover.
ADVARSEL: Når bremsen står på, skal du kontrollere at bremsen
faktis k bremser vogna. Det kan være at du må trille vog na litt for
at bremsen skal gå i lås på best mulig måte.
3.1
3.2
4.- SIKKERHETSSELE
Juster alltid beltene til barnet når du bruker vognen. 4
De to festepunktene på hver side av setet kan brukes til å
feste en ekstra sele.
Vognen er godkjent for nyfødte babyer. For å tilpasse beltene til spedbarnet din når det er under 6 måneder, før skulderbeltene gjennom de nederste hullene og en av skulderbeskytterneved hjelp av borrelåsen.
4B Fra 6-måneder salderen kan du føre beltene gjennom de
hullene som er mest komfortable for barnet.
5.- REGULERING AV HÅNDTAKETS HØYDE
Trykk knapp A for å regulere det. 5
6.- REGULERING AV RYGGSTØTTEN
Vognen er utstyrt med 4 posisjoner. Trekk i de øverste håndtakene plassert øverst på bak på ryggene, og juster vinkelen til
ønsket posisjon. 6
7.- REGULERING AV BEINBRETTET
Brettet er utstyr t med to posisjoner. For senke det, trykk A . 7
Page 61

8.- SAMMENFOLDING AV VOGNA
For å folde vognen sammen skyver du de bakre pedalene
oppover (A) og løsner manuelt sikringen (B), slik at du kan
folde vognen helt sammen. 8.1
Prøv å trykke vogna forsiktig når den er sammenfoldet for å
kontrollere at sidesikringen sitter som den skal. 8.2
ADVARSEL: Det er viktig å kontrollere at barnet holder seg unna
vogna mens du folder den sammen eller åpner den.
ADVARSEL: Under disse handlingene kommer nødvendigvis skjære- og klemmepunkter til syne.
9.- TRANSPORT
På rammen finner du et håndtak for lettere transport. 9
10.- BRUK AV KALESJEN
Plasser trekkene over siderørene på håndtaket på øvre del
av trekket. 10 .1
Juster klemmene på bakre del helt til de går hørbar t i lås.
Juster klemmen på midtrørene helt til den går hørbart i lås.
10.3
Før enden til den andre kalesjen i føringen for å sette dem
sammen. 10.4
10.2
Når kalesjen er festet, kan du jus tere posisjonen ved å fly tte
bøylene i forhold til vinkelen på ryggstøtten. Hvi du vil ta
dem av, går du frem på motsatt måte. 10.5
11.- BRUK AV STØTTEN
NANUQ T WIN-vognen er utstyrt med støtte.
For å bruke den skal du trekke i tappen plasser t midt på vognas nedre del. Trekk den innover for å ta den ut. 11
12.- REGNOVERTREKK
Juster de to nederste spennene og de bakre borrelåsene til
regnovertrekket. 12
13.- VEDLIKEHOLD
Du skal ikke la trekket utset tes for direkte sol over lengre perio der.
Vask plas tikkdelene med lunket vann og nøy tral såpe. Etterpå
skal du nøye tørke alle delene.
Trekket kan demonteres for vask.
Kontroller regelmessig bremser, seler og fester som kan utsettes for skader under bruk.
Både for din sikkerhet og for et godt vedlikehold av dette
produktet, er det vik tig at du foretar en jevnlig kontroll ved
ett av våre offisielle servicesteder.
norsk
61
Page 62

OPPLYSNINGER OM GARANTIEN
Dette produktet har garanti i henhold til spansk Lov nr. 23,
av 10. juli 20 03. Ta vare på kjøpsfakturaen, det er helt nød vendig å fremvise denne i butikken der du kjøpte produktet,
for slik å bekref te dens gyldighet ved enhver reklamasjon.
Denne garantien dekker ikke feil eller skader som er forårsaket av urik tig bruk av produktet eller manglende oppfyllelse
av sikkerhets- og vedlikeholdsreglene beskrevet i bruksanvisningen og vaskelappene, samt slitasje av elementene grunnet vanlig og daglig bruk.
Lappen som inneholder rammenummeret til din modell må
ikke under noen omstendigheter rives av, da den inneholder
viktige opplysninger.
Viktig:
For å få maksimal sikkerhet og informasjon om din nye JANE,
er det me get vik tig at du f yller ut regis treringskortet som du
finner på nettsiden w ww.jane.es
Registreringen gjør det mulig å få informasjon, hvis det er
NANUQ TWIN
nødvendig, om utviklingen og vedlikeholdet av produktet
ditt. Såfremt du ønsker det, kan vi også informere deg om
nye modeller eller nyheter som vi mener kan være av interesse for deg.
62
Page 63

INNEHÅLL
Varningar
1.- FÖR ATT VIKA UT VAGNEN
2.- SVÄNGBARA HJUL
3.- ANVÄNDNING AV PARKERINGSBROMSEN
4.- SÄKERHETSBÄLTE
5.- JUSTERING AV HANDTAGETS HÖJD
6.- INSTÄLLNING AV RYGGSTÖDET
7.- INSTÄLLNING AV FOTSTÖDET
8.- HOPVIKNING AV VAGNEN
9.- TRANSPORT
10.- ANVÄNDNING AV SUFFLETTEN
11.- HUR MAN ANVÄNDER STÖDET
12.- REGNSKYDD
13.- UNDERHÅLL
64-65
66
66
66
66
66
66
66
67
67
67
67
67
67
svenska
63
Page 64

Varningar
VARNINGAR
VIKTIGT - Spara dessa anvisningar för att
kunna läsa dem igen vid behov.
VARNING: Lämna aldrig barnet utan
uppsikt.
VARNING: Försäkra dig om att alla
fästanordningar/spärrar är ordentligt
fastsatta/låsta innan du använder
produkten.
NANUQ TWIN
VARNING: För att undvika skador måste
du se till att barnet håller sig på behörigt
avstånd vid upp- och hopfällningen av
64
denna produkt.
VARNING: Produkten är ingen leksak, låt
inte barn leka med den.
VARNING: Du måste alltid använda
spärrsystemet.
VARNING: Kontrollera att alla
fästanordningar/spärrar på babyskyddet,
sittvagnen eller bilbarnstolen är ordentligt
fastsatta/låsta innan du använder
produkten.
VARNING: Den här produkten är inte
avsedd att användas när du springer/
joggar eller åker rullskridskor (inlines/
rollerblades).
Page 65

Denna produkt är avsedd att användas
för barn från 0 månaders ålder och upp
till 15 kg.
Vi rekommenderar att den mest
tillbakalutade positionen används från
födseln och upp till 6 månaders ålder.
Bromsfunktionen bör aktiveras när barnet
ska placeras i eller tas ut ur produkten.
Alla typer av föremål/vikter som placeras
på handtaget och/eller på baksidan
av ryggstödet och/eller på sidan av
produkten kommer att påverkas dess
stabilitet.
Produkten har utformats för ett eller två
barn, den får inte användas för mer än
två barn samtidigt.
Du får inte använda tillbehör som inte är
godkända av JANÉ.
Använd aldrig reservdelar som inte är
godkända av JANÉ, S.A.
Vikten på de föremål som placeras i
förvaringskorgen får aldrig överskrida den
maxvikt som anges på korgen (4 kg).
svenska
65
Page 66

1.- FÖR ATT VIKA UT VAGNEN
Frigör spakarna som sitter på sidorna. 1.1
Dra handtaget uppåt och fäll upp vagnen. 1. 2
Trampa slutligen på pedalerna baktill såsom figur 1.3 vi sa r.
VARNING: Det är absolut nödvändigt att vagnen är utom räckhåll
för barnet när denna viks ihop eller vecklas upp.
VARNING: Det finns risk för skär- eller klämskador eller fastklämning under denna hantering.
2.- SVÄNGBAR A HJUL
Barnvagnen har svängbara framhjul som går att låsa.
För att låsa dem tryck knappen som sit ter bakom varje främre
hjulhållare nedåt. 2
För att låsa upp blockeringen av hjulen tryck på knappen i
motsatt riktning.
4.- SÄKERHETSBÄLTE
Justera alltid bältena på barnen när vagnen används. 4
De två fästpunkterna på sidorna av sitsarna kan användas för
att fäs ta en ex tra sele.
Din vagn är godkänd för nyfödda barn. Gör så här för att
justera selen för barn under 6 månader: För in axelbanden
genom de undre hålen och sätt fast axelskydden med hjälp
av kardborrebanden.
4B För barn från 6 månader och uppåt kan du föra in banden
genom de hål som är bekvämast för barnet
5.- JUSTERING AV HANDTAGETS HÖJD
För att ställa in det, tr yck på knapp A. 5
3.- ANVÄNDNING AV PARKERINGSBROMSEN
NANUQ TWIN
BROMSA: Tryck spaken nedåt.
LOSSA BROMSEN: Tryck spaken uppåt.
VARNING: När bromsen har aktiverats kontrollera att vagnens
broms har fungerat som den ska. Det kan bli nödvändigt att
förflytta vagnen något för att bromsen ska ta på optimalt sätt.
66
3.1
3.2
6.- INSTÄLLNING AV RYGGSTÖDET
Din vagn har 4 lägen. Dra i spakarna som sitter upptill på baksidan av ryggstöden och justera lutningen i önskat läge. 6
7.- INSTÄLLNING AV FOTSTÖDET
Fotstödet har två lägen. För att sänka det, tryck på A . 7
Page 67

8.- HOPVIKNING AV VAGNEN
För att fälla ihop vagnen, skjut pedalerna baktill uppåt (A)
och frigör sedan den manuella säkerhetsmekanismen ( B) och
fortsätt hopfällningen tills vagnen är helt hopfälld. 8.1
Tryck gärn a lätt på vagnen n är den väl är hopvikt för at t se till
att säkerhetsmekanismen på sidan har aktiverats. 8.2
VARNING: Det är absolut nödvändigt att vagnen är utom räckhåll
för barnet när denna viks ihop eller vecklas upp.
VARNING: Det finns risk för skär- eller klämskador eller fastklämning under denna hantering.
9.- TRANSPORT
Chassiet har et t handtag för att underlätta transporten. 9
10.- ANVÄNDNING AV SUFFLETTEN
Placera suffletterna på handtagets sidorör ovanpå klädseln.
10.1
Justera klämmorna på baksidan tills ett klickljud hörs . 10.2
Justera klämman på rören i mitten tills ett klickljud hörs.
10.3
Skjut änden på den andra suffletten längs skenan för att föra
ihop dem. 10.4
När suffletten väl är fastsatt, kan man ställa in dess läge ge nom att röra bågarna efter ryggstödets lutning. För att ta
bort suffletten gå tillväga i motsatt ordning. 10.5
11.- HUR MAN ANVÄNDER STÖDET
Din NANUQ TWIN-vagn har et t stöd.
För at t fälla ut det, dra i t appen som sit ter på den nedre delen
i mitten av vagnen. Skjut den inåt för att fälla ihop det. 11
12.- REGNSKYDD
Justera knapparna nedtill och kardborrbanden på baksidan
av regnskyddet. 12
13.- UNDERHÅLL
Utsätt inte klädseln för starkt solljus under lång tid.
Tvätta plastdelarna med ljummet vatten och tvål och torka sedan alla delarna noggrant.
Klädseln kan tas av för tvätt.
Kontrollera bromsar, selen och fästen som kan nötas vid användningen regelbundet.
För att säkerställa produktens säkerhet och dess goda skick är
det viktigt att göra en regelbundet återkommande översyn
av denna vid någon av våra officiella verkstäder.
svenska
67
Page 68

INFORMATION OM GARANTIN
Denna artikel har en garanti i enlighet med bestämmelserna i
lag 23/ 2003 av den 10 juli. För att verifiera garantins giltighet
vid en eventuell reklamation är det absolut nödvändigt att
man har sparat inköpskvittot och visar upp det i affären där
produkten inhandlats.
Denna garanti omfattar inte de defekter och skador som
up ps tåt t till föl jd av olämp li g an vä ndning av artikeln eller underlåtenhet att följa de säkerhets- och underhållsföreskrif ter
som beskrivs i bruksanvisningen och på t vättetiketterna eller
på grund av vanligt slitage genom användning.
Etiketten där chassinumret för din modell anges får under
inga omständigheter avlägsnas då den innehåller viktig information.
OBS!
För att få bästa möjliga säkerhet och omsorg för din nya JANÉ
är det mycket viktigt att du fyller i registreringskortet som du
hittar på vår webbsida w ww.jane.es
NANUQ TWIN
Registreringen gör det möjligt för dig at t få information, om
det behövs, om utve cklingen och underhållet av din produkt.
När du så önskar kan vi även informera om nya modeller eller
nyheter som vi anser kan vara av intresse för dig.
68
Page 69

СОДЕРЖАНИЕ
Предупреждения
1.- ЧТОБЫ РАЗЛОЖИТЬ КОЛЯСКУ
2.- “ПЛАВАЮЩИЕ” КОЛЕСА
3.- ИСПОЛЬЗОВАНИЕ СТОЯНОЧНОГО ТОРМОЗА
4.- РЕМЕНЬ БЕЗОПАСНОСТИ
5.- РЕГУЛИРОВКА ВЫСОТЫ РУЧКИ КОЛЯСКИ
6.- РЕГУЛИРОВКА ПОЛОЖЕНИЯ СПИНКИ СИДЕНЬЯ
7.- РЕГУЛИРОВК А ПОДНОЖКИ
8.- СКЛАДЫВАНИЕ КОЛЯСКИ
9.- ПЕРЕНОСКА
10.- РЕГУЛИРОВКА ПОДНОЖКИ
11.- ИСПОЛЬЗОВАНИЕ ОПОРЫ
12.- ДОЖДЕВИК
13.- УХОД
70-71
72
72
72
72
72
72
72
73
73
73
73
73
73
pусский
69
Page 70

ПРЕДУПРЕЖДЕНИЕ
ПРЕДУПРЕЖДЕНИЯ
ВАЖНО – Сохранить эти инструкции
для будущих консультаций.
ПРЕДУПРЕЖДЕНИЕ: Никогда не
оставляйте ребенка без присмотра.
ПРЕДУПРЕЖДЕНИЕ: Перед
использованием удостоверьтесь,
что все механизмы блокировки
приведены в действие.
NANUQ TWIN
ПРЕДУПРЕЖДЕНИЕ: Во избежание
травм убедитесь, что ребенка нет
рядом, когда складывается или
70
раскладывается данное изделие.
ПРЕДУПРЕЖДЕНИЕ:
Не разрешайте ребенку играть с
этим изделием.
ПРЕДУПРЕЖДЕНИЕ: Всегда
пользоваться системой удержания.
ПРЕДУПРЕЖДЕНИЕ: Проверить
перед использованием, что все
механизмы крепления люльки,
автокресла или автомобильного
сиденья надежно зафиксированы.
ПРЕДУПРЕЖДЕНИЕ: С этим
изделием нельзя бегать или
кататься на коньках
Page 71

Это транспортное средство
предназначено для детей с 0
месяцев до достижения ими веса
15 кг.
Рекомендуется использовать в
самом наклонном положении с
рождения до 6 месяцев.
Стояночный тормоз должен быть
задействован, когда вы кладете
ребенка в коляску или вынимаете
из нее.
Любой груз, повешенный на ручку
коляски и/ или на заднюю часть
спинки и/ или на боковины, может
нарушить равновесие коляски.
Эта коляска предназначена для
перевозки одного или двоих детей,
не использовать для перевозки
более двоих детей одновременно.
Не должны использоваться
неодобренные JANÉ аксессуары.
Никогда не используйте запасные
детали, неодобренные JANÉ, S.A.
Максимально допустимый вес
корзины для вещей никогда не
должен превышать вес, указанный
на корзине (4 кг).
pусский
71
Page 72

5.- РЕГ УЛИРОВКА УГЛА НАКЛОНА СПИНКИ
1.- ЧТОБЫ РАЗЛОЖИТЬ КОЛЯ СКУ
Разблокируйте рычаги, расположенные на боковинах. 1.1
Потяните ручку вверх, чтобы разложить коляску. 1. 2
В конце нажмите на задние педали как показано на рисунке. 1.3
ПРЕДУПРЕЖДЕНИЕ: Нео бходимо убедить ся, что ребенка
нет рядом с коляской, когда складывается или раскладывается коляска.
ПРЕДУПРЕЖДЕНИЕ: Появление точек сжатия и захвата
неизбежны во время таких операций.
2.- “П ЛАВАЮЩИЕ” КОЛЕСА
Передние колеса Вашей коляски функционируют в двух режимах:
вращающемся и фиксированным. Чтобы заблокировать колеса
нажмите вниз на кнопку, расположенную сзади держателя
переднего колеса. 2
Чтобы разблокировать колеса, нажмите кнопку в противоположном направлении.
NANUQ TWIN
72
3.- ИСП ОЛЬЗО ВАНИЕ С ТОЯНОЧ НОГО ТОР МОЗА
ЗАДЕЙСТВОВАТЬ ТОРМОЗ: Опустить рычаг вниз. 3.1
СНЯТЬ С ТОРМОЗА: Потянуть рычаг вверх. 3.2
ПРЕДУПРЕЖДЕНИЕ: Задействовав тормоз, убедитесь,
что коляска надежно стоит на тор мозе. Может, будет не обходимо прокатить слегка коляску, чтобы тормо з был
задействован оптимально.
4.- РЕМ ЕНЬ БЕЗО ПАСНОС ТИ
Подгоняйте ремни по размеру ребенка, когда пользуетесь
коляской. 4
Обе точки фиксации по бокам сиденья могут использоваться для фиксации дополнительного ремня.
Ваша прогулочная коляска утверждена для перевозки новорожденных детей. Чтобы пристегнуть ребенка, которому
меньше 6 месяцев, пропустите плечевые ремни через нижние петли и соедините плечевые накладки при помощи липучки.
4B Начиная с 6 месячного возраста, можно пропускать рем-
ни через петли, которые буду т более удобны для ребенка.
5.- РЕГ УЛИРОВКА ВЫС ОТЫ РУЧКИ КОЛЯСК И
Чтобы отрегулировать высоту ручки нажмите на кнопку А. 5
6.- РЕГУЛИРОВКА ПОЛОЖЕНИЯ СПИНКИ СИДЕНЬЯ
Спинка Вашей коляски устанавливается в 4 положениях.
Потяните за рычаги, расположенные в верхней части сза ди
спинки и отрег улируйте наклон спинки. 6
7.- РЕГУЛИРОВКА ПОДНОЖКИ
Может быть установлена в двух положениях. Чтобы опустить,
нажмите А. 7
Page 73

8.- СК ЛАД ЫВАНИЕ КОЛЯСКИ
Чтобы сложить коляск у поднимите задние педали вверх
(А) и затем разблокируйте ручной фиксатор (В), завершив
складывание коляски. 8 .1
Слегка надавите на сиденье, чтобы убедиться, что боковой
фиксатор задействован. 8.2
ПРЕДУПРЕЖДЕНИЕ: Необходимо убедиться, что ребенка нет рядом с коляской, когда складывается или раскладывается коляска.
ПРЕДУПРЕЖДЕНИЕ: Появление точек сжатия и захвата
неизбежны во время таких операций.
9.- ПЕРЕ НОСК А
На раме коляски имеется ручка для удобной переноски. 9
10.- РЕГ УЛИРОВК А ПОДНОЖКИ
Наденьте капюшоны на боковые трубки ручки в верхней
части обивки. 10.1
Отрег улируйте зажимы сзади, пока не услышите щелчок. 10.2
На центральных трубах отрег улируйте за жим, пока не
услышите щелчок. 10.3
Опустите другой капюшон по направляющим, чтобы соединить оба капюшона. 10.4
Когда капюшон будет установлен, вы сможете регулировать его наклон, передвигая дужки в зависимости от наклона спинки. Чтобы снять капюшоны выполняйте шаги в
обратном порядке. 10.5
11.- ИСПОЛЬЗОВАНИ Е ОПОРЫ
У Вашей коляски NANUQ TWIN имеется подставка.
Чтобы разложить подставку потяните пробку, на ходящуюся в центральной части внизу коляски. Чтобы сложить подставку, толкните ее вперед. 11
12.- ДОЖ ДЕВИК
Отрегулируйте две нижние застежки и задние липучки дождевика. 12
13.- УХОД
Обивка не должна находиться под прямыми солнечными
лучами длительное время.
Пла стиковые части мо йте теплой водо й с мылом, затем тщ ательно высушивайте все детали.
Обивк у можно снять для стирки.
Регулярно проверяйте тормоза, ремни безопасности и фиксаторы, чтобы убедиться, что они находятся в рабочем состоянии.
В целях безопасности и для сохранности данного изделия важно,
чтоб ы его периодически осматривали в лю бой из наши х официа льных мастерских.
pусский
73
Page 74

ИНФОРМАЦИЯ О ГАРАНТИИ
Данное изделие имеет гарантию, предусмотренную законом 23 / 2003 от 10 июля. Сохраните товарный чек, необходимый для предъявления в магазине, где Вы приобрели
изделие, для подтверждения юридической силы в случае
любой рекламации.
Данная гарантия не распространяется на дефекты и поломки, которые являются результатом неправильной эксплуатации или нарушения норм безопасности и ухода,
описанных в инструкции и на этикетке по правилам стирки,
как и на элементы естественного износа, появившиеся при
нормальном ежедневном пользовании.
Ни в коем случае не срывайте этикетку с номером шасси
Вашей модели, она содержит важную информацию.
Внимание:
Для максимальной надежности и заботы о Вашем новом
изделии фирмы JANÉ, очень важно чтобы Вы заполнили
регис трационный талон, который Вы найдете на странице
NANUQ TWIN
www.jane.es
Регистрация позволит Вам получать информацию, в случае
необход имос ти , об изм енен ия х и об уходе за ва шим из де ли ем. Также всегда, когда Вы пожелаете, мы можем информировать Вас о новых моделях и новостях, которые, мы полагаем, будут интересными для Вас.
74
Page 75

INDHOLDSFORTEGNELSE
Vigtige oplysninger
1.- UDFOLDNING AF KLAPVOGNEN
2.- DREJEHJUL
3.- ANVENDELSE AF PARKERINGSBREMSEN
4.- SIKKERHEDSSELE
5.- INDSTILLING AF HØJDEN PÅ HÅNDTAGET
6.- INDSTILLING AF RYGLÆNET
7.- INDSTILLING AF FODSTØTTEN
8.- SAMMENFOLDNING AF KLAPVOGNEN
9.- TRANSPORT
10.- ANVENDELSE AF KALECHEN
11.- BRUG AF STØTTEBENET
12.- REGNSLAG
13.-VEDLIGEHOLDELSE
76-77
78
78
78
78
78
78
78
79
79
79
79
79
79
dansk
75
Page 76

ADVARSEL
ADVARSEL: Anvend altid
ADVARSEL: Kontroller, at
VIGTIGE OPLYSNINGER
Vigtigt – Opbevar denne vejledning til
senere brug.
ADVARSEL: Efterlad aldrig barnet uden
opsyn.
ADVARSEL:
Kontroller, at alle låseanordninger er
blokeret korrekt før brug.
NANUQ TWIN
ADVARSEL: For at undgå at barnet
kommer til skade, er det vigtigt at sikre
sig, at det ikke befinder sig i nærheden,
når produktet foldes sammen eller
76
foldes ud.
ADVARSEL: Lad ikke barnet lege med
dette produkt.
fastholdelsesanordningen.
fastgørelsesanordningerne til liften,
sædet eller autostolen er låst korrekt før
brug.
ADVARSEL: Dette produkt er ikke egnet
til at jogge med eller til at bruge sammen
med rulleskøjter.
Denne vogn er beregnet til børn fra 0
måneder og op til 15 kg.
Page 77

Det anbefales at anvende den mest
tilbagelænede stilling fra nyfødt og op til
6 måneder.
Parkeringsanordningen skal være slået
til, når børnene sættes i eller løftes op
af vognen.
Enhver form for belastning, der er
fastgjort til styret, bag på ryglænet eller
på siden af vognen, påvirker stabiliteten.
Denne vogn er designet til at kunne
anvendes af et eller to børn, og den må
ikke anvendes med mere end to børn ad
gangen.
Anvend ikke tilbehør, der ikke er
godkendt af JANÉ.
Anvend aldrig reservedele, som ikke er
godkendt af JANÉ, S.A.
Den højst tilladte belastning af
varekurven må aldrig overstige den
vægt, der er angivet på kurven (4 kg).
dansk
77
Page 78

1.- UDFOLDNING AF KL APVOGNEN
Åbn låsemekanismerne i siderne. 1.1
Træk opad i st yret, og fold samtidig klapvognen ud. 1. 2
Træd til sidst på pedalerne bag på klapvognen som vist på
figuren. 1.3
ADVARSEL: Det er vigtigt at sikre sig, at barnet ikke befinder sig
i nærheden af vognen, når den foldes sammen eller foldes ud.
ADVARSEL: Det kan ikke undgås, at der fremkommer skarpe kanter og steder, hvor man kan skære sig, eller hvor kropsdele kan
komme i klemme, når man udfører disse handlinger.
2.- DREJEHJUL
Din klapv ogn er forsyn et med drejeli ge forhjul med mulighed
for blokering af hjulenes køreretning.
Tryk nedad på knap pen, der sidd er bag hver hjulhol der, for at
blokere forhjulene. 2
For at fjerne retningsblokeringen skal du trykke på knappen
igen.
NANUQ TWIN
78
3.- ANVENDELSE AF PARKERINGSBREMSEN
BLOKERING: Bevæg låsestangen nedad.
FJERNELSE AF BLOKERING : Bevæg låsestangen opad.
ADVARSEL: Når bremsen er slået til, er det vigtigt at kontrollere,
at vognen er bremset korrekt. Det kan være nødvendigt at køre
vognen en lidt frem og tilbage, for at bremsen fastlåses optimalt.
3.1
3.2
4.- SIKKERHEDSSELE
Børnene skal altid være spændt fast med sikkerhedsselerne,
når de sidder i klapvognen. 4
De to fastspændingspunkter i siderne på stolene kan bruges
til at montere en ekstra sele.
Klapvognen er typegodkendt til nyfødte børn. Tilpas sikkerhedsselerne til babyer under seks måneder ved at trække
skulderselerne gennem åbningerne forneden, og sæt skulderpuderne sammen vha. burrebåndene.
4B Fra 6-måneder s alderen kan selerne føres gennem de åb -
ninger, som er mest behagelige for barnet.
5.- INDSTILLING AF HØJDEN PÅ HÅNDTAGET
Tryk på A for at regulere højden. 5
6.- INDSTILLING AF RYGLÆNET
Klapvognen har 4 indstillinger. Træk i grebene foroven bag på
ryglænene, og indstil hældningen til den ønskede position. 6
7.- INDSTILLING AF FODSTØTTEN
Fodstøtten har to indstillinger. Tryk på A for at sænke fodstøtten. 7
Page 79

8.- SAMMENFOLDNING AF KLAPVOGNEN
Klapvognen foldes sammen ved at skubbe pedalerne bag på
vognen opad (A). Derefter løsnes den manuelle fastgørelsesanordning (B ), som holdes løsnet, indtil klapvognen er foldet
helt sammen. 8 .1
Giv klapvognen et let tryk, når den er foldet sammen for at
sikre, at låseanordningen i siden er blokeret. 8.2
ADVARSEL: Det er vigtigt at sikre sig, at barnet ikke befinder sig
i nærheden af vognen, når den foldes sammen eller foldes ud.
ADVARSEL: Det kan ikke undgås, at der fremkommer skarpe kanter og steder, hvor man kan skære sig, eller hvor kropsdele kan
komme i klemme, når man udfører disse handlinger.
9.- TRANSPORT
Stellet er forsynet med et håndgreb, der gør det lettere at
transportere klapvognen. 9
10.- ANVENDELSE AF K ALECHEN
Anbring kalecherne på håndtagsrørene oven over betrækket. 10.1
Juster klemmerne bagpå, indtil der høres et “klik”. 10.2
Juster klemmen på midterrørene, indtil der høres et “klik”.
10.3
Før enden af den anden kaleche ned over styreanordningen
for at koble kalecherne sammen. 10.4
Når kalechen er sat på, kan den reguleres ved at bevæge buerne ef ter hældningen af ryglænet. Følg de samme skridt i
omvendt rækkefølge for at tage kalecherne af. 10.5
11.- BRUG AF STØTTEBENET
Din NANUQ TWIN-klapvogn er fors ynet med støtteben.
Støttebenet trækkes ud ved at trække i en tap, der sidder i
midten forneden på klapvognen. Skub støttebenet indad for
at folde det på plads. 11
12.- REGNSLAG
Juster de to nederste lukninger og burrebåndene bag på
regnslaget. 12
13.-VEDLIGEHOLDELSE
Undgå a t udsætte be trækket for dire kte sol i længe re tidsrum.
Vask plas tikdelene med lunkent vand og sæbe. Tør deref ter
alle delene grundigt.
Betrækket kan tages af for at vaske det.
Kontroller jævnligt bremser, seler og fastgørelsesanordninger
som kan være beskadiget som følge af brug.
Såvel af hensyn til sikkerheden som for at sikre en god vedligeholdelse af dette produkt er det vigtigt at få foret aget
et regelmæssigt ef tersyn på et af vores autoriserede serviceværksteder.
dansk
79
Page 80

GARANTIOPLYSNINGER
Dette produk t leveres med garanti i henhold til bestemmel serne i spansk Lov 23 / 2003 af 10. juli. Gem kvitteringen, da
den skal fremvises ved enhver reklamation i den forretning,
hvor du købte produktet, for at dokumentere garantiens gyldighed.
Denne garanti omfat ter ikke fejl eller skader, der er opstået
som følge af forkert brug af produktet eller manglende overholdelse af reglerne for sikkerhed og vedligeholdelse beskrevet i brugervejledningen og vaskeanvisningerne på etiketterne. Garantien omfat ter heller ikke dele, som slid es ved normal
og daglig brug.
Bemærk:
For at opnå den største sikkerhed og service for din nye JANÉ
er det meget vigtigt, at du udfylder regis treringskortet, som
du finder på www.jane.es
Ved at registrere produktet kan du holde dig informeret om
udviklingen og vedligeholdelsen af dit produkt. Hvis du øns-
NANUQ TWIN
ker de t, kan vi også info rmere dig om nye modeller elle r andre
nyheder, som vi mener kan have din interesse.
80
Page 81

SPIS TREŚCI
Ostrzeżenia
1.- ROZKŁADANIE WÓZKA
2.- SKRĘTNE KOŁA
3.- HAMULEC POSTOJOWY
4.- PASY BEZPIECZEŃSTWA
5.- REGULACJA WYSOKOŚCI RĄCZKI
6.- REGULACJA OPARCIA
7.- REGULACJA PODNÓŻKA
8.- SKŁADANIE WÓZKA
9.- TRANSPORT
10.- ZAMOCOWANIE DASZKA
11.- STOSOWANIE NÓŻKI
12.- OSŁONA PRZECIWDESZCZOWA
13.- KONSERWACJA
82-83
84
84
84
84
84
84
84
85
85
85
85
85
85
polski
81
Page 82

OSTRZEŻENIE
OSTREŻENIA
WAŻNE - Instrukcję należy zachować do
późniejszego wglądu.
OSTRZEŻENIE: Dziecka nigdy nie należy
pozostawiać bez nadzoru.
OSTRZEŻENIE: Przed użyciem należy się
upewnić, czy wszystkie mechanizmy
blokujące zostały prawidłowo zamknięte.
OSTRZEŻENIE: Podczas składania i
NANUQ TWIN
rozkładania wózka dziecko powinno
znajdować się w bezpiecznej odległości.
OSTRZEŻENIE: Niniejszy produkt nie jest
82
zabawką.
OSTRZEŻENIE: Zawsze należy stosować
system mocujący.
OSTRZEŻENIE: Przed użyciem należy się
upewnić, czy wszystkie mechanizmy
mocujące gondolę, siedzisko lub fotelik
samochodowy zostały prawidłowo
zapięte.
OSTRZEŻENIE: Niniejszy produkt nie jest
przeznaczony do biegania lub jazdy na
rolkach.
Niniejszy wózek jest przeznaczony dla
dzieci od 0 miesiąca życia o wadze do
15 kg.
Page 83

Dla dzieci od urodzenia do 6 miesiąca
życia zaleca się stosowanie siedziska w
możliwie najbardziej odchylonej pozycji.
Przed umieszczeniem dziecka w wózku
lub jego wyciągnięciem, należy włączyć
hamulec postojowy.
Jakikolwiek ciężar zawieszony na rączce
i/lub z tyłu oparcia i/lub z boku wózka
wpływa na jego stabilność.
Niniejszy wózek jest przeznaczony
wyłącznie dla jednego lub dwojga dzieci.
Nie powinien być stosowany przez więcej
niż dwoje dzieci jednocześnie.
Nie stosować akcesoriów
niezatwierdzonych przez JANÉ.
Nie należy stosować części zamiennych
niezatwierdzonych przez JANÉ, S.A.
Maksymalny dozwolony ciężar kosza
na przedmioty nie może przekraczać
ciężaru wskazanego na koszu (4 kg).
polski
83
Page 84

1.- ROZKŁ ADANIE WÓZKA
Zwolnić blokady znajdujące się po bokach wózka. 1.1
Pociągnąć za rączkę do góry do rozłożenia wózka. 1.2
Na koniec nacisnąć nogą na tylne pedał y, tak jak zosta ło to
pokazane na rysunku. 1. 3
OSTRZEŻENIE: Należ y koniecznie upewnić się, czy dziecko
znajduje się z dala od wózka podczas czynnoś ci składania i
rozkładania.
OSTRZEŻENIE: Pojawienie się miejsc przecięcia, ściśnięcia oraz
przy trzaśnięć jest nieuniknione podczas w /w czynności.
2.- SKRĘTNE KOŁA
Wózek został wyposażony w przednie skrętne koła z układem
kierowniczym oraz możliwością zablokowania w/w układu.
Aby zablokować koła, wcisnąć jedną z dźwigienek
znajdujących się za prowadnicami przednich kół. 2
Aby odblokować koła, zwolnić dźwigienkę.
NANUQ TWIN
84
3.- HAMULEC POSTOJOWY
HAMOWANIE: Opuść dźwigienkę hamulca w dół. 3.1
ZWOLNIENIE HAMULC A: Podnieś dźwigienkę hamulca do góry. 3.2
OSTRZEŻENIE: Po wciśnięciu hamulca należy upewnić się,
czy wózek został prawidłowo zahamowany. Możliwe, że
kon ie czne będzie lekkie po to cz en ie wóz ka po to , by ham ulec opt ymalnie zaskoc zył.
4.- PASY BEZPIECZEŃSTWA
Dopasować długość pasków do wzrostu dzieci po dczas używania wózka. 4
Dwa boczne uchw yty mocujące siedzeń mogą być używane
do zamocowania dodatkowego paska.
Niniejszy wózek jest przeznaczony do wożenia noworodków i
niemowląt. Aby dostosować długość pasków do w zrostu niemowlęcia w wieku p oniżej 6 miesięcy, prze łożyć paski barkowe przez dolne otwory i spiąć razem ochraniacze na ramiona
za pomocą rzepów.
4B Kiedy niemowlę ukończy 6 miesięcy, można regulować
długo ść pasków przekładając je przez inne otwory w oparciu
w zależności od w zrostu dziecka.
5.- REGULACJA WYSOKOŚCI RĄCZKI
W celu regulacji, należy przycisnąć przycisk A. 5
6.- REGULACJA OPARCIA
Wózek ma 4 pozycję ustawienia. Pociągnąć za płytki znajdujące się za oparciem i us tawić wózek w odpowiedniej pozycji.
6
7.- REGULACJA PODNÓŻK A
Dwustopniowa. Aby obniżyć , należy nacisnąć A. 7
Page 85

8.- SKŁADANIE WÓZK A
Aby złoż yć wózek, unieść tylne pedał y w górę (A) i następnie
zwolnić ręczną blokadę (B), przytrzymując wózek do całko witego złożenia. 8.1
Po złożeniu należy lekko nacisnąć na wózek, aby się upewnić,
że boczne zabezpieczenie zost ało prawidłowo zamknięte. 8.2
OSTRZEŻENIE: Należy koniecznie upewnić się, czy dziecko
znajduje się z dala od wózka podczas czynności składania i
rozkładania.
OSTRZEŻENIE: Pojawienie się miejsc przecięcia, ściśnięcia oraz
przy trzaśnięć jest nieuniknione podczas w /w czynności.
9.- TRANSPORT
Stelaż został w yposażony w rączkę ułat wiającą transport. 9
10.- ZAMOCOWANIE DASZKA
Umieścić daszki nad bocznymi prętami rączki w górnej części
pokrowca. 10 .1
Zapiąć zaciski od tyłu, aż usłysz ymy charakter yst yczny dźwięk
zapięcia. 10.2
Zapiąć zaciski na środkowych prętach, aż usł yszymy charakterystyczny dźwięk zapięcia. 10.3
Przesunąć końcówkę drugiego daszka po prowadnic y do mo mentu połączenia daszków. 10.4
Po założeniu daszka można ustawić jego pozycję dopasowu jąc kąt ugięcia prętów daszka do kąta nachylenia oparcia. Aby
zdjąć daszki, wykonać powyższe cz ynności w odwrotnej kolejności. 10.5
11.- STOSOWANIE NÓŻKI
Wózek NANUQ TWIN zost ał wyposażony w stojak.
Aby go rozłożyć , pociągnąć za zatyczkę znajdującą się w środkowej dolnej części wózka. W celu złożenia stojaka wepchnąć
go środka. 11
12.- OSŁONA PR ZECIWDESZCZOWA
Zapiąć obydwa zapię cia dolne oraz t ylne rzepy osłony przeciwdeszczowej. 12
13.- KONSERWACJA
Tapicerki nie należy wystawia ć na zbyt długie działanie promieni słonecznych.
Wszystkie plastikowe części należy myć letnią wodą z neutralnym mydłem, po czym dokładnie wysuszyć.
Aby wyprać tapicerkę, można ją ściągnąć.
Regularnie sprawdzać hamulce, zamo cowania i paski, które
mogą zos tać uszkodzone podczas uży wania.
W celu zapewnienia bezpieczeń stwa i utrzymania produktu w odpowiednim stanie, należy go poddawać okresowym
przeglądom w dowolnym warsztacie JANÉ.
polski
85
Page 86

INFORMACJA GWARANCYJNA
Niniejszy produkt objęty jest gwarancją zgodnie z u stawą
23/ 2003 z 10 lipca 20 03 roku. Prosimy o zachowanie dowodu
zakupu, gdyż w razie jakichkolwiek reklamacji konieczne jest
jego przedstawienie w miejscu zakupu produktu.
Gwarancja nie obejmuje wad lub uszkodzeń powstałych w
wyniku nieodpowiedniego użytkowania artykułu lub niestosowania się do zasad bezpieczeń stwa i konserwacji, opisanych
w niniejszej instrukcji obsługi oraz na etykietach dotyczących
prania. Gwarancja nie obejmuje również części podlegających
normalnemu zużyciu, związanemu z codzienną eksploatacją.
Pod żadn ym pozorem nie należy odr yw ać tabliczki z numer em
podwozia modelu , ponieważ zawiera ona ważne informacje.
Uwaga:
Aby zapewnić optymalne bezpieczeństwo i uzyskać więcej informacji dotyczących Państ wa nowego produktu JANÉ, prosimy o w yp ełnienie formular za rej es trac yjne go zna jd uj ąc ego się
na stronie www.jane.es
NANUQ TWIN
Po rejestracji będą Państwo mogli śledzić nowości związane
z Państwa produk tem oraz, w razie konieczności, zapoznać
się z instrukcją jego konserwacji. Ponadto, za Państwa zgodą,
będziemy mogli informować Państwa o now ych modelach i
innych nowościach, które mogłyby Państwa zainteresować.
86
Page 87

KAZALO
Opozorila
1.- MONTAŽA VOZIČKA
2.- VRTLJIVA KOLESA
3.- UPORABA PARKIRNE ZAVORE
4.- VARNOSTNI PAS
5.- NAMESTITEV VIŠINE ROČAJA
6.- URAVNAVANJE NASLONJALA
7.- URAVNAVANJE NASTAVKA ZA NOGE
8.- SESTAVLJANJE VOZIČKA
9.- PRENOS
10.- UPORABA STREHICE
11.- UPORABA STOJALA
12.- ŠČITNIK PROTI DEŽJU
13.- VZDRŽEVANJE
88-89
90
90
90
90
90
90
90
91
91
91
91
91
91
slovenščina
87
Page 88

OPOZORILO
OPOZORILA
POMEMBNO – Hranite ta navodila za
nadaljnjo uporabo.
OPOZORILO: Nikoli ne puščajte otroka
brez nadzora.
OPOZORILO: Pred uporabo se
prepričajte se, da so vsi zapiralni sistemi
spojeni.
NANUQ TWIN
OPOZORILO: V izogib poškodbam, se
prepričajte, da je otrok oddaljen od
izdelka med njegovim sestavljanjem in
88
zlaganjem.
OPOZORILO: Ne dovolite, da se otrok
igra s tem izdelkom.
OPOZORILO: Vedno uporabljajte sistem
za zadrževanje.
OPOZORILO: Pred uporabo se
prepričajte, da so vsi sistemi za
pripenjanje košare, sedeža in lupinice
pravilno nameščeni.
OPOZORILO: Ta izdelek ni primeren za
tek ali kotalkanje.
Ta voziček je namenjen otrokom od 0.
mesecev dalje in do 15 kg.
Page 89

Od rojstva do 6. mesecev priporočamo
uporabo najbolj nagnjenega položaja.
Sistem za parkiranje morate aktivirati
med nameščanjem in odstranjevanjem
otrok iz vozička.
Katerokoli breme, nameščeno na
krmilo in/ali na zadnji del naslona in/
ali na stranske dele vozička, vpliva na
njegovo stabilnost.
To vozilo je bilo zasnovano za enega
ali dva otroka, ne uporabljajte ga z več
otroci hkrati.
Ne smejo se uporabljati pripomočki, ki
niso odobreni s strani podjetja JANÉ.
Nikoli ne uporabljajte rezervnih delov,
ki niso odobreni s strani podjetja
JANÉ, S.A.
Največja dovoljena teža, ki jo lahko
polagamo v košarico za shranjevanje
predmetov, ne sme presegati teže, ki je
navedena na njej (4kg).
slovenščina
89
Page 90

1.- MONTAŽA VOZIČKA
Sprostite vzvoda, ki sta nameščena na stranskih delih. 1.1
Potegnite ročaja navzgor tako, da raztegnete voziček. 1.2
Nato stopite na zadnja pedala tako, kot je prikazano na sliki.
1.3
OPOZORILO! Prepričati se morate, da otrok ni v stolčku, medtem
ko stolček pripravljate za shranjevanje ali ga sestavljate.
OPOZORILO! Medtem se lahko pojavijo odrezani ali stisnjeni deli
in različne poškodbe.
2.- VRTLJIVA KOLESA
Vaš voziček ima vrtljivi prednji kolesi, z možnostjo blokade
smeri.
Da bi ju blokirali, pritisnite gumb, ki je nameščen na zadnji
strani vsakega sprednjega nosilca za kolo. 2
Da bi sprostili smer, pritisnite gumb v obratni smeri.
3.- UPORABA PARKIRNE ZAVORE
NANUQ TWIN
ZAVIR ANJE : Vzvod potisnite navzdol.
SPROSTITEV ZAVORE: Vzvod povlecite navzgor.
OPOZORILO! Ko ste aktivirali zavore, se prepričajte, da je otroš ki
voziček pravilno
ustavljen. Morda je potrebno otroški voziček voziti počasi, da se
90
zavora ustrezno pritrdi.
3.1
3.2
4.- VARNOSTNI PAS
Ko uporabljate voziček, vedno otroka zavežite s pasovi. 4
Dve pri trdilni točki, ki se nahajata na straneh sedežev, se lah ko uporabljata tudi za pritrditev dodatnega pasu.
Vaš voziček je homologiran za novorojenčke. Da bi nastavili
pasove vašemu dojenčku mlajšemu od 6. mesecev, potegnite
ramenske pasove skozi zunanje odprtinice ter združite zaščiti
za ramena s sistemom za zapiranje na ježka.
4B Od 6. meseca starosti dalje nastavite pasove skozi odpr ti-
nice, ki so udobnejše za otroka.
5.- NAMESTITEV VIŠINE ROČAJA
Za izbiro višine pritisnite gumb A . 5
6.- UR AVNAVANJE NASLONJALA
Vaš voziček je nastavljiv v 4 položaje. Potegnite vzvoda, ki
se nahajata na zgornji strani naslonov in nastavite naklon v
želen položaj. 6
7.- URAVNAVANJE NASTAVKA ZA NOGE
Na voljo sta dva pložaja. Za spust, pritisnite A. 7
Page 91

8.- SESTAVLJANJE VOZIČKA
Da bi zložili voziček, potisnite zadnje pedale navzgor (A) in
nato sprostite ročno varovalo (B) ter dokončajte zlaganje.
8.1
Rahlo pritisnite na zloženi voziček in preverite, ali deluje
stransko varovalo. 8.2
OPOZORILO! Prepričati se morate, da otrok ni v stolčku, medtem
ko stolček pripravljate za shranjevanje ali ga sestavljate.
OPOZORILO! Medtem se lahko pojavijo odrezani ali stisnjeni deli
in različne poškodbe.
9.- PRENOS
Ohišje je opremljeno z ročajem, ki omogoča enos taven prenos
vozička. 9
10.- UPORABA STREHICE
Names tite strehici na stanske cevi ročajev na zgornji strani
oblazinjenja. 10.1
Names tite priponke z zgornje strani, dokler te ne zaskočijo in
zaslišite “klik”. 10.2
Names tite priponko na osrednjo cev, dokler ta ne zaskoči in
zaslišite “klik”. 10.3
Po ti snite kon čn i del dru ge stre hi ce preko vodila , da bi ju zdru žili. 10.4
Ko je strehica enkrat nameščena, lahko njen položaj prilagajate tako, da pomikate lok gle de na naklon naslona. Za njihovo
odstranitev, sledite istim korakom v obratnem vrstnem redu.
10.5
11.- UPOR ABA STOJALA
Vaš voziček NANUQ T WIN vključuje stojalo.
Da bi ga raztegnili, potegnite čep, ki se nahaja v sredini, na
zunanji strani vozička. Za zložitev vozička, ga potisnite navznoter. 11
12.- ŠČITNIK PROTI DEŽJU
Names tite notranji priponki in zadenjska velkro trakova ščitnika proti dežju. 12
13.- VZDRŽEVANJE
Prevleke ne izpost avljajte soncu dlje časa.
Za čiš čenje plastičnih delov uporabite blag detergent in mlačno vodo, potem pa vse sestavne dele dodobra posušite.
Prevleko lahko odstranite in op erete.
Redno preverjajte zavore, varnos tne pasove in pritrditve, ki so
se mora obrabile.
Tako za vašo varnost, kot tudi za dobro ohranjanje tega izdelka je pomembno, da ga redno date v pregled v katerokoli
izmed naših delavnic.
slovenščina
91
Page 92

INFORMACIJE O GARANCIJI
Ta izdelek ima garancijo v skaldu z zakonom 23 / 20 03 z dne 10
julij. Hranite račun, saj ga morate za uveljavljanje upravičenosti reklamacije, obvezno predložiti v trgovini, kjer ste izdelek
kupili.
V to garancijo niso vključene tiste poškodbe ali napake, ki nastanejo zaradi neprimerne uporabe izdelka ali zaradi neizpolnjevanja varnostnih predpisov in vzdrževanja, ki so opisani v
navodilih in na etiketa h z navodili za pr anj e. Prav tako ni vključena obraba izdelka, ki nas tane zaradi vsako dnevne nor malne
uporabe.
Etiketa v sebuje številko podvozja vašega modela in druge
pomembne informacije, zato v nobenem primeru se ne sme
odtrgati.
Opozorilo :
Da bi dosegli maksimalno varnost in informacije o vašem novem izdelku JANÉ, je zelo pomembno, da izpolnite kartico o
registraciji, ki jo najdete na spletni strani www.jane.es
NANUQ TWIN
Registracija vam bo omogočala, da se informirate o vsem kar
je potrebno glede razvoja in vzdrževanja izdelka. V kolikor to
želite, vas bomo obveščali o novih modelih in drugih novicah
za katere mislimo, da so za vas lahko koristne.
92
Page 93

OBSAH
Upozornenia
1.- ROZKLADANIE KOČÍKA
2.- OTOČNÉ KOLIESKAS
3.- POUŽITIE PARKOVACEJ BRZDY
4.- BEZPEČNOSTNÝ PÁS
5.- NASTAVENIE VÝŠKY RUKOVÄTI
6.- NASTAVENIE OPERADLA
7.- POLOHOVANIE PODNOŽKY
8.- SKLADANIA KOČÍKA
9.- PRENÁŠANIE
10.- POUŽITIE STRIEŠKY
11.- POUŽITIE PODPERY
12.- KRYT DO DAŽĎA
13.- ÚDRŽBA
94-95
96
96
96
96
96
96
96
97
97
97
97
97
97
slovensko
93
Page 94

UPOZORNENIE
UPOZORNENIA
DÔLEŽITÉ – tieto pokyny si odložte pre
prípad potreby v budúcnosti
UPOZORNENIE: Nikdy nenechávajte
dieťa bez dozoru.
UPOZORNENIE: Pred použitím
skontrolujte, či sú zapnuté všetky
uzatváracie mechanizmy.
NANUQ TWIN
UPOZORNENIE: S cieľom zabrániť
poraneniam sa počas skladania a
rozkladanie ubezpečte, či je dieťa v
94
dostatočnej vzdialenosti.
UPOZORNENIE: Nedovoľte dieťaťu hrať
sa s produktom.
UPOZORNENIE: Vždy používajte
príchytný systém.
UPOZORNENIE: Pred použitím
skontrolujte, či sú mechanizmy na
prichytenie striešky, sedačky alebo
sedadla kočíka správne zapojené.
UPOZORNENIE: Tento produkt nie je
vhodný na beh ani korčuľovanie.
Tento kočík je určený pre deti od 0
mesiacov po dosiahnutie hmotnosti
15 kg.
Page 95

Od narodenia po dovŕšenie 6 mesiacov
odporúčame využívať čo najviac
sklopenú polohu.
Zastavovací mechanizmus sa využíva
pri vkladaní a vyberaní detí z kočíka.
Akýkoľvek náklad pripevnený o
rukoväť a/alebo zadnú časť operadla
a/alebo bokov kočíka môže negatívne
ovplyvniť jeho stabilitu.
Tento kočík je navrhnutý len pre jedno
alebo dve deti, nevozte v ňom naraz
viac ako dve deti.
Nepoužívajte príslušenstvo, ktoré
neschválila spoločnosť JANÉ.
Nikdy nepoužívajte náhradné diely,
ktoré neschválila spoločosť JANÉ.
Maximálna hmotnosť vecí uložených
v košíku pod kočíkom nesmie nikdy
presiahnuť hmotnosť uvedenú na
košíku (4 kg).
slovensko
95
Page 96

1.- ROZKL ADANIE KOČÍK A
Uvoľnite páčky na bokoch buginy. 1.1
Potiahnite rúčku nahor, čím buginu rozložíte. 1.2
Nakoniec stúpte na zadné pedále ako je uvedené na obrázku. 1.3
UPOZORNENIE: Je nevyhnutné uistiť sa, že sa dieťa nenachádza v
blízkosti sedačky počas jej rozkladania a skladania.
UPOZORNENIE: Pri týchto činnostiach nev yhnutne vznikajú riziká
porezania, stlačenia a zachytenia.
2.- OTOČNÉ KOLIESKAS
Striešku vytiahnite medzi tyče rukoväte a boky operadla
popod bočné opierk y. Striešku pripevnite tým, že kotviaci
mechanizmus zasuniete do vodiacej drážky na boku opierky,
kým sa neozve cvaknutie. 2
Po jej roztiahnutí možno polohu udržiavať posúvaním obručí
v závislosti od sklonu op eradla.
NANUQ TWIN
96
3.- POUŽITIE PARKOVACEJ BRZDY
ZABR ZDIŤ: Stlačte páčku smerom nadol.
ODBRZDIŤ: Stlačte páčku smerom nahor.
UPOZORNENIE: Pri brzdení sa uistite, či zostal kočík správne zabrzdený. Môže byť potrebné jemne otočiť kočíkom, aby brzda
správne zapadla.
3.1
3.2
4.- BEZPEČNOSTNÝ PÁS
Pri každom použití buginy nastavte pásy podľa veľkosti dieťaťa. 4
Bočné fixačné body sedadla možno použiť na pripojenie dodatočných popruhov.
Bugina je homologizovaná aj pre práve narodené deti.Na
prispôsobenie popruhov dieťaťu mladšiemu ako 6 mesiacov
treba náplecné pásy prevliecť cez spodné otvory a pomocou
suchého zipsu na ne pripevniť ochranné náplecné vankúšiky.
4B Po dovŕšení 6 mesiacov môžte pásy prevliecť cez otvor y,
ktoré sú pre dieťa pohodlnejšie.
5.- NASTAVENIE V ÝŠKY RUKOVÄTI
Na nast avenie s tlačte gombík A. 5
6.- NASTAVENIE OPERADLA
Buginu možno nastaviť do 4 polôh. Potiahnite páčky na zadnej hornej časti operadla a nastavte sklon do želanej polohy.
6
7.- POLOHOVANIE PODNOŽK Y
Podnožka má dve polohy. Pri jej sklápaní stlač te gombík A. 7
Page 97

8.- SKLADANIA KOČÍKA
Na zloženie buginy treba potlačiť zadné pedále nahor (A) a
následne uvoľniť ručné istenie (B) a buginu celkom zložiť. 8.1
Po zložení kočíka ho ľahko stlačte, aby ste skontrolovali, či
bola aktivovaná bočná poistka. 8.2
UPOZORNENIE: Je nevyhnutné uistiť sa, že sa dieťa nenachádza v
blízkosti sedačky počas jej rozkladania a skladania.
UPOZORNENIE: Pri týchto činnostiach nev yhnutne vznikajú riziká
porezania, stlačenia a zachytenia.
9.- PRENÁŠANIE
Na podvozku je držadlo, ktoré uľahčuje prenášanie kočíka. 9
10.- POUŽITIE STRIEŠKY
Nasuňte striešku na bočné tyče rukoväte v hornej čas ti poťahu. 1 0.1
Nastavte háčiky okolo zadnej časti, kým sa neozve cvaknutie.
10.2
Nastavte háčik na stredových tyčiach, kým sa neozve cvaknutie. 10.3
Vsuňte koniec druhej striešky do vodiacej drážky a spojte ich.
10.4
Po nasadení striešky možno jej polohu zachovávať posúvaním
výstužných obručí podľa sklonu operadla. Na ich odňatie postupujte v opačnom poradí. 10.5
11.- POUŽITIE PODPERY
Bugina NANUQ T WIN má s tojan.
Na jeh o ro zl ož en ie potiahni te za uz áv er v horn ej stredn ej časti buginy. Zasuňte ho dovnútra, čím rozložíte stojan. 11
12.- KRY T DO DAŽĎA
Zapnite obe spodné spony a zadné suché zipsy ochranného
krytu do dažďa. 12
13.- UDRŽBA
Poťah nevystavujte dlhšiu dobu na slnko.
Umelohmotné časti čistite vlažnou vodou a neutrálnym
mydlom a potom ich dôkladne osušte.
Odnímateľný poťah je prací.
Pravidelne kontrolujte brzdy, popruhy a upevnenia, ktoré by
sa počas používania mohli poškodiť.
Na zach ovanie bezpe čnosti a udr žanie dobrého stavu výrobku
je dôležité nechať si ho pravidelne kontrolovať v našich oficiálnych servisoch.
slovensko
97
Page 98

INFORMÁCIE O ZÁRUKE
Na te nto výrob ok sa vz ťa huj e záruk a podľa ust anove ní zákona
23/2003 z 10. júla. Odložte si doklad o kúpe, jeho predloženie
v obchode, kde ste si výrobok kúpili, je nevyhnutné na osvedčenie oprávnenia akejkoľvek reklamácie.
Záruka sa nevzťahuje na poškodenia alebo poruchy spôsobené neprimeraným používaním produktu alebo nedo držaním
bezpečnostných a údržbových noriem uvedeným v návode na
použitie a na štítkoch s pracími znakmi, ani na opotrebovanie
spôsobené bežným používaním a každodennou manipuláciou.
Štítok s v ýro bným číslo m modelu kostry v žiad nom prípad e neodliepajte, obsahuje dôležité informácie.
Pozor:
Na zaistenie maximálnej bezpečnosti a starostlivosti o svoj
nový výrobok od spoločnosti JANÉ je dôležité vyplniť registračnú kartu, ktorú nájdete na www.jane.es
Registrácia vám v prípade potreby umožní informovať sa o
evolúcii a údržbe pro duk tu. Zároveň vás vždy, keď si to bude te
NANUQ TWIN
priať, bud eme informovať o nov ých modelo ch alebo správach ,
ktoré by vás podľa nás mohli zaujímať.
98
Page 99

OBSAH
Upozornění
1.- ROZLOŽENÍ KOČÁRKU
2.- OTOČNÁ KOLEČKA
3.- POUŽITÍ PARKOVACÍ BRZDY
4.- BEZPEČNOSTNÍ PÁS
5.- NASTAVENÍ VÝŠKY RUKOJETI
6.- POLOHOVÁNÍ OPERADLA
7.- POLOHOVÁNÍ OPĚRKY NOHOU
8.- SLOŽENÍ KOČÁRKU
9.- PŘENÁŠENÍ
10.- POUŽITÍ STŘÍŠKY
11.- POUŽITÍ PODPĚRY
12.- KRYT PROTI DEŠTI
13.- ÚDRŽBA
100-101
102
102
102
102
102
102
102
103
103
103
103
103
103
český
99
Page 100

UPOZORNĚNÍ
UPOZORNĚNÍ
Důležité – Uschovejte tento návod k
obsluze pro pozdější nahlédnutí.
UPOZORNĚNÍ: nenechávejte nikdy dítě
bez dozoru.
UPOZORNĚNÍ: před použitím se ujistěte,
zda jsou všechny uzavírací prvky správně
zajištěny.
NANUQ TWIN
UPOZORNĚNÍ: při skládání a rozkládání
se ujistěte, zda se dítě nachází
v bezpečné vzdálenosti od výrobku, aby
100
nedošlo k poranění.
UPOZORNĚNÍ: nedovolte dítěti, aby si s
výrobkem hrálo.
UPOZORNĚNÍ: používejte vždy dětský
upínací systém.
UPOZORNĚNÍ: před použitím se
ujistěte, zda jsou všechny upínací prvky
lůžka, autosedačky či kočárku správně
zapnuty.
UPOZORNĚNÍ: tento výrobek není
vhodný k běhu ani jízdě na bruslích.
Tento výrobek je určen pro děti od 0
měsíců do hmotnosti 15 kg.
 Loading...