

Page 1

Instruction Manual
T10
Thank you for your purchase.
Please read this manual carefully
before using your new player.
T10
http://www.iriver.com
Page 2

Contents
Before using the product
Welcome
....................................................................................................
03
Homepage
.................................................................................................
03
Copyrights/Certification/Trademarks/Limited Liability
.....................
04
Safety Instructions
...................................................................................
05
Chapter 1 I Getting started
Components
.............................................................................................
09
Location of Controls
................................................................................
10
Connection/Installation
...........................................................................
12
Chapter 4 I Useful features
Menu Configuration
.................................................................................
41
Menu Operation
........................................................................................
42
Customizing the function settings
........................................................
43
Chapter 5 I Customer Support
Firmware Upgrade
...................................................................................
61
Troubleshooting
.......................................................................................
62
Specification
.............................................................................................
63
Safety Information
...................................................................................
64
FCC Certification
......................................................................................
65
Chapter 2 I Quick start
Basic Usage
..............................................................................................
17
Chapter 3 I Basic operation
MUSIC
........................................................................................................
21
BROWSER/IMAGE VIEWER
...................................................................
28
*FM RADIO
................................................................................................
31
RECORDING
.............................................................................................
36
z
z
Some features might not be available in every region.
* Only for models including FM Radio function
0201
Page 3
04
Before using the product
W elcome
03
Before using the product
Obtain information about your player, look for updates, and find answers to
questions at our web site.
z
z
iriver website address is www.iriver.com.
z
z
The site provides product information and customer support.
z
z
Use the firmware (system software) upgrade function of our products from the site to
continuously improve the product performance.
Thank you for your iriver purchase.
The T10 comes complete with a long list of advanced features. It is important that you read
the manual to ensure that you get the most out of your new player.
z
z
iriver Limited has all the rights of the patent, trademark, literary property and
intellectual property related to this manual. You may not reproduce any part of this
manual unless authorized by iriver Limited. You can be punished by using any part
of this manual illegally.
z
z
The software, audio and video which have an intellectual property are protected by
copyright and international laws. It is user’s responsibilities when he/she reproduce
or distribute the contents created by this product.
z
z
The companies, institutions, products, people and events used in examples are not
real data. We don’t have any intension to be related with any companies, institutions,
products, people and events through this manual and should not draw inferences.
User’s are responsible for observing the copyrights and intellectual properties.
1999~2005 iriver Limited, All rights reserved
CE, FCC, MIC
z
z
Neither the Manufacturer, importers nor dealers is responsible for any accidental
damage including bodily injury or any damage resulting from misuse or unsuitable
operation by you.
z
z
The information on this manual is prepared with the current player specifications.
The manufacturer, iriver Limited, is adding new features to the product and may
persistently apply new technologies hereafter. All standards may be changed at any
time without notice.
Copyrights/Certification/Trademarks/Limited Liability
Thank you for your iriver purchase
http://www.iriver.com
Copyrights
Limited Liability
Certification
z
z
Windows 2000, Windows XP and Windows Media Player are the registered
trademarks of Microsoft Corp.
z
z
is a trademark of SRS Labs, Inc.
WOW technology is incorporated under license from SRS Labs, Inc.
Trademarks
Page 4
Product
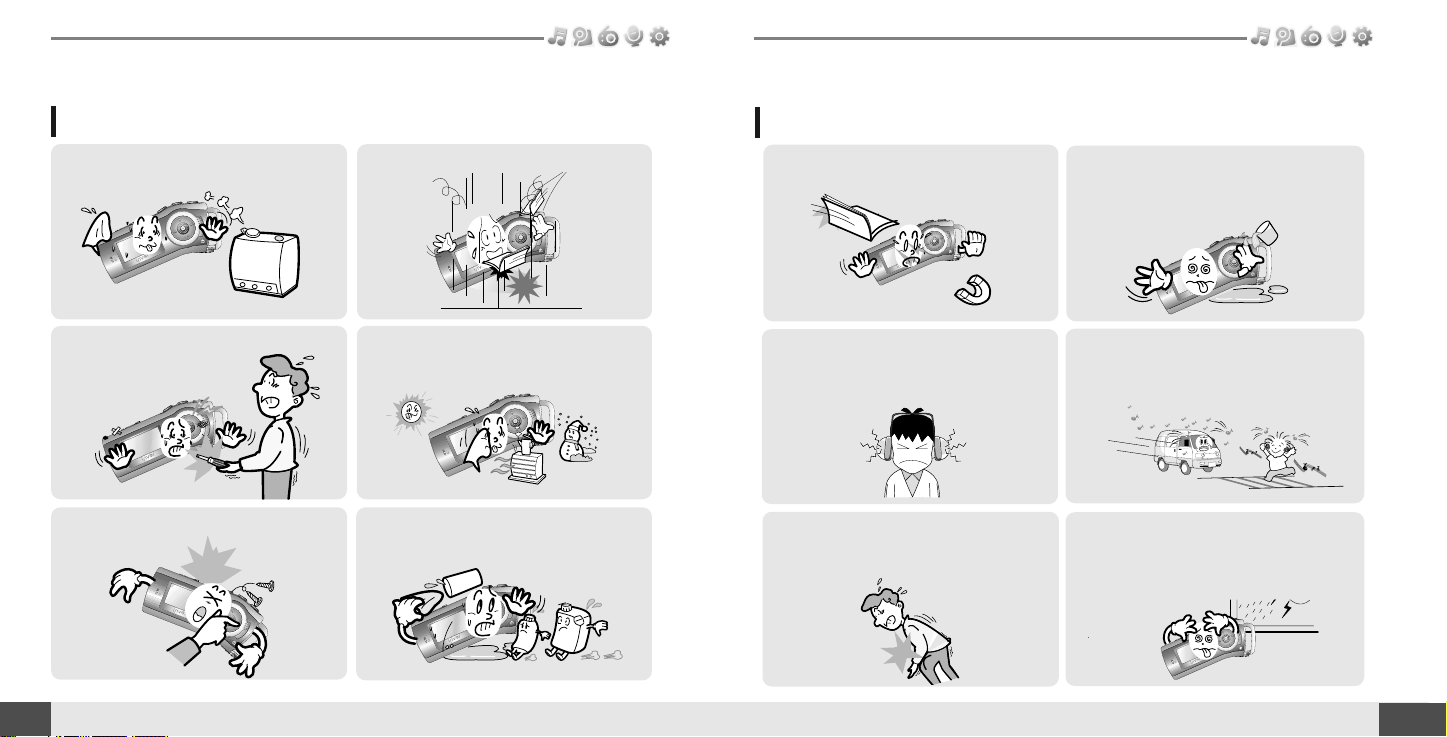
Safety Instructions
06
Before using the product
Product
Safety Instructions
05
Before using the product
Do not clean using chemicals or detergents.
Doing so may damage the surface or paint.
Do not disassemble or modify.
Keep out of direct sunlight and extreme heat
and cold.
Do not use excessive force on the buttons
or attempt to disassemble the device.
Avoid contact with water and other liquids
and dry immediately with a soft cloth
should contact occur.
Avoid impacting the player against other
objects when it is in your pocket or
backpack.
Keep the player away from strong magnets.Keep away from harsh environments
including humid, dusty, and smoky areas.
Do not drop or subject the device to impact.
For your safety, please read before use.
For your safety, please read before use.
Do not use headphones / earphones while
cycling, driving, or operating any motorized
vehicle. It is dangerous and is illegal in some
areas.
Do not use headphone / earphones at
high volume. Hearing experts advise
against listening to continuous, loud and
extended play.
External impact, lightning, power shorts or
other events may damage the data stored in
the product. The user is solely responsible
for data backup and the company will not be
liable for loss of stored data under any
circumstances.
Page 5

1
Chapter
08
Getting started
Components
.........................................
09
Locating the controls
.............................
10
Product
.................................................................
10
LCD Screen display .......................................................... 11
Connection/Installation
.........................
12
Connecting to the PC
..........................................
12
Connecting the earphones
..................................
13
Replacing the battery
..........................................
13
WMP 10 installation ............................................. 14
www.iriver.com
07
Page 6
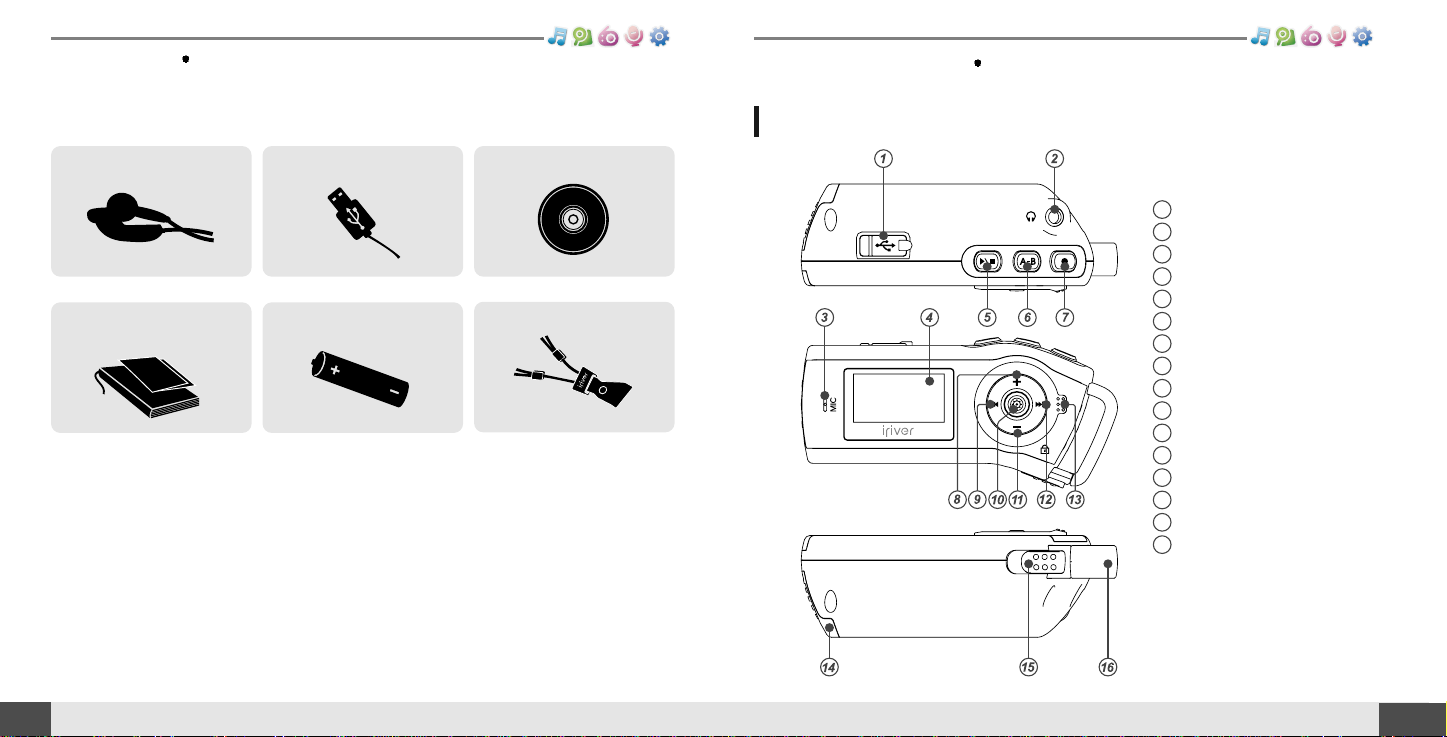
Components
09
Getting started
10
Locating the controls
Getting started
1
2
3
4
5
6
7
8
9
10
11
12
13
14
15
16
USB connection port
Earphone Jack
Microphone
LCD Screen
Play/Stop button
A-B (Interval repeat) button
Recording button
Volume + button
Previous/Fast Reverse button
NAVI/MENU button
Volume - button
Next/Fast forward button
Hold Switch
Battery cover
Neck Strap Locker
Neck Strap
Neck strap for carrying
Earphone Installation CDUSB cable
User Manual/ Warranty
card/Quick Start Guide
Battery(AA Type, 1EA)
Accessories subject to change without notice and may vary from image shown.
Product
Your player may differ sightly from that shown in the illustrations.
Page 7
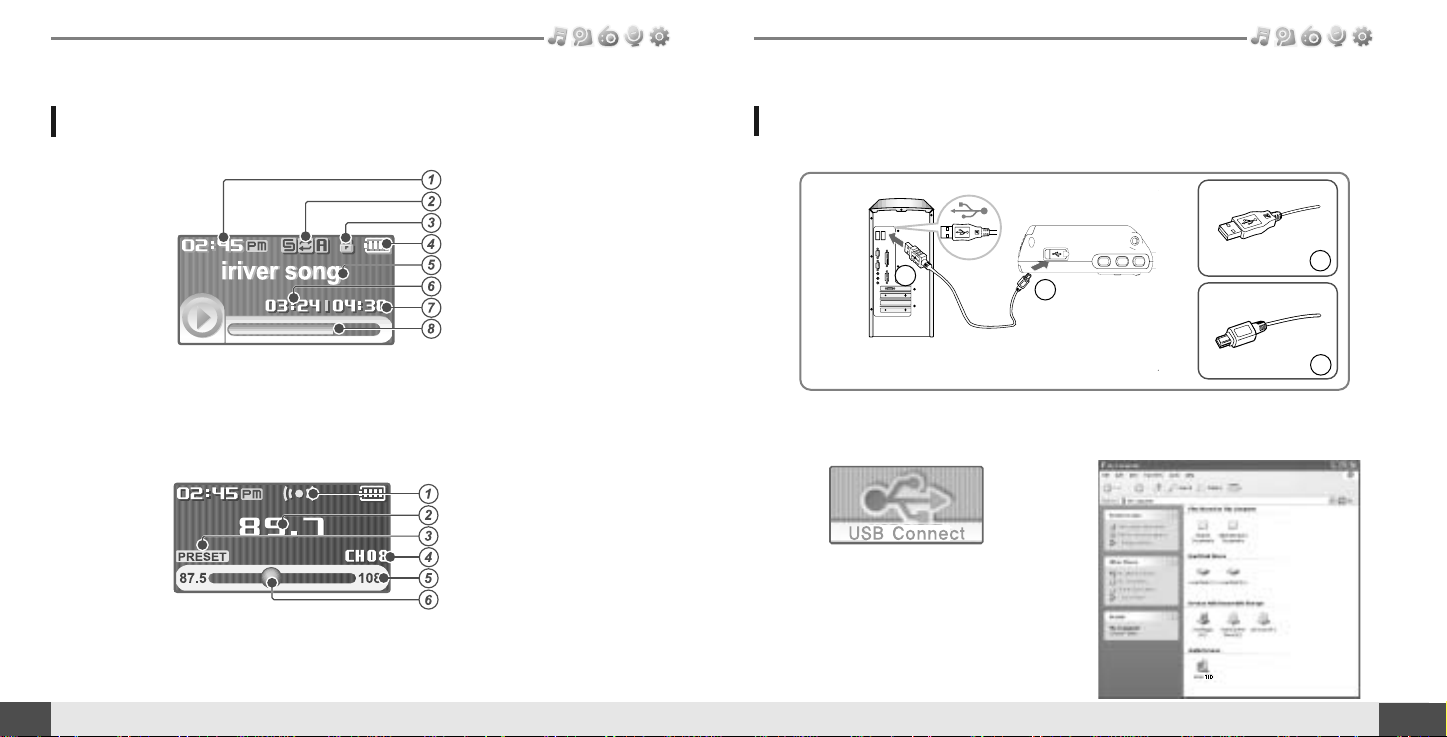
12
Connecting to the PC
Connection/Installation
Getting started
Locating the controls
11
Getting started
Time
Play Mode
Hold
Battery indicator
Title name
Playing time
Total Playing time
Progress Bar
Stereo indicator
Frequency
Preset indicator
Channel Number
Frequency Range
Frequency Bar
1. Connect the USB cable(provided) to the USB port on the player and to your PC.
3. Once installed, open Windows Explorer
and an additional drive should be listed
called “iriver T10”.
USB port on the PC
USB port on the T10
USB cable
A
A
B
B
LCD Screen display
1. MUSIC Mode
2. *FM RADIO Mode
2. Turn on the player, “USB Connect”
icon will appear on the LCD screen of
the player.
* Only for models including FM Radio function
Page 8
14
Connecting the earphones
Connection/Installation
Note
To avoid corrosion, remove the battery if the player is not to be used for a long time.
Remove dead battery immediately to avoid damage from corrosion.
When corrosion occurs, wipe the battery compartment immediately with a dry cloth and insert a new battery.
Getting started
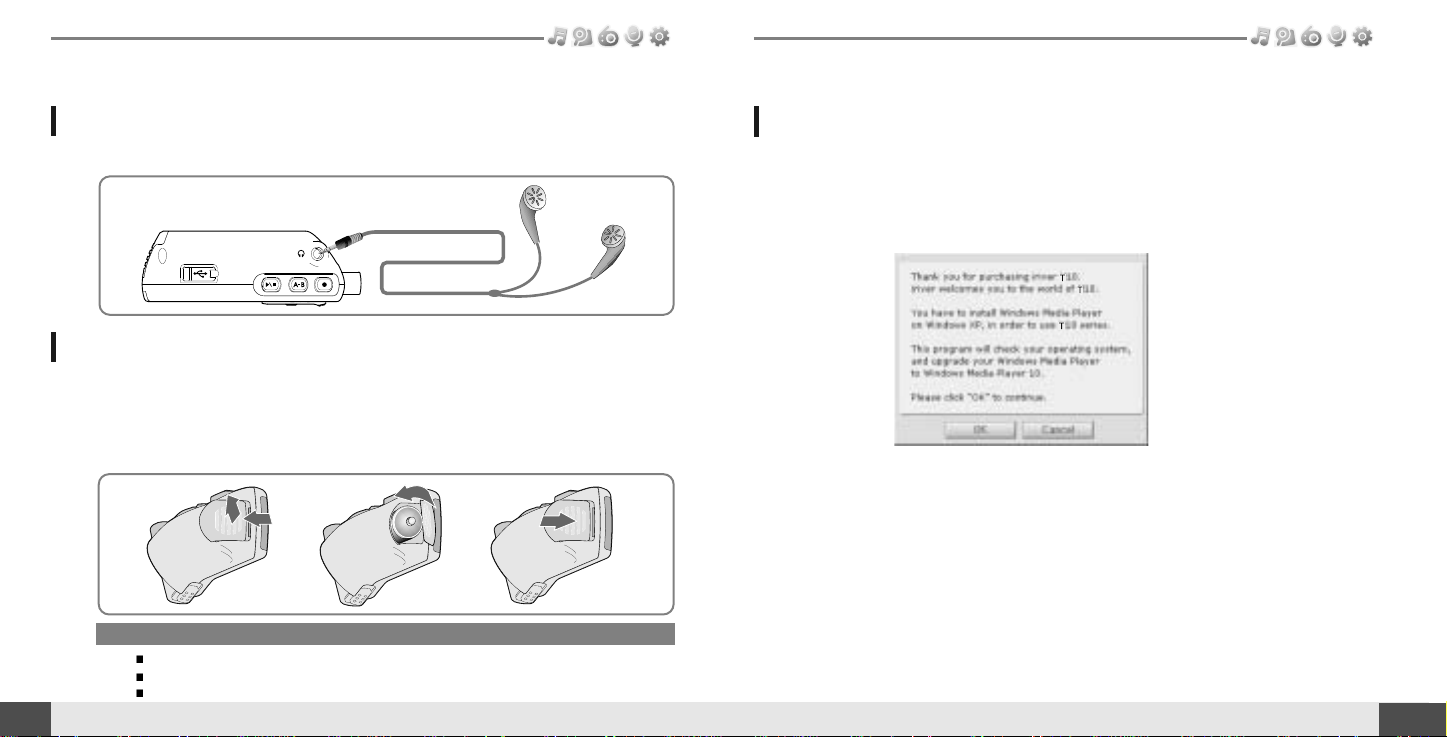
1. Connect the earphones jack to the earphone socket on the player.
1. Open the battery cover.
2. Insert the battery. (AA 1.5V type x 1ea)
Be sure to match the + and - ends of the battery with the diagram inside the battery
compartment.
3. Close the battery cover.
Replacing the battery
Connection/Installation
13
Getting started
WMP 10 installation
1. The program installation process will start automatically after inserting the
Installation CD to the PC's CD-ROM drive.
Click the [OK ] button and follow the on screen instructions which appear as
each window.
Page 9

16
Quick start
2
Chapter
www.iriver.com
Basic Usage
.......................................
17
Turning on/off the player
.................................
17
Playing a music file
..........................................
17
Adjusting the volume
.......................................
18
Selecting the function mode
...........................
18
15
Page 10
18
Adjusting the volume
1
Basic Usage
Quick start
Turning on/off the player
1
Note
If the player does not power ON, please replace your battery.
17
Quick start
Adjusting the volume
During the music file playback, press ,
button to adjust volume level.
: Increase volume level.
: Decrease volume level.
Note
Selecting the function mode
1
When powered on, press and hold button to
display the function mode screen.
Press
, button to choose the desired
function mode.
2
Press button to enter.
Press
/
button to cancel.
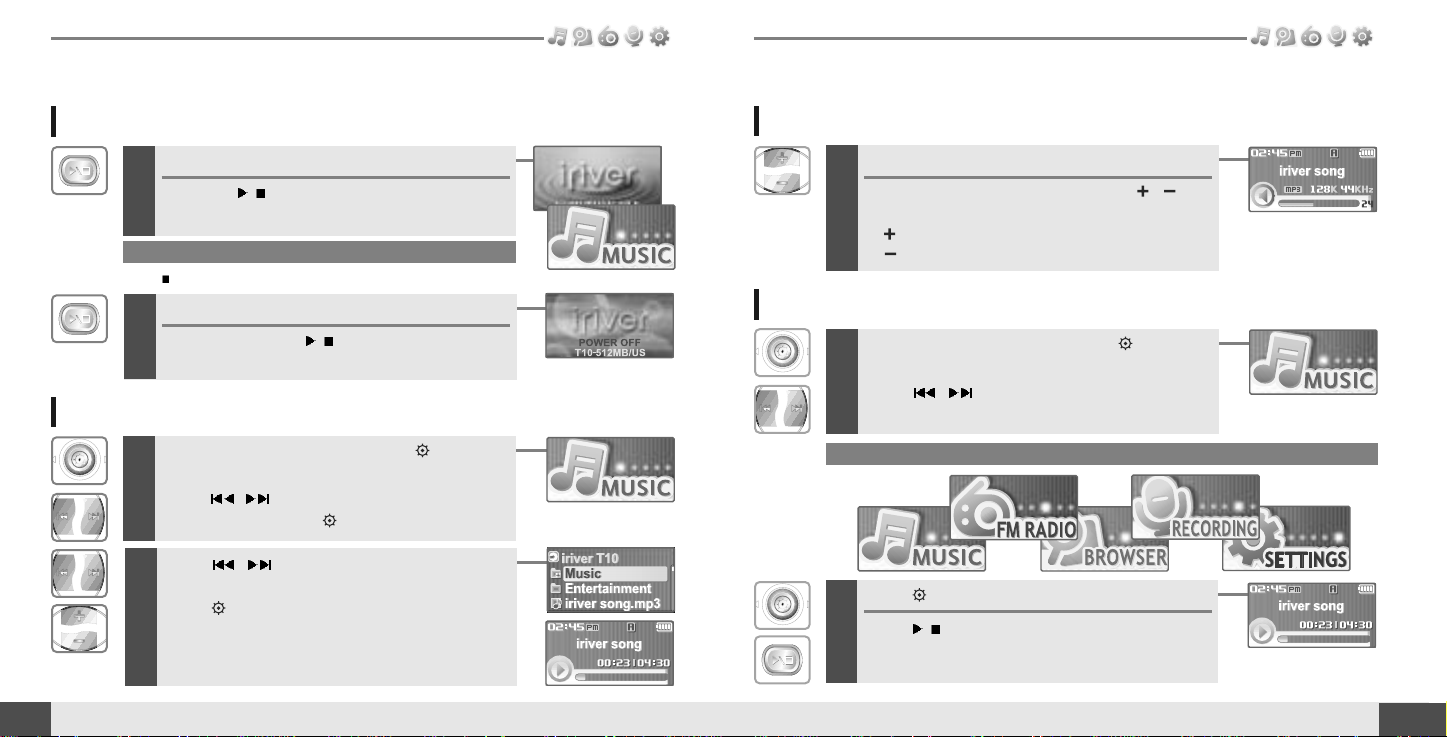
Turning on the player
Press the/button to turn on the player.
Previous function mode will be displayed.
Basic Usage
2
Turning off the player
Press and hold the/button.
Turns off the player.
Playing a music file
1
When powered on, press and hold button to
display the function mode screen.
Press
, button to choose the desired
function mode. Press button to enter.
2
Press , button to choose the desired
music file.
Press button to start playback.
<Only for models including
FM Radio function>
Page 11

3
Chapter
20
Basic operation
MUSIC
..................................................
21
Playing a music file
..............................................
21
Changing playback mode
...................................
23
A-B Repeat
............................................................
24
Changing the sound EQ
......................................
24
Download Music & Playlists
...............................
25
Deleting a file or folder on the player
.................
26
BROWSER/IMAGE VIEWER
..................
28
BROWSER
............................................................
28
IMAGE VIEWER
....................................................
29
Adding image file to player
.................................
29
*FM RADIO
...........................................
31
Listening to *FM radio
.........................................
31
Searching for a frequency - Manual Scan
.........
32
Searching for a frequency - Auto Scan
..............
32
Saving for a frequency - Manually
......................
33
Saving for a frequency - Automatically
.............
34
Selecting preset memory
....................................
34
Deleting a channel
...............................................
35
RECORDING
.........................................
36
To record *FM station
..........................................
36
Recording voice
...................................................
37
Note for recording
................................................
38
To play a recorded file
.........................................
38
www.iriver.com
* Only for models including FM Radio function
19
Page 12

4
Press the button to start music playback.
Press
/
to pause music playback.
Press
/
again to continue playing.
5
Adjusting the volume
During the music file playback, press ,
button to adjust volume level.
: Increase volume level.
: Decrease volume level.
6
Skipping to previous/next file
During the music file playback, press ,
button to skip to the previous/next file
: previous file : next file
7
Fast searching
Press and hold the , button for fastforward or fast-reverse playback.
: fast-rewind : fast-forward
Release the button for normal playback.
Release HOLD switch, then press/button to
turn on the player.
Previous function mode will display.
22
MUSIC
Basic operation
Playing a music file
1
MUSIC
21
Basic operation
2
Press and hold button to display the
function mode screen.
Press
, button to select [MUSIC] mode,
then press button to enter.
3
Use the , , , buttons to select a
music file.
: to go the upper folder
: to go the sub folder
: to select a file
To exit file list screen, press
/
button.
Page 13

Press button while playing to select the
beginning (A) point.
2
Press the , , , button to select
desired playback mode.
The playback mode is changed to the selected
mode.
While playing a music file, press the button to
display the playback mode select screen.
1
24
A-B Repeat
1
MUSIC
Note
You can select one of the following EQ types:
NORMAL, CLASSIC, LIVE, POP, ROCK, JAZZ, U BASS, METAL,
DANCE, PARTY, SRS, USER EQ
Basic operation
Changing playback mode
MUSIC
23
Basic operation
2
Press button again to select the end (B)
point.
Play a selected interval repeatedly.
To cancel interval repeat, press the button.
Changing the sound EQ
1
During the music file playback or pause, press
button, to display the EQ SELECT screen.
2
Press the , , , button to select
desired sound EQ.
The sound is changed to the selected EQ.
Note
The following the icons displayed to indicate playback mode.
Repeat
playback
Shuffle
playback
Shuffle
playback
repeatedly.
Normal
playback
Play all files in the player, then stop.
Play all files in the current folder, then stop.
Play a single file repeatedly.
Play all files in the player repeatedly.
Play all files in the current folder repeatedly.
Randomly play all files in the player, then stop.
Randomly play all files in the current folder, then stop.
Randomly play all files in the player repeatedly.
Randomly play all files in the current folder repeatedly.
Page 14

MUSIC
25
Basic operation
26
MUSIC
Basic operation
Get the latest version of Windows Media Player
In order to copy music & playlists to your player, you must use Windows Media Player 10.
The installation CD-ROM should include the proper version of Windows Media Player.
Windows Media Player 10 can also be found online at : www.microsoft.com/windowsmedia/download/
Please note, purchased music can only be copied to this player using Windows XP and the latest version of Windows Media Player.
Download Music & Playlists
1. Connect the USB cable to the USB port on the player and to your PC.
USB port on the PC
USB port on the T10
USB cable
A
A
B
B
2. Open Windows Media Player.
a. Click Start -All Programs -Accessories -
Entertainment -Windows Media Player.
b. Click “Library ” from the menu button near
the top of the screen..
Most of your music should be listed in this library.
If not, check Windows Media Player help for more
information about the library.
3. Locate a Song or Playlist in the Library
and Right-Click on it.
Select "Add to -Sync List".
A “Sync list ” will appear on the right side
of windows Media Player listing all the
Songs & Playlists to be added to your
player.
4. Click the "Sync" menu button.
On the right side the Sync screen
choose the T10 from the download list.
5. Click Start Sync to transfer the songs or
playlists on to the T10 player.
When complete, copied songs will
appear in the "Synchronized to Device"
list on the left side of Windows Media
Player and in the specified folder on the
right side of the screen.
Repeat for all the songs or playlists you would like to add to your player.
Disconnect the player from your computer and enjoy your music!
If you prefer to Auto Sync, please select "Auto Sync" in the menu of Set Up Sync.
You can download music and playlists.
Page 15

28
BROWSER/IMAGE VIEWER
Basic operation
Deleting a file or folder on the player
1
While in stop mode, press the button to
display music list screen.
Select a file or folder to delete by using the
,
, , button.
: to go the upper folder : to go the sub folder
, : to select a file
Note
You can only delete an empty folder.
2
Click the button.
3
Select “YES” by using the , button to
delete, then press NAVI/MENU button.
File or folder is deleted on the player.
MUSIC
27
Basic operation
BROWSER
1
Press and hold button to display the
function mode screen.
Press
, button to select [BROWSER]
mode, then press button to enter.
2
File list screen is displayed on the LCD screen.
Page 16

30
BROWSER/IMAGE VIEWER
Basic operation
BROWSER/IMAGE VIEWER
29
Basic operation
Note
Image file may not display if file is damaged.
Only 4/8/16/24 bit Mono/Color BMP file can be displayed.
RLE type BMP file is not supported.
IMAGE VIEWER
1
While BROWSER mode, select a image file by
using the
, , , button.
Press the button to to view .
: to go the upper folder : to go the sub folder
, : to select a file
: to execute image viewer
Adding image file to player
1. Connect the player and PC using the cable supplied with the player and power it
on.
(Refer to page 12.)
2. Open “Start - My Computer”.
7. Disconnect the USB cable once all copying has finished.
5. To get images on the player, drag and
drop the image files from your PC to
the “Dara” folder on the iriver T10.
6. A progress window will appear while
files are copying.
3. Locate your image files(BMP), usually
found in "My Documents" then "My
Pictures", keep this folder open.
4. Open a second My Computer window.
Double click on the iriver T10 device.
Page 17

*FM RADIO
31
Basic operation
32
*FM RADIO
Basic operation
1
Press and hold button to display the
function mode Screen.
Press the
, button to select [FM RADIO],
then press the button to confirm.
The previous station is displayed.
Listening to FM radio
Note
In areas where the signal is weak, some channels may be unavailable,
or reception may be poor.
2
Press the , button to select your desired
station.
3
To change STEREO/MONO
Press the/button to change Stereo or
Mono.
The station is changed to stereo or mono.
* Only for models including FM Radio function* Only for models including FM Radio function
Searching for a FM radio frequency - Manual Scan
1
If PRESET is displayed, first press the button to exit
PRESET mode.
Press the , button to select your desired
station.
Note
While in Preset mode, auto scan functions are not available.
Searching for a FM radio frequency - Auto Scan
1
If PRESET is displayed, first press the button to exit
PRESET mode.
To automatically locate a station press and hold
the
, button.
The player will quickly scan through each frequency
and stop at the next station that can tuned in.
Page 18

34
*FM RADIO
Basic operation
*FM RADIO
33
Basic operation
Note
Up to 20 stations can be saved.
Saving an FM Radio frequency - Manually
1
If PRESET is displayed, first press the button to exit
PRESET mode.
Press the , button to select your desired
station.
2
Press the button to display Save Channel
screen.
Press the
, , , button to select your
desired channel number.
: Saved : not used
3
Press the button to save.
To exit the Save Channel screen, press the
button.
* Only for models including FM Radio function * Only for models including FM Radio function
Saving an FM Radio frequency - Automatically
Note
When the player does not have any preset stations, EMPTY will be
displayed at Preset mode, then fade out.
1
If PRESET is displayed, first press the button to exit
PRESET mode.
Press and hold the button to automatically
select select stations and save them in
sequential order.
Selecting preset memory
1
If PRESET is not displayed, first press the button to
enter PRESET mode.
Press the , button to select your desired
channel.
Page 19

RECORDING
Basic operation
*FM RADIO
Basic operation
36
35
Deleting a channel
1
If PRESET is not displayed, first press the
button to enter PRESET mode.
Press the button to display Delete Channel
screen.
Note
Whenthe player does nothave any preset stations, EMPTY will be
displayedwhen pressing the button.
2
Select the channel to delete by using the ,
, , button.
You can delete only saved channel.
: Saved channel : Selected channel
: not used channel
3
Press the button to delete selected
channel.
Press the
/
button to exit Delete Channel
screen.
* Only for models including FM Radio function
Press and hold the button to display
function mode screen.
Select the [FM RADIO] by using the
,
button, then press button.
1
2
Press the button during FM reception.
The station will be recorded.
Press
/
button to pause the recording process.
Press
/
button again to restart recording.
3
Press the button again to stop recording.
The recorded file is saved.
To record *FM station
Note
Therecorded file is savedas TMMDDXXX.MP3 in the RECORD folder.
(T:Tuner,MM:Month, DD:day, XXX:sequential number)
Volumecan not be controlledwhile recording.
Youcan adjust recording qualityat the SETTINGS-RECORDING-
FM SETTING.(Refer to page 50)
* Only for models including FM Radio function
Page 20

38
RECORDING
Basic operation
RECORDING
37
Basic operation
Press and hold the button to display
function mode screen.
Select the [RECORDING] by using the
,
button, then press button.
The recording standby screen is displayed.
Recording voice
1
Note
The recorded file is saved as VMMDDXXX.MP3 in the VOICE folder.
(V:Voice, MM:Month, DD:day, XXX:sequential number)
Volume can not be controlled while recording.
You can adjust recording quality at the SETTINGS-RECORDING-
VOICE SETTING.(Refer to page 50)
2
Press the button to begin recording.
Press/button to pause the recording process.
Press
/
button again to restart recording.
3
Press the button to stop recording.
The recorded file is saved and then the recording
standby screen is displayed.
Note for recording
The recording will be stop if
- the amount of recorded data exceeds the
capacity.
- the battery is low.
1
Press and hold the button to display
function mode screen.
Select the [BROWSER] by using the
,
button, then press button.
2
Select a recorded file in the RECORD or
VOICE folder by using the
, , ,
button, then
press button.
The selected file will begin playing back.
To play a recorded file
Page 21

40
Useful features
4
Chapter
www.iriver.com
Menu configuration
............................
41
Menu operation
.................................
42
Enter Settings Menu
.........................................
42
Enter Sub Menu
................................................
42
Set the menu functions
....................................
43
Exit sub menu
...................................................
43
Customizing the function settings
.......
44
Sound
................................................................
44
Display
...............................................................
45
Recording
..........................................................
50
Timer
..................................................................
52
Advanced
..........................................................
55
39
Page 22

42
Enter Settings Menu
Menu operation
Useful features
Menu configuration
41
Useful features
Enter Sub Menu
Functions are subject to change with different firmware versions.
Users can configure their own settings.
SRS Setting
User EQ
Backlight Timer
Screen Saver
Scroll Speed
Tag Info.
Language
Battery Select
Name
LCD Contrast
Power Off Timer
Sleep Timer
Date & Time
Alarm/*FM Rec.
Set Alarm
*FM Rec. Reserve
Resume
System Info.
Scan Speed
Playback Speed
Study Mode
Load Default
Format
F/W Upgrade
*FM Setting
Voice Setting
Voice Detect
1
Press and hold the button to display the
Mode screen.
Press the
, button to select [SETTINGS]
mode.
2
Press the button to display the Settings
screen.
Press the , button to move the Settings
menu.
1
Press the button to enter the sub menu
screen.
* Only for models including FM Radio function
Page 23

Press the , button to select sub menu.
44
Sound
Customizing the function settings (Menu)
Useful features
Set the menu functions
1
Menu operation
43
Useful features
1. SRS Setting
Sets the 3D sound effect. SRS, FOCUS, TruBass, and
Boost are available.
SRS : Adjust the SRS value.
FOCUS : Adjust the sound resolution value.
TRUBASS : Adjust the TruBass value.
BOOST : Adjust the sound boost value.
Use proper boost value depends on t he earphones or
headphone characteristics.
2. User EQ
You can adjust the sound to your preference.
There are 5 band frequency steps, set from <-15dB> ~ <+15dB>
by 1dB increments.
2
Press the button to enter Sub Menu setting
screen.
3
You can set, cancel or change sub menu by
pressing the
, , , , button .
Exit sub menu
1
Press the/button to exit sub menu.
Page 24

46
Display
Customizing the function settings (Menu)
Useful features
Customizing the function settings (Menu)
45
Useful features
1. Backlight
You can adjust the time that the Backlight stays on.
The Backlight can be set to: <5 SEC>, <10 SEC>, <30 SEC>,
<1 MIN>, <5 MIN>, <10 MIN> or <ALWAYS ON>.
2. Screen Saver
Automatically display screen saver after a selected time
at playback mode.
The TIME can be set to :
<OFF>, <10 SEC>, <30 SEC>, <1 MIN>, or <3 MIN> .
The TYPE can be set to :
<IRIVER>, <SPECTRUM> or <WAVEFORM>.
Display
3. Scroll Speed
Select scroll type and speed of the current title playback
information.
The scroll type can be set to :
<VERTICAL> or <HORIZONTAL>.
The scroll speed can be set to :
<SLOW>, <NORMAL> or <FAST>.
4. Tag Info.
While playback mode, you can display the information of
music file by using ID3 Tag.
You can set <ON> or <OFF> .
Off : Display track with file name
z
z
File name will be displayed by default for songs with no ID3
information
Page 25

48
Display
Customizing the function settings (Menu)
Useful features
Customizing the function settings (Menu)
47
Useful features
5. Language
Select the language to display the file name and ID3 tag
information.
Support 40 languages.
6. Battery Select
Select the current battery.
You can set <RECHARGEABLE> or <ALKALINE>.
The player will manage the battery indicator icon to better match
the usage level.
3
To delete the character, press button.
To scroll between English and your preferred
language, use button.
4
Press and hold button to save and exit.
Display
1
Select the character by using , button
and press button to input the character.
2
To move the cursor in the name window,
use , button.
7. Name
You can input your name or custom text.
Page 26

50
Customizing the function settings (Menu)
Useful features
Customizing the function settings (Menu)
49
Useful features
Display
8. LCD Contrast
Adjust the LCD screen contrast.
The LCD contrast can be adjust from <-10> to <+10>.
Recording
1. *FM Setting
You can set recording quality (<HIGH>, <MIDDLE> or
<LOW>) when recording FM.
2. Voice Setting
You can set recording quality (<HIGH>, <MIDDLE> or
<LOW>) when recording voice.
* Only for models including FM Radio function
Page 27

52
Customizing the function settings (Menu)
Useful features
Customizing the function settings (Menu)
51
Useful features
Recording
3. Voice Detect
The voice recording mode will automatically pause
during silence. This is useful for recording over a long
period of time to save memory.
LEVEL : Set the relative level of sound needed to activate the
recorder. (<OFF>, <01>, <02>, <03>, <04> or <05>)
TIME(SEC) : Set the number of seconds of silence to record
before pausing.(<OFF>, <01>, <02>, <03>, <05> or <10>)
Timer
1. Power Off Timer
Automatically turns the power off at the stop mode.
Time range can be set from <1 MIN>, <2 MIN>, <3 MIN>, <5
MIN>, <10 MIN>, <20 MIN>, <30 MIN> or <60 MIN>.
2. Sleep Timer
Automatically turns the power off after a fixed time.
Time range can be set from <OFF>, <5 MIN>, <10 MIN>, <20
MIN>, <30 MIN>, <60MIN>, <120 MIN> or <180 MIN>.
OFF : Sleep timer function does not activate.
Page 28

54
Customizing the function settings (Menu)
Useful features
Customizing the function settings (Menu)
53
Useful features
Timer
3. Date & Time
Set the current date and time.
4. Alarm/*FM Rec.
OFF : The Alarm and FM Record functions are disabled and the
player will not power on at either indicated time.
ALARM : At the time indicated in the "Set Alarm" setting the player
will power on and begin music playback.
*FM RECORDING : At the time indicated in the "FM Rec.
Reserve" setting the player will power on and begin
recording from the selected radio station.
Timer
5. Set Alarm
Set the alarm time.
6. *FM Rec. Reserve
Set the time and station to be recorded.
* Only for models including FM Radio function
* Only for models including FM Radio function
Page 29

56
Customizing the function settings (Menu)
Useful features
Customizing the function settings (Menu)
55
Useful features
Advanced
1. Resume
ON : Playback will resume from the previous location in
a song when the player is stopped or powered off.
OFF : Playback begins from the first track after the player
is stopped or powered off.
2. System Info.
You can check the firmware version information, free
space memory and total number of tracks.
Advanced
3. Scan Speed
Adjust the speed of FF/RW(fast-forward/fast-rewind).
The Scan Speed can be set from <1X>, <2X>, <4X> or <6X>.
4. Playback Speed
Adjust the speed of playback.
The Playback Speed can be set from <-5 > to <+5>.
Page 30

58
Customizing the function settings (Menu)
Useful features
Customizing the function settings (Menu)
57
Useful features
Advanced
5. Study Mode
While playing, press and hold , button will skip
the current track set time ahead.
Time range can be set from <OFF>, <3 SEC>, <10 SEC>, <20
SEC>, <30 SEC>, <60 SEC>, <120 SEC> or <180 SEC>.
OFF : Study Mode function does not activate.
Advanced
6. Load Default
Reset menus to the original factory settings.
When the Load Default is done, the player will be rebooted
automatically.
7. Format
Memory is formatted and all saved files are deleted.
Before formatting can begin, you must backup all data stored on
the player.
Care must be taken as formatted files can not be recovered.
When the Format is done, the player will be rebooted
automatically.
Note : What is Firmware?
It is the operating system that works in the T10.
iriver provides you with the latest and best features through firmware upgrade.
Visit www.iriver.com to upgrade your firmware.
8. F/W Upgrade
Upgrade the operating system of T10.
Refer to 61 page “Firmware Upgrade” for details.
Page 31

5
Chapter
60
Customer Support
Firmware Upgrade
...............................
61
T roubleshooting
....................................
62
Specification
.........................................
63
Safety Information
................................
64
FCC Certification
...................................
65
Chapter
www.iriver.com
59
Page 32

62
T roubleshooting
Customer Support
Firmware Upgrade
Firmware Upgrade
61
Customer Support
Check whether the HOLD switch on the player is ON (Switch to
OFF position)
Check the condition of the battery. Insert a fresh battery.
Check whether VOLUME is set to "0".
Firmly connect the earphones.
Checkwhethertheplugisdirty.Cleantheplugwithadryandsoft
cloth.
Corrupted MP3 or WMA files may make a static noise and the
soundmaycutoff.ListentoyourfilesonthePCtoseeiftheyare
corrupted.
Check out SETTINGS Display Language and confirm whether
the right language has been selected.(Refer to page 47)
Adjust the position of the player and earphones.
Turn off the power of other electric devices near the player.
The Earphone cord functions as the antenna, they must be
plugged in for best reception.
Check the condition of the battery.
Check the connection between your computer and the player to
ensure that the cable is secure.
Check whether the player’s memory is full.
T10 supports up to 700 music files and 700 folders.
No Power.
No sound or distortion
during playback.
Characters in LCD
are corrupted.
Poor *FM Reception.
Failed download of
MP3 file
The title saved in T10
are not played.
Trouble
Solution
Shouldany problem persist after you have checkedthese symptoms, consult youririver
dealeror contact support atwww.iriver.com.
Note
Beforeupgrading the firmware, checkthe condition ofthe battery. The firmwareupgrade may fail due to
batterypower shortage.
Donot turn the playeroff until the upgrade is completed.
Whenthe upgrade is completed,the firmware file (T10_MTP.HEX) will be deletedautomatically.
Unzip the downloaded firmware file (T10_MTP.
HEX), then copy to Data folder on the player.
2
Disconnect USB cable, and T10 will be ready for
Firmware Upgrade.
3
Activating the Firmware Upgrade
Choose <YES> and press the button to start
Firmware Upgrade.
When the upgrade is done, T10 powers off
automatically. Please turn T10 on again.
If you chose <NO> by any chance, then execute
[Settings]
[Advanced] [F/W Upgrade].
4
Download the latest firmware upgrade file from
www.iriver.com/support.
1
* Only for models including FM Radio function
Page 33

20 Hz ~ 20 KHz
(L)15 mW + (R)15 mW (16 Ohm) max. Volume
90 dB(MP3)
87.5 MHz ~ 108 MHz
60 dB
Headphone/Earphone-Cord Antenna
MPEG 1/2/2.5 Layer 3, WMA, OGG, ASF
8 Kbps ~ 320 Kbps
ID3 VI, ID3 V2.2.0, ID3 V2.3.0, ID 3 V2.4.0
Approx. 53 hours (128 kbps, MP3, Vol 20,
LCD off, EQ Normal, Alkaline
AA 2400mAh)
256 MB 512 MB 1 GB
Approx. 18 hours Approx. 36 hours Approx. 72 hours
65,000 color 1.01 inch CSTN
40 languages
85.8 (W) x 40.8 (D) x 29.4 (H) mm
49 g (Battery included)
AA Type Alkaline battery 1EA
-5
~ 40
64
Customer Support
Specifications
63
Customer Support
Memory Capacity
Model No.
256 MB*
T10 256MB
512 MB*
T10 512MB
1 GB*
T10 1GB
* 1 MB = 1,000,000 Bytes / 1 GB = 1,000 MB = 1,000,000,000 Bytes
Not all memory available for storage. Memory is not expandable.
** Only for models including FM Radio function
Audio
**FM Tuner
File Playback
Recording
Display
General
Frequency range
Headphone Output
S/N ratio
FM Frequency range
S/N ratio
Antenna
File Type
Bit Rate
Tag Info
Max. Playtime
Max. Recording time
(@32kbps)
LCD
Language
Dimension
Weight
Battery
Operational Temperature
Specifications
ItemCategory
For Safety
On headphones and earphones
Avoid dropping or impacting the player.
The player is designed to operate while walking or running, but dropping or excessively
impacting the player may be cause damage.
Avoid contacting the player with water.
Damage to the internal parts of the player may occur if the player comes into contact with
water. If your player gets wet, dry the outside with a soft cloth as soon as possible.
Do not leave the player in a location near heat sources, or in a place subject to direct
sunlight, excessive dust or sand, moisture, rain, mechanical shock, unleveled surface, or in a
car with its windows closed.
Remove the battery if player is unused for long periods of time.
Battery left in the player for a long time can corrode and damage the device.
All data stored on this device may be erased by a excessive impact, a thunder or an
electricity failure, etc. on the device.
The manufacturer does not warrant and will not be held responsible in any way for damages or
loss of data, including loss of data stored on this device, resulting from a excessive impact, a
thunder or an electricity failure, You will be responsible for safe-guarding all data stored on this
device.
Road Safety
Do not use headphones/earphones while driving, cycling, or operating any motorized vehicle.
It may create a traffic hazard and is illegal in some areas. It can also be potentially dangerous
to play your headset at high volume while walking, especially at pedestrian crossings. You
should exercise extreme caution or discontinue use in potentially hazardous situations.
Preventing hearing damage
Avoid using headphones/earphones at high volume. Hearing experts advise against
continuously loud and extended play. If you experience a ringing in your ears, reduce volume
or discontinue use.
Consideration for others
Keep the volume at a moderate level. This will allow you to hear outside sound and to be
considerate of the people around you.
Safety Information
Page 34

FCC Certification
65
THIS DEVICE COMPLIES WITH PART 15 OF THE FCC RULES. OPERATION IS
SUBJECT TO THE FOLLOWING TWO CONDITIONS:
(1) THIS DEVICE MAY NOT CAUSE HARMFUL INTERFERENCE, AND
(2) THIS DEVICE MUST ACCEPT ANY INTERFERENCE, RECEIVED, INCLUDING
INTERFERENCE THAT MAY CAUSE UNDESIRED OPERATION.
Note : This equipment has been tested and found to comply with the limits for a Class B digital
device, pursuant to part 15 of the FCC Rules. These limits are designed to provide
reasonable protection against harmful interference in a residential installation.
This equipment generates, uses and can radiate radio frequency energy and, if not
installed and used in accordance with the instructions, may cause harmful interference to
radio communications. However, there is no guarantee that interference will not occur in a
particular installation. If this equipment does cause harmful interference to radio or
television reception, which can be determined by turning the equipment off and on, the
user is encouraged to try to correct the interference by one or more of the following
measures :
- Reorient or relocate the receiving antenna.
- Increase the separation between the equipment and receiver.
- Connect the equipment into an outlet on a circuit different from that to which
the receiver is connected.
- Consult the dealer or an experienced radio/TV technician for help.
NOTE: THE MANUFACTURER IS NOT RESPONSIBLE FOR ANY RADIO OR TV
INTERFERENCE CAUSED BY UNAUTHORIZED MODIFICATIONS TO THIS
EQUIPMENT. SUCH MODIFICATIONS COULD VOID THE USER'S AUTHORITY
TO OPERATE THE EQUIPMENT.
Memo
Page 35

Memo
Memo
 Loading...