

Page 1
Page 2

Contents...
Chapter 01 Getting Started
Components
4
Locating the Controls
5
Installing Applications
6
Chapter 02 Basic Operations
Turning the Product on/off
8
Using the Wheel and Selection Mode
9
Touch Screen
10
Using HOLD and RESET
11
Connecting Products
12
Chapter 03 Using the Product
FLASH
16
REC
17
PICTURE
20
VIDEO
23
MUSIC
26
RADIO
29
TEXT
32
FILE
34
Bluetooth
35
Playing Podcast File
36
Chapter 04 Setting up the SPINN
Setting up the SPINN38
Chapter 05 Other Information
Using iriver plus 3
42
Using Windows Media Player 11
45
Copyrights/Certification/
48
Trademarks/Limited Liability
Safety Instructions
49
Troubleshooting
52
Page 3

Page 4

Chapter 01 Getting Started
Components
4
Locating the Controls
5
Installing Applications
6
Installing iriver plus 3
Installing Windows Media Player 11
Page 5
Components
Quick Start Guide & Warranty Card Installation CD (with Instruction Guide) USB Cable
04 Getting Started
Components are subject to change without notice and may vary from images shown.
EarphonesSPINN
Page 6
Locating the Controls
Touch Screen AMOLED
Volume +
Volume -
Power
05 Getting Started
Appearance, printed or contoured sections of the product may vary depending on model.
Press: OK
MIC
BACK HOLD
Earphones jackUSB jack
Press and hold: Smart Key
RESETWheel
Page 7

iriver plus 3 and Windows Media Player 11 are integrated software applications that efficiently manage various multimedia files.
Installing Applications
iriver plus 3 and Windows Media Player 11 give you freedom to transfer music, video and picture files from PC to the product.
Installing iriver plus 3 Installing Windows Media Player 11
1. Insert the installation CD into your PC to display the
installation process screen.
2. Click iriver plus 3 and complete the installation process
by following the on-screen instructions.
1. Insert the installation CD into your PC to display the
installation process screen.
2. Click Windows Media Player 11 and complete the
installation process by following the on-screen
instructions.
Minimum requirements for software applications
Windows® 2000/XP
- Intel® Pentium® ll 233 MHz or higher processor speed -64 MB or greater memory -30 MB or greater hard disk space -16-bit enabled speaker and sound card
- Microsoft Internet Explorer version 6.0 or later - SVGA or high resolution monitor (1024x768 resolution or greater)
Windows® Vista (Windows® Vista only supports the 32-bit version and does not support the 64-bit version.)
- Intel® Pentium® ll 800MHz or higher processor speed -512 MB or greater memory -20 MB or greater hard disk space -16-bit enabled speaker and sound card
- Microsoft Internet Explorer version 6.0 or later - SVGA or high resolution monitor (1024x768 resolution or greater)
For more information on using iriver plus 3, refer to pages 42~44.
For more information on using Windows Media Player 11, refer to pages 45~47.
To connect the product to iriver plus 3, select SET > Advanced > Connection Type and set to MSC and to connect the product to Windows Media Player 11,
select SET > Advanced > Connection Type and set to MTP. (Refer to page 40.)
06 Getting Started
Page 8

Chapter 02 Basic Operations
Turning the Product on/off
8
Turning on the Product
Turning off the Product
Using the Wheel and Selection Mode
9
Using the Wheel
Selection Mode
Touch Screen
10
Using Touch Screen
Using HOLD and RESET
11
Using HOLD
Using RESET
Connecting Products
12
Connecting Earphones
Charging the Product
Connecting the SPINN to Your PC
Disconnecting the SPINN from Your PC
Copying files / folders to the product
Deleting files / folders from the product
Page 9

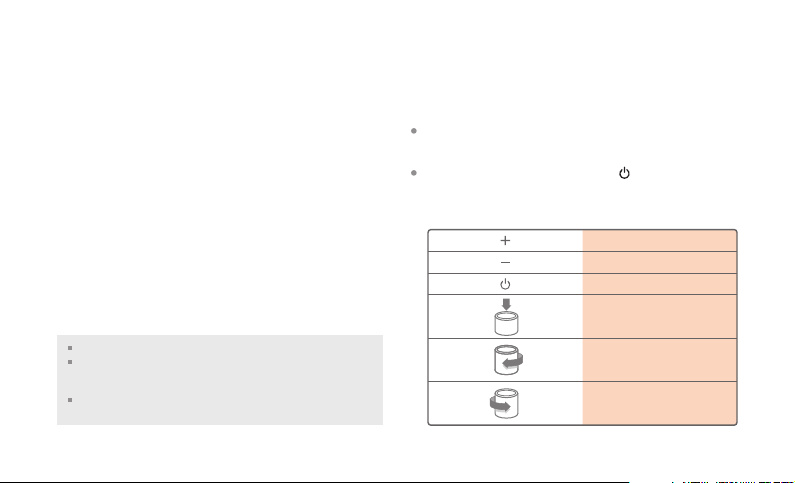
Turning the Product on/off
Turning on the Product Turning off the Product
1. Press the [ ]button on the product to turn it on.
1. Press and hold the [ ] button on the product again
to turn it off.
This product has an automatic power saving function to save battery power. Based on the settings in power save mode, the product will be automatically turned off after a
pre-determined period without operation. For more information on setting this mode, refer to SET > Advanced > Auto Power off. (Refer to page 40.)
Based on this setting, the way to turn off the product and battery consumption rate will be changed. For more information on setting this mode, refer to SET > Advanced >
Power Off Type. (Refer to page 40.)
Sleep
- When turning on the product, the last used function will be displayed.
- The battery will be consumed slightly in this mode.
Power Off
- When turning on the product, the main screen will be displayed. The device requires a moment read all stored files.
- The battery will not be consumed when powered off.
08 Basic Operations
Page 10
Using the Wheel and Selection Mode
Using the Wheel
1. In the main mode screen or any list, spin the wheel to
select the mode or menu.
Press: Moves to the selected mode.
Plays the selected sub-menu.
Press and hold: Performs the allocated function.
(For function allocation, refer to Smart Key on page 40.)
Moves right
Moves down
Set SET > Display > Display Orientation to Portrait to use the wheel as same
direction as the displayed screen.
09 Basic Operations
Moves left
Moves up
Selection Mode
1. Turn on the power to display the main mode screen.
While operating any mode, press and hold the [ ] button to
display the main mode screen.
2. Spin the wheel to select the mode and press the [OK]
button to enter it.
3. While operating any mode or displaying any menu,
press the [ ] button to return to the previous screen.
You can also select the mode via the touch screen.
Page 11
Touch Screen
Using Touch Screen
1. The SPINN has touch screen system which operates with user's direct touch. Touch one of the icons displayed on
the screen to operate.
Touch
Do not press screen with a sharp tip or excessive power to avoid damage.
10 Basic Operations
Page 12

Using HOLD and RESET
Using HOLD Using RESET
1. Slide the HOLD switch to the direction of arrow to
lock the product.
2. Slide the HOLD switch to the opposite direction of
arrow to unlock the product.
In SET > Sound > SPINN Volume, you can set whether you can control volume
using the wheel while the HOLD function is enabled. (Refer to page 38.)
11 Basic Operations
1. If the product stops and does not respond to any
operation, press the RESET pinhole at the bottom of
the product.
Performing RESET does not delete the date / time settings and data in the
integrated memory.
If you reset the product, the SPINN will turn off and on automatically. If it does not
turn on automatically, press the [ ] button on the product to turn it on manually.
Page 13
Connecting Products
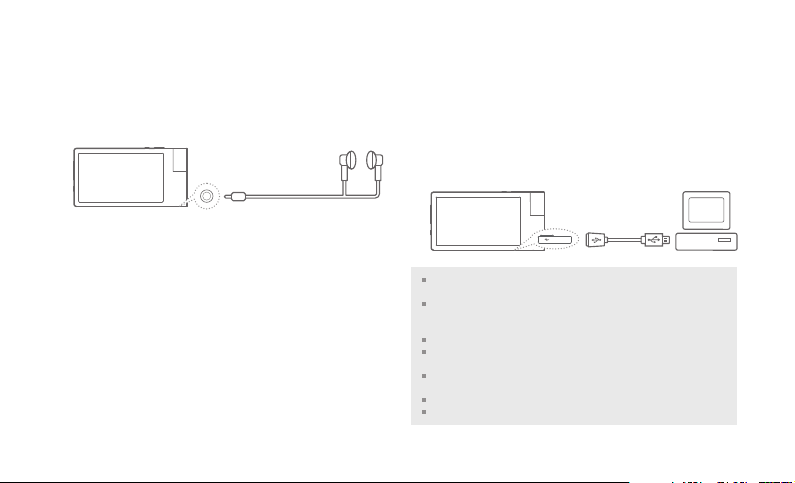
Connecting Earphones Charging the Product
1. Connect earphones to the Earphone jack. 1. Turn on your PC and connect the SPINN to it using
the USB cable provided.
2. The integrated battery will charge automatically.
Do not use any USB cable other than the one included with the product.
This may cause a malfunction.
Check if the product is connected to a high-power USB 2.0 port. Some low-power
USB ports built into certain peripheral devices, such as some types of keyboards
and USB hubs without integrated power may not provide enough power to charge.
While the PC is switched to standby mode, the product may not be charged.
Charge the product only at room temperature.
The product may not be charged in extremely hot or cold place.
The battery will be fully charged within about 2.5 hours.
(Based on fully discharged, power OFF)
The available usage time of charged battery becomes short over time.
The charging time might be extended if you use the product while charging.
12 Basic Operations
Page 14
Connecting Products
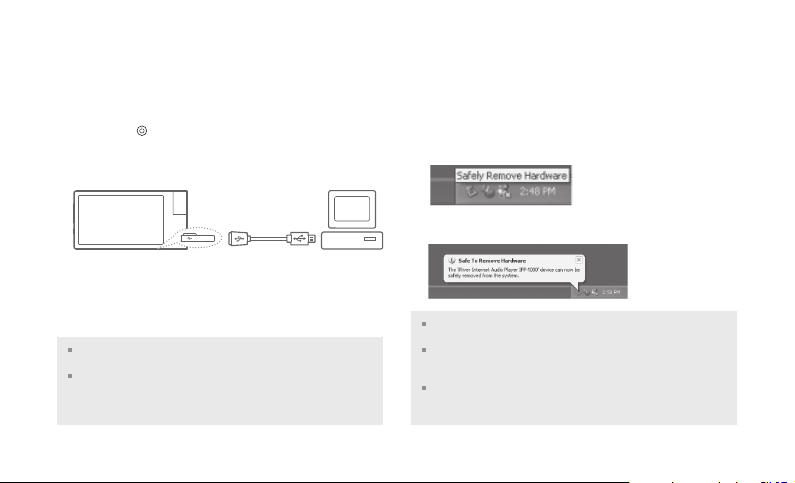
Connecting the SPINN to Your PC
1. Press the [ ] button on the product to turn it on.
2. Turn on your PC and connect the SPINN to it using
the USB cable provided.
3. The Select Connection Type message appears on
the screen.
-
Power & Data: The charging process starts and you can transfer data.
-
Power & Play: The charging process starts and you can use the product.
It is recommended to stop all operations before connect the product to your
PC for optimum performance.
Check if the product is connected to a high-power USB 2.0 port. Some lowpower USB ports built into certain peripheral devices, such as some types of
keyboards and USB hubs without integrated power may not provide enough
power to charge.
13 Basic Operations
Disconnecting the SPINN from Your PC
1. Click the icon on the taskbar to disconnect the product
using the Safely Remove Hardware menu.
2. Click the Stop button to confirm disconnection.
The icon on the taskbar may be hidden in some operating systems.
Click Show hidden icons to display the hidden icon.
The Safely Remove Hardware function may not be available while using some
applications such as Windows Explorer or Windows Media Player. Close all
applications first before performing the Safely Remove Hardware.
If the Safely Remove Hardware is not performed properly, try again after a few
minutes. If the product is removed without observing the above process,
data in the product might be damaged.
Page 15
Connecting Products
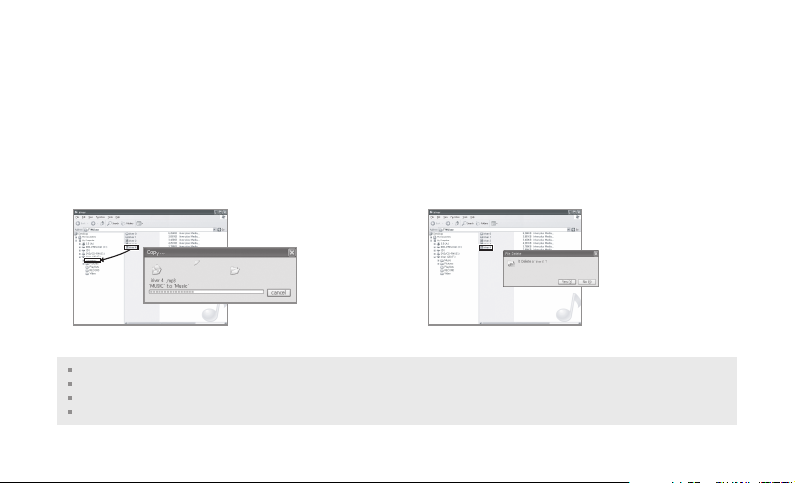
Copying files / folders to the product Deleting files / folders from the product
1. Select the desired files / folders in your PC and drag
& drop to the drive which appears as the product.
Always properly connect the product and PC.
When you transfer data, never disconnect it or turn off the power to protect your data from damage.
Transfer speed may vary depending on your computer and/or OS environments.
It is recommended to save media files using iriver plus 3 or Windows Media Player 11.
14 Basic Operations
1. After selecting the desired file / folder, right-click with
your mouse and select Delete.
2. Click Yes in the Confirm File Delete / Confirm Folder
Delete popup window to delete the file / folder.
Page 16

Chapter 03 Using the Product
FLASH
16
Selecting Flash Game
Playing Flash Game
REC
17
Recording
Screen Display While Recording
Listening to Recorded File
Deleting Recorded File
Additional Features
PICTURE
20
Selecting Picture
Viewing Picture
Screen Display While
viewing a picture
Additional Features
VIDEO
23
Selecting Video
Playing Video
Screen Display While
Playing Video
Additional Features
MUSIC
26
Selecting Music
Playing Music Files
Screen Display While
Playing Music
Additional Features
29
RADIO
Turning on FM Radio
Listening to FM Radio
Screen Display While
Listening to FM Radio
Additional Features
TEXT
32
Selecting Text
Viewing Text
Additional Features
FILE
34
Browsing Device
Deleting File
Bluetooth
35
Connecting Bluetooth Device
Disconnecting Bluetooth Device
36
Playing Podcast File
What is Podcast?
Transferring Podcast
file to the product
Playing Podcast File
Recovering Podcast
Page 17
FLASH
You can play various flash contents and games.
Selecting Flash Game
1. In the main mode, select FLASH to display the game
list.
2. In the game list, spin the wheel to select the content
and press the [OK] button to run it.
You can also select content in the game list by via the touch screen
Supported file formats: SWF
(FlashLite 2.1. Frame rate: Less than 20 frames/sec.
Audio: ADPCM MP3 128Kbps, less than 44/1 Khz)
If you start a flash game while listening to music, the music will stop and the
flash game will be played.
16 Using the Product
Playing Flash Game
Use the wheel, volume button, or touch screen
depending on the game.
While playing a game, press the [ ] button to finish it.
Moves up.
Moves down.
Exits Flash Game.
Confirms selection.
Moves right.
Moves left.
Page 18

REC
Recording Screen Display While Recording
1. In the main mode, select REC to display the recording
standby screen.
2. Press the [OK] button or touch [ ] on the screen to
start recording. To stop it, press OK or [ ] again.
You cannot control the volume while recording.
If the remaining memory space or power is insufficient, recording will be
automatically stopped.
The recorded file will be saved in the Recorded File List as following format.
VOICEYYMMDD_XXX.MP3 (YY: Year, MM: Month, DD: Day, XXX: Sequential number)
The file size per one minute varies by the recording quality.
Low: Approximately 240 KB / Middle: Approximately 480 KB /
High: Approximately 960 KB
17 Using the Product
1
2
3
4
1
Additional Features: Displays additional features.
2
Current status: Displays current status.
3
Record elapsed time: Displays the elapsed time of recording.
4
Available remaining time: Displays the remaining recording time.
5
Recorded File List: Displays the Recorded File List.
6
Back: Moves to the previous screen or higher up in
the file tree.
7
Start / stop recording: Starts / stops recording.
6
7
Page 19

REC
Listening to Recorded File
1. In the recording standby screen, touch [ ] on the
screen to display the Recorded File List.
2. Spin the wheel to select a file and press the [OK]
button to play it.
You can also select and play a file in the Recorded File List via the touch screen.
18 Using the Product
Deleting Recorded File
1. In the recording standby screen, touch [ ] on the
screen to display the Recorded File List.
2. Select a file and drag & drop it to [ ] on the screen
to delete.
Page 20

REC
Additional Features
1. In the recording standby screen, touch [OPT] on the
screen to display additional features.
2. Spin the wheel to select the additional feature and
press the [OK] button to display the sub items.
3. Spin the wheel to confirm the feature and press the
[OK] button to save / run it.
4. Press the [ ] button or touch [ ] on the screen to
hide the additional feature.
You can also select an additional feature in the additional features list via the
touch screen.
19 Using the Product
Voice Recording Quality: Sets the quality of recorded
voice.
Voice Detector: Records voice only when sound can
be detected.
Page 21

PICTURE
Selecting Picture Viewing Picture
1. In the main mode, select PICTURE to display the
picture list.
2. In the picture list, spin the wheel to select a picture
and press the [OK] button to display it in full screen.
Select a folder to enter it and press the [ ] button to move to the parent folder.
You can also touch a picture in the picture list to display it as a full screen.
Supported file format:
JPG (Some file types might have compatibility problem.)
Be sure to use iriver plus 3 when you transfer picture files. Otherwise,
unexpected errors may occur during picture playback.
20 Using the Product
While viewing a picture, press the [OK] button to start
/ stop slide show.
While viewing a picture, spin the wheel to display the
previous / next picture.
While viewing a picture, touch [ ] on the screen to
start the Zoom function and spin the wheel to zoom in
or out.
Some picture files with low resolution might not support the Zoom function.
Page 22

PICTURE
Screen Display While viewing a picture
1
2 3 4 5
21 Using the Product
6
1
Additional Features: Displays additional features.
2
Slide Show: Starts / stops slide show.
3
Previous Picture: Displays the previous picture.
4
Next Picture: Displays the next picture.
5
Zoom In / Zoom Out: Zooms picture in / out.
6
Back: Moves to the previous screen or higher up in
the file tree
Page 23

PICTURE
Additional Features
1. While a picture is displayed, touch [OPT] on the
screen to display additional features.
2. Spin the wheel to select the additional feature and
press the [OK] button to display the sub items.
3. Spin the wheel to confirm the feature and press the
[OK] button to save / run it.
4. Press the [ ] button or touch [ ] on the screen to
hide the additional feature.
You can also select an additional feature in the additional features list via the
touch screen.
22 Using the Product
Image Delay: Sets duration to perform slide show.
Slide Transitions: Sets an effect of slide show.
Set As Wallpaper: Sets the displayed picture as a
wallpaper.
Page 24

VIDEO
Selecting Video Playing Video
1. In the main mode, select VIDEO to display the video list.
2. In the video list, spin the wheel to select a video and
press the [OK] button to play it.
Select a folder to enter it and press the [ ] button to move to the parent folder.
You can also select and play a video in the video list via the touch screen.
Supported file formats: AVI (480x272: 1 Mbps), WMV9 (480x272: 850 Kbps)
Be sure to use iriver plus 3 when you transfer video file. Otherwise, unexpected
errors may occur during video playback.
Max. playtime: Approximately 5.5 hours
(based on avi, video: 480X272@30fps, 1 Mbps
Audio: based on MP3, 320Kbps, 44.1 Khz, CBR)
Max. playtime is subject to change depending on video type.
23 Using the Product
While playing, press the [ / ] button to control the
volume.
While playing, press the [OK] button or touch [ / ]
on the screen to pause/resume.
While playing, touch [ / ] on the screen to play fast
reverse / fast forward.
You can also touch specific position on the progress
bar to move to it.
Page 25

VIDEO
Screen Display While Playing Video
1
2
3
24 Using the Product
4
1
Additional Features: Displays additional features.
2
Elapsed Time: Displays the elapsed time of video.
5
3
Progress bar: Displays the status of video.
6
4
Back: Moves to the previous screen or higher up in
the file tree
7
5
Rewind: Rewinds video.
8
6
Pause / Play: Pauses / plays video.
7
Fast Forward: Plays fast forward video.
8
Total Playback Time: Displays total playback time of
video.
Page 26

VIDEO
Additional Features
1. While playing video, touch [OPT] on the screen to
display additional features.
2. Spin the wheel to select the additional feature and
press the [OK] button to display the sub items.
3. Spin the wheel to confirm the feature and press the
[OK] button to save / run it.
4. Press the [ ] button or touch [ ] on the screen to
hide the additional feature.
You can also select an additional feature in the additional features list via the
touch screen.
25 Using the Product
Scan Speed: Sets the speed of fast forward and reverse.
Resume: Selects whether the video is resumed from
the last played point or from the beginning of a file
when the player was stopped.
Sequence Play: Plays files with related names in
sequential order.
Page 27

MUSIC
Selecting Music Playing Music Files
1. In the main mode, select MUSIC to display the music
list.
2. In the music list, spin the wheel to select music and
press the [OK] button to play it.
Select an item / folder to enter it and press the [ ] button to move to the
parent item / folder.
You can also select and play music in the music list via the touch screen.
Supported file formats:
MP3(8~320Kbps), WMA(8~320Kbps), OGG(Q1~Q10), ASF, FLAG, and APE
The browsed result will be changed based on the setting in SET > Advanced >
Music Browse Type. (Refer to page 39.)
- Database: Browses files by Song, Now Playing, Playlists, Albums, Artists,
Genres, and Podcast.
- File Tree: Browses music file by folder.
You can manage your playlist using iriver plus 3 or Windows Media Player 11.
Max. playtime: Approximately 24 hours
(based on MP3, 128 Kbps, 44.1 KHz, Volume level 20, EQ Flat, AMOLED off)
26 Using the Product
While playing, press the [ / ] button to control the volume.
While playing, press the [OK] button or touch [ / ]
on the screen to pause/resume.
While playing, touch [ / ] on the screen to play fast
reverse / fast forward.
While playing, spin the wheel or touch [ / ] in the
screen to play the previous / next music.
You can also touch specific position on the progress
bar to move to it.
While playing, touch [ ] on the screen to select the
point A. Touch it again to select the point B.
Now the player plays between point A and B repeatedly.
While playing repeatedly, touch [ ] to deactivate
A-B Repeat.
To set the favorite rate, touch Rate on the screen.
Page 28

MUSIC
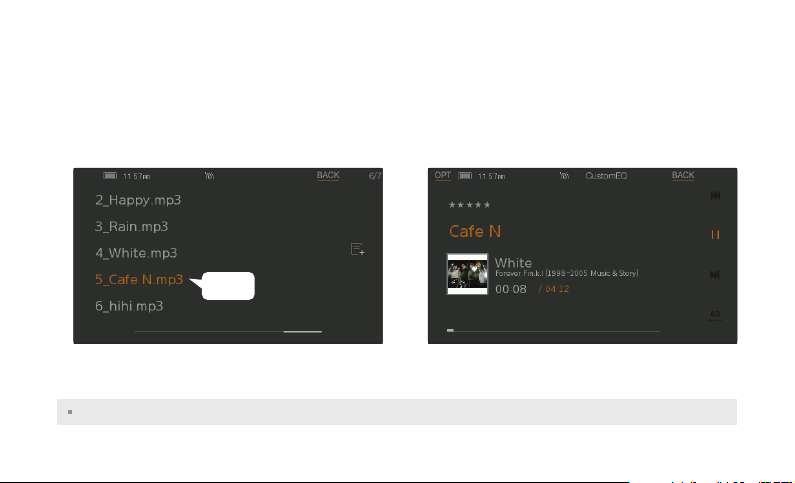
Screen Display While Playing Music
9
10
1
2
3
4
5
6
7
8
1
Additional Features: Displays additional features.
2
Rate: Classifies your favorite music by star ratings.
3
Songs (file name): Displays title (file name).
4
Album: Displays album name.
27 Using the Product
5
Album art: Displays album art image if available.
* You can add album art using iriver plus 3 or Windows Media
11
Player 11.
12
6
Elapsed Time: Displays the elapsed time of music.
13
7
Total Playback Time: Displays total playback time of music.
8
Progress bar: Displays the status of music.
14
9
EQ: Displays EQ.
15
10
Play Mode: Displays the play mode.
11
Back: Moves to the previous screen or higher up in
the file tree
12
Previous Music: Plays previous music.
13
Pause / Play: Pauses / plays music.
14
Next Music: Plays next music.
15
A-B Repeat: Activates / deactivates A-B Repeat.
Page 29

MUSIC
Additional Features
1. While playing music, touch [OPT] on the screen to
display additional features.
2. Spin the wheel to select the additional feature and
press the [OK] button to display the sub items.
3. Spin the wheel to confirm the feature and press the
[OK] button to save / run it.
4. Press the [ ] button or touch [ ] on the screen to
hide the additional feature.
You can also select an additional feature in the additional features list via the
touch screen.
28 Using the Product
Play Mode: Sets the play mode.
Select EQ: Sets the EQ.
Scan Speed: Sets the speed of rewind / fast forward.
Playback Speed: Sets the playback speed of music.
Lyric Display: Shows / hides lyric. It is available only
when the music file contains lyric information.
* It only supports Korean.
Page 30

RADIO
Turning on FM Radio
1. In the main mode, select RADIO to display recently
used Preset channels.
2. Spin the wheel to select the Preset channel.
Listening to FM Radio
While listening, press the [ / ] button to control the volume.
While listening, press the [OK] button to activate /
deactivate Preset.
After deactivating Preset, spin the wheel or touch [ /
] on the screen to move to the previous / next frequency.
While deactivating Preset, touch and hold [ / ] on the
screen to move to the available previous / next frequency.
You can use the PICTURE and TEXT modes while listening to FM Radio.
29 Using the Product
After activating Preset, spin the wheel or touch [ / ] on
the screen to move to the saved previous / next Preset.
While listening, touch [ ] on the screen to start
recording. Touch it again to stop recording.
While listening, touch [ ] on the screen to display
the Saved FM Recording list
- Spin the wheel to select a file and press the [OK] button to play it.
- Select a file and drag & drop it to [ ] on the screen to delete.
The cord of earphones functions as an antenna during radio reception.
(Use the supplied earphones. If you use other earphones, the reception rate
might be deteriorated.)
If the remaining memory space or power is insufficient, recording will be
automatically stopped.
The recorded file will be saved in the recording list as following format.
TUNERYYMMDD_XXX.MP3 (YY: Year, MM: Month, DD: Day, XXX: Sequential number)
The file size per one minute varies by the recording quality.
Low: Approximately 480 KB / Middle: Approximately 960 KB / High: Approximately 1.44 MB
The RADIO mode does not support Bluetooth headset.
Page 31

RADIO
Screen Display While Listening to FM Radio
1
2
3
4
5
6 7 8 9
30 Using the Product
10
1
Additional Features: Displays additional features.
2
Preset number: Displays the Preset number of
frequency currently being received.
11
3
Previous Preset / Channel: Moves to the previous
preset / channel.
4
Receiving Frequency: Displays frequency currently
being received.
5
Next Preset /Channel: Moves to the next preset / channel.
6
Saved Recordings: Displays the list of recorded files.
7
Frequency Band: Displays frequency band of current preset.
8
Saved Preset: Displays saved preset.
9
Recording: Records the radio broadcast you are listening to.
10
Back: Moves to the previous screen or higher up in
the file tree
11
Preset: Activates / deactivates preset.
Page 32

RADIO
Additional Features
1. While listening, touch [OPT] on the screen to display
additional features.
2. Spin the wheel to select the additional feature and
press the [OK] button to display the sub items.
3. Spin the wheel to confirm the feature and press the
[OK] button to save / run it.
4. Press the [ ] button or touch [ ] on the screen to
hide the additional feature.
You can also select an additional feature in the additional features list via the
touch screen.
31 Using the Product
FM Recording Quality: Sets the recording quality of
radio broadcasting.
Save Preset / Delete Preset: Stores the current
frequency to the channel. If the frequency is already
stored, the existing channel will be deleted.
Stereo / Mono: Switches the radio reception mode
between Stereo / Mono.
Auto Preset: Automatically scans and stores channel
frequencies.
* Up to 30 channels can be stored.
Tuner Region: Sets the frequency range based on
local standard.
- Korea / US: 87.5 - 108.0 MHz
- Japan: 76.0 - 108.0 MHz
- Europe: 87.50 - 108.0 MHz
Page 33

TEXT
Selecting Text Viewing Text
1. In the main mode, select TEXT to display the text list.
2. In the text list, spin the wheel to select a text and
press the [OK] button to display it.
Select a folder to enter it and press the [ ] button to move to the parent folder.
You can also select the text in the text list via the touch screen
The automatic scroll will be deactivated when the Text View Type is set to Percent.
If texts are not displayed properly, check the language setting in the Text Language.
32 Using the Product
Spin the wheel to scroll text up or down.
Press the [OK] button or touch [ ] on the screen to
start or stop the automatic scroll function.
If you stop viewing text, the last displayed point will be
stored.
* You can store 10 points for the latest 10 text files.
Page 34

TEXT
Additional Features
1. While viewing text, touch [OPT] on the screen to
display additional features.
2. Spin the wheel to select the additional feature and
press the [OK] button to display the sub items.
3. Spin the wheel to confirm the feature and press the
[OK] button to save / run it.
4. Press the [ ] button or touch [ ] on the screen to
hide the additional feature.
You can also select an additional feature in the additional features list via the
touch screen.
33 Using the Product
Show Icons: Selects whether to display icons on the
screen while viewing text.
Auto Scroll Speed: Sets the automatic scroll speed.
Text View Type: Sets how much amount will be skipped
when spinning the wheel.
Font Size: Selects the size of font.
Text Language: Selects the proper language for foreign
text.
Page 35

You can manually check and play various file saved in the SPINN.
FILE
Browsing Device
1. In the main mode, select FILE to display the file list.
2. Spin the wheel to select a file and press the [OK]
button to play it.
Select a folder to enter it and press the [ ] button to move to the parent folder.
To browse and play any music file saved in folder other than Music folder, use
the FILE mode.
To play files transferred by removable disk, follow the steps below.
Music file
: In SET > Advanced > Music Browse Type, set the type to File Tree and
browse the file in the MUSIC menu.
: In SET > Advanced > Music Browse Type, set the type to Database and
then rebuild database from SET > Advanced > Rebuild Library or use
Database Update from iriver plus 3. Now browse the file in the MUSIC menu.
: Browse and search in the FILE mode.
Picture file
: Browse and search in the FILE mode.
34 Using the Product
Deleting File
1. In the file list, select a file and drag & drop it to [ ] on
the screen to delete.
You cannot delete the file which is currently being played.
Page 36

Bluetooth
You can enjoy music with Bluetooth stereo headset.
Connecting Bluetooth Device
1. In the main mode, select SET > Bluetooth to display
the Bluetooth stereo headset list.
2. In the Bluetooth stereo headset list, select the Bluetooth
headset and press the [OK] button to connect to the product.
Disconnecting Bluetooth Device
1. Touch the [ ] icon at the right side of the connected
headset to disconnect it.
3. Now you can enjoy music or video with activated
Bluetooth headset.
While enjoying music with Bluetooth headset, you need to set the Playback Speed to “0”. You cannot play music if you change the speed.
The Connected icon is displayed at the right side of the connected headset.
You can also select a Bluetooth headset in the Bluetooth stereo headset list via the touch screen.
Do not turn the product off while using Bluetooth headset.
If the Bluetooth headset does not operate properly, turn the headset off and on again.
Refer to User’s Manual of each headset since the connection method might differ by model.
It is recommended to connect the product and headset within a 20 cm distance.
When you connect a Bluetooth headset for the first time, place it close to the product and select Add New Headset to browse available headset.
If the PinCode of a headset is 0000, it will be connected to the product directly. If it is not 0000, you need to enter the PinCode in the PinCode field.
The RADIO mode does not support Bluetooth function.
Some Bluetooth headset models might not support file below 32 KHz.
Sound quality may diminish upon increased distance between the two devices. Signal will be lost if this distance is greater than 3m. (May vary depending on Bluetooth model and environment.)
Due to some environmental conditions or battery power , malfunction or noise might occur:
When you use Bluetooth headset while grasping the product in one hand and another electronic device, such as mobile phone, in the other hand. this might cause radio signal interference.
When bodily contact is made with the transmitting / receiving ports of the product or headset. When there is signal barrier such as wall, corner, or partition.
When there is signal interference from other devices using same frequency band such as medical devices, microwaves, and wireless LAN. When it is used in areas with a weak signal such as in elevator or basement.
Radio signals may be distorted while using Bluetooth headset.
For more information on the recommended Bluetooth headset, refer to our web site iriver.com.
35 Using the Product
Page 37

Playing Podcast File
What is Podcast? Playing Podcast File
Podcast is a brand new customizable personal media
that allows users to download and enjoy favorite programs
without waiting for broadcasting schedule. Podcast
provides portable media player users with various kinds
of audio and video files including news, dramas and
other media contents. For more information, please visit
http://www.podcastready.com.
Transferring Podcast file to the product
To transfer Podcast file to the product, you need to use
Podcast Manager. To use the application, click the
Podcast icon in iriver plus 3.
36 Using the Product
1. Select MUSIC > Podcast in the main menu.
2. Spin the wheel to select a downloaded audio file and
press the [OK] button to play it.
In SET > Advanced > Music Browse Type, set the type to Database to play
Podcast file. (Refer to page 39.)
Recovering Podcast
If you format the product, all system files of Podcast will be
deleted.To recover those files, use the Recovering Podcast menu.
1. Connect the product to the USB jack of your PC
using the USB cable and run iriver plus 3.
2. Select Tools > Portable Device > Recovering Podcast
to start the recovery process.
3. When the recovery process is successfully completed,
disconnect and reconnect the product from/to your PC.
Now the Podcast icon is displayed.
Page 38

Chapter 04 Setting up the SPINN
38
Setting up the SPINN
Selecting Setting
Date & Time
Sound
Display
Advanced
Smart Key
Page 39

Setting up the SPINN
You can configure your own settings in the SPINN. The menu configurations are subject to change with
different firmware versions.
Selecting Setting
1. In the main mode, select the SET to display the
setting list.
2. Spin the wheel to select the item in the setting list
and press the [OK] button to display the sub items.
3. Spin the wheel to select the additional feature and press
the [OK] button to display the window for setting it up.
4. Spin the wheel to set the detailed function and press
the [OK] button to save it.
You can also select an item in the setting list via the touch screen.
Date & Time
Sets the current time and date.
- Press [OK] button: Moves among fields.
- Spin the wheel: Sets the value of each field.
38 Setting up the SPINN
Sound Setting
Custom EQ
Changes levels of each frequency range to create
your own equalization.
SRS Setting
Sets the levels of 3D sound effect.
- SRS: Customizes the SRS 3D sound effects.
- TruBass: Customizes the bass sound level
- FOCUS: Sets the clarity of sound.
- WOW: Sets the proper boost level by earphones model.
- Definition: Recovers reduced sound to original level.
Fade-In
Volume increases gradually when playback starts.
SPINN Volume
Sets whether you can control volume using the wheel
while the HOLD function is enabled.
Page 40

Setting up the SPINN
Display
Display Orientation
Reverses the screen 180 degrees.
Backlight
Sets the time that the backlight is turned on.
Wallpaper
Configures wallpaper settings.
AMOLED Brightness
Changes the brightness of display.
Theme
Selects a display theme.
Fonts
Changes the font to be displayed.
Menu Type
Sets the main menu to the Icon type or Text type.
Save UCI
Saves user defined theme and font to the product.
39 Setting up the SPINN
Advanced
Language
Selects the language for your convenience.
Sort
Determines the order of files.
Text Scroll Speed
Sets the scroll speed of characters when file information
is too long to display at one time.
Rebuild Library
Recreates the library data of a file.
Music Browse Type
Selects the type for browsing music.
- Database: Browses music files which are transferred by iriver
plus 3 or created DB by Rebuild Library using ID3 TAG or Playlist.
- File Tree: Browses music files transferred by Windows Explorer.
The default browse type is set to Database.
*
Page 41

Setting up the SPINN
Advanced
Connection Type
Selects the type for transferring file from / to PC.
- MSC (UMS): Using iriver plus 3, transfers file using the MSC
connection type.
- MTP: Using Windows Media Player 11, transfers file with the
MTP connection type.
Vibration
Turns the vibration function on / off.
* Vibration function will not activate if battery power is insufficient.
Power Off Type
Selects the type for turning off the product.
- Sleep: When turning on the product, the last used function
will be displayed.
- Power Off: When turning on the product, the main screen will
be displayed. The device requires a moment read all stored files.
40 Setting up the SPINN
System Information
Displays system information and formats the product.
Auto Power off
Automatically turns the power off after designated time
without operation.
Reset All Settings
Resets the product to the factory setting.
Smart Key
Allocates function to be performed when pressing the
Smart Key (press and hold the wheel.)
- Now Playing: Moves to the Now Playing screen.
- Play/Pause: Plays / pauses currently playing file.
- Display Orientation: Reverses the screen 180 degrees.
- Start/Stop Recording: Starts / stops recording.
- Display On/Off: Turns the display on or off.
Page 42

Chapter 05 Other Information
Using iriver plus 3
42
Adding Media to Library
Ripping Songs from a CD
Transferring Media to the Product
- Using iriver plus 3
- Using Windows Explorer
Initializing Disk
Upgrading Firmware
Using Windows Media Player 11
45
Adding Media to Library
Ripping Songs from a CD
Transferring Media to the Product
Initializing Disk
Upgrading Firmware
Copyrights/Certification/Trademarks/Limited Liability
48
Safety Instructions
49
Product Safety
Other
Troubleshooting
52
Please check out!
Page 43

Using iriver plus 3
To connect the product to iriver plus 3, select SET > Advanced > Connection Type and set it to MSC.
Adding Media to Library Ripping Songs from a CD
1. When you run iriver plus 3 for the first time, the Add
Media Wizard will start.
2. Follow the on-screen instructions on the PC to add
media files such as music, picture, and video to the
library.
42 Other Information
1. Insert an audio CD into the CD drive and run iriver
plus 3.
2. In iriver plus 3, select the checkbox from Music > CD
Drive and click CD Ripping in bottom left.
3. After ripping song, select the All Music to check
whether the ripped song is added to the library.
Page 44

Using iriver plus 3
Initializing Disk Upgrading Firmware
1. Connect the product to the USB jack of your PC and
run iriver plus 3.
2. Select Tools > Portable Device > Initialize Disk and
click Start when the initialization confirmation
message appears.
3. The initialization process is completed and the
product is disconnected from your PC.
You need to backup the necessary files before initialization, since formatted files
cannot be recovered.
It is recommended to use the format function integrated in the SPINN.
44 Other Information
1. Connect the product to the USB jack of internet
enabled PC and run iriver plus 3.
2. Select Tools > Portable Device > Firmware Upgrade
and complete the upgrade process by following the
on-screen instructions.
Do not disconnect the product from PC while downloading firmware upgrade file.
Once the download is completed, disconnect the product to activate the
firmware upgrade.
If the already installed firmware is the latest version, the message to confirm
latest version appears. When connect the product to your PC, if there is latest
firmware, the instruction message appears automatically.
Page 45

Using iriver plus 3
Initializing Disk Upgrading Firmware
1. Connect the product to the USB jack of your PC and
run iriver plus 3.
2. Select Tools > Portable Device > Initialize Disk and
click Start when the initialization confirmation
message appears.
3. The initialization process is completed and the
product is disconnected from your PC.
You need to backup the necessary files before initialization, since formatted files
cannot be recovered.
It is recommended to use the format function integrated in the SPINN.
44 Other Information
1. Connect the product to the USB jack of internet
enabled PC and run iriver plus 3.
2. Select Tools > Portable Device > Firmware Upgrade
and complete the upgrade process by following the
on-screen instructions.
Do not disconnect the product from PC while downloading firmware upgrade file.
Once the download is completed, disconnect the product to activate the
firmware upgrade.
If the already installed firmware is the latest version, the message to confirm
latest version appears. When connect the product to your PC, if there is latest
firmware, the instruction message appears automatically.
Page 46

Using Windows Media Player 11
To connect the product to Windows Media Player 11, select SET > Advanced >
Connection Type and set it to MTP.
Adding Media to Library Ripping Songs from a CD
1. When you run Windows Media Player 11, the Add
Media Wizard will start.
2. Follow the on-screen instructions on the PC to add
media files such as music and picture to the library.
45 Other Information
1. Insert an audio CD into the CD drive and run Windows
Media Player 11.
2. Select the Ripping tab on the Windows Media Player
11. Select the checkbox from and click the Start
Ripping in the bottom left.
3. The ripped music will be stored in My Documents >
My Music and automatically added to library.
Page 47

Using Windows Media Player 11
Transferring Media to the Product
1. Connect the product to the USB jack of your PC and
run Windows Media Player 11.
2. After selecting the file in your PC, drag & drop it to
the right pane.
46 Other Information
3. Click Start Sync in the bottom left to start transferring.
4. Now you can find the selected music in your library.
Page 48

Using Windows Media Player 11
Initializing Disk
1. Connect the product to the USB jack of your PC and
run Windows Media Player 11.
2. After selecting iriver SPINN, click the right mouse
button and select Format. Click OK when the
message to confirm initialization appears.
3. The initialization process is completed and the
product is disconnected from your PC.
You need to backup the necessary files before initialization, since formatted files
cannot be recovered.
It is recommended to use the format function integrated in the SPINN.
47 Other Information
Firmware upgrade in Windows Media Player 11
1. Connect the product to the USB jack of your PC.
2. Run iriver Firmware Updater application in the
installation CD and complete the upgrade process
by following the on-screen instructions.
Do not disconnect the product from PC while upgrading firmware.
Page 49

Copyrights/Certification/Trademarks/Limited Liability
Copyrights
Reigncom Limited holds all rights for the patent, trademark, literary property and
intellectual property related to this manual. You may not copy or reproduce any
part of this manual unless authorized by Reigncom Limited. You may be subject
to criminal penalties for illegal use of any part of this manual.
Software, audio and video including intellectual property are protected by
copyright and international laws. Reproduction or distribution of contents
created with this product is the responsibility of the user.
The companies, institutions, products, people and events used in examples
are for demonstration purposes only. Their appearance in this manual does not
imply any affiliation between Reigncom and other parties.
Users are responsible for observing all copyrights and intellectual property laws.
©1999~2008 Reigncom Limited. All rights reserved.
Specifications on SPINN Bluetooth
Frequency range: Transmitting / receiving 2402 – 2478 MHZ
Supported profiles: A2DP, AVRCP
Bluetooth version: Bluetooth 2.0+EDR
Modulation type: Frequency Hopping Spread Spectrum type
Output: 10 MW Electric wave type: F1D
This radio device is not suitable for use where interference may
endanger personal safety since it has possibility to cause electric
wave interference.
48 Other Information
Certification
QD ID: B014338 / MIC / FCC / CE
Class B Digital Device (Residential Communication Device). This device has
been tested and found to comply with the requirements for a Class B digital
device and designed to provide reasonable protection against harmful
interference in a residential installation.
Trademarks
Windows 2000, Windows XP, Windows Vista and Windows Media Player are
the registered trademarks of Microsoft Corp.
is a trademark of SRS Labs, Inc.
WOW technology is incorporated under license from SRS Labs, Inc.Labs, Inc.
Limited Liability
Neither the manufacturer, importers nor dealers are responsible for any
accidental damage, including bodily injury or any damages resulting from
misuse or inappropriate operation on behalf of the user.
The information on this manual is prepared with the current player
specifications. The manufacturer, Reigncom Limited, shall routinely add new
features to the product and may continuously apply new technologies
hereafter. All standards may be changed at any time without prior notice.
Page 50

Safety Instructions
Product Safety
Do not display the same image on the screen for an
extended amount of time since this may cause a
ghosting effect.
Do not place objects such as coins or hair pins inside
the product.
This may cause malfunction.
Do not place heavy objects on the product.
This may cause damage and malfunction.
Do not expose the player to sources of moisture such
as water, beverages, chemicals, cosmetics, and so on.
(Damage caused by submersion may not be covered
by warranty regardless of the warranty period.)
This may cause damage and malfunction.
Keep away from harsh environments including humid,
dusty, and smoky areas.
This may cause malfunction.
49 Other Information
Never dismantle, repair, or rebuild your player without
authorization.
This may cause damage and malfunction.
Keep out of direct sunlight and extreme heat and cold
(-5 - 40 ).
This may cause malfunction.
Do not keep the product close to magnetic substance
such as magnets, TVs, monitors, or speaker.
This may cause malfunction.
Do not clean with chemicals or detergents.
This may cause malfunction.
Do not drop or subject the device to impact.
This may cause damage and malfunction.
Page 51

Safety Instructions
Product Safety
Do not press more than two buttons simultaneously.
This may cause damage and malfunction.
Do not disconnect the product from your PC while
transferring data.
This may cause malfunction.
Try when possible to connect the product to the rear
USB port in your PC.
In some custom- assembled PCs, improper USB port
may cause malfunction.
Do not connect any device or object other than
earphones to the Earphone jack.
This may cause damage and malfunction.
50 Other Information
Do not touch the screen with sharp tools.
This may cause damage and malfunction.
Protection film or sticker attached on the screen might
cause touch screen malfunction.
Improper protection film might diminish touch
sensitivity and screen brightness.
Page 52

Safety Instructions
Other
Do not use headphones / earphones while cycling,
driving, or operating any motorized vehicle.
This is dangerous and might be illegal in some areas.
Do not use the product while in motion, such as while
driving, walking, or mountain climbing.
This may cause injury.
Use the product in a safe place to avoid accidents.
This may cause injury.
Always be careful to steer clear of nearby objects if
you use the product while in motion.
This may cause injury.
It is not recommended to use the product during
electrical storms.
This may cause injury.
51 Other Information
Reduce volume or stop using the player if you
experience ringing in your ears.
This may cause injury.
Do not listen to music via headphones/earphones at
high volume for a long time.
This may cause injury.
Do not use headphones / earphones at high volume.
This may cause injury.
Keep headphone /earphone cords under control in
order to avoid getting caught on nearby objects.
This may cause injury.
Do not sleep with headphones / earphones in the ears.
Do not use headphones / earphones for excessive
periods of time.
This may cause injury.
Page 53

Troubleshooting
Please check out!
The product will not power on!
- Check whether the battery is discharged. Charge
the product and turn it on again.
- Insert a thin and pointed object into the reset pinhole.
The product cannot be charged after connecting power.
- Check whether the product and your PC are firmly
connected.
The product cannot be connected properly using the
USB cable.
- Check whether the product and your PC are firmly
connected.
The battery power is consumed even though the
product is turned off.
- Check whether the setting in SET > Advanced >
Power Off Type is set to Sleep. The battery power is
slightly consumed in the Sleep mode.
52 Other Information
The screen turns off frequently.
- To save power consumption, the screen is designed
to be turned off after designated time.
Set up the duration in SET > Display > Backlight.
The screen is not clear.
- Check whether the screen is dirty.
Poor radio reception with heavy interference!
- Check whether the earphones jack is dirty.
- Check whether the earphones are connected.
- Adjust the position of the player and earphones.
- Turn off any nearby electronic equipment to avoid
potential interference.
Page 54

Troubleshooting
Please check out!
Music is not played after connecting Bluetooth headset.
- Check whether the Playback Speed of the MUSIC
mode is set to "0". The Bluetooth headset will only
function when the Playback Speed is set to "0".
No sound during playback!
- Check whether the volume is set to "0".
- Check whether the earphones plug or connection
jack is dirty.
- Check whether the music file is corrupted.
53 Other Information
The memory space has changed after formatting.
- The memory space may be changed depending on
the operating system.
The start-up time is too long.
- Check whether too many files are stored in the
product. It is recommended to store up to 1,000
music files and 2,000 picture files.
Page 55

Federal Communications Commission
FCC RF
CAUTION :
Any changes or modifications in construction of this
device which are not expressly approved by the party
responsible for compliance could void the user’s
authority to operate the equipment.
CAUTION : Exposure to Radio Frequency Radiation.
Antenna shall be mounted in such a manner to
minimize the portential for human contact during
normal operation.
The antenna should not be contacted during
operation to avoid the possibility of exceeding the
FCC radio frequency exposure limit.
This device complies with part 15 of the FCC Rules.
Operation is subject to the following two Conditions :
(1) This device may not cause harmful interference, and
(2) this device must accept any interference received,
including interference that may cause undesired
operation. for compliance could void the user’s
authority to operate the equipment.
54 Other Information
SAFETY
CAUTION
RISK OF EXPLOSION IF BATTERY IS REPLACED BY
AN INCORRECT TYPE.
DISPOSE OF USED BATTERIES ACCORDING TO
THE INSTRUCTIONS.
This equipment has been tested and found to comply with the limits
for a Class B digital device, pursuant to Part 15 of the FCC Riles.
These limits are designed to provide reasonable protection against
harmful interference in a residential installation. This equipment
generates, uses and can radiate radio frequency energy and, if not
installed and used in accordance with the instructions, may cause
harmful interference to radio communications. However, there is no
guarantee that interference will not occur in a particular installation.
If this equipment does cause harmful interference to radio or television
reception, which can be determined by turning the equipment off and
on, the user is encouraged to correct the interference by one or more
of the following measures:
- Reorient or relocate the receiving antenna.
- Increase the separation between the equipment and receiver.
- Connect the equipment into an outlet on a circuit different from that
to which the receiver is connected.
- Consult the dealer or an experienced radio/TV technician for help.
 Loading...