

Page 1
Instruction Manual
Portable Multimedia Player
Model PMP-100 Series
Thank you for purchasing the product.
Please read the manual carefully before use.
http://www.iRiver.com
Model PMP-100 Series
http://www.iRiver.com
Page 2
2
Copyrights/Certification/Trademarks/Limited Liability
iRiver Limited has all the rights of the patent, trademark, literary property
and intellectual property related to this manual. You may not reproduce
any part of this manual unless authorized by iRiver Limited. You can be
punished by using any part of this manual illegally.
The software, audio and video which have an intellectual property are
protected by copyright and international laws. It is user’s responsibilities
when he/she reproduce or distribute the contents created by this product.
The companies, institutions, products, people and events used in
examples are not real data. We don t have any intension to be related
with any companies, institutions, products, people and events through
this manual and should not draw inferences. User’s are responsible for
observing the copyrights and intellectual properties.
1999~2004 iRiver Limited. All rights reserved.
Windows, Windows 98SE, Windows ME, Windows 2000, Windows XP and
Windows Media Player are the registered trademarks of Microsoft Corp.
Neither the Manufacturer, importers nor dealers is responsible for any
accidental damage including bodily injury or any damage resulting from
misuse or unsuitable operation by you.
The information on this manual is prepared with the current player
specifications. The manufacturer, iRiver Limited, is adding new features
to the product and may persistently apply new technologies hereafter.
All standards may be changed at any time without notice.
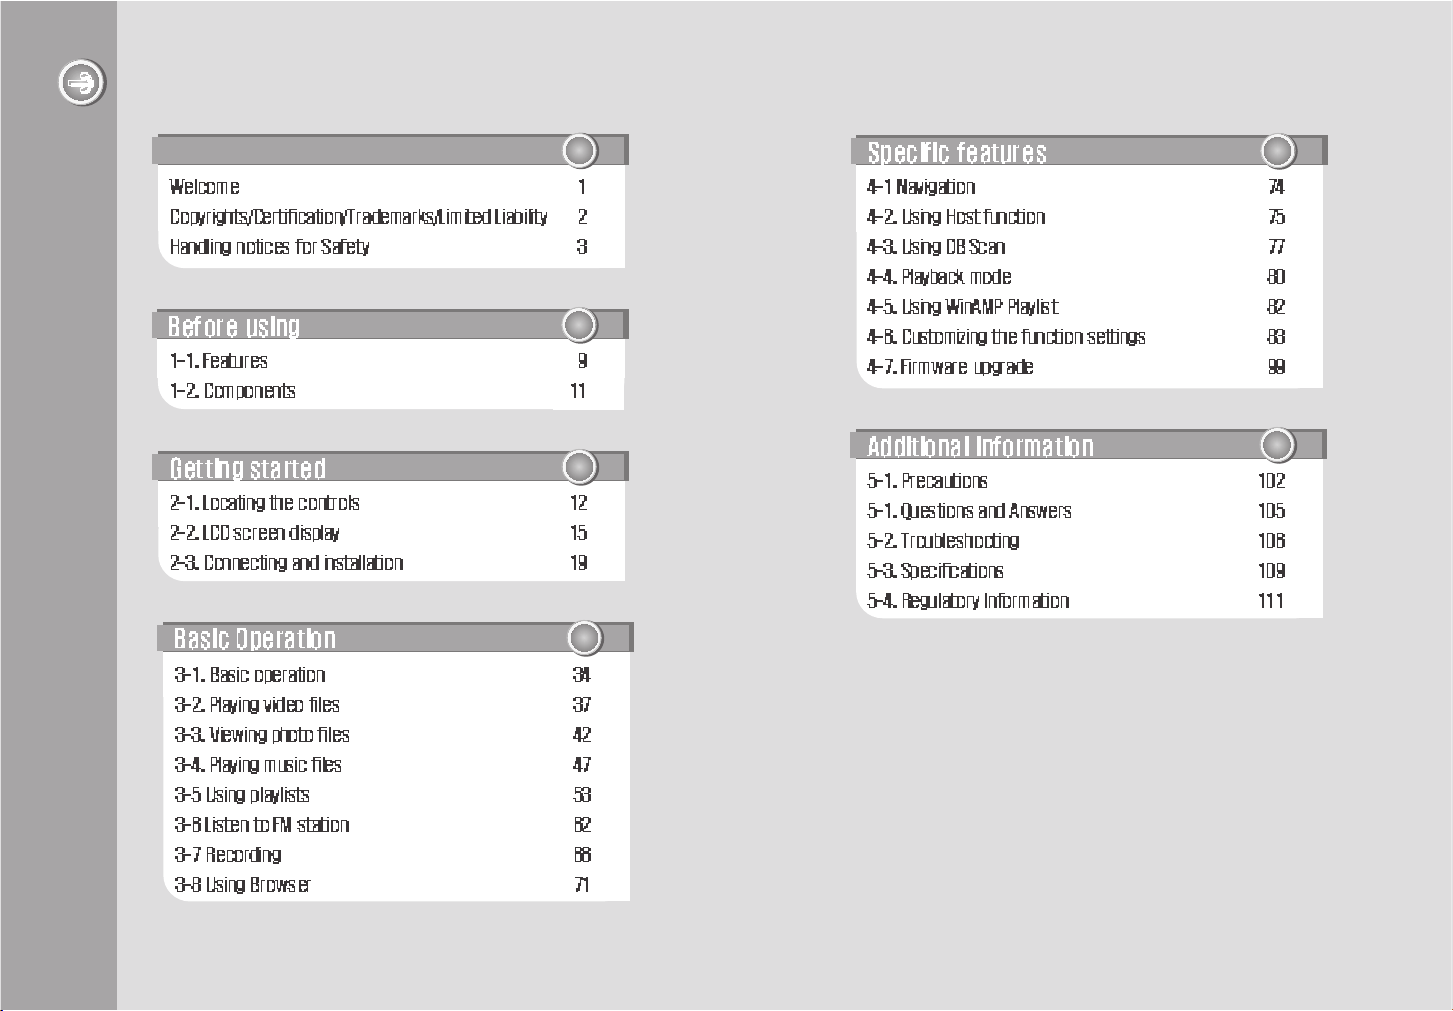
1
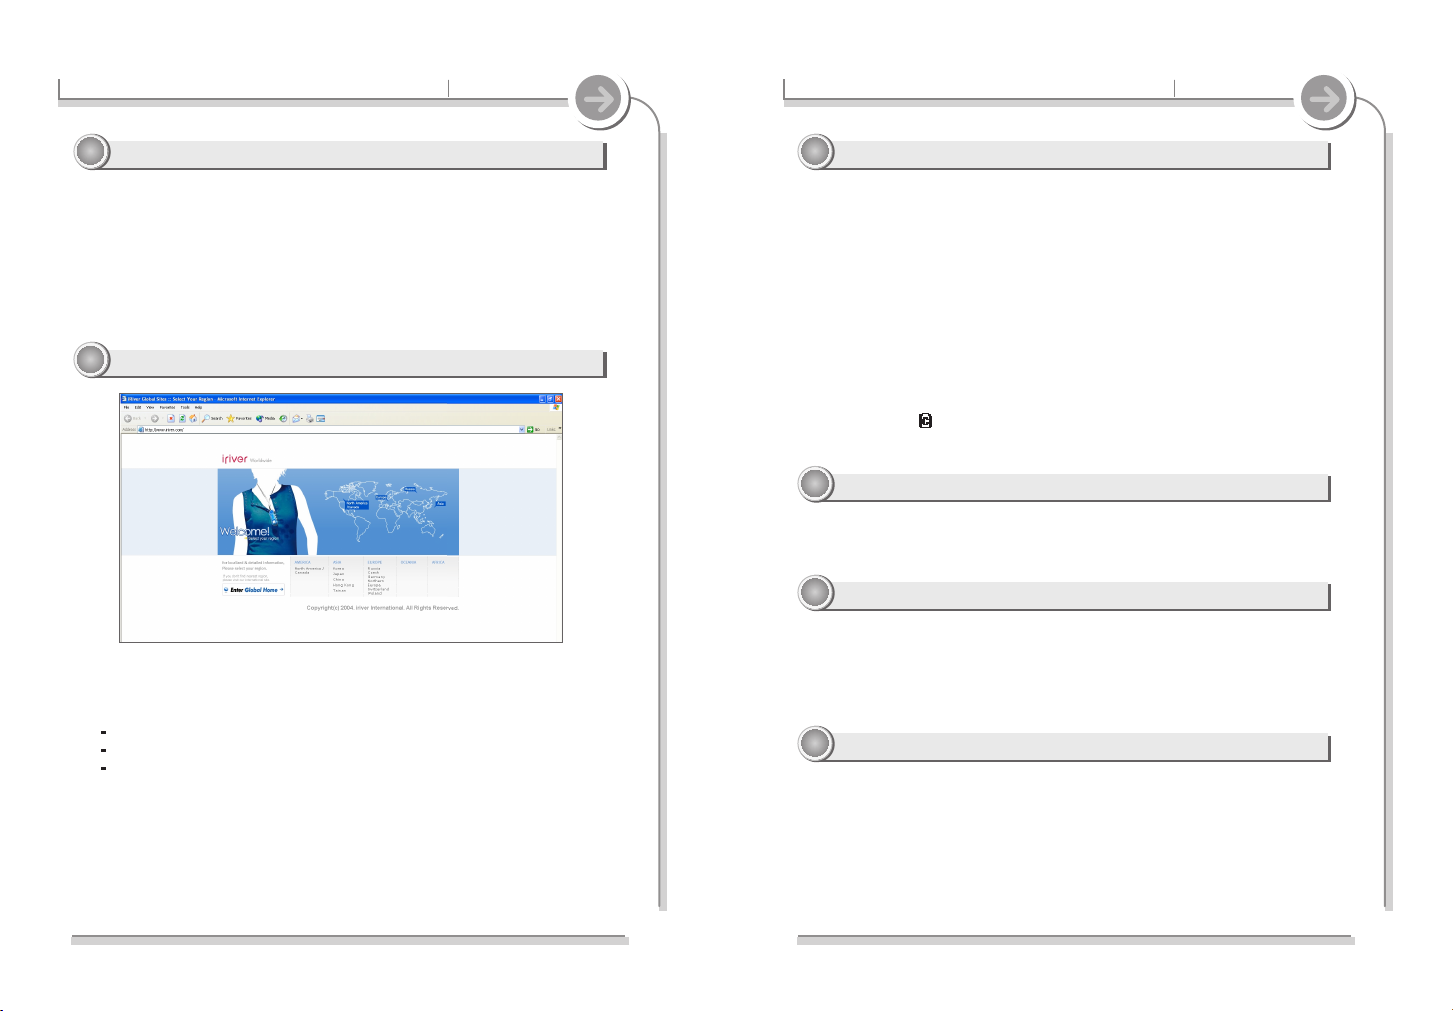
Welcome
Obtain information about your player, look for updates, and find
answers to questions at our web site.
iRiver website address is www.iriver.com.
The site provides product information and customer support.
Use the firmware (system software) upgrade function of our
products from the site to continuously improve the product
performance.
Thank your for your iRiver purchase.
The PMP-100 comes complete with a long list of advanced features.
It is important that you read the manual to ensure that you get the most
out of your new player.
Thank your for your iRiver purchase.
11
11
http://www.iRiver.com
22
22
Copyrights
11
11
Certification
22
22
Trademarks
33
33
Limited Liability
44
44
CE, FCC, MIC
Page 3
4
Handling notices for safety
Product
3
Handling notices for safety
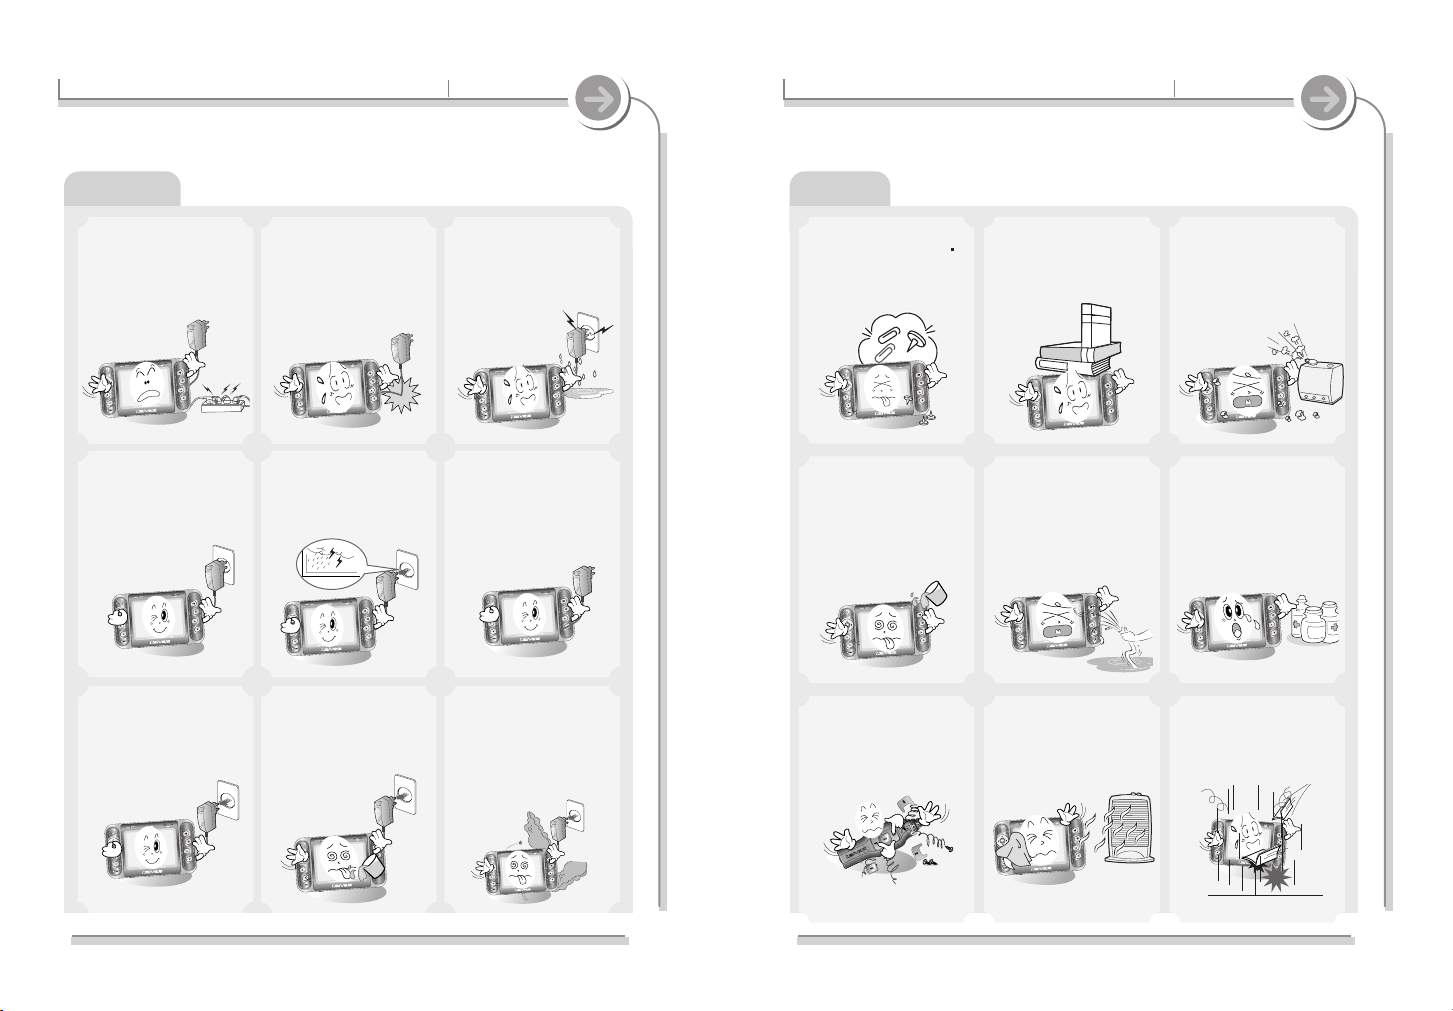
Electricity
Please read before using for your safety.
Do not overload a single
power circuit.
Overheating or fire can result.
Do not kink or crease the
power cable or place heavy
objects on the power cable.
Fire can result from damaged
power cables.
Do not handle power plug
and adapter with wet
hands.
Electrical Shock may result.
Firmly plug the adapter into
the wall socket.
Fire can result from improper
use.
Unplug the AC adapter
during electrical storms.
Electrical Shock may result.
Use only the supplied AC
adapter. Use of nonauthorized power adapters
is not recommended.
Damage to your player may
result from improper use.
Unplug adapter when it s
not in use.
Fire can result from improper
use.
Immediately power off the
player and unplug the AC
adapter if water or other
liquids are present.
Fire can result from improper
use.
Immediately power off the
player and unplug the AC
adapter if smoke or odors
emit from the player or
adapter.
Fire can result from improper
use.
Avoid contact with water
and other liquids and dry
immediately with a soft
cloth should contact occur.
Damage to your player may
result from improper use.
Do not use water or
chemicals to clean the
player. Clean the surface
with a soft cloth.
Damage to your player may
result from improper use.
Do not clean with chemical
or detergent. It damages
the surface and scraps
paint.
Do not use excessive force
on the buttons or attempt
to disassemble the device.
Damage to your player may
result from improper use.
Keep out of direct sunlight
and extreme heat and cold.
Damage to your player may
result from improper use.
Do not drop or subject the
device to impact.
Damage to your player may
result from improper use.
Do not place objects inside
the device other than CD
s
Damage to your player may
result from improper use.
Do not place heavy objects
on the device.
Damage to your player may
result from improper use.
Keep away from harsh
environments including
humid, dusty, and smoky
areas.
Damage to your player may
result from improper use.
Page 4
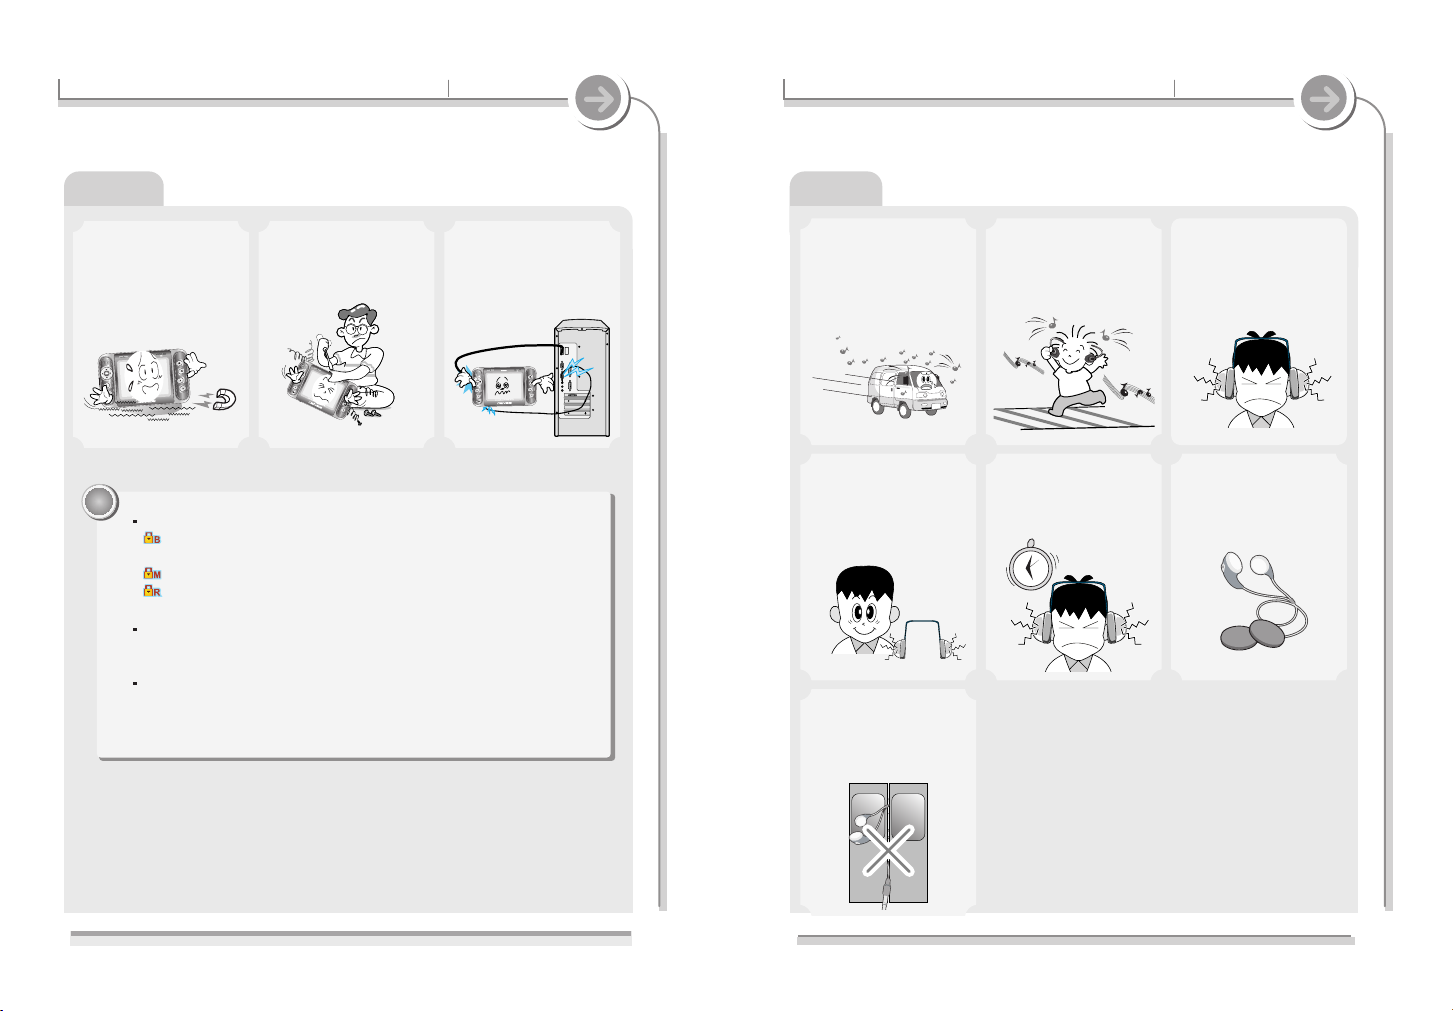
Others
6
Handling notices for safety
Do not use headphones /
earphones while cycling,
driving, or operating any
motorized vehicle.
It is dangerous and is illegal in
some areas.
Reduce volume while
walking, especially at
pedestrian crosswalk.
Do not use headphone /
earphones at high volume.
Hearing experts advise against
listening to continuous, loud
and extended play.
Reduce volume or stop using
the player if you experience a
ringing in your ears.
Hearing experts advise against
listening to continuous, loud
and extended play.
Do not use at high volume
for continuous listening.
Hearing experts advise against
listening to continuous, loud
and extended play.
Included earphones
include soft covers for your
comfort. They may be used
with or with out covers at
your preference.
Keep headphones / earphones
cords under control at all
times. Cords may get caught
on a variety of objects and
cause damage or injury.
Product
5
Handling notices for safety
Do not disassemble or
modify.
Keep the player away from
strong magnets.
Damage to your player may
result from improper use.
Do not simultaneously
connect the earphone jack,
Line-In/Out jack, and USB
jack to one device (i.e. a
PC). The product's power
may be turned off.
The following icons are displayed to indicate HOLD status.
: The HOLD function is set in both the player and the remote control
(Option).
: The HOLD function is set in the player.
: The HOLD function is set in the remote control (Option).
When stopped or in recording standby mode, the player automatically
turns off according to the setting of “STOP POWER OFF” on the
Setup.
If the player is disconnected suddenly or turned off during file transfer,
it may cause data loss and an error screen may appear on the player.
If this happens, attach the player to your PC and run the Windows
Scan Disk utility.
Note
Note
Page 5
8
7
22
22
11
11
33
33
44
44
55
55
Page 6
3.5inch 260,000 Color TFT LCD
44
44
Movies and videos come to life on the 3.5 inch color TFT LCD screen.
Full color menus make for easy navigation.
Supports 38 languages including traditional and simplified Chinese.
Built-in help screens for guidance in every function.
Portable Entertainment + Home Theater
33
33
Store and play movies, video, music, pictures, and more.
All on the built-in color display.
FM Tuner and FM recording
Built in FM tuner with memory presets and automatic searching.
Record from any FM station using the FM recording function.
Advanced Audio recording
Record voice notes and make recordings from external audio equipment (CD
players, tape decks, etc.) with the Line-In recording feature.
TV Out
Take your videos with you and watch them on the big screen. Use the
TV out plug to attach to any TV or video screen to view videos, movies,
and picture files.
Detachable Li-ion Rechargeable battery.
Onboard speaker
Listen to music or movies without earphones thorough the built-in
speaker.
10
1-1. Features
Before using
9
1-1. Features
Before using
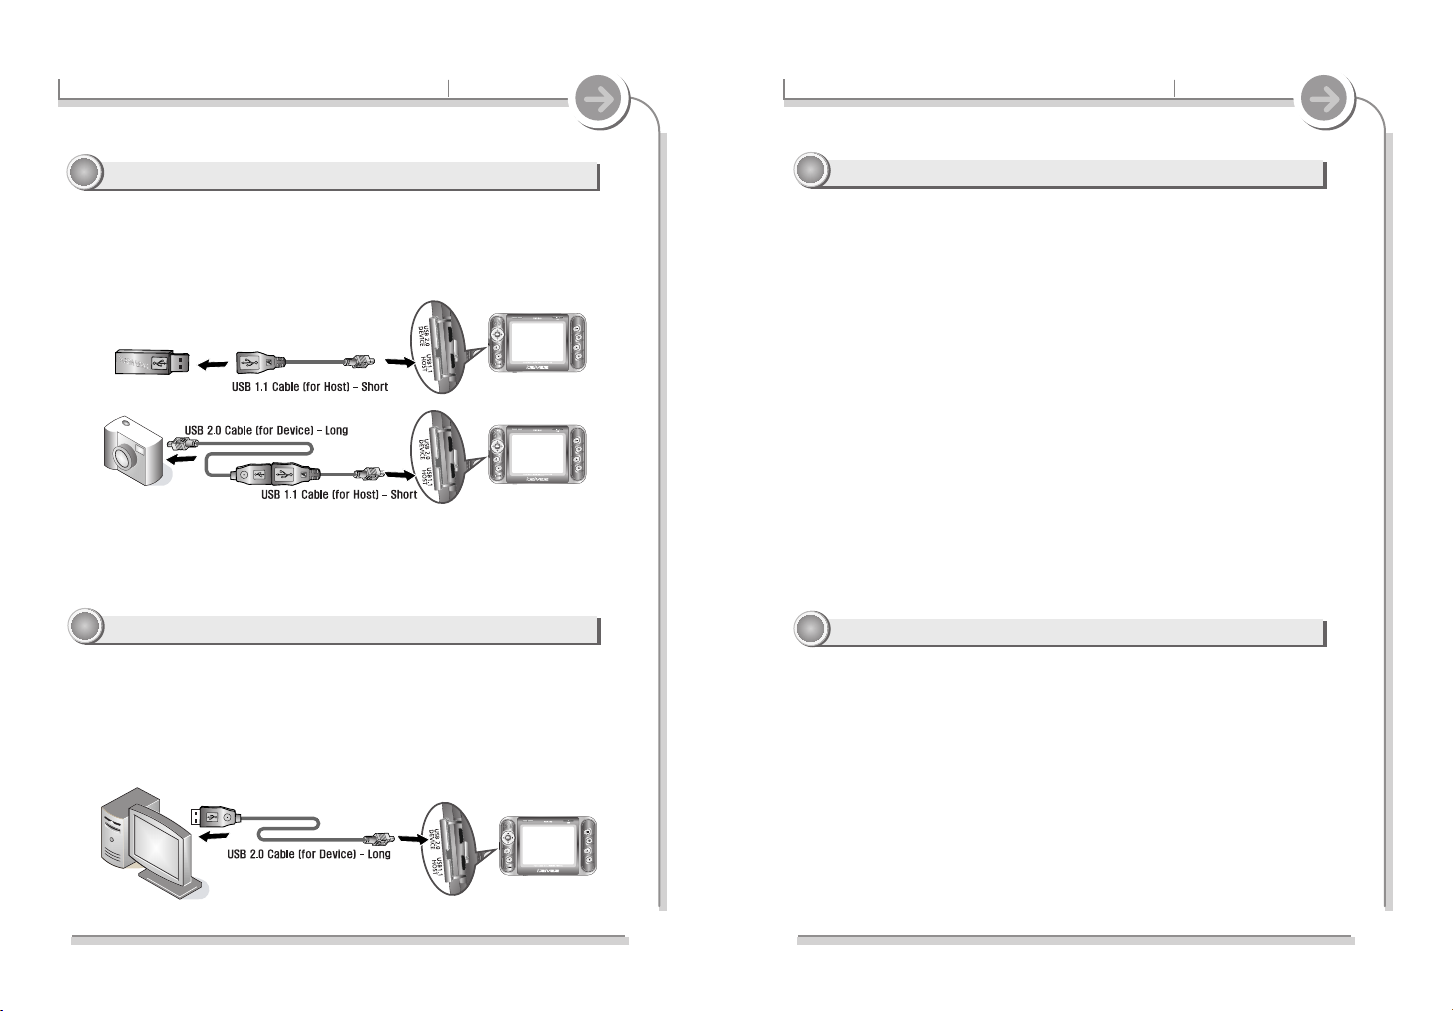
Data sharing without a PC - USB Host
11
11
Data sharing without a PC - USB Host
USB Host allows for transfer from certain portable devices without the
need of a computer.
The Browser function allows the PMP-100 series player to interface
with other USB devices such as Digital Cameras and External Hard
Drives.
Some devices, even with UMS support, may not be compatible with the PMP-100 series.
Please visit our web site for more details about compatible devices. Future devices may
be supported via firmware upgrades to the PMP-100, but no compatibility guarantees are
made by iRiver or your device manufacturer.
Portable Hard Drive with USB 2.0 and USB Host
22
22
External hard drive
Works just an external USB 2.0 hard drive for storing and transferring
files to almost any PC.
Easy to use - Easy Navigation/Playlist
Easy to locate movies, songs, playlists, and pictures. PMP supports up
to 999 folders for the ultimate in organization.
Page 7
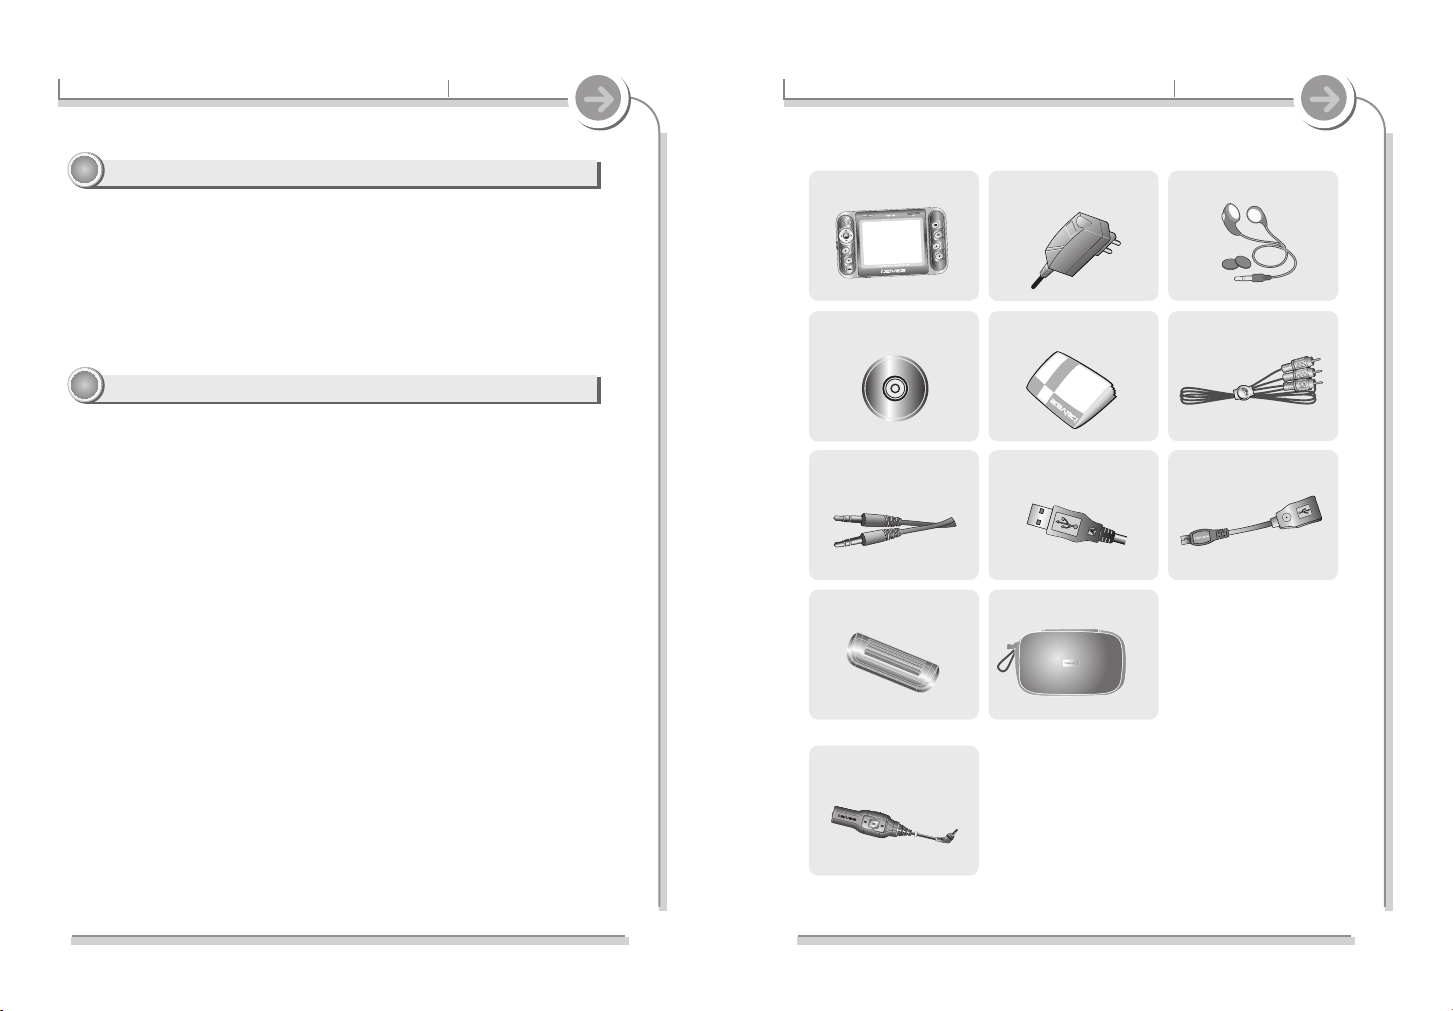
12
1-2. Components
Before using
Accessories may change without notice.
PMP-100 series
Remote Control (Option)
Earphones and CoversAC Adapter
Installation CD
USB Device Cable
Manual/Warranty form
(Quick Start Guide)
Audio Line-In Cable
AV Cable
USB Host Cable
Rechargeable Battery
(1EA)
Carrying Case
11
1-1. Features
Before using
Firmware Upgrade/Multi-Codec Player
66
66
Constant state-of-the-art performance - firmware upgrade
Latest features and fixes available with firmware updates.
Full featured Multimedia Player
The PMP-100 will play movie files (MPEG4, XviD encoded AVI and ASF) ,
photo files (JPG, BMP) and music files (MP3, WMA, ASF, WAV) on the
built-in LCD screen.
Powerful Sound Options
55
55
5 Preset and 1 User set equalizer
Select one of the 5 preset EQ (Normal, Rock, Jazz, Classical, Ultra Bass)
or set your own with the User EQ.
Page 8
14
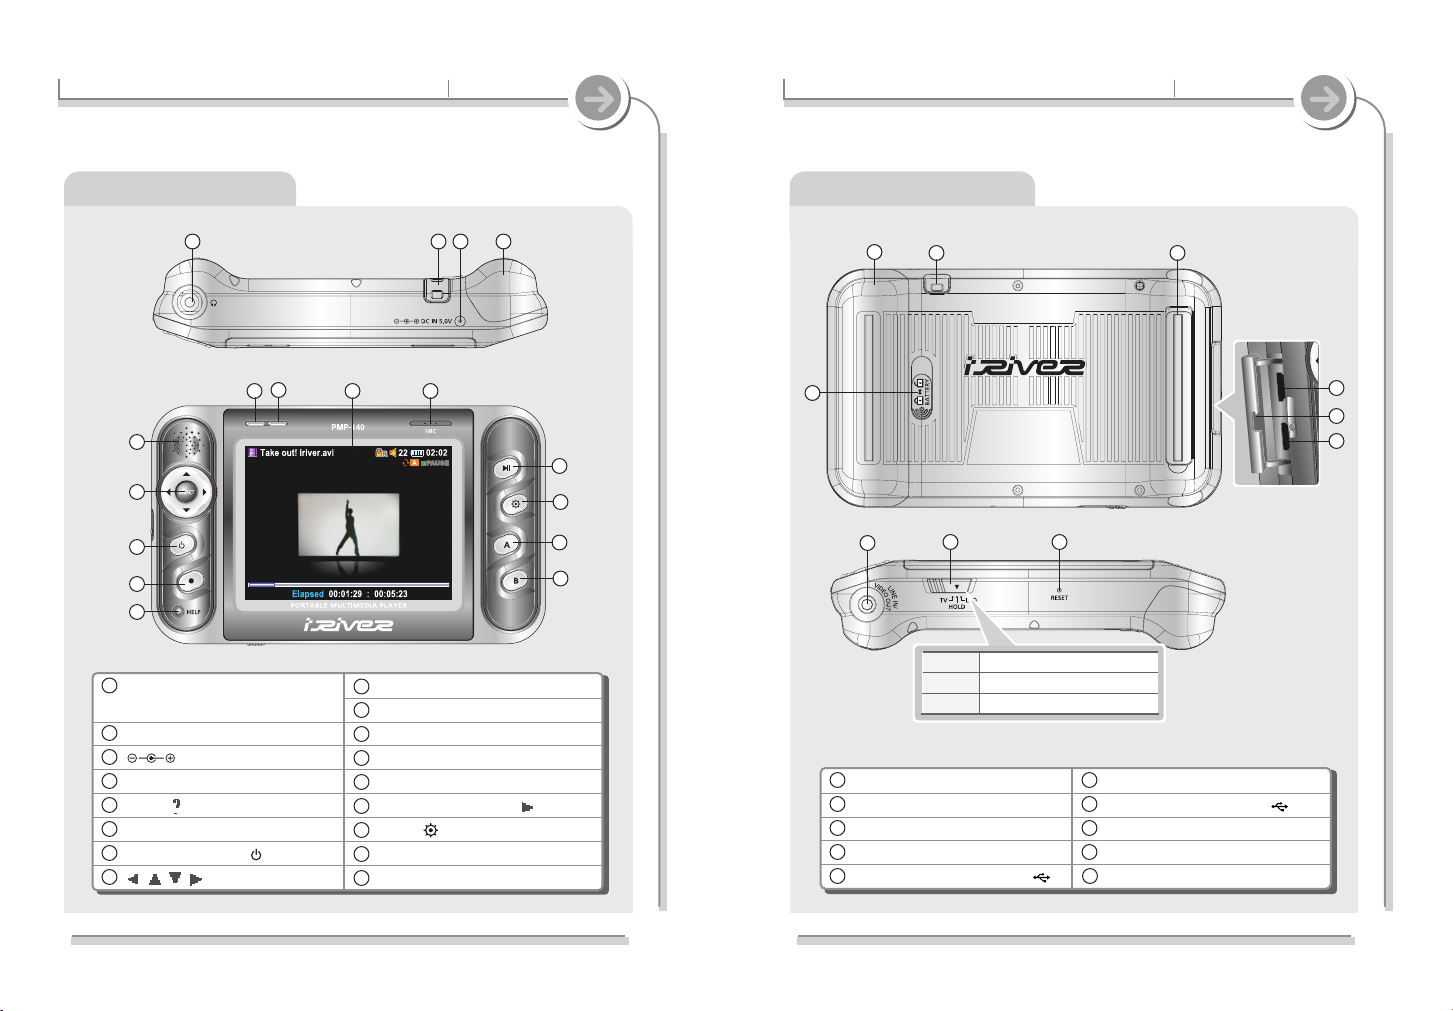
2-1. Locating the controls
Getting started
Player : Rear/Bottom View
Battery lock
Detachable Rechargeable battery
Strap
Stand
USB port (USB2.0 DEVICE)
USB port cover
USB port (USB1.1 HOST)
Line in / AV out jack
TV/HOLD/LCD switch
Reset
1
1
2
2
3
3
4
4
5
5
6
6
7
7
8
8
9
9
1
1
3
3
2
2
4
4
9
9
10
10
8
8
T V LCD off/enabled Video out
HOLD Disabled button function
LCD LCD on/disabled Video out
5
5
6
6
7
7
10
10
13
2-1. Locating the controls
Getting started
Player : Top/Front view
6
6
7
7
5
5
8
8
9
9
1
1
22334
4
Remote control (Option) /
earphones jack
Strap
DC IN 5.0V jack
Rechargeable battery
HELP (
) button
REC (
) button
POWER ON/OFF ( ) button
, , , ,
SELECT buttons
Speaker
HDD indicator
Charging indicator
LCD screen
Microphone
PLAY/PAUSE/STOP (
II
) button
NAVI ( ) button
A (A-B) button
B (EQ/MODE) button
1
1
2
2
3
3
4
4
5
5
6
6
7
7
8
8
9
9
10
10
17
17
11
11
12
12
13
13
14
14
15
15
16
16
10
10
11
11
12
12
13
13
14
14
15
15
16
16
17
17
Actual player may vary slightly from images shown.
Functions are similar.
Page 9
16
2-2. LCD screen display
Getting started
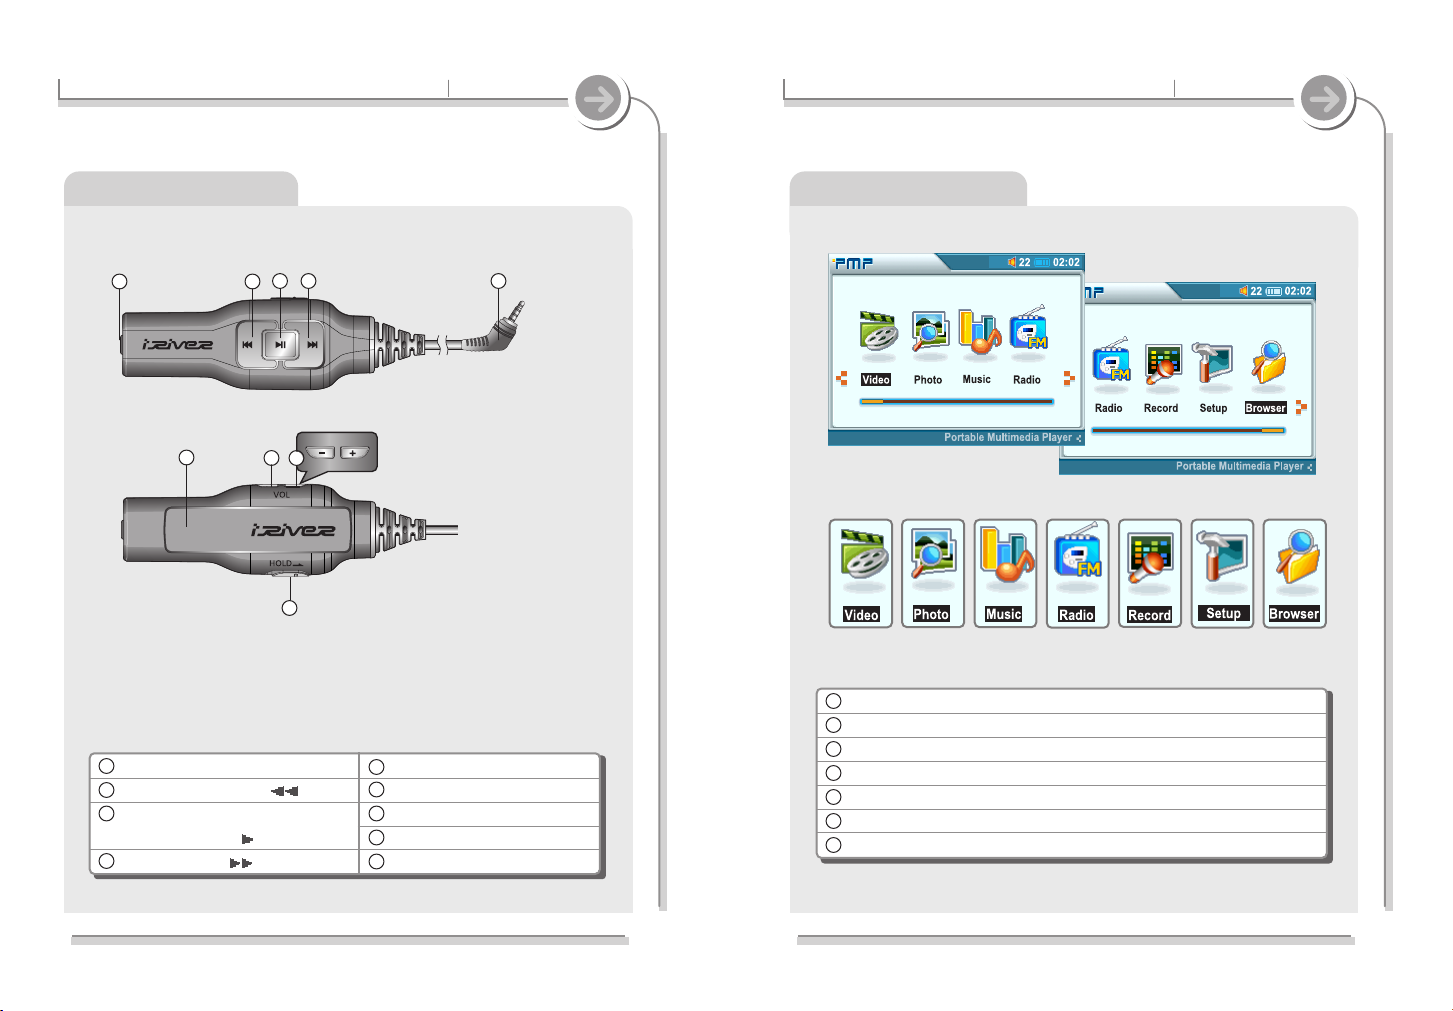
Function selection mode
Video : Playing video files.
Photo : Viewing photo files.
Music : Playing music files.
Radio : FM radio listening.
Record: Recording from the microphone or connected equipment
Setup: Customizing the function setting.
Browser : Searching folders/files
1
1
2
2
3
3
4
4
5
5
6
6
7
7
15
2-1. Locating the controls
Getting started
Remote Control (Option)
1
1
2
2
3
3
4
4
5
5
8
8
7
7
6
6
9
9
Earphones Jack
PREVIOUS/Reverse (
I
)
POWER ON/OFF,
Play/Pause/Stop (
II
)
NEXT/Forward (
I
)
Remote Control Jack
Clip
Volume -/Down
Volume +/Up
Remote control hold switch
1
1
2
2
3
3
4
4
5
5
6
6
7
7
8
8
9
9
Page 10
18
2-2. LCD screen display
Getting started
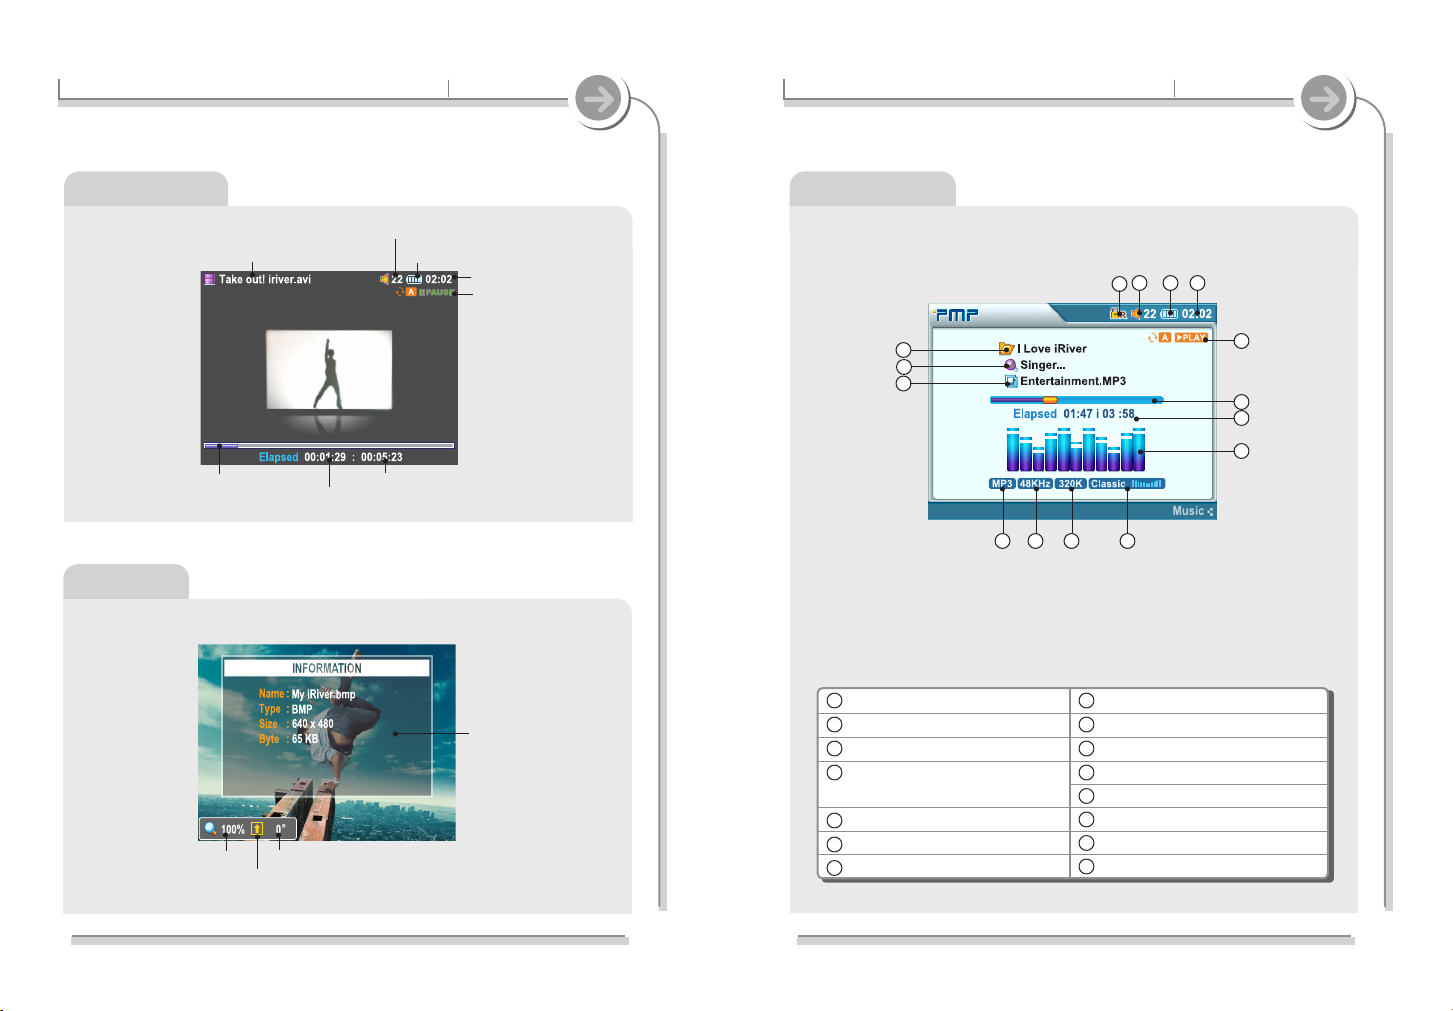
Music playback
File name
Artist
Folder name (Title)
Hold indicator (Machine /
Remote control<Option> / Both)
Volume level
Battery indicator
Clock
Playback mode/status
Progress bar
Play time (Elapsed l Remain)
Level meter
EQ mode
Bit rate
Sample rate
File Format
1
1
2
2
3
3
4
4
5
5
6
6
7
7
8
8
9
9
10
10
11
11
12
12
1
1
4
4
8
8
2
2
3
3
55667
7
9
9
10
10
11
11
12
12
13
13
14
14
15
15
13
13
14
14
15
15
Video playback
Photo view
17
2-2. LCD screen display
Getting started
Battery indicator
Elapsed time
Progress bar
Clock
Volume level
Total playing time
Magnification of photo
Symmetry
Rotation angle
File information
File name
Playback
mode/status
Page 11
20
2-3. Connecting and installation
Getting started
about battery indicator
If the battery is fully discharged, the red
battery icon is displayed on the LCD.
If the battery is fully discharged...
11
11
Low Battery will appear when the player is
powered on if the battery is low on charge.
The player will power itself off.
Charge the player again before use.
Fully charged
-
used
-
Fully discharged
If the player turn off because the battery is all worn out, please turn on the
player after connecting the AC adapter and charge over the 20 second.
If the battery is detached while the player is operated by AC adapter, the
player is turned off for system protection.
Note
Note
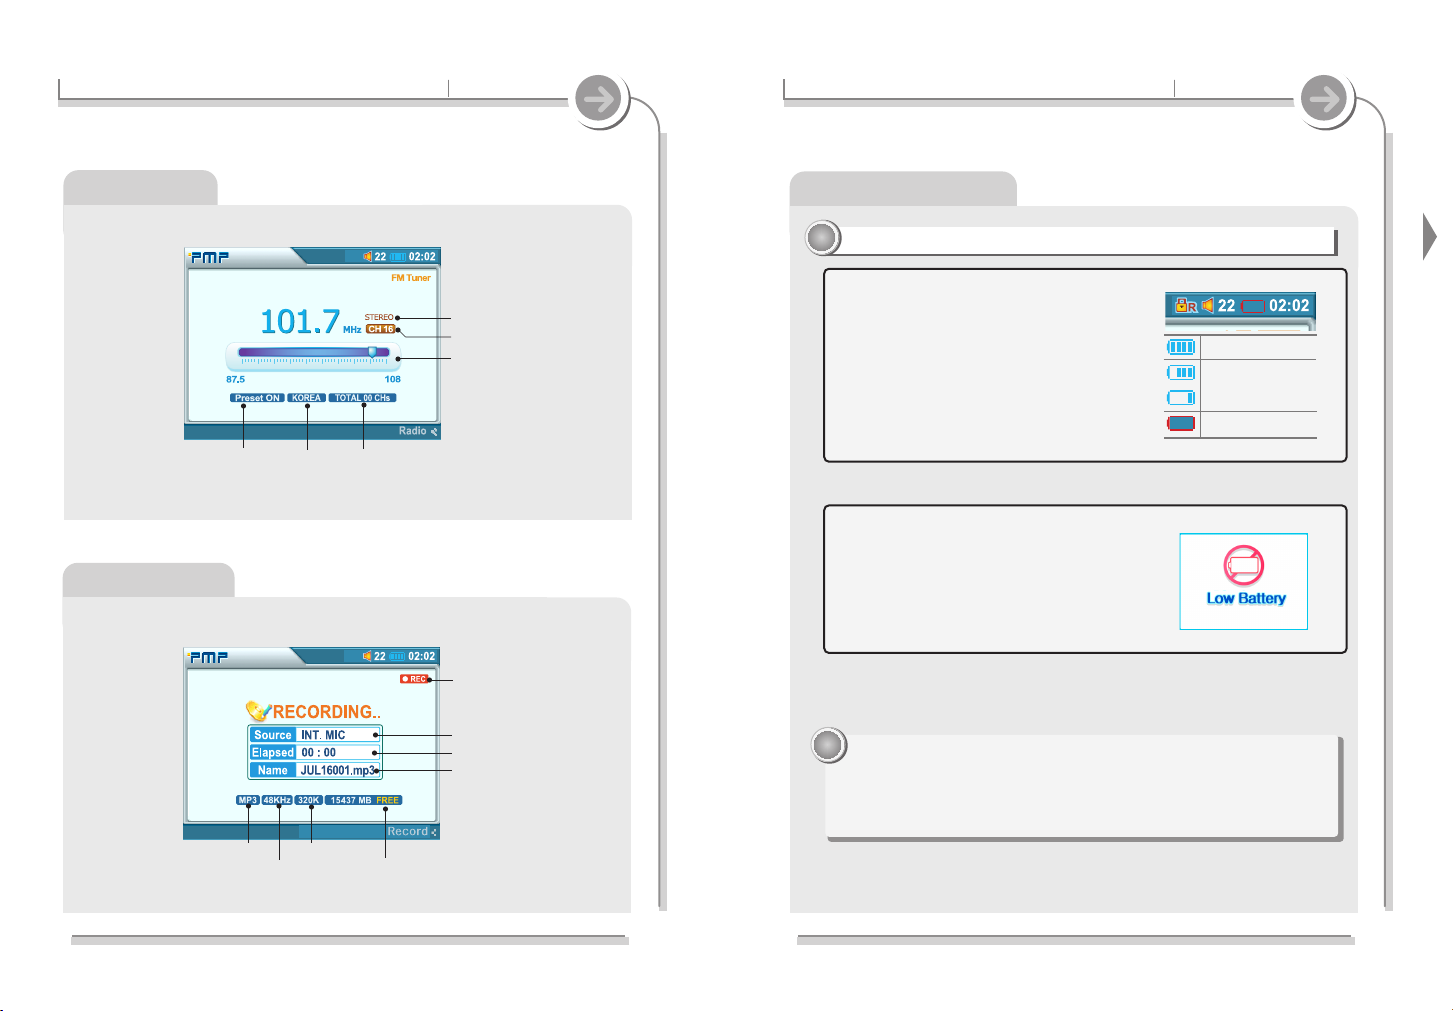
FM radio mode
Recording Mode
19
2-2. LCD screen display
Getting started
Stereo/Mono
Channel
Frequency Range
Total preset number
Region
Preset
on/off
Free space
Bit rate
Record status
Record File Name
Sample rate
Recording file format
Record elapsed time
Source
Page 12
22
2-3. Connecting and installation
Getting started
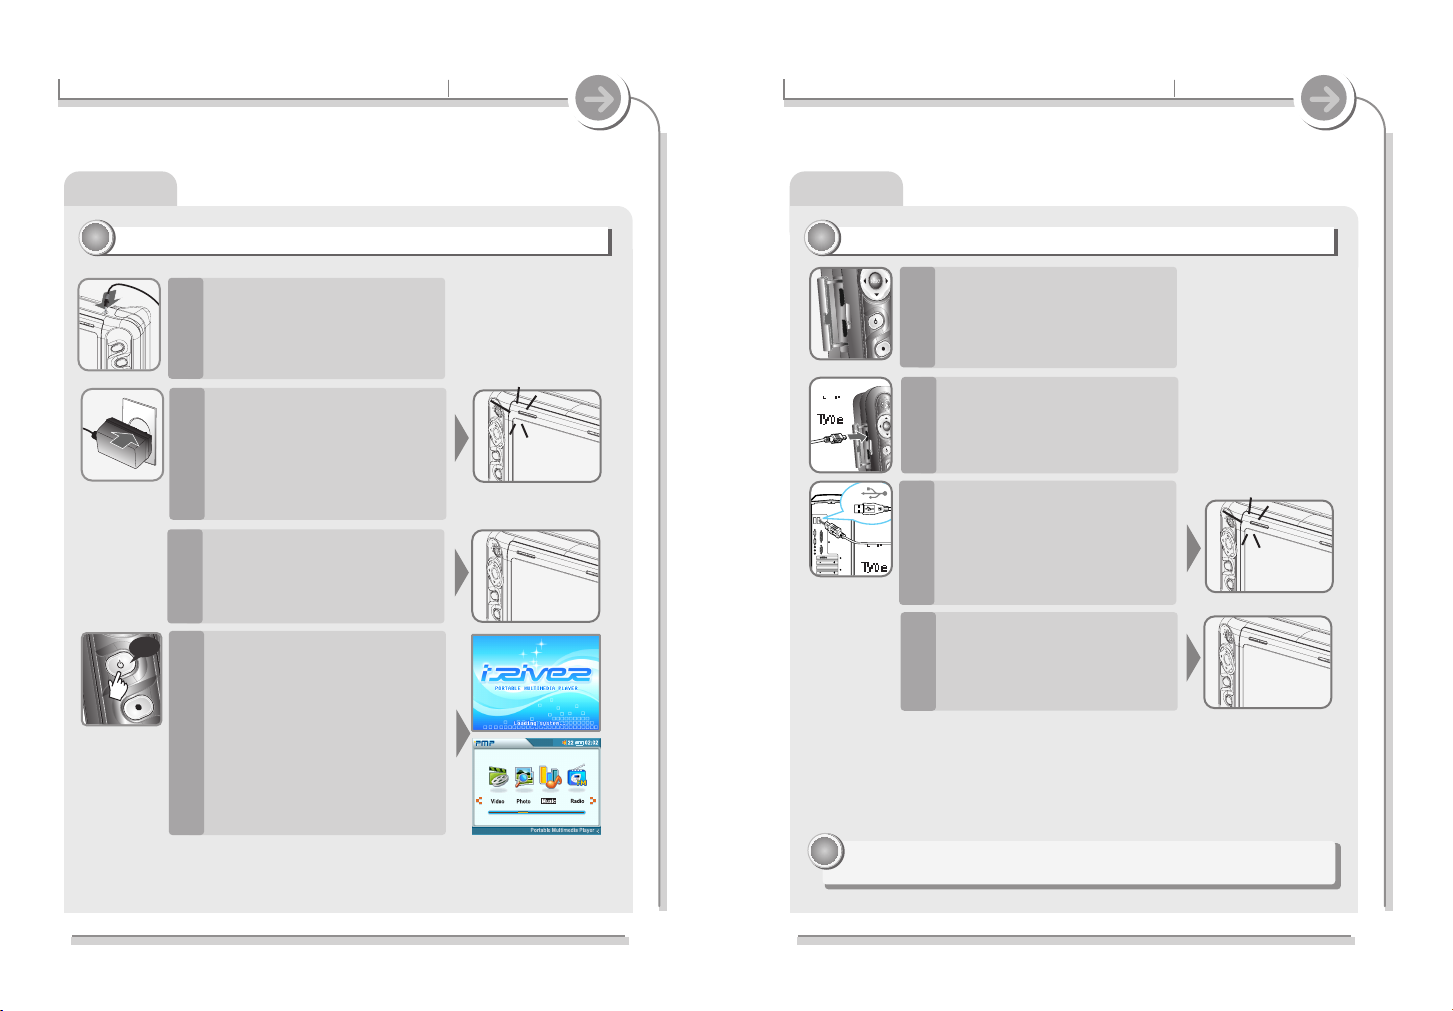
Charging
Charging by using USB cable
22
22
Push the USB lock to open the
protective cover.
1
Connect the USB cable to the
player ‘s USB Device Port.
2
The light will turn off when
charging is complete.
4
Connect the USB cable to the
PC’s USB port.
A charging indicator light will
illuminate while the player is
charging.
3
B
A
The charging time : Approx. 4 hours (At full discharge)
The playback time : Approx. 4 hours (Video)
Note
Note
21
2-3. Connecting and installation
Getting started
Charging
Charging by using AC adapter
11
11
Use only the AC Power Adapter supplied with the player.
The AC operating voltage of this player is 100~240V, 50/60Hz.
Connect the AC adapter to the
player's DC IN 5.0V connector.
1
Connect the AC adapter plug to a
power socket. (AC adapter for this
player is 120~240V, 50/60Hz.)
If a power source is connected when
the player is turned off, a charging
indicator light will illuminate while the
player is charging.
2
Press and hold the POWER
button while charging to start
the player in Function selection
mode.
4
The light will turn off when
charging is complete.
3
long
Page 13
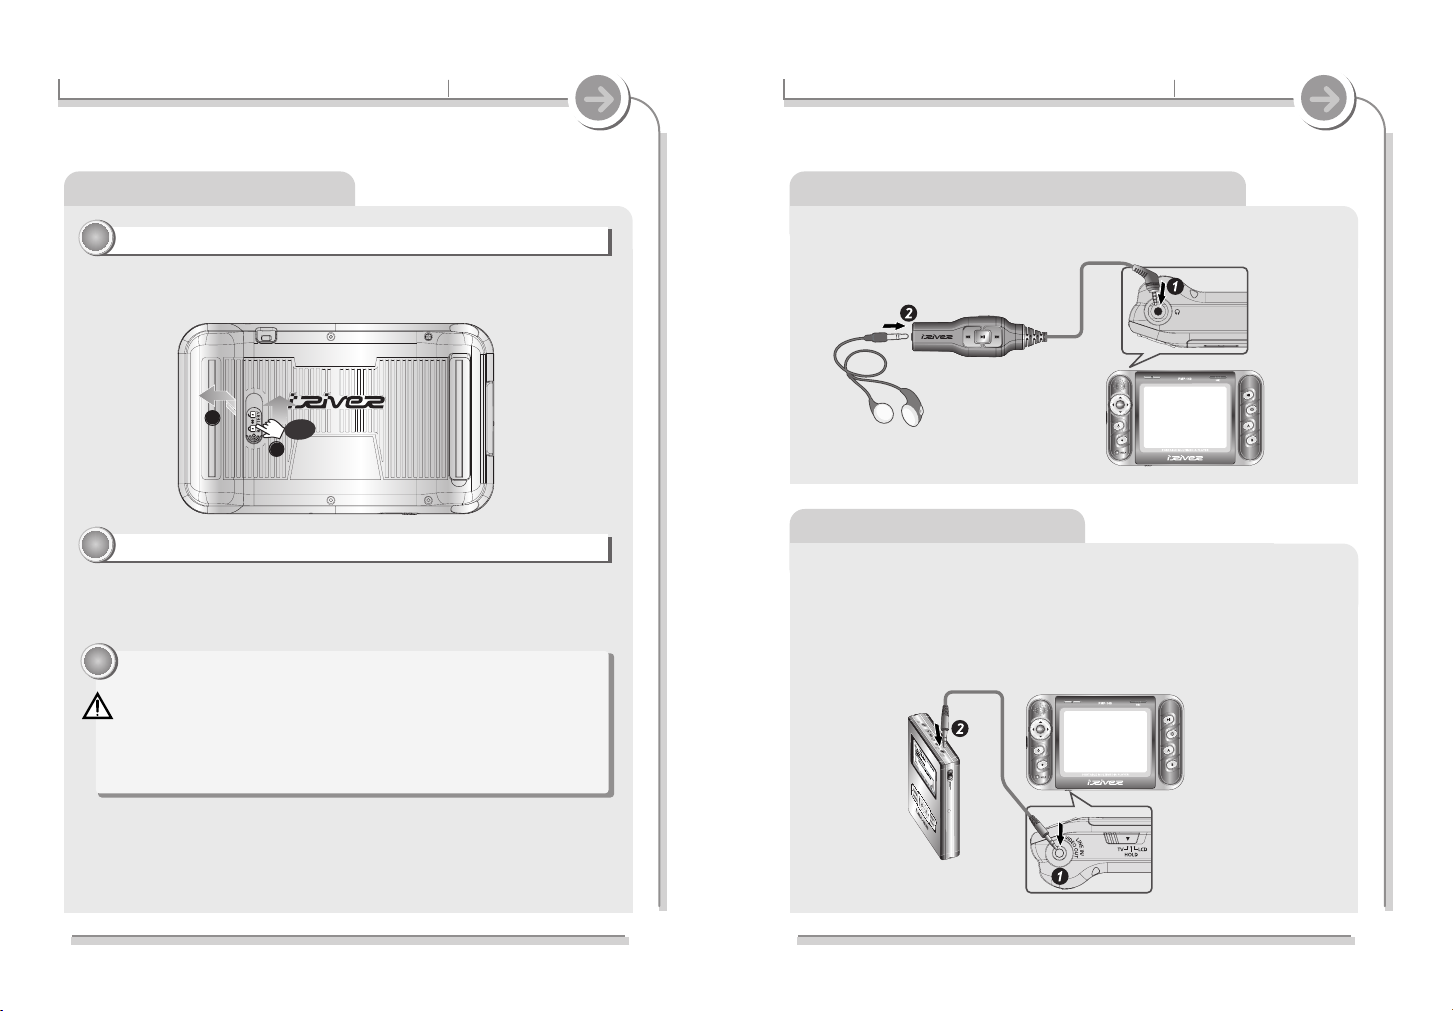
Connecting the remote control (Option)/earphones
24
2-3. Connecting and installation
Getting started
1. Connect the remote control (Option) to the socket on the top of the player.
2. Connect the earphones jack to the earphone socket of the remote control
(Option).
Connecting to audio equipment
Line-In : Connect external input devices for Line-In audio recording.
1. Connect the Line-Out or earphone socket of the external device to the
Line-In/Video out socket of the player with the Line-In cable.
2. Use the recording feature to record with the desired setting.
See Page 66 for Audio Recording instructions.
23
2-3. Connecting and installation
Getting started
About the Rechargeable battery
Detaching the rechargeable battery
11
11
Slide the battery onto the player until it locks into place.
Press the lock to release the battery and slide it out of the player.
Attaching the rechargeable battery
22
22
Charge and store the battery at room temperature.
It may not charge properly in hot or cold temperature environments.
Do not attempt to disassemble the battery.
Do not expose the battery to open flame.
These activities could cause the battery to explode resulting in serious injury.
Do not contact the connectors of the battery to metal objects, or an electrical
shock may occur.
Note
Note
1
1
2
2
Push
Page 14
26
2-3. Connecting and installation
Getting started
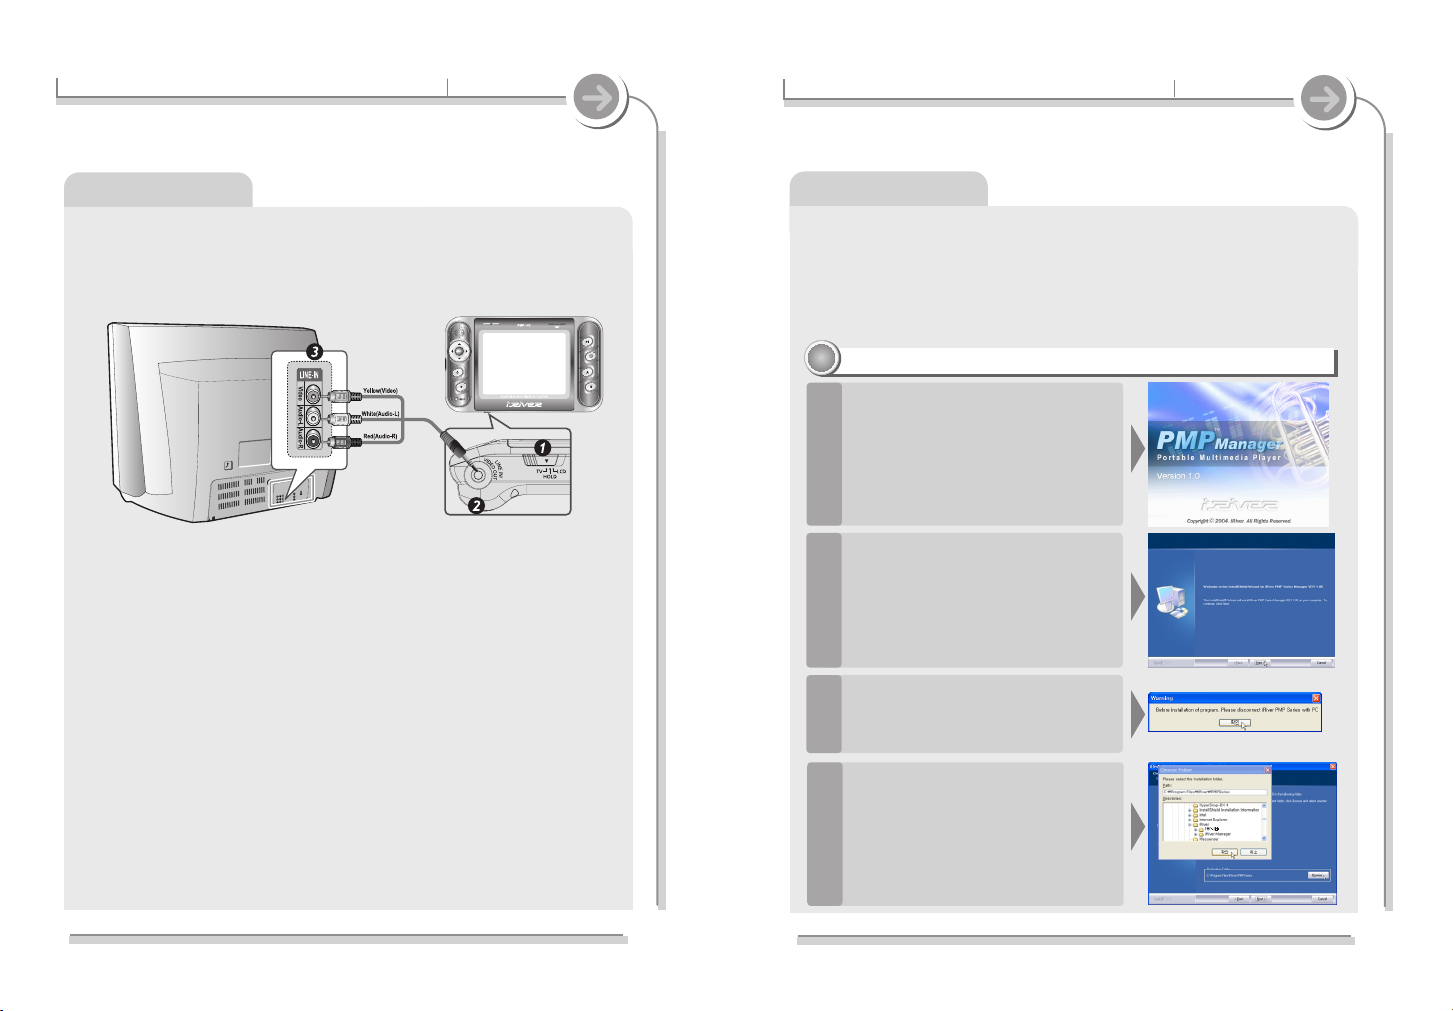
Operate the software
PMP Manager installation
11
11
Insert the Installation CD into the CDROM drive.
The installation will start automatically.
1
Click “Next” to continue installation.
2
If the product is connected, disconnect it
from the PC and press the "OK" button.
The message is displayed even if the
product is not connected to the PC.
3
Windows Me, Windows 2000 and Windows XP will recognize the PMP-100
as a USB drive automatically and you can use the player without installing
PMP Manager. Look for the "PMP" drive by opening My Computer.
For Windows 98 SE users, the PMP Manager must be installed for the
computer to recognize the player.
All users must install PMP Manager to use the Database function.
Select the folder to Install.
Click “OK”.
4
25
2-3. Connecting and installation
Getting started
Connecting to a TV
1. Select TV from "TV/HOLD/LCD" switch.
2. Connect AV cable with player as shown on the diagram below.
3. Connect RCA jack to the TV as shown on the diagram below.
(Yellow - Video, White - Audio L.ch, Red - Audio R.ch)
Page 15
28
2-3. Connecting and installation
Getting started
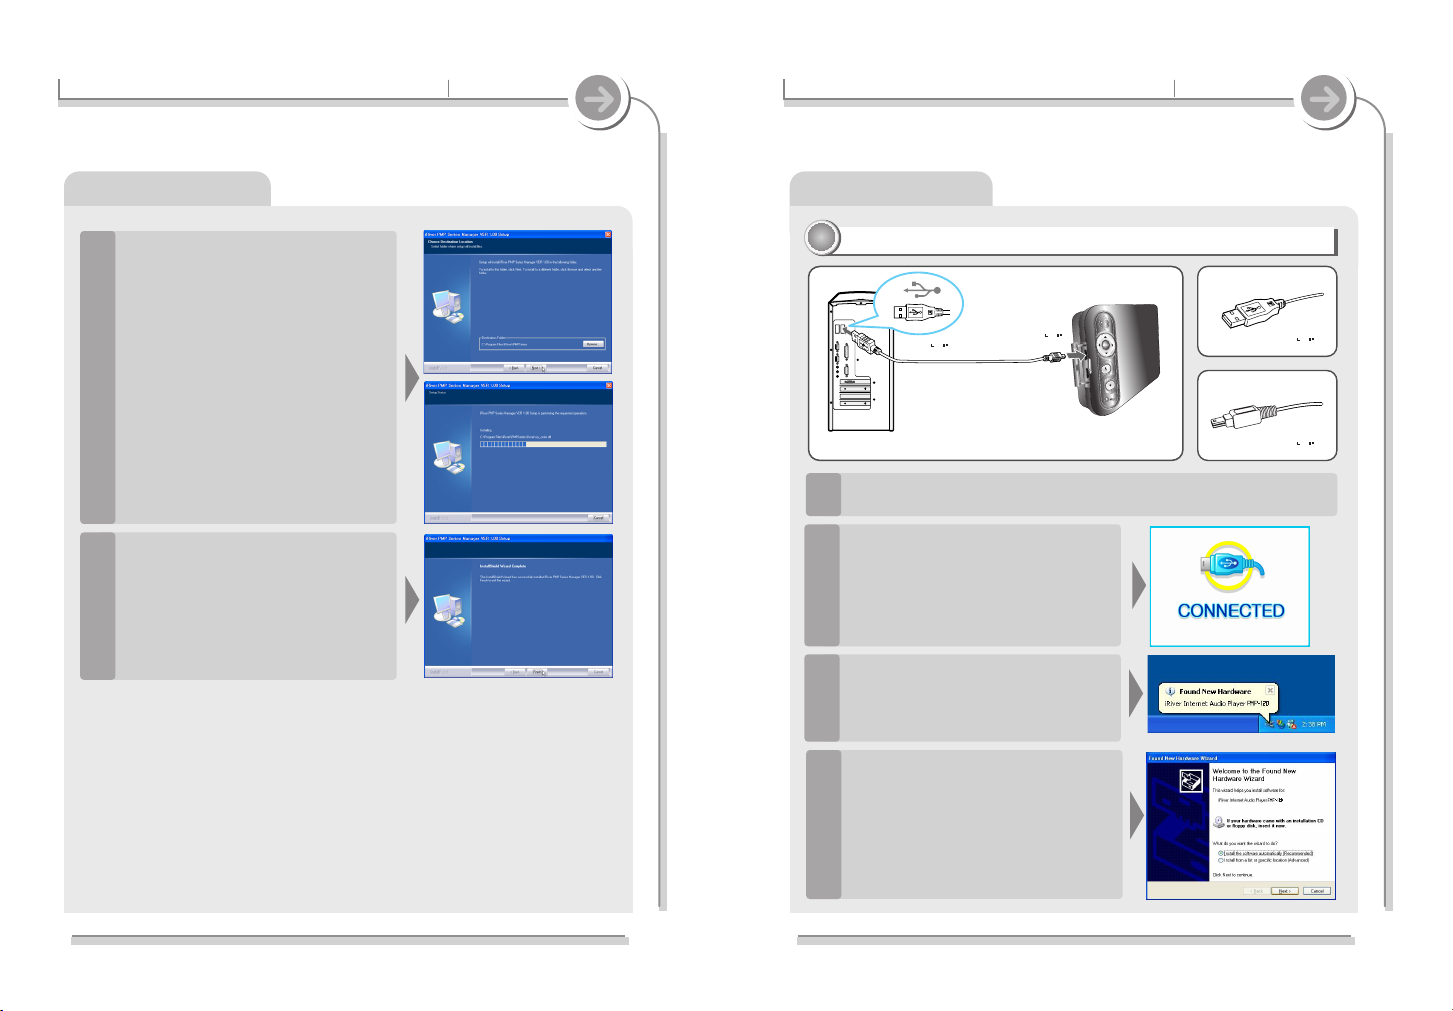
Operate the software
Connecting to a PC
22
22
Connect the USB cable (provided) to the USB port of your PC.
1
Turn on the player, open the
protective cover of the USB port, and
connect the USB cable.
“CONNECTED” icon will appear on
the LCD screen of the player.
2
After installing iRiver Music Manager
from the CD and connecting the
player to your PC, "Found New
Hardware" screen is displayed.
3
Type A
Type B
USB port on the PC
USB port on the player
(USB2.0/Device)
USB cable
Type A
Type B
Select “Install the software
automatically (Recommended)” and
click “Next”.
4
Complete the driver installation after installing the PMP Manager software.
27
2-3. Connecting and installation
Getting started
Operate the software
Click “Next” after confirming the
installation folder.
The installation is in process.
5
Click “Finish” after the installation is
completed.
6
Page 16
30
2-3. Connecting and installation
Getting started
Operate the software
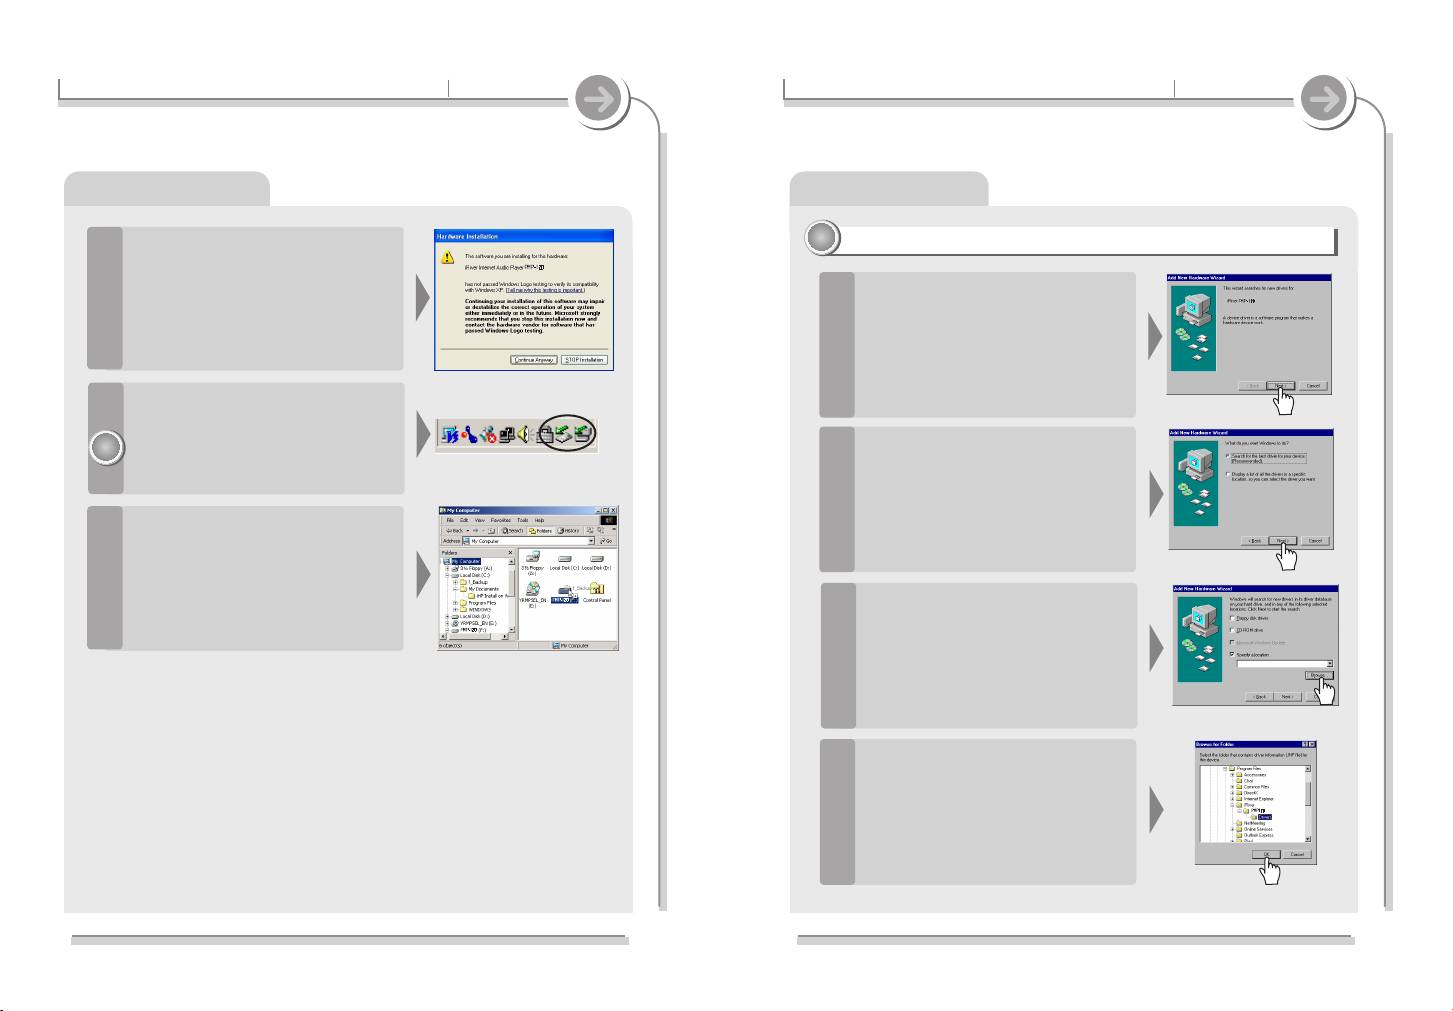
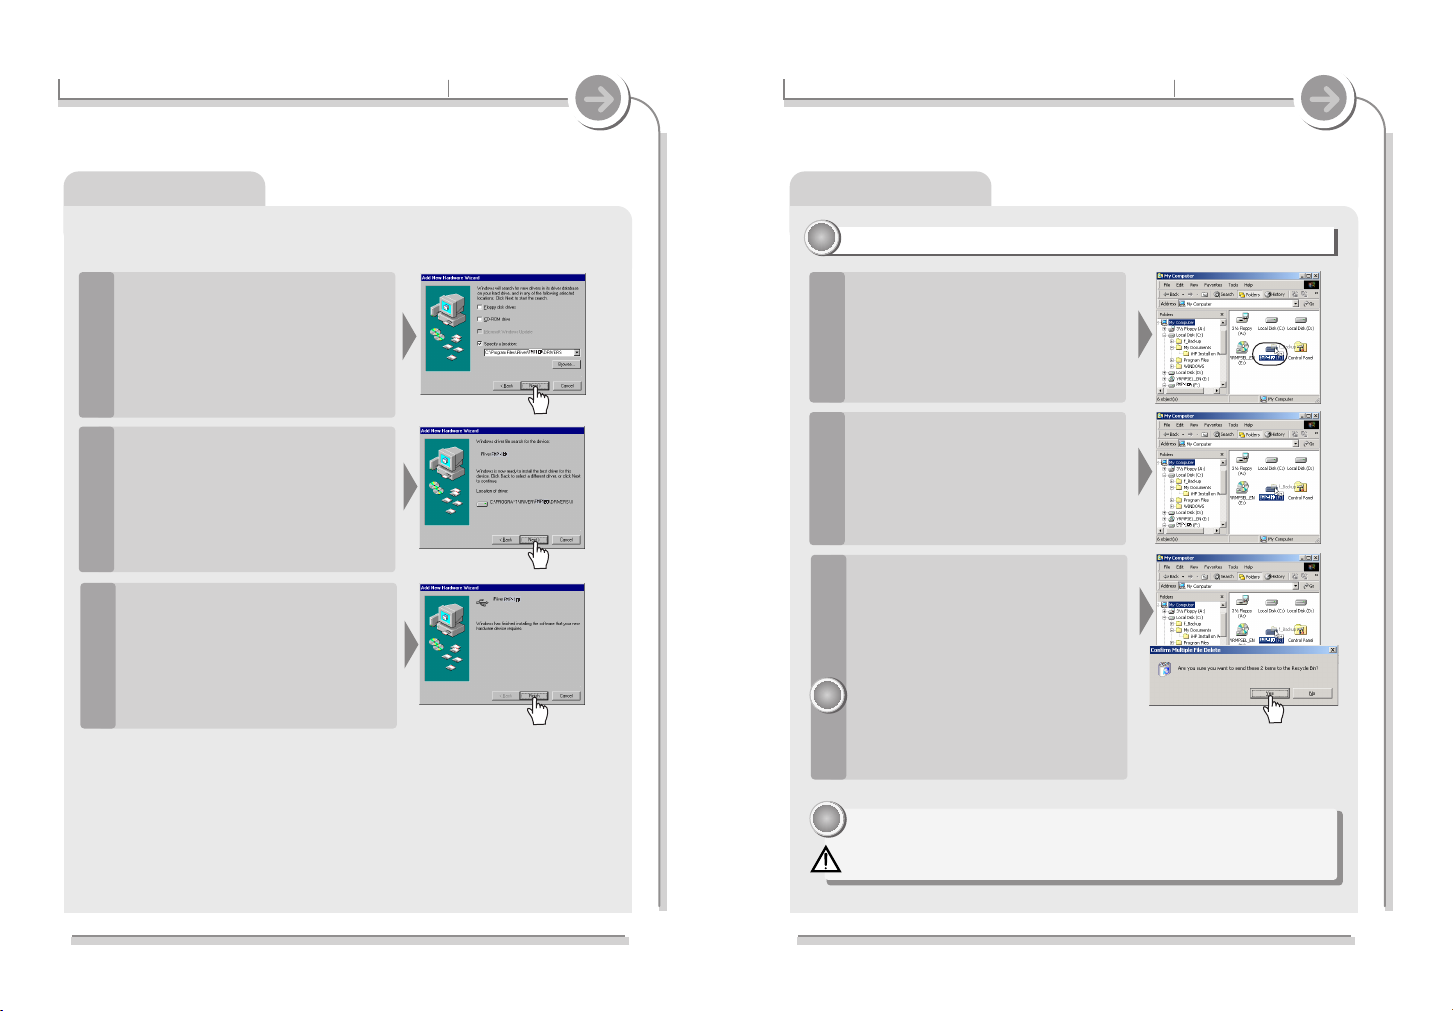
Installing the device driver manually
(Windows98 SE only)
33
33
If the player is not recognized by the
PC, an "Add new hardware wizard"
window is opened. Click the "Next"
button.
1
Click the "Search for the best device
driver (recommended)" and click the
"Next" button.
2
Click ‘the specify a location’ option
and click the "Browse" button.
3
Select the installation folder that
includes the iRiverH.inf file
(C:\Program Files\iRiver\PMP100\
drivers) and click the "OK" button.
4
29
2-3. Connecting and installation
Getting started
Operate the software
If a "Hardware Installation" warning
message appears, click "Continue
Anyway". (Windows XP)
The iRiver software driver will not cause
any damage to your computer.
5
Windows XP and Windows 2000 will
display a "Device Attached" icon.
Windows may ask to install a driver for the
PMP. Please follow the provided driver
installation guide on the following page.
6
Once installed, open Windows
Explorer and an additional drive
should be listed called “PMP-100”.
7
Note
Note
Page 17
32
2-3. Connecting and installation
Getting started
Operate the software
To copy/delete files/folders
44
44
The player will show up as a new
drive in Windows Explorer.
1
To copy files/folders
Click and Drag files from the PC to the
player.
2
To delete files/folders
To delete files or folders from the
player, select the files (folders) to be
deleted and press "Delete" on the
keyboard. Click “Yes” when asked to
confirm the delete.
When deleting files, some computers will
move them to the Recycle Bin on your
desktop. Be sure to empty your PC's
Recycle Bin to make sure the space on the
PMP is available for new file transfers."
3
When the player is attached to a computer for an extended period of
time, be sure to plug in the AC adapter.
Low batteries can prevent proper functioning of the player.
Note
Note
Note
Note
Operate the software
31
2-3. Connecting and installation
Getting started
When the folder is located, click the
"Next" button.
5
Click the "Next" button.
6
Click the "Finish" button to finish the
installation.
7
Page 18
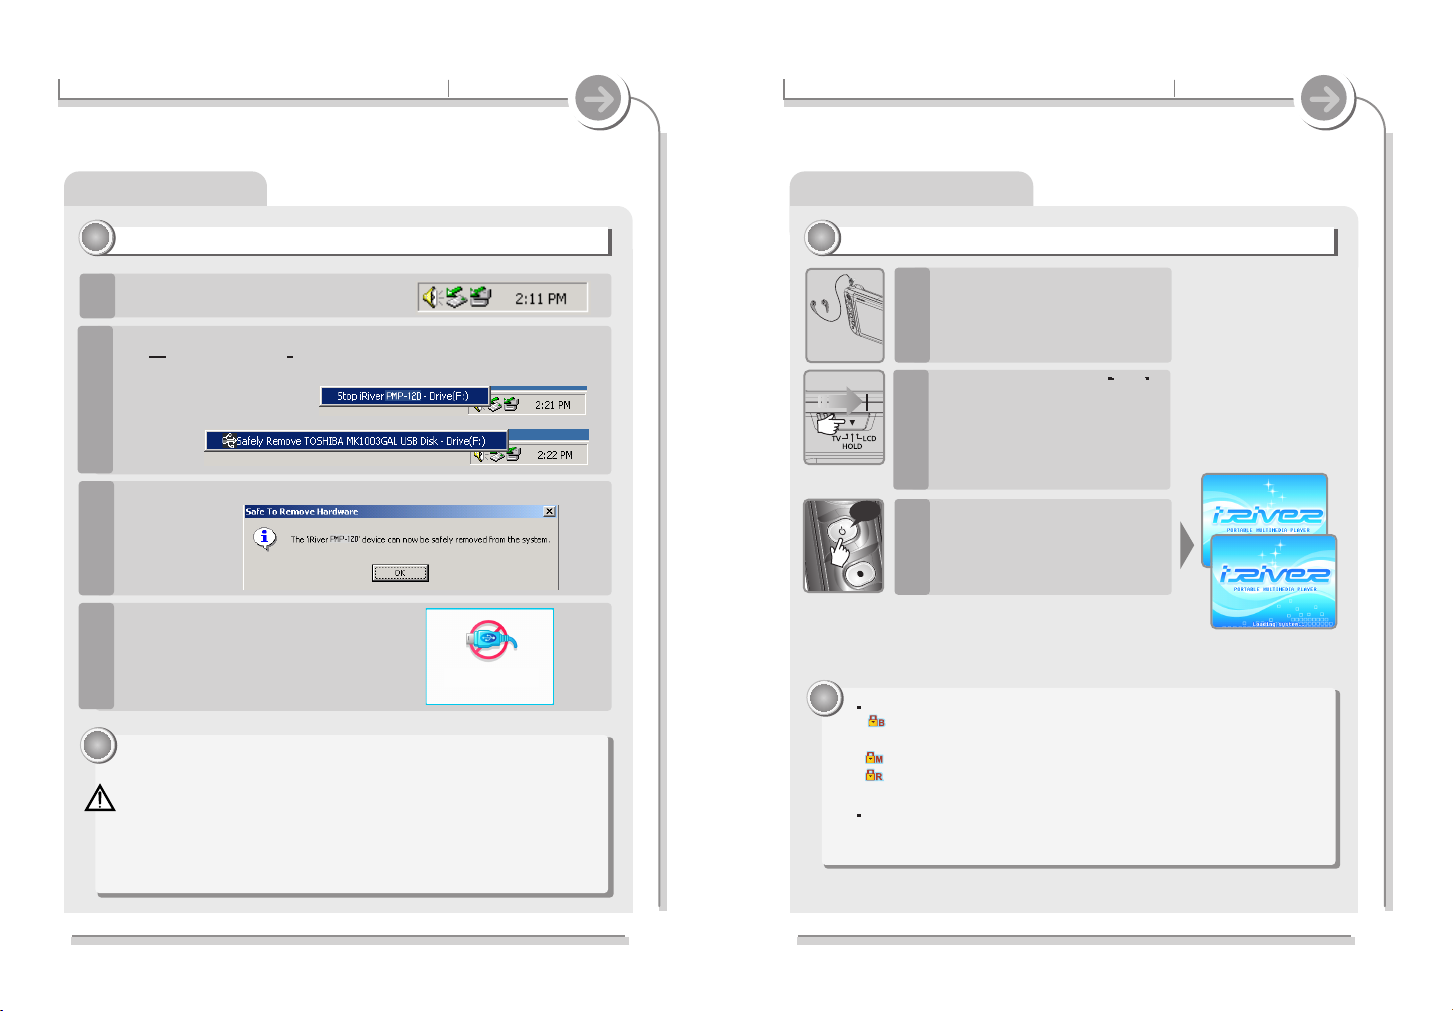
Turning on/off the player
Turning on the player
11
11
34
3-1. Basic operation
Basic operation
Connect the remote control
(Option) or earphones.
1
Press and hold the POWER
button to turn on the player.
3
The following icons are displayed to indicate HOLD status.
: The HOLD function is set in both the player and the remote control
(Option).
: The HOLD function is set in the player.
: The HOLD function is set in the remote control (Option).
When stopped or in recording standby mode, the player automatically
turns off according to the setting of “STOP POWER OFF” on the
Setup.
Note
Note
2
Put the HOLD switch to LCD
long
33
2-3. Connecting and installation
Getting started
Operate the software
Safely removing the player from the PC
55
55
Click the “Safely removing device” icon
in the PC tray.
1
Click “Stop iRiver PMP-100-Driver (X)” or “Safely Remove TOSHIBA
MK1 3GAL USB Disk Drive (X:)”. (Where X is the drive letter
assigned to the PMP) Click the following popup message.
2
Click the Confirm button in the hardware safe removal window
3
Disconnect the USB cable between
the player and host PC.
The following message is displayed in
the LCD screen.
4
The tray icon may be hidden in some Windows XP operating system settings.
Click the "Display hidden icon" to view the hidden icon.
Hardware safe removal may not be available while using some applications such
as Windows Explorer or Windows Media Player. Please close all applications
using the player before the hardware safe removal process.
In some Windows XP operation system settings, hardware safe removal is
temporarily unavailable due to some internal system communication.
Note
Note
DISCONNECTING
DISCONNECTING
Page 19

36
3-1. Basic operation
Basic operation
Sound control
To turn off the player, press and
hold the POWER button.
Turning off the player
44
44
long
35
3-1. Basic operation
Basic operation
Turning on/off the player
Selecting the function
22
22
1
Press SELECT button to execute
the selected function.
2
When powered on, the Function
menu will display.
Press or button to choose
the desired function.
Video Playing video files
Photo Viewing photo files
Music Playing music files
Radio Listening FM station
Record Recording voice/audio
Setup Setting the functions
Browser Searching folders/files
Adjusting the volume
33
33
During the music or video file
playback, press button to
increase or decrease volume
level.
<Browser>
Page 20

Playing a video file(s)
38
3-2. Playing video file(s)
Basic operation
Continue to use
buttons and SELECT to
highlight additional files in the
current folder.
Moving to a different folder will clear
all currently highlighted items.
Clicking SELECT on a previously
highlighted item will clear it from
the current list.
4
Press and hold the SELECT
button to open a pop-up menu.
Choose "Select All" and press
SELECT to highlight all items in
the current folder.
5
Press the button to play the
selected file directly or press
the SELECT button after
selecting “Play” on the pop-up
menu.
The highlighted files begin playing.
6
long
long
3-2. Playing video file(s)
Basic operation
Playing a video file(s)
Playing a video file
11
11
Press and hold the POWER
button to turn on.
Function selection screen is
displayed.
1
Use button to choose
Video and press SELECT.
Press the B button to choose
"Browser" or "Playlist" to search for
files. Only video files will appear on
the lists.
Browser: Look for files on the player.
Playlist: Display or create a list of
files to play."
The playable files with the selected
program are only displayed.
2
Use the buttons to
locate a video file then press
SELECT to highlight the file for
playback.
Press
button to enter the folder.
Press button to go the upper
folder.
If a folder is selected, all files in the
folder and all files in any sub-folders
will be added to the list.
3
<Browser>
<Playlist>
37
long
Page 21

Playing a video file(s)
40
3-2. Playing video file(s)
Basic operation
Changing Playback Mode
55
55
Press the B (EQ/ MODE) button
to view information about a
video file.
Press the B (EQ/MODE) button
again to exit viewing information
about a video file.
View information about a video file
66
66
long
While playing a video file, press
and hold the B (EQ/MODE)
button to change the playback
mode .
The playback mode is changed
whenever it is pressed. (1
All
Normal) See page 91 for details
about playback modes.
3-2. Playing video file(s)
Basic operation
Playing a video file(s)
Selecting a video file while playback
22
22
Press NAVI( ) button.
Use the buttons to
select a video file, then press
the PLAY( ) button to play
the selected file.
(See page 37 for details.)
Press and hold the button
for fast-forward or fast-reverse
playback.
Release the button for normal
playback.
Press the ?/Help button to see
an explanation of each button
function during video playback
mode.
Press the
?/Help button again to
exit Help.
FF and RW
33
33
Help for button
44
44
long
39
Page 22

3-3. Viewing photo file(s)
Basic operation
Viewing photo file(s)
Viewing photo files
11
11
Select Photo from the Function
menu and press SELECT to
enter photo viewing mode.
Press the B button to choose
"Browser" or "Playlist" to search for
files. Only image files that will
appear on the lists.
Browser: Look for files on the player.
Playlist: Display or create a list of
files to play."
1
Use the buttons to
locate an image file then press
SELECT to highlight the file for
playback.
Press
button to enter into the
folder. Press button to go the
upper folder.
If a folder is selected, all files in the
folder and all files in any sub-folders
will be added to the list.
2
42
3-2. Playing video file(s)
Basic operation
Playing a video file(s)
Pause playing
77
77
Press to pause video
playback.
Press again to continue
playing.
Press and hold to stop
playing.
When stopped the current playlist
screen will be displayed.
1
Press and hold the button
again to exit video playback
mode.
The Function menu will be
displayed.
2
Exit playing a video file
88
88
long
long
41
<Playlist>
<Browser>
<Playlist>
Page 23

3-3. Viewing photo file(s)
Basic operation
Viewing photo file(s)
While viewing images, press the
button to skip to the next
or previous file in the playlist.
If the last item in the list is currently
displayed, pressing
will stop
playback and the Playlist screen will
appear.
Skipping to next/previous file
22
22
44
3-3. Viewing photo file(s)
Basic operation
Viewing photo file(s)
Continue to use
buttons and SELECT to
highlight additional files in the
current folder. Moving to a
different folder will clear all
currently highlighted items.
3
Press and hold the SELECT
button to open a pop-up menu.
Choose "Select All" and press
SELECT to highlight all items in
the current folder.
4
Press the button to play the
selected file directly or press
the SELECT button after
selecting “Play” on the pop-up
menu.
The highlighted first file will show
on the LCD screen.
5
long
long
43
Press the A button to enlarge
the picture by 2/ 4/ 8/ 1 times.
1
Press the button to
move zoom point at Zoom
mode.
2
Zoom
33
33
Page 24

Viewing photo file(s)
46
3-3. Viewing photo file(s)
Basic operation
Viewing photo file(s)
3-3. Viewing photo file(s)
Basic operation
45
Rotating the picture
44
44
View photo file’s Information
55
55
Press the B (EQ/MODE) button
to view image information.
On some files, it will be necessary to
press B again to see the file detail.
Press the B (EQ/MODE) button
again to exit viewing image
information.
Press and hold the A button to
rotate the picture by 90 degree.
You can not zoom the picture during
rotate mode.
long
Press the ?(Help) button to see
an explanation of each button
function.
Press the
?(Help button again to
exit Help.
Help for button
66
66
Press and hold the button to
stop viewing images.
When stopped the current playlist
screen will be displayed.
1
Press and hold the button
again to exit video playback
mode.
The function menu will be displayed.
2
long
long
Exit viewing photo files
77
77
Page 25

Playing music file(s)
48
3-4. Playing music file(s)
Basic operation
Continue to use
buttons and SELECT to
highlight additional files in the
current folder.
Moving to a different folder will
clear all currently highlighted
items.
4
Press and hold the SELECT
button to open a pop-up menu.
Choose "Select All" and press
SELECT to highlight all items in
the current folder.
5
Press the button to play the
selected file directly or press
the SELECT button after
selecting “Play” on the pop-up
menu.
The highlighted files begin playing.
6
47
3-4. Playing music file(s)
Basic operation
Playing music file(s)
Basic playback
11
11
Select Music from the Function
menu and press SELECT to
enter music playback mode.
1
Press the B button to choose
"Browser" or "Playlist" to
search for files.
Only music files will appear on the
lists.
Browser: Look for files on the player.
Playlist: Display or create a list of
files to play.
2
Use the buttons to
locate a video file then press
SELECT to highlight the file for
playback.
Press
button to enter the folder.
Press button to go the upper
folder.
If a folder is selected, all files in the
folder and all files in any sub-folders
will be added to the list.
3
<Browser>
<Playlist>
Page 26

50
3-4. Playing music file(s)
Basic operation
Playing music file(s)
To pause playback
77
77
Press to pause music
playback. Press again to
continue playing.
Press and hold to stop
playback.
When stopped the current playlist
screen will be displayed.
1
Press and hold the button
again to exit music playback
mode.
The function menu will be displayed.
2
Playlist
Function selection
Exit playing a music file
88
88
long
long
During the music file playback
or pause, press B (EQ/MODE)
button, to change the sound
EQ.
Changing the sound EQ
66
66
49
3-4. Playing music file(s)
Basic operation
Playing music file(s)
Skipping to Next/Previous File
22
22
Press to skip to the next file in
the current playlist. Or press
to skip to the previous file in the
list. If the last item in the list is
currently playing, pressing will
stop playback and the Playlist
screen will display.
Press and hold the or
button for fast-forward or fastreverse playback.
Release the button for normal
playback.
Fast searching
33
33
long
Changing playback mode
44
44
While playing a music file, press
and hold the B (EQ/MODE) button
to change the playback mode .
The playback mode is changed
whenever it is pressed. (1
All
Normal) See page 91 for details
about playback modes.
Press the ? (Help) button to
see an explanation of each
button function during music
playback mode.
Help for button
55
55
long
Page 27

3-4. Playing music file(s)
Basic operation
Playing with DB Scan
Press and hold the SELECT
button to open a pop-up menu.
Choose "All" and press SELECT
to highlight all items in the
current view.
4
Press the button to play the
selected file directly or press
the SELECT button after
selecting “Play” on the pop-up
menu.
The highlighted files begin playing.
5
long
long
Press and hold the SELECT
button to open a pop-up menu.
Choose "Load List" and press
SELECT to exit DB Scan mode
and return to the file list.
6
long
52
3-4. Playing music file(s)
Basic operation
Playing with DB Scan
Playing with DB Scan
11
11
Press and hold the SELECT
button to open a pop-up menu.
Choose "Select All" and press
SELECT to highlight all items in
the current folder.
1
Choose DB Scan from the popup menu and press SELECT.
2
Press the SELECT button after
selecting a music file by using
the button.
Press
button to enter into the
folder.
Press
button to go the upper
folder.
If select Folder, all files and sub
folder in the folder are selected.
3
Note
Note
Files listed in red have been deleted from the player. Please connect the
player to your PC and update the DB file (see page 77 for details).
If DB Scan does not display any files, reconnect the player to your PC and
update the DB file. See page 77 for details.
51
DB Scan allows you to search for your music files by Song Title, Artist, and Genre.
Please see page 77 for more information about activating DB Scan.
Page 28

3-5. Using playlists
Basic operation
Using Playlists
Press the B button to select
“Playlist” screen.
Confirm the Playlist.
5
Press the button to play the
selected file directly or press
the SELECT button after
selecting “Play” on the pop-up
menu.
The selected files play in
sequential order.
6
long
54
3-5. Using playlists
Basic operation
Using playlists
Playing with playlists
11
11
Press the B button to open
Browser at the stop mode.
You can select Browser or Playlist
by turns by pressing the B button.
The playable files with the selected
program is only displayed.
1
Press the SELECT button after
selecting Playlist to play by
using the button.
2
<Browser>
<Playlist>
Press and hold the SELECT to
display the pop-up menu.
3
long
53
Press the SELECT button after
selecting “Open List” by using
the button.
Files in the Playlist is displayed.
4
Page 29

3-5. Using playlists
Basic operation
Using playlists
Press the B button to select
“Playlist” screen.
Confirm the added Playlists.
6
Choose "New List" and press
SELECT to create a new playlist
with the highlighted files.
5
Press and hold the SELECT to
display the pop-up menu.
4
long
56
Using playlists
55
3-5. Using playlists
Basic operation
Making a new playlist
11
11
Press the B button to display
Browser.
1
Continue to use
buttons and SELECT to
highlight additional files in the
current folder.
Moving to a different folder will clear
all currently highlighted items.
Clicking SELECT on a previously
highlighted item will remove it from
the current list.
3
Use the buttons to
locate a file then press SELECT
to highlight the file.
Press
button to enter into the
folder. Press button to go the
upper folder.
If a folder is selected, all files in the
folder and all files in any sub-folders
will be added to the list.
2
Page 30

3-5. Using playlists
Basic operation
Using Playlists
Press the B button again to
switch to the Browser view and
begin searching for files to add
to the list.
6
Press the SELECT button after
selecting the file to add by using
the button.
Press
button to enter into the
folder. Press button to go the
upper folder.
If a folder is selected, all files in the
folder and all files in any sub-folders
will be added to the list.
7
Continue to use
buttons and SELECT to
highlight additional files in the
current folder.
Moving to a different folder will
clear all currently highlighted
items.
8
58
3-5. Using playlists
Basic operation
Using playlists
Adding playlists
22
22
Press the B button to select
Browser at stop mode.
1
Locate a playlist and press the
SELECT button.
2
Press and hold the SELECT to
display the pop-up menu.
3
Select "Load List" and press the
SELECT button.
4
long
Press the B button again to
switch to the Playlist view and
confirm that the desired list was
loaded.
5
57
Page 31

Using Playlists
60
3-5. Using playlists
Basic operation
Remove files from Playlists
33
33
Using the Browser, locate the
playlist file to be deleted and
press SELECT.
1
Press and hold the SELECT
button to display the pop-up
menu.
2
Select "Load List" and press the
SELECT button.
3
Press the B button again to
switch to the Playlist view and
confirm that the desired list was
loaded.
4
Select the file to delete using the
button on the playlist.
5
long
3-5. Using playlists
Basic operation
Using playlists
Press and hold the SELECT to
display the pop-up menu.
9
"Add List" and press the
SELECT button.
The highlighted files will be added
to the playlist."
10
Press the B button to select
"Playlist screen".
Confirm the added playlists.
11
Press and hold the SELECT to
display the pop-up menu.
12
Select "Save List" and press the
SELECT to save the modified
playlist.
13
long
59
long
Page 32

3-6. Listen to FM station
Basic operation
Listen to FM radio
Listen to FM radio
11
11
Select Radio from the Function
menu and press SELECT to
enter FM Radio mode.
1
Press the button to select a
station.
2
Changing Stereo/Mono
22
22
Press the A button to change
Stereo/Mono.
Mono allows for stronger reception
in weak transmission areas.
62
The headphone cord is used as the
FM antenna. Reception will be very
poor if headphones are not attached
to the player."
3-5. Using playlists
Basic operation
Using playlists
Press and hold the SELECT
button to display the pop-up
menu.
6
Select "Del List" and press
SELECT.
The item on the list will be removed.
7
Press and hold the SELECT
button to display the pop-up
menu.
8
Select "Save List" and press
the SELECT to save the
modified playlist.
9
long
long
61
Note
Note
Page 33

3-6. Listen to FM station
Basic operation
Listen to FM radio
Memory Function
(Save Channels Manually)
44
44
If Preset is displayed, first
press the NAVI button to exit
Preset mode.
1
Press the button with short
or long click and select the
desired station.
2
Press the B (EQ/Mode) button.
MEMORY and Channel number
will be displayed on the screen.
3
Press the button to select a
Channel number to assign to the
frequency.
4
64
MEMORY
CH-3
MEMORY
CH-5
3-6. Listen to FM station
Basic operation
Listen to FM radio
Auto memory function
(To save Channels automatically)
33
33
If Preset is displayed, first
press the NAVI button to exit
Preset mode.
1
Press and hold the B (EQ/Mode)
button.
CH01 to CH20 will be saved
automatically with the first 20
stations the player finds.
2
FM tuner reception will be affected in weak transmission areas.
When player does not have any preset channels, EMPTY will be
blinking.
Note
Note
long
63
Page 34

Recording
66
3-7. Recording
Basic operation
Recording Voice/Source from External Audio Source
11
11
1
Use the and buttons to
select "Source" then and
to select the desired recording
source.
INT.MIC : To record through the
internal microphone
LINE-IN : To record from an
external audio source
3
Use and to select each
setting and or to choose
the desired value for each
setting.
4
Press the A button to enter the
Recording Settings menu.
2
Select Record from the Function
menu and press SELECT to
enter recording mode.
Volume can not be controlled while recording.
Note
Note
3-6. Listen to FM station
Basic operation
Listen to FM radio
Press the B (EQ/Mode) button to
store the frequency to the
selected channel number.
5
Erasing MEMORY (Delete saved stations)
55
55
Press the button to cancel
storing the frequency and return
to normal FM operation.
6
Select channel to be deleted by
pressing button at preset
mode.
2
Push and hold the B (EQ/MODE)
button to delete the selected
station.
The next channel will appear when
channel delete is completed.
3
long
65
If Preset is not displayed, first
press the NAVI button to enter
Preset mode.
1
Page 35

Recording
3-7. Recording
Basic operation
To play a recorded file
33
33
Press the button to play a
recorded file at the Recording
Standby Mode.
To stop recording
44
44
Press and hold the button to
exit Recording Mode at the
Recording Standby Mode.
The screen will be changed to
Function menu.
68
long
Recording
3-7. Recording
Basic operation
Press the (REC) button
recording to pause the recording.
Press the
(REC) button again to
resume recording to the same file.
To pause recording
22
22
Press the (REC) button to start
recording.
Press play on your external
equipment (if necessary) to begin
playback to be recorded.
6
Press and hold the NAVI button
to go to the Recording Standby
Mode.
5
long
67
l
Note
Note
The recorded file is saved as mmddxxx.MP3 in the RECORD folder.
(Month) (Day) (Number)
The recording will be stop if
- the amount of recorded data exceeds the capacity.
- the size of recorded file (MP3) exceeds 400MB.
- the RECORD time exceeds 10 hours.
- the battery is low on charge.
Page 36

3-7. Using Browser
Basic operation
Searching a File/Folder (Browser)
Continue to use
buttons and SELECT to
highlight additional files in the
current folder.
Moving to a different folder will
clear all currently highlighted
items. button.
Clicking SELECT on a previously
highlighted item will remove it from
the current list.
3
Press and hold the SELECT
button to open the pop-up
menu.
Choose "Select All" and press
SELECT to highlight all items in
the current folder.
4
Press the button to play the
selected file directly or press
and hold the SELECT button
after selecting “Play” on the
pop-up menu.
The highlighted files begin playing.
5
long
long
70
3-7. Using Browser
Basic operation
Searching a file/folder (Browser)
Playing a file/folder directly
11
11
Select Browser from the Function
menu and press SELECT to enter
the browser mode.
You can switch between the two
browser screens using the B
button.
All playable files, Video, Music, etc.
will appear with the appropriate icon.
Files with a “?” icon are not playable.
1
Use the buttons to
locate a file then press SELECT
to highlight the file for playback.
button.
Press
button to enter into the
folder. Press button to go the
upper folder.
2
<Browser 1>
<Browser 2>
69
Page 37

3-8. Using Browser
Basic operation
Searching a File/Folder (Browser)
Once all the desired items in the
folder are highlighted, press
and hold the SELECT button to
bring up the pop-up menu.
5
Choose “Copy”or “Move” and
press SELECT. The highlighted
items will be moved or copied
to the desired folder chosen in
Step 2.
6
Choose “Yes” to confirm the
action.
7
Press the B button to change
back to Browser 1 and confirm
that the files are in the new
location.
8
72
3-8. Using Browser
Basic operation
Searching a File/Folder (Browser)
Copying / Moving files
22
22
On the Function Menu, choose
Browser.
1
Use the buttons to
highlight your desired
“Destination” folder on the
Browser 1screen.
2
Press B to switch to Browser 2.
3
Use the buttons to
locate a file then press SELECT
to highlight the file for copying
or moving.
If a folder is selected, all files in
the folder and all files in any subfolders will be copied or moved.
Clicking SELECT on a previously
highlighted item will remove it from
the current list.
Continue to use and
SELECT button to highlight
additional files in the current
folder.
Moving to a different folder will clear
all currently highlighted items.
4
long
71
Page 38

Playing by using Navigation
74
4-1. Using Navigation
Specific features
Playing file/folder directly
11
11
You can play a music, photo or
video file using the file browser
or create, add to, delete from, or
modify a playlist.
3
Press the NAVI button while
playing.
The current playlist will be
displayed on the LCD.
1
You can select the “Browser”
and “Playlist” by turns by
pressing the B button.
2
Navigation mode is useful for deleting or adding and saving playlists to the
player and searching music files while playing.
These features have been described previously in this
manual. Please see above sections for details about
each of the items listed here.
4
Select All : Select all folders/files
Add List : Add a playlist.
Play : Play a selected file/ folder.
New List : Make a new playlist.
Load List : Open a selected playlist.
DB Scan : Search the music information on the player.
Info : Display the information of the selected file.
3-8. Using Browser
Basic operation
Searching a File/Folder (Browser)
Deleting Files/Folders
33
33
Use the buttons to
locate a file then press and
hold SELECT to display the
pop-up menu.
1
Choose "Delete" and press
SELECT" to delete the file.
2
Select "Yes" to confirm the
action and press SELECT.
3
To cancel the current action
select "No" and press SELECT.
4
long
73
Page 39

76
4-2. Using Host function
Specific features
Using Host function
75
4-2. Using Host function
Specific features
Using Host function
Use the Host function to exchange data from supported devices via a direct USB
connection. Using Host, you can perform the work connecting to external devices
such as digital camera etc.
Connecting to an external device
11
11
Connect the to an external device with Host cable (provided).
The USB Host icon will be displayed.
1
Excute Browser function from the Function menu.
The external device is displayed as “Device” window screen in the
Browser function.
2
Response time may vary depending on memory size and type of the
external device.
The external device’s root folder is displayed as “Device” in the
Device window screen.
To copy/delete files or folders
33
33
Removing the player from an external device
44
44
Disconnect the Host cable between the player and an external
device.
You can copy or delete file/folder between the player and an external
device. Use the Browser instructions found on page 69 to move or
delete files to or form an external device.
Not all devices will be detected by the PMP using this connection.
Many cameras/MP3 players/memory card reader/etc. will not function with the
PMP. Please visit our web site for details about the HOST function and what
devices it is compatible with.
Page 40

DB Scan
4-3. Using DB Scan
Specific features
Adding DB
33
33
Connect the player to the PC.
(Refer to “Connecting to the
PC”, page 28)
1
Open Windows Explorer and
select the player drive.
2
Select newly transferred MP3
files or folders containing
MP3 files. Right click on
those files and click "Add
Music(s) to DB."
3
Click OK after updating is
completed.
4
After disconnecting the player from the
host PC, you can search the added
music by using ID3 Tag.
(Refer to “Safely Removing the player from
the PC”, page 33.)
5
ID3 Tag information of the
selected files are added to DB.
78
DISCONNECTING
DISCONNECTING
DB Scan
4-3. Using DB Scan
Specific features
The DB is a Data Base of the MP3 songs on your player. It indexes all the Song Title, Artist, and Genre
information as found in the ID tags of your MP3 files. It is important to perform the steps below after transferring
MP3’s to your player. This can also be used to re-create the DB file if it is damaged or accidentally deleted.
Updating DB File
22
22
Connect the player to the PC.
(Refer to “Connecting to the
PC”, page 30)
1
Open Windows Explorer and
select the player drive.
2
Right click on the player.
Then select “DB File update”
to activate DB File update.
3
Click OK after updating is
completed.
4
NO DB indicates that the MP3 file
does not have ID3 information.
Fail, indicates that the file name or
folder name is over 52 characters.
Shorten filenames to correct this
issue."
After disconnecting the player from the
host PC, you can use the Navigation
function to search for songs using ID3
Tag information.
(Refer to “Safely Removing the player from
the PC”, page 33.)
5
77
DISCONNECTING
DISCONNECTING
Any time songs are deleted from the player, the DB must be updated to keep the Song Title, Artist, and
Genre lists accurate. When new MP3’s are added, the DB must be updated or the MP3’s must be added
to the DB using the instructions on the this page."
Page 41

Setting the Playback Mode
4-4. Playback Mode
Specific features
Press the B (EQ/MODE) button
to set the playback mode.
Refer to page 91 for details about
playback modes.
You can set Repeat, Shuffle or Intro playback by choosing these selections
under Mode while playing music or motion picture.
Play a single playlist repeatedly.
Play all playlist in the player repeatedly.
Repeat
11
11
Randomly play all playlists on the player and stop.
Shuffle
22
22
Intro
33
33
Play beginning 10 seconds of each track in sequential order.
80
DB Scan
Note for DB Scan
44
44
79
4-3. Using DB Scan
Specific features
To use the ID3 Tag Navigation function, folder and file names must use
52 characters or less.
Please try to use standard character sets such as English in the ID3 Tag
Navigation function. If you want to use special characters, please use
only the following:
, ,, , , , , , , , , , ,, , , , , , , , , , , , , ,
, , , , , , , , , , , , , , , , , , , , , , , ,
, , , , , , , , , , , , , , , , , , , , , , , , , , , , , ,
, , , , , , , , , , , , , , , , , , , , , , , , , ,
, , , ,., , , , , , , , , , , , , , , , , , , , , , ,
, , , , , , , , , , , , , , , , , , , , , , , , , ,
, , , , , , , , , , , , , , , , , , , , , , , , , ,
, , , , , , , , , , , , , , , , , , , , , , , , , ,
,
long
Intro is not available for video playback.
Page 42

How to use WINAMP PLAYLIST
82
Make a PLAYLIST ( * .M3U) using
WINAMP.
1
4-5. Using Winamp Playlist
Specific features
Launch WINAMP and add songs to
make a list.
Click "LIST OPTS" located on the right
bottom and click "SAVE LIST"
Winamp execution picture
Making a Playlist
11
11
Save to the player with the *.M3U and the files added to the playlist.
The player can also play the playlists created on the PC.
Refer to for details.
3
Name the file name (ex: iriver
.m3u) and click "SAVE" to save
the list.
2
Setting the Playback Mode
4-4. Playback Mode
Specific features
Press A button while playing to
select the beginning (A) point.
1
Play a selected interval repeatedly while playing music.
Press A button again to select
the end (B) point.
2
Press the A button to cancel the
interval repeat.
3
A-B Repeat
44
44
81
Page 43

4-6. Customizing the function settings
Specific features
2. Menu Setup Operation
1
<Function Selection>
Choose the desired menu item
and press SELECT to enter that
sub-menu.
2
<Main Menu>
Use and to select a feature
and or to set the value for
that feature.
3
<Sub Menu Setting>
long
Press and hold NAVI button to
enter Setup menu.
(On the Function menu, choose
Setup and press SELECT.)
84
1. Menu Setup Configuration
83
4-6. Customizing the function settings
Specific features
You can configure your own settings.
Function Control is subject to change with different firmware versions.
USB Device
Firmware Upgrade
System
Hour
Minute
Day
Month
Year
Setup
Clock
EQ
Balance
Sound
Repeat
Shuffle
Intro
Visualization
Mode
Playback
Video Out
LCD Brightness
Video X Position
Video Y Position
Display
Language
FM region
Resume
Load default
General
Caption
H align
V align
Delay
Video Caption
Source
Sample rate
Bitrate
Line In Volume
Record
60Hz(db)
250Hz(db)
1KHz(db)
4KHz(db)
12KHz(db)
User EQ
Power
Sleep Timer
Power Off (Min)
Sleep Timer Power Off
Auto Power Off
Power Off (Min)
LCD Off (Sec)
Auto Power Off
Page 44

4-6. Customizing the function settings
Specific features
1. General
Language : (supports 38 languages)
11
11
Select the language to display the file name and
ID3 tag information.
The file name and ID3 tag information for the
player is dependent on the version of the PC
operating system that was used to create it.
You can set the FM frequency and step according
to your area.
After selecting a new tuner region, all preset
stations will be deleted from memory.
FM Region
22
22
For example, if an MP3 file is created in a English
version of Windows, the language setting should be English for the proper title
display. When the language is changed, the changed language is displayed after
power off and on.
86
3. Exit Sub Menu Setup
4. Exit Menu Setup
4-6. Customizing the function settings
Specific features
Press and hold NAVI, SELECT
or PLAY button to exit the submenu and return to the Setup
menu screen.
Press and hold button to exit
Setup Menu at initial setting
menu.
<Function Selection>
long
long
long
<Main Menu>
85
long
When On, player resumes tp previous place in
video file after Stop or Power Off.
Resume
33
33
Page 45

4-6. Customizing the function settings
Specific features
2. Display
Adjust LCD contrast of the player.
The LCD contrast can range from 20/ 40/ 60/ 80/
100.
Adjust the Y Position (vertical position) of the
motion picture played from the player on the TV.
(-20 ~ 0 ~ 20)
Adjust the X Position (horizontal position) of the
motion picture played from the player on the TV.
(-20 ~ 0 ~ 20)
LCD Brightness
22
22
Video X Position
33
33
Video Y Position
44
44
88
1. General
Load Default
44
44
2. Display
Video Output
11
11
4-6. Customizing the function settings
Specific features
Initialize to original factory setting.
Press the SELECT button after selecting
Load
Default to set Load default.
Press the SELECT button after selecting Yes
by using the button to initialize to original
factory setting.
Press the SELECT button after selecting No to
cancel the Load Default Setting.
Select the video signal output system
correspondent with the TV on the player.
NTSC : Korea/ U.S.A etc.
PAL : Europe/ China etc.
87
PMP-100 cannot perform this action
while playback.
Note
Note
Page 46

90
4-6. Customizing the function settings
Specific features
3. Power
The player, automatically turns power off to
save the battery when there is not any action
during the set time at stop mode.
ON: Enable Auto Power off.
OFF: Disable Auto Power off.
Automatically turns the power off at the stop
mode.
Time steps are 3 / 10 / 20 / 30 / 60 / 120
minute.
Power Off (Min)
44
44
Auto Power Off
33
33
Set the number of minutes the backlight will
remain on.
Time steps are 3 / 5 / 10 / 20 / 30 / 60 / 120
second.
LCD Backlight Off (Sec)
55
55
89
4-6. Customizing the function settings
Specific features
3. Power
You can set the sleep timer function On or Off.
ON : enabled sleep timer
OFF : disabled sleep timer
Automatically turns the power off after set
time.
Time steps are 3 / 5 / 10 / 20 / 30 / 60 / 120
minute.
Sleep Timer
11
11
Power Off (Min)
22
22
This setting is ignored during video
playback.
Note
Note
Page 47

4. Mode
Visualization
44
44
4-6. Customizing the function settings
Specific features
Visualizes audio signal or lyric using LDB
manager at play mode.
Lyric : Displays lyric using LDB manager.
Level Meter : Displays audio signal level.
92
Caption
55
55
On : Displays the caption.
Off : Does not display the caption.
The player supports SMI captions for video
files. Please see your video encoding
software documentation for information on
SMI captions.
H align
66
66
Set video captioning justification while playing
motion picture. (Top/Bottom).
4-6. Customizing the function settings
Specific features
4. Mode
Select the repeat modes that are available during
playing a music or video file. (1/ ALL/ None)
Plays about 10 seconds of each files at the
beginning.
Set the shuffle mode to On or Off during playing
a music or video file.
You can play the selected mode simultaneously
by setting Repeat Mode / Shuffle Mode
respectively.
(Refer to page 80 for details about each mode)
Intro
33
33
Shuffle
22
22
Repeat
11
11
91
Page 48

4-6. Customizing the function settings
Specific features
5. Sound
EQ
11
11
You can select various EQ modes.
EQ is selected as follows :
Normal
Rock Jazz Classic Ultra Bass
User EQ
You can adjust the sound to your preference.
There are 5 band frequency steps, set from
-12dB to +12dB by 1dB increments.
Press the
button to select frequency band
and button to adjust the level.
When Sound Balance bar is moved to L (Left,
20),the sound outputs at the left earphone. When
the lever is moved to R (Right, -20)the sound
outputs at the right earphone. The default value is
0 and the sound outputs the same level at both
earphones.
Balance
22
22
User EQ
33
33
94
4-6. Customizing the function settings
Specific features
4. Playback Mode
V align
77
77
Set video captioning justification while playing
motion picture.
(Left/Center/Right).
Caption Delay
88
88
Set whether the caption is displayed ahead of
or behind the motion picture.
(-50 ~ 0 ~ 50)
93
Page 49

4-6. Customizing the function settings
Specific features
7. System
USB Device
11
11
Displays the device connected to the PMP-100
through the USB Host connection.
Note
Note
Firmware Upgrade
22
22
Upgrade the operating system of PMP-100.
Refer to “4-7 Firmware Upgrade” for details.
What is FIRMWARE?
It is the operating system that works in the PMP-100.
iRiver provides you with the latest and best features through Firmware
Upgrade. Visit www.iRiver.com to upgrade your Firmware.
96
4-6. Customizing the function settings
Specific features
6. Clock
Hour/Minute
Displays the current clock.
Day/Month/Year
Displays the current day.
Set
Set the time and day.
Press the SELECT button after selecting Set .
Clock
11
11
95
PMP-100 cannot perform this action
while playback.
Note
Note
Page 50

4-6. Customizing the function settings
Specific features
8. Recording
You can adjust recording level when recording
from External equipment.
(You can set from 0 to 20.)
Line In Volume
44
44
98
4-6. Customizing the function settings
Specific features
8. Recording
Source
11
11
Select the source to record.
You can select the source to record (Internal
microphone or Line In).
You can adjust recording quality by setting
Sample Rate (Sampling ratio).
You can select 32KHz or 44.1KHz.
The higher Sample Rate is, the better the
recorded sound is and the lower it is, the worse
the recorded sound is. Higher quality recordings
will create larger files and take up more space on
the player.
Sample Rate
22
22
You can adjust recording quality by setting
Bitrate (Compression ratio).
You can select the Bitrate to 96 Kbps or 128
Kbps.
The higher Bitrate is, the better the recorded
sound is and the lower it is, the worse the
recorded sound is. Higher quality recordings will
create larger files and take up more space on the
player.
Bit Rate
33
33
97
Page 51

4-7 Firmware upgrade
Specific features
Firmware Upgrade
Activating the Firmware Upgrade
22
22
Choose Setup from the Function
menu and press SELECT.
1
Choose the System sub-menu
item and Press SELECT.
2
Choose Firmware Upgrade and
press SELECT.
Automatically unzip the Firmware
Upgrade file (PMP-100.tar)
3
long
10099
4-7 Firmware upgrade
Specific features
Firmware Upgrade
Preparing the Firmware Upgrade
11
11
Download the latest firmware upgrade file
(PMP-100-Vxxx.zip) from www.iRiver.com.
1
Unzip the downloaded firmware file and
double click the EXE file.
This will create the firmware file.
(PMP-100.tar)
2
After connecting the player to the USB, copy
“PMP-100.tar” file to the “Root” folder on the
player.
Always use the AC adapter for Firmware
upgrade. If not, critical damage to the
player may result from to battery shortage.
3
Safely remove the player from the PC .
4
Note
Note
Page 52

102
5-1. Precautions
Additional
Information
Solving the problem about the Boot Failure
Precautions for Hard Disk Drive
11
11
When powering on, the player checks
several internal configurations.
If one of these configurations is not
working properly, a Boot Failure
message may appear.
See the following pages for steps to
resolve a Boot Failure."
The PMP player uses an internal Hard Disk Drive to store your data.
There should be no need to format or otherwise service the drive.
iRiver recommends carefully reading the troubleshooting section of this manual
and viewing updated online documentation before attempting to format the
device. Only under recommendation from iRiver should the drive be formatted.
If attempting to format the drive in the PMP for any reason, please observe the
following precautions:
The PMP-140 can not be formatted using Windows XP or Windows 2000.
These operating systems can not format drives over 32 GB using the FAT32
file system. This is a limitation of these operating systems and not a fault of
the device itself.
The PMP-140 player can be formatted using Windows 98 SE or Windows
Me. Always choose the FAT32 file system when formatting the player.
The PMP-120 player can be formatted using Windows XP, 2000, Me, and 98
SE. Always choose the FAT32 file system when formatting the player.
Should formatting become necessary, be sure to always use the FAT32 file
system. Under no circumstance should the player be formatted using the
NTFS file system. This will cause the player to become unusable.
The player can not be formatted on non-Windows computers (such as Mac).
Attempting to do so may cause the player to become unusable
About the Boot Failure
22
22
4-7 Firmware upgrade
Specific features
Firmware Upgrade
Choose "Yes" to confirm the
action and press SELECT.
The firmware upgrade is in process.
4
When the upgrade is done, turn
the player off.
5
After turning the player on,
confirm the Firmware Upgraded
operating.
6
101
Page 53

104
NOTE !
5-1. Precautions
Additional
Information
Note
Note
If a file is unable to play due to damage, the damaged part will skip;
if it is not possible to play continuously it will skip to the next file.
Folders and files are sorted in alphabetical order.
Only files with extension with MP3, WMA, WAV, ASF, AVI, BMP, and JPG
can be played.
The player can recognize the files/folders on the player without limit but
999 files or sub folders in a folder.
Battery level indicator may vary depending on battery type
(Internal/External) and operation mode.
The maximum play time for video (video 640X480@30fps / audio-MP3
128kps, 44.1KHz) is 4 hours and maximum play time for audio (MP3,
128kps, 44.1KHz) is 10 hours
Audio of moving picture only supports MP3, WMA.
AC3, DTS, AAC, and other formats are not supported.
Physical shock can cause bad sectors on the Hard Disk inside the player.
This can be recovered using Windows Scandisk.
All data stored on this device may be erased by a excessive impact, a
thunder or an electricity failure, etc. on the device.
The Manufacturer does not warrant and will not be held responsible in any
way for damages or loss of data, including loss of data stored on this
device, resulting from a excessive impact, a thunder or an electricity
failure. You will be responsible for safe-guarding all data stored on this
device.
If the video bitrate is below 700Kbps, the picture image and/or the sound
may get distorted.
Solving the problem about the Boot Failure
103
5-1. Precautions
Additional
Information
Solving the problem about the Boot Failure
22
22
If the "Boot Failure" message is still displayed, connect the
player to the USB cable and attempt to Format the internal drive
using the guidelines outlined on the previous page in the
"Precautions for Hard Disk Drive" section. Then repeat steps 2
and 3 above.
4
If the message persists, please contact your closest iRiver
Customer Support for assistance.
5
After performing steps 2 and 3, disconnect the player from the
USB cable and power it on.
3
Power on the player and make note of the firmware version that
is displayed during startup. The firmware version will
correspond to a “System File” that is kept on the drive inside the
player. Should this System File become damaged or missing,
the player may not boot and the file must be replaced. Please
download the version of the System File that matches your
firmware version from the iRiver web site.
2
Highly recommended to run Error-Checking and Defragmentation
utilities periodically for longer use.
Connect the player to a Windows PC and use Windows “Error
Checking” to attempt to recover the player. Please see Help
under your Windows Start Menu for details about error checking
a hard drive.
1
Page 54

106
5-3. Troubleshooting!
Additional
Information
Solution
Check whether the TV/HOLD/LCD switch is HOLD.
(Switch to LCD position.)
Check whether the rechargeable batteries are not
charged.
Check whether the plug is connected to the proper
jack on the player.
Check whether the HOLD switch on remote control
(Option) is ON. (Switch to OFF position.)
Connect the earphones/remote plug firmly.
Check whether the battery is discharged. If the
battery is discharged, the clock is initialized to
00:00 after approx. 1 month.
Set the current clock (Refer to page 95)
Trouble
Player will not
power on.
AC adapter
does not work.
Remote control
(Option) does
not work.
The clock is
changed to
00:00.
Should any problem continue after you have checked these symptoms,
please contact iRiver customer support.
105
Playing
5-2. Questions and Answers
Additional
Information
What is VBR?
VBR is "Variable Bit Rate". Some MP3 encoders support VBR. When
enabled, the compressor will use a bit rate that will fit the actual
passage. If it is a complex part, having much more variation in the
sound, it will use a high bit rate. If there is less variation in sound, it will
use a lower bit rate. Usually, the average bit rate will not be as high as a
same-quality MP3 with CBR (Constant Bit Rate). However, there is
shortcoming that it's hard to keep track of the actual position that may
not be favorable when studying language.
Q
Q
A
A
Can I change the playing order?
The PMP-100 supports m3u file lists. Also, the Playlist function allows
you to select your preferred songs.
Q
Q
A
A
I hear a 'hiccup' sound while the song is playing.
Corrupted MP3 or WMA files may make a static noise and the sound
may cut off. Listen to your files on the PC to see if they are corrupted.
Q
Q
A
A
Page 55

108
5-3. Troubleshooting!
Additional
Information
Solution
The image file may not conform to the
specifications of the PMP. Consult the specifications
section of this manual for details.
While playing audio file, the display is automatically
turned off to save the battery as the set time passes.
You can adjust the backlight time on the Setup Menu.
Check whether VOLUME is set to 0 .
Connect the earphone/remote plug firmly.
Check whether the plug is dirty (clean the plug with a
dry and soft cloth).
Corrupted MP3, WMA, ASF or AVI file may have
distortion or not play.
Try playing another music file.
Excessive jolting and constant vibration may affect
playback. Use the device in a more stable
environment.
Check out Menu General Language and confirm
whether the right language has been selected.
Check whether the adapter plug is properly
connected.
Fully charged batteries will not accept additional
charging.
Trouble
Image files does
not display.
Display turns off
repeatedly.
Audio files do not
play properly.
Either no sound
is heard or
defects are
heard.
Characters in
LCD are
corrupted.
Batteries do not
charge.
107
5-3. Troubleshooting!
Additional
Information
Should any problem continue after you have checked these symptoms,
please contact iRiver customer support.
Solution
Adjust the position of the player and remote control
(Option).
Electronic equipment can cause interference with
the FM reception. Turn off any nearby electronics or
move the player away from the source.
The earphones and remote control (Option) are the
antenna and reception will be poor unless one or
the other are attached to the device.
Check the TV/HOLD/LCD switch is set to TV.
When set to TV, no image will display on the LCD
screen.
What kind of TV do you use?
Often display errors on TV are caused by an
improper setting. Disconnect the player from your
TV and change the NTSC/PAL setting in the Setup
menu. See page 87 for details.
The display is determined by the settings used to
create the AVI file. Please consult your AVI creation
software documentation for settings.
When playing a video file, the loading time of a
motion picture is longer than the MP3 or WMA
formats because file size to read is larger than MP3
or WMA files.
The video file may not conform to the specifications
of the PMP.
Consult your video source and the specifications
section of this manual for details.
AVI files created in higher resolutions than
indicated in the Specifications section may not
playback properly.
Trouble
Poor FM
Reception
Nothing is
displayed on the
LCD screen.
Image on TV is
unstable,
flickering, fuzzy,
or otherwise
non-viewable.
Video files are
smaller than the
screen.
Video files do
not display
properly.
Page 56

110
File Specifications
5-4. Specifications
Additional
Information
Note
Note
1. For damaged audio or motion picture file, screen or sound may show
erratic behavior or may not be able to play.
2. If video resolution is larger than product specification, screen or sound
may not play.
3. Videos encoded with audio that is not in MP3 or WMA format may display
without sound.
4. Video files that do not conform to the specifications of the player may only
play as audio tracks or will not play at all.
5. It may be necessary to convert some AVI files using third part software if
they do not conform to product specifications.
6. Only Bassline (Non-progressive), JPG and BMP image file are supported.
7. Image files may not display if files are larger than specification, or they are
damaged.
File Type
Bit Rate
Tag
File Type
Video type
Audio type
Video Bit Rate
Audio Bit Rate
Video Resolution
Video Frame Rate
Caption
File Type
Resolution
Video
Image
MPEG1/2/2.5 Layer3, WMA, WAV, ASF (Audio)
8 Kbps~320 Kbps
ID3 V1, ID3 V2 2.0, ID3 V2 3.0
AVI , ASF, MPEG
Compatible XviD, MPEG-4 Video Compliant SP,
MPEG1 (Please see iRiver Media Converter
Software Manual for the detailed file specifications)
MPEG 1 / 2 / 2.5 Layer 3
Maximum 1.5 Mbps
8 Kbps ~192 Kbps
Maximum 640 x 480
Support maximum 30 fps
Support SMI Format
Baseline (Non-progressive) JPG,
BMP (Mono, 4, 8, 24 Bit)
JPG : 3100 x 2100
BMP : 800 x 600
Audio
Category Specifications
109
General Specifications
5-4. Specifications
Additional
Information
1GB equals 1,000,000,000 bytes, not all drive space is available for file storage.
Specifications
20Hz~20KHz
20mW (L) + 20mW (R) (16 Ω) Max. Volume
90dB (MP3)
3dB
Stereo (L+R)
320 X 240 Transflective LCD
NTSC/PAL
87.5MHz~108MHz
60dB
Headphone / Earphone-Cord Antenna
Earphone output / LCD : 60 / Volume : 20
4 hours (640X480 @24fps, Audio: 128kbps/44.1KHz)
5 hours (320X240 @24fps, Audio: 128kbps/44.1KHz)
(Playback time may be shortened by 1 to 2 hour(s)
if the built-in speakers are in use at max. volume.)
Earphone output / LCD : Off / Norma EQ / Volume : 20
10 hours (MP3 128kbps/44.1kHz)
DC 5.0V, 2A
Li-Ion 2400mAh
Approx. 139 (W) X 84 (D) X 31.7 (H)mm
PMP-120 : Approx. 280 g
PMP-140 : Approx. 299 g
0
~ 40
Windows 98 SE, ME, 2000, XP
USB2.0 (Device) / USB1.1 (Host)
FAT32
File System
Item
Frequency Range
Headphone output
S/N ratio
Frequency Characteristics
No. of Channels
LCD 3.5” TFT
Composite Output Type
Frequency Range
S/N ratio
Antenna
Video
Audio
AC Adapter
Built-in battery
Dimension
Weight
(Including Built-in battery)
Operational Temperature
IBM-PC
Interface
File System
Category
Audio
Video
FM Tuner
Playtime
Power
Supply
General
Operating
System
Model
Capacity/Size
PMP-120
20GB/1.8
PMP-140
40GB/1.8
Page 57

NOTE
Federal Communications Commission (FCC)
111
5-5. Regulatory Information
Additional
Information
The device manufactured and found to comply with limits for a Class B
computing device according to the specifications in FCC rules Part 15.
Operation is subject to the following two conditions;
1. This device may not cause harmful interference, and
2. This device must accept any interference received, including interference
that may cause undesired operation.
3. If your device needs repairs, you must arrange for the manufacturer to
make them if you are to keep the device's FCC registration valid.
This equipment, like other electronic equipment, generates and uses radio
frequency energy. If not installed and used according to the instructions in this
manual, this equipment may cause interference with your radio and television
reception.
If you think this equipment is causing interference with your radio or television
reception, try turning the equipment off and on. If the interference problems stop
when the equipment is switched off, then the equipment is probably causing the
interference. You may be able to correct the problem by doing one or more of the
following:
- Adjust the position of the radio or TV antenna
- Move away the device from the radio or TV
If necessary, consult your dealer or an experienced radio or television technician.
You may find this booklet helpful:"How to Identify and Resolve Radio and TV
Interference Problems" (Stock No. 004-000-00345-4), prepared by the FCC and
available from the U.S Government Printing Office, Washington, DC 20402. See
individual devices FCC ID and registration numbers.
For the customers in Europe
The CE mark on the CD player is valid only for products
marketed in the European Union.
 Loading...