

Page 1
2
2
2
2
2
2
2
2
2
2
2
2
2
2
2
2
2
2
2
2
2
2
2
2
2
2
2
2
2
2
2
2
2
2
2
2
2
2
2
2
2
2
2
2
2
2
2
2
2
2
2
2
2
2
2
2
2
2
2
2
2
2
2
2
2
2
2
2
2
2
2
2
2
2
2
2
2
2
2
2
2
2
2
2
2
2
2
2
2
2
2
2
2
2
2
2
2
2
2
2
2
2
2
2
2
2
2
2
2
2
2
2
2
2
2
2
2
2
2
2
2
2
2
2
2
2
2
2
2
2
2
2
2
2
2
2
2
Part No. D0890
23456789012345678901
23456789012345678901
23456789012345678901
23456789012345678901
23456789012345678901
23456789012345678901
23456789012345678901
23456789012345678901
23456789012345678901
23456789012345678901
23456789012345678901
23456789012345678901
23456789012345678901
23456789012345678901
23456789012345678901
23456789012345678901
23456789012345678901
23456789012345678901
23456789012345678901
23456789012345678901
23456789012345678901
23456789012345678901
23456789012345678901
23456789012345678901
23456789012345678901
23456789012345678901
23456789012345678901
23456789012345678901
23456789012345678901
23456789012345678901
23456789012345678901
23456789012345678901
23456789012345678901
23456789012345678901
23456789012345678901
23456789012345678901
23456789012345678901
23456789012345678901
23456789012345678901
23456789012345678901
23456789012345678901
23456789012345678901
23456789012345678901
23456789012345678901
23456789012345678901
23456789012345678901
23456789012345678901
23456789012345678901
23456789012345678901
23456789012345678901
23456789012345678901
23456789012345678901
23456789012345678901
23456789012345678901
23456789012345678901
23456789012345678901
23456789012345678901
23456789012345678901
23456789012345678901
23456789012345678901
23456789012345678901
23456789012345678901
23456789012345678901
23456789012345678901
23456789012345678901
23456789012345678901
23456789012345678901
23456789012345678901
23456789012345678901
23456789012345678901
23456789012345678901
23456789012345678901
23456789012345678901
23456789012345678901
23456789012345678901
23456789012345678901
23456789012345678901
23456789012345678901
23456789012345678901
23456789012345678901
23456789012345678901
23456789012345678901
23456789012345678901
23456789012345678901
23456789012345678901
23456789012345678901
23456789012345678901
23456789012345678901
23456789012345678901
23456789012345678901
23456789012345678901
23456789012345678901
23456789012345678901
23456789012345678901
23456789012345678901
23456789012345678901
23456789012345678901
23456789012345678901
23456789012345678901
23456789012345678901
23456789012345678901
23456789012345678901
23456789012345678901
23456789012345678901
23456789012345678901
23456789012345678901
23456789012345678901
23456789012345678901
23456789012345678901
23456789012345678901
23456789012345678901
23456789012345678901
23456789012345678901
23456789012345678901
23456789012345678901
23456789012345678901
23456789012345678901
23456789012345678901
23456789012345678901
23456789012345678901
23456789012345678901
23456789012345678901
23456789012345678901
23456789012345678901
23456789012345678901
23456789012345678901
23456789012345678901
23456789012345678901
23456789012345678901
23456789012345678901
23456789012345678901
23456789012345678901
23456789012345678901
23456789012345678901
23456789012345678901
23456789012345678901
23456789012345678901
IPSO - LSG n.v.
IPSO PC30
Preprogramming, programming,
copying, operating
Nieuwstraat 146 - B-8560 Wevelgem (Belgium)
Tel. 056/41 20 54 - Fax 056/41 86 74
Page 2

Table of contents 1
1 Introduction ..................................................................................... 1
Microprocessor PC30 .............................................................................. 1
Flow charts .............................................................................................. 1
2 Classification according to modes ................................................ 3
Preprogramming mode ............................................................................ 3
Programming mode ................................................................................. 3
Copying mode .......................................................................................... 3
Operating mode ....................................................................................... 3
3 Preprogramming mode ................................................................... 7
Preprogramming ...................................................................................... 7
4 Programming mode ........................................................................ 15
Programming ........................................................................................... 15
Insert and delete a program segment ...................................................... 33
Program tables ........................................................................................ 33
5 Copying mode ................................................................................. 39
Copying mode .......................................................................................... 39
Standard programs .................................................................................. 39
6 Operating mode ............................................................................... 60
To select a program ................................................................................. 60
To start a program ................................................................................... 60
Programmed start .................................................................................... 61
Changing to another program .................................................................. 61
One time modification of the level, wash time and temperature input ...... 61
Control of the temperature ....................................................................... 61
Control of a program in progress ............................................................. 61
Rapidly going through a program ............................................................ 62
Programmed stop .................................................................................... 62
Soaking .................................................................................................... 62
Time stop ................................................................................................. 62
Interruption and stopping the program ..................................................... 63
Adding water ............................................................................................ 63
Draining water .......................................................................................... 63
Heating the bath ...................................................................................... 63
Adding soap ............................................................................................. 63
Error message ......................................................................................... 64
Total operating hours, recieved coins ...................................................... 64
Overview of the total of steps per program .............................................. 64
7 Test mode ........................................................................................ 65
8 Liquid soap connection .................................................................. 67
Version 1.27 - 2.XX ß
Code: 249/000056/04
06/02/01
contents
Page 3

Index
°C XX 17, 61, 63
°F XX 17
A
ACCL 62
Add 11, 25
ALArm 13
ALArm.XXX 25, 31
B
Bu= 13
C
CDn XX 25
CDu XX 25
CLoSE 63
Coin 7, 15
Cold 61
CoPY PrG 3, 39
D
d2 27, 29
Data.XXXX 31
dAtA.XXXX 3
dELAY XX 61
dESt .YY 39
dI 27, 29
diSt 29
dO 29
door. oPEN 60
dt XXX 29
dX LXX 63
E
E 3 2 8 3
E 4 5 5 3
E 6 1 9 3
E 7 8 8 64
E 2 2 3 64
End 31
EntEr 61
Error = 00 3
Error = 02 60
Error = 03 3
Error = 04 64
Error = 05 64
Error = 06 64
Error = 07 64
Error = 08 64
Error = 09 64
Error = 10 64
Error = 11 64
Error = 12 64
Error = 13 64
ES.tilt.XX 13
F
FC 7
FREE = XX 64
R
Ram full 15, 33, 39
S
G
GEntlE 11
Good. XXXX 3
H
HEAt 17
HEAt-Mod 11, 17
HEAt-SYS 17
HECo 11, 19, 61
HF 7
HS. XXXX 27
I
i1 9
i2 9
i3 9
i4 9
i5 9
i6 9
i8 9
i9 9
iS.tilt.XX 13
iX LXX 63
L
L XX 23, 61
LECo 7, 61
LS. XXXX 27
M
Mod 11, 17
N
no Add 25
O
oPEn door 63
P
P.XX 61
P.XX.StArt 61
PrE 3
ProG 15
ProG XX 3, 15, 60
ProGr 3
ProM. XXXX 3
PXX. End 60,64
S XX 17
SE-i 7
SoAH 25, 62
SoAh.tiME 62
SoAH.XXX 25
SoAP XX 63
SourCE.XX 39
SoX tXXX 63
SP XX 17
SP2- X 27
SPI- X 27
SPin 27
StArt 3
StoP 25, 62
StoP.tiME 62
StoP.XXX 25
T
t XX 15, 19
t °C 11
t XX 19, 61
t °F 11
t= XXXX 29
t=XX°C 61
t1. XXX 21
td XXX 27
Tu XXX 31
W
WASh 29
X
XX del 33
XX ....YY 39
XX. del 33
XX. inS 33
XX. Cool 25
XX. CYt i 15
XX. dEti 27
XX. teMP 17
XX.id XX 15
XX.ti XXX 62
XX.tistop 62
The manufacturer reserves the right to change the contents
of this instruction manual without previous notice
Page 4
Introduction 1
Microprocessor PC30
Machines equipped with the electronic freely programmable microprocessor PC30 allow you to program 30
programs ( 0 to 29) of your own choice. There are also 10 standard programs ( 30 to 39) available. The operation
of the machine, as well as the input of data necessary to obtain a wash program occur via the keyboard in the fascia
panel.
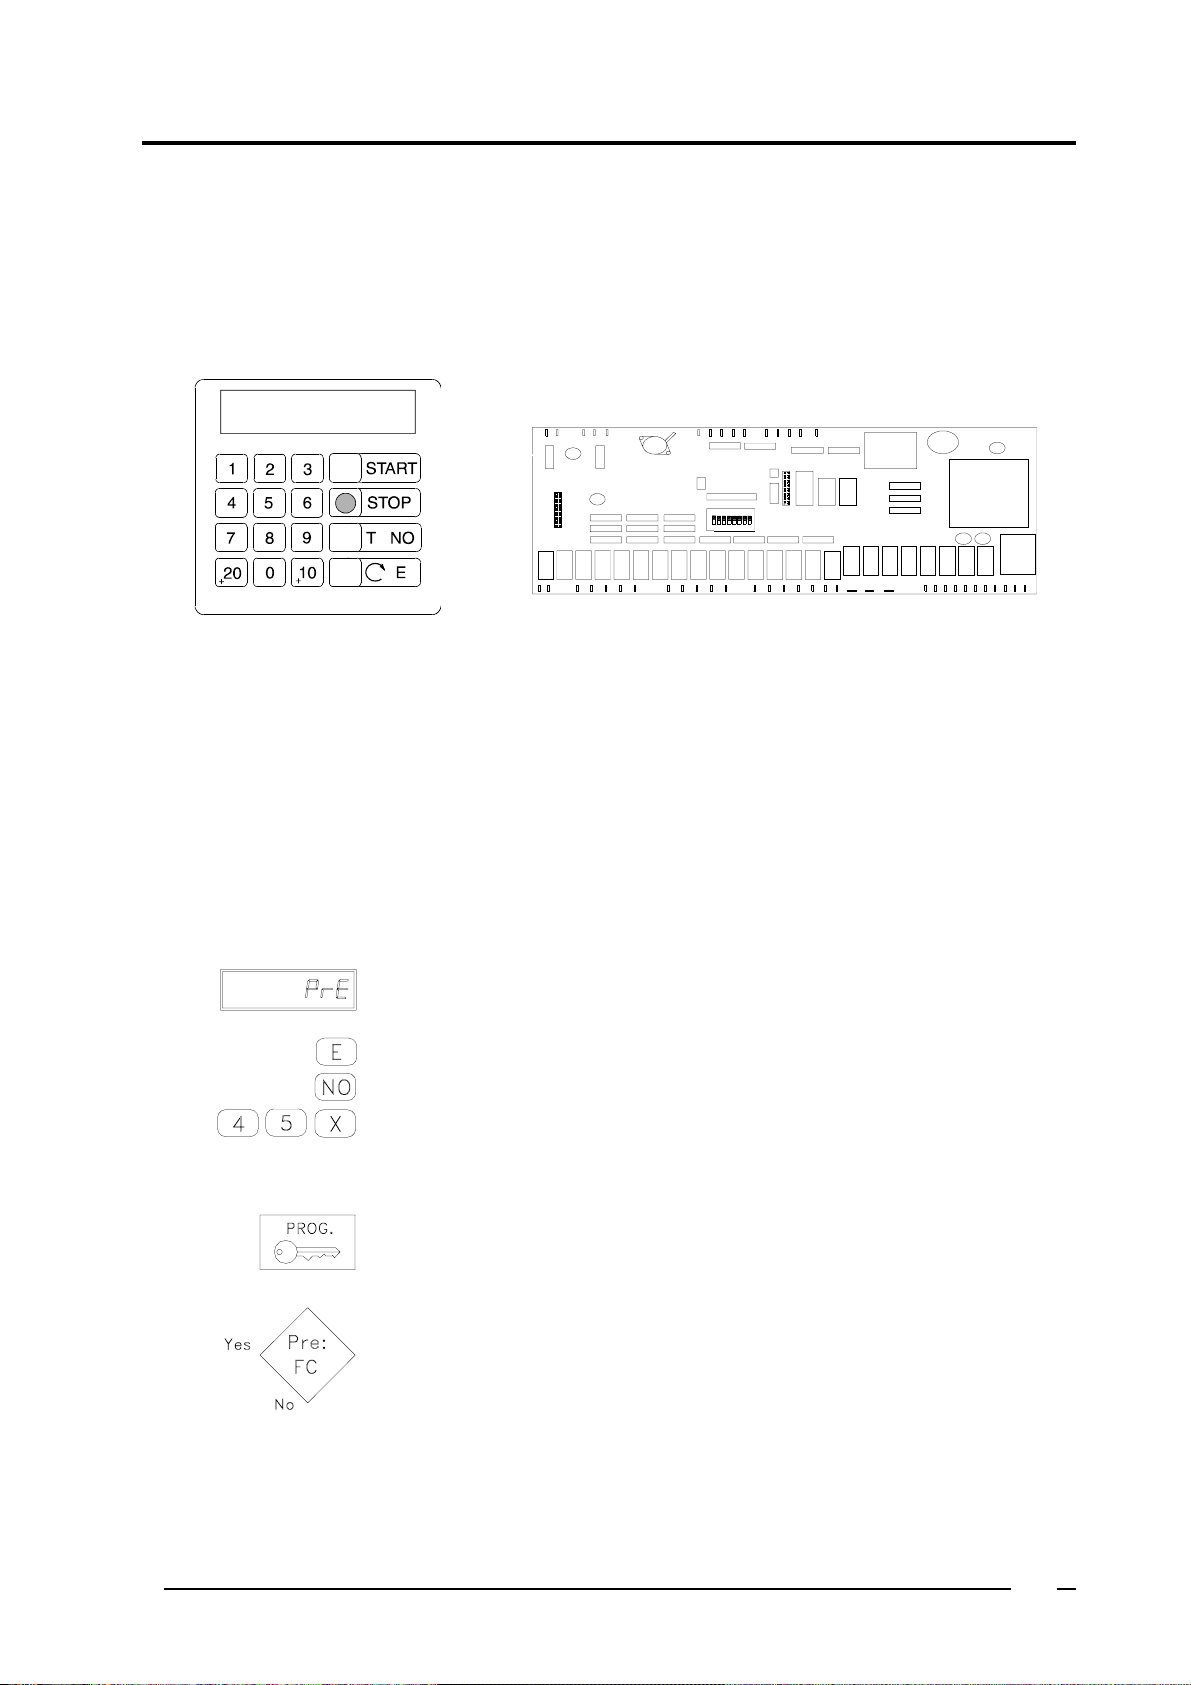
Flow charts
In this manual flow charts are frequently used. Below you can find an explication of the applied symbols.
This gives a presentation of a text that appears on the display.
These symbols with rounded off corners stand for pressing the appropriate keys
on the keyboard.
e.g. numbers, start, stop, etc. (X stands for a number of your choice).
The symbols in rectangulars stand for mechanical interventions that need to be
executed.
e.g. turning the key switch in the front.
The representation of a rhomb refers to a software requirement.
e.g. has a frequency controlled motor been selected in the preprogram or not, has
a coin-op machine been selected or not, etc.
5
Page 5
Pre-programmeer mode Programmeer mode Kopieer mode Bediening mode
Hoofdstuk 3 Hoofdstuk 4 Hoofdstuk 5 Hoofdstuk 6
6
Page 6

Classification according to modes 2
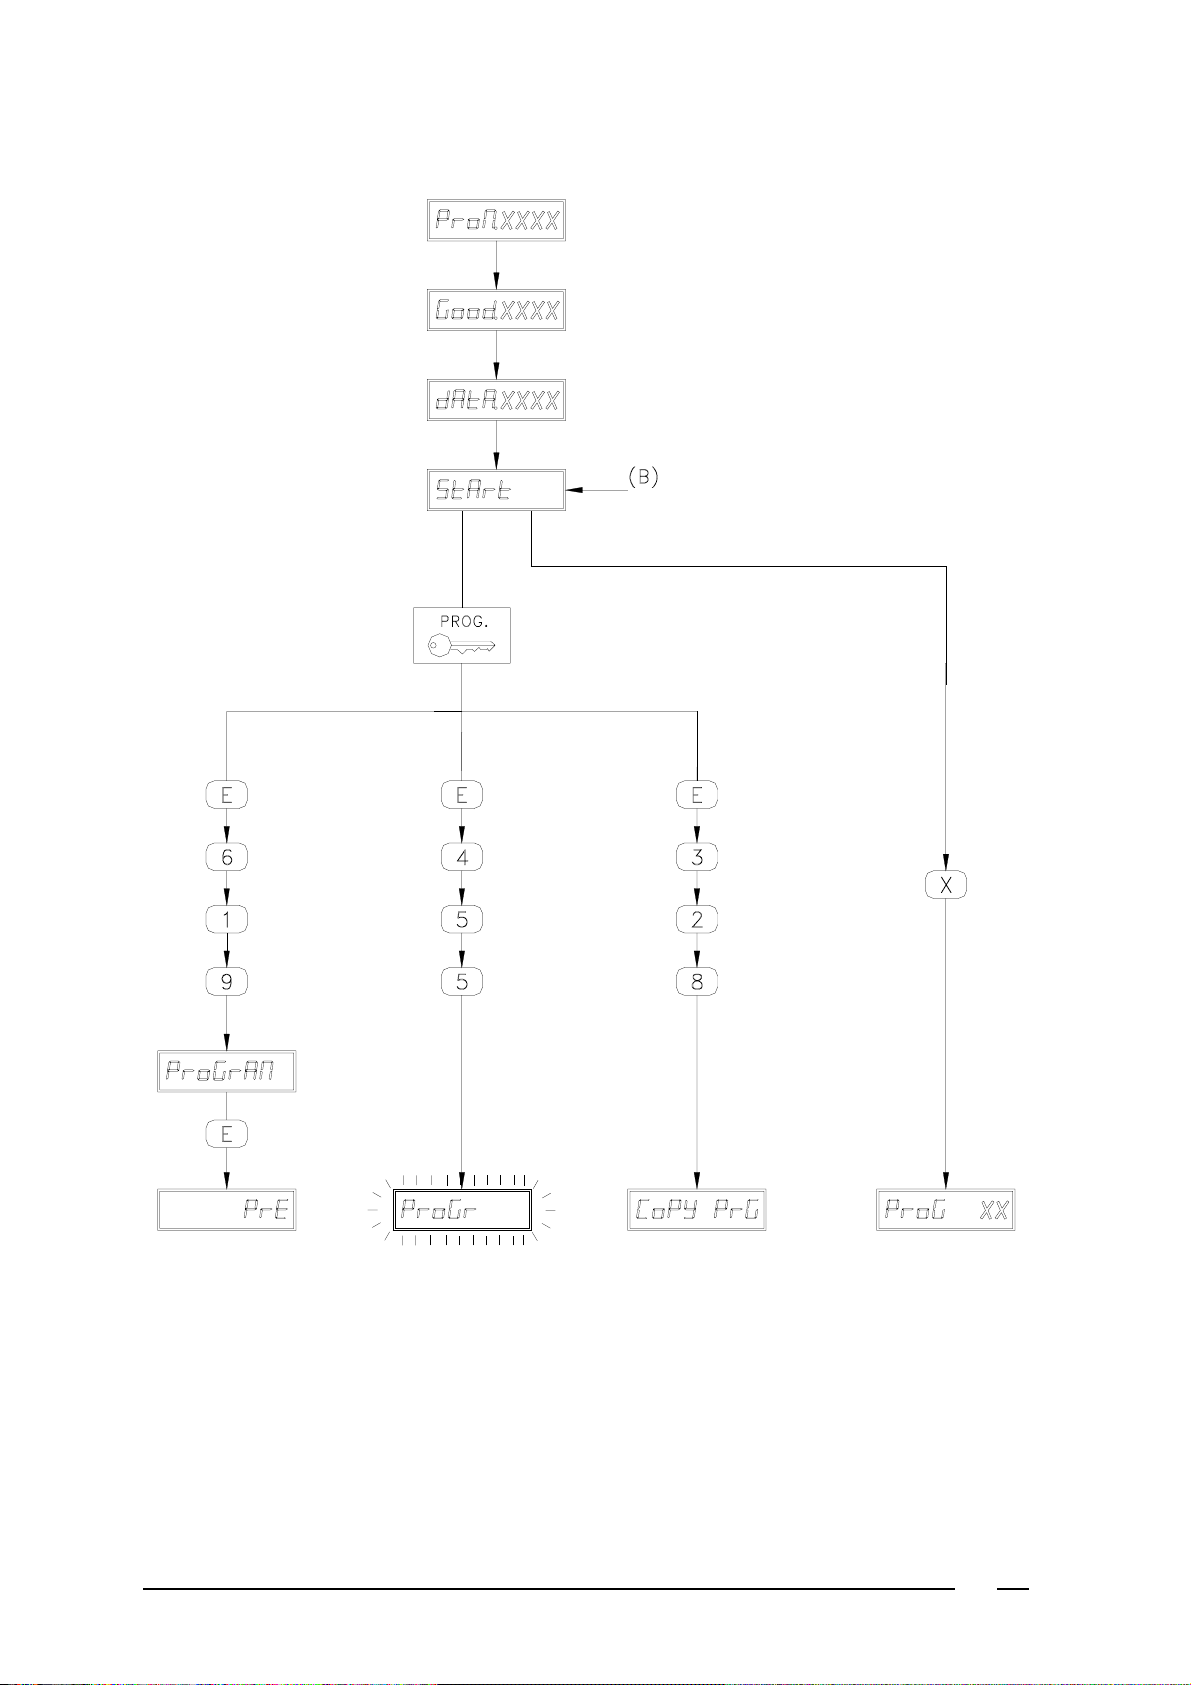
As soon as the electric power is connected to the machine, it will carry out a so-called " Eprom test ".
" ProM.XXXX " and " Good.XXXX " will appear temporarily on the display (XXXX stands for the number of the
Eprom version). Then " dAtA.XXXX " appears temporarily. This is the " Checksum " of the total data. This value
changes each time the program is altered.
Then " StArt " appears.
Now choose between 4 different modes.
Remark:
" Error 03 " appears on display when the electrical power is supplied to the machine for the very first time, or when
a fault is found in the Ram memory (memory wash programs). Press E .
Preprogramming mode
In this mode the machine can be initiated into its own technical specifications (e.g. coin-op or manually operated
machine, the number of water inlet valves, machine with or without heating, etc.), as well as into certain freely
programmable options (e.g. temperature in °C or °F, temperature displayed during the cycle or not, etc.).
To get into the "preprogramming mode":
- Set the key switch in the front to " PROG ".
- Put in " E 6 1 9 " (press quickly one after the other)
" ProGrAM " appears on the display. Press " E ".
" PrE " appears on the display.
To alter the "preprogram": see chapter 3.
Remark:
- The preprogram is fixed during assembly of the machine so that it usually needn't be altered anymore.
- If the key switch in the front is not set to " PROG ", " Error = 00 " (flashing) will appear for about 10 seconds after
" E 6 1 9 " is put in.
Programming mode
In this mode you can put in step by step the data necessary to obtain a complete wash cycle of your own choice.
To get into the "programming mode":
- Put the key switch in the front in the " PROG " position.
- Put in " E 4 5 5 ". (Press quickly one after the other)
" ProGr " (flashing) will appear on the display.
To program a wash program: see chapter 4.
Remark:
If the key switch in the front is not set to " PROG ", " Error = 00 " (flashing) will appear for about 10 seconds after
" E 4 5 5 " is put in.
Copying mode
In this mode existing programs can be copied to other program numbers. This can save a lot of work when almost
identical programs need to be programmed.
To get into the "copying mode":
- Put the key switch in the front in the " PROG " position.
- Put in " E 3 2 8 ". (Press quickly one after the other)
" CoPY PrG " will appear on the display.
To copy a program: see chapter 5.
Remark:
If the key switch in the front is not set to " PROG ", " Error = 00 " (flashing) will appear for about 10 seconds after
" E 3 2 8 " is put in.
Operating mode
In this mode an existing wash program can be started.
To get into the "operating mode", press the number of an existing wash program. " ProG XX " will appear on the
display ( XX stands for the selected wash program).
To start the program: see chapter 6.
7
Page 7

8
Page 8

Classification according to modes 2
Remark: coin-op machine
Press on the keyboard the number of an existing wash program.
XXX.XX = Price of the program (e.g. 120.00)
The amount due for this program.
Insert the necessary coins in the coin meter(s).
After each insertion the amount still due will appear on the display.
Once the full amount has been inserted, " StArt " will appear again.
Press " START " to start the program.
9
Page 9
10
Page 10

Preprogramming mode 3
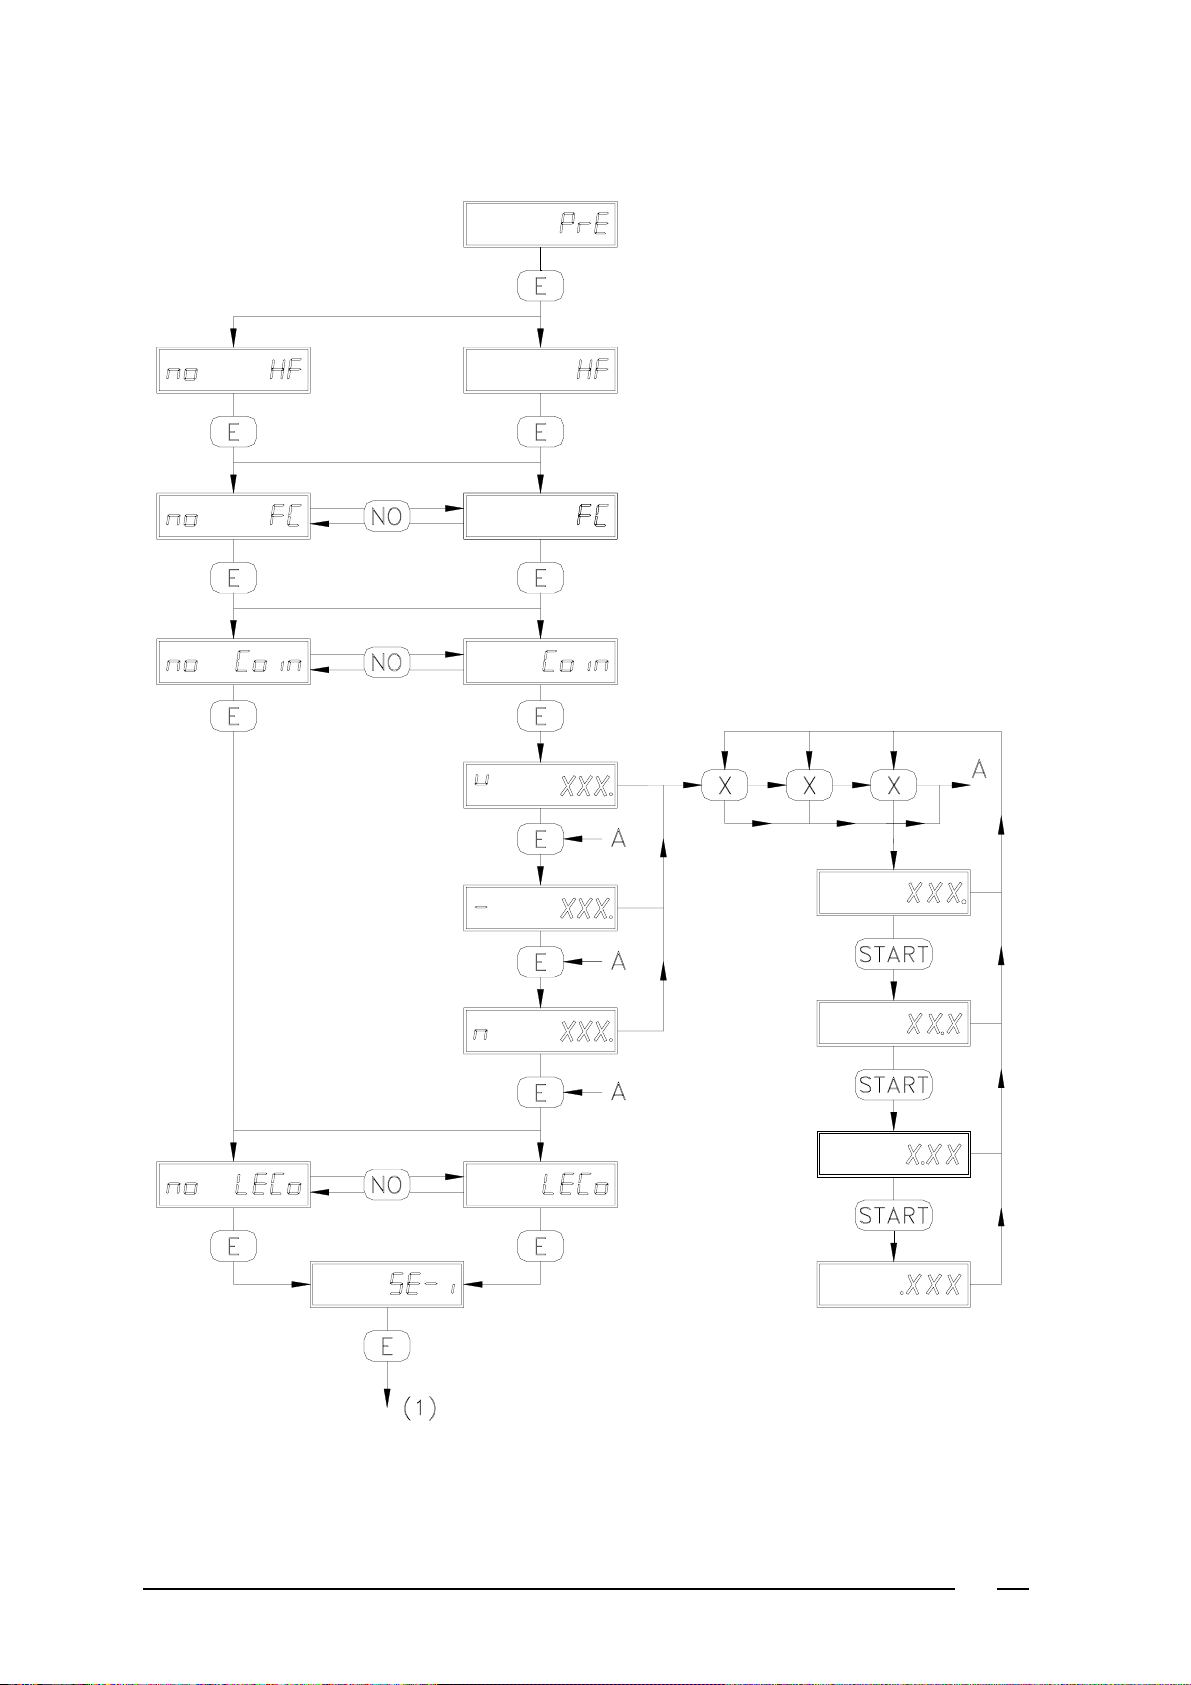
Preprogramming
To get into the "preprogramming mode": see " Classification according to modes 2 ".
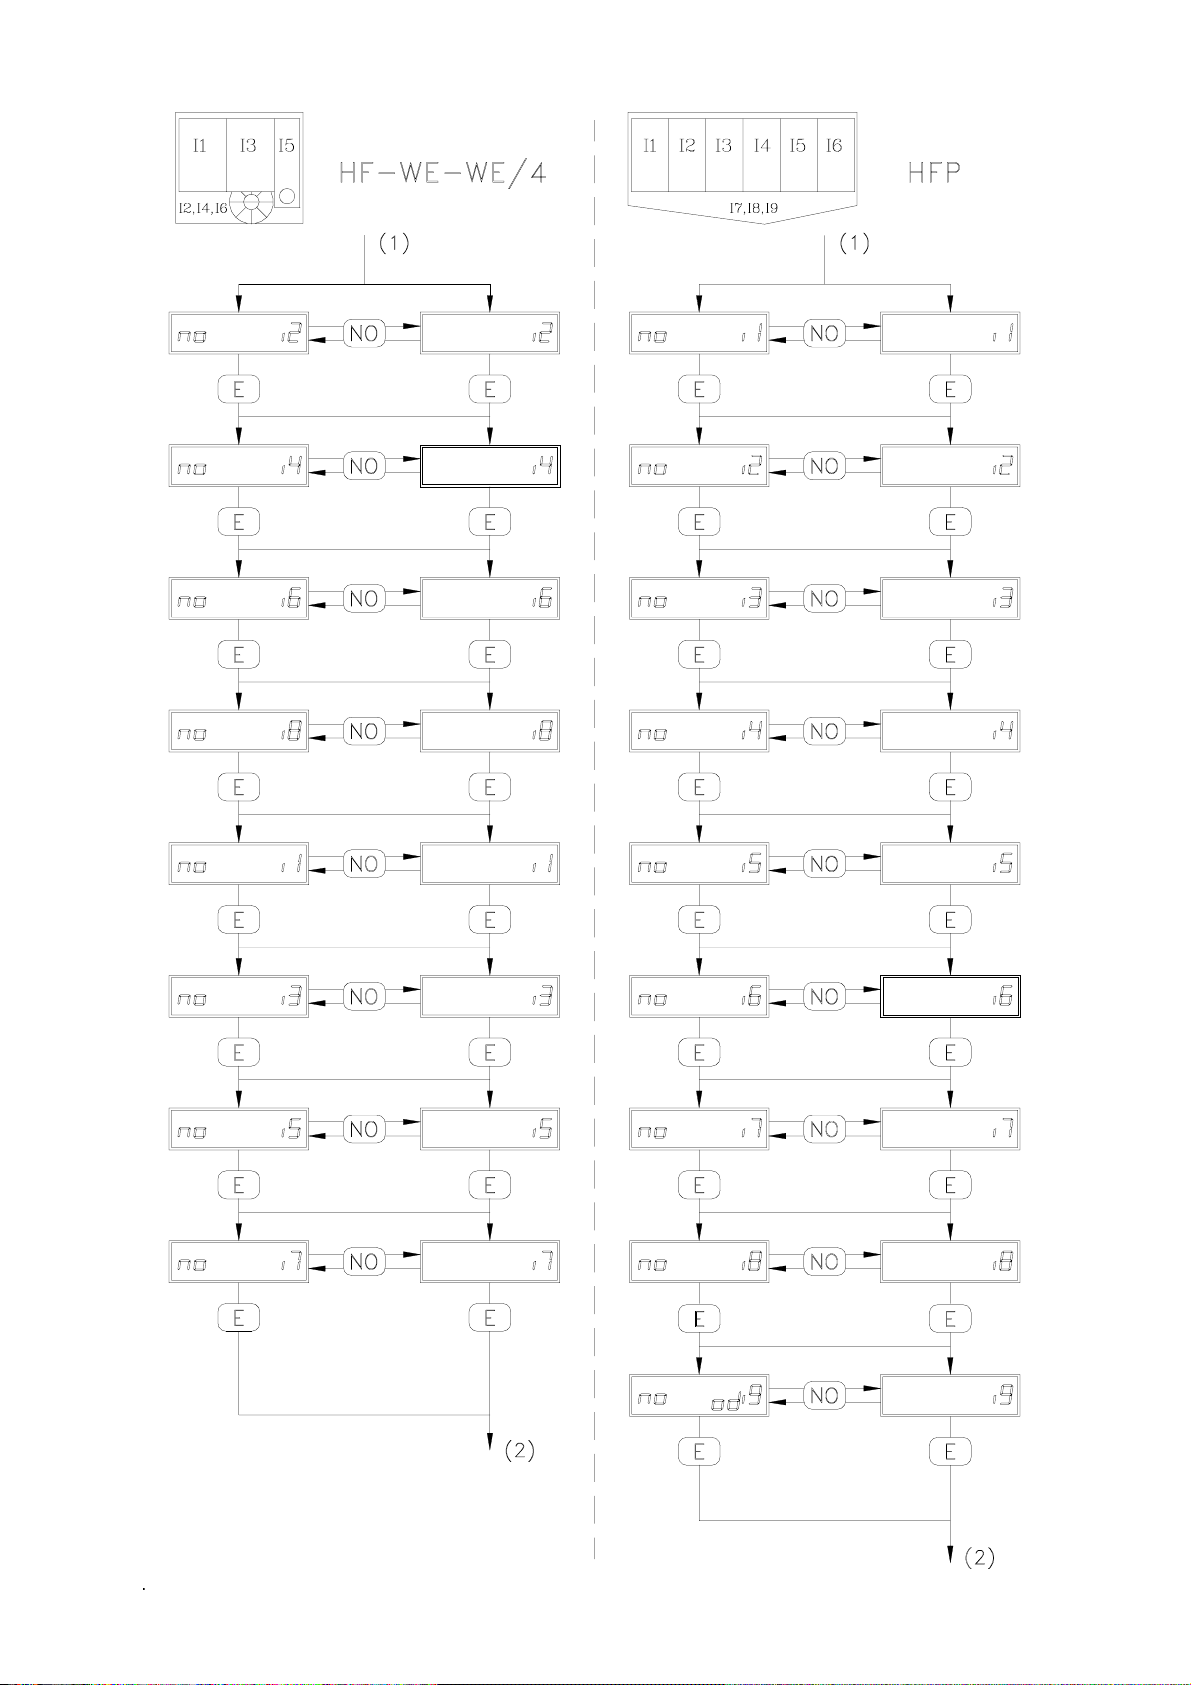
The selection here is generally made by altering, if necessary, the command on the display by means of
" NO " (e.g. " no FC " becomes " FC " after pressing " NO "). Confirm this selection with " E ".
While preprogramming, it is possible to return step by step by pressing the " STOP " button.
PrE = Preprogram (Altering the "Preprogram")
Press " E "
HF = Machine of type HF, WE245/304 or "high spin" WE-machine
FC = Frequency controlled (frequency controlled motor)
Coin = machine with coin mechanism
First, put in the value of the coin meter with the highest value by means of " X,X,X ".
If necessary, move the decimal point by pressing " START ".
By pressing " E " you can proceed to the other coin meters and install them in the same manner.
LECo = Level control (Control of the water level)
This means the program is temporarily stopped until the appropriate water level is reached.
SE-i = Select inlet (Selection of water inlet valves).
11
Page 11
12
Page 12

Preprogramming mode 3
HF - WE - WE/4 HFP
Inlet valve Inlet valve
i2 Soft (tub) i1 Soft (hopper 1)
i4 Warm (tub) i2 Soft (hopper 2)
i6 Hard (tub) i3 Soft (hopper 3)
i8 ---- i4 Hard (hopper 4)
i1 Soft (prewash) i5 Hard (hopper 5)
i3 Warm (main wash) i6 Hard (hopper 6)
i5 Hard (conditioner) i7 Soft (tub)
i7 ---- i8 Warm (tub)
i9 Hard (tub)
13
Page 13
14
Page 14

Preprogramming mode 3
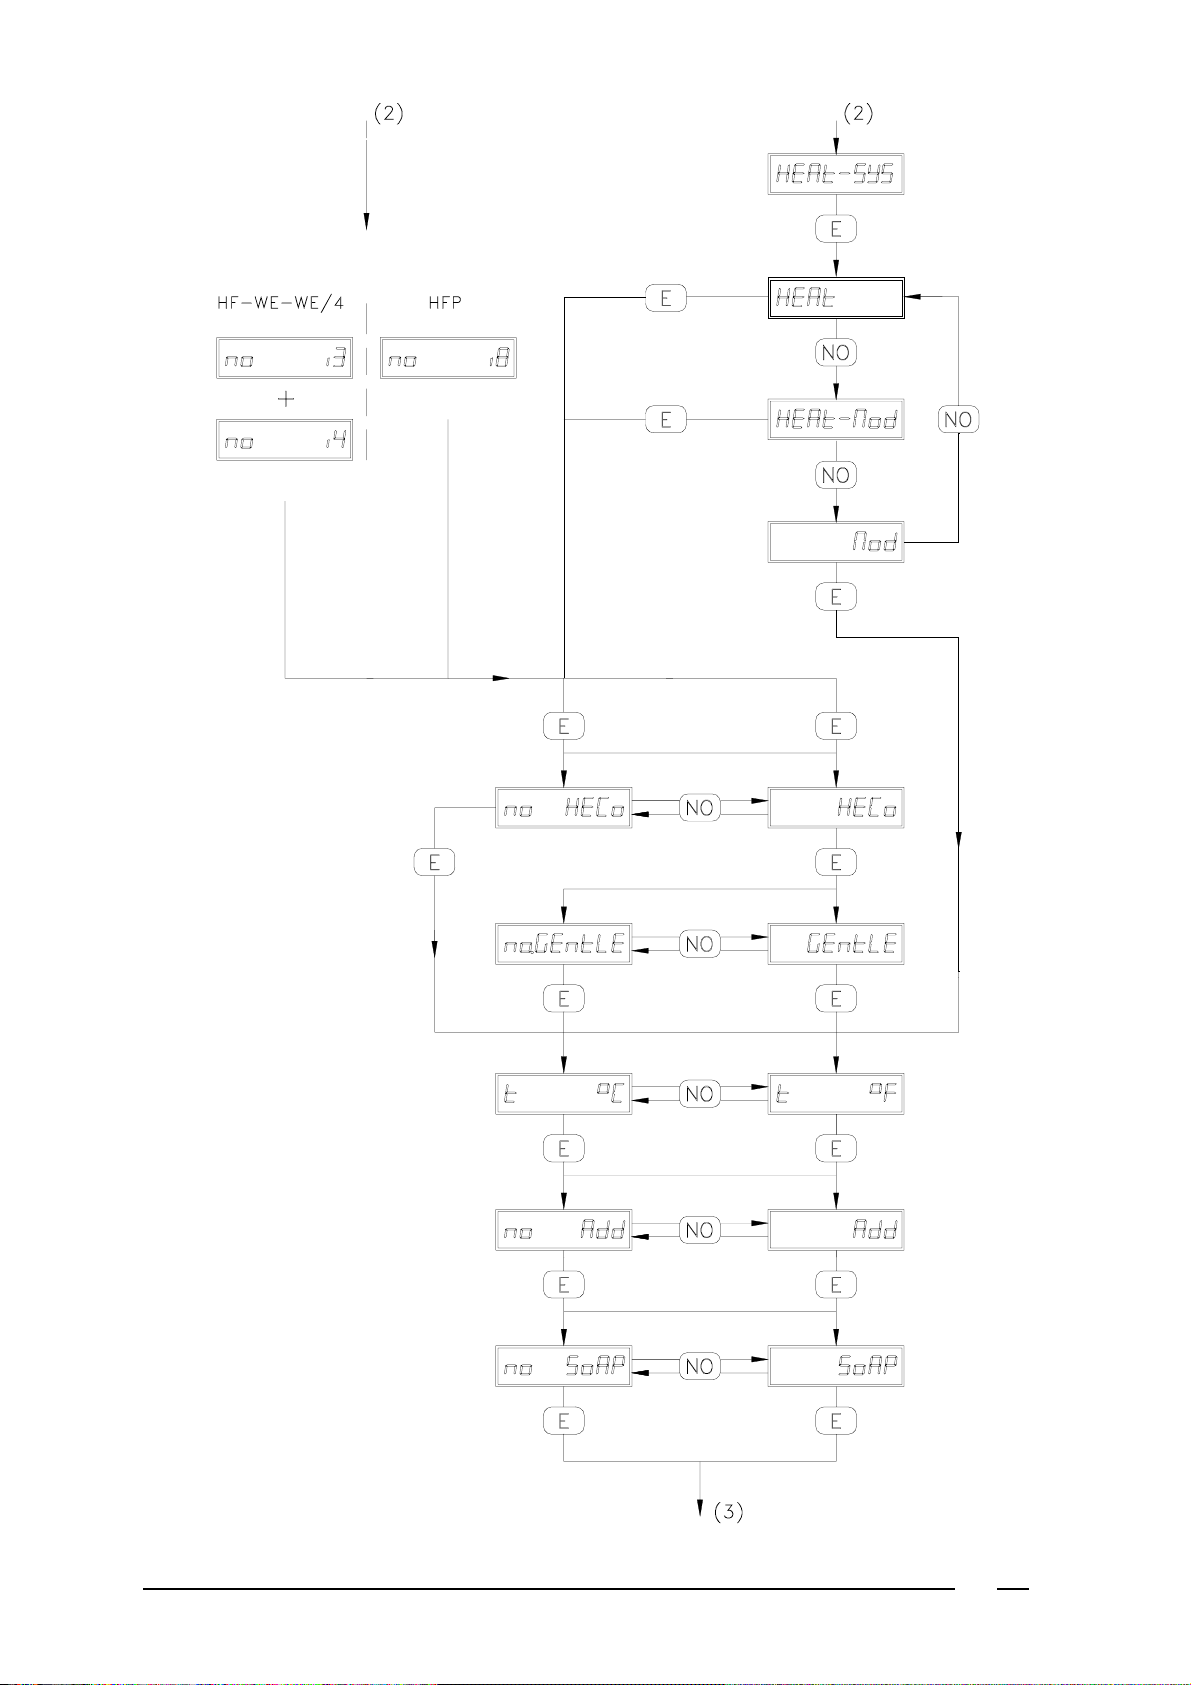
HEAt-SYS = Heating System
All machines with hot water feeding can use this temperature modulation technique. This technique consists
of a controlled water feeding -and mixture process which results in most cases in obtaining the correct water
temperature in the wash bath during the filling of the tub. If this function is disabled, a traditional water mixing
procedure will be executed.
The next steps require this function to be either activated or disabled.
Select from:
HEAt (filling and heating system without modulation)
HEAt-Mod (filling and heating system with modulation
Mod (filling procedure consisting only of modulation; no heating system)
If no hot water inlet valves were selected (see SE-i), HEAt will automatically be selected and
HEAt-SYS will not be displayed.
HECo = Execute heating control (temperature control)
This function will temporarily stop the program while the water is being heated to the programmed temperature
GEntlE = The action and stop times of the drum will be switched while the water is being heated
If the machine is not equipped with a heating system (Mod is selected at HEAt-SYS), the function HECo and
GEntlE will not be displayed.
t °C or t °F = Choice to display temperature in °C or °F.
Add = Additional programs
These 3 options (Cool-down, time stop and soak program) can be installed later on in the programming process.
SoAP = Liquid soap injection
15
Page 15
16
Page 16

Preprogramming mode 4
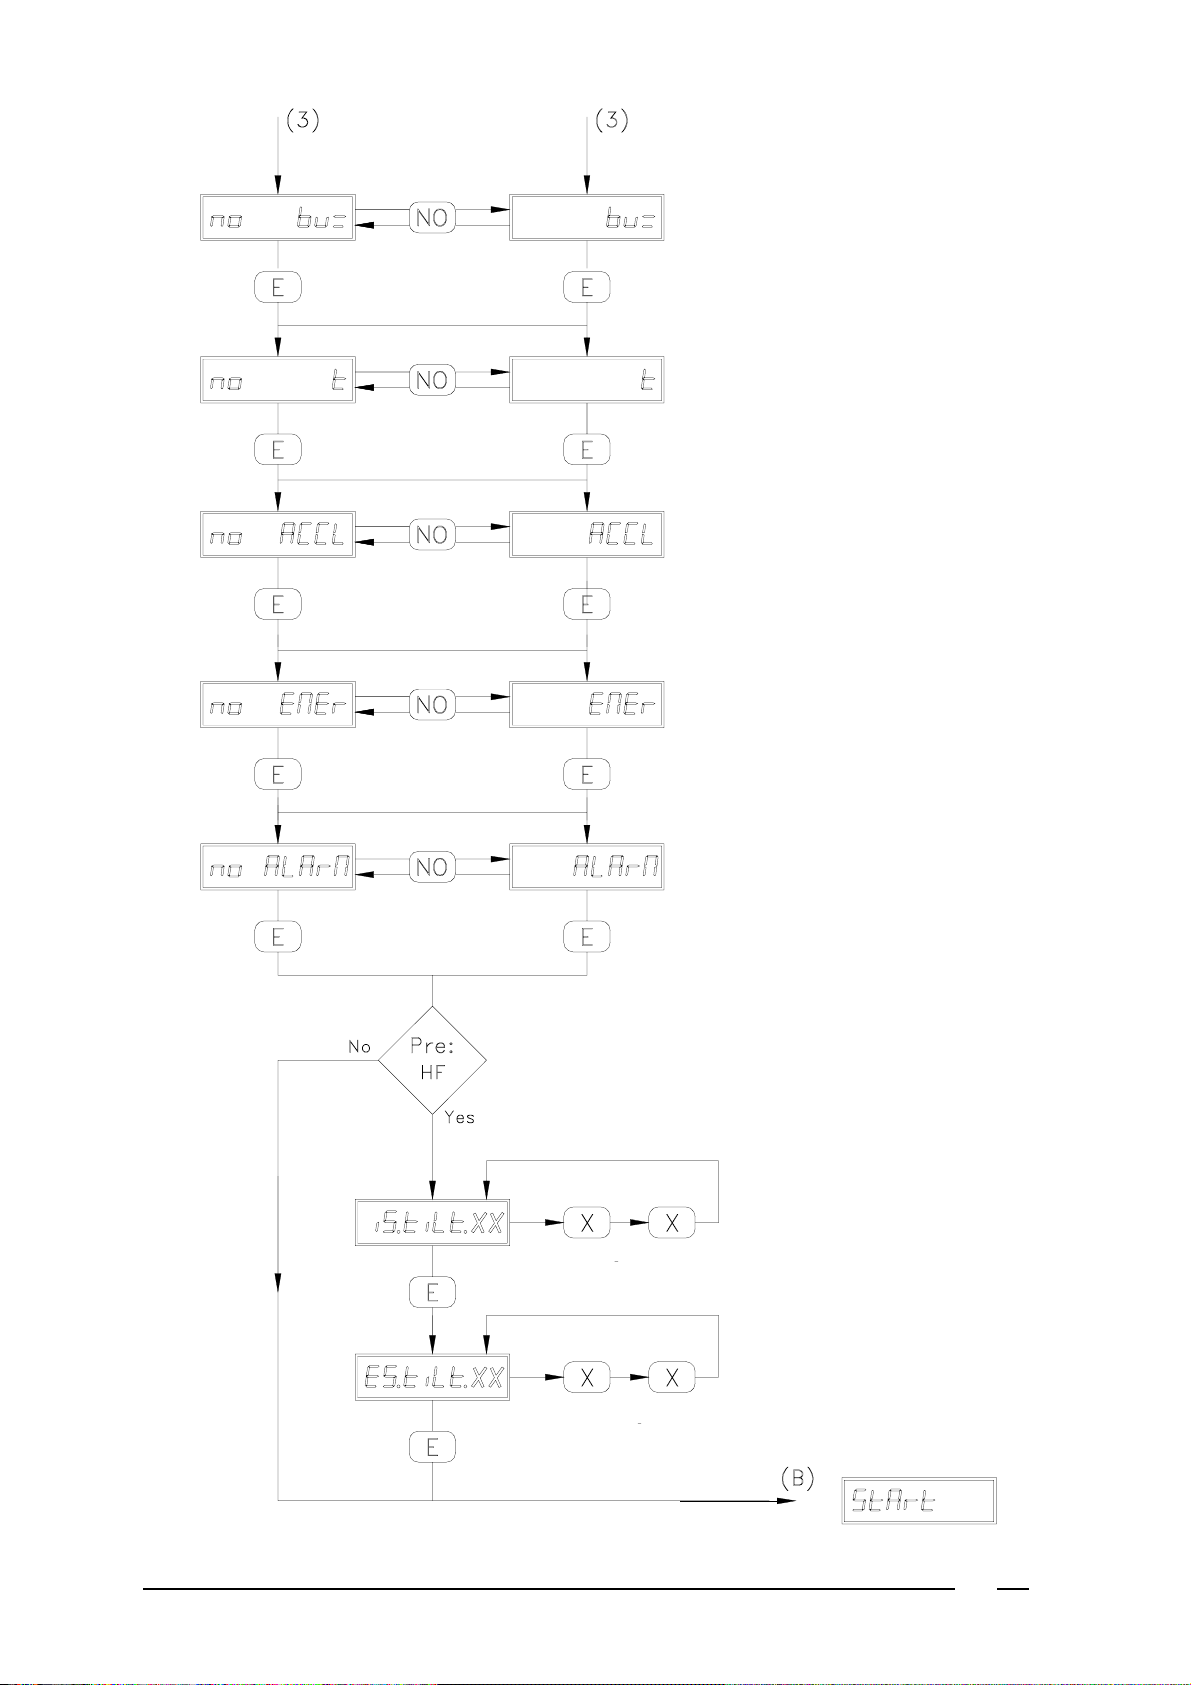
Bu = Buzzer at the end of the program
t = Temperature shown on the display
ACCL = Acceleration
With this it is possible to go through a program rapidly in the "operating mode" with the bottom " E ".
EMEr = Emergency stop
The button " STOP " is used as an emergency stop in the "operating mode".
ALArm
This allows to control an external light or sound source through the exit SOAP 6 . This source can e.g. indicate
the end of a program or soak cycle. However, this reduces the number of soap exits from 6 to 5.
The following steps will not be displayed on the WE machines. On all WE machines, the preprogramming is
now finished and the display returns to StArt .
iS.tilt.XX (Intermediate Spin unbalances)
Indicate the number of unbalances allowed during intermediate spin (from 1 to 15) before the spin cycle is
skipped.
ES.tilt.XX (Final Spin unbalances)
Indicate the number of unbalances allowed during final spin (from 1 to 15) before the spin cycle is skipped.
The preprogramming phase is now finished. The display will return to StArt .
17
Page 17
18
Page 18

Programming mode 4
Programming
To get into the "programming mode": see Classifications according to modes 2.
The selection here is generally made by altering, if necessary, the command on the display by means of
" N O " ( e. g. " no HECo " becomes " HECo " after pressing " NO "). Confirm this selection with " E ". While
programming, it is possible to return step by step by pressing the " STOP " button.
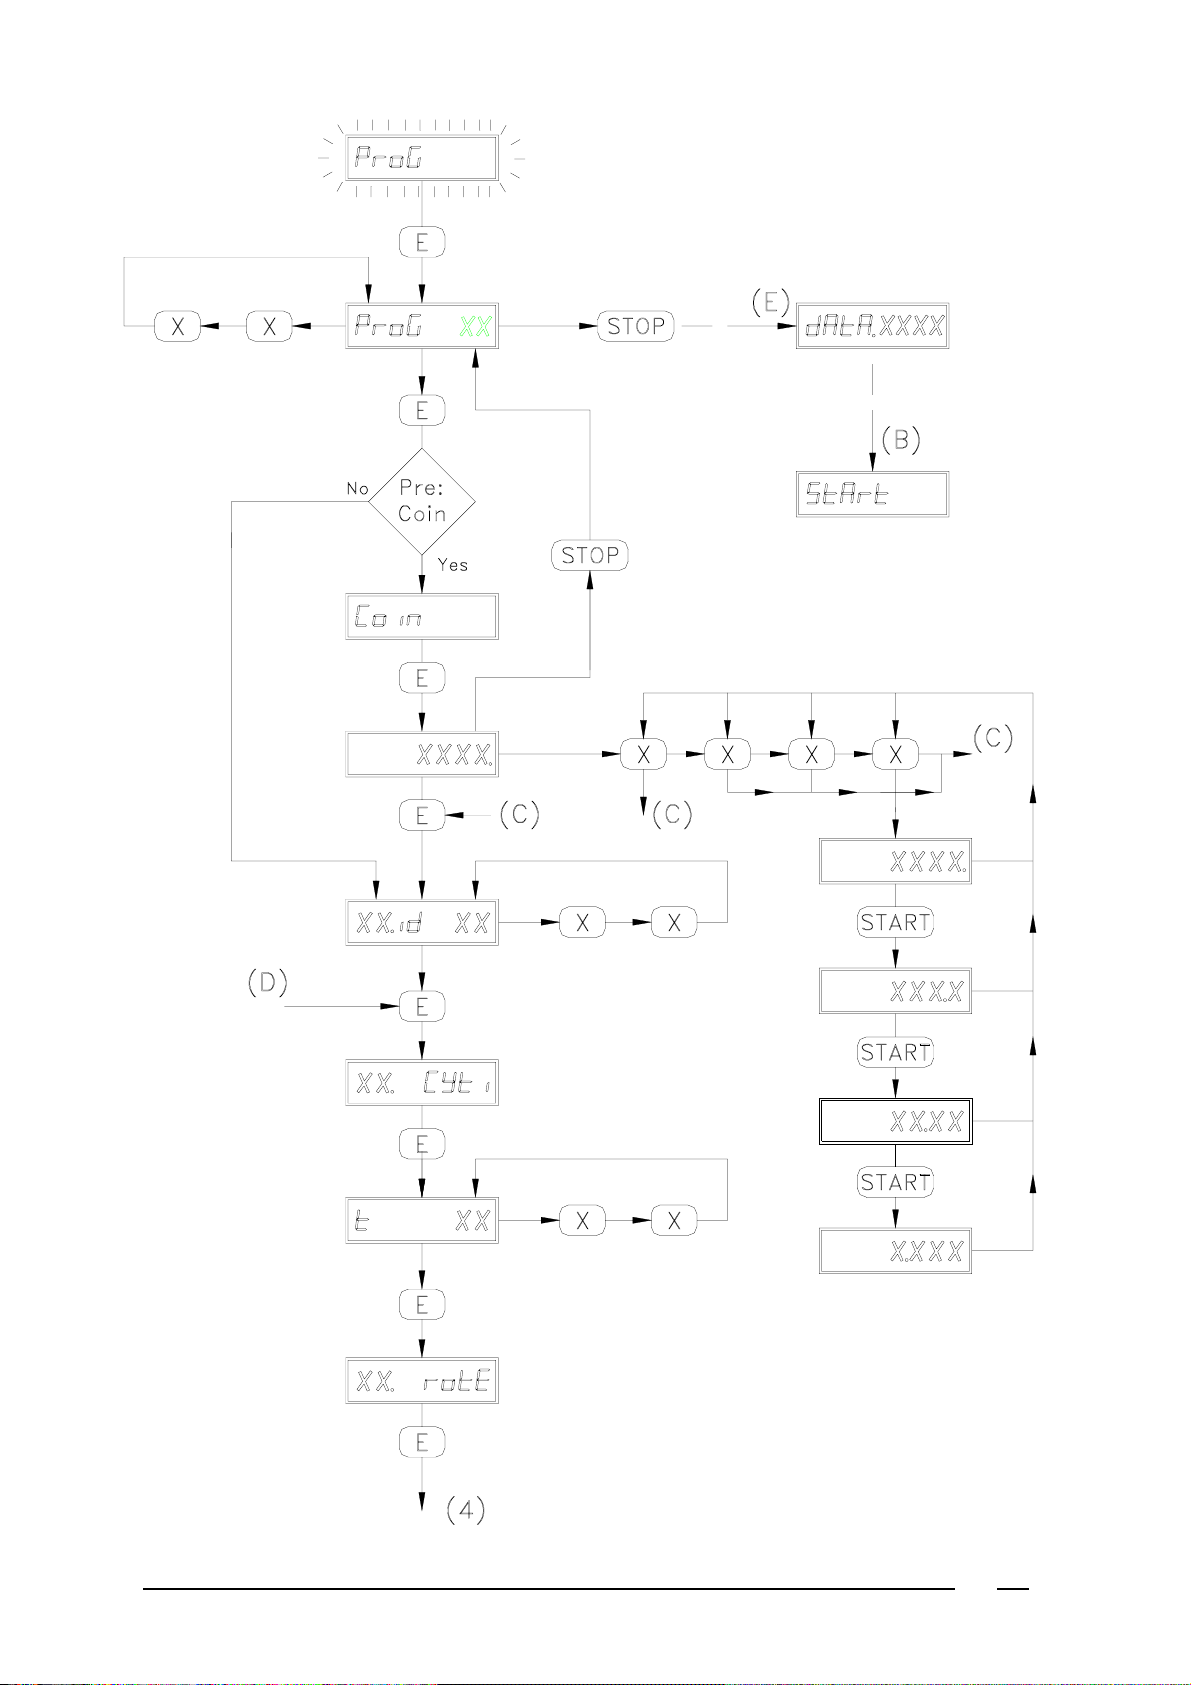
ProG (flashing) = Programming
Press " E "
ProG XX = The program number that is to be programmed
Put in the required program number with " X,X ".
The led in the button of the selected number on the keyboard will light up. If a program number higher than 9
is selected, press the number followed by " +10 " or " +20 ". Press " E " once more.
The next step depends on the selection during "preprogramming".
- With " no Coin " (without coin meter): transition to " XX.id XX ".
- With " Coin " (with coin meter): transition to " Coin ".
Coin = Amount due for the wash program
Press " E " and then put in the amount with " X,X,X,X ".
If necessary, move the decimal point by pressing " START ".
Press " E " once more.
By pressing " STOP ", it is possible to return to " ProG XX " to change the price of another program.
By pressing " STOP " once more, one can immediately proceed to " StArt ". This enables you to modify the
amount without running through the entire program.
XX.id XX = " Program number " and " Number of program segment ".
The first XX stands for the program number which is put in with " ProG ".
The second XX stands for the number of the segment of the program.
Example:
" 02.id 03 " stands for program 2, segment 3 in this program.
A segment is a part of a program (prewash, main wash, rince, etc.) and always ends with a drain. So in order
to obtain a complete wash cycle, different segments of a program must be put in one after the other. (maximum
99 per wash cycle)
Put in the number of the segment with " X,X " and press " E ".
Should there be insufficient space in the Ram memory, the error message " Ram full " will appear.
XX. CYt i = Cycle time
This is the duration of the wash time for this segment (XX) of the program (without taking into account the
temperature and level controls).
From now on, XX stands for the number of the program segment that was put in.
Press " E ".
t XX = Time (wash time in minutes)
Put in the time with " X,X " ( from 0 to 60 minutes) and press " E ".
If " 0 " was put in, the program immediately skips to " SPin " ( or " no SPin ").
XX. rotE = Rotation (Pause and cycle times)
Press " E ".
19
Page 19
20
Page 20

Programming mode 4
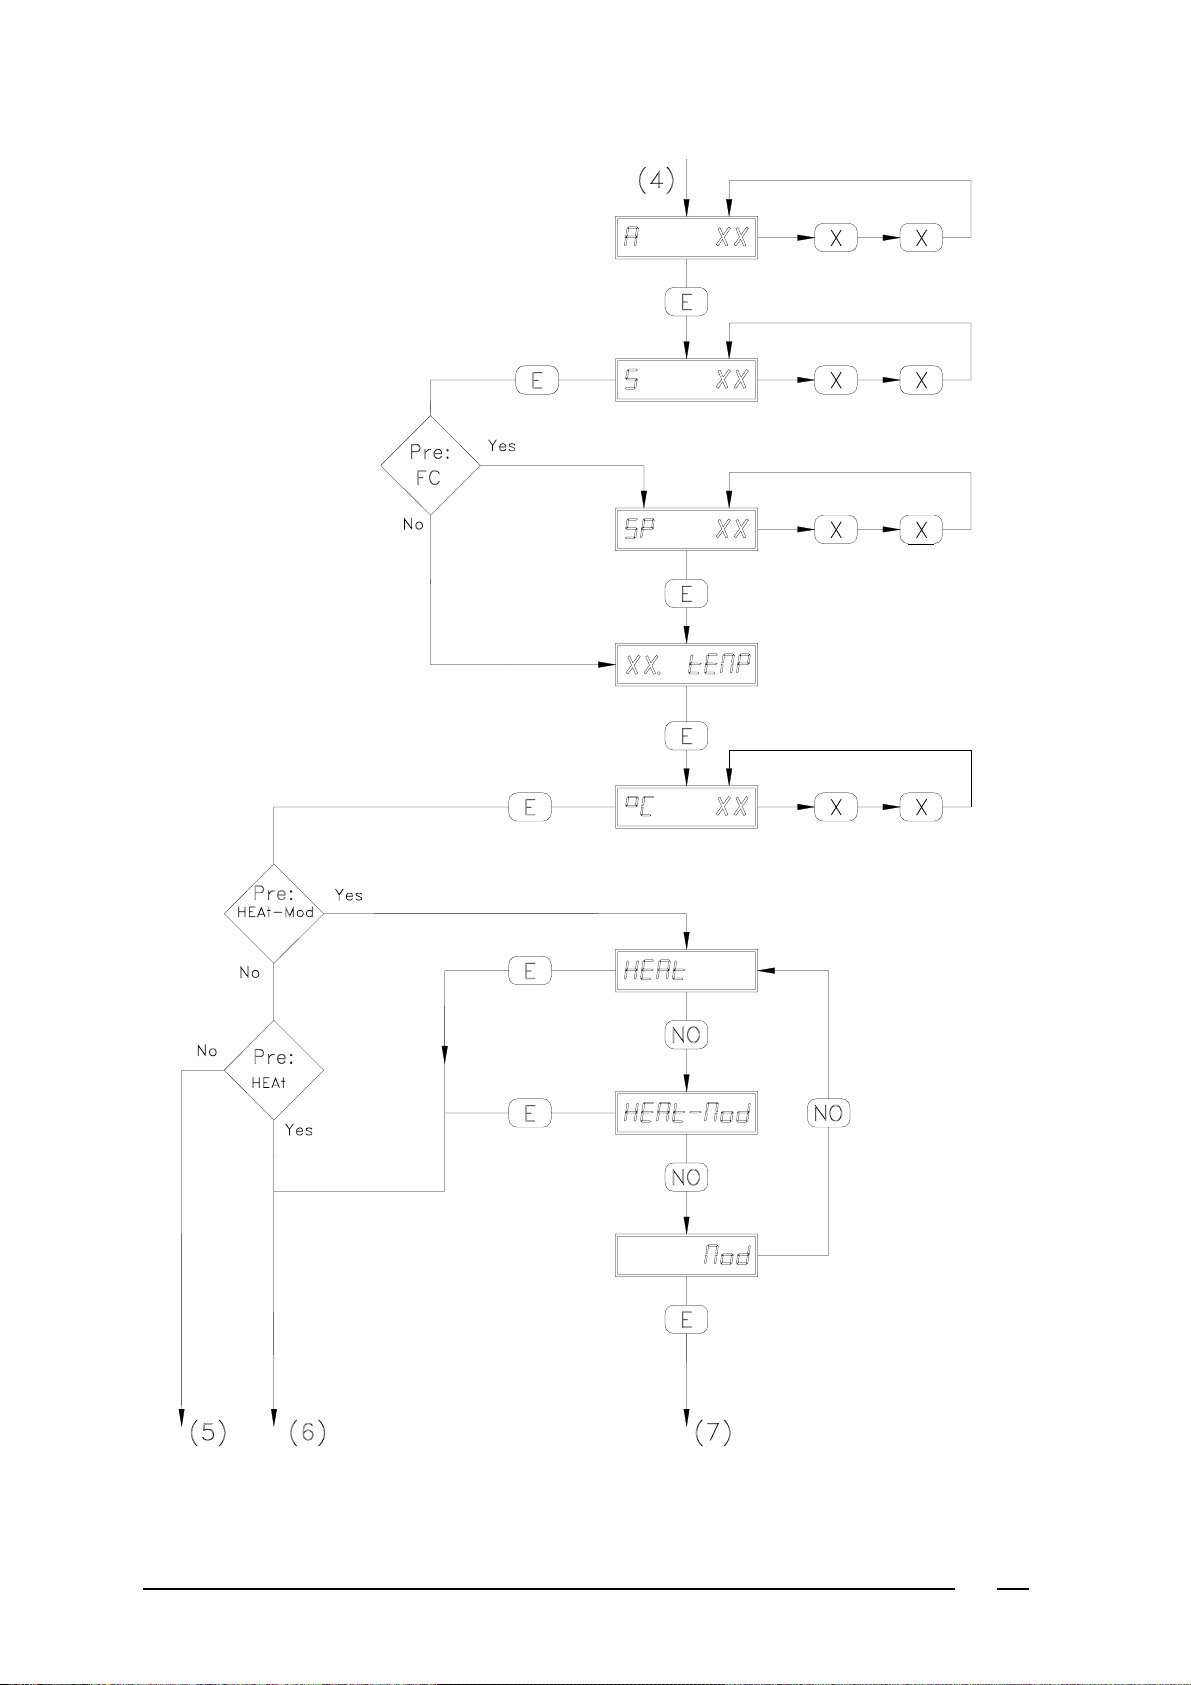
A XX = Action Time (Cycle Time)
Put in the action time (0 to 60 seconds) with " X,X ".
If the motor is frequency controlled, one decimal digit will appear which enables you to set the time accurately
to 0.1 seconds.
When " 0 " is put in (cycle without cylinder rotation), the next step (" S XX ") will be skipped.
Press " E ".
S XX = Stop time (Pause time)
Put in the pause time (1 to 60 seconds) with " X,X ".
If the motor is frequency controlled, one decimal digit will appear which enables you to set the time accurately
to 0.1 seconds. (Minimum 0.5 seconds)
Press " E ".
The next step depends on the selection during the "preprogram".
- With " no FC " (no frequency controlled motor): transition to " XX. tEMP ".
- With " FC " (frequency controlled motor): transition to " SP XX ".
SP XX = Speed
Put in the rpm speed of the wash cycle (10 to 50 rpm) with " X,X ".
Press " E ".
XX. tEMP = Temperature (temperature of the bath)
Press " E ".
°C XX = Temperature (Or °F XX °C or °F according to the setting in the Preprogramming).
Indicate the temperature (maximum 95°C) with X,X and press E .
If a cold wash bath is desired, select 0 . Now, the display will immediately show XX. SE-i .
The next step will depend on the setting selected during the preprogramming at HEAt-SYS .
If HEAt-Mod was selected, then NO will allow to choose between:
å
HEAt (heating without modulation) with transfer to HECo or XX. SE-i .
HEAt-Mod (modulation with additional heating) with transfer to HECo or XX. SE-i .
Mod (modulation without additional heating) with transfer to HECo or XX. SE-i .
Now press E .
If HEAt was selected, the display will immediately go to HECo or XX. SE-i .
å
If Mod was selected, the display will immediately go to XX. SE-i .
å
21
Page 21

22
Page 22

Programming mode 4
HECo = Heating control (Temperature control)
If no temperature control is desired, select " no HECo " and press " E ".
If temperature control is desired, select " HECo " and press " E ".
If Mod was selected, the display will immediately go to XX. SE-i .
t XX = Time (Time of the temperature control)
Put in the time when the temperature should be controlled with " X,X " (between " 0 " and the wash time that
was initiated at " Cycle time ") and press " E ".
GEntlE = switching of action and pause time (Put in at " A XX " and " S XX ") during temperature control.
XX. SE-i = Select water inlet valves
Press " E ".
i2 = Inlet 2 (Inlet valve 2) (HF-WE-WE/4) or i1 = Inlet 1 (Inlet valve 1) (HFP machine)
Choose using NO if an inlet valve should be selected or not.
Subsequently press E to continue to the next inlet valve.
In order to save space, not all inlet valves are drawn here. The action involved are identical to the first inlet.
A description of the function of each inlet valve is provided in chapter 3.
If, because of the selection of the wrong inlet valves, the water temperature should mount above the values of
°C XX , then the machine will automatically inject cold water through the inlet valve i2
(on HF-WE-WE/4) or i7 (on HFP machines) in order to protect the linen.
The next step will depend on the function selected during the preprogramming .
- With SoAP (liquid soap injection): transfer to XX. SE-L .
- Without SoAP (liquid soap injection): transfer to SoAP (or no SoAP ).
23
Page 23
24
Page 24

Programming mode 4
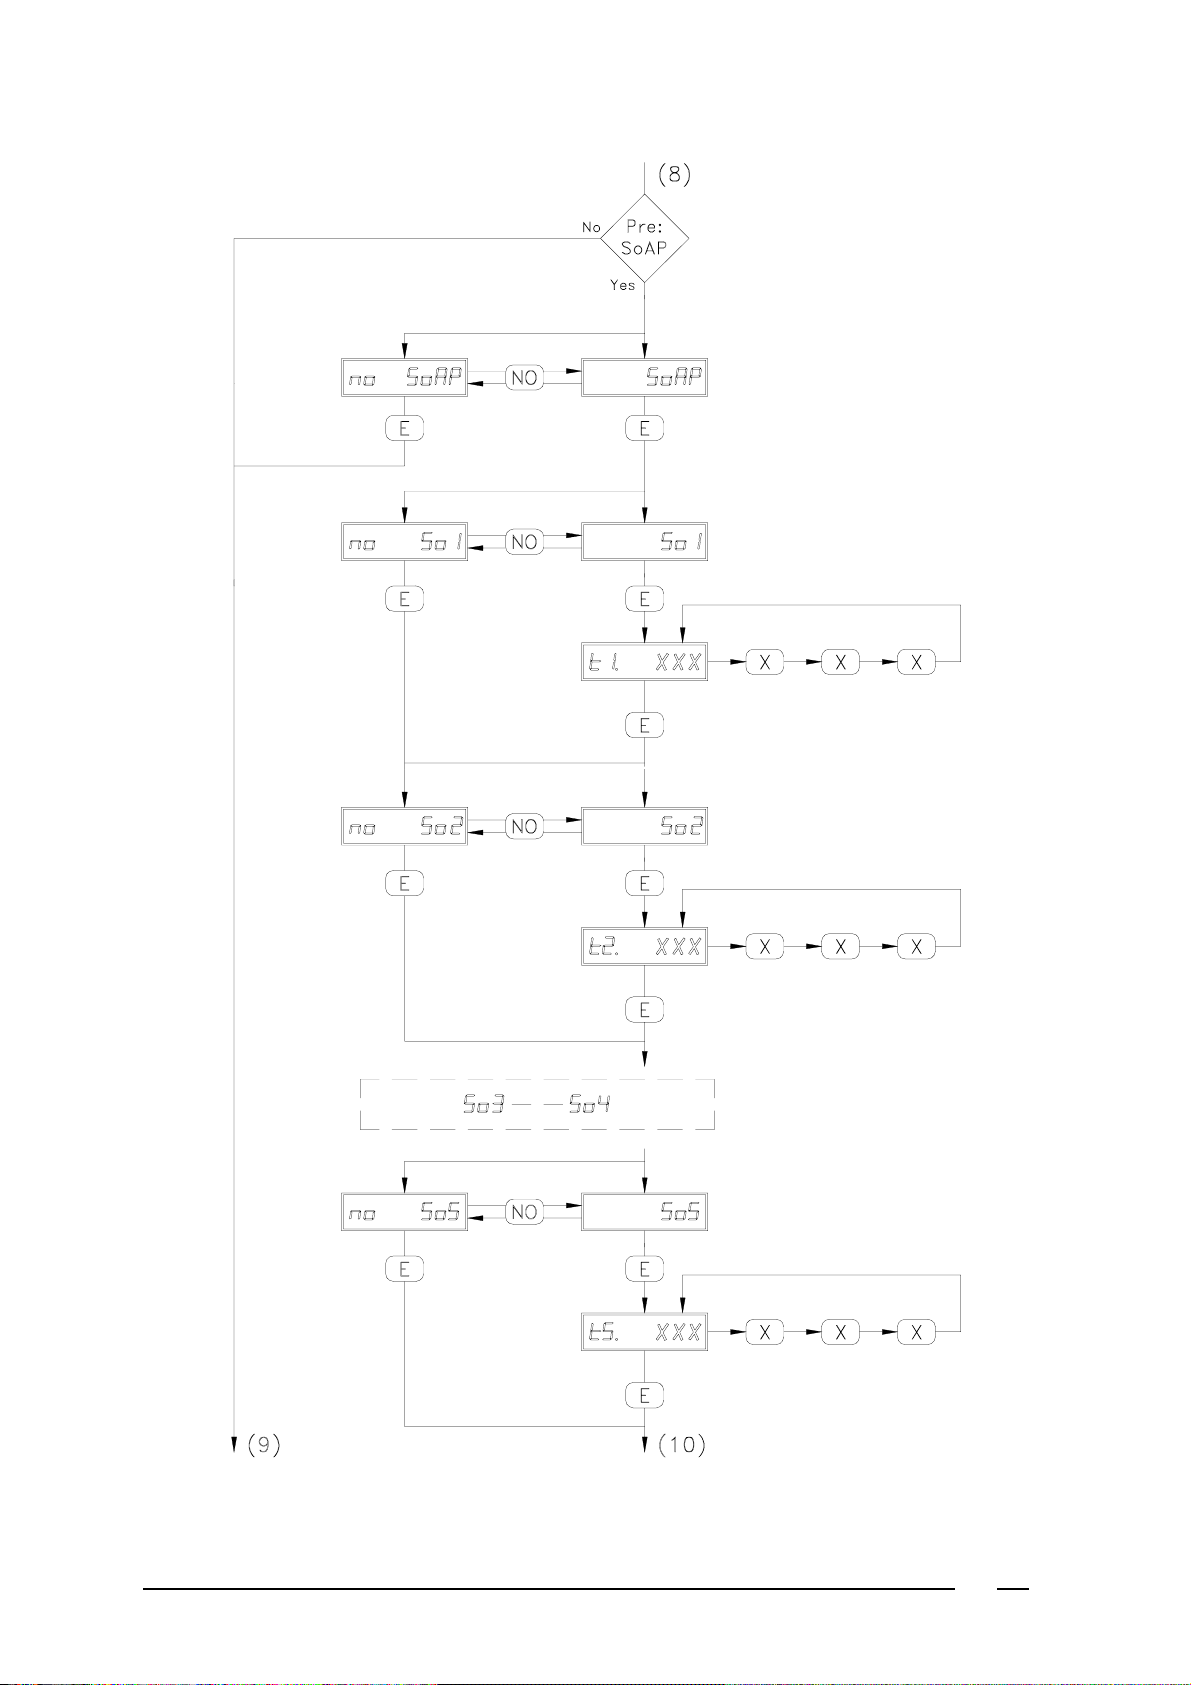
SoAP = Liquid soap injection
If soap injection is not desired, select " no SoAP " and press " E ". (Transition to " XX. SE-L ")
If soap injection is desired, select " SoAP " and press " E ".
SoI = Liquid soap injection 1
Choose with " NO " wether an inlet valve should be selected or not.
Then press " E ".
t1. XXX = Time 1 (Duration of the soap injection 1)
Put in the duration (maximum 999 seconds) with " X,X,X ".
Press " E " to continue to the next soap injection.
Only the blocks of So1, So2 , So5 and So6 are drawn to save space. The others (So3 and So4 ) are identical.
25
Page 25

26
Page 26

Programming mode 4
If during the preprogramming ALArm was selected, then So6 will not be displayed and the display will
immediately move on to XX. SE-L .
Press E .
XX. SE-L = Select level (of water)
Press " E ".
L XX = Level (of water)
Put in the level of water (by trial and error) with " X,X " and press " E ".
The next step depends on the selection made during "preprogramming".
- With " no LECo " (without level control): transition to " Add " (or " no Add ").
- With " LECo " (with level control): transition to " LECo " (or " no LECo ").
When " 0° " has been put in at " XX. tEMP ", the level can be chosen between 0 and 50.
Overflow (Very dirty linen).
å
- Put in " 0 °C " (or in °F) at " XX. tEMP ".
- Then select " no HECo ", and choose level " 00 " when " L XX " appears.
The machine will now continuously take water and drain it via the overflow during the entire wash time.
LECo = Level control
If no level control is desired, select " no LECo " and press " E ".
If level control is desired, select " LECo " and press " E ".
LS XX = Level stop
Put in the water level with " X,X " at which the processor must stop (this is automatically limited by the level
chosen in " L XX ").
The microprocessor will proceed as soon as this water level is reached, and the bath will be filled up to the level
chosen in " L XX ". Then press " E ".
27
Page 27

28
Page 28

Programming mode 4
The next step depends on the selection made during "preprogramming".
- With " no Add " (without auxiliary program): transition to " SPin " (or " no SPin ").
- With " Add " (with auxiliary program): transition to " Add " (or " no Add ").
Add = Additional program (Program extension)
If no program extension is desired, select no Add and press E to confirm (transfer to SPin ).
If a program extension is desired, select Add and press E to confirm.
Now select the desired program extensions using NO : Cool , StoP , STOP.tiME , SoAH ,
SoAH.tiME or again no Add and confirm the selection by pressing E .
XX. Cool = Cool-down
å
CDu XX = Highest cool-down temperature
Select the temperature (between 30 and 85) using X,X and press E to confirm.
CDn XX = Lowest cool-down temperature
Select the temperature (between 30 and 85 and automatically limited to the value selected under
CDu XX ) using X,X and press E to confirm.
StoP = Stop
å
Once in operating mode, the program will stop here, giving the opportunity to e.g. add additional soap or
bleach manually. The water will remain in the tub. See Operating mode: Programmed stop. The stop time
can be programmed up to 999 minutes. Once this stop time has passed, the program will resume
automatically.
StoP.XXX
Select the stop time with X,X,X (between 0 and 999 minutes) and confirm by pressing E .
If 0 was selected, the program will stop indefinitely until the START button is pressed again.
ALArm.XXX
At the beginning of this stop time, the alarm signal can be activated.
Select the duration of the alarm signal using X,X,X (between 0 and 250 seconds).
This option is only displayed if ALArm was selected during the preprogramming.
If " 999 " was selected, the signal will activated during the complete stop time.
SoAH = Soak (soak cycle)
å
Once in operating mode, the program will stop here, The water level will be increased to 25 and the
machine will execute one left-right movement once every 3 minutes. The temperature will remain constant.
See Operating mode: Soaking. The soak time can be programmed up to 999 minutes. Once this soak time
has passed, the program will resume automatically.
SoAH.XXX
Select the soak time with X,X,X (between 0 and 999 minutes) and confirm by pressing E .
If 0 was selected, the program will stop indefinitely until the START button is pressed again.
ALArm.XXX
At the beginning of this soak time, the alarm signal can be activated.
Select the duration of the alarm signal using X,X,X (between 0 and 250 seconds).
This option is only displayed if ALArm was selected during the preprogramming.
If " 999 " was selected, the signal will activated during the complete soak time.
no Add = No Additional (no program extension)
å
29
Page 29

30
Page 30

Programming mode 4
SPin = Spin
If spin is desired, select " SPin " and press " E ".
If no spin is desired, select " no SPin " and press " E ". (Transition to " d0 ", " d1 ", or " d2 ")
SPI- X = Duration of low spin
Put in the duration of the low spin (1 to 9 minutes) with " X " and press " E ".
The next step depends on the selection made during "preprogramming".
- With " no FC " (no frequency controlled motor): transition to " d1 ".
- With " FC " (frequency controlled motor): transition to " LS. XXXX ".
LS. XXXX = Low spin
Put in the speed of low spin (250 to 500 rpm) with " X,X,X,X "and press " E ".
On machines with a drum diameter larger than 850 mm, the high spin speed will be limited to 400 RPM.
d1 = Drain 1 (Drain valve 1)
Select " d1 " or " d2 " with " NO " and confirm with " E ".
d2 = Drain 2 (Drain valve 2)
SP2- X = Duration high spin
Put in the duration of high spin (maximum 15 minutes) with " X " and press " E ". (If no high spin is desired,
put in " 0 ")
The next step depends on the selection made during "preprogramming".
- With " no FC " (frequency controlled motor): transition to " XX. dEti ".
- With " FC " (frequency controlled motor): transition to " HS. XXXX ".
HS. XXXX = High spin (high spin speed)
Select the high spin speed RPM using X,X,X,X (maximally double the low spin speed) and press E to
confirm.
On machines with a drum diameter larger than 850 mm, the high spin speed will be limited to 800 RPM.
XX. dEti = Delay time
Press " E ".
td XXX = Delay time
Put in time with " X,X,X " and press " E ".
Required time: 30 to 180 seconds after spin 1
60 to 180 seconds after spin 2
31
Page 31

32
Page 32

Programming mode 4
d1 = Drain 1
Select " d0 ", " d1 " or " d2 " with " NO " and confirm with " E ".
d2 = Drain 2
d0 = Drain 0 (no drain)
Press " E " to select no drain. (Transition to the last program segment)
dt XXX = Drain time
Select the drain time using X,X,X (maximally 180 seconds) and press E to confirm. Now select between
following functions using NO the movement of the drum during draining of the water: WASh , diSt
, JoLt and DrAin . Press E to confirm.
WASh = Wash action during drain
å
diSt = Distribution (distribution speed) (not for machines type WE (no HF))
å
å
å
t= XXXX = Time
Distribution of washload during drain
Jolt = Short spin (10 seconds low spin after distribution)
Introduce for this purpose minimum 60 seconds with " Drain ".
Drain=Drain no action
Drain of water without action of drum.
Confirm selection with " E ".
This is the duration of the program segment.
Press " E ".
33
Page 33

Page 34

Programming mode 4
FrEE==XX = The maximum of segments available for programming
You can program a maximum of 160 segments.
Press " E ".
End = End of this program segment
Press " NO " to proceed automatically to the next program segment (transition to " XX.id YY ").
YY stands for the next program segment number.
Press " E " to put an end to the program.
Tu XXX = Tumble
This will be executed with a frequency of 6 sec. wash action and 9 sec. stop time. In case of frequency controlled
machines, the speed will be equivalent to the lowest programmed speed in that program.
Select the tumble time using X,X,X (from 30 to 999 sec.) and press E to confirm.
If no tumbling is required, 0 can be selected. There will then be a waiting time of 1 minute at the end of the
program.
ALArm.XXX
Here, the alarm can be activated again.
Select the duration of the alarm signal using X,X,X (between 0 and250 seconds).
This option is only displayed if ALArm was selected during the preprogramming
.
If " 999 " was selected, the signal will be activated until the door is opened.
Data.XXXX
The new " checksum" is displayed for a few seconds at the end of programming. Then it proceeds to " StArt
".
Page 35

Page 36

Programming mode 4
Insert and delete a program segment
Start the programming procedure up to " XX.id XX".
To insert a program segment
å
Press " START ".
XX. inS = Insert
Then press " E ".
The program segment " XX " moves up one place to the following number. " XX.id XX " will appear again
on the display. This program segment can now again be programmed.
Example:
Program " 01 " with 4 program segments (01, 02, 03, 04).
Suppose one segment should be inserted between 02 and 03.
Select " 01.id 03" and press " START ". " 03 ins " appears on the display. Press " E ". Now " 01.id 03 " will
appear once more. The program segment 03 must be put in again.
The previous segment 03 moves up to 04 and the previous 04 will become 05.
If there is not enough space in the Ram memory, the error message " Ram full " will appear.
To delete a program segment
å
Press " STOP ".
XX. del (flashing) = delete
Press " E ".
The program segment " XX " will now be deleted. The following program segments will move back one
place.
Example:
Program 01 with 4 segments (01, 02, 03, 04).
Segment 02 must be deleted.
Select " 01.id 02 " and press " STOP ". " 02 del " will appear on the display. Press " E ".
Now " 01.id 02 " will appear once more. This was previously program segment " 03 ". Program segment
04 was moved back to 03.
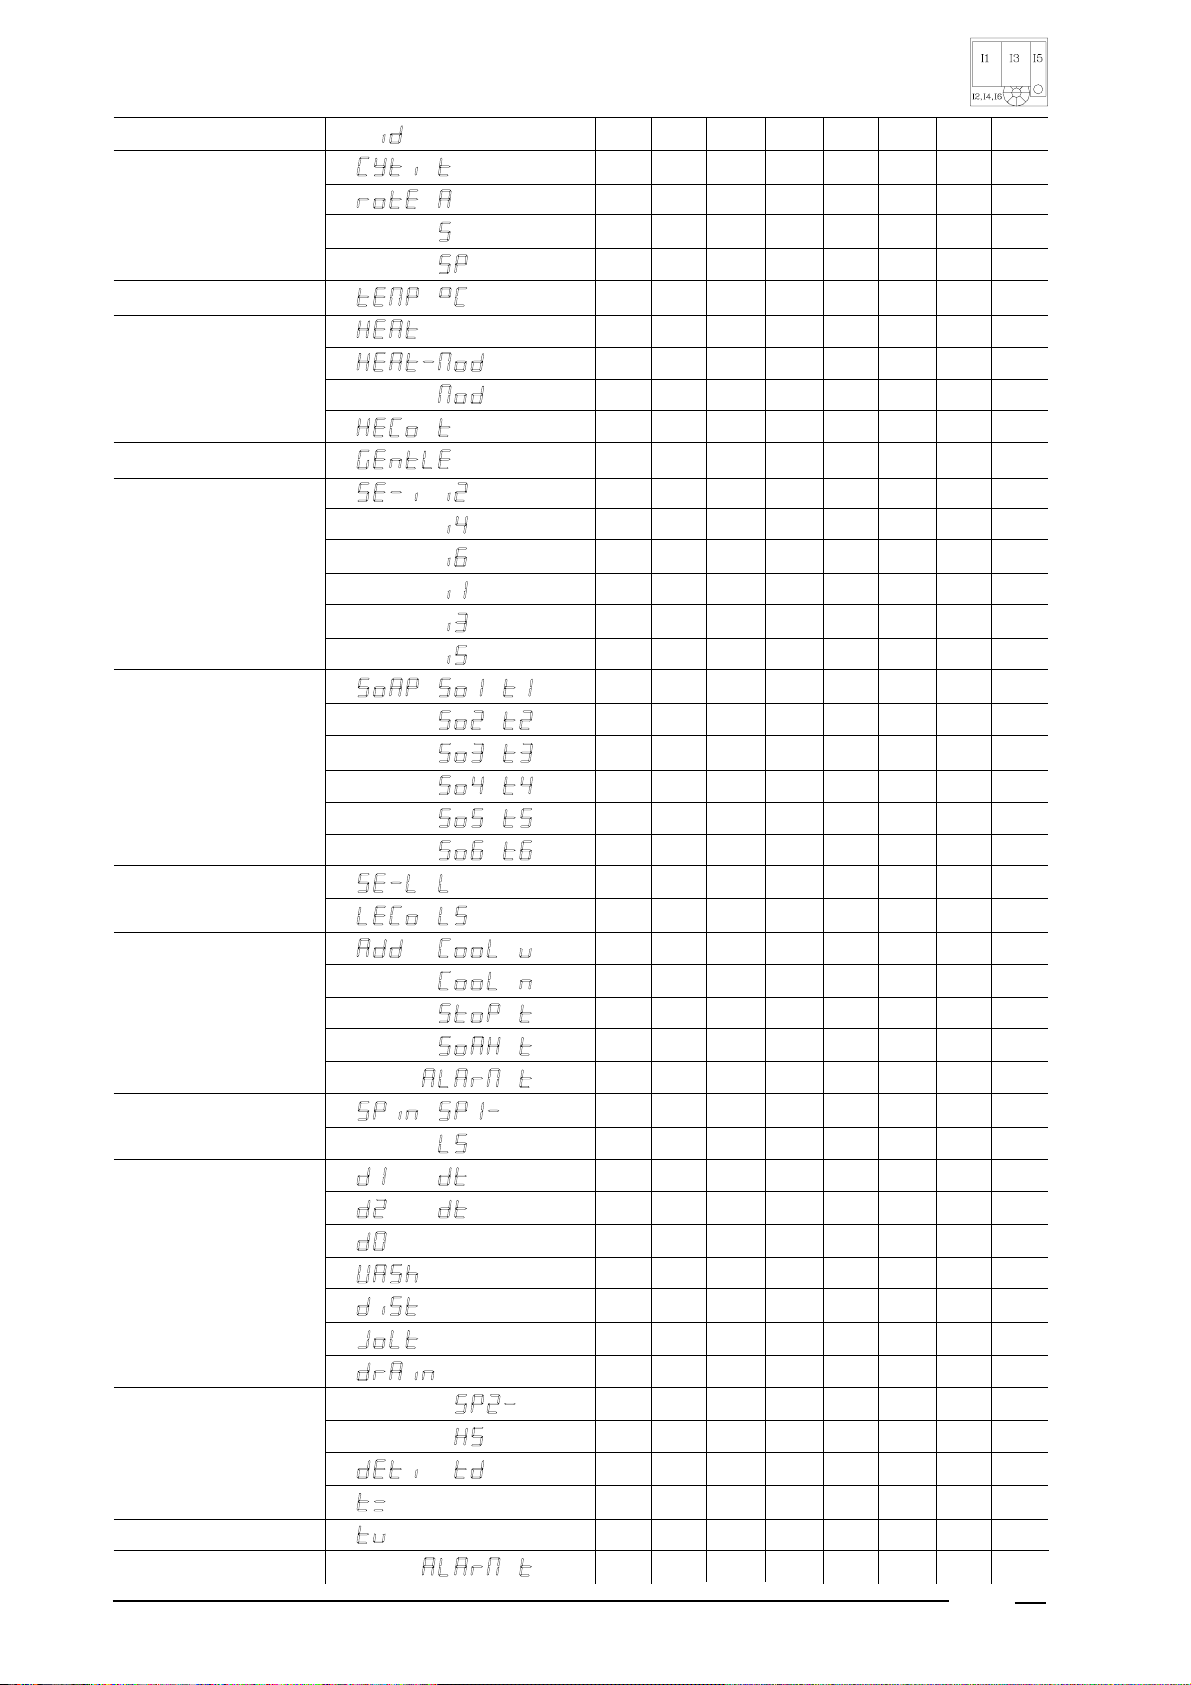
Program tables
The table on the next page shows how the programmed data are registered.
Page 37

Page 38

Copying mode 5
Copying mode
To get into the copying mode: see chapter Classification according to modes 2.
The PC 30 microprocessor is provided with 10 standard programs (30 to 39). These programs can be immediately
implemented.
On these places they cannot be modified. To modify them or to use them as structure for another program, you must
first copy them to a program number between 0 and 29. See further.
Other self-made programs can be copied the same way to other numbers (between 0 and 29) so you can use them
as a structure for a new program. This saves a lot of time when you want to program various simular programs.
CoPY PrG = Copy program
To confirm press " E ".
To cancel press any other key. (Transition to " StArt ")
SourCE.XX = Program to be copied
Put in the number of the program to be copied with " X,X " and confirm with " E ".
dESt .YY = Destination (destination of the copied program)
Put in the number of the program with " Y,Y " and confirm with " E ".
XX .... YY = Confirmation of copying
To confirm, press " E ". (Transition to " StArt ")
To cancel, press any other key. (Transition to " StArt ")
In case there isn't enough space left in the Ram memory, the error detection " Ram full " will appear.
Page 39

Operating mode 6
To get into the "operating mode": see chapter " Classification according to modes ( 2 )".
To select a program
ProG XX = Program XX (e.g. program 01)
If necessary, select another program.
The led in the button of the selected program on the keyboard lights up.
To select a program number higher than 9 you must put in the number and add " +10 " or " +20 ".
å
å
To start a program
Press " START "
The program has now started.
" XX. XX. XX " will appear on the display (e.g. " 01. 41' 15 ")
01 = program segment number
41' 15 = Total remaining program time
Example: program 15: put in " 5 " and " +10 " (2 leds light up).
To stelect one of the standard programs ( 30 to 39) you must put in " +20 " and "+10" afterwards.
Example: program 35: put in " 5 " + " +20 " + " +10 " (3 leds light up).
When the door is not properly closed, " door. oPEn " will appear.
When selecting a program number that doesn't contain a program yet, " Error = 02 " (flashing) will appear
for 10 seconds.
Program process
The remaining program time (in seconds) is displayed during the program.
After each program segment appears the next program segment number.
" XX. XX' XX " (e.g. " 01. 41' 15. ")
When the machine is taking water, the first decimal point will light up.
As long as there is also a level control active, this decimal point will flash.
" XX. XX' X.X " (e.g. " 01. 41' 1.5 ")
When the bath is been heated, the second decimal point will light up.
As long as there is also a temperature control active, this decimal point will flash.
" XX. XX' .XX " (e.g. " 01. 41' .15 ")
When the machine is draining water, the third decimal point will light up.
As long as there is also a distribution going on, this decimal point will flash.
" XX. XX'. XX " (e.g. " 01. 41'. 15 ")
When the machine is in high spin, the forth decimal point will light up.
In case of a low spin, the light will flash.
" PXX. End "
When the program has come to an end, " PXX. End " will appear (e.g. " P01. End
").
The buzzer sounds for 10 seconds (when de buzzer " bu= " was activated in the
preprogam).
If the alarm signal was programmed (ALArM.XXX), this will now be executed.
When the door is opened, " StArt " will appear again.
40
Page 40

Operating mode 6
In case of a programmed start (not with coin-op version)
After the program has been selected, press the " START " button for at least 5 seconds.
" dELAY .XX " will appear on the display.
The start can now be delayed per hour by entering a number between 0 and 99. Then press the " START " button
once more so that the countdown can begin (decimal point flashes). During the last hour of the countdown the
minutes are shown (flashing).
Remark:
If you want to cancel the countdown, press " STOP ".
Changing to another program
It is possible to change to another program during the first minutes after a start. Herefore you put in another
program number.
On the display " P.XX.StArt " will appear. " P.XX " stands for the new program. Then confirm by pressing
" START ".
Remark:
In case of coin-op machine, if the new program is more expensive, the additional amount required for this
program is shown in " XXX.XX ". The originally selected program will continue until the additional amount is
inserted. If this is not inserted, the original program will continue 3 minutes after the first start.
One-time modification of the level, wash time and temperature input.
Select a program number.
Before starting this program press " NO " first and then press " E " while keeping " NO " depressed. For each
program segment " L XX " followed by " t XX " and then " °C XX " will appear on the display. Adjust the data
if necessary and press " E " to continue to the wash time and temperature input of the next segment.
When all input is adapted according to your requirements, press " START " to initiate the program.
Remark:
The values of " LECo XX " and " HECo XX " are modified by the same values up to a minimum of " 00 ".
The program will be executed only once with the modifications that have been applied in this manner.
Control of the temperature of the bath
By pressing the button " T " it is possible to read the temperature and the rotation speed of the drum on the
display.These functions are only operational if the temperature reading function ("t") was selected in the "pre
program mode".
Press " T " once:
å
The temperature of the bath is displayed (" t=XX°C " followed by one horizontal bar).
Press " T " twice:
å
The programmed temperature of this segment is displayed ( " t=XX°C "followed by two horizontal bars).
Press " T " three times:
å
The highest temperature for this program is displayed ( " t=XX°C " followed by three horizontal bars).
When the displayed temperature is less than 25°C , " Cold " will appear.
Press " T " three times:
å
The rotation speed will be displayed if it is a frequency controlled machine ("FC"in th pre-progam
mode).
41
Page 41

Operating mode 6
Control of a program in progress
By pressing the " T " button for longer than 3 seconds and then letting go of this button, all steps that are put
in per program segment will be shown one after the other during 1 second. By pressing " T " once more and
keeping it depressed, the last step displayed is shown during this time span. After letting go of the " T " button
the next steps will be displayed.
At the end of a program segment " EntEr " will appear for about 3 seconds. If you want to proceed to the display
of the following segment, you must keep the " E " button depressed during this period. If not, the normal program
process will be displayed.
Rapidly going through a program
It is possible to go through the program rapidly by pressing " " (that is if acceleration " ACCL " is selected
in the "preprogram").
The seconds on the display are counted down faster. This acceleration is interrupted each time you come to an
important step (drain, cooldown, etc.). Then press the acceleration button to continue rapidly.
By means of this button it is possible to skip parts or the rest of the program.
It is not possible to advance the program during tumbling.
Programmed stop
When a time stop is programmed, the program will stop in that segment. The water remains in the tub, there is
no more drum rotation and the display shows StoP .
After pressing the START button once more, the program resumes.
Stop with predetermined stop time.
å
If a predetermined stop time was programmed, the display will alternately show StoP.tiME and the
remaining stop time counting down. After the stop time has elapsed, the program will resume automatically.
The stop time can also be interrupted by pressing the START button.
Alarm signal.
å
If the alarm signal was programmed, this will be executed at the beginning of the stop time.This can be
interrupted by pushing the " START ", or the " STOP "button.
Soaking (SoAH)
When a soak is programmed, the program will stop in that segment. The water level will be brought to 25 ,
the temperature will be kept constant and there will be one left-right drum rotation every 3 minutes.
After pressing the START button once more, the program resumes.
Soak with predetermined soak time.
å
If a predetermined soak time was programmed, the display will alternately show "SoAh.tiME"and the
remaining soak time counting down. After the soak time has elapsed, the program will resume automatically.
The soak time can also be interrupted by pressing the START button.
å
Alarm signal.
If the alarm signal was programmed, this will be executed at the beginning of the soak time. This can be
interrupted by pushing the " START ", or the " STOP "button.
42
Page 42

Operating mode 6
Time Stop (not on the coin version)
By keeping pressing the STOP button for more than 3 seconds, the program will go into time stop (only
if EMEr was selected in the preprogramming mode)
This can be used to e.g. extend a program segment in case of heavily soiled linen. The time will be stopped and
the step currently activated will be preformed indefinitely. The programmed water level and temperature will
be kept constant. During the time stop the display shows XX.tistop .
Now, the stop time can be entered if so desired. Press E to confirm.
The display now shows XX.ti XXX . Enter the desired stop time using X,X,X (between 1 and 999 minutes)
and press "E " again. The display will now alternately show StoP.tiME and the remaining stop time counting
down. After the stop time has elapsed, the program will resume automatically.
If no stop time was selected, the stop time will be indefinite until the START button is pressed again.
A " time stop " during the final spin will be automatically interrupted after 20 minutes.
Interruption and stopping the program
When the " STOP " button is briefly pressed , the text of the display flashes and after 5 seconds the machine
starts to drain the water (that is if an emergency stop " EMEr " was selected in the "preprogram").
The buzzer starts working after 30 seconds and " oPEn door " will appear and the door should be opened. Then
" CLoSE " appears.
After closing the door again you can:
- continue the program by pressing " START "
- cancel the program by pressing " STOP ".
The stop function has a delay of 60 seconds during spin 1 and a delay of 120 seconds during spin 2.
Adding water (not with coin-op version)
If you press one of the buttons from " 1 " to " 8 " during a program, the corresponding water inlet valve is opened.
While pressing this button, the number of the selected inlet valve and the level is shown in
" iX LXX ". This information is displayed for 3 seconds after the button is released.
This function does not work during the first 3 minutes of a program.
Draining water (not with coin-op version)
When you press button " 9 " during a program, drain valve " D1 " is opened.
When you press button " 0 " during a program, drain valve " D2 " is opened.
While pressing this button, the number of the selected drain valve and the level is shown in " dX LXX ". This
information is displayed for 3 seconds after the button is released.
This function does not work during the first 3 minutes of a program.
Heating the bath
By keeping the button " +10 " depressed during a program, the heating is activated. (Max. 95°C).
While pressing this button, the temperature of the bath is shown with " °C XX " (or " °F XX ").
This function does not work during the first 3 minutes of a program.
43
Page 43

Operating mode 6
Adding soap (not with coin-op version)
By pressing the button " +20 " during a program " SoX tXXX " appears.
If you then keep one of the buttons 1 to 6 depressed, soap is added through one of these valves.
While pressing the button, the selected soap valve and the time of the soap adding is displayed.
This function does not work during the first 3 minutes of a program.
Error message
When a technical error was detected during the program, " Error =XX " will appear at the end of the program
instead of " PXX.END ".
" Error = 04 " : the filling time was longer than 15 minutes
" Error = 05 " : the required temperature was not reached after 60 minutes of heating
" Error = 06 " : the door lock was released during the program
" Error = 07 " : there is still water in the tub at the end of the program
" Error = 08 " : the temperature sensor was out of order
" Error = 09 " : the thermo-magnetic protection was activated during the program
" Error = 10 " : the tilt switch was activated during the start of the program
" Error = 11 " : there was still water in the tub at the start of the program
" Error = 12 " : there was still water in the tub 3 minutes after drain, later the heating hasn't been
activated anymorre.
" Error = 13 " : during the extraction, there was no rotation speed detected (only with frequency controlled
motors).
To get back to " PXX. End " : open the door. (Attention with " Error 07 ").
Total operating hours, received coins
If you press " E 2 2 3 " before starting, the total operating hours are shown during 5 seconds.
In case of a coin-op machine " coin " will also appear after 3 seconds, followed by the number of received coins
during 5 seconds.
Overview of the total amount of steps per program.
By entering E 7 8 8 before starting a program, the display will show the first program number and the the
total amount of steps in that program.
Example: Prg 01. 08 = Program 1 containing 8 steps.
After one second, the display will automatically switch to the next program number. After the last program, the
total amount of free memory steps will be displayed with FrEE = XX .
Example: FrEE = 89
By pressing NO continuously, this overview is interrupted and the display remains fixed.
By pressing E , this overview is terminated and the display skips to the total amount of free memory steps
available.
Example: FrEE = 89
44
Page 44

45
Page 45

Test mode 7
The test mode is installed to be able to locate technical problems and is especially directed to specialized
technicians.
To get into the " test mode ":
- Turn the key switch at the front to " PROG ".
- Press " E 2 1 7 " (press quickly one after the other).
" tESt " will appear on the display.
Put in a number from " 1 " to " 7 " to select one of the following test functions:
Test 1: Control of the 8 entry contacts
With this function you can see if the entry contacts are open or closed.
Entry 1: Thermo-magnetic motor protection
Entry 2: key switch in display
Entry 3: door lock S2
Entry 4: door lock S1
Entry 5: tilt switch
Entry 6: rotation sensor
Entry 7: coin meter 2
Entry 8: coin meter 3
Example:
" t1.inP 1.o " = Entry 1 (thermo-magnetic motor protection) open
" t1.inP 1.c " = Entry 1 (thermo-magnetic motor protection) closed.
To control the next entry, press " E ".
To control the previous entry, press " NO ".
To stop this test, press the " STOP " button.
Test 2: Control of the DIP switches on the main print board.
In this test it is possible to verify whether the switches are open or closed.
In case of a machine type HF, WE245/304, or WE "high spin", these DIP
switches are used to determine how long the spin motor is activated during
acceleration to the distribution speed.
DIP switch 8: 1 second
HF 65 380V, HF 76 380V, HF 95 380V, WE 245/304, WE "high spin", all the machines with frequency
controlled motor.
DIP switch 7: 2 seconds
HF 110, HF 132, HF 165, HF 145, HF 176, HF 205, HF 234.
DIP switch 6: 3 seconds
HF 65 220V, HF 76 220V, HF 95 220V, HF 245, HF 304
Example:
" t2.diP 8.o " = DIP switch 8 is open.
" t2.diP 8.c " = DIP switch 8 is closed.
When a DIP switch is activated, " HF " will automatically be selected in the "preprogram".
To stop this test, press the " STOP " button.
46
Page 46

Test mode 7
Test 3: coin meters
In this test the operation of the coin meter is tested.
" t3.0 " will appear on the display.
Every time a coin is inserted, the sum is made of all inserted coins and the new value will appear.
By pressing the 0 button this value returns to 0.
Press the " STOP " button to leave this test.
Test 4: Control of water level sensor
In this test you can see the water level changing per 1/10 unit.
" t4.LEV 00.0 " will appear.
By pressing " START " now the drain valve will be closed and water is taken through I2.
The respective level is shown on the display.
If you press " STOP " the water inlet is temporarily interrupted until you press "START " once more.
To stop this test, press the " STOP " button.
Test 5: Control of temperature sensor
" t5. XX.X " will appear on the display. " XX.X " stands for the respective temperature in the tub.
To stop this test, press the " STOP " button.
Test 6: Control of the 24 exits
With this test you can activate each exit contact one after the other.
Exit 1: soap inlet 1
Exit 2: soap inlet 2
Exit 3: soap inlet 3
Exit 4: soap inlet 4
Exit 5: soap inlet 5
Exit 6: drain valve 1
Exit 7: drain valve 2
Exit 8: door lock
Example:
" t6.out 22.o " = Exit 22 (water inlet I2) is open.
You can close this exit contact by pressing 1 and water is taken via this valve.
On the di.splay appears:
" t6.out 22.c " = Exit 22 (water inlet I2) is closed.
To open this entry contact again, press 0.
To control the next exit, press " E ".
To control the previous exit, press " NO ".
To stop this test, press the " STOP " button.
Exit 9: high spin
Exit 10: low spin
Exit 11: distribution speed
Exit 12: wash action right
Exit 13: wash action left
Exit 14: heating
Exit 15: water inlet cool-down
Exit 16: water inlet I8
Test 7: Keyboard
" t8. -- " appears on the display.
For each key you press on the keyboard, the respective function is shown.
To stop this test, press the " STOP " button twice.
Exit 17: water inlet I7
Exit 18: water inlet I6
Exit 19: water inlet I5
Exit 20: water inlet I4
Exit 21: water inlet I3
Exit 22: water inlet I2
Exit 23: water inlet I1
Exit 24: soap inlet 6
Ram reset
With this function the entire data in the Ram memory is erased.
Press 0 when " tESt " appears.
On the display " Code " is shown.
Put in " 7 5 3 " (press quickly one afer the other).
By doing a Ram reset all the manually programmed program segments are erased.
47
Page 47

Liquid soap connection 8
Connection of the liquid
soap hoses
Electrical connection of
the liquid soap pumps
A rubber connection has been placed over the air break opening at
the back of the machine. There are 5 holes in this rubber connection,
through each of which a liquid soap hose can be driven (S1...S5).
Press the hoses until they appear well inside the soap dispenser.
The central gap in the rubber connection remains and serves as air
breaker.
On machines equipped with a liquid soap connection, connect the
wires directly on the print board next to the ground wire connection
(option). Connect as indicated on the wiring diagram.
The two connectors on the right give a tension of 220V ~ (max. 4A)
which can be applied to drive 220V ~ soap pumps. If more than 4A
is required, an external tension will have to be used.
6 connections have been provided, of which one (S6) can be used to
drive a waterproofing pump (e.g. for rain coats, etc.).
The 220V can be transformed to other values to drive other type soap
pumps.
Example: pumps 24V ~.
Also, pumps with different operating tension can be combined.
Example: 5 pumps 220V ~ and 1 pump 24V ~.
With an external tension 24V DC
48
Page 48

Standard programs 9
You can see on the naxt page the composition of the standard programs.
Program 30: Hot wash 1 40° - 90°
Program 31: Wamr Wash 40° - 60°
Program 32 : Synthetisch 1 35° - 40°
Program 33 : Synthetisch 2 40°
Program 34 : Fijne was 30° - 30°
Program 35 : Wol 20°
Program 36 : Dekbed 30° - 40°
Program 37 : Gordijnen 30° - 40°
Program 38 : Stijven
Program 39 : Kookwas 2 40° - 90° (Warme tussenspoeling)
49
Page 49

Program :
SEGMENT
WASH TIME
TEMPERATURE
HEAT. SYS
HEATING.CONTROL
WASH ACTION
SOFT (TUB)
WARM (TUB)
HARD (TUB)
SOFT (VOORWAS)
WARM (PREWASH)
HARD (CONDITIONER)
SOAP INJECTION
Total time :
41'30"30
Name:
01 02 03 04 05 06 07 08
LEVEL
LEVEL CONTROL
ADD PROGRAM.
LOW SPIN
DRAIN
HIGH SPIN
DELAY
TOTAL TIME
TRUMBLE
ALARM
50
Page 50

Program :
ONDERDEEL
WAS TIJD
TEMPERATUUR
VERWARM. SYS
TEMP. STURING
WASBEWEGING
ZACHT (BAK 1)
ZACHT (BAK 2)
ZACHT (BAK 3)
HARD (BAK 4)
HARD (BAK 5)
HARD (BAK 6)
ZACHT (KUIP)
WARM (KUIP)
HARD (KUIP)
ZEEPINJECTIE
Total Time: Name:
01 02 03 04 05 06 07 08
PEIL
PEILSTURING
PROG. UITBREID.
LAAGZWIEREN
AFVOER
HOOGZWIEREN
VRIJLOOP
TIJD
ONTWARREN
ALARM
51
Page 51

Program :
SEGMENT
WASH TIME
TEMPERATURE
HEAT. SYS
HEATING.CONTROL
WASH ACTION
SOFT (TUB)
WARM (TUB)
HARD (TUB)
SOFT (VOORWAS)
WARM (PREWASH)
HARD (CONDITIONER)
SOAP INJECTION
Total time :
Name:
01 02 03 04 05 06 07 08
LEVEL
LEVEL CONTROL
ADD PROGRAM.
LOW SPIN
DRAIN
HIGH SPIN
DELAY
TOTAL TIME
TRUMBLE
ALARM
52
Page 52

Program :
ONDERDEEL
WAS TIJD
TEMPERATUUR
VERWARM. SYS
TEMP. STURING
WASBEWEGING
ZACHT (BAK 1)
ZACHT (BAK 2)
ZACHT (BAK 3)
HARD (BAK 4)
HARD (BAK 5)
HARD (BAK 6)
ZACHT (KUIP)
WARM (KUIP)
HARD (KUIP)
ZEEPINJECTIE
Total Time: Name:
01 02 03 04 05 06 07 08
PEIL
PEILSTURING
PROG. UITBREID.
LAAGZWIEREN
AFVOER
HOOGZWIEREN
VRIJLOOP
TIJD
ONTWARREN
ALARM
53
Page 53
Program :
SEGMENT
WASH TIME
TEMPERATURE
HEAT. SYS
HEATING.CONTROL
WASH ACTION
SOFT (TUB)
WARM (TUB)
HARD (TUB)
SOFT (VOORWAS)
WARM (PREWASH)
HARD (CONDITIONER)
SOAP INJECTION
01 41'30" Hot wash
Total time :
Name:
01 02 03 04 05 06 07 08
714222
12 12 15 15 15
33333
4141414141
4090000
/////
XX///
/////
37///
/////
X/X/ /
XX///
///XX
X////
/X///
////X
LEVEL
LEVEL CONTROL
ADD PROGRAM.
LOW SPIN
DRAIN
HIGH SPIN
DELAY
TOTAL TIME
TRUMBLE
ALARM
13 10 20 20 16
10 10 13 13 13
1 / 111
500 / 500 500 500
X30XXX
/////
/////
/X///
/////
/////
/////
////7
////1000
30 / 303060
8.30 14.30 3.30 3.30 11
30
54
Page 54

Program :
ONDERDEEL
WAS TIJD
TEMPERATUUR
VERWARM. SYS
TEMP. STURING
WASBEWEGING
ZACHT (BAK 1)
ZACHT (BAK 2)
ZACHT (BAK 3)
HARD (BAK 4)
HARD (BAK 5)
HARD (BAK 6)
ZACHT (KUIP)
WARM (KUIP)
HARD (KUIP)
ZEEPINJECTIE
01 41'30" Hot wash
Total Time: Name:
01 02 03 04 05 06 07 08
714222
12 12 15 15 15
33333
28 28 28 28 28
4090000
/////
XX///
/////
37///
/////
X////
/X///
/////
/////
/////
////X
X/X/ /
XX///
///XX
PEIL
PEILSTURING
PROG. UITBREID.
LAAGZWIEREN
AFVOER
HOOGZWIEREN
VRIJLOOP
TIJD
ONTWARREN
ALARM
20 20 25 25 20
20 20 25 25 20
1 / 111
400 / 400 400 400
X30XXX
/////
/////
/X///
/////
/////
/////
////7
////800
30 / 303060
8.30 14.30 3.30 3.30 11
30
55
Page 55

Program :
SEGMENT
WASH TIME
TEMPERATURE
HEAT. SYS
HEATING.CONTROL
WASH ACTION
SOFT (TUB)
WARM (TUB)
HARD (TUB)
SOFT (VOORWAS)
WARM (PREWASH)
HARD (CONDITIONER)
SOAP INJECTION
30 41'30" Hot wash 1
Total time :
Name:
01 02 03 04 05 06 07 08
714222
12 12 15 15 15
33333
4141414141
4090000
/////
XX///
/////
37///
/////
X/X/ /
XX///
///XX
X////
/X///
////X
LEVEL
LEVEL CONTROL
ADD PROGRAM.
LOW SPIN
DRAIN
HIGH SPIN
DELAY
TOTAL TIME
TRUMBLE
ALARM
13 10 20 20 16
10 10 13 13 13
1 / 111
500 / 500 500 500
X30XXX
/////
/////
/X///
/////
/////
/////
////7
////1000
30 / 303060
8.30 14.30 3.30 3.30 11
30
56
Page 56

Program :
ONDERDEEL
WAS TIJD
TEMPERATUUR
VERWARM. SYS
TEMP. STURING
WASBEWEGING
ZACHT (BAK 1)
ZACHT (BAK 2)
ZACHT (BAK 3)
HARD (BAK 4)
HARD (BAK 5)
HARD (BAK 6)
ZACHT (KUIP)
WARM (KUIP)
HARD (KUIP)
ZEEPINJECTIE
30 41'30" Hot wash 1
Total Time: Name:
01 02 03 04 05 06 07 08
714222
12 12 15 15 15
33333
28 28 28 28 28
4090000
/////
XX///
/////
37///
/////
X////
/X///
/////
/////
/////
////X
X/X/ /
XX///
///XX
PEIL
PEILSTURING
PROG. UITBREID.
LAAGZWIEREN
AFVOER
HOOGZWIEREN
VRIJLOOP
TIJD
ONTWARREN
ALARM
20 20 25 25 20
20 20 25 25 20
1 / 111
400 / 400 400 400
X30XXX
/////
/////
/X///
/////
/////
/////
////7
////800
30 / 303060
8.30 14.30 3.30 3.30 11
30
57
Page 57

Program :
SEGMENT
WASH TIME
TEMPERATURE
HEAT. SYS
HEATING.CONTROL
WASH ACTION
SOFT (TUB)
WARM (TUB)
HARD (TUB)
SOFT (VOORWAS)
WARM (PREWASH)
HARD (CONDITIONER)
SOAP INJECTION
31 41'30" Warm wash
Total time :
Name:
01 02 03 04 05 06 07 08
714222
12 12 15 15 15
33333
4141414141
4060000
/////
XX///
/////
37///
/////
X/X/ /
XX///
///XX
XX///
/X///
////X
LEVEL
LEVEL CONTROL
ADD PROGRAM.
LOW SPIN
DRAIN
HIGH SPIN
DELAY
TOTAL TIME
TRUMBLE
ALARM
13 10 20 20 16
10 10 13 13 13
1 / 111
500 / 500 500 500
X30XXX
/////
/////
/X///
/////
/////
/////
////7
////1000
30 / 303060
8.30 14.30 3.30 3.30 11
30
58
Page 58

Program :
ONDERDEEL
WAS TIJD
TEMPERATUUR
VERWARM. SYS
TEMP. STURING
WASBEWEGING
ZACHT (BAK 1)
ZACHT (BAK 2)
ZACHT (BAK 3)
HARD (BAK 4)
HARD (BAK 5)
HARD (BAK 6)
ZACHT (KUIP)
WARM (KUIP)
HARD (KUIP)
ZEEPINJECTIE
31 41'30" Warm wash
Total Time: Name:
01 02 03 04 05 06 07 08
714222
12 12 15 15 15
33333
28 28 28 28 28
4060000
/////
XX///
/////
37///
/////
XX///
/X///
/////
/////
/////
////X
X/X/ /
XX///
///XX
PEIL
PEILSTURING
PROG. UITBREID.
LAAGZWIEREN
AFVOER
HOOGZWIEREN
VRIJLOOP
TIJD
ONTWARREN
ALARM
20 20 25 25 20
20 20 25 25 20
1 / 111
400 / 400 400 400
X30XXX
/////
/////
/X///
/////
/////
/////
////7
////800
30 / 303060
8.30 14.30 3.30 3.30 11
30
59
Page 59

Program :
SEGMENT
WASH TIME
TEMPERATURE
HEAT. SYS
HEATING.CONTROL
WASH ACTION
SOFT (TUB)
WARM (TUB)
HARD (TUB)
SOFT (VOORWAS)
WARM (PREWASH)
HARD (CONDITIONER)
SOAP INJECTION
32 27'30" Synthetics 1
Total time :
Name:
01 02 03 04 05 06 07 08
410222
10 10 12 12 12
44444
4141414141
35 40 0 0 0
/////
XXXXX
/////
24///
/////
XXX / /
XX///
///XX
X////
/X///
////X
LEVEL
LEVEL CONTROL
ADD PROGRAM.
LOW SPIN
DRAIN
HIGH SPIN
DELAY
TOTAL TIME
TRUMBLE
ALARM
13 13 20 20 16
10 10 13 13 13
////2
////400
30 30 30 30 X
/////
/////
XXXX /
/////
/////
/////
////2
////800
////60
4.30 10.30 2.30 2.30 7
30
60
Page 60

Program :
ONDERDEEL
WAS TIJD
TEMPERATUUR
VERWARM. SYS
TEMP. STURING
WASBEWEGING
ZACHT (BAK 1)
ZACHT (BAK 2)
ZACHT (BAK 3)
HARD (BAK 4)
HARD (BAK 5)
HARD (BAK 6)
ZACHT (KUIP)
WARM (KUIP)
HARD (KUIP)
ZEEPINJECTIE
32 27'30" Synthetics 1
Total Time: Name:
01 02 03 04 05 06 07 08
410222
10 10 12 12 12
44444
28 28 28 28 28
35 40 0 0 0
/////
XX///
/////
24///
/////
X////
/X///
/////
/////
/////
////X
XXX / /
XX///
///XX
PEIL
PEILSTURING
PROG. UITBREID.
LAAGZWIEREN
AFVOER
HOOGZWIEREN
VRIJLOOP
TIJD
ONTWARREN
ALARM
20 20 25 25 20
20 20 25 25 20
////2
////350
30 30 30 30 X
/////
/////
XXXX /
/////
/////
/////
////2
////700
////60
4.30 10.30 2.30 2.30 7
30
61
Page 61

Program :
SEGMENT
WASH TIME
TEMPERATURE
HEAT. SYS
HEATING.CONTROL
WASH ACTION
SOFT (TUB)
WARM (TUB)
HARD (TUB)
SOFT (VOORWAS)
WARM (PREWASH)
HARD (CONDITIONER)
SOAP INJECTION
33 19'30" Synthetics 2
Total time :
Name:
01 02 03 04 05 06 07 08
8222
10 10 10 10
5555
35 35 35 35
35000
////
X///
////
3///
////
XX / /
X///
//XX
X///
////
///X
LEVEL
LEVEL CONTROL
ADD PROGRAM.
LOW SPIN
DRAIN
HIGH SPIN
DELAY
TOTAL TIME
TRUMBLE
ALARM
13 20 20 16
10 13 13 13
///3
///500
30 30 30 X
////
////
XXX /
////
////
////
////
////
///30
8.30 2.30 2.30 5.30
30
62
Page 62

Program :
ONDERDEEL
WAS TIJD
TEMPERATUUR
VERWARM. SYS
TEMP. STURING
WASBEWEGING
ZACHT (BAK 1)
ZACHT (BAK 2)
ZACHT (BAK 3)
HARD (BAK 4)
HARD (BAK 5)
HARD (BAK 6)
ZACHT (KUIP)
WARM (KUIP)
HARD (KUIP)
ZEEPINJECTIE
33 19'30" Synthetics 2
Total Time: Name:
01 02 03 04 05 06 07 08
8222
10 10 10 10
5555
25 25 25 25
35000
////
X///
////
3///
////
X///
////
////
////
////
///X
XX / /
X///
//XX
PEIL
PEILSTURING
PROG. UITBREID.
LAAGZWIEREN
AFVOER
HOOGZWIEREN
VRIJLOOP
TIJD
ONTWARREN
ALARM
20 25 25 20
20 25 25 20
///3
///400
30 30 30 X
////
////
XXX /
////
////
////
////
////
///30
8.30 2.30 2.30 5.30
30
63
Page 63

Program :
SEGMENT
WASH TIME
TEMPERATURE
HEAT. SYS
HEATING.CONTROL
WASH ACTION
SOFT (TUB)
WARM (TUB)
HARD (TUB)
SOFT (VOORWAS)
WARM (PREWASH)
HARD (CONDITIONER)
SOAP INJECTION
34 22' Gentle wash
Total time :
Name:
01 02 03 04 05 06 07 08
47222
33555
10 10 10 10 10
30 30 30 30 30
30 30 0 0 0
/////
XX///
/////
23///
/////
XXX / /
/////
///XX
X////
/X///
////X
LEVEL
LEVEL CONTROL
ADD PROGRAM.
LOW SPIN
DRAIN
HIGH SPIN
DELAY
TOTAL TIME
TRUMBLE
ALARM
20 20 20 20 16
13 13 13 13 13
////2
////500
30 30 30 30 X
/////
/////
XXXX /
/////
/////
/////
/////
/////
////30
4.30 7.30 2.30 2.30 4.30
30
64
Page 64

Program :
ONDERDEEL
WAS TIJD
TEMPERATUUR
VERWARM. SYS
TEMP. STURING
WASBEWEGING
ZACHT (BAK 1)
ZACHT (BAK 2)
ZACHT (BAK 3)
HARD (BAK 4)
HARD (BAK 5)
HARD (BAK 6)
ZACHT (KUIP)
WARM (KUIP)
HARD (KUIP)
ZEEPINJECTIE
34 22' Gentle wash
Total Time: Name:
01 02 03 04 05 06 07 08
47222
33555
10 10 10 10 10
25 25 25 25 25
30 30 0 0 0
/////
XX///
/////
23///
/////
X////
/X///
/////
/////
/////
////X
XXX / /
/////
///XX
PEIL
PEILSTURING
PROG. UITBREID.
LAAGZWIEREN
AFVOER
HOOGZWIEREN
VRIJLOOP
TIJD
ONTWARREN
ALARM
25 25 25 25 20
25 25 25 25 20
////2
////400
30 30 30 30 X
/////
/////
XXXX /
/////
/////
/////
/////
/////
////30
4.30 7.30 2.30 2.30 4.30
30
65
Page 65

Program :
SEGMENT
WASH TIME
TEMPERATURE
HEAT. SYS
HEATING.CONTROL
WASH ACTION
SOFT (TUB)
WARM (TUB)
HARD (TUB)
SOFT (VOORWAS)
WARM (PREWASH)
HARD (CONDITIONER)
SOAP INJECTION
35 18'30' Cold wash
Total time :
Name:
01 02 03 04 05 06 07 08
9222
3336
12 12 12 12
25 25 25 25
20000
////
X///
////
3///
////
XX / /
////
//XX
X///
////
///X
LEVEL
LEVEL CONTROL
ADD PROGRAM.
LOW SPIN
DRAIN
HIGH SPIN
DELAY
TOTAL TIME
TRUMBLE
ALARM
18 18 18 16
13 13 13 13
///1
///400
30 30 30 X
////
////
XXX /
////
////
////
////
////
///30
9.30 2.30 2.30 3.30
30
66
Page 66

Program :
ONDERDEEL
WAS TIJD
TEMPERATUUR
VERWARM. SYS
TEMP. STURING
WASBEWEGING
ZACHT (BAK 1)
ZACHT (BAK 2)
ZACHT (BAK 3)
HARD (BAK 4)
HARD (BAK 5)
HARD (BAK 6)
ZACHT (KUIP)
WARM (KUIP)
HARD (KUIP)
ZEEPINJECTIE
35 18'30" Cold wash
Total Time: Name:
01 02 03 04 05 06 07 08
9222
3336
12 12 12 12
22 22 22 22
20000
////
X///
////
3///
////
X///
////
////
////
////
///X
XX / /
////
//XX
PEIL
PEILSTURING
PROG. UITBREID.
LAAGZWIEREN
AFVOER
HOOGZWIEREN
VRIJLOOP
TIJD
ONTWARREN
ALARM
25 25 25 20
25 25 25 20
///1
///350
30 30 30 X
////
////
XXX /
////
////
////
////
////
///30
9.30 2.30 2.30 3.30
30
67
Page 67

Program :
SEGMENT
WASH TIME
TEMPERATURE
HEAT. SYS
HEATING.CONTROL
WASH ACTION
SOFT (TUB)
WARM (TUB)
HARD (TUB)
SOFT (VOORWAS)
WARM (PREWASH)
HARD (CONDITIONER)
SOAP INJECTION
36 22' Duvet
Total time :
Name:
01 02 03 04 05 06 07 08
66222
55555
10 10 10 10 10
30 30 30 30 30
35 40 0 0 0
/////
XX///
/////
22///
/////
XXX / /
X////
///XX
X////
/X///
////X
LEVEL
LEVEL CONTROL
ADD PROGRAM.
LOW SPIN
DRAIN
HIGH SPIN
DELAY
TOTAL TIME
TRUMBLE
ALARM
20 20 20 20 20
10 10 15 15 15
////1
////500
30 30 30 30 X
/////
/////
XXXX /
/////
/////
/////
/////
/////
////30
6.30 6.30 2.30 2.30 3.30
30
68
Page 68

Program :
ONDERDEEL
WAS TIJD
TEMPERATUUR
VERWARM. SYS
TEMP. STURING
WASBEWEGING
ZACHT (BAK 1)
ZACHT (BAK 2)
ZACHT (BAK 3)
HARD (BAK 4)
HARD (BAK 5)
HARD (BAK 6)
ZACHT (KUIP)
WARM (KUIP)
HARD (KUIP)
ZEEPINJECTIE
36 22' Duvet
Total Time: Name:
01 02 03 04 05 06 07 08
66222
55555
10 10 10 10 10
25 25 25 25 25
35 40 0 0 0
/////
XX///
/////
22///
/////
X////
/X///
/////
/////
/////
////X
XXX / /
X////
///XX
PEIL
PEILSTURING
PROG. UITBREID.
LAAGZWIEREN
AFVOER
HOOGZWIEREN
VRIJLOOP
TIJD
ONTWARREN
ALARM
25 25 25 25 25
25 25 25 25 25
////1
////400
30 30 30 30 X
/////
/////
XXXX /
/////
/////
/////
/////
/////
////30
6.30 6.30 2.30 2.30 3.30
30
69
Page 69

Program :
SEGMENT
WASH TIME
TEMPERATURE
HEAT. SYS
HEATING.CONTROL
WASH ACTION
SOFT (TUB)
WARM (TUB)
HARD (TUB)
SOFT (VOORWAS)
WARM (PREWASH)
HARD (CONDITIONER)
SOAP INJECTION
37 26' Curtains
Total time :
Name:
01 02 03 04 05 06 07 08
142222
22222
10 10 10 10 10
25 25 25 25 25
300000
/////
XX///
/////
7////
/////
XX///
/////
/ / XXX
X////
/////
////X
LEVEL
LEVEL CONTROL
ADD PROGRAM.
LOW SPIN
DRAIN
HIGH SPIN
DELAY
TOTAL TIME
TRUMBLE
ALARM
20 20 20 20 20
8 8 10 10 10
////1
////350
30 30 30 30 X
/////
/////
XXXX /
/////
/////
/////
/////
/////
////30
14.30 2.30 2.30 2.30 3.30
30
70
Page 70

Program :
ONDERDEEL
WAS TIJD
TEMPERATUUR
VERWARM. SYS
TEMP. STURING
WASBEWEGING
ZACHT (BAK 1)
ZACHT (BAK 2)
ZACHT (BAK 3)
HARD (BAK 4)
HARD (BAK 5)
HARD (BAK 6)
ZACHT (KUIP)
WARM (KUIP)
HARD (KUIP)
ZEEPINJECTIE
37 26' Curtains
Total Time: Name:
01 02 03 04 05 06 07 08
142222
22222
10 10 10 10 10
22 22 22 22 22
300000
/////
X////
/////
7////
/////
X////
/////
/////
/////
/////
////X
XX///
/////
/ / XXX
PEIL
PEILSTURING
PROG. UITBREID.
LAAGZWIEREN
AFVOER
HOOGZWIEREN
VRIJLOOP
TIJD
ONTWARREN
ALARM
25 25 25 25 25
25 25 25 25 25
////1
////300
30 30 30 30 X
/////
/////
XXXX /
/////
/////
/////
/////
/////
////30
14.30 2.30 2.30 2.30 3.30
30
71
Page 71

Program :
SEGMENT
WASH TIME
TEMPERATURE
HEAT. SYS
HEATING.CONTROL
WASH ACTION
SOFT (TUB)
WARM (TUB)
HARD (TUB)
SOFT (VOORWAS)
WARM (PREWASH)
HARD (CONDITIONER)
SOAP INJECTION
38 12'30' Starch
Total time :
Name:
01 02 03 04 05 06 07 08
3
15
2
41
0
/
/
/
/
/
X
/
/
X
/
/
LEVEL
LEVEL CONTROL
ADD PROGRAM.
LOW SPIN
DRAIN
HIGH SPIN
DELAY
TOTAL TIME
TRUMBLE
ALARM
9
9
1
500
X
/
/
/
/
/
/
7
1000
60
12
30
72
Page 72

Program :
ONDERDEEL
WAS TIJD
TEMPERATUUR
VERWARM. SYS
TEMP. STURING
WASBEWEGING
ZACHT (BAK 1)
ZACHT (BAK 2)
ZACHT (BAK 3)
HARD (BAK 4)
HARD (BAK 5)
HARD (BAK 6)
ZACHT (KUIP)
WARM (KUIP)
HARD (KUIP)
ZEEPINJECTIE
38 12'30" Starch
Total Time: Name:
01 02 03 04 05 06 07 08
3
15
2
41
0
/
/
/
/
/
X
/
/
/
/
/
X
/
/
PEIL
PEILSTURING
PROG. UITBREID.
LAAGZWIEREN
AFVOER
HOOGZWIEREN
VRIJLOOP
TIJD
ONTWARREN
ALARM
18
18
1
400
X
/
/
/
/
/
/
7
800
60
12
30
73
Page 73

Program :
SEGMENT
WASH TIME
TEMPERATURE
HEAT. SYS
HEATING.CONTROL
WASH ACTION
SOFT (TUB)
WARM (TUB)
HARD (TUB)
SOFT (VOORWAS)
WARM (PREWASH)
HARD (CONDITIONER)
SOAP INJECTION
Total time :
Name:
01 02 03 04 05 06 07 08
7214222
12 10 12 15 15 15
343333
424242424242
409090 0 0 0
//////
XXX / / /
//////
3/7// /
//////
X/ /X/ /
XXX / / /
////XX
X/////
//X///
/////X
LEVEL
LEVEL CONTROL
ADD PROGRAM.
LOW SPIN
DRAIN
HIGH SPIN
DELAY
TOTAL TIME
TRUMBLE
ALARM
13 10 10 20 20 16
10 10 10 13 13 13
1 / / 111
500 / / 500 500 500
X3030XXX
//////
//////
/XX///
//////
//////
//////
//// 7
/////1000
30 / / 30 30 60
8.30 2.30 14.30 3.30 3.30 11
30
74
Page 74

Program :
ONDERDEEL
WAS TIJD
TEMPERATUUR
VERWARM. SYS
TEMP. STURING
WASBEWEGING
ZACHT (BAK 1)
ZACHT (BAK 2)
ZACHT (BAK 3)
HARD (BAK 4)
HARD (BAK 5)
HARD (BAK 6)
ZACHT (KUIP)
WARM (KUIP)
HARD (KUIP)
ZEEPINJECTIE
39 44' Hot wash 2
Total Time: Name:
01 02 03 04 05 06 07 08
7214222
12 10 12 15 15 15
343333
28 28 28 28 28 28
409090 0 0 0
//////
XXX / / /
//////
3/7// /
//////
X/////
//X///
//////
//////
//////
/////X
X/ /X/ /
XXX / / /
////XX
PEIL
PEILSTURING
PROG. UITBREID.
LAAGZWIEREN
AFVOER
HOOGZWIEREN
VRIJLOOP
TIJD
ONTWARREN
ALARM
22 20 20 25 25 20
22 20 20 25 25 20
1 / / 111
400 / / 400 400 400
X3030XXX
//////
//////
/XX///
//////
//////
//////
//// 7
/////800
30 / / 30 30 60
8.30 2.30 14.30 3.30 3.30 11
30
75
 Loading...