

Page 1

WATER ROCKER
QUICKSTART GUIDE
ENGLISH ( 3 – 6 )
GUÍA DE INICIO RÁPIDO
ESPAÑOL ( 7 – 10 )
GUIDE D'UTILISATION RAPIDE
FRANÇAIS ( 11 – 14 )
GUIDA RAPIDA
ITALIANO ( 15 – 18 )
KURZANLEITUNG
DEUTSCH ( 19 – 22 )
SNELSTARTGIDS
NEDERLANDS ( 23 – 26 )
Page 2

Page 3

QUICKSTART GUIDE (ENGLISH)
BOX CONTENTS
Make sure that the items listed below are included in the box:
• WATER ROCKER speaker
• Transmitter
• Power adapter
• Quickstart Guide
• Safety Instructions & Warranty Information Booklet
READ SAFETY INSTRUCTION BOOKLET BEFORE USING THE PRODUCT
THIS DEVICE COMPLIES WITH PART 15 OF THE FCC RULES. OPERATION IS SUBJECT TO THE FOLLOWING TWO CONDITIO NS:
(1) THIS DEVICE MAY NOT CAUSE HARMFUL INT ERFERENCE, AND (2) THIS DEVICE MUST ACCEPT AN Y INTERFERENCE
RECEIVED, INCLUDING INTERFERENCE THAT MAY CAUSE UNDESIRED OPERATION.
TRANSMITTER
Front Panel
1. Transmitter cover- Cover for the transmitter’s
front panel
2. Aux input- 3.5mm audio input plug
3. Audio player platform- Holds your media
device
4. Transmit LED- Displays status on the
transmitter: solid green LED= transmitting,
solid red LED= not transmitting
Rear Panel
5. Cable retrieval button- Accesses and adjusts
6. Power on/off switch- Powers the transmitter
7. RCA audio input jack- Stereo L/R RCA audio
8. DC power jack- Connect an optional 5v DC, 500mA power adapter here
9. Channel selector- Selects the wireless channel that the transmitter uses
10. Battery compartment- Install ‘AA’ batteries here
the length of the aux input’s 3.5mm audio
cable
on/off
input
Note: for optimal performance, do not
leave the speaker out in direct sunlight for
extended periods of time when not in use.
When finished, use a soft cloth to wipe away
excess water to dry off the speaker.
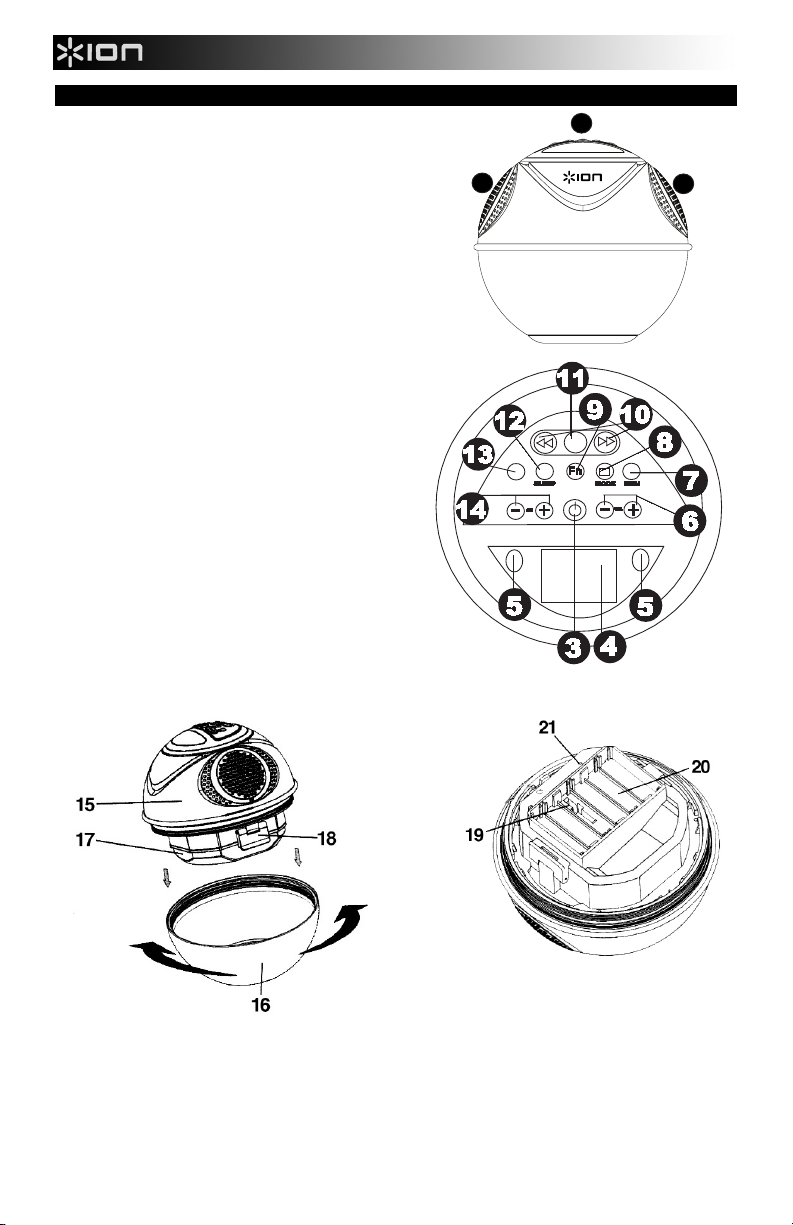
SPEAKER
1. Top control panel
2. Speakers- Built in waterproof speakers
3. Power button- Turns the speaker on/off
4. LCD- Displays various system information
5. Audio LED- Blinks according to the audio signal level
6. Volume +/- buttons- Adjusts the audio volume level up or down;
sets the clock minute
7. MEM/STOP button- Saves the radio station preset
8. MODE/DISPLAY button- When powered off, this selects the
clock setting and 12/24 format; selects the radio broadcast
system. In power on mode, toggles between operation mode and
clock display
9. Fn (Function) button- Selects between FM radio and wireless
receiving modes
10. TUN +/- >>/<< buttons- In power off mode, sets the clock hour;
in radio mode, tunes the radio frequency up/down
3
2
1
2
Page 4
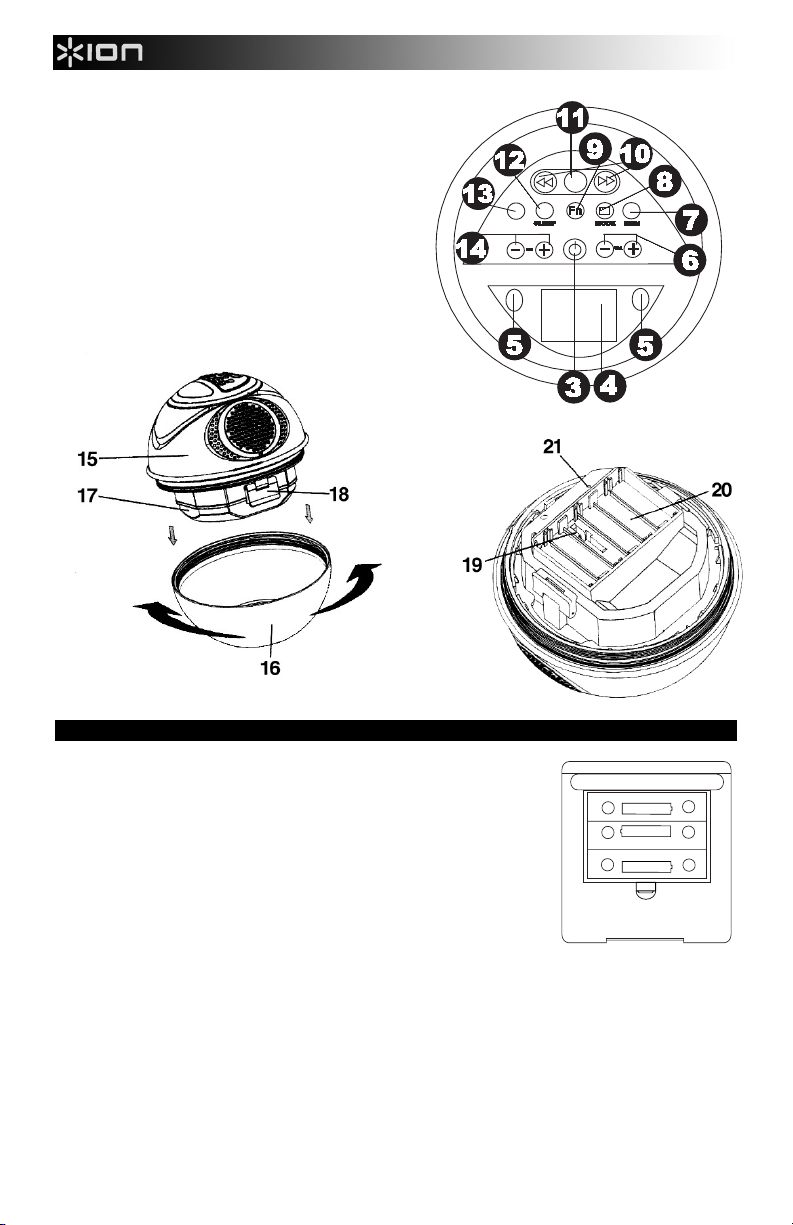
11. SCAN button- Scans for the wireless receiving signal
12. SLEEP button- Selects the duration of the sleep timer
13. ST/MO button- Selects FM radio mode to be stereo or
mono
14. CH/ +/- button- Scrolls through the saved preset radio
station channels
15. Upper housing
16. Lower housing
17. Battery cover- Cover for the internal batteries
18. Battery cover lock - Secures the AA battery
compartment
19. Clock battery compartment
20. AA battery compartment
21. RESET button- Sets the speaker back to factory
defaults
Note: If the unit ever locks up or will not power on, try the
above mentioned reset.
TUN
SCAN
ST
MO
INSTALLATION
Battery Installation
Transmitter
1. Open the battery compartment located at the bottom of the transmitter
2. Follow the polarity diagram located inside the compartment and install 3 AA
batteries
3. Close the compartment lid
Speaker
1. Wipe the speaker with a soft cloth to remove any water
2. Open the speaker by gripping the lower housing and turn it counter clockwise
3. Release the inner battery lock to open the cover
4. To install the batteries:
• When installing the clock battery, follow the diagram shown inside the clock battery compartment and install a
CR2032 lithium battery. If this speaker is being used for the first time, a battery is already installed. All you
need to do is remove the plastic cover tag from the battery slot to activate.
• When installing alkaline batteries to use the radio and wireless receiving, follow the polarity diagram shown
inside the compartment and install 6 AA alkaline batteries.
5. Close the inner battery cover and lock it
6. To close the speaker, grip the lower housing and turn it clockwise until it locks tight with the upper housing
-
+
DC1.5V (UM-3) X3
-
AA
AA
AA
Low battery detection
If the low battery detection indicator is displayed, replace the alkaline batteries.
Note: Remove the batteries if the speaker will not be used for an extended period of time.
4
+
-
+
Page 5

WIRELESS AUDIO SETUP
Transmitter
1. Raise the audio player cover and pull out the Aux in cable
2. Connect the 3.5mm stereo plug to the line out or headphone out jack of your external audio device play your
external audio device
3. Press the Aux in cable retrieval button on the back of the transmitter and adjust the aux in cable to the desired
length
4. Place your audio device on the audio player platform and close the audio player cover.
5. Turn on the transmitter by sliding the power switch to the ON position. The Tx (transmit) status LED will change to
Green to indicate the signal is transmitting. If the Tx status remains in RED, increase the volume level of your
external audio device. Once sufficient audio level is detected, the Tx Status will change to Green. If you
experience static or interference, try changing the channel on the transmitter
Speaker (receiver)
1. Press the POWER button on the speaker
2. Press the Fn (function) button to select wireless receiving mode. The wireless indicator will blink on the display
3. Once a signal has been received, the wireless indicator will stop blinking and remain steady. If no signal is
received, move the speaker closer to the transmitter as you may be out of the 90 foot transmission range
4. Adjust the desired volume level using the VOL +/- buttons.
5. Repeat steps 2-4 to sync additional speakers to the transmitter.
Secondary Aux In
You can also connect an audio device to the transmitter by using RCA type cables (not included) to the RCA stereo
jacks:
1. Connect an external audio device to the transmitter by using RCA audio cables
2. On the front of the Transmitter, unplug the 3.5mm cable if this is connected to an external audio device
Note: If both the front Aux in and rear RCA input jacks are receiving audio, both signals will be transmitted
3. Turn on the external audio device
4. Follow steps 1-5 from the above Speaker (receiver) section.
Frequency Scanning
There are three frequency channels to select from to avoid interference and find the best reception.
1. Select a channel on the transmitter using the Channel Selector button
2. From the speaker, press the SCAN button and transmitter will match with the new channel automatically
Auto-Shut-Off
If no signal is received by the speaker, the wireless indicator will blink and after about 4 minutes the speaker will
automatically turn off.
RADIO TUNER OPERATION
Radio Tuning
1. Press the Power button to turn on the speaker
2. Press the Fn button to select FM radio receiving mode
3. Press the ST/MO button to switch to FM stereo or mono receiving mode
4. To manually tune to a station, press the TUN +/- button
5. To automatically search for stations with a strong signal near you, press and hold the TUN +/- button until the
frequency digits on the display begin to scan, and then release the button. The tuner will stop at the first strong
signal it finds
Storing Radio Preset Stations
WATER ROCKER can store up to 20 FM stations in its memory for easy recall at any time:
1. Press the Power button to turn on the speaker
2. Press the Fn button to select FM radio receiving mode
3. Tune to the station that you want to store in memory using the TUN +/- buttons
4. Once the station is found, press the MEM button and the preset channel number will blink on the display
5. To select a preset station number, press the CH +/- buttons
6. To save to the preset location, press the MEM button
7. Repeat steps 3-6 to store more stations
Note: if no command is given within a few seconds, the display will go back to the radio receiving mode.
Recalling Radio Preset Stations
1. Press the Power button to turn on the speaker
2. Press the Fn button to select FM radio receiving mode
3. To select the desired preset station, press the CH +/- button
5
Page 6

Radio Broadcasting System Selection
If WATER ROCKER is used in another country, a different radio broadcasting system can be selected by:
1. Turn the speaker’s power off
2. Press the Mode button once and the flashing indicator for the countries will be displayed
3. Press the VOL +/- button to select one of the broadcasting systems
4. Press the MEM button to save the setting
CLOCK SETTING
With the speaker powered off, set the clock time by:
1. Press the MODE button twice to enter the 12/24 hour format setting mode
2. Press the VOL +/- button to select 12 or 24 hour time display format
3. Press the MODE button and the clock digits will blink
4. Press the TUN +/- button to set the hour
5. Press the VOL +/- button to set the minute
6. Press the MODE button to save settings and exit this mode
SLEEP TIMER FUNCTION
With this function you can fall asleep to the radio or wireless receiving signal and the speaker will turn itself off after a
certain time:
1. Press the Power button to turn the speaker on
2. Tune to the desired radio station or playback music from wireless reception
3. Set the sleep timer for 15, 30, 45, 60, 90, or 120 minutes by pressing the SLEEP button repeatedly to highlight the
setting of your choice
4. To turn the speaker off before the sleep timer reaches the selected time, press the Power button
Note: If the sleep timer is turned on and music is coming from wireless reception, the sleep timer will shut off the
speaker once the selected time is reached but the transmitter will remain on.
Factory Reset:
Try this reset if your unit will not power on.
Use a straight paper clip, toothpick, or similar object to press the RESET button located at
the inner bottom of the speaker. Do not use sharp, pointed objects to press the reset
button. The reset will clear the system memory and erase previous user settings such as
clock time and saved radio station presets.
6
Page 7
GUÍA DE INICIO RÁPIDO (ESPAÑOL)
CONTENIDO DE LA CAJA
Asegúrese de que todos los elementos abajo indicados estén incluidos en la caja:
• Altavoz WATER ROCKER
• Transmisor
• Adaptador de alimentación
• Guía de inicio rápido
• Folleto de instrucciones de seguridad e información sobre la garantía
LEA EL FOLLETO DE INSTRUCCIONES DE SEGURIDAD ANTES DE UTILIZAR EL PRODUCTO.
ESTE DISPOSITIVO CUMPLE LO ESTIPULADO EN LA PARTE 15 DE LAS REGLAS DE LA FCC. LA OPERACIÓN ESTÁ SUJETA A LAS
DOS CONDICIONES SIGUIENTES: (1) ESTE DISPOSITIVO NO DEBE CAUS AR INTERFERENCIAS PERJUDICIALES Y (2) DEBE
ACEPTAR CUALQUIER INTERFERENCIA RECIBIDA, INCLUIDA S LAS QUE PUEDEN CAUSAR UN FUNCIONAMIENTO INDESEABL E.
TRANSMISOR
Panel frontal
1. Tapa del transmisor- Cubierta del panel frontal del
transmisor
2. Entrada auxiliar- Enchufe de entrada de audio de
3.5mm
3. Plataforma del reproductor de audio- Se utiliza
para contener su dispositivo de medios
4. LED del transmisor- Muestra el estado del
transmisor: LED verde permanente = transmitiendo,
LED rojo permanente= sin transmitir
Panel trasero
5. Botón de recuperación del cable- Accede y
6. Interruptor de encendido- Para encender y
7. Conector de entrada de audio RCA- Entrada de audio RCA izq/der
8. Conector de alimentación de CC- Conecte aquí un adaptador de alimentación de 5 V DC, 500 mA
9. Selector de canal- Selecciona el canal inalámbrico que utiliza el transmisor
10. Compartimiento de las pilas- Instale aquí pilas ‘AA’
ajusta la longitud del cable de audio de 3.5 mm de
la entrada auxiliar
apagar el transmisor
Nota: para lograr un funcionamiento
óptimo, no deje el altavoz a la intemperie bajo
la luz solar directa durante períodos
prolongados cuando no está en uso. Cuando
termine, use un paño suave para limpiar el
exceso de agua y secar el altavoz.
7
Page 8
ALTAVOZ
1. Panel de control superior
2. Altavoces- Altavoces estancos integrados
3. Botón de encendido- Permite encender y apagar el altavoz
4. LCD- Muestra diversas informaciones del sistema
5. LED de audio- Parpadea en función del nivel de la señal de
audio
6. Botones de volumen +/-- Se utilizan para ajustar el nivel de
volumen hacia arriba y abajo, y también ajusta los minutos del
reloj
7. Botón MEMORIA/PARAR- Se utiliza para guardar las
preselecciones de emisoras de radio
8. Botón de MODO/PANTALLA- Cuando está apagado,
selecciona el ajuste y el formato 12/24 del reloj. También
selecciona el sistema de radiodifusión. En modo
encendido,conmuta entre la visualización del modo de
operación y reloj
9. Botón Fn (Función)- Selecciona entre los modos de
radio de FM y recepción inalámbrica
10. Botones de SINTONÍA +/- >>/<<- En modo apagado,
ajusta la hora del reloj y en modo de radio, sintoniza la
frecuencia de las emisoras
11. Botón de EXPLORACIÓN- Se utiliza para explorar la
señal de recepción inalámbrica
12. Botón de SUEÑO- Se utiliza para seleccionar la
duración del temporizador de sueño
13. Botón ESTÉREO/MONO- Se utiliza para seleccionar el
modo de radio de FM estéreo o mono
14. Botón de CANAL/ +/-- Permite recorrer los canales de
emisoras de radio preseleccionados guardados
15. Alojamiento superior
16. Alojamiento inferior
17. Tapa de las pilas- Cubierta de las pilas internas
18. Traba de la tapa de las pilas- Mantiene cerrado el
compartimiento de las pilas AA
19. Compartimiento de la pila del reloj
20. Compartimiento de las pilas AA
21. Botón de REINICIO- Se utiliza para reiniciar el altavoz
a las opciones predeterminadas de fábrica
Nota: Si la unidad se bloquea o no se enciende, pruebe con el reinicio arriba mencionado.
2
ST
MO
1
2
TUN
SCAN
8
Page 9

INSTALACIÓN
Instalación de las pilas
Transmisor
1. Abra el compartimiento de las pilas ubicado en la parte inferior del transmisor.
2. Siga el diagrama de polaridad del interior del compartimiento e instale 3 pilas
AA.
3. Cierre la tapa del compartimiento.
Altavoz
1. Limpie el altavoz con un paño suave para secar el agua.
2. Abra el altavoz tomando el alojamiento inferior y girándolo en sentido
antihorario.
3. Suelte la traba interna de las pilas para abrir la tapa.
4. Para instalar las pilas:
• Cuando instale la pila del reloj, siga el diagrama del interior del compartimiento de la pila e instale una pila de
litio CR2032. Si este altavoz se usa por primera vez, ya tiene una pila instalada. Todo lo que necesita hacer es
retirar la etiqueta plástica de la ranura de la pila para activarla.
• Cuando instale pilas alcalinas para usar la radio y la recepción inalámbrica, siga el diagrama de polaridad del
interior del compartimiento e instale 6 pilas alcalinas AA.
5. Cierre la tapa interna de las pilas y trábela
6. Para cerrar el altavoz, tome el alojamiento inferior y gírelo en sentido horario hasta que se acople en forma
hermética con el alojamiento superior
Detección de batería baja
Si se enciende el indicador de detección de batería baja, reemplace las pilas alcalinas
Nota: Retire las pilas si no va a usar el altavoz por un período prolongado.
INSTALACIÓN DEL AUDIO INALÁMBRICO
Transmisor
1. Levante la tapa del reproductor de audio y tire del cable de entrada auxiliar
2. Conecte el enchufe estéreo de 3.5 mm al conector de salida de línea o para auriculares de su dispositivo de
audio externo. Reproduzca desde dicho dispositivo
3. Pulse el botón de recuperación del cable de entrada auxiliar de la parte trasera del transmisor y ajuste el cable
a la longitud deseada
4. Coloque su dispositivo de audio en la plataforma para el reproductor y cierre la tapa del mismo.
5. Encienda el transmisor deslizando el interruptor de encendido a la posición ON. El LED de estado Tx
(transmisión) cambia a luz verde para indicar que la señal se está transmitiendo. Si el LED de estado de Tx
permanece en ROJO; aumente el nivel de volumen de su dispositivo de audio externo. Una vez detectado un
nivel de audio suficiente, el LED de estado de Tx cambia a verde. Si experimenta estáticas o interferencias,
pruebe cambiando el canal del transmisor
Altavoz (receptor)
1. Pulse el botón de ENCENDIDO del altavoz
2. Pulse el botón Fn (función) para seleccionar el modo de recepción inalámbrica. El indicador de modo
inalámbrico parpadea en la pantalla
3. Cuando se recibe una señal, el indicador de modo inalámbrico deja de parpadear y queda encendido
continuamente. Si no se recibe ninguna señal, acerque el altavoz al transmisor, puesto que es posible que
esté fuera del alcance de transmisión de 27 m (90 pies)
4. Ajuste el nivel de volumen deseado con los botones VOL +/-.
5. Repita los pasos 2 a 4 para sincronizar altavoces adicionales al transmisor.
Entrada auxiliar secundaria
Es posible conectar también un dispositivo de audio al transmisor usando cables tipo RCA (no incluidos) para
conectar a los conectores estéreo RCA:
1. Conecte un dispositivo de audio externo al transmisor con cables RCA de audio
2. En el frente del transmisor, desenchufe el cable de 3.5 mm si está conectado a un dispositivo de audio externo
Nota: Si ambos conectores de entrada RCA, el auxiliar delantero y el trasero, están recibiendo audio, se transmiten
ambias señales
3. Encienda el dispositivo de audio externo
4. Siga los pasos 1 a 5 de la sección Altavoz (receptor) precedente.
Exploración de frecuencia
Es posible seleccionar entre tres frecuencias de canales para evitar las interferencias y lograr la mejor recepción.
1. Seleccione un canal de transmisión con el botón Channel Selector (Selector de canal)
2. Desde el altavoz, pulse el botón SCAN. El transmisor se sintoniza automáticamente al nuevo canal.
Apagado automático
Si el altavoz no recibe ninguna señal, el indicador de modo inalámbrico parpadea y después de unos 4 minutos el
altavoz se apaga automáticamente.
-
+
DC1.5V (UM-3) X3
-
+
AA
AA
-
+
AA
9
Page 10

OPERACIÓN DEL SINTONIZADOR DE RADIO
Sintonía de la radio
1. Pulse el botón de encendido para encender el altavoz
2. Pulse el botón Fn para seleccionar el modo de recepción de radio de FM
3. Pulse el botón ST/MO para cambiar al modo de recepción de FM estéreo o mono
4. Para sintonizar manualmente una emisora, pulse el botón TUN +/-
5. Para buscar automáticamente las emisoras con señal fuerte cercanas, mantenga pulsado el botón TUN +/-
hasta que los dígitos de frecuencia de la pantalla comiencen a desplazarse y suelte el botón. El sintonizador
se detiene en la primera señal fuerte que encuentra
Cómo almacenar las emisoras de radio preseleccionadas
WATER ROCKER puede almacenar en su memoria hasta 20 emisoras de FM para sintonizarlas rápidamente en
cualquier momento:
1. Pulse el botón de encendido para encender el altavoz
2. Pulse el botón Fn para seleccionar el modo de recepción de radio de FM
3. Sintonice la emisora que desea almacenar en memoria con los botones TUN +/-
4. Una vez encontrada la estación, pulse el botón MEM. El número del canal preseleccionado parpadea en la
pantalla
5. Para seleccionar un número de emisora preseleccionado, pulse los botones CH +/-
6. Para guardarlo en la ubicación preseleccionada, pulse el botón MEM
7. Repita los pasos 3 a 6 para almacenar más estaciones
Nota: si no se aplica ningún comando dentro de algunos segundos, la pantalla vuelve al modo de recepción de radio.
Cómo sintonizar las estaciones de radio preseleccionadas
1. Pulse el botón de encendido para encender el altavoz
2. Pulse el botón Fn para seleccionar el modo de recepción de radio de FM
3. Para seleccionar la emisora preseleccionada deseada, pulse los botones CH +/-
Selección del sistema de radiodifusión
Si el WATER ROCKER se usa en otro país, se puede seleccionar el sistema de radiodifusión de la siguiente manera:
1. Apague el altavoz.
2. Pulse el botón Mode una vez. Aparece el indicador destellante de países
3. Pulse el botón VOL +/- para seleccionar uno de los sistemas de radiodifusión
4. Pulse el botón MEM para guardar este ajuste
AJUSTE DEL RELOJ
Con el altavoz apagado, ajuste la hora del reloj de la siguiente manera:
1. Pulse el botón MODE dos veces para activar el modo de ajuste de formato de 12/24 horas
2. Pulse el botón VOL +/- para seleccionar el formato de la pantalla de 12 ó 24 horas
3. Pulse el botón MODE. Los dígitos del reloj parpadean
4. Pulse el botón TUN +/- para ajustar la hora
5. Pulse el botón VOL +/- para ajustar los minutos
6. Pulse el botón MODE para guardar los ajustes y salir de este modo
FUNCIÓN DEL TEMPORIZADOR DE SUEÑO
Con esta función, usted puede quedarse dormido mientras escucha la radio o recibe la señal inalámbrica y el altavoz
se apaga automáticamente después de cierto tiempo:
1. Pulse el botón de encendido para encender el altavoz
2. Sintonice la emisora de radio deseada o reproduzca la música de la recepción inalámbrica
3. Ajuste el temporizador de sueño a 15, 30, 45, 60, 90 o 120 minutos pulsando el botón SLEEP repetidamente
hasta que se resalte el ajuste elegido
4. Para apagar el altavoz antes de que el temporizador de sueño llegue a la hora seleccionada, pulse el botón de
encendido.
Nota: Si se activa el temporizador de sueño mientras se escucha la música proveniente de la recepción inalámbrica,
el temporizador apaga el altavoz una vez alcanzada la hora seleccionada pero el transmisor queda encendido.
Reinicio a los valores de fábrica:
Pruebe este reinicio si la unidad no se enciende. Use un clip de papeles enderezado, un
palillo o un objeto similar para pulsar el botón RESET ubicado en la parte inferior interna
del altavoz. No use objetos filosos o puntiagudos para pulsar el botón de reinicio.
Con el reinicio se borra la memoria del sistema y los ajustes previos del usuario, tales
como el ajuste del reloj y las emisoras de radio preseleccionadas guardadas.
10
Page 11

GUIDE D’UTILISATION SIMPLIFIÉ (FRANÇAIS)
CONTENU DE LA BOÎTE
Assurez-vous que tous les articles énumérés dans le contenu de la boîte de ce guide sont inclus
dans la boîte :
• Haut-parleur WATER ROCKER
• Émetteur
• Câble d’alimentation
• Guide d’utilisation simplifié
• Consignes de sécurité et informations concernant la garantie
VEUILLEZ LIRE LE LIVRET DES CONSIGNES DE SÉCURITÉ AVANT D'UTILISER LE PRODUIT.
CET APPAREIL EST CONFORME AUX CARACTÉRISTIQUES ÉNONCÉES DANS LA PART IE 15 DES RÈGLEMENTS DE LA FCC.
L’UTILISATION DE CET APPAREIL EST SUJETTE AUX DEUX CONDITIONS SUIVANT ES : (1) CET APPAREIL NE PRÉSENTE PAS
D’INTERFÉRENCES NÉFASTES, ET (2) CET APPAREIL DOIT ACCEPTER LES INTERFÉR ENCES, MÊME SUSCEPTIBLES
D’ENTRAÎNER UN FONCTIONNEMENT DÉGRADÉ.
ÉMETTEUR
Panneau avant
1. Couvercle pour émetteur – Couvercle pour la face
avant de l'émetteur.
2. Entrée auxiliaire – Entrée audio 3,5 mm.
3. Socle multimédia – Logement pour appareil
multimédia.
4. DEL de l’émetteur : Cette DEL affiche l’état de
l'émetteur : DEL verte = transmission, DEL rouge =
pas de transmission
Panneau arrière
5. Touche de rappel de câble – Cette touche permet
d’accéder et d’ajuster la longueur du câble de
l'entrée auxiliaire 3,5 mm.
6. Interrupteur d'alimentation – Cet interrupteur
permet de mettre l’émetteur sous et hors tension.
7. Prise d'entrée audio RCA – Entrée audio RCA G/D stéréo.
8. Entrée d’alimentation CC – Ce connecteur permet de brancher un câble d’alimentation (5v DC, 500 mA)
vendu en option.
9. Sélecteur de canal – Ce sélecteur permet de sélectionner le canal sans fil qu’utilise l'émetteur.
10. Compartiment à piles – Insérez deux piles de type AA dans ce compartiment.
Remarque : pour des performances optimales, ne laissez pas
le haut-parleur en contact direct avec les rayons du soleil pendant
de longues périodes de temps lorsqu'il n'est pas utilisé. Lorsque
vous avez terminé, utilisez un chiffon doux pour essuyer l'excès
d'eau pour sécher le haut-parleur.
HAUT-PARLEUR
1. Panneau de commande supérieur
2. Haut-parleur – Haut-parleur imperméable intégré.
3. Interrupteur d'alimentation – Touche qui permet de mettre
l’appareil sous et hors tension.
4. Écran ACL – L’écran permet d’afficher diverses informations
système.
5. DEL audio – Cette DEL clignote selon les niveaux audio.
6. Touches volume +/- – Ces touches permettent de régler le
volume; et de régler les minutes de l'horloge.
7. Touche MEM/STOP – Cette touche permet de programmer la
station radio.
11
2
1
2
Page 12

8. Touche MODE/DISPLAY – Lorsque l’appareil est éteint, cette touche
permet d'accéder aux réglages de l’horloge et au format d’affichage de
l’heure; sélectionne le système de radiodiffusion. Lorsqu’allumé, il
permet de basculer entre le mode de fonctionnement normal et
l’affichage de l’horloge.
9. Touche Fn (Fonction) – Cette touche permet de basculer entre la
bande d’émission FM et les modes de réception sans fil.
10. Touches TUN +/- >>/<< – Lorsque l’appareil est éteint, cette touche
permet de régler l'heure; en mode radio, permet d'augmenter/diminuer
la fréquence radio.
11. Touche SCAN – Cette touche permet de balayer les ondes pour le
signal de réception sans fil.
12. Touche SLEEP – Cette touche permet de sélectionner la durée du
minuteur de mise en veille.
13. Touche ST/MO – Cette touche permet de sélectionner le mode radio FM stéréo ou mono.
14. Touches CH/ +/- – Ces touches permettent de parcourir à
travers les stations de radio.
15. Boîtier supérieur
16. Boîtier inférieur
17. Couvercle – Couvercle du compartiment des piles.
18. Loquet du couvercle – Ce loquet permet de sécuriser le
compartiment des piles AA.
19. Compartiment de la pile pour l’horloge
20. Compartiment des piles AA
21. Bouton RESET – Ce bouton permet de restaurer les réglages
d’usines du haut-parleur.
Remarque : Si l'appareil se bloque ou ne s'allume pas, procédez à
la réinitialisation mentionnée ci-dessus.
INSTALLATION
Installation des piles
Émetteur
1. Retirez le couvercle du compartiment à pile situé sous l’émetteur.
2. Suivez le schéma de polarité à l'intérieur du compartiment et insérez 3 piles
AA.
3. Refermez la porte du compartiment.
Haut-parleur
1. Essuyer le haut-parleur avec un chiffon doux pour enlever toute l'eau.
2. Ouvrez le haut-parleur en saisissant le boîtier inférieur et tourner dans le sens
antihoraire.
3. Relâchez le loquet du compartiment des piles pour ouvrir le couvercle.
4. Pour installer les piles :
• Lorsque vous installez la pile de l'horloge, suivez le schéma à l'intérieur du compartiment de la pile de l'horloge
et d'installer une pile au lithium CR2032. Si ce haut-parleur est utilisé pour la première fois, une pile est déjà
installée. Tout ce que vous devez faire est de retirer l'étiquette en plastique du connecteur de la pile pour
l'activer.
• Lors de l'installation des piles alcalines pour utiliser la radio et la réception sans fil, veuillez suivre le schéma de
polarité indiqué à l'intérieur du compartiment et installer 6 piles alcalines AA.
5. Refermez le loquet du compartiment des piles et verrouillez-le.
6. Pour re fermer le haut-parleur, saisissez le boîtier inférieur et tourner dans le sens horaire jusqu'à ce qu’il soit
bien aligné avec le boîtier supérieur.
Fonction d’indication de piles faibles- Si l'indicateur de piles faible est affiché, remplacez les piles alcalines.
Remarque : Retirer les piles si le haut-parleur ne doit pas servir pendant une longue période de temps.
ST
MO
TUN
SCAN
-
+
DC1.5V (UM-3) X3
-
+
AA
AA
-
+
AA
12
Page 13

CONFIGURATION SANS FIL
Émetteur
1. Soulevez le couvercle du lecteur audio et sortez le câble d’entrée auxiliaire.
2. Branchez la fiche stéréo de 3,5 mm à la sortie ligne ou casque de votre périphérique audio et faites jouer le
périphérique.
3. Appuyez sur la touche de rappel du câble d’entrée auxiliaire à l'arrière de l'émetteur et ajustez le câble à la
longueur désirée.
4. Placez votre périphérique audio sur le socle et refermez le couvercle du lecteur audio.
5. Mettez l’émetteur sous tension en déplaçant l’interrupteur marche/arrêt à la position en marche (ON). La DEL
d’état TX (transmission) devrait passer au vert afin d’indiquer qu’un signal est transmis. Si la DEL d’état TX
reste ROUGE, augmentez le volume de votre périphérique audio. Une fois que le niveau audio adéquat est
détecté, l’état Tx passera au vert. En présence d’interférences ou de statique, veuillez essayer de changer le
canal de l'émetteur.
Haut-parleur (récepteur)
1. Appuyez sur l’interrupteur d’alimentation pour mettre le haut-parleur sous tension.
2. Appuyez sur la touche Fn (Fonction) afin de sélectionner le mode de réception sans fil. L'indicateur sans fil
devrait se mettre à clignoter à l'écran.
3. Une fois qu'un signal est reçu, l'indicateur sans fil cesse de clignoter et reste stable. Si aucun signal n'est reçu,
déplacer le haut-parleur plus près de l'émetteur, car il se pourrait qu’il soit à l’extérieur de la plage de
transmission de 90 pieds (27,4 m).
4. Veuillez régler le volume au niveau désiré à l’aide des touches VOL +/-.
5. Veuillez répéter les étapes 2 à 4 pour la synchronisation des haut-parleurs supplémentaires.
Entrée auxiliaire secondaire (Aux In)
Vous pouvez également brancher un appareil audio à l'émetteur en utilisant des câbles de type RCA (non fourni) aux
prises RCA stéréo :
1. Vous pouvez brancher un autre appareil audio à l’émetteur à l’aide de câbles RCA.
2. Débranchez le câble de 3,5 mm du devant de l'émetteur si celui-ci est relié à un périphérique audio.
Remarque : Si l’entrée auxiliaire avant et l’entrée RCA arrière reçoivent toutes deux un signal audio, les deux
signaux seront transmis.
3. Veuillez mettre le périphérique audio sous tension.
4. Veuillez suivre les étapes 1 à 5 de la section Haut-parleur (récepteur) ci-dessus.
Balayage de fréquence
Vous pouvez choisir parmi trois canaux de fréquence afin d'éviter les interférences et trouver la meilleure réception.
1. Veuillez sélectionner un canal sur l’émetteur à l’aide du sélecteur de canal.
2. Sur le haut-parleur, appuyez sur la touche SCAN et l'émetteur devrait se synchroniser automatiquement au
nouveau canal.
Fermeture automatique
Si le haut-parleur ne reçoit aucun signal, l’indicateur sans fil devrait clignoter et après environ 4 minutes, le hautparleur devrait automatiquement se mettre hors tension.
SYNTONISATEUR
Syntonisation de la radio
1. Appuyez sur l’interrupteur d’alimentation pour mettre le haut-parleur sous tension.
2. Appuyez sur la touche Fn afin de sélectionner le mode de réception de bande d’émission FM.
3. Appuyez sur la touche ST/MO afin de sélectionner le mode de réception FM stéréo ou mono.
4. Pour syntoniser manuellement une station, appuyez sur les touches TUN +/-.
5. Pour rechercher automatiquement les stations qui ont un plus puissant signal, appuyez et maintenez la touche
TUN +/- jusqu'à ce que les chiffres de la fréquence à l'écran commencent à balayer, puis relâchez le bouton. Le
syntoniseur s'arrêtera sur le premier signal puissant.
Programmation des stations de radio
Le WATER ROCKER peut stocker jusqu'à 20 stations FM dans sa mémoire pour un rappel facile à tout moment :
1. Appuyez sur l’interrupteur d’alimentation pour mettre le haut-parleur sous tension.
2. Appuyez sur la touche Fn afin de sélectionner le mode de réception de bande d’émission FM.
3. Syntonisez la station que vous souhaitez stocker dans la mémoire en utilisant les touches TUN +/-.
4. Une fois la station trouvée, appuyez sur le bouton MEM et le numéro de canal prédéfini devrait clignoter à
l'écran.
5. Pour sélectionner un numéro prédéfini pour la station, appuyez sur les touches CH +/-.
6. Appuyez sur la touche MEM afin de sauvegarder le numéro.
7. Pour programmer d’autres stations, répétez les étapes 3 à 6.
Remarque : Si pendant quelques secondes aucune commande n'est donnée, l'affichage devrait revenir au mode de
réception radio.
Rappel des stations de radio programmées
1. Appuyez sur l’interrupteur d’alimentation pour mettre le haut-parleur sous tension.
2. Appuyez sur la touche Fn afin de sélectionner le mode de réception de bande d’émission FM.
3. Pour sélectionner une station programmée, appuyez sur les touches CH +/-.
13
Page 14

Sélection du système de radiodiffusion
Si le WATER ROCKER est utilisé dans un autre pays, il est possible de sélectionner un système de radiodiffusion
différent :
1. Veuillez mettre le haut-parleur hors tension.
2. Appuyez une fois sur le bouton Mode afin d’afficher l'indicateur de pays clignotant.
3. Appuyez sur une des touches VOL +/- afin de sélectionner un des systèmes de radiodiffusion.
4. Appuyez sur la touche MEM afin de sauvegarder les modifications.
RÉGLAGE DE L’HORLOGE
Avec le haut-parleur hors tension, réglez l'horloge :
1. Appuyez deux fois sur la touche MODE pour afficher le sélecteur de format d’affichage de l’heure (12/24).
2. Appuyez sur une des touches VOL +/- afin de sélectionner soit le format d’affichage 12 heures ou de 24
heures.
3. Appuyez sur la touche MODE et les chiffres affichés devraient se mettre à clignoter.
4. Appuyez sur les touches TUN +/- afin de régler l’heure.
5. Appuyez sur les touches VOL +/- afin de régler les minutes.
6. Appuyez sur la touche MODE afin de sauvegarder les modifications et de quitter ce mode.
MINUTEUR DE MISE EN VEILLE
Grâce à cette fonction, vous pouvez vous endormir au son de la radio ou du récepteur sans fil et le haut-parleur
s'éteindra après un certain temps :
1. Appuyez sur l’interrupteur d’alimentation pour mettre le haut-parleur sous tension.
2. Syntonisez la station de radio souhaitée ou lancez la lecture de musique à partir du récepteur sans fil.
3. Régler la minuterie de mise en veille pour 15, 30, 45, 60, 90 ou 120 minutes en appuyant plusieurs fois sur la
touche SLEEP afin de sélectionner le paramètre de votre choix.
4. Appuyez sur l’interrupteur d’alimentation pour mettre le haut-parleur hors tension avant que la minuterie
n’atteigne l’heure sélectionnée, puis appuyez à nouveau sur l'interrupteur d'alimentation.
Remarque : Si la minuterie est en marche et que la musique provient de la réception sans fil, la minuterie éteindra le
haut-parleur une fois que l’heure sélectionnée est passée, mais l'émetteur restera allumé.
RÉINITIALISATION DES PARAMÈTRES D’USINE :
Essayez de réinitialiser l’appareil s’il ne s'allume pas.
Utilisez un trombone droit, un cure-dent, ou un objet similaire pour appuyer sur le bouton
RESET situé au fond à l’intérieur du haut-parleur. Ne pas utiliser des objets affutés ou
pointus pour appuyer sur le bouton de réinitialisation. La réinitialisation efface la
mémoire système et supprime les paramètres utilisateur tels que l’heure et la
programmation des stations radio.
14
Page 15

GUIDA RAPIDA (ITALIANO)
CONTENUTI DELLA CONFEZIONE
Assicurarsi che gli elementi elencati di seguito siano contenuti nella confezione:
• Altoparlante WATER ROCKER
• Trasmettitore
• Adattatore di alimentazione
• Guida rapida
• Istruzioni di sicurezza e garanzia
LEGGERE ATTENTAMENTE IL LIBRETTO DI ISTRUZIONI PRIMA DI UTILIZZARE IL PRODOTTO
QUESTO DISPOSITIVO È CONFORME ALL A PARTE 15 DELLE NORME FCC. IL SUO UTILIZ ZO È SOGGETTO ALLE DUE SEGUENTI
CONDIZIONI: (1) NON PUÒ CAUSARE INTERFERENZE DANNOSE E (2) DEVE ACCETTARE QUALSIASI INTERFERENZA RICE VUTA,
INCLUSA QUALSIASI INTERFERENZA CHE POSSA CAUSARE UN FUNZIONAMENTO INDESIDERATO.
TRASMETTITORE
Pannello anteriore
1. Coperchio del trasmettitore - Coperchio per il
pannello anteriore del trasmettitore
2. Ingresso Aux - Presa per ingresso audio da
3,5mm
3. Piattaforma lettore audio - Contiene il
dispositivo media
4. LED di trasmissione - Mostra a display lo stato
del trasmettitore: LED verde fisso = in
trasmissione, LED rosso fisso = non in
trasmissione
Pannello posteriore
5. Tasto di riavvolgimento del cavo - Accede e
regola la lunghezza del cavo audio di ingresso
aux da 3,5 mm
6. Interruttore on/off - Accende/spegne il
trasmettitore
7. Jack di ingresso audio RCA - Ingresso audio stereo L/R RCA
8. Jack di alimentazione CC - Collegare a questo livello un adattatore di alimentazione da 5v DC, 500mA
opzionale
9. Selettore di canale - Seleziona il canale wireless utilizzato dal trasmettitore
10. Scomparto batterie - Inserire batterie ‘AA’ a questo livello
Nota bene: per ottenere prestazioni
ottimali, non lasciare l'altoparlante alla luce
diretta del sole per lunghi periodi di tempo
quando non è in uso. Una volta terminato,
servirsi di un panno morbido per eliminare
l'acquain eccesso e asciugare l'altoparlan
15
Page 16

ALTOPARLANTE
1. Pannello di controllo superiore
2. Altoparlanti - Casse impermeabili incorporate
3. Interruttore di alimentazione (power) – Accende e spegne
l'amplificatore.
4. LCD - Mostra le varie informazioni del sistema
5. LED Audio - Lampeggia in base al livello del segnale audio
6. Tasti volume +/- - Alza o abbassa il volume; imposta i minuti
dell'orologio
7. Tasto MEM/STOP - Salva le stazioni radio predefinite
8. Tasto MODE/DISPLAY - Quando spento, seleziona
l'impostazione dell'ora ed il formato 12/24; seleziona il sistema
di trasmissione radio. In modalità di accensione passa tra la
modalità operativa e la visualizzazione dell'orologio
9. Tasto Fn (Function) - Sceglie tra le modalità radio FM e
ricezione wireless
10. Tasti TUN +/- >>/<< - In modalità di alimentazione off, imposta
le ore dell'orologio; in modalità radio sintonizza la
frequenza radio verso l'alto/verso il basso
11. Tasto SCAN - Effettua la scansione per il segnale di
ricezione wireless
12. Tasto SLEEP - Seleziona la durata del timer
13. Tasto ST/MO - Seleziona la modalità radio FM tra stereo
e mono
14. Tasto CH/ +/- - Scorre tra i canali delle stazioni radio
predefinite memorizzate
15. Alloggiamento superiore
16. Alloggiamento inferiore
17. Coperchio dello scomparto batterie - Coperchio per le
batterie interne
18. Dispositivo di bloccaggio del coperchio dello
scomparto batterie - Fissa lo scomparto delle batterie
AA
19. Orologio scomparto batterie
20. Scomparto batterie AA
21. Tasto RESET - Riporta l'altoparlante ai valori predefiniti
Nota bene: se l'apparecchio si blocca o non si accende,
provare il pulsante reset indicato in precedenza.
1
2
TUN
SCAN
ST
MO
2
16
Page 17

INSTALLAZIONE
Inserimento della batteria
Trasmettitore
1. Aprire lo scomparto batterie situato sulla parte inferiore del trasmettitore
2. Seguire lo schema delle polarità indicato all'interno dello scomparto e inserire 3
batterie AA
3. Chiudere il coperchio dello scomparto
Altoparlante
1. Passare l'altoparlante con un panno morbido per rimuovere qualsiasi residuo
d'acqua
2. Aprire l'altoparlante afferrando l'alloggiamento inferiore e girandolo in senso
antiorario
3. Sbloccare il blocco interno dello scomparto per aprire il coperchio
4. Per installare le batterie:
• Al momento di inserire le batterie dell'orologio, seguire lo schema illustrato all'interno dello scomparto batterie e
inserire una batteria al litio CR2032. Se è la prima volta che si utilizza l'altoparlante, questo ha una batteria già
installata. Occorre unicamente rimuovere la linguetta di plastica dallo scomparto batterie per attivarla.
• Al momento di inserire le batterie alcaline per la ricezione radio e wireless, seguire lo schema delle polarità
presente all'interno dello scomparto, e inserire 6 batterie alcaline AA.
5. Chiudere il coperchio dello scomparto batterie e bloccarlo
6. Per chiudere l'altoparlante, afferrare l'alloggiamento inferiore e girarlo in senso orario finché non è ben bloccato
con quello superiore
Individuazione di basso livello di batterie
Se compare la spia che indica che la batteria è scarica, sostituire le batterie alcaline.
Nota bene: rimuovere le batterie se l'altoparlante non verrà utilizzato per lunghi periodi di tempo.
CONFIGURAZIONE AUDIO WIRELESS
Trasmettitore
1. Sollevare il coperchio del lettore audio ed estrarre il cavo di ingresso Aux
2. Collegare la spina stereo da 3,5 mm all'uscita di linea o cuffie del dispositivo audio esterno e riprodurre il
dispositivo stesso
3. Premere il tasto di riavvolgimento del cavo Aux in posto sul retro sel trasmettitore e regolare il cavo stesso alla
lunghezza desiderata
4. Collocare il dispositivo audio sulla apposita piattaforma e chiudere il coperchio del lettore audio.
5. Accendere il trasmettitore facendo scorrere l'interruttore di alimentazione su ON. Il LED di stato Tx
(trasmissione) diventa verde a indicare che il segnale viene trasmesso. Se il LED Tx rimane ROSSO, alzare il
volume del dispositivo audio esterno. Una volta individuato un livello audio sufficiente, il Tx status diventerà
verde. In caso di elettricità statica o di interferenze, provare a cambiare canale o trasmettitore
Altoparlante (ricevitore)
1. Premere il tasto POWER sull'altoparlante
2. Premere il tasto Fn (funzione) per selezionare la modalità di ricezione wireless. L'indicatore wireless lampeggia
a display
3. Una volta ricevuto il segnale, l'indicatore wireless smette di lampeggiare e rimane fisso. Se non viene ricevuto
alcun segnale, avvicinare l'altoparlante al trasmettitore in quanto si potrebbe essere al di fuori della portata di
trasmissione di 27 m
4. Regolare il volume sui livelli desiderati servendosi dei tasti VOL +/- .
5. Ripetere le fasi 2-4 per sincronizzare ulteriori altoparlanti al trasmettitore.
Aux In secondario
È inoltre possibile collegare un dispositivo audio al trasmettitore servendosi di cavi RCA (non in dotazione) ai jack
stereo RCA:
1. Collegare un dispositivo audio esterno al trasmettitore servendosi di cavi audio RCA
2. Sulla parte anteriore del trasmettitore, scollegare il cavo da 3,5 mm se questo è collegato ad un dispositivo
audio esterno
Nota bene: se entrambi i jack di ingresso Aux in anteriore ed RCA posteriore ricevono audio, entrambi i segnali
verranno trasmessi
3. Accendere il dispositivo audio esterno
4. Seguire le fasi 1-5 del paragrafo Altoparlante (ricevitore).
Scansione delle frequenze
Vi sono tre canali di frequenza tra cui scegliere per evitare interferenze e trovare la migliore ricezione.
1. Selezionare un canale sul trasmettitore, servendosi del tasto di selezione canale
2. Dall'altoparlante, premere il tasto SCAN ed il trasmettitore si abbinerà al nuovo canale automaticamente
Spegnimento automatico- Se l'altoparlante non riceve alcun segnale, l'indicatore wireless lampeggia e dopo circa 4
minuti l'altoparlante si spegne automaticamente.
17
-
+
-
AA
AA
DC1.5V (UM-3) X3
AA
+
-
+
Page 18

UTILIZZO DEL SINTONIZZATORE RADIO
Sintonizzare la radio
1. Premere il tasto Power per accendere l'altoparlante
2. Premere il tasto Fn per selezionare la modalità di ricezione radio FM
3. Premere il tasto ST/MO per passare alla modalità di ricezione FM stereo o mono
4. Per sintonizzare manualmente una stazione, premere il tasto TUN +/-
5. Per cercare automaticamente stazioni dal segnale forte nelle vicinanze, tenere premuto il tasto TUN +/- fino a
quando le cifre della frequenza visualizzate a display non iniziano la scansione e quindi rilasciare la pressione.
Il sintonizzatore si fermerà in corrispondenza del primo segnale forte che incontra
Memorizzazione di stazioni radio predefinite
WATER ROCKER è in grado di memorizzare fino a un massimo di 20 stazioni FM che possono essere richiamate
facilmente in qualsiasi momento:
1. Premere il tasto Power per accendere l'altoparlante
2. Premere il tasto Fn per selezionare la modalità di ricezione radio FM
3. Sintonizzare la stazione che si desidera memorizzare servendosi dei tasti TUN +/-
4. Una volta trovata la stazione, premere il tasto MEM e il numero del canale predefinito lampeggerà a display
5. Per selezionare un numero di stazione predefinito, premere i tasti CH +/-
6. Per salvare nel punto predefinito, premere il tasto MEM
7. Ripetere le fasi 3-6 per memorizzare ulteriori stazioni
Nota bene: se non viene dato alcun comando entro pochi secondi, il display tornerà alla modalità di ricezione radio.
Richiamo di stazioni radio predefinite
1. Premere il tasto Power per accendere l'altoparlante
2. Premere il tasto Fn per selezionare la modalità di ricezione radio FM
3. Per selezionare la stazione predefinita desiderata, premere il tasto CH +/-
Scelta del sistema di trasmissione radio
Se il WATER ROCKER viene utilizzato in un altro Paese, è possibile selezionare un diverso sistema di trasmissione
radio procedendo come segue:
1. Spegnere l'altoparlante
2. Premere una volta il tasto Mode, verrà mostrato a display l'indicatore lampeggiante per i Paesi
3. Premere il tasto VOL +/- per selezionare uno dei sistemi di trasmissione
4. Premere il tasto MEM per salvare la configurazione
IMPOSTAZIONE DELL'ORA
Ad altoparlante spento, impostare l'ora procedendo come segue:
1. Premere 2 volte il tasto MODE per entrare in modalità di configurazione a 12/24 ore
2. Premere il tasto VOL +/- per selezionare il formato a 12 o 24 ore da visualizzare a display
3. Premere il tasto MODE: le cifre dell'orologio lampeggiano
4. Premere il tasto TUN +/- per impostare l'ora
5. Premere il tasto VOL +/- per impostare i minuti
6. Premere il tasto MODE per salvare le configurazioni e uscire da questa modalità
FUNZIONE TIMER SLEEP
Grazie a questa funzione è possibile addormentarsi ascoltando la radio o il segnale di ricezione wireless e
l'altoparlante si spegnerà da solo dopo una certa ora:
1. Premere il tasto Power per accendere l'altoparlante
2. Sintonizzarsi sulla stazione radio desiderata o riprodurre musica tramite la ricezione wireless
3. Impostare il timer su 15, 30, 45, 60, 90 o 120 minuti premendo ripetutamente il tasto SLEEP per evidenziare
l'impostazione prescelta
4. Per spegnere l'altoparlante prima che il timer raggiunga l'ora selezionata, premere il tasto Power
Nota bene: se il timer sleep è acceso e proviene musica dalla ricezione wireless, il timer spegnerà l'altoparlante non
appena verrà raggiunta l'ora selezionata, ma il trasmettitore rimarrà acceso.
Reset valori di fabbrica:
Se l'apparecchio non si accende, provare questo reset.
Servirsi di una graffetta raddrizzata, di uno stuzzicadenti o di un altro oggetto simile per
premere il tasto RESET situato nella parte interna inferiore dell'altoparlante. Non servirsi
di oggetti taglienti o appuntiti per premere il tasto reset. Il reset cancellerà la memoria
di sistema e cancellerà le configurazioni dell'utente, quali l'ora e le stazioni radio
18
Page 19

VERKORTE HANDLEIDING (NEDERLANDS)
INHOUD PAKKET
Controleer of de volgende artikelen in het pakket zitten:
• WATER ROCKER luidspreker
• Zender
• Power adapter
• Verkorte handleiding
• Veiligheidsinstructies & Garantieboekje
LEES DE VEILIGHEIDSINSTRUCTIE ALVORENS HET PRODUCT TE GEBRUIKEN
DIT APPARAAT VOLDOET AAN PARAGRA AF 15 VAN DE FFC REGELS. DE WERKING IS ONDERG ESCHIKT AAN DE VOLGENDE
TWEE VOORWAARDEN: (1) DIT APPARAAT MAG GEEN SCHADELIJKE INTERFERENTIES VEROORZAKEN, EN (2) MOET ALLE
NTERFERENTIE ACCEPTEREN DIE WORDT ONTVANGEN, INCLUSIEF INTERFERENTIE DIE ONGEWENSTE W ERKING VAN HET
APPARAAT KAN VEROORZAKEN.
ZENDER
Voorpaneel
1. Zenderbescherming - Beschermt voorpaneel
van de zender
2. Aux-ingang - 3,5mm audio-ingang plug
3. Audiospeler platform - Houder voor uw
media-apparaat
4. LED weergave - Statusweergave van de
zender: groene LED = zender actief, rode
LED= zender inactief
Achterpaneel
5. Regelknop kabel - Toegang tot en regeling
6. Aan/uit knop - Aan/uitzetten van de zender
7. RCA audio-aansluiting - Stereo L/R RCA
8. DC aansluiting- Koppel deze aan een
9. Kanaalregelaar - Selecteert het draadloze kanaal dat door de zender wordt gebruikt
10. Batterijvak - Plaats hier de “AA” batterijen
van de 3,5 mm kabellengte voor de auxingang
audio ingang
optionele 5V DC, 500mA power adapter
Opmerking: voor een optimale werking,
zet de luidspreker niet in direct zonlicht indien
deze voor langere tijd niet gebruik wordt. Na
gebruik, neemt u de luidstreker af met een
zachte doek om het overtollig water te
verwijderen.
LUIDSPREKER
1. Bovenste controlepaneel
2. Luidsprekers - Ingebouwde waterdichte luidsprekers
3. Aan/uit knop - Zet de luidspreker aan of uit
4. LCD- Weergave van diverse systeeminformatie
5. Audio LED- Knippert volgens het niveau van het audiosignaal
6. Volume +/- knoppen - Regelt het volumeniveau; stelt de klok
in
7. MEM/STOP knop- Bewaart de voorkeurzenders
8. MODE/DISPLAY knop- Wanneer uitgeschakeld, selecteert
deze de klokinstelling en het 12/24 uur formaat; selecteert de
radio-omroep. In de ingeschakelde modus, regelt deze tussen
de werkingsmodus en klokweergave.
9. Fn (Functie) knop - Schakelt tussen de FM-radio en
draadloze ontvangst
2
1
2
19
Page 20

10. TUN +/- >>/<< knoppen- In de uitgeschakelde modus, stelt deze de klok in; in de radiomodus, regelt deze de
radiofrequentie
11. SCAN knop- Scant het draadloos te ontvangen signaal
12. SLEEP knop- Selecteert de duur van de slaapstand
13. ST/MO knop- Schakelt de FM-radio naar stereo of mono
14. CH/ +/- knop- Deze navigeert door de opgeslagen
voorkeurzenders
15. Bovenste behuizing
16. Onderste behuizing
17. batterijklep Afsluitklep voor de interne batterijen
18. batterijhouder- Vergrendelt de AA batterijen
19. Batterijvak voor de interne klok
20. AA batterijvak
21. RESET knop- Herstellen van de fabrieksinstellingen
Opmerking: Als het apparaat mocht blokkeren of niet wilt
inschakelen, probeer dan de hierboven genoemde resetknop.
TUN
SCAN
ST
MO
INSTALLATIE
Plaatsen van de batterij
Zender
1. Open het batterijvak aan de onderkant van de zender.
2. Installeer de 3 “AA” batterijen volgens de aangegeven polariteit op het
batterijvak.
3. Plaats het deksel weer terug.
Luidspreker
1. Veeg de luidspreker af met een zachte doek om waterresten te verwijderen.
2. Open de luidspreker door de onderste behuizing tegen de klok in te draaien.
3. Open het deksel van de interne batterijvergrendeling.
4. Om de batterijen te installeren:
• Voor het vervangen van de klokbatterij, volgt u het diagram getoond in het batterijvak en plaatst u de CR2032
lithium batterij. Indien deze luidspreker voor het eerst wordt gebruikt, is deze batterij al geïnstalleerd. U hoeft
dan alleen het plastic lipje te verwijderen om de batterij te activeren.
• Voor het plaatsen van de alkaline batterijen en voor het gebruiken van de radio en de draadloze functie, volgt u
polariteit aangegeven op het vakje en plaatst u de 6 “AA” alkaline batterijen.
5. Sluit en vergrendel het interne batterijvak.
6. Om de luidspreker te sluiten, draait u de onderste behuizing met de klok mee, totdat deze goed vastzit op de
bovenste behuizing.
Laag batterijniveau
Als het batterijniveau aangeeft laag te zijn, vervang dan de alkaline batterijen.
Opmerking: Verwijder de batterijen als u de luidspreker voor langere tijd niet gebruikt.
-
+
DC1.5V (UM-3) X3
-
+
AA
AA
-
+
AA
20
Page 21

DRAADLOZE GELUIDSINSTELLING
Zender
1. Til het deksel van de audiospeler op en trek de Aux-in kabel uit.
2. Koppel de 3,5 mm stereo plug aan de "line-out" of hoofdtelefoonaansluiting van het externe audioapparaat.
Speel uw externe audioapparaat af.
3. Druk op knop van de Aux-in kabel aan de achterkant van de zender en regel de gewenste lengte van de Aux-in
kabel.
4. Plaats uw audio-apparaat op het platform van de audiospeler en sluit het deksel hiervan.
5. Schakel de zender in via de aan/uit schakelaar. De Tx (verzend) status LED zal GROEN oplichten, wat
aangeeft dat het signaal uitzendt. Als de Tx status ROOD licht geeft, verhoog dan het volume van uw externe
audioapparaat. Zodra voldoende geluidsniveau is gedetecteerd, zal de Tx Status veranderen naar GROEN. Als
u ruis of storing ervaart, kunt u proberen het kanaal op de zender te veranderen.
Luidspreker (ontvanger)
1. Druk op de Aan/uit knop van de luidspreker.
2. Druk op de Fn (functie) knop om de draadloze ontvangst te selecteren. De draadloze indicator zal op het
scherm knipperen.
3. Zodra een signaal is ontvangen, zal de draadloze indicator stoppen met knipperen en ononderbroken branden.
Als u geen signaal ontvangt, plaats dan de luidspreker dichterbij de zender. Wellicht staat deze buiten de 30
meter bereik van de zender.
4. Regel het gewenste volume met de VOL +/- knoppen.
5. Herhaal stap 2-4 om extra luidsprekers te synchroniseren met de zender.
Secundaire Aux In
U kunt ook een audioapparaat koppelen aan de zender met behulp van RCA-kabels (niet meegeleverd) via de RCA
stereo-aansluitingen:
1. Koppel een extern audioapparaat aan de zender met behulp van RCA-audiokabels.
2. Aan de voorkant van de zender, ontkoppelt u de 3,5 mm-kabel, indien deze is aangesloten op een extern
audioapparaat.
Opmerking: Als zowel de vooraansluiting Aux-in en achterste RCA-ingangen audio ontvangen, zullen beide signalen
worden uitgezonden.
3. Schakel het externe audioapparaat in.
4. Volg stap 1-5 uit de bovenstaande sectie: “Luidspreker (ontvanger)”.
Scannen van frequenties
Er zijn drie frequentiekanalen waarmee u storingen kunt voorkomen en de beste ontvangst kunt krijgen.
1. Selecteer een kanaal op de zender via de Channel Selector-knop.
2. Vanuit de luidspreker, drukt u op de SCAN-knop en de zender zal automatisch synchroniseren met het nieuwe
kanaal.
Automatische uitschakeling
Als de luidspreker geen signaal ontvangt, zal de draadloze indicator knipperen en na ongeveer 4 minuten de
luidspreker automatisch uitschakelen.
RADIO INSTELLING
Radio instelling
1. Druk op de Aan/uit knop van de luidspreker om deze in te schakelen.
2. Druk op de Fn knop om de ontvangstmodus van de FM radio te selecteren.
3. Druk op de ST/MO knop voor het regelen van de FM stereo of mono functie.
4. Om de zender handmatig af te stemmen, drukt u op de TUN +/- knop.
5. Voor het automatisch zoeken van zenders met een sterk signaal in uw buurt, houdt u de TUN +/- knop
ingedrukt totdat de frequentiecijfers op het display beginnen met scannen. Vervolgens kunt u de knop loslaten.
De tuner zal stoppen bij het eerstvolgende sterke signaal.
Bewaren van voorkeurzenders
De WATER ROCKER kan maximaal 20 FM-zenders in het geheugen bewaren en zijn gemakkelijk terug te vinden:
1. Druk op de Aan/uit knop van de luidspreker om deze in te schakelen.
2. Druk op de Fn knop om de ontvangstmodus van de FM radio te selecteren.
3. Stem af op de zender die u in het geheugen wilt opslaan met behulp van de TUN +/- knoppen.
4. Zodra het station is gevonden, drukt u op de MEM knop en het nummer van de voorkeurzender zal op het
display knipperen.
5. Voor het selecteren van een nummer voor de voorkeurzender, gebruikt u de CH +/- knoppen.
6. Om de voorkeurzender te bewaren, drukt u op de MEM-knop.
7. Herhaal stap 3-6 om meer zenders te bewaren.
Opmerking: als er gedurende enkele seconden geen commando wordt gegeven, zal het display terugkeren naar de
ontvangstmodus.
21
Page 22

Oproepen van voorkeurzenders
1. Druk op de Aan/uit knop van de luidspreker om deze in te schakelen.
2. Druk op de Fn knop om de ontvangstmodus van de FM radio te selecteren.
3. Voor het selecteren van de voorkeurzender, gebruikt u de CH +/- knoppen.
Selectie radio-omroep
Als de WATER ROCKER wordt gebruikt in het buitenland, kan een andere radio-omroep worden geselecteerd:
1. Schakel de luidspreker uit.
2. Druk eenmaal op de MODE-knop en de knipperende indicator zal de betreffende landen weergeven.
3. Druk op de VOL +/- knop om een van de omroepen te selecteren.
4. Druk op de MEM-knop om de instelling te bewaren.
KLOK INSTELLING
Met de luidspreker uitgeschakeld, stelt u de klok als volgt in:
1. Druk op 2 keer op de MODE-knop om het 12/24 uur formaat te kunnen instellen.
2. Druk op de VOL +/- knop om de 12 of 24 uur weergave te selecteren.
3. Druk op de MODE-knop en de digitale cijfers zullen knipperen.
4. Druk op de TUN +/- knop om de uren in te stellen.
5. Druk op de VOL +/- knop om de minuten in te stellen.
6. Druk op de MODE-knop om de instellingen te bewaren en af te sluiten.
SLAAPSTAND FUNCTIE
Met deze functie kunt u in slaap vallen terwijl u naar de radio of draadloze ontvangst luistert en de speaker zal na
enige tijd automatisch uitschakelen:
1. Druk op de Aan/uit knop van de luidspreker om deze in te schakelen.
2. Stem af op de gewenste radiozender of speel muziek af via de draadloze ontvangst.
3. Stel de slaapstand in voor 15, 30, 45, 60, 90, of 120 minuten door herhaaldelijk op de SLEEP knop te drukken
totdat u de gewenste tijd heeft.
4. Om de luidspreker uit te schakelen voordat de ingestelde tijd van de slaapstand bereikt wordt, drukt u op de
Aan-uit knop.
Opmerking: Als de slaaptimer staat ingeschakeld en de muziek via de draadloze ontvangst afspeelt, zal de
slaapstand de luidspreker automatisch uitschakelen als de ingestelde tijd is bereikt, maar de zender zal blijven
aanstaan.
Resetten fabrieksinstellingen:
Gebruik deze resetknop als uw apparaat niet in te schakelen is.
Gebruik een rechte paperclip, tandenstoker of een dergelijk voorwerp om de RESET-knop
aan de onderkant van de luidspreker in te drukken. Gebruik geen scherpe, puntige
voorwerpen om de reset-knop in te drukken. Deze knop zal het systeemgeheugen
resetten en de vorige gebruikersinstellingen zoals de tijd en de opgeslagen
voorkeurszenders wissen.
22
Page 23

SCHNELLSTART-ANLEITUNG (DEUTSCH)
LIEFERUMFANG
Vergewissern Sie sich, dass alle hier aufgeführten Komponenten in der Schachtel enthalten sind:
• WATER ROCKER Lautsprecher
• Sendegerät
• Netzteil
• Schnellstart-Anleitung
• Sicherheitshinweise und Garantieinformationen
LESEN SIE DIE SICHERHEITSHINWEISE, BEVOR SIE DAS PRODUKT VERWENDEN.
DIESES PRODUKT ERFÜLLT TEIL 15 DER FCC-BESTIMMUNGEN. DER EINSATZ UNTERLIEGT DEN FOLGENDEN ZWEI
BEDINGUNGEN: (1) DIESES GERÄT DARF KEINE SCHÄDLICHE N INTERFERENZEN ERZEUGEN UND (2) DIESES GERÄT MUSS
EMPFANGENE INTERFERENZEN AUFNEHMEN, AUCH WENN DIESE ZU BETRIEBSSTÖRUNGEN FÜHREN KÖNNTEN.
SENDEGERÄT
Vorderseite
1. Abdeckung des Sendegeräts- Abdeckung
auf der Vorderseite des Sendegeräts
2. Aux-Eingang- 3,5 mm Audio-Eingangsbuchse
3. Audio-Player-Plattform- Halterung für Ihr
Medien-Gerät
4. Sende-LED- Zeigt den Status des
Sendegeräts an: grüne LED = Übertragung,
rote LED = keine Übertragung
Rückseite
5. Kabeleinzugstaste- Ermöglicht Zugang und
6. Ein-/Aus-Schalter- Schaltet das Sendegerät
7. Cinch-Eingangsbuchse- Stereo L/R Cinch-
8. DC-Buchse- Schließen Sie hier ein optionales Netzteil an (5V DC, 500mA)
9. Kanalwähler- Wählt den Funkkanal aus, den das Sendegerät verwendet
10. Batteriefach- Legen sie hier Ihre 'AA'-Batterien ein
Längenanpassung des 3,5mm-Audiokabels für
den Aux-Eingang
ein/aus
Eingang
Hinweis: Um eine optimale Leistung zu
erzielen, sollten Sie den Lautsprecher über
einen längeren Zeitraum hinweg keinem
direkten Sonnenlicht aussetzen, wenn er nicht
benutzt wird. Nach dem Gebrauch trocknen Sie
den Lautsprecher mit einem weichen Tuch ab.
Lautsprecher
1. Oberes Bedienfeld
2. Lautsprecher- Integrierte, wasserdichte Lautsprecher
3. Ein-/Ausschalter– Schaltet den Lautsprecher ein/aus.
4. LCD- Zeigt verschiedene Systeminformationen an
5. Audio-LED- Blinkt je nach Audiosignalpegel
6. Lautstärketasten +/-- Zur Regulierung der Lautstärke und zur
Einstellung der Minuten auf der Uhr
7. Taste MEM/STOPP- Speichert die Radiosendervoreinstellung
8. Taste MODUS/DISPLAY- Im ausgeschalteten Zustand kann mit
dieser Taste die Uhr gestellt, das 12/24-Format und das
Rundfunksystem ausgewählt werden. Im eingeschalteten Zustand
kann zwischen den Betriebsmodi und den Uhranzeigeformaten
gewählt werden
9. Taste Fn (Funktion)- Wählt zwischen FM-Radio und
Funkempfangsmodi
23
2
1
2
Page 24

10. Tasten TUN +/- >>/<<- Im ausgeschalteten Zustand können die Stunden auf der Uhr eingestellt werden, im
Radiomodus kann die Radiofrequenz eingestellt werden
11. SCAN-Taste- Sucht das Funksignal
12. SCHLUMMER-Taste- Wählt den Zeitraum für die Schlummer-
Funktion aus
13. ST/MO-Taste- Stellt den FM-Radiomodus auf Stereo oder Mono ein
14. Taste CH/ +/-- Blättert durch die gespeicherten Radiosender
15. Oberes Gehäuse
16. Unteres Gehäuse
17. Batteriefachabdeckung- Abdeckung für die internen Batterien
18. Batteriefachverriegelung- Sichert das Batteriefach der AA-
Batterien
19. Batteriefach für die Uhr
20. AA-Batteriefach
21. RESET-Taste- Setzt den Lautsprecher wieder auf die
Werkseinstellung zurück
Hinweis: Falls sich das Gerät nicht einschalten lässt oder eine Fehlfunktion
aufweist, drücken Sie die oben genannte Reset-Taste.
TUN
SCAN
ST
MO
EINRICHTEN
Einlegen der Batterien
Sendegerät
1. Öffnen Sie das Batteriefach an der Unterseite des Sendegeräts
2. Beachten Sie die Polaritätshinweise im Batteriefach und legen Sie die 3 AA-
Batterien entsprechend ein
3. Schließen Sie die Batteriefachabdeckung
Lautsprecher
1. Wischen Sie den Lautsprecher mit einem weichen Tuch ab, um überschüssiges
Wasser zu entfernen
2. Öffnen Sie den Lautsprecher, indem Sie das untere Gehäuse gegen den
Uhrzeigersinn drehen
3. Lösen Sie die innere Batteriefachverriegelung, um die Abdeckung zu öffnen
4. So legen Sie die Batterien ein:
• Beachten Sie beim Einlegen der Uhrenbatterie die Hinweise im Uhren-Batteriefach und setzen eine CR2032
Lithium-Batterie ein. Wenn dieser Lautsprecher zum ersten Mal verwendet wird, ist die Batterie bereits
eingelegt. Jetzt müssen Sie nur noch die Plastiklasche aus dem Batteriefach ziehen, um das Gerät zu
aktivieren.
• Wenn Sie Alkaline-Batterien für Radio und Funkempfang einlegen, beachten Sie die Hinweise im Batteriefach
und setzen 6 AA Alkaline-Batterien ein.
5. Schließen und verriegeln Sie die innere Batteriefachabdeckung
6. Um den Lautsprecher zu verschließen, drehen Sie das untere Gehäuse im Uhrzeigersinn bis es mit dem
oberen Gehäuse einrastet
Batteriestandanzeige
Wenn das Symbol für einen niedrigen Batteriestand angezeigt wird, ersetzen Sie die Alkaline-Batterien.
Hinweis: Entfernen Sie die Batterien, wenn die Lautsprecher für einen längeren Zeitraum nicht verwendet werden.
24
-
+
DC1.5V (UM-3) X3
-
+
AA
AA
-
+
AA
Page 25

EINRICHTEN DER FUNKVERBINDUNG
Sendegerät
1. Heben Sie die Abdeckung des Audio-Players an und ziehen Sie das Aux In-Kabel heraus
2. Verbinden Sie den 3,5mm Stereo-Stecker mit der Line-Out-Buchse oder der Kopfhörerbuchse Ihres externen
Audiogeräts und starten Sie die Wiedergabe Ihres externen Audiogeräts
3. Drücken Sie die Kabeleinzugstaste des Aux In-Kabels auf der Rückseite des Sendegeräts und justieren Sie die
Länge des Aux In-Kabels auf das gewünschte Maß
4. Platzieren Sie Ihr Audiogerät auf der Audio-Player-Plattform und schließen Sie die Abdeckung des Players.
5. Schalten Sie das Sendegerät ein, indem Sie den Ein-/Ausschalter auf die Position EIN bringen. Die Tx-Status-
LED (Senden) wechselt auf grün, um anzuzeigen, dass das Signal gesendet wird. Wenn der Tx-Status ROT
bleibt, erhöhen Sie die Lautstärke des externen Audiogeräts. Sobald eine ausreichende Lautstärke erkannt
wird, wechselt der Tx-Status auf Grün. Wenn Sie ein Rauschen hören oder andere Störungen auftreten,
versuchen Sie am Sendegerät einen anderen Kanal einzustellen
Lautsprecher (Empfänger)
1. Drücken Sie den EIN-/AUSSCHALTER am Lautsprecher
2. Drücken Sie die Taste Fn (Funktion), um den Funkempfangsmodus auszuwählen. Die Funkanzeige wird am
Display aufblinken
3. Sobald ein Signal empfangen wird, hört die Funkanzeige auf zu blinken und bleibt konstant. Wenn kein Signal
empfangen wird, bringen Sie den Lautsprecher näher an das Sendegerät heran, da Sie sich vielleicht
außerhalb des Übertragungsbereichs von 90 Fuß befinden
4. Stellen Sie die gewünschte Lautstärke mit den Tasten VOL +/- ein.
5. Wiederholen Sie die Schritte 2-4, um weitere Lautsprecher mit dem Sendegerät zu synchronisieren.
Sekundärer Aux In
Wahlweise können Sie das Audiogerät mit dem Sendegerät verbinden, indem Sie Cinch-Kabel (nicht im Lieferumfang
enthalten) an die Stereo-Cinch-Buchsen anschließen:
1. Verbinden Sie ein externes Audiogerät mit dem Sendegerät, indem Sie Cinch-Audiokabel verwenden
2. Ziehen Sie das 3,5 mm Kabel auf der Vorderseite des Sendegeräts ab, falls es an ein externes Audiogerät
angeschlossen ist
Hinweis: Wenn sowohl der Aux In auf der Vorderseite und die Cinch-Eingangsbuchsen an der Rückseite
Audiosignale empfangen, werden beide Signale übertragen
3. Schalten Sie das externe Audiogerät an
4. Befolgen Sie die Schritte 1-5 im obigen Abschnitt "Lautsprecher (Empfänger)".
Frequenzsuche
Es stehen drei Frequenzkanäle zur Auswahl, um Interferenzen zu vermeiden und einen idealen Empfang zu finden.
1. Wählen Sie mit der Kanalwähler-Taste einen Kanal am Sendegerät aus
2. Drücken Sie die SCAN-Taste und das Sendegerät stellt sich automatisch auf den neuen Kanal ein
Automatische Abschaltung
Wenn kein Signal vom Lautsprecher empfangen wird, blinkt die Funk-Anzeige und schaltet den Lautsprecher nach
etwa 4 Minuten automatisch ab.
RADIO TUNER
Einstellen der Radiofrequenz
1. Drücken Sie den EIN-/AUSSCHALTER am Lautsprecher
2. Drücken Sie die Fn-Taste, um den FM-Empfangsmodus zu wählen
3. Drücken Sie die Taste ST/MO, um auf FM-Stereo oder Mono-Empfangsmodus umzuschalten
4. Um einen Radiosender manuell einzustellen, drücken Sie die Taste TUN +/-
5. Um automatisch nach Sendern mit einem starken Signal in Ihrer Nähe zu suchen, halten Sie die Taste TUN +/-
gedrückt bis die Frequenz am Display zu scannen beginnt. Lassen Sie die Taste anschließend los. Der Tuner
stoppt beim ersten starken Signal
Speichern von Radiosendern
WATER ROCKER kann bis zu 20 FM-Sender speichern, um diese später schnell wieder aufrufen zu können.
1. Drücken Sie den EIN-/AUSSCHALTER am Lautsprecher
2. Drücken Sie die Fn-Taste, um den FM-Empfangsmodus zu wählen
3. Stellen Sie mit den Tasten TUN +/- den Sender ein, den Sie speichern möchten
4. Sobald der Sender gefunden wurde, drücken Sie die Taste MEM und die Kanalnummer beginnt am Display zu
blinken
5. Um eine gespeicherte Sendernummer auszuwählen, drücken Sie die Tasten CH +/-
6. Drücken Sie die MEM-Taste, um in diese Speicherstelle zu speichern
7. Wiederholen Sie die Schritte 3-6, um weitere Sender zu speichern
Hinweis: Wenn innerhalb von einigen Sekunden kein Befehl gegeben wird, springt das Display wieder in den
Radioempfangsmodus zurück.
25
Page 26

Aufrufen von gespeicherten Radiosendern
1. Drücken Sie den EIN-/AUSSCHALTER am Lautsprecher
2. Drücken Sie die Fn-Taste, um den FM-Empfangsmodus zu wählen
3. Um einen gespeicherten Sender auszuwählen, drücken Sie die Taste CH +/-
Auswahl des Rundfunksystems
Wenn WATER ROCKER in einem anderen Land verwendet wird, kann ein anderes Rundfunksystem gewählt
werden:
1. Schalten Sie den Lautsprecher aus
2. Drücken Sie einmal auf die Taste Modus und die blinkende Anzeige für die Länder wird angezeigt
3. Drücken Sie die Taste VOL +/-, um eines der Rundfunksysteme auszuwählen
4. Drücken Sie die MEM-Taste, um die Einstellung zu speichern
UHRZEIT EINSTELLEN
So stellen Sie die Uhrzeit bei ausgeschaltetem Lautsprecher ein:
1. Drücken Sie zweimal die Taste MODUS, um in den Einstellmodus für das 12/24-Format zu gelangen
2. Drücken Sie die Taste VOL +/-, um das 12- oder 24-Stunden-Zeitformat zu wählen
3. Drücken Sie die Taste MODUS und die Ziffern beginnen zu blinken
4. Drücken Sie die Taste TUN +/-, um die Stunden einzustellen
5. Drücken Sie die Taste VOL +/-, um die Minuten einzustellen
6. Drücken Sie die Taste MODUS, um die Einstellungen zu speichern und diesen Modus zu verlassen
SCHLUMMERFUNKTION
Mit dieser Funktion können Sie einschlafen während Sie Radio hören oder ein Funksignal empfangen. Der
Lautsprecher schaltet sich nach einer gewissen Zeit ab:
1. Drücken Sie den EIN-/AUSSCHALTER, um den Lautsprecher einzuschalten
2. Stellen Sie den gewünschten Radiosender oder die über Funk empfangenen Musiktitel ein
3. Stellen Sie den Timer für die Schlummerfunktion auf 15, 30, 45, 60, 90 oder 120 Minuten, indem Sie die
SCHLUMMER-Taste wiederholt drücken, bis die gewünschte Einstellung aufleuchtet
4. Um den Lautsprecher auszuschalten, bevor der Timer für die Schlummerfunktion den gewählten Zeitpunkt
erreicht, drücken Sie den Ein-/Ausschalter
Hinweis: Wenn der Timer für die Schlummerfunktion eingeschaltet ist und die Musik über den Funkempfang
empfangen wird, schaltet der Timer für die Schlummerfunktion den Lautsprecher aus, sobald der gewählte Zeitraum
vorüber ist. Das Sendegerät bleibt jedoch eingeschaltet.
Factory Reset:
Versuchen Sie, diese zurückgesetzt, wenn das Gerät nicht einschalten.
Verwenden Sie eine gerade Büroklammer, Zahnstocher oder ähnlichem Gegenstand die
RESET-Taste an der inneren Unterseite des Lautsprechers drücken. Verwenden Sie
keine scharfen, spitzen Gegenständen auf die Reset-Taste drücken. Der Reset löscht
den Arbeitsspeicher und löscht die früheren Benutzereinstellungen wie Uhrzeit und
gespeicherten Radiosender-Voreinstellungen.
26
Page 27

Transmitter (Phase lock loop):
• Battery for transmitter operation- DC 1.5V “AA” alkaline batteries x3 (not
included)
• Transmission range- open air distance up to 30 meters (90 feet)
• Optional power adapter- 5v DC, 500mA, positive tip
Speaker:
• Battery backup for clock/memory- DC 3V CR2032 Lithium battery x1 (included)
• Battery for speaker operation- DC 1.5V “AA” x6 (not included)
Wireless transmission frequencies:
• 3 channels (for EU version)- 863.5MHZ, 864 MHZ, 864.5MHZ
• 3 channels (for USA version)- 914 MHZ, 914.5 MHZ, 915 MHZ
This device conforms to Level IPX7 waterproofing standards.
TECHNICAL SPECIFICATIONS
www.ionaudio.com/supporthome
www.ionaudio.com/WATERROCKER
27
Page 28

www.ionaudio.com
MANUAL VERSION 1.0
 Loading...