


Quickstart Guide English ( 2 – 4 )
Guía de inicio rápido Español ( 5 – 7 )
Guide d'utilisation rapide Français ( 8 – 10 )
Guida rapida Italiano ( 11 – 13 )
Schnellstart-Anleitung Deutsch ( 14 – 16 )
Snelstartgids Nederlands ( 17 – 19 )
Vinyl Transport
™
Quickstart Guide (English)
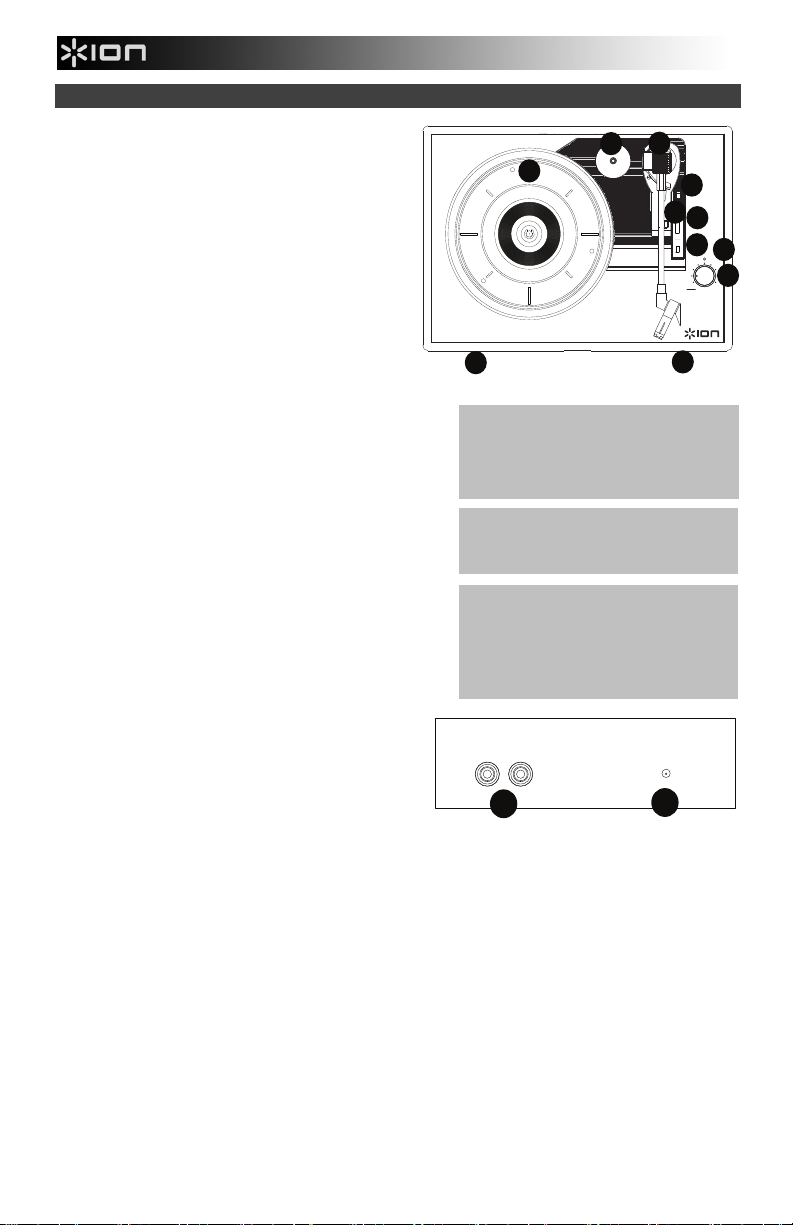
Introduction
Box Contents
Make sure that the items listed below are included in the box:
• Vinyl Transport™
• Felt Slipmat
• Power Adapter
• 45 RPM Adapter
• Quickstart Guide
• Safety & Warranty Manual
Support
For the latest information about this product (system requirements, compatibility information, etc.) and
product registration, visit ionaudio.com.
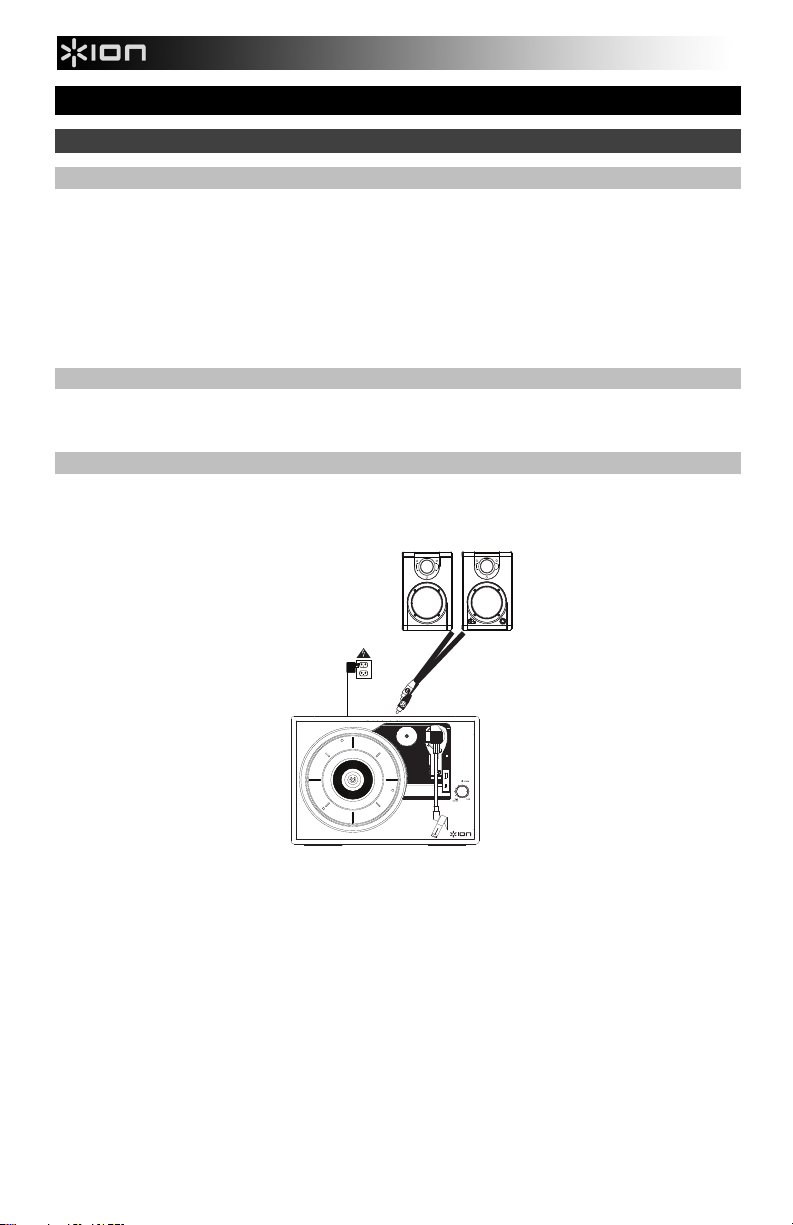
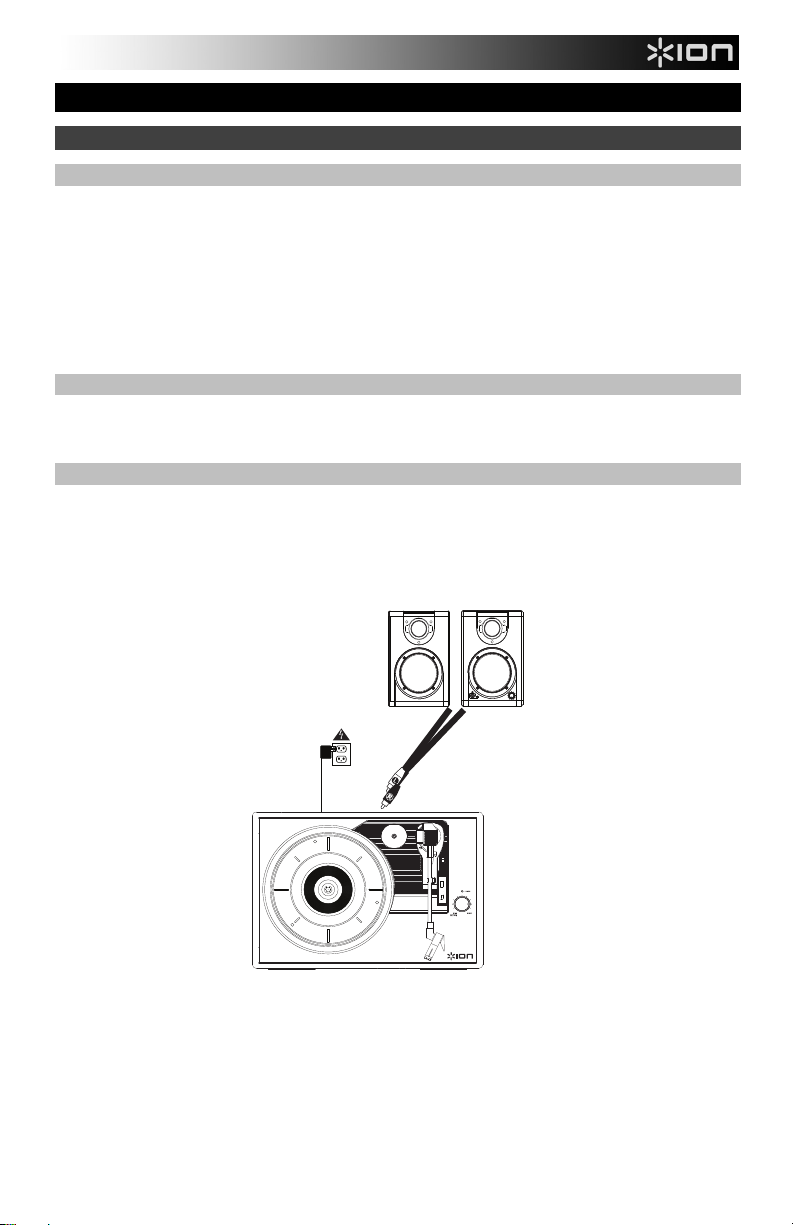
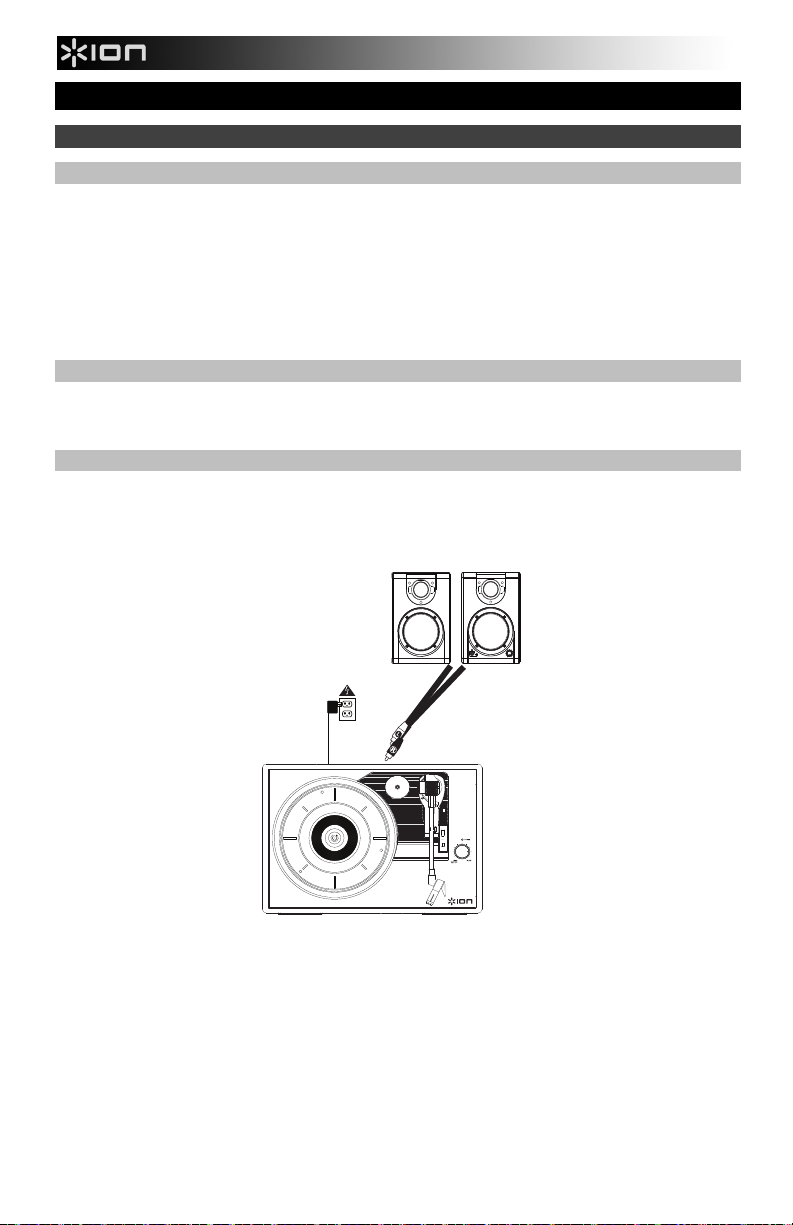
Connection Diagram
Items not listed under the Box Contents are sold separately.
Power
33
45
78
AUTO
STOP
OFF
ON
2
Speakers
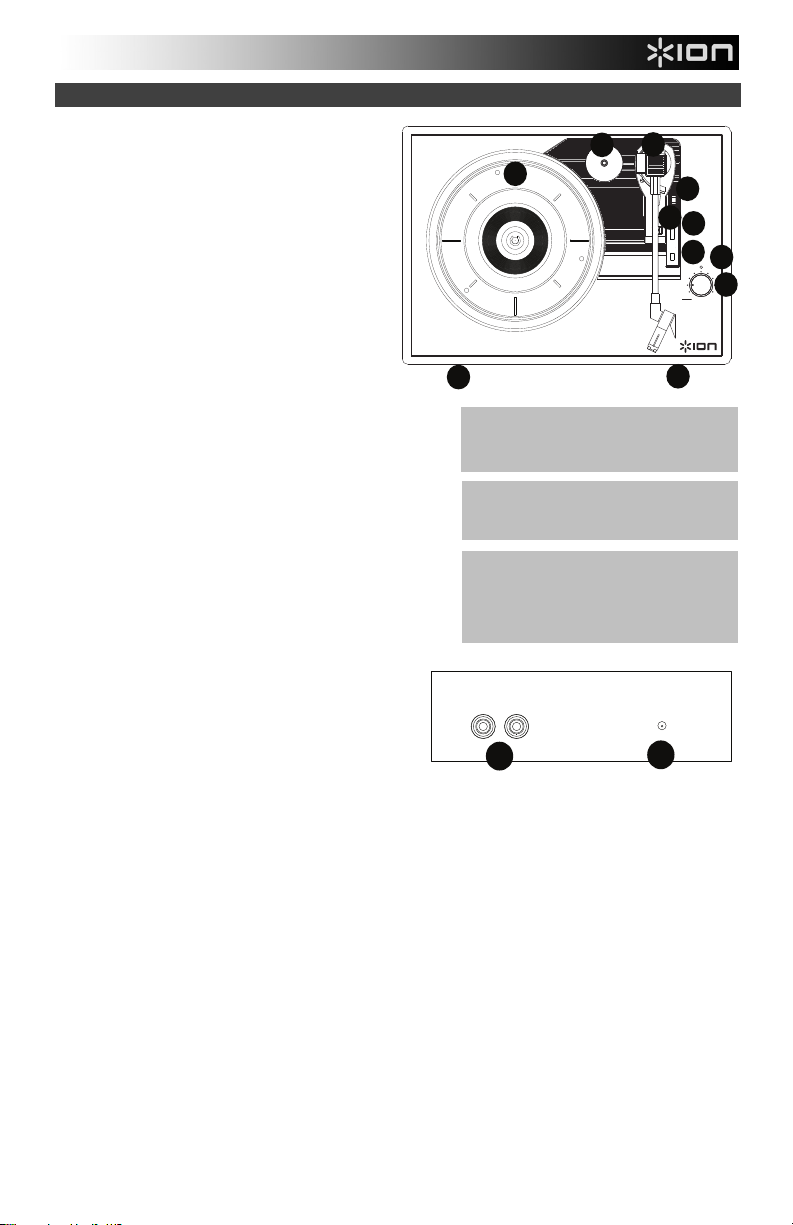
Features
1. Platter – Place your record here.
3
2. 45 RPM Adapter Holder – Holds the
included 45 RPM adapter. When not using
the adapter, please place it in this holder.
3. Tonearm – The fixed tonearm can be raised
and lowered by hand, or by pressing the
raise / lower lever.
4. Arm Clip – This specially designed arm clip
secures the tonearm while at rest or when
not in use. The arm clip has been designed
to remain in the up position while unlocked.
1
2
4
5
33
6
45
78
AUTO
STOP
OFF
7
ON
9
POWER
8
MAXMIN
ON / OFF
5. Raise / Lower Lever – Raises and lowers
the tonearm.
6. 33 / 45 / 78 Switch – This switch controls
the RPM of the turntable platter.
Note: For best results when playing 78 RPM vinyl
records, use a 78 stylus (sold separately). Only use a 78
stylus with 78 RPM vinyl records. Purchase the iCT06rs
78 stylus at ionaudio.com/ict06rs.
7. Autostop switch – This switch turns autostop on or off.
When autostop is on, the platter will start spinning
when the tonearm is placed over the record and stop
spinning when the record has reached the end. (When
autostop is off, the platter will always spin regardless of
the position of the tonearm.)
Note: If your vinyl record stops before it reaches the
end of the music, turn Autostop to the off position for
this particular record. This is generally recommended
for 45 RPM records.
10
IMPORTANT: Place the included felt slipmat
on the platter; then place your record on the
felt slipmat to carefully hold your records.
IMPORTANT: Remove the plastic cartridge
cover (needle cover) before operating the
turntable.
*WARNING: The RCA outputs are LINE
level. Please only connect these to LINE
level inputs. You may damage your receiver
if you plug in a LINE level device into a
PHONO level input.
10
8. Volume/Power Knob – To power on Vinyl
Transport, turn this knob clockwise until it clicks.
When powered on, use this knob to adjust the
volume. To turn off Vinyl Transport, turn this knob
OUT
RL
DC 5V 1A
counterclockwise until it clicks.
9. Power Indicator – This LED illuminates when the
power is on.
11
12
10. Speaker – The record's audio will be played
through this built-in speaker.
11. RCA Output* – The audio from a playing vinyl record is sent to this line-level coaxial audio output. This
must not be connected to phono level devices.
12. Power Cable Input – Use the included adapter to connect to wall power.
3
Troubleshooting
If you experience any difficulties, please refer to the troubleshooting steps below.
I'm not hearing any audio when playing music:
• If you are playing music from vinyl:
o Make sure that Vinyl Transport is powered on and that the needle is on the record.
o Connect Vinyl Transport's RCA outputs to a stereo system or powered speakers. (Do not
connect them to phono-level inputs; Vinyl Transport's RCA outputs are line-level and could
My record is not playing at the correct speed; its pitch is too high or too low:
My record is hitting the edge of the top cover:
BEFORE RETURNING THE PRODUCT, please contact ION Audio or your retailer for technical support.
Contact information can be found in the Safety Instruction Booklet included with this product.
damage a device with phono-level inputs.)
o Ensure the 33 / 45 / 78 switch is set to the correct speed for your record.
o Use a slipmat at all times to raise your records high enough to clear the top cover.
ionaudio.com
Technical Specifications
Dimensions
(Length x Width x Depth)
Weight
Power
Battery Type
Battery Life:
Cartridge Type
13.75” x 10” x 4.5”
349 mm x 254 mm x 114 mm
6.1 lbs; 2.8 kg
5V DC, 1A, center pin-positive, tip-negative; or 4 AA
batteries (into the bottom compartment).
4 AA batteries
Up to 6 hours
Ceramic
CZ-800-10 (sapphire-tipped) is included, and also available
Cartridge and Stylus
at www.ionaudio.com/products/details/CZ-800-10.
For a 78 stylus, the iCT06rs is available at
www.ionaudio.com/ict06rs.
Specifications are subject to change without notice.
Trademarks and Licenses
ION Audio is a trademark of ION Audio, LLC, registered in the U.S. and other countries.
The Bluetooth word mark and logos are owned by the Bluetooth SIG, Inc. and any use of such
marks by ION Audio is under license.
All other product or company names are trademarks or registered trademarks of their
respective owners.
4
Guía de inicio rápido (Español)
Introducción
Contenido de la caja
Asegúrese de que todos los elementos abajo indicados estén incluidos en la caja.
• Vinyl Transport
• Almohadillas antideslizantes de fieltro
• Adaptador de alimentación
• Adaptador para 45 RPM
• Guía de inicio rápido
• Manual sobre la seguridad y garantía
Soporte
Para obtener la información más completa acerca de este product (los requisitos del sistema,
compatibilidad, etc) y registro del producto, visite ionaudio.com.
Diagrama de conexión
Los elementos que no se enumeran en Contenido de la caja se venden por separado.
Suministro
Eléctrico
33
45
78
AUTO
STOP
OFF
ON
5
Altavoces
Características
1. Plato – Coloque aquí su disco.
3
2. Soporte del adaptador para 45 rpm – Sostiene
el adaptador para 45 RPM incluido. Cuando no
use el adaptador, póngalo en este soporte.
3. Brazo – El brazo fijo se puede subir y bajar a
mano o presionando la palanca de subir / bajar.
4. Clip del brazo – Este clip diseñado
especialmente fija el brazo mientras está en
reposo o no se usa. El clip ha sido diseñado
para que permanezca hacia arriba mientras está
1
2
5
4
33
6
45
78
AUTO
STOP
OFF
7
ON
9
POWER
8
MAXMIN
ON / OFF
desbloqueado.
5. Palanca de subir / bajar – Sube y baja el
brazo.
6. Conmutador de 33 / 45 / 78 rpm – Este
10
10
conmutador controla las RPM del plato del giradiscos.
7. Interruptor de parada automática – Este interruptor
activa y desactiva la parada automática. Cuando la
parada automática está activada, el plato comienza a
girar cuando el brazo se coloca sobre el disco y se
detiene cuando llega al final del mismo. (Si está
desactivada, el plato gira siempre, independientemente
de la posición del brazo.)
Nota: Para obtener los mejores resultados al
reproducir discos de vinilo de 78 RPM, use una púa
para 78 (que se vende por separado). Use sólo una púa
IMPORTANTE: Coloque la almohadilla
antideslizante de fieltro incluida sobre el
plato y coloque su disco encima de ella
para que sus discos queden apoyados
cuidadosamente.
IMPORTANTE : Retire la cubierta plástica
de la cápsula (cubierta de la púa) antes de
hacer funcionar el giradiscos.
para 78 con los discos de vinilo de 78 RPM. Adquiera
la púa para 78 iCT06rs en ionaudio.com/ict06rs.
8. Perilla de volumen/encendido – Para encender el
Vinyl Transport, gire esta perilla en sentido horario
hasta que se escuche un clic. Cuando la unidad está
encendida, use esta perilla para ajustar el volumen.
Para apagar el Vinyl Transport, gire esta perilla en
*ADVERTENCIA : Las salidas RCA son
para nivel de LÍNEA. Conéctelas sólo a las
entradas de nivel de línea (LINE). Puede
dañar el receptor si enchufa un
dispositivo de nivel de línea en una
entrada de nivel fonográfico (PHONO).
sentido antihorario hasta que se escuche un clic.
9. Indicador de encendido – Este LED se enciende
cuando el giradiscos está encendido.
10. Altavoz – El audio del disco se reproduce por este
OUT
RL
DC 5V 1A
altavoz incorporado.
11. Salida RCA* – El audio del disco de vinilo que se
11
12
está reproduciendo se aplica a esta salida de audio
coaxial de nivel de línea. Esta salida no debe conectarse a dispositivos de nivel fonográfico.
Nota: Si su disco de vinilo se detiene antes de llegar al final de la música, gire Autostop a la posición
de desactivado para este disco en particular. Esto se recomienda en general para los discos de 45
RPM.
12. Entrada del cable de corriente – Utilice el adaptador incluido para conectarlo a la toma de corriente
de la pared.
6

Solución de Problemas
Si experimenta alguna dificultad, consulte los pasos de solución de problemas que se indican a
continuación.
No oigo ningún audio cuando reproduzco la música:
• Si está reproduciendo la música de un vinilo:
o Asegúrese de que el Vinyl Transport esté encendido y que la púa esté sobre el disco.
o Conecte las salidas RCA del Vinyl Transport a un sistema estéreo o altavoces alimentados. (No
las conecte a entradas de nivel fonográfico —las salidas RCA del Vinyl Transport son de nivel de
Mi disco no se reproduce a la velocidad correcta. Su tono es demasiado alto o bajo:
Mi disco golpea contra el borde de la tapa superior:
ANTES DE DEVOLVER EL PRODUCTO, comuníquese con Ion Audio o con su vendedor minorista para
solicitar soporte técnico. La información de contacto se encuentra en el folleto de instrucciones de
seguridad incluido con este producto.
línea y podrían dañar un dispositivo con entradas de nivel fonográfico.)
o Asegúrese de que el interruptor 33 / 45 / 78 esté colocado en la velocidad correcta para su
disco.
o Utilice una almohadilla antideslizante para elevar sus discos lo suficiente para superar la tapa
superior.
ionaudio.com
Especificaciones técnicas
Dimensiones
(Largo x Ancho x Alto)
Peso
349 mm x 254 mm x 114 mm
13.75 x 10 x 4.5
6.1 lbs
2.8 kg
Potencia de salida
Tipo de batería
Vida útil de la batería
Tipo de cápsula
5 V CC, 1 A, patilla central positiva, punta negativa; o 4 pilas
AA (en el compartimiento de la parte inferior).
pilas AA
Hasta 6 horas
Cerámica
Se incluye una CZ-800-10 (con punta de zafiro), la cual
Cápsula y púa
también está disponible
en www.ionaudio.com/products/details/CZ-800-10.
Para una púa de 78, la iCT06rs está disponible en
www.ionaudio.com/ict06rs.
Especificaciones sujetas a cambio sin previo aviso.
7

Guide d’utilisation rapide (Français)
Introduction
Contenu de la boîte
Assurez-vous que tous les articles énumérés dans le contenu de la boîte de ce guide sont inclus dans la
boîte:
• Vinyl Transport
• Tapis en feutre
• Adaptateur d’alimentation
• Adaptateur 45 t/min
• Guide d’utilisation rapide
• Consignes de sécurité et informations concernant la garantie
Assistance
Pour les dernières informations concernant ce produit (la configuration système minimale requise, la
compatibilité, etc) et l'enregistrement du produit, veuillez visitez le site ionaudio.com.
Schéma de connexion
Les éléments qui ne figurent pas dans le Contenu de la boîte sont vendus séparément.
Haut-parleurs
Alimentation
33
45
78
AUTO
STOP
OFF
ON
8

Caractéristiques
1. Plateau – Veuillez placer le disque sur ce
plateau.
2. Rangement pour adaptateur 45 tr/min – Il
permet de ranger l'adaptateur 45 tr/min lorsqu’il
n’est pas utilisé. Lorsqu’il n’est pas utilisé,
veuillez mettre l'adaptateur dans cet
emplacement.
3. Bras de lecture – Le bras de lecture peut être
lever ou abaisser manuellement ou en utilisant le
bouton du levier de commande.
1
3
2
5
4
33
6
45
78
AUTO
STOP
OFF
7
ON
9
POWER
8
MAXMIN
ON / OFF
4. Serre-bras – Ce serre bras est conçu
spécialement afin de maintenir en place le bras
de lecture lorsque la platine n’est pas utilisée. Le
serre-bras a été conçu pour rester en position
10
10
élevée lorsqu’il est déverrouillé.
5. Levier de commande – Permet de lever ou
d’abaisser le bras de lecture.
6. Sélecteur de vitesse (33 / 45 / 78) – Ce sélecteur
régit la vitesse de rotation du plateau.
7. Autostop – Ce commutateur permet d'activer et de
désactiver la fonction autostop. Lorsqu’elle est
activée, le plateau commence à tourner dès que le
bras de lecture est placé au-dessus du disque et
IMPORTANT : Placez le tapis de feutrine
fourni sur le plateau ; placez ensuite votre
disque sur le tapis pour maintenir en place
vos disques.
IMPORTANT : Retirez le couvercle de
plastique de la cartouche (protège
aiguille) avant d’utiliser la platine.
s’arrête lorsque l’aiguille a atteint la fin du disque.
(Lorsqu'elle est désactivée, le plateau tourne, peu
importe l’emplacement du bras de lecture.)
Remarque : Pour de meilleurs résultats lors de la
lecture de disques vinyles de 78 tours, utilisez une
pointe de lecture 78 (vendu séparément). Utilisez
uniquement une pointe de lecture 78 pour les disques
vinyles de 78 tours. Vous pouvez acheter une pointe
*MISE EN GARDE : Les sorties RCA sont
à niveau ligne. Veuillez ne les brancher à
des entrées à niveau ligne. Vous pourriez
endommager votre récepteur si un
appareil À NIVEAU LIGNE est branché à
une entrée PHONO.
de lecture iCT06rs 78 sur le site ionaudio.com/ict06rs.
8. Interrupteur de mise en marche/arrêt/volume –
Afin de mettre Vinyl Transport sous tension,
tournez ce bouton dans le sens des aiguilles
d’une montre jusqu’à ce qu’un clic se fasse
OUT
RL
DC 5V 1A
entendre. Lorsqu’il est sous tension, utilisez ce
bouton pour régler le volume. Afin de mettre le
Vinyl Transport hors tension, veuillez tourner ce
11
12
bouton dans le sens antihoraire jusqu’à ce qu’un
clic se fasse entendre.
9. DEL d’alimentation – Cette DEL s'allume lorsque l’appareil est sous tension.
10. Haut-parleur – Le signal audio provenant du disque se joué par ce haut-parleur intégr.
11. Sortie RCA* – L'audio provenant du disque vinyle est envoyé à cette sortie audio coaxiale à niveau
ligne. Elle ne doit pas être branchée aux appareils phono.
Remarque : Si le disque s'arrête avant la fin de la musique, désactivez la fonction Autostop pour cet
enregistrement. Ceci est généralement recommandé pour les disques de 45 tours.
12. Entrée d'alimentation – Utilisez le câble d’alimentation secteur inclus pour brancher l’appareil à une
prise secteur.
9
Guide de Dépannage
Si vous éprouvez des difficultés, veuillez consulter les consignes de dépannage ci-dessous.
Je n’entends pas de signal audio lors de la lecture :
• Si vous faites la lecture à partir d’un vinyle :
o Assurez-vous que le Vinyl Transport est allumé et que l’aiguille est bien sur le disque.
o Branchez les sorties RCA du Vinyl Transport à une chaîne stéréo ou à des haut-parleurs.
(Ne tentez pas de les brancher à des entrées phono; les sorties RCA du Vinyl Transport sont à
Mon disque ne joue pas à la bonne vitesse, la tonalité est trop haute ou trop basse :
Le disque frappe le rebord du panneau supérieur :
AVANT DE RETOURNER CE PRODUIT, veuillez communiquer avec le service technique de ION Audio
ou votre détaillant pour de l’assistance. Vous trouverez les coordonnées pour nous rejoindre dans le
livret des Consignes de sécurité inclus avec ce produit.
niveau ligne et pourraient endommager un appareil phono.
o Veuillez vous assurer que le sélecteur de vitesse 33 / 45 / 78 est réglé sur la bonne vitesse pour
votre enregistrement.
o Utilisez le tapis de feutrine en tout temps pour élever les disques juste assez afin qu'ils ne
frappent pas le rebord du panneau supérieur.
ionaudio.com
Spécifications techniques
Dimensions
(longueur x largeur x hauteur)
Poids
Puissance de sortie
Type de batterie
Autonomie de la batterie
Type de cartouche
Cartouche et aiguille
Toutes les spécifications sont susceptibles d'être modifiées sans préavis.
349 mm x 254 mm x 114 mm
13,75 po x 10 po x 4,5 po
2,8 kg
6,1 lbs
Câble d'alimentation 5 V CC, 1 A, fiche à centre positif,
pointe négative ou 4 piles AA (compartiment dessous)
4 piles AA
Jusqu'à 6 heures
Céramique
CZ-8000-10 avec pointe de lecture en saphir incluse. Vous
pouvez vous procurer une cartouche de rechange sur le site
www.ionaudio.com/products/details/CZ-800-10.
Pour une pointe de lecture 78 tours, vous pouvez vous
procurer une cartouche iCT06rs sur le site
www.ionaudio.com/ict06rs.
10

Guida rapida (Italiano)
Introduzione
Contenuti della confezione
Assicurarsi che gli elementi elencati di seguito siano contenuti nella confezione:
• Vinyl Transport
• Tappetino in feltro
• Adattatore di alimentazione
• Adattatore 45 giri
• Guida rapida
• Istruzioni di sicurezza e garanzia
Assistenza
Per conoscere le ultime informazioni in merito a questo prodotto (i requisiti di sistema complete,
compatibilità, ecc) e per la registrazione del prodotto, recarsi alla pagina ionaudio.com.
Schema dei collegamenti
Elementi non elencati sotto Contenuti della confezione sono venduti separatamente.
Alimentazione
33
45
78
AUTO
STOP
OFF
ON
Altoparlanti
11

Caratteristiche
1. Piatto – Il disco va collocato qui.
3
2. Supporto adattatore 45 giri – Regge
l’incluso adattatore per 45 giri. Quando
l'adattatore non è in uso, può essere
collocato a questo livello.
3. Braccio – Il braccio fisso può essere
alzato e abbassato a mano, oppure
premendo la levetta di sollevamento /
abbassamento.
4. Fermabraccio – Questo fermabraccio dal
design speciale fissa il braccio quando è a
1
2
4
5
33
6
45
78
AUTO
STOP
OFF
7
ON
9
POWER
8
MAXMIN
ON / OFF
riposo o quando non è in uso. Il
fermabraccio è stato progettato in modo
da restare sollevato quando sbloccato.
5. Levetta di sollevamento /
abbassamento – Alza e abbassa il
10
10
braccio.
6. Interruttore 33 / 45 / 78 giri – Questo interruttore
regola i GIRI del piatto del giradischi.
7. Interruttore Autostop – Questo interruttore accende
o spegne la funzione di arresto automatico. Quando la
IMPORTANTE: collocare il tappetino in
feltro in dotazione sul piatto; quindi
posizionare il disco sul tappetino in modo
che venga retto in maniera accurata.
funzione "autostop" è attiva, il piatto inizia a girare
quando il braccio è posato sul disco e smette di girare
quando il disco arriva alla fine. (Quando la funzione
autostop è disattiva, il piatto continuerà a girare,
indipendentemente dalla posizione del braccio.)
IMPORTANTE: rimuovere il cappuccio
della cartuccia (copripuntina) prima di
utilizzare il giradischi.
Nota bene: per i migliori risultati durante la
riproduzione di dischi in vinile a 78 giri, servirsi di una
puntina 78 (venduta separatamente). Servirsi
unicamente di una puntina 78 con dischi in vinile a 78
giri. Acquistare la puntina 78 iCT06rs sulla pagina
ionaudio.com/ict06rs.
8. Manopola volume/power – Per accendere il Vinyl
*AVVERTENZA: le uscite RCA sono a
livello di LINEA. Collegarle unicamente a
ingressi a livello di LINEA. Si rischia di
danneggiare il ricevitore collegando un
dispositivo a livello di LINEA in un
ingresso PHONO.
Transport girare questa manopola in senso orario fino
allo scatto. Una volta acceso l'apparecchio,
servirsi di questa manopola per regolare il volume.
Per spegnere il Vinyl Transport, girare questa
manopola in senso antiorario fino allo scatto.
9. Indicatore di alimentazione – Questo LED
si
illumina quando il dispositivo è acceso.
10. Altoparlante – L'audio del disco verrà riprodotto
OUT
RL
11
DC 5V 1A
12
attraverso questo altoparlante incorporato.
11. Uscita RCA* – L'audio di un vinile riprodotto è inviato a questa uscita audio coassiale a livello di linea.
Questa non va collegata a dispositivi a livello phono.
Nota bene: se il vinile si ferma prima di raggiungere la fine della musica, spegnere la funzione
Autostop per quel particolare disco. Di solito, ciò è consigliato per i dischi a 45 giri.
12. Ingresso cavo di alimentazione – Servirsi dell'adattatore in dotazione per collegarsi alla presa a
parete.
12

Risoluzione di Problemi
In caso di problemi, fare riferimento alle fasi di risoluzione dei problemi indicate qui di seguito.
Non sento alcun audio durante la riproduzione di musica:
• Se si riproduce musica da vinile:
o Assicurarsi che l'Vinyl Transport sia acceso e che la puntina sia sul disco.
o Collegare le uscite RCA dell'Vinyl Transport ad un impianto stereo o ad altoparlanti. (Non
collegarle a ingressi a livello phono: le uscite RCA dell'Vinyl Transport sono a livello di linea e
Il mio disco non suona alla giusta velocità; il pitch è troppo alto o troppo basso:
Il disco sbatte contro il bordo del pannello superiore:
PRIMA DI RENDERE QUESTO PRODOTTO, contattare ION Audio o il proprio rivenditore per ricevere
assistenza tecnica. I dati di contatto si trovano nel libretto di istruzioni di sicurezza in dotazione con il
prodotto.
potrebbero danneggiare un dispositivo con ingressi a livello phono.)
o Assicurarsi che l'interruttore 33 / 45 / 78 sia impostato sulla velocità giusta per il disco specifico.
o servirsi sempre di un tappetino per sollevare il disco in modo tale da collocarlo a livello con il
bordo superiore.
ionaudio.com
Specifiche tecniche
Dimensioni
(lunghezza x larghezza x
altezza)
Peso
Potenza di uscita
Tipo di batteria
Carica volta
Tipo di cartuccia
349 mm x 254 mm x 114 mm
13,75 po x 10 po x 4,5 po
2,8 kg
6,1 lbs
5V CC, 1A, polo centrale positivo, punta negativa; o 4 batterie
AA (nello scomparto inferiore).
4 batterie AA
Fino a 6 ore
Ceramica
Cartuccia e puntina
pagina www.ionaudio.com/products/details/CZ-800-10.
Per una puntina 78 è disponibile l'iCT06rs alla pagina
www.ionaudio.com/ict06rs.
Le specifiche tecniche possono variare senza preavviso.
CZ-800-10 (con punta in zaffiro) in dotazione e disponibile alla
13
Schnellstart-Anleitung (Deutsch)
Einführung
Lieferumfang
Vergewissern Sie sich, dass alle hier angeführten Komponenten in der Schachtel enthalten sind:
• Vinyl Transport
• Filz-Slipmat
• Netzteil
• 45 RPM Adapter
• Schnellstart-Anleitung
• Sicherheitshinweise und Garantieinformationen
Kundendienst
Für aktuelledie neuesten Informationen zu diesem Produkt (Systemanforderungen, Informationen zur
Kompatibilität etc.) und zur Produktregistrierung besuchen Sie ionaudio.com.
Anschlussdiagramm
Teile, die nicht im Lieferumfang angegeben sind, sind separat erhältlich.
Strom
33
45
78
AUTO
STOP
OFF
ON
14
Lautsprecher

Funktionen
1. Plattenteller – Hier platzieren Sie Ihre
Schallplatte.
2. 45 RPM-adapterhalterung – Sichert den
mitgelieferten 45 RPM-Adapter. Wenn Sie
den Adapter nicht verwenden, legen Sie ihn
bitte in diese Haltevorrichtung.
3. Tonarm – Der fixe Tonarm kann mit der
Hand oder durch Drücken des
entsprechenden Hebels angehoben und
abgesenkt werden.
4. Arm-Clip – Dieser speziell entworfene
Arm-Clip sichert den Tonarm, wenn er
nicht verwendet wird. Der Arm-Clip wurde
so entwickelt, dass er in der oberen
Position bleibt, wenn er entsperrt ist.
5. Hebel – Hebt und senkt den Tonarm.
6. 33 / 45 / 78 RPM-schalter – Regelt die
Geschwindigkeit (RPM) des Plattentellers.
7. Autostop-schalter – Dieser Schalter schaltet Autostop
an oder aus. Wenn Autostop eingeschaltet ist, wird der
Plattenteller zu rotieren beginnen, sobald der Tonarm
über die Schallplatte gelegt wird und stoppen, wenn
die Platte das Ende erreicht hat. (Wenn Autostop
ausgeschaltet ist, wird sich der Plattenteller immer und
unabhängig von der Position des Tonarms drehen.)
Hinweis: Für die Wiedergabe von 78 RPM
Schallplatten verwenden Sie idealerweise eine 78
RPM-Nadel (separat erhältlich). Verwenden Sie für 78
RPM Schallplatten ausschließlich 78 RPM-Nadeln.
Kaufen Sie eine iCT06rs 78 Nadel auf
ionaudio.com/ict06rs.
8. Lautstärkeregler / ein-aus / schalter – Um Vinyl
Transport einzuschalten, drehen Sie diesen Regler im
Uhrzeigersinn bis er einrastet. Wenn das Gerät
eingeschaltet ist, verwenden Sie diesen Knopf, um die
Lautstärke einzustellen. Um Vinyl Transport
abzuschalten, drehen Sie diesen Regler gegen den
Uhrzeigersinn bis er einrastet.
9. Netzanzeige – Diese LED leuchtet, wenn das
Gerät eingeschaltet ist.
10. Lautsprecher – Die Platte wird über diese
eingebauten Lautsprecher zu hören sein.
11. Cinch-Ausgang* – Die Audiosignale von einer
Vinyl-Schallplatte, die gerade abgespielt wird, wird an diesen Line-Level-Koaxial-Ausgang gesendet.
Dieser darf nicht mit Phono-Level-Geräten verbunden werden.
Hinweis: Wenn Ihr Schallplatte stoppt, bevor sie das Ende des Songs erreicht hat, bringen Sie
Autostop für diese spezielle Schallplatte in die Position AUS. Dies wird in der Regel auch für 45 RPM
Schallplatten empfohlen.
12. Netzkabeleingang – Verwenden Sie den mitgelieferten Adapter, um eine Verbindung zum Stromnetz
herzustellen.
3
2
1
10
WICHTIG: Legen Sie die mitgelieferte FilzSlipmat auf den Plattenteller.
Anschließend legen Sie Ihre Platte auf die
Filz-Slipmat, um einen sicheren Sitz zu
gewährleisten.
WICHTIG: Entfernen Sie die
Kunststoffabdeckung des Tonabnehmers
(Nadelabdeckung) bevor Sie den
Plattenspieler verwenden.
*WARNUNG: Die Cinch-Ausgänge sind
line-pegel. Bitte nur verbinden um linepegel Eingängen. Sie könnten
beschädigen Ihre Empfänger wenn Sie
Verbindung Die Cinch-Ausgänge des Vinyl
Transport sind zu einem PhonoEingängen.
OUT
RL
11
4
AUTO
10
DC 5V 1A
12
5
33
6
45
78
STOP
OFF
7
ON
9
POWER
8
MAXMIN
ON / OFF
15

Fehlerbehebung
Wenn Sie Schwierigkeiten mit dem Produkt haben, lesen Sie bitte die unten aufgeführten Schritte zur
Fehlerbehebung.
Ich kann bei der Musikwiedergabe nichts hören:
• Wenn Sie Vinylplatten spielen:
o Stellen Sie sicher, dass Vinyl Transport eingeschaltet und die Nadel auf der Schallplatte ist.
o Verbinden Sie die Cinch-Ausgänge des Vinyl Transport mit einer Stereoanlage oder mit
Aktivlautsprechern. (Verbinden Sie sie nicht mit Phono-Eingängen; Die Cinch-Ausgänge des
Vinyl Transport sind Line-Verbindungen und könnten ein Gerät mit Phono-Eingängen
beschädigen.)
Meine Schallplatte wird nicht mit der richtigen Geschwindigkeit wiedergegeben. Die Tonlage ist zu
hoch oder zu tief:
Meine Platte schleift am Rand der oberen Abdeckung:
o Stellen Sie sicher, dass der 33/45/78-Schalter für diese Schallplatte auf die entsprechende
Geschwindigkeit eingestellt ist.
o Verwenden Sie stets eine Slipmat, damit Ihre Platten hoch genug aufliegen, um die obere
Abdeckung nicht zu berühren.
BEVOR SIE DIESES PRODUKT EINSENDEN, kontaktieren Sie bitte ION Audio oder Ihren Händler
für technischen Support. Die Kontaktinformationen finden Sie in den Sicherheitshinweisen, die
diesem Produkt beiliegen.
ionaudio.com
Technische Daten
Abmessungen
(Länge x Breite x Höhe)
Gewicht
Ausgangsleistung
Akku-Typ
Lade Mal
Tonabnehmerart
Tonabnehmer und
Nadel
Die Spezifikationen können ohne Ankündigung geändert werden.
349 mm x 254 mm x 114 mm
13,75 x 10 x 4,5
2,8 kg
6,1 lbs
5V DC, 1A, mittlerer Pin mit positiver Polarität, Spitze negativ;
oder 4 AA-Batterien (in das Bodenfach).
4 AA-Batterien
Bis zu 6 Stunden
Keramik
CZ-800-10 (mit Saphirspitze) ist im Lieferumfang enthalten und
auch auf www.ionaudio.com/products/details/CZ-800-10
erhältlich.
Eine 78 Nadel ist auf www.ionaudio.com/ict06rs verfügbar.
16

Snelstartgids (Nederlands)
Introductie
Inhoud van de doos
Controleer of de doos de onderstaande onderdelen bevat:
• Vinyl Transport
• Vilten slipmat
• Stroomadapter
• 45 TPM adapter
• Snelstartgids
• Veiligheids-en garantie handleiding
Ondersteuning
Voor de laatste informatie over dit product (systeemvereisten, compatibiliteitsinformatie, enz.) en
productregistratie, bezoek ionaudio.com.
Aansluitschema
Artikelen die niet zijn opgesomd in Inhoud van de doos worden afzonderlijk verkocht.
Stroom
33
45
78
AUTO
STOP
OFF
ON
Luidsprekers
17

gang
Kenmerken
1. Draaitafel: leg hierop uw plaat.
3
2. Houder 45-toerenadapter: houder
voor de meegeleverde 45toerenadapter. Plaats de adapter in de
houder wanneer u hem niet gebruikt.
3. Toonarm: De vaste toonarm kunt u
met de hand optillen of laten zakken, of
door de hendel omhoog/omlaag in te
drukken.
4. Armsteun: deze speciaal ontworpen
armsteun beveiligt de toonarm in
rustpositie of wanneer hij niet wordt
1
2
4
5
33
6
45
78
AUTO
STOP
OFF
7
ON
9
POWER
8
MAXMIN
ON / OFF
gebruikt. De armsteun werd ontworpen
om in de hoogste positie te blijven
wanneer hij ontgrendeld is.
5. Hendel zakken/opheffen: heft de
toonarm op en laat hem zakken.
10
10
6. Schakelaar 33 / 45 / 78 toeren: deze schakelaar
controleert het toerental van de draaitafel.
7. Autostop-schakelaar: deze schakelaar zet autostop
aan of uit. Wanneer autostop aan staat, begint de
draaitafel te draaien van zodra de toonarm zich boven
BELANGRIJK: Plaats de meegeleverde
vilten slipmat op de draaitafel; leg
vervolgens uw plaat op de vilten slipmat,
zodat uw plaat zorgvuldig is geplaatst.
de plaat bevindt en stopt ze met draaien wanneer de
plaat haar einde heeft bereikt. (Wanneer autostop
afstaat, blijft de draaitafel altijd draaien, ongeacht de
positie van de toonarm.)
Opmerking: Gebruik voor optimale resultaten bij het
BELANGRIJK: Verwijder het plastic kapje
van de naald (naaldbescherming) voor de
draaitafel aan te zetten.
afspelen van 78-toerenplaten een naald voor 78 toeren
(wordt afzonderlijk verkocht). Gebruik alleen een naald
voor 78 toeren met 78-toerenplaten. Koop op
ionaudio.com/ict06rs de iCT06rs naald voor 78
toeren.
8. Volumeknop, aan/uitknop: Draai deze knop naar
rechts tot hij klikt om de Vinyl Transport aan te zetten.
*WAARSCHUWING: De RCA-uitgangen
zijn op LIJNNIVEAU. Verbind deze enkel
met ingangen op LIJNNIVEAU. U kunt uw
receiver beschadigen indien u een
apparaat op LIJNNIVEAU aansluit op een
PHONO-in
.
Draai deze knop naar links of naar rechts om het
luidsprekervolume aan te passen wanneer het
apparaat aanstaat. Draai deze knop naar links tot
hij klikt om de Vinyl Transport uit te zetten.
9. Stroomindicator: deze led gaat branden wanneer
OUT
RL
DC 5V 1A
het apparaat aanstaat.
10. Luidspreker: De muziek op de plaat wordt
11
12
afgespeeld via deze ingebouwde luidspreker.
11. RCA-uitgang*: De audio van een spelende vinylplaat wordt gestuurd naar deze coaxiale audio-uitgang
op lijnniveau. Hij mag niet op apparaten met phononiveau worden aangesloten.
Opmerking: Als uw vinylplaat stopt voor het einde van de muziek is bereikt, schakel Autostop dan uit
voor deze plaat. Dit wordt aanbevolen voor de meeste 45-toerenplaten.
12. Ingang stroomkabel: gebruik de meegeleverde stroomadapter om het apparaat aan te sluiten op het
stroomnet.
18

Problemen Oplossen
Als u problemen ondervindt, raadpleeg dan de onderstaande stappen voor probleemoplossing.
Ik hoor geen geluid wanneer ik muziek afspeel:
• Als u muziek afspeelt vanaf vinyl:
o Zorg ervoor dat de Vinyl Transport is ingeschakeld en dat de naald op de plaat staat.
o Sluit de RCA-uitgangen van de Vinyl Transport aan op een stereo-installatie of actieve
luidsprekers. (Verbind ze niet met phono-ingangen; de RCA-uitgangen van de Vinyl Transport
staan ingesteld op lijnniveau en kunnen een apparaat met ingangen op phono-niveau
Mijn plaat draait niet aan de correcte snelheid; de klank is te hoog of te laag:
beschadigen.)
o Controleer of de schakelaar 33/45/78 op de correcte snelheid voor uw plaat staat.
Mijn plaat raakt de rand van het deksel:
o Gebruik steeds een slipmat om uw platen hoog genoeg op te tillen, zodat ze het deksel niet
Neem contact op met ION Audio of uw dealer voor technische ondersteuning VOORALEER DIT
PRODUCT TERUG TE ZENDEN. De contactgegevens zijn te vinden in het boekje met
veiligheidsinstructies bij dit product.
raken.
ionaudio.com
Technische specificaties
Afmetingen
(Lengte x Breedte x
Hoogte)
Gewicht
Uitvoervermogen
Batterijtype
Oplaad keer
Cartridge en stylus
349 mm x 254 mm x 114 mm
13,75 x 10 x 4,5
2,8 kg
6,1 lbs
5V DC, 1A, middelste pin: positief, tip: negatief; of 4 AA-batterijen
(in het onderste compartiment).
4 AA-batterijen
Tot 6 uur
Keramisch
Cartridge en stylus
De specificaties kunnen zonder voorafgaande kennisgeving worden gewijzigd.
De CZ-800-10 (saffieren naald) is meegeleverd en tevens
verkrijgbaar op www.ionaudio.com/products/details/CZ-800-10.
Een stylus voor 78 toeren, de iCT06rs, is verkrijgbaar op
www.ionaudio.com/ict06rs.
19

ionaudio.com
Manual Version 1.1
 Loading...