

Page 1

USER GUIDE
ENGLISH ( 3 – 8 )
GUÍA DEL USUARIO
ESPAÑOL ( 9 – 14 )
GUIDE D’UTILISATION
FRANÇAIS ( 15 – 20 )
GUIDA UTENTE
ITALIANO ( 21 – 26 )
BEDIENUNGSANLEITUNG
DEUTSCH ( 27 – 32 )
GEBRUIKERSHANDLEIDING
NEDERLANDS ( 33 – 38 )
Page 2

Page 3

WELCOME
Thank you for purchasing SLIDES 2 PC film and slide scanner. Please take a moment to read through this
manual in order to get the most out of your SLIDES 2 PC.
PRECAUTIONS
Before using SLIDES 2 PC, please ensure that you read and understand the safety precautions described
below. Always ensure that the SLIDES 2 PC is operated correctly:
Never operate SLIDES 2 PC inside of an aircraft or anywhere else where operation of such devices is
restricted. Improper use creates the risk of serious accident.
Do not try to open the case of SLIDES 2 PC or attempt to modify SLIDES 2 PC in any way. High-
voltage internal components create the risk of electric shock when exposed. Maintenance and repairs
should be performed only by authorized service providers.
Keep SLIDES 2 PC away from water and other liquids. Do not use SLIDES 2 PC with wet hands. Never
use SLIDES 2 PC in the rain or snow. Moisture creates the danger of fire and electric shock.
Keep SLIDES 2 PC and its accessories out of the reach of children and animals to prevent accidents or
damage to the image copier.
If you notice smoke or a strange odor coming from SLIDES 2 PC, turn the power off immediately. Take
SLIDES 2 PC to the nearest authorized service center for repair. Never attempt to repair SLIDES 2 PC
on your own.
Use only the recommended power accessories. Use of power sources not expressly recommended for
SLIDES 2 PC may lead to overheating, distortion of the equipment, fire, electrical shock or other
hazards.
SLIDES 2 PC may become slightly warm during use. This does not indicate malfunction.
If the exterior of SLIDES 2 PC needs cleaning, wipe it with a soft, dry cloth.
FCC NOTICE
This equipment has been tested and found to comply with the limits for a Class B digital device, pursuant to
Part 15 of the FCC Rules. These limits are designed to provide reasonable protection against harmful
interference in a residential installation. This equipment generates, uses and can radiate radio frequency
energy. If not installed and used in accordance with the instruction, it may cause harmful interference to radio
communication. However, there is no guarantee that interference will not occur in a particular installation. If
this equipment does cause harmful interference to radio or television reception, which can be determined by
turning the equipment on the off, the user is encouraged to try to correct the interference by one or more the
following suggestion:
Reorient or relocate the receiving antenna.
Increase the distance between the equipment and the receiver.
Connect the equipment to a different power outlet other than the one where the receiver is connected.
Consult an experienced television or radio technician for help.
SYSTEM REQUIREMENTS
PC:
Pentium® 4 1.6 GHz or equivalent AMD Athlon
Free USB2.0 port
512MB RAM internal memory minimum
500MB free hard disk space
1024 x 768 color monitor
CD-ROM drive
Windows XP Service Pack 2, Vista or 7 (32-bit
CAUTION: To comply with the limits for a Class B digital device, pursuant to Part 15 of the FCC
Rules, this device must only be installed on computer equipment certified to comply with the
Class B limits.
MAC:
Intel Core Duo or higher processor
recommended
Free USB2.0 port
768MB RAM internal memory minimum
500MB free hard disk space
1024 x 768 color monitor
CD-ROM drive
or 64-bit)
Mac OS X 10.6 or higher
3
Page 4
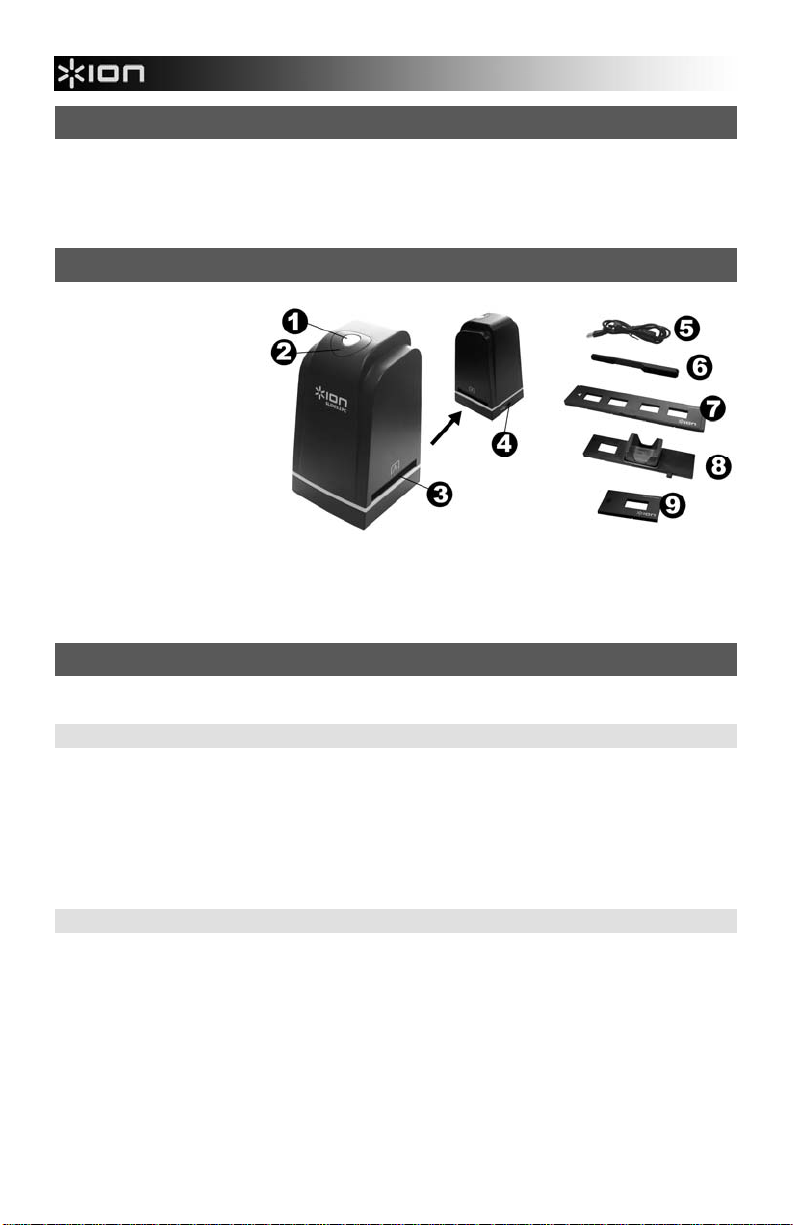
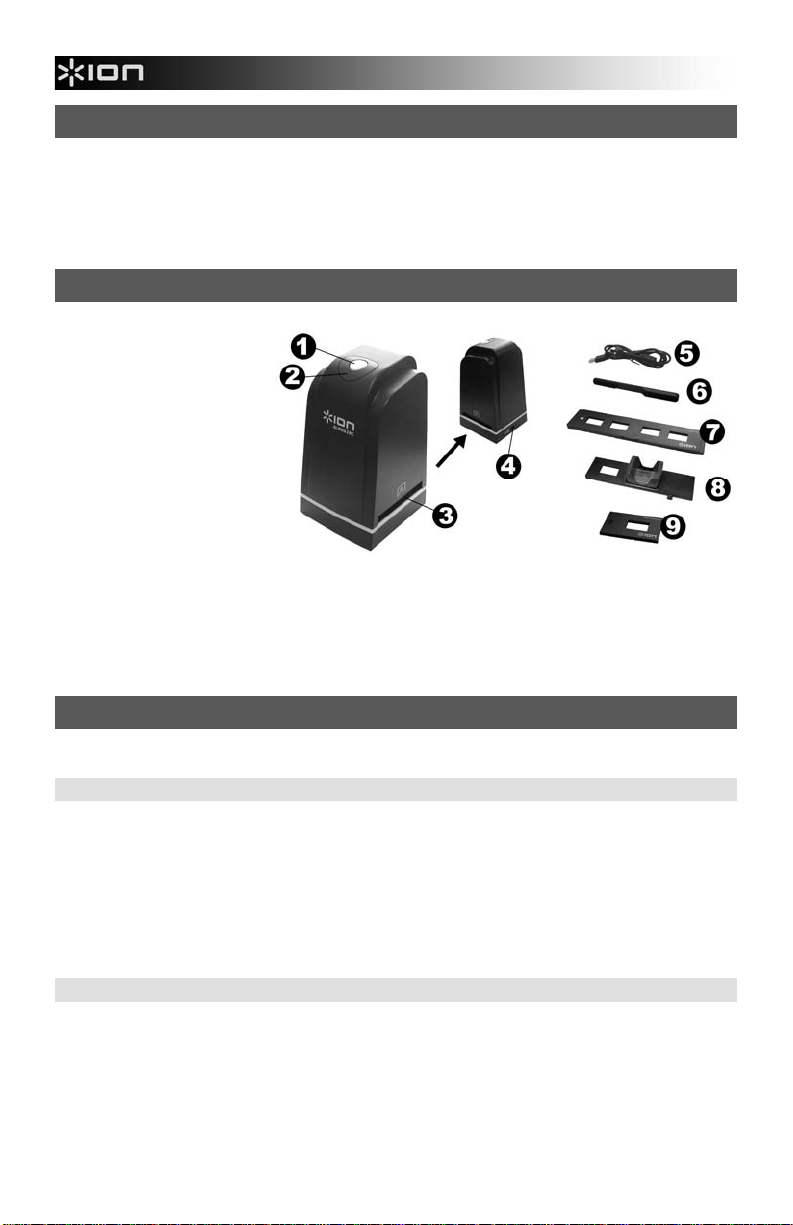
BOX CONTENTS
SLIDES 2 PC
Software CD
Slide holder
Rapid slide feeder
Negative roll feeder
Cleaning brush
Quickstart Poster
Safety Instructions & Warranty Information Booklet
SLIDES 2 PC FEATURES
1. COPY BUTTON
2. POWER LED
3. FILM HOLDER SLOT
4. USB PORT
5. USB CABLE
6. BRUSH
7. SLIDE HOLDER
8. RAPID SLIDER
FEEDER
9. NEGATIVE ROLL
FEEDER
Note: We strongly suggest using a clean, dry, non-alcohol cotton swab to insert into the image copier slot
and clean the glass surface periodically to produce a clear image. Please make sure your film negatives/
mounted slides and cover trays are clean before inserting into the copier as well. Dust or dirt from the
negatives and cover trays will affect the quality of your scanned images.
SOFTWARE INSTALLATION
To use the SLIDES 2 PC you must install ImageScanTool in advance.
SOFTWARE INSTALLATION (WINDOWS)
Note: Please remove any prior version of ImageScanTool before installing this version.
1. On the window that appears after you insert the disc, click "Install Software."
If this window does not automatically appear, double-click "My Computer" then double-click the name
of the CD. The window should appear. If the window still does not appear, right-click the name of the
CD and select "Explore." Once the CD's contents are shown, double-click "Install.exe."
2. Follow the on-screen instructions.
3. Restart the computer.
SOFTWARE INSTALLATION (MAC)
1. Insert the installation CD into the CD-ROM drive and the click the CD icon.
2. Double-click "ImageScanTool Installer."
3. Follow the on-screen instructions.
4
Page 5
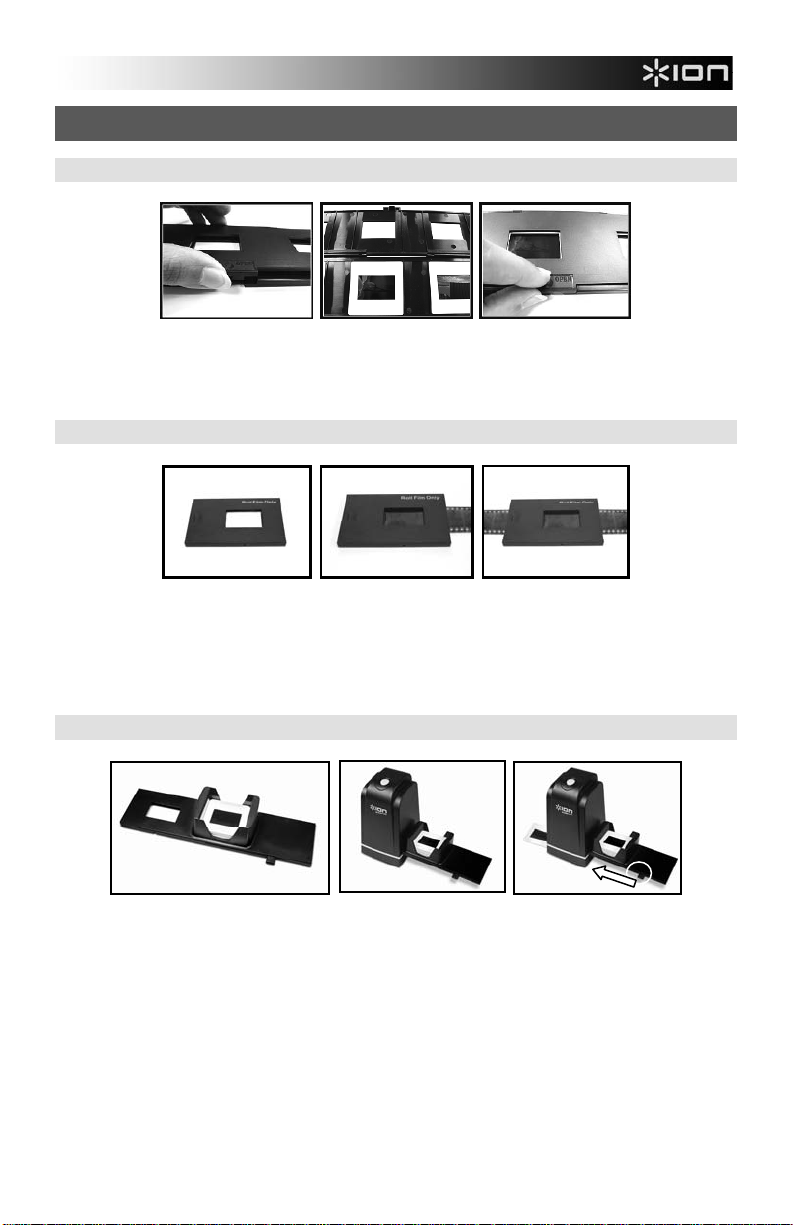
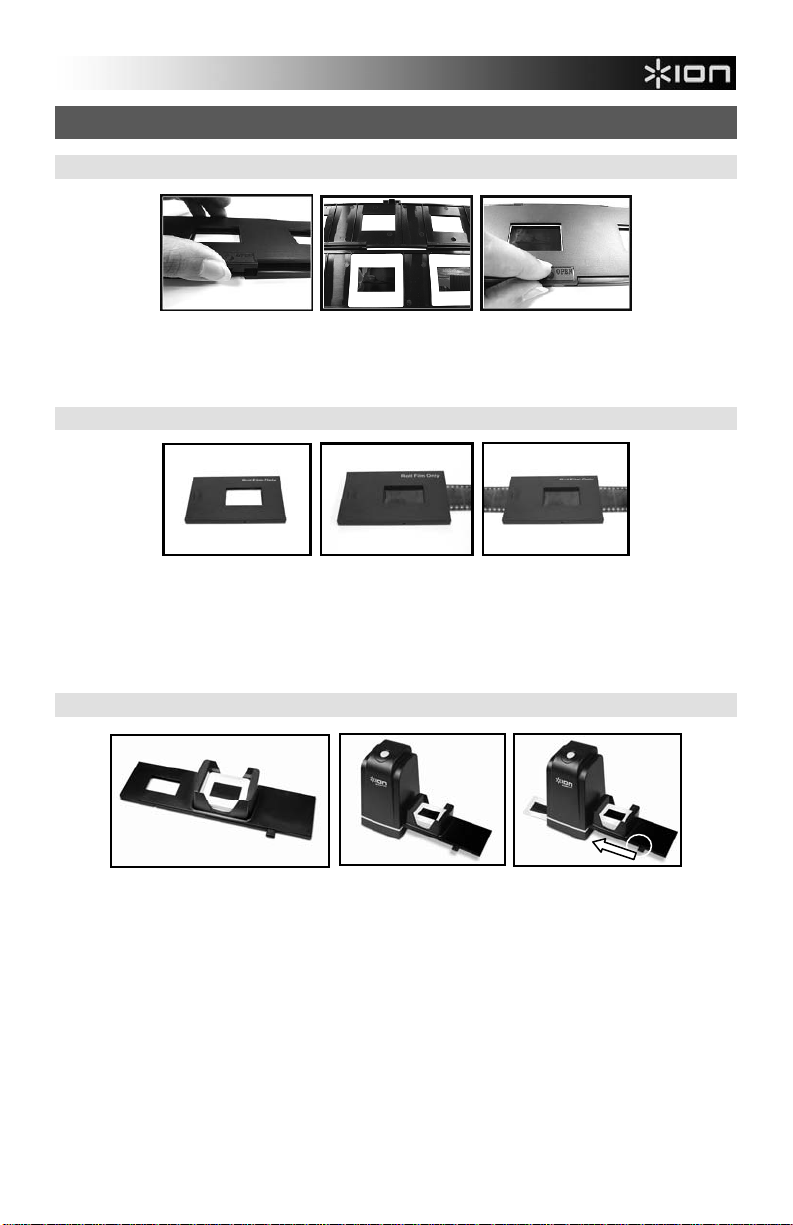
USING THE INCLUDED HOLDERS
SLIDE HOLDER
1. Open the film holder by lifting the tab on the bottom.
2. Insert the slide(s) into the slide slot(s) or lay the negative over the negative slot.
3. Close the film holder. Be sure the latch and sides of the holder are securely in place.
ROLL FILM HOLDER
1. Lay the film holder flat.
2. Insert one end of the roll of film in the slot on the right-hand side of the holder.
3. Gently push/pull the roll of film through the holder to move from picture to picture.
Tip: To avoid laying a negative in the wrong direction (which will produce a mirror image), be sure you
can correctly read the serial numbers at the top of the negative when placing it in the holder.
RAPID SLIDE FEEDER
1. With the lever all the way to the right, stack your slides in the rapid slide feeder.
2. Place the rapid slide feeder into the FILM HOLDER SLOT.
3. Push the lever towards the left, then pull the lever back to the right again to load a slide from the feeder
into SLIDES 2 PC. Repeat this step for subsequent slides (which will push the used slides out the
other side).
5
Page 6
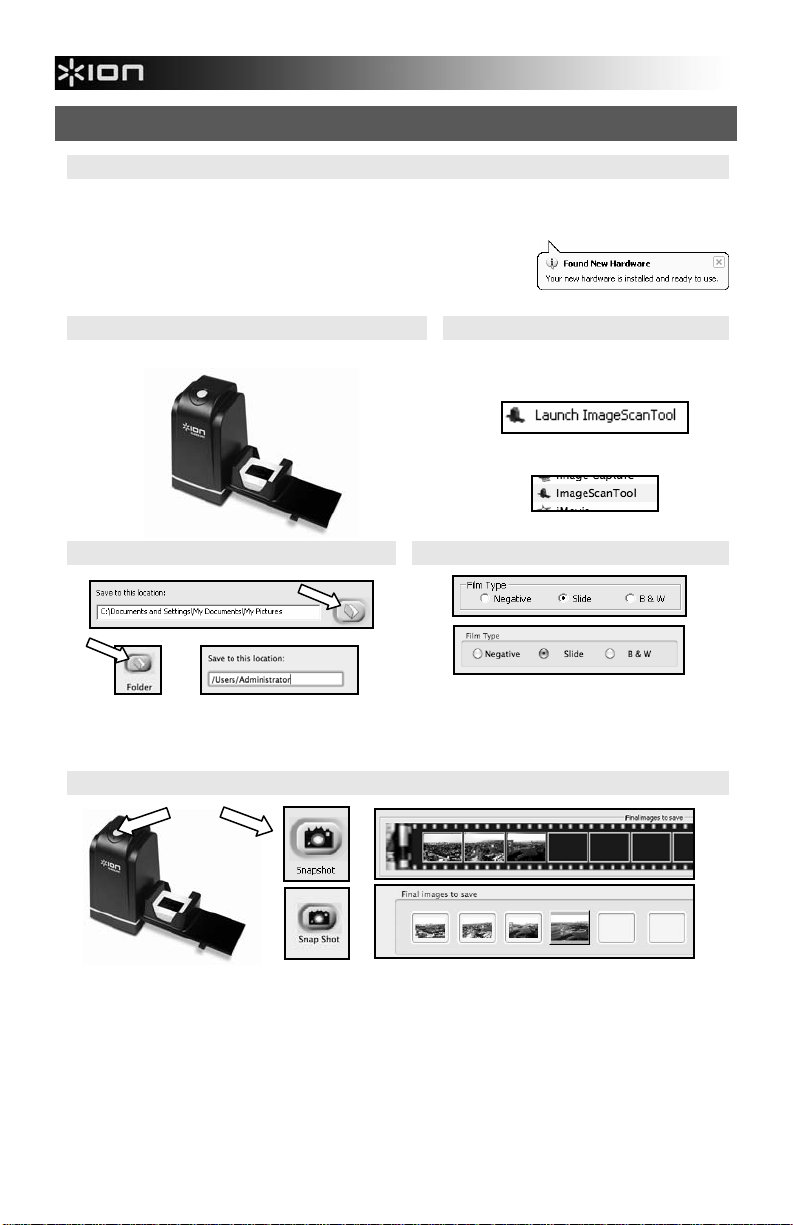
USING THE SLIDES 2 PC
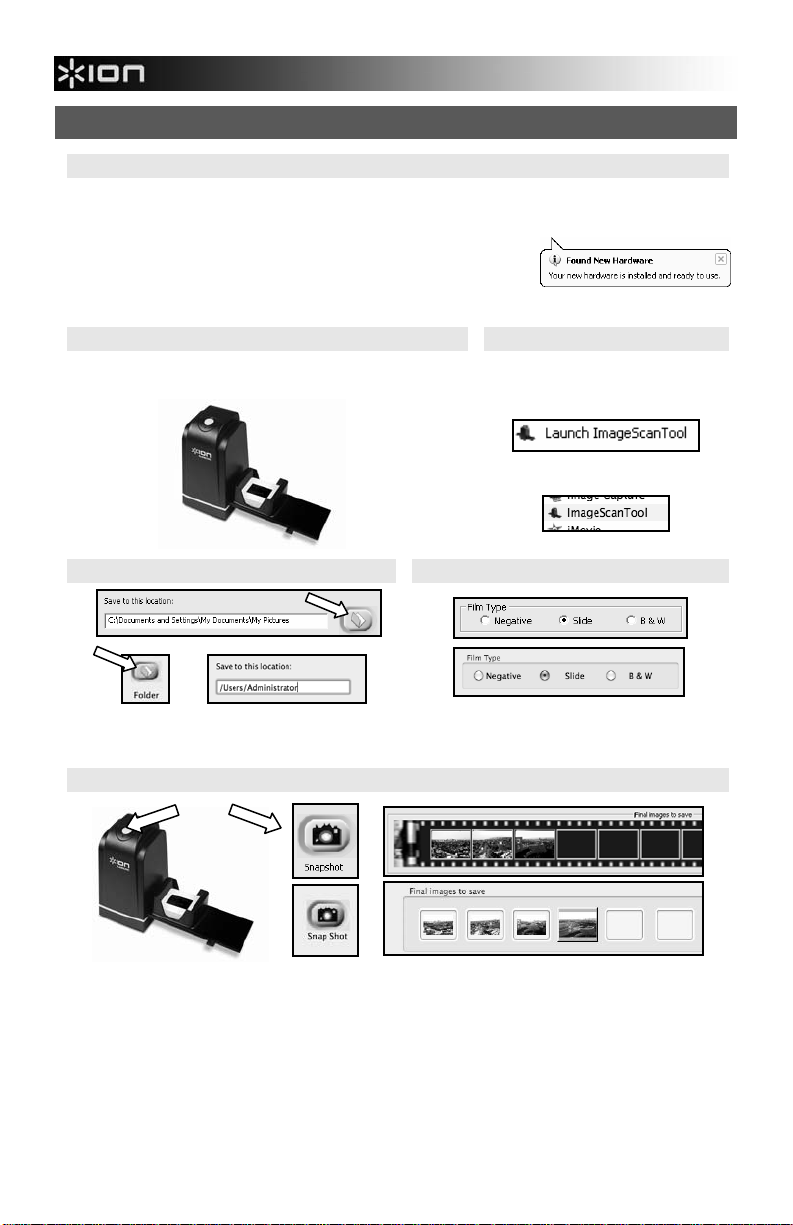
1
Plug the USB cable of the SLIDES 2 PC into your computer’s USB port. Once connected, the power LED
light will be blue.
Note for Windows users: The first time you connect SLIDES 2 PC to
your computer, wait a few seconds until you see a dialog box that says
"Found New Hardware" (this means the computer recognizes the
SLIDES 2 PC). After you see this, SLIDES 2 PC is ready to use.
2
Insert the loaded film / slide holder properly into the slot
as shown.
4
Click the "folder" icon button and select the location
to save your pictures.
6
or
3
Go to Start Menu All Programs 35mm
Film Scanner Launch ImageScanTool
(PC),
or Applications ImageScanTool (Mac).
5a
Select the proper film type.
Click “Snapshot” on the screen or press the COPY button on SLIDES 2 PC.
You can adjust the location of the film by moving the film holder.
The maximum is 12 pictures in the preview area. Press the “Save” button to save the pictures to your
computer.
Note1: To ensure the best image quality, please allow about 5 seconds between snapshots and transfers
for white balance enhancement.
6
Page 7

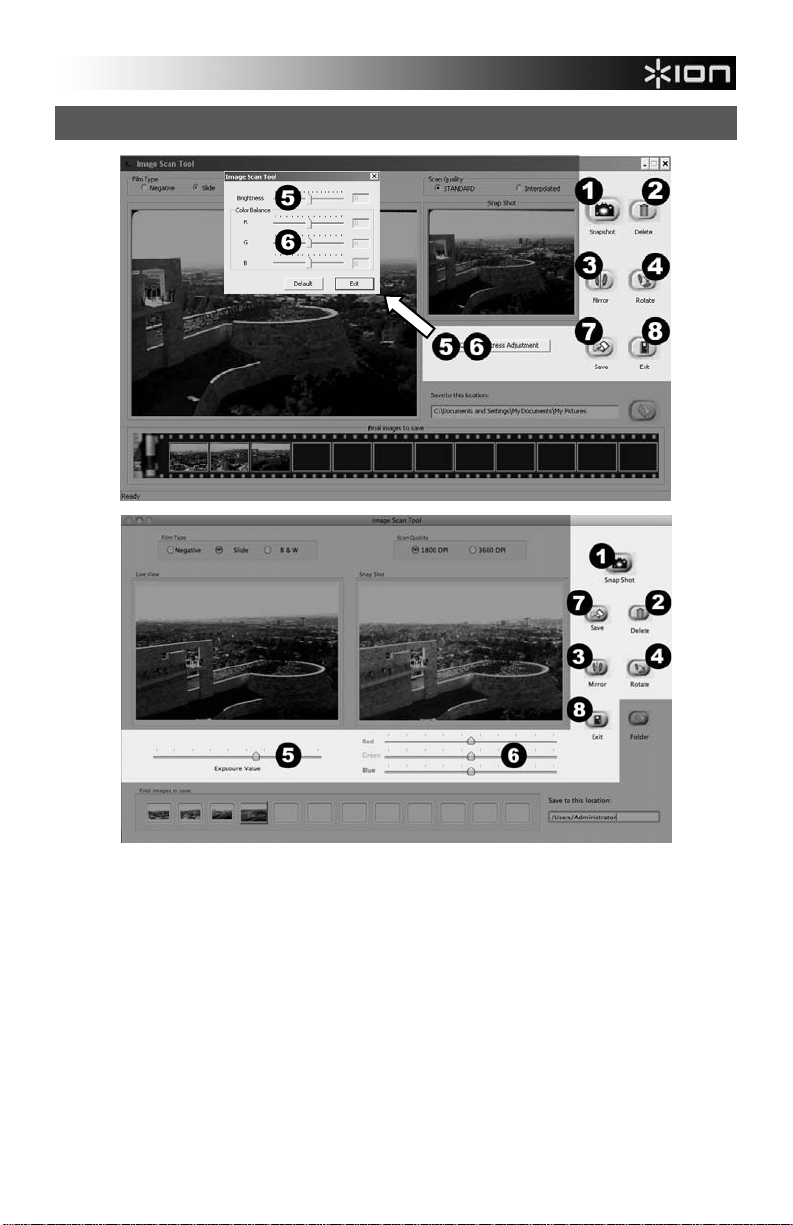
EDITING YOUR PICTURES
1. Snapshot – To capture your previewed image, click "Snapshot."
2. Delete – Deletes a file selected from the list.
3. Mirror – Click this button to mirror the image.
4. Rotate – Rotates the image right 90º.
5. Brightness/Exposure – Click and drag the slider to adjust the image's brightness.
6. Color Balance – Click and drag the RGB (red, green, and blue) sliders to adjust the image's co lor.
7. Save – Click "Save" to save the picture to your computer.
8. Exit – Click this button to exit the software.
7
Page 8

TROUBLESHOOTING
ISSUE POSSIBLE CAUSE RESOLUTION
My computer does not
recognize the SLIDES 2 PC.
I get a Windows message
that reads "device not
recognized."
I have a USB 2.0 port on my
computer, but my computer
still won't recognize my
image copier.
My installation disc will not
auto start.
Warning from Windows that
device "has not passed
Microsoft logo testing".
My SLIDES 2 PC is working
but some of my slides or
negatives look overexposed.
There is a black border
around the edge of the
image.
This symbol on the product or in the instructions means that your electrical and electronic
equipment should be disposed at the end of its life separately from your household waste.
There are separate collection systems for recycling in the EU. For more information, please
contact the local authority or your retailer where you purchased the product.
SLIDES 2 PC not plugged
into a high-speed USB
port.
All ports on your computer
may not be high speed.
May be a problem with
your CD drive.
This is normal. OK to
continue.
Time for auto exposure
varies according to your
computer configuration.
The slide or film might not
be properly inserted in the
holder, or the holder might
not be fully inserted into
the SLIDES 2 PC.
Your computer must have a USB 2.0 to
communicate with your SLIDES 2 PC. Check
to see if USB 2.0 is installed on your
computer. If you do not have a USB 2.0
installed on your computer you can upgrade
your USB ports. This hardware is available at
most electronic stores.
Even though you may have USB 2.0 installed,
all of your USB ports may not be USB 2.0
compatible. Check all your USB ports to find
the 2.0 compatible ports.
Check to see if your CD drive is operating
properly. If possible, check another
computer to see if the disc is recognized.
If you are able to browse the contents of the
CD but the installation does not start
automatically, please double-click on
Install.exe.
Choose "Continue anyway".
The image copier will not harm your computer.
(Windows certification is in process for this
software)
The image copier self adjusts to your
slide/negative exposure. Wait for the live
view window to stop adjusting for exposure
and then click "Capture."
Check your slides or negatives to see if they
may have been overexposed when originally
developed. Several photo adjusting software
applications are available to "clean-up" your
newly digitized picture.
Remove the holder from SLIDES 2 PC and
make sure the slide or film is placed correctly
in the holder. Reinsert the holder into SLIDES
2 PC (it should click into place when inserted
properly).
8
Page 9

BIENVENIDO
Gracias por adquirir un escáner de películas y diapositivas SLIDES 2 PC. Tómese un momento para leer
este manual a fin de obtener lo máximo de su SLIDES 2 PC.
PRECAUCIONES
Antes de usar el SLIDES 2 PC, asegúrese de leer y entender las precauciones de seguridad descritas a
continuación. Asegúrese siempre de operar correctamente el SLIDES 2 PC:
Nunca opere el SLIDES 2 PC dentro de una aeronave ni en ningún otro lugar donde la operación de
tales dispositivos esté restringida. El uso incorrecto crea el riesgo de graves accidentes.
No trate de abrir la cubierta del SLIDES 2 PC ni intente modificarlo de ninguna manera. Los
componentes internos de alta tensión crean el riesgo de electrocución cuando están expuestos. El
mantenimiento y las reparaciones deben realizarlos únicamente proveedores de servicio autorizados.
Mantenga el SLIDES 2 PC lejos del agua y de otros líquidos. No use el SLIDES 2 PC con las manos
mojadas. Nunca use SLIDES 2 PC en la lluvia o la nieve. La humedad crea el peligro de incendio y
electrocución.
Mantenga el SLIDES 2 PC y sus accesorios fuera del alcance de los niños y los animales, a fin de
prevenir accidentes o daños a la copiadora de imágenes.
Si nota que sale humo o un olor extraño del SLIDES 2 PC, apáguelo inmediatamente. Lleve el SLIDES
2 PC a centro de servicio autorizado más cercano para que lo reparen. Nunca intente reparar el
SLIDES 2 PC usted mismo.
Use únicamente los accesorios de alimentación recomendados. El uso de fuentes de alimentación no
recomendadas expresamente para el SLIDES 2 PC puede causar recalentamiento, deformación del
equipo, incendio, electrocución u otros riesgos.
El SLIDES 2 PC puede calentarse ligeramente durante el uso. Esto no indica falla
Si el exterior del SLIDES 2 PC necesita limpieza, pásele un paño blando y seco.
AVISO DE LA FCC
Este equipo fue probado y se comprobó que cumple los límites correspondientes a un dispositivo digital
clase B, según la Parte 15 de las reglamentaciones de la FCC. Estos límites están diseñados para
proporcionar una razonable protección contra las interferencias perjudiciales en una instalación residencial.
Este equipo genera, usa y puede irradiar energía de radiofrecuencia. Si no se instala y usa de acuerdo con
las instrucciones, puede causar interferencias perjudiciales a las radiocomunicaciones. No obstante, no
existe garantía de que no se produzcan interferencias en una instalación particular. Si este equipo causa
interferencias perjudiciales a la recepción de radio o televisión, lo que puede comprobarse encendiendo y
apagando el equipo, se recomienda al usuario intentar corregir la interferencia mediante una o más de las
siguientes medidas:
Reorientar o cambiar de posición la antena receptora.
Aumentar la separación entre el equipo y el receptor.
Conectar el equipo a un tomacorriente diferente al que está conectado el receptor.
Consultar a un técnico experimentado de televisión o radio para solicitar asistencia.
PRECAUCIÓN: Para cumplir con los límites correspondientes a un dispositivo digital clase B, de
acuerdo a la Parte 15 de las Reglas de la FCC, este dispositivo debe instalarse sólo en equipos
de computación certificados en cuanto al cumplimiento de los límites de la clase B.
REQUISITOS DE SISTEMA
PC:
Pentium® 4 de 1.6 GHz o AMD equivalente
Puerto USB2.0 libre
512 MB de RAM de memoria interna mínimo
500 MB de espacio libre en disco duro
Monitor color 1024 x 738
Lector de CD-ROM
Windows XP Service Pack 2, Vista o 7 (32-
/64-bit)
MAC:
Se recomienda procesador Intel Core Duo or
higher
Puerto USB2.0 libre
768 MB de RAM de memoria interna mínimo
500 MB de espacio libre en disco duro
Monitor color 1024 x 738
Lector de CD-ROM
Mac OS X 10.6 o superior
9
Page 10
CONTENIDO DE LA CAJA
SLIDES 2 PC
CD software
Soporte de diapositivas
Alimentador rápido de diapositivas
Alimentador de rollo de negativos
Cepillo de limpieza
Póster de inicio rápido
Instrucciones de seguridad e información
sobre la garantía
CARACTERÍSTICAS DEL SLIDES 2 PC
1. BOTÓN DE COPIA
2. LED DE ENCENDIDO
3. RANURA DEL SOPORTE
DE PELÍCULA
4. PUERTO USB
5. CABLE USB
6. CEPILLO
7. SOPORTE DE
DIAPOSITIVAS
8. ALIMENTADOR RÁPIDO
DE DIAPOSITIVAS
9. ALIMENTADOR DE
ROLLO DE NEGATIVOS
Nota: Recomendamos especialmente usar un hisopo de algodón seco, sin alcohol, para insertar en la
ranura de la copiadora de imágenes y limpiar la superficie de vidrio periódicamente, a fin de lograr imágenes
claras. Asegúrese de que sus negativos y diapositivas montadas y las bandejas estén limpias antes de
insertarlas en la copiadora. El polvo o la suciedad de los negativos y las bandejas pueden afectar a la
calidad de las imágenes escaneadas.
INSTALACIÓN DEL SOFTWARE
Para usar el SLIDES 2 PC, debe instalar previamente el programa ImageScanTool.
INSTALACIÓN DEL SOFTWARE (WINDOWS)
Nota: "BORRE" cualquier versión anterior de ImageScanTool antes de instalar esta versión.
1. En la ventana que aparece después de insertar el disco, haga clic en "Install Software".
Si esta ventana no aparece automáticamente, haga doble clic en "My Computer" (Mi PC) y luego en el
nombre del CD. Debe aparecer la ventana. (Si la ventana sigue sin aparecer, haga doble clic en el CD
y seleccione "Explore" (Explorar).) Una vez que se muestra el contenido del DVD, haga doble clic en
"Setup.exe".
2. Siga las instrucciones de la pantalla.
3. Reinicie la computadora.
INSTALACIÓN DEL SOFTWARE (MAC)
1. Inserte el CD de instalación en el lector de CD-ROM y haga clic en el icono del CD.
2. Haga doble clic en "ImageScanTool Installer".
3. Reinicie la computadora.
10
Page 11
CÓMO USAR LOS SOPORTES INCLUIDOS
SOPORTE DE DIAPOSITIVAS
1. Abra el soporte de diapositivas levantando la lengüeta de la parte inferior.
2. Inserte las diapositivas en las ranuras para las mismas.
3. Cierre el soporte de diapositivas. Asegúrese de que la traba y los costados del soporte estén
colocados firmemente en su sitio.
ALIMENTADOR DE ROLLO DE NEGATIVOS
1. Coloque el rollo de negativos en forma plana.
2. Inserte un extremo del rollo de película en la ranura del lado derecho del soporte.
3. Empuje o tire con delicadeza del rollo de película a través del soporte para pasar de foto a foto.
Consejo: Para evitar colocar el negativo en sentido incorrecto (lo que produciría una imagen
espejada), asegúrese de que pueda leer correctamente los números de serie de la parte superior del
mismo cuando lo coloca en el soporte.
ALIMENTADOR RÁPIDO DE DIAPOSITIVAS
1. Con la palanca totalmente a la derecha, apile las diapositivas en el alimentador rápido.
2. Coloque el alimentador rápido de diapositivas en la RANURA DEL SOPORTE DE PELÍCULA.
3. Empuje la palanca hacia la izquierda y luego de regreso a la derecha para cargar una diapositiva del
alimentador en el SLIDES 2 PC. Repita este paso para las diapositivas siguientes (que empujarán a
las usadas hacia afuera del otro lado).
11
Page 12
CÓMO USAR EL SLIDES 2 PC
1
Enchufe el cable USB del SLIDES 2 PC en el puerto USB de su computadora. Una vez conectado, el
LED de encendido se ilumina con luz azul.
Nota para usuarios de Windows: La primera vez que conecte SLIDES 2
PC a la computadora, espere algunos segundos hasta ver un cuadro de
diálogo que diga "Found New Hardware" (Encontrado nuevo hardware)
(esto significa que la computadora reconoce el SLIDES 2 PC). Cuando lo
vea, SLIDES 2 PC está listo para usar.
2
Inserte el soporte de película / diapositivas cargado
correctamente en la ranura, como se muestra.
3
Vaya al menú Start Menu All
Programs 35mm Film Scanner
Launch ImageScanTool (PC),
o Applications ImageScanTool
(Mac).
4
Haga clic en el icono de la "carpeta" y seleccione el
lugar donde guardará sus fotografías.
5a
Seleccione el tipo de película apropiados.
6
o
Haga clic en “Snapshot” (Instantánea) de la pantalla o pulse el botón COPY (Copiar) del SLIDES 2 PC.
Puede ajustar la ubicación de la película moviendo el soporte.
Un recuadro verde indica las imágenes fotografías en el área de vista preliminar, el máximo es 12
imágenes en esta área. Pulse el botón “Save” (Guardar) para guardar las fotografías en su computadora.
Nota 1: Para asegurar la mejor calidad de imagen, espere 5 segundos entre instantáneas y
transferencias, para mejorar el balance de blancos.
12
Page 13
CÓMO EDITAR LAS FOTOGRAFÍAS
1. Snapshot – Para capturar la imagen de la vista preliminar, haga clic "Snapshot" (instantánea).
2. Eliminar – Permite eliminar un archivo seleccionado en la lista.
3. Espejo – Haga clic en este botón para crear un espejo de la imagen.
4. Giro a izquierda o derecha – Permite girar la imagen 90º a la derecha.
5. Ajuste del brillo – Haga clic y arrastre el cursore para ajustar el brillo de la imagen.
6. Ajuste de color – Haga clic y arrastre los cursores RGB (rojo, verde y azul) para ajustar el color.
7. Guardar – Haga clic "Save" para guardar la fotografía en su computadora.
8. Exit – Haga clic en este botón para salir del software.
13
Page 14

SOLUCIÓN DE PROBLEMAS
PROBLEMA CAUSA POSIBLE RESOLUCIÓN
Mi computadora no reconoce el
SLIDES 2 PC.
Apareció un mensaje de
Windows que dice "device not
recognized" (Dispositivo no
reconocido)
Tengo un puerto USB 2.0 en
mi computadora, pero todavía
no reconoce a mi copiadora de
imágenes
Mi disco de instalación no
arranca automáticamente
Advertencia de Windows de
que el dispositivo "has not
passed Microsoft logo testing"
(no paso la prueba del logo de
Microsoft).
Mi SLIDES 2 PC funciona pero
algunas de mis diapositivas o
negativos parecen
sobreexpuestos.
Hay un reborde negro
alrededor del borde de la
imagen.
Este símbolo en el producto o en las instrucciones significa que su equi po eléctrico y electrónico
debe ser desechado al final de su vida útil separadamente de sus residuos domésticos. Existen
sistemas de recolección por separado para reciclado en la Unión Europea. Para más información,
consulte a la autoridad local o al minorista al que compró el producto.
SLIDES 2 PC no enchufado
en un puerto USB de alta
velocidad.
Todos los puertos de la
computadora pueden no
estar en alta velocidad
Puede existir un problema
en el lector de CD
Esto es normal. Puede
continuar.
El tiempo de autoexposición
varía de acuerdo a la
configuración de su
computadora.
Es posible que la diapositiva
o película no esté bien
insertada en el soporte o que
éste no esté totalmente
insertado en el SLIDES 2
PC.
Su computadora debe tener un puerto USB 2.0
para comunicarse con el SLIDES 2 PC. Verifique
si está instalado USB 2.0 en su computadora. Si
no lo tiene, puede actualizar sus puertos USB.
Este hardware está disponible en la mayoría de
las tiendas de electrónica.
Aunque pueda tener instalado USB 2.0, puede
ocurrir que no todos sus puertos USB sen
compatibles con USB 2.0. Verifique todos sus
puertos USB para encontrar los compatibles con
2.0
Verifique si su lector de CD está funcionando
correctamente. Si es posible, pruebe con otra
computadora para ver si se reconoce el disco.
SI puede examinar el contenido del CD pero no
instalación no arranca automáticamente, haga
doble clic en install.exe.
Elija "Continue anyway" (Continuar igualmente).
La copiadora de imágenes no dañará a su
computadora. (La certificación de Windows de
este software está en proceso).
La copiadora de imágenes se autoajusta a la
exposición de su diapositiva o negativo. Espere
que la ventana de vista en vivo termine de
ajustarse para la exposición y luego haga clic en
"Capture."
Revise sus diapositivas o negativos para ver si
pueden haber sido sobreexpuestos cuando se
revelaron originalmente. Se dispone de varias
aplicaciones de software de ajuste de fotografías
para "limpiar" su foto recién digitalizada.
Retire el soporte del SLIDES 2 PC y asegúrese
de que la diapositiva o película esté colocada
correctamente en el soporte. Reinserte el soporte
en el SLIDES 2 PC (debe hacer un clic en su sitio
cuando queda insertado correctamente).
14
Page 15

BIENVENUE
Nous vous remercions d’avoir fait l’achat d’un numériseur SLIDES 2 PC pour film et diapositives. Veuillez
prendre un moment pour lire ce manuel en entier afin de tirer le plus d’avantages possibles de votre SLIDES
2 PC.
MISES EN GARDE
Avant d'utiliser le SLIDES 2 PC, veuillez vous assurer de lire et comprendre les mises en garde relatives à la
sécurité décrites ci-dessous. Il est important de s'assurer que le SLIDES 2 PC est utilisé de façon adéquate.
Ne jamais utiliser le`SLIDES 2 PC à l'intérieur d'un aéronef/avion ou n'importe où ailleurs où l'utilisation
d'un tel appareil est interdite. Une mauvaise utilisation risque de provoquer un accident grave.
Ne pas essayer d’ouvrir le boîtier du SLIDES 2 PC ou d’altérer le SLIDES 2 PC de quelque façon que
ce soit. Les composants haute tension internes créent le risque de décharge électrique lorsqu’ils sont
exposés. L’entretien et les réparations doivent être effectués par des fournisseurs d'entretien agréés.
Garder le SLIDES 2 PC loin de l’eau et d'autres liquides. Ne pas utiliser le SLIDES 2 PC avec les
mains humides ou mouillées. Ne jamais utiliser le SLIDES 2 PC sous la pluie ou dans la neige.
L’humidité crée un risque d’incendie et de décharge électrique.
Garder le SLIDES 2 PC et ses accessoires hors de la portée des enfants et des animaux afin de
prévenir les accidents ou les dommages à l'appareil.
Si de la fumée ou une odeur étrange s'échappe du SLIDES 2 PC, éteindre l'appareil immédiatement.
Apporter le SLIDES 2 PC au centre de service agréé le plus près de chez vous pour les réparations.
Ne jamais essayer de réparer le SLIDES 2 PC vous-même.
Utiliser uniquement les accessoires d’alimentation recommandés. Utiliser des sources d’alimentation
qui ne sont pas recommandées pour le SLIDES 2 PC pourrait provoquer une surchauffe, une distorsion
de l’équipement, un incendie, un choc électrique ou d’autres dangers.
Le SLIDES 2 PC devient légèrement chaud pendant l’utilisation. Cela ne signifie pas une défectuosité.
Si l’extérieur du SLIDES 2 PC nécessite un nettoyage, essuyer avec un linge doux et sec.
AVIS FCC
Cet équipement a été testé et est conforme avec les limites de dispositif numérique de classe B en vertu de
l'article 15 des règlements du FCC. Ces limites sont conçues afin de fournir une protection raisonnable
contre les interférences dommageables dans une installation résidentielle. Cet équipement produit, utilise et
peut radier de l'énergie des fréquences radio. S’il n’est pas installé et utilisé selon les directives, il peut
provoquer une interférence dommageable aux communications radio. Cependant, il n’y a aucune garantie
que l’interférence ne se produira pas sur une installation particulière. Si cet équipement provoque une
interférence dommageable à la réception radio et télévision, laquelle peut être déterminée en éteignant ou
allumant l’équipement, l’utilisateur doit essayer de corriger l’interférence grâce aux mesures suivantes :
réorienter ou relocaliser les antennes de réception ;
augmenter la distance entre l’équipement et le récepteur ;
brancher l’équipement à une prise d’alimentation différente que celle où le récepteur est branché ;
consulter un technicien agréé pour de l’aide.
CONFIGURATION NÉCESSAIRE
PC :
Pentium® 4 1,6 GHz ou équivalent AMD
Po rt USB 2.0 disponible
Minimum de 512 Mo de mémoire vive
500 Mo d’espace disque libre
Moniteur couleur 1024 x 768
Lecteur CD-ROM
Windows XP Service Pack 2, Vista ou 7 (32-
MISE EN GARDE : Pour être conforme aux limites de dispositif numérique de Classe B, relatives
à l’article 15 des règlements du FCC, ce dispositif doit seulement être installé sur un équipement
informatique certifié afin d’être conforme aux limites de Classe b.
MAC :
Processeur Intel Core Duo or higher
Athlon
/64-bit)
recommandé
Po rt USB 2.0 disponible
Minimum de 768 Mo de mémoire vive
500 Mo d’espace disque libre
Moniteur couleur 1024 x 768
Lecteur CD-ROM
Mac OS X 10.6 ou supérieure
15
Page 16

CONTENU DE LA BOÎTE
SLIDES 2 PC
CD du logiciel
Porte-diapositive
Porte-diapositive d'alimentation rapide
Porte pour rouleau de pellicule
Brosse de nettoyage
Affiche de démarrage rapide
Consignes de sécurité et information concernant la
garantie
FONCTIONS DU SLIDES 2 PC
1. TOUCHE COPY
(COPIER)
2. DEL D'ALIMENTATION
3. FENTE POUR
SUPPORT
4. PORT USB
5. CÂBLE USB
6. BROSSE
7. PORTE-DIAPOSITIVE
8. PORTE-DIAPOSITIVE
D'ALIMENTATION
RAPIDE
9. PORTE POUR
ROULEAU DE PELLICULE
Remarque : nous recommandons fortement d’utiliser un coton tige propre, sec et sans alcool pour insérer
dans la fente du numériseur et nettoyer la surface en verre régulièrement afin d'obtenir une image plus claire.
Veuillez vous assurer que vos négatifs ou diapositives montées et les paniers sont propres avant d'insérer
dans le numériseur. La poussière ou la saleté provenant des négatifs et des paniers influencera la qualité
des images numérisées.
INSTALLATION DU LECTEUR ET DU LOGICIEL
Pour utiliser le SLIDES 2 PC, vous devez installer ImageScanTool au préalable.
INSTALLATION DU LOGICIEL (WINDOWS)
Remarque : veuillez « SUPPRIME » toute version antérieure de ImageScanTool avant d'installer cette
version.
1. Sur la fenêtre qui s’affiche une fois le DVD-ROM inséré, cliquez sur « Install Software ».
Si aucune fenêtre ne s'ouvre, double-cliquez sur « Poste de travail », puis double-cliquez sur le nom
du DVD-ROM. La fenêtre devrait s’afficher. Si la fenêtre ne s'ouvre toujours pas, double-cliquez sur le
nom du DVD-ROM puis sélectionnez « Explorer ». Une fois le contenu du DVD-ROM affiché, doublecliquez sur « Setup.exe ».
2. Suivre les instructions données à l’écran.
3. Redémarrer l’ordinateur.
INSTALLATION DU LOGICIEL (MAC)
Remarque : veuillez « SUPPRIME » toute version antérieure de ImageScanTool avant d'installer
ImageScanTool.
1. Insérez le CD d’installation dans le lecteur CD-ROM et cliquez sur l'icône CD.
2. Double-cliquez sur « ImageScanTool Installer ».
3. Redémarrer l’ordinateur.
16
Page 17

UTILISATION DES SUPPORTS INCLUS
PORTE-DIAPOSITIVES
1. Ouvrir le porte-diapositive en levant l’onglet du dessous.
2. Faites glisser la ou les diapositives dans les emplacements.
3. Fermez le porte-diapositive. Assurez-vous que le fermoir et les côtés du porte-diapositive sont bien
fermés.
SUPPORT POUR ROULEAU DE PELLICULE
1. Placez le support pour rouleau de pellicule à plat.
2. Insérez l’extrémité du rouleau de pellicule dans la fente droite du support.
3. Faites passer le rouleau de pellicule doucement dans le support afin de déplacer la pellicule image par
image.
Conseil : Afin d’éviter de placer le négatif dans la mauvaise position (image inversée), vérifiez que
vous pouvez lire correctement les numéros de série dans le haut du négatif.
PORTE-DIAPOSITIVE D'ALIMENTATION RAPIDE
1. En plaçant le levier complètement à droite, empilez les diapositives dans le porte-diapositive
d'alimentation rapide.
2. Insérez le porte-diapositive d'alimentation rapide dans la fente pour support.
3. Poussez le levier vers la gauche, puis de nouveau vers la droite afin de charger la prochaine
diapositive du support dans le SLIDES 2 PC. Répétez ces étapes pour toutes les autres diapositives
(les diapositives visionnées ressortiront de l’autre côté de l'appareil).
17
Page 18

UTILISATION DU SLIDES 2 PC
1
Brancher le câble USB du SLIDES 2 PC dans le port USB de l’ordinateur. Une fois branché, le témoin
d’alimentation DEL s’allume en bleu.
Remarque pour les utilisateurs de Windows :
La première fois que vous branchez le SLIDES 2 PC à votre ordinateur,
attendez quelques minutes, jusqu’à ce que la boîte de dialogue « Ajout
de nouveau matériel détecté » s'affiche indiquant que l’ordinateur
reconnait le SLIDES 2 PC. Une fois ce message affiché, le SLIDES 2
PC est prêt à utiliser.
2
Insérer le panier chargé de négatifs / diapositives de façon
adéquate dans la fente comme illustré.
4
Cliquez sur l'icône de "chemise" et sélectionner
l’emplacement où sauvegarder les photos/images.
5a
Sélectionnez le type de film approprié.
6
ou
3
Cliquez sur Start Menu All
Programs 35mm Film Scanner
Launch ImageScanTool (PC)
ou Applications ImageScanTool
(Mac).
Cliquer sur « Snapshot » (Cliché) à l’écran ou appuyer sur la touche COPY (Copier) sur SLIDES 2 PC.
Vous pouvez régler l’emplacement du négatif en déplaçant le panier de négatif.
Une trame verte indiquera les images sélectionnées dans la zone d’aperçus ; le maximum de photos
dans la zone d’aperçus est de 12 images. Appuyer sur la touche « Save » (Sauvegarder) pour
sauvegarder les images sur votre ordinateur.
Remarque1 : pour assurer la meilleure qualité d’image, veuillez laisser cinq secondes entre chaque
cliché et transferts pour un équilibrage de blancs.
18
Page 19

MODIFICATION DES IMAGES
1. Snapshot – Pour saisir votre image en aperçu, cliquez sur « Snapshot » (instantané).
2. Supprimer – Ce bouton permet de supprimer le fichier sélectionné.
3. Miroir – Cliquez ce bouton afin de présenter l’autre face.
4. Rotation – Ce bouton permet de pivoter l’image vers la droite de 90º.
5. Ajustement de la luminosité – Cliquez et faites glisser le contrôle afin de régler la luminosité de
l’image.
6. Ajustement de la couleur – Cliquez et faites glisser les contrôles afin de régler la saturation et la
teinte (rouge, vert et bleu) de l’image.
7. Enregistrer – Cliquez sur « Save » pour sauvegarder l'image sur votre ordinateur.
8. Exit – Cliquez ce bouton afin de quitter le logiciel.
19
Page 20

GUIDE DE DÉPANNAGE
PROBLÈME CAUSE POSSIBLE SOLUTION
Mon ordinateur ne reconnaît
pas SLIDES 2 PC.
Je reçois le message d’erreur
suivant « device not
recognize » (appareil inconnu)
Je possède un port USB 2.0
sur mon ordinateur, mais mon
ordinateur ne reconnaît et ne
supporte pas mon numériseur.
Mon disque d’installation ne
démarre pas automatiquement
Avertissement de Windows que
l’appareil « a échoué à
l’évaluation du logo Microsoft. »
Mon SLIDES 2 PC fonctionne
mais quelques-unes de mes
diapositives ou négatifs
semblent surexposés.
Il y a une bordure noire autour
de l’image.
Ce symbole sur le produit ou dans les instructions signifie que votre équipement électrique ou
électronique doit être éliminé de façon approprié, lorsque désuet, séparément de vos déchets
domestiques. Certains de ces systèmes peuvent être recyclés aux É.-U. Pour plus amples
renseignements, veuillez communiquer avec les autorités locales ou le fournisseur où vous avez fait
l'achat du produit.
SLIDES 2 PC n’est pas
branché dans un port USB
haute vitesse
Tous les ports sur votre
ordinateur pourraient ne pas
avoir de haute vitesse
Problème possible avec le
lecteur CD.
Cela est normal. Ok pour
continuer.
Le temps d’exposition
automatique varie selon la
configuration de l’ordinateur.
La diapositive ou le film peut
être mal inséré dans le
porte-film, ou le porte-film
peut ne pas être inséré à
fond dans le SLIDES 2 PC.
Votre ordinateur doit avoir un USB 2.0 pour
communiquer avec votre SLIDES 2 PC. Vérifier
pour voir si un USB 2.0 est installé sur votre
ordinateur. Si vous ne possédez pas d’USB 2.0
installé sur votre ordinateur, vous pouvez mettre à
jour vos port USB. Ce matériel est en vente dans
la plupart des magasins d’électronique.
Même si vous possédez un USB 2.0 installé, tous
vos ports USB peuvent ne pas prendre en charge
USB 2.0. Vérifier tous vos ports USB pour
déterminer celui qui prend en charge le 2.0.
Vérifier que votre lecteur CD fonctionne
adéquatement. Si possible, vérifier avec un
autre ordinateur pour voir si le disque fonctionne
Si vous êtes incapable de naviguer le contenu du
CD, mais que l'installation ne démarre pas
automatiquement, double-cliquer sur Install.exe.
Sélectionner « Continuer ».
Le numériseur n’endommagera as votre
ordinateur. (L’autorisation de Windows est en
cours pour ce logiciel).
Le numériseur règle automatiquement votre
diapositive/négatif. Patientez pour la fenêtre
d'aperçu en direct pour interrompre le réglage
pour l'exposition et puis cliquer sur « Capture ».
Vérifier vos diapositives ou négatifs pour voir s’ils
ont été surexposés au développement.
Plusieurs applications de logiciel de réglage sont
disponibles pour « nettoyer » votre photo
numérique.
Retirez le porte-film du SLIDES 2 PC et assurezvous que la diapositive ou le film est correctement
inséré dans le porte-film. Réinsérez le porte-film
dans le SLIDES 2 PC (vous devriez entendre un
clic lorsqu'il est correctement inséré).
20
Page 21

BENVENUTI!
Grazie per aver acquistato uno scanner SLIDES 2 PC per pellicole e diapositive. Dedichi un po’ di tempo alla
lettura completa di questo manuale per ottenere il massimo dal Suo SLIDES 2 PC.
PRECAUZIONI
Prima di utilizzare SLIDES 2 PC, assicurarsi di aver letto e compreso a fondo le pre cauzioni d’ uso descr itte
di seguito. Assicurarsi sempre che lo SLIDES 2 PC sia utilizzato correttamente:
Mai utilizzare lo SLIDES 2 PC all’interno di un aeromobile o in qualsiasi altro luogo ove l’utilizzo di
dispositivi simili è proibito. Un utilizzo inadeguato crea il rischio di gravi incidenti.
Non cercare di aprire l’alloggiamento dello SLIDES 2 PC né tentare di modificare lo SLIDES 2 PC in
alcun modo. I componenti interni ad alto voltaggio creano il rischio di scossa elettrica se esposti.
Manutenzione e riparazioni devono essere effettuate unicamente da provider di servizi autorizzati.
Conservare lo SLIDES 2 PC lontano da acqua e altri liquidi. Non servirsi dello SLIDES 2 PC con le
mani bagnate. Mai utilizzare lo SLIDES 2 PC sotto la pioggia o la neve. L’umidità crea il pericolo di
incendio e di scossa elettrica.
Conservare lo SLIDES 2 PC ed i suoi accessori lontani dalla portata dei bambini e degli animali per
evitare incidenti o danni al dispositivo di copia delle immagini.
Se dallo SLIDES 2 PC dovessero provenire fumo o strani odori, spegnere immediatamente
l'alimentazione. Portare lo SLIDES 2 PC al più vicino centro di assistenza autorizzato affinché venga
riparato. Mai tentare di riparare lo SLIDES 2 PC da soli.
Servirsi unicamente degli accessori di alimentazione raccomandati. L’utilizzo di sorgenti di
alimentazione non espressamente raccomandate per lo SLIDES 2 PC può portare a surriscaldamento,
distorsione dell’apparecchio, incendio, scossa elettrica o altri pericoli.
Durante l’uso, lo SLIDES 2 PC si può riscaldare leggermente. Ciò non è segno di malfunzionamento.
Se la parte esterna dello SLIDES 2 PC richiede di essere pulita, passarla con un panno morbido e
asciutto.
DICHIARAZIONE FCC
Questo dispositivo è stato testato ed è risultato conforme ai limiti specificati per i dispositivi digitali di Classe
B, in base alla Sezione 15 delle Regole FCC. Tali limiti sono stati concepiti per fornire una protezione
adeguata contro interferenze dannose quando l’apparecchiatura è utilizzata in zone residenziali.
Questa apparecchiatura genera, utilizza ed è in grado di irradiare energia in radiofrequenza. Se non
installata ed utilizzata in accordo con le istruzioni può provocare interferenze dannose alle trasmissioni radio.
Tuttavia, non vi è alcuna garanzia che in una particolare installazione non si verifichino interf erenze. Se
questa apparecchiatura provoca interferenze con la ricezione radio o televisiva, determinabile accendendo e
spegnendo l’apparecchiatura, si prega di correggere il problema applicando uno o più dei seguenti rimedi:
Riorientare o ricollocare l’antenna ricevente.
Aumentare la distanza tra l’apparecchiatura e il ricevitore.
Collegare l’apparecchiatura ad una presa elettrica su un circuito differente da quello a cui è collegato il
ricevitore.
Consultare un tecnico radiotelevisivo esperto per assistenza.
REQUISITI DI SISTEMA
PC:
Pentium® 4 1.6 GHz o equivalente AMD Athlon
Porta USB2.0 libera
Memoria interna minima: 512MB RAM
Spazio libero su disco fisso: 500MB
Monitor a colori 1024 x 768
Unità CD-ROM
Windows XP con Service Pack 2, Windows Vista
ATTENZIONE: per essere conforme ai limiti specificati per un dispositivo digitale di Classe B in
base alla sezione 15 delle regole FCC, questo dispositivo deve essere installato unicamente su
apparecchiature informatiche certificate conformi ai limiti di Classe B.
MAC:
processore Intel Core Duo (raccomandato)
Porta USB2.0 libera
Memoria interna minima: 768MB RAM
Spazio libero su disco fisso: 500MB
Monitor a colori 1024 x 768
Unità CD-ROM
(32-/64-bit) o Windows 7
Mac OS X 10.6 o superiore
21
Page 22

CONTENUTI DELLA CONFEZIONE
SLIDES 2 PC
CD recante software
Support per diapositive
Alimentatore rapido diapositive
Alimentatore pellicole
Spazzola per la pulizia
Poster quickstart
Istruzioni di sicurezza e garanzia
CARATTERISTICHE DEL SLIDES 2 PC
1. TASTO COPIA
2. LED DI
ALIMENTAZIONE
3. SLOT PER PORTA
PELLICOLE / PORTA
DIAPOSITIVE
4. PORTA USB
5. CAVO USB
6. SPAZZOLA
7. SUPPORT PER
DIAPOSITIVE
8. ALIMENTATORE
RAPIDO DIAPOSITIVE
9. ALIMENTATORE PELLICOLE
Nota bene: raccomandiamo vivamente di utilizzare uno scovolo pulito, asciutto, privo di alcol da inserire
nello slot del dispositivo di copia delle immagini e pulire periodicamente la superficie di vetro per produrre
un’immagine chiara. Assicurarsi che i negativi / le diapositive e i vassoi siano puliti prima di inserirli a loro
volte nel dispositivo di copia. Polvere o sporcizia sui negativi e sui vassoi influirà sulla qualità delle immagini
scannerizzate.
INSTALLAZIONE SOFTWARE
Per utilizzare lo SLIDES 2 PC bisogna innanzitutto installare ImageScanTool.
INSTALLAZIONE DEL SOFTWARE (WINDOWS)
prima di installare ImageScanTool, "RIMUOVERE" qualsiasi versione precedente di questo software.
Nota:
1. Nella finestra che appare dopo aver inserito il CD, cliccare su "Install Software" (installa software).
Se questa finestra non compare automaticamente, fare doppio clic su "Risorse del computer" e quindi
sul nome del CD. La finestra dovrebbe apparire. Se la finestra ancora non appare, fare clic col tasto
destro del mouse sul CD e selezionare "Esplora". Non appena compaiono i contenuti del CD, fare
doppio clic su "Setup.exe."
2. Seguire le istruzioni su schermo.
3. Riavviare il computer.
INSTALLAZIONE DEL SOFTWARE (MAC)
1. Inserire il CD di installazione nell'unità CD-ROM e cliccare l'icona CD.
2. Fare doppio clic su "ImageScanTool Installer."
3. Riavviare il computer.
22
Page 23

UTILIZZO DEI SUPPORTI IN DOTAZIONE
PORTA DIAPOSITIVE
1. Aprire il supporto della diapositiva sollevando la linguetta posta sul fondo.
2. inserire la/e diapositiva/e negli appositi supporti.
3. Chiudere il supporto della diapositive. Assicurarsi che il dispositivo di chiusura e i lati del supporto
siano saldamente in posizione.
ALIMENTATORE PELLICOLE
1. Stendere l’alimentatore delle pellicole piatto.
2. Inserire un capo della pellicola nello slot presente sul lato destro del supporto.
3. Spingere/tirare delicatamente la pellicola attraverso il supporto per passare di foto in foto.
Suggerimento: per evitare di collocare il negativo nella direzione sbagliata (cosa che provocherà
un’immagine specchiata), assicurarsi di leggere correttamente i numeri di serie in cima al negativo
quando lo si colloca nel supporto.
ALIMENTATORE RAPIDO DIAPOSITIVE
1. Posizionando la levetta all’estrema destra, inserire le diapositive nell’alimentatore rapido diapositive.
2. Collocare l’alimentatore rapido diapositive nello SLOT PER PORTA PELLICOLE.
3. Spingere la leva verso sinistra, quindi tirarla nuovamente verso destra per caricare una diapositiva
dall’alimentatore al SLIDES 2 PC. Ripetere questo passaggio per le diapositive successive (che
spingeranno le diapositive usate facendole uscire dal lato opposto).
23
Page 24

UTILIZZO DELLO SLIDES 2 PC
1
Collegare il cavo USB allo SLIDES 2 PC alla porta USB del computer. Una volta collegato, il LED di
alimentazione sarà blu.
Nota per gli utenti Windows: La prima volta che si connette SLIDES 2
PC al proprio computer, aspettare qualche secondo fino a quando non si
vede una finestra di dialogo che dice "Trovato nuovo hardware" (questo
significa che il computer ha riconosciuto SLIDES 2 PC). A questo punto,
SLIDES 2 PC è pronto per essere utilizzato.
2
Inserire il porta negativi / porta diapositive carico nello slot
come illustrato.
3
Recarsi su Start Menu All Programs
35mm Film Scanner Launch
ImageScanTool (PC)
o Applications ImageScanTool (Mac).
4
Cliccare sull'icona della "cartella" e selezionare
dove salvare le immagini.
5a
Selezionare la tipologia del film.
6
o
Cliccare su “Snapshot” sullo schermo o premere il tasto COPY sul SLIDES 2 PC di copia delle immagini.
Si può regolare l’ubicazione della pellicola spostando il supporto.
Una cornice indicherà le immagini selezionate nell’area di anteprima; il massimo sono 12 immagini.
Premere il tasto “Save” (Salvare) per salvare immagini selezionate sul computer.
Nota 1: per garantire la migliore qualità dell’immagine, attendere circa 5 secondi tra istantanee e
trasferimenti per un migliore bilanciamento del bianco.
24
Page 25

MODIFICA DELLE IMMAGINI
1. Snapshot – Per acquisire l'immagine visualizzata in anteprima, fare clic su "Snapshot" (istantanea).
2. Delete (cancella) – Cancella un file selezionato dall'elenco.
3. Mirror (specchio) – Cliccare su questo pulsante per girare l'immagine.
4. Rotate (ruota) – Ruota l'immagine a destra di 90º.
5. Brightness/Exposure – Cliccare e trascinare il cursore per regolare la luminosità.
6. Color Adjustment (regolazione del colore) – Cliccare e trascinare i cursori per regolare il valore di
RGB (rosso, verde e blu).
7. Save (salva) – Fare clic su "Save" per salvare l'immagine sul computer.
8. Exit – Cliccare su questo pulsante per uscire dal software.
25
Page 26

RISOLUZIONE DI PROBLEMI
PROBLEMA POSSIBILE CAUSA SOLUZIONE
Il computer non riconosce lo
SLIDES 2 PC.
Ricevo un messaggio Windows
che avvisa che il dispositivo
non è stato riconosciuto
("device not recognized")
Il mio computer è dotato di una
porta USB 2.0, ma non
riconosce il dispositivo di copia
delle immagini.
Il disco di installazione non
effettua l’avviamento
automatico.
Ricevuto l’avviso da Windows
che il dispositivo "non ha
superato il test logo di
Microsoft".
Lo SLIDES 2 PC funziona, ma
alcune diapositive o negativi
sembrano sovresposti.
Attorno al bordo dell’immagine
c’è una cornice nera.
Questo simbolo posto sul prodotto o sulle istruzioni per l’uso indica che il dis positivo elettrico o
elettronico deve essere smaltito separatamente dai rifiuti domestici. Il riciclaggio nell’EU prevede
numerosi sistemi di raccolta differenziata. Per maggiori informazioni in merito, contattare le autorità
locali o il rivenditore presso il quale è stato acquistato il prodotto.
Lo SLIDES 2 PC non è
collegato ad una porta USB
ad alta velocità.
Non tutte le porte del
computer sono ad alta
velocità.
Potrebbe esservi un
problema a livello del drive
CD.
Ciò è normale. Cliccare su
OK per continuare.
Il tempo di esposizione
automatica varia a seconda
della configurazione del
computer.
La diapositiva o la pellicola
potrebbero non essere ben
inserite nel supporto, o
quest’ultimo potrebbe non
essere ben inserito nel
SLIDES 2 PC.
Il computer deve essere dotato di una porta USB
2.0 per comunicare con lo SLIDES 2 PC.
Verificare che sul computer sia installata una
porta USB 2.0. Se sul computer non è installata
una porta USB 2.0 si possono aggiornare le porte
USB. Questo tipo di hardware è disponibile nella
maggior parte dei negozi di elettronica.
Sebbene sia installato il sistema USB 2.0, è
possibile che non tutte le porte USB siano
compatibili con USB 2.0. Controllare tutte le porte
USB per trovare quelle compatibili 2.0.
Verificare che il drive CD funzioni adeguatamente.
Se possibile, provare con un altro computer per
verificare se il disco viene riconosciuto.
Se è possibile navigare tra i contenuti del CD, ma
l’installazione non si avvia automaticamente,
effettuare doppio clic su Install.exe.
Scegliere "Continue anyway" (prosegui
ugualmente).
Il dispositivo di copia delle immagini non
danneggerà il computer. È in corso il processo di
certificazione Windows di questo software.
Il dispositivo di copia delle immagini si regola
automaticamente all’esposizione delle diapositive
/ dei negativi. Attendere che la finestra termini di
regolare l’esposizione e quindi cliccare su
"Capture".
Controllare le diapositive e i negativi per verificare
se sono state sovraesposte quando sviluppate
originariamente. Per pulire l'immagine appena
digitalizzata sono disponibili numerose
applicazioni software di fotoritocco.
Rimuovere il supporto dal SLIDES 2 PC e
assicurarsi che la diapositiva o la pellicola siano
inserite correttamente. Inserire nuovamente il
supporto nel SLIDES 2 PC (se inserito
adeguatamente, dovrebbe scattare in posizione).
26
Page 27

WILLKOMMEN
Besten Dank, dass Sie sich zum Kauf dieses Film- und Diascanners SLIDES 2 PC entschieden haben. Bitte nehmen
Sie sich im Interesse einer optimalen Nutzung Ihres SLIDES 2 PC die Zeit, diese Gebrauchsanweisung
durchzulesen.
ACHTUNG
Bitte lesen Sie vor der Inbetriebnahme Ihres SLIDES 2 PC die Sicherheitsvorschriften unten gründlich durch.
Vergewissern Sie sich, dass alle Bedingungen für einen sicheren Betrieb Ihres SLIDES 2 PC gegeben sind:
Benutzen Sie Ihren SLIDES 2 PC nicht in Flugzeugen oder an anderen Orten, an denen die Benutzung
derartiger Geräte Beschränkungen unterliegt. Verwendung am falschen Ort birgt ein ernsthaftes Unfallrisiko.
Versuchen Sie nic ht, das Gehäuse des SLIDES 2 PC zu öffnen oder den SLIDES 2 PC auf andere Weise
umzubauen. Hochspannungskomponenten im Inneren können zu eine m elek trisch e n Schla g führ en. Wartungsund Reparaturarbeiten sollten nur von hierzu befugtem Kundendienstpersonal vorgenommen werden.
Der SLIDES 2 PC darf nicht mit Wasser oder anderen Flüssigkeiten in Berührung kommen . Berühren Sie den
SLIDES 2 PC auch nicht mit feuchten Händen. Benutzen Sie den SLIDES 2 PC nicht unter Regen- oder
Schneeeinwirkung. Bei Feuchtigkeit besteht Brandgefahr ebenso wie die Gefahr eines elektrischen Schlages.
Der SLIDES 2 PC sollte von Kindern und Tieren ferng ehalten werden, um zu verhindern, dass es zu Unfällen
oder zu einer Schädigung des Bildkopierers kommt.
Bei Rauchent wicklung oder wenn ein sonderbarer Geruch vom SLIDES 2 PC ausgeht, sollten Si e das Gerät
sofort abschalten und den SLIDES 2 PC zum nächstgelegenen Kundendienst zur Reparatur bringen.
Versuchen Sie nicht, den SLIDES 2 PC selbst zu reparieren.
Verwenden Sie n ur die empfohlenen Netzteile. Die Verwendung einer Stromzufuhr, die nicht explizit für den
SLIDES 2 PC empfohlen ist, kann zu Überhitzung, verbogen en Geräteteilen, Feuer, elektrischem Schl ag und
anderen Gefährdungen führen.
Der SLIDES 2 PC kann sich beim Betrieb leicht erwärmen. Hierbei handelt es sich um keine Betriebsstörung.
W enn der SLIDES 2 PC von außen gereinigt werden muss, wischen Sie i hn mit einem weichen, trockenen
Tuch ab.
FCC-HINWEIS
Dieses Gerät wurde getestet und entspricht den Anforderunge n für digitale Geräte der Klasse B gemäß Abschnitt 15
der FCC-Vorschriften. Die Grenzwerte gewährleisten angemessenen Schutz vor schädlichen Interferenzen bei
Verwendung im Wohnumfeld. Dieses Gerät erzeugt und verbraucht Hochfrequenzstrom und kann diesen auch
abgeben. Wenn das Gerät nicht entsprechend dieser Gebr auchsanweisung instal liert und betrieben wird, kann es zu
Interferenzen kommen, die den Funkverkehr beeinträchtigen. Es kann ni cht ausgeschlossen werden, dass es in
bestimmten Konstellationen zu Interferenzen kommt. Wenn beim Radio- oder Fernsehempfang schädliche
Interferenzen auftreten (ob es sich um eine Interferenz handelt, kann durch Ein- und Ausschalten des Geräts
überprüft werden), empfehlen wir dem Benutzer, auf eine der folgenden Weisen für Abhilfe zu schaffen:
Richten Sie die Empfangsantenne anders aus oder stellen Sie sie an einer anderen Stelle auf.
Vergrößern Sie den Abstand zwischen Gerät und Empfänger.
Schließen Sie das Gerät an einen anderen Stromverteiler an als den Empfänger.
Bitten Sie einen erfahrenen Radio- oder Fernsehtechniker um Hilfe.
SYSTEMANFORDERUNGEN
PC:
Pentium® 4 1.6 GHz oder gleichwertiger
Freier USB2.0 Port
Mindestens 512MB RAM interner
500MB Festplattenspeicher
1024 x 768 Farbmonitor
CD-ROM Laufwerk
Windows XP Service Pack 2, Windows Vista
ACHTUNG: Um den Anforderungen für digitale Geräte der Klasse B gemäß Abschnitt 15 der FCCVorschriften zu entsprechen, muss bei der Installation dieses Geräts Computerau sstattung verwendet
werden, die den Anforderungen für Klasse B nachweislich entspricht.
MAC:
Intel Core Duo Prozessor wird empfohlen
AMD Athlon
Speicherplatz
oder 7 (32-/64-bit)
Freier USB2.0 Port
Mindestens 768MB RAM interner
Speicherplatz
500MB Festplattenspeicher
1024 x 768 Farbmonitor
CD-ROM Laufwerk
Mac OS X 10.6 oder höher
27
Page 28

INHALT DER VERPACKUNG
SLIDES 2 PC
Software-CD
Halter für Dias
Schnell-Zuführgerät für Dias
Zuführgerät für Negativfilme
Bürste zur Reinigung
Schnellstart-Poster
Sicherheitshinweise & Garantie-Booklet
BESTANDTEILE DES SLIDES 2 PC
1. KOPIERTASTE
2. LEUCHTDIODE
3. FILMSTREIFENHALTER
4. USB-PORT
5. USB-KABEL
6. BÜRSTE
7. HALTER FÜR DIAS
8. SCHNELLZUFÜHRGERÄT FÜR
DIAS
9. ZUFÜHRGERÄT FÜR
NEGATIVFILME
Hinweis: Um klare Bilder zu erhalten, empfehlen wir Ihnen, beim Einlegen der Vorlagen in den
Aufnahmeschlitz einen sauberen, trockenen, nicht mit Alkohol getränkten W attebausch zu verwenden und
die Glasoberfläche regelmäßig zu reinigen. Vergewissern Sie sich bitte auch, dass Ihre Filmnegative, Dias
und Abdeckungen sauber sind, bevor Sie diese in den Kopierer schieben. Schmutz und Staub auf Negativen
oder Abdeckungen beeinträchtigt die Qualität der eingescannten Bilder.
INSTALLATION VON TREIBER UND SOFTWARE
Um mit Ihrem SLIDES 2 PC arbeiten zu können, müssen Sie zuerst den ImageScanTool installieren.
INSTALLATION DER SOFTWARE (WINDOWS)
Hinweis: ENTFERNEN Sie eventuell vorhandene ältere Versionen von ImageScanTool, bevor Sie mit der
Installation von diese Software beginnen.
1. Klicken Sie im Fenster, das nach dem Einlegen der CD erscheint, auf „Install Software“ (Software
installieren).
Wenn dieses Fenster nicht automatisch aufscheint, doppelklicken Sie erst auf „Mein Computer“ und
anschließend auf den Namen der CD. Das Fenster sollte nun angezeigt werden. Wenn das Fenster
immer noch nicht angezeigt wird, rechtsklicken Sie auf den Namen der CD und wählen „Explorer“.
Sobald der Inhalt der CD angezeigt wird, doppelklicken Sie auf „Setup.exe“.
2. Folgen Sie den Anweisungen auf dem Bildschirm.
3. Starten Sie den Computer neu.
INSTALLATION DER SOFTWARE (MAC)
1. Installations-CD in das CD-ROM Laufwerk einlegen und auf CD-Icon klicken.
2. „ImageScanTool-Installer
3. Starten Sie den Computer neu.
”
doppelklicken.
28
Page 29

GEBRAUCH DER MITGELIEFERTEN HALTER
DIARAHMENHALTER
1. Öffnen Sie den Diarahmenhalter, indem Sie die Klappe an der Unterseite öffnen.
2. Setzen Sie das/die Dia(s) in den/die Dia-Slot(s).
3. Verschließen Sie den Diarahmenhalter. Vergewissern Sie sich, dass der Schnappverschluss und die
Seiten des Halters sicher eingerastet sind.
ZUFÜHRGERÄT FÜR NEGATIVFILME
1. Legen Sie das Zuführgerät für den Negativfilm flach auf.
2. Führen Sie das eine Ende der Filmrolle in den Slot auf der rechten Seite des Halters ein.
3. Schieben/ziehen Sie die Filmrolle vorsichtig durch den Halter, um von Bild zu Bild zu springen.
Tipp: Um das Negativ nicht verkehrt herum einzulegen (was ein Spiegelbild erzeugen würde),
vergewissern Sie sich, dass die Seriennummer an der Oberseite des Negativs lesbar ist, wenn Sie den
Film in den Halter einführen.
SCHNELL-ZUFÜHRGERÄT FÜR DIAS
1. Legen Sie den Hebel ganz nach rechts und setzen Sie Ihre Dias in das Schnell-Zuführgerät ein.
2. Platzieren Sie das Schnell-Zuführgerät für Dias im FILMSTREIFENHALTER.
3. Schieben Sie den Hebel ganz nach links und ziehen Sie ihn anschließend zurück nach rechts, um ein
Dia vom Zuführgerät in den SLIDES 2 PC zu laden. Wiederholen Sie diesen Schritt für alle weiteren
Dias (was die verwendeten Dias auf der anderen Seite herausschiebt).
29
Page 30

BEDIENUNG DES SLIDES 2 PC
1
Schließen Sie das USB-Kabel des SLIDES 2 PC an den USB-Port Ihres Computers an. Wenn das Gerät
angeschlossen ist, leuchtet die Leuchtdiode blau auf.
Hinweis für Windows-Benutzer: Wenn SLIDES 2 PC zum ersten Mal an
den PC angeschlossen wird, wartet man einige Sekunden bis das
Dialogfenster mit der Nachricht „Neue Hardware gefunden“ (dies
bedeutet, der PC hat SLIDES 2 PC erkannt) erscheint. Nachdem dieses
Fenster erschienen ist, ist SLIDES 2 PC einsatzbereit.
2
Schieben Sie den beladenen Film- / Diahalter wie oben
abgebildet in den Aufnahmeschlitz.
4
Klicken Sie auf das „Dateiordner-Symbol“.
Wählen Sie den Ordner, in den Ihre Bilder
abgespeichert werden sollen.
5a
Korrekte Filmart wählen.
6
oder
3
Über das Menü Start All Programs
35mm Film Scanner Launch
ImageScanTool (PC),
oder Applications ImageScanTool
(Mac).
Klicken Sie auf dem Bildschirm auf „Snap Shot (Schnappschuss)” oder betätigen Sie die Kopiertaste auf
dem SLIDES 2 PC.
Die Position kann geregelt werden, indem man den Filmhalter vorwärts und r ü ckwärts schiebt.
Der Voransicht-Bereich ist auf maximal 12 Bilder ausgelegt. Klicken Sie auf die Schaltfläche „Speichern”
(Save), um die ausgewählten Bilder auf Ihren Computer zu übertragen oder abzuspeichern.
Hinweis 1: Im Interesse der Bildqualität sollten Sie zwischen Schnappschuss und Transfer zur
Optimierung des Weißabgleichs etwa fünf Sekunden warten.
30
Page 31

BEARBEITEN VON BILDERN
1. Snapshot – Um Ihr Bild in der Voransicht zu digitalisieren, klicken Sie auf die Taste "Snapshot"
(Schnappschuss).
2. Löschen – Löscht eine Datei, die aus der Liste.
3. Horizontal spiegeln – Klicken Sie auf diese Schaltfläche um das Bild horizontal spiegeln.
4. Drehen links/rechts – Dreht das Bild um 90 º nach rechts.
5. Brightness/Exposure – Klicken Sie bei gedrückter Maustaste auf die Schieberegler, um Helligkeit des
Bildes anzupassen.
6. Farbanpassung – Klicken Sie bei gedrückter Maustaste auf die Schieberegler, um RGB-Wert (Rot,
Grün und Blau) des Bildes anzupassen.
7. Speichern – Klicken Sie auf die Taste "Save", um das ausgewählte Bild auf Ihrem Computer
abzuspeichern.
8. Exit – Klicken Sie auf diese Schaltfläche um das Software zu verlassen.
31
Page 32

FEHLERHILFE
PROBLEM MÖGLICHE URSACHE LÖSUNG
Mein Computer erkennt
SLIDES 2 PC nicht.
Ich erhalte die WindowsFehlermeldung „Gerät
nicht erkannt”.
Ich habe einen USB 2.0Port an meinem
Computer, aber er
erkennt meinen Bildkopierer trotzdem nicht.
Meine Installations-CD
läuft nicht automatisch
an.
Windows-Warnmeldung:
„Gerät hat den
Microsoft-Logo-Test
nicht bestanden”.
Mein SLIDES 2 PC
funktioniert, aber
manche Dias oder
Negative wirken
überbelichtet.
Um die Ränder des
Bildes befindet sich eine
schwarzer Rahmen.
Dieses Symbol auf dem Produkt oder in der Gebrauchsanweisung bedeutet, dass dieses
elektrische oder elektronische Gerät am Ende seiner Lebensdauer vom Hausmüll getrennt zu
entsorgen ist. In der EU existieren separate Sammelstellen zur Rohstoffrückgewinnung.
Nähere Informationen erhalten Sie von Ihrer Gemeindeverwaltung oder dem Händler, bei
dem Sie dieses Produkt erworben haben.
SLIDES 2 PC ist nicht an
einen
HochgeschwindigkeitsUSB-Port
angeschlossen.
Vielleicht sind nicht alle
Ports an Ihrem Computer
HochgeschwindigkeitsPorts.
Eventuell liegt es an
Ihrem CD-Laufwerk.
Das ist normal. Sie
können weiterarbeiten.
Die Belichtungszeiten
hängen von Ihrer
Computerkonfiguration
ab.
Das Dia oder der Film ist
unter Umständen nicht
richtig in den Halter
eingeschoben oder der
Halter sitzt nicht richtig im
alter SLIDES 2 PC.
Um mit Ihrem SLIDES 2 PC kommunizieren zu
können, braucht Ihr Computer USB 2.0. Überprüfen
Sie, ob USB 2.0 auf Ihrem Computer installiert ist.
Wenn nicht, können Sie Ihre USB-Ports nachrüsten.
Die für ein Upgrade erforderliche Hardware findet
sich in den meisten Elektronikfachgeschäften.
Auch wenn Sie USB 2.0 installiert haben, sind
möglicherweise nicht alle USB-Ports mit USB 2.0
kompatibel. Überprüfen Sie alle USB-Ports und
finden Sie heraus, welche von ihnen 2.0-kompatibel
sind.
Überprüfen Sie, ob Ihr CD-Laufwerk
ordnungsgemäß funktioniert. Falls möglich,
überprüfen Sie an einem anderen Computer, ob
dieser die CD erkennt.
Wenn Sie den Inhalt der CD angezeigt bekommen,
aber die Installation nicht automatisch beginnt,
doppelklicken Sie auf Install.exe.
Wählen Sie „Trotzdem fortfahren”.
Der Bildkopierer schädigt Ihren Computer nicht (Die
Windows-Zertifizierung der Software ist noch nicht
abgeschlossen).
Der Bildkopierer passt sich automatisch an die
Belichtung Ihres Dias / Negativs an. Warten Sie, bis
sich die Belichtung im Fenster mit der Liveansicht
eingestellt hat, und klicken Sie dann auf „Capture”
oder drücken Sie auf die Kopiertaste oben auf dem
Bildkopierer.
Überprüfen Sie, ob Ihre Dias oder Negative schon
bei der Erstentwicklung überbelichtet wurden. Es
gibt verschiedene Softwareanwendungen zur
Fotoanpassung, mit denen Sie neu digitalisierte
Bilder „aufhellen” können.
Halter aus dem SLIDES 2 PC entfernen und
überprüfen, ob Dia oder Film sich richtig im Halter
befindet. Halter wieder in den SLIDES 2 PC
einschieben (man sollte ein Klickgeräusch
vernehmen, wenn der Halter richtig eingerastet ist).
32
Page 33

WELKOM
Bedankt voor uw aanschaf van een SLIDES 2 PC film- en diascanner. Lees a.u.b. deze handleiding goed
door om zo het meeste uit uw SLIDES 2 PC te halen.
VOORZORGSMAATREGELEN
Zorg ervoor dat u, voor u de SLIDES 2 PC gebruikt, onderstaande veiligheidsvoorzorgen gelezen hebt en begrijpt. Zorg ervoor dat de SLIDES 2 PC altijd juist bediend wordt:
Bedien de SLIDES 2 PC nooit in een vliegtuig of ergens waar de bediening ervan beperkt of verboden
is. Onjuist gebruik vergroot het risico op letsel.
Probeer de behuizing van de SLIDES 2 PC niet te openen of op enige wijze te modificeren. Interne
componenten onder hoogspanning geven een risico op elektrische schok bij blootstelling. Onderhoud
en reparatie mogen alleen uitgevoerd worden door geautoriseerd servicepersoneel.
Gebruik de SLIDES 2 PC niet in de buurt van water en andere vloeistoffen. Gebruik de SLIDES 2 PC
niet wanneer uw handen nat zijn. Gebruik de SLIDES 2 PC nooit in regen of sneeuw. Vocht geeft een
gevaar op brand en elektrische schok.
Houd de SLIDES 2 PC en bijbehorende accessoires uit de buurt van kinderen en dieren om
ongelukken of schade aan het apparaat te voorkomen.
Wanneer u rook of een vreemde geur waarneemt bij de SLIDES 2 PC, schakel dan direct de stroom
uit. Laat de SLIDES 2 PC repareren bij het dichtstbijzijnde servicepunt. Probeer nooit zelf de SLIDES 2
PC te repareren.
Gebruik alleen de aanbevolen onderdelen voor elektriciteit. Gebruik van niet-aanbevolen elektriciteits-
bronnen voor de SLIDES 2 PC kan leiden tot oververhitting, vervorming van de apparatuur, brand,
elektrische schok of andere gevaren.
De SLIDES 2 PC kan tijdens gebruik warm worden. Dit is geen storing.
Als de buitenkant van de SLIDES 2 PC reiniging behoeft, reinig deze dan met een zachte, droge doek.
FCC-WAARSCHUWING
Deze apparatuur is getest en is in overeenstemming met de limieten voor een digitaal apparaat van klasse B,
zoals vermeld in Deel 15 van de FCC-reglementen. Deze limieten geven een redelijke bescherming tegen
schadelijke interferentie bij plaatsing in een woonomgeving. Deze apparatuur genereert en gebruikt radiofrequente energie en kan deze uitstralen. Als de apparatuur niet volgens de gebruiksaanwijzing wordt geinstalleerd en gebruikt, kan deze schadelijke interferentie bij radiocommunicatie veroorzaken. Er wordt echter niet
gegarandeerd dat er zich geen interferentie zal voordoen in bepaalde installaties. Als deze apparatuur schadelijke interferentie veroorzaakt bij radio- of TV-ontvangst, hetgeen vastgesteld kan worden door de apparatuur uit en weer in te schakelen, wordt aanbevolen deze interferentie te corrigeren door één of meer van de
onderstaande oplossingen toe te passen:
De ontvangende antenne opnieuw richten of plaatsen.
De afstand tussen de apparatuur en de ontvanger vergroten.
De apparatuur aansluiten op een andere wandcontactdoos dan die waarop ontvanger aangesloten is.
Een ervaren TV- of radiotechnicus raadplegen voor ondersteuning.
SYSTEEMVEREISTEN
PC:
Pentium® 4 1.6 GHz of gelijkwaardig AMD
Vrije USB 2.0-poort
Minimaal 512MB intern geheugen
500MB vrije schijfruimte
1024 x 768 kleurenmonitor
CD-ROM-station
Windows XP Service Pack 2, Windows Vista
VOORZICHTIG: Om te voldoen aan de limieten voor een digitaal apparaat van klasse B, volgens
Onderdeel 15 van de FCC-reglementen, dient het apparaat alleen geïnstalleerd te worden op
computerapparatuur die gecertificeerd is om te voldoen aan de limieten van klasse B.
MAC:
Intel Core Duo processor aanbevolen
Athlon
of 7 (32-/64-bi t)
Vrije USB 2.0-poort
Minimaal 768MB intern geheugen
500MB vrije schijfruimte
1024 x 768kleurenmonitor
CD-ROM-station
Mac OS X 10.6 of hoger
33
Page 34

INHOUD VERPAKKING
SLIDES 2 PC
Software-CD
Houder voor diafilms
Snelle dialader
Lader voor filmnegatieven
Borstel voor schoonmaken
Snelstartgids
Veiligheidsinstructies & garantie
KENMERKEN SLIDES 2 PC
1. KNOP 'KOPIËREN'
2. STROOM-LED
3. SLEUF VOOR
FILM/DIAHOUDER
4. USB-POORT
5. USB-KABEL
6. BORSTEL
7. HOUDER VOOR
DIAFILMS
8. SNELLE
DIALADER
9. LADER VOOR
FILMNEGATIEVEN
N.B.: Het wordt sterk aanbevolen om regelmatig een schoon, droog wattenstaafje zonder alcohol in de sleuf
voor het kopieergedeelte voor afbeeldingen te steken en het glazen oppervlak zo schoon te maken; dit om
een helder beeld te waarborgen. Zorg er a.u.b. ook voor dat filmnegatieven, dia's en omslaghoezen schoon
zijn voor ze in het kopieergedeelte worden geladen. Stof of vuil van de negatieven en hoezen zal de kwaliteit
van uw gescande afbeeldingen beïnvloeden.
INSTALLATIE VAN DRIVER EN SOFTWARE
Om de SLIDES 2 PC te gebruiken dienen ImageScanTool vooraf geïnstalleerd te worden.
SOFTWARE-INSTALLATIE (WINDOWS)
N.B.: Zorg ervoor dat de vorige versie van Media Impression is verwijderd voordat deze versie van de
software is geïnstalleerd.
1. Klik op "Install Software" (Software installeren) in het venster dat verschijnt na plaatsing van de cdrom.
Als dit venster niet automatisch verschijnt: dubbelklik eerst op “Mijn Computer” en daarna op de naam
van de cd-rom. Het venster zou moeten verschijnen. Als het venster nog steeds niet verschijnt, klik dan
met de rechtermuisknop op de naam van de cd-rom en selecteer: “Verkennen”. Van zodra de inhoud
van de cd-rom verschijnt, dubbelklik op "Setup.exe".
2. Volg de instructies op het scherm.
3. Start de PC opnieuw op.
SOFTWARE-INSTALLATIE (MAC)
1. Plaats de installatie-CD in het CD-ROM-station en klik op het pictogram van de CD.
2. Dubbelklik op "ImageScanTool Installer."
3. Start de PC opnieuw op.
34
Page 35

GEBRUIK VAN MEEGELEVERDE HOUDERS
DIAHOUDER
1. Open de diahouder door het klepje aan de onderkant op te tillen.
2. Plaats één of meerdere dia's in de diasleuven.
3. Sluit de diahouder. Zorg ervoor dat de vergrendeling en de zijkanten van de houder veilig op hun plek
zitten.
LADER VOOR FILMNEGATIEVEN
1. Leg de lader voor filmnegatieven plat.
2. Steek het ene uiteinde van het filmrolletje in de sleuf aan de rechterkant van de lader.
3. Duw/trek het filmrolletje zachtjes door de houder om van foto naar foto te gaan.
Tip: Om te voorkomen dat een negatief in de verkeerde richting ligt (wat een spiegelbeeld produceert),
zorgt u ervoor dat de serienummers op de bovenzijde van het negatief bij plaatsing in de houder
correct leesbaar zijn.
SNELLE DIALADER
1. Stapel uw dia's in de snelle dialader met de hendel helemaal naar rechts.
2. Plaats de snelle dialader in de SLEUF VAN DE FILMHOUDER.
3. Duw de hendel naar links en trek daarna de hendel terug naar rechts, om een dia uit de lader in de
SLIDES 2 PC te laden. Herhaal deze stap voor de volgende dia's (die de gebruikte dia's de andere
kant op zullen duwen).
35
Page 36

GEBRUIK VAN DE SLIDES 2 PC
1
Sluit de USB-kabel van de SLIDES 2 PC aan op een USB 2.0-poort van de PC. Na aansluiting zal de
stroomLED blauw oplichten.
N.B.: De eerste keer dat de SLIDES 2 PC wordt aangesloten op uw
computer moet ene paar seconden gewacht worden tot een
dialoogvenster verschijnt met "Nieuwe hardware gevonden" (dit betekent
dat de SLIDES 2 PC wordt herkend door de PC). Na dit dialoogvenster
is de SLIDES 2 PC klaar voor gebruik.
2
Plaats de geladen film-/diahouder juist in de sleuf zoals
weergegeven.
4
Klik op het pictogram "bestandmap" en selecteer
een locatie waar de afbeeldingen mogen worden
opgeslagen.
5a
Selecteer een juiste filmtype.
6
of
3
Ga naar Start Menu All Programs
35mm Film Scanner Launch
ImageScanTool (PC)
of Applications ImageScanTool (Mac).
Klik in het scherm op "Snapshot" of druk op COPY knop op het SLIDES 2 PC.
De locatie van de film kan worden ingesteld door het verplaatsen van de filmhouder.
Een frame geeft de geselecteerde afbeeldingen aan in het gebied voor de preview; hier kunnen maximaal
12 afbeeldingen worden weergegeven. Druk op knop "Save" om geselecteerde afbeeldingen op te slaan
op/over te zetten naar PC.
N.B.1: Om de beste beeldkwaliteit te waarborgen, kan het best 5 seconden tijd tussen snapshots en
transfers worden genomen voor het verbeteren van de witbalans.
36
Page 37

BEWERKEN VAN AFBEELDINGEN
1. Snapshot – Voor het vastleggen van uw beeld bekeken, klik op de knop "Snapshot."
2. Verwijderen –Verwijdert het bestand, geselecteerd uit de lijst.
3. Spiegelen – Klik op deze knop om het beeld horizontaal te draaien.
4. Draai rechts – Draait het beeld 90º naar rechts.
5. Brightness/Exposure – Klik en sleep de schuifregelaar om de helderheid aan te passen.
6. Kleuraanpassing – Klik en sleep de schuifregelaars om de RGB-parameters (rood, groen en blauw)
aan te passen.
7. Opslaan – Klik op de knop "Save" om de afbeelding opslaan op uw computer.
8. Exit – Klik op deze knop om het software te verlaten.
37
Page 38

PROBLEEMOPLOSSING
PROBLEEM
De SLIDES 2 PC wordt niet
herkend door de PC
Er verschijnt een Windowsbericht "apparaat wordt niet
herkend"
Mijn PC beschikt over USB
2.0, maar het apparaat wordt
nog steeds niet herkend
De installatie-CD start niet
automatisch
Windows-waarschuwing dat
het apparaat "geen Microsoft
logotesten heeft doorstaan".
De SLIDES 2 PC werkt maar
sommige dia's of negatieven
zien er overbelicht uit.
Er staat een zwarte rand
rond de kant van de
afbeelding.
Dit symbool op het product of in de handleiding geeft aan dat elektrische en elektronische
apparaten na afloop van de gebruiksduur niet bij het huishoudelijk afval mogen worden
geplaatst. Er zijn aparte inzamelsystemen voor hergebruik in de EU. Voor meer informatie
kunt u contact opnemen met uw lokale overheid of de verkoper waar u het product hebt
aangeschaft.
MOGELIJKE OORZAAK OPLOSSING
SLIDES 2 PC niet aangesloten op een USB 2.0poort
Het kan zijn dat niet alle
poorten op de PC versie
2.0 zijn.
Er kan een probleem zijn
met het CD-station.
Dit is normaal. Klik op OK
om door te gaan.
De tijd voor automatische
belichting varieert met de
configuratie van de PC.
De dia of film kan onjuist in
de houder geplaatst zijn, of
de houder is wellicht niet
volledig in de SLIDES 2
PC geplaatst.
De PC dient over USB 2.0 te beschikken om
met de SLIDES 2 PC te kunnen communiceren. Controleer of USB 2.0 op de PC is geïnstalleerd. Als dit niet het geval is kunnen de
USB-poorten van een upgrade worden voorzien. Deze hardware is bij de meeste elektronicazaken verkrijgbaar.
Zelfs wanneer USB 2.0 is geïnstalleerd kan
het zijn dat niet alle poorten geschikt zijn voor
USB 2.0. Controleer alle USB-poorten om die
poorten te vinden die voor versie 2.0 geschikt
zijn.
Controleer de werking van het CD-station.
Controleer, Indien mogelijk, op een andere PC
of de CD daar wel herkend wordt.
Als het mogelijk is door de inhoud van de CD
te bladeren, maar de installatie niet automatisch begint, dubbelklik dan op Install.exe.
Kies "Toch doorgaan". Het apparaat is niet
schadelijk voor de PC. (Er wordt aan
Windows-certificering voor deze software
gewerkt)
Het apparaat stelt zichzelf in op de belichting
van uw dia/negatief. Wacht voor het venster
met de daadwerkelijke afbeelding om de
aanpassing voor de belichting te stoppen en
klik op "Capture" of knop COPY bovenop het
apparaat.
Controleer de dia's of negatieven om te zien of
het origineel wellicht overbelicht is geweest.
Er zijn verschillende softwaretoepassingen
beschikbaar om de nieuw-gedigitaliseerde
foto's te verbeteren.
Verwijder de houder uit de SLIDES 2 PC en
waarborg dat de dia of film juist in de houder
geplaatst is. Plaats de houder opnieuw in de
SLIDES 2 PC (de houder dient op zijn plaats
te 'klikken' bij juiste plaatsing).
38
Page 39

p
)
APPENDIX
SPECIFICATIONS
Image Sensor 5 mega CMOS sensor, 5.17 megapixels
Lens Specification Precision Glass Element Fixed Focus
Color Balance Automatic+ software
Exposure Control Automatic + software
Supported film size auto-convertingSlide; color negative film; black/white negative film
Focus Range Fixed focus
PC interface USB 2.0
Scan High Resolution 1,800 dpi (enhances to 3,600 dpi via interpolation)
Data Conversion 10 bitsper color channel
Light Source Back Light 3 white LED
Power From USB
Dimension 152 mm x 86 mm x 82 mm (H x W x L
Bundled Software ImageScanTool
*Specifications are subject to change without prior notice.
ort
39
Page 40

Page 41

www.ionaudio.com
MANUAL VERSION 1.6
 Loading...