

Page 1

MOBILE DJ
QUICKSTART GUIDE
ENGLISH ( 2 – 4 )
GUÍA DE INICIO RÁPIDO
ESPAÑOL ( 5 – 7 )
GUIDE D'UTILISATION RAPIDE
FRANÇAIS ( 8 – 10 )
GUIDA RAPIDA
ITALIANO ( 11 – 13 )
KURZANLEITUNG
DEUTSCH ( 14 – 16 )
SNELSTARTGIDS
NEDERLANDS ( 17 – 19 )
Page 2
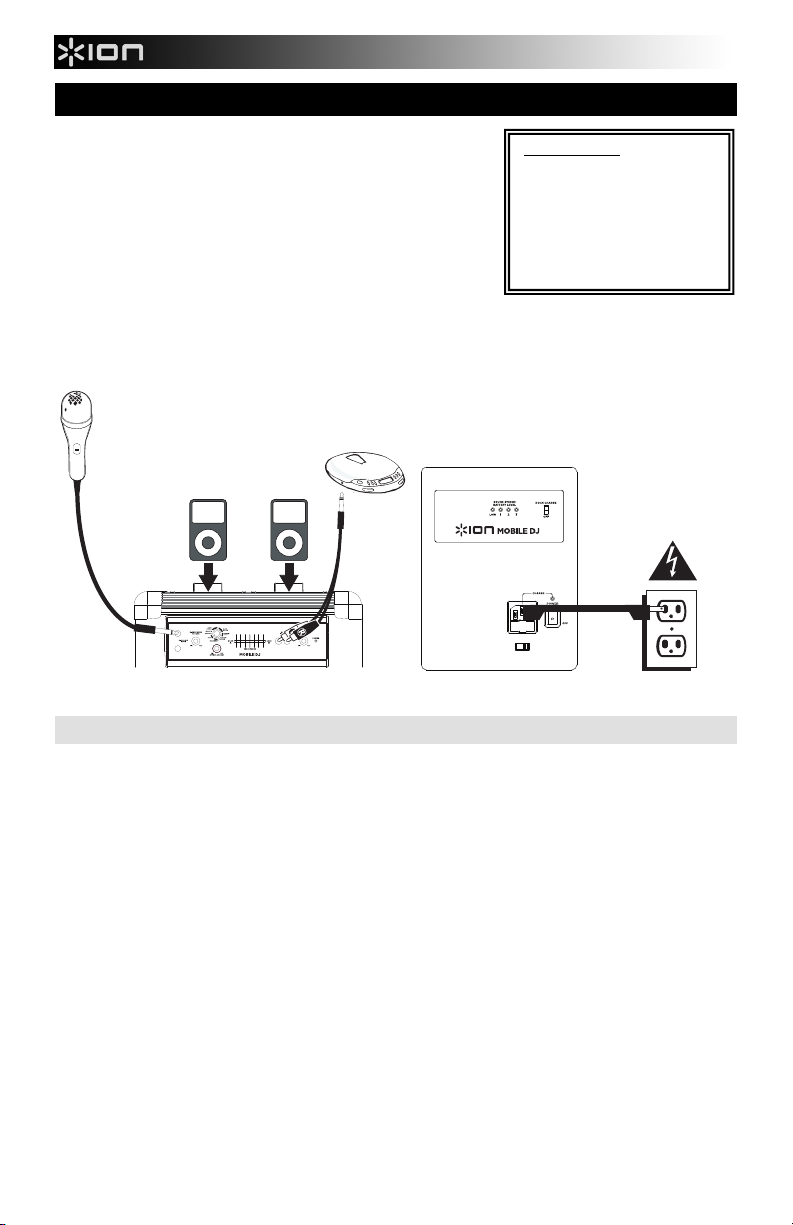
QUICKSTART GUIDE
1. Make sure all items listed on the front of this guide are included in the
box.
2. READ SAFETY INSTRUCTION BOOKLET BEFORE USING THE
PRODUCT.
3. MAKE SURE THAT YOU HAVE COMPLETELY CHARGED THE
BATTERY PRIOR TO FIRST USE FOR MAXIMUM BATTERY LIFE.
4. Study this setup diagram.
5. Place product in an appropriate position for operation.
6. Make sure all input devices such as microphones, CD players, mp3
players, and linked amplifiers/PAs are turned off and volume settings are
set at "zero."
7. Switch everything on in the following order:
• audio input sources (i.e. microphones, instruments, CD/MP3 Players)
• MOBILE DJ
8. When turning off, always reverse this operation:
• MOBILE DJ
• audio input sources
MICROPHONE
iPod
(not included)
TOP PANEL SIDE PANEL
CD PLAYER
(not included)
RECHARGEABLE BATTERIES
Rechargeable lead-acid batteries are the same type used in automobiles. As with your car battery, how you use this battery has
a significant impact on its lifespan. With proper use and treatment, a lead-acid battery can last for years. Here are some
recommendations for getting the longest life from the internal battery.
GENERAL USAGE
• Fully charge the battery before using it.
• Avoid completely draining the battery.
• For maximum life, drain the battery 80% once a month.
• Charge the battery completely after each use.
• When fully charged, the battery may be left for up to a week.
• You may leave the unit plugged in for up to two weeks.
STORAGE
• Avoid storing in high temperatures and moist places.
• For long-term storage, periodically recharge the battery.
• If you do not charge the battery for six months, it may not charge.
REPAIR
• As the battery nears the end of its life, it may lose its ability to recharge. If this occurs, contact your local authorized ION
Audio service center.
• Do not attempt to service, modify, or replace the battery yourself.
DISPOSAL
• Bring the unit to a recycling center or dispose of in accordance with local ordinances.
BOX CONTENTS
MOBILE DJ
Microphone cable
Microphone
Power cable
Quickstart Guide
Safety Instructions & Warranty
Information Booklet
POWER
2
Page 3
g
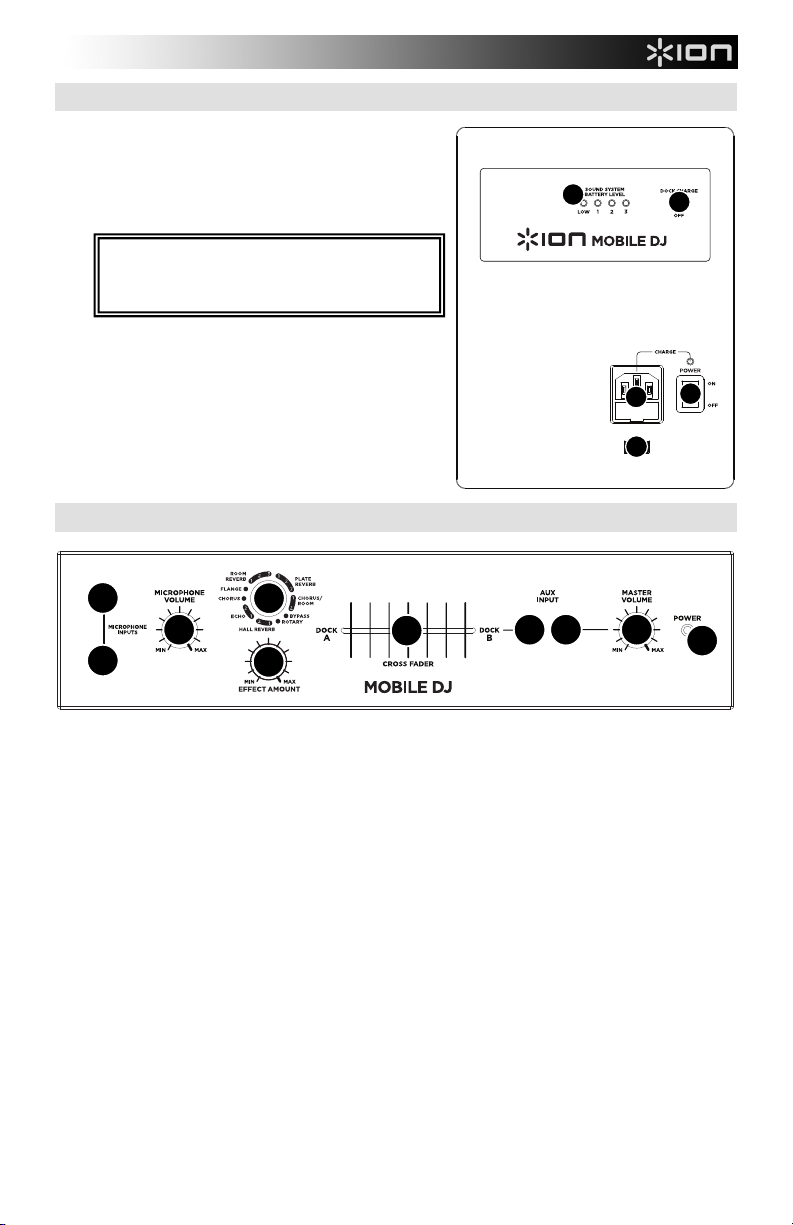
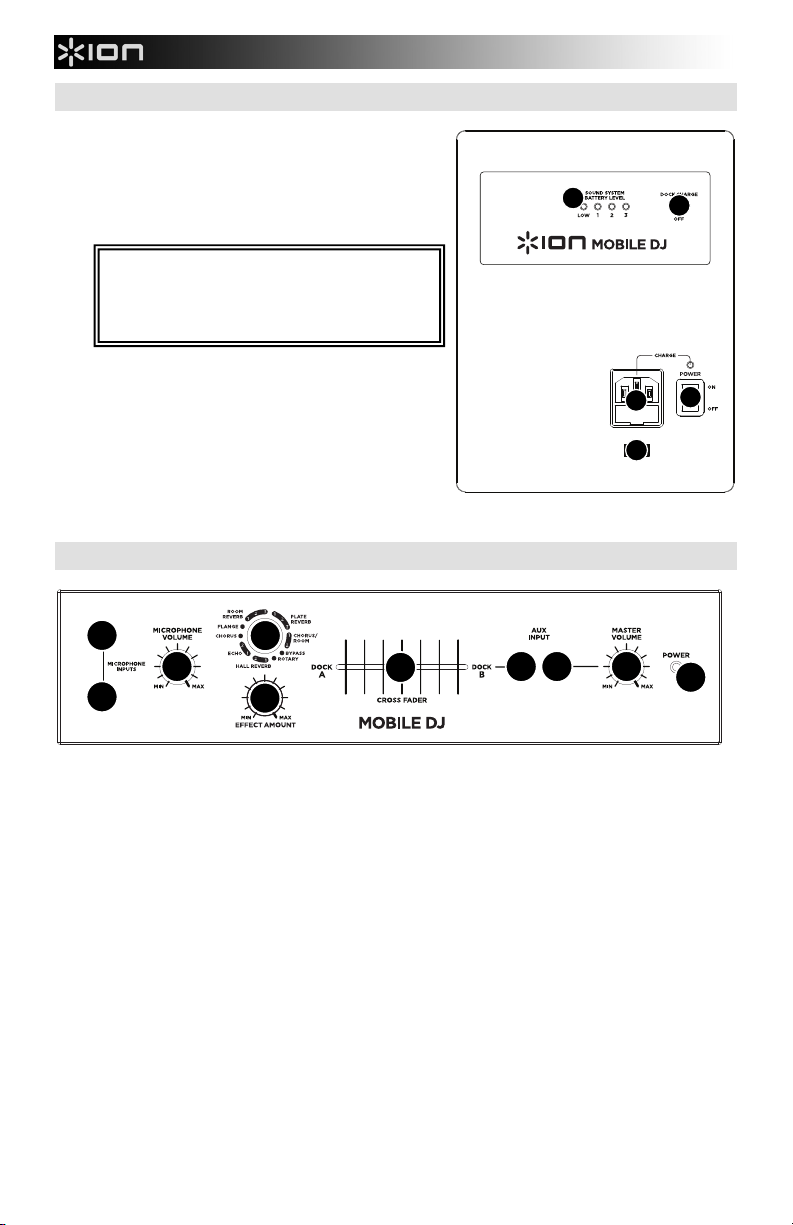
SIDE PANEL FEATURES
1. POWER IN (IEC) – Insert the included power cable here
and connect the other end to a power source, which will
simultaneously power and charge the unit. The charge
indicator will illuminate when the battery is charging.
2. VOLTAGE SELECTOR * – Set this to the correct voltage
for your location.
* WARNING: U.S. users should set this switch to "100120V" whereas U.K. and most European users should
set this to "220-240V." Selecting the improper voltage
can dama
3. POWER SWITCH – Turns MOBILE DJ on or off. Please
note that while MOBILE DJ is connected to a power source,
the battery will charge.
4. BATTERY LEVEL INDICATOR – When the unit is on,
these lights indicate the remaining battery power. Battery
life varies based on volume and usage.
5. DOCK CHARGE SWITCH – To charge your iPod when the
unit is on, set this switch to the "charge" position.
e the unit.
TOP PANEL FEATURES
4
5
3
1
2
2
4 5
2
1. POWER LED – This light will illuminate when MOBILE DJ is on.
2. MICROPHONE INPUTS (1/4") – These 1/4" mono inputs can be used to connect a microphone to the unit.
3. AUX INPUT (STEREO RCA) – This stereo RCA input can be used to connect a CD, MP3, or other audio
source. To connect to a portable device with a 1/8" stereo headphone jack, use a standard 1/8"-to-RCA stereo
cable.
4. MICROPHONE VOLUME – This knob controls the volume of the MICROPHONE INPUTS.
5. MASTER VOLUME – This knob controls the MOBILE DJ's speaker volume.
6. CROSSFADER – Blends music playing between Docks A and B. Sliding this to the left plays Dock A; sliding to
the right plays Dock B.
7. EFFECT SELECTION KNOB – This knob selects which effect is applied to the MICROPHONE INPUTS. You
can choose from any one of the effects described in the EFFECTS section.
8. EFFECT AMOUNT – This knob controls how much of the selected effect you hear.
7
8
6
3 3
1
3
Page 4
EFFECTS
ROTATING SPEAKER EFFECT
ROTARY: Fast rotary speaker simulator creates the classic, lush Doppler effect of an organ’s spinning horn. Effective
on guitars, vocals, keyboards and other instruments.
REVERB EFFECTS
HALL 1: A large, bright concert hall reverberation effect suitable for vocals and instruments.
HALL 2: A large, warm concert hall reverberation effect suitable for drums, piano and other instruments.
ROOM 1: A medium-sized, moderately bright reflective room reverberation effect suitable for vocals, lead guitars and
other instruments.
ROOM 2: A small, very reflective bright room reverberation effect suitable for drums and percussion as well as
electric guitars and other instruments.
ROOM 3: A large, warm room reverberation effect suitable for acoustic instruments.
PLATE 1: A lush, smooth vocal plate reverb with a long decay time and warm tonality.
PLATE 2: An emulation of vintage plate reverb with bright, slightly tinny tonality and a medium-length decay.
PLATE 3: A short, bright plate reverb effective for creating subtle spaces.
MODULATION EFFECTS
CHORUS: A complex, 6-voice chorus ensemble effect with short delays often referred to as a "Chorus / Doubler".
Discrete stereo signal path. Slow and watery.
FLANGE: Classic stereo flange: a slow, slightly metallic sweep with a discrete stereo signal path.
DELAY EFFECTS
DELAY 1: A simple slap-back echo with no feedback particularly effective on vocals and rhythm guitars.
DELAY 2: Medium-length poly-rhythmic delay with crossover feedback. 3 to 4 ratio between L and R delay times
(291 to 388ms) for 3/4 vs. 4/4 feel. Useful for solo instruments where a long, trailing echo effect is desired.
MULTI EFFECTS
CHORUS – ROOM 1: Room reverb into a slow flanging modulation creates a spacey effect.
CHORUS – ROOM 2: Fast modulation provides a dramatic chorus effect in a small room for a very lush chorus +
reverb sound with a discrete stereo signal path.
BYPASS: Bypasses the effects processor – no effects will be heard.
IMPORTANT NOTES
Use this troubleshooting guide if the sound is distorted at high volumes.
• Input is "clipping" (distorting): Try lowering the input gain or the volume control on your sound source or
music instrument.
• Output is "clipping" (distorting): Lower the main volume level.
• There is too much bass: Try adjusting the tone or EQ control on your sound source to lower the bass level.
This will allow you to play the music louder before "clipping" (distortion) occurs.
• The link cable: is being plugged into the instrument or MIC input instead of the RCA line input.
Important: With all large speakers, an initial "break-in" period is needed to perform at optimal levels. To properly
"break in" your MOBILE DJ, play an audio source at medium volume for a few hours.
SPECIFICATIONS
Input Voltage: AC 100–120V / 60Hz, 220–240V / 50Hz
Input Wattage: 50W
Output Wattage: 22W (Peak)
Frequency Response (±3dB): 77Hz–20kHz
Time required to fully charge the MOBILE DJ: under 4 hours
Battery life: Over 12 hours* when fully charged.
* Note: Battery life may vary based on temperature, age, and volume usage of product.
4
Page 5
GUÍA DE INICIO RÁPIDO
1. Asegúrese de que todos los artículos aquí indicados estén incluidos en la
caja.
2. LEA LAS INSTRUCCIONES DEL FOLLETO DE SEGURIDAD ANTES DE
UTILIZAR EL PRODUCTO.
3. PARA ASEGURAR UNA MÁXIMA VIDA ÚTIL DE LA BATERÍA,
CÁRGUELA COMPLETAMENTE ANTES DE USARLA POR PRIMERA
VEZ.
4. Estudie este diagrama de instalación.
5. Coloque el producto en una posición adecuada para su funcionamiento.
6. Asegúrese de que todos los dispositivos de entrada tales como micrófonos,
reproductores de CD, reproductores MP3 y amplificadores/sistemas de
amplificadores para altavoces estén apagados y con el control de volumen en
“cero”.
7. Encienda todo en el siguiente orden:
• fuentes de entrada de audio (por ejemplo, micrófonos, instrumentos, reproductores de CD/MP3)
• MOBILE DJ
8. Al apagar, realice siempre esta operación en forma inversa:
• MOBILE DJ
• dispositivos de entrada
MICRÓFONO
iPod
(no incluido)
PANEL SUPERIOR PANEL LATERAL
REPRODUCTOR DE CD
(no incluido)
BATERÍAS RECARGABLES
Las baterías de plomo-ácido recargables son del mismo tipo que se usa en los automóviles. Como ocurre con las baterías de
automóviles, la forma en que la use tiene una influencia significativa sobre la duración de su vida útil. Con un uso y tratamiento
apropiados, una batería de plomo-ácido puede durar varios años. He aquí algunas recomendaciones para prolongar la vida útil
de la batería interna.
USO GENERAL
• Cargue completamente la batería antes de usarla.
• Evite agotarla completamente.
• Para obtener máxima vida, descargue la batería el 80% una vez por mes.
• Cargue la batería completamente después de cada uso.
• Cuando está completamente cargada, la batería puede dejarse por hasta una semana.
• Puede dejar la unidad enchufada durante hasta dos semanas.
ALMACENAMIENTO
• Evite almacenar la batería en lugares húmedos y de alta temperatura.
• Si la almacena durante períodos prolongados, recárguela periódicamente.
• Si no carga la batería durante seis meses, es posible que luego no pueda cargarse.
REPARACIÓN
• Cuando la batería se acerca al final de su vida útil, puede perder su capacidad de recarga. Si esto ocurre, comuníquese
con el centro de servicio de ION Audio local autorizado.
• No intente realizar el servicio, modificar o reemplazar la batería usted mismo.
DISPOSICIÓN FINAL
• Lleve la unidad a un centro de reciclaje o deséchela de acuerdo a las ordenanzas locales.
CONTENIDO DE LA CAJA
MOBILE DJ
Cable de micrófono
Micrófono
Cable de alimentación
Guía de inicio rápido
Folleto de instrucciones de
seguridad e información
sobre la garantía
SUMINISTRO
ELÉCTRICO
5
Page 6
CARACTERÍSTICAS DEL PANEL LATERAL
1. ENTRADA DE ALIMENTACIÓN (IEC) – Inserte aquí el
cable de alimentación incluido y conecte el otro extremo a
un suministro eléctrico, desde el que se alimentará y
cargará la unidad. El indicador de carga se enciende
cuando se está cargando la batería.
2. SELECTOR DE VOLTAJE* – Ajuste este selector al voltaje
de su ubicación.
*ADVERTENCIA: Los usuarios de EE.UU. deben
colocar este conmutador en “100-120V”, mientras que
los del Reino Unido y la mayoría de los países europeos
deben colocarlo en “220-240V”. Si se selecciona el
voltaje incorrecto, se puede dañar la unidad.
3. INTERRUPTOR DE ENCENDIDO – Enciende y apaga el
MOBILE DJ. Tenga en cuenta que cuando el MOBILE DJ
está conectado a una fuente de alimentación, se carga la
batería.
4. INDICADOR DE NIVEL DE BATERÍA – Cuando está
encendida la unidad, estas luces indican la energía
remanente de la batería. La vida útil de la batería varía en
función del volumen y el consumo.
5. INTERRUPTOR DE CARGA DE LA ESTACIÓN DE
ACOPLAMIENTO – Para cargar su iPod cuando la unidad está encendida, coloque este posición en la
posición "Charge" (Carga).
4
1
2
CARACTERÍSTICAS DEL PANEL SUPERIOR
5
3
2
4 5
2
1. LED DE ENCENDIDO – Este LED se ilumina cuando el MOBILE DJ está encendido.
2. ENTRADAS DE MICRÓFONO (1/4") – Estas entradas mono de 1/4" se pueden usar para conectar dos
micrófonos a la unidad.
3. ENTRADA AUXILIAR (RCA ESTÉREO) – Esta entrada RCA estéreo se puede usar para conectar un
reproductor de CD, MP3 u otra fuente de audio. Para conectar un dispositivo portátil con un conector para
auriculares estéreo de 1/8", use un cable de 1/8" a RCA estéreo.
4. VOLUMEN DE MICRÓFONO – Esta perilla controla el volumen de las ENTRADAS DE MICRÓFONO.
5. VOLUMEN MAESTRO – Esta perilla controla el volumen del altavoz del MOBILE DJ.
6. CROSSFADER – Funde la música que se reproduce entre las estaciones de acoplamiento A y B.
Deslizándolo a la izquierda se reproduce la estación A y deslizándolo hacia la derecha la estación B.
7. PERILLA DE SELECCIÓN DE EFECTOS – Esta perilla selecciona qué efecto se aplica a las ENTRADAS DE
MICRÓFONO. Puede elegir cualquier a de los efectos descritos en la sección EFECTOS.
8. MAGNITUD DEL EFECTO – Esta perilla controla la proporción del efecto seleccionado que usted oye.
7
8
6
6
3 3
1
Page 7

EFECTOS
EFECTO DE ALTAVOZ GIRATORIO
ROTARY (Giratorio): El simulador de altavoz giratorio rápido crea el clásico y lujurioso efecto de la bocina giratoria de un
órgano. Eficaz para guitarras, vocales, teclados y otros instrumentos.
EFECTOS DE REVERBERACIÓN
HALL 1 (Auditorio 1): Un efecto de reverberación en auditorio de conciertos grande y brillante, adecuado para vocales e
instrumentos.
HALL 2: Un efecto de reverberación en auditorio de conciertos grande y cálido, adecuado para batería, piano y otros
instrumentos.
ROOM 1 (Sala 1): Efecto de reverberación en sala reflectiva mediana y moderadamente brillante, adecuado para vocales,
guitarras lead y otros instrumentos.
ROOM 2: Efecto de reverberación en sala pequeña, brillante y muy reflectiva, adecuado para batería y percusión, así como
para guitarras eléctricas y otros instrumentos.
ROOM 3: Efecto de reverberación en sala grande y cálida, adecuado para instrumentos acústicos.
PLATE 1 (Placa 1): Reverberación en placa vocal lujuriosa y suave con largo tiempo de decaimiento y tonalidad cálida.
PLATE 2: Emulación de una placa clásica con tonalidad brillante ligeramente metálica y un decaimiento de mediana duración.
PLATE 3: Reverberación en placa corta y brillante eficaz para crear espacios sutiles.
EFECTOS DE MODULACIÓN
CHORUS (Coro): Complejo efecto de conjunto de coro de 6 voces con retardos cortos denominado también “Chorus /
Doubler” (Coro / Doblador). Ruta de señal estéreo discreta. Lenta y acuosa
FLANGE: Flange estéreo clásico: Barrido lento y ligeramente metálico con ruta de señal estéreo discreta.
EFECTOS DE RETARDO
DELAY 1 (Retardo 1): Sencillo eco de golpe sin realimentación, particularmente eficaz en vocales y guitarras de ritmo.
DELAY 2: Retardo polirrítmico de mediana duración con realimentación de crossover. Relación 3 a 4 entre los tiempos de
retardo izquierdo y derecho (291 a 388 ms) para obtener sensación 3/4 ó 4/4. Útil para instrumentos de solo donde se desea
un efecto de eco largo arrastrado.
MULTIEFECTOS
CHORUS – ROOM 1: Reverberación de sala en una modulación tipo flange lenta que crea un efecto espacial.
CHORUS – ROOM 2: Modulación rápida que brinda un efecto dramático de coro en una sala pequeña para obtener un sonido
muy lujurioso de coro + reverberación con ruta de señal estéreo discreta.
BYPASS (Puenteo): Se puentea el procesador de efectos —no se oirá ningún efecto.
NOTAS IMPORTANTES:
Use esta guía de solución de problemas si el sonido se distorsiona a altos volúmenes.
• La entrada se “recorta” (distorsiona): Intente bajando la ganancia de entrada o el control de volumen de su
fuente de sonido o instrumento musical.
• La salida se “recorta” (distorsiona): Baje el nivel de volumen general.
• Hay demasiados graves: Intente ajustando el control de tono o ecualización de su fuente de sonido para
reducir el nivel de graves. De esta forma podrá reproducir la música con más volumen antes de que se
produzca el "recorte " (distorsión).
• El cable de enlace: está enchufado a la entrada de instrumentos o micrófono en lugar de la entrada de línea
RCA.
Importante: Con todos los altavoces grandes, se requiere un período de "asentamiento" para que funcione con
niveles óptimos. Para "asentar" correctamente su MOBILE DJ, reproduzca una fuente de audio a volumen medio
durante varias horas.
ESPECIFICACIONES
Voltaje de entrada: CA 100–120 V / 60 Hz, 220–240 V / 50 Hz
Potencia de entrada: 50 W
Potencia de salida: 22 W (pico)
Respuesta en frecuencia (±3dB): 77 Hz–20 kHz
Tiempo requerido para cargar totalmente el MOBILE DJ: menos de 4 horas
Vida útil de la batería: Más de 12 horas* cuando está completamente cargada.
* Nota: La vida útil de la batería puede variar en función de la temperatura, la antigüedad y el volumen al que se usa el producto.
7
Page 8

GUIDE D’UTILISATION SIMPLIFIÉ
1. Assurez-vous que tous les articles énumérés dans le contenu de la boîte
de ce guide sont inclus dans la boîte.
2. VEUILLEZ LIRE LE LIVRET DES CONSIGNES DE SÉCURITÉ AVANT
D'UTILISER LE PRODUIT.
3. ASSUREZ-VOUS D'AVOIR COMPLÈTEMENT RECHARGÉ LA PILE
AVANT LA PREMIÈRE UTILISATION AFIN D’AUGMENTER SA
DURÉE DE VIE.
4. Examinez bien le schéma d'installation.
5. Placez l'appareil en position de fonctionnement.
6. Assurez-vous que tous les appareils d’entrée tels que microphones,
lecteurs de disques compacts, lecteur MP3 et amplificateurs/système de
sonorisation raccordés sont éteints et que leur volume est à « zéro ».
7. Mettez tous les appareils sous tension dans l'ordre suivant :
• sources d'entrée audio (p. ex., microphones, instruments, lecteurs de disques compacts, lecteurs MP3)
• MOBILE DJ
8. Pour mettre hors tension, toujours inversez l'opération :
• MOBILE DJ
• sources d’entrée audio
MICROPHONE
PANNEAU SUPÉRIEUR PANNEAU LATÉRAL
LECTEUR DE DISQUES COMPACTS
(non inclus)
iPod
(non inclus)
PILES RECHARGEABLES
Les piles au plomb rechargeables sont du même type que les batteries utilisées dans les automobiles. Comme pour la batterie
de votre automobile, la manière dont vous l’utilisez a un impact direct sur sa durée de vie. Cependant, avec une bonne
utilisation, la pile au plomb peut avoir une durée de vie de plusieurs années. Voici quelques recommandations pour prolonger
au maximum la durée de vie de la pile interne.
UTILISATION GÉNÉRALE
• Chargez complètement la pile avant de l’utiliser.
• Évitez de décharger la pile complètement.
• Afin de prolonger la durée de vie, déchargez la pile à 80 % une fois par mois.
• Rechargez la pile complètement après chaque utilisation.
• Lorsque complètement chargée, la pile peut demeurer chargée jusqu’à une semaine.
• L’appareil peut demeurer branché jusqu’à deux semaines.
ENTREPOSAGE
• Évitez d’exposer l’appareil à de hautes températures et à l’humidité.
• Pour l’entreposage à long terme, rechargez la pile périodiquement.
• S’il se passe plus de six mois sans que la pile soit rechargée, il se pourrait qu’elle ne se recharge plus.
RÉPARATION
• Lorsque la pile approche la fin de sa durée de vie, il se peut qu’elle perdre la capacité de se recharger. Si cela se produit,
contactez le centre de service ION Audio autorisé le plus près.
• N’essayez pas d’effectuer des réparations, des modifications ou de remplacer la pile vous-même.
DISPOSITION
• Apportez l’appareil dans un centre de recyclage ou disposez selon les règlements de votre municipalité.
8
CONTENU DE LA BOÎTE
MOBILE DJ
Câble du microphone
Microphone
Câble d'alimentation
Guide d’utilisation simplifié
Consignes de sécurité et
informations concernant la
garantie
ALIMENTATION
Page 9

CARACTÉRISTIQUES DU PANNEAU LATÉRAL
1. ENTRÉE D'ALIMENTATION (IEC) – Insérez le câble
d’alimentation inclus dans cette prise et branchez l’autre
extrémité à une prise d’alimentation, ce qui permet
d’alimenter et de recharger l’appareil simultanément.
L’indicateur de niveau de charge s’allume lorsque la pile se
recharge.
2. SÉLECTEUR DE TENSION* – Réglez le sélecteur à la
tension appropriée pour votre pays.
*MISE EN GARDE : Pour l’Amérique du Nord, ce
sélecteur doit être réglé sur « 100-120 V », alors que
pour le Royaume-Uni et la majeure partie de l’Europe il
doit être réglé sur « 220-240 V ». L'utilisation d’une
tension inappropriée pourrait endommager l’appareil.
3. L'INTERRUPTEUR D'ALIMENTATION – Met l’appareil
sous et hors tension. Veuillez noter que lorsque le MOBILE
DJ est branché à une source d’alimentation, la pile se
recharge.
4. INDICATEUR DE NIVEAU DE CHARGE – Lorsque
l’appareil est sous tension, ces voyants indiquent le niveau
de charge restant de la pile. La durée de vie de la pile est
affectée par le niveau d’utilisation.
5. INTERRUPTEUR DE RECHARGE – Pour recharger votre iPod lorsque l’appareil fonctionne, réglez cet
interrupteur à « On ».
4
5
3
1
2
CARACTÉRISTIQUES DU PANNEAU SUPÉRIEUR
2
4 5
2
7
8
6
3 3
1
1. DEL D’ALIMENTATION – S’allume lorsque le MOBILE DJ est sous tension.
2. ENTRÉES MICROPHONE (1/4 po) – Ces entrées 1/4 po mono permettent de brancher deux microphones.
3. ENTRÉES AUXILIAIRES (RCA STÉRÉO) – Ces entrées RCA stéréo permettent de brancher un lecteur de
disques compacts, un lecteur MP3 ou autres sources audio. Pour brancher un appareil portatif doté d’une prise
casque 1/8 po stéréo, utilisez un câble 1/8 po à RCA stéréo standard.
4. VOLUME MICROPHONE – Ce bouton permet de régler le volume des entrées microphone.
5. VOLUME GÉNÉRAL – Ce bouton permet de régler le volume général du haut-parleur du MOBILE DJ.
6. CROSSFADER – Ce potentiomètre permet d’effectuer un fondu de la musique entre les modules A et B.
Lorsqu’il est déplacé vers la gauche, le module A joue et lorsqu’il est déplacé vers la droite, c’est le module B
qui joue.
7. BOUTON DE SÉLECTION D’EFFET – Ce bouton permet de sélectionner l’effet appliqué aux ENTRÉES
MICROPHONE. Vous pouvez sélectionner parmi tous les effets détaillés dans la section EFFETS.
8. QUANTITÉ D’EFFET – Ce bouton permet de sélectionner la quantité d'effet à ajouter au mixe.
9
Page 10

EFFETS
ÉMULATION D’UNE ENCEINTE ACOUSTIQUE À EFFET LESLIE
ROTARY : Reproduit le son classique d’une enceinte acoustique à effet Leslie, créant un effet Doppler similaire à celui d’un
orgue. Convient aux guitares, voix, claviers et autres instruments.
EFFETS DE RÉVERBÉRATION
HALL 1 : Correspond à la simulation de la réverbération d’une salle de concert plus chaleureuse convenant aux voix et aux
instruments.
HALL 2 : Correspond à la simulation de la réverbération d’une salle de concert plus chaleureuse convenant à la batterie, au
piano et autres instruments.
ROOM 1 : Correspond à la simulation d’une réverbération d’une d’une petite pièce, convenant à la voix, aux guitares solistes et
autres instruments.
ROOM 2 : Correspond à la simulation d’une réverbération brillante d’une d’une petite pièce, convenant à la batterie et à la
percussion et également aux guitares électriques et autres instruments.
ROOM 3 : Simulation de la réverbération d’une grande pièce plus chaleureuse convenant aux instruments acoustiques.
PLATE 1 : Simulation d’une réverbération à plaque avec un long délai et une tonalité chaleureuse.
PLATE 2 : Simulation d’une réverbération à plaque avec une tonalité aiguë et un affaiblissement moyen.
PLATE 3 : Simulation d’une réverbération à plaque brillante et courte, idéale pour créer des espaces subtils.
EFFETS DE MODULATION
CHORUS : Un ensemble d'effets de 6 voix avec de courts délais aussi connus comme « Chorus / Doublage ». Affaiblissement
du trajet du signal discret. Lent et dilué.
FLANGE : Effet flange classique : un son lent et métallique avec un affaiblissement de trajet du signal stéréo.
EFFET DE DELAI
DELAY 1 : Un simple écho sans rétroaction particulièrement efficace avec les voix et les guitares d’accompagnements.
DELAY 2 : Délai polyrythmique de moyenne durée avec rétroaction de croisement; un ratio de 3 à 4 entre la durée de délai
gauche et droit (291 à 388 ms) pour 3/4 vs une impression de 4/4. Utile pour les solistes lorsqu’un écho long et soutenu est
désiré.
MULTI-EFFETS
CHORUS – ROOM 1 : Réverbération devant un effet flanger lent créant une illusion d'espace.
CHORUS – ROOM 2 : Une modulation rapide créant un effet chorus dramatique dans une petite pièce avec un son profond et
un affaiblissement de trajet du signal stéréo.
BYPASS : Dérivation du processeur d’effet – aucun effet n’est entendu.
REMARQUES IMPORTANTES
Si le son est déformé lorsque le volume est élevé, veuillez vous reporter aux scénarios suivants :
• Le signal d’entrée est distorsionné (écrêtage) : Diminuez le niveau de gain d’entrée ou le volume sur l’appareil de
source d’entrée audio ou l’instrument de musique.
• Le signal de sortie est distorsionné (écrêtage) : Diminuez le niveau du volume général.
• Il y a trop de basses fréquences : Essayez de régler le niveau de tonalité et d’égalisation sur l’appareil de source
d’entrée audio afin de diminuer le niveau des basses fréquences. Cela vous permettra d'augmenter le volume de la
musique avant que l'écrêtage se produise.
• Le câble de relais : Le câble est branché dans l’entrée instrument ou microphone au lieu de l’entrée ligne RCA.
Important : Comme pour tous les gros haut-parleurs, le MOBILE DJ fonctionnera mieux après une période de rodage de
quelques heures à volume moyen.
SPÉCIFICATIONS
Tension d'entrée : 100-120 V CA/60 Hz, 220-240 V CA/50 Hz
Puissance d’entrée : 50 W
Puissance de sortie : 22 W (Point)
Réponse en fréquence (±3 dB) : 77 Hz – 20 kHz
Temps de recharge complet du MOBILE DJ : moins de 4 heures
Durée de vie de la pile : Plus de 12 heures* lorsque chargée à fond.
*Remarque : La durée de vie de la pile peut être affectée par la température, l’âge du produit, ainsi que le niveau du volume d’utilisation.
10
Page 11

GUIDA RAPIDA
1. Assicurarsi che tutti gli elementi elencati siano contenuti nella
confezione.
2. LEGGERE ATTENTAMENTE IL LIBRETTO DELLE ISTRUZIONI
DI SICUREZZA PRIMA DI UTILIZZARE IL PRODOTTO.
3. PER GARANTIRE LA MASSIMA DURATA DELLA BATTERIA,
ASSICURARSI DI AVERLA CARICATA COMPLETAMENTE
PRIMA DEL PRIMO UTILIZZO.
4. Studiare lo schema dei collegamenti.
5. Collocare il prodotto in una posizione adeguata all’uso.
6. Assicurarsi che tutti i dispositivi di ingresso quali microfoni, lettori
CD, lettori mp3 e amplificatori/PA collegati siano spenti e che i
relativi volumi siano su "zero".
7. Accendere tutto nel seguente ordine:
• sorgenti di ingresso audio (microfoni, strumenti, lettori CD/MP3, ecc.)
• MOBILE DJ
8. Al momento dello spegnimento, invertire questa operazione spegnendo:
• MOBILE DJ
• dispositivi di ingresso
MICROFONO
iPod
(non in dotazione)
PANNELLO SUPERIORE
LETTORE CD
(non in dotazione)
PANNELLO LATERALE
BATTERIE RICARICABILI
Le batterie ricaricabili al piombo-acido sono dello stesso tipo di quelle utilizzate nelle automobili. Come nel caso della batteria
dell'auto, la maniera in cui si utilizza questa batteria ha un notevole impatto sulla sua vita utile. Con un utilizzo adeguato, una
batteria al piombo-acido può durare per anni. Ecco alcune raccomandazioni per garantire la massima durata dalla batteria
interna:
UTILIZZO GENERICO
• Caricare a fondo la batteria prima di utilizzarla.
• Evitare di scaricare del tutto la batteria.
• Per il massimo della durata, scaricare la batteria dell’80% una volta al mese.
• Caricare a fondo la batteria dopo ciascun utilizzo.
• Una volta carica, la batteria può essere lasciata inserita per una settimana.
• È possibile lasciare l’apparecchio collegato alla rete elettrica per un massimo di due settimane.
COME RIPORRE L’APPARECCHIO
• Evitare di riporre l’apparecchio a temperature elevate e in luoghi umidi.
• Se si ripone l’apparecchio per lunghi periodi di tempo, ricaricare periodicamente la batteria.
• Se non si carica la batteria per sei mesi, potrebbe non ricaricarsi più.
RIPARAZIONI
• Man mano che la batteria si avvicina al termine della sua vita utile, potrebbe perdere la sua capacità di ricarica. Se ciò
dovesse accadere, rivolgersi al centro di assistenza clienti autorizzato ION Audio più vicino.
• Non tentare di riparare, alterare o sostituire la batteria da soli
COME ELIMINARE L’APPARECCHIO
• Recarsi con l’apparecchio presso un centro di riciclaggio oppure eliminarlo in conformità con le normative locali.
CONTENUTI DELLA CONFEZIONE
MOBILE DJ
Cavo per microfono
Microfono
Cavo di alimentazione
Guida rapida
Istruzioni di sicurezza e garanzia
ALIMENTAZIONE
11
Page 12

CARATTERISTICHE PANNELLO LATERALE
1. INGRESSO DI ALIMENTAZIONE POWER IN (IEC) –
Inserire a questo livello il cavo di alimentazione in
dotazione e collegare l'altro capo ad una fonte di
alimentazione che alimenterà e caricherà il prodotto al
tempo stesso. La spia di ricarica si accende quando la
batteria è sotto carica.
2. SELETTORE DI TENSIONE * – Impostare questo
comando sulla tensione corretta per la propria residenza.
* AVVERTENZA: gli utenti statunitensi devono
impostare l’interruttore su "100-120V", mentre i residenti
nel Regno Unito e nella maggior parte dei Paesi europei
devono impostarlo su "220-240V". Selezionare il livello di
tensione inadeguato può danneggiare l’apparecchio.
3. INTERRUTTORE DI ALIMENTAZIONE – Accende e
spegne il MOBILE DJ. Va notato che quando il MOBILE
DJ è collegato ad una fonte di alimentazione, la batteria si
ricarica.
4. INDICATORE DEL LIVELLO DELLA BATTERIA –
Quando l'apparecchio è acceso, questa spia indica la
batteria residua. La durata della batteria dipende a
seconda del volume e dell'utilizzo che se ne fa.
5. INTERRUTORE DI CARICA DEL DOCK – Per caricare l'iPod quando l'apparecchio è acceso, impostare
questo interruttore su "carica".
4
5
3
1
2
CARATTERISTICHE PANNELLO SUPERIORE
2
4 5
2
1. LED DI ALIMENTAZIONE – Questa spia si accende quando il MOBILE DJ è acceso.
2. INGRESSO MICROFONO (1/4") – Questi ingressi mono da 1/4" possono essere utilizzati per collegare di
microfoni all'apparecchio.
3. INGRESSO AUX (STEREO RCA) – Questo ingresso stereo RCA può essere utilizzato per collegare un CD,
MP3, o altre sorgenti audio. Per collegare un dispositivo portatile con un jack cuffie stereo da 1/8", servirsi di
un cavo standard stereo da 1/8" a RCA.
4. VOLUME MICROFONO – Questa manopola regola il volume degli INGRESSI MICROFONO.
5. VOLUME MASTER – Questa manopola regola il volume dell'altoparlante del MOBILE DJ.
6. CROSSFADER – Miscela la musica riprodotta tra i Dock A e B. Facendolo scorrere verso sinistra si riproduce il
Dock A; facendolo scorrere a destra, si riproduce il Dock B.
7. MANOPOLA DI SELEZIONE EFFETTI – Questa manopola seleziona quale effetto verrà applicato al mix. Si
può scegliere uno qualsiasi degli effetti descritti al paragrafo EFFETTI.
8. QUANTITÀ DI EFFETTI – Questa manopola regola quanto dell'effetto selezionato si sentirà.
7
8
6
3 3
1
12
Page 13

EFFETI
EFFETTO AD ALTOPARLANTE ROTANTE
ROTARY: il simulatore di altoparlante rotante rapido crea il classico e ricco effetto Doppler del corno rotante di un organo.
Efficace con chitarre, voci, tastiere e altri strumenti.
EFFETTI REVERB
HALL 1: un ampio e limpido effetto di riverbero da sala da concerti adatto per voci e strumenti.
HALL 2: un ampio e caldo effetto di riverbero da sala da concerti adatto per batteria, pianoforte e altri strumenti.
ROOM 1: un effetto di riverbero di medie dimensioni moderatamente luminoso adatto per voci, attacchi e altri strumenti.
ROOM 2: un piccolo effetto di riverbero di estremo riflesso luminoso adatto per batteria e percussioni, nonché per chitarre
elettriche e altri strumenti.
ROOM 3: un effetto di riverbero das ala ampia e calda adatto a strumenti acustici.
PLATE 1: un ricco e liscio effetto plate reverb vocale con un lungo tempo di decadenza ed una tonalità calda.
PLATE 2: una simulazione di un plate reverb vintage, con una tonalità luminosa, leggermente tintinnanti ed un decay di
lunghezza media.
PLATE 3: un effetto plate reverb breve e luminoso, efficace nel creare spazi sottili.
EFFETTI DI MODULAZIONE
CHORUS: un complesso effetto d’insieme chorus a 6 voci con brevi delay cui si fa spesso riferimento come “Chorus / Doubler”.
Percorso di segnale stereo discreto. Lento e acquoso.
FLANGE: classico flange stereo: uno sweep lento, leggermente metallico con un percorso di segnale stereo discreto.
EFFETTI DELAY
DELAY 1: un semplice eco slap back privo di feedback particolarmente efficace per voci e chitarre ritmate.
DELAY 2: delay a più ritmi di media lunghezza con feedback crossover. rapporto da 3 a 4 tra I tempi di delay sinistro e destro
(L ed R) (da 291a 388 ms) per una sensazione a 3/4 vs. 4/4. Utile per strumenti in assolo in cui si desidera un effetto eco lungo
e finale.
MULTI EFFETTI
CHORUS – ROOM 1: riverbero da sala in una lenta modulazione di flangia che crea un effetto spazioso.
CHORUS – ROOM 2: una rapida modulazione offer un drammatico effetto chorus in una piccolo sala per un ricchissimo suono
chorus + reverb con un percorso di segnale stereo discreto.
BYPASS: bypassa il processore di effetti: non si sente alcun effetto.
NOTE IMPORTANTI
Se il suono è distorto ad alto volume, servirsi di questa guida per la risoluzione di problemi.
• L'ingresso "salta" (è distorto): provare ad abbassare il comando del gain o del volume a livello della fonte audio o
dello strumento musicale.
• L'uscita "salta" (è distorta): abbassare il livello del volume principale (main).
• Eccessivi bassi: provare a regolare la tonalità o il comando EQ a livello della fonte audio per abbassare il livello dei
bassi. Ciò permetterà di suonare la musica più forte prima che "salti" (che si verifichi distorsione).
• Il cavo link: è stato collegato all'ingresso dello strumento o del microfono anziché all'ingresso RCA di linea.
Importante: Tutti gli altoparlanti di grandi dimensioni richiedono un periodo di "riscaldamento" iniziale prima che garantiscano
prestazioni ottimali. Per "riscaldare" adeguatamente il MOBILE DJ, riprodurre una fonte audio a medio volume per alcune ore.
SPECIFICHE TECNICHE
Tensione di ingresso: CA 100–120V / 60Hz, 220–240V / 50Hz
Wattaggio di ingresso: 50W
Wattaggio di uscita: 22W (picco)
Risposta di frequenza (±3dB): 77Hz–20kHz
Tempo richiesto per una ricarica a fondo del MOBILE DJ: meno di 4 ore
Durata della batteria: Oltre 12 ore* quando pienamente carico.
* Nota bene: la durata della batteria varia a seconda della temperatura, dell’età e del volume di utilizzo del prodotto.
13
Page 14

KURZANLEITUNG
1. Vergewissern Sie sich, dass alle hier angeführten Komponenten in der
Schachtel enthalten sind.
2. LESEN SIE DIE SICHERHEITSHINWEISE, BEVOR SIE DAS PRODUKT
VERWENDEN.
3. STELLEN SIE SICHER, DASS DIE BATTERIE VOR DER ERSTEN
VERWENDUNG VOLLSTÄNDIG AUFGELADEN IST, UM EINE MAXIMALE
BATTERIELEBENSDAUER ZU ERZIELEN.
4. Studieren Sie das Aufbaudiagramm.
5. Für den Betrieb platzieren Sie das Produkt in einer geeigneten Position.
6. Stellen Sie sicher, dass alle Eingabegeräte wie Mikrofone, CD-Player, MP3Player und verbundene Verstärker/PAs ausgeschaltet sind und deren
Lautstärke auf "Null“ steht.
7. Schalten Sie alles in der folgenden Reihenfolge ein:
• Audio-Eingangsquellen (z.B. Mikrofone, Instrumente, CD/MP3-Player)
• MOBILE DJ
8. Beim Ausschalten gehen Sie in umgekehrter Reihenfolge vor:
• MOBILE DJ
• Eingabegeräte
MIKROFON
iPod
(nicht inkludiert)
OBERSEITE
CD-PLAYER
(nicht inkludiert)
SEITENTEIL
WIEDERAUFLADBARE BATTERIEN
Wiederaufladbare Blei-Säure-Batterien des gleichen Typs werden auch in Automobilen eingesetzt. Ganz wie bei Ihrer
Autobatterie wirkt sich die Art und Weise wie Sie diese Batterie verwenden stark auf ihre Lebensdauer aus. Bei sachgemäßer
Verwendung und Behandlung kann eine Blei-Säure-Batterie viele Jahre halten. Hier sind einige Empfehlungen, um die
maximale Lebensdauer für die interne Batterie zu erzielen.
ALLGEMEINE VERWENDUNG
• Laden Sie die Batterie vollständig auf, bevor Sie sie verwenden.
• Vermeiden Sie es, die Batterie völlig zu entladen.
• Für eine maximale Lebensdauer entladen Sie die Batterie einmal monatlich zu 80%.
• Laden Sie die Batterie nach jedem Gebrauch vollständig auf.
• Wenn die Batterie voll geladen ist, kann sie eine Laufzeit von bis zu einer Woche erreichen.
• Sie können das Gerät bis zu zwei Wochen eingesteckt lassen.
AUFBEWAHRUNG
• Bewahren Sie das Gerät nicht an Orten mit hohen Temperaturen und Feuchtigkeit auf.
• Bei langfristiger Lagerung sollte die Batterie regelmäßig aufgeladen werden.
• Wenn Sie die Batterie sechs Monate lang nicht aufgeladen haben, kann es sein, dass sie nicht mehr aufgeladen werden
kann.
REPARATUR
• Je älter die Batterie wird, desto mehr kann sie ihre Aufladefähigkeit verlieren. Wenn dies geschieht, kontaktieren Sie Ihren
lokalen autorisierten ION Audio Kundendienst.
• Versuchen Sie nicht die Batterie selbst zu warten, zu modifizieren oder auszutauschen.
ENTSORGUNG
• Bringen Sie das Gerät in ein Recyclingzentrum oder entsorgen Sie es entsprechend lokaler Verordnungen.
LIEFERUMFANG
MOBILE DJ
Mikrofonkabel
Mikrofon
Netzkabel
Schnellstart-Anleitung
Sicherheitshinweise und
Garantieinformationen
STROM
14
Page 15

p
SEITENELEMENTE
1. POWER IN (IEC) - Schließen Sie hier das mitgelieferte
Netzkabel an und verbinden das andere Ende mit einer
Stromquelle, die das Gerät gleichzeitig lädt und mit Strom
versorgt. Die Ladeanzeige leuchtet auf, wenn die Batterie
aufgeladen wird.
2. SPANNUNGSWAHLSCHALTER * - Setzen Sie diesen
Schalter auf die richtige Spannung für Ihren Standort.
*WARNUNG: Benutzer in den USA sollten diesen
Schalter auf "100-120V" setzen, Benutzer in
Großbritannien und den meisten europäischen Ländern
sollten ihn jedoch auf „220-240V“setzen. Die Wahl der
falschen S
3. NETZSCHALTER - Schaltet MOBILE DJ ein oder aus.
Bitte beachten Sie, dass die Batterie geladen wird,
während MOBILE DJ an einer Stromquelle angeschlossen
ist.
4. LADEKONTROLLANZEIGE - Wenn das Gerät
eingeschaltet ist, zeigen diese Lichter die verbleibende
Batterieleistung an. Die Lebensdauer der Batterie hängt
von Lautstärke und Betriebsdauer ab.
5. DOCK LADESCHALTER - Um Ihren iPod aufzuladen,
wenn das Gerät eingeschaltet ist, bringen Sie diesen Schalter in die Position "Laden".
annung kann das Gerät beschädigen.
ELEMENTE DER OBERSEITE
4
5
3
1
2
2
4 5
2
7
8
6
3 3
1
1. POWER-LED - Diese LED leuchtet, wenn MOBILE DJ eingeschaltet ist.
2. MIKROFON-EINGÄNGE (1/4") - Diese 1/4" Mono-Eingänge können verwendet werden, um zwei Mikrofonen
an das Gerät anzuschließen.
3. AUX-EINGANG (STEREO-CINCH) - Dieser Stereo-Cinch-Eingang kann dazu verwendet werden, einen CDPlayer, MP3-Player oder eine andere Audio-Quelle anzuschließen. Um ein tragbares Gerät mit einem 1/8"Stereo-Kopfhöreranschluss anzuschließen, verwenden Sie ein standardmäßiges Stereokabel von 1/8" auf
Cinch.
4. MIKROFON-LAUTSTÄRKE - Regelt die Lautstärke der MIKROFONEINGÄNGE.
5. MASTER VOLUME – Mit diesem Drehregler kann die Gesamtlautstärke der Lautsprecher von MOBILE DJ
eingestellt werden.
6. CROSSFADER – Mischt die Musik, die auf den Docks A und B läuft. Schieben Sie den Crossfader nach links,
so wird Dock A wiedergegeben. Schieben Sie ihn nach rechts, wird die Musik von Dock B wiedergegeben.
7. EFFEKT-DREHREGLER – Dieser Regler wählt den Effekt aus, der im Gesang zu hören sein soll. Sie können
jeden im EFFEKT-Abschnitt beschriebenen Effekt auswählen.
8. EFFEKTANTEIL – Mit diesem Drehregler stellen Sie ein, wie stark der ausgewählte Effekt zu hören sein soll.
15
Page 16

EFFEKTE
ROTATING-SPEAKER-EFFEKT
ROTARY: Simuliert einen sich schnell drehenden Lautsprecher und erzeugt damit den klassischen, satten Dopplereffekt des
sich drehenden Trichterlautsprechers einer Orgel. Effektvoll bei Gitarren, Stimmen, Keyboard und anderen Instrumenten.
REVERB-EFFEKTE
HALL 1: Erzeugt das Echo einer grossen, offenen Konzerthalle, ideal für Stimmen und Instrumente.
HALL 2: Erzeugt das Echo einer grossen, angenehmen Konzerthalle, ideal für Schlagzeug, Klavier und andere Instrumente.
ROOM 1: Erzeugt das Echo eines mittelgrossen, relativ hohen Raumes, ideal für Stimmen, Lead-Gitarren und andere
Instrumente.
ROOM 2: Erzeugt das Echo eines kleinen Raumes mit guter Wiedergabe, ideal für Schlagzeug und Perkussionsinstrumente
sowie für E-Gitarren und andere Instrumente.
ROOM 3: Erzeugt das Echo eines grossen, angenehmen Raumes, ideal für akustische Instrumente.
PLATE 1: Erzeugt das Echo eines satten, weichen Vocal-Plate Reverbs mit langer Verfallzeit und warmen Tönen.
PLATE 2: Nachahmung eines Vintage-Plate Reverbs mit hellen, leicht blechernen Tönen und einer mittleren Verfallszeit.
PLATE 3: Ein kurzes, helles Plate Reverb, wirksam, um feinabgestimmte Pausen zu kreieren.
MODULATIONSEFFEKTE
CHORUS: Erzeugt den komplexen Effekt eines sechstimmigen Chorensembles mit kleinen Verzögerungen, die oft als "Chorus
/ Doubler" bezeichnet werden. Besitzt separaten Pfad für Stereosignal. Langsam und verwässert.
FLANGE: Klassisches Stereo-Flange: ein langsamer, metallischer Schwung mit separatem Pfad für Stereosignal.
VERZÖGERUNGSEFFEKTE
DELAY 1: Ein einfaches Rückschlagsecho ohne Feedback, besonders wirksam bei Stimmen und rhythmischen Gitarren.
DELAY 2: Mittellange, poly-rhythmische Verzögerung mit Crossover-Feedback. Verhältnis 3 zu 4 zwischen L und R
Verzögerungsspannen (291 zu 388ms), um ein 3/4 gegenüber 4/4 Gefühl zu vermitteln. Geeignet für Soloinstrumente, bei
denen ein langer, nachfolgender Echoeffekt gewünscht ist.
MEHRFACHEFFEKTE
CHORUS – ROOM 1: Ein Raum-Reverb geht in eine langsame Flange über und kreiert damit einen “ausserirdischen” Effekt.
CHORUS – ROOM 2: Dramatischer Choreffekt in einem kleinen Raum geht in einen satten Chor mit Reverb über, besitzt
separaten Pfad für Stereosignal.
BYPASS: Umgehen des Effektprozessors – Effekte werden nicht gehört.
WICHTIGE HINWEISE
Verwenden Sie diese Anleitung zur Fehlerbehebung, wenn der Klang bei hoher Lautstärke verzerrt ist.
• Eingang "clippt" (verzerrt): Verringern Sie den Eingangspegel oder drehen Sie den Lautstärkeregler an Ihrer
Tonquelle oder dem Musikinstrument zurück.
• Ausgang "clippt" (verzerrt): Verringern Sie die Gesamtlautstärke.
• Zu viel Bass: Versuchen Sie, den Ton- oder EQ-Regler Ihrer Tonquelle anzupassen, um den Bass zu
verringern. Dies ermöglicht Ihnen, die Musik lauter abzuspielen, bevor der Klang verzerrt.
• Das Link-Kabel: wird anstelle des Cinch-Line-Eingangs mit dem Instrument oder dem Mikrofoneingang
verbunden.
Wichtig: Wie bei allen großen Lautsprechern sollte zunächst eine „Einspielphase“ erfolgen, um eine optimale
Leistung zu erzielen. Spielen Sie einige Stunden lang eine Tonquelle bei mittlerer Lautstärke ab, um die
„Einspielphase“ zu absolvieren.
TECHNISCHE DATEN
Eingangsspannung: AC 100–120V / 60Hz, 220–240V / 50Hz
Eingangsleistung: 50W
Ausgangsleistung: 22W (Peak)
Frequenzgang (±3dB): 77Hz–20kHz
Benötigte Zeit für den Ladevorgang des MOBILE DJ: unter 4 Stunden
Batterielaufzeit: Über 12 Stunden* in voll aufgeladenem Zustand.
* Hinweis: Die Batterielaufzeit des Produkts kann aufgrund von Faktoren wie Temperatur, Alter und gespielter Lautstärke variieren.
16
Page 17

SNELSTARTGIDS
1. Zorg ervoor dat alle hier opgesomde artikelen zich in de doos bevinden.
2. LEES DE VEILIGHEIDSVOORSCHRIFTEN VOORALEER HET
PRODUCT TE GEBRUIKEN.
3. ZORG ERVOOR DAT DE ACCU VOOR HET EERSTE GEBRUIK
VOLLEDIG IS OPGELADEN, VOOR EEN MAXIMALE LEVENSDUUR
VAN DE ACCU.
4. Bestudeer dit installatiediagram.
5. Plaats het product in een positie, geschikt voor werking.
6. Zorg ervoor dat alle invoerapparaten, zoals microfoons, cd-spelers, mp3spelers, aangekoppelde versterkers en PA-systemen uitgeschakeld zijn
en het volume op “nul” staat.
7. Zet alles in deze volgorde in werking:
• Geluidsbronnen (bijv. microfoons, instrumenten, cd/mp3-spelers)
• MOBILE DJ
8. Doe bij het uitschakelen steeds het omgekeerde:
• MOBILE DJ
• invoerapparaten
MICROFOON
iPod
(niet meegeleverd)
BOVENPANEEL ZIJPANEEL
CD-SPELER
(niet meegeleverd)
HERLAADBARE ACCU'S
Herlaadbare loodaccu's van hetzelfde type als de accu's, gebruikt in auto's. Net als met uw autoaccu, heeft de manier waarop u
met de accu omgaat een grote invloed op de levensduur. Wanneer een loodaccu naar behoren wordt gebruikt en behandeld,
kan hij jarenlang meegaan. Hierna volgen enkele aanbevelingen om een zo lang mogelijke levensduur uit uw accu te halen.
ALGEMEEN GEBRUIK
• Laad de accu voor gebruik volledig op.
• Vermijd het om de accu volledig op te gebruiken.
• Voor een maximale levensduur dient de accu een keer per maand tot 80 % worden opgebruikt.
• Laad de accu na elk gebruik volledig op.
• Een volledig opgeladen accu kan een week zonder oplaadbeurt.
• De unit mag tot twee weken ingeplugd blijven.
OPSLAG
• Vermijd opslag bij hoge temperaturen en in vochtige ruimtes.
• Bij opslag voor langere periodes, is het aangeraden om de accu nu en dan te herladen.
• Als u de accu zes maanden lang niet herlaadt, kan het herladen mislukken.
HERSTELLEN
• Wanneer de levensduur van de accu opraakt, kan hij zijn mogelijkheid om te herladen verliezen. Neem wanneer dit gebeurt
contact op met een geautoriseerd servicecentrum van ION Audio.
• Probeer de accu zelf niet te onderhouden, aan te passen of vervangen.
VERWIJDERING
• Breng de accu-eenheid naar een recyclagecentrum of verwijder hem in overeenstemming met de plaatselijke wetgeving.
INHOUD VAN DE DOOS
Mobile DJ
Microfoonkabel
Microfoon
Stroomkabel
Snelstartgids
Veiligheidsvoorschriften &
boekje met informatie over de
garantie
STROOM
17
Page 18

FUNCTIES VAN HET ZIJPANEEL
1. POWER IN (IEC) – Plaats hier de stroomkabel en verbindt
het andere uiteinde met een stroombron die tegelijkertijd de
unit van stroom voorziet en de accu herlaadt. Tijdens het
opladen van de accu brandt de oplaadindicator.
2. SPANNINGKEUZESCHAKELAAR * – Zet dit op het juiste
plaatselijke voltage.
* WAARSCHUWING: Gebruikers uit de VS moeten deze
schakelaar op “100-12+” zetten, terwijl gebruikers uit het
VK en de meeste Europese landen “220-240V” moeten
gebruiken. Een ongepaste spanning selecteren kan de
unit beschadigen.
3. STROOMSCHAKELAAR – Zet MOBILE DJ aan of uit. Let
op dat de accu blijft laden zolang MOBILE DJ is verbonden
met een stroombron.
4. INDICATOR ACCUNIVEAU – Wanneer de eenheid
ingeschakeld is, duiden deze lichtjes de overblijvende
accustroom aan. De levensduur van de accu hangt af van
volume en gebruik.
5. SCHAKELAAR “DOCK CHARGE” – zet deze schakelaar
in de “charge”-stand als u uw iPod wilt herladen wanneer
de unit ingeschakeld is.
KENMERKEN VAN HET BOVENSTE PANEEL
4
5
3
1
2
2
4 5
2
1. STROOMLED – Dit lichtje gaat branden wanneer MOBILE DJ wordt aangezet.
2. MICROFOONINGANGEN (1/4") – Deze 1/4" mono-ingangen kunnen worden gebruikt om twee microfoons met
de unit te verbinden.
3. AUX-INGANG (STEREO RCA) – Deze stereo RCA-ingang kan worden gebruikt om een cd-speler, mp3-speler
of andere geluidsbron te verbinden. Gebruik een standaard 1/8”-naar-RCA stereokabel om een draagbaar
apparaat met 1/8" stereo hoofdtelefooningang te verbinden met de unit.
4. MICROFOONVOLUME – Deze knop controleert het volume van de microfooningangen.
5. HOOFDVOLUME – Deze knop controleert het luidsprekervolume van de Mobile DJ.
6. CROSSFADER – Mengt de muziek die op docks A en B wordt afgespeeld. Naar links schuiven speelt de
muziek uit dock A af; naar rechts schuiven de muziek van dock B.
7. EFFECTSELECTIE – Deze knop kiest welk effect aan de microfooningangen wordt toegevoegd. U kunt kiezen
uit één van de effecten, beschreven in het onderdeel EFFECTEN.
8. HOEVEELHEID EFFECT – Deze knop controleert hoeveel u hoort van het gekozen effect.
7
8
6
3 3
1
18
Page 19

EFFECTEN
ROTARY SPEAKER
ROTARY: Deze simulator van snel roterende speakers creëert het klassieke, overdadige dopplereffect dat eigen is aan
draaiende orgelluidsprekers. Effectief voor gitaren, stemmen, toetsenborden en andere instrumenten.
GALMEFFECTEN
HALL 1: Een ruim, helder galmeffect dat de akoestiek van een concertzaal nabootst. Geschikt voor stemmen en instrumenten.
HALL 2: Een ruim, warm galmeffect dat de akoestiek van een concertzaal nabootst. Geschikt voor drums, piano's en andere
instrumenten.
ROOM 1: Een galmeffect dat de akoestiek van een middelgrote, vrij heldere en weerkaatsende kamer nabootst. Geschikt voor
stemmen, gitaarsolo's en andere instrumenten.
ROOM 2: Een galmeffect dat de akoestiek van een kleine, heldere kamer met veel weerkaatsing nabootst. Geschikt voor
drums en percussie, elektrische gitaren en andere instrumenten.
ROOM 3: Een galmeffect dat de akoestiek van een ruime, warme kamer nabootst. Geschikt voor akoestische instrumenten.
PLATE 1: Een rijke, gladde vocale plaatgalm met lange vervaltijd en warme tonen.
PLATE 2: Een emulatie van vintage plaatgalmen met heldere, licht metaalachtige toon en gemiddelde vervaltijd.
PLATE 3: Een korte, heldere plaatgalm. Effectief voor het creëren van subtiele ruimtes.
MODULATIE-EFFECTEN
CHORUS: Een complex, 6-stemmig koorensemble-effect met korte echo's. Vaak ook “Chorus / Verdubbelaar” genoemd.
Afzonderlijke stereosignalen. Traag en vloeiend.
FLANGER: Klassieke stereo flanger: een trage, vrij metaalachtige golfbeweging, met afzonderlijke stereosignalen.
DELAY-EFFECTEN
DELAY 1: Een simpele terugkerende echo zonder feedback. Zeer effectief voor vocalen en gitaarritmepartijen.
DELAY 2: Middellange polyritmische delay met crossover feedback. Verhouding van 3 op 4 tussen de L en R delay-tijden (van
291 tot 388 ms) voor een 3/4- vs. 4/4-gevoel. Nuttig voor solo-instrumenten wanneer een lang, aanhoudend echo-effect
gewenst is.
MULTI-EFFECTEN
CHORUS – ROOM 1: De kamergalm gecombineerd met trage flangermodulatie creëert een zeer ruimtelijk effect.
CHORUS – ROOM 2: De snelle modulatie zorgt voor een dramatisch kooreffect in een kleine ruimte, voor een zeer rijk chorus-
en galmgeluid, met afzonderlijke stereosignalen.
BYPASS: De effectenprocessor overslaan. Er zullen geen effecten worden gehoord.
BELANGRIJKE OPMERKINGEN
Gebruik deze gids voor probleemoplossing als het geluid bij hoge volumes vervormd wordt.
• De input wordt “afgeknipt” (vervorming): Probeer het gain- of volumeniveau aan de geluidsbron of het
muziekinstrument lager te zetten.
• De output wordt “afgeknipt” (vervorming): Verlaag het hoofdvolume.
• Er zijn teveel bassen: Probeer op de toon- of EQ-bedieningsknoppen aan uw geluidsbron het niveau van de lage
tonen te verlagen. Dit stelt u in staat de muziek luider te zetten vooraleer “afgeknipte” (vervormde) klanken optreden.
• De verbindingskabel: is ingeplugd in de instrumentingang of de MIC-ingang in plaats van de RCA lijningang.
Belangrijk: Alle grote luidsprekers hebben nood aan een initiële opwarmingstijd voor ze optimaal beginnen functioneren.
Speel voor enkele uren op gemiddeld volume een geluidsbron af, om uw MOBILE DJ naar behoren op te warmen.
SPECIFICATIES
Ingangsvoltage: Wisselstroom 100–120V / 60Hz, 220–240V / 50Hz
Inputwattage: 50W
Outputwattage: 22W (piek)
Frequentiebereik (±3dB): 77Hz–20kHz
Tijd nodig om MOBILE DJ volledig op te laden: minder dan 4 uur
Levensduur van de accu: Meer dan 12 uur* indien volledig opgeladen.
* Let op: De levensduur van de accu varieert afhankelijk van temperatuur, ouderdom en gebruikt volume.
19
Page 20

www.ionaudio.com
MANUAL VERSION 1.1
 Loading...