

Page 1

Rock Block/ Mini Block Rocker
User Guide
English ( 2 – 3 )
Guía del usuario
Español ( 4 – 5 )
Guide d'utilisation
Français ( 6 – 7 )
Guida per l'uso
Italiano ( 8 – 9 )
Benutzerhandbuch
Deutsch ( 10 – 11 )
Gebruikershandleiding
Nederlands ( 12 – 13 )
Användarmanual
Svenska ( 14 – 15 )
Käyttöopas
Suomi ( 16 – 17 )
Appendix
English ( 18 )
Page 2
User Guide (English)
Introduction
Box Contents
• Rock Block/ Mini Block Rocker
• USB Charging Cable
• 3.5 mm (1/8”) Stereo Aux Cable
• Quickstart Guide
Support
For the latest information about this product (system requirements, compatibility information,
etc.) and product registration, visit ionaudio.com/rock-block
or ionaudio.com/miniblockrocker.
For additional product support, visit ionaudio.com/support.
For safety and warranty information, see ionaudio.com/warranty.
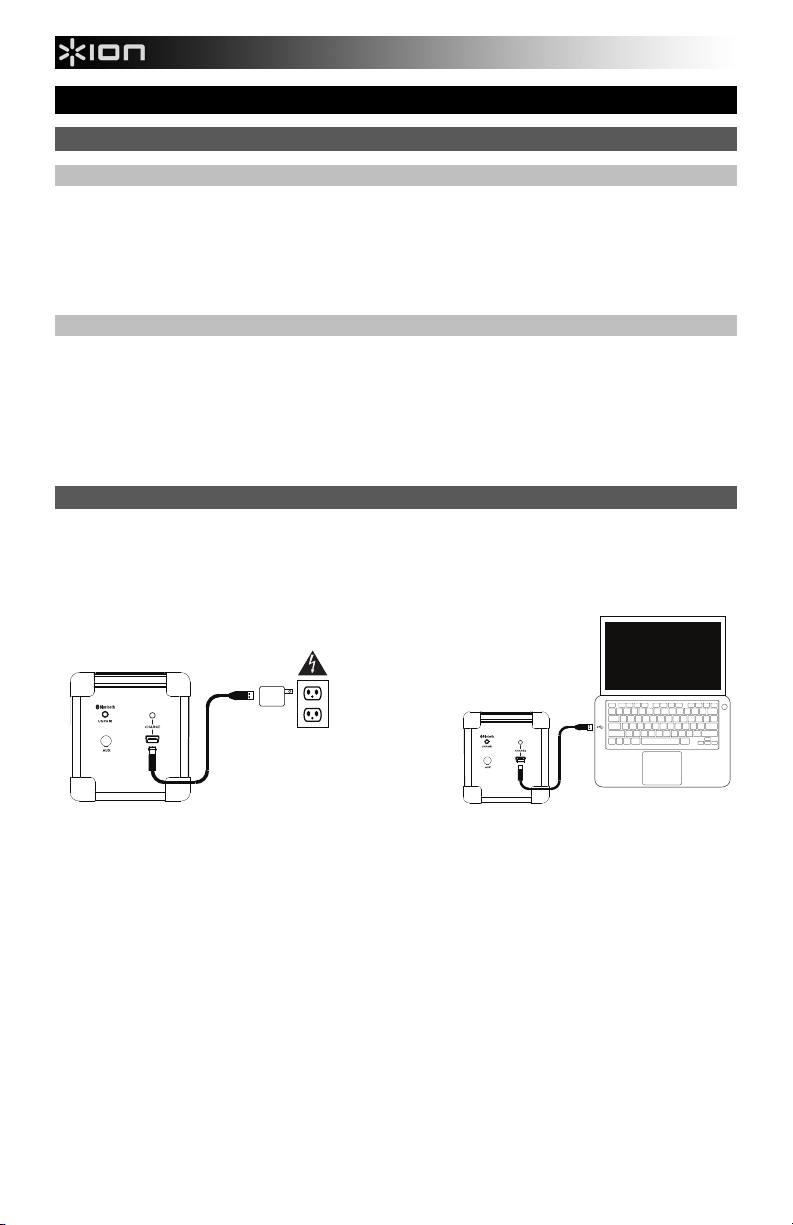
Charging Rock Block/ Mini Block Rocker
Use the included micro-USB cable to connect Rock Block/ Mini Block Rocker to (A) a USB
power adapter connected to a power outlet or (B) your computer (powered on) for 3 hours.
The Battery Charging LED will be lit while the unit is charging and the LED will turn off when
charging has completed.
Power Supply*
(A)
Computer*
(B)
*Sold Separately
2
Page 3
Features
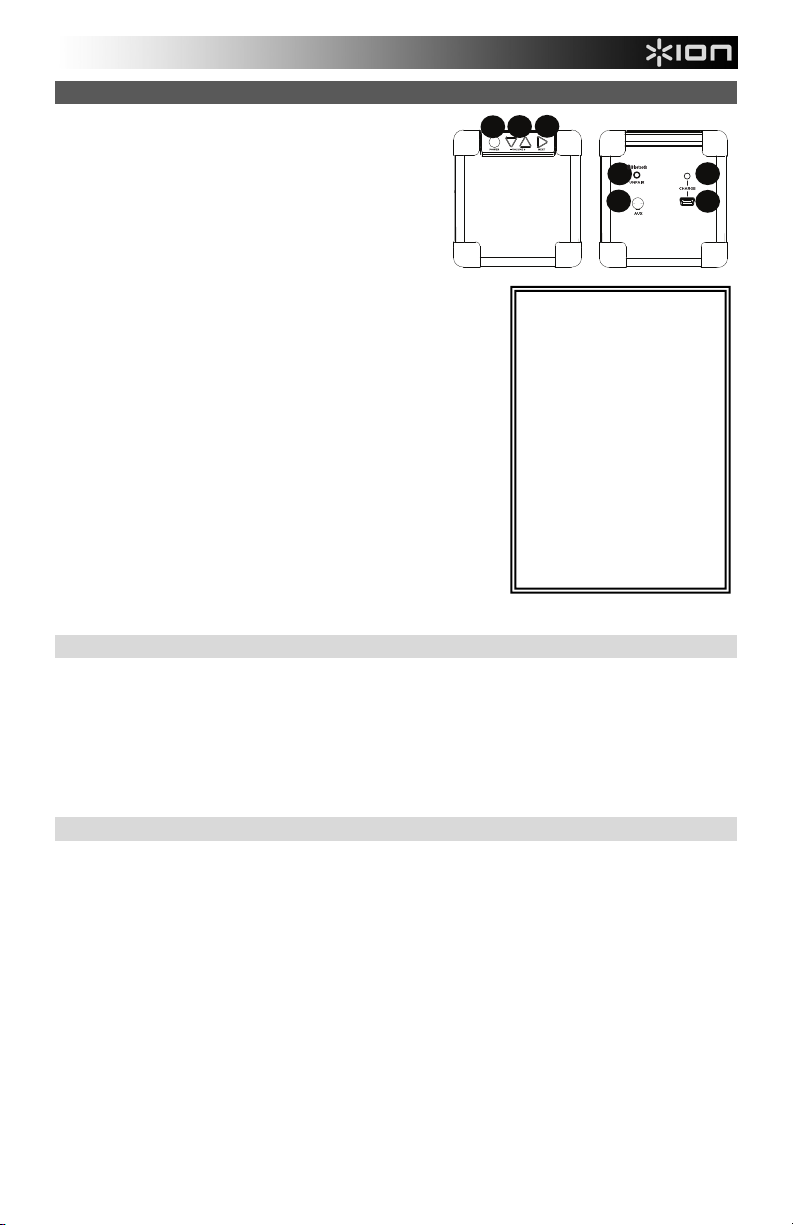
1. Power – Press this button to power Rock Block/ Mini
Block Rocker on and off. The power button LED shows
the state of the Bluetooth connection. See the Rock
Block/ Mini Block Rocker LED activity box for more
details.
Note: Rock Block/ Mini Block Rocker will turn itself off
after 5 minutes of no audio playing through either
Bluetooth or the aux input. To continue to use Rock
Block/ Mini Block Rocker, power on the unit by
pressing the power button.
2. Volume Down/Up Controls – Press these buttons to decrease
or increase the volume level for the aux input and Bluetooth
sources. Rock Block/ Mini Block Rocker defaults to 2/3 volume
when it is turned on. Please adjust the volume using your
device’s volume controls and Rock Block/ Mini Block Rocker’s
volume buttons.
3. Next Track – Press this button to advance to the next track
when listening to Bluetooth sources.
Note: In some apps, pressing the Next button may advance to
the next playlist or music genre.
4. Unpair Button – Press this button to disconnect from a
connected Bluetooth source.
5. Battery Charging LED –
charging, it will be on, when fully charged or not plugged into a
charge cable, it will be off.
6. Micro-USB Charging Port – Connect the included micro-USB
cable to connect Rock Block/ Mini Block Rocker to a USB
power adapter connected to a power outlet or to your computer.
7. Aux Input – Connect the output of an MP3 player or other audio source to this input.
Connecting with a Bluetooth Device
1. Power on Rock Block/ Mini Block Rocker.
2. Turn on your Bluetooth device.
3. Navigate to your Bluetooth device’s setup screen, find “Rock Block/ Mini BlockRocker” and connect.
Note: If your Bluetooth device prompts for a pairing code, enter ‘0000’.
4. Play music and adjust Rock Block/ Mini Block Rocker’s volume buttons.
Note: If you experience trouble connecting or playing music, update your device's OS.
5. To disconnect a connected Bluetooth device, press the Unpair button on Rock Block/ Mini Block
Rocker.
This shows the charge status. When
Troubleshooting
If the sound is distorted: Try lowering the volume control of your sound source.
Also, try to reduce the overall volume of Rock Block/ Mini Block Rocker.
If there is too much bass: Try adjusting the tone or EQ control on your sound source to lower the bass
level. This will allow you to play the music louder before clipping (distortion) occurs.
2
3
1
4
7
Power Button LED
activity:
Solid Red LED = No
Bluetooth connection.
Solid Blue LED =
Bluetooth connected.
Blinking Red LED =
Battery is low and needs
to be recharged (no
Bluetooth connection).
Blinking Blue/Purple
LED = Battery is low and
needs to be recharged
(Bluetooth connected).
5
6
3
Page 4

Guía del usuario (Español)
Introducción
Contenido de la caja
• Rock Block/ Mini Block Rocker
• Cable de carga USB
• Cable auxiliar estéreo de 3.5 mm (1/8 pulg.)
• Guía de inicio rápido
Soporte
Para obtener la información más reciente acerca de este producto (requisitos de sistema,
información de compatibilidad, etc.) y registrarlo, visite ionaudio.com/rock-block o
ionaudio.com/miniblockrocker.
Para soporte adicional del producto, visite ionaudio.com/support.
Para información sobre la seguridad y la garantía, consulte ionaudio.com/warranty.
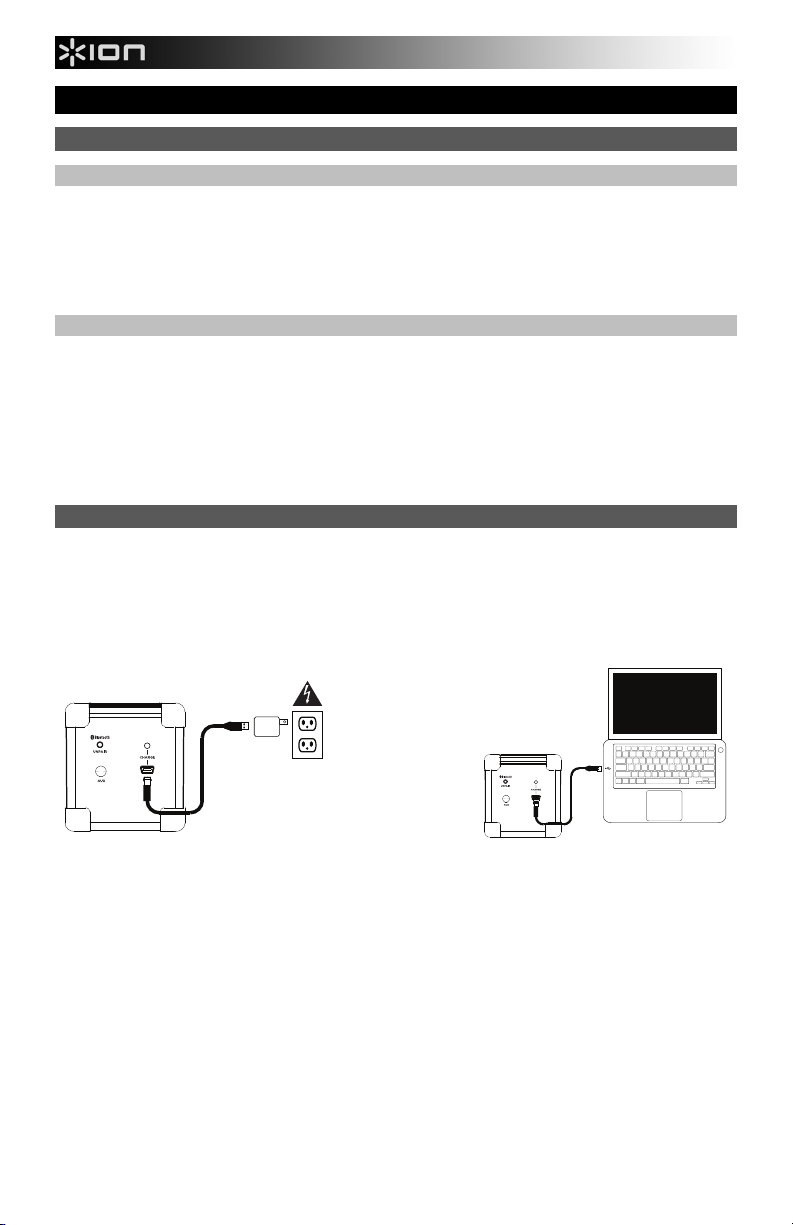
Cómo cargar el Rock Block/ Mini Block Rocker
Use el cable micro-USB incluido para conectar el Rock Block/ Mini Block Rocker a (A) un
adaptador de alimentación USB conectado a una toma de corriente o (B) su ordenador
(encendido) durante 3 horas.
El LED de batería en carga se enciende cuando la unidad se está cargando y se apaga
cuando la carga está completa.
suministro
electric*
(A)
Ordenador*
(B)
*Se vende por
separado
4
Page 5
Características
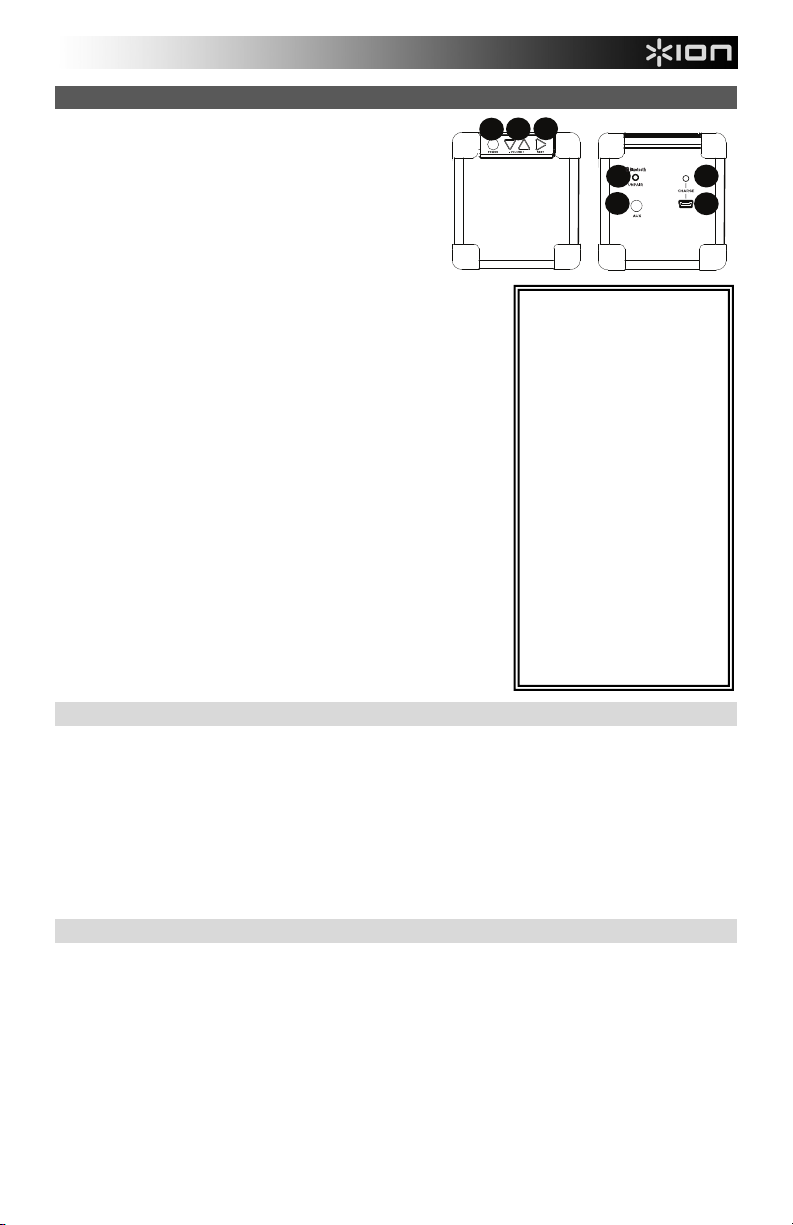
1. Encendido – Pulse este botón para encender o
apagar el Rock Block/ Mini Block Rocker. El LED del
botón de encendido muestra el estado de la conexión
Bluetooth. Vea la caja de actividad del LED del Rock
Block/ Mini Block Rocker para más detalles.
Nota: El Rock Block/ Mini Block Rocker se apagará
automáticamente después de 5 minutos sin reproducir
audio ya sea por Bluetooth o la entrada auxiliar. Para
continuar utilizando el Rock Block/ Mini Block Rocker,
encienda la unidad presionando el botón de
encendido.
2. Controles de subir/bajar volumen – Pulse estos botones para
reducir o aumentar el nivel de volumen de las fuentes de la
entrada auxiliar y Bluetooth. El Rock Block/ Mini Block Rocker
ajusta su volumen a 2/3 de forma predeterminada al
encenderse. Ajuste el volumen utilizando los controles de
volumen de su dispositivo y los botones de volumen del Rock
Block/ Mini Block Rocker.
3. Próxima pista – Pulse este botón para avanzar a la siguiente
pista cuando esté escuchando audio desde fuentes Bluetooth.
Nota: En algunas aplicaciones, pulsar el botón Next hará que
avance a la próxima lista de reproducción o género musical.
4. Botón de desapareamiento – Pulse este botón para
desconectarse de una fuente Bluetooth a la que esté conectado.
5. LED de batería en carga –
cargarse, estará iluminado, al completar la carga o al estar
desenchufado del cable de carga, estará apagado.
6. Puerto de carga micro USB – Conecte el cable micro USB
incluido para conectar el Rock Block/ Mini Block Rocker a un
adaptador de corriente USB conectado a su vez a una toma de
corriente o a su ordenador.
7. Entrada auxiliar – Conecte a esta entrada la salida de un
reproductor MP3 u otra fuente de audio.
Muestra el estado de la carga. Al
Conexión con un dispositivo Bluetooth
1. Encienda el Rock Block/ Mini Block Rocker.
2. Encienda su dispositivo Bluetooth.
3. Navegue a la pantalla de configuración de su dispositivo Bluetooth, busque “Rock Block/ Mini
BlockRocker” y conecte.
Nota: Si su dispositivo Bluetooth solicita un código de apareamiento, ingrese ‘0000’.
4. Reproduzca música y ajuste los botones de volumen del Rock Block/ Mini Block Rocker.
Nota: Si tiene problemas para conectarse o reproducir música, actualice el sistema operativo de su
dispositivo.
5. Para desconectar un dispositivo Bluetooth conectado, pulse el botón Unpair del Rock Block/ Mini
Block Rocker.
Solución de problemas
Si el sonido está distorsionado: trate de disminuir el volumen de su fuente de sonido. Pruebe también
reduciendo el volumen general del Rock Block/ Mini Block Rocker.
Si los graves son demasiado fuertes: intente ajustar el control de tono o ecualización de su fuente de
sonido para reducir el nivel de graves. De esta forma podrá reproducir la música con más volumen antes de
que se produzca el recorte (distorsión).
2
3
1
4
7
LED de actividad del
botón de encendido:
LED con luz roja
permanente = No hay
conexión Bluetooth.
LED con luz azul
permanente = Bluetooth
conectado.
LED con luz roja
parpadeante = La
batería tiene poca carga
y debe recargarse (no
hay conexión Bluetooth).
LED con luz
azul/violeta
parpadeante = La
batería tiene poca carga
y debe recargarse
(Bluetooth conectado).
5
6
5
Page 6
Guide d’utilisation (Français)
Présentation
Contenu de la boîte
• Rock Block/ Mini Block Rocker
• Câble de rechargement USB
• Câble auxiliaire stéréo de 3,5 mm (1/8 po)
• Guide de démarrage rapide
Assistance technique
Pour les toutes dernières informations concernant la configuration système requise, la
compatibilité et l’enregistrement du produit, veuillez visiter ionaudio.com/rock-block ou
ionaudio.com/miniblockrocker.
Pour de l’assistance supplémentaire, veuillez visiter le site ionaudio.com/support.
Pour des consignes de sécurité et des informations concernant la garantie : veuillez visiter
ionaudio.com/warranty.
Rechargement de la batterie du Rock Block/ Mini Block Rocker :
Utilisez le câble micro-USB inclus afin de brancher le Rock Block/ Mini Block Rocker à (A) un
adaptateur d’alimentation USB branché à une prise secteur, ou (B) à un ordinateur (sous
tension) pendant 3 heures.
La DEL de rechargement s'allume lors du rechargement et s'éteint lorsque la batterie est
entièrement rechargée.
Câble d’alimentation*
(A)
Ordinateur*
(B)
*Vendu
séparément
6
Page 7

Caractéristiques
1. Touche d’alimentation – Cette touche permet de
mettre le Rock Block/Mini Block Rocker sous et hors
tension. Le témoin DEL de la touche d'alimentation
indique l'état de la connexion Bluetooth. Veuillez
consulter l’encadré Légende du témoin DEL pour plus
de détails.
Remarque : Le Rock Block/Mini Block Rocker s'éteint
après 5 minutes d’inactivité Bluetooth ou provenant de
l'entrée auxiliaire. Pour continuer à utiliser le Rock
Block/Mini Block Rocker, rallumez l'appareil en
appuyant sur la touche d'alimentation.
2. Touches Volume – Ces touches permettent de diminuer ou
d’augmenter le niveau du volume pour l'entrée auxiliaire et les
sources Bluetooth. Le niveau par défaut du volume au
démarrage du Rock Block/Mini Block Rocker est de 2/3.
Veuillez ajuster le volume à l'aide des commandes de volume
de votre appareil et du Rock Block/Mini Block Rocker.
3. Piste suivante – Cette touche permet de passer à la piste
suivante lorsque vous écoutez des sources Bluetooth.
Remarque : Dans certaines applications, la touche Piste
suivante permet de passer à la liste de lecture ou le genre de
musique suivant.
4. Touche de déjumelage – Cette touche permet de supprimer
la connexion d'une source Bluetooth connectée.
5. DEL de rechargement – Ce témoin indique l'état de charge
de la batterie. Il reste allumé lors du rechargement, puis
lorsque la batterie est complètement chargée ou lorsque le
câble de rechargement n’est pas branché, il s’éteint.
6. Port de rechargement mini-USB – Ce port permet d’utiliser
le câble mini-USB inclus afin de brancher le Rock Block/Mini
Block Rocker à un adaptateur d’alimentation USB branché à
une prise secteur ou à un ordinateur.
7. Entrée auxiliaire – Cette entrée permet de brancher la sortie
d'un lecteur MP3 ou d’une autre source audio.
Jumelage d’un appareil Bluetooth
1. Mettez le Rock Block/Mini Block Rocker sous tension.
2. Mettez votre appareil Bluetooth sous tension.
3. Accédez à l'écran de configuration de votre appareil Bluetooth, recherchez « Rock Block/Mini
BlockRocker » et lancez le jumelage.
Remarque : Si votre appareil Bluetooth vous demande d’entrer un code de jumelage, entrez « 0000 ».
4. Lancez la musique et ajuster le volume du Rock Block/Mini Block Rocker.
Remarque : Si vous éprouvez de la difficulté à jumeler votre appareil ou à faire jouer de la musique,
faites une mise à jour du système d'exploitation de votre appareil.
5. Appuyez sur la touche de déjumelage pour déjumeler l’appareil Bluetooth connecté au Rock
Block/Mini Block Rocker.
Guide de dépannage
Lorsqu’il y a de la distorsion : Essayez de diminuer le volume de votre appareil. Essayez également
d'abaisser le volume du Rock Block/ Mini Block Rocker.
Lorsqu’il y a trop de basses fréquences : Essayez de régler le niveau de tonalité et d’égalisation sur
l’appareil de source d’entrée audio afin de diminuer le niveau des basses fréquences. Cela vous permettra
d'augmenter le volume de la musique avant que l'écrêtage se produise.
2
3
1
4
7
Légende des indicateurs
DEL de touche
d’alimentation:
DEL rouge = Aucun
appareil Bluetooth n’est
jumelé.
DEL bleue = Appareil
Bluetooth jumelé.
DEL rouge clignotante =
La batterie est faible et a
besoin d'être rechargée
(aucun appareil Bluetooth
n’est jumelé).
DEL bleue/violette
clignotante = La batterie
est faible et a besoin d'être
rechargée (appareil
Bluetooth jumelé).
5
6
7
Page 8

r
Guida per l'uso (Italiano)
Introduzione
Contenuti della confezione
• Rock Block/ Mini Block Rocker
• Cavo di ricarica USB
• Cavo Aux Stereo da 3,5 mm (1/8”)
• Guida rapida
Assistenza
Per le ultime informazioni in merito a questo prodotto (requisiti di sistema, informazioni sulla
compatibilità, ecc.) recarsi alla pagina ionaudio.com/rock-block o
ionaudio.com/miniblockrocker.
Per ulteriore assistenza sul prodotto, recarsi alla pagina ionaudio.com/support.
Istruzioni di sicurezza e garanzia, si veda la pagina ionaudio.com/warranty.
Ricarica del Rock Block/ Mini Block Rocker
Servirsi del cavo micro-USB in dotazione per collegare il Rock Block/ Mini Block Rocker a (A)
un adattatore di alimentazione USB collegato a una presa elettrica o (B) al computer (acceso)
per 3 ore.
il LED di ricarica della batteria sarà acceso mentre l'apparecchio si sta caricando e si spegnerà
quando la ricarica è completa.
Alimentazione*
(A)
Compute
8
*
(B)
*Venduti
separatamente
Page 9

Caratteristiche
1. Power (alimentazione) – Premere questo tasto per
accendere e spegnere il Rock Block/ Mini Block Rocker. Il
LED del tasto di alimentazione mostra lo stato del
collegamento Bluetooth. Si veda la casella relativa all'attività
dei LED del Rock Block/ Mini Block Rocker per maggiori
informazioni.
Nota bene: il Rock Block/ Mini Block Rocker si spegne da
solo dopo 5 minuti di mancata riproduzione audio tramite
Bluetooth o tramite l'ingresso aux. Per continuare a utilizzare
il Rock Block/ Mini Block Rocker, accendere l'apparecchio
premendo l'apposito tasto.
2. Comandi Volume giù/su – Premere questi tasti per ridurre o
aumentare il livello del volume per l'ingresso aux e le fonti
Bluetooth. Quando viene acceso, il Rock Block/ Mini Block
Rocker in via predefinita si colloca a 2/3 del volume. Regolare il
volume servendosi dei comandi del dispositivo e i tasti volume
del Rock Block/ Mini Block Rocker.
3. Next Track (traccia successiva) – Premere questo tasto per
passare alla traccia successiva quando si ascoltano fonti
Bluetooth.
Nota bene: in alcune app, la pressione del tasto Next può far
passare alla playlist successiva o al genere musicale
successivo.
4. Tasto unpair (scollega) – Premere questo tasto per scollegare
il prodotto da una fonte Bluetooth collegata.
5. LED di carica della batteria –
Durante la ricarica sarà acceso; quando carico o non collegato
al cavo di carica, sarà spento.
6. Porta di ricarica mini-USB – Collegare il cavo mini-USB in
dotazione per collegare il Rock Block/ Mini Block Rocker a un
adattatore di alimentazione USB collegato ad una presa
elettrica o al computer.
7. Ingresso Aux – Collegare l'uscita di un lettore MP3 o di un'altra fonte audio a questo ingresso.
Collegamento a un dispositivo Bluetooth
1. Accendere il Rock Block/ Mini Block Rocker.
2. Accendere il dispositivo Bluetooth.
3. Navigare nella schermata di configurazione del dispositivo Bluetooth, trovare “Rock Block/ Mini Block
Rocker” e collegarlo.
Nota bene: se il dispositivo Bluetooth richiede un codice, digitare ‘0000’.
4. Riprodurre musica e regolare i tasti volume del Rock Block/ Mini Block Rocker.
Nota bene: in caso di problemi nel collegare gli apparecchi o nel riprodurre la musica, aggiornare il
sistema operativo del dispositivo.
5. Per scollegare un dispositivo Bluetooth collegato, premere il tasto Unpair (scollega) sul Rock Block/
Mini Block Rocker.
Mostra il livello della carica.
Risoluzione di problemi
Il suono è distorto: provare ad abbassare il volume a livello della fonte audio. Inoltre, provare a ridurre il
volume complessivo del Rock Block/ Mini Block Rocker.
Eccessivi bassi: provare a regolare la tonalità o il comando EQ a livello della fonte audio per abbassare il
livello dei bassi. Ciò permetterà di suonare la musica più forte prima che salti (che si verifichi distorsione).
9
2
3
1
4
7
5
6
Attività del LED del
tasto di alimentazione:
LED rosso fisso =
nessun collegamento
Bluetooth.
LED blu fisso =
Bluetooth collegato.
LED rosso
lampeggiante = la
batteria è scarica e deve
essere ricaricata (nessun
collegamento Bluetooth).
LED blu/viola
lampeggiante = la
batteria è scarica e deve
essere ricaricata
(Bluetooth collegato).
Page 10

gung
Benutzerhandbuch (Deutsch)
Einführung
Lieferumfang
• Rock Block/ Mini Block Rocker
• USB-Ladekabel
• Stereo-Aux-Kabel Schnellstart-Anleitung
• Schnellstart-Anleitung
Kundendienst
Für die neuesten Informationen zu diesem Produkt (Systemanforderungen, Informationen zur Kompatibilität
etc.) und zur Produktregistrierung besuchen Sie bitte ionaudio.com/rock-block oder
ionaudio.com/miniblockrocker.
Für zusätzlichen Produkt-Support besuchen Sie ionaudio.com/support.
Für Sicherheits- und Garantieinformationen besuchen sie ionaudio.com/warranty.
Aufladen des Rock Block/ Mini Block Rocker
Verwenden Sie das mitgelieferte Micro-USB-Kabel, um den Rock Block/ Mini Block Rocker (A) mit einem
USB-Netzteil, das in einer Steckdose eingesteckt ist oder (B) mit Ihrem (eingeschalteten) Computer für einen
Zeitraum von 3 Stunden zu verbinden.
Die Akkulade-LED leuchtet, während das Gerät aufgeladen wird und erlischt, wenn der Ladevorgang
abgeschlossen ist.
Stromversor
*
(A)
10
Computer*
(B)
*Separat erhältlich
Page 11

Funktionen
1. Ein-/Ausschalter - Drücken Sie diese Taste, um den Rock
Block/Mini Block Rocker ein- oder auszuschalten. Die LED
des Ein-/Ausschalters zeigt den Status der BluetoothVerbindung an. Siehe LED-Aktivität des Rock Block/Mini
Block Rocker für weitere Details.
Hinweis: Rock Block/ Mini Block Rocker wird sich nach 5
Minuten ohne Audiowiedergabe über Bluetooth oder den AuxEingang ausschalten. Um den Rock Block/ Mini Block Rocker
weiterhin zu verwenden, schalten Sie das Gerät durch
Drücken des Ein-(Ausschalters ein.
2. Steuerelemente für Lautstärke - Drücken Sie diese
Tasten zum Erhöhen bzw. Verringern der Lautstärke des
Aux-Eingangs und der Bluetooth-Quellen. Rock Block/ Mini
Block Rocker wechseln beim Einschalten standardmäßig
auf 2/3 der Lautstärke. Bitte passen Sie die Lautstärke mit
dem Lautstärkeregler des Geräts und den Lautstärketasten
der Rock Block/ Mini Block Rocker an.
3. Nächster Titel - Drücken Sie diese Taste, um beim Hören
über Bluetooth-Quellen zum nächsten Titel zu springen.
Hinweis: In einigen Apps kann es vorkommen, dass beim
Drücken der Taste Nächster Titel zur nächsten Playliste
oder Musikrichtung gewechselt wird.
4. Taste Entkoppeln - Drücken Sie diese Taste, um das
Gerät von einer verbundenen Bluetooth-Quelle zu trennen.
5. Batterielade-LED leuchtet beim Ladevorgang. Ist das Gerät voll aufgeladen
oder nicht mit einem Ladekabel verbunden, leuchtet die
LED nicht.
6. Mini-USB-Ladeanschluss - Stecken Sie hier das mitgelieferte Micro-USB-Kabel ein, um Rock Block/
Mini Block Rocker mit Ihrem Computer zu verbinden oder mit einem USB-Netzteil zu verbinden, das in
eine Steckdose gesteckt wird.
7. Aux-Eingang - Verbinden Sie den Ausgang eines MP3-Players oder einer anderen Audioquelle mit
diesem Eingang.
Verbindung mit einem Bluetooth-Gerät
1. Schalten Sie Rock Block/ Mini Block Rocker ein.
2. Schalten Sie Ihr Bluetooth-Gerät ein.
3. Navigieren Sie zum Setup-Bildschirm Ihres Bluetooth-Geräts, wählen Sie “Rock Block/ Mini Block
Rocker” und stellen Sie eine Verbindung her.
Hinweis: Wenn Ihr Bluetooth-Gerät die Eingabe eines Koppel-Codes anfordert, geben Sie '0000' ein.
4. Spielen Sie Musik und passen Sie die Lautstärke des Rock Block/ Mini Block Rocker mit den
Lautstärke-Tasten an.
Hinweis: Wenn Sie Probleme bei der Musikwiedergabe oder beim Verbinden Ihres Gerätes haben,
aktualisieren Sie das OS Ihres Gerätes.
5. Um ein angeschlossenes Bluetooth-Gerät zu trennen, drücken Sie am Rock Block/ Mini Block Rocker
die Taste Entkoppeln.
Zeigt den Ladezustand an. Die LED
Fehlerbehebung
Der Ton klingt verzerrt: Reduzieren Sie die Lautstärke Ihrer Tonquelle oder Ihres Musikinstruments.
Versuchen Sie auch, das Gesamtvolumen des Rock Block/ Mini Block Rockers zu reduzieren.
Zu viel Bass: Versuchen Sie den Ton oder den EQ-Regler Ihrer Tonquelle anzupassen, um den Bass zu
verringern. Dies ermöglicht Ihnen, die Musik lauter abzuspielen, bevor der Klang verzerrt.
Allgemeinhinweis zur Konformitätserklärung: Hiermit erklären wir, daß sich das Gerät Rock Block/ Mini Block
Rocker in Übereinstimmung mit den grundlegenden Anforderungen der europäischen Richtlinie 1999/5/EG
befindet.
Die vollständige EG Konformitätserklärung kann unter folgender Adresse angefordert werden:
inMusic GmbH
Halskestrasse 16-18
D – 47877 Willich
GERMANY
2
3
1
4
7
5
6
Ein-/Ausschalter LEDAktivität:
Stetes, rotes Licht der LED=
Keine Bluetooth-Verbindung.
Stetes, blaues Licht der LED =
Über Bluetooth verbunden.
Rot blinkende LED = Akku ist
schwach und muss wieder
aufgeladen werden (keine
Bluetooth-Verbindung).
Blaue/lila blinkende LED =
Akkuladestand ist niedrig, der
Akku muss wieder aufgeladen
werden (über Bluetooth
verbunden).
11
Page 12

g
Gebruikershandleiding (Nederlands)
Inleiding
Inhoud van de doos
• Rock Block/ Mini Block Rocker
• USB-oplaadkabel
• Stereo aux-kabel van 3,5 mm (1/8”)
• Snelstartgids
Ondersteuning
Voor de laatste informatie over dit product (systeemvereisten, informatie over compatibiliteit,
enz.) en productregistratie, bezoek ionaudio.com/rock-block of
ionaudio.com/miniblockrocker.
Bezoek voor bijkomende productondersteuning ionaudio.com/support.
Voor informatie over veiligheid en garantie, zie ionaudio.com/warranty.
Rock Block/ Mini Block Rocker opladen
Gebruik de meegeleverde micro-USB-kabel om Rock Block/ Mini Block Rocker gedurende 3
uur te verbinden met (A) een USB-stroomadapter, aangesloten op een stopcontact, of (B) uw
pc (ingeschakeld).
De batterij-LED gaat branden wanneer het toestel aan het laden is en de LED gaat uit wanneer
het laden is voltooid.
Stroomvoorzienin
(A)
PC*
*
(B)
*Wordt afzonderlijk verkocht
12
Page 13

Kenmerken
1. Aan/uit – Druk op deze knop om de Rock Block/ Mini
Block Rocker AAN en UIT te zetten. Het ledlampje
van de power-knop geeft de status weer van de
Bluetoothverbinding. Raadpleeg voor meer informatie
de Rock Block/ Mini Block Rocker LED-activiteit.
Opmerking: de Rock Block/ Mini Block Rocker
schakelt zichzelf automatisch uit na 5 minuten zonder
audiosignaal, zowel via Bluetooth als via de auxingang. Wilt u de Rock Block/ Mini Block Rocker
verder gebruiken, schakel hem dan in door op de
Aan/uit-knop te drukken.
2. Knoppen Volume verlagen/verhogen – Druk op deze
knoppen om het volume van de aux-ingang of de
Bluetooth-bron te verlagen of te verhogen. De standaard
volumeregeling bij het inschakelen van de Rock Block/
Mini Block Rocker is 2/3 van het volume. U kunt het
volume bijregelen via de volumeregeling van uw apparaat
en via de volumeknoppen van de Rock Block/ Mini Block
Rocker.
3. Volgend nummer – Druk op deze knop om het volgend
nummer te selecteren als u naar Bluetooth-bronnen
luistert.
Opmerking: het is mogelijk dat bij sommige applicaties
door het drukken op de knop "Volgend nummer" [NEXT]
de volgende afspeellijst of het volgende muziekgenre
wordt gekozen.
4. Ontkoppelingsknop – Druk op deze knop om een
gekoppelde Bluetooth-bron te ontkoppelen.
5. Batterij -LED –
Wanneer het toestel aan het laden is gaat het branden. De LED gaat uit wanneer het volledig geladen
of niet verbonden is met een laadkabel.
6. Micro-USB ingang voor laden –Gebruik de meegeleverde micro-USB-kabel om de Rock Block/ Mini
Block Rocker aan te sluiten op een USB-lichtnetadapter of op uw computer.
7. Aux-ingang – Gebruik deze ingang om de uitgang van een MP3-speler of andere audiobron aan te
sluiten.
Een Bluetooth-apparaat koppelen
1. Schakel de Rock Block/ Mini Block Rocker in.
2. Zet uw Bluetooth-apparaat aan.
3. Navigeer naar het setup-scherm van uw Bluetooth-apparaat, selecteer “Rock Block/ Mini Block Rocker”
en koppel hem.
Opmerking: Als uw Bluetooth-apparaat om een koppelingscode verzoekt, voer dan '0000' in.
4. Start de muziekweergave en regel het volume met de knoppen van de Rock Block/ Mini Block Rocker.
Opmerking: Als u problemen ondervindt bij het koppelen of bij het weergeven van muziek, update dan
het OS van uw apparaat.
5. Druk op de knop Unpair [ontkoppelingsknop] om de Rock Block/ Mini Block Rocker los te koppelen van
een Bluetooth-apparaat.
Deze LED toont de status van het laden.
Problemen oplossen
Het geluid is vervormd: Probeer het volumeniveau van uw geluidsbron te verlagen. Probeer ook het
algemeen volume van Rock Block/ Mini Block Rocker te verlagen.
Er zijn teveel bassen: Probeer op de toon- of EQ-bedieningsknoppen aan uw geluidsbron het niveau van de
lage tonen te verlagen. Dit stelt u in staat de muziek luider te zetten vooraleer “afgeknipte” (vervormde)
klanken optreden.
2
3
1
4
7
Aan/uitknop LED-activiteit:
5
6
Solide rode LED = Geen
Bluetooth-verbinding.
Solide Blauwe LED =
Bluetooth is verbonden.
Knipperende rode LED = de
batterij is bijna leeg en moet
herladen worden (geen
Bluetooth-verbinding).
Knipperende blauwe/paarse
LED = de batterij is leeg en
moet herladen worden
(Bluetooth is verbonden).
13
Page 14

Användarmanual (Svenska)
Inledning
Paketet innehåller
• Rock Block/ Mini Block Rocker
• USB-laddningskabel
• 3,5 mm (1/8") stereo-aux-kabel
• Snabbstartsguide
Support
För senaste information om denna produkt (systemkrav, information om kompabiliteten, osv.)
och produktregistrering, besök ionaudio.com/rock-block eller
ionaudio.com/miniblockrocker.
För ytterligare produktsupport, besök ionaudio.com/support.
För säkerhets-och underhållsinformation, se ionaudio.com/warranty.
Hur du laddar Rock Block/ Mini Block Rocker
Använd den medföljande micro-USB-kabeln för att ansluta Rock Block/ Mini Block Rocker till
(A) en USB-strömadapter som finns ansluten till ett strömuttag eller (B) din dator (som är på) i 3
timmar.
LED-lampan för batteriladdning kommer att lysa medan enheten laddas och LED-lampan
stängs av när laddningen har slutförts.
Strömkälla*
(A)
Dator*
(B)
*Saäljs separat
14
Page 15

Funktioner
1. Strömbrytare - Tryck på denna knapp för att
sätta på och stänga av Rock Block/ Mini Block
Rocker. Strömbrytarens LED-lampa visar
tillståndet av Bluetooth-anslutningen. Se LEDlampans aktivitetsbox för Rock Block/Mini Block
Rocker för mer detaljer.
Obs: Rock Block/Mini Block Rocker kommer att
stängas av själv efter 5 minuter utan
ljuduppspelning genom antingen Bluetooth eller
aux-ingången. För att fortsätta använda Rock Block/Mini
Block Rocker, sätt på enheten genom att trycka på
strömbrytaren.
2. Volymknappar Ner/Upp - Tryck på dessa knappar för
att sänka eller höja volymnivån för aux-ingången och
Bluetooth-källorna. Rock Block/Mini Block Rocker är
som standard inställd till 2/3 volymen när den är på.
Vänligen justera volymen med volymknapparna på
enheten och volymknapparna på Rock Block/Mini Block
Rocker.
3. Nästa spår - Tryck på denna knapp för att gå till nästa
spår när du lyssnar på Bluetooth-källor.
Obs: Om du trycker på Nästa-knappen i vissa appar,
kommer du kanske till nästa spellista eller musikgenre.
4. Para från-knappen - Tryck på denna knapp för att
koppla från från en ansluten Bluetooth-källa.
5. LED för batteriladdning - Visar laddningsstatus. Medan
du laddar kommer den att vara på, om det är helt laddat
eller inte ansluten till laddningskabeln, kommer den att
vara av.
6. Micro-USB-laddningsport – Ansluit den medföljande micro-USB-kabeln för att ansluta
Rock Block/Mini Block Rocker till en USB-strömadapter som är ansluten till ett strömuttag
eller din dator.
7. Aux-ingång - Anslut utgången på en MP3-spelare eller annan ljudkälla till denna ingång.
Ansluta med en Bluetooth-enhet
1. Sätt på Rock Block/Mini Block Rocker.
2. Sätt på din Bluetooth-enhet.
3. Gå till inställningsskärmen på din Bluetooth-enhet, hitta "Rock Block/Mini BlockRocker"
och anslut.
Obs! Om din Bluetooth-enhet uppmanar dig att ange en parningskod, mata in "0000".
4. Spela upp musik och justera volymknapparna på Rock Block/Mini Block Rocker.
Obs! Om du upplever problem med anslutningen eller musikuppspelningen, uppdatera
enhetens operativsystem.
5. För att koppla från en ansluten Bluetooth-enhet, tryck på Para från-knappen på Rock
Block/Mini Block Rocker.
Felsökning
Om ljudet är förvridet: Försök att sänka volymknappen på din ljudkälla. Försök också att
sänka all volymen på Rock Block/ Mini Block Rocker.
Om det finns för mycket bas: Försök att justera tonen eller EQ-knappen på din ljudkälla för
att sänka basnivån. Detta möjliggör att du kan spela musik med högre volymen innan den
hänger sig (blir förvriden).
2
3
1
4
7
Power-knapp LEDlampan-aktivitet:
Varaktigt rött lysande
LED-lampa = Ingen
Bluetooth-anslutning
Varaktigt blått lysande
LED-lampa = Bluetooth
ansluten
Rött blinkade LEDlampa = Lågt batteri och
behöver laddas (ingen
Bluetooth-anslutning)
Blått/lila blinkade LEDlampa = Lågt batteri och
behöver laddas (ingen
Bluetooth ansluten)
5
6
15
Page 16

Käyttöopas (Suomi)
Johdanto
Laatikon sisältö
• Rock Block/ Mini Block Rocker
• USB-latausjohto
• 3,5 mm (1/8”) Stereo Aux-kaapeli
• Pikaohje
Tuki
Viimeisimmät tiedot tästä tuotteesta (järjestelmävaatimukset, yhteensopivuustiedot, jne.) ja
tuotteen rekisteröinti ovat saatavilla osoitteessa ionaudio.com/rock-block tai
ionaudio.com/miniblockrocker.
Lisätuotetukea on saatavilla osoitteessa ionaudio.com/support.
Turvallisuus- ja takuutiedot löytyvät osoitteesta ionaudio.com/warranty.
Rock Block/ Mini Block Rocker-laitteen lataus:
Kytke mukana toimitetulla micro-USB-kaapelilla Rock Block/ Mini Block Rocker (A) USB-
virtasovittimeen, joka on kytketty USB-pistorasiaan tai (B) tietokoneeseesi (virta päällä) 3
tunniksi.
Akkulatauksen merkkivalo
palaa, kun laite latautuu ja sammuu, kun lataus on valmis.
Virtalähteeseen*
(A)
tietoko*
(B)
*Ostettavissa erikseen
16
Page 17

Ominaisuudet
1. Virta – Kytke Rock Block -/ Mini Block Rocker laitteeseen virta päälle ja pois päältä tästä
painikkeesta. Virtapainikkeen merkkivalo osoittaa
Bluetooth-yhteyden tilaa. Katso lisätietoja Rock Block -/
Mini Block Rocker -merkkivalon aktiviteettiruudusta.
Huomautus: Rock Block -/ Mini Block Rocker -laite
kytkeytyy itsestään pois päältä 5 minuutin kuluttua, kun
ääntä ei ole toistettu Bluetoothin tai aux input tulon kautta. Jos haluat jatkaa Rock Block -/ Mini
Block Rocker -laitteen käyttöä, kytke laite päälle
painamalla virtapainiketta.
2. Äänenvoimakkuus alas/ylös -säädöt – Nosta
tai laske äänenvoimakkuuden tasoa aux input tulolle ja Bluetooth-lähteille. Rock Block -/ Mini
Block Rocker -laitteen äänenvoimakkuuden
oletus on 2/3, kun se on kytketty päälle. Säädä
äänenvoimakkuutta laitteesi
äänenvoimakkuuden säädöillä ja Rock Block -/
Mini Block Rocker -laitteen
äänenvoimakkuuspainikkeilla.
3. Seuraava kappale – Etene seuraavaan
kappaleeseen Bluetooth-lähteitä kuunnellessasi
painamalla tätä painiketta.
Huomautus: Joissakin sovelluksissa Seuraavapainikkeen painaminen saattaa siirtää
Virtapainike-merkkivalon
toiminnot:
Kiinteä punainen merkkivalo
= Ei Bluetooth-yhteyttä.
Kiinteä sininen merkkivalo =
Bluetooth kytketty.
Vilkkuva punainen
merkkivalo = Akkuvirta on
vähissä ja akku täytyy ladata (ei
Bluetooth-yhteyttä).
Vilkkuvasininen/purppuranpunainen merkkivalo =
Akkuvirta on vähissä ja akku
täytyy ladata (Bluetoothyhteys).
seuraavaan soittoluetteloon tai musiikkilajiin.
4. Poista laitepari – Irrota kytketystä Bluetooth-lähteestä painamalla tätä painiketta.
5. Akun latauksen merkkivalo –
Tämä osoittaa lataustilan. Kun lataus on käynnissä,
merkkivalo on päällä. Kun akku on täysin ladattu tai sitä ei ole kytketty latauskaapeliin,
merkkivalo on pois päältä.
6. Mikro-USB-latausportti – Kytke mukana toimitettu mini-USB-kaapeli ja yhdistä Rock
Block -/ Mini Block Rocker -laite USB-virtasovittimeen, joka on kytketty pistorasiaan tai
tietokoneeseesi.
7. Aux Input -tulo – Kytke MP3-soittimen tai muun äänilähteen lähtö tähän tuloon.
Bluetooth-laitteeseeen kytkeminen
1. Kytke virta päälle Rock Block -/ Mini Block Rocker -laitteeseen.
2. Kytke Bluetooth-laitteesi päälle.
3. Siirry Bluetooth-laitteesi määritysnäytölle, etsi "Rock Block/ Mini BlockRocker" ja kytke.
Huomautus: Jos Bluetooth-laitteesi pyytää parituskoodia, kirjoita "0000".
4. Toista musiikkia ja säädä Rock Block -/ Mini Block Rocker -laitteen
äänenvoimakkuuspainikkeita.
Huomautus: Jos yhdistämisessä tai musiikin toistossa ilmenee ongelmia, päivitä laitteesi
käyttöjärjestelmä.
5. Voit irrottaa kytketyn Bluetooth-laitteen painamalla Rock Block -/ Mini Block Rocker laitteen Poista laitepari -painiketta.
Vianmääritys
Jos ääni on vääristynyt: Yritä laskea äänilähteesi äänenvoimakkuuden säätöä. Yritä myös
vähentää Rock Block/ Mini Block Rocker -laitteen kokonaisäänenvoimakkuutta.
Jos bassoa on liikaa: Yritä säätää äänilähteesi äänensävyä tai EQ-säätöä laskeaksesi
bassotasoa. Tämän avulla voit toistaa musiikkia äänekkäämmin ennen kuin vääristymistä
tapahtuu.
17
2
3
1
4
7
5
6
Page 18

Appendix (English)
Technical Specifications
Power: 3.7v/500mAh battery (charges via micro-USB)
Battery Life: 3 hours
Recharge time: 3 hours
Dimensions (Length x Width x Height): 2.75” x 2.85” x 3.1”; 69.9 mm x 72.4 mm x 78.8 mm
Weight: .75 lb; .34 kg
Specifications are subject to change without notice.
Trademarks and Licenses
ION Audio is a trademark of ION Audio, LLC, registered in the U.S. and other countries.
The Bluetooth word mark and logos are owned by the Bluetooth SIG, Inc. and any use of such marks by ION
Audio is under license.
All other product or company names are trademarks or registered trademarks of their respective owners.
18
Page 19

ionaudio.com
Manual Version 1.1
 Loading...