

Page 1

QUICKSTART GUIDE
ENGLISH ( 1 – 14 )
MANUAL DE INICIO RÁPIDO PARA EL USUARIO
ESPAÑOL ( 15 – 28 )
GUIDE D’UTILISATION RAPIDE
FRANÇAIS ( 29 – 42 )
KURZANLEITUNG
DEUTSCH ( 43 – 57 )
MANUALE RAPIDO DI UTILIZZAZIONE
ITALIANO ( 58 – 71 )
SNELSTARTGIDS
NEDERLANDS ( 72 – 85 )
Page 2

Page 3
QUICK START GUIDE
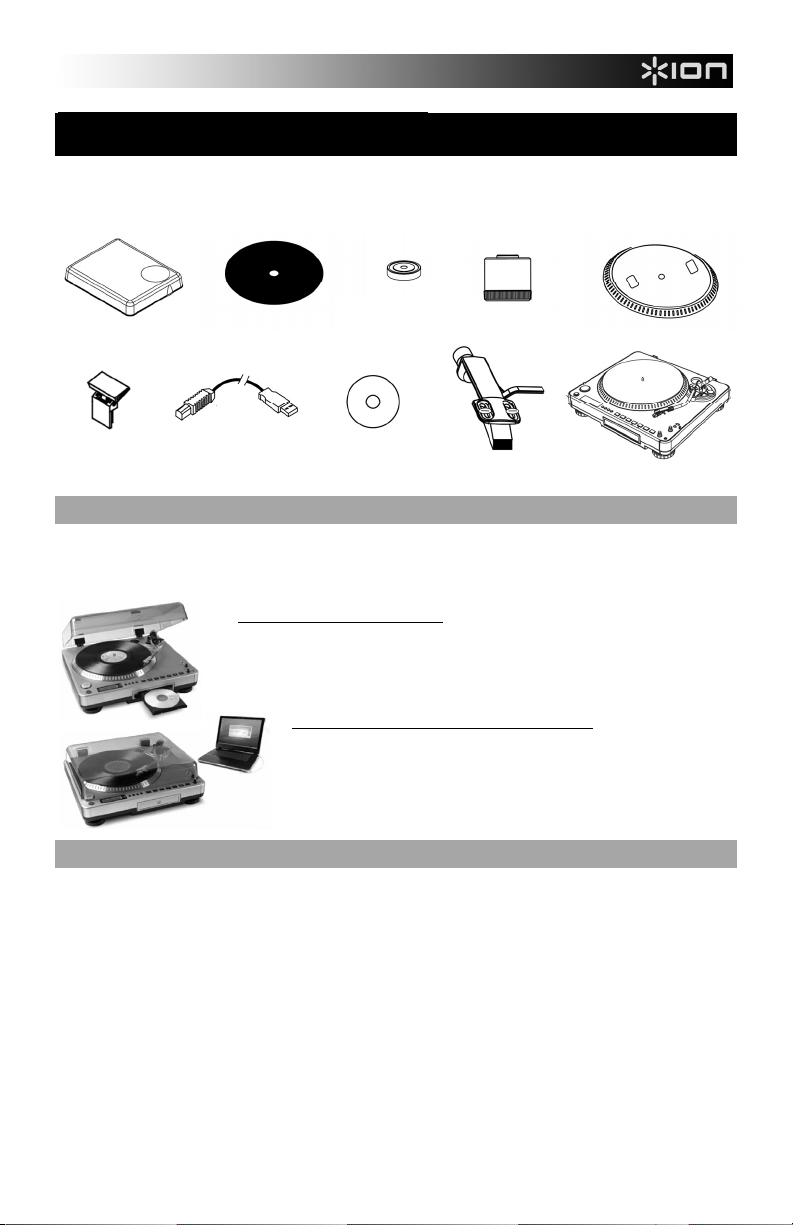
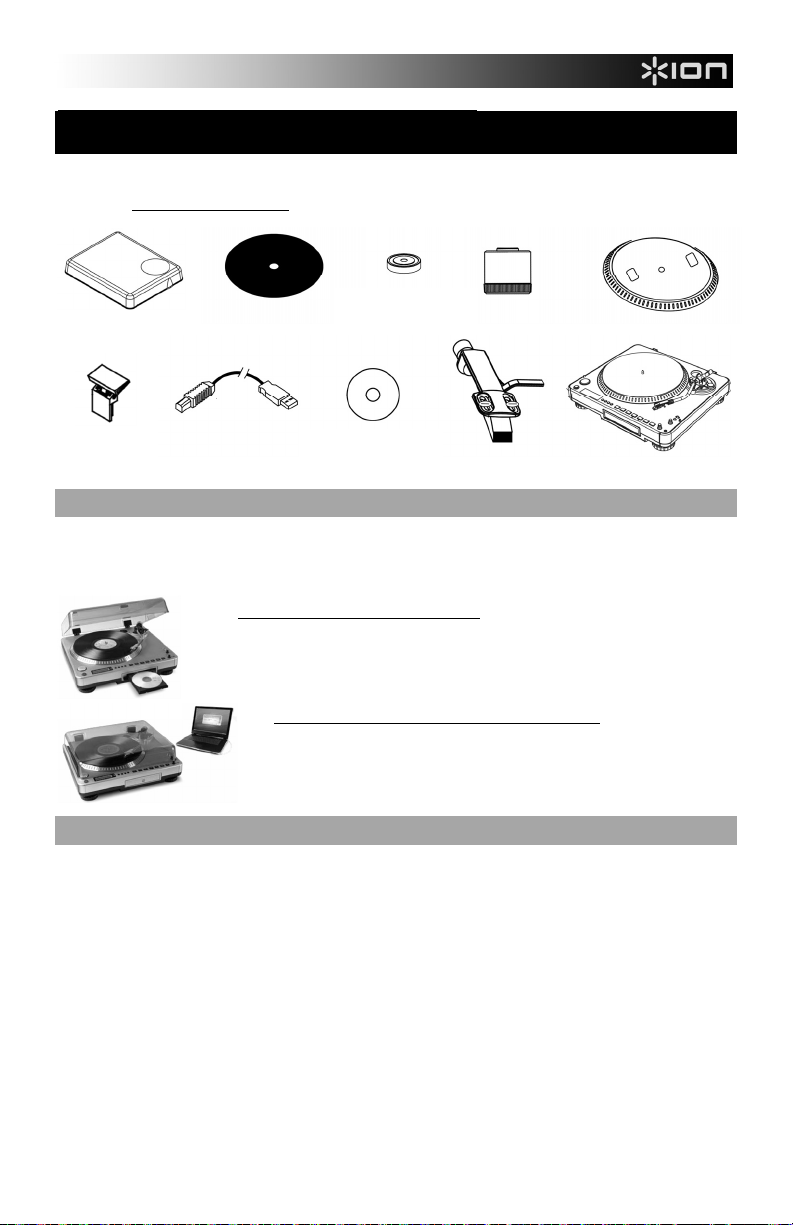
o Make sure that the items listed below are included in the box.
o READ SAFETY INSTRUCTION BOOKLET BEFORE USING THE PRODUCT
o Go to http://www.ion-audio.com for product registration.
45RPM
ADAPTER
DUST COVER
SLIPMAT
COUNTERWEIGHT
PLATTER
CD
PRE-MOUNTED
CARTRIDGE
LP 2 CD
TURNTABLE
USB
DUST COVER
MOUNT
CABLE
INTRODUCTION
Thank you for purchasing this product. The LP 2 CD is the fastest and easiest way to convert music from vinyl
recordings or external audio sources, such as tape players or reel-to-reel, to a CD or directly to your computer.
Featuring Automatic Track Split, the LP 2 CD detects silence between songs and automatically splits them into
individual tracks for your convenience.
RECORDING METHOD 1 – TO CD
Rip your album to the Internal Flash Player, and burn one or more CDs. Once your
CD has been recorded, you can listen to it in the car, at home, on your computer, or
anyplace with a standard CD player.
RECORDING METHOD 2 – TO YOUR COMPUTER
Use the included software to automatically convert tracks to your iTunes*
library during playback. Once your recordings have been converted, you
can transfer them to portable media devices, such as an iPod*, or burn them
onto a CD using third-party CD-burning applications
INCLUDED SOFTWARE
We have included software to aid you in converting your records to digital music:
EZ Vinyl/Tape Converter (PC only) is the quickest and easiest way to turn your recordings into digital media.
EZ Vinyl/Tape Converter conveniently saves your recordings in your iTunes* library. Novice users may find
this application preferable. On the CD, we have included a handy Software Quickstart Guide with step-by-step
instructions on software installation and operation.
EZ Audio Converter (Mac only) is a basic converter application for Mac OS X and is ideal for novice users.
Please refer to the included Software Quickstart Guide for step-by-step instructions on software installation and
operation.
* iTunes and iPod are trademarks of Apple, Inc., registered in the U.S.A. and other countries.
1
Page 4
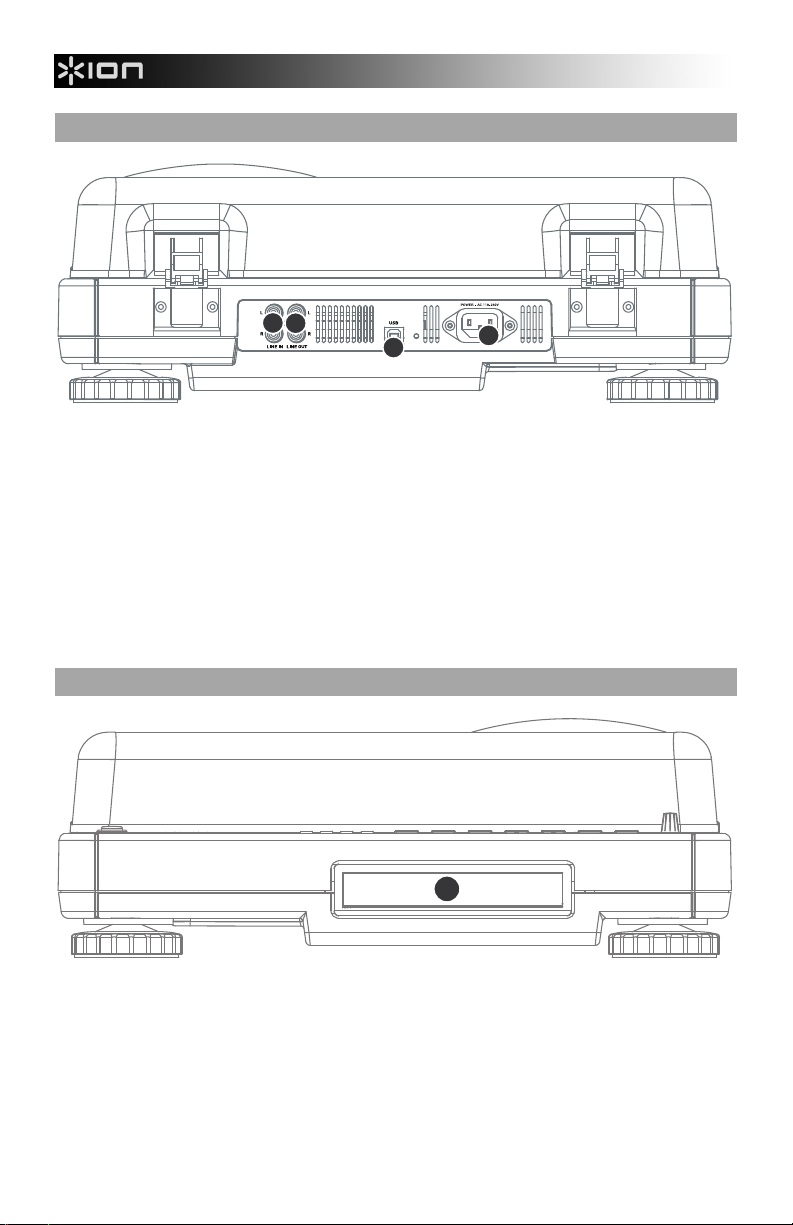
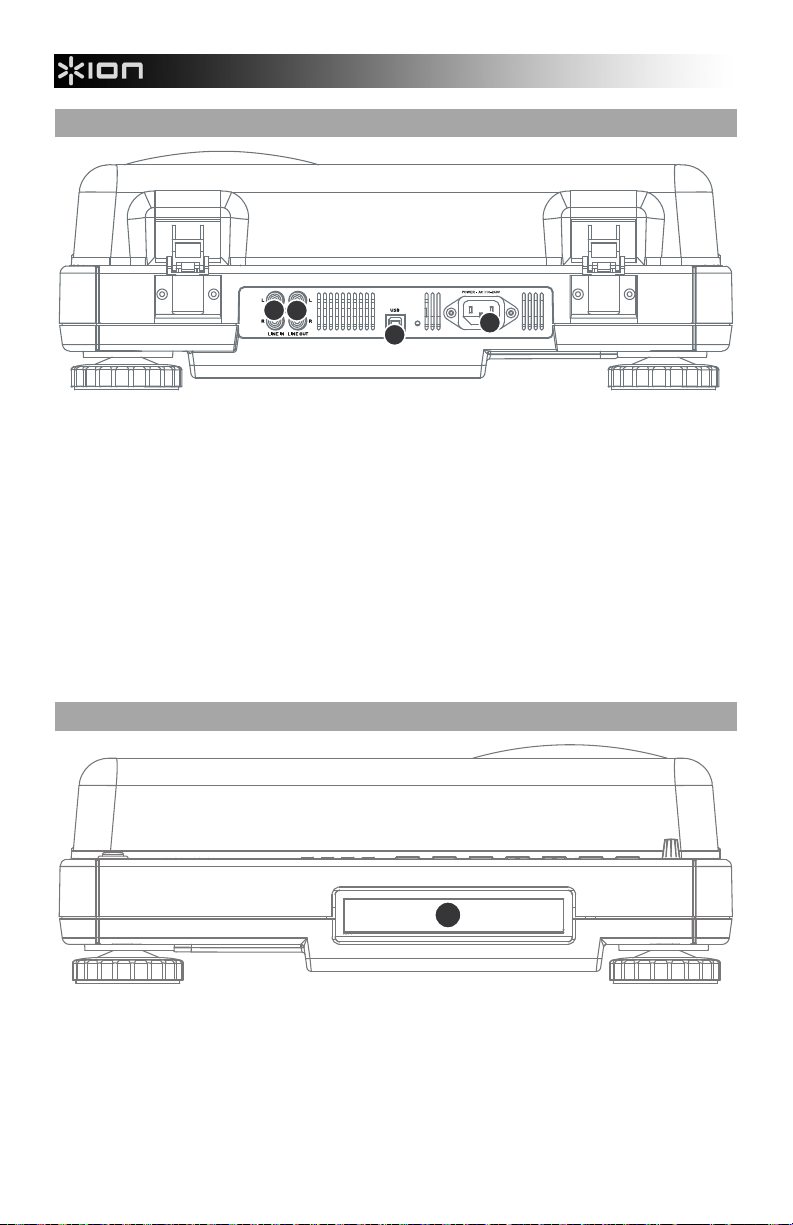
REAR PANEL OVERVIEW
4
3
2
1
1. Power Input: Connect the included power cable from the turntable to a live power source.
2. USB Audio Output: Use the included USB cable to connect your turntable to your computer. The
USB connection will provide audio from the turntable (or the Line In inputs, if the Line/Phono switch on
the top panel is set to Line) to your computer. The USB connection will also output audio from your
computer through the turntable’s RCA outputs. For transferring your vinyl records to your computer, we
have provided several software applications on the included CD. Please refer to “Included Software”
section for details on the bundled software applications.
3. Line Out: Use a standard stereo RCA cable to connect these outputs to the audio inputs of your home
stereo system. (Please note: you can still copy music to a CD or to your computer even if the audio
outputs of the turntable are not connected to a stereo system).
4. Line In: Connect tape players, reel-to-reel, or any other line-level audio source to these RCA inputs.
FRONT PANEL OVERVIEW
1
1. CD Drive: The turntable’s CD drive functions as a CD player or burner, depending on the type of disc
inserted into the tray. When using non-blank, finalized CDs, the drive will function as a CD player,
allowing you to play music through the turntable’s Line Out or to rip tracks to the Internal Flash Player.
When using blank CD-R discs, the drive functions as a CD burner allowing you to burn audio from the
unit’s Internal Flash Player (i.e. audio ripped from the turntable or from external sound sources
connected to the Line In).
2
Page 5
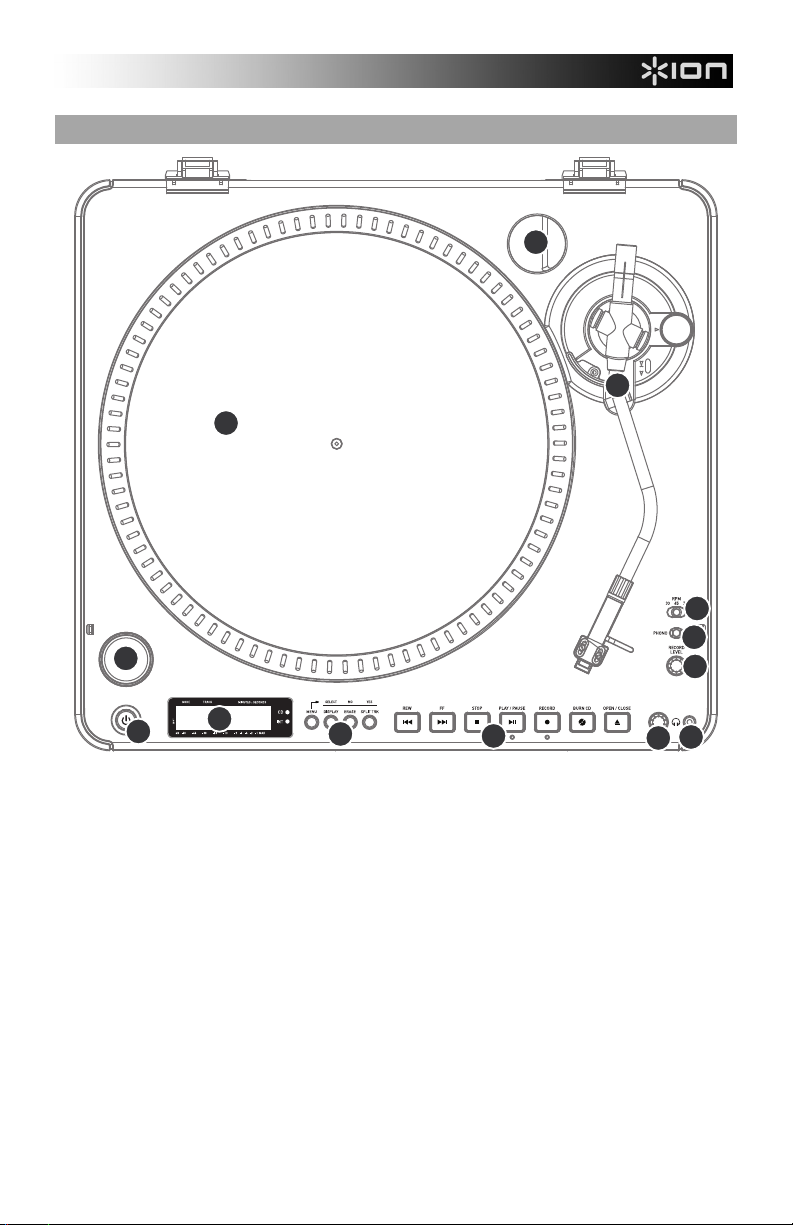
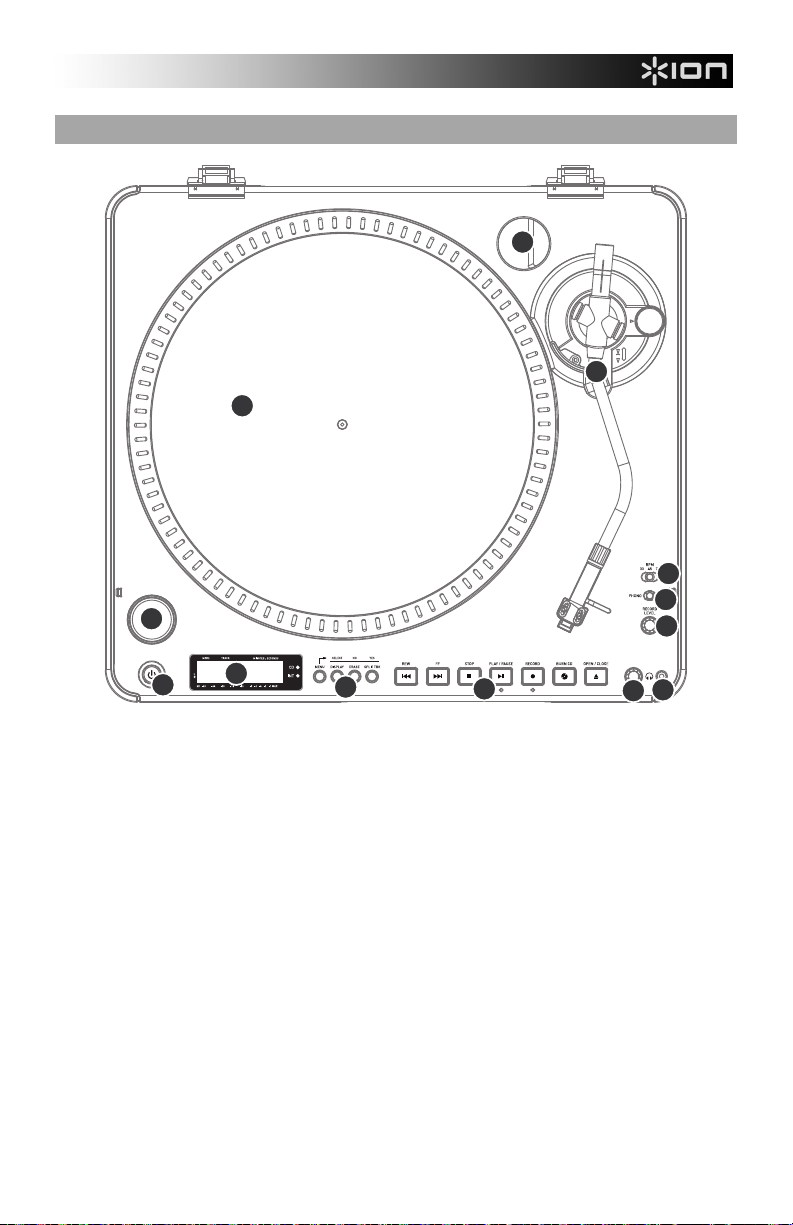
TOP PANEL OVERVIEW
2
5
4
3
13
12
11
1
6
7
8
109
1. POWER BUTTON: Press this button to turn the unit on and off.
2. PLATTER: This platter must be securely fastened to the turntable prior to operation. The Motor Drive Belt can
be found on the drive ring underneath the platter. See “Platter Setup” section for detailed information on
installing the Motor Drive Belt.
3. TONEARM ASSEMBLY: See “Tonearm Overview” section for a detailed description of the tonearm.
4. 45 RPM ADAPTER HOLDER: You may place the 45 adapter here when it is not in use.
5. START/STOP BUTTON: This button starts and stops the turntable motor. If the button doesn’t seem to be
functioning, check to make sure that the Motor Drive Belt is properly installed, as described in the “Platter
Setup” section. Please note that the tonearm needs to be moved away from resting position (arm clip) for the
turntable motor to activate.
6. DISPLAY: The display helps you access menu options and information relevant to the operation of the unit.
7. MENU AND FUNCTION BUTTONS: See “Menu and Function Buttons” section for a detailed description of
these buttons.
8. CD CONTROL BUTTONS: See “CD Control Buttons” section for detailed information.
9. HEADPHONE VOLUME: Adjust the volume of the headphone signal with this knob.
10. 1/8” HEADPHONE OUTPUT: Connect your 1/8” headphones to this output.
11. RECORD LEVEL: This knob adjusts the level of the audio signal from the turntable or from audio sources
connected to the Line In inputs on the rear panel.
12. PHONO / LINE SWITCH: This switch selects the input audio signal. Set this switch to Phono when playing
and transferring your vinyl records to CD or to your computer. Set this switch to Line if you would like to
transfer or listen to music from external audio sources connected to the Line In inputs on the rear panel.
13. 33 / 45 / 78 RPM SELECTOR SWITCH: Set this switch to the appropriate position when playing back records.
If the music plays at a strange or unusual pitch, this may be a good indication that the wrong RPM setting has
been selected.
3
Page 6

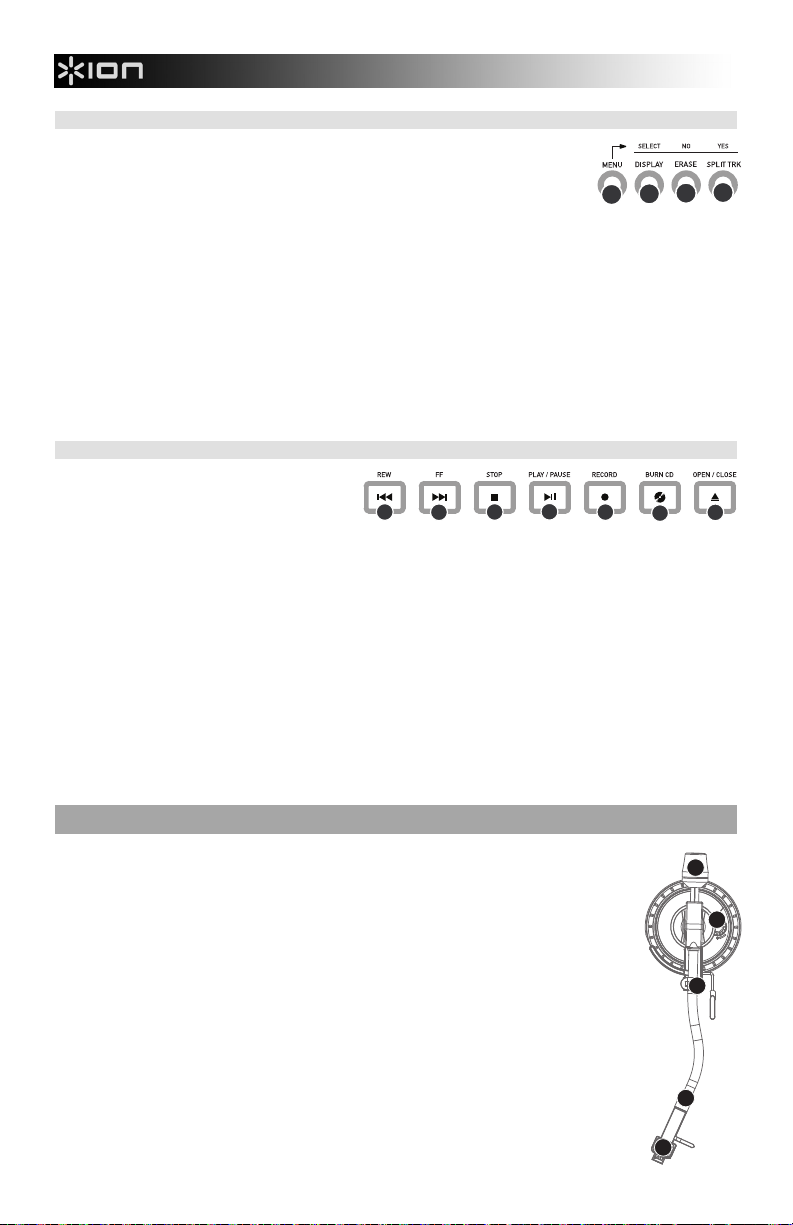
MENU AND FUNCTION BUTTONS
1. [MENU]: This button enters the menu options for the current Mode of
operation. CD Player Mode menu options include Switch Mode, Copy
Track, Copy All, Repeat, System Info. Internal Flash Player Mode menu
options include Switch Mode, Move Track, Repeat, System Info.
2
1
4
3
2. [DISPLAY]: Press this button to cycle through different time display settings on the LP 2 CD: Elapsed
(default), Track Remain, Total Remain. This button also functions as a [SELECT] button while
selecting Menu options.
3. [ERASE]: This button allows you to erase tracks from the Internal Flash Player. This button also
functions as a [NO] button while selecting Menu options.
4. [SPLIT TRK]: The LP 2 CD features Auto Split, which automatically detects silence between songs
and splits the recording into individual tracks. By default, Auto Split is enabled. If you choose to
disable this feature and manually split your tracks, then you can use the [SPLIT TRK] button in between
songs to create a new track. You can also perform this operation after you’ve recorded your music
(see “Splitting Tracks In Internal Flash Player” section). This button also functions as a [YES] button
while selecting Menu options.
5.
CD CONTROL BUTTONS
1. [REW]: Press this button to skip to the
previous track. Hold down this button
while playing a track to quickly scan
backward.
1
2
4
3
5
7
6
2. [FF]: Press this button to skip to the next track. Hold down this button while playing a track to quickly
scan forward.
3. [STOP]: Press this button to stop playback and go back to the first track. This button also stops
recording when ripping your music to the Internal Flash Player.
4. [PLAY / PAUSE]: Press this button to play the currently selected track; the green LED below the button
will light. Press again while the track is playing to pause; the green LED will blink while paused. Press
again to resume playback. This button also initiates recording while in Record Ready Mode.
5. [RECORD]: Press this button to enter Record Ready Mode. This mode allows you to record audio
from the turntable platter or from external audio sources connected to the Line In inputs to the Internal
Flash Player (see “Recording Music to the Internal Flash Player” section for more details). When you
press [RECORD], a red LED below the button will begin to blink to let you know that you are ready to
record.
6. [BURN CD]: Once you have recorded your music to the Internal Flash Player, press this button to burn
the player contents directly to a compatible, blank CD-R (see “Burning Internal Flash Player Contents
to CD” section for more details).
7. [OPEN/CLOSE]: This button opens and closes the CD tray.
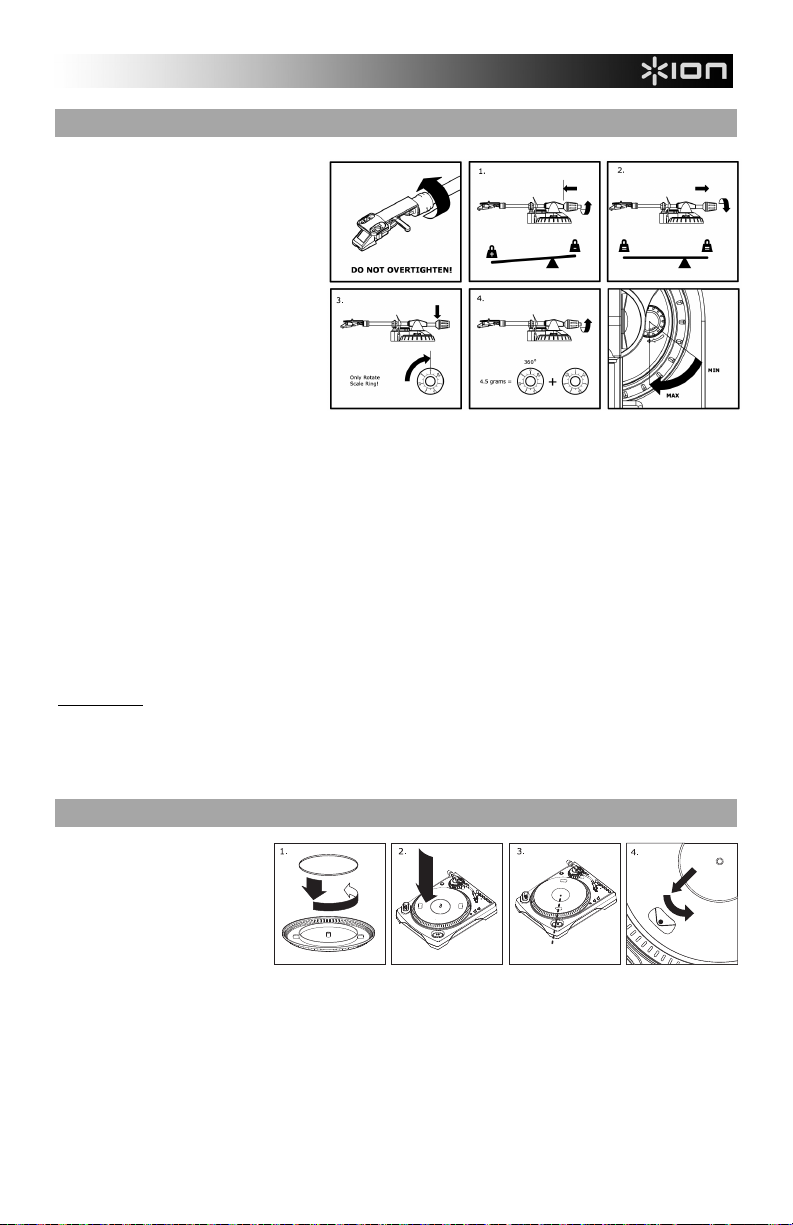
TONEARM OVERVIEW
1. Counter Weight and Scale Ring: The Counterweight is used to balance the head
shell and cartridge assembly so that the proper amount of stylus pressure is
1
applied to the record.
2. Anti-Skate Adjustment: This knob is used to compensate for inward tracking
forces. See “Tonearm Setup” section for more details.
3. Arm Clip: This specially designed arm clip secures the tone arm while at rest or
2
when not in use. The arm clip has been designed to remain in the up position while
unlocked.
NOTE: When transporting the turntable, it is always recommended that the
headshell be removed and the arm clip secured to prevent tonearm or turntable
3
damage.
4. Tone Arm Lock Nut: This Aluminum nut is used to secure the head shell and
cartridge assembly to the tone arm tube. See Cartridge Setup for more details.
5. Cartridge and Headshell: The cartridge is pre-mounted on a standard headshell.
The cartridge is user replaceable and compatible with a variety of standard
cartridges. Be sure to remove the clear plastic cover before operating the turntable
from the cartridge.
4
5
4
Page 7
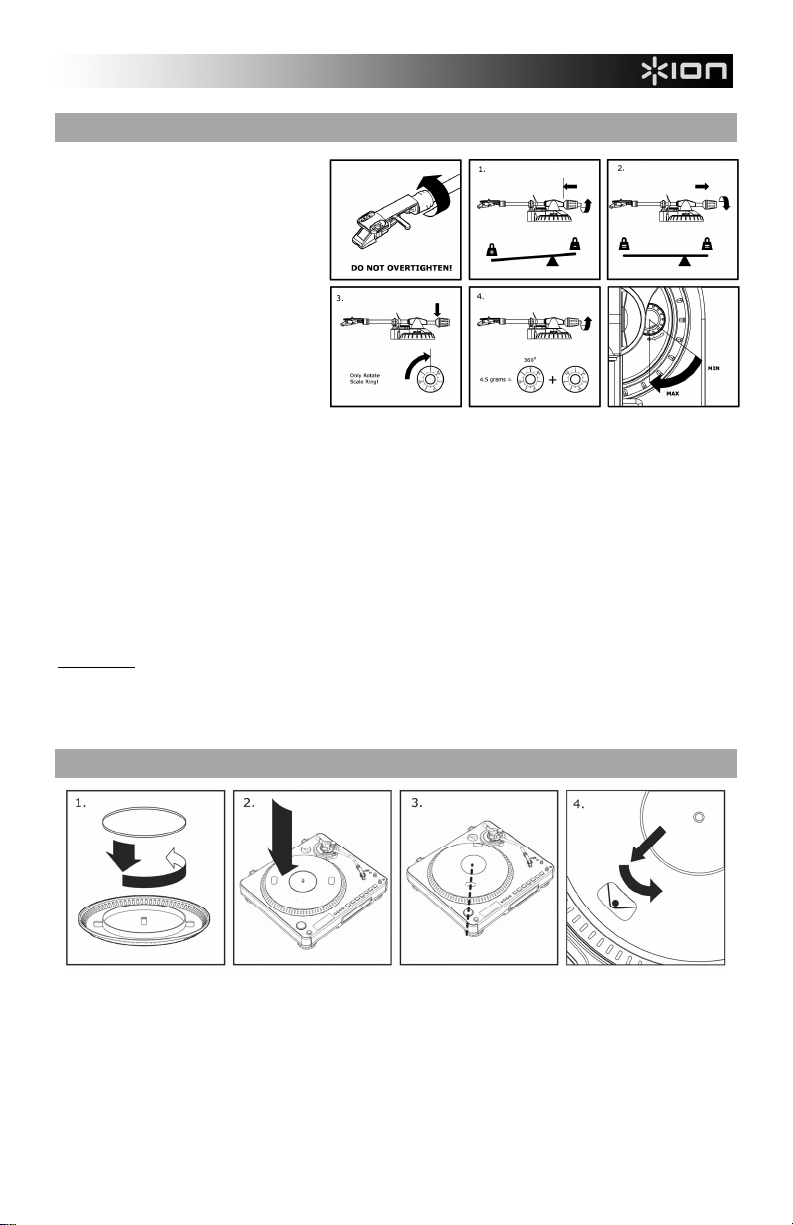
TONEARM SETUP
1. Begin by rotating the counterweight
counter-clockwise until it is in the
complete forward position (NOTE:
this is also the maximum amount of
pressure that can be applied to the
cartridge.)
2. Now there should be a feeling of
weight and resistance when the head
shell is raised and lowered. Begin
rotating the counterweight clockwise
(away from the pivot point) until the
weight and resistance feeling is
gone. If done properly, the tone arm
will pivot with very little resistance
back and forth indicating that there is
exactly 0 grams of stylus pressure.
3. With the counterweight in its new
position further away from tone arm pivot point, grasp the scale ring of the counter weight and rotate it until "0"
is in the vertical position.
4. Finally, rotate the counterweight (and scale ring) counter-clockwise (towards the pivot point) until the desired
amount of weight is reached. If the scale rotates 360 degrees beyond the zero point, the new scale ring reading
should be added to 3.5.
*The included head shell and cartridge assembly requires a minimum of 3 grams and no more than 5 grams for
optimum performance.
Setting the Anti-Skate Adjustment
In most cases, the Anti-Skate should be set to its minimum setting. Anti-Skate compensates for inward tracking forces
that occur with certain cartridges when the stylus nears the center of the record. If the turntable is experiencing
excessive skipping while nearing the center spindle, try increasing the Anti-Skate in the increments indicated on the
dial. Start by adding an increment of 1, test its performance, then increase it more, and so on.
IMPORTANT
Make sure that the felt slipmat is always placed on top of the platter while using the turntable. Failure to use
Please remove the plastic cartridge cover (needle cover) before operating the turntable.
The tonearm needs to be moved away from resting position (arm clip) for the turntable motor to activate.
PLATTER SETUP
the slipmat may cause damage to your media as well as damage to the turntable.
WARNING: Incorrect Platter setup can lead to poor turntable performance, platter instability or permanent motor damage.
1. Start by placing the rubber drive belt around the inner bottom ring of the turntable platter. This should come
preinstalled, but check to make sure that it is not twisted or damaged.
2. Install the platter on the center spindle and press it down firmly. Check to make sure that it rotates uniformly
and does not wobble excessively.
3. Rotate the platter so that the one of the holes is aligned with the Start Stop button on the front corner of the
turntable. The brass motor spindle should be visible through this hole.
4. Reach into the hole and pull the rubber drive belt off of the inner ring, and install it over the motor spindle. Be
careful not to twist the rubber drive belt during this step. Check to make sure the platter rotates uniformly. If the
drive belt is properly installed, there should be a slight amount of tension that brings the platter to a stop after
spinning it freely.
5
Page 8
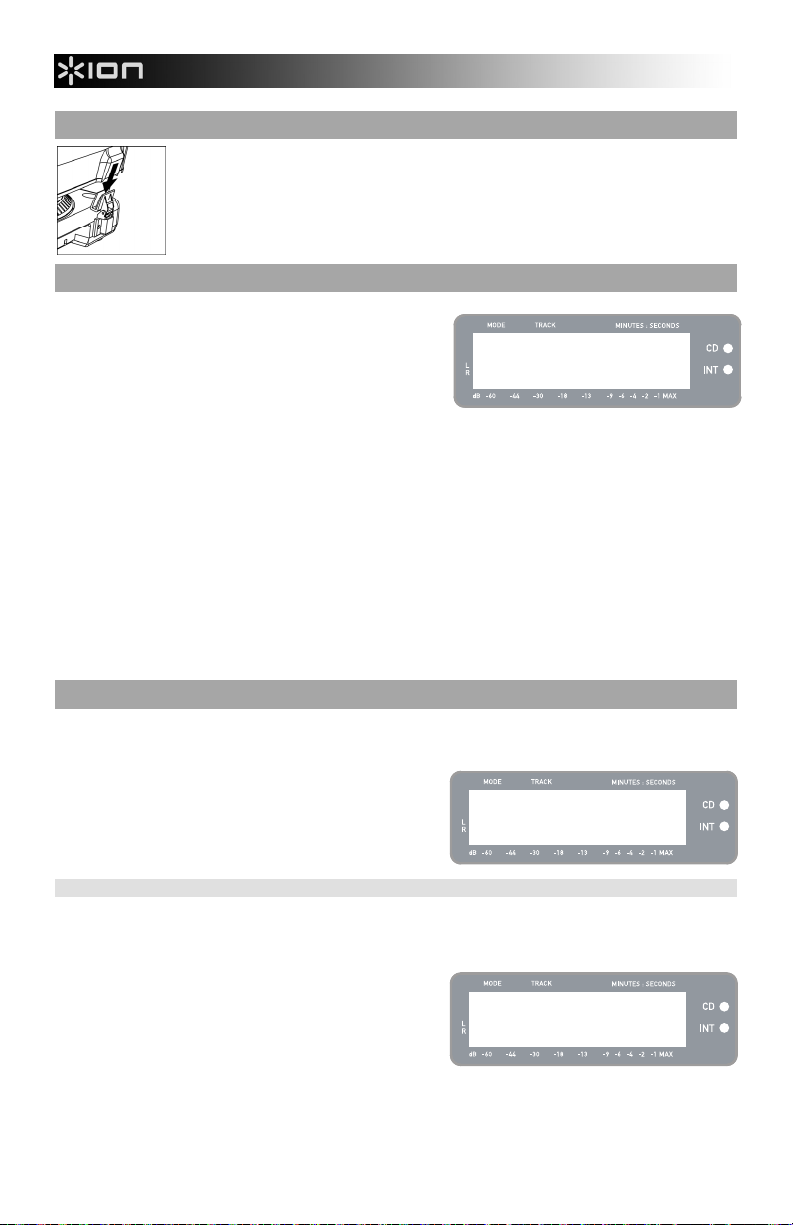
MOUNTING THE DUST COVER
1. Attach the included dust cover mounts to the turntable.
2. Attach the dust cover to the mounts as shown in illustration on the left.
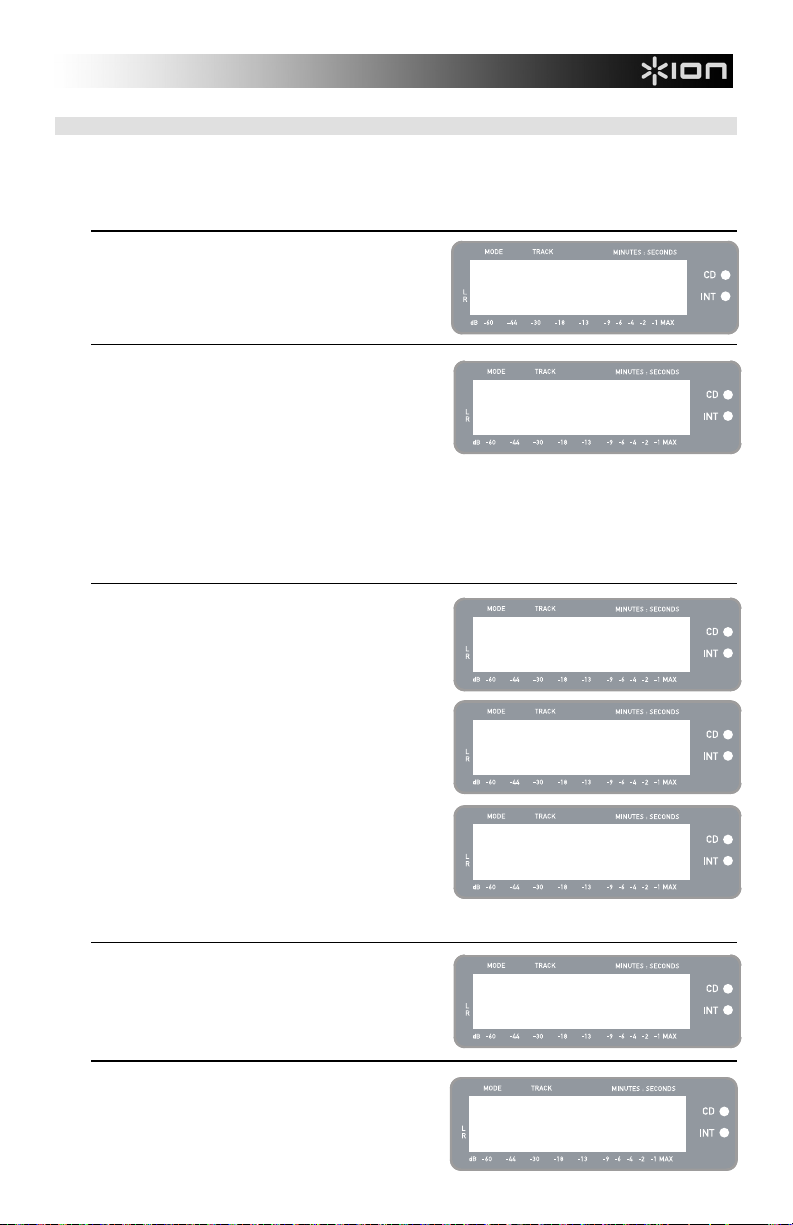
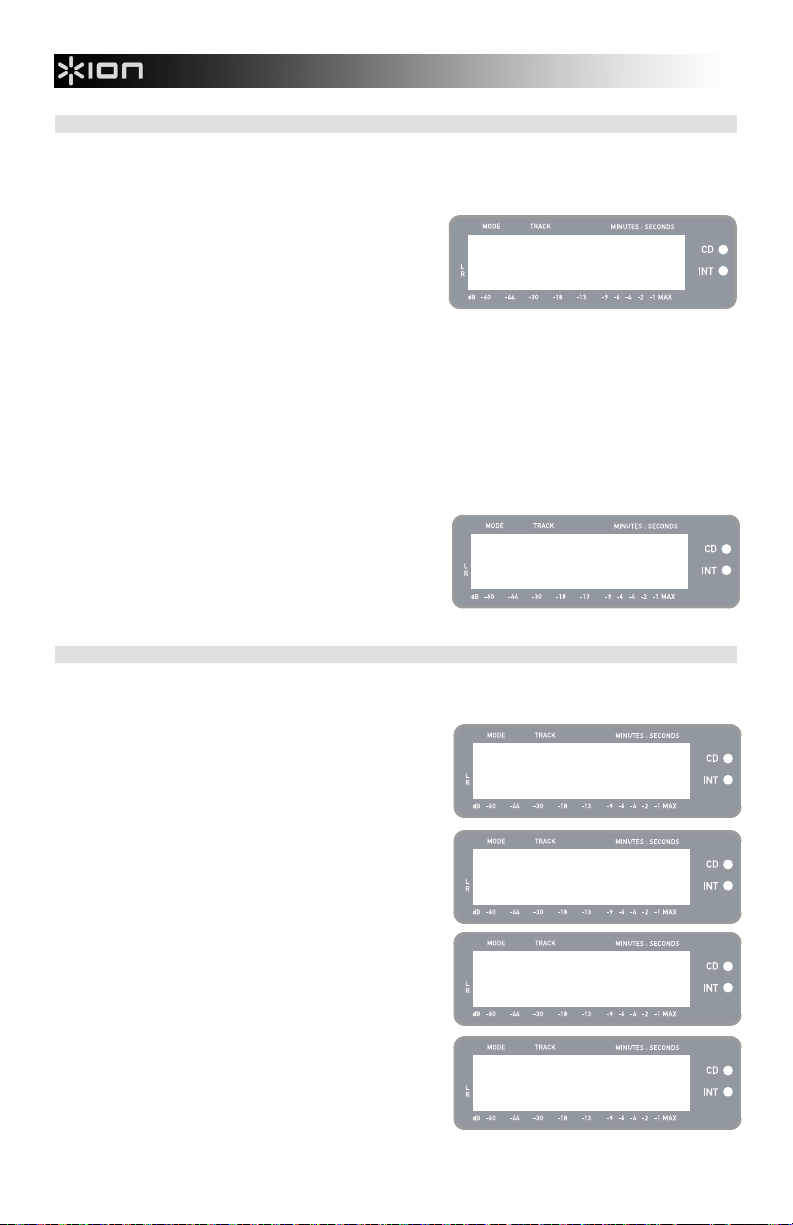
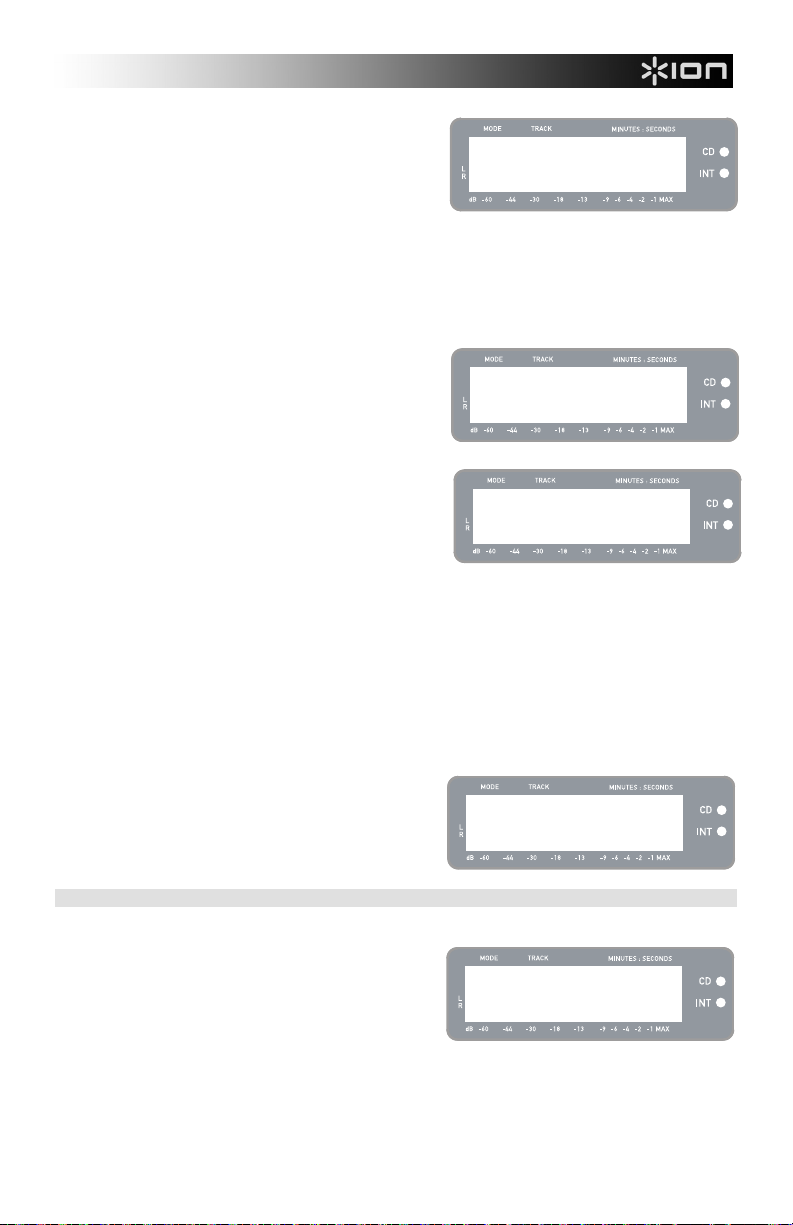
THE TWO MODES
The LP 2 CD features two general modes of operation: CD
Player Mode and Internal Flash Player Mode. The currently
selected Mode will be indicated by the two LEDs (CD and
INT) located to the right of the display, as shown here.
Scanning disc...
CD Player Mode allows you to:
Play music from non-blank CDs using standard transport controls (Play, Pause, Stop, Skip, Fast-
Forward and Rewind)
Copy a specific CD track to the Internal Flash Player
Copy the entire CD contents to the Internal Flash Player
Internal Flash Player Mode allows you to:
Rip tracks from an audio source (vinyl or external source connected to Line In)
Play tracks stored in the Internal Flash Player, using standard transport controls (Play, Pause, Stop,
Skip, Fast-Forward and Rewind)
Erase recorded tracks from the Internal Flash Player
Split a recorded track into multiple tracks
Burn Internal Flash Player contents to a blank CD-R
CD PLAYER MODE
In this mode, you can play or rip music from a non-blank CD. When you first insert your CD, the screen will
display the information shown on the right:
1. The track which will be played when you press
[PLAY] (01 in this example).
2. The total number of tracks on the CD (12 in this
example).
CD: 01/12 T62:35
CD Player
3. The total duration of the CD in MM:SS
(minutes:seconds) format (62:35 in this example).
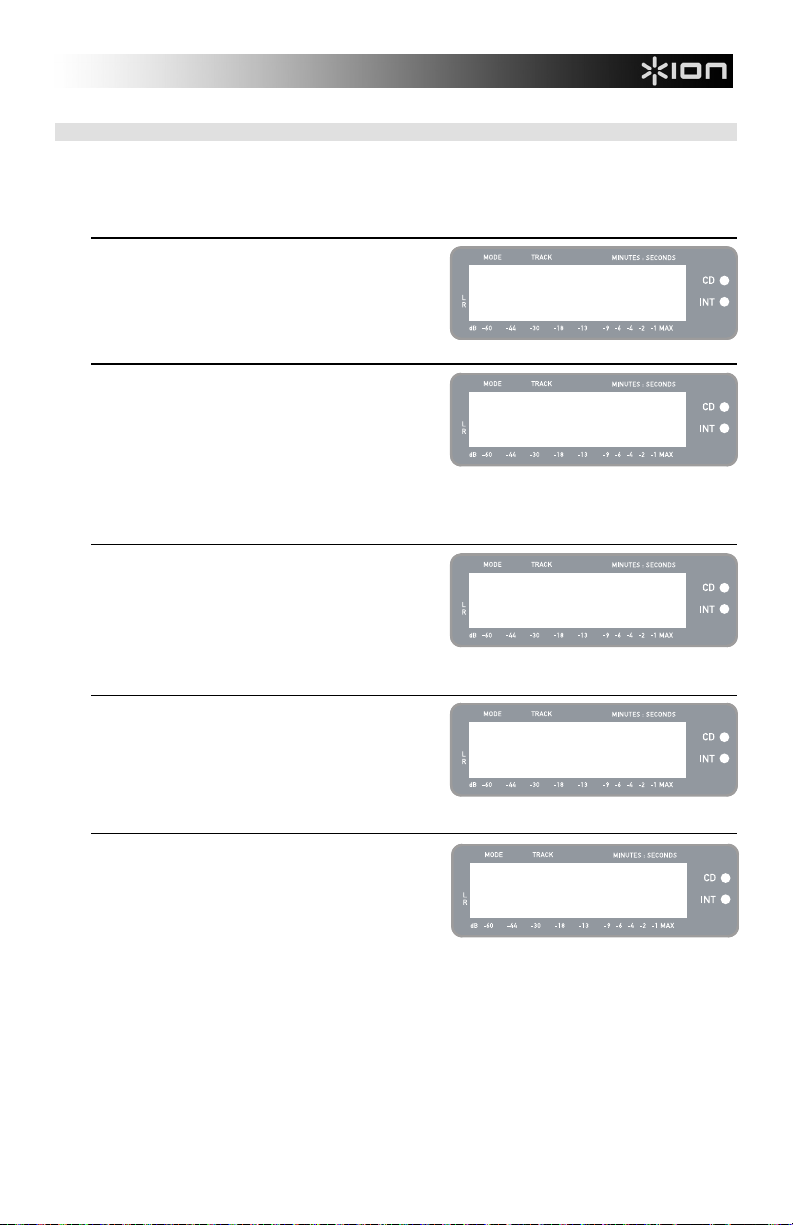
PLAYING MUSIC FROM CD
To play music from the CD, simply press the [PLAY] button. Once the CD is playing, the top line of the
display will show the elapsed track time and the bottom line will show stereo level metering with peak hold,
as shown in the illustration on the right.
You can cycle through different time display options by
pressing the [DISPLAY] button. Options include
‘Elapsed’, ‘Track Remain’ and ‘Total Remain’.
Press [FF] or [REW] to skip to the next or previous
track, respectively. Press and hold either button while
CD: 01/12 00:15
========== =
playing a track to quickly scan forward or backward.
Press [PAUSE] while a track is playing to pause
playback. Press again to resume.
Press [STOP] to stop playback.
6
Page 9
CD PLAYER MODE MENU OPTIONS
To access different menu options while in CD Player Mode, press the [MENU] button. To step through menu
options, continue to press the [MENU] button. After cycling through all available menu options, the unit will
return to the default CD Player Mode screen. The available menu options are described below:
Switch to Internal Flash Player Mode
This option allows you to manually switch to Internal Flash
Player Mode. Press [YES] to switch.
Copy Track
This option allows you to copy a single CD track to the
Internal Flash Player. You will see the screen displayed on
the right. The track which will be copied is the track which
was selected before entering the menu options. (Track “01”
in the example on the right).
Use [REW] and [FF] to select the destination for the copied
track (“03” in the example on the right). Press [YES] to
copy the track to the selected destination. Press [NO] to
cancel the operation.
Please note that the unit’s Internal Flash Player has a 99
track or 80 minute maximum capacity.
Copy All
This option allows you to copy an entire CD to the Internal
Flash Player. Press [YES] to copy the entire CD.
If the Internal Flash Player already contains data, you may
see the screen displayed on the right. Press [YES] if you
would like to copy the contents of the CD anyway.
Again, please note that the unit’s Internal Flash Player has
a 99 track or 80 minute maximum capacity.
You will then see the screen shown on the right. If you
would like to erase Internal Flash Player contents before
proceeding, press [YES]. If you would like to keep the
contents, press [NO]; in this case, the new tracks will be
copied starting at the next available location. (For
example, if there are 8 tracks currently stored in the player,
the new tracks will begin at 9).
Repeat Mode
This option allows you to repeat playback of a single track
or the entire CD. Options include Repeat Off, Repeat
Track, Repeat All. Use the [SELECT] button to cycle
through the different options.
System Info
This page displays various system information. While on
this page, press [SELECT] to cycle through the information
fields.
Note: System information may be required when contacting
our Technical Support team.
Menu: Switch to
Flash Player?
Menu: Copy Track
CD:01 -> INT:03?
Menu: Copy Whole
CD to Int Flash?
Flash not empty
Copy anyway?
Flash not empty
Clear Flash 1st?
Menu: Repeat
Repeat Off
Menu: SystemInfo
Software: 1.00
7
Page 10
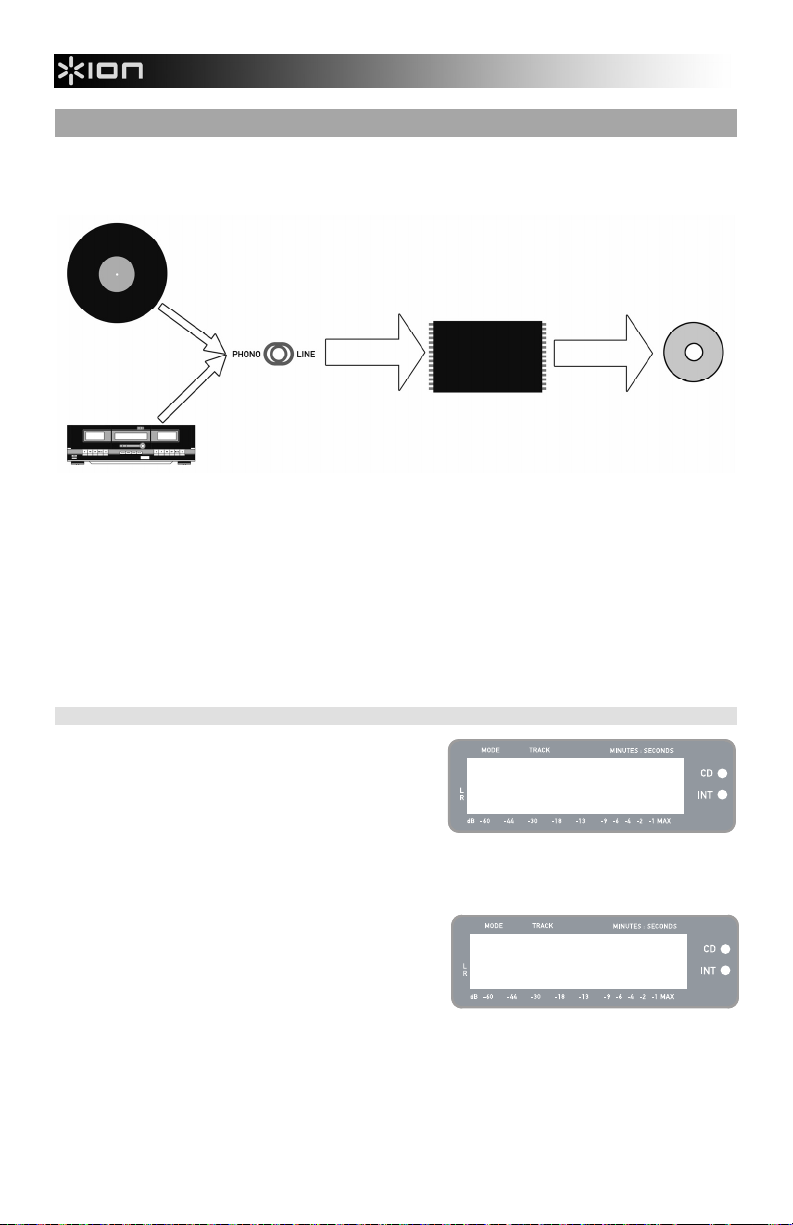
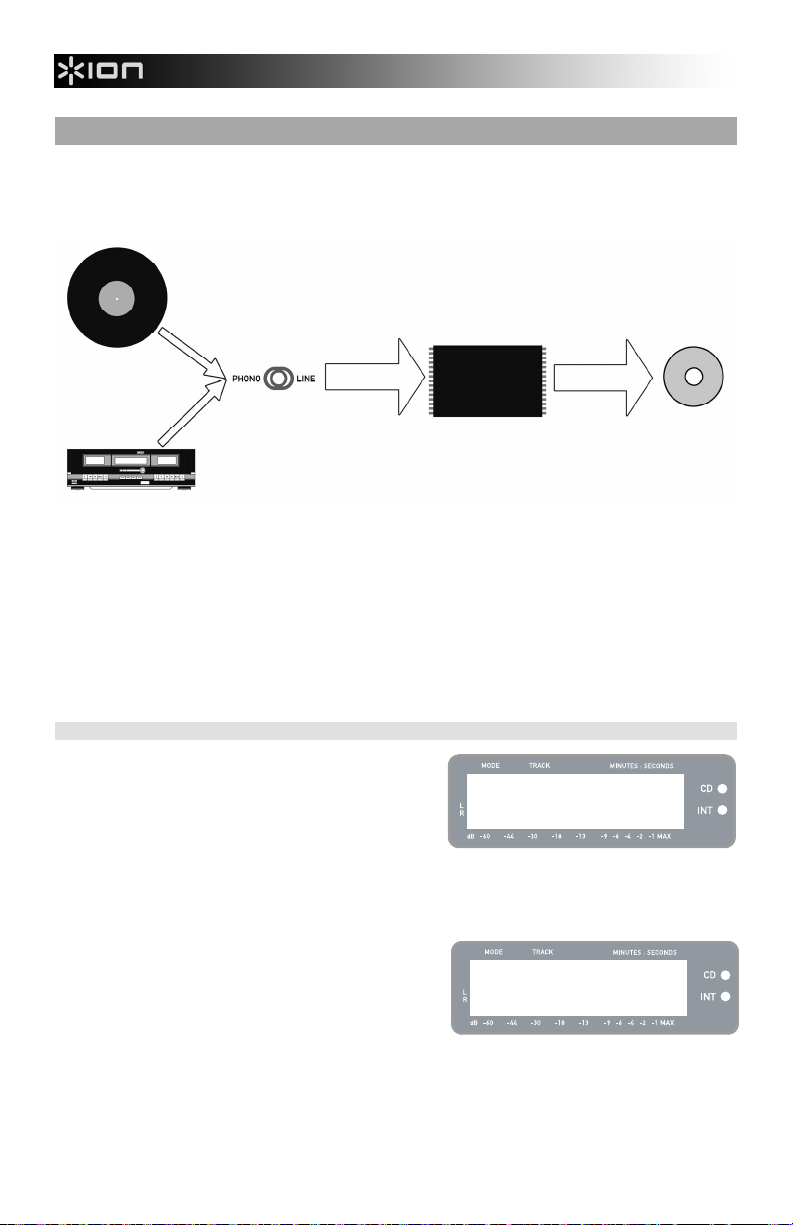
INTERNAL FLASH PLAYER MODE
The LP 2 CD features an Internal Flash Player. This player is used to rip music from the turntable or from an
external source connected to the line inputs on the rear of the unit. The process is illustrated below:
RECORD
LINE-LEVEL AUDIO
SOURCE
RECORD
SELECT
SOURCE
TO BE
RECORDED
RECORD
MUSIC TO
INTERNAL
FLASH
PLAYER
INTERNAL
FLASH
PLAYER
BURN
INTERNAL
FLASH
PLAYER
CONTENTS
TO CD
CD
You might ask “why not burn my music directly to CD?” There are a couple of reasons why we have chosen
this approach:
Recording to the Internal Flash Player first allows you to correct any mistakes and perfect your track
transitions before committing your recording to a CD.
The spinning of a CD drive produces mechanical noise which can leak into your recordings. Recording
to the Internal Flash Player prevents this noise from entering your recordings, ensuring the highest
possible audio fidelity.
RECORDING MUSIC TO THE INTERNAL FLASH PLAYER
1. First, make sure that you are in Internal Flash
Player Mode (an orange LED next to “INT” should be
lit). If the unit is in CD Player Mode (green LED next to
“CD”), press [MENU] once and press [YES] when you
Menu: Switch to
Flash Player?
see the screen shown on the right to switch to Internal
Flash Player Mode.
2. Select which source you would like to record by flipping the PHONO / LINE switch to the
appropriate position. Set the switch to PHONO if you would like to record vinyl from the turntable
platter, or set the switch to LINE if you would like to record from an external source, such as a tape or
personal music player, connected to the LINE IN on the rear of the LP 2 CD.
3. Press the [RECORD] button. The red LED below the
button will begin to blink to let you know that you are
ready for recording and you will see the screen
displayed on the right. The number after ‘INT’ is the
INT:01 PressPLAY
location where the recording will be saved.
4. Cue the music which you would like to record. If
recording vinyl from the turntable platter, put the
needle on the vinyl record, at the beginning of the
section which you would like to record.
5. Play the music which you would like to record. If recording vinyl from the turntable platter, press
the turntable’s [START/STOP] button to begin playing the record.
8
Page 11
6. Use the RECORD LEVEL knob to adjust the level of
the audio signal. The recording level will be
displayed on the screen. It is important to set your
recording levels correctly during this step, otherwise
you may end up with a recording that is too soft or is
INT:01 PressPLAY
============ =
too loud and distorted. Try to set the RECORD LEVEL
knob such that the peaks hit the (-4) or (-2) mark but
never reach MAX (“!” will be displayed if the recording
level is too loud and clipping).
7. Once you have adjusted your recording level to its optimal setting, stop the music. If recording
vinyl from the turntable, press the [START/STOP] button to stop the turntable platter.
8. Cue the section which you would like to record. If recording vinyl from the turntable, put the needle
back to the beginning of the section you wish to record.
9. When you are ready to begin recording, press [PLAY]
and then play the music you wish to record. If
recording vinyl from the turntable, immediately press
the [START/STOP] button to begin playing the record.
The red LED will be lit continuously to let you know
INT:01 T70:13
=========== =
that recording is in progress. On the right of the
display, you will see a readout of the remaining
recording time.
10. By default, the LP 2 CD will detect silence between
songs and automatically split them into individual
tracks (Auto Split).
INT:02 T65:01
New Track!
If you have not disabled Auto Split, then proceed to the
next step.
However, if you have disabled Auto Split, you will need to manually insert track markers in between
songs. To insert a track marker, press the [SPLIT TRK] button between songs. The ‘INT’ number
will increment to let you know that a new track was started. Inserting track markers will allow you to
burn songs as individual tracks when burning to CD.
Note: Redbook CD specification requires a 4 second minimum track length. The [SPLIT TRK] will
become active again 4 seconds after it has been pressed.
11. If recording music from a vinyl record, you may wish to pause recording while you flip the record:
a. Press [PAUSE] to temporarily pause recording once you reach the end of Side A.
b. Flip your record to Side B.
c. Press [SPLIT TRK] to insert a marker for the first track on Side B.
d. Press [PLAY] to begin recording Side B.
12. Once you have finished recording, press the [STOP]
button. The display will return to the default Internal
Flash Player screen, as shown on the right.
For information on burning the recordings onto a CD-
INT:13/13 T56:14
Int Flash Player
R, please refer to “Burning Internal Flash Player
Contents to CD” section.
PLAYING MUSIC FROM THE INTERNAL FLASH PLAYER
Once you have recoded your music to the Internal Flash Player, press the [PLAY] button to hear the
recordings.
You can cycle through different time display options by
pressing the [DISPLAY] button. Options include
‘Elapsed’, ‘Track Remain’ and ‘Total Remain’.
Press [FF] or [REW] to skip to the next or previous
INT:01/13 00:15
========== =
track, respectively. Press and hold either button while
a track is playing to quickly scan backward or forward.
Press [PAUSE] while a track is playing to pause
playback. Press again to resume.
Press [STOP] to stop playback.
9
Page 12
SPLITTING TRACKS IN THE INTERNAL FLASH PLAYER
The Internal Flash Player allows you to split a selected track into two tracks, in case you may have missed
the transition when you first recorded your music to the Internal Flash Player. This is applicable if you have
disabled Auto Split and have chosen to split your tracks manually.
1. Make sure that you are in Internal Flash Player Mode
(an orange LED next to “INT” should be lit). If the unit
is in CD Player Mode (green LED next to “CD”), press
[MENU] once and press [YES] when you see the
screen shown on the right to switch to Internal Flash
Menu: Switch to
Flash Player?
Player Mode.
2. Locate the track which you would like to split, using the
[REW] and [FF] buttons.
3. Press [PLAY] to play the selected track.
4. Press and hold [FF] to locate the position where you
would like to split the track. If you go too far, you can
press and hold [REW] to scan backward.
5. Once at the location where you would like to make the
split, pause the music.
6. Press the [SPLIT TRK] button.
7. You will see the screen displayed on the right. You
can preview the 2
pressing [PLAY] while on this screen. Hold down [FF]
or [REW] to quickly scan forward or backward in the
nd
track resulting from the split by
Track Split!
Keep? YES or NO
track. Press [STOP] to stop the preview.
Press [YES] to keep or press [NO] to cancel the split.
ERASING MUSIC FROM THE INTERNAL FLASH PLAYER
In situations where you might have made a mistake during the recording process, or if the unit’s flash
memory becomes filled to capacity, you have the option to erase songs.
To erase a single track:
1. Make sure you are in Internal Flash Player Mode.
2. Use [REW] or [FF] to select the track you wish to
erase. The currently selected track will be displayed in
INT:02/13 T56:14
Int Flash Player
the upper left corner (‘02’ in this example).
3. Press [ERASE]. You will see the screen shown on the
right.
4. Press [YES] to erase the currently selected track or
press [NO] to cancel the operation.
INT:Erase Trk02?
YES or NO
To erase all tracks:
1. Make sure you are in Internal Flash Player Mode.
2. Press [ERASE]. You will see a screen similar to the
INT:Erase Trk02?
YES or NO
one shown on the right.
3. Press [SELECT] and you will see the screen change
as shown on the right.
4. Press [YES] to erase all tracks currently stored in the
Internal Flash Player, or press [NO] to cancel.
INT:Erase ALL?
YES or NO
Please note that there is no way to “undo” this
operation! If you press [YES], all tracks stored in
Internal Flash Player will be erased permanently.
10
Page 13
INTERNAL FLASH PLAYER MENU OPTIONS
To access different menu options while in Internal Flash Player Mode, press the [MENU] button. To step
through menu options, continue to press the [MENU] button. To change the selected setting, press the
[SELECT] button. The available menu options are described below:
Switch to CD Player Mode
This option allows you to manually switch to CD Player
Mode. Press [YES] to switch.
Menu: Switch to
CD Player Mode?
Move Track
This option allows you to re-organize stored recordings by
moving a track to a new location. The track which will be
moved is the track which was selected before entering the
menu options (Track “01” in the example to the right).
The destination track is indicated in the ‘New’ field and can
be incremented and decremented with [FF] and [REW],
respectively. Once you have selected the desired
destination, press [YES] to move the track.
Auto Split
Auto Split is a feature which automatically detects silence
between songs and splits the recording into tracks in realtime. By default, this option is enabled. However, you may
choose to disable this option and set track markers
manually.
Press [SELECT] to enable or disable Auto Split.
Repeat Mode
This option allows you to repeat a single track or the entire
collection of recordings stored in the Internal Flash Player.
Options include Repeat Off, Repeat Track, Repeat All.
While on this menu page, press [SELECT] to toggle
between these options.
Menu: Move Track
Old:01 -> New:02
Menu: Auto Split
On
Menu: Repeat
Repeat Off
System Info
This page displays the unit’s firmware version. While on
this page, press [SELECT] to cycle through the information
fields.
Note: System information may be required when contacting
our Technical Support team.
Menu: SystemInfo
Software: 1.00
11
Page 14
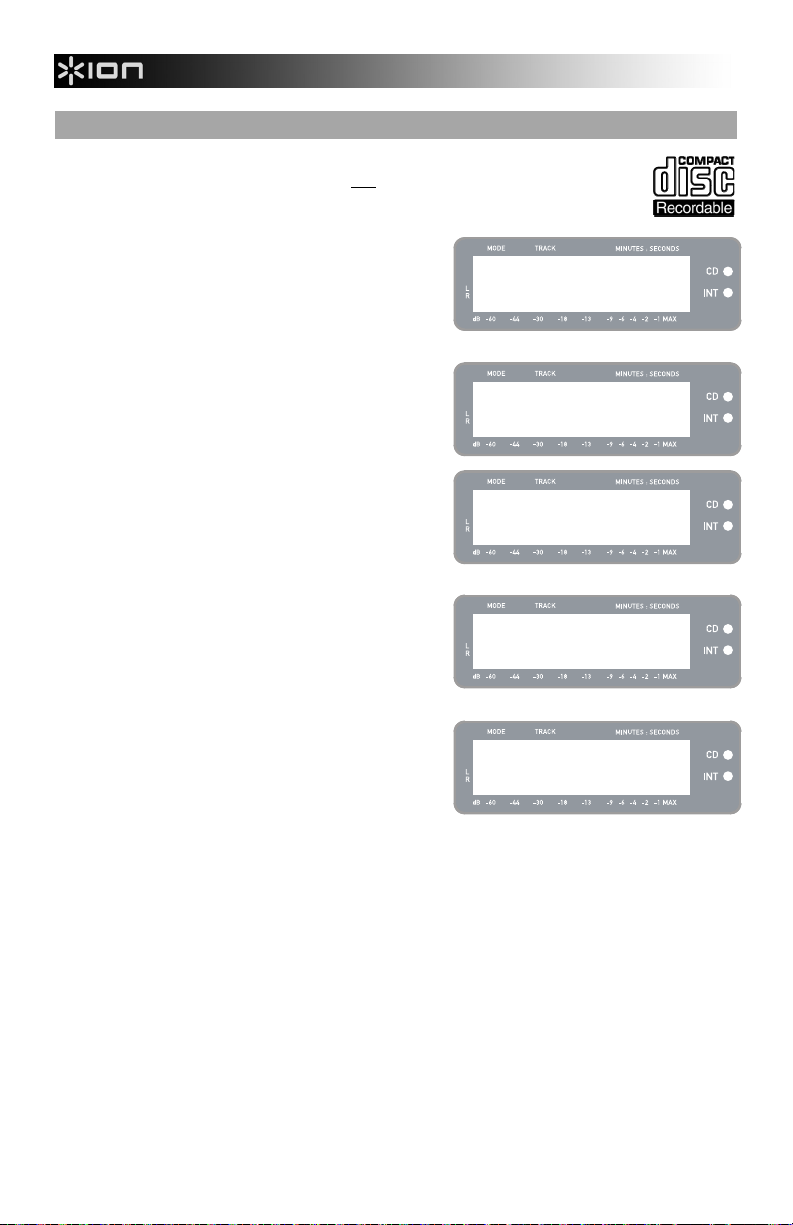
BURNING INTERNAL FLASH PLAYER CONTENTS TO CD
Once you have recorded your music to the Internal Flash Player, you can burn it to a CD-R.
Please note that the LP 2 CD allows recording only
proper logo (shown on the right) appears on the CD you intend to use.
1. First, make sure that you are in Internal Flash Player
Mode (an orange LED next to “INT” should be lit). If
the unit is in CD Player Mode (green LED next to
“CD”), press [MENU] once and press [YES] when you
see the screen shown on the right to switch to Internal
Flash Player Mode.
2. Press the [BURN CD] button.
3. Insert a blank CD-R into the unit’s CD drive. If a noncompatible blank CD is inserted, the unit will eject the
CD and ask you to insert a blank CD-R.
4. Once a blank CD-R has been detected, the burning
process will begin automatically. You will see the
screen displayed on the right. Please allow this
process to complete
Note: To cancel the burn process, press [STOP].
5. Once the burning process has completed, the LP 2 CD
will eject the CD and you will see the screen displayed
on the right. If you would like to burn another copy,
insert another CD-R and press [YES]. If you do not
wish to burn another copy, simply press [NO].
6. When you select [NO], you will see the screen
displayed on the right. Select [YES] if you would like
to erase all tracks currently stored in the Internal Flash
Player, or press [NO] if you wish to keep the tracks.
Note: For most applications, you may wish to erase
Internal Flash Player contents after each successful
transfer to CD. However, please ensure that the CD
was burned to your expectations before clearing the
Internal Flash Player contents.
to a blank CD-R. Please ensure that the
Menu: Switch to
Flash Player?
Insert blank
CD-R disc
CD Burner
Burning CD...
CD Burn Complete
Burn Another?
CD Burn Complete
Clear Flash?
12
Page 15

FREQUENTLY ASKED QUESTIONS
Question: Can I record from the turntable and from external audio sources simultaneously?
Answer: No. The LP 2 CD can only record from the turntable or from audio sources connected
to the Line In inputs, but not both simultaneously. This is to prevent unwanted mixing
of audio signals. The Phono / Line switch selects which source will be routed to the
internal recorder.
Question: Can I burn my vinyl records directly to CD?
Answer: You will need to record your music to the unit’s Internal Flash Player before you can
burn it to a CD. This approach allows you to correct any mistakes and perfect your
track transitions before committing your recording to a CD. It also as ensures that the
spinning of the CD drive does not introduce mechanical noise into your recordings.
Question: What CD formats is the LP 2 CD compatible with?
Answer: The LP 2 CD can play music from virtually any CD containing audio data. The LP 2
CD can only record music to CD-R. Please ensure that the CD you wish to record
contains the proper “Digital Audio Recordable” logo.
Question: How much data can the Internal Flash Player hold?
Answer: The Internal Flash Player on the LP 2 CD can hold about 700Mb of data; this equals
roughly 80 minutes of music. Please note, however, that the Internal Flash Player
also has a 99 track limit. We recommend that you wipe the player contents after each
successful transfer to CD.
Question: Can I listen to my music while recording it?
Answer: Yes, you can listen to your music while recording by connecting the unit’s Line Out to
a line-level input on a home stereo receiver. Alternatively, you can connect
headphones to the 1/8” headphone jack on the lower right corner of the top panel.
Question: Can I record audio from other devices?
Answer: Yes, you can record audio to the unit’s Internal Flash Player from virtually any line-
level audio source, such as tape or reel-to-reel players, connected to the Line In on
the rear panel.
Question: What is the purpose of the USB port?
Answer: The USB port allows you to connect the turntable to your computer and use the
included software to transfer music from vinyl or external line-level audio sources
directly to digital music. Please consult the included MixMeister Software Guide for
information on recording audio from the LP 2 CD into your computer.
Question: Do I need special software drivers when connecting the LP 2 CD to my computer?
Answer: No, the LP 2 CD is a plug-and-play device. This means that there are no special
drivers to install. When you connect the unit to your computer for the first time, it will
automatically load all the necessary components onto your system.
Question: With what operating systems is the LP 2 CD compatible?
Answer: The LP 2 CD is a plug-and-play device under Windows XP/Vista and Mac OSX
operating systems. If you would like to transfer your music to your computer, please
refer to the MixMeister Software Guide.
13
Page 16
TROUBLESHOOTING
PROBLEM CAUSE SOLUTION
My recordings sound loud
and distorted.
I can barely hear the
recorded audio when I play it
back.
My records are playing at an
unusual pitch.
I don’t hear anything when I
try to play or record audio
from my vinyl records.
I don’t hear anything when I
try to play or record external
sources connected to the
Line In.
I get a “Not enough space on
blank CDR” message.
I get a “Too many tracks in
Flash to REC” message.
I get a “Can’t Record Flash is
Full” message.
I can’t hear my record
playing.
I am experiencing poor sound
quality.
My recording came out as
one continuous, long track,
instead of individual tracks.
Recording level was too loud.
Recording level was too soft.
RPM switch not set correctly.
PHONO / LINE switch set to
Line, instead of Phono.
PHONO / LINE switch set to
Phono, instead of Line.
Internal Flash Player
contents exceed the
maximum capacity of the CDR you are attempting to burn.
Internal Flash Player is filled
to capacity.
LP 2 CD is already playing
audio from CD or from the
Internal Flash Player.
Cartridge connection is not
secure.
Vinyl record is dirty or
scratched.
Auto Split menu option was
disabled.
It is important to carefully set your recording level prior to
recording. When you first press [RECORD] to enter Rec
Ready Mode, please check the level metering on the
display. Use the RECORD LEVEL knob to adjust the
level. At the loudest moments of the music, the meters
should hit the (-4) or (-2) mark but should not reach
(MAX). If the level of the audio signal is too “hot”, you
will see (!) flash on the right side of the display.
Please set the RPM switch as appropriate for the record
you wish to play (33/45/78).
Set the PHONO / LINE switch to Phono to play and
record audio from the turntable.
Set the PHONO / LINE switch to Line to hear and record
audio from the external sources connected to the Line
In.
Erase tracks from Internal Flash Player which may have
already been burnt to a previous disc. In general, we
recommend that you erase the player contents after
each successful burn.
Try a higher capacity CD-R. If using a 74min CD-R,
please try an 80min CD-R.
Erase tracks from the Internal Flash Player to free up
space.
Burn Internal Flash Player contents to CD-R, then erase
all tracks.
Press the [STOP] button to ensure that the unit is not
actively playing back or pausing a song.
Cartridge must be securely connected to the tonearm
whenever you are using the turntable.
Try dusting off and gently wiping the surface of the
record before playing it.
Enable Auto Split in the Menu options and try again.
See “Internal Flash Player Menu Options” section for
details.
Use the [SPLIT TRK] to manually split your recordings
into individual tracks. See “Splitting Tracks in the
Internal Flash Player” section for details.
LP 2 CD HOT KEYS
BUTTON COMBINATION DESCRIPTION
RECORD + STOP Forces system to load an OS (Operating System) upon startup.
RECORD + PLAY Restores the default system parameters.
Please visit www.ion-audio.com regularly for updates.
14
Page 17
GUÍA DE INICIO RÁPIDO
o Asegúrese de que todos los elementos abajo indicados estén incluidos en la caja.
o LEA EL FOLLETO DE INSTRUCCIONES DE SEGURIDAD ANTES DE UTILIZAR EL PRODUCTO.
o Visite http://www.ion-audio.com
para registrar el producto.
ADAPTADOR PARA
45RPM
CUBIERTA ANTIPOLVO
ALFOMBRILLA
ANTIDESLIZANTE
CONTRAPESO
PLATO
CD
CÁPSULA
PREMONTADA
GIRADISCOS
LP 2 CD
CABLE USB
MONTAJE DE LA TAPA
GUARDAPOLVO
INTRODUCCIÓN
Gracias por comprar este producto. LP 2 CD es la manera más rápida y sencilla de convertir la música de
discos de vinilo o fuentes de audio externas, tales como reproductores de casetes o cinta, en un CD o
guardarla directamente en su computadora. Con la función de división automática de pistas, el LP 2 CD
detecta los silencios entre temas y los separa en pistas individuales para su conveniencia.
MÉTODO DE GRABACIÓN 1 – A UN CD
Extraiga su álbum al reproductor flash interno y queme uno o más CD. Una vez
grabado su CD, puede escucharlo en el auto, en su casa, en su computadora o en
cualquier lugar donde haya un reproductor de CD estándar.
MÉTODO DE GRABACIÓN 2 – A SU COMPUTADORA
Use el software incluido para convertir automáticamente las pistas a su
biblioteca de iTunes* durante la reproducción. Una vez convertidas, puede
transferirlas a dispositivos de medios portátiles, como iPod* o grabarlas
quemando un CD con aplicaciones de grabación en CD de terceros.
SOFTWARE
Hemos incluido software EZ Vinyl Converter para ayudarle a convertir sus grabaciones de vinilo:
EZ Vinyl/Tape Converter (sólo PC) es la forma más rápida y fácil de convertir las grabaciones en medios
digitales. Este software guarda convenientemente sus grabaciones en la biblioteca de iTunes*. Es posible
que los usuarios novicios prefieran esta aplicación. En el CD, incluimos una práctica Guía de inicio rápido con
instrucciones paso a paso sobre la instalación y la operación del software.
EZ Audio Converter (Mac únicamente) es una aplicación de convertidor básica para Mac OS X, ideal para
usuarios novicios. Consulte en la Guía de inicio rápido del software incluida las instrucciones detalladas sobre
la instalación y la operación del software.
* iTunes e iPod son marcas registradas de Apple, Inc., registradas en EE.UU. y otros países.
15
Page 18
VISTA DEL PANEL TRASERO
4
3
2
1
1. Entrada de alimentación: Conecte el cable de alimentación incluido desde el giradiscos a un
suministro eléctrico activo.
2. Salida de audio USB: Use el cable USB incluido para conectar el giradiscos a su computadora. La
conexión USB provee el audio del giradiscos (o de las entradas de línea Line In, si el conmutador de
entrada Line/Phono (Línea/Fonográfica) del panel superior está en Line) a su computadora. La
conexión USB también entrega audio desde la computadora a través de las salidas RCA del
giradiscos. Para transferir sus discos de vinilo a la computadora, proporcionamos varios paquetes de
software diferentes en el CD incluido. Consulte en la sección “Software incluido” los detalles sobre las
aplicaciones de software incluidas.
3. Line Out (Salida de línea): Use un cable RCA estéreo estándar para conectar estas salidas a las
entradas de audio de su sistema estéreo hogareño. (Para tener en cuenta: igualmente se puede
copiar música en un CD o computadora, incluso si las salidas de audio del giradiscos no están
conectadas a un sistema estéreo).
4. Line In (Entrada de línea): Estas entradas RCA se usan para conectar reproductores de casetes o
cintas o cualquier otra fuente de audio de nivel de línea.
VISTA DEL PANEL FRONTAL
1
1. Lectora de CD: La lectora de CD del giradiscos funciona como reproductor o quemador de CD, según
sea el tipo de disco insertado en la bandeja. Cuando se usan CD finalizados no vacíos, la lectora
funciona como reproductor de CD, permitiéndole reproducir música a través de la línea de salida del
giradiscos o extraer pistas al reproductor flash interno (Internal Flash Player). Cuando se usan discos
CD-R vacíos, la lectora funciona como quemador de CD permitiéndole grabar el audio proveniente del
reproductor flash interno de la unidad (por ej., el audio extraído del giradiscos o de fuentes de sonido
externas conectadas a la entrada de línea).
16
Page 19
VISTA DEL PANEL SUPERIOR
2
5
4
3
13
12
11
1
1. BOTÓN DE ENCENDIDO: Pulse este botón para encender y apagar la unidad.
2. PLATO: Este plato se debe ajustar firmemente al giradiscos antes de hacerlo funcionar. La correa de
transmisión del motor se puede encontrar en el aro impulsor debajo del plato. Vea en “Instalación del plato” la
información detallada sobre la instalación de la correa de transmisión del motor.
3. CONJUNTO DE BRAZO DE LECTURA: Consulte en la sección “Descripción del brazo de lectura” una
descripción detallada del mismo.
4. SOPORTE DEL ADAPTADOR PARA 45 RPM: Puede colocar aquí el adaptador para 45 cuando no lo usa.
5. BOTÓN DE ARRANQUE/PARADA: Con este botón se arranca y para el motor del giradiscos. Si parece que
no funciona, asegúrese que la correa de transmisión del motor esté bien instalada, como se explica en la
sección “Instalación del plato”.
6. PANTALLA: La pantalla le permite acceder a opciones de menú e información correspondientes a la
operación de la unidad.
7. BOTONES DE MENÚ Y FUNCIONES: Consulte en la sección “Botones de menú y funciones” una descripción
detallada de los mismos.
8. BOTONES DE CONTROL DE CD: Consulte en la sección “Botones de control de CD” la información más
detallada.
9. VOLÚMEN DE AURICULARES: Con esta perilla se ajusta el volumen de la señal para auriculares.
10. SALIDA PARA AURICULARES DE 1/8": A esta entrada se conectan los auriculares de 1/8”.
11. NIVEL DE GRABACIÓN: Con esta perilla se ajusta en nivel de la señal de audio proveniente del giradiscos o
12. CONMUTADOR DE ENTRADA FONOGRÁFICA/LÍNEA Con este conmutador se selecciona la señal de
13. CONMUTADOR SELECTOR DE 33 / 45 / 78 RPM: Coloque este conmutador en la posición apropiada
de fuentes de audio conectadas a las entradas Line In del panel trasero.
audio de entrada. Coloque este conmutador en Phono cuando reproduce y transfiere sus grabaciones en
vinilo al CD o la computadora. Colóquelo en Line si desea transferir o escuchar música de fuentes de audio
externas conectadas a las entradas Line In del panel trasero.
cuando reproduce discos. Si la música se reproduce con un pitch extraño o anormal, puede ser una buena
indicación de que se seleccionó un valor de RPM incorrecto.
6
7
8
109
17
Page 20
BOTONES DE MENÚ Y FUNCIONES:
1. [MENU] (Menú): Con este botón se introducen las opciones de menú
correspondientes al modo de operación en uso. Las opciones del menú CD Player
Mode (Modo de reproductor de CD) son Switch Mode (Cambiar modo), Copy Track
(Copiar pista), Copy All (Copiar todas), Repeat (Repetir) y System Info (Información
del sistema). Las opciones del menú Internal Flash Player Mode (Modo de
reproductor flash interno) son Switch Mode (Cambiar modo), Move Track (Mover
pista), Repeat (Repetir) y System Info (Información del sistema).
2. [DISPLAY] (Pantalla): Pulse este botón para recorrer las diferentes configuraciones de la pantalla de tiempo
del LP 2 CD: Elapsed (Transcurrido) (por defecto), Track Remain (Remanente de pista), Total Remain
(Remanente total). Este botón también funciona como botón de SELECCIÓN cuando se seleccionan opciones
del menú.
3. [ERASE] (Borrar): Este botón permite borrar pistas del reproductor flash interno. También funciona como
botón de NO cuando se seleccionan opciones del menú.
4. [SPLIT TRK] (Dividir pista): El LP 2 CD ofrece Auto Split, que detecta automáticamente los silencios entre
temas y divide la grabación en pistas individuales. Por defecto, Auto Split está activada. Si decide desactivar
esta función y dividir manualmente sus pistas, puede usar el botón [SPLIT TRK] entre temas para crear una
pista nueva. También puede realizar esta operación después de grabar su música (consulte la sección
“Cómo dividir pistas en el reproductor flash interno”). Este botón también funciona como botón de [SÍ] cuando
se seleccionan opciones del menú.
BOTONES DE CONTROL DE CD
1. [REW] (Rebobinar): Pulse este botón para
saltar a la pista anterior. Manténgalo
pulsado mientras reproduce una pista para
retroceder rápidamente.
2. [FF] (Avance rápido): Pulse este botón para saltar a la pista siguiente. Manténgalo pulsado mientras
reproduce una pista para avanzar rápidamente.
3. [STOP] (Parar): Pulse este botón para detener la reproducción y volver a la primera pista. Con este botón
también se detiene la grabación cuando extrae su música al reproductor flash interno.
4. [PLAY / PAUSE] (Reproducción/pausa): Pulse este botón para reproducir la pista seleccionada —se enciende
el LED verde de abajo del botón. Para hacer una pausa, púlselo nuevamente mientras se reproduce la cinta
—el LED verde destella durante dicha pausa. Púlselo nuevamente para reanudar la reproducción. Este botón
también inicia la grabación en modo Record Ready (Listo a grabar).
5. [RECORD] (Grabación): Pulse este botón para entrar al modo Record Ready. Este modo le permite grabar
audio proveniente del plato del giradiscos o de fuentes de audio externas conectadas a las entradas Line In del
reproductor flash interno (consulte la sección “Cómo grabar música en el reproductor flash interno” para
obtener más detalles). Cuando pulsa [RECORD], comienza a destellar el LED rojo de abajo del botón, para
indicarle que está listo a grabar.
6. [BURN CD] (Grabar en CD): Una vez que haya grabado su música en el reproductor flash interno, pulse este
botón para quemar el contenido del reproductor directamente en un CD-R vacío compatible (consulte la
sección “Cómo grabar el contenido del reproductor flash interno en un CD” para obtener más detalles).
7. [OPEN/CLOSE] (Abrir/cerrar): Con este botón se abre y cierra la bandeja de CD.
1
2
4
3
2
1
5
6
4
3
7
VISTA DEL BRAZO
1. Contrapeso y anillo de escala: El contrapeso se usa para balancear el conjunto del
portacápsula y la cápsula para que se le aplique la cantidad adecuada de presión de la púa
al disco.
2. Ajuste antideslizamiento: Esta perilla se usa para compensar las fuerzas de tracción hacia
adentro. Consulte INSTALACIÓN DEL BRAZO para ver más detalles.
3. Clip del brazo: Este clip diseñado especialmente fija el brazo mientras está en reposo o no
se usa. El clip ha sido diseñado para que permanezca hacia arriba mientras está
desbloqueado.
NOTA: Al transportar el giradiscos, siempre se recomienda retirar el portacápsula y sujetar
bien el clip del brazo para evitar daños al brazo o al giradiscos.
4. Tuerca de fijación del brazo: Esta tuerca de aluminio se usa para fijar el conjunto del
portacápsula y la cápsula al tubo del brazo. Consulte Instalación de la cápsula para ver más
detalles.
5. Cápsula y portacápsula: La cápsula está preinstalada en un portacápsula estándar. La
cápsula es reemplazable por el usuario y compatible con una variedad de cápsulas
estándar. Asegúrese de retirar la cubierta plástica transparente antes de hacer funcionar el
giradiscos con la cápsula.
1
2
3
4
5
18
Page 21
INSTALACIÓN DEL BRAZO
1. Para empezar, gire el contrapeso en
sentido antihorario hasta que esté
completamente en la posición hacia
adelante. (NOTA: ésta es también la
máxima cantidad de presión que se
le puede aplicar a la cápsula.)
2. Ahora debe sentir una sensación de
peso y resistencia cuando levanta o
baja el portacápsula. Comience a
girar el contrapeso en sentido horario
(alejándolo del punto de pivote)
hasta que la sensación de peso y
resistencia desaparezca. Si esto se
hace correctamente, el brazo
pivotará de un lado al otro con muy
poca resistencia indicando que hay
exactamente 0 gramos de presión
sobre la aguja.
3. Con el contrapeso en su nueva posición más lejos del punto de pivote del brazo, tome el anillo de escala del
contrapeso y gírelo hasta que el “0” esté en la posición vertical.
4. Finalmente, gire el contrapeso (y el anillo de escala ) en sentido antihorario (hacia el punto de pivote) hasta
que se alcance el peso deseado. Si el anillo de escala gira 360 grados más del punto de cero, la nueva lectura
del anillo debe agregarse a 3.5.
*El conjunto de portacápsula y cápsula que se incluye requiere un mínimo de 3 gramos y no más de 5 gramos
para un funcionamiento óptimo.
Ajuste del dispositivo antideslizamiento
En la mayoría de los casos, el dispositivo antideslizamiento debe ajustarse a su valor mínimo. Este dispositivo
compensa las fuerzas de tracción hacia adentro que ocurren con ciertas cápsulas cuando la aguja se acerca al
centro del disco. Si el giradiscos experimenta excesivos saltos cuando se acerca al eje central, intente aumentar el
valor del dispositivo antideslizamiento en los incrementos indicados en el cuadrante. Comience agregando un
incremento de 1, pruebe el funcionamiento, auméntelo más si fuera necesario y así sucesivamente.
IMPORTANTE
Asegúrese de que la alfombrilla de fieltro esté siempre colocada sobre el plato cuando se usa el giradiscos. Si
Retire la cubierta plástica de la cápsula (cubierta de la púa) antes de hacer funcionar el giradiscos.
Tenga en cuenta que es necesario sacar el brazo de lectura de la posición de reposo (clip del brazo) para que
INSTALACIÓN DEL PLATO
ADVERTENCIA: La instalación
incorrecta del plato puede causar
el mal funcionamiento del
giradiscos, la inestabilidad del
plato o un daño permanente al
motor.
1. Comience la instalación colocando la correa de transmisión de goma alrededor del anillo inferior del centro del
2. Instale el plato en el eje central y presiónelo firmemente. Revise para asegurarse que gira de modo uniforme y
3. Gire el plato para que uno de los orificios esté alineado con el botón Start/Stop de la esquina anterior del
4. Meta la mano en este agujero y tire de la correa de transmisión de goma del anillo interior, e instálela sobre el
no se usa la alfombrilla, puede dañarse el medio, así como el giradiscos.
se active el motor del giradiscos.
plato del giradiscos. Éste debería venir preinstalado, pero revíselo para asegurar que no esté doblado o
dañado.
que no se bambolea en exceso.
giradiscos. El eje de latón del motor debe ser visible a través de este agujero.
eje del motor. Tenga cuidado de no doblar la correa de transmisión de goma durante este paso. Verifique que
el plato gire de modo uniforme. Si la correa de transmisión está bien instalada, debe haber un poco de tensión
que detiene el plato después de girar libremente.
19
Page 22
CÓMO MONTAR LA CUBIERTA ANTIPOLVO
1. Fije al giradiscos los montajes de la cubierta antipolvo provistos.
2. Fije la cubierta antipolvo a los montajes como se muestra en la ilustración de la
izquierda.
LOS DOS MODOS
El LP 2 CD tiene dos modos de operación generales: CD Player
(Reproductor de CD) e Internal Flash Player (Reproductor flash
interno). El modo seleccionado se muestra con los dos LED (CD
e INT) ubicados a la derecha de la pantalla, como se muestra en
la ilustración.
El modo de reproductor de CD le permite:
Reproducir música de CD que no están vacíos usando los controles de transporte convencionales (Reproducir,
Pausa, Parar, Saltar, Avance rápido y Rebobinar)
Copiar una pista específica del CD en el reproductor flash interno
Copiar el contenido completo del CD en el reproductor flash interno
El modo de reproductor flash interno le permite:
Extraer pistas de una fuente de audio (vinilo o fuente externa conectada a Line In)
Reproducir pistas almacenadas en el reproductor flash interno, usando los controles de transporte
convencionales (Reproducir, Pausa, Parar, Saltar, Avance rápido y Rebobinar)
Borrar pistas grabadas desde el reproductor flash interno
Dividir una pista grabada en varias pistas
Quemar el contenido del reproductor flash interno en un CD-R vacío
MODO DE REPRODUCTOR DE CD
En este modo, es posible reproducir o extraer música de un CD que no está vacío. Cuando inserta el CD por
primera vez, la pantalla muestra la información que se ilustra a la derecha:
1. La pista que se reproducirá cuando pulse [PLAY] (01 en
este ejemplo).
2. El número total de pistas del CD (12 en este ejemplo).
3. La duración total del CD en formato MM:SS
(minutos:segundos) (62:35 en este ejemplo).
Scanning disc...
CD: 01/12 T62:35
CD Player
CÓMO REPRODUCIR MÚSICA DEL CD
Para reproducir música del CD, pulse simplemente el botón [PLAY]. Una vez que se esté reproduciendo el CD, la
línea superior de la pantalla muestra el tiempo de pista transcurrido y la inferior el medidor de nivel estéreo con
retención de pico, como se muestra en la ilustración de la derecha.
Pulsando el botón [DISPLAY] es posible recorrer las
distintas opciones de la pantalla de tiempo. Las opciones
son ‘Elapsed’ (Transcurrido), ‘Track Remain’ (Remanente
de pista) y ‘Total Remain’ (Remanente total).
Pulse [FF] o [REW] para saltar a la pista siguiente o
anterior respectivamente. Pulse y retenga un botón
mientras se reproduce una pista para avanzar o retroceder
rápidamente.
Pulse [PAUSE] mientras se reproduce una pista para
hacer una pausa en la reproducción. Púlselo nuevamente
para reanudarla.
Pulse [STOP] para detener la reproducción.
CD: 01/12 00:15
========== =
20
Page 23
OPCIONES DEL MENÚ DEL MODO DE REPRODUCTOR DE CD
Para acceder a las diferentes opciones de menú en modo de reproductor de CD, pulse el botón [MENU].
Para recorrer las opciones del menú, continúe pulsando el botón [MENU]. Después de recorrer todas las
opciones de menú disponibles, la unidad vuelve a la pantalla por defecto del modo de reproductor de CD.
Las opciones de menú disponibles se describen a continuación:
Switch to Internal Flash Player Mode
Esta opción le permite conmutar manualmente al modo de
reproductor flash interno. Pulse [YES] para conmutar.
Copy Track
Esta opción le permite copiar una pista del CD en el reproductor
flash interno. Verá la pantalla ilustrada a la derecha. La pista
que se copia es la que se seleccionó antes de introducir las
opciones de menú. (Pista “01” en el ejemplo de la derecha).
Use [REW] y [FF] para seleccionar el destino de la pista
copiada (“03” en el ejemplo de la derecha). Pulse [YES] para
copiar la pista en el destino seleccionado. Pulse [NO] para
cancelar la operación.
Tenga en cuenta que el reproductor flash interno de la unidad
tiene una capacidad máxima de 99 pistas u 80 minutos.
Copy All
Esta opción le permite copiar todas las pistas del CD en el
reproductor flash interno. Pulse [YES] para copiar el CD
completo.
Si el reproductor flash interno ya contiene datos, es posible que
vea la pantalla ilustrada a la derecha. Pulse [YES] si desea
copiar el contenido del CD de cualquier manera.
También en este caso, tenga en cuenta que el reproductor flash
interno de la unidad tiene una capacidad máxima de 99 pistas u
80 minutos.
Verá entonces la pantalla ilustrada a la derecha. Si desea
borrar el contenido del reproductor flash interno antes de
proceder, pulse [YES]. Si desea conservar el contenido, pulse
[NO]. En este caso, las pistas nuevas se copian a partir de la
próxima posición disponible. (Por ejemplo, si hay 8 pistas
almacenadas en el reproductor, las pistas nuevas comienzan
en la 9).
Repeat Mode
Esta opción le permite repetir la reproducción de una pista o el
CD completo. Las opciones son Repeat Off (Repetición
desactivada), Repeat Track (Repetir pista), Repeat All (Repetir
todas). Use el botón [SELECT] para recorrer las diferentes
opciones.
System Info
Esta página muestra información del sistema. Desde esta
página, pulse [SELECT] para recorrer los campos de
información.
Nota: La información del sistema puede solicitarse a nuestro
equipo de Soporte Técnico.
Menu: Switch to
Flash Player?
Menu: Copy Track
CD:01 -> INT:03?
Menu: Copy Whole
CD to Int Flash?
Flash not empty
Copy anyway?
Flash not empty
Clear Flash 1st?
Menu: Repeat
Repeat Off
Menu: SystemInfo
Software: 1.00
21
Page 24
MODO DE REPRODUCTOR FLASH INTERNO
El LP 2 CD cuenta con un reproductor flash interno (Internal Flash Player). Este reproductor se usa para
extraer música del giradiscos o de una fuente externa conectada a las entradas de línea de la parte trasera
de la unidad. El proceso se ilustra a continuación:
DISCO
FUENTE DE AUDIO
DE NIVEL DE LÍNEA
RECORD
SELECCIO
NAR LA
FUENTE A
GRABAR
GRABAR LA
MÚSICA EN EL
REPRODUCTO
R FLASH
INTERNO
REPRODUCTOR
FLASH
INTERNO
QUEMAR EL
CONTENIDO
DEL
REPRODUCT
OR FLASH
INTERNO EN
UN CD
CD
Es posible que se pregunte , ¿por qué no quemar mi música directamente en el CD? Hay un par de razones
por la que hemos elegido este criterio:
Grabar primero en el reproductor flash interno le permite corregir los posibles errores y perfeccionar las
transiciones entre las pistas antes de pasar su grabación a un CD.
La rotación de la lectora de CD produce un ruido mecánico que puede infiltrarse en sus grabaciones.
La grabación en el reproductor flash interno evita que este ruido entre a sus grabaciones, asegurando
la más alta fidelidad de audio posible.
CÓMO GRABAR MÚSICA EN EL REPRODUCTOR FLASH INTERNO
1. En primer lugar, asegúrese de que está en el modo de
reproductor flash interno (debe estar encendido el LED
anaranjado que está junto a “INT”). Si la unidad está en
modo de reproductor de CD (LED verde que está junto a
“CD”), pulse [MENU] una vez y [YES] cuando vea la
pantalla que se muestra a la derecha, para conmutar al
modo de reproductor flash interno.
2. Seleccione la fuente de la que desea grabar pasando el conmutador PHONO / LINE a la posición
apropiada. Coloque el conmutador en PHONO si desea grabar discos de vinilo desde el plato del giradiscos o
en LINE si desea grabar desde una fuente externa, tal como un grabador de cinta o reproductor personal de
música, conectados a la entrada LINE IN de la parte trasera del LP 2 CD.
3. Pulse el botón [RECORD]. EL LED rojo de abajo del
botón comienza a destellar para indicarle que está listo
para grabar y verá la pantalla que se ilustra a la derecha.
El número que está después de ‘INT’ es la posición donde
se guarda la grabación.
4. Ubique el comienzo de la música que desea grabar. Si
va a grabar desde un vinilo colocado en el giradiscos,
coloque la púa en el disco, al comienzo de la sección que
desea grabar.
5. Reproduzca la música que desea grabar. Si graba desde un vinilo colocado en el plato del giradiscos, pulse
el botón [START/STOP] del mismo para comenzar la reproducción del disco.
Menu: Switch to
Flash Player?
INT:01 PressPLAY
22
Page 25
6. Use la perilla RECORD LEVEL para ajustar el nivel de
la señal de audio. El nivel de grabación aparece en la
pantalla. Es importante ajustar correctamente los niveles
de grabación durante este paso, porque de lo contrario
podría obtener una grabación de nivel demasiado baja o
de excesiva sonoridad y distorsionada. Trate de ajustar la
perilla RECORD LEVEL de modo que los picos lleguen
hasta la marca (-4) o (-2) pero nunca alcancen la marca
MAX (si el nivel de grabación es muy alto y se produce
recorte, aparece el signo “!”).
7. Una vez hecho el ajuste del nivel de grabación al valor óptimo, pare la música. Si va a grabar desde un
vinilo colocado en el giradiscos, pulse el botón [START/STOP] del mismo para detenerlo.
8. Ubique el comienzo de la sección que desea grabar. Si va a grabar desde un vinilo colocado en el
giradiscos, coloque nuevamente la púa al comienzo de la sección que desea grabar.
9. Cuando esté listo para comenzar a grabar, pulse [PLAY]
y luego reproduzca la música. Si graba desde un vinilo
colocado en el plato del giradiscos, pulse inmediatamente
el botón [START/STOP] del mismo para comenzar la
reproducción del disco. El LED rojo se enciende
continuamente para indicarle que se está realizando la
grabación. A la derecha de la pantalla, verá una lectura
del tiempo de grabación remanente.
10. Por defecto, el LP 2 CD detecta los silencios entre temas y
los separa automáticamente en pistas individuales (Auto
Split).
Si no desactivó Auto Split, continúe con el paso siguiente.
En cambio, si desactivó Auto Split, será necesario que
inserte manualmente los marcadores de pista entre temas.
Para insertar un marcador de pista, pulse el botón [SPLIT
TRK] entre temas. El número ‘INT’ se incrementa para
indicarle que se inició una nueva pista. La inserción de
marcadores de pista le permite grabar temas como pistas
individuales cuando quema el CD.
11. Si está grabando música desde un disco de vinilo, es conveniente que haga una pausa en la grabación cuando
cambia el disco:
INT:01 PressPLAY
============ =
INT:01 T70:13
=========== =
INT:02 T65:01
New Track!
a. Pulse [PAUSE] para hacer una pausa temporal en la grabación una vez que llegue al final del lado A.
b. Invierta el disco al lado B.
c. Pulse [SPLIT TRK] para insertar un marcador correspondiente ala primera pista del lado B.
d. Pulse [PLAY] para comenzar a grabar el lado B.
12. Cuando termine de grabar, pulse el botón [STOP]. La
pantalla vuelve a la presentación por defecto del
reproductor flash interno, como se ilustra a la derecha.
Para información sobre el quemado de las grabaciones en
un CD-R, consulte la sección “Cómo grabar el contenido
del reproductor flash interno en un CD”.
CÓMO REPRODUCIR MÚSICA DEL REPRODUCTOR FLASH INTERNO
Una vez que haya grabado su música en el reproductor flash interno, pulse el botón [PLAY] para escucharla.
Pulsando el botón [DISPLAY] es posible recorrer las
distintas opciones de la pantalla de tiempo. Las opciones
son ‘Elapsed’ (Transcurrido), ‘Track Remain’ (Remanente
de pista) y ‘Total Remain’ (Remanente total).
Pulse [FF] o [REW] para saltar a la pista siguiente o
anterior respectivamente. Pulse y retenga un botón
mientras se reproduce una pista para avanzar o retroceder
rápidamente.
Pulse [PAUSE] mientras se reproduce una pista para
hacer una pausa en la reproducción. Púlselo nuevamente
para reanudarla.
Pulse [STOP] para detener la reproducción.
INT:13/13 T56:14
Int Flash Player
INT:01/13 00:15
========== =
23
Page 26
CÓMO DIVIDIR PISTAS EN EL REPRODUCTOR FLASH INTERNO
El reproductor flash interno le permite dividir una pista seleccionada en dos, en caso de que haya omitido la
transición cuando grabó por primera vez su música en dicho reproductor. Esto es aplicable si desactivó
Auto Split y decidió dividir sus pistas manualmente.
1. Asegúrese de que está en el modo de reproductor
flash interno (debe estar encendido el LED anaranjado
que está junto a “INT”). Si la unidad está en modo de
reproductor de CD (LED verde que está junto a “CD”),
pulse [MENU] una vez y [YES] cuando vea la pantalla
Menu: Switch to
Flash Player?
que se muestra a la derecha, para conmutar al modo
de reproductor flash interno.
2. Localice la pista que desea dividir con los botones [REW] y [FF].
3. Pulse [PLAY] para reproducir la pista seleccionada.
4. Pulse y mantenga pulsada [FF] para localizar la posición donde desea dividir la pista. Si se pasa,
puede pulsar y mantener pulsada [REW] para retroceder.
5. Una vez que esté en la posición donde desea hacer la división, haga una pausa en la música.
6. Pulse el botón [SPLIT TRK].
7. Verá la pantalla ilustrada a la derecha. Puede
escuchar una presentación preliminar de la 2
resultante de la división pulsando [PLAY] en esta
pantalla. Mantenga pulsadas [FF] o [REW] para
avanzar o retroceder rápidamente en la pista. Pulse
“STOP” para parar la presentación preliminar.
da
pista
Track Split!
Keep? YES or NO
Pulse [YES] para mantener o [NO] para cancelar la
división.
CÓMO BORRAR MÚSICA DEL REPRODUCTOR FLASH INTERNO
En situaciones en las que pueda haber cometido un error durante el proceso de grabación o si la memoria
flash de la unidad se llenó totalmente, tiene la opción de borrar temas.
Para borrar una pista:
1. Asegúrese de estar en el modo de reproductor flash
interno.
2. Use [REW] o [FF] para seleccionar la pista que desea
INT:02/13 T56:14
Int Flash Player
borrar. La pista seleccionada aparece en la esquina
superior izquierda (‘02’ en este ejemplo).
3. Pulse [ERASE]. Verá la pantalla ilustrada a la
derecha.
4. Pulse [YES] para borrar la pista seleccionada o [NO]
para cancelar la operación.
INT:Erase Trk02?
YES or NO
Para borrar todas las pistas:
5. Asegúrese de estar en el modo de reproductor flash
interno.
6. Pulse [ERASE]. Verá una pantalla similar a la
ilustrada a la derecha.
INT:Erase Trk02?
YES or NO
7. Pulse [SELECT] y verá que la pantalla cambia como
se ilustra a la derecha.
8. Pulse [YES] para borrar todas las pistas almacenadas
en el reproductor flash interno o [NO] para cancelar.
¡Tenga en cuenta que no hay manera de
INT:Erase ALL?
YES or NO
"deshacer" esta operación! Si pulsa [YES], se
borrarán permanentemente todas las pistas
almacenadas en el reproductor flash interno.
24
Page 27
OPCIONES DEL MENÚ DEL REPRODUCTOR FLASH INTERNO
Para acceder a las diferentes opciones de menú en modo de reproductor flash interno, pulse el botón
[MENU]. Para recorrer las opciones del menú, continúe pulsando el botón [MENU]. Para cambiar el valor
seleccionado, pulse el botón [SELECT]. Las opciones de menú disponibles se describen a continuación:
Switch to CD Player Mode
Esta opción le permite conmutar manualmente al modo de
reproductor de CD. Pulse [YES] para conmutar.
Menu: Switch to
CD Player Mode?
Move Track
Esta opción le permite reorganizar las grabaciones
almacenadas moviendo una pista a una nueva posición.
La pista que se mueve es la seleccionada antes de
introducir las opciones de menú (pista “01” en el ejemplo
de la derecha).
La pista de destino se indica en el campo ‘New’ (Nueva) y
se puede incrementar y decrementar con [FF] y [REW],
respectivamente. Una vez seleccionado el destino
deseado, pulse [YES] para mover la pista.
Menu: Move Track
Old:01 -> New:02
Auto Split
Auto Split es una función que detecta automáticamente los
silencios entre temas y divide la grabación en pistas en
tiempo real. Por defecto, esta opción está activada. No
obstante, puede elegir desactivarla y colocar los
marcadores de pista manualmente.
Pulse [SELECT] para activar o desactivar Auto Split.
Menu: Auto Split
On
Repeat Mode
Esta opción le permite repetir una pista o la colección
completa de grabaciones almacenadas en el reproductor
flash interno. Las opciones son Repeat Off (Repetición
desactivada), Repeat Track (Repetir pista), Repeat All
(Repetir todas). Desde esta página del menú, pulse
[SELECT] para conmutar entre estas opciones.
Menu: Repeat
Repeat Off
System Info
Esta página muestra la versión de firmware de la unidad
Desde esta página, pulse [SELECT] para recorrer los
campos de información.
Nota: La información del sistema puede solicitarse a
nuestro equipo de Soporte Técnico.
Menu: SystemInfo
Software: 1.00
25
Page 28
CÓMO GRABAR EL CONTENIDO DEL REPRODUCTOR FLASH INTERNO EN UN CD
Una vez que haya grabado su música en el reproductor flash interno, puede grabarla
quemando un CD-R. Tenga en cuenta que el LP 2 CD permite grabar sólo
Asegúrese de que aparezca el logotipo correcto (ilustrado a la derecha) en el CD que piensa
usar.
1. En primer lugar, asegúrese de que está en el modo
de reproductor flash interno (debe estar encendido
el LED anaranjado que está junto a “INT”). Si la
unidad está en modo de reproductor de CD (LED
verde que está junto a “CD”), pulse [MENU] una vez y
[YES] cuando vea la pantalla que se muestra a la
derecha, para conmutar al modo de reproductor flash
interno.
2. Pulse el botón [BURN CD] (Quemar CD).
3. Inserte un CD-R vacío en la lectora de CD de la
unidad. Si se inserta un CD vacío no compatible, la
unidad lo expulsa y le pide que inserte un CD-R vacío.
4. Una vez que haya sido detectado un CD-R vacío, el
proceso de grabación comienza automáticamente.
Verá la pantalla ilustrada a la derecha. Espere que
termine este proceso.
Nota: Para cancelar el proceso de grabación, pulse
[STOP].
5. Una vez terminado el proceso de grabación, el LP 2
CD expulsa el CD y verá la pantalla ilustrada a la
derecha. Si desea quemar otra copia, inserte otro CDR y pulse [YES]. En caso contrario, pulse
simplemente [NO].
6. Si selecciona [NO], verá la pantalla ilustrada a la
derecha. Seleccione [YES] si desea borrar todas las
pistas almacenadas en el reproductor flash interno o
[NO] si desea conservarlas.
Nota: En la mayoría de las aplicaciones, es
conveniente borrar el contenido del reproductor flash
interno después de cada transferencia exitosa a CD.
No obstante, asegúrese de que el CD se grabó según
sus expectativas antes de borrar el contenido del
reproductor flash interno.
en un CD-R vacío.
Menu: Switch to
Flash Player?
Insert blank
audio CD-R disc
CD Burner
Burning CD...
CD Burn Complete
Burn Another?
CD Burn Complete
Clear Flash?
26
Page 29

PREGUNTAS FRECUENTES
Pregunta: ¿Puedo grabar desde el giradiscos y desde fuentes de audio externas
Respuesta: No. El LP 2 CD puede grabar solamente desde el giradiscos o desde fuentes de
Pregunta: ¿Puedo quemar mis grabaciones en vinilo directamente en un CD?
Respuesta: Es necesario que grabe su música en el reproductor flash interno de la unidad antes
Pregunta: ¿Con qué formatos de CD es compatible el LP 2 CD?
Respuesta: El LP 2 CD puede reproducir música desde prácticamente cualquier CD que
Pregunta: ¿Qué cantidad de datos puede contener el reproductor flash interno?
Respuesta: El reproductor flash interno del LP 2 CD puede contener alrededor de 700 Mb de
Pregunta: ¿Puedo escuchar mi música mientras la grabo?
Respuesta: Sí, puede escuchar su música mientras la graba conectando la salida de línea de la
Pregunta: ¿Puedo grabar audio desde otros dispositivos?
Respuesta: Sí, puede grabar audio del reproductor flash interno de la unidad desde
Pregunta: ¿Para qué sirve el puerto USB?
Respuesta: El puerto USB le permite conectar el giradiscos a su computadora y usar el software
Pregunta: ¿Necesito drivers de software especiales cuando conecto el LP 2 CD a mi
Respuesta: No, el LP 2 CD es un dispositivo “plug-and-play”. Esto significa que no hay que
Pregunta: ¿Con qué sistemas operativos es compatible el LP 2 CD?
Respuesta: El LP 2 CD es un dispositivo “plug-and-play” bajo los sistemas operativos Windows
simultáneamente?
audio conectadas a las entradas Line In, pero no desde ambos simultáneamente.
Esto es para evitar la mezcla no deseada de las señales de audio. El conmutador
Phono / Line selecciona la fuente que se conecta al grabador interno.
de grabarla en un CD. Esta disposición le permite corregir posibles errores y
perfeccionar las transiciones entre pistas antes de pasar la grabación a un CD.
También asegura que el giro de la lectora de CD no introduzca ruido mecánico en
sus grabaciones.
contenga datos de audio. Sólo puede grabar música en CD-R. Asegúrese de que el
CD en el que desea grabar contenga el logotipo “Digital Audio Recordable” (Grabable
con audio digital) apropiado.
datos, que equivalen aproximadamente a 80 minutos de música. Tenga en cuenta,
sin embargo, que el reproductor flash interno también tiene un límite de 99 pistas.
Recomendamos que borre el contenido del reproductor después de cada
transferencia exitosa a CD
unidad a la entrada de nivel de línea de un receptor estéreo hogareño. Como
alternativa, puede conectar auriculares al zócalo para auriculares de 1/8" de la
esquina inferior izquierda del panel superior.
prácticamente cualquier fuente de audio de nivel de línea, tal como un reproductor de
casetes o cinta, conectado a la entrada Line In del panel trasero.
incluido para transferir música desde vinilos o fuentes de audio externas de nivel de
línea directamente a música digital. Consulte la Guía de Software MixMeister
incluida para obtener información sobre cómo grabar audio desde el LP 2 CD en su
computadora.
computadora?
instalar drivers especiales. Cuando conecte la unidad a su computadora por primera
vez, cargará automáticamente en su sistema todos los componentes necesarios.
XP/Vista y Mac OSX. Si desea transferir su música a su computadora, consulte la
Guía de Software MixMeister.
27
Page 30

SOLUCIÓN DE PROBLEMAS
PROBLEMA CAUSA SOLUCIÓN
Mis grabaciones suenan con
alto volumen y
distorsionadas.
Apenas puedo oír el audio
grabado cuando lo
reproduzco.
Mis grabaciones se
reproducen con un pitch
anormal.
No oigo nada cuando trato de
reproducir o grabar audio de
mis discos de vinilo.
No oigo nada cuando trato de
reproducir o grabar fuentes
externas conectadas a la
entrada Line In.
Aparece el mensaje “Not
enough space on blank CDR”
(No hay espacio suficiente en
el CDR vacío).
Aparece el mensaje “Too
many tracks in Flash to REC”
(Demasiadas pistas en el
reproductor flash).
Aparece el mensaje “Can’t
Record Flash is Full” (No se
puede grabar, flash lleno).
No puedo oír la reproducción
de mi disco.
Experimento un sonido de
baja calidad.
Mi grabación sale como un
tema largo continuo en lugar
de pistas individuales.
El nivel de grabación fue
demasiado alto.
El nivel de grabación fue
demasiado bajo.
El conmutador de RPM no
está ajustado correctamente.
Conmutador PHONO / LINE
colocado en Line en lugar de
Phono.
Conmutador PHONO / LINE
colocado en Phono en lugar
de Line.
El contenido del reproductor
flash interno excedió la
capacidad máxima del CD-R
que está intentando quemar.
El reproductor flash interno
se llenó al tope de su
capacidad.
LP 2 CD ya está
reproduciendo audio del CD
o del reproductor flash
interno.
La conexión de la cápsula no
es firme.
El disco de vinilo está sucio o
rayado.
La opción de menú Auto Split
está desactivada.
Es importante ajustar cuidadosamente el nivel de
grabación antes de grabar. Cuando pulse [RECORD]
por primera vez para entrar al modo Rec Ready (Listo a
grabar), verifique el medidor de nivel de la pantalla. Use
la perilla RECORD LEVEL para ajustar el nivel. En los
momentos de más nivel sonoro de la música, los
medidores deben llegar a la marca (-4) o (-2) pero sin
alcanzar (MAX). Si el nivel de la señal de audio es
demasiado “caliente”, verá que aparece (!) destellando
del lado derecho de la pantalla.
Ajuste el conmutador de RPM según corresponda para
la grabación que desea reproducir (33/45/78).
Coloque el conmutador PHONO / LINE en Phono para
reproducir y grabar audio del giradiscos.
Coloque el conmutador PHONO / LINE en Line para
escuchar y grabar audio de las fuentes externas
conectadas a la entrada Line In.
Borre las pistas del reproductor flash interno que puede
ya haber grabado en un disco anterior. En general,
recomendamos que borre el contenido del reproductor
después de cada quemado exitoso.
Pruebe con un CD-R de mayor capacidad. Si usa un
CD-R de 74 minutos, pruebe con uno de 80 minutos.
Borre pistas del reproductor flash interno para liberar
espacio.
Grabe el contenido del reproductor flash interno en un
CD-R y luego borre todas las pistas.
Pulse el botón [STOP] para asegurarse de que la unidad
no esté reproduciendo activamente un tema o en pausa.
La cápsula debe estar conectada firmemente al brazo
toda vez que use el giradiscos.
Pruebe desempolvando y limpiando suavemente la
superficie del disco antes de reproducirlo.
Active Auto Split en las opciones del menú y pruebe otra
vez. Consulte los detalles en la sección “Opciones de
menú del reproductor flash interno”.
Use el botón [SPLIT TRK] para dividir manualmente sus
grabaciones en pistas individuales. Consulte los
detalles en la sección “Cómo dividir pistas en el
reproductor flash interno”.
TECLAS DE ACCESO DIRECTO DEL LP 2 CD
COMBINACIÓN DE BOTONES
RECORD + STOP Fuerza al sistema a cargar un OS (sistema operativo) al
RECORD + PLAY Restaura los parámetros por defecto del sistema.
DESCRIPCIÓN
arrancar. Visite regularmente www.ion-audio.com para conocer
las actualizaciones.
28
Page 31

GUIDE D’UTILISATION RAPIDE
o Vérifiez que les éléments ci-dessous se trouvent dans la boîte.
o LISEZ LE LIVRET D'INSTRUCTIONS RELATIVES À LA SÉCURITÉ AVANT UTILISATION DU PRODUIT
o Accédez au site Web http://www.ion-audio.com pour enregistrer le produit.
ADAPTATEUR
45 TOURS
CAPOT
ANTI-POUSSIÈRE
FEUTRINE
SLIPMAT
CONTREPOIDS
PLATEAU
CD
CARTOUCHE
PRÉMONTÉE
PLATINE
LP 2 CD
CÂBLE
FIXATION CAPOT
ANTI-POUSSIÈRE
USB
INTRODUCTION
Merci d’avoir acheté ce produit. La platine LP 2 CD offre les solutions les plus rapides et les plus faciles pour
transférer des pistes musicales provenant d’enregistrements vinyles ou de sources audio externes (lecteurs
de cassettes ou de bobines) sur un CD ou directement sur votre ordinateur. Doté de la fonction de
séparation des pistes automatique, le LP 2 CD détecte les silences entre les pistes et les sépare en pistes
individuelles automatiquement.
LOGICIELS INCLUS
Des logiciels EZ Vinyl Converter sont inclus afin de vous aider à faire la conversion des enregistrements de vos
disques de vinyle :
Le EZ Vinyl/Tape Converter (PC seulement) est la façon la plus rapide et la plus simple de convertir vos
enregistrements au média numérique. Le EZ Vinyl/Tape Converter permet de sauvegarder vos
enregistrements dans votre bibliothèque iTunes*. L'utilisateur débutant préférera peut-être cette application
pour sa simplicité d'utilisation. Sur le CD, nous avons inclus un guide d'utilisation simplifié avec des instructions
détaillées sur l'installation et le fonctionnement du logiciel.
Le EZ Audio Converter (pour Mac seulement) est un logiciel de conversion pour Mac OS X idéal pour
l’utilisateur débutant. Veuillez consulter le guide de démarrage rapide du logiciel pour les instructions étape par
étape sur l’installation et l’utilisation.
* iTunes et iPod sont des maques de commerce enregistrées de Apple, Inc., enregistrées aux États-Unis et dans d’autres pays.
MÉTHODE D’ENREGISTREMENT 1 – VERS CD
Rippez votre album et transférez-le sur le lecteur Flash interne, puis gravez un ou plusieurs
CD. Une fois votre CD est enregistré, vous pouvez l’écouter dans la voiture, chez vous, sur
votre ordinateur ou dans n’importe quel endroit disposant d’un lecteur CD standard.
MÉTHODE D’ENREGISTREMENT 2 – VERS VOTRE ORDINATEUR
Utilisez le logiciel fourni pour convertir automatiquement des pistes vers votre
bibliothèque iTunes* pendant leur lecture. Une fois vos enregistrements convertis,
vous pouvez les transférer vers des périphériques multimédia portables, tels qu’un
iPod*, ou encore les graver sur un CD à l’aide d’applications tiers de gravure.
29
Page 32

VUE D’ENSEMBLE DU PANNEAU ARRIÈRE
4
3
2
1
1. Entrée d’alimentation : Utilisez le câble d'alimentation fourni pour brancher l’appareil à une prise de
courant active.
2. Sortie audio USB : Utilisez le câble USB fourni pour brancher votre platine à votre ordinateur. Le
branchement USB permet de transmettre les données sonores de la platine (ou du périphérique
branché aux prises Line In, si le commutateur Line/Phono du panneau supérieur est réglé sur Line) à
votre ordinateur. Le branchement USB permet également d’écouter le son de votre ordinateur par
l’intermédiaire des sorties RCA de la platine. Pour transférer vos disques vinyles sur votre ordinateur,
nous avons inclus plusieurs applications logicielles sur le CD fourni. Veuillez vous reporter à la section
« Logiciels inclus » pour obtenir de plus amples renseignements au sujet des applications logicielles
fournies.
3. Line Out : Utilisez un câble stéréo RCA standard pour relier ces sorties aux entrées de votre chaîne
stéréo. (Remarque : vous pouvez copier des pistes sur un CD ou sur votre ordinateur, même si les
prises de sortie audio de la platine ne sont pas reliées à une chaîne stéréo).
4. Line-in : Branchez un lecteur de cassette, un magnétophone à bobines, ou toute autre source audio à
niveau ligne à ces entrées RCA.
VUE D’ENSEMBLE DU PANNEAU AVANT
1
1. Lecteur CD : Le lecteur CD de la platine fonctionne comme n’importe quel graveur ou lecteur CD,
selon le type de disque inséré. Lors de l’utilisation de CD non vierges et finalisés, le lecteur
fonctionnera comme n’importe quel lecteur CD, vous permettant ainsi de lire des pistes musicales par
l'intermédiaire des prises Line Out de la platine, ou encore de ripper des pistes et de les transférer sur
le lecteur Flash interne. Lors de l’utilisation de disques CD-R vierges, le lecteur fonctionne comme
n’importe quel graveur CD, vous permettant ainsi de graver des pistes audio depuis le lecteur Flash
interne de la platine (c.-à.-d. des pistes audio rippées depuis la platine ou depuis des sources sonores
externes reliées aux prises Line In).
30
Page 33

VUE D’ENSEMBLE DU PANNEAU SUPÉRIEUR
4
2
5
3
13
12
11
1
1. TOUCHE D’ALIMENTATION : Appuyez sur cette touche pour mettre la platine sous tension ou hors tension.
2. PLATEAU : Ce plateau doit être solidement fixé à la platine avant utilisation. La courroie d’entraînement du
moteur est située sur l’anneau en dessous du plateau. Voir la section « Installation du plateau » pour obtenir
des renseignements au sujet de l’installation de la courroie d’entraînement du moteur.
3. BRAS DE LECTURE : Voir la section « Vue d’ensemble du bras de lecture » pour obtenir une description
détaillée du bras de lecture.
4. SUPPORT ADAPTATEUR 45 TOURS : Déposez l’adaptateur 45 tours à cet endroit après utilisation.
5. TOUCHE DÉMARRER/ARRÊTER : Cette touche permet de démarrer et d’arrêter le moteur de la platine. Si la
touche ne semble pas fonctionner, vérifiez que la courroie d’entraînement du moteur est correctement installée
(voir section « Installation du plateau »).
6. ÉCRAN : L’écran vous permet d’accéder aux options des menus et aux informations relatives au
fonctionnement de la platine.
7. TOUCHES DE MENU ET DE FONCTIONS : Voir la section « Touches de menu et de fonctions » pour obtenir
une description détaillée de ces touches.
8. TOUCHES DE CONTRÔLE DES CD : Voir la section « Touches de contrôle des CD » pour obtenir des
renseignements détaillés.
9. VOLUME DE CASQUE D’ÉCOUTE : Réglez le volume du signal du casque d’écoute à l’aide de cette molette.
10. SORTIE CASQUE 1/8” : Branchez votre casque d’écoute avec embout 1/8” à cette prise.
11. MOLETTE RECORD LEVEL : Cette molette permet de régler le volume du signal audio de la platine ou des
sources audio branchées aux prises d’entrée Line In situées sur le panneau arrière.
12. COMMUTATEUR PHONO / LINE : Ce commutateur permet de sélectionner le signal audio d’entrée. Réglez ce
commutateur sur Phono lorsque vous lisez des disques vinyles ou que vous les transférez sur CD ou sur votre
ordinateur. Réglez ce commutateur sur Line si vous souhaitez transférer ou écouter de la musique à partir de
sources audio externes reliées aux prises d’entrée Line In situées sur le panneau arrière.
13. COMMUTATEUR DE SÉLECTION DE TOURS 33 / 45 / 78 : Réglez ce commutateur sur la position appropriée
lors de l’écoute de disques. Si le son vous paraît étrange (vitesse ou hauteur différentes), il est fort probable
que vous n’avez pas sélectionné la bonne vitesse de lecture.
6
7
8
109
31
Page 34

TOUCHES DE MENU ET DE FONCTIONS
1. [MENU] : Cette touche permet d’accéder aux options de menu du mode actuel de
fonctionnement. Le menu du mode Lecteur CD comprend les options suivantes :
Switch Mode (Basculer mode), Copy Track (Copier piste), Copy All (Copier tout),
Repeat (Répéter), System Info (Renseignements système). Le mode Lecteur Flash
interne propose les options suivantes : Switch Mode (Basculer mode), Move Track
(Déplacer piste), Repeat (Répéter), System Info (Renseignements système).
2. [DISPLAY] : Appuyez sur cette touche pour faire défiler les divers paramètres d’affichage de durée que la
platine propose : Elapsed (Temps écoulé – réglage par défaut), Track Remain (Durée restante de la piste),
Total Remain (Durée restante totale). Cette touche fait également office de touche de sélection (SELECT sur la
platine) lorsque vous parcourez les options du menu.
3. [ERASE] : Cette touche vous permet de supprimer des pistes du lecteur Flash interne. Cette touche fait
également office de touche « Non » (NO sur la platine) lors de la sélection des options de menu.
4. [SPLIT TRK] : Doté de la fonction de séparation des pistes automatique, le LP 2 CD détecte les silences entre
les pistes et sépare automatiquement les enregistrements en pistes individuelles. La fonction Auto Split est
activée par défaut. Si vous désirez désactiver cette fonction et séparer manuellement les pistes, utilisez la
touche [SPLIT TRK] durant les silences afin de créer de nouvelles pistes. Vous pouvez également faire cette
opération après que vous ayez enregistré votre musique (voir la section « Séparation des pistes dans le lecteur
Flash interne »). Cette touche fonctionne également comme touche de confirmation [YES] lors de la sélection
des options menu.
5.
TOUCHES DE CONTRÔLE DES CD :
1. [REW] : Appuyez sur cette touche pour revenir à la
piste précédente. Maintenez cette touche enfoncée
pendant la lecture d’une piste pour effectuer un
balayage arrière rapide.
2. [FF] : Appuyez sur cette touche pour passer à la piste suivante. Maintenez cette touche enfoncée pendant la
lecture d’une piste pour effectuer un balayage avant rapide.
3. [STOP] : Appuyez sur cette touche pour interrompre la lecture et revenir à la première piste. Cette touche
permet également d’arrêter l’enregistrement lors du rip d’une piste avec le lecteur Flash interne.
4. [PLAY / PAUSE] : Appuyez sur cette touche pour démarrer la lecture de la piste sélectionnée ; le voyant DEL
vert sous la touche s’allumera. Appuyez de nouveau pendant la lecture de la piste pour mettre en pause ; le
voyant DEL vert clignotera lorsque la lecture sera mise en pause. Appuyez de nouveau pour reprendre la
lecture. Cette touche permet également de démarrer l’enregistrement lorsque la platine est en mode Record
Ready (Prêt à enregistrer).
5. [RECORD] : Appuyez sur cette touche pour accéder au mode Record Ready (Prêt à enregistrer). Ce mode
vous permet d’enregistrer du son sur le lecteur Flash interne ; l’enregistrement peut être effectué depuis un
disque vinyle (positionné sur le plateau de la platine) ou depuis des sources audio externes branchées aux
prises Line In (voir la section « Enregistrer de la musique sur le lecteur Flash interne » pour obtenir de plus
amples renseignements). Quand vous appuyez sur la touche [RECORD], un voyant DEL rouge situé sous la
touche se mettra à clignoter pour vous indiquer que la platine est prête à effectuer l’enregistrement.
6. [BURN CD] : Une fois vos pistes musicales enregistrées sur le lecteur Flash interne, appuyez sur cette touche
pour graver directement le contenu du lecteur sur un CD-R vierge compatible (voir la section « Graver le
contenu du lecteur Flash interne sur CD » pour obtenir de plus amples renseignements).
1
2
4
3
2
1
5
4
3
7
6
7. [OPEN/CLOSE] : Cette touche permet d’ouvrir et de fermer le tiroir du lecteur CD.
BRAS DE LECTURE
1. Contrepoids et anneau de tension : Le contrepoids est utilisé pour équilibrer l’ensemble de
coquille et de cartouche afin que la force d’appui de la pointe de lecture soit adéquate.
2. Réglage de la commande anti-dérapage : Ce réglage sert à compenser pour la force
d’appui. Voir la section « Installation du bras de lecture » pour plus de détails.
3. Serre-bras : Le serre-bras est conçu spécialement pour maintenir le bras de lecture en
place. Le serre-bras est conçu pour demeurer en position élevée lorsqu’il n’est pas verrouillé.
REMARQUE : Lors du transport du tourne-disque, il est recommandé de retirer la coquille et
de verrouiller le bras de lecture à l’aide du serre-bras afin d’éviter de l’endommager.
4. Écrou de blocage du bras de lecture : Cette bague en aluminium est utilisée pour fixer
l'ensemble de coquille et de cartouche au bras de lecture. Voir la section « Réglage de la
cartouche » pour plus de détails.
5. Cartouche et coquille : La cartouche est préinstallée sur une coquille standard. La
cartouche peut être remplacée et est compatible avec les différentes cartouches standards.
Assurez-vous de bien retirer le plastique transparent avant de faire fonctionner le tournedisque à partir de la cartouche.
1
2
3
4
5
32
Page 35

RÉGLAGE DU BRAS DE LECTURE
1. Commencez par tourner le contrepoids
dans le sens horaire jusqu’à ce qu’il soit
complètement penché vers l’avant. (Note :
C’est également la quantité de tension
maximale qui peut être appliquée sur la
cartouche.)
2. Il devrait y avoir maintenant une sensation
de tension et de résistance lorsque la
coquille est levée et abaissée. Tournez le
contrepoids dans le sens antihoraire (en
vous éloignant du point de pivot) jusqu’à ce
que la sensation de tension et de
résistance soit éliminée. Lorsque fait
correctement, le bras de lecture devrait
pivoter avec très peu de résistance
indiquant qu’il y a 0 gramme de tension sur
l'aiguille.
3. Avec le contrepoids en sa nouvelle position éloignée du point de pivot du bras de lecture, saisissez l’anneau de
tension du contrepoids et tournez-le jusqu’à ce que « 0 » soit en position verticale.
4. Pour terminer, tournez le contrepoids (et l’anneau de tension) dans le sens horaire (vers le point de pivot)
jusqu’à ce que la quantité désirée de tension soit atteinte. Si le contrepoids tourne 360 degrés au-delà du point
zéro, 3,5 devra être ajoutée à la nouvelle lecture de l’anneau de tension.
*L’ensemble de coquille et de cartouche inclus requiert un minimum de 3 grammes et un maximum de 5
grammes pour un rendement optimal.
Réglage de la commande anti-dérapage
Dans la plupart des cas, la commande anti-dérapage doit être réglée au minimum. L'anti-dérapage compense pour la
force d’appui qui se produit avec certaines cartouches lorsque la pointe de lecture s’approche du centre du disque. Si
le tourne-disque saute excessivement pendant la lecture près de l’axe central, essayez d’augmenter l’anti-dérapage
en utilisant les incréments indiqués sur le cadran. Commencez par ajouter un incrément de 1, examinez le résultat,
ensuite augmentez-le un peu plus, et ainsi de suite.
IMPORTANT
Assurez-vous que le tapis de feutre est toujours placé sur le plateau lors de l’utilisation du tourne-disque. À
Assurez-vous de retirer le protège-cartouche en plastique (protège-aiguille) avant de faire fonctionner le
Remarque : pour activer le moteur de la platine, il est nécessaire de déplacer le bras de lecture afin qu’il ne soit
INSTALLATION DU PLATEAU
MISE EN GARDE : Une
mauvaise installation du plateau
peut mener à une piètre
performance du tourne-disque, à
une instabilité du plateau ou
causer des dommages
permanents à l’entraînement.
1. Commencez par placer la courroie en caoutchouc autour de l'anneau intérieur inférieur du plateau. Cette
2. Installez le plateau sur l’axe du centre et appuyez fermement. Assurez-vous qu’il tourne uniformément et qu’il
3. Faites tourner le plateau pour qu’un des trous soit aligné avec la touche Start Stop située sur le coin avant du
4. Attrapez la courroie en caoutchouc à travers le trou et retirez-le de l'anneau intérieur inférieur et installez-le sur
défaut de respecter cette condition, vous pourriez endommager le support ainsi que le tourne-disque.
tourne-disque.
plus en position arrêt (posé sur son support).
opération est habituellement faite en usine, mais veuillez vous assurer que la courroie n'est pas torsadée ou
endommagée.
ne ballotte pas.
tourne-disque. L'axe du moteur devrait être visible à travers le trou du plateau.
l'axe du moteur. Faites attention de ne pas torsader la courroie lors de cette étape. Assurez-vous que le
plateau tourne uniformément. Si la courroie est correctement installée, il devrait y avoir une légère tension qui
arrête le plateau après l’avoir fait tourner manuellement.
33
Page 36

MONTAGE DU CAPOT ANTI-POUSSIÈRE
1. Fixez les supports du capot anti-poussière sur la platine.
2. Fixez le capot anti-poussière sur les supports comme le montre l’illustration à gauche.
LES DEUX MODES
La platine LP 2 CD propose deux modes principaux de
fonctionnement : Le Mode CD Player (Lecteur CD) et le mode
Internal Flash Player (Lecteur Flash interne). Le mode en cours
de sélection sera indiqué par les deux voyants DEL (CD et INT)
situés sur la partie droite de l’écran (voir l’illustration ci-contre).
Scanning disc...
Le mode Lecteur CD vous permet de :
Lire de la musique depuis des CD non vierges à l’aide des commandes standard (lecture, pause, arrêt, saut,
avance rapide et retour arrière)
Copier une piste spécifique d’un CD sur le lecteur Flash interne
Copier l’intégralité du contenu d’un CD sur le lecteur Flash interne
Le mode Lecteur Flash interne vous permet de :
Ripper des pistes depuis une source audio (vinyle ou source externe reliée aux prises Line In)
Lire des pistes mémorisées dans le lecteur Flash interne, à l’aide des commandes standard (lecture, pause,
arrêt, saut, avance rapide et retour arrière)
Supprimer les pistes enregistrées depuis le lecteur Flash interne
Fractionner une piste enregistrée en plusieurs pistes
Graver le contenu du lecteur Flash interne sur un CD-R vierge
MODE LECTEUR CD
Dans ce mode, vous pouvez lire ou ripper des pistes musicales depuis un CD non vierge. Quand vous insérez le CD,
l’écran affichera les informations se trouvant sur l’illustration de droite :
1. La piste sera lue quand vous appuierez sur [PLAY] (01
dans cet exemple).
2. Le nombre total de pistes se trouvant sur le CD (12
dans cet exemple).
3. La durée totale du CD en format MM:SS
(minutes:secondes – 62:35 dans cet exemple).
LIRE DES PISTES MUSICALES DEPUIS UN CD
Pour lire des pistes musicales depuis un CD, appuyez simplement sur la touche [PLAY]. Une fois la lecture
démarrée, la ligne du haut de l’écran indiquera la durée écoulée de la piste, tandis que la ligne du bas indiquera la
hauteur du niveau sonore stéréo avec maintien de la valeur de crête, comme le montre l’illustration à droite.
Vous pouvez faire défiler les diverses options d’affichage
de durée en appuyant sur la touche [DISPLAY] :
« Elapsed » (Durée écoulée), « Track Remain » (Durée
restante de la piste) et « Total Remain » (Durée totale
restante).
Appuyez sur [FF] ou sur [REW] pour passer
respectivement à la piste suivante ou précédente. Appuyez
sur l’une de ces touches et maintenez-la enfoncée pendant
la lecture d’une piste pour effectuer un balayage avant ou
arrière rapide.
Appuyez sur [PAUSE] pendant la lecture d’une piste pour
mettre la lecture en pause. Appuyez de nouveau pour
reprendre la lecture.
CD: 01/12 T62:35
CD Player
CD: 01/12 00:15
========== =
Appuyez sur [STOP] pour arrêter la lecture.
34
Page 37

OPTIONS DE MENU DU MODE LECTEUR CD
Pour accéder aux diverses options de menu en mode Lecteur CD, appuyez sur la touche [MENU]. Pour faire défiler
les diverses options, continuez d’appuyer sur la touche [MENU]. Une fois que vous avez parcouru toutes les options
de menu disponibles, l’écran retourne à l’affichage par défaut du mode Lecteur CD. Les options de menu disponibles
sont décrites ci-dessous :
Switch to Internal Flash Player Mode (Basculer en mode Lecteur Flash interne)
Cette option permet manuellement de basculer en mode Lecteur
Flash interne. Appuyez sur [YES] pour confirmer.
Copy Track (Copier piste)
Cette option vous permet de copier une piste unique d’un CD sur
le lecteur Flash interne. L’illustration à droite montre le message
qui s’affichera à l’écran. La piste qui sera copiée est la piste qui a
été sélectionnée avant d’accéder aux options (Piste « 1 » dans
l’exemple).
Utilisez les touches [REW] et [FF] pour sélectionner la destination
de la piste copiée (« 03 » dans l’exemple sur la droite). Appuyez
sur [YES] pour copier la piste vers la destination sélectionnée.
Appuyez sur [NO] pour annuler.
Remarque : le lecteur Flash interne de la platine dispose d’une
capacité maximale de 99 pistes ou de 80 minutes.
Copy All (Copier tout)
Cette option permet de copier le CD entier sur le lecteur Flash
interne. Appuyez sur [YES] pour copier le CD entier.
Si le lecteur Flash interne contient déjà des données, le message
ci-contre s’affichera. Appuyez sur [YES] si vous souhaitez malgré
tout copier le contenu du CD.
Remarque : le lecteur Flash interne de la platine dispose d’une
capacité maximale de 99 pistes ou de 80 minutes.
L’illustration à droite montre le message qui s’affichera à l’écran.
Si vous souhaitez supprimer le contenu du lecteur Flash interne
avant de continuer, appuyez sur [YES]. Si vous préférez
conserver le contenu, appuyez sur [NO]; dans ce cas, les
nouvelles pistes seront copiées à partir du premier emplacement
disponible (Par exemple, s’il y a 8 pistes mémorisées dans le
lecteur, les nouvelles pistes commenceront à 9).
Repeat Mode (Mode Répétition)
Cette option vous permet de répéter la lecture d’une piste unique
ou du CD entier. Les options disponibles sont les suivantes :
Repeat Off (Répétition désactivée), Repeat Track (Répétition de
la piste), Repeat All (Répéter tout). Utilisez la touche [SELECT]
pour faire défiler les options.
System Info (Informations sur le système)
Cette page affiche divers renseignements relatifs au système.
Lorsque cette page est affichée, appuyez sur [SELECT] pour
faire défiler les champs d’informations.
Remarque : il vous sera peut-être demandé de consulter la page
System Info lorsque vous contacterez notre équipe d’assistance
technique.
Menu: Switch to
Flash Player?
Menu: Copy Track
CD:01 -> INT:03?
Menu: Copy Whole
CD to Int Flash?
Flash not empty
Copy anyway?
Flash not empty
Clear Flash 1st?
Menu: Repeat
Repeat Off
Menu: SystemInfo
Software: 1.00
35
Page 38

MODE LECTEUR FLASH INTERNE
La platine LP 2 CD contient un lecteur Flash interne. Ce lecteur est utilisé pour ripper des pistes musicales à
partir de la platine ou d’une source externe reliée aux prises Line In situées à l’arrière de la platine. Le
procédé est illustré ci-dessous :
DISQUE
RECORD
SÉLECTIONNER
LA SOURCE À
ENREGISTRER
SOURCE AUDIO DE
NIVEAU LIGNE
Vous vous demandez peut-être, « Pourquoi ne pas graver ma musique directement sur le CD? » Voici les deux
raisons qui nous ont poussés à opter pour une autre méthode :
Enregistrer d’abord sur le lecteur Flash interne vous permet de corriger d'éventuelles erreurs et de travailler sur
les transitions entre les pistes avant de graver votre enregistrement sur un CD.
La rotation du CD dans le lecteur produit un bruit mécanique susceptible d’être audible dans vos
enregistrements. Enregistrer sur le lecteur Flash interne évite à ce bruit d’être incorporé dans vos
enregistrements, vous garantissant ainsi la meilleure fidélité audio possible.
ENREGISTRER DE LA MUSIQUE SUR LE LECTEUR FLASH INTERNE
1. Tout d’abord, vérifiez que la platine est en mode Lecteur
Flash interne (le voyant DEL orange en face de « INT »
doit être allumé). Si la platine est en mode Lecteur CD
(voyant DEL vert en face de « CD »), appuyez une fois sur
[MENU] et appuyez sur [YES] quand le message de
l’illustration sur la droite s’affiche à l’écran pour basculer en
mode Lecteur Flash interne.
2. Sélectionnez la source que vous souhaitez enregistrer en réglant le commutateur PHONO / LINE sur la
position appropriée. Positionnez le commutateur sur PHONO pour enregistrer le disque vinyle qui se trouve sur
le plateau de la platine; positionnez le commutateur sur LINE pour enregistrer à partir d'une source externe,
telle qu'un lecteur de cassettes ou un baladeur, branchée aux prises LINE IN situées à l’arrière de la platine LP
2 CD.
3. Appuyez sur la touche [RECORD]. Le voyant DEL situé
en dessous de la touche se mettra à clignoter pour vous
indiquer que la platine est prête à enregistrer; vous verrez
également le message de l’illustration à droite. Le chiffre à
droite du message « INT » est l’emplacement où
l’enregistrement sera effectué.
4. Préparez la piste musicale que vous souhaitez enregistrer. Si vous effectuez un enregistrement depuis le
plateau de la platine, mettez l’aiguille sur le disque vinyle au début de la section que vous souhaitez
enregistrer.
5. Démarrez la piste musicale que vous souhaitez enregistrer. Si vous enregistrez depuis la platine, appuyez
sur la touche [START/STOP] pour démarrer la lecture du disque vinyle.
ENREGISTRER
LA MUSIQUE
SUR LE LECTEUR
FLASH INTERNE
LECTEUR
FLASH
INTERNE
GRAVER
CONTENU
LECTEUR
INTERNE
SUR CD
Menu: Switch to
Flash Player?
INT:01 PressPLAY
CD
LE
DU
FLASH
36
Page 39

6. Réglez le niveau du signal audio à l’aide de la molette
RECORD LEVEL. Le niveau d’enregistrement sera affiché
à l’écran. Il est important de régler correctement les
niveaux d’enregistrement au cours de cette étape, ou vous
risquez d’obtenir un enregistrement au volume trop faible
ou trop élevé et déformé. Réglez la molette RECORD
LEVEL de manière à ce que la valeur de crête atteigne la
valeur (-4) ou (-2), mais jamais MAX (« ! » s’affichera si le
niveau d’enregistrement est trop élevé).
7. Une fois le niveau d’enregistrement réglé de manière optimale, arrêtez la lecture de la piste. Si vous
enregistrez depuis la platine, appuyez sur la touche [START/STOP] pour arrêter la lecture.
8. Préparez la section que vous souhaitez enregistrer. Si vous effectuez l’enregistrement à partir de la platine,
repositionnez l’aiguille au début de la section que vous souhaitez enregistrer.
9. Quand vous êtes prêt, appuyez sur [PLAY], puis démarrez
la piste souhaitée. Si vous enregistrez depuis un disque
vinyle, appuyez sur la touche [START/STOP] pour
démarrer la lecture. Le voyant DEL rouge restera allumé
pour indiquer que l'enregistrement est en cours. Sur la
droite de l’écran, vous verrez la durée restante de
l’enregistrement.
INT:01 PressPLAY
============ =
INT:01 T70:13
=========== =
10. Par défaut, le LP 2 CD détecte les silences entre les
pistes et les sépare automatiquement en pistes
individuelles (Auto Split).
Si vous n'avez pas désactivé la fonction Auto Split,
INT:02 T65:01
New Track!
procédez à la prochaine étape.
Cependant, si vous avez désactivé la fonction Auto Split, vous devrez insérer manuellement les
marqueurs entre les pistes. Pour insérer un marqueur, appuyez sur la touche [SPLIT TRK] entre les
pistes. Le numéro « INT » est incrémenté pour vous faire savoir qu’une nouvelle piste est commencée.
Insérer des marqueurs vous permettra de graver des pistes individuelles sur un CD
11. Si vous enregistrez de la musique provenant d’un disque vinyle, il est conseillé de mettre l’enregistrement en
pause quand vous tournez le disque :
a. Appuyez sur [PAUSE] pour interrompre l’enregistrement, une fois la face A terminée.
b. Tournez le disque (Face B).
c. Appuyez sur [SPLIT TRK] pour insérer un repère pour la première piste de la face B.
d. Appuyez sur [PLAY] pour démarrer l'enregistrement de la face B.
12. Une fois l’enregistrement terminé, appuyez sur [STOP].
L’écran retourne à l’affichage par défaut du lecteur Flash
interne, comme le montre l’illustration.
Pour des renseignements sur la gravure d'enregistrements
sur un CD-R, voir la section « Graver le contenu du lecteur
Flash interne sur CD ».
LIRE DE LA MUSIQUE SUR LE LECTEUR FLASH INTERNE
Une fois vos enregistrements sur le lecteur Flash interne terminés, appuyez sur [PLAY] pour les écouter.
Vous pouvez faire défiler les diverses options d’affichage
de durée en appuyant sur la touche [DISPLAY] :
« Elapsed » (Durée écoulée), « Track Remain » (Durée
restante de la piste) et « Total Remain » (Durée totale
restante).
Appuyez sur [FF] ou sur [REW] pour passer
respectivement à la piste suivante ou précédente. Appuyez
sur l’une de ces deux touches et maintenez-la enfoncée
pendant la lecture d’une piste pour effectuer un balayage
avant ou arrière rapide.
Appuyez sur [PAUSE] pendant la lecture d’une piste pour
mettre la lecture en pause. Appuyez de nouveau pour
reprendre la lecture.
INT:13/13 T56:14
Int Flash Player
INT:01/13 00:15
========== =
Appuyez sur [STOP] pour arrêter la lecture.
37
Page 40

FRACTIONNER LES PISTES DANS LE LECTEUR FLASH INTERNE
Le lecteur flash interne vous permet de fractionner une piste sélectionnée en deux pistes, au cas où vous
auriez manqué une transition lors de votre enregistrement initial sur le lecteur Flash interne. Ceci s’applique
seulement si vous avez désactivé la fonction Auto Split afin de séparer manuellement les pistes
1. Vérifiez que la platine est en mode Lecteur Flash
interne (le voyant DEL orange en face de « INT » doit
être allumé). Si la platine est en mode Lecteur CD
(voyant DEL vert en face de « CD »), appuyez une fois
sur [MENU] et appuyez sur [YES] quand le message
Menu: Switch to
Flash Player?
de l’illustration ci-contre s’affiche à l’écran pour
basculer en mode Lecteur Flash interne.
2. Trouvez la piste que vous souhaitez fractionner à l’aide des touches [REW] et [FF].
3. Appuyez sur [PLAY] pour lire la piste sélectionnée.
4. Appuyez sur la touche [FF] et maintenez-la enfoncée pour localiser l’endroit où vous souhaitez
fractionner la piste. Si vous allez trop loin, appuyez sur [REW] et maintenez enfoncée pour revenir en
arrière.
5. Une fois l’endroit où vous souhaitez exécuter le fractionnement atteint, mettez la musique sur pause.
6. Appuyez sur la touche [SPLIT TRK].
7. L’illustration ci-contre montre le message qui
s’affichera à l’écran. Vous pouvez écouter la deuxième
piste ainsi créée en appuyant sur [PLAY] lorsque cet
écran est affiché. Maintenez la touche [FF] ou [REW]
enfoncée pour effectuer un balayage avant ou arrière
rapide. Appuyez sur [STOP] pour arrêter la lecture.
Track Split!
Keep? YES or NO
Appuyez sur [YES] pour conserver le fractionnement
ou sur [NO] pour l’annuler.
SUPPRIMER DE LA MUSIQUE DU LECTEUR FLASH INTERNE
Dans les situations où vous auriez commis une erreur au cours du processus d’enregistrement, ou si la
mémoire flash de la platine est pleine, vous avez la possibilité de supprimer des chansons.
Pour effacer une piste unique :
1. Vérifiez que vous êtes en mode Lecteur Flash interne.
2. Sélectionnez la piste que vous souhaitez supprimer à
l’aide de [REW] et [FF]. La piste sélectionnée sera
affichée en haut à gauche (« 02 » dans l'exemple).
INT:02/13 T56:14
Int Flash Player
3. Appuyez sur [SUPPRIMER]. L’illustration montre le
message affiché à l’écran.
4. Appuyez sur [YES] pour supprimer la piste
sélectionnée ou sur [NO] pour annuler l’opération.
INT:Erase Trk02?
YES or NO
Pour supprimer toutes les pistes :
1. Vérifiez que vous êtes en mode Lecteur Flash interne.
2. Appuyez sur [SUPPRIMER]. Vous verrez un écran
identique à celui de l’illustration.
INT:Erase Trk02?
YES or NO
3. Appuyez sur [SELECT]; l'écran affichera alors le même
message que celui de l’illustration.
4. Appuyez sur [YES] pour supprimer toutes les pistes du
lecteur Flash interne ou sur [NO] pour annuler.
Remarque : il est impossible d’annuler cette
opération! Si vous appuyez sur [YES], toutes les
INT:Erase ALL?
YES or NO
pistes du lecteur Flash interne seront supprimées
de façon permanente.
38
Page 41

OPTIONS DE MENU DU LECTEUR FLASH INTERNE
Pour accéder aux diverses options de menu en mode Lecteur Flash interne, appuyez sur la touche [MENU].
Pour faire défiler les diverses options, continuez d’appuyer sur la touche [MENU]. Pour modifier le paramètre
sélectionné, appuyez sur la touche [SELECT]. Les options de menu disponibles sont décrites ci-dessous :
Switch to CD Player Mode (Basculer en mode Lecteur CD)
Cette option vous permet manuellement de basculer en
mode Lecteur CD. Appuyez sur [YES] pour confirmer.
Menu: Switch to
CD Player Mode?
Move Track (Déplacer piste)
Cette option vous permet de réorganiser les
enregistrements mémorisés en déplaçant une piste vers un
nouvel emplacement. La piste qui sera déplacée est la
piste qui a été sélectionnée avant d’accéder aux options
(Piste « 01 » dans l’exemple ci-contre).
La piste de destination est indiquée dans le champ
« New »; il est possible de modifier le numéro de la piste
de destination à l’aide des touches [FF] et [REW]. Une fois
que vous avez sélectionné la destination souhaitée,
appuyez sur [YES] pour déplacer la piste.
Menu: Move Track
Old:01 -> New:02
Fonction Auto Split
La fonction de séparation des pistes automatique permet
de détecter les silences entre les pistes et de séparer
automatiquement les enregistrements en pistes
individuelles en temps réel. Cette option est activée par
défaut. Cependant, vous pouvez la désactiver et insérer les
marqueurs manuellement.
Appuyez sur [SELECT] afin d’activer ou de désactiver la
fonction Auto Split.
Menu: Auto Split
On
Repeat Mode (Mode Répétition)
Cette option vous permet de répéter une piste unique ou la
collection entière d’enregistrements mémorisés dans le
lecteur Flash interne. Les options disponibles sont les
suivantes : Repeat Off (Répétition désactivée), Repeat
Track (Répétition de la piste), Repeat All (Répéter tout).
Lorsque cette page du menu est affichée, appuyez sur
[SELECT] pour faire défiler ces options.
Menu: Repeat
Repeat Off
System Info (Informations sur le système)
Cette page affiche la version du firmware de la platine.
Lorsque cette page est affichée, appuyez sur [SELECT]
pour faire défiler les champs d’informations.
Remarque : Il vous sera peut-être demandé de consulter la
page System Info lorsque vous contacterez notre équipe
d’assistance technique.
Menu: SystemInfo
Software: 1.00
39
Page 42

GRAVER LE CONTENU DU LECTEUR FLASH INTERNE SUR CD
Une fois que vous avez enregistré votre musique sur le lecteur Flash interne, vous pouvez la
graver sur un CD-R. Remarque : la platine LP 2 CD permet d’enregistrer uniquement
CD-R vierge. Vérifiez que le bon logo (voir à droite) se trouve sur le CD que vous avez
l’intention d’utiliser.
1. Tout d’abord, vérifiez que la platine est en mode
Lecteur Flash interne (le voyant DEL orange en face
de « INT » doit être allumé). Si la platine est en mode
Lecteur CD (voyant DEL vert en face de « CD »),
appuyez une fois sur [MENU] et appuyez sur [YES]
quand le message de l’illustration de droite s’affiche à
l’écran pour basculer en mode Lecteur Flash interne.
2. Appuyez sur la touche [BURN CD].
3. Insérez un CD-R vierge dans le lecteur CD de la
platine. Si un CD vierge incompatible est inséré, la
platine l’éjectera et vous invitera à insérer un CD-R
vierge.
4. Une fois qu’un CD-R vierge a été détecté, le
processus de gravure démarre automatiquement.
L’illustration à droite montre le message qui s’affichera
à l’écran. Veuillez patienter jusqu’à la fin de la gravure.
Remarque : pour annuler le processus de gravure,
appuyez sur [STOP].
5. Une fois la gravure terminée, la platine LP 2 CD
éjectera le CD, vous verrez alors le même message
que celui de l’illustration ci-contre. Si vous souhaitez
graver un autre exemplaire, insérez un autre CD-R,
puis appuyez sur [YES]. Si vous ne souhaitez pas
graver un autre CD, appuyez simplement sur [NO].
6. Après avoir sélectionné [NO], vous verrez le message
de l’illustration ci-contre. Sélectionnez [YES] pour
effacer toutes les pistes actuellement mémorisées
dans le lecteur Flash interne ou [NO] pour les
conserver.
Remarque : pour la plupart des applications, il est
conseillé de supprimer le contenu du lecteur Flash
interne après chaque transfert sur CD réussi.
Cependant, vérifiez que la gravure du CD corresponde
bien à vos attentes avant de supprimer le contenu du
lecteur Flash interne.
Menu: Switch to
Flash Player?
Insert blank
audio CD-R disc
CD Burner
Burning CD...
CD Burn Complete
Burn Another?
CD Burn Complete
Clear Flash?
sur un
40
Page 43

FOIRE AUX QUESTIONS
Question : Puis-je enregistrer simultanément depuis la platine et depuis des sources audio
Réponse : Non. Avec la platine LP 2 CD, il est possible d’enregistrer uniquement depuis la
Question : Puis-je graver mes disques vinyles directement sur CD?
Réponse : Il vous faudra enregistrer votre musique sur le lecteur Flash interne avant de pouvoir
Question : Quels sont les formats de CD avec lesquels la platine LP 2 CD est compatible?
Réponse : La platine LP 2 CD peut lire la quasi-totalité des CD contenant des données sonores.
Question : Combien de données le lecteur Flash interne peut-il contenir?
Réponse : Le lecteur Flash interne de la platine LP 2 CD peut contenir environ 700 Mo de
Question : Puis-je écouter de la musique pendant que je l’enregistre?
Réponse : Oui, vous pouvez écouter votre musique tout en l’enregistrant en reliant les prises
Question : Puis-je enregistrer le son provenant d’autres périphériques?
Réponse : Oui, vous pouvez enregistrer sur le lecteur Flash interne, du son provenant de la
Question : À quoi sert le port USB?
Réponse : Le port USB vous permet de relier votre platine à votre ordinateur et d’utiliser le
Question : Ai-je besoin d’un pilote logiciel spécial lors du branchement de la platine LP 2 CD à
Réponse : Non, la platine LP 2 CD est un périphérique prêt à tourner. En d’autres termes, vous
Question : Avec quels systèmes d’exploitation la platine LP 2 CD est-elle compatible?
Réponse : La platine LP 2 CD est un périphérique prêt à tourner, compatible avec les systèmes
externes?
platine ou depuis des sources audio branchées aux prises d’entrée Line In, mais non
pas depuis les deux simultanément. Cette méthode permet d'éviter le mélange
indésirable de signaux sonores. Le commutateur Phono / Line permet de sélectionner
depuis quelle source les signaux doivent être acheminés vers l’enregistreur interne.
la graver sur CD. Cette méthode vous permet de corriger les éventuelles erreurs et
de travailler sur les transitions entre les pistes avant de graver votre enregistrement
sur CD. Cette méthode permet également d’éviter que le bruit mécanique du CD dans
le lecteur soit incorporé à vos enregistrements.
La platine LP 2 CD peut enregistrer de la musique uniquement sur CD-R. Vérifiez
bien que le CD sur lequel vous souhaitez effectuer votre enregistrement présente le
logo « Digital Audio Recordable ».
données, ce qui représente environ 80 minutes de musique. Veuillez néanmoins
noter que le lecteur Flash interne a également une limite de 99 pistes. Nous vous
recommandons d’éliminer le contenu du lecteur après chaque gravure sur CD
réussie.
Line Out de la platine aux entrées à niveau ligne d’un récepteur stéréo. Vous pouvez
également brancher un casque d'écoute à la prise 1/8” pour casque, située dans la
partie inférieure droite du panneau supérieur.
quasi-totalité des sources audio à niveau ligne (lecteurs de cassettes ou
magnétophone à bobines) branchées aux prises Line In du panneau arrière.
logiciel fourni pour convertir de la musique provenant d’un disque vinyle ou de
sources audio externes à niveau ligne, directement en musique numérique. Veuillez
vous reporter au manuel d'utilisation du logiciel de conversion MixMeister pour plus
de renseignements sur l’enregistrement de pistes musicales de votre platine LP 2 CD
sur votre ordinateur.
mon ordinateur?
n’avez pas besoin d’installer de pilotes spéciaux pour la faire fonctionner. Quand vous
brancherez pour la première fois la platine à votre ordinateur, elle lui transmettra tous
les éléments nécessaires.
d’exploitation Windows XP/Vista et Mac OSX. Si vous souhaitez transférer de la
musique sur votre ordinateur, veuillez vous reporter au manuel du logiciel de
conversion MixMeister.
41
Page 44

DÉPANNAGE
PROBLÈME CAUSE SOLUTION
Le niveau sonore de mes
enregistrements est très
élevé et le son est déformé.
Quand je l'écoute, mon
enregistrement est à peine
audible.
La hauteur de son de mes
disques est étrange.
Je n’entends rien quand
j’essaye de lire ou
d’enregistrer du son
provenant de mes disques
vinyles.
Je n’entends rien quand
j’essaye de lire ou
d’enregistrer des sources
externes reliées aux prises
Line In.
Le message « Not enough
space on blank CD »
s’affiche à l’écran.
Le message « Too many
tracks in Flash to REC »
s’affiche à l’écran.
Le message « Can’t Record
Flash is Full » s’affiche à
l’écran.
Je n’entends pas mon disque
tourner.
La qualité sonore est
mauvaise.
L’enregistrement est une
longue piste continue au lieu
de pistes individuelles.
Le niveau d’enregistrement
était trop élevé.
Le niveau d’enregistrement
était trop faible.
Le commutateur RPM n’est
pas réglé correctement.
Le commutateur PHONO /
LINE est positionné sur LINE
plutôt que sur PHONO.
Le commutateur PHONO /
LINE est positionné sur
PHONO plutôt que sur LINE.
Le contenu du lecteur Flash
interne excède la capacité
maximale du CD-R sur lequel
vous tentez d’effectuer la
gravure.
La capacité du lecteur Flash
interne a atteint sa limite.
La platine LP 2 CD lit déjà le
son à partir du CD ou du
lecteur Flash interne.
La cartouche est mal fixée.
Le disque vinyle est sale ou
rayé.
La fonction Auto Split est
désactivée.
Il est important de régler avec soin le niveau
d’enregistrement avant de démarrer l'enregistrement.
Quand vous appuyez sur [RECORD] pour la première
fois pour accéder au mode Rec Ready (Prêt à
l’enregistrement), vérifiez les hauteurs de niveau sur
l’écran. Utilisez la molette RECORD LEVEL pour régler
le niveau. Aux moments les plus bruyants, les hauteurs
de niveau doivent atteindre la valeur (-4) ou (-2), mais
jamais (MAX). Si le niveau du signal sonore est trop
élevé, vous verrez le symbole ( !) clignoter sur la partie
droite de l’écran.
Veuillez positionner le commutateur RPM en fonction du
type de disque se trouvant sur le plateau de la platine
(33/45/78).
Positionnez le commutateur PHONO / LINE sur PHONO
pour lire et enregistrer du son provenant de la platine.
Positionnez le commutateur PHONO / LINE sur LINE
pour écouter et enregistrer à partir des sources externes
reliées aux prises Line In.
Supprimez les pistes de votre lecteur Flash interne qui
ont déjà été gravées sur un disque précédent. En
général, nous recommandons d'effacer le contenu du
lecteur après chaque gravure réussie.
Essayez avec un CD-R de plus grande capacité. Si vous
utilisez un CD-R de 74 minutes, essayez avec un CD-R
de 80 minutes.
Supprimer des pistes du lecteur Flash interne pour
libérer de l’espace.
Gravez le contenu du lecteur Flash interne sur un CD-R,
puis supprimez toutes les pistes.
Appuyez sur la touche [STOP] pour vous assurer qu'une
chanson n'est pas lue ou mise en pause par la platine.
Pour que la platine fonctionne correctement, la
cartouche doit être solidement fixée au bras de lecture.
Essayez d’épousseter et d'essuyer doucement la
surface du disque avant de le lire.
Activez la fonction Auto Split dans les options menu et
réessayez. Voir la section « Options menu du lecteur
Flash interne » pour de plus amples détails.
Utilisez la touche [SPLIT TRK] pour séparer
manuellement l’enregistrement en pistes individuelles.
Voir la section « Séparation des pistes dans le lecteur
Flash interne » pour de plus amples détails.
TOUCHES RACCOURCI DE LA PLATINE LP 2 CD
COMBINAISON TOUCHES DESCRIPTION
RECORD + STOP Oblige le système à charger un système d’exploitation au
RECORD + PLAY Permet de rétablir les paramètres par défaut du système.
démarrage. Veuillez visiter régulièrement www.ion-audio.com pour
obtenir des mises à jour.
42
Page 45

KURZANLEITUNG
o Überprüfen SIe bitte, dass sich die in der unteren Abbildung aufgeführten Gegenstände in der
Produktverpackung befinden.
o LESEN SIE BITTE DIE SICHERHEITSHINWEISE, BEVOR SIE DAS PRODUKT VERWENDEN
o Registrieren Sie Ihr Produkt online auf http://www.ion-audio.com.
EINFÜHRUNG
Wir bedanken uns bei Ihnen für den Kauf dieses Produktes. Der LP 2 CD ist der schnellste Weg, um Musik von
Vinylschallplatten oder externen Audiogeräten auf CD oder direkt auf den Computer aufzunehmen. Durch die
automatische Track Split Funktion, erkennt der LP 2 CD Pausen zwischen den Songs und teilt für Sie die Titel
selbständig in einzelne Tracks.
AUFNAHMEMETHODE 1 – AUF CD
Überspielen Sie Ihr Album auf den internen Flash Player und brennen Sie eine oder
mehrere CDs. Nachdem Sie eine CD aufgenommen haben, können Sie diese im Auto,
zu Hause, auf Ihrem Computer oder überall auf einem normalen CD Player wiedergeben.
AUFNAHMEMETHODE 2 – AUF IHREM COMPUTER
Verwenden Sie die beiliegende Software, um während der Wiedergabe Ihrer
Schallplatte die Titel automatisch in Ihre iTunes* Library zu übertragen.
Nachdem Sie Ihre Aufnahmen digitalisiert haben, lassen sie sich leicht auf
portable Musik Player, wie einem iPod* übertragen oder mit Hilfe einer CDBrennsoftware auf einer CD aufnehmen.
SOFTWARE
Wir haben mehrere Softwareprogramms beigefügt, die Sie beim Konvertieren Ihrer Vinylaufnahmen
unterstützen sollen.
o EZ Vinyl/Tape Converter (nur für PC) ist die schnellste und einfachste Lösung überhaupt, um Ihre
Schallplatten in das digitale Format umzuwandeln. EZ Vinyl/Tape Converter speichert Ihre Aufnahmen für Sie
direkt in Ihrer iTunes* Bibliothek. Gerade Anwender, die zum ersten Mal Schallplatten digitalisieren lieben
diese Software. Auf der CD, sie finden in einer handlichen Kurzanleitung schrittweise Anleitungen zur
Softwareinstallation und zur Bedienung des Programms.
o EZ Audio Converter (nur für Mac) ist ein grundlegendes Converter-Programm für Mac OS X und ideal für
Neueinsteiger. Softwareinstallation und Betrieb sind Schritt für Schritt in der beigefügten SoftwareKurzanleitung erklärt.
* iTunes und iPod sind geschützte Warenzeichen von Apple, Inc., registriert in den U.S.A. und anderen Ländern.
43
Page 46

ÜBERBLICK ÜBER DIE RÜCKSEITE
4
3
2
1
1. Netzkabelbuchse: Verbinden Sie das mitgelieferte Netzkabel vom Plattenspieler zu einer
Stromquelle.
2. USB Audio Ausgang: Verwenden Sie das mitgelieferte USB Kabel, um den Turntable mit Ihrem
Computer zu verbinden. Die USB Verbindung überträgt das Audiosignal vom Turntable (oder den Line
In Eingängen, falls der Line/Phono Schalter auf der Oberseite auf Line steht) zum Computer. Die USB
Verbindung überträgt auch den Audioausgang Ihres Computers über die Cinch (RCA) Ausgänge des
Turntables. Zur Übertragung Ihrer Vinylschallplatten auf Ihren Computer finden Sie verschiedene
Softwareprogramme im Lieferumfang des Gerätes. Bitte beachten Sie dazu Abschnitt “Mitgelieferte
Software” für weitere Einzelheiten zu den Programmen.
3. Line Out: Verwenden Sie ein normales Cinch (RCA) Kabel zum Anschluss dieser Ausgänge an die
Audioeingänge Ihrer Stereoanlage. (Bitte beachten Sie: Sie können auch dann Musik auf CD oder den
Computer kopieren, wenn die Audioausgänge nicht mit einer Stereoanlage verbunden sind).
4. Line In: Schließen Sie hier Kassettendecks, Tonbandgeräte oder andere Geräte, die einen Line Pegel
abgeben, zu Aufnahme auf CD oder Ihrem Computer an.
ÜBERSICHT ÜBER DIE VORDERSEITE
1
1. CD Drive: Das CD-Laufwerk des Turntables funktioniert CD Player und Brenner, je nachdem, was für
eine Disc Sie in das Laufwerk einlegen. Wenn Sie bespielte, abgeschlossene CDs verwenden,
funktioniert das Laufwerk als CD Player. Die Musik wird dann über die Line Out Ausgänge des
Turntables wiedergegeben oder auf den internen Flash Player kopiert. Falls Sie leere CD-R Rohlinge
verwenden, funktioniert das Laufwerk als CD Brenner. Sie können dann Audiotitel aus dem Internal
Flash Players des Gerätes (z.B. Signale, die Sie über die Line In des Turntables aufgenommen haben),
brennen.
44
Page 47

ÜBERSICHT ÜBER DIE OBERSEITE
2
5
4
3
13
12
11
1
6
7
8
109
1. NETZSCHALTER: Drücken Sie diese Taste, um das Gerät ein- und auszuschalten.
2. PLATTENTELLER: Dieser Plattenteller muss sicher befestigt werden, bevor Sie den Turntable in Betrieb
nehmen. Der Motorriemen befindet sich auf dem Ring unter dem Plattenteller. Weitere Informationen zur
Installation des Riemens finden Sie im Abschnitt “Montage des Plattentellers”.
3. TONARM: Beachten Sie bitte die Hinweise im Abschnitt “Überblick über den Tonarm” für weitere
Beschreibungen zum Tonarm.
4. HALTER FÜR 45 RPM ADAPTER: Falls Sie den 45 Adapter nicht benötigen, können Sie ihn hier ablegen.
5. START/STOP TASTE: Diese Taste startet und stoppt den Motor des Turntables. Falls diese taste nicht zu
funktionieren scheint, überprüfen Sie, dass der Motorriemen, wie im Abschnitt “Montage des Plattentellers“
beschrieben, richtig montiert wurde.
6. DISPLAY: Das Display hilft bei der Menünavigation und zeigt Informationen, die beim Betrieb des Gerätes
erscheinen.
7. MENÜ UND FUNKTIONSTASTEN: Weitere Informationen und detaillierte Beschreibungen dieser Tasten
finden Sie im Abschnitt “Menu und Function Tasten.”
8. CD STEUERTASTEN: Detaillierte Informationen zu diesen Tasten finden Sie im Abschnitt “CD Steuertasten.”
9. KOPFHÖRERLAUTSTÄRKE: Mit diesem Regler justieren Sie die Lautstärke des Kopfhörersignals.
10. 3,5 mm KOPFHÖRERAUSGANG: Schließen Sie Ihre Kopfhörer mit 3,5 mm Klinkenstecker an diesen
Ausgang an.
11. RECORD LEVEL: Dieser Regler dient zum Einstellen der Signalstärke vom Turntable oder von externen, an
dem rückwärtigen Line In Eingang angeschlossenen Audioquellen.
12. PHONO / LINE SCHALTER: Mit diesem Schalter wählen Sie das Audioeingangssignal aus. Zum Abspielen
und Aufnehmen Ihrer Vinylschallplatten auf CD oder den Computer, wählen Sie die Phono Schalterstellung.
Falls Sie die Musik Ihrer externer Quellen aufnehmen oder anhören wollen, verwenden Sie die Line
Schalterstellung.
13. 33 / 45 / 78 RPM SCHALTER: Mit diesem Schalter wählen Sie die Abspielgeschwindigkeit bei der
Wiedergabe von Schallplatten aus. Wenn die Musik eigenartig und nicht in der richtig Tonhöhe klingt, sollten
Sie überprüfen, ob die Schallplatte in der richtigen Geschwindigkeit abgespielt wird.
45
Page 48

MENÜ UND FUNKTIONSTASTEN
1. [MENU]: Diese Taste ruft die Menüoptionen für den gerade gewählten Modus auf. Das
Menü des CD Player Modus enthält die Optionen Switch Mode (Schaltermodus), Copy
Track (Titel kopieren), Copy All (Alles kopieren), Repeat (Wiederholen), System Info.
Im Internal Flash Player Modus Menü finden Sie die Optionen Switch Mode
(Schaltermodus), Move Track (Titel verschieben), Repeat (Wiederholen), System Info.
2. [DISPLAY]: Mit dieser Taste schalten Sie zwischen den verschiedenen Zeitanzeigen im Display des um LP 2
CD: Elapsed (vergangene Zeit - Grundeinstellung), Track Remain (verbleibende Zeit des Titels) und Total
Remain (gesamte verbleibende Zeit). Diese Taste funktioniert auch als [SELECT] Taste bei der Auswahl von
Menüoptionen.
3. [ERASE]: Diese Taste ermöglicht das Löschen von Titeln aus dem internen Flash Player. Diese Taste
funktioniert auch als [NO] (NEIN) Taste bei der Auswahl von Menüoptionen.
4. [SPLIT TRK]: Der LP 2 CD besitzt eine Auto Split Funktion. Diese erkennt automatisch die Pausen zwischen
den Songs und teilt die Aufnahme in einzelne Tracks auf. In der Grundeinstellung ist die Auto Split Funktion
aktiviert. Falls Sie diese Funktion ausschalten möchten, um die Titelpausen selbst zu setzen, können Sie zum
Erzeugen eines neuen Tracks die [SPLIT TRK] Taste verwenden. Sie können diesen Vorgang auch erst nach
der Musikaufnahme ausführen (siehe Abschnitt “Tracks im Internal Flash Player aufteilen”). Diese taste
funktioniert auch als [YES] Taste bei der Auswahl von Menüoptionen.
5.
CD STEUERTASTEN
1. [REW]: Drücken zum zurückspringen zum
vorherigen Titel diese Taste. Halten Sie für den
schnellen Rücklauf durch den Titel diese Taste bei
der Wiedergabe gedrückt.
2. [FF]: Mit dieser Taste springen Sie zum nächsten Titel. Halten Sie diese Taste während der Wiedergabe zum
schnellen Titelvorlauf gedrückt.
3. [STOP]: Drücken Sie diese Taste, um Wiedergabe zu stoppen und zum ersten Track zu gehen. Diese taste
beendet auch die Aufnahme beim kopieren von Musik auf den internen Flash Player.
4. [PLAY / PAUSE]: Zum Abspielen des gegenwärtig gewählten Titels drücken Sie diese Taste; die grüne LED
unter der Taste leuchtet dann. Drücken Sie diese Taste während der Wiedergabe noch einmal, um das
Abspielen des Titels zu unterbrechen, die grüne LED unter der Taste blinkt. Zur Wiederaufnahme der
Wiedergabe drücken Sie die Taste noch einmal. Diese Taste startet auch die Aufnahme im Record Ready
Modus.
5. [RECORD]: Drücken Sie diese Taste, um in den Record Ready Modus zu gelangen. In diesem Modus können
Sie Audio vom Schallplattenspieler oder von an den rückwärtigen Line In Eingängen angeschlossen auf dem
internen Flash Player aufnehmen (siehe Abschnitt “Musik auf dem internen Flash Player aufnehmen”).
Nachdem die [RECORD] Taste gedrückt wurde, beginnt eine rote LED unter der Taste zu blinken, was Ihnen
die Aufnahmebereitschaft visuell anzeigt.
6. [BURN CD]: Nachdem Sie Musik in den internen Flash Player aufgenommen haben, drücken Sie diese Taste,
um den Inhalt des Flash Players direkt auf eine kompatible, leere CD-R zu brennen. (siehe “Brennen des Flash
Player Inhalts auf CD”).
7. [OPEN/CLOSE]: Diese Taste öffnet und schließt die CD Schublade.
1
2
4
3
2
1
5
4
3
7
6
TONEARM
1. Gegengewicht und Skalenring: Das Gegengewicht dient dazu, die Headshell
(Systemträger) mit dem Tonabnehmersystem so auszubalancieren, dass der korrekte
Nadeldruck auf die Schallplatte ausgeübt wird.
2. Anti-Skate Einstellung: Das Gegengewicht dient dazu, dieHeadshell (Systemträger) mit
dem Tonabnehmersystem so auszubalancieren, dass der korrekte Nadeldruck auf die
Schallplatte ausgeübt wird.
3. Arm Clip: Dieser speziell entworfene Arm-Clip sichert den Tonarmwährend Pausen und bei
Nichtgebrauch. Der Arm-Clip wurde so entworfen, dass er in der aufrechten Stellung
verbleibt solang er geöffnet ist.
HINWEIS: Beim Transport des Plattenspielers ist es immer empfehlenswert, das Headshell
mit dem Tonabnehmer System zu entfernen und den Arm-Clip zu verschliessen, um den
Tonarm oder den Plattenspieler vor Beschädigung zu schützen.
4. Tonarm Verschluss: Diese Aluminiummutter dient zur festen Verbindung von Headshell-
Systems mit dem Tonarm. Für weitere Einzelheiten, sehen Sie bitte unter Tonarm Aufbau
nach.
5. Tonabnehmersystem und Headshell: Das Tonabnehmersystem ist auf eine StandardHeadshell vormontiert. Sowohl das Tonabnehmersystem als auch die Nadel kann selbst
ausgetauscht werden und ist kompatibel mit den meisten Standard DJ Systemen. Vor dem
ersten Gebrauch entfernen Sie die Plastik Schutzkappe vom System.
1
2
3
4
5
46
Page 49

AUFBAU DES TONARMS
1. Zuerst drehen Sie das Gegengewicht
im Uhrzeigersinn, bis es sich
vollständig in der vordersten Position
befindet (HINWEIS: dies ist zugleich
der größtmögliche Druck, der auf das
Tonabnehmersystem ausgeübt werden
kann.)
2. Sie sollten nun Gewicht und
Widerstand fühlen können, wenn der
Tonarm angehoben und abgesenkt
wird. Fangen Sie nun an, das
Gegengewicht gegen den
Uhrzeigersinn (weg vom
Schwenkpunkt) so lange zu drehen,
bis das Gefühl von Gewicht und
Widerstand nicht mehr wahrzunehmen
ist. Falls dies genau ausgeführt wird,
schwenkt der Tonarm ohne großen
Widerstand auf und ab, was bedeutet, dass der Druck auf der Abtastnadel genau 0 Gramm beträgt.
3. Lassen Sie das Gegengewicht in der neuen Position und drehen sie nur den beweglichen Skalenring des
Gegengewichts solange, bis “0” in der vertikalen Position steht.
4. Zuletzt drehen Sie das Gegengewicht (samt Skalenring) in Richtung der Skala (von vorne: gegen den
Uhrzeigersinn) bis das gewünschte Gewicht erreicht ist. Falls die Skala sich mehr als 360 Grad über den
Nullpunkt hinaus dreht, sollte der angezeigte neue Wert des Skalenrings zu 3.5 dazu addiert werden.
*Das mitgelieferte Tonabnehmersystem erfordert mindestens 3 Gramm, jedoch höchstens 5 Gramm für eine
optimale Leistung.
Einstellung der Anti-Skate Einstellung
In den meisten Fällen sollte Anti-Skate auf seinen minimalsten Wert eingestellt werden. Anti-Skate gleicht nach innen
gerichtete Kräfte aus, welche bei manchen Systemen auftreten, während sich die Abtastnadel auf die Plattenmitte
zubewegt. Falls beim Plattenspieler während Back-Cueing und Scratching außergewöhnlich starkes “Springen” in
Richtung der mittleren Spindel auftritt, versuchen Sie Anti-Skate in den auf der Anzeige gezeigten Schritten zu
erhöhen. Fangen Sie mit einer Steigerung von 1 an, testen Sie das Verhalten, dann steigern Sie es weiter, und so
fort.
WICHTIG
Achten Sie immer darauf, dass die Slipmat im auf dem Plattenteller liegt, wenn Sie den Schallplattenspieler
verwenden. Anderenfalls könnten Sie sowohl Ihre Schallplatten als auch den Plattenspieler beschädigen.
Bitte entfernen Sie die Nadelabdeckung aus Plastik, bevor Sie den Plattenspieler verwenden.
Bitte beachten Sie, dass der Tonarm von der Auflageposition in Richtung Vinylplatte bewegt werden muss, um
den Turntable Motor zu starten.
MONTAGE DES PLATTENTELLERS
WARNUNG:
Unvorschriftsmäßiger Aufbau
des Plattentellers kann zu
schlechter Leistung des
Plattenspielers, Instabilität des
Tellers oder zu permanentem
Schaden des Motors führen.
1. Zuerst legen Sie den Gummi-Antriebsriemen um den inneren unteren Ring des Plattentellers. Dies sollte
bereits vorher installiert sein, aber überprüfen Sie, dass der Riemen nicht verdreht oder beschädigt ist.
2. Setzen Sie den Teller auf die Zentralspindel und drücken Sie ihn herunter, bis er fest sitzt. Stellen Sie sicher,
dass er rund läuft und nicht eiert.
3. Drehen Sie den Teller so, dass eines der Löcher mit der Start/Stop-Taste an der vorderen Ecke des
Plattenspielers in einer Linie steht. Die Messingmotorspindel sollte durch das Loch sichtbar sein.
4. Greifen Sie in das Loch und ziehen Sie den Gummiantriebsriemen vom inneren Ring über die Motorspindel.
Achten Sie darauf, den Gummiantriebsriemen dabei nicht zu verdrehen. Stellen Sie sicher,dass der
Plattenteller gleichmäßig läuft. Wenn der Antriebsriemen korrekt installiert ist, sollte eine leichte Spannung
bestehen, die den Drehteller zum Halt bringt nachdem er frei gedreht wurde.
47
Page 50

MONTAGE DER ABDECKHAUBE
DIE ZWEI BETRIEBSARTEN
Der LP 2 CD verfügt über zwei generelle Betriebsarten (auch
Modi genannt): den CD Player Modus und den Internal Flash
Player Modus. Der gegenwärtig gewählte Modus wird Ihnen
durch zwei, rechts neben dem Display befindliche LEDs (CD und
INT) angezeigt.
1. Befestigen Sie die beiliegenden Abdeckhaubenhalter an die Abdeckhaube, wie in der
Abbildung gezeigt.
2. Befestigen Sie die Abdeckhaube am Turntable. Dazu führen Sie die
Abdeckhaubenhalter in die dafür vorgesehenen Montageaussparungen, wie es in der
oberen Grafik abgebildet ist.
Scanning disc...
Der CD Player Modus ermöglicht Ihnen:
Musikwiedergabe von Standard CDs mit Hilfe der normalen Transporttasten (Play, Pause, Stop, Skip, Fast-
Forward und Rewind)
Kopieren eines bestimmten CD Titels zum Internal Flash Player
Kopieren einer gesamten CD zum Internal Flash Player
Der Internal Flash Player Mode kann dazu verwendet werden:
Aufnehmen von externen Audioquellen, die am Line In Eingang abgeschlossen sind
Wiedergabe von Titeln, die im Internal Flash Player gespeichert sind, unter Zuhilfenahme der Transporttasten
(Play, Pause, Stop, Skip, Fast-Forward und Rewind)
Löschen aufgenommener Titel vom Internal Flash Player
Teilen eines aufgenommenen Tracks in mehrere Titel
Brennen der Inhalte des Internal Flash Players auf eine leere CD-R
CD PLAYER MODUS
In diesem Modus können Sie Musik von einer bespielten CD abspielen oder kopieren. Wenn Sie eine CD einlegen,
sehen Sie zunächst im Display die Informationen, die wir hier rechts abgebildet sehen:
1. Der Titel, der als nächstes gespielt wird, wenn Sie
[PLAY] drücken (01 in unserem Beispiel).
2. Die gesamte Anzahl aller Titel der CD (12 i diesem
Beispiel).
3. Die Gesamtspielzeit der CD im Format MM:SS
(Minuten:Sekunden – 62:35 in diesem Beispiel).
CD: 01/12 T62:35
CD Player
WIEDERGABE VON CD
Um Musik von einer CD abzuspielen, drücken Sie einfach die [PLAY] Taste. Wenn eine CD abgespielt wird, zeigt die
obere Zeile im Display die vergangene Zeit des Titels und die untere Zeile den Pegelausschlag des Stereosignal mit
Peak Hold, wie in der rechten Abbildung gezeigt wird.
Sie können zwischen verschiedenen Zeitanzeigen mit der
[DISPLAY] Taste wechseln. Die verfügbaren Optionen
sind ‘Elapsed’ – vergangene Zeit, ‘Track Remain’ –
verbleibende Speilzeit des Titels und ‘Total Remain’ –
verbleibende Gesamtspielzeit.
Um den nächsten oder vorherigen Titel abspielen zu
lassen, drücken Sie die [FF] oder [REW] Tasten. Wenn
Sie die Tasten bei der Wiedergabe gedrückt halten schaltet
die das Gerät in den schnellen Vor- oder Rücklauf.
Drücken Sie während der Wiedergabe auf [PAUSE], um
das Abspielen zu unterbrechen. Drücken Sie die taste noch
einmal, um die Wiedergabe wieder aufzunehmen.
CD: 01/12 00:15
========== =
Mit [STOP] beenden Sie die Wiedergabe.
48
Page 51

OPTIONEN DES CD PLAYER MODUS MENÜS
Die verschiedenen Menüoptionen erreichen Sie im CD Player Modus dann, wenn Sie die [MENU] Taste
drücken. Wenn die Sie [MENU] Taste mehrmals drücken, rufen Sie nacheinander die verfügbaren
Menüoptionen auf. Nachdem alle Menüoptionen angewählt haben, wechselt das Gerät wieder zur normalen
CD Player Modus Anzeige. Folgende Menüoptionen sind verfügbar:
Switch to Internal Flash Player Mode
Mit dieser Option wechseln zum Internal Flash Player Modus.
Zum Umschalten drücken Sie [YES].
Copy Track
Diese Option dient zum Kopieren eines einzelnen CD Titels zum
Internal Flash Player. Sie sehen den hier rechts abgebildeten
Bildschirm. Sie kopieren immer den Titel, der bei der Auswahl
der Menüoption ausgewählt ist. (in diesem Beispiel Track “01”).
Zur Auswahl eines anderen Titels verwenden Sie die Tasten
[REW] und [FF]. Mit [YES] kopieren Sie den Tack zum
gewählten Ziel. Mit [NO] brechen Sie den Vorgang ab.
Beachten Sie, dass der Internal Flash Player des Gerätes eine
Kapazität von 99 Tracks oder 80 Minuten besitzt.
Copy All
Diese Option gestattet das Kopieren einer ganzen CD zum
Internal Flash Player. Mit [YES] Bestätigen Sie den Vorgang.
Falls im Internal Flash Player bereits Daten enthalten sind, wird
Ihnen das hier rechts dargestellte Display angezeigt. Falls Sie die
gesamte CD kopieren wollen, drücken Sie [YES].
Vergessen Sie nicht, dass der Internal Flash Player des Gerätes
eine Kapazität von 99 Tracks oder 80 Minuten besitzt.
Sie sehen dann die hier rechts angezeigte Displaymeldung. Falls
Sie den Inhalt des Internal Flash Players vor dem Fortfahren
löschen wollen, drücken Sie [YES]. Falls Sie den Inhalt des
Internal Flash Players behalten wollen, drücken Sie [NO]; in
diesem Fall werden die Tracks ab der nächsten freien Stelle
eingefügt (wenn es zum Beispiel bereits 8 Tracks im Flash Player
gibt, beginnen die neuen Tracks ab Position 9).
Repeat Modus
Diese Option ermöglicht die Wiederholung der Wiedergabe eines
einzelnen Titels oder der gesamten CD. Folgende Einstellungen
stehen dazu zur Verfügung: Repeat Off, Repeat Track, Repeat
All. Mit der [SELECT] Taste lassen sich die Optionen
nacheinander anwählen.
System Info
Auf dieser Seite sehen Sie verschiedene System Informationen.
Wenn Sie sich auf dieser Seite befinden, können Sie mit der
[SELECT] Taste durch die verschiedenen Informationsfelder
wechseln.
Hinweis: Die System Informationen könnten dann wichtig werden,
wenn Sie den Technischen Support kontaktieren.
Menu: Copy Track
CD:01 -> INT:03?
Menu: Copy Whole
CD to Int Flash?
Flash not empty
Copy anyway?
Flash not empty
Clear Flash 1st?
Menu: Repeat
Repeat Off
Menu: SystemInfo
Software: 1.00
49
Page 52

INTERNAL FLASH PLAYER MODUS
Der LP 2 CD besitzt einen Internal Flash Player, der zum Kopieren der Musik vom Plattenspieler oder von
externen Audioquellen, die an den Line In Eingängen angeschlossen sind, verwendet werden kann. Der
Vorgang wird in folgender Illustration verdeutlicht:
SCHALLPLATTE
LINEPEGEL AUDIO
SIGNAL
RECORD
WÄHLEN SIE
DIE
AUFNAHME-
QUELLE
NEHMEN
SIE DIE
MUSIK
AUF DEM
INTERNAL
FLASH
PLAYER
AUF
INTERNAL
FLASH
PLAYER
BRENNEN
SIE DEN
INHALT
DES
INTERNAL
FLASH
PLAYER
AUF CD
CD
Sie werden nun fragen, warum die Musik nicht direkt auf CD gebrannt wird. Es gibt einige Gründe dafür,
warum wir uns für einen anderen Weg entschieden haben:
Durch die Aufnahme in den Internal Flash Player können Sie zunächst Fehler korrigieren und
Titelübergänge perfektionieren, bevor Sie Ihre Aufnahmen auf CD brennen.
Das Drehen des CD Laufwerks produziert mechanische Geräusche, die Ihre Aufnahmen ruinieren
würden. Durch das Überspielen in den Internal Flash Player gelangen diese Geräusche nicht in Ihre
Aufnahmen – Sie erhalten also die bestmögliche Klangqualität.
MUSIK IN DEN INTERNAL FLASH PLAYER AUFNEHMEN
1. Überprüfen Sie zuerst, dass Sie sich im Internal Flash
Player Modus befinden (eine orange LED neben
“INT” sollte dann leuchten). Falls das Gerät noch im
CD Player Modus arbeitet (die grüne LED neben “CD”
Menu: Switch to
Flash Player?
leuchtet), drücken Sie einmal auf [MENU] und danach
auf [YES], wenn Sie die Dispalyanzeige sehen, die wir
rechts abgebildet haben, um zum Internal Flash Player
Modus umzuschalten.
2. Wählen Sie mit dem PHONO/LINE Schalter die aufzunehmende Signalquelle aus. Wählen Sie die
PHONO Schalterposition, falls Sie Vinylplatten vom Turntable aufnehmen wollen. Bei der
Schalterstellung LINE können Sie von einer externen Signalquelle, wie einem Kassettenrecorder oder
einem anderen Musikabspielgerät, das mit dem rückseitigen LINE IN des LP 2 CD verbunden ist,
aufnehmen.
3. Drücken Sie die [RECORD] Taste. Die rote LED
unter der Taste beginnt zu blinken, wodurch Sie nun
wissen, dass das Gerät zur Aufnahme bereit ist. Im
Display sehen Sie die hier rechts dargestellte
INT:01 PressPLAY
Meldung. Die Nummer nach ‘INT’ ist die Position, an
der die neue Aufnahme gespeichert werden wird.
4. Suchen Sie die Musik, die Sie aufnehmen wollen.
Falls Sie von Schallplatte aufnehmen wollen, legen Sie
die Plattennadel auf den Beginn des Abschnitts, den
Sie mitschneiden wollen.
50
Page 53

5. Spielen Sie die Musik ab, die aufgenommen werden soll. Bei der Aufnahme von Schallplatte,
drücken sie die [START/STOP] Taste des Turntables, um die Aufnahme zu beginnen.
6. Bestimmen Sie mit dem RECORD LEVEL Regler
den Pegel des Audiosignals. Der Aufnahmepegel
wird im Display angezeigt. Es ist sehr wichtig, die
Aufnahmelautstärke jetzt korrekt auszupegeln,
anderenfalls ist die Aufnahme zu leise oder zu laut und
INT:01 PressPLAY
============ =
verzerrt. Stellen Sie den Pegel mit dem RECORD
LEVEL Regler so ein, dass die Pegelspitzen die (-4)
oder (-2) Markierung berühren, aber niemals bis MAX
ausschlagen (“!” wird angezeigt, wenn der
Aufnahmepegel zu laut ist und übersteuert.)
7. Wenn Sie Ihre Aufnahmelautstärke optimal eingestellt haben, stoppen Sie die Musik. Falls Sie
Musik von Schallplatte aufnehmen wollen, drücken Sie die [START/STOP] Taste zum Stoppen des
Plattentellers.
8. Gehen Sie wieder zum Abschnitt der Musik, die Sie aufnehmen wollen. Falls Sie von Schallplatte
aufnehmen wollen, legen Sie die Plattennadel auf den Beginn des Abschnitts, den Sie mitschneiden
wollen.
9. Wenn Sie zur Aufnahme bereit sein, drücken Sie
[PLAY] und starten Sie die Wiedergabe der Musik,
die aufgenommen werden soll. Falls Sie von
Schallplatte aufnehmen, drücken Sie sofort die
[START/STOP] Taste, um die Wiedergabe zu starten.
INT:01 T70:13
=========== =
Die rote LED leuchtet durchgehend, um Ihnen
anzuzeigen, dass der Aufnahmevorgang läuft. Rechts
im Display wird Ihnen die noch verbleibende
Aufnahmezeit dargestellt.
10. In der Grundeinstellung erkennt der LP 2 CD Pausen
zwischen den Titeln selbständig und erzeugt daraufhin
individuelle Tracks (Auto Split).
Falls Sie die Auto Split Funktion nicht deaktiviert
haben, gehen Sie zum nächsten Schritt.
INT:02 T65:01
New Track!
Falls Sie jedoch Auto Split deaktiviert haben, müssen
Sie die Track Markierungen zwischen den Songs
manuell setzen. Zum Einfügen einer Track Markierung,
drücken Sie zwischen den Songs die [SPLIT TRK]
Taste. Die ‘INT’ Nummer erhöht sich auf die nächste
Nummer, wodurch Sie erkennen, dass ein neuer Track
gestartet wurde. Durch das Einfügen von Track
Markierungen können Sie die Songs später als
einzelne Titel auf CD brennen.
11. Falls Sie Musik von Schallplatte aufnehmen, wollen Sie möglicherweise die Aufnahme anhalten,
während Sie die Schallplatte umdrehen:
a. Drücken Sie [PAUSE], um die Aufnahme zu unterbrechen, wenn das Ende der Seite A erreicht
wurde.
b. Drehen Sie die Schallplatte auf Seite B.
c. Drücken Sie die [SPLIT TRK] Taste, um eine neue Titelmarkierung für den ersten Titel der Seite B
anzulegen.
d. Starten Sie die Aufnahme der Seite B mit [PLAY].
12. Wenn Sie die Aufnahme beenden wollen, drücken Sie
die [STOP] Taste. Das Display kehrt zur normalen
Internal Flash Player Anzeige, wie hier rechts
angezeigt, zurück.
INT:13/13 T56:14
Int Flash Player
Weitere Informationen zum Brennen Ihrer Aufnahmen
auf eine CD-R finden Sie im Abschnitt “Brennen des
Internal Flash Player Inhalts auf CD.”
51
Page 54

MUSIK VOM INTERNAL FLASH PLAYER WIEDERGEBEN
Nachdem Sie Musik in den Internal Flash Player aufgenommen haben, starten Sie die Wiedergabe der Musik
mit der [PLAY] Taste. Dieses ist dann verwendbar, wenn Sie die Auto Split Funktion deaktiviert haben und
die Tracks manuell teilen.
Mit der [DISPLAY] Taste können Sie die
verschiedenen Optionen der Zeitanzeige aufrufen. Es
stehen die Optionen ‘Elapsed’, ‘Track Remain’ und
‘Total Remain’ zur Verfügung.
INT:01/13 00:15
========== =
Mit [FF] oder [REW] können Sie zum nächsten bzw.
zum vorherigen Titel springen. Für einen schnellen
Vor- oder Rücklauf in der Musik halten Sie die Tasten
gedrückt.
Drücken Sie [PAUSE] während der Wiedergabe, um
die Musik anzuhalten. Drücken Sie die Taste noch
einmal, um die Musik wieder zu starten.
Drücken Sie zum beenden der Wiedergabe die [STOP]
Taste.
TEILEN VON TRACKS IM INTERNAL FLASH PLAYER
Im Internal Flash Player aufgenommene Tracks lassen sich in zwei Titel aufteilen, falls Sie vergessen haben,
zwischen zwei Titeln bei der Aufnahme in den Internal Flash Player eine Titelmarkierung anzulegen.
1. Vergewissern Sie sich, dass Sie sich im Internal Flash
Player Modus befinden (eine orange LED neben “INT”
sollte leuchten). Falls sich das Gerät im CD Player
Modus befindet (grüne LED neben “CD”), drücken Sie
[MENU] einmal und dann auf [YES], falls Ihnen die
Menu: Switch to
Flash Player?
Anzeige im Display angezeigt wird, die Sie rechts
sehen, um zum Internal Flash Player Modus
umzuschalten.
2. Suchen Sie mit den [REW] und [FF] Tasten den Track,
den Sie teilen wollen.
3. Drücken Sie zur Wiedergabe des gewählten Tracks
[PLAY].
4. Halten Sie die [FF] Taste gedrückt, um die Stelle zu
suchen, an der Sie den Track teilen möchten. Wenn
Sie zu weit “spulen“, können Sie mit gedrückt
gehaltener [REW] Taste wieder zurück gehen.
5. Wenn Sie die gewünschte Position für die Aufteilung
gefunden haben, drücken unterbrechen Sie die Musik
mit [PAUSE].
6. Drücken Sie die [SPLIT TRK] Taste.
7. Nun wird Ihnen die hier rechts abgebildete LCD
Ansicht angezeigt. Sie können den zweiten Titel vom
Punkt der Teilung an vorhören, indem Sie in dieser
Anzeige auf [PLAY] drücken. Wenn Sie die Tasten
Track Split!
Keep? YES or NO
[FF] oder [REW] gedrückt halten, können Sie im Titel
schnell vor- und zurückspulen. Mit [STOP] beenden
Sie das Vorhören.
Drücken Sie [YES] und den Vorgang auszuführen oder
[NO], um ihn abzubrechen.
52
Page 55

MUSIK AUS DEM INTERNAL FLASH PLAYER LÖSCHEN
Manchmal, wenn Sie bei der Aufnahme einen Fehler gemacht haben oder wenn Sie bemerken, dass die
Kapazität des Flashspeichers erschöpft ist, sollten Sie die Option zum Löschen von Songs nutzen.
Zum Löschen eines einzelnen Tracks:
1. Achten Sie darauf, dass Sie sich im Internal Flash
Player Modus befinden.
2. Verwenden Sie [REW] oder [FF] zur Auswahl des zu
INT:02/13 T56:14
Int Flash Player
löschenden Tracks. Der gegenwärtig gewählte Track
wird in der oberen linken Ecke angezeigt (‘02’ in
diesem Beispiel).
3. Drücken Sie [ERASE]. Sie sehen dann die hier rechts
angezeigte Displayanzeige.
4. Drücken Sie [YES], um den gerade ausgewählten
INT:Erase Trk02?
YES or NO
Track zu löschen oder [NO] zum Abbruch des
Vorgangs.
Zum Löschen aller Tracks:
1. Achten Sie darauf, dass Sie sich im Internal Flash
Player Modus befinden.
INT:Erase Trk02?
YES or NO
2. Drücken Sie [ERASE]. Sie werden eine
Bildschirmanzeige sehen, die ähnlich, wie die hier
rechts gezeigt aussieht.
3. Drücken Sie [SELECT] und Sie werden die hier rechts
angezeigte LED Ansicht sehen.
4. Mit der [YES] Taste löschen Sie nun alle Tracks, die
gegenwärtig im Internal Flash Player gespeichert sind.
Mit [NO] brechen Sie den Vorgang ab.
INT:Erase ALL?
YES or NO
Bitte beachten Sie, dass sich dieser Vorgang nicht
zurücknehmen lässt! Alle Tracks im Internal Flash
Player werden unwiederbringlich gelöscht, falls Sie
[YES] drücken.
53
Page 56

MENÜOPTIONEN DES INTERNAL FLASH PLAYERS
Um im Internal Flash Player Modus Zugriff auf die verschiedenen Menüoptionen zu erhalten, drücken Sie die
[MENU] Taste. Um nacheinander die nachfolgend beschriebenen Menüoptionen aufzurufen, drücken Sie
wiederholt auf die [MENU] Taste. Zum Ändern der gewählten Einstellung verwenden Sie die [SELECT]
Taste.
Umschalten in den CD Player Modus
Diese Option ermöglicht das manuelle Umschalten zum
CD Player Modus. Drücken Sie die [YES] Taste zum
Moduswechsel.
Menu: Switch to
CD Player Mode?
Move Track
Mit dieser Option können Sie die gespeicherten
Aufnahmen umorganisieren, indem Sie einen Track auf
eine andere Position verschieben. Der Track, der vor dem
Aufrufen der Menüoptionen gewählt war, ist der Track, der
auch verschoben wird (Track “01” in unserem Beispiel).
Die neue Position des Tracks wird im ‘New’ Feld
angegeben und kann mit den Tasten [FF] und [REW]
definiert werden. Nachdem Sie den gewünschten Zielplatz
ausgesucht haben, bewegen Sie mit [YES] den Track
dorthin.
Menu: Move Track
Old:01 -> New:02
Auto Split
Auto Split ist eine Funktion, die automatisch die Pausen
zwischen den Songs erkennt und die Aufnahme in Echtzeit
in einzelne Tracks teilt. Normalerweise ist diese Funktion
aktiviert. Sie können jedoch die Funktion ausschalten und
Track Markierungen manuell setzen..
Drücken Sie [SELECT] zum Ein- oder Ausschalten der
Auto Split Funktion.
Menu: Auto Split
On
Repeat Modus
Diese Option ermöglicht es, einen einzelnen Track oder
den gesamten im Internal Flash Player gespeicherten
Inhalt zu wiederholen. Dazu stehen Ihnen die Optionen
Repeat Off, Repeat Track und Repeat All zur Verfügung,
die Sie wiederholtem Drücken der [SELECT] Taste
auswählen können.
Menu: Repeat
Repeat Off
System Info
Auf dieser Seite wird Ihnen die Firmware Version des
Gerätes angezeigt. Wenn Sie sich auf dieser Seite
befinden, drücken Sie die [SELECT] Taste, um durch die
Informationsfelder zu wechseln.
Hinweis: Die Seite System Information könnte bei der
Kontaktaufnahme mit unserem Technischen Support von
Bedeutung sein.
Menu: SystemInfo
Software: 1.00
54
Page 57

BRENNEN DES INTERNAL FLASH PLAYER INHALTS AUF CD
Nachdem Sie Ihre Musik in den Internal Flash Player aufgenommen haben, können Sie nun
eine CD brennen. Bitte beachten Sie, dass die Aufnahme im LP 2 CD nur auf eine leere CDR erfolgen kann. Achten Sie darauf, dass das richtige Logo (wie hier rechts dargestellt) auf
der CD gedruckt ist, die Sie verwenden möchten.
1. Vergewissern Sie sich, dass Sie sich im Internal Flash
Player Modus befinden (eine orange LED neben “INT”
sollte leuchten). Falls sich das Gerät im CD Player
Modus befindet (grüne LED neben “CD”), drücken Sie
[MENU] einmal und dann auf [YES], falls Ihnen die
Anzeige im Display angezeigt wird, die Sie rechts
sehen, um zum Internal Flash Player Modus
umzuschalten.
2. Drücken Sie die Taste [BURN CD].
3. Legen Sie eine leere CD-R in das CD Laufwerk des
Gerätes ein. Sollte ein nicht kompatibler CD Rohling
eingelegt werden, wirft das Gerät die CD aus und
fordert Sie auf, eine leere CD-R einzulegen.
4. Nachdem eine leere CD-R erkannt wurde, startet
automatisch der Brennvorgang. Nun sehen Sie die
hier rechts angezeigte Displayanzeige. Bitte warten
Sie, bis der Vorgang abgeschlossen ist.
Hinweis: Mit der [STOP] Taste können Sie den
Brennvorgang abbrechen.
5. Nachdem der Brennvorgang abgeschlossen wurde,
wirft der LP 2 CD die CD aus. Sie sehen dann die hier
rechts dargestellte Displayanzeige. Falls Sie eine
weitere CD brennen möchten, legen Sie eine weitere
leere CD-R ein und drücken Sie [YES]. Drücken Sie
hingegen [NO], wenn keine weitere Kopie erstellt
werden soll.
6. Nachdem Sie [NO] gedrückt haben, sehen Sie die hier
rechts dargestellte Displayanzeige. Wählen Sie [YES],
damit alle sich gegenwärtig im Speicher des Internal
Flash Players befindlichen Tracks gelöscht werden
oder [NO], um diese tracks zu behalten.
Hinweis: Zumeist werden Sie den Inhalt des Internal
Flash Players nach dem erfolgreichen Erstellen einer
CD löschen wollen. Überprüfen Sie jedoch, dass die
gebrannte CD Ihren Vorstellungen entspricht, bevor
Sie den Internal Flash Player leeren.
Menu: Switch to
Flash Player?
Insert blank
audio CD-R disc
CD Burner
Burning CD...
CD Burn Complete
Burn Another?
CD Burn Complete
Clear Flash?
55
Page 58

OFT GESTELLTE FRAGEN
Frage: Kann ich gleichzeitig von Schallplatte und von einer externen Audioquelle
Antwort: Nein. Der LP 2 CD kann nur entweder vom Plattenspieler oder von einem
Frage: Kann ich meine Schallplatten direkt auf CD aufnehmen?
Antwort: Sie müssen Ihre Schallplatte zunächst in den Internal Flash Player des Gerätes
Frage: Mit welchen CD Formaten ist der LP 2 CD kompatibel?
Antwort: Der LP 2 CD kann Musik von eigentlich jeder CD, die Audiodaten enthält,
Frage: Wie viele Daten können im Internal Flash Player aufgenommen werden?
Antwort: Der Internal Flash Player des LP 2 CD nimmt etwa 700MB Daten auf, was etwa 80
Frage: Kann ich mir während der Aufnahme die Musik anhören?
Antwort: Ja, Sie können während der Aufnahme die Musik hören, die Sie mitschneiden. Dazu
Frage: Kann ich Musik von anderen Audiogeräten aufnehmen?
Antwort: Ja, Sie können Audiosignale von jeder Audioquelle (wie Kassettendecks,
Frage: Wozu dient der USB Port?
Antwort: Der USB Port ermöglicht den Anschluss des Turntables an Ihren Computer. Sie
Frage: Muss ich spezielle Treiber auf meinen Computer installieren, um den LP 2 CD
Antwort: Nein der LP 2 CD folgt dem Plug-and-Play Standard. Das bedeutet, dass Sie keine
Frage: Mit welchen Betriebssystemen ist der LP 2 CD kompatibel?
Antwort: Der LP 2 CD ist ein Plug-and-Play Gerät unter Windows XP/Vista und Mac OSX. Zur
aufnehmen?
Audiogerät, welches an den Line In Eingängen des Gerätes angeschlossen ist,
aufnehmen, aber nicht gleichzeitig. Dadurch wird das unerwünschte Mischen beider
Signalquellen vermieden. Der Phono / Line Schalter wählt die Quelle, die im internen
Recorder aufgenommen wird.
überspielen, bevor die Musik auf CD gebrannt werden kann. Dadurch haben Sie die
Möglichkeit, Fehler zu korrigieren und die Übergänge der Titel vor dem Brennen der
CD perfekt abstimmen zu können. Durch diese Vorgehensweise wird außerdem
vermieden, dass mechanische Geräusche des CD Laufwerks Ihre Aufnahmen stören
könnten.
wiedergeben. Der LP 2 CD kann Musik nur auf CD-R brennen. Achten Sie deshalb
darauf, dass Ihr CD Rohling das “Digital Audio Recordable” Logo aufweist.
Minuten Musik entspricht. Beachten Sie bitte, dass die maximale Titelanzahl des
Internal Flash Players auf 99 Tracks begrenzt ist. Wir empfehlen Ihnen, den Inhalt
des Internal Flash Players nach jedem erfolgreichen CD-Brennvorgang zu löschen.
müssen Sie die Line Out Ausgänge des Gerätes mit einem Linepegel Eingang Ihrer
Stereoanlage verbinden. Alternativ lassen sich Kopfhörer an die 3,5 mm
Kopfhörerbuchse an der rechten unteren Ecke der Oberseite des Gerätes
anschließen.
Tonbandgeräten, usw.), die am Line In Eingang des Gerätes angeschlossen sind,
aufnehmen.
können mit Hilfe der beiliegenden Software die Musik von der Schallplatte oder von
einem externen Gerät direkt auf den Computer übertragen. Weitere Hinweise zur
Audioaufnahme vom LP 2 CD auf den Computer finden Sie im beiliegenden
MixMeister Software Guide.
anschließen zu können?
Spezialtreiber installieren müssen. Wird das Gerät zum ersten Mal an den Computer
angeschlossen, werden automatisch alle benötigten Komponenten geladen.
Übertragung der Musik auf den Computer beachten Sie bitte die Hinweise und
Anleitungen im beiliegenden MixMeister Software Guide.
56
Page 59

FEHLERHILFE
PROBLEM URSACHE LÖSUNG
Meine Aufnahmen klingen
laut und verzerrt.
Ich kann meine Aufnahmen
gerade so hören, wenn ich
sie abspiele.
Meine Aufnahmen werden in
der falschen Tonhöhe
wiedergegeben.
Ich höre überhaupt nichts,
wenn ich meine Schallplatten
aufnehme oder wiedergebe.
Ich höre überhaupt nichts,
wenn ich das Signal externer
Geräte abspiele oder
aufnehme.
Ich erhalte die Warnmeldung
“Not enough space on blank
CDR”.
Ich erhalte die Warnmeldung
“Too many tracks in Flash to
REC”.
Ich erhalte die Warnmeldung
“Can’t Record Flash is Full”
message.
Ich höre meine Schallplatte
nicht.
Die Klangqualität ist ziemlich
schlecht.
Meine Aufnahme ist ein
langer, durchgehender Track,
ich wollte aber einzelne Titel.
Aufnahmepegel war zu hoch.
Aufnahmepegel war zu leise.
RPM Schalter ist nicht richtig
eingestellt.
PHONO / LINE Schalter steht
auf Line, anstatt auf Phono.
PHONO / LINE steht auf
Phono, anstatt auf Line.
Der Inhalt des Internal Flash
Players übertrifft die
maximale Kapazität der CDR, die Sie brennen möchten. Nehmen Sie einen CDRohling mit höherer Kapazität.
Internal Flash Player ist voll.
LP 2 CD spielt bereits Audio
von CD oder vom Internal
Flash Player ab.
Das System ist nicht richtig
installiert.
Schallplatte ist schmutzig
oder verkratzt.
Auto Split Menüoption war
deaktiviert.
Es ist sehr wichtig, den Aufnahmepegel vor der
Aufnahme richtig auszusteuern. Wenn Sie zum ersten
Mal [RECORD] drücken, um in den Rec Ready Modus
zu gehen, überprüfen Sie die Aussteuerungsanzeigen im
Display. Bestimmen Sie den Aufnahmepegel mit dem
RECORD LEVEL Regler. Achten Sie darauf, dass die
Pegelspitzen die (-4) oder (-2) Markierung berühren,
aber niemals bis MAX ausschlagen (“!” wird angezeigt,
wenn der Aufnahmepegel zu laut ist und übersteuert.)
Stellen Sie den RPM Schalter auf die richtige
Geschwindigkeit der Schallplatte ein (33/45/78).
Stellen Sie den PHONO / LINE Schalter auf Phono, um
Musik vom Plattenspieler hören und aufnehmen zu
können.
Stellen Sie den PHONO / LINE Schalter auf Line, um am
Line In angeschlossene externe Audiogeräte hören und
aufnehmen zu können.
Löschen Sie Tracks vom Internal Flash Player, die Sie
bereits auf CD gebrannt haben. Generell empfehlen wir,
den Internal Flash Player nach einem erfolgreichen CD
Brennvorgang zu löschen.
Falls Sie einen 74min CD Rohling probiert haben,
verwenden Sie stattdessen eine CD-R mit 80min.
Löschen Sie Tracks aus dem Internal Flash Player, um
freien Platz zu schaffen.
Brennen Sie den Inhalt des Internal Flash Players auf
eine CD-R und löschen Sie danach alle Tracks.
Drücken Sie die [STOP] Taste, um sicher zu gehen,
dass das Gerät nicht gerade einen Song abspielt oder
sich im Pause Modus befindet.
Das System muss sicher am Tonarm befestigt sein,
wenn Sie den Plattenspieler verwenden.
Reinigen Sie die Oberfläche der Schallplatte mit einem
antistatischen Tuch, bevor Sie die Schallplatte
abspielen.
Aktivieren Sie Auto Split in den Menüoptionen und
probieren Sie es noch einmal. Siehe Abschnitt “Internal
Flash Player Menüoptionen”.
Teilen Sie die Titel manuell mit der [SPLIT TRK] Taste
auf. Siehe Abschnitt “Tracks im Internal Flash Player
aufteilen”.
57
Page 60

GUIDA RAPIDA
o Assicurarsi che gli elementi elencati di seguito siano contenuti nella confezione.
o LEGGERE ATTENTAMENTE IL LIBRETTO DI ISTRUZIONI PRIMA DI UTILIZZARE IL PRODOTTO
o Recarsi alla pagina http://www.ion-audio.com per la registrazione del prodotto.
ADATTATORE 45 GIRI
COPERCHIO ANTIPOLVERE
TAPPETINO
CONTRAPPESO
PIATTO
CD
CARTUCCIA PRE-
INSTALLATA
GIRADISCHI LP 2 CD
CAVO USB
SUPPORTO PER
COPERCHIO ANTIPOLVERE
INTRODUZIONE
Grazie per aver acquistato questo prodotto. L’LP 2 CD è il modo più semplice e rapido di convertire musica da
registrazioni in vinile o sorgenti audio esterne quali lettori di nastro o reel-to-reel (a bobine), su un CD oppure
direttamente sul computer. Dotato della funzione di “Automatic Track Split” (suddivisione automatica delle tracce),
l’LP 2 CD individua i silenzi tra le canzoni e le suddivide automaticamente in tracce individuali per vostra comodità.
SOFTWARE
Per aiutarvi nella conversione dei dischi in vinile, abbiamo incluso EZ Vinyl Converter software:
EZ Vinyl/Tape Converter (unicamente per PC) è il modo più facile e veloce di trasformare le vostre
registrazioni in media digitali. EZ Vinyl/Tape Converter salva comodamente le vostre registrazioni nella libreria
iTunes*. Questa è probabilmente l’applicazione preferibile per gli utenti alle prime armi. Sul CD, abbiamo
allegato una comoda Guida Rapida con istruzioni passo passo circa l’installazione e l’uso del software.
EZ Audio Converter (solo Mac) è un applicativo base di conversione per Mac OS X ed è l’ideale per utenti
principianti. Fate riferimento alla comoda Guida Rapida allegata, recante le istruzioni passo passo circa
l’installazione e l’uso del software.
* iTunes e iPod sono marchi di fabbrica di Apple, Inc., registrati negli Stati Uniti e in altri paesi.
METODO DI REGISTRAZIONE 1: SU CD
Rasterizzate l’album sul Flash Player interno, e masterizzatelo su uno o più CD. Una
volta registrato, si può ascoltare il CD in macchina, a casa, sul computer o dovunque
si desideri con un lettore CD standard.
METODO DI REGISTRAZIONE 2: SU COMPUTER
Servirsi del software in dotazione per convertire automaticamente le
tracce nella vostra libreria iTunes* durante la riproduzione. Una volta
convertite le registrazioni, queste possono essere trasferite a dispositivi
media portatili quali l’iPod* o masterizzate su un CD servendosi di
applicazioni di terzi per la masterizzazione su CD.
58
Page 61

PANORAMICA PANNELLO POSTERIORE
4
3
2
1
1. Ingresso di alimentazione: collegare il cavo di alimentazione in dotazione dal giradischi ad una
sorgente di alimentazione attiva.
2. Uscita audio USB: servirsi del cavo USB in dotazione per collegare il giradischi al computer. Il
collegamento USB fornirà l’audio dal giradischi (o dagli ingressi Line In, se l’interruttore Linea/Phono
sul pannello superiore è impostato su linea) al computer. Il collegamento USB convoglierà inoltre audio
dal computer tramite le uscite RCA del giradischi. Per il trasferimento dei dischi in vinile al computer,
abbiamo previsto diversi pacchetti software nel CD incluso. Fare riferimento al paragrafo “Software in
dotazione” per maggiori dettagli circa gli applicativi software incorporati.
3. Uscita di linea: servirsi di un cavo stereo RCA standard per collegare queste uscite agli ingressi audio
dell’impianto home stereo. (Nota bene: si può copiare musica su CD o sul computer, anche se le uscite
audio del giradischi non sono collegate ad un impianto stereo).
4. Ingresso di linea: collegare lettori nastro, reel-to-reel o qualsiasi altra sorgente audio a questi ingressi
RCA.
PANORAMICA PANNELLO ANTERIORE
1
1. Drive CD: il drive CD del giradischi funziona come un lettore CD o masterizzatore, a seconda del tipo
di disco inserito nel vassoio. Quando si utilizzano CD non vergini, finalizzati, il drive funzionerà come
un lettore CD, permettendovi di riprodurre musica tramite l’uscita di Linea del giradischi o di
rasterizzare tracce al Flash Player interno. Quando si utilizzano dischi vergini CD-R, il drive funziona da
masterizzatore CD permettendovi di masterizzare audio dal Flash Player interno del dispositivo (cioè
audio rasterizzate dal giradischi o da sorgenti audio esterne collegate all’ingresso di linea Line In).
59
Page 62

PANORAMICA PANNELLO SUPERIORE
2
5
4
3
13
12
11
1
1. TASTO DI ALIMENTAZIONE: premere questo pulsante per accendere e spegnere l’apparecchio.
2. PIATTO: il piatto va fissato bene al giradischi prima dell’uso. La cinghia di trazione motore si trova sull’apposito
anello posto sotto al piatto. Per istruzioni dettagliate sull’installazione della cinghia di trazione motore vedi la
sezione “Setup del piatto”.
3. GRUPPO DEL BRACCIO: per una descrizione dettagliata del braccio, vedi “Panoramica del braccio”.
4. SUPPORTO ADATTATORE 45 GIRI: quando non è in uso, è possibile appoggiare qui l'adattatore per 45 giri.
5. TASTO START/STOP: questo tasto avvia e ferma il motore del giradischi. Se il tasto sembra non funzionare,
assicurarsi che la cinghia di trazione motore sia ben installata come descritto nella sezione “Setup del piatto”.
6. DISPLAY: il display permette di accedere alle opzioni del menu e alle informazioni relative all’uso del
dispositivo.
7. MENU E TASTI FUNZIONE: per una descrizione dettagliata di questi pulsanti, vedi la sezione “Menu e tasti
8. TASTI DI COMANDO CD: per informazioni dettagliate, vedi la sezione “Tasti di controllo CD”.
9. VOLUME CUFFIA: regolare il volume del segnale in cuffia servendosi di questa manopola.
10. USCITA CUFFIE DA 1/8”: collegate a questa uscita le vostre cuffie da 1/8”.
11. LIVELLO DI REGISTRAZIONE: questa manopola regola il livello del segnale audio proveniente dal giradischi
12. INTERRUTTORE PHONO / LINEA: questo interruttore seleziona il segnale di ingresso audio. Impostare
13. SELETTORE 33 / 45 / 78 GIRI: impostare correttamente questo interruttore al momento di riprodurre dischi.
funzione”.
o da sorgenti audio collegate agli ingressi di linea Line In posti a livello del pannello posteriore.
questo interruttore su Phono quando si riproducono e si trasferiscono i dischi in vinile su CD o sul computer.
Impostare l’interruttore su Linea se si desidera trasferire o ascoltare musica da sorgenti audio esterne collegate
agli ingressi di linea Line In posti a livello del pannello posteriore.
Se la musica viene riprodotta con un pitch strano o inusuale, ciò può indicare che è stata selezionata
l’impostazione errata dei giri.
6
7
8
109
60
Page 63

MENU E TASTI FUNZIONE
1. [MENU]: questo tasto entra nelle opzioni del menu per la Modalità operativa
corrente. Le opzioni del menu CD Player Mode (modalità lettore CD)
comprendono Switch Mode, Copy Track, Copy All, Repeat, System Info (cambia
modalità, copia traccia, copia tutto, ripeti, informazioni di sistema). Le opzioni del
menu Internal Flash Player Mode (modalità Flash Player interno) comprendono
Switch Mode, Move Track, Repeat, System Info (cambia modalità, sposta
traccia, ripeti, informazioni di sistema).
2. [DISPLAY]: premere questo tasto per scorrere lungo le varie impostazioni di visualizzazione del tempo dell'LP
2 CD: Elapsed (predefinito), Track Remain, Total Remain (trascorso, rimanente traccia, rimanente totale).
Questo tasto funziona anche come tasto [SELECT] al momento di selezionare le opzioni del Menu.
3. [ERASE]: questo tasto permette di cancellare tracce dal Flash Player interno. Funziona inoltre come tasto [NO]
al momento di selezionare le opzioni del Menu.
4. [SPLIT TRK]: L’LP 2 CD è dotato della funzione Auto Split, che individua automaticamente i silenzi tra le
canzoni e suddivide la registrazione in singole tracce. Auto Split è attivo in via predefinita. Se si sceglie di
disattivare questa funzione e di suddividere manualmente le tracce, è possibile utilizzare il tasto [SPLIT TRK]
tra una canzone e l'altra per creare una nuova traccia. Si può anche effettuare questa operazione dopo aver
registrato la propria musica (vedi la sezione “Suddivisione delle tracce nel Flash Player interno”). Questo tasto
funziona, inoltre, come tasto [YES - SÌ] al momento di selezionare le opzioni del Menu.
5.
TASTI DI COMANDO CD
1. [REW]: premere questo tasto per tornare alla
traccia precedente. Tenere premuto questo tasto
durante la riproduzione di una traccia per
effettuare una scansione rapida all’indietro.
2. [FF]: premere questo tasto per passare alla traccia successiva. Tenere premuto questo tasto durante la
riproduzione di una traccia per effettuare una scansione rapida in avanti.
3. [STOP]: premere questo tasto per interrompere la riproduzione e tornare alla prima traccia. Questo tasto,
inoltre, interrompe la registrazione durante la rasterizzazione della vostra musica sul Flash Player interno.
4. [PLAY / PAUSE]: premere questo tasto per riprodurre la traccia selezionata: il LED verde sotto al tasto si
illuminerà. Premerlo nuovamente durante la riproduzione della traccia per interromperla momentaneamente: il
LED verde lampeggia durante la pausa. Premere il tasto ancora una volta per riprendere la riproduzione.
Questo tasto, inoltre, avvia la registrazione in modalità Record Ready (registrazione pronta).
5. [RECORD]: premere questo tasto per entrare in modalità Record Ready. Questa modalità vi permette di
registrare audio dal piatto del giradischi o da sorgenti audio esterne collegate agli ingressi Line In al Flash
Player interno (per maggiori dettagli, vedi la sezione “Registrare musica sul Flash Player interno”). Quando si
preme [RECORD], un LED rosso situato sotto al tasto inizierà a lampeggiare a indicare che tutto è pronto per
registrare.
6. [BURN CD]: una volta registrata la musica sul Flash Player interno, premere questo tasto per masterizzare i
contenuti del lettore direttamente su un CD-R compatibile vergine (per maggiori dettagli, vedi la sezione
“Masterizzare i contenuti del Flash Player interno su CD”).
1
2
4
3
2
1
5
4
3
7
6
7. [OPEN/CLOSE]: questo tasto apre e chiude il vassoio porta CD.
BRACCIO
1. Contrappeso e anello graduato: il contrappeso serve a bilanciare il gruppo fonorivelatore
e cartuccia in modo che venga applicato il giusto livello di pressione della puntina sul disco.
2. Dispositivo anti-scivolamento: questa manopola serve a compensare le forze di trazione
centripete. Per maggiori dettagli, vedi “CONFIGURAZIONE DEL BRACCIO”.
3. Ferma braccio: questo ferma braccio dal design speciale fissa il braccio quando è a riposo
o quando non è in uso. Il ferma braccio è stato progettato in modo che resti sollevato
quando sbloccato.
NOTA BENE: quando si trasporta il giradischi, si raccomanda di rimuovere il fonorivelatore
e di fissare il ferma braccio per evitare danni al braccio o al giradischi.
4. Dado di fissaggio del braccio: questo dado in alluminio serve a fissare il gruppo
fonorivelatore e cartuccia al tubo del braccio. Per maggiori dettagli, vedi “Configurazione
cartuccia”.
5. Cartuccia e fonorivelatore: la cartuccia è pre-installata su un fonorivelatore standard. La
cartuccia è sostituibile dall’utente e compatibile con numerose cartucce standard.
Assicurarsi di rimuovere la copertura in plastica trasparente prima di utilizzare il giradischi
dalla cartuccia.
1
2
3
4
5
61
Page 64

CONFIGURAZIONE DEL BRACCIO
1. Iniziare facendo ruotare il contrappeso in
senso antiorario fino a che non si trovi
completamente dritto (NOTA BENE:
questa è anche la quantità massima di
pressione che è possibile applicare alla
cartuccia).
2. Ora, quando il fonorivelatore viene alzato e
abbassato, si dovrebbe avere una
sensazione di peso e di resistenza. Iniziare
ruotando il contrappeso in senso orario
(lontano dal punto pivot) fino a quando la
sensazione di peso e resistenza non è
scomparsa. Se fatto correttamente, il
braccio ruoterà con una resistenza minima
avanti e indietro, indicando che vi sono
esattamente 0 grammi di pressione sulla
puntina.
3. Con il contrappeso nella sua nuova posizione lontana dal punto pivot del braccio, far ruotare l’anello graduato
del contrappeso fino a quando lo “0” non si trovi in posizione verticale.
4. Infine, far ruotare il contrappeso (e l’anello graduato) in senso antiorario (verso il punto pivot) fino a
raggiungere la quantità di peso desiderata. Se la scala ruota di 360 gradi oltre lo zero, la nuova lettura
dell’anello graduato va aggiunta a 3,5.
*Per ottenere le prestazioni migliori, il gruppo fonorivelatore e cartuccia in dotazione richiede un minimo di 3
grammi e non più di 5 grammi.
Regolazione del dispositivo antiscivolamento
Nella maggior parte dei casi, il dispositivo antiscivolamento va impostato al minimo. Questo dispositivo compensa le
forze centripete che si verificano con determinate cartucce quando la puntina si avvicina al centro del disco. Se il
giradischi salta eccessivamente al momento di avvicinarsi all‘asse centrale, provare ad aumentare la configurazione
dell’antiscivolamento degli incrementi indicati sul quadrante. Iniziare aumentando di 1, testare le prestazioni, quindi
aumentarlo ulteriormente e così via.
IMPORTANTE
Quando si usa il giradischi, assicurarsi sempre che il tappetino sia posto sul piatto. Il mancato utilizzo del
Rimuovere il cappuccio della cartuccia (copripuntina) prima di utilizzare il giradischi.
Va notato che il braccio deve essere allontanato dalla posizione di riposo (fermabraccio) affinché il motore del
CONFIGURAZIONE DEL PIATTO
AVVERTENZA:
Una configurazione scorretta
del piatto può portare a scarse
prestazioni del giradischi,
instabilità del piatto o danni
permanenti al motore.
1. Iniziare posizionando la cinghia di trasmissione in gomma attorno all’anello inferiore interno del piatto del
2. Installare il piatto sull’asse centrale e premerlo verso il basso con decisione. Assicurarsi che ruoti
3. Ruotare il piatto in modo che uno dei fori sia allineato con il pulsante Start Stop posto sull’angolo anteriore del
4. Tramite il foro, estrarre la cinghia di trasmissione in gomma dall’anello interno e installarla sull’albero motore.
tappetino può provocare danni al disco, oltre a danneggiare il giradischi stesso.
giradischi si attivi.
giradischi. Questa dovrebbe essere pre-installata, ma verificare che non sia torta o danneggiata.
uniformemente e non oscilli eccessivamente.
giradischi. L’albero del motore in ottone deve essere visibile attraverso questo foro.
Prestare attenzione a non torcere la cinghia di trasmissione in gomma durante questa operazione. Assicurarsi
che il piatto ruoti uniformemente. Se la cinghia di trasmissione è installata correttamente, ci sarà una leggera
quantità di tensione che farà fermare il piatto dopo averlo lasciato girare liberamente.
62
Page 65

INSTALLAZIONE DEL COPERCHIO ANTIPOLVERE
1. Fissare al giradischi i supporti in dotazione per il coperchio antipolvere.
2. Fissare il coperchio antipolvere ai supporti come illustrato a sinistra.
LE DUE MODALITÀ
L’LP 2 CD è dotato di due modalità operative generali: modalità
CD Player (lettore CD) e modalità Internal Flash Player (Flash
Player interno). La modalità selezionata verrà indicata dai due
LED (CD e INT) situati a destra del display, come illustrato.
La modalità CD Player permette di:
Riprodurre musica da CD non vergini servendosi di comandi di trasporto standard (Play, Pause, Stop, Skip,
Fast-Forward e Rewind)
Copiare una traccia CD specifica sul Flash Player interno
Copiare gli interi contenuti del CD sul Flash Player interno
La modalità Flash Player interno permette di:
Rasterizzare tracce da una sorgente audio (vinile o sorgente esterna collegata all’ingresso Line In)
Riprodurre tracce memorizzate nel Flash Player interno servendosi di comandi di trasporto standard (Play,
Pause, Stop, Skip, Fast-Forward e Rewind)
Cancellare tracce registrate dal Flash Player interno
Suddividere una traccia registrata in tracce multiple
Masterizzare contenuti del Flash Player interno su un CD-R vergine
MODALITÀ CD PLAYER (LETTORE CD)
In questa modalità si può riprodurre o rasterizzare musica da un CD non vergine. Quando viene inserito il CD la
prima volta, sullo schermo appariranno le informazioni illustrate a destra.
1. La traccia che verrà riprodotta quando si preme [PLAY]
(01 in questo esempio).
2. Il numero totale di tracce presenti sul CD (12 in questo
esempio).
3. La durata totale del CD in formato MM:SS
(minuti:secondi) (62:35 in questo esempio).
Scanning disc...
CD: 01/12 T62:35
CD Player
RIPRODUZIONE DI MUSICA DA CD
Per riprodurre musica dal CD, premere il tasto [PLAY]. Una volta iniziata la riproduzione del CD, la linea superiore del
display mostrerà il tempo trascorso della traccia e la linea inferiore mostrerà la misurazione del livello stereo con il
valore di picco, come illustrato a destra.
Si può scorrere lungo le varie opzioni di visualizzazione del
tempo premendo il tasto [DISPLAY]. Le opzioni
comprendono ‘Elapsed’, ‘Track Remain’ e ‘Total Remain’
(Trascorso, Rimanente traccia e Rimanente totale).
Premere [FF] o [REW] per passare rispettivamente alla
traccia successiva o precedente. Premere e tenere
premuto uno dei due tasti durante la riproduzione della
traccia per effettuare una scansione rapida in avanti o
indietro.
Premere [PAUSE] durante la riproduzione di una traccia
per interromperla temporaneamente. Premere nuovamente
il tasto per riprenderla.
CD: 01/12 00:15
========== =
Premere [STOP] per interrompere la riproduzione.
63
Page 66

OPZIONI MENU MODALITÀ CD PLAYER (LETTORE CD)
Per accedere a diverse opzioni del menu quando in modalità CD Player, premere il tasto [MENU]. Per
passare da un’opzione all’altra del menu, continuare a premere il tasto [MENU]. Una volta scorso lungo tutte
le opzioni del menu disponibili, l’apparecchio tornerà alla schermata predefinita della modalità CD Player. Le
opzioni del menu disponibili sono descritte di seguito:
Passa alla modalità Flash Player interno
Questa opzione permette di passare manualmente alla modalità
Flash Player interno. Premere [YES] per effettuare il passaggio.
Copy Track (Copia traccia)
Questa opzione permette di copiare una singola traccia del CD
sul Flash Player interno. Apparirà la schermata illustrata a
sinistra. La traccia che verrà copiata è quella che è stata
selezionata prima di entrare nelle opzioni del menu. (Traccia “01”
nell’esempio a destra).
Servirsi di [REW] ed [FF] per selezionare la destinazione per la
traccia copiata (“03” nell’esempio a destra). Premere [YES] per
copiare la traccia dove selezionato. Premere [NO] per annullare
l’operazione.
Va notato che il Flash Player interno dell’apparecchio è dotato di
una capacità massima di 99 tracce o 80 minuti.
Copy All (Copia tutte)
Questa opzione permette di copiare un intero CD sul Flash
Player interno. Premere [YES] per copiare l’intero CD.
Se il Flash Player interno già contiene dati, può apparire la
schermata illustrata a destra. Premere [YES] se si desidera
copiare comunque i contenuti del CD.
Anche in questo caso va notato che il Flash Player interno
dell’apparecchio è dotato di una capacità massima di 99 tracce o
80 minuti.
Apparirà la schermata illustrata a destra. Se si desidera
cancellare i contenuti del Flash Player interno prima di procedere,
premere [YES]. Se si desidera conservare i contenuti, premere
[NO]; in questo caso, le nuove tracce verranno copiate a partire
dalla prima posizione libera successiva. (Ad esempio, se vi sono
8 tracce attualmente memorizzate sul lettore, le tracce nuove
inizieranno dalla 9.)
Repeat Mode (Modalità di ripetizione)
Questa opzione vi permette di ripetere la riproduzione di una
singola traccia o dell’intero CD. Le opzioni comprendono Repeat
Off, Repeat Track, Repeat All (ripetizione off, ripeti traccia, ripeti
tutte). Servirsi del tasto [SELECT] per scorrere tra le diverse
opzioni.
System Info (Informazioni di sistema)
Questa pagina mostra varie informazioni di sistema. Quando ci
si trova in questa pagina, premere [SELECT] per scorrere lungo i
campi relativi alle informazioni.
Nota bene: informazioni di sistema possono essere necessarie al
momento di contattare il nostro team di Assistenza tecnica.
Menu: Switch to
Flash Player?
Menu: Copy Track
CD:01 -> INT:03?
Menu: Copy Whole
CD to Int Flash?
Flash not empty
Copy anyway?
Flash not empty
Clear Flash 1st?
Menu: Repeat
Repeat Off
Menu: SystemInfo
Software: 1.00
64
Page 67

MODALITÀ FLASH PLAYER INTERNO
L’LP 2 CD è dotato di un Flash Player interno. Questo lettore serve per rasterizzare musica dal giradischi o
da una sorgente esterna collegata agli ingressi di linea sul retro dell’apparecchio. Il processo è illustrato di
seguito:
DISCO
SORGENTE AUDIO A
LIVELLO DI LINEA
RECORD
SELEZIONE
SORGENTE
DA
REGISTRAR
E
REGISTRA
MUSICA
SU FLASH
PLAYER
INTERNO
FLASH
PLAYER
INTERNO
MASTERIZZA
CONTENUTI
DEL
FLASH
PLAYER
INTERNO SU
CD
CD
Probabilmente vi state chiedendo “perché non masterizzare direttamente la musica su CD”? Vi sono un paio
di motivi per cui abbiamo deciso di scegliere questo approccio:
Registrando prima sul Flash Player interno permette di correggere eventuali errori e di perfezionare i
passaggi di traccia prima di impegnarsi nella registrazione su CD.
La rotazione del drive CD produce rumore meccanico che può passare nelle registrazioni. Registrare
sul Flash Player interno impedisce a questo rumore di entrare nelle registrazioni, garantendo la
massima fedeltà audio.
REGISTRARE MUSICA SUL FLASH PLAYER INTERNO
1. Innanzitutto, assicurarsi di essere in modalità Flash
Player interno (un LED arancione vicino a “INT” deve
essere acceso). Se l’apparecchio si trova in modalità CD
Player (LED verde vicino a “CD”), premere [MENU] una
volta e premere [YES] quando appare la schermata
illustrata a destra per passare in modalità Flash Player
interno.
2. Selezionare la sorgente sulla quale si desidera registrare facendo scattare l’interruttore PHONO / LINEA
sulla posizione adeguata. Impostare l’interruttore su PHONO se si desidera registrare vinili dal piatto del
giradischi, oppure impostarlo su LINEA se si desidera registrare da una sorgente esterna quale un nastro o un
lettore musicale personale, collegato all’ingresso LINE IN sulla parte posteriore dell’LP 2 CD.
3. Premere il tasto [RECORD]. Il LED rosso posto sotto al
tasto inizierà a lampeggiare per farvi sapere che tutto è
pronto per registrare e apparirà la schermata illustrata a
destra. Il numero che segue ‘INT’ è la posizione in cui la
registrazione verrà salvata.
4. Effettuare il cueing della musica che si desidera
registrare. Se si registra un vinile dal piatto del giradischi,
porre la puntina sul disco all’inizio della sezione che si
desidera registrare.
5. Riprodurre la musica che si desidera registrare. Se si registra un vinile dal piatto del giradischi, premere il
tasto [START/STOP] sul giradischi stesso per iniziare a riprodurre il disco.
Menu: Switch to
Flash Player?
INT:01 PressPLAY
65
Page 68

6. Servirsi della manopola RECORD LEVEL per regolare il
livello del segnale audio. Il livello della registrazione
apparirà a display. È importante impostare correttamente i
livelli di registrazione durante questa fase, altrimenti si
rischia di ottenere una registrazione troppo bassa o troppo
alta e distorta. Provare a impostare la manopola RECORD
LEVEL in modo tale che i picchi tocchino il segno (-4) o (-
2), ma non raggiungano mai MAX (se il livello della
registrazione è troppo alto e salta, apparirà “!” a display).
7. Una volta regolato il livello di registrazione in maniera ottimale, interrompere la musica. Se si registra un
vinile dal piatto del giradischi, premere il tasto [START/STOP] per fermare il piatto del giradischi.
8. Effettuare il cueing della sezione che si desidera registrare. Se si registra un vinile dal giradischi, porre
nuovamente la puntina all’inizio della sezione che si desidera registrare.
9. Quando si è pronti a iniziare a registrare, premere [PLAY]
e riprodurre la musica che si desidera registrare. Se si
registra un vinile dal giradischi, premere immediatamente il
tasto [START/STOP] per iniziare a riprodurre il disco. Il
LED rosso rimarrà acceso in maniera costante a indicare
che la registrazione è in corso. A destra del display,
apparirà una lettura del tempo di registrazione rimanente.
INT:01 PressPLAY
============ =
INT:01 T70:13
=========== =
10. In via predefinita, l’LP 2 CD individuerà il silenzio tra le
canzoni e le suddividerà automaticamente in tracce
singole (Auto Split).
Se non avete disattivato la funzione Auto Split,
passate alla fase successiva.
INT:02 T65:01
New Track!
Tuttavia, se avete disattivato l’Auto Split, sarà necessario inserire manualmente marcatori di traccia tra
le canzoni. Per inserire un marcatore di traccia, premere il tasto [SPLIT TRK] tra le canzoni. Il numero
‘INT’ aumenterà a indicare che è stata avviata una nuova traccia. L’inserimento di marcatori di traccia
permetterà di masterizzare canzoni come tracce individuali su CD
.
11. Se si registra musica da un disco in vinile, si può voler interrompere la registrazione mentre si gira il disco:
a. Premere [PAUSE] per interrompere temporaneamente la registrazione una volta raggiunta la fine del Lato
A.
b. Girare il disco sul Lato B.
c. Premere [SPLIT TRK] per inserire un marcatore per la prima traccia del Lato B.
d. Premere [PLAY] per iniziare a registrare il Lato B.
12. Una volta finito di registrare, premere il tasto [STOP]. Il
display tornerà alla schermata predefinita del Flash Player
interno, come illustrato a destra.
Per maggiori informazioni sulla masterizzazione delle
registrazioni su un CD-R, fare riferimento alla sezione
“Masterizzare i contenuti del Flash Player interno su CD”.
RIPRODURRE MUSICA DAL FLASH PLAYER INTERNO
Una volta registrata la musica sul Flash Player interno, premere il tasto [PLAY] per ascoltare le registrazioni.
Si può scorrere lungo le varie opzioni di visualizzazione del
tempo premendo il tasto [DISPLAY]. Le opzioni
comprendono ‘Elapsed’, ‘Track Remain’ e ‘Total Remain’
(Trascorso, Rimanente traccia e Rimanente totale).
Premere [FF] o [REW] per passare rispettivamente alla
traccia successiva o precedente. Premere e tenere
premuto uno dei due tasti durante la riproduzione della
traccia per effettuare una scansione rapida in avanti o
indietro.
Premere [PAUSE] durante la riproduzione di una traccia
per interromperla temporaneamente. Premere nuovamente
il tasto per riprenderla.
INT:13/13 T56:14
Int Flash Player
INT:01/13 00:15
========== =
Premere [STOP] per interrompere la riproduzione.
66
Page 69

SUDDIVISIONE DELLE TRACCE NEL FLASH PLAYER INTERNO
Il Flash Player interno vi permette di suddividere una traccia selezionata in due tracce, nel caso in cui sia
stata persa la transizione la prima volta in cui è stata registrata la musica sul Flash Player interno. Questo
vale se avete disattivato l’Auto Split e avete scelto di suddividere le tracce manualmente.
1. Assicurarsi di essere in modalità Flash Player interno (un
LED arancione vicino a “INT” deve essere acceso). Se
l’apparecchio si trova in modalità CD Player (LED verde
vicino a “CD”), premere [MENU] una volta e premere [YES]
quando appare la schermata illustrata a destra per passare
in modalità Flash Player interno.
2. Individuare la traccia che si desidera suddividere
servendosi dei tasti [REW] ed [FF].
Menu: Switch to
Flash Player?
3. Premere [PLAY] per riprodurre la traccia selezionata.
4. Premere e tenere premuto [FF] per individuare il punto in
cui si desidera dividere la traccia. Se si supera il punto, si
può tenere premuto [REW] per scorrere indietro.
5. Una volta raggiunto il punto in cui si desidera effettuare la
divisione, interrompere la musica.
6. Premere il tasto [SPLIT TRK].
7. Apparirà la schermata illustrata a destra. Si può avere
un’anteprima della 2
premendo [PLAY] in questa schermata. Tenere premuto
[FF] o [REW] per scorrere rapidamente in avanti o indietro
lungo la traccia. Premere [STOP] per interrompere
l’anteprima.
Premere [YES] per conservare o [NO] per annullare la
suddivisione.
CANCELLARE MUSICA DAL FLASH PLAYER INTERNO
Nel caso in cui fosse stato compiuto un errore durante il processo di registrazione, o che la memoria flash del
dispositivo fosse piena, è possibile cancellare canzoni.
Per cancellare una traccia singola:
1. Assicurarsi di essere in modalità Flash Player.
2. Servirsi di [REW] o [FF] per selezionare la traccia che si
desidera cancellare. La traccia selezionata verrà
visualizzata nell’angolo superiore sinistro (“02” in questo
esempio).
3. Premere [ERASE]. Apparirà la schermata illustrata a
destra.
4. Premere [YES] per cancellare la traccia selezionata o [NO]
per annullare l’operazione.
a
traccia risultante dalla suddivisione
Track Split!
Keep? YES or NO
INT:02/13 T56:14
Int Flash Player
INT:Erase Trk02?
YES or NO
Per cancellare tutte le tracce:
1. Assicurarsi di essere in modalità Flash Player.
2. Premere [ERASE]. Apparirà una schermata simile a quella
illustrata a destra.
3. Premendo [SELECT] la schermata cambierà come
illustrato a destra.
4. Premere [YES] per cancellare tutte le tracce memorizzate
nel Flash Player interno o premere [NO] per annullare
l’operazione.
Va notato che non c'è modo di "annullare" questa
operazione! Premendo [YES], tutte le tracce
memorizzate nel Flash Player interno verranno
cancellate in via permanente.
INT:Erase Trk02?
YES or NO
INT:Erase ALL?
YES or NO
67
Page 70

OPZIONI MENU FLASH PLAYER INTERNO
Per accedere a diverse opzioni del menu quando in modalità Flash Player interno, premere il tasto [MENU].
Per passare da un’opzione all’altra del menu, continuare a premere il tasto [MENU]. Per modificare le
impostazioni selezionate, premere il tasto [SELECT]. Le opzioni del menu disponibili sono descritte di
seguito:
Passa a modalità CD Player
Questa opzione permette di passare manualmente alla
modalità CD Player. Premere [YES] per effettuare il
passaggio.
Menu: Switch to
CD Player Mode?
Move Track (sposta traccia)
Questa opzione vi permette di riorganizzare le registrazioni
memorizzate spostando una traccia in un nuovo punto. La
traccia che verrà spostata è quella selezionata prima di
entrare nelle opzioni del menu (Traccia “01” nell’esempio a
destra).
La traccia di destinazione è indicata nel campo ‘New’
(nuova) e può essere aumentata o diminuita servendosi
rispettivamente di [FF] e [REW]. Una volta selezionato la
destinazione desiderata, premere [YES] per spostare la
traccia.
Menu: Move Track
Old:01 -> New:02
Auto Split (suddivisione automatica)
L’Auto Split è una funzione che individua automaticamente
i silenzi tra le canzoni e suddivide la registrazione in tracce
in tempo reale. In via predefinita, questa opzione è attiva.
Tuttavia, è possibile scegliere di disattivare questa opzione
e di impostare marcatori di traccia manualmente.
Premere [SELECT] per attivare o disattivare la funzione
Auto Split.
Menu: Auto Split
On
Repeat Mode (Modalità di ripetizione)
Questa opzione vi permette di ripetere una singola traccia
o l’intera collezione di registrazioni memorizzata nel Flash
Player interno. Le opzioni comprendono Repeat Off,
Repeat Track, Repeat All (ripetizione off, ripeti traccia,
ripeti tutte). Quando ci si trova nella pagina del menu,
premere [SELECT] per passare da un’opzione all’altra.
Menu: Repeat
Repeat Off
System Info (Informazioni di sistema)
Questa pagina mostra a display la versione del firmware
dell’apparecchio. Quando ci si trova in questa pagina,
premere [SELECT] per scorrere lungo i campi relativi alle
informazioni.
Nota bene: informazioni di sistema possono essere
necessarie al momento di contattare il nostro team di
Assistenza tecnica.
Menu: SystemInfo
Software: 1.00
68
Page 71

MASTERIZZARE I CONTENUTI DEL FLASH PLAYER INTERNO SU CD
Una volta registrata musica sul Flash Player interno, la si può masterizzare su un CD-R. Va
notato che l’LP 2 CD consente di registrare unicamente
il logo appropriato (illustrato a destra) appaia sul CD che si intende utilizzare.
1. Innanzitutto, assicurarsi di essere in modalità Flash
Player interno (un LED arancione vicino a “INT” deve
essere acceso). Se l’apparecchio si trova in modalità
CD Player (LED verde vicino a “CD”), premere [MENU]
una volta e premere [YES] quando appare la
schermata illustrata a destra per passare in modalità
Flash Player interno.
2. Premere il tasto [BURN CD].
3. Inserire un CD-R nel drive CD dell’apparecchio. Se
viene inserito un CD vergine non compatibile,
l’apparecchio espellerà il CD e richiederà di inserire un
CD-R vergine.
4. Una volta individuato un CD-R vergine, il processo di
masterizzazione inizierà automaticamente. Apparirà la
schermata illustrata a destra. Lasciare che il processo
venga portato a termine.
Nota bene: per annullare il processo di
masterizzazione, premere [STOP].
5. Una volta portato a termine il processo di
masterizzazione, l’LP 2 CD espelle il CD e appare la
schermata illustrata a destra. Se si desidera
masterizzare un’altra copia, inserire un altro CD-R e
premere [YES]. Se non si desidera masterizzare
un’altra copia, premere [NO].
6. Quando si seleziona [NO], apparirà la schermata
illustrata a destra. Selezionare [YES] se si desidera
cancellare tutte le tracce attualmente memorizzate nel
Flash Player interno o premere [NO] se si desidera
conservare le tracce.
Nota bene: nella maggior parte delle applicazioni,
potreste desiderare di cancellare i contenuti del Flash
Player interno dopo ogni trasferimento su CD andato a
buon fine. Tuttavia, assicurarsi che il CD sia stato
masterizzato a dovere prima di cancellare i contenuti
del Flash Player interno.
su un CD-R vergine. Assicurarsi che
Menu: Switch to
Flash Player?
Insert blank
audio CD-R disc
CD Burner
Burning CD...
CD Burn Complete
Burn Another?
CD Burn Complete
Clear Flash?
69
Page 72

DOMANDE FREQUENTI (FAQ)
Domanda: Posso registrare contemporaneamente dal giradischi e da sorgenti audio esterne?
Risposta: No. L’LP 2 CD può registrare dal giradischi o da sorgenti audio collegate agli ingressi
Domanda: Posso masterizzare i miei vinili direttamente su CD?
Risposta: Prima di poterla masterizzare su CD, sarà necessario copiare la musica sul Flash
Domanda: Con quali formati di CD è compatibile l’LP 2 CD?
Risposta: L’LP 2 CD può riprodurre musica praticamente da qualsiasi CD che contenga dati
Domanda: Quanti dati può contenere il Flash Player interno?
Risposta: Il Flash Player interno dell’LP 2 CD può contenere circa 700Mb di dati; questo
Domanda: Posso ascoltare la musica mentre la registro?
Risposta: Sì, è possibile ascoltare la musica durante la registrazione collegando l’uscita line Out
Domanda: Posso registrare audio da altri dispositivi?
Risposta: Sì, si può registrare audio sul Flash Player interno dell’apparecchio da praticamente
Domanda: Qual è lo scopo della porta USB?
Risposta: La porta USB permette di collegare il giradischi al computer e di utilizzare il software
Domanda: Occorrono speciali driver software al momento di collegare l’LP 2 CD al computer?
Risposta: No, l’LP 2 CD è un dispositivo plug-and-play. Ciò significa che non vi sono speciali
Domanda: Con quali sistemi operativi è compatibile l’LP 2 CD?
Risposta: L’LP 2 CD è un dispositivo plug-and-play con i sistemi operativi Windows XP/Vista e
Line In, ma non contemporaneamente. Questo è per evitare che vengano mischiati
segnali audio indesiderati. L’interruttore Phono / Linea seleziona la sorgente che
verrà convogliata al registratore interno.
Player interno dell’apparecchio. Questo approccio permette di correggere eventuali
errori e di perfezionare le transizioni delle tracce prima di impegnarsi nella
registrazione di un CD. Garantisce inoltre che la rotazione del drive CD non introduca
rumore meccanico nelle registrazioni.
audio. L’LP 2 CD può registrare musica unicamente su CD-R. Assicurarsi che il CD
che si desidera registrare rechi il giusto logo “Digital Audio Recordable”.
equivale a circa 80 minuti di musica. Tuttavia, il Flash Player interno ha anche un
limite di 99 tracce. Si raccomanda di pulire i contenuti del lettore dopo ogni
trasferimento su CD andato a buon fine.
dell’apparecchio ad un ingresso a livello di linea di un ricevitore home stereo.
Alternativamente, è possibile collegare le cuffie al jack cuffie da 1/8” situato
nell’angolo inferiore destro del pannello superiore.
qualsiasi sorgente audio a livello di linea, quali lettori di nastro o reel-to-reel (bobina),
collegati all’ingresso Line In sul pannello posteriore.
incluso per trasferire musica da vinili o da sorgenti audio a livello di linea direttamente
su musica digitale. Consultare la guida del software MixMeister per maggiori
informazioni sulla registrazione di audio dall’LP 2 CD al computer.
driver da installare. Quando si collega l’apparecchio al computer per la prima volta,
caricherà automaticamente tutti i componenti necessari nel sistema.
Mac OSX. Se si desidera trasferire musica sul computer, fare riferimento alla guida
del software MixMeister.
70
Page 73

RISOLUZIONE DI PROBLEMI
PROBLEMA CAUSA SOLUZIONE
È importante impostare attentamente il volume di
Le mie registrazioni suonano
alte e distorte.
Sento a malapena l’audio
registrato quando lo
riproduco.
Le mie registrazioni suonano
ad un pitch insolito.
Non sento niente quando
provo a riprodurre o a
registrare audio dai miei vinili.
Non sento niente quando
provo a riprodurre o a
registrare sorgenti esterne
collegate all’ingresso Line In.
Ricevo un messaggio
“Spazio insufficiente su
CDR”.
Ricevo il messaggio “Troppe
tracce su Flash da REC”.
Ricevo il messaggio
“Impossibile registrare, Flash
pieno”
Non riesco a sentire la
riproduzione della mia
registrazione.
Scarsa qualità sonora.
La mia registrazione è
risultata un’unica, lunga
traccia continua anziché
tracce singole.
Il volume di registrazione era
troppo elevato.
Il volume di registrazione era
troppo basso.
L’interruttore RPM non è
impostato correttamente.
L’interruttore PHONO /
LINEA è su Linea, anziché su
Phono.
L’interruttore PHONO /
LINEA è su Phono, anziché
su Linea.
I contenuti del Flash Player
interno superano la capacità
massima del CD-R che si
cerca di masterizzare.
Il Flash Player interno è
pieno.
L’LP 2 CD sta già
riproducendo audio da CD o
dal Flash Player interno.
Il collegamento della
cartuccia non è ben fisso.
Il vinile è sporco o graffiato.
L’opzione Auto Split è stata
disattivata da menu.
registrazione prima di registrare. Quando si preme la
prima volta [RECORD] per entrare in modalità Rec
Ready, verificare la misurazione del livello a display.
Servirsi della manopola RECORD LEVEL per regolare il
livello. Nei punti più rumorosi della musica, i misuratori
dovrebbero arrivare al segno (-4) o (-2), ma non
raggiungere (MAX). Se il livello dell’audio è troppo
“caldo”, (!) lampeggerà sul lato destro del display.
Impostare l’interruttore RPM in maniera adeguata al
disco che si desidera riprodurre (33/45/78).
Impostare l’interruttore PHONO / LINEA su Phono per
riprodurre e registrare audio dal giradischi.
Impostare l’interruttore PHONO / LINEA su Linea per
ascoltare e registrare audio dalle sorgenti esterne
collegate all’ingresso Line In.
Cancellare tracce dal Flash Player interno che possono
già essere state masterizzate su un disco precedente. In
generale, raccomandiamo di cancellare i contenuti del
lettore dopo ogni masterizzazione andata a buon fine.
Provare un CD-R dalla capacità maggiore. Se si utilizza
un CD-R da 74 min, provare un CD-R da 80 min.
Cancellare tracce dal Flash Player interno per liberare
spazio.
Masterizzare i contenuti del Flash Player interno su CDR, quindi cancellare tutte le tracce.
Premere il tasto [STOP] per verificare che l’apparecchio
non stia riproducendo una canzone o che non sia in
pausa.
La cartuccia va fissata saldamente al braccio ogni volta
che si utilizza il giradischi.
Provare a spolverare delicatamente con un panno la
superficie del disco prima di riprodurlo.
Attivare l’Auto Split tra le opzioni da Menu e riprovare.
Per maggiori dettagli, si veda il paragrafo “Opzioni menu
Flash Player interno”.
Servirsi di [SPLIT TRK] per suddividere manualmente le
registrazioni in tracce individuali. Per maggiori dettagli, si
veda il paragrafo “Suddivisione delle tracce nel Flash
Player interno”.
TASTI RAPIDI DELL’LP 2 CD
COMBINAZIONE DI TASTI
RECORD + STOP Forza il sistema a caricare un Sistema Operativo all’avviamento.
RECORD + PLAY Ripristina i parametri di sistema predefiniti.
DESCRIZIONE
Recarsi regolarmente sul sito www.ion-audio.com per eventuali
aggiornamenti.
71
Page 74

SNELSTARTGIDS
o Controleer of onderstaande onderdelen in de doos zitten.
o LEES DE VEILIGHEIDSINSTRUCTIES VOOR HET PRODUCT GEBRUIKT WORDT
o Bezoek http://www.ion-audio.com voor productregistratie.
45 TPM
ADAPTER
STOFDEKSEL
SLIPMAT
TEGENGEWICHT
DRAAIPLATEAU
HOUDER VOOR
STOFDEKSEL
USB
KABEL
CD
VOORGEMONTEERD
ELEMENT
LP 2 CD
DRAAITAFEL
INLEIDING
Bedankt voor uw aanschaf van dit product. De LP 2 CD is de snelste en meest gemakkelijke manier om muziek vanaf
vinyl platen of externe geluidsbronnen zoals cassettespelers naar een CD of direct naar uw computer te converteren.
Met functie Automatic Track Split (automatische nummersplitsing) detecteert de LP 2 CD stilte tussen liedjes en
splitst deze, voor uw gemak, automatisch in individuele nummers.
OPNAMEMETHODE 1 – NAAR CD
Kopieer uw album naar de interne Flash-speler en brand één of meer CDs. Nadat de CD
is opgenomen kunt u er in de auto, thuis, op uw PC of waar dan ook met een standaard
CD-speler naar luisteren.
OPNAMEMETHODE 2 – NAAR UW COMPUTER
Gebruik de meegeleverde software om nummers tijdens afspelen
automatisch te converteren naar uw iTunes*-bibliotheek. Na het converteren
van uw opnamen kunt u ze overbrengen naar draagbare media, zoals een
iPod*, of ze op een CD branden met daarvoor bestemde toepassingen.
SOFTWAREPAKKETTEN
Er zijn EZ Vinyl Converter softwarepakketten meegeleverd om u te helpen uw vinyl platen te
converteren:
EZ Vinyl/Tape Converter (alleen voor PC) is de snelste en makkelijkste manier om uw opnamen om te zetten
in digitale media. EZ Vinyl/Tape Converter bewaart uw opnamen voor uw gemak in uw iTunes*-bibliotheek.
Voor nieuwe gebruikers geniet deze toepassing de voorkeur. Op de CD, we hebben een handige snelstartgids
meegeleverd met stap voor stap instructies voor installatie en werking van de software.
EZ Audio Converter (alleen Mac) is een basistoepassing voor conversie voor Max OS X en is ideaal voor
beginners. Raadpleeg de bijgesloten snelstartgids voor de software voor stap voor stapinstructies over
installatie en bediening van de software.
* iTunes en iPod zijn handelsmerken van Apple, Inc., geregistreerd in de V.S. en andere landen.
72
Page 75

OVERZICHT ACHTERPANEEL
4
3
2
1
1. Stroomingang: Sluit de meegeleverde stroomkabel van de draaitafel aan op een ingeschakelde
stroombon.
2. USB audio-uitgang: Gebruik de meegeleverde USB-kabel voor het aansluiten van de draaitafel op uw
computer. De USB-aansluiting zal het geluid van de draaitafel (of de Line In-ingangen, wanneer de
Line/Phono-schakelaar op het bovenpaneel op 'Line' is ingesteld) naar uw computer leiden. De USBaansluiting zal ook geluid van uw computer door de RCA-uitgangen van de draaitafel leiden. Voor het
overzetten van uw platen naar uw computer worden diverse softwaretoepassingen meegeleverd op de
bijgeleverde CD. Raadpleeg sectie "Meegeleverde software" voor informatie over de gebundelde
softwaretoepassingen.
3. Line Out: Gebruik een standaard stereo RCA-kabel om deze uitgangen aan te sluiten op de geluidsingangen van uw eigen stereosysteem. (N.B.: u kunt muziek naar een CD of computer blijven opnemen,
ook wanneer de geluidsuitgangen van de draaitafel niet aangesloten zijn op een stereosysteem).
4. Line In: Sluit cassettespelers of andere geluidsbronnen op lijnniveau aan op deze RCA-ingangen.
OVERZICHT VOORPANEEL
1
1. CD-station: Het CD-station van de draaitafel functioneert als CD-speler of -brander, afhankelijk van het
erin geplaatste type schijf. Bij gebruik van niet-blanco, afgeronde CDs zal het station werken als CDspeler, waarmee u muziek kunt afspelen via de Line Out-functie van de draaitafel of nummers kunt
kopiëren naar de interne Flash-speler. Bij gebruik van blanco CD-R schijfjes fungeert het station als
CD-brander, waarmee geluid van de interne Flash-speler van de unit opgenomen kan worden (dus
geluid gekopieerd van de draaitafel of externe geluidsbronnen die op de Line In aangesloten zijn).
73
Page 76

OVERZICHT BOVENPANEEL
2
5
4
3
13
12
11
1
6
7
8
109
1. STROOMKNOP: Druk op deze knop om de unit in en uit te schakelen.
2. DRAAIPLATEAU: Dit plateau dient vóór gebruik stevig bevestigd te zijn op de draaitafel. De aandrijfriem voor
de motor vindt u op de ring onder het plateau. Raadpleeg sectie "Installatie draaiplateau" voor meer informatie
over installatie van deze aandrijfriem.
3. MONTAGE TOONARM: Raadpleeg sectie "Overzicht toonarm" voor een meer gedetailleerde beschrijving van
de toonarm.
4. 45 TPM ADAPTERHOUDER: U kunt de adapter voor 45 toeren hier plaatsen als deze niet gebruikt wordt.
5. START/STOPKNOP: Deze knop start/stopt de motor van de draaitafel. Wanneer de knop niet lijkt te functioneren, controleer dan of de aandrijfriem goed is geïnstalleerd, zoals beschreven in "Installatie draaiplateau".
6. DISPLAY: De display helpt u toegang te verkrijgen tot menuopties en informatie die relevant is voor de bediening van de unit.
7. MENU- EN FUNCTIEKNOPPEN: Raadpleeg sectie "Menu- en functieknoppen" voor een gedetailleerde beschrijving van deze knoppen.
8. KNOPPEN VOOR CD-BEDIENING: Raadpleeg sectie "Knoppen voor CD-bediening" voor meer informatie.
9. VOLUME KOPTELEFOON: Pas het volume van het koptelefoonsignaal aan met deze knop.
10. 1/8” KOPTELEFOONUITGANG: Sluit uw 1/8” koptelefoon aan op deze uitgang.
11. OPNAMENIVEAU: Deze knop past het niveau van het geluidssignaal aan van de draaitafel of geluidsbronnen
die aangesloten zijn op de Line In-ingangen op het achterpaneel.
12. PHONO / LINE-SCHAKELAAR: Deze schakelaar selecteert het ingangsgeluidssignaal. Stel deze schakelaar
in op Phono bij het afspelen en overzetten van uw vinyl platen naar CD of uw computer. Stel de schakelaar in
op Line wanneer u muziek wilt overzetten of beluisteren van externe geluidsbronnen die aangesloten zijn op de
Line In-ingangen op het achterpaneel.
13. 33 / 45 / 78 TPM SELECTIESCHAKELAAR: Stel deze schakelaar in op de juiste positie bij het afspelen van
platen. Wanneer de muziek op een vreemde of ongewone pitch wordt afgespeeld, kan dit een indicatie zijn dat
een verkeerde TPM-instelling geselecteerd is.
74
Page 77

MENU- EN FUNCTIEKNOPPEN
1. [MENU]: Deze knop geeft toegang tot de menuopties voor de huidige
bedrijfsmodus. Menuopties voor de CD-speler zijn o.a.: Switch Mode (modus
schakelen), Copy Track (nummer kopiëren), Copy All (alles kopiëren), Repeat
(herhalen), System Info (systeeminformatie). Menuopties voor de interne Flashspeler zijn o.a.: Switch Mode (modus schakelen), Move Track (nummer verplaatsen), Repeat (herhalen), System Info (systeeminformatie).
2. [DISPLAY] (weergave): Druk op deze knop om door de instellingen voor tijdweergave van de LP 2 CD te
bladeren: Elapsed (verstreken; standaard), Track Remain (resterend nummer), Total Remain (resterend totaal).
Deze knop fungeert ook als knop voor [SELECTIE] bij het selecteren van menuopties.
3. [ERASE] (wissen): Deze knop stelt u in staat nummers te wissen van de interne Flash-speler. Deze knop
fungeert ook als [NEE]-knop bij het selecteren van menuopties.
4. [SPLIT TRK] (nummer splitsen): De LP 2 CD heeft een functie Auto split (automatisch splitsen), die
automatisch stilte tussen liedjes detecteert en de opname splitst in individuele nummers. Standaard is Auto
Split ingeschakeld. Als u deze functie wilt uitschakelen en uw nummers handmatig wilt splitsen kunt u knop
[SPLIT TRK] tussen liedjes gebruiken om een nieuw nummer te creëren. U kunt deze bewerking ook uitvoeren
nadat u de muziek hebt opgenomen (raadpleeg sectie "Nummers splitsen in interne flash player"). Deze knop
fungeert ook als [JA]-knop bij het selecteren van menuopties.
5.
KNOPPEN VOOR CD-BEDIENING
1. [REW] (terugscannen): Druk op deze knop om
terug te gaan naar het vorige nummer. Houd
deze knop ingedrukt tijdens het afspelen van een
nummer om snel terug te scannen.
2. [FF] (vooruit scannen): Druk op deze knop naar het volgende nummer te gaan. Houd deze knop ingedrukt
tijdens het afspelen van een nummer om snel vooruit te scannen.
3. [STOP] (stop): Druk op deze knop om het afspelen te stoppen en terug te keren naar het eerste nummer.
Deze knop stopt ook het opnemen wanneer u muziek aan het kopiëren bent naar de interne Flash-speler.
4. [PLAY / PAUSE] (afspelen/pauzeren): Druk hierop om het geselecteerde nummer af te spelen. De groene
LED onder de knop zal oplichten. Druk tijdens het afspelen van het nummer opnieuw om te pauzeren; de
groene LED zal in pauzestand knipperen. Druk opnieuw om het afspelen te hervatten. Deze knop initieert ook
het opnemen in Record Ready-modus.
5. [RECORD] (opnemen): Druk op deze knop om te schakelen naar Record Ready-modus. Deze modus stelt u
in staat geluid van de draaitafel of externe geluidsbronnen die aangesloten zijn op de Line In-ingangen op te
nemen naar de interne Flash-speler (raadpleeg sectie "Muziek opnemen naar de interne Flash-speler" voor
meer informatie). Wanneer u op [RECORD] drukt zal een rode LED onder de knop gaan knipperen om aan te
geven dat u klaar bent voor opnemen.
6. [BURN CD] (CD branden): Nadat u uw muziek heeft opgenomen naar de interne Flash-speler drukt u op deze
knop om de inhoud van de Flash-speler direct op te nemen naar een compatibele, blanco CD-R (raadpleeg:
"Branden inhoud interne Flash-speler naar CD" voor meer informatie).
1
2
4
3
2
1
5
4
3
7
6
7. [OPEN/CLOSE] (openen/sluiten): Deze knop opent en sluit de CD-lade.
TOONARM
1. Tegengewicht en schaalring: Het tegengewicht wordt gebruikt om de naalddruk juist te
kunnen instellen.
2. Anti-Skate aanpassing: deze knop wordt gebruikt om inwaartse krachten op de arm te
compenseren. Zie INSTALLATIE TOONARM voor meer informatie.
3. Armklem: Deze speciaal ontworpen armklem zorgt ervoor dat de toonarm in positie blijft
wanneer deze niet wordt gebruikt. De klem is ontworpen om in opwaartse positie te blijven
staan wanneer ontgrendeld.
OPMERKING: Bij transport van de draaitafel wordt het aanbevolen de head shell te
verwijderen en de armklem vast te zetten om schade aan toonarm of draaitafel te
voorkomen.
4. Borgmoer Toonarm: Deze aluminium moer wordt gebruikt om de head shell en
elementmontage vast te zetten op de toonarm. Raadpleeg sectie Installatie Element voor
meer informatie.
5. Element en Head shell: Het element is voorgemonteerd op een standaard head shell. Het
element kan door gebruiker vervangen worden en is compatibel met veel
standaardelementen. Zorg ervoor dat het plastic beschermkapje verwijderd wordt vóór
ingebruikname van de draaitafel.
1
2
3
4
5
75
Page 78

INSTALLATIE TOONARM
1. Begin door het tegengewicht tegen de
klok in te draaien tot deze niet verder
naar voren kan (N.B.: dit is ook de
maximale druk die op het element kan
worden toegepast).
2. Bij het optillen en laten zakken van de
head shell voelt de arm relatief zwaar
aan met weerstand. Draai het tegengewicht met de klok mee (weg van het
scharnierpunt) tot het gevoel van
gewicht/weerstand is verdwenen. Bij
juiste toepassing zal de toonarm met
weinig weerstand heen en weer draaien,
zo aangevend dat er 0 gram naalddruk
is.
3. Met het tegengewicht in deze nieuwe positie, verder verwijder van het scharnierpunt van de toonarm, draait u
de schaalring van het tegengewicht tot de “0” verticaal staat.
4. Draai hierna het tegengewicht (en de schaalring) tegen de klok in (naar het scharnierpunt) tot het gewenste
gewicht bereikt wordt. Wanneer de schaal 360 graden draait vanaf het nulpunt wordt de nieuwe aflezing van de
schaalring opgeteld bij 3,5 gram.
*De bijgeleverde head shell en elementmontage vereisen minimaal 3 en maximaal 5 gram voor optimale
prestatie.
Instellen van de Anti-Skate-aanpassing
In de meeste gevallen wordt de Anti-Skate ingesteld op de minimale instelling. Anti-Skate compenseert de inwaartse
krachten die zich voordoen bij bepaalde elementen wanneer de naald bij het midden van de plaat komt, te
compenseren. Bij overmatig overslaan bij het naderen van de as kunt u proberen de Anti-Skate te verhogen met de
hoeveelheden die op de schijf worden aangegeven. Begin met een verhoging van 1, test prestatie en verhoog indien
nodig verder.
BELANGRIJK
Zorg ervoor dat de vilten slipmat altijd op het plateau ligt bij gebruik van de draaitafel. Het niet gebruiken van
Verwijder het plastic elementkapje (naaldbescherming) voor gebruik van de draaitafel.
Vergeet niet dat de toonarm uit de rustpositie (armklem) genomen dient te worden voordat de motor van de
INSTALLATIE PLATEAU
WAARSCHUWING Onjuiste
installatie van het plateau kan
leiden tot slechte prestaties
en/of instabiliteit van de
draaitafel of permanente
schade aan de motor.
1. Begin met het plaatsen van de rubberen aandrijfriem rond de binnenste ring aan de onderzijde van de
2. Installeer de draaischijf op de centrale as en druk deze stevig aan. Controleer of de schijf goed draait en geen
3. Draai de draaischijf zo dat één van de gaten is uitgelijnd met de start/stopknop aan de linker voorzijde van de
4. Trek via dit gat de rubberen aandrijfriem van de binnenste ring en leg deze over de motor-as. Zorg ervoor dat
deze slipmak kan zowel uw media als de draaitafel beschadigen.
draaitafel geactiveerd wordt.
draaischijf. Deze zou al geïnstalleerd moeten zijn maar controleer altijd of deze niet gedraaid of beschadigd is.
vreemde bewegingen maakt.
draaitafel. De koperen motor-as dient zichtbaar te zijn door dit gat.
de aandrijfriem bij deze stap niet gedraaid wordt. Controleer of de schijf goed draait. Bij een juiste installatie
van de aandrijfriem ondervindt de schijf een lichte weerstand waardoor draaischijf na een aantal
omwentelingen tot stilstand komt.
76
Page 79

MONTEREN VAN HET STOFDEKSEL
1. Bevestig de meegeleverde houders voor het stofdeksel op de draaitafel.
2. Bevestig het stofdeksel op de houders zoals hier links getoond.
DE TWEE MODI
De LP 2 CD heeft twee algemene bedrijfsmodi: CD-spelermodus
en interne Flash-spelermodus. De huidig geselecteerde modus
wordt aangegeven door de twee LEDs (CD en INT) die zich aan
de rechterzijde van de display bevinden, zoals hier getoond.
CD-spelermodus stelt u in staat:
muziek af te spelen van niet-blanco CDs met standaard besturing (Play, Pause, Stop, Skip, Fast Forward en
Rewind: afspelen, pauze, stop, overslaan, vooruit en terug scannen)
een specifiek nummer van CD te kopiëren naar de interne Flash-speler
de inhoud van een CD in zijn geheel te kopiëren naar de interne Flash-speler
Interne Flash-spelermodus stelt u in staat:
nummers van een geluidsbron te kopiëren (vinyl of externe bron aangesloten op Line In)
muziek af te spelen die opgeslagen is in de interne Flash-speler, met standaard besturing (Play, Pause, Stop,
Skip, Fast Forward en Rewind: afspelen, pauze, stop, overslaan, vooruit en terug scannen)
opgenomen nummers uit de interne Flash-speler te wissen
een opgenomen nummer te splitsen in meerdere nummers
de inhoud van de interne Flash-speler naar een blanco CD-R te branden
CD-SPELERMODUS
In deze modus kunt u muziek beluisteren of opnemen vanaf een niet-blanco CD. Wanneer u de CD voor het eerst
plaatst, zal het scherm de informatie tonen zoals hier weergegeven:
1. het nummer dat wordt gespeeld wanneer u op [PLAY]
drukt (01 in dit voorbeeld);
2. het totale aantal nummers op de CD (12 in dit voorbeeld);
3. totaalduur van de CD in MM:SS- (minuten:seconden-)
formaat (62:35 in dit voorbeeld).
Scanning disc...
CD: 01/12 T62:35
CD Player
MUZIEK VAN CD AFSPELEN
Om muziek van de CD af te spelen drukt u op knop [PLAY]. Wanneer de CD wordt afgespeeld, geeft de bovenste
regel van de display de verstreken tijd van het nummer weer; de onderste lijn geeft stereo niveaumeting weer met
pieken, zoals in de illustratie rechts getoond.
U kunt door de opties voor tijdweergave bladeren door het
indrukken van knop [DISPLAY]. De opties zijn ‘Elapsed’
(verstreken), ‘Track Remain’ (resterend nummer) en ‘Total
Remain’ (totaal resterend).
Druk op [FF] of [REW] om resp. het volgende of vorige
nummer over te slaan. Druk de knop in en houd deze
ingedrukt tijdens het afspelen om snel vooruit of terug te
scannen.
Een druk op [PAUSE] tijdens het afspelen laat het afspelen
pauzeren. Druk opnieuw om te hervatten.
CD: 01/12 00:15
========== =
Druk op [STOP] om het afspelen te stoppen.
77
Page 80

MENUOPTIES CD-SPELERMODUS
Voor toegang tot de verschillende menuopties in CD-spelermodus drukt u op knop [MENU]. Om door de
menuopties te bladeren blijft u op knop [MENU] drukken. Nadat door alle beschikbare menuopties is gebladerd, keert de unit terug naar het standaardscherm voor CD-spelermodus. De beschikbare menuopties worden hieronder beschreven:
Schakelen naar interne Flash-spelermodus
Deze optie stelt u in staat handmatig te schakelen naar interne
Flash-spelermodus. Druk op [YES] om te schakelen.
Copy Track (nummer kopiëren)
Deze optie stelt u in staat een nummer van de CD naar de interne Flash-speler te kopiëren. U zult het scherm zien zoals hier
rechts getoond. Het nummer dat gekopieerd wordt is het nummer
dat geselecteerd was voor de menuopties werden geopend.
(Nummer "01" in dit voorbeeld).
Gebruik [REW] en [FF] voor selecteren van de bestemming voor
het gekopieerde nummer ("03" in dit voorbeeld). Druk op [YES]
om te kopiëren naar deze bestemming. Druk op [NO] om de
bewerking te annuleren.
N.B.: de interne Flash-speler van de unit heeft een maximale
capaciteit van 99 nummers of 80 minuten.
Copy All (alles kopiëren)
Deze optie stelt u in staat een complete CD naar de interne
Flash-speler te kopiëren. Druk op [YES] om de complete CD te
kopiëren.
Als de interne Flash-speler al gegevens bevat, ziet u het scherm
zoals hier rechts getoond. Druk op [YES] als u de inhoud van de
CD toch wilt kopiëren.
Wederom: de interne Flash-speler van de unit heeft een
maximale capaciteit van 99 nummers of 80 minuten.
Hierna ziet u het scherm zoals hier rechts getoond. Wilt u de
inhoud van de interne Flash-speler wissen voor u doorgaat, druk
dan op [YES]. Wilt u de inhoud behouden, druk dan op [NO]; in
dat geval zullen de nieuwe nummers gekopieerd worden vanaf
de eerstvolgende beschikbare locatie. (Bijv.: als er 8 nummers in
de speler opgeslagen zijn, beginnen de nieuwe nummers bij 9).
Repeat Mode (herhalingsmodus)
Deze optie stelt u in staat het afspelen van een nummer of de
gehele CD te herhalen. Opties zijn: Repeat Off (herhalen uit),
Repeat Track (nummer herhalen), Repeat All (alles herhalen).
Gebruik knop [SELECT] om door de verschillende opties te
bladeren.
System Info (systeeminformatie)
Deze pagina geeft diverse systeeminformatie weer. Druk op
[SELECT] wanneer u zich op deze pagina bevindt, om door de
informatievelden te bladeren.
N.B.: Systeeminformatie kan vereist zijn bij contact met de
afdeling Technische Ondersteuning.
Menu: Switch to
Flash Player?
Menu: Copy Track
CD:01 -> INT:03?
Menu: Copy Whole
CD to Int Flash
Flash not empty
Copy anyway?
Flash not empty
Clear Flash 1st
Menu: Repeat
Repeat Off
Menu: SystemInfo
Software: 1.00
78
Page 81

INTERNE FLASH-SPELERMODUS
De LP 2 CD heeft een interne Flash-speler. Deze speler wordt gebruikt voor het kopiëren van muziek vanaf
de draaitafel of een externe geluidsbron die aangesloten is op de Line In-ingangen aan de achterzijde van de
unit. Het proces wordt hieronder aangegeven:
OPNEMEN
GELUIDSBRON
LIJNNIVEAU
OPNEMEN
SELECTEER
BRON VOOR
OPNEMEN
NEEM MUZIEK
OP NAAR
INTERNE FLASH-
SPELER
INTERNE
FLASHSPELER
BRAND INHOUD
INTERNE
FLASH-SPELER
NAAR CD
CD
U kunt zich afvragen "waarom brand ik mijn muziek niet direct naar CD"? Er zijn verschillende redenen
waarom we voor deze aanpak hebben gekozen:
Eerst opnemen naar de interne Flash-speler stelt u in staat fouten te corrigeren en de overgangen in de
nummers te perfectioneren voor de opnamen op CD worden gezet.
Het draaien van een CD-station geeft mechanische ruis die in de opnamen kan doorlekken. Opnemen
naar de interne Flash-speler voorkomt dat deze ruis in uw opnamen terechtkomt, waardoor de hoogst
mogelijke geluidsgetrouwheid gewaarborgd wordt.
MUZIEK OPNEMEN NAAR DE INTERNE FLASH-SPELER
1. Ten eerste zorgt u ervoor dat u zich in interne Flash-
spelermodus bevindt (oranje LED naast “INT” hoort op te
lichten). Als de unit zich in CD-spelermodus bevindt
(groene LED naast "CD"), druk dan eenmaal op [MENU] en
daarna op [YES] wanneer het scherm zoals in het
voorbeeld, hier rechts, wordt getoond om te schakelen
naar interne Flash-spelermodus.
2. Selecteer de bron waarvandaan u wilt opnemen door schakelaar PHONO/LINE in de gewenste positie te
zetten. Stel de schakelaar in op PHONO wanneer u platen wilt opnemen vanaf de draaitafel, stel deze in op
LINE bij opnemen vanaf een externe geluidsbron, zoals een cassette- of persoonlijke muziekspeler die
aangesloten is op de LINE IN-ingang aan de achterzijde van de LP 2 CD.
3. Druk op knop [RECORD] (opnemen). De rode LED
onder de knop gaat knipperen, wat aangeeft dat u klaar
bent voor opnemen en u zult het scherm zien zoals hier
rechts weergegeven. Het cijfer achter “INT” is de locatie
waar de opname zal worden opgeslagen.
4. Start de muziek die u wilt opnemen. Bij opname van
vinyl vanaf de draaitafel plaatst u de naald op de plaat aan
het begin van de sectie die u wilt opnemen.
5. Speel de muziek af die u wilt opnemen. Bij opname van vinyl vanaf de draaitafel drukt u op knop
[START/STOP] van de draaitafel om te beginnen met het afspelen van de plaat.
Menu: Switch to
Flash Player?
INT:01 PressPLAY
79
Page 82

6. Gebruik knop RECORD LEVEL om het niveau van het
geluidsignaal in te stellen. Het opnameniveau wordt
weergegeven op het scherm. Het is belangrijk de
opnameniveaus in deze stap juist in te stellen, omdat u
anders het risico loopt op een opname die te zacht of te
hard en vervormd klinkt. Probeer knop RECORD LEVEL
zodanig in te stellen dat de pieken de markering voor (-4)
of (-2) raken maar nooit naar MAX gaan (er wordt "!"
weergegeven wanneer het opnameniveau te hard is en
vastloopt).
7. Nadat het opnameniveau is aangepast naar optimale instellingen, stopt u de muziek. Bij opname van
vinyl vanaf de draaitafel drukt u op knop [START/STOP] van de draaitafel om te beginnen met het afspelen van
de plaat.
8. Start de sectie die u wilt opnemen. Bij opname van vinyl vanaf de draaitafel plaatst u de naald aan het begin
van de sectie die u wilt opnemen.
9. Wanneer u klaar bent om te beginnen met opnemen, drukt
u op [PLAY] en speelt de muziek af die u wilt opnemen.
Bij opname van vinyl vanaf de draaitafel drukt u direct op
knop [START/STOP] om te beginnen met het afspelen van
de plaat. De rode LED zal continu oplichten om aan te
geven dat er een opname gemaakt wordt. Aan de
rechterzijde van de display kunt u de resterende
opnametijd aflezen.
INT:01 PressPLAY
============ =
INT:01 T70:13
=========== =
10. Standaard zal de LP 2 CD stilte tussen liedjes
detecteren en ze automatisch splitsen in individuele
nummers (Auto Split).
Als u Auto Split niet uitgeschakeld hebt, gaat u verder
naar de volgende stap.
INT:02 T65:01
New Track!
Als u Auto Split echter uitgeschakeld hebt dient u handmatig nummermarkeringen tussen liedjes in te
voegen. Voor het invoegen van een markering voor een nieuw nummer drukt u tussen nummers op
knop [SPLIT TRK] (nr. splitsen). Het cijfer bij 'INT’ wordt verhoogd om aan te geven dat een nieuw
nummer begonnen is. Het invoegen van nummermarkeringen stelt u in staat liedjes als individuele
nummers op te slaan bij branden naar CD
.
11. Bij opname vanaf vinyl kan het nodig zijn de opname te pauzeren bij het omdraaien van de plaat:
a. Druk op [PAUSE] om het opnemen tijdelijk te pauzeren wanneer het einde van kant A bereikt is.
b. Draai de plaat om naar kant B.
c. Druk op [SPLIT TRK] om een markering voor het eerste nummer op kant B in te voegen.
d. Druk op [PLAY] om te beginnen met het opnemen van kant B.
12. Na het afronden van de opname drukt u op knop [STOP].
De unit keert terug naar het standaardscherm van de
interne Flash-speler, zoals rechts getoond.
Voor informatie over het branden van opnamen naar een
CD-R raadpleegt u sectie "Branden van inhoud van interne
Flash-speler naar CD".
MUZIEK AFSPELEN VAN DE INTERNE FLASH-SPELER
Na het opnemen van muziek naar de interne Flash-speler, drukt u op knop [PLAY] om deze te beluisteren.
U kunt door de opties voor tijdweergave bladeren door het
indrukken van knop [DISPLAY]. De opties zijn ‘Elapsed’
(verstreken), ‘Track Remain’ (resterend nummer) en ‘Total
Remain’ (totaal resterend).
Druk op [FF] of [REW] om resp. het volgende of vorige
nummer over te slaan. Druk een van de knoppen in en
houd deze ingedrukt tijdens het afspelen om snel terug of
vooruit te scannen.
Een druk op [PAUSE] tijdens het afspelen laat het afspelen
pauzeren. Druk opnieuw om te hervatten.
INT:13/13 T56:14
Int Flash Player
INT:01/13 00:15
========== =
Druk op [STOP] om het afspelen te stoppen.
80
Page 83

NUMMERS SPLITSEN IN DE INTERNE FLASH-SPELER
De interne Flash-speler stelt u in staat een geselecteerd nummer in twee nummers te splitsen, wanneer u de
overgang bij initiële opname van de muziek naar de interne Flash-speler hebt gemist.
Auto Split uitgeschakeld hebt en ervoor gekozen hebt uw nummers handmatig te splitsen.
Dit is van toepassing als u
1. Zorg ervoor dat u zich in interne Flash-spelermodus
bevindt (oranje LED naast “INT” hoort op te lichten). Als de
unit zich in CD-spelermodus bevindt (groene LED naast
"CD"), druk dan eenmaal op [MENU] en daarna op [YES]
wanneer het scherm zoals hier rechts wordt getoond om te
schakelen naar interne Flash-spelermodus.
Menu: Switch to
Flash-player?
2. Zoek het nummer dat u wilt splitsen met [REW] / [FF].
3. Druk op [PLAY] om het dit nummer af te spelen.
4. Druk op [FF] in en houd de knop ingedrukt om de positie te
vinden waar het nummer gesplitst moet worden. Wanneer
u te ver doorgaat, drukt u op [REW] en houdt deze ingedrukt om terug te scannen.
5. Op de locatie van splitsing pauzeert u de muziek.
6. Druk op knop [SPLIT TRK] (nummer splitsen).
7. U zult het scherm zien zoals hier rechts getoond. U kunt
het tweede nummer dat het resultaat is van de splitsing
beluisteren door indrukken van [PLAY] terwijl u zich in dit
scherm bevindt. Houd [FF] of [REW] ingedrukt om snel in
het nummer vooruit of terug te scannen. Druk op [STOP]
om het beluisteren te stoppen.
Druk op [YES] om te behouden, [NO] om te annuleren.
MUZIEK WISSEN VAN DE INTERNE FLASH-SPELER
In situaties waar u een fout gemaakt kan hebben tijdens het opnameproces, of wanneer het geheugen van de Flash
geheel vol is, kunnen liedjes gewist worden.
Om een nummer te wissen:
1. Zorg voor interne Flash-spelermodus.
2. Gebruik [REW] of [FF] om het te wissen nummer te selecteren. Het huidig geselecteerde nummer wordt getoond in
de linkerbovenhoek (‘02’ in dit voorbeeld).
3. Druk op [ERASE] (wissen). U ziet het scherm zoals rechts
getoond.
4. Druk op [YES] om het geselecteerde nummer te wissen of
[NO] om de bewerking te annuleren.
Om alle nummers te wissen:
1. Zorg voor interne Flash-spelermodus.
2. Druk op [ERASE] (wissen). U ziet een scherm dat verge-
lijkbaar is met wat hier rechts wordt getoond.
3. Druk op [SELECT] en u ziet het scherm veranderen naar
wat hier rechts wordt getoond.
4. Druk op [YES] om alle nummers die nu opgeslagen zijn in
de interne Flash-speler te wissen, of [NO] om te annuleren.
N.B.: Deze actie kan NIET ongedaan worden gemaakt!
Een druk op [YES] zorgt ervoor dat alle nummers die in
de interne Flash-speler zijn opgeslagen, permanent
worden gewist.
Track Split!
Keep? YES or NO
INT:02/13 T56:14
Int Flash Player
INT:Erase Trk02?
YES or NO
INT:Erase Trk02?
YES or NO
INT:Erase ALL?
YES or NO
81
Page 84

MENUOPTIES INTERNE FLASH-SPELER
Voor toegang tot de verschillende menuopties in interne Flash-spelermodus drukt u op knop [MENU]. Om
door de menuopties te bladeren blijft u op knop [MENU] drukken. Voor het wijzigen van de geselecteerde
instelling drukt u op knop [SELECT]. De beschikbare menuopties worden hieronder beschreven:
Schakelen naar CD-spelermodus
Deze optie stelt u in staat handmatig te wisselen naar CDspelermodus. Druk op [YES] om te schakelen.
Menu: Switch to
CD Player Mode?
Move Track (nummer verplaatsen)
Deze optie stelt u in staat opgeslagen opnamen te reorganiseren door een nummer naar een nieuwe locatie te verplaatsen. Het nummer dat verplaatst wordt is het nummer
dat geselecteerd was voordat u toegang verkreeg tot de
menuopties (Nummer "01" in het voorbeeld rechts).
Het bestemmingsnummer wordt aangegeven in veld ‘New’
(nieuw) en kan verhoogd en verlaagd worden met resp.
[FF] en [REW]. Nadat de gewenste bestemming geselecteerd is, drukt u op [YES] om het nummer te verplaatsen.
Menu: Move Track
Old:01 -> New:02
Auto Split (automatisch splitsen)
Auto Split is een functie die automatisch stilte tussen
liedjes detecteert en de opname in real-time in nummers
splitst. Deze optie is standaard ingeschakeld. U kunt er
echter voor kiezen deze optie uit te schakelen en
handmatig nummermarkeringen in te stellen.
Druk op [SELECT] om Auto Split in of uit te schakelen.
Menu: Auto Split
On
Repeat Mode (herhalingsmodus)
Deze optie stelt u in staat een nummer of de verzameling
aan nummers, opgeslagen op de interne Flash-speler, te
herhalen. Opties zijn: Repeat Off (herhalen uit), Repeat
Track (nummer herhalen), Repeat All (alles herhalen). In
deze menupagina drukt u op [SELECT] om te wisselen
tussen de opties.
Menu: Repeat
Repeat Off
System Info (systeeminformatie)
Deze pagina geeft de versie van de firmware van de unit
weer. In deze pagina drukt u op [SELECT] om door de informatievelden te bladeren.
N.B.: Systeeminformatie kan vereist zijn bij contact met de
afdeling Technische Ondersteuning.
Menu: SystemInfo
Software: 1.00
82
Page 85

BRANDEN INHOUD INTERNE FLASH-SPELER NAAR CD
Nadat de muziek is opgenomen op de interne Flash-speler kan deze gebrand worden naar
een CD-R. Vergeet hierbij niet dat de LP 2 CD alleen
Zorg ervoor dat het juiste logo (hier rechts getoond) op de te gebruiken CD staat.
1. Ten eerste zorgt u ervoor dat u zich in interne Flash spelermodus bevindt (oranje LED naast “INT” zou
moeten oplichten). Als de unit zich in CD-spelermodus
bevindt (groene LED naast "CD"), druk dan eenmaal
op [MENU] en daarna op [YES] wanneer het scherm
zoals hier rechts te zien, wordt getoond om te
schakelen naar interne Flash-spelermodus.
2. Druk op knop [BURN CD] (CD branden).
3. Plaats een blanco CD-R in het CD-station van de unit.
Wanneer een niet-compatibele blanco CD wordt
geplaatst zal deze door de unit uitgeworpen worden
met de vraag een blanco CD-R te plaatsen.
4. Na detectie van een blanco CD-R zal het brandproces
automatisch beginnen. U zult het scherm zien zoals
hier aan de rechterzijde weergegeven. Laat dit proces
lopen tot afronding.
N.B.: Om het brandproces te annuleren, drukt u op
[STOP].
5. Nadat het brandproces is afgerond, werpt de LP 2 CD
de CD uit en ziet u het scherm zoals hier rechts getoond. Als u nog een CD wilt branden, plaatst u een
andere CD-R en drukt u op [YES]. Als u niet nog een
kopie wilt branden, drukt u op [NO].
6. Wanneer u [NO] selecteert, zult u het scherm zien
zoals hier rechts weergegeven. Bij selectie van [YES]
worden alle nu in de interne Flash-speler opgeslagen
nummers gewist, bij [NO] blijven deze behouden.
N.B.: Voor de meeste toepassingen zult u de inhoud
van de interne Flash-speler na succesvolle overzetting
naar CD willen wissen. Waarborg echter dat de
gebrande CD aan uw verwachtingen beantwoordt
voordat u de inhoud van de interne Flash-speler wist.
opname naar blanco CD-R toestaat.
Menu: Switch to
Flash Player?
Insert blank
audio CD-R disc
CD burner
Burning CD...
CD Burn Complete
Burn Another?
CD Burn Complete
Clear Flash?
83
Page 86

VEEL GESTELDE VRAGEN
Vraag: Kan ik tegelijkertijd vanaf de draaitafel en vanaf externe geluidsbronnen opnemen?
Antwoord: Nee. De LP 2 CD kan slechts opnemen vanaf de draaitafel of vanaf geluidsbronnen
die aangesloten zijn op de Line In-ingangen, niet vanaf beide tegelijkertijd. Dit is ter
voorkoming van het ongewenst vermengen van geluidssignalen. De Phono/Lineschakelaar selecteert welke bron naar de interne recorder wordt gerouteerd.
Vraag: Kan ik mijn vinyl platen direct naar CD opnemen?
Antwoord: U moet de muziek naar de interne Flash-speler van de unit opnemen voor u deze
naar een CD kan branden. Door deze aanpak stelt u in staat fouten te corrigeren en
de overgangen in de nummers te perfectioneren voor de opnamen op CD worden
gezet Ook wordt gewaarborgd dat het draaien van het CD-station geen mechanische
ruis in uw opnamen veroorzaakt.
Vraag: Met welke CD-formaten is de LP 2 CD compatibel?
Antwoord: De LP 2 CD kan muziek afspelen van vrijwel elke CD die audiogegevens bevat. De
LP2 CD kan alleen muziek opnemen naar CD-R. Zorg ervoor dat de CD waarnaar u
wilt opnemen het juiste “Digital Audio Recordable”-logo bevat.
Vraag: Hoeveel gegevens kan de interne Flash-speler bevatten?
Antwoord: De interne Flash-speler van de LP 2 CD kan ca. 700 Mb aan gegevens bevatten; dit
staat gelijk aan ca. 80 minuten muziek. Houd er echter rekening mee dat de interne
Flash-speler ook een limiet van 99 nummers heeft. We bevelen het wissen van de
inhoud van de speler na elke succesvolle overzetting naar CD aan.
Vraag: Kan ik tijdens het opnemen naar de muziek luisteren?
Antwoord: Ja, u kunt naar de muziek luisteren terwijl deze wordt opgenomen door de Line Out
van de unit aan te sluiten op een ingang van lijnniveau op een stereo-ontvanger. U
kunt ook een koptelefoon aansluiten op de ingang voor koptelefoon in de rechter onderhoek van het bovenpaneel.
Vraag: Kan ik geluid vanaf andere apparaten opnemen?
Antwoord: Ja, u kunt geluid opnemen naar de interne Flash-speler van de unit vanaf vrijwel elke
geluidsbron op lijnniveau, zoals een cassettespeler, zolang deze aangesloten is op
Line In op het achterpaneel.
Vraag: Wat is het doel van de USB-poort?
Antwoord: Met de USB-poort kunt u de draaitafel aansluiten op uw computer en de meegelever-
de software te gebruiken voor het direct overzetten van muziek vanaf vinyl of externe
geluidsbronnen van lijnniveau naar digitale muziek. Raadpleeg de meegeleverde
MixMeister-softwaregids voor informatie over het opnemen van geluid van de LP 2
CD naar uw computer.
Vraag: Heb ik speciale stuurprogramma's nodig voor het aansluiten van de LP 2 CD op mijn
computer?
Antwoord: Nee, de LP 2 CD is een plug-en-play-apparaat. Dit betekent dat er voor installatie
geen speciale stuurprogramma's nodig zijn. Wanneer u de unit voor het eerst aansluit
op uw computer zal deze automatisch alle benodigde componenten op uw systeem
laden.
Vraag: Met welke besturingssystemen is de LP 2 CD compatibel?
Antwoord: De LP 2 CD is een plug-en-play-apparaat onder Windows XP/Vista en Mac OSX
besturingssystemen. Wanneer u uw muziek naar uw computer wilt overzetten,
raadpleeg dan de MixMeister-softwaregids.
84
Page 87

PROBLEEMOPLOSSING
PROBLEEM OORZAAK OPLOSSING
Het is belangrijk het opnameniveau zorgvuldig in te
Mijn opnamen klinken hard
en vervormd.
Ik kan het opgenomen geluid
nauwelijks horen wanneer
het wordt afgespeeld.
Mijn opnamen worden op een
afwijkende pitch afgespeeld.
Ik hoor niets wanneer ik
geluid van mijn vinylplaten wil
opnemen of afspelen.
Ik hoor niets wanneer ik
geluid van een externe bron,
aangesloten op Line In, wil
opnemen of afspelen.
Ik krijg een bericht “Not
enough space on blank CDR”
(niet voldoende ruimte op
blanco CDR).
Ik krijg een bericht “Too many
tracks in Flash to REC”
(teveel nummers in Flash
voor opname).
Ik krijg een bericht “Can’t
Record Flash is Full” (kan
niet opnemen, Flash is vol).
Ik kan mijn plaat niet horen
bij het afspelen.
De geluidskwaliteit is slecht.
Mijn opname is één
voortdurend, lang nummer
geworden in plaats van
individuele nummers.
Opnameniveau was te hard.
Opnameniveau was te zacht.
TPM-schakelaar niet juist ingesteld.
PHONO/LINE-schakelaar is
ingesteld op Line in plaats
van Phono.
PHONO/LINE-schakelaar is
ingesteld op Phono in plaats
van Line.
De inhoud van de interne
Flash-speler overschrijdt de
maximale capaciteit van de
CD-R die u wilt branden.
Capaciteit interne Flash-speler is volledig benut.
De LP 2 CD speelt al geluid
af van een CD of de interne
Flash-speler.
Aansluiting van het element
is niet in orde.
Vinyl plaat is vuil of beschadigd.
Menuoptie Auto Split is
uitgeschakeld.
stellen vóór opname. Wanneer u voor het eerst
[RECORD] indrukt om naar Record Ready-modus te
schakelen, controleer dan de niveaumeters op de
display. Gebruik knop RECORD LEVEL om het niveau
in te stellen. Op de luidste momenten in de muziek
dienen de meters de markering voor (-4) of (-2) te raken
maar nooit (MAX) te bereiken. Als het niveau van het
geluidssignaal te ver gaat, ziet u een knipperend (!) aan
de rechterzijde van de display.
Stel de TPM-schakelaar juist in voor de plaat die u wilt
afspelen (33/45/78).
Stel de PHONO/LINE-schakelaar in op Phono om geluid
vanaf de draaitafel af te spelen of op te nemen.
Stel de PHONO/LINE-schakelaar in op Line om geluid
vanaf de externe bronnen die op Line In aangesloten
zijn, af te spelen of op te nemen.
Wis nummers van de interne Flash-speler die al eerder
naar CD zijn gebrand. Over het algemeen wordt aanbe-
volen de inhoud van de speler te wissen na elke
succesvolle overzetting.
Probeer een CD-R met een hogere capaciteit. Bij
gebruik van een CD-R van 74 minuten kunt u een CD-R
proberen van 80 minuten.
Wis nummers van de interne Flash-speler om ruimte vrij
te maken.
Brand de inhoud van de interne Flash-speler naar een
CD-R en wis daarna alle nummers.
Druk op knop [STOP] om te waarborgen dat de unit niet
bezig is met afspelen van een lied of op pauze staat.
Element dient stevig bevestigd te zijn aan de toonarm
wanneer de draaitafel in gebruik is.
Stof de plaat af en veeg het oppervlak voorzichtig
schoon voordat de plaat afgespeeld wordt.
Schakel Auto Split in de menuopties in en probeer het
opnieuw. Raadpleeg sectie "Menuopties interne flash
player" voor details.
Gebruik [SPLIT TRK] om uw opnames handmatig te
splitsen in individuele nummers. Raadpleeg sectie
"Nummers splitsen in de interne flash player" voor
details.
LP 2 CD SNELTOETSEN
COMBINATIE VAN KNOPPEN BESCHRIJVING
RECORD + STOP Laat het systeem een OS (besturingssysteem) laden bij het
RECORD + PLAY Herstelt de standaard systeemparameters.
opstarten. Bezoek www.ion-audio.com regelmatig voor updates.
85
Page 88

LP 2 CD SPECIFICATIONS
CD playback
Type: Redbook CD and CDR
SNR: 96dB
THD+N: 0.007%
CD burning
Type: CDR
Speed: 12X
Computer audio playback via USB
SNR: 94dB A-weighted
THD+N: 0.008%
Flash recording
Size: 1GB internal flash memory
Quality: 16 bit, 44.1kHz sample rate
Line-in recording to internal flash memory at unity gain
SNR: 96dB
THD+N: < 0.008%
Line-in recording to internal flash memory at max gain
SNR: > 86dB A-weighted
THD+N: < 0.01%
USB interface
Type: USB1.1 or higher, Plug and Play, Mac and PC compatible
Quality: 16-bit, 44.1kHz sample rate
Computer recording via USB at unity gain
SNR: > 86dB A-weighted
THD+N: < 0.05%
Computer recording via USB at max gain
SNR: > 86dB A-weighted
THD+N: < 0.05%
MANUAL VERSION 1.5
86
Page 89

Page 90

Page 91

Page 92

www.ion-audio.com
 Loading...