

Page 1
PORTABLE DJ STATION
WITH EFFECTS
Quick Start Owner’s Manual
BOX CONTENTS
• iCD04FX
• POWER CORD
Manual de inicio rápido del usuario (ESPAÑOL)
CONTENIDO DE LA CAJA
• iCD04FX
• CABLE DE ALIMENTACIÓN
Schnellbedienungsanleitung (DEUTSCH)
INHALT DER SCHACHTEL
• iCD04FX
• Genormtes STROMKABEL
Guide d’utilisation simplifié (FRANÇAIS)
CONTENU DE LA BOÎTE
• iCD04FX
• CÂBLE D’ALIMENTATION
Manuale Rapido di Utilizzazione (ITALIANO)
CONTENUTO DELLA CONFEZIONE:
• iCD04FX
• CAVO DI ALIMENTAZIONE
Page 2
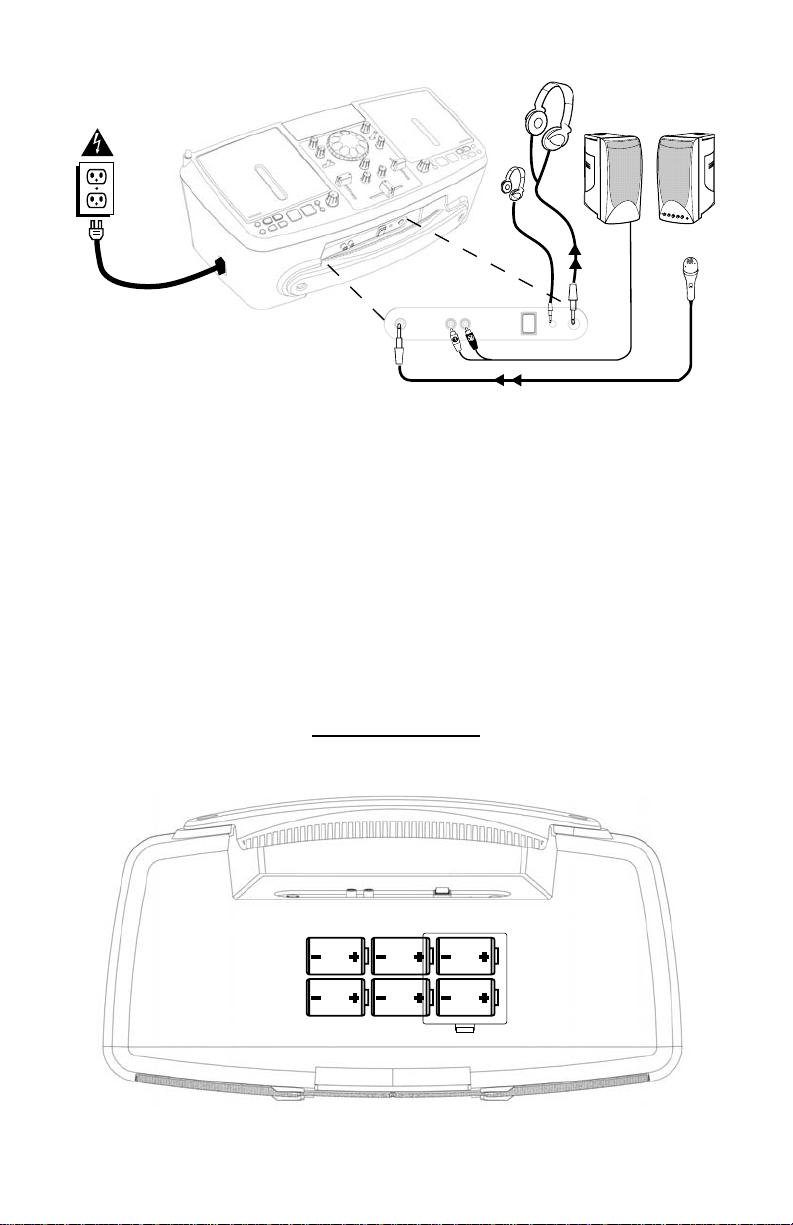
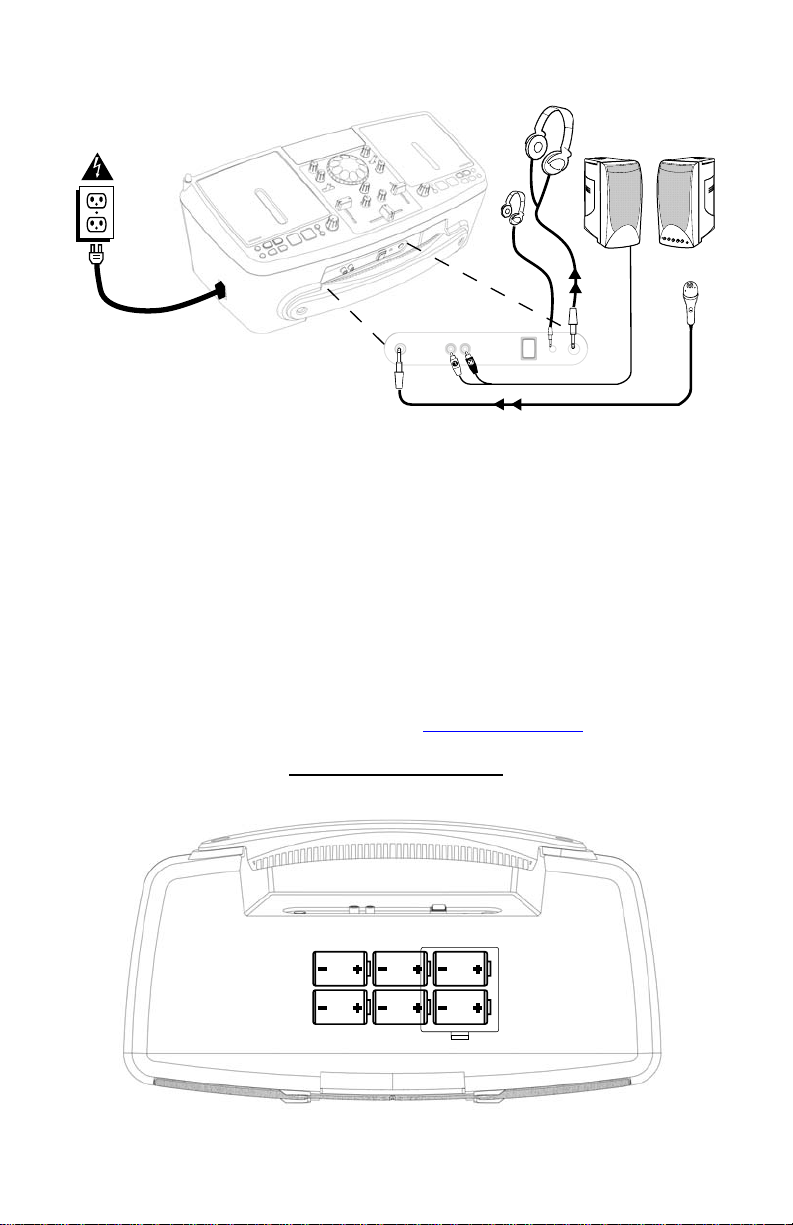
QUICK SETUP
1. Make sure all items listed on the front of this guide are included in the box.
2. READ SAFETY INSTRUCTION BOOKLET BE FORE USING THE PRODUCT.
3. Study this setup diagram.
4. Make sure all devices are turned off and all faders and volume knobs are set to “zero”
5. Connect microphone (optional) as indicated in the diagram.
6. Connect an external amplifier or home stereo as indicated in the diagram (optional)
7. Plug all devices into power.
8. Switch everything on in the following order.
9. When turning off, always reverse this operation by
10. Go to http://www.ion-audio.com for product registration.
More information about this product may be found at http://www.ion-audio.com
This product can be powered by 6 “D” Cell batteries. They should be loaded as shown above and on the
compartment door.
• iCD04FX
• any amplifiers or output devices
• plug in headphones
• unplug headphones
• turn off any amplifiers or output devices
• turn off iCD04FX
BATTERY INSTALLATION
Page 3
BATTERY COMPARTMENT: load 6 “D” “UM1” batteries for use without AC power input.
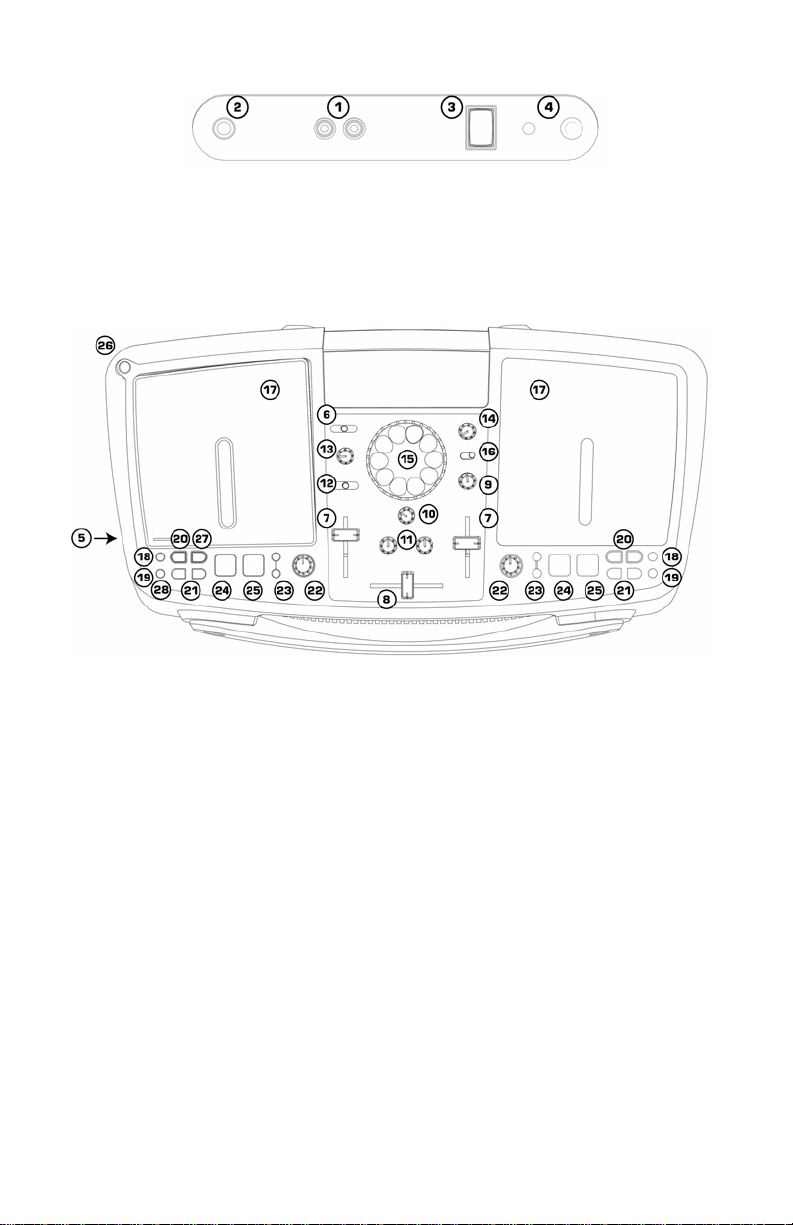
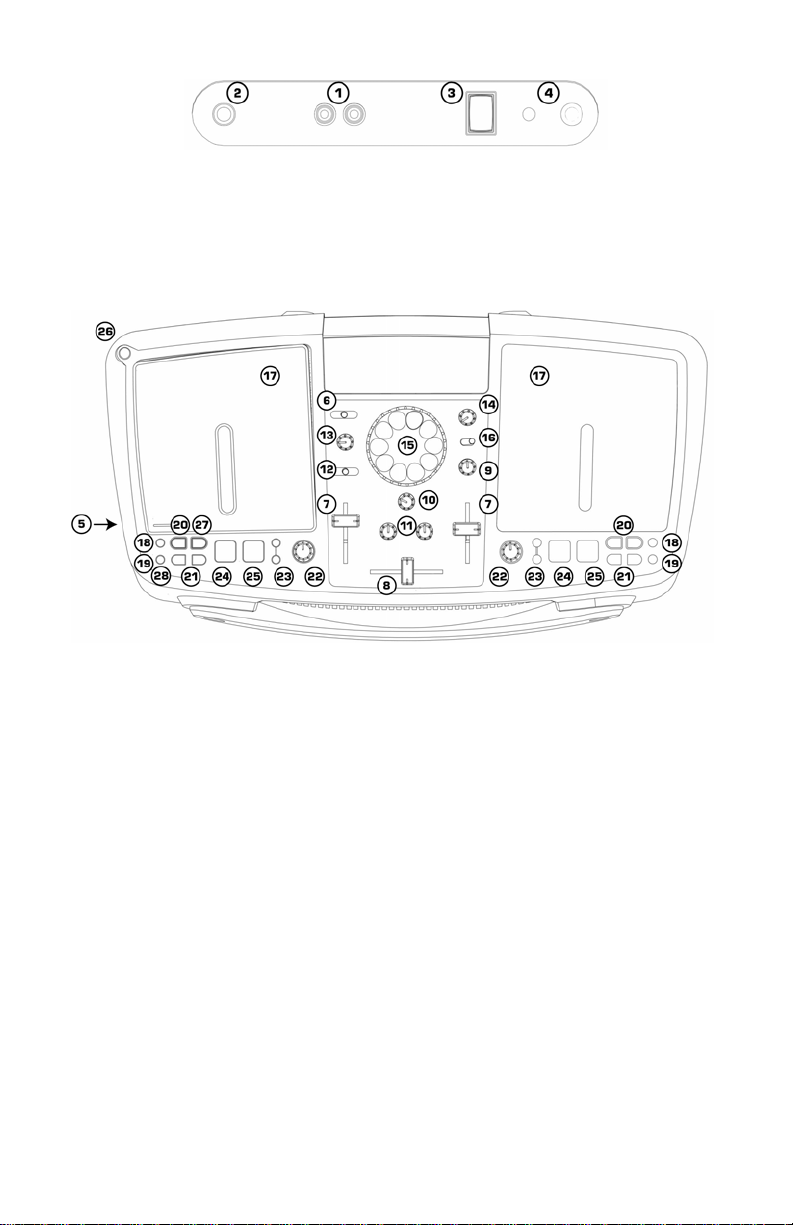
FRONT PANEL
1. LINE OUTPUT: This output is for connecting an external audio system such as a PA speaker
system, powered monitors, or a home stereo. When a device is attached, the internal
speakers will shut off automatically. The level of the master stereo output signal is controlled
by the master fader.
2. MIC INPUT: Plug a 1/4” connector style Microphone in here.
3. POWER: Use this switch to turn on the unit. Turn the unit on before you turn on external
audio devices, and turn off external audio devices before you turn off the unit.
4. Headphone Jacks: Used to connect either 1/8” or 1/4” plugs for listening with headphones.
SIDE PANEL
5. AC POWER INPUT: This unit is designed to work with the power supply cord that comes with
the unit. While the power is switched off, plug the power supply into the unit first, then plug it
VOLUME/MIXER CONTROLS
EFFECT FEATURES
CD PLAYER FEATURES
into the outlet. Leave this unplugged for battery operation.
6. INPUT SELECTOR: Selects which source will go to Channel 1 (CD or FM tuner).
7. CHANNEL FADER: Controls the channel volume level.
8. CROSSFADER: Cleanly fades between the two input channels. "Hard left" selects Channel 1.
"Hard right" selects Channel 2. With the crossfader centered, both assigned channels are live.
Use the crossfader for fast and seamless fades from one selected channel to the other
9. MIC VOLUME: Adjusts the microphone level.
10. MASTER VOLUME: Controls the overall output level.
11. STEREO EQ: Adjusts the treble and bass of the master output.
12. CHANNEL CUE SELECTOR: Used to route channel audio to your headphones.
13. CUE (HEADPHONE) VOLUME: Adjusts volume for headphones. (NOTE: Be sure the volume
control is set to the OFF position before plugging in any headphones to avoid permanent
hearing damage.)
14. EFFECT SELECT: Use this knob to select the desired effect. These include DJ effects like
scratching, filters, flangers (to create that “jet wash” sound), pan, and vocoder.
15. EFFECT WHEEL: Use this wheel to control the effect.
16. EFFECT WHEEL MODE: Use this switch set wheel mode (RETURN allows the effect to
automatically stop when the wheel stops – HOLD keeps the effect on until the switch is moved
to RETURN).
17. CD DOOR: Press down on the door to load or remove the CD. Each press will open or close
the door.
18. TIME: Switches the time display between elapsed track time, remaining track time, and
remaining time on the entire CD.
Page 4
19. MODE: Allows all tracks to play in order (default), just a single track to play (SINGLE) or
repeat tracks (REPEAT).
20. SEARCH: Used to quickly move through the music. When music is paused, you can step
through the music slowly in order to set a cue point.
21. TRACK SELECT: Used to select the track to be played.
22. PITCH: The pitch can be continuously changed up to +/-10% by moving the knob. By
changing pitch you can change the feeling of the music. You also change the tempo with pitch
and can make the tempo of 2 songs match.
23. PITCH BEND: Temporarily shifts the tempo of the music.
24. CUE: Pressing the CUE button returns to the last set cue point.
25. START/PAUSE (Play/Pause Button) - Each press of the PLAY/PAUSE button starts or pauses
the music. While the music is playing, if you press this button to pause, then press it again to
RADIO FEATURES
PLAY & CUE
Pressing the “PLAY/PAUSE” button starts the disc. Pressing the “CUE” button will reset the disc to the last
place where the disc was started. This is called the cue point. By alternately pressing the “PLAY/PAUSE”
button and the “CUE” button, the disc may be returned and played from the cue point any number of
times. This function is called back cue.
resume playing, a cue point will be set at that spot in the music.
26. ANTENNA: Should be raised and positioned for good FM reception.
27. SEARCH: Used to select the radio station.
28. MODE: Used to toggle mono or stereo reception. For low signals, mono mode can offer better
overall reception.
PLAY / PAUSE & CUE OPERATIONS
Press "PLAY/PAUSE"
to start music
Play Interval
Press "CUE" return to
last starting point
Position on Disc
PLAY, PAUSE & CUE
When play has been paused and then started again, the return position for the back cue will be updated to this
new position.
Press "PLAY/PAUSE"
to start music
Play Interval Play Interval
EDITING CUE POINTS
When the search button is pressed while at a cue point, the cue point will be moved. The CD player will
repeatedly play small parts of the CD as you move it to the desired position. By pressing “PLAY/PAUSE” then
“CUE” you can confirm that the new cue point is desirable.
Adjust the "CUE" point
Press "PLAY/PAUSE"
to start music
Back Cue Operation
Press "PLAY/PAUSE"
to pause music
Play Interval
Back Cue Operation
Press "PLAY/PAUSE"
to start music
Press "CUE" return to
last starting point
Back Cue Operation
Position on Disc
Press "CUE" return to
last starting point
Position on Disc
Page 5
ESPAÑOL
INSTALACIÓN RÁPIDA
1. Asegúrese de que todos los artículos incluidos al inicio de este manual están incluidos en la
caja.
2. LEA LAS INSTRUCCIONES DEL FOLLETO DE SEGURIDAD ANTES DE UTILIZAR EL
PRODUCTO.
3. Estudie este diagrama de instalación.
4. Asegúrese de que todos los dispositivos están apagados y de que todos los faders están en
posición «cero».
5. Conecte el micrófono (opcional) como se indica en el diagrama.
6. Conecte un amplificador externo o un estéreo hogareño como se indica en el diagrama
(opcional)
7. Enchufe todos los dispositivos a la fuente de electricidad.
8. Encienda todo en el siguiente orden:
• iCD04FX
• los amplificadores o dispositivos de salida
9. Al apagar, realice siempre esta operación al contrario, apagando:
• los amplificadores o dispositivos de salida
• iCD04FX
10. Visite http://www.ion-audio.com para registrar el producto.
Puede encontrar más información sobre este producto en http://www.ion-audio.com
Este producto funciona con 6 baterías tipo «D». Deben insertarse como se muestra arriba y en el piso del
compartimiento.
NSTALACIÓN DE LAS BATERÍAS
COMPARTIMIENTO DE LA BATERÍA: use 6 pilas “D” “UM1” para que el equipo funcione sin alimentación de
CA.
Page 6

PANEL FRONTAL
1. SALIDA DE LÍNEA: Esta salida sirve para conectar un sistema de audio externo tal como un
sistema de altavoces de potencia, monitores de potencia o un estéreo hogareño. Cuando se
conecta un equipo, los altavoces internos se apagan automáticamente. El nivel maestro de
salida de la señal estéreo es controlado por el fader maestro.
2. Entrada de micrófono (Mic): Enchufe aquí un micrófono con conector tipo ¼”.
3. ALIMENTACIÓN: Use este interruptor para encender la unidad. Encienda la unidad antes de
encender los dispositivos de audio externos, y apague los dispositivos de audio externos antes
de apagar la unidad.
4. Jacks de auriculares: Se usan para conectar enchufes de 1/8” o de ¼" para escuchar con los
auriculares.
PANEL LATERAL
5. ENTRADA DE ALIMENTACIÓN DE CA: Esta unidad está diseñada para funcionar con el cable
de alimentación que acompaña la unidad. Mientras está apagada la alimentación, enchufe la
fuente de alimentación a la unidad primero, y luego al tomacorriente. Mantenga esto
CONTROLES DE VOLUMEN/MEZCLADOR
CARACTERÍSTICAS DE LOS EFECTOS
CARACTERÍSTICAS DEL REPRODUCTOR DE CD
desenchufado para que funcione con batería.
6. SELECTOR DE ENTRADA: Selecciona la fuente que se aplica al canal 1 (sintonizador de FM o
CD)
7. Fader de canal [CHANNEL FADER]: Controla el nivel de volumen del canal.
8. CROSSFADER: Cambia nítidamente entre los dos canales de entrada. “Completamente hacia la
izquierda” selecciona el canal 1. “Completamente hacia la derecha” selecciona el canal 2. Con
el crossfader en el centro, ambos canales están activos. Use el crossfader para cambios
rápidos y uniformes de un canal seleccionado a otro.
9. VOLUMEN DE MICRÓFONO: Ajusta el nivel del micrófono.
10. VOLUMEN MAESTRO: Controla el nivel general de salida.
11. ECUALIZADOR ESTÉREO: Ajusta los graves y agudos de la salida maestra.
12. SELECTOR DE SEÑAL DE CANAL: Se usa para enviar el audio del canal a sus auriculares.
13. VOLUMEN DE SEÑAL (AURICULAR): Ajusta el volumen para los auriculares. (NOTA: Asegúrese
de que el control del volumen esté en posición OFF antes de conectar los auriculares para
evitar daños auditivos permanentes).
14. SELECCIÓN DE EFECTO: Use esta perilla para seleccionar el efecto deseado. Estos incluyen
efectos de DJ como scratching, filtros, flangers (para crear ese sonido de “lavado de jet”),
pan, y vocoder (codificador de voz).
15. RUEDA DE EFECTOS: Use esta rueda para controlar el efecto.
16. MODO DE LA RUEDA DE EFECTOS: Use este interruptor para ajustar el modo de la rueda
(RETURN permite que el efecto pare automáticamente cuando pare la rueda – HOLD mantiene
el efecto activado hasta que la rueda de mueva a RETURN).
Page 7

17. PUERTA DEL CD: Presione la puerta para insertar o retirar el CD. Cada presión abrirá o
cerrará la puerta.
18. TIEMPO: Conmuta la pantalla de tiempo entre el tiempo transcurrido del tema, y el tiempo
remanente de todo el CD.
19. MODO: Permite reproducir todos los temas en orden (predeterminado), reproducir sólo una
pista (SINGLE) o repetir pistas (REPEAT).
20. BÚSQUEDA: Se usa para buscar rápidamente por la música. Cuando la música está en pausa,
puede avanzar lentamente para establecer un punto de señal (cue).
21. SELECCIÓN DE PISTA: Se usa para seleccionar la pista o tema a reproducirse.
22. PITCH: El pitch puede variarse continuamente hasta +/-10% al mover la perilla. Al variar el
pitch, puede cambiar la sensación de la música. Puede también cambiar el tempo con el pitch
y conseguir que coincida el tempo de 2 canciones.
23. PITCH BEND (inflexión del tono): Desplaza el tempo de la música temporariamente.
24. CUE: Presionando el botón CUE, se vuelve al último punto de cue ajustado.
25. ARRANQUE/PAUSA (Botón Reproducir/Pausa) – Cada vez que se presiona el botón
PLAY/PAUSE (REPRODUCCIÓN/PAUSA), la música comienza o hace una pausa. Mientras se
reproduce la música, si presiona este botón para hacer una pausa, y lo presiona otra vez para
CARACTERÍSTICAS DE LA RADIO
REPRODUCCIÓN Y CUE
Pulsando el botón “PLAY/PAUSE” se pondrá el disco en funcionamiento. Pulsando el botón "CUE" se el disco
comenzará de nuevo en la misma posición en la que comenzó anteriormente. Esto es lo que se llama
punto cue. Pulsando los botones de “PLAY/PAUSE” y “CUE” alternativamente, el disco podrá volver al
mismo punto cue y reproducirse cuantas veces desee. Esta función se denomina back cue.
volver a reproducir, se ajustará un punto de señal (cue) en ese punto de la música.
26. ANTENA: Debe ser elevada y posicionada para obtener una buena recepción de FM.
27. BÚSQUEDA: Se usa para seleccionar la estación de radio.
28. MODO: Se usa para conmutar la recepción mono o estéreo. Para las señales débiles, el modo
mono puede ofrecer una mejor recepción.
OPERACIONES DE REPRODUCCIÓN/PAUSA Y CUE
Pulse "PLAY/PLAUSE" para
que comience la música
Reproduzca la música
durante cierto tiempo
Pulse "CUE" para volver al
último punto de partida
Posición en el disco
REPRODUCCIÓN, PAUSA Y CUE
Cuando se pausa la reproducción y se arranca otra vez, la posición de retorno para el cue hacia atrás back cue será
actualizada a esta nueva posición.
Pulse "PLAY/PLAUSE" para
que comience la música
MODIFICACIÓN DE PUNTOS CUE
Cuando se presiona el botón de búsqueda mientras en un punto de señal (cue), el punto de señal se moverá. El
reproductor de CD reproducirá repetidamente fragmentos cortos del CD a medida que lo mueve a la posición
deseada. Pulsando “PLAY/PAUSE” y luego “CUE” podrá confirmar que el nuevo punto cue es el que usted desea.
Ajuste el punto "CUE" con la rueda.
Pulse "PLAY/PLAUSE" para
que comience la música
Operación de back cue
Pulse "PLAY/PLAUSE" para
Reproduzca la música
durante cierto tiempo
Reproduzca la música
durante cierto tiempo
Operación de back cue
que pare la música
Pulse "PLAY/PLAUSE" para
que comience la música
Pulse "CUE" para volver al
último punto de partida
Reproduzca la música
durante cierto tiempo
Operación de back cue
Posición en el disco
Pulse "CUE" para volver al
último punto de partida
Posición en el disco
Page 8

DEUTSCH
SCHNELLAUFBAU
1. Überprüfen Sie, dass sich alle auf der Vorderseite dieser Anleitung aufgeführten Gegenstände
in der Schachtel befinden.
2. LESEN SIE DAS SICHERHEITSVORSCHRIFTENHEFT VOR INBETRIEBNAHME DES
PRODUKTS.
3. Sehen Sie sich dieses Aufbaudiagramm genau an.
4. Stellen Sie sicher, dass alle Geräte ausgeschaltet sind und alle Fader und Lautstärkenregler
auf “null” stehen.
5. Schließen Sie das Mikrofon (wahlweise) wie im Diagramm gezeigt an.
6. Schließen Sie einen externen Verstärker oder eine Heimstereoanlage wie im Diagramm gezeigt
an (wahlweise)
7. Schließen Sie alle Geräte an das Stromnetz an.
8. Schalten Sie alle Geräte in der folgenden Reihenfolge ein.
• iCD04FX
• vorhandene Verstärker oder Wiedergabegeräte
9. Beim Ausschalten drehen Sie diese Reihenfolge jeweils um, indem Sie
• vorhandene Verstärker oder Wiedergabegeräte
• und dann die iCD04FX ausschalten
10. Registrieren Sie das Produkt auf der Webseite http://www.ion-audio.com.
Weitere Informationen über dieses Produkt finden Sie auf der Webseite http://www.ion-audio.com.
Dieses Produkt kann mit 6 “D-Zellen”-Batterien verwendet werden. Diese sollten wie oben und auf der
Klappe des Batteriefachs gezeigt eingelegt werden.
INSTALLATION DER BATTERIEN
BATTERIEFACH: Legen Sie 6 “D-UM1”-Batterien zum Betrieb ohne Netzanschluss ein.
Page 9
VORDERSEITE
1. LINE-AUSGANG: Dieser Ausgang dient zum Anschluss von externen Audiosystemen wie z. B.
ein PA-Lautsprechersystem, aktive Monitoren oder eine Heimstereoanlage. Ist ein Gerät
angeschlossen, schalten sich die internen Lautsprecher automatisch aus. Der Pegel des
Master-Stereoausgabesignals wird über den Master-Fader gesteuert.
2. MIC-EINGANG: Schließen Sie hier ein Mikrofon mit einem 6,3 mm-Stecker an.
3. EIN-AUS: Schalten Sie hier das Gerät ein. Tun Sie dies, bevor Sie vorhandene externe
Audiogeräte einschalten und schalten Sie diese aus, bevor Sie die iCD04FX ausschalten.
4. Kopfhörerbuchsen: Zum Anschluss von Kopfhörern ausgerüstet mit entweder 3,1 mm oder 6,3
mm Steckern.
SEITENKONSOLE
5. NETZANSCHLUSS: Dieses Gerät wurde zum Betrieb mit dem mitgelieferten Netzkabel
entworfen. Schließen Sie zunächst das Netzkabel an das ausgeschaltete Gerät an und stecken
BEDIENELEMENTE LAUTSTÄRKE/MISCHPULT
BEDIENELEMENTE EFFEKTE
BEDIENELEMENTE CD-SPIELER
Sie diese dann in die Steckdose. Stecken Sie das Kabel während Batteriebetrieb aus.
6. EINGABEAUSWAHL: Zur Auswahl der Tonquelle für Kanal 1 (CD oder FM-Radio).
7. KANAL-FADER: Zur Steuerung der Lautstärke des Kanals.
8. CROSSFADER: Blendet sauber zwischen den beiden Eingabekanälen. "Ganz links" zur Auswahl
von Kanal 1. "Ganz rechts" zur Auswahl von Kanal 2. Befindet sich der Crossfader in der Mitte,
sind beide zugeordneten Kanäle live. Benutzen Sie den Crossfader zum schnellen und
stufenlosen Blenden von einem Kanal zum anderen.
9. MIC-LAUTSTÄRKE: Zur Steuerung des Mikrofonpegels.
10. MASTER-LAUTSTÄRKE: Zur Steuerung des gesamten Ausgabepegels.
11. STEREO-EQ: Einstellung der Höhen und Bässe der Master-Ausgabe.
12. KANAL-CUE-AUSWAHL: Sendet Tonausgabe vom Kanal an Ihren Kopfhörer.
13. CUE-(KOPFHÖRER)-LAUTSTÄRKE: Steuert die Lautstärke Ihres Kopfhörers. (HINWEIS: Stellen
Sie sicher, dass der Lautstärkeregler auf AU S steht, bevor Sie einen Kopfhörer anschließen,
um bleibende Hörschäden zu vermeid en.)
14. EFFEKTAUSWAHL: Wählen Sie den gewünschten Effekt mit diesem Drehregler. Die Effekte
enthalten DJ-Effekte wie Scratching, Filter, Flanger (um den “Jet-Wash Sound” zu erzeugen),
Pan, und Vocoder.
15. EFFEKTRAD: Dieses dient zur Steuerung des Effekts.
16. BETRIEBSMODUS EFFEKTRAD: Dieser Schalter dient zur Einstellung des Radbetriebs (RETURN
führt zum automatischen Anhalten des Effekts, wenn das Rad angehalten wird – HOLD behält
den Effekt bei, bis der Schalter auf RETURN geschaltet wird).
17. CD-KLAPPE: Drücken Sie die Klappe herunter, um eine CD einzulegen oder herauszunehmen.
Jedes Betätigen führt zum Öffnen oder Schließen der Klappe.
18. ZEIT: Zum Umschalten der Zeitanzeige zwischen abgelaufener oder verbleibender Zeit des
Musikstücks oder der verbleibenden Zeit der gesamten CD.
Page 10

19. MODUS: Zum Abspielen der Musikstücke in Reihenfolge (Standard), nur eines bestimmten
Musikstücks (SINGLE) oder zum wiederholten Abspielen der Musikstücke (REPEAT).
20. SUCHE: Zum schnellen Absuchen der Musikstücke. Wird der Abspielbetrieb pausiert, können
Sie langsam die Musikstücke absuchen, um einen Cue-Punkt festzulegen.
21. MUSIKSTÜCKAUSWAHL: Zur Auswahl eines abzuspielenden Musikstücks.
22. TONLAGE: Die Tonlage kann fortwährend bis zu +/-10% durch Verschiebung des Reglers
verändert werden. Durch Veränderung der Tonlage verändert sich die Musik. Sie können auch
das Tempo mit der Tonlage verändern und das Tempo zweier Musikstücke aneinander
anpassen.
23. TONLAGENVERBIEGUNG: Temporäre Verschiebung des Tempos der Musik.
24. CUE: Wird die CUE-Taste gedrückt, erfolgt eine Rückkehr zum zuletzt gesetzten CUE-Punkt.
25. START/PAUSE (Play/Pause-Taste) – Jedes Drücken der PLAY/PAUSE-Taste führt zum Abspielen
oder Unterbrechen der Musik. Wird ein Musikstück abgespielt und Sie drücken diese Taste,
um dieses zu unterbrechen und Sie die Taste erneut drücken, um den Spielbetrieb wieder
BEDIENELEMENTE RADIO
PLAY & CUE
Wird die “PLAY/PAUSE”-Taste gedrückt, wird die CD abgespielt. Wird die “CUE”-Taste gedrückt, wird die CD
auf den letzten Abspielstart zurückgesetzt. Dies wird Cue-Punkt genannt. Werden die “PLAY/PAUSE”- und
die “CUE”-Taste abwechselnd gedrückt, kann die CD beliebig oft vom Cue-Punkt abgespielt werden. Diese
Funktion wird als Back-Cue bezeichnet.
aufzunehmen, wird an dieser Stelle des Musikstücks ein CUE-Punkt gesetzt.
26. ANTENNE: Sollte nach oben gestellt und auf guten FM-Empfang eingestellt werden.
27. SUCHE: Zur Auswahl von Radiostationen.
28. BETRIEBSART: Hier kann zwischen Mono- und Stereoempfang umgeschaltet werden. Bei
schwachem Signal kann Mono zu einem insgesamt besseren Empfang führen.
PLAY / PAUSE & CUE SPIELBETRIEB
Drücken Sie "PLAY/PAUSE",
um Musik abzuspielen.
Abspielintervall
Drücken Sie "CUE", um zum letzten
Anfangspunkt zurückzukehren
Position auf Disc
PLAY, PAUSE & CUE
Ist der Abspielbetrieb durch die PAUSE-Taste angehalten und dann wieder aufgenommen worden, wird die
Rückkehrposition für das Back-Cue auf diese neue Position festgelegt.
Drücken Sie "PLAY/PAUSE",
um Musik abzuspielen.
Abspielintervall Abspielintervall
BEARBEITUNG VON CUE-PUNKTEN
Wird die Suchtaste gedrückt, während sich die CD an einem Cue-Punkt befindet, wird dieser Cue-Punkt verlegt.
Der CD-Spieler wird, während Sie die gewünschte Position ansteuern, wiederholt kleinere Stücke der CD
abspielen. Durch Drücken der Taste “PLAY/PAUSE” gefolgt von “CUE” können Sie bestätigen, dass der neue
Cue-Punkt von Ihnen gewünscht wird.
Stellen Sie den "CUE"-
Drücken Sie "PLAY/PAUSE",
um Musik abzuspielen.
Rück-Cue-Funktion
Drücken Sie "PLAY/PAUSE",
um das Abspielen der
Musik zu pausieren.
Abspielintervall
Rück-Cue-Funktion
Drücken Sie "PLAY/PAUSE",
um das Abspielen der
Musik zu starten.
Rück-Cue-Funktion
Drücken Sie "CUE", um zum letzten
Anfangspunkt zurückzukehren
Drücken Sie "CUE", um zum letzten
Anfangspunkt zurückzukehren
Position auf Disc
Position auf Disc
Page 11

FRANÇAIS
Guide d’installation rapide
1. Assurez-vous que tous les articles énumérés sur la page couverture de ce guide sont inclus
dans la boîte.
2. VEUILLEZ LIRE LE LIVRET DES CONSIGNES DE SÉCURITÉ AVANT D'UTILISER LE
PRODUIT.
3. Examinez bien le schéma d'installation.
4. Assurez-vous que tous les appareils sont hors tension et que tous les atténuateurs et les
boutons de réglages pour le volume sont réglés à « zéro ».
5. Branchez le microphone (optionnel) tel qu'indiqué sur le schéma.
6. Branchez un amplificateur externe ou un stéréo maison tel qu'indiqué sur le schéma
(optionnel).
7. Branchez tous les appareils à une prise de courant alternatif (AC).
8. Mettre tous les appareils sous tension dans l'ordre suivant :
• iCD04FX
• tous amplificateurs ou appareils de sortie
9. Pour mettre hors tension, toujours inverser l'opération :
• tous amplificateurs ou appareils de sortie
• iCD04FX
10. Allez à http://www.ion-audio.com pour enregistrer le produit.
Plus d'information sur ce produit est disponible au site internet http://www.ion-audio.com.
Cet appareil fonctionne avec 6 piles de format « D ». Elles doivent être insérées tel qu’indiqué ci-dessus
et sur le couvercle du compartiment des piles.
INSTALLATION DES PILES
COMPARTIMENT À PILES : Insérez 6 piles de format « D » « UM1 » pour un fonctionnement sans
alimentation électrique.
Page 12

PANNEAU AVANT
1. SORTIE LIGNE : Cette sortie sert à connecter un système audio externe tel qu'un système PA, des
moniteurs amplifiés ou un stéréo maison. Lorsqu'un appareil est raccordé, les haut-parleurs internes
se désactivent automatiquement. Le niveau du signal de la sortie stéréo principale est commandé par
l’atténuateur principal.
2. ENTRÉE MICRO : Branchez un microphone doté d’un connecteur de ¼ po dans cette entrée.
3. Alimentation électrique (POWER) : Utilisez cet interrupteur pour mettre l'appareil sous tension. Mettre
l’appareil sous tension avant les appareils audio externes et mettre les appareils audio externes hors
tension avant l’appareil.
4. Prise casque d'écoute : Permet de brancher un casque d'écoute doté de prise de ⅛ po ou de ¼ po.
PANNEAU DE CÔTÉ
5. ENTRÉE POUR CÂBLE D'ALIMENTATION CA : Cet appareil est conçu pour fonctionner avec le câble
d'alimentation fourni. Lorsque l'appareil est hors tension, branchez le câble d'alimentation dans
l'appareil, puis dans la prise de courant. Ne rien brancher dans cette prise lors du fonctionnement sur
COMMANDES DU VOLUME/CONSOLE DE MIXAGE
CARACTÉRISTIQUES DES EFFETS
CARACTÉRISTIQUES DU LECTEUR DE DISQUE COMPACT
pile.
6. SÉLECTEUR D’ENTRÉE : Sélectionne la source qui sera acheminée au Canal 1 (disque compact ou
syntonisateur FM).
7. ATTÉNUATEUR DE CANAL (CHANNEL FADER) : Permet d'ajuster le niveau du signal audio du canal.
8. ATTÉNUATEUR CROSSFADER : Effectue la transition entre les deux canaux d'entrée. Lorsque
l’atténuateur est à l'extrême gauche, il sélectionne le Canal 1, lorsqu’il est à l’extrême droite, il
sélectionne le Canal 2 et lorsqu'il est à mi-chemin entre les deux extrémités, les deux canaux sont
sélectionnés. Utilisez l'atténuateur pour effectuer des transitions rapides et en douceur d’un canal à
l’autre.
9. VOLUME MICRO : Permet d'ajuster le niveau du signal audio du microphone.
10. RÉGLAGE PRINCIPAL DU VOLUME : Contrôle le niveau de sortie générale.
11. ÉGALISATION STÉRÉO : Permet d'ajuster le niveau des fréquences aiguës et graves du niveau de
sortie générale.
12. SÉLECTEUR DU CANAL DE PRÉ-ÉCOUTE : Permet d’acheminer le signal audio vers le casque d’écoute.
13. VOLUME DE PRÉ-ÉCOUTE (CASQUE D’ÉCOUTE) : Permet d'ajuster le volume du casque d’écoute.
(Remarque : Veuillez vous assurer que le réglage du volume est à la position Arrêt (OFF) avant de
brancher tout casque d’écoute pour éviter d’endommager votre ouïe.
14. SÉLECTEUR D’EFFET : Utilisez ce bouton de réglage pour sélectionner l’effet désiré. Ceux-ci incluent,
les effets typiques des DJ tels que le scratching, les filtres, les effets de flanger (pour créér un effet
d'avion à réaction), le panoramique et le vocodeur.
15. ROUE DE RÉGLAGE DE L’EFFET : Permet de modifier l'effet.
16. MODE DE LA ROUE DE RÉGLAGE DE L’EFFET : Utilisez le sélecteur de mode de la roue de réglage de
l’effet (le mode retour (RETURN) a pour but d'arrêter automatiquement l’effet lorsque la roue s’arrête;
le mode en garde (HOLD) permet à l’effet de continuer jusqu’à ce que le sélecteur soit à nouveau en
mode retour (RETURN).
17. PORTE DU LOGEMENT POUR CD : Appuyez sur la porte pour insérer ou retirer un disque. À chaque
fois que vous appuyez sur la porte, elle s’ouvre ou se ferme.
Page 13

18. Durée (Time) : Modifie le mode d'affichage de la durée entre le temps de lecture écoulé, le temps
restant de la piste et le temps restant sur le disque.
19. MODE : Permet à toutes les pistes de jouer dans l’ordre (défaut) une seule piste (SINGLE) ou de
répéter des pistes (REPEAT).
20. Recherche (SEARCH) : Pour défiler à travers la musique rapidement. Lorsque la musique est mise en
mode pause, il est possible de défiler à travers la musique doucement pour programmer un nouveau
point de repère.
21. SÉLECTEUR DE PISTE : Permet de sélectionner la piste à jouer.
22. TOUCHE DE VITESSE DE LECTURE : La tonalité et la vitesse peuvent être modifiées jusqu’à +/-10 %
en ajustant le bouton. En modifiant la tonalité et la vitesse vous pouvez changer la musique. Il est
également possible de modifier le tempo en même temps que la tonalité et de faire en sorte que les
tempo de 2 chansons soient identiques.
23. MODIFICATION TEMPORAIRE DE LA TONALITÉ ET DE LA VITESSE (PITCH BEND) : Modifie
temporairement le tempo de la musique.
24. REPÉRAGE (CUE) : Appuyer sur cette touche permet de retourner au dernier point de repérage
mémorisé.
25. TOUCHE DE LECTURE/PAUSE( Play/pause) : Appuyer sur cette touche permet de lancer la lecture de la
musique ou de faire une pause. Lorsque la musique joue, si vous appuyez sur cette touche pour faire
CARACTÉRISTIQUES RADIO
LECTURE ET PAUSE
Appuyer sur la touche de lecture/pause (PLAY/PAUSE) permet de lancer la lecture du disque. Appuyer sur
la touche de repérage (CUE) permet de relancer le disque au même endroit où il avait été lancé. Ceci
s’appelle un point de repère. En appuyant en alternance la touche de lecture/pause (PLAY/PAUSE) et la
touche de recherche (CUE), le disque peut être lancé du point de repérage autant que vous le désirez.
Cette fonction s’appelle le repérage arrière (back cue).
une pause et appuyez de nouveau, un nouveau point de repère sera programmé.
26. ANTENNE : Doit être surélevée et positionnée pour une bonne réception FM.
27. RECHERCHE : Permet de syntoniser une station radio.
28. MODE : Permet de modifier le mode de réception entre mono et stéréo. Pour les signaux faibles, le
mode mono offre une meilleure réception générale.
LECTURE/PAUSE ET OPÉRATIONS DE RECHERCHE
LECTURE, PAUSE ET RECHERCHE
Lorsque vous passez du mode lecture au mode pause et retournez ensuite au mode lecture, cette nouvelle position
devient le nouveau point de repérage arrière.
L'ÉDITION DE POINTS DE REPÉRAGE
Lorsque la touche de recherche est enfoncée au point de repérage, ce point de repérage est déplacé. Le lecteur
de disque compact fait la lecture de petites parties du disque tout en se déplaçant vers la position désirée. Pour
accepter le nouveau point de repère, appuyez sur la touche de lecture/pause (PLAY/PAUSE) et ensuite sur la
touche de repérage (CUE).
Page 14

ITALIANO
IMPOSTAZIONE RAPIDA
1. Assicurarsi che tutti gli elementi elencati sul frontespizio di questo manuale siano inclusi nella
confezione.
2. PRIMA DI UTILIZZARE IL PRODOTTO LEGGERE IL LIBRETTO DELLE ISTRUZIONI DI
SICUREZZA.
3. Esaminare attentamente lo schema di montaggio.
4. Assicurarsi che tutti i dispositivi siano spenti e che i fader e le manopole di regolazione del
volume siano su “zero”
5. Collegare il microfono (opzionale) come indicato nello schema.
6. Collegare un amplificatore esterno o un home stereo come indicato nello schema (opzionale)
7. Inserire tutti i dispositivi nell’alimentazione.
8. Accendere tutto nel seguente ordine:
• iCD04FX
• amplificatori o dispositivi di uscita
9. Al momento dello spegnimento invertire sempre questa operazione spegnendo
• gli amplificatori o i dispositivi di uscita
• iCD04FX
10. Recarsi sul sito http://www.ion-audio.com per la registrazione del prodotto.
Ulteriori informazioni relative al prodotto possono essere trovate all’indirizzo http://www.ion-audio.com
Il prodotto può essere alimentato con 6 batterie “D” Cell. Queste vanno caricate come illustrato in
precedenza e sullo sportello dello scomparto batterie.
INSTALLAZIONE BATTERIE
SCOMPARTO BATTERIE: inserire 6 batterie “D” “UM1” per un uso separato dall’ingresso di
alimentazione c.a.
Page 15

PANNELLO ANTERIORE
1. USCITA DI LINEA: questa uscita serve al collegamento di un sistema audio esterno quale un
sistema di altoparlanti PA, un monitor oppure un home stereo. Quando il dispositivo è
collegato, gli altoparlanti interni verranno spenti automaticamente. Il livello del segnale di
uscita stereo master è regolato dal fader master.
2. INGRESSO MIC: inserire un microfono dotato di connettore da 1/4” a questo livello.
3. ALIMENTAZIONE: servirsi di questo interruttore per accendere l’apparecchio. Accendere
l’apparecchio prima di accendere i dispositivi audio esterni, e spegnere questi ultimi prima di
spegnere l’apparecchio.
4. Jack cuffie: servono al collegamento di prese da 1/8” o 1/4” per l’ascolto con le cuffie.
PANNELLO LATERALE
5. INGRESSO ALIMENTAZIONE CA: questo apparecchio è inteso per l’uso con il cavo di
alimentazione in dotazione. Ad alimentazione spenta, inserire innanzi tutto il cavo di
alimentazione a livello dell’apparecchio, quindi collegarlo alla presa di corrente. Lasciare
COMANDI VOLUME/MIXER
CARATTERISTICHE EFFETTI
CARATTERISTICHE LETTORE CD
l’apparecchio scollegato durante l’uso a batterie.
6. SELETTORE D’INGRESSI: seleziona la sorgente che verrà inviata al Channel 1 (sintonizzatore
CD o FM).
7. FADER CANALE: controlla il livello del volume di canale.
8. CROSSFADER: sfuma in maniera pulita tra i due canali d’ingresso. "Hard left" seleziona il
Channel 1. "Hard right" seleziona il Channel 2. Quando il crossfader è centrato, entrambi I
canali assegnati sono dal vivo. Servirsi del crossfader per sfumare rapidamente e senza
soluzione di continuità da un canale all’altro.
9. VOLUME MIC: regola il livello del microfono.
10. VOLUME MASTER: regola il livello di uscita generale.
11. STEREO EQ: regola gli acuti e i bassi dell’uscita master.
12. SELETTORE CHANNEL CUE: serve a indirizzare l’audio di canale alle cuffie.
13. VOLUME CUE (CUFFIE): regola il volume delle cuffie. (NOTA: assicurarsi che il volume sia su
OFF prima di inserire le cuffie per prevenire danni all’udito)
14. SELETTORE EFFETTI: servirsi di questa manopola per selezionare l’effetto desiderato. Questi
includono effetti da DJ quali lo scratching, filtri, flanger (per creare il suono di “rombo del
jet”), pan, e vocoder.
15. MANOPOLA EFFETTI: servirsi di questa manopola per controllare l’effetto.
16. MODALITÀ MANOPOLA EFFETTI: servirsi di questo interruttore per impostare la modalità
(RETURN fa sì che l’effetto si interrompa automaticamente quando la manopola si ferma –
HOLD mantiene l’effetto attivo fino a quando l’interruttore non viene spostato su RETURN).
17. SPORTELLO CD: premere lo sportello verso il basso per caricare o rimuovere un CD. Ciascuna
pressione aprirà o chiuderà lo sportello.
Page 16

18. TIME: commuta il display del tempo tra tempo trascorso della traccia, tempo rimanente della
traccia e tempo rimanente sull’intero CD.
19. MODE: permette la riproduzione di tutte le tracce in ordine (predefinito), di una singola traccia
(SINGLE) o di ripetere le tracce (REPEAT).
20. SEARCH: serve a muoversi rapidamente all’interno della musica. Quando la musica è in pausa,
si può far scorrere lentamente i brani per impostare un punto cue.
21. TRACK SELECT: serve a selezionare la traccia da riprodurre.
22. PITCH: è possibile modificare continuamente il pitch fino a +/-10% muovendo questa
manopola. Modificando il pitch potete cambiare le sensazioni trasmesse dalla musica. Potete
anche cambiare il tempo con pitch e far combaciare il tempo di 2 canzoni.
23. PITCH BEND: sposta temporaneamente il tempo della musica.
24. CUE: premendo il tasto CUE si torna all’ultimo punto cue impostato.
25. START/PAUSE (Tasto Play/Pause) – ciascuna pressione del tasto PLAY/PAUSE avvia o
interrompe la musica. Se durante la riproduzione viene premuto questo tasto per
interrompere momentaneamente la musica, per riprendere la riproduzione va premuto
CARATTERISTICHE RADIO
PLAY & CUE
La pressione del tasto “PLAY/PAUSE” avvia la riproduzione del disco. La pressione del tasto “CUE”
imposterà il disco a livello dell’ultimo punto in cui è stato avviato. Questo è chiamato punto cue. Premendo
in maniera alternata i tasti “PLAY/PAUSE” e “CUE”, il disco può essere fatto tornare ad un punto cue e
riprodurre da qui infinite volte. Questa funzione è chiamata “back cue”.
nuovamente, e un punto cue verrà impostato a quel livello.
26. ANTENNA: alzare e posizionare l’antenna per una buona ricezione FM.
27. SEARCH: serve a selezionare la stazione radio.
28. MODE: serve per passare da una ricezione mono a stereo. In caso di segnali bassi, la
modalità mono offre una migliore ricezione.
FUNZIONI PLAY / PAUSE & CUE
Premere "PLAY/PAUSE"
per avviare la musica
Intervallo di Riproduzione
Premere "CUE" per tornare
all'ultimo punto di avvio
Posizione sul disco
PLAY, PAUSE & CUE
Quando la riproduzione è stata interrotta momentaneamente e riavviata, la posizione di ritorno per il back cue verrà
aggiornata con questa nuova posizione.
Premere "PLAY/PAUSE"
per avviare la musica
Intervallo di Riproduzione Intervallo di Riproduzione
EDITING DI PUNTI CUE
Premendo il tasto search a livello di un punto cue, questo verrà spostato. Il lettore CD riprodurrà ripetutamente
piccole parti del CD man mano che viene spostato verso la posizione desiderata. Premendo “PLAY/PAUSE” e
quindi “CUE” verrà confermato il nuovo punto cue.
Regolare il punto "CUE"
Premere "PLAY/PAUSE"
per avviare la musica
Operare il Back Cue
Premere "CUE" per tornare
all'ultimo punto di avvio
Intervallo di Riproduzione
Operare il Back Cue
Premere "PLAY/PAUSE"
per avviare la musica
Operare il Back Cue
Premere "CUE" per tornare
all'ultimo punto di avvio
Premere "CUE" per tornare
all'ultimo punto di avvio
Posizione sul disco
Posizione sul disco
 Loading...