

Page 1

Flash Cube
Quickstart Guide English ( 3 – 6 )
Guía de inicio rápido Español ( 7 – 10 )
Guide d'utilisation rapide Français ( 11 – 14 )
Guida rapida Italiano ( 15 – 18 )
Schnellstart-Anleitung Deutsch ( 19 – 22 )
Snelstartgids Nederlands ( 23 – 26 )
Appendix English ( 27 )
Page 2

Page 3
Quickstart Guide (English)
Introduction
1. Make sure all items listed in the Box Contents section are included in the box.
2. READ SAFETY INSTRUCTION BOOKLET BEFORE USING THE PRODUCT.
Box Contents
Flash Cube
Remote Control
1/8” Stereo Aux Cable
Quickstart Guide
Safety & Warranty Information Booklet
Support
For the latest information about this product (system requirements, compatibility information,
etc.) and product registration, visit ionaudio.com.
Quick Setup
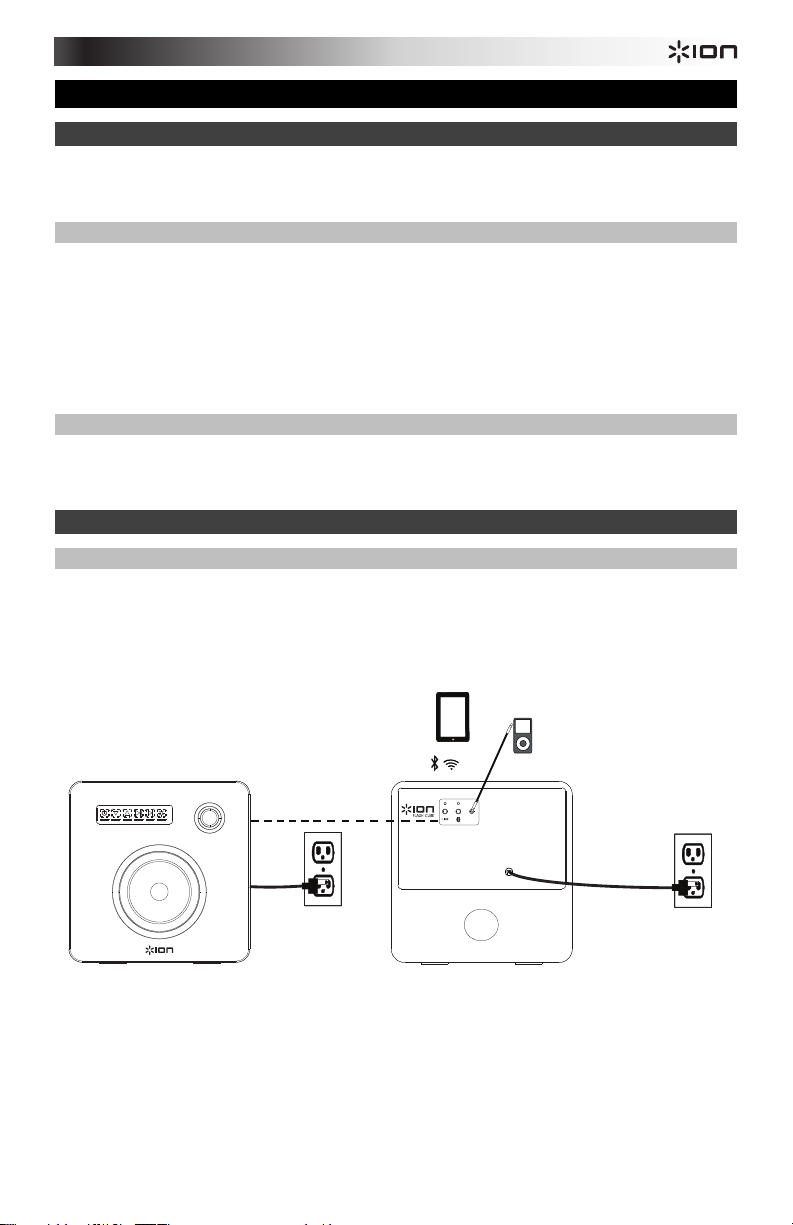
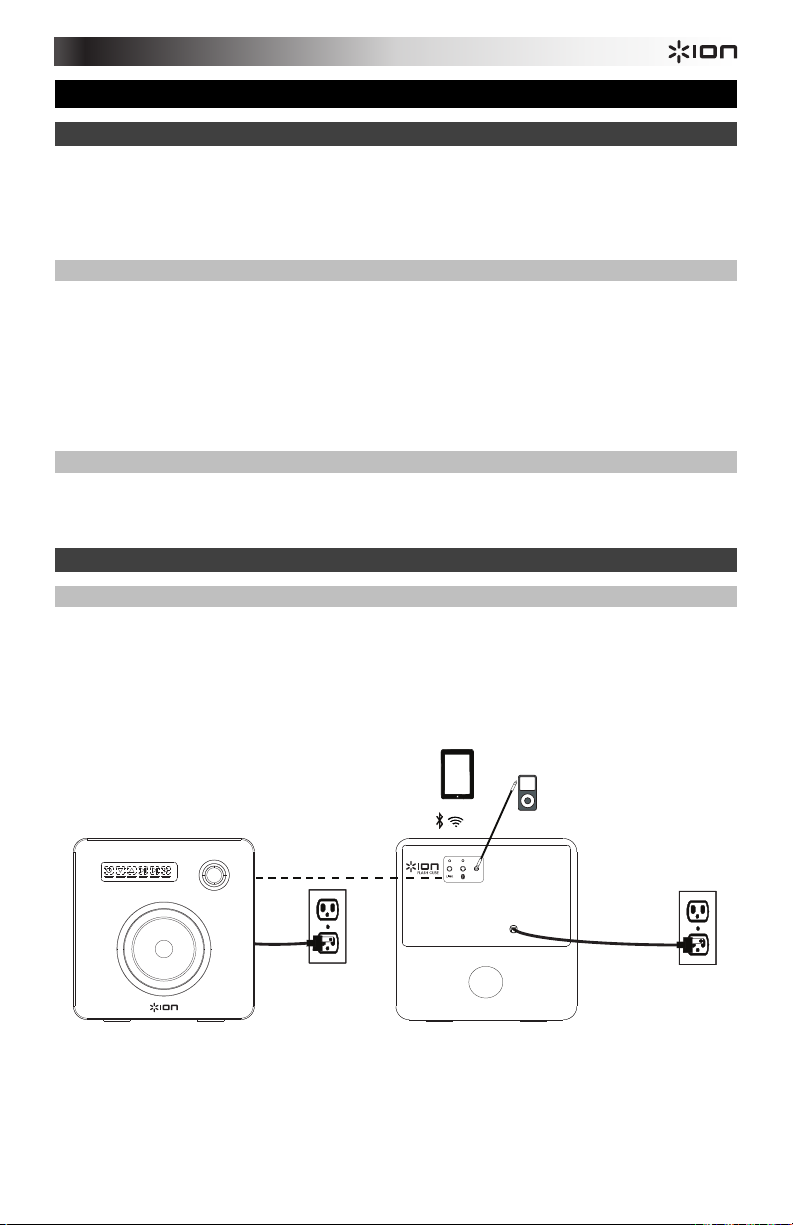
Connection Diagram
Items not listed in the Box Contents section are sold separately.
Second Flash Cube
Wireless
Stereo Link
Power
Bluetooth Device
(smartphone, tablet, etc.)
Connecting to one Flash Cube:
1. Power on Flash Cube.
2. Press and Release the Bluetooth Connect button to enter Connecting Mode.
3. Navigate to your device’s Bluetooth setup screen, nd Flash Cube, and connect.
4. To disconnect, hold the Bluetooth Connect button on Flash Cube.
Note: The Bluetooth LED will be blinking if not yet connected.
Once connected, the LED will be solid.
AUX IN
Linking two Flash Cube units:
1. Power on each Flash Cube.
2. If necessary, disconnect previous Bluetooth connections by holding down
the Bluetooth Connect button for 3 seconds.
3. Press and Release the Link button on each Flash Cube.
4. Press and Release the Bluetooth Connect button on the Flash Cube
that you want to be the "master" (left channel).
5. Navigate to your device’s Bluetooth setup screen, nd Flash Cube, and connect.
The speakers will relink automatically the next time they are both powered on.
6. To disconnect linking, hold the Link button on the
“master” Flash Cube for 5 seconds.
For detailed instructions, please see the included Quickstart Guide.
Aux Audio Source
(MP3 Player, CD Player,
Stereo Receiver, etc.)
Power
3
Page 4
3
6
7
8
9
10
1
2 4 5
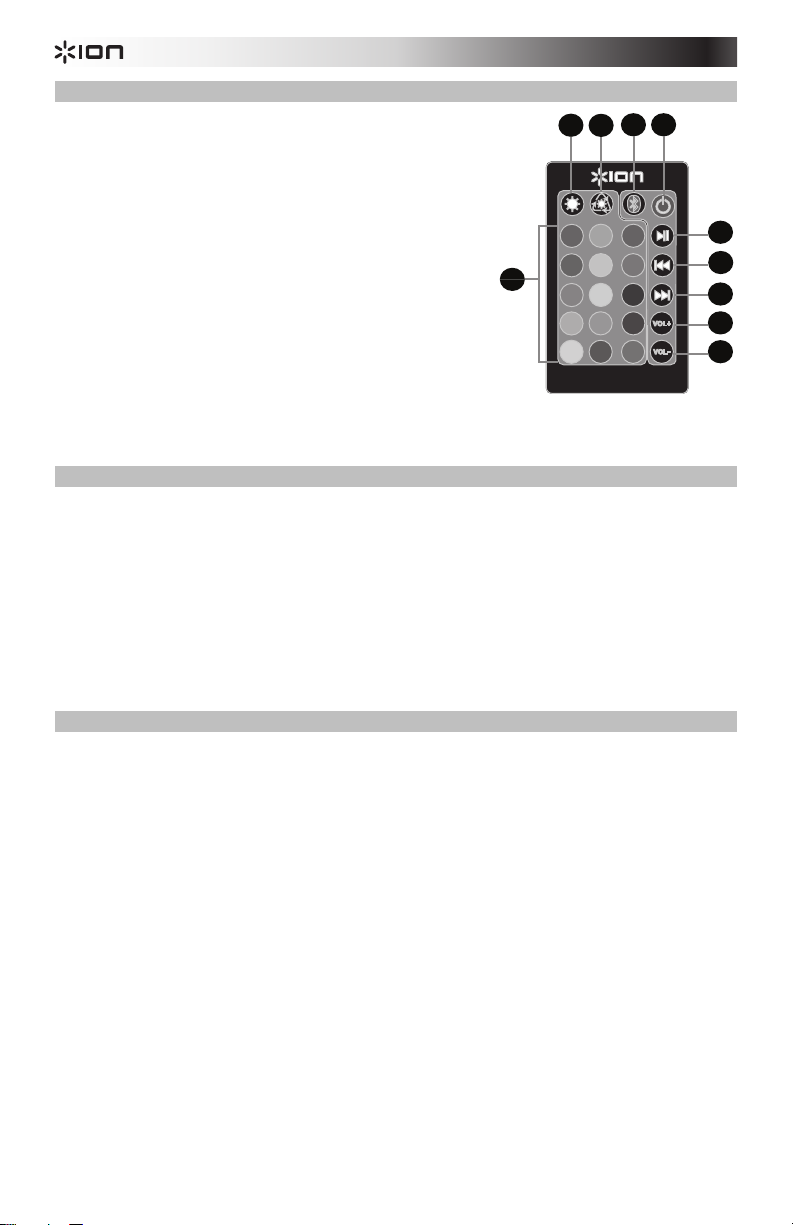
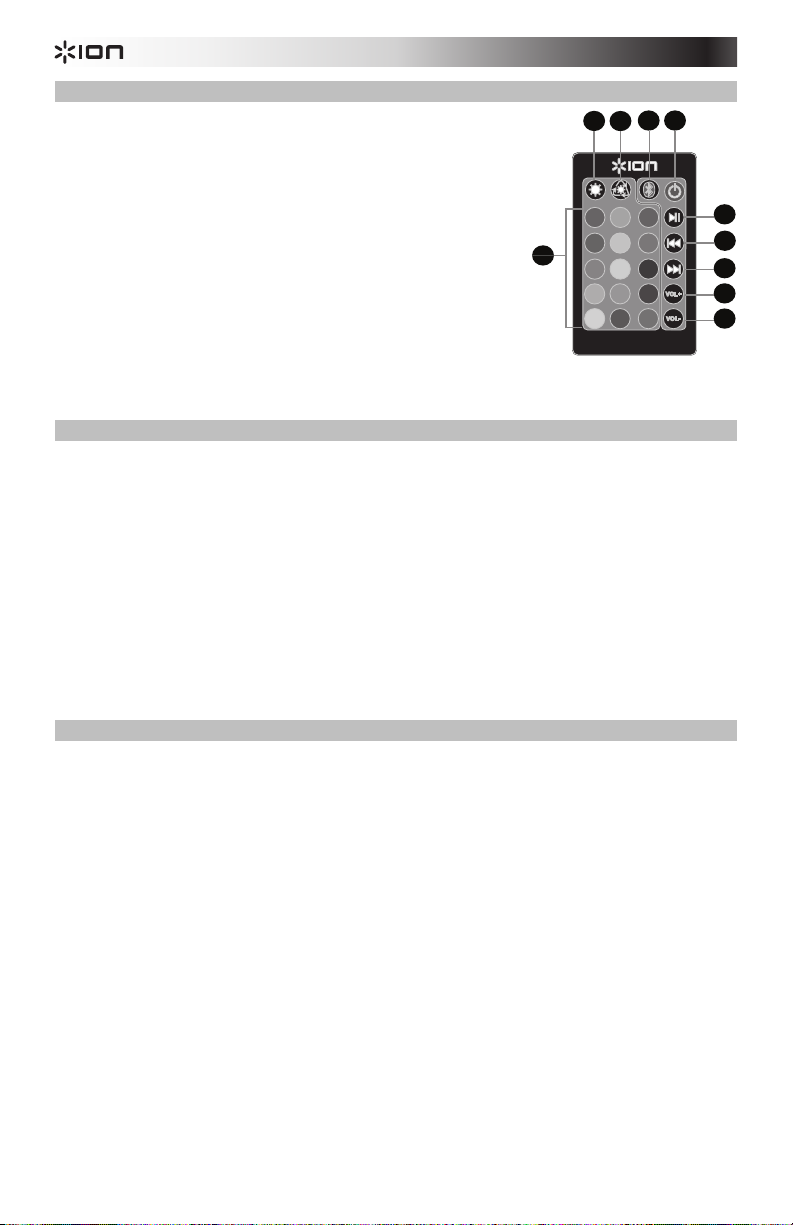
Remote Control
1. LEDs On/Off
2. LED Mode Select
3. LED Color Select
4. Bluetooth
5. Power On/Off
6. Play/Pause
7. Previous Track *
8. Next Track *
9. Volume Up
10. Volume Down
* Note: With some apps, pressing the Previous Track button or Next Track button may go to
another playlist or music genre.
®
Connecting
3
Bluetooth Connecting with Flash Cube
1. Press and hold the power button for two seconds to power on Flash Cube.
2. Press and release the Bluetooth Connecting button to enter Connecting Mode. Flash
Cube's Bluetooth LED will blink during the connection process.
3. Navigate to your device’s Bluetooth setup screen, find Flash Cube, and connect. Flash
Cube’s Bluetooth LED will light up solid when it is connected.
Note: If you experience trouble in connecting, select Forget this Device on your
Bluetooth device and try to connect again.
4. To disconnect, hold the Bluetooth Connecting button on Flash Cube for 3 seconds.
Speaker Linking
To link two Flash Cubes together:
1. Power on each Flash Cube.
2. If necessary, disconnect previous Bluetooth connections by holding down the Bluetooth
Connecting button for 3 seconds.
3. Press and release the Link button on each Flash Cube. Flash Cube's Link LED will blink
and a beeping tone will sound on each Flash Cube during the linking process. Linking
may take up to a minute. Once the two Flash Cubes are fully linked, the Link LEDs on
both Flash Cubes will be lit solid.
4. Press and release the Bluetooth Connecting button on the Flash Cube that you want to
be the master (left channel).
5. Navigate to your device’s Bluetooth setup screen, find Flash Cube, and connect. The
speakers will re-link automatically the next time they are both powered on.
6. To disconnect linking, hold the Link button on the master Flash Cube for 5 seconds.
Note: When using the remote, there will be a response delay of a few seconds with the play
and pause commands.
4
7
10
Page 5
1
2 3 4 5 6
8
9
5
6
7
1
2
4
7
3
Features
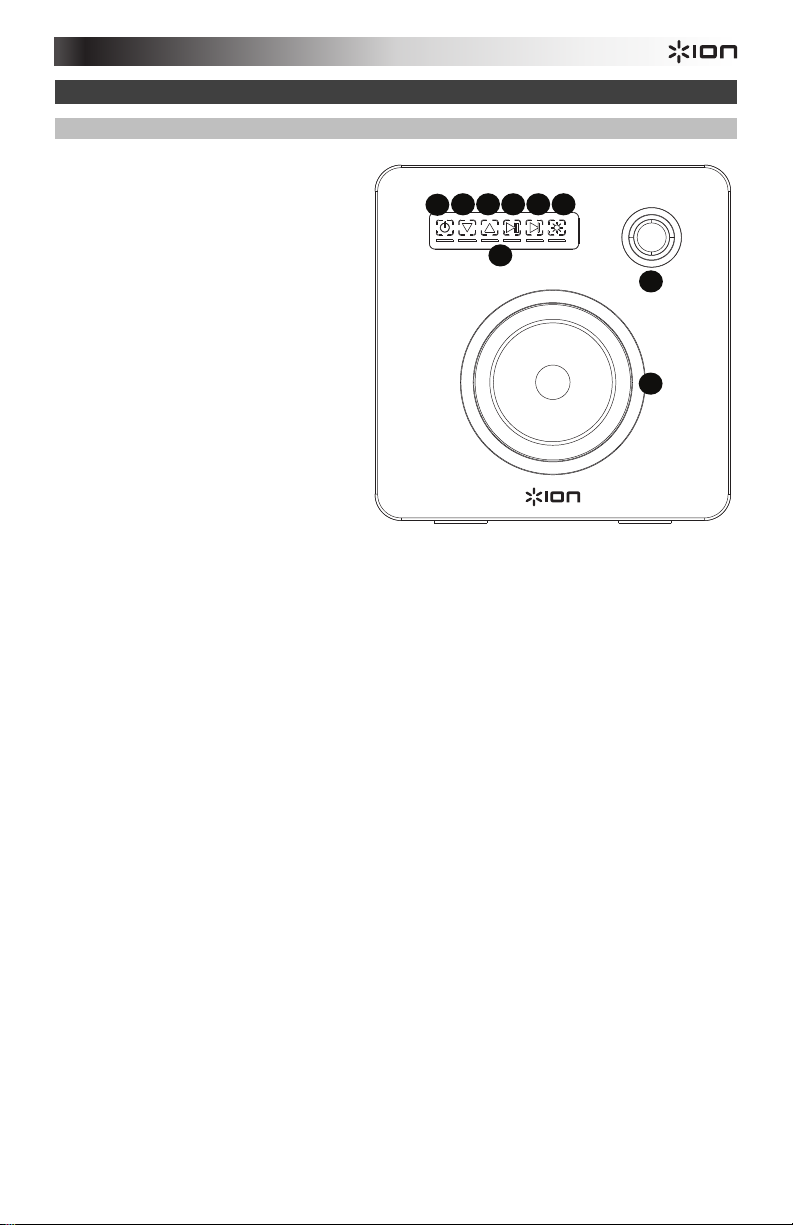
Front Panel
1. Power: Press and hold this
capacitive touch button for 2
seconds to power Flash Cube on or
off.
Note: Flash Cube will power off
after 1 hour if no audio is playing
and there is no Bluetooth
connection.
2. Volume Down: Press and release
this capacitive touch button to
decrease the speaker volume.
3. Volume Up: Press and release this
capacitive touch button to increase
the speaker volume.
4. Play/Pause: Press and release this
capacitive touch button to play or
pause the sound source.
5. Next Track: Press and release this
capacitive touch button to skip to the next track.
Note: With some apps, pressing the Next Track button may go to another playlist or
music genre.
6. Light Mode: Press and release this capacitive touch Light Mode button to toggle
through these different options:
• Color Cycle: The lights slowly glow and cycle through colors. This is the default
mode when Flash Cube is first powered on. Once the speaker is powered on, the
lights will turn on before any music starts.
• Beat Sync: The lights react to the beat of the music.
• OFF: The lights are turned off.
7. Volume LEDs: These LED segments light up as the volume control is adjusted.
8. Tweeter: Outputs the high frequencies of the sound source.
9. Woofer: Outputs the low frequencies of the sound source.
5
Page 6
5
6
1
2
4
7
3
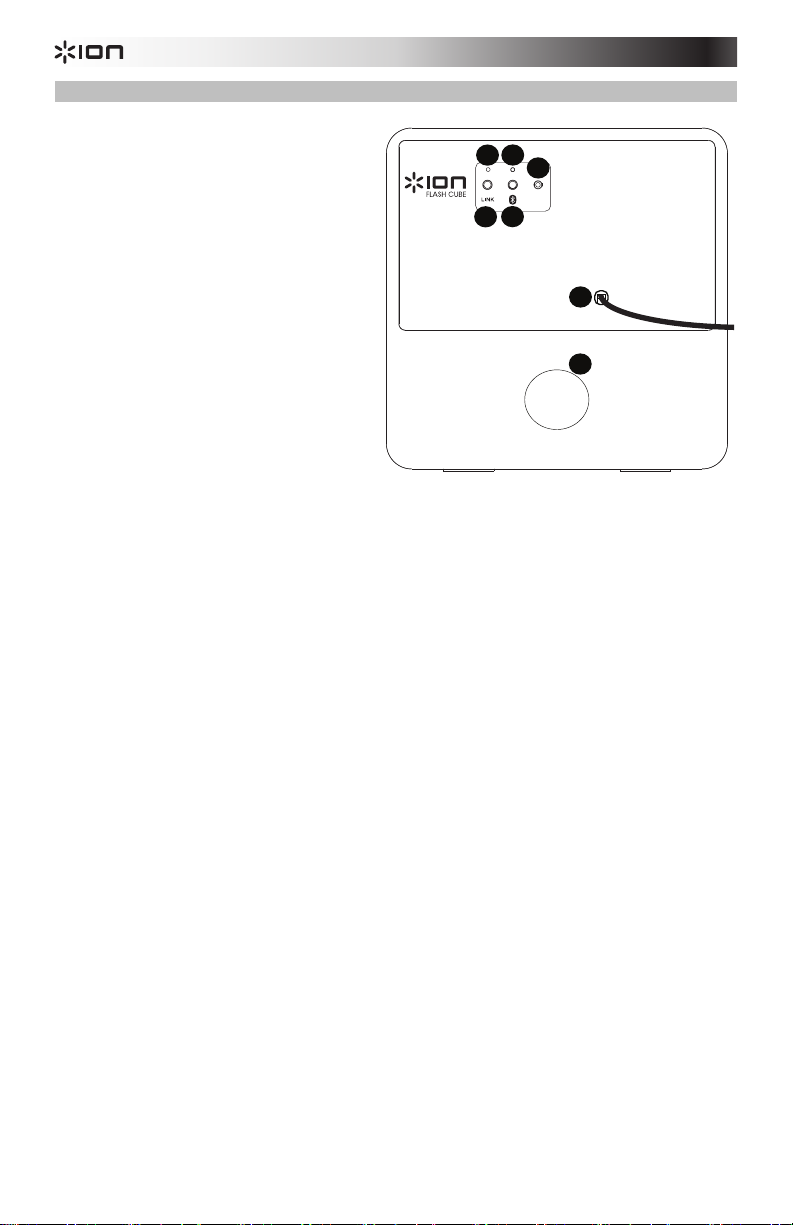
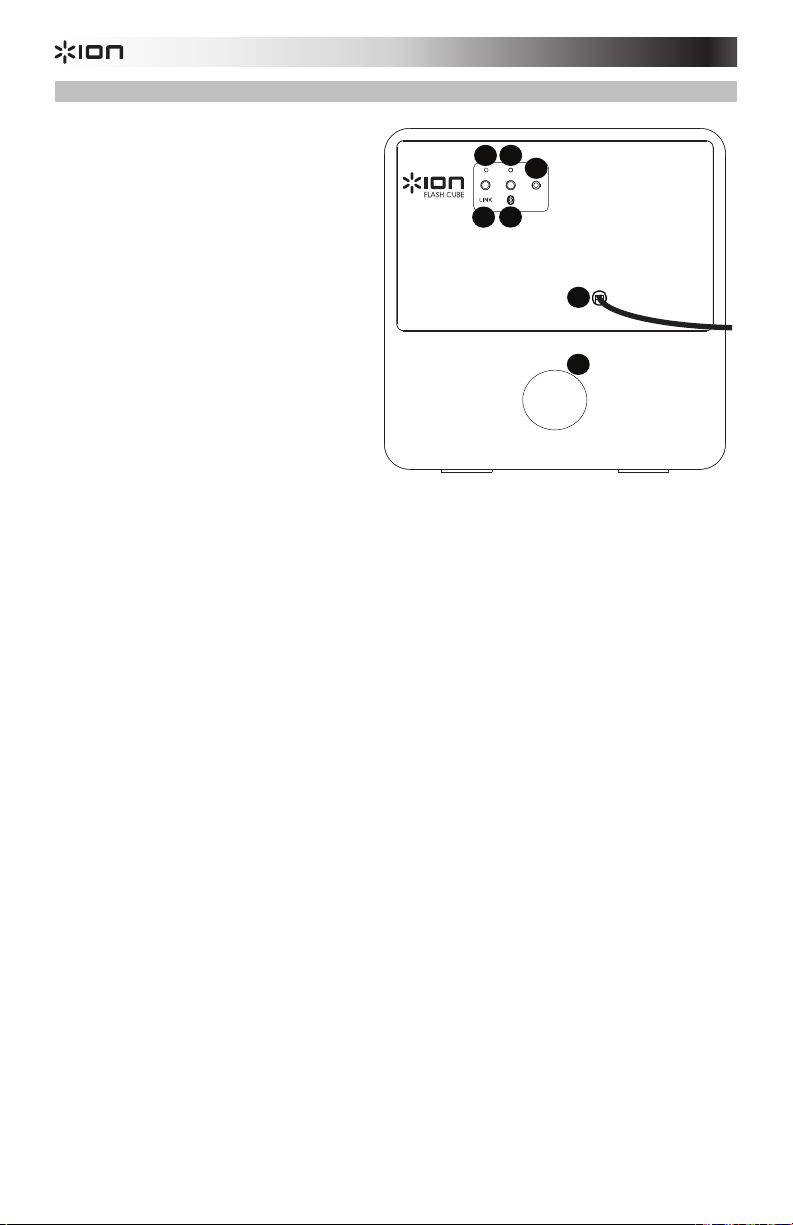
Rear Panel
1. Link: Press this button on both
speakers to link two Flash Cubes
together. Refer to Quick Setup >
Speaker Linking for more details.
2. Link LED: When linking two Flash
Cubes, this LED will blink on both
Flash Cubes during the linking
process. Once fully linked with
another Flash Cube, this LED will
remain solid on both Flash Cubes.
3. Bluetooth Connecting: Press this
button to pair to your Bluetooth
device. For more details, refer to
Quick Setup > Bluetooth
Connecting with Flash Cube.
4. Bluetooth LED: This LED blinks
when pairing with a Bluetooth device.
Once fully paired, the LED will remain
solid.
5. Aux Input: Connect a media player, smartphone, or other audio source to this stereo 1/8”
input.
6. Power Cable: This power cable is hard-wired into Flash Cube.
7. Bass Port: Adds increased bass to the sound.
Connecting to one Flash Cube:
1. Power on Flash Cube.
2. Press and Release the Bluetooth Connect button to enter Connecting Mode.
3. Navigate to your device’s Bluetooth setup screen, nd Flash Cube, and connect.
4. To disconnect, hold the Bluetooth Connect button on Flash Cube.
Note: The Bluetooth LED will be blinking if not yet connected.
Once connected, the LED will be solid.
AUX IN
Linking two Flash Cube units:
1. Power on each Flash Cube.
2. If necessary, disconnect previous Bluetooth connections by holding down
the Bluetooth Connect button for 3 seconds.
3. Press and Release the Link button on each Flash Cube.
4. Press and Release the Bluetooth Connect button on the Flash Cube
that you want to be the "master" (left channel).
5. Navigate to your device’s Bluetooth setup screen, nd Flash Cube, and connect.
The speakers will relink automatically the next time they are both powered on.
6. To disconnect linking, hold the Link button on the
“master” Flash Cube for 5 seconds.
For detailed instructions, please see the included Quickstart Guide.
6
Page 7

Guía de inicio rápido (Español)
Introducción
1. Asegúrese de que todos los artículos indicados en Contenido de la Caja estén incluidos
en la misma.
2. LEA EL FOLLETO DE INSTRUCCIONES DE SEGURIDAD ANTES DE UTILIZAR EL
PRODUCTO.
Contenido de la caja
Flash Cube
Control remoto
Cable auxiliar estéreo de 3,5 mm (1/8 pulg.)
Guía de inicio rápido
Folleto de información sobre la seguridad y la garantía
Soporte
Para obtener la información más reciente acerca de este producto (requisitos de sistema,
información de compatibilidad, etc.) y registrarlo, visite ionaudio.com.
Instalación rápida
Diagrama de conexión
Los elementos que no se enumeran en la sección Contenido de la caja se venden por
separado.
Segundo Flash Cube
Enlace estéreo
inalámbrico
Suministro
eléctrico
Dispositivo Bluetooth
(smartphone, tableta, etc.)
Connecting to one Flash Cube:
1. Power on Flash Cube.
2. Press and Release the Bluetooth Connect button to enter Connecting Mode.
3. Navigate to your device’s Bluetooth setup screen, nd Flash Cube, and connect.
4. To disconnect, hold the Bluetooth Connect button on Flash Cube.
Note: The Bluetooth LED will be blinking if not yet connected.
Once connected, the LED will be solid.
AUX IN
Linking two Flash Cube units:
1. Power on each Flash Cube.
2. If necessary, disconnect previous Bluetooth connections by holding down
the Bluetooth Connect button for 3 seconds.
3. Press and Release the Link button on each Flash Cube.
4. Press and Release the Bluetooth Connect button on the Flash Cube
that you want to be the "master" (left channel).
5. Navigate to your device’s Bluetooth setup screen, nd Flash Cube, and connect.
The speakers will relink automatically the next time they are both powered on.
6. To disconnect linking, hold the Link button on the
“master” Flash Cube for 5 seconds.
For detailed instructions, please see the included Quickstart Guide.
Fuente de audio auxiliary
(reproductor de CD,
reproductor MP3, receptor
estéreo, etc.)
Suministro
eléctrico
7
Page 8
3
6
7
8
9
10
1
2 4 5
Control remoto
1. LED encendidos/apagados
2. Selección del modo del LED
3. Selección del color del LED
4. Bluetooth conectando
5. Encendido/apagado
6. Reproducir/Pausa
7. Pista anterior *
3
8. Pista siguiente *
9. Subir volumen
10. Bajar volumen
* Nota: En algunas aplicaciones, pulsar los botones Previous Track (Pista anterior) o Next
Track (Pista siguiente) hará que vaya a otra lista de reproducción o género musical.
Bluetooth conectando con Flash Cube
1. Mantenga pulsado el botón de encendido durante dos segundos para encender el Flash
Cube.
2. Pulse y suelte el botón Bluetooth Connecting (Bluetooth conectando) para ingresar al
modo de conexión. El LED del Bluetooth del Flash Cube parpadeará durante el proceso
de conexión.
3. Navegue a la pantalla de configuración Bluetooth de su dispositivo, busque Flash Cube
y conéctelo. El LED del Bluetooth del Flash Cube se enciende con luz permanente
cuando está conectado.
Nota: Si tiene problemas para conectarse, seleccione Forget this Device (Olvidar este
dispositivo) en su dispositivo Bluetooth e intente conectarse nuevamente.
4. Para desconectarse, mantenga pulsado el botón Bluetooth Connecting del Flash Cube
durante 3 segundos.
Enlace de altavoces
Cómo enlazar dos Flash Cubes entre sí:
1. Encienda ambos Flash Cubes.
2. De ser necesario, desconecte las conexiones Bluetooth previas manteniendo pulsado el
botón Bluetooth Connecting durante 3 segundos.
3. Pulse y suelte el botón Link (Enlace) de cada Flash Cube. El LED de enlace del Flash
Cube parpadeará y se escuchará un tono de pitido en cada Flash Cube durante el
proceso de enlace. El enlace puede tardar hasta un minuto. Una vez que los dos Flash
Cubes están totalmente enlazados, los LED de enlace en ambos Flash Cubes quedarán
encendidos permanentemente.
4. Pulse y suelte el botón Bluetooth Connecting en el Flash Cube que quiere que sea el
maestro (canal izquierdo).
5. Navegue a la pantalla de configuración Bluetooth de su dispositivo, busque Flash Cube
y conéctelo. Los altavoces vuelven a enlazarse automáticamente la próxima vez que se
enciendan.
6. Para cortar el enlace, mantenga pulsado el botón Link del Flash Cube maestro durante 5
segundos.
Nota: Cuando utilice el control remoto, habrá unos segundos de demora en la respuesta de
los comandos reproducir y pausa.
8
7
10
Page 9

1
2 3 4 5 6
8
9
5
6
7
1
2
4
7
3
Características
Panel frontal
1. Encendido: Mantenga pulsado este
botón táctil capacitivo durante 2
segundos para encender o apagar el
Flash Cube.
Nota: El Flash Cube se apagará
después de 1 hora sin reproducir
audio y sin conexión Bluetooth.
2. Bajar volumen: Pulse y suelte este
botón táctil capacitivo para
disminuir el volumen del altavoz.
3. Subir volumen: Pulse y suelte este
botón táctil capacitivo para
aumentar el volumen del altavoz.
4. Reproducir/Pausa: Pulse y suelte
este botón táctil capacitivo para
reproducir o hacer una pausa en la
fuente de sonido.
5. Pista siguiente: Pulse y suelte este
botón táctil capacitivo para saltar a la pista siguiente.
Nota: En algunas aplicaciones, pulsar el botón Next Track hará que vaya a otra lista de
reproducción o género musical.
6. Modo de luz: Pulse y suelte este botón táctil capacitivo Light Mode (Modo de luz) para
alternar entre estas opciones diferentes:
• Ciclo de color: Las luces brillan suavemente y cambian de un color a otro. Este
es el modo predeterminado la primera vez que se enciende el Flash Cube. Una
vez encendido el altavoz, las luces se encenderán antes de que comience la
música.
• Sincronización con el ritmo: Las luces reaccionan al ritmo de la música.
• Apagadas: Las luces se apagan.
7. LED de volumen: Estos segmentos de LED se iluminan a medida que se ajusta el control
de volumen.
8. Tweeter: Emite las frecuencias altas de la fuente de sonido.
9. Woofer: Emite las frecuencias bajas de la fuente de sonido.
9
Page 10

5
6
1
2
4
7
3
Panel trasero
1. Enlace: Pulse este botón en ambos
altavoces para enlazar dos Flash
Cubes entre sí. Consulte
Configuración rápida > Enlace de
altavoces para más detalles.
2. LED de enlace: Cuando se enlazan
dos Flash Cubes, este LED
parpadeará en ambos Flash Cubes
durante el proceso de enlace. Una
vez totalmente enlazado con otro
Flash Cube, este LED permanecerá
encendido en ambos Flash Cubes.
3. Conexión de Bluetooth: Pulse este
botón para aparear su dispositivo
Bluetooth. Para más detalles,
consulte Configuración rápida >
Conexión Bluetooth con Flash
Cube.
4. LED de Bluetooth: Este LED
parpadea cuando se está apareando con un dispositivo Bluetooth. Una vez totalmente
apareado, el LED permanecerá encendido.
5. Entrada auxiliar: Conecte a esta entrada estéreo de 1/8 pulg. un reproductor de medios,
un teléfono inteligente (smartphone) u otra fuente de audio.
6. Cable de corriente: Este cable de corriente viene integrado con el Flash Cube.
7. Puerto de graves: Agrega graves al sonido.
Connecting to one Flash Cube:
1. Power on Flash Cube.
2. Press and Release the Bluetooth Connect button to enter Connecting Mode.
3. Navigate to your device’s Bluetooth setup screen, nd Flash Cube, and connect.
4. To disconnect, hold the Bluetooth Connect button on Flash Cube.
Note: The Bluetooth LED will be blinking if not yet connected.
Once connected, the LED will be solid.
AUX IN
Linking two Flash Cube units:
1. Power on each Flash Cube.
2. If necessary, disconnect previous Bluetooth connections by holding down
the Bluetooth Connect button for 3 seconds.
3. Press and Release the Link button on each Flash Cube.
4. Press and Release the Bluetooth Connect button on the Flash Cube
that you want to be the "master" (left channel).
5. Navigate to your device’s Bluetooth setup screen, nd Flash Cube, and connect.
The speakers will relink automatically the next time they are both powered on.
6. To disconnect linking, hold the Link button on the
“master” Flash Cube for 5 seconds.
For detailed instructions, please see the included Quickstart Guide.
10
Page 11
Guide d'utilisation rapide (Français)
Présentation
1. Veuillez vous assurer que tous les articles énumérés dans la section Contenu de la boîte
de ce guide sont inclus dans la boîte.
2. VEUILLEZ LIRE LE LIVRET DES CONSIGNES DE SÉCURITÉ AVANT D'UTILISER LE
PRODUIT.
Contenu de la boîte
Flash Cube
Télécommande
Câble auxiliaire stéréo 3,5 mm (1/8 po)
Guide d'utilisation rapide
Livret des consignes de sécurité et des informations concernant la garantie
Assistance technique
Pour les toutes dernières informations concernant ce produit (configuration système,
compatibilité, etc.), veuillez visiter le site ionaudio.com.
Installation
Schéma de connexion
Les éléments qui ne figurent pas dans la section Contenu de la boîte sont vendus
séparément.
Deuxième Flash Cube
11
Connexion stéréo
sans fil
Alimentation
Périphérique Bluetooth
(smartphone, tablette,
etc.)
Connecting to one Flash Cube:
1. Power on Flash Cube.
2. Press and Release the Bluetooth Connect button to enter Connecting Mode.
3. Navigate to your device’s Bluetooth setup screen, nd Flash Cube, and connect.
4. To disconnect, hold the Bluetooth Connect button on Flash Cube.
Note: The Bluetooth LED will be blinking if not yet connected.
Once connected, the LED will be solid.
AUX IN
Linking two Flash Cube units:
1. Power on each Flash Cube.
2. If necessary, disconnect previous Bluetooth connections by holding down
the Bluetooth Connect button for 3 seconds.
3. Press and Release the Link button on each Flash Cube.
4. Press and Release the Bluetooth Connect button on the Flash Cube
that you want to be the "master" (left channel).
5. Navigate to your device’s Bluetooth setup screen, nd Flash Cube, and connect.
The speakers will relink automatically the next time they are both powered on.
6. To disconnect linking, hold the Link button on the
“master” Flash Cube for 5 seconds.
For detailed instructions, please see the included Quickstart Guide.
Autres sources auxiliaires
(lecteur de disques
compacts, lecteur MP3,
récepteur stéréo, etc.)
Alimentation
Page 12

3
6
7
8
9
10
1
2 4 5
Télécommande
1. Activation/désactivation des DEL
2. Sélection du mode d'éclairage
3. Sélection des couleurs d'éclairage
4. Connexion Bluetooth
5. Interrupteur d'alimentation
6. Lancer/interrompre la lecture
7. Piste précédente *
3
8. Piste suivante *
9. Volume +
10. Volume -
* Remarque : Dans certaines applications, les touches piste suivante et piste précédente
permettent de passer à la liste de lecture ou le genre de musique suivant ou précédent.
Connexion d’un appareil Bluetooth
1. Maintenez l’interrupteur d’alimentation enfoncé pendant deux secondes afin de mettre le
Flash Cube sous tension.
2. Appuyez puis relâchez la touche de connexion Bluetooth afin de lancer le processus de
connexion. La DEL Bluetooth du Flash Cube clignote pendant le processus de
connexion.
3. Accédez à l'écran de configuration de votre appareil Bluetooth, recherchez Flash Cube
et appuyez sur Connecter. La DEL du Flash Cube s'allume lorsqu'il est connecté.
Remarque : Si la connexion ne peut être établie, sélectionnez Oublier cet appareil sur
votre appareil Bluetooth et lancer à nouveau le jumelage.
4. Pour supprimer la connexion à l’appareil Bluetooth, maintenez la touche de connexion
Bluetooth du Flash Cube enfoncée pendant 3 secondes.
Raccordement de deux enceintes
Pour relier deux enceintes Flash Cube :
1. Mettez les deux enceintes Flash Cube sous tension.
2. Si nécessaire, supprimez les connexions Bluetooth existantes en maintenant la touche de
connexion Bluetooth du Flash Cube enfoncée pendant 3 secondes.
3. Appuyez et relâchez la touche Link sur chaque Flash Cube. La DEL Link du Flash Cube
clignote et un bip sonore retentira sur chaque Flash Cube pendant le processus de
connexion. Ce processus peut prendre jusqu'à une minute. Une fois que les deux Flash
Cube sont raccordés, les DEL Link sur les deux Flash Cube resteront allumées.
4. Appuyez puis relâchez la touche de connexion Bluetooth sur l’enceinte Flash Cube que
vous désirez mettre en mode « maître » (canal gauche).
5. Accédez à l'écran de configuration de votre appareil Bluetooth, recherchez Flash Cube
et appuyez sur Connecter. Les enceintes seront connectées automatiquement la
prochaine fois qu'ils seront tous les deux mises sous tension.
6. Pour supprimer la connexion, maintenez la touche Link du Flash Cube « maître »
pendant 5 secondes.
Remarque : Lorsque vous utilisez la télécommande, il y aura un délai de réponse de quelques
secondes avec les commandes pour lancer/interrompre la lecture.
12
7
10
Page 13

1
2 3 4 5 6
8
9
5
6
7
1
2
4
7
3
Caractéristiques
Panneau avant
1. Interrupteur d’alimentation :
Maintenez cette touche enfoncée
pendant 2 secondes afin de mettre
le Flash Cube sous et hors tension.
Remarque : Le Flash Cube s’éteint
automatiquement après 1 heure
d’inutilisation et qu'il n'y pas
d’appareil Bluetooth connecté.
2. Volume - : Appuyez et relâchez
cette touche pour diminuer le
volume de l’enceinte.
3. Volume + : Appuyez et relâchez
cette touche pour augmenter le
volume de l’enceinte.
4. Lancer/interrompre la lecture :
Appuyez et relâchez cette touche
pour lancer ou interrompre la lecture
de la source audio.
5. Piste suivante : Appuyez et relâchez cette touche pour passer à la piste suivante.
Remarque : Dans certaines applications, la touche piste suivante permet de passer à la
liste de lecture ou le genre de musique suivant.
6. Mode d’éclairage : Appuyez et relâchez la touche Light Mode pour parcourir les
différentes options d’éclairage :
• Color Cycle : Les lumières brillent et défilent à travers toutes les couleurs. C'est
le mode par défaut lorsque le Flash Cube est mis sous tension la première fois.
Lors de la mise sous tension de l’enceinte, les lumières s’allument avant que la
musique ne joue.
• Beat Sync : Les lumières réagissent au rythme de la musique.
• Off (désactivé) : Les lumières sont désactivées.
7. DEL du niveau du volume : Ces DEL s'allument lorsque le volume est ajusté.
8. Haut-parleur des aigus : Reproduit les hautes fréquences de la source audio.
9. Haut-parleur des graves : Reproduit les basses fréquences de la source audio.
13
Page 14

5
6
1
2
4
7
3
Panneau arrière
1. Link : Appuyez sur cette touche sur
les deux enceintes pour relier les
deux Flash Cube. Veuillez consulter
la section Installation >
Raccordement de deux enceintes
pour plus de détails.
2. DEL Link : Lors du raccordement de
deux Flash Cube, cette DEL clignote
sur chaque Flash Cube pendant le
processus de connexion. Une fois
raccordées, les DEL Link sur les
deux Flash Cube demeurent
allumées.
3. Connexion Bluetooth : Appuyez
cette touche pour jumeler l’enceinte
à votre périphérique Bluetooth. Pour
plus de détails, veuillez consulter la
section Installation > Connexion
d’un appareil Bluetooth.
4. DEL Bluetooth : Ce DEL clignote lors du jumelage d’un périphérique Bluetooth. Une fois
connectée, la DEL reste allumée.
5. Entrée auxiliaire : Cette entrée stéréo 3,5 mm (1/8 po) permet de brancher un lecteur
multimédia, un smartphone ou autres sources audio.
6. Câble d’alimentation : Ce câble d’alimentation est câblé au Flash Cube.
7. Évent : Cet évent permet d’ajouter un niveau accru des graves.
Connecting to one Flash Cube:
1. Power on Flash Cube.
2. Press and Release the Bluetooth Connect button to enter Connecting Mode.
3. Navigate to your device’s Bluetooth setup screen, nd Flash Cube, and connect.
4. To disconnect, hold the Bluetooth Connect button on Flash Cube.
Note: The Bluetooth LED will be blinking if not yet connected.
Once connected, the LED will be solid.
AUX IN
Linking two Flash Cube units:
1. Power on each Flash Cube.
2. If necessary, disconnect previous Bluetooth connections by holding down
the Bluetooth Connect button for 3 seconds.
3. Press and Release the Link button on each Flash Cube.
4. Press and Release the Bluetooth Connect button on the Flash Cube
that you want to be the "master" (left channel).
5. Navigate to your device’s Bluetooth setup screen, nd Flash Cube, and connect.
The speakers will relink automatically the next time they are both powered on.
6. To disconnect linking, hold the Link button on the
“master” Flash Cube for 5 seconds.
For detailed instructions, please see the included Quickstart Guide.
14
Page 15

Guida rapida (Italiano)
Introduzione
1. Assicurarsi che tutti gli elementi elencati nel paragrafo “Contenuti della confezione”
siano contenuti nella confezione stessa.
2. LEGGERE ATTENTAMENTE IL LIBRETTO DELLE ISTRUZIONI DI SICUREZZA
PRIMA DI UTILIZZARE IL PRODOTTO.
Contenuti della confezione
Flash Cube
Telecomando
Cavo aux stereo da 3,5 mm (1/8")
Guida rapida
Libretto di istruzioni di sicurezza e garanzia
Assistenza
Per le ultime informazioni in merito a questo prodotto (requisiti di sistema, informazioni sulla
compatibilità, ecc.) e per la registrazione del prodotto, recarsi alla pagina ionaudio.com.
Configurazione rapida
Schema dei collegamenti
Gli elementi non elencati sotto Contenuti della confezione sono venduti separatamente.
Secondo Flash Cube
Dispositivo Bluetooth (telefono
Link wireless
stereo
intelligente, tablet, ecc.)
Connecting to one Flash Cube:
1. Power on Flash Cube.
2. Press and Release the Bluetooth Connect button to enter Connecting Mode.
3. Navigate to your device’s Bluetooth setup screen, nd Flash Cube, and connect.
4. To disconnect, hold the Bluetooth Connect button on Flash Cube.
Note: The Bluetooth LED will be blinking if not yet connected.
Once connected, the LED will be solid.
AUX IN
Linking two Flash Cube units:
1. Power on each Flash Cube.
2. If necessary, disconnect previous Bluetooth connections by holding down
the Bluetooth Connect button for 3 seconds.
3. Press and Release the Link button on each Flash Cube.
4. Press and Release the Bluetooth Connect button on the Flash Cube
that you want to be the "master" (left channel).
5. Navigate to your device’s Bluetooth setup screen, nd Flash Cube, and connect.
The speakers will relink automatically the next time they are both powered on.
6. To disconnect linking, hold the Link button on the
“master” Flash Cube for 5 seconds.
For detailed instructions, please see the included Quickstart Guide.
Fonti audio ausiliari
(lettore CD, lettore MP3,
ricevitori stereo, ecc.)
Alimentazione Alimentazione
15
Page 16

3
6
7
8
9
10
1
2 4 5
Telecomando
1. LED On/Off
2. Scelta modalità LED
3. Scelta colore LED
4. Collegamento Bluetooth
5. Alimentazione On / Off
6. Play/Pause
7. Traccia precedente*
8. Traccia successiva
9. Volume su
10. Volume giù
* Nota bene: in alcune app, la pressione del tasto Previous Track o Next Track può far
passare a un'altra playlist o a un altro genere musicale.
3
Collegamento Bluetooth con Flash Cube
1. Premere e tenere premuto il tasto power per 2 secondi per accendere il Flash Cube.
2. Premere e rilasciare il tasto Bluetooth Connecting (collegamento Bluetooth) per entrare
in modalità di collegamento. Il LED Bluetooth del Flash Cube lampeggia durante il
processo di collegamento.
3. Navigare nella schermata di configurazione Bluetooth del dispositivo, trovare “Flash
Cube” e collegarlo. Il LED Bluetooth del Flash Cube rimarrà illuminato quando è
collegato.
Nota bene: in caso di problemi di collegamento, selezionare Forget this Device
(dimentica questo dispositivo) sul dispositivo Bluetooth e cercare di collegarlo di nuovo.
4. Per scollegarlo, tenere premuto il tasto Bluetooth Connecting (collegamento Bluetooth)
sul Flash Cube per 3 secondi.
Collegamento dell'altoparlante
Per collegare due Flash Cube:
1. Accendere entrambi i Flash Cube.
2. Se necessario, scollegare i precedenti collegamenti Bluetooth tenendo premuto il tasto
Bluetooth Connecting (collegamento Bluetooth) per 3 secondi.
3. Premere e rilasciare il tasto Link su ciascun Flash Cube. Il LED di collegamento del Flash
Cube lampeggia e un cicalino suonerà su ciascun Flash Cube durante il processo di
collegamento. Il collegamento può richiedere fino a un massimo di un minuto. Una volta
collegati i due Flash Cube, i LED di collegamento su entrambi i Flash Cube si
illumineranno in maniera fissa.
4. Premere e rilasciare il tasto Bluetooth Connecting (collegamento Bluetooth) sul Flash
Cube che si desidera sia quello master (canale sinistro).
5. Navigare nella schermata di configurazione Bluetooth del dispositivo, trovare “Flash
Cube” e collegarlo. La prossima volta in cui entrambi saranno accesi, gli altoparlanti si
collegheranno nuovamente automaticamente.
6. Per scollegare il collegamento, tenere premuto il tasto Link sul Flash Cube master per 5
secondi.
Nota bene: quando si utilizza il telecomando, ci sarà un ritardo nella risposta di alcuni secondi
con i comandi di riproduzione (play) e pausa.
16
10
Page 17

1
2 3 4 5 6
8
9
5
6
7
1
2
4
7
3
Caratteristiche
Pannello anteriore
1. Alimentazione: tenere premuto
questo tasto capacitivo per 2
secondi per accendere o spegnere il
Flash Cube.
Nota bene: il Flash Cube si
spegnerà dopo 1 ora se non viene
riprodotto alcun audio e se non è
presente un collegamento
Bluetooth.
2. Volume giù: tenere premuto questo
tasto capacitivo per ridurre il volume
dell'altoparlante.
3. Volume su: tenere premuto questo
tasto capacitivo per aumentare il
volume dell'altoparlante.
4. Play/Pause: tenere premuto questo
tasto capacitivo per riprodurre o
mettere in pausa la fonte audio.
5. Traccia successiva: tenere premuto questo tasto capacitivo per passare alla traccia
successiva.
Nota bene: in alcune app, la pressione del tasto Next Track può far passare a un'altra
playlist o a un altro genere musicale.
6. Modalità luci: tenere premuto il tasto capacitivo Light Mode per commutare tra le varie
opzioni seguenti:
• Ciclo cromatico: le luci si accendono lentamente e commutano da un colore
all'altro. Questa è la modalità predefinita al momento dell'accensione del Flash
Cube. Una volta acceso l'altoparlante, le luci si accenderanno prima che la
riproduzione della musica abbia inizio.
• Beat Sync: le luci reagiscono al battito della musica.
• OFF: le luci sono spente.
7. LED volume: questi LED si accendono man mano che il controllo del volume viene
regolato.
8. Tweeter: emette le frequenze alte della fonte audio.
9. Woofer: emette le frequenze basse della fonte audio.
17
Page 18

5
6
1
2
4
7
3
Pannello posteriore
1. Link: premere questo tasto su
entrambi gli altoparlanti per collegare
due Flash Cube. Per maggiori
dettagli, fare riferimento a
Configurazione rapida >
Collegamento dell'altoparlante.
2. LED di collegamento: al momento
di collegare due Flash Cube, questo
LED lampeggerà su entrambi i Flash
Cube durante il processo di
collegamento. Una volta collegato
con un altro Flash Cube, il LED
rimarrà acceso su entrambi i Flash
Cube.
3. Collegamento Bluetooth: premere
questo tasto per accoppiare
l'altoparlante al dispositivo
Bluetooth. Per maggiori dettagli, fare
riferimento a Configurazione rapida
> Collegamento Bluetooth con Flash Cube.
4. LED Bluetooth: questo LED lampeggia durante il collegamento a un dispositivo
Bluetooth. Una volta collegato, il LED rimarrà fisso.
5. Ingresso Aux: collegare un lettore di media, uno smartphone o altre fonti audio a questo
ingresso stereo da 1/8".
6. Cavo di alimentazione: questo cavo di alimentazione è cablato nel Flash Cube.
7. Porta dei bassi: aggiunge bassi potenziati al suono.
18
Connecting to one Flash Cube:
1. Power on Flash Cube.
2. Press and Release the Bluetooth Connect button to enter Connecting Mode.
3. Navigate to your device’s Bluetooth setup screen, nd Flash Cube, and connect.
4. To disconnect, hold the Bluetooth Connect button on Flash Cube.
Note: The Bluetooth LED will be blinking if not yet connected.
Once connected, the LED will be solid.
AUX IN
Linking two Flash Cube units:
1. Power on each Flash Cube.
2. If necessary, disconnect previous Bluetooth connections by holding down
the Bluetooth Connect button for 3 seconds.
3. Press and Release the Link button on each Flash Cube.
4. Press and Release the Bluetooth Connect button on the Flash Cube
that you want to be the "master" (left channel).
5. Navigate to your device’s Bluetooth setup screen, nd Flash Cube, and connect.
The speakers will relink automatically the next time they are both powered on.
6. To disconnect linking, hold the Link button on the
“master” Flash Cube for 5 seconds.
For detailed instructions, please see the included Quickstart Guide.
Page 19

Schnellstart-Anleitung (Deutsch)
Einführung
1. Stellen Sie sicher, dass alle im Lieferumfang aufgelisteten Teile in der Verpackung
enthalten sind.
2. LESEN SIE DIE SICHERHEITSHINWEISE, BEVOR SIE DAS PRODUKT VERWENDEN.
Lieferumfang
Flash Cube
Fernbedienung
3,5 mm Stereo Aux-Kabel
Schnellstart-Anleitung
Sicherheits- und Garantieinformationen
Kundendienst
Für die neuesten Informationen zu diesem Produkt (Systemanforderungen, Informationen zur
Kompatibilität etc.) und für die Produktregistrierung besuchen Sie ionaudio.com.
Schnelles Einrichten
Anschlussdiagramm
Teile, die nicht im Lieferumfang angegeben sind, sind separat erhältlich.
Zweiter Flash Cube
Drahtloses
Stereo Link
19
Bluetooth-Gerät
(Smartphone, Tablet usw.)
Connecting to one Flash Cube:
1. Power on Flash Cube.
2. Press and Release the Bluetooth Connect button to enter Connecting Mode.
3. Navigate to your device’s Bluetooth setup screen, nd Flash Cube, and connect.
4. To disconnect, hold the Bluetooth Connect button on Flash Cube.
Note: The Bluetooth LED will be blinking if not yet connected.
Once connected, the LED will be solid.
AUX IN
Linking two Flash Cube units:
1. Power on each Flash Cube.
2. If necessary, disconnect previous Bluetooth connections by holding down
the Bluetooth Connect button for 3 seconds.
3. Press and Release the Link button on each Flash Cube.
4. Press and Release the Bluetooth Connect button on the Flash Cube
that you want to be the "master" (left channel).
5. Navigate to your device’s Bluetooth setup screen, nd Flash Cube, and connect.
The speakers will relink automatically the next time they are both powered on.
6. To disconnect linking, hold the Link button on the
“master” Flash Cube for 5 seconds.
For detailed instructions, please see the included Quickstart Guide.
Anderen Aux-
Audioquellen
(CD/MP3-Spieler, Stereo-
Ontvanger usw.)
Voeding Voeding
Page 20

3
6
7
8
9
10
1
2 4 5
Fernbedienung
1. LEDs Ein/Aus
2. LED Modus-Auswahl
3. LED-Farbauswahl
4. Bluetooth-Verbindung
5. Einschalten/Ausschalten
6. Wiedergabe/Pause
7. Vorheriger Track*
8. Nächster Track*
9. Lautstärke erhöhen
10. Lautstärke verringern
* Hinweis: Bei einigen Apps kann durch Drücken der Taste Vorheriger Track oder Nächster
Track zu einer anderen Wiedergabeliste oder zu einem anderen Musikgenre gewechselt
werden.
Bluetooth-Verbindung zum Flash Cube
1. Halten Sie den Ein-/Ausschalter zwei Sekunden lang gedrückt, um den Flash Cube
einzuschalten.
2. Drücken Sie kurz die Taste Bluetooth-Verbindung, um in den Verbindungsmodus zu
gelangen. Die Bluetooth-LED des Flash Cube blinkt während des Verbindungsprozesses.
3. Navigieren Sie zum Setup-Bildschirm Ihres Bluetooth-Geräts, suchen Sie Flash Cube
und verbinden Sie die Geräte. Die Bluetooth-LED des Flash Cube leuchtet dauerhaft,
wenn das Gerät verbunden ist.
Hinweis: Wenn es zu Problemen bei der Verbindung kommt, wählen Sie am BluetoothGerät Forget this Device ("Dieses Gerät ignorieren") und versuchen es erneut.
4. Um die Verbindung zu trennen, halten Sie die Taste Bluetooth-Verbindung am Flash
Cube 3 Sekunden lang gedrückt.
Lautsprecher verbinden
Um zwei Flash Cubes miteinander zu verbinden:
1. Schalten Sie jeden Flash Cube ein.
2. Lösen Sie bei Bedarf frühere Bluetooth-Verbindungen auf, indem Sie die Taste
Bluetooth-Verbindung 3 Sekunden lang gedrückt halten.
3. Drücken Sie kurz die Link-Taste auf jedem Flash Cube. Die Link-LED des Flash Cube
wird blinken - jeder Flash Cube wird während des Verknüpfungsvorgangs einen Piepton
ausgeben. Der Verbindungsvorgang kann bis zu einer Minute dauern. Sobald die beiden
Flash Cubes vollständig verbunden sind, leuchten die Link-LEDs auf beiden Flash Cubes
durchgehend.
4. Drücken Sie kurz die Taste Bluetooth-Verbindung auf jenem Flash Cube, den Sie als
Master (linker Kanal) auswählen möchten.
5. Navigieren Sie zum Setup-Bildschirm Ihres Bluetooth-Geräts, suchen Sie Flash Cube
und verbinden Sie die Geräte. Die Lautsprecher werden beim nächsten Mal, wenn beide
eingeschaltet sind, erneut automatisch verbunden.
6. Um die Verbindung zu trennen, halten Sie die Link-Taste am Master-Flash Cube 5
Sekunden lang gedrückt.
Hinweis: Bei Verwendung der Fernbedienung, kann es zu einer Reaktionsverzögerung von
wenigen Sekunden bei Wiedergabe- und Pause-Befehlen kommen.
20
3
7
10
Page 21

1
2 3 4 5 6
8
9
5
6
7
1
2
4
7
3
Funktionen
Vorderseite
1. Stromversorgung: Halten Sie diese
kapazitive Touch-Taste 2 Sekunden
lang gedrückt, um den Flash Cube
ein- oder auszuschalten.
Hinweis: Der Flash Cube schaltet
sich nach 1 Stunde aus, wenn keine
Musik gespielt wird und es keine
Bluetooth-Verbindung gibt.
2. Lautstärke verringern: Drücken Sie
kurz diese kapazitive Touch-Taste,
um die Lautstärke zu verringern.
3. Lautstärke erhöhen: Drücken Sie
kurz diese kapazitive Touch-Taste,
um die Lautstärke zu erhöhen.
4. Wiedergabe/Pause: Drücken Sie
kurz diese kapazitive Touch-Taste,
um die Tonquelle wiederzugeben
oder zu pausieren.
5. Nächster Track: Drücken Sie kurz diese kapazitive Touch-Taste, um zum nächsten
Track zu springen.
Hinweis: Bei einigen Apps kann durch Drücken der Taste Nächster Track zu einer
anderen Wiedergabeliste oder zu einem anderen Musikgenre gewechselt werden.
6. Licht-Modus: Drücken Sie kurz die kapazitive Touch-Taste Licht-Modus, um durch
diese verschiedenen Optionen zu wechseln:
• Farbwahl: Die Lichter glühen langsam und wechseln die Farben. Dies ist der
Standardmodus beim ersten Einschalten des Flash Cube. Sobald der
Lautsprecher eingeschaltet ist, werden sich die Lichter einschalten noch bevor
irgendeine Musik zu spielen beginnt.
• Takt: Das Licht regiert auf den Takt der Musik.
• AUS: Die Lichter werden ausgeschaltet.
7. Pegel-LEDs: Diese LED-Segmente leuchten sobald der Lautstärkeregler angepasst wird.
8. Hochtöner: Gibt die hohen Frequenzen der Tonquelle wieder.
9. Woofer: Gibt die tiefen Frequenzen der Tonquelle wieder.
21
Page 22

5
6
1
2
4
7
3
Rückseite
1. Link: Drücken Sie diese Taste auf
beiden Lautsprechern, um zwei Flash
Cubes miteinander zu verlinken.
Siehe Schnelles Einrichten >
Lautsprecher verbinden für weitere
Details.
2. Link-LED: Bei der Verknüpfung von
zwei Flash Cubes wird diese LED auf
beiden Flash Cubes beim
Verknüpfen blinken. Wenn Sie eine
komplette Verbindung zu einem
anderen Flash Cube hergestellt
haben, wird diese LED auf beiden
Flash Cubes durchgehend leuchten.
3. Bluetooth-Verbindung: Drücken Sie
diese Taste, um das Bluetooth-Gerät
zu koppeln. Für weitere Einzelheiten
lesen Sie den Abschnitt Schnelles
Einrichten > BluetoothVerbindung zum Flash Cube.
4. Bluetooth-LED: Diese LED blinkt, wenn eine Verbindung zu einem Bluetooth-Gerät
hergestellt wurde. Ist eine Verbindung vollständig hergestellt, leuchtet die LED
durchgehend.
5. Aux-Eingang: Schließen Sie Media-Player, Smartphones oder andere Audioquellen an
diesen 1/8" Stereo-Eingang an.
6. Stromkabel: Dieses Stromkabel ist fix am Flash Cube verdrahtet.
7. Bass-Öffnung: Verstärkt die Bassfrequenzen.
Connecting to one Flash Cube:
1. Power on Flash Cube.
2. Press and Release the Bluetooth Connect button to enter Connecting Mode.
3. Navigate to your device’s Bluetooth setup screen, nd Flash Cube, and connect.
4. To disconnect, hold the Bluetooth Connect button on Flash Cube.
Note: The Bluetooth LED will be blinking if not yet connected.
Once connected, the LED will be solid.
AUX IN
Linking two Flash Cube units:
1. Power on each Flash Cube.
2. If necessary, disconnect previous Bluetooth connections by holding down
the Bluetooth Connect button for 3 seconds.
3. Press and Release the Link button on each Flash Cube.
4. Press and Release the Bluetooth Connect button on the Flash Cube
that you want to be the "master" (left channel).
5. Navigate to your device’s Bluetooth setup screen, nd Flash Cube, and connect.
The speakers will relink automatically the next time they are both powered on.
6. To disconnect linking, hold the Link button on the
“master” Flash Cube for 5 seconds.
For detailed instructions, please see the included Quickstart Guide.
22
Page 23

Snelstartgids (Nederlands)
Inleiding
1. Zorg ervoor dat alle artikelen, opgesomd in Inhoud van de doos, zich in de doos
bevinden.
2. LEES DE VEILIGHEIDSVOORSCHRIFTEN VOORALEER HET PRODUCT TE
GEBRUIKEN.
Inhoud van de doos
Flash Cube
Afstandsbediening
Stereo aux-kabel van 3,5 mm (1/8”)
Snelstartgids
Informatieboekje Veiligheid en Garantie
Ondersteuning
Voor de laatste informatie over dit product (systeemvereisten, informatie over compatibiliteit,
enz.) en productregistratie, ga naar ionaudio.com.
Snelle opstelling
Aansluitschema
Artikelen die niet zijn opgesomd in Inhoud van de doos worden afzonderlijk verkocht.
Tweede Flash Cube
Draadloze
stereoverbinding
Stromversorgung
Bluetooth-apparaat
(smartphone, tablet, etc.)
Connecting to one Flash Cube:
1. Power on Flash Cube.
2. Press and Release the Bluetooth Connect button to enter Connecting Mode.
3. Navigate to your device’s Bluetooth setup screen, nd Flash Cube, and connect.
4. To disconnect, hold the Bluetooth Connect button on Flash Cube.
Note: The Bluetooth LED will be blinking if not yet connected.
Once connected, the LED will be solid.
AUX IN
Linking two Flash Cube units:
1. Power on each Flash Cube.
2. If necessary, disconnect previous Bluetooth connections by holding down
the Bluetooth Connect button for 3 seconds.
3. Press and Release the Link button on each Flash Cube.
4. Press and Release the Bluetooth Connect button on the Flash Cube
that you want to be the "master" (left channel).
5. Navigate to your device’s Bluetooth setup screen, nd Flash Cube, and connect.
The speakers will relink automatically the next time they are both powered on.
6. To disconnect linking, hold the Link button on the
“master” Flash Cube for 5 seconds.
For detailed instructions, please see the included Quickstart Guide.
Aux geluidsbron aan
(CD Player, MP3 Player,
stereoanlage
empfänger, etc.)
Stromversorgung
23
Page 24

3
6
7
8
9
10
1
2 4 5
Afstandsbediening
1. LED's aan/uit
2. Selecteer LED-modus
3. Selecteer LED-kleur
4. Koppeling via Bluetooth
5. Voeding aan/uit
6. Afspelen/pauzeren
7. Vorig nummer *
8. Volgend nummer *
9. Volume omhoog
10. Volume omlaag
* Opmerking: In sommige apps kunnen de knoppen Vorig of Volgend nummer een andere
afspeellijst of muziekgenre oproepen.
3
Een verbinding maken met Flash Cube over Bluetooth
1. Druk en houd de aan/uit-knop twee seconden lang ingedrukt om de Flash Cube aan te
zetten.
2. Druk op de knop Bluetooth verbinden en laat hem los om de Verbindingsmodus in te
schakelen. De Bluetooth-LED van de Flash Cube gaat knipperen tijdens het
verbindingsproces.
3. Navigeer naar het instelscherm van uw Bluetooth-apparaat, zoek naar Flash Cube en
maak verbinding. Bij een succesvolle verbinding gaat de Bluetooth-LED op Flash Cube
ononderbroken branden.
Opmerking: Indien u problemen ondervindt bij het verbinden, selecteer dan Dit apparaat
vergeten op uw Bluetooth-apparaat en probeer opnieuw verbinding te maken.
4. Om de verbinding te verbreken, houdt u de knop Bluetooth verbinden op de Flash Cube
3 seconden lang ingedrukt.
Luidsprekers verbinden
Om twee Flash Cubes met elkaar te verbinden:
1. Zet elke Flash Cube aan.
2. Verbreek indien nodig vorige Bluetooth-verbindingen door de knop Bluetooth verbinden
3 seconden lang in te drukken.
3. Op elke Flash Cube de knop Koppelen indrukken en loslaten. De koppelings-LED van
Flash Cube begint te knipperen en op elke Flash Cube weerklinkt een pieptoon tijdens
het koppelingsproces. Het koppelen kan een minuut lang duren. Van zodra de twee Flash
Cubes volledig aan elkaar zijn gekoppeld, blijven de koppelings-LED's op beide Flash
Cubes branden.
4. Druk op de knop Bluetooth verbinden op de Flash Cube die u als master wilt
inschakelen (linkerkanaal).
5. Navigeer naar het instelscherm van uw Bluetooth-apparaat, zoek naar Flash Cube en
maak verbinding. De volgende keer wanneer ze allebei worden aangezet, zullen de
luidsprekers opnieuw met elkaar koppelen.
6. Om de koppeling te verbreken, drukt u 5 seconden lang op de knop Koppelen van de
Flash Cube die als master is ingesteld.
Opmerking: Bij het gebruik van de afstandsbediening ondervinden de knoppen afspelen en
pauseren een vertraging van enkele seconden.
24
7
10
Page 25

1
2 3 4 5 6
8
9
5
6
7
1
2
4
7
3
Kenmerken
Voorpaneel
1. Voeding: Druk en houd deze
capacitive touch-knop 2 seconden
lang ingedrukt om de Flash Cube
aan te zetten.
Opmerking: Flash Cube gaat uit na
1 uur als er geen audio wordt
afgespeeld en er geen Bluetoothverbinding is.
2. Volume omlaag: De capacitive
touch-knop indrukken en loslaten
om het luidsprekervolume te
verlagen.
3. Volume omhoog: De capacitive
touch-knop indrukken en loslaten
om het luidsprekervolume te
verhogen.
4. Afspelen/pauzeren: De capacitive
touch-knop indrukken en loslaten
om de geluidsbron af te spelen of te pauseren.
5. Volgend nummer: De capacitive touch-knop indrukken en loslaten om het volgende
nummer af te spelen.
Opmerking: In sommige apps kan het indrukken van de knop Volgend nummer een
andere afspeellijst of muziekgenre oproepen.
6. Lichtmodus: De capacitive touch-knop indrukken en loslaten om door de volgende
verschillende opties te bladeren:
• Kleurencyclus: De lichten gaan traag branden en doorlopen alle kleuren. Dit is de
standaardmodus wanneer Flash Cube voor het eerst word ingeschakeld.
Wanneer de luidspreker wordt ingeschakeld, gaan eerst de lichten aan en pas
daarna start de muziek.
• Beat Sync: De verlichting reageert op de beat van de muziek.
• UIT: De verlichting wordt uitgeschakeld.
7. Volume-LED's: Deze LED-segmenten gaan branden bij het aanpassen van de
volumeregeling.
8. Tweeter: Produceert de hoge frequenties van de geluidsbron.
9. Woofer: Produceert de lage frequenties van de geluidsbron.
25
Page 26
5
6
1
2
4
7
3
Achterpaneel
1. Koppeling: Druk deze knop in op
beide luidsprekers om twee Flash
Cubes met elkaar te verbinden.
Raadpleeg Snelle opstelling >
Luidsprekers verbinden voor meer
details.
2. Koppelings-LED: Bij het koppelen
van twee Flash Cubes gaat deze
LED op beide Flash Cubes
knipperen. Van zodra hij volledig is
gekoppeld aan de andere Flash
Cube, blijft deze LED op beide Flash
Cubes branden.
3. Koppeling via Bluetooth: Druk op
deze knop voor een koppeling met
uw Bluetooth-apparaat. Raadpleeg
voor meer details Snelle opstelling
> Bluetooth verbinden met Flash
Cube.
4. Bluetooth-LED: Deze LED gaat knipperen bij het koppelen met een Bluetooth-apparaat.
Eens gekoppeld, blijft de LED permanent branden.
5. Aux-ingang: Sluit op deze stereo 1/8”-ingang een mediaspeler, smartphone of andere
geluidsbron aan.
6. Stroomkabel: Deze stroomkabel is permanent aan de Flash Cube bevestigd.
7. Baspoort: Bezorgt het geluid rijkere lage tonen.
Connecting to one Flash Cube:
1. Power on Flash Cube.
2. Press and Release the Bluetooth Connect button to enter Connecting Mode.
3. Navigate to your device’s Bluetooth setup screen, nd Flash Cube, and connect.
4. To disconnect, hold the Bluetooth Connect button on Flash Cube.
Note: The Bluetooth LED will be blinking if not yet connected.
Once connected, the LED will be solid.
AUX IN
Linking two Flash Cube units:
1. Power on each Flash Cube.
2. If necessary, disconnect previous Bluetooth connections by holding down
the Bluetooth Connect button for 3 seconds.
3. Press and Release the Link button on each Flash Cube.
4. Press and Release the Bluetooth Connect button on the Flash Cube
that you want to be the "master" (left channel).
5. Navigate to your device’s Bluetooth setup screen, nd Flash Cube, and connect.
The speakers will relink automatically the next time they are both powered on.
6. To disconnect linking, hold the Link button on the
“master” Flash Cube for 5 seconds.
For detailed instructions, please see the included Quickstart Guide.
26
Page 27
Appendix (English)
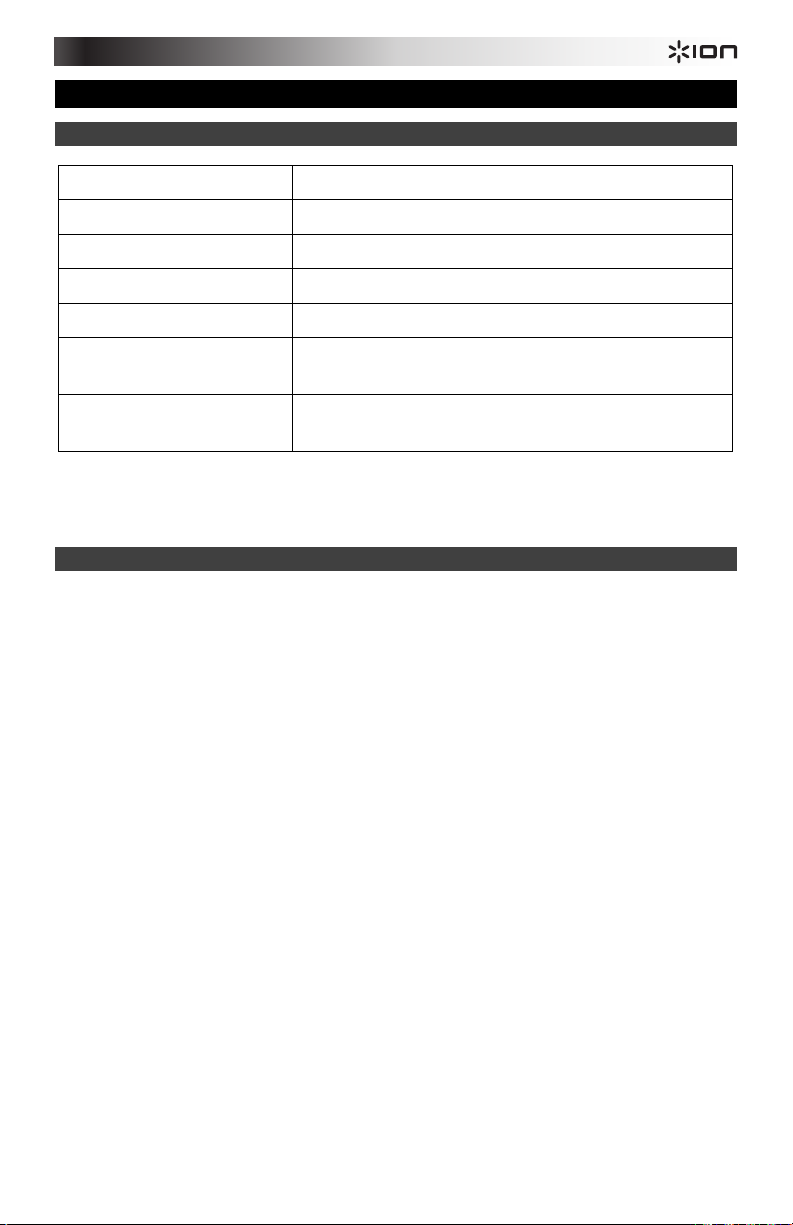
Technical Specifications
Output Power
50 W (peak)
Supported Bluetooth Profile
Bluetooth Range
Linked Range
Power
Dimensions
(width x depth x height)
Weight
Specifications are subject to change without notice.
* Bluetooth range is affected by walls, obstructions, and movement. Best performance is achieved in a wide open area.
** Battery life may vary based on temperature, age, and volume usage of product.
A2DP
Up to 100’ / 30.5 m *
Up to 50’ / 15.2 m *
Input voltage: 100-120V AC, 60 Hz; 220-240V AC, 50 Hz
10.6" x 10.02" x 10.6"
26.9 cm x 25.4 cm x 26.9 cm
9.6 lbs.
4.37 kg
Trademarks and Licenses
ION Audio is a trademark of ION Audio, LLC, registered in the U.S. and other countries.
iPod is a trademark of Apple Inc., registered in the U.S. and other countries.
The Bluetooth word mark and logos are owned by the Bluetooth SIG, Inc. and any use of such
marks by ION Audio is under license.
All other product or company names are trademarks or registered trademarks of their
respective owners.
27
Page 28

ionaudio.com
Manual Version 1.0
 Loading...