

Page 1
Internal ATAPI Drive
Owner’s Manual
• Installation Guide
• User’s Guide
• Troubleshooting
• How to Get Help
IMPORTANT! Before installing the hardware for your Zip
®
Internal drive, insert the Owner’s Manual CD and click the
button that says “Watch Installation Video” to give you an
overview of the installation process.
http://www.iomega.com
Page 2

Table of Contents
Installation Guide
Getting Started ................................................................................ 4
Identifying the IDE Configuration ................................................. 6
Installing the Zip® drive as the Slave Device ................................ 11
Installing the Zip® drive as the only device on the
secondary IDE channel .............................................................. 17
Installing the IomegaWare™ Software ......................................... 23
User’s Guide
Operating Your Zip® Drive ............................................................ 27
Zip® Tips ........................................................................................... 30
IomegaWare™ Software ................................................................ 31
Using Zip® Disks .............................................................................. 33
Understanding IDE/ATAPI Connections........................................ 36
Troubleshooting
The green activity light does not turn on ................................... 38
The Zip® drive is not assigned a drive letter ................................ 38
Computer does not recognize a slave drive after
installing the Zip® drive ............................................................. 39
Computer fails to boot correctly after installing
the Zip® Internal drive ............................................................... 40
Computer won’t boot in Windows NT unless a
disk is in the Zip® drive .............................................................. 40
Data transfer problems ................................................................. 40
Installing the Zip® drive changes other drive letters .................. 40
You want to change the drive letter for your Zip® drive ........... 41
You can’t change the drive letter assigned to Zip® drive........... 42
Zip® disk won’t eject using Windows NT ..................................... 42
Copy Machine problems in Windows 3.1 .................................... 42
Using the Zip® drive in Windows 95/98 DOS Mode .................... 43
How to Get Help
Iomega’s Home Page ..................................................................... 44
Automated Voice Technical Support............................................ 44
Automated FAX-Back Help ........................................................... 45
One-on-One Technical Support .................................................... 45
Product Repair or Return .............................................................. 46
Warranty Information ................................................................... 46
Product Information ...................................................................... 46
International Support Numbers ................................................... 46
Page 3
1
2
3
Welcome to Zip® Drive!
Zip® Internal ATAPI drive offers you everything a standard Zip® drive has
with the ease of installing to an existing IDE channel on your computer!
Here’s how to get started using your new drive and software:
Install your Zip
®
Internal drive and IomegaWare
™
software using the
instructions in the Installation Guide (pages 4-26 of this manual).
Check the User’s Guide (pages 27-37 of this manual) for
information on using your Zip
®
drive and IomegaWare
™
software.
Insert a Zip
®
disk and start using your new Zip drive to:
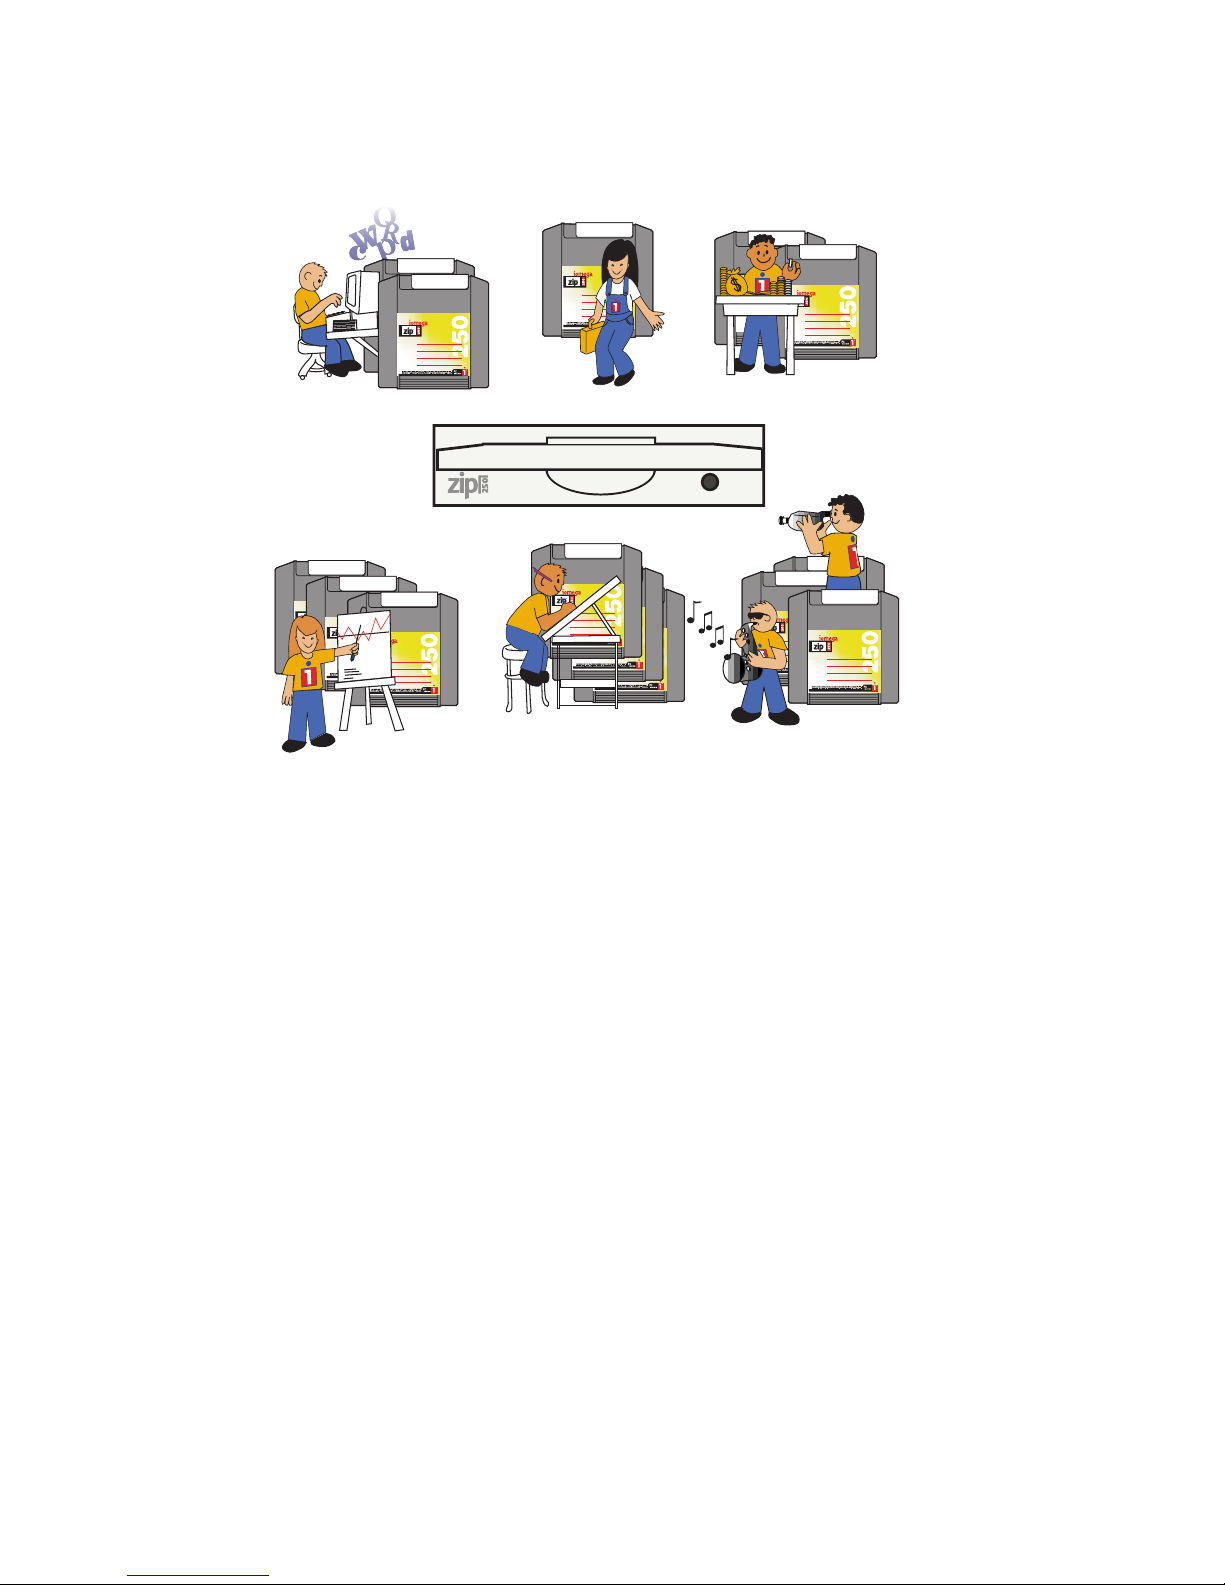
Expand your computer storage – 250MB or 100MB at a time...
Move your work to different locations and computers... Back up
your hard disk quickly and easily*... Create a multimedia library...
Store large scanned or downloaded files... Protect sensitive
information... Organize large amounts of information... Take work
home or on the road... Store and run all your games... Stretch the
limits of your creativity!
M *IMPORTANT! Two or more blank 250MB Zip® disks are required
to utilize the full backup and recovery capabilities of the software
package included with your drive. For maximum reliability, use only
Genuine 250MB and 100MB Zip
®
disks. M
Page 4

4
Installation
Guide
Getting Started
M IMPORTANT! The Zip Internal drive uses the computer’s
onboard IDE/ATA interface. See the User’s Guide section
Understanding IDE Connections on pages 36 and 37 of this guide
for important information. M
Check system requirements.
• Pentium 100 MHz or higher IBM-compatible computer
• Empty 31⁄2” or 51⁄4 “ drive bay with front panel access
• Embedded IDE interface or IDE controller card
• Windows NT®, Windows® 95/98, or Windows 3.1
• Iomega software (included with the Zip® Internal drive)
M
NOTE:
The Zip® Internal drive meets the latest ATAPI
specifications; however, some computers with early ATAPI support
do not meet these specifications and may not work correctly with
removable ATAPI drives like the Zip Internal drive. If the computer
fails to boot correctly or hangs while booting after the Zip Internal
drive is installed, refer to page 40 in the Troubleshooting section
of this guide. M
Unpack the Zip® Internal ATAPI drive.
CAUTION Before handling the Zip® Internal drive, touch a grounded
metal object (like an unpainted metal screw on the back of your
computer) to discharge any buildup of personal static electricity. M
IDE Data
Cable
Zip Internal Drive
Drive Bay Mounting Screws
Power-Y Cable
Owner's Manual
Jumper
IomegaWare™ CD
Owner's Manual CD
250MB Zip Disk
M IMPORTANT! The jumper that shipped with your Zip drive is not
always needed for proper installation. M
2
1
Page 5
5
Installation
Guide
Watch the instructional video.
Before installing the hardware for your Zip® Internal drive, insert the
Owner’s Manual CD and click the button that says “Watch Installation
Video” to give you an overview of the installation process.
Write down the serial number of your Zip
®
Internal ATAPI drive for future reference.
You will need the serial number of your Zip Internal drive for registration
purposes or if you need to call technical support. The serial number is
located on the label on the top of your Zip drive. Write it down and keep
it with your documentation.
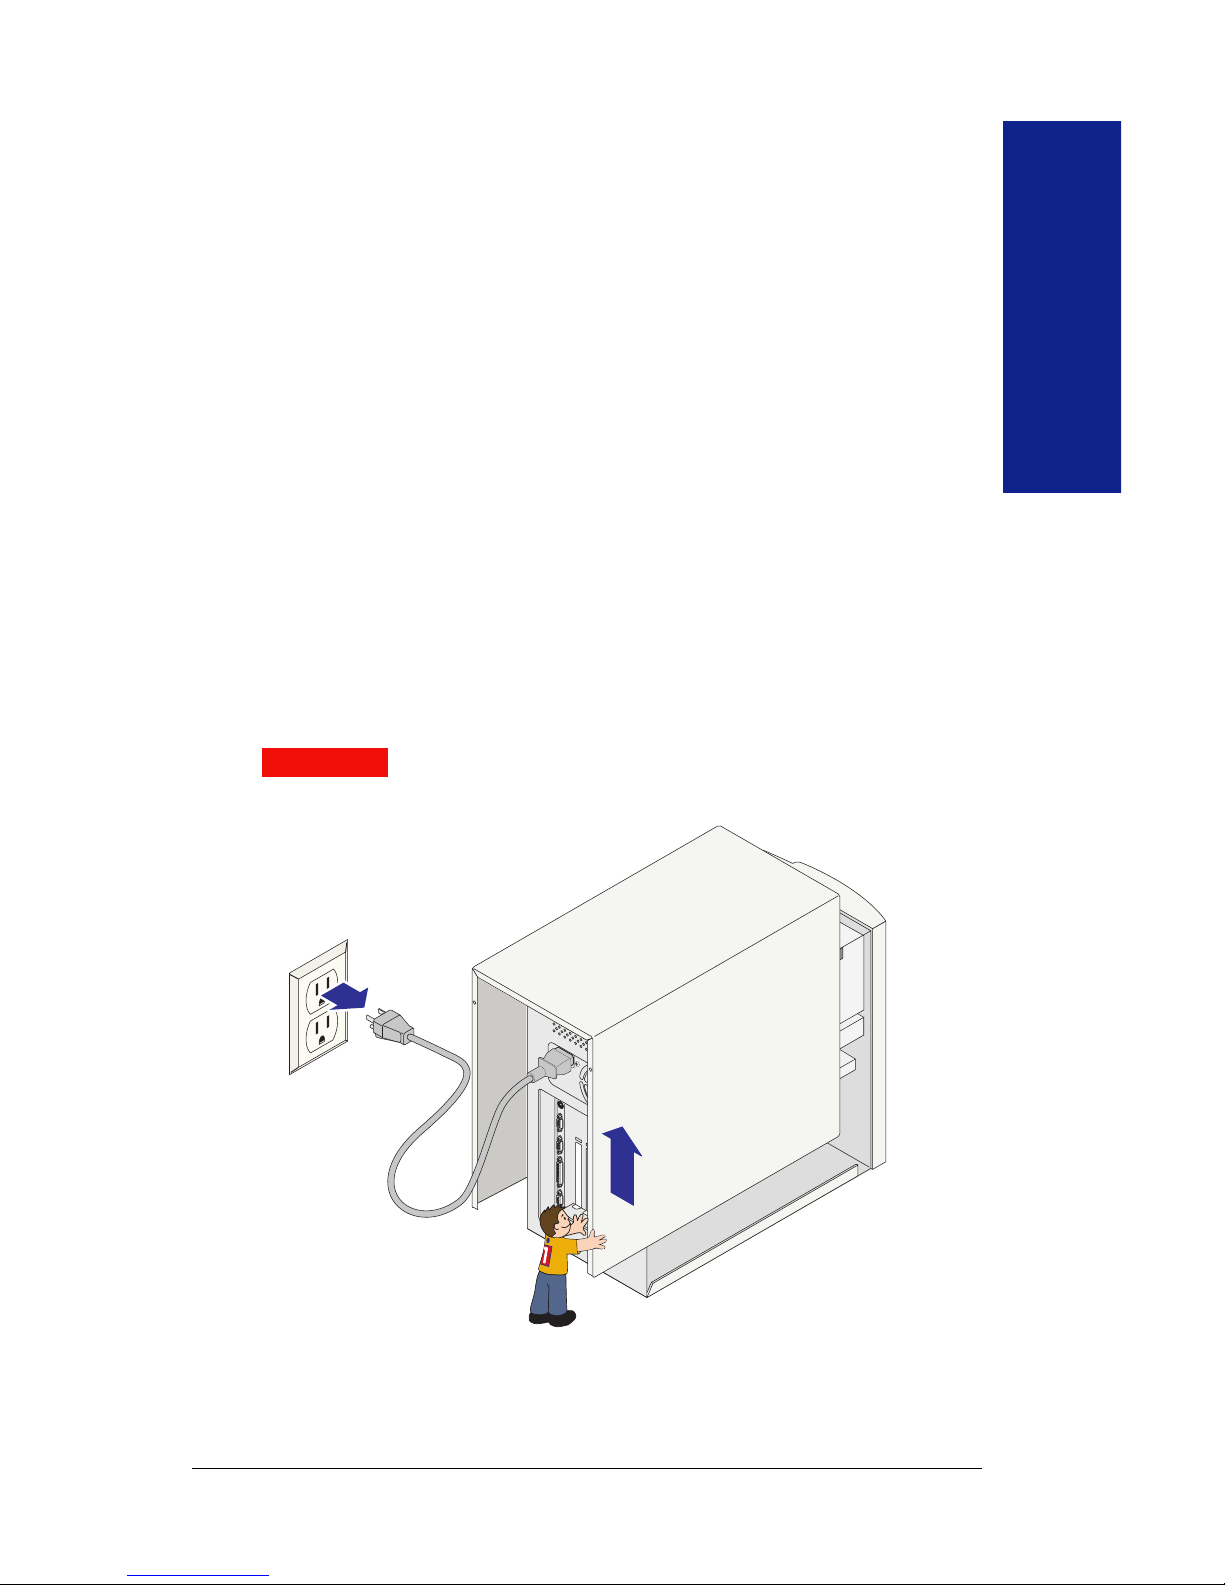
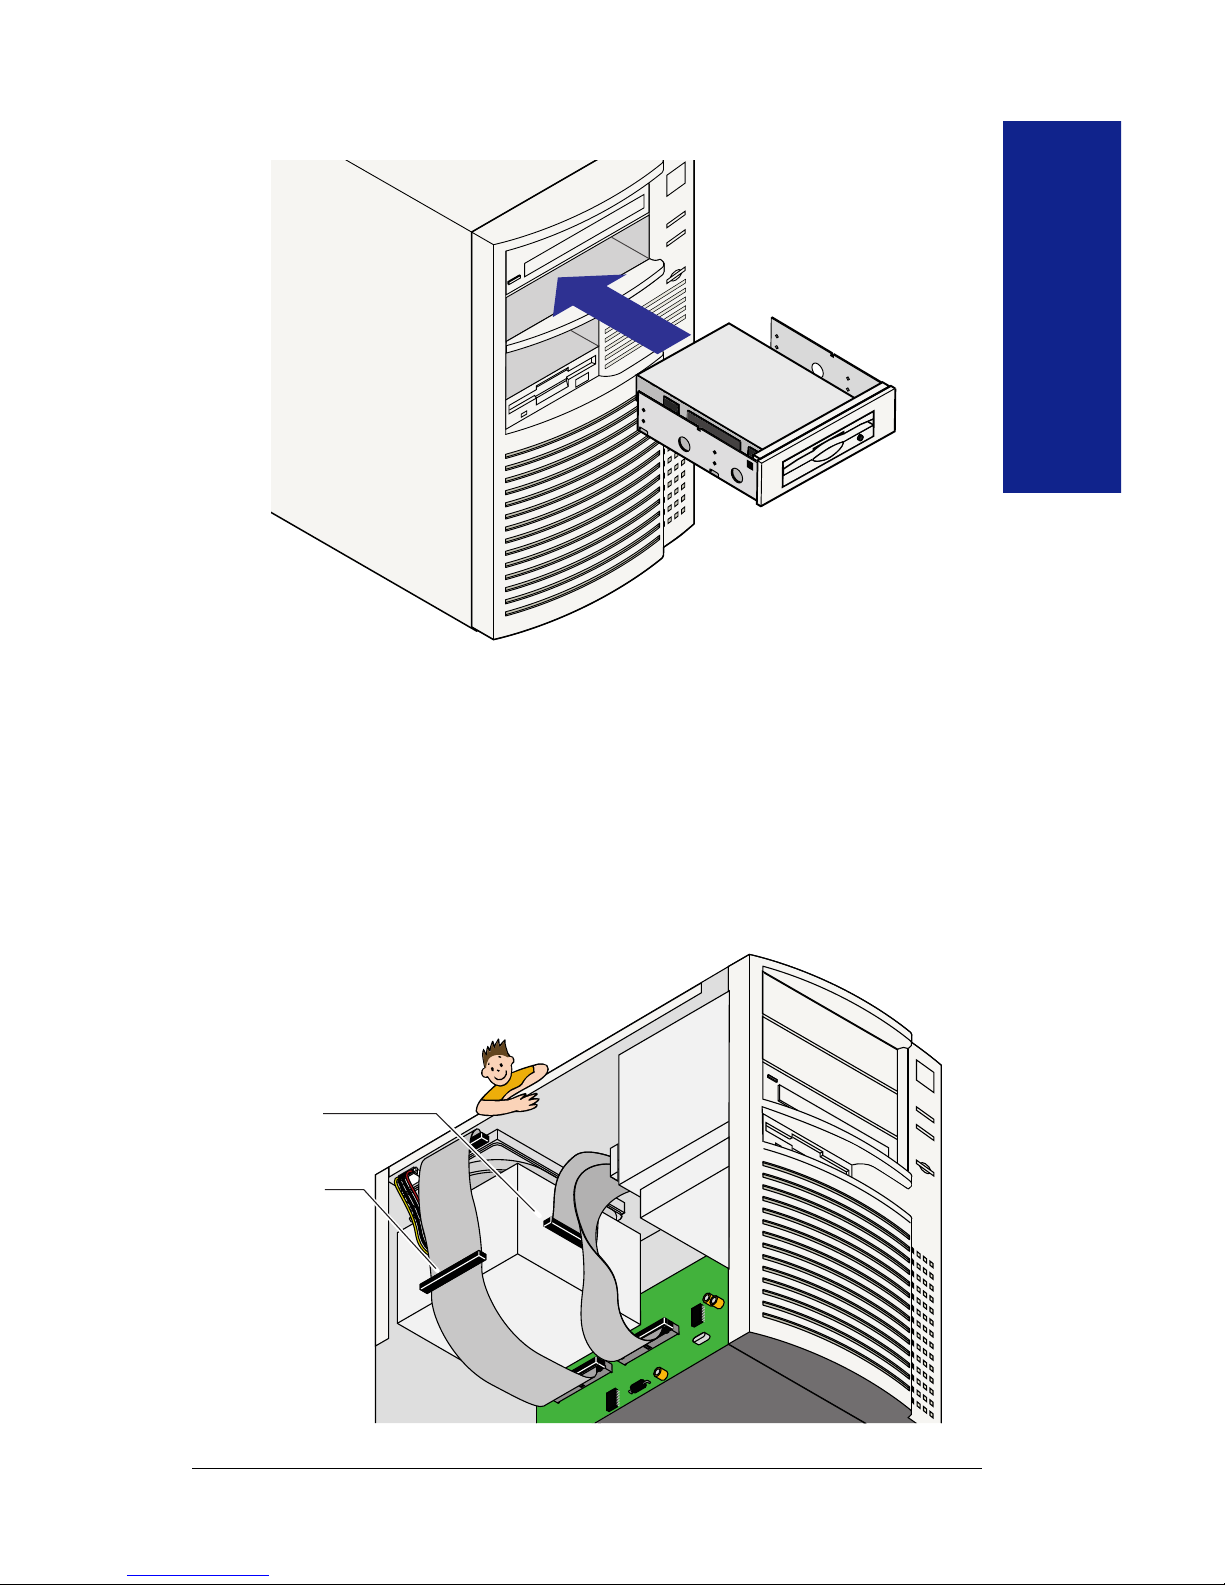
DISCONNECT the computer power cord and
remove the cover. (Refer to your computer manual
for more complete instructions.)
Some computers require removing the computer’s face plate as well as the
cover to access the drive bays.
WARNING Always disconnect computer electrical power before
beginning a computer hardware change. M
M IMPORTANT! Be aware that computers are arranged differently
and that your computer may not look like the illustrations shown. M
3
4
5
Page 6
6
Installation
Guide
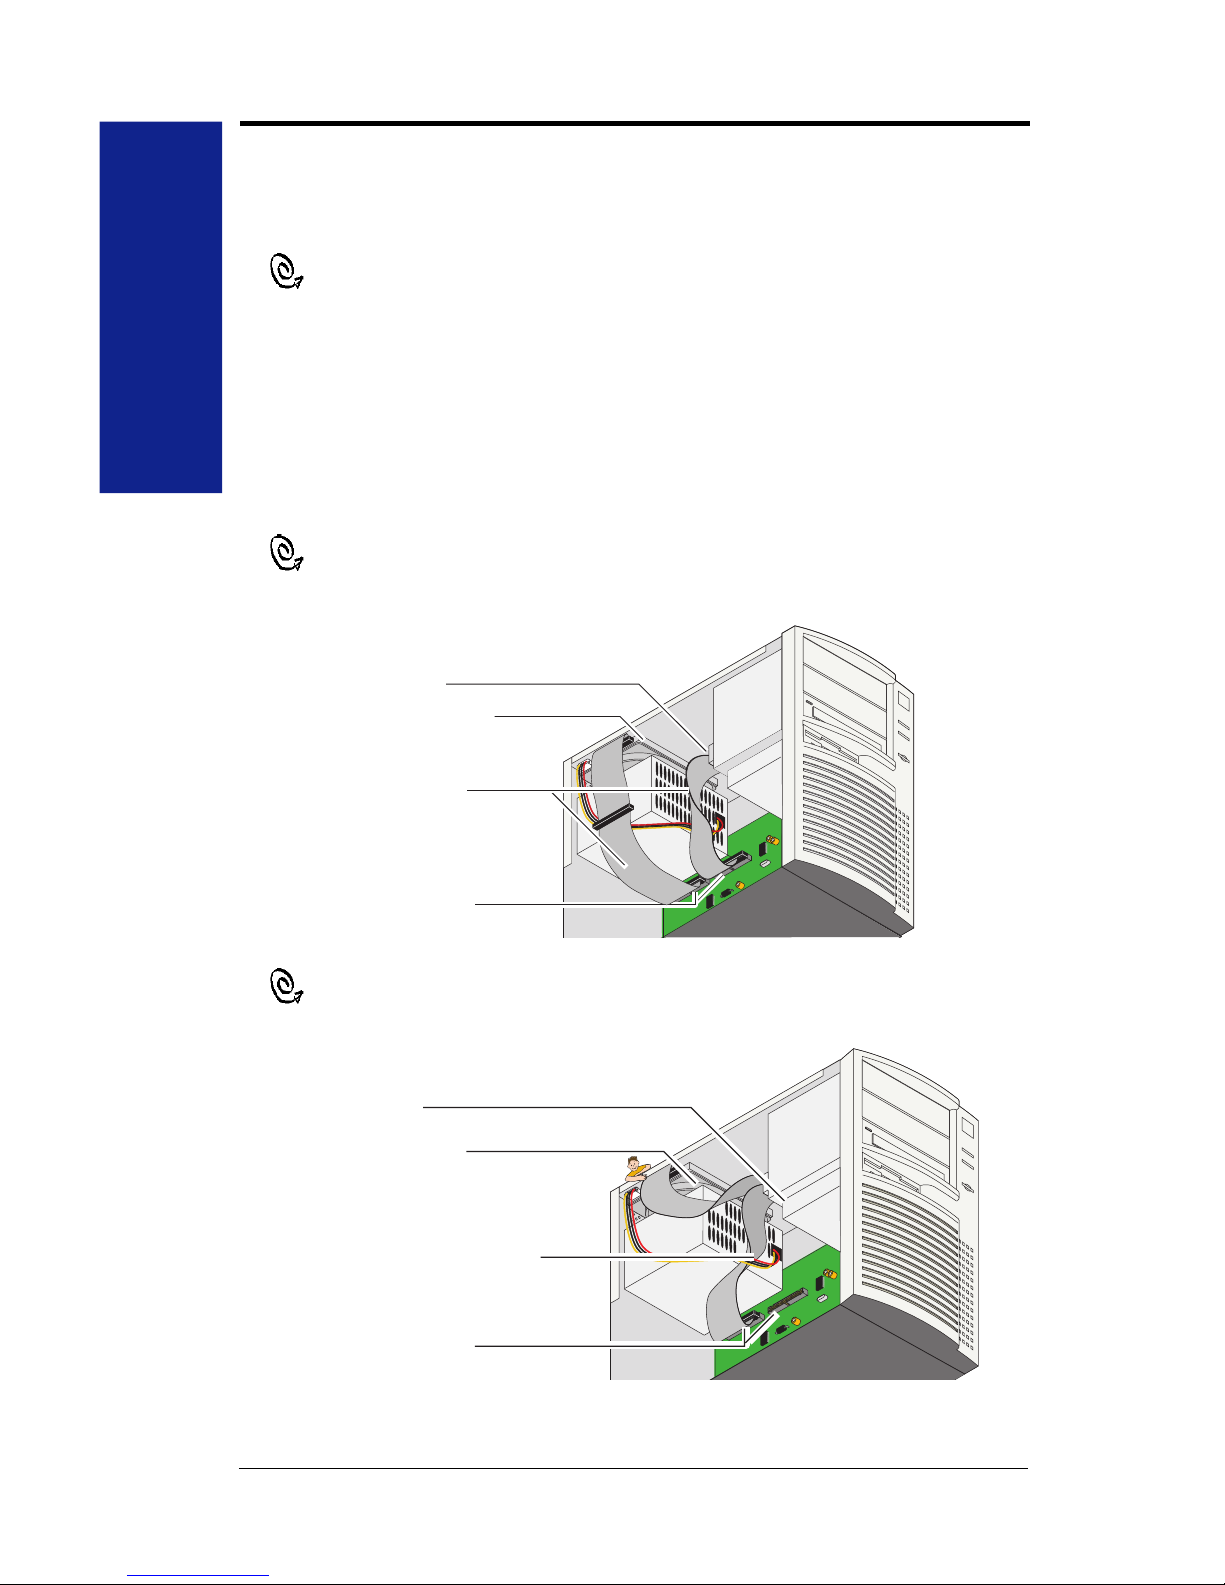
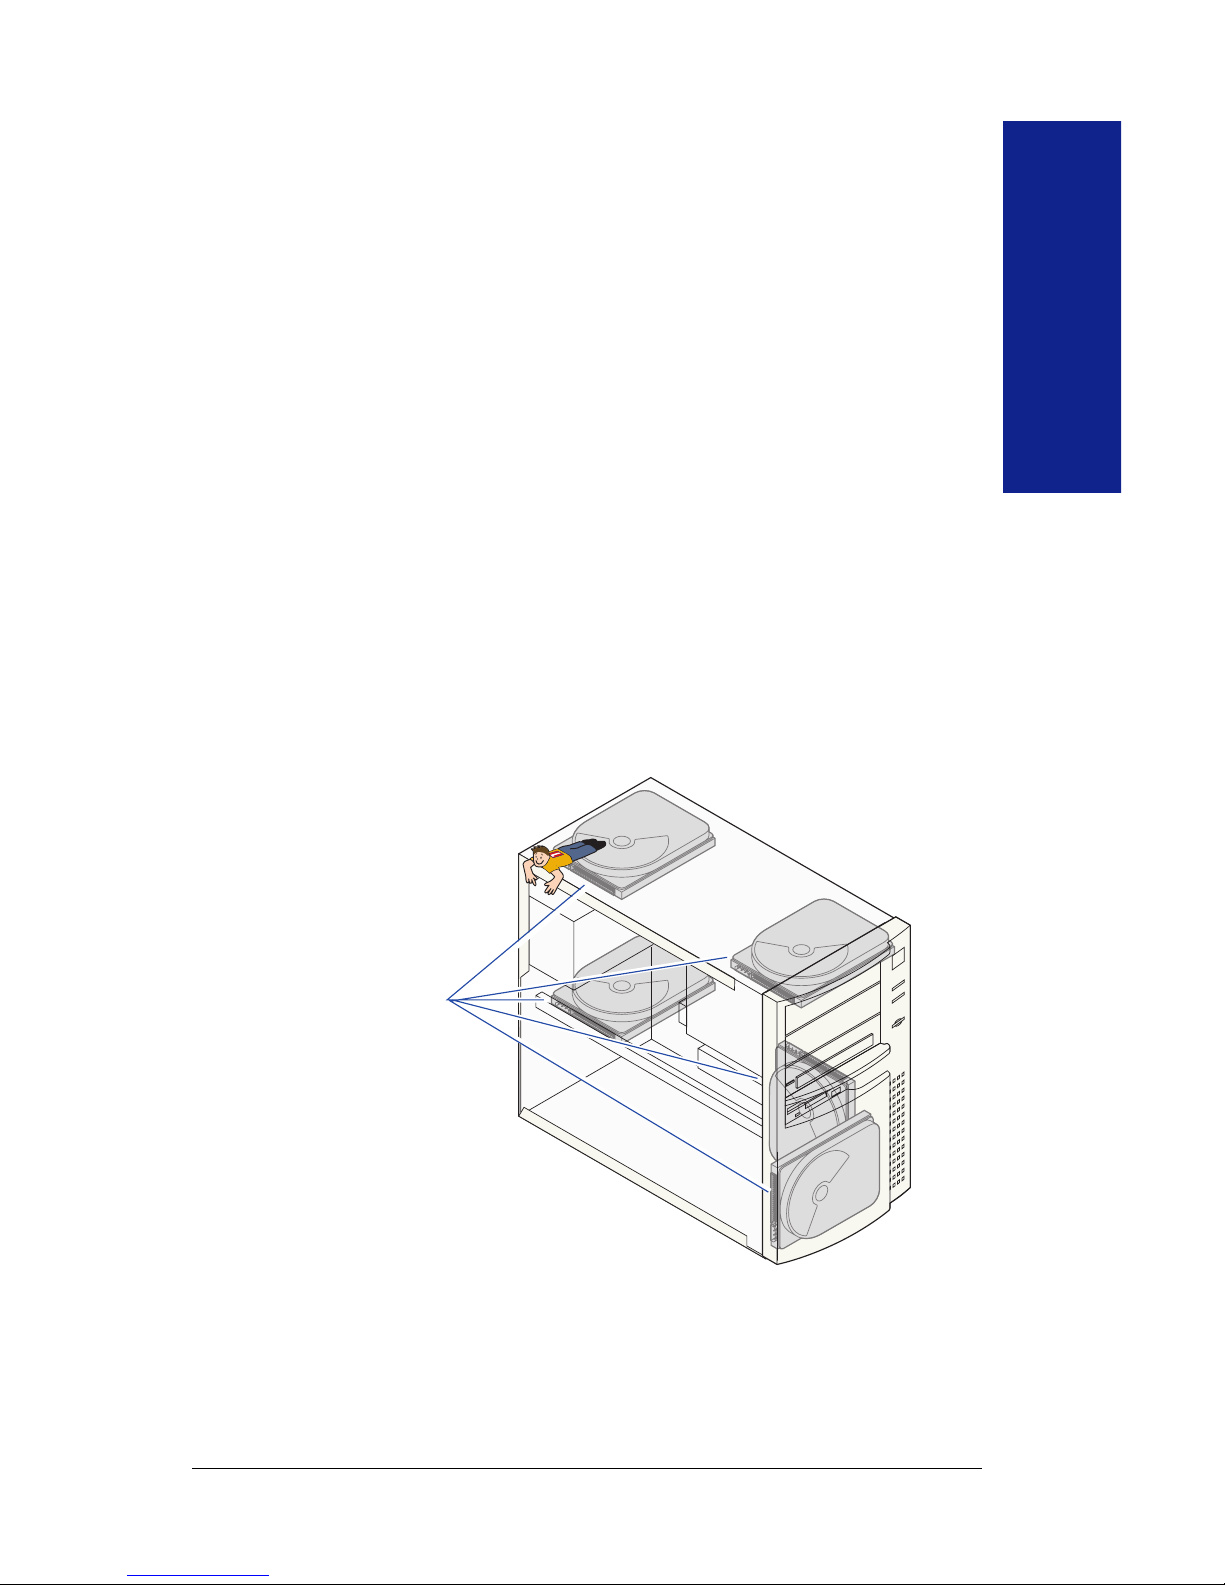
Identifying the computer’s IDE
configuration
IDE/ATAPI devices can be connected to your computer in different
configurations. The following illustrations are examples of ways the IDE/
ATAPI devices may be connected to your computer. If you are familiar
with IDE connections, you can use these to quickly find your configuration
and go to the appropriate hardware installation section. If you are not able
to recognize your computer’s configuration from these illustrations, detailed
instructions starting on the following page will help you do this. Iomega
suggests that you install your Zip
®
drive on the secondary IDE channel.
If your hard drive and CD drive are connected to different IDE channels,
see pages 11-16 for instructions on installing your Zip drive.
IDE hard drive
IDE data cables
that extend
to the motherboard
CD drive
IDE Channels
If your hard drive and CD drive are connected to the same IDE channel,
see pages 17-22 for instructions on installing your Zip drive.
IDE hard drive
IDE data cable that extends
to the motherboard
CD drive
IDE Channels
Page 7
7
Installation
Guide
Follow these instructions if you were unable to
identify your computer’s IDE configuration
from the illustrations on the previous page:
Locate the IDE channels using the CD drive
From the back of the CD drive in your computer, follow the flat, wide
cable to where it connects to the large main board, or motherboard. The
area where it connects is called the IDE channel. If the cable leads to the
motherboard, go to step 2 on the next page.
If you find that the CD drive is connected to a card that is attached to the
motherboard (probably the sound card), go to the next step and follow the
instructions to locate the IDE channels using the computer’s hard drive.
Locate the IDE channels using the computer’s
hard drive
If you don’t have a CD drive on your computer, you will need to use the
hard drive to locate the IDE channels. There are many locations within
your computer where your hard drive might be found. Here are a few of
the locations to help you get started.
Possible
Hard Drive
Locations
Locate your computer’s hard drive and the flat, wide cable attached to it.
Follow this cable to where it connects to the large main board or
motherboard. This connection is called the IDE channel.
M IMPORTANT! If you are unable to locate the hard drive and IDE
channels from the illustrations shown, (you will need to refer to your
computer’s manual for additional help). M
1
1a
1b
Page 8
8
Installation
Guide
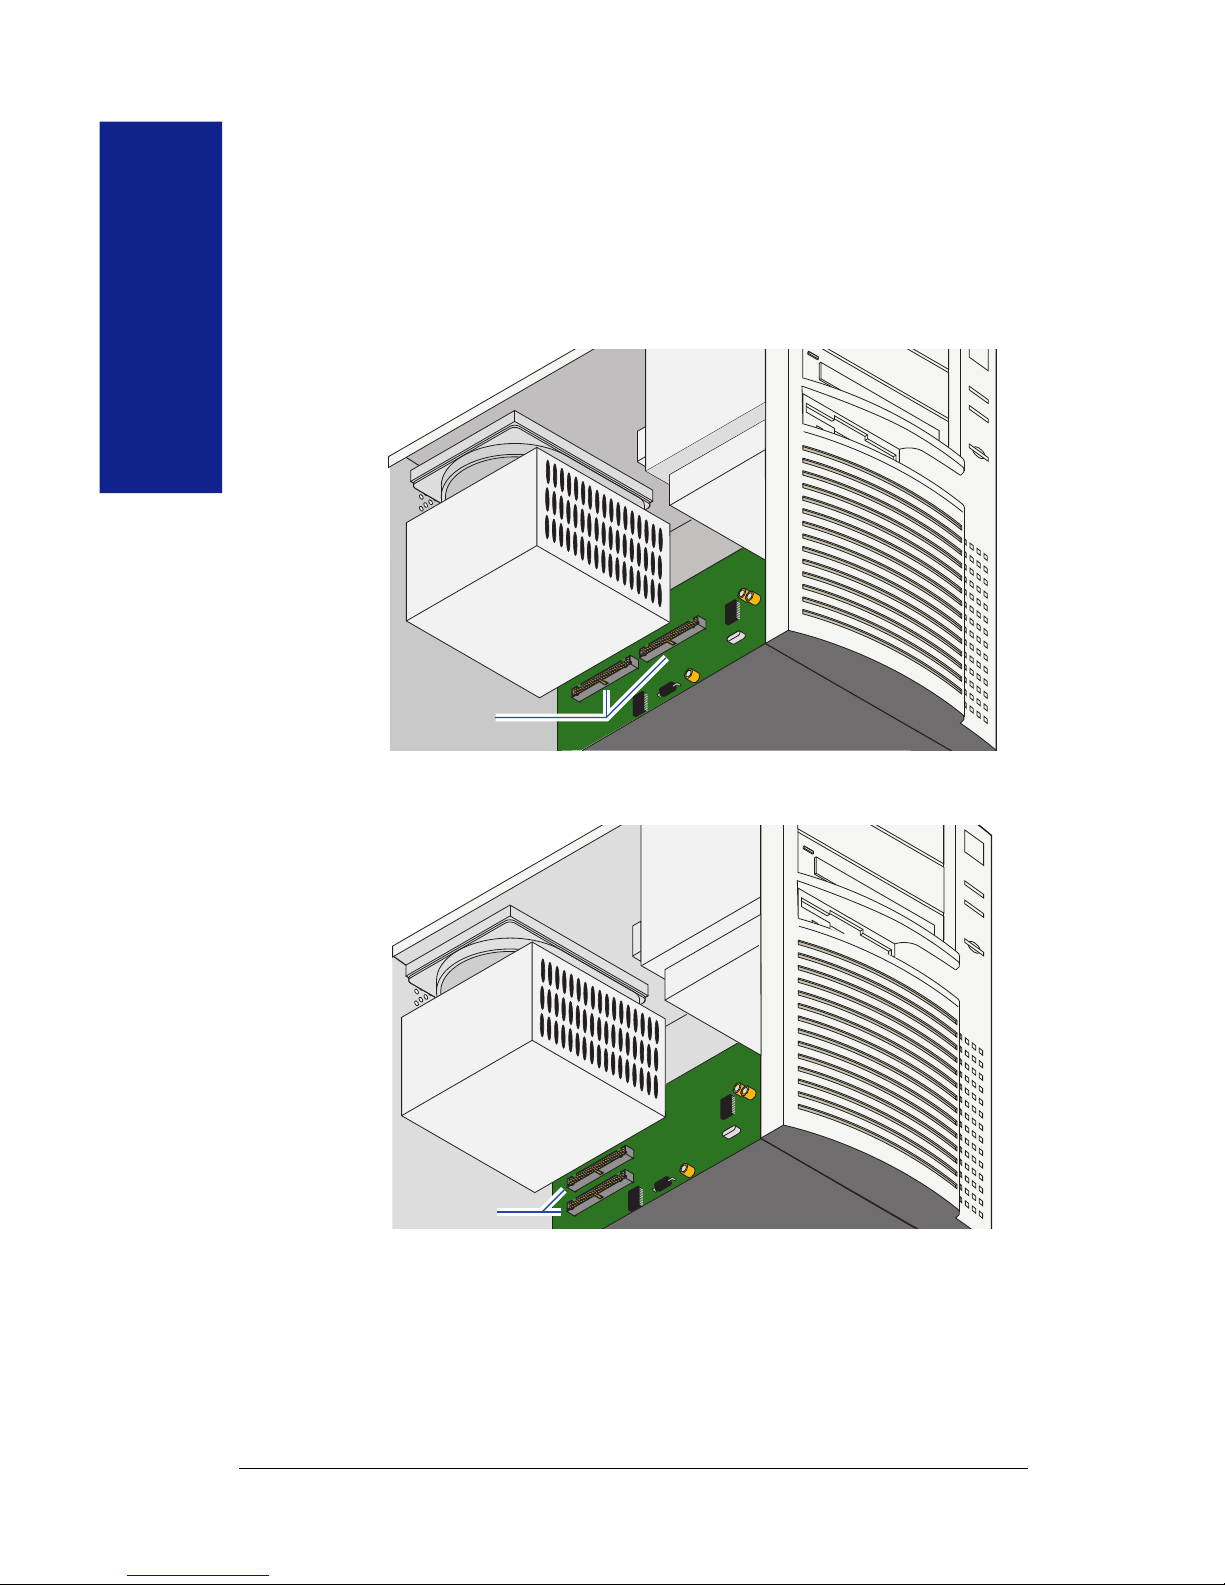
Possible IDE channel locations
There are usually two IDE channels, called the primary and secondary IDE
channel, which are either side-by-side or end-to-end as shown in the
illustrations below. Look for “pri IDE” and “sec IDE,” written on the
motherboard to identify which channel is the primary and which is the
secondary.
The hard drive is usually connected to the primary IDE channel.
IDE Channels
IDE channels
1c
Page 9
9
Installation
Guide
Determining your computer’s configuration
Once you have located the IDE channels, determine the configuration of
the IDE/ATAPI devices that are connected to your computer. Steps 2a
through 2c show some possible ways that your computer might be
configured.
If the hard drive is the only IDE device connected...
The hard drive is usually connected to the primary IDE channel. If the hard
drive is the only IDE device connected, the secondary IDE channel will be
unused, as shown in the illustration below. With this configuration,
connect the Zip drive to the secondary IDE channel as the master device.
For instructions see the section entitled
Installing the Zip drive as the
only device on the secondary IDE channel
on page 17 of this manual.
Secondary IDE Channel
Hard Drive
Primary IDE Channel
Continued on next page …
2
2a
Page 10

10
Installation
Guide
If the CD drive and hard drive are on different IDE
channels...
Follow the IDE interface cable to find out if the CD drive is the only
device connected to the secondary IDE channel. If it is, see
Installing
the Zip Drive as the Slave Device
starting on page 11 of this manual
for instructions on installing your Zip
®
drive.
IDE hard drive
IDE data cables
that extend
to the motherboard
CD drive
IDE Channels
If the CD drive and hard drive are on the same IDE
channel...
If the CD drive and the hard drive are both connected to the primary IDE
channel, the secondary IDE channel should be unused, as shown in the
following illustration. If your system has this configuration, see the section
entitled
Installing the Zip® drive as the only device on the secondary
IDE channel
starting on page 17 of this manual for instructions on
installing your Zip
®
drive.
IDE hard drive
IDE data cable that extends
to the motherboard
CD drive
IDE Channels
2b
2c
Page 11
11
Installation
Guide
Installing the Zip® drive as the slave, or
second device
M IMPORTANT! The Zip® Internal drive uses the computer’s
onboard IDE/ATA interface. If you are not familiar with how
devices connect to the IDE interface, please see Understanding
IDE Connections section on pages 36 and 37. M
M NOTE: Iomega recommends that you connect your Zip® drive to the
secondary IDE channel and not on the same channel as your hard drive. M
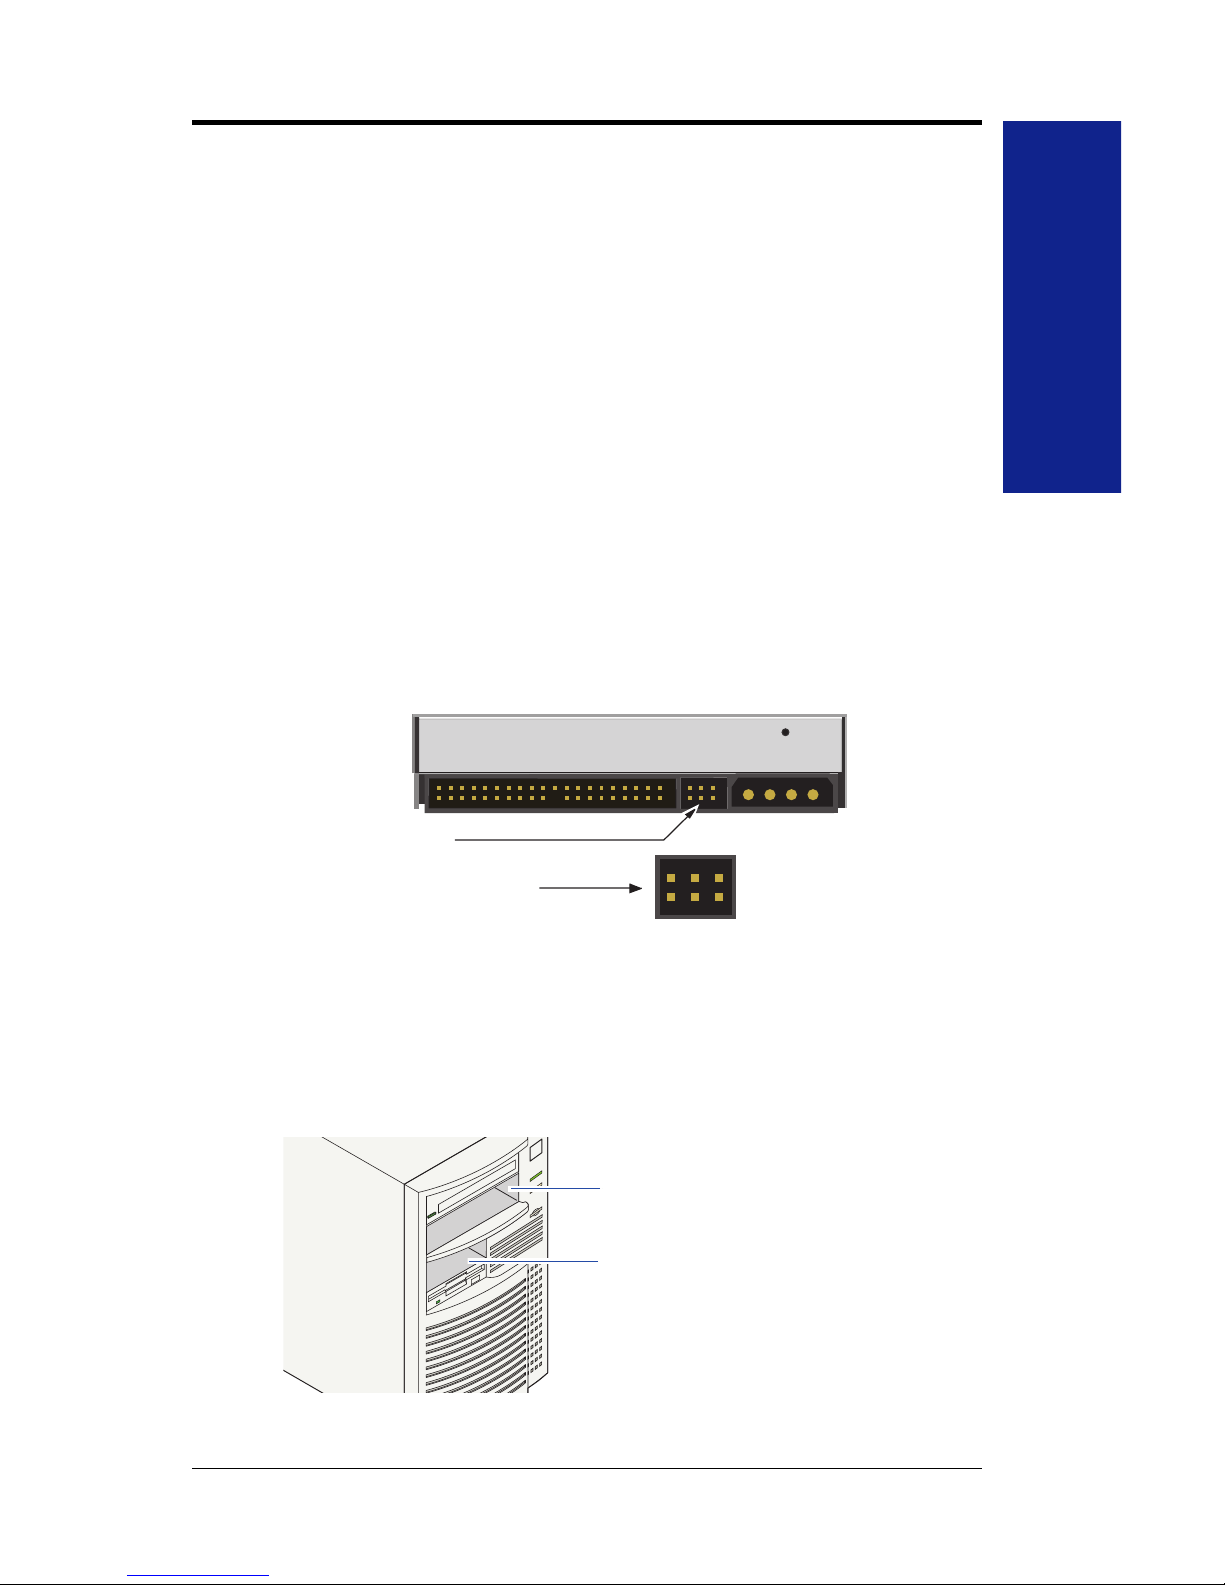
Check the jumper setting on the Zip® drive.
The Zip® Internal drive is set as the factory default to the “slave”
configuration indicating that another drive connected to the same IDE
cable will be the “master”. This is the way the Zip
®
drive should be set to
connect it to the secondary IDE channel with your CD drive. Verify that
there is no jumper on the back of the Zip
®
drive as shown in the illustration
below. The jumper is a small plastic piece that surrounds two of the pins.
Jumper block
Slave (Factory Setting)
(no jumper on pins)
Locate a vacant drive bay and remove the
panel cover.
The Zip® Internal drive is ready to install in a 5 1/4” drive bay. The
mounting bracket must be removed for installation in a 3 1/2” drive bay.
31/2" Bay
51/4" Bay
1
2
Page 12

12
Installation
Guide
3 1/2” drive bays ONLY.
To install your Zip® drive in a 3 1/2” drive bay, remove the mounting
screws as illustrated and slide the drive out of the sled.
Check mounting requirements. Your drive bay
may require side rails.
M HINT: Check other drives in the system (such as a CD drive) to see if
they use mounting rails. If so, you may need similar mounting rails for
the Zip® Internal drive. If the computer does not include extra
mounting rails, contact your computer dealer to obtain them. M
31/2" Bay
51/4" Bay
2a
3
Page 13
13
Installation
Guide
Slide the Zip® drive into the drive bay.
M NOTE: If it makes it easier to connect cables on your computer,
you can secure the Zip® drive in the drive bay now. (See step 9 for
instructions on securing the drive.) M
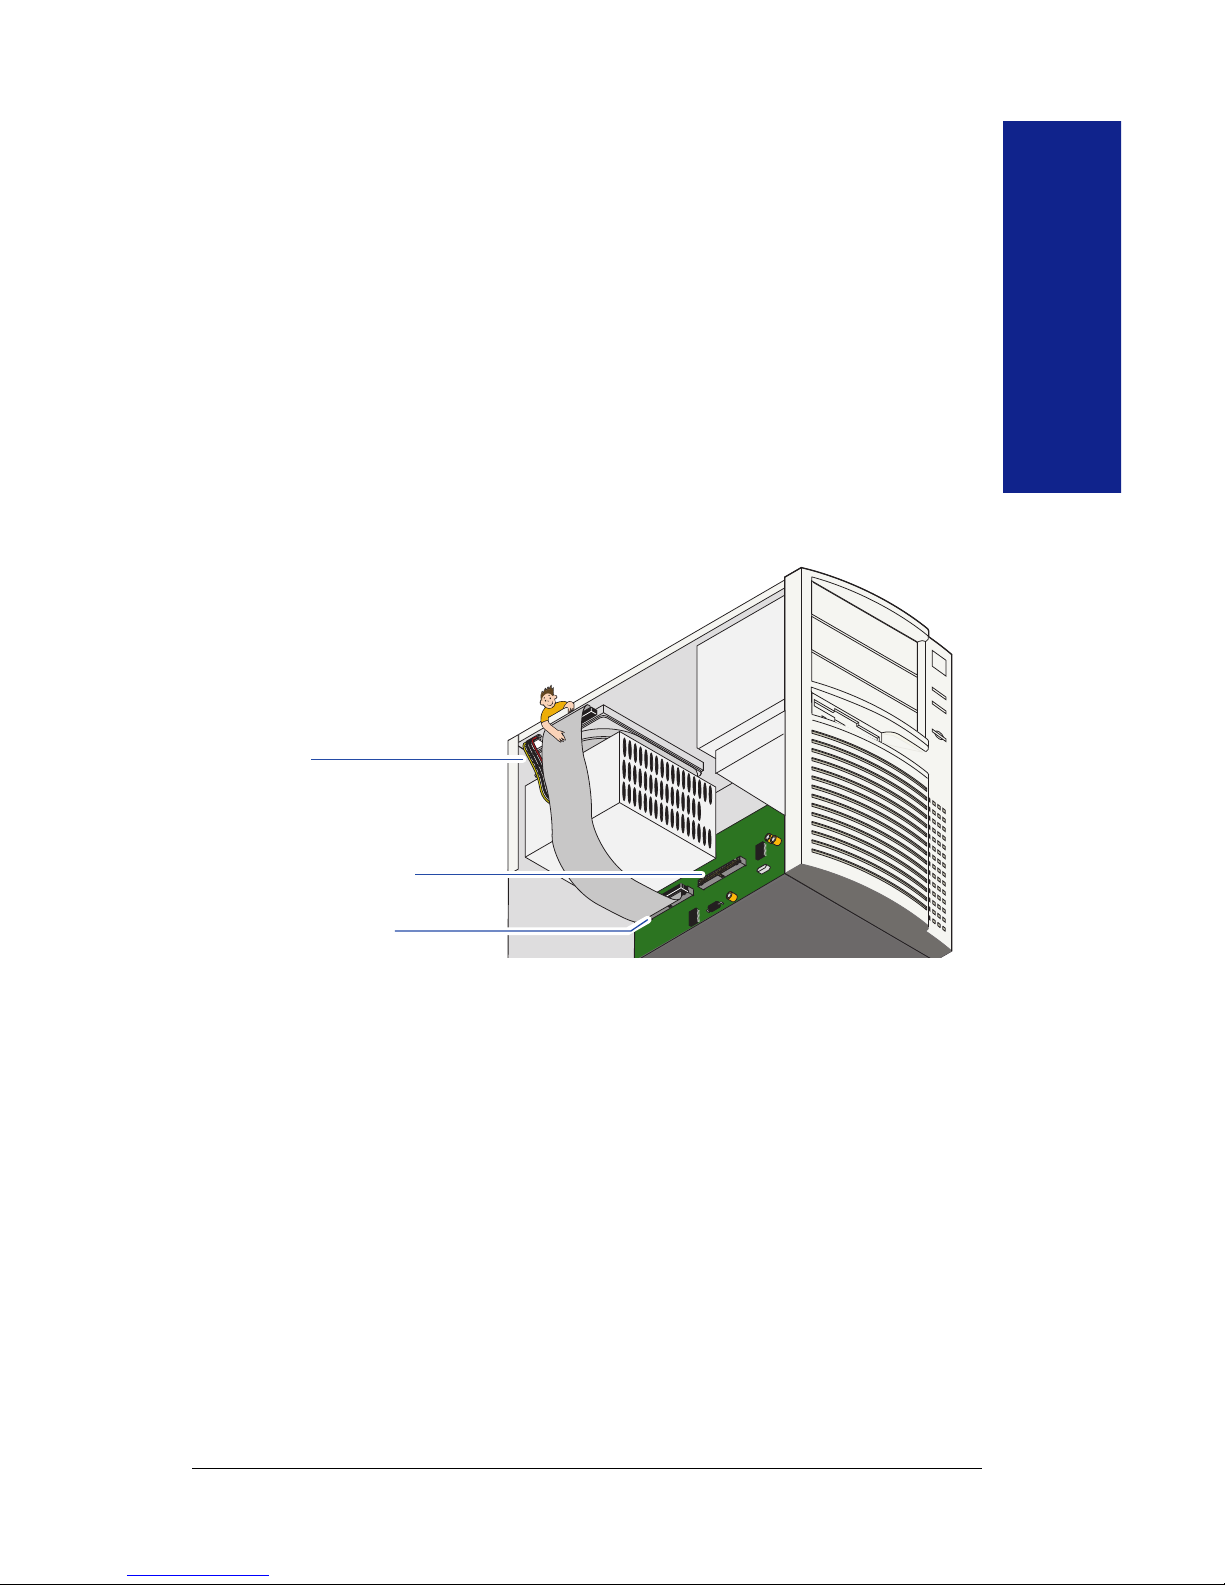
Remove the IDE Interface cable that is
currently connected to your CD drive.
Find the flat, wide cable connected to the back of the CD drive. Note the
side of the cable with the red stripe or PIN 1 indicator and disconnect the
cable from the motherboard and the CD drive and set it aside.
Existing IDE
Data Cable
From Hard Drive
4
5
Page 14
14
Installation
Guide
Verify that the jumper on your CD drive is set
to “Master.”
In order for the CD drive and Zip® drive to work together properly, ensure
that the jumper on the CD drive is set to the “master” setting. A chart
indicating the jumper setting should be located on the CD drive. If you are
unsure of the setting or how to change it, refer to the documentation that
came with your CD drive or computer.
Connect the CD drive and the Zip® Internal
drive to the motherboard.
Using the 40-pin IDE interface cable that is provided, connect the long
end, or the end furthest from the middle connector on the cable, to the
secondary IDE channel. Connect the middle connector to the CD drive
and then connect the other end of the cable to the Zip
®
Internal drive.
CAUTION Make sure PIN 1 on the cable connects to PIN 1 on the
Zip® Internal drive, the CD drive and the motherboard. All IDE
interface cable connections must maintain correct PIN 1 orientation
in order for the Zip® drive to be recognized by the system. M
PIN 1
Zip Internal drive
PIN 1
40-pin Interface Cable Connector
Stripe on Interface Cable indicates PIN 1
The IDE interface cable can be connected from the secondary IDE channel
to the CD drive and then to the Zip
®
drive, or it can be connected from the
secondary IDE channel to the Zip drive and then to the CD drive. For
information on possible IDE/ATAPI drive configurations for your
computer, see Understanding IDE Connections on pages 36 and 37.
6
7
Page 15
15
Installation
Guide
Connect an internal computer power supply
cable to the Zip® drive.
M NOTE: If the computer does not have a spare power supply
cable, use the power Y-cable provided. Disconnect the power from
the CD drive or another device (do not disconnect the power to the
hard drive) and connect the power Y-cable. Connect the two
extensions of the power Y-cable to both the CD drive or other device
and to the Zip® Internal drive. M
Zip Internal
drive
Power Supply Cable
from Computer
CAUTION Make sure the power supply cable is securely connected to
the Zip
®
drive. M
Secure drive in drive bay.
Align the front of the Zip® drive with other drives installed in the computer.
If there is not clear access to the drive bay mounting holes, refer to your
computer manual for additional instructions. Note that if the drive is held
in place securely by rails, you will not need to use the mounting screws.
Drive Bay
Mounting Screws
CAUTION Mounting screws must not extend into the Zip® Internal
drive farther than 4.0 mm (about 0.16 inch). Mounting screws that
are too long could damage the drive. M
8
9
Page 16

16
Installation
Guide
Check the following items before replacing the
computer cover:
PIN 1 on the IDE interface cable matches the PIN 1 connector on
your Zip
®
Internal drive.
The IDE interface cable is securely connected to all pins on your Zip
®
drive.
An internal power supply cable from the computer has been connected
to your Zip
®
drive.
Your Zip
®
drive has been securely mounted to your computer.
Make sure the IDE interface cable is still connected properly at the
hard drive or CD drive and the motherboard connections.
Check all connections, arrange the cables to
fit under the cover, and replace the
computer cover.
Reconnect power cord, turn ON power switch,
and wait for the operating system to load.
Go to page 23 of this manual for instructions
on installing the Zip
®
ATAPI driver and the
IomegaWare
™
software.
10
11
12
13
Page 17

17
Installation
Guide
Installing the Zip® drive as the only
device on the secondary IDE channel
M IMPORTANT! The Zip® Internal drive uses the computer’s
onboard IDE/ATA interface. If you are not familiar with how devices
connect to the IDE interface, please see Understanding IDE
Connections on pages 36 and 37. M
Change the jumper setting to “Master”.
The Zip Internal drive is set to the slave configuration as the factory default
at shipping. In order to connect the Zip Internal drive as the only device on
the secondary IDE channel, you will need to change the jumper setting on
the drive. The jumper is a small plastic piece that surrounds two pins. Use
the jumper provided and set it on the back of the Zip drive as shown in the
illustration below.
Jumper block
Master (Drive 0)
Locate a vacant 31/2” or 51/4” drive bay.
31/2" Bay
51/4" Bay
1
2
Page 18

18
Installation
Guide
3 1/2” drive bays ONLY.
To install your Zip® drive in a 3 1/2” drive bay, remove the mounting
screws as illustrated and slide the drive out of the sled.
Check mounting requirements. Your drive bay
may require side rails.
M HINT: Check other drives in the system (such as a CD drive) to see
if they use mounting rails. If so, you may need similar mounting rails
for the Zip® Internal drive. If the computer does not include extra
mounting rails, contact your computer dealer to obtain the them. M
31/2" Bay
51/4" Bay
2a
3
Page 19

19
Installation
Guide
Slide the Zip® drive into the drive bay.
M NOTE: If it makes it easier to connect cables on your computer,
you can secure the Zip® drive in the drive bay now. (See step 9 for
instructions on securing the drive.) M
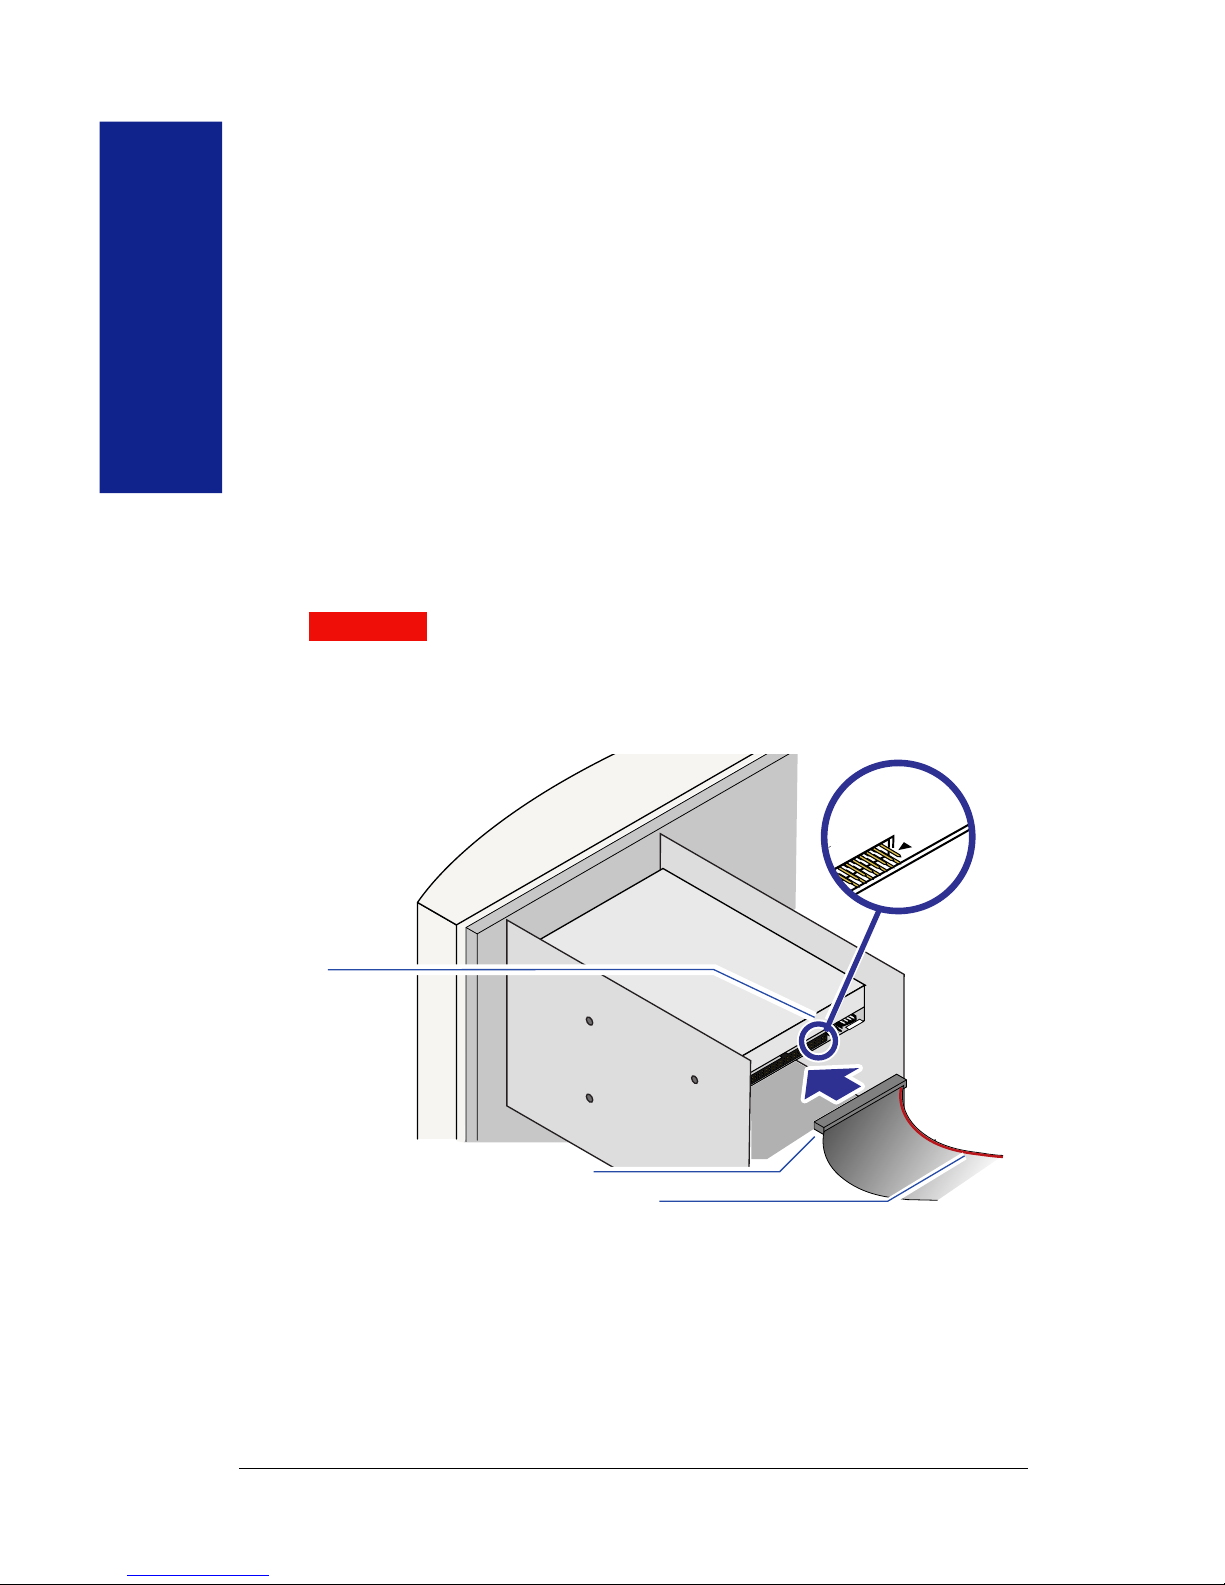
Locate the data cable that comes packaged
with the Zip
®
drive. Find the colored stripe or
print on one side of the data cable showing
PIN 1.
Stripe or printing shows the
PIN 1 side of the data cable.
Locate the PIN 1 connection on the IDE channel. PIN 1 on your
computer’s IDE channels can be indicated by any of the following marks.
If you have a keyed receptacle, you should only be able to connect the cable
one way.
1
2
40
39
Keyed
Connector
4
5
Page 20

20
Installation
Guide
Connect the data cable to the secondary IDE
channel on the motherboard.
(Be sure PIN 1 on
the cable is connected to PIN 1 on the motherboard.)
PIN 1
to PIN 1
Connect the other end of the data cable to the
Zip® drive.
CAUTION Make sure PIN 1 on the cable connects to PIN 1 on the
Zip® Internal drive. All IDE interface cable connections must maintain
correct PIN 1 orientation in order for the Zip® drive to be recognized
by the system. M
PIN 1
Zip Internal drive
PIN 1
40-pin Interface Cable Connector
Stripe on Interface Cable indicates PIN 1
6
7
Page 21

21
Installation
Guide
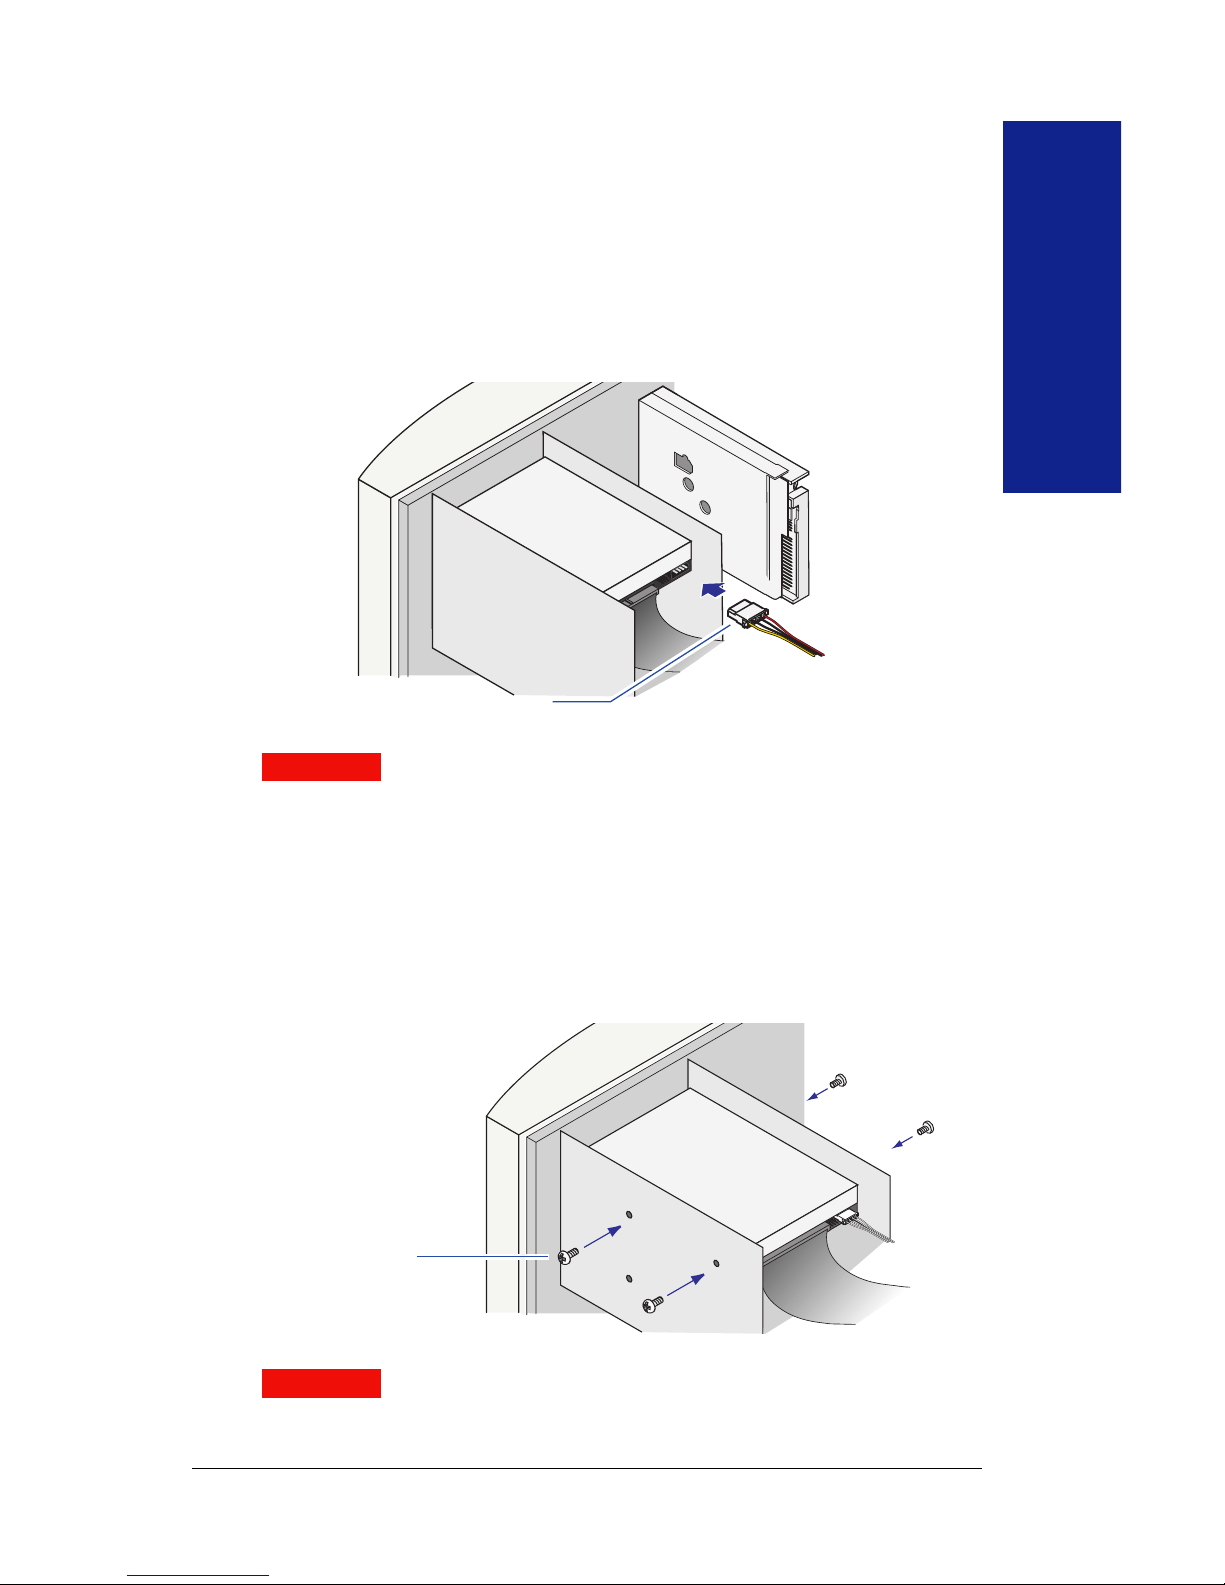
Connect an internal computer power supply
cable to your Zip® drive.
M NOTE: If the computer does not have a spare power supply cable,
use the power Y-cable provided. Disconnect the power from the CD
drive or another device (do not disconnect the power to the hard drive)
and connect the power Y-cable. Connect the two extensions of the
power Y-cable to both the CD drive or other device and to the Zip
®
Internal drive. M
Zip Internal
drive
Power Supply Cable
from Computer
CAUTION Make sure the power supply cable is securely connected to
the Zip® drive. M
Secure drive in drive bay.
Align the front of the Zip® drive with other drives installed in the computer.
If there is not a clear access to the drive bay mounting holes, refer to your
computer manual for additional instructions. Note that if the drive is held
in place securely by rails, you will not need to use the mounting screws.
Drive Bay
Mounting Screws
CAUTION Mounting screws must not extend into the Zip® Internal
drive farther than 4.0 mm (about 0.16 inch). Mounting screws that are
too long could damage the drive. M
8
9
Page 22

22
Installation
Guide
Check the following items before replacing the
computer cover:
PIN 1 on the IDE interface cable matches the PIN 1 connector on
your Zip
®
Internal drive and the motherboard.
The IDE interface cable is securely connected to all pins on your Zip
®
drive.
An internal power supply cable from the computer has been connected
to your Zip
®
drive.
Your Zip
®
drive has been securely mounted to your computer.
Check all connections, arrange the cables to
fit under the cover, and replace the computer
cover.
Reconnect power cord, turn ON power switch,
and wait for the operating system to load.
Turn to the next page for instructions on
installing the Zip
®
ATAPI driver and the
IomegaWare™ software.
10
11
12
13
Page 23

23
Installation
Guide
Installing the IomegaWare™ Software
Insert the IomegaWare™ CD into the computer’s
CD drive.
M No CD Drive? If you want to install the Zip® Internal drive on a
computer that does not have a CD drive, you can download Iomega
software from the Internet. You can also create an install floppy
diskette for installing only the critical software drivers. Refer to
How to Install Without a CD drive on page 25 for additional
information. M
If the Iomega software setup program does
not start automatically, follow these steps:
a) Open My Computer, Windows Explorer, or File Manager.
b) Double click the CD drive letter (usually D:, E:, or F:).
c) Double click
Setup.exe.
Follow the screen instructions to install the
software.
1
2
3
Page 24

24
Installation
Guide
Additional instructions for your system...
Windows 95/98 Users
Your Zip® drive and IomegaWare™ software should now be ready to use.
Open My Computer to see if you have an icon for your Zip drive.
Windows NT Users
The Iomega installation software will try to install and update the necessary
drivers on your system. If the Zip
®
drive does not appear on your system,
or appears as the B: drive, after the Iomega software installation is complete
and your system has rebooted, you will need to manually install the driver
using the procedure described for Windows NT 3.51. Windows NT 4.0 is
automatically updated.
M IMPORTANT! You must have administrator privileges for your local
computer in order to install the Iomega software or the Zip® ATAPI
software driver under Windows NT. M
Installing the Iomega Zip® ATAPI driver under Windows NT 3.51
1. If you have not already done so, install Iomega software from the
IomegaWare
™
CD using the setup.exe program.
2. From the Windows NT Main program group, double click on the
Windows NT Setup icon.
3. From the Setup window, choose the Options pull-down menu and
select “Add/Remove SCSI adapters.”
M
NOTE:
Windows NT installs drives or adapters that use the
IDE interface as SCSI adapters. M
4. When the list of adapters appears, click “Add,” then click “OK” in the
message box.
5. Click the down arrow next to the window for “Select SCSI Adapter
Option” to open the adapter list.
6. Scroll down to the bottom of the adapter list box and click on
“Other.”
7. Make sure the IomegaWare CD is inserted into the computer’s CD
drive.
8. Select the drive letter for the CD drive and open the folder for the
language you want to use.
9. Open the WNTStuff folder, then open the IDE folder.
10. Click “OK.” When the list of Iomega adapters appears, select the
Iomega Zip ATAPI/IDE driver and click “OK.”
Page 25

25
Installation
Guide
11. Click the “Install” button. Windows NT will copy the driver file and
add the Iomega Zip
®
driver to the list of installed adapters found by
the system.
12. Click the “Close” button and exit Windows NT Setup.
13. Click “OK” at the message box and reboot the system.
14. Your Zip
®
drive and Iomega software should now be ready to use.
If your drive letters change after installing the Zip® Internal drive:
Refer to the Troubleshooting section starting on page 38 for instructions
on how to assign a specific drive letter for your Zip
®
drive.
How to Install Without a CD Drive
If you need to install or use your Zip® drive on a computer that does not
have a CD drive, you can download Iomega software from the Internet or
install the necessary driver software from a floppy diskette.
Download Software from the Iomega Web Site
Visit Iomega’s web site for the latest version of Iomega software. All
components of the IomegaWare
™
software package can be downloaded.
1. Visit the Iomega web site at
http://www.iomega.com.
2. Click on
Software Download to find the Iomega software package
for your system.
Create Install Floppy Diskettes
If you have access to a computer that has a CD drive, you can create floppy
diskettes for installing the necessary driver software:
M NOTE: The floppy install diskette can only be used on a PC. The
install diskette includes only the driver software required to provide
access to the Zip® drive, not the complete Iomega software package.
You can download all components of the software package from
Iomega’s web site. M
1. Insert a blank floppy diskette into the computer’s floppy drive.
2. Insert the IomegaWare
™
CD into the CD drive. If the Setup program
starts automatically, cancel by clicking
Exit Setup.
3. Open My Computer or Windows Explorer, right click on the icon
for the IomegaWare CD, and select
Explore from the shortcut
menu.
Page 26

26
Installation
Guide
4. Double click the Diskette icon, and follow the
screen instructions.
5. To install software drivers for your Zip
®
drive, run
setup.exe from the install diskette you created.
Congratulations! When the software
installation is complete, your Zip® drive will be
ready to use.
Your Zip® drive will have its own drive letter just like any other drive on
your computer. Store and copy files to and from the Zip
®
drive like you do
on other drives. For additional information on using the Zip
®
drive and
IomegaWare
™
software, refer to the User’s Guide starting on the next page.
Page 27

27
User’s Guide
Operating Your Zip® Drive
To use the Zip® drive, insert a 250MB* Zip disk, then select the drive letter
assigned to the Zip drive in My Computer (Windows 95/98; Windows NT
4.0) or File Manager (Windows NT 3.51; Windows 3.1). You can store
and copy files to and from the Zip
®
drive using the same methods you use
for other drives on your system. (If you need instructions on how to copy
files, refer to the help file for your operating system.)
*250MB or 100MB capacity where 1MB = 1 million bytes. The capacity reported by
your operating system may vary. Use 250MB Zip disks for maximum performance.
Disk Eject Button / Green Activity Light
(Flashes when drive is transferring data
or a disk is inserted or ejected)
Inserting Zip® Disks
Always turn on power to the computer before inserting a Zip® disk.
When you insert a Zip
®
disk, the drive activity light will flash momentarily
and go out. (If the light continues to blink slowly, push the disk eject
button to eject the Zip
®
disk, then reinsert it.)
Disk shown
fully inserted
IMPORTANT!
Insert Gently!
CAUTION Never put anything into your
Zip® drive except Zip disks with the genuine
Zip 250 or Zip 100 symbol. Using disks that
do not have the genuine Zip symbol may
cause damage to your drive or loss of data. M
Page 28

28
User’s Guide
Ejecting Zip® Disks
Windows 95/98 systems: Push the disk eject button or use the Iomega
software eject command.
Windows NT systems: Use the Iomega software eject
command.
Windows 3.1 systems: Push the disk eject button.
When your Zip
®
drive is not in use, remove the disk from the drive. Always
remove the Zip
®
disk before moving your computer.
Disk Eject in Case of Power Loss
The computer must be powered on for normal disk insertion and removal.
If you need to eject a Zip
®
disk during a power failure, access the rear of the
Zip drive and push a straightened paper clip into the emergency eject hole
which is located just above the power connector (see illustration below).
CAUTION Disconnect power from the computer before using the
emergency disk eject hole. Do not try to forcibly remove a Zip® disk
from the drive. If the disk does not eject immediately, repeat the
emergency disk eject procedure as described above. M
Emergency Eject Hole
Drive Sleep
The Zip® Internal drive has an automatic sleep mode that spins down a
Zip
®
disk after 15 minutes of inactivity. This feature minimizes power
consumption when the Zip drive is not being accessed. The Zip disk
automatically spins up again when the drive is accessed.
You can use the Iomega Tools program included with your drive to change
the drive sleep setting. Refer to the Iomega Tools help file included in your
software package for additional information.
M Windows 3.1 or Windows NT 3.51 users - See the Iomega
Tools help file included in your software package for instructions. M
Page 29

29
User’s Guide
Compatibility with 100MB Zip® Disks
The 250MB Zip® drive features backward compatibility that allows you to
read and write to 100MB Zip disks. However, because of the higher
capacity of the 250MB Zip drive, performance when writing to a 100MB
Zip disk is significantly reduced. This means that a large file that takes 10
seconds to write to a 250MB Zip disk could take about a minute-and-ahalf to write to a 100MB Zip disk (using your 250MB Zip ATAPI drive to
write both disks).
To maximize performance of your 250MB Zip
®
drive, you should use
250MB Zip disks whenever you want to store new information. If you
have existing data on 100MB disks, you can transfer it to 250MB Zip disks
using Copy Machine. (See the Copying Zip Disks on page 33.)
Here are some important things to know about using 250MB
and 100MB Zip® disks and drives together:
If you write information to a 100MB Zip® disk using a 250MB Zip
drive and later find that the disk cannot be read by a 100MB Zip
drive, try reading the disk again in your 250MB Zip drive.
If the 250MB Zip
®
drive appears to hang when you are writing to
a 100MB Zip ®disk, you can verify that the drive is operating
correctly by checking that the green activity light is blinking
irregularly. (A slow, steady blink may indicate a problem with the
drive. If there is a slow, steady blink, try pushing the disk eject
button to eject the disk, then reinserting it.)
You can use the Short Format option if you need to format a
100MB Zip® disk in a 250MB Zip drive; the Long Format option is
not supported for 100MB Zip disks in the 250MB Zip drive.
A 250MB Zip
®
disk cannot be used in a 100MB Zip drive; the
100MB Zip drive will automatically reject a 250MB disk.
Page 30

30
User’s Guide
Zip® Tips
Here are a few tips you’ll want to keep in mind to care for
your Zip
®
drive and disks!
Always turn on power to your computer before inserting a
Zip
®
disk.
CAUTION If a disk is inserted without the power on, and power is
then applied, it could damage the drive. M
Never force a Zip® disk into or out of the drive.
Never use ordinary 3.5" diskettes or floppy head-cleaning disks in
your Zip
®
drive. They will damage your drive. Only use 250MB or
100MB Zip disks with the Zip logo on them.
CAUTION Never put anything into your
Zip® drive except Zip disks with the genuine
Zip 250 or Zip 100 symbol. Using disks that
do not have the genuine Zip symbol may
cause damage to your drive or loss of data. M
Avoid exposing Zip® disks to direct sunlight, high temperature,
moisture, and magnetic fields (such as from monitors or
speakers).
Page 31

31
User’s Guide
IomegaWare™ Software
The IomegaWare software package* includes tools and programs designed
to help you take advantage of all the features of your Zip
®
drive. You can
use Iomega software to format, copy, and protect your Zip disks, back up
your hard drive, set options for your Zip drive, and more. The Iomega
software package includes:
1-Step Backup/Restore
1-Step Backup easily backs up data files from your hard drive to Zip® disks.
(1-Step Backup does not back up all of your operating system files or files
that are in use.) When you need to restore a backup, double click the 1Step Restore icon. For information on using 1-Step Backup/Restore, see
IomegaWare Quick Help in the IomegaWare folder or click the Help
button that is available when the program is running. 1-Step Backup/
Restore is available for Windows 95/98 and Windows NT.
RecordIt™ Software
RecordIt software allows you to record audio tracks from a compact disc to
a Zip
®
disk and take those recordings anywhere a Zip drive is available. The
Audio Mic In feature allows you to record from a microphone, making it
easy and convenient to record meetings or to dictate a memo. RecordIt
software is available for Windows 95/98.
M IMPORTANT! RecordIt software is intended for non-infringing
use only. Digital recording of music must be done within the bounds
of the personal use statutes of applicable copyright laws. M
Copy Machine
Copy Machine allows you to make a copy of a Zip® disk using a single Zip
drive. On Windows PCs, Copy Machine can also be used to copy files
from one drive on your system to another (for example from the hard drive
to your Zip drive). Note that Copy Machine cannot copy files that are in
use. Copy Machine is available for Windows 95/98, Windows NT, and
Windows 3.1.
Iomega Tools
Iomega Tools is a collection of disk and drive management utilities,
including format, disk protection, drive startup options, and more. Under
Windows 95/98 and NT 4.0, the Tools are available directly from the drive
shortcut menus (just right mouse click any Zip
®
drive icon, then choose the
tool you want to use). There are versions of Iomega Tools for Windows
95/98, Windows NT, and Windows 3.1.
*The IomegaWare™ software package shipped with your drive includes the programs
described in this section. The programs that work on your system will vary
depending on your operating system.
®
Page 32

32
User’s Guide
Drive Shortcuts
Create Drive Shortcuts puts a Zip® drive icon directly on your Desktop and
in the “Windows\SendTo” and “My Documents” folders, making it easier
to use your Zip drive. You can use these icons much like you would the
Zip drive icon that is available in My Computer – double click the icon to
open a window for your Zip disk or right mouse click the icon to access
Iomega Tools. Create Drive Shortcuts runs automatically during setup to
provide easy access to your Zip drive. If you want to remove the icons, you
must use the Remove Drive Shortcuts icon in the IomegaWare folder
(deleting the drive icons will not remove them). Drive shortcuts are
available for Windows 95/98 and Windows NT.
For information on how to use IomegaWare™ software:
After the software is installed (see the instructions in the installation guide
for your system), you can find information on using IomegaWare
™
software
by checking the help files as described below:
Windows 95/98 Users
Open IomegaWare Quick Help located in the IomegaWare™ folder on
your Desktop. The Quick Help guide contains answers to frequently
asked questions as well as troubleshooting and basic “how to” information.
For additional help on any of the Iomega application programs, just open
the application and click the Help button.
Users with Windows NT 4.0
Open Iomega ToolsNT Help from the IomegaWare™ folder on your Start
Programs menu.
Users with Windows NT 3.51
Double click on the Iomega ToolsNT Help icon that is located in your
IomegaWare program group.
Users with Windows 3.1 or Windows for Workgroups
Double click on the IomegaWare Help icon that is located in your
IomegaWare program group.
Page 33

33
User’s Guide
Using Zip® Disks
Use only genuine 250MB* or 100MB* Zip® disks with your Zip drive.
This section describes just some of the things you can do with Zip disks.
The help files contained in your IomegaWare
™
software package include
additional information on using Zip disks.
Backing Up with Zip® Disks
It’s important to always keep current backups of your valuable data –
whether the primary data is stored on your hard drive or Zip
®
disks! And
you can use Zip disks to back up both. The easiest way to back up your
hard drive to Zip disks is to use the backup program included in your
IomegaWare
TM
software package (1-Step Backup/Restore for Windows 95/
98 and Windows NT).
If you want to back up important selected files and have them immediately
available without having to run a restore procedure, you can use your
system’s standard procedures to copy files from your hard drive to your
Zip
®
drive (for example, drag-and-drop files or folders using My Computer
in Windows 95/98). For information on how to back up one Zip disk to
another, see the next section.
M NOTE: The 1-Step Backup program is designed to back up data
files and will not back up any of the operating system files on your
hard drive or any files that are in use. M
Copying Zip® Disks
To make a copy of a Zip® disk, use Copy Machine – it can duplicate a Zip
disk using a single Zip drive. To copy a disk with Copy Machine, double
click the Copy Machine icon in your IomegaWare
™
folder, insert the disk
you want to copy, and follow the screen instructions. If you need
information on how to set Copy Machine options, select Help from the
Copy Machine menu bar.
M NOTE: Copy Machine cannot copy any files that are open or in
use at the time the copy is made. M
M IMPORTANT! When copying Zip® disks on IBM-compatible PC systems,
do NOT use the Microsoft CopyDisk utility that is available when you right
mouse click on the Zip drive icon under Windows 95/98 or Windows NT.
These utilities only work correctly with floppy drives. M
*250MB or 100MB capacity where 1MB = 1 million bytes. The capacity reported by
your operating system may vary. Use 250MB Zip disks for maximum performance.
Page 34

34
User’s Guide
Installing Applications to Zip® Disks
On a PC, some applications and games will only install to, or run from, a
fixed disk such as a hard drive. In order to install these programs to a Zip
®
disk, use the Make Nonremovable tool in your IomegaWareTM software
package to make the Zip disk appear as a fixed disk to the system. After the
software installation is complete, use Make Removable to restore disk
removability. Note that you may need to use the Make Nonremovable
tool whenever you run the program from your Zip disk.
M NOTE: The Zip® disk will not eject when you push the eject
button if the Zip drive is in Make Nonremovable mode. M
Formatting Zip® Disks
Zip® disks are available pre-formatted for IBM-compatible PCs. You can
format your Zip disks as needed using Format in Iomega Tools.
CAUTION Formatting a disk erases all data on the disk. Do not
format any disk that contains information you want to keep! M
Formatting Zip® Disks under Windows 95/98 or NT 4.0
1. Insert the disk you want to format into your Zip® drive.
2. Right mouse click on the Zip
®
drive icon on your Windows Desktop.
(If you have removed the drive shortcut icons from your Desktop,
open My Computer and right mouse click on the Zip drive icon.)
3. Select Format from the drive shortcut menu.
4. Choose the format type:
• Use Short Format if you want to quickly erase all data on a disk so you
can reuse it.
• Use Long Format with Surface Verify if you want to change the
format type (from Mac to PC), if you are formatting a disk where you
have forgotten the password, or if you need to repair a disk that has
developed read/write errors due to bad sectors.
5. Click Start to start formatting the Zip
®
disk.
Page 35

35
User’s Guide
Read/Write Protecting Zip® Disks
IomegaWareTM software includes a special read/write protect feature that
allows you to:
• Write Protect a disk through software instead of with a mechanical write
protect switch.
• Write Protect a disk and assign a password that must be used to remove
the write protect.
• Read Protect a disk so that it cannot be read from, or written to, unless the
user enters the password you assign.
Setting Zip® Disk Protection under Windows 95/98 and NT 4.0
1. Insert the disk you want to protect into your Zip drive.
2. Open My Computer and right mouse click on the Zip drive icon.
3. Select Protect from the drive shortcut menu.
4. Choose the protection option you want to use. Click the Help button
if you need information on any of the options.
M NOTE: Although Zip disk protection options are set and
removed using IomegaWareTM software, the actual protection
mechanism is secured in the drive hardware. This means the disk
protection cannot be bypassed using other software programs. M
Page 36

36
User’s Guide
Understanding IDE/ATAPI Connections
What is IDE?
IDE (Integrated Drive Electronics) is the built-in system a PC computer
uses to connect drives to the computer. You may have also heard it called
ATA (Advanced Technology Attachment)—they mean the same thing.
How IDE Works
There are usually two places on the motherboard for the IDE cables to
connect. These are the primary and secondary IDE channel connections.
The hard drive usually uses the primary connection. The IDE channel
connections are usually located next to each other either end-to-end or one
above the other. They are also generally labeled on the motherboard as “pri
IDE” and “sec IDE” or something similar. If you are unsure of where the
IDE channels for your computer are located, refer to your computer’s
documentation.
The IDE channels can support a maximum of two drives each. If there are
two drives connected to the IDE interface cable, one drive must be
configured as a master and the other as a slave. If only one drive is attached
to the cable, it is configured as a master.
What is ATAPI?
IDE (ATA) was originally designed for hard disks only, not removable
devices such as Zip
®
drives, CD drives and tape drives. ATAPI, which
stands for Advanced Technology Attachment Packet Interface, is designed
to bridge this gap and support removable drives. ATAPI devices use your
IDE channel to communicate with the computer.
Jumper Settings
The jumper is the small plastic piece that surrounds two pins and can be
removed and placed in different locations as needed. There are different
jumper configurations that can be used with ATAPI devices such as your
Zip
®
drive. There are also jumper blocks located on the back of your CD
drive and hard drive. If you need to change the settings on your CD drive,
refer to the table on the next page on the CD drive or in its documentation.
This diagram shows the possibilities for the Zip Internal drive.
Page 37

37
User’s Guide
Jumper block
Slave (Drive 1)
(Factory Setting)
Master (Drive 0)
Cable Select
Reserved
(do not use)
Zip Internal drive
Slave (Drive 1)
Use this setting if you’re connecting the Zip® Internal drive on the same cable as
your CD drive or another ATAPI device that is configured as the master.
Master (Drive 0)
Use this setting if you’re connecting the Zip® Internal drive as the only device on
the secondary IDE channel or when installing to an IDE add-on card. Use the
jumper provided when configuring the drive to the “Master” setting.
Cable Select
Use this jumper setting if your computer features “Cable Select.” On a
Cable Select system, the master/slave configuration is automatically determined by
the system. Contact the computer manufacturer if you need additional information.
Use the jumper provided when configuring the drive to the “Cable Select” setting.
Possible System IDE/ATAPI Configurations
Your computer may be configured in one of the following ways. If you
need to change the jumper settings for your CD drive, check its
documentation to see how to configure it as master or slave as needed.
Primary IDE
Channel
Secondary IDE
Channel
Master
Device
Slave
Device
Hard Drive
CD drive
Zip ATAPI
Drive
Primary IDE
Channel
Secondary IDE
Channel
Master
Device
Slave
Device
Hard Drive
CD drive
Zip ATAPI
Drive
Primary IDE
Channel
Secondary IDE
Channel
Master
Device
Slave
Device
Hard Drive
CD drive
Zip ATAPI
Drive
(Recommended)
(Alternative) (Alternative)
BIOS/CMOS Support
BIOS support for the Zip® Internal drive should be disabled in the CMOS
Setup. If your system includes autodetection, it should be turned off for
the Zip Internal drive.
Page 38

Troubleshooting
38
Troubleshooting
If you encounter a problem while installing or using your Zip® drive, check
this section for help.
CAUTION To avoid damage to your computer, disconnect all
electrical connections before connecting or disconnecting cables. M
The green activity light on the Zip® drive does not turn on.
(a) Make sure the computer is receiving power.
(b) Make sure the power cable connection to the Zip® Internal drive is
secure.
(c) Make sure there is a disk in the drive.
The Zip® drive is not assigned a drive letter, or the Iomega
software cannot find the Zip® drive.
(a) Make sure PIN 1 is properly connected on all IDE interface
connections. The stripe on the interface cable should align with
PIN 1 on each connection. If the cable does not have a keyed
connector, make sure the connector has not shifted by a pair of
pins.
(b) Make sure the Zip® Internal drive IDE channel connections and
the jumper settings are correct. Refer to the Hardware Installation
Guide pages 4 - 22 for details.
(c) If there is another drive on the same IDE channel, make sure it is
also properly configured. Refer to the documentation that
accompanied the other IDE drive for configuration information
(often this information is on the drive case). If you cannot locate
the documentation, contact the manufacturer of the drive.
(d) Make sure the software drivers for the Zip® Internal drive are
correctly installed on the computer system. The necessary drivers
are included with the IomegaWareTM software package. Carefully
follow the installation instructions given for the computer’s
operating system, starting on page 23 of the Installation Guide
section.
(e) Make sure BIOS support for the Zip® Internal drive is disabled in
the computer’s CMOS setup. Note that this may require turning
off autodetection for the Zip Internal drive. Refer to the Owner’s
Manual for the computer if you need instructions on getting into
the CMOS setup and disabling autodetection.
Page 39

Troubleshooting
39
If you are unable to disable BIOS support for the Zip® drive in the
CMOS setup and the Zip Internal drive does not appear on the
system, the computer may have an incompatible BIOS that does
not correctly understand removable internal drives. You may be
able to solve the problem by obtaining an updated BIOS from the
computer manufacturer. If an updated BIOS is not available, it
may be possible to install the Zip Internal drive using an add-on
IDE card.
(f) If the computer’s operating system is Windows 95/98, make sure
the system is running in 32-bit mode (Protected mode). To check
whether the system is running in 32-bit mode, right mouse click on
My Computer and select “Properties.” Click the “Performance” tab
and check that “File System” and “Virtual Memory” are listed as
32-bit. If the mode is 16-bit, refer to the Windows 95/98
documentation for instructions on improving the system
performance to 32-bit.
(g) Some IDE hard drives do not work properly unless they are in a
certain position on the IDE cable. You may need to reverse the
position of the master drive, such as a CD drive, and the Zip
®
Internal (slave) drive on the cable for the drives to work properly.
(h) If the computer still does not recognize the Zip® Internal drive, it
may be that the existing IDE master drive does not allow access to
a slave drive on the same cable. If the Zip Internal drive is
currently on the primary IDE channel, try installing it on the
secondary IDE channel or rearrange devices to make the Zip drive
a master drive.
Computer does not recognize a slave drive connected to the
same IDE connection with a Zip® Internal master drive.
(a) Make sure PIN 1 is properly connected on all IDE interface
connections. The stripe on the interface cable should align with
PIN 1 on each connection. If the cable does not have a keyed
connector, make sure the connector is not shifted by a pair of pins.
(b) Make sure the slave drive is correctly jumpered as a slave. Refer to
the documentation that accompanied the slave drive for
configuration information (often this information is on the drive
case). If you cannot locate the documentation, contact the
manufacturer of the drive.
(c) Some IDE hard drives do not work properly unless they are in a
certain position on the IDE cable. You may need to reverse the
position of the slave drive and the Zip internal (master) drive on
the cable for the slave drive to work properly.
Page 40

Troubleshooting
40
Computer fails to boot correctly or hangs while booting after the
Zip® Internal drive is installed.
Make sure BIOS support for the Zip® Internal drive is disabled in the
computer’s CMOS setup. Note that this may require turning off
autodetection for the Zip Internal drive. Refer to the Owner’s Manual for
the computer if you need instructions on getting into the CMOS setup and
disabling autodetection.
If you are unable to disable BIOS support for the Zip
®
drive in the CMOS
setup and the computer hangs during boot-up, the computer may have an
incompatible BIOS that does not correctly understand removable internal
drives. You may be able to solve the problem by obtaining an updated
BIOS from the computer manufacturer. If an updated BIOS is not
available, it may be possible to install the Zip Internal drive using an addon IDE card.
Computer will not boot under Windows NT unless a disk is
present in the Zip® Internal drive.
This happens if Windows NT has set the Zip® Internal drive as the location
for the system page file. To eliminate the problem under version 4.0, open
the Control Panel and double click on the “System” icon. Click the
“Performance” tab and change the location of the system page file. Note
that you may not be able to use the default hard drive as the location for the
system page file if it does not have sufficient space available. (This may be
why Windows NT set the Zip drive as the system page file location.)
Data transfer problems or drive operation is erratic.
Make sure the Zip® Internal drive is electrically grounded. If the drive bay
mounting screws do not make contact with a direct metallic path to the Zip
drive chassis (for example, if you are using a plastic carrier to mount the
drive in a 5 1/4” bay), then you need to provide a grounding strap. The
grounding strap should be a wire from the ground lug on the right side of
the drive by the power connector to a solid, metal connection on the
computer chassis.
Installing the Zip® drive changes other drive letters.
Drive letter assignments are controlled by the operating system – in order
to change a drive letter assignment, you must work with the procedures
required by your computer’s operating system. Use the instructions on
page 41 to change the drive letter.
Page 41

Troubleshooting
41
You want to change the drive letter assigned to the Zip® drive.
Windows 95/98 Users:
If your computer is running Windows 95/98, you can change drive letters
as desired for any of your removable drives (including your Zip
®
drive and
CD drive) by running the Guest program (guest9x.exe). Use the
instructions below:
(a) Open the IomegaWare
™
folder on your Desktop.
(b) Double click on the Guest icon.
(c) Guest will display the current drive letter assignments on your system.
(d) To change the drive letter for any removable drive, click the drop-
down arrow next to the current drive letter and select the drive letter
you want to use.
Windows 3.1 Users:
If your computer is using Windows 3.1, refer to the information in the
electronic manual on the IomegaWare CD. To access the manual, insert
the IomegaWare CD into the computer’s CD drive and double click on the
file manual.exe in the Windows File Manager. Follow the instructions
on the first panel of the manual to jump directly to the section on DOS
drive letter assignments (Section 4.1).
Windows NT Users:
Changing drive letter assignments under Windows NT is a fairly technical
process. If you want information on doing this, refer to the MS
Knowledgebase on Microsoft’s web page at:
http://www.microsoft.com
If you cannot readily locate the MS Knowledgebase, select Microsoft’s
support option and enter a keyword search for “cannot change drive letter
of removable drive.”
Page 42

Troubleshooting
42
You can’t change the drive letter assigned to your Zip® drive.
Make sure BIOS support for the Zip® Internal drive is disabled in the
computer’s CMOS setup. This may require turning off autodetection for
the Zip Internal drive. Refer to the Owner’s Manual for the computer if
you need instructions on getting into the CMOS setup and disabling
autodetection.
Zip® disk won’t eject using Windows NT
If a disk does not eject from the Zip® Internal drive, one of the following
suggestions should solve the problem:
(a) Close any windows listing the disk contents (such as My Computer or
Windows Explorer).
(b) The Iomega Zip ATAPI driver may not have loaded correctly. Try
reinstalling the driver following the instructions starting on page 23 of
this manual.
(c) If the disk still does not eject immediately, it may be due to the way
Windows NT handles disk caching. Eventually, NT will allow the
disk to eject.
Hard drive does not appear as an option in Copy Machine when
using Windows 3.1.
When using Copy Machine in Windows 3.1 or Windows for Workgroups
3.11, turn off 32-bit disk and/or file access. (This option is available when
changing virtual memory options under 386 Enhanced in the Windows
Control Panel). If 32-bit access is not turned off, your hard drive will not
appear for selection in the Copy Machine window.
Page 43

Troubleshooting
43
You want to use Windows 95/98 DOS mode with your Zip® drive.
M NOTE: This section describes how to switch in and out of the
MS-DOS mode which is a start option for Windows 95/98. It does not
apply to the DOS box (or window) that opens when you double click
the MS-DOS Prompt icon within Windows 95/98. Use of the DOS
box with the Zip
®
drive works the same as it does with any other
drive under Windows 95/98. M
In order for the Zip® drive to operate properly in Windows 95/98 DOS
mode, you must perform a clean reboot when switching to or from DOS
mode. Do
not use the option from the Windows 95/98 Shut Down menu
that reads: “Restart the computer in MS-DOS mode.” This option does
not fully support the Zip drive.
To switch to DOS mode:
(1) Restart the computer and press F8 just before the full-color
Windows logo screen loads. (If you are using Windows 95, look
for the text line “Starting Windows 95” to appear on the screen. If
you are using Windows 98, watch for a black screen with a
blinking cursor.)
(2) When the menu appears, select "Command Prompt Only."
(3) After the system boots into DOS mode, run guest.exe from the
directory containing your IomegaWare
TM
software. If you have used
the default directory for a new software installation, the command line
is:
c:\progra~1\iomega\tools\guest.exe
This procedure will provide access to any Iomega drives on the system.
To return to the Windows 95/98 graphical interface again, restart the
computer.
M IMPORTANT! Do NOT type "WIN" at the DOS prompt after
running GUEST.EXE as this will cause duplicate drive letters. M
Page 44

How To Get Help
44
How to Get Help
Iomega’s goal is to provide state-of-the-art support for its customers. Over
time, our support options and pricing policies may change in light of
evolving technology and global changes across the computer industry. This
section of the manual contains information on the support options available
at the time this manual was prepared. For up-to-date support information,
contactIomega’s Home Page on the World Wide Web or call our
automated FAX-back help system at 1-801-778-5763.
Iomega’s Home Page: http://www.iomega.com
If you have access to the Internet, Iomega’s home page offers advanced
problem-solving support readily available 24 hours a day. Here’s just some of
what you can do from our home page:
Download the latest IomegaWareTM software – The software that
shipped with your drive may be updated over time. Choose
Software
Download
from the Iomega Home Page to check for the most up-to-date
IomegaWareTM software.
Diagnose and solve problems on-line – Use your Web browser to
access individualized troubleshooting for all Iomega products. With a little
information from you, the interactive troubleshooting system diagnoses your
problem and guides you through a solution. It’s like having a personal
support technician available 24 hours a day!
Locate Iomega manuals – You can access an electronic copy of the
manual for any Iomega product in PDF format. All you need to view and
print the PDF file you select is the Acrobat Reader. If you don’t already have
the Acrobat Reader installed on your system, you can download it from
Adobe’s Web site:
http://www.adobe.com.
Access on-line help pages – You can find help pages with answers to
common questions (FAQs), troubleshooting or basic “how to” information.
The help pages are in HTML format and can be viewed and browsed directly
within your Web browser.
Automated Voice Technical Support: 1-800-879-7660*
This free, 24 hour support option allows you to use a touch-tone phone
to quickly and easily access pre-recorded solutions to common problems.
Just dial 1-800-879-7660* and the automated voice technical support
system will guide you through a series of questions to an easy-to-follow
solution.
*1-800-879-7660 is available in the U.S. and Canada only.
Page 45

How To Get Help
45
Automated FAX-back Help: (801) 778-5763 (U.S. & Canada)
Our FAX-back automated help system allows you to use any touch-tone phone
to instantly retrieve detailed support information to your FAX machine. When
you call our FAX-back help number, you can order a catalog listing the FAXback documents available for your Iomega product, or any document listed in
the catalog. Just follow the voice instructions to order what you need.
One-on-One Iomega Technical Support
If you don’t have access to the Internet or a FAX machine and you have a
problem you just can’t resolve using our automated voice technical support
system or the troubleshooting information in the manual, you can call Oneon-One technical support for help.
Before calling Iomega for technical support, turn on your computer and call
from a phone at or near your computer. You may be asked to type
commands at the keyboard or relay information about the system.
If your Zip
®
product is under warranty, One-on-One technical support is
currently provided free of charge (i) during the warranty period for a
consecutive 30-day period beginning with the first call, and (ii) for those
calls during the warranty period in which your product is determined to be
defective. Other calls are charged at the rate of $14.99 per incident. You
can call 1-888-4-IOMEGA* (1-888-446-6342), toll-free, to charge the
support cost to your credit card (VISA, MasterCard, American Express, or
Discover), or you can call 1-900-988-4318** to put the support cost on
your phone bill. Your credit card will not be charged if your Zip product is
still under warranty and (i) if your call is made within thirty days from your
first call for technical support, or (ii) if your Zip product is determined to
be defective. Technical support fees are subject to change without notice.
Iomega's highly trained technical support associates are ready to take your
call Monday through Friday from 6 a.m. to 9 p.m. and Saturday from 7
a.m. to 2 p.m. (Mountain Time). Technical support hours are subject to
change without notice.
*1-888-4-IOMEGA is available in the U.S. and Canada.
**1-900-988-4318 is a toll call of $14.99. This number is available only in the U.S.
Continued on next page …
Page 46

How To Get Help
46
Return or Repair
For information on returning your Zip® drive or other Iomega product for
warranty service (or repair after the warranty period), please call the Iomega
Customer Satisfaction Hotline at 1-888-4-IOMEGA (1-888-446-6342).
Because many returns are found to be due to a technical problem rather
than a defective product, you may want to check with Iomega Technical
Support before returning your drive – our trained support personnel can
often resolve the problem over the phone. If you choose to contact
Technical Support, you will not be charged the standard support fee for the
call if your Iomega product is still under warranty and is determined to be
defective.
Limited Warranty Information
Your Zip® drive has a one-year limited warranty from the date of
purchase. For complete warranty information, refer to the warranty card
included with your drive. If you have a question about the limited
warranty on your Zip drive or other Iomega product, please call 1-888-4IOMEGA (1-888-446-6342) and choose the option for warranty
information. If you choose to contact Technical Support, the standard
support fee may apply.
Product Information
Call 1-800-MY-STUFF (1-800-697-8833) for information on new
Iomega products, promotions, and rebates. You can also purchase
Iomega products over the phone using your credit card (VISA,
MasterCard, American Express, or Discover). Simply select the option of
interest to you. See the Iomega web site for detailed product
specifications.
International Support Numbers
For information on international customer support options and phone
numbers, contact the Iomega Web site at
http://www.iomega.com.
Page 47

Regulatory Information
Product Name: Iomega Zip® Internal ATAPI 250MB drive
Model Number: Z250ATAPI
FCC (United States)
The computer equipment described in this guide generates and uses radio frequency
(RF) energy. If the equipment is not installed and operated in strict accordance with
the manufacturer’s instructions, interference to radio and television reception may
result.
M Interference This equipment complies with Part 15 of the FCC
Rules and its operation is subject to the following conditions; (1) the
equipment may not cause harmful interference, and (2) the
equipment must accept any interference received, including
interference that may cause undesired operation. M
Part 15, Class B, of the FCC Rules, is designed to provide reasonable protection
against radio and television interference in a residential installation. Although the
equipment has been tested and found to comply with allowed RF emission limits, as
specified in the above cited Rules, there is no guarantee that interference will not occur
in a particular situation. Interference can be determined by turning the equipment off
and on while monitoring radio or television reception. The user may be able to
eliminate any interference by implementing one or more of the following measures:
• Reorient the affected device and or its receiving antenna.
• Increase the distance between the affected device and the computer equipment
• Plug the computer and its peripherals into a different branch circuit from that used by
the affected device.
WARNING Changes or modification to the electronics or enclosure of
this product must be expressly approved by Iomega; otherwise, the user’s
authority to operate the equipment may be voided by the FCC. M
Canadian Verification
This Class B digital apparatus meets all requirements of the Canadian InterferenceCausing Equipment Regulations (ICES-003, Class B).
CE (European Community)
The Zip Internal ATAPI 250MB Zip drive conforms to the following European
Directive(s) and Standard(s): Application of Council Directives: 73/23/EEC, 89/336/
EEC. Standards to which Conformity is declared: EN60950, EN55022, EN50082-1.
Importer’s Name: Iomega Netherlands branch of Iomega International, S.A. Type of
Equipment: Internal Disk Drive.
Manufacturer/Responsible Party
Iomega Corporation
1821 West Iomega Way
Roy, UT 84067 U.S.A.
801-778-1000
Page 48

Visit our web site!
http://www.iomega.com
• Free software updates* and cool free software
• Online Customer Support
• Purchase Iomega products at BuyIt Online
• Product information and specifications
• Customer solutions for educators, businesses,
and home
• Special promotions and contests
• News releases and company information
• The latest and greatest from Iomega!
* The software that shipped with your drive may be updated over
time. Choose Software Download from the Iomega Home Page to
check for the most up-to-date software versions. Check back often
for free updates and special software promotions.
Copyright © 1999 Iomega Corporation. The following trademarks of Iomega are registered in the U.S. Patent and
Trademarks Office and in other countries: the graphic “hand” and “swirl” designs, Iomega, the stylized “i” logo, Zip
and the “1 & foot print” icon. Some other marks of Iomega which may be registered is some countries are the
following: the graphic “eye” design, IomegaWare, Zip 100, Zip 250, the Zip 100 block, and the Zip 250 brand
block. Certain other product names, brand names and company names mentioned in this material may be
trademarks or designations of their respective owners.
03798300 2/17/99 r12
 Loading...