

Page 1

Iomega® StorCenter™
Network Hard Drive
Quick Start Guide
Guide de démarrage rapide
Schnellstart-Handbuch
Guida di installazione rapida
Guía de instrucciones rápidas
Guia de uso rápido
Snel aan de slag
Snabbstartguide
Introduktion
Hurtigreferanse
Pikaopas
Οδηγός γρήγορης εκκίνησης
Stručná příručka
Wprowadzenie
Gyors útmutató
Page 2

If you have a problem, we can help. Please do NOT return this product to the store!
Your answer is on the web. Visit our award-winning web support site www.iomega.com.
Select your region, then select Support and Downloads.
Si vous avez un problème, nous pouvons vous aider. NE RENVOYEZ PAS ce produit au
magasin !
Votre réponse est sur le Web. Site Web d’assistance primé www.iomega.com.
Sélectionnez votre région puis Support et téléchargements.
Wenn Sie ein Problem haben, können wir Ihnen helfen. Bringen Sie dieses Produkt
NICHT zu Ihrem Händler zurück!
Ihre Antwort steht im Netz. Preisgekrönte Support-Website www.iomega.com. Wählen
Sie Ihr Gebiet aus und klicken Sie auf Support und Downloads
In caso di problemi, noi possiamo fornire assistenza. NON restituire questo prodotto al
rivenditore!
La risposta è sul Web. Sito di supporto sul Web premiato www.iomega.com. Selezionare
la propria regione, quindi scegliere Supporto tecnico e download
Si tiene algún problema, podemos ayudar. ¡Por favor, NO devuelva este producto a la
tienda!
Su respuesta está en la web. Destacado sitio Web de atención al cliente
www.iomega.com. Seleccione su región y, a continuación, acceda al
área de asistencia y descarga.
.
.
Se você tiver um problema, nós podemos ajudar. NÃO devolva esse produto à loja!
A resposta para você está na web. Site da web vencedor de prêmios www.iomega.com.
Selecione a sua região e Suporte e Downloads.
Page 3

Contents • Matières • Inhalt • Sommario • Contenido
Conteúdo • Inhoudsopgave • Innehåll • Indhold • Innhold
Sisällys • Περιεχόµενα • Obsah • Spis treści • Tartalom
Quick Install . . . . . . . . . . . . . . . . . . . . . . . . . . . . . . . . . . . . . . . . 4
Installation rapide . . . . . . . . . . . . . . . . . . . . . . . . . . . . . . . . . . . . . 4
Instalación rápida . . . . . . . . . . . . . . . . . . . . . . . . . . . . . . . . . . . . . 4
Instalação rápida . . . . . . . . . . . . . . . . . . . . . . . . . . . . . . . . . . . . . 4
Schnellinstallation . . . . . . . . . . . . . . . . . . . . . . . . . . . . . . . . . . . . . 5
Installazione rapida . . . . . . . . . . . . . . . . . . . . . . . . . . . . . . . . . . . . 5
Snelle installatie . . . . . . . . . . . . . . . . . . . . . . . . . . . . . . . . . . . . . . 5
Snabbinstallation . . . . . . . . . . . . . . . . . . . . . . . . . . . . . . . . . . . . . 5
Hurtig installation . . . . . . . . . . . . . . . . . . . . . . . . . . . . . . . . . . . . . 6
Rask installering . . . . . . . . . . . . . . . . . . . . . . . . . . . . . . . . . . . . . . 6
Rychlá instalace . . . . . . . . . . . . . . . . . . . . . . . . . . . . . . . . . . . . . . 6
Skrócona instrukcja insalacji . . . . . . . . . . . . . . . . . . . . . . . . . . . . . . . 6
Pika-asennus . . . . . . . . . . . . . . . . . . . . . . . . . . . . . . . . . . . . . . . . 7
Γρήγορη εγκατάσταση . . . . . . . . . . . . . . . . . . . . . . . . . . . . . . . . . . 7
Gyors telepítés . . . . . . . . . . . . . . . . . . . . . . . . . . . . . . . . . . . . . . . 7
Using Your StorCenter Network Hard Drive
Troubleshooting . . . . . . . . . . . . . . . . . . . . . . . . . . . . . . . . . . . . . . 8
Utilisation de votre disque dur réseau StorCenter Network Hard Drive . . . . . . . . 9
Dépannage . . . . . . . . . . . . . . . . . . . . . . . . . . . . . . . . . . . . . . . . .10
Arbeiten mit dem StorCenter-Netzlaufwerk . . . . . . . . . . . . . . . . . . . . . . .10
Problembehandlung . . . . . . . . . . . . . . . . . . . . . . . . . . . . . . . . . . . .11
Utilizzo del disco rigido di rete StorCenter . . . . . . . . . . . . . . . . . . . . . . . .11
Risoluzione dei problemi . . . . . . . . . . . . . . . . . . . . . . . . . . . . . . . . .12
Uso de la unidad de disco duro de red StorCenter . . . . . . . . . . . . . . . . . . .13
Solución de problemas . . . . . . . . . . . . . . . . . . . . . . . . . . . . . . . . . .14
Uw StorCenter-netwerkdrive gebruiken . . . . . . . . . . . . . . . . . . . . . . . . .14
Problemen oplossen . . . . . . . . . . . . . . . . . . . . . . . . . . . . . . . . . . . .15
Customer Support
Assistance clientèle . . . . . . . . . . . . . . . . . . . . . . . . . . . . . . . . . . . .16
Kundenunterstützung . . . . . . . . . . . . . . . . . . . . . . . . . . . . . . . . . . .16
Assistenza clienti . . . . . . . . . . . . . . . . . . . . . . . . . . . . . . . . . . . . .16
Asistencia al cliente . . . . . . . . . . . . . . . . . . . . . . . . . . . . . . . . . . . .16
Klantenondersteuning . . . . . . . . . . . . . . . . . . . . . . . . . . . . . . . . . . .16
. . . . . . . . . . . . . . . . . . . . . . . . . . . . . . . . . . . . .16
. . . . . . . . . . . . . . . . . . . . . . . 8
Page 4
Quick Install • Installation rapide • Instalación rápida • Instalação rápida
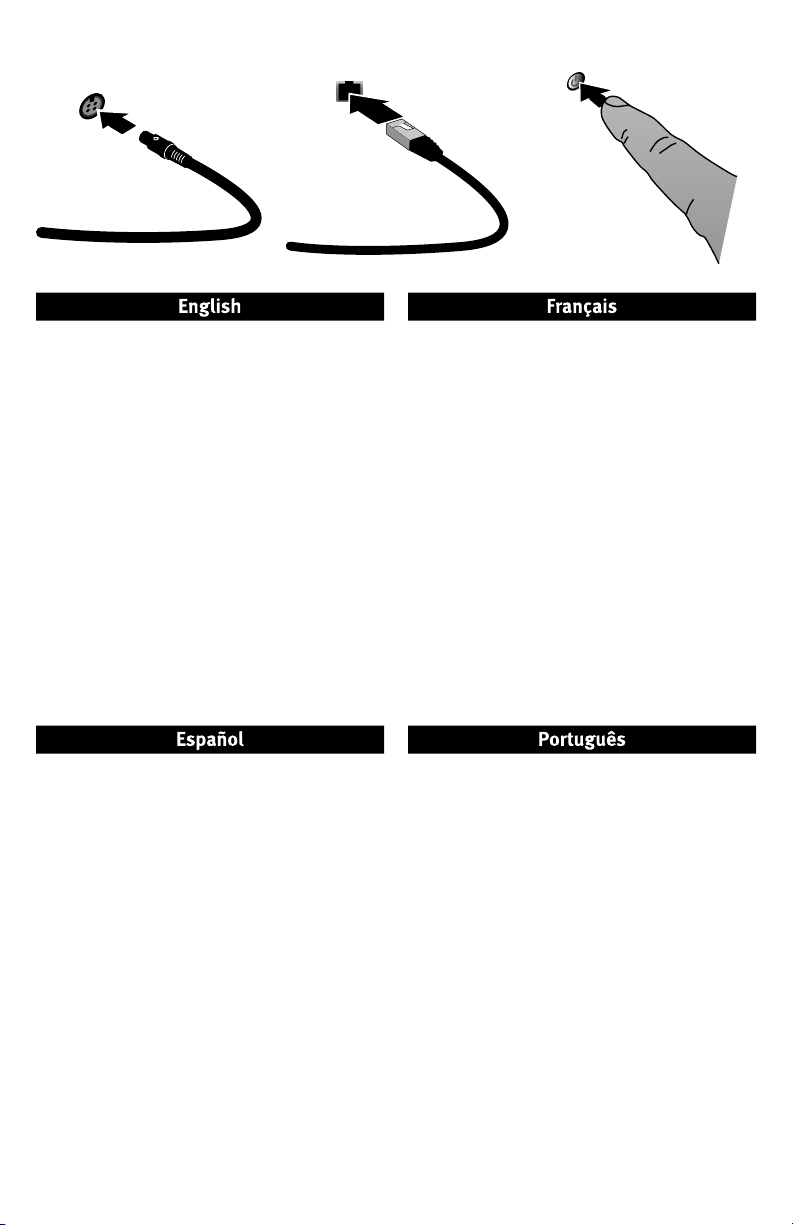
1. Plug the the StorCenter drive into an uninterruptible
power supply (UPS) or power outlet.
2. Using the included cable, connect the StorCenter
drive to your network.
3. Power up the StorCenter drive. Wait until the activity
light turns blue before proceeding.
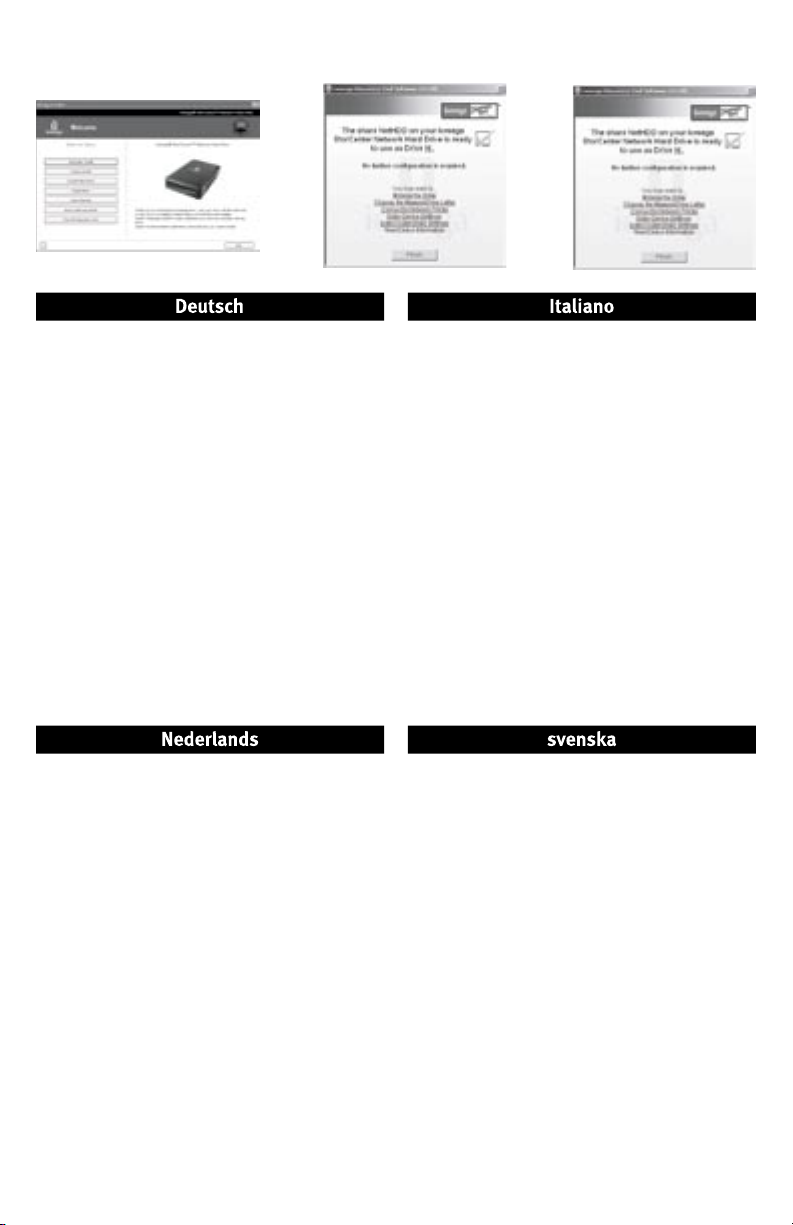
4. Insert the Solutions CD. If the CD menu does not
launch automatically, launch the Start program on
the Solutions CD.
Click on Automatic Install and then follow the
onscreen instructions to install the software.
5.
During the installation, Iomega Discovery Tool will
automatically configure your StorCenter drive and
assign it a drive letter. Reboot the computer when
the installation has completed.
6. To use advanced StorCenter features, such as
shares, users, and drive utilities, run the Iomega
Discovery Tool and click on Enter Device Settings
1.
Conecte la unidad StorCenter a un sistema de
alimentación ininterrumpida (UPS) o a la toma eléctrica.
2. Utilice el cable que se incluye para conectar la unidad
StorCenter a la red.
3. Encienda la unidad StorCenter. Espere hasta que la
luz de actividad se ponga azul antes de continuar.
4. Inserte el CD de soluciones. Si el menú del CD no se
inicia automáticamente, ejecute el programa de Start
del CD de soluciones.
Haga clic en Instalación automática y, a continuación,
siga las instrucciones que aparecen en pantalla para
instalar el software.
5. Durante la instalación, Iomega Discovery Tool
configurará automáticamente la unidad StorCenter y
le asignará una letra de unidad. Reinicie el ordenador
cuando la instalación haya finalizado.
6. Para utilizar las funciones avanzadas de StorCenter,
como recursos compartidos, usuarios y utilidades de
la unidad, ejecute Iomega Discovery Tool y haga clic
en Introducir configuración del dispositivo.
1. Branchez le lecteur StorCenter à un onduleur (UPS)
ou à une prise secteur.
2. Connectez le lecteur StorCenter à votre réseau en
utilisant le câble fourni.
3. Mettez le lecteur StorCenter sous tension. Attendez
que le voyant d’activité devienne bleu avant de
continuer.
4. Insérez le CD Solutions. Si le menu du CD ne se lance
pas automatiquement, lancez le programme Start sur
le CD Solutions.
Cliquez sur Installation automatique, puis suivez les
instructions à l’écran pour installer le logiciel.
5. Pendant l’installation, le logiciel Iomega Discovery Tool
configure automatiquement votre lecteur StorCenter
et lui attribue une lettre de lecteur. Redémarrez
l’ordinateur une fois l’installation terminée.
6. Pour utiliser les fonctions avancées StorCenter, telles
.
que les partages, les utilisateurs et les utilitaires de
lecteur, exécutez le logiciel Iomega Discovery Tool et
cliquez sur Accéder aux paramètres du périphérique
1. Conecte a unidade StorCenter a uma fonte de
alimentação ininterrupta (UPS) ou tomada elétrica.
2. Com o cabo fornecido, conecte a unidade StorCenter
à sua rede.
3. Ligue a unidade StorCenter. Aguarde até que a luz
atividade fique azul antes de prosseguir.
4. Insira o CD Soluções. Se o menu do CD não for
exibido automaticamente, abra o programa Start no
CD Soluções.
Clique em Instalação automática e siga as instruções
na tela para instalar o software.
5. Durante a instalação, o Iomega Discovery Tool irá
automaticamente configurar a unidade StorCenter
e atribuir uma letra de unidade a ela. Reinicialize o
computador quando a instalação terminar.
6. Para usar os recursos avançados do StorCenter, como
compartilhamentos, usuários e utilitários de unidade,
execute o Iomega Discovery Tool e clique em Entrar
em Configurações do dispositivo
.
.
4
Page 5
l
l
l
Schnellinstallation • Installazione rapida • Snelle installatie • Snabbinstallation
1. Schließen Sie das StorCenter-Laufwerk an eine
USV (unterbrechungsfreie Stromversorgung) oder
Steckdose an.
2. Verbinden Sie das StorCenter-Laufwerk unter Verwendung
des mitgelieferten Kabels mit dem Netzwerk.
3. Schalten Sie das StorCenter-Laufwerk ein. Warten Sie
nun, bis die Betriebsleuchte blau leuchtet.
4. Legen Sie die Lösungs-CD ein. Wird das CDMenü nicht automatisch gestartet, rufen Sie das
Startprogramm auf der Lösungs-CD auf.
Klicken Sie auf Automatische Installation und
befolgen Sie dann die Anweisungen auf dem
Bildschirm, um die Software zu installieren.
5. Während der Installation Iomega Discovery Tool
konfiguriert das StorCenter-Laufwerk automatisch und
weist ihm einen Laufwerksbuchstaben zu. Nach der
Installation müssen Sie den Computer neu starten.
6. Um die erweiterten Funktionen von StorCenter, z.
B. Dienstprogramme für Freigaben, Benutzer oder
Laufwerke zu nutzen, rufen Sie Iomega Discovery Tool
auf und klicken Sie auf Geräteeinstellungen aufrufen
1. Collegare l’unità StorCenter a un gruppo di continuità
o a una presa di corrente.
2. Con il cavo in dotazione, collegare l’unità StorCenter
alla rete.
3. Accedere l’unità StorCenter. Prima di continuare
attendere che il LED di attività blu si illumini.
4. Inserire il CD Soluzioni. Se il menu del CD non si apre
automaticamente, avviare il programma di Start sul
CD Soluzioni.
Per installare il software, fare clic su Installazione
automatica e seguire le istruzioni che appaiono sullo
schermo.
5. Durante l’installazione, Iomega Discovery Tool
configura automaticamente l’unità StorCenter
e le assegna una lettera di unità. Al termine
dell’installazione riavviare il computer.
6. Per usare le funzioni avanzate dell’unità StorCenter,
quali condivisioni, utenti e utility, eseguire Iomega
Discovery Tool e fare clic su Accedi a impostazioni
della periferica
.
.
1. Sluit de StorCenter-drive aan op een UPS
(uninterruptible power supply) of stopcontact.
2. Sluit de StorCenter-drive met de meegeleverde kabel
aan op uw netwerk.
3. Schakel de StorCenter-drive in. Wacht tot het
statuslampje blauw brandt voordat u verdergaat.
4. Plaats de cd Solutions in het cd-rom-station. Als het
cd-menu niet automatisch wordt gestart, Start u het
programma Start op de cd Solutions.
Klik op Automatic Install en volg de instructies op het
scherm op om de software te installeren.
5. Tijdens de installatie zal Iomega Discovery Tool
automatisch uw StorCenter-drive configureren en
er een stationsaanduiding aan toewijzen. Start de
computer opnieuw op nadat de installatie is voltooid.
6. Als u de geavanceerde functies van het StorCenter
wilt gebruiken, zoals voor gedeelde mappen,
gebruikers en de drive, start u Iomega Discovery Tool
en klikt u op Enter Device Settings
Voor een gebruikershandleiding van uw Iomega-product
bezoekt u de sectie Support & Downloads op
www.iomega.com
.
.
1. Anslut StorCenter-enheten till en UPS-enhet
(avbrottsfri strömkälla) eller ett strömuttag.
2. Anslut StorCenter-enheten till ditt nätverk med den
medföljande kabeln.
3. Slå på strömmen till StorCenter-enheten. Vänta tills
aktivitetslampan lyser med blått sken innan du fortsätter.
4.
Sätt i Solutions-cd:n. Om cd-menyn inte öppnas
automatiskt, starta programmet
Klicka på Automatic install (Automatisk installation)
och installera sedan programvaran genom att följa
instruktionerna på skärmen.
5. Under installationen konfigurerar Iomega Discovery
Tool automatiskt StorCenter-enheten och tilldelar
den en enhetsbeteckning. Starta om datorn när
installationen är klar.
6. Om du vill använda avancerade StorCenterfunktioner, som delnings-, användar- och
enhetsverktyg, startar du Iomega Discovery
Tool och klickar på Enter Device Settings (ange
enhetsinställningar).
Start
på Solutions-cd:n.
5
Page 6

Hurtig installation • Rask installering • Rychlá instalace • Szybka instalacja
1. Sæt StorCenter-drevet i en UPS (uninterruptible
power supply) eller en stikkontakt.
2. Slut StorCenter-drevet til dit netværk ved hjælp af det
medfølgende kabel.
3. Tænd for StorCenter-drevet. Vent, indtil
aktivitetsindikatoren skifter til blå, før du fortsætter.
4. Læg Solutions-cd’en i. Hvis cd-menuen ikke startes
automatisk, skal du starte programmet Start pŒ
Solutions-cd’en.
Klik på Automatic Install, og følg derefter
vejledningen på skærmen for at installere softwaren.
5. Under installationen konfigurerer Iomega Discovery
Tool automatisk dit StorCenter-drev og tildeler det et
drevbogstav. Genstart computeren, når installationen
er udført.
6. Hvis du vil bruge de avancerede StorCenterfunktioner, som f.eks. shares, brugere og
drevhjælpeprogrammer, skal du køre Iomega
Discovery Tool og klikke på Enter Device Settings
1. Zapojte jednotku StorCenter do nepřerušitelného
zdroje napájení (UPS) nebo do elektrické zásuvky.
2. Pomocí př iloženého kabelu připojte jednotku
StorCenter k síti.
3.
Zapněte napájení jednotky StorCenter. Než budete
pokračovat, počkejte, až se indikátor činnosti rozsvítí modře.
4. Vložte disk CD Solutions. Pokud se nabídka disku CD
nespustí automaticky, spusťte na disku CD Solutions
program Start
Klepněte na možnost Automatic Install
instalace) a nainstalujte software podle pokynů na
obrazovce.
5. Během instalace nástroj Iomega Discovery
automaticky nakonfiguruje jednotku StorCenter a
přiřadí jí písmeno jednotky. Po dokončení instalace
restartujte počítač.
6. Chcete-li používat rozšířené funkce jednotky
StorCenter, jako jsou sdílené položky, uživatelé a
obslužné programy jednotky, spusťte nástroj Iomega
Discovery a klepněte na možnost Enter Device
Settings (Zadat nastavení zařízení).
.
(automatické
.
6
1. Koble StorCenter-stasjonen til en UPS (uninterruptible
power supply) eller en stikkontakt.
2. Koble StorCenter-stasjonen til nettverket med den
medfølgende kabelen.
3. Slå på StorCenter-stasjonen. Vent til aktivitetslampen
lyser blått før du fortsetter.
4. Sett inn Solutions CD (løsnings-CD). Hvis CD-menyen
ikke starter automatisk, bruker du Start-programmet
på Solutions CD.
Klikk på Automatic Install og følg veiledningen på
skjermen for å installere programvaren.
5. Under installeringen vil Iomega Discovery Tool
automatisk konfigurere StorCenter-stasjonen og
tildele den en stasjonsbokstav. Start datamaskinen
på nytt når installeringen er fullført.
6. Hvis du skal bruke avanserte StorCenter-funksjoner,
som fellesområder, brukere og stasjonsverktøy,
kjører du Iomega Discovery Tool og klikker på Enter
Device Settings
1. Podłącz napęd StorCenter do zasilacza UPS lub
ściennego gniazdka elektrycznego.
2. Za pomocą dołączonego przewodu podłącz napęd
StorCenter do sieci.
3. Włącz zasilanie napędu StorCenter. Poczekaj
do zmiany koloru lampki na niebieski przed
kontynuowaniem.
4. Włóż płytę CD Solutions. Jeżeli menu płyty CD nie
zostanie automatycznie uruchomione, uruchom
program Start zlokalizowany na płycie CD Solutions.
Kliknij pozycję Automatic Install (Instalacja
automatyczna) i postępuj zgodnie z instrukcjami
wyświetlanymi na ekranie, żeby zainstalować program.
5. W trakcie instalacji narzędzie Iomega Discovery
Tool automatycznie skonfiguruje napęd StorCenter i
przypisze mu literę napędu. Po zakończeniu instalacji
ponownie uruchom komputer.
6. Żeby korzystać z zaawansowanych funkcji napędu
StorCenter, jak udostępnianie, użytkownicy oraz
narzędzia napędu, należy uruchomić narzędzie
Iomega Discovery Tool i kliknąć pozycję Enter Device
Settings (Wprowadź ustawienia napędu).
.
Page 7

l
l
l
Pika-asennus • Γρήγορη εγκατάσταση • Gyors telepítés
1. Kytke StorCenter-asema häiriöttömään
virtalähteeseen (UPS) tai pistorasiaan.
2. Liitä asema käytössäsi olevaan verkkoon laitteen
mukana tulleella kaapelilla.
3. Kytke virta StorCenter-asemaan. Odota kunnes
laitteen merkkivalo muuttuu siniseksi.
4. Pane Solutions-levy CD-asemaan. Jos CD-valikko ei
avaudu automaattisesti, suorita Solutions-levyllä
oleva Start (Käynnistä) -ohjelma.
Napsauta valintaa Automatic Install (Automaattinen
asennus) ja asenna ohjelmisto näyttöön tulevien
ohjeiden mukaisesti.
5. Asennuksen aikana Iomega Discovery Tool -työkalu
määrittää automaattisesti StorCenter-aseman
asetukset ja kirjaintunnuksen. Käynnistä tietokone
uudelleen, kun asennus on päättynyt.
6. Jos haluat käyttää kehittyneempiä toimintoja, kuten
shares (jako), users (käyttäjät) ja drive utilities
(aseman käyttötoiminnot), suorita Iomega Discovery
Tool -ohjelma ja napstauta valintaa Enter Device
Settings (Määritä laitteen asetukset).
1. Συνδέστε το δίσκο StorCenter σε ένα τροφοδοτικό
αδιάλειπτης ισχύος (UPS) ή σε µια πρίζα του δικτύου.
2. Με το καλώδιο που περιλαµβάνεται στη συσκευασία,
συνδέστε το δίσκο StorCenter στο δίκτυό σας.
3.
Ενεργοποιήστε το δίσκο StorCente. Για να συνεχίσετε,
περιµένετε µέχρι η φωτεινή ένδειξη δραστηριότητας να
γίνει µπλε.
4. Τοποθετήστε το CD Solutions. Εάν το µενού του CD
δεν ξεκινήσει αυτόµατα, ξεκινήστε το πρόγραµµα
Start στο CD Solutions.
Κάντε κλικ στην επιλογή Automatic Install (Αυτόµατη
εγκατάσταση) και ακολουθήστε τις οδηγίες στην
οθόνη, για να εγκαταστήσετε το λογισµικό.
5. Κατά τη διάρκεια της εγκατάστασης, το Iomega
Discovery Tool θα κάνει αυτόµατη διαµόρφωση
του δίσκου σας StorCenter και θα του αντιστοιχίσει
ένα γράµµα µονάδας δίσκου. Επανεκκινήστε τον
υπολογιστή όταν ολοκληρωθεί η εγκατάσταση.
6. Για να χρησιµοποιήστε τις εξελιγµένες δυνατότητες του
StorCenter, όπως τα κοινόχρηστα στοιχεία, τους χρήστες
και τα βοηθητικά προγράµµατα δίσκου, εκτελέστε το
Iomega Discovery Tool
Device Setting
και κάντε κλικ στην επιλογή
(Καταχώρηση ρυθµίσεων της συσκευής).
Enter
1. Csatlakoztassa a StorCenter meghajtót egy
szünetmentes tápegységbe (UPS) vagy hálózati
csatlakozó aljzatba.
2. A mellékelt kábellel csatlakoztassa a StorCenter
meghajtót a hálózatához.
3.
Kapcsolja be a StorCenter meghajtót. Az eljárás előtt várjon,
amíg a tevékenység világítódióda kék színűre változik.
4. Helyezze be a Megoldások CD-t. Ha nem indul
automatikusan a CD menü, indítsa el a Megoldások
CD-n lévő Start programot.
Kattintson az Automatikus telepítés gombra, majd
a szoftver telepítéséhez kövesse a képernyőn
megjelenő útmutatásokat.
5. A telepítés során az Iomega Discovery Tool
automatikusan konfigurálja StorCenter meghajtóját
és egy meghajtó-betűjelzést rendel hozzá. A telepítés
befejezése után indítsa újra a számítógépet.
6. A StorCenter speciális funkcióinak használatához,
úgy mint megosztások, felhasználók és meghajtó
segédprogramok, futtassa az Iomega Discovery
Tool-t és kattintson a Belépés az eszközbeállítások
menütételre.
7
Page 8

Using Your StorCenter Network Hard Drive
Disconnecting the Drive
CAUTION: To prevent data loss, do not disconnect the drive during data transfer. The activity light on the drive flashes
blue when it is transferring data. Use caution when moving the drive while it is connected to power.
Discovering Your Drive with Iomega Discovery Tool
Iomega Discovery Tool allows users to easily configure the Iomega StorCenter Network Hard Drive. Simply run the tool on each
computer connected to your network to quickly assign a drive letter for browsing the drive.
Iomega Discovery Tool allows you to:
• Find the drive's IP address
• Connect to a shared printer
• Change the mapped drive letter
For more information on Iomega Discovery Tool, see the user's manual on the Solutions CD.
Using Advanced Network Features
The Iomega StorCenter Network Hard Drive has several advanced features that require special configuration.
• Media Server—Play media files on your TV. The StorCenter drive can be configured to share media files, such as
movies, music, and photos, with a digital media adapter that connects to your TV.
• USB Print Server—Automatically share any USB printer with other computers on your network.
• Shares, Users, and Quotas—Create a home directory for each user. Quotas allow you to limit the storage space
available to each user.
For more information on configuring these advanced features, see the HTML user's manual on the Solutions CD.
Backing Up with Your Drive
Iomega recommends periodic system backups and more frequent data backups to ensure that your critical data is always
protected. The frequency of your backups should depend on the importance of your data. To protect your data, you can
simply drag and drop copies of your critical files onto the drive, or you can use the included software to schedule regular
backups.
Set your backup strategy based on information that is most valuable and important to you. If you are using the drive for
primary data storage of critical files, it is recommended that you back up the drive to another device.
For complete setup instructions and more information on backup strategies, install the software and select
Backup Software Availability
All Iomega Hard Drives include backup software in the package. Specific software versions and features differ. Visit the
Support & Downloads area on
www.iomega.com for the latest information and software downloads.
Help.
User’s Manual
See the Solutions CD for a user’s manual in HTML format. If you have additional questions on your new drive and
software, visit www.iomega.com and check the Support and Downloads area.
Troubleshooting
Drive Not Detected
If the Iomega Discovery Tool cannot detect the drive, try the following suggestions:
• Make sure the drive is powered on. The indicator light on the top of drive should be solid blue.
• Make sure you are using a functional Ethernet cable. Verify that the link LED on the back of the drive is on.
• Try re-running Iomega Discovery Tool to assign a drive letter for the Iomega StorCenter Network Hard Drive. You
should run Discovery Tool on each computer connected to your network.
8
Page 9

NOTE: The drive will not be detected if it is powering up when Discovery Tool runs. Wait until the indicator light is
solid blue and run Discovery Tool again.
If the drive is still not detected, check the support information on www.iomega.com
.
Changing the Name of the Drive
Always use Iomega Discovery Tool’s Device Settings to change the drive’s name. Changing the name on your host
computer does not change the name on the network.
Utilisation de votre disque dur réseau StorCenter Network Hard Drive
Déconnexion du lecteur
ATTENTION : Pour éviter toute perte de données, ne déconnectez pas le lecteur pendant un transfert de données. Le
voyant d’activité du lecteur clignote en bleu lorsque celui-ci transfère des données. Déplacez le lecteur avec prudence
lorsqu’il est connecté à l’alimentation.
Découverte de votre lecteur avec le logiciel Iomega Discovery Tool
Le logiciel Iomega Discovery Tool permet aux utilisateurs de configurer le disque dur réseau Iomega StorCenter Network Hard
Drive facilement. Exécutez simplement l’outil sur chaque ordinateur connecté à votre réseau afin d’attribuer rapidement une
lettre de lecteur pour parcourir ce dernier.
Le logiciel Iomega Discovery Tool vous permet de :
• Trouver l’adresse IP du lecteur
• Vous connecter à une imprimante partagée
• Changer la lettre associée au lecteur
Pour obtenir plus d’informations sur le logiciel Iomega Discovery Tool, consultez le Guide de l’utilisateur disponible sur
le CD Solutions.
Utilisation des fonctions réseau avancées
Le disque dur réseau Iomega StorCenter Network Hard Drive possède plusieurs fonctions avancées nécessitant une
configuration spéciale.
• Serveur multimédia – permet de lire des fichiers multimédia sur votre téléviseur. Le lecteur StorCenter peut être
configuré pour partager des fichiers multilmédia, tels que des films, des musiques et des photos, avec un Digital
Media Adapter qui se connecte à votre téléviseur.
• Serveur d’impression USB – permet le partage automatique de tout imprimante USB avec d’autres ordinateurs sur
votre réseau.
• Partages, utilisateurs et quotas – permet de créer un répertoire de base pour chaque utilisateur. Les quotas vous
permettent de limiter l’espace de stockage disponible pour chaque utilisateur.
Pour obtenir plus d’informations sur la configuration de ces fonctions avancées, consultez le Guide de
l’utilisateur au format HTML disponible sur le CD Solutions.
Sauvegarde sur le lecteur
Iomega recommande d’effectuer des sauvegardes régulières du système complet et des sauvegardes fréquentes de
données pour assurer la protection permanente de vos données les plus importantes. La périodicité des sauvegardes
dépend directement de l’importance des données à sauvegarder. Pour protéger vos données, copiez vos fichiers les
plus importants sur le lecteur par simple glisser-déplacer ou utilisez le logiciel inclus pour programmer des sauvegardes
régulières.
Définissez votre stratégie de sauvegarde en vous basant sur les informations qui vous semblent les plus importantes.
Si vous utilisez le lecteur pour le stockage primaire de données de fichiers importants, nous vous recommandons de
sauvegarder le lecteur sur un autre périphérique.
Pour obtenir des instructions de configuration complètes et plus d’informations sur les stratégies de sauvegarde,
installez le logiciel et sélectionnez
Aide.
9
Page 10

Disponibilité du logiciel de sauvegarde
Tous les disques durs Iomega sont livrés avec un logiciel de sauvegarde. Les versions et fonctionnalités spécifiques des
logiciels sont susceptibles de varier d’un produit à l’autre. Consultez la section Support et Téléchargements sur le site
www.iomega.com pour les dernières informations et les derniers téléchargements disponibles.
Guide de l’utilisateur
Le CD Solutions comprend un guide de l’utilisateur au format HTML. Pour toute question supplémentaire concernant
votre nouveau lecteur ou le logiciel l’accompagnant, visitez la section Assistance et Téléchargements du site
www.iomega.com
.
Dépannage
Lecteur non détecté
Si le logiciel Iomega Discovery Tool ne peut pas détecter le lecteur, essayez les suggestions suivantes :
• Assurez-vous que le lecteur est sous tension. Le clignotement du voyant sur le dessus du lecteur doit être bleu fixe.
• Vérifiez que vous utilisez un câble Ethernet fonctionnel. Vérifiez que le voyant gauche à l’arrière du lecteur est
allumé.
• Essayez de réexécuter le logiciel Iomega Discovery Tool pour attribuer une lettre de lecteur au disque dur réseau
Iomega StorCenter Network Hard Drive. Vous devez exécuter le logiciel Discovery Tool sur chaque ordinateur
connecté à votre réseau.
REMARQUE : le lecteur ne sera pas détecté s’il est mis sous tension lors de l’exécution du logiciel Discovery Tool.
Attendez que le clignotement du voyant soit bleu fixe et exécutez le logiciel.
Si le lecteur n’est toujours pas détecté, vérifiez les informations d’assistance du site www.iomega.com
Modification du nom du lecteur
Utilisez toujours les paramètres du périphérique du logiciel Iomega Discovery Tool pour modifier le nom du lecteur. Le fait
de modifier le nom sur l’ordinateur hôte ne modifie pas le nom sur le réseau.
.
Arbeiten mit dem StorCenter-Netzlaufwerk
Trennen des Laufwerks vom System
ACHTUNG: Um Datenverluste zu vermeiden, trennen Sie das Laufwerk während der Datenübertragung nicht vom
Computer. Die Aktivitätsleuchte am Gerät blinkt blau, wenn Daten übertragen werden. Bewegen Sie das Laufwerk nur
vorsichtig, wenn es an die Stromversorgung angeschlossen ist.
Laufwerkserkennung mit Iomega Discovery Tool
Iomega Discovery Tool ermöglicht dem Benutzer das einfache Konfigurieren des Iomega StorCenter-Netzlaufwerks. Sie
brauchen nur das Tool auf jedem mit dem Netzwerk verbundenen Computer auszuführen und können dem Laufwerk dann einen
Buchstaben zuweisen, anhand dessen Sie es später im Netzwerk finden.
Iomega Discovery Tool bietet folgende Möglichkeiten:
• Suchen nach der IP-Adresse des Laufwerks
• Verbinden mit einem freigegebenen Drucker
• Ändern des zugeordneten Laufwerkbuchstabens
Weitere Informationen zu Iomega Discovery Tool finden Sie im Benutzerhandbuch auf der Lösungs-CD.
Verwenden der erweiterten Netzwerkfunktionen
Das Iomega StorCenter-Netzlaufwerk weist verschiedene erweiterte Funktionen auf, die eine eigene Konfiguration erfordern.
• Medienserver – Wiedergabe von Mediendateien auf dem Fernseher. Das StorCenter-Laufwerk lässt sich so
konfigurieren, dass Mediendateien (Videos, Musik, Fotos) mithilfe eines digitalen Medienadapters, der am
Fernseher angeschlossen wird, auf diesem wiedergegeben werden können.
• USB Print Server – Automatische Freigabe eines beliebigen USB-Druckers für andere Computer im Netzwerk.
• Freigaben, Benutzer, Kontingente (Quotas) – Erstellen eines Stammverzeichnisses für jeden Benutzer. Mit den
10
Page 11

Kontingenten können Sie den Speicherplatz, der dem jeweiligen Benutzer zur Verfügung steht, begrenzen.
Weitere Informationen zur Konfiguration dieser erweiterten Funktionen finden Sie im HTML-Benutzerhandbuch
auf der Lösungs-CD.
Mit dem Iomega Laufwerk auf Nummer Sicher
Es empfiehlt sich, das System regelmäßig und die Daten noch häufiger zu sichern, um den ständigen Schutz Ihrer
wichtigen Daten zu gewährleisten. Wie oft Sie eine Sicherung vornehmen, hängt jeweils von der Wichtigkeit Ihrer Daten
ab. Sie können die Daten auf einfache Weise sichern, indem Sie Kopien derselben durch Ziehen und Ablegen auf das
Laufwerk kopieren. Alternativ dazu bietet die mitgelieferte Software die Möglichkeit, eine regelmäßige Sicherung zu
planen.
Wählen Sie Ihre Sicherungsstrategie unter dem Aspekt, welche Daten für Sie besonders wichtig und wertvoll sind. Wenn
Sie das Laufwerk hauptsächlich als primären Datenspeicher für wichtige Dateien verwenden, empfiehlt es sich, das
Laufwerk auf einem anderen Gerät zu sichern.
Um die vollständigen Anweisungen zum Einrichten sowie weitere Informationen zu Sicherungsstrategien zu erhalten,
installieren Sie die Software und wählen Sie Hilfe.
Verfügbarkeit der Sicherungssoftware
Alle Iomega Festplatten (Hard Drives) werden mit Sicherungssoftware ausgeliefert. Bei einigen Softwareversionen und
Funktionen sind Abweichungen möglich. Die neuesten Informationen und Softwareversionen zum Herunterladen finden Sie
im Bereich „Support & Downloads“ unter www.iomega.com.
Benutzerhandbuch
Das vollständige Benutzerhandbuch im HTML-Format finden Sie auf der Solutions-CD. Wenn Sie weitere Fragen zu Ihrem
neuen Laufwerk oder zur Software haben, besuchen Sie unsere Webseite www.iomega.com und rufen Sie dort den
Bereich Support und Downloads auf.
Problembehandlung
Laufwerk nicht gefunden
Sollte Iomega Discovery Tool das Laufwerk nicht finden, probieren Sie Folgendes:
• Stellen Sie sicher, dass das Laufwerk eingeschaltet ist. Das Kontrolllämpchen auf der Laufwerksoberseite muss
durchgehend blau leuchten.
• Stellen Sie sicher, dass Sie ein funktionsfähiges Ethernetkabel verwenden. Stellen Sie sicher, dass die VerbindungsLED auf der Rückseite des Laufwerks leuchtet.
• Versuchen Sie, Iomega Discovery Tool erneut auszuführen, um dem Iomega StorCenter-Netzlaufwerk einen
Laufwerksbuchstaben zuzuweisen. Sie müssen Discovery Tool auf jedem mit dem Netzwerk verbundenen Computer
ausführen.
Hinweis: Das Laufwerk wird nicht erkannt, wenn Discovery Tool beim Starten läuft. Warten Sie, bis das
Kontrolllämpchen durchgehend blau leuchtet, und starten Sie Discovery Tool erneut.
Wird das Laufwerk immer noch nicht erkannt, informieren Sie sich im Support-Bereich unter www.iomega.com
Ändern des Laufwerksnamens
Verwenden Sie zum Ändern des Laufwerksnamens immer die Geräteeinstellungen von Iomega Discovery Tool. Bei einer
Änderung des Namens auf Ihrem Hostcomputer bleibt der Name im Netzwerk unverändert.
.
Utilizzo del disco rigido di rete StorCenter
Scollegamento dell’unità
ATTENZIONE: per evitare perdite di dati, non scollegare l’unità durante il trasferimento dei dati. Quando è in corso il
trasferimento dei dati, la spia che segnala l’attività sull’unità si illumina di blu e lampeggia. Se si desidera spostare
un’unità collegata alla rete di alimentazione, agire con cautela.
11
Page 12

Rilevazione dell’unità con Iomega Discovery Tool
Iomega Discovery Tool consente la configurazione agevole del disco rigido di rete Iomega StorCenter. Basta eseguire il software
su ogni computer collegato alla rete per assegnare rapidamente una lettera di unità che consente di sfogliare l’unità.
Iomega Discovery Tool consente di:
• Trovare l’indirizzo IP dell’unità
• Collegarsi a una stampante condivisa
• Modificare la lettera di unità associata
Per ulteriori informazioni su Iomega Discovery Tool, consultare il manuale d’uso sul CD Soluzioni.
Utilizzo delle funzioni di rete avanzate
Il disco rigido di rete Iomega StorCenter dispone di diverse funzioni avanzate che richiedono una configurazione speciale.
• Media Server—Consente l’esecuzione di file multimediali sul televisore. L’unità StorCenter può essere configurata
per la condivisione di file multimediali quali filmati, musica e foto con un digital media adapter che si collega al
televisore.
•
Server di stampa USB—Consente di condividere automaticamente qualsiasi stampante USB con altri computer sulla rete.
• Condivisioni, utenti e quote—Crea una home directory per ogni utente. Le quote consentono di limitare lo spazio di
archiviazione disponibile per ogni utente.
Per ulteriori informazioni sulla configurazione delle funzioni avanzate, consultare il manuale d’uso sul CD
Soluzioni.
Esecuzione di backup con l’unità
Iomega consiglia di eseguire backup di sistema periodici e backup di dati più frequenti per garantire che i dati essenziali
siano sempre protetti. La frequenza dei backup varia in base all’importanza dei dati da memorizzare. Per proteggere i
dati, è sufficiente selezionare e trascinare copie dei dati più importanti sull’unità oppure utilizzare il software incluso per
pianificare l’esecuzione di backup a intervalli regolari.
Impostare la strategia di backup in base alle informazioni più preziose e importanti. Se l’unità viene utilizzata come
dispositivo primario di storage per l’archiviazione di file di importanza critica, si consiglia di eseguirne il backup su
un’altra periferica.
Per istruzioni complete sulla configurazione e per ulteriori informazioni sulle strategie di backup, installare il software e
richiamarne la Guida in linea.
Software di backup disponibili
Tutte le unità a disco rigido Iomega prevedono in dotazione il relativo software di backup. È possibile che le versioni
software e alcune funzionalità specifiche siano differenti. Per scaricare le versioni software più recenti e le ultime
informazioni, visitare l’area Assistenza e download all’indirizzo www.iomega.com.
Manuale dell’utente
Il manuale in formato HTML è disponibile sul CD Soluzioni. Se si desidera rivolgere ulteriori domande sulla nuova unità e
sul software, visitare l’area Assistenza e download all’indirizzo www.iomega.com.
Risoluzione dei problemi
Unità non rilevata
Se Iomega Discovery Tool non riesce a rilevare l’unità, provare ad applicare i seguenti suggerimenti:
• Assicurarsi che l’unità sia accesa. Attendere che l’indicatore luminoso posto nella parte superiore dell’unità sia di
colore blu fisso.
• Assicurarsi di usare un cavo Ethernet funzionante. Verificare che il LED di collegamento nella parte posteriore
dell’unità sia acceso.
• Provare ad eseguire nuovamente Iomega Discovery Tool per assegnare una lettera di unità al disco rigido di rete
Iomega StorCenter. Si deve eseguire Iomega Discovery Tool su ogni computer collegato alla rete.
NOTA: l’unità non sarà rilevata se è in fase di accensione quando si esegue Iomega Discovery Tool. Attendere che
l’indicatore luminoso blu sia acceso in modalità fissa ed eseguire nuovamente Iomega Discovery Tool.
Se ancora non si riesce a rilevare l’unità, controllare le informazioni dell’assistenza tecnica all’indirizzo www.iomega.com
12
.
Page 13

Modifica del nome dell’unità
Usare sempre le Impostazioni periferica di Iomega Discovery Tool per cambiare il nome dell’unità. La modifica del nome
sul computer host non determina la modifica del nome in rete.
Uso de la unidad de disco duro de red StorCenter
Desconexión de la unidad
PRECAUCIÓN: Para impedir la pérdida de datos, no desconecte la unidad durante el proceso de transferencia de datos.
La luz de actividad de la unidad parpadea en azul cuando se están transfiriendo datos. Tenga precaución al transportar
la unidad cuando esté conectada a la alimentación.
Descubrimiento de la unidad con Iomega Discovery Tool
Iomega Discovery Tool permite a los usuarios configurar de un modo sencillo la unidad de disco duro de red Iomega
StorCenter. Simplemente, ejecute la herramienta en todos los ordenadores conectados a la red y asigne una letra de
unidad para buscar la unidad.
Iomega Discovery Tool le permite:
• Encontrar la dirección IP de la unidad
• Conectarse a una impresora compartida
• Cambiar la letra de unidad asignada
Para obtener más información acerca de Iomega Discovery Tool, consulte el manual del usuario del CD de soluciones.
Uso de las funciones de red avanzadas
La unidad de disco duro de red Iomega StorCenter dispone de varias funciones avanzadas que requieren una
configuración especial.
• Media Server: reproduzca archivos multimedia en su televisor. La unidad StorCenter se puede configurar para
compartir archivos multimedia, como películas, música y fotos, mediante un adaptador de medios digitales que se
conecta al televisor.
• Servidor de impresora USB: comparta automáticamente cualquier impresora USB con otros ordenadores de la red.
• Recursos compartidos, usuarios y cuotas: cree un directorio particular para cada usuario. Las cuotas le permiten
limitar el espacio de almacenamiento disponible para cada usuario.
Para obtener más información acerca de estas funciones avanzadas, consulte el manual del usuario en HTML del
CD de soluciones.
Realizar copias de seguridad con su unidad
Iomega recomienda realizar con periodicidad copias de seguridad del sistema y copias de seguridad más frecuentes de
los datos para garantizar que los datos importantes estén siempre protegidos. La frecuencia de las copias de seguridad
dependerá de la importancia de los datos. Para proteger los datos, no tiene más que arrastrar y soltar copias de los
archivos importantes a la unidad o utilizar el software incluido para programar copias de seguridad regulares.
Establezca una estrategia de copias de seguridad basada en la información que le sea más valiosa e importante. Si está
utilizando la unidad como almacenamiento de datos principal de archivos importantes, se recomienda que realice una
copia de seguridad de la unidad con otro dispositivo.
Para obtener instrucciones completas sobre la configuración, así como más información sobre estrategias de realización
de copias de seguridad, instale el software y seleccione Ayuda
.
Disponibilidad del software de copia de seguridad
Todas las unidades de disco Iomega incluyen software de copia de seguridad en el paquete. Las versiones y
características del software específico difieren. Visite el área de asistencia y descargas del sitio www.iomega.com para
obtener la información y las descargas de software más actualizadas.
Manual del usuario
Consulte el manual del usuario en formato HTML que se encuentra en el CD de soluciones. Si tiene más preguntas sobre
su nueva unidad y el software, visite www.iomega.com y consulte el área de asistencia y descargas.
13
Page 14

Solución de problemas
No se detecta la unidad
Si Iomega Discovery Tool no puede detectar la unidad, siga las recomendaciones que se muestran a continuación:
• Asegúrese de que la unidad está encendida. La luz de indicación de la parte superior de la unidad debe estar azul
de forma continua.
• Asegúrese de que está utilizando un cable Ethernet en buen estado. Compruebe que el indicador LED de conexión
de la parte posterior de la unidad está encendido.
• Vuelva a ejecutar Iomega Discovery Tool para asignar una letra de unidad a la unidad de disco duro de red Iomega
StorCenter. Debe ejecutar Discovery Tool en todos los ordenadores que estén conectados a la red.
NOTA: no se detectará la unidad si ésta se está encendiendo cuando se ejecuta Discovery Tool. Espere hasta que la
luz de indicación esté azul de forma continua y vuelva a ejecutar Discovery Tool.
Si aún no se detecta la unidad, consulte la información de asistencia técnica en www.iomega.com
.
Configuración del nombre de la unidad
Utilice siempre la configuración del dispositivo de Iomega Discovery Tool para cambiar el nombre de la unidad. Cambiar
el nombre de su ordenador host no cambia el nombre de la red.
Uw StorCenter-netwerkdrive gebruiken
De drive loskoppelen
WAARSCHUWING! Koppel de drive nooit los tijdens een gegevensoverdracht. Zo vermijdt u dat er gegevens verloren
gaan. Het statuslampje op de drive knippert blauw wanneer er gegevens worden verzonden. Wees voorzichtig als u de
drive verplaatst terwijl deze op een voedingsbron is aangesloten.
Uw drive verkennen met Iomega Discovery Tool
Met Iomega Discovery Tool kunt u eenvoudig de Iomega StorCenter-netwerkdrive configureren. U hoeft alleen maar het
programma uit te voeren op elke computer die is aangesloten op uw netwerk om snel een stationsaanduiding toe te wijzen om
naar de drive te kunnen bladeren.
Met Iomega Discovery Tool kunt u:
• Het IP-adres van de drive zoeken
• Verbinding maken met een gedeelde printer
• De toegewezen stationsaanduiding wijzigen
Zie de gebruikershandleiding op www.iomega.com voor meer informatie over Iomega Discovery Tool.
De geavanceerde netwerkfuncties gebruiken
De Iomega StorCenter-netwerkdrive heeft verschillende geavanceerde functies die speciaal moeten worden geconfigureerd.
• Mediaserver: mediabestanden afspelen op uw pc. U kunt de StorCenter-drive configureren voor het delen van
mediabestanden, zoals films, muziek en foto’s, met een digitale media-adapter die wordt aangesloten op de tv.
• USB-afdrukserver: automatisch elke USB-printer delen met andere computers in het netwerk.
• Gedeelde mappen, gebruikers en quota’s: een eigen directory maken voor elke gebruiker. Met quota’s kunt u de
opslagruimte die beschikbaar is voor elke gebruiker beperken.
Zie de HTML-gebruikershandleiding op de cd Solutions voor meer informatie over de configuratie van deze
geavanceerde functies.
Back-ups maken met uw drive
Iomega raadt u aan regelmatig een back-up te maken van uw systeem en nog regelmatiger een back-up van uw
gegevens, zodat u er altijd op kunt vertrouwen dat uw kritieke gegevens zijn veiliggesteld. De regelmaat waarmee u
back-ups maakt, stemt u het beste af op het belang van uw gegevens. U kunt uw gegevens eenvoudig beschermen
door kopieën van uw bestanden naar de drive te verslepen of door gebruik te maken van de meegeleverde software om
regelmatig back-ups te plannen.
14
Page 15

Bepaal uw strategie voor het maken van back-ups op basis van informatie die het waardevolst en belangrijkst voor u is.
Als u de drive gebruikt als primaire gegevensopslag van belangrijke bestanden, wordt u aanbevolen een back-up van de
drive te maken naar een ander apparaat.
Voor volledige instructies voor de instelling van het programma en voor informatie over back-upstrategieën installeert u
de software en selecteert u
Help.
Beschikbaarheid van back-upsoftware
Bij alle Iomega Hard Drives wordt back-upsoftware meegeleverd in de verpakking. Specifieke softwareversies en –functies
kunnen echter verschillen. Bezoek de sectie Support & Downloads op www.iomega.com voor de nieuwste informatie en
softwaredownloads.
Gebruikershandleiding
Voor een gebruikershandleiding van uw Iomega-product bezoekt u de sectie Support & Downloads op
www.iomega.com
.
Problemen oplossen
De drive wordt niet gedetecteerd
Als Iomega Discovery Tool de drive niet detecteert, probeert u het volgende:
• Controleer of de drive is ingeschakeld. Het statuslampje boven op de drive moet ononderbroken blauw branden.
• Controleer of u een goede Ethernet-kabel gebruikt. Controleer of het koppelingslampje aan de achterkant van de
drive brandt
• Voer Iomega Discovery Tool nogmaals uit om een stationsaanduiding toe te wijzen aan de Iomega StorCenternetwerkdrive. U moet Discovery Tool uitvoeren op elke computer die is aangesloten op het netwerk.
OPMERKING: de drive wordt niet gedetecteerd als deze wordt opgestart wanneer Discovery Tool wordt uitgevoerd.
Wacht tot het indicatielampje ononderbroken blauw brandt en voer Discovery Tool nogmaals uit.
Als de drive nog steeds niet wordt gedetecteerd, controleert u de ondersteuningsinformatie op www.iomega.com
De naam van de drive wijzigen
Gebruik altijd de apparaatinstellingen van Iomega Discovery Tool als u de naam van de drive wilt wijzigen. Als u de naam
op uw hostcomputer wijzigt, wordt deze niet in het netwerk veranderd.
.
15
Page 16

Customer Support • Assistance clientèle • Kundenunterstützung
Assistenza clienti • Asistencia al cliente • Klantenondersteuning
For service and support for your Iomega product, visit us at www.iomega.com.
Pour obtenir du service et de l’assistance pour votre produit Iomega, visitez notre site à l’adresse suivante :
www.iomega.com
Servicedienstleistungen und Kundendienst für Ihr Iomega Produkt finden Sie unter www.iomega.com.
Per ottenere assistenza e supporto per il prodotto Iomega in uso, visitare il sito Web all’indirizzo www.iomega.com.
Para obtener información sobre servicio y asistencia técnica para su producto Iomega, visítenos en www.iomega.com.
Voor service en ondersteuning van uw Iomega-product kunt u terecht op onze website www.iomega.com.
.
Copyright © 2006 Iomega Corporation. All rights reserved. Iomega, the stylized “i” logo, and all Iomega brand blocks are either registered
trademarks or trademarks of Iomega Corporation in the United States and/or other countries. Microsoft and Windows are either registered
trademarks or trademarks of Microsoft Corporation in the United States and/or other countries. Apple and Mac are either registered
trademarks or trademarks of Apple Computer, Inc. in the United States and/or other countries. Certain other product names, brand names,
and company names may be trademarks or designations of their respective owners.
31500100 02/07/06 b
 Loading...