

Page 1

TM
dri ve
Insider SCSIInsider SCSI
Insider SCSI
Insider SCSIInsider SCSI
Installation and
Reference Guide
100
Page 2

Table of Contents
Installation Guide ............................................................. 1
Reference Guide.............................................................. 11
Page 3
1
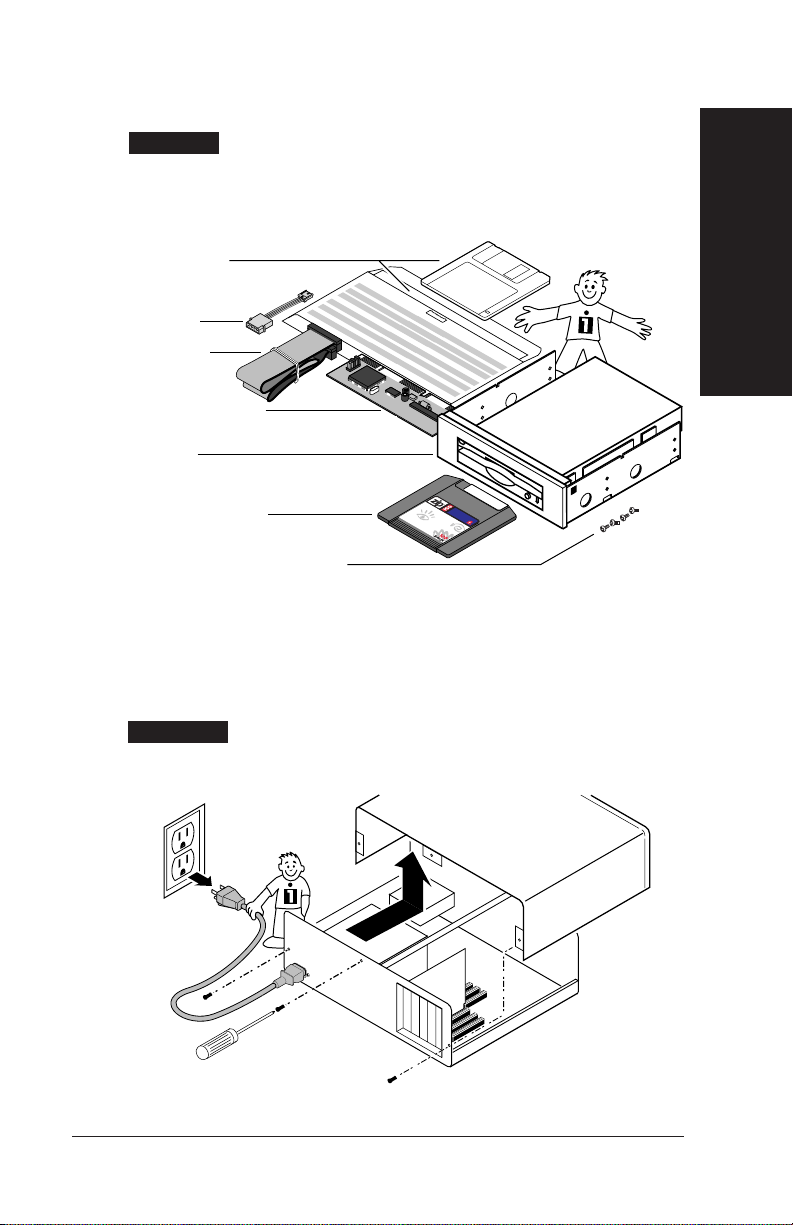
Unpack the Zip drive and accessories.
CAUTION Before handling the Zip zoom board, touch a
grounded metal object (like an unpainted metal screw on the
back of your computer) to discharge any buildup of personal
static electricity. M
Install Diskette
and Manual
Power Cable
Converter
Data Cable
Zip zoom SCSI Board
Zip Drive
Installation Guide
2
100MB Zip Tools Disk
(contains Tools software)
Drive Bay Mounting Screws (6-32)
Tools
DISCONNECT the computer power cord and
remove the cover.
if removal is unclear.)
WARNING Always disconnect computer electrical power at
power source before beginning a computer hardware change. M
(Refer to your computer manual
1
Page 4
3
4
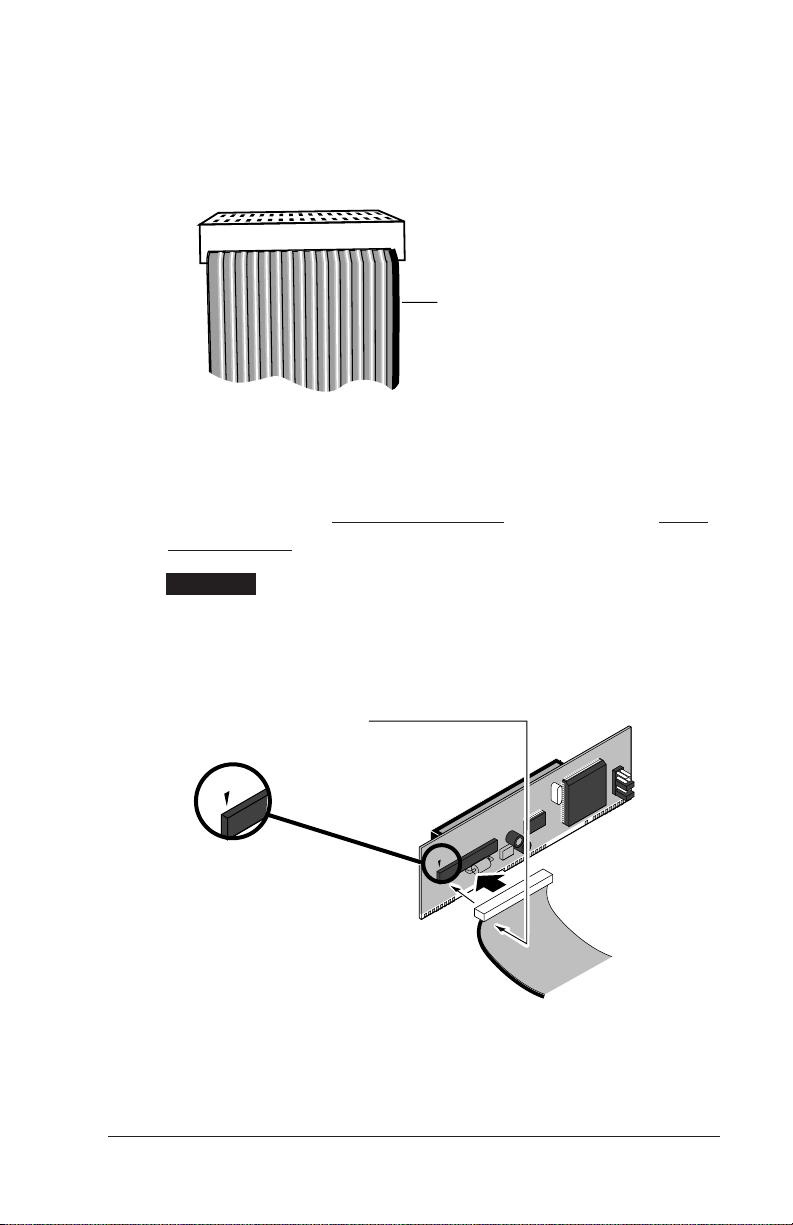
Pick up the data cable and find the colored
stripe (or printing) on one side of the data cable,
indicating PIN 1.
Stripe or printing shows the
PIN 1 side of the data cable.
Connect the data cable to your Zip zoom
board. (Be sure PIN 1 on the cable is connected to PIN 1
on the board.)
CAUTION If the data cable is not connected to PIN 1 on both the
Zip Insider and the Zip zoom board, your computer will not be able
to find your drive. M
PIN 1
PIN 1
PIN 1
2
Page 5
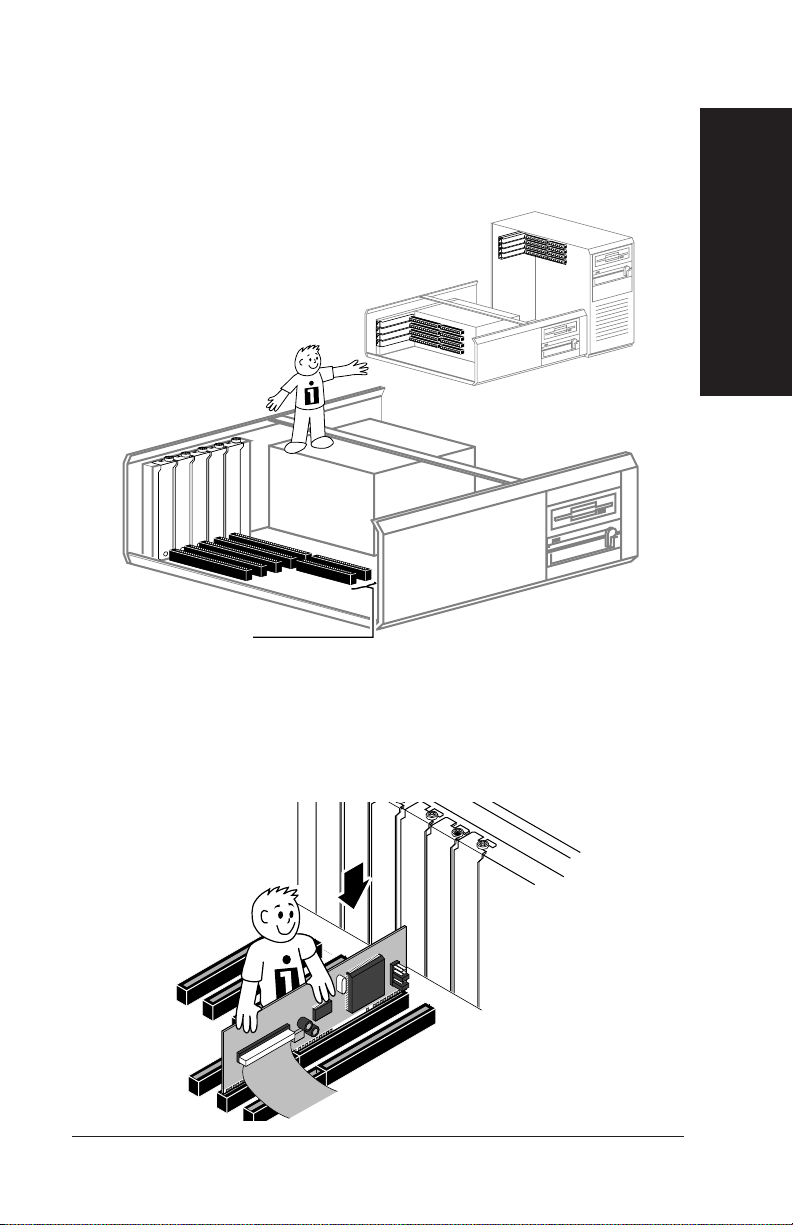
Locate any vacant 16-bit ISA expansion slot. (A
16-bit expansion slot is needed to install the Zip zoom.)
5
M NOTE: You will not have to remove the slot cover. Refer to your
computer manual if you need information on available expansion
slots. M
16-bit expansion slots
Installation Guide
6
Push the Zip zoom board firmly into the
expansion slot until it CLICKS
M HINT: Try rocking the board into place by pushing in one corner first,
then the other. M
(or seats all the way).
3
Page 6
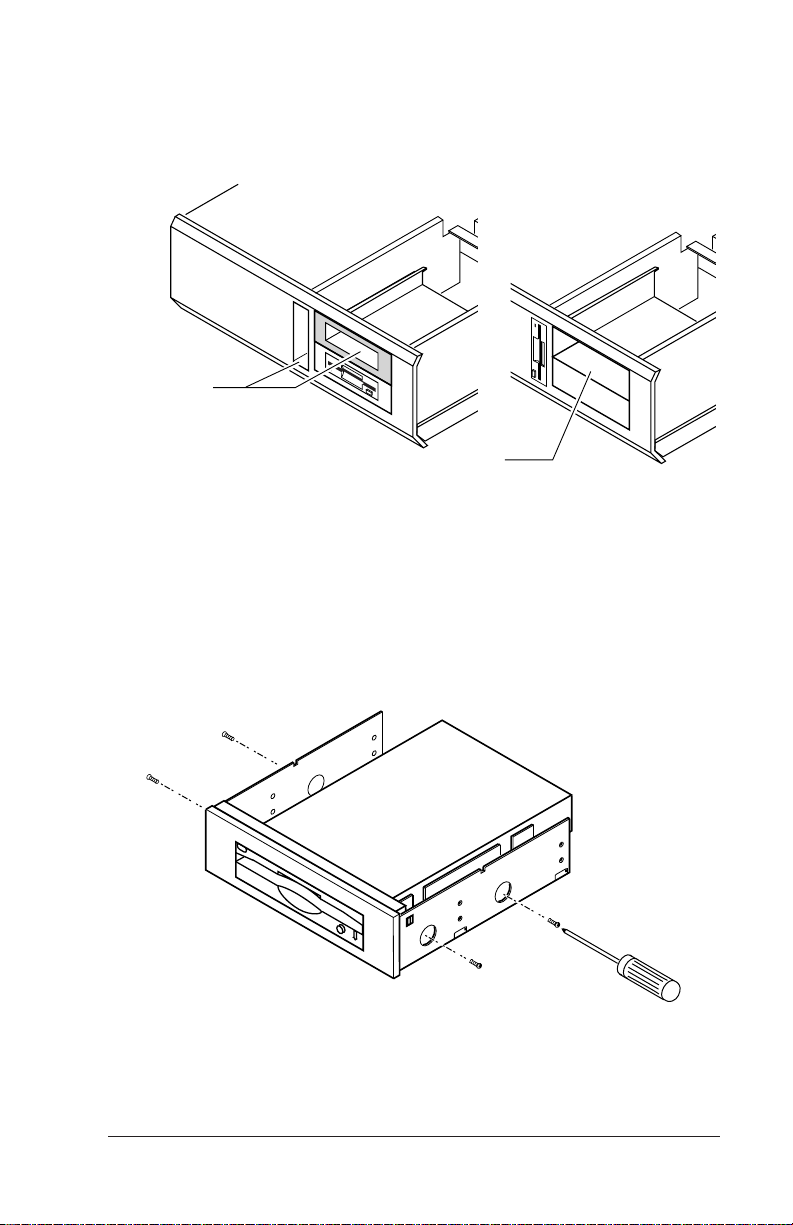
Locate a vacant drive bay and remove the
panel cover.
7
31/2-inch Bays
(You must first remove the
mounting sled. See Step 7a.)
31/2-inch drive bays ONLY.
7a
To install your Zip Insider in a 31/2-inch drive bay remove the mounting
screws as illustrated and slide the drive out of the sled.
51/4-inch Bay
(Your Zip Insider ships ready to install
in a 51/4-inch drive bay.)
4
Page 7

8
Check mounting requirements: Your drive bay
may require side rails.
M HINT: Use the same mounting hardware as on similar drives in your
system. See your computer dealer for any special hardware. M
Installation Guide
51/4-inch Bay
9
31/2-inch Bay
Slide the Zip Insider into the drive bay.
M NOTE: You may want to secure your drive now to hold it in place
while connecting cables. M
5
Page 8

10
11
Connect a computer power supply cable. (Use
the power cable converter if needed.)
M N0TE: If your computer has no spare power supply cable, you
will need to use a power Y-cable. To order one, call your dealer. M
Zip Drive
Power Cable Converter
Power Supply Cable from Computer
Follow the data cable from the Zip zoom board
and connect it to your Zip drive.
the cable is connected to PIN 1 on the drive.)
(Be sure PIN 1 on
Pin One
Cable Connector
6
Zip Drive
PIN 1
Page 9

12
13
Secure drive in drive bay using the mounting
screws (if not secured already).
Drive Bay Mounting
Screws (6-32)
Check all connections, arrange the cables to
fit under the cover, and replace the
computer cover.
Installation Guide
14
Reconnect power cord, turn ON power switch,
and wait for DOS or Windows to load.
7
Page 10

®
15
Insert the 100MB Zip “tools” disk into the Zip
drive.
When you insert a Zip disk, the amber data light on the drive will flash
momentarily. When pushing the eject button, the drive takes a few seconds
to deliver the disk.
Insert Gently!
16
Tools
Disk Eject Button
Disk Inserted
Insert the INSTALL diskette into the computer’s
floppy drive.
8
Page 11

17
Start the Setup or Install program as described
below and follow the screen instructions to
install your Zip software.
Windows® 95 Users: Open My Computer and double click on the
floppy drive icon. Double click on the Setup icon to install Tools 95.
Windows 3.1 Users: Start Windows. In the Windows Program
Manager, select the File menu and choose
box, type
drive
DOS Users (Windows not installed): At the DOS prompt, type
a:guest if the “Install” floppy is in drive a: (or b:guest if it is in drive b:), and press
Enter. Note the drive letter Guest assigns to your Zip drive. At the DOS promt
type:
After the software intallation is complete, type
use the Zip drive letter in place of
save files to your Zip “tools” disk until you run the reclaim program.
If you need Help, there is troubleshooting information in the
Reference Guide section.
a:setup if the “Install” floppy is in drive a: (or b:setup if it is in
b:), then click OK or press the Enter key.
d:\dosstuff\install (use the Zip drive letter in place of d:), then press Enter.
Run. In the Command Line
d:\dosstuff\reclaim (again
d:), and press Enter. You will not be able to
Congratulations! When the software
installation is complete, your Zip drive will be
ready to use.
Installation Guide
For additional information on using your new drive and Zip tools
software, refer to the Reference Guide section.
9
Page 12

Page 13

Using Your Zip Drive
®
®
Use your Zip drive just like any other drive on your system. To access the
Zip drive, insert a disk and select the Zip disk icon. Store and copy files to
and from the Zip drive using the same methods you use for other drives on
your system.
Amber Drive Status Light
(Flashes when drive is busy)
Disk Eject Button
Handling Zip Disks
Always store Zip disks in their protective cases when they are not inserted in
your Zip drive.
Drive Sleep
The Zip drive has an automatic sleep mode designed to reduce power
consumption and prolong the life of Zip disks. Sleep mode automatically
spins down a disk after 15 minutes of inactivity, and the disk automatically
spins up again when accessed. You can change the sleep mode time using
your Zip Tools software.
Disk Eject in Case of Power Loss
If you need to eject a disk during a power failure, use a paper clip to hook the
manual eject lever, then pull gently until the disk ejects.
CAUTION Use this manual disk eject procedure only when the
computer is without power. M
Manual eject
lever hole
Pull manual eject
lever out gently
Reference Guide
M Before reinserting the disk ... Make sure the manual eject lever
is returned to its original position. If necessary, push it back into place
with a paper clip. M
11
Page 14

Non-Iomega SCSI Adapters
The Zip Insider is shipped with a Zip zoom board which should be used with
your new drive. However, if you wish to use a non-Iomega SCSI adapter, the
Zip Insider is a high performance drive that will work with any SCSI adapter
that has a compatible ASPI manager for Windows/DOS or 32-bit miniport
driver for Windows 95. (If you are not sure that your adapter is 100% ASPI
or Windows 95 compatible, contact the dealer where you purchased the
adapter or the adapter manufacturer.) Before installing the Zip drive, make
sure the necessary software for the adapter is correctly installed on your
system. To take advantage of all the features of your Zip drive, you should
install Zip Tools.
Zip Tools Software
Your 100MB Zip "tools" disk contains a complete package of software tools
to help you manage all the stuff you use and create with your Zip drive. The
Zip Setup or Install program automatically installs Zip tools for your system.
For information on using Zip tools, refer to Zip Tools Help which is
installed in the Iomega Zip Tools group.
Zip Tools Disk
The Zip "tools" disk that came with your drive cannot be used for data
storage until it has been used to install the Zip tools software package (or
until you run the Reclaim utility). After the first installation, the Zip tools
disk can be used to install or reinstall Zip tools software. Additional blank
disks for your Zip drive are available preformatted for Windows/DOS.
Make sure you keep all the original files on your "tools" disk in case you
need to reinstall your Zip tools software.
Read/Write Protecting Zip Disks
Iomega Tools includes a special read/write protect feature that lets you:
• Write Protect a Zip disk through software instead of with a mechanical write
protect switch.
• Write Protect a Zip disk and assign a password that must be used to remove
the write protect.
• Read Protect a Zip disk so that it cannot be read from, or written to, unless
the user enters the password you assign.
For information on using read/write protect, refer to Zip Tools help.
12
Page 15

SCSI Guidelines
The Small Computer System Interface (SCSI) is an industry standard for
connecting peripherals to most personal computers. SCSI rules define how to
connect more than one SCSI device to the same SCSI connection (either
built-in or from a SCSI host adapter).
SCSI "Chain"
A SCSI chain is a series of SCSI devices cabled one to another on a single
SCSI connection. You can add your Zip drive to a SCSI chain.
For any SCSI chain, the combined chain length (the total of all cables in the
SCSI chain, including internal cables) should not exceed 6 meters (19.6 feet).
SCSI ID
SCSI ID is an address number (0 through 7) that is assigned to each SCSI
device. In a SCSI chain, each device in the chain must have a different SCSI
ID number, and ID 7 should NOT be used for any device as it is usually
reserved for use by the SCSI adapter. The Zip drive is set at the factory to
SCSI ID 5.
If you need to use a different SCSI ID for your Zip drive, change the SCSI
ID setting before installing the drive. (SCSI ID jumpers are located at the
back of the drive.) Optional SCSI ID jumper settings are illustrated below.
SCSI ID Location
Termination jumpers
(shown in black)
Reference Guide
SCSI ID 0
SCSI ID 4
SCSI Termination
SCSI rules require that the first and last devices in a SCSI chain (and no
others) have termination ON in order to provide proper data transfer. The
internal Zip drive ships with SCSI termination ON. To turn termination
OFF, simply remove the jumper from the pins marked "Term on".
SCSI ID 1
SCSI ID 5
(factory setting)
SCSI ID 2
SCSI ID 6
SCSI ID 3
SCSI ID 7
13
Page 16

Zip Zoom Settings
Zip Zoom Factory Settings
IRQ 11
I/O Port Address
140h-15Fh
PIN 1
The factory settings on the Zip zoom board should work with most operating
systems, including DOS/Windows, Windows 95, Windows NT, and OS/2.
However, you will need to change the settings if:
• Another device on your system is using IRQ 11 or I/O Port Address 140h-
15Fh.
• You have an Adaptec SCSI adapter, Jaz jet ISA, or PC1600 installed.
M NOTE: Zip zoom jumper settings must be changed manually.
Under Windows 95, you must run the Add New Hardware control
panel
after making any setting changes. M
Optional Zip Zoom Settings
Alternate Port Address Optional IRQ Interrupts
IRQ 9
Jumper OFF
or Hanging = I/O
Port Address
340h-35Fh
14
IRQ 10
IRQ 11*
*IRQ 11 must be
used with
Windows NT
IRQ 12
Page 17

Troubleshooting
If you encounter a problem while installing or using your Zip drive, check
this section for help.
CAUTION Electrical power should be turned off before connecting
or disconnecting any cables; otherwise, computer equipment could
be damaged. M
The Zip drive is not assigned a drive letter, or the Iomega software
1
cannot find the Zip drive.
(a) Make sure pin one is properly connected on both the Zip Insider and
the Zip zoom board (or other SCSI connection). Labels have been placed
on both to help you identify pin one. Pin one on the Zip Insider is closest
to the power connector (or on the right if looking at the back of the drive).
(b) Make sure a power cable from the computer's power supply is securely
connected to the Zip Insider as shown in the Installation Guide.
(c) Make sure that all cable connections are straight and fully seated.
(d) There may be a conflict between the Zip zoom board and another
SCSI adapter on your system. Try using the alternate I/O port address
setting or changing the IRQ setting. Refer to the section on "Zip Zoom
Settings" for more information.
(e) Reinstall your Zip Tools software.
Computer does not start up properly after the Zip drive is installed.
2
There may be a conflict between the Zip zoom board and another SCSI
adapter on your system. Try using the alternate I/O port address setting
or changing the IRQ setting. Refer to the section on "Zip Zoom
Settings" for more information.
Reference Guide
Data transfer problems or drive operation is erratic.
3
Make sure that all cable connections are straight and fully seated.
Warranty
This product carries a one year limited warranty. For complete warranty
information, refer to the detailed warranty statement shipped with this product.
If you did not receive the warranty statement, call one of the support numbers
listed under "Contacting Iomega" inside the back cover of this guide.
15
Page 18

Page 19

Page 20

Iomega's Automated Help Systems
Internet Home Page: ........................................ http://www.iomega.com
™
America Online
.............................................. Keyword: Iomega
Microsoft Network .......................................... GoWord: Iomega
Automated E-Mail ............................................support@iomega.com
(Please type "Zip" in the subject header when sending your E-Mail)
Iomega Bulletin Board ......................................1-801-778-5888
8,N,1; 9600 baud and above; ANSI (24 hrs - Download only)
Iomega Pacific Pte Ltd
111-B Telok Ayer St.
Singapore 068580
Tel : 65-2227 225
Fax : 65-2227 119
© 1997 Iomega Corporation. Iomega and the Iomega logo are registered trademarks of, and Zip and the
graphic swirl, hand, and eye are trademarks of, Iomega Corporation. All other product and brand names are the
property of their respective companies.
EN181102
 Loading...