

Page 1

Natural-Fit Handrims
Assembly and Installation Instructions
Part Numbers: 1145545, 1145546, 1145547, 1145548, 1145549,
1145550, 1145551, 1145552, 1145553, 1145554
NOTE: Check all parts for shipping damage. In case of shipping damage, DO NOT use. Contact
Invacare for further instruction.
Safety Summary
To ensure the safe and proper installation of the handrims, these instructions MUST be
followed:
WARNING
DO NOT install this equipment without first reading and understanding this
instruction sheet. If you are unable to understand the warnings, cautions and
instructions, contact Invacare, before attempting to install this equipment otherwise, injury or damage may occur.
Invacare products are specifically designed and manufactured for use in conjunction
with Invacare accessories. Accessories designed by other manufacturers have not
been tested by Invacare and are not recommended for use with Invacare products.
INSTALLATION WARNING
This procedure MUST be performed by a qualified technician.
After any adjustments, repair or service and before use, make sure that all attaching
component parts are secure.
Proper installation is critical to the performance of the handrim.
Removing/Installing Handrims with Rivnuts
NOTE: For this procedure, refer to FIGURE 1 on page 2.
Tool Needed:
®
• Phillips
1. Remove the wheel from the wheelchair. Refer to the wheelchair owner’s manual.
2. Remove the mounting screws that secure the existing handrim to the wheel.
3. Place the Natural Fit handrim on a flat surface with the rivnuts facing up.
4. Place the thumb guard on top of the handrim.
NOTE: The thumb guard is installed on the outside of the wheelchair with wider edge making
contact with the wheel.
head screwdriver
®
5. Place the wheel on top of the thumb guard and handrim.
NOTE: The outside of the wheel should be facing down.
For more information regarding Invacare products, parts, and services,
please visit www.invacare.com
Part No. 1144492 1 Natural-Fit Handrims
Page 2
6. Insert the new mounting screws through the wheel and the new spacers.
7. Thread the mounting screw into the rivnuts on the handrim.
NOTE: DO NOT tighten the screws.
NOTE: Screws and spacers are provided. DO NOT use the old screws and spacers, you may
damage the thumb guard and void the warranty.
8. Center the handrim on the wheel.
NOTE: The thumb guard should not spin when pushed on and should be centered on the wheel. If
the thumb guard tilts to one side, loosen the mounting screws and readjust the thumb guard.
9. Secure the handrim to the wheel by tightening the screws.
10. Reinstall the wheel onto the wheelchair. Refer to wheelchair owner’s manual.
11. Repeat STEPS 1-10 for the other wheel.
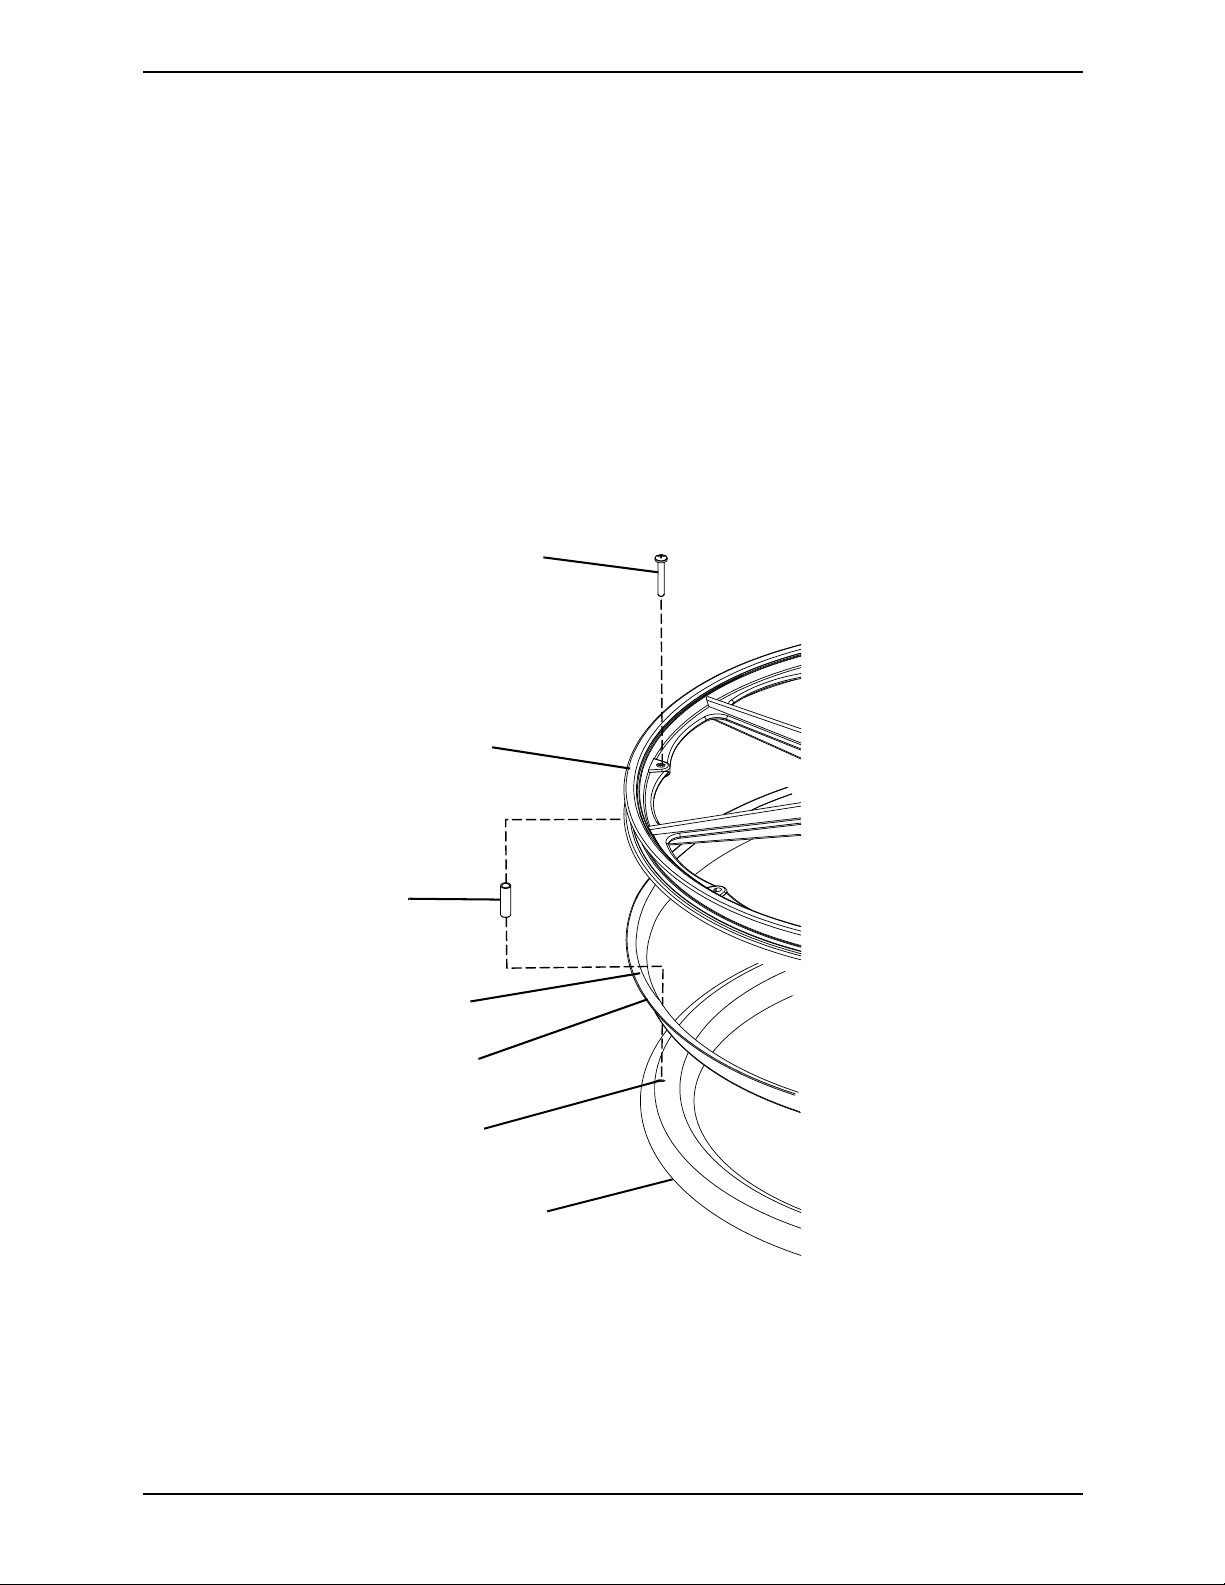
Mounting Screw
Wheel
Spacer
Wider Edge
Thumb Guard
Rivnut
Handrim
FIGURE 1 Removing/Installing Handrims with Rivnuts
®
Natural-Fit Handrims 2 Part No. 1144492
Page 3

Removing/Installing Handrims with Tabs
NOTE: For this procedure, refer to FIGURE 2 on page 4.
Tools Needed:
• Phillips head screwdriver
• 3/8” wrench
•Air pump
• Tire irons (tools to remove the tire) - if necessary
• Pliers - if necessary
1. Remove the wheel from the wheelchair. Refer to wheelchair owner’s manual.
2. Deflate and remove the tire from the wheel.
3. Using a Phillips screwdriver and a 3/8” wrench, remove the six mounting screws and
locknuts that secure the old handrim to the wheel. Discard the old handrim.
4. Inspect the tabs on the handrim of the Natural-Fit for proper placement inside the
wheel.
NOTE: It is important to evenly bend the tabs so the oval handrim will mount symmetrically to
the wheel.
5. Place the handrim on a flat surface with the tabs facing up.
6. Place the thumb guard around the tabs and on top of the handrim.
NOTE: The thumb guard is installed on the outside of the wheelchair with wider edge making
contact with the wheel.
7. Place the wheel on top of the thumb guard and handrim.
NOTE: Make sure the holes on the tabs match up with the holes on the wheel.
NOTE: The outside of the wheel should be facing down.
8. Secure the wheel to the handrim and thumb guard with the six mounting screws and
locknuts (Detail “A” of FIGURE 2).
NOTE: DO NOT tighten the locknuts.
9. Position hook and loop straps at opposite ends of the wheel (Detail “B” of FIGURE 2).
10. Tighten the assembly together by securing the two hook and loop straps.
NOTE: The thumb guard should not spin when pushed on and should be centered on the wheel. If
the thumb guard tilts to one side, loosen the straps and readjust the thumb guard.
11. Secure the handrim by tightening the six locknuts.
12. Remove the hook and loop straps.
13. Reinstall the tire and inflate to the correct pressure.
14. Reinstall the wheel on the wheelchair. Refer to the wheelchair owner’s manual.
15. Repeat STEPS 1-14 for the other wheel.
Part No. 1144492 3 Natural-Fit Handrims
Page 4

Wheel
Thumb Guard
Handrim
Tabs
DETAIL “A” - ATTACHING THE HANDRIM
Locknut
Screw
Tab
DETAIL “B” - SECURING THE HANDRIM
Hook and
Loop Strap
Wheel
Handrim
Hook and
Loop Strap
FIGURE 2 Removing/Installing Handrims with Tabs
Natural-Fit Handrims 4 Part No. 1144492
Page 5

NOTES
Part No. 1144492 5 Natural-Fit Handrims
Page 6

NOTES
Natural-Fit Handrims 6 Part No. 1144492
Page 7

LIMITED WARRANTY
PLEASE NOTE: THE WARRANTY BELOW HAS BEEN DRAFTED TO COMPLY WITH
FEDERAL LAW APPLICABLE TO PRODUCTS MANUFACTURED AFTER JULY 4, 1975.
This warranty is extended only to the original purchaser/user of our products.
This warranty gives you specific legal rights and you may also have other legal rights which vary
from state to state.
Invacare warrants its product to be free from defects in materials and workmanship for the period
of one year of use by original purchaser. If within such warranty period any such product shall be
proven to be defective, such product shall be repaired or replaced, at Invacare's option. This
warranty does not include any labor or shipping charges incurred in replacement part installation
or repair of any such product. Invacare's sole obligation and your exclusive remedy under this
warranty shall be limited to such repair and/or replacement.
For warranty service, please contact the dealer from whom you purchased your Invacare product.
In the event you do not receive satisfactory warranty service, please write directly to Invacare at
the address on the back cover. Provide dealer's name, address, model number, and the date of
purchase, indicate nature of the defect and, if the product is serialized, indicate the serial number.
Invacare Corporation will issue a return authorization. The defective unit or parts must be
returned for warranty inspection using the serial number, when applicable, as identification within
thirty days of return authorization date. DO NOT return products to our factory without our
prior consent. C.O.D. shipments will be refused; please prepay shipping charges.
LIMITATIONS AND EXCLUSIONS: THE FOREGOING WARRANTY SHALL NOT APPLY TO
SERIAL NUMBERED PRODUCTS IF THE SERIAL NUMBER HAS BEEN REMOVED OR
DEFACED, PRODUCTS SUBJECT TO NEGLIGENCE, ACCIDENT, IMPROPER OPERATION,
MAINTENANCE OR STORAGE, COMMERCIAL OR INSTITUTIONAL USE, PRODUCTS
MODIFIED WITHOUT INVACARE'S EXPRESS WRITTEN CONSENT INCLUDING, BUT NOT
LIMITED TO, MODIFICATION THROUGH THE USE OF UNAUTHORIZED PARTS OR
ATTACHMENTS; PRODUCTS DAMAGED BY REASON OF REPAIRS MADE TO ANY
COMPONENT WITHOUT THE SPECIFIC CONSENT OF INVACARE, OR TO A PRODUCT
DAMAGED BY CIRCUMSTANCES BEYOND INVACARE'S CONTROL, AND SUCH
EVALUATION WILL BE SOLELY DETERMINED BY INVACARE. THE WARRANTY SHALL
NOT APPLY TO PROBLEMS ARISING FROM NORMAL WEAR OR FAILURE TO ADHERE TO
THESE INSTRUCTIONS.
THE FOREGOING EXPRESS WARRANTY IS EXCLUSIVE AND IN LIEU OF ANY OTHER
WARRANTIES WHATSOEVER, WHETHER EXPRESS OR IMPLIED, INCLUDING THE
IMPLIED WARRANTIES OF MERCHANTABILITY AND FITNESS FOR A PARTICULAR
PURPOSE, AND THE SOLE REMEDY FOR VIOLATIONS OF ANY WARRANTY
WHATSOEVER, SHALL BE LIMITED TO REPAIR OR REPLACEMENT OF THE DEFECTIVE
PRODUCT PURSUANT TO THE TERMS CONTAINED HEREIN, THE APPLICATION OF ANY
IMPLIED WARRANTY WHATSOEVER SHALL NOT EXTEND BEYOND THE DURATION OF
THE EXPRESS WARRANTY PROVIDED HEREIN. INVACARE SHALL NOT BE LIABLE FOR
ANY CONSEQUENTIAL OR INCIDENTAL DAMAGES WHATSOEVER.
THIS WARRANTY SHALL BE EXTENDED TO COMPLY WITH STATE/PROVINCIAL LAWS
AND REQUIREMENTS.
Part No. 1144492 7 Natural-Fit Handrims
Page 8

Invacare Corporation
USA
One Invacare Way
Elyria, Ohio USA
44036-2125
800-333-6900
www.invacare.com
Invacare, Yes, you can. and the Medallion
Design are registered trademarks of
Invacare Corporation.
Phillips is a registered trademark of The
Phillips Screw Co.
Rivnut is a registered trademark of
Bollhoff.
©2006 Invacare Corporation
Part No. 1144492
Rev A - 8/16/06
 Loading...