

Page 1

P/N 1073352-Multilingual • REV A • ISS 07AUG17
TruVision DVR 45HD Quick
Start Guide
EN
TruVision DVR 45HD Quick Start Guide
DE
TruVision DVR 45HD Schnellstartanleitung
ES
Guía de inicio rápido de TruVision DVR 45HD
FI
TVR 45HD:n pikaopas
FR
Guide de démarrage rapide du TruVision DVR 45HD
IT
Guida di avvio rapido di TruVision DVR 45HD
NL
TruVision DVR 45HD Snel aan de slag-gids
PL
Instrukcja szybkiego uruchamiania rejestratora TruVision
DVR 45HD
PT
Guia Rápido do TruVision DVR 45HD
RU
Краткое руководство по началу работы с TruVision
DVR 45HD
TR
TruVision DVR 45HD Hızlı Başlangıç Kılavuzu
Page 2

Copyright
© 2017 United Technologies Corporation.
Interlogix is part of UTC Climate, Controls & Security, a unit of United
Technologies Corporation. All rights reserved.
Trademarks and
patents
Trade names used in this document may be trademarks or registered trademarks
of the manufacturers or vendors of the respective products.
Contact
information
www.interlogix.com or www.utcfssecurityproducts.eu
Page 3
TruVision DVR 45HD Quick Start Guide 1 EN
EN
TruVision DVR 45HD Quick Start
Guide
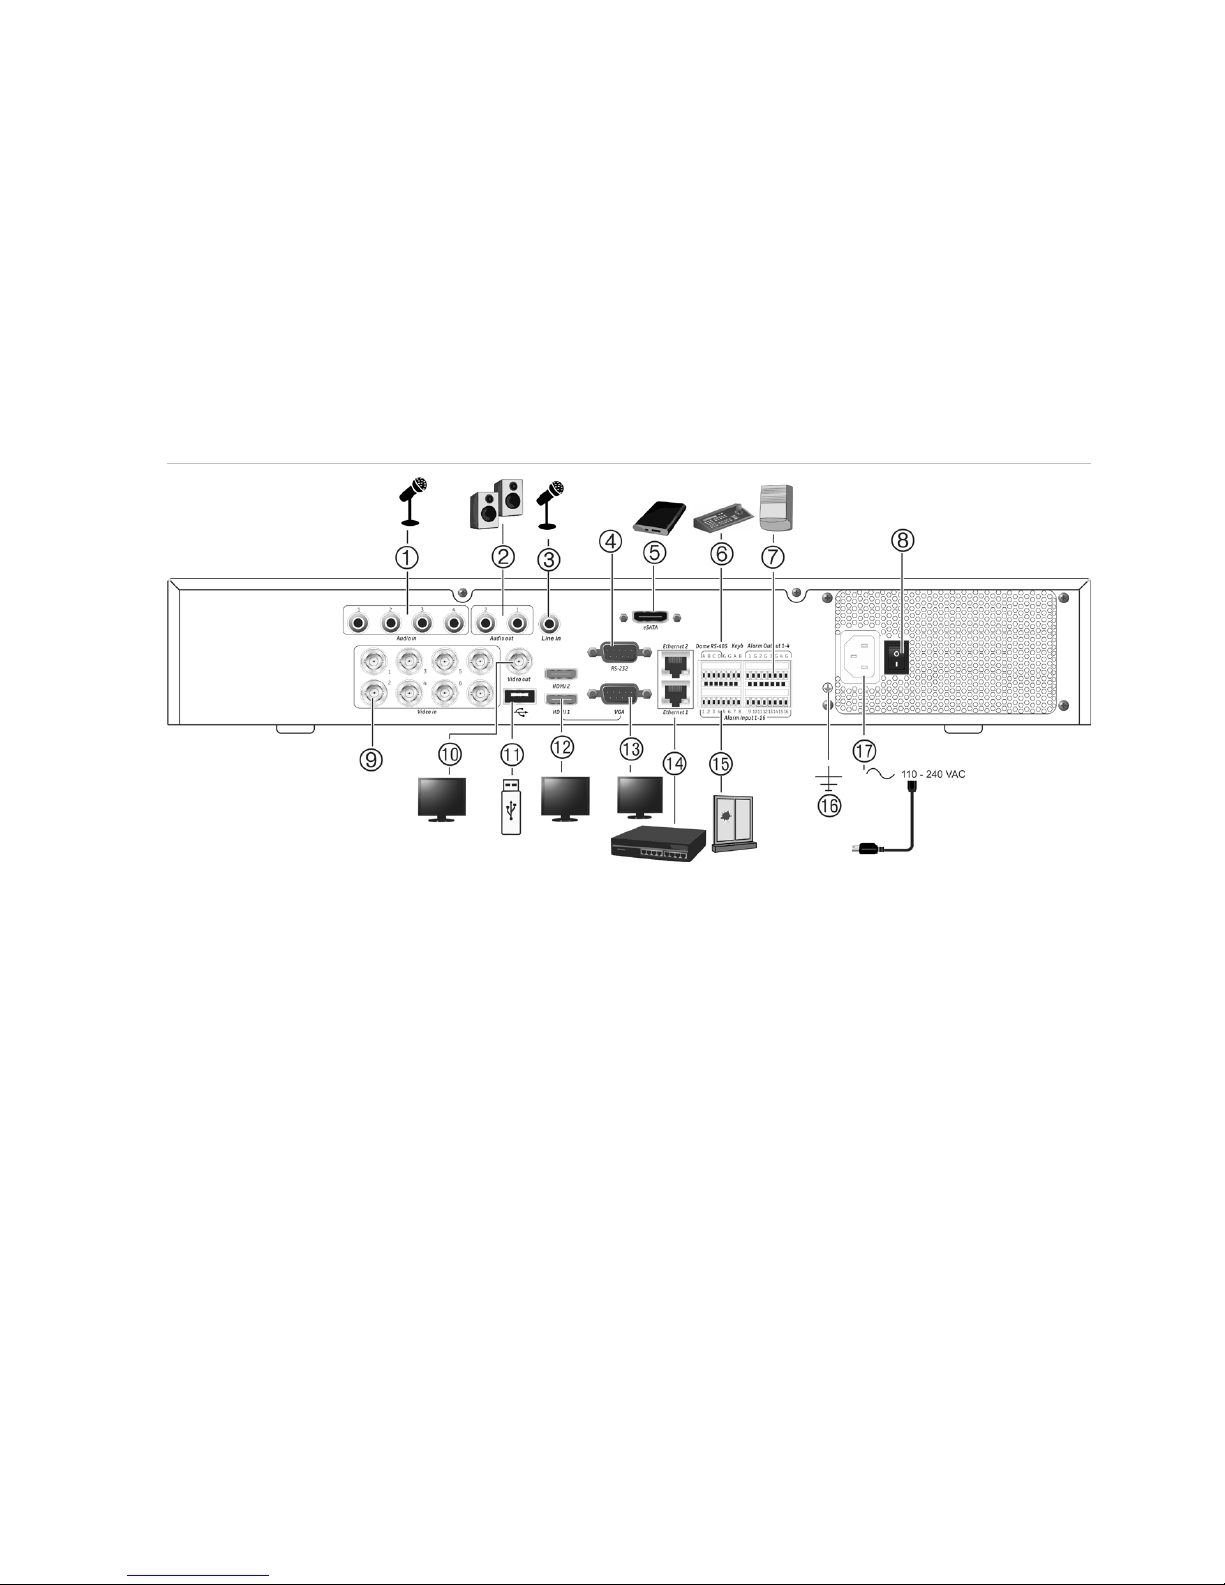
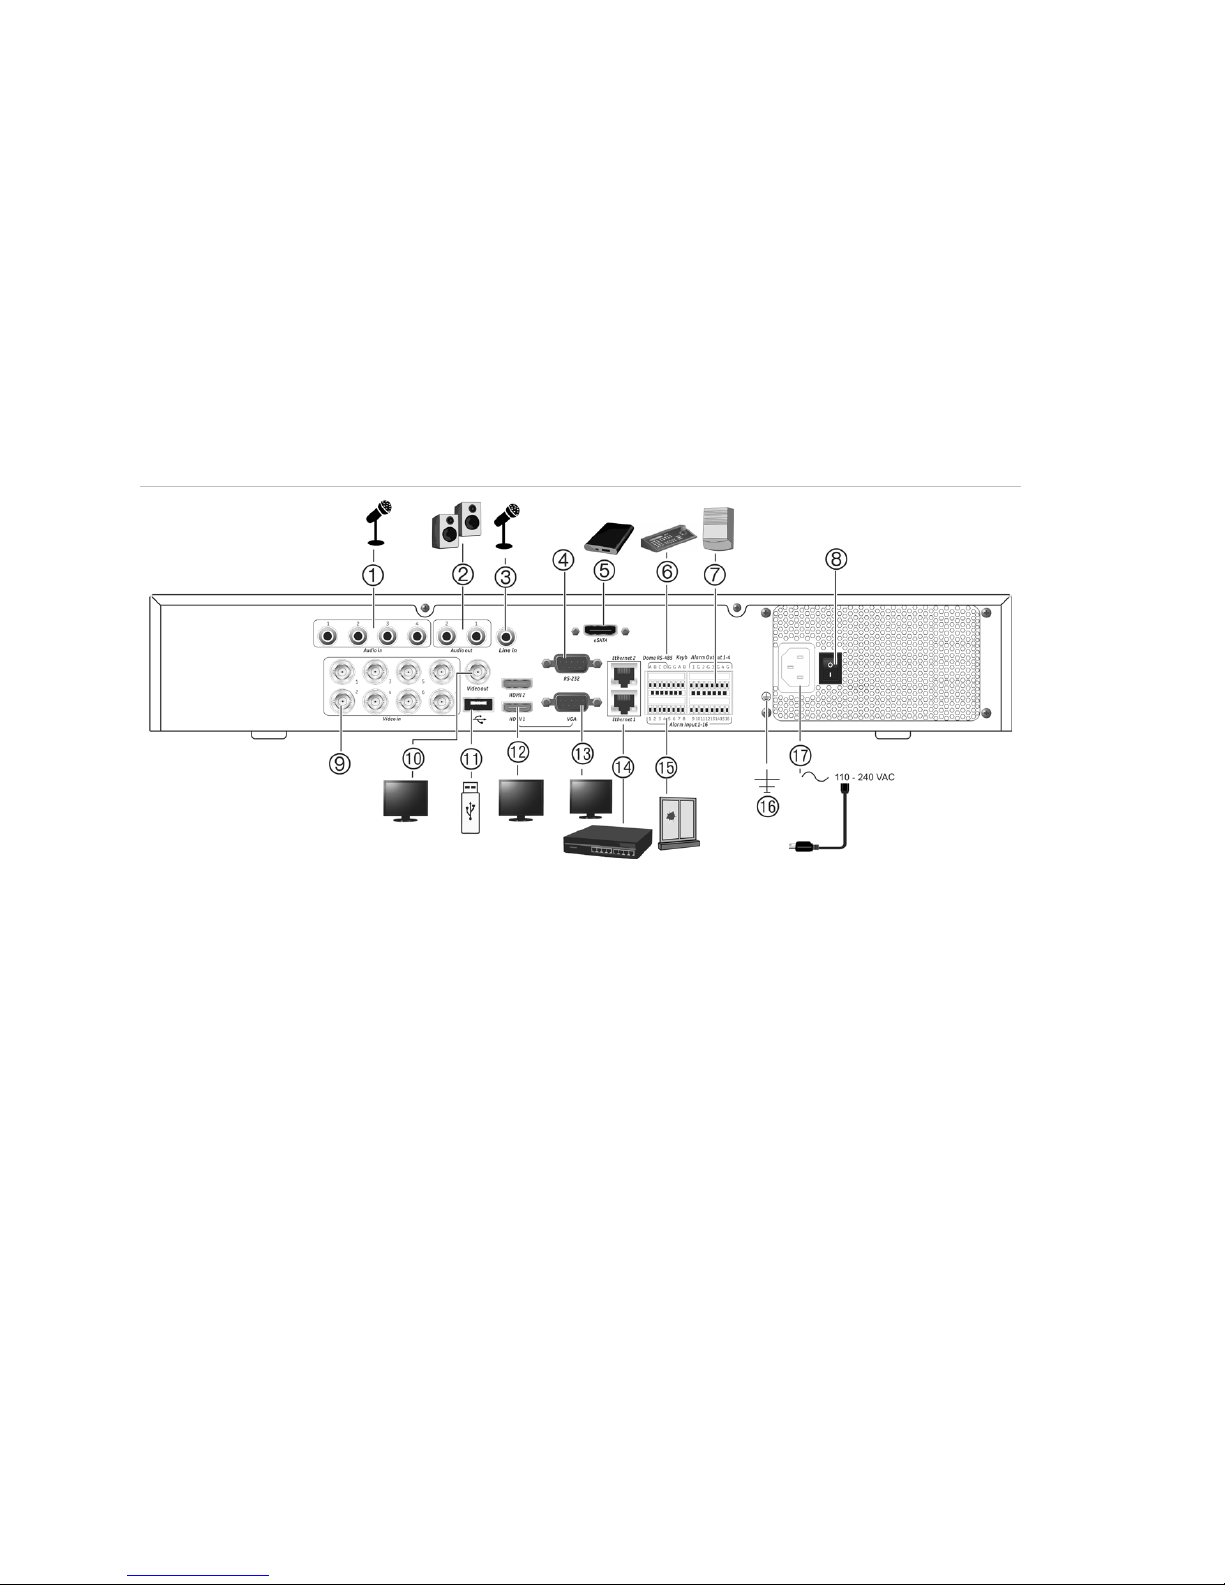
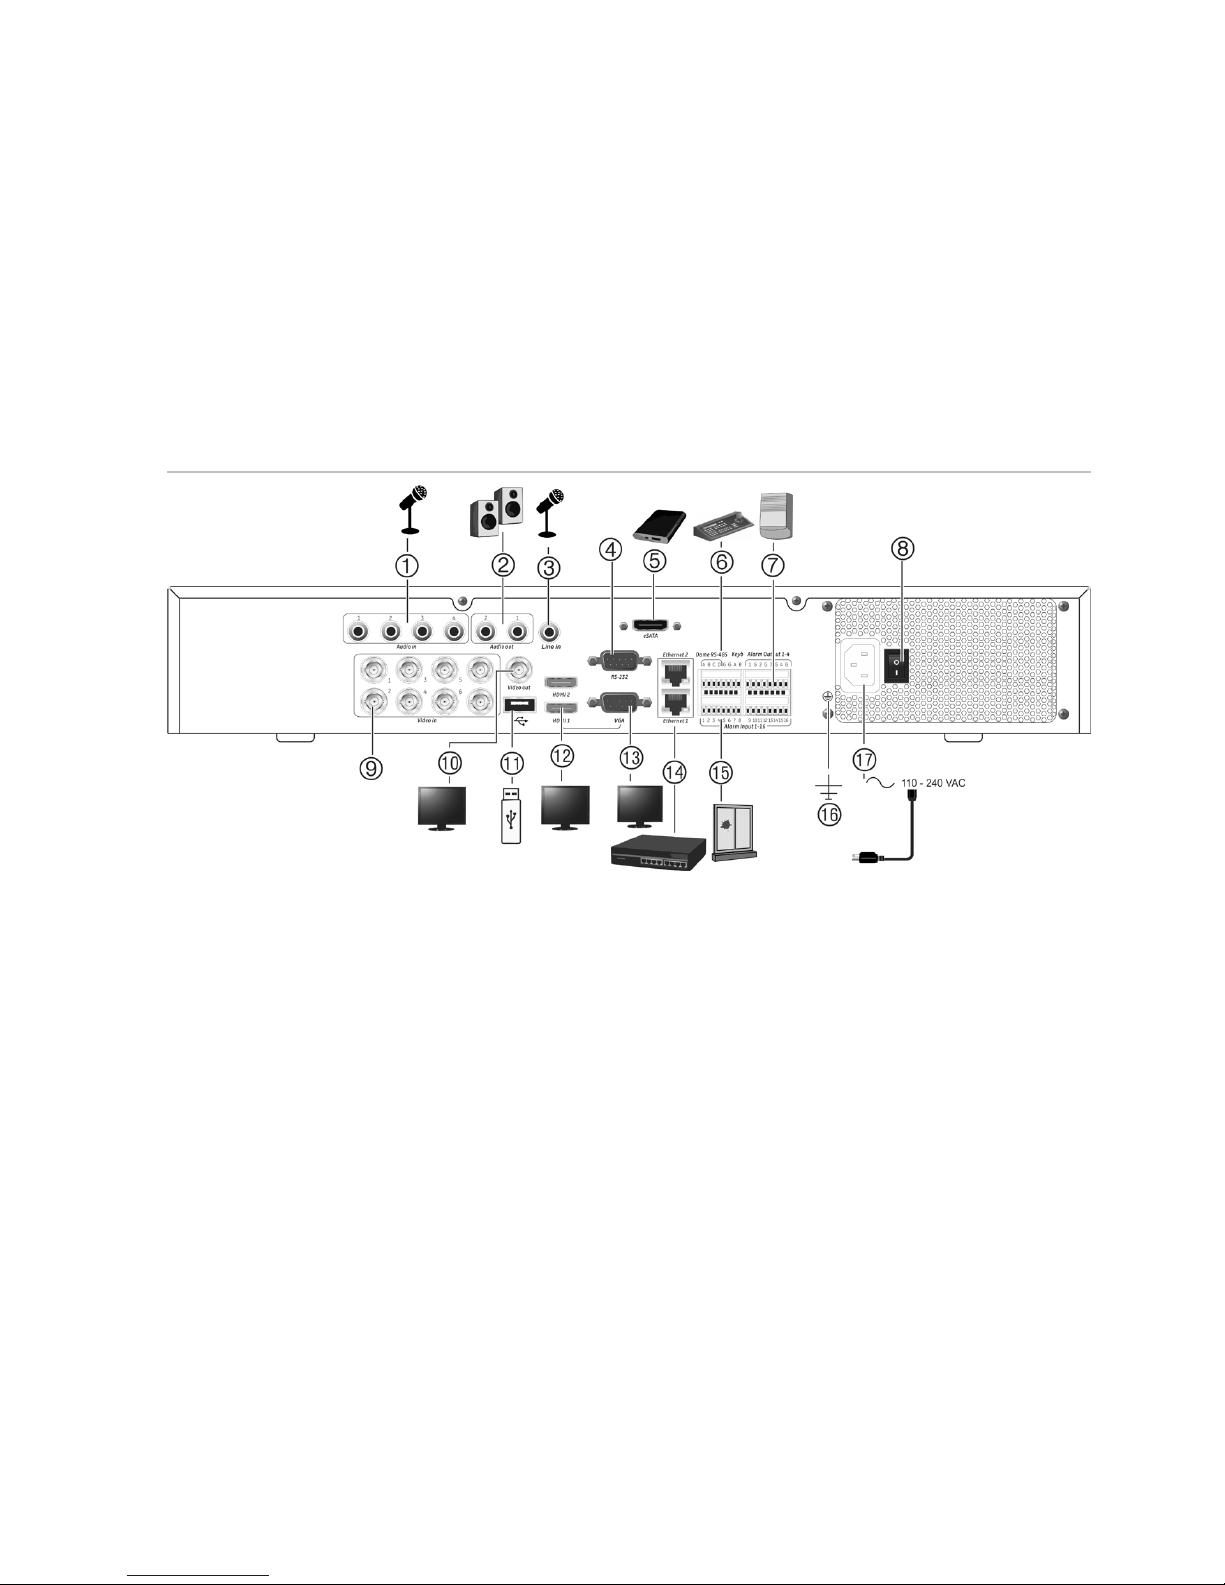
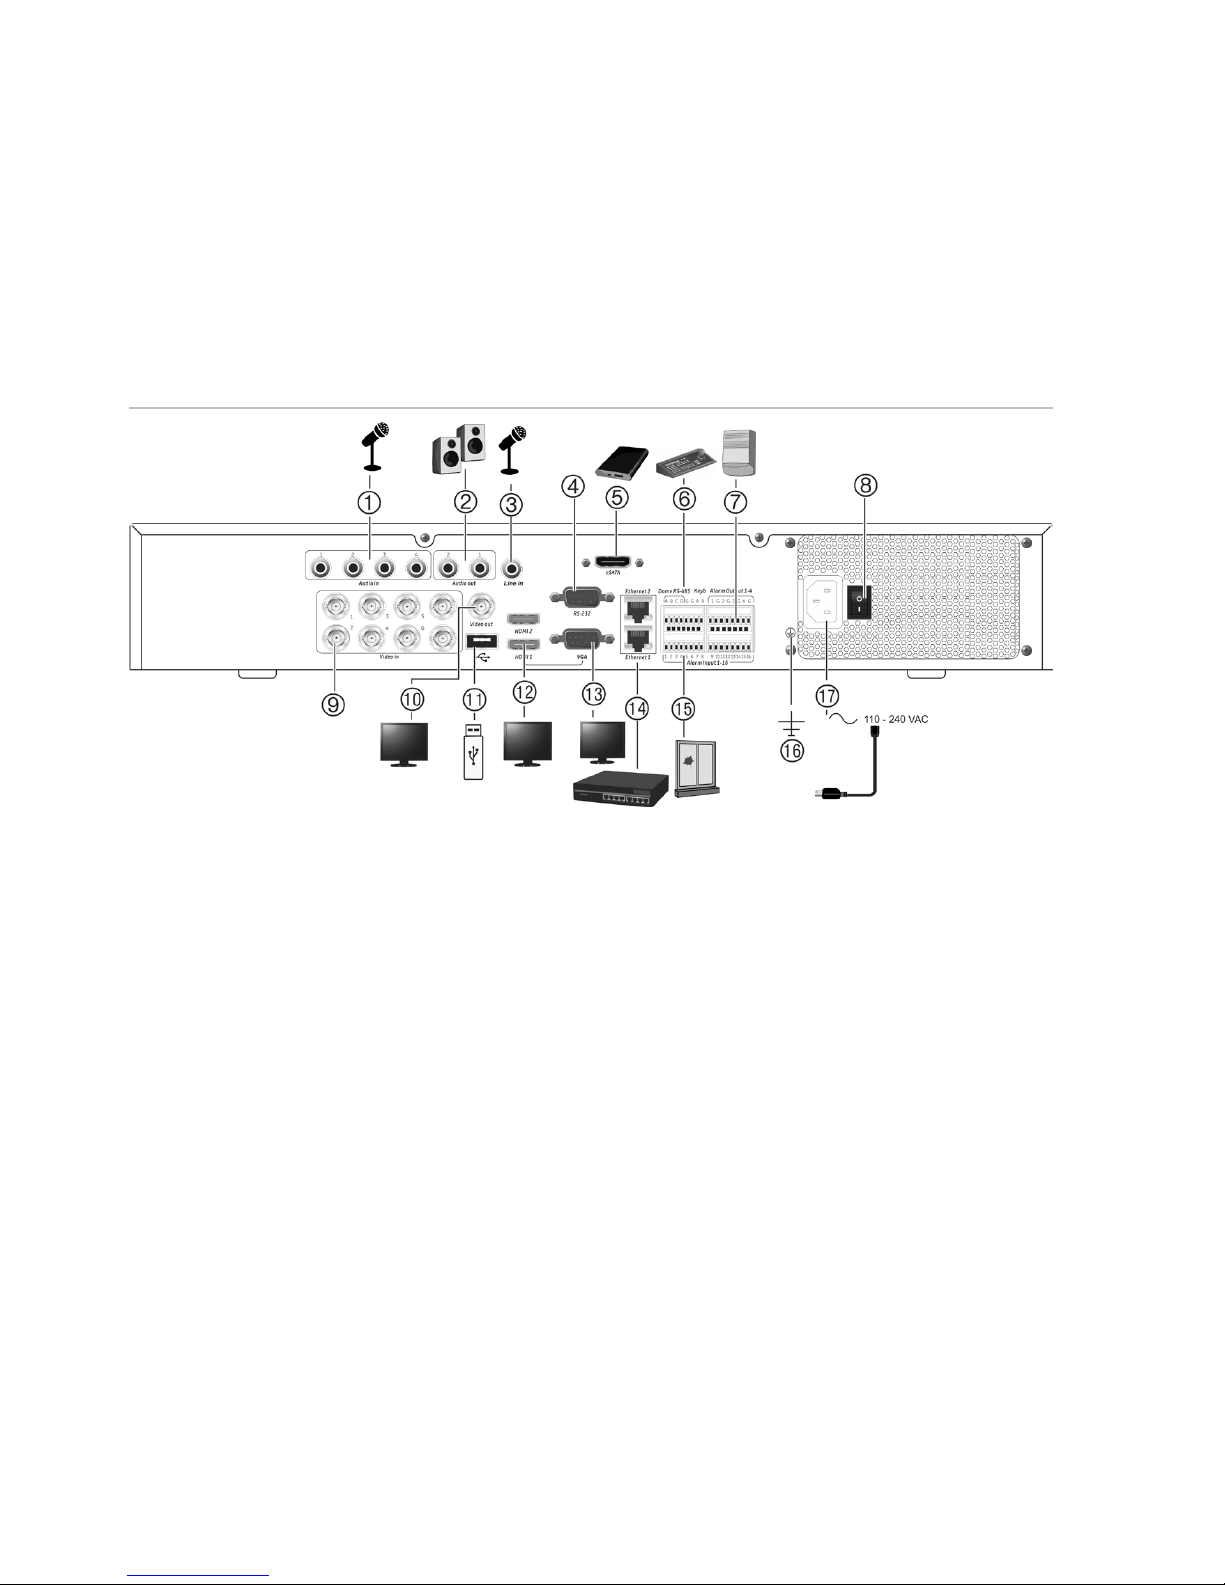
Figure
1: Back panel connections (8-channel model shown)
1. Connect four audio inputs to RCA connectors.
2. Connect to speakers for audio output.
3. Line In.
4. Connect to a RS-232 device.
5. Connect eSATA.
6. Connect to a RS-485 device such as a PTZ
camera or a keypad.
7. Connect up to four alarm outputs.
8. Power switch (on/off).
9. Connect up to 8 analog cameras to BNC-type
connectors (depends on the recorder model).
10. Connect to a BNC monitor (event monitor only).
11. Connect to an optional USB device such as a
mouse, CD/DVD burner or HDD.
12. Connect to a HDTV. The HDMI connection
supports both digital audio and video.
13. Connect to a VGA monitor.
14. Connect to a network.
15. Connect up to 16 alarm inputs.
16. Connect to ground.
17. Connect a power cord to the recorder (included).
Default IP address: 192.168.1.82
Page 4
EN 2 TruVision DVR 45HD Quick Start Guide
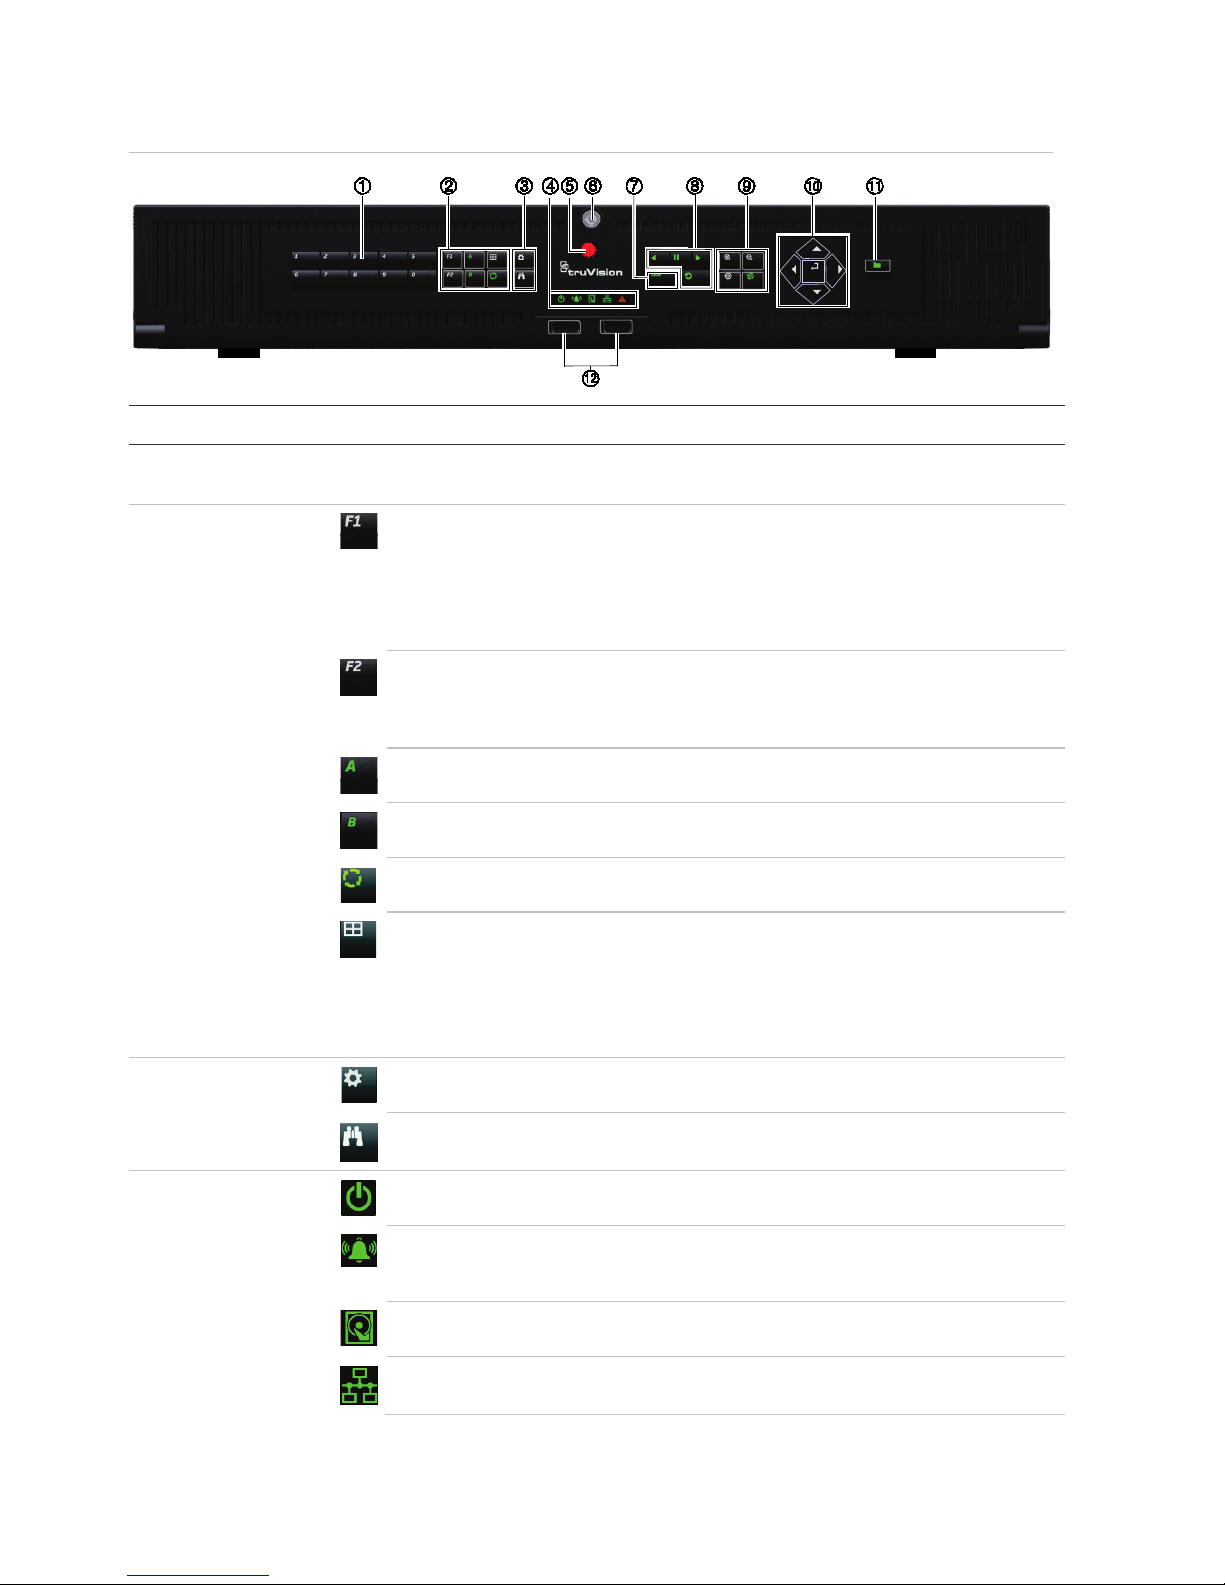
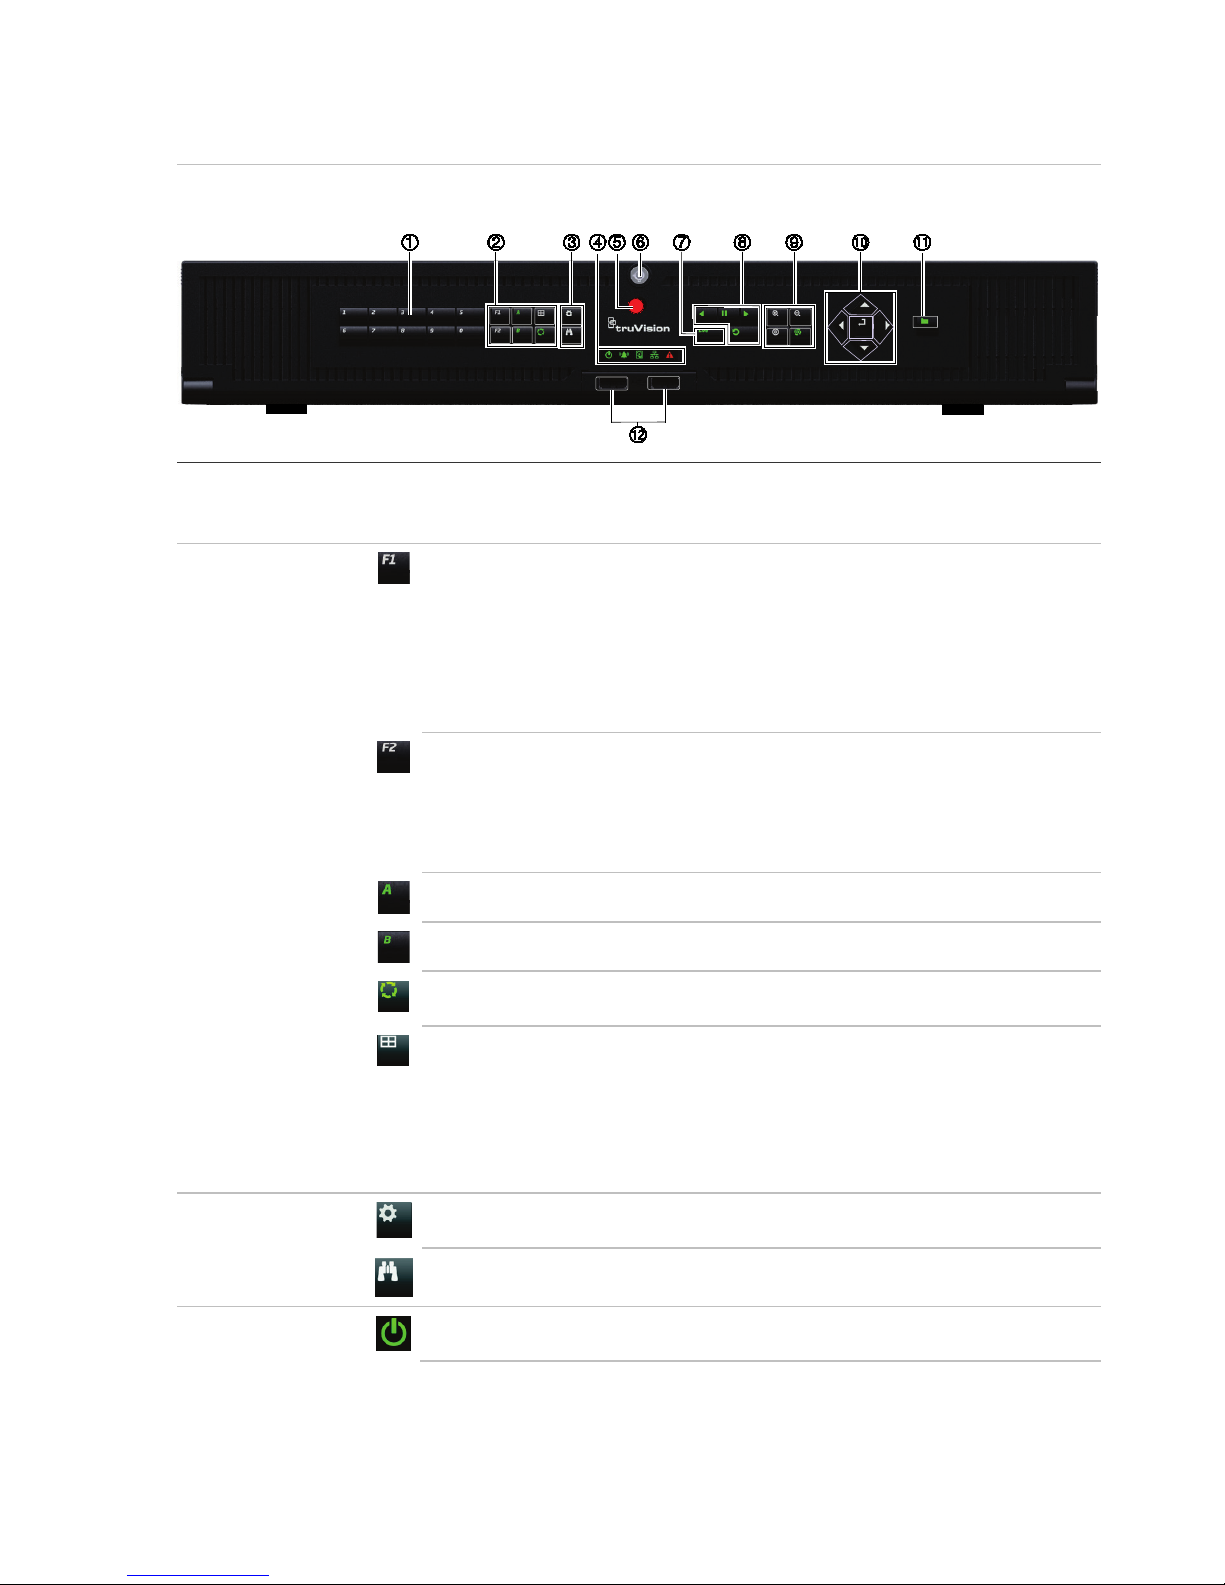
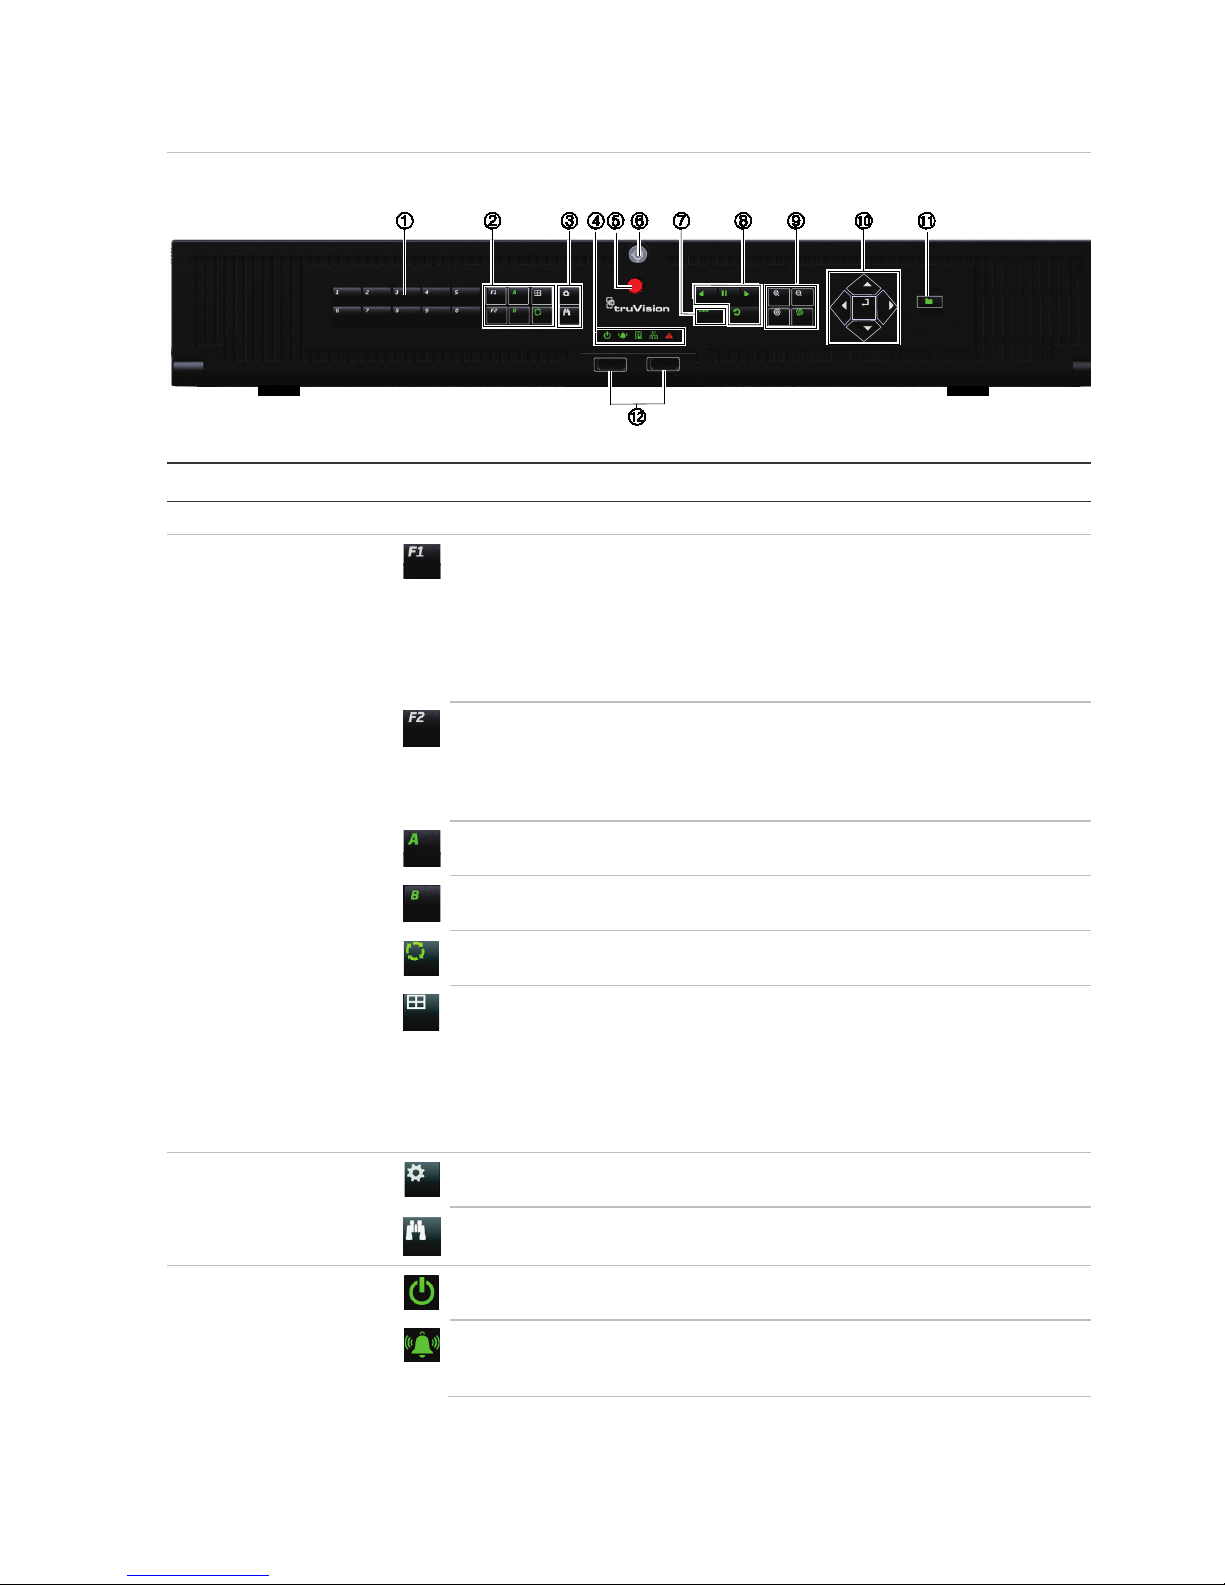
Figure
2: Front panel controls (8-channel model shown)
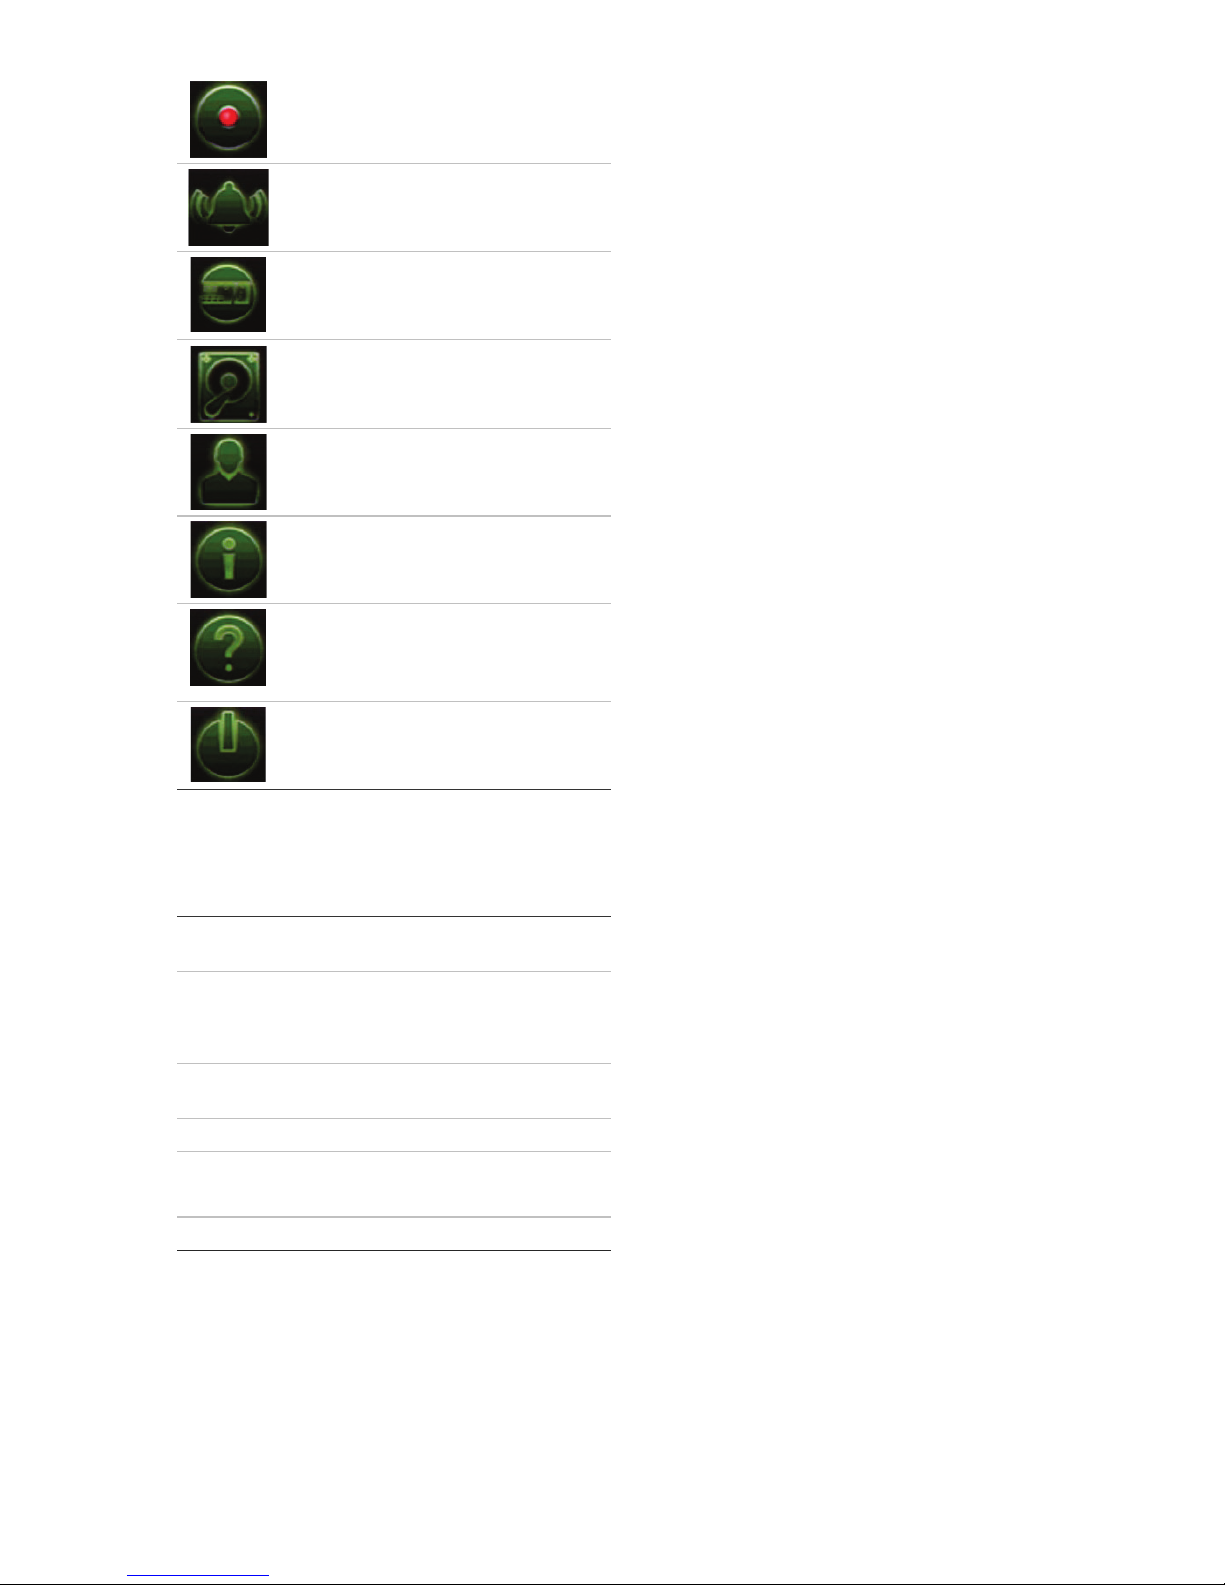
Name Description
1
. Channel buttons Switch between different cameras in live, PTZ control or playback modes.
Use the soft keyboard to enter numerals 0 to 9.
2
. Display buttons
F1: In playback mode, click to start and stop video clipping. For audio, press F1
and a numerical button to play the audio of the specified camera in live view.
In System Information mode, get the DDNS URL. In User Management mode,
pop up the Permission screen of a selected item in User Management > User >
User Management. Delete a selected item from USB flash drive. Exit the virtual
keypad.
F2: In live view mode, all-day playback, and playback modes press to display or
hide the time or control bar. In PTZ mode, stop all ongoing operations. Select or
deselect an item. Enter a selected folder of the external storage device, such as
a USB flash drive used for archiving.
A: In live view mode, select the main monitor.
B: In live view mode, select the event monitor.
Seq: In live view mode, start/stop sequencing cameras on the current monitor.
Display: In multiview mode, toggle through the various multiviews. For 8-ch
DVR: full, quad, 1+5, 1+7 and 9). For 16-ch DVR: full, quad, 1+5, 1+7, 4+4 and
9.
In HDD information mode and user management mode delete a selected item. In
PTZ mode, delete a selected key point. In Log Search mode, display the details
of a log file in Log Search result.
3
. Menu and
Search buttons
Menu: Enter/exit the main menu.
Search: In live view mode, enter the advanced search menu.
4
. Status LEDs
Power: A steady green light indicates the recorder is working correctly. Red
indicates a fault.
Event Alarm: A flashing red light indicates that there is a sensor Alarm In or
another alarm such as motion or tampering. No light indicates that there is no
alarm.
HDD: HDD indicator blinks red when data is being read from or written to the
HDD. A steady red light indicates an HDD exception or error.
Tx/Rx: Steady green indicates a normal network connection. No light indicates
that it is not connected to a network.
Page 5
TruVision DVR 45HD Quick Start Guide 3 EN
Name Description
Technical Alarm: A steady red light indicates that there is a technical alarm from
the recorder. No light indicates that there is no alarm.
5
. IR receiver Receiver for IR remote.
To connect the remote control to the recorder, press the Device button, enter the
device address, and press Enter.
6
. Front panel lock You can lock or unlock the front panel with a key. It provides access to the
HDDs.
7
. Live button Switch to live view mode.
8
. Playback buttons
Reverse: In live view mode, use to play back the earliest video. In playback
mode, playback a camera in the reverse direction.
Pause: In live view mode, freeze the last image of the live display for all active
cameras displayed. In playback mode, stop playback.
Play: In live view mode, play all day playback of the current camera (upper-left
video tile if in multiview mode). In playback mode, play back a camera in the
forward direction. In search mode, play back a selected video or view a
snapshot. In PTZ mode, do an auto tour.
Replay: In playback mode, start playing the current file. Starts at the
beginning of
the file.
9
. PTZ buttons
Zoom +/-: In live view mode, playback mode, and PTZ control mode use this
button to zoom in and out. Also use them to navigate within menus.
Preset: In PTZ control mode, press Preset and a numeric button to call the
specified preset.
Also use to edit holiday mode, video search mode, HDD selection mode, user
management mode, bookmark management, and bookmark search.
Tour: In PTZ control mode, press Tour and a numeric button to call the specified
shadow tour.
Also use to scroll between calendar months and to navigate in a text field.
10
. Direction
The DIRECTION buttons are used to navigate between different fields and items
in menus.
Enter button
The ENTER button is used to confirm selection in any of the menu modes.
11
. Archive button
Press once to enter quick archive mode. Press twice to start archiving. The
indicator blinks green when data is being written to a backup device.
12
. USB Interface There are two USB ports. Use the USB ports to archive video, upgrade firmware,
use a USB mouse or connect a USB CD/DVD burner.
Page 6

EN 4 TruVision DVR 45HD Quick Start Guide
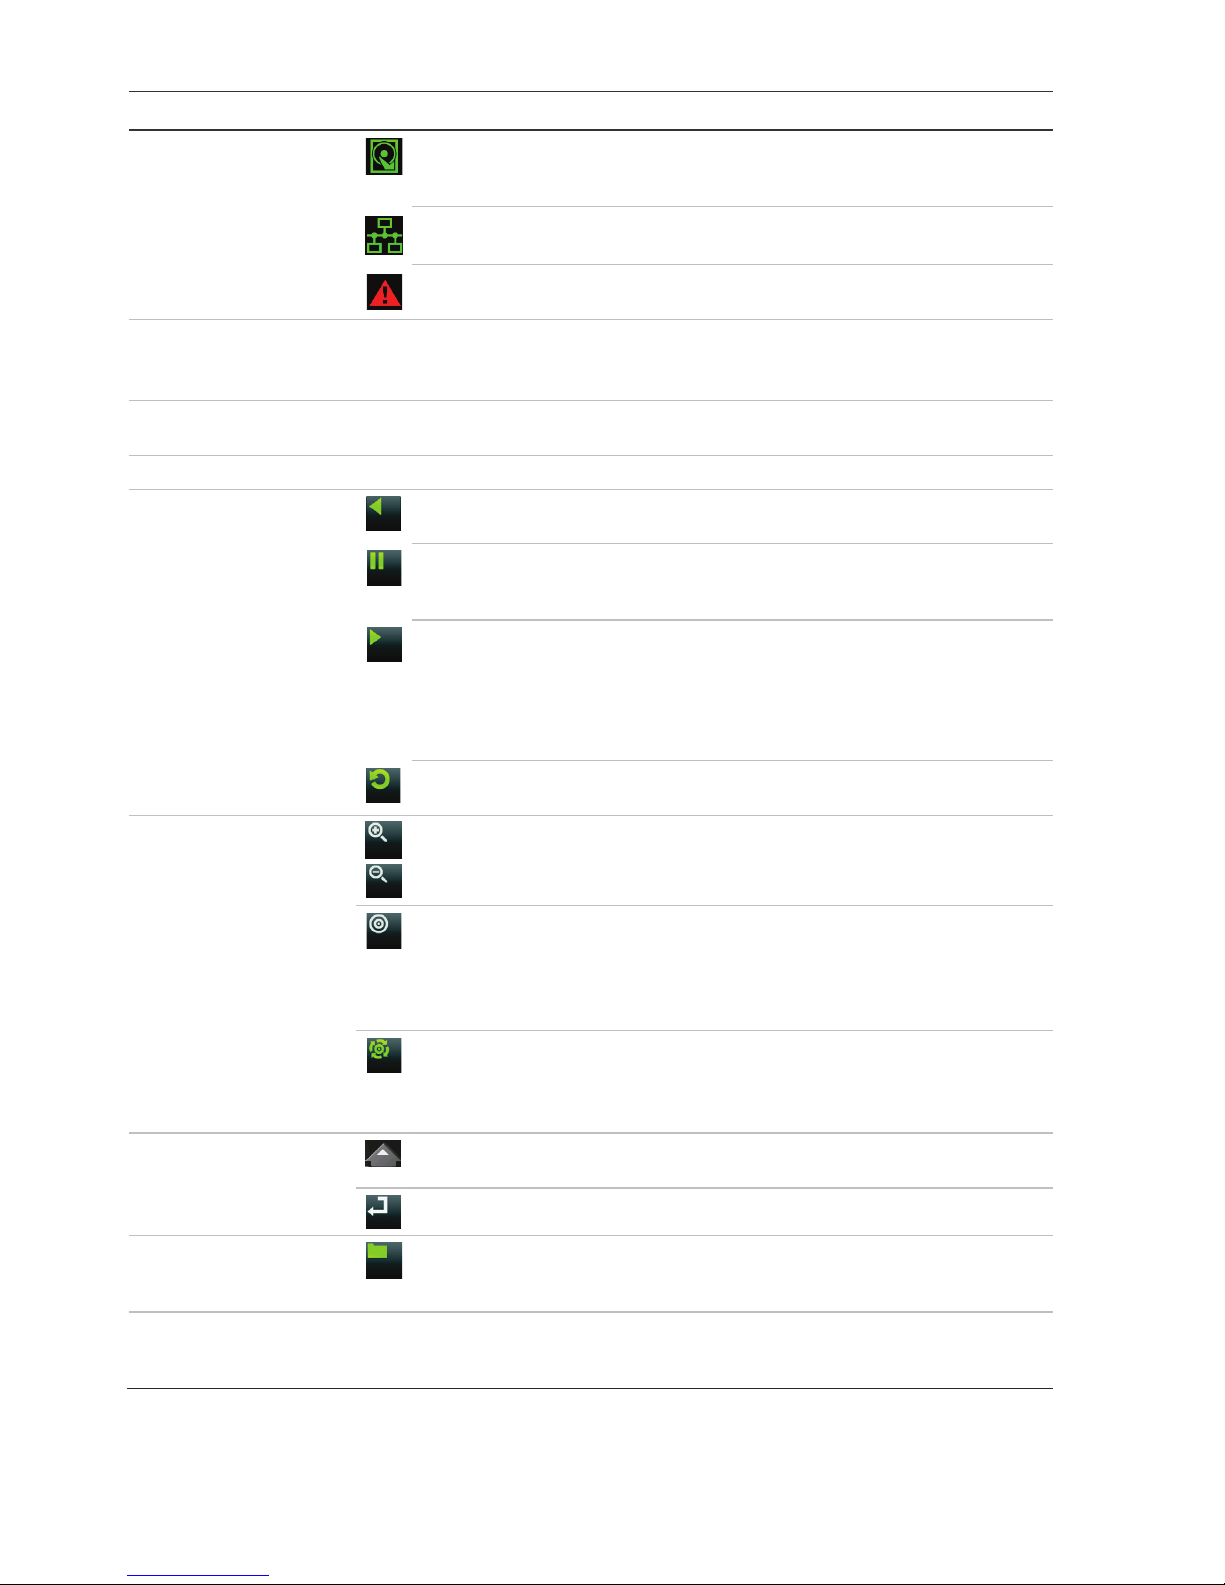
Figure
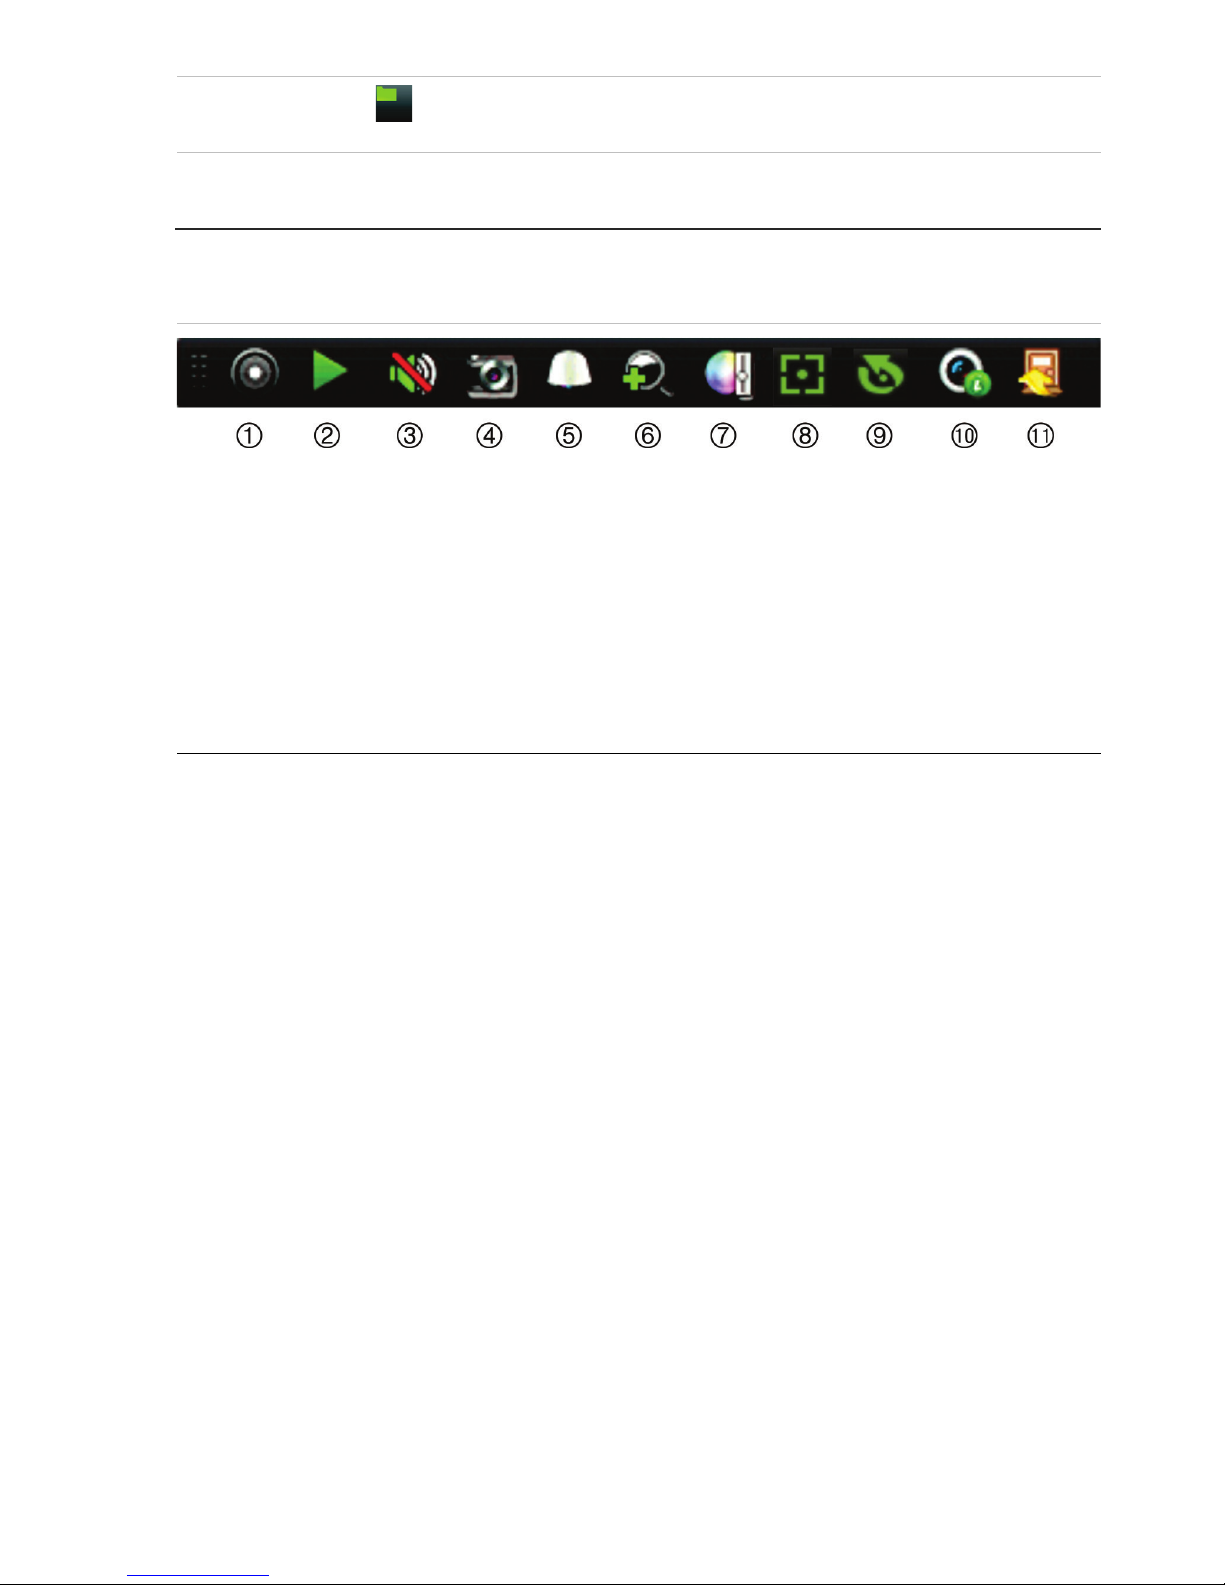
3: Quick access toolbar
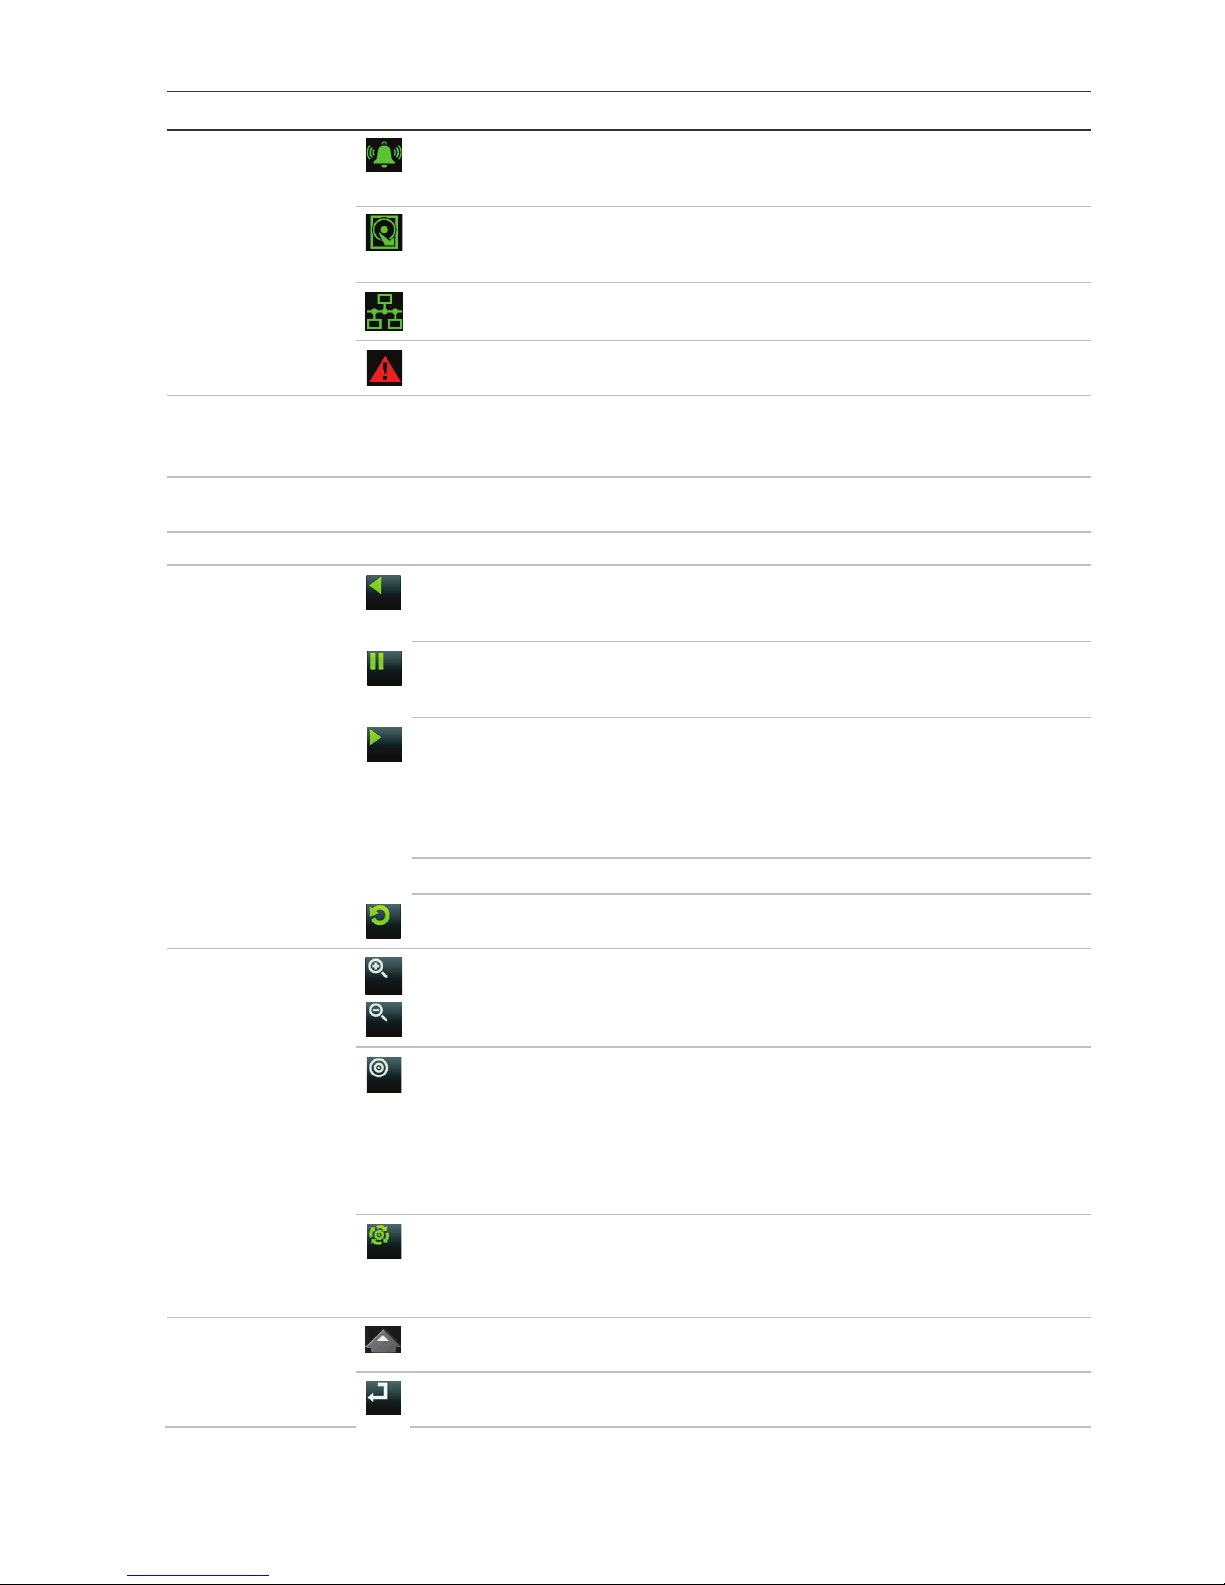
1. Start Manual Recording: Start/stop manual
recording.
2. Instant Playback: Play back the recorded
video from the last five minutes.
3. Audio On: Enable/disable audio output.
4. Snapshot: Capture a snapshot of a video
image.
5. PTZ Control: Enter PTZ control mode.
6. Digital Zoom: Enter digital zoom mode.
7. Image Settings: Modify the image lighting
levels.
8. Show Text: Display inserted text on screen.
9. Auxiliary Focus: Automatically focus the
camera lens
10. Lens Initialization: Initialize the lens of a
camera with a motorized lens
11. Close Toolbar: Close the toolbar.
Package contents
The TruVision DVR 45HD (model TVR 45HD)
is shipped with the following items:
• IR (infrared) remote control
• Two AAA batteries for the remote control
• AC power cords
• USB mouse
• Recorder
• CD with software and manuals
• TruVision DVR 45HD Quick Start Guide
• TruVision DVR 45HD User Manual (on
CD)
• TruVision Recorder Operator Guide (on
CD)
Installation environment
Refer to the user manual for detailed
information, but observe these important
requirements:
• Place the unit in a secure location.
• Ensure that the unit is in a well-ventilated
area.
• Do not expose the unit to rain or moisture.
Quick install
Recommended steps for setting up the
recorder:
1. Connect all the devices required to the
back panel of the recorder. See Figure 1
on page 1.
Basic connections:
Connect the cameras to the BNC camera
inputs and monitor A to a VGA or HDMI
output. Connect the mouse to the USB
port in the front panel.
Optional connections:
All the other connections shown are
optional and depend upon installation
requirements.
2. Connect the power cable and turn on the
power.
3. Set up the unit with the required settings
using the setup Wizard.
First-time use
The recorder has an express installation
wizard that lets you easily configure basic
recorder settings when first used. It
configures all cameras simultaneously. The
configuration can then be customized as
required.
Page 7

TruVision DVR 45HD Quick Start Guide 5 EN
By default, the setup wizard will start once the
recorder has loaded. The wizard walks you
through some of the more important settings
of your recorder. Select the preferred
language for the system and then set the
administrator password. There is no default
password provided.
The wizard will then guide you through the
menus to set the time and date, network
configuration, HDD management, and
recording configuration.
When all the required changes have been
entered, click Finish to exit the wizard. The
recorder is now ready to use. Recording
starts automatically.
Operating the recorder
There are several ways to control the unit:
• Front panel control
• IR remote control
• Mouse control
• Web browser control
• TVK-800 keypad
• Software (TruVision Navigator,
TVRmobile)
Front panel
The buttons on the front panel control most
functions. See Figure 2 on page 2 for the
locations of the controls.
IR remote control
The IR remote control buttons are similar to
those on the front panel. Place the two AAA
batteries in the remote control.
To connect the remote control to the
recorder:
1. Press Menu on the front panel or rightclick the mouse and select Menu. The
main menu screen appears.
2. Select Display Mode Settings >
Monitor.
3. Check the recorder’s device address
value. The default value is 255. The
device address is valid for all IR controls.
4. On the remote control press the Device
button.
5. Enter the device address value. It must
be the same as that on the recorder.
6. Press OK on the remote control.
USB mouse
The USB mouse provided with the recorder
operates all the functions of the recorder,
unlike the front panel, which has limited
functionality. The mouse lets you navigate
and make changes to settings in the user
interface.
Connect the mouse to the recorder by
plugging the mouse USB connector into the
USB port on the back or front panel. The
mouse is immediately operational and the
pointer should appear.
Web browser control
The recorder’s Web browser lets you view,
record, and play back videos as well as
manage all aspects of the recorder from any
PC with Internet access. The browser’s easyto-use controls give you quick access to all
recorder functions.
To access the unit, open a web browser and
enter the IP address assigned to the recorder
as a web address. In the logon screen, enter
the user ID and password.
The default values for recorder network
settings are:
• DHCP: Disabled by default.
• IP address: 192.168.1.82
• Subnet mask: 255.255.255.0
• Gateway address: 192.168.1.1
• Server Port: 8000
• HTTP Port: 80
• RTSP port: 554
Note: The following ports need to be
forwarded in the router in order to connect
properly: Server port and RTSP port.
Page 8
EN 6 TruVision DVR 45HD Quick Start Guide
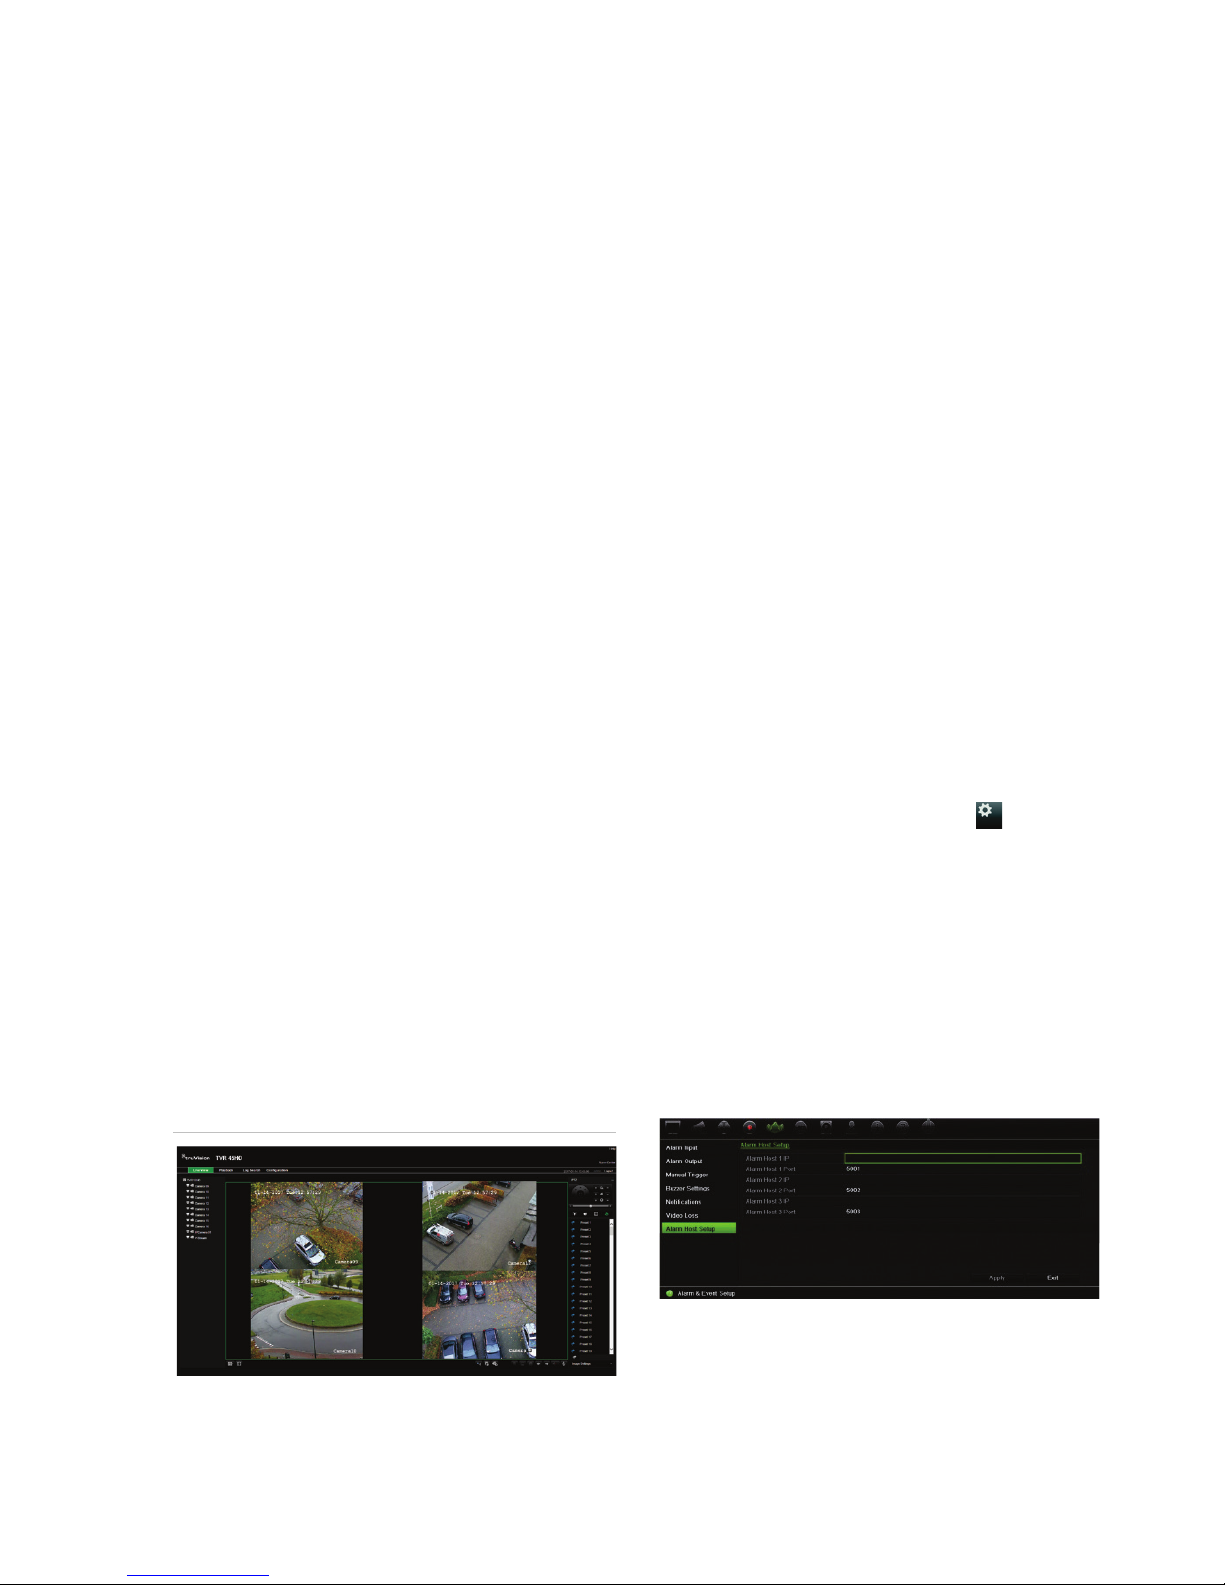
Figure 4: Web browser interface
Live view mode
Live mode is the normal operating mode of
the unit where you watch live pictures from
the cameras.
Regularly used functions in live view can be
quickly accessed by clicking the left-button of
the mouse when its cursor is on the camera
image. The live view toolbar appears. See
Figure 3 on page 4 for a description of the
functions available.
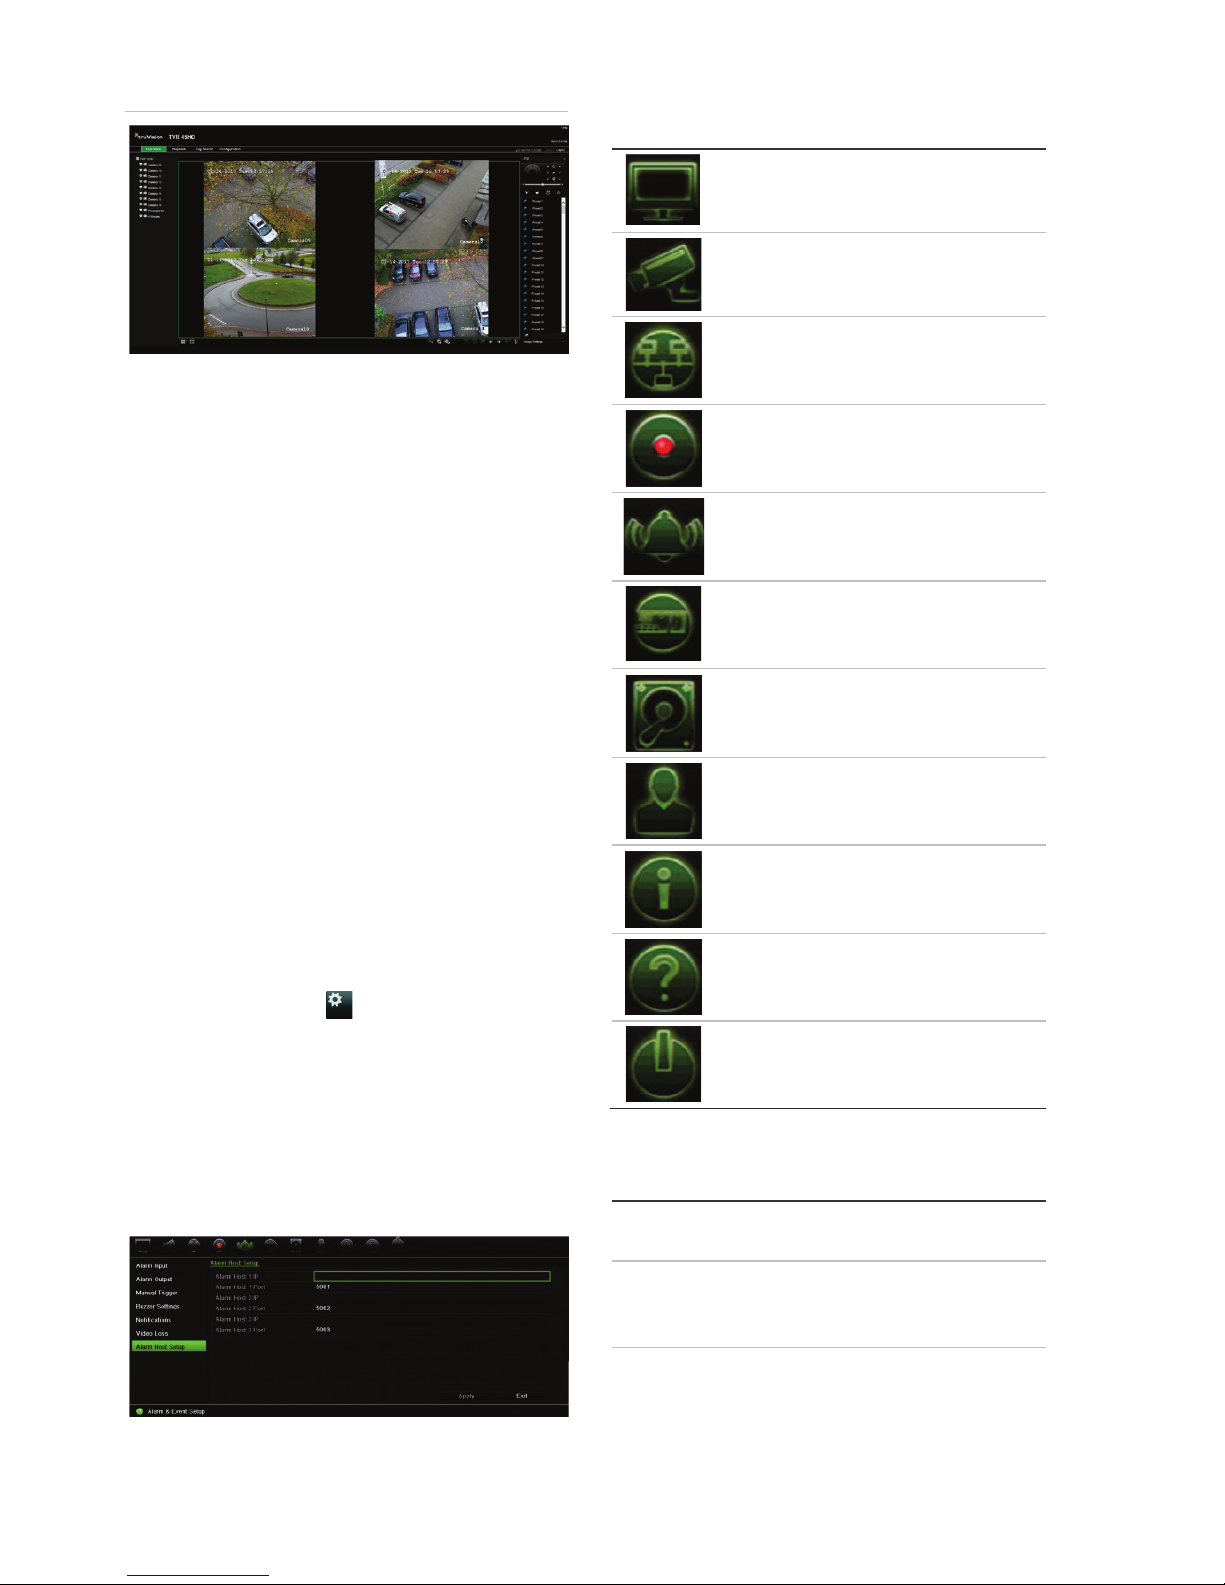
Configuring the recorder
The recorder has an icon-driven menu
structure that allows you to configure the
unit’s parameters. Each command icon
displays a screen that lets you edit a group of
settings. Most menus are available only to
system administrators.
Refer to the recorder user manual for detailed
information on configuring the unit.
To access the main menu from live view:
• Press the Menu button on the remote
control or front panel.
- Or -
• Right-click the mouse and select Menu
from the pop-up menu.
The main menu screen appears. Move the
mouse over a command icon in the menu
toolbar and click to select it.
Description of the command icons in the
menu toolbar:
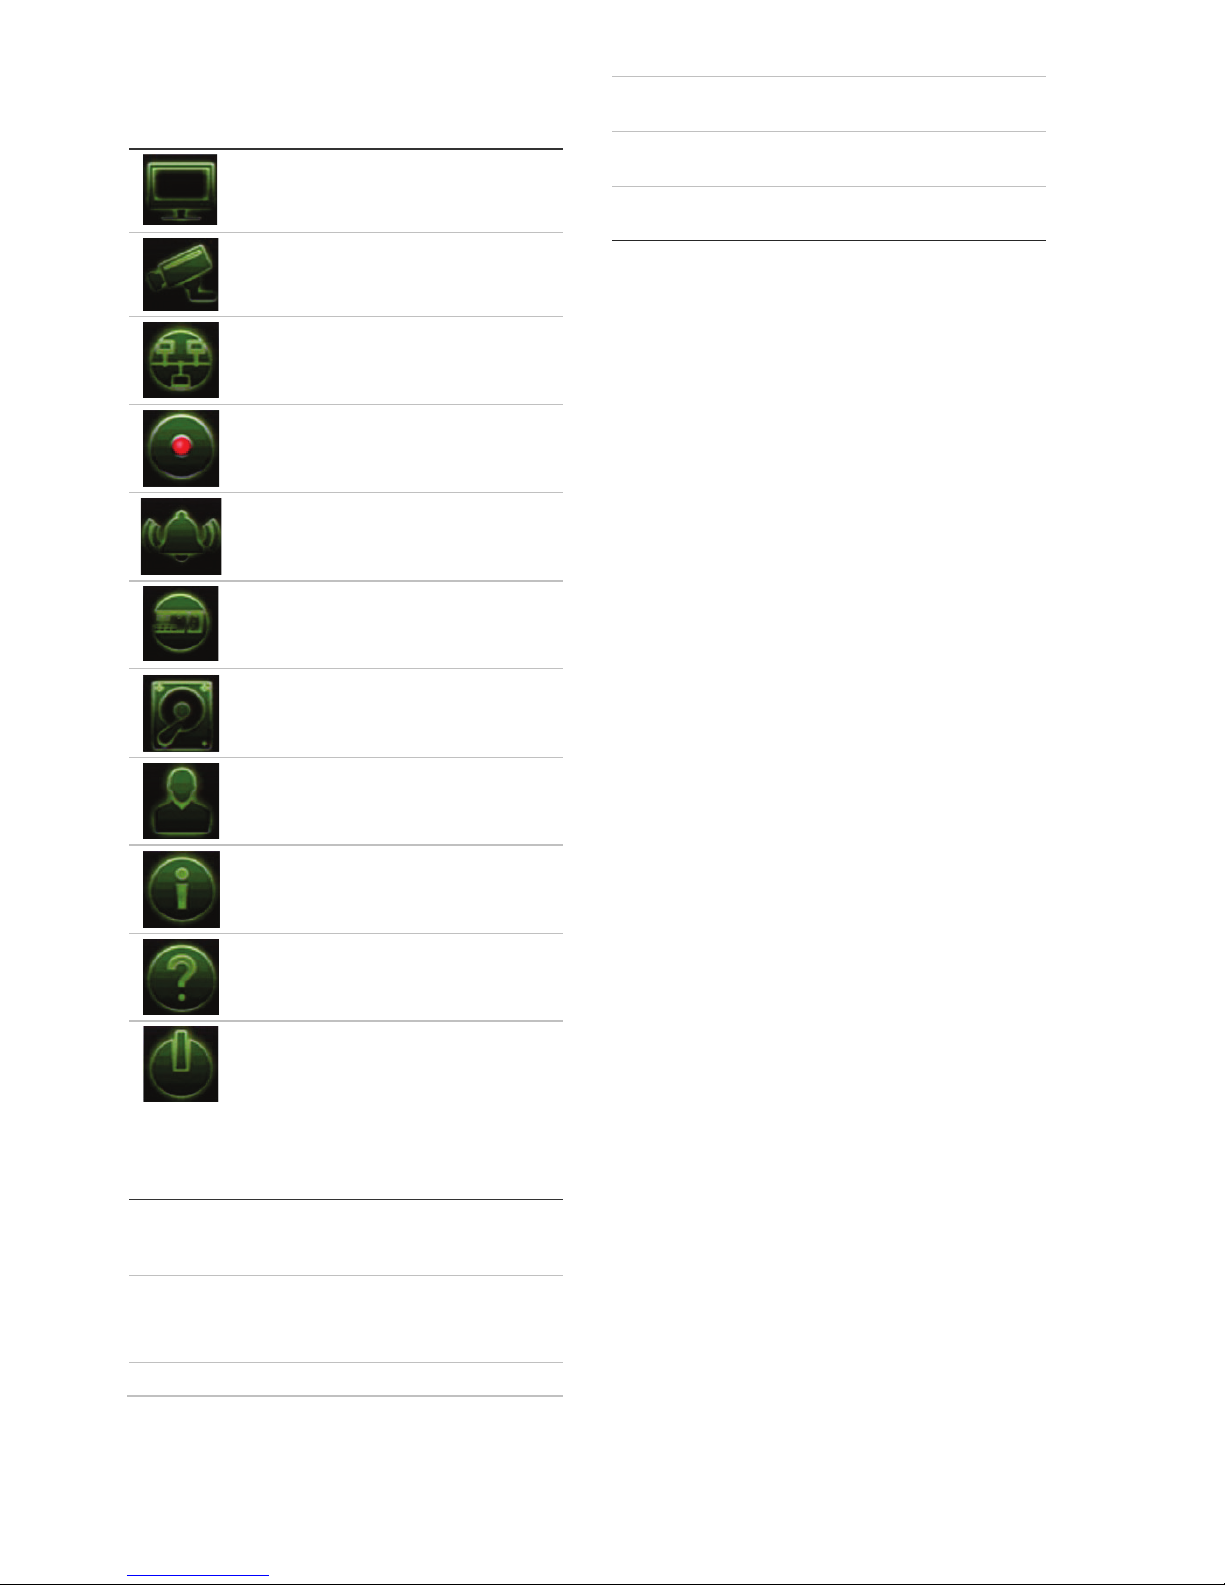
Configures display settings.
Configures analog and IP camera
settings.
Configures standard network
settings.
Configures recording settings.
Configures alarm and event settings.
Configures system settings.
Configures storage management.
Configures user settings.
View system information.
Provides reference information to the
various toolbars and menus within
the interface.
Provides access to logout, reboot
and shutdown options.
Specifications
Power supply
: 100 to 240 VAC,
6.3 A, 50 to 60 Hz
Power consumption (without HDD):
TVR 4508HD
TVR 4516HD
≤ 45 W
≤ 65 W
Operating temperature
: -10 to +55 ºC
(14 to 131 °F)
Page 9

TruVision DVR 45HD Quick Start Guide 7 EN
Relative humidity
: 10 to 90%
Dimensions (W x H x D): 445 × 390 × 70 mm
(17.5 × 15.3 × 2.7 in.)
Weight
(without HDD):
≤ 5.0 kg (11.02 lb.)
Page 10
DE 8 TruVision DVR 45HD Schnellstartanleitung
DE
TruVision DVR 45HD
Schnellstartanleitung
Abbildung 1: Anschlüsse an der Rückseite (Abbildung für 8-kanaliges Modell)
1. Anschluss von bis zu vier Audioeingängen
über Cinchstecker.
2. Lautsprecheranschluss für Audioausgang.
3. Line In.
4. Anschluss an ein RS-232-Gerät.
5. eSATA-Anschluss.
6. Anschluss an ein RS-485-Gerät, wie z. B. eine
PTZ-Kamera oder ein Bedienpult.
7. Anschluss von bis zu vier Alarmausgängen.
8. Netzschalter (Ein/Aus).
9. Anschluss von bis zu 8 Analog-/HD-TVI-
Kameras an BNC-Anschlüsse (abhängig vom
Rekorder-Modell).
10. Anschluss an einen BNC-Monitor (nur
Ereignismonitor).
11. Anschluss an ein optionales USB-Gerät, z. B.
Maus, CD/DVD-Brenner oder Festplatte.
12. Anschluss an einen HDTV. Die HDMIVerbindung unterstützt digitales Audio und
Video.
13. Anschluss an einen VGA-Monitor.
14. Anschluss an ein Netzwerk.
15. Anschluss für bis zu 16 Alarmeingänge.
16. Anschluss an die Erdung.
17. Anschluss eines Netzkabels zum Rekorder
(im Lieferumfang enthalten).
Standard-IP-Adresse: 192.168.1.82
Page 11
TruVision DVR 45HD Schnellstartanleitung 9 DE
Abbildung
2: Anschlüsse auf der Vorderseite des TVR 45HD (Abbildung für 8-kanaliges
Modell)
Detaillierte Informationen zu den Tastenkombi
nationen finden Sie im Benutzerhandbuch.
1
. Kanaltasten Schaltet in den Live-, PTZ-Steuerungs- und Wiedergabe-Modi zwischen
verschiedenen Kameras um.
Verwenden Sie zur Eingabe der Ziffern 0 bis 9 die Tasten.
2
. Display-Tasten
F1: Im Wiedergabemodus startet und stoppt das Mitschneiden von Videos. Bei
Audio drücken Sie F1 und eine Zifferntaste, um das Audio der angegebenen
Kamera in der Livebildanzeige wiederzugeben.
Im Systeminformationsmodus wird die DDNS URL abgerufen. Im
Benutzerverwaltungsmodus wird unter "Benutzerverwaltung" > "Benutzer" >
"Benutzerverwaltung" der Bildschirm für die Benutzerberechtigungen eines
ausgewählten Elements angezeigt. Löscht das ausgewählte Element vom USBFlash-Laufwerk. Verlässt die virtuelle Tastatur.
F2: Im Livebildanzeigemodus, im Modus für die ganztägige Wiedergabe und im
Wiedergabemodus wird durch Drücken dieser Taste die Zeit- oder
Steuerungsleiste ein- oder ausgeblendet. Im PTZ-Modus werden alle aktiven
Vorgänge angehalten. Auswählen oder Verwerfen eines Elements. Aufrufen des
ausgewählten Ordners auf dem externen Speichergerät, z. B. einem zur
Archivierung genutzten USB-Flash-Laufwerk.
A: Im Livebildanzeigemodus erfolgt die Auswahl des Hauptmonitors.
B: Im Livebildanzeigemodus erfolgt die Auswahl des Ereignismonitors.
Seq: Startet/stoppt im Livebildanzeigemodus die Sequenzierung von Kameras
auf dem aktuellen Bildschirm.
Display: Schaltet im Mehrfachanzeigemodus zwischen den verschiedenen
Mehrfachanzeigen um.Für 8-Kanal-DVR: Voll, Quad, 1+5, 1+7 und 3+3. Für 16Kanal-DVR: Voll, Quad, 1+5, 1+7, 3+3 und 4+4.
Löscht im Festplatteninformations- und im Benutzerverwaltungsmodus ein
ausgewähltes Element. Löscht im PTZ-Modus einen ausgewählten Keypoint.
Zeigt im Protokollsuchmodus die Details einer Protokolldatei als
Protokollsuchergebnis an.
3
. Tasten Menü
und Suchen
Menü: Das Hauptmenü aufrufen/beenden.
Suche: Geben Sie in der Livebildanzeige das erweiterte Suchmenü ein.
4
. Status-LEDs
Netz: Eine konstant leuchtende grüne LED zeigt an, dass der Rekorder
ordnungsgemäß funktioniert. Rot weist auf einen Fehler hin.
Page 12

DE 10 TruVision DVR 45HD Schnellstartanleitung
Ereignis-Alarm: Eine blinkende rote LED zeigt an, dass ein Sensor-Alarmeingang
oder ein anderer Alarm, z. B. ein Bewegungs- oder Sabotagealarm vorliegt.
Leuchtet keine LED, gibt es keinen Alarm.
Festplatte: Wenn der HDD-Anzeiger rot blinkt, werden auf der HDD Daten
gelesen oder geschrieben. Ein durchgehend rotes Licht zeigt eine Ausnahme
oder einen Fehler auf der Festplatte an.
Tx/Rx: Ein durchgehend grünes Licht zeigt eine normale Netzwerkverbindung an.
Leuchtet keine LED, ist das Gerät mit keinem Netzwerk verbunden.
Technischer Alarm: Ein dauerhaft rot leuchtendes Licht zeigt einen technischen
Alarm vom Rekorder an. Leuchtet keine LED, gibt es keinen Alarm.
5
. IR-Empfänger Empfänger für IR-Fernbedienung
Drücken Sie zum Verbinden der Fernbedienung mit dem Rekorder auf die
Gerätetaste, geben Sie die Geräteadresse ein und drücken
6
. Frontbedienelementsperre
Sie können das Frontbedienelement mit einem Schlüssel sperren oder
entsperren. Es ermöglicht Zugriff auf die Festplatten.
7
. Live-Taste Live: Zum Livebildanzeigemodus wechseln.
8
. Wiedergabe-
tasten
Rücklauf: Dient im Livebildanzeige-Modus zum Wiedergeben des ältesten
Videos. Im Wiedergabemodus wird eine Kamera damit rückwärts
wiedergegeben.
Pause: In der Livebildanzeige kann damit das letzte Bild der Liveanzeige bei alle
n
angezeigten, aktiven Kameras eingefroren werden. Im Wiedergabemodus wird
die Wiedergabe gestoppt.
Wiedergabe: Gibt im Liveanzeigemodus die ganztägigen Aufnahmen der aktuellen
Kamera (im Mehrfachbildmodus die obere linke Videokachel) wieder. Im
Wiedergabemodus wird eine Kamera damit vorwärts wiedergegeben. Im
Suchmodus wird ein ausgewähltes Video wiedergegeben oder ein
Schnappschuss angezeigt. Im PTZ-Modus wird eine automatische Tour
durchgeführt.
Live: Zum Livebildanzeigemodus wechseln.
Wiedergabe
: Im Wiedergabemodus erfolgt die Wiedergabe der aktuellen Datei.
Startet am Anfang der Datei.
9
. PTZ-Tasten
Zoom +/-: Im Live-, Wiedergabe- und PTZ-Steuerungsmodus können Sie diese
Tasten zum Vergrößern und Verkleinern des Bildes verwenden. Sie dienen auch
zur Navigation innerhalb der Menüs.
Preset: Drücken Sie im PTZ-Steuerungsmodus auf Preset und eine Zahlentaste,
um das angegebene Preset aufzurufen.
Die Taste dient auch zur Bearbeitung des Feiertagsmodus, Videosuchmodus,
HDD-Auswahlmodus, Benutzerverwaltungsmodus, Markerverwaltung und
Markersuche.
Tour: Drücken Sie im PTZ-Steuerungsmodus auf Tour und eine Zahlentaste, um
die angegebene Tour aufzurufen.
Die Taste dient auch zum Scrollen zwischen den Kalendermonaten und zur
Navigation in einem Textfeld.
10
. Richtung
Mit den Richtungstasten können Sie durch die verschiedenen Felder und
Elemente der Menüs navigieren.
ENTER-Taste
Mit der ENTER-Taste wird in jedem Menümodus eine Auswahl bestätigt.
Page 13
TruVision DVR 45HD Schnellstartanleitung 11 DE
11
. Taste
Archivieren
Einmal drücken, um den Schnellarchivierungsmodus aufzurufen. Zweimal
drücken, um die Archivierung zu starten. Die Anzeige blinkt grün, wenn Daten
auf ein Sicherungsgerät geschrieben werden.
12
. USB-Anschluss Es gibt zwei USB-Anschlüsse. Verwenden Sie die USB-Anschlüsse, um Videos
zu archivieren, die Firmware zu aktualisieren, eine USB-Maus zu verwenden
oder einen USB-CD/DVD-Brenner anzuschließen.
Abbildung
3: Symbolleiste für den Schnellzugriff
1. Manuelle Aufnahme starten: Manuelle
Aufnahme starten/beenden.
2. Sofortige Wiedergabe: Wiedergabe der
letzten fünf Minuten des aufgenommenen
Videos.
3. Audio ein: Aktivieren/Deaktivieren des
Audioausgangs.
4. Schnappschuss: Erstellt einen
Schnappschuss des Videobilds.
5. PTZ-Steuerung: Aufrufen des PTZ-
Steuerungsmodus.
6. Digitalzoom: Zugriff auf den Digitalzoom-
Modus.
7. Bildeinstellungen: Bildhelligkeitsstufen ändern.
8. Text anzeigen: Eingefügten Text auf Bildschirm
anzeigen.
9. Fokusassistent: Stellt das Kameraobjektiv
automatisch scharf.
10. Objektivinitialisierung: Initialisiert das Objektiv
von Kameras mit motorbetriebenem Objektiv.
11. Schließen: Symbolleiste schließen.
Lieferumfang
Im Lieferumfang des TruVision DVR 45HD
(Modell TVR 45HD) sind folgende Teile
enthalten:
• IR (Infrarot)-Fernbedienung
• Zwei AAA-Batterien für die
Fernbedienung
• Netzkabel (Wechselspannung)
• USB-Maus
• Rekorder
• CD mit Software und
Benutzerhandbüchern
• TruVision TVR 45HD-
Schnellstartanleitung
• TruVision DVR 45HD--Benutzerhandbuch
(auf CD)
• TruVision-Rekorder – Bedieneranleitung
(auf CD)
Installationsumgebung
Einzelheiten hierzu finden Sie im
Benutzerhandbuch. Beachten Sie jedoch
Folgendes:
• Stellen Sie das Gerät an einem
geschützten Ort auf.
• Stellen Sie sicher, dass das Gerät in einer
gut belüfteten Umgebung installiert wird.
• Achten Sie darauf, dass das Gerät vor
Regen oder Feuchtigkeit geschützt ist.
Schnellinstallation
Empfohlene Schritte für das Setup des
Rekorders:
1. Schließen Sie alle erforderlichen Geräte
an der Rückseite des Rekorders an.
Siehe Abb. 1 auf Seite 8.
Page 14

DE 12 TruVision DVR 45HD Schnellstartanleitung
Grundlegende Anschlüsse:
Schließen Sie die Kameras an die BNCKameraeingänge und den Monitor A an
einen VGA- oder HDMI-Ausgang
an.Schließen Sie die Maus an den USBPort des Frontbedienelements an.
Optionale Anschlüsse:
Alle sonstigen dargestellten
Verbindungen sind optional und hängen
von den jeweiligen
Installationsanforderungen ab.
2. Schließen Sie das Netzkabel an und
schalten Sie das Gerät ein.
3. Nehmen Sie die erforderlichen
Geräteeinstellungen mithilfe des SetupAssistenten vor.
Erstmalige Verwendung
Der Rekorder verfügt über einen ExpressInstallationsassistenten, der bei der
erstmaligen Verwendung die Konfiguration
grundlegender Rekorder-Einstellungen
erleichtert. Er konfiguriert alle Kameras
simultan. Anschließend kann die
Konfiguration nach Bedarf angepasst werden.
Der Setup-Assistent wird standardmäßig
gestartet, sobald der Rekorder bereit ist. Der
Assistent führt Sie durch die wichtigsten
Einstellungen Ihres Rekorders. Wählen Sie
die gewünschte Sprache für das System aus
und legen Sie anschließend das
Administratorpasswort fest. Ein
Standardpasswort ist nicht festgelegt.
Der Assistent führt Sie anschließend durch
die Menüs, um Uhrzeit und Datum, Netzwerkkonfiguration, Festplattenverwaltung sowie
Aufnahmekonfiguration festzulegen.
Wenn Sie alle erforderlichen Änderungen
vorgenommen haben, klicken Sie auf Fertig
stellen, um den Setup-Assistenten zu
beenden. Der Rekorder ist nun einsatzbereit.
Die Aufnahme wird automatisch gestartet.
Bedienung des Rekorders
Es bestehen verschiedene Möglichkeiten, das
Gerät zu steuern:
• Steuerung über das Frontbedienelement
• IR-Fernbedienung
• Steuerung über die Maus
• Steuerung über den Webbrowser
• TVK 800-Bedienpult
• Software (TruVision Navigator,
TVRmobile).
Frontbedienelement
Mithilfe der Tasten des Frontbedienelements
können die meisten Funktionen gesteuert
werden. Die Position der Steuerungen finden
Sie in Abbildung 2 auf Seite 9.
IR-Fernbedienung
Die Tasten der IR-Fernbedienung sind
ähnlich den Tasten auf dem
Frontbedienelement. Legen Sie die zwei
AAA-Batterien in die Fernbedienung.
So verbinden Sie die Fernbedienung mit
dem Rekorder:
1. Drücken Sie die Taste Menü auf der
Fernbedienung oder wählen Sie per
Rechtsklick mit der Maus die Option
Menü aus. Der Hauptmenü-Bildschirm
wird angezeigt.
2. Wählen Sie Anzeigemodus-
Einstellungen > Monitor aus.
3. Prüfen Sie den Adresswert des
Rekorders. Der Standardwert ist 255. Die
Geräteadresse gilt für alle
Infrarotfernbedienungen.
4. Drücken Sie auf der Fernbedienung die
Taste Gerät.
5. Geben Sie den Adresswert des Geräts
ein. Er muss mit dem entsprechenden
Wert des Rekorders übereinstimmen.
6. Drücken Sie auf der Fernbedienung auf
OK.
USB-Maus
Die mit dem Rekorder mitgelieferte USBMaus steuert alle Funktionen des Rekorders
(im Gegensatz zum Frontbedienelement,
dessen Funktionalität eingeschränkt ist).
Verwenden Sie die Maus zum Navigieren und
Page 15
TruVision DVR 45HD Schnellstartanleitung 13 DE
nehmen Sie in der Bedieneroberfläche so
Änderungen an den Einstellungen vor.
Schließen Sie die Maus an den Rekorder an,
indem Sie den Maus-USB-Anschluss in den
USB-Anschluss am Frontbedienelement
einstecken. Die Maus ist sofort betriebsbereit
und der Mauszeiger sollte angezeigt werden.
Steuerung über den Webbrowser
Mit dem Rekorder-Webbrowser können Sie
Videos anzeigen, aufzeichnen und
wiedergeben sowie alle Aspekte des
Rekorders von jedem PC mit Internetzugriff
verwalten. Die benutzerfreundlichen
Steuerelemente des Browsers ermöglichen
einen schnellen Zugriff auf alle
Rekorderfunktionen.
Um auf das Gerät zuzugreifen, öffnen Sie
einen Webbrowser und geben Sie die IPAdresse ein, die dem Rekorder als
Webadresse zugewiesen ist. Geben Sie im
Anmeldebildschirm die Benutzer-ID und das
Passwort ein.
Die Standardwerte für die
Netzwerkeinstellungen des Rekorders sind:
• DHCP: Standardmäßig deaktiviert.
• IP-Adresse – 192.168.1.82
• Subnetzmaske – 255.255.255.0
• Gateway-Adresse – 192.168.1.1
• Server-Port: 8000
• HTTP-Port: 80
• RTSP-Port: 554
Hinweis: Für die folgenden Ports muss eine
Weiterleitung im Router eingerichtet werden,
um eine ordnungsgemäße Verbindung zu
gewährleisten: Server-Port und RTSP-Port.
Abbildung 4: Webbrowser-Oberfläche
Livebildanzeige-Modus
Der Livemodus ist der normale
Betriebsmodus des Geräts, in dem Sie die
Liveschnappschüsse der Kameras sehen.
Regelmäßig verwendete Funktionen in der
Livebildanzeige können durch Klicken mit der
linken Maustaste schnell aufgerufen werden,
wenn sich der Cursor auf dem Kamerabild
befindet. Die Symbolleiste für die
Livebildanzeige wird angezeigt. Eine
Beschreibung der verfügbaren Funktionen
finden Sie in Abbildung 3 auf Seite 11.
Konfigurieren des Rekorders
Der Rekorder hat eine symbolgesteuerte
Menüstruktur, die Ihnen die Konfiguration der
Geräteparameter erlaubt. Jeder Befehl zeigt
einen Bildschirm an, in dem Sie eine Gruppe
von Einstellungen bearbeiten können. Die
meisten Menüs sind nur für
Systemadministratoren zugänglich.
Einzelheiten zur Konfiguration des Gerätes
finden Sie im Benutzerhandbuch des
Rekorders.
So greifen Sie in der Liveanzeige auf das
Hauptmenü zu:
• Drücken Sie die Taste Menü auf der
Fernbedienung oder dem Frontbedienelement.
- Oder -
• Klicken Sie mit der rechten Maustaste
und wählen Sie Menü aus dem PopupMenü.
Der Hauptmenü-Bildschirm wird angezeigt.
Bewegen Sie die Maus über ein
Befehlssymbol in der Menüsymbolleiste und
klicken Sie darauf, um es auszuwählen.
Page 16
DE 14 TruVision DVR 45HD Schnellstartanleitung
Beschreibung der Befehlssymbole in der
Menüsymbolleiste:
Konfiguriert Anzeige-einstellungen.
Konfiguriert die analogen und IPKameraeinstellungen.
Konfiguriert StandardNetzwerkeinstellungen.
Konfiguriert Aufnahme-einstellungen.
Konfiguriert die Alarm- und
Ereigniseinstellungen.
Konfiguriert System-einstellungen.
Konfiguriert die Speicher-verwaltung.
Konfiguriert Benutzer-einstellungen.
Zeigt Systeminformationen an.
Enthält Informationen zu den
verschiedenen Symbolleisten und
Menüs der Benutzer-oberfläche.
Enthält Informationen zu Optionen für
Abmeldung, Neustart und
Herunterfahren.
Spezifikationen
Stromversorgung:
100 bis 240 V
Wechselspannung, 6.3
A,
50 bis 60 Hz
Energieverbrauch (ohne HDD):
TVR 4508HD
TVR 4516HD
≤ 45 W
≤ 65 W
Betriebstemperatur:
-10 bis +55 ºC
Relative
Luftfeuchtigkeit:
10 bis 90 %
Abmessungen
(B × H × T):
445 × 390 × 70 mm
Gewicht
(ohne HDD):
≤ 5 kg
Page 17
Guía de inicio rápido de TruVision DVR 45HD 15 ES
ES
Guía de inicio rápido de TruVision
DVR 45HD
Figura
1: Conexiones del panel posterior (imagen del modelo de 8 canales)
1. Conexión de cuatro entradas de audio a
conectores RCA.
2. Conexión a los altavoces para la salida de
audio.
3. Entrada de línea.
4. Conexión a un dispositivo RS-232.
5. Conexión a eSATA.
6. Conexión a un dispositivo RS-485 como, por
ejemplo, una cámara PTZ o un teclado.
7. Conexión de hasta cuatro salidas de alarma.
8. Interruptor de alimentación (encender/apagar).
9. Conexión de hasta 8 cámaras analógicas/HD-
TVI a conectores de tipo BNC (dependiendo
del modelo del grabador).
10. Conexión a un monitor BNC (solo monitor
secundario).
11. Conexión a un dispositivo USB opcional como,
por ejemplo, un ratón, un grabador de CD/DVD
o una unidad de HDD.
12. Conexión a un dispositivo HDTV. La conexión
HDMI admite tanto audio como vídeo digital.
13. Conexión a un monitor VGA.
14. Conexión a una red.
15. Conexión de hasta 16 entradas de alarma.
16. Conexión a tierra.
17. Conexión de un cable de alimentación al
grabador (incluido).
Dirección IP predeterminada: 192.168.1.82
Page 18

ES 16 Guía de inicio rápido de TruVision DVR 45HD
Figura
2: Controles del panel frontal (imagen del modelo de 8 canales)
Nombre Descripción
1
.
Botones de
canal
Permiten cambiar entre las diferentes cámaras en los modos de visualización en
directo, control PTZ o reproducción.
2
. Botones de
visualización
F1: En el modo de reproducción, haga clic para iniciar y detener la delimitación
de vídeo. Para el audio, pulse F1 y un botón numérico para reproducir el audio
de la cámara especificada en la visualización en directo.
En el modo de información del sistema, se obtiene la URL del DDNS. En el
modo de administración de usuarios, se abrirá la pantalla de permisos de un
elemento seleccionado en Administración de usuarios > Usuario >
Administración de usuarios. Permite eliminar un elemento seleccionado de la
unidad flash USB. Sale del teclado virtual.
F2: en los modos de visualización, reproducción de todo el día y reproducción,
pulse para mostrar u ocultar la barra de tiempo o control. En el modo PTZ,
detiene todas las operaciones en curso. Seleccione o anule la selección de un
elemento. Introduzca una carpeta seleccionada del dispositivo de
almacenamiento externo, como una unidad flash USB usada para el archivado.
A: En el modo de visualización en directo, seleccione el monitor principal.
B: En el modo de visualización en directo, seleccione el monitor secundario.
Secuencia: En el modo de visionado en directo, inicia/detiene la secuencia de
cámaras que se visualizan en el monitor actual.
Visualización: En el modo de vista múltiple, alterne entre las diversas vistas
múltiples. Para el DVR de 8 canales: completa, cuádruple, 1+5, 1+7 y 3+3. Para
el DVR de 16 canales: completa, cuádruple, 1+5, 1+7, 3+3 y 4+4.
En el modo de información de unidad de disco duro y el modo de administración
de usuarios, permite eliminar un elemento seleccionado. En el modo PTZ,
elimina un punto clave seleccionado. En el modo de búsqueda de registros,
muestra los detalles de un archivo de registro encontrado en los resultados de la
búsqueda de registros.
3
. Botones Menú
y Búsqueda
Menú: accede/sale del menú principal.
Búsqueda: en el modo de visualización en directo, entra en el menú de
búsqueda avanzada.
4
. LED de estado
Alimentación: una luz verde fija indica que el grabador está funcionando
correctamente. Si se ilumina en rojo, indica la presencia de un fallo.
Page 19
Guía de inicio rápido de TruVision DVR 45HD 17 ES
Nombre Descripción
Alarma de evento: una luz roja parpadeante indica que se ha activado un
sensor de entrada de alarma u otra alarma como de movimiento o de tamper. Si
no hay luz, indica que no hay ninguna alarma.
HDD: el indicador de unidad de disco duro parpadea en rojo cuando se están
leyendo o escribiendo datos en la unidad de disco duro. La luz roja fija indica
que hay una excepción o un error en la unidad de disco duro.
Tx/Rx: cuando permanece fijo en verde indica una conexión de red normal. Si
no hay luz, indica que no hay conexión a ninguna red.
Alarma técnica: una luz roja fija indica que hay una alarma técnica proveniente
del grabador. Si no hay luz, indica que no hay ninguna alarma.
5
. Receptor de
infrarrojos
Receptor para el control remoto de infrarrojos.
Para conectar el control remoto al grabador, pulse el botón Dispositivo y, a
continuación, pulse el botón Intro.
6
.
Bloqueo del panel
frontal
Puede bloquear o desbloquear el panel frontal con una llave. Esta llave
proporciona acceso a las unidades de disco duro.
7
.
Botón de directo Cambia al modo de visualización en directo.
8
. Botones de
reproducción
Atrás: en el modo de visualización en directo, utilice este botón para reproducir el
vídeo anterior. En el modo de reproducción, reproduce una cámara en el sentido
contrario de reproducción.
Pausa
: en la visualización en directo, congela la última imagen de la
reproducción en directo de todas las cámaras activas que se están visualizando.
En el modo de reproducción, detiene la reproducción.
Reproducir: en la visualización en directo, reproduce la reproducción de todo el
día de la cámara actual (mosaico de vídeo superior izquierdo cuando se está en
el modo de vista múltiple). En el modo de reproducción, reproduce una cámara
en el sentido de la reproducción. En el modo de búsqueda, reproduce un vídeo
seleccionado o visualiza una fotografía. En el modo PTZ, realiza un tour
automático.
En directo
: cambia al modo de visualización en directo.
Repetición: en el modo de reproducción, se inicia la reproducción del archivo
actual. Comienza al principio del archivo.
9
. Botones PTZ
Zoom +/-: en los modos de visualización en directo, reproducción y control PTZ,
utilice este botón para acercar y alejar el zoom. Úselos también para navegar
dentro de los menús.
Posición preestablecida: en el modo de control PTZ, pulse Posición
preestablecida y un botón numérico para solicitar una posición preestablecida
específica.
Úselo también para modificar el modo de vacaciones, el modo de búsqueda de
vídeo, el modo de selección de la unidad de disco duro, el modo de
administración de usuarios, la administración de marcadores y la búsqueda de
marcadores.
Tour: en el modo de control PTZ, pulse Tour y un botón numérico para solicitar
un tour de sombra específico.
Úselo también para desplazarse entre los meses del calendario y para navegar
en un campo de texto.
10
. Dirección
Los botones de DIRECCIÓN se utilizan para desplazarse entre diferentes
campos y elementos en los menús.
Botón Intro
El botón INTRO se utiliza para confirmar la selección en cualquiera de los
modos de menú.
Page 20

ES 18 Guía de inicio rápido de TruVision DVR 45HD
Nombre Descripción
11
. Botón Archivo
Púlselo una vez para entrar en el modo de archivado rápido. Púlselo dos veces
para iniciar el archivado. El indicador parpadeará en verde cuando se esté
escribiendo o se estén realizando copias de seguridad de datos en el dispositivo.
12
. Interfaz USB Puerto bus universal en serie (USB) para dispositivos adicionales como, por
ejemplo, un ratón USB, un grabador de CD/DVD o una unidad de disco duro
USB.
Figura
3: Barra de herramientas de acceso rápido
1. Iniciar grabación manual: Iniciar/detener
grabación manual.
2. Reproducción instantánea: Permite
reproducir los últimos cinco minutos del vídeo
grabado.
3. Audio encendido: Activa y desactiva la salida
de audio.
4. Fotografía: Permite capturar una fotografía del
vídeo.
5. Control PTZ: accede al modo de control PTZ.
6. Zoom digital: Permite acceder al zoom digital.
7. Configuración de imagen: Permite modificar el
nivel de iluminación de la imagen.
8. Mostrar texto: muestra el texto insertado en
pantalla.
9. Enfoque auxiliar: Enfoca automáticamente la
óptica de la cámara
10. Inicialización de lentes: Inicializa la óptica de
una cámara con óptica motorizada
11. Cerrar: Púlselo para cerrar la barra de
herramientas.
Contenido del paquete
El grabador TruVision DVR 45HD (modelo
TVR 45HD) se suministra con los siguientes
elementos:
• Control remoto por infrarrojos
• Dos pilas AAA para el control remoto
• Cables de alimentación de CA
• Ratón USB
• Grabador
• CD con software y manuales
• Guía de inicio rápido de TruVision
DVR 45HD
• Manual del usuario del grabador
TruVision DVR 45HD (en CD)
• Guía del operador del grabador TruVision
(en CD)
Entorno de instalación
Consulte el manual del usuario para obtener
información detallada; tenga en cuenta
además estos requisitos importantes:
• Coloque la unidad en un lugar seguro.
• Asegúrese de que la unidad esté en una
zona bien ventilada.
• No exponga la unidad a la lluvia ni a la
humedad.
Instalación rápida
Pasos recomendados para configurar el
grabador:
1. Conecte todos los dispositivos necesarios
al panel posterior del grabador. Consulte
la figura 1 en la página 15.
Page 21

Guía de inicio rápido de TruVision DVR 45HD 19 ES
Conexiones básicas:
Conecte las cámaras a las entradas de
cámara BNC y el monitor A a la salida
VGA o HDMI. Conecte el ratón al puerto
USB del panel frontal.
Conexiones opcionales:
El resto de conexiones mostradas son
opcionales, y su uso depende de los
requisitos de instalación.
2. Conecte el cable de alimentación y
enciéndala.
3. Configure la unidad con los parámetros
necesarios, usando el asistente de
configuración.
Primer uso
El grabador cuenta con un asistente de
instalación rápida que le permite establecer
con facilidad la configuración básica de este
cuando se utiliza por primera vez. Configura
todas las cámaras de forma simultánea. A
continuación, la configuración se puede
personalizar según corresponda.
El asistente de configuración se iniciará de
forma predeterminada una vez que se haya
cargado el grabador. Le guiará por algunos
de los parámetros de configuración más
importantes de su grabador. Seleccione el
idioma que prefiera para el sistema, e
introduzca la contraseña de administrador.
No se proporciona una contraseña
predeterminada.
Después, el asistente le guiará por los menús
para establecer la hora y fecha, la
configuración de red, la administración de
HDD y la configuración de grabación.
Una vez introducidos todos los cambios
necesarios, haga clic en Finalizar para salir
del asistente de configuración. El grabador ya
puede utilizarse. La grabación se iniciará de
manera automática.
Funcionamiento del grabador
Existen varias formas de controlar la unidad:
• Panel de control frontal
• Control remoto por infrarrojos
• Control mediante ratón
• Control mediante explorador web
• Teclado TVK-800
• Software (TruVision Navigator,
TVRMobile).
Panel frontal
Los botones del panel frontal controlan casi
todas las funciones. Para conocer la
localización de los controles, consulte la
figura 2 en la página 16.
Control remoto por infrarrojos
Los botones del mando a distancia son
similares a los del panel de control. Coloque
las dos pilas AAA en el mando a distancia.
Para conectar el control remoto al
grabador:
1. Pulse el botón Menú del panel frontal o
bien haga clic con el botón derecho del
ratón y seleccione el botón Menú.
Aparecerá la pantalla del menú principal.
2. Seleccione Configuración del modo de
visualización > Monitor.
3. Compruebe el valor de dirección del
grabador. El valor predeterminado es
255. El dispositivo es compatible con todo
tipo de mandos por infrarrojos.
4. En el control remoto, pulse el botón
Dispositivo.
5. Introduzca el valor de dirección del
dispositivo. Debe ser igual al del
grabador.
6. Pulse OK en el control remoto.
Ratón USB
El ratón USB que se suministra con el
grabador controla todas las funciones del
grabador, a diferencia del panel frontal, que
cuenta con una funcionalidad limitada. El
ratón USB le permite navegar y hacer
cambios en las opciones de la interfaz de
usuario.
Conecte el ratón al grabador insertando el
conector USB del ratón en el puerto USB
situado en el panel frontal o trasero. El ratón
se puede utilizar de forma inmediata y el
puntero debe aparecer en pantalla.
Page 22

ES 20 Guía de inicio rápido de TruVision DVR 45HD
Control mediante explorador web
El explorador web del grabador le permite
ver, grabar y reproducir vídeos, así como
administrar todos los aspectos del grabador
desde cualquier PC con acceso a Internet.
Los sencillos controles del explorador le
ofrecen un rápido acceso a todas las
funciones del grabador.
Para acceder a la unidad, abra el explorador
web e introduzca la dirección IP asignada el
grabador, como si fuese una dirección web.
En la pantalla de registro, introduzca el ID de
usuario y la contraseña.
Los valores predeterminados de la
configuración de red del grabador son los
siguientes:
• DHCP: Los siguientes parámetros están
desactivados por defecto:
• Dirección IP: 192.168.1.82
• Máscara de subred: 255.255.255.0
• Dirección de puerta de enlace:
192.168.1.1
• Puerto del servidor: 8000
• Puerto HTTP: 80
• Puerto RTSP: 554
Nota: es necesario direccionar los siguientes
puertos en el router para una conexión
correcta: Puerto del servidor y puerto RTSP.
Figura 4: Interfaz del navegador web
Modo de visualización en directo
El modo de visualización en directo es el
modo de funcionamiento normal de la unidad,
mediante el que se visualizan imágenes en
vivo de las cámaras.
Puede acceder de manera rápida a todas
funciones que se usan regularmente en el
modo de visualización en directo colocando el
cursor sobre la imagen de cámara y pulsando
el botón izquierdo del ratón. Aparecerá la
barra de herramientas de visualización en
directo. Para obtener una descripción del
teclado, consulte la figura 3 en la página 18.
Configuración del grabador
El grabador tiene una estructura de menús
organizada por iconos que le permite
configurar sus parámetros. Cada icono de
comando muestra una pantalla que le permite
editar un grupo de valores. La mayoría de los
menús solo están disponibles para los
administradores del sistema.
Para obtener información detallada sobre
la configuración del grabador, consulte el
Manual del usuario.
Para acceder al menú principal del modo
de visualización en directo:
•. Pulse Menú en el mando a distancia
o en el panel frontal.
O bien
• Haga clic con el botón derecho del ratón
y seleccione la opción Menú del menú
emergente.
Aparecerá la pantalla del menú principal.
Sitúe el ratón sobre uno de los iconos de
comando de la barra de herramientas del
menú y haga clic para seleccionarlo.
Descripción de los iconos de comando de
la barra de herramientas del menú:
Permite configurar los parámetros de
la pantalla.
Permite configurar los parámetros de
la cámara analógica o IP.
Permite configurar parámetros de red
estándar.
Page 23
Guía de inicio rápido de TruVision DVR 45HD 21 ES
Permite configurar los parámetros de
grabación.
Permite configurar las alarmas
y eventos.
Permite configurar los parámetros del
sistema.
Permite configurar la administración
del almacenamiento.
Permite configurar los parámetros de
usuario.
Permite ver la información
del sistema.
Proporciona información de
referencia sobre las diversas barras
de herramientas y menús de la
interfaz.
Proporciona acceso a las opciones
de cierre de sesión, reinicio y
apagado.
Especificaciones
Fuente de
alimentación:
100 a 240 V CA; 6,3A; 50
a 60 Hz
Consumo de energía
(sin HDD):
TVR 4508HD
TVR 4516HD
≤ 45 W
≤ 65 W
Temperatura de
funcionamiento:
De -10 a +55 ºC
Humedad relativa:
Del 10 al 90 %
Dimensiones (An. x Al. x Pro.):
445 × 390 × 70 mm
Peso (sin HDD): ≤ 5,0 kg
Page 24
FI 22 TruVision DVR45HD:n pikaopas
FI
TruVision DVR 45HD:n pikaopas
Kuva
1: Takapaneelin liitännät
1. Liitä neljä audiotuloa RCA-liittimiin.
2. Liitä kaiuttimet audiolähtöön.
3. Linjatulo.
4. Liitä RS-232-laite.
5. Liitä eSATA-laite.
6. Liitä RS-485-laite, kuten PTZ-kamera tai
käyttölaite.
7. Liitä jopa neljä hälytyslähtöä.
8. Virtakytkin (päällä/pois).
9. Liitä jopa 8 analogista / HD-TVI-kameraa BNCtyyppisiin liittimiin (riippuu tallentimen mallista).
10. Liitä BNC-monitori (vain tapahtumanäyttö).
11. Liitä valinnainen USB-laite, kuten hiiri, tallentava
CD/DVD-asema tai kiintolevy.
12. Liitä HD-televisio. HDMI-liitäntä tukee sekä
digitaalista audiota että videota.
13. Liitä VGA-monitori.
14. Liitä verkkoon.
15. Liitä jopa 16 hälytystuloa.
16. Liitä maadoitukseen.
17. Liitä virtajohto tallentimeen (kuuluu
toimitukseen).
Oletus-IP-osoite: 192.168.1.82
Page 25
TruVision DVR45HD:n pikaopas 23 FI
Kuva
2: Etupaneelin ohjaimet (kuvassa 8-kanavainen malli)
Tarkat tiedot painiketoiminnoista ovat käyttöohjeessa.
Nimi Kuvaus
1
. Kanavapainikkeet Vaihda kamerasta toiseen live-, PTZ-ohjaus- tai toistotilassa.
2
. Näkymäpainikkeet
F1: Toistotilassa painikkeella voi aloittaa ja lopettaa videon leikkauksen. Jos
haluat käyttää audiota, toista määritetyn kameran audio live-näkymässä
painamalla F1 ja jotakin numeropainiketta.
Järjestelmätietotilassa painikkeella voi hakea hakee DDNS URL-osoitteen.
Käyttäjähallintatilassa painikkeella voi avata kohdassa Käyttäjähallinta >
Käyttäjä > Käyttäjähallinta valitun kohteen oikeusnäytön. Poista valittu
kohde USB-muistista. Sulje virtuaalinen käyttölaite.
F2: Live-näkymä-, koko päivän toisto- tai toistotilassa painikkeella voi tuoda
näkyviin tai piilottaa aika- tai ohjauspalkin. PTZ-tilassa painikkeella voi
pysäyttää kaikki meneillään olevat toiminnot. Valitse kohde tai poista sen
valinta. Siirry valittuun kansioon ulkoisessa tallennuslaitteessa, kuten
arkistointiin käytettävässä USB-muistissa.
A: Live-näkymätilassa painikkeella voi valita päämonitorin.
B: Live-näkymätilassa painikkeella voi valita tapahtumanäytön.
Kierto: Live-näkymätilassa painikkeella voi käynnistää/pysäyttää
kamerakierron valitussa monitorissa.
Näkymä: Moninäyttötilassa painikkeella voi siirtyä moninäytöstä toiseen. 8-
kanavainen DVR: täysi, neli, 1+5, 1+7 ja 3+3. 16-kanavainen DVR: täysi,
neli, 1+5, 1+7, 3+3 ja 4+4.
Kiintolevytietotilassa ja käyttäjähallintatilassa painikkeella voi poistaa valitun
kohteen. PTZ-tilassa painikkeella voi poistaa valitun avainkohdan.
Lokihakutilassa painikkeella voi näyttää lokitiedoston tiedot
lokihakutuloksissa.
3
. Valikko- ja Haku-
painikkeet
Valikko: Siirry päävalikkoon tai poistu siitä.
Haku: Live-näkymässä painikkeella voi siirtyä laajennetun haun valikkoon.
4
. Tilan merkkivalot
Virta: Tasaisesti palava vihreä valo tarkoittaa, että tallennin toimii
asianmukaisesti. Punainen tarkoittaa vikatilaa.
Tapahtumahälytys: Vilkkuva punainen valo tarkoittaa, että tunnistin
hälytystulossa on hälytystilassa, tai jotain muuta hälytystä (esim. liike- tai
häirintähälytystä). Jos valo ei pala, hälytystä ei ole.
Page 26
FI 24 TruVision DVR 45HD:n pikaopas
Nimi Kuvaus
Kiintolevy: HDD-merkkivalo palaa tasaisesti vihreänä, kun tietoja luetaan
kiintolevyltä tai kirjoitetaan kiintolevylle. Tasaisesti palava punainen valo
tarkoittaa, että kiintolevyssä on poikkeus tai virhe.
Tx/Rx: Tasaisesti palava vihreä valo tarkoittaa, että verkkoyhteys toimii
normaalisti. Jos valo ei pala, tallennin ei ole yhteydessä verkkoon.
Tekninen hälytys: Tasaisesti palava punainen valo tarkoittaa, että
tallentimessa on tekninen hälytys. Jos valo ei pala, hälytystä ei ole.
5
. IR-vastaanotin IR-kaukosäätimen vastaanotin.
Yhdistä kaukosäädin tallentimeen painamalla Laite -painiketta, antamalla
laitteen osoite ja painamalla Enter.
6
. Etupaneelin lukitus Etupaneelin voi lukita tai avata avaimella. Kiintolevyt ovat käytettävissä sen
avulla.
7
. Live-painike Live: Siirry live-näkymätilaan.
8
. Toisto-painikkeet
Taaksepäin: Live-näkymätilassa painikkeella voi toistaa varhaisimman
videon. Toistotilassa painikkeella voi toistaa kameraa taaksepäin.
Tauko: Live-näkymätilassa painikkeella voi pysäyttää kaikkien käynnissä
olevien katseltavien kameroiden viimeisen kuvan. Toistotilassa painikkeella
voi pysäyttää toiston.
Toista: Live-näkymätilassa senhetkisen kameran koko päivän toisto
(vasemmalla ylhäällä olevan videoruudun toisto, jos monikuvanäyttötila on
käytössä). Toistotilassa painikkeella voi käynnistää kameran toiston
eteenpäin. Hakutilassa painikkeella voi käynnistää valitun videon toiston tai
pikakuvan katselun. PTZ-tilassa painikkeella voi käynnistää automaattisen
kierron.
Toisto: Toistotilassa painikkeella voi aloittaa nykyisen tiedoston toiston.
Toisto alkaa tiedoston alusta.
9
. PTZ-painikkeet
Zoomaus +/-: Live-näkymä-, toisto- tai PTZ-ohjaustilassa painikkeilla voi
lähentää ja loitontaa. Painikkeita käytetään myös valikoissa liikkumiseen.
Esiasento: PTZ-ohjaustilassa määritetyn esiasennon voi ottaa käyttöön
painamalla Esiasento- ja numeropainiketta.
Käytetään myös poikkeuspäivä-, videohaku-, kiintolevyn valinta- ja
käyttäjähallintatilan muokkaamiseen sekä kirjanmerkkien hallintaan ja
hakuun.
Sarja: PTZ-ohjaustilassa määritetyn ohjelmoidun kierron voi ottaa käyttöön
painamalla Sarja- ja numeropainiketta.
Käytetään myös kalenterikuukausien selaamiseen ja tekstikentässä
liikkumiseen.
10
. Suunta
SUUNTA-painikkeiden avulla voi liikkua eri kenttien ja kohteiden välillä
valikoissa.
Enter-painike
ENTER-painikkeella voi vahvistaa valinnan valikkotiloissa.
11
. Arkistoi
-painike
Siirry pika-arkistointitilaan painamalla kerran. Aloita arkistointi painamalla
kaksi kertaa. Merkkivalo vilkkuu vihreänä, kun tietoja kirjoitetaan
varmuuskopiointilaitteeseen.
12
. USB-liitäntä Laitteessa on kaksi USB-porttia. Käytä USB-portteja videoiden arkistointiin,
laiteohjelmiston päivittämiseen, USB-hiiren käyttämiseen tai tallentavan
USB-CD/DVD-aseman liittämiseen.
Page 27
TruVision DVR45HD:n pikaopas 25 FI
Kuva
3: Pikatyökalupalkki
1. Käynnistä manuaalinen tallennus:
Käynnistä/lopeta manuaalinen tallennus.
2. Välitön toisto: Toista tallennettu video
viimeisten viiden minuutin ajalta.
3. Audio päällä: Ota audiolähtö käyttöön tai pois
käytöstä.
4. Pikakuva: Ota pikakuva videokuvasta.
5. PTZ-ohjaus: Siirry PTZ-ohjaustilaan.
6. Digitaalinen zoomaus: Siirry digitaaliseen
zoomaustilaan.
7. Kuva-asetukset: Muuta kuvan valotasoja.
8. Näytä teksti: Näyttää syötetyn tekstin näytöllä.
9. Aputarkennus: Tarkenna kameran objektiivi
automaattisesti.
10. Objektiivin alustus: Alusta moottoroidulla
objektiivilla varustetun kameran objektiivi.
11. Sulje: Sulje työkalupalkki.
Pakkauksen sisältö
TruVision DVR 45HD:n (malli TVR 45HD)
mukana toimitetaan seuraavat tarvikkeet:
• infrapunakaukosäädin
• kaksi AAA-paristoa kaukosäädintä varten
• virtajohdot
• USB-hiiri
• tallennin
• CD, joka sisältää ohjelmiston ja
käyttöohjeet
• TruVision DVR 45HD:n pikaopas
• TruVision DVR 45HD:n käyttöohje (CD:llä)
• TruVision-tallentimen operaattorin opas
(CD:llä).
Asennusympäristö
Lue tarkat tiedot käyttöohjeesta, mutta
huomioi seuraavat tärkeät vaatimukset:
• Sijoita laite turvalliseen paikkaan.
• Varmista, että laite on hyvin ilmastoidulla
alueella.
• Älä altista laitetta sateelle tai kosteudelle.
Pika-asennus
Tallennin on suositeltavaa ottaa käyttöön
seuraavasti:
1. Liitä kaikki tarvittavat laitteet tallentimen
takapaneeliin. Katso kuva 1 sivulla 22.
Perusliitännät:
Liitä kamerat BNC-kameratuloihin ja
monitori A VGA- tai HDMI-lähtöön. Liitä
hiiri etupaneelin USB-porttiin.
Valinnaiset liitännät:
Muut esitellyt liitännät ovat valinnaisia ja
riippuvat asennusvaatimuksista.
2. Liitä virtakaapeli ja kytke virta päälle.
3. Käytä ohjattua asennusta ja ota laite
käyttöön tarvittavilla asetuksilla.
Ensimmäinen käyttökerta
Tallentimessa on ohjattu pika-asennustoiminto, jonka avulla tallentimen
perusasetukset voidaan helposti määrittää
ensimmäisellä käyttökerralla. Se määrittää
kaikkien kameroiden asetukset yhtä aikaa.
Asetuksia voi myöhemmin muuttaa tarpeen
mukaan.
Ohjattu asennus alkaa oletusarvoisesti, kun
tallennin on käynnistynyt. Asennus opastaa
tallentimen tärkeimpien asetusten
määrittämisessä. Valitse järjestelmän kieli ja
aseta järjestelmänvalvojan salasana.
Oletussalasanaa ei ole määritetty.
Ohjattu toiminto opastaa sitten valikoissa
päivämäärän ja ajan asettamisessa,
Page 28

FI 26 TruVision DVR 45HD:n pikaopas
verkkoasetuksissa, kiintolevyn hallinnassa ja
tallennusmäärityksissä.
Kun tarvittavat muutokset on tehty, poistu
ohjatusta toiminnosta klikkaamalla Valmis.
Tallennin on nyt käyttövalmis. Tallennus alkaa
automaattisesti.
Tallentimen käyttäminen
Laitetta voi ohjata usealla tavalla:
• etupaneelin ohjaimilla
• IR-kaukosäätimellä
• hiiriohjauksella
• selainohjauksella
• TVK-800-käyttölaitteella
• ohjelmistolla (TruVision Navigator,
TVRMobile).
Etupaneeli
Useimpia toimintoja hallitaan etupaneelissa
olevilla painikkeilla. Katso ohjainten sijainnit
kuvasta 2 sivulla 23.
IR-kaukosäädin
IR-kaukosäätimen painikkeet vastaavat
etupaneelin painikkeita. Laita kaukosäätimeen
kaksi AAA-paristoa.
Kaukosäätimen yhdistäminen tallentimeen:
1. Paina Valikko etupaneelissa tai klikkaa
hiiren oikeanpuoleista painiketta ja valitse
Valikko. Päävalikkonäyttö tulee näkyviin.
2. Valitse Näytön tila-asetukset > Monitori.
3. Tarkista tallentimen laiteosoitteen arvo.
Oletusarvo on 255. Tämä laiteosoite toimii
kaikkien IR-kaukosäätimien kanssa.
4. Paina kaukosäätimen Laite -painiketta.
5. Syötä laitteen osoitearvo. Sen tulee olla
sama kuin tallentimen osoitearvo.
6. Paina kaukosäätimen OK-painiketta.
USB-hiiri
Tallentimen kanssa toimitettua USB-hiirtä voi
käyttää kaikkien tallentimen toimintojen
ohjaamiseen, toisin kuin etupaneelia, jonka
toiminnallisuus on rajoitettu. Hiirellä voit
navigoida ja tehdä muutoksia käyttöliittymän
asetuksiin.
Liitä hiiri tallentimeen liittämällä sen USB-liitin
taka- tai etupaneelin USB-porttiin. Hiiri on heti
käyttövalmis, ja osoittimen pitäisi tulla
näyttöön.
Selainohjaus
Tallentimen selainkäyttöliittymä mahdollistaa
videoiden katselun, tallentamisen ja
toistamisen sekä kaikkien tallentimen
ominaisuuksien hallitsemisen miltä tahansa
internetiin yhteydessä olevalta tietokoneelta.
Selaimen helppokäyttöisillä ohjaimilla pääsee
nopeasti käyttämään kaikkia tallentimen
toimintoja.
Muodosta yhteys laitteeseen avaamalla
internetselain ja syöttämällä tallentimelle
annettu IP-osoite www-osoitteeksi. Anna
käyttäjätunnuksesi ja salasanasi
kirjautumisruudussa.
Tallentimen oletusverkkoasetukset ovat:
• DHCP: oletusarvoisesti pois käytöstä.
• IP-osoite: 192.168.1.82.
• Aliverkon peite: 255.255.255.0.
• Oletusyhdyskäytävä: 192.168.1.1.
• Palvelimen portti: 8000.
• HTTP-portti: 80.
• RTSP-portti: 554.
Huomautus: Seuraavat portit pitää toistaa
reitittimessä, jotta yhteys voidaan muodostaa
asianmukaisesti: palvelinportti ja RTSP-portti.
Kuva 4: Selainkäyttöliittymä
Page 29

TruVision DVR45HD:n pikaopas 27 FI
Live-näkymätila
Live-tila on laitteen normaali toimintatila, jonka
avulla käyttäjä voi tarkastella reaaliaikaista
kuvaa kameroista.
Live-näkymän usein käytettyjä toimintoja voi
käyttää nopeasti klikkaamalla hiiren vasemmanpuoleista painiketta, kun osoitin on
kameran kuvan päällä. Live-näkymän
työkalurivi tulee näkyviin. Katso käytettävissä
olevien toimintojen kuvaukset kuvasta 3
sivulla 25.
Tallentimen määrittäminen
Tallentimessa on kuvakepohjainen
valikkorakenne, jolla voit määrittää laitteen
parametrien arvot. Jokainen komentokuvake
avaa näytön, josta voi muokata tiettyjä
asetuksia. Useimmat valikot ovat vain
järjestelmänvalvojan nähtävissä.
Lisätietoja laitteen määrittämisestä on
tallentimen käyttöohjeessa.
Päävalikkoon pääsee live-näkymästä
seuraavasti:
• Paina kaukosäätimen tai etupaneelin
Valikko -painiketta.
– tai –
• Klikkaa hiiren oikeanpuoleista painiketta ja
valitse ponnahdusvalikosta Valikko.
Päävalikkonäyttö tulee näkyviin. Vie hiiri
valikon työkalurivillä olevan komentokuvakkeen päälle ja valitse se klikkaamalla.
Valikon työkalurivillä olevien
komentokuvakkeiden kuvaukset:
Määritä näyttöasetukset.
Määritä analogisen ja IP-kameran
asetukset.
Määritä yleiset verkkoasetukset.
Määritä tallennusasetukset.
Määritä hälytys- ja tapahtumaasetukset.
Määritä järjestelmäasetukset.
Määritä tallennusvälineiden hallinta.
Määritä käyttäjäasetukset.
Tarkastele järjestelmän tietoja.
Lisätietoja käyttöliittymän eri
työkaluriveistä ja valikoista.
Uloskirjautuminen,
uudelleenkäynnistys ja
sammuttaminen.
Tekniset tiedot
Tehons
yöttö: 100–240 VAC,
6,3 A, 50–60 Hz
Virrankulutus (ilman kiintolevyä):
TVR 4508HD
TVR 4516HD
≤ 45 W
≤ 65 W
Käyttölämpötila:
-10...+55 ºC
Suhteellinen
ilmankosteus:
10–90 %
Mitat (leveys x korkeus x syvyys):
445 × 390 × 70 mm
Paino (ilman kiintolevyä): ≤ 5.0 kg
Page 30

FR 28 Guide de démarrage rapide du TruVision DVR 45HD
FR
Guide de démarrage rapide du
TruVision DVR 45HD
Figure
1 : Connexions de la face arrière
1. Connexion de quatre entrées audio aux
connecteurs RCA
2. Connexion à des haut-parleurs pour la sortie
audio
3. Entrée de ligne
4. Connexion à un périphérique RS-232
5. Connexion d’un périphérique eSATA
6. Connexion à un périphérique RS-485, comme
un clavier ou une caméra PTZ
7. Connexion de quatre sorties alarme au
maximum
8. Commutateur d’alimentation
9. Connexion de 8 caméras analogiques/HD-TVI
au maximum aux connecteurs BNC (en fonction
du modèle d’enregistreur)
10. Connexion à un moniteur BNC (moniteur
d’événements uniquement)
11. Connexion à un périphérique USB facultatif
(par exemple, une souris, un graveur de
CD/DVD ou un disque dur)
12. Connexion à un téléviseur HD (les connexions
HDMI peuvent être de type audio et vidéo)
13. Connexion à un moniteur VGA
14. Connexion à un réseau
15. Connexion de 16 entrées alarme au maximum
16. Connexion à la masse
17. Connexion d’un câble d’alimentation (inclus) à
l’enregistreur
Adresse IP par défaut : 192.168.1.82
Page 31

Guide de démarrage rapide du TruVision DVR 45HD 29 FR
Figure
2 : Commandes de la face avant (modèle à 8 canaux illustré ci-dessous)
Pour obtenir des inform
ations détaillées sur les fonctions de tous les boutons, reportez-vous au
guide de l’utilisateur.
Nom Description
1
. Boutons associés aux
canaux
Permettent de basculer d’une caméra à l’autre en mode d’affichage en
direct, en mode de commande PTZ ou en mode de lecture.
2
. Boutons
d’affichage
F1 : en mode de lecture, permet de démarrer et d’arrêter la création de
clips vidéo. Appuyez sur cette touche, ainsi que sur une touche
numérique, pour diffuser l’audio de la caméra spécifiée en mode
d’affichage en direct.
En mode Informations système, permet d’obtenir l’URL DDNS. En mode
Gestion des utilisateurs, permet d’accéder à l’écran Autorisation
applicable à l’élément sélectionné dans Gestion des utilisateurs >
Utilisateur > Gestion des utilisateurs. Permet également de supprimer un
élément sélectionné d’une clé USB, ou encore de quitter le clavier virtuel.
F2 : en mode d’affichage en direct, de lecture journalière ou de lecture
standard, permet d’afficher/de masquer la barre temporelle ou la barre de
contrôle. En mode PTZ, permet d’arrêter toutes les opérations en cours.
Permet également de sélectionner ou de désélectionner un élément, ainsi
que d’accéder au contenu d’un dossier sélectionné du périphérique de
stockage externe (tel qu’une clé USB).
A : en mode d’affichage en direct, permet de sélectionner le moniteur
principal.
B : en mode d’affichage en direct, permet de sélectionner le moniteur
d’événements.
Séq : en mode d’affichage en direct, permet de démarrer et d’arrêter le
séquençage des caméras sur le moniteur.
Affichage : en mode multi-affichage, permet de parcourir les diverses
vues (DVR 8 canaux : plein écran, quad, 1+5, 1+7 et 3+3 ; DVR 16
canaux : plein écran, quad, 1+5, 1+7, 3+3 et 4+4).
En mode Informations HDD et Gestion des utilisateurs, permet de
supprimer un élément sélectionné. En mode PTZ, permet de supprimer
un point clé sélectionné. En mode Recherche de journal, permet d’afficher
les détails d’un fichier journal.
3
. Boutons Menu et
Recherche
Menu : permet d’accéder au menu principal ou de le quitter.
Recherche : en mode d’affichage en direct, permet d’accéder au menu
de recherche avancée.
4
. LED d’état
Alimentation : un voyant vert fixe indique que l’enregistreur fonctionne
correctement. Un voyant rouge indique une erreur.
Page 32

FR 30 Guide de démarrage rapide du TruVision DVR 45HD
Alarme d’événement : un voyant rouge clignotant indique la présence
d’un signal d’entrée d’alarme ou d’une autre alarme (par exemple, de
détection de mouvement ou d’autoprotection). S’il ne s’allume pas,
aucune alarme n’est en cours.
Disque dur : le voyant du disque dur clignote en vert lorsque des
données sont en cours de lecture ou d’écriture sur le disque dur. S’il reste
fixe, il existe une exception ou une erreur.
Tx/Rx : un voyant vert fixe indique une connexion réseau normale. S’il ne
s’allume pas, aucune connexion réseau n’existe.
Alarme technique : un voyant rouge fixe indique une alarme technique
au niveau de l’enregistreur. S’il ne s’allume pas, aucune alarme n’est en
cours.
5
. Récepteur IR Récepteur pour la télécommande infra-rouge.
Pour connecter la télécommande à l’enregistreur, appuyez sur le bouton
Périphérique, saisissez l’adresse du périphérique, puis appuyez sur
Entrée.
6
. Verrouillage de la face
avant
Il est possible de verrouiller ou déverrouiller la face avant à l’aide d’une
clé. Celle-ci permet d’accéder aux disques durs.
7
. Bouton de l’affichage en
direct
Permet de passer au mode d’affichage en direct.
8
. Boutons de
lecture
Lecture inversée : en mode d’affichage en direct, permet de lire la vidéo
la plus ancienne. En mode de lecture, permet de lire le contenu d’une
caméra en sens inverse.
Pause : en mode d’affichage en direct, permet de figer la dernière image
pour toutes les caméras actives affichées. En mode de lecture, permet
d’arrêter la lecture.
Lecture : en mode d’affichage en direct, permet de lire le contenu de
toute la journée, avec la caméra sélectionnée (écran vidéo en haut à
gauche en mode multi-affichage). En mode de lecture, permet de lire le
contenu d’une caméra dans le sens normal. En mode de recherche,
permet de lire une vidéo sélectionnée ou d’afficher une photo. En mode
PTZ, permet d’effectuer un tour automatique.
Lecture : en mode de lecture, permet de démarrer la lecture du fichier
actuel, au début de ce dernier.
9
. Boutons PTZ
Zoom +/- : en mode d’affichage en direct, en mode de lecture et en mode
de commande PTZ, permet d’effectuer un zoom avant ou arrière. Permet
également de parcourir les menus.
Préposition : en mode de commande PTZ, permet, en association avec
une touche numérique, d’initialiser la préposition spécifiée.
Permet également de modifier le mode congés, le mode de recherche de
vidéo, le mode de sélection du disque dur, le mode de gestion des
utilisateurs, ainsi que les fonctionnalités de gestion et de recherche des
signets.
Tour : en mode de commande PTZ, permet, en association avec une
touche numérique, d’initialiser la patrouille spécifiée.
Permet également de parcourir les mois du calendrier et de naviguer dans
une zone de texte.
10
. Direction
Les boutons de direction sont utilisés pour naviguer entre les différents
champs et éléments d’un menu.
Touche Entrée
La touche Entrée est utilisée pour confirmer une sélection.
Page 33

Guide de démarrage rapide du TruVision DVR 45HD 31 FR
11
. Bouton Archiver
Appuyez une fois sur ce bouton pour accéder au mode d’archivage
rapide. Appuyez deux fois pour démarrer l’archivage. Le voyant clignote
en vert lorsque des données sont enregistrées sur le périphérique de
sauvegarde.
12
. Interface USB Il existe deux ports USB. Ceux-ci permettent d’archiver des vidéos, de
mettre le microprogramme à niveau, d’utiliser une souris USB ou de
connecter un graveur de CD/DVD.
Figure
3 : Barre d’outils d’accès rapide
1. Démarrage de l’enregistrement manuel :
permet de démarrer/arrêter l’enregistrement
manuel.
2. Lecture instantanée : permet de lancer la
lecture des cinq dernières minutes de la vidéo
enregistrée.
3. Audio activé : permet d’activer/désactiver la
sortie audio.
4. Photo : permet de capturer une image vidéo.
5. Commande PTZ : permet d’accéder au mode
de commande PTZ.
6. Zoom numérique : permet d’accéder au mode
de zoom numérique.
7. Paramètres de l’image : permet de modifier les
niveaux d’éclairage de l’image.
8. Affichage du texte : permet d’afficher le texte
inséré à l’écran.
9. Mise au point auxiliaire : permet d’effectuer
une mise au point automatique de l’objectif de la
caméra.
10. Initialisation de l’objectif : permet d’initialiser
l’objectif d’une caméra à l’aide d’un objectif
motorisé.
11. Fermeture : permet de fermer la barre d’outils.
Contenu
Le DVR TruVision 45HD (modèle TVR 45HD)
est fourni avec les éléments suivants :
• Télécommande infra-rouge ;
• Deux piles AAA pour la télécommande ;
• Cordons d’alimentation CA ;
• Souris USB ;
• Enregistreur ;
• CD avec logiciel et manuels d’utilisation ;
• Guide de démarrage rapide du DVR
TruVision 45HD ;
• Guide de l’utilisateur du DVR TruVision
45HD (sur CD) ;
• Guide de l’opérateur de l’enregistreur
TruVision (sur CD).
Lieu d’installation
Reportez-vous au guide de l’utilisateur pour
obtenir des informations détaillées, mais
tenez compte des considérations importantes
suivantes :
• Placez l’unité dans un endroit sûr.
• Assurez-vous qu’elle se trouve dans une
zone bien ventilée.
• Évitez d’exposer l’unité à l’humidité.
Installation rapide
Les étapes suivantes sont recommandées
lors du paramétrage de l’enregistreur :
1. Connectez tous les périphériques
nécessaires à la face arrière de
l’enregistreur. Reportez-vous à la figure 1,
à la page 28.
Page 34

FR 32 Guide de démarrage rapide du TruVision DVR 45HD
Connexions de base :
Connectez les caméras aux entrées BNC
et le moniteur A aux sorties VGA ou
HDMI. Connectez la souris au port USB
situé sur la face avant.
Connexions facultatives :
Les autres connexions illustrées dans ce
document sont facultatives et dépendent
du type d’installation.
2. Branchez le câble ad hoc et activez
l’alimentation.
3. Configurez l’unité en appliquant les
paramètres requis à l’aide de l’assistant
d’installation.
Première utilisation
L’enregistreur est doté d’un assistant
d’installation qui vous permet de configurer
facilement ses paramètres de base lors de sa
première utilisation, ainsi que toutes les
caméras simultanément. La configuration
peut ensuite être personnalisée.
Par défaut, l’assistant d’installation démarre
dès que l’enregistreur est chargé. L’assistant
vous guide au fil de certains des
paramétrages les plus importants.
Sélectionnez la langue du système, puis
configurez le mot de passe administrateur.
Aucun mot de passe par défaut n’est fourni.
L’assistant vous permet ensuite de régler la
date et l’heure, de configurer le réseau et les
enregistrements, ainsi que la fonction de
gestion du disque dur.
Une fois les modifications effectuées, cliquez
sur Terminer pour quitter l’assistant
d’installation. L’enregistreur est désormais
prêt à l’emploi. L’enregistrement démarre
automatiquement.
Utilisation de l’enregistreur
L’unité peut être contrôlée de plusieurs
façons :
• À l’aide de la face avant ;
• À l’aide de la télécommande infra-rouge ;
• À l’aide de la souris ;
• À l’aide du navigateur Web ;
• À l’aide du clavier TVK-800 ;
• À l’aide d’un logiciel (TruVision Navigator,
TVRmobile).
Face avant
Les boutons situés sur la face avant
permettent de contrôler la plupart des
fonctions. Consultez la figure 2, à la page 29,
pour connaître l’emplacement des
commandes.
Télécommande infra-rouge
Les touches de la télécommande infrarouge
sont similaires aux boutons de la face avant.
Insérez les deux piles AAA dans la
télécommande.
Pour connecter la télécommande à
l’enregistreur :
1. Appuyez sur Menu à partir de la face
avant, ou cliquez sur le bouton droit de la
souris et sélectionnez Menu. Le menu
principal s’affiche.
2. Sélectionnez Paramètres du mode
d’affichage > Moniteur.
3. Vérifiez l’adresse associée à
l’enregistreur. La valeur par défaut
est 255. L’adresse du périphérique est
valable pour toutes les télécommandes
infra-rouges.
4. Appuyez sur le bouton Device
(Périphérique) de la télécommande.
5. Saisissez l’adresse du périphérique.
Celle-ci doit être identique à la valeur
indiquée sur l’enregistreur.
6. Appuyez sur le bouton OK de la
télécommande.
Souris USB
À la différence de la face avant dont la
fonctionnalité est limitée, la souris USB
fournie avec l’enregistreur peut être utilisée
pour activer toutes les fonctions de ce
dernier. La souris permet de parcourir et de
modifier les paramètres de l’interface
utilisateur.
Connectez la souris à l’enregistreur en
branchant son connecteur USB au port USB
Page 35

Guide de démarrage rapide du TruVision DVR 45HD 33 FR
situé sur la face avant ou arrière. La souris
est immédiatement prête à l’emploi et le
curseur doit alors s’afficher.
Navigateur Web
Le navigateur Web de l’enregistreur vous
permet d’afficher, d’enregistrer et de visionner
des vidéos. Il vous offre également la
possibilité de gérer toutes les fonctionnalités
de l’enregistreur à partir de tout PC doté
d’une connexion Internet. Enfin, il dispose de
commandes faciles à utiliser qui vous
donnent un accès rapide à toutes les
fonctions.
Pour accéder à l’unité, ouvrez le navigateur
Web et saisissez l’adresse IP attribuée à
l’enregistreur en tant qu’adresse Web. Dans
la fenêtre d’ouverture de session, saisissez
l’identifiant utilisateur et le mot de passe.
Les valeurs par défaut sont les suivantes :
• DHCP : désactivé par défaut
• Adresse IP : 192.168.1.82
• Masque de sous-réseau : 255.255.255.0
• Adresse de la passerelle : 192.168.1.1
• Port serveur : 8000
• Port HTTP : 80
• Port RTSP : 554
Remarque : vous devez faire en sorte que le
port serveur et le port RTSP soient redirigés
afin de pouvoir vous connecter correctement.
Figure 4 : Interface du navigateur Web
Mode d’affichage en direct
Le mode d’affichage en direct est le mode de
fonctionnement normal de l’unité. Il vous
permet de regarder les photos prises en
direct.
Vous pouvez accéder rapidement aux
fonctions utilisées régulièrement en mode
d’affichage en direct en cliquant sur l’image
de la caméra. Une barre d’outils s’affiche.
Reportez-vous à la figure 3, à la page 31,
pour obtenir une description des fonctions
disponibles.
Configuration de l’enregistreur
L’enregistreur profite d’une structure de menu
basée sur des icônes, vous permettant de
configurer les paramètres de l’unité. Chaque
icône de commande permet d’afficher une
fenêtre dans laquelle il est possible de
modifier certaines fonctions. La plupart des
menus ne sont accessibles qu’aux
administrateurs système.
Reportez-vous au guide de l’utilisateur de
l’enregistreur pour obtenir des informations
détaillées sur la configuration de l’unité.
Pour accéder au menu principal en mode
d’affichage en direct :
• Appuyez sur le bouton à partir de la
télécommande ou de la face avant.
- Ou -
• Appuyez sur le bouton droit de la souris
et sélectionnez Menu dans le menu
contextuel.
Le menu principal s’affiche. Cliquez sur une
icône de commande dans la barre d’outils du
menu pour la sélectionner.
Description des icônes de commande de
la barre d’outils du menu :
Permet de configurer les paramètres
d’affichage.
Permet de configurer les paramètres
de la caméra IP et de la caméra
analogique.
Page 36

FR 34 Guide de démarrage rapide du TruVision DVR 45HD
Permet de configurer les paramètres
réseau standard.
Permet de configurer les paramètres
d’enregistrement.
Permet de configurer les paramètres
d’événement et d’alarme.
Permet de configurer les paramètres
système.
Permet de configurer la fonction de
gestion du stockage.
Permet de configurer les paramètres
utilisateur.
Permet de consulter des informations
sur le système.
Permet d’obtenir des informations sur
les menus et barres d’outils de
l’interface.
Permet d’accéder aux options de
déconnexion, de redémarrage et
d’arrêt.
Caractéristiques techniques
Alimentation :
100 à 240 VAC, 50 à
60 Hz
Consommation énergétique (sans disque dur) :
TVR 4508HD
TVR 4516HD
≤ 45 W
≤ 65 W
Température de
fonctionnement
:
-10 à 55 ºC
Humidité relative
: 10 à 90 %
Dimensions (L x H x P) : 445 × 390 × 70 mm
Page 37

Guida di avvio rapido di TruVision DVR 45HD 35 IT
IT
Guida di avvio rapido di
TruVision DVR 45HD
Figura
1: Collegamenti del pannello posteriore (è mostrato il modello a 8 canali)
1. Consente di collegare quattro ingressi audio ai
connettori RCA.
2. Consente di collegare gli altoparlanti per
l'uscita audio..
3. Linea di ingresso.
4. Consente il collegamento a un dispositivo RS-
232.
5. Consente di collegare eSATA.
6. Consente di collegare un dispositivo RS-485
come una telecamera PTZ o una tastiera.
7. Consente di collegare fino a quattro uscite
allarme.
8. Interruttore di alimentazione (on/off).
9. Consente di collegare fino a 8 telecamere
analogiche/HD-TVI a connettori di tipo BNC
(in base al modello di registratore).
10. Consente di collegare un monitor BNC (solo per
il monitor evento).
11. Consente di collegare un dispositivo USB
opzionale, ad esempio un mouse, un
masterizzatore CD/DVD o un HDD.
12. Consente di collegare un HDTV. Il collegamento
HDMI supporta audio e video digitali.
13. Consente di collegare un monitor VGA.
14. Consente il collegamento a una rete.
15. Consente di collegare fino a 16 ingressi allarme.
16. Connessione di terra.
17. Consente di collegare un cavo di alimentazione
al registratore (incluso).
Indirizzo IP predefinito: 192.168.1.82
Page 38

IT 36 Guida di avvio rapido di TruVision DVR 45HD
Figura
2: Collegamenti del pannello anteriore (è illustrato il modello a 8 ingressi)
Nome Descrizione
1
. Pulsanti dei canali Consentono di passare da una telecamera all’altra nelle modalità live,
controllo PTZ o riproduzione.
2
. Pulsanti di
visualizzazione
F1: nella modalità di riproduzione, cliccare su questo pulsante per avviare
o arrestare il ritaglio del video. Per l'audio, premere F1 e un pulsante
numerico per riprodurre l'audio della telecamera selezionata nella
modalità di visualizzazione live.
Nella modalità delle informazioni di sistema, è possibile ottenere l'URL del
DDNS. Nella modalità di gestione degli utenti, viene visualizzata la
schermata Autorizzazione relativa a un elemento selezionato in Gestione
utenti > Utente > Gestione utenti. Eliminare l'elemento selezionato
dall'unità flash USB. Uscire dal tastierino virtuale.
F2: nella modalità di visualizzazione live, riproduzione continua e
riproduzione, premere questo pulsante per visualizzare o nascondere la
barra di controllo o del tempo. Nella modalità PTZ, consente di arrestare
le operazioni in corso. Consente di selezionare o deselezionare un
elemento. Consente di aprire una cartella selezionata del dispositivo di
archiviazione esterno, come un'unità flash USB utilizzata per
l'archiviazione.
A: nella modalità di visualizzazione live, consente di selezionare il monitor
principale.
B: nella modalità di visualizzazione live, consente di selezionare il monitor
degli eventi.
Seq: nella modalità di visualizzazione live, consente di avviare/arrestare la
visualizzazione in sequenza delle telecamere sul monitor corrente.
Visualizzazione: nella modalità vista multipla, consente di passare da una
vista multipla all'altra. Per il DVR a 8 ingressi: schermo intero, quad, 1 + 5,
1 + 7 e 3 + 3. Per il DVR a 16 ingressi: schermo intero, quad, 1 + 5, 1 + 7
e 4 + +4.
Nella modalità di informazioni sull'HDD o gestione utente, consente di
eliminare l'elemento selezionato. Nella modalità PTZ, consente di
eliminare un punto chiave selezionato. Nella modalità di ricerca nei
registri, consente di visualizzare i dettagli di un file di registro nei risultati
della ricerca nei registri.
3
. Pulsanti Menu e
Cerca
Menu: consente di accedere/uscire dal menu principale.
Cerca: nella visualizzazione live, consente di accedere al menu di ricerca
avanzata.
4
. LED di stato
Potenza: una luce verde fissa indica che il registratore funziona
correttamente. Una luce rossa indica un guasto.
Page 39

Guida di avvio rapido di TruVision DVR 45HD 37 IT
Nome Descrizione
Allarme evento: una luce rossa lampeggiante indica la presenza di un
sensore Ingr. allarme o di un altro allarme, come ad esempio il
rilevamento di movimento o di manomissione. L’assenza di luce indica
nessun allarme.
HDD: l’indicatore HDD è verde fisso durante la lettura o la scrittura dei
dati sull’HDD. Una luce rossa fissa indica un’eccezione o un errore
dell’HDD.
Tx/Rx: una luce verde fissa indica il corretto funzionamento della
connessione di rete. L’assenza di luce indica l’assenza di connessione a
una rete.
Allarme tecnico: una luce rossa fissa indica la presenza di un allarme
tecnico nel registratore. L’assenza di luce indica nessun allarme.
5
. Ricevitore IR Ricevitore per telecomando IR.
Per collegare il telecomando al registratore, premere il pulsante
Dispositivo, immettere l’indirizzo del dispositivo e premere Invio.
6
. Blocco pannello
anteriore
È possibile bloccare o sbloccare il pannello anteriore con una chiave.
Consente di accedere agli HDD.
7
. Pulsante Live Live: consente di passare alla modalità di visualizzazione live.
8
. Pulsanti di
riproduzione
Inverti: utilizzarlo nella modalità di visualizzazione live per riprodurre il
video più recente. Nella modalità di riproduzione, consente di riprodurre
una telecamera in direzione inversa.
Sospendi: nella modalità di visualizzazione live, consente di fermare
l’ultima immagine della visualizzazione live per tutte le telecamere attive.
Nella modalità di riproduzione, consente di arrestare la riproduzione.
Riproduci: nella modalità di visualizzazione live, consente di eseguire la
riproduzione dell’intera giornata per la telecamera corrente (riquadro video
superiore sinistro se in modalità di vista multipla). Nella modalità di
riproduzione, consente di riprodurre una telecamera in avanti. Nella
modalità di ricerca, consente di riprodurre un video selezionato o di
visualizzare un’istantanea. Nella modalità PTZ, consente di eseguire un
tour automatico.
Riproduzione: nella modalità di riproduzione, consente di avviare la
riproduzione del file corrente. La riproduzione comincia dall’inizio del file.
9
. Pulsanti PTZ
Zoom +/-: nelle modalità di visualizzazione live, di riproduzione e di
controllo PTZ, utilizzare questo pulsante per ingrandire e ridurre lo zoom.
Utilizzarlo anche per spostarsi all’interno dei menu.
Preset: nella modalità di controllo PTZ, premere Preset e un pulsante
numerico per richiamare il preset specificato.
Utilizzarlo anche per modificare le modalità festività, di ricerca video, di
selezione degli HDD, di gestione utenti e di gestione e ricerca dei
segnalibri..
Tour: nella modalità di controllo PTZ, premere Tour e un pulsante
numerico per richiamare lo shadow tour specificato.
Utilizzarlo anche per scorrere tra i mesi del calendario e per spostarsi in
un campo di testo.
10
. Direzione
I pulsanti di DIREZIONE vengono utilizzati per spostarsi tra diversi campi
e voci nei menu.
Pulsante Invio
Il pulsante INVIO viene utilizzato per confermare la selezione in una
qualsiasi modalità del menu.
Page 40

IT 38 Guida di avvio rapido di TruVision DVR 45HD
Nome Descrizione
11
. Pulsante Archivia
Premere una volta per accedere alla modalità di archiviazione rapida.
Premere due volte per avviare l’archiviazione. L’indicatore lampeggia in
verde durante la scrittura dei dati su un dispositivo di backup.
12
. Interfaccia USB Sono disponibili due porte USB. Utilizzare le porte USB per archiviare
video, aggiornare il firmware, utilizzare un mouse USB o collegare un
masterizzatore CD/DVD USB.
Figura
3: Barra di accesso rapido
1. Avvia registrazione manuale: consente di
avviare/arrestare una registrazione manuale.
2. Riproduzione immediata: consente di
riprodurre il video registrato dagli ultimi cinque
minuti.
3. Audio attivato: Consente di
abilitare/disabilitare l'uscita audio.
4. Istantanea: consente di acquisire
un'istantanea di un'immagine video.
5. Controllo PTZ: Passa in modalità Controllo
PTZ.
6. Zoom digitale: consente di impostare la
modalità di zoom digitale.
7. Impostazioni immagine: consente di
modificare i livelli di illuminazione dell'immagine.
8. Mostra testo: consente di visualizzare il testo
inserito sullo schermo.
9. Auxiliary Focus [Fuoco ausiliario]: consente di
attivare la messa a fuoco automatica
dell'obiettivo della telecamera
10. Lens Initialization [Inizializzazione obiettivo]:
consente di inizializzare l'obiettivo di una
telecamera con obiettivo motorizzato
11. Chiudi: consente di chiudere la barra degli
strumenti.
Contenuto della confezione
L'unità TruVision DVR 45HD (modello
TVR 45HD) viene fornita con i seguenti
elementi:
• Telecomando IR (a infrarossi)
• Due batterie AAA per il telecomando
• Cavi di alimentazione CA
• Mouse USB
• DVR
• CD con software e manuali
• Guida di avvio rapido di TruVision
DVR 45HD
• Manuale dell'utente di TruVision
DVR 45HD (su CD)
• Guida operatore del registratore
TruVision (su CD)
Ambiente di installazione
Per informazioni dettagliate fare riferimento al
manuale dell'utente, ma osservare comunque
i seguenti importanti requisiti:
• Posizionare l'unità in un luogo sicuro.
• Accertarsi che l'unità sia ubicata in
un'area ben ventilata.
• Non esporre l'unità alla pioggia o
all'umidità.
Installazione rapida
Passaggi consigliati per la configurazione del
registratore:
1. Collegare tutti i dispositivi richiesti al
pannello posteriore del registratore.
Vedere la Figura 1 a pagina 35.
Page 41

Guida di avvio rapido di TruVision DVR 45HD 39 IT
Connessioni di base:
Connettere le telecamere agli ingressi
della telecamera BNC e il monitor A
all'uscita VGA o HDMI. Collegare il
mouse alla porta USB posizionata sul
pannello frontale.
Connessioni opzionali:
Tutte le altre connessioni visualizzate
sono opzionali e variano in base ai
requisiti di installazione.
2. Collegare il cavo di alimentazione all'unità
e accenderla.
3. Configurare l'unità con le impostazioni
richieste utilizzando la procedura guidata
di configurazione.
Primo utilizzo
Il registratore dispone di una procedura
guidata per l'installazione rapida che
consente di configurare facilmente le
impostazioni di base del registratore al primo
utilizzo. La procedura consente di configurare
tutte le telecamere in maniera simultanea.
È successivamente possibile personalizzare
la configurazione come richiesto.
Per impostazione predefinita, la procedura di
configurazione guidata viene avviata in
seguito al caricamento del registratore. La
procedura guidata illustra dettagliatamente
all'utente alcune delle più importanti
impostazioni del registratore. Selezionare la
lingua preferita per il sistema, quindi
impostare la password dell'amministratore.
Non viene fornita alcuna password
predefinita.
La procedura guidata accompagnerà l'utente
attraverso i menu per l'impostazione di data
e ora, configurazione di rete gestione HDD
e configurazione della registrazione.
Una volta apportate tutte le modifiche
desiderate, fare clic sul pulsante Finish [Fine]
per uscire dalla procedura guidata. Il
registratore è pronto per essere utilizzato.
La registrazione inizia automaticamente.
Funzionamento del registratore
Sono disponibili diversi modi per controllare
l'unità:
• Controllo tramite pannello frontale
• Telecomando IR
• Controllo tramite mouse
• Controllo tramite browser Web
(TruVision Navigator, TVRmobile)
• Controllo tramite tastiera KTD-405
• Tastiera TVK-800 (da TVK-800 con
versione firmware 1.0i)
• Software (TruVision Navigator,
TVRmobile).
Pannello frontale
I pulsanti del pannello frontale consentono di
controllare la maggior parte delle funzioni. Per
una descrizione delle posizioni dei controlli,
vedere la Figura 2 a pagina 36.
Telecomando IR
I pulsanti del telecomando IR sono simili a
quelli del pannello frontale. Posizionare due
batterie AAA nel telecomando.
Per collegare il telecomando al
registratore:
1. Premere Menu sul pannello frontale
oppure fare clic con il pulsante destro del
mouse e selezionare Menu. Verrà
visualizzata la schermata del menu
principale.
2. Selezionare Gestione dispositivi >
Impostazioni generali.
3. Selezionare il valore dell'ID del controllo
remoto del registratore. Il valore
predefinito è 255. L'indirizzo del
dispositivo è valido per tutti i telecomandi
a infrarossi.
4. Sul telecomando premere il pulsante
Dispos.
5. Immettere il valore dell'ID del controllo
remoto. Deve essere uguale a quello del
registratore.
6. Premere OK sul telecomando.
Mouse USB
Il mouse USB fornito con il registratore
utilizza tutte le funzioni del registratore,
diversamente dal pannello frontale che
Page 42

IT 40 Guida di avvio rapido di TruVision DVR 45HD
dispone di funzionalità limitate. Utilizzare il
mouse per spostarsi ed apportare modifiche
alle impostazioni nell'interfaccia utente.
Collegare il mouse al registratore inserendo il
connettore USB del mouse nella porta USB
nel pannello posteriore o frontale. Il puntatore
dovrebbe comparire, indicando che il mouse
è immediatamente disponibile per l'uso.
Controllo tramite browser Web
Il browser Web del registratore consente di
visualizzare, registrare e riprodurre video,
nonché gestire tutti gli aspetti del registratore
da qualsiasi PC dotato di accesso a Internet.
Gli intuitivi controlli del browser consentono di
accedere rapidamente a tutte le funzioni del
registratore.
Per accedere all'unità, aprire un browser Web
e immettere l'indirizzo IP assegnato al
registratore come indirizzo Web. Nella
schermata di accesso, immettere l'ID utente e
la password.
I valori predefiniti delle impostazioni di rete
del registratore sono i seguenti:
• DHCP: Disabilitato per impostazione
predefinita.
• Indirizzo IP - 192.168.1.82
• Subnet mask - 255.255.255.0
• Indirizzo gateway - 192.168.1.1
• Porta server: 8000
• Porta HTTP: 80
• Porta RTSP: 554
Nota: per eseguire correttamente il
collegamento, è necessario inoltrare le
seguenti porte nel router: porta server e porta
RTSP.
Figura 4: Interfaccia browser Web
Mod. Vista Live
La Mod. Vista Live è la modalità di
funzionamento normale dell'unità, che
consente di visualizzare immagini in diretta
dalle telecamere.
È possibile accedere rapidamente alle
funzioni regolarmente utilizzate nella vista live
facendo clic sul tasto sinistro del mouse
quando il cursore si trova sull'immagine della
telecamera. Verrà visualizzata il collegamento
rapido della barra degli strumenti a comparsa.
Per una descrizione delle funzioni disponibili,
vedere la Figura 3 a pagina 38.
Configurazione del registratore
Il registratore dispone di una struttura basata
su menu accessibili tramite icone che
consente di configurare i parametri dell'unità.
Ciascuna icona di comando consente di
visualizzare una schermata che consente di
modificare un gruppo di impostazioni. La
maggior parte dei menu è disponibile solo per
gli amministratori del sistema.
Per informazioni dettagliate sulla
configurazione dell'unità, fare riferimento al
manuale dell'utente del registratore.
Accesso al menu principale dalla modalità
live:
• Premere il pulsante Menu sul
telecomando o sul pannello frontale.
- Oppure -
• Fare clic con il pulsante destro del mouse
e selezionare Menu dal menu a
comparsa.
Verrà visualizzata la schermata del menu
principale. Spostare il mouse su un'icona di
comando nella barra degli strumenti del menu
e fare clic per selezionarla.
Page 43

Guida di avvio rapido di TruVision DVR 45HD 41 IT
Descrizione delle icone di comando nella
barra degli strumenti del menu:
Consente di configurare le
impostazioni di visualizzazione.
Consente di configurare imp
ostazioni
di telecamere analogiche e IP.
Consente di configurare le
impostazioni standard di rete.
Consente di configurare le
impostazioni di registrazione.
Consente di configurare impostazioni
di allarmi ed eventi.
Consente di configurare le
impostazioni di sistema.
Consente di configurare la funzione
di gestione archiviazione.
Consente di configurare le
impostazioni dell'utente.
Consente di visualizzare informazioni
di sistema.
Fornisce informazioni di riferimento
sulle varie barre degli strumenti e i
menu dell'interfaccia.
Fornisce l'accesso a opzioni di
disconnessione, riavvio e arresto.
Specifiche
Alimentazione:
Da 100 a 240 V CA, 6,3
A, da 50 a 60 Hz
Assorbimento (senza HDD):
TVR 4508HD
TVR 4516HD
≤ 45 W
≤ 65 W
Temper
atura di
esercizio:
Da -10 a +55 ºC
Umidità relativa:
Da 10 a 90%
Dimensioni (L x A x P):
TVR 4508HD
TVR 4516HD
445 × 390 × 70 mm
Peso
(senza HDD):
≤ 5.0 kg
Page 44

NL 42 TruVision DVR 45HD Snel aan de slag-gids
NL
TruVision DVR 45HD Snel aan de
slag-gids
Afbeelding
1: Aansluitingen achterpaneel (8-kanaals model wordt getoond)
1. Aansluiting voor vier audio-ingangen op de
RCA-aansluitingen.
2. Aansluiting voor luidsprekers voor audiouitgang.
3. Lijninvoer.
4. Aansluiting voor een RS-232-apparaat.
5. Aansluiting voor eSATA.
6. Aansluiting voor een RS-485-apparaat, zoals
een PTZ-camera of bediendeel.
7. Aansluiting voor maximaal vier
alarmuitgangen.
8. Aan/uit-schakelaar.
9. Aansluiting voor maximaal 8 analoge
camera's/HD-TVI-camera's op de BNCaansluiting (afhankelijk van het
recordermodel).
10. Aansluiting voor een BNC-monitor (alleen
gebeurtenismonitor).
11. Aansluiting voor een optioneel USB-apparaat,
zoals een muis, CD/DVD-brander of HDD.
12. Aansluiting voor een HDTV. De HDMIaansluiting ondersteunt digitale audio en video.
13. Aansluiting voor een VGA-monitor.
14. Aansluiting voor een netwerkverbinding.
15. Aansluiting voor maximaal 16 alarmingangen.
16. Aardeaansluiting.
17. Aansluiting voor een voedingskabel op de
recorder (meegeleverd).
Standaard IP-adres: 192.168.1.82
Page 45

TruVision DVR 45HD Snel aan de slag-gids 43 NL
Afbeelding
2: Bedieningselementen op voorpaneel (8-kanaals model wordt afgebeeld)
Raadpleeg de gebruikershandleiding voor uitgebreide informatie over alle knopfuncties.
Naam Beschrijving
1
. Kanaalknoppen Schakel tussen de verschillende camera's in de live-
weergave-, PTZ-beheer- of afspeelmodi.
2
. Weergaveknoppen
F1: Klik in de afspeelmodus om het opnemen van videoclips te starten
en stoppen. Voor audio drukt u op F1 en een numerieke knop¨om de
audio van een opgegeven camera in de live-weergavemodus af te
spelen.
Met deze knop kunt u in de systeeminformatiemodus de het URL van
de DDNS opvragen. Met deze knop kunt u in de
gebruikersbeheermodus het machtigingenscherm van een geselecteerd
item onder Gebruikersbeheer > Gebruiker > Gebruikersbeheer openen.
Met deze knop kunt u een geselecteerd item van het USB-flashstation
verwijderen. Met deze knop kunt u het virtuele bediendeel sluiten.
F2: Met deze knop kunt u in de live-weergavemodus de modus voor de
gehele dag afspelen en de afspeelmodus, de tijd of de bedieningsbalk
weergeven of verbergen. Met deze knop kunt u in de PTZbedieningsmodus alle actuele bewerkingen stoppen. Met deze knop
kunt u een item selecteren of deselecteren. Met deze knop kunt u een
geselecteerde map van een extern opslagapparaat invoeren (bijv. USBflashstation voor archivering).
A: Hiermee kunt u in de live-weergavemodus de hoofdmonitor
selecteren.
B: Hiermee kunt u in de live-weergavemodus de gebeurtenismonitor
selecteren.
Weergavereeks: in de live-weergavemodus kunt u de weergavereeks
van camera's op de huidige monitor starten/stoppen.
Weergave: in de multiview-modus kunt u schakelen tussen de
verschillende multiviews. Voor 8-kanaals DVR: volledig, quad, 1+5, 1+7
en 3+3. Voor 16-kanaals DVR: volledig, quad, 1+5, 1+7, 3+3 en 4+4.
Met de knop Weergave kunt u in de HDD-gegevensmodus en de
gebruikersbeheermodus een geselecteerd item verwijderen. Met de
knop Weergave kunt u in de PTZ-modus een geselecteerde
sleutelpositie verwijderen. Met de knop Weergave kunt u in de
logboekzoekmodus de gegevens van een logboek in de zoekresultaten
voor logboeken weergeven.
3
. Knop Menu en knop
Zoeken
Menu: Het hoofdmenu openen/sluiten.
Zoeken: Met de knop Zoeken kunt u in de live-weergave het
geavanceerde zoekmenu openen.
Page 46

NL 44 TruVision DVR 45HD Snel aan de slag-gids
Naam Beschrijving
4
. Statuslampjes
Voeding: Een continu brandend groen lampje geeft aan dat de recorder
correct werkt. Een rood lampje geeft aan dat er een storing is
opgetreden.
Gebeurtenisalarm: Een knipperend rood lampje geeft aan dat er een
sensoralarm In of een ander alarm, zoals beweging of sabotage,
geactiveerd is. Als het niet brandt, betekent dit dat er geen alarm is.
HDD: Het HDD-lampje brand continu groen wanneer gegevens worden
gelezen van of geschreven naar de HDD. Een continu brandend rood
lampje geeft aan dat een HDD-uitzondering of -fout is opgetreden.
Tx/Rx: Een continue brandend groen lampje geef
t een normale werking
van de netwerkverbinding aan. Als het lampje niet brandt, betekent dit
dat het apparaat niet met een netwerk verbonden is.
Technisch alarm: Een continu brandend rood lampje geeft aan dat er
een technisch alarm vanuit de recorder is. Als het niet brandt, betekent
dit dat er geen alarm is.
5
. Infraroodontvanger Ontvanger voor de infrarood afstandsbediening.
Om de afstandsbediening op de recorder aan te sluiten, drukt u op de
knop Apparaat, voert u het apparaatadres in en drukt u op de knop
Enter.
6
. Vergrendeling voorpaneel U kunt het voorpaneel vergrendelen of ontgrendelen met een sleutel.
Het voorpaneel biedt toegang tot de HDD's.
7
. Knop Live Live: Overschakelen naar de live-weergavemodus.
8
. Afspeelknoppen
Achteruit afspelen: Met deze knop kunt u in de live-weergavemodus
het oudste videobestand afspelen. Met deze knop kunt u in de
afspeelmodus camerabeelden in de omgekeerde richting afspelen.
Pauzeren: In de live-weergavemodus het laatste beeld stilzetten van de
live weergave van alle actieve camera's die worden weergegeven. In de
afspeelmodus kunt u met de knop Pauzeren het afspelen stoppen.
Afspelen: In de live-weergavemodus een 24-uurs weergave afspelen
van de huidige camera (videosegment linksboven indien in multiviewmodus). Met deze knop kunt u in de afspeelmodus camerabeelden
vooruit afspelen. Met deze knop kunt u in de zoekmodus een
geselecteerde video afspelen of een momentopname bekijken.
Met deze knop kunt u in de PTZ-beheermodus een automatisch traject
uitvoeren.
Afspelen: In de afspeelmodus kunt u het afspelen van het huidige
bestand starten. Start aan het begin van het bestand.
9
. PTZ-knoppen
Zoomen +/-: Gebruik in de live-weergavemodus, de afspeelmodus
en de PTZ-beheermodus deze knop om in en uit te zoomen.
Gebruik deze knop ook om in de menu's te navigeren.
Preset: Druk in de PTZ-beheermodus op Preset en een numerieke
knop om de opgegeven preset op te roepen.
Gebruik deze knop ook om de vakantiemodus, de videozoekmodus, de
HDD-selectiemodus, de gebruikersbeheermodus, het bladwijzerbeheer
en de bladwijzerzoekfunctie te bewerken.
Traject: Druk in de PTZ-beheermodus op Traject en een numerieke
knop om het opgegeven schaduwtraject op te roepen.
Gebruik deze knop ook om tussen kalendermaanden te wisselen en in
een tekstveld te navigeren.
Page 47

TruVision DVR 45HD Snel aan de slag-gids 45 NL
Naam Beschrijving
10
. Richting
Met de knoppen RICHTING kunt u navigeren tussen de verschillende
velden en items in menu's.
Knop Enter
Met de knop ENTER kunt u selecties in de menumodi bevestigen.
11
. Knop Archiveren
Druk één keer op de knop Archiveren om de snelle archiveringsmodus
te activeren. Druk twee keer op de knop Archiveren om het archiveren
te starten. Het lampje knippert in het groen wanneer er gegevens naar
het back-upapparaat worden geschreven.
12
. USB-interface Er zijn twee USB-poorten. Gebruik de USB-poorten om video te
archiveren of firmware bij te werken, gebruik de poort voor een USBmuis of een USB CD/DVD-brander.
Afbeelding
3: De werkbalk voor snelle toegang
1. Handmatige opname starten: Start/stopt de
opname handmatig.
2. Direct afspelen: Speelt het opgenomen
videomateriaal van de afgelopen vijf minuten
af.
3. Audio aan: Schakelt de audio-uitgang in/uit.
4. Momentopname: Maakt een momentopname
van een videobeeld.
5. PTZ-bediening: Schakelt u de PTZ-
bedieningsmodus in.
6. Digitale zoom: Schakelt de digitale
zoommodus in.
7. Beeldinstellingen: Wijzigt de
belichtingsniveaus van het beeld.
8. Tekst weergeven: Geeft de ingevoerde tekst op
het scherm weer.
9. Extra scherpstellen: Stelt het cameraobjectief
automatisch scherp.
10. Objectief initialiseren: Initialiseert het objectief
van een camera met een gemotoriseerd
objectief.
11. Sluiten: Sluit de werkbalk.
Inhoud van de verpakking
De TruVision DVR 45HD (model TVR 45HD)
wordt geleverd met de volgende items:
• Draadloze (infrarood) afstandsbediening
• Twee AAA-batterijen voor de
afstandsbediening
• Voedingskabels
• USB-muis
• Recorder
• CD met software en handleidingen
• TruVision DVR 45HD Beknopte
handleiding
• TruVision DVR 45HD
Gebruikershandleiding (op CD)
• TruVision Recorder Operator-handleiding
(op CD)
Installatieomgeving
Raadpleeg de gebruikershandleiding voor
gedetailleerde informatie. Houd echter
rekening met de volgende belangrijke
vereisten:
• Zet de recorder op een veilige plek neer.
• Zorg dat de recorder in een goed
geventileerde omgeving staat.
• Stel de recorder niet bloot aan regen of
vocht.
Page 48

NL 46 TruVision DVR 45HD Snel aan de slag-gids
Snelle installatie
Aanbevolen stappen voor het instellen van de
recorder:
1. Sluit alle vereiste apparaten aan op het
achterpaneel van de recorder. Zie
afbeelding 1 op pagina 42.
Basisaansluitingen:
Sluit de camera's aan op de BNCcamera-ingangen en monitor A op de
VGA- of HDMI-uitgang. Sluit de muis aan
op de USB-poort in het voorpaneel.
Optionele aansluitingen:
Alle overige weergegeven aansluitingen
zijn optioneel en afhankelijk van de
installatievereisten.
2. Sluit de voedingskabel aan op de
recorder en schakel de voeding in.
3. Stel de vereiste instellingen in voor de
recorder met behulp van de
installatiewizard.
Voor de eerste keer gebruiken
De recorder beschikt over een
installatiewizard waarmee u snel en
eenvoudig voor het eerst de basisinstellingen
van de recorder kunt instellen. In de
installatiewizard kunt u alle camera's tegelijk
configureren. Daarna kunt u de configuratie
naar wens aanpassen.
Standaard wordt de installatiewizard gestart
zodra de recorder is geladen. De
installatiewizard helpt u met een aantal van
de belangrijkste instellingen van uw recorder.
Stel de voorkeurstaal in voor het systeem en
voer vervolgens het admin-wachtwoord in. Er
is geen standaardwachtwoord toegewezen.
De installatiewizard leidt u vervolgens door de
menu's voor het instellen van tijd en datum,
de netwerkconfiguratie, het HDD-beheer en
de opnameconfiguratie.
Wanneer alle vereiste wijzigingen zijn
ingesteld, klikt u op de knop Beëindigen om
de installatiewizard af te sluiten. De recorder
is nu klaar voor gebruik. Het opnemen wordt
automatisch gestart.
De recorder bedienen
De recorder kan op een aantal manieren
worden bediend:
• Bediening via het voorpaneel
• Draadloze afstandsbediening
• Muisbediening
• Bediening via de webbrowser
• TVK-800-bediendeel
• Software (TruVision Navigator,
TVRmobile)
Voorpaneel
Met de knoppen op het voorpaneel kunt u de
meeste functies bedienen. Zie afbeelding 2
op pagina 43 voor een beschrijving van het
bediendeel.
Draadloze afstandsbediening
De knoppen op de draadloze
afstandsbediening lijken op die van het
voorpaneel. Plaats twee AAA-batterijen in de
afstandsbediening.
U verbindt als volgt de afstandsbediening
met de recorder:
1. Druk op de knop Menu op het voorpaneel
of klik met de rechtermuisknop en
selecteer Menu. Het hoofdmenuscherm
wordt weergegeven.
2. Selecteer Instellingen weergavemodus
> Monitor.
3. Controleer de waarde voor het
apparaatadres van de recorder. De
standaard waarde is 255. Dit
apparaatadres is geldig voor alle
draadloze afstandsbedieningen.
4. Druk op de knop Apparaat op de
afstandsbediening.
5. Voer de waarde voor het apparaatadres
in. Deze moet hetzelfde zijn als die van
de recorder.
6. Druk op OK op de afstandsbediening.
USB-muis
De USB-muis die bij de recorder is geleverd,
bedient alle functies van de recorder, in
Page 49

TruVision DVR 45HD Snel aan de slag-gids 47 NL
tegenstelling tot het voorpaneel dat slechts
een beperkte functionaliteit biedt. Met de muis
kunt u navigeren en instellingen wijzigen in de
gebruikersinterface.
Sluit de muis aan op de recorder door de
USB-aansluiting van de muis in de USB-poort
in het achter- of het voorpaneel te steken. U
kunt de muis direct gebruiken en de
muisaanwijzer moet op het scherm
verschijnen.
Bediening via de webbrowser
Met de webbrowser van de recorder kunt u
video bekijken, opnemen en afspelen, maar
ook alle aspecten van de recorder beheren
vanaf een willekeurige PC met internettoegang. De eenvoudige browserbediening
biedt u snel toegang tot alle recorderfuncties.
Als u toegang wilt tot de recorder, opent u
een webbrowser en voert u het IP-adres dat
is toegewezen aan de recorder in als
webadres. Geef in het inlogvenster de
standaard gebruikers-ID en het wachtwoord
op:
De standaard waarden voor de
netwerkinstellingen van de recorder zijn:
• DHCP: Standaard uitgeschakeld.
• IP-adres - 192.168.1.82
• Subnetmasker - 255.255.255.0
• Gateway-adres - 192.168.1.1
• Serverpoort: 8000
• HTTP-poort: 80
• RTSP-poort: 554
Opmerking: De volgende poorten moeten
worden doorgestuurd in de router voor een
juiste verbinding: Serverpoort en RTSP-poort.
Afbeelding 4: Webbrowserinterface
Live-weergavemodus
De live-weergavemodus is de normale modus
van de camera voor het bekijken van livebeelden van de camera's.
Regelmatig gebruikte functies in de liveweergave kunnen snel worden geselecteerd
door op de linkermuisknop te klikken wanneer
de cursor in het camerabeeld staat. De
werkbalk voor live-weergave verschijnt.
Zie afbeelding 3 op pagina 45 voor een
beschrijving van de beschikbare functies.
Recorder configureren
De recorder beschikt over een met
pictogrammen aangestuurde
bedieningsstructuur waarmee u de
parameters van de camera kunt instellen.
Elk opdrachtpictogram toont een scherm
waarmee u een groep instellingen kunt
bewerken. De meeste menu's zijn alleen
beschikbaar voor administrators.
Raadpleeg de gebruikershandleiding van de
recorder voor uitgebreide informatie over het
configureren van de recorder.
U opent als volgt het hoofdmenu vanuit de
live-weergavemodus:
• Druk op de knop Menu op de
afstandsbediening of het voorpaneel.
- Of -
• Klik met de rechtermuisknop en selecteer
Menu in het pop-upmenu.
Het hoofdmenuscherm wordt weergegeven.
Beweeg de muis over een opdrachtpictogram
in de menuwerkbalk en klik erop om het te
selecteren.
Page 50

NL 48 TruVision DVR 45HD Snel aan de slag-gids
Beschrijving van de
opdrachtpictogrammen in de
menuwerkbalk:
Weergave-instellingen configureren.
Analoge camera-instellingen en IPcamera-instellingen configureren.
Standaard netwerkinstellingen
configureren.
Opname-instellingen configureren.
Alarm- en gebeurtenis-instellingen
configureren.
Systeeminstellingen configureren.
Opslagbeheer configureren.
Gebruikersinstellingen configureren.
Systeemgegevens bekijken.
Verschaft refere
ntiegegevens over de
verschillende werkbalken en menu's
van de interface.
Verschaft toegang tot de opties voor
uitloggen, opnieuw opstarten en
afsluiten.
Specificaties
Voeding:
100 tot 240 VAC,
6,3 A, 50 tot 60 Hz
Stroomverbruik (zonder HDD):
TVR 4508HD
TVR 4516HD
≤ 45 W
≤ 65 W
Bedrijfstemperatuur:
-10 tot +55 ºC
Relatieve
luchtvochtigheid:
10 tot 90%
Afmetingen (B x H x D):
445 × 390 × 70 mm
Gewicht (zonder HDD):
≤ 5 kg
Page 51

Skrócona instrukcja obsługi rejestratora TruVision DVR 45HD 49 PL
PL
Skrócona instrukcja obsługi
rejestratora TruVision DVR 45HD
Rysunek
1: złącza na panelu tylnym
1. Podłącz cztery wejścia audio do złączy RCA.
2. Podłącz do głośników w celu odtwarzania
dźwięku.
3. Wejście liniowe
4. Podłącz do urządzenia RS-232.
5. Podłącz eSATA.
6. Podłącz do urządzenia wyposażonego w port
RS-485, na przykład do kamery PTZ lub
klawiatury.
7. Podłącz do czterech wyjść alarmowych.
8. Wyłącznik zasilania (wł./wył.).
9. Podłącz do 8 kamer analogowych/HD-TVI do
złączy BNC (zależy od modelu rejestratora).
10. Podłącz do monitora BNC (tylko monitor
zdarzeń).
11. Podłącz do opcjonalnego urządzenia USB,
takiego jak mysz, nagrywarka CD/DVD lub dysk
twardy.
12. Podłącz do telewizora HD. Połączenie HDMI
obsługuje cyfrowe audio i wideo.
13. Podłącz do monitora VGA.
14. Podłącz do sieci.
15. Podłącz maksymalnie 16 wejść alarmowych.
16. Podłącz do uziemienia.
17. Podłącz przewód zasilający do rejestratora (w
zestawie).
Domyślny adres IP: 192.168.1.82
Page 52

PL 50 Skrócona instrukcja obsługi rejestratora TruVision DVR 45HD
Rysunek
2: połączenia na panelu przednim (pokazano model 8-kanałowy)
Szczegółowe informacje na temat wszystkich funkcji przycisków można znaleźć w instrukcji
obsługi.
Nazwa Opis
1
. Przyciski kanałów
Przełączanie między różnymi kamerami na żywo i trybami sterowania PTZ lub
odtwarzania.
2
. Przyciski
wyświetlania
F1: naciśnij w trybie podglądu na żywo, aby rozpocząć lub zakończyć wycinanie
fragmentu wideo. Aby uzyskać dźwięk, naciśnij przycisk F1 i przycisk
numeryczny w celu odtwarzania dźwięku z określonej kamery w trybie podglądu
na żywo.
W trybie Informacje o systemie umożliwia pobranie adresu URL DDNS. W trybie
Zarządzanie użytkownikami powoduje wyświetlenie ekranu Uprawnienie dla
wybranej pozycji w menu Zarządzanie użytkownikami > Użytkownik >
Zarządzanie użytkownikami. Umożliwia usunięcie wybranego elementu z
pamięci USB. Powoduje zamknięcie klawiatury wirtualnej.
F2: naciśnij w trybach podglądu na żywo, odtwarzania całodniowego i
odtwarzania, aby wyświetlić/ukryć pasek czasu lub pasek sterowania. W trybie
PTZ powoduje zatrzymanie wszystkich trwających operacji. Umożliwia
zaznaczenie lub anulowanie zaznaczenia elementu. Umożliwia przejście do
wybranego folderu zewnętrznego urządzenia pamięci masowej, takiego jak
pamięć USB używana do archiwizacji.
A: w trybie podglądu na żywo umożliwia wybranie monitora głównego.
B: w trybie podglądu na żywo umożliwia wybranie monitora zdarzeń.
Sekwencja: W trybie podglądu na żywo umożliwia uruchomienie/zatrzymanie
sekwencyjnego wyświetlania obrazu z kamer na bieżącym monitorze.
Ekran: W trybie widoku z wielu kamer służy do przełączania się między
widokami z wielu kamer. W rejestratorze 8-kanałowym: pełny, poczwórny, 1+5,
1+7 i 3+3). W rejestratorze 16-kanałowym: pełny, poczwórny, 1+5, 1+7 i 3+3 i
4+4.
W trybie informacji HDD oraz zarządzania użytkownikami umożliwia usunięcie
wybranej pozycji. W trybie PTZ umożliwia usunięcie wybranego punktu
zatrzymania. W trybie przeszukiwania rejestru umożliwia wyświetlenie pliku
rejestru w oknie Wyniki przeszukiwania rejestru.
Page 53

Skrócona instrukcja obsługi rejestratora TruVision DVR 45HD 51 PL
Nazwa Opis
3
. Przyciski Menu
i Szukaj
Menu: przejście do menu głównego/wyjście z tego menu.
Szukaj: w trybie podglądu na żywo umożliwia uruchomienie menu
zaawansowanego wyszukiwania.
4
. Diody stanu
Zasilanie
: świecenie się diody w kolorze zielonym wskazuje prawidłową pracę
rejestratora.Kolor czerwony oznacza błąd.
Alarm dotyczący zdarzenia: migająca dioda czerwona sygnalizuje alarm z wejścia
lub inny alarm, np. związany z ruchem lub sabotażem.Jeśli dioda nie świeci,
oznacza to brak alarmu.
Dysk twardy: wskaźnik dysku twardego miga na czerwono podczas odczytywania
lub zapisywania danych na dysku twardym. świecące stale czerwone światło
oznacza wyjątek lub błąd dysku twardego.
Tx/Rx: świecenie się diody w kolorze zielonym wskazuje stan normalny
połączenia sieciowego.Brak światła oznacza, że rejestrator nie jest połączony
z siecią.
Alarm techniczny
: świecąca stale czerwona dioda oznacza, że aktywny jest alarm
techniczny sygnalizowany przez rejestrator. Jeśli dioda nie świeci, oznacza to
brak alarmu.
5
. Odbiornik pilota na
podczerwień
Odbiornik dla pilota na podczerwień.
Aby podłączyć pilot zdalnego sterowania do rejestratora, naciśnij przycisk
Urządzenie, wprowadź adres urządzenia i naciśnij przycisk Enter.
6
.
Blokada panelu
przedniego
Panel przedni można zablokować lub odblokować za pomocą klucza. Umożliwia
to dostęp do dysków twardych.
7
.
Przycisk Podgląd na
żywo
Przełączanie do trybu podglądu na żywo.
8
. Przyciski
odtwarzania
Wstecz
: użyj go w trybie podglądu na żywo, aby odtworzyć najwcześniejsze
wideo. W trybie odtwarzania powoduje odtwarzanie obrazu z kamery do tyłu.
Pauza
: w trybie podglądu na żywo zatrzymuje ostatni obraz ze wszystkich
aktywnych kamer. W trybie odtwarzania powoduje zatrzymanie odtwarzania.
Odtwórz: w trybie podglądu na żywo odtwarzanie całodniowe z bieżącej kamery
(w lewym górnym rogu, jeśli jest widoczny tryb widoku z wielu kamer). W trybie
odtwarzania powoduje odtwarzanie obrazu z kamery do przodu. W trybie
wyszukiwania powoduje odtwarzanie wybranego wideo lub wyświetlenie zrzutu
obrazu. W trybie PTZ powoduje wykonanie trasy automatycznej.
Live: przełączanie do trybu podglądu na żywo.
Powtórka: w trybie odtwarzania powoduje rozpoczęcie odtwarzania bieżącego
pliku. Odtwarzanie rozpoczyna się od początku pliku.
9
. Przyciski PTZ.
Zoom +/-: w trybach podglądu na żywo, odtwarzania i sterowan
ia PTZ przyciski te
umożliwiają powiększenie lub zmniejszenie obrazu z kamery. Służą także do
poruszania się po menu.
Preset: w trybie sterowania PTZ naciśnij przycisk Preset i przycisk numeryczny,
aby przywołać określony preset.
Służy także do edycji trybu świąt, trybu wyboru dysku twardego, trybu
zarządzania użytkownikami, zarządzania znacznikami i wyszukiwania zakładek.
Trasa: w trybie sterowania PTZ naciśnij przycisk Trasa i przycisk numeryczny,
aby przywołać określoną trasę typu shadow.
Służy także do przewijania miesięcy kalendarza oraz do nawigacji w polu
tekstowym.
Page 54

PL 52 Skrócona instrukcja obsługi rejestratora TruVision DVR 45HD
Nazwa Opis
10
. Kierunek
PRZYCISKI KIERUNKU służą do nawigacji między różnymi polami i elementami
w menu.
Przycisk Enter
Przycisk ENTER służy do potwierdzania wyboru w dowolnym trybie menu.
11
. Przycisk
Archiwum
Naciśnij raz, aby przejść do trybu szybkiej archiwizacji. Naciśnij dwa razy, aby
rozpocząć archiwizację. Podczas zapisywania danych na urządzeniu kopii
zapasowej wskaźnik miga na zielono.
12
. Interfejs USB Dostępne są dwa porty USB. Portów USB można użyć do archiwizowania wideo,
aktualizowania oprogramowania sprzętowego, podłączenia myszy lub
nagrywarki USB CD/DVD.
Rysunek
3: pasek narzędzi szybkiego dostępu
1. Rozpocznij ręczne nagrywanie:
rozpoczęcie/zatrzymanie nagrywania
ręcznego.
2. Natychmiastowe odtwarzanie: odtwarzanie
pięciu ostatnich minut nagrania.
3. Audio włączone: włącz/wyłącz wyjście audio.
4. Zrzut obrazu: umożliwia przechwycenie
migawki obrazu wideo.
5. Sterowanie PTZ: wejście do trybu sterowania
PTZ.
6. Powiększenie cyfrowe: wejście do
powiększenia cyfrowego.
7. Ustawienia obrazu: modyfikacja poziomu
oświetlenia obrazu.
8. Pokaż tekst: wyświetlanie wstawionego tekstu.
9. Ostrość dodatkowa: automatyczne ustawienie
ostrości obiektywu.
10. Inicjowanie soczewki: inicjalizacja
sterowanego silnikiem obiektywu kamery.
11. Zamknij: zamknięcie paska narzędzi.
Zawartość opakowania
Rejestrator TruVision DVR 45HD (model
TVR 45HD) jest dostarczany z następującymi
elementami:
• Pilot zdalnego sterowania (na
podczerwień)
• Dwie baterie typu AAA do pilota
• Przewody zasilające prądu przemiennego
• Mysz USB
• Rejestrator
• Dysk CD z oprogramowaniem oraz
instrukcjami obsługi
• Skrócona instrukcja obsługi rejestratora
TruVision DVR 45HD
• Instrukcja obsługi rejestratora TruVision
DVR 45HD (na płycie CD)
• Instrukcja obsługi dla operatora
rejestratora TruVision (na dysku CD)
Warunki instalacji
Szczegółowe informacje znajdują się
w instrukcji obsługi, ale należy przestrzegać
następujących ważnych wymagań:
• Umieścić urządzenie w bezpiecznym
miejscu.
• Upewnić się, że urządzenie znajduje się
w dobrze wentylowanym pomieszczeniu.
• Nie wystawiać urządzenia na działanie
deszczu czy wilgoci.
Page 55

Skrócona instrukcja obsługi rejestratora TruVision DVR 45HD 53 PL
Szybka instalacja
Zalecana procedura konfigurowania
rejestratora:
1. Podłącz wszystkie wymagane urządzenia
do panelu tylnego rejestratora. Patrz
rysunek 1 na stronie 49.
Połączenia podstawowe:
Podłącz kamery do wejść kamer BNC
oraz monitor A do wyjścia VGA lub HDMI.
Podłącz mysz do portu USB na panelu
przednim.
Połączenia opcjonalne:
wszystkie inne przedstawione połączenia
są opcjonalne i zależne od wymagań
instalacji.
2. Podłącz przewód zasilający i włącz
zasilanie.
3. Skonfiguruj wymagane ustawienia
urządzenia przy użyciu kreatora
konfiguracji.
Pierwsze użycie
Rejestrator jest wyposażony w ekspresowy
kreator instalacji, który umożliwia łatwą
konfigurację podstawowych ustawień
rejestratora przy pierwszym użyciu.
Konfiguruje on wszystkie kamery
jednocześnie. Konfigurację taką można
następnie zmienić lub dostosować.
Domyślnie kreator konfiguracji uruchamia się
po załadowaniu rejestratora. Kreator
umożliwia skonfigurowanie najważniejszych
ustawień rejestratora krok po kroku. Wybierz
preferowany język dla systemu, a następnie
wprowadź hasło administratora. Nie ma
domyślnego hasła.
Następnie kreator prowadzi przez menu
w celu ustawienia daty i godziny,
skonfigurowania sieci, zarządzania
przestrzenią dyskową i skonfigurowania
nagrywania.
Po wprowadzenia wszelkich niezbędnych
zmian, kliknij przycisk Zakończ, aby
zakończyć pracę kreatora. Rejestrator jest
gotowy do użytku. Nagrywanie rozpoczyna
się automatycznie.
Obsługa rejestratora
Dostępnych jest kilka sposobów sterowania
urządzeniem:
• Sterowanie za pomocą panelu
przedniego
• Pilot zdalnego sterowania (na
podczerwień)
• Sterowanie za pomocą myszy
• Sterowanie za pomocą przeglądarki
internetowej
• Pulpit TVK-800
• Oprogramowanie (TruVision Navigator,
TVRmobile)
Panel przedni
Przyciski na panelu przednim służą do
sterowania większością funkcji. Zobacz
rysunek 2 na stronie 50, aby sprawdzić
lokalizację elementów sterujących.
Pilot zdalnego sterowania na podczerwień
Obsługa przycisków pilota na podczerwień
przypomina użycie panelu przedniego. Włóż
do pilota dwie baterie typu AAA.
Aby podłączyć pilota zdalnego sterowania
do rejestratora:
1. Naciśnij przycisk Menu na panelu
przednim lub kliknij prawym przyciskiem
myszy i wybierz polecenie Menu.
Otworzy się menu główne.
2. Wybierz kolejno Ustawienia trybu
wyświetlania > Monitor.
3. Sprawdź wartość adresu rejestratora.
Wartość domyślna wynosi 255. Ten adres
urządzenia jest prawidłowy dla wszystkich
pilotów na podczerwień.
4. Na pilocie naciśnij przycisk Urządzenie.
5. Wprowadź adres urządzenia. Musi być
taki sam, jak na rejestratorze.
6. Naciśnij przycisk OK na pilocie.
Mysz USB
Mysz USB dostarczona z rejestratorem może
być używana do obsługi wszystkich funkcji
urządzenia w przeciwieństwie do panelu
Page 56

PL 54 Skrócona instrukcja obsługi rejestratora TruVision DVR 45HD
przedniego, który ma ograniczone funkcje. Za
pomocą myszy można przechodzić między
menu i wprowadzać zmiany w ustawieniach
w interfejsie użytkownika.
Mysz należy podłączyć do rejestratora
za pośrednictwem portu USB na panelu
przednim lub tylnym. Mysz uruchomi się
natychmiast i na ekranie powinien pojawić
się kursor.
Sterowanie za pomocą przeglądarki
internetowej
Przeglądarka internetowa rejestratora
umożliwia wyświetlanie, nagrywanie
i odtwarzanie obrazów wideo, a także
zarządzanie wszystkimi aspektami systemu
z dowolnego komputera z dostępem do
Internetu. Łatwe w obsłudze elementy
sterujące przeglądarki zapewniają szybki
dostęp do wszystkich funkcji rejestratora.
Aby uzyskać dostęp do rejestratora, należy
otworzyć przeglądarkę internetową i jako
adres internetowy wpisać adres IP przypisany
do urządzenia. Na ekranie logowania należy
wprowadzić identyfikator użytkownika i hasło.
Domyślne wartości ustawień sieciowych
rejestratora:
• DHCP: wyłączony domyślnie.
• Adres IP — 192.168.1.82
• Maska podsieci — 255.255.255.0
• Adres bramy — 192.168.1.1
• Port serwera: 8000
• Port HTTP: 80
• Port RTSP: 554
Uwaga: aby uzyskać poprawne połączenie,
należy poprawnie ustawić przekazywanie
wymienionych poniżej portów w routerze:
port serwera i port RTSP.
Rysunek 4: interfejs przeglądarki
internetowej
Tryb podglądu na żywo
Tryb podglądu na żywo to standardowy tryb
pracy urządzenia, w którym użytkownik widzi
bieżący obraz z kamer.
Regularnie używane funkcje trybu podglądu
na żywo są dostępne za pomocą kliknięcia
lewym przyciskiem myszy, gdy kursor
znajduje się na obrazie z kamery. Zostanie
wyświetlony pasek narzędzi podglądu na
żywo. Opis dostępnych funkcji przedstawia
rysunek 3 na stronie 52.
Konfigurowanie rejestratora
Rejestrator udostępnia menu złożone z ikon
umożliwiające skonfigurowanie parametrów
urządzenia. Każda ikona polecenia wyświetla
ekran, który umożliwia edycję grupy ustawień.
Większość menu jest dostępna tylko dla
administratorów systemu.
Szczegółowe informacje na temat
konfigurowania rejestratora zawiera Instrukcja
użytkownika rejestratora.
Aby przejść do menu głównego z trybu
podglądu na żywo:
• Naciśnij przycisk Menu na pilocie lub
panelu przednim.
- lub -
• Kliknij prawym przyciskiem myszy
i wybierz opcję Menu z menu
podręcznego.
Otworzy się menu główne. Umieść wskaźnik
myszy nad ikoną polecenia na pasku narzędzi
menu i kliknij, aby wybrać ikonę.
Page 57

Skrócona instrukcja obsługi rejestratora TruVision DVR 45HD 55 PL
Opis ikon poleceń na pasku narzędzi
menu:
Konfigurowanie ustawień
wyświetlania.
Konfigurowanie ustawień kamery
analogowej oraz IP.
Konfigurowanie standardowych
ustawień sieci.
Konfigurowanie ustawień
nagrywania.
Konfigurowanie ustawień alarmów
i zdarzeń.
Konfigurowanie ustawień systemu.
Konfigurowanie zarządzania
pamięcią.
Konfigurowanie ustawień
użytkownika.
Wyświetlanie informacji o systemie.
Dostarcza informacje dotyczące
różnych pasków narzędzi i menu
interfejsu.
Dostęp do opcji wylogowania,
ponownego uruchomienia
i wyłączenia.
Dane techniczne
Zasilanie:
Od 100 do 240 VAC, 6,3
A, od 50 do 60 Hz
Pobór mocy (bez dysku twardego):
TVR 4508HD
TVR 4516HD
≤ 45 W
≤ 65 W
Temperatura
eksploatacji:
Od -10 do +55°C
Wilgotność względna:
Od 10 do 90%
Wymiary (szer. x wys.
x głęb.):
445 × 390 × 70 mm
Waga (bez
dysków): ≤ 5,0 kg
Page 58

PT 56 Guia Rápido do TruVision DVR 45HD
PT
Guia Rápido do TruVision
DVR 45HD
Figura
1: Ligações do painel traseiro do TVR 45HD (modelos de 8 canais mostrados)
1. Ligar quatro entradas de áudio a conectores
RCA.
2. Ligar a colunas para saída de áudio.
3. Entrada de linha.
4. Ligar a um dispositivo RS-232.
5. Ligar eSATA.
6. Ligar a um dispositivo RS-485, como uma
câmara PTZ ou um teclado.
7. Ligar até quatro saídas de alarme.
8. Interruptor de alimentação (ligar/desligar).
9. Ligar até 8 câmaras analógicas/HD-TVI a
conectores de tipo BNC (consoante o modelo
do gravador).
10. Ligar a um monitor BNC (apenas para monitor
de eventos).
11. Ligar a um dispositivo USB opcional, como um
rato, gravador de CD/DVD ou HDD.
12. Ligar a uma HDTV. A ligação HDMI suporta
áudio e vídeo digital.
13. Ligar a um monitor VGA.
14. Ligar a uma rede.
15. Ligar até 16 entradas de alarme.
16. Ligar à terra.
17. Ligar um cabo de alimentação ao gravador
(incluído).
Endereço IP predefinido: 192.168.1.82
Page 59

Guia Rápido do TruVision DVR 45HD 57 PT
Figura
2: Controlos do painel frontal (na figura, modelo de 8 canais)
Para informações detalhadas sobre todas as funções dos botões, consulte o manual do
utilizador.
Nome Descrição
1
. Botões de canal Alternar entre câmaras diferentes nos modos de visualização em direto, controlo
PTZ ou reprodução.
2
. Botões do visor
F1: no modo de reprodução, clique para iniciar e parar recorte de vídeo. Para
áudio, premir F1 e uma tecla numérica para reproduzir o áudio da câmara
específica no modo de visualização em direto.
No modo de informações do sistema, obter o URL de DDNS. No modo de
gestão de utilizadores, chamar o ecrã de permissão de um item selecionado em
Gestão de utilizadores > Utilizador > Gestão de utilizador. Eliminar um item
selecionado a partir da unidade USB flash. Sair do teclado virtual.
F2: nos modos de visualização em direto, reprodução de dia todo e reprodução,
prima para apresentar ou ocultar a barra de tempo ou de controlo. No modo
PTZ, parar todas as operações em curso. Selecionar ou anular a seleção de um
item. Aceder a uma pasta selecionada do dispositivo de armazenamento
externo, como uma unidade USB flash utilizada para arquivar.
A: no modo de visualização em direto, selecione o monitor principal.
B: no modo de visualização em direto, selecione o monitor de eventos.
Sequência: no modo de visualização em direto, iniciar/parar a sequenciação de
câmaras no monitor atual.
Visualização: no modo de ecrã dividido, alternar entre os vários ecrãs. Para
DVR de 8 canais: total, quad, 1+5, 1+7 e 3+3). Para DVR de 16 canais: total,
quad, 1+5, 1+7, 3+3 e 4+4.
Nos modos de informação do disco rígido e gestão de utilizadores, eliminar um
item selecionado. No modo PTZ, eliminar um ponto-chave selecionado. No
modo de procura de registos, apresentar os detalhes de um ficheiro de registo
nos resultados da procura de registos.
3
. Botões de
menu e procura
Menu: entrar/sair do menu principal.
Procurar: no modo de visualização em direto, aceder ao menu de procura
avançada.
4
. LEDs de
estado
Alimentação: uma luz verde fixa indica que o gravador está a funcionar
corretamente. Vermelho indica uma falha.
Page 60

PT 58 Guia Rápido do TruVision DVR 45HD
Nome Descrição
Alarme de evento: uma luz vermelha intermitente indica que existe um sensor de
entrada de alarme ou outro alarme, como um alarme de movimento ou de
violação. Nenhuma luz indica que não existe um alarme.
Disco rígido
: o indicador de disco rígido pisca a vermelho durante a leitura de
dados a partir do disco rígido ou durante a gravação de dados no disco. Uma luz
vermelha fixa indica uma exceção ou um erro do disco rígido.
Tx/Rx: verde fixo indica uma ligação de rede normal. Nenhuma luz indica que
não existe ligação a uma rede.
Alarme técnico: uma luz vermelha fixa indica que existe um alarme técnico do
gravador. Nenhuma luz indica que não existe um alarme.
5
. Recetor de
infravermelhos (IV)
Recetor do comando à distância por infravermelhos.
Para ligar o comando à distância ao gravador, prima o botão Device, introduza o
endereço do dispositivo e prima Enter.
6
.
Bloqueio do painel frontal
O painel frontal pode ser bloqueado ou desbloqueado com uma chave. Dá
acesso aos discos rígidos.
7
.
Botão para visualização
em direto
Mudar para o modo de visualização em direto.
8
. Botões de
reprodução
Inverter
: no modo de visualização em direto, utilizar para reproduzir o vídeo mais
antigo. No modo de reprodução, reproduzir uma câmara no sentido inverso.
Pausa
: no modo de visualização em direto, imobilizar a última imagem da
apresentação em direto para todas as câmaras ativas apresentadas. No modo
de reprodução, parar a reprodução.
Reproduzir
: no modo de visualização em direto, reproduzir as imagens de dia
todo da câmara atual (mosaico de vídeo superior esquerdo se no modo de ecrã
dividido). No modo de reprodução, reproduzir as imagens de uma câmara para a
frente. No modo de procura, reproduzir um vídeo selecionado ou visualizar uma
fotografia. No modo PTZ, fazer uma ronda automática.
Direto: mudar para o modo de visualização em direto.
Reproduzir novamente: no modo de reprodução, começar a reproduzir o ficheiro
atual. Começa no princípio do ficheiro.
9
. Botões PTZ
Zoom +/-: nos modos de visualização em direto, reprodução e controlo PTZ,
utilize estes botões para aplicar mais ou menos zoom. Utilize-os também para
navegar dentro dos menus.
Predefinição: no modo de controlo PTZ, prima este botão e um botão numérico
para chamar a predefinição especificada
Utilize também para editar os modos de férias, procura de vídeo, seleção de
disco rígido, gestão de utilizadores, gestão de marcadores e procura de
marcadores.
Ronda: no modo de controlo PTZ, prima este botão e um botão numérico para
chamar a ronda gravada predefinida.
Utilize também para percorrer os meses de calendário e para navegar num
campo de texto.
10
. Direção
Os botões de DIREÇÃO são utilizados para navegar entre os diferentes campos
e itens dos menus.
Botão Enter
O botão ENTER é utilizado para confirmar a seleção em qualquer um dos
modos de menu.
Page 61

Guia Rápido do TruVision DVR 45HD 59 PT
Nome Descrição
11
. Botão de
arquivo
Premir uma vez para entrar no modo de arquivo rápido. Premir duas vezes para
começar a arquivar. O indicador pisca a verde durante a gravação de dados no
dispositivo de cópia de segurança.
12
. Interface USB Existem duas portas USB. Utilize as portas USB para arquivar vídeo, atualizar
firmware, utilizar um rato USB ou ligar um gravador CD/DVD USB.
Figura
3: Barra de ferramentas de acesso rápido
1. Iniciar gravação manual: iniciar/parar a
gravação manual.
2. Reprodução instantânea: reproduzir o vídeo
gravado nos últimos cinco minutos.
3. Áudio ligado: ativar/desativar a saída de
áudio.
4. Fotografia: capturar uma fotografia de uma
imagem de vídeo.
5. Controlo PTZ: entrar no modo de controlo
PTZ.
6. Zoom digital: entrar no modo de zoom digital.
7. Definições de imagem: alterar os níveis de
iluminação da imagem.
8. Mostrar texto: apresentar texto inserido no
ecrã.
9. Focagem auxiliar: focar automaticamente a
lente da câmara
10. Inicialização da lente: inicializar a lente de uma
câmara com uma lente motorizada
11. Fechar: Fechar a barra de ferramentas.
Conteúdo da embalagem
O TruVision DVR 45HD (modelo TVR 45HD)
é fornecido com os seguintes elementos:
• Comando à distância IV (infravermelhos)
• Duas pilhas AAA para o comando à
distância
• Cabos de alimentação CA
• Rato USB
• Gravador
• CD com software e manuais
• Guia Rápido do TruVision DVR 45HD
• Manual do Utilizador do TruVision
DVR 45HD (em CD)
• Manual do Operador do Gravador
TruVision (em CD)
Ambiente de instalação
Consulte o manual do utilizador para obter
informações detalhadas, mas observe os
seguintes requisitos importantes:
• Coloque a unidade num local seguro.
• Certifique-se de que a unidade se
encontra num local bem ventilado.
• Não exponha a unidade à chuva ou à
humidade.
Instalação rápida
Passos recomendados para a configuração
do gravador:
1. Ligue todos os dispositivos necessários
ao painel traseiro do gravador. Consulte a
Figura 1 na página 56.
Page 62

PT 60 Guia Rápido do TruVision DVR 45HD
Ligações básicas:
Ligue as câmaras às entradas de câmara
BNC e o monitor A a uma saída VGA ou
HDMI. Ligue o rato à porta USB no painel
frontal.
Ligações opcionais:
Todas as restantes ligações mostradas
são opcionais e dependem dos requisitos
de instalação.
2. Ligue o cabo de alimentação e ligue a
alimentação.
3. Configure a unidade com as definições
requeridas, utilizando o assistente de
configuração.
Primeira utilização
O gravador dispõe de um assistente de
instalação rápida que permite configurar
facilmente as definições básicas do gravador
quando o aparelho é utilizado pela primeira
vez. Configura todas as câmaras em
simultâneo. A configuração pode ser
personalizada conforme necessário.
Por predefinição, o assistente de
configuração inicia-se assim que o gravador é
carregado. O assistente orienta o utilizador
por algumas das definições mais importantes
do gravador. Selecione o idioma preferido
para o sistema e, a seguir, defina a password
de administrador. Não é fornecida nenhuma
password predefinida.
O assistente orienta então o utilizador pelos
menus para definir a data e a hora, a
configuração de rede, a gestão de discos
rígidos e a configuração de gravação.
Após a introdução de todas as alterações
pretendidas, clique em Terminar para sair do
assistente. O gravador está agora pronto
para ser utilizado. A gravação inicia-se
automaticamente.
Operar o gravador
A unidade pode ser controlada de várias
maneiras:
• Controlo a partir do painel frontal
• Controlo através do comando à distância
IV (infravermelhos)
• Controlo com o rato
• Controlo pelo browser da Web
• Teclado TVK-800
• Software (TruVision Navigator,
TVRmobile)
Painel frontal
Os botões do painel frontal controlam a maior
parte das funções. Consulte a Figura 2na
página 57 para ver a localização dos
controlos.
Comando à distância IV (infravermelhos)
Os botões do comando à distância IV
assemelham-se aos do painel frontal.
Coloque as duas pilhas AAA no comando à
distância.
Para ligar o comando à distância ao
gravador:
1. Prima Menu no painel frontal ou clique
com o botão direito do rato e selecione
Menu. É apresentado o ecrã do menu
principal.
2. Selecione Definições do modo de
visualização > Monitor.
3. Verifique o valor do endereço do
dispositivo do gravador. A predefinição é
255. O endereço do dispositivo é válido
para todos os controlos IV.
4. No comando à distância, prima o botão
Device.
5. Introduza o valor do endereço do
dispositivo. O valor tem de ser idêntico ao
valor no gravador.
6. Prima OK no comando à distância.
Rato USB
O rato USB fornecido com o gravador opera
todas as funções do gravador, ao contrário do
painel frontal, o qual tem uma funcionalidade
limitada. O rato permite navegar e alterar
definições na interface de utilizador.
Ligue o rato ao gravador, ligando o conector
USB do rato à porta USB localizada no painel
frontal ou traseiro. O rato fica imediatamente
operacional e deverá aparecer o ponteiro.
Page 63

Guia Rápido do TruVision DVR 45HD 61 PT
Controlo pelo browser da Web
O browser da Web do gravador permite
visualizar, gravar e reproduzir vídeos, bem
como gerir todos os aspetos do gravador, a
partir de qualquer PC com acesso à Internet.
Os controlos do browser, muito fáceis de
utilizar, proporcionam um acesso rápido a
todas as funções do gravador.
Para aceder à unidade, abra um browser da
Web e introduza o endereço IP atribuído ao
gravador como um endereço da Web. No
ecrã de acesso, introduza a ID de utilizador e
a password.
Os valores predefinidos para as definições de
rede do gravador são os seguintes:
• DHCP: Desativado por predefinição
• Endereço IP - 192.168.1.82
• Máscara de subrede - 255.255.255.0
• Endereço gateway - 192.168.1.1
• Porta do servidor: 8000
• Porta de HTTP: 80
• Porta de RTSP: 554
Nota: as portas seguintes têm de ser
reencaminhadas no router para poder
estabelecer ligação corretamente: Porta do
servidor e Porta RTSP.
Figura 4: Interface do browser da Web
Modo de visualização em direto
O modo de visualização em direto é o modo
de funcionamento normal da unidade,
permitindo a visualização em direto das
imagens das câmaras.
As funções utilizadas com regularidade no
modo de visualização em direto podem ser
acedidas rapidamente, clicando para tal com
o botão do rato quando o respetivo cursor se
encontra na imagem da câmara. Aparece a
barra de ferramentas de visualização em
direto. Consulte a Figura 3 na página 59 para
ver a descrição das funções disponíveis.
Configuração do gravador
O gravador dispõe de uma estrutura de
menus controlada por ícones que permite
configurar os parâmetros da unidade. Cada
ícone de comando dá acesso a um ecrã no
qual é possível editar um conjunto de
definições. A maior parte dos menus está
disponível apenas aos administradores do
sistema.
Para informações detalhadas sobre a
configuração da unidade, consulte o manual
do utilizador do gravador.
Para aceder ao menu principal no modo
de visualização em direto:
• Prima o botão Menu no comando à
distância ou no painel frontal.
- Ou -
• Clique com o botão direito do rato e
selecione Menu no menu instantâneo.
É apresentado o ecrã do menu principal.
Mova o rato sobre um ícone de comando na
barra de ferramentas do menu e clique para
selecionar.
Descrição dos ícones de comando na
barra de ferramentas do menu:
Configurar as definições de
visualização.
Configurar as definições de câmaras
analógicas e IP.
Configurar as definições de rede
padrão.
Page 64

PT 62 Guia Rápido do TruVision DVR 45HD
Configurar as definições de
gravação.
Configurar as definições de alarme e
evento.
Configurar as definições do sistema.
Configurar a gestão do
armazenamento.
Configurar as definições de
utilizador.
Visualizar informações do sistema.
Apresentar informações de
referência às diversas barras de
ferramentas e menus na interface.
Aceder às opções de saída de
sessão, reinicialização e
encerramento.
Especificações
Fonte de alimentação:
100 a 240 VCA,
6,3 A, 50 a 60 Hz
Consumo de energia (sem disco rígido):
TVR 4508HD
TVR 4516HD
≤ 45 W
≤ 65W
Temperatura de
funcionamento:
-10 a +55 ºC
Humidade relativa:
10 a 90%
Dimensões (L x A x P):
TVR 4508HD
TVR 4516HD
445 × 390 × 70 mm
Peso (sem disco rígido):
TVR 4508HD
TVR 4516HD
≤ 5.0 kg
Page 65

Краткое руководство по началу работы с TruVision DVR 45HD 63 RU
RU
Краткое руководство по началу
работы с TruVision DVR 45HD
Рис.
1. Соединения задней панели TVR 45HD (на примере 8-канальной модели)
1. Подключение четырех аудиовходов к
разъемам RCA.
2. Подключение аудиовыхода к
громкоговорителям.
3. Линейный вход.
4. Подключение к устройству RS-232.
5. Подключение eSATA.
6. Подключение к устройству RS-485,
например к PTZ-камере или клавиатуре.
7. Подключение до четырех сигнальных
выходов.
8. Переключатель питания (вкл./выкл.).
9. Подключение до 8 аналоговых/HD-TVIкамер к разъемам BNC (в зависимости от
модели регистратора).
10. Подключение BNC-монитора (только монитор
событий).
11. Подключение дополнительного USBустройства, например мыши, устройства
записи CD/DVD или жесткого диска.
12. Подключение к HDTV. Соединение HDMI
поддерживает цифровое аудио и видео.
13. Подключение к VGA-монитору.
14. Подключение к сети.
15. Подключение до 16 тревожных входов.
16. Подключение заземления.
17. Подключение шнура питания к
видеорегистратору (входит в комплект).
IP-адрес по умолчанию 192.168.1.82
Page 66

RU 64 Краткое руководство по началу работы с TruVision DVR 45HD
Рис.
2. Передняя панель TVR 45HD (на примере 8-канальной модели)
Более подробная информация по всем функциям кнопок содержится в руководстве
пользователя.
Имя Описание
1
. Кнопки каналов Переключение между различными камерами в режиме прямого просмотра,
а также в режимах управления PTZ или воспроизведения.
2
. Кнопки
дисплея
F1: нажмите в режиме воспроизведения для запуска и остановки обрезки
видео. Нажмите F1 и кнопку с цифрой для воспроизведения звука с
указанной камеры в режиме реального времени.
В режиме информации о системе выдает URL-адрес DDNS. В режиме
управления пользователями вызывает окно «Разрешения» для выбранного
элемента: User Management > User > User Management (Управление
пользователями > Пользователь > Управление пользователем). Удаляет
выбранный элемент с флеш-накопителя USB. Выход из виртуальной
клавиатуры.
F2: нажмите в режиме просмотра в реальном времени, воспроизведения
всего дня или воспроизведения для отображения или скрытия времени на
панели управления. В режиме PTZ останавливает все выполняющиеся
операции. Выбор или отмена выбора элемента. Вход в выбранную папку на
внешнем запоминающем устройстве, например флеш-накопителе USB,
используемом для архивации.
A: в режиме просмотра в реальном времени выбирает основной монитор.
B: в режиме просмотра в реальном времени выбирает монитор событий.
Посл.: в режиме прямого просмотра запускает/останавливает
последовательный вывод изображений с камер на текущий монитор.
Отображение: в режиме мультипросмотра переключение между
различными режимами мультипросмотра. Для 8-канального цифрового
видеорегистратора: полный, четыре камеры, 1 + 5, 1 + 7 и 3 + 3. Для 16канального цифрового видеорегистратора: полный, четыре камеры, 1 + 5,
1 + 7, 3 + 3 и 4 + 4.
В режиме представления информации о жестком диске и в режиме
управления пользователями удаляет выбранный элемент. В режиме PTZ
удаляет выбранную ключевую точку. В режиме поиска журналов
отображает сведения о файле журнала в результатах поиска журналов.
3
. Кнопки Меню и
Поиск
Меню: открытие/закрытие главного меню.
Поиск: вход в меню расширенного поиска в режиме прямого просмотра.
Page 67

Краткое руководство по началу работы с TruVision DVR 45HD 65 RU
Имя Описание
4
. Светодиодные
индикаторы
состояния
Питание: Постоянный зеленый цвет указывает на правильную работу
регистратора. Красный индикатор означает наличие сбоя.
Сигнал тревоги по событию
: Мигающий красный свет указывает на наличие
сигнала тревоги с датчика, или на наличие другого сигнала тревоги,
например, сигнала обнаружения движения или несанкционированного
доступа. Отсутствие светового сигнала указывает на отсутствие сигнала
тревоги.
Жесткий диск
: Красный индикатор жесткого диска мигает, когда данные
считываются с жесткого диска или записываются на него. Постоянный
красный свет указывает на исключение жесткого диска или на ошибку.
Прием/передача: Постоянный зеленый означает нормальное сетевое
соединение. Отсутствие светового сигнала означает, что видеорегистратор
не подключен к сети.
Технический сигнал тревоги
: Постоянный красный свет указывает на
технический сигнал тревоги с регистратора. Отсутствие светового сигнала
указывает на отсутствие сигнала тревоги.
5
. Инфракрасный
приемник
Приемник для инфракрасного пульта ДУ.
Чтобы подключить пульт ДУ к видеорегистратору, нажмите кнопку Device
(Устройство), введите адрес устройства и нажмите Enter.
6
.
Фиксация
фронтальной панели
Переднюю панель можно заблокировать или разблокировать с помощью
ключа. Панель предоставляет доступ к жестким дискам.
7
.
Кнопка режима
реального времени
Режим реального времени: Переключение в режим прямого просмотра.
8
. Кнопки
воспроизведен
ия
Обратное воспроизведение: В режиме прямого просмотра используется для
воспроизведения последнего видео. В режиме воспроизведения
воспроизводит видео с камеры в обратном направлении.
Пауза: В режиме прямого просмотра, останавливает последнее
изображение активного дисплея в реальном времени для всех
отображаемых активных камер. В режиме воспроизведения останавливает
воспроизведение.
Воспроизведение: В режиме просмотра в реальном времени воспроизводит
запись текущей камеры за весь день (верхняя левая ячейка видео, если
используется мультиэкранный режим). В режиме воспроизведения
воспроизводит видео с камеры в прямом направлении. В режиме поиска
воспроизводит выбранное видео или показывает снимок. В режиме PTZ
выполняет автоматическое патрулирование.
Воспроизведение В режиме воспроизведения останавливает
воспроизведение текущего файла. Воспроизведение начинается с начала
файла.
9
. Кнопки PTZ
Масштаб +/-: Используйте эту кнопку для увеличения и уменьшения
масштаба в режимах просмотра в реальном времени, воспроизведения и
управления PTZ. Также используется для перемещения по меню.
Предустановка: В режиме управления PTZ нажмите Предварительная
настройка и кнопку с цифрой для вызова предварительно
запрограммированного положения.
Также используется для режима редактирования праздников, режима
поиска видео, режима выбора жесткого диска, режима управления
пользователями, управления и поиска закладок.
Page 68

RU 66 Краткое руководство по началу работы с TruVision DVR 45HD
Имя Описание
Маршрут В режиме управления PTZ нажмите Маршрут и кнопку с цифрой
для вызова предварительно запрограммированного маршрута
патрулирования.
Также используется для прокручивания месяцев в календаре и
перемещения по текстовому полю.
10
. Кнопки
направления
Кнопки НАПРАВЛЕНИЯ используются для навигации между различным
полями и элементами в меню.
Кнопка ENTER
Кнопка ENTER используется для подтверждения выбора в любом режиме
меню.
11
. Кнопка Archive
Нажмите один раз для перехода в режим быстрого архивирования.
Нажмите дважды, чтобы запустить архивацию. Зеленый индикатор мигает,
когда производится запись данных на устройство резервного копирования.
12
. Интерфейс USB Имеются два USB-порта. USB-порты используются для архивации видео,
обновления встроенного ПО, подключения мыши или устройства записи
CD/DVD-дисков с USB-интерфейсом.
Рис.
3. Панель прямого просмотра
1. ачать запись вручную: пуск и остановка
ручного режима записи.
2. Немедленное воспроизведение:
воспроизведение записанного за последние
пять минут видео.
3. Включить звук: включение/выключение
аудиовыхода.
4. Снимок: захват снимка видеоизображения.
5. Управление PTZ: вход в режим управления
PTZ.
6. Цифровое масштабирование: переход к
цифровому масштабированию.
7. Настройки изображения: изменение
уровней освещенности изображения.
8. Показать текст: отображение вставленного
текста на экране.
9. Дополнительная фокусировка:
автоматическая фокусировка линз камеры.
10. Инициализация объектива: инициализация
линз камеры с электроприводным
объективом.
11. Закрыть: закрытие панели инструментов.
Комплектация
В комплект видеорегистратора TruVision
DVR 45HD (модель TVR 45HD) входят
следующие компоненты:
• инфракрасный пульт ДУ,
• две батареи типа AAA для пульта ДУ
• шнуры электропитания переменного
тока
• USB-мышь,
• регистратор
• диск с программным обеспечением и
руководствами
• Краткое руководство по началу
работы с TruVision DVR 45HD
• Руководство пользователя DVR 45HD
(на компакт-диске)
• Руководство оператора
видеорегистратора TruVision (на
компакт-диске)
Page 69

Краткое руководство по началу работы с TruVision DVR 45HD 67 RU
Среда установки
Подробные инструкции содержатся в
руководстве пользователя. Однако
необходимо учитывать следующие важные
обстоятельства.
• Устанавливайте устройство в
безопасном месте.
• Устройство должно быть установлено в
зоне с хорошей вентиляцией.
• Необходимо защищать устройство от
дождя и сырости.
Краткое описание установки
Рекомендуемые действия по установке
регистратора.
1. Подключите все необходимые
устройства к задней панели
регистратора. См. рисунок 1 на стр. 63.
Основные подключения
Подключите камеры к BNC-входам
камер, а монитор А — к выходу VGA
или HDMI. Подключите мышь к USBпорту на передней панели.
Дополнительные подключения
Все другие показанные подключения
являются необязательными и зависят
от требований к установке.
2. Подсоедините шнур питания и
включите питание.
3. Задайте необходимые настройки
устройства, используя мастер
настройки.
Первое использование
В регистраторе имеется мастер экспрессустановки, с помощью которого можно
легко настроить основные параметры
регистратора при первом включении.
Мастер установки настраивает все камеры
одновременно. Настройки, при
необходимости, можно затем изменить на
пользовательские.
Мастер настройки запускается по
умолчанию сразу же после загрузки
регистратора. Он помогает задать
основные настройки устройства. Выберите
нужный язык системы и введите пароль
администратора. Пароль по умолчанию не
предусмотрен.
Затем мастер поможет настроить дату и
время, задать настройки сети, жесткого
диска и записи.
После внесения всех необходимых
изменений нажмите кнопку Готово, чтобы
закрыть мастер. Теперь регистратор готов к
работе. Запись начинается автоматически.
Работа с регистратором
Есть несколько способов управления
устройством.
• кнопки на передней панели
• инфракрасный пульт ДУ
• мышь
• Управление с помощью веб-браузера
• Клавиатура TVK-800 keypad
• ПО (TruVision Navigator, TVRmobile).
Передняя панель
Кнопки на передней панели управляют
большинством функций. Расположение
элементов управления см. на рис. 2 на стр.
64.
Инфракрасный пульт ДУ
Кнопки ИК-пульта дистанционного
управления аналогичны тем, что
расположены на передней панели. В пульт
ДУ необходимо вставить две батареи типа
AAA.
Подключение пульта ДУ к регистратору.
1. Нажмите кнопку Меню на передней
панели или щелкните правой кнопкой
мыши и выберите пункт Меню.
Появится экран основного меню.
2. Выберите
Настройки
режима
отображения > Монитор.
3. Проверьте значение адреса
устройства. Значение по умолчанию —
255. Адрес устройства действителен
для всех ИК-элементов управления.
Page 70

RU 68 Краткое руководство по началу работы с TruVision DVR 45HD
4. Нажмите кнопку Устройство на пульте
дистанционного управления.
5. Введите адрес устройства. Он должен
совпадать с адресом, указанным в
регистраторе.
6. Нажмите OK на пульте ДУ.
USB-мышь
Поставляемую вместе с регистратором
USB-мышь можно использовать для
управления всеми функциями
регистратора, в отличие от передней
панели, функциональность которой
ограничена. Мышь позволяет
перемещаться и изменять настройки в
пользовательском интерфейсе.
Подсоедините мышь к регистратору,
подключив USB-разъем мыши к USB-порту
на задней или передней панели. Мышью
можно пользоваться сразу же; на экране
должен появиться курсор.
Управление с помощью веб-браузера
Веб-браузер регистратора позволяет
просматривать, записывать и
воспроизводить видео, а также управлять
всей системой регистратора с любого ПК с
доступом в Интернет. Удобные элементы
управления браузера предоставляют
быстрый доступ ко всем функциям
регистратора.
Чтобы получить доступ к устройству,
откройте веб-браузер и в качестве вебадреса введите IP-адрес, присвоенный
регистратору. В окне входа в систему
введите имя пользователя и пароль.
Значения параметров сети для
регистратора по умолчанию:
• DHCP: по умолчанию отключено.
• IP-адрес: 192.168.1.82
• Маска подсети: 255.255.255.0
• Адрес шлюза: 192.168.1.1
• Порт сервера: 8000
• Порт HTTP: 80
• Порт RTSP: 554
Примечание. Необходимо перенаправить
следующие порты в маршрутизаторе,
чтобы выполнить подключение правильно.
Порт сервера и порт RTSP.
Рис. 4. Интерфейс веб-браузера
Режим прямого просмотра
Режим прямого просмотра является
обычным рабочим режимом устройства, в
котором пользователь может
просматривать видео прямо с камеры.
Можно легко получить доступ к регулярно
используемым функциям в режиме
просмотра в реальном времени, нажав
левую кнопку мыши, когда курсор наведен
на изображение камеры. Сразу появится
панель прямого просмотра. Описание
доступных функций см. на рисунке 3 на стр.
66.
Настройка регистратора
В основе структуры меню регистратора
используются значки, с помощью которых
можно настроить параметры устройства.
Каждый значок команды выводит на экран
окно, которое позволяет изменять группу
настроек. Большая часть меню доступна
только системным администраторам.
Более подробная информация о настройке
устройства содержится в руководстве
пользователя к регистратору.
Доступ к главному меню в режиме
прямого просмотра
• Нажмите кнопку Меню на пульте ДУ
или на передней панели.
- или -
• Нажмите правую кнопку мыши и
выберите пункт Меню из
всплывающего меню.
Page 71

Краткое руководство по началу работы с TruVision DVR 45HD 69 RU
Появится экран основного меню. Наведите
курсор на значок команды в панели
инструментов меню и нажмите, чтобы
выбрать.
Описание значков команд на панели
инструментов меню
Настройка параметров дисплея.
Настройка параметров аналоговой
и IP-камеры.
Настройка стандартных
параметров сети.
Настройка параметров записи.
Настройка параметров тревоги и
события.
Настройка системных параметров.
Настройка параметров
управления запоминающими
устройствами.
Настройка параметров
пользователя.
Просмотр сведений о системе.
Справочная информация о
различных панелях инструментов и
меню интерфейса.
Изменение настроек выхода из
системы, перезагрузки и
выключения.
Характеристики
Электропита
ние: 100-240 В переменного
тока,
6,3 A, 50 to 60 Гц
Энергопотребление (без жесткого диска):
TVR 4508HD
TVR 4516HD
≤ 45 Вт
≤ 65 Вт
Рабочая температура
от -10 до +55 ºC
Относительная
влажность
от 10 до 90%
Размеры (Ш х В х Г):
TVR 4508HD
TVR 4516HD
445 × 390 × 70 мм
Вес (без жесткого диска):
TVR 4508HD
TVR 4516HD
≤ 5,0 кг
Page 72

TR 70 TruVision DVR 45HD Hızlı Başlangıç Kılavuzu
TR
TruVision DVR 45HD Hızlı
Başlangıç Kılavuzu
Ş
ekil 1: TVR 45HD arka panel bağlantıları (8 kanallı modeller gösterilmektedir)
1. Dört ses girişini RCA konnektöre bağlayın.
2. Ses çıkışı için hoparlörler bağlayın.
3. Hat Girişi.
4. RS-232 cihazına bağlayın.
5. ESATA bağlayın.
6. PTZ kamera veya klavye gibi bir RS-485
cihazına bağlayın.
7. Dört alarm rölesi çıkışına kadar bağlayın.
8. Güç anahtarı (açık/kapalı).
9. BNC tipi konnektörlere 8'e kadar analog/HD-
TVI kamera bağlayabilirsiniz (kaydedici
modeline bağlıdır).
10. Bir BNC monitör (yalnızca olay monitörü)
bağlayın.
11. Fare, CD/DVD yazıcı veya HDD gibi isteğe bağlı
bir USB cihazına bağlayın.
12. Bir HDTV'ye bağlayın. HDMI bağlantısı dijital
ses ve videoyu destekler.
13. Bir VGA monitöre bağlayın.
14. Bir ağa bağlayın.
15. 16'ya kadar alarm girişi bağlayın.
16. Topraklamaya bağlayın.
17. Bir güç kablosunu (pakete dahil edilmiştir) kayıt
cihazına bağlayın.
Varsayılan IP adresi: 192.168.1.82
Page 73

TruVision DVR 45HD Hızlı Başlangıç Kılavuzu 71 TR
Şekil
2: TVR 45HD ön paneli (8 kanallı model gösterilmektedir)
Tüm buton fonksiyonları hakkında detaylı bilgi için, lütfen kulla
nım kılavuzuna bakın.
Ad Açıklama
Kanal düğmeleri Canlı, PTZ kontrolü veya izleme modlarında farklı kameralar arasında geçiş yapın.
Ekran düğmeleri
F1: İzleme modunda video kırpmayı başlatmak ve durdurmak için tıklayın. Ses için
canlı izlemede belirtilen kameranın sesini oynatmak üzere F1 ve bir sayı düğmesine
basın.
Sistem Bilgileri modunda DDNS URL'sini alın. Kullanıcı Yönetimi modunda Kullanıcı
Yönetimi > Kullanıcı > Kullanıcı Yönetimi bölümünde seçilen öğenin İzin ekranını
açın. USB flash sürücüden seçili bir öğeyi silin. Sanal klavyeden çıkın.
F2: Canlı İzlemede, tüm gün izleme ve izleme modlarında zaman veya kontrol
çubuğunu görüntülemek veya gizlemek için basın. PTZ modunda, devam eden tüm
işlemleri durdurun. Bir öğeyi seçin veya seçim
ini kaldırın. Arşivleme için kullanılan bir
USB flash sürücü gibi harici depolama cihazının seçilen klasörüne girin.
A: Canlı izleme modunda ana monitörü seçin.
B: Canlı izleme modunda olay monitörünü seçin.
Sıra: Canlı izleme modunda geçerli monitörde kameraların sıralanmasını
başlatın/durdurun.
Ekran: Çoklu görüntü modunda çeşitli çoklu görüntüler arasında geçiş yapın. 8
kanallı DVR: tam, dörtlü, 1+5, 1+7 ve 3+3 için. 16 kanallı DVR: tam, dörtlü, 1+5, 1+7,
3+3 ve 4+4 için.
HDD bilgileri modu ve kullanıcı yönetimi modunda seçili bir öğeyi silin. PTZ
modunda, seçili bir anahtar noktasını silin. Kayıt Arama modunda; Kayıt Arama
sonuçlarındaki bir kayıt dosyasının ayrıntılarını görüntüleyin.
Menü ve Arama
düğmeleri
Menü: Ana menüye gir/ana menüden çık.
Ara: Canlı görüntülemede gelişmiş arama menüsüne girin.
Durum LED’leri
Güç: Sürekli yanan yeşil ışık, kayıt cihazının doğru şekilde çalıştığını gösterir. Kırmızı
ışık, bir arıza olduğunu gösterir.
Olay Alarmı: Yanıp sönen bir kırmızı ışık, bir sensör Alarm Girişinin ya da hareket
veya kurcalama gibi bir başka alarmın olduğunu gösterir. Işık yanmıyorsa alarm
yoktur.
HDD: HDD göstergesi, HDD'den veri okunurken veya HDD'ye veri yazılırken kırmızı
yanıp söner. Sürekli yanan kırmızı bir ışık bir HDD istisnasını veya hatasını gösterir.
Tx/Rx: Sabit yeşil, normal bir ağ bağlantısı olduğunu gösterir. Hiçbir ışık olmaması,
DVR herhangi bir ağa bağlı olmadığını gösterir.
Page 74

TR 72 TruVision DVR 45HD Hızlı Başlangıç Kılavuzu
Ad Açıklama
Teknik Alarm: Sürekli yanan kırmızı ışık, kayıt cihazından kaynaklı bir teknik alarm
olduğunu gösterir. Işık yanmıyorsa alarm yoktur.
IR alıcı IR uzaktan kumanda için alıcı
Kayıt cihazına uzaktan kumandayı bağlamak için Cihaz düğmesine basın, cihaz
adresini girin ve Enter düğmesine basın.
Ön panel kilidi Ön paneli bir anahtar ile kilitleyebilir ve açabilirsiniz. HDD'lere erişim sağlar.
Canlı düğmesi Canlı: Canlı görüntüleme moduna geçer.
İzleme
düğmeleri
Geri Oynat
: Canlı görüntüleme modunda, ilk videoyu oynatmak için kullanın. İzleme
modunda bir kamerayı ters yönde izleyin.
Duraklat
: Canlı görüntüleme modunda, görüntülenen tüm aktif kameralar için canlı
ekranın son görüntüsünü dondurun. İzleme modunda, izlemeyi durdurun.
Oynat: Canlı görüntüleme modunda, geçerli kameranın tüm gün kayıtlarını izleyin
(eğer çoklu görüntü izleme modundaysa, sol üst video döşemesi). İzleme modunda
bir kamerayı ileri yönde izle. Arama modunda seçilen videoyu izleyin veya bir anlık
fotoğrafı görüntüleyin. PTZ modunda bir otomatik tur yapın.
Tekrar İzle: İzleme modunda, mevcut dosyayı oynatmayı başlatın. Dosyanın
başından başlatır.
PTZ düğmeleri
Zoom +/
-: Canlı görüntüleme modunda, izleme modu ve PTZ kontrol modu, bu
düğmeyi yakınlaştırmak ve uzaklaştırmak için kullanır. Ayrıca bunları menüler içinde
gezinmek için kullanın.
Önayar: PTZ Kontrol modunda belirtilen önayarı çağırmak için Önayar ve bir sayı
düğmesine basın.
Ayrıca tatil modunu, video arama modunu, HDD seçim modunu, kullanıcı yönetimi
modunu, yer imi yönetimini ve yer imi aramayı düzenlemek için de kullanın.
Tur: PTZ Kontrol modunda, belirtilen gölge turunu çağırmak için Tur ve bir sayı
düğmesine basın.
Ayrıca takvim ayları arasında gezinmek ve bir metin alanına gitmek için de kullanın.
Yön
YÖN düğmeleri, menülerdeki farklı alanlar ve öğeler arasında gezinmek için
kullanılır.
Enter düğmesi
ENTER düğmesi, tüm menü modlarında seçimi doğrulamak için kullanılır.
Arşiv düğmesi
Hızlı arşiv moduna girmek için bir defa basın. Arşivlemeyi başlatmak için iki defa
basın. Gösterge, veriler yedek cihaza yazılırken yeşil yanıp söner.
USB arayüzü İki USB portu mevcuttur. Video arşivlemek, firmware yükseltmek, USB fare
kullanmak veya USB CD/DVD yazıcı bağlamak için USB portlarını kullanın.
Page 75

TruVision DVR 45HD Hızlı Başlangıç Kılavuzu 73 TR
Şekil
3: Canlı görüntüleme araç çubuğu
1. Manuel kaydı başlat: Manuel kaydı
başlatır/durdurur.
2. Anlık izleme: Kaydedilen videoyu son beş
dakikadan itibaren oynatır.
3. Ses Açık: Ses çıkışını etkileştirir/devre dışı
bırakır.
4. Anlık fotoğraf: Video görüntüsünün bir anlık
fotoğrafını çeker.
5. PTZ kontrolü: PTZ kontrol moduna girin.
6. Dijital Zoom: Dijital zoom moduna girer.
7. Görüntü ayarları: Görüntü aydınlatma
seviyelerini değiştirin.
8. Metni Göster: Ekranda yerleştirilen metni
gösterir.
9. Yardımcı Fokus: Kamera lensini otomatik
olarak odaklayın
10. Lens Başlatma: Motorlu bir lense sahip
kameranın lensini başlatır
11. Kapat: Araç çubuğunu kapatır.
Paketin içindekiler
TruVision DVR 45HD (model TVR 45HD)
aşağıdaki unsurlarla nakledilir:
• IR (kızıl ötesi) uzaktan kumanda
• Uzaktan kumanda için iki AAA pil
• AC güç kabloları
• USB fare
• Kayıt Cihazı
• Yazılım ve kılavuzlar içeren CD
• TruVision DVR 45HD Hızlı Başlangıç
Kılavuzu
• TruVision DVR 45HD Kullanıcı Kılavuzu
(CD'de)
• TruVision Kayıt Cihazı Kullanıcı Kılavuzu
(CD'de)
Kurulum ortamı
Detaylı bilgi için kullanım kılavuzuna bakın,
ama aşağıdaki önemli gereksinimlere dikkat
edin:
• Üniteyi güvenli bir konuma yerleştirin.
• Kameranın, iyi havalandırılan bir alanda
olduğundan emin olun.
• Üniteyi yağmura ya da neme maruz
bırakmayın.
Hızlı kurulum
Kaydediciyi kurmak için önerilen adımlar:
1. Gereken tüm cihazları kaydedicinin arka
paneline bağlayın. Bkz Şekil 1 sayfa 70.
Temel bağlantılar:
Kameraları BNC kamera girişlerine,
monitör A'yı ise bir VGA veya HDMI
çıkışına bağlayın. Ön panelde bulunan
USB portuna fareyi bağlayın.
Opsiyonel bağlantılar:
Gösterilen tüm diğer bağlantıları
opsiyoneldir ve montaj gereksinimlerine
bağlıdır.
2. Üniteye güç kablosunu bağlayın ve gücü
açın.
3. Kurulum Sihirbazı'nı kullanarak ünitenin
gerekli ayarlarını yapılandırın.
İlk kez kullanım
Kaydedicide, ilk kullanıldığında temel
kaydedici ayarlarını kolaylıkla
yapılandırmanıza olanak veren bir hızlı
kurulum sihirbazı vardır. Tüm kameraları
eşzamanlı olarak yapılandırır. Daha sonra
yapılandırma gerektiği gibi özelleştirilebilir.
Page 76

TR 74 TruVision DVR 45HD Hızlı Başlangıç Kılavuzu
Kaydedici yüklendiğinde varsayılan olarak,
kurulum sihirbazı başlayacaktır. Sihirbaz
kaydedicinizin daha önemli bazı ayarları
sırasında size rehberlik eder. Sistem için
tercih edilen dili seçin ve sonra yönetici
parolasını girin. Verilen varsayılan bir şifre
mevcut değildir.
Sihirbaz daha sonra, saat ve tarih, ağ
kurulumu, HDD yönetimi ve kayıt
yapılandırmasını ayarlamak için menülerde
size yol gösterecektir.
Gerekli tüm değişiklikler girildiğinde,
sihirbazdan çıkmak için Son tuşuna tıklatın
Kaydedici, artık kullanıma hazırdır. Kayıt
otomatik olarak başlar.
Kaydediciyi Çalıştırma
Üniteyi kontrol etmek için çeşitli yollar
mevcuttur:
• Ön panel kontrolü
• IR uzaktan kumanda
• Fare kontrolü
• Web tarayıcı kontrolü
• TVK-800 klavyesi
• Yazılım (TruVision Navigator, TVRmobile)
Ön panel
Ön paneldeki düğmeler çoğu fonksiyonu
kontrol eder. Kontrol yerleri için bkz. Şekil 2,
sayfa 71.
IR uzaktan kumanda
IR uzaktan kumanda düğmeleri ön
paneldekilere benzemektedir. Uzaktan
kumandaya için iki AAA pil takın.
Uzaktan kumandayı kaydediciye bağlamak
için:
1. Ön paneldeki Menü düğmesine basın
veya fareye sağ tıklayın ve Menü
düğmesini seçin. Ana menü ekranı
görünür.
2. Ekran modu ayarları > Monitör öğesini
seçin.
3. Kaydedicinin cihaz adresi değerini kontrol
edin. Varsayılan değer 255'tir. Bu cihaz
adresi tüm IR kontrolleri için geçerlidir.
4. Uzaktan kumanda üzerinde Cihaz
düğmesine basın.
5. Cihazın adres değerini girin.
Kaydedicidekiyle aynı olmalıdır.
6. Uzaktan kumandadaki Tamam öğesine
basın.
USB fare
Kaydedici ile birlikte gelen USB fare, sınırlı
işlevselliğe sahip ön panelin tersine
kaydedicinin tüm işlevlerini çalıştırır. Fare
kullanıcı arayüzünde gezinmenizi ve
ayarlarda değişiklikler yapmanızı sağlar.
Farenin USB konektörünü arka veya ön
paneldeki USB portuna takarak fareyi
kaydediciye bağlayın. Fare hemen çalışır ve
imleç görünmelidir.
Web tarayıcı kontrolü
Kaydedicinin web tarayıcısı videoları
görüntülemenize, kaydetmenize ve
izlemenize olanak vermenin yanı sıra
kaydedici ile ilgili her şeyi İnternet erişimi olan
herhangi bir bilgisayar üzerinden yönetmenizi
de sağlar. Tarayıcının kullanımı kolay
kontrolleri, tüm kaydedici işlevlerine hızla
erişmenizi sağlar.
Üniteye erişmek için bir Web tarayıcı açın ve
kaydediciye atanmış IP adresini bir web
adresi gibi girin. Oturum açma ekranında
kullanıcı adını ve parolayı girin.
Kaydedicinin ağ ayarları için varsayılan
değerler şunlardır:
• DHCP: Varsayılan olarak devre dışı.
• IP adresi: 192.168.1.82
• Alt ağ maskesi: 255.255.255.0
• Ağ geçidi adresi: 192.168.1.1
• Sunucu Portu: 8000
• HTTP Portu: 80
• RTSP portu (RTSP port) 554
Not: Doğru biçimde bağlamak için aşağıdaki
portların yönlendiricide iletilmesi gerekir:
Sunucu portu ve RTSP portu.
Page 77

TVR 45HD Hızlı Başlangıç Kılavuzu 75 TR
Şekil 4: Web tarayıcısı arayüzü
Canlı görüntüleme modu
Canlı görüntüleme modu, ünitenin
kameralardan canlı görüntüler izlediğiniz
normal çalışma modudur.
Canlı görünümde düzenli kullanılan işlevler
imleci kamera görüntüsü üzerinde olduğunda
fare sol butonuna tıklayarak hızla
ulaşılabilirler. Canlı görüntüleme araç çubuğu
görüntülenir. Mevcut fonksiyonlarının
açıklamaları için bkz. Şekil 3, sayfa 73.
Kaydediciyi yapılandırma
Kaydedici, ünitenin parametrelerini
ayarlamanıza olanak veren simgelere simge
destekli bir menü yapısına sahiptir.
Her bir komut simgesi, bir grup ayarını
düzenlemenize izin veren bir ekranı
görüntüler. Çoğu menü yalnızca sistem
yöneticilerine açıktır.
Üniteyi yapılandırma hakkında detaylı bilgi
için kaydedicinizin kullanım kılavuzuna bakın.
Canlı moddan ana menüye erişmek için:
• Uzaktan kumandadaki veya ön paneldeki
Menü düğmesine basın.
- Veya -
• Fareye sağ tıklayın ve açılır menüden
Menü öğesini seçin.
Ana menü ekranı görünür. Fareyi bir komut
simgesinin üzerine hareket ettirin ve seçmek
için tıklayın.
Menü araç çubuğundaki kontrol
simgelerinin açıklaması:
Ekran ayarlarını yapılandırır.
Analog kamera ve IP kamera
ayarlarını yapılandırır.
Standart ağ ayarlarını yapılandırır.
Kayıt ayarlarını yapılandırır.
Alarm ve olay ayarlarını yapılandırır.
Sistem ayarlarını yapılandırır.
Depolama yönetimini yapılandırır.
Kullanıcı ayarlarını yapılandırır.
Sistem bilgilerini görüntüler.
Arayüzdeki çeşitli araç çubukları ve
menüler için referans bilgileri sağlar.
Oturumu kapatma, yeniden başlatma
ve kapatma seçeneklerine erişim
sağlar.
Page 78

TR 76 TruVision DVR 45HD Hızlı Başlangıç Kılavuzu
Teknik Özellikler
Güç kaynağı:
100 ila 240 VAC,
6,3 A, 50 ila 60 Hz
Güç tüketi
mi (HDD olmadan):
TVR 4508HD
TVR 4516HD
≤ 45 W
≤ 65 W
Çalışma sıcaklığı:
-10 ila +55 ºC
Bağıl nem:
%10 ila 90
Boyutlar (G x Y x D):
445 × 390 × 70 mm
Ağırlık (HDD olmadan):
≤ 5,0 kg
Page 79

77
Legal and regulatory information
Copyright
© 2017 United Technologies Corporation. All rights reserved.
Interlogix is part of UTC Climate, Controls & Security, a unit of
United Technologies Corporation. All rights reserved
Trademarks and patents
Trade names used in this document may be trademarks or
registered trademarks of the manufacturers or vendors of the
respective products.
Contact information
For contact information, see www.inter logix.com or
www.utcfssecurityproducts.eu
EU directives
2012/19/EU (WEEE directive):
EN Equipment Disposal
Products marked with this symbol cannot be disposed of as
unsorted municipal waste in the European Union. For proper
recycling, return this product to your local supplier upon the
purchase of equivalent new equipment, or dispose of it at
designated collection points. For more information see:
www.recyclethis.info.
BG Изхвърляне на оборудването
Пуснатите на пазара продукти, които имат изобразен този
символ, не могат да се изхвърлят в общинските кофи за
боклук в Европейския съюз. За извършване на правилно
рециклиране трябва да върнете този продукт на местния
доставчик при покупката на еквивалентен нов продукт или
да го предадете на специално определените пунктове за
събиране на такова старо оборудване. За допълнителна
информация вижте: www.recyclethis.info.
CS Nakládání se zařízením
Výrobky označené tímto symbolem nelze likvidovat v
Evropské unii jako netříděný komunální odpad. Pro správnou
recyklaci vraťte tento výrobek svému dodavateli na nákup
nového rovnocenného zařízení , nebo s ním nakládejte v
určených sběrných místech. Pro více informací viz:
www.recyclethis.info.
DA Elektrisk affald
Bortskaffelse af elektrisk og elektronisk udstyr har til formål at
minimere den indvirkning, som affald af elektrisk og
elektronisk udstyr har på miljøet og mennesker. I henhold til
direktivet må elektrisk udstyr, der er mærket med dette
symbol, ikke bortskaffes sammen med almindeligt
husholdningsaffald i Europa. Europæiske brugere af elektrisk
udstyr skal aflevere kasserede produkter til genbrug.
Yderligere oplysninger findes på webstedet
www.recyclethis.info.
DE Entsorgung von Geräten
Produkte die mit diesem Symbol gekennzeichnet sind, dürfen
nicht als unsortierter städtischer Abfall in der europäischen
Union entsorgt werden. Für die korrekte Wiederverwertung
bringen Sie dieses Produkt zu Ihrem lokalen Lieferanten nach
dem Kauf der gleichwertigen neuen Ausrüstung zurück, oder
entsorgen Sie das Produkt an den gekennzeichneten
Sammelstellen. Weitere Informationen hierzu finden Sie auf
der folgenden Website: www.recyclethis.info.
EL Απόρριψη εξοπλισμού
Προϊόντα που φέρουν σήμανση με αυτή την ένδειξη δεν
πρέπει να απορρίπτονται σε δημόσια συστήματα απόρριψης
στην Ευρωπαϊκή Κοινότητα. Για την κατάλληλη ανακύκλωση,
επιστρέψτε αυτό το προϊόν στον προμηθευτή σας με την
αγορά αντίστοιχου νέου εξοπλισμού, ή απορρίψτε το στα
καθορισμένα σημεία συλλογής. Για περισσότερες
πληροφορίες δείτε: www.recyclethis.info.
ES Eliminación de equipos
Los productos marcados con este símbolo no se pueden
eliminar como basura normal sin clasificar en la Unión
Europea. Para el reciclaje apropiado, devuelva este producto
a su distribuidor al comprar el nuevo equipo equivalente, o
deshágase de él en los puntos de reciclaje designados. Para
mas información : www.recyclethis.info.
ET Seadmete kõrvaldamine
Käesoleva sümboliga märgitud tooteid ei tohi Euroopa Liidus
kõrvaldada sorteerimata olmejäätmetena. Nõuetekohaseks
ringlussevõtmiseks tagastage käesolev toode tarnijale
samaväärse uue toote ostmisel, või viige see
kindlaksmääratud vastuvõtupunkti. Lisainformatsiooni saab
Internetist aadressil: www.recyclethis.info.
FI Tuotteiden hävittäminen
Tällä symbolilla merkittyjä tuotteita ei saa hävittää Euroopan
Unionin alueella talousjätteen mukana kaupungin
jätehuoltoasemille. Oikean kierrätystavan varmistamiseksi
palauta tuote paikalliselle jälleenmyyjälle tai palauta se
elektroniikkajätteen keräyspisteeseen. Lisätietoja sivuilla
www.recyclethis.info.
FR Elimination de matériel
Les produits marqués de ce symbole peuvent pas être
éliminés comme déchets municipaux non triés dans l'Union
européenne. Pour le recyclage, retourner ce produit à votre
fournisseur au moment de l'achat d'un nouvel équipement
équivalent, ou à des points de collecte désignés. Pour plus
d'informations, voir: www.recyclethis.info.
HR Odlaganje opreme
U Europskoj uniji proizvodi označeni ovim simbolom ne smiju
se odlagati kao nerazvrstani gradski otpad. Zbog ispravnog
recikliranja vratite ovaj proizvod lokalnom dobavljaču nakon
Page 80

78
kupnje jednakovrijedne nove opreme ili ga odložite u posebne
centre za sabiranje takve vrste otpada. Više informacija
možete pronaći na: www.recyclethis.info
HU Elektonikai hulladék kezelése
Az ezen jellel ellátott termékek az Európai Unión csak a
kijelölt módon és helyen dobhatók ki. Az elektronikai hulladék
leadható a termék forgalmazójánál az új termék vásárlásakor,
vagy a kijelölt elektronikai hulladékudvarokban. További
információ a www.recyclethis.info oldalon.
IT Smaltimento apparati
I prodotti contrassegnati con questo simbolo, non possono
essere smaltiti nei comuni contenitori per lo smaltimento rifiuti,
nell' Unione Europea. Per il loro corretto smaltimento, potete
restituirli al vostro fornitore locale a seguito dell'acquisto di un
prodotto nuovo equivalente, oppure rivolgervi e consegnarli
presso i centri di raccolta preposti. Per maggiori informazioni
vedere: ww.recyclethis.info.
LT Elektros ir elektroninės įrangos šalinimas
Įrangą, pažymėtą šiuo simboliu, draudžiama šalinti Europos
Sąjungos viešose nerūšiuotų atliekų šalinimo sistemose.
Eksploatavimui nebetinkamą įrangą pristatykite į tam skirtas
surinkimo vietas arba, perkant naujus anlogiškus gaminius,
grąžinkite ją pardavėjui, kad ji būtų tinkamai utilizuota.
Daugiau informacijos rasite šioje interneto svetainėje:
www.recyclethis.info.
LV Iekārtu likvidēšana
Eiropas Parlamenta un Padomes direktīvas par elektrisko un
elektronisko iekārtu atkritumiem (EEIA) mērķis ir mazināt
elektrisko un elektronisko iekārtu atkritumu ietekmi uz vidi un
cilvēku veselību. Saskaņā ar šīs direktīvas noteikumiem
elektriskās iekārtas, kuru marķējumā ir zemāk norādītais
simbols, nedrīkst izmest Eiropā esošajās sadzīves atkritumu
sistēmās. Pēc ekspluatācijas laika beigām elektrisko iekārtu
lietotājiem iekārtas jānodod otrreizējai pārstrādei. Sīkāku
informāciju var iegūt vietnē www.recyclethis.info.
NL Materiaal verwijdering
Producten met deze label mogen niet verwijdert worden via
de gemeentelijke huisvuilscheiding in de Europese
Gemeenschap. Voor correcte vorm van kringloop, geef je de
producten terug aan jou locale leverancier tijdens het
aankopen van een gelijkaardige nieuw toestel, of geef het af
aan een gespecialiseerde verzamelpunt. Meer informatie
vindt u op de volgende website: www.recyclethis.info.
NO Retur av utstyr
Produkter merket med dette symbolet kan ikke kastes med
usortert kommunalt søppel i den Europeiske Unionen. For
riktig gjenvinning, returner dette produktet til din lokale
leverandør når du kjøper et nytt produkt av tilsvarende type,
eller lever det ved ett dedikert oppsamlingspunkt. For mer
informasjon se: www.recyclethis.info.
PL Pozbywanie się zużytego sprzętu
W Unii Europejskiej produkty oznaczone tym symbolem mogą
być usuwane tylko jako posegregowane odpady komunalne.
Dla zapewnienia właściwej utylizacji, należy zwrócić ten
produkt do dostawcy przy zakupie ekwiwalentnego, nowego
urządzenia albo dostarczyć go do wyznaczonego punktu
zbiórki. Więcej informacji można znaleźć na stronie
internetowej www.recyclethis.info.
PT Eliminação de equipamento
Produtos marcados com este símbolo não podem ser
eliminados como resíduos urbanos indiferenciados na União
Europeia. Para proceder à reciclagem adequada, devolva
este produto ao seu fornecedor local na compra de novo
equipamento equivalente, ou entregue-o nos pontos de
recolha designados para o efeito. Para mais informações, ver
www.recyclethis.info.
RO Eliminarea echipamentelor
In Uniunea Europeană, produsele marcate cu acest simbol nu
pot fi aruncate ca deşeuri municipale nesortate. Pentru
reciclarea adecvată a acestui produs, returnaţi-l la furnizorul
din zona dumneavoastră în momentul achiziţionării unui
echipament nou echivalent sau depuneţi-l la unul dintre
punctele de colectare specializate. Pentru mai multe
informaţii, consultaţi: www.recyclethis.info.
RU Утилизация оборудования
Согласно европейской директиве об отходах
электрического и электронного оборудования (WEEE),
помеченное этим символом оборудование нельзя
утилизировать как обычные отходы на территории ЕС.
Для надлежащей утилизации по окончании срока
эксплуатации пользователь должен возвратить данное
оборудование локальному поставщику в момент покупки
аналогичного нового оборудования, или сдать в
специальный пункт приема. Подробности можно найти на
веб-сайте: www.recyclethis.info.
SK Zaobchádzanie so zariadením
S produktmi označenými týmto symbolom sa v Európskej únii
nesmie nakladať ako s netriedeným komunálnym odpadom.
Na správnu recykláciu vráťte tento produkt vášmu lokálnemu
dodávateľovi pri nákupe ekvivalentného nového zariadenia
alebo ho uložte v na to určených zberných miestach. Pre viac
informácii pozrite: www.recyclethis.info.
SL Odlaganje opreme
Izdelkov, označenih s tem simbolom, v Evropski uniji ni
dovoljeno odstranjevati kot nesortirane komunalne odpadke.
Za ustrezno recikliranje ta izdelek vrnite lokalnemu
dobavitelju, ko kupite ustrezno novo opremo, ali pa ga
odstranite na določenih zbirališčih. Za več informacij obiščite
spletno stran: www.recyclethis.info.
SV Kassering av utrustning
Produkter märkta med denna symbol får inte kastas i
allmänna sophanteringssytem inom den europeiska unionen.
För korrekt återvinning av utrustningen skall den returneras
din lokala återförsäljare vid köp av liknande ny utrustning eller
Page 81

79
lämnas till en därför avsedd deponering. För mer information,
se: www.recyclethis.info.
TR Geri Dönüşüm
Bu sembolle işaretlenmiş olan elektrikli teçhizat, Avrupa Birliği
genel atık sistemlerine atılmamalıdır. Doğru geri dönüşüm için
bu ürünü ya denk bir ürün satın almak üzere yerel
tedarikçinize iade ediniz ya da özel olarak işaretlenmiş
toplama noktalarına atınız. Daha fazla bilgi için:
www.recyclethis.info.
European representative for manufacture (EMC)
UTC Fire & Security B.V.
Kelvinstraat 7, 6003 DH Weert, The Netherlands.
www.interlogix.com
2013/56/EU & 2006/66/EC (battery directive):
EN Battery Disposal
This product contains a battery that cannot be disposed of as
unsorted municipal waste in the European Union. See the
product documentation for specific battery information. The
battery is marked with this symbol, which may include
lettering to indicate cadmium (Cd), lead (Pb), or mercury (Hg).
For proper recycling return the battery to your supplier or to a
designated collection point. For more information see:
www.recyclethis.info.
BG Изхвърляне на батерията
Този продукт има батерия, която не може да се изхвърля
в общинските кофи за боклук в Европейския съюз. Вижте
документацията на продукта за конкретна информация
относно батериите. Батерията се маркира с този символ,
който може да включва и допълнителни букви за
показване на съдържанието й – например Cd за кадмий,
Pb за олово или Hg за живак. За правилното рециклиране
трябва да върнете батерията на своя доставчик или в
специално определените пунктове за събиране. За
допълнителна информация вижте: www.recyclethis.info.
CS Nakládání s bateriemi
Tento produkt obsahuje baterie, které nemohou být
zneškodněny v Evropské unii jako netříděný komunální
odpadu. Viz dokumentace k produktu pro informace pro
konkrétní baterie. Baterie je označena tímto symbolem, který
může zahrnovat i uvedena písmena, kadmium (Cd), olovo
(Pb), nebo rtuť (Hg). Pro správnou recyklaci baterií vraťte
svémudodavateli nebo na určeném sběrném místě. Pro více
informací viz: www.recyclethis.info
DA Batteri affald
Dette produkt indeholder et batteri som ikke kan bortskaffes
sammen med almindeligt husholdningsaffald i Europa. Se
produktinformation for specifikke informationer om batteriet.
Batteriet er forsynet med indgraveret symboler for hvad
batteriet indeholder: kadmium (Cd), bly (Pb) og kviksølv (Hg).
Europæiske brugere af elektrisk udstyr skal aflevere
kasserede produkter til genbrug eller til leverandøren.
Yderligere oplysninger findes på webstedet
www.recyclethis.info.
DE Entsorgung von Batterien
Dieses Produkt beinhaltet eine Batterie, die nicht als
unsortierter städtischer Abfall in der europäischen Union
entsorgt werden darf. Beachten Sie die spezifischen Batterieinformationen in der Produktdokumentation. Die Batterie ist
mit diesem Symbol gekennzeichnet, welches auch Hinweise
auf möglicherweise enthaltene Stoffe wie Kadmium (Cd), Blei
(Pb) oder Quecksilber (Hektogramm) darstellt. Für die
korrekte Wiederverwertung bringen Sie diese Batterie zu
Ihrem lokalen Lieferanten zurück oder entsorgen Sie das
Produkt an den gekennzeichneten Sammelstellen. Weitere
Informationen hierzu finden Sie auf der folgenden Website:
www.recyclethis.info.
EL Απόρριψη μπαταριών
Αυτό το προϊόν περιέχει μια μπαταρία που δεν πρέπει να
απορρίπτεται σε δημόσια συστήματα απόρριψης στην
Ευρωπαϊκή Κοινότητα. Δείτε την τεκμηρίωση του προϊόντος
για συγκεκριμένες πληροφορίες που αφορούν τη μπαταρία. Η
μπαταρία είναι φέρει σήμανση με αυτό το σύμβολο, το οποίο
μπορεί να περιλαμβάνει γράμματα για να δηλώσουν το κάδμιο
(Cd), τον μόλυβδο (Pb), ή τον υδράργυρο (Hg). Για την
κατάλληλη ανακύκλωση επιστρέψτε την μπαταρία στον
προμηθευτή σας ή σε καθορισμένο σημείο συλλογής. Για
περισσότερες πληροφορίες δείτε: www.recyclethis.info.
ES Eliminacion de baterias
Este producto contiene una batería que no se pueda eliminar
como basura normal sin clasificar en la Unión Europea.
Examine la documentación del producto para la información
específica de la batería. La batería se marca con este
símbolo, que puede incluir siglas para indicar el cadmio (Cd),
el plomo (Pb), o el mercurio (Hg ). Para el reciclaje apropiado,
devuelva este producto a su distribuidor ó deshágase de él en
los puntos de reciclaje designados. Para mas información :
wwwrecyclethis.info.
ET Patareide kõrvaldamine
Käesolev toode sisaldab patareisid, mida Euroopa Liidus ei
tohi kõrvaldada sorteerimata olmejäätmetena. Andmeid
patareide kohta vaadake toote dokumentatsioonist. Patareid
on märgistatud käesoleva sümboliga, millel võib olla
kaadmiumi (Cd), pliid (Pb) või elavhõbedat (Hg) tähistavad
tähed. Nõuetekohaseks ringlusse võtmiseks tagastage patarei
tarnijale või kindlaksmääratud vastuvõtupunkti.
Lisainformatsiooni saab Internetist aadressil:
www.recyclethis.info.
FI Paristoje ja akkujen hävittäminen
Tuote sisältää pariston, jota ei saa hävittää Euroopan Unionin
alueella talousjätteen mukana. Tarkista tuoteselosteesta
Page 82

80
tuotteen tiedot. Paristo on merkitty tällä symbolilla ja saattaa
sisältää cadmiumia (Cd), lyijyä (Pb) tai elohopeaa (Hg).
Oikean kierrätystavan varmistamiseksi palauta tuote
paikalliselle jälleenmyyjälle tai palauta se paristojen
keräyspisteeseen. Lisätietoja sivuilla www.recyclethis.info.
FR Élimination des piles
Ce produit contient une batterie qui ne peuvent être éliminés
comme déchets municipaux non triés dans l'Union
européenne. Voir la documentation du produit au niveau des
renseignements sur la pile. La batterie est marqué de ce
symbole, qui comprennent les indications cadmium (Cd),
plomb (Pb), ou mercure (Hg). Pour le recyclage, retourner la
batterie à votre fournisseur ou à un point de collecte. Pour
plus d'informations, voir: www.recyclethis.info.
HB Odlaganje baterija
Ovaj proizvod sadrži bateriju koja se u Europskoj uniji ne
smije odlagati kao nerazvrstani gradski otpad. Specifične
informacije o bateriji potražite u dokumentaciji proizvoda.
Baterija je označena ovim simbolom koji može sadržavati
simbole kadmija (Cd), olova (Pb) ili žive (Hg). Radi ispravnog
recikliranja vratite bateriju dobavljaču ili je odložite u
posebnom centru za sabiranje takvog otpada. Više
informacija možete pronaći na: www.recyclethis.info
HU Akkumulátor hulladék kezelése
Ezen termék akkumulátort tartalmaz, amely az Európai Unión
belül csak a kijelölt módon és helyen dobható ki. A terméken
illetve a mellékelt ismertetőn olvasható a kadmium (Cd), ólom
(Pb) vagy higany (Hg) tartalomra utaló betűjelzés. A hulladék
akkumulátor leadható a termék forgalmazójánál új
akkumulátor vásárlásakor, vagy a kijelölt elektronikai
hulladékudvarokban. További információ a
www.recyclethis.info oldalon.
IT Smaltimento batterie
Questo prodotto contiene una batteria che non può essere
smaltita nei comuni contenitori per lo smaltimento rifiuti, nell'
Unione Europea. Controllate la documentazione del prodotto
per le informazioni specifiche sulla batteria. La batteria è
contrassegnata con questo simbolo e può includere alcuni
caratteri ad indicare la presenza di cadmio (Cd), piombo (Pb)
oppure mercurio (Hg). Per il corretto smaltimento, potete
restituirli al vostro fornitore locale, oppure rivolgervi e
consegnarli presso i centri di raccolta preposti. Per maggiori
informazioni vedere: ww.recyclethis.info.
LT Baterijų šalinimas
Šios įrangos sudėtyje yra baterijų, kurias draudžiama šalinti
Europos Sąjungos viešose nerūšiuotų atliekų šalinimo
sistemose. Informaciją apie baterijas galite rasti įrangos
techninėje dokumentacijoje. Baterijos žymimos šiuo simboliu,
papildomai gali būti nurodoma kad baterijų sudėtyje yra
kadmio (Cd), švino (Pb) ar gyvsidabrio (Hg). Eksploatavimui
nebetinkamas baterijas pristatykite į tam skirtas surinkimo
vietas arba grąžinkite jas tiesioginiam tiekėjui, kad jos būtų
tinkamai utilizuotos. Daugiau informacijos rasite šioje
interneto svetainėje: www.recyclethis.info.
LV Bateriju likvidēšana
Šis produkts satur bateriju vai akumulatoru, kuru nedrīkst
izmest Eiropas Savienībā esošajās sadzīves atkritumu
sistēmās. Sk. produkta dokumentācijā, kur ir norādīta
konkrēta informācija par bateriju vai akumulatoru. Baterijas
vai akumulatora marķējumā ir šis simbols, kas var ietvert
burtus, kuri norāda kadmiju (Cd), svinu (Pb) vai dzīvsudrabu
(Hg). Pēc ekspluatācijas laika beigām baterijas vai
akumulatori jānodod piegādātājam vai specializētā bateriju
savākšanas vietā. Sīkāku informāciju var iegūt vietnē:
www.recyclethis.info.
NL Verwijderen van baterijen
Dit product bevat een batterij welke niet kan verwijdert worden
via de gemeentelijke huisvuilscheiding in de Europese
Gemeenschap. Gelieve de product documentatie te
controleren voor specifieke batterij informatie. De batterijen
met deze label kunnen volgende indictaies bevatten cadium
(Cd), lood (Pb) of kwik (Hg). Voor correcte vorm van
kringloop, geef je de producten terug aan jou locale
leverancier of geef het af aan een gespecialiseerde
verzamelpunt. Meer informatie vindt u op de volgende
website: www.recyclethis.info.
NO Retur av batteri
Dette produkt inneholder et batteri som ikke kan kastes med
usortert kommunalt søppel i den Europeiske Unionen. Se
produktdokumentasjonen for spesifikk batteriinformasjon.
Batteriet er merket med dette symbolet som kan inkludere
symboler for å indikere at kadmium (Cd), bly (Pb), eller
kvikksølv (Hg) forekommer. Returner batteriet til leverandøren
din eller til et dedikert oppsamlingspunkt for korrekt
gjenvinning. For mer informasjon se: www.recyclethis.info.
PL Pozbywanie się zużytych baterii
Ten produkt zawiera baterie, które w Unii Europejskiej mogą
być usuwane tylko jako posegregowane odpady komunalne.
Dokładne informacje dotyczące użytych baterii znajdują się w
dokumentacji produktu. Baterie oznaczone tym symbolem
mogą zawierać dodatkowe oznaczenia literowe wskazujące
na zawartość kadmu (Cd), ołowiu (Pb) lub rtęci (Hg). Dla
zapewnienia właściwej utylizacji, należy zwrócić baterie do
dostawcy albo do wyznaczonego punktu zbiórki. Więcej
informacji można znaleźć na stronie internetowej
www.recyclethis.info.
PT Eliminação de Baterias
Este produto contêm uma bateria que não pode ser
considerado lixo municipal na União Europeia. Consulte a
documentação do produto para obter informação específica
da bateria. A bateria é identificada por meio de este símbolo,
que pode incluir a rotulação para indicar o cádmio (Cd),
chumbo (Pb), ou o mercúrio (hg). Para uma reciclagem
apropriada envie a bateria para o seu fornecedor ou para um
Page 83

81
ponto de recolha designado. Para mais informação veja:
www.recyclethis.info.
RO Eliminarea bateriilor
Acest produs conţine o baterie care, în Uniunea Europeană,
nu poate fi aruncată ca deşeu municipal nesortat. Pentru
informaţii specifice privind bateria, consultaţi documentaţia
produsului. Bateria este marcată cu acest simbol, care poate
include litere pentru a indica prezenţa cadmiului (Cd), a
plumbului (Pb) sau a mercurului (Hg). Pentru reciclare
adecvată, returnaţi bateria la furnizor sau la un punct de
colectare specializat. Pentru mai multe informaţii, consultaţi:
www.recyclethis.info.
RU Утилизация батарей
Согласно европейской директиве об отходах
электрического и электронного оборудования, продукты,
содержащие батареи, нельзя утилизировать как обычные
отходы на территории ЕС. Более подробную информацию
вы найдете в документации к продукту. На этом символе
могут присутствовать буквы, которые означают, что
батарея собержит кадмий (Cd), свинец (Pb) или ртуть
(Hg). Для надлежащей утилизации по окончании срока
эксплуатации пользователь должен возвратить батареи
локальному поставщику или сдать в специальный пункт
приема. Подробности можно найти на веб-сайте:
www.recyclethis.info.
SK Zaobchádzanie s batériami
Tento produkt obsahuje batériu, s ktorou sa v Európskej únii
nesmie nakladať ako s netriedeným komunálnym odpadom.
Dokumentácia k produktu obsahuje špecifické informácie o
batérii. Batéria je označená týmto symbolom, ktorý môže
obsahovať písmená na označenie kadmia (Cd), olova (Pb),
alebo ortuti (Hg). Na správnu recykláciu vráťte batériu vášmu
lokálnemu dodávateľovi alebo na určené zberné miesto. Pre
viac informácii pozrite: www.recyclethis.info.
SL Odlaganje baterij
Ta izdelek vsebuje baterijo, ki je v Evropski uniji ni dovoljeno
odstranjevati kot nesortiran komunalni odpadek. Za posebne
informacije o bateriji glejte dokumentacijo izdelka. Baterija je
označena s tem simbolom, ki lahko vključuje napise, ki
označujejo kadmij (Cd), svinec (Pb) ali živo srebro (Hg). Za
ustrezno recikliranje baterijo vrnite dobavitelju ali jo odstranite
na določenem zbirališču. Za več informacij obiščite spletno
stran: www.recyclethis.info.
SV Kassering av batteri
Denna produkt innehåller ett batteri som inte får kastas i
allmänna sophanteringssytem inom den europeiska unionen.
Se produktdokumentationen för specifik batteriinformation.
Batteriet är märkt med denna symbol, vilket kan innebära att
det innehåller kadmium (Cd), bly (Pb) eller kvicksilver (Hg).
För korrekt återvinning skall batteriet returneras till
leverantören eller till en därför avsedd deponering. För mer
information, se: www.recyclethis.info.
TR Pil Geri Dönüşümü
Bu ürün Avrupa Birliği genel atık sistemlerine atılmaması
gereken pil içermektedir. Daha detaylı pil bilgisi için ürünün
kataloğunu inceleyiniz. Bu sembolle işaretlenmiş piller
Kadmiyum(Cd), Kurşun(Pb) ya da Civa(Hg) içerebilir. Doğru
geri dönüşüm için ürünü yerel tedarikçinize geri veriniz ya da
özel işaretlenmiş toplama noktlarına atınız. Daha fazla bilgi
için: www.recyclethis.info.
Page 84

Page 85

Page 86

Page 87

Page 88

 Loading...