

Page 1

TruVision DVR 11 Quick Start
Guide
EN TruVision DVR 11 Quick Start Guide
DE TruVision DVR 11 Schnellstartanleitung
ES Guía de inicio rápido de TruVision DVR 11
FI TruVision DVR 11 Pikaohje
FR Guide rapide de démarrage du TruVision DVR 11
IT Guida di avvio rapido di TruVision DVR 11
NL TruVision DVR 11 Snel aan de slag-gids
PL Instrukcja szybkiego uruchamiania rejestratora TruVision DVR 11
PT Guia Rápido do TruVision DVR 11
RU Краткое руководство по началу работы с TruVision DVR 11
TR TruVision DVR 11 Hızlı Başlangıç Kılavuzu
P/N 1072596B-Multilingual • REV 1.0 • ISS 07MAY13
Page 2

Copyright © 2013 UTC Fire & Security Americas Corporation, Inc.
Interlogix is part of UTC Climate Controls & Security, a unit of United
Technologies Corporation. All rights reserved.
Trademarks and
patents
The TruVision and Interlogix names and logos are trademarks of United
Technologies.
Other trade names used in this document may be trademarks or
registered trademarks of the manufacturers or vendors of the respective
products.
Contact
information
www.interlogix.com or www.utcfssecurityproducts.eu/support
Page 3
TruVision DVR 11 Quick Start Guide 3 : EN
EN
TruVision DVR 11 Quick Start
Guide
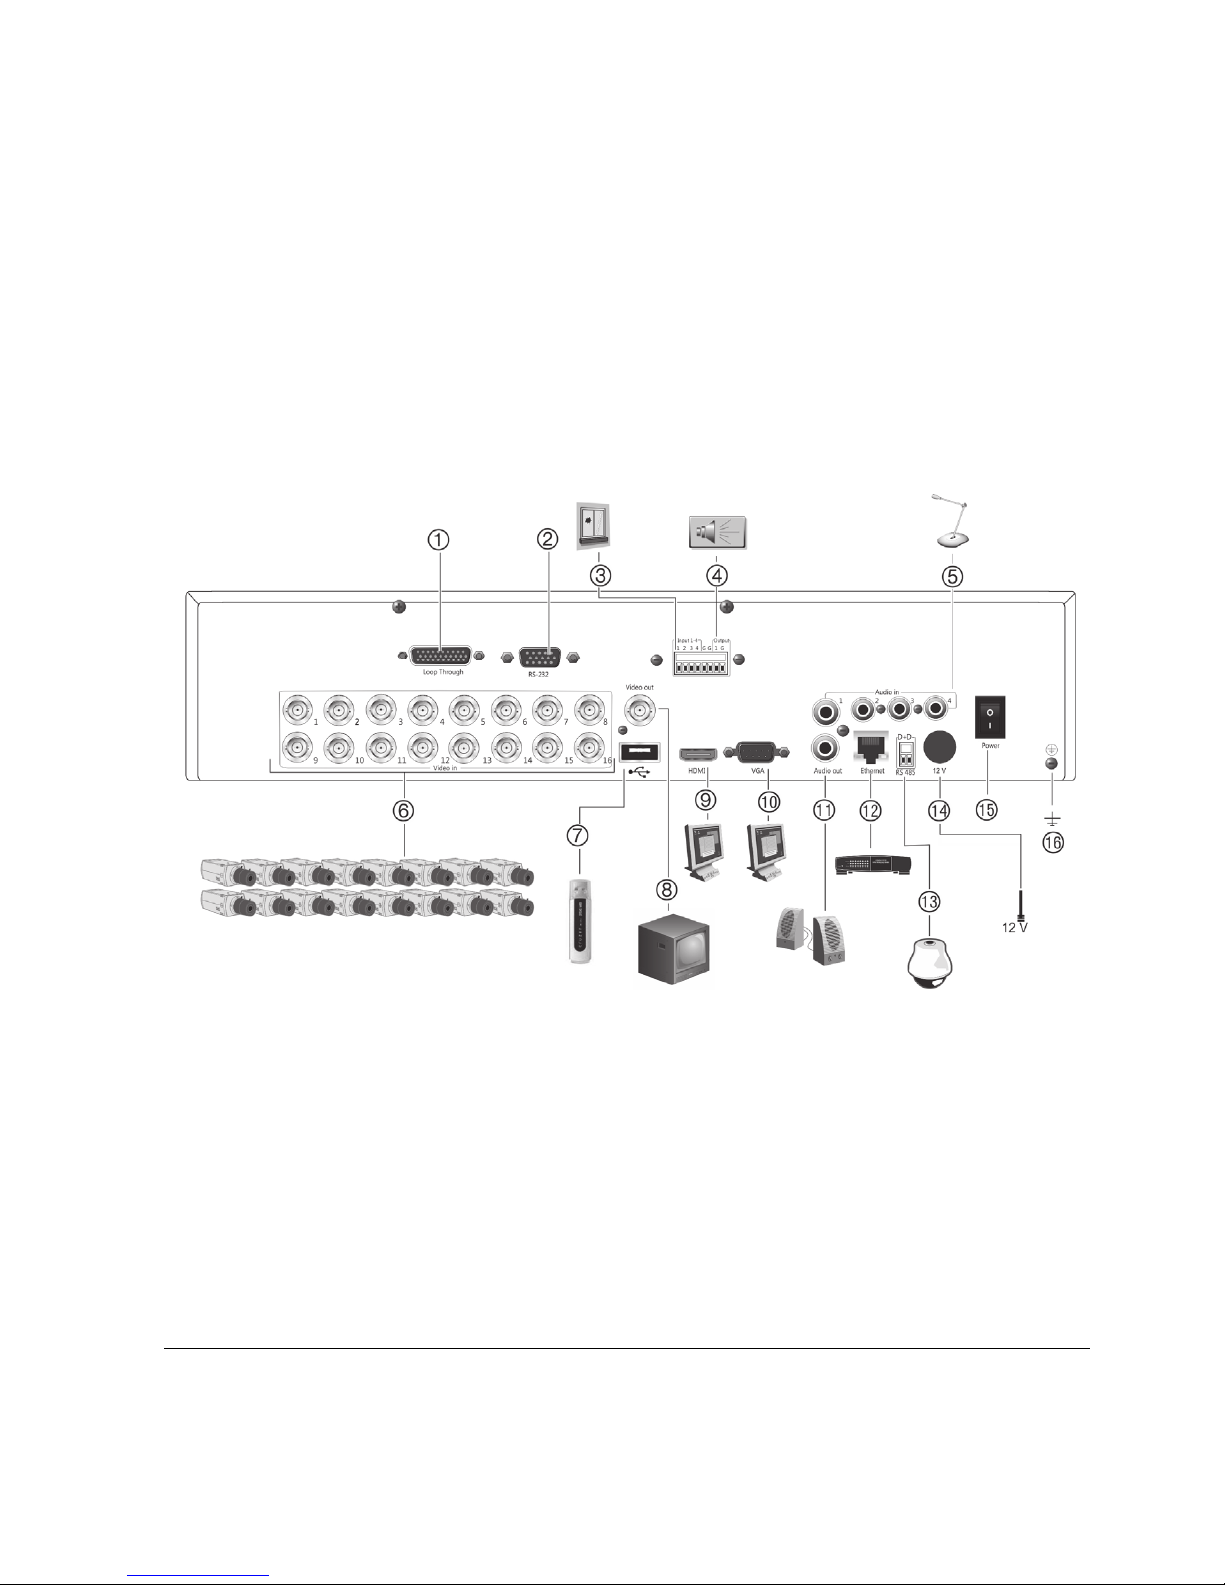
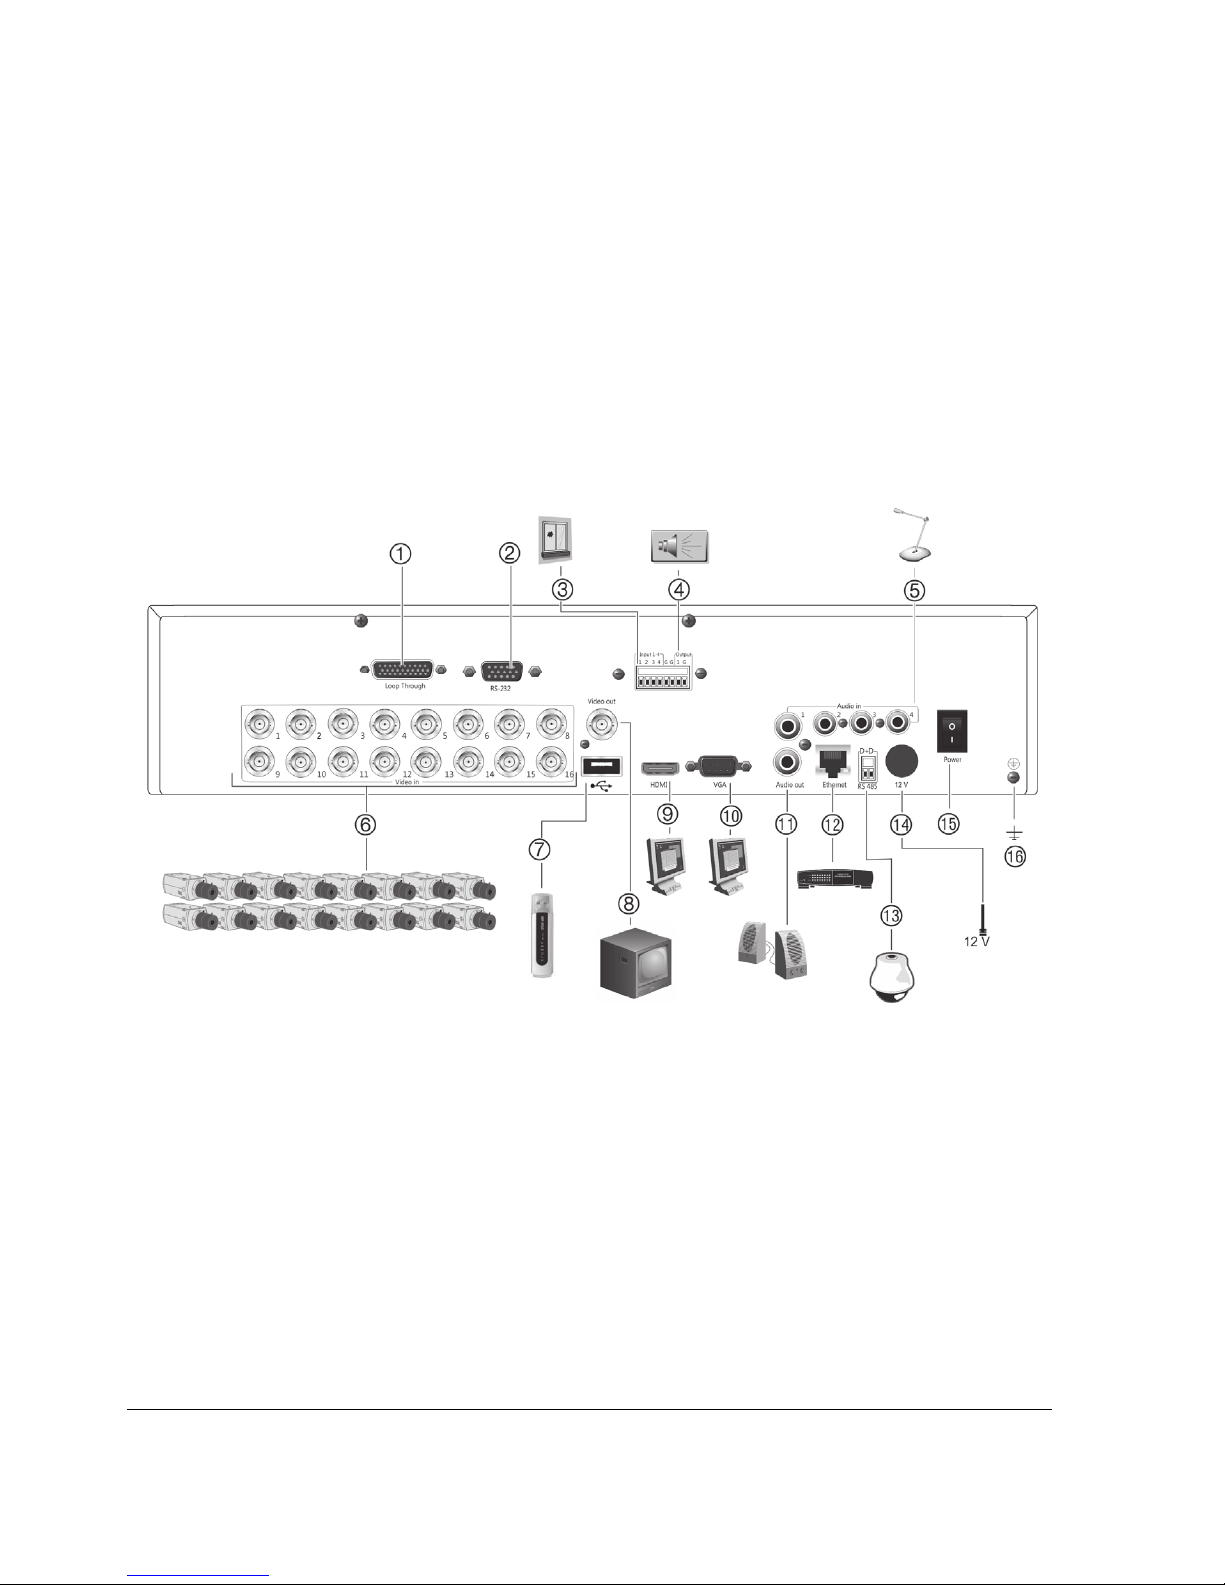
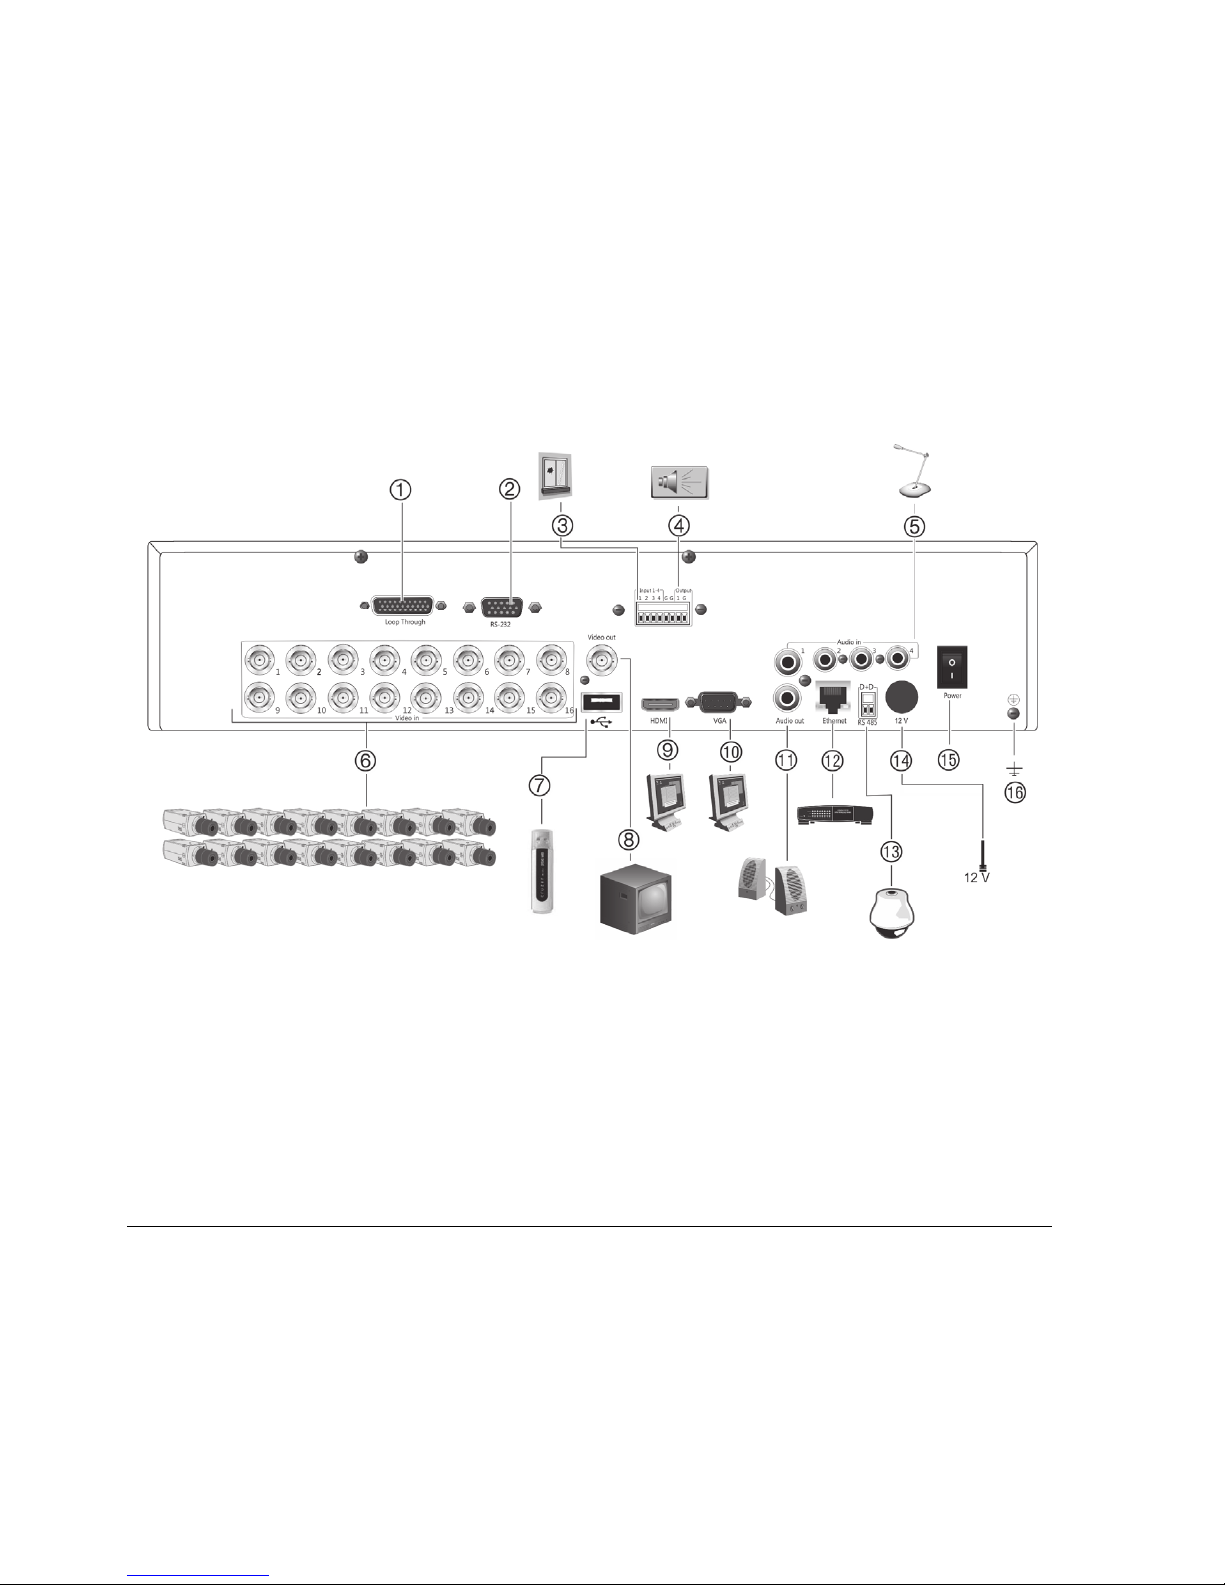
Figure 1: Back panel connections
1. Loop through for up to 16 analog cameras
(depends on DVR model).
2. Connect to a RS-232 device.
3. Connect up to four alarm input cables to relay
outputs.
4. Connect one alarm relay output.
5. Connect four audio inputs to RCA connectors.
6. Connect up to 16 analog cameras to BNC
connectors (depends on model of DVR).
7. Connect to an optional USB device such as a
mouse, CD/DVD burner or HDD. The DVR
supports both a USB DVD and a USB HD on
the front and rear USB ports.
8. Connect one CCTV monitor (CVBS connector).
9. Connect to a HDTV. The HDMI connection
supports both digital audio and video.
10. Connect to a VGA monitor.
11. Connect to speakers for audio output.
12. Connect to a network.
13. Connect to a RS-485 device such as a PTZ
camera or a keypad.
14. Connect to the 12 VDC PSU (enclosed).
15. Power switch (on/off).
16. Connect to ground.
Page 4

EN : 4 TruVision DVR 11 Quick Start Guide
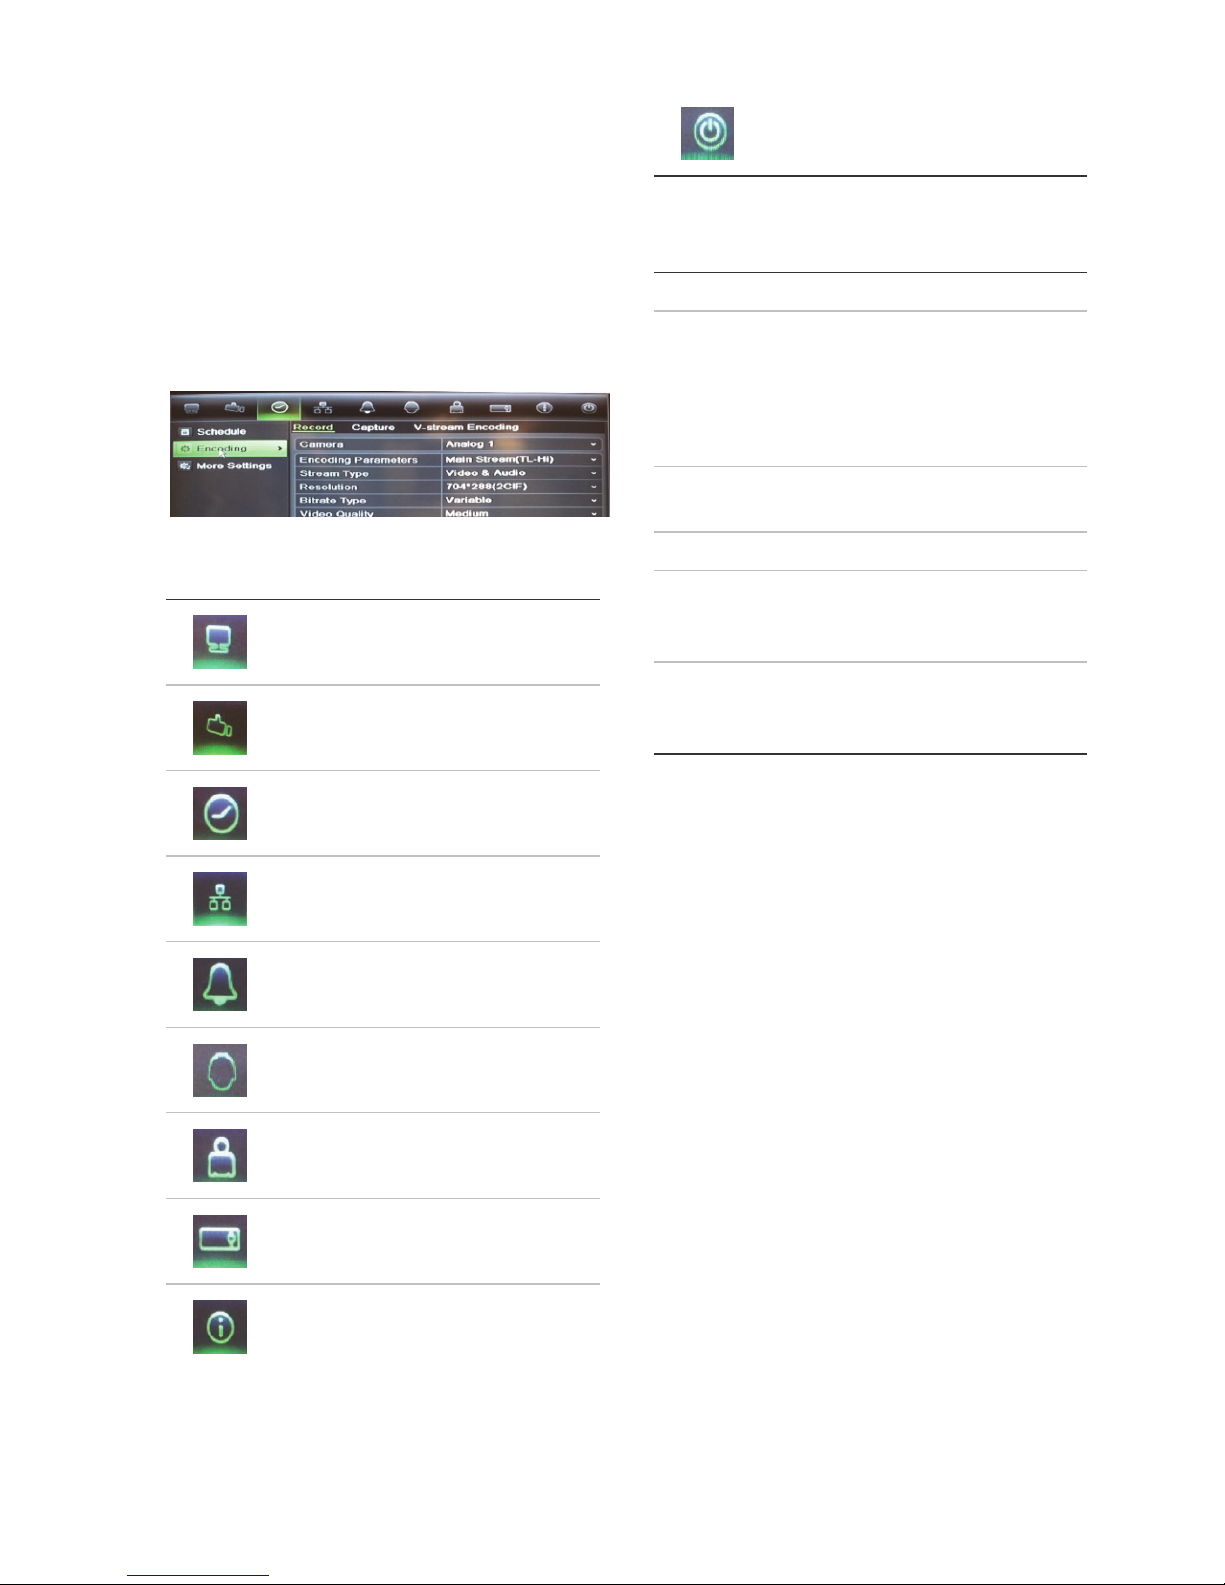
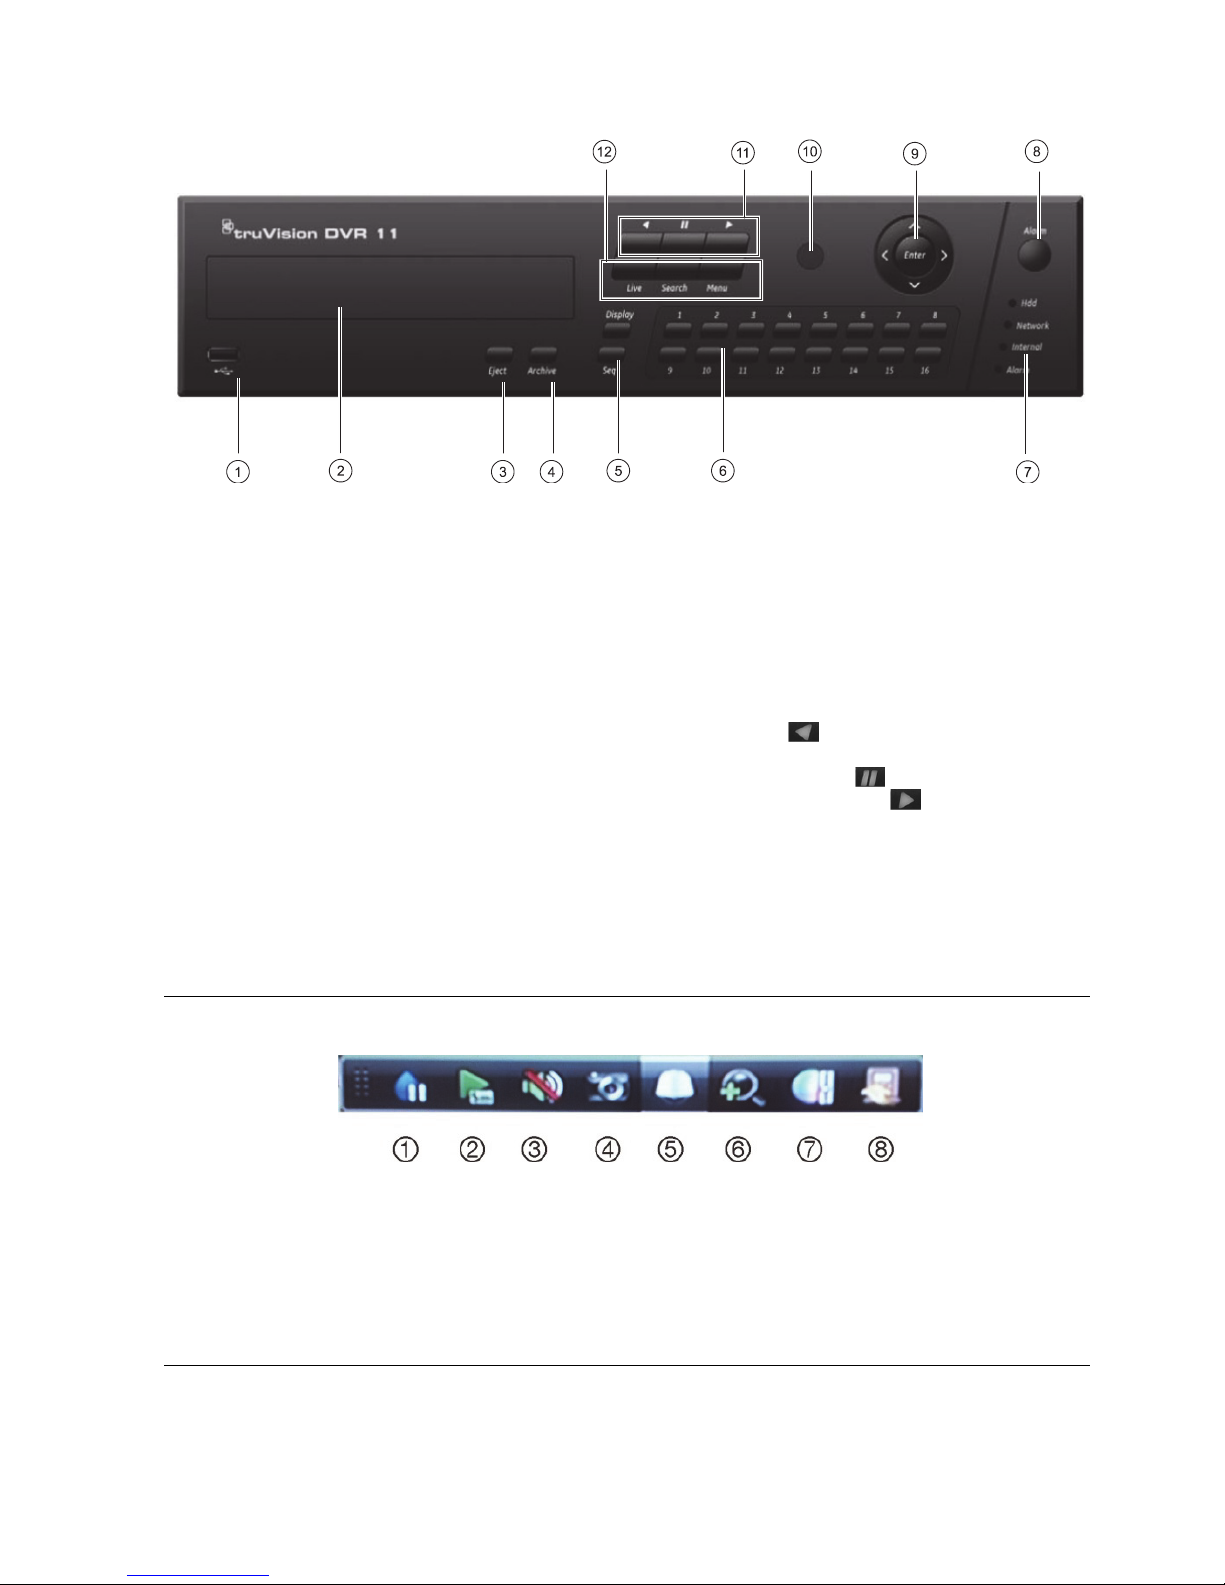
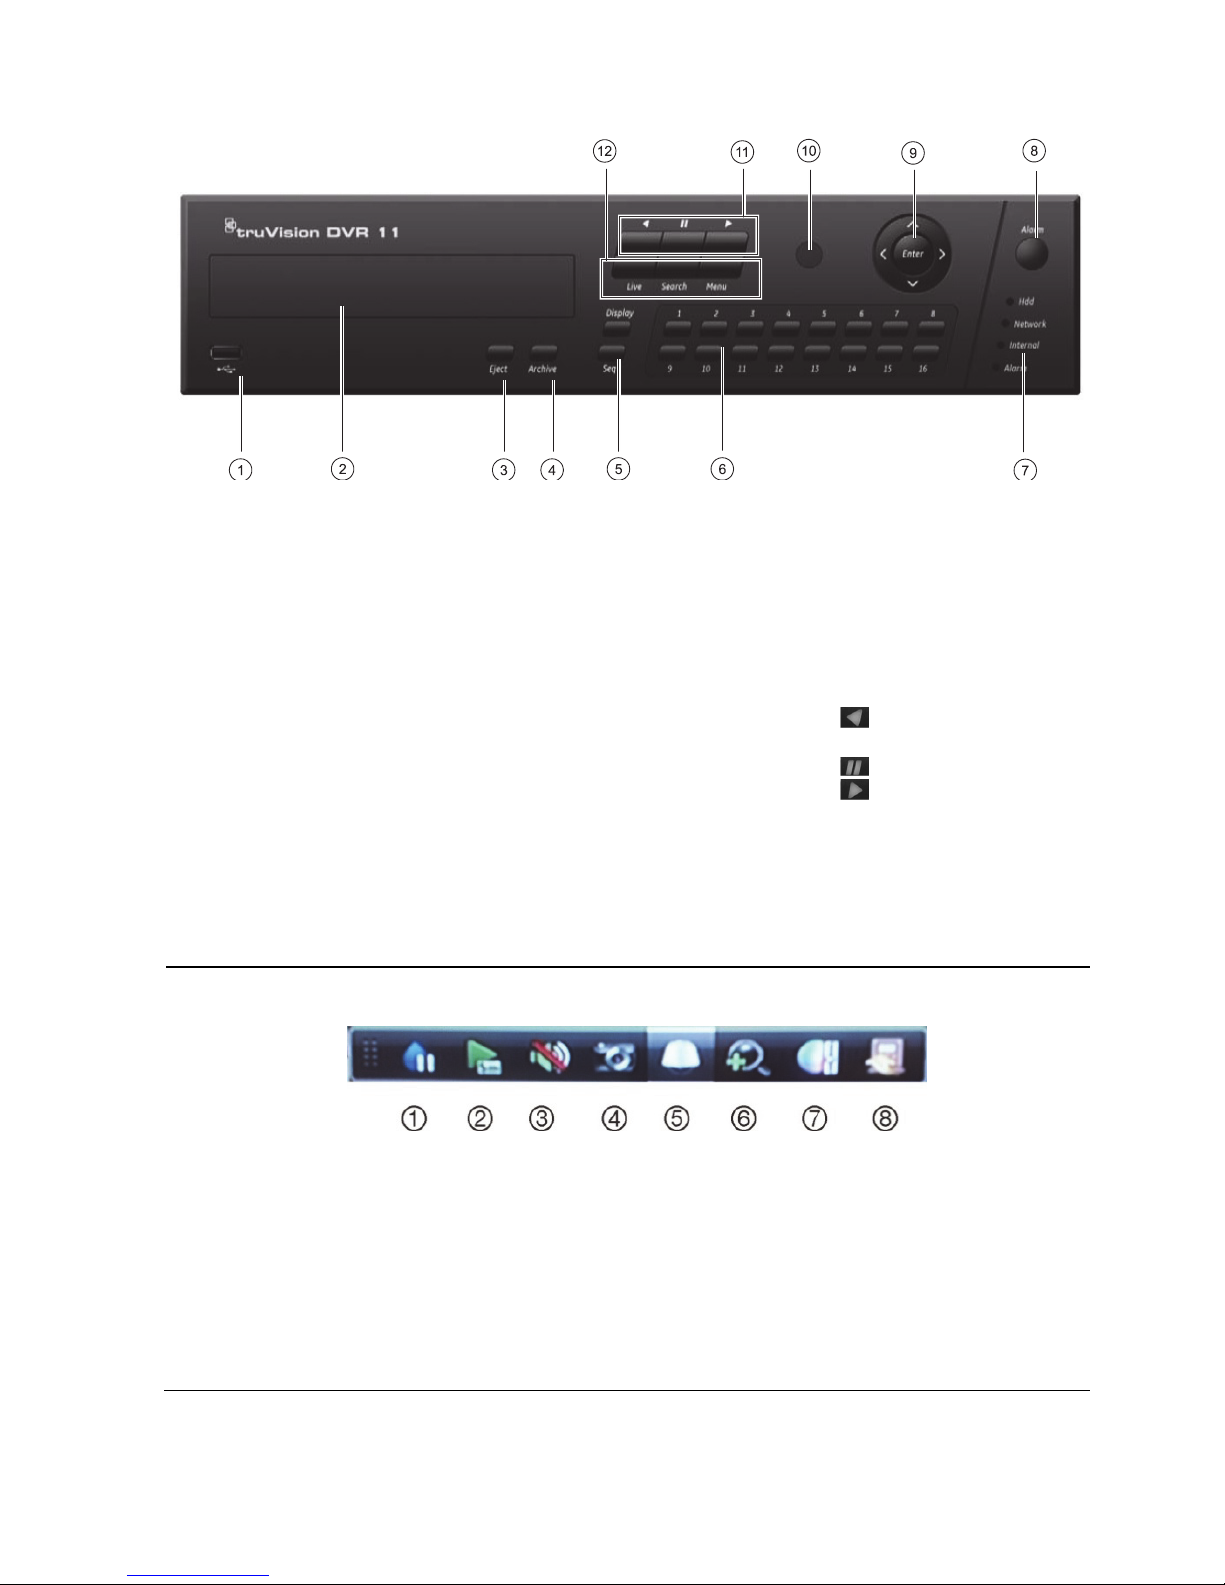
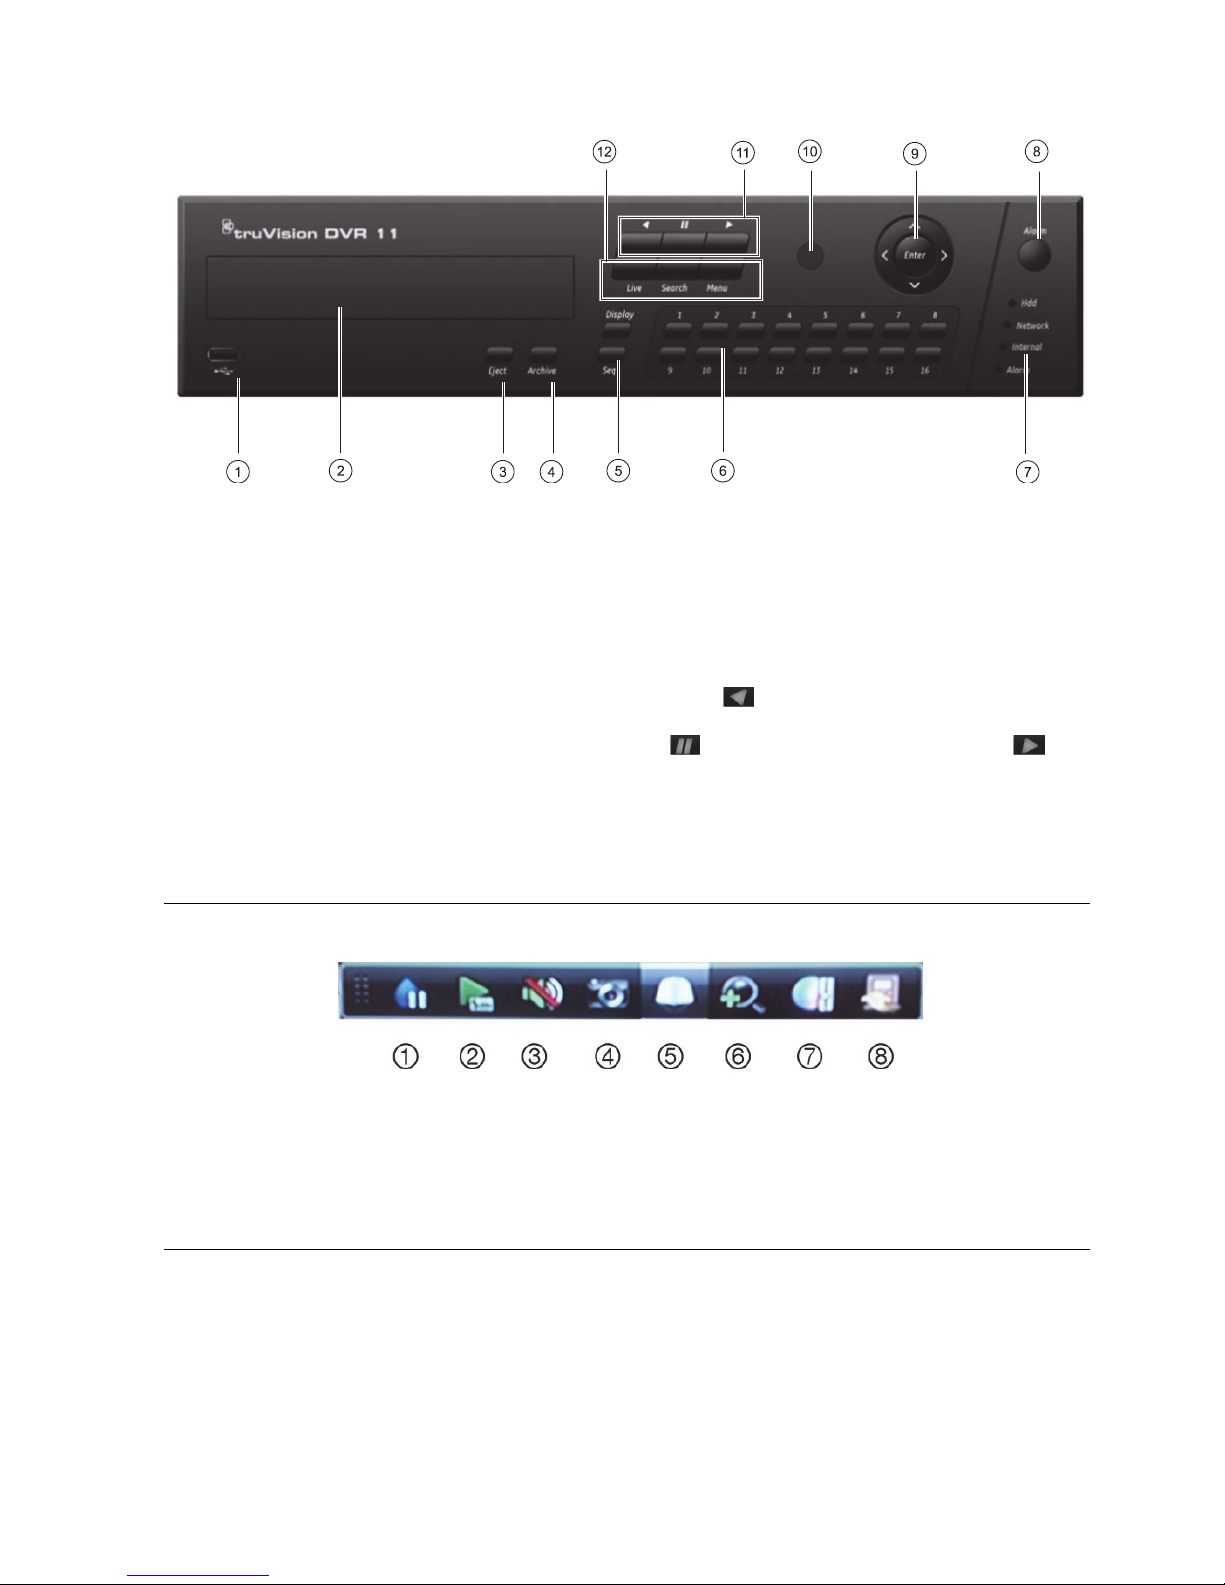
Figure 2: Front panel controls
1 USB port. The DVR supports both a USB DVD
and a USB HD on the front and rear USB ports.
2. CD/DVD burner.
3. Eject button: Press to eject CD/DVD disc.
4. Archive button: Press to enter archive mode.
5. Display and Seq buttons: In live view mode,
press Display to toggle through the single and
multiviews. Press Seq to start/stop sequencing
in live view mode.
In menu mode, press Enter to select a menu
window and then Seq to toggle through the tabs
along the top of the menu window.
6. Channel buttons. Switch between different
cameras in live view, PTZ control or playback
modes.
7. Status LEDs.
8. Alarm button: Press to manually acknowledge
an alarm. 9. Enter and arrow buttons: Use to
select options in a menu and to control playback.
Press for Enter.
10. IR receiver.
11. Playback buttons: Press to control playback.
Press to jump back to the oldest available
video and start playback. Press to pause
playback. Press for all-day playback.
12. Live, Menu and Search buttons: Press Live to
switch to live view mode. Press Menu to enter
the main menu. Press Search to enter the
advanced search menu.
Figure 3: Quick access toolbar
1. Freeze: Freeze live image of the selected
camera.
2. Instant playback: Play back the recorded video
from the last five minutes.
3. Audio: Enable/disable audio output.
4. Quick snapshot: Capture a snapshot of a video
image.
5. PTZ control: Enter PTZ control mode.
6. Digital zoom: Enter digital zoom.
7. Image settings: Modify the image lighting levels.
8. Close: Close the toolbar.
Page 5

TruVision DVR 11 Quick Start Guide 5 : EN
Quick Start Guide
Package contents
The TruVision DVR 11 (model TVR 11) is
shipped with the following items:
• IR (infrared) remote control
• Two AAA batteries for the remote control
• AC power cords
• 12 VDC PSU
• USB mouse
• DVR
• Video loop through cable
• CD with software and manuals
• TruVision DVR 11 Quick Start Guide
• TruVision DVR 11 User Manual (on CD)
Installation environment
Refer to the user manual for detailed
information, but observe these important
requirements:
• Place the unit in a secure location.
• Ensure that the unit is in a well-ventilated
area.
• Do not expose the unit to rain or moisture.
Quick install
Recommended steps for setting up the DVR:
1. Connect all the devices required to the
back panel of the TVR 11. See Figure 1 on
page 3.
Basic connections:
Connect the cameras to the BNC camera
inputs and monitor A to the BNC, VGA or
HDMI output. Connect the mouse to the
USB port in the front panel.
Optional connections:
All the other connections shown are
optional and depend upon installation
requirements.
2. Connect the power supply to the unit and
turn on the power.
3. Set up the unit with the required settings
using the setup Wizard.
First-time use
The TVR 11 has an express installation wizard
that lets you easily configure basic DVR
settings when first used. It configures all
cameras simultaneously. The configuration
can then be customized as required.
By default, the setup wizard will start once the
DVR has loaded. The wizard walks you
through some of the more important settings
of your DVR. Select the preferred language for
the system and then enter the administrator
password. The default admin password is
1234. It is strongly recommended that this
password is changed.
The wizard will then guide you through the
menus to set the time and date, network
configuration, HDD management, and
recording configuration.
When all the required changes have been
entered, click Finish to exit the wizard. The
TVR 11 is now ready to use. Recording starts
automatically.
Operating the TVR 11
There are several ways to control the unit:
• Front panel
• IR remote control
• Mouse
• Web browser
Front panel
The buttons on the front panel control most
functions. See Figure 2 on page 4 for the
locations of the controls.
IR remote control
The IR remote control buttons are similar to
those on the front panel. Place the two AAA
batteries in the remote control.
Page 6

EN : 6 TruVision DVR 11 Quick Start Guide
To connect the remote control to the DVR:
1. Press Menu on the front panel or right-click
the mouse and select Menu. The main
menu screen appears.
2. Select Display mode settings > Monitor.
3. Check and remember DVR device address
value. The default value is 255. The device
address is valid for all IR controls.
4. On the remote control press the Device
button.
5. Enter the device address value. It must be
the same as that on the TVR 11.
6. Press OK on the remote control or front
panel.
USB mouse
The USB mouse provided with the TVR 11
operates all the functions of the DVR, unlike
the front panel, which has limited functionality.
The mouse lets you navigate and make
changes to settings in the user interface.
Connect the mouse to the DVR by plugging
the mouse USB connector into the USB port
on the back or front panel. The mouse is
immediately operational and the pointer
should appear.
Web browser control
The TVR 11 web browser lets you view,
record, and play back videos as well as
manage all aspects of the DVR from any PC
with Internet access. The browser’s easy-touse controls give you quick access to all DVR
functions.
To access the unit, open a web browser and
enter the IP address assigned to the DVR as a
web address. In the logon screen, enter the
default user ID and password:
• User ID: admin
• Password: 1234
The default values for TVR 11 network
settings are:
• DHCP: Enabled by default.
• IP address - 192.168.1.82
• Subnet mask - 255.255.255.0
• Gateway address - 192.168.1.1
• Server Port: 8000
• HTTP Port: 80
• RTSP port: 554
Note: The following ports need to be followed
in the router in order to connect properly:
Server port and RTSP port.
Figure 4: Web browser interface
Live view mode
Live mode is the normal operating mode of the
unit where you watch live pictures from the
cameras.
Regularly used functions in live view can be
quickly accessed by clicking the left-button of
the mouse when its cursor is on the camera
image. The shortcut pop-up toolbar appears.
See Figure 3 on page 4 for a description of
the functions available.
Configuring the TVR 11
The TVR 11 has an icon-driven menu
structure that allows you to configure the unit’s
parameters. Each command icon displays a
screen that lets you edit a group of settings.
Most menus are available only to system
administrators.
Refer to the TVR 11 user manual for detailed
information on configuring the unit.
Page 7
TruVision DVR 11 Quick Start Guide 7 : EN
To access the main menu from live view:
Press the Menu button on the remote
control or front panel
- Or -
Right-click the mouse and select Menu
from the pop-up menu.
The main menu screen appears. Move the
mouse over a command icon in the menu
toolbar and click to select it.
Description of the command icons in the
menu toolbar:
Configures display settings.
Configures camera settings.
Configures recording settings.
Configures standard network
settings.
Configures alarm settings.
Configures PTZ settings.
Configures user settings.
Configures system settings.
Provides reference information
to the various toolbars and
menus within the interface.
Provides access to logout,
reboot and shutdown options.
Specifications
Power supply 12 VDC
Power consumption (without HDD or DVDR/W):
TVR 1104
TVR 1108
TVR 1116
≤ 10 W
≤ 15 W
≤ 20 W
Operating
temperature
-10 to +55 ºC
(14 to 131 °F)
Relative humidity 10 to 90%
Dimensions
(W x H x D)
362 × 330 × 78 mm
(14.25 × 13.0 × 3.07
in.)
Weight ≤ 3 kg (6.6 lb.)
(without HDD or DVDR/W)
Contact information
For contact information, see
www.interlogix.com, or
www.utcfssecurityproducts.eu
Page 8
DE : 8 TruVision DVR 11 Schnellstartanleitung
DE
TruVision DVR 11
Schnellstartanleitung
Abbildung 1: Anschlüsse an der Rückseite
1. Durchschleifanschluss für bis zu 16 analoge
Kameras (abhängig vom DVR-Modell).
2. Anschluss an ein RS-232-Gerät.
3. Anschluss von bis zu vier Alarmeingangskabeln
an Relaisausgänge.
4. Anschluss für einen Alarmrelaisausgang.
5. Anschluss von bis zu vier Audioeingängen über
Cinchstecker.
6. Anschluss von bis zu 16 analogen Kameras an
BNC-Anschlüsse (abhängig vom DVR-Modell).
7. Anschluss an ein optionales USB-Gerät, z. B.
Maus, CD/DVD-Brenner oder Festplatte. Der
DVR unterstützt sowohl eine USB DVD als
auch ein USB HD an den vorderen und hinteren
USB-Anschlüssen.
8. Anschluss eines CCTVVideoüberwachungsmonitors (CVBS-Anschluss).
9. Anschluss an einen HDTV. Die HDMIVerbindung unterstützt digitales Audio und Video.
10. Anschluss an einen VGA-Monitor.
11. Anschluss von Lautsprechern für Audioausgabe.
12. Anschluss an ein Netzwerk.
13. Anschluss an ein RS-485-Gerät, wie z. B eine
PTZ-Kamera oder -Bedienpult.
14. Anschluss an ein Netzteil mit 12 V Gleichstrom
(enthalten).
15. Netzschalter (Ein/Aus).
16. Erdung.
Page 9
TruVision DVR 11 Schnellstartanleitung 9 : DE
Abbildung 2: Steuerungen des Frontbedienelements
1 USB-Anschluss.
2. CD-/DVD-Brenner.
3. Eject-Taste (Auswurf): Drücken, um eine
CD/DVD auszuwerfen.
4. Archive-Taste (Archivierung): Drücken, um den
Archivierungsmodus aufzurufen.
5. Display- und Seq-Tasten (Anzeige und
Sequenz): Drücken Sie im Liveanzeigemodus
auf Display (Anzeige), um zwischen den Einzelund Mehrfachanzeigen zu wechseln. Drücken
Sie Seq (Sequenz), um Sequenzen im
Liveanzeigemodus zu starten/stoppen.
Drücken Sie im Menümodus Enter (Eingabe),
um ein Menüfenster auszuwählen, und dann Seq
(Sequenz), um zwischen den Registerkarten
oben im Menüfenster zu wechseln.
6. Channel-Tasten (Kanal). Schaltet zwischen
verschiedenen Kameras in den Modi
"Liveanzeige", "PTZ-Steuerung" oder
"Wiedergabe" um.
7. Status-LEDs.
8. Alarm-Taste: Drücken, um einen Alarm
manuell zu bestätigen.
9. Enter- und Pfeiltasten: Wird verwendet, um
die Optionen in einem Menü auszuwählen und
die Wiedergabe zu steuern. Drücken, um
aufzurufen.
10. IR-Empfänger.
11. Wiedergabetasten. Steuern die Wiedergabe.
Drücken Sie , um zum ältesten verfügbaren
Video zurückzuspringen und die Wiedergabe zu
starten. Drücken Sie , um die Wiedergabe
anzuhalten. Drücken Sie für eine
ganztägige Wiedergabe.
12. Live-, Menu- und Search-Tasten (Live, Menü,
Suche): Drücken Sie Live, um zum
Liveanzeigemodus zu wechseln. Drücken Sie
Menu (Menü), um ins Hauptmenü zu gelangen.
Drücken Sie Search (Suche), um ins erweiterte
Suchmenü zu gelangen.
Abbildung 3: Symbolleiste für den Schnellzugriff
1. Fixieren: Livebild der ausgewählten Kamera
fixieren.
2. Sofortige Wiedergabe: Wiedergabe der letzten
fünf Minuten des aufgenommenen Videos.
3. Audio: Audioausgabe aktivieren/deaktivieren.
4. Schneller Schnappschuss: Erstellt einen
Schnappschuss des Videobilds.
5. PTZ-Steuerung: PTZ-Steuerungsmodus
aufrufen.
6. Digitalzoom: Digitalzoom aufrufen.
7. Bildeinstellungen: Bildhelligkeitsstufen ändern.
8. Schließen: Symbolleiste schließen.
Page 10

DE : 10 TruVision DVR 11 Schnellstartanleitung
Schnellstartanleitung
Packungsinhalt
Die folgenden Teile sind im Lieferumfang des
TruVision DVR 11 (Modell TVR 11) enthalten:
• IR (Infrarot)-Fernbedienung
• Zwei AAA-Batterien für die Fernbedienung
• Netzkabel (Wechselspannung)
• Netzteil 12 V Gleichstrom
• USB-Maus
• DVR
• Video-Durchschleifkabel
• CD mit Software und Benutzerhandbüchern
• TruVision DVR 11 Schnellstartanleitung
• TruVision DVR 11 Benutzerhandbuch
(auf CD)
Installationsumgebung
Ausführliche Informationen dazu finden Sie im
Benutzerhandbuch, die folgenden wichtigen
Anforderungen sollten jedoch beachtet werden:
• Stellen Sie das Gerät an einem geschützten
Ort auf.
• Stellen Sie sicher, dass das Gerät in einer
gut belüfteten Umgebung installiert wird.
• Achten Sie darauf, dass das Gerät vor
Regen oder Feuchtigkeit geschützt ist.
Schnellinstallation
Empfohlene Schritte für das Setup des DVR:
1. Schließen Sie alle erforderlichen Geräte an
der Rückseite des TVR 11 an. Siehe Abb. 1
auf Seite 8.
Grundlegende Anschlüsse:
Schließen Sie die Kameras an die BNCKameraeingänge und den Monitor A an den
BNC-, VGA- oder HDMI-Ausgang an.
Schließen Sie die Maus an den USB-Port
des Frontbedienelements an.
Optionale Anschlüsse:
Alle sonstigen dargestellten Verbindungen
sind optional und hängen von den jeweiligen
Installationsanforderungen ab.
2. Schließen Sie das Netzkabel an und
schalten Sie das Gerät ein.
3. Nehmen Sie die erforderlichen
Geräteeinstellungen mithilfe des SetupAssistenten vor.
Erstmalige Verwendung
Der TVR 11 verfügt über einen ExpressInstallationsassistenten, der Sie bei der
erstmaligen Verwendung grundlegende DVREinstellungen problemlos konfigurieren lässt. Er
konfiguriert alle Kameras gleichzeitig. Die
Konfiguration kann anschließend je nach
Bedarf angepasst werden.
Der Setup-Assistent wird standardmäßig
gestartet, sobald der DVR bereit ist. Der
Assistent führt Sie durch die wichtigsten
Einstellungen Ihres DVR. Wählen Sie die
gewünschte Sprache für das System aus und
geben Sie anschließend das
Administratorpasswort ein. Das StandardAdministratorpasswort lautet 1234. Es wird
dringend empfohlen, dieses Passwort zu
ändern.
Der Assistent führt Sie anschließend durch die
Menüs, um Uhrzeit und Datum,
Netzwerkkonfiguration, Festplattenverwaltung
sowie Aufnahmekonfiguration festzulegen.
Wenn Sie alle erforderlichen Änderungen
vorgenommen haben, klicken Sie auf Fertig
stellen, um den Setup-Assistenten zu
beenden. Der TVR 11 ist nun einsatzbereit. Die
Aufnahme wird automatisch gestartet.
Betrieb des TVR 11
Es bestehen verschiedene Möglichkeiten, das
Gerät zu steuern:
• Frontbedienelement
• IR-Fernbedienung
Page 11

TruVision DVR 11 Schnellstartanleitung 11 : DE
• Maus
• Webbrowser
Frontbedienelement
Mithilfe der Tasten des Frontbedienelements
können die meisten Funktionen gesteuert
werden. Die Position der Steuerungen finden
Sie in Abbildung 2 auf Seite 9.
IR-Fernbedienung
Die Tasten der IR-Fernbedienung sind ähnlich
den Tasten auf dem Frontbedienelement.
Legen Sie die zwei AAA-Batterien in die
Fernbedienung.
So verbinden Sie die Fernbedienung mit
dem DVR:
1. Drücken Sie die Taste Menu (Menü) auf der
Fernbedienung oder wählen Sie per
Rechtsklick mit der Maus die Option Menü
aus. Das Hauptmenü wird angezeigt.
2. Wählen Sie Anzeigemodus-Einstellungen
> Monitor.
3. Prüfen und merken Sie sich den Adresswert
des DVR-Gerätes. Der Standardwert beträgt
255. Die Geräteadresse gilt für alle
Infrarotfernbedienungen.
4. Drücken Sie auf der Fernbedienung die
Taste Device (Gerät).
5. Geben Sie den Adresswert des Gerätes ein.
Sie muss mit dem entsprechenden Wert des
TVR 11 übereinstimmen.
6. Drücken Sie die Taste ENTER (EINGABE)
auf der Fernbedienung oder dem
Frontbedienelement.
USB-Maus
Die mit dem TVR 11 gelieferte USB-Maus
steuert alle Funktionen des DVR (im Gegensatz
zum Frontbedienelement, dessen Funktionalität
eingeschränkt ist). Verwenden Sie die Maus
zum Navigieren und nehmen Sie in der
Bedieneroberfläche so Änderungen an den
Einstellungen vor.
Schließen Sie die Maus an den DVR an, indem
Sie den Maus-USB-Anschluss in den USB-
Anschluss am Frontbedienelement einstecken.
Die Maus ist sofort einsatzbereit, und der
Mauszeiger sollte erscheinen.
Steuerung über den Webbrowser
Mit dem TVR 11-Webbrowser können Sie
Videos anzeigen, aufzeichnen und
wiedergeben sowie alle Aspekte des DVR von
jedem PC mit Internetzugriff verwalten. Die
benutzerfreundlichen Steuerungen des
Browsers ermöglichen einen schnellen Zugriff
auf alle DVR-Funktionen.
Um auf das Gerät zuzugreifen, öffnen Sie einen
Webbrowser und geben Sie die IP-Adresse ein,
die dem DVR als Webadresse zugewiesen ist.
Geben Sie im Anmeldebildschirm die StandardBenutzer-ID und das Standard-Passwort ein.
• Benutzer-ID: admin
• Passwort: 1234
Die Standardwerte für die
Netzwerkeinstellungen des TVR 11 sind:
• DHCP: Standardmäßig aktiviert.
• IP-Adresse – 192.168.1.82
• Subnetzmaske – 255.255.255.0
• Gateway-Adresse – 192.168.1.1
• Server-Port: 8000
• HTTP-Port: 80
• RTSP-Port: 554
Hinweis: Für die folgenden Ports muss eine
Weiterleitung im Router eingerichtet werden,
um eine ordnungsgemäße Verbindung zu
gewährleisten: Server-Port und RTSP-Port.
Page 12

DE : 12 TruVision DVR 11 Schnellstartanleitung
Abbildung 4: Webbrowser-Oberfläche
Liveanzeigemodus
Der Livemodus ist der normale Betriebsmodus
des Geräts, in dem Sie die Livebilder der
Kameras sehen.
Regelmäßig verwendete Funktionen in der
Liveanzeige können durch Klicken mit der
linken Maustaste schnell aufgerufen werden,
wenn sich der Cursor auf dem Kamerabild
befindet. Die Popup-Symbolleiste der
jeweiligen Verknüpfung wird angezeigt. Eine
Beschreibung der verfügbaren Funktionen
finden Sie in Abbildung 3 auf Seite 9.
Konfigurieren des TVR 11
Der TVR 11 hat eine symbolgesteuerte
Menüstruktur, die Ihnen die Konfiguration der
Geräteparameter erlaubt. Jeder Befehl zeigt
einen Bildschirm an, in dem Sie eine Gruppe
von Einstellungen bearbeiten können. Die
meisten Menüs sind nur für
Systemadministratoren zugänglich.
Einzelheiten zur Konfiguration des Gerätes
finden Sie im Benutzerhandbuch des TVR 11.
So greifen Sie in der Liveanzeige auf das
Hauptmenü zu:
. Drücken Sie die Taste Menu (Menü) auf
der Fernbedienung oder dem
Frontbedienelement.
- oder -
Klicken Sie mit der rechten Maustaste und
wählen Sie Menü aus dem Popup-Menü.
Das Hauptmenü wird angezeigt. Bewegen Sie
die Maus über ein Befehlssymbol in der
Menüsymbolleiste und klicken Sie darauf, um
es auszuwählen.
Beschreibung der Befehlssymbole in der
Menüsymbolleiste:
Konfiguriert
Anzeigeeinstellungen.
Konfiguriert
Kameraeinstellungen.
Konfiguriert
Aufnahmeeinstellungen.
Konfiguriert StandardNetzwerkeinstellungen.
Konfiguriert Alarmeinstellungen.
Konfiguriert PTZ-Einstellungen.
Konfiguriert
Benutzereinstellungen.
Konfiguriert
Systemeinstellungen.
Enthält Informationen zu den
verschiedenen Symbolleisten
und Menüs der
Benutzeroberfläche.
Enthält Informationen zu
Optionen für Abmeldung,
Neustart und Herunterfahren.
Page 13

TruVision DVR 11 Schnellstartanleitung 13 : DE
Technische Daten
Stromversorgung 12 V Gleichstrom
Energieverbrauch (ohne HDD oder DVD-R/W)
TVR 1104
TVR 1108
TVR 1116
≤ 10 W
≤ 15 W
≤ 20 W
Betriebstemperatur -10 bis +55 ºC
(14 bis 131 °F)
Relative
Luftfeuchtigkeit
10 bis 90 %
A
bmessungen
(B × H × T)
362 × 330 × 78 mm
Gewicht ≤ 3 kg (ohne HDD
oder DVD-R/W)
Kontaktinformationen
Kontaktinformationen finden Sie unter
www.interlogix.com oder
www.utcfssecurityproducts.eu
Page 14

ES : 14 Guía de inicio rápido de TruVision DVR 11
ES
Guía de inicio rápido de TruVision
DVR 11
Figura 1: Conexiones del panel posterior
1. Bucle de hasta 16 cámaras analógicas
(dependiendo del modelo DVR).
2. Conexión a un dispositivo RS-232.
3. Conexión de hasta cuatro cables de entrada
de alarma a salidas de relé.
4. Conexión de una salida de relé de alarma.
5. Conexión de cuatro entradas de audio a un
conector RCA.
6. Conexión de hasta 16 cámaras análogas a
conectores BCN (dependiendo del modelo DVR)
7. Conexión a un dispositivo USB opcional como,
por ejemplo, un ratón, un grabador de CD/DVD
o una unidad de HDD.
8. Conexión de un monitor CCTV (conector CVBS)
9. Conexión a un dispositivo HDTV. La conexión
HDMI admite tanto audio como vídeo digital.
10. Conexión a un monitor VGA.
11. Conexión de altavoces para la salida de audio.
12. Conexión a una red.
13. Conexión a un dispositivo RS-485 como, por
ejemplo, una cámara PTZ.o un teclado
14. Conexión a PSU de 12 VCC (incluido)
15. Interruptor de alimentación (activar/desactivar)
16. Conexión a toma de tierra.
Page 15
Guía de inicio rápido de TruVision DVR 11 15 : ES
Figura 2: Controles del panel frontal
1 Puerto USB
2. Grabador de CD/DVD
3. Botón Eject (Expulsar): Púlselo para expulsar
el disco CD/DVD
4. Botón Archive (Archivado): Púlselo para entrar
en el modo archivo.
5. Botones Display y Seq (Mostrar y Secuencia):
Estando en Modo visionado en directo, pulse
Display para cambiar entre vista simple y
múltiple. Pulse Seq para empezar/detener la
secuencia de modo visual en directo.
Estando en el modo de menú, pulse Enter para
seleccionar una ventana de menú, y luego
pulse Seq para pasar de una ficha a otra.
6. Botones Channel (Canal). Permiten cambiar
de una cámara a otra en los modos visionado
en directo control PTZ o reproducción.
7. LED de estado
8. Botón Alarm (Alarma): Pulse el botón para
reconocer de forma manual una alarma.
9. Botones Enter y flechas: Utilícelos para
seleccionar las opciones de menú y controlar la
reproducción. Púlselo para la función Enter (Intro).
10. Receptor de infrarrojos
11. Botones de reproducción: Permiten controlar la
reproducción. Pulse para retroceder hasta el
vídeo más antiguo disponible e iniciar la
reproducción. Pulse para pausar la
reproducción. Pulse para iniciar la
reproducción de todo el día.
12. Botones Live, Menu y Search (En directo,
Menú y Búsqueda) Pulse Live para volver al
modo en directo. Pulse Menu para abrir el menú
principal Pulse Search para entrar en el menú de
búsqueda avanzada.
Figura 3: Barra de herramientas de acceso rápido
1. Congelar: Permite congelar la imagen de la
cámara seleccionada.
2. Reproducción instantánea: Permite
reproducir los últimos cinco minutos del vídeo
grabado.
3. Audio: Permite habilitar o deshabilitar la salida
de audio.
4. Captura rápida: Permite capturar una
fotografía del vídeo.
5. Control PTZ: Permite acceder al modo de
control PTZ.
6. Digital zoom (Zoom digital): Permite acceder al
zoom digital.
7. Image settings (Configuración de imagen):
Permite modificar el nivel de iluminación de la
imagen.
8. Cerrar: Púlselo para cerrar la barra de
herramientas.
Page 16

ES : 16 Guía de inicio rápido de TruVision DVR 11
Guía de inicio rápido
Contenido del paquete
La DVR 11 de TruVision (modelo TRV 11) se
suministra con los siguientes elementos:
• Mando a distancia de infrarrojos
• Dos pilas AAA para el mando a distancia
• Cables de alimentación de CA
• PSU de 12 VCC
• Ratón USB
• DVR
• Cable de vídeo a través de bucle
• CD con software y manuales
• Guía de inicio rápido de TruVision DVR 11
• Manual de usuario de TruVision DVR 11
(en CD)
Entorno de instalación
Consulte el manual del usuario para obtener
información detallada, pero cumpla los
importantes requisitos que se indican a
continuación:
• Coloque la cámara en un lugar seguro.
• Asegúrese de que la unidad esté en una
zona bien ventilada.
• No exponga la unidad a la lluvia ni a la
humedad.
Instalación rápida
Pasos recomendados para configurar la DVR:
1. Conecte todos los dispositivos necesarios
al panel trasero del TVR 11. Consulte la
figura 1 en la página 14.
Conexiones básicas:
Conecte las cámaras a las entradas de
cámara BNC y el monitor A al la salida
BNC, VGA o HDMI. Conecte el ratón al
puerto USB del panel delantero.
Conexiones opcionales:
El resto de conexiones mostradas son
opcionales, y su uso depende de los
requisitos de instalación.
2. Conecte la fuente de alimentación a la
unidad y encienda la unidad.
3. Configure la unidad con los parámetros
necesarios, usando el asistente de
configuración.
Primer uso
TVR 11 cuenta con un asistente de instalación
rápida que le permite establecer con facilidad
la configuración básica de DVR cuando se
utilice por primera vez. El asistente configura
todas las cámaras simultáneamente. La
configuración se puede personalizar
posteriormente según sea necesario.
El asistente de configuración se iniciará de
forma predeterminada una vez que se haya
cargado el dispositivo DVR. Le guiará por
algunos de los parámetros de configuración
más importantes de su DVR. Seleccione el
idioma que prefiera para el sistema, e
introduzca la contraseña de administrador. La
contraseña de administrador predeterminada
es 1234. Le recomendamos encarecidamente
que cambie dicha contraseña.
Después, el asistente le guiará por los menús
para establecer la hora y fecha, la
configuración de red, la administración de
HDD y la configuración de grabación.
Una vez introducidos todos los cambios
necesarios, haga clic en Finish (Finalizar)
para salir del asistente de configuración. La
unidad TVR 11 ya puede utilizarse. La
grabación se iniciará de manera automática.
Funcionamiento del TVR 11
Existen varias formas de controlar la unidad:
• Panel frontal
• Mando a distancia por infrarrojos
• Ratón
• Explorador Web
Page 17

Guía de inicio rápido de TruVision DVR 11 17 : ES
Panel frontal
Los botones del panel frontal controlan casi
todas las funciones. Para conocer la
localización de los controles, consulte la figura
2 en la página 15.
Mando a distancia por infrarrojos
Los botones del mando a distancia son
similares a los del panel de control. Coloque
las dos pilas AAA en el mando.
Para conectar el mando a distancia con la
DVR:
1. Pulse el botón Menu del panel frontal o
bien haga clic con el botón derecho del
ratón y seleccione el botón Menu.
Aparecerá la pantalla de menú principal.
2. Seleccione Display mode settings
(Configuración del modo de visualización)
> Monitor.
3. Compruebe y recuerde el valor de
dirección del dispositivo DVR. El valor
predeterminado es 255. El dispositivo es
compatible con todo tipo de mandos por
infrarrojos.
4. En el mando a distancia, pulse Device
(Dispositivo).
5. Introduzca el valor de dirección del
dispositivo. Debe ser igual al de la unidad
TVR 11.
6. Pulse el botón OK del mando o del panel
frontal.
Ratón USB
El ratón USB que se suministra con el TVR 11
controla todas las funciones del DVR, a
diferencia del panel frontal, que cuenta con
una funcionalidad limitada. El ratón USB le
permite navegar y hacer cambios en las
opciones de la interfaz de usuario.
Conecte el ratón a la DVR insertando el
conector USB del ratón en el puerto USB
situado en el panel trasero. Aparecerá el
puntero y podrá utilizar el ratón de inmediato.
Control mediante explorador Web
El explorador Web de la unidad TVR 11 le
permite ver, grabar y reproducir vídeos, así
como administrar todos los aspectos del
sistema desde cualquier PC con acceso a
Internet. Los sencillos controles del explorador
le ofrecen un rápido acceso a todas las
funciones de la DVR.
Para acceder a la unidad, abra el explorador
Web e introduzca la dirección IP asignada a la
DVR, como si fuese una dirección Web. En la
pantalla de registro, introduzca el ID de
usuario y la contraseña predeterminados.
• User Name (nombre de usuario) = admin
• Password (Contraseña): 1234
Los valores predeterminados de la
configuración de red de la unidad TVR 11 son
los siguientes:
• DHCP: Los siguientes parámetros están
activados por defecto:
• IP address (Dirección IP) - 192.168.1.82
• Subnet mask (Máscara de subred)-
255.255.255.0
• Gateway address (Dirección de puerta de
enlace)- 192.168.1.1
• Server Port (Puerto del servidor): 8000
• HTTP Port (Puerto HTTP): 80
• RTSP port (Puerto RTSP) 554
Nota: Es necesario abrir los siguientes
puertos en el enrutador para una conexión
correcta. Puerto del servidor y puerto
RTSP.
Page 18

ES : 18 Guía de inicio rápido de TruVision DVR 11
Figura 4: Interfaz del explorador Web
Modo visual directo
El modo de vídeo en directo es el modo de
operación normal de la unidad, mediante el
que se visualiza la imagen en directo de las
cámaras.
Puede acceder de manera rápida a todas
funciones que se usan regularmente en el
modo de visualización en directo colocando el
cursor sobre la imagen de cámara y pulsando
el botón izquierdo del ratón. Aparecerá una
barra de herramientas de acceso rápido. Para
obtener una descripción del teclado, consulte
la figura 3 en la página 15 .
Configuración de TVR 11
La unidad TVR 11 tiene una estructura
controlada a través de menús que le permite
configurar sus parámetros. Cada icono de
comando muestra una pantalla que le permite
editar un grupo de valores. La mayoría de los
menús solo están disponibles para los
administradores del sistema.
Para obtener información detallada sobre las
cámaras, consulte el Manual del Usuario de
TRV 11
Para acceder al menú principal del modo
de visualización en directo:
Pulse Menu en el mando a distancia o en
el panel frontal.
O bien,
Haga clic con el botón derecho del ratón y
seleccione la opción Menu del menú
emergente.
Aparecerá la pantalla de menú principal. Sitúe
el ratón sobre uno de los iconos de comando
de la barra de herramientas y haga clic para
seleccionarlo.
Descripción de los iconos de comando de
la barra de herramientas:
Permite configurar los
parámetros de la pantalla.
Permite configurar los
parámetros de la cámara.
Permite configurar los
parámetros de grabación.
Permite configurar parámetros
de red estándar.
Permite configurar los
parámetros de alarma.
Permite configurar los
parámetros de PTZ.
Permite configurar los
parámetros de usuario.
Permite configurar los
parámetros de sistema.
Proporciona información de
referencia sobre las diversas
barras de herramientas y menús
de la interfaz.
Proporciona acceso a las
opciones de cierre de sesión,
reinicio y apagado.
Page 19

Guía de inicio rápido de TruVision DVR 11 19 : ES
Especificaciones
Fuente de
alimentación
12 VDC
Consumo de energía eléctrica (sin HDD o
DVD-R/W)
TVR 1104
TVR 1108
TVR 1116
≤ 10 W
≤ 15 W
≤ 20 W
Temperatura de
funcionamiento
de -10 a +55 ºC
(de 14 a 131 °F)
Humedad relativa de 10 a 90%
Dimensiones
(An. x Al. x Pro.)
362 × 330 × 78 mm
(14,25 ×13,0 × 3,07
pulgadas)
Peso ≤ 3 Kg. (6,6 libras.)
(sin HDD o DVD-R/W)
Información de contacto
Para ver la información de contacto, consulte
www.interlogix.com o
www.utcfssecurityproducts.eu.
Page 20
FI : 20 TruVision DVR 11 Pikaohje
FI
TruVision DVR 11 Pikaohje
Kuva 1: Takapaneelin liitännät
1. Kameroiden läpikytkentäpaneelin liitäntä
(kameramäärä mallista riippuen).
2. RS232-liitäntä.
3. Hälytystulot.
4. Hälytyslähtö (rele).
5. Audiotulot, RCA-liitännät.
6. Kameratulot 4-16 kpl (mallista riippuen).
7. USB-liitäntä ulkoisille USB-laitteille (hiiri, USBmuisti, USB-kiintolevy, USB-CD/DVD-asema).
8. Videolähtö monitorille (BNC-liitin).
9. HDMI-lähtö HD-näytölle. HDMI-tukee sekä kuvaa
että ääntä.
10. VGA-lähtö monitorille.
11. Audiolähtö.
12. RJ45-liitäntä lähiverkkoyhteydelle.
13. RS-485-liitäntä PTZ-kameroille.
14. Jännitesyöttö (12 VDC).
15. Virtakytkin (on/off).
16. Maadoitus.
Page 21
TruVision DVR 11 Pikaohje 21 : FI
Kuva 2: Etupaneelin toiminnot
1 USB-portti.
2. CD/DVD-asema.
3. Eject-painike: Avaa CD/DVD-aseman.
4. Archive-painike: Siirtyy tallenteiden
kopiontitilaan.
5. Display- ja Seq-painikkeet: Live-tilassa, paina
Display vaihtaaksesi yksittäisen kuvan ja
monikuvatilan välillä. Paina Seq
aloittaaksesi/lopettaaksesi kuvakierto livetilassa.Valikossa, paina Enter valitaksesi
valikko ja Seq siirtyäksesi välilehdillä valikon
yläreunassa.
6. Kamerapainikkeet. Valitse kamera live-tilassa,
PTZ-ohjaukselle tai toistotilassa.
7. Merkkivalot.
8. Alarm-painike: Kuittaa hälytykset.
9. Enter- ja nuolipainikkeet: Käytä liikkuaksesi ja
valitaksesi eri vaihtoehtoja valikoissa sekä
hallitaksesi videotoistoa.
10. IR-vastaanotin kaukosäätimelle.
11. Playback -painikkeet: Hallinnoi videon toistoa.
Paina siirtyäksesi vanhinpaan saatavilla
olevaan videoon jota aletaan toistamaan. Paina
pysäyttääksesi videon toiston. Paina
aloittaaksesi videon toiston koko päivän osalta.
12. Live, Menu ja Search -painikkeet: Paina Live
siirtyäksesi live-tilaan. Paina Menu siirtyäksesi
valikkoon. Paina Search aloittaaksesi videohaun.
Kuva 3: Pikavalintavalikko
1. Freeze: Pysäyttää kuvan valitulta kameralta.
2. Instant playback: Toistaa tallenteen viimeiseltä
viideltä minuutilta.
3. Audio: Salli/Estä audiolähtö.
4. Quick snapshot: Ottaa still-kuvan videosta.
5. PTZ control: Avaa PTZ-ohjauksen.
6. Digital zoom: Avaa digitaalisen zoomauksen.
7. Image settings: Muokkaa kuvan
valoisuusasetuksia.
8. Close: Sulkee pikavalintapalkin.
Page 22

FI : 22 TruVision DVR 11 Pikaohje
Pikaohje
Tuotepakkauksen sisältö
TruVision DVR 11 (TVR 11) pakkaukseen
sisältyvät seuraavat laitteet ja ohjeet:
• IR-kaukosäädin
• Kaksi AAA-paristoa kaukosäätimelle
• AC-virtajohto
• 12 VDC virtalähde
• USB-hiiri
• Tallennin
• Kaapelit kameroiden läpikytkennälle
• CD-levy jossa ohjeet ja ohjelmistot
• TruVision DVR 11 Pikaohje
• TruVision DVR 11 Käyttöohje (CD-levyllä)
Asennusympäristö
Lisätietoa löydät käyttöohjeesta, mutta
huomioi seuraavat vaatimukset tallentimen
sijoittamiselle:
• Aseta laite turvalliseen paikkaan.
• Varmista että tilassa on riittävä ilmanvaihto.
• Älä altista laitetta kosteudelle.
Asentaminen
Suositeltavat vaiheet DVR:n asentamiselle:
1. Kytke tarvittavat laitteet TVR 11:n
takapaneeliin. Katso kuva 1 sivulla 20.
Peruskytkennät:
Kytke kamerat BNC-tuloihin ja monitori A
BNC, VGA tai HDMI -lähtöön. Kytke hiiri
USB-porttiin.
Muut kytkennät:
Kaikki muut kytkennät ovat valinnaisia ja
riippuvat asennuksen vaatimuksista.
2. Kytke virtalähde ja käynnistä tallennin
virtakytkimestä.
3. Määritä tallentimelle tarvittavat asetukset
ohjatun toiminnon avulla.
Ensimmäinen käyttökerta
TVR 11:sta on nopea ohjattu toiminto
asetusten määrittelyyn, joka ohjaa sinua
ensimmäisellä kerralla tallentimen
perusasetusten määrittelyissä. Se mm. auttaa
määrittelemään kaikille kameroille asetukset
samanaikaisesti, mutta voit myös määritellä
ne yksitellenkin niin halutessasi.
Oletuksena ohjattu toiminto käynnistyy kun
tallennin käynnistetään. Se ohjaa sinua
tallentimen tärkeimpien ominaisuuksien
määrittelyissä. Valitse haluamasi kieli
järjestelmälle ja sen jälkeen määritä
pääkäyttäjän salasana. Pääkäyttäjän
oletussalasana on 1234. On erittäin
suositeltavaa vaihtaa se ennen järjestelmän
käyttöönottoa.
Ohjattu toiminto ohjaa sinut seuraavaksi
määrittämään aika- ja päivämääräasetukset,
verkkoasetukset, kiintolevyjen hallinnan ja
tallennusasetukset.
Kun tarvittavat asetukset on määritelty, valitse
Finish poistuaksesi ohjatusta toiminnosta.
TVR 11 on valmis käytettäväksi. Tallennus
käynnistyy automaattisesti.
TVR 11 käyttö
Tallentimen käyttämiselle on useita
vaihtoehtoja:
• Etupaneeli
• IR-kaukosäädin
• Hiiri
• Internetselain
Etupaneeli
Etupaneelin painikkeilla voidaan hallinnoida
eri toimintoja. Katso kuvaa 2 sivulla 21
painikkeiden toiminnoista.
Page 23

TruVision DVR 11 Pikaohje 23 : FI
IR-kaukosäädin
IR-kaukosäätimen painikkeet ovat vastaavat
kuin etupaneelissa. Aseta kaksi AAA-paristoa
kaukosäätimeen.
Kaukosäätimen yhdistäminen tallentimeen:
1. Paina Menu etupaneelissa tai hiiren
oikealla painikkeella ja valitse Menu.
Päävalikko avautuu.
2. Valitse Display mode settings > Monitor.
3. Tarkista tallentimen osoite. Oletusosoite on
255. Tallentimen osoite on käytössä kaikille
IR-ohjaimille.
4. Paina kaukosäätimen Device -painiketta.
5. Syötä tallentimen osoite. Sen tulee olla
sama kuin TVR 11:ssa.
6. Paina OK kaukosäätimestä tai
etupaneelista.
USB-hiiri
USB-hiiri mahdollistaa TVR 11:n kaikkien
ominaisuuksien käytön, toisin kuin etupaneeli
jonka käytössä on joitakin rajoitteita. Hiiren
avulla voit siirtyä ja tehdä muutoksia
asetuksiin käyttöliittymässä.
Liitä hiiri tallentimen USB-porttiin ja hiiri on heti
käytettävissä.
Käyttö internetselaimella
TVR 11 selainkäyttöliittymä mahdollistaa livekuvien katselun, tallentamisen sekä
tallennetun materiaalin toistamisen ja
tallentamisen eri medioille kuten myös
tallentimen täydellisen hallinnan kaikkialta
missä on internetyhteydessä oleva PC.
Käyttöliittymän helppokäyttöiset toiminnot
mahdollistavat kaiken tämän ja tekevät sen
vielä helpoksi.
Avataksesi yhteyden, avaa internetselain ja
anna tallentimen IP-osoite tai rekisteröity
osoite. Kirjautumisikkunassa syötä oletus
käyttäjätunnus ja salasana (mikäli et ole niitä
vielä vaihtanut):
• Käyttäjätunnus: admin
• Salasana: 1234
TVR 11 verkkoasetusten oletusasetukset:
• DHCP: Käytössä
• IP-osoite - 192.168.1.82
• Aliverkonpeite - 255.255.255.0
• Oletusyhdyskäytävä - 192.168.1.1
• Palvelimen portti: 8000
• HTTP-portti: 80
• RTSP-portti: 554
Huom: Palvelimen portti ja RSTP-portti tulee
olla avoinna reitittimiltä ja palomuurista
yhteyden muodostamiseksi.
Kuva 4: Internetselaimen käyttöliittymä
Live-näkymä
Live-näkymä on tallentimen normaali tila,
jossa voit katsella kameroiden tapahtumia
reaaliaikaisesti.
Useimmin käytetyt toiminnot live-näkymässä
saat klikkaamalla kameran kuvaa hiiren
vasemmalla painikkeella jolloin
pikavalintavalikko avautuu. Katso kuva 3
sivulla 21, josta löydät kuvaukset
pikakuvakkeille.
TVR 11 asetusten määrittely
TVR 11:ssa on kuvakkeisiin perustuvat valikot,
joista voit määritellä laitteen asetuksia.
Jokaisesta kuvakkeesta avautuu
valikkonäkymä jossa voit muokata eri
Page 24

FI : 24 TruVision DVR 11 Pikaohje
asetuksia. Suurin osa valikoista on tarkoitettu
vain järjestelmän pääkäyttäjälle.
Katso TVR 11 käyttöohjeesta tarkemmat
tiedot järjestelmän määritysten tekemisestä.
Siirtyminen asetuksiin Live-tilasta:
Paina Menu –painiketta etupaneelista tai
kaukosäätimestä
- Tai -
Paina hiiren oikeaa painiketta ja valitse
Menu avautuvasta valikosta.
Päävalikko avautuu. Siirry hiirellä halutun
kuvakkeen kohdalle ja klikkaa sitä valitaksesi
sen.
Asetusvalikon kuvakkeiden kuvaukset:
Näyttöjen asetukset
Kamera-asetukset
Tallennusasetukset
Verkkoasetukset
Hälytysasetukset
PTZ-asetukset
Käyttäjäasetukset
Järjestelmäasetukset
Tietoja eri toiminnallisuuksista
j
a
määrityksistä
Uloskirjautuminen, uudelleen
käynnistys ja sammuttaminen
Tekniset tiedot
Virtalähde 12 VDC
Virrankulutus (ilman kiintolevyjä tai DVDasemaa):
TVR 1104
TVR 1108
TVR 1116
≤ 10 W
≤ 15 W
≤ 20 W
Käyttölämpötila -10 - +55 ºC
(14 - 131 °F)
Sallittu ilmankosteus 10 - 90%
Mitat
(S x L x K)
362 × 330 × 78 mm
(14.25 × 13.0 × 3.07
in.)
Paino ≤ 3 kg (6.6 lb.) (ilman
kiintolevyjä tai DVDasemaa)
Yhteystiedot
Maakohtaiset yhteystiedot löydät osoitteesta
www.interlogix.com tai
www.utcfssecurityproducts.eu
Page 25

Guide de démarrage rapide du TruVision DVR 11 25 : FR
FR
Guide de démarrage rapide du
TruVision DVR 11
Figure 1 : Connexions du panneau arrière
1. Boucle pour un maximum de 16 caméras
analogiques (en fonction du modèle de l’enregistreur
vidéo digital).
2. Connexion à un périphérique RS-232.
3. Connexion d’un maximum de quatre câbles d’entrée
d’alarme aux sorties relais.
4. Connexion d’une sortie de relais d’alarme.
5. Connexion de quatre entrées audio aux connecteurs
RCA.
6. Connexion d’un maximum de 16 caméras
analogiques aux connecteurs BNC (en fonction du
modèle de l’enregistreur vidéo digital).
7. Connexion à un périphérique USB facultatif (par
exemple, une souris, un graveur CD/DVD ou un
disque dur). L'enregistreur vidéo digital est doté
de ports USB à l'avant et à l'arrière lui
permettant de connecter aussi bien un graveur
de DVD qu'un disque dur USB.
8. Connexion d’un moniteur CCTV (connecteur CVBS).
9. Connexion à un téléviseur HD. La connexion HDMI
prend en charge l’audio et la vidéo numériques.
10. Connexion à un moniteur VGA.
11. Connexion de haut-parleurs pour sortie audio.
12. Connexion à un réseau.
13. Connexion à un périphérique RS-485 comme un
clavier ou une caméra PTZ.
14. Connexion à une unité d’alimentation standard de
12 V c.c (fournie).
15. Interrupteur marche/arrêt de l’alimentation.
16. Connexion à la masse.
Page 26

FR : 26 Guide de démarrage rapide du TruVision DVR 11
Figure 2 : Commandes du panneau avant
1 Port USB.
2. Graveur de CD/DVD.
3. Bouton Eject (Ejecter) Bouton d’éjection du disque
CD/DVD.
4. Bouton Archive (Archiver) : Bouton d’entrée en
mode d’archivage.
5. Boutons Display (Afficher) et Seq : En mode
d’affichage en direct, appuyez sur Display (Afficher)
pour basculer entre les affichages simples et
multiples. Appuyez sur Seq pour démarrer/arrêter le
séquenceur en mode d’affichage en direct.
En mode Menu, appuyez sur Enter (Entrée) pour
sélectionner une fenêtre de menu, puis sur Seq pour
parcourir les onglets situés dans la partie supérieure
de celle-ci.
6. Boutons de canaux. Permettent de basculer d’une
caméra à l’autre en mode d’affichage en direct,
commande PTZ ou lecture.
7. Voyants d’état.
8. Touche Alarm (Alarme) : Bouton de confirmation
manuelle d’une alarme.
9. Boutons fléchés et Enter (Entrée) : Permet de
sélectionner des options dans un menu et de
commander la lecture. Appuyez sur Enter (Entrée).
10. Récepteur IR.
11. Touches de lecture : Permet de contrôler la lecture.
Appuyez sur pour revenir à la plus ancienne
vidéo disponible et commencer la lecture. Appuyez sur
pour mettre la lecture en pause. Appuyez sur
pour démarrer la lecture de l’enregistrement de
toute la journée.
12. Boutons Live (En direct), Menu et Search
(Recherche) : Appuyez sur Live (En direct) pour
passer en mode d’affichage en direct. Appuyez sur
Menu pour accéder au menu principal. Appuyez sur
Search (Recherche) pour accéder au menu de
recherche avancée.
Figure 3 : Barre d’outils d’accès rapide
1. Figer : permet de figer l’image de la caméra
sélectionnée.
2. Lecture instantanée : permet de lancer la lecture
des cinq dernières minutes de la vidéo enregistrée.
3. Audio : permet d’activer/désactiver la sortie audio.
4. Capture rapide : Prendre une photo d’une image
vidéo.
5. Commande PTZ : permet d’accéder au mode de
commande PTZ.
6. Zoom numérique : permet d’accéder au zoom
numérique.
7. Paramètres de l’image : permet de modifier les
niveaux d’éclairage de l’image.
8. Fermer : permet de fermer la barre d’outils.
Page 27

Guide de démarrage rapide du TruVision DVR 11 27 : FR
Guide de démarrage rapide
Contenu du coffret
Le TruVision DVR 11 (modèle TVR 11) est
livré avec les éléments suivants :
• Télécommande infrarouge
• Deux piles AAA pour la télécommande
• Cordons d’alimentation CA
• Unité d’alimentation standard 12 V c.c
• Souris USB
• Enregistreur vidéo digital
• Câble boucle vidéo
• CD avec logiciel et manuels d’utilisation
• Guide de démarrage rapide du TruVision
DVR 11
• Manuel d’utilisation du TruVision DVR 11
(sur CD)
Environnement d’installation
Reportez-vous au manuel de l’utilisateur pour
obtenir des informations détaillées, mais tenez
compte des considérations importantes
suivantes :
• Placez l’unité dans un endroit sûr.
• Assurez-vous qu’elle se trouve dans une
zone bien ventilée.
• Évitez d’exposer l’unité à l’humidité.
Installation rapide
Étapes recommandées pour la configuration
de l’enregistreur vidéo digital :
1. Connectez tous les périphériques requis au
panneau arrière du TVR 11. Voir la Figure
1 à la page 25.
Connexions de base :
Connectez les caméras aux entrées BNC
et le moniteur A aux sorties BNC, VGA ou
HDMI. Connectez la souris au port USB
situé sur le panneau avant.
Connexions facultatives :
Les autres connexions illustrées dans ce
document sont facultatives et dépendent
du type d’installation.
2. Branchez l’unité à l’alimentation et allumez
cette dernière.
3. Configurez l’unité avec les paramètres
requis à l’aide de l’assistant d’installation.
Première utilisation
Le TVR 11 est doté d’un assistant
d’installation express qui vous permet de
configurer facilement les paramètres de base
de l’enregistreur vidéo digital lors de sa
première utilisation. Il configure toutes les
caméras de manière simultanée. La
configuration peut ensuite être personnalisée
au gré de l’utilisateur.
Par défaut, l’assistant d’installation démarre
dès que l’enregistreur vidéo digital est chargé.
L’assistant vous accompagne durant
quelques-uns des réglages les plus importants
de votre enregistreur vidéo digital.
Sélectionnez la langue du système, puis
saisissez le mot de passe administrateur.
Le mot de passe administrateur par défaut
est 1234. Nous vous recommandons de le
modifier.
L’assistant vous aidera ensuite à régler la date
et l’heure, la configuration réseau, la gestion
du disque dur, ainsi que la configuration
d’enregistrement.
Une fois les modifications effectuées, cliquez
sur Finish (Terminer) pour quitter l’assistant
d’installation. Le TVR 11 est désormais prêt à
l’emploi. L’enregistrement commence
automatiquement.
Utilisation du TVR 11
L’unité peut être contrôlée de plusieurs
façons :
• Panneau avant
• Télécommande infrarouge
Page 28

FR : 28 Guide de démarrage rapide du TruVision DVR 11
• Souris
• Navigateur Web
Panneau avant
Les boutons du panneau avant contrôlent la
plupart des fonctions. Consultez la figure 2 sur
la page 26 pour connaître l’emplacement des
commandes.
Télécommande infrarouge
Les touches de la télécommande infrarouge
sont similaires aux boutons du panneau avant.
Insérez les deux piles AAA dans la
télécommande.
Pour connecter la télécommande
à l’enregistreur vidéo digital :
1. Appuyez sur Menu à partir du panneau
avant ou cliquez sur le bouton droit de la
souris et sélectionnez Menu. L’écran du
menu principal s’affiche.
2. Sélectionnez Display mode settings >
Monitor (Paramètres du mode d’affichage
> Moniteur).
3. Vérifiez et mémorisez la valeur de
l’adresse de l’enregistreur vidéo. La valeur
par défaut est 255. L’adresse du
périphérique est valable pour toutes les
télécommandes infrarouges.
4. Sur la télécommande, appuyez sur le
bouton Device (Périphérique).
5. Entrez la valeur d’adresse du périphérique.
Celle-ci doit être égale à la valeur indiquée
sur le TVR 11.
6. Appuyez sur OK (Entrée) à partir de la
télécommande ou du panneau avant.
Souris USB
À la différence du panneau avant dont la
fonctionnalité est limitée, la souris USB fournie
avec le TVR 11 peut être utilisée pour activer
toutes les fonctions de l’enregistreur vidéo
digital. La souris permet de parcourir le menu
et de modifier les réglages de l’interface
utilisateur.
Connectez la souris à l’enregistreur vidéo
digital en raccordant le connecteur USB de la
souris au port USB situé sur le panneau avant
ou arrière. La souris est immédiatement prête
à l’emploi et le curseur devrait s’afficher.
Commande à l’aide du navigateur Web
Le navigateur Web du TVR 11 vous permet
d’afficher, d’enregistrer et de visionner les
vidéos. Il vous offre également la possibilité
de gérer toutes les fonctionnalités de
l’enregistreur vidéo digital à partir de tout PC
doté d’une connexion Internet. Il dispose de
commandes faciles à utiliser qui vous donnent
un accès rapide à toutes les fonctions de
l’enregistreur vidéo digital.
Pour accéder à l’unité, ouvrez un navigateur
Web et entrez l’adresse IP attribuée à
l’enregistreur comme adresse Web. Dans
l’écran d’ouverture de session, entrez l’ID
utilisateur et le mot de passe par défaut :
• ID utilisateur : admin
• Mot de passe : 1234
Les valeurs par défaut des paramètres réseau
du TVR 11 sont les suivantes :
• DHCP : activé par défaut.
• Adresse IP : 192.168.1.82
• Masque de sous-réseau : 255.255.255.0
• Adresse de la passerelle : 192.168.1.1
• Port Serveur : 8000
• Port HTTP : 80
• Port RTSP : 554
Remarque : vous devez faire en sorte que les
ports Serveur et RTSP se suivent dans le
routeur pour vous connecter correctement.
Page 29

Guide de démarrage rapide du TruVision DVR 11 29 : FR
Figure 4: Interface du navigateur Web
Mode d’affichage en direct
Le mode direct est le mode de fonctionnement
normal de l’unité. Il vous permet de regarder
les images filmées en direct par les caméras.
Vous pouvez accéder rapidement aux
fonctions utilisées régulièrement dans
l’affichage direct en cliquant sur l’image de la
caméra. La barre d’outils contextuelle de
raccourci s’affiche. Consultez la figure 3 de la
page 26 pour obtenir une description des
fonctions disponibles.
Configuration du TVR 11
Le TVR 11 dispose d’une structure de menu
basée sur des icônes vous permettant de
configurer les paramètres de l’unité. Chaque
icône de commande affiche un écran
permettant de modifier certains paramètres.
La plupart des menus ne sont accessibles
qu’aux administrateurs du système.
Reportez-vous au manuel d’utilisation du TVR
11 pour obtenir des informations détaillées sur
la configuration de l’unité.
Pour accéder au menu principal en mode
direct :
Appuyez sur le bouton Menu à partir de la
télécommande ou du panneau avant
- Ou -
Appuyez sur le bouton droit de la souris et
sélectionnez Menu dans le menu
contextuel.
L’écran du menu principal s’affiche. Cliquez
sur une icône de commande dans la barre
d’outils du menu pour la sélectionner.
Description des icônes de commande de la
barre d’outils du menu :
Permet de configurer les
paramètres d’affichage.
Permet de configurer les
paramètres de caméras.
Permet de configurer les
paramètres d’enregistrement.
Permet de configurer les
paramètres réseau standard.
Permet de configurer les
paramètres d’alarme.
Permet de configurer les
paramètres PTZ.
Permet de configurer les
paramètres utilisateur.
Permet de configurer les
paramètres système.
Fournit des informations de
référence aux divers menus et
barres d’outils de l’interface.
Permet d’accéder aux options
de déconnexion, de
redémarrage et d’arrêt.
Page 30

FR : 30 Guide de démarrage rapide du TruVision DVR 11
Spécifications
A
limentation
électrique
12 V c.c
Consommation (sans disque dur ou
DVD-R/W)
TVR 1104
TVR 1108
TVR 1116
≤ 10 W
≤ 15 W
≤ 20 W
Température de
service
-10 à +55 ºC
(14 à 131 °F)
Humidité relative 10 à 90 %
Dimensions
(l x H x P)
362 × 330 × 78 mm
(14,25 × 13 × 3,07 po.)
Poids ≤ 3 kg (6,6 livres) (sans
disque dur ou DVDR/W)
Informations de contact
Pour connaître nos coordonnées, consultez
les sites www.interlogix.com ou
www.utcfssecurityproducts.eu.
Page 31

Guida di avvio rapido di TruVision DVR 11 31 : IT
IT
Guida di avvio rapido di TruVision
DVR 11
Figura 1: Collegamenti del pannello posteriore
1. Loop through per un massimo di 16 telecamere
analogiche (in base al modello DVR).
2. Collegare a un dispositivo RS-232.
3. Collegare fino a quattro cavi di ingresso allarme
a uscite a relè.
4. Consente di collegare un'uscita allarme a relè.
5. Consente di collegare quattro ingressi audio ai
connettori RCA.
6. Consente di collegare fino a 16 telecamere
analogiche ai connettori BNC (in base al
modello DVR).
7. Collegare a un dispositivo USB opzionale, ad
esempio un mouse, un masterizzatore CD/DVD
o un HDD. Il DVR supporta lettore DVD e HDD
USB nelle porte USB sia posteriori sia anteriori.
8. Consente di connettere un monitor CCTV
(connettore di tipo CVBS).
9. Collegare a un HDTV. Il collegamento HDMI
supporta audio e video digitali.
10. Collegare a un monitor VGA.
11. Collegare ad altoparlanti per l'uscita audio.
12. Collegare a una rete.
13. Collegare a un dispositivo RS-485 come una
telecamera PTZ o una tastiera.
14. Consente di collegare fino a 12 VDC PSU
(inclusi).
15. Interruttore di alimentazione (on/off).
16. Collegare alla terra.
Page 32

IT : 32 Guida di avvio rapido di TruVision DVR 11
Figura 2: Controlli del pannello frontale
1 Porta USB.
2. Masterizzatore CD/DVD.
3. Pulsante di espulsione: Premere per
espellere il disco CD/DVD.
4. Pulsante Archivia: Premere per accedere alla
modalità di archiviazione.
5. Pulsanti Visualizza e Seq: Nella modalità di
visualizzazione live, premere Visualizza per
passare tra la visualizzazione singola e
multipla. Premere Seq per avviare/arrestare la
sequenza nella modalità di visualizzazione live.
Nella modalità menu, premere Enter per
selezionare una finestra del menu, quindi Seq
per passare attraverso le schede lungo la parte
superiore della finestra del menu.
6. Pulsanti Canale. Consentono di passare da
una telecamera all'altra nella visualizzazione
live, controllo PTZ o riproduzione.
7. LED di stato.
8. Tasto Alarm: Premere per riconoscere
manualmente un allarme.
9. Tasti Enter e a freccia: Utilizzare per
selezionare le opzioni di un menu e controllare la
riproduzione. Premere per confermare.
10. Ricevitore IR.
11. Tasti di riproduzione: Premere per controllare
la riproduzione. Premere
per passare al
video meno recente disponibile e avviare la
riproduzione. Premere per mettere in pausa
la riproduzione. Premere
per una
riproduzione continua.
12. Pulsanti Live, Menu e Ricerca: Premere
nuovamente Live per passare alla modalità di
visualizzazione live. Premere Menu per accedere
al menu principale. Premere Ricerca per
accedere al menu di ricerca avanzato.
Figura 3: Barra di accesso rapido
1. Fermo immagine: consente di congelare
l'immagine live della telecamera selezionata.
2. Riprod immediata: consente di riprodurre il
video registrato dagli ultimi cinque minuti.
3. Audio: Consente di abilitare/disabilitare l'uscita
audio.
4. Snapshot rapida: consente di acquisire
un'istantanea di un'immagine video.
5. Controllo PTZ: consente di accedere alla
modalità di controllo PTZ.
6. Zoom digitale: consente di accedere allo zoom
digitale.
7. Imp. Immagine: consente di modificare i livelli di
illuminazione dell'immagine.
8. Chiudi: consente di chiudere la barra degli
strumenti.
Page 33

Guida di avvio rapido di TruVision DVR 11 33 : IT
Guida di avvio rapido
Contenuto della confezione
L'unità TruVision DVR 11 (modello TVR 11)
viene spedita insieme ai seguenti componenti:
• Telecomando IR (a infrarossi)
• Due batterie AAA per il telecomando
• Cavi di alimentazione CA
• 12 VDC PSU
• Mouse USB
• DVR
• Cavo video loop-through
• CD con software e manuali
• Guida di avvio rapido TruVision DVR 11
• Manuale dell'utente di TruVision DVR 11
(su CD)
Condizioni ambientali per
l'installazione
Per informazioni dettagliate fare riferimento al
manuale utente, ma rispettare i seguenti
importanti requisiti:
• Posizionare l'unità in un luogo sicuro.
• Accertarsi che l'unità sia ubicata in un'area
ben ventilata.
• Non esporre l'unità alla pioggia o all'umidità.
Installazione rapida
Passaggi consigliati per la configurazione del
DVR:
1. Collegare tutti i dispositivi richiesti al
pannello posteriore dell'unità TVR 11.
Vedere la Figura 1 a pagina 31.
Connessioni di base:
connettere le telecamere agli ingressi della
telecamera BNC e il monitor A all'uscita
BNC, VGA o HDMI. Collegare il mouse alla
porta USB posizionata sul pannello frontale.
Connessioni opzionali:
tutte le altre connessioni visualizzate sono
opzionali e variano in base ai requisiti di
installazione.
2. collegare l'alimentazione all'unità e
accenderla.
3. configurare l'unità con le impostazioni
richieste utilizzando la procedura guidata di
configurazione.
Primo utilizzo
L'unità TVR 11 dispone di una procedura
guidata per l'installazione rapida che consente
di configurare facilmente le impostazioni di
base del DVR in occasione del primo utilizzo.
Tutte le telecamere vengono configurate
simultaneamente. La configurazione può quindi
essere personalizzata secondo necessità.
Per impostazione predefinita, la procedura di
configurazione guidata viene avviata una volta
caricato il DVR. La procedura guidata guida
l'utente attraverso alcune delle più importanti
impostazioni dell'unità DVR. Selezionare la
lingua preferita per il sistema, quindi
immettere la password di amministratore.
La password predefinita dell'amministratore è
1234. Si consiglia di modificare la password.
La procedura guidata accompagnerà l'utente
attraverso i menu per l'impostazione di data e
ora, configurazione di rete gestione HDD e
configurazione della registrazione.
Una volta apportate tutte le modifiche
desiderate, fare clic sul pulsante Finish [Fine]
per uscire dalla procedura guidata. L'unità
TVR 11 è pronta per essere utilizzata. La
registrazione inizia automaticamente.
Funzionamento dell'unità TVR 11
Sono disponibili diversi modi per controllare
l'unità:
• Pannello frontale
• Telecomando IR
• Mouse
• Browser web
Page 34

IT : 34 Guida di avvio rapido di TruVision DVR 11
Pannello frontale
I pulsanti sul pannello frontale controllano la
maggior parte delle funzioni. Per una
descrizione delle posizioni dei controlli, vedere
la Figura 2 a pagina 32.
Telecomando a infrarossi
I pulsanti del telecomando IR sono simili a
quelli del pannello frontale. Posizionare due
batterie AAA nel telecomando.
Per collegare il telecomando al DVR:
1. Premere Menu sul pannello frontale
oppure fare clic con il pulsante destro del
mouse e selezionare Menu. Verrà
visualizzata la schermata del menu
principale.
2. Selezionare Impostazioni modalità di
visualizzazione > Monitor.
3. Controllare e ricordare il valore
dell'indirizzo del dispositivo DVR. Il valore
predefinito è 255. L'indirizzo del dispositivo
è valido per tutti i telecomandi a infrarossi.
4. Sul telecomando premere il pulsante
Dispos..
5. Immettere il valore dell'indirizzo del
dispositivo. Deve essere uguale a quello
dell'unità TVR 11.
6. Premere OK sul telecomando o sul
pannello frontale.
Mouse USB
Il mouse USB fornito insieme all'unità TVR 11
utilizza tutte le funzioni del DVR, a differenza
del pannello frontale, che ha funzionalità
limitate. Utilizzare il mouse per spostarsi ed
apportare modifiche alle impostazioni
nell'interfaccia utente.
Collegare il mouse all'unità DVR inserendo il
connettore del mouse USB nella porta USB
sul pannello posteriore o anteriore. Il mouse è
immediatamente operativo e dovrebbe venire
visualizzato il puntatore.
Browser Web
Il browser web dell'unità TVR 11 consente di
visualizzare, registrare e riprodurre video, oltre
a gestire tutti gli aspetti del DVR da qualsiasi
PC dotato di accesso a Internet. Gli intuitivi
comandi del browser consentono di accedere
rapidamente a tutte le funzioni del DVR.
Per accedere all'unità, aprire un browser Web
e immettere l'indirizzo IP assegnato al DVR
come indirizzo Web. Nella schermata di
accesso, immettere l'ID utente e la password
predefiniti.
• ID utente: admin
• Password: 1234.
I valori predefiniti per le impostazioni di rete
dell'unità TVR 11 sono i seguenti:
• DHCP: Abilitato per impostazione
predefinita.
• Indirizzo IP - 192.168.1.82
• Subnet mask - 255.255.255.0
• Indirizzo gateway - 192.168.1.1
• Porta server: 8000.
• Porta HTTP: 80.
• Porta RTSP: 554.
Nota: per eseguire correttamente la
connessione, è necessario seguire le
seguenti porte nel router: porta server e
porta RTSP.
Figura 4: Interfaccia browser Web
Page 35

Guida di avvio rapido di TruVision DVR 11 35 : IT
Mod. Vista Live
La modalità live è la modalità di
funzionamento normale dell'unità in cui
vengono visualizzate le immagini live
provenienti dalle telecamere.
È possibile accedere rapidamente alle funzioni
regolarmente utilizzate nella vista live facendo
clic sul tasto sinistro del mouse quando il
cursore si trova sull'immagine della
telecamera. Verrà visualizzata il collegamento
rapido della barra degli strumenti a comparsa.
Per una descrizione delle funzioni disponibili,
vedere la Figura 3 a pagina 32.
Configurazione dell'unità TVR 11
L'unità TVR 11 ha una struttura basata su
menu accessibili tramite icone che consente di
impostare i parametri dell'unità. Ciascuna
icona di comando consente di visualizzare
una schermata che consente di modificare un
gruppo di impostazioni. La maggior parte dei
menu è disponibile solo per gli amministratori
del sistema.
Per informazioni dettagliate sulla
configurazione dell'unità, fare riferimento al
manuale utente di TVR 11
Accesso al menu principale dalla modalità
live:
Premere il pulsante Menu sul telecomando
o sul pannello frontale.
- Oppure -
Fare clic con il pulsante destro del mouse e
selezionare Menu dal menu a comparsa.
Verrà visualizzata la schermata del menu
principale. Spostare il mouse su un'icona di
comando nella barra degli strumenti del menu
e fare clic per selezionarla.
Descrizione delle icone di comando nella
barra degli strumenti del menu:
Consente di configurare
impostazioni di visualizzazione.
Consente di configurare le
impostazioni della telecamera.
Consente di configurare le
impostazioni di registrazione.
Consente di configurare le
impostazioni standard di rete.
Consente di configurare le
impostazioni degli allarmi.
Consente di configurare le
impostazioni PTZ.
Consente di configurare le
impostazioni dell'utente.
Consente di configurare le
impostazioni di sistema.
Fornisce informazioni di
riferimento sulle varie barre degli
strumenti e i menu
dell'interfaccia.
Fornisce l'accesso a opzioni di
disconnessione, riavvio e
arresto.
Page 36

IT : 36 Guida di avvio rapido di TruVision DVR 11
Specifiche tecniche
A
limentazione 12 VDC
Consumo (senza HDD o DVD-R/W):
TVR 1104
TVR 1108
TVR 1116
≤ 10 W
≤ 15 W
≤ 20 W
Temperatura di
funzionamento
Da -10 a +55 ºC
Umidità relativa Da 10 a 90%
Dimensioni
(L x A x P)
362 × 330 × 78 mm
(14,25 × 13,0 × 3,07 in.)
Peso ≤ 3 kg (6.6 lb.) (senza
HDD o DVD-R/W)
Informazioni di contatto
Per informazioni di contatto, vedere
www.interlogix.com o
www.utcfssecurityproducts.eu.
Page 37

TruVision DVR 11 Snel aan de slag-gids 37 : NL
NL
TruVision DVR 11 Snel aan de
slag-gids
Afbeelding 1: Aansluitingen achterpaneel
1. Doorlusmogelijkheid voor maximaal 16 analoge
camera's (afhankelijk van het model DVR)
2. Aansluiting voor een RS-232-apparaat.
3. Aansluiting voor maximaal 16
alarmingangskabels op relaisuitgangen.
4. Aansluiting voor een alarmrelaisuitgang.
5. Aansluiting voor vier audioingangen op de
RCA-connectors.
6. Aansluiting voor maximaal 16 analoge camera's
op de BNC-connectors (afhankelijk van het
model DVR).
7. Aansluiting voor een optioneel USB-apparaat,
zoals een muis, CD/DVD-brander of HDD. De
DVR ondersteunt zowel een USB DVD en een
USB HD op de USB-poorten aan de voorkant
en de achterkant.
8. Aansluiting voor een CCTV-monitor (CVBSaansluiting).
9. Aansluiting voor een HDTV. De HDMI-aansluiting
ondersteunt digitale audio en video.
10. Aansluiting voor een VGA-monitor.
11. Aansluiting voor luidsprekers op de audiouitgang.
12. Aansluiting voor een netwerk.
13. Aansluiting voor een RS-485-apparaat, zoals een
PTZ-camera of bediendeel.
14. Aansluiting voor de 12 VDC PSU (meegeleverd).
15. Aan-/uitschakelaar.
16. Aansluiting voor aarde.
Page 38

NL: 38 TruVision DVR 11 Snel aan de slag-gids
Afbeelding 2: Bedieningselementen op het voorpaneel
1 USB-poort
2. CD/DVD-brander
3. De uitwerpknop: Druk hierop om de CD/DVD
uit te werpen.
4. De archiveringsknop: Druk hierop om de
archiveringsmodus te activeren.
5. De knoppen Display en Seq: Druk in de live-
weergavemodus op Display om te schakelen
tussen de enkelvoudige en multiviewweergaven. Druk op Seq om de weergavereeks
in de live-weergavemodus te starten/stoppen.
Druk in de menumodus op Enter een
menuvenster te selecteren en vervolgens op
Seq om te schakelen tussen de tabbladen aan
de bovenkant van een menuvenster.
6. Kanaalknoppen. Schakel tussen de
verschillende camera's in de live-weergave-,
PTZ-bedienings- of afspeelmodus.
7. Statuslampjes
8. Alarmtoets: Druk hierop om een alarm
handmatig te bevestigen.
9. Enter en pijlknoppen: Selecteer hiermee opties
in een menu en bedien het afspelen. Druk erop
voor Enter.
10. Infraroodontvanger.
11. Afspeeltoetsen. Klik hierop om het afspelen te
bedienen. Druk op om terug te springen
naar de oudste beschikbare video-opname en te
beginnen met afspelen. Klik op om het
afspelen te onderbreken. Druk op voor
gehele dag afspelen.
12. De knoppen Live, Menu en Search: Druk op
Live om naar de live-weergavemodus te
schakelen. Druk op Menu om het hoofdmenu te
openen. Druk op Search om het geavanceerde
zoekmenu te openen.
Afbeelding 3: De werkbalk voor snelle toegang
1. Bevriezen: Bevriest de live-weergavemodus
van de geselecteerde camera.
2. Direct afspelen: Speelt het opgenomen
videomateriaal van de afgelopen vijf minuten af.
3. Audio: Audio-uitgang inschakelen/uitschakelen.
4. Snelle snapshot: Een momentopname van een
videobeeld maken.
5. PTZ-bediening: PTZ-bedieningsmodus activeren.
6. Digitale zoom: Digitale zoom activeren.
7. Beeldinstellingen: De belichtingsniveaus van
het beeld wijzigen.
8. Sluiten: De werkbalk sluiten.
Page 39

TruVision DVR 11 Snel aan de slag-gids 39 : NL
Snel aan de slag-gids
Inhoud van de verpakking
De TruVision DVR 11 (model TVR 11) wordt
geleverd met de volgende items:
• Draadloze afstandsbediening
• Twee AAA-batterijen voor de
afstandsbediening
• Voedingskabels
• 12 VDC PSU
• USB-muis
• DVR
• Doorgeluste videokabel
• CD met software en handleidingen
• TruVision DVR 11 Snel aan de slag-gids
• TruVision DVR 11 Gebruikershandleiding
(op CD)
Installatieomgeving
Raadpleeg de gebruikershandleiding voor
gedetailleerde informatie maar let op de
volgende belangrijke vereisten:
• Zet de camera op een veilige plek neer.
• Zorg dat de camera in een goed
geventileerde omgeving staat.
• Stel de unit niet bloot aan regen of vocht.
Snelle installie
Aanbevolen stappen voor het instellen van
de DVR:
1. Sluit alle vereiste apparaten aan op het
achterpaneel van de TVR 11. Zie
afbeelding 1 op pagina 37.
Basisaansluitingen:
Sluit de camera's aan op de BNC-cameraingangen en monitor A op de BNC-, VGAof HDMI-uitgang. Sluit de muis aan op de
USB-poort in het voorpaneel.
Optionele aansluitingen:
Alle overige weergegeven aansluitingen
zijn optioneel en afhankelijk van de
installatievereisten.
2. Sluit de stroomvoorziening aan op de
eenheid en schakel de voeding in.
3. Stel de vereiste instellingen in voor de
eenheid met behulp van de
installatiewizard.
Voor de eerste keer
De TVR 11 beschikt over een installatiewizard
waarmee u snel en eenvoudig voor het eerst
de basis DVR-instellingen kunt instellen. Alle
camera's worden gelijktijdig geconfigureerd.
De configuratie kan vervolgens naar wens
worden aangepast.
Standaard wordt de installatiewizard gestart
zodra de DVR is geladen. De wizard helpt u
met een aantal van de belangrijkste
instellingen van uw DVR. Stel de voorkeurtaal
in voor het systeem en voer vervolgens het
admin-wachtwoord in. Het standaard adminwachtwoord is 1234. Het wordt ten zeerste
aanbevolen om dit wachtwoord te wijzigen.
De wizard leidt u vervolgens door de menu's
voor het instellen van tijd en datum,
netwerkconfiguratie, HDD-beheer en
opnameconfiguratie.
Wanneer alle vereiste wijzigingen zijn
ingesteld, klikt u op de knop Finish
(Voltooien) om de wizard af te sluiten. De
TVR 11 is nu klaar voor gebruik. Het opnemen
wordt automatisch gestart.
De TVR 11 bedienen
De eenheid kan op een aantal manieren
worden bediend:
• Voorpaneel
• Draadloze afstandsbediening
• Muis
• Webbrowser
Page 40

NL: 40 TruVision DVR 11 Snel aan de slag-gids
Voorpaneel
Met de toetsen op het voorpaneel kunt u de
meeste functies bedienen. Zie afbeelding 2 op
pagina 38 voor een beschrijving van het
bediendeel.
Draadloze afstandsbediening
De knoppen op de draadloze
afstandsbediening lijken op die van het
voorpaneel. Plaats twee AAA-batterijen in de
afstandsbediening.
U verbindt als volgt de afstandsbediening
met de DVR:
1. Druk op de toets Menu op het voorpaneel
of klik met de rechtermuisknop en
selecteer Menu. Het hoofdmenu wordt
weergegeven.
2. Selecteer Display mode settings
(Instellingen weergavemodus) > Monitor
(Monitor).
3. Controleer en onthoud de waarde van het
DVR-apparaatadres. De standaardwaarde
is 255. Dit apparaatadres is geldig voor alle
infrarood afstandsbedieningen.
4. Druk op de knop Device (Apparaat) op de
draadloze afstandsbediening.
5. Voer de waarde voor het apparaatadres in.
Deze moet hetzelfde zijn als die van de
TVR 11.
6. Druk op OK op de afstandsbediening of het
voorpaneel.
USB-muis
De USB-muis die bij de TVR 11 is geleverd
bedient alle functies van de DVR, in
tegenstelling tot het voorpaneel dat slechts
een beperkte functionaliteit biedt. Met de muis
kunt u navigeren en instellingen wijzigen in de
gebruikersinterface.
Sluit de muis aan op de DVR door de USBaansluiting van de muis in de USB-poort in het
achter- of het voorpaneel te steken. De muis
is meteen operationeel en de muisaanwijzer
wordt weergegeven.
Bediening via de webbrowser
Met de TVR 11-webbrowser kunt u video
bekijken, opnemen en afspelen, maar ook alle
aspecten van de DVR beheren vanaf een
willekeurige PC met internettoegang. De
eenvoudige browserbediening biedt u snel
toegang tot alle DVR-functies.
Als u toegang wilt tot de eenheid, opent u een
webbrowser en voert u het IP-adres dat is
toegewezen aan de DVR in als webadres.
Geef in het aanmeldingsvenster het standaard
gebruikers-ID en wachtwoord op.
• Gebruikers-id: admin
• Wachtwoord: 1234
De standaardwaarden voor de TVR 11netwerkinstellingen zijn:
• DHCP: Standaard ingeschakeld.
• IP-adres - 192.168.1.82
• Subnetmasker - 255.255.255.0
• Gateway-adres - 192.168.1.1
• Serverpoort: 8000
• HTTP-poort: 80
• RTSP-poort: 554
Opmerking: De volgende poorten moeten
worden gevolgd in de router voor een juiste
verbinding: Server-poort en RTSP-poort.
Afbeelding 4: Webbrowserinterface
Page 41

TruVision DVR 11 Snel aan de slag-gids 41 : NL
Live-weergavemodus
De live-weergavemodus is de normale modus
van de eenheid voor het bekijken van
livebeelden van de camera's.
Regelmatig gebruikte functies in de liveweergave kunnen snel worden geselecteerd
door op de linkermuisknop te klikken wanneer
de cursor in het camerabeeld staat. De
snelkoppeling voor de pop-upwerkbalk
verschijnt. Zie afbeelding 3 op pagina 38 voor
een beschrijving van de beschikbare functies.
De TVR 11 configureren
De TVR 11 beschikt over een pictogramaangestuurde bedieningsstructuur waarmee
u de parameters van de unit kunt instellen.
Elk opdrachtpictogram toont een scherm
waarmee u een groep instellingen kunt
bewerken. De meeste menu's zijn alleen
beschikbaar voor systeembeheerders.
Raadpleeg de gebruikershandleiding van de
TVR 11 voor gedetailleerde informatie over
het configureren van de eenheid.
U opent als volgt het hoofdmenu vanuit de
live-weergave:
Druk op de knop Menu op de
afstandsbediening of het voorpaneel.
- Of -
Klik met de rechtermuisknop en selecteer
Menu in het pop-upmenu.
Het hoofdmenu wordt weergegeven. Beweeg
de muis over een opdrachtpictogram en klik
erop om het te selecteren.
Beschrijving van de opdrachtpictogrammen
in de menuwerkbalk:
Weergave-instellingen
configureren.
Camera-instellingen
configureren.
Opnameinstellingen
configureren.
Standaard netwerkinstellingen
configureren.
Alarminstellingen configureren.
PTZ-instellingen configureren.
Gebruikersinstellingen
configureren.
Systeeminstellingen
configureren.
Referentiegegevens over de
verschillende werkbalken en
menu's van de interface.
Verschaft toegang tot de opties
voor afmelden, opnieuw
opstarten en afsluiten.
Page 42

NL: 42 TruVision DVR 11 Snel aan de slag-gids
Specificaties
Voedingseenheid 12 VDC
Stroomverbruik (zonder HDD of DVD-R/W):
TVR 1104
TVR 1108
TVR 1116
≤ 10 W
≤ 15 W
≤ 20 W
Bedrijfstemperatuur -10 tot +55 ºC
(14 tot 131 °F)
Relatieve
luchtvochtigheid
10 tot 90%
A
fmetingen
(B x H x D)
362 × 330 × 78 mm
(14,25 × 13,0 × 3,07 in.)
Gewicht ≤ 3 kg (6,6 lb.) (zonder
HDD of DVD-R/W)
Contactgegevens
Zie www.interlogix.com of
www.utcfssecurityproducts.eu voor
contactgegevens.
Page 43

Skrócona instrukcja obsługi rejestratora TruVision DVR 11 43 : PL
PL
Skrócona instrukcja obsługi
rejestratora TruVision DVR 11
Rysunek 1: Złącza na panelu tylnym
1. Zapętl do 16 kamer analogowych (zależy od
modelu rejestratora DVR).
2. Podłącz do urządzenia RS-232.
3. Podłącz do czterech alarmowych kabli
wejściowych do wyjść przekaźnikowych.
4. Podłącz jedno wyjście przekaźnika
alarmowego.
5. Podłącz cztery wejścia audio do złączy RCA.
6. Podłącz do 16 kamer analogowych do złączy
BNC (zależy od modelu rejestratora DVR).
7. Podłącz do opcjonalnego urządzenia USB,
takiego jak mysz, nagrywarka CD/DVD lub dysk
twardy. Rejestrator obsługuje napędy DVD i
dyski twarde USB za pośrednictwem portów
USB z przodu i z tyłu urządzenia.
8. Podłącz jeden monitor telewizji przemysłowej
(złącze typu CVBS).
9. Podłącz do telewizora HD. Połączenie HDMI
obsługuje cyfrowe audio i wideo.
10. Podłącz do monitora VGA.
11. Podłącz do głośników w celu uzyskania audio.
12. Podłącz do sieci.
13. Podłącz do urządzenia wyposażonego w port
RS-485, na przykł
ad do kamery PTZ lub
klawiatury.
14. Podłącz do zasilacza 12 V prądu stałego
(w zestawie).
15. Wyłącznik zasilania (wł./wył.).
16. Podłączenie uziemienia.
Page 44

PL : 44 Skrócona instrukcja obsługi rejestratora TruVision DVR 11
Rysunek 2: Elementy sterujące na panelu przednim
1 Port USB.
2. Nagrywarka dysków CD/DVD.
3. Przycisk wysunięcia: naciśnij, aby wysunąć dysk
CD/DVD.
4. Przycisk archiwizacji: naciśnij, aby włączyć tryb
archiwizacji.
5. Przyciski Display (Wyświetlacz) i Seq (Praca
sekwencyjna): W trybie podglądu na żywo naciśnij
przycisk Display (Wyświetlacz), aby przełączać się
pomiędzy widokiem pojedynczym i wielokrotnym.
Naciśnij przycisk Seq (Praca sekwencyjna), aby
rozpocząć/zatrzymać pracę sekwencyjną w trybie
podglądu na żywo.
W trybie menu naciśnij przycisk Enter, aby wybrać
okno menu, a następnie przycisk Seq (Praca
sekwencyjna) w celu przełączania się pomiędzy
kartami w górnej części okna menu.
6. Przyciski kanałów. Służą do prze
łączania między
różnymi kamerami z podglądem na żywo i trybami
sterowania PTZ lub odtwarzania.
7. Diody stanu.
8. Przycisk alarmu: naciśnij, aby ręcznie potwierdzić
alarm.
9. Przyciski Enter i strzałek: użyj go, aby wybrać
opcje w menu i sterować odtwarzaniem. Naciśnięcie
manipulatora odpowiada naciśnięciu przycisku Enter.
10. Odbiornik pilota na podczerwień.
11. Przyciski odtwarzania: naciśnij, aby sterować
odtwarzaniem. Naciśnij przycisk , aby przejść do
najstarszego, dostępnego nagrania wideo i rozpocząć
odtwarzanie. Naciśnij przycisk , aby wstrzymać
odtwarzanie. Naciśnij przycisk , aby wykonać
odtwarzanie z całego dnia.
12. Przyciski podglądu na żywo, menu
i wyszukiwania: Naciśnij przycisk Live (Na żywo)),
aby przejść do trybu podglądu na żywo. Naciśnij
przycisk
Menu, aby przejść do menu głównego.
Naciśnij przycisk Search (Szukaj), aby przejść do
menu wyszukiwania.
Rysunek 3: Pasek narzędzi szybkiego dostępu
1. Stopklatka (Freeze): Zamrożenie obrazu z
wybranej kamery.
2. Powtórka (Instant playback): Odtwarzanie pięciu
ostatnich minut nagrania.
3. Audio: Włącz/wyłącz wyjście audio.
4. Szybka migawka (Quick snapshot): Umożliwia
przechwycenie migawki obrazu wideo.
5. Sterowanie PTZ (PTZ control): Wejście do trybu
sterowania PTZ.
6. Zoom cyfrowy (Digital zoom): Wejście do
powiększenia cyfrowego.
7. Ustawienia obrazu (Image settings): Modyfikacja
poziomu oświetlenia obrazu.
8. Zamknij (Close): Zamknięcie paska narzędzi.
Page 45

Skrócona instrukcja obsługi rejestratora TruVision DVR 11 45 : PL
Instrukcja szybkiego
uruchamiania
Zawartość opakowania
Rejestrator TruVision DVR 11 (model TVR 11)
jest dostarczany z następującymi elementami:
• Pilot zdalnego sterowania (na
podczerwień)
• Dwie baterie typu AAA do pilota
• Przewody zasilające prądu przemiennego
• Zasilacz 12 V prądu stałego
• Mysz USB
• Rejestrator DVR
• Pętla wideo za pomocą kabla
• Dysk CD z oprogramowaniem oraz
instrukcjami obsługi
• TruVision DVR 11 Instrukcja szybkiego
uruchamiania
• TruVision DVR 11 Instrukcja obsługi
rejestratora (na dysku CD)
Warunki instalacji
Szczegółowe informacje znajdują się
w instrukcji obsługi, ale należy przestrzegać
następujących ważnych wymagań:
• Umieścić urządzenie w bezpiecznym
miejscu.
• Upewnić się, że urządzenie znajduje się
w dobrze wentylowanym pomieszczeniu.
• Nie wystawiać urządzenia na działanie
deszczu czy wilgoci.
Szybka instalacja
Zalecana procedura konfigurowania
rejestratora DVR:
1. Podłącz wszystkie wymagane urządzenia
do panelu tylnego rejestratora TVR 11.
Patrz rysunek 1 na stronie 43.
Połączenia podstawowe:
Podłącz kamery do wejść kamer BNC oraz
monitor A do wyjścia BNC, VGA lub HDMI.
Podłącz mysz do portu USB na panelu
przednim.
Połączenia opcjonalne:
Wszystkie inne przedstawione połączenia
są opcjonalne i zależne od wymagań
instalacji.
2. Podłącz zasilacz do urządzenia i włącz
zasilanie.
3. Skonfiguruj wymagane ustawienia
urządzenia przy użyciu kreatora
konfiguracji.
Pierwsze użycie
Rejestrator TVR 11 jest wyposażony
w ekspresowy kreator instalacji, który
umożliwia łatwą konfigurację podstawowych
ustawień rejestratora przy pierwszym użyciu.
Konfiguruje wszystkie kamery jednocześnie.
Konfigurację można następnie dostosować.
Domyślnie kreator konfiguracji uruchomi się
po załadowaniu rejestratora. Kreator
umożliwia skonfigurowanie najważniejszych
ustawień rejestratora krok po kroku. Wybierz
preferowany język dla systemu, a następnie
wprowadź hasło administratora. Domyślne
hasło administratora to ciąg 1234. Zaleca się
zmianę tego hasła.
Następnie kreator prowadzi przez menu
w celu ustawienia daty i godziny,
skonfigurowania sieci, zarządzania dyskiem
twardym i skonfigurowania nagrywania.
Po wprowadzenia wszelkich niezbędnych
zmian, kliknij przycisk Finish (Zakończ), aby
zakończyć pracę kreatora. Rejestrator TVR 11
jest gotowy do użytku. Nagrywanie
rozpoczyna się automatycznie.
Page 46

PL : 46 Skrócona instrukcja obsługi rejestratora TruVision DVR 11
Obsługa rejestratora TVR 11
Dostępnych jest kilka sposobów sterowania
urządzeniem:
• Panel przedni
• Pilot zdalnego sterowania (na
podczerwień)
• Mysz
• Przeglądarka internetowa
Panel przedni
Przyciski na panelu przednim służą do
sterowania większością funkcji. Zobacz
rysunek na stronie 44, aby sprawdzić
lokalizację elementów sterujących.
Sterowanie za pomocą pilota na
podczerwień
Obsługa przycisków pilota na podczerwień
przypomina użycie panelu przedniego. Włóż
do pilota dwie baterie typu AAA.
Aby podłączyć pilota do rejestratora:
1. Naciśnij przycisk Menu na panelu
przednim lub kliknij prawym przyciskiem
myszy i wybierz polecenie Menu. Otworzy
się menu główne.
2. Wybierz kolejno opcje Display mode
settings > Monitor (Ustawienia trybu
wyświetlania > Monitor).
3. Sprawdź i zapamiętaj adres urządzenia
DVR. Wartość domyślna wynosi 255. Ten
adres urządzenia jest prawidł
owy dla
wszystkich pilotów na podczerwień.
4. Na pilocie naciśnij przycisk Device
(Urządzenie).
5. Wprowadź adres urządzenia. Musi być taki
sam jak na urządzeniu TVR 11.
6. Naciśnij przycisk OK na pilocie lub panelu
przednim.
Mysz USB
Mysz USB dostarczona z rejestratorem
TVR 11 może być używana do obsługi
wszystkich funkcji urządzenia
w przeciwieństwie do panelu przedniego, który
ma ograniczone funkcje. Za pomocą myszy
można przechodzić między menu
i wprowadzać zmiany w ustawieniach
w interfejsie użytkownika.
Mysz należy podłączyć do rejestratora DVR
za pośrednictwem portu USB na panelu
przednim lub tylnym. Mysz natychmiast
rozpocznie pracę i powinien pojawić się
kursor.
Sterowanie za pomocą przeglądarki
internetowej
Przeglądarka internetowa rejestratora TVR 11
umożliwia wyświetlanie, nagrywanie
i odtwarzanie obrazów wideo, a także
zarządzanie wszystkimi aspektami systemu z
dowolnego komputera z dost
ępem do
Internetu. Łatwe w obsłudze elementy
sterujące przeglądarki zapewniają szybki
dostęp do wszystkich funkcji rejestratora.
Aby uzyskać dostęp do rejestratora, należy
otworzyć przeglądarkę internetową i jako
adres internetowy wpisać adres IP przypisany
do urządzenia DVR. Na ekranie logowania
należy wprowadzić domyślny identyfikator
użytkownika i hasło:
• User ID (ID użytkownika): admin
• Password (Hasło): 1234
Domyślne wartości ustawień sieciowych
rejestratora TVR 11:
• DHCP: włączony domyślnie.
• Adres IP — 192.168.1.82
• Maska podsieci — 255.255.255.0
• Adres bramy — 192.168.1.1
• Port serwera: 8000
• Port HTTP: 80
• Port RTSP: 554
Uwaga: Aby uzyskać poprawne połączenie,
wymienione poniżej porty należy odpowiednio
ustawić w routerze: port serwera i port RTSP.
Page 47

Skrócona instrukcja obsługi rejestratora TruVision DVR 11 47 : PL
Rysunek 4: Interfejs przeglądarki
internetowej
Tryb podglądu na żywo
Tryb podglądu na żywo to standardowy tryb
pracy urządzenia, w którym użytkownik widzi
bieżący obraz z kamer.
Regularnie używane funkcje trybu podglądu
na żywo są dostępne za pomocą kliknięcia
lewym przyciskiem myszy, gdy kursor
znajduje się na obrazie z kamery. Zostanie
wyświetlony wyskakujący pasek narzędzi ze
skrótami. Opis dostępnych funkcji przedstawia
rysunek 3 na stronie 44.
Konfigurowanie rejestratora
TVR 11
Rejestrator TVR 11 udostępnia menu złożone
z ikon umożliwiające skonfigurowanie
parametrów urządzenia. Każda ikona
polecenia wyświetla ekran, który umożliwia
edycję grupy ustawień. Większość menu jest
dostępna tylko dla administratorów systemu.
Szczegółowe informacje na temat
konfigurowania urządzenia zawiera Instrukcja
użytkownika rejestratora TVR 11.
Aby przejść do menu głównego z trybu
podglądu na żywo:
Naciśnij przycisk Menu na pilocie lub
panelu przednim.
- lub -
Kliknij prawym przyciskiem myszy i wybierz
opcję Menu z menu podręcznego.
Otworzy się menu główne. Umieść wskaźnik
myszy nad ikoną polecenia na pasku narzędzi
menu i kliknij, aby wybrać ikonę.
Opis ikon poleceń na pasku narzędzi
menu:
Konfigurowanie ustawień
wyświetlania.
Konfigurowanie ustawień
kamery.
Konfigurowanie ustawień
nagrywania.
Konfigurowanie standardowych
ustawień sieci.
Konfigurowanie ustawień
alarmu.
Konfigurowanie ustawień PTZ.
Konfigurowanie ustawień
użytkownika.
Konfigurowanie ustawień
systemu.
Dostarcza informacje dotyczące
różnych pasków narzędzi i menu
interfejsu.
Dostęp do opcji wylogowania,
ponownego uruchomienia
i wyłączenia.
Page 48

PL : 48 Skrócona instrukcja obsługi rejestratora TruVision DVR 11
Dane techniczne
Zasilanie 12 V prądu stałego
Pobór mocy (bez dysku twardego lub
nagrywarki DVD-R/W):
TVR 1104
TVR 1108
TVR 1116
≤ 10 W
≤ 15 W
≤ 20 W
Temperatura
robocza
-10 do +55°C
(14 do 131°F)
Wilgotność
względna:
10 do 90%
Wymiary
(Sz x W x G):
362 × 330 × 78 mm
(14,25 × 13,0 × 3,07 cala)
Waga ≤ 3 kg (6,6 funta) (bez
dysku twardego lub
nagrywarki DVD-R/W)
Informacje kontaktowe
Informacje kontaktowe zawiera witryna
internetowa www.interlogix.com lub
www.utcfssecurityproducts.eu
Page 49

Guia Rápido do TruVision DVR 11 49 : PT
PT
Guia Rápido do TruVision DVR 11
Figura 1: Ligações do painel traseiro
1. "Loop through" para um máximo de 16 câmaras
analógicas (consoante o modelo de DVR).
2. Ligar a um dispositivo RS-232.
3. Ligar até quatro cabos de entrada de alarme a
saídas de relé.
4. Ligar uma saída de relé de alarme.
5. Ligar quatro entradas de áudio a conectores
RCA.
6. Ligar até 16 câmaras analógicas a conectores
BNC (consoante o modelo de DVR).
7. Ligar a um dispositivo USB opcional, como um
rato, gravador de CD/DVD ou HDD. O DVR
suporta um DVD USB e um HD USB nas portas
USB dianteira e traseira.
8. Ligar um monitor de CCTV (conector tipo CVBS).
9. Ligar a uma TV de alta definição. A ligação HDMI
suporta áudio e vídeo digital.
10. Ligar a um monitor VGA.
11. Ligar a colunas para saída de áudio.
12. Ligar a uma rede.
13. Ligar a um dispositivo RS-485, como uma
câmara PTZ ou um teclado.
14. Ligar à PSU de 12 VDC (incluída).
15. Interruptor de alimentação (ligar/desligar).
16. Ligar à terra.
Page 50

PT : 50 Guia Rápido do TruVision DVR 11
Figura 2: Controlos do painel frontal
1 Porta USB.
2. Gravador de CD/DVD.
3. Botão Eject (Ejectar): Premir para ejectar o
CD/DVD.
4. Botão Archive (Arquivo): Premir para entrar
no modo de arquivo.
5. Botões Display e Seq (Visor e Sequência):
No modo de visualização em directo, prima
Display para navegar pelos ecrãs divididos e o
ecrã total. Prima Seq para iniciar/parar a
sequenciação no modo de visualização em
directo.
No modo de menu, prima Enter para
seleccionar uma janela de menu e depois prima
Seq para percorrer os separadores no topo da
janela do menu.
6. Botões de canal. Alternar entre câmaras
diferentes nos modos de visualização em
directo, controlo PTZ ou reprodução.
7. LEDs de estado.
8. Botão Alarm: Prima para confirmar
manualmente um alarme. 9. Botões Enter e
de setas: Utilize para seleccionar opções num
menu e para controlar a reprodução. Prima para
activar a função de Enter.
10. Receptor de infravermelhos (IR).
11. Botões de reprodução: Premir para controlar a
reprodução. Prima para retroceder até ao
vídeo mais antigo disponível e iniciar a
reprodução. Prima para pausar a
reprodução. Prima para reprodução de dia
todo.
12. Botões Live, Menu e Search (Directo, Menu e
Procura): Prima Live para entrar no modo de
visualização em directo. Prima Menu para
aceder ao menu principal. Prima Search para
aceder ao menu de pesquisa avançada.
Figura 3: Barra de ferramentas de acesso rápido
1. Imobilizar: imobilizar uma imagem em directo
da câmara seleccionada.
2. Reprodução instantânea: reproduzir o vídeo
gravado nos últimos cinco minutos.
3. Áudio: activar/desactivar a saída de áudio.
4. Fotografia: capturar um instantâneo de uma
imagem de vídeo.
5. Controlo PTZ: entrar no modo de controlo PTZ.
6. Zoom digital: entrar no modo de zoom digital.
7. Definições de imagem: alterar os níveis de
iluminação da imagem.
8. Fechar: Fechar a barra de ferramentas.
Page 51

Guia Rápido do TruVision DVR 11 51 : PT
Guia Rápido
Conteúdo da embalagem
O TruVision DVR 11 (modelo TVR 11) é
fornecido com os seguintes elementos:
• Comando à distância IR (infravermelhos)
• Duas baterias AAA para o comando à
distância
• Cabos de alimentação CA
• PSU de 12 VDC
• Rato USB
• DVR
• Cabo de vídeo "loop-through"
• CD com software e manuais
• Guia Rápido do TruVision DVR 11
• Manual do Utilizador do TruVision DVR 11
(em CD)
Ambiente de instalação
Consulte o manual do utilizador para obter
informações detalhadas, mas observe os
seguintes requisitos importantes:
• Coloque a unidade num local seguro.
• Certifique-se de que a unidade se encontra
num local bem ventilado.
• Não exponha a unidade à chuva ou à
humidade.
Instalação rápida
Recomendações de configuração do DVR:
1. Ligue todos os dispositivos necessários ao
painel traseiro do TVR 11. Consulte a
Figura 1 na página 49.
Ligações básicas:
Ligue as câmaras às entradas de câmara
BNC e o monitor A à saída BNC, VGA ou
HDMI. Ligue o rato à porta USB no painel
frontal.
Ligações opcionais:
Todas as restantes ligações mostradas
são opcionais e dependem de requisitos
de instalação.
2. Ligue a fonte de alimentação à unidade e
ligue a alimentação.
3. Configure a unidade com as definições
requeridas, utilizando o assistente de
configuração.
Primeira utilização
O TVR 11 possui um assistente de instalação
rápida (Express) que permite configurar
facilmente definições básicas de DVR na
primeira utilização. Configura
simultaneamente todas as câmaras. A
configuração pode então ser personalizada
conforme necessário.
Por predefinição, o assistente de configuração
inicia-se depois de o DVR ser carregado. O
assistente guia o utilizador por algumas das
definições mais importantes do DVR.
Seleccione o idioma preferido para o sistema
e, a seguir, introduza a password de
administrador. A password admin predefinida
é 1234. Recomenda-se vivamente a alteração
desta password.
O assistente orienta então o utilizador pelos
menus para definir data e hora, a
configuração de rede, a gestão dos discos
rígidos (HDDs) e a configuração de gravação.
Após a introdução de todas as alterações
pretendidas, clique em Finish (Terminar) para
sair do assistente. O TVR 11 está agora
pronto para ser utilizado. A gravação inicia-se
automaticamente.
Funcionamento do TVR 11
A unidade pode ser controlada de várias
maneiras:
• Painel frontal
• Comando à distância IR (infravermelhos)
• Rato
• Browser web
Page 52

PT : 52 Guia Rápido do TruVision DVR 11
Painel frontal
Os botões do painel frontal controlam a maior
parte das funções. Consulte a Figura 2 na
página 50 para ver a localização dos
controlos.
Comando à distância IR (infravermelhos)
Os botões do comando à distância IR
assemelham-se aos do painel frontal. Coloque
as duas pilhas AAA no comando à distância.
Para ligar o comando à distância ao DVR:
1. Prima Menu no painel frontal ou clique
com o botão direito do rato e seleccione
Menu. É apresentado o ecrã do menu
principal.
2. Seleccione Disposições do modo de
visualização > Monitor.
3. Seleccione e fixe o valor do endereço do
dispositivo DVR. O valor predefinido é 255.
O endereço do dispositivo é válido para
todos os controlos IR.
4. No comando à distância, prima o botão
Device (Dispositivo).
5. Introduza o valor do endereço do
dispositivo. O valor tem de ser idêntico ao
valor no TVR 11.
6. Prima OK no comando à distância ou no
painel frontal.
Rato USB
O rato USB fornecido com o TVR 11 pode ser
utilizado para operar todas as funções do
DVR, ao contrário do painel frontal, o qual tem
uma funcionalidade limitada. O rato permite
navegar e efectuar alterações às definições
na interface de utilizador.
Para ligar o rato ao DVR, ligue o conector
USB do rato à porta USB localizada no painel
frontal ou traseiro. O rato fica imediatamente
operacional e o ponteiro deverá ser visível
no ecrã.
Controlo pelo browser da Web
O browser Web do TVR 11 permite visualizar,
gravar e reproduzir vídeos, bem como gerir
todos os aspectos do DVR a partir de
qualquer PC com acesso à Internet. Os
controlos do browser, muito fáceis de utilizar,
proporcionam um acesso rápido a todas as
funções do DVR.
Para aceder à unidade, abra um browser web
e introduza o endereço IP atribuído ao DVR
como endereço da web. No ecrã de acesso,
introduza a ID de utilizador e a password
predefinidos.
• ID de utilizador: admin
• Password: 1234
Os valores predefinidos para as definições de
rede do TVR 11 são os seguintes:
• DHCP: Activado por predefinição.
• Endereço IP - 192.168.1.82
• Máscara de subrede - 255.255.255.0
• Endereço gateway - 192.168.1.1
• Porta do servidor: 8000
• Porta de HTTP: 80
• Porta de RTSP: 554
Nota: As portas seguintes têm de ser
seguidas no router para poder estabelecer
ligação correctamente: porta do servidor e
porta de RTSP.
Figura 4: Interface do browser da Web
Modo de visualização em directo
O modo em directo é o modo de funcionamento
normal da unidade, permitindo a visualização
de imagens das câmaras em directo.
Page 53

Guia Rápido do TruVision DVR 11 53 : PT
As funções utilizadas com regularidade no
modo de visualização em directo podem ser
acedidas rapidamente, clicando para tal com
o botão do rato quando o respectivo cursor se
encontra na imagem de câmara. Aparece a
barra de ferramentas instantânea de atalhos.
Consulte a Figura 3 na página 50 para ver a
descrição das funções disponíveis.
Configuração do TVR 11
O TVR 11 possui uma estrutura de menus
controlada por ícones que permite configurar
os parâmetros da unidade. Cada ícone de
comando apresenta um ecrã que permite
editar um conjunto de definições. A maior
parte dos menus está disponível apenas aos
administradores do sistema.
Consulte o manual do utilizador do TVR 11
para obter informações detalhadas sobre a
configuração da unidade.
Para aceder ao menu principal no modo de
visualização em directo:
Prima o botão Menu no comando à
distância ou no painel frontal.
- Ou -
Clique com o botão direito do rato e
seleccione Menu no menu instantâneo.
É apresentado o ecrã do menu principal.
Mova o rato sobre um ícone de comando na
barra de ferramentas do menu e clique para
seleccionar.
Descrição dos ícones de comando na
barra de ferramentas do menu:
Configurar definições de
visualização.
Configurar definições de
câmara.
Configurar definições de
gravação.
Configurar definições
normalizadas de rede.
Configurar definições de alarme.
Configurar as definições PTZ.
Configurar definições de
utilizador.
Configurar definições de
sistema.
Proporciona informações de
referência às diversas barras de
ferramentas e menus na
interface.
Dá acesso às opções de logout,
reiniciar e encerrar.
Especificações
Fonte de
alimentação
12 VDC
Consumo de energia (sem HDD ou
DVD-R/W):
TVR 1104
TVR 1108
TVR 1116
≤ 10 W
≤ 15 W
≤ 20 W
Temperatura de
funcionamento
-10 a +55 ºC
(14 a 131 °F)
Humidade
relativa
10 a 90%
Dimensões
(L x A x P)
362 × 330 × 78 mm
(14,25 × 13,0 × 3,07 pol.)
Page 54

PT : 54 Guia Rápido do TruVision DVR 11
Peso ≤ 3 kg (6,6 lb.) (sem HDD
ou DVD-R/W)
Informações de contacto
Para informações de contacto, consulte
www.interlogix.com, ou
www.utcfssecurityproducts.eu
Page 55

TruVision DVR 11 Краткое руководство по началу работы 55 : RU
RU
TruVision DVR 11 Краткое
руководство по началу работы
Рис. 1: Соединения задней панели
1. Проходной вход для 16 аналоговых камер
(максимум) (в зависимости от модели
видеорегистратора).
2. Подключение к устройству RS-232.
3. Подключение до четырех кабелей ввода
аварийных сигналов к релейным выходам.
4. Подключение одного выхода реле тревоги.
5. Подключение четырех аудиовходов к
разъемам RCA.
6. Подключение до 16 аналоговых камер к
разъемам BNC (в зависимости от модели
видеорегистратора).
7. Подключение дополнительного
USB-
устройства, например, мыши, устройства
записи CD/DVD или жесткого диска.
Цифровой видеорегистратор поддерживает
DVD-дисководы и жесткие диски с USBинтерфейсом, которые можно подключить к
USB-портам на передней и задней панели.
8. Подключение одного CCTV монитора (разъем
CVBS).
9. Подключение к HDTV. Соединение HDMI
поддерживает цифровое аудио и видео.
10. Подключение к VGA-монитору.
11. Подключение к громкоговорителям для
аудиовыхода
.
12. Подключение к сети.
13. Подключение к устройству RS-485, например,
к PTZ-камере или клавиатуре.
14. Подключение к БП 12 В пост. тока (закрыто).
15. Выключатель питания (вкл./выкл.).
16. Заземление.
Page 56

RU : 56 TruVision DVR 11 Краткое руководство по началу работы
Рис. 2: Элементы управления передней панели
1 USB-порт
2. Устройство записи CD/DVD-дисков.
3. Кнопка Eject (Извлечение): Нажмите для
извлечения CD/DVD-диска.
4. Кнопка Archive (Архивирование): Нажмите для
перехода в режим архивирования.
5. Кнопки Display (Отображение) и Seq (Посл.): В
режиме просмотра в реальном времени нажмите
Display (Отображение) для переключения
режимов одноэкранного и мультиэкранного
просмотра. Нажмите Seq (Посл.), чтобы
запустить/остановить последовательное
переключение в
режиме просмотра в реальном
времени.
В режиме меню нажмите Enter, чтобы открыть
окно меню, а затем Seq (Посл.) для переключения
между вкладками в верхней части окна меню.
6. Кнопки каналов. Переключение между
различными камерами в режиме просмотра в
реальном времени, а также в режимах
управления PTZ или воспроизведения.
7. Светодиодные индикаторы состояния.
8. Кнопка Alarm: Нажмите для подтверждения
сигнала тревоги вручную.
9. Клавиша Enter и клавиши со стрелками:
Используется для выбора параметров меню и
управления воспроизведением. Нажать для
перехода.
10. Инфракрасный приемник.
11. Кнопки воспроизведения: Нажимайте для
управления воспроизведением. Нажмите для
возврата к наиболее давней из видеозаписей и ее
воспроизведения. Чтобы приостановить
воспроизведение, нажмите . Нажмите
для
воспроизведения записи всего дня
12. Кнопки Live (Режим реального времени), Menu
(Меню) и Search (Поиск): Нажмите Live (Режим
реального времени) для переключения в режим
просмотра в реальном времени. Нажмите Menu
(Меню) для входа в основное меню. Нажмите
Search (Поиск) для входа в меню расширенного
поиска.
Рис. 3: Панель быстрого доступа
1. Стоп-кадр (Freeze): Останавливает
изображение на выбранной камере.
2. Немедленное воспроизведение (Instant
playback): Воспроизведение записанного за
последние пять минут видео.
3. Звук (Audio): Включение/отключение звукового
выхода.
4. Быстрый снимок (Quick snapshot): Захват
снимка видеоизображения.
5. Управление PTZ (PTZ control): Переход в режим
управления PTZ.
6. Цифровое масштабирование (Digital zoom):
Переход к цифровому масштабированию.
7. Настройки изображения (Image settings):
Изменение уровней освещенности
изображения.
8. Закрыть (Close): Закрытие панели
инструментов.
Page 57

TruVision DVR 11 Краткое руководство по началу работы 57 : RU
Краткое руководство по
началу работы
Комплектация
Видеорегистратор TruVision DVR 11
(модель TVR 11) поставляется в
следующей комплектации:
• Инфракрасный пульт ДУ
• Две батареи типа AAA для пульта ДУ
• Шнуры электропитания переменного
тока
• БП 12 В пост. тока
• USB-мышь
• DVR (Цифровой видеорегистратор)
• Кабель для подключения видео
• Диск с программным обеспечением и
руководствами
• Краткое руководство по началу
работы с TruVision DVR 11
• Руководство пользователя DVR 11 (на
компакт-диске)
Требования по установке
Подробные инструкции содержатся в
руководстве пользователя, но имейте в
виду следующие важные обстоятельства:
• Устанавливайте устройство в
безопасном месте.
• Устройство должно быть установлено в
зоне с хорошей вентиляцией.
• Необходимо защищать устройство от
дождя и сырости.
Краткое описание установки
Рекомендуемые действия по установке
цифрового видеорегистратора:
1. Подключите все необходимые
устройства к задней панели TVR 11. См.
рисунок 1 на стр. 55.
Основные подключения
Подключите камеры к BNC-входам
камер, а монитор А – к выходу BNC,
VGA или HDMI. Подключите мышь к
USB-порту на передней панели.
Дополнительные подключения
Все другие показанные подключения
являются необязательными и зависят от
требований
к установке.
2. Подсоедините источник питания к
устройству и включите питание.
3. Задайте необходимые настройки
устройства, используя мастер
настройки.
Первое использование
TVR 11 предоставляет мастер экспрессустановки, упрощающий настройку
основных параметров цифрового
видеорегистратора при первом
использовании. Он позволяет настроить
все камеры одновременно. При
необходимости конфигурацию можно
позднее изменить.
Мастер настройки запускается по
умолчанию сразу же после загрузки
цифрового видеорегистратора. Он
помогает задать основные настройки
цифрового видеорегистратора. Выберите
нужный язык системы и введите пароль
администратора. По умолчанию пароль
администратора задан как 1234.
Настоятельно рекомендуется сменить этот
пароль.
Затем мастер поможет настроить дату и
время, задать настройки сети, жесткого
диска и записи.
После внесения всех необходимых
изменений нажмите кнопку Finish (Готово),
чтобы закрыть мастер. Теперь TVR 11
готов к работе. Запись начинается
автоматически.
Page 58

RU : 58 TruVision DVR 11 Краткое руководство по началу работы
Управление TVR 11
Есть несколько способов управления
устройством:
• Передняя панель
• Инфракрасный пульт ДУ
• Мышь
• Веб-браузер
Передняя панель
Кнопки, находящиеся на передней панели,
позволяют работать с большинством
функций. Расположение элементов
управления см. на рис. 2 на стр. 56.
Инфракрасный пульт ДУ
Кнопки ИК-пульта дистанционного
управления аналогичны тем, что
расположены на передней панели. В
пульт
ДУ необходимо вставить две батареи
типа AAA.
Подключение пульта ДУ к цифровому
видеорегистратору:
1. Нажмите кнопку Menu (Меню) на
передней панели или щелкните правой
кнопкой мыши и выберите пункт Menu
(Меню). Появится экран основного
меню.
2. Нажмите Display mode settings
(Настройки режима отображения) >
Monitor (Монитор).
3. Просмотрите и запомните адрес
цифрового видеорегистратора.
Значение
по умолчанию — 255. Адрес
устройства действителен для всех ИКэлементов управления.
4. Нажмите кнопку Device (Устройство) на
пульте дистанционного управления.
5. Введите адрес устройства. Он должен
совпадать с адресом, указанным в
TVR 11.
6. Нажмите кнопку OK на пульте ДУ или
передней панели.
USB-мышь
Поставляемую вместе с TVR 11 USB-мышь
можно использовать для управления всеми
функциями
цифрового видеорегистратора,
в отличие от передней панели,
функциональность которой ограничена.
Мышь позволяет перемещаться и изменять
настройки в пользовательском интерфейсе.
Подсоедините мышь к видеорегистратору,
подключив USB-разъем мыши к USB-порту,
который расположен на передней панели.
Мышь готова к работе, на экране должен
появиться курсор.
Веб-браузер
Веб-браузер TVR 11 позволяет
просматривать, записывать и
воспроизводить видео, а также управлять
всей системой с любого ПК с доступом в
Интернет. Удобные элементы управления
браузера предоставляют быстрый доступ
ко всем функциям цифрового
видеорегистратора.
Чтобы получить доступ к устройству,
откройте веб-браузер и в качестве вебадреса введите IP-адрес, присвоенный
видеорегистратору. В окне входа в систему
введите имя пользователя
и пароль по
умолчанию.
• Имя пользователя: admin
• Пароль: 1234
Значения параметров сети для TVR 11 по
умолчанию:
• DHCP: По умолчанию включено.
• IP-адрес: 192.168.1.82
• Маска подсети: 255.255.255.0
• Адрес шлюза: 192.168.1.1
• Порт сервера: 8000
• Порт HTTP: 80
• Порт RTSP: 554
Page 59

TruVision DVR 11 Краткое руководство по началу работы 59 : RU
Примечание. Следует соблюдать
последовательность следующих портов
в маршрутизаторе, чтобы выполнить
подключение правильно. Порт сервера и
порт RTSP.
Рис. 4: Интерфейс веб-браузера
Режим просмотра в реальном
времени
Режим просмотра в реальном времени
является обычным рабочим режимом
устройства, в котором пользователь может
просматривать видео прямо с камеры.
Можно легко получить доступ к регулярно
используемым функциям в режиме
просмотра в реальном времени, нажав
левую кнопку мыши, когда курсор наведен
на изображение камеры. Откроется
всплывающая панель инструментов.
Описание доступных функций см
. на
рисунке 3 на стр. 56.
Настройка TVR 11
В основе структуры меню TVR 11
используются значки, с помощью которых
можно настроить параметры устройства.
Каждый значок команды выводит на экран
окно, которое позволяет изменять группу
настроек. Большая часть меню доступна
только системным администраторам.
Более подробная информация о настройке
устройства содержится в Руководстве
пользователя TVR 11.
Доступ к главному меню в режиме
просмотра в реальном
времени
Нажмите кнопку Menu (Меню) на пульте
ДУ или на передней панели.
- или -
Нажмите правую кнопку мыши и
выберите пункт Menu (Меню) из
всплывающего меню.
Появится экран основного меню. Наведите
указатель мыши на значок команд в панели
инструментов меню и нажмите, чтобы
выбрать.
Описание значков команд панели
инструментов меню:
Настройка параметров
дисплея.
Настройка параметров
камеры.
Настройка параметров записи.
Настройка стандартных
параметров сети.
Настройка параметров
тревоги.
Настройка параметров PTZ.
Настройка параметров
пользователя.
Page 60

RU : 60 TruVision DVR 11 Краткое руководство по началу работы
Настройка системных
параметров.
Справочная информация о
различных панелях
инструментов и меню
интерфейса.
Изменение настроек выхода
из системы, перезагрузки и
выключения.
Характеристики
Электропитание 12 В пост. тока
Потребление энергии (без жесткого диска
или DVD-R/W):
TVR 1104
TVR 1108
TVR 1116
≤ 10 Вт
≤ 15 Вт
≤ 20 Вт
Рабочая
температура
от -10 до +55 ºC
Относительная
влажность
от 10 до 90%
Размеры
(Ш х В х Г)
362 × 330 × 78 мм
Вес ≤ 3 кг (без жесткого
диска или DVD-R/W)
Контактная информация
Контактную информацию см. по адресу
www.interlogix.com или
www.utcfssecurityproducts.eu
Page 61

TruVision DVR 11 Hızlı Başlangıç Kılavuzu 61 : TR
TR
TruVisin DVR 11 Hızlı Başlangıç
Kılavuzu
Şekil 1: Arka panel bağlantıları
1. En fazla 16 analog kamera için loop through
özelliği (DVD modeline göre).
2. RS-232 cihazına bağlayın.
3. Dört alarm girişi kablosuna kadar röle çıkışına
bağlayın.
4. Bir alarm rölesi çıkışını bağlayın.
5. Dört ses girişini RCA konnektöre bağlayın.
6. BNC konnektörlerine (DVR modeline bağlıdır)
16’ya kadar analog kamera bağlayın.
7. Fare, CD/DVD yazıcı veya HDD gibi isteğe
bağlı bir USB cihazına bağlayın. DVR ön ve
arka USB portlarında hem USB DVD hem de
USB HD'yi destekler.
8. Bir CCTV monitör (CVBS konnektörü) bağlayın.
9. Bir HDTV’ye bağlayın. HDMI bağlantısı dijital ses
ve videoyu destekler.
10. Bir VGA monitöre bağlayı
n.
11. Ses çıkışı için hoparlörler bağlayın.
12. Bir ağa bağlayın.
13. PTZ kamera veya klavye gibi bir RS-485 cihazına
bağlayın.
14. 12 VDC PSU’ya (kapalı) bağlayın.
15. Güç anahtarı (açık/kapalı).
16. Toprak hattına bağlayın.
Page 62

TR : 62 TruVision DVR 11 Hızlı Başlangıç Kılavuzu
Şekil 2: Ön panel kontrolleri
1 USB bağlantı noktası
2. CD/DVD yakıcı
3. Çıkarma düğmesi: CD/DVD diski çıkartmak
için basın.
4. Arşiv düğmesi: Arşiv moduna girmek için
basın.
5. Ekran ve Seq düğmeleri: Canlı görüntüleme
modunda, tek ve çoklu izleme arasında geçiş
yapmak için Display (Ekran) tuşuna basın.
Canlı görüntüleme modunda sıralamayı
durdurmak/başlatmak için Seq tuşuna basın.
Bir menü penceresi seçmek için menü
modunda Enter tuşuna basın ve daha sonra
Seq tuşuna basarak menü penceresinin üst
kısmındaki sekmeler arasında geçiş yapın.
6. Kanal dü
ğmeleri Canlı, PTZ kontrolü veya
izleme modlarında farklı kameralar arasında
geçiş yapın.
7. Durum LED’leri.
8. Alarm düğmesi: Bir alarmı manuel olarak
onaylamak için basın.
9. Enter ve ok düğmeleri: Bir menüdeki
seçenekleri belirlemek ve izlemeyi kontrol etmek
için kullanın. Enter için basın.
10. IR alıcı.
11. Oynatma düğmeleri: İzlemeyi kontrol etmek için
basın. Mevcut olan en eski videoya gitmek ve
izleme işlemini başlatmak için tuşuna
basınız. İzlemeyi duraklatmak için öğesine
basın. Tüm gün oynatma için öğesine basın.
12. Canlı, Menü ve Arama düğmeleri: Canlı moda
dönmek için Live tuşuna basın. Ana menüye
girmek için Menu öğesine basın. Detaylı arama
menüye girmek için Search öğesine basın.
Şekil 3: Hızlı erişim araç çubuğu
1. Dondur: Seçilen kameranın canlı görüntüsünü
dondurur.
2. Anlık izleme: Kaydedilen videoyu son beş
dakikadan itibaren oynatır.
3. Ses: Ses çıkışını etkileştirin/devre dışı bırakın.
4. Hızlı sanpshot: Video görüntüsünün bir anlık
fotoğraf görüntüsünü çeker.
5. PTZ kontrolü: PTZ kontrol moduna girin.
6. Dijital zoom: Dijital zooma girin.
7. Görüntü ayarları: Görüntü aydınlatma
seviyelerini değiştirin.
8. Kapat: Araç çubuğunu kapatır.
Page 63

TruVision DVR 11 Hızlı Başlangıç Kılavuzu 63 : TR
Hızlı Başlangıç Kılavuzu
Paketin içindekiler
TruVision DVR 11 (model TVR 11) aşağıdaki
unsurlarla nakledilir:
• IR (kızıl ötesi) uzaktan kumanda
• Uzaktan kumanda için iki AAA pil
• AC güç kabloları
• 12 VDC çıkış
• USB fare
• DVR
• Video loop through kablosu
• Yazılım ve kılavuzlar içeren CD
• TruVision DVR 11 Hızlı Başlangıç Kılavuzu
• TruVision DVR 11 Kullanıcı Kılavuzu
Kurulum ortamı
Ayrıntılı bilgiler için kullanım kılavuzuna
başvurun, ancak bu önemli gereksinimleri
dikkate alın:
• Üniteyi güvenli bir konuma yerleştirin.
• Kameranın, iyi havalandırılan bir alanda
olduğundan emin olun.
• Üniteyi yağmura ya da neme maruz
bırakmayın.
Hızlı kurulum
DVR’ı kurmak için önerilen adımlar:
1. Gerekli olan tüm cihazları TVR 11 arka
paneline bağlayın. Bkz Şekil 1 sayfa 61.
Temel bağlantılar:
Kameraları BNC kamera girişlerine ve
monitör A’yı ise BNC, VGA veya HDMI
çıkışına bağlayın. Ön panelde bulunan
USB portuna fareyi bağlayın.
Opsiyonel bağlantılar:
Gösterilen tüm diğer bağlantıları
opsiyoneldir ve montaj gereksinimlerine
bağlıdır.
2. Üniteye güç kaynağını bağlayın ve gücü
açın.
3. Kurulum Sihirbazı’nı kullanarak ünitenin
gerekli ayarlarını yapılandırın.
İlk kez kullanım
TVR 11, ilk kullanıldığında temel DVR
ayarlarını kolaylıkla yapılandırabileceğiniz hızlı
bir kurulum sihirbazına sahiptir. Tüm
kameraları eşzamanlı olarak yapılandırır.
Konfigürasyon sonrasında gerektiği şekilde
özelleştirilebilir.
Varsayılan olarak, DVR yüklendiğinde kurulum
sihirbazı başlatılır. Sihirbaz DVR’nizin önemli
birkaç ayarında size rehberlik eder. Sistem
için tercih edilen dili seçin ve sonra yönetici
parolasını girin. Varsayılan şifre 1234’tür. Bu
şifrenin değiştirilmesi önemle tavsiye edilir.
Sihirbaz daha sonra, saat ve tarih, ağ
kurulumu, HDD yönetimi ve kayıt
yapılandırmasını ayarlamak için menülerde
size yol gösterecektir.
Gerekli tüm deği
şiklikler girildiğinde,
sihirbazdan çıkmak için Finish (Son) tuşuna
tıklatın TVR 11 artık kullanıma hazır. Kayıt
otomatik olarak başlar.
TVR 11’i çalıştırma
Üniteyi kontrol etmek için çeşitli yollar
mevcuttur:
• Ön panel
• IR uzaktan kumanda
• Fare
• Web tarayıcı
Ön panel
Ön paneldeki düğmeler çoğu fonksiyonu
kontrol eder. Kontrol yerleri için bkz. Şekil 2,
sayfa 62.
Page 64

TR : 64 TruVision DVR 11 Hızlı Başlangıç Kılavuzu
IR uzaktan kumanda
IR uzaktan kumanda düğmeleri ön
paneldekilere benzemektedir. Uzaktan
kumandaya için iki AAA pil takın.
Uzaktan kumandayı DVR’a bağlamak için:
1. Ön paneldeki Menu (Menü) düğmesine
basın veya fareyi sağ tıklayıp Menu (Menü)
düğmesini seçin. Ana menü ekranı
görünür.
2. Display mode settings > Monitor (Ekran
Modu Ayarları > Monitör) öğesine tıklayın.
3. DVR aygıt adresi değerini kontrol edin ve
unutmayın. Varsayılan değer 255’tür. Bu
cihaz adresi tüm IR kontrolleri için
geçerlidir.
4. Uzaktan kumanda üzerinde Device (Cihaz)
düğmesine basın.
5. Cihazın adres değerini girin.
TVR 11’dekiyle aynı olmalıdır.
6. Uzaktan kumandadaki veya ön panelinde
bulunan OK düğmesine basın.
USB fare
TVR 11 ile birlikte gelen USB fare, sınırlı
işlevselliğe sahip ön panelden farklı olarak
DVR’nin tüm işlevlerini için kullanılabilir. USB
fare kullanıcı arayüzünde gezinmenizi ve
ayarlarda değişiklikler yapmanızı sağlar.
Fareyi DVR’a bağlamak için farenin USB
konektörünü arka paneldeki USB portuna
takın. Fare hemen çalışır hale gelir ve işaretçi
görünür.
Web tarayıcı kontrolü
TVR 11, web tarayıcısı videoları
görüntülemenizi, kaydetmenizi ve izlemenizi
sağlamasının yanında, DVR ile ilgili her şeyi
Internet erişimi olan her bilgisayar üzerinden
yönetmenizi de sağlar. Tarayıcının kullanımı
kolay kontrolleri size tüm DVR fonksiyonları
için hızlı bir erişim sunar.
Üniteye erişmek için bir Web tarayıcı açın ve
DVR’a atanmış IP adresini bir Web adresi gibi
girin. Oturum açma ekranında varsayılan
kullanıcı adını ve parolayı girin.
• User ID(Kullanıcı Kimliği): admin
• Şifre: 1234
TVR 11 ağ ayarları için varsayılan değer:
• DHCP: Varsayılan etkindir.
• IP adresi - 192.168.1.82
• Alt ağ maskesi - 255.255.255.0
• Ağ geçidi adresi - 192.168.1.1
• Servis portu: 8000
• HTTP portu: 80
• RTSP portu (RTSP port) 554
Not: Aşağıdaki portların doğru bir şekilde
bağlamak için yönlendiricide takip edilmesi
gerekir: Sunucu portu ve RTSP portu.
Şekil 4: Web tarayıcı arayüzü
Canlı izleme modu
Canlı mod, ünitenin, kameralardan canlı
resimler izlediğiniz normal çalışma modudur.
Canlı görünümde düzenli kullanılan işlevler
imleci kamera görüntüsü üzerinde olduğunda
fare sol butonuna tıklayarak hızla
ulaşılabilirler. Kısayol açılır ekranı görünür.
Mevcut fonksiyonlarının açıklamaları için bkz.
Şekil 3, sayfa 62.
Page 65

TruVision DVR 11 Hızlı Başlangıç Kılavuzu 65 : TR
TVR 11’in yapılandırılması
TVR 11, ünitenin parametrelerini
ayarlamanıza izin veren simgelere dayalı bir
menü yapısına sahiptir. Her bir komut simgesi,
bir grup ayarını düzenlemenize izin veren bir
ekranı görüntüler. Çoğu menü yalnızca sistem
yöneticilerine açıktır.
Üniteyi yapılandırma hakkında detaylı bilgi için
TVR 11 Kullanım Kılavuzuna başvurun.
Canlı moddan ana menüye erişmek için:
Uzaktan kumanda veya ön paneldeki
Menu (Menü) düğmesine basın.
- Veya -
Fareye sağ tıklayın ve açılır menüden
Menu (Menü) öğesini seçin.
Ana menü ekranı görünür. Fareyi bir komut
simgesinin üzerine hareket ettirin ve seçmek
için tıklayın.
Menu (Menü) araç çubuğundaki kontrol
simgelerinin açıklaması:
Ekran ayarlarını yapılandırır.
Kamera ayarlarını yapılandırır.
Kayıt ayarlarını yapılandırır.
Standart ağ ayarlarını
yapılandırır.
Alarm ayarlarını yapılandırır.
PTZ ayarlarını yapılandırır.
Kullanıcı ayarlarını yapılandırır.
Sistem ayarlarını yapılandırır.
Arayüzdeki çeşitli araç çubukları
ve menüler için referans bilgileri
sağlar.
Oturumu kapatma, yeniden
başlatma ve kapatma
seçeneklerine erişim sağlar.
Teknik özellikler
Güç kaynağı 12 VDC
Güç tüketimi (HDD veya DVD-R/W olmadan):
TVR 1104
TVR 1108
TVR 1116
≤ 10 W
≤ 15 W
≤ 20 W
Çalışma sıcaklığı -10 ila +55 ºC
(14 ila 131 °F)
Bağıl nem 10 ila %90
Boyutlar
(G x Y x D)
362 × 330 × 78 mm
(14,25 × 13,0 × 3,07 in.)
A
ğırlık ≤ 3 kg (6,6 lb.) (HDD
veya DVD-R/W yok)
İletişim bilgileri
İletişim bilgileri için, www.interlogix.com veya
www.utcfssecurityproducts.eu adreslerine
bakınız
Page 66

TR : 66 TruVision DVR 11 Hızlı Başlangıç Kılavuzu
Page 67

Page 68

 Loading...