


NetworX
™
NX-8E
User Manual
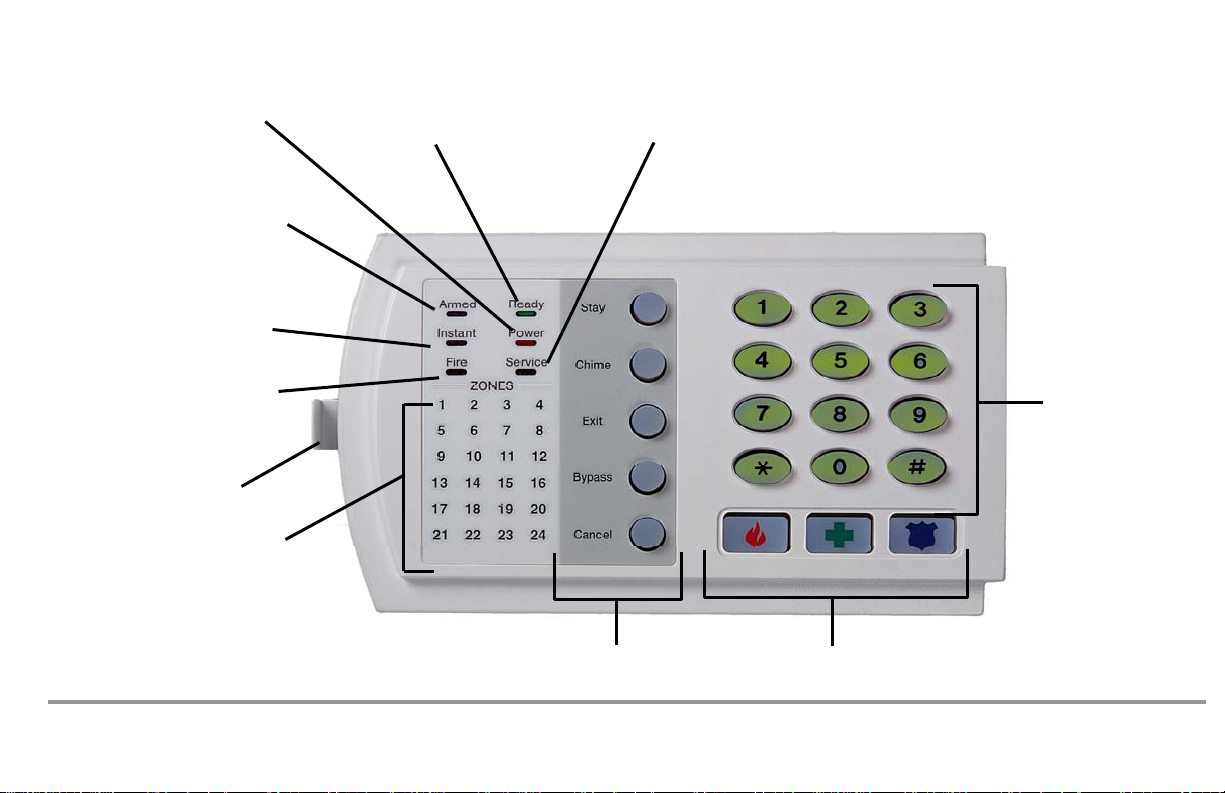
POWER Light is “on” when AC
E
power is present; flashes to
indicate a low battery condition.
ARMED Light is “on” when
armed; “off” when disarmed;
flashes to indicate a previous
alarm.
INSTANT Light is “on” when
there is no entry/exit delay.
READY Light is “on” when the
system is ready to arm; flashes
if ready to “force arm”.
SERVICE Light is “on” to indicate a
trouble condition with your system.
NX-8E SYSTEM
KEYPAD
Includes models
NX-108E, NX-116E, NX-124
FIRE Light is “on” to indicate fire
alarm; flashes to indicate a
trouble condition with your fire
system.
PULL OUT ZONE ID TAB
ZONE LIGHTS are “on” steady to
indicate bypass; slow flash for
zone fault; rapid flash for service
condition.
NOTE: Some of the features described above may or may not be available for your system. Check with your installation company
5 FUNCTION KEYS perform
various functions.
EMERGENCY ACTIVATION KEYS
to find out how your system is programmed.
NUMERIC CODE
ENTRY KEYS

SECURITY SYSTEM NOTES
Installing/Service Company _________________________________
For Service Call __________________________________________
Central Station ___________________________________________
Duress Code ____________________
FUNCTION CODES
Function Code Controls Function
EMERGENCY ACTIVATION KEYS (check if enabled)
Fire Auxiliary Emergency Police
Abort Delay ()
Auto Bypass ()
Auto Instant Chime
Battery Test Communicator Test Re Exit
Siren Test
() These features should not be enabled on UL listed systems.
Exit Delay Time __________ Secondary Exit Delay Time ________
Entry Delay Time _________ Secondary Entry Delay Time _______
This system is is not partitioned.
PROGRAMMED FUNCTIONS
Cancel Alarm
Change Partitions
ENTRY / EXIT DELAY TIMES
ZONE DESCRIPTIONS
01 _______________ 09 _______________ 17 _______________
02 _______________ 10 _______________ 18 _______________
03 _______________ 11 _______________ 19 _______________
04 _______________ 12 _______________ 20 _______________
05 _______________ 13 _______________ 21 _______________
06 _______________ 14 _______________ 22 _______________
07 _______________ 15 _______________ 23 _______________
08 _______________ 16 _______________ 24 _______________
Forced Arming ()
Group Bypass ()
Quick Arm ()
1

THIS MANUAL IS FURNISHED TO HELP YOU UNDERSTAND YOUR SECURITY
SYSTEM AND BECOME PROFICIENT IN ITS OPERATION. ALL USERS OF
YOUR SECURITY SYSTEM SHOULD READ AND FOLLOW THE INSTRUCTIONS
AND PRECAUTIONS IN THIS BOOKLET. FAILURE TO DO SO COULD RESULT
IN THE SECURITY SYSTEM NOT WORKING PROPERLY. THIS BOOKLET
SHOULD BE KEPT IN AN ACCESSIBLE LOCATION FOR THE LIFE OF THE
SECURITY SYSTEM. IF YOU DO NOT UNDERSTAND ANY PART OF THIS
MANUAL YOU SHOULD NOTIFY YOUR I NSTALLING COMPANY.
The SECURITY CONTROL can be turned on (ARMED) and off (DISARMED) by
entering a 4 or 6 digit code into the Keypad Control, which is similar to a telephone
keypad. If your Security Control has been so programmed, you may be able to turn on
(ARM) your System by simply pressing the [STAY] or [EXIT] key. The system must
always be disarmed using a 4 or 6 digit code. The LED keypad includes up to 35
lights and a built-in electronic sounder. These provide specific information relating to
the status of the security system which is described in the booklet. Understanding
what the lights and sounds mean will help you to easily operate your system.
READ THE ENTIRE MANUAL AND, IF POSSIBLE, PRACTICE ON THE KEYPAD
CONTROL WHILE YOUR PROFESSIONAL INSTALLER IS ON SITE.
KEEP IN MIND, THE LEVEL OF SECURITY YOU WILL OBTAIN WITH THIS
SYSTEM RELATES SPECIFICALLY WITH TWO MAJO R FACTORS:
1. The quantity, quality, and placement of security devices attached to this
system.
2. The knowledge you have of the security system and how that knowledge is
utilized in a weekly test of the complete system.
YOU SHOULD BE AWARE OF THE FOLLOWING FACTS WHEN PREPARING A
SAFETY/SECURITY PLAN FOR YOUR HOME/BUSINESS.
Your security system is an electronic device and is subject to failure or
malfunction. Do not rely on it as your single source of security.
Your system should be tested weekly.
Your system will not work without power.
Warning devices will need to be loud enough, wired correctly, and properly
placed to provide notification of an alarm event.
Smoke and heat detectors may not detect heat and smoke in all situations.
Use qualified security professionals to install and maintain your security system.
It may be possible to arm the security system without the backup battery
connected. Your periodic test should be done with A.C. Power removed to verify
the battery is connected and adequately charged.
Care should be taken to plug in and restrain the A.C. Transformer after testing.
PLEASE READ THE FOLLOWING INFORMATION AND INSTRUCTIONS
CAREFULLY BEFORE OPERATING YOUR SECURITY CONTROL SYSTEM. IF
YOU DO NOT UNDERSTAND ANY PORTION OF THIS MANUAL, OR IF YOU
HAVE ANY QUESTIONS ABOUT YOUR SYSTEM, CONTACT THE INSTALLING
COMPANY LISTED ON PAGE 1 OF THIS BOOKLET.
2

TABLE OF CONTENTS
GLOSSARY OF TERMS ..........................................................................4
UNDERSTANDING THE LIGHTS............................................................5
Armed Light ........................................................................................5
Bypass Light.......................................................................................5
Cancel Light........................................................................................5
Chime Light.........................................................................................5
Exit Light.............................................................................................5
Fire Light.............................................................................................5
Instant Light........................................................................................5
Power Light.........................................................................................5
Ready Light.........................................................................................6
Stay Light............................................................................................6
Zone Light...........................................................................................6
EMERGENCY ACTIVATION KEYS.........................................................6
KEYPAD FUNCTIONS.............................................................................7
Arming Your System In The “Away” Mode.........................................7
Arming Your System In The “Stay” Mode...........................................7
Using The Quick Arm .........................................................................8
Disarming The System.......................................................................8
Cancel / Abort Feature .......................................................................9
Bypassing Zones................................................................................9
Group Bypass.....................................................................................9
Unbypassing.......................................................................................9
Turning The Door Chime On And Off.................................................9
CHANGING USER CODES....................................................................10
ASSIGNING USER CODE AUTHORITY LEVELS ................................10
OTHER KEYPAD FUNCTIONS .............................................................12
Setting The Keypad Tone.................................................................12
Change Partition ..............................................................................12
View Alarm Memory .........................................................................12
Test Function....................................................................................12
Walk Test..........................................................................................12
Reset Function..................................................................................13
Set System Date...............................................................................13
Setting The System Clock................................................................13
KEYPAD CONTROL TONES (BEEPS).................................................15
SERVICE MENU.....................................................................................16
EMERGENCY EVACUATION PLANS...................................................17
3

GLOSSARY OF TERMS
Abort Delay: An option that allows a delay in reporting to the central station.
There is a communicator delay of 30 seconds. It can be removed, or increased
up to 45 seconds at the option of the end user by consulting with the installer.
Authority Level: The level of access an individual has when using an alarm
panel.
Central Station: Location where alarm data is sent during an alarm report.
Chime Feature: An option that allows the keypad to sound a ding-dong
whenever an entry/exit door is opened.
Codes: Can be either User Codes (relating to a person) or Function Codes (a
toggle switch to turn specific functions on/off). NOTE: A system may have either
99 four (4) digit codes or 66 six (6) digit codes, but not a mixture of the two.
Duress Code: An option that allows a special code to be sent to the central
station that indicates the alarm system is being operated under duress. Any
arming or disarming operation performed using the Duress PIN (in lieu of the
User PIN) will operate normally, without additional audible or visual indicators.
Forced Arming: An option that allows the system to be turned on (ARMED) with
one or more zones open. A system that is ready to be “force armed” will flash the
ready light. (Note: Those zones that are not ready will not create an alarm.)
Function Code: A Function Code is either a four (4) or six (6) digit code that has
been programmed by the installer to operate a device.
Group Bypass: An option that allows the user to bypass multiple zones with a
single operation.
Instant/Delay: An option that allows an instant alarm condition for Entry/Exit
doors, or grants a delay to allow someone to enter/exit the building without an
alarm, or before entering a user code to disarm.
Master Code: A master arm/disarm code that can program other user codes.
Partitioned System: A system divided into multiple areas in which its own user
or users control each area.
Perimeter: The outer edge of the protected area.
Quick Arm: An option that allows you to turn on (ARM) the security system by
pressing either the [STAY] or [EXIT] key on the keypad control (for ARMING
only) as programmed by the installing company.
User Code: A four (4) or six (6) digit entry used to arm or disarm the system.
4

UNDERSTANDING THE LIGHTS
Armed Light
The armed light is “on” when the system is armed. The armed light is “off”
when it is disarmed. The armed light will flash when there has been an alarm
during the previous arm cycle.
Bypass Light
The bypass light is “on” when any zone in this keypad’s partition is bypassed.
The zone(s) that is bypassed will also be illuminated. If the bypass light is “off”,
no zones are bypassed.
Cancel Light
The cancel light will flash during an abort delay time. If a code is entered
followed by the [CANCEL] key while this light is flashing, all abortable reports
will stop the communication process. Note: The abort feature must be
enabled. Entering a code followed by the [CANCEL] key during or after an
alarm report to the central station will cause the cancel light to come on. It will
stay on until the central station has received the cancel report. Note: The
cancel feature must be enabled. No additional keypad tones will be emitted.
Chime Light
The chime light is “on” when the chime feature is “on”; “off” otherwise.
Exit Light
The exit light is “on” during the exit delay. During the last 10 seconds of the
exit delay, the exit light will flash rapidly and the keypads will beep rapidly as a
warning to the user that the exit time is about to expire. (The user may want to
disarm the system if the exit light is flashing in order to prevent an alarm. The
user may then re-arm the system and exit before the delay expires.)
Fire Light
A steady fire light means a fire zone has been faulted. A rapidly flashing fire
light means that a fire zone is in a trouble condition.
Instant Light
The instant light is “on” when there is no delay on your entry/exit door(s). Any
time the instant light is “on” and the exit delay has expired, the opening
of an entry/exit door will produce an immediate alarm. The instant light can
be toggled on or off by pressing the [Stay] key while the system is armed.
When the instant light is “off”, the entry/exit door(s) is delayed.
Power Light
The power light is on if the primary power is on. The power light will flash if the
system has a low battery condition.
5
 Loading...