

Page 1

StudioZ Console
Quick-S tart Guide
October 1996
DSA077810
Page 2

Warranties and Liabilities
The information and the software discussed in this document are subject to change without notice and
should not be considered commitments by Intergraph Corporation. Intergraph Corporation assumes no
responsibility for any errors in this document.
The software discussed in this document is furnished under a license and may be used or copied only in
accordance with the terms of the license. No responsibility is assumed by Intergraph for the use or
reliability of software on equipment that is not supplied by Intergraph or its affiliated companies.
All warranties given by Intergraph Corporation about equipment or software are set forth in your purchase
contract, and nothing stated in, or implied by, this document or its contents shall be considered or deemed a
modification or amendment of such warranties.
Copyright
1996, Intergraph Corporation including this documentation, and any software and its file formats and
audio-visual displays described herein; all rights reserved; may only be used pursuant to the applicable
software license agreement; contains confidential and proprietary information of Intergraph and/or other
third parties which is protected by copyright, trade secret and trademark law and may not be provided or
otherwise made available without prior written authorization.
Restricted Rights Legend
Use, duplication, or disclosure by the United States Government is subject to restrictions as set forth in
subdivision (c)(1)(ii) of the rights in technical data and computer software clause at DFARS 252.227-7013.
Unpublished rights reserved under the copyright laws of the United States.
Intergraph Corporation
Huntsville AL 35894-0001
Trademarks
Intergraph
and the Intergraph logo are registered trademarks of Intergraph Corporation. TDZ and
StudioZ are trademarks of Intergraph Corporation.
Microsoft
, Windows, and the Microsoft logo are registered trademarks of Microsoft Corporation.
Windows NT is a trademark of Microsoft Corporation.
Other brands and product names are trademarks of their respective owners.
Page 3

Contents
Preface.......................................................................................................................................v
About This Document................................................................................................................v
Document Conventions.............................................................................................................vi
Finding Additional StudioZ Console Information.....................................................................vi
Finding Hardware Information..................................................................................................vi
Finding Operating System Information................................................................................... vii
Getting Documentation and Training...................................................................................... vii
Getting Telephone Support ..................................................................................................... vii
Using the Intergraph Bulletin Board Service ......................................................................... viii
Using the Intergraph FAXLink...............................................................................................viii
Finding Intergraph on the Internet.............................................................................................ix
1 Overview................................................................................................................................1
Video Input ................................................................................................................................2
Video Playback ..........................................................................................................................2
StudioZ Console Components....................................................................................................3
StudioZ Console Input and Output.............................................................................................3
Workflow...................................................................................................................................4
StudioZ Console File Types.......................................................................................................6
Using the StudioZ Console Utilities...........................................................................................7
Getting Help...............................................................................................................................8
Getting Started ...........................................................................................................................9
iii
2 Installing and Removing StudioZ Console........................................................................11
Installing StudioZ Console Software........................................................................................11
Removing StudioZ Console .....................................................................................................12
3 Using AVI Capture .............................................................................................................13
Before You Begin ....................................................................................................................13
Starting and Stopping AVI Capture .........................................................................................13
Naming the Capture File ..........................................................................................................14
Using a Capture List for Recording Audio/Video Sequences ..................................................16
Creating a Capture List..............................................................................................16
Removing Files from a Capture List..........................................................................17
Configuring Video Capture Settings ........................................................................................17
Configuring Audio Capture Settings........................................................................................18
Capturing an Audio/Video Sequence.......................................................................................20
Capturing Individual Video Frames.........................................................................................21
4 Using AVI Builder...............................................................................................................23
Before You Begin ....................................................................................................................23
Starting and Stopping AVI Builder..........................................................................................23
Configuring the Video Output Settings....................................................................................24
Page 4

iv
Loading a Raster Image Sequence........................................................................................... 26
Manipulating a Raster Image Sequence................................................................................... 27
Selecting Frames....................................................................................................... 27
Using Insert Mode and Overwrite Mode................................................................... 28
Inserting Frames........................................................................................................28
Deleting Frames........................................................................................................ 29
Saving an Edited Sequence to an AVI File.............................................................................. 29
5 Using SDI Control .............................................................................................................. 31
Before You Begin.................................................................................................................... 31
Starting and Stopping SDI Control.......................................................................................... 31
Adjusting the Brightness in a Video Sequence........................................................................ 32
Adjusting the Colors in a Video Sequence.............................................................................. 33
Setting Default Values............................................................................................................. 33
6 Using AVI Player................................................................................................................35
Before You Begin.................................................................................................................... 35
Starting and Stopping AVI Player........................................................................................... 35
Playing an AVI File.................................................................................................................36
Setting Playback Options.........................................................................................................37
Moving to a Point in an AVI File............................................................................................ 37
Playing Part of an AVI File.....................................................................................................37
Using a Playlist for Multiple AVI Files................................................................................... 38
Creating a Playlist ..................................................................................................... 38
Removing Files from a Playlist................................................................................. 38
Saving Video Frames as a Raster File Sequence..................................................................... 39
Recording an AVI File on Video Tape.................................................................................... 40
Glossary.................................................................................................................................. 41
Index....................................................................................................................................... 47
Page 5

Preface
v
The StudioZ Console Quick-Start Guide describes how to install and use the StudioZ
Console software product.
About This Document
The StudioZ Console Quick-Start Guide is organized as follows:
u
The Preface introduces you to the document, describes document conventions, and
provides information on related documentation, product support, and contacting
Intergraph.
u
Chapter 1, “Overview,” introduces you to the StudioZ Console and describes how to start
using it.
u
Chapter 2, “Installing and Removing StudioZ Console,” gives instructions for installing
and removing StudioZ Console on your system.
u
Chapter 3, “Using AVI Capture,” gives instructions for capturing video and audio signals.
This chapter explains how to start and stop AVI Capture, name the capture file, use a
capture list, configure the video and audio capture settings, and capture the audio/video
input.
u
Chapter 4, “Using AVI Builder,” gives instructions for building video (AVI) files. This
chapter explains how to start and stop AVI Builder, configure the video output settings,
load a raster image sequence, manipulate frames in the sequence, and save the edited
sequence to an AVI file.
u
Chapter 5, “Using SDI Control,” gives instructions for manipulating captured video
sequences.
u
Chapter 6, “Using AVI Player,” gives instructions for playing AVI files.
u
The Glossary defines terms used in this document.
u
The Index provides keys to information in this document.
The StudioZ Console Quick-Start Guide assumes you have a working knowledge of the
Windows NT 3.51 operating system, and are familiar with video production techniques.
Page 6

vi
Document Conventions
Bold Commands, words, or characters that you key in literally.
Italic Variable values that you supply, or cross-references.
Monospace Output displayed on the screen.
SMALL CAPS Key names on the keyboard, such as D, ALT or F3; names of files and
directories. You can type filenames and directory names in the dialog boxes
or the command line in lowercase unless directed otherwise.
CTRL+D Press a key while simultaneously pressing another key; for example, press
CTRL and D simultaneously.
ALT,SHIFT,F Press keys sequentially; for example, press ALT, then press SHIFT, then press
F.
Finding Additional StudioZ Console Information
Additional StudioZ Console information is available online through the following sources,
which are delivered when you install the StudioZ Console software:
u
The README.TXT file contains information about installation, documentation, training
courses, product fixes, new options and features for each utility, and known problems.
u
The StudioZ Console Help file (STUDIOZ.HLP) contains detailed information about the
StudioZ Console utilities.
Finding Hardware Information
For more information about StudioZ hardware and compatible audio and video input and
output devices, refer to the StudioZ Hardware User’s Guide or the StudioZ Producer
Hardware User’s Guide. For more information on the StudioZ workstation, refer to the
hardware documentation delivered with the workstation.
Finding Operating System Information
For more detailed information on the Windows NT Workstation operating system, refer to the
printed and online Windows NT documentation from Microsoft:
Page 7

u
For information on installing and updating Windows NT Workstation, refer to the
Installation Guide, delivered in the Windows NT Workstation software package.
u
For information on using Windows NT Workstation, refer to the online System Guide,
delivered on the Windows NT software CD-ROM, and to Windows NT Workstation
Help.
Getting Documentation and Training
You can purchase additional product documentation from Intergraph.
u
In the United States, contact your sales account representative, call the Intergraph Order
Desk at 1-800-543-1054, or send a fax to 1-800-548-3318 to place an order. If you call
or fax the Order Desk, have the document numbers ready for the items you wish to
purchase.
u
Outside the United States, contact the Intergraph subsidiary or distributor from which you
purchased your Intergraph product to place an order.
To find information on training for Intergraph products, or to enroll for an available class,
contact Intergraph Training Solutions at 1-800-240-3000.
vii
Getting Telephone Support
If you experience problems with your Intergraph product, or have questions about the
information in this document, you can contact Intergraph for help.
u
In the United States, call the Customer Response Center at 1-800-633-7248 between the
hours of 7:00 a.m. and 7:00 p.m. Central Time, Monday through Friday (except
holidays).
u
Outside the United States, contact the Intergraph subsidiary or distributor from which you
purchased your Intergraph product.
Have the following information readily available when you call:
u
The product’s serial number or your service/CPIN number.
u
The product’s name or model number.
u
Your name and telephone number.
u
A brief description of the question or problem.
Page 8

viii
Using the Intergraph Bulletin Board Service
Available 24 hours a day, 7 days a week, the Intergraph Bulletin Board Service (IBBS) is an
electronic forum for Intergraph customers to exchange information with Intergraph’s technical
and marketing staff, and with other Intergraph customers. You can use the IBBS to get
technical support information, documentation and training information, programs, and
software updates and fixes. The IBBS is also available for you to give suggestions, make
inquiries, and report problems.
To connect to the IBBS:
1. Set your system’s communications protocol for eight (8) data bits, no parity, one (1) stop
bit, and any baud rate up to 14,400.
2. Using a modem, dial the IBBS number, 1-205-730-8786. You can dial 1-205-730-6504 if
you are using a 2,400 baud connection.
Mirror sites are maintained for locations outside the United States. Information on these
sites is available on Intergraph Online, Intergraph’s World Wide Web server.
3. When connected, respond to the login request by keying in your user ID. If you have not
connected before, key in new to create a user ID.
4. Follow the menus to find what you need. If you are new to computer bulletin boards, the
IBBS provides clear choices and plenty of online help. A text file that explains IBBS
commands and organization is available for you to download.
If you have trouble connecting to or using the IBBS, log a support request through the
Customer Response Center (product entry IBBS), send a fax to 1-205-730-1110, or leave a
message for the System Operator (Sysop) at 1-205-730-1413.
Using the Intergraph FAXLink
You can use the Intergraph FAXLink to get technical support information by fax 24 hours a
day, 7 days a week. From a touch-tone phone or fax machine phone:
u
Call 1-800-240-4300 to get new user instructions, an index listing of available documents,
and an overview of the categories of available information.
u
Call 1-205-730-9000 to order the documents (up to 5 per call).
Follow the prompts provided to locate and deliver the information you need.
Page 9

Finding Intergraph on the Internet
You can find Intergraph on the Internet in the following ways:
u
If you have a World Wide Web browser, connect to Intergraph Online, Intergraph’s
World Wide Web server, at http://www.intergraph.com. From the home page, follow
the links to Customer Services for information on available customer services and support
options.
u
If you have a File Transfer Protocol (FTP) program, connect to Intergraph at
ftp.intergraph.com.
u
If you have a Gopher program, connect to Intergraph at gopher.intergraph.com.
u
You can get information from Intergraph’s email server at info@intergraph.com. Put
help in the body of the message (the subject line is ignored) to get information on such
subjects as Intergraph’s online services and where to get World Wide Web browsers.
u
You can participate in the Intergraph Customer Forum (ICF), a bidirectional gateway to
the USENET newsgroup comp.sys.intergraph. Anything posted to that group or sent to
comp-sys-intergraph@ingr.com is emailed to all subscribers. Incoming email messages
are also posted to the newsgroup. You can subscribe to the ICF via Intergraph Online.
ix
Page 10

x
Page 11

1 Overview
Intergraph’s StudioZ Console product is a professional-quality, all-digital, audio/video
capture, playback, and animation frame-to-movie build solution for the Microsoft Windows
NT operating system.
Video production professionals, computer graphics animators, and multimedia producers can
use StudioZ Console to capture and play back real-time video or animated computer graphics.
StudioZ Console also provides the capability to convert a sequence of individual frames into
an Audio/Video Interleaved (AVI) file, a Microsoft standard format for motion audio/video
files. StudioZ Console works with standard graphics creation, animation, non-linear editing,
computer-aided design, and visualization software. You can create images in a separate
graphical design application and then use StudioZ Console to place them in a presentation.
StudioZ Console greatly improves recording of audio and video over traditional techniques.
With previous single-frame video techniques, one minute of video could require several hours
of recording time. Using StudioZ Console, however, you can record video frames in realtime. Thus, one minute of video is recorded in one minute, resulting in shorter production
time.
1
StudioZ Console uses a non-linear editing environment, which reduces editing time and
increases productivity over traditional linear editing methods. Non-linear editing allows
quick, random access to any part of the video from a computer disk as well as instant rearrangement of video clips that follow a change. (With linear editing on video tape, the editor
has to re-edit all material that follows the change.)
The all-digital design of StudioZ Console prevents the generational loss of quality common to
hybrid and analog video editing solutions. The result is high-resolution, true-color video
images and high-quality audio captured in real-time. StudioZ Console outputs data in realtime, directly from the hard disk. You can record this output to video tape or view it on a
video monitor. You can also convert the output to any AVI format supported by Video for
Windows.
StudioZ Console software is delivered as part of Intergraph’s StudioZ workstation solution.
For detailed information on StudioZ hardware, refer to the StudioZ Hardware User’s Guide or
the StudioZ Producer Hardware User’s Guide.
Page 12

2
Video Input
StudioZ Console:
u
Captures audio/video in real-time directly to a system’s hard disk.
u
Captures and (if desired) compresses video in a single step, requiring no file conversion.
u
Provides a single solution for generating video that conforms to both NTSC (525 line, 60
Hz) and PAL (625 line, 50 Hz) video standards.
u
Captures full frame sizes at the following field rates, which results in professional-quality
input, smooth motion, and no loss of video information during data capture:
−
NTSC: 720 x 283 pixels at 59.94 fields per second (720 x 486 frames). (The frames
are 640 x 480 frames if your system has the StudioZ Producer board set.)
−
PAL: 720 x 288 pixels at 50 fields per second (720 x 576 frames). (The frames are
768 x 576 frames if your system has the StudioZ Producer board set.)
u
Captures true-color images (YUV 4:2:2) for optimal image quality.
u
Allows resampling while capturing images for users who want reduced resolution or
square pixel data.
u
Allows the adjustment of brightness, contrast, saturation, and hue of data while capturing
video.
u
Uses motion JPEG compression technology for high-quality image compression (if you
select image compression options).
u
Provides user-selectable JPEG compression ratios, which allow you to select between
increased online storage (high ratios) or optimal image quality (low ratios).
u
Offers the option of uncompressed image capture for the highest image quality.
u
Captures images to a standard Windows Audio/Video Interleaved (AVI) file, allowing
you to use standard Windows NT AVI editing tools.
u
Captures single frames to raster files (.TGA, .PIC, and .BMP files).
Video Playback
StudioZ Console:
u
Plays back video using full frame sizes and field rates. No video data is lost during
playback and motion remains smooth.
u
Plays back true-color output for optimal quality.
Page 13

u
Allows adjustment of brightness, contrast, hue, and saturation of video as it is played
back.
u
Can play a video loop for demonstrations and composition review.
u
Plays back under Windows NT applications that use Media Control Interface (MCI)
device drivers.
u
Offers accelerated playback over standard MCI playback.
u
Allows the creation of a playlist to seamlessly play a series of AVI files, one after the
other.
StudioZ Console Components
StudioZ Console includes the following software utilities:
u
AVI Capture, for capturing live video and audio into an AVI file or a series of raster files
from video sources.
u
AVI Builder, for converting sequences of files into one AVI file.
u
SDI Control, for manipulating the color, intensity, and brightness data being captured and
played back.
3
u
AVI Player, for playing back an AVI file or a series of AVI files on a StudioZ
workstation.
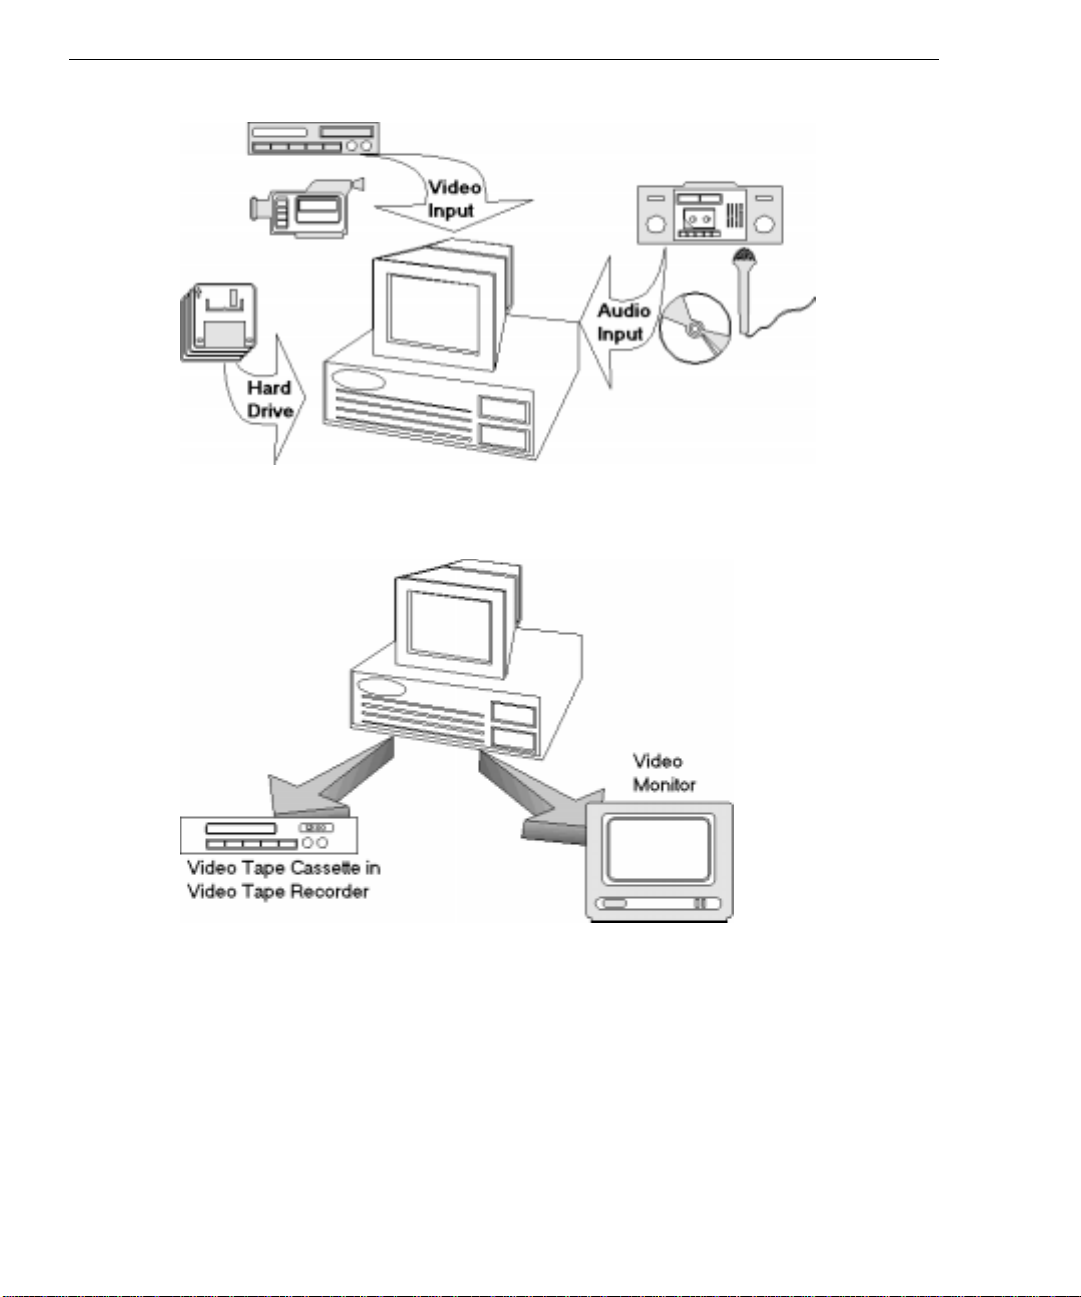
StudioZ Console Input and Output
StudioZ Console accepts input from a variety of sources, as shown in the following figure.
Page 14
4
StudioZ Console utilities send output to video tape or a video monitor, as shown in the
following figure.
Workflow
When using the StudioZ Console, a typical workflow consists of these steps:
1. Create a storyboard or outline for the intended video presentation.
2. Gather and organize source material, such as live video clips, graphic animation
sequences, single raster images, and audio tracks.
Page 15

−
Use AVI Capture to capture live video and audio.
−
Use SDI Console to adjust the color intensity and brightness of the sequence stored
in the AVI file during capture, if needed.
−
Use AVI Builder to convert a sequence of raster images into an AVI file.
−
Use the supplied audio (WAV) editing software to digitize additional audio tracks
from a CD, microphone, or other audio source (as needed).
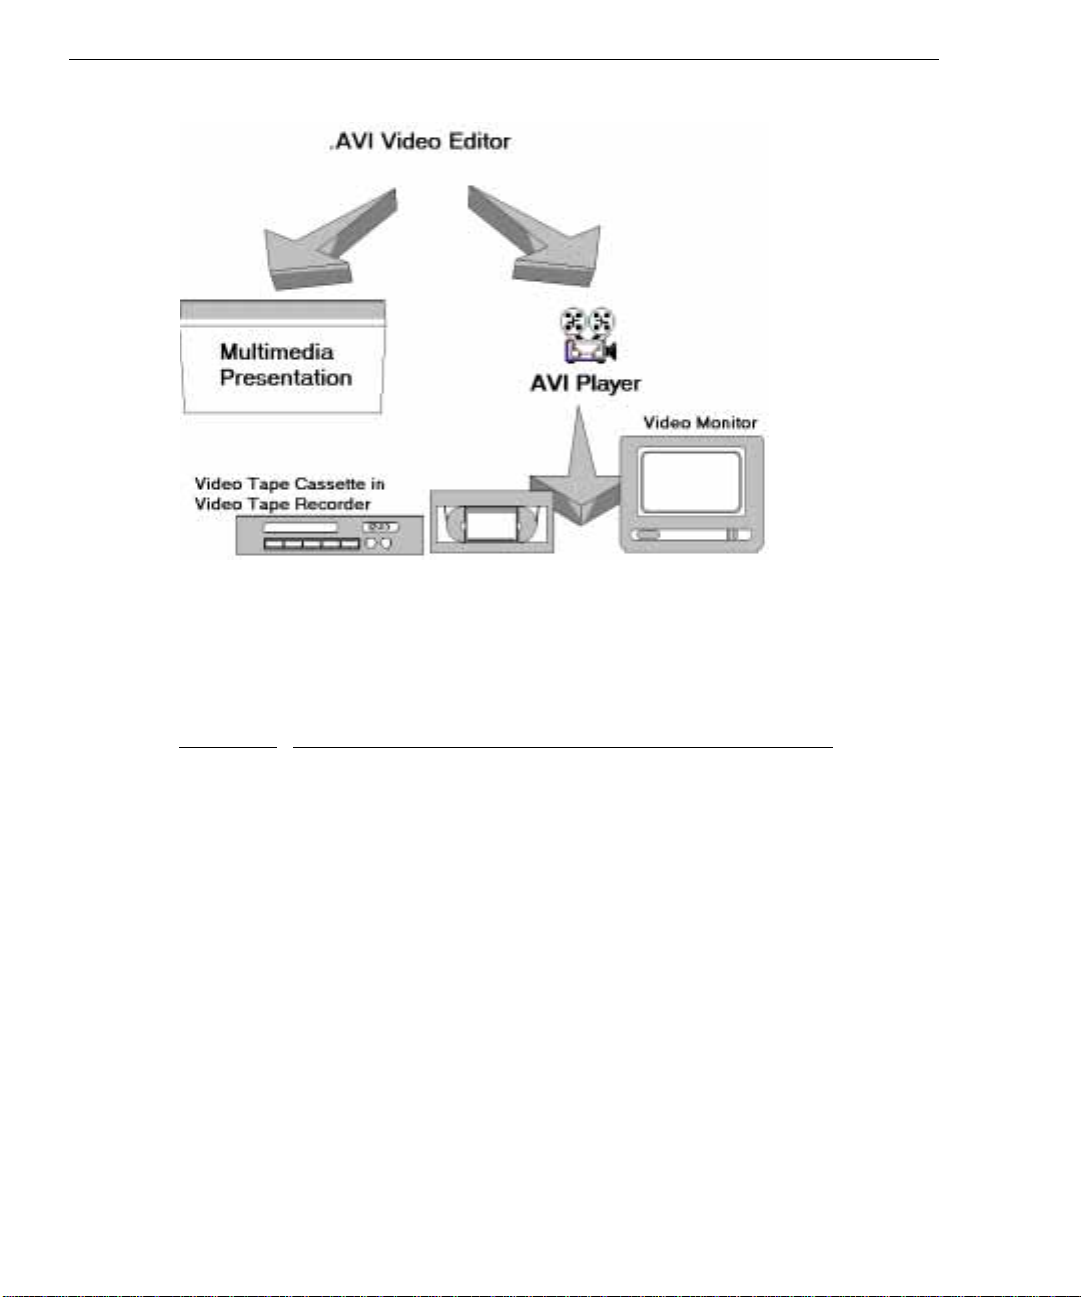
3. Edit the source materials into an AVI file. You can add titles and transitions (wipes,
fades, dissolves, and so on) with the supplied video editing software, or with another
compatible package.
5
4. Use AVI Player to play back the AVI file in real-time on a video monitor, or to record the
output directly to video tape. You can also use the finished AVI file to create a multimedia presentation, as shown in the following figure.
Page 16
6
StudioZ Console File Types
StudioZ Console supports the following media file types:
File Type
.AVI An interleaved file format for storing combined audio and video.
.
WAV A file format for storing sound. Audio is stored as a sequence of
Description of File Type
Video and audio are stored in alternating blocks in a video file.
instantaneous amplitude samples.
Page 17
StudioZ Console supports the following raster image files and raster animation sequences:
7
File Type
Description of File Type
.BMP The Microsoft Windows bitmap format.
.
PCX The PC Paintbrush format.
.
PIC SoftImage picture file format.
.
TGA The Truevision Targa 24-bit color format.
.
TIF The Tagged Image Format File (TIFF) format. This is a popular industry
standard file format.
.
GIF The file format for CompuServe.
.
RGB An extension for raster image files. The .RGB type is the ModelView
software’s default format for storing the red, green, blue (RGB) color data in a
single compressed raster file.
The individual StudioZ Console utilities support the following input and output file types:
Software
Input Output
AVI Capture real-time audio and video signals .AVI, .BMP, .PIC, .TGA
AVI Builder .RGB, .BMP, .TGA, .TIF, .PCX, .PIC .AVI
SDI Control .AVI (input video) .AVI (output video)
AVI Player .
AVI output video and audio
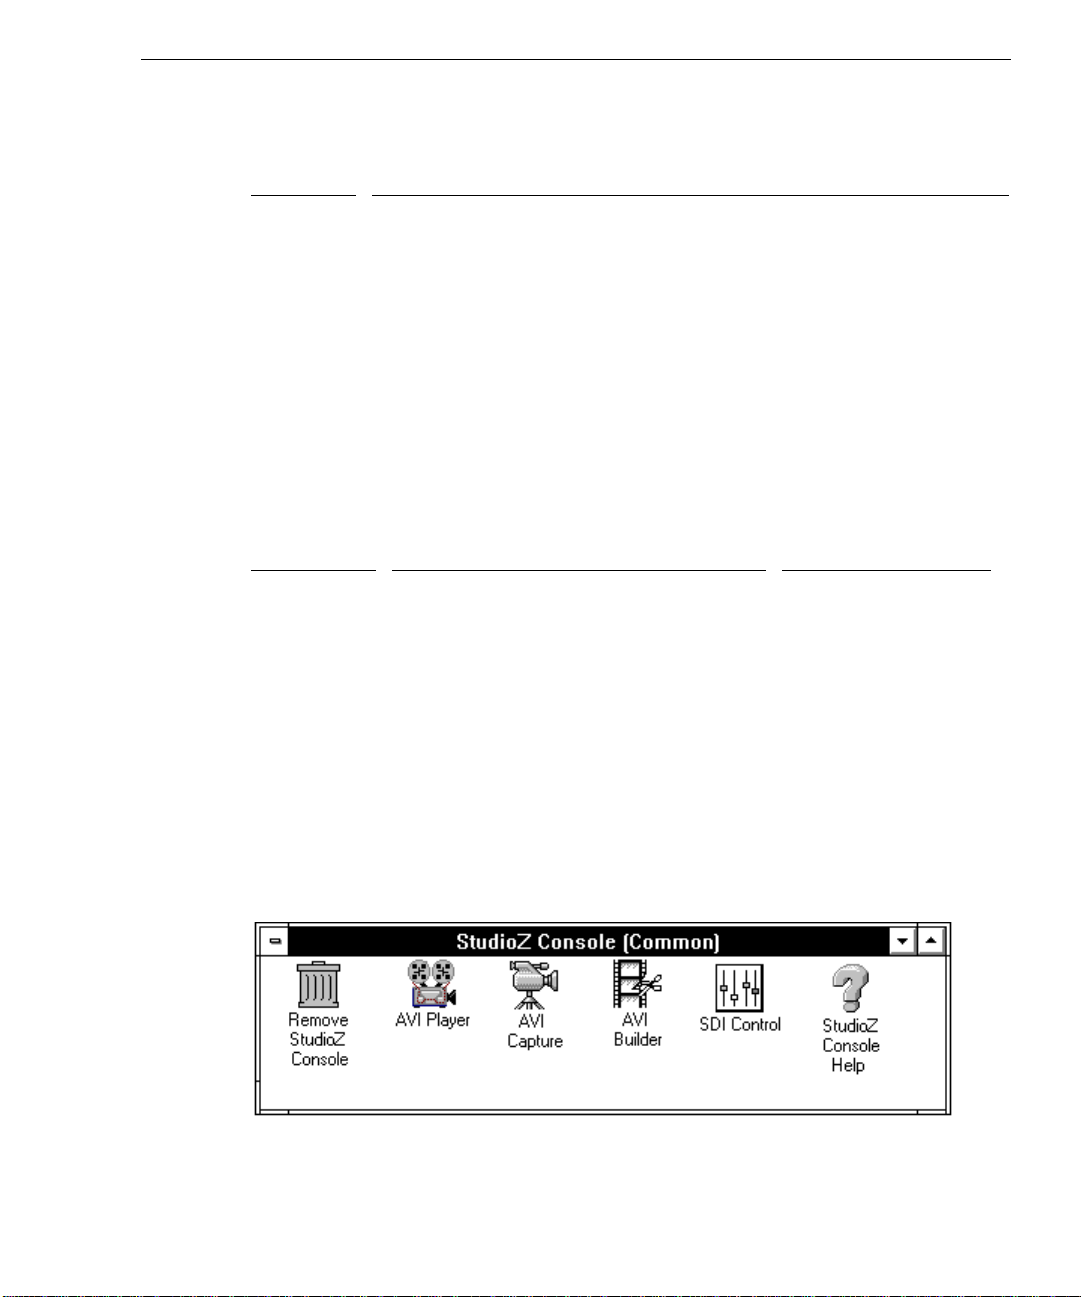
Using the StudioZ Console Utilities
During installation, the StudioZ Console installation software creates the StudioZ Console
program group. The program group contains StudioZ Console programs. Double-click on a
program’s icon to open it, or use the arrow keys to select a program’s icon, and then press
ENTER.
Page 18

8
You can use the programs in this group to remove the StudioZ Console software from the
system, play video and audio files, capture video and audio, edit video files, make color and
sound adjustments to video files, or display online Help.
Getting Help
Reference information for each StudioZ Console utility is available through online Help.
StudioZ Console Help contains information on screens, commands, dialog boxes, options, and
tools. To view StudioZ Console Help:
u
Select Index or Contents on the Help menu of the active StudioZ Console utility.
u
Double-click the StudioZ Console Help icon in the StudioZ Console program group.
u
Open the StudioZ Console Help file (STUDIOZ.HLP) in the Windows NT File Manager.
For other ways to use Help, select How to Use Help from the Help menu in Program Manager.
For additional information about StudioZ Console, see the online Readme file (
README.TXT).
The Readme file contains information about installation, documentation, training courses,
product fixes, new options and features for each utility, and known problems.
Page 19

Getting Started
Begin by following the instructions in Chapter 2, “Installing and Removing StudioZ Console,”
to install the StudioZ Console software on your system. Then refer to the rest of the document
as follows:
u
To remove StudioZ Console software, go to Chapter 2, “Installing and Removing StudioZ
Console.”
u
To record audio and video using AVI Capture, go to Chapter 3, “Using AVI Capture.”
u
To edit audio and video sequences using AVI Builder, go to Chapter 4, “Using AVI
Builder.”
u
To adjust the color levels, contrast, and brightness of video sequences using SDI Control,
go to Chapter 5, “Using SDI Control.”
u
To play audio and video sequences using AVI Player, go to Chapter 6, “Using AVI
Player.”
9
Page 20

10
Page 21

2 Installing and Removing
StudioZ Console
Your StudioZ system comes with the StudioZ Console already installed. This chapter
describes how to re-install StudioZ Console software on a system running the Windows NT
operating system. For example, if you need to rebuild a system or upgrade StudioZ Console
software, you must re-install StudioZ Console. This chapter also describes how to remove
StudioZ Console software from the system.
Installing StudioZ Console Software
Intergraph uses Windows NT Setup as the standard method for installing software products on
a system running the Windows NT operating system. Setup copies product files to the system,
and then creates or modifies your system configuration files.
11
To install StudioZ Console software:
1. Start your system with the Windows NT operating system.
2. Insert the StudioZ Console Disk 1 diskette into the floppy disk drive.
3. To start Setup, do one of the following:
−
In the Windows NT File Manger, select the directory window for the diskette in the
floppy disk drive; then double-click
−
In the Windows NT File Manager, select Run from the File menu; then key the
following into the Command Line box, where drive is the drive letter for the floppy
disk drive:
drive:\setup
4. Follow the instructions displayed as Setup installs the StudioZ Console software.
Remove and insert the remaining StudioZ Console diskettes when prompted by Setup.
5. During installation, note the following:
− When prompted for user information, key in your name and the product’s serial
number. Company name is optional.
CAUTION Setup verifies the serial number before installation continues. If the serial number is incorrect,
the product does not install. Keep a record of the product’s serial number in case you need to
re-install the product later.
SETUP.EXE.
Page 22

12
−
When prompted for a path to the destination directory for the product files, key in a
new path or leave the default path as displayed. By default, the product directory is
C:\PROGRAM FILES\STUDIOZ CONSOLE.
6. After Setup completes, select OK on the Setup Successful dialog.
Removing StudioZ Console
If you wish to remove StudioZ Console from your system for any reason, use the REMOVE.EXE
program to do so.
To remove StudioZ Console software:
1. Double-click on the Remove StudioZ Console icon in the StudioZ Console program
group of the Windows NT Program Manager.
Alternately, you may double-click REMOVE.EXE in the StudioZ Console product directory
in the Windows NT File Manager. By default, the product directory is
C:\PROGRAM FILES\STUDIOZ CONSOLE.
2. Select OK on the confirmation dialog to remove StudioZ Console software.
Page 23

3 Using AVI Capture
AVI Capture records audio and video data and saves it to an AVI file or to raster files (.TGA,
PIC, or .BMP files) on your system’s hard disk. You can then use the supplied audio/video
editing software (or a compatible software package) to create an audio-visual presentation.
This chapter explains how to start and stop AVI Capture, name the capture file, use a capture
list, configure video and audio capture settings, capture an audio/video sequence, and capture
individual video frames.
Before You Begin
Before using AVI Capture, you must set up audio and video input sources. Connect a video
camera, camcorder, video tape recorder, or other external source to the StudioZ workstation as
described in the StudioZ Hardware User’s Guide or the StudioZ Producer Hardware User’s
Guide. These documents also list the types of sources you can use for StudioZ hardware and
utilities.
13
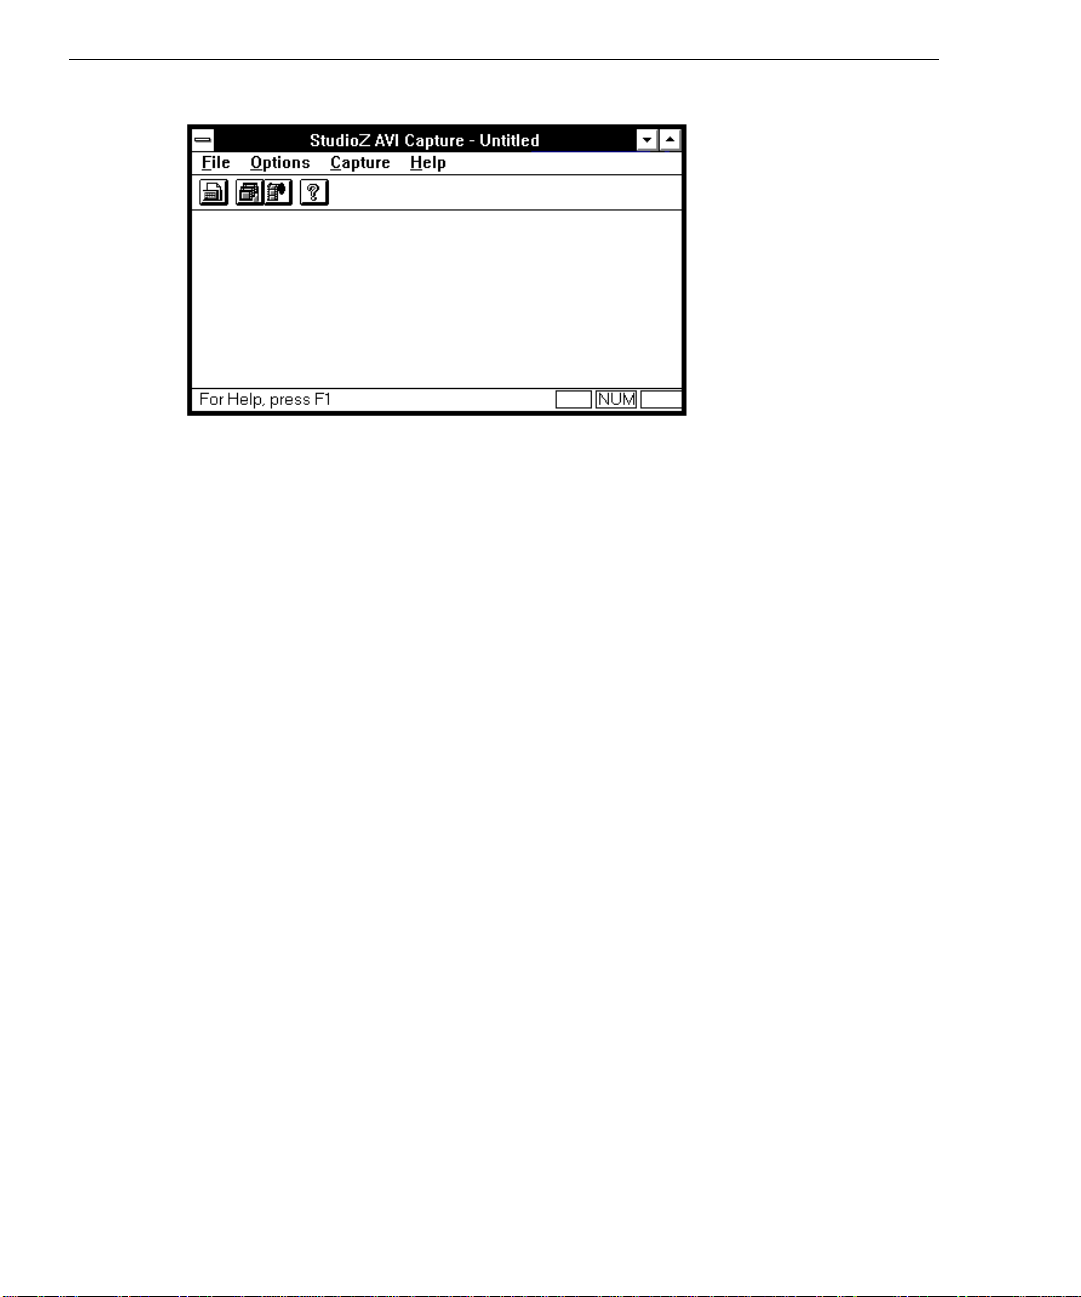
Starting and Stopping AVI Capture
To start AVI Capture, double-click the AVI Capture icon in the StudioZ Console program
group.
The AVI Capture window displays, as shown in the following figure.
Page 24
14
To stop AVI Capture, select Exit from the File menu.
Naming the Capture File
Before you begin to record an audio/video sequence or individual frames, you must create and
name a capture file. This file will receive and store the captured audio and video data. This
file can then be played back using AVI Player, or manipulated by audio and video editors.
To name the file to which audio and video will be captured:
1. Start AVI Capture.
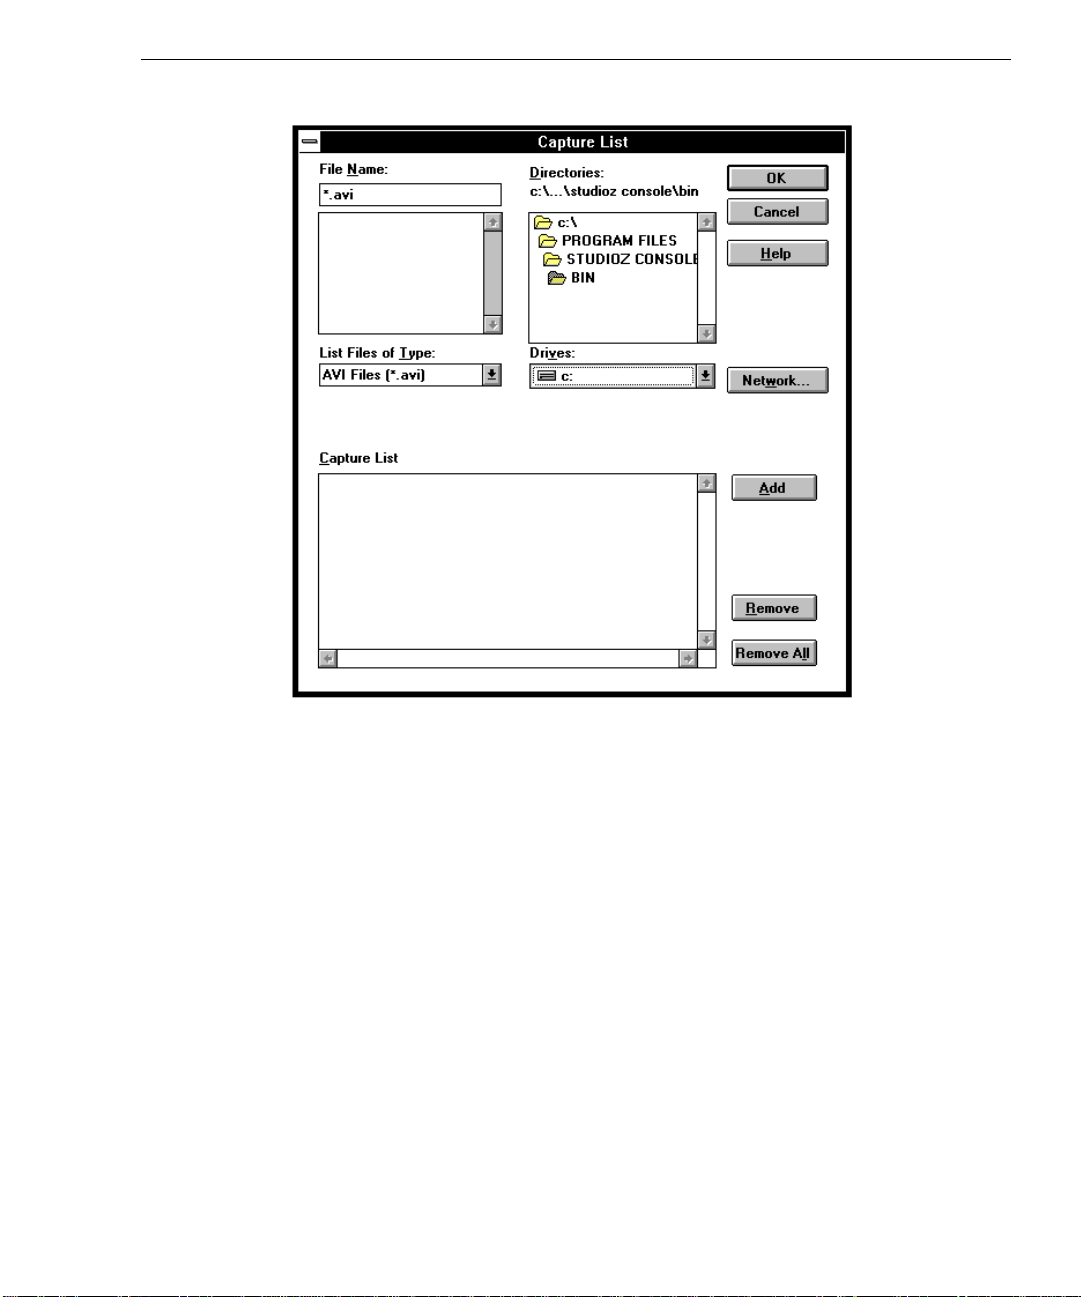
2. From the File menu, select Set Capture File. The Capture List dialog displays, as shown
in the following figure.
Page 25
15
3. Type the filename (up to 249 characters) in the File Name box.
4. Select the directory and drive where you want the capture file to be placed.
5. Select Add. The file is added to the Capture List in the lower portion of the dialog.
6. Select OK to close the Capture List dialog.
NOTE The actual filename of the capture file will be
filename (up to 249 characters) that you specified,
yyy
with 000, and
example, if you name the capture file
the file
DANCING000.AVI. If you save audio and video sequences to multiple AVI files, the
is the file type extention (.AVI for AVI files, or .BMP for bitmap files). For
DANCING.AVI, the captured audio and video are saved in
number portion of the filename increases by 1 as each file is recorded (
DANCING001.AVI, DANCING002.AVI, and so on). See “Using a Capture List for Recording
Audio/Video Sequences” for information.
NOTE The specified file type must match the type of file to be captured (a video sequence or
individual frames). For example, specify .AVI for real-time capture of video and audio
sequences, or .BMP for capture of an individual video frame to a bitmap file.
filenamennn.yyy
nnn
is a 3-digit sequential number starting
, where
filename
DANCING00.AVI,
is the capture
Page 26

16
Using a Capture List for Recording Audio/Video Sequences
You can create a capture list to allow seamless recording of long audio and video sequences.
Currently, the maximum size permitted for an AVI file is 2 gigabytes (GB). Instead of
manually recording the audio and video sequence in 2 GB segments, you can specify a capture
list to automatically record a series of files, each containing up to 2 GB of video data.
With a capture list, you also do not need to monitor disk space and manually switch disk
drives when a drive becomes full. You can use a capture list to automatically switch drives if
a drive becomes full during recording. For example, you have 3 GB left on drive D:\ and 4
GB on drive E:\. You can create a capture list to start recording video data to drive D:\ and
then continue recording on drive E:\ when drive D:\ becomes full.
Creating a Capture List
To create a capture list:
1. Start AVI Capture.
2. From the File menu, select Set Capture File. The Capture List dialog displays.
3. Specify the file name (up to 249 characters), directory name, and drive for the capture file
and select Add. The file is added to the Capture List in the lower portion of the dialog.
4. Repeat step 3 to add more capture files to the capture list.
NOTE You may use the same capture file name on different drives. For example, you may add
D:\TESTING.AVI and F:\TESTING.AVI to the capture list.
5. When you finish adding capture files to the Capture List, select OK to close the Capture
List dialog.
When you record audio and video sequences, the files in the capture list are recorded in the
order in which they appear in the capture list.
NOTE The actual filenames of the capture files will be
letter,
filename
3-digit sequential number starting with 000. For example, if you create a capture list of
C:\MOVIE.AVI and D:\MOVIE.AVI, the captured sequences is saved to the files C:\MOVIE000.AVI,
C:\MOVIE001.AVI, D:\MOVIE002.AVI (if the C:\ drive becomes full), and so on. Each of the AVI files
has a maxium size of 2 GB. You can then view a seamless playback of the recorded
sequence by creating a playlist of the
the correct order in the playlist, based on the 3-digit sequential number (000, 001, 002, and so
on).
is the capture filename (up to 249 characters) that you specified, and
MOVIE*.AVI files in AVI Player. Be sure to put the files in
drive:\filenamennn
.AVI, where
drive
is the drive
nnn
is a
Page 27

Removing Files from a Capture List
To remove a file from a capture list:
1. Start AVI Capture.
2. From the File menu, select Set Capture File. The Capture List dialog displays.
3. Select any AVI file from the Capture List dialog and select Remove. The file is removed
from the capture list in the lower portion of the dialog.
4. Repeat step 3 to remove more capture files from the capture list, if desired.
5. When you finish removing files from the capture list, select OK to close the Capture List
dialog.
To remove all of the capture files in the capture list:
1. Start AVI Capture.
2. From the File menu, select Set Capture File. The Capture List dialog displays.
3. Select Remove All. All of the capture files in the current capture list are removed.
4. Select OK to close the Capture List dialog.
17
Configuring Video Capture Settings
Before you can record video signals, you must configure certain video capture settings.
To configure video capture settings:
1. From the Options menu, select Video. The Video Configuration dialog displays.
2. Under Video Quality, type or select a video quality value to specify how much the image
will be compressed. The video quality value ranges from 0 to 100. A higher quality
value results in higher quality video that requires more disk space. A lower quality value
requires less disk space for the captured AVI file, but the output image quality is lower.
Page 28

18
3. Under Video Standard, select the NTSC video format or the PAL video format as
appropriate for the equipment connected to your StudioZ workstation.
NOTE You must use the same video format (NTSC or PAL) throughout an entire video project.
StudioZ Console does not act as a video standards converter.
4. Video data is normally captured at full frame sizes, which are 720 x 486 for NTSC (525
line, 60 Hz) and 720 x 576 for PAL (625 line, 50 Hz). Video data can be resampled on
capture to lower resolutions or square pixel sizes, if desired. Under Capture Frame
Dimensions, type or select the desired frame dimensions (height and width). The default
frame dimensions are set to the full frame size for the selected video standard.
NOTE If your system has the StudioZ Producer board set, the frames are 640 x 480 for NTSC and
768 x 576 for PAL, and subsampled capture is not available.
5. If capture without JPEG compression of the video is desired, select Uncompressed
Capture. Video data is then captured and written to the capture file without compression.
Uncompressed capture without dropping frames of video requires a very high
performance disk subsystem and high system throughput, available on StudioZ RAX
workstations.
6. Select Continue to accept the video capture settings, or Cancel to dismiss the Video
Configuration dialog without changing the video capture settings.
7. Select Set Frame Rate from the Options menu. The Set Frame Rate dialog displays, as
shown in the following figure.
8. Select either the NTSC frame rate (29.97 fps) or the PAL frame rate (25 fps) and select
OK.
Configuring Audio Capture Settings
Before you can record audio data, you must configure certain audio capture settings.
To configure audio capture settings:
1. From the Options menu, select Audio. The Audio Configuration dialog displays.
Page 29

NOTE The default audio settings are 44 kHz sampling rate, Stereo channel, 16-bit resolution, and 10
Rec Buffers. If you want to experiment with different settings for specific applications, you can
change them. Otherwise, accept the default values.
2. Select a Sampling Rate. The sampling rate defines the rate at which audio samples are
taken. Audio CD-ROMs use a sampling rate of 44.100 kHz. The sound quality from a
telephone line is roughly equivalent to 22.050 kHz. AM radio quality equals 11.025 kHz.
19
3. Under Channels, select Stereo or Mono. Stereo files use two tracks to store audio
information, doubling the amount of information per frame. Mono files use one track to
store information.
4. Under Resolution, select 16-bit or 8-bit resolution. Resolution defines the amount of
storage space required for each portion of the digitized audio file. 16-bit files have
greater dynamic range; 8-bit files use less memory to store information.
5. The Rec Buffers value designates how much memory to use during the capture session.
The recommended value is the default value of 10. Intergraph recommends that you do
not change this setting without consulting StudioZ technical support.
6. Under Level Test, select Average to see the level of input signal. The Level Test gauge
shows the sound level picked up by AVI Capture, much like an audio level meter on a
tape recorder. When you first open the Audio Configuration dialog, the gauge shows the
overall intensity of the input signal. When you select Average, the label on the button
changes to Live.
NOTE To see any indication on the Level Test gauge, you must have a live audio source feeding the
audio input. You must also set the input sound levels appropriately. You can use the
Windows NT Volume Control to adjust the level of the input signal that AVI Capture records.
Use the Level Test gauge to monitor the adjustments you make on the Volume Control.
Page 30

20
The Level Test gauge is a bar graph that shows the relative sound level of the input signal. As
you adjust to the input signal with the Volume Control, the input signal intensity on the Level
Test gauge should begin to register. Avoid adjusting the input signal intensity so that it
remains in the upper third of the gauge, as this will distort the recorded audio data. For best
results, adjust the input volume to peak at the mid-range of the gauge.
7. Select OK to accept the audio settings, or select Cancel to dismiss the dialog without
changing the configuration settings.
Capturing an Audio/Video Sequence
Once you have configured the audio and video capture settings, you are ready to record the
signal and save it to an audio/video capture file.
To capture the audio/video sequence:
1. From the Capture menu, select Video Sequence. The Capture Video Sequence dialog
displays, as shown in the following figure.
2. Under Timed Capture, select Enable Timer if you wish to record a pre-determined length
of video. The timer automatically starts when the capture session begins. Then type or
select a value in the Seconds field to set the time limit for the capture session. The
capture session will end once the time you specify elapses.
3. Select Capture Audio to capture audio while you are capturing video. This will
synchronize the audio and video data. If this check box is not selected, only video data is
captured.
4. The Data Buffers value determines how much memory to use during the capture session.
The recommended value is 10. A higher value increases the quality, but also increases
the amount of memory used during the capture session. A smaller value decreases the
amount of memory used, but can cause frames to be dropped during the capture.
Page 31

Intergraph recommends that you do not change the Data Buffers setting without
consulting StudioZ technical support.
5. Start the audio/video signal from the signal source (video tape recorder, camcorder, or
other appropriate source).
6. Select Capture on the Capture Video Sequence dialog to start capturing your video and
audio.
7. The Capture in Progress dialog appears. The system writes both the audio and video to
an AVI file. If you enabled the capture timer, the session automatically stops after the
specified amount of time elapses.
NOTE Even if you have enabled the timer, you can manually stop the capture by selecting Interrupt
on the Capture in Progress dialog.
When the capture is complete, the Capture in Progress dialog disappears.
Capturing Individual Video Frames
Instead of capturing an audio/video sequence, you may choose to capture several individual
video frames and store them in an AVI file or raster file (.
TGA, .PIC, or .BMP).
21
To capture individual video frames:
1. Make sure the capture filename, video settings, and audio settings are specified.
2. From the Capture menu, select Frames. The Capture Frame dialog displays.
3. Start the audio/video signal from the signal source (video tape recorder, camcorder, or
other appropriate device).
4. When the desired frame displays on the video monitor, select Capture to record the frame.
You may continue to capture single frames by selecting Capture for each frame you want
to capture. The number of frames you capture appears in the Frames Captured field. The
audio and video data for each frame you capture is stored in the capture file you named
previously. (See “Naming the Capture File” in this chapter.)
Page 32

22
NOTE When you save individual frames to raster files, the files are named
XXX
is the three-character name based on the name of the capture file,
YYY
sequential number, and
is the file type extension (such as .BMP for bitmap files, .PIC for
SoftImage files, and so on). For example, if the capture file is named
three frames of the video to a series of three bitmap files, the files are named
FLI00001.BMP, and FLI00002.BMP.
XXXnnnnn.YYY
nnnnn
FLIGHT.AVI and you save
, where
is a 5-digit
FLI00000.BMP,
5. Select Cancel to close the Capture Frame dialog.
NOTE You must capture at least 40 frames into an AVI file that you want to play back using AVI
Player (see Chapter 6, “Using AVI Player”). If the AVI file contains fewer than 40 frames, you
must use another utility, such as Windows NT Media Player, to play back the AVI file.
Page 33

4 Using AVI Builder
AVI Builder allows you to efficiently convert a series of frames, stored as individual raster
files, into a single AVI file. This chapter explains how to start and stop AVI Builder,
configure the video output settings, load and manipulate a raster image sequence, and save the
edited video to an AVI file.
Before You Begin
Before using AVI Builder, you must create and save a series of raster image files using
another application (typically an animation program). The series of raster files is the normal
output of many animation software packages. See Chapter 1, “Overview,” for a list of the
raster image file types accepted by AVI Builder.
Starting and Stopping AVI Builder
23
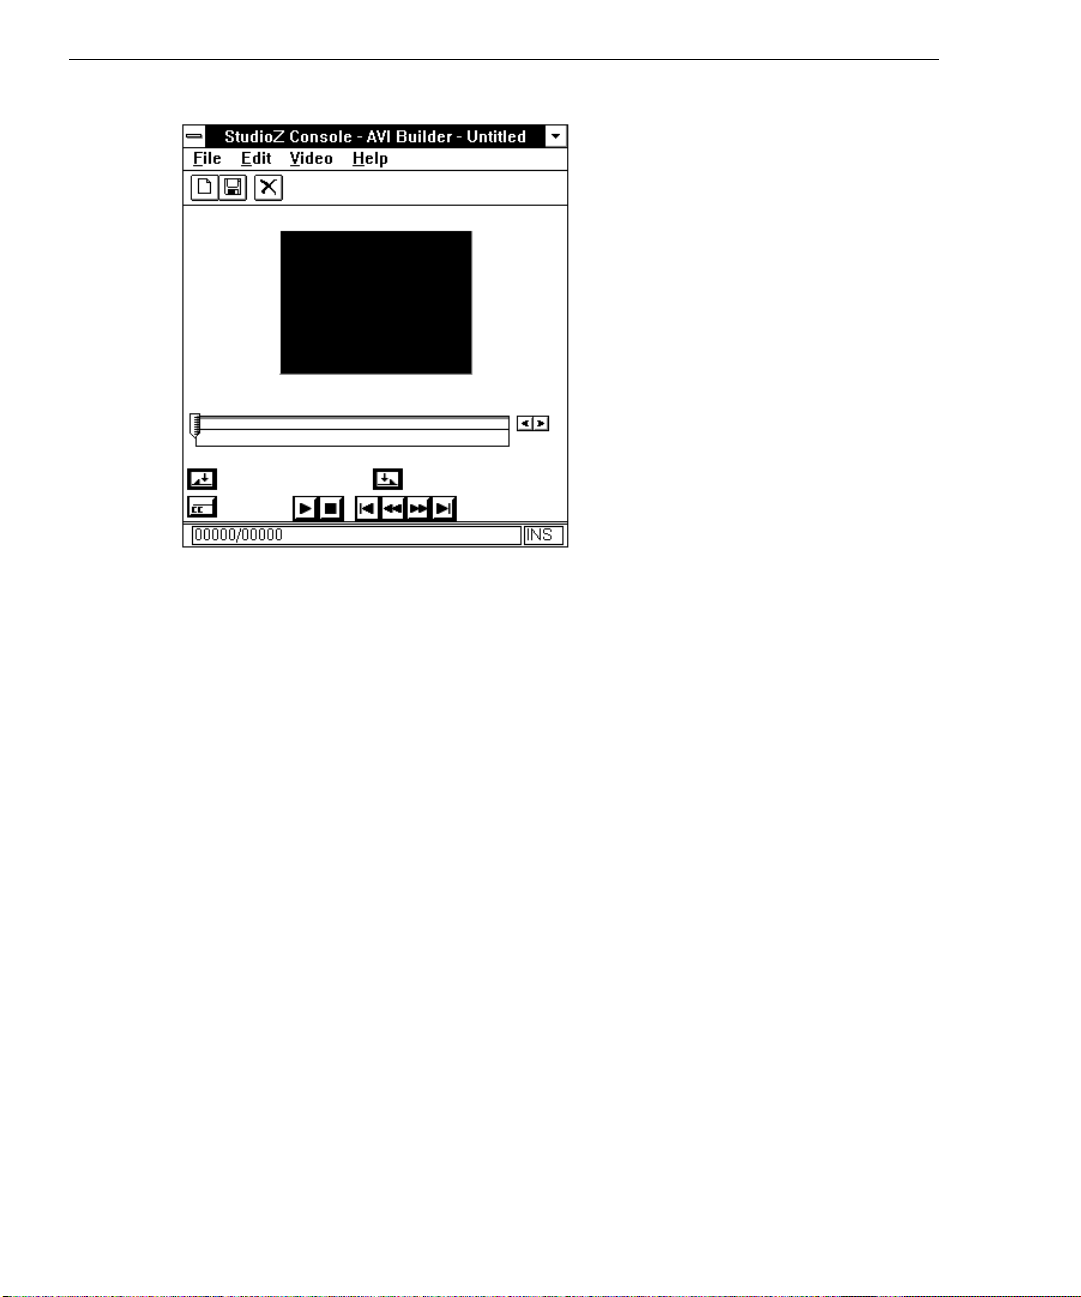
To start AVI Builder, double-click the AVI Builder icon in the StudioZ Console program
group.
The AVI Builder window displays, as shown in the following figure.
Page 34
24
To stop AVI Builder, select Exit from the File menu.
Configuring the Video Output Settings
Intergraph recommends that you configure the video output settings before you import a raster
image sequence into AVI Builder. Configuring the video output settings first can make the
editing easier, particularly if the image sequence has color problems, such as not enough
contrast. In such a case, the image sequence may be so dark that you must adjust the
brightness to see picture details.
NOTE You may change the video settings configuration at any time during editing; however, some
changes to settings, such as the Gamma Correction coefficient, may not be apparent until you
save the raster image series as an AVI file and play it back.
To configure the video output settings:
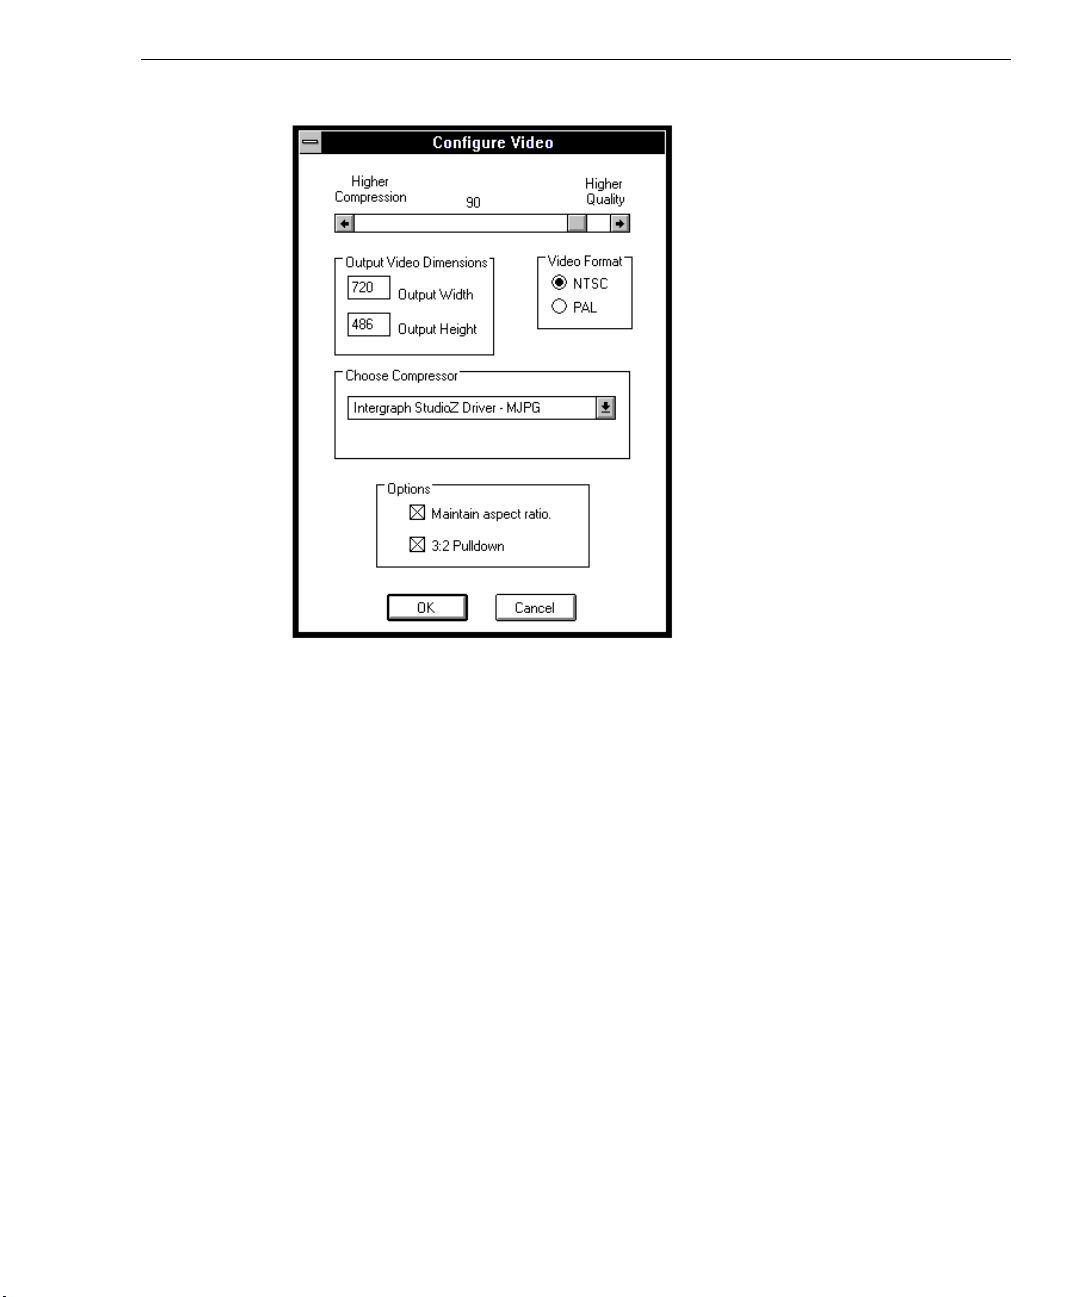
1. From the Video menu, select Configure. The Configure Video dialog displays, as shown
in the following figure.
Page 35
25
2. Under Choose Compressor, select the appropriate compression driver from the list.
Selecting the Intergraph StudioZ Driver (IYUV) creates an uncompressed YUV video
sequence; the AVI file will be built without any compression applied. Selecting the
Intergraph StudioZ Driver (MJPG) creates a JPEG compressed video sequence.
NOTE If the AVI file is meant for multimedia software playback, a driver can be selected from those
available on the system instead of specifying one on the Configure Video dialog.
NOTE You must select one of the Intergraph StudioZ drivers if you want to play the AVI file using AVI
Player. If you select any other driver, you must use other AVI file playback software.
3. Drag the slider in the top portion of the dialog to specify the compression and quality of
the image. The number shown above the slider is the quality factor. The higher the
quality factor, the less an image is compressed. Low image compression means that less
video data is lost, and results in higher quality video that requires more disk space.
The lower the quality factor, the more an image is compressed. More image compression
means that more video data is lost, and results in lower quality video that requires less
disk space.
4. Under Output Video Dimensions, either accept the default Output Width and Output
Height values, or type or select other dimensions. If the NTSC video format standard
(with frame speed of 29.97 fps) is selected, the output width defaults to 720 lines and the
output height defaults to 486 lines. If the PAL video format standard (with frame speed
of 25 fps) is selected, the output width defaults to 720 lines, and the output height defaults
to 576 lines.
Page 36
26
NOTE If your system has the StudioZ Producer board set, the frames are 640 x 480 for NTSC and
768 x 576 for PAL.
5. Under Video Format, select NTSC or PAL to apply a video format standard.
6. Under Options, select Maintain aspect ratio to ensure that the frames will remain
consistent with their original size ratio. Not selecting this option causes frames to be
stretched or shrunk until they completely fill the video frame. This may distort the
original pixel aspect ratios of the image.
NOTE When you select the Maintain aspect ratio option, the image may not completely fill in the
preview window. Some of the background may be visible around the edges of the image.
You can match the background color to the color of your image by selecting Background Color
on the Video menu. For more details, see the online help.
7. Select 3:2 Pulldown (if desired) to play 24 fps video sequences at NTSC speed (29.97
fps).
8. Select OK to save the video output settings.
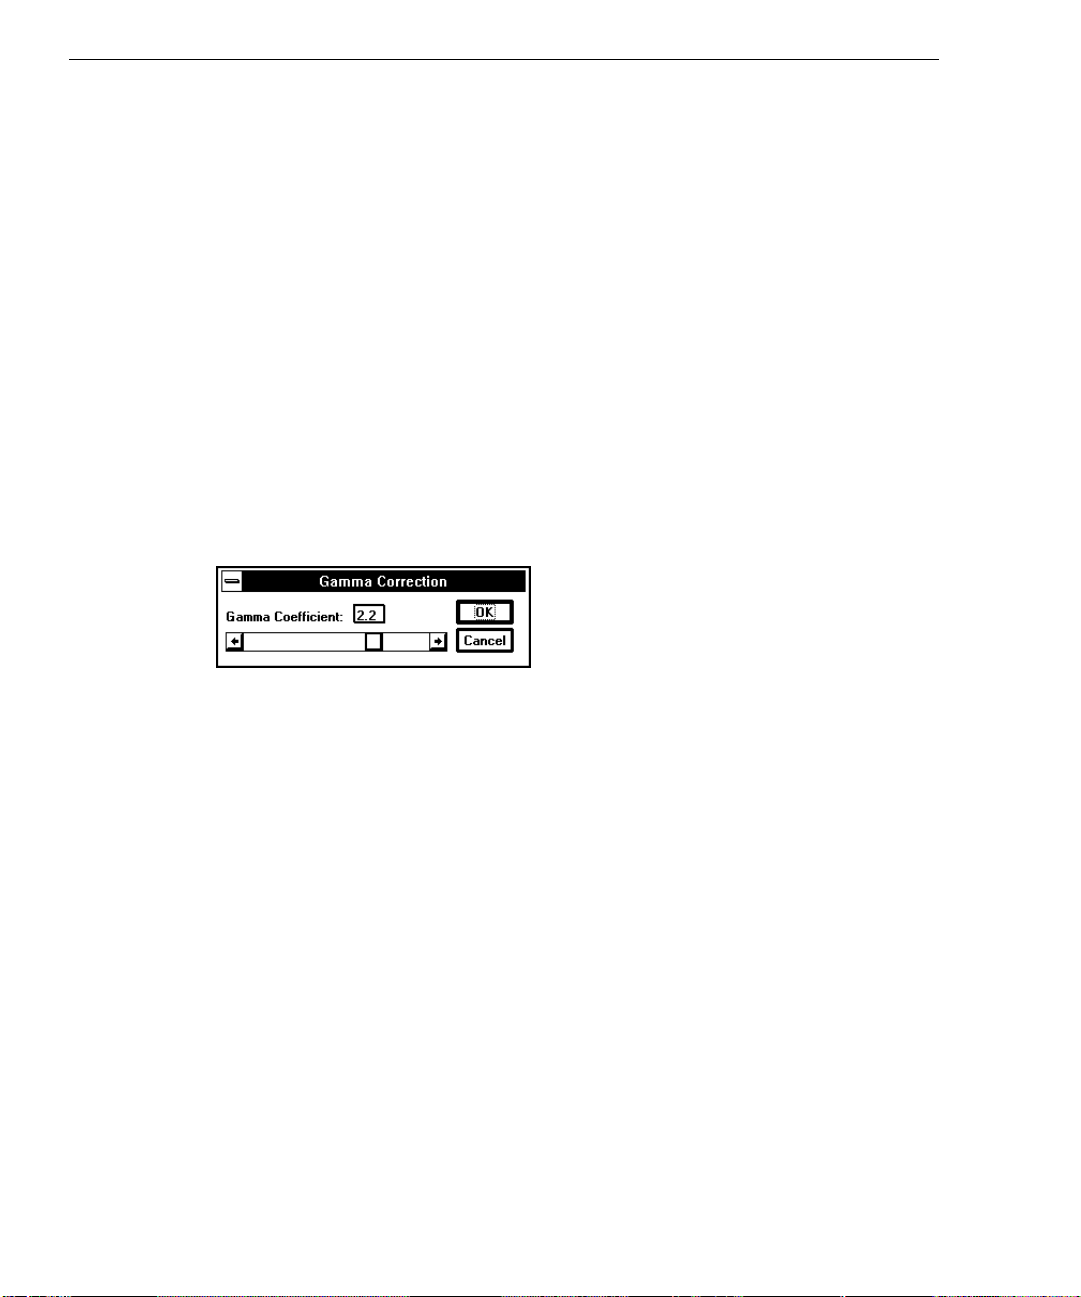
9. From the Video menu, select Gamma Correction. The Gamma Correction dialog
displays.
10. Type a value in the Gamma Coefficient field to adjust the perceived intensity to a range
that is suitable for your monitor. The greater the gamma coefficient value, the brighter
the picture.
11. Select OK to save the settings.
The settings you saved are reflected in the preview window, which is the large colored box in
the AVI Builder window.
NOTE Some changes to settings, such as the Gamma Correction coefficient, may not be apparent
until you save the AVI file and play it back.
Loading a Raster Image Sequence
To load a raster image sequence:
1. Start AVI Builder.
2. In the Windows NT File Manager, select the names of one or more raster image files.
3. Drag the files to AVI Builder and drop them into the preview window, which is the large
colored box in the AVI Builder window. The first image in the sequence appears in the
Page 37
preview window. Loading the entire raster image sequence may take a while, depending
on the length of the sequence.
NOTE For faster loading of raster files, select Disable Thumbnail on the Configure menu. The
frames will be imported faster, but the images will not appear in the preview window.
Manipulating a Raster Image Sequence
AVI Builder allows you to make changes to raster image sequences once they have been
imported. You may manipulate a single frame or a series of frames.
Selecting Frames
You can select frames in the raster sequence to perform editing operations. You can use the
slider, Mark In button, and Mark Out button in the AVI Builder window, or use the Mark In
and Mark Out commands from the Edit menu.
To select frames with the Mark In and Mark Out buttons:
27
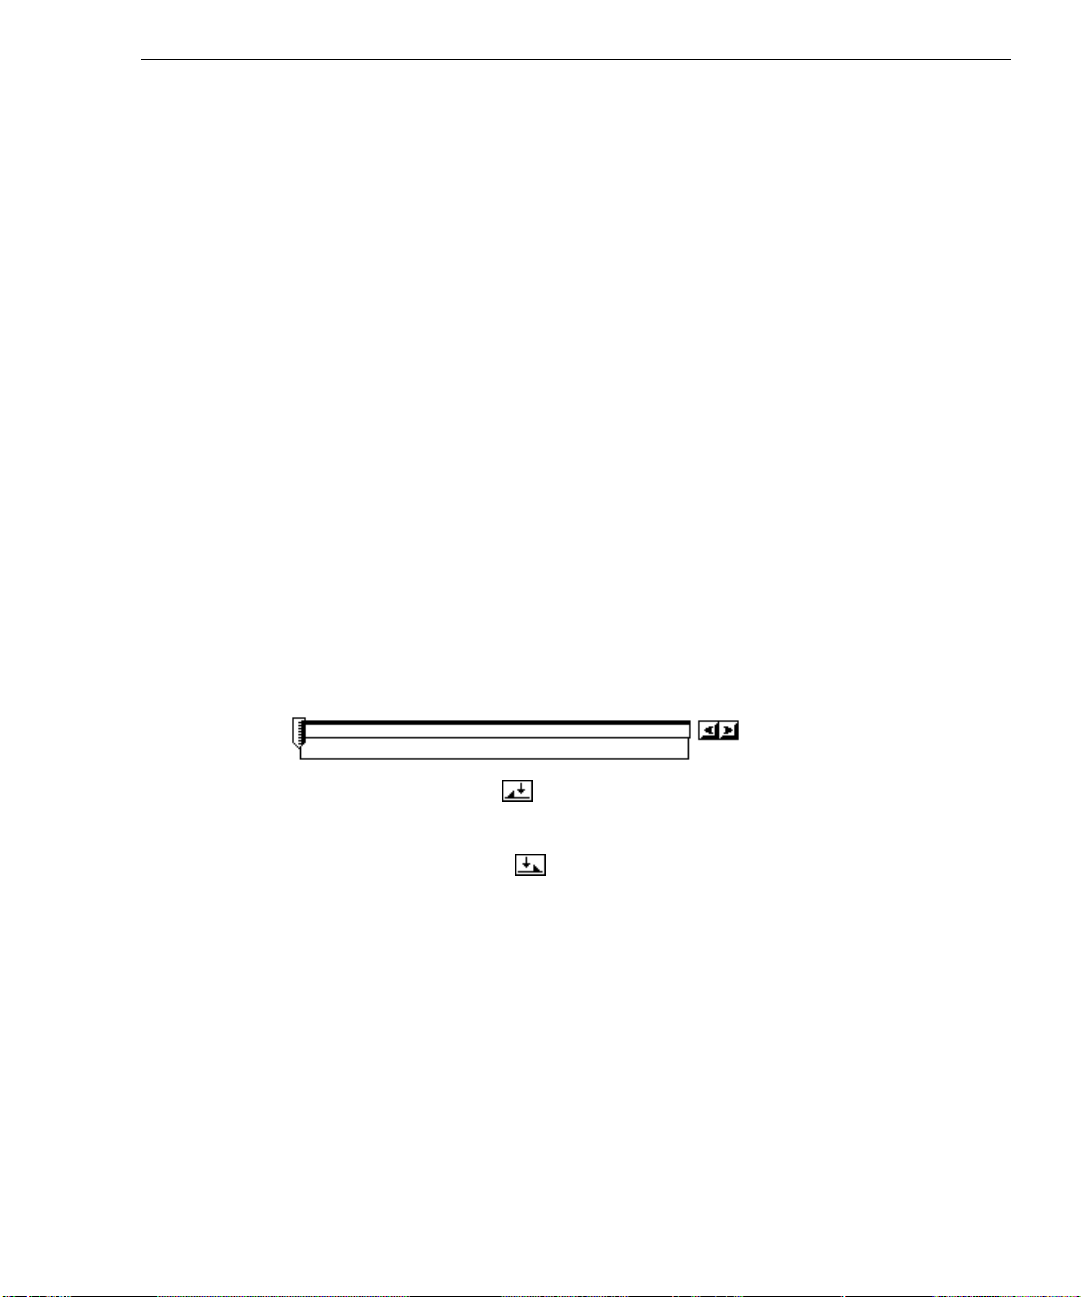
1. Drag the slider under the preview window to the beginning of your selection in the loaded
raster image sequence. The following figure shows the slider. You can also use the
buttons to the right of the slider to move the slider to the beginning of your selection.
2. Select the Mark In button.
3. Drag the slider to the end of your selection in the loaded raster image sequence.
4. Select the Mark Out button.
To select frames with the Mark In and Mark Out commands:
1. Drag the slider to the beginning of your selection in the loaded raster image sequence.
2. From the Edit menu, select Mark to mark the beginning of your selection. This places
both the Mark In and Mark Out marks.
3. Drag the slider to the end of your selection in the loaded raster image sequence.
4. From the Edit menu, select Mark Out to mark the end of your selection.
NOTE If you do not select a beginning point before selecting the Mark Out command, AVI Builder
assumes it to be the first frame in the loaded raster image sequence.
Page 38

28
Using Insert Mode and Overwrite Mode
AVI Builder provides two modes for editing raster image sequences:
u
Insert mode adds frames by placing new frames before the currently-selected frame.
When deleting frames, insert mode deletes the selected frames and repositions the
remaining frames to form a shorter, continuous sequence.
u
Overwrite mode adds frames by replacing the selected original with the new frames.
When deleting frames, overwrite mode deletes the frames and does not reposition the
remaining frames. The resulting sequence is the same length as the original, with blank
(black) frames appearing where frames were deleted.
To toggle between insert mode and overwrite mode, press
right-hand corner of the AVI Builder window shows the current mode (OVR for overwrite
mode, or INS for insert mode).
Inserting Frames
The results of the frame insertion vary depending on the mode that is selected.
In insert mode, if no frames are selected, the new frames are inserted just before the current
frame. If frames are selected, the new frames are inserted at the Mark In selection point. (See
“Selecting Frames” for more information about the Mark In selection point.)
In overwrite mode, if no frames are selected, the new frames are placed at the current frame
position, overwriting the current frame only. If frames are selected, the new frames overwrite
the selected frames.
To insert frames into a raster image sequence:
1. From the Edit menu, select Always on Top to keep the AVI Builder window on top of all
other open application windows on the video display.
2. In the Windows NT File Manager, select one or more raster image files containing the
frames you want to insert into the loaded raster image sequence.
3. Drag the files to the AVI Builder window and drop them in the preview window.
INSERT. The status bar in the lower
Deleting Frames
The results of the frame deletion vary depending on the mode that is selected. In insert mode,
the selected frames are deleted, and the time of the raster image sequence is shortened. In
overwrite mode, only the data in the selected frames is deleted (leaving a blank frame). The
total time of the raster image sequence stays the same.
Page 39

To delete frames from a raster image sequence:
1. Select the frames in the loaded raster image sequence that you want to delete. (See
“Selecting Frames” for instructions.)
NOTE If you do not select frames first, only the current frame is deleted.
2. From the Edit menu, select Delete, or press DELETE.
Saving an Edited Sequence to an AVI File
To save an edited sequence to an AVI file:
1. From the File menu, select Save As.
2. Type the name of the file in the Save As dialog and select OK.
29
Page 40

30
Page 41

5 Using SDI Control
SDI Control allows you to adjust the color levels, contrast, and brightness of the video data as
it is captured or played back on the StudioZ workstation. SDI Control adjusts the video data
that is being captured or played back using AVI Capture, AVI Player, or other capture and
playback utilities.
NOTE If your system has the StudioZ Producer board set, you cannot use SDI Control. This utility is
not compatible with the StudioZ Producer board set.
NOTE Adjustments made to video being captured to an AVI file are retained by the video data stored
in the file. Changes made to video being played back affect only the video output and do not
change the data in the AVI file. If you want to save the adjustments you make with SDI
Control during playback with AVI Player, you must record the audio/video output to video tape.
Before You Begin
31
Before you can use SDI Control, start AVI Player, AVI Capture, or other video capture and
playback utilities. SDI Control allows you to make adjustments to the video quality while you
are using these video capture and playback utilities.
Starting and Stopping SDI Control
To start SDI Control, double-click the SDI Control icon in the StudioZ Console program
group in the Windows NT Program Manager.
The SDI Video Control window displays, as shown in the following figure.
Page 42

32
To exit SDI Control, select OK or Cancel, or select Close from the system menu. Selecting
OK saves any changes you make to the settings and lets the settings take effect on the video
data. Selecting Cancel or selecting Close from the system menu does not save any changes
you make to the settings and does not have any effect on the video data.
Adjusting the Brightness in a Video Sequence
The sliders under Luminance in the SDI Video Control window control the luminance or
brightness of the video. The Gain slider controls the overall brightness level of objects in the
video. The Setup slider controls the black levels or overall brightness of the entire video
picture. For example, your video shows planets in deep space orbiting a sun. Moving the
Gain slider adjusts how bright the sun, nearby stars, and the planets appear against the black
background. Moving the Setup slider adjusts the overall picture brightness--in other words,
whether the deep space background appears to be black or a washed-out gray.
To adjust brightness in a video sequence:
1. Under Mode, select the appropriate mode to adjust the video input or video output.
Select Capture if you want to adjust the input video, or select Playback if you want to
adjust the output video.
2. Under Range Limits, select Compress ranges to CCIR 601 if you want to limit the values
for the luminance. If you select this checkbox, the luminance values are limited from 32
through 438 only.
Page 43

3. Under Luminance, drag the Gain slider to adjust the desired brightness of objects in the
video. For example, use the Gain slider to change very bright objects (such as stars in a
starfield) to be barely visible against a dark background.
4. Under Luminance, drag the Setup slider to adjust the desired brightness of the entire
picture in the video. Using this slider is much like turning a knob to adjust the brightness
of your monitor screen.
Adjusting the Colors in a Video Sequence
The sliders under Chrominance in the SDI Video Control window control the chrominance or
colors of the video. The Gain slider controls the color shade of objects in the video. The
Phase slider controls the primary color of objects in the video. For example, your video of
planets orbiting the sun shows three red planets. Moving the Gain slider adjusts how red the
planets are--light red, dark red, rosy red, blood red, and so on. Moving the Setup slider
changes the color shades of the planets from red to orange, yellow, green, blue, or purple--the
colors contained in the visible spectrum.
To adjust the colors in a video sequence:
33
1. Under Mode, select the appropriate mode to adjust the video input or video output.
Select Capture if you want to adjust the input video, or select Playback if you want to
adjust the output video.
2. Under Range Limits, select Compress ranges to CCIR 601 if you want to limit the values
for the chrominance. If you select this checkbox, the chrominance values are limited from
32 through 438 only.
3. Under Chrominance, drag the Gain slider to adjust the desired color shade of the objects
in the video. For example, use the Gain slider to change a dark green object to be olive
green, neon green, forest green, or pale green.
4. Under Chrominance, drag the Phase slider to adjust the desired primary color of objects
in the video. For example, use the Phase slider to change a blue object to be purple, red,
yellow, pink, or orange.
Setting Default Values
You can set default values for luminance and chrominance. Once you set defaults, you can
quickly return the luminance and chrominance to their original values after making changes to
them.
Page 44

34
To set default values for luminance and chrominance:
1. Under Luminance, drag the sliders for Gain and Setup to the desired brightness levels for
the video.
2. Under Chrominance, drag the sliders for Gain and Phase to the desired color intensity
levels for the video.
3. Select Set Defaults.
The default values are now set. If you make changes to the color and brightness of the video
and later want to return to the default values you just set, select Defaults.
Page 45

6 Using AVI Player
AVI Player allows you to view an AVI file. The video output displays on an external video
monitor, not the computer display monitor. The audio/video output may also be recorded to a
video tape.
Before You Begin
Before using AVI Player, you must connect an external video monitor to the workstation. For
more details about this installation, see the StudioZ Hardware User’s Guide or the StudioZ
Producer Hardware User’s Guide.
Starting and Stopping AVI Player
To start AVI Player, double-click the AVI Player icon in the StudioZ Console program group
in the Windows NT Program Manager.
35
The AVI Player window displays, as shown in the following figure.
To stop AVI Player, select Exit from the File menu.
Page 46

36
Playing an AVI File
To play an AVI file:
1. Start AVI Player.
2. From the File menu, select Playlist. The Playlist dialog displays.
3. Select any AVI file from the Playlist dialog and select Add. The file is added to the
Playlist in the lower portion of the dialog.
4. Select OK to close the Playlist dialog.
5. Select the Play button.
When playback starts, the status bar displays the number of frames that have played.
To stop the playback at any time, select the Stop button.
Page 47

Setting Playback Options
The Options menu contains the following settings that control how AVI Player displays the
AVI file:
Auto Loop Continuously plays the file from beginning to end, until you select the
Stop button.
Auto Rewind Returns to the first frame in the AVI file after playing the sequence.
Auto Exit Exits the file when the last frame in the AVI file displays.
Always on Top Keeps the AVI Player window on top of any other application windows.
Each of these options is a toggle option. Select the playback option from the Options menu to
enable it. Select the playback option again on the Options menu to disable it.
Moving to a Point in an AVI File
There are several ways to move around in an audio/video sequence without playing the entire
AVI file.
37
To change the starting point of the playback:
u
Drag the slider to the desired point in the AVI file. As you move the scrollbar right or
left, frames display on the video monitor.
u
Select the scroll arrows to the right of the slider to scroll to a new point in the AVI file.
u
Select the Page Left , Page Right , Next Mark , or Previous Mark
buttons to move to a new point in the AVI file.
Playing Part of an AVI File
AVI Player allows you to play a selected part of an audio/video sequence.
To play a selected part of an AVI file:
1. Drag the slider to the starting point of the section you want to mark.
2. Select the Mark In button.
3. Drag the slider to the ending point of the section you want to mark.
Page 48

38
4. Select the Mark Out button.
5. Drag the slider to the beginning of the section you want to play.
6. Select the Play button
to play your selection.
Using a Playlist for Multiple AVI Files
You can play a series of AVI files by creating a playlist. When you specify a playlist with two
or more AVI files, AVI Player plays the files in the order in which they appear in the list. For
example, if you create a playlist containing the files
AVI Player plays the entire
BOOM.AVI file.
Creating a Playlist
To create a playlist:
1. Start AVI Player.
2. From the File menu, select Playlist. The Playlist dialog displays.
3. Select any AVI file from the Playlist dialog and select Add. The file is added to the
Playlist in the lower portion of the dialog.
4. Repeat step 3 to add more AVI files to the playlist.
5. When you finish adding AVI files to the Playlist, select OK to close the Playlist dialog.
FLIGHT.AVI file first, then the CHASE.AVI file, and finally the
FLIGHT.AVI, CHASE.AVI, and BOOM.AVI,
When you select the Play button in AVI Player, the files in the playlist are played in the order
in which they appear in the playlist.
Removing Files from a Playlist
To remove a file from a playlist:
1. Start AVI Player.
2. From the File menu, select Playlist. The Playlist dialog displays.
3. Select any AVI file from the Playlist dialog and select Remove. The file is removed from
the playlist in the lower portion of the dialog.
4. Repeat step 3 to remove more AVI files from the playlist.
5. When you finish removing files from the playlist, select OK to close the Playlist dialog.
Page 49

To remove all of the AVI files in the playlist:
1. Start AVI Player.
2. From the File menu, select Playlist. The Playlist dialog displays.
3. Select Remove All. All of the AVI files in the current playlist are removed.
4. Select OK to close the Playlist dialog.
Saving Video Frames as a Raster File Sequence
You can save a video frame as an individual raster file, or you can save a range of video
frames as a series of raster files. Each frame of the video sequence is stored as a separate
raster file.
To save a range of video frames to a series of raster files:
1. In AVI Player, open the AVI file containing the video you want to save to a raster file
sequence.
2. Drag the slider to the starting point of the section you want to mark.
39
3. Select the Mark In button.
4. Drag the slider to the ending point of the section you want to mark.
5. Select the Mark Out button.
6. From the File menu, select Save to Raster File Format.
7. Select the file format from the File Type drop box.
8. Type the correct file extension in the Filename box and select OK. The file extension is
The selected video sequence is saved in individual raster files, one video frame per raster file.
The files are named XXXnnnnn.YYY, where XXX is the three-character name based on the
name of the AVI file, nnnnn is a 5-digit sequential number, and YYY is the file type extension
(such as .
file is named
files, the files are named
NOTE The
5, the file names for the raster file series in the FLIGHT.AVI example would be FLI00000.BMP,
FLI00005.BMP, and FLI00010.BMP. See the online Help for more information about setting the
scroll size.
not automatically added when you select the file format.
BMP for bitmap files, .PIC for SoftImage files, and so on). For example, if the AVI
FLIGHT.AVI and you save three frames of the video to a series of three bitmap
FLI00000.BMP, FLI00001.BMP, and FLI00002.BMP.
nnnnn
number is affected by the scroll size. For example, if you set the scroll size to be
Page 50

40
Recording an AVI File on Video Tape
To record an AVI file to video tape, connect a video tape recorder to the StudioZ workstation
as described in the StudioZ Hardware User’s Guide or the StudioZ Producer Hardware
User’s Guide. Start the video tape recorder, then play the AVI file as described previously.
NOTE The status bar in the AVI Player window may display a number that represents the number of
video frames waiting to play. If you see such a number, the hard disk is not keeping up with
the video playback. In this situation, you would see a hesitation in the sequence on the video
monitor, and the hesitation would be recorded to the video tape. The number in the status bar
alerts you of any hesitiations in case you were not watching the video monitor when the
hesitation occurred.
Page 51

Glossary
aliasing
The inaccurate rendering of an image due to a low digital sampling rate. Aliasing
appears as jagged edges on graphics and especially text. Aliasing is corrected by
special software and techniques that smooth out the jagged edges by anticipating and
displaying the interim pixels. Contrast with anti-aliasing.
anti-aliasing
A technique for smoothing the jagged edges of pixelized graphics by blending the
edges with colors. This technique fills the pixels along the jagged edges with varying
amounts of transition colors that soften the edge and blend the edge smoothly into the
background. Contrast with aliasing.
artifacts
Visual disturbances within the video signal such as noise, color displacement, and
compression distortion, which negatively affect the image appearance.
41
aspect ratio
The ratio of height to width of an image. Standard video monitors have an aspect
ratio of three units of height (vertical) to four units of width (horizontal). This is
expressed as an 3:4 aspect ratio. Images become distorted if they are forced into a
different aspect ratio during enlargement, reduction, or transfers.
Audio Video Interleaved (AVI)
A file format for digital video movies with optional soundtrack that is supported by
StudioZ. Video and audio are stored in alternating chunks in a video file. The
display resolution of general AVI files can vary in size from 120 x 160 pixel
resolution up to full PAL resolution.
bits per pixel
The number of bits used to represent the color value of each pixel in an image. See
also color depth.
capture
The process of receiving video and/or audio from a selected source and writing it to
disk.
chrominance
The color data of a video signal.
Page 52

42
codec
Data compression/decompression algorithm that reduces the number of bits required
to represent video data during transmission and storage. During display, this
algorithm restores compressed data to accurately represent the original data. Motion
JPEG and MPEG are both examples of codecs.
color depth
A measure of the number of colors available for display. The color depth is 2 to the
n power, where n represents the number of bits per pixel. One bit per pixel provides
two colors for display; two bits per pixel provide four colors; three bits provide eight
colors; four bits provide 16 colors; eight bits provide 256 colors; 15 bits provide
32,768 colors; 16 bits provide 65,536 colors; and 24 bits provide 16,777,216 colors.
component video
A video signal in which different aspects of the signal are transmitted and stored
separately. Examples of component video are separate luminance and chrominance
data, or separate color components. Betacam SP is a video tape format that can
utilize a component video signal. See also RGB and YUV.
composite video
A video signal that combines brightness, color, and synchronization data. Combining
all of the data into a single signal causes artifacts to appear in the data. VHS utilizes
a composite video signal.
compression
The amount that video data is “squeezed” in order to occupy less disk space on the
hard drive. Compression is controlled by the video quality factor. A higher video
quality factor results in higher quality video that requires more disk space. A lower
video quality factor results in lower quality video that requires less disk space. The
more the data is compressed, the more information is lost.
compression ratio
The size of the original image in bytes divided by the size of the compressed image
in bytes.
dropped frames
Frames not shown when a digital sequence plays. AVI sequences have an encoded
frame rate (fps). If the hardware (disk subsystem, compressor/decompressor, host
processor) is unable to capture or play back all video frames at that rate, frames are
dropped. See also fps, frame, and frame rate.
field
One half of a television frame. Two interlaced fields compose a frame.
Page 53

fps (frames per second)
A measurement of video rate. The NTSC video rate is 29.97 fps and the PAL video
rate is 25 fps.
frame
One full video image, comprised of two interlaced fields.
frame rate
The speed at which frames advance. Frame rate is expressed as the number of frames
per second (fps).
JPEG (Joint Photographic Experts Group)
A still-image data compression standard devised by the Joint Photographics Experts
Group. Since JPEG was created for still images, it does intra-frame compression
based on a discrete cosine transform-based algorithm on each video frame at video
rates. Contrast with motion JPEG and MPEG.
keyframes
A frame that provides a complete frame image, acts as a reference point for
successive frames in a video sequence, and stores only differences from the previous
frame. The motion JPEG compression used by StudioZ treats every frame as a
keyframe.
43
linear editing
Traditional video editing from video tape. In this type of editing, when an editor
shortens or lengthens a video presentation, the editor must rearrange all materials that
follow the change. Contrast with non-linear editing.
lossless compression
A data compression scheme that reduces the size of a file by as much as a fourth
without losing data; commonly used for compressing text or numerical data.
lossy compression
A data compression scheme that achieves much smaller file sizes by allowing some
loss of data. Although text or numerical data would be rendered useless by this form
of compression, image file can still be viewed after having their sizes reduced in this
manner (while retaining excellent visual quality even with the sacrifice of some
image quality). JPEG compression is one example of lossy compression.
luminance
A measure of a video signal’s brightness. The luminance is the black and white
information of the NTSC and PAL video signal, designated by Y.
Page 54

44
motion JPEG
A moving image data compression scheme based on the JPEG standard for still
images. Each image is compressed independently. Thus, compression is as fast as
decompression. Contrast with JPEG and MPEG.
MPEG (Motion Picture Experts Group)
A moving image data compression standard, developed by the Motion Picture
Experts Group, compares images to keyframes for compression. Both data within
frames and between frames are compressed. Thus, compression is much slower than
decompression. Contrast with JPEG and motion JPEG.
noise
The distortion of an audio or video signal.
non-linear editing
Much like film editing, non-linear editing allows quick re-arrangement of large
sections of the edited program without having to re-edit each individual scene. With
digital video editing, pictures and sound are transferred from either film or video tape
to computer disk, and are then edited from the disk. This allows for quick, random
access to any piece of video from a computer disk. Contrast with linear editing.
NTSC (National Television Standard Committee) format
The video standard for color television with 486 active lines (525 total lines) of video
per frame, and 59.94 interlaced video fields per second. It is the common standard in
North America, Japan, and in some South American countries. Contrast with PAL
and SECAM.
overlay
An image or video that is merged with the underlying video. Titling is an example of
an overlay. An overlay is sometimes referred to as “CG” (Character Generation)
when overlaying text or a “super” (super-imposed image).
PAL (Phase Alternating Line) format
The video standard used in Western Europe, Latin America, Great Britain, South
Africa, and Australia. PAL has a slightly higher resolution than NTSC, with a
slightly lower frame rate. PAL resolution is 576 visible lines (625 total lines) with a
frame rate of 25 frames per second. Contrast with NTSC and SECAM.
playback
The process of transmitting video and/or audio data from disk to a computer screen,
monitor, videotape recorder, or other device.
quality factor
A quantization factor used in JPEG compression to determine how much a video
sequence is compressed. A higher quality factor results in higher quality video that
Page 55

requires more disk space. A lower quality factor results in lower quality video that
requires less disk space.
raster
The arrangement of pixels in a display monitor as a two-dimensional array or grid of
pixels.
real-time capture
The process of digitizing video as it is played at normal speed. See also step-time
capture.
resolution
The number of samples that make up an image.
RGB (red, green, blue)
The primary colors of light, which are mixed to produce an image. In video, RGB
refers to a system in which the primary colors are delivered from the source to the
display device over separate wires, resulting in high-quality pictures. See also
component video.
S-video (separate video)
A video transmission standard that uses separate channels for luminance and
chrominance. S-video is usually better quality than composite video, but not as good
as component video.
45
S-VHS
An enhancement to VHS which provides better resolution. S-VHS video devices
support separate luminance (Y) and chrominance (C) video inputs and outputs.
sampling rate
The rate at which hardware equipment reads audio or video samples from an audio or
video source.
scaling
Resizing an image or video clip, while maintaining the aspect ratio or freely changing
both horizontal and vertical resolution.
SECAM (Sequential With Memory)
The color encoding video standard used in France, the former Soviet Republics, and
most Eastern European countries. See also NTSC and PAL.
SDI (Serial Digital Interface)
The highest-quality video transmission standard, SMPTE 259, which is a standard for
transmission of component digital video data in a serial bitstream.
Page 56

46
step-time capture
A sequential, single frame video digitizing process in which the computer controls
the rate at which each video frame advances.
video format
The format in which the video data is captured and played back. The StudioZ video
format is either NTSC or PAL.
Video Home System (VHS)
A composite videotape system used with most consumer-grade videotape recorders.
video quality factor
A factor used in JPEG compression to control the amount a video sequence is
compressed. A higher video quality factor results in less data compression and
higher quality video that requires more disk space. A lower video quality factor
results in more data compression and lower quality video that requires less disk
space. See also compression ratio.
Y/C
Designator for luminance (Y) and chrominance (C).
YUV
Component video data consisting of separate luminance and chrominance
components. The Y designates the luminance component, while the U and V
designate the chrominance components.
Page 57

Index
47
A
about this document, v
accessing help, 8
adding files to the playlist, 38
additional information
StudioZ Console, vi
StudioZ hardware, vi
adjusting
chrominance (colors) of a
video sequence, 33
luminance (brightness) of a
video sequence, 32
aliasing, 41
anti-aliasing, 41
artifacts, 41
aspect ratio, 41
audio
capture settings, configuring,
18
recording from a disk file to a
video tape, 40
audio/video interleaved (AVI) file
format, 41
audio/video sequences, capturing,
20
AVI Builder utility, 3
configuring video output
settings, 24
deleting frames, 29
exiting, 24
icon, 23
inserting frames, 28
loading raster image
sequences, 26
main window, 24
manipulating a raster image
sequence, 27
modes
insert, 28
overwrite, 28
preparing to use, 23
saving the AVI file, 29
selecting frames, 27
starting, 23
stopping, 23
using, 23
AVI Capture utility, 3
capturing an audio/video
sequence, 20
capturing individual video
frames, 21
configuring audio settings, 18
configuring video capture
settings, 17
creating capture lists, 16
exiting, 14
icon, 13
main window, 14
naming the capture file, 14
preparing to use, 13
removing files from the capture
list, 17
starting, 13
stopping, 13
using, 13
using capture lists, 16
AVI file format, 41
AVI Player utility, 3
exiting, 35
icon, 35
main window, 35
moving to another point in the
AVI file, 37
playing AVI files, 35
playing part of an AVI file, 37
preparing to use, 35
recording an AVI file on video
tape, 40
saving video frames as a raster
file sequence, 39
setting playback options, 37
starting, 35
Page 58

48
stopping, 35
using, 35
using a playlist
creating, 38
removing files from, 38
B
bits per pixel, 41
C
capture, 41
real-time, 45
step-time, 46
capture file, naming, 14
capture lists
creating, 16
removing files from, 17
using, 16
capturing
audio/video sequences, 20, 41
individual video frames, 21
chrominance, 33, 41
adjusting, 33
setting default values in SDI
Control, 33
codec, 42
color depth, 42
component video, 42
components of StudioZ Console, 3
composite video, 42
compression, 42
lossless, 43
lossy, 43
ratio, 42
compression/decompression
(codec), 42
configuring
audio capture settings, 18
video capture settings, 17
video output settings, 24
creating
capture lists, 16
playlists, 38
D
default values
for chrominance (color), 33
for luminance (brightness), 33
deleting frames, 29
document conventions, vi
documentation, vii
dropped frames, 42
E
edited AVI file, saving in AVI
Builder, 29
editing
linear, 1, 43
non-linear, 1, 44
editing modes
insert, 28
overwrite, 28
exiting
AVI Builder, 24
AVI Capture, 14
AVI Player, 35
SDI Control, 32
F
FAXLink, viii
features
video input, 2
video playback, 2
field, 42
file formats
audio/video interleaved (AVI),
41
AVI, 41
JPEG, 43
motion JPEG, 44
MPEG, 44
raster, 45
file types for StudioZ Console, 6
files
Page 59

49
adding to the capture list, 16
adding to the playlist, 38
loading raster image sequences
into AVI Builder, 26
naming captured audio/video,
14
playing AVI files, 36
removing from the capture list,
17
removing from the playlist, 38
saving edited sequences in AVI
Builder, 29
finding
additional StudioZ Console
information, vi
operating system information,
vii
StudioZ hardware information,
vi
fps (frames per second), 43
frame
definition, 43
rate, 43
frames
capturing, 21
deleting, 29
dropped, 42
inserting, 28
keyframe, 43
per second (fps), 43
selecting, 27
selecting with the Mark In and
Mark Out buttons, 27
selecting with the Mark In and
Mark Out commands, 27
G
gamma correction value, 26
getting
help, vi, 8
started, 9
H
hardware information, vi
I
icons
AVI Builder, 23
AVI Capture, 13
AVI Player, 35
SDI Control, 31
input file types, 7
input to StudioZ Console, 3
insert editing mode, 28
inserting frames, 28
installing StudioZ Console, 11
Intergraph Bulletin Board Service,
viii
Intergraph FAXLink, viii
Intergraph on the Internet, ix
J
Joint Photographic Experts Group
(JPEG) file format, 43
K
keyframes, 43
L
linear editing, 1, 43
loading files
raster image sequences in AVI
Builder, 26
lossless compression, 43
lossy compression, 43
luminance, 32, 43
adjusting, 32
setting default values in SDI
Control, 33
M
main window
AVI Builder, 24
AVI Capture utility, 14
AVI Player, 35
SDI Control, 32
manipulating raster image
sequences, 27
Page 60

50
media file types, 6
motion JPEG file format, 44
Motion Picture Experts Group
(MPEG) file format, 44
N
naming
the capture file, 14
the edited AVI file in AVI
Builder, 29
National Television Standard
Committee (NTSC) video
standard, 44
noise, 44
non-linear editing, 1, 44
O
online help, 8
operating system information, vii
output file types, 7
output of StudioZ Console, 3
overlay, 44
overview of StudioZ Console, 1
overwrite editing mode, 28
P
Phase Alternating Line (PAL)
video standard, 44
playback, 44
changing the starting point of
the AVI file, 37
moving to another point in the
AVI file, 37
options, setting, 37
playing part of an AVI file, 37
playing
AVI files with AVI Player, 35,
36
part of an AVI file, 37
playlists
creating, 38
removing files, 38
using, 38
preparing to use
AVI Builder, 23
AVI Capture, 13
AVI Player, 35
SDI Control, 31
product information, vi
program group, StudioZ Console
Utilities, 7
Q
quality factor, 45
R
raster file format, 45
raster file types, 7
raster image sequences
loading into AVI Builder, 26
manipulating, 27
real-time capture, 45
recording an AVI file on video
tape, 40
red, green, blue (RGB) system, 45
removing
files from the capture list, 17
files from the playlist, 38
StudioZ Console software, 12
resolution, 45
RGB (red, green, blue), 45
S
sampling rate, 45
saving
the edited sequence to an AVI
file in AVI Builder, 29
video frames as a raster file
sequence, 39
scaling, 45
SDI Control utility, 3
adjusting the video
chrominance (colors), 33
adjusting the video luminance
(brightness), 32
exiting, 32
icon, 31
main window, 32
Page 61

51
preparing to use, 31
setting default values, 33
starting, 31
stopping, 31
using, 31
SDI standard, 46
selecting frames, 27
with the Mark In and Mark Out
buttons, 27
with the Mark In and Mark Out
commands, 27
separate video (S-video) video
standard, 45
Sequential With Memory
(SECAM) video standard, 45
Serial Digital Interface (SDI)
standard, 46
setting
default values for chrominance
and luminance, 33
playback options in AVI
Player, 37
standards
National Television Standard
Committee (NTSC), 44
Phase Alternating Line (PAL),
44
Sequential With Memory
(SECAM), 45
Serial Digital Interface (SDI),
46
S-video, 45
starting
AVI Builder, 23
AVI Capture, 13
AVI Player, 35
SDI Control, 31
utilities from the program
group, 7
step-time capture, 46
stopping
AVI Builder, 23
AVI Capture, 13, 14
AVI Player, 35
SDI Control, 31
StudioZ Console
AVI Builder utility, 3
AVI Capture utility, 3
AVI Player utility, 3
components, 3
input, 3
installing, 11
output, 3
overview, 1
removing, 11, 12
SDI Control utility, 3
supported
input file types, 7
media file types, 6
output file types, 7
raster file types, 7
using utilities, 7
utilities, 7
AVI Builder, 23
AVI Capture, 13
AVI Player, 35
SDI Control, 31
workflow, 4
support
bulletin board service, viii
FAXLink, viii
Internet, ix
telephone, vii
S-VHS, 45
S-video video standard, 45
T
telephone support, vii
training, vii
U
Page 62

52
using
AVI Builder utility, 23
AVI Capture utility, 13
AVI Player utility, 35
capture lists, 16
playlists, 38
creating, 38
removing files, 38
SDI Control utility, 31
utilities from the program
group, 7
utilities
AVI Builder, 23
AVI Capture, 13
AVI Player, 35
SDI Control, 31
starting from the program
group, 7
V
VHS format, 46
video
adjusting
chrominance (colors), 33
luminance (brightness), 32
capture settings, configuring,
17
capturing, 41
format, 46
input features, 2
output settings, configuring, 24
playback, 44
playback features, 2
quality factor, 46
recording from a disk file to a
video tape, 40
saving frames as a raster file
sequence, 39
setting default values for
chrominance (color) and
luminance (brightness), 33
standards
NTSC, 44
PAL, 44
SECAM, 45
Serial Digital Interface
(SDI), 46
S-video, 45
Video Home System (VHS) file
format, 46
viewing
AVI files, 35, 36
W
workflow using StudioZ Console, 4
Y
Y/C, 46
YUV, 46
 Loading...