

Page 1

StudioZ Central Plus
Quick-Start Guide
May 1998
DSA084010
Page 2

Copyright
1998 Intergraph Computer Systems. All rights reserved. This document contains information protected by copyright, trade secret, and
trademark law. This document may not, in whole or in part, be reproduced in any form or by any means, or be used to make any
derivative work, without written consent from Intergraph Computer Systems.
Use, duplication, or disclosure by the United States Government is subject to restrictions as set forth in subdivision (c)(1)(ii) of the rights in
technical data and computer software clause at DFARS 252.227-7013. Unpublished rights are reserved under the copyright laws of the
United States.
Intergraph Computer Systems, Huntsville AL 35894-0001
Notice
Information in this document is subject to change without notice and should not be considered a commitment by Intergraph Computer
Systems. Intergraph Computer Systems shall not be liable for technical or editorial errors in, or omissions from, this document. Intergraph
Computer Systems shall not be liable for incidental or consequential damages resulting from the furnishing or use of this document.
All warranties given by Intergraph Computer Systems about equipment or software are set forth in your purchase contract. Nothing stated
in, or implied by, this document or its contents shall be considered or deemed a modification or amendment of such warranties.
Trademarks
Intergraph Computer Systems and the Intergraph Computer Systems logo are registered trademarks of Intergraph Computer Systems.
StudioZ and TD are trademarks of Intergraph Computer Systems.
Microsoft, Windows, Windows NT, and the Microsoft logo are registered trademarks of Microsoft Corporation. SOFTIMAGE is a
registered trademark of SOFTIMAGE, a Microsoft affiliate. Adobe and the Adobe logo are registered trademarks of Adobe Systems
Incorporated. Intel, Pentium, and Pentium Pro are registered trademarks of Intel Corporation. WinZip is a registered trademark of Nico
Mak Computing, Inc. InstallShield is a registered trademark of InstallShield Corporation, a business unit of Stirling Technologies, Inc.
All other brands and product names are trademarks of their respective owners.
Page 3

Contents
Preface................................................................................................................................v
Video Input.......................................................................................................................... v
Video Playback................................................................................................................... vi
StudioZ Central Plus Input and Output .............................................................................. vii
About This Document.......................................................................................................viii
Document Conventions.....................................................................................................viii
Hardware Information....................................................................................................... viii
Additional StudioZ Central Plus Information ...................................................................... ix
Customer Support...............................................................................................................ix
1 Getting Started................................................................................................................ 1
System Requirements........................................................................................................... 1
Obtaining the Latest StudioZ Driver .................................................................................... 1
Installing StudioZ Central Plus ............................................................................................ 3
Removing StudioZ Central Plus...........................................................................................4
Starting StudioZ Central Plus .............................................................................................. 4
iii
Hardware and Software Support Services..............................................................ix
World Wide Web................................................................................................... x
Intergraph Bulletin Board Service .......................................................................... x
FAXLink................................................................................................................ x
Telephone .............................................................................................................. x
More Support Options........................................................................................... xi
Stopping the Current Driver ................................................................................... 2
Loading and Starting the New Driver ..................................................................... 2
2 Capturing a New AVI.....................................................................................................9
Before You Begin................................................................................................................ 9
Configuring the Video Output Settings ................................................................................ 9
Configuring the Audio Settings.......................................................................................... 12
Capturing an Audio/Video Sequence.................................................................................. 13
3 Building an AVI from Bitmaps..................................................................................... 15
Before You Begin.............................................................................................................. 15
Configuring the Video Output Settings .............................................................................. 15
Loading a Raster Image Sequence...................................................................................... 18
Adjusting the Gamma ........................................................................................................ 19
Saving an Edited Sequence to an AVI................................................................................ 20
4 Setting Up a Batch Build .............................................................................................. 21
Before You Begin.............................................................................................................. 21
Configuring the Batch Build Settings................................................................................. 21
Specifying a Raster Image Sequence.................................................................................. 22
Scheduling the Batch Build................................................................................................ 24
Adjusting the Gamma ........................................................................................................ 25
Page 4

iv
Following the Batch Job Progress....................................................................................... 26
Using the Summary Dialog Box........................................................................... 26
Using the Details Dialog Box............................................................................... 27
5 Playing the AVI............................................................................................................. 29
Before You Begin.............................................................................................................. 29
Playing an AVI.................................................................................................................. 29
Setting Playback Options................................................................................................... 30
Navigating the AVI ........................................................................................................... 30
Playing Part of an AVI....................................................................................................... 31
Using a Playlist for Multiple AVIs..................................................................................... 31
Creating a Playlist................................................................................................ 31
Saving Video Frames......................................................................................................... 33
Saving a Range of Files to an AVI........................................................................ 33
Saving Video Frames as a Raster File Sequence ................................................... 35
Saving the Playlist to a File .................................................................................. 36
Recording an AVI to Video Tape....................................................................................... 37
Displaying the VTR Control .............................................................................................. 37
Capturing from Tape to an AVI ......................................................................................... 38
Capturing Multiple Sequences from Tape .......................................................................... 38
Recording to Tape from an AVI......................................................................................... 40
6 Using the SDI Video Control........................................................................................ 41
Before You Begin.............................................................................................................. 41
Adjusting Brightness and Color ......................................................................................... 42
Changing the Luminance of a Video Sequence..................................................... 42
Changing the Chrominance of a Video Sequence ................................................. 43
Setting Default Values....................................................................................................... 43
7 Frequently Asked Questions......................................................................................... 45
Index................................................................................................................................. 49
Page 5

Preface
Intergraph’s StudioZ Central Plus product is an audio/video capture, playback, and
animation frame-to-movie build solution for the Microsoft Windows NT operating system.
Video production professionals, computer graphics animators, and multimedia producers can
use StudioZ Central Plus to capture and play back real-time video or animated computer
graphics.
StudioZ Central Plus also has the capability to convert a sequence of individual frames into
an Audio/Video Interleaved (AVI) file, a Microsoft standard format for motion audio/video
files. StudioZ Central Plus works with standard graphics creation, animation, nonlinear
editing, computer-aided design, and visualization software. You can create images in a
separate graphical design application and then use StudioZ Central Plus to place them in a
presentation.
StudioZ Central Plus uses a nonlinear editing environment which reduces editing time and
increases productivity over traditional linear editing methods. Nonlinear editing allows
quick, random access to any part of video you want from a computer disk, as well as instant
rearrangement of video clips that follow a change. (With linear editing on video tape, the
editor has to reedit all material that follows the change.)
v
The all-digital design of StudioZ Central Plus prevents the generational loss of quality
common to hybrid and analog video editing solutions. This results in high-resolution, truecolor video images and high-quality audio captured in real time. StudioZ Central Plus
outputs data in real time directly from the hard disk. You can record this output to video
tape, view it on a video monitor, or convert it to any AVI format supported by Video for
Windows.
StudioZ Central Plus software is delivered as part of the Intergraph Computer Systems
StudioZ workstation solution. For detailed information on StudioZ hardware, refer to the
StudioZ Hardware User’s Guide and workstation documentation delivered with your
workstation.
Video Input
StudioZ Central Plus:
u
Captures audio/video in real time directly to a system’s hard disk.
u
Captures and (if specified) compresses video in a single step, requiring no file
conversion.
Page 6

vi
u
Provides a single solution for generating video that conforms to both NTSC (525 line,
59.94 Hz) and PAL (625 line, 50 Hz) video standards.
u
Captures full frame sizes at the following field rates, which result in professional-quality
input, smooth motion, and no loss of video information during data capture:
−
NTSC: 720 x 243 pixels at 59.94 fields per second (720 x 486 frames).
−
PAL: 720 x 288 pixels at 50 fields per second (720 x 576 frames).
u
Captures true-color images (YUV 4:2:2) for optimal image quality.
u
Allows resampling while capturing images for users who want reduced resolution or
square pixel data.
u
Allows adjustment of brightness, contrast, saturation, and hue of data while capturing
video.
u
Uses motion JPEG compression technology for high-quality image compression (if you
select image compression options).
u
Provides user-selectable JPEG compression ratios, which allow you to select between
increased online storage (high ratios) or optimal image quality (low ratios).
u
Offers the option of uncompressed image capture for the highest image quality.
u
Captures images to a standard Windows Audio/Video Interleaved (AVI) file, allowing
you to use standard Windows NT AVI editing tools.
u
Captures single frames to raster files (TGA, PIC, and BMP files).
Video Playback
StudioZ Central Plus:
u
Plays back video using full frame sizes and field rates. No video data is lost during
playback and motion remains smooth.
u
Plays back true-color output for optimal quality.
u
Allows adjustment of brightness, contrast, hue, and saturation of video as it is played
back.
u
Can play a video loop for demonstrations and composition review.
u
Plays back under Windows NT applications that use Media Control Interface (MCI)
device drivers.
u
Offers accelerated playback over standard MCI playback.
u
Allows the creation of a playlist to seamlessly play a series of AVIs, one after the other.
Page 7
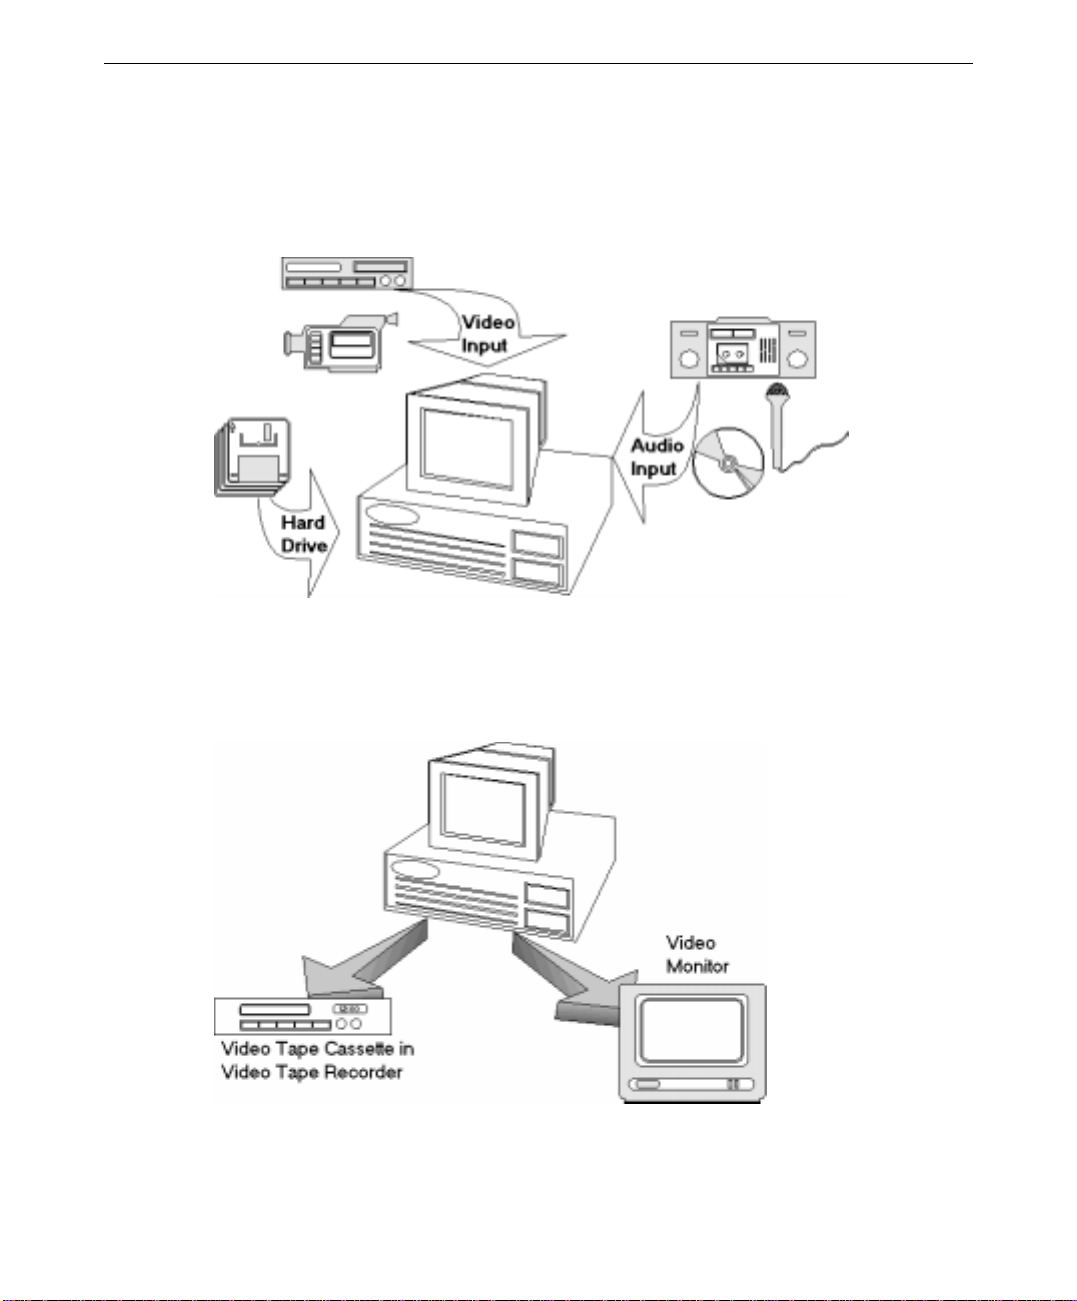
StudioZ Central Plus Input and Output
StudioZ Central Plus accepts input from a variety of sources, as shown in the following
figure.
vii
StudioZ Central Plus utilities send output to video tape or a video monitor, as shown in the
following figure.
Page 8

viii
About This Document
The StudioZ Central Plus Quick-Start Guide is organized as follows:
u
Chapter 1, “Getting Started,” introduces you to StudioZ Central Plus, lists the minimum
system requirements, instructions for obtaining the latest drivers, and instructions for
installing and removing the product.
u
Chapter 2, “Capturing a New AVI,” shows you how to create new AVIs.
u
Chapter 3, “Building an AVI from Bitmaps,” describes how to build AVIs from raster
images.
u
Chapter 4, “Setting Up a Batch Build,” describes how to schedule AVI batch jobs.
u
Chapter 5, “Playing the AVI,” describes how to set the play options and use the AVI
Controls to play part or all of the AVI(s).
u
Chapter 6, “Using the SDI Video Control,” provides instructions for manipulating
captured video sequences.
u
Chapter 7, “Frequently Asked Questions,” addresses issues other users have
encountered.
Document Conventions
Bold
Italic Variable values that you supply, or cross-references.
Monospace
SMALL CAPS Key names on the keyboard, such as D, ALT or F3; names of files and directories.
CTRL+D Press a key while simultaneously pressing another key; for example, press CTRL
Commands, words, or characters that you key in literally.
Output displayed on the screen.
You can type filenames and directory names in the dialog boxes or the command
line in lowercase unless directed otherwise.
and D simultaneously.
Hardware Information
For more information about StudioZ hardware and compatible audio/video input and output
devices, refer to the StudioZ Hardware User’s Guide. For more information about your
StudioZ workstation, see the hardware documentation.
Page 9

Additional StudioZ Central Plus Information
Additional StudioZ Central Plus information is available in an online reference guide, which
is installed on your system in the product \
There are four ways to activate the online reference guide:
u
Inside the application, click the Help button on the application toolbar and select a
command to activate its corresponding Help topic.
u
Choose Help Topics from the StudioZ Central Plus Help pulldown menu.
u
Select Help from the application program group on the Start menu.
u
In Explorer or My Computer, move to the StudioZ Central Plus product directory and
double-click the
NOTE If you are unfamiliar with using online documents, press F1 to activate Windows Help, which
provides instructions for using and customizing Help.
SZCENTRAL.HLP file.
The README.TXT file contains information about installation, documentation, training
courses, product fixes, new options and features for each utility, and known problems.
BIN directory (the file is called SZCENTRAL.HLP).
ix
Customer Support
Intergraph Computer Systems offers an assortment of customer support options.
Hardware and Software Support Services
Intergraph Computer Systems provides a variety of hardware services for Intergraph and
third-party equipment. Services include warranty upgrades, repair depot service, on-site
hardware maintenance, system administration, and network consulting. Hardware
purchased from Intergraph Computer Systems includes a factory warranty ranging from 30
days to three years. A detailed warranty description is available on the World Wide Web;
see the Support pages at http://www.intergraph.com/ics.
Intergraph Computer Systems provides complimentary software support for 30 or 90 days
following shipment of a hardware or software product. This includes World Wide Web
access, Intergraph Bulletin Board Service access, FAXLink service, and telephone (Help
Desk) support. At the end of the complimentary support period, you can purchase other
levels of software support.
Page 10

x
World Wide Web
You can visit Intergraph Computer Systems on the World Wide Web at
http://www.intergraph.com/ics. On these pages, you can get news and product
information, technical support information, software updates and fixes, and more.
Intergraph Bulletin Board Service
On the Intergraph Bulletin Board Service (IBBS), you can get technical support information,
software updates and fixes, and more.
To connect to the IBBS:
1. Set your system’s communications protocol for eight (8) data bits, no parity, one (1) stop
bit, and any baud rate up to 14,400.
2. Using a modem, call 1-205-730-8786. Outside the United States, call one of the mirror
sites listed on World Wide Web; see the Software Support pages at
http://www.intergraph.com.
3. At the login prompt, key in your user ID. If you have not connected before, key in new
to create a user ID.
4. Follow the menus to find what you need. The IBBS provides clear choices and online
If you have trouble connecting to or using the IBBS, call the Customer Response Center at
1-800-633-7248 (product entry IBBS) or leave a message for the IBBS System Operator at
1-205-730-1413.
FAXLink
To use the FAXLink:
u
u
Telephone
To get customer support by telephone:
u
help.
Call 1-800-240-4300 for information on how to get technical support information using
the FAXLink.
Call 1-205-730-9000 to get documents (up to five per call).
In the United States, call 1-800-633-7248 between the hours of 7:00 a.m. and 7:00
p.m. Central Time, Monday through Friday (except holidays).
Page 11

u
Outside the United States, contact your local Intergraph Computer Systems subsidiary or
distributor.
Have the following information available when you call:
u
Your service number, which identifies your site to Intergraph Computer Systems. You
use your service number for warranty or maintenance calls.
u
Your Customer Personal Identification Number (CPIN). You get a CPIN the first time
you call the Customer Response Center; it is associated with your service number for
future call logging.
u
The product’s name or model number.
u
The product’s serial number. Software product serial numbers are included in the
product packaging. Hardware product serial numbers are on a sticker affixed to the
hardware product.
u
Your name and telephone number.
u
A brief description of the question or problem.
More Support Options
xi
To get information on more customer support options:
u
Visit the Support pages on the World Wide Web at http://www.intergraph.com/ics.
u
For hardware support questions in the United States, call 1-800-763-0242.
u
For software support questions in the United States, call 1-800-345-4856.
u
Outside the United States, contact your local Intergraph Computer Systems subsidiary or
distributor.
Page 12

xii
Page 13

1 Getting Started
StudioZ Central Plus provides video functionality and utilities for Intergraph Computer
Systems StudioZ workstation.
System Requirements
StudioZ Central Plus is loaded onto your StudioZ workstation prior to shipment. The
application is provided on two floppy diskettes that are delivered with your workstation in
case you need to reinstall the software. See the instructions in “Installing StudioZ Central
Plus” in this chapter for more information.
Your StudioZ workstation meets all of the requirements needed to run StudioZ Central Plus.
For more information on the StudioZ workstation, see the StudioZ Hardware User’s Guide
delivered with the workstation. The hardware requirements are as follows:
u
Windows NT 4.0 operating system, Service Pack 3.0
u
An Intel processor-based PC with a Pentium or Pentium Pro processor
1
u
At least 32 megabytes of RAM
u
6 megabytes of free disk space
u
StudioZ SDI card
Obtaining the Latest StudioZ Driver
Depending on which board you have, you may need to upgrade the StudioZ driver. You can
obtain the latest driver from the diskette delivered with your workstation, or from the
Intergraph Bulletin Board Service (IBBS) File Libraries. See “IBBS” in the Preface for more
information on the IBBS. See “Loading and Starting the New Driver” in this chapter for
instructions on obtaining the driver from the IBBS.
There are two StudioZ drivers. The following table specifies which driver you need
according to the StudioZ workstation you purchased:
If you have this workstation:
StudioZ Solo, Duo, or Quattro STUDIOZ.ZIP (this is the StudioZ driver)
StudioZ T-RAX STUDIOZ.ZIP
StudioZ Pro STUDIOZ.ZIP
StudioZ for SOFTIMAGE|DS STUDIO~1.ZIP (this is the StudioZBurst driver)
Select this ZIP file:
Page 14

2
Stopping the Current Driver
You must stop your current driver before you load the new one.
To stop the current driver:
1. From the Windows NT Start menu, go to Control Panel/Devices.
2. Scroll down the Device list and select the Intergraph StudioZ driver.
NOTE Depending on your workstation, the Device list will display either “Intergraph StudioZ Driver”
or “Intergraph StudioZBurst Driver.” See the “Obtaining the Latest StudioZ Driver” in this
chapter for a list of workstations and drivers.
3. Click Stop.
4. Click Close to dismiss the Devices dialog box.
Loading and Starting the New Driver
If you are installing the driver from the diskette delivered with your workstation, insert the
diskette into the floppy disk drive. In Explorer, select the floppy disk drive (usually drive
A:\), and double-click
displays, go to step 6 of the following instructions.
SETUP.EXE from the diskette. When the InstallShield setup wizard
To load and start the new driver:
1. Using your Web browser, go to the IBBS File Libraries page
(http://archive.intergraph.com/bbs/ibbsfile.htm).
2. Scroll down the list and select number 27, DIGSWH, to open the Digital Media StudioZ
Driver page.
3. From the driver page, select either
STUDIO~1.ZIP (the Intergraph StudioZBurst driver). The necessary files are downloaded
STUDIOZ.ZIP (the Intergraph StudioZ driver) or
to a temporary folder on your system. When the transfer is complete, WinZip displays
the contents of the
ZIP file.
4. In WinZip, click Extract and place all of the files in a directory on your machine (for
example, C:\
NOTE See the WinZip Help File if you need information on extracting files. From the WinZip Help
menu, select Search for Help on... and type extract in the first field of the Index tab. Select a
topic from the index entries and click Display.
TEMP).
5. In Explorer, move to the directory where you extracted the files and double-click the
SETUP.EXE file. The InstallShield setup wizard displays.
6. Follow the prompts to install the driver. See the
README.TXT file delivered with the
driver if you need more information.
Page 15

NOTE If you select the wrong driver, a warning message will notify you that the driver could not be
started. If this happens, go back to the diskette or your web browser and select the other
file.
7. When you see a notification that the installation is complete, go back to Control
Panel/Devices.
8. Scroll down the list of devices to the Intergraph StudioZ Driver or Intergraph
StudioZBurst Driver and verify that it is started (the word “Started” should appear under
the Status column).
9. If the driver is not started, select it and click Start.
10. Click Close to dismiss the Devices dialog box.
Installing StudioZ Central Plus
StudioZ Central Plus is loaded onto your StudioZ workstation prior to shipment. These
installation instructions are provided in case you need to reinstall the product due to
upgrades, fixes, or system reconfiguration
To install StudioZ Central Plus on your workstation:
3
ZIP
1. Make sure that you are logged on with administrative privileges before attempting to
install the product. You must run the installation of StudioZ Central Plus as an
administrative user for it to install properly.
2. If you are installing over a previous version of StudioZ Central or StudioZ Central Plus,
make sure the application is closed (choose Exit from the File pulldown menu within the
product to close the application).
3. From the application’s program group, select the unInstallShield and follow the prompts
to remove the application from your machine.
In Explorer, double-click the drive:\
installation media. (Typically, the
SETUP.EXE file, where drive is the drive letter of the
SETUP.EXE file will be in the product \BIN directory.)
The InstallShield setup wizard is displayed.
4. Follow the prompts to load StudioZ Central Plus onto your workstation. Be sure to enter
a user name along with the serial number when you are prompted. The serial number is
included in the product packaging.
Page 16
4
Removing StudioZ Central Plus
To remove StudioZ Central Plus:
1. From the Windows NT Start menu, go to StudioZ Central Plus/unInstallShield.
2. Follow the prompts to remove the StudioZ Central Plus application and all of its
components from your workstation.
Starting StudioZ Central Plus
To start StudioZ Central Plus:
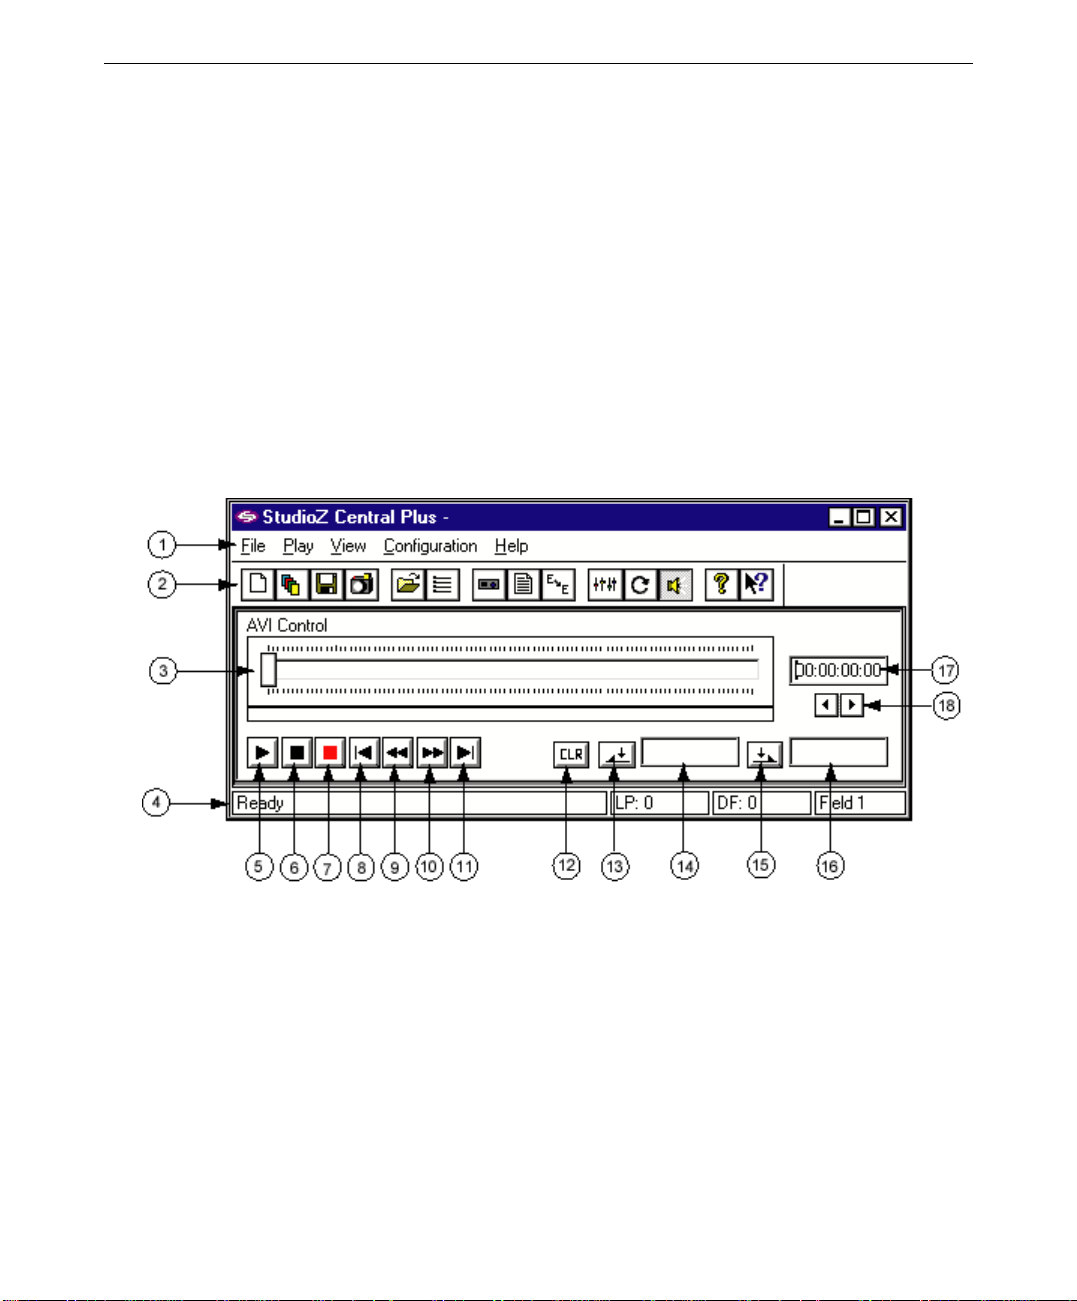
From the StudioZ Central Plus program group in the Start menu, select SZCentral. The
StudioZ Central Plus application interface displays:
The following table provides a brief description of the parameters in StudioZ Central Plus.
Refer to the StudioZ Central Plus Online Reference Guide for detailed information about
each command.
Page 17

StudioZ Central Plus Parameters
1 Menus
The menus contain commands for creating, opening, and saving
AVIs; parameters for customizing play and capture; and
parameters for controlling your VTR. Many of the commands in
these menus are also available on the toolbar.
2 Toolbar
The toolbar contains shortcuts to commands, most of which are
available from the pulldown menus. The exception is the SDI
Slider, which is available only from the toolbar. See Chapter 6,
“Using the SDI Video Control,” for more information on this
control
The toolbar should be displayed the first time you activate
StudioZ Central Plus. To show or hide the toolbar, select
Toolbar from the View pulldown menu.
3 Frame slider
The AVI Control frame slider lets you move through the frames
in the active AVI sequence. Select the slider and drag it back
and forth to move through the sequence. See “Navigating the
AVI” in Chapter 5 for more information on scrolling through
sequences.
4 Status bar
The status bar displays information that helps you use StudioZ
Central Plus. The status bar should be displayed the first time
you activate StudioZ Central Plus. To show or hide the status
bar, select Status Bar from the View pulldown menu.
Ready This part of the status bar displays the state of the
application (whether it is capturing, playing, and so on).
Also, when you hold the cursor over a control this field
displays the name of the control.
LP If you have Auto Loop turned on when you play or
capture a sequence, the sequence will run until you
press the Stop button. This part of the status bar shows
you how many cycles of the sequence have run.
DF Sometimes during play or capture, the video sequence
cannot be stored in memory or played back fast enough
to maintain full frame rates. This can cause dropped
frames. This part of the status bar lets you know how
many frames have been dropped. See the StudioZ
Hardware User’s Guide for tips on avoiding dropped
frames.
Field This part of the status bar displays the option you
selected under Stop Field (in the View pulldown menu).
You can choose Field 1, Field2, or Both.
5 Play
Plays the sequence of frames you have defined. See Chapter 5,
“Playing the AVI,” for more information.
5
Page 18

6
StudioZ Central Plus Parameters, cont.
6 Stop
Stops the play or capture of an AVI. See Chapter 5, “Playing the
AVI,” for more information.
7 Record
Captures a new AVI. When you click the Record button, the
Capture AVI File dialog box activates. Fill it out to meet your
specifications and click OK to start recording. Click the Stop
button if you need to halt the capture process. See Chapter 2,
“Capturing a New AVI,” for more information.
8 Go to mark in
Moves the frame slider to the beginning of the sequence. If you
have not defined a mark in point, the slider moves to the first
frame in the AVI. See “Navigating the AVI” in Chapter 5 for
more information on scrolling through sequences.
9 Rewind
Rewinds the AVI to the first frame, disregarding any mark in
points you defined.
10 Fast forward
Advances the AVI to the last frame, disregarding any mark out
points you defined.
11 Go to mark out
Moves the frame slider to the end of the sequence. If you have
not defined a mark out point, the slider moves to the last frame
in the AVI. See “Navigating the AVI” in Chapter 5 for more
information on scrolling through sequences.
12 Clear marks
Clears any mark in and mark out points you set. See
“Navigating the AVI” in Chapter 5 for more information on
setting in and out points.
13 Set mark in
Accepts the current slider position (or a value you enter in the
Mark In field) as the first frame in the sequence. See
“Navigating the AVI” in Chapter 5 for more information on
setting in points.
14 Mark in
Specifies the beginning of the media sequence. See “Navigating
the AVI” in Chapter 5 for more information on setting in points.
15 Set mark out
Accepts the current slider position (or a value you enter in the
Mark Out field) as the last frame in the sequence. See
“Navigating the AVI” in Chapter 5 for more information on
setting out points.
16 Mark out
Specifies the end of the media sequence. See “Navigating the
AVI” in Chapter 5 for more information on setting out points.
Page 19

StudioZ Central Plus Parameters, cont.
17 Current frame
Displays the current frame number or the current timecode of
the slider position. See “Navigating the AVI” in Chapter 5 for
more information.
18 Frame scroll
arrows
Lets you move back and forth through the sequence, frame by
frame. See “Navigating the AVI” in Chapter 5 for more
information.
7
Page 20

8
Page 21

2 Capturing a New AVI
You can record audio and video data and save it to an AVI. You can then use the supplied
audio/video editing software (or a compatible software package) to create an audiovisual
presentation. This chapter explains how to configure video and audio capture settings and
how to capture an audio/video sequence.
Before You Begin
Before you can capture an AVI, you must set up audio and video input sources. Connect a
video camera, camcorder, video tape recorder, or other external source to your workstation as
described in the StudioZ Hardware User’s Guide.
The StudioZ Central Plus application must be active. Select SZCentral from the StudioZ
Central Plus program group to start the application. See “Starting StudioZ Central Plus” in
Chapter 1 for more information.
9
Configuring the Video Output Settings
You must configure certain video capture settings before you record video signals.
To configure video capture settings:
1. From the File menu on the StudioZ Central Plus interface, select New AVI. This
displays a secondary cascading menu; select Capture from this secondary menu.
– OR –
Click the Capture AVI
displayed at the top of the StudioZ Central Plus interface by default. If it is not
displayed, select Toolbar from the View menu.)
The Capture AVI File dialog box displays, and the AVI File Settings tab is active:
button on the StudioZ Central Plus toolbar. (The toolbar is
Page 22

10
2. Click the Browse button and locate your video storage drive, then type a file name for
the AVI file you are capturing.
NOTE If you place the captured video sequence in the system drive, the sequence will drop frames.
3. Set the frame dimensions (width and height) to meet your requirements. The default
frame dimensions are set to the full frame size for the selected video standard.
NOTE With the exception of 720 x 486, the width and height must be a multiple of 16. Video data
is normally captured at full frame sizes, which are 720 x 486 for NTSC (525 line, 59.94 Hz)
and 720 x 576 for PAL (625 line, 50 Hz). You can resample video data on capture to lower
resolutions or square pixel sizes to meet your requirements.
4. Click either the NTSC or PAL radio button to specify a video format for the capture.
NOTE You must use the same video format (NTSC or PAL) throughout an entire video project.
StudioZ Central Plus does not act as a video standards converter.
5. From the Compress menu, select the method that meets your requirements. If you
choose a type of compression other than MJPEG Compressed (that is, you do not want
JPEG compression of the video), the video data is captured and written to the capture
file without compression.
Page 23

11
6. Under Quality, either key in a value between 0 and 100 or use the scroll arrows to set the
value. A higher quality value results in higher quality video that requires more disk
space. A lower quality value requires less disk space for the captured AVI, but the
output image quality is lower.
−
Recommended video quality settings:
Betacam SP, 98
S-Video, 91 to 98
DigiBeta, 98
7. Under Capture Duration, key in the number of frames you want to capture. A 0 value
allows you to capture an infinite number of frames.
8. Click the Audio Settings tab at the top of the dialog box and go to the next exercise,
“Configuring the Audio Settings.”
Page 24

12
Configuring the Audio Settings
In addition to defining the video settings, you must also configure some audio settings. The
Capture AVI File dialog box should still be open.
In the last step of the previous exercise, you selected the Audio Settings tab. The Audio
Settings parameters should be displayed.
To configure audio settings:
1. Click the Audio Enable option to select it. A checkmark is displayed in the box to
indicate that the option is enabled.
2. From the Sample Rate menu, select a rate that meets your specifications. The sampling
rate defines the rate at which audio samples are taken. For example, audio CD-ROMs
use a sampling rate of 44.100 kHz, whereas AM radio quality is 11.025 kHz.
3. Under Channels, select either Mono or Stereo. Mono files use one track to store
information. Stereo files use two tracks to store audio information, doubling the amount
of information per frame.
Page 25

4. Under Resolution, select either 8 Bit or 16 Bit. Resolution defines the amount of storage
space required for each sample of the digitized audio file. 16-bit files have greater
dynamic range; 8-bit files use less memory to store information.
5. Click OK to accept your settings and dismiss the Capture AVI File dialog box.
Capturing an Audio/Video Sequence
Once you have configured the audio and video capture settings, you are ready to record the
signal and save it to an audio/video capture file.
To capture the audio/video sequence:
1. Start the audio/video signal from the signal source (video tape recorder, camcorder, or
other source).
2. From the AVI Control (displayed on the StudioZ Central Plus interface), click the
Record button
bar at the bottom of the StudioZ Central Plus interface.
. The number of frames captured and dropped is displayed in the status
13
Page 26

14
Page 27

3 Building an AVI from Bitmaps
The Bitmaps command lets you convert a series of frames, stored as individual raster files,
into a single AVI. This chapter explains how to configure the video output settings, then
load and manipulate a raster image sequence.
Before You Begin
Before you can build an AVI from bitmaps, you must create and save a series of raster image
files using another application (typically an animation package). A series of raster files is
the normal output of many animation software packages.
The StudioZ Central Plus application must be active. Select SZCentral from the StudioZ
Central Plus program group to start the application. See “Starting StudioZ Central Plus” in
Chapter 1 for more information.
Configuring the Video Output Settings
15
You should configure the video output settings before you import a raster image sequence.
This will make the editing easier, particularly if your image has color problems. For
example, if there is not enough contrast the image sequence may be so dark that you must
adjust the brightness to see picture details.
NOTE You can change the video settings configuration at any time during editing. However, some
changes to settings — such as gamma adjustments — may not be apparent until you save
the raster image series as an AVI and play it back.
To configure the video output settings:
1. From the File menu on the StudioZ Central Plus interface, select New AVI. This
displays a secondary cascading menu; select From Bitmaps from this secondary menu.
– OR –
Click the Build AVI
displayed at the top of the StudioZ Central Plus interface by default. If it is not
displayed, select Toolbar from the View menu.)
The Build AVI from Bitmaps dialog box is displayed:
button on the StudioZ Central Plus toolbar. (The toolbar is
Page 28

16
2. Click the Browse button and locate your video storage drive, then type a file name for
the AVI file you are capturing.
NOTE If you place the captured video sequence in the system drive, the sequence will drop frames.
3. Set the Width and Height to meet your specifications.
NOTE With the exception of 720 x 486, the width and height must be a multiple of 16. Video data is
normally captured at full frame sizes, which are 720 x 486 for NTSC (525 line, 59.94 Hz) and
720 x 576 for PAL (625 line, 50 Hz). You can resample video data on capture to lower
resolutions or square pixel sizes to meet your requirements.
4. Click either the NTSC or PAL radio button to specify a video format for the capture.
NOTE You must use the same video format (NTSC or PAL) throughout an entire video project.
StudioZ Central Plus does not act as a video standards converter.
5. From the Compress menu, select a compression driver.
The Intergraph StudioZ Driver (IYUV) creates an uncompressed YUV video sequence;
the AVI will be built without any compression applied. The Intergraph StudioZ Driver
(MJPG) creates a JPEG-compressed video sequence. See “StudioZ Driver Requirements
in Chapter 1 for information on obtaining the latest StudioZ driver for your workstation.
Page 29

NOTE If the AVI is meant for multimedia software playback, you can select a driver available from
the system instead of specifying one here.
NOTE You must select one of the Intergraph StudioZ drivers if you want to play the AVI within
StudioZ Central Plus. If you select any other driver, you must use other AVI playback
software.
6. If you are using video compression, either key in a value between 0 and 100 or use the
scroll arrows to set the Quality value. A higher quality value results in higher quality
video that requires more disk space. A lower quality value requires less disk space for
the captured AVI, but the output image quality is lower.
−
Recommended video quality settings:
Betacam SP, 98
S-Video, 91 to 98
DigiBeta, 98
7. Select the Maintain Aspect Ratio option to ensure that the frames will remain consistent
with their original size ratio.
If you do not select this option, the frames may stretch or shrink to completely fill the
video frame. This can distort the original pixel aspect ratios of the image.
8. Select the 3:2 Pulldown option if you want to play 24 fps sequences at NTSC speed
(29.97 fps).
17
9. Click the Bitmap Files tab at the top of the dialog box and go to the next exercise,
“Loading a Raster Image Sequence.”
Page 30

18
Loading a Raster Image Sequence
Now that you have the video output settings configured, specify the raster files you are going
to use to build the AVI. The Build AVI from Bitmaps dialog box should still be open.
In the last step of the previous exercise, you selected the Bitmap Files tab. The Bitmap Files
parameters should be displayed:
To load a raster image sequence:
1. Select the files you want to use to build the AVI.
There are two ways to do this:
−
Open Windows NT Explorer and move to the directory containing the files you
want to use. Select the files and drag them to the list box on the Bitmap Files tab.
−
Click the Browse button. When the Select Bitmap Files dialog box displays, select
the images you want to use.
2. Use the MoveUp, MoveDn, Remove, and Clear buttons to place the raster images in the
order you want.
Page 31

3. If you want to view a bitmap on your external monitor, select that bitmap from the list
box on the Bitmap Files tab and then select Display. That frame is then displayed on the
external monitor — this is useful when you adjust the gamma as described in the next
exercise.
NOTE A checkmark displays in the box beside the Display option, indicating that it is selected.
Select the option again to turn Display off.
4. Click the Gamma Adjust tab at the top of the dialog box and go to the next exercise,
“Adjusting the Gamma.”
Adjusting the Gamma
Once you have loaded the raster images from which you are going to build the AVI, you can
adjust the RGB values of the images. You may find it useful to display the frame on your
external monitor as described in the previous exercise, “Loading a Raster Image Sequence.”
If the frame is not displayed, click the Bitmap Files tab and verify that the Display option is
selected.
In the last step of the previous exercise, you selected the Gamma Adjust tab. The Gamma
Adjust parameters should be displayed:
19
Page 32

20
To adjust the gamma:
1. Select Locked if you want to adjust all three values by the same amount, or Unlocked if
you want to adjust each color individually.
2. Under Red, Green, and Blue, either key in a value or drag that color’s slider to adjust it.
3. Go to the next exercise, “Saving an Edited Sequence to an AVI.”
Saving an Edited Sequence to an AVI
Once you have set the parameters on all three tabs of the Build AVI from Bitmaps dialog box
to meet your specifications, you can save the sequence to an AVI.
To save an edited sequence to an AVI:
1. On the Build AVI from Bitmaps dialog box, click OK. The dialog box is dismissed and
you are prompted to confirm that you want to build the file.
2. When the build confirmation dialog box displays, click Yes to build the AVI.
If you do not want to build the AVI, click No and the Build AVI from Bitmaps dialog
box will be reactivated. Click Cancel to exit the command, or modify the settings again
and click OK to create an AVI.
Page 33

4 Setting Up a Batch Build
StudioZ Central Plus can search for a series of raster image files in different directories and
build the AVI from those images — even when you are not on the system. The Batch Build
AVI from Bitmaps command is useful for setting up a build before the raster images are
created. The batch job will wait for the files to be created and then build the AVI. This
chapter explains how to set up a batch job and build an AVI at a time you specify.
Before You Begin
Before you can build an AVI from bitmaps, you must specify a directory where the raster
files will be stored when they are created. A series of raster files is the normal output of
many animation software packages; see the documentation for your application if you need
information on saving the files.
The StudioZ Central Plus application must be active. Select SZCentral from the StudioZ
Central Plus program group to start the application. See “Starting StudioZ Central Plus” in
Chapter 1 for more information.
21
Configuring the Batch Build Settings
You should configure the video output settings before you import a raster image sequence.
This will make the editing easier, particularly if your image has color problems. For
example, if there is not enough contrast the image sequence may be so dark that you must
adjust the brightness to see picture details.
NOTE You can change the video settings configuration at any time during editing. However, some
changes to settings, such as gamma adjustments, may not be apparent until you save the
raster image series as an AVI and play it back.
To configure the video output settings:
1. From the File menu on the StudioZ Central Plus interface, select New AVI. This
displays a secondary cascading menu; select Batch Build from this secondary menu.
The Batch Build AVI From Bitmaps dialog box is displayed, and the AVI File tab is
selected.
NOTE This tab is identical to the AVI File Settings tab on the Build AVI from Bitmaps dialog box,
discussed in the previous chapter. See “Configuring the Video Output Settings” in Chapter 3
if you need information on setting these parameters.
2. Fill out the parameters on the AVI File Settings tab to meet your specifications.
Page 34

22
3. Click the Bitmap Files tab at the top of the dialog box and go to the next exercise,
“Specifying a Raster Image Sequence.”
Specifying a Raster Image Sequence
Now that you have the video output settings configured, specify the raster files you are going
to use to build the AVI.
In the last step of the previous exercise, you selected the Bitmap Files tab. The parameters
for selecting raster images and specifying the number of frames are displayed.
To load a raster image sequence:
1. Under Base name, specify a prefix for a series of raster images from which the command
will build the AVI.
The “base name” refers to the name of the raster images that you specify. This name
can contain up to 249 characters. The last part of the filename is a multidigit sequential
number starting with 000. For example, if you want to build an AVI from a set of
bitmaps called
FRM001.BMP, FRM002.BMP, and so on, type FRM in the Base Name field.
Page 35

2. From the File type menu, select the type of raster images that will be used in the build.
3. Under First in the Frames portion of the dialog box, specify the beginning frame for the
sequence. For example, if the first raster image is FRM0073.BMP, type 73 in the First
field.
4. Under Count in the Frames box, specify the total number of frames in the sequence.
Make sure you enter the total number of frames in the sequence rather than the last
frame number.
NOTE All frame numbers must be sequential.
5. Under Copies in the Frames box, enter the number of times each raster image is placed
in the AVI.
6. Under Source directories, enter the directories that contain the raster images for the
AVI.
You can key in the directory (or directories) in the list box, or click the Browse button to
activate a Directory Browser where you can search for the directories.
If you want to specify a directory on another node, type the \\node\share name in the list
box.
7. Click the Schedule tab at the top of the dialog box and go to the next exercise,
“Scheduling the Batch Build.”
23
Page 36

24
Scheduling the Batch Build
Now that you have defined which images will be used in the AVI, you will specify a time for
the batch build. The Batch Build AVI From Bitmaps dialog box should still be displayed.
In the last step of the previous exercise, you selected the Schedule tab: The Schedule
parameters should be displayed:
To schedule the build:
1. Under Start Job, click In and either key in an amount of time (in hours:minutes) or use
the scroll arrows to start the batch build after the specified amount of time has passed.
– OR –
Click At and either key in a time or use the scroll arrows to specify when the job will
start. The time is based on a 24-hour clock that is synced with your computer’s clock.
2. Under Check Rate, specify how often the batch job checks for the raster images to
appear.
Page 37

3. Click the Gamma Adjust tab at the top of the dialog box and go to the next exercise,
“Adjusting the Gamma.”
Adjusting the Gamma
Now that you have defined the images you want to use or specified the directories in which
the command will search and set a time for the batch build, you can adjust the gamma values
of the images. The Batch Build AVI From Bitmaps dialog box should still be displayed.
In the last step of the previous exercise, you selected the Gamma Adjust tab. The Gamma
Adjust parameters should be displayed:
25
To adjust the gamma:
1. Fill out the parameters on the Gamma Adjust tab to meet your specifications.
NOTE This tab is identical to the Gamma Adjust tab on the Build AVI from Bitmaps dialog box,
discussed in the previous chapter. See “Adjusting the Gamma” in Chapter 3 if you need
information on setting these parameters.
Page 38

26
2. Click OK. The Batch Build AVI From Bitmaps dialog box is dismissed and a summary
dialog box is activated. The Summary dialog box displays the time at which the job will
start. See “Following the Batch Job Progress” in this chapter for more information on
the Summary and Details dialog boxes.
Following the Batch Job Progress
When you click OK on the Batch Build AVI From Bitmaps dialog box, that dialog box is
dismissed and a Summary dialog box is displayed.
Using the Summary Dialog Box
The Summary dialog box displays the name of the AVI to be created and start time for the
batch job.
Options
Cancel Deletes the batch job. If you click Cancel, the job is cancelled. If you want to
collapse this dialog box, click the minimize button in the upper right corner.
Do not click Cancel to collapse it.
Details Displays the Details dialog box which contains specific information on the job,
including details about each frame. See “Using the Details Dialog Box” in this
chapter for more information.
Help Activates the online Help for this topic.
Start Now Disregards the time you specified on the Schedule tab of the Batch Build AVI
From Bitmaps dialog box and initiates the job.
Page 39

Using the Details Dialog Box
The Details dialog box displays when you click Details on the Summary dialog box
(discussed in “Using the Summary Dialog Box” in this chapter).
27
The Cancel, Help, and Start Now buttons have the same functionality as they did on the
Summary dialog box. If you want to return to the Summary dialog box, click the Summary
button.
NOTE As with Summary, the Cancel button deletes the batch job. If you only want to minimize the
dialog box, click the minimize button in the upper right corner. Do not click Cancel to
collapse the Details dialog box.
In addition to telling you when the batch job will start, the Details dialog box displays the
status of each frame in the build. Before the job begins, the information field shows that the
file is not found — this is not an error message. The command is just letting you know that
it hasn’t started looking for the bitmaps yet because it’s not time for the job to start.
Page 40

28
Each square in the dialog box represents a potential frame. Squares that contain an ‘X’ are
empty; that is, they are not associated with a frame. Empty squares indicate a placeholder
for a frame that has not been found yet. The square displays a red box when the frame
associated with it is found, and a green box when that frame has been processed. Position
the mouse over the squares to get more information on a particular frame.
Once the job starts, the information field updates as each bitmap is found. The message “All
files have been found!” is displayed when it is finished searching. The process will build the
AVI as frames are available, and waits if it needs a frame that is not yet available. The
information field continues to update, providing a count of how many frames are complete
and how many have yet to process.
Page 41

5 Playing the AVI
Once you have an AVI (created using one of the commands under New AVI, or an existing
AVI), you can view that AVI on an external video monitor. The AVI does not appear on
your computer display monitor. You can also record the audio/video output to video tape.
Before You Begin
Before you play the AVI, you must connect an external video monitor to your workstation.
For details on connecting the appropriate hardware, see the StudioZ Hardware User’s Guide.
The StudioZ Central Plus application must be active. Select SZCentral from the StudioZ
Central Plus program group to start the application. See “Starting StudioZ Central Plus” in
Chapter 1 for more information.
Playing an AVI
29
To play an AVI:
From the AVI Control (displayed on the StudioZ Central Plus interface), click the Play
button
When the AVI starts playing, the Status Bar displays the number of frames played. The
Status Bar is displayed by default. If you do not see it, choose Status Bar from the View
menu. A checkmark displays beside the menu item, indicating that it is selected.
To stop the AVI:
From the AVI Control, click the Stop
.
button to stop the playback at any time.
Page 42

30
Setting Playback Options
The Play menu contains some settings that control how the AVI displays:
Edit Playlist Lets you choose multiple AVIs for playing. See “Using a Playlist for
Multiple AVIs” later in this chapter for more information.
Audio Enable Plays any audio information associated with the AVI. You can also select
this command from the toolbar.
Auto Loop Plays the file continuously from beginning to end, until you select the
Stop button. You can also select this command from the toolbar.
The Audio Enable and Auto Loop options are toggles. A checkmark appears in the Play
menu and the button on the toolbar is depressed when the option is selected. Select the
option again (either from the Play menu or from the toolbar) to turn it off.
Navigating the AVI
There are several ways to move around in an audio/video sequence without playing the entire
AVI.
To change the starting point of the playback, under AVI Control:
u
Drag the Frame Slider to the point you want in the AVI. As you move the slider to the
left or right, the corresponding frames display on the video monitor.
u
Click the Frame Scroll arrows to move forward or back to another point in the AVI.
u
Select the Go To Mark In, Rewind, Fast Forward, and Go To Mark Out buttons to move
to another point in the AVI.
u
Key in the frame number you want in Current Frame field (on the right of the slider).
Playing Part of an AVI
You can define how much of the audio/video sequence plays by defining a starting and
ending point.
To play a selected part of an AVI:
1. Drag the AVI Control frame slider to the starting point of the section you want to mark.
Page 43

2. Click the Set Mark In button. This marks the current frame as the first frame in the
sequence to play.
3. Drag the slider to the ending point of the section you want to mark.
31
4. Click the Set Mark Out
section you want to play.
5. Click the Play
button to play the selection you just defined.
button, then drag the slider back to the beginning of the
Using a Playlist for Multiple AVIs
You can play a series of AVIs by creating a playlist. When you specify a playlist with two or
more AVIs, those files are played in the order in which they are listed in the playlist. For
example, if you create a playlist containing the files
the entire
BOOM.AVI file.
FLIGHT.AVI file is played first, followed by the CHASE.AVI file, and finally the
Creating a Playlist
To create a playlist:
1. From the Play menu on the StudioZ Central Plus interface, select Edit Playlist or click
the Edit Playlist
button on the toolbar. The Edit Playlist dialog box is activated:
FLIGHT.AVI, CHASE.AVI, and BOOM.AVI,
Page 44

32
2. In the File text entry field, key in the name of the AVI that you want to play. Or, click
the Browse button to activate the Open dialog box where you can search for the files you
want. The files you select are displayed in the Edit Playlist dialog box.
3. Use the MoveUp, Remove, Duplicate, and MoveDn buttons to put the AVIs in the order
you want. The files will play in the order in which they appear in the playlist.
If you need to remove a file from the playlist, select that file and click Remove. Click
Clear to remove all of the files from the current playlist.
4. Define Start and End points for the files in the playlist. Select a file from the list, then
either key in a starting position or move the slider to define the Start parameter.
Once you have defined the Start point, follow the same procedure to define the End
point.
NOTE The start and end points define a segment to play from each AVI. You can play a bitmap on
the list for any duration.
5. Click OK to accept the changes and close the Edit Playlist dialog box.
6. From the AVI Control, click the Play
button to play the sequence of files you selected
with Edit Playlist.
Page 45

Saving Video Frames
There are three ways to save your video frames or video sequence: as an AVI, as bitmaps, or
to a playlist.
Saving a Range of Files to an AVI
To save a range of video frames to an AVI:
1. Under AVI Control, drag the Frame Slider to the starting point of the section you want
to mark.
33
2. Click the Set Mark In
sequence to save.
3. Drag the slider to the ending point of the section you want to save and click the Set
Mark Out
4. From the File menu, select Save As. This displays a secondary cascading menu; select
AVI from this secondary menu.
– OR –
Click the Save AVI
The Save AVI File dialog box displays.
button.
button. This marks the current frame as the first frame in the
button on the toolbar.
Page 46

34
5. Key in a name for the AVI File, or click the Browse button to move to another directory
and save the file or overwrite an existing file.
NOTE If you place the captured video sequence in the system drive, the sequence will drop frames.
6. Set the rest of the parameters to meet your specifications, and click OK. The sequence
is compiled and saved, and you are returned to the StudioZ Central Plus interface.
NOTE Audio information is not copied to the output AVI.
Page 47

Saving Video Frames as a Raster File Sequence
To save frames to a series of raster files:
1. From the File menu on the StudioZ Central Plus interface, select Save As. This
displays a cascading menu; select Bitmap from this secondary menu. The Save As
dialog box displays:
35
2. From the Save as type menu, select the type of file to which you want to save the image.
3. Key in the file name and extension in the File name field and press TAB. The file
extension is not automatically added when you select the file format.
4. Click the Save button. The file is saved and the dialog box is dismissed.
The selected video sequence is saved in individual raster files, one video frame per raster
file. The file name is based on the bitmap name specified on this dialog box; a file
ABC.BMP produces files ABC000, ABC001.BMP, and so on.
named
Page 48

36
Saving the Playlist to a File
When you save the playlist, a file is created that contains the contents of that playlist. This
command only saves the names of the AVIs in the playlist file. If you delete the AVIs that
playlist calls, the playlist becomes invalid. When you open the playlist file, all of the AVIs
contained in that playlist are opened. You can add and delete AVIs from your playlist
without having to rebuild anything.
To save the AVI to the playlist:
1. From the File menu on the StudioZ Central Plus interface, select Save As. This displays
a secondary cascading menu; select PlayList from this secondary menu. The Save As
dialog box displays.
This is the same dialog box that is activated by Save As Bitmap, although the Save as
type field is set to SZ PlayList (*.
SZL).
2. Key in a name for the playlist, or move through the directories to find a playlist file that
you want to overwrite.
NOTE If you save the playlist file to the same directory where the AVIs that playlist calls are stored,
you can move the playlist and the AVIs simultaneously and not invalidate your playlist. This
is useful if you have a working directory where you store current projects, and want to move
finished projects to another location. If you move the playlist file and the AVIs separately;
that is, you save the playlist file to a particular directory, then later move the AVIs that playlist
references, your playlist becomes invalid.
3. Click the Save button. The AVI is saved to the playlist that you specified. Use the Edit
Playlist command to place the AVI in the order you want to play it.
Page 49

Recording an AVI to Video Tape
Before you can record an AVI to video tape, you must connect a video tape recorder to the
StudioZ workstation as described in the StudioZ Hardware User’s Guide. Start the video
tape recorder, then play the AVI.
NOTE The status bar may display a number that represents the number of video frames waiting to
play (dropped frames). If you see such a number, the hard disk is not keeping up with the
video playback and is dropping frames. In this situation, you would see a hesitation in the
sequence on the video monitor, and the hesitation would be recorded to the video tape. The
number in the status bar alerts you of any dropped frames in case you were not watching the
video monitor when it occurred. See the
information.
StudioZ Hardware User’s Guide
for more
Displaying the VTR Control
The parameters on the VTR Control let you manipulate your VTR from within StudioZ
Central Plus. You must have a VTR connected to your StudioZ workstation to use these
controls. See the StudioZ Hardware User’s Guide for information on connecting a VTR to
your workstation.
37
To display the VTR control:
From the View menu on the StudioZ Central Plus interface, select VTR Control.
– OR –
Click the VTR Control
the StudioZ Central Plus interface.
Use the VTR controls to define and go to specific points on the tape. See the online Help for
a description of each VTR control.
button on the toolbar. The VTR controls display at the bottom of
Page 50

38
Capturing from Tape to an AVI
You can use the VTR controls to record from tape and save the data to an AVI.
To capture from tape to an AVI:
1. Under VTR Control, drag the jog shuttle (slider) to the starting point of the sequence
you want to capture.
2. Click the Set Mark In
starting point.
3. Drag the jog shuttle to the ending point of the sequence you want to capture and click
the Set Mark Out
point.
– OR –
Key in a location in the Duration text entry field to define the length of the sequence you
are going to capture.
4. Click the Capture to File
NOTE See Chapter 1, “Capturing a New AVI,” for information on this dialog box.
5. Fill out the Capture AVI File dialog box to meet your specifications, and click OK. The
tape in the VTR is positioned at the pre-roll point and starts playing. It is saved to the
file name you specified and stops at the end point you defined or after the duration you
specified.
button (under VTR Control) to mark that frame as the
button (under VTR Control) to mark that frame as the ending
button. The Capture AVI File dialog box displays.
Capturing Multiple Sequences from Tape
Use the Batch Capture command to capture multiple sequences from tape. This is different
than the Batch Build from Bitmaps command discussed in Chapter 4, “Setting Up a Batch
Build.” With Batch Build, you saved a series of raster files to an AVI. With the Batch
Capture command, you will capture several sequences from a tape and save them to an AVI.
To perform a batch capture:
1. Select the Batch Capture
capture parameters display under the VTR Controls:
button from the StudioZ Central Plus toolbar. The batch
Page 51

39
2. Under Directory, type a directory path where the new AVI will be saved.
NOTE If you place the captured video sequence in the system drive, the sequence will drop frames.
3. Under Reel Name, type the name of the tape from which you are capturing AVI
sequences.
4. Under File Name, type a name for the new AVI.
5. Click the Setup button to display the Capture Parameters. This is where you define the
width and height, compression, quality, sample rate, channels, and resolution for the
sequences being captured.
The settings you define apply to the entire capture list, not the individual sequences that
are captured. The parameters on the Capture Parameters dialog box work the same way
as the parameters described in Chapter 2, “Capturing a New AVI.”
See “Configuring the Video Output Settings” in Chapter 2 for information on setting the
parameters on the Capture Parameters AVI File Settings tab.
See “Configuring the Audio Settings” in Chapter 2 for information on setting the
parameters on the Capture Parameters Audio Settings tab, then click OK to return to the
Batch Capture dialog box.
Page 52

40
6. Follow the steps outlined in the previous section, “Capturing from Tape to an AVI” to
mark a sequence for capture.
7. Click Add to place the sequence defined under the VTR Control Start, End, or Duration
fields in the Filename list box under Batch Capture.
8. Continue to define as many sequences as you want to capture using the VTR Control,
and click Add to add each of those sequences to the capture list under Batch Capture.
9. Select a sequence from the capture list and click Remove if you need to delete it from the
capture list.
10. Under VTR Control, click the Capture to File
the capture list are saved to the AVI you specified.
11. Click Clear to remove all of the sequences from the capture list.
12. When you are finished capturing sequences, select the Batch Capture
the toolbar again to dismiss those parameters.
Recording to Tape from an AVI
You can use the VTR controls to record data from an AVI and save it to tape.
To record a video sequence from an AVI to tape:
1. Under VTR Control, drag the jog shuttle (slider) to the starting point of the sequence
you want to record.
2. Click the Set Mark In
starting point.
3. Drag the jog shuttle to the ending point of the sequence you want to capture and click
the Set Mark Out
point.
– OR –
button (under VTR Control) to mark that frame as the
button (under VTR Control) to mark that frame as the ending
button. The sequences you placed in
button from
Key in a location in the Duration text entry field to define the length of the sequence you
are going to record.
4. Click the Record to Tape
tape in the VTR device.
button. The video sequence you defined is written to the
Page 53

6 Using the SDI Video Control
The SDI Video Control lets you adjust the color levels, contrast, and brightness of the video
data as it is captured or played back on the StudioZ workstation.
NOTE Adjustments made to video that you capture to an AVI are retained by the video data stored
in the file. Changes you make to video being played back affect only the video output and do
not change the data in the AVI. If you want to save the adjustments you make with SDI
Video Control during playback, you must record the audio/video output to video tape.
Before You Begin
The StudioZ Central Plus application must be active. Select SZCentral from the StudioZ
Central Plus program group to start the application. See “Starting StudioZ Central Plus” in
Chapter 1 for more information.
The SDI Video Control must be displayed.
To display the SDI Video Control:
41
From the StudioZ Central Plus toolbar, select the SDI Slider
Control dialog box displays:
button. The SDI Video
Page 54

42
Adjusting Brightness and Color
Changing the Luminance of a Video Sequence
The sliders under Luminance in the SDI Video Control allow you to adjust the brightness of
the video data. The Gain slider controls the overall brightness level of objects in the video.
The Setup slider controls the black levels, or overall brightness, of the entire video picture.
For example, your video shows planets orbiting a sun in deep space. Moving the Gain slider
adjusts how bright the sun, nearby stars, and the planets appear against the black
background. Moving the Setup slider adjusts the overall picture brightness — in other
words, whether the deep space background appears to be black or a washed-out gray.
To adjust brightness in a video sequence:
1. Under Mode in the SDI Video Control, click Capture if you want to adjust the input
video, or Playback if you want to adjust the output video.
2. Under Range Limits, select Compress ranges to CCIR 601 if you want to limit the values
for the luminance. If you select this option, the luminance values are limited from 32
through 438 only.
3. Under Luminance, drag the Gain slider to adjust the brightness of the objects in the
video. For example, use this slider to change very bright objects (such as stars in a star
field) to be barely visible against a dark background.
– OR –
Key in a value between -12dB and +12dB.
4. Under Luminance, drag the Setup slider to adjust the brightness of the entire picture in
the video. Using this slider is much like turning a knob to adjust the brightness of your
monitor screen.
– OR –
Key in a value between -63.6 and 63.5.
Next you will adjust the colors in the video sequence, so do not close the SDI Video
Control.
Page 55

Changing the Chrominance of a Video Sequence
The sliders under Chrominance in the SDI Video Control manipulate the colors of the video.
The Gain slider controls the color shade of objects in the video. The Phase slider controls
the primary color of objects in the video. For example, your video of planets orbiting the sun
shows three red planets. Move the Gain slider to adjust how red the planets are — light red,
dark red, rosy red, blood red, and so on. Move the Phase slider to change the color shades of
the planets from red to orange, yellow, green, blue, or purple — all of the colors contained in
the visible spectrum.
NOTE The SDI Video Control should be displayed.
To adjust the colors in a video sequence:
1. Under Chrominance, drag the Gain slider to adjust the color shade of the objects in the
video. For example, you can change a dark green object to olive green, neon green,
forest green, or pale green.
– OR –
Key in a value between -12dB and +12dB.
2. Under Chrominance, drag the Phase slider to adjust the primary color of objects in the
video. For example, change a blue object to purple, red, yellow, pink, or orange.
43
– OR –
Key in a value between -180 degrees and +180 degrees.
Next you will set some default values, so do not close the SDI Video Control.
Setting Default Values
You can set default values for the luminance and chrominance. Once you set defaults, you
can quickly return the luminance and chrominance to their original values after you modify
them.
NOTE The SDI Video Control should be displayed.
To set default values for luminance and chrominance:
1. Under Luminance, drag the sliders for Gain and Setup to the brightness levels you
require.
2. Under Chrominance, drag the sliders for Gain and Phase to the color intensity you
require.
3. Click the Change Defaults button. The default values are now set. If you make changes
to the color and brightness of the video and later want to return to the default values you
just set, click the Load Defaults button.
Page 56

44
4. Once you have finished adjusting the parameters on the SDI Video Control, click OK.
Your changes are applied and the SDI Video Control is dismissed.
Page 57

7 Frequently A sked Questions
Why is there a popping noise when one clip ends and another clip starts?
This normally only occurs when the two clips have different audio formats. If this is the
case, you must stop and restart the WAV driver that caused the popping noise. To avoid this
problem in the future, do not mix clips of different audio formats in the playlist when
playing with audio. See Chapter 2, “Capturing a New AVI,” for information on setting
audio formats.
Why does my saved AVI have some discolored areas in every frame?
This normally will occur only if the original AVI was captured with luminance and
chrominance values outside of the legal CCIR 601 ranges. If this happens, when a color
space transformation is performed on the AVI (which occurs when you save it to another
AVI through StudioZ Central Plus), the colors will be transformed incorrectly. To avoid this
problem, always make sure that the Compress Ranges to CCIR 601 option on the SDI video
Control is selected. See Chapter 6, “Using the SDI Video Control” for more information.
Why does my saved AVI have no sound?
45
If you save an AVI to another AVI using StudioZ Central Plus, it does not copy the audio
portion of the file.
Why does a movie captured using audio resolution 8 crackle when played?
There is not enough resolution in 8-bit audio to ensure clear sound. For clean audio, capture
at 16-bit resolution. See “Configuring the Audio Settings” in Chapter 2 for more
information.
Why does my movie look fine after capture but jitter after being used in an editor
program?
The field order for the clip could be incorrect. Most editors allow the user to select the field
order for both the output movie and for the reading of individual clips.
Why does the output become distorted when I build a movie from bitmaps?
When you change the dimensions of a movie, the output will be distorted unless you select
the Maintain Aspect Ratio option. This will ensure that the visible part of the movie is not
distorted, and places black borders at the edges to make up the unfilled space. If you do not
select the Maintain Aspect Ratio option, the movie will be stretched to fit the new screen
dimension which can distort the output.
The Maintain Aspect Ratio option is located on the AVI File Settings tab for the Build AVI
from Bitmaps, Batch Build AVI from Bitmaps, and Save as AVI commands. See
“Configuring the Video Output Settings” and “Saving an Editing Sequence to an AVI” in
Page 58

46
Chapter 3 for more information. See the StudioZ Central Plus Online Reference Guide for
detailed information on this option.
Why can’t I delete a movie after capturing and playing it using VTR Control?
The file is still on the StudioZ Central Plus playlist and shows as open to the Windows
operating system. From the File menu, select Close All to remove the movie from the
playlist, after which you can delete it.
Why does the current frame keep changing on the VTR Control?
The current frame tracks the current position of the VTR, and if the VTR is in motion the
time changes. See Chapter 5, “Playing the AVI,” for more information on the VTR Control.
Why can’t I select all of my bitmaps to build an AVI?
This is a limitation within the Microsoft standard Open File dialog box. However, you can
select all of the files in Explorer and drag them into the Bitmap window. Otherwise, select
as many as you can in the Open File browser and click OK. When the original dialog box is
re-displayed, click the Browse button again to return to the Open File dialog box and select
more files (this can take multiple browser operations depending on the number of files you
want to select).
Why am I dropping frames during capture?
Video capture is a very CPU-intensive process, and very time critical. If any other processes
are running concurrently with the capture, these processes use up valuable CPU cycles and
can cause frame dropping. Even moving the cursor around the screen excessively or
popping up other windows can cause this on some systems. Therefore it is best to close all
other windows and shut down as many other processes as possible for the duration of the
capture process.
Why am I not getting any sound during capture or playback?
This could be any of several problems:
u
The audio cables may not be hooked up. See the StudioZ Hardware User’s Guide for
information on connecting audio equipment.
u
The audio may not be enabled. Verify that the Audio Enable button on the StudioZ
Central Plus toolbar is selected or that a checkmark is displayed beside the Audio Enable
option under the Play menu. See “Setting Playback Options” in Chapter 5 for
information on the Audio Enable toggle.
u
The file may have been captured without audio. See “Configuring the Audio Settings”
in Chapter 2 for information on capturing audio.
Page 59

How do I fix an AVI built from bitmaps if one of the images was missing or needs to be
replaced?
Create a new playlist (using the Edit Playlist dialog box) that has the good sections from the
AVI and the replacement bitmaps needed, and then save the playlist as a new AVI. Note
that you will have to put the AVI on the playlist multiple times and specify different Mark In
and Mark Out points for each section. See “Using a Playlist for Multiple AVIs” in Chapter 5
for more information.
Why were some of my frames overwritten during Frame Snapshot?
47
This can happen if your frame names (the File name, such as
NEWFRAME002.BMP, and so on) are too long. Try using shorter file names for frame capture.
NEWFRAME001.BMP,
When I tried to create a file using the Batch Build command, an error message
informed me that it could not append to the file name and the command aborted. What
happened?
You probably tried to create an AVI with the same file name as an existing AVI. Batch
Build AVI from Bitmaps will not overwrite an existing file, and the command will exit. Try
specifying a unique file name. See Chapter 4, “Setting Up a Batch Build,” for more
information.
Why can’t my editing program read my captured file?
StudioZ Central Plus supports the ODML file format. If you captured an AVI while not in
Multi File Mode, then the ODML file produced may be larger than 2GB. If so, your editor
will only see the first 2GB of data in the file. Select Multi-File Capture on the AVI File
Settings tab of the Capture AVI dialog box when capturing long clips to resolve this
problem. See “Configuring the Video Output Settings” in Chapter 2 for more information.
Why can’t I read a PIC file sequence?
StudioZ Central Plus can read and write the PIC file format used by SOFTIMAGE, but
cannot read the PIC format that Adobe uses. See the Preface for information on video input
and output formats used in StudioZ Central Plus.
Page 60

48
Page 61

Index
A
about this document, viii
adjusting gamma, 19, 25
aspect ratio, 17
audio capture settings, 12
AVI
batch build, 21
batch capture from tape, 38
building from bitmaps, 15
capturing from file, 9, 13
capturing from tape, 38
navigating, 30
playing, 29, 31
recording, 9, 37, 40
saving as, 20
saving to playlist, 36
AVI control, 30
current frame, 30
fast forward, 30
frame scroll, 30
frame slider, 30, 33
go to mark in, 30
go to mark out, 30
play, 29, 32
record, 13
rewind, 30
set mark in, 31, 33
set mark out, 31, 33
stop, 29
B
base name, 22
batch build, 21
check rate, 24
details, 27
gamma adjust, 25
overriding start time, 26
scheduling, 24
49
settings, 21
summary, 26
batch capture
from tape, 38
bitmaps
base name, 22
batch build, 21
building AVIs, 15
brightness
adjusting, 42
building AVIs
batch build, 21
from bitmaps, 15
C
capturing AVIs, 9, 13
from tape to file, 38
batch, 38
channels
mono, 12
stereo, 12
check rate, 24
chrominance
adjusting, 43
gain, 43
phase, 43
setting default, 43
colors
adjusting, 43
compression, 10
configure
audio output settings, 12
batch build, 21
video output settings, 9, 15, 21
controls
AVI, 29, 30
SDI, 41
VTR, 37
creating a playlist, 31
current frame, 30
Page 62

50
customer support, ix
D
details
batch build, 27
displaying
AVI Control, 9, 15
SDI video control, 41
toolbar, 9, 15
VTR control, 37
document conventions, viii
drag-and-drop, 18
drivers
loading, 2
obtaining, 1
starting, 3
stopping, 2
StudioZ, 1, 16
duration, 11, 38, 40
E
edit playlist, 31
editing
linear, v
nonlinear, v
F
fast forward, 30
FAXLink, x
features
video input, v
video playback, vi
files
drag-and-drop, 18
selecting, 18
frame
current, 30
dimensions, 10
height, 10
size, 17
width, 10
frame scroll, 30
frame slider, 30
AVI control, 33
frequently asked questions, 45
G
gamma
adjusting, 19, 25
go to
mark in, 30
mark out, 30
H
hardware
information, viii
support services, ix
height of frame, 10
Help
online reference guide, ix
I
input to StudioZ Central Plus, vii
installing StudioZ Central Plus, 3
InstallShield, 3
Intergraph
customer support, ix
FAXLink, x
hardware support, ix
IBBS, x
software support, ix
telephone support, x
WWW, x
J
jog shuttle, 38, 40
L
linear editing, v
loading
raster images, 18, 22
luminance
gain, 42
range limits, 42
setting default, 43
Page 63

51
setup, 42
M
maintain aspect ratio, 17
mark in, 30
mark out, 30
mono, 12
multiple files
playlist, 31
N
nonlinear editing, v
NTSC, vi
O
online Help, ix
output of StudioZ Central Plus, vii
overview of StudioZ Central Plus,
v
P
PAL, vi
play
AVI, 29, 31
AVI control, 32
playback options
setting, 30
playlist, 31
creating, 31
saving AVI, 36
product information
online Help, ix
readme.txt, ix
R
raster images
base name, 22
batch build, 21
loading, 18, 22
saving, 35
readme.txt, ix
recording AVIs, 9, 37, 40
removing StudioZ Central Plus, 4
requirements
system, 1
resolution
16-bit, 13
8-bit, 13
rewind, 30
S
sampling rate, 12
saving
raster images, 35
video frames, 33
saving sequences
as an AVI, 20
scheduling batch builds, 24
check rate, 24
overriding start time, 26
SDI video control, 41
adjusting brightness, 42
adjusting colors, 43
setting default values, 43
selecting
files, 18
set mark in
AVI control, 31, 33
VTR control, 38, 40
set mark out
AVI control, 31, 33
VTR control, 38, 40
software support services, ix
stereo, 12
StudioZ Central Plus
additional information, ix
input, vii
installing, 3
output, vii
overview, v
removing, 4
starting, 4
StudioZ drivers, 16
loading, 2
obtaining, 1
starting, 3
Page 64

52
stopping, 2
StudioZ hardware
information, viii
support services, ix
summary
batch build, 26
support services
FAXLink, x
hardware, ix
IBBS, x
software, ix
telephone, x
World Wide Web, x
system requirements, 1
T
telephone support, x
V
video
brightness, 42
capture settings, 9
compression, 10
input features, v
output settings, 15, 21
playback features, vi
quality, 11
video frames
saving, 33
video standards
NTSC, vi
PAL, vi
VTR control
batch capture, 38
capture to file, 38, 40
displaying, 37
duration, 38, 40
jog shuttle, 38, 40
record AVI file, 38
record to tape, 40
set mark in, 38, 40
set mark out, 38, 40
W
width of frame, 10
World Wide Web, x
 Loading...