

Page 1

StudioZ Starts Here!
Important Installation and Operation Notes
June 1998
DHA0170C0
Page 2

Copyright
1998 Intergraph Computer Systems. All rights reserved. This document contains information protected by copyright, trade secret,
and trademark law. This document may not, in whole or in part, be reproduced in any form or by any means, or be used to make any
derivative work, without written consent from Intergraph Computer Systems.
Use, duplication, or disclosure by the United States Government is subject to restrictions as set forth in subdivision (c)(1)(ii) of the
rights in technical data and computer software clause at DFARS 252.227-7013. Unpublished rights are reserved under the copyright
laws of the United States.
Intergraph Computer Systems, Huntsville AL 35894-0001
Notice
Information in this document is subject to change without notice and should not be considered a commitment by Intergraph Computer
Systems. Intergraph Computer Systems shall not be liable for technical or editorial errors in, or omissions from, this document.
Intergraph Computer Systems shall not be liable for incidental or consequential damages resulting from the furnishing or use of this
document.
All warranties given by Intergraph Computer Systems about equipment or software are set forth in your purchase contract. Nothing
stated in, or implied by, this document or its contents shall be considered or deemed a modification or amendment of such warranties.
Trademarks
Intergraph Computer Systems and the Intergraph Computer Systems logo are registered trademarks of Intergraph Computer Systems.
StudioZ, TDZ, RealiZm, and Intergraph ViZfx are trademarks of Intergraph Computer Systems.
Adobe, the Adobe logo, and Adobe Premiere are trademarks of Adobe Systems inforporated. Softimage is a registered trademark of
Softimage, a wholly-owned subsidiary of Microsoft Corporation. Microsoft and the Microsoft logo are registered trademarks of
Microsoft Corporation. Sonic Foundry and Sound Forge are registered trademarks of Sonic Foundry, Inc. SPEED RAZOR and the
SPEED RAZOR logo are trademarks of in:sync corporation. in:sync and RAZOR are registered trademarks of in:sync corporation.
Other brands and product names are trademarks of their respective owners.
Page 3

Contents
General Information ...............................................................................................................1
Delayed Power-up..................................................................................................................... 1
StudioZ Options....................................................................................................................... 1
Ensemble Serial Box I with PAL............................................................................................... 1
Single-Channel InterRAID-8e Video Storage........................................................................... 1
StudioZ for SOFTIMAGE|DS................................................................................................5
Flashkey .................................................................................................................................... 5
Antex Driver Settings................................................................................................................ 5
Antex Driver Reinstallation....................................................................................................... 5
Stripe Sets.................................................................................................................................. 7
StudioZ T-RAX........................................................................................................................7
Antex Driver Reinstallation....................................................................................................... 7
Stripe Sets.................................................................................................................................. 9
StudioZ Pro.............................................................................................................................. 9
Stripe Sets.................................................................................................................................. 9
Application Software............................................................................................................... 9
Adobe Premiere LE and Adobe Premiere 4.2 ........................................................................... 9
Adobe Premiere 5.0................................................................................................................. 16
in:sync SPEED RAZOR.......................................................................................................... 16
InterSite Products.................................................................................................................... 16
Sound Forge ............................................................................................................................ 16
StudioZ Central Plus ............................................................................................................... 17
Connecting Additional Single-Channel IR-8e Disk Arrays......................................... 2
Configuring Single-Channel IR-8e Disk Arrays.......................................................... 3
Obtaining the Fix Disk Utility..................................................................................... 4
Scratch Disk.............................................................................................................. 10
Preset......................................................................................................................... 10
Time Base ................................................................................................................. 11
Compression.............................................................................................................. 11
Output Options..........................................................................................................12
Preview Options........................................................................................................13
Capture Settings........................................................................................................ 14
Importing StudioZ AVI Files into Sound Forge 4.0.................................................. 16
Reblocking StudioZ AVI Files Edited in Sound Forge 4.0....................................... 17
Page 4

Page 5

General Information
Delayed Power-up
You may notice that your workstation seems to hang when you are booting up, or displays the
message “Device Not Ready.” Because of initial power requirements, drive spin-up is delayed
by 12 seconds times the SCSI ID number of each disk drive. For example, disk drive 4 (SCSI
ID 4) is delayed 12 seconds times 4, or 48 seconds. This is not a problem; the disk drive will
be ready when the BIOS process finishes. The required system BIOS level is 8000D or later.
StudioZ Options
Ensemble Serial Box I with PAL
The Ensemble Serial Box I is an optional A/D converter you can purchase for your StudioZ
workstation. If you experience a vertical roll when using the Serial Box I with PAL, verify
that the DIP switch setting (S1) in the converter is set to PAL. You will have to open the
converter box to make this change. See the Serial Box Digital and Analog Converters
Technical Manual delivered with your A/D converter for more information.
1
Single-Channel InterRAID-8e Video Storage
If you purchased the Just a Bunch of Disks (JBOD) FDSK590 InterRAID-8e (IR-8e) disk
array for your StudioZ workstation, you can create even more uncompressed and compressed
video file storage by purchasing the single-channel IR-8e (FDSK548) disk array. Each singlechannel IR-8e provides an additional hour of video storage space.
The StudioZ for SOFTIMAGE|DS comes with two Adaptec cards, while the StudioZ Pro and
StudioZ T-RAX workstations come with one. If you have either the StudioZ Pro or the
StudioZ T-RAX, you will need to purchase an additional Adaptec controller.
NOTE The JBOD IR-8e video storage option, setup instructions, and disk striping instructions are
provided in Appendix A, “StudioZ Options,” in the
NOTE If you have to purchase an additional Adaptec controller, see Chapter 4, “System-Specific
Information,” in the
that controller.
The Adaptec cards take up slots two and three on the StudioZ workstation. Refer to the
following illustration for the slot assignments.
StudioZ Hardware User’s Guide
StudioZ Hardware User’s Guide
for information on installing the driver for
.
Page 6

2
The following illustration shows the cables connected from the Adaptec card external
connectors to Channel 0 and 1 of the JBOD dual-channel IR-8e:
Connecting Additional Single-Channel IR-8e Disk Arrays
Because of the IR-8e drive configuration, you will need to purchase single-channel IR-8e disk
arrays in multiples of two. These first two single-channel IR-8e disk arrays (FDSK548) to the
JBOD (FDSK590). You can purchase subsequent sets of single-channel IR-8e disk arrays to
connect to each previous single-channel IR-8e. The following illustration shows how the first
single-channel IR-8e set connects to the JBOD.
Page 7
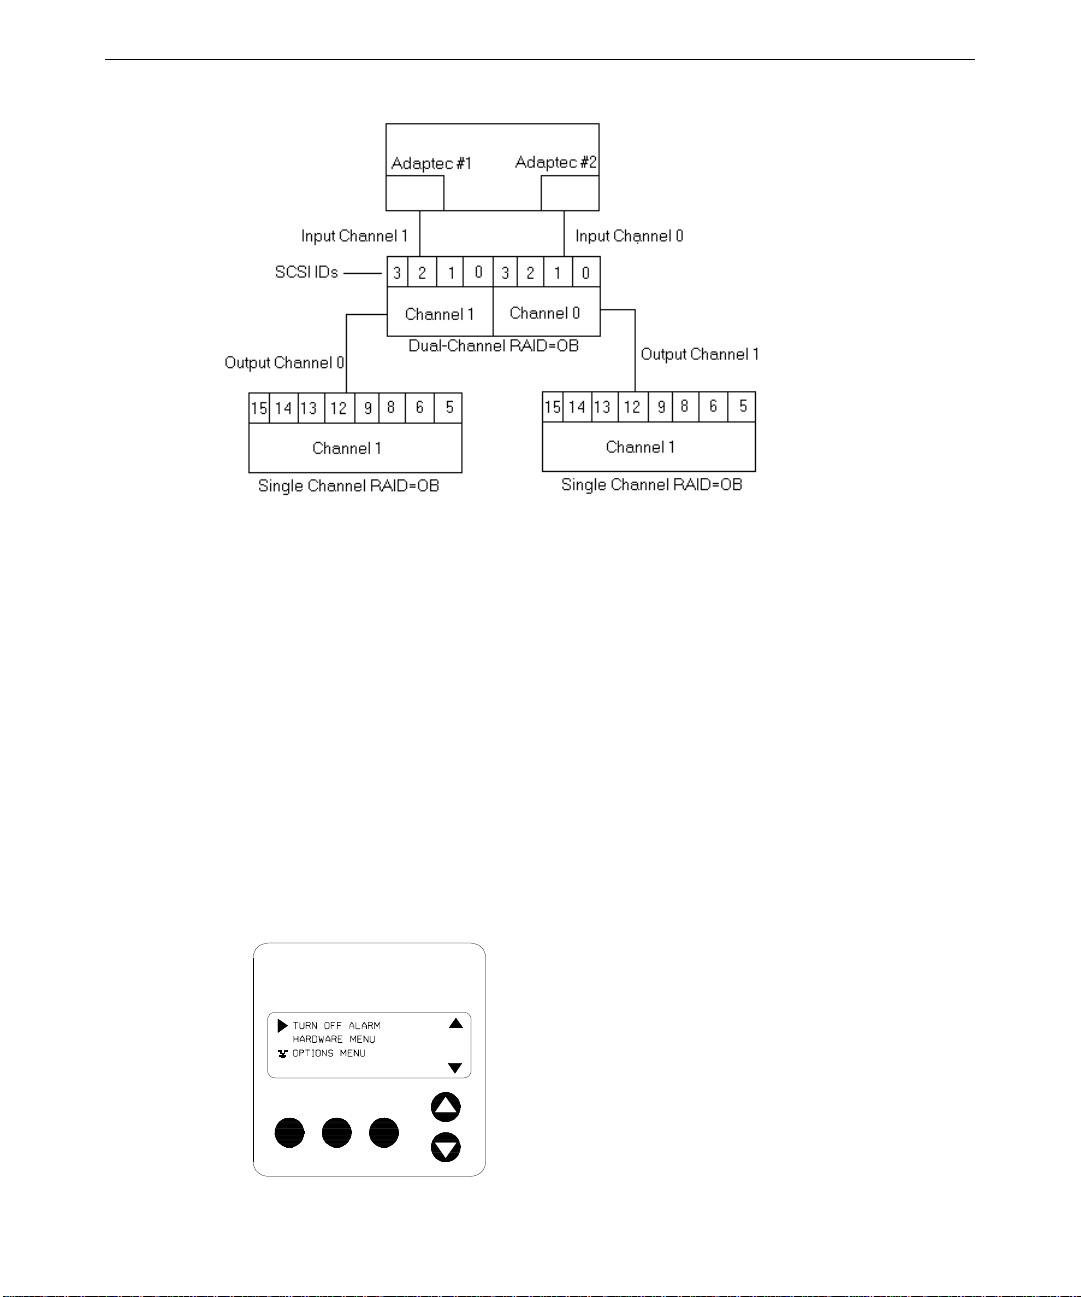
To connect the single-channel IR-8e disk arrays:
1. Using an MCBL220A7 cable, connect the Channel 0 output on the JBOD (this is the
channel furthest from the power connection) to the Channel 1 input on the first singlechannel IR-8e (FDSK548).
3
2. Using another MCBL220A7 cable, connect the Channel 1 output on the JBOD to the
Channel 1 input of the second single-channel IR-8e.
Configuring Single-Channel IR-8e Disk Arrays
Once you have connected the IR-8e (FDSK548) disk arrays to the JBOD IR-8e, you must
remove and reset the SCSI IDs for the SAFTE ID, the lower slot, and the upper slot of the
single-channel IR-8e.
To set the SAFTE ID:
1. Turn on power to the IR-8e, and then press Menu on the Information Control Panel (ICP).
(See the InterRAID-8e Hardware User’s Guide for power switch and ICP location.)
MENU ENTER ESCAPE
Page 8

4
2. Press MENU again to display the list of menus.
3. Use the arrow keys to move to the OPTIONS menu, and then press E
NTER to display that
menu.
4. Select the SCSI ID menu and press E
5. Select SET SAFTE ID and press E
6. Use the arrow keys to change the SAFTE ID to OB (for off bus), and then press E
7. Press
ESCAPE to return to the SCSI ID menu.
NTER.
NTER.
NTER.
To set the Lower Slot ID:
8. You should be in the SCSI ID menu; select SET LOWER SLOT IDS and press ENTER.
9. Use the arrow keys to move to the selection, 5 6 8 9, and then press ENTER.
10. Press ESCAPE to return to the SCSI ID menu.
To set the Upper Slot ID
11. You should be in the SCSI ID menu; select SET UPPER SLOT IDS and press ENTER.
12. Use the arrow keys to move to the selection, 12 13 14 15, and then press ENTER.
13. Press ESCAPE until you have exited all of the menus.
14. Follow steps 1 through 13 to perform the same function on the other single-channel IR-8e.
NOTE The IDs for the second single-channel IR-8e will be the same (that is, 5, 6, 8, and 9 for the
lower slot; and 12, 13, 14, and 15 for the upper slot).
15. After you finish naming the slots on the second single-channel IR-8e, reboot your
workstation.
16. Load and run the Fix Disk utility. This utility enables write caching — without it you will
drop frames when working with uncompressed video.
NOTE See the following section, “Obtaining the Fix Disk Utility,” for more information.
17. Once your workstation reboots and you have run the Fix Disk utility, set up the drives as a
stripe set. See the StudioZ Hardware User’s Guide for information on creating stripe
sets.
Obtaining the Fix Disk Utility
You can get the Fix Disk utility from the Intergraph Bulletin Board Service (IBBS). See the
Preface in the StudioZ Hardware User’s Guide for information on the IBBS.
Page 9

To get the Fix Disk Utility:
1. Using your Web browser, go to the IBBS File Libraries page
(http://archive.intergraph.com/bbs/ibbsfile.htm).
2. On the IBBS File Libraries page, scroll down the list and select DIG3PH.
3. Select the Fix Disk utility from the page that displays.
StudioZ for SOFTIMAGE|DS
Flashkey
If you install a new version of SOFTIMAGE|DS or upgrade your StudioZ for
SOFTIMAGE|DS workstation, run the
driver.
Antex Driver Settings
Currently, a bug in the Antex driver causes the system to lose your Antex settings in
SOFTIMAGE|DS. See the Intergraph StudioZ for SOFTIMAGE|DS System Guide, delivered
with your workstation, for more information.
INSTALL_INI.BAT file from Disk 3 of the Flashkey
5
Antex Driver Reinstallation
If you need to update or reinstall the Antex Digital Audio Driver, you must remove the current
Antex Digital Audio Driver first. The latest driver is delivered on a diskette with your Antex
Studio Card. See the documentation delivered with the Antex Studio Card for more
information
To remove the current Antex Digital Audio Driver device:
1. Verify that you are logged on as Administrator.
2. From the Windows NT Start menu, go to Settings/Control Panel/Multimedia.
3. On the Multimedia Properties dialog box, click the Devices tab.
4. From the list of Multimedia devices, double-click Audio Devices.
5. Select Audio for Antex Digital Audio Driver from the list of audio devices, and click
Remove.
6. Click Yes when prompted to confirm the device removal. Do not close the Multimedia
Properties dialog box.
Page 10

6
NOTE Do not click OK or Cancel on the Multimedia Properties dialog box. You will need this dialog
box in the following instructions.
NOTE Due to a problem removing the Antex driver, the following steps MUST be taken.
To remove the current Antex Digital Audio Driver from the registry:
1. From the Windows NT Start menu, select Run and type regedit in the Open field, then
click OK.
2. In the Registry Editor, go to My Computer/HKEY_LOCAL_MACHINE/SOFTWARE/
Microsoft/WindowsNT/CurrentVersion/Drivers32.
3. Under the Data column on the right side of the Registry Editor, locate A
4. Under the Name column, double-click the device associated with A
NTEXWAV.DLL.
NTEXWAV.DLL.
This activates the Edit String dialog box.
5. Under Value data, highlight A
NTEXWAV.DLL and click DELETE.
6. Click OK.
7. Repeat steps 3 through 6 to remove all occurrences of the A
NTEXWAV.DLL (there
should be a total of three; scroll through the Data column to locate them).
8. Select Exit from the Registry menu.
9. On the Multimedia Properties dialog box, click OK.
10. Shut down and restart your workstation. Once your system reboots, log on as
Administrator.
To load and start the new driver:
1. Make sure that you are logged on as Administrator, and that all applications that use the
audio card are closed.
2. Insert the diskette containing the latest driver (this diskette was delivered with your Antex
Studio Card).
3. In Windows NT Explorer or My Computer, move to the drive containing the diskette
(usually A:\).
4. Double-click
INSTALL.BAT (not SETUP.EXE), and follow the prompts to install the driver.
Accept all default settings.
5. Click OK on the Antex Audio Driver Setup dialog box.
6. Click Yes to confirm that all audio applications are closed. If an audio application is
open, click No; close that application and click OK again on the Antex Audio Driver
Setup dialog box.
7. From the Windows NT Start menu, go to Settings/Control Panel/Devices and verify that
the Antex Digital Audio Driver is started (the word "Started" should display in the Status
column). If the device is not started, select it and click Start.
Page 11

8. Click Close to dismiss the Devices dialog box.
Stripe Sets
If you purchase the additional video storage option for your StudioZ for SOFTIMAGE|DS
workstation (see “Single-Channel InterRAID-8e Storage Option” in this document), you must
set up the internal drives on your workstation and the drives in each IR-8e as a single stripe set
if you are using SOFTIMAGE|DS v1.0. The latest version of SOFTIMAGE|DS (v2.0) does
not have this limitation.
NOTE See the disk striping instructions in the following sections, “StudioZ T-RAX” or “StudioZ Pro,”
for information on striping the disks as more than one stripe set.
WARNING When you stripe the internal drives, all information contained on them will be lost. See
StudioZ Hardware User’s Guide
the
for more information.
7
NOTE Use the Windows NT Disk Administrator program to stripe the disks. See the
Hardware User’s Guide
and for instructions for both methods.
for the advantages and disadvantages of both disk striping methods,
StudioZ T-RAX
Antex Driver Reinstallation
If you need to update or reinstall the Antex Digital Audio Driver, you must remove the current
Antex Digital Audio Driver first. The latest driver is delivered on a diskette with your Antex
Studio Card. See the documentation delivered with the Antex Studio Card for more
information.
To remove the current Antex Digital Audio Driver device:
1. Verify that you are logged on as Administrator.
2. From the Windows NT Start menu, go to Settings/Control Panel/Multimedia.
3. On the Multimedia Properties dialog box, click the Devices tab.
4. From the list of Multimedia devices, double-click Audio Devices.
5. Select Audio for Antex Digital Audio Driver from the list of audio devices, and click
Remove.
StudioZ
6. Click Yes when prompted to confirm the device removal. Do not close the Multimedia
Properties dialog box.
Page 12

8
NOTE Do not click OK or Cancel on the Multimedia Properties dialog box. You will need this dialog
box in the following instructions.
NOTE Due to a problem removing the Antex driver, the following steps MUST be taken.
To remove the current Antex Digital Audio Driver from the registry:
1. From the Windows NT Start menu, select Run and type regedit in the Open field, then
click OK.
2. In the Registry Editor, go to My Computer/HKEY_LOCAL_MACHINE/SOFTWARE/
Microsoft/WindowsNT/CurrentVersion/Drivers32.
3. Under the Data column on the right side of the Registry Editor, locate A
4. Under the Name column, double-click the device associated with A
NTEXWAV.DLL.
NTEXWAV.DLL.
This activates the Edit String dialog box.
5. Under Value data, highlight A
NTEXWAV.DLL and click DELETE.
6. Click OK.
7. Repeat steps 3 through 6 to remove all occurrences of the A
NTEXWAV.DLL (there
should be a total of three; scroll through the Data column to locate them).
8. Select Exit from the Registry menu.
9. On the Multimedia Properties dialog box, click OK.
10. Shut down and restart your workstation. Once your system reboots, log on as
Administrator.
To load and start the new driver:
1. Make sure that you are logged on as Administrator, and that all applications that use the
audio card are closed.
2. Insert the diskette containing the latest driver (this diskette was delivered with your Antex
Studio Card).
3. In Windows NT Explorer or My Computer, move to the drive containing the diskette
(usually A:\).
4. Double-click
INSTALL.BAT (not SETUP.EXE), and follow the prompts to install the driver.
Accept all default settings.
5. Click OK on the Antex Audio Driver Setup dialog box.
6. Click Yes to confirm that all audio applications are closed. If an audio application is
open, click No; close that application and click OK again on the Antex Audio Driver
Setup dialog box.
7. From the Windows NT Start menu, go to Settings/Control Panel/Devices and verify that
the Antex Digital Audio Driver is started (the word "Started" should display in the Status
column). If the device is not started, select it and click Start.
Page 13

8. Click Close to dismiss the Devices dialog box.
Stripe Sets
If you purchase the additional video storage option for your StudioZ T-RAX workstation (see
“Single-Channel InterRAID-8e Storage Option” in this document), you can set up the internal
drives on your workstation and the drives in each IR-8e as a single stripe set. Alternatively,
you can set up the internal drives as one stripe set and the drives on the IR-8e disk arrays as
another stripe set.
9
NOTE Use the Windows NT Disk Administrator program to stripe the disks. See the
Hardware User’s Guide
and for instructions for both methods.
for the advantages and disadvantages of both disk striping methods,
StudioZ
StudioZ Pro
Stripe Sets
If you purchase the additional video storage option for your StudioZ Pro workstation (see
“Single-Channel InterRAID-8e Storage Option” in this document), you can set up the internal
drives on your workstation and the drives in each IR-8e as a single stripe set. Alternatively,
you can set up the internal drives as one stripe set and the drives on the IR-8e disk arrays as
another stripe set.
NOTE Use the Windows NT Disk Administrator program to stripe the disks. See the
Hardware User’s Guide
and for instructions for both methods.
for the advantages and disadvantages of both disk striping methods,
StudioZ
Application Software
Adobe Premiere LE and Adobe Premiere 4.2
To best use Adobe Premiere LE with a StudioZ workstation, you should maintain certain
configuration settings. These settings let you capture, edit, preview, and build in Premiere LE
with maximum efficiency by using your workstation’s digital video hardware at maximum
performance. If you do not maintain these settings, you may encounter problems when using
Premiere LE with your workstation’s digital video hardware and StudioZ Central or StudioZ
Central Plus.
Page 14

10
For detailed information on Premiere LE, refer to the Adobe Premiere LE user documentation.
For more information on StudioZ functionality, refer to the StudioZ Hardware User’s Guide
delivered with your workstation.
Scratch Disk
The first time you run Premiere LE, assign a scratch disk on your workstation. From the File
menu, select Preferences. Set the scratch disk to the audio/video (A/V) drive on your StudioZ
workstation with the most available free space (typically D:\).
Preset
The first time you run Premiere LE, build a preset for your workstation. From the Make
menu, select Presets. Set the correct values for Time Base, Compression, Output Options, and
Preview Options, as described in the following sections.
When you save the new preset, name the preset StudioZ. The next time you run Premiere LE,
select the appropriate preset name to use the preset values you have defined.
The following figure shows a preset built for a StudioZ workstation.
Page 15

Time Base
In the Presets dialog, select Time Base. In the Change Time Base dialog, set Time Base to
29.97 frames per second (fps) for NTSC video (525 lines, 60 fields/sec) or 25 fps for PAL
video (625 lines, 50 fields/sec).
Compression
When building a movie, the compression and output settings work together to optimize the
movie for StudioZ. The StudioZ Central or StudioZ Central Plus AVI play function is
optimized for fast, high-quality playback. To achieve this level of performance, StudioZ
Central and StudioZ Central Plus require an AVI file built with certain parameters. This
section shows the settings you should use to assure optimum movie (AVI file) building for
playback with StudioZ Central or StudioZ Central Plus.
In the Presets dialog box, select Compression. In the Compression Settings dialog box, use
the settings shown in the following figure, with the following exceptions:
u
Set Method to Intergraph StudioZ Driver (IYUV) for uncompressed or Intergraph
StudioZ Driver (MJPEG) for compressed.
u
Under Data Rate, set Limit Data Rate to 30,000 for YUV or 9,000 for MJPEG.
11
u
Under Options, set Frames per second to 30 for NTSC video or 25 for PAL video.
u
Under Quality, set the slider to the value you want. Start with a value of 85 percent to 90
percent (94 percent for MJPEG); you may have to use a lower value for some types of
data.
The proper Quality setting is a function of the data to be compressed. Setting higher
Quality values requires higher data rates for real-time playback. You may have to
experiment to determine the optimal balance between image quality and disk storage
requirements.
CAUTION Do not set Quality higher than 98 percent. This could build a movie at a higher data rate than
Intergraph’s digital video hardware can be play back.
Page 16

12
CAUTION Under Options, do not select Optimize stills if you want to play back video using the StudioZ
Central or StudioZ Central Plus playback function. To properly block the data for playback
through StudioZ Central or StudioZ Central Plus, use the settings shown under Data Rate.
Failure to use these settings will cause playback through StudioZ Central or StudioZ Central
Plus to fail. You can still play the movie using Windows NT Media Player and other
applications at a reduced rate.
NOTE Unless you select Recompress Always, only video sections to which filters or transitions are
applied will be recompressed at the selected Quality value. Intergraph recommends that you
leave Recompress Always unselected.
Output Options
When building a movie, the compression and output settings work together to optimize the
movie for StudioZ playback. The Output Options settings are used when you create the final
build of a movie.
In the Presets dialog, select Output Options. In the Project Output Options dialog, use the
settings shown in the following figure, except as follows:
u
Under Video, set Size to 720 x 486 for NTSC video, and to 720 x 576 for PAL video.
Do not select 4:3 Aspect.
u
Under Video, set Type to Field 2. Full Size Frame works, but provides rougher motion.
Page 17

u
Under Audio, set Rate and Format to meet your requirements.
You can set Output to Entire Project or Work Area, depending on your needs. Neither setting
will affect the operation of your StudioZ workstation.
To set the Output Options:
13
1. In the Project Output Options dialog, under Audio, make sure that Interleave is set to 1
Frame.
2. In the Project Output Options dialog, under Audio, select Sync. Set the Sync value to 1.
3. In the Project Output Options dialog, under Audio, select Skew. The skew value should
be 0.
Preview Options
The Preview Options settings let you build previews to disk, and then play them at full
broadcast resolution on the video monitor.
In the Presets dialog, select Preview Options. In the Preview Settings dialog, use the settings
shown in the following figure, except as follows:
u
Under Video, set Type to Field 2. Full Size Frame works, but provides rougher motion.
u
Under Audio, set Rate and Format to meet your requirements.
Page 18

14
Capture Settings
You can capture video and audio in Premiere LE, or use the StudioZ Central or StudioZ
Central Plus capture utility. To capture video and audio in Premiere LE, you must configure
capture correctly.
CAUTION AVI files captured in Premiere LE can be used to build movies, but will not play back directly
through the StudioZ Central or StudioZ Central Plus playback function. To play back data
captured in Premiere LE through StudioZ Central, you must configure Premiere LE to build an
AVI file as described in the previous sections. AVI files captured in Premiere LE can be used
directly by Windows NT Media Player, or by the playback utility in Premiere LE. For best
performance, you must rebuild the AVI file for use by StudioZ Central or StudioZ Central Plus.
To rebuild the AVI file:
1. From the Premiere LE File menu, select Capture, then select Movie Capture.
2. From the Movie Capture menu, select Preview Rate. In the Preview Rate dialog, set both
preview and capture rates to Off.
3. From the Movie Capture menu, select Recording Options. In the Recording Options
dialog, use the settings shown in the following figure, except as follows:
− Under Video, set Rate to 30 fps for NTSC video or 25 fps for PAL video.
− Under Options, select Capture Limit and set a time for capture if desired.
− Under Options, select Report Dropped Frames if desired.
Page 19

CAUTION Do not select Capture directly to memory or Conform movie to.
4. In the Recording Options dialog, select Video Format. In the Video Configuration
dialog, use the settings shown in the following figure for a Studio Z workstation.
15
5. Set Video Quality to the value you want; remember that higher video image quality
requires higher data rates. At higher settings, frames may be dropped on certain input
data. If this happens, recapture the video with a lower quality setting.
6. In the Recording Options dialog, select Compression. In the Video Compression dialog,
set Compressor to No Recompression.
NOTE This dialog does not control data captured to disk, but rather data displayed in the capture
preview window in Premiere LE.
Page 20

16
Adobe Premiere 5.0
Currently, Adobe Premiere version 5.0, is not supported on the StudioZ product line.
in:sync SPEED RAZOR
If you build AVI files using in:sync SPEED RAZOR, you may encounter problems in files
with 240 or more frames. At or near frame 240, the AVI file may start displaying doubled
images, skipped frames, or out-of-order frames. If this occurs, do the following:
1. Under the SPEED RAZOR Project menu, select Editing Settings.
2. Set the frame rate for the AVI output to 29.9706 fps instead of 30 fps.
3. Rebuild the AVI file.
NOTE Currently, in:sync SPEED RAZOR Mach 4.0 is not supported on the StudioZ product line.
InterSite Products
The StudioZ for SOFTIMAGE|DS, StudioZ Pro, and StudioZ T-RAX workstations ship with
the following InterSite products:
u
Diskeeper Lite (run this defragmentation tool periodically to improve disk performance)
u
InterSite Manager (IM)
u
Desktop Management Interface (DMI) Console
u
Welcome
u
Version Manager
u
Watchdog
Sound Forge
Importing StudioZ AVI Files into Sound Forge 4.0
To set up Sound Forge 4.0 to import a StudioZ AVI file:
1. From the Options menu, click Preferences.
2. In the Preferences dialog, click Performance (tab).
3. Under Video Decompression Mode, click Full Decompress Always; then click OK.
Page 21

Reblocking StudioZ AVI Files Edited in Sound Forge 4.0
The AVI file format is typically written to maximize data transfer — a process known as
“blocking.” Sound Forge 4.0 can successfully read a StudioZ AVI file; however, when that
file is saved, it is not blocked in a way that the StudioZ Central or StudioZ Central Plus
playback function can read. The quickest way to work around this problem is to use Adobe
Premiere or in:sync Speed Razor to reblock the file into StudioZ format. The following
example shows how to use Adobe Premiere to reblock a StudioZ AVI file.
To reblock a StudioZ AVI file edited in Sound Forge 4.0 (using Adobe Premiere):
1. In Sound Forge, save the edited StudioZ AVI as a separate WAV.
2. Exit Sound Forge without saving the AVI.
3. In Adobe Premiere, import the AVI, and the WAV saved from Sound Forge.
4. Drag the AVI file into the Construction Window.
5. Delete the existing audio track from the AVI.
6. Drag the WAV saved from Sound Forge into the Construction Window audio track.
Make sure you line up the starting points of the audio track and the video track precisely.
7. Build a new movie from the Construction Window using the proper StudioZ presets. You
can now play the newly constructed AVI file using the StudioZ Central Plus playback
utilities.
17
NOTE See the
Reference Guide
NOTE For more information on Adobe Premiere or in:sync Speed Razor, refer to the documentation
delivered with those applications.
StudioZ Central Plus Quick-Start Guide
for more information on capturing and playing back video.
and the
StudioZ Central Plus Online
StudioZ Central Plus
All StudioZ workstations are shipped with the StudioZ Central Plus application; see the online
Help or reference manual delivered with the application more information. StudioZ Console
users who have a maintenance agreement, or whose workstations are under warranty, are
entitled to a free upgrade to StudioZ Central Plus. Call the Customer Response Center (1800-633-7248) for your free upgrade.
Page 22

18
 Loading...