

Page 1

Intel® Workstation Board
S5000XVN User Guide
A Guide for Technically Qualified Assemblers of Intel® Identified Subassemblies/
Products
Intel Order Number D36222-004
Page 2

Disclaimer
Information in this document is provided in connection with Intel® products. No license, express or implied, by
estoppel or otherwise, to any intellectual property rights is granted by this document. Except as provided in Intel's
Terms and Conditions of Sale for such products, Intel assumes no liability whatsoever, and Intel disclaims any
express or implied warranty, relating to sale and/or use of Intel products including liability or warranties relating to
fitness for a particular purpose, merchantability, or infringement of any patent, copyright or other intellectual property
right. Intel products are not designed, intended or authorized for use in any medical, life saving, or life sustaining
applications or for any other application in which the failure of the Intel product could create a situation where
personal injury or death may occur. Intel may make changes to specifications and product descriptions at any time,
without notice.
Intel workstation boards contain a number of high-density VLSI and power delivery components that need adequate
airflow for cooling. Intel's own chassis are designed and tested to meet the intended thermal requirements of these
components when the fully integrated system is used together. It is the responsibility of the system integrator that
chooses not to use Intel developed server building blocks to consult vendor datasheets and operating parameters to
determine the amount of airflow required for their specific application and environmental conditions. Intel Corporation
can not be held responsible if components fail or the workstation board does not operate correctly when used
outside any of their published operating or non-operating limits.
Intel, Intel Pentium, and Intel Xeon are trademarks or registered trademarks of Intel Corporation or its subsidiaries in
the United States and other countries.
* Other names and brands may be claimed as the property of others.
Copyright © 2006-2007, Intel Corporation. All Rights Reserved
ii Intel® Workstation Board S5000XVN
Page 3

Safety Information
Important Safety Instructions
Read all caution and safety statements in this document before performing any of the
instructions. See also Intel Server Boards and Server Chassis Safety Information on the
®
Server Deployment Toolkit 2.0 CD and/or at http://support.intel.com/support/
Intel
motherboards/server/sb/cs-010770.htm.
Wichtige Sicherheitshinweise
Lesen Sie zunächst sämtliche Warnund Sicherheitshinweise in diesem Dokument, bevor
Sie eine der Anweisungen ausführen. Beachten Sie hierzu auch die Sicherheitshinweise zu
Intel-Serverplatinen und Servergehäusen auf der Intel
CD oder unter http://support.intel.com/support/motherboards/server/sb/cs-010770.htm.
®
Server Deployment Toolkit 2.0
Consignes de sécurité
Lisez attention toutes les consignes de sécurité et les mises en garde indiquées dans ce
document avant de suivre toute instruction. Consultez Intel Server Boards and Server
Chassis Safety Information sur le Intel
rendez-vous sur le site http://support.intel.com/support/motherboards/server/sb/cs-
010770.htm.
®
Server Deployment Toolkit 2.0 CD ou bien
Instrucciones de seguridad importantes
Lea todas las declaraciones de seguridad y precaución de este documento antes de realizar
cualquiera de las instrucciones. Vea Intel Server Boards and Server Chassis Safety
Information en el Intel
support.intel.com/support/motherboards/server/sb/cs-010770.htm.
®
Server Deployment Toolkit 2.0 CD y/o en http://
Page 4

重要安全指导
在执行任何指令之前,请阅读本文档中的所有注意事项及安全声明。 和/或
http://support.intel.com/support/motherboards/server/sb/CS-010770.htm
上的 Intel
Server Boards and Server Chassis Safety Information(《Intel
服务器主板与服务器机箱安全信息》)。
iv Intel® Workstation Board S5000XVN
Page 5

Warnings
Heed safety instructions: Before working with your workstation product, whether you
are using this guide or any other resource as a reference, pay close attention to the safety
instructions. You must adhere to the assembly instructions in this guide to ensure and
maintain compliance with existing product certifications and approvals. Use only the
described, regulated components specified in this guide. Use of other products /
components will void the UL listing and other regulatory approvals of the product and
will most likely result in noncompliance with product regulations in the region(s) in which
the product is sold.
System power on/off: The power button DOES NOT turn off the system AC power. To
remove power from system, you must unplug the AC power cord from the wall outlet.
Make sure the AC power cord is unplugged before you open the chassis, add, or remove
any components.
Hazardous conditions, devices and cables: Hazardous electrical conditions may be
present on power, telephone, and communication cables. Turn off the workstation and
disconnect the power cord, telecommunications systems, networks, and modems attached
to the workstation before opening it. Otherwise, personal injury or equipment damage can
result.
Electrostatic discharge (ESD) and ESD protection: ESD can damage disk drives,
boards, and other parts. We recommend that you perform all procedures in this chapter
only at an ESD workstation. If one is not available, provide some ESD protection by
wearing an antistatic wrist strap attached to chassis ground any unpainted metal surface on
your workstation when handling parts.
ESD and handling boards: Always handle boards carefully. They can be extremely
sensitive to ESD. Hold boards only by their edges. After removing a board from its
protective wrapper or from the workstation, place the board component side up on a
grounded, static free surface. Use a conductive foam pad if available but not the board
wrapper. Do not slide board over any surface.
Installing or removing jumpers: A jumper is a small plastic encased conductor that slips
over two jumper pins. Some jumpers have a small tab on top that you can grip with your
fingertips or with a pair of fine needle nosed pliers. If your jumpers do not have such a tab,
take care when using needle nosed pliers to remove or install a jumper; grip the narrow
sides of the jumper with the pliers, never the wide sides. Gripping the wide sides can
damage the contacts inside the jumper, causing intermittent problems with the function
controlled by that jumper. Take care to grip with, but not squeeze, the pliers or other tool
you use to remove a jumper, or you may bend or break the pins on the board.
Intel® Workstation Board S5000XVN v
Page 6

vi Intel® Workstation Board S5000XVN
Page 7

Preface
About this Manual
Thank you for purchasing and using the Intel® Workstation Board S5000XVN.
Multiple versions of the Intel
applies to workstation boards with the following product codes:
• S5000XVNSATA
• S5000XVNSATAR
• S5000XVNSAS
• S5000XVNSASR
Where a feature varies from one product to the next, the difference will be noted in this
document. Unless specified, features apply to all versions of the workstation board.
This manual is written for system technicians who are responsible for troubleshooting,
upgrading, and repairing this workstation board. This document provides a brief overview
of the features of the board/chassis, a list of accessories or other components you may
need, troubleshooting information, and instructions on how to add and replace
components on the Intel
manual, see
http://support.intel.com/support/motherboards/server/S5000XVN/.
®
Workstation Board S5000XVN are available. This manual
®
Workstation Board S5000XVN. For the latest version of this
Manual Organization
Chapter 1 provides a brief overview of the Workstation Board S5000XVN. In this chapter,
you will find a list of the workstation board features, photos of the product, and product
diagrams to help you identify components and their locations.
Chapter 2 provides instructions on using the utilities that are shipped with the board or
that may be required to update the system. This includes how to navigate through the
BIOS Setup screens, how to perform a BIOS update, and how to reset the password or
CMOS. Information about the specific BIOS settings and screens is available in the
Technical Product Specification. See “Additional Information and Software” on page viii
for a link to the Technical Product Specification.
Chapter 3 provides instructions on adding and replacing components. Use this chapter for
step-by-step instructions and diagrams for installing or replacing components such as the
memory, processor, and the CMOS battery.
Page 8

Chapter 4 provides troubleshooting information. In this chapter, you will find BIOS error
messages and POST code messages. You will also find suggestions for performing
troubleshooting activities to identify the source of a problem.
Product Accessories
This workstation board is compatible with the following Intel® Server Chassis:
• Intel
• Intel
You may need or want to purchase one or more of the following items for your
workstation:
Processor, memory FBDIMMs, hard drive, USB floppy drive, CD-ROM or DVD-ROM
drive, RAID controller, operating system.
For information about which accessories, memory, processors, and third-party hardware
have been tested and can be used with your board, and for ordering information for Intel
products, see http://support.intel.com/support/motherboards/server/S5000XVN/
compat.htm.
®
Server Chassis SC5400 Base
®
Entry Server Chassis SC5299-E WS
Additional Information and Software
If you need more information about this product or information about the accessories that
can be used with this workstation board, use the following resources. These files are
available at http://support.intel.com/support/motherboards/server/S5000XVN/
Table 1. Additional Information and Software
For this Information or
Software
Technical information,
including BIOS settings
and chipset information
Hardware integration
instructions
Virtual system tours and
interactive repair
information
®
Intel
Workstation Board S5000XVN Technical Product
Specification and the Intel
Family Datasheet.
See the section on the web page titled Technical Specifications.
Intel® Workstation Board S5000XVN Quick Start User's Guide in
the product box.
See the section on the web page titled Installation and Use.
A link to the SMaRT Tool is available under Other Resources at the
right side of the screen at
http://support.intel.com/support/motherboards/server/S5000XVN
Use this Document or Software
®
S5000 Series Chipsets Server Board
viii Intel® Workstation Board S5000XVN
Page 9

Table 1. Additional Information and Software
For this Information or
Software
Accessories or other Intel
server products
Hardware and operating
systems that have been
tested with this product
Chassis that have been
tested with this product
Processors that have
been tested with this
product
FBDIMMs that have been
tested with this product
To make sure your system
falls within the allowed
power budget
Software to manage your
®
Intel
workstation
Drivers Driver (for an extensive list of available drivers),
Spares and Configuration Guide.
See the section on the web page titled Installation and Use.
Tested Hardware Operating Systems List.
See the section on the web page titled Compatibility.
Reference Chassis List.
See the section on the web page titled Compatibility.
Supported Processors.
See the section on the web page titled Compatibility.
Tested Memory List.
See the section on the web page titled Compatibility.
Power Budget Analysis Tool.
See the section on the web page titled Installation & Use
Intel System Management Software.
See the section on the web page titled Installation & Use
Operating System Driver (for operating system drivers).
See the section on the web page titled Software & Drivers.
Use this Document or Software
Firmware and BIOS
updates, or BIOS
recovery files
Diagnostics test software Diagnostics.
Firmware Updates.
See the section on the web page titled Software & Drivers.
See the section on the web page titled Software & Drivers.
See also the Intel® Server Deployment Toolkit 2.0 CD that came with your workstation
board.
Intel® Workstation Board S5000XVN ix
Page 10

x Intel® Workstation Board S5000XVN
Page 11

Contents
Safety Information ..................................................................................................... iii
Important Safety Instructions ................................................................................................ iii
Wichtige Sicherheitshinweise ............................................................................................... iii
Consignes de sécurité .......................................................................................................... iii
Instrucciones de seguridad importantes ............................................................................... iii
Warnings ................................................................................................................................ v
Preface .......................................................................................................................vii
About this Manual ................................................................................................................ vii
Manual Organization ............................................................................................................vii
Product Accessories ............................................................................................................viii
Additional Information and Software ....................................................................................viii
Chapter 1: Workstation Board Features ................................................................... 1
Connector and Header Locations ..........................................................................................4
Configuration Jumpers ........................................................................................................... 6
®
Intel
Light-Guided Diagnostics .............................................................................................8
Back Panel Features ...........................................................................................................11
RAID Support ....................................................................................................................... 12
SATA Workstation Board .............................................................................................12
SAS Workstation Board ...............................................................................................13
Audio Support ......................................................................................................................14
Hardware Requirements ......................................................................................................15
Processor .................................................................................................................... 15
Memory ........................................................................................................................15
Power Supply ..............................................................................................................17
Optional Hardware ............................................................................................................... 18
®
Intel
RAID Activation Key ..........................................................................................18
Hard Disk Drives ..........................................................................................................18
®
Intel
Local Control Panel ...........................................................................................18
Chapter 2: System Utilities ...................................................................................... 19
Using the BIOS Setup Utility ................................................................................................19
Starting Setup ..............................................................................................................19
If You Cannot Access Setup ........................................................................................19
Setup Menus ...............................................................................................................20
Upgrading the BIOS .............................................................................................................21
Preparing for the Upgrade ...........................................................................................22
Upgrading the BIOS ....................................................................................................22
Reverting to the Previous BIOS ...........................................................................................23
xi
Page 12

Clearing the Password ........................................................................................................ 24
Clearing the CMOS ............................................................................................................. 25
Chapter 3: Hardware Installations and Upgrades ..................................................27
Before You Begin ................................................................................................................ 27
Tools and Supplies Needed ........................................................................................ 27
Installing and Removing Memory ........................................................................................ 27
Installing FBDIMMs ..................................................................................................... 27
Removing FBDIMMs ................................................................................................... 30
Installing or Replacing the Processor .................................................................................. 30
Installing the Processor ............................................................................................... 31
Installing the Heatsink(s) ............................................................................................. 34
Removing a Processor ................................................................................................ 37
Replacing the CMOS Battery .............................................................................................. 40
Appendix A: Troubleshooting .................................................................................43
System Boot Quiet Time ..................................................................................................... 43
Resetting the System .......................................................................................................... 43
Problems following Initial System Installation ...................................................................... 44
First Steps Checklist ................................................................................................... 44
Hardware Diagnostic Testing .............................................................................................. 45
Verifying Proper Operation of Key System Lights ....................................................... 45
Confirming Loading of the Operating System ............................................................. 45
Specific Problems and Corrective Actions .......................................................................... 46
Power Light Does Not Light ........................................................................................ 46
No Characters Appear on Screen ............................................................................... 47
Characters Are Distorted or Incorrect ......................................................................... 48
System Cooling Fans Do Not Rotate Properly ............................................................ 48
CD-ROM Drive or DVD-ROM Drive Activity Light Does Not Light .............................. 48
Cannot Connect to a Server ........................................................................................ 49
Problems with Network ............................................................................................... 49
System Boots when Installing PCI Card ..................................................................... 50
Problems with Newly Installed Application Software ................................................... 50
Problems with Application Software that Ran Correctly Earlier .................................. 51
Devices are not Recognized under Device Manager (Windows* Operating System) . 51
Hard Drive(s) are not Recognized ............................................................................... 51
Bootable CD-ROM Disk Is Not Detected .................................................................... 52
LED Information .......................................................................................................... 52
BIOS POST Beep Codes ............................................................................................ 52
Appendix B: Regulatory and Compliance Information .........................................55
Product Regulatory Compliance .......................................................................................... 55
Product Safety Compliance ......................................................................................... 55
Certifications / Registrations / Declarations ................................................................ 56
Product Regulatory Compliance Markings .................................................................. 56
xii
Page 13

Electromagnetic Compatibility Notices ................................................................................57
FCC (USA) ..................................................................................................................57
ICES-003 (Canada) .....................................................................................................58
Europe (CE Declaration of Conformity) .......................................................................58
VCCI (Japan) ...............................................................................................................58
BSMI (Taiwan) .............................................................................................................59
RRL (Korea) ................................................................................................................59
CNCA (CCC-China) .....................................................................................................59
Product Ecology Change (EU RoHS) .................................................................................. 60
Product Ecology Change (CRoHS) .....................................................................................60
China Packaging Recycle Marks (or GB18455-2001) ......................................................... 62
CA Perchlorate Warning ......................................................................................................62
End-of-Life / Product Recycling ...........................................................................................62
Appendix C: Getting Help ........................................................................................63
World Wide Web .................................................................................................................. 63
Telephone ............................................................................................................................63
Appendix D: System Issue Report Form ............................................................... 67
xiii
Page 14

xiv
Page 15

List of Figures
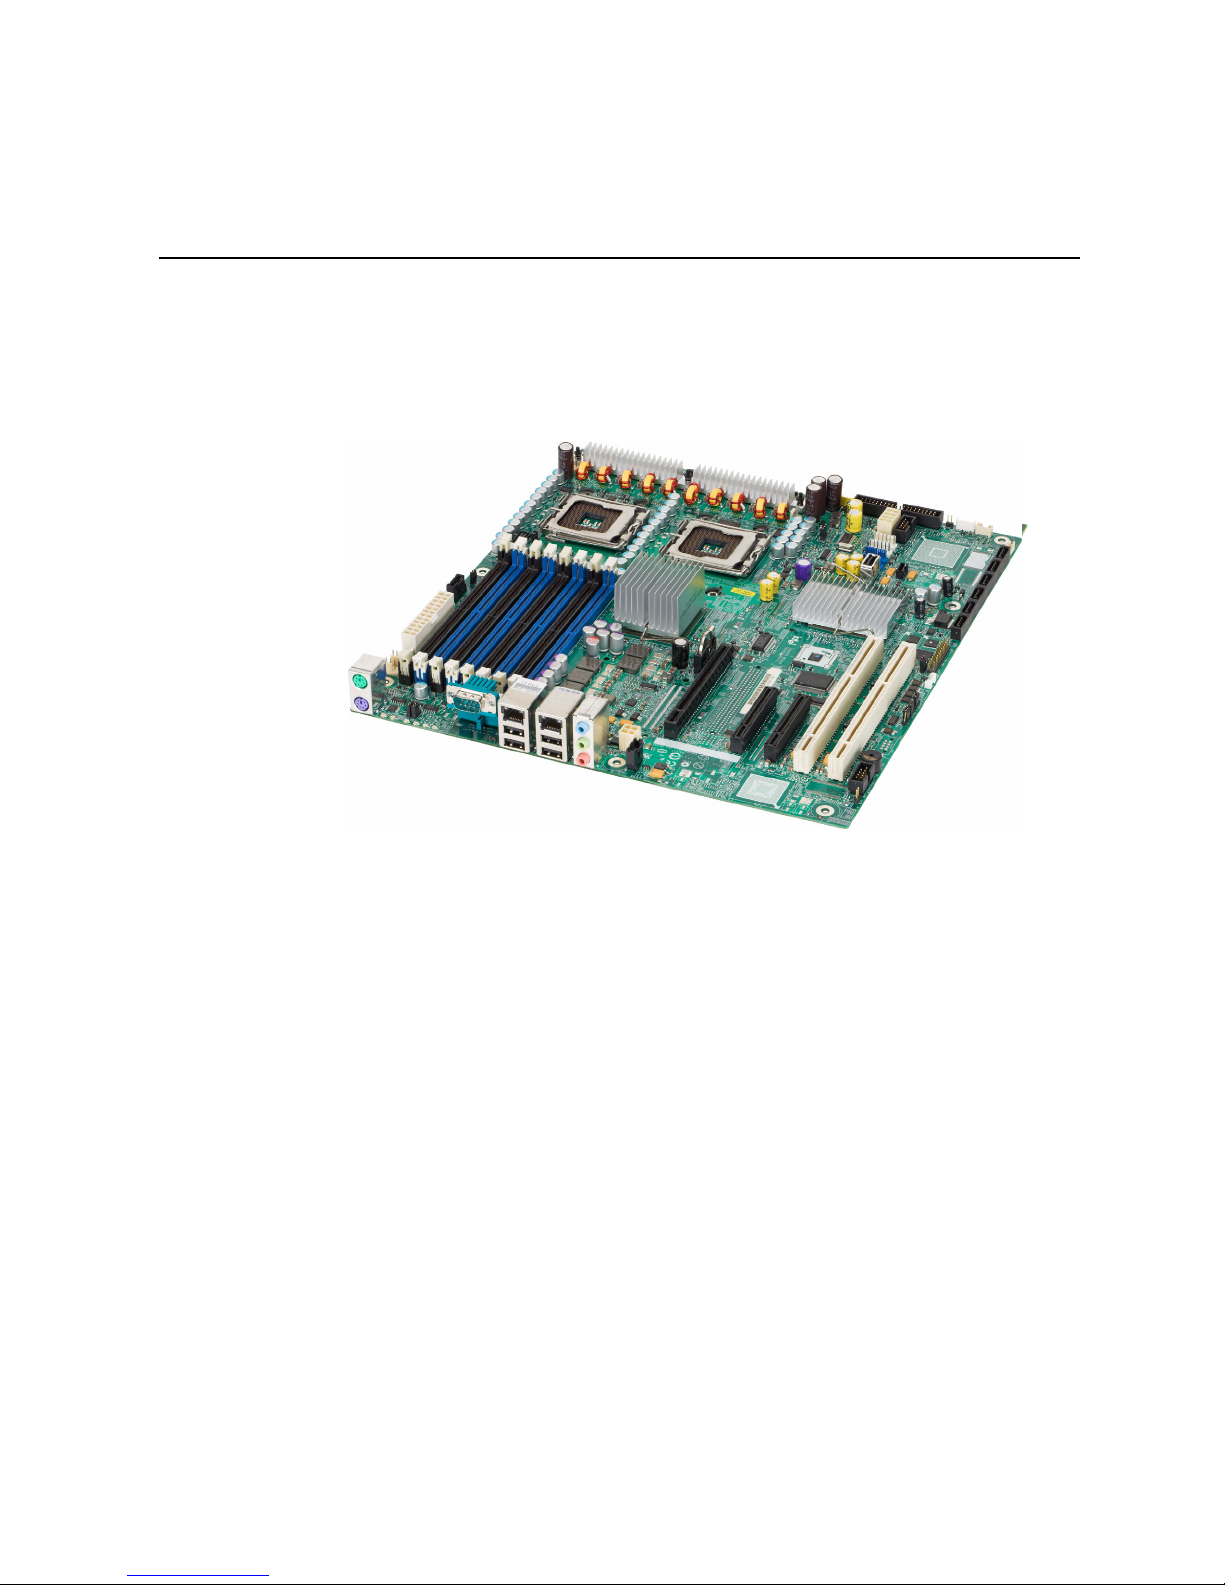
Figure 1. Intel® Workstation Board S5000XVN......................................................................... 1
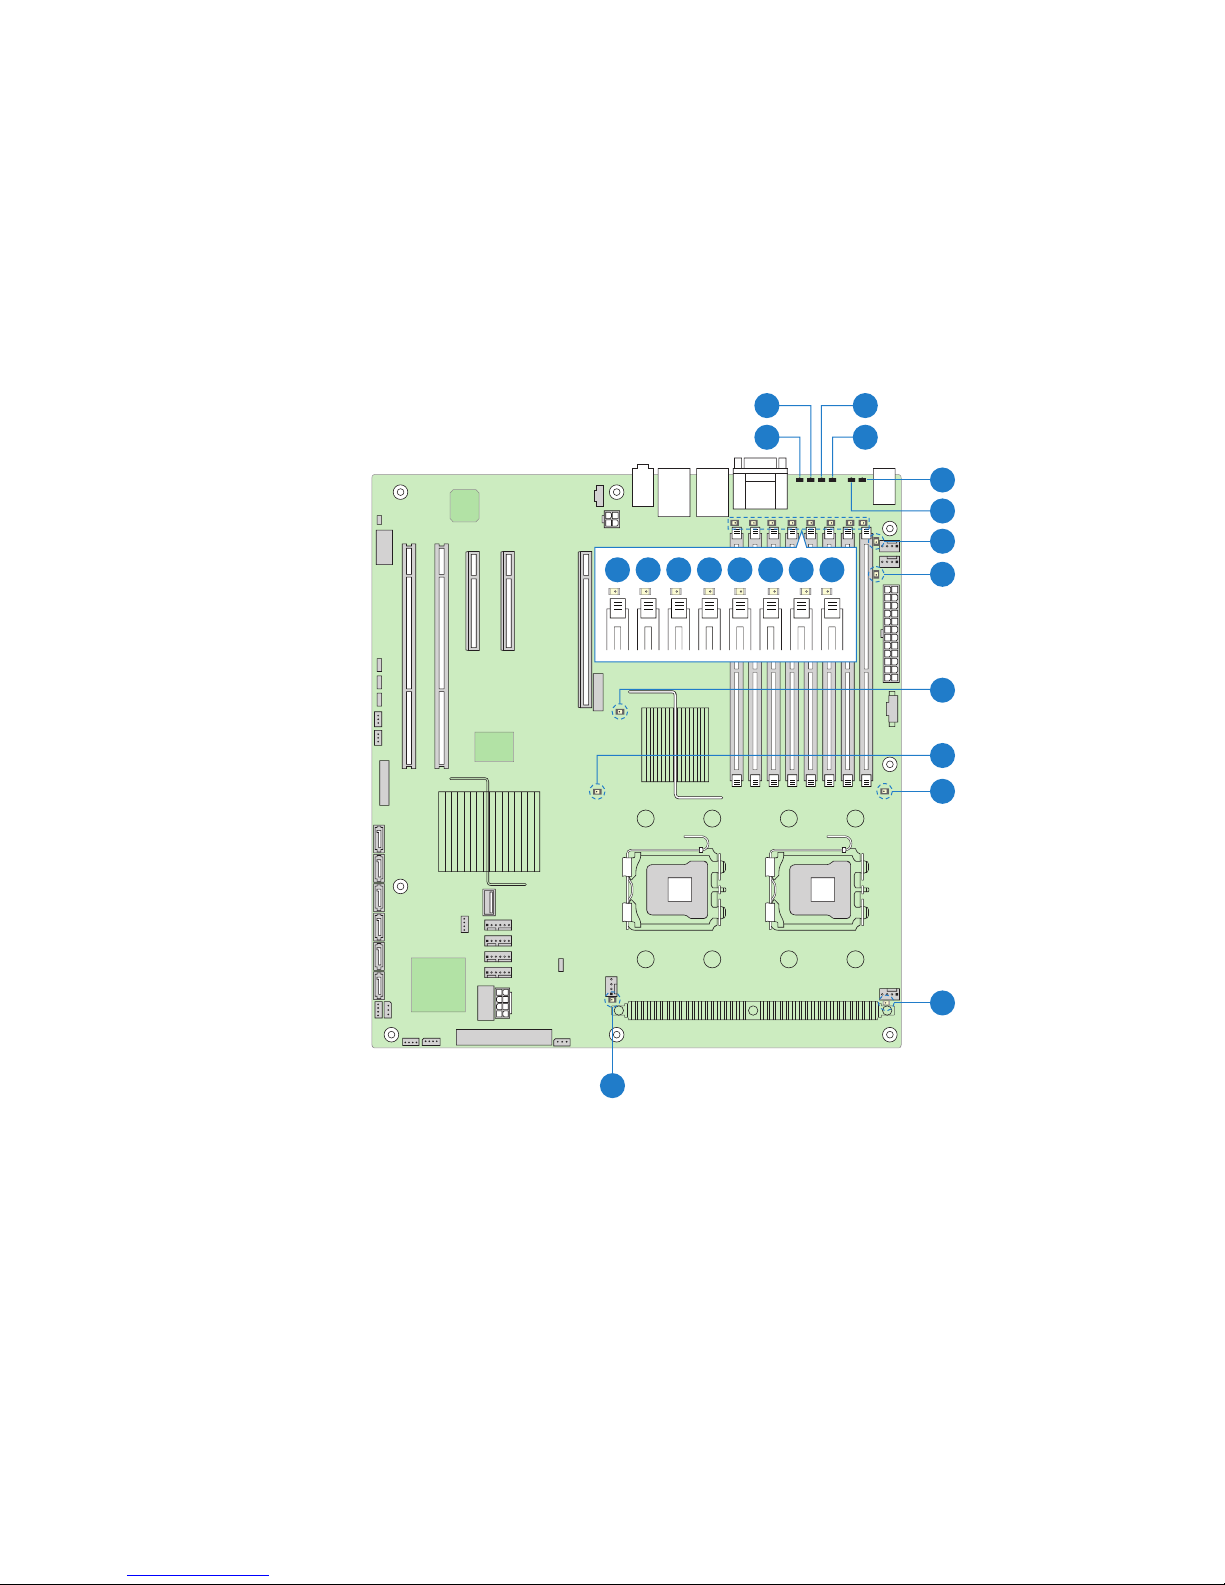
Figure 2. Connector and Component Locations........................................................................ 4
Figure 3. Configuration Jumpers............................................................................................... 7
Figure 4. Back Panel Connectors and LEDs........................................................................... 11
Figure 5. DIMM Sockets.......................................................................................................... 16
Figure 6. BIOS Bank Select Jumper in Force Lower Bank Position........................................ 23
Figure 7. Password Clear Jumper in Clear Password Position............................................... 24
Figure 8. CMOS Clear Jumper in the Clear CMOS Position................................................... 25
Figure 9. Locating DIMM Sockets ........................................................................................... 28
Figure 10. Installing FBDIMMs................................................................................................ 29
Figure 11. Locating Processor Sockets................................................................................... 31
Figure 12. Opening Processor Socket Lever .......................................................................... 32
Figure 13. Opening Load Plate ............................................................................................... 32
Figure 14. Removing Protective Cover from Load Plate......................................................... 33
Figure 15. Setting Processor in Place..................................................................................... 33
Figure 16. Installing Heatsink (passive heatsink shown)......................................................... 35
Figure 17. Locating Active Heatsink Cable Connections ........................................................ 36
Figure 18. Opening Processor Socket Lever .......................................................................... 38
Figure 19. Opening Load Plate ............................................................................................... 38
Figure 20. Removing Processor from Socket.......................................................................... 39
Figure 21. Installing Protective Cover onto Load Plate ........................................................... 39
Figure 22. Locating and Removing the CMOS Battery ........................................................... 41
xv
Page 16

xvi
Page 17

List of Tables
Table 1. Additional Information and Software .........................................................................viii
Table 2. Workstation Board Features ........................................................................................2
Table 3. NIC LEDs ..................................................................................................................11
Table 4. Setup Menu Key Use ................................................................................................20
Table 5. Heatsink Requirements for Compatible Intel
Table 6. Resetting the System ................................................................................................43
Table 7. POST Error Beep Codes ...........................................................................................52
Table 8. Error Beep Codes Generated by Intel
Table 9. Product Certification Markings ..................................................................................56
®
®
Server Chassis ................................. 34
Remote Management Module ....................53
xvii
Page 18

xviii
Page 19
1 Workstation Board Features
This chapter briefly describes the main features of the Intel® Workstation Board
S5000XVN. This chapter provides a photograph of the product, a list of the workstation
board features, and diagrams showing the location of important components and
connections on the workstation board.
Figure 1. Intel
®
Workstation Board S5000XVN
Page 20

Table 2 summarizes the features of the workstation board.
Table 2. Workstation Board Features
Feature Description
Processor support Support for one from the following list:
• Up to two Dual-Core Intel
sequence with a 677-, 1066-, or 1333-MHz front side bus
• Up to two Quad-Core Intel
with a 1066- or 1333-MHz front side bus
®
Xeon® processors 5000 or 5100
®
Xeon® processors 5300 sequence
• Up to two 45nm 2P Dual-Core Intel
Product code S5000XVNSATAR and S5000XVNSASR only
• Up to two 45nm next generation Quad-Core Intel
processors. Product code S5000XVNSATAR and
S5000XVNSASR only
®
Xeon® processors.
®
Xeon®
System memory support
• Eight FBDIMM sockets (DDR2-533 and DDR2-667) supporting
32 GB maximum memory
• Quad-channel memory architecture
®
Intel
5000X Chipset • Intel® 6321ESB I/O Controller Hub
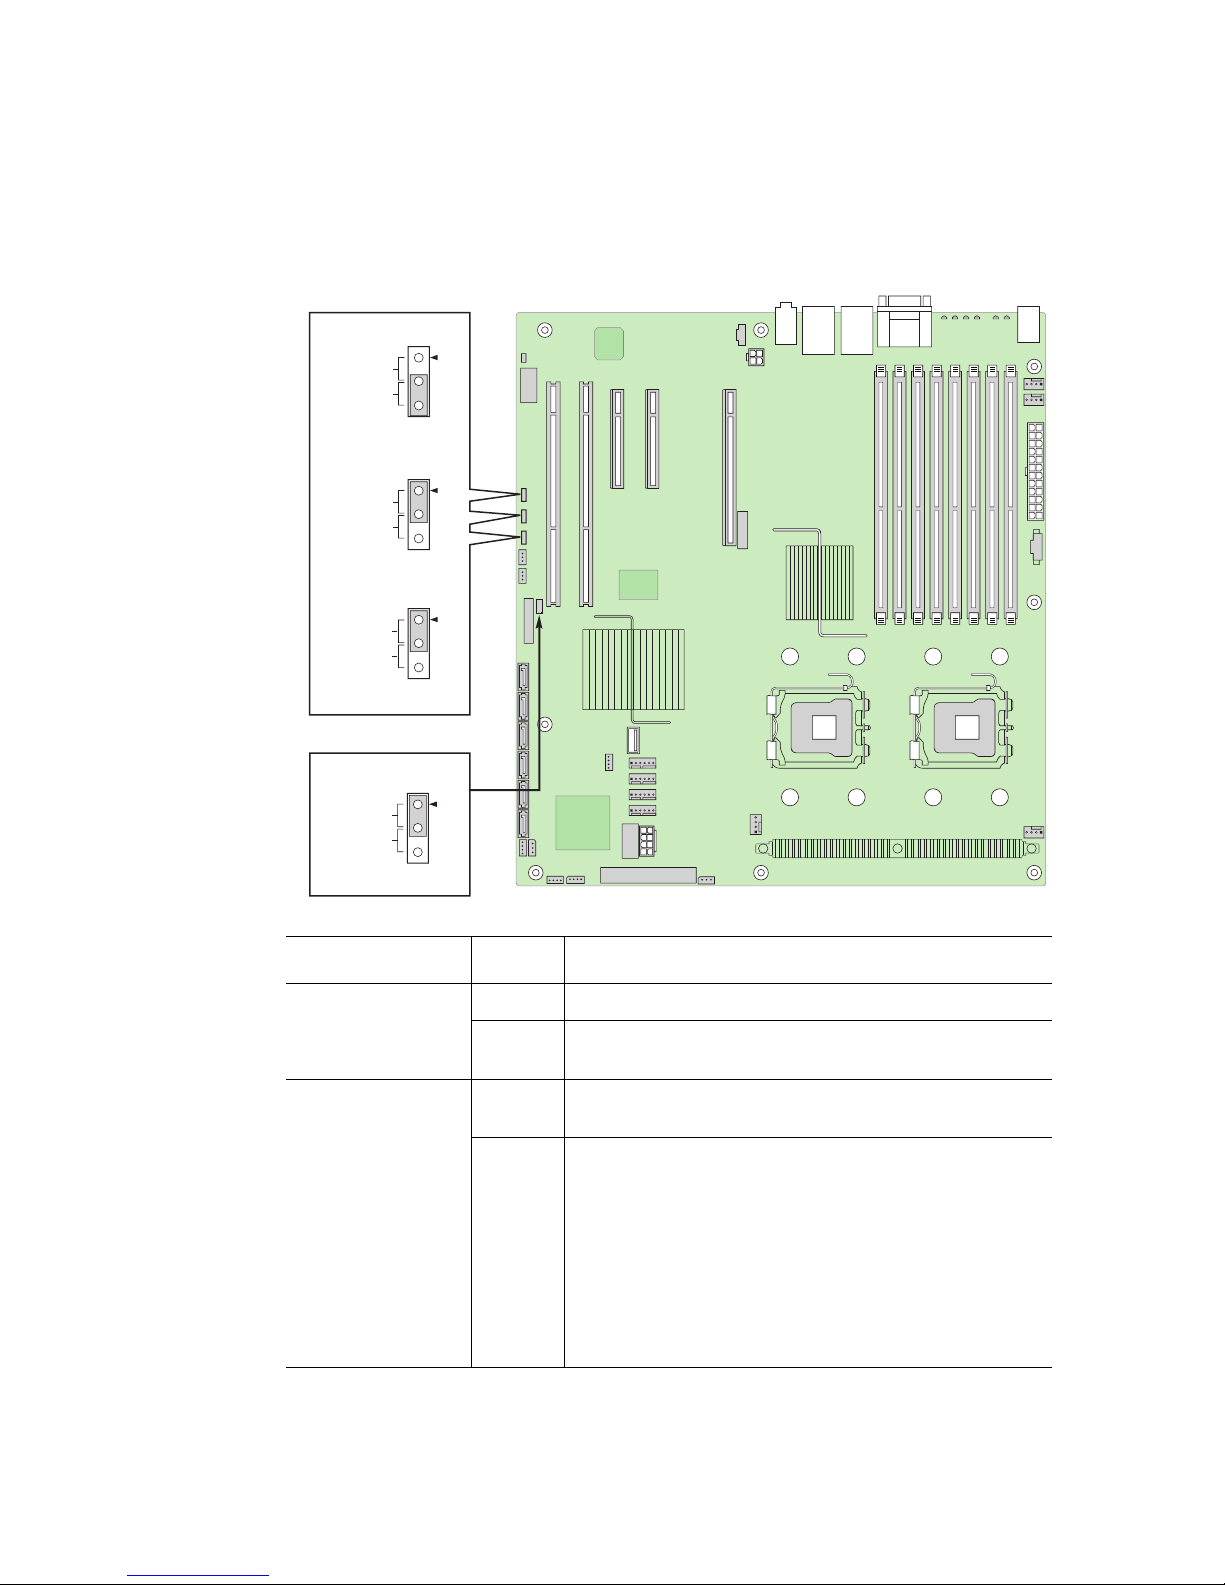
Cooling Support for
• Intel
®
5000X Memory Controller Hub
• Two processor fans (4-pin headers)
• Four front fans (6-pin headers)
• Two rear fans (4-pin header)
3-pin fans are compatible with all fan headers. 4-pin fans should be
used only with the following fans:
• CPU1 Fan
• CPU2 Fan
• Sys Fan 1
• Sys Fan 2
• Sys Fan 5
• Sys Fan 6
Sys Fan 3 and Sys Fan 4 are connected to the CPU1 PWM, which
is programmed to work with the 4-pin active heatsink fans.
Add-in card slots Five expansion slots:
• One PCI-X* 64-bit / 100-MHz slot
• One PCI-X* 64-bit / 100- / 133-MHz slot
• One PCI Express x16 slot
and one of from the following list
• Two PCI Express* x4 slots (Product code S5000XVNSAS or
S5000XVNSASR)
• One PCI Express* x4 slot and one PCI Express x8 slot
(Product code S5000XVNSATA or S5000XVNSATAR)
Video support Use the PCI Express x16 slot to add the video card of your choice
2 Intel® Workstation Board S5000XVN
Page 21

Table 2. Workstation Board Features
Feature Description
Hard drive and optical
drive support
• Optical devices are supported
• Ultra ATA-100 support: One IDE channel that is capable of
supporting up to two drives
• One of the following:
– Product code S5000XVNSATA or S5000XVNSATAR: Six
SATA connectors at 1.5 Gbps or 3 Gbps
– Product code S5000XVNSAS or S5000XVNSASR: Four
SAS connectors at 3 Gbps, and two SATA connectors at
1.5 Gbps and 3 Gbps
USB drive support One internal USB port
I/O control support External connections:
• PS/2* ports for keyboard and mouse
• DB9 serial port A connection
• One DH10 serial port B connector (optional)
• Two RJ45 NIC connectors for 10/100/1000 Mb connections:
Dual GbE through the Intel
• Four USB 2.0 ports at the back of the board
Internal connections:
• One 9-pin USB header that supports two external USB 2.0
ports
• One internal USB port that supports a peripheral, such as a
floppy drive
• One DH10 serial port B header
• One of the following:
– Product code S5000XVNSATA or S5000XVNSATAR: Six
SATA connectors at 1.5 Gbps or 3 Gbps
– Product code S5000XVNSAS or S5000XVNSASR: Four
SAS connectors at 3 Gbps, and two SATA connectors at
1.5 Gbps and 3 Gbps
• One ATA-100 40-pin connector
• One SSI-compliant 24-pin front control panel header
®
8256EB Network Connection
RAID support One of the following:
Cooling fan support
Intel® Workstation Board S5000XVN 3
• Product code S5000XVNSATA or S5000XVNSATAR: Intel
Embedded Server RAID Technology II provides SATA RAID 0,
1, and 10 with optional RAID 5 support provided by the Intel
RAID Activation Key AXXRAKSW5
• Product code S5000XVNSAS or S5000XVNSASR: Intel
Embedded Server RAID Technology II provides SAS/SATA
RAID 0, 1, and 10 with optional RAID 5 support provided by the
®
Intel
RAID Activation Key AXXRAKSW5
®
• Two 4-pin processor fan connectors
• Four 6-pin front fan connectors
• Two 4-pin rear fan connectors
®
®
Page 22

Table 2. Workstation Board Features
AF000499
O
K
L
M
N
S
P
Q
R
LL
NN
OO
PP
QQ
RR
KK
JJ
II
HH
GG
FF
EE
A B
E
DC
I
V
AACC
DD ZBB
YXW
U
T
F
J
H
MM
G
Feature Description
Management support • Support for the Intel® Local Control Panel (optional component
sold separately)
• Support for Intel
®
• Intel
Light-Guided Diagnostics on field replaceable units
®
System Management software
Audio
• Integrated audio with Realtec* ALC260 high-definition
2-channel audio
Connector and Header Locations
4 Intel® Workstation Board S5000XVN
Figure 2. Connector and Component Locations
Page 23

A. PCI-X* 64-bit, 100-MHz
slot 1
P. Processor 1 socket EE. Enclosure management SAS
SES (available only with product
code S5000XVNSAS or
S5000XVNSASR)
B. PCI-X 64-bit, 100-/133-MHz
Q. Processor 2 socket FF. Hot-swap backplane A header
slot 2
C. PCI Express* x4 or x8 slot 3 R. Processor 2 fan header GG. SATA 0
D. PCI Express x4 slot 4 S. Processor 1 fan header HH. SATA 1
E. CMOS battery T. System fan 4 header II. SATA 2 or SAS 0 (SAS 0 is
available only with product code
S5000XVNSAS or
S5000XVNSASR)
F. PCI Express x8 slot 6 U. System fan 3 header JJ. SATA 3 or SAS 1 (SAS 1 is
available only with product code
S5000XVNSAS or
S5000XVNSASR)
G. CD-ROM In connector V. IPMB connector KK. SATA 4 or SAS 2 (SAS 2 is
available only with product code
S5000XVNSAS or
S5000XVNSASR)
H. P12V4 connector W. System fan 2 header LL. SATA 5 or SAS 3 (SAS 3 is
available only with product code
S5000XVNSAS or
S5000XVNSASR)
I. Back panel I/O ports (see
X. System fan 1 header MM. USB port
Figure 4 on page 11)
J. Diagnostic and Identify
Y. Processor power connector NN. Front control panel header
LEDs (see Figure 4 on
page 11)
K. System fan 6 header Z. USB header OO. SATA_Key: SATA RAID 5 key
connector (available only with
product code S5000XVNSATA
or S5000XVNSATAR)
L. System fan 5 header AA. IDE connector PP. SAS_Key: SAS RAID 5 key
connector (available only with
product code S5000XVNSAS or
S5000XVNSASR)
M. Main power connector BB. Enclosure management
SATA GPIO header (only
QQ. Serial B / emergency
management port header
with product code
S5000XVNSATA or
S5000XVNSATAR)
N. Auxiliary power signal
connector
O. DIMM sockets (see Figure 5
on page 16)
CC. Intel
DD. Hot-swap backplane B
®
Local Control Panel
header
header
RR. Chassis intrusion header
Intel® Workstation Board S5000XVN 5
Page 24
Configuration Jumpers
AF000500
3
2
CMOS Clear
3
2
Password Clear
J1E3
J1D1
Disable
Enable
3
2
BMC Force Update
J1D2
Disable
Enable
BIOS Bank Select
J1C3
3
2
Bank 0
Normal
Operation
(default)
Protect
Clear
Jumper Name Pins What Happens at System Reset
6 Intel® Workstation Board S5000XVN
BIOS Bank Select
(J1C3)
CMOS Clear
(J1D1)
1 - 2 Bank 0: Boot to an alternate BIOS.
2 - 3 Boot from the standard BIOS. These pins should be
jumpered for normal operation.
1 - 2 Protect CMOS: these pins should be jumpered for normal
operation.
2 - 3 Erase CMOS: If these pins are jumpered for 5 to 10
seconds, the CMOS settings will be cleared on the next
workstation reset. These pins should not be jumpered for
normal operation.
The workstation does not need to be reset with the
jumpers on these pins for the CMOS to be cleared. To use
the jumper to clear the CMOS: Power down the
workstation, leaving AC power connected. Place the
jumper on pins 2 - 3 for 5 to 10 seconds. Move the jumper
back to pins 1 - 2. Power on the workstation
Page 25

Jumper Name Pins What Happens at System Reset
Password Clear
(J1D2)
BMC Force Update
(J1E3)
1 - 2 Protect password: These pins should be jumpered for
normal operation.
2 - 3 Erase password: If these pins are jumpered for 5 to 10
seconds, the password will be cleared on the next
workstation reset. These pins should not be jumpered for
normal operation.
The workstation does not need to be reset with the
jumpers on these pins for the password to be cleared. To
use this jumper to reset the password: Power down the
workstation. Place the jumper on pins 2 - 3. Power on the
workstation and wait 5 to 10 seconds. Power down the
workstation. Move the jumper back to pins 1 - 2. Power on
the workstation.
1 - 2 Disable force update: These pins should be jumpered for
normal operation.
2 - 3 Enable force update: Jumpering these pins forces a BMC
update.
Figure 3. Configuration Jumpers
Intel® Workstation Board S5000XVN 7
Page 26
Intel® Light-Guided Diagnostics
AF000502
U
S
T
E
F
G
H
R
B
A
D
C
I J K L M N O P
Q
The workstation board contains diagnostic LEDs to help you identify failed and failing
components and to help you identify the workstation from among several workstations.
Except for the ID LED, the status LED, and the +5-volt standby LED, the LEDs turn on
(amber) only if a failure occurs.
8 Intel® Workstation Board S5000XVN
Page 27

Callout LED Function
A. Bit 3 LED POST LED. The sequence of lit POST LEDs is used
to identify specific errors that might occur during the
boot process. See the appendix of the Technical
Product Specification for a description of how to read
these LEDs.
B. LSB LED POST LED. The sequence of lit POST LEDs is used
to identify specific errors that might occur during the
boot process. See the appendix of the Technical
Product Specification for a description of how to read
these LEDs.
C. Bit 2 LED POST LED. The sequence of lit POST LEDs is used
to identify specific errors that might occur during the
boot process. See the appendix of the Technical
Product Specification for a description of how to read
these LEDs.
D. MSB LED POST LED. The sequence of lit POST LEDs is used
to identify specific errors that might occur during the
boot process. See the appendix of the Technical
Product Specification for a description of how to read
these LEDs.
E. Status LED The status LED indicates whether a system is
operating correctly, has experienced a minor fault, or
a major system error. For details about this LED, see
the Technical Product Specification.
F. ID LED This LED can be turned on and off either by pressing
a chassis button or by using system management
software. This LED is useful when the system is
grouped with several systems, such as in a rack, and
you need to easily find the system to perform
maintenance on it.
G. System fan 6 fault LED This LED indicates a fault has occurred with system
fan 6. See your server chassis documentation for
instructions to replace the fan.
H. System fan 5 fault LED This LED indicates a fault has occurred with system
fan 5. See your server chassis documentation for
instructions to replace the fan.
I. DIMM A1 fault LED This LED indicates a fault has occurred with the
J. DIMM A2 fault LED This LED indicates a fault has occurred with the
K. DIMM B1 fault LED This LED indicates a fault has occurred with the
Intel® Workstation Board S5000XVN 9
FBDIMM installed in socket DIMM_A1. Replace the
faulty FBDIMM.
FBDIMM installed in socket DIMM_A2. Replace the
faulty FBDIMM.
FBDIMM installed in socket DIMM_B1. Replace the
faulty FBDIMM.
Page 28

Callout LED Function
L. DIMM B2 fault LED This LED indicates a fault has occurred with the
FBDIMM installed in socket DIMM_B2. Replace the
faulty FBDIMM.
M. DIMM C1 fault LED This LED indicates a fault has occurred with the
FBDIMM installed in socket DIMM_C1. Replace the
faulty FBDIMM.
N. DIMM C2 fault LED This LED indicates a fault has occurred with the
FBDIMM installed in socket DIMM_C2. Replace the
faulty FBDIMM.
O. DIMM D1 fault LED This LED indicates a fault has occurred with the
FBDIMM installed in socket DIMM_D1. Replace the
faulty FBDIMM.
P. DIMM D2 fault LED This LED indicates a fault has occurred with the
FBDIMM installed in socket DIMM_D2. Replace the
faulty FBDIMM.
Q. +5-volt standby LED This LED is green whenever AC power is applied to
the system. The system does not need to be
powered on in order for this LED to be on.
R. Processor 2 fault LED This LED indicates a fault has occurred with the
processor installed in socket CPU_2 socket. Replace
the faulty processor.
S. Processor 1 fault LED This LED indicates a fault has occurred with the
processor installed in socket CPU_1 socket. Replace
the faulty processor.
T. Processor 2 fan fault LED This LED applies only to workstation systems that
use an active heatsink. This LED indicates a fault
has occurred with fan that is installed on the heatsink
for processor 2. Replace the faulty unit.
U. Processor 1 fan fault LED This LED applies only to workstation systems that
use an active heatsink. This LED indicates a fault
has occurred with fan that is installed on the heatsink
for processor 1. Replace the faulty unit.
10 Intel® Workstation Board S5000XVN
Page 29

Back Panel Features
AF000501
C D
E
BA
O G
H
F
N L J
M K I
The diagram and table show the back panel connectors and LEDs. For information about
the LEDs, see “Intel
A. Mouse I. LSB LED (POST LED)
B. Serial A J. Bit 1 LED (POST LED
C. NIC 1 K. Bit 2 LED (POST LED)
D. NIC 2 L. MSB LED (POST LED)
E. Audio in M. ID LED
®
Light-Guided Diagnostics” on page 8.
F. Audio out N. Status LED
G. Microphone O. Keyboard
H. USB (four ports)
Figure 4. Back Panel Connectors and LEDs
The NIC LEDs at the right and left of each NIC provide the following information.
Table 3. NIC LEDs
LED LED State Description
Left Off No network connection is in place
Solid green Active network connection is in place
Blinking green Transmit / receive activity is occurring
Right Off 10 Mbps connection (if left LED is on or blinking)
Solid green 100 Mbps connection
Solid amber 1000 Mbps connection
Intel® Workstation Board S5000XVN 11
Page 30

RAID Support
The Intel® Workstation Board S5000XVN is available in SATA models and a SAS
models.
• The SATA model has product code S5000XVNSATA or S5000XVNSATAR.
• The SAS model has product code S5000XVNSAS or S5000XVNSASR.
The SAS models provides both SAS and SATA support; the SATA models provides only
SATA support. For information on configuring RAID, see the RAID software user’s guide
that is included on the Intel
SATA Workstation Board
The SATA models of the Intel® Workstation Board S5000XVN (product code
S5000XVNSATA or S5000XVNSATAR) provide an embedded SATA controller that
supports both 1.5 Gbps and 3.0 Gbps data transfer rates.
The BIOS Setup utility provides drive configuration options on the Advanced | ATA
Controller setup page, some of which affect the ability to configure RAID. The “Onboard
SATA Controller” option is enabled by default and when enabled, the “SATA Mode”
option can be set to either Legacy or Enhanced.
• Legacy supports four disk drives and does not provide RAID support.
®
Server Deployment Toolkit 2.0 CD.
Notes:
• Enhanced supports six disk drives and is required for RAID configurations.
When enhanced mode is selected, you can enable or disable “AHCI Mode” or “Configure
SATA as RAID”. Intel
SATA as RAID.” The Intel
RAID modes 0, 1, and 10.
If RAID 5 is desired, the optional Intel
must be installed. This activation key is placed on the SATA_Key connector that is located
at the left side of the workstation board. For installation instructions, see the
documentation that is included with the activation key. See Figure 2 on page 4 for
connection locations.
®
When Intel
Embedded Server RAID Technology II is enabled, enclosure management is
provided through the SATA_SGPIO connector on the workstation board when a cable is
attached between this connector on the workstation board and to the backplane or I
interface.
• For help with navigating the BIOS Setup utility, see the Intel
S5000XVN Technical Product Specification.
®
Embedded Server RAID Technology II is enabled by “Configure
®
Embedded Server RAID Technology II feature provides
®
RAID Activation Key AXXRAKSW5 accessory
2
C
®
Workstation Board
• For help with enclosure management cabling, see the Enclosure Management
Cabling Guide for Pedestal Systems with Hot-swap Drive Backplanes. This guide is
on the Intel
®
Server Deployment Toolkit 2.0 CD.
12 Intel® Workstation Board S5000XVN
Page 31

SAS Workstation Board
In addition to the SATA features described above, SAS models of the workstation board
(product code S5000XVNSAS or S5000XVNSASR) have a dual-mode 4-port Serial
Attached SCSI (SAS) controller that supports both SAS and SATA hard disk drives. This
controller is capable of data transfer rates of up to 3.0 Gbps per port. The SAS controller
supports up to 120 physical drives when expanders are used.
The BIOS Setup utility includes options on the Advanced | Mass Storage setup page to
enable or disable the SAS option ROM and the SAS controller. Both of these options must
be enabled to use RAID.
• When the SAS controller is enabled, the two black SATA ports on the workstation
board continue to function as SATA ports. The four blue ports can be used as either
SAS or SATA ports. When the SAS controller is disabled in the BIOS Setup utility,
SATA ports 0 and 1 (the two black ports) function as SATA ports and all other SAS /
SATA ports are disabled.
• When the SAS option ROM is enabled in the BIOS Setup utility, Intel
Server RAID Technology II is available. This enables SAS RAID modes 0, 1, or 10
for the four blue ports on the workstation board. This SAS controller can mix SAS
and SATA drives and the RAID mode of this SAS controller supports up to eight
SAS/SATA physical drives and eight logical drives.
If the SAS option ROM is disabled in the BIOS Setup utility, but the SAS controller is
enabled, the four blue ports on the workstation board continue to function as either SAS or
SATA ports and the two black ports on the workstation board continue to function as
SATA only ports. However, RAID support is not available.
®
Embedded
Notes:
®
If RAID 5 is desired, the optional Intel
RAID Activation Key AXXRAKSW5 can be
installed. To enable RAID 5, this activation key is placed on the SAS_Key connector that
is located at the left side of the workstation board. For information on how to install the
®
RAID Activation Key AXXRAKSW5 accessory to enable RAID 5, see the
Intel
documentation that is included with the accessory kit. See Figure 2 on page 4 for
connection locations.
Two SGPIO connectors are available on SAS models of the workstation board, one for the
SAS controller and one for the SATA controller.
SAS enclosure management is provided through the SES2 connector on the workstation
board when a cable is attached between the SES2 connector and the non-expander
backplane.
• For help with navigating the BIOS Setup utility, see the Intel
®
Workstation Board
S5000XVN Technical Product Specification.
• For help with enclosure management cabling, see the Enclosure Management
Cabling Guide for Pedestal Systems with Hot-swap Drive Backplanes. This guide is
on the Intel
®
Server Deployment Toolkit 2.0 CD.
Intel® Workstation Board S5000XVN 13
Page 32

Audio Support
The Intel® Workstation Board S5000XVN includes the Realtec* ALC260 2-channel highdefinition audio codec with universal audio architecture. It features a 24-bit, 2-channel
DAC and two stereo 20-bit ADCs.
The ALC260 provides two output channels with flexible mixing, mute and fine gain
controls to provide a complete integrated audio solution. The ALC260 provides highquality audio using S/PDIF to output analog data or multiple-source recording
applications. Jack sensing allows inputs and output device loads to be auto-detected.
Analog IOs are both input and output capable. The ALC260 supports 32-bit S/PDIF input/
output functions.
The feature list for the ALC260 is as follows:
• Single-chip multi-bit Sigma-Delta converters with high S/N ratio
• One stereo DAC that supports 16/20/24-bit PCM format with 44.1K/48K/96K/
192kHz sample rate
• Two stereo ADCs that support 16/20-bit PCM format with 44.1K/48K/96kHz
sample rate
• Applicable for 2-channel 192kHz DVD audio solutions
• Line out, HP out, line 1, line 2, mic 1, and mic 2 are stereo input and output re-
tasking
• Mono line level output to subwoofer speaker for 2.1 channel applications
• High-quality differential CD analog input
• Two jack detection pins, each designed to detect four jacks
• Support for 44.1K/48K/96kHz/192kHz S/PDIF output
• Support for 44.1K/48K/96kHz S/PDIF input
• Reserve analog mixer architecture is backwards compatible with AC'97*
• –64dB ~ +30dB with 1dB mixer gain for fine volume control
• Impedance-sensing capability for each re-tasking jack
• Built-in headphone amplifier for each re-tasking jack
• Supports GPIOs (general-purpose input/output) for customized applications
• Meets Microsoft WHQL/WLP 2.0 audio requirements
• Emulation of 26 sound environments to enhance gaming experience
• 10-band software equalizer
• Enhanced configuration panel and device sensing wizard to improve user experience
• Content copy protection for S/PDIF interface
• Mono / stereo microphone noise suppression
14 Intel® Workstation Board S5000XVN
Page 33

Hardware Requirements
To avoid integration difficulties and possible board damage, your system must meet the
requirements outlined below. For a list of qualified components, see the links under
“Additional Information and Software” on page viii.
Processor
Memory
• One or two Dual-Core Intel
®
Xeon® processors 5300 sequence.
Intel
• One or two 45 nm next generation Quad-Core Intel
codes S5000XVNSATAR and S5000XVNSASR only)
• One or two 45 nm 2P Dual-Core Intel
S5000XVNSATAR and S5000XVNSASR only)
For a list of supported processors, see the links under “Additional Information and
Software”.
The Intel® Workstation Board S5000XVN provides eight DIMM sockets in two branches.
Each branch contains two channels:
®
Xeon® processors 5000 / 5100 sequence or Quad-Core
®
Xeon® processors (Product
®
Xeon® processors (Product codes
• Branch 1 contains Channel A and Channel B
• Branch 2 contains Channel C and Channel D
Each channel contains two DIMM sockets:
• Channel A, nearest to the center of the workstation board, consists of DIMM sockets
A1 and A2
• Channel B consists of DIMM sockets B1 and B2
• Channel C consists of DIMM sockets C1 and C2
• Channel D consists of DIMM sockets D1 and D2
Intel® Workstation Board S5000XVN 15
Page 34

See the following diagram to identify the DIMM sockets.
AF000503
A
B
C
D E
F
G
H
Callout DIMM Socket Callout DIMM Socket
A. Branch 1, Channel A,
B. Branch 1, Channel A,
C. Branch 1, Channel B,
D. Branch 1, Channel B,
DIMM_A1
DIMM_A2
DIMM_B1
DIMM_B2
E. Branch 2, Channel C,
DIMM_C1
F. Branch 2, Channel C,
DIMM_C2
G. Branch 2, Channel D,
DIMM_D1
H. Branch 2, Channel D,
DIMM_D2
Figure 5. DIMM Sockets
16 Intel® Workstation Board S5000XVN
Page 35

A minimum of one 512 MB FBDIMM is required in DIMM socket DIMM_A1.
FBDIMMs must meet the following requirements:
• Use only FBDIMMs (DDR2-533 or DDR2-667).
• Use only 240-pin FBDIMMs.
• Use FBDIMMs with capacities of 512 MB, 1 GB, 2 GB, or 4 G.
• Use only FBDIMMs that comply with the JEDEC Rev 2.0 specifications.
• FBDIMMs in a given channel must be identical with respect to manufacturing,
speed, timing, and organization. For example, this means the FBDIMMs in sockets
A1 and B1 must be identical, and the FBDIMMs in sockets C1 and D1 must be
identical. FBDIMMs in adjacent sockets on the same channel do not need to be
identical.
The workstation will run in single-channel mode under the following conditions:
• Only a single FBDIMM is installed. This FBDIMM must be in socket DIMM_A1.
• The population of socket DIMM_A1 determines the mode that is selected. If
DIMM_A1 and DIMM_B1 are not identical, then the system reverts to singlechannel mode and DIMM_B1 is disabled.
• If the FBDIMMs in socket positions on adjacent channels of the branch are different
in terms of timing, technology, or size. If the FBDIMMs on adjacent channels of a
branch are not identical, the FBDIMM on the higher channel is disabled.
• If Branch 0 cannot support the dual-channel mode of operation for any reason, the
workstation will run in single-channel mode.
For dual-channel interleave, providing optimum performance, a minimum of two
FBDIMMs must be installed. Populate FBDIMMs of the same size in each channel.
Install these FBDIMMs in DIMM sockets DIMM_A1 and DIMM_B1. For dual-channel
interleave, FBDIMMs must be installed in pairs and populated as follows:
• DIMM_A1 and DIMM_B1: Populate these two sockets together first.
• Populate FBDIMMs in channel order, populating all FBDIMMs in each channel.
For example, if four FBDIMMs are to be installed, they need to be in sockets A1,
B1, C1, and D1.
• The minimum memory population for enabling Branch 1 is four FBDIMMs:
DIMM_A1, DIMM_B1, DIMM_C1 and DIMM_D1.
During the boot process, FBDIMMs that do not meet the population requirements are
disabled.
For a complete list of supported memory FBDIMMs, see the links under “Additional
Information and Software” on page viii
Power Supply
A minimum of 550 watts is required. Your power supply must provide a minimum of
3 amps of 5-volt standby current or the workstation will not boot.
Intel® Workstation Board S5000XVN 17
Page 36

Optional Hardware
Intel® RAID Activation Key
The Intel® RAID Activation Key AXXRAKSW5 can be purchased and installed to enable
RAID 5 support on your workstation board.
For the SATA workstation board, product codes S5000XSLSATA and S5000XSLSATAR,
an Intel
For the SAS workstation board, product code S5000XSLSAS and S5000XSLSASR, an
Intel
the SAS RAID 5 Key connector, or in each of these connectors.
For information about RAID support on this workstation board, see “RAID Support” on
page 12. See Figure 2 on page 4 to locate the connectors on the workstation board.
Installation instructions for the RAID Activation Key are included with the accessory.
®
RAID Activation Key can be installed in the SATA RAID 5 Key connector.
®
RAID Activation Key can be installed in either the SATA RAID 5 Key connector,
Hard Disk Drives
The Intel® Workstation Board S5000XVN supports different hard disk drive options,
depending on the version of the workstation board purchased.
• Optical hard disk drives
• Serial ATA (SATA) and (SAS):
— Product code S5000XVNSATA or S5000XSLSATAR: Six SATA ports at 1.5
Gbps
— Product code S5000XVNSAS or S5000XSLSASR: Four SAS ports at 3 Gbps
and two SATA ports at 1.5 Gbps
or 3 Gbps, no SAS ports
or 3 Gbps
• Parallel ATA (IDE): The workstation board includes one IDE connector.
See the documentation included with your server chassis for additional drive information
and drive installation instructions.
Intel® Local Control Panel
The Intel® Local Control Panel provides enhanced system control by utilizing a LCD
display, which provides additional controls and indicators beyond the standard control
panel.
18 Intel® Workstation Board S5000XVN
Page 37

2 System Utilities
Using the BIOS Setup Utility
This section describes the BIOS Setup Utility options, which is used to change system
configuration defaults. You can run BIOS Setup with or without an operating system
being present. See “Additional Information and Software” for a link to the Technical
Product Specification where you will find details about specific BIOS setup screens.
Starting Setup
You can enter and start BIOS Setup under several conditions:
• When you turn on the workstation, after POST completes the memory test.
• When you have moved the CMOS jumper on the workstation board to the “Clear
CMOS” position (enabled).
In the two conditions listed above, during the Power On Self Test (POST), you will see
this prompt:
Press <F2> to enter SETUP
In a third condition, when CMOS/NVRAM has been corrupted, you will see warning
prompts but not the <F2> prompt:
Warning: CMOS checksum invalid
Warning: CMOS time and date not set
In this condition, the BIOS will load default values for CMOS and attempt to boot.
If You Cannot Access Setup
If you are not able to access BIOS Setup, you might need to clear the CMOS memory. For
instructions on clearing the CMOS, see “Clearing the CMOS” on page 25.
Page 38

Setup Menus
The BIOS Setup utility provides multiple pages to allow you to view and change system
settings. Some parameters are configured automatically and cannot be changed. If an
administrator password has been set, administrator privileges are required to change most
settings. If a value cannot be changed for any reason, the feature's value field is
inaccessible.
The following table describes the keyboard commands you can use in the BIOS Setup
menus.
Key to Press Description
<F1> Pressing <F1> on any menu invokes the general help window.
Table 4. Setup Menu Key Use
Left and right arrows The left and right arrow keys are used to move between the major menu
Up arrow Select Item up - The up arrow is used to select the previous value in a
Down arrow Select Item down - The down arrow is used to select the next value in a
<F5> or <-> Change Value - The minus key or the <F5> function key is used to
<F6> or <+> Change Value - The plus key or the <F6> function key is used to change
<Enter> Execute Command - The <Enter> key is used to activate submenus
<Esc> Exit - The <Esc> key provides a mechanism for backing out of any field.
pages. The keys have no affect if a submenu or pick list is displayed.
menu item's option list, or a value field pick list. Pressing the <Enter> key
activates the selected item.
menu item's option list, or a value field pick list. Pressing the <Enter> key
activates the selected item.
change the value of the current item to the previous value. This key
scrolls through the values in the associated pick list without displaying
the full list.
the value of the current menu item to the next value. This key scrolls
through the values in the associated pick list without displaying the full
list. On 106-key Japanese keyboards, the plus key has a different scan
code than the plus key on the other keyboard, but it has the same effect.
when the selected feature is a submenu, or to display a pick list if a
selected feature has a value field, or to select a sub-field for multi-valued
features like time and date. If a pick list is displayed, the <Enter> key will
undo the pick list, and allow another selection in the parent menu.
This key will undo the pressing of the <Enter> key. When the <Esc> key
is pressed while editing any field or selecting features of a menu, the
parent menu is re-entered. When the <Esc> key is pressed in any
submenu, the parent menu is re-entered. When the <Esc> key is
pressed in any major menu, the exit confirmation window is displayed
and the user is asked whether changes can be discarded.
20 Intel® Workstation Board S5000XVN
Page 39

Table 4. Setup Menu Key Use
Key to Press Description
<F9> Setup Defaults - Pressing <F9> causes the following to appear:
Setup Confirmation
Load default configuration now?
[Yes] [No]
If “Yes” is selected and the <Enter> key is pressed, all Setup fields are
set to their default values. If “No” is selected and the <Enter> key is
pressed, or if the <Esc> key is pressed, the user is returned to where
they were before <F9> was pressed without affecting any existing field
values.
<F10> Save and Exit - Pressing <F10> causes the following message to
appear:
If “Yes” is selected and the <Enter> key is pressed, all changes are
saved and Setup is exited. If “No” is selected and the <Enter> key is
pressed, or the <Esc> key is pressed, the user is returned to where they
were before <F10> was pressed without affecting any existing values.
Upgrading the BIOS
The upgrade utility allows you to upgrade the BIOS in flash memory. The code and data
in the upgrade file include the following:
• On-board system BIOS, including the recovery code, BIOS Setup utility, and
strings.
• On-board video BIOS and other option ROMs for devices embedded on the
workstation board.
• OEM binary area
• Microcode
Setup Confirmation
Save Configuration changes and exit now?
[Yes] [No]
• A way to change the BIOS language
When you perform an upgrade to your BIOS, the upgrade is performed into a secondary
BIOS partition on specialized workstation board hardware. When you boot your
workstation, the system checks for an upgraded BIOS in this secondary partition. If it
finds a BIOS upgrade has been installed, it attempts to boot with the new BIOS. If it
encounters a problem with the upgraded BIOS, the system reverts to the BIOS that was in
place before the upgrade was performed. This provides a safeguard against problems that
might happen during the upgrade, such as a power outage during the upgrade process.
This is called the rolling BIOS feature.
Intel® Workstation Board S5000XVN 21
Page 40

Preparing for the Upgrade
The steps below explain how to prepare to upgrade the BIOS, including how to record the
current BIOS settings and how to obtain the upgrade utility.
Note: In the unlikely event that a BIOS error occurs during the BIOS update process, a recovery
process may need to be followed to return the system to service. See “Additional
Information and Software” on page viii for a link to necessary software and instructions.
Recording the Current BIOS Settings
1. Boot the computer and press <F2> when you see the message:
Press <F2> Key if you want to run SETUP
2. Write down the current settings in the BIOS Setup program.
Note: Do not skip step 2. You will need these settings to configure your computer at the end of
the procedure.
Obtaining the Upgrade
Download the BIOS image file to a temporary folder on your hard drive. See “Additional
Information and Software” for a link to the update software.
Note: Review the instructions and release notes that are provided in the readme file distributed
with the BIOS image file before attempting a BIOS upgrade. The release notes contain
critical information regarding jumper settings, specific fixes, or other information to
complete the upgrade.
Upgrading the BIOS
Follow the instructions in the readme file that came with the BIOS upgrade. When the
update completes, remove the bootable media from which you performed the upgrade.
Caution: Do not power down the system during the BIOS update process!
Note: You may encounter a CMOS Checksum error or other problem after reboot. If this
happens, shut down the system and boot it again. CMOS checksum errors require that you
enter Setup, check your settings, save your settings, and exit Setup.
22 Intel® Workstation Board S5000XVN
Page 41

Reverting to the Previous BIOS
AF000508
BIOS Bank Select
J1C3
3
2
Force Lower
Bank
Normal Operation
(default)
If you encounter a problem with your BIOS, you may want to revert to the previously
installed BIOS. Because of the rolling BIOS feature, your workstation contains two
versions of the BIOS: the current BIOS, and the BIOS that was previously installed.
Note: If you upgrade the BIOS more than once with the same BIOS version, the two versions of
the BIOS stored in your workstation will be identical.
To revert to the previous BIOS:
1. Power down the workstation and disconnect the AC power.
2. Open the chassis. See your chassis documentation for instructions on removing the
chassis cover.
3. Locate the BIOS Bank Select jumper at board position J1C3. See Figure 6.
4. Move the jumper from the normal operation position, covering pins 2 and 3, to the
Bank_0 position, covering pins 1 and 2, as shown by the diagram.
Figure 6. BIOS Bank Select Jumper in Force Lower Bank Position
5. Close the chassis.
Intel® Workstation Board S5000XVN 23
6. Reconnect the AC power and power up the workstation.
The BIOS will boot to the previous BIOS until you either move the jumper again or until
you perform another BIOS update.
Page 42

Clearing the Password
AF000504
3
2
J1D2
Default
Clear
Password
PASSWRD CLR
If the user or administrator password(s) is lost or forgotten, moving the password clear
jumper into the “clear” position clears both passwords. The password clear jumper must
be restored to its original position before a new password(s) can be set.
1. Power down the workstation. Leave the AC power cord connected.
2. Open the chassis. See your chassis documentation for instructions on removing the
chassis cover.
3. Locate the Password Clear jumper block at board position J1D2. See Figure 7.
4. Move the jumper from the normal operation position, covering pins 1 and 2, to the
Password Clear position, covering pins 2 and 3, as shown by the diagram.
Figure 7. Password Clear Jumper in Clear Password Position
5. Power up the workstation and wait 10 seconds.
6. Power down the workstation.
7. Move the Password Clear jumper back to the original position, covering pins
1 and 2.
24 Intel® Workstation Board S5000XVN
8. Close the chassis.
9. Power up the workstation.
Page 43

Clearing the CMOS
AF000505
3
2
Default
Clear
CMOS
J1D1
CMOS CLR
If you are not able to access the BIOS setup screens, the CMOS Clear jumper will need to
be used to reset the configuration RAM.
1. Power down the system. Leave the AC power cord connected.
2. Open the chassis. See your chassis documentation for instructions on removing the
chassis cover.
3. Locate the CMOS Clr jumper block at board position J1D1. See Figure 8.
4. Move the jumper from the normal operation position, covering pins 1 and 2, to the
CMOS Clear position, covering pins 2 and 3, as shown by the diagram.
Figure 8. CMOS Clear Jumper in the Clear CMOS Position
5. Wait 10 seconds.
6. Move the CMOS Clear jumper back to the original position, covering pins 1 and 2.
7. Close the chassis.
8. Power up the workstation.
Intel® Workstation Board S5000XVN 25
Page 44

26 Intel® Workstation Board S5000XVN
Page 45

3 Hardware Installations and
Upgrades
Before You Begin
Before working with your workstation product, pay close attention to the “Safety
Information” on page iii.
Tools and Supplies Needed
• Phillips* (cross head) screwdriver (#1 bit and #2 bit)
• Needle nosed pliers
• Antistatic wrist strap and conductive foam pad (recommended)
Installing and Removing Memory
The silkscreen on the board for the FBDIMMs displays DIMM_A1, DIMM_A2,
DIMM_B1, DIMM_B2, DIMM_C1, DIMM_C2, DIMM_D1, and DIMM_D2, starting
from the inside of the board. DIMM_A1 is the socket closest to the MCH. See “Memory”
on page 15 for a discussion of the memory requirements and options. See “Additional
Information and Software” on page viii for a link to the list of tested FBDIMMs.
Installing FBDIMMs
To install FBDIMMs, follow these steps:
1. Observe the safety and ESD precautions in “Safety Information” on page iii.
2. Turn off all peripheral devices connected to the workstation. Turn off the
workstation.
3. Disconnect the AC power cord from the workstation.
4. Remove the chassis cover. See the documentation that came with your chassis for
instructions on removing the cover.
Page 46

5. Locate the DIMM sockets (see Figure 9).
AF000503
A
B
C
D E
F
G
H
6. Disconnect and remove any components necessary to access the DIMM sockets.
See the documentation that came with your chassis for instructions on removing
chassis components.
Callout DIMM Socket Callout DIMM Socket
A. DIMM_A1 E. DIMM_C1
B. DIMM_A2 F. DIMM_C2
C. DIMM_B1 G. DIMM_D1
D. DIMM_B2 H. DIMM_D2
Figure 9. Locating DIMM Sockets
28 Intel® Workstation Board S5000XVN
Page 47

7. Make sure the clips at each end of the DIMM socket(s) are pushed outward to the
open position. See letter “A” in Figure 10.
8. Holding the FBDIMM by the edges, remove it from its anti-static package.
9. Position the FBDIMM above the socket. Align the notch on the bottom edge of the
FBDIMM with the key in the DIMM socket. The arrow for letter “B” in Figure 10
is pointing to the key in the socket.
10. Insert the bottom edge of the FBDIMM into the socket.
11. When the FBDIMM is inserted, push down on the top edge of the FBDIMM until
the retaining clips snap into place. See letter “C” in Figure 10.
12. Make sure the clips latch firmly in place. See letter “D” in Figure 10.
C
D
B
A
TP000425
Figure 10. Installing FBDIMMs
13. Reinstall and reconnect any parts you removed or disconnected to reach the DIMM
sockets. See the documentation that came with your chassis for instructions on
removing chassis components.
14. Replace the chassis cover and reconnect the AC power cord. See the documentation
that came with your chassis for instructions on installing the chassis cover.
Intel® Workstation Board S5000XVN 29
Page 48

Removing FBDIMMs
To remove a FBDIMM, follow these steps:
1. Observe the safety and ESD precautions in “Safety Information” on page iii.
2. Turn off all peripheral devices connected to the workstation. Turn off the
workstation.
3. Remove the AC power cord from the workstation.
4. Remove the chassis cover. See the documentation that came with your chassis for
instructions on removing the cover.
5. Disconnect and remove any components necessary to access the DIMM sockets.
See the documentation that came with your chassis for instructions on removing
chassis components.
6. Push the clips at each end of the DIMM socket(s) outward to the open position. The
FBDIMM lifts from the socket.
7. Holding the FBDIMM by the edges, lift it from the socket. Store the FBDIMM in
an anti-static package.
8. Reinstall and reconnect any parts you removed or disconnected to reach the DIMM
sockets. See the documentation that came with your chassis for instructions on
installing chassis components.
9. Replace the chassis cover and reconnect the AC power cord. See the documentation
that came with your chassis for instructions on installing the cover.
Installing or Replacing the Processor
Caution: Processor must be appropriate: You may damage the workstation board if you install a
processor that is inappropriate for your workstation. See “Additional Information and
Software” on page viii for a link to the list of compatible processor(s).
Caution: ESD and handling processors: Reduce the risk of electrostatic discharge (ESD) damage to
the processor by doing the following: (1) Touch the metal chassis before touching the
processor or workstation board. Keep part of your body in contact with the metal chassis
to dissipate the static charge while handling the processor. (2) Avoid moving around
unnecessarily.
30 Intel® Workstation Board S5000XVN
Page 49

Installing the Processor
AF000506
A B
Notes:
• Do not touch the contacts on either the processor or the processor socket.
• Do not force the processor socket into place. When correctly aligned, the socket will
easily drop into place.
To install a processor, follow these instructions:
1. Observe the safety and ESD precautions in “Safety Information” on page iii.
2. Turn off all peripheral devices connected to the workstation. Turn off the
workstation.
3. Disconnect the AC power cord from the workstation.
4. Remove the chassis cover. See the documentation that came with your chassis for
instructions on removing the cover.
5. Locate the processor sockets (see Figure 11).
Callout Processor Socket Callout Processor Socket
A. CPU_2 B. CPU_1
Intel® Workstation Board S5000XVN 31
Figure 11. Locating Processor Sockets
Page 50

6. Disconnect and remove any components necessary to access the processor sockets.
AF000095
AF000096
See the documentation that came with your chassis for instructions on removing
chassis components.
7. Push down on the lever attached to the processor socket. While holding the lever
down, pull it towards the center of the board to disengage the lever from the hook.
Fully open the lever. See Figure 12.
Figure 12. Opening Processor Socket Lever
8. Push down on the rear tab of the load plate to swing the front of the load plate up
slightly. Fully open the load plate. See Figure 13.
32 Intel® Workstation Board S5000XVN
Figure 13. Opening Load Plate
Page 51

9. If the protective cover is attached from the load plate, remove it and store it for
AF000097
AF000101
future use.
Figure 14. Removing Protective Cover from Load Plate
10. Remove the processor from the box and remove the protective shipping cover.
11. Set the processor in the socket with the processor cutouts matching the processor
socket notches. See Figure 15.
12. Close the load plate.
13. Close the socket lever. Push downward on the socket lever while pushing it toward
the center of the to engage it under the hook on the processor socket.
14. Install the heatsink(s). See “Installing the Heatsink(s)” on page 34 for instructions.
Intel® Workstation Board S5000XVN 33
Figure 15. Setting Processor in Place
Page 52

Installing the Heatsink(s)
Note: The heatsink has thermal interface material (TIM) located on the bottom of it. Use caution
when handling the heatsink so you do not damage the TIM.
Each processor requires a heatsink. Depending on your chassis, you may need to use
either a passive or an active heatsink. An active heatsink has a fan attached to the top of it
and a cable that needs to be connected to the workstation board. The following table
shows the Intel
chassis requires an active or a passive heatsink:
Table 5. Heatsink Requirements for Compatible Intel
®
Intel
Entry Server Chassis SC5299-E WS
®
Server Chassis SC5400 Base Passive heatsink
Intel
®
server chassis compatible with this workstation board and whether each
Server Chassis Heatsink Requirement
®
Server Chassis
Active heatsink
34 Intel® Workstation Board S5000XVN
Page 53

Use the following steps to install a heatsink.
AF000098
Chassis
Front
2
1
3
4
1. Install the processor. See “Installing the Processor” on page 31 for instructions.
2. Set the heatsink over the processor, lining up the four captive screws with the four
posts surrounding the processor.
3. Loosely screw in the captive screws on the heat sink corners in the order shown by
Figure 16. Do not fully tighten one screw before loosely attaching the others.
4. In the same order, gradually and equally tighten each captive screw until each is
firmly tightened. Do not fully tighten one screw at a time.
Figure 16. Installing Heatsink (passive heatsink shown)
Intel® Workstation Board S5000XVN 35
Page 54

5. Active heatsink only: Connect the heatsink cable to the workstation board.
Callout
A. CPU_2 B. CPU_1
Processor Heatsink
Connector
Callout
Processor Heatsink
Connector
Figure 17. Locating Active Heatsink Cable Connections
6. Reinstall and reconnect any parts you removed or disconnected to reach the
processor sockets. See the documentation that came with your chassis for
instructions on installing chassis components.
7. Replace the chassis cover and reconnect the AC power cord. See the documentation
that came with your chassis for instructions on installing the cover.
36 Intel® Workstation Board S5000XVN
Page 55

Removing a Processor
1. Observe the safety and ESD precautions in “Safety Information” on page iii.
2. Turn off all peripheral devices connected to the workstation. Turn off the
workstation.
3. Remove the AC power cord from the workstation.
4. Remove the chassis cover. See the documentation that came with your chassis for
instructions on removing the cover.
5. Disconnect and remove any components necessary to access the processor sockets.
See the documentation that came with your chassis for instructions on removing
chassis components.
6. Active heatsink only: Unplug the processor fan cable from the workstation board.
7. Loosen the four captive screws on the corners of the heat sink.
8. Twist the heat sink slightly to break the seal between the heat sink and the
processor.
9. Lift the heat sink from the processor. If it does not pull up easily, twist the heat sink
again. Do not force the heat sink from the processor. Doing so could damage the
processor.
Caution:
—Do not attempt to operate your workstation system without a heatsink installed
over each installed processor. Doing so will cause your workstation to overheat
and may cause permanent damage.
— The heatsink has Thermal Interface Material (TIM) located on the bottom of it.
Use caution when handling the heatsink so you do not damage the TIM.
Intel® Workstation Board S5000XVN 37
Page 56

10. Push down on the lever attached to the processor socket. While holding the lever
AF000095
AF000415
down, pull it towards the center of the board to disengage the lever from the hook.
Fully open the lever. See Figure 18.
Figure 18. Opening Processor Socket Lever
11. Push down on the rear tab of the load plate to swing the front of the load plate up
slightly. Fully open the load plate. See Figure 19.
Figure 19. Opening Load Plate
38 Intel® Workstation Board S5000XVN
Page 57

12. Lift the processor from the socket. See Figure 15.
AF000416
AF000417
Caution: Do not touch the contacts on either the processor or the processor socket.
Figure 20. Removing Processor from Socket
13. Store the processor in the packaging materials in which it came.
14. Install the protective cover over the load plate if a replacement processor will not be
installed.
Figure 21. Installing Protective Cover onto Load Plate
Intel® Workstation Board S5000XVN 39
Page 58

15. Close the load plate.
16. Close the socket lever. Push downward on the socket lever while pushing it toward
the center of the to engage it under the hook on the processor socket.
17. If installing a replacement processor, see “Installing the Processor” on page 31.
18. Reinstall and reconnect any parts you removed or disconnected to reach the
processor sockets. See the documentation that came with your chassis for
instructions on installing chassis components.
19. Replace the chassis cover. See the documentation that came with your chassis for
instructions on installing the cover.
Replacing the CMOS Battery
The lithium CMOS battery on the workstation board powers the RTC in the absence of
power. When the battery starts to weaken, it loses voltage, and the system settings stored
in CMOS RAM in the RTC (for example, the date and time) may be wrong. Contact your
customer service representative or dealer for a list of approved devices.
Warni n g: Danger of explosion if battery is incorrectly replaced. Replace only with the same or
equivalent type recommended by the equipment manufacturer. Discard used batteries
according to manufacturer's instructions.
Advarsel: Lithiumbatteri - Eksplosionsfare ved fejlagtig håndtering. Udskiftning må kun ske med
batteri af samme fabrikat og type. Levér det brugte batteri tilbage til leverandøren.
Var ni n g : Explosionsfara vid felaktigt batteribyte. Använd samma batterityp eller en ekvivalent typ
som rekommenderas av apparattillverkaren. Kassera använt batteri enligt fabrikantens
instruktion.
Varoitus: Paristo voi räjähtää, jos se on virheellisesti asennettu. Vaihda paristo ainoastaan
laitevalmistajan suosittelemaan tyyppiin. Hävitä käytetty paristo valmistajan ohjeiden
mukaisesti.
40 Intel® Workstation Board S5000XVN
Page 59

1. Observe the safety and ESD precautions in “Safety Information” on page iii.
AF000099
2. Turn off all peripheral devices connected to the workstation. Turn off the
workstation.
3. Disconnect the AC power cord from the workstation.
4. Remove the chassis cover and locate the CMOS battery. See the documentation that
came with your chassis for instructions on removing the cover.
5. Use a finger to pull the lever away from the top of the battery until it clears the
battery. Use caution so you do not bend the lever.
6. Lift the battery from the socket.
Figure 22. Locating and Removing the CMOS Battery
7. Dispose of the battery according to local ordinance.
8. Remove the new battery from its package.
9. Being careful to observe the correct polarity, insert the battery into the battery
socket. The “+” side of the battery must face the lever side of the socket, toward the
add-in card slots.
10. Reinstall and reconnect any parts you removed or disconnected to reach the battery.
See the documentation that came with your chassis for instructions on installing
chassis components.
11. Replace the chassis cover and reconnect the AC power cord. See the documentation
that came with your chassis for instructions on installing the cover.
12. Run the BIOS Setup utility to restore the configuration settings to the real-time
clock.
Intel® Workstation Board S5000XVN 41
Page 60

42 Intel® Workstation Board S5000XVN
Page 61

Appendix A: Troubleshooting
This chapter helps you identify and solve problems that might occur while you are using
the system.
For any issue, first ensure you are using the latest software.These software updates
include updates for BIOS, the baseboard management controller (BMC), and the hot-swap
controller (HSC). See “Additional Information and Software” on page viii for a link to the
software updates. In addition to the system firmware and files, also update any drivers
used for components you have installed in your system, such as video drivers and network
drivers.
Intel provides a package called the “Platform Confidence Test” that may help with your
diagnostics. See “Additional Information and Software” for a link to this software.
If you are unable to resolve your workstation problems on your own, see “Getting Help”
on page 63 for assistance.
System Boot Quiet Time
The power-on self test (POST) process includes a quiet time, during which the system
may appear to be hung. This may last as long as 40 seconds. Do not power off or reboot
the system during this time. The POST LEDs will indicate activity. They may alternate
blinking between amber and green. When the quiet time completes, the status LED will
change to solid green.
Resetting the System
Before going through in-depth troubleshooting, attempt first to perform reset your system
using one of the methods below.
Table 6. Resetting the System
Soft boot reset to clear the system memory and reload the operating
system
Clear system memory, restart POST, and reload the operating system Reset button
Cold boot reset. Turn the system power off and then on. This halts power
to all peripherals, clears system memory, restarts POST, reloads the
operating system, and halts power to all peripherals
To do this Press
<Ctrl+Alt+Del>
Power off/on
button
Page 62

Problems following Initial System Installation
Problems that occur at initial system startup are usually caused by an incorrect installation
or configuration. Hardware failure is a less frequent cause. If the problem you are
experiencing is with a specific software application, see “Problems with Newly Installed
Application Software” on page 50.
First Steps Checklist
• Is AC power available at the wall outlet?
• Are the power supplies plugged in? Check the AC cable(s) on the back of the chassis
and at the AC source.
• Are all cables correctly connected and secured?
• Are the processors fully seated in their sockets on the workstation board?
• Are all standoffs in the proper location and not touching any components, causing a
potential short?
• Are all add-in PCI boards fully seated in their slots on the workstation board?
• Are all jumper settings on the workstation board correct?
• Are all jumper and switch settings on add-in boards and peripheral devices correct?
To check these settings, refer to the manufacturer's documentation that comes with
them. If applicable, ensure that there are no conflicts-for example, two add-in boards
sharing the same interrupt.
• Are all peripheral devices installed correctly?
• If the system has a hard disk drive, is it properly formatted or configured?
• Are all device drivers properly installed?
• Are the configuration settings made in Setup correct?
• Is the operating system properly loaded? See the operating system documentation.
• Did you press the system power on/off switch on the front panel to turn the
workstation on (power on light should be lit)?
• Is the system power cord properly connected to the system and plugged into a
NEMA 5 15R outlet for 100-120V or a NEMA 6-15R outlet for 200-240 V?
• Are all integrated components from the tested components lists? Check the tested
memory, and chassis lists, as well as the supported hardware and operating system
list. See “Additional Information and Software” on page viii for links to the tested
component lists.
44 Intel® Workstation Board S5000XVN
Page 63

Hardware Diagnostic Testing
This section provides a more detailed approach to identifying a hardware problem and
locating its source.
Caution: Turn off devices before disconnecting cables: Before disconnecting any peripheral cables
from the system, turn off the system and any external peripheral devices. Failure to do so
can cause permanent damage to the system and/or the peripheral devices.
1. Turn off the system and all external peripheral devices. Disconnect each device
from the system, except for the keyboard and the video monitor.
2. Make sure the system power cord is plugged into a properly grounded AC outlet.
3. Make sure your video display monitor and keyboard are correctly connected to the
system. Turn on the video monitor. Set its brightness and contrast controls to at
least two thirds of their maximum ranges (see the documentation supplied with
your video display monitor).
4. If the operating system normally loads from the hard disk drive, make sure there is
no diskette in drive A and no CD-ROM disk in the CD-ROM drive.
5. If the power LED does light, attempt to boot from a floppy diskette or from a CDROM disk.
6. Turn on the system. If the power LED does not light, see “Power Light Does Not
Light” on page 46.
Verifying Proper Operation of Key System Lights
As POST determines the system configuration, it tests for the presence of each mass
storage device installed in the system. As each device is checked, its activity light should
turn on briefly. Check for the following:
• Does the diskette drive activity light turn on briefly? If not, see “CD-ROM Drive or
DVD-ROM Drive Activity Light Does Not Light” on page 48.
• If system LEDs are illuminated, see “Intel
for a description of the lights.
®
Light-Guided Diagnostics” on page 8
Confirming Loading of the Operating System
Once the system boots up, the operating system prompt appears on the screen. The prompt
varies according to the operating system. If the operating system prompt does not appear,
see “No Characters Appear on Screen”.
Intel® Workstation Board S5000XVN 45
Page 64

Specific Problems and Corrective Actions
This section provides possible solutions for these specific problems:
• Power light does not light.
• No characters appear on screen.
• Characters on the screen appear distorted or incorrect.
• System cooling fans do not rotate.
• Hard disk drive activity light does not light.
• CD-ROM drive activity light does not light.
• There are problems with application software.
• The bootable CD-ROM is not detected.
Try the solutions below in the order given. If you cannot correct the problem, contact your
service representative or authorized dealer for help.
Power Light Does Not Light
Check the following:
• Did you press the power-on button?
• Is the system operating normally? If so, the power LED might be defective or the
cable from the control panel to the workstation board might be loose.
• Have you securely plugged the workstation AC power cord into the power supply?
• Some power supplies have a power switch on the back of the power supply, next to
the fan. If your system has one, is it turned on?
• Remove all add-in cards and see if the system boots. If successful, add the cards
back in one at a time with a reboot between each addition to determine which card
might be causing the problem.
• Make sure the memory FBDIMMs comply with the system requirements.
• Make sure the memory FBDIMMs have been populated according to the system
requirements.
• Remove the memory FBDIMMs and re-seat them.
• Make sure the processor(s) comply with the system requirements.
• Make sure the processor(s) have been populated according to the system
requirements.
• Remove the processor(s) and re-seat them.
• Make sure the chassis standoffs are installed only below mounting holes. Misplaced
standoffs can contact the pins on the bottom of the workstation board and cause a
short.
• In a DC powered system, make sure all DC cables are connected.
46 Intel® Workstation Board S5000XVN
Page 65

No Characters Appear on Screen
Check the following:
• Is the keyboard functioning? Test it by turning the “Num Lock” function on and off
to make sure the Num Lock light is functioning.
• Is the video monitor plugged in and turned on? If you are using a switch box, is it
switched to the correct system?
• Are the brightness and contrast controls on the video monitor properly adjusted?
• Is the video monitor signal cable properly installed?
• Does this video monitor work correctly if plugged into a different system?
• Is the onboard video controller enabled in the BIOS?
• Remove all add-in cards and see if the video returns. If successful, add the cards
back in one at a time with a reboot between each addition to determine which card
might be causing the problem.
• Make sure the memory FBDIMMs comply with the system requirements.
• Make sure the memory FBDIMMs have been populated according to the system
requirements.
• Remove the memory FBDIMMs and re-seat them.
• Make sure the processor(s) comply with the system requirements.
• Make sure the processor(s) have been populated according to the system
requirements.
• Remove the processor(s) and re-seat them.
If you are using an add-in video controller board, do the following:
1. Verify that the video works using the onboard video controller.
2. Verify that the video controller board is fully seated in the workstation board
connector.
3. Reboot the system for changes to take effect.
4. If there are still no characters on the screen after you reboot the system and POST
emits a beep code, write down the beep code you hear. This information is useful
for your service representative.
5. If you do not receive a beep code and characters do not appear, the video display
monitor or video controller may have failed. Contact your service representative or
authorized dealer for help.
Intel® Workstation Board S5000XVN 47
Page 66

Characters Are Distorted or Incorrect
Check the following:
• Are the brightness and contrast controls properly adjusted on the video monitor? See
the manufacturer's documentation.
• Are the video monitor's signal and power cables properly installed?
• Does this video monitor work correctly if plugged into a different system?
System Cooling Fans Do Not Rotate Properly
If the system cooling fans are not operating properly, it is an indication of possible system
component failure.
Check the following:
• Is the power-on light lit? If not, see “Power Light Does Not Light” on page 46.
• If your system has LED lights for the fans, is one or more of these LEDs lit?
• Are any other control panel LEDs lit?
• Have any of the fan motors stopped? Use the server management subsystem to
check the fan status.
• Have your fans speeded up in response to an overheating situation?
• Have your fans speeded up in response to a fan that has failed?
• Are the fan power connectors properly connected to the workstation board?
• Is the cable from the control panel board connected to the both the control panel
board and to the workstation board?
• Are the power supply cables properly connected to the workstation board?
• Are there any shorted wires caused by pinched-cables or have power connector
plugs been forced into power connector sockets the wrong way?
CD-ROM Drive or DVD-ROM Drive Activity Light Does Not
Light
Check the following:
• Are the CD-ROM/DVD-ROM drive's power and signal cables properly installed?
• Are all relevant switches and jumpers on the drive set correctly?
• Is the drive properly configured?
48 Intel® Workstation Board S5000XVN
Page 67

Cannot Connect to a Server
• Make sure the network cable is securely attached to the correct connector at the
system back panel.
• Try a different network cable.
• Make sure you are using the correct and the current drivers. See “Additional
Information and Software” on page viii for a link to the current drivers.
• Make sure the driver is loaded and the protocols are bound.
• Make sure the hub port is configured for the same duplex mode as the network
controller.
• Make sure the correct networking software is installed.
• If you are directly connecting two servers (without a hub), you will need a crossover
cable.
• Check the network controller LEDs next to the NIC connectors.
Problems with Network
The system hangs when the drivers are loaded
• Certain drivers may require interrupts that are not shared with other PCI drivers. For
these drivers, it may be necessary to alter settings so that interrupts are not shared.
See the documentation that came with your PCI card(s) for information on changing
interrupts.
Diagnostics pass but the connection fails
• Make sure the network cable is securely attached.
• Make sure you specify the correct frame type in your NET.CFG file.
• The controller stopped working when an add-in adapter was installed.
• Make sure the cable is connected to the port from the onboard network controller.
• Make sure your BIOS is current. See “Additional Information and Software” for a
link to the current version.
• Make sure the other adapter supports shared interrupts. Make sure your operating
system supports shared interrupts.
• Try reseating the add-in adapter.
Intel® Workstation Board S5000XVN 49
Page 68

The add-in adapter stopped working without apparent cause
• Reseat the adapter.
• Put the adapter in a different slot.
• The network driver files may be corrupt or deleted. Delete and then reinstall the
drivers.
• Run diagnostics.
System Boots when Installing PCI Card
System management features require full-time “standby” power. This means some parts of
the system have power going to them whenever the power cord is plugged in, even if you
have turned the system power off with the power button on the front panel. If you install a
PCI card with the AC power cord plugged in, a signal may be sent to command the system
to boot. Before installing a PCI card, you should always:
• Turn off the workstation power by using the power button on the front of the system.
• Unplug the AC power cord(s) from the workstation.
Problems with Newly Installed Application Software
Problems that occur when you run new application software are usually related to the
software, not the workstation hardware. Faulty equipment is unlikely, especially if other
software runs correctly.
Check the following:
• Make sure the system meets the minimum hardware requirements for the software.
See the software documentation.
• Make sure the software is properly installed and configured for the system. See the
software documentation.
• Use only an authorized copy. Unauthorized copies often do not work.
• If you are running the software from a USB floppy disk, CD-ROM or DVD-ROM,
try a different disk.
• Make sure the correct device drivers installed.
If the problems persist, contact the software vendor's customer service representative.
50 Intel® Workstation Board S5000XVN
Page 69

Problems with Application Software that Ran Correctly
Earlier
Problems that occur after the system hardware and software have been running correctly
sometimes indicate equipment failure. However, they can also be caused by file
corruption or changes to the software configuration.
Check the following:
• If you are running the software from a USB floppy disk, CD-ROM or DVD-ROM,
try a different disk.
• Check your system for a virus infection.
• Uninstall and reinstall the software. Make sure all necessary files are installed.
• If the problems are intermittent, there may be a loose cable, dirt in the keyboard (if
keyboard input is incorrect), a marginal power supply, or other random component
failures.
• If you suspect that a transient voltage spike, power outage, or brownout might have
occurred, reload the software and try running it again. Symptoms of voltage spikes
include a flickering video display, unexpected system reboots, and the system not
responding to user commands.
Note: Random errors in data files: If you are getting random errors in your data files, they may
be getting corrupted by voltage spikes on your power line. If you are experiencing any of
the above symptoms that might indicate voltage spikes on the power line, you may want to
install a surge suppressor between the power outlet and the system power cord.
Devices are not Recognized under Device Manager
(Windows* Operating System)
The Windows* operating systems do not include all of the drivers for the Intel® chipsets,
onboard NICs, and other components. See “Additional Information and Software” on
page viii for a link to the current drivers and chipset files.
Hard Drive(s) are not Recognized
Check the following:
• Make sure the drive is not disabled in BIOS Setup.
• Make sure the drive is connected correctly and that is plugged into the power supply.
• Make sure the drive is compatible. See “Additional Information and Software” for a
link to the tested drives.
• Make sure you have not exceeded the power budget for the workstation. See
“Additional Information and Software” for a link to software to check your power
budget.
Intel® Workstation Board S5000XVN 51
Page 70

• Verify your SAS or SATA drives are connected to the correct ports on the
workstation board and the chassis backplane. See your chassis documentation for
details about backplane connections.
• If using ATA drives, verify that the master/slave settings are set correctly. See your
drive documentation for details on setting the master/slave settings.
• If using a RAID configuration with an add-in RAID adapter, make sure the RAID
adapter is installed correctly.
Bootable CD-ROM Disk Is Not Detected
Check the following:
• Make sure the BIOS is configured to allow the CD-ROM to be the first bootable
device.
LED Information
The Intel® Workstation Board S5000XVN includes LEDs that can aid in troubleshooting
your system. For the location of the LEDs, see “Intel
page 8.
BIOS POST Beep Codes
The table below lists the POST error beep codes. Prior to system video initialization, the
BIOS uses these beep codes to inform users of error conditions. Please note that not all
error conditions are supported by BIOS beep codes.
Number of
Beeps
1, 2, or 3 Memory error. Reseat the memory or replace the FBDIMMs with known
good modules.
4 - 7 or 9 - 11 Fatal error indicating a possible serious system problem. Remove all add-in
cards and re-start the system. If the error still occurs, contact your service
representative. If the beep codes are not generated after the add-in cards
are removed, insert the cards one at a time, booting the system between
each card addition, until the beeps again occur to reveal the malfunctioning
card.
8 Replace or reseat the system video add-in card. If on-board video is being
used, the workstation board may be faulty.
®
Light-Guided Diagnostics” on
Table 7. POST Error Beep Codes
Reason for Beeps and Action to Take
52 Intel® Workstation Board S5000XVN
Page 71

In addition to the beep codes above, additional beep codes are provided if an Intel®
Remote Management Module is installed. The Intel
®
Remote Management Module
provides the following additional beep codes.
®
Table 8. Error Beep Codes Generated by Intel
Remote Management
Module
Number of
Beeps
1 Front panel CMOS clear has been initiated.
1-5-1-1 Processor failure. Reseat or replace the failed processor.
1-5-2-1 No processor is installed or the CPU 1 socket is empty. Reseat or replace
the failed processor.
1-5-2-3 Processor configuration error or CPU 1 socket is empty. Reseat or replace
the failed processor. In a two-processor system, make sure the processors
are identical.
1-5-2-4 Front-side bus select configuration error.
1-5-4-2 DC power unexpectedly lost.
1-5-4-3 Chipset control failure.
1-5-4-4 Power control failure.
Reason for Beeps and Action to Take
Intel® Workstation Board S5000XVN 53
Page 72

54 Intel® Workstation Board S5000XVN
Page 73

Appendix B: Regulatory and
Compliance Information
Product Regulatory Compliance
Product Safety Compliance
The Intel® Workstation Board S5000XVN complies with the following safety
requirements:
• UL60950 - CSA 60950 (USA / Canada)
• EN60950 (Europe)
• IEC60950 (International)
• CB Certificate & Report, IEC60950 (report to include all country national
deviations)
• CE - Low Voltage Directive 73/23/EEE (Europe)
Product EMC Compliance - Class A Compliance
The Intel® Workstation Board S5000XVN has been has been tested and verified to
comply with the following electromagnetic compatibility (EMC) regulations when
installed a compatible Intel
see Intel's Server Builder Web site or contact your local Intel representative.
• FCC /ICES-003 - Emissions (USA/Canada) Verification
• CISPR 22 - Emissions (International)
• EN55022 - Emissions (Europe)
• EN55024 - Immunity (Europe)
• CE - EMC Directive 89/336/EEC (Europe)
• VCCI Emissions (Japan)
• AS/NZS 3548 Emissions (Australia / New Zealand)
• BSMI CNS13438 Emissions (Taiwan)
• RRL MIC Notice No. 1997-41 (EMC) & 1997-42 (EMI) (Korea)
®
host system. For information on compatible host system(s)
Page 74

Certifications / Registrations / Declarations
• UL Certification (US/Canada)
• CE Declaration of Conformity (CENELEC Europe)
• FCC/ICES-003 Class A Attestation (USA/Canada)
• C-Tick Declaration of Conformity (Australia)
• MED Declaration of Conformity (New Zealand)
• BSMI Certification (Taiwan)
• RRL Certification (Korea)
• Ecology Declaration (International)
Product Regulatory Compliance Markings
This product is marked with the following Product Certification Markings:
Table 9. Product Certification Markings
Regulatory Compliance Region Marking
UL Mark USA/Canada
CE Mark Europe
EMC Marking (Class A) Canada CANADA ICES-003 CLASS A
CANADA NMB-003 CLASSE A
BSMI Marking (Class A) Taiwan
Ctick Marking Australia / New Zealand
RLL MIC Mark Korea See the regulatory information document
for additional information.
56 Intel® Workstation Board S5000XVN
Page 75

Electromagnetic Compatibility Notices
FCC (USA)
This device complies with Part 15 of the FCC Rules. Operation is subject to the following
two conditions: (1) this device may not cause harmful interference, and (2) this device
must accept any interference received, including interference that may cause undesired
operation.
For questions related to the EMC performance of this product, contact:
Intel Corporation
5200 N.E. Elam Young Parkway
Hillsboro, OR 97124-6497
1-800-628-8686
This equipment has been tested and found to comply with the limits for a Class A digital
device, pursuant to Part 15 of the FCC Rules. These limits are designed to provide
reasonable protection against harmful interference in a residential installation. This
equipment generates, uses, and can radiate radio frequency energy and, if not installed and
used in accordance with the instructions, may cause harmful interference to radio
communications. However, there is no guarantee that interference will not occur in a
particular installation. If this equipment does cause harmful interference to radio or
television reception, which can be determined by turning the equipment off and on, the
user is encouraged to try to correct the interference by one or more of the following
measures:
• Reorient or relocate the receiving antenna.
• Increase the separation between the equipment and the receiver.
• Connect the equipment to an outlet on a circuit other than the one to which the
receiver is connected.
• Consult the dealer or an experienced radio/TV technician for help.
Any changes or modifications not expressly approved by the grantee of this device could
void the user's authority to operate the equipment. The customer is responsible for
ensuring compliance of the modified product.
Only peripherals (computer input/output devices, terminals, printers, etc.) that comply
with FCC Class A or B limits may be attached to this computer product. Operation with
noncompliant peripherals is likely to result in interference to radio and TV reception.
All cables used to connect to peripherals must be shielded and grounded. Operation with
cables, connected to peripherals, that are not shielded and grounded may result in
interference to radio and TV reception.
Intel® Workstation Board S5000XVN 57
Page 76

ICES-003 (Canada)
Cet appareil numérique respecte les limites bruits radioélectriques applicables aux
appareils numériques de Classe A prescrites dans la norme sur le matériel brouilleur:
“Apparelis Numériques”, NMB-003 édictee par le Ministre Canadian des
Communications.
This digital apparatus does not exceed the Class A limits for radio noise emissions from
digital apparatus set out in the interference-causing equipment standard entitled: “Digital
Apparatus,” ICES-003 of the Canadian Department of Communications.
Europe (CE Declaration of Conformity)
This product has been tested in accordance too, and complies with the Low Voltage
Directive (73/23/EEC) and EMC Directive (89/336/EEC). The product has been marked
with the CE Mark to illustrate its compliance.
VCCI (Japan)
English translation of the notice above:
This is a Class B product based on the standard of the Voluntary Control Council for
Interference (VCCI) from Information Technology Equipment. If this is used near a radio
or television receiver in a domestic environment, it may cause radio interference. Install
and use the equipment according to the instruction manual.
58 Intel® Workstation Board S5000XVN
Page 77

BSMI (Taiwan)
声明
此为A级产品,在生活环境中,该产品可能会造成无线电干扰。在这种情况下,可能需要用户
对其干扰采取可行的措施。
The BSMI Certification Marking and EMC warning is located on the outside rear area of
the product.
RRL (Korea)
English translation of the notice above:
1. Type of Equipment (Model Name): On License and Product
2. Certification No.: On RRL certificate. Obtain certificate from local Intel
representative
3. Name of Certification Recipient: Intel Corporation
4. Date of Manufacturer: Refer to date code on product
5. Manufacturer/Nation: Intel Corporation/Refer to country of origin marked on
product
CNCA (CCC-China)
The CCC Certification Marking and EMC warning is located on the outside rear area of
the product.
Intel® Workstation Board S5000XVN 59
Page 78

Product Ecology Change (EU RoHS)
Intel has a system in place to restrict the use of banned substances in accordance with the
European Directive 2002/95/EC. Compliance is based on declaration that materials
banned in the RoHS Directive are either (1) below all applicable threshold limits or (2) an
approved / pending RoHS exemption applies.
RoHS implementation details are not fully defined and may change.
Threshold limits and banned substances are noted below:
• Quantity limit of 0.1% by mass (1000 PPM) for:
—Lead
—Mercury
— Hexavalent Chromium
— Polybrominated Biphenyls Diphenyl Ethers (PBDE)
• Quantity limit of 0.01% by mass (100 PPM) for:
—Cadmium
Product Ecology Change (CRoHS)
CRoHS (China RoHS, or Ministry of Information Industry Order #39,
“Management Methods for Controlling Pollution by Electronic Information
Products.” ):
• China bans the same substances and limits as noted for EU RoHS; however require
product marking and controlled substance information Environmental Friendly
Usage Period (EFUP) Marking Is defined in number of years in which controlled
listed substances will not leak or chemically deteriorate while in the product. Intel
understands the end-seller (entity placing product into market place) is responsible
for providing EFUP marking.
• Intel “retail” products are provided with EFUP marking
• For “Business to Business” products, Intel intends to place EFUP marking on
product for customer convenience
• EFUP for Intel server products has been determined as 20 years.
Below is an example of EFUP mark applied to Intel server products.
60 Intel® Workstation Board S5000XVN
Page 79

CRoHS Substance Tables
␂ℝ䶵⚗₼⦌ᇵ䟄≰㋾ℶ❐㻰㩢㘶Ⓟ丰䚕┭㽤ᇶ䤓⭿㢝
0DQDJHPHQW0HWKRGVRQ&RQWURORI3ROOXWLRQIURP
(OHFWURQLF,QIRUPDWLRQ3UR
GXFWV
&KLQD5R+6GHFODUDWLRQ
ℶ❐₼㦘㹡㦘⹂䓸德䤓⚜䱿♙⚺摞
China CRoHS requires products to be provided with controlled substance information.
Intel understands the end-seller (entity placing product into market place) is responsible
for providing the controlled substance information. Controlled substance information is
required to be in Simplified Chinese. Substance table for this board product is as follows:
␂
㦘㹡㦘⹂䓸德㒥⏒侯捷ↅ⚜䱿
3DUWV
摠⻭捷ↅ
0HWDO3DUWV
◿Ⓠ㨎兓ↅ
3ULQWHG%RDUG$VVHPEOLHV
3%$
Ⴜ᧶嫷䯉年㦘㹡㦘⹂䓸德⦷年捷ↅ㓏㦘⧖德㧟㠨₼䤓⚺摞⧖⦷ 6-7 㪖屓⸩䤓
棟摞尐㻑ⅴₚᇭ
Ⴜ᧶,QGLFDWHVWKDWWKLVKD]DUGRXVVXEVWDQFHFRQWDLQHGLQDOOKRPRJHQHRXVPDWHULDOVRIWKLV
SDUWLVEHORZWKHOLPLWUHTXLUHPHQWLQ6-7
᧶嫷䯉年㦘㹡㦘⹂䓸德咂⺠⦷年捷ↅ䤓㩟⧖德㧟㠨₼䤓⚺摞怔⒉ 6-7 㪖
屓⸩䤓棟摞尐㻑ᇭ
᧶,QGLFDWHVWKDWWKLVKD]DUGRXVVXEVWDQFHFRQWDLQHGLQDWOHDVWRQHRIWKHKRPRJHQHRXV
PDWHULDOVRIWKLVSDUWLVDERYHWKHOLPLWUHTXLUHPHQWLQ6-7
⺈枏➽㡴䤓㓏➽ℶ❐㦻嫷㣍䯉㒠⏻⚇∪ㄣ枍䤓䟄≰㋾ℶ❐♾厌▔⚺扨K䓸德ᇭ㽷㎞᧶⦷
㓏➽ℶ❐₼♾厌↩♾厌ₜ↩⚺㦘㓏㦘㓏⒦䤓捷ↅ
7KLVWDEOHVKRZVZKHUHWKHVHVXEVWDQFHVPD\EHIRXQGLQWKHVXSSO\FKDLQRIRXU
HOHFWURQLFLQIRUPDWLRQSURGXFWVDVRIWKHGDWHRIVDOHRIWKHHQFORVHGSURGXFW1RWHWKDW
VRPHRIWKHFRPSRQHQWW\SHVOLVWHGDERYHPD\RUPD\QRWEHDSDUWRIWKHHQFORVHG
SURGXFW
杔
3E㻭+J柘&G
Ⴜ Ⴜ Ⴜ Ⴜ Ⴜ
Ⴜ Ⴜ Ⴜ Ⴜ Ⴜ
⏼ↆ杻
&U
⮩䅃勣啾
3%%
⮩䅃ℛ啾搩
3%'(
Intel® Workstation Board S5000XVN 61
Page 80

China Packaging Recycle Marks (or GB18455-
2001)
Intel EPSD has the following ecological compliances:
Cardboard and fiberboard packaging will be marked as recyclable in China.
China Packaging Recycling Marks is required on retail packaging to be marked as
recyclable using China’s recycling logo. Due to regional variances in mark acceptances,
all three marks accepted worldwide will be implemented on Intel’s cardboard and
fiberboard. Examples of marks are shown below.
CA Perchlorate Warning
CA Lithium Perchlorate Warning (California Code of Regulations, Title 22, Division
4.5, Chapter 33: Best Management Practices for Perchlorate Materials):
The State of California requires a warning to be included for products containing a device
using Lithium Perchlorate.
Intel understands CA Lithium Perchlorate require a printed warning to be included with
all products containing a Lithium battery, either as an insert, in existing product literature,
or as part of the shipping memo wording.
Wording is as follows:
Perchlorate Material - special handling may apply. See www.dtsc.ca.gov/hazardouswaste/
perchlorate
This notice is required by California Code of Regulations, Title 22, Division 4.5, Chapter
33: Best Management Practices for Perchlorate Materials. This product/part includes a
battery that contains Perchlorate material.
End-of-Life / Product Recycling
Product recycling and end-of-life take-back systems and requirements vary by country.
Contact the retailer or distributor of this product for information about product recycling
and / or take-back.
62 Intel® Workstation Board S5000XVN
Page 81

Appendix C: Getting Help
World Wide Web
http://support.intel.com/support/motherboards/server/S5000XVN.
Telephone
All calls are billed per incident, levied in local currency at the applicable credit card
exchange rate plus applicable taxes. (Intel reserves the right to change the pricing for
telephone support at any time without notice).
Before calling, fill out an “System Issue Report Form”. A sample form is provided on the
following pages. However, for the fastest service, please submit your form via the
Internet.
For an updated support contact list, see http://www.intel.com/support/9089.htm/
U.S. and Canada
See http://support.intel.com/support/motherboards/server/S5000XVN.
Europe
Belgium ..... 02 714 3182
Denmark ... 38 487077
Finland ...... 9 693 79297
France........ 01 41 918529
Germany ... 069 9509 6099
Holland...... 020 487 4562
Italy............ 02 696 33276
Norway ...... 23 1620 50
Spain .......... 91 377 8166
Sweden....... 08 445 1251
UK.............. 870 6072439
Page 82

In Asia-Pacific Region
Australia.... 1800 649931
Cambodia.. 63 2 636 9797 (via Philippines)
China ......... 800 820 1100 (toll-free)
.................... 8 621 33104691 (not toll-free)
Hong Kong 852 2 844 4456
India........... 0006517 2 68303634 (manual toll-free. You need an IDD-equipped
telephone)
Indonesia... 803 65 7249
Korea......... 822 767 2595
Malaysia .... 1 800 80 1390
Myanmar... 63 2 636 9796 (via Philippines)
New Zealand 0800 444 365
Pakistan..... 632 63684 15 (IDD via Philippines)
Philippines 1 800 1 651 0117
Singapore .. 65 6213-1311
Tai wa n ....... 2 2545-1640
Thailand .... 1 800 631 0003
Vietnam ..... 632 6368416 (IDD via Philippines)
Japan
Domestic.... 0120 868686
Outside country 81 298 47 0800
Latin America
Argentina .. Contact AT&T USA at 0-800 222 1288. Once connected, dial 800 843 4481
Brazil ......... 001-916 377 0180
Chile
Easter Island.. ............ Contact AT&T USA at 800 800 311. Once
connected, dial 800 843 4481
Mainland and Juan .. Contact AT&T USA at 800 225 288. Once
connected, dial 800 843 4481
64 Intel® Workstation Board S5000XVN
Page 83

Colombia ... Contact AT&T USA at 01 800 911 0010. Once connected, dial 800 843 4481
Costa Rica . Contact AT&T USA at 0 800 0 114 114. Once connected, dial 800 843 4481
Ecuador
(Andimate) .... Contact AT&T USA at 1 999 119. Once connected,
dial 800 843 4481
(Pacifictel) ..... Contact AT&T USA at 1 800 225 528. Once connected, dial
800 843 4481
Guatemala. Contact AT&T USA at 99 99 190. Once connected, dial 800 843 4481
Mexico ....... Contact AT&T USA at 001 800 462 628 4240. Once connected, dial 800 843
4481
Miami ........ 1 800 621 8423
Panama...... Contact AT&T USA at 00 800 001 0109. Once connected, dial 800 843 4481
Paraguay ... 001 916 377 0114
Peru ........... 001 916 377 0114
Uruguay..... 001 916 377 0114
Venezuela... Contact AT&T USA at 0 800 2255 288. Once connected, dial 800 843 4481
Intel® Workstation Board S5000XVN 65
Page 84

66 Intel® Workstation Board S5000XVN
Page 85

Appendix D: System Issue Report
Form
Note: An on-line / automatic submission version of this form is available at http://
support.intel.com/support/motherboards/server/S5000XVN/. For the fastest service,
please submit your form via the Internet.
Date Submitted: _______________________________________________________
Company Name: ______________________________________________________
Contact Name: ________________________________________________________
Email Address: _______________________________________________________
Intel Workstation Product: ______________________________________________
Priority (Critical, Hot, High, Low): _______________________________________
Brief Problem Description. Provide a brief description below. See the last page for space
to include a detailed problem description.
____________________________________________________________________
____________________________________________________________________
____________________________________________________________________
____________________________________________________________________
Board / Chassis Information
Baseboard Revision - PBA#: _____________________________________________
Baseboard Serial Number: _______________________________________________
Chassis Model:________________________________________________________
CPU1 Speed/Stepping/Spec: _____________________________________________
CPU2 Speed/Stepping/Spec: _____________________________________________
System BIOS Version: __________________________________________________
HSC Firmware Version: _________________________________________________
BMC Firmware Version: ________________________________________________
Page 86

FBDIMM Configuration
DIMM A1 MB and vendor / part number: __________________________________
DIMM A2 MB and vendor / part number: __________________________________
DIMM B1 MB and vendor / part number: __________________________________
DIMM B2 MB and vendor / part number: __________________________________
DIMM C1 MB and vendor / part number: __________________________________
DIMM C2 MB and vendor / part number: __________________________________
DIMM D1 MB and vendor / part number: __________________________________
DIMM D2 MB and vendor / part number: __________________________________
Operating System Information
Operating System:_____________________________________________________
Version: _____________________________________________________________
Service Pack / Update: _________________________________________________
Add-in Card, Peripheral, Video, NIC
Check each box below as applicable, and provide the requested information.
Peripheral Description
Add-in Card
Slot 1
Slot 2
Slot 3
Slot 4
Slot 5
Video
Add-in video
NIC
On-board NIC1
On-board NIC2
Driver
Revision
IRQ
I/O Base
Address
FW
Revision
68 Intel® Workstation Board S5000XVN
Page 87

Hard Drive Information
Drive Type (SATA,
SAS, etc.)
Control Panel Information
Standard Control Panel _________________________________________________
®
Local Control Panel_______________________________________________
Intel
Make/Model
Hot-swap
or Fixed
IRQ
FW
Revision
Intel® Workstation Board S5000XVN 69
Page 88

Complete Problem Description
In the space below, provide a complete description of the steps used to reproduce the
problem or a complete description of where the problem can be found. Please also include
any details on troubleshooting already done.
____________________________________________________________________
____________________________________________________________________
____________________________________________________________________
____________________________________________________________________
____________________________________________________________________
____________________________________________________________________
____________________________________________________________________
____________________________________________________________________
____________________________________________________________________
____________________________________________________________________
____________________________________________________________________
____________________________________________________________________
____________________________________________________________________
____________________________________________________________________
____________________________________________________________________
____________________________________________________________________
____________________________________________________________________
____________________________________________________________________
____________________________________________________________________
____________________________________________________________________
____________________________________________________________________
70 Intel® Workstation Board S5000XVN
 Loading...