

Page 1

®
Express 8205 and
Page 2

Copyright © 2000, Intel® Corporation. All rights reserved.
Intel Corporation, 5200 NE Elam Young Parkway, Hillsboro OR 97124-6497
Intel Corporation assumes no responsibility for errors or omissions in this manual. Nor does Intel make any commitment to update the
information contained herein.
* Other product and corporate names may be trademarks of other companies and are used only for explanation and
to the owners’ benefit, without intent to infringe.
First Edition October 2000 A43586-001
Page 3

Contents
Quick Start
1
2
Install the Router Hardware ............... 2
Select a Scenario ............................... 3
Scenario Descriptions....................................4
Firewall Filters and NAT ...............................10
Using the VPN Option ..................................11
Configuring a VPN Tunnel ............................12
VPN Tunnel Examples ..................................13
VPN Tunnel Worksheet.................................15
1
Page 4

Install the Router Hardware
Install the Router
1
1
Hardware
Connect the LAN 1 port to your
local network
1 Connect the LAN 1 port to the local
network or the Ethernet port of a PC,
using the provided blue cable.
2 Set the HUB/PC switch to Hub when
connecting to a network hub or Ethernet
switch, and PC when connecting
directly to a PC.
Connect the LAN 2 port to your
DSL or cable modem
3 Connect the LAN 2 port to your DSL or
cable modem. Use the appropriate cable
that came with your modem.
Connect
4
to power
source
Input
5.1VDC/2.6A
Recovery
Power
user
supplied
LAN 2:
3
Connect
to DSL or
cable
modem
Figure 1. Connecting the Express 8205 Router.
LAN 1:
Connect
to local
network
blue
HubIIPC
LAN 1
LAN 2
10 Mbps
2
MAC
ADDRESS
10 / 100 Mbps
Set switch:
Hub II for hub or
switch
PC X for single
computer
See “About
the Console
Port” below.
X
00AA00D1865D
Console
CASE
789
123456
ASSY
Connect the power
4 Connect the router to a power source
(100-250 V AC) using the provided
power supply and cord.
Check the LEDs
If the Status, LAN 1, and LAN 2 LEDs are
all green, the router begins to assign a set of
pre-configured IP addresses to your local
network using its DHCP server.
If any LEDs are red, orange, or off:
Make sure the PC/Hub switch is set
correctly, as described in step 2 above.
Make sure all the cables are securely
connected to the correct devices as
described in the steps above.
LAN 1 and LAN 2 LEDs
Green - port is operational.
Orange - port is down. Check cables.
Status LED
Green blinking - router is using factory default settings
and ready for configuration.
Red - error, router is not operational.
Figure 2. Check Status and LAN LEDs.
About the Console Port
You can use the console port to manage the
router with Local Management, through a
directly connected workstation. See the Online
Documentation on the Intel® Device View CDROM for information about managing the router
if you do not have a Windows-based operating
system, or if you are using Telnet to manage the
router from a remote location.
2
Page 5
Select a Scenario
ISP
Intel®Router
®
IntelRouter
Status LAN WAN Link WAN Switch WAN Control Test Mode100 Mbps
xDSL/cable
modem
LAN 2 port gets dynamic
IP address from ISP
LAN 1 port connects
to the local network
7069
PC
PC
DHCP Server
Existing DHCP
server assigns
LAN IP addresses
Intel®Router
®
IntelRouter
Status LAN WAN Link WAN Switch WAN Control Test Mode100 Mbps
xDSL/cable
modem
LAN 2 port gets static
IP address from ISP
LAN 1 port connects
to the local network
7071
PC
PC
E-mail Server
Internet users must be
able to access this internal
e-mail server
ISP/
Internet
Select a Scenario
2
PC
This guide describes four scenarios in
which you can connect the router to the
Internet through a DSL or cable modem.
PC
LAN 1 port connects
to the local network, and the
router’s DHCP server assigns
IP addresses to the LAN
Intel®Router
IntelRouter
Status LAN WAN Link WAN Switch WAN Control Test Mode100 Mbps
®
xDSL/cable
modem
ISP
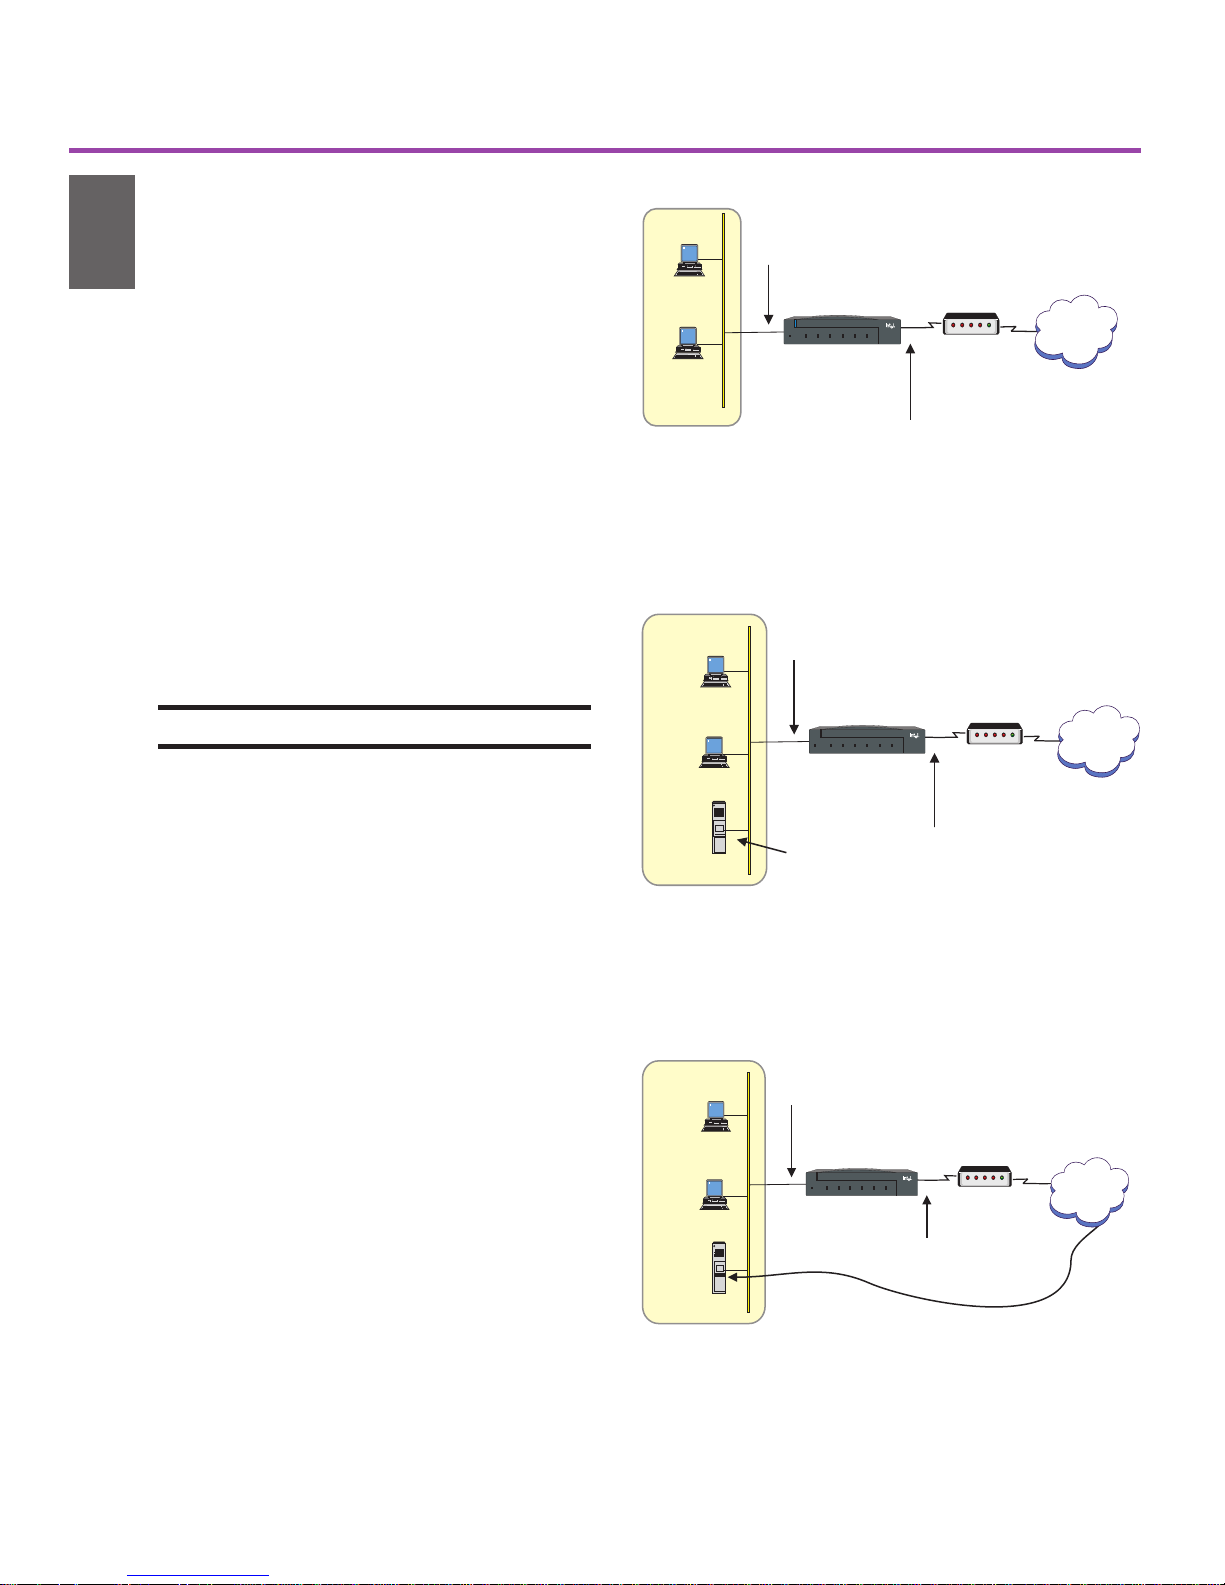
Scenario 1: Router is the DHCP
Server
In this scenario, the LAN PCs are configured as DHCP clients, and you do not need
to do any configuration other than installing
the router and connecting cables. As long as
the PCs on your LAN request IP configuration from a DHCP server, the router assigns
a preset range of IP addresses to your LAN.
See page 4.
About scenarios 2, 3, and 4
Before configuring the router for these
scenarios, you must install Intel® Device
View as described on page 5.
Scenario 2: Cable Modem
In this scenario, as shown in Figure 8 on
page 6, you connect the LAN 2 port to a
cable modem. Your ISP (Internet service
provider) provides a dynamic IP address
and a name to identify the router, which you
must configure. See page 6.
LAN 2 port gets dynamic
IP address from ISP
Figure 3. Scenario 1 - LAN PCs Get IP Address from
Router’s DHCP Server. You can access the Internet
through your DSL or cable modem once you have
connected the router cables. See page 4 for information.
Figure 4. Scenario 3 - Existing DHCP Server on
LAN. For instructions on setting up this scenario,
see page 7.
7068
Scenario 3: Existing DHCP Server
In this scenario, your LAN uses an existing
DHCP server. You must change the routers
default LAN 1 IP address and disable the
routers DHCP server. See page 7.
Scenario 4: Static IP from ISP
In this scenario, the LAN 2 port uses a static
(permanent) IP address assigned by the ISP
each time the modem connects to the
Internet. You can also configure the router
to allow access to internal servers on the
local network from the Internet (such as an
e-mail or Web server). See page 9.
Figure 5. Scenario 4 - Static IP Address on
LAN 2. For instructions on setting up this scenario,
see page 9.
3
Page 6

Scenario Descriptions
Scenario 1
LAN PCs Get IP Address from
DHCP Server on Router
The default IP address on the routers LAN 1
port is 192.168.1.1. The router automatically
assigns IP addresses sequentially to the hosts
(PCs and servers, for example) on your LAN,
using the address range from 192.168.1.2 to
192.168.1.254.
The LAN 2 port accepts an IP address from the
ISP, and the router automatically configures
your LAN. As long as your DSL or cable
modem is working properly and has a connection to the Internet, you are finished with
setting up this scenario. The PCs on your LAN
can now access the Internet.
Network address translation (NAT) and
security
LAN 1 port
192.168.1.1
PC
192.168.1.2
PC
192.168.1.3
Figure 6. This scenario does not require any
configuration on the router.
Parameter Setting
LAN 1 IP Address 192.168.1.1
DHCP Server Enabled
Start of Address Range 192.168.1.2
Last Address in Range 192.168.1.254
Network Address Translation Enabled
Intel®Router
IntelRouter
Status LAN WAN Link WAN Switch WAN Control Test Mode100 Mbps
Router’s DHCP
server configures
LAN
LAN 2 port
Dynamic IP address
from ISP
®
xDSL/cable
modem
ISP
7076
In this scenario, the router automatically maps the
dynamic IP address you receive from the ISP to the
internal IP addresses it assigns to the LAN.
The NAT mappings provide adequate security to
prevent access to your network from the Internet.
However, you can set up firewall filters to limit
access to the Internet from the internal LAN (for
example, to allow LAN users access to only e-mail
and WWW traffic through the Internet connection).
See page 10 for more information.
Table 1. Router’s factory default settings. The
settings shown in this table allow the router to work in
this scenario with no further configuration.
To reset the router to factory defaults:
1 Press the Recovery button located on the
back of the router. After a few seconds the
Status LED blinks orange.
2 Press and hold the Recovery button until the
LEDs begin to blink in sequence. When the
Status LED blinks green, the router is set to
factory default.
4
Page 7

Scenario Descriptions
Install Intel® Device View for
Scenarios 2, 3, and 4
®
We recommend using Intel
ment software provided with the router) to configure
the router for scenarios 2, 3, and 4. Intel Device
View manages and configures the router from a PC
running Microsoft Windows* 95, 98, 2000, or
Windows NT* 4.0.
Install Intel Device View
Device View (manage-
1 Insert the Intel Device View CD-ROM in your
computers CD-ROM drive.
If the installation screen does not appear within 10
seconds, run the autoplay.exe file on the CDROM.
2 Click Install for Windows.
The other installation options do not apply to the
scenarios described in this guide. See the Online
Documentation for more information about the
Install for Web and Install as Plug-in options.
3 Follow the screen instructions to complete the
installation.
4 Select Launch Intel Device View on the final
wizard dialog box, and then continue with the
instructions for your scenario.
Scenario 2 - Connecting to a Cable Modem
See page 6
Scenario 3 -Existing DHCP Server on LAN
See page 7
Scenario 4 - Static IP Address from ISP
See page 9
Firewall Filters and NAT for Scenarios 2, 3, and 4
See page 10
Figure 7. Intel Device View Installation. Choose Install
for Windows, then follow the screen instructions in the
installation wizard.
For non-Windows* operating systems:
Consult the Online Documentation on the Intel
Device View CD for information on configuring
the router through Local Management. You can
access Local Management through Telnet or
directly through the console port on the router.
To view the Online Documentation:
• In Intel Device View, select Online
Documentation from the Help menu
• If you are not using Intel Device View, open the
Index.htm file located in the \Manuals\Router
User Guide folder on the Intel Device View
CD-ROM.
5
Page 8

Scenario Descriptions
Scenario 2
LAN 1 port connects
Connecting to a Cable
Modem
If you are connecting the LAN 2 port to a cable
modem for Internet access, some ISPs require that
you configure a name to identify the router. Check
your Internet subscription to see if your ISP requires
this setting. The name of this setting depends on
your ISP, but alternative names include Device
Name, System Name, Host Name, or Account
Name.
Enter the router name provided in your
Internet subscription
1 From the Configuration menu, select Connection
Setup.
PC
PC
Server
Figure 8. Cable modem with name to identify
router. Some ISPs might require you to enter a
name that identifies the router each time the cable
modem connects to the Internet.
to the local network
using this IP address:
192.168.1.1
Intel®Router
IntelRouter
Status LAN WAN Link WAN Switch WAN Control Test Mode100 Mbps
LAN 2 port gets dynamic
IP address from ISP
ISP uses a name to
identify the router on the
cable modem connection
®
Cable
modem
ISP/
Internet
7077
2 Double-click the LAN 2 port in the
Ports/Connections list.
3 On the first wizard screen, click Connect to the
Internet through a DSL modem, and then click
Next.
5 Click Dynamic IP Address from ISP (using
DHCP).
6 Type the Router Name provided by your ISP.
Some ISPs might call this the Device Name,
System Name, Host Name, or Account Name.
Contact your ISP if you are not sure about this
setting.
7 Click Next.
Firewall filtering and local servers
To increase security to your local LAN, or to
manage the types of traffic allowed on the LAN,
you can set up firewall filters. If you have any
servers on your local LAN that must be accessible
from the Internet, you need to set up the LAN 2 port
to translate the internal server address to the
external address received from the ISP. See page 10.
Figure 9. Enter the Router Name. Select Dynamic
IP Address and type the name assigned by your
ISP.
6
Page 9

Scenario Descriptions
Scenario 3
Internet
Existing DHCP Server on the
LAN
If your LAN uses an existing DHCP server, complete
the following steps to get Internet access through the
DSL or cable modem.
Connect a PC directly to the Router
1 Use the provided blue cable to connect a PC to the
routers LAN 1 port. You must temporarily
remove this PC from the network.
2 On the back of the router, set the Hub/PC switch
to PC.
DSL/cable modem
Input
5.1VDC/2.6A
Recovery
Power
7070
Figure 10. Connect a PC directly to the router.
PC
Console
HubIIPC
WAN
LAN 2
10 Mbps
10 / 100 Mbps
X
LAN 1
CASE
MAC
123456
789
00AA00D1865D
ASSY
ADDRESS
Set this switch to “PC”
3 Configure the PC to obtain an IP address from a
DHCP server. See the documentation that came
with your PC for instructions on this setting.
4 Restart your PC; otherwise you will not be able to
contact the router.
Disable the DHCP server on the router
1 If it is not already open, start Intel
®
Device View.
2 In the Discovered Device Tree, expand the Subnet
192.168.1 (see Figure 11).
3 Double-click on 192.168.1.1 (the default IP
address for LAN 1).
4 From the Configuration menu, select DHCP
Server Setup.
5 Clear the Enable DHCP Server check box.
6 Click OK.
Figure 11. Open the router for management.
Figure 12. Disable the router’s DHCP server.
7
Page 10

Scenario Descriptions
Change the LAN 1 IP address
1 From the Configuration menu, select Connection
Setup.
2 Double-click the LAN 1 port in the
Ports/Connections list.
3 Type a new IP address for the router, which must
be within the range of IP addresses your DHCP
server assigns (and on the same subnet as your
LAN).
4 Click OK.
5 On the Connection Setup dialog, click Accept.
6 From the Configuration menu, select Save to Flash
Memory.
Figure 13. Change the LAN 1 IP address. Type an IP
address on the same subnet as your local network.
7 Click Yes when asked if you want to proceed.
Restore your network connections
1 Disconnect the PC from the router (and reconnect
it to the normal network).
2 On the back of the router, set the Hub/PC switch
to Hub.
3 Connect the LAN 1 port on the router to the local
network (to an Ethernet hub or switch, for
example).
Firewall filtering and local servers
To increase security to your local LAN, or to manage
the types of traffic allowed on the LAN, you can set
up firewall filters. If you have any servers on your
local LAN that must be accessible from the Internet,
you need to set up the LAN 2 port to translate the
internal server address to the external address
received from the ISP. See page 10.
WWW server must
be accessible
from the Internet
IntelRouter
Status LAN WAN Link WAN Switch WAN Control Test Mode100 Mbps
Intel® Router
provides firewall
filters
Figure 14. Firewall filtering and access to servers
on your LAN from the Internet.
®
DSL modem
Internet
7075
8
Page 11

Scenario Descriptions
Scenario 4
Static IP Address from ISP
and Server Access on LAN 1
In this scenario, you get a permanent (static) IP
address from your ISP. The following section
describes how to configure the static IP address. This
section also describes how to set up firewall filters
on the LAN 2 port, and allow access to local servers
(such as WWW or e-mail) from the Internet.
Configure a static IP address on LAN 2
1 From the Configuration menu, select Connection
Setup.
2 Double-click the LAN 2 port in the
Ports/Connections list.
3 On the first wizard screen, click Connect to the
Internet through a DSL modem, and then click
Next.
LAN 1 port connects
to the local network
using this IP address:
192.168.1.1
PC
PC
E-mail Server
192.168.1.10
Figure 15. Scenario using a static IP address and
internal servers accessible from the Internet.
Intel®Router
IntelRouter
Status LAN WAN Link WAN Switch WAN Control Test Mode100 Mbps
Internet users must be
able to access this internal
e-mail server
®
xDSL/Cable
LAN 2 port gets static
IP address from ISP
modem
ISP/
Internet
7072
5 Click Static IP Address.
6 Type the IP Address and Network Mask assigned
by your ISP.
7 Type the ISP Gateway Address (the IP address of
the ISPs gateway router). Contact your ISP if you
are not sure about this setting.
8 Click Next. See the next page of this guide for
instructions on the following wizard dialog boxes,
if applicable.
Figure 16. Configure a static IP address on the
LAN 2 port.
9
Page 12

Firewall Filters and NAT
Firewall Filtering and NAT for
Servers on the LAN
This section describes how to set up firewall filters
and NAT (network address translation) for servers on
your LAN, using the LAN 2 port setup wizard.
Create firewall filters for LAN users
For added security, you can enable firewall filtering
on the LAN 2 port. If you enable the firewall, then
you must choose which types of traffic to allow
through the firewall on the Internet connection. For
example, in order for LAN users to browse the Web,
you must enable the WWW firewall filter.
1 From Connection Setup dialog box, double-click
the LAN 2 port.
Figure 17. Set up a firewall and filters.
2 On the first wizard screen, click Connect to the
Internet through a DSL modem, and then click
Next.
3 Fill out the IP Address dialog box as appropriate
for your scenario, and then click Next.
4 Select the Enable Firewall Filters check box.
5 Select the check box corresponding to the types of
traffic to allow from the LAN to the Internet, and
then click Next.
Access internal servers from the Internet
If you have servers on the internal LAN that must be
accessible from the Internet (such as a mail server or
a WWW server), configure the LAN 2 port to
recognize these servers. The router automatically
creates NAT (Network Address Translation) mappings between the IP address the router receives from
the ISP and the internal address used for the servers.
Figure 18. Allow access to internal servers from the
Internet.
1 Click the type of server to which the router should
allow access from the Internet.
2 Type the server IP address, which must be on the
same subnet as the address range assigned by your
DHCP server.
3 Click Next and follow the screen instructions.
10
Page 13

Using the VPN Option
Setting up a VPN Tunnel
A VPN (virtual private network) tunnel is a connection to a remote site over the public Internet. VPN
tunnels are a cost effective solution for sending and
receiving secure business data between two sites.
®
If you ordered an Intel
purchased one of the VPN Options for Intel
Express Routers separately, you can create a VPN
over the Internet.
A VPN provides the security of a private network
without the costs associated with a wide area
network (WAN). The costs for a VPN consist of only
the subscription to an Internet service provider (ISP)
and local calls to your ISP.
8205 VPN router or
®
Figure 19. Configuring a VPN Tunnel. Select
Connection Setup from the Configuration menu.
Note: You must have a working connection to the
Internet (through the DSL or cable modem connected
to the LAN 2 port) before you can add a VPN tunnel.
To add a VPN tunnel
1 Complete the VPN Tunnel Worksheet on
page 15.
2 If it is not already open, start Intel® Device View.
3 From the Configuration menu, select Connection
Setup.
4 Select Add Tunnel from the Port / Connection list
in the Connection Setup dialog box, and then click
the Add Tunnel button.
5 Click Next in the Start dialog box of the wizard.
6 On the Tunnel Identification dialog box:
- type a Tunnel Name
- type the Remote IP Address for the peer device
- select LAN 2 as the Connection for Tunnel
7 Follow the screen instructions throughout the rest
of the wizard.
Figure 20. Connection Setup. To create a VPN tunnel,
select Add Tunnel from the Port/Connection list and click
Add Tunnel.
For more information about VPN tunnels:
The VPN Tunnel Wizard configures tunnels using
default settings that work for most situations. You
can modify the configuration using Advanced
Setup, if necessary. Consult the Online Documentation on the Intel Device View CD for more
information.
11
Page 14

VPN Tunnel Example 1
VPN Tunnel From More Than
One 8205 Router to the Same
Remote Peer Device
If you are configuring tunnels to a central site from
more than one 8205 router, the tunnels will not work
with the routers factory default configuration. When
more than one 8205 router establishes a tunnel to the
same remote device, you must change the default IP
configuration on the additional 8205 routers.
The central site VPN device will not be able to
recognize the difference between the local network at
each remote site with the default configuration. The
default IP subnet assigned to the LAN by the router
is 192.168.1.0. You cannot have more than one
tunnel configured to the same subnet.
Complete these basic steps:
1 Change the default IP address of the routers
LAN 1 port.
2 Change the range of addresses assigned by the
routers DHCP server.
Branch office 1
Subnet 192.168.1.0
192.168.1.1
IntelRouter
Status LAN WAN LinkWAN Switch WAN Control Test Mode100 Mbps
®
Intel®8205
Router
Branch office 2
Subnet 192.168.2.0
192.168.2.1
IntelRouter
Status LAN WAN LinkWAN Switch WAN Control Test Mode100 Mbps
Intel®8205
Router
Figure 21. Example VPN Tunnels. Two tunnels to the
same central site VPN device from more than one 8205
router.
®
xDSL/cable
xDSL/cable
modem
modem
V
P
N
n
n
Tu
Internet
(ISP)
l
e
Central Site
Subnet 10.3.4.0
VPN Peer
(gateway
10.3.4.1
or router)
7074
3 Start the VPN Tunnel wizard.
Change the default IP address on LAN 1
®
1 If it is not already open, start Intel
Device View
and open the router for management.
2 From the Configuration menu, select Connection
Setup.
3 Double-click the LAN 1 port in the Ports/
Connections list.
4 Type the new IP address and network mask. Get
this from the system administrator at the central
site who configures the remote VPN peer device.
5 Click OK.
6 On the Connection Setup dialog, click Accept.
7 From the Configuration menu, select Save to
Flash Memory.
Important! The PC you use to configure the router
from now on must have an IP address on the same
subnet as the routers new IP address.
Figure 22. Change the LAN 1 IP address. Type an IP
address on the same subnet as your local network.
12
Page 15

VPN Tunnel Example 1
Change the range of IP addresses used
by the DHCP server
Once you change the IP address of the router, you
must change the range of IP addresses assigned by
the DHCP server in the router. The range should be
on the same subnet as the new IP address for the
LAN 1 port. Find out what range to use from the
system administrator of the remote peer device on
the tunnel.
1 From the Configuration menu, select DHCP
Server Setup.
2 Select the Enable DHCP Server check box.
3 Click the first entry in the IP Addresses dialog
box, and then click Edit.
Figure 23. Example VPN Tunnels. Two tunnels to the
same central site from more than one 8205 router.
4 Type a new First IP Address and Last Address,
and make sure the Network Mask matches the
new address range.
5 Click OK, then click OK again.
Start the VPN Tunnel Wizard
1 From the Configuration menu, select Connection
Setup.
2 Select Add Tunnel from the Port / Connection list
in the Connection Setup dialog box, and then
click the Add Tunnel button.
3 Fill in the parameters in each wizard dialog box,
as appropriate for your setup. Table 2 shows the
settings used for this example.
Note: The values for the parameters in Table 2 are
examples only; you must enter the values specific to
your network.
Branch Office 1 Setting
Remote IP Address 10.3.4.1
Local User ID remoteoffice1
Local Network Address 192.168.1.0
Local Network Mask 255.255.255.0
Remote Network Address 10.3.4.0
Remote Network Mask 255.255.255.0
Encryption Algorithm DES
Authentication Algorithm MD5
Re-keying Interval 1 Day
Branch Office 2 Setting
Remote IP Address 10.3.4.1
Local User ID remoteoffice2
Local Network Address 192.168.2.0
Local Network Mask 255.255.255.0
Remote Network Address 10.3.4.0
Remote Network Mask 255.255.255.0
Encryption Algorithm DES
Authentication Algorithm MD5
Re-keying Interval 1 Day
Table 2. Configuration Parameters. Settings used for
this example when configuring the VPN tunnel using the
VPN Tunnel Wizard.
13
Page 16

VPN Tunnel Example 2
Connecting Two Branch
Offices
Two sites can use a VPN tunnel to send and receive
secure business data over the Internet. The two sites
could be two branch offices, a remote worker and a
central office, a branch office and a central office, or
your site and a business partners site. For more
information, see the online documentation on the
Intel® Device View CD-ROM.
Connecting two branch offices with a VPN tunnel
enables both offices to share each others resources
securely. Using a VPN tunnel saves the cost of
dialing into a distant site; the only cost is that of
connecting to the local Internet service provider
(ISP).
In this example, the IP address on the local side is
dynamically assigned. Therefore, the Local User ID
identifies the branch office, rather than a permanent
external IP address. If the local router had a permanent IP address, then you would not have to enter a
Local User ID. The IP address would identify the
branch office.
Branch Office 1
Local Network Address
®
Intel 8205 Router
IntelRouter
Status LAN WAN Link WAN Switch WAN Control Test Mode100 Mbps
Internet
(ISP)
®
Intel Router
Intel Router
Status LAN WAN Link WAN Switch WAN Control Test Mode100 Mbps
175.123.45.1
Branch Office 2
Remote Network Address 175.123.45.0
Figure 24. Example Branch Office to Branch Office
VPN Tunnel. A VPN tunnel between two remote offices.
192.168.1.0
®
xDSL/cable
modem
connection to Internet with
®
Connection to
Internet with dynamic
IP address
Permanent
a fixed IP address
Fixed
IP address
7073
Table 3 shows the configuration parameters used in
the VPN Tunnel Wizard to create a tunnel for the
Branch Office to Branch Office example.
Note: The values for the parameters in Table 3 are
examples only; you must enter the values specific to
your network.
Firewalls and network address translation
If you are using firewall filters or network address
translation (NAT) on the LAN 2 port, the VPN
Tunnel Wizard modifies your settings to enable the
tunnel.
Parameter Setting
Remote IP Address 175.123.45.1
Local User ID aradomsk23
Local Network Address 192.168.1.0
Local Network Mask 255.255.255.0
Remote Network Address 175.123.45.0
Remote Network Mask 255.255.255.0
Encryption Algorithm DES
Authentication Algorithm MD5
Re-keying Interval 1 Day
Table 3. Configuration Parameters. Settings used for
the Branch Office to Branch Office example when
configuring the VPN tunnel using the VPN Tunnel Wizard.
14
Page 17

VPN Tunnel Worksheet
These pages help you gather needed information to
create a VPN Internet tunnel using the VPN Tunnel
Wizard.
VPN tunnels created with the VPN Tunnel Wizard
use default settings for a number of parameters. If
necessary, you can modify these parameters using
Advanced Setup. Advanced Setup is accessible from
Intel® Device View and from Local Management.
For more information on configuring a VPN tunnel
using Advanced Setup, see the Online
Documentation on the Intel Device View CD-ROM.
Tunnel Identification
Tunnel name:
(A name to identify the tunnel. The name can be
up to 31 characters.)
Remote IP address:
Networks and Security Profile
Local network address:
(The network IP address for the local network sending
and receiving data on this end of the tunnel.)
Local network mask:
(The network mask for the local network.)
Remote network address:
(The network IP address for the remote network
sending and receiving data on the other end of the
tunnel.)
Remote network mask:
(The network mask for the remote network.)
Encryption Algorithm:
(The IP address for the VPN device at the other
end of the tunnel; the remote peer device.)
Connection for tunnel:
LAN 2
(The connection to the ISP that the router uses to
establish the VPN tunnel; select LAN 2 from the list for
the 8205 router)
Local user ID:
(The user ID that identifies this router. Only required
when using dynamically assigned IP addresses for the
Internet.)
Shared Key
(The key is between 8 and 63 characters. For maximum
security, enter a key that is as long as possible using a
combination of numbers, letters, and symbols.)
(The type of encryption to use on the tunnel. The
encryption algorithms supported on your device vary,
depending on the VPN option that you purchased.)
Authentication Algorithm
m MD5 m SHA-1 m None
(The type of authentication to use on the tunnel. SHA-1
offers higher security, but also takes longer to process.
MD5 is the standard used on most devices supporting
IPSec.)
p Re-keying Interval based on time
Days:____Hours:____Minutes:____
p Re-keying Interval based on traffic
Traffic amount: ____
(How often the device generates a new encryption key,
based on time, traffic, or both. The interval must be at
least 5 minutes, or at least 1 MB, and no greater than
4194303 MB.)
MB
15
 Loading...