

Page 1
Intel® Express 535T
Switch
Quick Start and User Guide
Page 2

Copyright © 2000, Intel Corporation. All rights reserved.
Intel Corporation, 5200 NE Elam Young Parkway, Hillsboro OR 97124-6497
Intel Corporation assumes no responsibility for errors or omissions in this manual. Nor does Intel make any commitment to update the
information contained herein.
Intel Corporation décline toute responsabilité en cas d’erreur ou d’omission dans ce manuel. Intel ne s’engage nullement à mettre à jour
les informations comprises dans ce document.
Intel non si assume alcuna responsabilità per eventuali errori e omissioni presenti in questo manuale, né si assume alcun impegno ad
aggiornare le informazioni ivi contenute.
Die Intel Corporation übernimmt keine Verantwortung für Fehler oder Auslassungen in diesem Handbuch. Auch verpflichtet sich Intel
nicht, die hierin enthaltenen Informationen zu aktualisieren.
La corporación Intel no asume ninguna responsabilidad por los errores u omisiones que pueda haber en este manual. Además, Intel
tampoco se compromete a actualizar la información aquí contenida.
* Other product and corporate names may be trademarks of other companies and are used only for explanation and
to the owners’ benefit, without intent to infringe.
Second Edition September 2000 A30582-001
Page 3

Contents
Quick Starts 2
English .................................................................................. 2
Chinese .................................................................................. 4
Korean ................................................................................... 6
French.................................................................................... 8
Italian .................................................................................... 10
German .................................................................................. 12
Spanish .................................................................................. 14
User Guide 17
Overview ............................................................................... 17
Features ................................................................................. 17
LEDs ..................................................................................... 18
Connecting to Devices .......................................................... 19
Connection Guidelines ................................................ 19
Stacking with 530T Switches ................................................ 20
Stacking Capabilities ................................................... 20
Workgroup Example ............................................................. 22
Cabling Devices .................................................................... 23
Media Requirements ................................................... 23
Straight-through vs. Crossover Cables ........................ 23
FAQs/Troubleshooting .......................................................... 25
Regulatory Information and Warnings .................................. 26
Limited Hardware Warranty.................................................. 29
Intel Customer Support 35
1
Page 4
Quick Start
135 79
246 8
12345
6
7
8
English
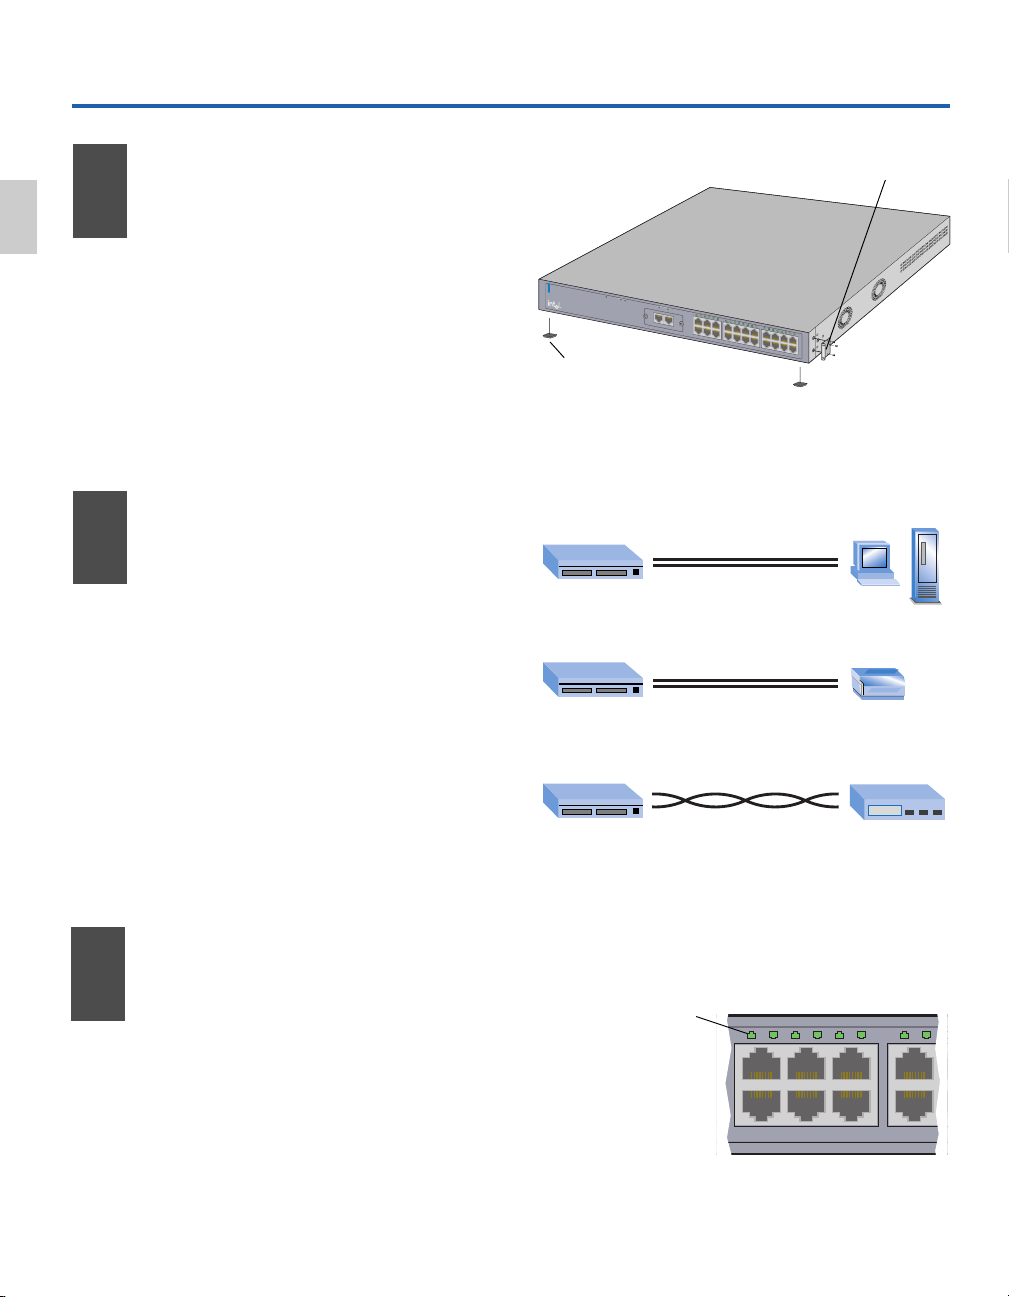
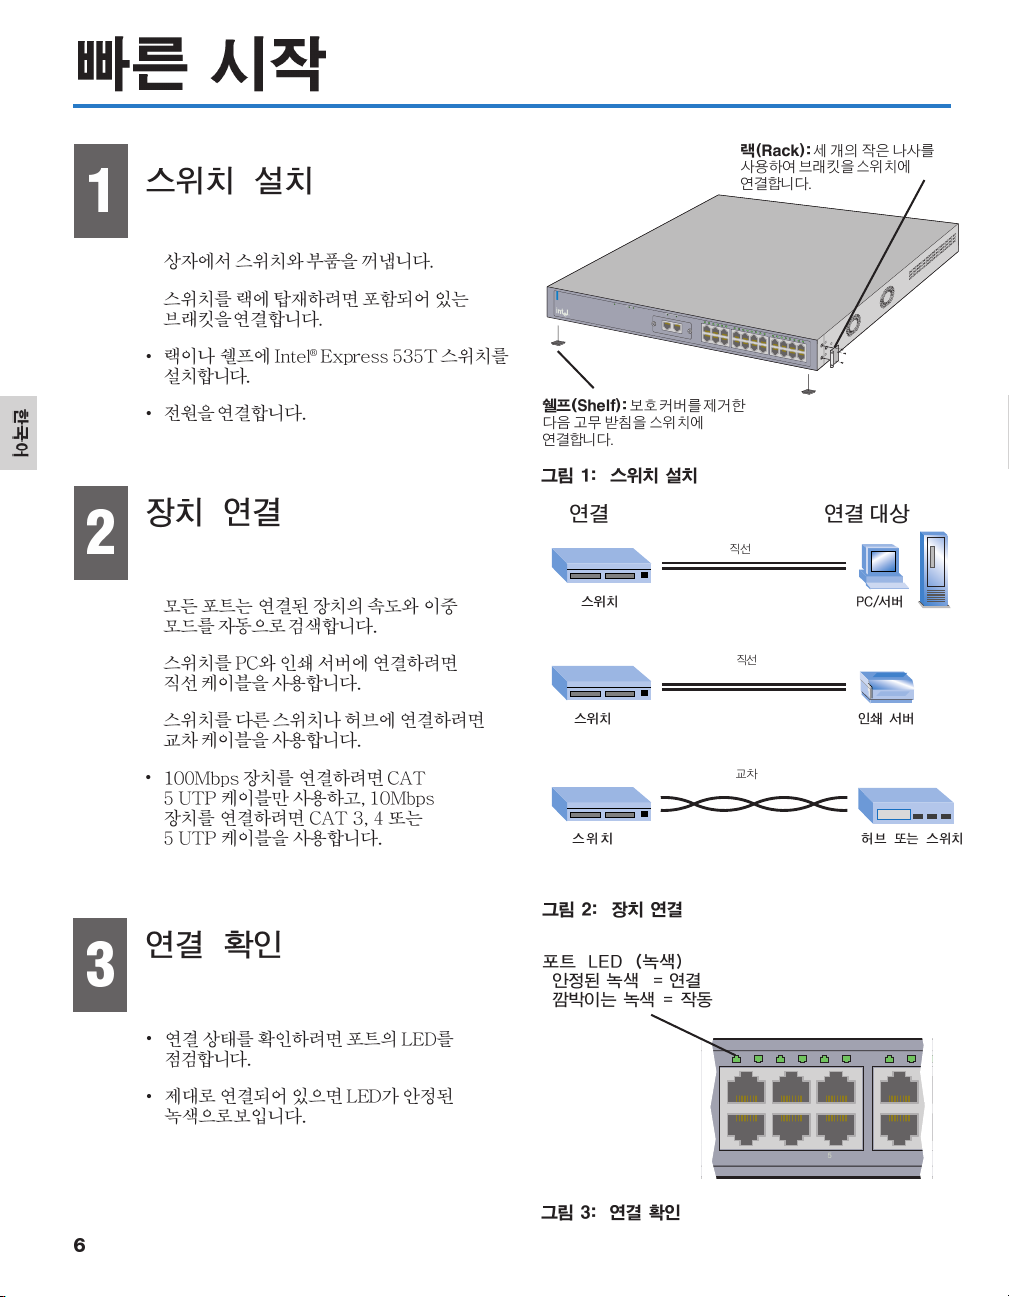
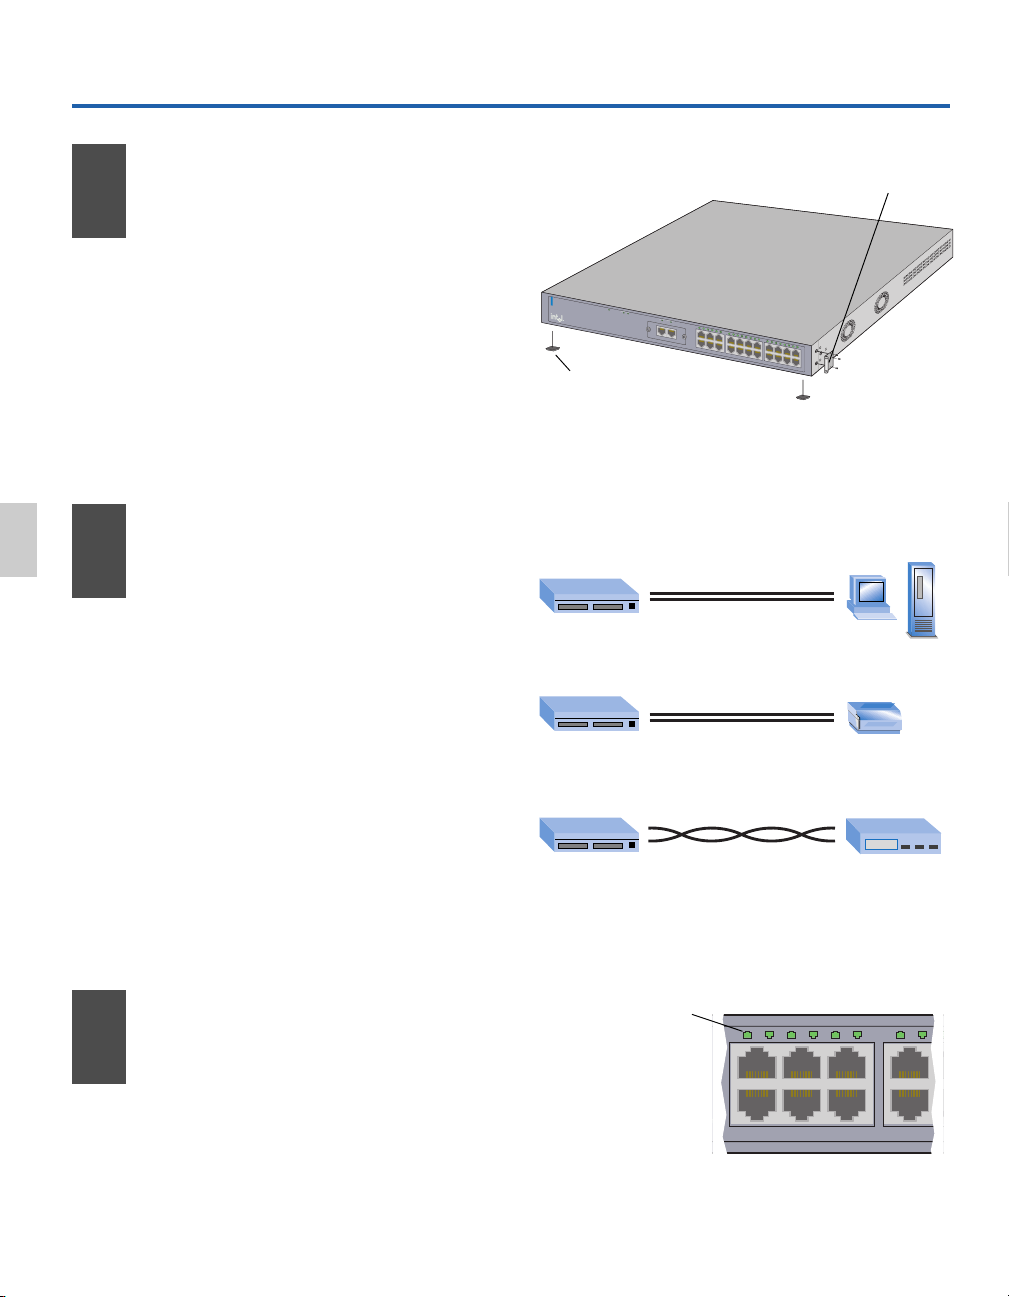
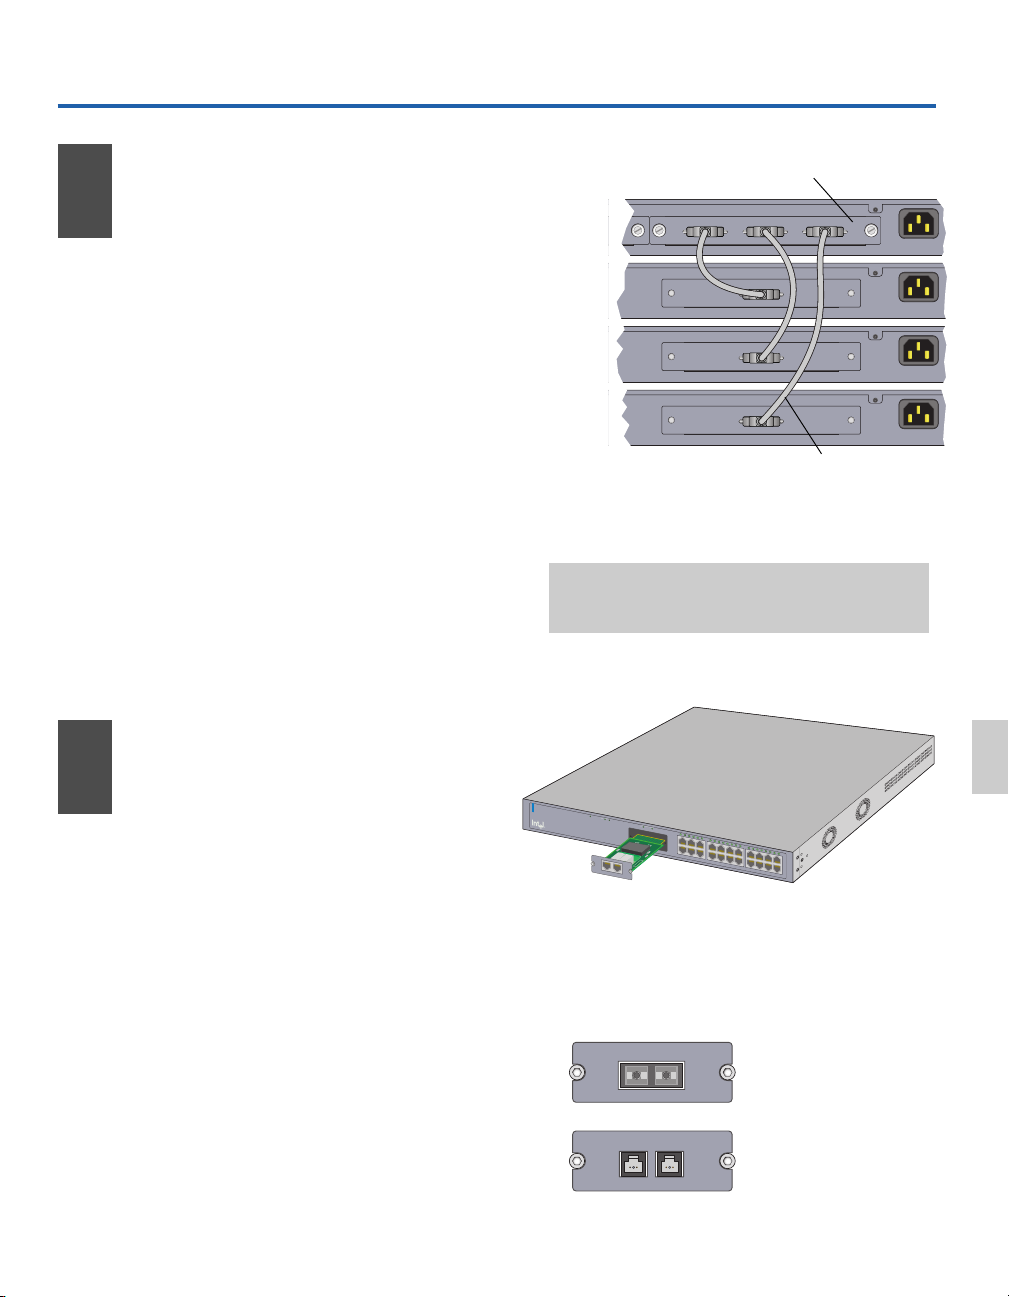
Install the Switch
1
• Remove the switch and parts from the box.
• Attach the enclosed brackets if you plan
to mount the switch in a rack.
• Install the Intel
rack or on a shelf.
• Plug in the power cord.
®
Express 535T Switch in a
Rack: Use the three small screws to
attach the brackets to the switch.
®
In
te
l
E
x
p
re
s
s
5
3
5
T
S
w
itc
h
S
tackin
S
w
g
it
c
h
Mo
d
S
t
ul
a
t
e
u
s
S
t
a
t
u
s
L
i
n
k
Mo
d
ul
e
A
P
o
r
t
1
P
o
r
t
2
1
0
/
1
0
0
B
a
s
e
T
M
o
d
u
L
l
e
ink\A
c
tivi
ty
Lin
k = So
lid G
Ac
ree
n
t
ivity = Blink
ing
Gre
1
2
3
4
5
6
7
en
P
o
r
t
1
P
o
r
t
2
M
o
du
le
A
8
1
2
3
4
5
6
7
8
Shelf: Peel off the protective
backing and attach the rubber
feet to the switch.
Figure 1: Install the Switch
9
10
11
12
1
3
14
15
16
17
1
8
19
20 22
2
1
9
1
0
1
1
12
1
3
1
4
15
16
17
18
19
2
0
21
22
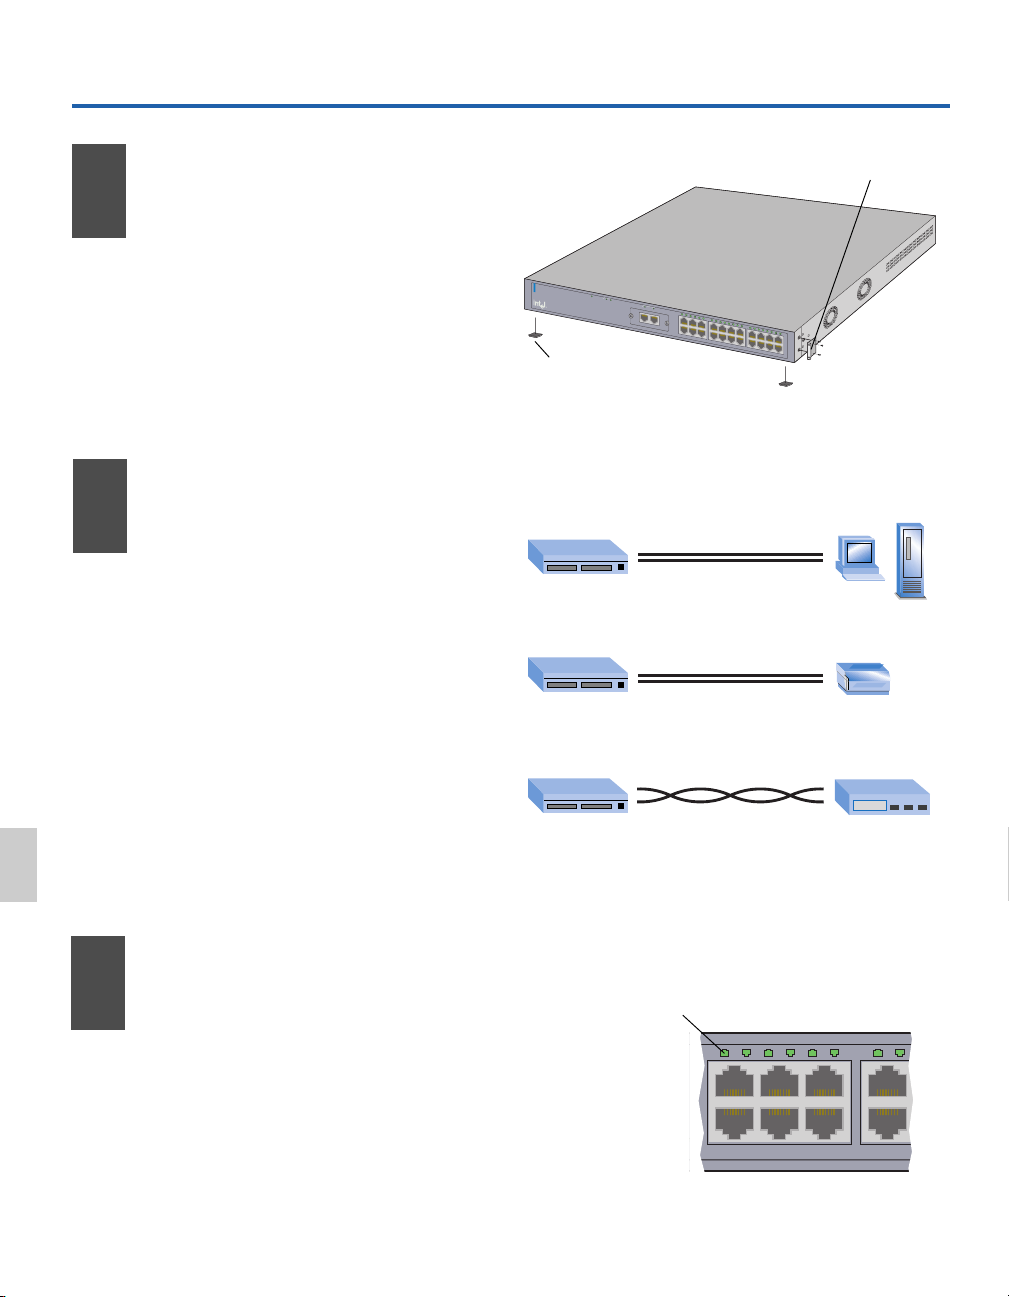
Connect
2
the Devices
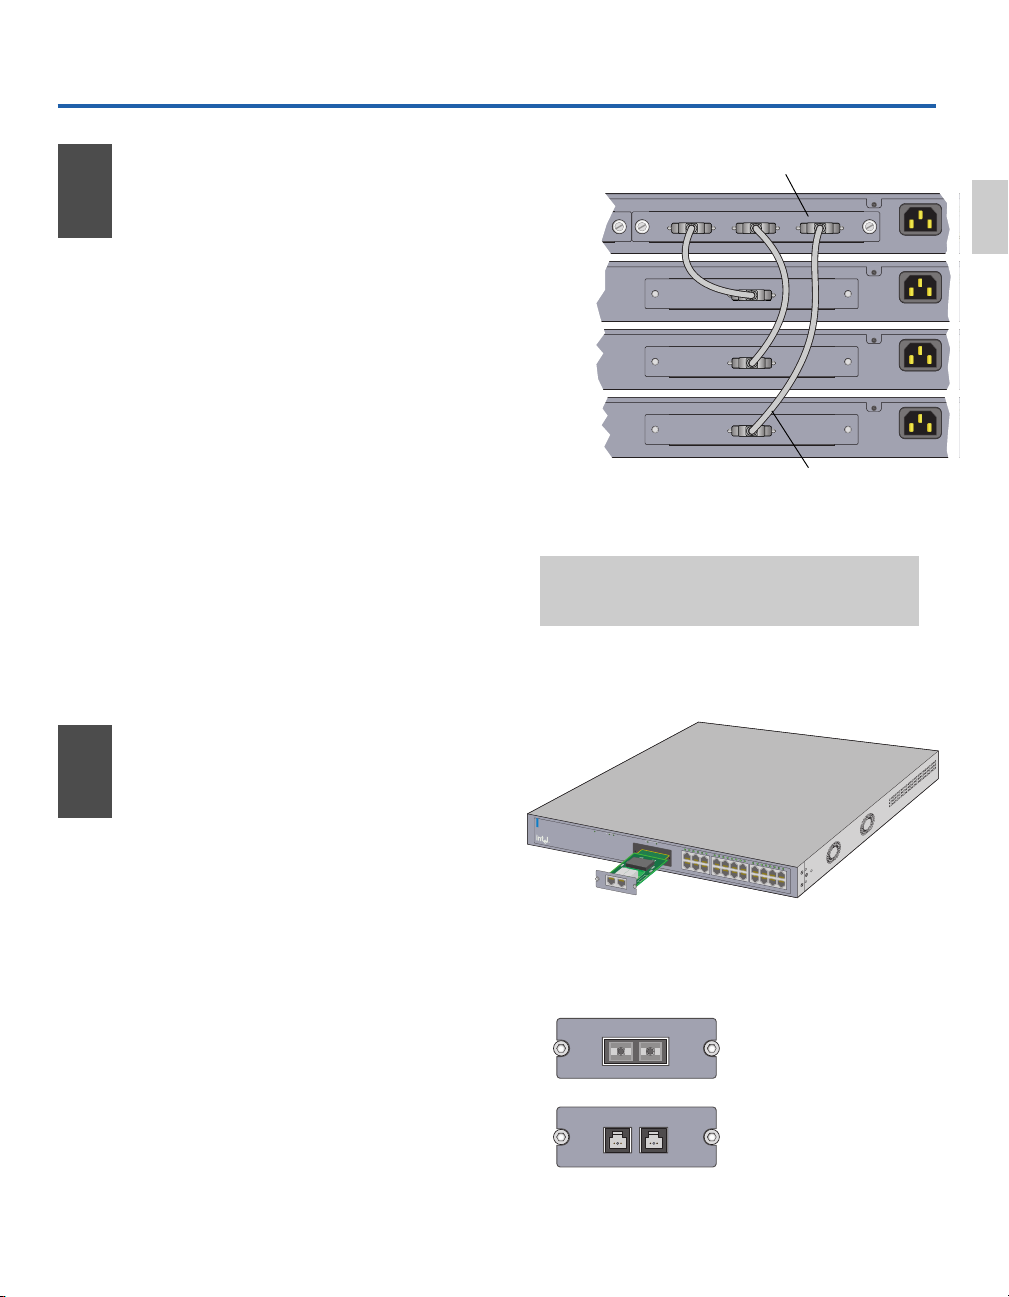
• All ports automatically detect the speed
and duplex-mode of any connected
device.
• Connect PCs and print servers to the
switch with straight-through cables.
• Use a crossover cable to connect a switch
to another switch or hub.
• Use only CAT 5 UTP cable to connect
100Mbps devices. To connect 10Mbps
devices, use CAT 3, 4, or 5 UTP cable.
Check the
3
Connections
• Check the port LEDs to confirm the link
status.
From To
straight-through
Switch PC/Server
straight-through
Switch Print Server
crossover
10/100
Switch Hub or Switch
Figure 2: Connect the Devices
Port LED (Green)
Solid Green = Link
Blinking Green = Activity
• A solid green LED indicates a valid link.
2
Figure 3: Check the Connections
Page 5
p
2
z
p
2
z
p
2
z
p
2
z
0
Optional Information
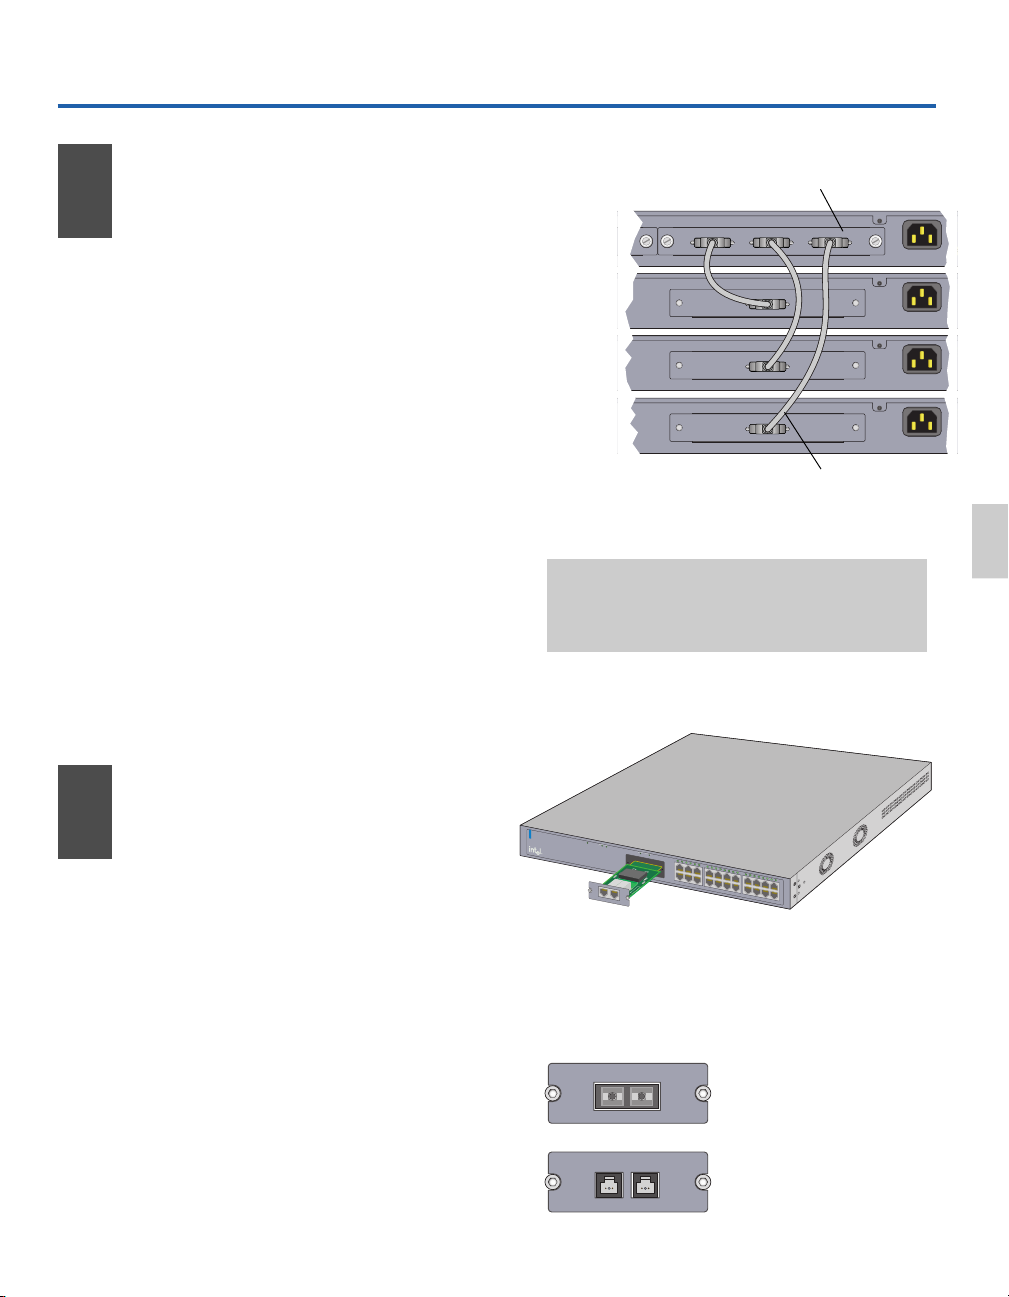
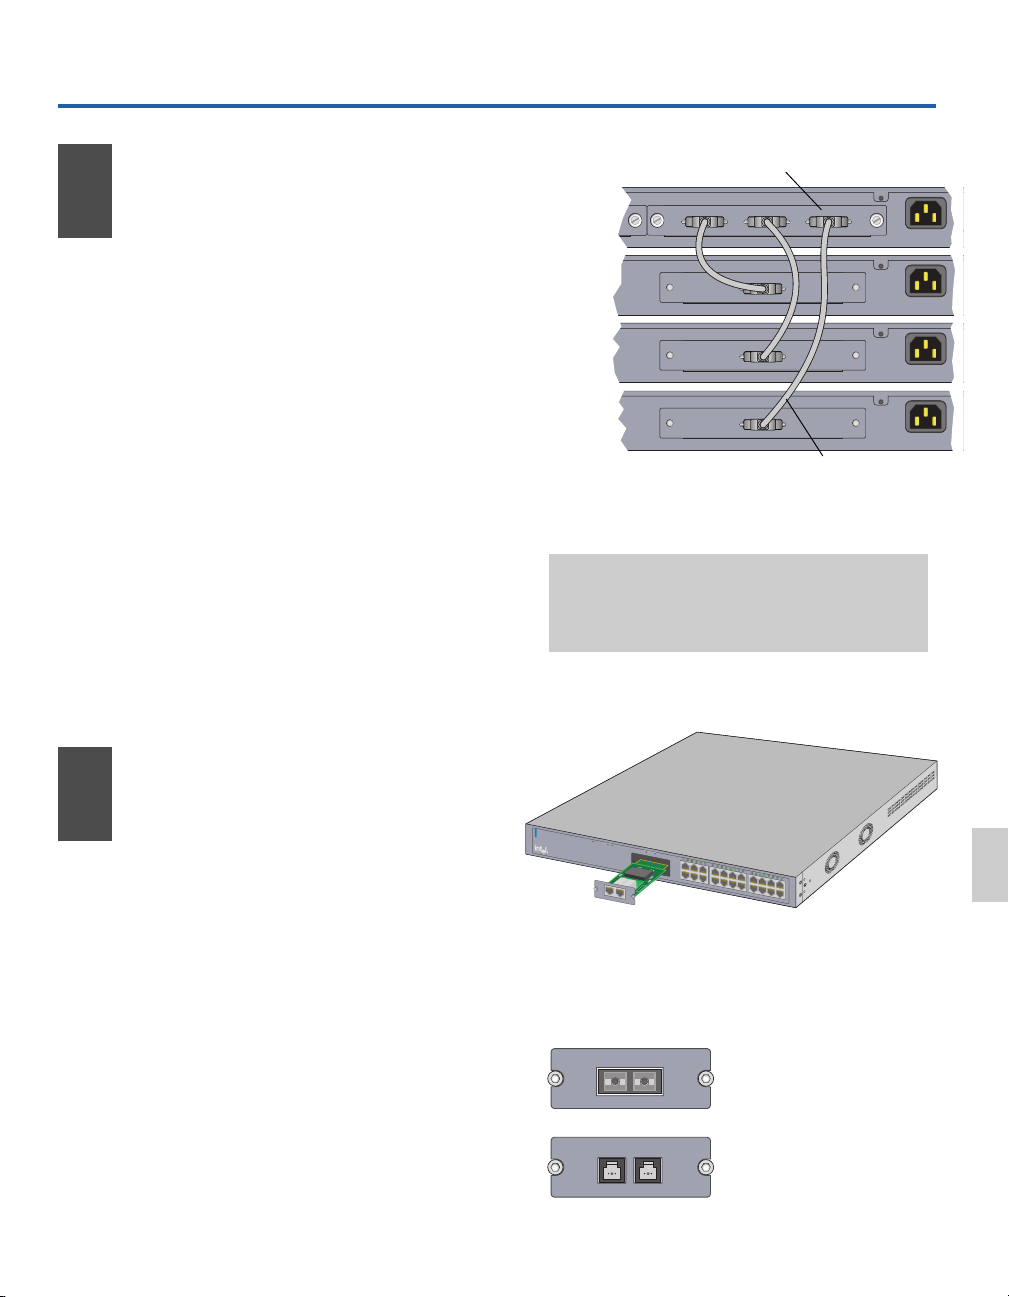
Stack the Switch
4
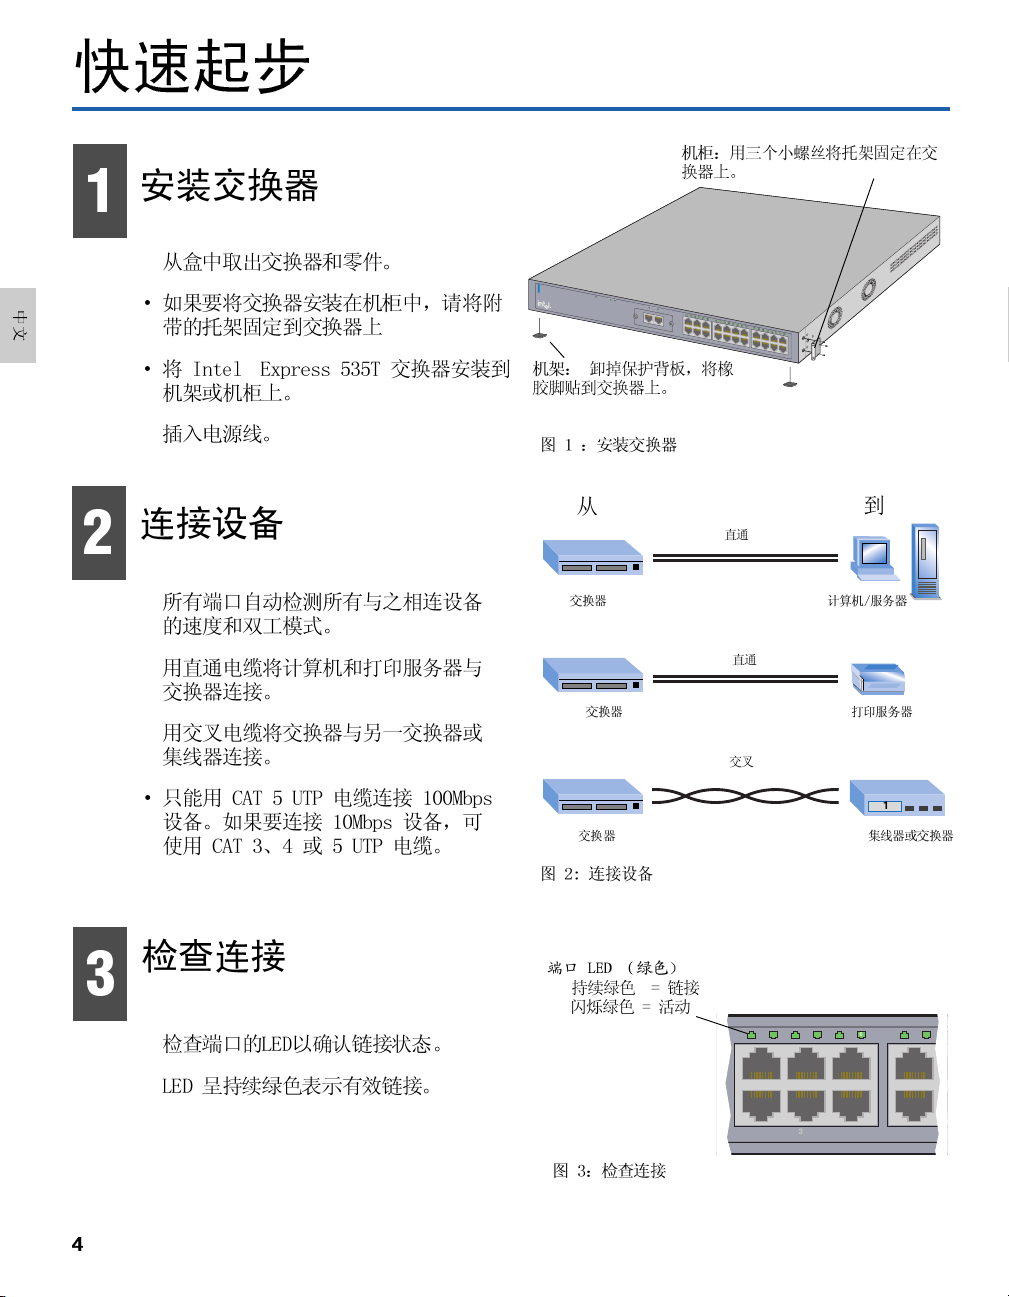
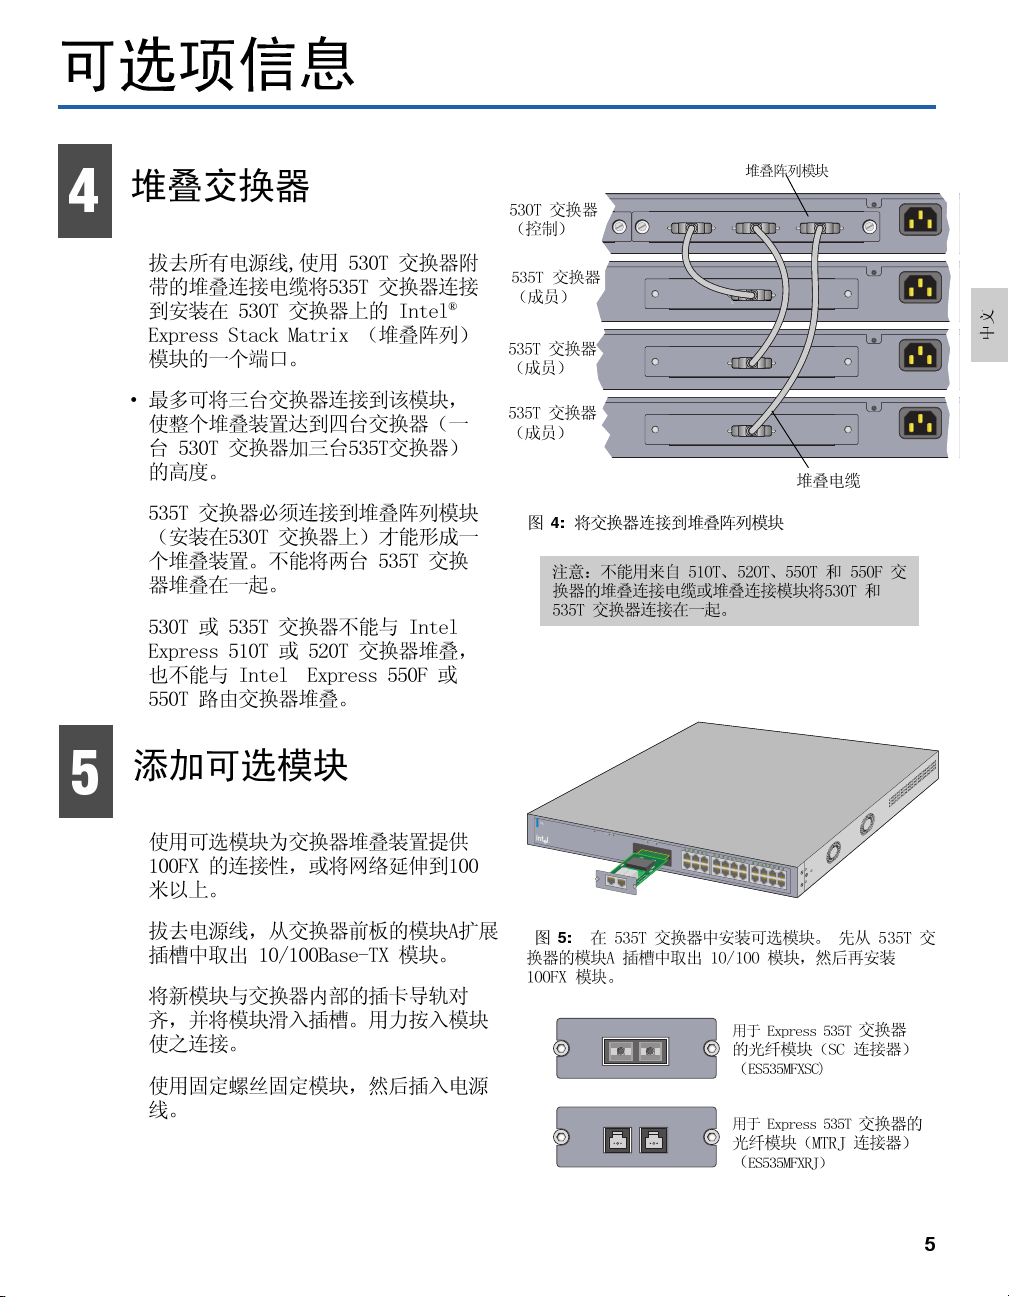
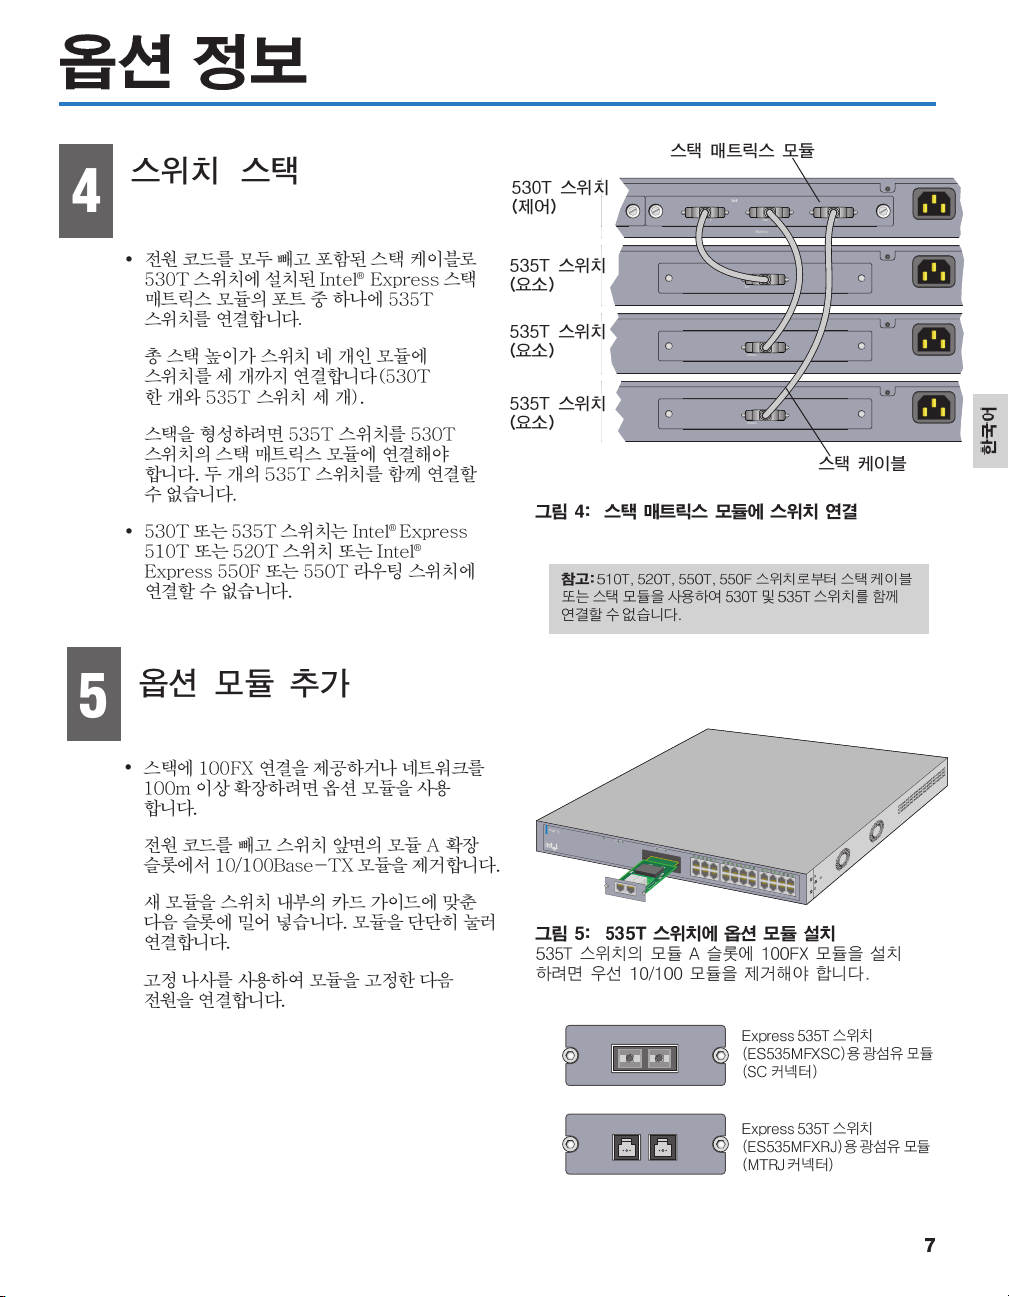
• Unplug all power cords and use the
included stacking cable to attach the 535T
switch to one of the ports on the Intel
®
Express Stack Matrix Module installed in
the 530T switch.
• Attach up to three switches to the module
for a total stack height of four switches
(one 530T and three 535T switches).
• The 535T switch must be connected to a
stack matrix module (in a 530T switch) in
order to form a stack. You cannot stack
two 535T switches together.
• The 530T or 535T switches do not stack
with the Intel® Express 510T or 520T
Switches or the Intel® Express 550F or
550T Routing Switches.
530T Switch
(Control)
535T Switch
(Member)
535T Switch
(Member)
535T Switch
(Member)
Figure 4: Connect switches to the stack matrix module
Note: You cannot use the stacking cables or stacking
modules from the 510T, 520T, 550T, and 550F switches
to connect the 530T and 535T switches together.
Stack Matrix Module
Intel® Express 530T Matrix Module
Switch 1 Switch 2 Switch 3
Matrix Module
Connect to Matrix Module
Stack Interface Module
Connect to Matrix Module
Stack Interface Module
Connect to Matrix Module
Stack Interface Module
Stacking Cable
AC In
100-
50H
1.5A
English
AC In
100-
50H
1.5A
AC In
100-
50H
1.5A
AC In
100-
50H
1.5A
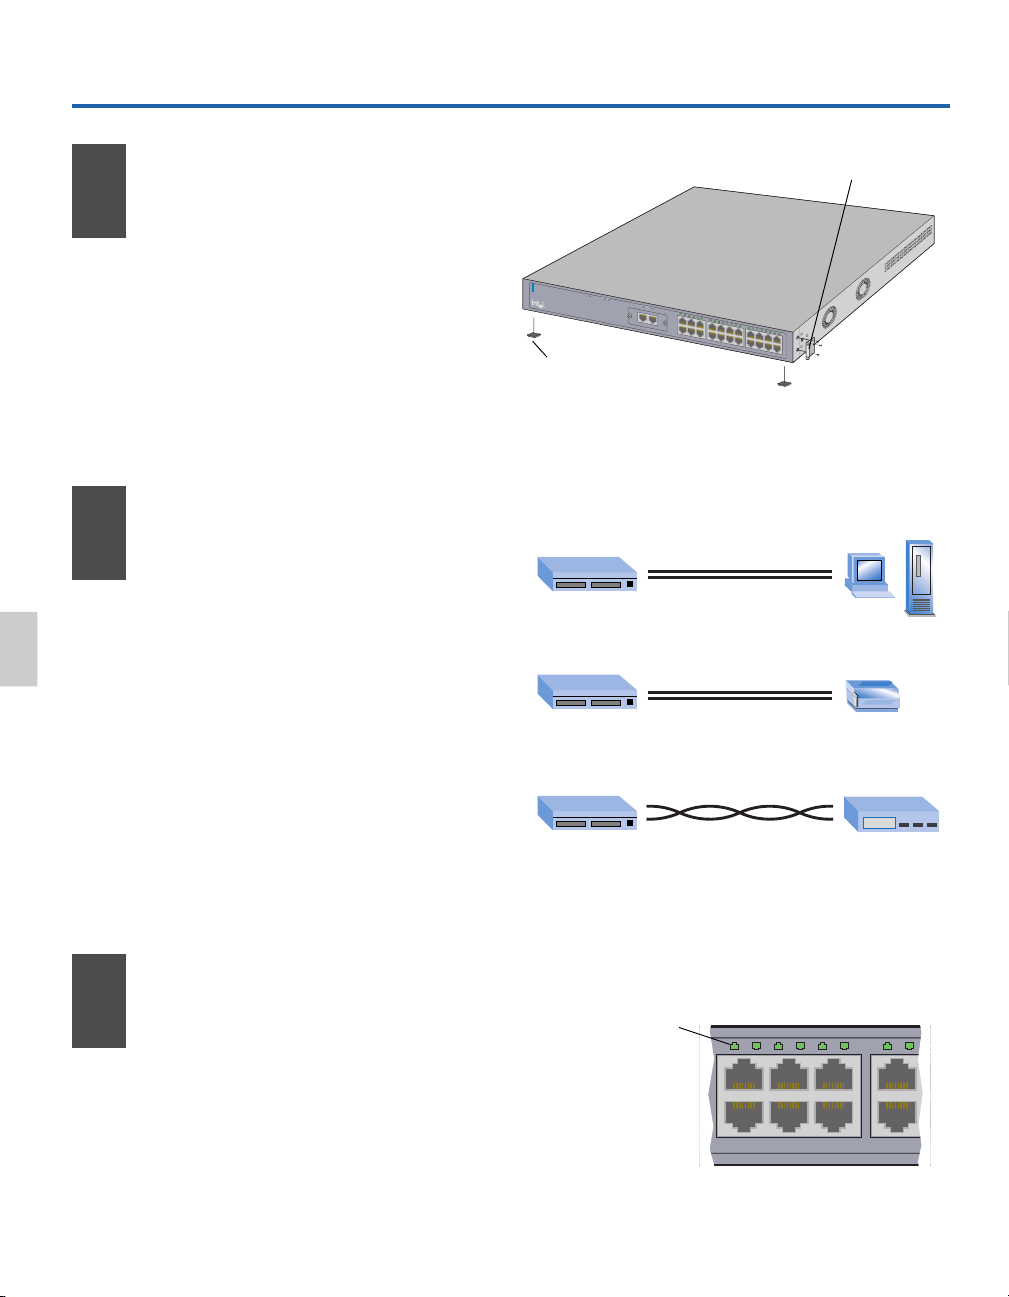
5
Add Optional Modules
• Use optional modules to provide 100FX
connectivity for the stack, or to extend the
network beyond 100 meters.
• Unplug the power cord and remove the
10/100Base-TX module from the Module A
expansion slot on the front of the switch.
• Align the new module with the card guides
inside the switch and slide the module into
the slot. Press firmly to connect the module.
• Secure the module using the retaining
screws and plug in the power cord.
®
In
te
l
E
x
p
re
s
s
5
3
5
T
S
w
itc
h
Stacking
S
w
i
t
c
h
M
od
S
t
ule
a
t
u
s
S
t
a
t
u
s
L
i
n
k
M
odule A
P
o
r
t
1
P
o
r
t
2
Link\Activity
Link = Solid Green
A
ctivity = Blinking Green
100Base-T Module
Port 1
Port 2
1
2
3
4
5
6
7
8
9
10
11
12
13
14
15 1
M
odule A
1
2
3
16
7
18
19
20
21
2
4
5
6
7
8
9
2
10
11
12
13
14
15
16
17
18
19
20
21
22
Figure 5: Install optional modules in the 535T switch.
Remove the 10/100 Module before installing a 100FX
module in the Module A slot on the 535T switch.
100Base-FX - SC Module
Port 1
Tx Rx
100Base-FX - MTRJ Module
Port 1 Port 2
Fiber Module (SC connector)
for Express 535T Switch
(ES535MFXSC)
Fiber Module (MTRJ connector)
for Express 535T Switch
(ES535MFXRJ)
3
Page 6
1
135 79
246 8
12345
6
7
8
2
®
In
te
l
E
x
p
re
ss
5
3
5
T
S
w
itc
h
Stacking
S
w
it
c
h
Module
S
t
a
t
u
s
S
t
a
t
u
s
L
i
n
k
Module A
P
o
®
r
t
1
P
o
r
t
2
10/100Base-T Module
L
ink\Ac
tivi
ty
Link = So
lid
G
Ac
reen
t
ivity
=
Blin
king G
1
2
3
4
5
6
7
ree
n
P
o
r
t
1
P
o
r
t
2
M
od
ule A
8
9
1
0
11
1
2
13
14
15
16
17
1
8
19
2
0
2
1
1
2
3
4
5
6
7
8
22
9
10
1
1
12
13
14
15
16
17
1
8
19
2
0
2
1
2
2
3
4
10/100
Page 7
p
2
z
p
2
z
p
2
z
p
2
z
0
4
AC In
100-
Intel® Express 530T Matrix Module
Switch 1 Switch 2 Switch 3
Matrix Module
®
Connect to Matrix Module
Stack Interface Module
Connect to Matrix Module
Stack Interface Module
Connect to Matrix Module
Stack Interface Module
50H
1.5A
AC In
100-
50H
1.5A
AC In
100-
50H
1.5A
AC In
100-
50H
1.5A
5
®
4:
®
®
In
te
l
E
x
p
re
s
s
5
3
5
T
S
w
itc
h
Stacking
S
w
i
t
c
h
M
od
S
t
ule
a
t
u
s
S
t
a
t
u
s
L
i
n
k
M
odule A
P
o
r
t
1
P
o
r
t
5:
2
Link\Activity
Link = Solid Green
A
ctivity = Blinking Green
100Base-T Module
Port 1
Port 2
1
2
3
4
5
6
7
8
9
10
11
12
13
14
15 1
M
odule A
1
2
3
16
7
18
19
20
21
2
4
5
6
7
8
9
2
10
11
12
13
14
15
16
17
18
19
20
21
22
100Base-FX - SC Module
Port 1
Tx Rx
100Base-FX - MTRJ Module
Port 1 Port 2
5
Page 8
1
9
2
®
Intel
®
Express 535T Switch
Stacking
Switch
Module
Status
Status
Link
Module A
Port 1
Port
2
10/100Base-T Module
Link\Activity
Link = Solid Green
Activity = Blinking Green
1
2
3
4
5
6
7
8
9
10
11
Port 1
Port 2
Module A
12
13
14
15
16
1
7
1
8
19
2
022
1
2
3
4
5
6
7
8
21
9
10
11
12
13
14
15
16
17
18
19
20
21
22
6
3
10/100
246 8
135 7
1
23456
7
8
Page 9
4
p
2
z
p
2
z
p
2
z
p
2
z
0
AC In
100-
Intel® Express 530T Matrix Module
Switch 1 Switch 2 Switch 3
Matrix Module
•
®
Connect to Matrix Module
Stack Interface Module
.
•
•
Connect to Matrix Module
Stack Interface Module
Connect to Matrix Module
Stack Interface Module
50H
1.5A
AC In
100-
50H
1.5A
AC In
100-
50H
1.5A
AC In
100-
50H
1.5A
5
•
®
®
•
®
Intel
Express 535T Switch
S
ta
ck
Sw
in
g
itch
M
o
d
Status
ule
Status
Link
M
o
du
le
A
•
•
Port 1 Port 2
Link
\A
c
tiv
ity
L
ink
=
S
o
lid G
A
re
e
ctivity
n
=
B
lin
king
G
100Base-T Module
Port 1
Port 2
1
2
3
4
5
6
7
re
en
M
od
u
le
A
8
9
10
11
12
13
14
15 17
16
18
19
20
21
1
2
3
4
5
6
7
8
22
9
1
0
11
1
2
13
14
1
5
16
1
7
1
8
1
9
2
0
21
22
•
100Base-FX - SC Module
Port 1
Tx Rx
100Base-FX - MTRJ Module
Port 1 Port 2
7
Page 10
Démarrage rapide
135 79
246 8
12345
6
7
8
Français
1
2
Installez le
commutateur
• Sortez le commutateur et les pièces de
la boîte.
• Fixez les supports livrés avec l'appareil si
vous avez l'intention de le monter en armoire.
®
• Installez le commutateur Intel
Express
535T dans une armoire ou sur une étagère.
• Branchez le câble d’alimentation.
Connectez les
périphériques
• Tous les ports sont configurés de manière à
détecter automatiquement la vitesse et le
mode duplex du périphérique connecté.
• Connectez les PC et les serveurs
d’impression au commutateur à l’aide de
câbles directs.
• Utilisez un câble croisé pour connecter le
commutateur à un autre commutateur ou à un
concentrateur.
• Utilisez uniquement un câble CAT 5 UTP
pour connecter des périphériques 100 Mbps.
Pour connecter des périphériques 10 Mbps,
utilisez un câble CAT 3, 4 ou 5 UTP.
Armoire : utilisez les trois petites vis pour
fixer les supports au commutateur.
®
Intel
E
xp
re
ss
5
35
T S
w
itc
h
S
ta
c
k
S
in
w
g
i
t
c
h
M
o
d
S
t
u
a
l
t
e
u
s
S
t
a
tu
s
L
i
n
k
M
o
d
u
l
e
A
P
o
r
t
1
P
o
r
t
2
1
0
/
1
0
0
B
a
s
e
T
M
o
d
u
L
l
e
in
k
\
A
c
tiv
ity
L
in
k
=
S
o
lid
G
r
e
A
en
c
tivi
ty
=
B
lin
k
in
g
G
r
e
1
2
3
4
5
6
7
e
n
P
o
r
t
1
P
o
r
t
2
M
o
d
u
le
A
8
9
1
0
1
1
12
13
14
15
16
17
18
19
20
2
1
1
2
3
4
5
6
7
8
22
9
1
0
1
1
1
2
1
3
1
4
1
5
1
6
17
1
8
1
9
2
0
2
1
2
2
Étagère : enlevez la pellicule
adhésive et placez les supports en
caoutchouc sous le commutateur.
Figure 1 : installation du commutateur
De À
direct
Commutateur PC/Serveur
direct
Commutateur Serveur
croisé
Commutateur Concentrateur
Figure 2 : connexion des périphériques
d’impression
10/100
ou commutateur
Vérifiez les
3
connexions
• Vérifiez les diodes du port pour confirmer
l’état de la liaison.
8
• Si le voyant vert est allumé en permanence,
la liaison est valable.
Diode du port (vert)
Vert continu = Liaison
Vert clignotant = Activité
Figure 3 : vérification des connexions
Page 11
p
2
z
p
2
z
p
2
z
p
2
z
0
Informations facultatives
4
Empilez le
commutateur
• Débranchez tous les câbles d'alimentation et,
à l'aide du câble d'empilage fourni, connectez
le commutateur 535T à l'un des ports du
module matriciel d'empilage Intel
installé dans le commutateur 530T.
• Vous pouvez connecter jusqu'à trois
commutateurs au module : la plus grande pile
comprend donc quatre commutateurs (un
commutateur 530T et trois 535T).
• Le commutateur 535T doit être connecté à un
module matriciel d'empilage (dans un
commutateur 530T) pour faire partie d'une
pile. Vous ne pouvez pas empiler deux
commutateurs 535T.
• Les commutateurs 530T ou 535T ne peuvent
pas être empilés avec les commutateurs Intel
Express 510T ou 520T ni avec les
commutateurs avec routage Intel® Express
550F ou 550T.
®
Express
Commutateur
530T (contrôle)
Commutateur
535T (membre)
Commutateur
535T (membre)
Commutateur
535T (membre)
®
Module matriciel d'empilage
Intel® Express 530T Matrix Module
Switch 1 Switch 2 Switch 3
Matrix Module
Connect to Matrix Module
Stack Interface Module
Connect to Matrix Module
Stack Interface Module
Connect to Matrix Module
Stack Interface Module
Câble d'empilage
Figure 4 : connexion de commutateurs au module
matriciel d'empilage
Remarque : vous ne pouvez pas utiliser les câbles
d'empilage ni les modules d'empilage des commutateurs
510T, 520T, 550T et 550F pour connecter entre eux les
commutateurs 530T et 535T.
AC In
100-
50H
1.5A
AC In
100-
50H
1.5A
AC In
100-
50H
1.5A
AC In
100-
50H
1.5A
çais
Fran
5
Ajoutez des modules
optionnels
• À l'aide des modules optionnels, vous pouvez
fournir à la pile une connectivité 100FX ou
étendre le réseau au-delà de 100 mètres.
• Débranchez le câble d'alimentation et retirez
le module 10/100Base-TX du logement
d'extension du Module A situé sur la face
avant du commutateur.
• Alignez le nouveau module sur les guides à
l’intérieur du commutateur et insérez-le en
appuyant fermement pour le connecter.
• Vissez le module en utilisant les vis de
fixation et branchez le câble d’alimentation.
®
In
te
l
E
x
p
re
s
s
5
3
5
T
S
w
itc
h
Stacking
S
w
it
c
h
M
odu
S
t
a
le
t
u
s
S
t
a
t
u
s
L
i
n
k
M
odule A
P
o
r
t
1
P
o
r
t
2
Link\A
Link = Solid
Activity = Blinking Green
100Base-T Module
Port 1
ctivity
G
reen
Port 2
1
2
3
4
5
6
7
8
9
10
1
1
12
13
14
15 1
M
od
ule A
1
2
3
4
16
7
18
19
20
21
5
6
7
8
22
9
10
11
12
13
14
15
16
17
18
19
20
21
22
Figure 5 : installation des modules optionnels dans
le commutateur 535T.
Retirez le module 10/100 avant d'installer un module
100FX dans le logement du Module A situé sur le
commutateur 535T.
100Base-FX - SC Module
Port 1
Tx Rx
100Base-FX - MTRJ Module
Port 1 Port 2
Module fibre (connecteur SC)
pour le commutateur Express
535T (ES535MFXSC)
Module fibre (connecteur MTRJ)
pour le commutateur Express
535T (ES535MFXRJ)
9
Page 12
Introduzione rapida
9
Installazione dello
1
switch
• Rimuovere lo switch e le altre parti
dalla confezione.
• Se si intende montare lo switch a rack,
fissare i supporti allegati.
®
• Installare lo switch Intel
in un rack o su un ripiano.
• Collegare il cavo di alimentazione.
Express 535T
®
In
tel
E
x
press 53
5
T S
w
itch
St
ac
k
S
in
w
g
it
c
h
M
o
d
S
t
u
a
le
t
u
s
S
t
a
tu
s
L
i
n
k
M
od
u
le
A
P
1
0
L
in
k
\A
ct
iv
ity
L
ink
=
S
olid
G
A
r
e
e
c
n
tiv
it
y =
B
lin
k
ing G
re
e
n
P
Su ripiano: Rimuovere la
protezione dell’autoadesivo
dai piedini in gomma e farli
aderire allo switch.
Figura 1: Installazione dello switch
A rack: Usare le tre viti piccole per
fissare i supporti allo switch.
o
r
t
1
P
o
r
t
2
/
1
0
0
B
a
s
e
T
M
o
d
u
l
e
1
2
3
4
5
6
7
8
9
10
11
o
r
t
1
P
o
r
t
2
M
o
d
u
le A
12
1
3
14
15
16
17
18
19
20
21
1
2
3
4
5
6
7
8
22
9
1
0
1
1
12
1
3
1
4
1
5
16
1
7
1
8
1
9
2
0
2
1
2
2
Italiano
2
3
Connessione dei
dispositivi
• Tutte le porte sono in grado di rilevare
la velocità e la modalità duplex dei
dispositivi collegati.
• Connettere i PC e i server di stampa
utilizzando un cavo diretto.
• Utilizzare un cavo incrociato per
connettere uno switch a un altro
switch o hub.
• Utilizzare solo cavi UTP CAT 5 per
collegare i dispositivi a 100Mbps. Per
collegare dispositivi a 10Mbps, utilizzare
un cavo UTP CAT 3, 4 e 5.
Controllo dei
collegamenti
• Controllare le spie LED delle porte per
individuare lo stato del collegamento.
Da A
dretto
Switch PC/Server
dretto
Switch Server di stampa
incrociato
Switch Hub o Switch
Figura 2: Connessione dei dispositivi
LED porta (Verde)
Verde costante = Collegamento
Verde lampeggiante = Attività
246 8
135 7
10/100
10
• Una spia LED verde costante indica un
collegamento valido.
12345
Figura 3: Controllo dei collegamenti
7
6
8
Page 13

p
2
z
p
2
z
p
2
z
p
2
z
0
Opzioni di gestione
4
Installazione di uno
stack di switch
• Disconnettere tutti i cavi di alimentazione
e utilizzare il cavo di stack fornito per
collegare lo switch 535T a una delle porte
del modulo Intel® Express Stack Matrix
Module installato nello switch 530T.
• Collegare al modulo fino a tre switch per
un’altezza totale dello stack di quattro
switch (uno switch 530T e tre switch
535T).
• Collegare lo switch 535T al modulo a
matrice di stack (in uno switch 530T) per
formare uno stack. Non è possibile
eseguire lo stack di due switch 535T.
• Non è inoltre possibile eseguire lo stack
di switch 530T o 535T con switch Intel
Express 510T o 520T oppure con routing
switch Intel® Express 550F o 550T.
®
Modulo a matrice di stack
Switch 530T
(Controllo)
Intel® Express 530T Matrix Module
Switch 1 Switch 2 Switch 3
Matrix Module
Switch 535T
(Membro)
Connect to Matrix Module
Stack Interface Module
Switch 535T
(Membro)
Connect to Matrix Module
Stack Interface Module
Switch 535T
(Membro)
Connect to Matrix Module
Stack Interface Module
Cavo di stack
Figura 4: Collegamento di switch al modulo
a matrice di stack
Nota: non è possibile utilizzare cavi o moduli di stack di
switch 510T, 520T, 550T e 550F per collegare switch
530T e 535T.
AC In
100-
50H
1.5A
AC In
100-
50H
1.5A
AC In
100-
50H
1.5A
AC In
100-
50H
1.5A
Italiano
5
Aggiunta di moduli
opzionali
• Utilizzare i moduli opzionali per fornire
allo stack una connettività 100FX oppure
per estendere la rete oltre i 100 metri.
• Disconnettere il cavo di alimentazione e
rimuovere il modulo 10/100Base-TX dallo
slot di espansione nella parte frontale
dello switch (Modulo A).
• Allineare il nuovo modulo con le guide
all’interno dello switch e inserire il
modulo nello slot. Premere fermamente
per connettere il modulo.
• Utilizzare le viti di ritenzione per fissare
il modulo, quindi collegare il cavo di
alimentazione.
®
Intel
E
x
p
re
s
s 53
5
T
S
w
itch
S
ta
c
k
S
in
w
g
i
t
c
h
M
o
d
S
t
u
a
le
t
u
s
S
t
a
t
u
s
L
i
n
k
M
o
d
u
le
A
P
o
r
t
1
P
o
r
t
2
L
in
k
\A
c
t
iv
ity
L
in
k
=
S
o
lid
G
A
re
e
c
n
tiv
ity
=
B
lin
k
in
g
G
re
1
00B
ase-T Module
Port 1 Port 2
1
2
3
4
5
6
7
e
n
M
o
d
u
le
A
8
9
10
11
12
13
14
15 17
16
18
19
20
21
1
2
3
4
5
6
7
8
22
9
1
0
11
1
2
1
3
1
4
1
5
1
6
1
7
1
8
1
9
2
0
2
1
2
2
Figura 5: Installazione di moduli opzionali nello
switch 535T.
Rimuovere il modulo 10/100 prima di procedere
all’installazione del modulo 100FX nello slot di
espansione (Modulo A) dello switch 535T.
100Base-FX - SC Module
Port 1
Tx Rx
100Base-FX - MTRJ Module
Port 1 Port 2
Modulo fibre ottiche (connettore
SC) per switch Express 535T
(ES535MFXSC)
Modulo fibre ottiche (connettore
MTRJ) per switch Express 535T
(ES535MFXRJ)
11
Page 14

Schnellstart
9
Deutsch
Installieren des
1
Switches
• Entfernen Sie den Switch und die Bauteile
aus der Schachtel.
• Befestigen Sie die enthaltenen Klammern,
wenn Sie den Switch in einem Gestell
montieren möchten.
• Installieren Sie den Intel® Express 535T
Switch in einem Gestell oder Regal.
• Schließen Sie das Stromkabel an.
Anschließen
2
der Geräte
• Alle Anschlüsse stellen automatisch die
Geschwindigkeit und den Duplexmodus
der angeschlossenen Geräte fest.
• Schließen Sie PCs und Druckerserver
über direkte Kabelverbindungen an.
• Verwenden Sie zur Verbindung des
Switches mit einem Hub oder einem
anderen Switch ein Crossover-Kabel.
Gestell: Befestigen Sie die Klammern mit
den drei kleinen Schrauben am Switch.
®
In
tel
E
xp
re
ss 5
35
T S
w
itc
h
S
ta
c
k
S
in
w
g
it
c
h
M
o
d
S
t
u
a
le
t
u
s
S
ta
t
u
s
L
i
n
k
M
od
u
le
A
P
o
r
t
1
P
o
r
t
2
1
0
/
1
0
0
B
a
s
e
T
M
o
d
u
L
le
in
k\
A
c
ti
v
ity
L
in
k
=
S
o
lid
Gr
e
A
e
ct
n
iv
ity
=
B
lin
ki
n
g
G
1
2
3
4
5
6
7
re
e
n
P
o
r
t
1
P
o
r
t
2
M
o
d
u
le
A
8
9
10
11
12
1
3
1
4
15
16
1
7
18
19
20 2
21
1
2
3
4
5
6
7
8
9
2
1
0
1
1
1
2
1
3
1
4
1
5
1
6
17
1
8
1
9
2
0
2
1
22
Regal: Entfernen Sie die
Schutzfolie, und befestigen Sie
die Gummifüße am Switch.
Abbildung 1: Installieren des Switches
Vom Zum
Direkt
Switch PC/Server
Direkt
Switch Druckerserver
crossover
12
3
• Verwenden Sie für den Anschluß von
100Mbps-Geräten ausschließlich CAT 5
UTP Kabel. Verwenden Sie für den
Anschluß von 10Mbps-Geräten CAT 3, 4
oder 5 UTP Kabel.
Überprüfen der
Verbindungen
• Überprüfen Sie die Anschluß-LEDs, um
den Verbindungsstatus zu bestätigen.
• Eine ununterbrochen grün aufleuchtende
LED signalisiert eine gültige Verbindung.
Switch Hub oder Switch
Abbildung 2: Anschließen der Geräte
Anschluß-LED (grün)
Ununterbrochen grün = Verbindung
Blinkend grün = Aktivität
246 8
135 7
1
345
2
6
Abbildung 3: Überprüfen der Verbindungen
10/100
7
8
Page 15
p
2
z
p
2
z
p
2
z
p
2
z
0
Zusätzliche Informationen
4
Stapeln des Switches
• Ziehen Sie alle Stromkabel ab, und schließen
Sie den 535T Switch mit dem beiliegenden
Stapelkabel an einen der Anschlüsse am
Intel® Express Stack Matrix Modul an, das
im 530T Switch installiert ist.
• Schließen Sie bis zu drei Switches am
Modul an. Damit sollten maximal vier
Switches aufeinander gestapelt sein (ein
530T und drei 535T Switches).
• Der 535T Switch muß an ein
Stapelmatrixmodul (in einem 530T Switch)
angeschlossen werden. Es ist nicht möglich,
zwei 535T Switches zusammen zu stapeln.
• Die 530T oder 535T Switches lassen sich
nicht mit den Intel® Express 510T oder 520T
Switches oder den Intel® Express 550F oder
550T Routing Switches stapeln.
Stapelmatrixmodul
530T Switch
(Steuerung)
535T Switch
(passiv)
535T Switch
(passiv)
535T Switch
(passiv)
Intel® Express 530T Matrix Module
Switch 1 Switch 2 Switch 3
Matrix Module
Connect to Matrix Module
Stack Interface Module
Connect to Matrix Module
Stack Interface Module
Connect to Matrix Module
Stack Interface Module
Stapelkabel
Abbildung 4: Anschließen der Switches an das
Stapelmatrixmodul
Hinweis: Die Stapelkabel bzw. Stapelmodule von den
510T, 520T, 550T und 550F Switches sind ungeeignet,
um die 530T und 535T Switches zu verbinden.
AC In
100-
50H
1.5A
AC In
100-
50H
1.5A
AC In
100-
50H
1.5A
AC In
100-
50H
1.5A
5
Hinzufügen weiterer
Module
• Fügen Sie nach Wunsch weitere Module
hinzu, um 100FX-Konnektivität für den Stapel
herzustellen oder das Netzwerk über 100 m
hinaus zu erweitern.
• Ziehen Sie das Stromkabel ab, und entfernen
Sie das 10/100Base-TX Modul vom
Erweiterungssteckplatz für Modul A an der
Vorderseite des Switches.
• Richten Sie das neue Modul an den
Kartenführungen innerhalb des Switches aus,
und schieben Sie es in den Steckplatz. Drücken
Sie kräftig, um das Modul anzuschließen.
• Befestigen Sie das Modul mit den
Halteschrauben, und stecken Sie den
Netzstecker ein.
®
Inte
l
E
xp
re
ss 5
35
T
S
w
itc
h
S
ta
c
k
S
in
w
g
i
t
c
h
M
o
d
S
t
u
a
le
t
u
s
S
t
a
t
u
s
L
i
n
k
M
o
d
u
le
A
P
o
r
t
1
P
o
r
t
2
L
in
k
\
A
c
tiv
it
y
L
in
k
=
S
o
lid
G
A
re
e
c
n
tiv
ity =
B
lin
k
in
g
G
100Base-T
M
od
ule
Port 1
P
ort 2
1
2
3
4
5
6
7
re
e
n
M
o
d
u
le
A
8
9
10
11
12
13
14
15 17
16
18
19
20
21
1
2
3
4
5
6
7
8
22
9
1
0
1
1
1
2
1
3
1
4
1
5
1
6
1
7
1
8
1
9
20
2
1
2
2
Abbildung 5: Wahlweise Installation weiterer
Module im 535T Switch.
Entfernen Sie das 10/100 Modul, bevor Sie ein 100FX
Modul in den Steckplatz für Modul A am 535T Switch
installieren.
100Base-FX - SC Module
Port 1
Tx Rx
100Base-FX - MTRJ Module
Port 1 Port 2
Glasfasermodul (SC-Stecker)
für Express 535T Switch
(ES535MFXSC)
Glasfasermodul (MTRJ-Stecker)
für Express 535T Switch
(ES535MFXRJ)
Deutsch
13
Page 16
Guía de instalación rápida
9
Bastidor: utilice los tres tornillos pequeños
para atornillar las abrazaderas al Switch.
Instalación del Switch
1
• Extraiga el Switch y las piezas de la caja.
®
In
te
l
E
x
p
r
es
s
5
3
5
T
S
w
itc
h
S
tac
k
S
in
w
g
i
t
c
h
M
o
d
S
t
ule
a
t
u
s
S
t
a
t
u
s
L
i
n
• Coloque las abrazaderas que se incorporan
si va a montar el Switch en un bastidor.
• Instale el Intel® Express 535T Switch en
un bastidor o en una estantería.
• Conecte el cable de alimentación.
Estantería: despegue el
respaldo protector y colóquele
el pie de goma al Switch.
Figura 1: Instalación del Switch
k
M
o
dule
A
P
o
r
t
1
P
o
r
t
2
1
0
/
1
0
0
B
a
s
e
T
M
o
d
u
Lin
l
e
k\Ac
tivity
Link = So
lid G
Ac
ree
n
tiv
ity = B
lin
kin
g Gr
1
2
3
4
5
6
7
ee
n
P
o
r
t
1
P
o
r
t
2
M
od
ule A
8
9
10
11
12
1
3
1
4
15
16
17
18
1
9
20
21
2
1
2
3
4
5
6
7
8
2
9
1
0
11
12
1
3
14
15
1
6
1
7
1
8
19
2
0
2
1
22
Conexión de los
2
dispositivos
• Todos los puertos detectan de manera
automática la velocidad y la modalidad
dúplex de todos los dispositivos
conectados.
• Conecte los servidores de PC y de
impresión al Switch con cables planos.
• Utilice un cable cruzado para conectar un
Switch con otro Switch o con un nudo de
conexiones.
Español
• Utilice sólo un cable UTP de categoría 5
para conectar dispositivos a 100Mbps.
Para conectar dispositivos 10Mbps,
utilice un cable UTP de categoría 3, 4 ó 5.
Comprobación de
3
las conexiones
• Compruebe los indicadores luminosos
(LEDs) del puerto para confirmar el
estado del enlace.
De A
plano
Switch PC/Servidor
plano
Switch Servidor de impresión
cruzado
Switch Nudo de conexiones
Figura 2: Conexión de los dispositivos
Puerto LED (verde)
Verde constante = Enlace
Verde parpadeante = Actividad
246 8
135 7
o Switch
10/100
14
• Un LED verde constante indica que el
enlace es válido.
123
5
4
6
Figura 3: Comprobación de las conexiones
7
8
Page 17
p
2
z
p
2
z
p
2
z
p
2
z
0
Información opcional
4
Apilamiento del
Switch
• Desconecte todos los cables de
alimentación y utilice el cable de
apilamiento que se adjunta para conectar
el Switch 535T a uno de los puertos del
módulo matriz de apilamiento Intel
Express instalado en el Switch 530T.
• Conecte hasta tres Switches al módulo para
un total de altura de apilamiento de cuatro
Switches (un Switch 530T y tres 535T)
• Cada Switch 535T tiene que estar
conectado a un módulo matriz de
apilamiento (dentro del Switch 530T) para
poder formar un apilamiento. No puede
apilar juntos dos Switches 535T.
• Los Switches 530T ó 535T no se pueden
apilar con los Switches Intel® Express
510T ó 520T, o con los Switches de ruta
Intel® Express 550F ó 550T.
®
Módulo matriz de apilamiento
Switch 530T
(Control)
Switch 535T
(Miembro)
Switch 535T
(Miembro)
Switch 535T
(Miembro)
Intel® Express 530T Matrix Module
Switch 1 Switch 2 Switch 3
Matrix Module
Connect to Matrix Module
Stack Interface Module
Connect to Matrix Module
Stack Interface Module
Connect to Matrix Module
Stack Interface Module
Cable de apilamiento
Figura 4: Conexión de Switches al módulo matriz
de apilamiento
Nota: No pueden utilizar los cables de apilamiento o los
módulos de apilamiento desde los Switches 510T, 520T,
550T y 550F para interconectar los Switches 530T y
535T entre sí.
AC In
100-
50H
1.5A
AC In
100-
50H
1.5A
AC In
100-
50H
1.5A
AC In
100-
50H
1.5A
5
Adición de módulos
opcionales
• Utilice módulos opcionales para proporcionar
conectividad 100FX para el apilamiento o
para extender la red más allá de 100 metros.
• Desconecte el cable de alimentación y retire
el módulo 10/100Base-TX de la ranura de
expansión del Módulo A situada en la parte
frontal del Switch.
• Alinee el nuevo módulo con las guías de
tarjeta que encontrará dentro del Switch y
deslice el módulo en la ranura. Presione
firmemente para conectar el módulo.
• Utilice el resto de los tornillos para asegurar el
módulo y, a continuación, enchufe el cable de
alimentación.
®
In
te
l
E
x
p
re
s
s
5
3
5
T
S
w
itc
h
S
ta
c
k
S
in
w
g
it
c
h
M
o
d
S
t
u
a
le
t
u
s
S
t
a
t
u
s
L
i
n
k
M
o
d
u
le
A
P
o
r
t
1
P
o
r
t
2
L
in
k
\A
c
tiv
it
y
L
in
k
=
S
o
lid
G
A
r
e
e
c
n
tiv
ity
=
B
lin
k
in
g
G
r
e
100Base-T Module
Port 1
Port 2
1
2
3
4
5
6
7
e
n
M
o
d
u
le
A
8
9
10
11
12
13
14
15 17
16
18
1
9
20
21
2
1
2
3
4
5
6
7
8
2
9
1
0
1
1
1
2
1
3
1
4
1
5
1
6
1
7
1
8
1
9
2
0
2
1
2
2
Figura 5: Instalación de módulos opcionales en el
Switch 535T.
Retire el módulo 10/100 antes de instalar un módulo
100FX en la ranura del Módulo A del
Switch 535T.
100Base-FX - SC Module
Port 1
Tx Rx
100Base-FX - MTRJ Module
Port 1 Port 2
Módulo de fibra (conector SC )
para el Switch Express 535T
(ES535MFXSC)
Módulo de fibra (conector MTRJ)
para el Switch Express 535T
(ES535MFXRJ)
Español
15
Page 18

16
Page 19

User Guide - Overview
Features
This guide covers the Intel® Express 535T Switch.
Stacking Module LEDs
Status Link
Port 1
Status LED
Module A LEDs
Status Link
Link\Activity
Link = Solid Green
Activity = Blinking Green
Module A
Module A: Port 1
Stacking Module
Port 1 Port 2
10/100Base-T Module
Port 1 Port 2
Module A
Port 2
Port 2
Connect to Matrix Module
Stack Interface Module
Intel® Express 535T Switch
Stacking
Switch
Module
Status
Port Status LEDs
246 8
135 79
123456789101112131415161718192021
10 12 14 16 18 20 22
13 15 17 19 21
11
AC Input
100-240 VAC
50Hz-60Hz
1.5A max
22
• Autonegotiates speed—10Mbps or 100Mbps
per port.
• Autonegotiates flow control.
• Can be used alone as an unmanaged switch, or as a managed switch in a stack with
up to two additional 535T switches and a 530T (control) switch.
17
Page 20
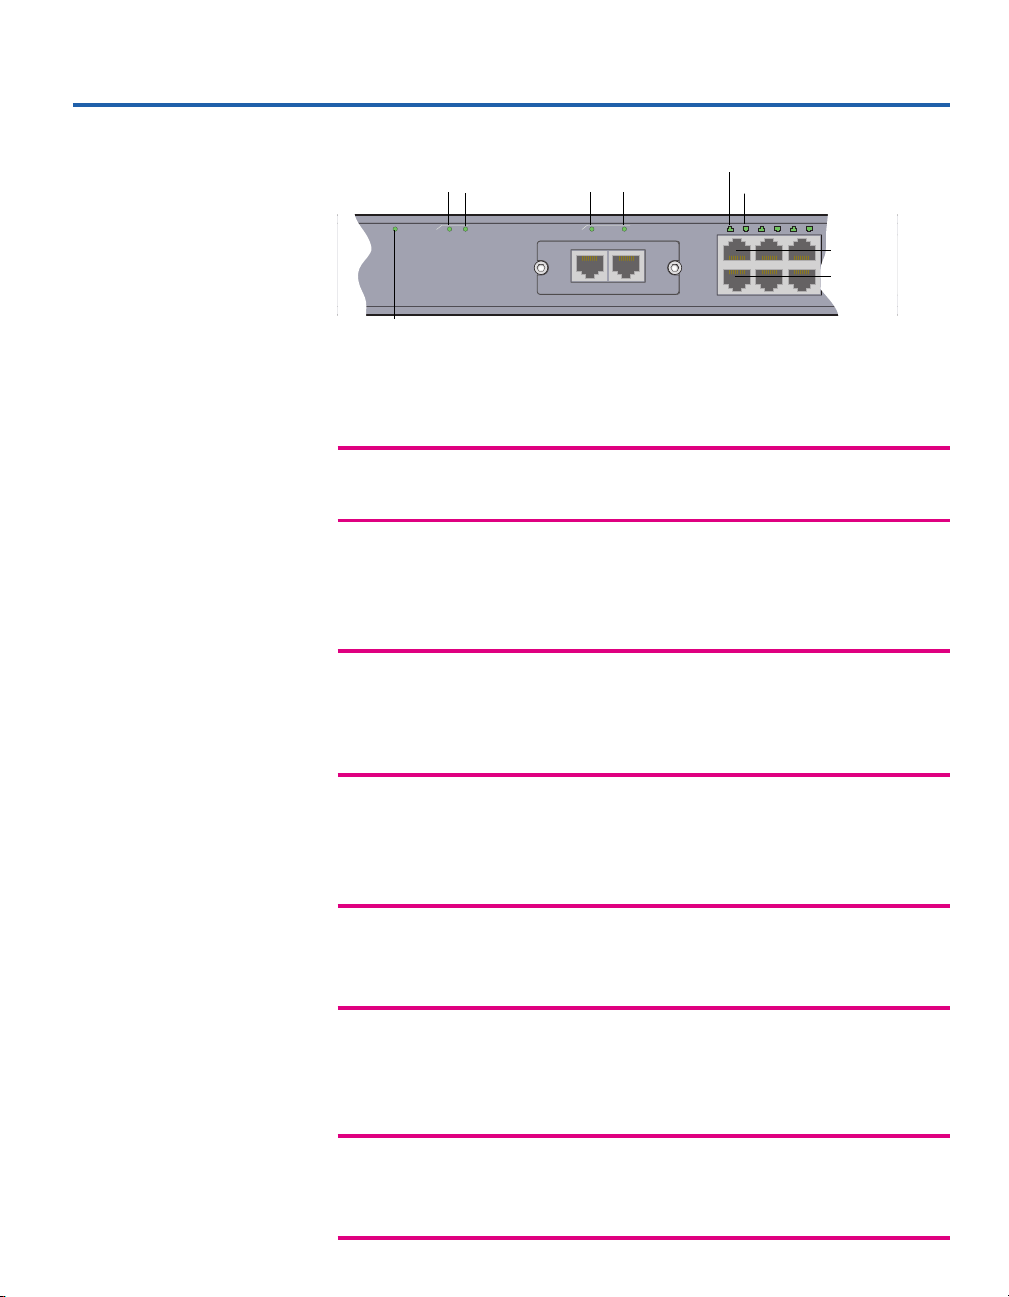
LEDs
Stacking module
Status Link
Stacking
Module
Switch
Status Link
Status
Link\Activity
Link = Solid Green
Activity = Blinking Green
Module A
Port 1 Port 2
Module A
Port 1 Port 2
10/100Base-T Module
Port 1 Port 2
Module A
Switch status
Switch Status LED
LED Status Meaning
Switch Solid green Power.
Status
Off No power.
Stacking Module LEDs
LED Status Meaning
Status Solid green Module present.
Off No module present.
Link Solid green Device linked.
Off No link detected.
Port 1 LED
Port 2 LED
246 8
135 79
12345
6
Port 1
Port 2
789
10
10
18
Module A LEDs (10/100 TX, 100FX)
LED Status Meaning
Ports 1/2 Solid green Device linked.
Blinking green Receiving traffic on that port.
Off No link detected.
Port LEDs
LED Status Meaning
Left/Right Solid green Device linked.
Blinking green Receiving traffic on that port.
Off No link detected.
Page 21

Connecting to Devices
Connection Guidelines
General
• The copper ports of the 535T switches are capable of autonegotiating
port speed and can operate at 10Mbps or 100Mbps per port. The switch
matches the highest possible speed of an attached device.
• The 535T’s fiber modules always operate at 100Mbps.
• The 535T switches are capable of autonegotiating port duplex and can
operate at half- or full-duplex.
• Configure the network so devices that talk primarily to each other are
on the same segment. Each port is a single segment.
Cabling
• Use Category 5 unshielded twisted-pair (CAT 5 UTP) cable when
connecting 100Mbps devices to the switch.
• Use Category 3, 4, or 5 unshielded twisted-pair (CAT 3, 4, or 5 UTP)
cable when connecting 10Mbps devices to the switch.
• Limit the cable length between devices to 100 meters (328 feet).
• Use a straight-through cable to connect the switch to a server or
workstation. For more information on cabling, see “Cabling Devices.”
• To connect to another switch or hub use crossover cables.
• To connect a device to one of the fiber ports, use 62.5/125 µm
multimode cabling. This cabling can be a maximum of 2,000m when
operating at full-duplex, and 160m (to a hub) or 400m (to a router,
switch, or PC) when operating at half-duplex.
19
Page 22

Stacking with 530T Switches
135 79
11
13 15 17 19 21
246 8
10 12 14 16 18 20 22
Local
Management
(EIA 232)
Console: 9600-8-N-1
FlowCtrl=None
Link\Activity
Link = Solid Green
Activity = Blinking Green
123456789101112131415161718192021
22
Switch
Status
Status Sw1 Sw2 Sw3
Matrix
Module
StatusPort 1
Link/
Act
Port 2
Link/
Act
Module A
(Gigabit)
Intel® Express 530T Switch
135 79
11
13 15 17 19 21
246 8
10 12 14 16 18 20 22
Link\Activity
Link = Solid Green
Activity = Blinking Green
Port 1 Port 2
123456789101112131415161718192021
22
10/100Base-T Module
Port 1 Port 2
Switch
Status
Status Link
Stacking
Module
Module A
Module A
Intel® Express 535T Switch
135 79
11
13 15 17 19 21
246 8
10 12 14 16 18 20 22
Link\Activity
Link = Solid Green
Activity = Blinking Green
Port 1 Port 2
123456789101112131415161718192021
22
10/100Base-T Module
Port 1 Port 2
Switch
Status
Status Link
Stacking
Module
Module A
Module A
Intel® Express 535T Switch
135 79
11
13 15 17 19 21
246 8
10 12 14 16 18 20 22
Link\Activity
Link = Solid Green
Activity = Blinking Green
Port 1 Port 2
123456789101112131415161718192021
22
Switch
Status
Status Link
Stacking
Module
Module A
Module A
Intel® Express 535T Switch
100Base-FX - SC Module
Port 1
Tx Rx
Stacking Capabilities
The 535T can be used alone or in a stack. Stacking the 535T allows it to
become a managed switch.
About a stack
• To stack two or more 535T switches, you must have a 530T switch with
the Stack Matrix Module installed.
• 535Ts can only be stacked with other 535Ts (and one 530T).
• A stack can consist of up to three 535Ts and one 530T.
• In a stack, the 535T switches are the member switches and the 530T is
the control switch.
• The member switches are all managed through the console switch’s
management interface.
• The entire stack has one IP address (the control switch’s IP address).
20
Control switch (530T)
Member switch 1 (535T)
Member switch 2 (535T)
Member switch 3 (535T)
Page 23

Connect to Matrix Module
Stack Interface Module
AC Input
100-240 VAC
50Hz-60Hz
1.5A max
Connect to Matrix Module
Stack Interface Module
AC Input
100-240 VAC
50Hz-60Hz
1.5A max
Connect to Matrix Module
Stack Interface Module
AC Input
100-240 VAC
50Hz-60Hz
1.5A max
Matrix ModuleModule A (Gigabit)
AC Input
100-240 VAC
50Hz-60Hz
1.5A max
MAC Address
009027390008
Switch 1 Switch 2 Switch 3
Intel® Express 530T Matrix Module
Control switch (530T)
Member switch 1 (535T)
Member switch 2 (535T)
Assemble a stack
To stack 535Ts with a 530T, you need to purchase a Stack Matrix Module
for the 530T.
1 Insert the Stack Matrix Module into the slot in the back of the 530T,
labeled Matrix Module, and tighten the screws.
2 Run a cable from the slot in the back of the 535T, labeled Stack
Interface Module, to the control switch’s Stack Matrix Module, where
it reads “Switch 1.” This connection makes this 535T switch Member 2
in the stack.
3 Repeat step 2 until you have added all member switches (535Ts) to the
stack. You can have a total of three member switches.
4 Power on the control switch.
Stack Matrix Module
Member switch 3 (535T)
Stack Interface Module
21
Page 24

Workgroup Example
78
123456
RX TX RX TX
Speed
Status
Link\Act
Console: 9600-8-N-1
Flow Ctrl=None
Local
Management
(EIA 232)
100/1000 Base-T
Speed
1000Mbps = Solid Green
100Mbps = Off
Link\Activity
Link = Solid Green
Activity = Blinking Green
12345678
Intel® NetStructure™ 470T Switch
910111213141516
12345678
1234 5678
9101112
Speed
Link\Act
Speed
Link\Act
Link\Activity : Solid Green = Link
Blinking Orange = Activity
Blinking Green = Disabled
Speed : Solid Green = 1000Mbps
Off = 100Mbps
Power Supply 1
Power Supply 2
Management
13 14 15 16
1000BASE-X
100BASE-TX/1000BASE-T
Tx Rx Tx Rx Tx Rx Tx Rx
Intel® NetStructure
™
480T Routing Switch
Stack of 530T and 535T switches
Intel
®
NetStructure™ 480T Routing Switch
Intel
®
NetStructure™ 470T Switch
1000T
connection
Clients at
10Mbps or
100Mbps
Clients at
10Mbps or
100Mbps
Aggregated
1000SX
connection
Aggregated
1000SX
connection
135 79
11
13 15 17 19 21
246 8
10 12 14 16 18 20 22
Link\Activity
Link = Solid Green
Activity = Blinking Green
Port 1 Port 2
123456789101112131415161718192021
22
10/100Base-T Module
Port 1 Port 2
Switch
Status
StatusLink
Stacking
Module
Module A
Module A
Intel® Express 535T Switch
135 79
11
13 15 17 19 21
246 8
10 12 14 16 18 20 22
Link\Activity
Link = Solid Green
Activity = Blinking Green
Port 1 Port 2
123456789101112131415161718192021
22
Switch
Status
StatusLink
Stacking
Module
Module A
Module A
Intel® Express 535T Switch
100Base-FX - SC Module
Port 1
Tx Rx
135 79
11
13 15 17 19 21
246 8
10 12 14 16 18 20 22
Link\Activity
Link = Solid Green
Activity = Blinking Green
Port 1 Port 2
123456789101112131415161718192021
22
10/100Base-T Module
Port 1 Port 2
Switch
Status
StatusLink
Stacking
Module
Module A
Module A
Intel® Express 535T Switch
135 79
11
13 15 17 19 21
246 8
10 12 14 16 18 20 22
Local
Management
(EIA 232)
Console: 9600-8-N-1
FlowCtrl=None
Link\Activity
Link = Solid Green
Activity = Blinking Green
123456789101112131415161718192021
22
Switch
Status
StatusSw1 Sw2 Sw3
Matrix
Module
StatusPort 1
Link/
Act
Port 2
Link/
Act
Module A
(Gigabit)
Intel® Express 530T Switch
Servers
connected
at 1000Mbps
Second Floor
First Floor
Data Center
135 79
11
13 15 17 19 21
246 8
10 12 14 16 18 20 22
Link\Activity
Link = Solid Green
Activity = Blinking Green
Port 1 Port 2
123456789101112131415161718192021
22
10/100Base-T Module
Port 1 Port 2
Switch
Status
StatusLink
Stacking
Module
Module A
Module A
Intel® Express 535T Switch
135 79
11
13 15 17 19 21
246 8
10 12 14 16 18 20 22
Link\Activity
Link = Solid Green
Activity = Blinking Green
Port 1 Port 2
123456789101112131415161718192021
22
Switch
Status
StatusLink
Stacking
Module
Module A
Module A
Intel® Express 535T Switch
100Base-FX - SC Module
Port 1
Tx Rx
135 79
11
13 15 17 19 21
246 8
10 12 14 16 18 20 22
Link\Activity
Link = Solid Green
Activity = Blinking Green
Port 1 Port 2
123456789101112131415161718192021
22
10/100Base-T Module
Port 1 Port 2
Switch
Status
StatusLink
Stacking
Module
Module A
Module A
Intel® Express 535T Switch
135 79
11
13 15 17 19 21
246 8
10 12 14 16 18 20 22
Local
Management
(EIA 232)
Console: 9600-8-N-1
FlowCtrl=None
Link\Activity
Link = Solid Green
Activity = Blinking Green
123456789101112131415161718192021
22
Switch
Status
StatusSw1 Sw2 Sw3
Matrix
Module
StatusPort 1
Link/
Act
Port 2
Link/
Act
Module A
(Gigabit)
Intel® Express 530T Switch
The example below shows a sample network. The Intel® NetStructure
480T Routing Switch serves as the backbone of the network, and the stacks
of 530T/535T switches provide the connection between the 480T and the
users on each of the floors.
TM
22
Page 25

Cabling Devices
13
24
123
4
Media Requirements
Incorrect cabling is often the cause of network performance problems. The
next two pages discuss the requirements.
100Base-TX
The 100Base-TX Fast Ethernet specification requires that you use
CAT 5 UTP cabling to operate at 100Mbps. You’re limited to 100 meters
between any two devices. If you use lower grade cabling (CAT 3 or CAT 4),
you may get a connection, but will soon experience data loss or slow
performance.
10Base-T
The 10Base-T Ethernet specification allows you to use CAT 3, CAT 4, or
CAT 5 UTP cabling. You’re limited to 100 meters of cable between any two
devices.
100Base-FX
The fiber ports of the 535T switch let you connect to a switch up to 400
meters (hubs up to 160m) away at half-duplex or up to 2 km at full-duplex.
Use 62.5/125µm multimode fiber optic cable with an SC-type or MTRJ
fiber optic connector.
Straight-through vs. Crossover Cables
Switch ports are wired MDI-X, so use a straight-through cable when
ccvonnecting to a workstation or server. (Network adapter cards are wired
MDI, not MDI-X.) For direct connection to another MDI-X port, use a
crossover cable. Here are the pin arrangements for the switch’s Ethernet port
and the typical RJ-45 connector.
8
1
Pin 8
Pin 1
Ethernet Port
Pin 1
Pin 8
Clip
RJ-45 Connector
23
Page 26

Straight-through UTP cable
Hub (MDI-X) Adapter (MDI)
10/100
1 (RX+) 1 (TX+)
2 (RX-) 2 (TX-)
3 (TX+) 3 (RX+)
6 (TX-) 6 (RX-)
4 Not used 4 Not used
5 Not used 5 Not used
7 Not used 7 Not used
8 Not used 8 Not used
Crossover UTP cable
Hub (MDI-X) Switch (MDI-X)
24
10/100
1 (RX+) 1 (RX+)
2 (RX-) 2 (RX-)
3 (TX+) 3 (TX+)
6 (TX-) 6 (TX-)
4 Not used 4 Not used
5 Not used 5 Not used
7 Not used 7 Not used
8 Not used 8 Not used
Page 27

FAQs/Troubleshooting
I’ve connected the cable but the port LED is off. Why?
• Remove the cable and plug it in again. Wait up to six seconds for a link.
• Make sure you’re using the correct type of cable (straight-through or
crossover) for the device you want to connect to. If you’re using the
wrong cable, the link LED will not come on.
• Make sure the device you’ve connected to a port is a 10Base-T or
100Base-TX device. The Express 535T Switch doesn’t support
100Base-T4 devices running at 100Mbps. However, they do support T4
devices running at 10Mbps.
• Check the speed and duplex settings on the PC’s network adapter.
• The cable is defective.
I keep getting an intermittent loss of link (or data is not being
transmitted). Why?
• You may be using the wrong grade of cable. The wrong cable can cause
erratic performance and you may eventually lose the connection
between the port and the attached device.
• A cable segment somewhere in your collision domain may be too long.
Make sure no segment of your UTP cabling is longer than 100 meters.
• Check the Ethernet cable pairs. The TX pairs (pins 1 and 2) and the RX
pairs (pins 3 and 6) should be twisted pairs. See diagram on page 24.
How can I set the speed or duplex on individual ports?
Normally the switch handles all connections automatically. If you need
to force speed or duplex, ( to accommodate older devices that don’t
support autonegotiation) the 535T switch will need to be part of a stack
so you can use the Local Management on the Intel® Express 530T
Switch to configure the port.
25
Page 28

Regulatory Information and Warnings
FCC Part 15 Compliance Statement
This product has been tested and found to comply with the limits for
a Class A digital device pursuant to Part 15 of the FCC rules. These
limits are designed to provide reasonable protection against harmful
interference when the equipment is operated in a commercial
environment.
This product generates, uses, and can radiate radio frequency energy
and, if not installed and used in accordance with the instruction
manual, may cause harmful interference to radio communications.
However, there is no guarantee that interference will not occur in a
particular installation. If this equipment does cause harmful
interference to radio or television reception, which can be
determined by turning this equipment off and on, the user is
encouraged to try to correct the interference by one or more of the
following measures:
· Change the direction of the radio or TV antenna.
· To the extent possible, relocate the radio, TV, or other receiver
away from the product.
· Plug the product into a different electrical outlet so that the
product and the receiver are on different branch circuits.
If these suggestions don’t help, consult your dealer or an
experienced radio/TV repair technician for more suggestions.
NOTE This device complies with Part 15 of the FCC Rules.
Operation is subject to the following two conditions: (1) This device
may not cause harmful interference, and (2) this device must accept
any interference received, including interference that may cause
undesired operation.
CAUTION If you make any modification to the equipment not
expressly approved by Intel, you could void your authority to
operate the equipment.
Canada Compliance Statement (Industry Canada)
Cet appareil numérique respecte les limites bruits radioélectriques
applicables aux appareils numériques de Classe A prescrites dans la
norme sur le matériel brouilleur: “Appareils Numériques”,
NMB-003 édictée par le Ministre Canadien des Communications.
This digital apparatus does not exceed the Class A limits for radio
noise emissions from digital apparatus set out in the
interference-causing equipment standard entitled: “Digital
Apparatus,” ICES-003 of the Canadian Department of
Communications.
Manufacturer Declaration
This certifies that the Intel® Express 535T Switch complies with the
EU Directive 89/336/EEC, using the EMC standards EN55022
(Class A) and EN55024. This product also meets or exceeds EN
60950 (safety) requirements. These products have been tested and
verified to meet CISPR 22 Class A requirements.
Australia Statement
Taiwan Class A EMI Statement
VCCI Statement
Class A ITE
This is a Class A product based on the standard of the Voluntary
Control Council for Interference by Information Technology
Equipment (VCCI). If this equipment is used in a domestic environment, radio disturbance may arise. When such trouble occurs, the user
may be required to take corrective actions.
Warnings
WARNING
This is a Class A product. In a domestic environment this product may
cause radio interference in which case the user may be required to take
adequate measures. Internal access to Intel® Express 535T Switch is
intended only for qualified service personnel. Do not remove any
covers.
WARNING
The system is designed to operate in a typical office environment.
Choose a site that is:
· Clean and free of airborne particles (other than normal room
dust).
· Well ventilated and away from sources of heat including direct
sunlight.
· Away from sources of vibration or physical shock.
· Isolated from strong electromagnetic fields produced by
electrical devices.
· In regions that are susceptible to electrical storms, we
recommend you plug your system into a surge suppressor and
disconnect telecommunication lines to your modem during an
electrical storm.
· Provided with a properly grounded wall outlet.
Do not attempt to modify or use the supplied AC power cord if it is not
the exact type required.
Ensure that the system is disconnected from its power source and from
all telecommunications links, networks, or modems lines whenever the
chassis cover is to be removed. Do not operate the system with the
cover removed.
26
Page 29

AVERTISSEMENT
AVVERTENZA
Le système a été conçu pour fonctionner dans un cadre de travail
normal. L’emplacement choisi doit être:
· Propre et dépourvu de poussière en suspension (sauf la
poussière normale).
· Bien aéré et loin des sources de chaleur, y compris du soleil
direct.
· A l’abri des chocs et des sources de ibrations.
· Isolé de forts champs magnétiques géenérés par des
appareils électriques.
· Dans les régions sujettes aux orages magnétiques il est
recomandé de brancher votre système à un supresseur de
surtension, et de débrancher toutes les lignes de
télécommunications de votre modem durant un orage.
· Muni d’une prise murale correctement mise à la terre.
Ne pas utiliser ni modifier le câble d’alimentation C. A. fourni,
s’il ne correspond pas exactement au type requis.
Assurez vous que le système soit débranché de son alimentation
ainsi que de toutes les liaisons de télécomunication, des réseaux,
et des lignes de modem avant d’enlever le capot. Ne pas utiliser le
système quand le capot est enlevé.
WARNUNG
Das System wurde für den Betrieb in einer normalen
Büroumgebung entwickelt. Der entwickelt. Der Standort sollte:
· sauber und staubfrei sein (Hausstaub ausgenommen);
· gut gelüftet und keinen Heizquellen ausgesetzt sein
(einschließlich direkter Sonneneinstrahlung);
· keinen Erschütterungen ausgesetzt sein;
· keine starken, von elektrischen Geräten erzeugten
elektromagnetischen Felder aufweisen;
· in Regionen, in denen elektrische Stürme auftreten, mit
einem Überspannungsschutzgerät verbunden sein; während
eines elektrischen Sturms sollte keine Verbindung der
Telekommunikationsleitungen mit dem Modem bestehen;
· mit einer geerdeten Wechselstromsteckdose ausgerüstet sein.
Versuchen Sie nicht, das mitgelieferte Netzkabel zu ändern oder
zu verwenden, wenn es sich nicht um genau den erforderlichen
Typ handelt.
Das System darf weder an eine Stromquelle angeschlossen sein
noch eine Verbindung mit einer Telekommunikationseinrichtung,
einem Netzwerk oder einer Modem-Leitung haben, wenn die
Gehäuseabdeckung entfernt wird. Nehmen Sie das System nicht
ohne die Abdeckung in Betrieb.
Il sistema è progettato per funzionare in un ambiente di lavoro
tipico. Scegliere una postazione che sia:
· Pulita e libera da particelle in sospensione (a parte la
normale polvere presente nell’ambiente).
· Ben ventilata e lontana da fonti di calore, compresa la luce
solare diretta.
· Al riparo da urti e lontana da fonti divibrazione.
· Isolata dai forti campi magnetici prodotti da dispositivi
elettrici.
· In aree soggette a temporali, è consigliabile collegare il
sistema ad un limitatore di corrente. In caso di temporali,
scollegare le linee di comunicazione dal modem.
· Dotata di una presa a muro correttamente installata.
Non modificare o utilizzare il cavo di alimentazione in c. a.
fornito dal produttore, se non corrisponde esattamente al tipo
richiesto.
Prima di rimuovere il coperchio del telaio, assicurarsi che il
sistema sia scollegato dall’alimentazione, da tutti i collegamenti
di comunicazione, reti o linee di modem. Non avviare il sistema
senza aver prima messo a posto il coperchio.
ADVERTENCIAS
El sistema está diseñado para funcionar en un entorno de trabajo
normal. Escoja un lugar:
· Limpio y libre de partículas en suspensión (salvo el polvo
normal)
· Bien ventilado y alejado de fuentes de calor, incluida la luz
solar directa.
· Alejado de fuentes de vibración.
· Aislado de campos electromagnéticos fuertes producidos
por dispositivos eléctricos.
· En regiones con frecuentes tormentas eléctricas, se
recomienda conectar su sistema a un eliminador de
sobrevoltage y desconectar el módem de las líneas de
telecomunicación durante las tormentas.
· Previsto de una toma de tierra correctamente instalada.
No intente modificar ni usar el cable de alimentación de
corriente alterna, si no se corresponde exactamente con el tipo
requerido.
Asegúrese de que cada vez que se quite la cubierta del chasis, el
sistema haya sido desconectado de la red de alimentación y de
todos lo enlaces de telecomunicaciones, de red y de líneas de
módem. No ponga en funcionamiento el sistema mientras la
cubierta esté quitada
27
Page 30

Wichtige Sicherheitshinweise
1. Bitte lesen Sie sich diese Hinweise sorgfältig durch.
2. Heben Sie diese Anleitung für den spätern Gebrauch auf.
3. Vor jedem Reinigen ist das Gerät vom Stromnetz zu trennen. Vervenden Sie keine Flüssig- oder Aerosolreiniger. Am besten dient
ein angefeuchtetes Tuch zur Reinigung.
4. Um eine Beschädigung des Gerätes zu vermeiden sollten Sie nur Zubehörteile verwenden, die vom Hersteller zugelassen sind.
5. Das Gerät is vor Feuchtigkeit zu schützen.
6. Bei der Aufstellung des Gerätes ist auf sichern Stand zu achten. Ein Kippen oder Fallen könnte Verletzungen hervorrufen.
Verwenden Sie nur sichere Standorte und beachten Sie die Aufstellhinweise des Herstellers.
7. Die Belüftungsöffnungen dienen zur Luftzirkulation die das Gerät vor Überhitzung schützt. Sorgen Sie dafür, daß diese Öffnungen
nicht abgedeckt werden.
8. Beachten Sie beim Anschluß an das Stromnetz die Anschlußwerte.
9. Die Netzanschlußsteckdose muß aus Gründen der elektrischen Sicherheit einen Schutzleiterkontakt haben.
10. Verlegen Sie die Netzanschlußleitung so, daß niemand darüber fallen kann. Es sollete auch nichts auf der Leitung abgestellt
werden.
11. Alle Hinweise und Warnungen die sich am Geräten befinden sind zu beachten.
12. Wird das Gerät über einen längeren Zeitraum nicht benutzt, sollten Sie es vom Stromnetz trennen. Somit wird im Falle einer
Überspannung eine Beschädigung vermieden.
13. Durch die Lüftungsöffnungen dürfen niemals Gegenstände oder Flüssigkeiten in das Gerät gelangen. Dies könnte einen Brand
bzw. Elektrischen Schlag auslösen.
14. Öffnen Sie niemals das Gerät. Das Gerät darf aus Gründen der elektrischen Sicherheit nur von authorisiertem Servicepersonal
geöffnet werden.
15. Wenn folgende Situationen auftreten ist das Gerät vom Stromnetz zu trennen und von einerqualifizierten Servicestelle zu
überprüfen:
a— Netzkabel oder Netzstecker sint beschädigt.
b— Flüssigkeit ist in das Gerät eingedrungen.
c— Das Gerät war Feuchtigkeit ausgesetzt.
d— Wenn das Gerät nicht der Bedienungsanleitung ensprechend funktioniert oder Sie mit Hilfe dieser Anleitung keine
Verbesserung erzielen.
e— Das Gerät ist gefallen und/oder das Gehäuse ist beschädigt.
f— Wenn das Gerät deutliche Anzeichen eines Defektes aufweist.
16. Bei Reparaturen dürfen nur Orginalersatzteile bzw. den Orginalteilen entsprechende Teile verwendet werden. Der Einsatz von
ungeeigneten Ersatzteilen kann eine weitere Beschädigung hervorrufen.
17. Wenden Sie sich mit allen Fragen die Service und Repartur betreffen an Ihren Servicepartner. Somit stellen Sie die
Betriebssicherheit des Gerätes sicher.
18. Zum Netzanscluß dieses Gerätes ist eine geprüfte Leitung zu verwenden, Für einen Nennstrom bis 6A und einem Gerätegewicht
größer 3kg ist eine Leitung nicht leichter als H05VV-F, 3G, 0.75mm2 einzusetzen.
28
Page 31

Limited Hardware Warranty
Intel warrants to the original owner that the hardware product delivered in this package will be free from defects in material and workmanship for
three (3) years following the latter of: (i) the date of purchase only if you register by returning the registration card as indicated thereon with
proof of purchase; or (ii) the date of manufacture; or (iii) the registration date if by electronic means provided such registration occurs within
thirty (30) days from purchase. This warranty does not cover the product if it is damaged in the process of being installed. Intel recommends that
you have the company from whom you purchased this product install the product.
INTEL RESERVES THE RIGHT TO FILL YOUR ORDER WITH A PRODUCT CONTAINING NEW OR REMANUFACTURED COMPONENTS. THE ABOVE WARRANTY IS IN LIEU OF ANY OTHER WARRANTY, WHETHER EXPRESS, IMPLIED OR STATUTORY,
INCLUDING, BUT NOT LIMITED TO, ANY WARRANTY OF NONINFRINGEMENT OF INTELLECTUAL PROPERTY, MERCHANTABILITY, FITNESS FOR A PARTICULAR PURPOSE, OR ANY WARRANTY ARISING OUT OF ANY PROPOSAL, SPECIFICATION,
SAMPLE OR OTHERWISE.
This warranty does not cover replacement of products damaged by abuse, accident, misuse, neglect, alteration, repair, disaster, improper
installation or improper testing. If the product is found to be otherwise defective, Intel, at its option, will replace or repair the product at no charge
except as set forth below, provided that you deliver the product along with a return material authorization (RMA) number either to the company
from whom you purchased it or to Intel (North America only). If you ship the product, you must assume the risk of damage or loss in transit. You
must use the original container (or the equivalent) and pay the shipping charge. Intel may replace or repair the product with either new or
remanufactured product or parts, and the returned product becomes Intel’s property. Intel warrants the repaired or replaced product to be free from
defects in material and workmanship for a period of the greater of: (i) ninety (90) days from the return shipping date; or (ii) the period of time
remaining on the original three (3) year warranty.
This warranty gives you specific legal rights and you may have other rights which vary from state to state. All parts or components contained in
this product are covered by Intel’s limited warranty for this product; the product may contain fully tested, recycled parts, warranted as if new. For
warranty information call one of the numbers below.
Returning a Defective Product (RMA)
Before returning any product, contact an Intel Customer Support Group and obtain an RMA number by calling:
North America only: (916) 377-7000
Other locations: Return the product to the place of purchase.
If the Customer Support Group verifies that the product is defective, they will have the Return Material Authorization Department issue you an
RMA number to place on the outer package of the product. Intel cannot accept any product without an RMA number on the package.
LIMITATION OF LIABILITY AND REMEDIES
INTEL SHALL HAVE NO LIABILITY FOR ANY INDIRECT OR SPECULATIVE DAMAGES (INCLUDING, WITHOUT LIMITING THE
FOREGOING, CONSEQUENTIAL, INCIDENTAL AND SPECIAL DAMAGES) ARISING FROM THE USE OF OR INABILITY TO USE
THIS PRODUCT, WHETHER ARISING OUT OF CONTRACT, NEGLIGENCE, TORT, OR UNDER ANY WARRANTY, IRRESPECTIVE
OF WHETHER INTEL HAS ADVANCE NOTICE OF THE POSSIBILITY OF ANY SUCH DAMAGES, INCLUDING, BUT NOT LIMITED
TO LOSS OF USE, INFRINGEMENT OF INTELLECTUAL PROPERTY, BUSINESS INTERRUPTIONS, AND LOSS OF PROFITS,
NOTWITHSTANDING THE FOREGOING, INTEL’S TOTAL LIABILITY FOR ALL CLAIMS UNDER THIS AGREEMENT SHALL NOT
EXCEED THE PRICE PAID FOR THE PRODUCT. THESE LIMITATIONS ON POTENTIAL LIABILITIES WERE AN ESSENTIAL
ELEMENT IN SETTING THE PRODUCT PRICE. INTEL NEITHER ASSUMES NOR AUTHORIZES ANYONE TO ASSUME FOR IT ANY
OTHER LIABILITIES.
Some states do not allow the exclusion or limitation of incidental or consequential damages, so the above limitations or exclusions may not apply
to you.
Critical Control Applications: Intel specifically disclaims liability for use of the hardware product in critical control applications (including, for
example only, safety or health care control systems, nuclear energy control systems, or air or ground traffic control systems) by Licensee or
Sublicensees, and such use is entirely at the user’s risk. Licensee agrees to defend, indemnify, and hold Intel harmless from and against any and
all claims arising out of use of the hardware product in such applications by Licensee or Sublicensees.
Software: Software provided with the hardware product is not covered under the hardware warranty described above. See the applicable software
license agreement which shipped with the hardware product for details on any software warranty.
29
Page 32

Limited Hardware Warranty (Europe only)
Intel warrants to the original owner that the hardware product delivered in this package will be free from defects in material and workmanship for
three (3) years following the latter of: (i) the date of purchase only if you register by returning the registration card as indicated thereon with proof of
purchase; or (ii) the date of manufacture; or (iii) the registration date if by electronic means provided such registration occurs within thirty (30) days
from purchase. This warranty does not cover the product if it is damaged in the process of being installed. Intel recommends that you have the
company from whom you purchased this product install the product.
INTEL RESERVES THE RIGHT TO FILL YOUR ORDER WITH A PRODUCT CONTAINING NEW OR REMANUFACTURED COMPONENTS. THE ABOVE WARRANTY IS IN LIEU OF ANY OTHER WARRANTY, WHETHER EXPRESS, IMPLIED OR STATUTORY,
INCLUDING, BUT NOT LIMITED TO, ANY WARRANTY OF NONINFRINGEMENT OF INTELLECTUAL PROPERTY, SATISFACTORY
QUALITY, FITNESS FOR A PARTICULAR PURPOSE, OR ANY WARRANTY ARISING OUT OF ANY PROPOSAL, SPECIFICATION,
SAMPLE OR OTHERWISE.
This warranty does not cover replacement of products damaged by abuse, accident, misuse, neglect, alteration, repair, disaster, improper installation
or improper testing. If the product is found to be otherwise defective, Intel, at its option, will replace or repair the product at no charge except as set
forth below, provided that you deliver the product along with a return material authorization (RMA) number either to (a) the company from whom
you purchased it or (b) to Intel, North America only (if purchased in Europe you must deliver the product to “(a)”. If you ship the product, you must
assume the risk of damage or loss in transit. You must use the original container (or the equivalent) and pay the shipping charge. Intel may replace or
repair the product with either new or remanufactured product or parts, and the returned product becomes Intel’s property. Intel warrants the repaired
or replaced product to be free from defects in material and workmanship for a period of the greater of: (i) ninety (90) days from the return shipping
date; or (ii) the period of time remaining on the original three (3) year warranty.
This warranty gives you specific legal rights and you may have other rights which vary from state to state. All parts or components contained in this
product are covered by Intel’s limited warranty for this product; the product may contain fully tested, recycled parts, warranted as if new. For
warranty information call one of the numbers below.
Returning a Defective Product (RMA)
Before returning any product, contact an Intel Customer Support Group and obtain an RMA number by calling the non-toll free numbers below:
Country Number Language
France +33 (0) 1 41 91 85 29 French
Germany +49 (0) 69 9509 6099 German
Italy +39 (0) 2 696 33276 Italian
UK +44 (0) 870 607 2439 English
If the Customer Support Group verifies that the product is defective, they will have the Return Material Authorization Department issue you an RMA
number to place on the outer package of the product. Intel cannot accept any product without an RMA number on the package.
LIMITATION OF LIABILITY AND REMEDIES
INTEL SHALL HAVE NO LIABILITY FOR ANY INDIRECT OR SPECULATIVE DAMAGES (INCLUDING, WITHOUT LIMITING THE
FOREGOING, CONSEQUENTIAL, INCIDENTAL AND SPECIAL DAMAGES) ARISING FROM THE USE OF OR INABILITY TO USE THIS
PRODUCT, WHETHER ARISING OUT OF CONTRACT, NEGLIGENCE, TORT, OR UNDER ANY WARRANTY, IRRESPECTIVE OF
WHETHER INTEL HAS ADVANCE NOTICE OF THE POSSIBILITY OF ANY SUCH DAMAGES, INCLUDING, BUT NOT LIMITED TO
LOSS OF USE, INFRINGEMENT OF INTELLECTUAL PROPERTY, BUSINESS INTERRUPTIONS, AND LOSS OF PROFITS, NOTWITHSTANDING THE FOREGOING, INTEL’S TOTAL LIABILITY FOR ALL CLAIMS UNDER THIS AGREEMENT SHALL NOT EXCEED THE
PRICE PAID FOR THE PRODUCT. THESE LIMITATIONS ON POTENTIAL LIABILITIES WERE AN ESSENTIAL ELEMENT IN SETTING
THE PRODUCT PRICE. INTEL NEITHER ASSUMES NOR AUTHORIZES ANYONE TO ASSUME FOR IT ANY OTHER LIABILITIES.
Critical Control Applications: Intel specifically disclaims liability for use of the hardware product in critical control applications (including, for
example only, safety or health care control systems, nuclear energy control systems, or air or ground traffic control systems) by Licensee or
Sublicensees, and such use is entirely at the user’s risk. Licensee agrees to defend, indemnify, and hold Intel harmless from and against any and all
claims arising out of use of the hardware product in such applications by Licensee or Sublicensees.
Software: Software provided with the hardware product is not covered under the hardware warranty described above. See the applicable software
license agreement which shipped with the hardware product for details on any software warranty.
This limited hardware warranty shall be governed by and construed in accordance with the laws of England and Wales. The courts of England shall
have exclusive jurisdiction regarding any claim brought under this warranty.
30
Page 33

Limitation de garantie du matériel (Europe)
Intel garantit au propriétaire original que le produit matériel livré dans le présent coffret est exempt de défaut matériel ou de fabrication pour une période de
trois (3) ans à compter de la plus récente des dates suivantes : (i) la date d’achat uniquement si vous vous êtes inscrit en renvoyant la carte d’inscription de la
façon indiquée, avec une preuve d’achat ; (ii) la date de fabrication ou (iii) la date d’inscription électronique à condition qu’elle ait lieu dans les 30 jours
suivant l’achat. La présente garantie sera nulle si le produit matériel est endommagé lors de son installation. Intel recommande de faire installer le produit
matériel par la société auprès de laquelle il a été acheté.
INTEL SE RESERVE LE DROIT DE VOUS LIVRER UN PRODUIT CONTENANT DES COMPOSANTS NOUVEAUX OU REPARES. CETTE
GARANTIE REMPLACE TOUTES LES AUTRES GARANTIES, EXPRESSES, TACITES OU LEGALES, Y COMPRIS, MAIS SANS QUE CETTE
ENUMERATION SOIT LIMITATIVE, LES GARANTIES CONCERNANT LE NON RESPECT DE LA PROPRIETE INTELLECTUELLE, LA
QUALITE SATISFAISANTE, L’ADEQUATION POUR UN USAGE PARTICULIER, OU TOUTE AUTRE GARANTIE ISSUE DE TOUT AUTRE
PROPOSITION, SPECIFICATION, ECHANTILLON OU AUTRE.
La présente garantie ne couvre pas le remplacement de produits matériels endommagés par abus, accident, mauvaise utilisation, négligence, altération,
réparation, catastrophe, installation ou tests incorrects. Si le produit matériel s’avère défectueux pour une autre raison, Intel décidera de le remplacer ou de le
réparer gratuitement, à l’exception des cas énumérés ci-après, à condition que le produit soit renvoyé avec un numéro d’autorisation de retour du matériel
(ARM) à (a) la société auprès de laquelle il a été acheté ou (b) à Intel, en Amérique du Nord seulement (si l’achat a eu lieu en Europe vous devez le
renvoyer à “(a)”. Si vous expediéz le produit matériel, vous devez assumer le risque de dégâts ou de perte pendant le transport. Vous devez utiliser le coffret
original (ou l’équivalent) et payer les frais de transport. Intel peut réparer le produit matériel ou le remplacer par un produit neuf ou remis à neuf, le produit
renvoyé devenant la propriété d’Intel. Intel garantit que le produit matériel réparé ou de remplacement est exempt de défaut matériel ou de fabrication
pendant la plus longue des périodes suivantes: (i) quatre-vingt-dix (90) jours à compter de la date de retour; ou (ii) la période encore couverte par la garantie
originale de trois (3) ans.
La présente garantie vous accorde des droits juridiques spécifiques et vous pouvez également disposer d’autres droits variant d’un Etat à l’autre. Tous les
composants ou pièces du produit matériel sont couverts par la garantie limitée d’Intel relative à ce dernier ; il peut contenir des pièces recyclées, entièrement
testées et garanties comme neuves. Pour plus d’informations sur la garantie, appelez l’un des numéros énumérés ci-après.
Retour d’un produit défectueux (ARM)
Avant de retourner un produit matériel, contactez le service d’assistance à la clientèle Intel pour obtenir un numéro ARM.
Pays Numéro Langue
France +33 (0) 1 41 91 85 29 Français
Allemagne +49 (0) 69 9509 6099 Allemand
Italie +39 (0) 2 696 33276 Italien
R.U. +44 (0) 870 607 2439 Anglais
Si le service d’assistance confirme que le produit est défectueux, il demandera au Département d’autorisation de retour de matériel de vous attribuer un
numéro ARM à indiquer sur l’emballage externe. Intel ne peut accepter aucun produit sans numéro ARM.
LIMITATION DE RESPONSABILITE ET DE RECOURS
INTEL DECLINE TOUTE RESPONSABILITE RELATIVE A DES DOMMAGES INDIRECTS OU SPECULATIFS (Y COMPRIS, SANS LIMITATION
DES ELEMENTS CI-DESSUS, LES DOMMAGES CONSECUTIFS, ACCIDENTELS ET SPECIAUX) DECOULANT DE L’UTILISATION OU DE
L’INCAPACITE D’UTILISER CE PRODUIT, DUS A UN CONTRAT, UNE NEGLIGENCE, UN TORT OU COUVERTS PAR TOUTE GARANTIE,
MEME SI LA POSSIBILITE D’UN TEL DOMMAGE A DEJA ETE PORTEE A LA CONNAISSANCE D’INTEL, Y COMPRIS, MAIS SANS QUE
CETTE ENUMERATION SOIT LIMITATIVE, UNE PRIVATION DE JOUISSANCE, UN NON RESPECT DE LA PROPRIETE INTELLECTUELLE,
UNE INTERRUPTION DES ACTIVITES ET UN MANQUE A GAGNER . NONOBSTANT LA DECLARATION QUI PRECEDE, LA
RESPONSABILITE GLOBALE DE INTEL CONCERNANT TOUS LES LITIGES RELATIFS AU PRESENT ACCORD NE SERA PAS SUPERIEURE
AU PRIX PAYE POUR LE PRODUIT. CES LIMITATIONS DE RESPONSABILITE POTENTIELLE ONT CONSTITUE UN FACTEUR
DETERMINANT LORS DE LA FIXATION DU PRIX DU PRODUIT. INTEL N’ASSUME AUCUNE AUTRE RESPONSABILITE ET N’AUTORISE
QUICONQUE A LE FAIRE EN SON NOM.
Applications de contrôle critique: Intel décline toute responsabilité en cas d’utilisation du produit matériel dans le cadre d’applications de contrôle critique
(y compris et pour ne citer que des exemples, les systèmes de contrôle de sécurité ou de services médicaux, les systèmes de contrôle d’énergie nucléaire, ou
de trafic terrestre ou aérien) par le licencié ou le sous-licencié, l’utilisateur encourt entièrement les risques d’une telle utilisation. Le titulaire de la licence
accepte de défendre, d’indemniser et de garantir Intel de toute réclamation survenant par suite de l’utilisation du produit matériel dans de telles applications
par le licencié ou le sous-licencié.
Logiciel: Le logiciel fourni avec le produit matériel n’est pas couvert par la garantie du matériel décrite ci-dessus. Consultez l’accord de licence du logiciel
qui accompagne le produit matériel pour obtenir des détails sur la garantie du logiciel.
La garantie limitée du matériel est régie et interprétée par les lois en vigueur en Angleterre et au Pays de Galles. Les tribunaux anglais jouissent d’une
juridiction exclusive en matière de litige concernant cette garantie.
31
Page 34

Garanzia limitata sull’hardware (valida solo in Europa)
Intel garantisce al proprietario originale che il prodotto hardware incluso in questo pacchetto è privo di difetti in materiale e in lavorazione per un periodo di
tre (3) anni a partire dall’ultima data tra: (i) la data di acquisto, solo nel caso in cui l’utente effettua la registrazione tramite la scheda di registrazione, come
indicato, accompagnata dalla prova di acquisto; oppure (ii) la data di fabbricazione; oppure (iii) la data di registrazione, se effettuata per via elettronica, a
condizione che tale registrazione avvenga entro trenta (30) giorni dall’acquisto. Questa garanzia non copre il prodotto nel caso questo fosse danneggiato
durante l’installazione. Intel raccomanda di fare installare il prodotto dall’azienda da cui il prodotto è stato acquistato.
INTEL SI RISERVA IL DIRITTO DI ONORARE L’ORDINAZIONE CON UN PRODOTTO CONTENENTE PARTI NUOVE O RIFABBRICATO. LA
GARANZIA QUI SOPRA SOSTITUISCE QUALSIASI ALTRA GARANZIA, SIA QUELLA ESPLICITA, IMPLICITA O STATUTORIA, INCLUSO,
MA NON LIMITATO A, QUALSIASI GARANZIA DI NON VIOLAZIONE DI PROPRIETÀ INTELLETTUALE, QUALITÀ SODDISFACENTE,
IDONEITÀ A QUALSIASI SCOPO PARTICOLARE O QUALSIASI GARANZIA DERIVANTE DA PROPOSTA, SPECIFICAZIONI, CAMPIONI O
ALTRO.
Questa garanzia non include la sostituzione di prodotti danneggiati a causa di abuso, incidente, uso inappropriato, negligenza, alterazione, riparazione,
disastro, installazione o controllo inadeguati. Se il prodotto viene considerato difettoso per altri motivi, Intel, a sua discrezione, sostituirà o riparerà il
prodotto, a proprie spese, eccetto nei casi qui sotto menzionati, a condizione che il prodotto venga consegnato congiuntamente al numero di autorizzazione
per la restituzione del materiale (RMA, Return Material Authorization) (a) all’azienda da cui si è acquistato il prodotto, oppure (b) a Intel, solo quando in
Nord America (se il prodotto è stato acquistato in Europa, sarà necessario consegnare il prodotto seguendo le modalità indicate in “(a)”). Se il prodotto viene
inviato, il mittente si assume la responsabilità in caso di danni o di perdita durante il tragitto. È necessario utilizzare l’imballaggio originale del prodotto (o
un suo equivalente) e pagare le spese di spedizione. Intel sostituirà o riparerà il prodotto (o la parte) con uno nuovo o uno rifabbricato, e il prodotto restituito
diventerà proprietà di Intel. Intel garantisce che il prodotto riparato o sostituito sarà privo di difetti in materiale e in lavorazione per un periodo comunque
non superiore: (i) a novanta (90) giorni dalla data di spedizione all’utente; oppure (ii) al periodo rimanente nella garanzia originale di tre (3) anni.
Questa garanzia dà all’utente diritti legali specifici; potrebbero esistere altri diritti, variabili da stato a stato. Tutte le parti e i componenti contenuti in questo
prodotto sono coperti dalla garanzia limitata di Intel relativa a questo prodotto; il prodotto potrebbe contenere parti riciclate, completamente collaudate e
garantite come nuove. Per maggiori informazioni sulla garanzia, chiamare uno dei numeri indicati qui sotto.
Restituzione di prodotti difettosi (RMA)
Prima di restituire un prodotto, contattare l’assistenza tecnica di Intel e richiedere un numero RMA; i numeri verdi sono qui sotto elencati:
Paese Numero Lingua
Francia +33 (0) 1 41 91 85 29 Francese
Germania +49 (0) 69 9509 6099 Tedesco
Italia +39 (0) 2 696 33276 Italiano
Regno Unito +44 (0) 870 607 2439 Inglese
Se il gruppo di supporto alla clientela determina che il prodotto è difettoso, richiederà l’emissione di un numero di autorizzazione per la restituzione del
materiale (RMA) da porre all’esterno dell’imballaggio del prodotto. Intel non accetterà prodotti sprovvisti di tale numero visibile sull’imballaggio.
LIMITAZIONI DI RESPONSABILITÀ E RIMEDI
INTEL NON POTRÀ ESSERE CONSIDERATA RESPONSABILE DI ALCUN DANNO, DIRETTO O SPECULATIVO (INCLUSI, SENZA
LIMITAZIONI COME INDICATO IN PRECEDENZA, I DANNI CONSEQUENZIALI, INCIDENTALI E SPECIALI) DERIVANTI DALL’USO O
DALLA IMPOSSIBILITÀ DI UTILIZZARE QUESTO PRODOTTO, PER MOTIVI NON CONTEMPLATI NEL CONTRATTO, O DOVUTI A
NEGLIGENZA, TORTO O SOTTO QUALSIASI GARANZIA, INDIPENDENTEMENTE DAL FATTO CHE INTEL SIA A CONOSCENZA O MENO
DELLA POSSIBILITÀ DI TALI DANNI, INCLUSI, MA NON LIMITATI ALLA PERDITA D’USO, VIOLAZIONE DI PROPRIETÀ
INTELLETTUALE, INTERRUZIONI D’AFFARI E PERDITA DI PROFITTI, NONOSTANTE QUANTO DETTO IN PRECEDENZA, LA
RESPONSABILITÀ TOTALE DI INTEL NEI CONFRONTI DEI RECLAMI, SECONDO QUESTO ACCORDO, NON ECCEDERÀ IL PREZZO
PAGATO PER IL PRODOTTO. QUESTE LIMITAZIONI SULLE RESPONSABILITÀ POTENZIALI SONO STATE FATTORE DECISIVO NELLA
DETERMINAZIONE DEL PREZZO DEL PRODOTTO. INTEL NON ASSUME, NÉ AUTORIZZA ALCUNO AD ASSUMERE PER SÉ,
NESSUN’ALTRA RESPONSABILITÀ.
Applicazioni di controllo di situazioni critiche: Intel disconosce specificatamente la responsabilità nel caso di uso dell’hardware in applicazioni di
controllo di situazioni critiche (inclusi, al solo scopo di esempio, sistemi di controllo della sicurezza o della salute, dell’energia nucleare, o sistemi di
controllo aereo o terrestre) da parte dei licenziatari o dei sottolicenziatari, e tale uso fa parte completamente del rischio intrapreso dall’utente. Il licenziatario
è d’accordo nel difendere, indennizzare e liberare Intel da ogni reclamo risultante dall’uso del prodotto hardware in tale applicazioni da parte del
licenziatario o del sottolicenziatario.
Software: il software accluso al prodotto hardware non è coperto dalla garanzia dell’hardware sopra descritta. Per maggiori dettagli sulla garanzia del
software, vedere l’accordo di licenza relativo al software, inviato assieme al prodotto hardware.
Questa garanzia limitata dell’hardware è governata da, ed è conforme a, le leggi di Inghilterra e Galles. Il tribunale di Inghilterra avrà la completa
giurisdizione su qualsiasi reclamo presentato sotto questa garanzia.
32
Page 35

Beschränkte Hardwaregarantie (Nur für Europa)
Intel garantiert dem ursprünglichen Eigentümer, daß die in diesem Paket enthaltene Hardware keine Material- oder Herstellungsfehler aufweist. Diese
Garantie gilt für drei (3) Jahre (a) nach dem Kaufdatum, wenn die ausgefüllte Registrierungskarte entsprechend den darauf enthaltenen Angaben zusammen
mit einem Kaufnachweis eingesendet wurde; oder (b) nach dem Herstellungsdatum; oder (c) nach dem Registrierungsdatum, wenn die Registrierung
innerhalb von 30 Tagen auf elektronischem Weg durchgeführt wird. Diese Garantie entfällt, wenn die Hardware bei der Installation beschädigt wird. Intel
empfiehlt, die Installation durch den Verkäufer der Hardware durchführen zu lassen.
INTEL BEHÄLT SICH DAS RECHT VOR, IHREN AUFTRAG MIT EINEM PRODUKT ZU ERFÜLLEN, DAS NEUE ODER ERNEUERTE
KOMPONENTEN ENTHÄLT. OBIGE GARANTIE GILT ANSTELLE ALLER ANDEREN AUSDRÜCKLICHEN, STILLSCHWEIGENDEN ODER
GESETZLICH FESTGELEGTEN GARANTIEN. AUSGESCHLOSSEN SIND DAMIT AUCH UNTER ANDEREM ALLE GARANTIEN FÜR DIE
VERKEHRSFÄHIGKEIT, DIE VERLETZUNG DER RECHTE VON DRITTEN, DIE EIGNUNG FÜR EINEN BESTIMMTEN ZWECK ODER
GARANTIEN, DIE IM ZUSAMMENHANG MIT EINEM ANGEBOT, EINER SPEZIFIKATION ODER EINEM MUSTER GEGEBEN WURDEN.
Diese Garantie schließt den Hardware-Ersatz bei Beschädigung aufgrund von Mutwilligkeit, Unfall, falscher Verwendung, Fahrlässigkeit, Umänderung,
Reparatur, Katastrophen, falscher Installation oder unvorschriftsmäßigem Testen aus. Wenn das Hardwareprodukt aus anderen Gründen beschädigt ist, liegt
die Entscheidung bei Intel, ob die Hardware mit Ausnahme der im folgenden beschriebenen Einschränkungen kostenlos ersetzt oder repariert wird. Hierzu
müssen Sie das Produkt zusammen mit einer Rückgabenummer (RMA-Nummer, siehe unten) entweder (a) an den Verkäufer des Produkts oder (b) an Intel
zurücksenden (bei Kauf in Europa muß das Produkt an “(a)” geliefert werden). Das Risiko des Verlusts oder der Beschädigung während des Transports liegt
bei Ihnen als Käufer. Sie müssen zum Versenden die Originalverpackung (oder einen gleichwertigen Ersatz) verwenden und die Versandkosten
übernehmen. Intel ersetzt die Hardware entweder durch ein neues oder ein neuwertiges Produkt. Das zurückgegebene Hardwareprodukt wird Eigentum von
Intel. Intel garantiert, daß das reparierte oder ersetzte Hardwareprodukt für einen Zeitraum von: (i) neunzig (90) Tagen ab Rückgabedatum oder (ii) für die
verbleibende Zeit der ursprünglichen Garantie von drei (3) Jahren frei von Material- und Herstellungsfehlern ist. Dabei gilt jeweils der längere Zeitraum.
Mit dieser Garantie erhalten Sie bestimmte Rechte, die je nach Staat durch weitere Rechte ergänzt werden können. Alle Teile oder Komponenten dieses
Hardwareprodukts werden durch die beschränkte Hardwaregarantie von Intel abgedeckt. Das Hardwareprodukt kann vollständig getestete,
wiederverwendete Teile enthalten, die derselben Garantie wie neue Produkte unterliegen. Informationen zur Garantie erhalten Sie unter einer der Intel
Kundendienstnummern, die am Ende dieses Handbuchs zu finden sind.
Rückgabe eines beschädigten Produkts (RMA)
Bevor Sie ein Hardwareprodukt zurücksenden, sollten Sie sich vom Intel Kundendienst eine sogenannte RMA-Nummer zuweisen lassen, indem Sie eine der
folgenden gebührenpflichtigen Telefonnummern anrufen:
Land Telefon Sprache
Frankreich +33 (0) 1 41 91 85 29 Französisch
Deutschland +49 (0) 69 9509 6099 Deutsch
Italien +39 (0) 2 696 33276 Italienisch
GB +44 (0) 870 607 2439 Englisch
Nachdem die Beschädigung vom Kundendienst bestätigt worden ist, wird von der zuständigen Abteilung eine Rückgabenummer (RMA-Nummer)
ausgegeben, die auf der äußeren Verpackung der Hardware angebracht werden muß. Intel akzeptiert kein Produkt ohne RMA-Nummer auf der Verpackung.
Haftungsbeschränkung und Rechtsmittel
INTEL HAFTET NICHT FÜR INDIREKTE ODER SPEKULATIVE SCHÄDEN (EINSCHLIESSLICH ALLER FOLGESCHÄDEN SOWIE ALLER
ZUFÄLLIGEN UND BESONDEREN SCHÄDEN), DIE DURCH DIE VERWENDUNG ODER NICHTVERWENDBARKEIT DIESES PRODUKTS
ENTSTEHEN, SEI DIES IM ZUSAMMENHANG MIT EINER VERTRAGLICHEN VERPFLICHTUNG, AUFGRUND VON FAHRLÄSSIGKEIT,
DURCH UNERLAUBTE HANDLUNGEN ODER IM RAHMEN EINER GARANTIE. DIES GILT AUCH FÜR FÄLLE, IN DENEN INTEL ÜBER DIE
MÖGLICHKEIT SOLCHER SCHÄDEN, DIE SICH UNTER ANDEREM DURCH NUTZUNGSAUSFÄLLE, BETRIEBSUNTERBRECHUNGEN UND
GEWINNVERLUSTE ERGEBEN KÖNNEN, IN KENNTNIS GESETZT WURDE.
UNGEACHTET DER GEWÄHRTEN GARANTIE ÜBERSTEIGT DIE HAFTUNG VON INTEL IM RAHMEN DIESER VEREINBARUNG IN
KEINEM FALL DEN KAUFPREIS DES HARDWAREPRODUKTS. DIESE HAFTUNGSBESCHRÄNKUNG IST EIN WESENTLICHER FAKTOR
BEI DER FESTLEGUNG DES PREISES FÜR DAS HARDWAREPRODUKT. INTEL ÜBERNIMMT KEINE WEITERE HAFTUNG UND ERTEILT
DRITTEN KEINERLEI BEFUGNIS, FÜR INTEL EINE WEITERE HAFTUNG ZU ÜBERNEHMEN.
Steuer- und Überwachungsanwendung von hoher Wichtigkeit: Intel schließt insbesondere die Haftung bei der Verwendung des Hardwareprodukts mit
Steueranwendungen von hoher Wichtigkeit (z.B. Sicherheits- und Krankenversicherungssysteme, Steuersysteme für Nuklearanlagen sowie
Verkehrsüberwachungssysteme für Boden- und Luftverkehr) durch den Lizenznehmer oder Unterlizenznehmer ab, und eine derartige Verwendung liegt
ausschließlich in der Verantwortung des Benutzers. Der Lizenznehmer erklärt sich bereit, Intel zu verteidigen und schadlos zu halten bezüglich aller Klagen,
die aus der Verwendung eines Hardwareprodukts für solche Zwecke vom Lizenznehmer oder Unterlizenznehmern erhoben werden.
Software: Die mit diesem Hardwareprodukt gelieferte Software wird von der oben beschriebenen Hardwaregarantie nicht abgedeckt. Bitte lesen Sie die
entsprechende Softwarelizenzvereinbarung, die mit dem Hardwareprodukt geliefert wurde, um genaue Informationen zur Softwaregarantie zu erhalten.
Diese eingeschränkte Hardwaregarantie unterliegt den Gesetzen von England und Wales. Die englischen Gerichte sind Gerichtsstand für alle Klagen, die im
Rahmen der Garantie erhoben werden.
33
Page 36

Garantía limitada de hardware (sólo para Europa)
Intel garantiza al propietario original que el producto de hardware entregado en este paquete no tendrá defectos de materiales ni fabricación durante tres (3)
años contados a partir de la fecha que resulte más reciente de entre las opciones siguientes: (i) la fecha de compra, sólo si devuelve la tarjeta de registro con
prueba de compra de la forma indicada al respecto para registrarse; o bien (ii) la fecha de fabricación; o (iii) la fecha de registro, si éste se ha producido por
medios electrónicos y dentro de los treinta (30) días siguientes a la compra. Esta garantía no cubre los daños sufridos por el producto durante el proceso de
instalación. Intel recomienda que sea la empresa a la que adquirió el producto la que se encargue de su instalación.
INTEL SE RESERVA EL DERECHO DE CUMPLIMENTAR EL PEDIDO CON UN PRODUCTO QUE CONTENGA COMPONENTES NUEVOS O
REFRABRICADOS. LA GARANTÍA ANTERIOR PREVALECE SOBRE CUALQUIER OTRA GARANTÍA, YA SEA EXPLÍCITA, IMPLÍCITA O
REGLAMENTARIA, INCLUIDAS, SIN LIMITACIÓN, CUALESQUIERA GARANTÍAS DE NO INFRINGIMIENTO DE LA PROPIEDAD
INTELECTUAL, CALIDAD SATISFACTORIA, ADECUACIÓN PARA UNA FINALIDAD DETERMINADA O CUALQUIER GARANTÍA SURGIDA
DE CUALQUIER PROPUESTA, ESPECIFICACIÓN, MUESTRA O DE OTRA CLASE.
Esta garantía no cubre la sustitución de productos dañados por abuso, accidente, mal uso, negligencia, alteración, reparación, desastre, instalación incorrecta
o pruebas incorrectas. Si el producto tuviera cualquier otro defecto, Intel se reserva la opción de reemplazar o reparar el producto sin cargo alguno, excepto
los descritos a continuación, siempre que el producto se entregue con un número de autorización de devolución de material (RMA), a (a) la empresa a la que
se adquirió o (b) a Intel, sólo en América del Norte (si lo adquirió en Europa, debe entregar el producto a “(a)”. Si envía el producto, debe asumir el riesgo
de daños o pérdida en el transporte. Debe utilizar el embalaje original (o equivalente) y costear los gastos de envío. Intel puede reemplazar o reparar el
producto con piezas o productos nuevos o refabricados, y el producto devuelto pasa a ser propiedad de Intel. Intel garantiza que el producto reparado o
reemplazado no tendrá defectos materiales ni de fabricación durante el periodo que resulte mayor de los siguientes: (i) noventa (90) días desde la fecha de
envío; o (ii) el periodo de tiempo restante de la garantía original de tres (3) años.
Esta garantía le otorga derechos legales concretos y puede tener otros derechos que varían según la jurisdicción. Todas las piezas o componentes que
contiene este producto están cubiertos por la garantía limitada de Intel sobre este producto; el producto puede contener piezas recicladas, completamente
comprobadas, garantizadas como si de piezas nuevas se tratase. Si desea obtener más información sobre la garantía, puede llamar a uno de los números
indicados a continuación.
Devolución de productos defectuosos (RMA)
Antes de devolver cualquier producto, póngase en contacto con el grupo de Asistencia al cliente de Intel y obtenga un número RMA en uno de los siguientes
números no gratuitos:
País Número Idioma
Francia +33 (0) 1 41 91 85 29 Francés
Alemania +49 (0) 69 9509 6099 Alemán
Italia +39 (0) 2 696 33276 Italiano
Reino Unido +44 (0) 870 607 2439 Inglés
Si el grupo de Asistencia al cliente comprueba que el producto es defectuoso, se podrá en contacto con el Departamento de autorización de devolución de
material para que éste le envíe un número RMA que debe colocar en el envoltorio externo del producto. Intel no puede aceptar productos sin el número
RMA en el paquete.
LIMITACIÓN DE RESPONSABILIDAD Y REPARACIONES
INTEL NO SERÁ RESPONSABLE DE NINGÚN DAÑO INDIRECTO O ESPECULATIVO (INCLUIDOS, SIN LIMITAR A LOS ANTERIORES, LOS
DAÑOS INDIRECTOS, INCIDENTALES Y ESPECIALES) PRODUCIDO POR EL USO O POR LA IMPOSIBILIDAD DEL USO DE ESTE
PRODUCTO, YA PROVENGA DE CONTRATO, NEGLIGENCIA, AGRAVIO O BAJO CUALQUIER GARANTÍA, SIN IMPORTAR QUE INTEL
HAYA RECIBIDO PREVIO AVISO DE LA POSIBILIDAD DE DICHOS DAÑOS, INCLUIDOS, AUNQUE NO LIMITADOS A, PÉRDIDAS DE USO,
INFRINGIMIENTO DE LA PROPIEDAD INTELECTUAL, SUSPENSIÓN DEL EJERCICIO COMERCIAL Y PÉRDIDA DE BENEFICIOS, A PESAR
DE LO ANTERIOR, TODA LA RESPONSABILIDAD DE INTEL SOBRE LAS RECLAMACIONES REALIZADAS BAJO ESTE ACUERDO NO
EXCEDERÁ EL PRECIO PAGADO POR EL PRODUCTO. ESTAS LIMITACIONES SOBRE LAS RESPONSABILIDADES POTENCIALES HAN
CONSTITUIDO UN ELEMENTO ESENCIAL A LA HORA DE DETERMINAR EL PRECIO DEL PRODUCTO. INTEL NO ASUME NI AUTORIZA
QUE NINGUNA PERSONA ASUMA EN SU LUGAR NINGUNA OTRA RESPONSABILIDAD.
Aplicaciones de control crítico: Intel deniega específicamente la responsabilidad por el uso del producto de hardware en aplicaciones de control crítico
(incluidos, sólo a modo de ejemplo, los sistemas de seguridad o atención sanitaria, sistemas de control de energía nuclear o sistemas de control de tráfico
aéreo o rodado) por Receptores o Subreceptores de la Licencia, y dicho uso queda enteramente a riesgo del usuario. El Receptor de la Licencia acuerda
defender, indemnizar y mantener la inocencia de Intel por y contra toda reclamación surgida del uso del producto de hardware en tales aplicaciones por parte
del Receptor o Subreceptor de la Licencia.
Software: El software proporcionado con el producto de hardware no está cubierto por la garantía de hardware descrita anteriormente. Si desea obtener
información detallada sobre las garantías de software, consulte el acuerdo de licencia correspondiente al software incluido con el producto de hardware.
Esta garantía limitada de hardware se regirá e interpretará de acuerdo con las leyes de Inglaterra y Gales. Los tribunales de Inglaterra tendrán la exclusiva
jurisdicción sobre todas las reclamaciones presentadas bajo esta garantía.
34
Page 37

Intel Customer Support
You can purchase a range of support services including hardware, software,
phone and on-site installation services. Services are designed and packaged
for ease of ordering and provide reliable, flexible support for your
networking equipment. For details about Intel® NetStructureSM Support
Services, go to www.intel.com/network/services.
Worldwide Access to Technical Support
Intel has technical support centers worldwide. Technicians who speak the
local languages staff many of the centers. Visit our Web site at
support.intel.com or contact your local dealer/distributor.
United States and Canada only
For support, call (800) 838-7136 or (916) 377-7000.
Japan only
For support, call +81-298-47-0800.
Other areas
(Access number + 800-838-7136)
For support in other countries, use the following table to dial the toll-free
support number. Using the table, locate the country from which you are
calling, dial the access number, wait for the dial tone, and then dial
800-838-7136.
Country Access Number
Australia 1-800-881-011
1 4
Austria
1
Belgium
3
China
Denmark 8001-0010
1
Finland
France (Includes Andorra) 19-0011
Germany 0130-0010
Hong Kong 800-1111
5
India
022-903-011
0-800-100-10
10811
9800-100-10
000-117
35
Page 38

Indonesia
Italy (Includes Vatican City)
Korea
Malaysia
Netherlands
2
1
4
1
1
001-801-10
172-1011
0-911
800-0011
06-022-9111
New Zealand 000-911
Norway 800-190-11
Pakistan 0080001001
Philippines 105-11
1 3
Poland
Portugal
3
0-0-800-111-1111
05017-1-288
RSA (South Africa) 0-800-99-0123
1 2 3
Russia
755-5042
Singapore 800-0111-111
Spain 900-99-00-11
Sri Lanka 430-430
36
Sweden 020-795-611
Switzerland
Taiwan
Thailand
United Kingdom (BT)
United Kingdom (Mercury)
1
1
5
3
3
0-800-550011
0080-10288-0
0019-991-1111
0800-89-0011
0500-89-0011
Vietnam 12010288
Notes:
1 Public phones require coin deposit
2 Use phones allowing international access
3 May not be available from every phone
4 Public phones require local phone payment through the call duration
5 Not available from public phones
Page 39

A30582-001
 Loading...