


DUOTM
Mini, 6 and 8 Quart
Multi-Use Pressure Cookers
User Manual
Important Safeguards
Product Specifications
Initial Setup
Product, Parts and Accessories
Smart Program Settings
Cleaning Before First Use
Overview of Pressure Control
Features
Initial Test Run (Water Test)
Cooking with the Duo
Pressure Cooking Timetable
Grain-to-Water Ratios
Care and Cleaning
Troubleshooting
Warranty
Contact Information

Welcome to the world of Instant cooking.
Thank you for welcoming us into your kitchen.
Having families ourselves, we developed the Instant Pot® Duo™ pressure cookers to allow busy families and professionals alike to cook healthy, delicious meals more easily and in less time.
We have partnered with chefs, authors and bloggers to compile a collection of recipes that we hope you enjoy!
Happy cooking,
Robert J. Wang
Founder and Chief Innovation Officer
Download the Instant Pot App
• Original Recipes
• New User Tips
• Getting Started Videos
Find helpful how-to videos, download the app, or visit our recipe site.

Table of Contents |
|
IMPORTANT SAFEGUARDS.............................................................................. |
5–10 |
Special Cord Set Instructions............................................................................. |
10 |
Product Specifications........................................................................................ |
10 |
Initial Setup.............................................................................................................. |
11 |
Product, Parts and Accessories...................................................................... |
12–14 |
Control Panel..................................................................................................... |
15–16 |
Smart Program Settings.................................................................................. |
17–19 |
Adjust and Save Pressure Cooking Temperature........................................... |
17 |
Adjust and Save Pressure Cooking Time......................................................... |
17 |
Adjust and Save Non-Pressure Cooking Temperatures................................ |
17 |
Adjust and Save Non-Pressure Cooking Time................................................ |
17 |
Cancel and Standby Mode................................................................................. |
18 |
Turn Sound On/Off.............................................................................................. |
18 |
Set a Delay Start Timer........................................................................................ |
18 |
Automatically Keep Food Warm for Long Periods......................................... |
19 |
Reheat Food or Keep Warm for Long Periods................................................ |
19 |
Reset Smart Programs to Factory Default Settings........................................ |
19 |
Status Messages.................................................................................................... |
20 |
Cleaning Before First Use..................................................................................... |
21 |
Overview of Pressure Control Features....................................................... |
22–29 |
Pressure Cooking Lid.......................................................................................... |
22 |
Steam Release Handle................................................................................... |
23–24 |
Anti-Block Shield.................................................................................................. |
25 |
Sealing Ring.......................................................................................................... |
26 |
Float Valve....................................................................................................... |
27–28 |
Condensation Collector...................................................................................... |
29 |
3

Table of Contents
Introduction to Pressure Cooking....................................................................... |
30 |
Cooking with the Duo.................................................................................. |
30-31 |
Depressurizing the Cooker (Venting Methods).......................................... |
32-34 |
Initial Test Run (Water Test).................................................................................. |
35 |
Using Pressure Cooking Smart Programs.................................................... |
36-42 |
Pressure Cooking Settings.......................................................................... |
39-40 |
Pressure Cooking Tips.................................................................................. |
41-42 |
Pressure Cooking Timetable and Grain-to-Water Ratios.......................... |
43-44 |
Using Non-Pressure Cooking Smart Programs........................................... |
45–49 |
Slow Cook............................................................................................................. |
46 |
Sauté...................................................................................................................... |
47 |
Yogurt.............................................................................................................. |
48-49 |
Care and Cleaning........................................................................................... |
50–51 |
Troubleshooting............................................................................................... |
52-54 |
Warranty............................................................................................................ |
55-56 |
Contact Information.............................................................................................. |
57 |
4

IMPORTANT SAFEGUARDS
When using electrical appliances, basic safety precautions should always be followed:
1.READ THE GETTING STARTED GUIDE AND ALL INSTRUCTIONS, SAFEGUARDS, AND WARNINGS BEFORE OPERATING THE APPLIANCE.
FAILURE TO FOLLOW THESE SAFEGUARDS AND INSTRUCTIONS MAY
RESULT IN INJURY AND/OR PROPERTY DAMAGE.
2.Use only the Instant Pot Duo lid with the Instant Pot Duo pressure cooker base. Using any other pressure cooker lids may cause injury and/or damage.
3.To reduce the risk of pressure leakage, cook only in an authorized stainless steel Instant Pot inner pot. DO NOT use the appliance without the removable inner pot installed.
4.Always operate the appliance on a stable, non-combustible, level surface.
5.Do not use the appliance for anything other than its intended use. Failure to follow these instructions may result in injury or property damage.
6.For household use only. Do not use outdoors. Not for commercial use.
7.
 CAUTION Do not place the appliance on or in close proximity to a hot gas or electric burner, or a heated oven. Heat from an external source will damage the appliance. Failure to follow these instructions may result in injury or property damage.
8.
 CAUTION Do not use the appliance near water or flame. Keep out of direct sunlight. Failure to follow these instructions may result in injury or property damage.
9.
 CAUTION Do not touch hot surfaces. Only use side handles for carrying or moving. Extreme caution must be used when moving the appliance containing hot liquids. Do not move the appliance when it is under pressure.
10.The cooker base contains electrical components. To avoid electrical shock, do not put liquid of any kind into cooker base, and do not immerse power cord, plug, or the appliance in water or other liquid. Do not rinse the appliance under tap.
11.
 CAUTION Do not fill over PC MAX — 2/3 as indicated on the inner pot. When cooking foods that expand during cooking such as rice or dried vegetables, do not fill the inner pot over —1/2 line. Overfilling may cause a risk of clogging the steam release pipe and developing excess pressure.
5

IMPORTANT SAFEGUARDS
12.
 WARNING This appliance cooks under pressure. Inappropriate use may result in burns, injury and/or property damage. Make certain the appliance is properly closed before operating. Refer to Pressure Control Features— Pressure Cooking Lid.
13.When cooking meat with skin (e.g. sausage with casing), the skin can swell when heated. Do not pierce the skin while it is swollen; this could result in scalding injury.
14.
 CAUTION When pressure cooking food with a doughy or thick texture, or a high fat/oil content, contents may splatter when opening the lid. Please follow recipe instructions for pressure release method. Refer to Depressurizing the Cooker (Venting Methods).
15.
 CAUTION Before each use, check the steam release valve/handle, steam release pipe, anti-block shield and float valve for clogging. Failure to do so may result in injury or property damage.
16.
 DANGER Do not open the appliance until it has depressurized and all internal pressure has been released. If the float valve is still up and/or the lid is difficult to open, this indicates that the appliance is still pressurized — do not force it open. Any pressure in the appliance can be hazardous. Refer to
Depressurizing the Cooker (Venting Methods) for information on releasing pressure. Opening appliance while it is still pressurized may lead to sudden release of hot contents and may cause burns or other injuries.
17.Do not use this appliance for deep frying or pressure frying with oil.
18.Do not lean over or place your hands or face over the steam release valve/ handle or float valve when the appliance is in operation or has residual pressure. Do not touch the metal portion of the lid when the appliance is in operation; this could result in injury.
19.Do not cover or obstruct the steam release valve/handle and/or float valve with cloth or other objects. Obstructing the steam release valve/handle and/or float valve can create a safety issue and may cause injury.
20.Turn the appliance off if steam escapes from the steam release valve/handle and/or float valve in a steady stream for longer than 3 minutes.There may be residual pressure in the appliance. Allow the appliance to depressurize naturally or release all excess pressure before opening. For more information on how to release pressure, refer to Depressurizing the Cooker (Venting Methods).
|
WARNING |
Read this manual carefully and completely, and retain for future reference. |
||
|
Failure to adhere to safety instructions may result in serious injury. |
|||
|
|
|
|
|
|
|
|
|
|
6

IMPORTANT SAFEGUARDS
21.Turn the appliance off if steam escapes from the sides of the lid and ensure sealing ring is properly installed. Overview of Pressure Control Features— Sealing Ring for more information.
22.To disconnect, select Cancel, then remove plug from power source.
23.Unplug from the outlet when not in use, as well as before adding or removing parts or accessories, and before cleaning. To unplug, grasp the plug and pull from the outlet. Never pull from the power cord.
24.Regularly inspect the appliance and power cord. Do not operate the appliance if the power cord or plug is damaged, or after the appliance malfunctions or is dropped or damaged in any manner. For assistance, contact Customer Care at support@instantpot.com or 1-800-828-7280.
25.
 CAUTION Do not let the power cord hang over edges of tables or counters, or touch hot surfaces or open flame, including the stovetop.
26.
 CAUTION Spilled food can cause serious burns. A short power-supply cord is provided to reduce the hazards resulting from grabbing, entanglement and tripping.
•Keep the appliance and cord away from children.
•Never drape the power cord over edges of tables or counters.
•Never use below-counter power outlets, and never use with an extension cord.
27.Intended for countertop use only. Keep the appliance on a stable, heatresistant platform. Do not place on anything that may block the vents on the bottom of the appliance. Do not place on a hot stove.
28.
 CAUTION Do not use any accessories or attachments not authorized by Instant Brands™ Inc. The use of attachments not recommended by the manufacturer, may cause a risk of injury, fire or electric shock.
29.
 CAUTION Before inserting the inner pot into the appliance, clean the outer surface of the inner pot and the heating element located on the inner surface of the outer pot with a clean, dry cloth. Ensure they are dry and free of food debris.
30.Do not attempt to repair, replace, or modify components of the appliance, as this may cause electric shock, fire or injury, and will void the warranty.
WARNING |
Read this manual carefully and completely, and retain for future reference. |
|
|
Failure to adhere to safety instructions may result in serious injury. |
|
|
|
|
|
|
|
|
|
|
|
7

IMPORTANT SAFEGUARDS
31.Do not tamper with any of the safety mechanisms, as this may result in injury or property damage.
32.Do not use the appliance in electrical systems other than 120 V/60 Hz for North America. Do not use with power converters or adapters.
33.This appliance is NOT to be used by children or by persons with reduced physical, sensory, or mental capabilities. Close supervision is necessary when any appliance is used near children and these individuals. Children should not play with this appliance.
34.To prevent personal injury and damage to the appliance, only replace the sealing ring with an authorized Instant Pot sealing ring.
35.The use of accessory attachments not recommended by the appliance manufacturer may cause injuries.
36.Proper maintenance is recommended after each use. Refer to Care and Cleaning. Let the appliance cool to room temperature before cleaning or storage.
37.Never connect this appliance to an external timer switch or separate remotecontrol system.
38.
 CAUTION DO NOT touch accessories during or immediately after cooking. To avoid personal injury,
•Always use oven mitts when removing accessories, and to handle the inner pot.
•Always place hot accessories on a heat resistant surface or cooking plate.
•Use extreme caution when disposing of hot grease.
Failure to follow these instructions may result in serious injury or property damage.
39.Do not leave the appliance unattended while in use.
40.
 CAUTION Extreme caution must be used when the inner pot contains hot oil, hot food, or hot liquids. Improper use, including moving the cooker base, may result in personal injury. Do not move the appliance while it is in use.
41.Oversized foods and/or metal utensils must not be inserted into the inner pot as they may cause risk of fire and/or personal injury.
42.Do not store any materials in the cooker base or inner pot when not in use.
|
WARNING |
Read this manual carefully and completely, and retain for future reference. |
||
|
Failure to adhere to safety instructions may result in serious injury. |
|||
|
|
|
|
|
|
|
|
|
|
8

IMPORTANT SAFEGUARDS
43.Do not place any combustible materials in the cooker base or inner pot, such as paper, cardboard, plastic, Styrofoam or wood.
44.Do not use the included accessories in a microwave, toaster oven, convection or conventional oven, or on a ceramic cooktop, electric coil, gas range, or outdoor grill.
45.The removable inner pot can be extremely heavy when full of ingredients. Care should be taken when lifting the inner pot from the cooker base to avoid burn injury.
46.Use caution when removing the lid. Heat and steam escapes as soon as the lid is removed. Never place your face, hands or exposed skin over the appliance opening where heat and steam escapes when removing the lid.
SAVE THESE INSTRUCTIONS
WARNING |
Read this manual carefully and completely, and retain for future reference. |
|
|
Failure to adhere to safety instructions may result in serious injury. |
|
|
|
|
|
|
|
|
|
|
|
9

IMPORTANT SAFEGUARDS
 WARNING
To avoid injury, read and understand instruction manual before using this appliance. Failure to do so may result in injury.
 WARNING
Electrical shock hazard. Use grounded outlet only. DO NOT remove ground. DO NOT use an adapter. DO NOT use an extension cord. Failure to follow instructions can cause electric shock or death.
 WARNING
THE FAILURE TO FOLLOW ANY OF THE IMPORTANT SAFEGUARDS AND THE IMPORTANT INSTRUCTIONS FOR SAFE USE IS A MISUSE OF YOUR APPLIANCE THAT CAN VOID YOUR WARRANTY AND CREATE THE RISK OF SERIOUS INJURY.
Special Cord Set Instructions
As per safety requirements, a short power supply cord (0.6 m to 0.9 m / 24" to 35") is provided to reduce the hazards resulting from grabbing, entanglement and tripping.
This appliance has a 3-prong grounding plug. To reduce the risk of electric shock, plug the power cord into a grounded (earthed) electrical outlet that is easily accessible.
Product Specifications
Duo Mini |
3 Quart |
700 watts |
120 V / 60 Hz |
3.9 kg |
in: 11.4 L × 10 W × 11.2 H |
|
2.8 Litres |
8.6 lbs. |
cm: 29 L × 25.5 W × 28.5 H |
||||
|
|
|
||||
Duo 60 V3 |
6 Quart |
1000 watts |
120 V / 60 Hz |
5.35 kg |
in: 13.4 L × 12.2 W × 12.5 H |
|
5.7 Litres |
11.80 lbs. |
cm: 34 L × 31 W × 31.7 H |
||||
|
|
|
||||
Duo 80 V2 |
8 Quart |
1200 watts |
120 V / 60 Hz |
7.16 kg |
in: 14.8 L × 13.3 W × 14.2 H |
|
7.6 Litres |
15.79 lbs. |
cm: 37.6 L × 33.8 W × 36.1 H |
||||
|
|
|
|
WARNING |
Read this manual carefully and completely, and retain for future reference. |
||
|
Failure to adhere to safety instructions may result in serious injury. |
|||
|
|
|
|
|
|
|
|
|
|
10
Initial Setup
•Read all the Important Safeguards before using the appliance. Failure to read and follow the Important Safeguards may result in damage to the appliance, property damage or personal injury.
•Use only the Instant Pot Duo lid with the Instant Pot Duopressure cooker base. Using any other pressure cooker lids may cause injury and/or damage.
•Remove all packaging material and accessories from within and around the appliance.
•Place the appliance on a stable, level surface, away from combustible material and external heat sources.
•Do not remove safety warning stickers from the lid or rating label from back of the cooker base.
•Follow Cleaning Before First Use instructions to clean the appliance before first use.
 CAUTION
Do not place the appliance on a stovetop. Heat from an external source will damage the appliance.
Do not place anything on top of the appliance, and do not cover or block the steam release valve or anti-block shield located on the appliance lid.
11

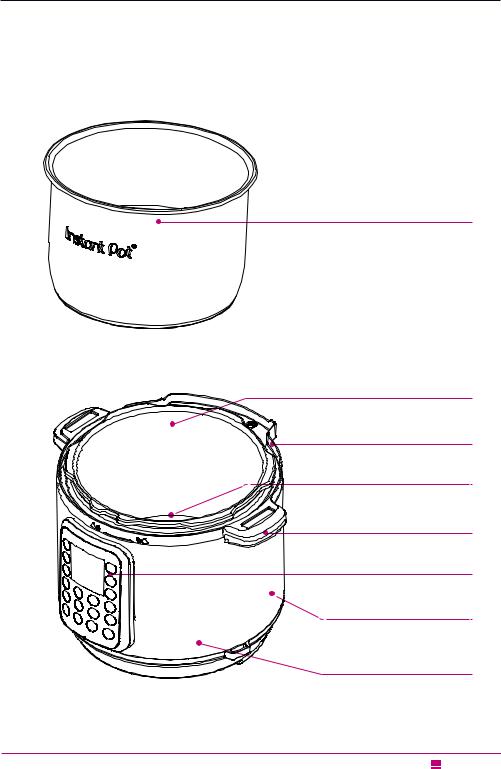
Product, Parts and Accessories
Duo Mini, 6 and 8 Quart Pressure Cookers
Before using the Instant Pot Duo, verify that all parts are accounted for.
Top of Lid
Bottom of Lid
Steam Release Handle
Float Valve
Handle
Lid Fins
Lid Position Marker
Locking Pin
Silicone Cap
(bottom of float valve)
Anti-Block Shield
Steam Release Pipe
(beneath anti-block shield)
Sealing Ring Rack
Sealing Ring
Illustrations are for reference only and may differ from the actual product.
Instant Tip: The lid has been designed with lid fins that fit perfectly inside the handles on the left and right sides of the cooker base to help keep your countertop dry!
12
Product, Parts and Accessories
Inner Pot
Cooker Base
Stainless Steel Inner Pot
Outer Pot
Condensation Rim
Heating Element
(interior)
Cooker Handles
Control Panel
Base Power Socket
(rear, 8 quart is hardwired)
Stainless Steel Exterior
Illustrations are for reference only and may differ from the actual product.
13

Product, Parts and Accessories
Accessories
Sealing Ring
(installed in lid)
Condensation Collector
Steam Rack with Handles
(Mini steam rack may not have handles)
Getting Started Guide
Safety, Maintenance and Warranty
Illustrations are for reference only and may differ from the actual product.
14
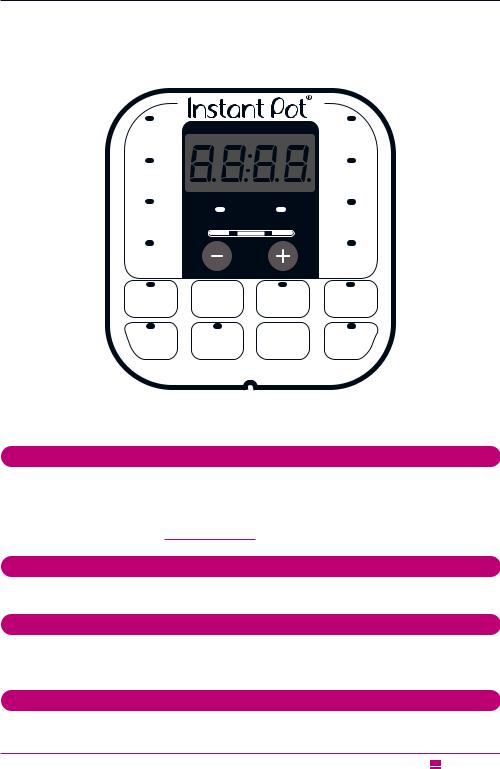
Control Panel
The Instant Pot Duo multi-use pressure cooker features an intuitive control panel to help make cooking fast and easy.
|
|
|
Duo |
|
Soup |
|
|
Rice |
|
Broth |
|
|
||
|
|
|
||
Meat |
|
|
Multigrain |
|
Stew |
|
|
||
|
|
|
||
Bean |
Low Pressure |
High Pressure |
|
|
|
|
Porridge |
||
Chili |
Less Normal More |
|||
|
||||
Poultry |
|
|
Steam |
|
Slow |
Pressure |
Keep |
Yogurt |
|
Cook |
Level |
Warm |
||
|
||||
Sauté |
Delay |
Cancel |
Pressure |
|
Start |
Cook |
|||
|
|
|||
1Time Display
•Countdown timer indicates cooking and Delay Start time in hour format: 05:20 is 5 hours, 20 minutes.
•Keep Warm timer counts up.
•Display also shows Status Messages as described below.
2Pressure Field
•LED indicators illuminate to indicate Low or High pressure level.
3Less – Normal – More
•Pressure cooking: 3 preset time options.
•Non-Pressure cooking: 3 temperature levels.
4LED Indicators
•Illuminate to indicate the active Smart Program and settings selected.
15

Control Panel
5Smart Program Settings
•Pressure Level
•Keep Warm
•− / + buttons
•Delay Start
•Cancel
See Smart Program Settings for more information.
6 Smart Programs
Pressure Cooking:
•Pressure Cook
•Soup/Broth
•Meat/Stew
•Bean/Chili
•Poultry (Not available on Duo Mini)
•Rice
•Multigrain (Not available on Duo Mini)
•Porridge
•Steam
Non-Pressure Cooking:
•Slow Cook
•Sauté
•Yogurt
•Keep Warm
16

Smart Program Settings
Adjust and Save Pressure Cooking Temperature
Select a pressure cooking Smart Program, then press Pressure Level to toggle between High (10.2–11.6 psi) and Low (5.8–7.2 psi) pressure levels.
Note: A higher pressure results in higher cooking temperature.
When cooking begins, the pressure level you selected is saved and remembered the next time the Smart Program is selected.
The cooking temperature may be adjusted at any time during pressure cooking by pressing Pressure Level, but adjustments made after cooking has begun will not be saved.
Adjust and Save Pressure Cooking Time
Select a pressure cooking Smart Program, then press the Smart Program button again to cycle through the Less, Normal and More cooking time options.
If desired, use the − / + buttons to further customize the time.
When cooking begins, your customizations are saved and remembered the next time the Smart Program is selected.
The cooking time may be adjusted at any time during pressure cooking, but adjustments made after cooking has begun will not be saved.
Adjust and Save Non-Pressure Cooking Temperatures
Select a non-pressure cooking Smart Program, then press the Smart Program button again to cycle through the Less, Normal and More cooking temperature levels.
When cooking begins, the temperature level is saved and remembered the next time the Smart Program is selected.
The cooking temperature may be adjusted at any time during non-pressure cooking by pressing the Smart Program button, but adjustments made after cooking has begun will not be saved.
Adjust and Save Non-Pressure Cooking Time
Select a non-pressure cooking Smart Program, then use the − / + buttons to adjust the cooking time.
The cooking time may be adjusted at any time during non-pressure cooking, but adjustments made after cooking has begun will not be saved.
17

Smart Program Settings
Cancel and Standby Mode
When the cooker is plugged in but not in operation, the display reads OFF to indicate Standby mode.
Press Cancel to stop a Smart Program at any time. The cooker returns to Standby mode.
Turn Sound On/Off
Sound On: When in Standby, press and hold + button until display indicates S On.
Sound Off: When in Standby, press and hold − button until display indicates SOFF.
Note: Audible safety alerts (beeps) cannot be turned off.
Set a Delay Start Timer
Delay Start can be set to a minimum of 10 minutes or a maximum of 24 hours.
1.Select a Smart Program and adjust the settings as you desire, then press Delay Start.
Note: Once Delay Start has been selected, there is no way to return to the cooking settings. To adjust Smart Program settings, press Cancel and enter new selections.
2.When the hours field flashes, use the − / + buttons to adjust the delay time. E.g., 02:00 indicates that cooking will start after 2 hours.
3.Press Delay Start again to toggle to the minutes field and follow the same process as the previous step.
4.Delay Start begins automatically after 10 seconds and the timer counts down.
5.When Delay Start ends, the Smart Program begins, and the display indicates On.
Delay Start is not available with the Sauté or Yogurt Smart Programs.
18
 Loading...