

Page 1

LED TV User Guide
USER GUIDE
Before using your new product, please read these instructions to prevent any damage.
Page 2

Contents
Introduction . . . . . . . . . . . . . . . . . . . . . . . . . . . . . . . . . . . . . . . . . . . . . . . . . . . . . . . . . . . . . . . . . . . . . . . . . . . . . . . . . . . . . 4
INlink . . . . . . . . . . . . . . . . . . . . . . . . . . . . . . . . . . . . . . . . . . . . . . . . . . . . . . . . . . . . . . . . . . . . . . . . . . . . . . . . . . . . . . . . . . . . . . . . . . . . . . . . 4
DTS® audio enhancement . . . . . . . . . . . . . . . . . . . . . . . . . . . . . . . . . . . . . . . . . . . . . . . . . . . . . . . . . . . . . . . . . . . . . . . . . . . . . . . . . . . .4
Game mode . . . . . . . . . . . . . . . . . . . . . . . . . . . . . . . . . . . . . . . . . . . . . . . . . . . . . . . . . . . . . . . . . . . . . . . . . . . . . . . . . . . . . . . . . . . . . . . . . .4
Audio accessibility . . . . . . . . . . . . . . . . . . . . . . . . . . . . . . . . . . . . . . . . . . . . . . . . . . . . . . . . . . . . . . . . . . . . . . . . . . . . . . . . . . . . . . . . . . .4
TV components . . . . . . . . . . . . . . . . . . . . . . . . . . . . . . . . . . . . . . . . . . . . . . . . . . . . . . . . . . . . . . . . . . . . . . . . . . . . . . . . . . 4
TV front . . . . . . . . . . . . . . . . . . . . . . . . . . . . . . . . . . . . . . . . . . . . . . . . . . . . . . . . . . . . . . . . . . . . . . . . . . . . . . . . . . . . . . . . . . . . . . . . . . . . . 4
Jacks . . . . . . . . . . . . . . . . . . . . . . . . . . . . . . . . . . . . . . . . . . . . . . . . . . . . . . . . . . . . . . . . . . . . . . . . . . . . . . . . . . . . . . . . . . . . . . . . . . . . . . . . 5
Remote control . . . . . . . . . . . . . . . . . . . . . . . . . . . . . . . . . . . . . . . . . . . . . . . . . . . . . . . . . . . . . . . . . . . . . . . . . . . . . . . . . . . . . . . . . . . . . .6
Connecting a cable or satellite box . . . . . . . . . . . . . . . . . . . . . . . . . . . . . . . . . . . . . . . . . . . . . . . . . . . . . . . . . . . . . . . . 7
HDMI (best). . . . . . . . . . . . . . . . . . . . . . . . . . . . . . . . . . . . . . . . . . . . . . . . . . . . . . . . . . . . . . . . . . . . . . . . . . . . . . . . . . . . . . . . . . . . . . . . . . 7
AV (good) . . . . . . . . . . . . . . . . . . . . . . . . . . . . . . . . . . . . . . . . . . . . . . . . . . . . . . . . . . . . . . . . . . . . . . . . . . . . . . . . . . . . . . . . . . . . . . . . . . . 7
Coaxial (good) . . . . . . . . . . . . . . . . . . . . . . . . . . . . . . . . . . . . . . . . . . . . . . . . . . . . . . . . . . . . . . . . . . . . . . . . . . . . . . . . . . . . . . . . . . . . . . . 8
Connecting an antenna or cable TV (no box) . . . . . . . . . . . . . . . . . . . . . . . . . . . . . . . . . . . . . . . . . . . . . . . . . . . . . . 8
Connecting a DVD or Blu-ray player . . . . . . . . . . . . . . . . . . . . . . . . . . . . . . . . . . . . . . . . . . . . . . . . . . . . . . . . . . . . . . . 9
HDMI (best). . . . . . . . . . . . . . . . . . . . . . . . . . . . . . . . . . . . . . . . . . . . . . . . . . . . . . . . . . . . . . . . . . . . . . . . . . . . . . . . . . . . . . . . . . . . . . . . . . 9
AV (good) . . . . . . . . . . . . . . . . . . . . . . . . . . . . . . . . . . . . . . . . . . . . . . . . . . . . . . . . . . . . . . . . . . . . . . . . . . . . . . . . . . . . . . . . . . . . . . . . . . . 9
Connecting a game console . . . . . . . . . . . . . . . . . . . . . . . . . . . . . . . . . . . . . . . . . . . . . . . . . . . . . . . . . . . . . . . . . . . . . 10
HDMI (best). . . . . . . . . . . . . . . . . . . . . . . . . . . . . . . . . . . . . . . . . . . . . . . . . . . . . . . . . . . . . . . . . . . . . . . . . . . . . . . . . . . . . . . . . . . . . . . . . 10
AV (good) . . . . . . . . . . . . . . . . . . . . . . . . . . . . . . . . . . . . . . . . . . . . . . . . . . . . . . . . . . . . . . . . . . . . . . . . . . . . . . . . . . . . . . . . . . . . . . . . . . 10
Connecting a computer . . . . . . . . . . . . . . . . . . . . . . . . . . . . . . . . . . . . . . . . . . . . . . . . . . . . . . . . . . . . . . . . . . . . . . . . . 11
Connecting a USB flash drive . . . . . . . . . . . . . . . . . . . . . . . . . . . . . . . . . . . . . . . . . . . . . . . . . . . . . . . . . . . . . . . . . . . . 11
Connecting headphones . . . . . . . . . . . . . . . . . . . . . . . . . . . . . . . . . . . . . . . . . . . . . . . . . . . . . . . . . . . . . . . . . . . . . . . . 12
Connecting external speakers or a sound bar . . . . . . . . . . . . . . . . . . . . . . . . . . . . . . . . . . . . . . . . . . . . . . . . . . . . . 12
Digital audio. . . . . . . . . . . . . . . . . . . . . . . . . . . . . . . . . . . . . . . . . . . . . . . . . . . . . . . . . . . . . . . . . . . . . . . . . . . . . . . . . . . . . . . . . . . . . . . . 12
Analog audio . . . . . . . . . . . . . . . . . . . . . . . . . . . . . . . . . . . . . . . . . . . . . . . . . . . . . . . . . . . . . . . . . . . . . . . . . . . . . . . . . . . . . . . . . . . . . . . 13
Connecting power . . . . . . . . . . . . . . . . . . . . . . . . . . . . . . . . . . . . . . . . . . . . . . . . . . . . . . . . . . . . . . . . . . . . . . . . . . . . . . 13
Using a universal remote control . . . . . . . . . . . . . . . . . . . . . . . . . . . . . . . . . . . . . . . . . . . . . . . . . . . . . . . . . . . . . . . . . 14
Programming universal remote controls . . . . . . . . . . . . . . . . . . . . . . . . . . . . . . . . . . . . . . . . . . . . . . . . . . . . . . . . . . . . . . . . . . . . .14
Viewing universal remote control codes . . . . . . . . . . . . . . . . . . . . . . . . . . . . . . . . . . . . . . . . . . . . . . . . . . . . . . . . . . . . . . . . . . . . .14
Turning on your TV for the first time . . . . . . . . . . . . . . . . . . . . . . . . . . . . . . . . . . . . . . . . . . . . . . . . . . . . . . . . . . . . . 15
Understanding the basics . . . . . . . . . . . . . . . . . . . . . . . . . . . . . . . . . . . . . . . . . . . . . . . . . . . . . . . . . . . . . . . . . . . . . . . . 17
Turning your TV on or off . . . . . . . . . . . . . . . . . . . . . . . . . . . . . . . . . . . . . . . . . . . . . . . . . . . . . . . . . . . . . . . . . . . . . . . . . . . . . . . . . . . .17
Selecting the video input source . . . . . . . . . . . . . . . . . . . . . . . . . . . . . . . . . . . . . . . . . . . . . . . . . . . . . . . . . . . . . . . . . . . . . . . . . . . . .18
On-screen menu overview . . . . . . . . . . . . . . . . . . . . . . . . . . . . . . . . . . . . . . . . . . . . . . . . . . . . . . . . . . . . . . . . . . . . . . . . . . . . . . . . . . .18
Selecting a channel . . . . . . . . . . . . . . . . . . . . . . . . . . . . . . . . . . . . . . . . . . . . . . . . . . . . . . . . . . . . . . . . . . . . . . . . . . . . . . . . . . . . . . . . .19
Adjusting the volume . . . . . . . . . . . . . . . . . . . . . . . . . . . . . . . . . . . . . . . . . . . . . . . . . . . . . . . . . . . . . . . . . . . . . . . . . . . . . . . . . . . . . . .19
Viewing channel information . . . . . . . . . . . . . . . . . . . . . . . . . . . . . . . . . . . . . . . . . . . . . . . . . . . . . . . . . . . . . . . . . . . . . . . . . . . . . . . .19
Navigating the menus . . . . . . . . . . . . . . . . . . . . . . . . . . . . . . . . . . . . . . . . . . . . . . . . . . . . . . . . . . . . . . . . . . . . . . . . . . . . . . . . . . . . . . .19
2
www.insigniaproducts.com
Page 3

Contents
Adjusting settings . . . . . . . . . . . . . . . . . . . . . . . . . . . . . . . . . . . . . . . . . . . . . . . . . . . . . . . . . . . . . . . . . . . . . . . . . . . . . . . . . . . . . . . . . . .20
Using INlink . . . . . . . . . . . . . . . . . . . . . . . . . . . . . . . . . . . . . . . . . . . . . . . . . . . . . . . . . . . . . . . . . . . . . . . . . . . . . . . . . . . . . 20
Using a USB flash drive . . . . . . . . . . . . . . . . . . . . . . . . . . . . . . . . . . . . . . . . . . . . . . . . . . . . . . . . . . . . . . . . . . . . . . . . . . 21
Switching to USB mode . . . . . . . . . . . . . . . . . . . . . . . . . . . . . . . . . . . . . . . . . . . . . . . . . . . . . . . . . . . . . . . . . . . . . . . . . . . . . . . . . . . . .21
Adjusting the picture . . . . . . . . . . . . . . . . . . . . . . . . . . . . . . . . . . . . . . . . . . . . . . . . . . . . . . . . . . . . . . . . . . . . . . . . . . . . 22
Adjusting the TV picture . . . . . . . . . . . . . . . . . . . . . . . . . . . . . . . . . . . . . . . . . . . . . . . . . . . . . . . . . . . . . . . . . . . . . . . . . . . . . . . . . . . . .22
Automatically adjusting the aspect ratio . . . . . . . . . . . . . . . . . . . . . . . . . . . . . . . . . . . . . . . . . . . . . . . . . . . . . . . . . . . . . . . . . . . . .24
Setting the power on picture mode . . . . . . . . . . . . . . . . . . . . . . . . . . . . . . . . . . . . . . . . . . . . . . . . . . . . . . . . . . . . . . . . . . . . . . . . . .24
Adjusting the sound . . . . . . . . . . . . . . . . . . . . . . . . . . . . . . . . . . . . . . . . . . . . . . . . . . . . . . . . . . . . . . . . . . . . . . . . . . . . . 24
Adjusting sound settings . . . . . . . . . . . . . . . . . . . . . . . . . . . . . . . . . . . . . . . . . . . . . . . . . . . . . . . . . . . . . . . . . . . . . . . . . . . . . . . . . . . .24
Selecting the audio out mode . . . . . . . . . . . . . . . . . . . . . . . . . . . . . . . . . . . . . . . . . . . . . . . . . . . . . . . . . . . . . . . . . . . . . . . . . . . . . . .25
Playing TV audio only . . . . . . . . . . . . . . . . . . . . . . . . . . . . . . . . . . . . . . . . . . . . . . . . . . . . . . . . . . . . . . . . . . . . . . . . . . . . . . . . . . . . . . .25
Changing channel settings . . . . . . . . . . . . . . . . . . . . . . . . . . . . . . . . . . . . . . . . . . . . . . . . . . . . . . . . . . . . . . . . . . . . . . 26
Setting parental controls . . . . . . . . . . . . . . . . . . . . . . . . . . . . . . . . . . . . . . . . . . . . . . . . . . . . . . . . . . . . . . . . . . . . . . . . 27
Locking the power button on your TV . . . . . . . . . . . . . . . . . . . . . . . . . . . . . . . . . . . . . . . . . . . . . . . . . . . . . . . . . . . . . . . . . . . . . . . .28
Using closed captioning . . . . . . . . . . . . . . . . . . . . . . . . . . . . . . . . . . . . . . . . . . . . . . . . . . . . . . . . . . . . . . . . . . . . . . . . . 29
Adjusting time settings . . . . . . . . . . . . . . . . . . . . . . . . . . . . . . . . . . . . . . . . . . . . . . . . . . . . . . . . . . . . . . . . . . . . . . . . . . 29
Adjusting menu settings . . . . . . . . . . . . . . . . . . . . . . . . . . . . . . . . . . . . . . . . . . . . . . . . . . . . . . . . . . . . . . . . . . . . . . . . 29
Adjusting accessibility settings . . . . . . . . . . . . . . . . . . . . . . . . . . . . . . . . . . . . . . . . . . . . . . . . . . . . . . . . . . . . . . . . . . 30
Maintaining . . . . . . . . . . . . . . . . . . . . . . . . . . . . . . . . . . . . . . . . . . . . . . . . . . . . . . . . . . . . . . . . . . . . . . . . . . . . . . . . . . . . . 30
Cleaning the TV cabinet . . . . . . . . . . . . . . . . . . . . . . . . . . . . . . . . . . . . . . . . . . . . . . . . . . . . . . . . . . . . . . . . . . . . . . . . . . . . . . . . . . . . .30
Cleaning the TV screen . . . . . . . . . . . . . . . . . . . . . . . . . . . . . . . . . . . . . . . . . . . . . . . . . . . . . . . . . . . . . . . . . . . . . . . . . . . . . . . . . . . . . .30
Troubleshooting . . . . . . . . . . . . . . . . . . . . . . . . . . . . . . . . . . . . . . . . . . . . . . . . . . . . . . . . . . . . . . . . . . . . . . . . . . . . . . . . 31
Using the HELP menu . . . . . . . . . . . . . . . . . . . . . . . . . . . . . . . . . . . . . . . . . . . . . . . . . . . . . . . . . . . . . . . . . . . . . . . . . . . . . . . . . . . . . . .31
Video and audio . . . . . . . . . . . . . . . . . . . . . . . . . . . . . . . . . . . . . . . . . . . . . . . . . . . . . . . . . . . . . . . . . . . . . . . . . . . . . . . . . . . . . . . . . . . . 31
Remote control . . . . . . . . . . . . . . . . . . . . . . . . . . . . . . . . . . . . . . . . . . . . . . . . . . . . . . . . . . . . . . . . . . . . . . . . . . . . . . . . . . . . . . . . . . . . . 34
General. . . . . . . . . . . . . . . . . . . . . . . . . . . . . . . . . . . . . . . . . . . . . . . . . . . . . . . . . . . . . . . . . . . . . . . . . . . . . . . . . . . . . . . . . . . . . . . . . . . . . 35
INlink (CEC-compatible) device . . . . . . . . . . . . . . . . . . . . . . . . . . . . . . . . . . . . . . . . . . . . . . . . . . . . . . . . . . . . . . . . . . . . . . . . . . . . . . 36
Legal notices . . . . . . . . . . . . . . . . . . . . . . . . . . . . . . . . . . . . . . . . . . . . . . . . . . . . . . . . . . . . . . . . . . . . . . . . . . . . . . . . . . . . 38
ONE-YEAR LIMITED WARRANTY . . . . . . . . . . . . . . . . . . . . . . . . . . . . . . . . . . . . . . . . . . . . . . . . . . . . . . . . . . . . . . . . . . 39
One-year limited warranty - Insignia Televisions—Mexico . . . . . . . . . . . . . . . . . . . . . . . . . . . . . . . . . . . . . . . . 40
www.insigniaproducts.com
3
Page 4
Insignia LED TV
Insignia LED TV
Introduction
Congratulations on your purchase of a high-quality,
Insignia TV. Your TV represents the state-of-the-art in
LED TV technology and is designed for reliable and
trouble-free performance.
INlink
Enjoy the benefit of having HDMI CEC-compatible
products plug and play! No setup is needed! CEC
technology lets different devices discover and
communicate with each other. (See page 20 for
instructions on how to use INlink.)
TV components
This section covers basic information for:
• TV front
•Jacks
• Remote control
TV front
You can find these items on the front of your TV.
DTS® audio enhancement
DTS sound solutions delivers clear, crisp, and natural sound
while providing deep, enveloping bass.
Game mode
Video games generally require adjustments to the TV
picture settings to get the maximum experience. By simply
pressing the GAME button on your remote control, your
TV settings automatically adjust for video games. It
couldn't be easier.
Audio accessibility
Your TV provides audio descriptions of menus and some
remote control functions. Depending on the broadcaster,
audio narration of key elements in programs may also be
available. (See page 30 for instructions on how to turn on
audio narration.)
ITEM DESCRIPTION
Remote control sensor Receives signals from the remote control. Do not block.
Power indicator Turns off when your TV is on. Lights red when your TV is off (standby mode).
4
www.insigniaproducts.com
Page 5
Insignia LED TV
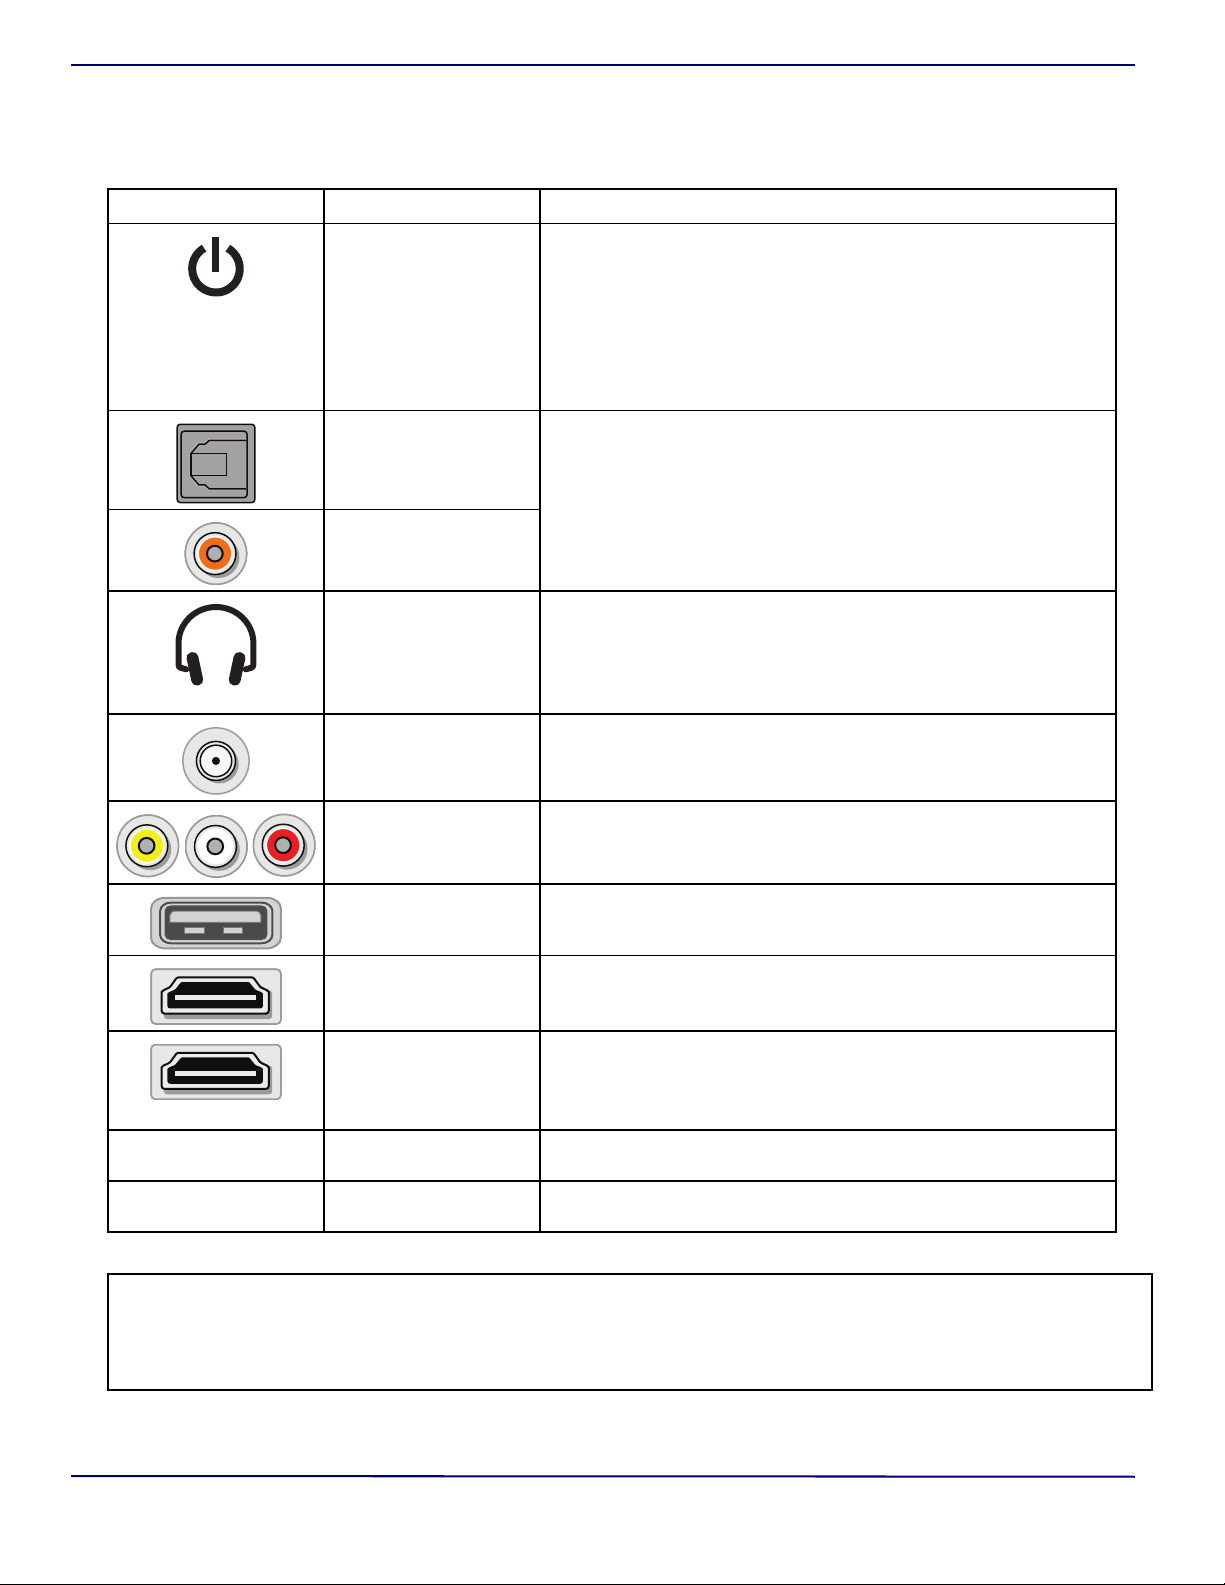
Jacks
Your TV may have any of the following items:
ITEM DESCRIPTION FUNCTION
Power/Input button
Digital OPTICAL output
jack
Digital COAXIAL output
jack
Power—Press to turn on your TV when your TV is off (in standby
mode). Press and hold to turn off your TV when your TV is on.
Warning : When your TV is off, power still flows through it. To
completely disconnect power, unplug the power cord.
Input—Quickly press and release to open the INPUT SOURCE list,
press one or more times to select a video input source, then wait a
few seconds. Your TV switches to the source you selected. See
Selecting the video input source on page 18.
Connect a sound bar, digital speaker system, or home theater system
to this jack to listen to TV audio through external speakers. See
Digital audio on page 12.
Headphone jack
OR
AUDIO OUT jack
Antenna/Cable in jack
Analog video and audio
(AV) jacks
USB
HDMI
HDMI/ARC
RESET
SERVICE Do not connect a device to this jack. Do not insert anything into this
On some TVs the headphone jack and audio out jack are combined
into one jack.
Connect headphones, a sound bar, analog speaker system, or a
home theater system to this jack to listen to TV audio through
external speakers. See Analog audio on page 13.
Connect an antenna or cable TV to this jack. See Coaxial (good) on
page 8 or Connecting an antenna or cable TV (no box) on page 8.
Connect the video and audio for an AV device to these jacks. See AV
(good) on page 7, 9, or 10.
Connect a USB flash drive to this jack to view compatible JPEG
picture files. See Connecting a USB flash drive on page 11 and Using
a USB flash drive on page 21.
Connect an HDMI device to this jack. See HDMI (best) on page 7, 9, or
10, or Connecting a computer on page 11.
Connect an ARC-enabled home theater receiver to this jack.
OR
Connect an HDMI device to this jack. See HDMI (best) on page 7, 9
10, or Connecting a computer on page 11.
Press to reset your TV to the factory defaults. If this button is in a
recessed hole, use a thin item, like a paper clip, to press the button.
jack.
, or
CAUTIONS:
• Check the jacks for position and type before making any connections.
• Loose connections can cause poor audio or video quality. Make sure that all connections are tight and secure.
• The external audio/video equipment shown may be different from your equipment. If you have questions, refer to the documentation
that came with your equipment.
• Always unplug the power cord when connecting external equipment.
www.insigniaproducts.com
5
Page 6
Insignia LED TV
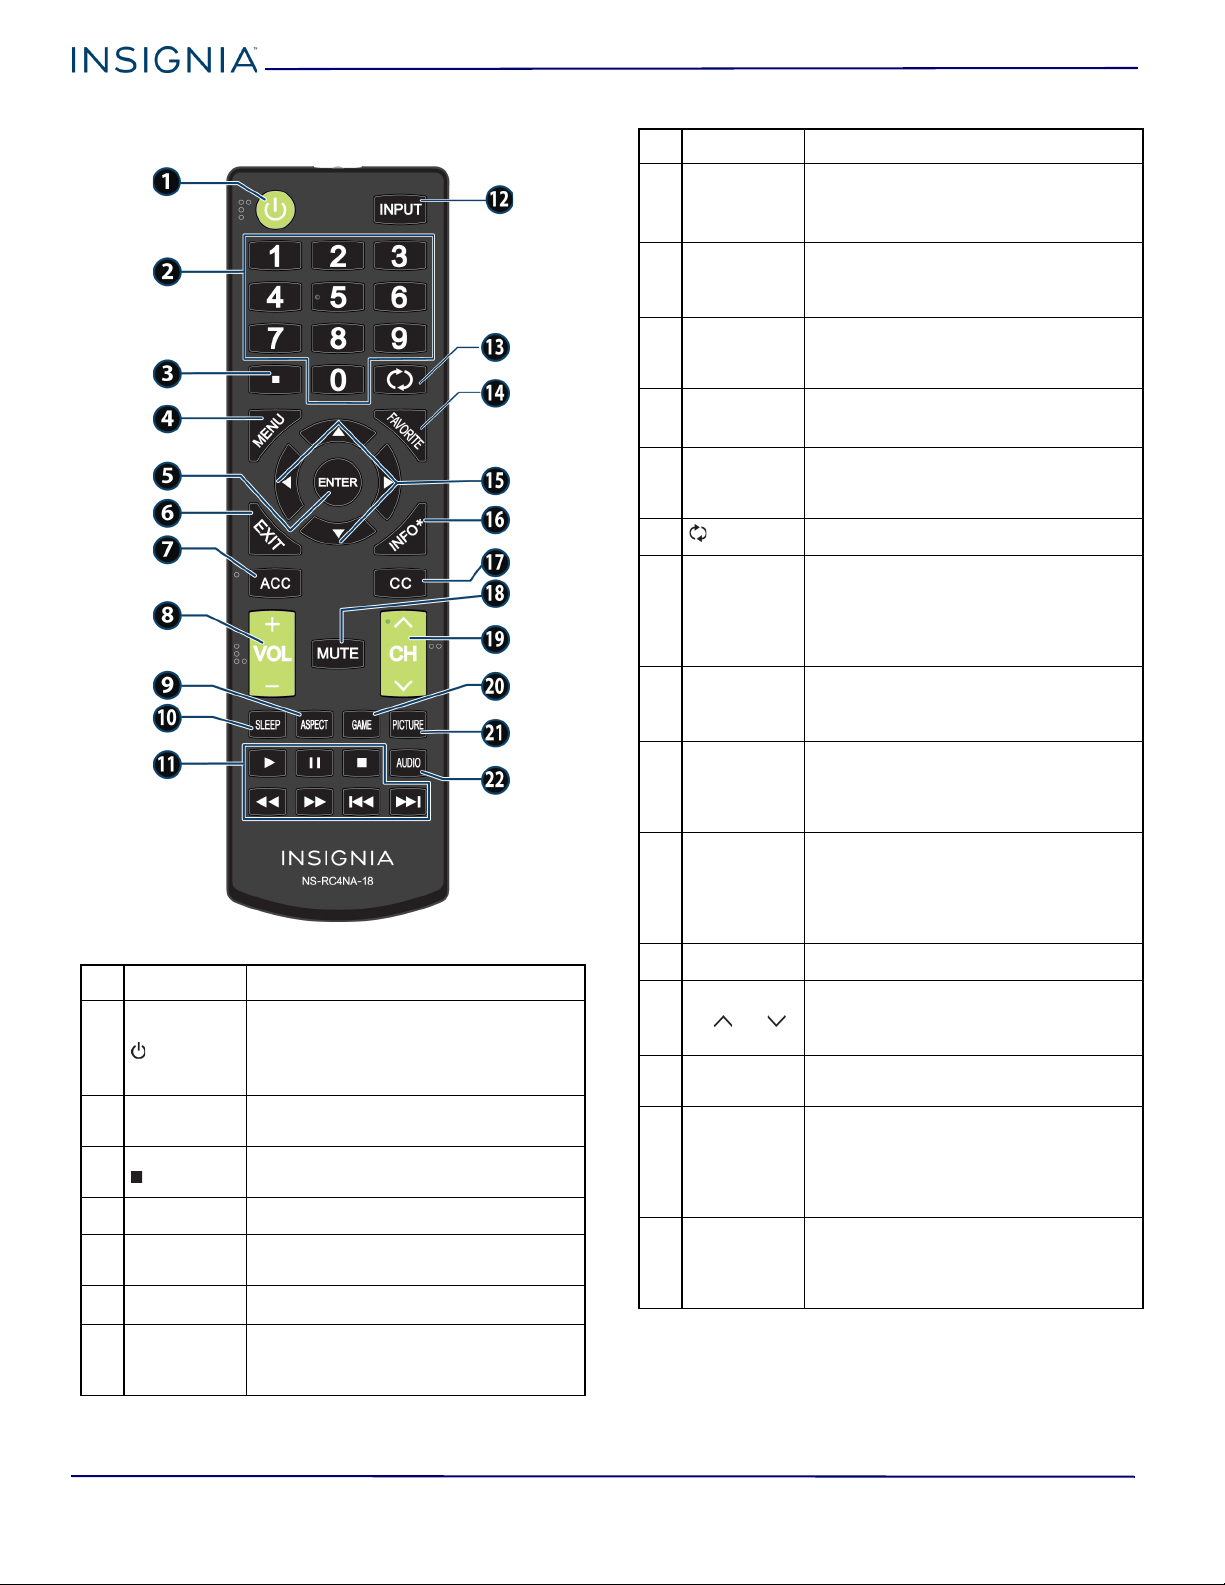
Remote control
# BUTTON PRESS TO...
Turn your TV on or off (standby mode).
1
(power)
2
Numbers
3
MENU Open the on-screen menu.
4
5
ENTER
6
EXIT Close the on-screen TV menu.
7
ACC
War ning: When your TV is off, power
still flows through it. To disconnect
power, unplug the power cord.
Enter channel numbers and the
parental control password.
Enter a digital sub-channel number. See
Selecting a channel on page 19.
Confirm selections or changes in TV
menus.
Open the Accessibility menu. See
Adjusting accessibility settings on
page 30.
# BUTTON PRESS TO...
TV: Adjusts the volume.
8
VOL+/VOL–
TV menu: Navigate left or right.
USB: Control a photo slideshow.
TV: Change how the pictures appears
9
ASPECT
on the screen.
USB: Zoom when displaying a photo.
Set the sleep timer. You can select Off,
10
11
SLEEP
Media
controls
5, 10, 15, 30, 60, 90, 120, 180, or 240
minutes.
Control INlink-compatible (HDMI CEC)
devices. See Using INlink on page 20.
Open the INPUT SOURCE list and select a
12
INPUT
video input source. See Selecting the
video input source on page 18.
(return) Return to the previous channel.
13
Set up the Favorite channel list or open
the existing Favorite channel list. See
14
FAV OR I TE
the Favorite Channel Setup and
Favorite Channel List options in
Changing channel settings on page 26.
TV menus—Navigate on-screen TV
15
menus and adjust settings.
USB—Control a photo slideshow.
Display TV status information, such as
16
INFO*
the channel number, channel name (if
available), or signal source. See Viewing
channel information on page 19.
Turn closed captioning on or off. You
can select CC Off, CC On, or CC On
17
CC
when mute. See the Caption Control
option in Using closed captioning on
page 29.
MUTE Mute or un-mute the sound.
18
TV: Change to the next higher or lower
19
CH /CH
channel in the channel list.
TV menu: Navigate up or down.
20
GAME
Change the picture mode to Game
mode.
Select the picture mode. You can select
Vivid, Standard, Energy Savings,
21
PICTURE
Movie, Game, or Custom. See the
Picture Mode option in Adjusting the
TV picture on page 22.
Select the audio mode. You can select
22
AUDIO
Standard, Theater, Music, News, or
Custom. See the Audio Mode option in
Adjusting sound settings on page 24.
6
www.insigniaproducts.com
Page 7
Insignia LED TV
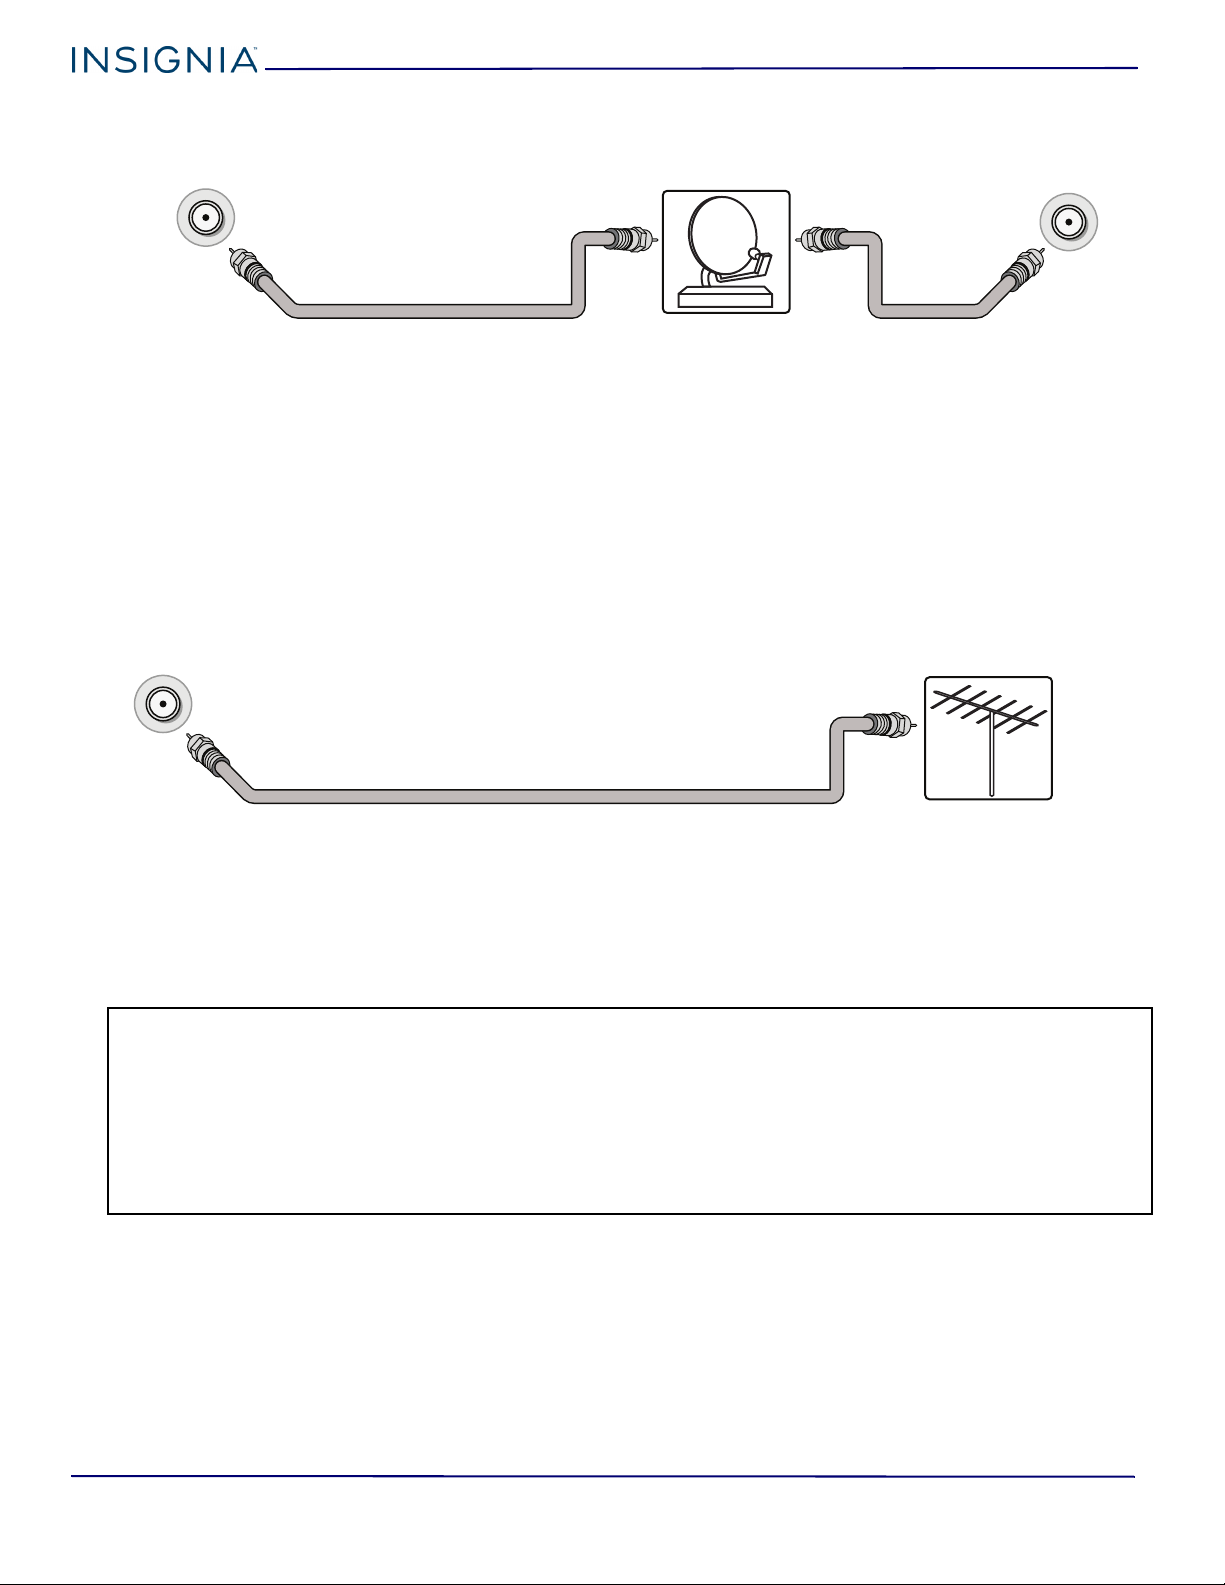
Cable or satellite box
HDMI Cable
Coaxial
cable
HMDI jack Cable wall jack
Video and audio jacks
AV cable
Cable or satellite box Cable wall jack
Coaxial
cable
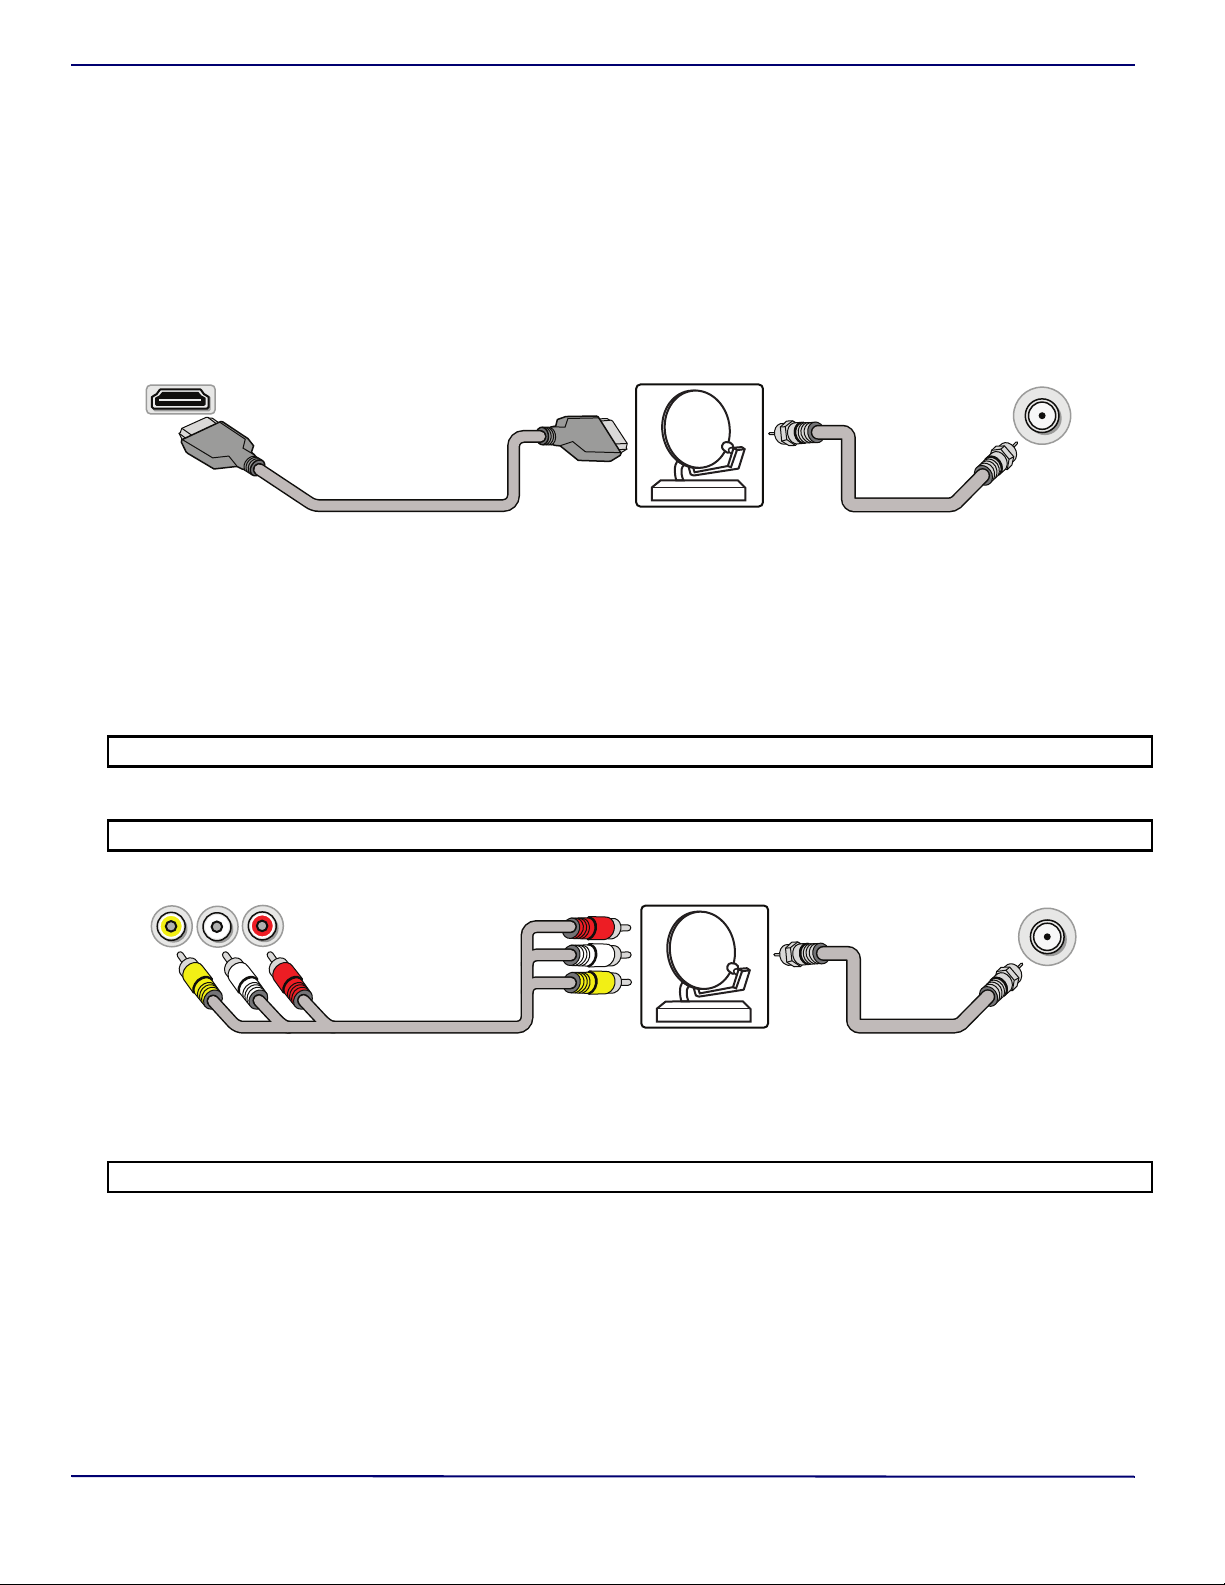
Connecting a cable or satellite box
Many cable or satellite TV boxes have more than one connection type. To get the best video, you should use the best
connection type available. See Jacks on page 5.
You can connect a cable or satellite box using:
•HDMI (best)
•AV (good)
• Coaxial (good)
HDMI (best)
1 Make sure that your TV’s power cord is unplugged and all connected equipment is turned off.
2 Connect a coaxial cable (not provided) to the cable wall jack and to the cable-in jack on the cable or satellite box.
3 Connect an HDMI cable (not provided) to one of the HDMI jacks on your TV and to the HDMI out jack on the cable or
satellite box.
4 Plug your TV’s power cord into a power outlet, turn on your TV, then turn on the cable or satellite box.
5 Press INPUT to open the INPUT SOURCE list, select the HDMI jack you connected the cable or satellite box to, then press
ENTER.
Note: An HDMI cable carries both audio and video. You do not need to use any audio cables.
AV (good)
Note: Cables are often color-coded to match color-coded jacks.
1 Make sure that your TV’s power cord is unplugged and all connected equipment is turned off.
2 Connect a coaxial cable (not provided) to the cable wall jack and to the cable-in jack on the cable or satellite box.
3 Connect an AV cable (not provided) to the AV jacks on your TV and to the AV out jacks on the cable or satellite box.
IMPORTANT: When you connect the audio using the AV jacks, the audio output is analog.
4 Plug your TV’s power cord into a power outlet, turn on your TV, then turn on the cable or satellite box.
5 Press INPUT to open the INPUT SOURCE list, select AV, then press ENTER.
www.insigniaproducts.com
7
Page 8
Insignia LED TV
Cable or satellite box
Coaxial cable
Cable wall jackAntenna/cable jack
Coaxial
cable
Coaxial cable
Antenna or cable TV (no box)
Antenna/cable
jack
Coaxial (good)
1 Make sure that your TV’s power cord is unplugged and all connected equipment is turned off.
2 Connect the coaxial cable to the cable wall jack and to the cable-in jack on the cable or satellite box.
3 Connect a coaxial cable (not provided) to the antenna/cable jack on your TV and to the coaxial out jack on the cable or
satellite box.
4 Plug your TV’s power cord into a power outlet, turn on your TV, then turn on the cable or satellite box.
5 Press INPUT to open the INPUT SOURCE list, select TV, then press ENTER.
6 If you cannot tune to channels you know exist, scan for channels. See the Auto Channel Search option in Changing
channel settings on page 26.
Connecting an antenna or cable TV (no box)
1 Make sure that your TV’s power cord is unplugged and all connected equipment is turned off.
2 Connect a coaxial cable (not provided) to the antenna/cable jack on your TV and to the antenna or cable TV wall jack.
3 Plug your TV’s power cord into a power outlet, then turn on your TV.
4 Press INPUT to open the INPUT SOURCE list, select TV, then press ENTER.
5 If you cannot tune to channels you know exist, scan for channels. See the Auto Channel Search option in Changing
channel settings on page 26.
Notes:
• Use a coaxial cable to eliminate interference and noise from radio waves.
• If the antenna is not installed correctly, contact qualified service personnel to correct the problem.
• If the signal level for a channel is weak, the picture may be distorted. Adjust the antenna or use a highly directional outdoor or set-top
antenna with a built-in amplifier.
• If the picture quality is good on some channels and poor on others, the problem may be caused by a poor or weak signal from the
broadcaster or cable TV provider.
• If you connect to cable TV without a set-top box and experience poor picture quality, you may need to install a set-top box to improve
signal reception and picture quality. Contact your cable TV provider about upgrading to a set-top box.
• Many high-definition (HD) channels upscale standard-definition (SD) content. The picture displayed on your TV is still displayed as SD,
thus the picture quality will not be as clear or crisp as it would be if the content was originally recorded in HD.
8
www.insigniaproducts.com
Page 9
Insignia LED TV
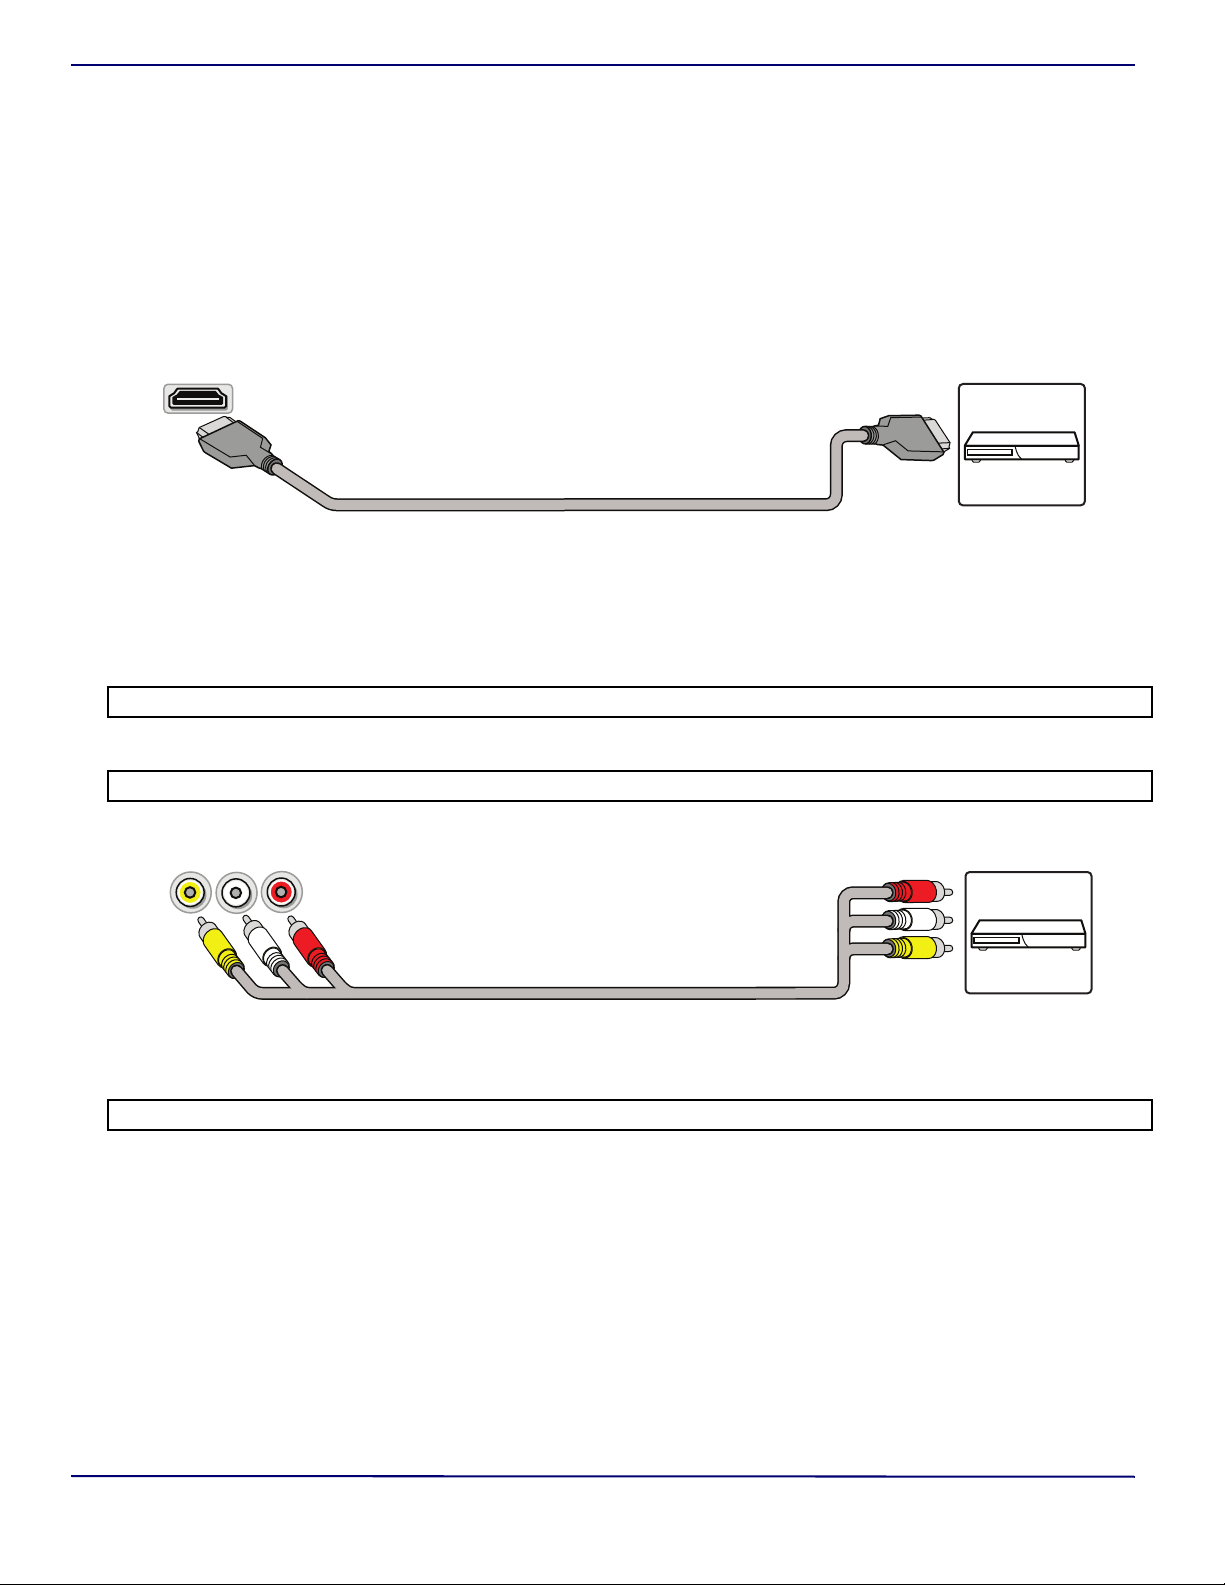
HDMI cable
DVD or Blu-ray
player
HDMI jack
AV cable
DVD or Blu-ray
player
Video and audio jacks
Connecting a DVD or Blu-ray player
Many DVD or Blu-ray players have more than one connection type. To get the best video, you should use the best connection
type available. See Jacks on page 5.
You can connect a DVD or Blu-ray player using:
•HDMI (best)
•AV (good)
HDMI (best)
1 Make sure that your TV’s power cord is unplugged and the DVD or Blu-ray player is turned off.
2 Connect an HDMI cable (not provided) to one of the HDMI jacks on your TV and to the HDMI out jack on the DVD or Blu-ray
player.
3 Plug your TV’s power cord into a power outlet, then turn on your TV and DVD or Blu-ray player.
4 Press INPUT to open the INPUT SOURCE list, select the HDMI jack you connected the player to, then press ENTER.
Note: An HDMI cable carries both audio and video. You do not need to use any audio cables.
AV (good)
Note: Cables are often color-coded to match color-coded jacks.
1 Make sure that your TV’s power cord is unplugged and the DVD or Blu-ray player is turned off.
2 Connect an AV cable (not provided) to the AV jacks on your TV and to the AV out jacks on the DVD or Blu-ray player.
IMPORTANT: When you connect the audio using the AV jacks, the audio output is analog.
3 Plug your TV’s power cord into a power outlet, then turn on your TV and DVD or Blu-ray player.
4 If needed, set the player to the correct output mode. See the documentation that came with the player.
5 Press INPUT to open the INPUT SOURCE list, select AV, then press ENTER.
www.insigniaproducts.com
9
Page 10
Insignia LED TV
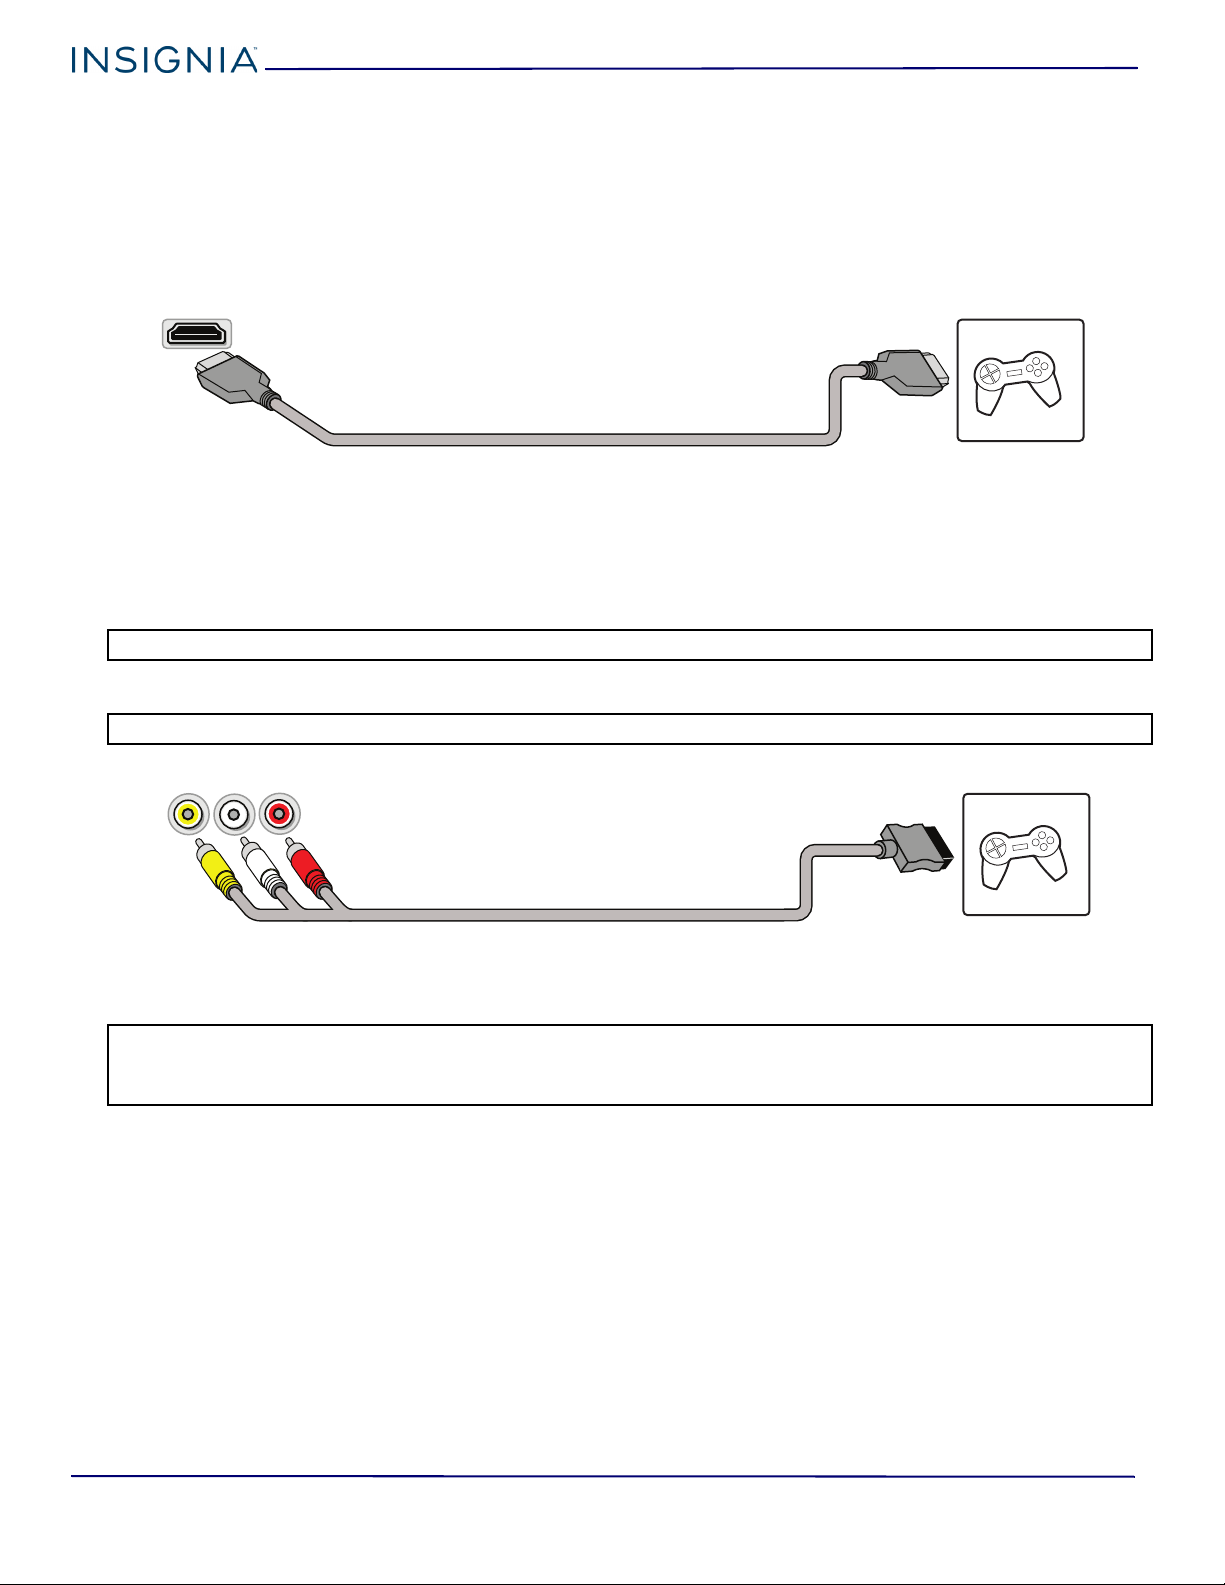
HDMI cable
Game consoleHDMI jack
Game console
Console-specific AV cable
Video and audio jacks
Connecting a game console
You can connect a game console using:
•HDMI (best)
•AV (good)
HDMI (best)
1 Make sure that your TV’s power cord is unplugged and the game console is turned off.
2 Connect an HDMI cable (not provided) to one of the HDMI jacks on your TV and to the HDMI out jack on the game console.
3 Plug your TV’s power cord into a power outlet, then turn on your TV.
4 Turn on the game console, then set it to the correct output mode. See the documentation that came with the console.
5 Press INPUT to open the INPUT SOURCE list, select the HDMI jack you connected the console to, then press ENTER.
Note: An HDMI cable carries both audio and video. You do not need to use any audio cables.
AV (good)
Note: Cables are often color-coded to match color-coded jacks.
1 Make sure that your TV’s power cord is unplugged and the game console is turned off.
2 Connect the console-specific AV cable to the AV jacks on your TV and to the AV jack(s) on the game console.
IMPORTANT:
• Some older game consoles come with a special AV cable. See the documentation that came with your game console or check the
manufacturer’s website.
• When you connect the audio using the AV jacks, the audio output is analog.
3 Plug your TV’s power cord into a power outlet, then turn on your TV.
4 Turn on the game console, then set it to the correct output mode. See the documentation that came with the console.
5 Press INPUT to open the INPUT SOURCE list, select AV, then press ENTER.
10
www.insigniaproducts.com
Page 11
Insignia LED TV
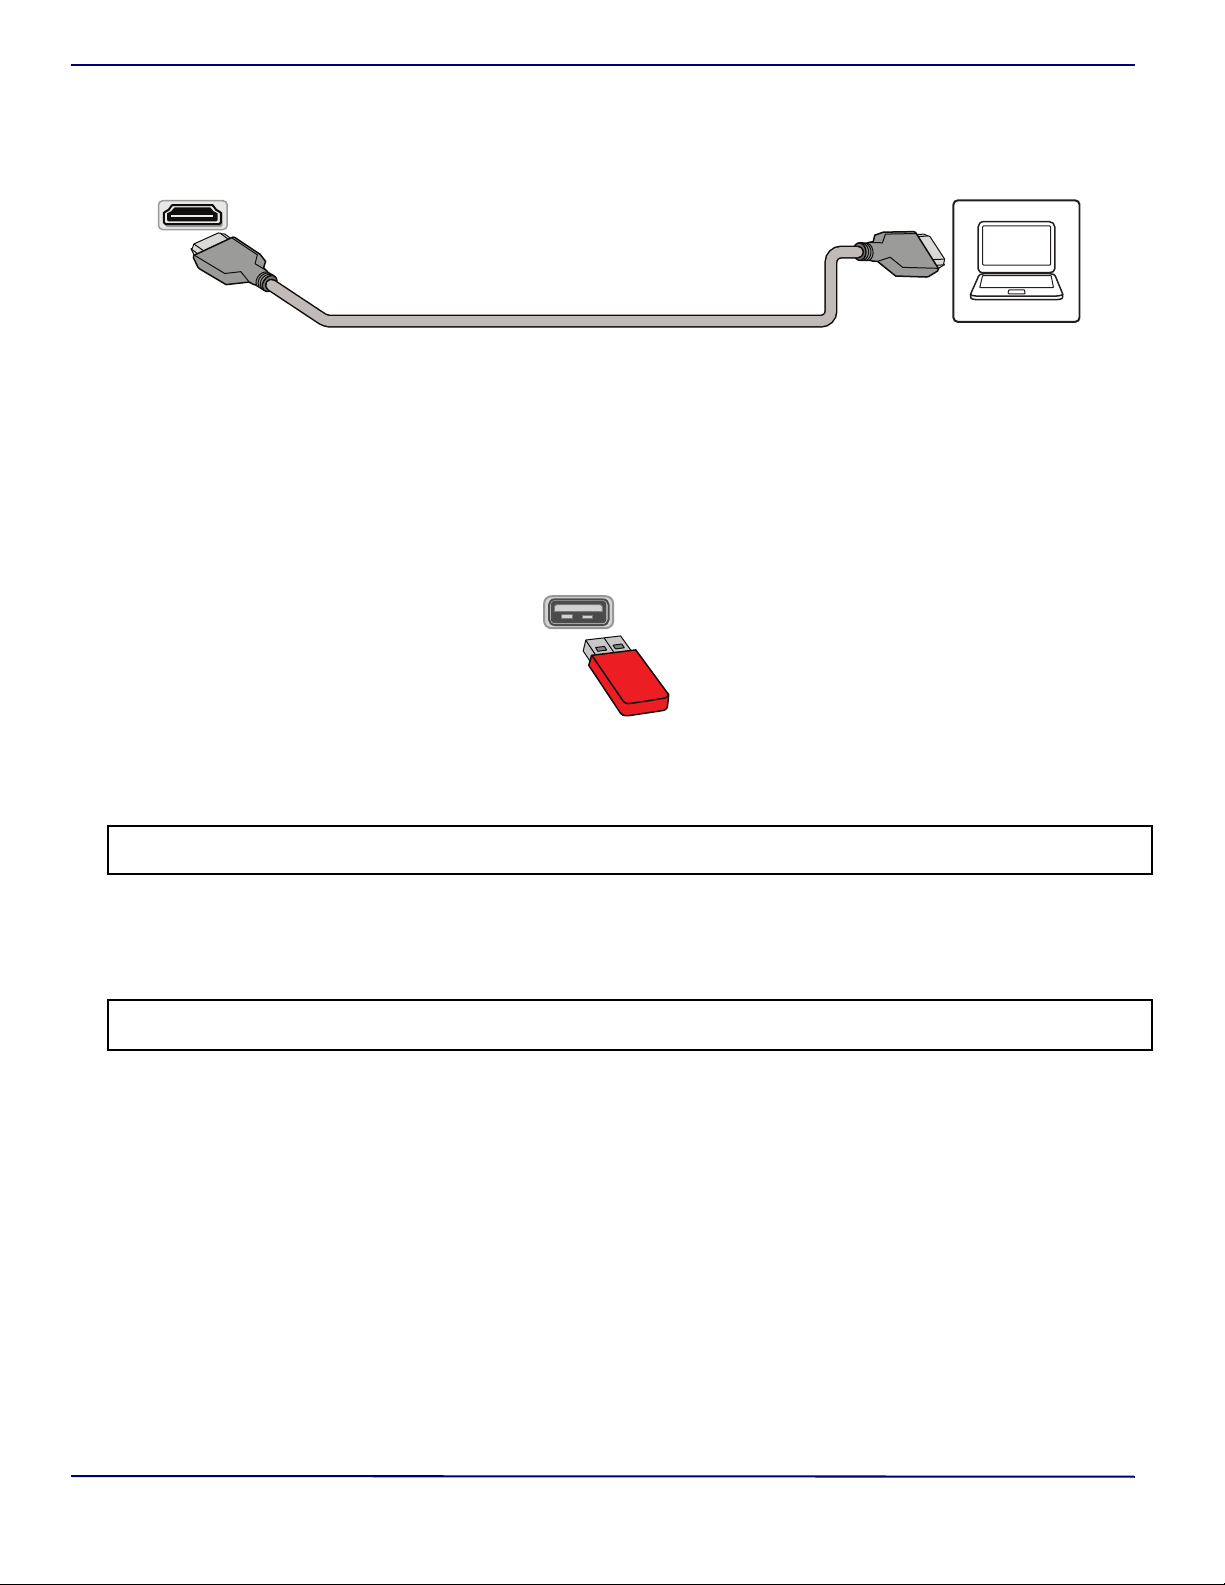
HDMI cable
Computer
HDMI jack
USB port
USB flash drive
Connecting a computer
1 Make sure that your TV’s power cord is unplugged and the computer is turned off.
2 Connect an HDMI cable (not provided) to one of the HDMI jacks on your TV and to the HDMI out jack on the computer.
3 Plug your TV’s power cord into a power outlet, then turn on your TV and the computer.
4 Press INPUT to open the INPUT SOURCE list, select the HDMI jack you connected the computer to, then press ENTER.
5 Adjust the display properties on the computer, if necessary.
Connecting a USB flash drive
1 Plug a USB flash drive into the USB port on your TV.
CAUTION: Do not remove the USB flash drive or turn off the TV while using the USB flash drive. You may lose data or damage the USB flash
drive.
2 Select Ye s in the message that appears. The PHOTOS menu opens.
OR
If you switch to a different video input source after you plug in the USB flash drive and want to switch back to the drive, press
INPUT to open the INPUT SOURCE list, select USB(Photos), then press ENTER. The PHOTOS menu opens.
Note: The Photos viewer only supports JPEG format images (with “.jpg” file extensions) and not all JPEG files are compatible with your TV.
See Using a USB flash drive on page 21.
www.insigniaproducts.com
11
Page 12
Insignia LED TV
Headphone/Audio out
jack
Digital coaxial audio cable
Digital speaker system
Sound bar
Digital optical audio cable
Digital coaxial
audio jack
Digital optical
audio jack
OR
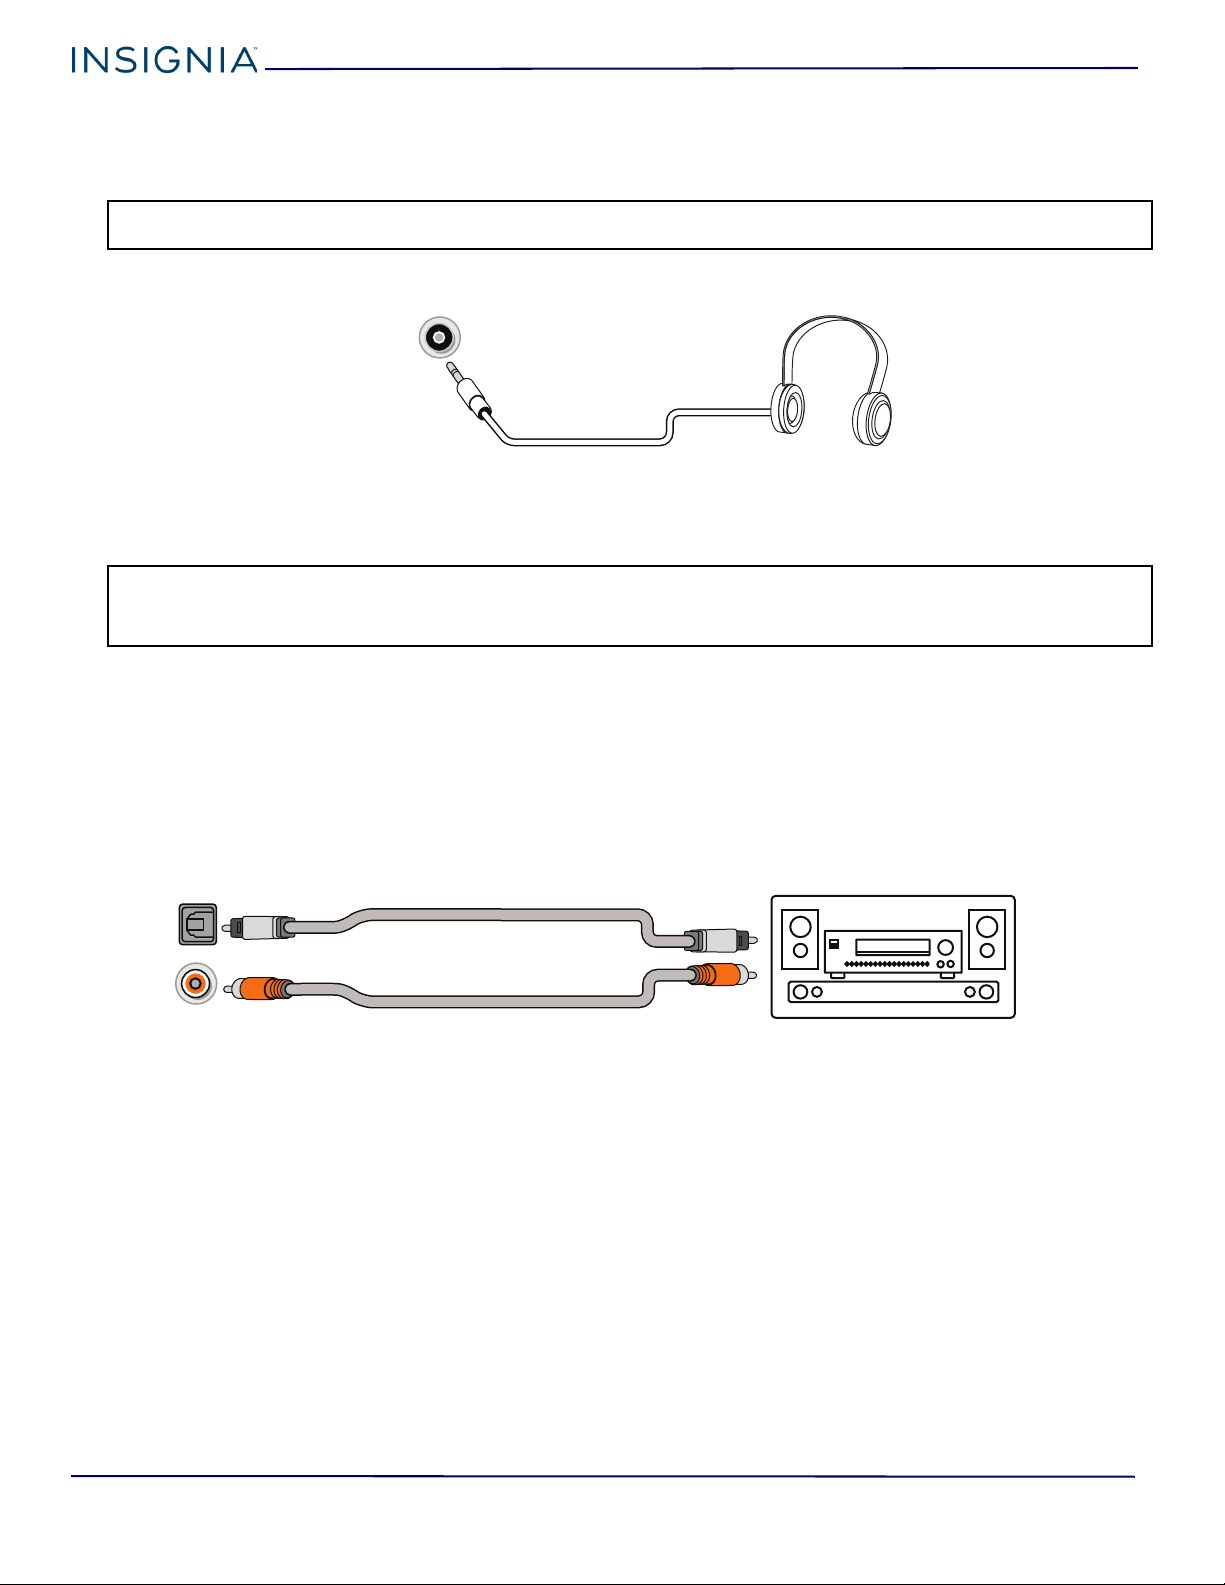
Connecting headphones
When you connect headphones, the TV speakers are muted.
WAR NIN G: Loud noise can damage your hearing. When using headphones, use the lowest volume setting on your headphones that still
lets you hear the sound.
1 Connect the headphones to the headphone jack on your TV.
2 In the screen that opens, select Headphones/Audio Out Variable, then press ENTER. See Selecting the audio out mode
on page 25.
Notes:
• If you connect headphones when your TV is turned off, then you turn on your TV, the TV speakers are muted and the audio plays
through the headphones.
• You can also connect a home theater system, sound bar, or external speaker system to the headphone jack.
Connecting external speakers or a sound bar
You can connect external speakers or a sound bar using:
• Digital audio
•Analog audio
Digital audio
Depending on the model, your TV may have a digital optical or digital coaxial audio jack.
1 Make sure that your TV’s power cord is unplugged and the digital speaker system or sound bar is turned off.
2 Connect a digital coaxial or digital optical audio cable (not provided) to the digital output jack on your TV and to the audio
in jack on the digital speaker system or sound bar.
3 Plug your TV’s power cord into a power outlet, then turn on your TV.
4 Turn on the digital speaker system or sound bar, then set it to the correct source. See the documentation that came with
the digital speaker system or sound bar.
5 On your TV’s Audio menu, select Digital Audio Format / Audio Delay, then set the Audio Format option to PCM. See the
Digital Audio Format / Audio Delay option in Adjusting sound settings on page 24.
12
www.insigniaproducts.com
Page 13
Insignia LED TV
Audio cable
Analog speaker system
Sound bar
Audio out jack
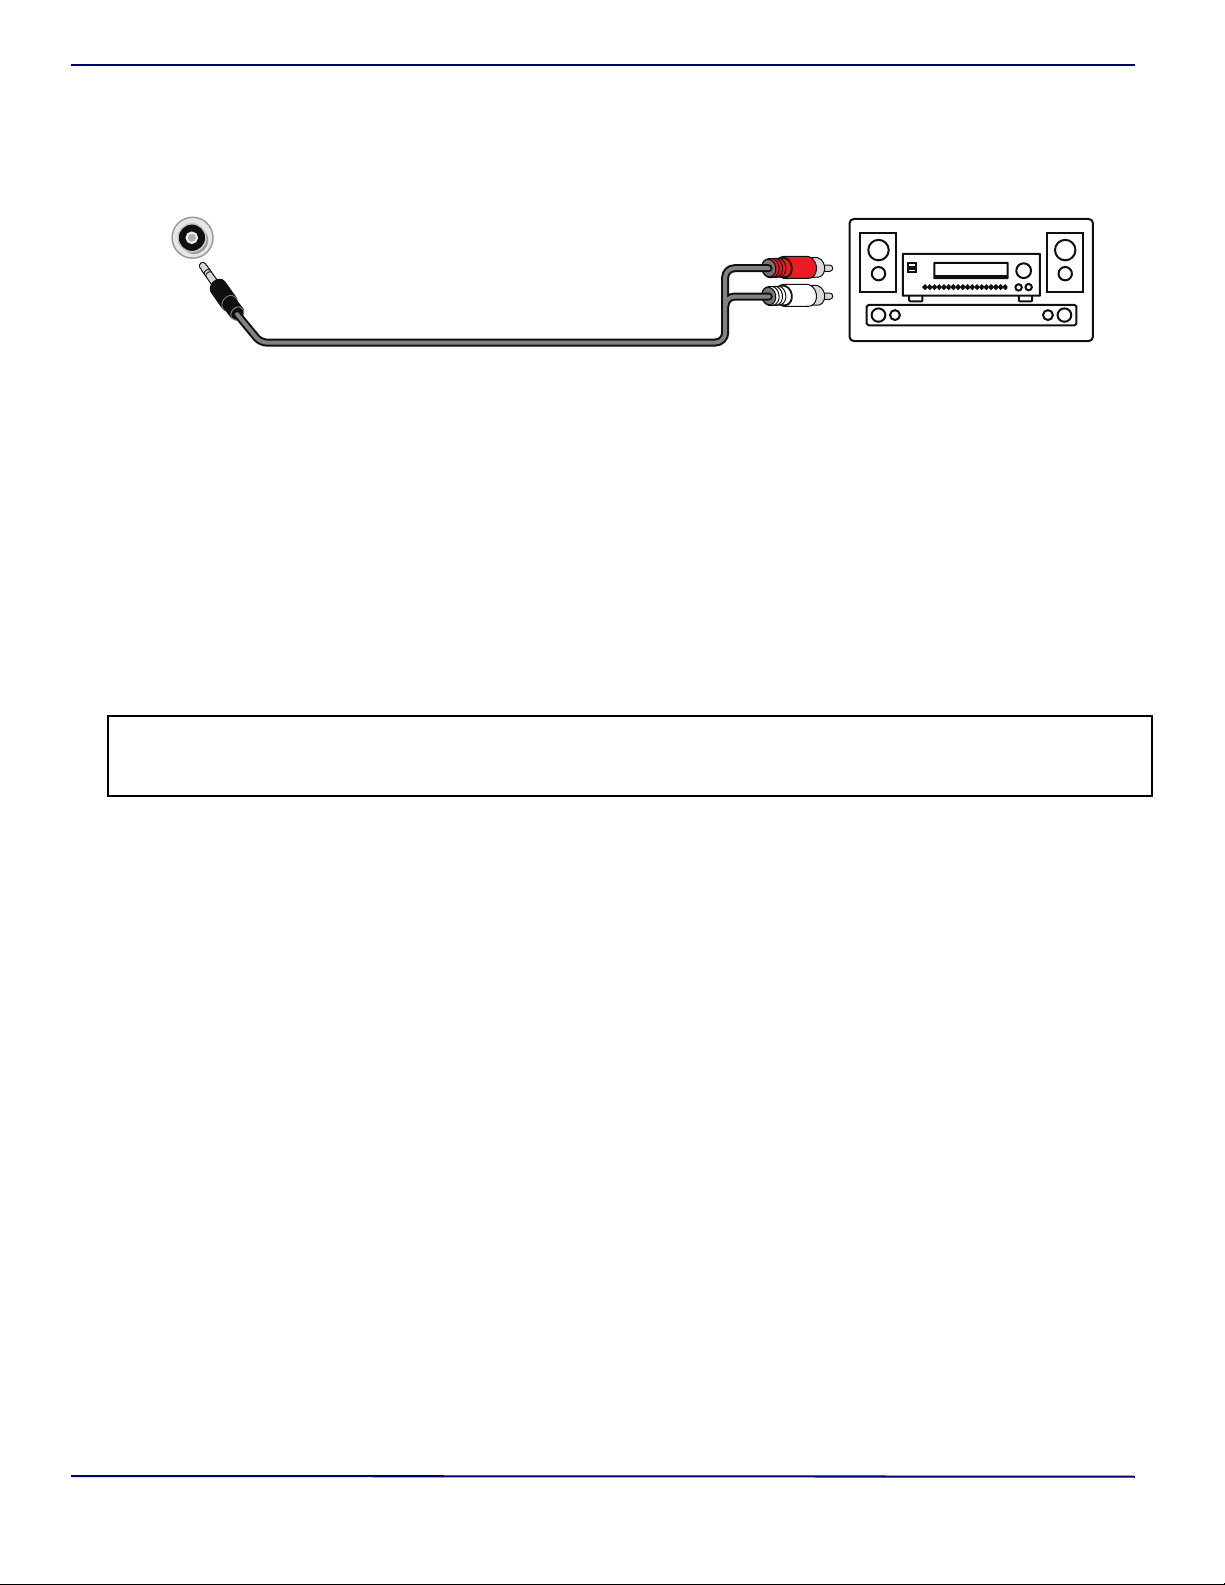
Analog audio
When you connect an analog speaker system or sound bar to the audio out jack, the TV speakers are muted.
1 Make sure that your TV’s power cord is unplugged and the analog speaker system or sound bar is turned off.
2 Connect an audio cable (not provided) to the audio out jack on your TV and to the audio in jacks on the analog speaker
system or sound bar.
3 Plug your TV’s power cord into a power outlet, then turn on your TV.
4 Turn on the analog speaker system or sound bar, then set it to the correct source. See the documentation that came with
the analog speaker system or sound bar.
5 On your TV, set the Headphones / Audio Out option on the Audio menu to Headphones/Audio Out Variable or Audio
Out Fixed. See the Headphones / Audio Out option in Adjusting sound settings on page 24.
Connecting power
1 If your power cord is not permanently connected to your TV, connect it to the power connector on your TV.
2 Connect the power cord to a power outlet.
CAUTION:
• Your TV should only be operated from the power source indicated on the label.
• Always unplug the power cord from the power outlet when you will not be using your TV for an extended period of time.
• If the power cord is permanently attached to your TV, do not try to unplug it from your TV.
www.insigniaproducts.com
13
Page 14

Insignia LED TV
Using a universal remote control
This section covers:
• Programming universal remote controls
• Viewing universal remote control codes
Programming universal remote controls
You can operate your Insignia TV with a new or existing
universal remote control.
1 See Viewing universal remote control codes on page 14
for common codes. If you have problems programming
your remote or need a different remote control code:
• Contact the universal remote control or
cable/satellite company of the remote control you
are trying to program.
• Visit www.insigniaproducts.com/remotecodes for
the latest remote control code information.
• Call the Insignia Customer Care Center at
1-877-467-4289.
2 Follow your universal remote control’s instructions to
enter the TV code you found in Step 1.
Tips:
• If your universal remote control has a code search feature,
run a code search to identify a code that matches your TV.
See your universal remote control’s instructions for details.
• If your universal remote control has a “Learn” feature, you
can manually program it using the Insignia TV remote to
“teach” the commands one at a time. See your universal
remote control’s instructions for details.
Viewing universal remote control codes
You can view a list of universal remote control codes in the
on-screen menu.
Tips:
• The brand name is often visible on the front of the universal
remote control, and the model number is often visible on
the back.
• If your universal remote control isn’t listed on the chart,
refer to your universal remote control’s instructions and try
codes for the brands Orion, Emerson, Memorex, Sansui,
Sylvania, or Zenith. You may need to try several codes
before finding a match.
1 Select the HELP menu, then select Learn More.
2 Select Remote control codes. Your TV displays
information about the universal remote codes that you
can use to make your TV work with a universal remote.
3 Press ENTER or
control codes for various brands of universal remote
controls.
4 Press MENU to return to the previous menu, or press
EXIT to close the menu.
. Your TV displays a list of remote
Note: You can also find codes for other remote controls at:
http://www.insigniaproducts.com/remotecodes
Or, check with your cable or satellite TV provider for the remote
control code.
14
www.insigniaproducts.com
Page 15

Insignia LED TV
Turning on your TV for the first time
The first time you turn on your TV, the Easy Setup wizard
opens. The wizard guides you through setting up basic
settings including the menu language, time setting,
picture mode, TV signal source, and the channel list.
1 Make sure that you have:
• Installed the remote control batteries.
• Connected an antenna, cable TV, or satellite TV. (See
page 7 through page 8.)
2 Press (power) to turn on your TV. The Easy Setup
wizard opens.
3 Press
or to highlight a language, then press
ENTER.
If you selected Store Display Mode, a message asks if
you are sure you want this mode. Select OK to continue
using Store Display Mode, or select Cancel to change
to Home Use Mode. Store Display Mode is not an
energy savings mode.
6 Press
Customize my TV
or to highlight an option, then press ENTER.
You can selec t:
• Wat ch T V to skip the customization options. You can
press MENU later to customize settings. Go to Finish
the wizard on page 16.
• Customize my TV to set options to maximize your
experience. Go to Customize my TV on page 15.
4 Press
5 Press
or to select Ye s (to turn on the Voice Guide)
or No (to turn off the Voice Guide), then press ENTER.
or to highlight Home Use Mode or Store
Display Mode, then press ENTER.
www.insigniaproducts.com
7 Press
ENTER.
or to highlight a time zone, then press
15
Page 16

Insignia LED TV
8 Press or to select On to turn on Daylight Saving
or Off to turn off Daylight Saving, then press ENTER.
9 Press
or to highlight Month, Day, or Year, press
or
to adjust the setting, then press ENTER one or
more times to highlight Next. When Next is
highlighted, press ENTER again.
13 If you select a preset label, press to select Next, then
press ENTER.
OR
If you select Custom, press ENTER, then press
to enter the first character in your custom label. Press
or
to move to the previous or next character position.
Use the arrow buttons to enter additional characters.
You can enter 12 characters (letters or numbers). When
you have finished creating your label, press ENTER,
press
to select Next, then press ENTER again.
Finish the wizard
14 Press
or to highlight Cable/Satellite Box, Cable
from the wall, or Antenna, then press ENTER.
•If you select Cable/Satellite Box, the screen that
opens shows you the ways you can connect the box.
or
10 Press
or to highlight Hour, Minute, or the AM/PM
field, press or adjust the option, then press ENTER
one or more times to highlight Next. When Next is
highlighted, press ENTER again.
11 Press
12 Press
or to highlight a video input source, then
press
to move to the label area.
or to highlight a preset label or Custom.
Press ENTER.
16
www.insigniaproducts.com
Page 17

Insignia LED TV
• If you select Cable from the wall or Antenna your
TV starts scanning for channels and displays a
progress screen.
Note: You can press EXIT to stop the auto channel search, but
you will need to run the auto channel search again to create a
channel list.
15 Press ENTER to close the wizard. If you selected:
• Cable from the wall or Antenna, your TV tunes to
the first channel it found in the scan.
• Cable/Satellite box, press INPUT to open the INPUT
SOURCE list, press
(HDMI or AV) you connected the box to, then press
ENTER. Your TV switches to the input you selected.
or to select the video input
Understanding the basics
This section covers basic information for:
• Turning your TV on or off
• Selecting the video input source
• On-screen menu overview
• Navigating the menus
• Selecting a channel
• Adjusting the volume
• Viewing channel information
Turning your TV on or off
1 Make sure that the power cord is connected to a power
outlet.
2 Press (power) to turn on your TV. The power
indicator turns off.
3 Press (power) again to turn off your TV. Your TV
enters standby mode, and the power indicator turns
red.
WAR NIN G: When your TV is in standby mode, it is still
receiving power. To completely disconnect power, unplug the
power cord.
If your TV does not receive an input signal for several
Note:
minutes, it automatically goes into standby mode.
www.insigniaproducts.com
17
Page 18

Insignia LED TV
Selecting the video input source
Note: Your TV automatically detects and displays which video
jacks have devices connected to them when the devices are
turned on. You can turn this feature off to always display all
inputs. See Adjusting menu settings on page 29.
1 Turn on your TV.
2 If you want to use a device connected to a video input
(such as a DVD or Blu-ray player), turn on the device.
3 Press INPUT, then select a video input source.
On-screen menu overview
Notes:
• Depending on the signal source selected, you may see
different options on your screen.
• Menu items that are not selectable are grayed out.
Picture menu (TV mode)
Settings menu (TV mode)
Accessibility menu
Audio menu (TV mode)
Channels menu (TV mode)
Help menu
PHOTOS menu (USB mode)
18
www.insigniaproducts.com
Page 19

Insignia LED TV
Press MENU to open the on-screen menu.
Press the right or left arrow to move the cursor on
the screen or to adjust a selected item.
Press the up or down arrow to select menu options.
Press ENTER to confirm a selection or enter a
sub-menu.
Press MENU to return to the previous menu.
Press EXIT to close the menu.
Selecting a channel
• Press CH or CH to go to the next or previous
channel on the memorized channel list.
• Press the number buttons to enter the channel number
you want, then wait for the channel to change or press
ENTER to immediately change the channel.
• To select a digital sub-channel, press the number
buttons to select the main digital channel, press
(sub-channel), then press the number button for the
sub-channel. Wait for the channel to change, or press
ENTER to immediately change the channel. For
example, to tune to channel 5.1, press 5,
(sub-channel), then 1.
Note: Button presses must be within three seconds of each
other.
• Press (return) to go to the last viewed channel.
Adjusting the volume
• Press VOL+ or VOL– to increase or decrease the
volume.
• Press MUTE to turn off the sound. Press MUTE again to
turn the sound back on.
Viewing channel information
• Press INFO* to view an information banner. The
information banner shows the current program
information, such as channel number, video input
source, and resolution.
• Digital channel information—Displays the channel
number, station name, channel label, broadcast
program name, TV rating, signal type, audio
information, resolution, current time, signal
strength, day of the week, date, and current program
start and end times, if provided by the broadcaster.
• Analog channel information—Displays channel
number, channel label (if present), signal type, audio
information, day of the week, date, and resolution, if
provided by the broadcaster.
Navigating the menus
www.insigniaproducts.com
19
Page 20

Insignia LED TV
Adjusting settings
1 Press MENU to open the on-screen menu.
2 Press
3 Press
4 If a sub-menu opens, press
5 Use the arrow buttons to adjust the option setting,
6 Press MENU to return to the previous menu, or press
or to highlight a menu, then press ENTER.
or to select an option, then press ENTER. If
the menu has more options than it can display on a
screen, use the
to view the other options.
or to select an option,
then press ENTER. If the menu has more options than it
can display on a screen, use the
to view the other
options.
then press ENTER.
EXIT to close the menu.
Using INlink
INlink lets you control HDMI CEC-compatible devices
connected to the HDMI jacks on your TV using the remote
control that came with your TV.
Note: You can use the media buttons on your remote control
to control playback.
To use INlink, you must set the INlink Control option on
the INlink menu to On.
Notes:
• HDMI cables must be used to connect HDMI
CEC-compatible devices to your TV.
• The connected device’s HDMI CEC feature must be turned
on.
• If you connect an HDMI device that is not HDMI
CEC-compatible, none of the INlink Control features work.
• Depending on the connected HDMI device, some INlink
Control features may not work.
1 Select the SETTINGS menu, then select
INlink(HDMI-CEC).
2 Select an option, then adjust the setting. You can
select:
• INlink Control—Turns the INlink feature on or off. You
must set this option to On to use the other INlink
options.
• Device Auto Power Off—Automatically turns off
HDMI CEC devices when you turn off your TV.
• TV Auto Power On—Automatically turns on your TV
when an HDMI CEC device is turned on, if the device
has this feature.
• Audio Receiver—Lets you use your TV’s remote
control to control the volume on an HDMI
CEC-compatible audio receiver connected to your TV.
• INlink Device List—Lets you display a list of HDMI CEC
devices that are connected to your TV.
• Connect—When you have more than one
INlink-compatible device connected, lets you select the
device you want to use.
• Root Menu—Lets you open an INlink-compatible
device’s root menu, then use your TV’s remote control
to control the device, if the device has this feature.
3 Press MENU to return to the previous menu, or press
EXIT to close the menu.
20
www.insigniaproducts.com
Page 21

Insignia LED TV
Using a USB flash drive
You can connect a USB flash drive to your TV to view
compatible JPEG pictures.
Notes:
• Never remove the USB flash drive or turn off your TV while
viewing JPEG pictures.
• The JPEG picture viewer only supports JPEG format images
(with “.jpg” file extensions) and not all JPEG files are
compatible with your TV.
Switching to USB mode
1 Make sure that you have connected the USB flash drive
to the USB port on your TV.
2 Press
or to highlight Ye s in the message that
appears, then press ENTER.
OR
If you connected the USB flash drive, then changed to a
different video input source, press INPUT, select
USB(Photos), then press ENTER.
To navigate the thumbnail index screen, press:
PRESS... TO...
or Browse through the files and folders.
ENTER View a highlighted photo full-screen or
open a highlighted folder.
MENU or EXIT Open the PHOTOS menu.
When a photo is displayed full-screen, a control bar
appears at the bottom of the photo. The file name,
picture resolution, size, and date are displayed on the
bottom of the control bar. If you do not press a button
within eight seconds, the control bar closes. Press
INFO* to open the control bar again.
To exit USB mode, press INPUT, then select another
Note:
input source.
3 Select one of the following options:
•Browse Photos
•Start Slideshow
Browse Photos
Browse Photos displays folder names and photo files
stored on the USB flash drive in a thumbnail index with the
first folder or file highlighted. A control bar appears at the
bottom of the screen.
To navigate on the photo screen, press:
PRESS... TO...
Go to the previous photo.
Go to the next photo.
ENTER Rotate the photo clockwise.
ASPECT Enlarge the image by 2×, or 4× or to select
Fill (to fill the screen). You can press
or to pan the photo.
EXIT Return to the thumbnail index.
MENU Return to the PHOTOS menu.
Start Slideshow
Start Slideshow displays photos in a slideshow. If the
photos you want to view are in a folder on the USB flash
drive, select the folder.
To control the slideshow:
PRESS... TO...
MENU Open the PHOTOS menu.
ENTER Pause the slideshow. Press again to
resume the slideshow.
EXIT Stop the slideshow and return to the
thumbnail index.
Note:
Photos are shown in the order they appear on the USB
flash drive. They may not be listed in file name order.
www.insigniaproducts.com
21
Page 22

Insignia LED TV
Adjusting the picture
This section covers:
• Adjusting the TV picture
• Automatically adjusting the aspect ratio
• Setting the power on picture mode
Adjusting the TV picture
You can adjust various settings to improve the quality of
the TV picture. Also, you can reset all picture settings to the
factory default.
1 Select the PICTURE menu.
2 Select an option, then adjust the setting. You can
select:
• Picture Mode—Selects the picture mode. You can
select:
• Vivid—(a bright and vivid picture). Significantly
increases the contrast, brightness, and sharpness.
This selection is good for video games, animation,
and in bright light environments.
• Standard—(a standard picture). Moderately
increases the contrast, brightness, and sharpness.
This selection is good for standard TV broadcasts.
• Energy Savings—(the backlight brightness is
decreased). Your TV has a backlight that provides
light for displaying a picture. By reducing the
amount of light, your TV uses less energy.
• Movie—(a finely detailed picture). Adjusts the
brightness and contrast and lowers the sharpness
for a more realistic picture. This selection is good for
watching the highest quality video such as Blu-ray
Discs, DVDs, and HDTV.
• Game—Adjusts the picture for the ultimate gaming
experience.
Notes:
• You can also press GAME to select game mode.
• Game is only available when the video input is set to HDMI
or AV.
• Custom—(customized picture). Lets you manually
adjust picture settings, such as brightness, contrast,
and sharpness.
Note: You can also pre ss PICTURE to select the picture mode.
• Advanced Settings—Opens the Advanced Settings
menu where you can adjust additional video options.
22
www.insigniaproducts.com
Page 23

Insignia LED TV
• Aspect Ratio—Adjusts how the picture fills the
screen. You can select:
ASPECT RATIO
OPTIONS
Normal:
Displays the image in the
original aspect ratio. You
may see black bars if the
original content is not
widescreen (16:9).
Zoom:
Expands the image to fill
the screen. The top and
bottom of the image may be
cropped.
Wide:
Use this option to view
content recorded in a
widescreen (16:9) aspect
ratio.
Cinema:
Stretches the image at the
edges, but keeps a clear
image in the center.
Auto:
Automatically adjusts the
image based on the screen
size and the TV program.
Select this option if you do
not know which aspect ratio
to choose.
Note: Auto is only
available when Auto
Aspect Ratio in the
Channels menu is set to On.
EXAMPLE
• OverScan—Extends text and images past the
screen edges to hide edge artifacts. You can select
On or Off.
• Dynamic Backlight—Enhances the contrast ratio
between light and dark areas of the picture. You can
select Off, Low, or High.
• Color Temperature—Selects the color temperature.
You can selec t Cool (to enhance the blues), Normal,
or Warm (to enhance the reds).
• Noise Reduction—Selects the noise reduction
mode to reduce picture noise (snow). You can select
Off, Low, Middle, or High.
• Dynamic Contrast—Automatically adjusts picture
detail and brightness. You can select On or Off.
• Backlight—Sets the overall brilliance of the screen.
• Brightness—Adjusts the brightness of the dark areas
of the picture.
• Contrast—Adjusts the brightness of the light areas of
the picture.
• Color—Adjusts the color intensity of the picture. A low
setting may make the color look faded. A high setting
may make the color look artificial.
• Tint—Adjusts the color balance of the picture. Use this
control to make skin tones look more natural.
• Sharpness—Adjusts the color detail of images. If you
set this control too high, dark images may appear with
light or white edges.
• Reset Picture Settings—Resets all picture settings to
factory mode.
3 Press MENU to return to the previous menu, or press
EXIT to close the menu.
www.insigniaproducts.com
23
Page 24

Insignia LED TV
Automatically adjusting the aspect ratio
Auto Aspect Ratio automatically changes how the picture
looks on the screen (aspect ratio) based on the TV program
you are viewing.
1 Select the CHANNELS menu.
2 Select Auto Aspect Ratio, then select On
(automatically adjust the aspect ratio) or Off (does not
automatically adjust the aspect ratio).
3 Press MENU to return to the previous menu, or press
EXIT to close the menu.
Setting the power on picture mode
You can set the picture mode your TV uses when you turn
it on.
1 Select the HELP menu, then select Power on in Vivid
Mode.
3 Press MENU to return to the previous menu, or press
EXIT to close the menu.
Adjusting the sound
This section covers:
• Adjusting sound settings
• Selecting the audio out mode
• Playing TV audio only
Adjusting sound settings
You can adjust sound settings to improve the sound
quality. You also can reset all sound settings to the factory
default.
1 Select the AUDIO menu.
2 Select an option, then adjust the setting. You can
select:
• Audio Mode—Selects the sound mode. You can select:
• Standard—Balances treble and bass. This setting is
good for watching standard TV broadcasts.
• Theater—Enhances treble and bass for a rich sound
experience. This setting is good for watching DVDs,
Blu-ray discs, and HDTV.
• Music—Preserves the original sound. This setting is
good for listening to music.
• News—Enhances vocals for TV audio. This setting is
good for watching news broadcasts.
• Custom—Lets you manually adjust sound settings.
2 Select On (when you turn on your TV, it will be in Vivid
picture mode) or Off (when you turn on your TV, it will
be in the picture mode it was in before you turned it
off).
24
www.insigniaproducts.com
Note: You can also pre ss AUDI O to select the audio mode.
• Balance—Adjusts the balance between the left and
right audio channels.
• Bass—Adjusts the low sounds.
• Treble—Adjusts the high sounds.
Page 25

Insignia LED TV
• TV Speakers—Selects where to play TV audio. When
you connect headphones to your TV, audio plays
through both the headphones and the TV speakers.
You can se le c t:
• Auto (default setting)—Automatically turns off the
TV speakers when you connect a device to the
/AUDIOOUT jack. When you disconnect the
device, the TV speakers turn on automatically.
• On—Always plays the audio through the TV
speakers. If a device is connected to the
/AUDIOOUT jack, the audio is played through
both the TV speakers and the device.
• Off—Turns off the TV speakers and plays the audio
only through the device connected to the
/AUDIOOUT jack. If you disconnect the device,
the TV speakers remain turned off.
• Digital Audio Format/Audio Delay—Adjusts the
digital audio sent to an external audio system. You can
select:
• Audio Format—Selects the digital audio format
sent to an external audio system. You can select:
• Pass Thru (to pass through the original digital
audio sound).
• PCM (to output audio in 2-channel stereo).
• Audio Delay—Fine tunes the audio when it is not in
sync with the video.
• MTS/SAP—(Analog channels only) Selects the audio
mode. You can select:
• Mono—Select this option if there is noise or static
on weak stereo broadcasts.
• Stereo—Select this option for programs broadcast
in stereo.
• SAP—Select this option to listen to a secondary
audio program, if available.
• Audio Language—(Digital channels only) Selects an
alternate audio language, if available.
• Headphones / Audio Out—You can use the
/AUDIOOUT jack on your TV to connect
headphones, a home theater system, soundbar, or
external speaker system. When a device is connected
to the /AUDIOOUT jack, the TV speakers are
muted. You can select:
• Headphones/Audio Out Variable—Select this
option to use the remote control that came with
your TV to control the audio from headphones, a
home theater system, a soundbar, or an external
speaker system you connected to the
/AUDIOOUT jack.
• Audio Out Fixed—Select this option to use the
remote control that came with the home theater
system, soundbar, or external speaker system you
connected to the /AUDIOOUT jack to control the
audio.
• Reset Audio Settings—Reset all audio settings to
factory defaults.
3 Press MENU
to return to the previous menu, or press
EXIT to close the menu.
Selecting the audio out mode
If your TV is on when you connect a device to the
/AUDIOOUT jack on your TV, a screen opens where
you select which audio out mode you want to use.
1 Connect headphones, a home theater system,
soundbar, or external speaker system to the
/AUDIOOUT jack on your TV.
2 Select an audio out mode. You can select:
• Headphones / Audio Out Variable—Select this
option to use the remote control that came with
your TV to control the audio from headphones, a
home theater system, or a soundbar you connected
to the /AUDIOOUT jack.
• Audio Out Fixed—Select this option to use the
remote control that came with the home theater
system, soundbar, or external speaker system you
connected to the /AUDIOOUT jack to control the
audio.
Playing TV audio only
You can turn off the picture on your TV and listen to the
program audio only.
1 Select the CHANNELS menu, then select Audio Only.
2 Select On.
3 Press MENU, ENTER, or
menu, or press EXIT to close the menu.
Notes:
• The picture turns off in about five seconds.
• Audio Only works only when the input source is TV, and
your TV is receiving a broadcast signal.
• To exit audio only mode, press any button. When you exit
audio only mode, the Audio Only option is automatically
reset to Off.
to return to the previous
www.insigniaproducts.com
25
Page 26

Insignia LED TV
Changing channel settings
You can scan for channels, control which channels are
displayed, set up and view favorite channels, change
channel labels, and check a digital channel’s signal
strength.
1 Select the CHANNELS menu.
2 Select an option, then adjust the setting. You can
select:
• Auto Channel Search—Lets you scan for channels
with signals. Your TV stores the channel information in
the channel list. When you press CH or CH , your
TV goes to the next or previous channel in the channel
list. You should scan for channels if the TV signal source
changes, for example you change from an outdoor
antenna to cable TV (no box). You can select
Cable / Satellite Box, Cable from the wall, or
Antenna.
Notes:
• If you have a cable or satellite box, you do not need to scan
for channels.
• You can press EXIT to stop the auto channel search, but you
will need to run the auto channel search again to create a
channel list.
• Add/Skip Channels—Lets you hide channels in the
channel list. When you press CH or CH , your TV
skips the hidden channels. You can still tune to a
hidden channel by pressing the number buttons for
the channel.
Notes:
• If you highlight a channel in the list, your TV displays the
channel in the background.
• A channel with a filled circle to the left is not hidden. A
channel with an empty circle to the left is hidden.
• If the list has more than one page, press or to scroll
through the pages.
• Favorite Channel Setup—Lets you create a list of
favorite channels so you can quickly browse through
your favorite channels.
Notes:
• If you highlight a channel in the list, your TV displays the
channel in the background.
• To remove a channel from the favorites list, highlight the
channel, then press ENTER. The filled circle is replaced with
an empty circle and the channel is removed from the list.
• If the list has more than one page, press
through the pages.
or to scroll
• Favorite Channel List—Lets you select a channel from
the favorite channel list.
Note: You can also pres s FAVO RI TE to select a channel.
• Channel Labels—Lets you add or change a channel
label to make it easier to identify the channel.
• Channel Strength—Lets you check the digital signal
strength to determine if you need to adjust your
antenna or digital cable input. The higher the signal
strength, the less likely you are to experience picture
degradation.
3 Press MENU to return to the previous menu, or press
EXIT to close the menu.
26
www.insigniaproducts.com
Page 27

Insignia LED TV
Setting parental controls
Parental controls let you prevent your children from
watching inappropriate material on TV. When set, parental
controls read the rating of the program (with some
exceptions, such as news and sports) and deny access to
programs that exceed the ratings level you select. To watch
programs that exceed the selected rating, you must enter a
password.
1 Select the SETTINGS menu, then select Parental
Controls.
2 Use the number buttons to enter your parental controls
password. The default password is 0000.
• USA Parental Locks—Lets you block U.S. TV shows
based on ratings and content types and movies based
on MPAA ratings.
Note: When you block a rating, that rating and all higher
ratings are blocked.
U.S. TV RATINGS
NONE Not rated
TV-Y All children
TV-Y7 Suitable for children 7 and older
TV-G General audiences
TV-PG Parental guidance suggested
TV-14 Parental guidance strongly suggested
TV-MA Mature audiences only
U.S. TV CONTENT RATINGS
All All ratings are blocked
FV Fantasy violence
L Strong language
SSexual situations
VViolence
D Suggestive dialog
Notes:
• You should change the default password to a number you
can remember.
• If you forget your password, enter 9999.
3 Select an option, then adjust the setting. You can
select:
• Block Unrated TV—Some TV programs, such as news
and sports shows are not rated. When Block Unrated
TV is turned on, TV programs that do not have ratings
are blocked. When you try to watch a blocked program,
you are prompted to enter the parental controls
password.
U.S. MOVIE (MPAA) RATINGS
None Movie not rated
G General audiences
PG Parental guidance suggested
PG-13 Suitable for children 13 and older
R Parental guidance suggested for children
under 17
NC-17 Not suitable for children under 17
XAdults only
www.insigniaproducts.com
27
Page 28

Insignia LED TV
• Canadian Parental Locks—Lets you block Canadian
TV shows based on ratings and content types.
Note: When you block a rating, that rating and all higher
ratings are blocked.
CANADIAN ENGLISH RATINGS
E Exempt programming
C Suitable for all children
C8+ Suitable for children 8 and older
G General audiences
PG Parental guidance suggested
14+ Suitable for children 14 and older
18+ Adult only
CANADIAN FRENCH RATINGS
E Exempt programming
G General audiences
8 ans+ Suitable for children 8 and older
13 ans+ Suitable for children 13 and older
16 ans+ Suitable for children 16 and older
18 ans+ Adult only
• Change Password—Lets you change the parental
control password.
• RRT5—If the program you are viewing has
downloadable rating information, lets you download
the information to use when setting parental controls.
Note: If the program you are viewing does not have RRT5
rating information, the RRT5 option is grayed.
• Reset RRT5—Resets the RRT5 information to the
factory default.
4 Press MENU to return to the previous menu, or press
EXIT to close the menu.
Locking the power button on your TV
When the button lock is turned On, the power button on
your TV is locked, and you can only turn your TV on or off
or change the video input source using the remote control.
1 Select the SETTINGS menu, then select Button Lock.
2 Select On (locks the power button) or Off (unlocks the
power button).
3 Press MENU to return to the previous menu, or press
EXIT to close the menu.
28
www.insigniaproducts.com
Page 29

Insignia LED TV
Using closed captioning
Closed captioning displays a text version of the TV
program audio or displays information provided by the
broadcaster.
You can turn closed captioning on or off, select the analog
or digital captioning mode, and change the style of the
digital captioning display.
1 Select the ACCESSIBILITY menu, then select Closed
Caption.
2 Select an option, then adjust the setting. You can
select:
• Caption Control—Turns captioning on or off. You can
select CC Off (turns off closed captioning), CC On
(turns on closed captioning), or CC on when mute
(turns on closed captioning when the sound is muted).
Note: You can also press CC to turn closed captioning on, off,
or on when mute.
• Analog Caption—Lets you select the captioning
mode for analog channels.
The CC1 mode usually displays a text version of the TV
program audio in a small banner. The other CC modes
display information provided by the broadcaster. You
can select CC1 through CC4.
The Te x t modes display information in a box that
covers half of the screen. You can select Te x t1 through
Te xt 4 .
• Digital Caption—Lets you select the captioning mode
for digital channels. Digital channels usually have one
or more closed captioning modes. The CS1 mode
usually displays a text version of the TV program audio
in a small banner. The other CS modes display
information provided by the broadcaster. You can
select CS1 through CS6.
• Digital CC Settings—Lets you customize how the
digital captioning appears on the screen. Set Style to
Custom, then select a style and adjust the setting.
3 Press MENU to return to the previous menu, or press
EXIT to close the menu.
Adjusting time settings
You can set the clock or turn on the sleep timer.
1 Select the SETTINGS menu, then select Time.
2 Select an option, then adjust the setting. You can
select:
• Date/Time—Lets you set the time zone, date, and
time.
If you skipped the steps in the Easy Setup wizard for
setting the date and time or if you move your TV to a
different time zone, you need to reset the clock to the
correct time.
• Sleep Timer—Let you specify the amount of time
before your TV automatically turns off. You can select
Off, 5, 10, 15, 30, 60, 90, 120, 180, or 240 minutes.
Note: You can also press SLEEP to set the sleep timer.
3 Press MENU to return to the previous menu, or press
EXIT to close the menu.
Adjusting menu settings
You can adjust how the TV menus look by:
• Selecting the menu language
• Turning the Input Sensor on or off
• Labeling an input source.
1 Select the SETTINGS menu.
www.insigniaproducts.com
29
Page 30

Insignia LED TV
2 Select an option, then adjust the setting. You can
select:
• Menu Language—Your TV can display the on-screen
menu in English, French, or Spanish. When you set up
your TV for the first time, you selected the language.
You can change the menu language to a different
language.
• Auto Input Sensing—When the Input Sensor feature
is turned on, your TV automatically detects which
video jacks have devices connected to them and
turned on. Your TV uses this information to determine
what options you can select on the INPUT SOURCE list
when you press INPUT.
• Input Labels—You can add a label to an input source
to make it easier to identify. The next time you press
INPUT, your label appears in the INPUT SOURCE list.
3 Press MENU to return to the previous menu, or press
EXIT to close the menu.
Adjusting accessibility settings
Your TV provides audio descriptions of menus and some
remote control functions. Depending on the broadcaster,
audio narration of key elements in programs may also be
available.
1 Select the ACCESSIBILITY menu.
• Closed Caption—Displays a text version of the TV
program audio or displays information provided by the
broadcaster. See Using closed captioning on page 29
for instructions about using closed captioning features.
• Audio Language—(Digital channels only) Selects an
alternate audio language, if available.
• Video Description—Audibly narrates key visual
elements in TV programs (not available on all
broadcasts). You can select On or Off.
• Learn How To Use Remote Control—Provides
information about using the remote control.
• Reset Accessibility Settings—Resets all accessibility
settings to factory mode.
3 Press MENU to return to the previous menu, or press
EXIT to close the menu.
Notes:
•The Voice Guide option is only available in the English
language.
• For more information about accessibility, call Customer
Care at 1-877-467-4289 (U.S. and Canada) or
01-800-926-3000 (Mexico).
Maintaining
• Do not use your TV in areas that are too hot or too cold,
because the cabinet may warp or the screen may
malfunction. Your TV works best in temperatures that
are comfortable to you.
• Storage temperatures are 32° to 122°F (0° to 50°C).
• Working temperatures are 41° to 104°F (5° to 40°C).
• Do not place your TV in direct sunlight or near a heat
source.
2 Select an option, then adjust the setting. You can
select:
• Voice Guide—Audibly narrates menu selections and
some remote control functions. You can select On or
Off.
Note: The Voice Guide option is only available in the English
language.
Cleaning the TV cabinet
Clean the cabinet with a soft, lint-free cloth. If the cabinet
is especially dirty, moisten a soft, lint-free cloth in a weak
detergent solution, squeeze the excess moisture from the
cloth, then wipe the cabinet with the cloth. Use a clean
cloth to dry the cabinet.
Cleaning the TV screen
Clean the screen with a soft, lint-free cloth.
30
www.insigniaproducts.com
Page 31

Insignia LED TV
Troubleshooting
Use the following troubleshooting information to solve
common problems.
Troubleshooting topics include:
•Using the HELP menu
• Video and audio problems
• Remote control problems
• General problems
• INlink (CEC-compatible) device problems
Using the HELP menu
The HELP menu provides information about frequently
asked questions.
1 Select the HELP menu.
• Learn More—Displays remote control codes and
information about connecting a soundbar.
• Update Firmware—If your TV is behaving oddly and
you have tried all the solutions in the troubleshooting
pages, lets you update your TV’s firmware. To update
the TV firmware, you need a:
• Computer with an available USB port
• High-speed Internet connection
•USB flash drive
CAUTIONS:
• Make sure that you have tried all other solutions before you
upgrade the firmware.
• While the firmware is updating, do not turn off your TV.
Notes:
• Firmware updates may not be available for your model.
• If you see a message that says the firmware file is incorrect,
make sure that you have downloaded the correct file for
your model.
• If you see a message that says the update failed or the TV
screen is blank and the power LED blinks red then blue, turn
your TV off and on, then run the upgrade again.
2 Select an option. You can select:
• System Info—Displays system information during
troubleshooting. If your TV uses open source code,
press ENTER to display the open source code
information.
Video and audio
PROBLEM SOLUTION
Picture does not fill the screen. There are
black bars around the picture.
No picture (screen is not lit) and no sound.
• Customize my TV—If you did not complete the
customization part of the Easy Setup wizard the first
time you turned on your TV, run the wizard again to
customize settings.
• TV Speaker Test—Tests your TV’s speakers to make
sure that they are working correctly.
• Reset to Default—Resets all settings (except parental
controls) to the factory defaults and runs the Easy Setup
wizard. See Turning on your TV for the first time on
page 15.
• Change the aspect ratio. See the Aspect Ratio option in Adjusting the
TV picture on page 22.
• Press on the TV or the remote control.
• Make sure that the Audio Only option is set to Off. See Playing TV
audio only on page 25.
• Make sure that the video cables are connected correctly and securely to
your TV.
• Adjust the contrast and brightness. See Adjusting the TV picture on
page 22.
• Make sure that the power cord is plugged into a working outlet.
• Press INPUT and make sure that the correct video input source is
selected. See Selecting the video input source on page 18.
• Try another channel. The station may be experiencing problems.
• Make sure that the incoming signal is compatible.
• Make sure that the antenna or cable TV is connected correctly and
securely. See Connecting a cable or satellite box on page 7 or
Connecting an antenna or cable TV (no box) on page 8.
• Check the closed caption settings. Some TEXT modes can block the
screen. See Using closed captioning on page 29.
www.insigniaproducts.com
31
Page 32

PROBLEM SOLUTION
Dark, poor, or no picture (screen is lit), but
sound is good.
No color, dark picture, or color is not
correct.
Only snow (noise) appears on the screen.
Picture quality is good on some channels
and poor on others. Sound is good.
• Try another channel. The station may be experiencing problems.
• Make sure that the antenna or cable TV is connected correctly and
securely. See Connecting a cable or satellite box on page 7 or
Connecting an antenna or cable TV (no box) on page 8.
• Adjust the brightness. See Adjusting the TV picture on page 22.
• Press PICTURE to change to a different picture mode. See Adjusting the
TV picture on page 22.
• If you are using an antenna, the digital channel signal may be low. To
check the digital channel signal strength, see the Channel Strength
option in Changing channel settings on page 26.
• If you are using an antenna and the signal strength is low, adjust the
antenna or use a highly directional outdoor antenna or set-top antenna
with a built-in amplifier.
• Make sure that the video cables are connected correctly and securely to
your TV.
• The video cable(s) you are using may be bad. Try a new set.
• Try another channel. The station may be experiencing problems.
• Adjust the color settings. See Adjusting the TV picture on page 22.
• Make sure that the video cables are connected correctly and securely to
your TV.
• Make sure that the antenna or cable TV is connected correctly and
securely. See Connecting a cable or satellite box on page 7 or
Connecting an antenna or cable TV (no box) on page 8.
• If you are using an antenna, the digital channel signal may be low. To
check the digital channel signal strength, see Channel Strength option
in Changing channel settings on page 26.
• If you are using an antenna and the signal strength is low, adjust the
antenna or use a highly directional outdoor antenna or set-top antenna
with a built-in amplifier.
• Try another channel. The station may be experiencing problems.
• Make sure that the antenna or cable TV is connected correctly and
securely. See Connecting a cable or satellite box on page 7 or
Connecting an antenna or cable TV (no box) on page 8.
• If you are using an antenna, the digital channel signal may be low. To
check the digital channel signal strength, see Channel Strength option
in Changing channel settings on page 26.
• If you are using an antenna and the signal strength is low, adjust the
antenna or use a highly directional outdoor antenna or set-top antenna
with a built-in amplifier.
• The problem may be caused by a poor or weak signal from the
broadcaster or cable TV provider.
• If you connect to cable TV without a set-top box and experience poor
picture quality, you may need to install a set-top box to improve signal
reception and picture quality. Contact your cable TV provider about
upgrading to a set-top box.
Insignia LED TV
32
www.insigniaproducts.com
Page 33

Insignia LED TV
PROBLEM SOLUTION
Dotted lines or stripes appear on the
screen.
The picture has a few bright or dark spots.
Video description or voice guide does not
work.
Good picture, but no sound.
Poor picture.
Good sound, but poor color.
• Make sure that the antenna or cable TV is connected correctly and
securely. See Connecting a cable or satellite box on page 7 or
Connecting an antenna or cable TV (no box) on page 8.
• If you are using an antenna, the digital channel signal may be low. To
check the digital channel signal strength, see Channel Strength option
in Changing channel settings on page 26.
• If you are using an antenna and the signal strength is low, adjust the
antenna or use a highly directional outdoor antenna or set-top antenna
with a built-in amplifier.
• Make sure that the video cables are connected correctly and securely to
your TV.
• The video cable(s) you are using may be bad. Try a new set.
• Other devices (for example, a surround sound receiver, external
speakers, fans, or hair dryers) may be interfering with your TV. Try
turning off one device at a time to determine which device is causing
interference. After you have determined which device is causing
interference, move it further from the TV to eliminate the interference.
• A few bright or dark spots on an LCD screen is normal. It does not affect
the operation of your TV.
• Make sure that your TV is not muted and the volume is turned up.
• Make sure that the options listed under the Accessibility menu are
turned on. See Adjusting accessibility settings on page 30.
• Video descriptions are not available on all broadcasts.
• Some remote functions are not narrated.
• Increase the volume.
• Make sure that the sound is not muted.
• Make sure that you do not have headphones connected. When
headphones are connected, no sound comes from the TV speakers.
• Change to a different audio mode. See the Audio Mode option in
Adjusting sound settings on page 24.
• If you are using a home theater system, soundbar, or external speaker
system, make sure that it is turned on and is not muted.
• If you are using a home theater system, soundbar, or external speaker
system, make sure that you have selected the correct output mode.
• If you are using a home theater system, soundbar, or external speaker
system and have connected it with a digital audio cable, select Digital
Audio Format/Audio Delay on the Audio menu, then set Audio
Format to PCM. See the Digital Audio Format/Audio Delay option in
Adjusting sound settings on page 24.
• Make sure that the audio cables are connected correctly and securely to
your TV.
• Make sure that the antenna or cable TV is connected correctly and
securely. See Connecting a cable or satellite box on page 7 or
Connecting an antenna or cable TV (no box) on page 8.
• If you are using an antenna, the digital channel signal may be low. To
check the digital channel signal strength, see
in Changing channel settings on page 26.
• If you are using an antenna and the signal strength is low, adjust the
antenna or use a highly directional outdoor antenna or set-top antenna
with a built-in amplifier.
• The audio cables you are using may be bad. Try a new set.
• Make sure that the room is not too bright. Light reflecting off the screen
can make the picture difficult to see.
• If an S-VHS camera or a camcorder is connected while another
connected device is turned on, the picture may be poor. Turn off one or
more devices.
• Adjust the contrast, color, and brightness settings. See Adjusting the TV
picture on page 22.
Channel Strength option
www.insigniaproducts.com
33
Page 34

PROBLEM SOLUTION
Audio noise.
No output from one of the speakers.
After images appear.
• Other devices (for example, a surround sound receiver, external
speakers, fans, or hair dryers) may be interfering with your TV. Try
turning off one device at a time to determine which device is causing
interference. After you have determined which device is causing
interference, move it further from the TV to eliminate the interference.
• Adjust the audio balance. See Adjusting sound settings on page 24.
• Test the TV’s speakers. See the TV Speaker Test option in Using the
HELP menu on page 31. If one or both of the speakers fails, try one of
the following solutions:
• Make sure that the audio cables are connected correctly and securely
to your TV.
• Make sure that the audio cables are connected to the AUDIO OUT
jacks on the connected device.
• Try a different set of audio cables.
• Make sure that the sound on the connected device is not muted.
• Try connecting the device to a different TV. If you do not hear sound,
the problem is with the device.
• Do not display a still image, such as a logo, game, or computer image,
for an extended period of time. This can cause a permanent after-image
to be burned into the screen. This type of damage is not covered by
your warranty.
Insignia LED TV
Remote control
PROBLEM SOLUTION
Remote control does not work.
Trouble programming your existing
universal remote control.
• Make sure that the power cord is plugged into a working outlet.
• Make sure that there are no obstructions between the remote control
and the remote control sensor on the front of the TV.
• Point the remote control directly at the remote control sensor on your
TV.
• The supplied batteries are wrapped tightly in clear plastic. Make sure
that you have removed this plastic from the batteries.
• Make sure that the batteries are installed correctly.
• Replace dead batteries with new batteries.
• See instructions in Programming universal remote controls on page 14.
• Codes are subject to change. For up-to-date codes, go to
Viewing universal remote control codes on page 14 or visit
www.insigniaproducts.com/remotecodes
• Replace dead batteries with new batteries.
• Refer to the User Guide that accompanied your universal remote
control and contact the manufacturer if problems persist.
34
www.insigniaproducts.com
Page 35

Insignia LED TV
General
PROBLEM SOLUTION
No power.
“No signal” error message is displayed.
After Auto Channel Search, there are no
channels.
When I press INPUT, I cannot select my
device (it is grayed out).
One or more channels do not display.
Password is lost.
Some settings cannot be accessed.
TV cabinet creaks.
button does not work.
• Make sure that the power cord is plugged into a working outlet.
• Unplug the power cord, wait 60 seconds, then plug the cord back in
and turn on your TV.
• Other devices (for example, a surround sound receiver, external
speakers, fans, or hair dryers) may be interfering with your TV. Try
turning off one device at a time to determine which device is causing
interference. After you have determined which device is causing
interference, move it further from the TV to eliminate the interference.
• Press INPUT and make sure that you have selected the correct input for
the device or service you are trying to use.
• If you are using a cable or satellite box, use the remote that came with
that box to change channels.
• Reception can vary by channel depending on the broadcast power
level of a given station. Contact your cable or satellite TV provider.
• Make sure that the antenna or cable/satellite TV is connected securely
to your TV.
• Try replacing the cable between the antenna/cable or cable/satellite
box and your TV.
• Turn on the device. Your TV automatically detects and displays which
video jacks have devices connected to them when the devices are
turned on.
• Turn off Auto Input Sensing. See Adjusting menu settings on page 29.
• Make sure that the channels are not blocked. See Setting parental
controls on page 27.
• Make sure that the channels are not hidden. The channel may have
been deleted from the channel list. You can tune to the channel by
pressing the number buttons or you can add the channel back to the
channel list. See the Add/Skip Channels option in Changing channel
settings on page 26.
• If you are using a cable or satellite box, use the remote that came with
that box to change channels.
• Press INPUT and make sure that you have selected the correct input for
the device or service you are trying to use.
• If you are using an antenna, the digital channel signal may be low. To
check the digital channel signal strength, see the Channel Strength
option in Changing channel settings on page 26.
•Enter 9999 to access parental controls, then set a new password. See
the Change Password option in Changing channel settings on
page 26.
• If a setting is grayed, the setting is not available in the current video
input mode (for example TV mode). Change to a different video input
source. See Selecting the video input source on page 18.
• When the TV is in use, the temperature rises naturally and may cause
the cabinet to expand or contract which can cause a creaking noise.
This is not a malfunction.
• Make sure that the Button Lock option is set to Off. See Locking the
power button on your TV on page 28.
• Unplug the power cord, wait a few seconds, then plug the cord back in
and turn on your TV.
www.insigniaproducts.com
35
Page 36

PROBLEM SOLUTION
TV keeps turning off.
A retail banner is displayed.
INlink (CEC-compatible) device
PROBLEM SOLUTION
My TV is not displaying the video from the
connected CEC device.
My TV is not playing the audio from the
connected CEC device.
Insignia LED TV
• Make sure that the sleep timer is not turned on. See the Sleep Timer
option in Adjusting time settings on page 29.
•You selected Store Display Mode when you ran the Easy Setup wizard.
Run the Easy Setup wizard and select Home User Mode on the Viewing
Environment screen. See the Customize my TV option in Using the
HELP menu on page 31.
• Make sure that the HDMI cable is connected securely to your TV and the
device.
• Make sure that the device is connected to your TV with an HDMI cable.
• Make sure that the device is a CEC device. See the documentation that
came with the device for more information.
• Press INPUT and make sure that the correct video input source is
selected. See Selecting the video input source on page 18.
• Make sure that the INlink feature is turned on. See the INlink Control
option in Using INlink on page 20.
• Try adjusting the TV picture. See Adjusting the TV picture on page 22.
• Make sure that the HDMI cable is connected securely to your TV and the
device.
• Make sure that the device is connected to your TV with an HDMI cable.
• Make sure that the device is a CEC device. See the documentation that
came with the device.
• Make sure that the TV volume is turned up and not muted.
• Try adjusting the TV sound. See Adjusting sound settings on page 24.
• Make sure that the TV speakers are turned on and not muted. See
Adjusting sound settings on page 24.
• Make sure that the INlink feature is turned on. See INlink Control
option in Using INlink on page 20.
• If you have connected an HDMI CEC audio receiver, adjust the volume
on the receiver. When your TV detects an audio receiver, the TV
speakers turn off and sound plays through receiver speakers only.
• If you are using a home theater system, soundbar, or external speaker
system, make sure that it is turned on and is not muted.
• If you are using a home theater system, soundbar, or external speaker
system, make sure that you have selected the correct output mode.
• If you are using a home theater system, soundbar, or external speaker
system and have connected it with a digital audio cable, select
Audio Format/Audio Delay on the Audio menu, then set Audio
Format to PCM. See the Digital Audio Format/Audio Delay option in
Adjusting sound settings on page 24.
Digital
36
www.insigniaproducts.com
Page 37

Insignia LED TV
PROBLEM SOLUTION
My TV’s remote control does not control
the device.
The device does not show up in the INlink
Device list.
My device does not turn off when I turn off
my TV.
My TV does not turn on when I turn on my
device.
The Audio Receiver setting on the INlink
menu keeps turning back on after it is
turned off.
Two volume bars appear when adjusting
the volume.
I cannot select the Root Menu option on
the INlink menu.
OR
The device’s root menu does not open
when I select Root Menu on the INlink
menu.
• Make sure that there are no obstructions between the remote control
and the remote control sensors on your TV and the device.
• Depending on the device, all the buttons may not work.
• After you switch to an INlink device, use the remote control that came
with the device to control playback.
• Make sure that the INlink feature is turned on. See INlink Control
option in Using INlink on page 20.
• If you are trying to control the volume on an HDMI CEC audio receiver
using your TV remote control, make sure that the TV Speakers option
on the Audio menu is set to On. See Adjusting sound settings on
page 24.
• If you are trying to control the volume on an HDMI CEC audio receiver
using your TV remote control, make sure that the Audio Receiver
option on the INlink menu is set to On. See the Audio Receiver option
in Using INlink on page 20.
• The device may not support this feature. See the documentation that
came with the device for more information.
• Make sure that the device is turned on.
• Make sure that the HDMI cable is connected securely to your TV and the
device.
• Make sure that the device is connected to your TV with an HDMI cable.
• Make sure that the INlink feature is turned on. See the INlink Control
option in Using INlink on page 20.
• Make sure that the device is a CEC device. See the documentation that
came with the device.
• Make sure that the INlink feature is turned on. See the INlink Control
option in Using INlink on page 20.
• Make sure that Device Auto Power Off is set to On on the INlink menu.
See the Device Auto Power Off option in Using INlink on page 20.
• The device may not support this feature. See the documentation that
came with the device for more information.
• Make sure that the INlink feature is turned on. See the INlink Control
option in Using INlink on page 20.
•Make sure that
the TV Auto Power On option in Using INlink on page 20.
• The device may not support this feature. See the documentation that
came with the device for more information.
• When Audio Receiver is set to Off and INlink Control is set to On and
you make an adjustment to the audio receiver (for example, turn the
volume knob or press a button), Audio Receiver is automatically set to
On. To prevent this from happening, turn off the INlink feature. See the
INlink Control option in Using INlink on page 20.
• When you adjust the volume on the audio receiver or with the TV
remote control, a double volume bar appears, one for the TV volume
and one for the audio receiver volume.
• The device may not support this feature. See the documentation that
came with the device for more information.
TV Auto Power On is set to On on the INlink menu. See
Note: If the problem is not solved by using these troubleshooting instructions, turn off your TV, then turn it on again.
www.insigniaproducts.com
37
Page 38

Insignia LED TV
Legal notices
FCC Statement
This device complies with Part 15 of the FCC Rules. Operation is
subject to the following two conditions: (1) this device may not cause
harmful interference, and (2) this device must accept any interference
received, including interference that may cause undesired operation.
This equipment has been tested and found to comply with the limits
for a Class B digital device, pursuant to Part 15 of the FCC Rules. These
limits are designed to provide reasonable protection against harmful
interference in a residential installation. This equipment generates,
uses, and can radiate radio frequency energy and, if not installed and
used in accordance with the instructions, may cause harmful
interference to radio communications. However, there is no guarantee
that interference will not occur in a particular installation. If this
equipment does cause harmful interference to radio or television
reception, which can be determined by turning the equipment off and
on, the user is encouraged to try to correct the interference by one or
more of the following measures:
• Reorient or relocate the receiving antenna.
• Increase the separation between the equipment and receiver.
• Connect the equipment into an outlet on a circuit different from
that to which the receiver is connected.
• Consult the dealer or an experienced radio/TV technician for
help.
War ni ng
Changes or modifications not expressly approved by the party
responsible for compliance could void the user's authority to operate
the equipment.
Cables
Connections to this device must be made with shielded cables with
metallic RF/EMI connector hoods to maintain compliance with FCC
Rules and Regulations.
Canadian Notice
Analog and Digital Television Receiving Apparatus
– Appareil de réception de télévision analogique et numérique,
Canada BETS-7 / NTMR-7
IC Statement
This device complies with Industry Canada licence—exempt RSS
standard(s).
Operation is subject to the following two conditions: (1) this device
may not cause interference, and (2) this device must accept any
interference, including interference that may cause undesired
operation of the device.
This equipment complies with IC radiation exposure limits set forth for
an uncontrolled environment.
Dolby License Notice and Trademark Acknowledgement
Manufactured under license from Dolby
Laboratories. Dolby, Dolby Audio, and the double-D
symbol are trademarks of Dolby Laboratories.
HDMI
HDMI, the HDMI logo, and High-Definition
Multimedia Interface are trademarks or registered
trademarks of HDMI Licensing LLC.
DTS Sound™
For DTS Pate nts, s ee http://patents.dts.com. Manufactured under
license from DTS Licensing Limited. DTS, the Symbol, & DTS and
the Symbol together are registered trademarks and DTS Sound is
a trademark of DTS, Inc. © DTS, Inc. All Rights Reserved.
Open Source
Font name: Arimo
Version 1.23
Copyright 2013 Steve Matteson
Licensed under the Apache License, Version 2.0 (the “License”); you
may not use this file except in compliance with the License. You may
obtain a copy of the License at
http://www.apache.org/licenses/LICENSE-2.0
Unless required by applicable law or agreed to in writing, software
distributed under the License is distributed on an “AS IS” BASIS,
WITHOUT WARRANTIES OR CONDITIONS OF ANY KIND, either express
or implied. See the License for the specific language governing
permissions and limitations under the License.
If you require additional information please call the Insignia support
line at 1-877-467-4289.
Copyright
INSIGNIA is a trademark of Best Buy and its affiliated companies.
Distributed by Best Buy Purchasing, LLC
7601 Penn Ave South, Richfield, MN 55423 U.S.A.
©2018 Best Buy. All rights reserved.
38
www.insigniaproducts.com
Page 39

Insignia LED TV
ONE-YEAR LIMITED WARRANTY
Definitions:
The Distributor* of Insignia branded products warrants to you, the
original purchaser of this new Insignia-branded product ("Product"),
that the Product shall be free of defects in the original manufacturer of
the material or workmanship for a period of one (1) year from the date
of your purchase of the Product ("Warranty Period").
For this warranty to apply, your Product must be purchased in the
United States or Canada from a Best Buy branded retail store or online
at www.bestbuy.com or www.bestbuy.ca and is packaged with this
warranty statement.
How long does the coverage last?
The Warranty Period lasts for 1 year (365 days) from the date you
purchased the Product. Your purchase date is printed on the receipt
you received with the Product.
What does this warranty cover?
During the Warranty Period, if the original manufacture of the material
or workmanship of the Product is determined to be defective by an
authorized Insignia repair center or store personnel, Insignia will (at its
sole option): (1) repair the Product with new or rebuilt parts; or (2)
replace the Product at no charge with new or rebuilt comparable
products or parts. Products and parts replaced under this warranty
become the property of Insignia and are not returned to you. If service
of Products or parts are required after the Warranty Period expires, you
must pay all labor and parts charges. This warranty lasts as long as you
own your Insignia Product during the Warranty Period. Warranty
coverage terminates if you sell or otherwise transfer the Product.
How to obtain warranty service?
If you purchased the Product at a Best Buy retail store location or from
a Best Buy online website (www.bestbuy.com or www.bestbuy.ca),
please take your original receipt and the Product to any Best Buy store.
Make sure that you place the Product in its original packaging or
packaging that provides the same amount of protection as the
original packaging.
To obtain warranty service, in the United States call 1-888-BESTBUY or
in Canada call 1-866-BESTBUY. Call agents may diagnose and correct
the issue over the phone.
Where is the warranty valid?
This warranty is valid only in the United States and Canada at Best Buy
branded retail stores or websites to the original purchaser of the
product in the county where the original purchase was made.
What does the warranty not cover?
This warranty does not cover:
• Customer instruction/education
•Installation
•Set up adjustments
• Cosmetic damage
• Damage due to weather, lightning, and other acts of God, such
as power surges
•Accidental damage
•Misuse
•Abuse
•Negligence
• Commercial purposes/use, including but not limited to use in a
place of business or in communal areas of a multiple dwelling
condominium or apartment complex, or otherwise used in a
place of other than a private home.
• Modification of any part of the Product, including the antenna
• Display panel damaged by static (non-moving) images applied
for lengthy periods (burn-in).
• Damage due to incorrect operation or maintenance
• Connection to an incorrect voltage or power supply
• Attempted repair by any person not authorized by Insignia to
service the Product
• Products sold "as is" or "with all faults"
• Consumables, including but not limited to batteries (i.e. AA, AAA,
C etc.)
• Products where the factory applied serial number has been
altered or removed
• Loss or Theft of this product or any part of the product
• Display panels containing up to three (3) pixel failures (dots that
are dark or incorrectly illuminated) grouped in an area smaller
than one tenth (1/10) of the display size or up to five (5) pixel
failures throughout the display. (Pixel based displays may
contain a limited number of pixels that may not function
normally.)
• Failures or Damage caused by any contact including but not
limited to liquids, gels or pastes.
REPAIR REPLACEMENT AS PROVIDED UNDER THIS WARRANTY IS YOUR
EXCLUSIVE REMEDY FOR BREACH OF WARRANTY. INSIGNIA SHALL NOT
BE LIABLE FOR ANY INCIDENTAL OR CONSEQUENTIAL DAMAGES FOR
THE BREACH OF ANY EXPRESS OR IMPLIED WARRANTY ON THIS
PRODUCT, INCLUDING, BUT NOT LIMITED TO, LOST DATA, LOSS OF USE
OF YOUR PRODUCT, LOST BUSINESS OR LOST PROFITS. INSIGNIA
PRODUCTS MAKES NO OTHER EXPRESS WARRANTIES WITH RESPECT
TO THE PRODUCT, ALL EXPRESS AND IMPLIED WARRANTIES FOR THE
PRODUCT, INCLUDING BUT NOT LIMITED TO ANY IMPLIED
WARRANTIES OF AND CONDITIONS OF MERCHANTABILITY AND
FITNESS FOR A PARTICULAR PURPOSE, ARE LIMITED IN DURATION TO
THE WARRANTY PERIOD SET FORTH ABOVE AND NO WARRANTIES,
WHETHER EXPRESS OR IMPLIED, WILL APPLY AFTER THE WARRANTY
PERIOD. SOME STATES, PROVINCES AND JURISDICTIONS DO NOT
ALLOW LIMITATIONS ON HOW LONG AN IMPLIED WARRANTY LASTS,
SO THE ABOVE LIMITATION MAY NOT APPLY TO YOU. THIS WARRANTY
GIVES YOU SPECIFIC LEGAL RIGHTS, AND YOU MAY ALSO HAVE OTHER
RIGHTS, WHICH VARY FROM STATE TO STATE OR PROVINCE TO
PROVINCE.
Contact Insignia:
1-877-467-4289
www.insigniaproducts.com
INSIGNIA is a trademark of Best Buy and its affiliated companies.
*Distributed by Best Buy Purchasing, LLC
7601 Penn Ave South, Richfield, MN 55423 U.S.A.
©2018 Best Buy. All rights reserved.
Made in China
www.insigniaproducts.com
39
Page 40

Insignia LED TV
One-year limited warranty Insignia Televisions—Mexico
Esta póliza de garantía, expedida por Best Buy Imports, S. de R.L. de C.V. (Best
Buy), con domicilio en Av. Santa Fe No.440 Piso 2 OFNA 202 y 203 P3 y P4, Col.
Santa Fe Cuajimalpa, C.P. 05348, Del. Cuajimalpa de Morelos, México, Ciudad
De México, teléfono (01) (52) (55) 88-50-20-00 para productos de la marca
INSIGNIA, DYNE X, ROCKETFISH, PLATINUM y MODAL (el “Producto” o los
“Productos”) establece las normas y condiciones de garantía para el Producto
que se describe en la siguiente tabla de Productos adquiridos por el cliente
(cómo se define más adelante) en tiendas Best Buy localizadas dentro de la
República Mexicana.
El tiempo de garantía aplicable a cada producto será marcado con una “x” por
el vendedor en el listado que antecede al momento de su venta. El tiempo de
garantía correspondiente empieza a correr a partir de la Fecha de compra y
recepción * que se coloca al momento de su venta.
D Y N E X
ACCESORIOS DE COMPUTO 1 AÑO
ACCESORIOS PARA LAPTOPS 1 AÑO
CABLES 1 AÑO / LIMITADO DE POR
LIMPIEZA DE AV 1 AÑO
RATONES 1 AÑO
SOPORTES DE TV 3 AÑOS
SUPRESORES DE PICOS 1 AÑO
TECLADOS 1 AÑO
OTROS ACCESORIOS 1 AÑO
OTROS PRODUCTOS HARDWARE 1 AÑO
R O C K E T F I S H
ACCESORIOS PARA LAPTOPS 1 AÑO
ACCESORIOS PARA VIDEOJUEGOS 90 DÍAS
ADAPTADORES 1 AÑO
ADAPTADORES LAPTOPS 3 AÑOS
ALIMENTACIÓN CPU 1 AÑO
AMPLIFICADORES DE CABLES 1 AÑO
AUDÍFONOS PARA CELULAR 1 AÑO
BOCINAS 1 AÑO
CABLES 1 AÑO / LIMITADO DE POR
CARGADORES 1 AÑO
CONECTORES 1 AÑO
REGULADORES DE CORRIENTE 1 AÑO
SELECTOR DE BOCINAS 1 AÑO
SOPORTES DE TV 5 AÑOS
OTROS ACCESORIOS LIMITADO DE POR VIDA
OTROS PRODUCTOS HARDWARE 1 AÑO
M O D A L
ACCESORIOS LIMITADO DE POR VIDA
PRODUCTOS HARDWARE 1 AÑO
VIDA
VIDA
IN S I G N I A
ACCESORIOS AUDIO PORTÁTIL 90 DÍAS
ACCESORIOS DE COMPUTO 1 AÑO
ACCESORIOS PARA LAPTOPS 1 AÑO
ACCESORIOS PARA VIDEOJUEGOS 90 DÍAS
ADAPTADORES 1 AÑO
ADAPTADORES LAPTOPS 1 AÑO/3 AÑOS
BOCINAS 90 DÍAS / 1 AÑO
BOCINAS DE COMPUTO 1 AÑO
BOOM BOXES / GRABADORAS 90 DÍAS
CABLES 1 AÑO / LIMITADO DE POR
CARGADORES 1 AÑO
CONEC TORES 1 AÑO
DVD PORTÁTIL 90 DÍAS / 1 AÑO
LIMPIEZA DE AV 1 AÑO
MUEBLES 1 AÑO
RADIO RELOJ 90 DÍAS
RATONES 1 AÑO
RECEPTORES 1 AÑO
SISTEMAS COMPACTOS 90 DÍAS
TAB L ETA S 90 DÍAS
TEATRO EN CASA 1 AÑO
TECLADOS 1 AÑO
TELEVISIONES 1 AÑO
TRIPIES Y MONOPIES 1 AÑO
OTROS ACCESORIOS 1 AÑO
OTROS PRODUCTOS HARDWARE 1 AÑO
VIDA
P L A T I N U M
MALETINES 1 AÑO
ESTUCHES PARA CÁMARAS 1 AÑO
OTROS ACCESORIOS LIMITADO DE POR VIDA
OTROS PRODUCTOS HARDWARE 1 AÑO
Para efectos de esta Póliza, se entenderá como Cliente, aquellos que adquieran
con carácter de usuario final, cualesquiera de los Productos vendidos en las
tiendas Best Buy, localizadas dentro de los Estados Unidos Mexicanos
(“México”).
CONC EPTOS
Mediante esta garantía, Best Buy se compromete a respaldar el Producto
contra cualquier defecto de los materiales y/o mano de obra empleados en la
fabricación del Producto. Asimismo, la presente garantía ampara todas las
piezas y componentes de este producto. Best Buy reparará el Producto en caso
de estar defectuoso, y remplazará la pieza o componente defectuosos, sin
costo para el Cliente, incluyendo la mano de obra y los gastos de
transportación derivados de su cumplimiento en nuestra red de servicio que
más adelante se detallará.
CONDICIONES
1. Notificación de las reclamaciones.
Solamente será necesario para ejercer la garantía, presentar el Producto y la
póliza de garantía debidamente sellada por el establecimiento de Best Buy que
lo vendió o se puede presentar la factura, o recibo, o el comprobante en el que
consten los datos específicos del producto adquirido.
40
www.insigniaproducts.com
Page 41

Insignia LED TV
Garantía de Servicio: Si el Cliente identifica que el Producto tiene partes,
componentes o materiales defectuosos, o defectos por mano de obra, deberá
dar aviso con prontitud y una explicación de la reclamación a la tienda Best Buy
donde adquirió su Producto y/o al centro de servicio especializado señalado en
esta póliza. Todas las reclamaciones para efectos de la presente garantía
deberán hacerse dentro de la vigencia de la misma. El personal especializado
del centro de servicio, realizará una inspección al Producto con el fin de
determinar la procedencia de la garantía. Ninguna reparación o reposición de
cualquier Producto o parte del mismo se hará sin cargo fuera de la vigencia de
la garantía del Producto. La garantía sobre la reparación de una falla específica
así como de las partes empleadas para la misma, estará vigente por el período
restante de la garantía del Producto o por un período de 90 (noventa) días
contados a partir de la fecha de reparación del Producto o instalación de los
repuestos, lo que resulte mayor.
Durante el período de garantía, para reparar el Producto defectuoso, el Cliente
podrá llevarlo a la tienda Best Buy en que lo adquirió, o al centro de servicio
especializado señalado en esta póliza. El Cliente deberá presentar el Producto
defectuoso con la póliza de garantía debidamente sellada por la tienda Best
Buy. Una vez reparado, Best Buy, o sus representantes, entregarán el Producto
al Cliente, en la misma tienda Best Buy en la que fue reclamada la garantía. Best
Buy no está obligado a proporcionar al Cliente un Producto substituto durante
el período de evaluación y en su caso de reparación en que el Producto
defectuoso se encuentre en el centro de servicio autorizado.
2. Recurso exclusivo.
Aceptación: El recurso exclusivo del Cliente y la única obligación de Best Buy
consiste en realizar todos los trabajos necesarios para reparar cualquier
Producto que se determine como defectuoso dentro del período de esta
garantía y proporcionar, sin cargo extra para el Cliente, los repuestos de las
partes defectuosas. [En el caso de que la reparación del Producto o el
reemplazo de partes no solucione el defecto, o que hayan transcurrido 30 días
posteriores a la recepción del Producto para su reparación, o se hayan
realizado 3 (tres) reparaciones consecutivas sobre la misma falla e incurra en
una cuarta entonces y sólo en dichos casos, Best Buy substituirá el Producto
defectuoso por otro igual ó de similares características, o reembolsará al
Cliente el precio de adquisición de dicho Producto, en la fecha en que fue
adquirido
3. Excepciones de la Garantía Limitada:
Best Buy no tendrá responsabilidad ni obligación ante el Cliente y por lo tanto
se exime de hacer efectiva la garantía en los siguientes casos: (i) cuando el
Producto se hubiese utilizado en condiciones distintas a las normales; (ii)
cuando el Producto no hubiese sido operado de acuerdo con el instructivo de
uso que se le acompaña; y (iii) cuando el Producto hubiese sido alterado o
reparado por personas no autorizadas por Best Buy. Best Buy excluye también
todos aquellos Productos que no hayan sido vendidos por Best Buy en
cualquiera de sus tiendas localizadas dentro de la República Mexicana. No
están cubiertas por la presente garantía las partes consumibles del Producto.
Esta garantía cubrirá defectos y/o fallos dentro del período de garantía
derivado de cualquier defecto de los materiales en la fabricación del Producto.
4. Validez territorial: La presente póliza de garantía es válida únicamente en
la República Mexicana.
RENUNCIA DE LA GARANTIA:
Excepto por la garantía aquí estipulada, la cual cumple con lo dispuesto por la
NOM-024-SCFI-2013, Best Buy excluye expresamente del alcance de la
presente garantía cualquier otra garantía explícita o implícita incluyendo, sin
limitar, todas o cualquier declaración o garantías de comerciabilidad y/o
aplicación o uso del Producto para propósitos específicos. Best Buy excluye
expresamente, a toda y cualesquiera garantía relativas a que su Producto sea
compatible con cualquier otro Producto o combinación de productos
diferentes a los Productos de la marca INSIGNIA, DYNEX, ROCKETFISH,
PLATINUM y MODAL a los que el Cliente decida conectar el Producto.
DATOS DEL PRODUCTO ADQUIRIDO:
Modelo: _______________________________________________________
No. de serie: ____________________________________________________
Tienda donde se adquirió: _________________________________________
Dirección de la tienda:
Calle ____________________________________________ no ___________
Col. _______________________________________ C.P. ________________
Delegación/Municipio _____________ Ciudad/ Estado _________________
Las Tiendas Best Buy en la Republica Mexicana, son los establecimientos donde
se puede hacer efectiva la garantía donde se pueden obtener componentes,
consumibles y accesorios del Producto: Centro de Servicio (y/o red de servicio):
•BEST BUY MUNDO E: Bvd. Manuel Ávila Camacho, No. 1007, San
Lucas Tepetlatalco, Tlalnepantla, C.P. 54055, Estado de México.
• BEST BUY INTERLOMAS: Boulevard Magnocentro 35, Col. Centro
Urbano San Fernando la Herradura C.P 52784 Huixquilucan,
Estado de México.
• BEST BUY ACOXPA: Avenida Acoxpa 430 Col. Ex Hacienda Coapa,
Del. Tlalpan, C.P 14300, Ciudad de México.
•BEST BUY POLANCO: Francisco Petrarca 202 Col. Polanco, Del.
Miguel Hidalgo, C.P. 11570, Ciudad de México.
• BEST BUY CIUDADELA: Calle Labna 1437, Col. Ciudad del Sol, C.P.
45071, Zapopan, Jalisco.
• BEST BUY GALERIAS: Av. Rafael Sanzio 150, Sub Ancla 3, Col. La
Estancia, C.P. 45030, Zapopan, Jalisco.
• BEST BUY TLAQUEPAQUE; Boulevard Marcelino García Barragán,
Nº 2077 y 2377, Col. Prados del Nilo, C.P. 44840, Guadalajara,
Jalisco.
• BEST BUY CUAUTITLAN: Av. Primero de Mayo, S/N, Manzana
C-34-C', Col. Centro Urbano, Cuautitlán Izcalli, Estado de México.
• BEST BUY MORELIA: Avenida Montaña Monarca Norte Nº 1000,
Col. Desarrollo Montaña Monarca C.P. 58350, Morelia,
Michoacán.
• BEST BUY PEDREGAL: Calle de Ladera no. 16 Col. Jardines del
Pedregal de San Ángel, C.P. 04500, Del. Coyoacán Ciudad de
México.
• BEST BUY MONTERREY: Av. Batallón de San Patricio No. 1000 Col.
Residencial San Agustín, C.P. 66260, San Pedro Garza Garcia,
Nuevo León, Monterrey.
•BEST BUY ANDARES: Blvd. Puerta de Hierro no. 4965 Fracc. Plaza
Andares, C.P. 45116, Zapopan, Jalisco
También consulte el listado de los nuevos establecimientos en
http://www.bestbuy.com.mx/tiendas
Sello del establecimiento que vendió el Producto:
(O puede presentar la factura, o recibo, o el comprobante en el que
Fecha de compra y recepción*
Fecha de Instalación (en caso de ser aplicable)
___________/_____________/_____________
Centro de atención telefónica para la Ciudad de México e interior de la
República:
01-800 BESTBUY (2378289)
http://www.bestbuy.com.mx/
www.insigniaproducts.com
consten los datos específicos del producto adquirido)
DÍA MES AÑO
41
Page 42

If the power cord is damaged, it must be replaced by the manufacturer or
its service agent or qualified personnel to avoid risk.
For product inquiries or accessibility assistance, please contact us with the information below:
1-877-467-4289
www.insigniaproducts.com
INSIGNIA is a trademark of Best Buy and its affiliated companies.
Distributed by Best Buy Purchasing, LLC
7601 Penn Ave South, Richfield, MN 55423 U.S.A.
©2018 Best Buy. All rights reserved.
Made in China
Mexico:
01-800-926-3000
Best Buy Imports S. DE R.L. DE C.V.
Avenida Santa Fe No. 440 Piso 2 Ofna 202 Y 203 P3 Y P4
Colonia Santa Fe Cuajimalpa, C.P. 05348, Delegación Cuajimalpa De Morelos, México, Ciudad De México
©2018 Best Buy. All rights reserved.
Made in China
V1 ENGLISH
17-0791
 Loading...