

Page 1

User Guide
20” Widescreen LED Monitor
NS-20EM50A13
Page 2

Contents
Introduction . . . . . . . . . . . . . . . . . . . . . . . . . . . . . . . . . . . . . . . . . . . . . . . . . . . . .1
Safety Precautions . . . . . . . . . . . . . . . . . . . . . . . . . . . . . . . . . . . . . . . . . . . . . . .1
WARNINGS: . . . . . . . . . . . . . . . . . . . . . . . . . . . . . . . . . . . . . . . . . . . . . . . . . . . . . . 1
Features . . . . . . . . . . . . . . . . . . . . . . . . . . . . . . . . . . . . . . . . . . . . . . . . . . . . . . . . .1
Package contents . . . . . . . . . . . . . . . . . . . . . . . . . . . . . . . . . . . . . . . . . . . . . . . . 1
Front view . . . . . . . . . . . . . . . . . . . . . . . . . . . . . . . . . . . . . . . . . . . . . . . . . . . . . . . 1
Rear view . . . . . . . . . . . . . . . . . . . . . . . . . . . . . . . . . . . . . . . . . . . . . . . . . . . . . . . . 1
Setting up your monitor . . . . . . . . . . . . . . . . . . . . . . . . . . . . . . . . . . . . . . . . . .2
Installing the stand base . . . . . . . . . . . . . . . . . . . . . . . . . . . . . . . . . . . . . . . . . 2
Stand removal for mounting the monitor . . . . . . . . . . . . . . . . . . . . . . . . . 2
Making connections . . . . . . . . . . . . . . . . . . . . . . . . . . . . . . . . . . . . . . . . . . . . . .2
Using the on screen display (OSD) . . . . . . . . . . . . . . . . . . . . . . . . . . . . . . . .3
Maintaining . . . . . . . . . . . . . . . . . . . . . . . . . . . . . . . . . . . . . . . . . . . . . . . . . . . . . .3
Care . . . . . . . . . . . . . . . . . . . . . . . . . . . . . . . . . . . . . . . . . . . . . . . . . . . . . . . . . . . . . 3
Safety Tips . . . . . . . . . . . . . . . . . . . . . . . . . . . . . . . . . . . . . . . . . . . . . . . . . . . . . . . 3
Troubleshooting . . . . . . . . . . . . . . . . . . . . . . . . . . . . . . . . . . . . . . . . . . . . . . . . .3
Troubleshooting questions . . . . . . . . . . . . . . . . . . . . . . . . . . . . . . . . . . . . . . 3
Specifications . . . . . . . . . . . . . . . . . . . . . . . . . . . . . . . . . . . . . . . . . . . . . . . . . . . .5
Supported Timing Modes . . . . . . . . . . . . . . . . . . . . . . . . . . . . . . . . . . . . . . . . 6
Legal notices . . . . . . . . . . . . . . . . . . . . . . . . . . . . . . . . . . . . . . . . . . . . . . . . . . . . .6
One-year limited warranty . . . . . . . . . . . . . . . . . . . . . . . . . . . . . . . . . . . . . . . .7
ii
www.insigniaproducts.com
Page 3
20” Widescreen LED Monitor
Introduction
Congratulations on your purchase of this
high-resolution multi-scan color monitor. This color
monitor represents the state of the art in monitor
design, and is designed for reliable and trouble-free
performance. Please read this guide thoroughly
before installation.
Safety Precautions
This monitor is manufactured and tested on the
principle that a user’s safety comes first. However,
improper use or installation may result in danger to
the monitor as well as to the user. Carefully go over
the following WARNINGS before installation and
keep this guide handy.
WARN INGS :
• This monitor should be operated only at the
correct power sources indicated on the label on
the back of the monitor. If you’re unsure of the
power supply in your residence, consult your local
dealer or power company.
• Do not try to repair the monitor yourself as it
contains no user serviceable parts. The monitor
should only be repaired by a qualified technician.
• Do not remove the monitor cabinet. There are
high-voltage parts inside that may cause electric
shock to human bodies, even when the power
cord is disconnected .
• Stop using the monitor if the cabinet is damaged.
Have it checked by a service technician.
• Put your monitor only in a clean, dry environment.
Unplug the monitor immediately if gets wet and
consult your service technician.
• Always unplug the monitor before cleaning it.
Clean the cabinet with a clean, dry cloth. Apply
non-ammonia based cleaner onto the cloth, not
directly onto the glass screen.
• Keep the monitor away from magnetic objects,
motors, TV sets, and transformers.
• Do not place heavy objects on the cable or power
cord.
• For PLUG CABLE EQUIPMENT, the outlet shall be
installed near the equipment and shall be easily
accessible.
• Due to safety concerns, if the VESA mounting kit is
purchased separately, please make sure that the
mounting kit is UL-Listed, and replaceable only by
service personnel.
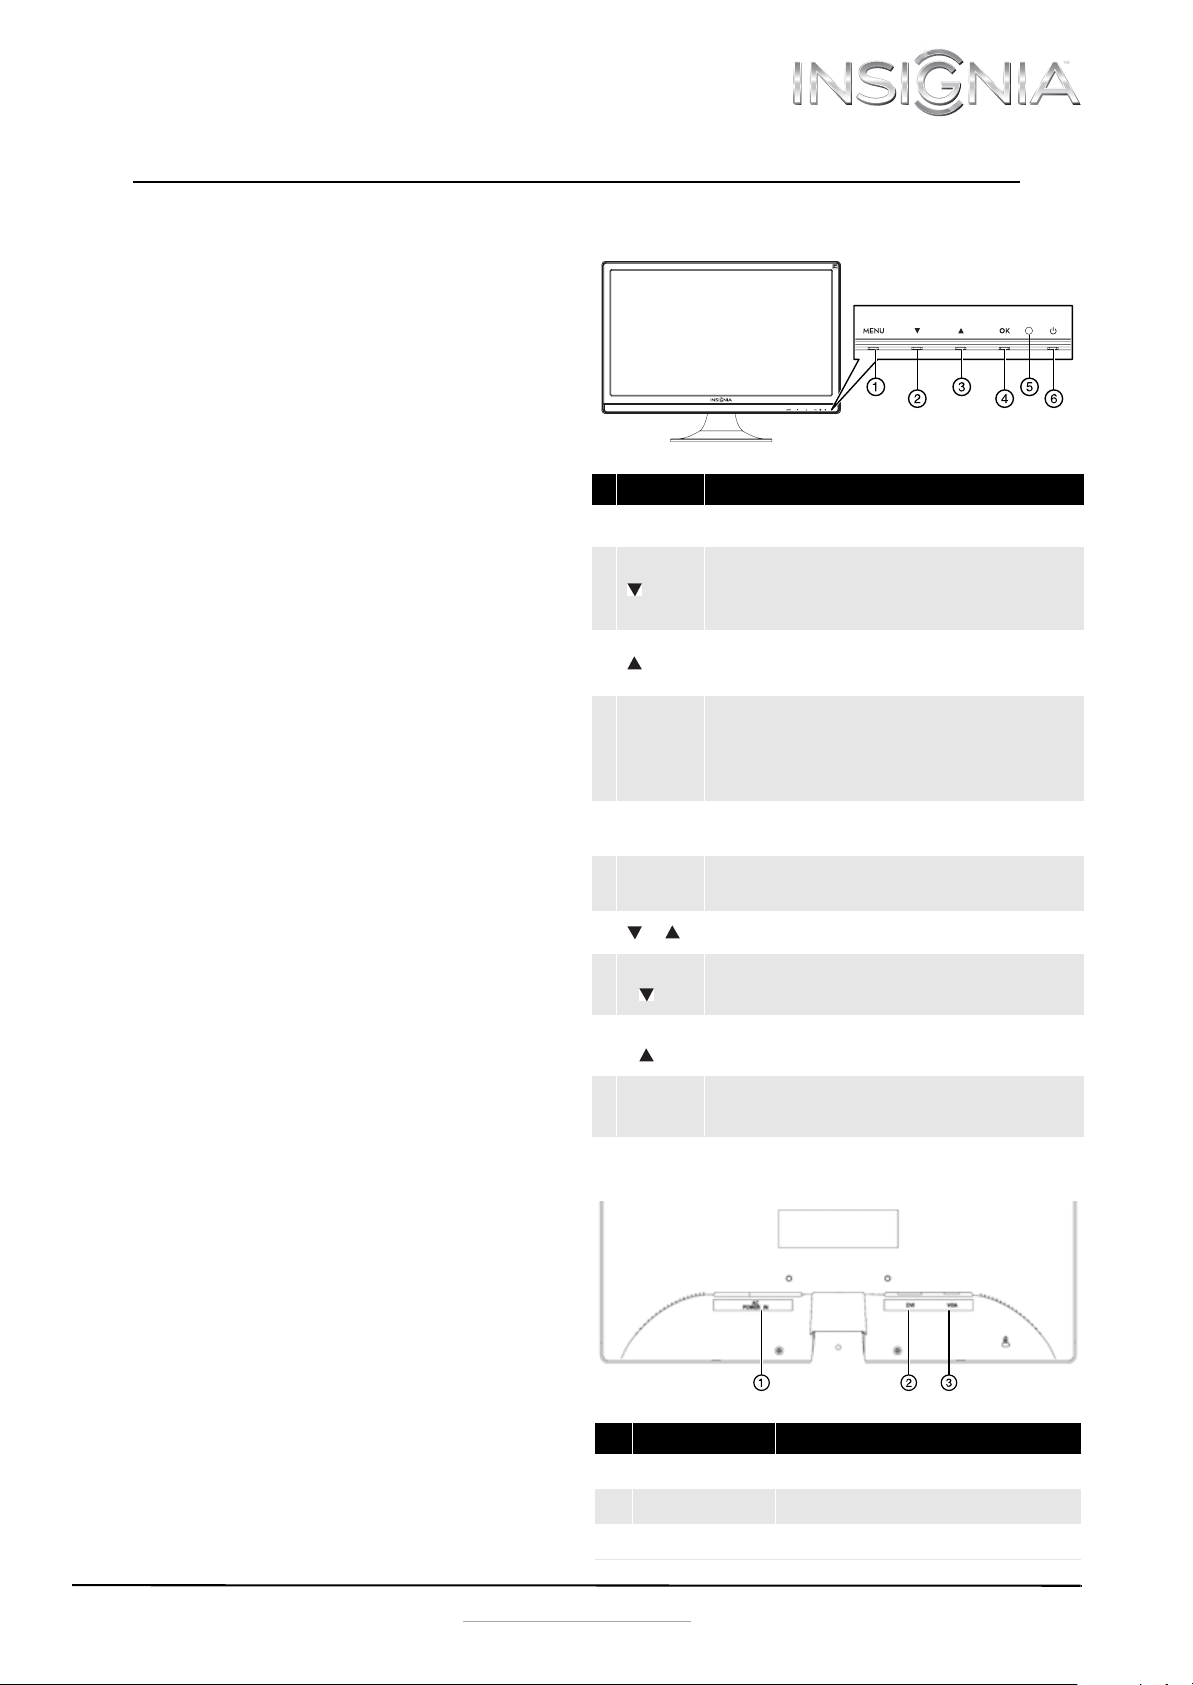
Front view
# Component Description
1MENU
2
3
4 OK
LED
5
indicator
Power
6
On/Off
+
MENU
+
MENU
+
MENU + OK
Press to open the on screen display (OSD) menu and enter menu
mode. Press again to exit the OSD and return to display mode.
In menu mode, press to scroll down or decrease settings in the OSD
menus.
In normal operation, press to access the Contrast/Brightness/
Backlight menu.
In menu mode, press to scroll up or increase settings in the OSD
menus.
In normal operation, press to access Color Vision mode.
In menu mode, press to confirm a selection or setting in the OSD
menus.
In normal operation, press and hold for three seconds to auto adjust
the image.
Press to enter the input select menu. You can choose VGA or DVI.
Turns blue when the monitor is on. Turns off when the monitor is
turned off.
Press to turn the monitor on. Press again to turn the monitor off.
In normal operation, press simultaneously to reset contrast and
backlight.
In normal operation, press simultaneously to lock/unlock the power
button functionality. (So the monitor cannot be turned on or off
with the Power button.)
In normal operation, press simultaneously to lock/unlock the MENU
button functionality. (So you cannot access the OSD menus by
pressing the MENU button.)
In normal operation, press simultaneously to switch between
similar PC timings (for example 720 x 400 @70 Hz and 640 x 400 @
70 Hz).
Rear view
Features
Package contents
• 20” Widescreen LED monitor
•Power cable
•VGA cable
•Quick Setup Guide
# Item Description
1 Power connector
2 DVI jack
3VGA jack
www.insigniaproducts.com
Plug the AC power cord into this connector.
Plug an optional DVI connector into this jack.
Plug the VGA connector into this jack.
1
Page 4

NS-20EM50A13 20” Widescreen LED Monitor
Setting up your monitor
Installing the stand base
To install the stand base:
1 Remove the monitor from the box and lay it face
down on a table, with a soft cloth or towel
beneath it to protect the screen.
2 Insert the base into the stand column until it
clicks into place.
Stand removal for mounting the monitor
To remove the stand base:
1 Lay the monitor face down on a table, with a
soft cloth or towel beneath it, to protect the
screen.
2 Squeeze the sides of the column cover and pull
to remove it.
3 Using a Phillips screwdriver, remove the three
screws that secure the column to the monitor.
4 Wiggle the column loose from the monitor.
Making connections
To connect your monitor:
1 Connect the power cord (A) to the monitor, then
to a properly grounded AC outlet.
OR
2 Make sure that both the monitor and the
computer are powered OFF. Connect the VGA
cable (B) to the computer, then to the monitor.
-ORConnect a DVI cable (not included)(C) from the
DVI output of the computer to the DVI input of
the monitor. If your PC has an HDMI output, you
can use an HDMI to DVI cable (not included).
3 Turn on the computer, then the monitor.
4 If you are using Windows, you may need to set
the resolution and refresh rate (example: 1600 x
900 @ 60 Hz).
•Windows 7:
1 Click the Start button and select Control
Panel.
2 Under Appearance and Personalization,
click Adjust screen resolution.
3 Click the drop-down list next to Resolution,
move the slider to the resolution you want,
then click Apply.
4 Click Keep to use the new resolution, or
click Revert to go back to the previous
resolution.
•Windows Vista:
1 Click the Start button and select Control
Panel.
2 Click Appearance and Personalization,
then click Display Settings.
3 Under Resolution, move the slider to the
resolution you want, then click Apply.
• Windows XP:
1 Right-click on your desktop and select
Properties.
2 Click the Settings tab at the top of the
window.
3 Under Resolution, move the slider to the
resolution you want, then click Apply.
-ORIf you are using a Mac you may need to set the
resolution.
•Open the Apple menu and select System
Preferences.
•Click Displays, then click Display.
• Select the appropriate resolution from the
Resolutions list.
2
www.insigniaproducts.com
Page 5

20” Widescreen LED Monitor
Using the on screen display
(OSD)
To use the on screen display (OSD) menus:
1 Press the MENU button to open the menus. The
Main Menu opens.
MENU: Exit OK: Select
2 Press or to select a menu item, then press
OK to go to that sub-menu. You can select:
• Auto Image Adjust–automatically adjusts
Horizontal Position, Vertical Position, Phase
(Fine Tune) and Clock (H.Size) of the screen
(available only with VGA cable (analog)
connections)
• Contrast/Brightness
•Contrast
•Brightness
•Backlight
•Input Select
• Color Adjust
• Warm-Emphasis on the red end of the
spectrum.
• Normal- No emphasis.
• Cool-Emphasis on the blue end of the
spectrum.
• User Color–to manually adjust the color
levels. Press OK to select the color to
adjust.
• Information–to display information on the
current input signal.
• Manual Image Adjust
• Horizontal Size
•H./V. Position
•H. Position
•V. Position
• Fine Tune–to fine tune the phase and
clock.
• Sharpness–to adjust the clarity of a
non-WXGA+ (1600x900) image.
• Video Mode Adjust–select Full Screen,
Over Screen, or Aspect Ratio.
• Color Vision Mode–to select a preset
display environment. You can select
Standard, Game, Cinema, Scenery, Text,
or ECO.
•Setup Menu
• Language Select
•OSD Position
•H. Position
•V. Position
• OSD Time Out–to automatically turn off
the OSD after a preset period of time.
• Memory Recall–to reset all settings to factory
default. Press OK.
3 When the sub-menu opens, press or to
go to the item you want to adjust, then press OK
to select that item.
4 Press or to adjust the item you selected,
then press MENU to exit the menu.
Maintaining
Care
• Avoid exposing your monitor to direct sunlight or
other heat source. Place your monitor away from
the sun to reduce glare.
• Put your monitor in a well ventilated area.
• Do not place any heavy things on top of your
monitor.
• Make certain your monitor is installed in a clean
and moisture-free area.
• Keep your monitor away from magnets, motors,
transformers, speakers, and TV sets.
Safety Tips
• If smoke, abnormal noise, or odor came out of
your monitor, you should remove the power cord
immediately and call your service center.
• Never remove the back cover of your monitor
cabinet. The display unit inside contains
high-voltage parts and may cause an electric
shock.
• Never try to repair your monitor yourself. Always
call your service center or a qualified technician to
fix it.
Troubleshooting
Troubleshooting questions
How do I connect my monitor to two computer systems?
1 Connect the power cord to the monitor, then to
a properly grounded AC outlet.
2 Make sure that the monitor and both computers
are turned OFF. Connect the included VGA cable
to the VGA output jack on one of the computers,
then to the VGA input jack on the monitor.
3 Connect a DVI cable (not included) from the DVI
output jack on the other computer to the DVI
input jack on the monitor.
OR
If your PC has an HDMI output, you can use an
HDMI to DVI cable (not included).
4 Turn ON your computers and monitor. The
monitor's blue power LED turns ON.
www.insigniaproducts.com
3
Page 6

NS-20EM50A13 20” Widescreen LED Monitor
5 You may need to set the resolution and refresh
rate on both computers (example: 1600 x 900 @
60 Hz).
How do I connect two monitors to one computer system?
1 Connect the power cord to both monitors, then
to properly grounded AC outlets.
2 Make sure that both monitors and the computer
are turned OFF. Connect VGA cables to the VGA
output jacks on the computer, then to the VGA
input jack on each monitor.
OR
Connect DVI cables to the DVI output jacks on
the computer, then to the DVI input jack on
each monitor.
OR
Use a VGA cable connection between one
monitor and the computer, and a DVI cable
connection between the other monitor and the
computer.
Note
If your PC has an HDMI output, you can use an HDMI
to DVI cable (not included).
3 Turn ON your computer and monitors. The
monitor's blue power LED turns ON.
4 You will need to choose if you would like your
screen to be a duplication of the other monitor
or and extension.
Note
You may also need to set the resolution and refresh
rate on both computers (example: 1600 x 900 @
60 Hz).
How do I set the refresh rate of my display?
Windows 7:
1 Click the Start button, then select Control
Panel.
2 Under Appearance and Personalization, click
Display.
3 Click Adjust screen resolution on the left of the
screen.
4 Click Advanced Setting.
5 Click the Monitor tab, then click the drop-down
list under Screen refresh rate and select your
desired refresh rate.
6 Click OK.
7 Click OK to exit out of the Display Settings
window
Windows Vista:
1 Click the Start button and select Control Panel.
2 Click Appearance and Personalization, then
click Personalization.
3 Click Display Settings.
4 Click the Advanced Setting button.
5 Click the Monitor tab, then click the drop-down
list under Screen refresh rate and select your
desired refresh rate.
6 Click OK.
7 Click OK to close the Display Settings window.
Windows XP:
1 Right-click on your desktop, then select
Properties.
2 Click the Settings tab at the top of the window.
3 Click the Advanced button.
4 Click the Monitor tab, then click the drop-down
list under Screen refresh rate and select your
desired refresh rate.
5 Click OK.
6 Click OK to close the Display Settings window.
Mac:
1 Open the Apple menu, then select System
Preferences.
2 Click Displays under Hardware, then click
Display.
3 Click the drop-down list beside Refresh Rate,
then select your desired refresh rate.
For more information, refer to the User Manual that
came with your computer or your graphics card.
My picture is not filling the screen. I have black bars around my picture.
This is due to the aspect ratio. Different sources and
software programs may be presented in different
aspect ratios. Try changing the appearance of the
screen…(cross-reference to Manual Image Adjust
section of the manual.)
The image is out of focus.
You may need to adjust your resolution. (Add
cross-reference to adjusting resolution section of
the manual).
How do I extend my display to a second monitor?
Windows 7:
1 Right-click on your desktop, then click Screen
resolution.
2 Click the Multiple displays dropdown and
select Extend these displays.
3 Click OK.
4 Click Keep to use the extended display, or click
Revert to go back to the previous setting.
Windows Vista:
1 Right-click on your desktop, then click
Personalize.
2 Click Display Settings.
3 Click the large dropdown menu choose 2.
(Default Monitor), then click the Extend the
desktop to this monitor check box.
4 Drag the monitor icons to match the way you
have your monitors setup on your desk.
Note
To be sure which monitor is 1 or 2 click the Identify
Monitors button.
5 Click OK.
6 Click Ye s to use the extended display, or click No
to go back to the previous setting.
4
www.insigniaproducts.com
Page 7

20” Widescreen LED Monitor
Windows XP:
1 Right-click on your desktop, then click
Properties.
2 Click the Display dropdown menu and select 2.
(Default Monitor), then click the Extend my
Windows desktop onto this monitor check
box.
3 Drag the monitor icons to match the way you
have your monitors setup on your desk.
Note
To be sure which monitor is 1 or 2 click the Identify
button.
4 Click OK.
5 Click Ye s to use the extended display, or click No
to go back to the previous setting.
Mac:
1 Open the Apple menu, then select System
Preferences.
2 Click Displays under Hardware, then click
Arrangement.
3 Drag the monitor icons to match the way you
have your monitors setup on your desk.
4 Close the Displays window.
How do I duplicate my screen to a second monitor?
Windows 7:
1 Right-click on your desktop, then click Screen
resolution.
2 Click the Multiple displays dropdown and
select Duplicate these displays.
3 Click OK.
4 Click Keep to use the extended display, or click
Revert to go back to the previous setting.
Windows Vista:
1 Right-click on your desktop, then click
Personalize.
2 Click Connect to a projector or other external
display. The Windows Mobility Center opens.
3 Click Connect display. The new display is
detected.
4 Select Duplicate my desktop on all display
(mirrored), then click OK.
5 Close the Windows Mobility Center window and
the Control Panel.
My power cord or VGA cable is damaged or missing. Can I get a replacement?
Yes, power cords or VGA cables are available.
Contact Insignia Customer Support at
1-877-467-4289 or www.insigniaproducts.com
Symptom Possible Solutions
No power
Power on but n o
screen image
Wrong or abnormal
colors
• Make sure A/C power co rd is securely connected to the
power adapter and the power supply is firmly connected
to the monito r.
• Plug another electrical device into the power outlet to
verify that the outlet is supplying proper voltage.
• Make sure a VGA or DVI cable is installed.
• Check to see if the blue power LED is ON.
• Make sure that the computer is turned ON.
• Make sure the VGA cable supplied with the monitor, or
DVI cable (not included) is tightly secured to the VGA or
DVI output port on back of the computer. If not, tightly
secure it.
• Adjust the brightness. See “Using the on screen display
(OSD)” on page 3.
• If any colors (red, green, blue) are missing, check the
VGA or DVI cable to make sure it is securely connected.
Loose or broken pins in the cable connector could cause
an improper connection.
• Connect the monitor to another computer.
• Make sure that the VGA or DVI cable you are using is not
damaged or broken.
• Try adjusting the colors on your monitor, see Color Adjust
under Using the On Screen Display (OSD). (Make sure to
cross-reference or hyperlink the text to this section in
the manual). See “Using the on screen display (OSD)” on
page 3.
Specifications
Note: Product specifications are subject to change without notice.
LCD Panel 20” (50.8 cm) TFT
Power Manage ment Energy Star Compliant VESA
DPMS compatible
<1 W
Display Resolution WXGA+ 1600 x 900 max. Vertical Frequency 60Hz max.
Pixel Dimensions 0.2768 x 0.2768 mm
LCD Display Color 16.7 M
Tilt -5° ~ 20°
Active Display Area 17.43 x 9.81 inches (442.8 x 249.07 mm)
Tem p er a tu r e Operating: 32° F ~ 104° F (0° C ~ +40° C)
Storage: -4° F ~ 140° F (-20° C ~ +60° C)
Compliance cULus, FCC-B, Energy Star
Power Input voltage AC 100-240 V
Windows XP:
1 Right-click on the desktop, then click the control
panel for your video card (if available).
2 Set the display mode on the video card control
panel.
Mac:
1 Open the Apple menu, then select System
Preferences.
2 Click Displays under Hardware, then click
Arrangement.
3 Check the Mirror Displays box.
4 Close the Displays window.
www.insigniaproducts.com
5
Page 8

Supported Timing Modes
VGA 720 x 400 @ 70 Hz
VGA 640 x 480 @ 60 Hz
MAC 640 x 480 @ 67 Hz
VESA 640 x 480 @ 72 Hz
VESA 640 x 480 @ 75 Hz
VESA 800 x 600 @ 56 Hz
VESA 800 x 600 @ 60 Hz
VESA 800 x 600 @ 72 Hz
VESA 800 x 600 @ 75 Hz
MAC 832 x 624 @ 75 Hz
VESA 1024 x 768 @ 60 Hz
VESA 1024 x 768 @ 70 Hz
VESA 1024 x 768 @ 75 Hz
VESA 1152 x 864 @ 75 Hz
MAC 1152 x 870 @ 75 Hz
VESA 1280 x 720 @ 60 Hz
VESA 1280 x 960 @ 60 Hz
VESA 1280 x 1024 @ 60 Hz
VESA 1280 x 1024 @ 75 Hz
VESA 1440 x 900 @ 60 Hz
VESA 1440 x 900 @ 75 Hz
VESA 1600 x 900 @ 60 Hz
NS-20EM50A13 20” Widescreen LED Monitor
Caution
Do not set the graphic card in your computer to
exceed these maximum refresh rates. Doing so may
result in permanent damage to your monitor.
Legal notices
FCC Part 15
This device complies with Part 15 of the FCC Rules. Operation of
this product is subject to the following two conditions: (1) this
device may not cause harmful interference, and (2) this device
must accept any interference received, including interference
that may cause undesired operation.
This equipment has been tested and found to comply within the
limits for a class B digital device, pursuant to Part 15 of the FCC
Rules. These limits are designed to provide reasonable
protection against harmful interference in a residential
installation. This equipment generates, uses, and can radiate
radio frequency energy and, if not installed and used in
accordance with the instructions, may cause harmful
interference to radio communications. However, there is no
guarantee that interference will not occur in a particular
installation. If this equipment does cause harmful interference to
radio or television reception, which can be determined by
turning the equipment off and on, the user is encouraged to try
to correct the interference by one or more of the following
measures:
• Reorient or relocate the receiving antenna.
• Increase the separation between the equipment and
receiver.
• Connect the equipment into an outlet on a circuit different
from that to which the receiver is connected.
• Consult the dealer or an experienced technician for help.
FCC warning
Changes or modifications not expressly approved by the party
responsible for compliance with the FCC Rules could void the
user’s authority to operate this equipment.
Note
If necessary, shielded interface cables and AC power
cord must be used to meet the emission level limits.
6
www.insigniaproducts.com
Page 9

20” Widescreen LED Monitor
One-year limited warranty
Insignia Products (“Insignia”) warrants to you, the original
purchaser of this new NS-20EM50A13 (“Product”), that the
Product shall be free of defects in the original manufacture of the
material or workmanship for a period of one (1) year from the
date of your purchase of the Product (“Warranty Period”). This
Product must be purchased from an authorized dealer of
Insignia brand products and packaged with this warranty
statement. This warranty does not cover refurbished Product. If
you notify Insignia during the Warranty Period of a defect
covered by this warranty that requires service, terms of this
warranty apply.
How long does the coverage last?
The Warranty Period lasts for 1 year (365 days) from the date you
purchased the Product. The purchase date is printed on the
receipt you received with the Product.
What does this warranty cover?
During the Warranty Period, if the original manufacture of the
material or workmanship of the Product is determined to be
defective by an authorized Insignia repair center or store
personnel, Insignia will (at its sole option): (1) repair the Product
with new or rebuilt parts; or (2) replace the Product at no charge
with new or rebuilt comparable products or parts. Products and
parts replaced under this warranty become the property of
Insignia and are not returned to you. If service of Products or
parts are required after the Warranty Period expires, you must
pay all labor and parts charges. This warranty lasts as long as you
own your Insignia Product during the Warranty Period. Warranty
coverage terminates if you sell or otherwise transfer the Product.
How to obtain warranty service?
If you purchased the Product at a retail store location, take your
original receipt and the Product to the store you purchased it
from. Make sure that you place the Product in its original
packaging or packaging that provides the same amount of
protection as the original packaging. If you purchased the
Product from an online web site, mail your original receipt and
the Product to the address listed on the web site. Make sure that
you put the Product in its original packaging or packaging that
provides the same amount of protection as the original
packaging.
To obtain in-home warranty service for a television with a screen
25 inches or larger, call 1-888-BESTBUY. Call agents will diagnose
and correct the issue over the phone or will have an
Insignia-approved repair person dispatched to your home.
Where is the warranty valid?
This warranty is valid only to the original purchaser of the
product in the United States, Canada, and Mexico.
What does the warranty not cover?
This warranty does not cover:
• Customer instruction
• Installation
•Set up adjustments
•Cosmetic damage
• Damage due to acts of God, such as lightning strikes
• Accident
• Misuse
•Abuse
•Negligence
• Commercial use
• Modification of any part of the Product, including the
antenna
• Plasma display panel damaged by static (non-moving)
images applied for lengthy periods (burn-in).
This warranty also does not cover:
• Damage due to incorrect operation or maintenance
• Connection to an incorrect voltage supply
• Attempted repair by anyone other than a facility
authorized by Insignia to service the Product
• Products sold as is or with all faults
• Consumables, such as fuses or batteries
• Products where the factory applied serial number has been
altered or removed
REPAIR REPLACEMENT AS PROVIDED UNDER THIS WARRANTY IS
YOUR EXCLUSIVE REMEDY. INSIGNIA SHALL NOT BE LIABLE FOR
ANY INCIDENTAL OR CONSEQUENTIAL DAMAGES FOR THE
BREACH OF ANY EXPRESS OR IMPLIED WARRANTY ON THIS
PRODUCT, INCLUDING, BUT NOT LIMITED TO, LOST DATA, LOSS
OF USE OF YOUR PRODUCT, LOST BUSINESS OR LOST PROFITS.
INSIGNIA PRODUCTS MAKES NO OTHER EXPRESS WARRANTIES
WITH RESPECT TO THE PRODUCT, ALL EXPRESS AND IMPLIED
WARRANTIES FOR THE PRODUCT, INCLUDING, BUT NOT LIMITED
TO, ANY IMPLIED WARRANTIES OF AND CONDITIONS OF
MERCHANTABILITY AND FITNESS FOR A PARTICULAR PURPOSE,
ARE LIMITED IN DURATION TO THE WARRANTY PERIOD SET
FORTH ABOVE AND NO WARRANTIES, WHETHER EXPRESS OR
IMPLIED, WILL APPLY AFTER THE WARRANTY PERIOD. SOME
STATES, PROVINCES AND JURISDICTIONS DO NOT ALLOW
LIMITATIONS ON HOW LONG AN IMPLIED WARRANTY LASTS, SO
THE ABOVE LIMITATION MAY NOT APPLY TO YOU. THIS
WARRANTY GIVES YOU SPECIFIC LEGAL RIGHTS, AND YOU MAY
ALSO HAVE OTHER RIGHTS, WHICH VARY FROM STATE TO STATE
OR PROVINCE TO PROVINCE.
Contact Insignia:
For customer service please call 1-877-467-4289
www.insigniaproducts.com
Distributed by Best Buy Purchasing, LLC
7601 Penn Avenue South, Richfield, Minnesota, U.S.A.
55423-3645
© 2012 BBY Solutions, Inc.
All rights reserved. INSIGNIA is a trademark of BBY Solutions, Inc.
Registered in some countries. All other products and brand
names are trademarks of their respective owners.
www.insigniaproducts.com
7
Page 10

www.insigniaproducts.com (877) 467-4289
Distributed by Best Buy Purchasing, LLC
7601 Penn Avenue South, Richfield, MN 55423-3645 USA
© 2012 BBY Solutions, Inc.
All rights reserved. INSIGNIA is a trademark of BBY Solutions, Inc. Registered in some countries.
All other products and brand names are trademarks of their respective owners.
ENGLISH
12-0349
 Loading...