

Page 1

User Guide | Guide de l’utilisateur | Guía del Usuario
DVD Player | Lecteur de DVD | Reproductor de DVD
NS-1UCDVD
Page 2

Page 3
Insignia NS-1UCDVD
DVD Player
Contents
Contents. . . . . . . . . . . . . . . . . . . . . . . . . . . . . . . . 3
Introduction . . . . . . . . . . . . . . . . . . . . . . . . . . . . . 3
Safety information . . . . . . . . . . . . . . . . . . . . . . . . 3
Features. . . . . . . . . . . . . . . . . . . . . . . . . . . . . . . . 5
Setting up your DVD player . . . . . . . . . . . . . . . . . .6
Using your DVD player. . . . . . . . . . . . . . . . . . . . . 8
Maintaining. . . . . . . . . . . . . . . . . . . . . . . . . . . . . 16
Troubleshooting . . . . . . . . . . . . . . . . . . . . . . . . . 17
Specifications. . . . . . . . . . . . . . . . . . . . . . . . . . . 17
Legal Notices . . . . . . . . . . . . . . . . . . . . . . . . . . . 18
90-Day Limited Warranty . . . . . . . . . . . . . . . . . . 19
Francais. . . . . . . . . . . . . . . . . . . . . . . . 21
Español . . . . . . . . . . . . . . . . . . . . . . . . 41
Introduction
Congratulations on your purchase of a
high-quality Insignia product. Your NS-1UCDVD
represents the state of the art in DVD players
and is designed for reliable and trouble-free
performance.
This guide explains how to correctly operate and
get the best performance from your player. Read
this user guide carefully before using your
player, then keep it with your player for quick
reference.
Verify that the box contains:
• DVD player
• Remote control
• Video cable (1)
• Audio cable (1)
• AAA batteries (2)
• User guide
If any item is missing or damaged, contact
Insignia at (877) 467-4289. Keep the box and
packing materials so that you can store or
transport your player.
Note
Due to Insignia’s policy of constant improvement and technical
refinement, we reserve the right to change or alter the
software.
Safety information
Electric shock warning
CAUTION
Risk of Electric Shock
Do Not Open
Warning
To reduce the risk of electric shock, do not remove the cover or
back. There are no user-serviceable parts inside. Refer
servicing to qualified service personnel.
Warning
To prevent fire or electric shock hazard, do not expose this
DVD player to rain or moisture.
Caution
The DVD player should not be exposed to water (dripping or
splashing) and no objects filled with liquids, such as vases,
should be placed on the DVD player.
Ventilation
Caution
Do not block any ventilation openings. Install in accordance
with these instructions.
Slots and openings in the case are provided for ventilation and
to ensure reliable operation of the DVD player and to protect it
from over-heating.
The openings should never be blocked by placing the DVD
player on a bed, sofa, rug, or other similar surface. This DVD
player should not be placed in a built-in installation, such as a
bookcase or rack, unless proper ventilation is provided or
these instructions have been adhered to.
Laser warning
Warning
This DVD player uses a laser
system.
To ensure proper use of this
DVD player, read this user
guide carefully and retain it for
future reference. Should the
DVD player require
maintenance, contact
authorized service personnel.
Changing controls, making adjustments, or carrying out
procedures other than those specified herein may result in
hazardous radiation exposure.
To prevent direct exposure to the laser beam, do not try to
open the enclosure. There is visible laser radiation when open.
Do not stare into the beam.
This lightning flash with arrowhead symbol within
an equilateral triangle is intended to alert the user
to the presence of uninsulated dangerous voltage
within the DVD player’s enclosure that may be of
sufficient magnitude to constitute a risk of electric
shock to persons.
The exclamation point within an equilateral triangle
is intended to alert the user to the presence of
important operating and maintenance (servicing)
instructions in the literature accompanying the
DVD player.
Caution
Visible and invisible laser radiation is present when the DVD
player is open and interlocks are defeated.
www.insignia-products.com
3
Page 4

Insignia NS-1UCDVD DVD Player
Power cord
Warning
We recommend that most appliances be placed upon a
dedicated circuit—a single outlet circuit which powers only that
appliance and has no additional outlets or branch circuits.
Check the specification page of this manual for power
requirements.
Do not overload wall outlets. Overloaded wall outlets, loose or
damaged wall outlets, extension cords, frayed power cords, or
damaged or cracked wire insulation are dangerous. Any of
these conditions could result in electric shock or fire.
Periodically examine the DVD player cord, and if its
appearance indicates damage or deterioration, unplug it,
discontinue use of the DVD player, and have the cord replaced
with an exact replacement part by an authorized service
provider.
Protect the power cord from physical or mechanical abuse,
such as being twisted, kinked, pinched, closed in a door, or
walked upon. Pay particular attention to plugs, wall outlets, and
the point where the cord exits the DVD player.
To disconnect power from the outlet, pull out the plug. When
installing the DVD player, make sure that the plug is easily
accessible.
Important safety instructions
Warning
Read and observe all warnings and instructions in this manual
and those marked on the DVD player. Retain this manual for
future reference.
This DVD player has been designed and manufactured to
assure personal safety. Improper use can result in electric
shock or fire hazard. The safeguards incorporated in this DVD
player will protect you if you observe the following procedures
for installation, use, and servicing. This DVD player does not
contain any parts that can be repaired by you.
Do not remove the case or you may be exposed to dangerous
voltage. Refer servicing to qualified service personnel only.
• Read all of these safety and operating
instructions before operating the DVD player.
• Retain these safety, operation, and use
instructions for future reference.
• Adhere to all warnings on the DVD player and
in the operating instructions.
• Follow all operation and use instructions.
• Do not use this DVD player near water. For
example, do not use this DVD player near a
bath tub, wash bowl, kitchen sink, laundry
tub, in a wet basement, near a swimming
pool, and other areas located near water.
• Clean only with a lightly dampened cloth.
Unplug this DVD player from the wall outlet
before cleaning. Do not use liquid cleaners.
• Do not block any ventilation openings. Install
in accordance with these instructions. Slots
and openings in the case are provided for
ventilation, to ensure reliable operation of the
DVD player, and to protect it from
over-heating. The openings should never be
blocked by placing the DVD player on a bed,
sofa, rug or other similar surface. This DVD
player should not be placed in a built-in
installation such as a bookcase or rack
unless proper ventilation is provided or these
instructions have been adhered to.
• Do not install near any heat sources such as
radiators, heat registers, stoves, or other
electronic devices (including amplifiers) that
produce heat.
• If the DVD player is brought directly from a
cold to a warm location, moisture may
condense inside the player. When you move
it from a cold to a warm location, wait for
about one hour before operating the player,
or remove the disc and leave the player
turned on until the moisture evaporates.
• Do not defeat the safety purpose of the
polarized or grounding-type plug. A polarized
plug has two blades with one wider than the
other. A grounding type plug has two blades
and a third grounding prong. The wide blade
or the third prong are provided for your safety.
If the provided plug does not fit into your
outlet, consult an electrician for replacement
of the obsolete outlet.
• Protect the power cord from being walked on
or pinched particularly at plugs, receptacles,
and the point where they exit from the DVD
player.
• Use only attachments or accessories
specified by Insignia.
• Unplug this DVD player during lightning
storms or when unused for long periods of
time.
• Refer all servicing to qualified service
personnel. Servicing is required when the
DVD player has been damaged in any way,
such as power-supply cord or plug is
damaged, liquid has been spilled or objects
have fallen into the DVD player, the DVD
player has been exposed to rain or moisture,
does not operate normally, or has been
dropped.
• It is hazardous to replace the battery
incorrectly. Replace the battery only with the
same or equivalent type, in order to protect
the environment, dispose of the battery
properly. Do not use the player in
temperatures higher than 95 degrees
Fahrenheit or 35 degrees Celsius.
• Do not use irregularly shaped discs such as
heart or star-shaped discs as they may cause
the player to malfunction. Do not stick paper,
tape, or glue on the disc. Do not expose the
disc to direct sunlight or heat sources. Do not
touch the surface of disc. Handle the disc by
its edge. Clean the disc by wiping the disc
from the center out with a cleaning cloth.
Remove the disc from the player and store it
in its case after playing. Some playback
operations of discs may be intentionally fixed
by software producers. Because this player
plays discs according to the disc contents the
software producers designed, some playback
features may not be available. Also refer to
the instructions supplied with the discs.
4
www.insignia-products.com
Page 5
Insignia NS-1UCDVD DVD Player
Features
• Combination A/V in and out jack
• Parental controls
• Remote control
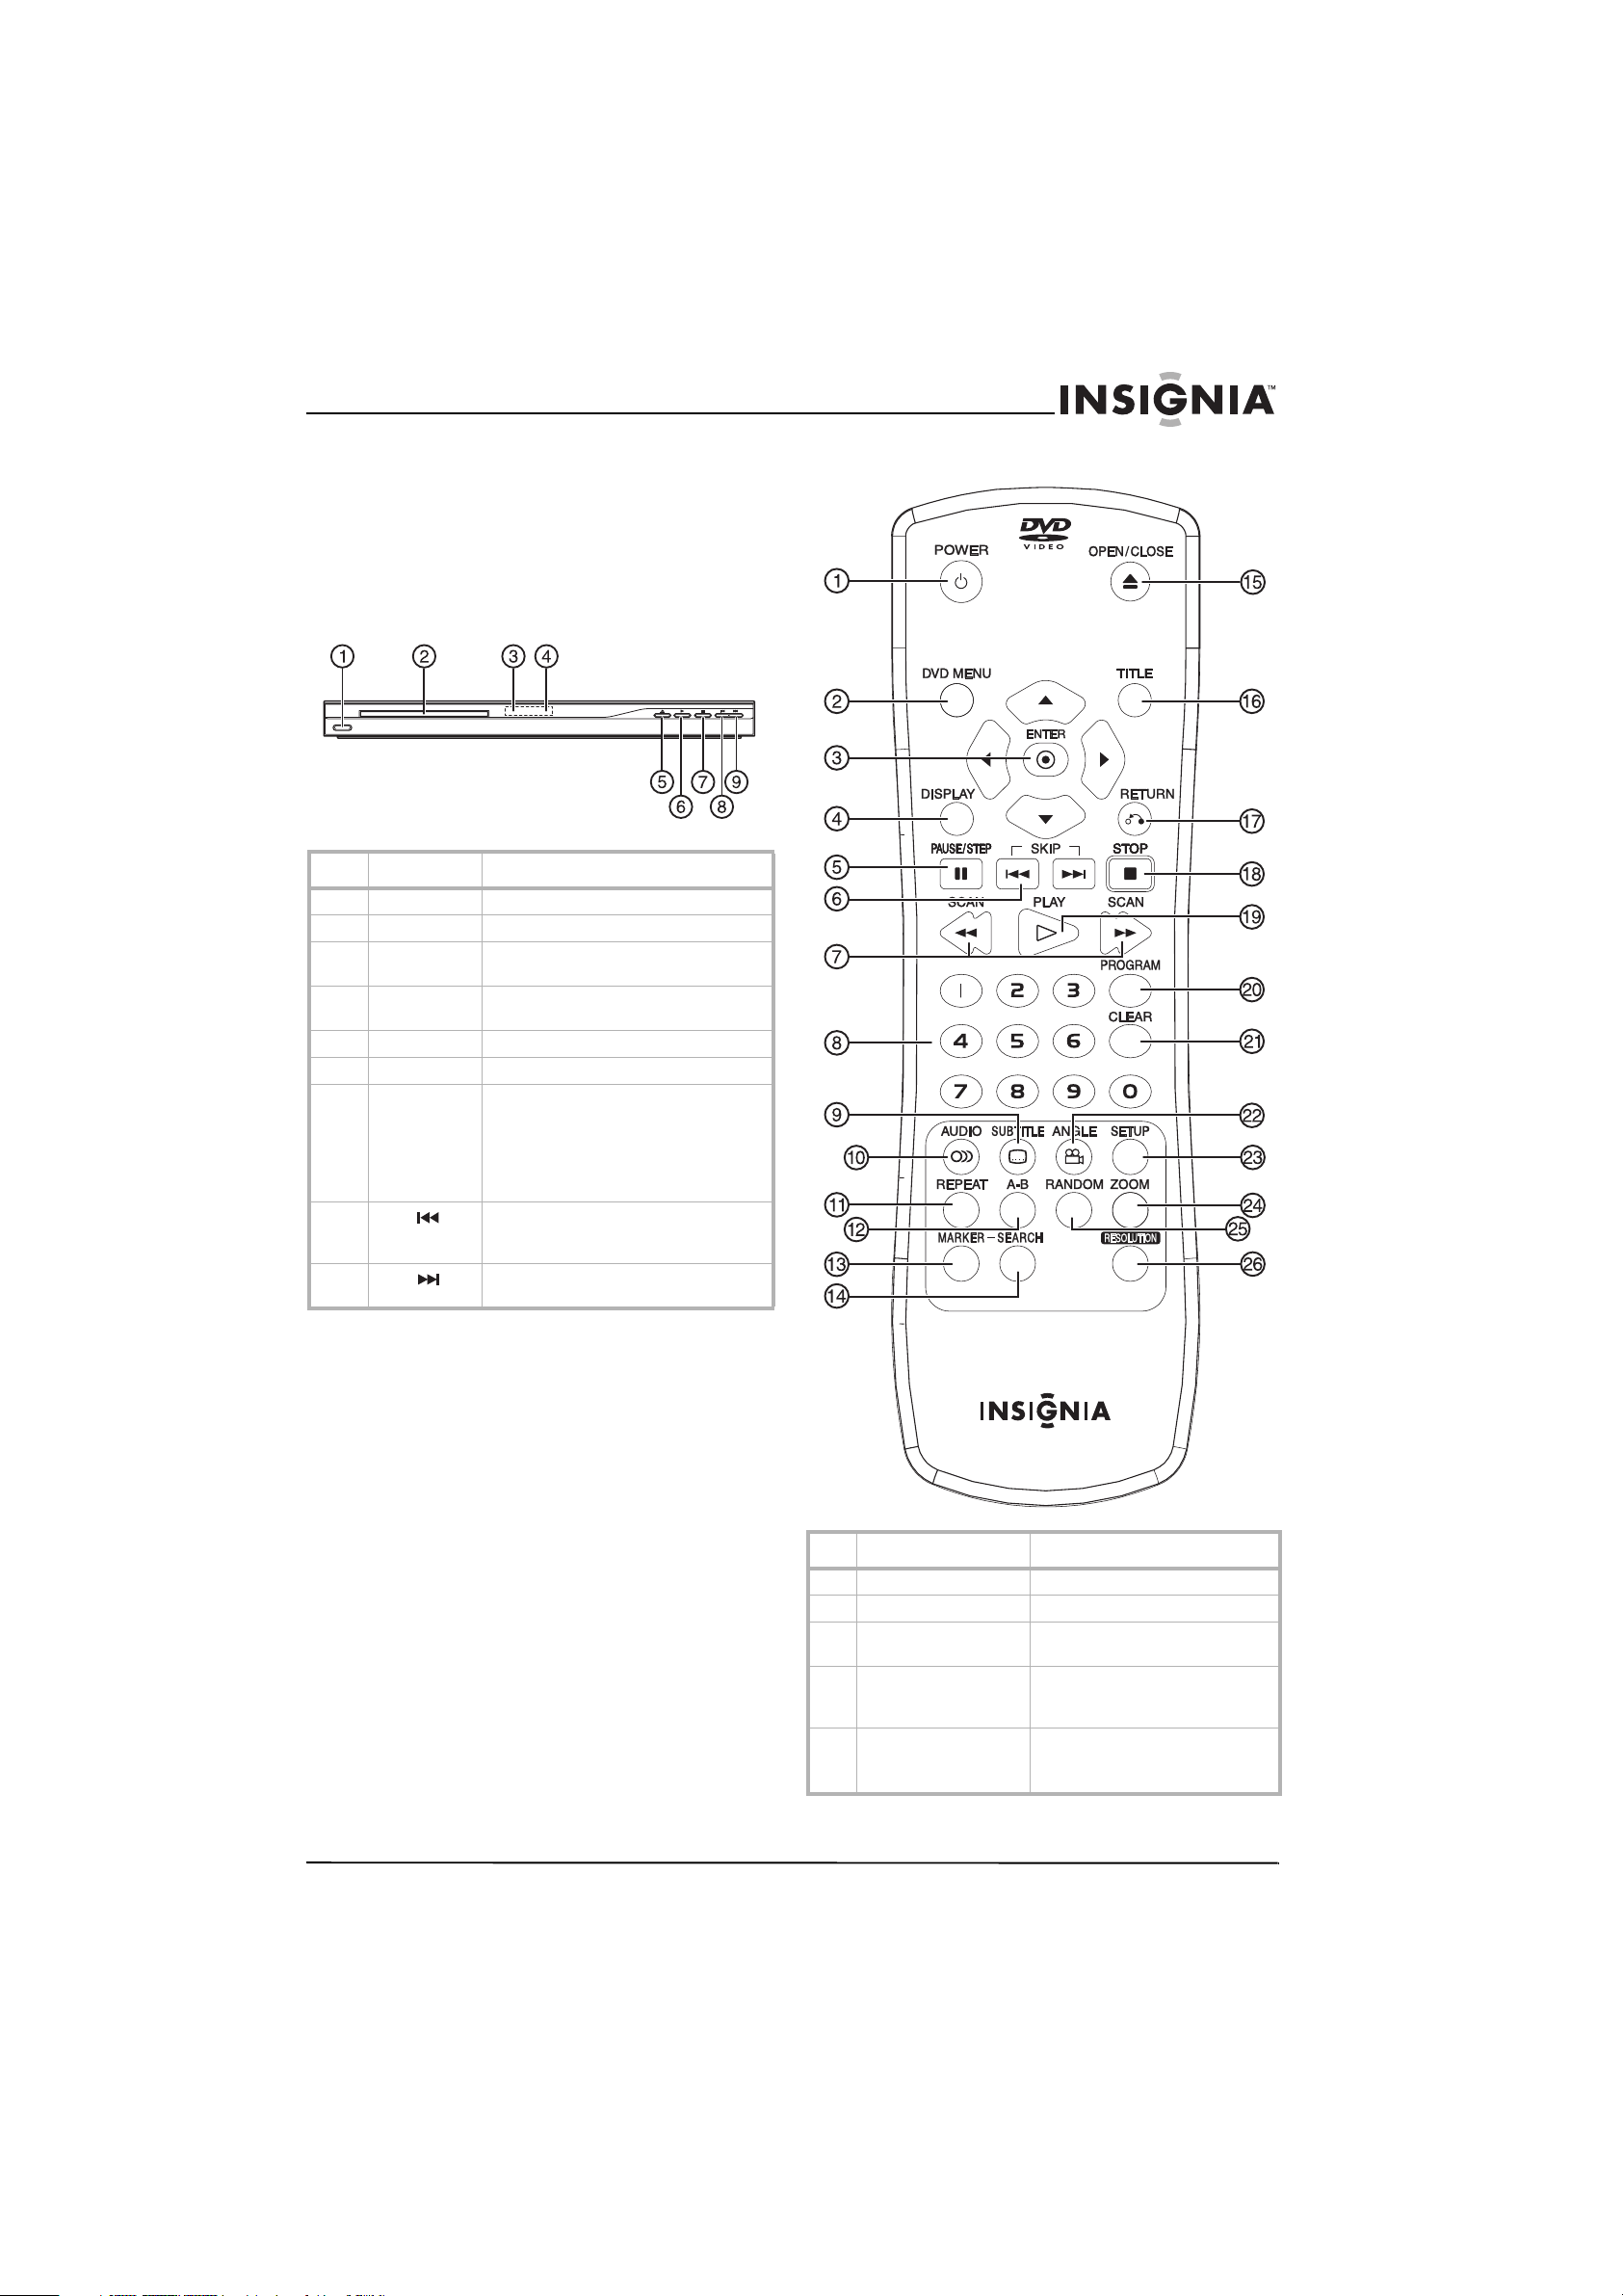
Identifying components
Front
Item Component Description
1 Power Switches the player on and off.
2 Disc tray Holds CD or DVD disc.
3Display
4 Remote
5 Open/Close Opens or closes the disc tray.
6 Play Press to start playback.
7 Stop Press once to stop playback. The player
8
9
window
sensor
Skip
Skip
N
Shows the current status of the player.
Receives signals from the remote
control. Do not block this sensor.
remembers where you stopped playback
and you can restart playing at this point.
Press twice to stop playback. The player
does not remember where you stopped
playback.
Go to the beginning of the current
chapter or track or go to previous
chapter, track, or scene during playback.
Go to the next chapter, track, or scene
during playback.
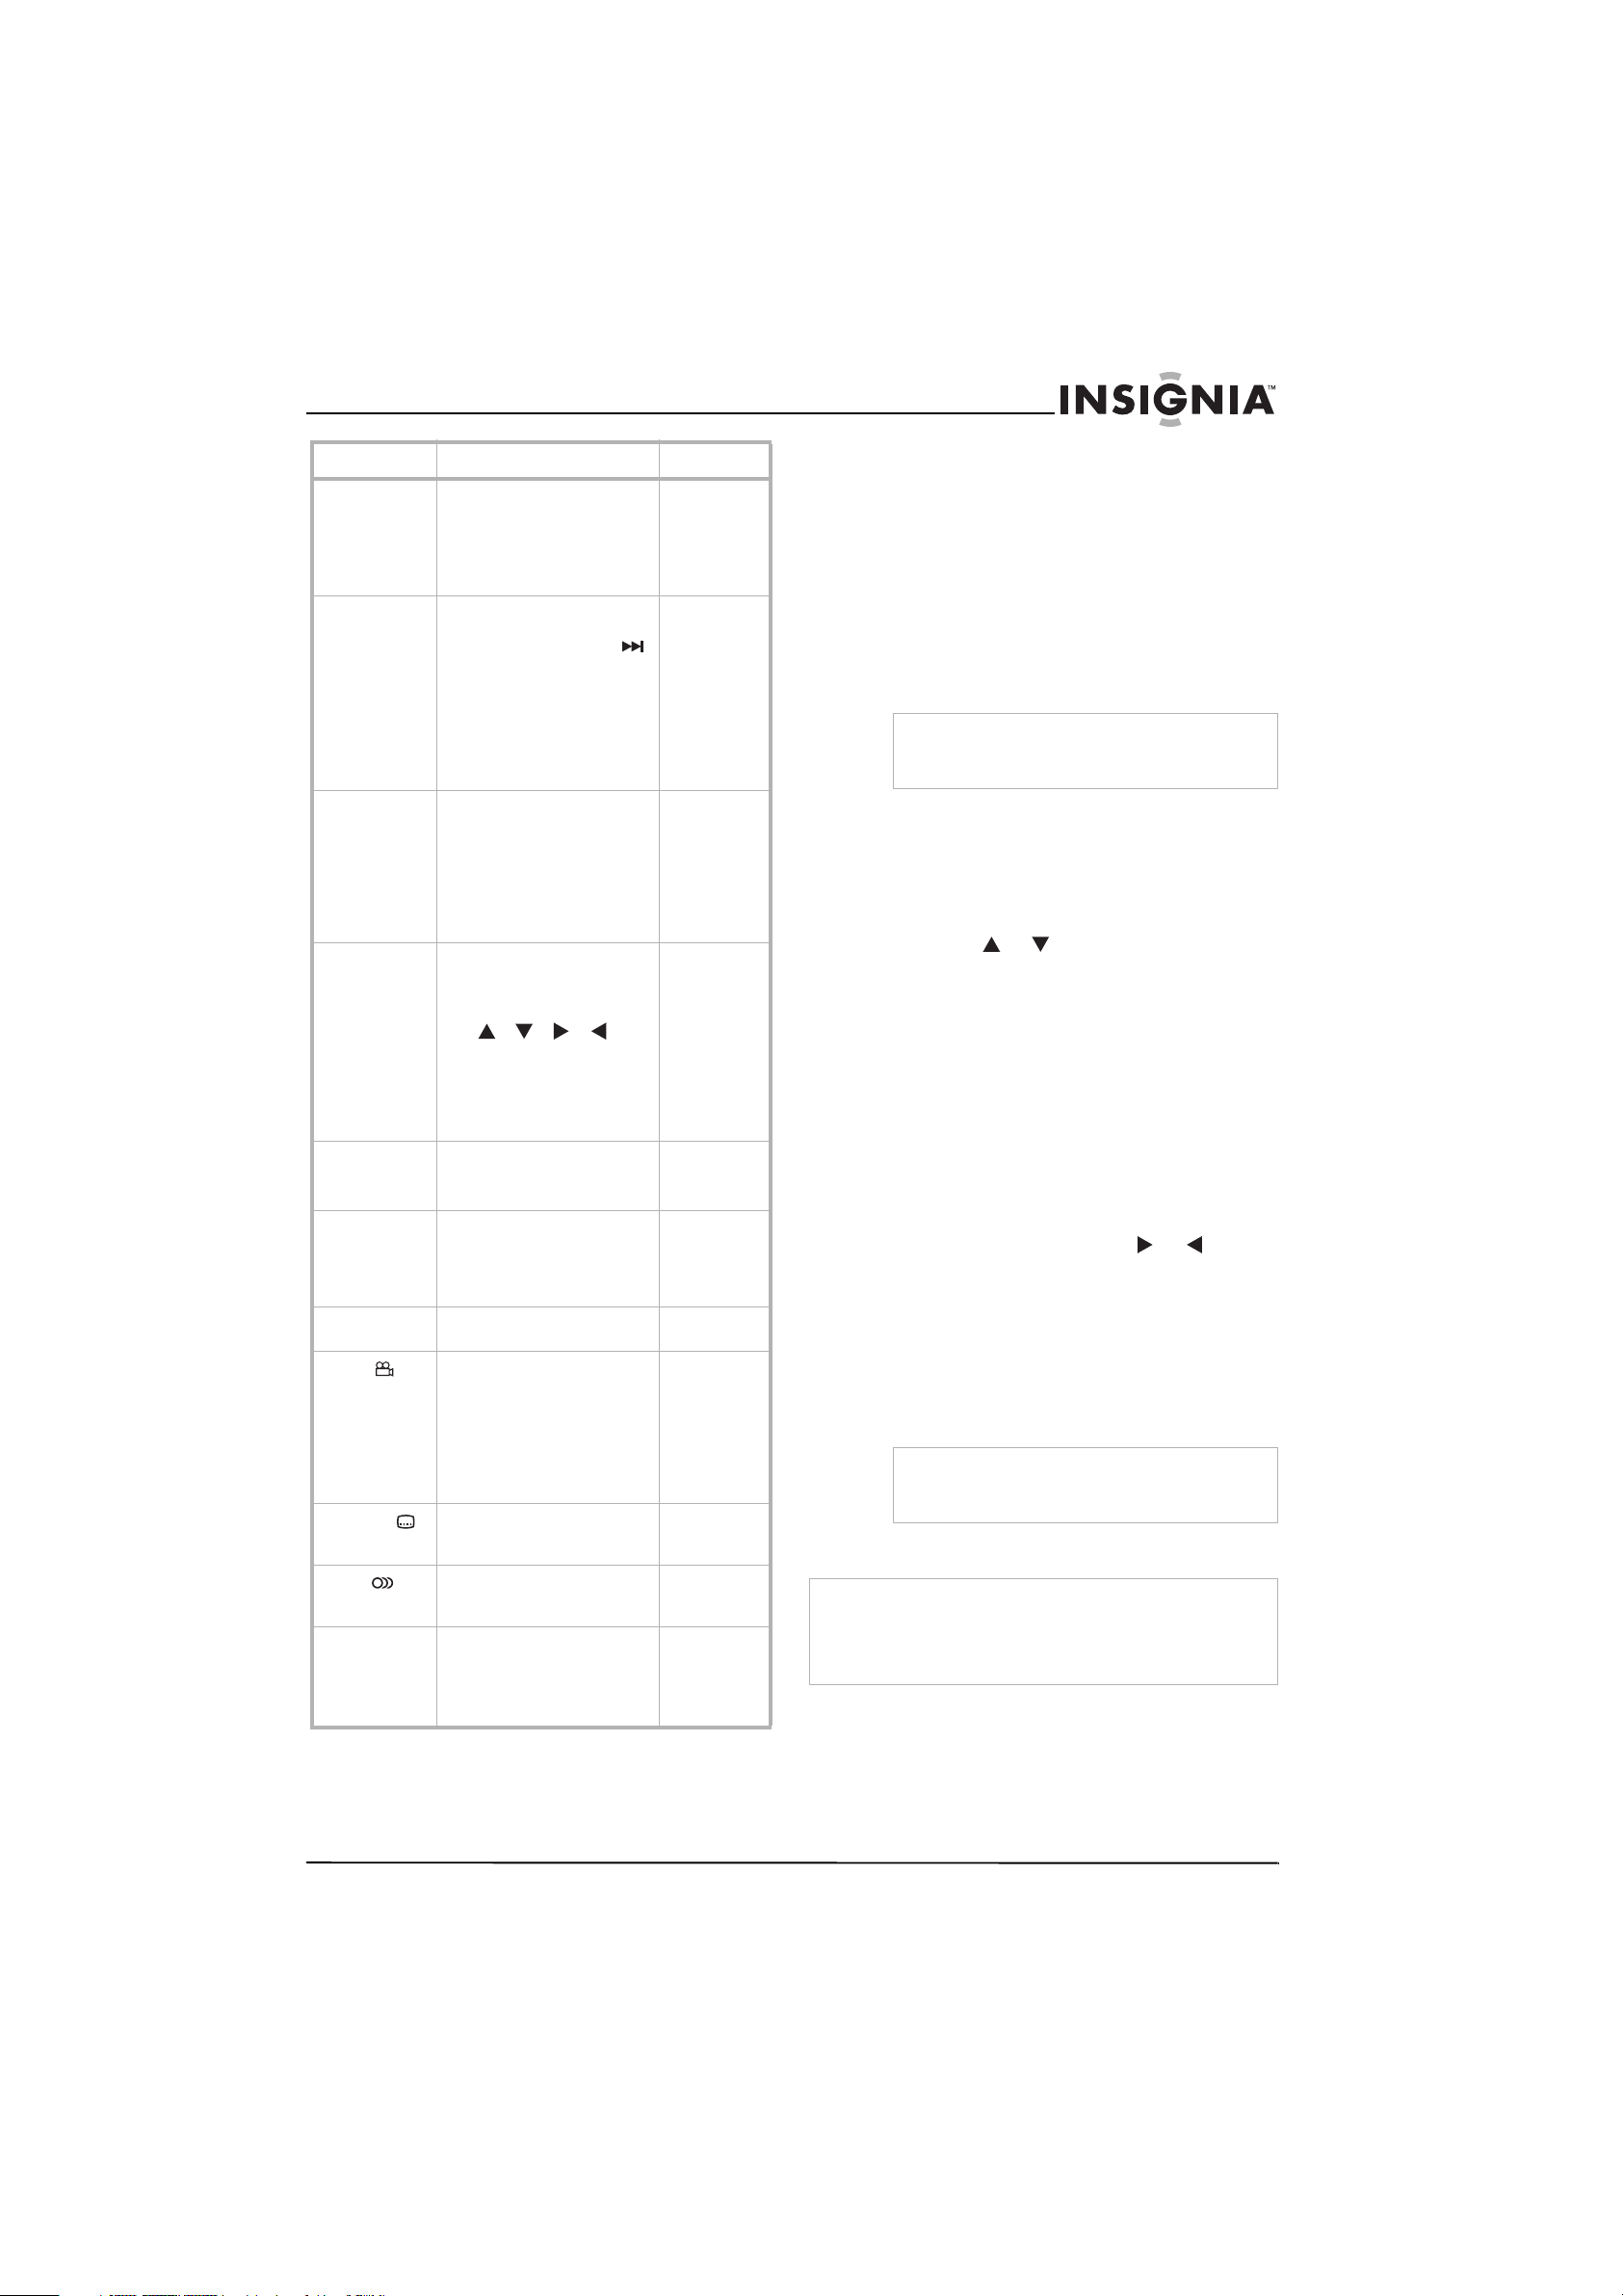
Remote control
Item Button Description
1 Power Switches the player on and off.
2 DVD Menu Displays the menu on a DVD disc.
3Up/Down/Enter/
Right/Left
4 Display Display information about the
5 Pause/Step Pauses playback temporarily.
www.insignia-products.com
Navigate in the menus and confirm
your selection.
DVD, such as title, chapter
number, track number, and time
Press repeatedly for
frame-by-frame playback.
5
Page 6

Insignia NS-1UCDVD DVD Player
Item Button Description
6
Skip
Skip
7 Scan - Use to search backward.
Scan + Use to search forward.
8 Numbers Use to select an item in a menu or
9 Subtitle Turn subtitles on and off and select
10 Audio Select the audio language or audio
11 Repeat Repeat a chapter, track, title, or all.
12 A-B Repeat Repeat a specific portion of a disc.
13 Marker Use to mark any point during
14 Search Displays the Marker Search Menu.
15 Open/Close Opens or closes the disc tray.
16 Title Displays the title menu, if available.
17 Return Displays the menu of a video CD
18 Stop Press once to stop playback. The
19 Play Press to start playback.
20 Program Use to enter the program edit
21 Clear Removes a track number on the
22 Angle Change the viewing angle of a
23 Setup Enter or exit the setup menu.
24 Zoom Enlarge the image 2, 3, or 4 times
25 Random Plays tracks in random order.
26 Resolution Changes the resolution of the
Go to the beginning of the current
chapter or track or go to previous
chapter, track, or scene during
playback.
Go to the next chapter, track, or
scene during playback.
enter a password.
the subtitle language.
channel for the DVD.
playback.
with PBC.
player remembers where you
stopped playback and you can
restart playing at this point.
Press twice to stop playback. The
player does not remember where
you stopped playback.
mode.
Program List or a mark on the
Marker Search Menu.
scene.
the original size.
display.
To change the batteries:
1 Detach the battery cover on the rear of the
remote control.
2 Insert two AAA batteries with the + and -
aligned correctly.
3 Replace the battery cover.
Installing your DVD player
The picture and sound of a nearby TV, VCR, or
radio may be distorted during playback. If this
occurs, position the player away from the TV,
VCR, or radio, or turn off the unit after removing
the disc.
To install your player:
1 Position the DVD player on a solid surface.
2 Plug the DVD player cord into a 120 V AC
power receptacle.
Connecting your DVD player to a television
Depending on your TV and other equipment
there are various ways to connect the player.
Please refer to the manual for your TV, stereo
system or other devices for additional
connection information.
Setting up your DVD player
Installing the remote batteries
Your player uses two AAA batteries.
Caution
Do not mix old and new batteries and never mix different types
of batteries, such as standard, alkaline, etc.
6
www.insignia-products.com
To connect your player to a television:
If your TV is high-definition or digital ready, you
may take advantage of the player’s progressive
scan output for the best possible video output.
• Progressive scan does not work with the
analog video connections (yellow
VIDEO-OUT jack).
• The 720p and 480p resolutions are the
progressive scan applied resolutions.
1 Make sure the DVD player is connected
directly to the TV and not to a VCR. Failure to
connect the player properly will cause the
DVD image to be distorted by the copy
protection system.
Page 7
Insignia NS-1UCDVD DVD Player
2 Plug the audio/video cables from the DVD
player’s jacks to the TV as follows:
Cable
S-video
cable (S)
Video
Cable (V)
Audio
Cable (A)
Y PB PR
Cable (C)
Connect on player
to:
S-VIDEO OUT S-VIDEO IN
VIDEO OUT VIDEO IN
AUDIO OUT AUDIO IN (left and
COMPONENT/PROGRE
SSIVE SCAN
Note
Connecting both the S-video and component
cables may cause the TV display to be unstable.
To resolve the problem, disconnect one of the
problems.
Connect on tv to:
right)
Corresponding TV jacks
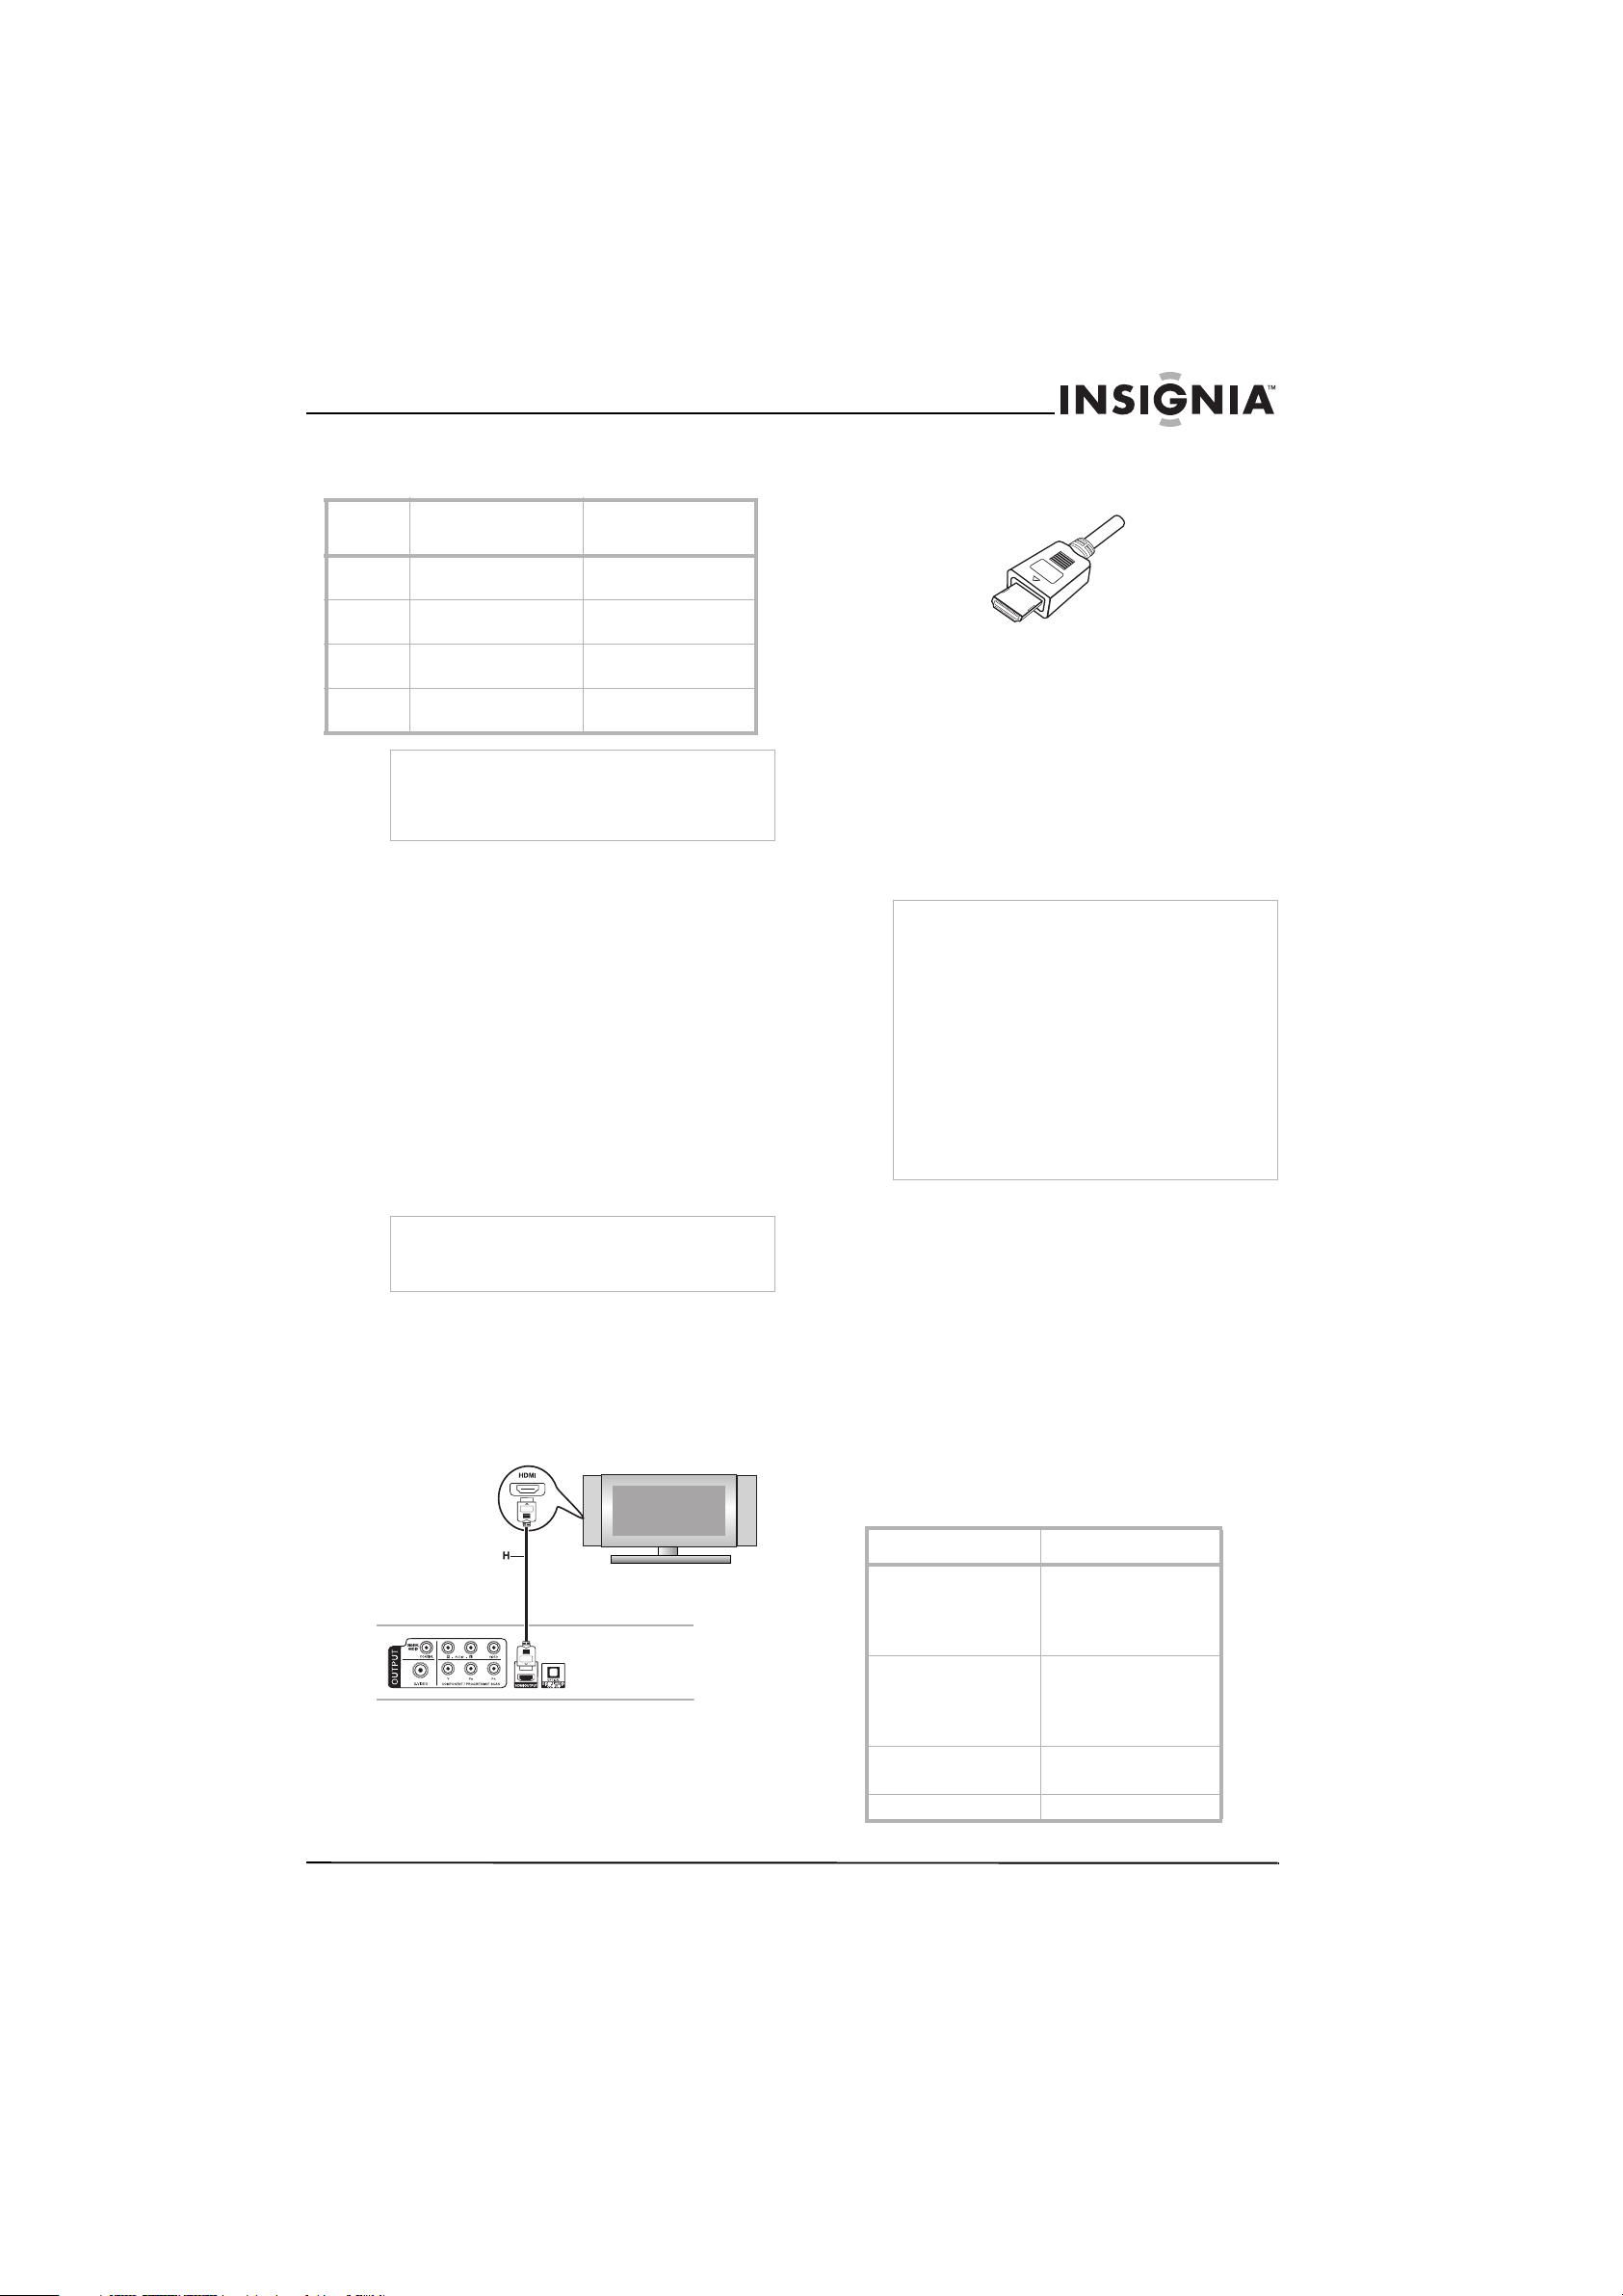
Connecting your player to an HDMI TV
High Definition Multimedia Interface (HDMI)
supports both video and audio on a single digital
connection for use with DVD players, set-top
boxes, and other AV devices.
HDMI was developed to provide the
technologies of High-bandwidth Digital Content
Protection (HDCP). HDCP is used to protect
both transmitted and received digital content.
HDMI has the capability to support standard,
enhanced or high-definition video plus standard
to multi-channel surround-sound audio. HDMI
features include uncompressed digital video, a
bandwidth of up to 5 gigabytes per second, one
connector (instead of several cables and
connectors), and communication between the
AV source and AV devices such as DTVs.
Note
HDMI, the HDMI logo and High-Definition
Multimedia Interface are trademarks or registered
trademarks of HDMI licensing LLC.
To connect your player to an HDMI device:
1 Set the source on your HDMI TV or monitor
to HDMI as instructed in the owner’s manual.
2 Connect the HDMI OUT jack on the DVD
player to the HDMI jack on your HDMI TV or
monitor using an HDMI cable (H).
The arrow on the cable connector body
should face up for correct alignment with the
connector on the player.
3 Press RESOLUTION repeatedly to select the
desired resolution. When you use an HDMI
connection, you can change the resolution
(480i, 480p, 720p, 1080i) for the HDMI
output.
The HDMI output will have a resolution of
480p, even if you set the resolution to 480i on
the HDMI connection.
When no sound or noisy sound result from
the HDMI connection, set the Audio option
[Dolby Digital, DTS or MPEG] on SETUP
menu to PCM or Off.
Notes
If there is noise or lines on the screen, check the
HDMI cable.
Not all HDCP-compatible DVI devices will work
with this player.
If your HDMI TV does not support HDCP, the
screen is blue in color.
If the TV picture is abnormal, turn off the unit and
then turn the unit on again.
Both PCM and Bitstream Audio out is available
when the sample frequency is set to 48kHz in HDMI
connection.
If Audio setup is set to bitstream and your TV does
not support Bitstream Audio out when using an
connection, there may be no audio sound or
HDMI
sound may not be distorted.
Setting the resolution
If your TV does not accept your resolution
setting, the tv picture displays abnormally. Refer
to the owner’s manual for your TV to set the
correct resolution.
To set the resolution:
1 Press the STOP button to stop playback and
put the player in stop mode.
2 Press the RESOLUTION button once. The
current resolution displays in the window.
3 Press the RESOLUTION button repeatedly
to change to the desired resolution. Available
resolutions according to the connections
include:
Output connection Available resolution
HDMI VIDEO OUT 1920 x 1080i
COMPONENT VIDEO
OUT
VIDEO OUT 720 x 480i
S-VIDEO 720 x 480i
www.insignia-products.com
1280 x 720p
720 x 480p
720 x 480i
1920 x 1080i
1280 x 720p
720 x 480p
720 x 480i
720 x 480p
7
Page 8
Insignia NS-1UCDVD DVD Player
• For Video and S-VIDEO connections,
resolution must be set to 480i or 480p;
however, VIDEO OUT is always at 480i
standard resolution.
• For 720p and 1080i resolution on the
component video out, only non-copy
protected discs can be played back.If the
disc is copy protected, it will be displayed
at the 480p resolution without HDMI cable
connection. With HDMI cable connection,
the picture may not be display properly.
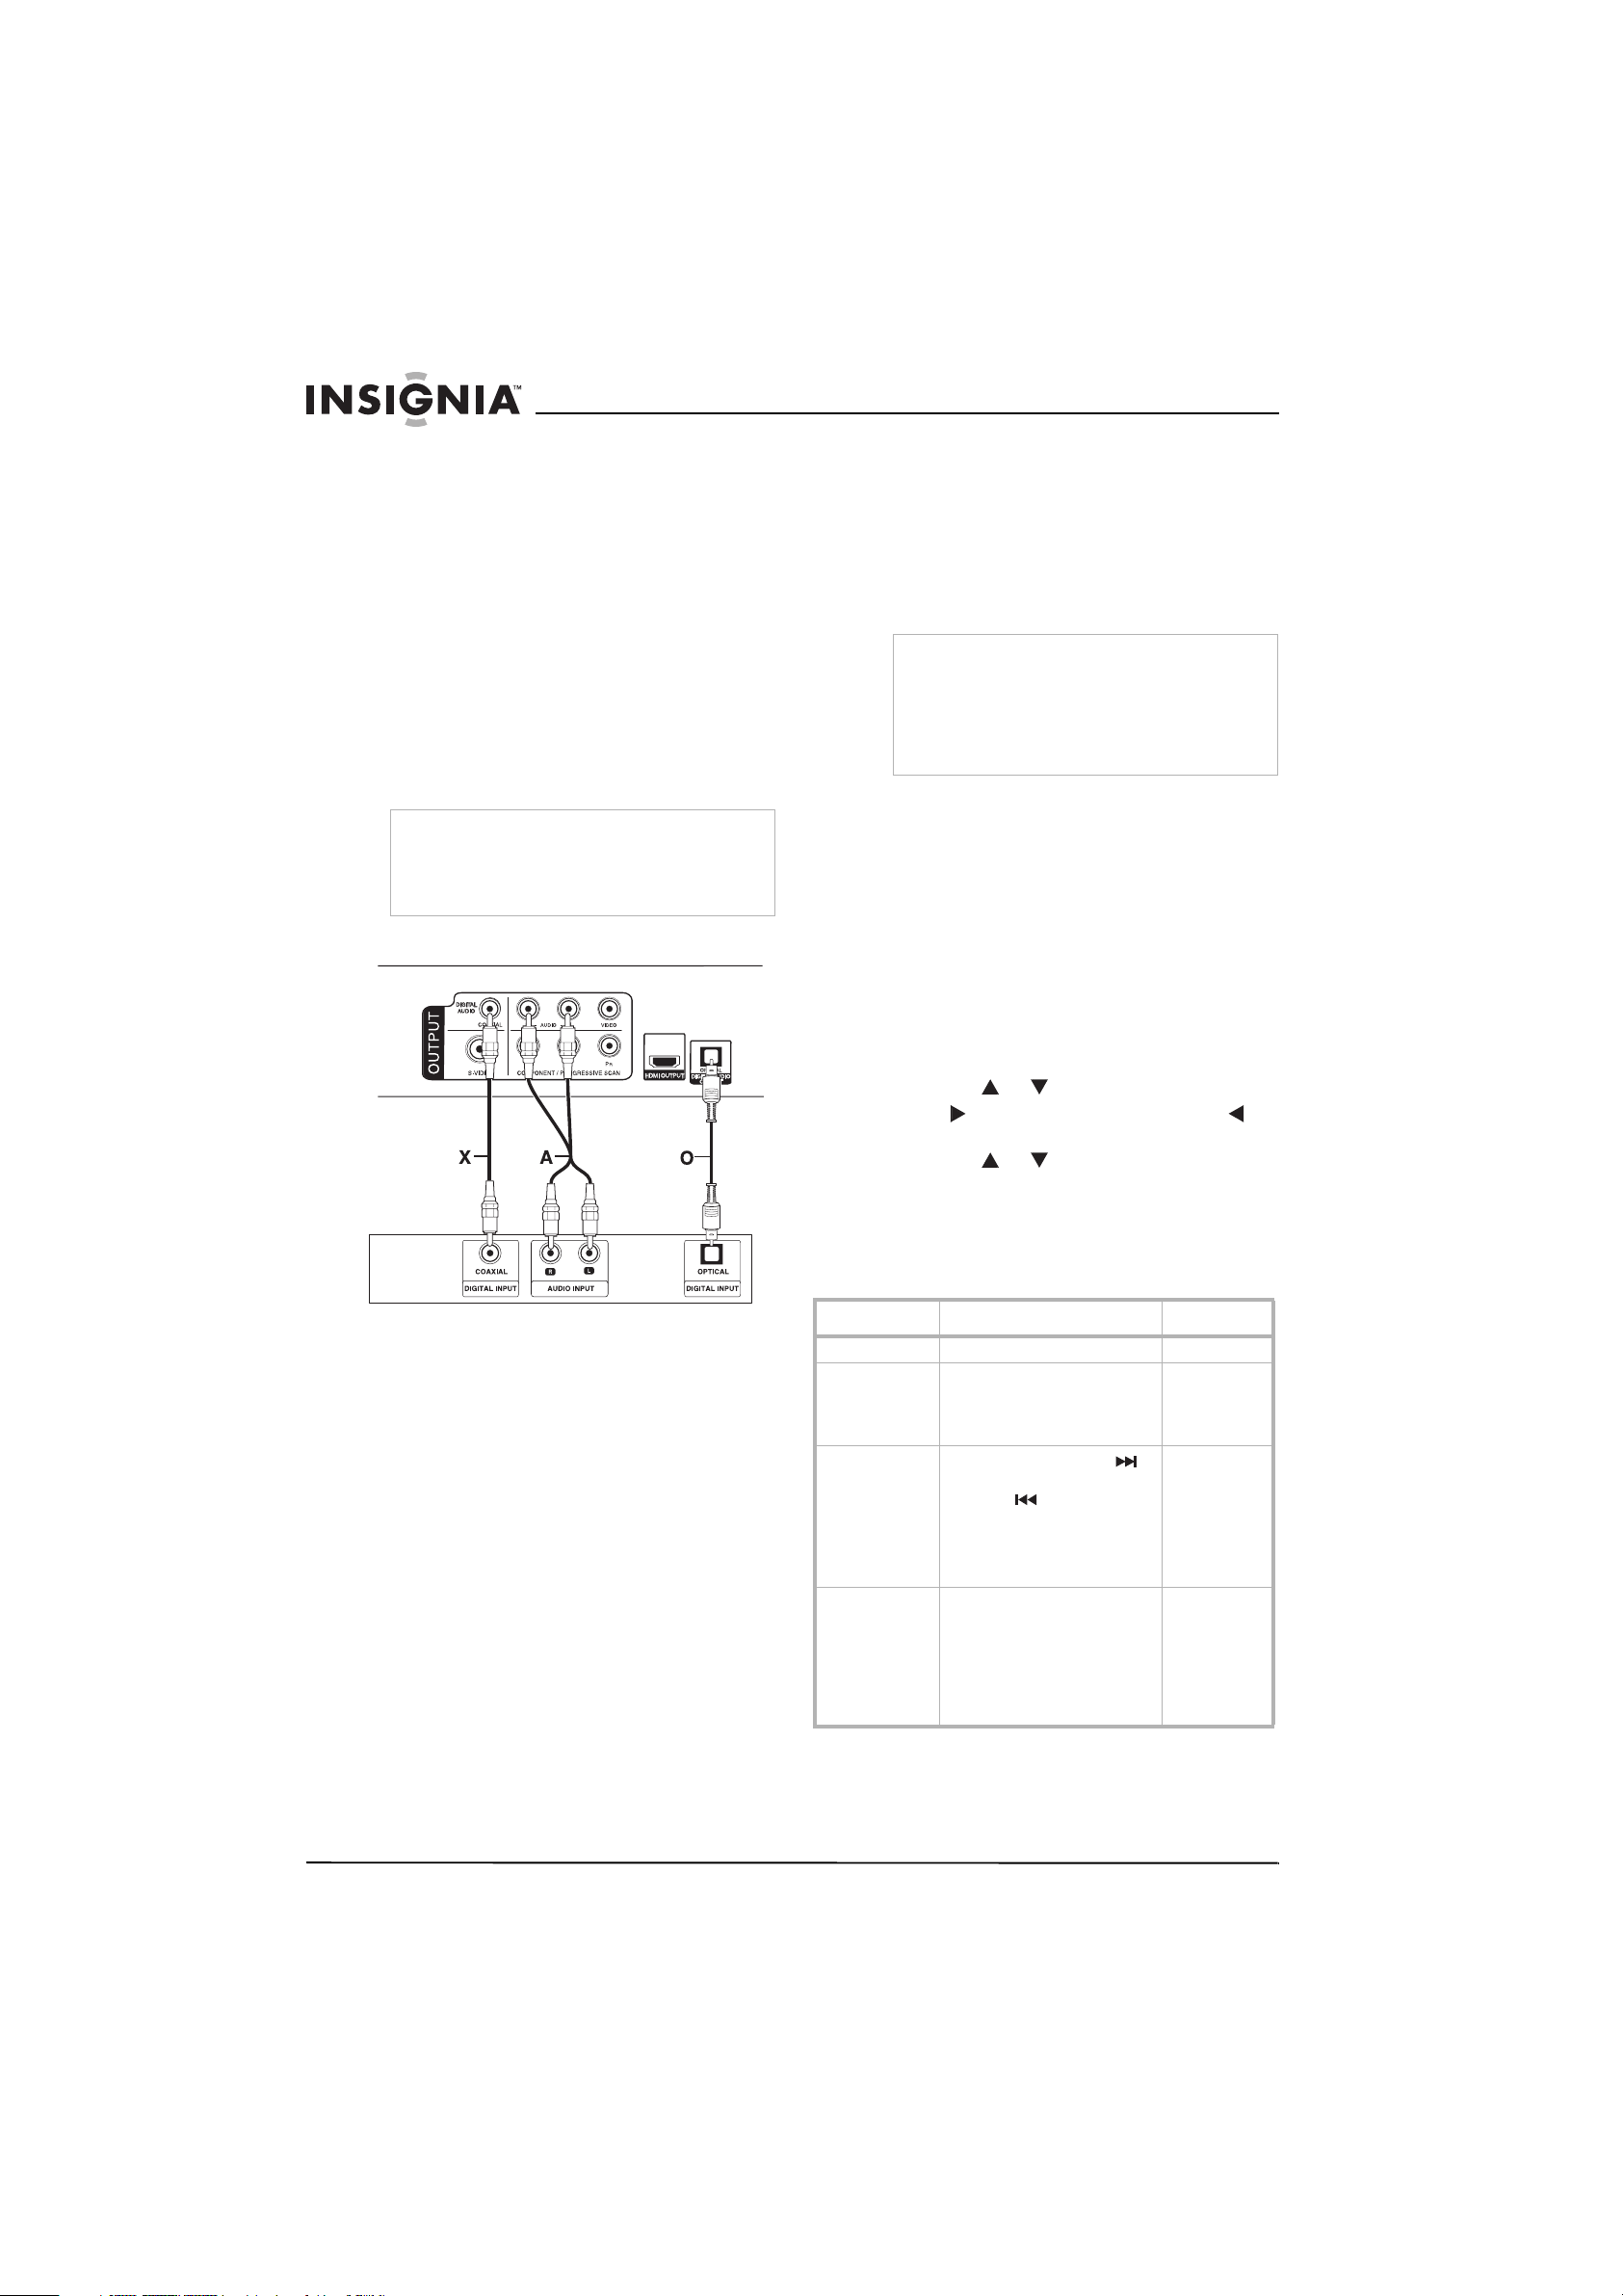
Connecting your player to optional audio
equipment
You can connect your player to an external
source to enjoy high quality stereo sound from
your DVD player.
Note
This DVD player has been manufactured under
license from Dolby Laboratories. “Dolby”, “Pro
Logic” and the double-D symbol are trademarks of
Dolby Laboratories. DTS and DTS Digital Out are
trademarks of Digital Theater Systems, Inc.
Rear of DVD player
A digital multi-channel connection using a
multi-channel audio/video receiver that
supports one or more of the audio formats
supported by your DVD player such as
MPEG 2, Dolby Digital and DTS, provides the
best sound quality. Check the owner’s
manual for your receiver and the logos on the
front of the receiver to verify the type of
system you are using.
Note
If the audio format of the digital output does not
match the capabilities of your receiver, the
receiver produces a strong, distorted sound or no
sound at all.
Six Channel Digital Surround Sound via a digital
connection can only be obtained if your receiver is
equipped with a digital multi-channel decoder.
Using your DVD player
Using your remote control
Accessing DVD player features using your remote
control buttons
All features of your DVD player can be accessed
using the remote control. Some functions work
with all types of discs, while some features work
only with certain types of discs.
Amplifier (Receiver)
To connect your player to optional audio
equipment:
1 Amplifier equipped with 2-channel analog
stereo or Dolby Pro Logic ll / Pro Logic:
Use audio cables (A) to connect the left and
right AUDIO OUT jacks on the DVD player to
the audio left and right IN jacks on your
amplifier, receiver, or stereo system.
2 Amplifier equipped with 2-channel digital
stereo (PCM) or audio/video receiver
equipped with a multi-channel decoder
(Dolby Digital™, MPEG 2, or DTS):
Use an optional OPTICAL O or COAXIAL X
(A) digital audio cable to connect one of the
DVD player’s OPTICAL O or COAXIAL X
DIGITAL AUDIO OUT jacks to the
corresponding OPTICAL O or COAXIAL X
jack on your amplifier.
3 Digital multi-channel sound:
To access DVD features:
1 Press the button that corresponds to the
operation desired.
2 Press the or button to select a menu.
3 Press to enter a sub menu or press to
return to the previous menu.
4 Press the or button to select a sub
menu if necessary, then press ENTER to
confirm your selection.
The following table specifies the feature
operations and the type of discs required for
the feature to work.
Button Operation Type of disc
OPEN/CLOSE Opens or closes the disc tray. All
PAUSE/STEP During playback, press to
SKIP
SCAN During playback, press
pause play.
Press repeatedly to play
frame-by-frame.
During playback, press
to go to the next chapter/track
or press to return to the
beginning of the currently
playing chapter/track.
Press briefly twice to step back
to the previous chapter/track.
repeatedly to select the desired
scan speed.
DVD discs have four scan
speeds.
MP3 and audio CD discs have
three scan speeds.
All
DVD
DVD
Audio CD
(ACD)
MP3
8
www.insignia-products.com
Page 9
Insignia NS-1UCDVD DVD Player
Button Operation Type of disc
While playback is paused,
press SCAN repeatedly to play
in slow motion.
There are four slow motion
steps, which work only in
forward.
REPEAT During playback, press
A-B Press once to select a Point A
ZOOM During playback or pause
RANDOM During playback or in stop
TITLE If the current DVD title has a
DVD MENU Press to display the disc
ANGLE
SUBTITLE
AUDIO
MARKER Press to mark a point on a
repeatedly to select a desired
repeat mode. Press SKIP
once to cancel repeat
playback.
For DVD discs, modes include
Chapter, Title, and Off.
For audio CD, MP3 and WMA
discs, modes include Track,
All, and Off.
and a second time to select a
Point B. The player repeats the
sequence from Point A to
Point B.
For audio CD’s, this feature is
available only for the current
track.
modes, press to enlarge the
video image. There are three
zoom levels.
/ / /
Use
buttons to move through the
zoomed picture. Press CLEAR
to exit.
Note that ZOOM may not work
with some DVDs.
mode, press for random
playback.
menu, press to display the title
menu on the screen. If there is
no title menu, the disc menu
displays.
menu.
During playback of DVD that
contains scenes filmed at
different angles, press
repeatedly to select a desired
angle.
The angle indicator will blink
on the screen to indicate that
angle switching is possible.
During playback, press
repeatedly to select a desired
subtitle language.
During playback, press
repeatedly to hear a different
language or audio track.
DVD. A marker icon displays
briefly on the screen.
Repeat to enter up to nine
markers.
DVD
All
DVD
ACD
DVD
ACD
MP3
WMA
DVD
DVD
DVD
DVD
DVD
DVD
Accessing additional DVD player features
This DVD player has four additional features:
• Time search
• Marker search
• Last scene memory
• Screen saver
Time search allows you to begin play from a
specific time point on a DVD.
Using marker search, you can start playback
from up to nine memorized points.
The DVD player automatically memorizes the
last scene from the last disc viewed. This scene
remains in memory even if you remove the disc
from the player or switch off the player. When
you load a disc that has had the last scene
memorized, the scene is recalled automatically.
Note
This player does not memorize the scene of a disc
if you switch off the player before beginning to play
the disc.
The screen saver displays when you leave the
DVD player on and in stop mode for 5 minutes.
After the screen saver is displayed for another 5
minutes, the player automatically turns itself off.
To access Time Search (DVDs only):
1 Press the DISPLAY button during playback.
2 Press the or button to select the time
clock icon. “--:--:--” appears.
3 Input the desired start time on hours,
minutes, and seconds. Press the CLEAR
button to remove numbers entered
incorrectly, then re-enter the correct numbers
4 Press the ENTER button to confirm your
selection.
To access Marker Search (DVDs only):
1 Press the MARKER button during playback
to memorize a point.
2 During playback, press the SEARCH button.
The Marker Menu displays.
3 Within 9 seconds, press the or button
to select a marker number to either recall or
delete.
4 Press the ENTER button to begin playback
from the memorized point
OR
Press the CLEAR button to delete the
selected memorized point.
Note
You can play any memorized point by using the
number pad on the remote control to input the
marker number after accessing the Marker Menu.
Playing a DVD or CD
Note
Both the DVD player and DVD are coded by region. These
regional codes must match in order for the DVD to play. If the
codes don’t match, the DVD won’t play. This player’s code is
region 1. DVDs with other regional codes cannot be played in
this player.
To play a DVD or CD:
1 Press the POWER button to turn on the
player.
2 Press the OPEN button. The tray opens.
3 Place a disc onto the spindle. Make sure it
snaps into place.
www.insignia-products.com
9
Page 10
Insignia NS-1UCDVD DVD Player
4 Slide the tray closed. Your player starts
playing. Use the VOLUME +/- to adjust your
player’s volume.
5 Press the STOP button to stop playing the
DVD or CD.
Using the DVD menu
A DVD is divided into sections called titles and
chapters. When you play a DVD, a root menu of
the disc appears on the screen. The contents of
the menu vary from disc to disc. Some DVDs
only allow you to select disc playback options
using the DVD root menu.
To access the DVD menu:
• Press the DVD MENU button during playback
to display the menu.
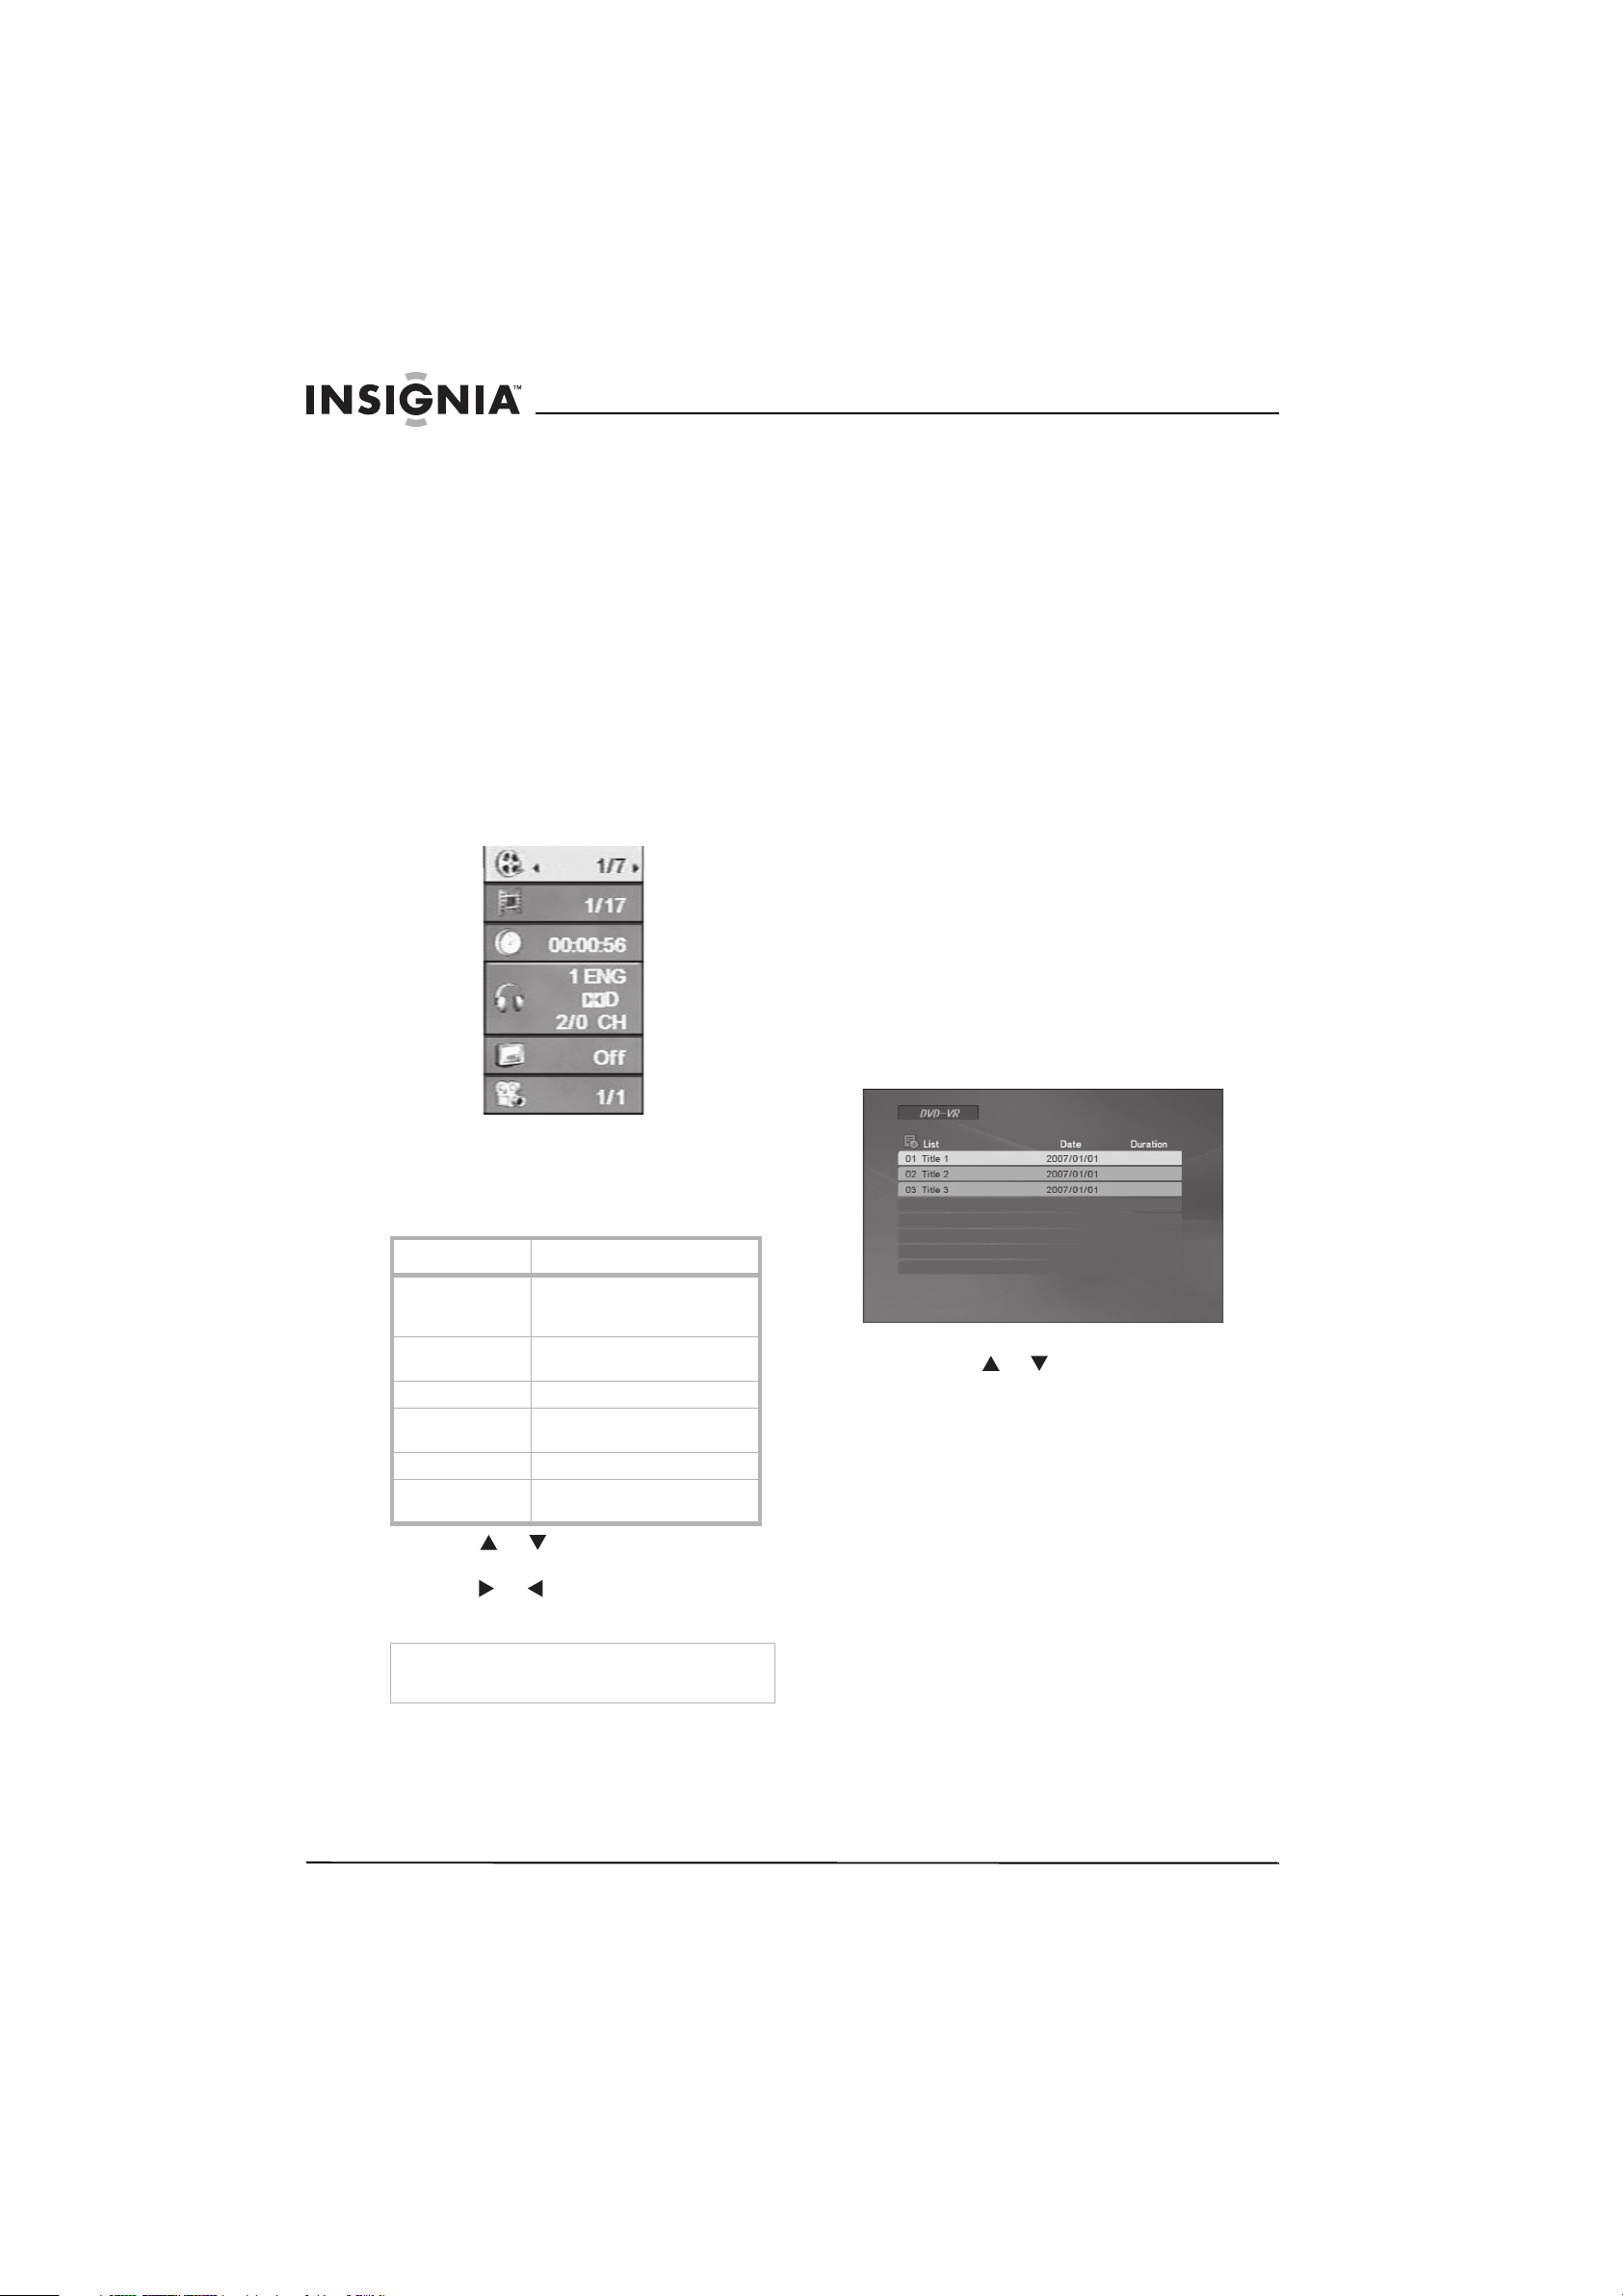
Displaying information
Title (Track)
Chapter
Time
Audio
Subtitle
2 Press the A-B button a second time to set the
ending point. The player repeatedly plays the
part between the start and end points.
3 Press the A-B button a third time to cancel
A-B repeat and resume normal playback.
To repeat a DVD or the chapter or title of a
DVD:
• Press the REPEAT button repeatedly to set
the repeat type:
• Chapter: Repeat the current chapter
• Title: Repeat the current title
• All: Repeat all chapters and titles
• Off: Resume normal playback
Playing a VR format DVD
DVDs recorded using a Video Recording (VR)
format can be played on this DVD player;
however, unfinalized DVR discs will not play.
Some DVD discs with VR formatting use Content
Protection for Recordable Media (CPRM), which
is a copy protection (scramble) system that only
allows the recording of “copy once” broadcast
programs. VR format DVDs using CPRM will not
work with this DVD player.
To play a VR format DVD:
1 Insert a disc in the tray and close the tray.
The DVD-VR List menu displays on the
screen.
Angle
To display information about the DVD:
1 Press the DISPLAY button during playback to
display the following information about the
elapsed time of the title:
Menu Item Information Displayed
Title (Track) Current title (or track)
number/Total number of titles
(or tracks)
Chapter Current chapter number/Total
number of chapters
Time Elapsed playing time
Audio Selected audio language or
channel
Subtitle Selected subtitle
Angle elected angle/Total number of
angles
2 Press the or button to select a menu
item.
3 Press the or button to change or select
a setting.
2 Press the or button to select a track on
the disc, then press the PLAY button or the
ENTER button to start playback.
3 Press the DVD MENU button to return to the
List menu.
Note
The on-screen display disappears if no button is
pressed for a few seconds.
Repeating part of a DVD
To repeat a segment of a DVD:
1 Press the A-B button on the remote control
during playback to set the starting point.
10
www.insignia-products.com
Page 11
Insignia NS-1UCDVD DVD Player
Using setup
This DVD was programmed by the manufacturer
with default settings. By using the setup option,
you can change performance-related features,
such as picture, sound and language. The setup
option also offers access to a parental lock, if
desired.
T
To access the setup menu:
1 Press the SETUP button to display the menu.
Press the SETUP button a second time to
remove the menu from the screen.
2 Press the or button to access a menu
item. The current settings for the selected
menu item are shown on the menu.
3 Press to select a menu item. Press to
return to the previous level.
4 Repeat Steps 2 and 3 to access additional
menu items. Press ENTER to confirm your
selection(s).
5 Press either the SETUP button or the PLAY
button to exit the Setup menu.
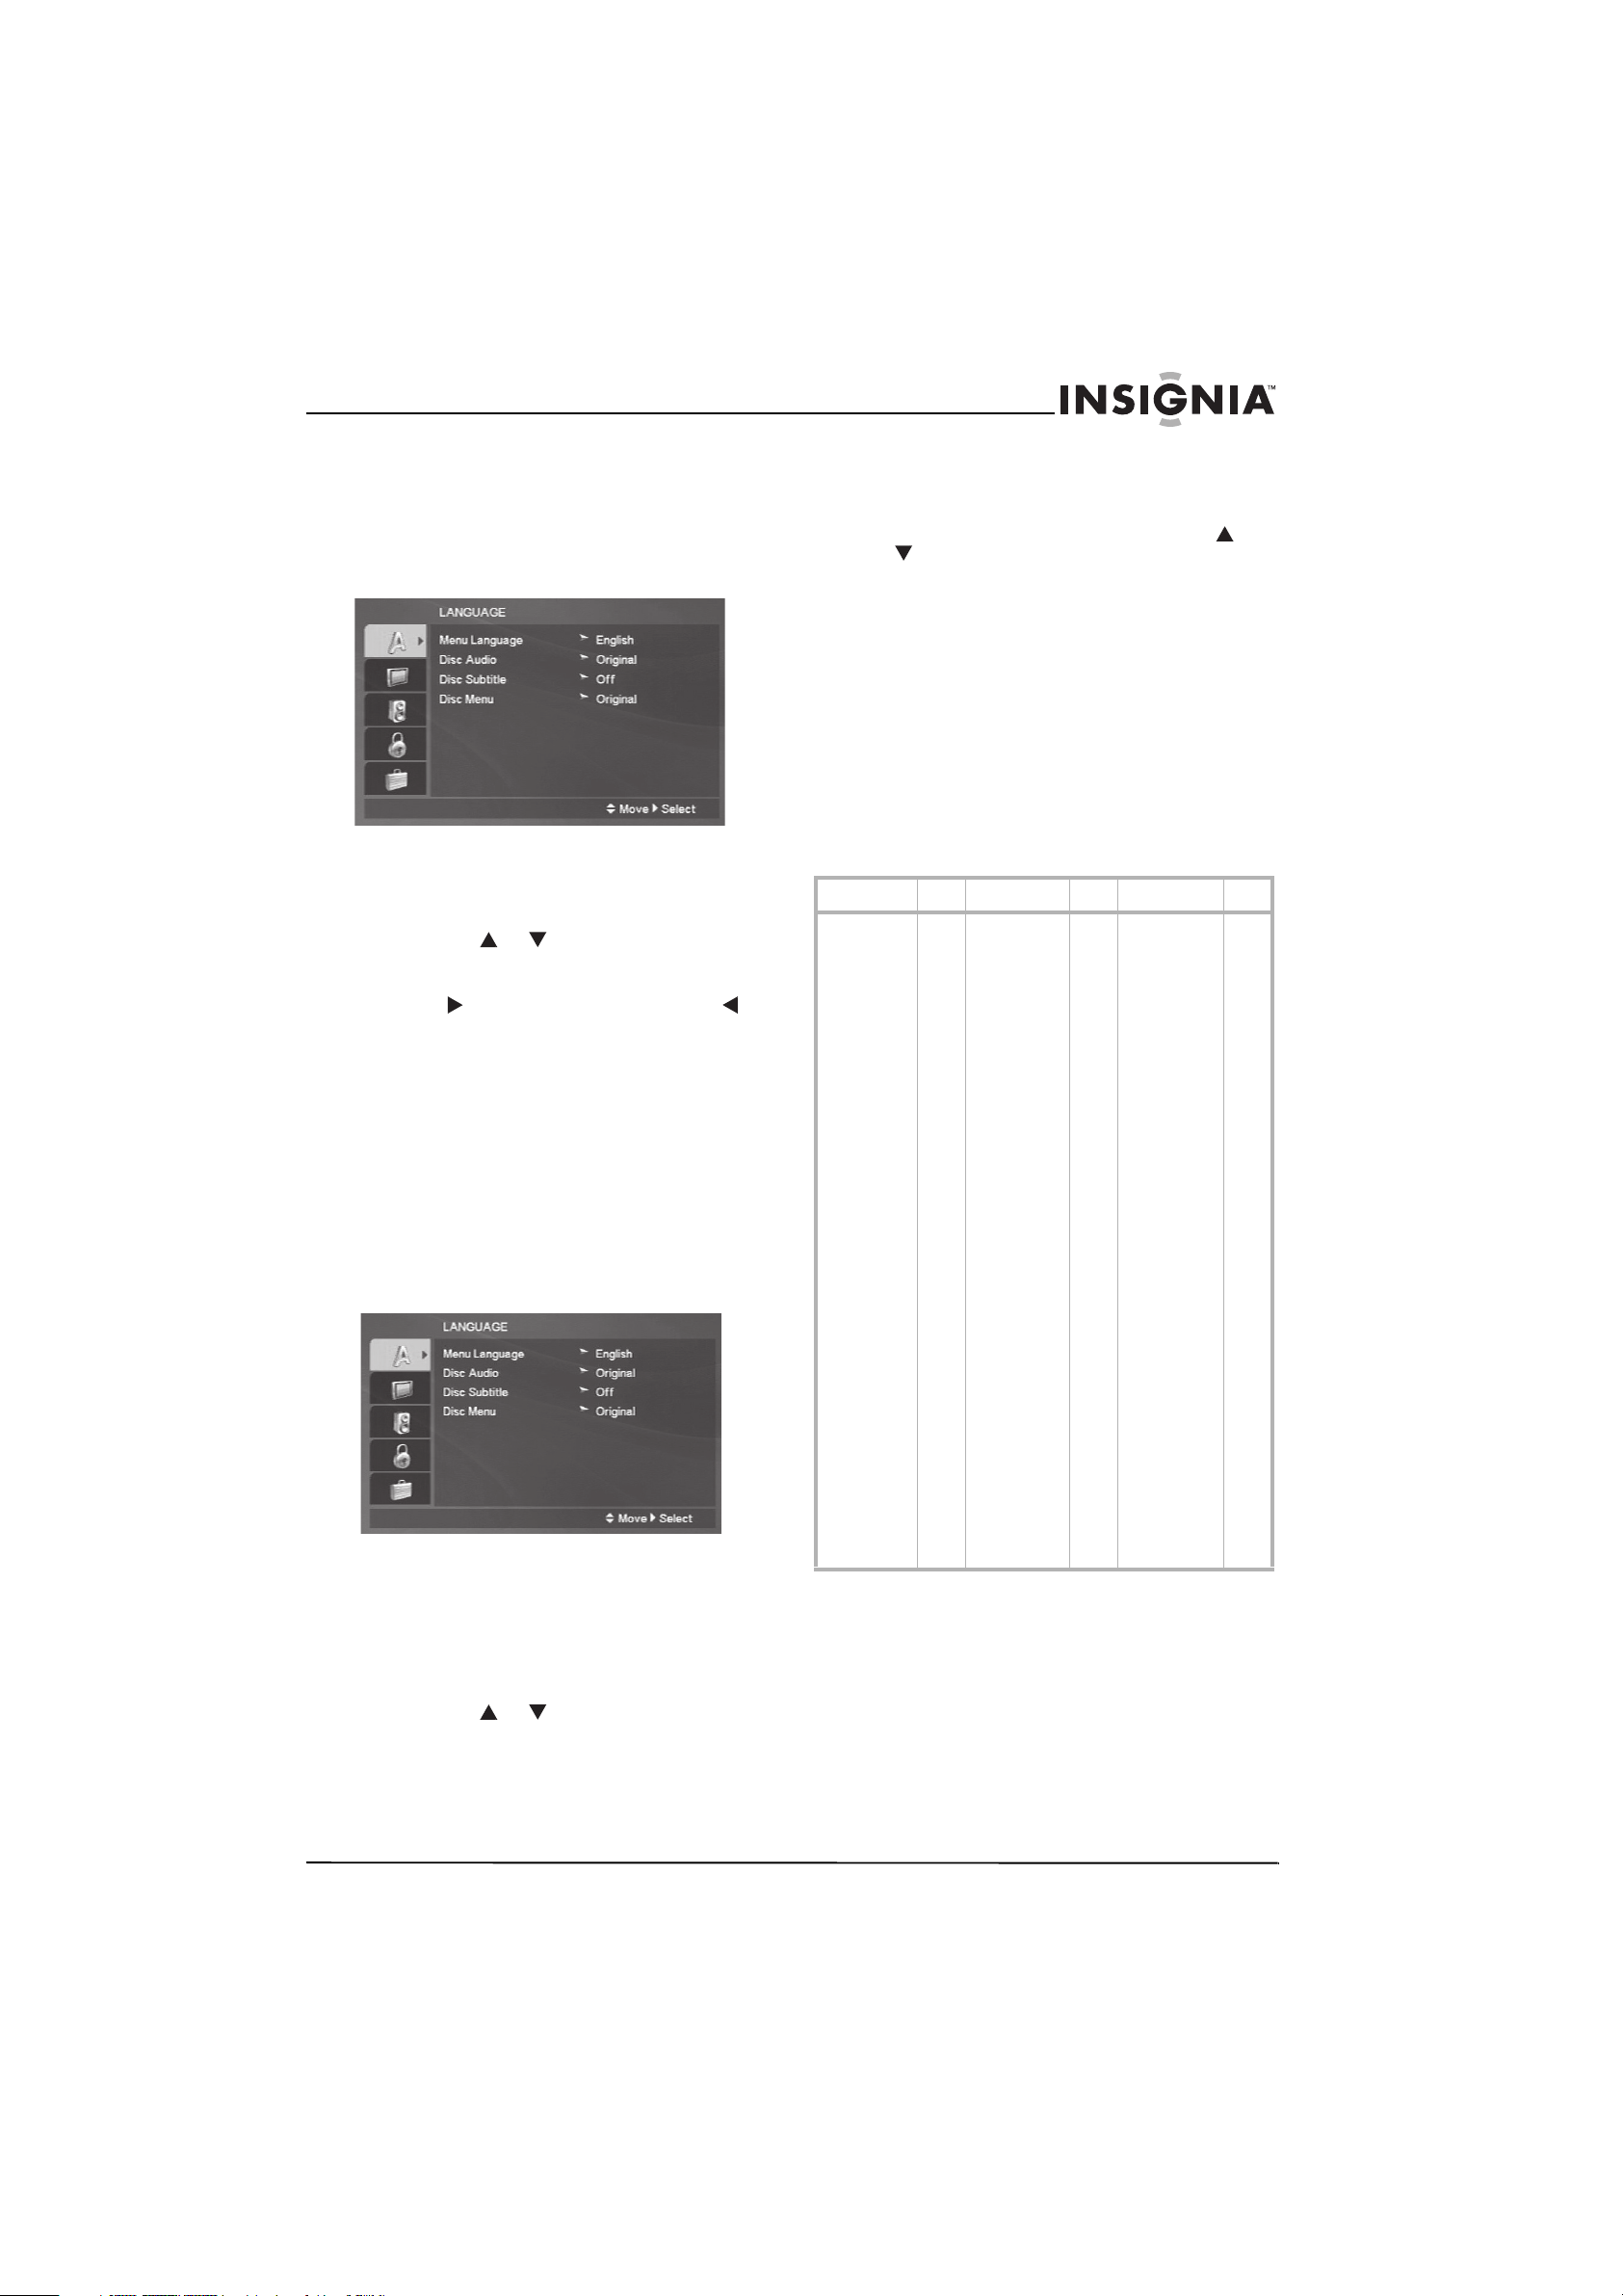
Selecting language options
The LANGUAGE menu allows you to select a
language for both the menus, for the on-screen
display of subtitles and for audio.
The Disc Audio, Disc Subtitle, and Disc Menu
options all use the same procedure.
To select a menu language:
1 On the Setup menu, select LANGUAGE.
Press the ENTER button to confirm your
selection.
2 On the LANGUAGE menu, select Menu
Language. Press the ENTER button to
confirm your selection.
3 Press the or button to access the
desired language. Press the ENTER button
to confirm your selection.
To select a disc language:
1 On the Setup menu, select LANGUAGE.
Press the ENTER button to confirm your
selection.
2 On the LANGUAGE menu, press the or
button to access Disc Audio, Disc
Subtitle, or Disc Menu. Press the ENTER
button to confirm your selection.
3 Select one of the following options:
• Original - Select original for the audio on
the disc to play in the language in which it
was originally recorded.
• Other - To select another language, press
the numeric buttons corresponding to the
4-digit language code in the following
table. Press the ENTER button to confirm
your selection or the CLEAR button to
erase.
• Off - Select off to turn off display of disc
subtitles.
Language Code Language Code Language Code
Abkhazian
Afar
Afrikaans
Albanian
Ameharic
Arabic
Armenian
Assamese
Aymara
Azerbaijani
Bashkir
Basque
Bengali;Bangla
Bhutani
Bihari
Breton
Bulgarian
Burmese
Byelorussian
Cambodian
Catalan
Chinese
Corsican
Croatian
Czech
Danish
Dutch
English
Esperanto
Estonian
Faroese
Fiji
Finnish
French
Frisian
Galician
Georgian
German
Greek
Greenlandic
Guarani
6566
6565
6570
8381
6577
6582
7289
6583
6588
6590
6665
6985
6678
6890
6672
6682
6671
7789
6669
7577
6765
9072
6779
7282
6783
6865
7876
6978
6979
6984
7079
7074
7073
7082
7089
7176
7565
6869
6976
7576
7178
Gujarati
Hausa
Hebrew
Hindi
Hungarian
Icelandic
Indonesian
Interlingua
Irish
Italian
Japanese
Javanese
Kannada
Kashmiri
Kazakh
Kirghiz
Korean
Kurdish
Laothian
Latin
Latvian, Lettish
Lingala
Lithuanian
Macedonian
Malagasy
Malay
Malayalam
Maltese
Maori
Marathi
Moldavian
Mongolian
Nauru
Nepali
Norwegian
Oriya
Panjabi
Pashto, Pushto
Persian
Polish
Portuguese
Quechua
7185
7265
7387
7273
7285
7383
7378
7365
7165
7384
7465
7487
7578
7583
7575
7589
7579
7585
7679
7665
7686
7678
7684
7775
7771
7783
7776
7784
7773
7782
7779
7778
7865
7869
7879
7982
8065
8083
7065
8076
8084
8185
RhaetoRomance
Rumanian
Russian
Samoan
Sanskrit
Scots, Gaelic
Serbian
Serbo-Croatian
Shona
Sindhi
Singhalese
Slovak
Slovenian
Somali
Spanish
Sudanese
Swahili
Swedish
Tagalog
Taji k
Tami l
Tata r
Telugu
Thai
Tibetan
Tigrinya
Ton ga
Tur ki sh
Tur km en
Tw i
Ukrainian
Urdu
Uzbek
Vietnamese
Volapuk
Welsh
Wolof
Xhosa
Yiddish
Yoruba
Zulu
8277
8279
8285
8377
8365
7168
8382
8372
8378
8368
8373
8375
8376
8379
6983
8385
8387
8386
8476
8471
8465
8484
8469
8472
6679
8473
8479
8482
8475
8487
8575
8582
8590
8673
8679
6789
8779
8872
7473
8979
9085
www.insignia-products.com
11
Page 12
Insignia NS-1UCDVD DVD Player
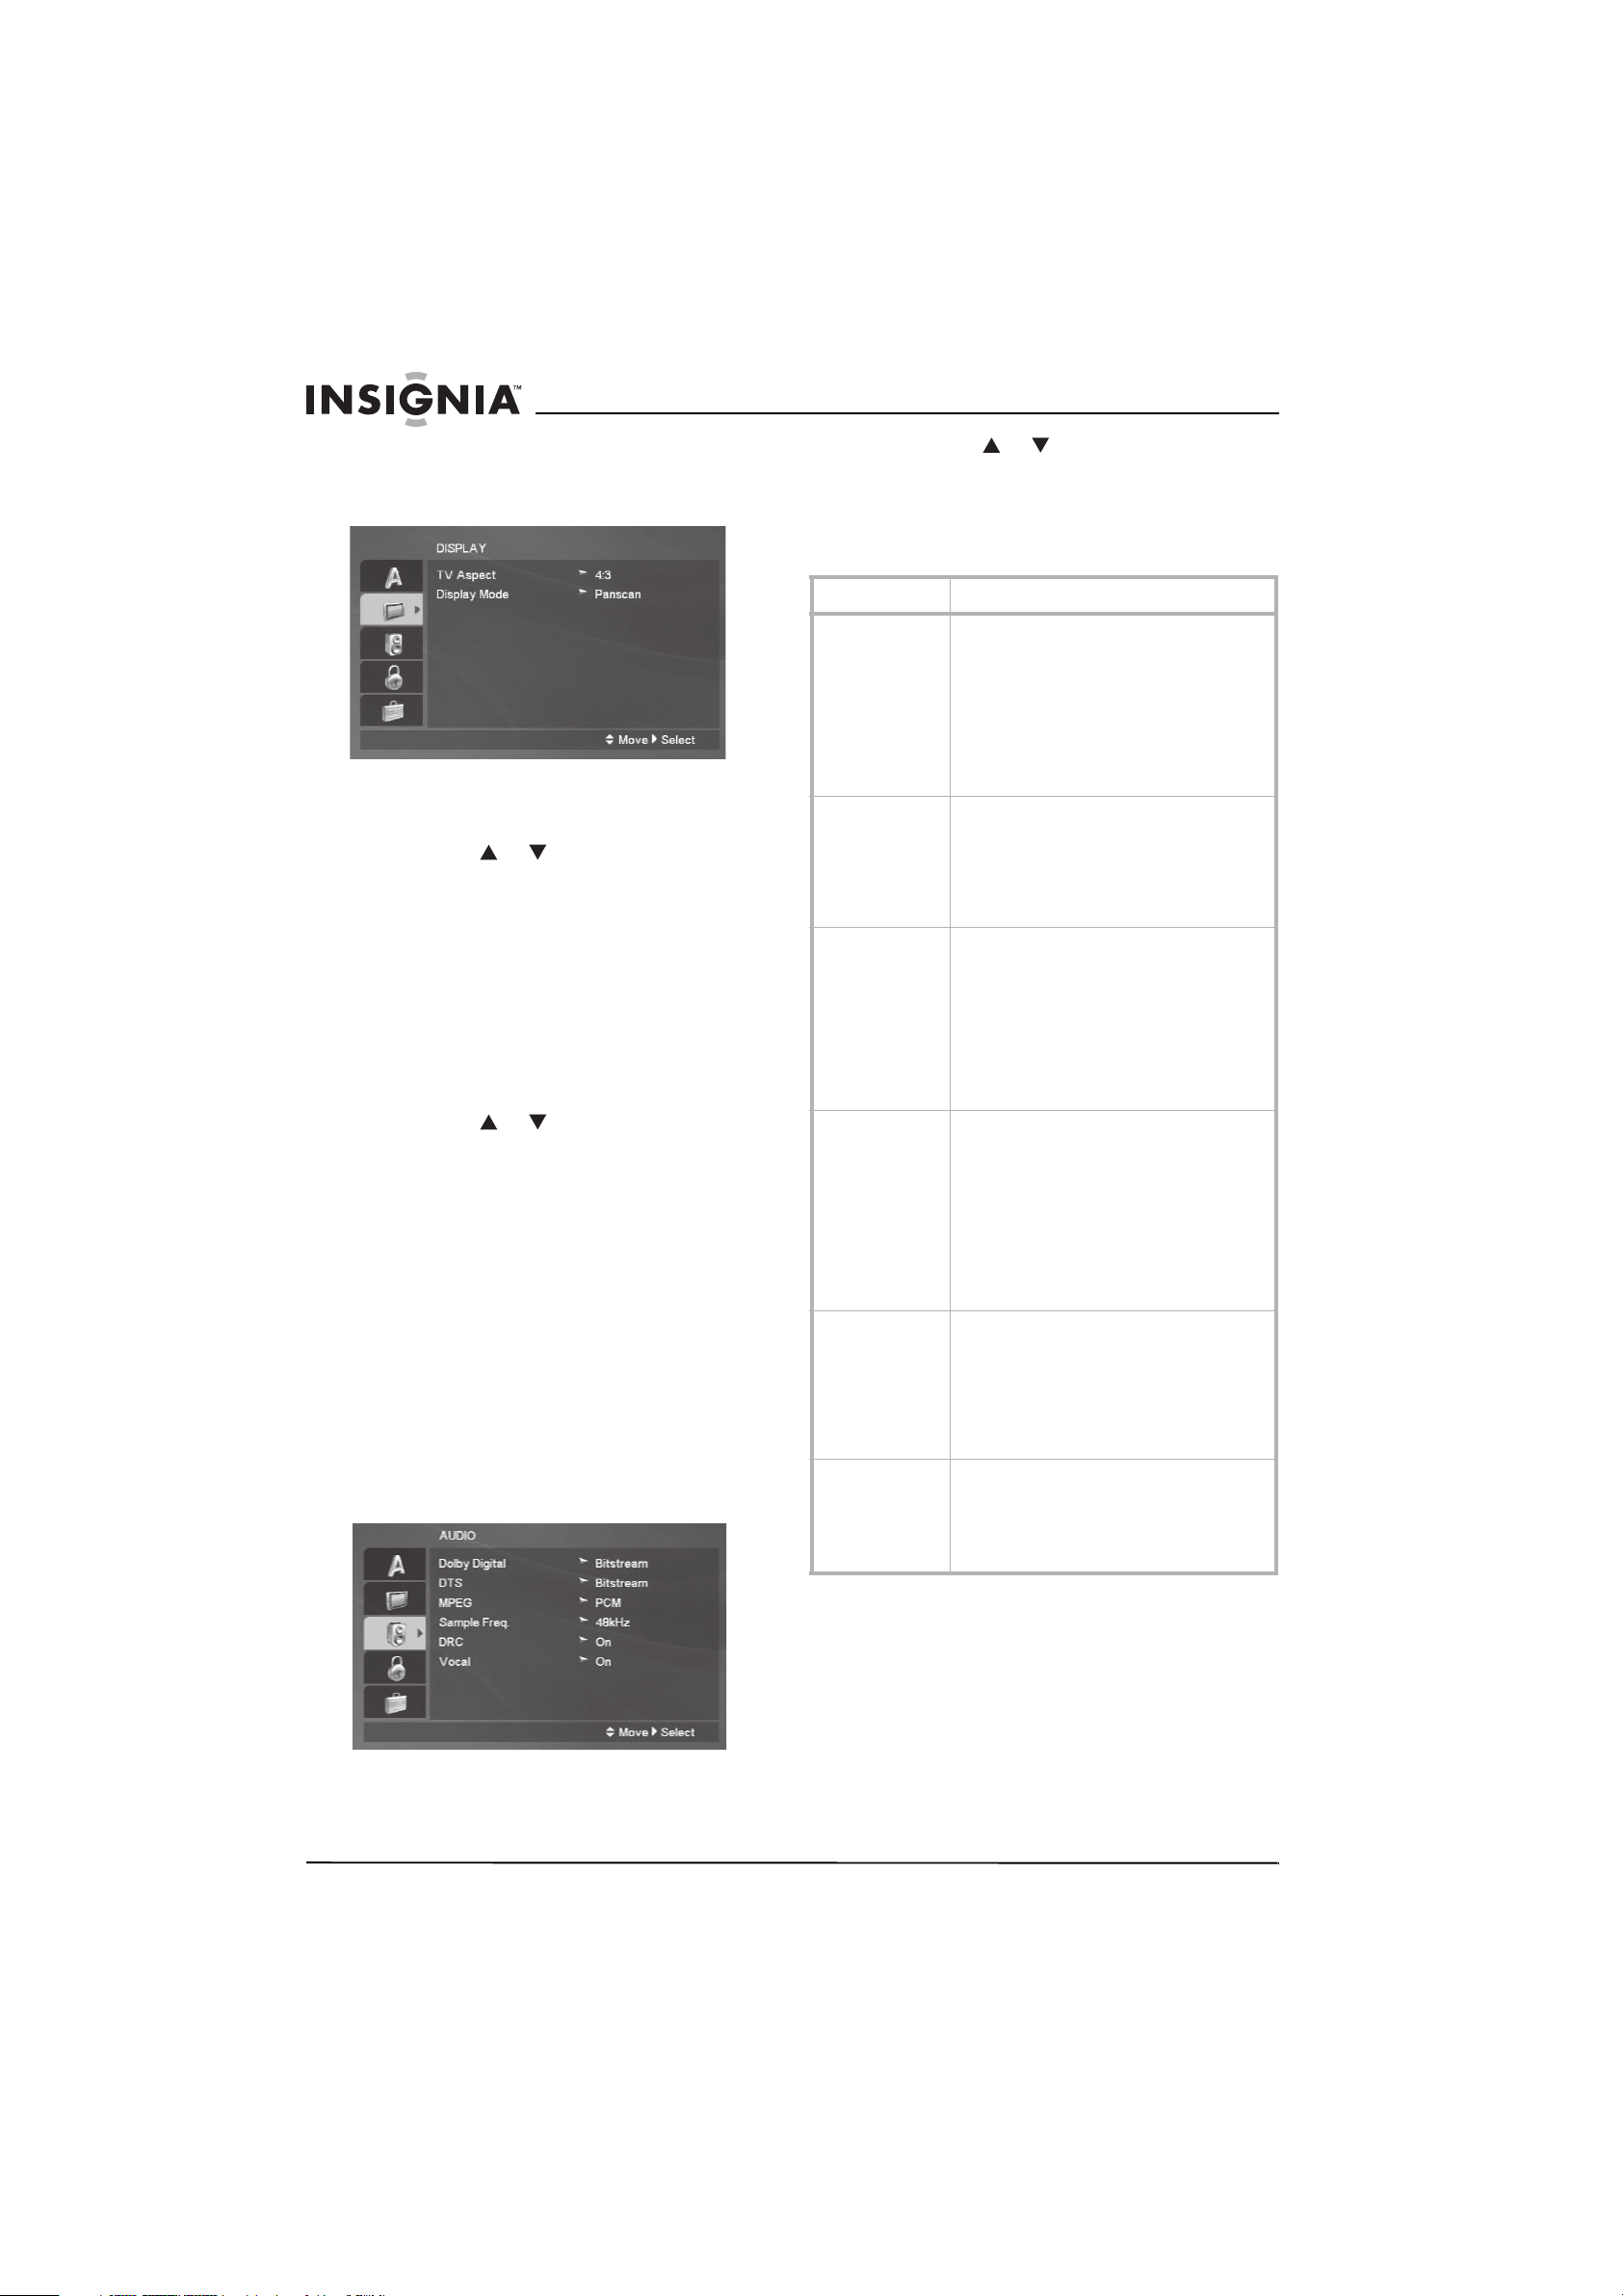
Selecting display options
The Display menu allows you to select an aspect
for your TV and the mode.
To set up a password:
1 On the Setup menu, select DISPLAY. Press
the ENTER button to confirm your selection.
2 Press the or button to access TV
Aspect. Press the ENTER button to confirm
your selection. Choose one of the following
options and press the ENTER button to
confirm your selection.
• 4:3 - Select when a standard 4:3 TV is
connected to the DVD player.
• 16:9 - Select when a 16:9 wide TV is
connected to the DVD player.
To select display mode:
1 On the Setup menu, select DISPLAY. Press
the ENTER button to confirm your selection.
2 Press the or button to access Display
Mode. Press the ENTER button to confirm
your selection. The display mode setting only
works when the TV aspect is set to 4:3.
3 Choose one of the following options and
press the ENTER button to confirm your
selection.
• Letterbox - Select to display a wide
picture with bands on the upper and lower
portions of the screen.
• Panscan - Select to display the wide
picture on the entire screen. Portions that
do not fit on the screen will be cut off.
Selecting audio options
Each DVD disc has a number of audio input
options. Set the DVD player’s audio options
according to the type of audio system that you
use.
2 Press the or button to access the
desired audio option. Press the ENTER
button to confirm your selection. Set the
option according to the following table and
press the ENTER button to confirm your
selection.
Menu Item Information Displayed
Dolby Digital • Bitstream - Select if you connected
DTS • Bitstream - Select if you connected
MPEG • Bitstream - Select if you connected
Sample
Frequency
DRC
(Dynamic Range
Control)
Vocal • ON - Select when a multi-channel
this player’s DIGITAL OUT jack to an
amplifier or other equipment with a
Dolby Digital, DTS or MPEG decoder.
• PCM - Select for Dolby Digital or MPEG
when connected to a two-channel
digital stereo amplifier. DVDs encoded
in Dolby Digital, MPEG will be
automatically downmixed to
two-channel PCM audio.
this player’s DIGITAL OUT jack to an
amplifier or other equipment with a
Dolby Digital, DTS or MPEG decoder.
• Off - Select if the DTS signal is not
output through this player’s DIGITAL
OUT jack.
this player’s DIGITAL OUT jack to an
amplifier or other equipment with a
Dolby Digital, DTS or MPEG decoder.
• PCM - Select for Dolby Digital or MPEG
when connected to a two-channel
digital stereo amplifier. DVDs encoded
in Dolby Digital, MPEG will be
automatically downmixed to
two-channel PCM audio
• 48 kHz. - Select If your receiver or
amplifier is NOT capable of handling 96
kHz signals. When this option is
selected, the player automatically
converts any 96 kHz signals to 48 kHz
so your system can decode them.
• 96 kHz. - Select if your receiver or
amplifier is capable of handling 96 kHz
signals.
Check your amplifier documentation to verify
its capabilities.
• ON - Select to compress the dynamic
range of the audio output (the
difference between the loudest sounds
and the quietest ones). This allows you
to listen to a movie at a lower volume
without losing clarity of sound.
• OFF - Select to hear audio in the most
realistic and accurate presentation.
karaoke DVD is playing. The karaoke
channels on the disc mix into normal
stereo sound.
• OFF - Select when playing any other
type of audio.
12
To set audio:
1 On the Setup menu, select AUDIO. Press the
ENTER button to confirm your selection.
www.insignia-products.com
Page 13
Insignia NS-1UCDVD DVD Player
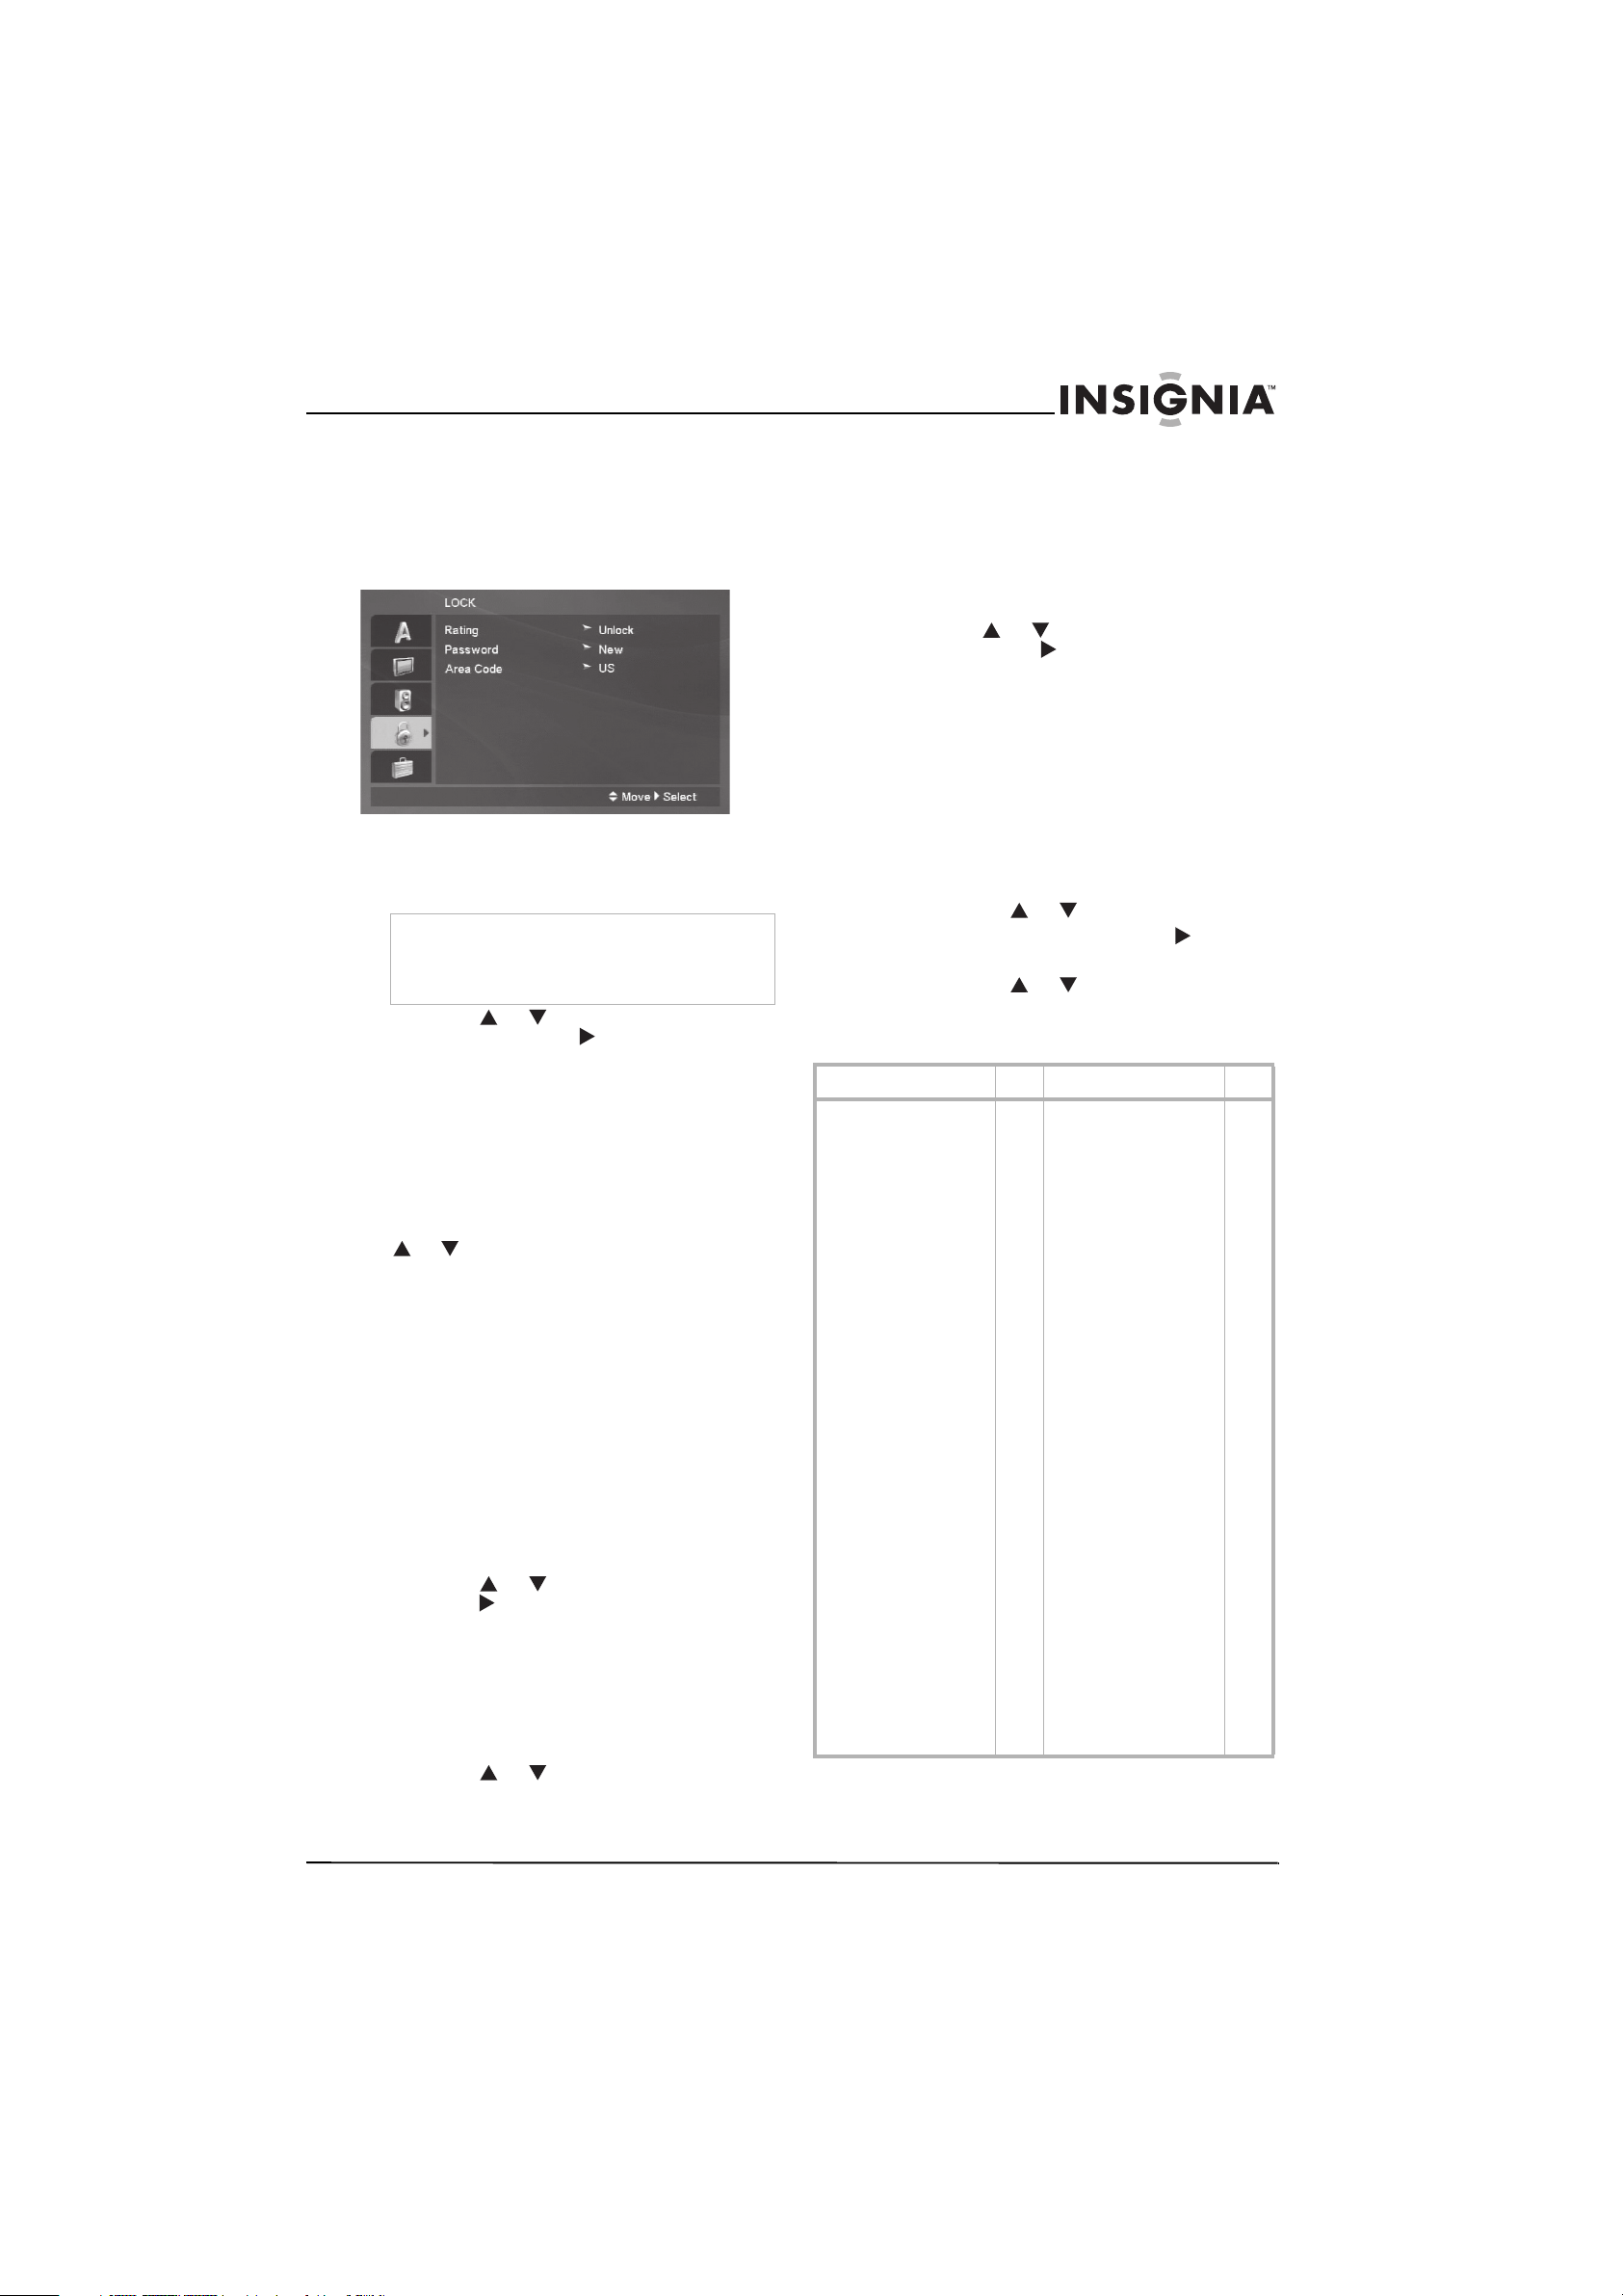
Setting the parental lock
The Parental Lock menu allows you to block
playback of DVDs that have been rated based on
their content. Not all discs are rated.
The lock is protected by a password and the
ratings standards are based on area code.
To set the password:
1 On the Setup menu, select LOCK. Press the
ENTER button to confirm your selection.
Note
The lock function is password-based. You must set
up a password before accessing the other options.
You only need to set up your password once, but
you can change the password at any time.
2 Press the or button to access
Password. Press the button to confirm
your selection.
• At the prompt, input a password using the
number pad on your remote control and
press the ENTER button.
• Re-enter the password and press the
ENTER button to verify.
• Use the CLEAR button if you make a
mistake.
3 To change an existing password, press the
or button to access Change. Press the
ENTER button to confirm your selection.
• At the prompt, input a new password
using the number pad on your remote
control and press the ENTER button.
• Re-enter the password and press the
ENTER button to verify.
• Use the CLEAR button if you make a
mistake.
4 If you forget your password, press the
SETUP button to display the Setup menu,
then input 210499 to clear the old password.
To set rating:
1 On the Setup menu, select LOCK. Press the
ENTER button to confirm your selection.
2 Press the or button to access Rating.
Press the button to confirm your selection.
3 Because the lock function is protected by a
password, you must set up a password
before accessing the other options. When
accessing the rating option, you will be
prompted for your password. Either enter
your password or refer to page 13 to set up
your password.
4 Press the or button to select a rating
from 1 to 8 or to unlock the control. Press the
ENTER button to confirm your selection.
• Rating 1-8 - Rating 1 has the most
restrictions and Rating 8 has the least
restrictions.
• Unlock - Unlocks the parental control so
that all discs play in full.
To set area code:
1 On the Setup menu, select LOCK. Press the
ENTER button to confirm your selection.
2 Press the or button to access Area
Code. Press the button to confirm your
selection.
3
Because the lock function is protected by a
password, you must set up a password
before accessing the other options. When
accessing the area code option, you will be
prompted for your password. Either enter
your password or refer to page 13 to set up
your password.
4 Enter the area code of the area whose
standards were used to rate the DVD, based
on the following table.
• Press the or button to select the
first character, then press the button to
confirm your selection.
• Press the or button to select the
second character, Press the ENTER
button to confirm your selection.
Area Code Area Code
Afghanistan
Argentina
Australia
Austria
Belgium
Bhutan
Bolivia
Brazil
Cambodia
Canada
Chile
China
Colombia
Congo
Costa Rica
Croatia
Czech Republic
Denmark
Ecuador
Egypt
El Salvador
Ethiopia
Fiji
Finland
France
Germany
Great Britain
Greece
Greenland
Herd and Mcdonald Islands
Hong Kong
Hungary
India
Indonesia
Israel
Italy
Jamaica
Japan
Kenya
Kuwait
Libya
Luxembourg
AF
Malaysia
AR
Maldives
AU
Mexico
AT
Monaco
BE
Mongolia
BT
Morocco
BO
Nepal
BR
Netherlands
KH
Netherlands Antilles
CA
New Zealand
CL
Nigeria
CN
Norway
CO
Oman
CG
Pakistan
CR
Panama
HR
Paraguay
CZ
Philippines
DK
Poland
EC
Portugal
EG
Romania
SV
Russian Federation
ET
Saudi Arabia
FJ
Senegal
FI
Singapore
FR
Slovak Republic
DE
Slovenia
GB
South Africa
GR
South Korea
GL
Spain
HM
Sri Lanka
HK
Sweden
HU
Switzerland
IN
Taiw an
ID
Thailand
IL
Tur ke y
IT
Uganda
JM
Ukraine
JP
United States
KE
Uruguay
KW
Uzbekistan
LY
Vietnam
LU
Zimbabwe
MY
MV
MX
MC
MN
MA
NP
NL
AN
NZ
NG
NO
OM
PK
PA
PY
PH
PL
PT
RO
RU
SA
SN
SG
SK
SI
ZA
KR
ES
LK
SE
CH
TW
TH
TR
UG
UA
US
UY
UZ
VN
ZW
www.insignia-products.com
13
Page 14
Insignia NS-1UCDVD DVD Player
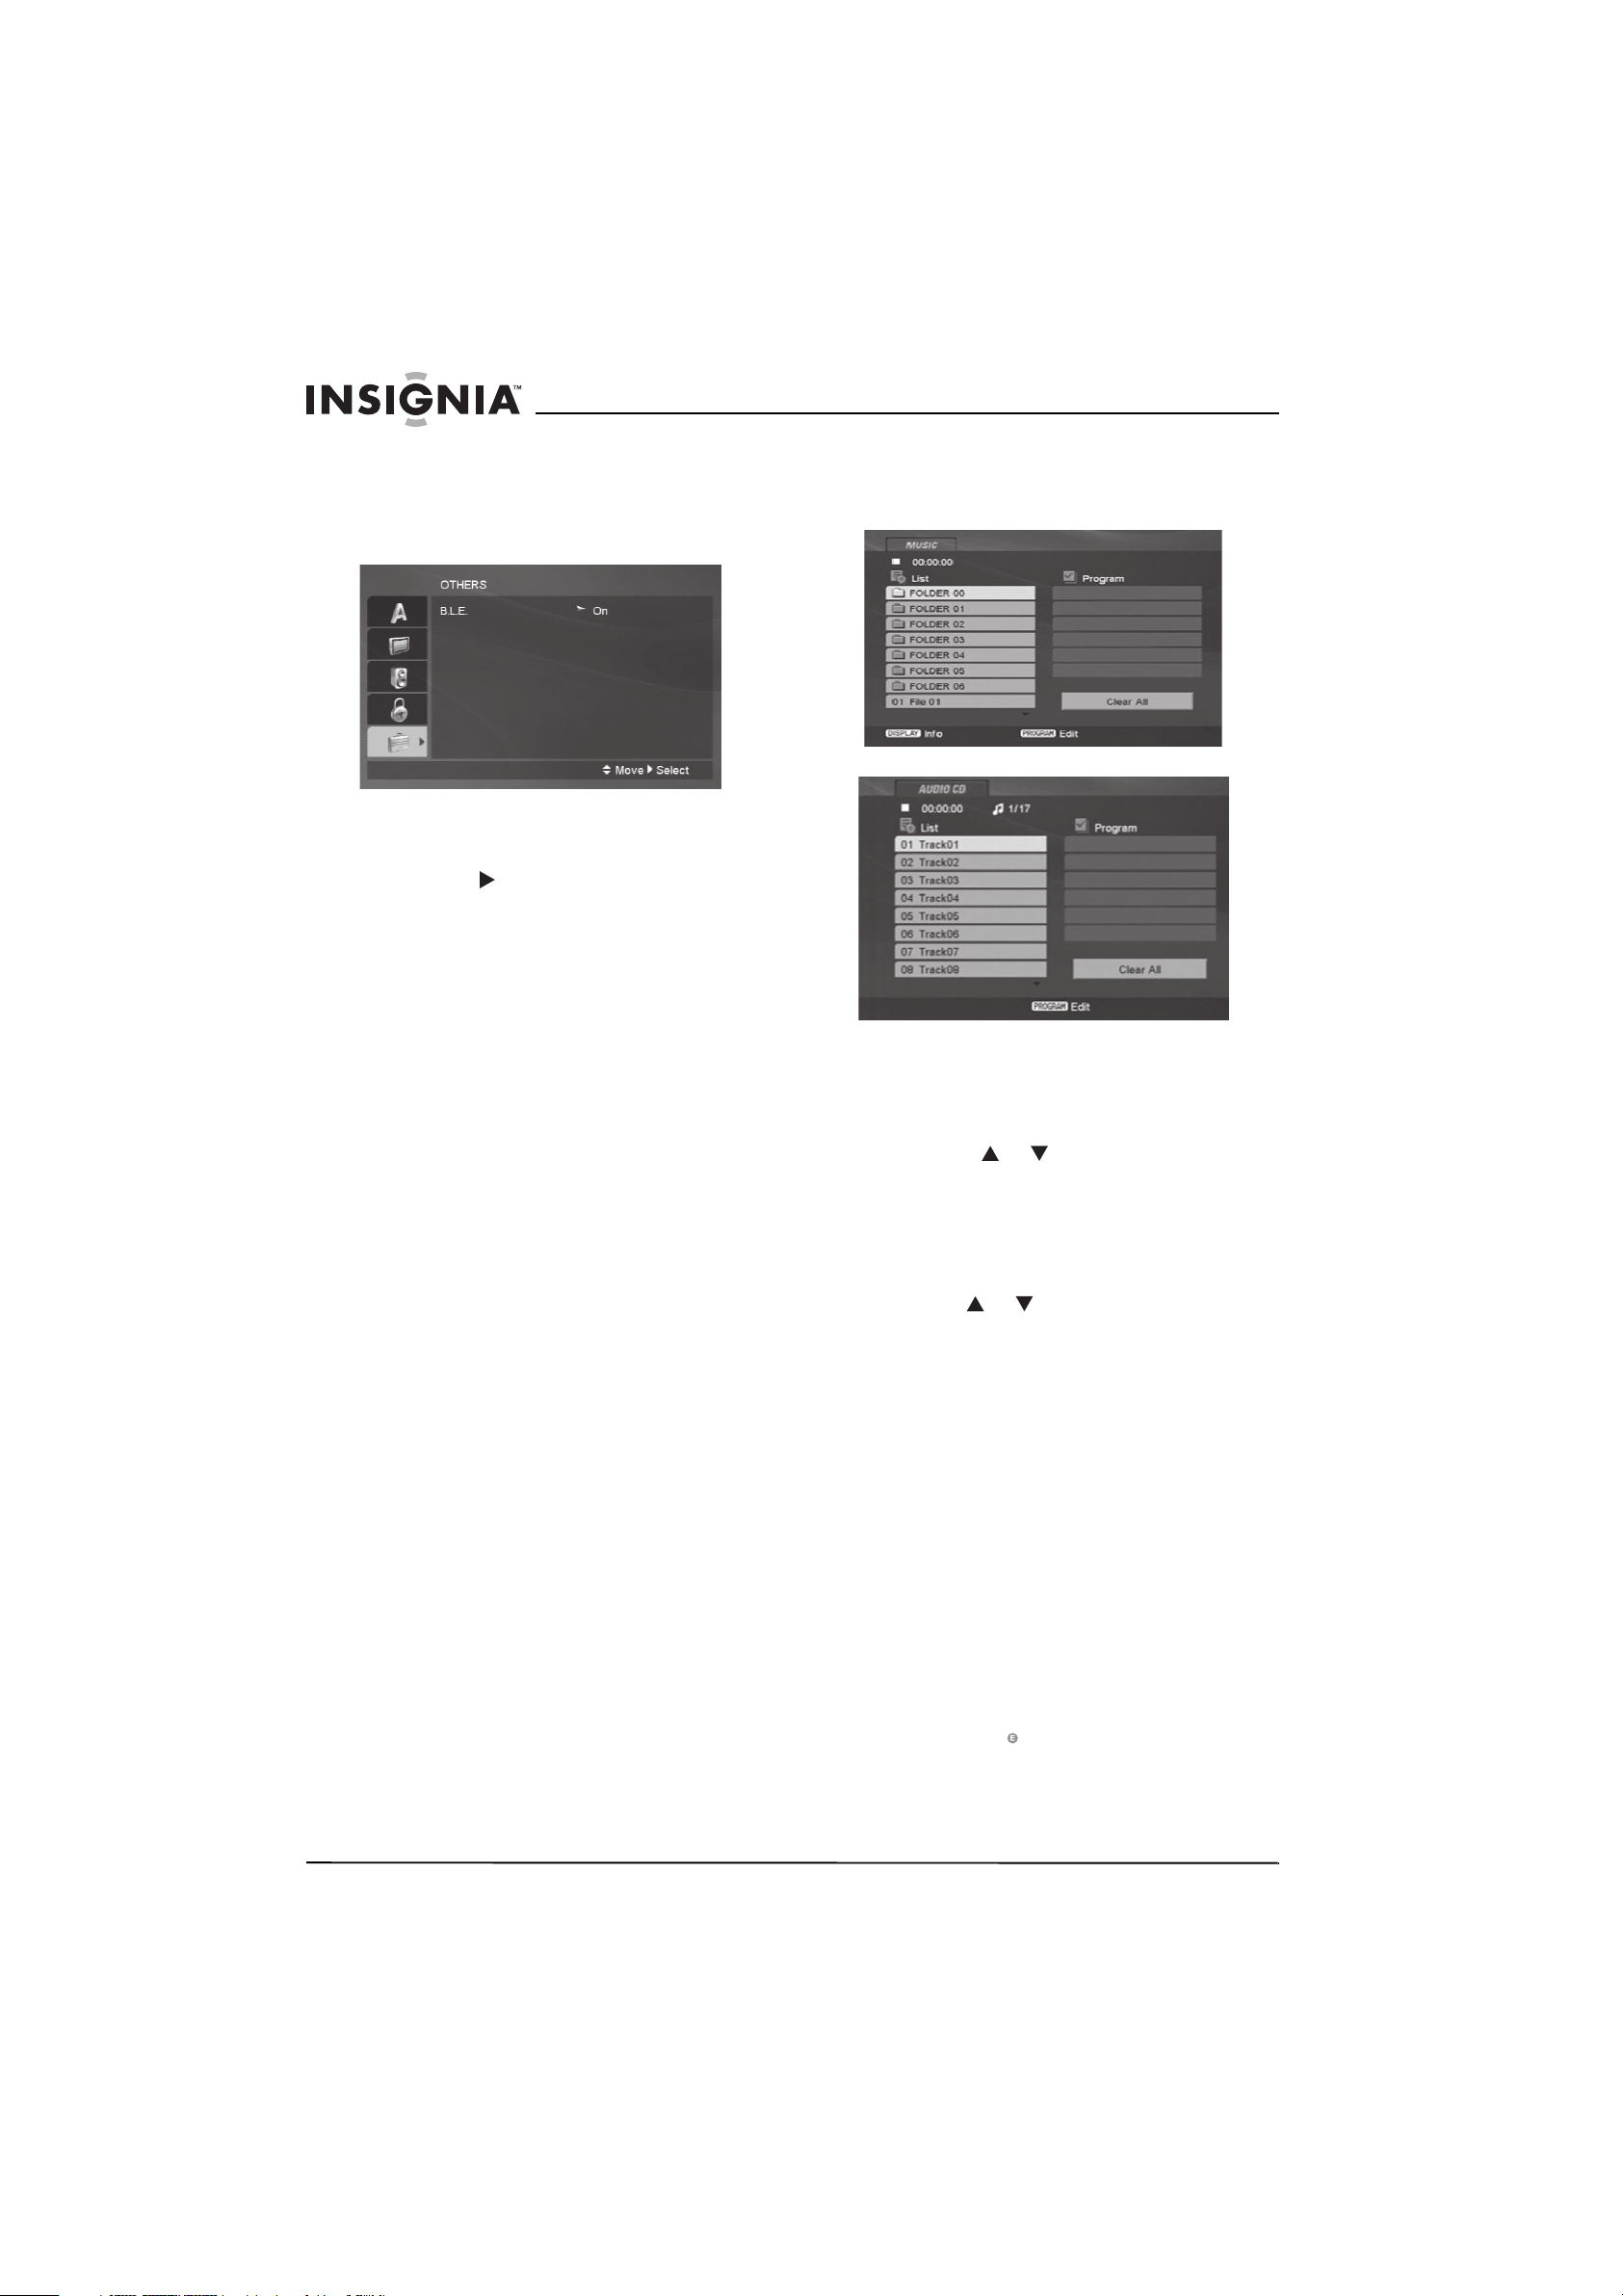
Setting black level expansion
The Others menu allows you to set Black Level
Expansion (BLE), which is the level of black in
playback displays, according to your preference
and the capabilities of your TV or monitor.
To set BLE:
1 On the Setup menu, select OTHERS. Press
the ENTER button to confirm your selection.
2 Press the button to toggle between the
two BLE options, then press the ENTER
button to confirm your selection.
• On - Expanded gray scale (0 IRE cutoff).
• Off - Standard gray scale (7.5 IRE cutoff).
When playing a file that contains additional
information, such as song title, artist, album,
comment, or genre, you can view that
information by pressing the DISPLAY button.
Playing audio, MP3, or WMA discs
MP3 and WMA are formats for storing digital
audio. An audio CD-quality song is compressed
into one of these formats with very little loss of
audio quality while taking up much less disc
space. CD-R or CD-RW discs that have been
encoded in MP3 or WMA format are compatible
with this player.
Because this DVD player supports VR
formatting, you can create your own audio CDs
and play them on this player. However, when
creating discs, use the following guidelines:
• If you record MP3 or WMA files using
software that cannot create a file system
(such as Direct-CD), the files will not play on
this player. The software (such as Easy CD
Creator) must create an ISO 9660 file
structure.
• File names should have a maximum of 8
letters and must incorporate an “.mp3” or
“.wma” extension. This player cannot read an
MP3/WMA file that has a file extension other
than “.mp3” or “.wma.”
• File names should not contain special letters
such as / ? * : “ < > l etc.
• The total number of files in a folder should be
less than 1012 files.
When a disc is inserted into the player, the menu
screen appears. You can use the menu screen
to select folders and songs.
To select folders and songs:
1 Insert an audio CD or a disc containing
MP3/WMA files in the tray and close the tray.
The Audio CD menu or the Music menu
displays.
2 Press the or button to choose a folder
from the folder list on the left side of the
screen. Press the DVD MENU button to move
to the next page.
3 Press the ENTER button to select the
highlighted folder. The songs available under
the folder are listed.
4 Use the or button to choose a song
track from the track list on the left side of the
screen. Press the DVD MENU button to move
to the next page
5 Press the PLAY button or the ENTER button
to select and begin playback of the
highlighted track or song.
Using programmed playback
The program function on this DVD player allows
you to store favorite tracks from an audio CD or
MP3 or WMA files on a disc in the player to the
storage memory for future playback in a specific
order. The program can contain up to 30 tracks.
To program tracks:
1 Insert an audio CD or a disc containing
MP3/WMA files in the tray and close the tray.
The Audio CD menu or the Music menu
displays.
2 Press the PROGRAM button on the remote
control. The icon displays on the screen.
Press the PROGRAM button again to exit the
program edit mode and remove the symbol
from the screen.
14
www.insignia-products.com
Page 15
Insignia NS-1UCDVD DVD Player
3 While in the program edit mode, select a
song or track, then press the ENTER button
to place the selected song or track in
memory.
4 Repeat this process to store up to 30 songs
or tracks in memory.
5 Use the / / / buttons to highlight
the programmed song or track that you want
to play first on your programmed playback
list, then press the PLAY button or the
ENTER button to begin play.
• Playback begins in the order in which you
programmed the songs or tracks.
• Playback stops after all of the songs or
tracks on the program list have played
once.
6 To resume normal playback, select any track
on the list and press the PLAY button.
To repeat playback of programmed tracks:
1 Press the REPEAT button to display a screen
which offers three possible repeat options:
• Track - Repeats the currently playing
track.
• All - Repeats all tracks on the
programmed list.
• Off (No display) - Cancels the repeat play.
2 Select either of the first two options to repeat
programmed playback. Select the Off option
to cancel all programmed playback. You also
can press the SKIP button once during track
playback to cancel the repeat playback.
To erase programmed tracks:
1 Stop playback, then press the PROGRAM
button on the remote control. The icon
displays on the screen.
2 Use the / / / buttons to highlight
the programmed song or track that you want
to erase from your programmed playback list,
then press the CLEAR button to remove the
song or track from the list.
3 Repeat this process to erase additional
songs or tracks from memory.
If you are using a disc that also contains audio
files, you can also listen to music files while
viewing pictures from the disc. Program the
music to play using the instructions in the
“Playing audio, MP3, or WMA discs” section,
then use the following procedure to view the
images.
Because this DVD player supports VR
formatting, you can create your own picture CDs
and play them on this player. However, when
creating discs, use the following guidelines:
• If you record images using software that
cannot create a file system (such as
Direct-CD), the files will not play on this
player. The software (such as Easy CD
Creator) must create an ISO 9660 file
structure.
• File names should have a maximum of 8
letters and must incorporate a “.jpg”
extension. This player cannot read an file that
has a file extension other than “.jpg” so JPEG
files with other extensions must be renamed
before burning them to a disc.
• File names should not contain special letters
such as / ? * : “ < > l etc.
• The total number of files in a folder should be
less than 1012 files.
When a disc is inserted into the player, the menu
screen appears. You can use the menu screen
to select folders and images. Depending on the
size and number of JPEG files, the player may
be very slow in displaying folder contents. If
folder contents do not appear after several
minutes, some of the files may be too large.
Reduce the resolution of the JPEG files to less
than five million pixels and burn another disc.
To erase the programmed playback list:
1 Stop playback, then press the PROGRAM
button on the remote control. The icon
displays on the screen.
2 Use the / / / buttons to select the
CLEAR ALL option, then press the ENTER
button. The entire programmed playback list
is erased.
3 Turning off the DVD player or removing the
disc from the tray also will erase the
programmed playback list.
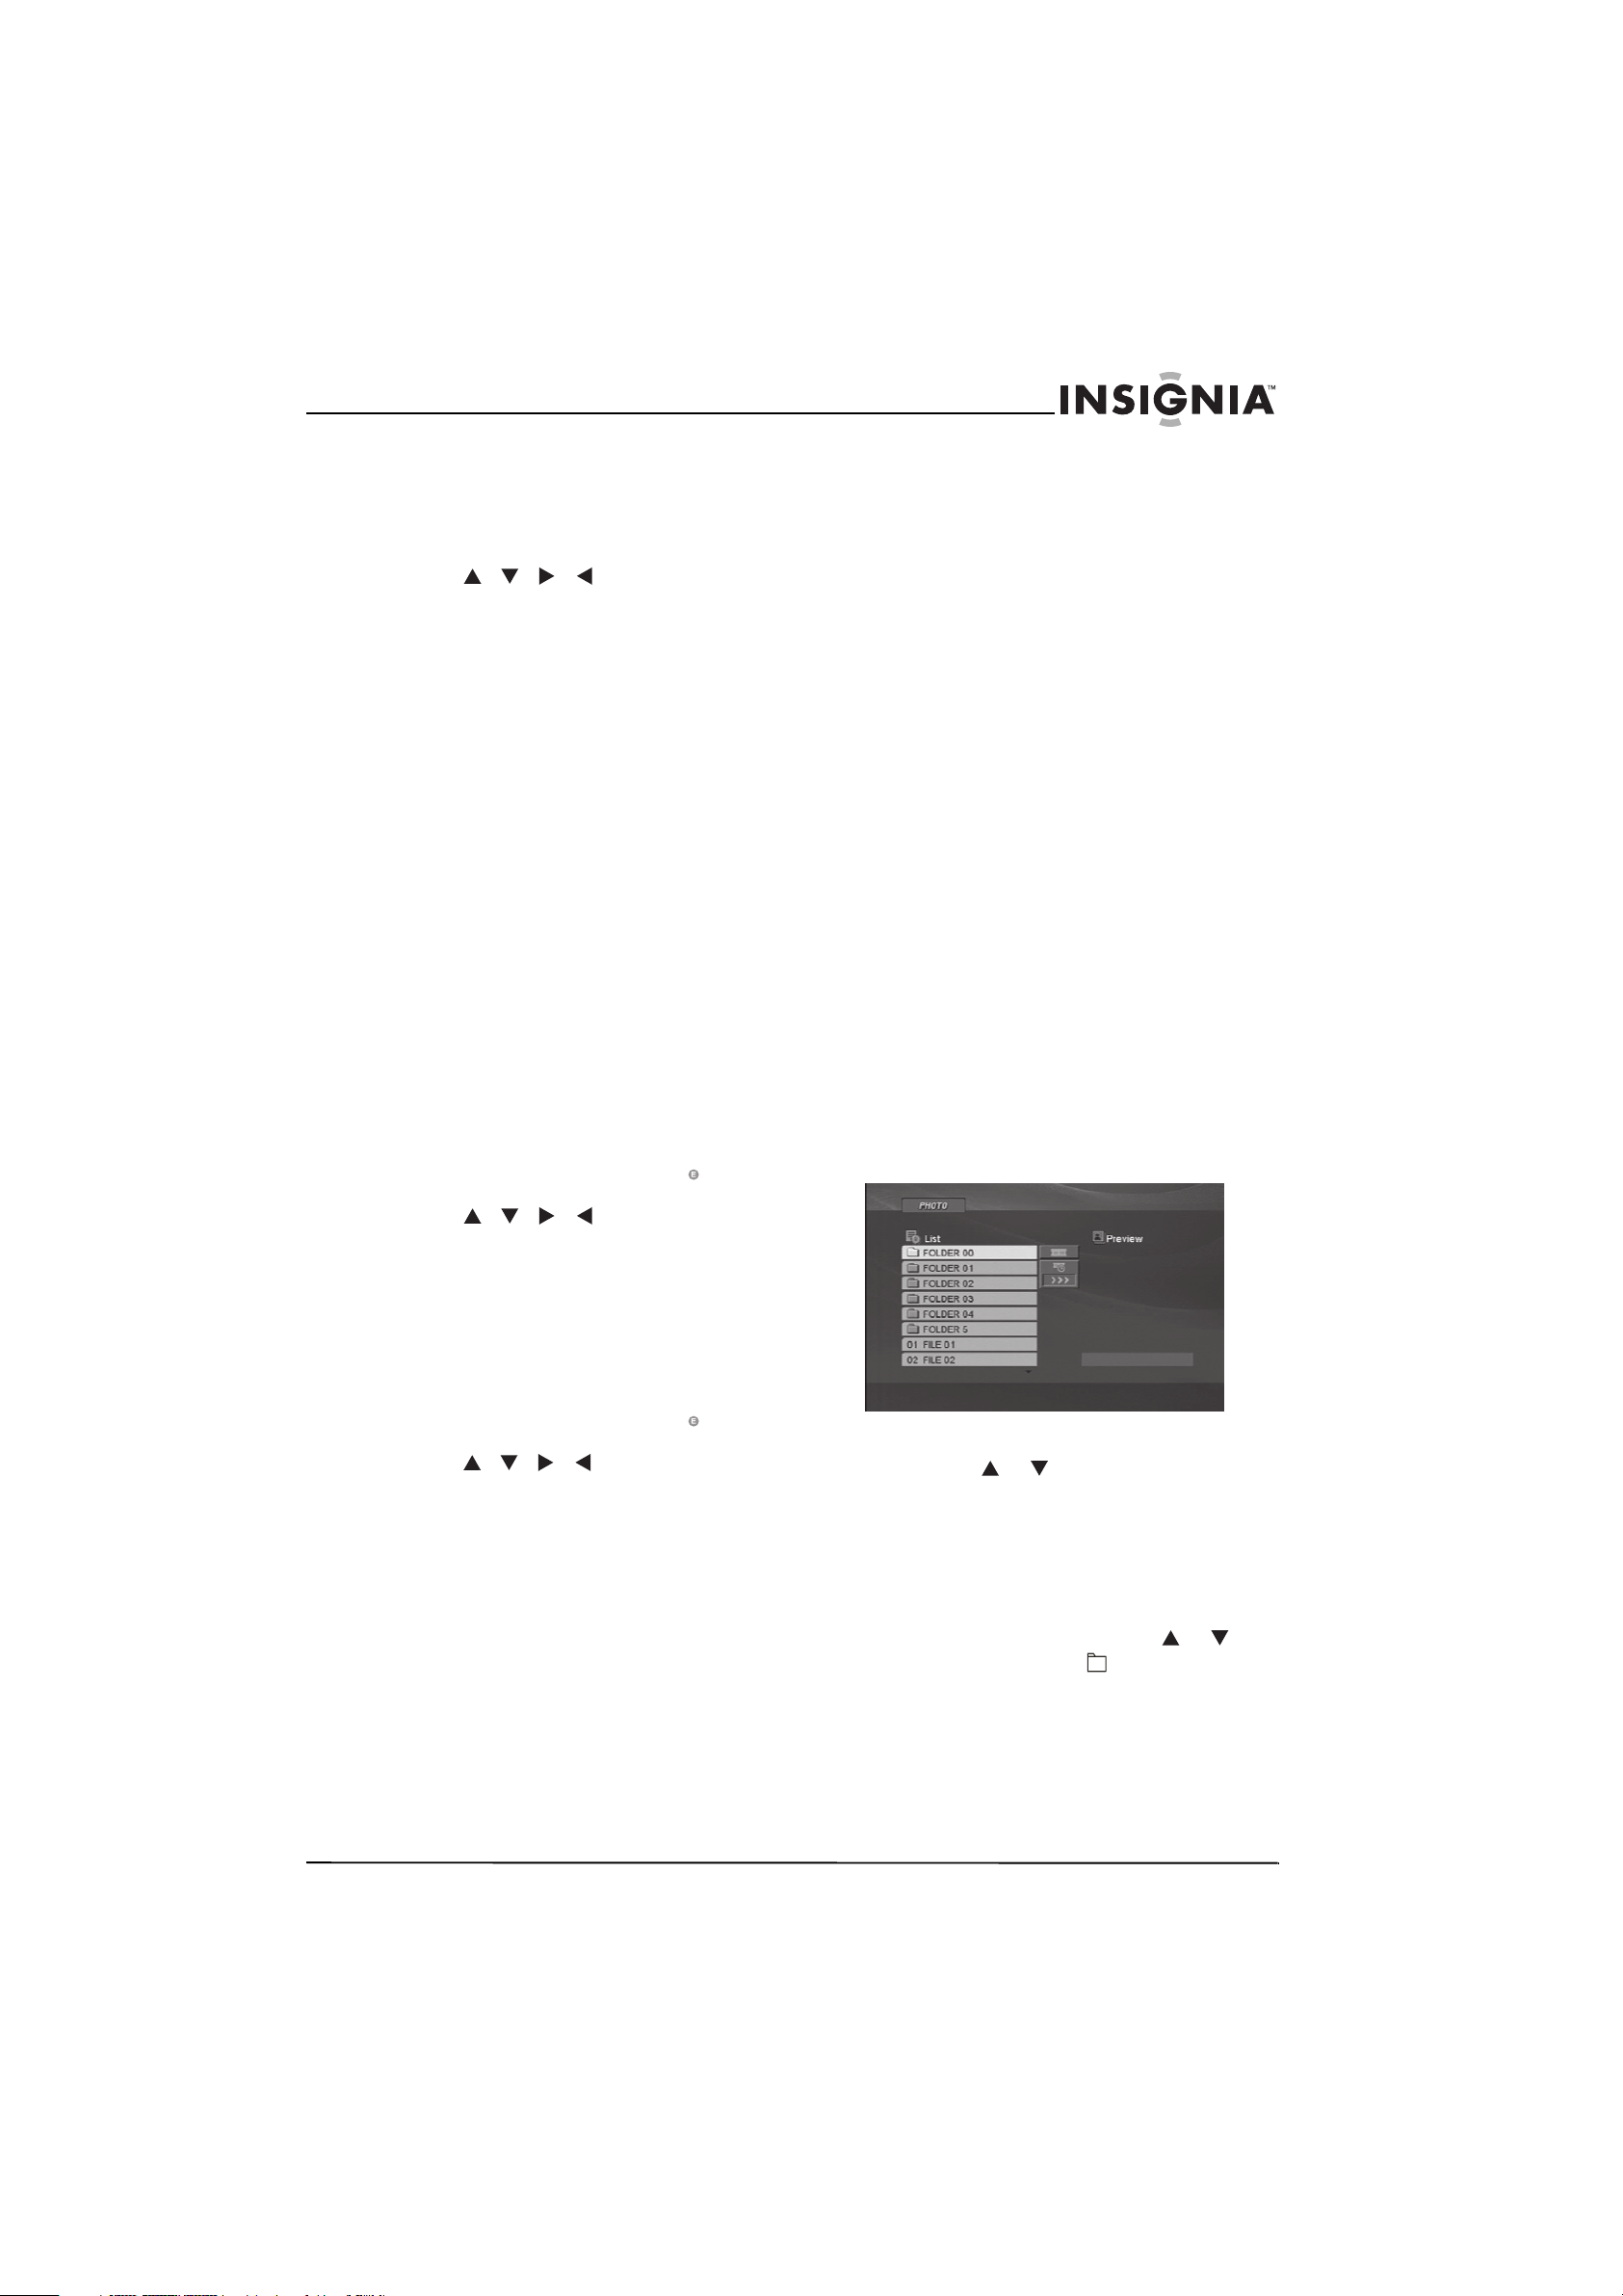
Viewing pictures
This DVD player also has the capability to
display pictures that have been recorded in a
JPEG format.
To select folders and images:
1 Press the or button to choose a folder
from the folder list on the left side of the
screen. Press the DVD MENU button to move
to the next page.
2 Press the ENTER button to select the
highlighted folder. The images available in
that folder are listed.
To return to the previously viewed Folder list
while viewing a file list, use the or
button to highlight the button and press
ENTER.
www.insignia-products.com
15
Page 16
Insignia NS-1UCDVD DVD Player
To view images:
1 Use the or button to view an image
from the list. Press the PLAY button or the
ENTER button to select. Press the STOP
button to return to the Photo menu.
• Press the SKIP ( or ) button or
the SCAN (forward or back) button once
to advance to the next image or move
back to the previous image.
• A help menu displays on the screen when
viewing JPEG files. To hide the help file,
press the RETURN button. If the
resolution on the TV screen is set to 720p
or 1080i, the help menu does not appear.
• Press the ZOOM button to enlarge the
JPEG image up to three levels.
• Use the or button to view images
while in the zoom mode. The zoom
feature is not available when the
resolution on the TV screen is set to 720p
or 1080i.
• Use the or button to rotate the
image on the screen either clockwise or
counterclockwise.
2 To view the images as a slide show, use the
/ / / buttons to highlight the
icon on the screen and press ENTER.
• There are three slide speed options: Fast
(>>>), Normal (>>) and Slow (>).
• Use the / / / buttons to
highlight the icon on the screen and
press ENTER.
• Press the or button to select the
desired speed option and press ENTER.
3 Press the PAUSE/STEP button to pause the
slide show. Press the PAUS E/ ST EP button
again or the PLAY button to resume the slide
show.
4
To clean the optical components:
1 Disconnect the player from the outlet.
2 Use a blower lens brush to remove dust or
dried-on grit.
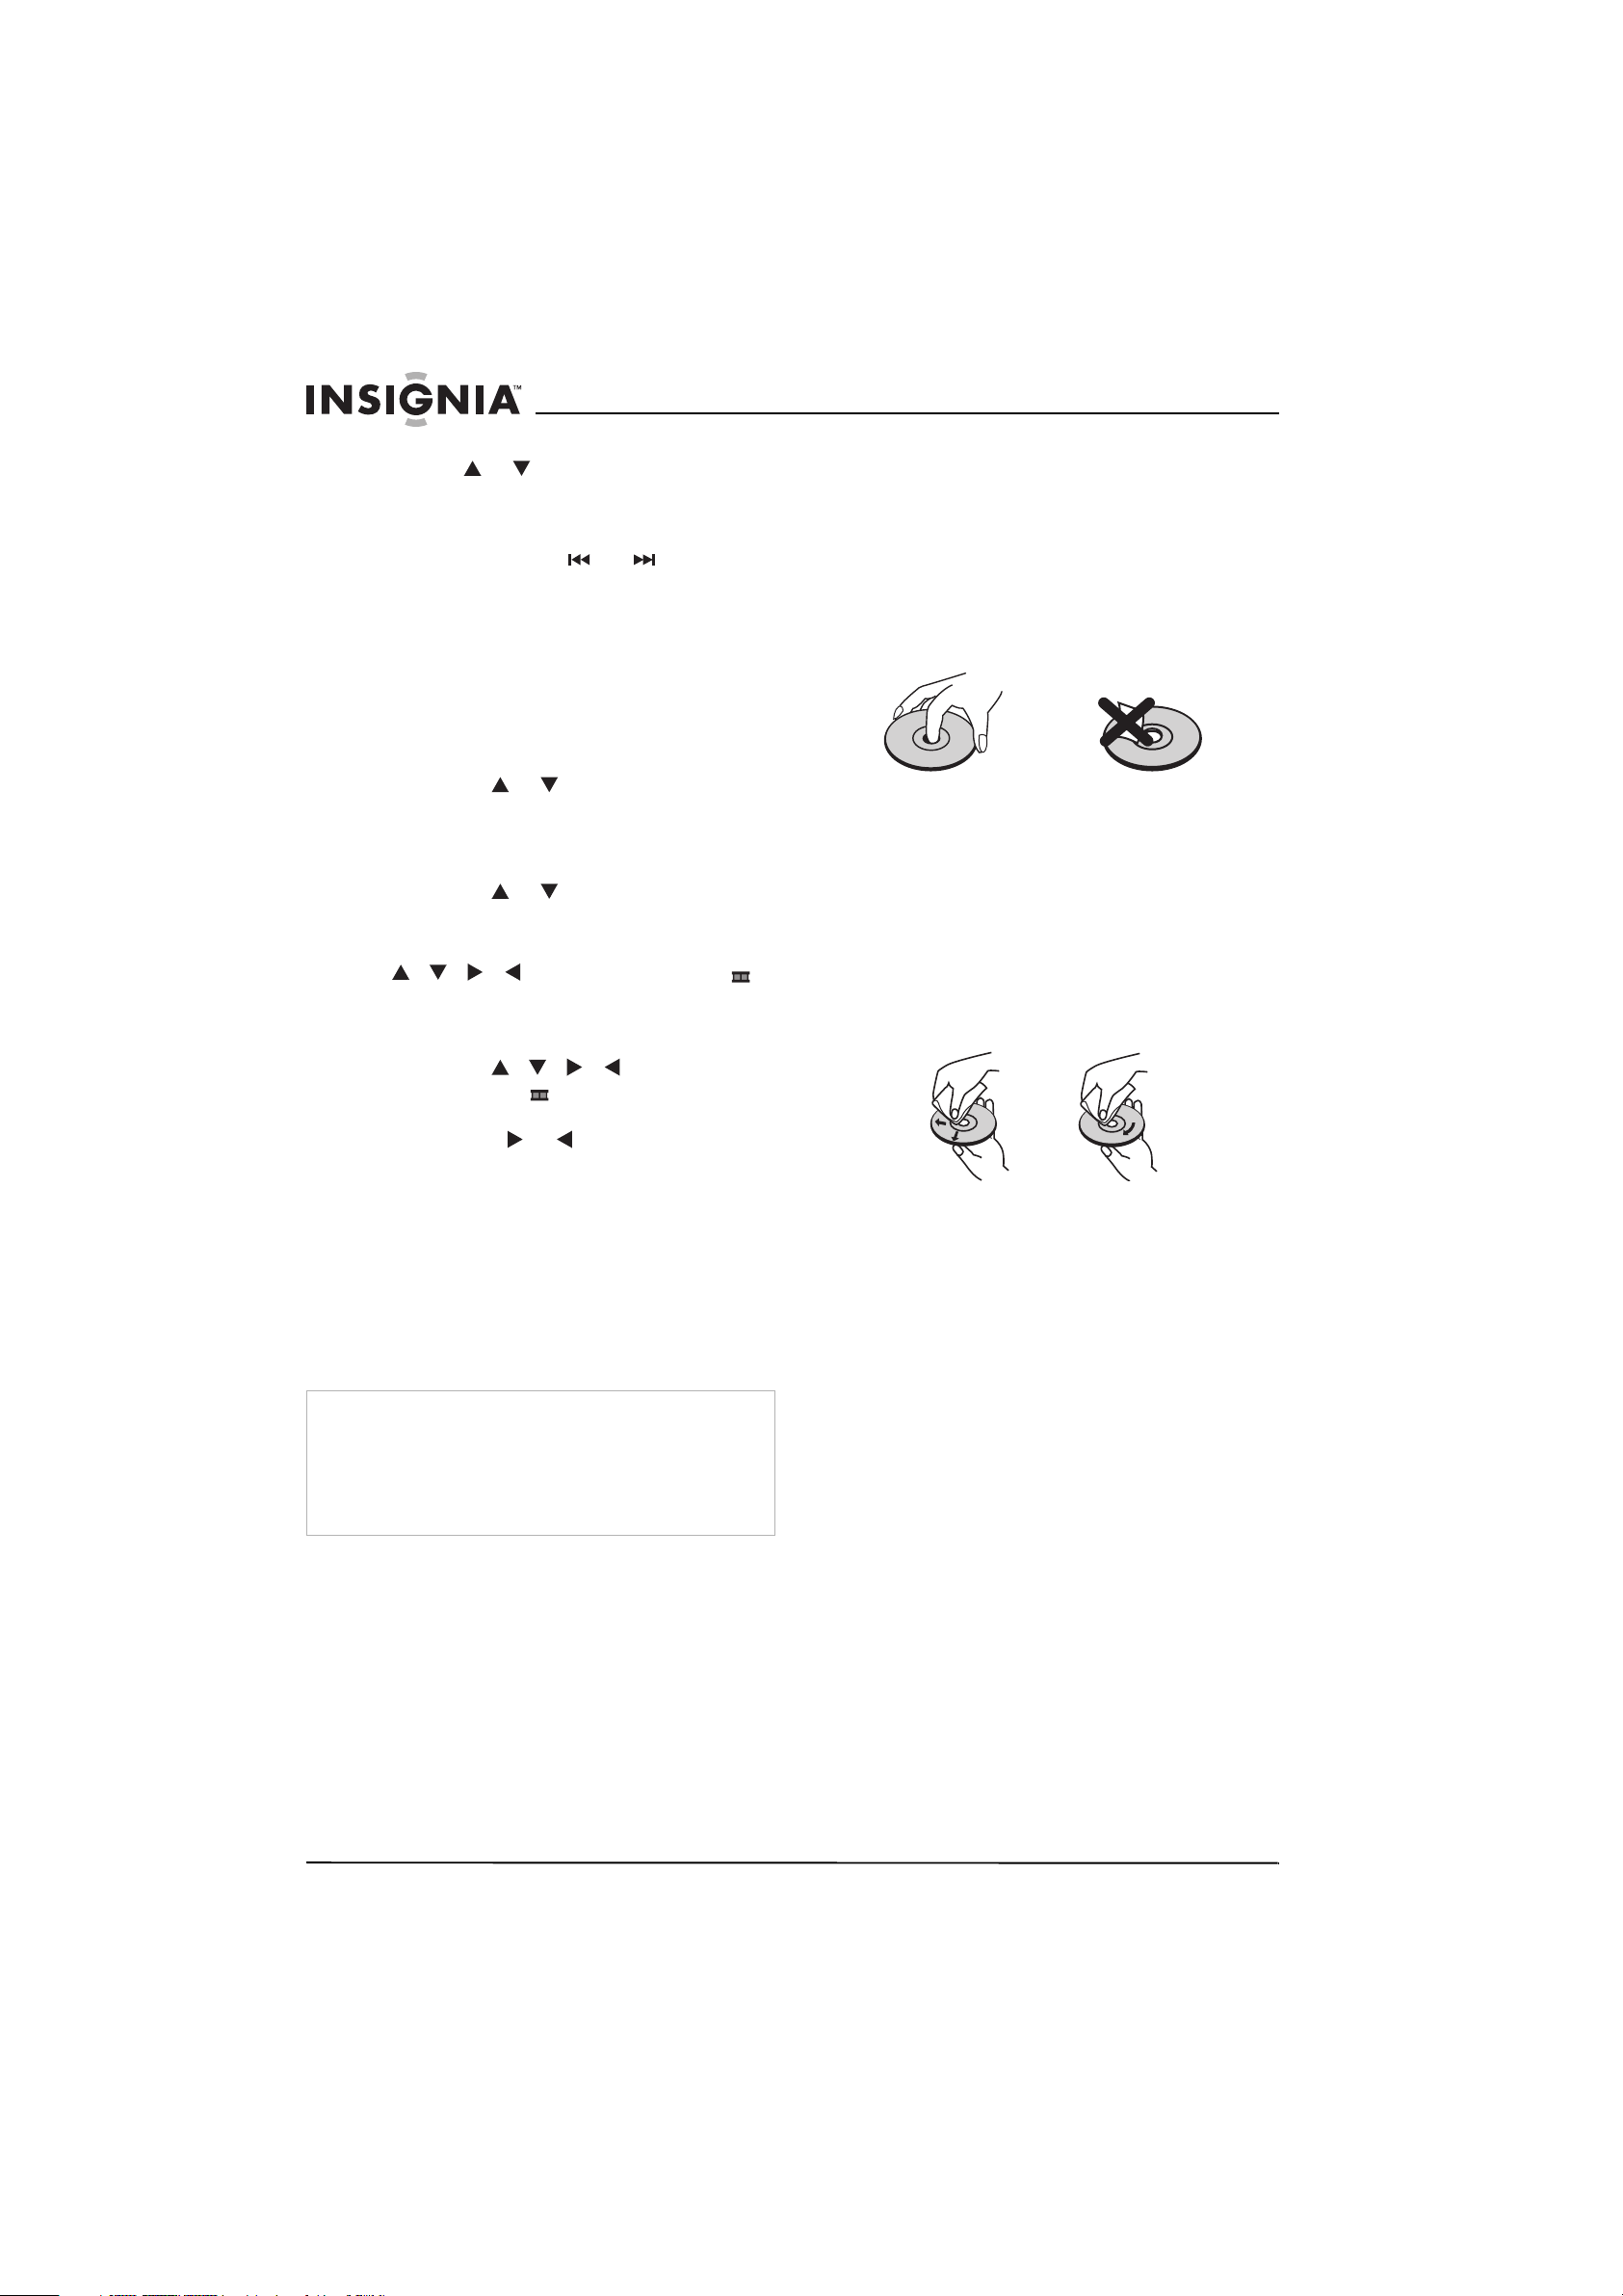
Handling discs
Do not touch the playback side of the disc.
Hold the disc by the edges so that fingerprints
will not get on the surface.
Do not stick paper or tape on the disc.
Storing discs
After playing, store the disc in its case.
Do not expose the disc to direct sunlight or
sources of heat, or leave it in a parked car
exposed to direct sunlight, as it may get very hot
inside the car.
Cleaning discs
Fingerprints and dust on the disc can cause
sound distortion. Before playing, clean the disc
with a clean cloth. Wipe the disc from the center
outward.
This Not this
Do not use strong solvents such as alcohol,
benzine, thinner, commercially available
cleaners, or anti-static spray intended for older
vinyl records.
Maintaining
Cleaning the player
Caution
Never use caustic cleaners. Solvents, spirits, paint thinners, or
similar cleaning fluids may damage the case.
Do not leave rubber or plastic products in contact with the unit
for a long period of time. These items may leave marks on the
case.
Do not use flammable liquids, such as insecticide sprays, near
the DVD player. Such fluids are possibly volatile.
To clean the case:
1 Disconnect the player from the outlet.
2 Use a moist cloth or a disposable plastics
cleaner cloth to wipe the case clean.
DVD player tips
Over the course of time, dust may build up on
the optical components or a thin, barely visible
film may form over them. This may prevent the
laser from reading the DVD.
Depending on the operating environment,
regular inspection and maintenance are
recommended every 1,000 hours of use.
16
www.insignia-products.com
Page 17

Insignia NS-1UCDVD DVD Player
Troubleshooting Specifications
Problem Solution
No power. Make sure that the power cord is
Power is on, but DVD player
does not work.
No picture. • Make sure that all
No sound or distorted sound. • Make sure the correct
Can’t advance through a movie. You can’t advance through the
Picture is distorted. • The disc might be
Remote control does not work
properly or IR sensor is
inoperative.
Play starts, but then stops
immediately.
plugged securely into the wall
outlet.
• Insert a disc with the label
side facing up.
• Check the type of disc you
put into disc tray. This
player only plays DVDs,
audio CDs, MP3s, and
WMAs.
equipment is turned on.
• Make sure the correct
video input mode is
selected on the TV.
• Make sure all cables are
securely inserted into the
appropriate jacks.
input mode of the audio
receiver is selected.
• Make sure all cables are
securely inserted into the
appropriate jacks.
• Make sure that all
equipment is turned on.
• Make sure that the AUDIO
option is set to the correct
position, then press
POWER again to turn on
the DVD player.
opening credits and warning
information that appears at the
beginning of movies because the
disc is programmed to prohibit
that action.
damaged. Try another
disc.
• It is normal for some
distortion to appear
during forward or reverse
scan.
• Verify that the batteries in
the remote are fresh.
• Verify that the remote
sensor eye is not
obstructed.
• Verify that the infrared
transmitter is pointed
directly at the IR sensor,
and is within 10 feet of the
sensor.
• Both the player and the
disc are coded by region.
If the regional codes don’t
match, the disc can’t be
played.
• There is a parental lock on
the DVD player which
prevents DVDs with an
unacceptable rating to
play.
• The disc is dirty. Clean it.
• Condensation has formed.
Allow player to dry out.
Note
Specifications are subject to change without notice or
obligation.
General:
Power requirements: . . . . . . . . . . 120 V AC, 60 Hz
Power consumption:. . . . . . . . . . . . . . . . . . . . . 8 W
Dimensions (W x D x H): . . . . 17 x 1.4 x 7.9 inches
. . . . . . . . . . . . . . . . . . . . . . . . (430 x 35 x 202 mm)
Weight:. . . . . . . . . . . . . . . . . . . . . . .3.5 lbs (1.6 kg)
Operating temperature: . . . . . . . 41~95°F (5~35°C)
Operating humidity: . . . . . . . . . . . . . . . . . . . 5~90%
Compatible discs:. . . . . . . . . . . DVD/CD/MP3/WMA
Battery Type: . . . . . . . . . . . . . . . . . . . . . . . . . . AAA
Outputs:
VIDEO OUT: . . . . . . . . . . . . . 1.0 V (P-P), 75 ohms
(synch. negative, RCA jack x 1)
S-VIDEO OUT (Y):. . . . . . . . .1.0 V (P-P), 75 ohms
(synch. negative, Mini DIN 4-pin x 1)
S-VIDEO OUT (C):. . . . . . . . . 0.3 V (P-P), 75 ohms
COMPONENT VIDEO OUT: . . . . . . . . . . . . . . . . . .
(Y): 1.0 V (P-P), 75 ohms
(synch. negative, RCA jack x 1)
(Pb and Pr): 0.7 V (P-P), 75 ohms
(RCA jack x 2)
AUDIO OUT: . . . .2.0 Vms (1kHz, 0 dB), 600 ohms
(RCA jack (L,R) x 1)
DIGITAL OUT (COAXIAL): . .0.5 V (P-P), 75 ohms
(RCA jack x 1)
DIGITAL OUT (OPTICAL): . . .3.0 V (P-P), 75 ohms
(Optical jack x 1)
System:
Signal system: . . . . . . . . . . . . . . . . . . . . . . . .NTSC
Laser: . . . . . . . . . . . . . . . . . . .Semiconductor Laser
Frequency response: . . . . . . . . . . . . . . . . . . . . . . . .
(PCM 96 kHz):. . . . . . . . . . . . . . . . 8 Hz to 44 kHz
(PCM 48 kHz):. . . . . . . . . . . . . . . . 8 Hz to 22 kHz
(CD): . . . . . . . . . . . . . . . . . . . . . . . 8 Hz to 20 kHz
Harmonic distortion:. . . . . . . . . . . Less than 0.02%
Dynamic range: . . . . . . . . . . . . . .Better than 95 dB
Signal-to-noise ratio: . . . . . . . . . .Better than 90 dB
(ANALOG OUT connectors only)
www.insignia-products.com
17
Page 18

Legal Notices
FCC
Warning
This equipment may generate or use radio frequency energy.
Changes or modifications to this equipment may cause
harmful interference unless the modifications are expressly
approved in this manual. The user could lose the authority to
operate this equipment if an unauthorized change or
modification is made.
Regulatory information: FCC Part 15
This equipment has been tested and found to comply with the
limits for a Class B digital device, pursuant to Part 15 of the
FCC Rules. These limits are designed to provide reasonable
protection against harmful interference when the DVD player is
operated in a residential installation. This DVD player
generates, uses, and can radiate radio frequency energy and,
if not installed and used in accordance with this manual, may
cause harmful interference to radio communications. However,
there is no guarantee that interference will not occur in a
particular installation. If this DVD player does cause harmful
interference to radio or television reception, which can be
determined by turning the DVD player off and on, the user is
encouraged to try to correct the interference by one or more of
the following measures:
• Reorient or relocate the receiving antenna.
• Increase the separation between the DVD player and
receiver.
• Connect the DVD player into an outlet on a circuit different
from that to which the receiver is connected.
• Consult the dealer or an experienced radio/TV technician
for help.
Insignia NS-1UCDVD DVD Player
Macrovision
This Product incorporates copyright protection technology that
is protected by method claims of certain U.S. Patents and
other intellectual property rights owned by Macrovision
Corporation and other rights owners.
Use of this copyright protection technology must be authorized
by Macrovision Corporation, and is intended for home and
other limited viewing uses only unless otherwise authorized by
Macrovision Corporation. Reverse engineering or disassembly
is prohibited.
Apparatus Claims of U.S. Patent Nos. 4,631,603; 4,577,216;
4,819,098 and 4,907,093 licensed for limited viewing uses
only.
Copyright
© 2007 Insignia. Insignia and the Insignia logo are
trademarks of Best Buy Enterprise Services, Inc. Other
brands and product names are trademarks or
registered trademarks of their respective holders.
Specifications and features are subject to change
without notice or obligation.
18
www.insignia-products.com
Page 19

Insignia NS-1UCDVD DVD Player
Warranty
90-Day Limited Warranty
Insignia Products (“Insignia”) warrants to you, the
original purchaser of this new NS-1UCDVD (“Product”),
that the Product shall be free of defects in the original
manufacture of the material or workmanship for a period
of 90 days from the date of your purchase of the Product
(“Warranty Period”). This Product must be purchased
from an authorized dealer of Insignia brand products and
packaged with this warranty statement. This warranty
does not cover refurbished Product. If you notify Insignia
during the Warranty Period of a defect covered by this
warranty that requires service, terms of this warranty
apply.
HOW LONG DOES THE COVERAGE LAST?
The Warranty Period lasts for 90 days from the date you
purchased the Product. The purchase date is printed on
the receipt you received with the Product.
WHAT DOES THIS WARRANTY COVER?
During the Warranty Period, if the original manufacture of
the material or workmanship of the Product is
determined to be defective by an authorized Insignia
repair center or store personnel, Insignia will (at its sole
option): (1) repair the Product with new or rebuilt parts;
or (2) replace the Product at no charge with new or
rebuilt comparable products or parts. Products and parts
replaced under this warranty become the property of
Insignia and are not returned to you. If service of
Products or parts are required after the Warranty Period
expires, you must pay all labor and parts charges. This
warranty lasts as long as you own your Insignia Product
during the Warranty Period. Warranty coverage
terminates if you sell or otherwise transfer the Product.
HOW TO OBTAIN WARRANTY SERVICE?
If you purchased the Product at a retail store location,
take your original receipt and the Product to the store
you purchased it from. Make sure that you place the
Product in its original packaging or packaging that
provides the same amount of protection as the original
packaging. If you purchased the Product from an online
web site, mail your original receipt and the Product to the
address listed on the web site. Make sure that you put
the Product in its original packaging or packaging that
provides the same amount of protection as the original
packaging.
To obtain in-home warranty service for a television with a
screen 25 inches or larger, call 1-888-BESTBUY. Call
agents will diagnose and correct the issue over the
phone or will have an Insignia-approved repair person
dispatched to your home.
WHERE IS THE WARRANTY VALID?
This warranty is valid only to the original purchaser of the
product in the United States and Canada.
WHAT DOES THE WARRANTY NOT COVER?
This warranty does not cover:
• Customer instruction
• Installation
• Set up adjustments
• Cosmetic damage
• Damage due to acts of God, such as lightning
strikes
• Accident
• Misuse
• Abuse
• Negligence
• Commercial use
• Modification of any part of the Product, including
the antenna
• Plasma display panel damaged by static
(non-moving) images applied for lengthy periods
(burn-in).
This warranty also does not cover:
• Damage due to incorrect operation or maintenance
• Connection to an incorrect voltage supply
• Attempted repair by anyone other than a facility
authorized by Insignia to service the Product
• Products sold as is or with all faults
• Consumables, such as fuses or batteries
• Products where the factory applied serial number
has been altered or removed
REPAIR REPLACEMENT AS PROVIDED UNDER THIS
WARRANTY IS YOUR EXCLUSIVE REMEDY.
INSIGNIA SHALL NOT BE LIABLE FOR ANY
INCIDENTAL OR CONSEQUENTIAL DAMAGES FOR
THE BREACH OF ANY EXPRESS OR IMPLIED
WARRANTY ON THIS PRODUCT, INCLUDING, BUT
NOT LIMITED TO, LOST DATA, LOSS OF USE OF
YOUR PRODUCT, LOST BUSINESS OR LOST
PROFITS. INSIGNIA PRODUCTS MAKES NO OTHER
EXPRESS WARRANTIES WITH RESPECT TO THE
PRODUCT, ALL EXPRESS AND IMPLIED
WARRANTIES FOR THE PRODUCT, INCLUDING, BUT
NOT LIMITED TO, ANY IMPLIED WARRANTIES OF
AND CONDITIONS OF MERCHANTABILITY AND
FITNESS FOR A PARTICULAR PURPOSE, ARE
LIMITED IN DURATION TO THE WARRANTY PERIOD
SET FORTH ABOVE AND NO WARRANTIES,
WHETHER EXPRESS OR IMPLIED, WILL APPLY
AFTER THE WARRANTY PERIOD. SOME STATES,
PROVINCES AND JURISDICTIONS DO NOT ALLOW
LIMITATIONS ON HOW LONG AN IMPLIED
WARRANTY LASTS, SO THE ABOVE LIMITATION MAY
NOT APPLY TO YOU. THIS WARRANTY GIVES YOU
SPECIFIC LEGAL RIGHTS, AND YOU MAY ALSO
HAVE OTHER RIGHTS, WHICH VARY FROM STATE
TO STATE OR PROVINCE TO PROVINCE.
Contact Insignia:
For customer service please call 1-877-467-4289
www.insignia-products.com
INSIGNIA™ is a trademark of Best Buy Enterprise
Services, Inc.
Distributed by Best Buy Purchasing, LLC.
Insignia, 7601 Penn Avenue South, Richfield, Minnesota,
U.S.A.
www.insignia-products.com
19
Page 20

Insignia NS-1UCDVD DVD Player
20
www.insignia-products.com
Page 21

Lecteur de DVD Insignia NS-1UCDVD
Lecteur de DVD
Insignia NS-1UCDVD
Table des matières
Introduction . . . . . . . . . . . . . . . . . . . . . . . . . . . . 21
Informations sur la sécurité . . . . . . . . . . . . . . . . 21
Fonctionnalités. . . . . . . . . . . . . . . . . . . . . . . . . . 23
Installation du lecteur de DVD . . . . . . . . . . . . . . 24
Fonctionnement du lecteur de DVD . . . . . . . . . . 27
Entretien. . . . . . . . . . . . . . . . . . . . . . . . . . . . . . . 36
Problèmes et solutions. . . . . . . . . . . . . . . . . . . . 37
Spécifications. . . . . . . . . . . . . . . . . . . . . . . . . . . 37
Avis légaux. . . . . . . . . . . . . . . . . . . . . . . . . . . . . 38
Garantie . . . . . . . . . . . . . . . . . . . . . . . . . . . . . . . 39
Introduction
Félicitations d’avoir acheté ce produit Insignia de
haute qualité. Le modèle NS-1UCDVD
représente la dernière avancée technologique
dans la conception de lecteur de DVD et a été
conçu pour des performances et une fiabilité
exceptionnelles.
Ce manuel explique comment faire fonctionner
et obtenir les meilleures performances de cet
appareil. Lire ce guide de l’utilisateur avec
attention avant d’utiliser cet appareil et le
conserver à proximité de ce dernier pour pouvoir
s’y référer rapidement.
Vérification du contenu du carton d’expédition :
• Lecteur de DVD
• Télécommande
• Câble vidéo (1)
• Câble audio (1)
• Piles de type AAA (2)
• Guide de l’utilisateur
Si un article manque ou est endommagé,
contacter Insignia au (877) 467-4289.
Conserver le carton et le matériel
d’emballage afin de pouvoir ranger ou
transporter l'appareil.
Informations sur la sécurité
Avertissement sur le risque de choc
électrique
ATTENTION
Risque de choc
électrique
Ne pas ouvrir
Avertissement
Afin de réduire le risque de choc électrique, ne pas enlever le
couvercle (ou le panneau arrière). Aucune pièce interne ne
peut être réparée par l'utilisateur. Confier l’entretien à du
personnel qualifié.
Le symbole d’un éclair à l’intérieur d’un triangle
équilatéral est destiné à alerter l'utilisateur de la
présence d'une tension dangereuse non isolée à
l’intérieur de l’appareil et dont la puissance est
suffisante pour présenter un risque de choc
électrique pour les personnes.
Le point d’exclamation à l’intérieur d’un triangle
équilatéral est destiné à alerter l’utilisateur de la
présence d’instructions importantes sur le
fonctionnement et sur la maintenance (entretien)
dans la documentation accompagnant l’appareil.
Avertissement
Afin de réduire le risque d’incendie et de choc électrique, ne
pas exposer cet appareil à la pluie ou à l’humidité.
Attention
L’appareil ne doit pas être exposé à des gouttes d’eau ou des
éclaboussures et aucun objet rempli de liquide, tel qu’un vase,
ne doit être posé sur l’appareil.
Ventilation
Attention
Ne pas obstruer les ouvertures d’aération. Installer l’appareil
conformément à ces instructions.
Les fentes et ouvertures du boîtier sont prévues pour la
ventilation, pour assurer un fonctionnement fiable de l’appareil
et le protéger contre toute surchauffe.
Elles ne doivent jamais être bloquées en installant l'appareil
sur un lit, un sofa, une moquette ou toute autre surface
semblable. Ne pas installer l'appareil dans un meuble encastré
comme une bibliothèque ou une étagère, sauf si une
ventilation adéquate a été prévue ou si ces instructions ont été
respectées.
Avertissement relatif au laser
Remarque
En raison de sa politique de sans cesse tenir compte des
derniers développements technologiques, Insignia se réserve
le droit de remplacer ou de modifier le logiciel.
www.insignia-products.com
Avertissement
Cet appareil est équipé d’un
système au laser.
Pour garantir une utilisation
appropriée de cet appareil, lire
ce guide de l’utilisateur avec
attention et le conserver à titre
de référence ultérieure.
Contacter un réparateur
qualifié si un entretien de l’appareil s'avère nécessaire.
Le recours à des commandes, réglages ou procédures autres
que celles spécifiées dans ce guide, présente des dangers
d'exposition aux rayonnements.
Pour éviter toute exposition directe aux rayons laser, ne pas
essayer d’ouvrir le boîtier. Radiation au laser visible en cas
d'ouverture. Ne pas regarder directement le rayonnement
laser.
Attention
Un rayonnement laser visible et invisible est émis quand le
boîtier de l’appareil est ouvert ou que le dispositif de
verrouillage est défectueux.
21
Page 22

Lecteur de DVD Insignia NS-1UCDVD
Cordon d’alimentation
Avertissement
Il est recommandé en général que les appareils
électroménagers soient branchés sur un circuit dédié – une
seule prise secteur qui alimente uniquement l’appareil sans
prises additionnelles ou autres circuits dérivés. Vérifier la
puissance nécessaire à la page relative aux spécifications
dans ce guide.
Ne pas surcharger les prises secteur. Des prises secteur
surchargées, desserrées ou endommagées, des rallonges,
des cordons effilochés ou des isolations de fils endommagées
ou craquelées, sont dangereux. N’importe quelle situation de
ce type peut être la cause d’un choc électrique ou d’un
incendie.
Vérifier régulièrement le cordon de l’appareil et s’il est
endommagé ou détérioré, le débrancher, arrêter d’utiliser
l’appareil et le faire remplacer par un cordon identique dans un
centre agréé.
Protéger le cordon d’alimentation des détériorations résultant
de torsions, déformations, pincements, coincements dans une
porte qui se ferme ou piétinement. Prêter particulièrement
attention au point de branchement du cordon à la prise, à la
prise murale et à l’endroit où il est raccordé à l’appareil.
Pour débrancher le cordon, tirer sur la prise. Lors de
l’installation de l’appareil, veiller à ce que la prise soit d’un
accès facile.
Instructions de sécurité importantes
Avertissement
Lire avec attention tous les avertissements et instructions
indiqués dans ce guide ou sur l’appareil. Conserver ce guide
pour toute référence ultérieure.
Cet appareil a été conçu et fabriqué pour garantir la sécurité
personnelle. Toute utilisation incorrecte peut provoquer un
risque de choc électrique ou d’incendie. Des dispositifs de
protection intégrés à cet appareil protégeront l’utilisateur sous
réserve de respecter les procédures ci-dessous lors de
l’installation, l’utilisation et l’entretien. Cet appareil ne contient
aucune pièce réparable par l'utilisateur.
L’ouverture du boîtier peut exposer l’utilisateur à des tensions
dangereuses. Confier l’entretien à du personnel qualifié.
• Lire toutes les instructions de sécurité et de
fonctionnement avant d’utiliser cet appareil.
• Conserver les instructions de sécurité et de
fonctionnement pour toute référence
ultérieure.
• Observer tous les avertissements figurant sur
l’appareil et dans le mode d’emploi.
• Appliquer toutes les instructions d’utilisation
et de fonctionnement.
• Ne pas utiliser ce produit près de l’eau. Par
exemple, ne pas utiliser cet appareil, à côté
d’une baignoire, d'un lavabo, d'un évier, d’un
bac à laver, dans une cave humide, à côté
d’une piscine ou à proximité de l’eau.
• Nettoyer uniquement avec un chiffon doux
humecté. Débrancher l'appareil de la prise
murale avant tout nettoyage. Ne pas utiliser
de détergents liquides.
• Ne pas obstruer les ouvertures d’aération.
Installer l’appareil conformément à ces
instructions. Les fentes et ouvertures du
boîtier sont prévues pour la ventilation, pour
assurer un fonctionnement fiable de l’appareil
et pour le protéger contre toute surchauffe.
Elles ne doivent jamais être bloquées en
installant l'appareil sur un lit, un sofa, une
moquette ou toute autre surface semblable.
Ne pas installer l'appareil dans un meuble
encastré comme une bibliothèque ou une
étagère, sauf si une ventilation adéquate a
été prévue ou si ces instructions ont été
respectées.
• Installer l’appareil à l’écart de sources de
chaleur, telles que radiateurs, bouches de
chaleur, fours ou autres appareils (y compris
les amplificateurs) qui produisent de la
chaleur.
• Si l’appareil est transporté d’un endroit froid
dans un emplacement chaud, de la
condensation peut se former à l’intérieur.
Quand il est déplacé d’un endroit froid vers
un endroit chaud, attendre une heure avant
de l’utiliser ou enlever le disque et le laisser
sous tension jusqu’à évaporation de
l’humidité.
• Ne pas chercher à modifier le dispositif de
sécurité de la prise polarisée ou de type mise
à la terre. Une prise polarisée comporte deux
plots, un plus large que l'autre. Une prise de
type mise à la terre est composée de deux
plots et d’un troisième de mise à la terre. Ce
troisième plot, large ou rond a été prévu pour
la sécurité de l’utilisateur. Si la prise fournie
ne rentre pas dans la prise secteur, faire
appel à un électricien pour qu’il remplace
cette dernière qui est obsolète.
• Protéger le cordon d’alimentation afin d’éviter
qu’il soit piétiné ou qu’il soit pincé, en
particulier au niveau des prises murales,
plaques multiprises et à l’endroit où il est
rattaché à l’appareil.
• N’utiliser que des périphériques et
accessoires spécifiés par Insignia.
• Débrancher l’appareil lors d’orages ou quand
il n’est pas utilisé pendant une période
prolongée.
• Toutes les réparations doivent être réalisées
par du personnel qualifié. Faire réparer
l’appareil s’il a été endommagé, qu’il s’agisse
du cordon d’alimentation ou de la prise qui
seraient détériorés, de liquide entré dans
l’appareil ou d’objets qui seraient tombés
dessus, d’une exposition à la pluie ou à l’eau,
d’un fonctionnement anormal ou qu’on l’ait
fait tomber.
• Le remplacement incorrect des piles peut
être dangereux. Ne remplacer les piles que
par un type identique ou équivalent; afin de
protéger l’environnement, se débarrasser
des piles de façon appropriée. Ne pas utiliser
l’appareil avec des températures supérieures
à 95 degrés Fahrenheit ou 35 degrés
Celsius.
• Ne pas utiliser de disques à forme irrégulière,
tels que les disques cordiformes ou en forme
d’étoile, car ils peuvent être source d’un
fonctionnement défectueux. Ne pas coller de
papier, de ruban adhésif ou de colle sur le
disque. Ne pas exposer le disque à la lumière
directe du soleil ou à des sources de chaleur.
Ne pas toucher la surface du disque.
Manipuler le disque par ses extrémités.
Nettoyer le disque en l’essuyant du centre
vers l’extérieur avec un chiffon. Enlever le
22
www.insignia-products.com
Page 23

Lecteur de DVD Insignia NS-1UCDVD
disque de l’appareil et le ranger dans son étui
après lecture. Certaines opérations de
lecture peuvent avoir été verrouillées
intentionnellement par l'éditeur de logiciels.
Cet appareil ne lit les disques qu’en fonction
de leur contenu tel qu’il a été conçu par
l’éditeur de logiciels, aussi certaines
fonctions de lecture peuvent ne pas être
disponibles. Se référer aux instructions
fournies avec les disques.
Fonctionnalités
• Prise combinée d’entrée-sortie A/V
• Contrôle parental
• Télécommande
Identification des composants
Face avant
Télécommande
Élém
ent
1 Marche/Arrêt Permet la mise sous/hors tension du
2Plateau à
3 Fenêtre
4 Capteur de
5 Ouvrir/Fermer Ouvre ou ferme le plateau à disque.
6 Lecture Permet de commencer la lecture.
7 Arrêt Appuyer une fois sur cette touche pour
8 Saut - Permet d'aller au début du chapitre ou de
9 Saut + Avance au chapitre, à la piste ou à la
Composant Description
disque
d'affichage
télécommande
N
lecteur.
Reçoit le disque CD ou DVD.
Indique l’état actuel de l’appareil.
Reçoit les signaux de la télécommande.
Ne pas obstruer ce capteur.
arrêter la lecture. Le lecteur peut
mémoriser l’endroit où la lecture a été
arrêtée et peut la reprendre à partir de ce
point.
Appuyer deux fois pour arrêter la lecture.
Le lecteur ne mémorise pas l’endroit où
la lecture a été arrêtée.
la piste actuelle ou au chapitre, à la piste
ou à la scène précédente pendant la
lecture.
scène suivante pendant la lecture.
Élém
Touche Description
ent
1 Marche/Arrêt Permet la mise sous/hors tension
2 Menu du DVD Affiche le menu d’un disque DVD.
3 Vers le haut/Vers le
bas/Entrée/À droite/À
gauche
4 Affichage Affiche l’information sur le disque
du lecteur.
Permet de parcourir les menus et
de confirmer la sélection.
DVD, telle que le titre, le numéro
du chapitre, le numéro de piste et
la durée de lecture.
www.insignia-products.com
23
Page 24

Lecteur de DVD Insignia NS-1UCDVD
Élém
Touche Description
ent
5 Pause/Image par image Suspend momentanément la
6 Saut - Permet d'aller au début du chapitre
Saut + Avance au chapitre, à la piste ou à
7 Balayage - Permet d'effectuer une recherche
Balayage + Permet d'effectuer une recherche
8 Pavé numérique Permet de sélectionner une option
9 Sous-titres Active ou désactive la fonction
10 Audio Permet de sélectionner la langue
11 Lecture en boucle Permet de répéter la lecture d’un
12 Répéter A-B Permet de répéter une partie
13 Signet Permet de marquer un point
14 Recherche Affiche le menu de recherche de
15 Ouvrir/Fermer Ouvre ou ferme le plateau à
16 Titre Affiche le menu des titres, si
17 Retour Affiche le menu d’un CD vidéo avec
18 Arrêt Appuyer une fois sur cette touche
19 Lecture Permet de commencer la lecture.
20 Programme Permet d'accéder au mode de
21 Effacer Permet d'effacer un numéro de
22 Angle Change l'angle de prise de vues
23 Configuration Permet d’accéder ou de quitter le
24 Zoom Permet d’agrandir une image de 2,
lecture.
Appuyer plusieurs fois sur cette
touche pour une lecture image par
image.
ou de la piste actuelle ou au
chapitre, à la piste ou à la scène
précédente pendant la lecture.
la scène suivante pendant la
lecture.
arrière.
avant.
dans le menu ou de saisir un mot
de passe.
sous-titres et sélectionne une
langue pour les sous-titres.
audio ou le canal audio pour un
DVD.
chapitre, d’une piste, d’un titre ou
de l’ensemble.
spécifique d’un disque.
quelconque d’un DVD au cours de
sa lecture.
signet.
disque.
disponible.
PBC.
pour arrêter la lecture. Le lecteur
peut mémoriser l’endroit où la
lecture a été arrêtée et peut la
reprendre à partir de ce point.
Appuyer deux fois pour arrêter la
lecture. Le lecteur ne mémorise
pas l’endroit où la lecture a été
arrêtée.
modification de programme.
piste de la liste de programmation
ou un signet dans le menu Marker
Search (Recherche de signets).
d’une scène.
menu de configuration.
3, ou 4 fois sa taille originale.
Élém
Touche Description
ent
25 Aléatoire Lit les pistes dans un ordre
26 Résolution Change la résolution de l'affichage.
aléatoire.
Installation du lecteur de
DVD
Installation des piles de la télécommande
Le lecteur utilise deux piles de type AAA.
Attention
Ne pas mélanger des piles neuves avec des anciennes et ne
jamais mélanger différents types de piles, comme par exemple
des piles normales et des piles alcalines.
Pour changer les piles :
1 Détacher le couvercle du compartiment des
piles au dos de la télécommande.
2 Insérer deux piles AAA en alignant
correctement les polarités (+) et (-).
3 Remettre le couvercle du compartiment des
piles.
Installation du lecteur de DVD
L’image et le son d’un téléviseur, d’un
magnétoscope ou d’une radio à proximité
risquent d’être déformés lors de la lecture. Si
cela se produit, éloigner le lecteur du téléviseur,
du magnétoscope ou de la radio, ou mettre
l'appareil hors tension après avoir retiré le
disque.
Pour installer le lecteur :
1 Positionner l'appareil sur une surface solide.
2 Brancher le cordon d'alimentation du lecteur
de DVD sur une prise secteur CA de 120 V.
24
www.insignia-products.com
Page 25

Lecteur de DVD Insignia NS-1UCDVD
Connexion de l’appareil à un téléviseur
Il existe diverses façons de connecter l'appareil,
en fonction du téléviseur et d'autres
équipements. Consulter le manuel du téléviseur,
système stéréo ou autres périphériques pour
des informations complémentaires concernant la
connexion.
Pour connecter l’appareil à un téléviseur :
Si le téléviseur est du type haute-définition ou
compatible au numérique, il est possible de
profiter de la sortie de balayage progressif de
l’appareil pour obtenir la meilleure sortie vidéo
possible.
• Le balayage progressif ne fonctionne pas
avec les connexions vidéo analogiques (prise
jaune VIDEO OUT [Sortie vidéo]).
• Les résolutions 720p et 480p sont les
résolutions appliquées au balayage
progressif.
1 Vérifier que le lecteur de DVD est connecté
directement au téléviseur, non à un
magnétoscope. Si le lecteur n'est pas
connecté correctement, l’image DVD sera
déformée par le système de protection contre
la copie.
2 Brancher les câbles audio/vidéo des prises
du lecteur de DVD au téléviseur comme suit :
Câble
Câble
S-Vidéo
(S)
Câble
vidéo (V)
Câble
audio (A)
Câble Y
PB PR (C)
Connecter sur le
lecteur à :
S-VIDEO OUT (Sortie
S-Vidéo)
VIDEO OUT (Sortie
vidéo)
AUDIO OUT (Sortie
audio)
COMPONENT/PROGRE
SSIVE SCAN
(Composantes/balayag
e progressif)
Remarque
En cas de connexion simultanée d’un câble
S-Vidéo et d'un câble à composantes, l'affichage
du téléviseur peut être instable. Pour résoudre le
problème, déconnecter un des câbles.
Connecter sur le
téléviseur à :
S-VIDEO IN (Entrée
S-Vidéo)
VIDEO IN (Entrée
vidéo)
AUDIO IN (Entrée
audio) (gauche et
droite)
Prises correspondantes
sur le téléviseur
Connexion du lecteur à un téléviseur HDMI
L'interface multimédia haute définition (High
Definition Multimedia Interface, ou HDMI) prend
en charge à la fois la vidéo et l'audio grâce à une
connexion numérique unique pouvant être
utilisée avec des lecteurs DVD, des décodeurs et
d'autres périphériques AV.
L'interface HDMI a été développée pour fournir
les technologies HDCP (High-bandwidth Digital
Content Protection [Protection du contenu
numérique à large bande passante]). HDCP est
utilisé pour protéger le contenu numérique,
aussi bien transmis que reçu.
HDMI a la capacité de prendre en charge la
vidéo standard, améliorée ou haute définition,
plus l'audio allant de l'audio standard au son
ambiophonique multicanal. Les caractéristiques
de HDMI comprennent un signal vidéo
numérique non compressé, une bande passante
allant jusqu'à 5 gigaoctets par seconde, un seul
connecteur (au lieu de plusieurs câbles et
connecteurs) et une communication entre la
source AV et des périphériques AV tels que des
TVN.
www.insignia-products.com
Remarque
HDMI, le logo HDMI et High-Definition Multimedia
Interface sont des marques de commerce ou des
marques déposées de HDMI licensing LLC.
25
Page 26

Lecteur de DVD Insignia NS-1UCDVD
Pour connecter le lecteur à un périphérique
HDMI :
1 Régler la source sur le téléviseur ou moniteur
HDMI sur HDMI, selon les instructions du
guide de l'utilisateur.
2 Brancher la prise HDMI OUT (Sortie HDMI)
du lecteur de DVD sur la prise HDMI du
téléviseur ou du moniteur HDMI, à l’aide d'un
câble HDMI (H).
La flèche figurant sur le corps du connecteur
du câble doit être orientée vers le haut pour
un alignement correct avec le connecteur du
lecteur.
3 Appuyer à plusieurs reprises sur
RESOLUTION (Résolution) pour
sélectionner la résolution souhaitée. Lors de
l'utilisation d'une connexion HDMI, il est
possible de changer la résolution (480i, 480p,
720p, 1080i) pour la sortie HDMI.
La sortie HDMI aura une résolution de 480p,
même si la résolution est réglée sur 480i au
niveau de la connexion HDMI.
Si la connexion HDMI ne produit aucun son
ou donne lieu à un son parasité, régler
l'option Audio [Dolby Digital, DTS ou MPEG]
du menu SETUP (Configuration) sur PCM ou
Off (Désactivé).
Remarques
Si des parasites ou des lignes apparaissent à
l'écran, vérifier le câble HDMI.
Certains périphériques DVI compatibles HDCP ne
fonctionneront pas avec ce lecteur.
Si le téléviseur HDMI utilisé ne prend pas en
charge la fonction HDCP, l'écran est de couleur
bleue.
Si l'image affichée sur le téléviseur n'est pas
normale, éteindre l'appareil et le rallumer.
Une sortie audio est disponible à la fois en PCM et
Bitstream (Train de bits)
d'échantillonnage est réglée sur 48 kHz dans la
connexion HDMI.
Si la configuration audio est réglée sur Bitstream
et que le téléviseur ne prend pas en charge une
sortie audio Bitstream lorsqu'une
est utilisée, il est possible qu'aucun son ne soit audible ou
que le son soit distordu.
lorsque la fréquence
connexion HDMI
Réglage de la résolution
Si le téléviseur ne prend pas en charge la
résolution demandée, l’image s’affiche de façon
anormale. Consulter le guide de l'utilisateur du
téléviseur pour régler la résolution correcte.
Pour régler la résolution :
1 Appuyer sur STOP (Arrêt) pour arrêter la
lecture et mettre le lecteur en mode arrêt.
2 Appuyer une fois sur RESOLUTION
(Résolution). La résolution en cours s’affiche
dans la fenêtre.
3 Appuyer à plusieurs reprises sur
RESOLUTION (Résolution) pour passer à la
résolution souhaitée. Les résolutions
disponibles, en fonction des connexions, sont
les suivantes :
Connexion de sortie
HDMI VIDEO OUT
(Sortie vidéo HDMI)
COMPONENT VIDEO
OUT (Sortie vidéo à
composantes)
VIDEO OUT (Sortie
vidéo)
S-VIDEO (S-Vidéo) 720 x 480i
• Pour les connexions Vidéo and S-Vidéo,
la résolution doit être réglée sur 480i or
480p; cependant, VIDEO OUT (Sortie
vidéo) est toujours à une résolution
standard de 480i.
• Pour une résolution de 720p et 1080i sur
la sortie vidéo à composantes, seuls les
disques qui ne sont pas protégés contre
la copie peuvent être lus. Si le disque est
protégé contre la copie, il sera affiché à la
résolution de 480p sans connexion à un
câble HDMI. Avec une connexion à un
câble HDMI, l'image risque de ne pas
s'afficher correctement.
Résolution
disponible
1920 x 1080i
1280 x 720p
720 x 480p
720 x 480i
1920 x 1080i
1280 x 720p
720 x 480p
720 x 480i
720 x 480i
720 x 480p
26
www.insignia-products.com
Page 27

Lecteur de DVD Insignia NS-1UCDVD
Connexion du lecteur à des équipements
audio en option
Il est possible de connecter le lecteur à une
source externe pour profiter d'un son stéréo de
haute qualité diffusé par le lecteur de DVD.
Remarque
Ce lecteur de DVD a été fabriqué sous licence de
Dolby Laboratories. « Dolby », « Pro Logic » et le
symbole double D sont des marques de
commerce de Dolby Laboratories. DTS et DTS
Digital Out sont des marques de commerce de
Digital Theater Systems, Inc.
Face arrière du lecteur de DVD
Amplificateur (Récepteur)
Pour connecter le lecteur à des équipements
audio en option :
1 Amplificateur équipé d'un système stéréo
analogique à deux canaux ou d'un
système Dolby Pro Logic II / Pro Logic :
Utiliser des câbles audio (A) pour connecter
les prises AUDIO OUT (Sortie audio) gauche
et droite du lecteur de DVD sur les prises
audio IN (Entrée) gauche et droite de
l’amplificateur, du récepteur ou du système
stéréo.
2 Amplificateur équipé d'un système stéréo
numérique à deux canaux (PCM) ou
récepteur audio/vidéo équipé d'un
décodeur multi-canaux (Dolby Digital
MPEG 2 ou DTS) :
Utiliser un câble audio numérique OPTICAL
O ou COAXIAL X (optique ou coaxial) (A) en
option pour connecter une des prises
DIGITAL AUDIO OUT (Sortie audio
numérique) OPTICAL O ou COAXIAL X du
lecteur de DVD à la prise OPTICAL O ou
COAXIAL X correspondante de
l'amplificateur.
3 Son multicanal numérique :
Une connexion multicanal numérique utilisant
un récepteur audio/vidéo multicanal qui
prend en charge un ou plusieurs des formats
audio acceptés par le lecteur de DVD, tels
que MPEG 2, Dolby Digital et DTS, fournit la
meilleure qualité sonore.
MC
Consulter le guide le l'utilisateur du récepteur et
vérifier les logos à l'avant du récepteur pour
s'assurer du type de système utilisé.
Remarque
Si le format audio de la sortie numérique ne
correspond pas aux capacités du récepteur,
celui-ci produit un son de niveau élevé et déformé
ou pas de son du tout.
Le récepteur doit être équipé d’un décodeur
multi-canaux numérique pour la reproduction d’un
son ambiophonique numérique à six canaux via
une connexion numérique.
Fonctionnement du lecteur
de DVD
Fonctionnement de la télécommande
Accès aux fonctionnalités du lecteur de DVD à
l'aide des touches de la télécommande
Toutes les fonctionnalités du lecteur de DVD
sont accessibles à l'aide de la télécommande.
Certaines fonctions sont disponibles avec tous
les types de disques, tandis que d'autres le sont
uniquement avec certains types de disques.
Pour accéder aux fonctionnalités du lecteur
de DVD :
1 Appuyer sur la touche qui correspond à
l'opération souhaitée.
2 Appuyer sur ou pour sélectionner un
menu.
3 Appuyer sur pour accéder à un
sous-menu ou sur pour revenir au menu
précédent.
4 Appuyer sur ou pour sélectionner un
sous-menu, le cas échéant, puis sur ENTER
(Entrée) pour confirmer la sélection.
Le tableau suivant décrit les fonctionnalités et
spécifie le type de disques pour lequel elles
sont disponibles.
Touche Fonctionnement
OPEN/CLOSE
(Ouvrir/Fermer)
,
PAUSE/STEP
(Pause/Image
par image)
SKIP (Saut)
Ouvre ou ferme le plateau à
disque.
Pendant la lecture, permet
d'arrêter momentanément la
lecture.
Appuyer plusieurs fois sur
cette touche pour une lecture
image par image.
Pendant la lecture,
permet de passer au chapitre
ou à la piste suivante et
de retourner au début du
chapitre ou de la piste en
cours de lecture. Appuyer
deux fois brièvement sur pour
revenir au chapitre ou à la
piste précédente.
Type de
disque
Tou s
Tou s
DVD
www.insignia-products.com
27
Page 28

Lecteur de DVD Insignia NS-1UCDVD
Touche Fonctionnement
SCAN
(Balayage)
REPEAT
(Répétition)
A-B Appuyer une fois pour
ZOOM Pendant la lecture ou les
RANDOM
(Lecture
aléatoire)
TITLE (Titre) Si le titre du DVD en cours a
DVD MENU
(Menu du DVD)
Pendant la lecture, appuyer de
façon répétée sur cette touche
pour sélectionner la vitesse de
balayage souhaitée.
Les disques DVD ont quatre
vitesses de balayage.
Les disques MP3 et CD audio
ont trois vitesses de balayage.
Lorsque la lecture est en
pause, appuyer de façon
répétée sur SCAN (Balayage)
pour effectuer une lecture au
ralenti.
Il existe quatre niveaux de
ralenti, qui fonctionnent
uniquement vers l'avant.
Pendant la lecture, appuyer de
façon répétée pour
sélectionner le mode de
répétition souhaité. Appuyer
une fois sur SKIP (Saut)
pour annuler la lecture répétée.
Pour les disques DVD, les
modes sont : Chapter
(Chapitre), Title (Titre) et Off
(Désactivé).
Pour les disques CD audio,
MP3 et WMA, les modes sont :
Track (Piste), All (Tous) et Off
(Désactivé).
sélectionner un point A et une
deuxième fois pour
sélectionner un point B. Le
lecteur répète la séquence du
point A au point B.
Pour les CD audio, cette
fonction n’est disponible que
pour la piste en cours.
modes de pause, permet
d’agrandir l’image vidéo. Il
existe trois niveaux de zoom.
Utiliser les touches
/
dans l’image agrandie.
Appuyer sur CLEAR (Effacer)
pour quitter.
Il est possible que la fonction
ZOOM ne fonctionne pas avec
certains DVD.
Pendant la lecture ou en mode
arrêt, permet d'effectuer une
lecture aléatoire.
un menu, permet d'afficher le
menu du titre à l’écran. En
l'absence de menu de titre, le
menu du disque s'affiche.
Permet d’afficher le menu du
disque.
pour se déplacer
/ /
Type de
disque
DVD
CD audio
(ACD)
MP3
DVD
Tous
DVD
CDA
DVD
CDA
MP3
WMA
DVD
DVD
Touche Fonctionnement
ANGLE
SUBTITLE
(Sous-titres)
AUDIO
MARKER
(Signet)
Pendant la lecture d'un DVD
qui contient des scènes
filmées sous différents angles,
appuyer de façon répétée pour
sélectionner l'angle souhaité.
Le témoin des angles
clignotera à l'écran pour
indiquer qu'il est possible de
changer d'angle.
Pendant la lecture, appuyer de
façon répétée pour
sélectionner la langue
souhaitée pour les sous-titres.
Pendant la lecture, appuyer de
façon répétée pour entendre
une langue ou une piste audio
différente.
Permet de repérer un point
quelconque sur un DVD. Une
icône représentant un signet
s'affiche brièvement à l’écran.
Répéter la procédure pour
saisir jusqu’à neuf signets.
Type de
disque
DVD
DVD
DVD
DVD
Accès aux fonctionnalités supplémentaires du
lecteur de DVD
Ce lecteur de DVD possède quatre
fonctionnalités supplémentaires :
• Recherche horaire
• Recherche de signets
• Mémorisation de la dernière scène
• Économiseur écran
La recherche horaire permet de commencer la
lecture à partir d'un instant spécifique sur un
DVD.
En utilisant la recherche de signets, il est
possible de commencer la lecture à partir de
points mémorisés (9 au maximum).
Le lecteur de DVD mémorise automatiquement
la dernière scène du dernier disque lu. Cette
scène reste en mémoire même si le disque est
retiré de l’appareil ou que l’appareil est mis hors
tension. Lorsqu'un disque dont la dernière scène
a été mémorisée est chargé, la scène est
automatiquement rappelée à l’écran.
Remarque
Ce lecteur ne mémorise pas la scène d'un disque
si l’appareil est mis hors tension avant la lecture
du disque.
L’économiseur d’écran s’affiche lorsque le
lecteur de DVD est laissé sous tension et en
mode arrêt pendant 5 minutes. Une fois que
l'économiseur d'écran a été affiché pendant
encore 5 minutes, l'appareil se met
automatiquement hors tension.
Pour accéder à la recherche horaire (DVD
uniquement) :
1 Appuyer sur DISPLAY (Affichage) pendant la
lecture.
2 Appuyer sur ou pour sélectionner
l’icône de l'horloge. « --:--:-- » s'affiche.
28
www.insignia-products.com
Page 29

Lecteur de DVD Insignia NS-1UCDVD
3 Entrer l'heure de début souhaitée en heures,
minutes et secondes. Appuyer sur CLEAR
(Effacer) pour effacer les chiffres entrés de
façon incorrecte, puis entrer à nouveau les
chiffres corrects
4 Appuyer sur ENTER (Entrée) pour confirmer
la sélection.
Pour accéder à la recherche des signets
(DVD uniquement) :
1 Appuyer sur MARKER (Signet) pendant la
lecture pour mémoriser un point.
2 Pendant la lecture, appuyer sur SEARCH
(Recherche). Le menu Marker (Signet)
s'affiche.
3 Dans les 9 secondes, appuyer sur ou
pour sélectionner le numéro du signet à
rappeler ou à supprimer.
4 Appuyer sur ENTER (Entrée) pour
commencer la lecture à partir du point
mémorisé
OU
Appuyer sur CLEAR (Effacer) pour
supprimer le point mémorisé sélectionné.
Remarque
À partir du menu Marker (Signet), il est possible
d'accéder à n'importe quel point mémorisé en
utilisant le pavé numérique de la télécommande
pour entrer le numéro de signet.
Lecture d’un DVD ou d’un CD
Remarque
L’appareil et les disques DVD comportent un code régional.
Ces codes régionaux doivent correspondre pour permettre la
lecture du DVD. Si les codes ne correspondent pas, la lecture
est impossible. Le code régional de cet appareil est 1. Les
DVD avec d’autres codes régionaux ne peuvent pas être lus
avec cet appareil.
Pour la lecture d’un DVD ou d’un CD :
1 Appuyer sur POWER (Marche/Arrêt) pour
mettre le lecteur en marche.
2 Appuyer sur OPEN (Ouvrir). Le plateau à
disque s’ouvre.
3 Placer un disque sur l’axe. S’assurer que le
disque s'enclenche en place.
4 Fermer le plateau à disque. La lecture
commence automatiquement. Utiliser
VOLUME +/- pour régler le volume du
lecteur.
5 Appuyer sur STOP (Arrêt) pour arrêter la
lecture du DVD ou du CD.
Utilisation du menu du DVD
Un DVD est divisé en sections appelées titres et
chapitres. Lors de la lecture d’un DVD, au début
du disque, un menu racine s’affiche à l’écran. Le
contenu du menu varie d’un disque à l’autre.
Certains DVD permettent uniquement de
sélectionner les options de lecture du disque
dans le menu racine.
Pour accéder au menu du DVD :
• Appuyer sur DVD MENU (Menu du DVD)
pendant la lecture pour afficher le menu.
Affichage d’informations à l'écran
Titre (Piste)
Chapitre
Durée
Audio
Sous-titres
Angle
Pour afficher des informations relatives au
DVD :
1 Appuyer sur DISPLAY (Affichage) pendant la
lecture pour afficher l’information suivante
relative à la durée écoulée du titre :
Élément du
menu
Title (Track) [Titre
(Piste)]
Chapter [Chapitre] Numéro du chapitre en cours
Time [Durée] Durée de lecture écoulée
Audio Canal ou langue audio
Subtitle
(Sous-titres)
Angle Angle de prise de vues
Information affichée
Numéro du titre (ou piste) en
cours de lecture/nombre total
de titres (ou pistes).
de lecture/nombre total de
chapitres
sélectionné
Sous-titres sélectionnés
sélectionné/nombre total
d’angles de prise de vues
2 Appuyer sur ou pour sélectionner un
élément du menu.
3 Appuyer sur ou pour changer ou
sélectionner un paramètre.
Remarque
L’affichage à l’écran disparaît si aucune touche
n’est appuyée pendant quelques secondes.
Répétition d’une partie spécifique d’un
DVD
Pour répéter un segment d’un DVD :
1 Pendant la lecture d’un disque, appuyer sur
A-B de la télécommande pour fixer le point
de départ A.
2 Appuyer une deuxième fois sur A-B pour
fixer le point de fin de lecture B. Le lecteur lira
en boucle la partie entre les points A et B.
3 Appuyer sur A-B une troisième fois pour
annuler la lecture en boucle de A à B et
reprendre la lecture normale.
Pour répéter le DVD tout entier ou le chapitre
ou un titre de DVD :
• Appuyer plusieurs fois sur REPEAT
(Répéter) pour définir le type de lecture en
boucle :
www.insignia-products.com
29
Page 30

Lecteur de DVD Insignia NS-1UCDVD
• Chapter (Chapitre) : Répétition du
chapitre en cours
• Title (Titre) : Répétition du titre en cours
• All (Tous) : Répétition de tous les
chapitres et titres
• Off (Désactivé) : Reprise de la lecture
normale
Lecture d’un DVD au format VR
Les DVD enregistrés au format Video Recording
(VR) [Enregistrement vidéo] peuvent être lus sur
ce lecteur de DVD; cependant, des disques DVR
non finalisés ne seront pas lisibles.
Certains DVD au format VR utilisent le dispositif
CPRM (Content Protection for Recordable
Media), qui est un système de protection contre
la copie (brouillage) ne permettant qu'une seule
copie d'émissions diffusées. Les DVD au format
VR utilisant CPRM ne fonctionnent pas avec ce
le cteur de DVD.
Pour lire un DVD au format VR :
1 Insérer un disque dans le plateau à disque et
fermer le plateau. Le menu DVD-VR List
(Liste du DVD-VR) s’affiche à l'écran.
Pour accéder au menu de configuration :
1 Appuyer sur SETUP (Configuration) pour
afficher le menu. Appuyer sur SETUP une
deuxième fois pour enlever le menu de
l’écran.
2 Appuyer sur ou pour accéder à un
élément du menu. Les réglages actuels pour
l'élément de menu sélectionné sont indiqués
sur le menu.
3 Appuyer pour sélectionner un élément de
menu. Appuyer sur pour revenir au niveau
précédent.
4 Répéter les étapes 2 et 3 pour accéder à des
éléments de menu supplémentaires. Appuyer
sur ENTER (Entrée) pour confirmer la
sélection.
5 Appuyer sur SETUP (Configuration) ou PLAY
(Lecture) pour quitter le menu Setup
(Configuration).
Sélection des options de langue
Le menu LANGUAGE (Langue) permet de
sélectionner une langue pour les menus, pour
l'affichage à l'écran des sous-titres et pour
l'audio.
Les options Disc Audio (Audio du disque), Disc
Subtitle (Sous-titres du disque) et Disc Menu
(Menu du disque) utilisent tous la même
procédure.
2 Appuyer sur ou pour sélectionner une
piste du disque, puis appuyer sur PLAY
(Lecture) ou ENTER (Entrée) pour
commencer la lecture.
3 Appuyer sur DVD MENU (Menu du DVD)
pour revenir au menu List (Liste).
Utilisation du menu de configuration
Ce lecteur de DVD a été programmé par le
fabricant avec des réglages par défaut. En
utilisant l'option de configuration, il est possible
de modifier des fonctionnalités affectant les
performances, telles que l'image, le son et la
langue. L'option de configuration donne
également accès à un verrouillage parental, si
souhaité.
T
Pour sélectionner la langue du menu :
1 Dans le menu Setup (Configuration),
sélectionner LANGUAGE (Langue). Appuyer
sur ENTER (Entrée) pour confirmer la
sélection.
2 Dans le menu LANGUAGE (Langue),
sélectionner Menu Language (Langue du
menu). Appuyer sur ENTER (Entrée) pour
confirmer la sélection.
3 Appuyer sur ou pour accéder à la
langue souhaitée. Appuyer sur ENTER
(Entrée) pour confirmer la sélection.
Pour sélectionner la langue du disque :
1 Dans le menu Setup (Configuration),
sélectionner LANGUAGE (Langue). Appuyer
sur ENTER (Entrée) pour confirmer la
sélection.
2 Dans le menu LANGUAGE (Langue),
appuyer sur ou pour accéder à Disc
Audio (Audio du disque), Disc Subtitle
(Sous-titres du disque) ou Disc Menu (Menu
du disque). Appuyer sur ENTER (Entrée)
pour confirmer la sélection.
30
www.insignia-products.com
Page 31

Lecteur de DVD Insignia NS-1UCDVD
3 Sélectionner l’une des options suivantes :
• Original - Sélectionner cette option pour
que l'audio figurant sur le disque soit lu
dans la langue dans laquelle il a été
enregistré à l'origine.
• Other (Autre) - Pour sélectionner une
autre langue, appuyer sur les touches
numériques correspondant au code de
langue à 4 chiffres figurant dans le
tableau suivant. Appuyer sur ENTER
(Entrée) pour confirmer la sélection, ou
sur CLEAR pour l'effacer.
• Off (Désactivé) - Sélectionner cette option
pour désactiver l'affichage des sous-titres
du disque.
Langue Code Langue Code Langue Code
Abkhaze
Afar
Afrikaans
Albanais
Amehar
Arabe
Arménien
Assamais
Aymara
Azéri
Bachkir
Basque
Bengali
Bhoutanais
Bihari
Breton
Bulgare
Birman
Biélorusse
Khmer
Catalan
Chinois
Corse
Croate
Tchèque
Danois
Néerlandais
Anglais
Espéranto
Estonien
Féroïen
Fidji
Finlandais
Français
Frison
Galicien
Géorgien
Allemand
Grec
Groenlandais
Guarani
6566
6565
6570
8381
6577
6582
7289
6583
6588
6590
6665
6985
6678
6890
6672
6682
6671
7789
6669
7577
6765
9072
6779
7282
6783
6865
7876
6978
6979
6984
7079
7074
7073
7082
7089
7176
7565
6869
6976
7576
7178
Goujrati
Haoussa
Hébreu
Hindi
Hongrois
Islandais
Indonésien
Interlingua
Irlandais
Italien
Japonais
Javanais
Kannada
Cachemiri
Kazakh
Kirghiz
Coréen
Kurde
Laotien
Latin
Letton
Lingala
Lituanien
Macédonien
Malgache
Malais
Malayalam
Maltais
Maori
Marathe
Moldave
Mongol
Nauruan
Népalais
Norvégien
Oriya
Pendjabi
Afghan
Iranien
Polonais
Portugais
Quetchua
7185
7265
7387
7273
7285
7383
7378
7365
7165
7384
7465
7487
7578
7583
7575
7589
7579
7585
7679
7665
7686
7678
7684
7775
7771
7783
7776
7784
7773
7782
7779
7778
7865
7869
7879
7982
8065
8083
7065
8076
8084
8185
Rhéto-roman
Roumain
Russe
Samoan
Sanskrit
Gaélique
écossais
Serbe
Serbo-croate
Shona
Sindhi
Cinghalais
Slovaque
Slovène
Somali
Espagnol
Soudanais
Souahili
Suédois
Tagalog
Tadjik
Tamo ul
Tata r
Telougou
Thaï
Tibétain
Tigréen
Ton ga
Tur c
Tur km èn e
Twi
Ukrainien
Ourdou
Ouzbek
Vietnamien
Volapük
Gallois
Wolof
Xhosa
Yiddish
Yorouba
Zoulou
8277
8279
8285
8377
8365
7168
8382
8372
8378
8368
8373
8375
8376
8379
6983
8385
8387
8386
8476
8471
8465
8484
8469
8472
6679
8473
8479
8482
8475
8487
8575
8582
8590
8673
8679
6789
8779
8872
7473
8979
9085
Pour configurer un mot de passe :
4 Dans le menu Setup (Configuration),
sélectionner DISPLAY (Affichage). Appuyer
sur ENTER (Entrée) pour confirmer la
sélection.
5 Appuyer sur ou pour accéder à TV
Aspect (Format d'image). Appuyer sur
ENTER (Entrée) pour confirmer la sélection.
Choisir une des options suivantes et appuyer
sur ENTER (Entrée) pour confirmer la
sélection.
• 4:3 - Sélectionner cette option lorsqu'un
téléviseur standard 4:3 est connecté au
le cteur de DVD.
• 16:9- Sélectionner cette option lorsqu'un
téléviseur à écran panoramique 16:9 est
connecté au lecteur de DVD.
Pour sélectionner le mode d’affichage :
1 Dans le menu Setup (Configuration),
sélectionner DISPLAY (Affichage). Appuyer
sur ENTER (Entrée) pour confirmer la
sélection.
2 Appuyer sur ou pour accéder à
Display Mode (Mode d'affichage). Appuyer
sur ENTER (Entrée) pour confirmer la
sélection. Le réglage du mode d'affichage est
disponible uniquement lorsque le format
d'image est réglé sur 4:3.
3 Choisir une des options suivantes et appuyer
sur ENTER (Entrée) pour confirmer la
sélection.
• Letterbox (Boîte aux lettres) Sélectionner cette option pour afficher
une large image avec des bandes dans
les parties supérieure et inférieure de
l’écran.
• Panscan (Recadrage automatique) Sélectionner cette option pour afficher
une image panoramique sur la totalité de
l'écran. Les parties qui ne tiennent pas
sur l'écran seront tronquées.
Sélection des options audio
Chaque disque DVD offre plusieurs options
d'entrée audio. Régler les options audio du
lecteur de DVD conformément au type de
système audio utilisé.
Sélection des options d'affichage
Le menu Display (Affichage) permet de
sélectionner un format d'écran pour le téléviseur
et le mode.
Pour régler l'audio :
1 Dans le menu Setup (Configuration),
sélectionner AUDIO. Appuyer sur ENTER
(Entrée) pour confirmer la sélection.
www.insignia-products.com
31
Page 32

Lecteur de DVD Insignia NS-1UCDVD
2 Appuyer sur ou pour accéder à l'option
audio souhaitée. Appuyer sur ENTER
(Entrée) pour confirmer la sélection. Régler
l'option conformément au tableau suivant et
appuyer sur ENTER (Entrée) pour confirmer
la sélection.
Élément du
menu
Dolby Digital • Bitstream (Train de bits) - Sélectionner
DTS • Bitstream (Train de bits) - Sélectionner
MPEG • Bitstream (Train de bits) - Sélectionner
Sample
Frequency
(Fréquence
d'échantillonnage
)
DRC
(Dynamic Range
Control)
[Commande de
portée
dynamique]
Information affichée
cette option si la prise DIGITAL OUT
(Sortie numérique) de ce lecteur est
connectée à un amplificateur ou à un
autre appareil muni d'un décodeur
Dolby Digital, DTS ou MPEG.
• PCM - Sélectionner pour Dolby Digital
ou MPEG lorsque l'appareil est
connecté à un amplificateur stéréo
numérique à deux canaux. Les DVD
codés au format Dolby Digital ou
MPEG seront automatiquement réduit
à un signal audio PCM à deux canaux.
cette option si la prise DIGITAL OUT
(Sortie numérique) de ce lecteur est
connectée à un amplificateur ou à un
autre appareil muni d'un décodeur
Dolby Digital, DTS ou MPEG.
• Off (Désactivé) - Sélectionner cette
option si le signal DTS n'est pas émis
par la prise DIGITAL OUT (Sortie
numérique) de ce lecteur.
cette option si la prise DIGITAL OUT
(Sortie numérique) de ce lecteur est
connectée à un amplificateur ou à un
autre appareil muni d'un décodeur
Dolby Digital, DTS ou MPEG.
• PCM - Sélectionner pour Dolby Digital
ou MPEG lorsque l'appareil est
connecté à un amplificateur stéréo
numérique à deux canaux. Les DVD
codés au format Dolby Digital ou
MPEG seront automatiquement réduits
à un signal audio PCM à deux canaux.
• 48 kHz. - Sélectionner cette option si le
récepteur ou l'amplificateur n'est PAS
capable de prendre en charge des
signaux de 96 kHz. Lorsque cette
option est sélectionnée, le lecteur
convertit automatiquement les signaux
de 96 kHz en 48 kHz afin que le
système puisse les décoder.
• 96 kHz. - Sélectionner cette option si le
récepteur ou l'amplificateur est
capable de prendre en charge des
signaux de 96 kHz.
Consulter la documentation de l'amplificateur
pour vérifier ses capacités.
• ON (Activé) - Sélectionner cette option
pour comprimer la portée dynamique
de la sortie audio (la différence entre
les sons les plus élevés et les plus
bas). Ceci permet de regarder un film
avec un niveau de volume plus bas
sans perte de clarté du son.
• OFF (Désactivé) - Sélectionner cette
option pour reproduire
l'enregistrement audio de la façon la
plus précise et réaliste possible.
Élément du
menu
Vocal • ON (Activé) - Sélectionner cette option
Information affichée
lors de la lecture d’un DVD de karaoke
multicanal. Les canaux du karaoké sur
le disque seront mixés avec le son
stéréo normal.
• OFF (Désactivé) - Sélectionner cette
option pour lire un autre type
d'enregistrement audio.
Réglage du verrouillage parental
Le menu Parental Lock (Verrouillage parental)
permet d'interdire la lecture de DVD suivant la
classification qui leur a été attribuée en fonction
de leur contenu. Pour certains disques, aucune
classification n'a été établie.
Le verrouillage est protégé par un mot de passe
et les classifications standard sont basées sur le
code régional.
Pour définir le mot de passe :
1 Dans le menu Setup (Configuration),
sélectionner LOCK (Verrouillage). Appuyer
sur ENTER (Entrée) pour confirmer la
sélection.
Remarque
La fonction de verrouillage est protégée par un
mot de passe. Un mot de passe doit être établi
avant de pouvoir accéder aux autres options. Il
suffit de configurer une seule fois le mot de passe,
mais il est possible de le changer à n'importe quel
moment.
2 Appuyer sur ou pour accéder à
Password (Mot de passe). Appuyer sur
pour confirmer la sélection.
• À l'invite, entrer un mot de passe à l'aide
du pavé numérique de la télécommande,
puis appuyer sur ENTER (Entrée).
• Entrer à nouveau le mot de passe et
appuyer sur ENTER (Entrée) pour le
vérifier.
• En cas d'erreur, utiliser CLEAR (Effacer).
3 Pour changer un mot de passe existant,
appuyer sur ou pour accéder à Change
(Modification). Appuyer sur ENTER (Entrée)
pour confirmer la sélection.
• À l'invite, entrer un nouveau mot de passe
à l'aide du pavé numérique de la
télécommande, puis appuyer sur ENTER
(Entrée).
• Entrer à nouveau le mot de passe et
appuyer sur ENTER (Entrée) pour le
vérifier.
• En cas d'erreur, utiliser CLEAR (Effacer).
32
www.insignia-products.com
Page 33

Lecteur de DVD Insignia NS-1UCDVD
4 En cas d'oubli du mot de passe, appuyer sur
SETUP (Configuration) pour afficher le menu
Setup (Configuration), puis saisir 210499
pour effacer l'ancien mot de passe.
Pour paramétrer la classification :
1 Dans le menu Setup (Configuration),
sélectionner LOCK (Verrouillage). Appuyer
sur ENTER (Entrée) pour confirmer la
sélection.
2 Appuyer sur ou pour accéder à Rating
(Classification). Appuyer sur pour
confirmer la sélection.
3 Étant donné que la fonction de verrouillage
est protégée par un mot de passe, un mot de
passe doit être établi avant de pouvoir
accéder aux autres options. L'accès à l'option
de classification requiert la saisie du mot de
passe. Entrer le mot de passe ou se référer à
la page 13 pour établir un mot de passe.
4 Appuyer sur ou pour sélectionner une
classification de 1 à 8 ou pour déverrouiller le
contrôle. Appuyer sur ENTER (Entrée) pour
confirmer la sélection.
• Rating 1-8 (Classification 1-8) - Rating 1
comporte le plus de restrictions, Rating 8
le moins.
• Unlock (Déverrouillage) - Déverrouille le
contrôle parental, permettant de lire tous
les disques en entier.
Pour établir le code régional :
1 Dans le menu Setup (Configuration),
sélectionner LOCK (Verrouillage). Appuyer
sur ENTER (Entrée) pour confirmer la
sélection.
2 Appuyer sur ou pour accéder à Area
Code (Code régional). Appuyer sur pour
confirmer la sélection.
3 Étant donné que la fonction de verrouillage
est protégée par un mot de passe, un mot de
passe doit être établi avant de pouvoir
accéder aux autres options. L'accès à l'option
de code régional requiert la saisie du mot de
passe. Entrer le mot de passe ou se référer à
la page 13 pour établir un mot de passe.
4 Saisir le code de la région dont les standard
ont été utilisés pour classifier le DVD, en se
référant au tableau suivant.
• Appuyer sur ou pour sélectionner le
deuxième caractère, puis sur ENTER
(Entrée) pour confirmer la sélection.
Région Code Région Code
Afghanistan
Argentine
Australie
Autriche
Belgique
Bhoutan
Bolivie
Brésil
Cambodge
Canada
Chili
Chine
Colombie
Congo
Costa Rica
Croatie
République tchèque
Danemark
Équateur
Égypte
El Salvador
Éthiopie
Fidji
Finlande
France
Allemagne
Grande-Bretagne
Grèce
Groenland
Îles Heard et McDonald
Hongkong
Hongrie
Inde
Indonésie
Israël
Italie
Jamaïque
Japon
Kenya
Koweït
Libye
Luxembourg
AF
Malaisie
AR
Maldives
AU
Mexique
AT
Monaco
BE
Mongolie
BT
Maroc
BO
Népal
BR
Hollande
KH
Antilles néerlandaises
CA
Nouvelle-Zélande
CL
Nigeria
CN
Norvège
CO
Oman
CG
Pakistan
CR
Panama
HR
Paraguay
CZ
Philippines
DK
Pologne
EC
Portugal
EG
Roumanie
SV
Fédération russe
ET
Arabie saoudite
FJ
Sénégal
FI
Singapour
FR
République slovaque
DE
Slovénie
GB
Afrique du sud
GR
Corée du Sud
GL
Espagne
HM
Sri Lanka
HK
Suède
HU
Suisse
IN
Taïw an
ID
Thaïlande
IL
Turquie
IT
Ouganda
JM
Ukraine
JP
États-Unis
KE
Uruguay
KW
Ouzbékistan
LY
Vietnam
LU
Zimbabwe
Réglage de l'expansion du niveau des
noirs
Le menu Others (Autres) permet de définir
l'expansion du niveau des noirs (Black Level
Expansion, ou BLE), qui est le niveau des noirs
à l'écran lors de la lecture, en fonction des
préférences et des capacités du téléviseur ou du
moniteur.
MY
MV
MX
MC
MN
MA
NP
NL
AN
NZ
NG
NO
OM
PK
PA
PY
PH
PL
PT
RO
RU
SA
SN
SG
SK
SI
ZA
KR
ES
LK
SE
CH
TW
TH
TR
UG
UA
US
UY
UZ
VN
ZW
• Appuyer sur ou pour sélectionner le
premier caractère, puis sur pour
confirmer la sélection.
www.insignia-products.com
Pour effectuer le réglage de BLE :
1 Dans le menu Setup (Configuration),
sélectionner OTHERS (Autres). Appuyer sur
ENTER (Entrée) pour confirmer la sélection.
2 Appuyer sur pour alterner entre les deux
options BLE, puis sur ENTER (Entrée) pour
confirmer la sélection.
33
Page 34

• On (Activé) - Échelle de gris étendue
(tronquée à 0 IRE).
• Off (Désactivé) - Échelle de gris standard
(tronquée à 7,5 IRE).
Lecture de disques audio, MP3 ou WMA
MP3 et WMA sont des formats de stockage de
données numériques audio. Une piste de qualité
CD audio peut être compressée en l'un ou
l'autre de ces formats avec très peu de perte de
qualité audio tout en occupant beaucoup moins
d’espace sur le disque. Les disques CD-R ou
CD-RW qui ont été codés au format MP3 ou
WMA sont compatibles avec ce lecteur.
Étant donné que ce lecteur de DVD prend en
charge le format VR, il est possible de créer des
CD audio et de les lire sur ce lecteur.
Cependant, pour créer des disques, suivre les
recommandations suivantes :
• Si des fichiers MP3 ou WMA sont enregistrés
à l'aide d'un logiciel qui ne peut pas créer un
système de fichiers (tel que Direct-CD), les
fichiers ne seront pas lisibles par ce lecteur.
Le logiciel (par exemple Easy CD Creator)
doit créer un système de fichiers ISO 9660.
• Les noms de fichiers doivent comprendre au
maximum 8 lettres et comporter une
extension « .mp3 » ou « .wma ». Ce lecteur
ne peut pas lire un fichier MP3/WMA ayant
une extension de fichier autre que « .mp3 »
ou « .wma ».
• Les noms de fichiers ne doivent pas contenir
de caractères spéciaux tels que / ? * : “ < > |
etc.
• Le nombre total de fichiers dans un dossier
doit être inférieur à 1012.
Quand un disque est inséré dans le lecteur,
l’écran du menu s’affiche. Utiliser l’écran du
menu pour sélectionner les dossiers et les
chansons.
Lors de la lecture d'un fichier qui contient des
informations supplémentaires, telles que le titre
de la chanson, l'artiste, l'album, un commentaire
ou le genre, il est possible de consulter ces
informations en appuyant sur DISPLAY
(Affichage).
Lecteur de DVD Insignia NS-1UCDVD
Pour sélectionner les dossiers et les
chansons :
1 Insérer un CD audio ou un disque contenant
des fichiers MP3/WMA dans le plateau à
disque et fermer le plateau. Le menu Audio
CD (CD audio) ou le menu Music (Musique)
s’affiche.
2 Appuyer sur ou pour sélectionner un
dossier dans la liste sur le côté gauche de
l’écran. Appuyer sur DVD MENU (Menu du
DVD) pour passer à la page suivante.
3 Appuyer sur ENTER (Entrée) pour
sélectionner le dossier en surbrillance. Les
chansons disponibles sous ce dossier sont
indiquées.
4 Appuyer sur ou pour choisir une
chanson dans la liste de morceaux figurant
sur le côté gauche de l’écran. Appuyer sur
DVD MENU (Menu du DVD) pour passer à la
page suivante.
5 Appuyer sur PLAY (Lecture) ou sur ENTER
(Entrée) pour sélectionner et commencer la
lecture de la piste ou de la chanson
sélectionnée.
Utilisation d'une lecture programmée
La fonction de programmation de ce lecteur de
DVD permet de mémoriser les pistes préférées
d'un CD audio ou des fichiers MP3 ou WMA d'un
disque dans le lecteur pour les lire
ultérieurement dans un ordre spécifique. Le
programme peut contenir jusqu'à 30 pistes.
34
Pour programmer des pistes :
1 Insérer un CD audio ou un disque contenant
des fichiers MP3/WMA dans le plateau à
disque et fermer le plateau. Le menu Audio
CD (CD audio) ou le menu Music (Musique)
s’affiche.
2 Appuyer sur PROGRAM (Programmation) de
la télécommande. L’icône s’affiche à
l’écran. Appuyer de nouveau sur PROGRAM
(Programmation) pour sortir du mode de
modification du programme et effacer le
symbole de l'écran.
3 Une fois en mode de modification de
programme, sélectionner une chanson ou
une piste, puis appuyer sur ENTER (Entrée)
pour mettre la chanson ou la piste
sélectionnée en mémoire.
4 Répéter ce processus pour mémoriser
jusqu'à 30 chansons ou pistes.
www.insignia-products.com
Page 35

Lecteur de DVD Insignia NS-1UCDVD
5 Utiliser les touches / / / pour
mettre en surbrillance la chanson ou la piste
programmée à lire en premier dans la liste de
lecture programmée, puis appuyer sur PLAY
(Lecture) ou ENTER (Entrée) pour
commencer la lecture.
• La lecture commence dans l'ordre selon
lequel les chansons ou les pistes ont été
programmées.
• La lecture s'arrête lorsque toutes les
chansons ou pistes de la liste de
programmation ont été lues une fois.
6 Pour reprendre la lecture normale,
sélectionner une piste quelconque dans la
liste et appuyer sur PLAY (Lecture).
Pour répéter la lecture des pistes
programmées :
1 Appuyer sur REPEAT (Répétition) pour
afficher un écran qui offre trois options de
répétition possibles :
• Track (Piste) - Répète la piste en cours
de lecture.
• All (Tout) - Répète toutes les pistes de la
liste programmée.
• Off (Désactivé) (pas d'affichage) - Annule
la lecture répétée.
2 Sélectionner une des deux premières options
pour répéter la lecture programmée.
Sélectionner l'option Off (Désactivé) pour
annuler toute lecture programmée. Il est
également possible d'appuyer une fois sur
touche SKIP (Saut) pendant la lecture d'une
piste pour annuler la lecture répétée.
Pour effacer des pistes programmées :
1 Arrêter la lecture, puis appuyer sur
PROGRAM (Programmation) de la
télécommande. L’icône s’affiche à l’écran.
2 Utiliser les touches / / / pour
mettre en surbrillance la chanson ou la piste
programmée à effacer de la liste de lecture
programmée, puis appuyer sur CLEAR
(Effacer) pour supprimer la chanson ou la
piste de la liste.
3 Répéter ce processus pour effacer d'autres
chansons ou pistes de la mémoire.
Si le disque utilisé contient également des
fichiers audio, il est possible d'écouter les
fichiers de musique tout en regardant des
photos du disque. Programmer la lecture de
musique en suivant les instructions de la section
« Playing audio, MP3, or WMA discs », puis
utiliser la procédure suivante pour regarder les
photos.
Étant donné que ce lecteur de DVD prend en
charge le format VR, il est possible de créer des
CD image et de les lire sur ce lecteur.
Cependant, pour créer des disques, suivre les
recommandations suivantes :
• Si des images sont enregistrées à l'aide d'un
logiciel qui ne peut pas créer un système de
fichiers (tel que Direct-CD), les fichiers ne
seront pas lisibles par ce lecteur. Le logiciel
(par exemple Easy CD Creator) doit créer un
système de fichiers ISO 9660.
• Les noms de fichiers doivent comprendre au
maximum 8 lettres et comporter une
extension « .jpg ». Ce lecteur ne peut pas lire
un fichier comportant une extension autre
que « .jpg »; par conséquent, les fichiers
JPEG avec d'autres extensions doivent être
renommés avant d'être gravés sur un disque.
• Les noms de fichiers ne doivent pas contenir
de caractères spéciaux tels que / ? * : “ < > |
etc.
• Le nombre total de fichiers dans un dossier
doit être inférieur à 1012.
Quand un disque est inséré dans le lecteur,
l’écran du menu s’affiche. Utiliser l’écran du
menu pour sélectionner les dossiers et les
images. Selon la taille et le nombre de fichiers
JPEG, le lecteur peut être très lent à afficher le
contenu des dossiers. Si le contenu d'un dossier
n'apparaît pas après plusieurs minutes, il est
possible que certains des fichiers soient trop
gros. Réduire la résolution des fichiers JPEG à
moins de cinq millions de pixels et graver un
autre disque.
Pour effacer la liste de lecture programmée :
1 Arrêter la lecture, puis appuyer sur
PROGRAM (Programmation) de la
télécommande. L’icône s’affiche à l’écran.
2 Utiliser les touches / / / pour
sélectionner l'option CLEAR ALL (Effacer
tout), puis appuyer sur ENTER (Entrée). La
liste de lecture programmée est entièrement
effacée.
3 La liste de lecture programmée sera
également effacée si le lecteur de DVD est
mis hors tension ou si le disque est retiré du
plateau.
Visualisation de photos
Ce lecteur de DVD permet également d'afficher
des photos qui ont été enregistrées au format
JPEG.
Pour sélectionner les dossiers et les images :
1 Appuyer sur ou pour sélectionner un
dossier dans la liste sur le côté gauche de
l’écran. Appuyer sur DVD MENU (Menu du
DVD) pour passer à la page suivante.
2 Appuyer sur ENTER (Entrée) pour
sélectionner le dossier en surbrillance. Les
images disponibles dans ce dossier sont
indiquées.
www.insignia-products.com
35
Page 36

Lecteur de DVD Insignia NS-1UCDVD
Pour revenir à la liste Folder (Dossiers)
précédente lorsqu'une liste de fichiers est
affichée, utiliser les touches ou pour
mettre en surbrillance et appuyer sur
ENTER (Entrée).
Pour voir des images :
1 Utiliser les touches ou pour voir une
image de la liste. Appuyer sur PLAY
(Lecture) ou ENTER (Entrée) pour la
sélectionner. Appuyer sur STOP (Arrêt) pour
revenir au menu Photo.
• Appuyer une fois sur SKIP (Saut) (vers
l'avant ou vers l'arrière) ou sur SCAN
(Balayage) (vers l'avant ou vers l'arrière)
pour passer à l'image suivante ou revenir
à l'image précédente.
• Lors du visionnement de fichiers JPEG,
un menu d'aide s'affiche à l'écran. Pour
masquer le fichier d'aide, appuyer sur
RETURN (Retour). Si la résolution de
l'écran du téléviseur est réglée à 720p ou
1080i, le menu d'aide ne s'affiche pas.
• Appuyer sur ZOOM pour agrandir l'image
JPEG jusqu'à trois niveaux.
• Utiliser les touches ou pour voir des
images en mode zoom. La fonction de
zoom n'est pas disponible lorsque la
résolution de l'écran du téléviseur est
réglée à 720p ou 1080i.
• Utiliser les touches ou pour faire
pivoter l'image à l'écran dans le sens
horaire ou anti-horaire.
2 Pour voir les images sous forme de
diaporama, utiliser les touches / / /
pour mettre en surbrillance à l'écran
l'icône , puis appuyer sur ENTER
(Entrée).
• Il existe trois options pour la vitesse du
diaporama : Fast (Rapide) (>>>), Normal
(>>) et Slow (Lent) (>).
• Utiliser les touches / / / pour
mettre en surbrillance l'icône à l'écran,
puis appuyer sur ENTER (Entrée).
• Appuyer sur ou pour sélectionner
l'option de vitesse souhaitée, puis sur
ENTER (Entrée).
3 Appuyer sur PAU SE /S TE P (Pause/image par
image) pour arrêter momentanément le
diaporama. Appuyer une nouvelle fois sur
PAU SE/ STE P (Pause/image par image) ou
sur PLAY (Lecture) pour reprendre le
diaporama.
Pour nettoyer le boîtier :
1 Débrancher le lecteur de la prise secteur.
2 Utiliser un chiffon légèrement humidifié ou un
chiffon fait de plastique jetable pour essuyer
le boîtier.
Conseils pour le lecteur de DVD
Avec le temps, une accumulation normale ou
même une couche mince de poussière peut se
former sur les composants optiques. Cela peut
empêcher le laser de lire le DVD.
Suivant les conditions de fonctionnement, une
inspection régulière et un entretien sont
recommandés toutes les 1 000 heures
d'utilisation
Pour nettoyer les composants optiques :
1 Débrancher le lecteur de la prise secteur.
2 Utiliser une brosse pneumatique pour lentille
pour enlever la poussière.
Manipulation des disques
Ne pas toucher la surface gravée du disque.
Tenir le disque par la périphérie, de manière à
ne pas mettre d'empreintes digitales sur la
surface.
Ne pas coller du papier ou du ruban adhésif sur
le disque.
Rangement des disques
Après lecture, ranger le disque dans son boîtier.
Ne pas exposer le disque à la lumière directe du
soleil ou d’autres sources de chaleur, et ne pas
le laisser dans une voiture garée en plein soleil,
étant donné que la température peut devenir très
importante à l'intérieur de la voiture.
Nettoyage des disques
Des empreintes digitales et de la poussière sur
un disque peuvent provoquer une déformation
du son. Nettoyer le disque avec un chiffon
propre avant de l’utiliser. Essuyer le disque en
partant du centre vers l’extérieur.
Entretien
Nettoyage du lecteur
Attention
Ne jamais utiliser de détergents caustiques. Les solvants,
l’essence minérale, les diluants, ou d’autres solutions de
nettoyage similaires peuvent endommager le boîtier.
Ne pas laisser des produits en caoutchouc ou en plastique en
contact avec l'appareil pendant de longues durées. Ces
articles risquent de laisser des marques sur le boîtier.
Ne pas utiliser de liquides inflammables, tels que des
insecticides en pulvérisation, à proximité du lecteur de DVD.
Ces liquides sont parfois volatils.
36
Correct Incorrect
Ne pas utiliser des solvants puissants comme
l’alcool, le benzène, les diluants, les nettoyants
disponibles dans le commerce ou les
vaporisateurs antistatiques destinés aux anciens
disques en vinyle.
www.insignia-products.com
Page 37

Lecteur de DVD Insignia NS-1UCDVD
Problèmes et solutions
Problème Solution
Pas d’alimentation. Vérifier que le cordon
L’appareil est sous tension, mais
ne fonctionne pas.
Absence d’image. • Vérifier que tous les
Absence ou distorsion de son. • Vérifier que le mode
Impossible de faire avancer
rapidement un film.
L’image est déformée. • Le disque est peut-être
La télécommande ne fonctionne
pas correctement ou le capteur
infrarouge ne fonctionne pas.
d’alimentation est fermement
branché sur la prise secteur.
• Insérer un disque avec
l’étiquette vers le haut.
• Vérifier le type de disque
qui a été inséré dans le
plateau à disque. Ce
lecteur ne peut lire que les
DVD, les CD audio, les
MP3 et les WMA.
appareils sont sous
tension.
• Vérifier que le mode
d'entrée vidéo correct est
sélectionné sur le
téléviseur.
• Vérifier que les câbles
sont bien insérés dans les
prises appropriées.
d'entrée correct du
récepteur audio est
sélectionné.
• Vérifier que les câbles
sont bien insérés dans les
prises appropriées.
• Vérifier que tous les
appareils sont sous
tension.
• Vérifier que l'option
AUDIO est réglée sur la
position correcte, puis
appuyer une nouvelle fois
sur POWER
(Marche/Arrêt) pour
mettre le lecteur de DVD
sous tension.
L'avance rapide est impossible
pendant le générique et les
avertissements qui apparaissent
au début d’un film parce que le
disque est programmé pour
interdire cette fonction.
endommagé. En essayer
un autre.
• Une certaine déformation
est normale pendant le
balayage avant ou arrière.
• Vérifier que les piles de la
télécommande sont
bonnes.
• Vérifier que le viseur du
capteur de la
télécommande n’est pas
obstrué.
• Vérifier que le
transmetteur infrarouge
est pointé directement
vers le capteur infrarouge
et qu’il n’est pas à plus de
10 pieds (3 m) du capteur.
Problème Solution
La lecture commence, mais
s’arrête immédiatement.
• Le lecteur et les disques
comportent un code
régional. Si les codes
régionaux ne
correspondent pas, la
lecture ne peut pas se
faire.
• Il y a un verrouillage
parental sur le lecteur de
DVD qui empêche la
lecture des DVD dont la
classification n'est pas
acceptable.
• Le disque est sale. Le
nettoyer.
• Il s’est formé de la
condensation. Laisser
sécher le lecteur.
Spécifications
Remarque
Les spécifications sont susceptibles d’être modifiées sans
préavis.
Divers :
Alimentation nécessaire :. . . . . . . 120 V CA, 60 Hz
Consommation électrique . . . . . . . . . . . . . . . . 8 W
Dimensions (L x P x H) : . . . 17 x 1,4 x 7,9 pouces
. . . . . . . . . . . . . . . . . . . . . . . . (430 x 35 x 202 mm)
Poids : . . . . . . . . . . . . . . . . . . . . . . . .3,5 lb (1,6 kg)
Température de fonctionnement :41 à 95 °F (5 à 35
°C)
Humidité en fonctionnement : . . . . . . . . . 5 à 90 %
Disques compatibles : . . . . . . .DVD/CD/MP3/WMA
Type de pile : . . . . . . . . . . . . . . . . . . . . . . . . . . AAA
Sorties :
VIDEO OUT (Sortie vidéo) :. . . . 1 V (c-c), 75 ohms
(synch. négative, 1 prise RCA)
S-VIDEO OUT (Sortie S-Vidéo) (Y) : . . 1 V (c-c), 75
ohms
(synch. négative, 1 Mini DIN à 4 broches)
S-VIDEO OUT (Sortie S-Vidéo) (C) : 0,3 V (c-c), 75
ohms
COMPONENT VIDEO OUT (Sortie vidéo à
(Pb et Pr) : 0,7 V (c-c), 75 ohms
AUDIO OUT (Sortie audio) : . 2 Vms (1 kHz, 0 dB),
DIGITAL OUT (COAXIAL) [Sortie numérique
(coaxiale)] : . . . . . . . . . . . . . 0,5 V (c-c), 75 ohms
DIGITAL OUT (OPTICAL) [Sortie numérique
(optique)] : . . . . . . . . . . . . . . . . 3 V (c-c), 75 ohms
Système :
Standard de signal : . . . . . . . . . . . . . . . . . . . .NTSC
Système laser : . . . . . . . Laser à semi-conducteurs
Réponse en fréquence :. . . . . . . . . . . . . . . . . . . . . .
(PCM 96 kHz) : . . . . . . . . . . . . . . . 8 Hz à 44 kHz
(PCM 48 kHz) : . . . . . . . . . . . . . . . 8 Hz à 22 kHz
(CD) :. . . . . . . . . . . . . . . . . . . . . . . 8 Hz à 20 kHz
Distorsion harmonique : . . . . . . Inférieure à 0,02 %
Gamme dynamique : . . . . . . . . Supérieure à 95 dB
Rapport signal à bruit :. . . . . . . . Supérieur à 90 dB
(Connecteurs ANALOG OUT
[sortie analogique] uniquement)
composantes) : . . . . . . . .
(Y) : 1 V (c-c), 75 ohms
(synch. négative, 1 prise RCA)
(2 prises RCA)
600 ohms
(1 prise RCA (L, R))
(1 prise RCA)
(1 prise optique)
www.insignia-products.com
37
Page 38

Avis légaux
FCC
Avertissement
Cet appareil peut générer ou utiliser de l'énergie
radiofréquence. Les changements ou modifications apportés à
cet appareil peuvent donner lieu à des interférences
indésirables, à moins que les modifications ne soient
expressément approuvées dans ce manuel. L'utilisateur
pourrait perdre le droit d’utiliser cet appareil s'il a subi un
changement ou une modification non autorisée.
Information réglementaire : FCC article 15
Cet équipement a été testé et déclaré conforme aux limitations
prévues dans le cadre de la catégorie B des appareils
numériques, définies par l’article 15 du règlement de la FCC.
Ces normes ont été établies afin de fournir une protection
raisonnable contre toute interférence indésirable en cas
d’exploitation de l’appareil dans un environnement résidentiel.
Cet appareil génère, utilise et diffuse des ondes radio et s’il
n’est pas installé ni utilisé en conformité avec les instructions
dont il fait l’objet, il peut provoquer des interférences
indésirables avec les communications radio. Cependant, il
n'est pas possible de garantir qu’aucune interférence ne se
produira pour une installation particulière. Si cet équipement
produit des interférences importantes lors de réceptions radio
ou télévisées, qui peuvent être détectées en éteignant puis en
rallumant l’appareil, essayer de corriger l’interférence au
moyen de l’une ou de plusieurs des mesures suivantes :
• Réorienter ou déplacer l’antenne réceptrice.
• Augmenter la distance entre l’appareil et le récepteur.
• Brancher l’appareil sur une prise électrique d’un circuit
différent de celui auquel le récepteur est connecté.
• Contacter le revendeur ou un technicien radio/télévision
qualifié pour toute assistance.
Lecteur de DVD Insignia NS-1UCDVD
Macrovision
Ce produit incorpore une technologie de protection de droits
d’auteurs protégée par des revendications de procédé de
certains brevets américains et d’autres droits de propriété
intellectuelle de Macrovision Corporation et d’autres
propriétaires de droits.
L’utilisation de cette technologie de protection des droits
d’auteur doit être autorisée par la société Macrovision et doit
se limiter à des fins de divertissement privé à moins d’une
autorisation préalable et explicite de Macrovision Corporation.
La rétro-ingénierie ou le démontage sont interdits.
Numéros des brevets américains relatifs à cet appareil
4,631,603; 4,577,216; 4,819,098 et 4,907,093; la licence n'est
accordée que pour une utilisation de l'appareil à des fins de
visionnement limitées.
Droits d'auteurs
© 2007 Insignia. Insignia et le logo Insignia sont
des marques de commerce de Best Buy
Enterprise Services, Inc. Les autres noms de
marques et de produits mentionnés sont des
marques de commerce ou des marques
déposées de leurs propriétaires respectifs. Les
spécifications et caractéristiques sont
susceptibles d’être modifiées sans préavis.
38
www.insignia-products.com
Page 39

Lecteur de DVD Insignia NS-1UCDVD
Garantie
Garantie limitée de 90 jours
Insignia Products (“Insignia”) garantit au premier
acheteur de ce NS-1UCDVD neuf (“Produit”), qu’il est
exempt de vices de fabrication et de main-d’œuvre à
l’origine, pour une période de 90 jours à partir de la date
d’achat du Produit (“Période de garantie”). Ce produit
doit avoir été acheté chez un revendeur agréé des
produits de la marque Insignia et emballé avec cette
déclaration de garantie. Cette garantie ne couvre pas les
Produits remis à neuf. Les conditions de la présente
garantie s’appliquent à tout Produit pour lequel Insignia
est notifié, pendant la Période de garantie, d’un vice
couvert par cette garantie qui nécessite une réparation.
QUELLE EST LA DURÉE DE LA COUVERTURE ?
La Période de garantie dure 90 jours à compter de la
date d’achat de ce Produit. La date d’achat est imprimée
sur le reçu fourni avec le Produit.
QUE COUVRE CETTE GARANTIE ?
Pendant la Période de garantie, si un vice de matériau
ou de main-d’œuvre d'origine est détecté sur le Produit
par un service de réparation agréé par Insignia ou le
personnel du magasin, Insignia (à sa seule discrétion) :
(1) réparera le Produit en utilisant des pièces détachées
neuves ou remises à neuf ; ou (2) remplacera le Produit
par un produit ou des pièces neuves ou remises à neuf
de qualité comparable. Les produits et pièces remplacés
au titre de cette garantie deviennent la propriété
d’Insignia et ne sont pas retournés à l’acheteur. Si les
Produits ou pièces nécessitent une réparation après
l’expiration de la Période de garantie, l’acheteur devra
payer tous les frais de main d’œuvre et les pièces. Cette
garantie reste en vigueur tant que l’acheteur reste
propriétaire du Produit Insignia pendant la Période de
garantie. La garantie prend fin si le Produit est revendu
ou transféré d’une quelconque façon que ce soit à tout
autre propriétaire.
COMMENT OBTENIR UNE RÉPARATION SOUS GARANTIE ?
Si le Produit a été acheté chez un détaillant, le rapporter
accompagné du reçu original chez ce détaillant.
S’assurer de remettre le Produit dans son emballage
d’origine ou dans un emballage qui procure la même
qualité de protection que celui d’origine. Si le Produit a
été acheté en ligne, l’expédier accompagné du reçu
original à l’adresse indiquée sur le site Web. S’assurer
de remettre le Produit dans son emballage d’origine ou
dans un emballage qui procure la même qualité de
protection que celui d’origine.
Pour obtenir le service de la garantie à domicile pour un
téléviseur avec écran de 25 po ou plus, appeler le
1-888-BESTBUY. L’assistance technique établira un
diagnostic et corrigera le problème au téléphone ou
enverra un technicien agréé par Insignia pour la
réparation à domicile.
OÙ CETTE GARANTIE S’APPLIQUE-T-ELLE ?
Cette garantie ne s’applique qu’à l’acheteur original du
Produit aux États-Unis et au Canada.
CE QUI N’EST PAS COUVERT PAR CETTE GARANTIE LIMITÉE
La présente garantie ne couvre pas :
• la formation du client ;
• l'installation ;
• les réglages de configuration ;
• les dommages esthétiques ;
• les dommages résultants de catastrophes
naturelles telles que la foudre ;
• les accidents ;
• une utilisation inadaptée ;
• une manipulation abusive ;
• la négligence ;
• une utilisation commerciale ;
• la modification de tout ou partie du Produit, y
compris l’antenne ;
• Un écran plasma endommagé par les images fixes
(sans mouvement) qui restent affichées pendant de
longues périodes (rémanentes).
La présente garantie ne couvre pas non plus :
• les dommages ayant pour origine une utilisation ou
une maintenance défectueuse ;
• la connexion à une source électrique dont la
tension est inadéquate ;
• Toute réparation effectuée par quiconque autre
qu’un service de réparation agréé par Insignia pour
la réparation du Produit
• les Produits vendus en l’état ou hors service ;
• les consommables tels que les fusibles ou les piles
;
• les produits dont le numéro de série usine a été
altéré ou enlevé du Produit.
LA RÉPARATION OU LE REMPLACEMENT, TELS
QU’OFFERTS PAR LA PRÉSENTE GARANTIE,
CONSTITUENT LE SEUL RECOURS DE L’ACHETEUR.
INSIGNIA NE SAURAIT ÊTRE TENU POUR
RESPONSABLE DE DOMMAGES ACCESSOIRES OU
CONSÉCUTIFS, RÉSULTANT DE L’INEXÉCUTION
D'UNE GARANTIE EXPRESSE OU IMPLICITE SUR CE
PRODUIT, Y COMPRIS, SANS S’Y LIMITER, LA
PERTE DE DONNÉES, L’IMPOSSIBILITÉ D’UTILISER
LE PRODUIT, L’INTERRUPTION D’ACTIVITÉ OU LA
PERTE DE PROFITS. INSIGNIA PRODUCTS
N’OCTROIE AUCUNE AUTRE GARANTIE EXPRESSE
RELATIVE À CE PRODUIT ; TOUTES LES GARANTIES
EXPRESSES OU IMPLICITES POUR CE PRODUIT, Y
COMPRIS MAIS SANS LIMITATION, TOUTE
GARANTIE DE QUALITÉ MARCHANDE,
D'ADÉQUATION À UN BUT PARTICULIER, SONT
LIMITÉES À LA PÉRIODE DE GARANTIE
APPLICABLE TELLE QUE DÉCRITE CI-DESSUS ET
AUCUNE GARANTIE EXPRESSE OU IMPLICITE, NE
S’APPLIQUERONT APRÈS LA PÉRIODE DE
GARANTIE. CERTAINS ÉTATS ET PROVINCES NE
RECONNAISSENT PAS LES LIMITATIONS DE LA
DURÉE DE VALIDITÉ DES GARANTIES IMPLICITES.
PAR CONSÉQUENT, LES LIMITATIONS
SUSMENTIONNÉES PEUVENT NE PAS S'APPLIQUER
À L’ACHETEUR ORIGINAL. LA PRÉSENTE GARANTIE
DONNE À L'ACHETEUR DES GARANTIES
JURIDIQUES SPÉCIFIQUES ; IL PEUT AUSSI
BÉNÉFICIER D'AUTRES GARANTIES QUI VARIENT
D'UN ÉTAT OU D'UNE PROVINCE À L'AUTRE.
Pour contacter Insignia :
Pour le service à la clientèle, appeler le 1-877-467-4289
www.insignia-products.com
INSIGNIAMC est une marque commerciale de Best Buy
Enterprise Services, Inc.
Distribué par Best Buy Purchasing, LLC.
Insignia, 7601 Penn Avenue South, Richfield, Minnesota,
U.S.A.
www.insignia-products.com
39
Page 40

Lecteur de DVD Insignia NS-1UCDVD
40
www.insignia-products.com
Page 41

Reproductor de DVD Insignia NS-1UCDVD
Reproductor de DVD
Insignia NS-1UCDVD
Contenido
Introducción . . . . . . . . . . . . . . . . . . . . . . . . . . . . 41
Información de seguridad . . . . . . . . . . . . . . . . . 41
Características . . . . . . . . . . . . . . . . . . . . . . . . . . 43
Instalación de su reproductor de DVD . . . . . . . . 45
Uso de su reproductor de DVD . . . . . . . . . . . . . 47
Mantenimiento . . . . . . . . . . . . . . . . . . . . . . . . . . 56
Localización y corrección de fallas . . . . . . . . . . 57
Especificaciones . . . . . . . . . . . . . . . . . . . . . . . . 57
Avisos Legales. . . . . . . . . . . . . . . . . . . . . . . . . . 58
Garantía . . . . . . . . . . . . . . . . . . . . . . . . . . . . . . . 59
Introducción
Felicitaciones por su compra de un producto de
alta calidad de Insignia. Su NS-1UCDVD
representa lo último en reproductores de DVD y
está diseñado para brindarle un rendimiento
confiable y sin problemas.
Esta guía explica cómo operar correctamente su
reproductor y obtener el mejor rendimiento de él.
Lea esta guía del usuario cuidadosamente antes
de instalar su reproductor y luego guárdela
cerca de él para una referencia rápida.
Verifique que la caja contenga lo siguiente:
• Reproductor de DVD
• Control remoto
• Cable de video (1)
• Cable de audio (1)
• Pilas AAA (2)
• Guía del usuario
Si falta algún artículo o alguno de ellos está
dañado, comuníquese con Insignia en el
(877) 467-4289. Conserve la caja y los
materiales de embalaje por si necesita más
adelante guardar o transportar su
reproductor.
Información de seguridad
Advertencia de choque eléctrico
CUIDADO
Riesgo de choque
eléctrico
No abra la unidad
Advertencia
Para reducir el riesgo de choque eléctrico, no retire la cubierta
ni la parte posterior. No existen partes reparables por el
usuario en el interior. Para realizar reparaciones, contacte con
personal de servicio calificado.
El símbolo del relámpago que termina en punta de
flecha y se encuentra dentro de un triángulo
equilátero tiene por finalidad alertar al usuario de
la presencia de voltaje peligroso sin aislamiento en
el interior del reproductor de DVD que podría tener
choque eléctrico para las personas.
Advertencia
Para prevenir el riesgo de incendio o choque eléctrico, no
exponga este reproductor de DVD a la lluvia o humedad.
Cuidado
El reproductor de DVD no debe entrar en contacto con agua
(goteo o salpicaduras) y no debe colocarse sobre él ningún
objeto lleno de líquido, como por ejemplo vasijas.
Ventilación
Cuidado
No bloquee ninguna abertura de ventilación. Instale la unidad
de acuerdo con estas instrucciones.
Las ranuras y aberturas en la caja del reproductor sirven para
proporcionar ventilación, para asegurar la operación confiable
del reproductor de DVD y para protegerlo contra el
sobrecalentamiento.
Las aberturas nunca se deben bloquear colocando el
reproductor de DVD sobre una cama, un sofá, una alfombra u
otra superficie similar. Este reproductor de DVD no debe
colocarse en una instalación empotrada, como una librería o
estantería, a menos que se proporcione ventilación apropiada
o se hayan seguido estas instrucciones.
potencia suficiente para constituir riesgo de
El signo de admiración que se encuentra dentro de
un triángulo equilátero tiene por finalidad alertar al
usuario de la presencia de importantes
instrucciones de operación y mantenimiento
(servicio) en la literatura que se incluye con el
reproductor de DVD.
Nota
Debido a la política de Insignia de un mejoramiento y un
refinamiento técnico continuos, nos reservamos el derecho de
cambiar o alterar el software.
www.insignia-products.com
Advertencia sobre el láser
Advertencia
Este reproductor de DVD utiliza
un sistema láser.
Para asegurar el uso adecuado
de este reproductor de DVD,
lea cuidadosamente la guía del
usuario y consérvela para
referencia futura. Si el
reproductor de DVD necesitase
mantenimiento, contacte con personal de servicio calificado.
Cambiar controles, hacer ajustes o llevar a cabo
procedimientos que no estén especificados en este manual
pueden resultar en una exposición peligrosa a la radiación.
Para evitar la exposición directa al rayo láser, no trate de abrir
la caja del equipo. Cuando se encuentra abierta, existe
radiación láser visible. No mire directamente al haz de luz.
Cuidado
Cuando el reproductor de DVD está abierto y los seguros
desactivados hay radiación láser visible e invisible presente.
41
Page 42

Reproductor de DVD Insignia NS-1UCDVD
Cable de alimentación
Advertencia
Recomendamos que la mayoría de los electrodomésticos se
coloquen en un circuito dedicado, esto es, un circuito con un
tomacorriente que alimenta sólo a ese electrodoméstico y no
tiene otro tomacorriente o ramas de circuito. Consulte la
página de especificaciones de este manual para ver los
requisitos de alimentación.
No sobrecargue los tomacorrientes de pared. Los
tomacorrientes sobrecargados, los cables de extensión
sueltos o dañados, los cables de alimentación pelados o
aislamientos de cables que se hayan dañado o rajado son
peligrosos. Cualquiera de estas condiciones puede causar un
choque eléctrico o un incendio.
Examine periódicamente el cable del reproductor de DVD, y si
su aspecto indica daño o deterioro, desconéctelo, interrumpa
el uso del reproductor de DVD, y reemplace el cable con un
repuesto exacto proporcionado por un proveedor de servicio
autorizado.
Proteja el cable de alimentación contra abusos físicos o
mecánicos cómo cuando se retuerce, se enrosca, se pellizca,
se aplasta al cerrar una puerta o se le pisa. Preste especial
atención a los enchufes, a los tomacorrientes y al punto por
donde el cable sale del reproductor de DVD.
Para desconectar la alimentación del tomacorriente, tire del
enchufe. Al instalar el reproductor de DVD, asegúrese de que
puede accederse fácilmente al enchufe.
Instrucciones importantes de seguridad
Advertencia
Lea y observe todas las advertencias e instrucciones en este
manual y las marcadas en su reproductor de DVD. Guarde
este manual para su referencia futura.
Este reproductor de DVD ha sido diseñado y fabricado para
garantizar la seguridad personal. Su uso indebido puede
ocasionar un choque eléctrico o riesgo de incendio. Los
mecanismos de protección incorporados en este reproductor
de DVD le protegerán si observa los siguientes
procedimientos de instalación, uso y mantenimiento. Este
reproductor de DVD no contiene piezas que puedan ser
reparadas por el usuario.
No retire la caja ya que podrá quedar expuesto a voltajes
peligrosos. Para realizar reparaciones, contacte sólo con
personal de servicio calificado.
• Lea todas estas instrucciones de seguridad y
operación antes de utilizar el reproductor de
DVD.
• Guarde estas instrucciones de seguridad,
operación y uso para su referencia futura.
• Cumpla con todas las advertencias indicadas
en el reproductor de DVD y en las
instrucciones de operación.
• Siga todas las instrucciones de operación y
uso.
• No utilice este reproductor de DVD cerca de
agua. Por ejemplo, no use este reproductor
de DVD cerca de una bañera, lavabo,
fregadero de cocina, o lavadero; en un
sótano mojado o cerca de una piscina, o en
otras áreas cerca de agua.
• Límpielo únicamente con un paño un poco
humedecido. Desconecte este reproductor
de DVD del tomacorriente antes de limpiarlo.
No utilice productos de limpieza líquidos.
• No bloquee ninguna abertura de ventilación.
Instale la unidad de acuerdo a estas
instrucciones. Las ranuras y aberturas en la
caja del reproductor sirven para proporcionar
ventilación, para asegurar la operación
confiable del reproductor de DVD y para
protegerlo contra el sobrecalentamiento. Las
aberturas nunca se deben bloquear
colocando el reproductor de DVD sobre una
cama, un sofá, una alfombra u otra superficie
similar. Este reproductor de DVD no debe
colocarse en una instalación empotrada,
como una librería o estantería, a menos que
se proporcione ventilación apropiada o se
hayan seguido estas instrucciones.
• No instale la unidad cerca de fuentes de
calor tales cómo radiadores, estufas u otros
aparatos (incluyendo amplificadores) que
produzcan calor.
• Si el reproductor de DVD se lleva
directamente de un lugar frío a uno caliente,
la humedad se puede condensar en su
interior. Cuando lo lleve de un lugar frío a uno
caliente, espere una hora antes de volver a
usar el reproductor, o extraiga el disco y deje
el reproductor encendido hasta que la
humedad se evapore.
• No anule el propósito de seguridad del
enchufe con polarización o con conexión a
tierra. Un enchufe polarizado tiene dos
clavijas planas, una más ancha que la otra.
Un enchufe del tipo de conexión a tierra tiene
dos clavijas planas y una tercera clavija de
tierra. La clavija ancha o la tercera clavija se
proporcionan para su seguridad. Si el
enchufe proporcionado no entra en el
tomacorriente, consulte con un electricista
para reemplazar el tomacorriente obsoleto.
• Evite caminar sobre el cable de alimentación
o que éste sea aplastado, especialmente en
los enchufes, los receptáculos y en el punto
donde éste sale del reproductor de DVD.
• Use sólo aditamentos y accesorios
especificados por Insignia.
• Desconecte el reproductor de DVD durante
tormentas de rayos o cuando no se utilice por
un periodo de tiempo prolongado.
• Encomiende todas las reparaciones al
personal de servicio calificado. Es necesario
que se efectúe el mantenimiento cuando el
reproductor de DVD se haya dañado de
alguna forma, como, por ejemplo, cuando el
cordón o enchufe de suministro de
alimentación esté defectuoso o cuando se
haya derramado líquido o se hayan caído
objetos dentro del reproductor de DVD, o que
el mismo haya estado expuesto a la lluvia o
humedad, no funcione normalmente o se
haya dejado caer.
• Es peligroso cambiar las pilas
incorrectamente. Cambie las pilas
únicamente por otras del mismo tipo o uno
equivalente. Para proteger el medio
ambiente, por favor deseche las pilas
adecuadamente. No utilice el reproductor en
temperaturas superiores a 95 ºF o 35 ºC.
42
www.insignia-products.com
Page 43

Reproductor de DVD Insignia NS-1UCDVD
• No use discos con formas irregulares tales
como corazones o estrellas ya que estos
pueden hacer que el reproductor no funcione
correctamente. No pegue papel, cinta
adhesiva o pegamento en el disco. No
exponga el disco a la luz solar directa ni a
fuentes de calor. No toque la superficie del
disco. Manipule el disco por sus orillas.
Limpie el disco desde el centro hacia fuera
con un paño de limpieza. Extraiga el disco
del reproductor y guárdelo en su funda
después de reproducirlo. Algunas
operaciones de reproducción de discos
pueden ser fijadas intencionalmente por los
productores del software. Debido a que este
reproductor reproduce discos de acuerdo
con el contenido que los productores del
software diseñaron, algunas funciones de
reproducción pueden estar inhabilitadas.
También consulte las instrucciones provistas
con los discos.
Características
• Conector de entrada y salida de A/V
combinado
• Controles de los padres
• Control remoto
Identificación de componentes
Vista frontal
Elem
ento
1 Encendido/Apa
2 Bandeja de
3Ventana de
4Sensor del
5 Abrir/Cerrar Abre o cierra la bandeja de discos.
6 Reproducir Presione para empezar la reproducción.
7 Detener Presione una vez para detener la
8 Saltar - Avance al principio del capítulo o pista
9 Saltar + Avance al capítulo, pista o escena
Componente Descripción
gado
discos
visualización
control remoto
N
Enciende y apaga el reproductor.
Acepta discos CD o DVD.
Muestra el estado actual del reproductor.
Recibe las señales del control remoto.
No bloquee este sensor.
reproducción. El reproductor recuerda
dónde se detuvo la reproducción y usted
puede empezar a reproducirlo a partir de
ese punto.
Presione dos veces para detener la
reproducción. El reproductor no
recuerda dónde se detuvo la
reproducción.
actual o avance al capítulo, pista o
escena anterior durante la reproducción.
siguiente durante la reproducción.
www.insignia-products.com
43
Page 44

Reproductor de DVD Insignia NS-1UCDVD
Control remoto
Elem
Botón Descripción
ento
1 Encendido/Apagado Enciende y apaga el monitor.
2 Menú DVD Muestra el menú de un disco DVD.
3 Arriba/Abajo/Entrar/Der
echa/Izquierda
4 Visualización Visualice en la pantalla
Desplácese por los menús y
confirme su selección.
información sobre el disco DVD,
tal como el título, número de
capítulo, número de pista y la hora.
Elem
Botón Descripción
ento
5 Pausa/Paso Detiene la reproducción
6 Saltar - Avance al principio del capítulo o
Saltar + Avance al capítulo, pista o escena
7 Barrido - Realice una búsqueda hacia atrás.
Barrido + Realice una búsqueda hacia
8 Números Seleccione un elemento en un
9 Subtítulos Active y desactive los subtítulos y
10 Audio Seleccione el idioma de audio o el
11 Repetir Repita un capítulo, pista, título o
12 Repetir A-B Repita una parte específica de un
13 Marcador Marque cualquier punto durante la
14 Buscar Muestra el menú de búsqueda de
15 Abrir/Cerrar Abre o cierra la bandeja de discos.
16 Títulos Muestra el menú de títulos, si lo
17 Retorno Muestra el menú del CD de video
18 Detener Presione una vez para detener la
19 Reproducir Presione para empezar la
20 Programa Permite entrar en el modo de
21 Borrar Elimina un número de pista en la
22 Ángulo Cambie el ángulo de visualización
23 Configurar Permite entrar o salir del menú de
24 Aumentar Amplía la imagen a 2, 3 o 4 veces
25 Aleatorio Reproduce pistas de forma
26 Resolución Cambia la resolución de la imagen.
temporalmente.
Presione repetidamente para
reproducir imagen por imagen.
pista actual o avance al capítulo,
pista o escena anterior durante la
reproducción.
siguiente durante la reproducción.
delante.
menú o introduzca una
contraseña.
seleccione el idioma de los
subtítulos.
canal de audio para el DVD.
todo.
disco.
reproducción.
marcadores.
hay.
con el control de reproducción
(PBC).
reproducción. El reproductor
recuerda dónde se detuvo la
reproducción y usted puede
empezar a reproducirlo a partir de
ese punto.
Presione dos veces para detener la
reproducción. El reproductor no
recuerda dónde se detuvo la
reproducción.
reproducción.
edición de programa.
lista de programas o una marca en
el menú de búsqueda de
marcadores.
de una escena.
configuración.
su tamaño original.
aleatoria.
44
www.insignia-products.com
Page 45

Reproductor de DVD Insignia NS-1UCDVD
Instalación de su
reproductor de DVD
Instalación de las pilas del control remoto
Su reproductor utiliza dos pilas AAA.
Cuidado
No mezcle pilas usadas y nuevas, y nunca mezcle pilas de
distintos tipos, como normales, alcalinas, etc.
Para cambiar las pilas:
1 Retire la cubierta de las pilas en la parte
posterior del control remoto.
2 Inserte dos pilas AAA con las polaridades + y
– alineadas correctamente.
3 Vuelva a colocar la cubierta de las pilas.
Instalación de su reproductor de DVD
La imagen o el sonido de un aparato cercano de
TV, VCR o radio podría verse distorsionado
durante la reproducción. Si esto ocurre, coloque
el reproductor alejado del aparato de TV, VCR o
radio, o apague la unidad después de extraer el
disco.
Para instalar su reproductor:
1 Coloque el reproductor de DVD sobre una
superficie firme.
2 Enchufe el cable del reproductor de DVD en
un enchufe de CA de 120 V.
Conexión de su reproductor de DVD al
televisor
Dependiendo de su TV y de su otro equipo, hay
varias formas de conectar el reproductor.
Consulte el manual de su TV, sistema estéreo u
otros dispositivos para obtener más información
sobre la conexión.
Para conectar su reproductor a un televisor:
Si su televisor es de alta definición o es un
modelo listo para la televisión digital, puede
aprovechar la salida de barrido progresivo del
reproductor para conseguir la mejor salida de
video posible.
• El barrido progresivo no funciona con las
conexiones de video analógico (conector
amarillo VIDEO OUT [salida de video]).
• Las resoluciones de 720p y 480p son las
aplicadas por el barrido progresivo.
1 Asegúrese de que el reproductor de DVD
esté conectado directamente al TV y no a un
VCR. Si el reproductor no se conecta
correctamente, la imagen del DVD se verá
distorsionada por el sistema de protección
contra copia.
2 Enchufe los cables de audio-video desde los
conectores del reproductor de DVD al
televisor como sigue:
Cable
Cable de
S-Video
(S)
Cable de
video (V)
Cable de
audio (A)
Cable Y
PB PR (C)
Conéctelo en el
reproductor a:
S-VIDEO OUT (salida
de S-Video)
VIDEO OUT (salida de
video)
AUDIO OUT (salida de
audio)
COMPONENT/PROGRE
SSIVE SCAN (video de
componentes/barrido
progresivo)
Nota
La conexión de cables de S-Video y de
componentes a la vez puede causar inestabilidad
en la imagen del TV. Para resolver este problema,
desconecte uno de los cables.
Conéctelo en el
televisor a:
S-VIDEO IN (entrada de
S-Video)
VIDEO IN (entrada de
video)
AUDIO IN (entrada de
audio) (Izq. [L] y Der.
[R])
Conectores del TV
correspondientes
Conexión de su reproductor a un TV HDMI
High Definition Multimedia Interface (HDMI,
interfaz multimedia de alta definición) es
compatible con video y audio en una sola
conexión digital que puede usarse con
reproductores de DVD, cajas de TV por cable y
otros equipos audiovisuales.
HDMI fue desarrollado para proporcionar las
tecnologías de protección de contenido digital
de gran ancho de banda (HDCP, por sus siglas
en inglés). HDCP se utiliza para proteger tanto
el contenido digital transmitido como el recibido.
www.insignia-products.com
45
Page 46

HDMI puede funcionar con video normal,
mejorado o de alta definición, además de con
audio normal a multicanal con sonido
envolvente. Las características de HDMI
incluyen video digital descomprimido, un ancho
de banda de hasta 5 GB por segundo, un
conector (en lugar de varios cables y
conectores), y comunicación entre la fuente de
audio-video y dispositivos audiovisuales, tales
como televisores digitales (DTV, por sus siglas
en inglés).
Nota
HDMI, el logotipo de HDMI y High-Definition
Multimedia Interface son marcas comerciales o
marcas registradas de HDMI licensing LLC.
Para conectar su reproductor a un
dispositivo HDMI:
1 Configure la fuente en su televisor o monitor
HDMI en HDMI tal como se indica en el
manual del propietario.
2 Conecte el conector HDMI OUT (salida de
HDMI) en el reproductor de DVD al conector
HDMI en su televisor o monitor HDMI
mediante un cable HDMI (H).
Reproductor de DVD Insignia NS-1UCDVD
Notas
Si se escucha ruido o aparecen líneas en la
pantalla, compruebe el cable HDMI.
No todos los dispositivos DVI compatibles con
HDCP funcionarán con este reproductor.
Si su televisor HDMI no es compatible con HDCP,
la pantalla tendrá un color azul.
Si la imagen del televisor no se ve bien, apague y
vuelva a encender la unidad.
Se puede seleccionar tanto PCM como Bitstream
(secuencia de bits) como salida de audio
frecuencia de muestreo se fija en 48kHz en la conexión
HDMI.
Si el Audio se configura en secuencia de bits y su
televisor no admite una salida de audio de
secuencia de bits cuando se utiliza una conexión
, es posible que no haya sonido de audio o que el
HDMI
sonido se escuche distorsionado.
Configuración de la resolución
Si su televisor no acepta la resolución
configurada, la imagen de la pantalla no se verá
bien. Consulte el manual del propietario de su
televisor para configurar la resolución correcta.
Para configurar la resolución:
1 Presione STOP (Detener) para detener la
reproducción y poner el reproductor en el
modo de parada.
2 Presione RESOLUTION (Resolución) una
vez. La resolución actual aparece en la
pantalla.
3 Presione RESOLUTION repetidamente para
cambiar a la resolución deseada. Las
resoluciones disponibles según las
conexiones son:
cuando la
La flecha en el cuerpo del conector del cable
debe estar mirando hacia arriba para la
alineación correcta con el conector del
reproductor.
3 Presione RESOLUTION (Resolución)
repetidamente para seleccionar la resolución
deseada. Cuando se utiliza una conexión
HDMI, se puede cambiar la resolución (480i,
480p, 720p, 1080i) para la salida HDMI.
La salida HDMI tendrá una resolución de
480p, incluso si la resolución en la conexión
HDMI se configura en 480i.
Si no se escucha sonido ni ningún ruido
procedente de la conexión HDMI, configure
la opción Audio [Dolby Digital, DTS o MPEG]
en el menú SETUP (Configuración) en PCM
o en Off (Desactivado).
Conexión de salida
HDMI VIDEO OUT
(salida de video HDMI)
COMPONENT VIDEO
OUT (salida de video de
componentes)
VIDEO OUT (salida de
video)
S-VIDEO 720 x 480i
Resolución
disponible
1920 x 1080i
1280 x 720p
720 x 480p
720 x 480i
1920 x 1080i
1280 x 720p
720 x 480p
720 x 480i
720 x 480i
720 x 480p
• Para las conexiones Video y S-VIDEO, la
resolución debe estar configurada en 480i
o 480p; sin embargo, la conexión VIDEO
OUT emite siempre una señal a la
resolución estándar 480i.
• A las resoluciones 720p y 1080i de la
salida de video de componentes sólo
pueden reproducirse discos no protegidos
contra copia. Si el disco está protegido
contra copia, se mostrará a la resolución
480p cuando no haya un cable HDMI
conectado. Si hay un cable HDMI
conectado, la imagen podría no verse
bien.
46
www.insignia-products.com
Page 47

Reproductor de DVD Insignia NS-1UCDVD
Conexión del reproductor a equipo de
audio opcional
Puede conectar su reproductor a una fuente
externa para disfrutar de sonido estéreo de alta
calidad en su reproductor de DVD.
Nota
Este reproductor de DVD ha sido fabricado con
licencia de Dolby Laboratories. "Dolby", “Pro
Logic” y el símbolo de la doble D son marcas
registradas de Dolby Laboratories. DTS y DTS
Digital Out son marcas comerciales de Digital
Theater Systems, Inc.
Parte posterior del reproductor de DVD
Amplificador (receptor)
3 Sonido digital multicanal:
Una conexión digital multicanal que utilice un
receptor multicanal de audio-video
compatible con uno o más de los formatos de
audio admitidos por su reproductor DVD,
tales como MPEG 2, Dolby Digital y DTS,
proporciona la máxima calidad de sonido.
Compruebe el manual del propietario de su
receptor y los logotipos en la parte delantera
del receptor para verificar el tipo de sistema
que tiene.
Nota
Si el formato de audio de la salida digital no
corresponde a las capacidades de su receptor, el
receptor producirá un sonido fuerte y
distorsionado o no producirá ningún sonido.
Sólo puede conseguir un sonido envolvente digital
de seis canales a través de una conexión digital si
su receptor está equipado con un decodificador
multicanal digital.
Uso de su reproductor de
DVD
Uso del control remoto
Acceso a las características del reproductor de
DVD mediante los botones del control remoto
A todas las características de su reproductor de
DVD puede accederse mediante el control
remoto. Algunas funciones son válidas con toda
clase de discos, mientras que otras sólo
funcionan con ciertos tipos de discos.
Para conectar el reproductor a equipo de
audio opcional:
1 Amplificador equipado con un estéreo
analógico de 2 canales o Dolby Pro Logic
II / Pro Logic:
Utilice los cables de audio (A) para conectar
los conectores AUDIO OUT (salida de audio)
izquierdo y derecho en el reproductor de
DVD a los conectores IN (entrada) izquierdo
y derecho en su amplificador, receptor o
sistema estéreo.
2 Amplificador equipado con estéreo digital
de 2 canales (PCM) o receptor de
audio-video equipado con un
decodificador multicanal (Dolby Digital™,
MPEG 2 o DTS):
Utilice un cable de audio digital óptico O o
coaxial X (A) para conectar un conector
DIGITAL AUDIO OUT (salida de audio
digital), ya sea el OPTICAL O o el COAXIAL
X, del reproductor de DVD al
correspondiente conector OPTICAL O o
COAXIAL X de su amplificador.
Para acceder a las características del DVD:
1 Presione que corresponde a la operación
deseada.
2 Presione o para seleccionar un menú.
3 Presione para entrar en un submenú o
presione para regresar al menú anterior.
4 Presione o para seleccionar un
submenú si es necesario y luego presione
ENTER (Entrar) para confirmar su selección.
La tabla siguiente especifica las operaciones
de cada característica y el tipo de discos
requeridos para que ésta funcione.
Botón Operación
OPEN/CLOSE
(Abrir/Cerrar)
PAUSA/STEP
(Pausa/Paso)
SKIP (Saltar) Durante la reproducción,
Abre o cierra la bandeja de
discos.
Durante la reproducción,
presione para detenerla
momentáneamente.
Presione repetidamente para
reproducir imagen por imagen.
presione para pasar al
siguiente capítulo/pista o
para regresar al principio del
capítulo/pista que se está
reproduciendo. Presione
brevemente dos veces para
retroceder al capítulo/pista
anterior.
Tipo de
disco
Tod os
Tod os
DVD
www.insignia-products.com
47
Page 48

Reproductor de DVD Insignia NS-1UCDVD
Botón Operación
SCAN (Barrido) Durante la reproducción,
REPEAT
(Repetir)
A-B Presione una vez para
ZOOM
(Aumentar)
RANDOM
(Aleatorio)
TITLE (Título) Si el título del DVD actual tiene
DVD MENU
(Menú del DVD)
presione repetidamente para
seleccionar la velocidad de
barrido deseada.
Los discos DVD tienen cuatro
velocidades de barrido.
Los discos MP3 y los CD de
audio tienen tres velocidades
de barrido.
Mientras está en el modo de
pausa, presione SCAN
repetidamente para reproducir
en movimiento lento.
Hay cuatro pasos de
movimiento lento que sólo
funcionan en el modo de
avance.
Durante la reproducción,
presione repetidamente para
seleccionar el modo de
repetición deseado.
Presione SKIP (Saltar)
una vez para cancelar la
repetición de la reproducción.
Para discos DVD, los modos
son: Chapter (Capítulo), Title
(Título) y Off (Desactivado).
Para discos CD de audio, MP3
y WMA, los modos son: Track
(Pista), All (Todo) y Off
(Desactivado).
seleccionar un punto A y una
segunda vez para seleccionar
un punto B. El reproductor
repite la secuencia del punto A
al punto B.
Para discos CD de audio, esta
característica está disponible
sólo para la pista actual.
Durante los modos de
reproducción o de pausa,
presione para ampliar la
imagen de video. Hay tres
niveles de aumento.
Utilice los botones
para desplazarse por
/
la imagen aumentada.
Presione CLEAR (Borrar) para
salir.
Observe que la función ZOOM
podría no funcionar con
algunos DVD.
Durante la reproducción o en
el modo de parada, presione
para reproducir
aleatoriamente.
un menú, presione para
mostrar el menú de títulos en
la pantalla. Si no hay menú de
títulos, aparece el menú del
disco.
Presione para visualizar el
menú del disco.
/ /
Tipo de
disco
DVD
CD de audio
(ACD)
MP3
DVD
Todos
DVD
ACD
DVD
ACD
MP3
WMA
DVD
DVD
Botón Operación
ANGLE
(Ángulo)
SUBTITLE
(Subtítulos)
AUDIO (Audio) Durante la reproducción,
MARKER
(Marcador)
Durante la reproducción de un
DVD que contiene escenas
filmadas en ángulos
diferentes, presione
repetidamente para
seleccionar el ángulo deseado.
El indicador de ángulo
parpadeará en la pantalla para
indicar que es posible cambiar
el ángulo.
Durante la reproducción,
presione repetidamente para
seleccionar el idioma de los
subtítulos deseado.
presione repetidamente para
escuchar otro idioma o una
pista de audio diferente.
Presione para marcar un punto
en un DVD. Aparece
brevemente el icono del
marcador en la pantalla.
Repita para definir hasta nueve
marcadores.
Tipo de
disco
DVD
DVD
DVD
DVD
Acceso a otras características del reproductor de
DVD
Este reproductor de DVD tiene cuatro
características más:
• Búsqueda por tiempo
• Búsqueda de marcadores
• Memoria de la última escena
• Salvapantallas
La búsqueda por tiempo le permite empezar a
reproducir a partir de un punto temporal
específico en un DVD.
Con la búsqueda de marcadores puede
empezar a reproducir a partir de nueve puntos
memorizados.
El reproductor de DVD memoriza
automáticamente la última escena del último
disco que se ha visto. La escena permanece en
la memoria incluso si se extrae el disco o se
apaga el reproductor. Al insertar un disco cuya
última escena está memorizada, ésta se
muestra en la pantalla automáticamente.
Nota
Este reproductor no memoriza la escena de un
disco si el reproductor se apaga antes de que
empiece a reproducirse el disco.
El salvapantallas aparece cuando se deja el
reproductor de DVD encendido o en el modo de
parada durante cinco minutos. El salvapantallas
permanece activo otros 5 minutos más, tras lo
cual el reproductor se apaga automáticamente.
Para acceder a la función de búsqueda por
tiempo (sólo DVD):
1 Presione DISPLAY (Visualización) durante la
reproducción.
2 Presione o para seleccionar el icono
del reloj de tiempo. Aparece “--:--:--”.
48
www.insignia-products.com
Page 49

Reproductor de DVD Insignia NS-1UCDVD
3 Introduzca la hora de inicio deseada en
horas, minutos y segundos. Presione CLEAR
(Borrar) para eliminar los números
introducidos incorrectamente y luego vuelva
a introducirlos correctamente.
4 Presione ENTER (Entrar) para confirmar su
selección.
Para acceder a la función de búsqueda de
marcadores (sólo DVD):
1 Presione MARKER (Marcador) durante la
reproducción para memorizar un punto.
2 Durante la reproducción, presione SEARCH
(Buscar). Aparece el menú de marcadores.
3 Antes de que transcurran 9 segundos,
presione o para seleccionar un
número, ya sea para reproducirlo o para
eliminarlo.
4 Presione ENTER (Entrar) para empezar a
reproducir a partir del punto memorizado.
O
Presione CLEAR (Borrar) para eliminar el
punto memorizado que ha seleccionado.
Nota
Puede reproducir cualquier punto memorizado
utilizando el teclado numérico del control remoto
para introducir el número del marcador después
de acceder al menú de marcadores.
Reproducción de un DVD o CD
Nota
Tanto el reproductor de DVD como el disco DVD están
codificados por región. Estos códigos regionales deben de ser
iguales para que el DVD pueda reproducirse. Si los códigos no
son iguales, el DVD no podrá reproducirse. El código de este
reproductor es el de la región 1. Los discos DVD con códigos
de otra región no podrán reproducirse en este reproductor.
Para reproducir un DVD o CD:
1 Presione POWER (Encendido/Apagado)
para encender el reproductor.
2 Presione OPEN (Abrir). La bandeja se abre.
3 Ponga un disco en el eje de giro. Asegúrese
de que encaje en su lugar.
4 Cierre la bandeja. Su reproductor empezará
a reproducir el disco. Utilice el botón
VOLUME +/- (Volumen +/-) para ajustar el
volumen del reproductor.
5 Presione STOP (Detener) para detener la
reproducción del DVD o CD.
Uso del menú del DVD
Un DVD esta dividido en secciones llamadas
títulos y capítulos. Cuando se reproduce un
DVD, el menú raíz del disco aparecerá en la
pantalla. El contenido del menú varía de disco a
disco. Algunos DVD solamente permiten
seleccionar opciones de reproducción mediante
el menú raíz del disco.
Para acceder al menú del DVD:
• Presione DVD MENU (Menú del DVD)
durante la reproducción para visualizar el
menú.
Visualización de información
Título (pista)
Capítulo
Tiempo
Audio
Subtítulos
Ángulo
Para mostrar información acerca del DVD:
1 Presione DISPLAY (Visualización) durante la
reproducción para visualizar la siguiente
información acerca del tiempo transcurrido
del título:
Elemento de
menú
Title (Track)
[Título (pista)]
Chapter (Capítulo) Número del capítulo
Time (Tiempo) Tiempo de reproducción
Audio Idioma o canal de audio
Subtitle
(Subtítulo)
Angle (Ángulo) Ángulo seleccionado/número
Información mostrada
Número del título (o pista)
actual/número total de títulos (o
pistas)
actual/número total de
capítulos
transcurrido
seleccionado
Subtítulo seleccionado
total de ángulos
2 Presione o para seleccionar un
elemento de menú.
3 Presione o para cambiar o seleccionar
un ajuste.
Nota
Si no se presiona ningún botón en unos
segundos, la imagen en pantalla desaparece.
Repetición de una parte de un DVD
Para repetir un segmento de un DVD:
1 Presione A-B en el control remoto durante la
reproducción para fijar el punto inicial.
2 Presione A-B una segunda vez para fijar el
punto final. El reproductor repite una y otra
vez el segmento entre los puntos inicial y
final.
3 Presione A-B una tercera vez para cancelar
la repetición A-B y reanudar la reproducción
normal.
Para repetir un DVD o un capítulo o título de
un DVD:
• Presione REPEAT (Repetir) repetidamente
para seleccionar el tipo de repetición:
• Chapter (Capítulo): Repite el capítulo
actual
www.insignia-products.com
49
Page 50

Reproductor de DVD Insignia NS-1UCDVD
• Title (Título): Repite el título actual
• All (todo): Repite todos los capítulos y
títulos
• Off (Desactivado): Reanuda la
reproducción normal
Reproducción de un DVD con formato VR
Los DVD grabados con formato de grabación de
video (VR, por sus siglas en inglés) pueden
reproducirse en este reproductor de DVD; sin
embargo, los discos DVR no finalizados no se
reproducirán.
Algunos discos DVD con formato VR utilizan
protección de contenidos para medios grabables
(CPRM, por sus siglas en inglés), un sistema
(codificado) de protección contra copia que sólo
permite la grabación de aquellos programas
retransmitidos que únicamente pueden
“copiarse una vez”. Los discos DVD con formato
VR que utilicen CPRM no funcionarán con este
reproductor de DVD.
Para reproducir un DVD con formato VR:
1 Inserte un disco en la bandeja y ciérrela.
Aparece en la pantalla el menú con la lista de
pistas del DVD-VR.
Para acceder al menú de configuración:
1 Presione SETUP (Configuración) para
mostrar el menú. Presione SETUP una
segunda vez para que el menú desaparezca
de la pantalla.
2 Presione o para acceder a un
elemento de menú. Los valores actuales
para dicho elemento de menú se muestran
en el menú.
3 Presione para seleccionar uno de los
valores. Presione para volver al nivel
anterior.
4 Repita los pasos 2 y 3 para acceder a otros
elementos de menú. Presione ENTER
(Entrar) para confirmar sus selecciones.
5 Presione SETUP o PLAY (Reproducir) para
salir del menú de configuración.
Selección de las opciones de idiomas
El menú LANGUAGE (Idioma) le permite
seleccionar un idioma para los menús, los
subtítulos de la pantalla y el audio.
Las opciones Disc Audio (Audio del disco) Disc
Subtitle (Subtítulos del disco) y Disc Menu
(Menú del disco) utilizan todas el mismo
procedimiento.
2 Presione o para seleccionar una pista
en el disco y luego presione PLAY
(Reproducir) o el botón ENTER (Entrar) para
empezar la reproducción.
3 Presione DVD MENU (Menú del DVD) para
regresar a la lista.
Uso del menú de configuración
Este reproductor de DVD ha sido programado
por el fabricante con valores de fábrica.
Mediante la opción de configuración, se pueden
cambiar características de funcionamiento,
como la imagen, el sonido y el idioma. La opción
de configuración también ofrece acceso al
bloqueo de los padres, si se desea.
Para seleccionar el idioma de los menús:
1 En el menú Setup (Configuración),
seleccione LANGUAGE (Idioma). Presione
ENTER (Entrar) para confirmar su selección.
2 En el menú LANGUAGE (Idioma),
seleccione Menu Language (Idioma del
menú). Presione ENTER (Entrar) para
confirmar su selección.
3 Presione o para acceder al idioma
deseado. Presione ENTER para confirmar su
selección.
Para seleccionar el idioma del disco:
1 En el menú Setup (Configuración),
seleccione LANGUAGE (Idioma). Presione
ENTER (Entrar) para confirmar su selección.
2 En el menú LANGUAGE (Idioma), presione
o para acceder a Disc Audio (Audio
del disco) Disc Subtitle (Subtítulos del
disco) Disc Menu (Menú del disco).
Presione ENTER para confirmar su
selección.
3 Seleccione una de las siguientes opciones:
• Original (Original) - Seleccione esta
opción para escuchar el disco en el
idioma en que se grabó originalmente.
50
www.insignia-products.com
Page 51

Reproductor de DVD Insignia NS-1UCDVD
• Other (Otro) - Para seleccionar otro
• Off (Desactivado) - Seleccione esta
Idioma
Abkhaziano
Afar
Afrikaans
Albanés
Amárico
Árabe
Armenio
Asamés
Aymara
Azerí
Bashkir
Vasco
Bengalí;Bangla
Bhutaní
Bihari
Bretón
Búlgaro
Birmano
Bielorruso
Camboyano
Catalán
Chino
Corso
Croata
Checo
Danés
Holandés
Inglés
Esperanto
Estonio
Feroés
Fidji
Finlandés
Francés
Frisón
Gallego
Georgiano
Alemán
Griego
Groenlandés
Guaraní
idioma, presione los botones numéricos
correspondientes al código de idiomas de
4 dígitos en la tabla siguiente. Presione
ENTER para confirmar su selección o el
botón CLEAR (Borrar) para eliminarla.
opción para cancelar los subtítulos del
disco.
Códi
go
6566
6565
6570
8381
6577
6582
7289
6583
6588
6590
6665
6985
6678
6890
6672
6682
6671
7789
6669
7577
6765
9072
6779
7282
6783
6865
7876
6978
6979
6984
7079
7074
7073
7082
7089
7176
7565
6869
6976
7576
7178
Idioma
Gujarati
Hausa
Hebreo
Hindi
Húngaro
Islandés
Indonesio
Interlingua
Irlandés
Italiano
Japonés
Javanés
Kannada
Kashmiri
Kazaj
Kirghiz
Coreano
Curdo
Laosiano
Latín
Letón
Lingala
Lituano
Macedonio
Malgache
Malayo
Malayalam
Maltés
Maorí
Maratí
Moldavo
Mongol
Naurí
Nepalés
Noruego
Oriya
Punyabi
Pashto
Persa
Polaco
Portugués
Quechua
Códi
go
7185
7265
7387
7273
7285
7383
7378
7365
7165
7384
7465
7487
7578
7583
7575
7589
7579
7585
7679
7665
7686
7678
7684
7775
7771
7783
7776
7784
7773
7782
7779
7778
7865
7869
7879
7982
8065
8083
7065
8076
8084
8185
Idioma
RetoRomance
Rumano
Ruso
Samoano
Sánscrito
Escocés,
gaélico
Serbio
Serbo-Croata
Shona
Sindhi
Singalés
Eslovaco
Esloveno
Somalí
Español
Sudanés
Swahili
Sueco
Taga lo
Tayi c
Tami l
Tata r
Telu gu
Tailandés
Tibetano
Tigrinya
Ton ga
Tur co
Tur km en o
Twi
Ucraniano
Urdu
Uzbequiano
Vietnamita
Volapuk
Galés
Uolof
Xhosa
Yidish
Yoruba
Zulú
Códi
go
8277
8279
8285
8377
8365
7168
8382
8372
8378
8368
8373
8375
8376
8379
6983
8385
8387
8386
8476
8471
8465
8484
8469
8472
6679
8473
8479
8482
8475
8487
8575
8582
8590
8673
8679
6789
8779
8872
7473
8979
9085
5 Presione o para acceder a TV Aspect
(Relación de aspecto del TV). Presione
ENTER para confirmar su selección. Elija
una de las opciones siguientes y presione
ENTER para confirmar su selección.
• 4:3 - Seleccione esta opción cuando haya
conectado un TV de 4:3 al reproductor de
DVD.
• 16:9 - Seleccione esta opción cuando
haya conectado un TV de 16:9 de
anchura al reproductor de DVD.
Para seleccionar el modo de visualización:
1 En el menú Setup (Configuración),
seleccione DISPLAY (Visualización).
Presione ENTER (Entrar) para confirmar su
selección.
2 Presione o para acceder a Display
Mode (Modo de visualización). Presione
ENTER para confirmar su selección. El
ajuste del modo de visualización sólo
funciona cuando la relación de aspecto del
TV está configurada en 4:3.
3 Elija una de las opciones siguientes y
presione ENTER para confirmar su
selección.
• Letterbox - Seleccione esta opción para
mostrar una imagen panorámica con
bandas en las partes superior e inferior
de la pantalla.
• Panscan- Seleccione esta opción para
mostrar la imagen panorámica en toda la
pantalla. Las partes que no entren en la
pantalla se cortarán.
Selección de las opciones de audio
Cada disco DVD tiene un número de opciones
de entrada de audio. Configure las opciones de
audio del reproductor de DVD de acuerdo con el
tipo de sistema de audio que esté utilizando.
Selección de las opciones de visualización
El menú Display (Visualización) le permite
seleccionar una relación de aspecto para su TV
y el modo.
Para establecer una contraseña:
4 En el menú Setup (Configuración),
seleccione DISPLAY (Visualización).
Presione ENTER (Entrar) para confirmar su
selección.
www.insignia-products.com
Para configurar el audio:
1 En el menú Setup (Configuración),
seleccione AUDIO. Presione ENTER (Entrar)
para confirmar su selección.
51
Page 52

Reproductor de DVD Insignia NS-1UCDVD
2 Presione o para acceder a la opción de
audio deseada. Presione ENTER para
confirmar su selección. Seleccione la opción
según la tabla siguiente y presione ENTER
para confirmar su selección.
Elemento de
menú
Dolby Digital • Bitstream - Seleccione esta opción si
DTS • Bitstream - Seleccione esta opción si
MPEG • Bitstream - Seleccione esta opción si
Sample
Frequency
(Frecuencia de
muestreo)
DRC
(Compresión de
rango dinámico)
Vocal • ON - Seleccione esta opción cuando se
Información mostrada
conectó el conector DIGITAL OUT de
este reproductor a un amplificador o a
otro equipo con un decodificador
Dolby Digital, DTS o MPEG.
• PCM - Seleccione esta opción para
Dolby Digital o MPEG cuando el
reproductor está conectado a un
amplificador estéreo digital de dos
canales. Los DVD codificados en Dolby
Digital o MPEG se mezclarán
automáticamente a audio PCM de dos
canales.
conectó el conector DIGITAL OUT de
este reproductor a un amplificador o a
otro equipo con un decodificador
Dolby Digital, DTS o MPEG.
• Off - Seleccione esta opción si la señal
DTS no sale a través del conector
DIGITAL OUT de este reproductor.
conectó el conector DIGITAL OUT de
este reproductor a un amplificador o a
otro equipo con un decodificador
Dolby Digital, DTS o MPEG.
• PCM - Seleccione esta opción para
Dolby Digital o MPEG cuando el
reproductor está conectado a un
amplificador estéreo digital de dos
canales. Los DVD codificados en Dolby
Digital o MPEG se mezclarán
automáticamente a audio PCM de dos
canales.
• 48 kHz. - Seleccione esta opción si su
receptor o amplificador NO es capaz de
procesar señales de 96 kHz. Cuando se
selecciona esta opción, el reproductor
convierte automáticamente las señales
de 96 kHz a 48 kHz para que su
sistema pueda decodificarlas.
• 96 kHz. - Seleccione esta opción si su
receptor o amplificador es capaz de
procesar señales de 96 kHz.
Compruebe la documentación de su
amplificador para verificar sus capacidades.
• ON - Seleccione esta opción para
comprimir el rango dinámico de la
salida de audio (la diferencia entre los
sonidos fuertes y los suaves). Esto le
permite escuchar una película a un
volumen más bajo sin perder la
claridad del sonido.
• OFF - Seleccione esta opción para
escuchar el audio en la presentación
más exacta y realista.
esté reproduciendo un DVD con
karaoke multicanal. Los canales de
karaoke en el disco se mezclan a un
sonido estéreo normal.
• OFF - Seleccione esta opción cuando
se esté reproduciendo cualquier otro
tipo de audio.
Configuración del control de los padres
El menú del control de los padres le permite
bloquear la reproducción de discos DVD en
función de la clasificación de su contenido. No
todos los discos están clasificados.
El bloqueo está protegido por contraseña y las
normas de las clasificaciones están basadas en
el código del área.
Para configurar la contraseña:
1 En el menú Setup (Configuración),
seleccione LOCK (Bloqueo). Presione
ENTER (Entrar) para confirmar su selección.
Nota
La función de bloqueo se activa mediante
contraseña. Tiene que configurar una contraseña
para poder acceder a otras opciones. Sólo
necesita configurar la contraseña una vez, pero
puede cambiarla en cualquier momento.
2 Presione o para acceder a Password
(Contraseña). Presione para confirmar su
selección.
• En la línea de comandos, introduzca una
contraseña mediante el teclado numérico
del control remoto y presione ENTER
(Entrar).
• Vuelva a introducir la contraseña y
presione ENTER para confirmarla.
• Utilice el botón CLEAR (Borrar) si comete
un error.
3 Para cambiar una contraseña existente,
presione o para acceder a Change
(Cambiar). Presione ENTER para confirmar
su selección.
• En la línea de comandos, introduzca una
nueva contraseña mediante el teclado
numérico del control remoto y presione
ENTER.
• Vuelva a introducir la contraseña y
presione ENTER para confirmarla.
• Utilice el botón CLEAR si comete un
error.
4 Si olvida la contraseña, presione SETUP
para que aparezca el menú Setup
(Configuración) e introduzca 210499 para
borrar la contraseña anterior.
Para configurar la clasificación:
1 En el menú Setup (Configuración),
seleccione LOCK (Bloqueo). Presione
ENTER (Entrar) para confirmar su selección.
2 Presione o para acceder a Rating
(Clasificación). Presione para confirmar
su selección.
52
www.insignia-products.com
Page 53

Reproductor de DVD Insignia NS-1UCDVD
3 Como la función de bloqueo está protegida
mediante contraseña, debe configurar una
contraseña para poder acceder a otras
opciones. Al acceder a la opción de
clasificación, se le pedirá la contraseña.
Introduzca su contraseña o consulte la
page 13 para configurarla.
4 Presione o para seleccionar una
clasificación de 1 a 8 o para desbloquear el
control. Presione ENTER para confirmar su
selección.
• Clasificación 1-8 - La clasificación 1 es
la que más restricciones tiene y la
clasificación 8 la que menos restricciones
tiene.
• Unlock (Desbloquear) - Desbloquea el
control de los padres de manera que
todos los discos se puedan reproducir en
su totalidad.
Para configurar el código del área:
1 En el menú Setup (Configuración),
seleccione LOCK (Bloqueo). Presione
ENTER (Entrar) para confirmar su selección.
2 Presione o para acceder a Area Code
(Código de área). Presione para confirmar
su selección.
3 Como la función de bloqueo está protegida
mediante contraseña, debe configurar una
contraseña para poder acceder a otras
opciones. Al acceder a la opción del código
de área, se le pedirá su contraseña.
Introduzca su contraseña o consulte la
page 13 para configurarla.
4 Introduzca el código de área para el área
cuyas normas se utilizaron para clasificar el
DVD basándose en la tabla siguiente.
• Presione o para seleccionar la
primera letra y presione para confirmar
su selección.
• Presione o para seleccionar la
segunda letra y presione ENTER para
confirmar su selección.
Área
Afganistán
Argentina
Australia
Austria
Bélgica
Bután
Bolivia
Brasil
Cambodia
Canadá
Chile
China
Colombia
Congo
Costa Rica
Croacia
República Checa
Dinamarca
Ecuador
Egipto
El Salvador
Etiopía
Fidji
Finlandia
Francia
Alemania
Gran Bretaña
Grecia
Groenlandia
Islas Herd y Mcdonald
Hong Kong
Hungría
India
Indonesia
Israel
Italia
Jamaica
Japón
Kenia
Kuwait
Libia
Luxemburgo
Códi
Área
go
AF
Malasia
AR
Maldivas
AU
México
AT
Mónaco
BE
Mongolia
BT
Marruecos
BO
Nepal
BR
Países Bajos
KH
Antillas Neerlandesas
CA
Nueva Zelanda
CL
Nigeria
CN
Noruega
CO
Omán
CG
Pakistán
CR
Panamá
HR
Paraguay
CZ
Filipinas
DK
Polonia
EC
Portugal
EG
Rumania
SV
Federación Rusa
ET
Arabia Saudí
FJ
Senegal
FI
Singapur
FR
República Eslovaca
DE
Eslovenia
GB
Sudáfrica
GR
Corea del Sur
GL
España
HM
Sri Lanka
HK
Suecia
HU
Suiza
IN
Taiw án
ID
Tailandia
IL
Turquía
IT
Uganda
JM
Ucrania
JP
Estados Unidos
KE
Uruguay
KW
Uzbekistán
LY
Vietnam
LU
Zimbabwe
Selección de expansión del nivel negro
El menú Others (Otros) le permite seleccionar la
opción de expansión del nivel negro (BLE, por
sus siglas en inglés), esto es, la cantidad de
negro en las imágenes reproducidas, de
acuerdo con sus preferencias y con las
capacidades de su televisor o monitor.
Códi
go
MY
MV
MX
MC
MN
MA
NP
NL
AN
NZ
NG
NO
OM
PK
PA
PY
PH
PI
PT
RO
RU
SA
SN
SG
SK
SI
ZA
KR
ES
LK
SE
CH
TW
TH
TR
UG
UA
US
UY
UZ
VN
ZW
Para seleccionar BLE:
1 En el menú Setup (Configuración),
seleccione OTHERS (Otros). Presione
ENTER (Entrar) para confirmar su selección.
2 Presione para alternar entre las dos
opciones BLE y luego presione ENTER para
confirmar su selección.
www.insignia-products.com
53
Page 54

• On (Activado) - Escala de grises
expandida (corte de 0 IRE).
• Off (Desactivado) - Escala de grises
estándar (corte de 7.5 IRE).
Reproducción de discos de audio, MP3 o
WMA
MP3 y WMA son formatos para almacenar audio
digital. Una canción con calidad de CD de audio
se comprime en uno de estos formatos con muy
poca pérdida de la calidad del audio, al tiempo
que ocupa mucho menos espacio en el disco.
Los discos CD-R o CD-RW que están
codificados en el formato MP3 o WMA son
compatibles con este reproductor.
Al ser este reproductor de DVD compatible con
el formato de grabación de video (VR, por sus
siglas en inglés), usted puede crear sus propios
CD de audio y reproducirlos en este reproductor.
Sin embargo, al crear discos, siga estas pautas:
• Si graba archivos MP3 o WMA usando
software que no puede crear un sistema de
archivos (tal como Direct-CD), los archivos
no podrán escucharse en este reproductor.
El software (tal como Easy CD Creator) debe
crear una estructura de archivos ISO 9660.
• Los nombres de archivos tienen que tener un
máximo de ocho letras y deben incorporar la
extensión “.mp3” o “.wma”. Este reproductor
no puede leer un archivo MP3/WMA con una
extensión distinta a “.mp3” o “.wma”.
• Los nombres de los archivos no deben
contener letras especiales, tales como / ? * : “
< > l, etc.
• El número total de archivos en una carpeta
debe ser inferior a 1012 archivos.
Cuando se inserta un disco en el reproductor,
aparece la pantalla del menú. Puede usar la
pantalla del menú para seleccionar carpetas y
canciones.
Cuando reproduzca un archivo que contenga
información adicional, como el título de la
canción, el artista, el álbum, un comentario o el
género de música, puede ver dicha información
presionando el botón DISPLAY (Visualización).
Reproductor de DVD Insignia NS-1UCDVD
Para seleccionar carpetas y canciones:
1 Inserte un CD de audio o un disco que
contenga archivos MP3/WMA en la bandeja
y ciérrela. Aparece el menú del CD de audio
o el menú de música.
2 Presione los botones o para elegir la
carpeta de la lista de carpetas en el lado
izquierdo de la pantalla. Presione DVD
MENU (Menú del DVD) para pasar a la
siguiente página.
3 Presione ENTER (Entrar) para seleccionar la
carpeta resaltada. Se muestra la lista de las
canciones disponibles dentro de la carpeta.
4 Utilice los botones o para escoger una
pista o canción de la lista en el lado izquierdo
de la pantalla. Presione DVD MENU para
pasar a la siguiente página.
5 Presione PLAY (Reproducir) o el botón
ENTER para seleccionar y empezar la
reproducción de la pista o canción resaltada.
Uso de la opción de reproducción
programada
La función de programación en este reproductor
de DVD le permite almacenar sus canciones
favoritas de un CD de audio o sus archivos MP3
o WMA favoritos de un disco insertado en el
reproductor a la memoria de almacenamiento
para reproducirlos más tarde en un orden
determinado. Se pueden programar hasta 30
pistas.
54
Para programar pistas:
1 Inserte un CD de audio o un disco que
contenga archivos MP3/WMA en la bandeja
y ciérrela. Aparece el menú del CD de audio
o el menú de música.
2 Presione PROGRAM (Programa) en el
control remoto. Aparece el icono en la
pantalla. Presione PROGRAM otra vez para
salir del modo de edición de programa; el
símbolo desaparece de la pantall.
3 Mientras está en el modo de edición de
programa, seleccione una canción o pista, y
luego presione ENTER (Entrar) para guardar
la canción o pista seleccionada en la
memoria.
4 Repita estos pasos para almacenar hasta 30
canciones o pistas en la memoria.
www.insignia-products.com
Page 55

Reproductor de DVD Insignia NS-1UCDVD
5 Utilice los botones / / / para
resaltar la canción o pista programada que
desea reproducir primero en su lista de
reproducción y luego presione PLAY
(Reproducir) o el botón ENTER para
empezar a reproducirlas.
• La reproducción comienza en el orden en
que programó las canciones o pistas.
• La reproducción se detiene después de
que todas las canciones o pistas en la
lista programada se han reproducido una
vez.
6 Para reanudar la reproducción normal,
seleccione una de las pistas de la lista y
presione PLAY.
Para volver a reproducir las pistas
programadas:
1 Pulse el botón REPEAT (Repetir) para
mostrar una pantalla que ofrece tres posibles
opciones de repetición:
• Track (Pista) - Repite la pista que se está
reproduciendo en ese momento.
• All (Todas) - Repite todas las pistas de la
lista de programación.
• Off (Sin indicador) - Cancela la repetición.
2 Seleccione una de las dos primeras opciones
para repetir la lista programada. Seleccione
la opción Off para cancelar la lista
programada. También puede presionar el
botón SKIP (Saltar) una vez durante la
reproducción de una pista para cancelar la
repetición.
Para borrar pistas programadas:
1 Detenga la reproducción y luego presione
PROGRAM (Programa) en el control remoto.
Aparece el icono en la pantalla.
2 Utilice los botones / / / para
resaltar la canción o pista programada que
desea borrar de su lista de reproducción
programadas y luego presione CLEAR
(Borrar) o el botón para eliminar la canción o
pista de la lista.
3 Repita este procedimiento para borrar otras
canciones o pistas de la memoria.
Si está utilizando un disco que también contiene
archivos de audio, puede también escuchar
archivos de música mientras ve las imágenes
del disco. Programe la música que desea
escuchar siguiendo las instrucciones descritas
en el apartado “Playing audio, MP3, or WMA
discs” y luego utilice el procedimiento siguiente
para ver las imágenes.
Como este reproductor de DVD es compatible
con el formato de grabación de video (VR, por
sus siglas en inglés), usted puede crear y
reproducir en él sus propios CD de imágenes.
Sin embargo, al crear discos, siga estas pautas:
• Si graba imágenes usando software que no
puede crear un sistema de archivos (tal
como Direct-CD), los archivos no podrán
escucharse en este reproductor. El software
(tal como Easy CD Creator) debe crear una
estructura de archivos ISO 9660.
• Los nombres de archivos tienen que tener un
máximo de ocho letras y deben incorporar la
extensión “.jpg”. Este reproductor no puede
leer un archivo que tenga otra extensión que
no sea “.jpg”, por lo que es necesario
cambiar el nombre a los archivos JPEG con
otras extensiones antes de grabarlos en un
disco.
• Los nombres de los archivos no deben
contener letras especiales, tales como / ? * : “
< > l etc.
• El número total de archivos en una carpeta
debe ser inferior a 1012 archivos.
Cuando se inserta un disco en el reproductor,
aparece la pantalla del menú. Puede usar la
pantalla del menú para seleccionar carpetas e
imágenes. Dependiendo del tamaño y del
número de archivos JPEG, el reproductor puede
tardar cierto tiempo en mostrar el contenido de
las carpetas. Si el contenido de las carpetas no
aparece después de unos minutos, algunos de
los archivos podrían ser demasiado grandes.
Reduzca la resolución de los archivos JPEG a
menos de cinco millones de píxeles y grábelos
en otro disco.
Para borrar la lista de reproducción
programada:
1 Detenga la reproducción y luego presione
PROGRAM (Programa) en el control remoto.
Aparece el icono en la pantalla.
2 Utilice los botones / / / para
seleccionar la opción CLEAR ALL (Borrar
todo) y luego presione ENTER (Entrar). Se
borra toda la lista de reproducción.
3 Al apagarse el reproductor de DVD o al
extraer el disco de la bandeja también se
borra la lista de reproducción.
Visualización de imágenes
Este reproductor de DVD tiene también la
capacidad de mostrar imágenes que se han
grabado en un formato JPEG.
Para seleccionar carpetas e imágenes:
1 Presione los botones o para elegir la
carpeta de la lista de carpetas en el lado
izquierdo de la pantalla. Presione DVD
MENU (Menú del DVD) para pasar a la
siguiente página.
2 Presione ENTER (Entrar) para seleccionar la
carpeta resaltada. Aparece la lista de las
imágenes disponibles en esa carpeta.
www.insignia-products.com
55
Page 56

Reproductor de DVD Insignia NS-1UCDVD
Para regresar a la lista de carpetas vista
anteriormente mientras ve una lista de
archivos, utilice el botón o para resaltar
el botón y presione ENTER (Entrar)
Para ver imágenes:
1 Utilice el botón o para ver una imagen
de la lista. Presione PLAY (Reproducir) o el
botón ENTER para seleccionarla. Presione
STOP (Detener) para regresar al menú de
fotografías.
• Presione SKIP (Saltar) (hacia delante o
hacia atrás) o el botón SCAN (Barrido)
(hacia delante o hacia atrás) una vez para
avanzar a la imagen siguiente o
retroceder a la imagen anterior.
• En la pantalla aparece un menú de ayuda
cuando se están viendo archivos JPEG.
Para ocultar el archivo de ayuda, presione
RETURN (Atrás). Si la resolución de la
pantalla del TV está configurada en 720p
o 1080i, el menú de ayuda no aparece.
• Presione ZOOM (Aumento) para ampliar
hasta tres veces la imagen JPEG.
• Utilice el botón o para ver imágenes
mientras está en el modo de aumento. La
característica de zoom no está disponible
cuando la resolución en la pantalla del TV
está configurada en 720p o 1080i.
• Utilice el botón o para girar la
imagen en la pantalla ya sea en el sentido
de las agujas del reloj o en el sentido
contrario.
2 Para ver las imágenes como una
presentación de diapositivas, utilice los
botones / / / para resaltar el
icono en la pantalla y presione ENTER
(Entrar).
• Hay tres opciones para la velocidad de la
presentación de diapositivas: rápida
(>>>), normal (>>) y lenta (>).
• Utilice los botones / / / para
resaltar el icono en la pantalla y
presione ENTER.
• Presione o para seleccionar la
velocidad deseada y presione ENTER.
3 Presione PAUSE/STEP (Pausa/Paso) para
parar momentáneamente la presentación de
diapositivas. Presione PAUSE/STEP otra vez
o el botón PLAY (Reproducir) para reanudar
la presentación de diapositivas.
Mantenimiento
Limpieza del reproductor
2 Utilice un paño húmedo o un paño limpiador
de plásticos desechable para limpiar la caja.
Consejos para el reproductor de DVD
Con el transcurso del tiempo, se puede
acumular polvo en los componentes ópticos o se
puede formar una película muy delgada sobre
ellos. Esto puede impedir que el láser lea el
DVD.
Dependiendo del entorno de operación, se
recomienda llevar a cabo una inspección y
mantenimiento regular cada 1000 horas de uso.
Para limpiar los componentes ópticos:
1 Desconecte el reproductor del tomacorriente.
2 Use un soplador/brocha para soplar el lente
para remover el polvo o suciedad seca.
Manejo de los discos
No toque el lado de reproducción del disco.
Sostenga el disco por las orillas para que las
huellas digitales no se marquen en la superficie.
Nunca pegue papel o cinta adhesiva en el disco.
Almacenamiento de los discos
Después de reproducir un disco, guárdelo en su
estuche.
No exponga el disco a la luz directa del sol ni a
fuentes de calor y nunca lo deje dentro de un
automóvil aparcado expuesto a la luz directa del
sol, ya que se puede volver muy caliente dentro
del automóvil.
Limpieza de los discos
Las huellas digitales y el polvo en el disco
pueden deteriorar el sonido. Antes de utilizar un
disco, límpielo con un paño limpio. Pase el paño
desde el centro hacia fuera.
Esto No esto
No utilice solventes fuertes como alcohol,
benceno, diluyente, limpiadores de venta en
comercios o spray antiestático para uso con los
antiguos discos de vinilo.
Cuidado
Nunca use limpiadores cáusticos. Los solventes, alcoholes,
disolventes de pintura o líquidos limpiadores similares pueden
dañar la caja.
No deje productos de hule o plástico en contacto con la unidad
por un período de tiempo prolongado. Estos productos pueden
dejar marcas en la caja.
No use líquidos inflamables, como insecticidas de aerosol,
cerca del reproductor de DVD. Algunos líquidos son
probablemente volátiles.
Para limpiar la caja:
1 Desconecte el reproductor del tomacorriente.
56
www.insignia-products.com
Page 57

Reproductor de DVD Insignia NS-1UCDVD
Localización y corrección
de fallas
Problema Solución
La unidad no enciende. Asegúrese de que el cable de
El reproductor de DVD está
encendido, pero no funciona.
No hay imagen. • Asegúrese de que todos
No hay sonido o el sonido está
distorsionado.
No puede hacer avanzar la
película.
La imagen está distorsionada. • El disco puede estar
El control remoto no funciona
correctamente o el sensor de
infrarrojos no reacciona.
alimentación esté enchufado
firmemente en el tomacorriente
de la pared.
• Inserte un disco con el
lado de la etiqueta hacia
arriba.
• Verifique el tipo de disco
que está en la bandeja de
discos. Este reproductor
sólo reproduce discos
DVD, CD de audio, MP3, y
WMA.
los aparatos estén
encendidos.
• Asegúrese de que esté
seleccionado el modo de
entrada de video correcto
en el televisor.
• Asegúrese de que todos
los cables estén
insertados firmemente en
sus conectores
apropiados.
• Asegúrese de que esté
seleccionado el modo de
entrada correcto del
receptor de audio.
• Asegúrese de que todos
los cables estén
insertados firmemente en
sus conectores
apropiados.
• Asegúrese de que todos
los aparatos estén
encendidos.
• Asegúrese de que la
opción AUDIO esté en la
posición correcta y
presionePOWER
(Encendido/Apagado) otra
vez para encender el
reproductor de DVD.
No se puede avanzar durante los
créditos y la información de
advertencia que aparecen al
principio de la película porque el
disco esta programado para
prohibir ese tipo de acción.
dañado. Pruebe con otro
disco.
• Es normal que se
produzca cierta distorsión
durante la búsqueda hacia
delante o atrás.
• Verifique que las pilas en
el control remoto son
nuevas.
• Verifique que el sensor del
control remoto no está
obstruido.
• Verifique que el
transmisor infrarrojo está
apuntado directamente al
sensor infrarrojo, y que
está dentro de 10 pies
(9,1 m) del sensor.
Problema Solución
La reproducción comienza pero
luego se detiene
inmediatamente.
• Tanto el reproductor como
el disco están codificados
por región. Si los códigos
regionales no son iguales,
el disco no podrá
reproducirse.
• Hay un bloqueo de los
padres en el reproductor
de DVD que impide que se
reproduzcan discos DVD
con una clasificación
inaceptable.
• El disco está sucio.
Límpielo.
• Se ha formado
condensación. Permita
que el reproductor se
seque.
Especificaciones
Nota
Estas especificaciones están sujetas a cambio sin previo aviso
ni obligación.
General:
Requisitos de alimentación: . . . . . 120 V CA, 60 Hz
Consumo de potencia: . . . . . . . . . . . . . . . . . . . 8 W
Dimensiones (A x P x Al): . 17 x 1.4 x 7.9 pulgadas
. . . . . . . . . . . . . . . . . . . . . . . . (430 x 35 x 202 mm)
Peso: . . . . . . . . . . . . . . . . . . . . . . . . .3.5 lb (1.6 kg)
Temperatura en funcionamiento:41~95 °F (5~35 °C)
Humedad en funcionamiento: . . . . . . . . . . . 5~90%
Discos compatibles: . . . . . . . . .DVD/CD/MP3/WMA
Tipo de pilas: . . . . . . . . . . . . . . . . . . . . . . . . . . AAA
Salidas:
VIDEO OUT: . . . . . . . . . . . 1.0 V (P-P), 75 ohmios
(sinc. negativa, conector RCA x 1)
S-VIDEO OUT (Y):. . . . . . . 1.0 V (P-P), 75 ohmios
(sinc. negativa, Mini DIN 4 terminales x 1)
S-VIDEO OUT (C):. . . . . . . 0.3 V (P-P), 75 ohmios
COMPONENT VIDEO OUT: . . . . . . . . . . . . . . . . . .
(Pb y Pr): 0.7 V (P-P), 75 ohmios
AUDIO OUT: . . 2.0 Vms (1kHz, 0 dB), 600 ohmios
1)
DIGITAL OUT (COAXIAL): 0.5 V (P-P), 75 ohmios
DIGITAL OUT (ÓPTICO):. . 3.0 V (P-P), 75 ohmios
1)
Sistema:
Sistema de señales:. . . . . . . . . . . . . . . . . . . .NTSC
Láser: . . . . . . . . . . . . . . . . . . . Láser semiconductor
Respuesta en frecuencia: . . . . . . . . . . . . . . . . . . . .
(PCM 96 kHz):. . . . . . . . . . . . . . . . 8 Hz a 44 kHz
(PCM 48 kHz):. . . . . . . . . . . . . . . . 8 Hz a 22 kHz
(CD): . . . . . . . . . . . . . . . . . . . . . . . 8 Hz a 20 kHz
Distorsión armónica: . . . . . . . . . . Menos de 0.02%
Rango dinámico: . . . . . . . . . . . . . Mejor que 95 dB
Relación de señal a ruido: . . . . . . Mejor que 90 dB
(sólo conectores ANALOG OUT)
(Y): 1.0 V (P-P), 75 ohmios
(sinc. negativa, conector RCA x 1)
(conector RCA x
2)
(conector RCA (I,D) x
(conector RCA x
1)
(conector óptico x
www.insignia-products.com
57
Page 58

Avisos Legales
FCC
Advertencia
Este equipo podría generar o usar energía de radiofrecuencia.
Los cambios o modificaciones que se realicen a este equipo
podrían causar interferencia perjudicial a menos que las
modificaciones estén expresamente autorizadas en este
manual. El usuario podría perder la autoridad de operar este
equipo si se realiza un cambio o modificación no autorizada.
Información reglamentaria: FCC Parte 15
Este equipo ha sido sometido a pruebas y se ha determinado
que satisface los límites establecidos para clasificarlo cómo
dispositivo digital de Clase B de acuerdo con la Parte 15 del
reglamento FCC. Estos límites están diseñados para
proporcionar una protección razonable contra interferencias
dañinas cuando el reproductor de DVD funciona en un
ambiente residencial. Este reproductor de DVD genera, utiliza
y puede irradiar energía de radiofrecuencia y, si no es
instalado y utilizado de acuerdo a las instrucciones, puede
causar interferencias perjudiciales en las comunicaciones de
radio. Sin embargo, no se garantiza que no ocurrirá
interferencia en una instalación particular. Si este reproductor
de DVD causa interferencias perjudiciales en la recepción de
la señal de radio o televisión, lo cual puede comprobarse
encendiendo y apagando el reproductor alternativamente, se
recomienda al usuario corregir la interferencia mediante uno
de los siguientes procedimientos:
• Cambie la orientación o la ubicación de la antena
receptora.
• Aumente la distancia entre el reproductor de DVD y el
receptor.
• Conecte el reproductor de DVD a un tomacorriente de un
circuito distinto de aquel al que esta conectado el receptor.
• Solicite consejo al distribuidor o a un técnico experto en
radio/TV para obtener ayuda.
Reproductor de DVD Insignia NS-1UCDVD
Macrovision
Este producto incorpora tecnología de protección de derechos
de autor protegida por demandas de método de ciertas
patentes de los Estados Unidos y otros derechos de
propiedad intelectual poseídos por Macrovision Corporation y
otros dueños de los derechos.
El uso de esta tecnología con protección de derechos de autor
debe ser autorizada por Macrovision Corporation, y está
destinada únicamente para visualización en casa y otros usos
limitados de visualización a menos que sea autorizada por
Macrovision Corporation. Se prohíbe la ingeniería inversa y el
desensamblaje.
Este aparato esta protegido por las patentes de EE.UU. núm.
4,631,603; 4,577,216; 4,819,098 y 4,907,093 con licencia
únicamente para usos limitados.
Derechos de reproducción
© 2007 Insignia. Insignia y el logotipo de Insignia son
marcas de comercio de Best Buy Enterprise Services,
Inc. Otras marcas y nombres de productos son marcas
comerciales o marcas registradas de sus dueños
respectivos. Las especificaciones y características
están sujetas a cambio sin aviso previo u obligación.
58
www.insignia-products.com
Page 59

Reproductor de DVD Insignia NS-1UCDVD
Garantía
Garantía limitada de 90 días
Insignia Products (“Insignia”) le garantiza a usted, el
comprador original de este nuevo NS-1UCDVD
(“Producto”), que éste se encontrará libre de defectos de
material o de mano de obra en su fabricación original
por un período de 90 (noventa) días a partir de la fecha
de compra del Producto (“Período de Garantía”). Este
producto debe ser comprado en un distribuidor
autorizado de productos de la marca Insignia y
empacado con esta declaración de garantía. Esta
garantía no cubre Productos reacondicionados. Si
notifica a Insignia durante el Período de Garantía sobre
un defecto cubierto por esta garantía que requiere
reparación, los términos de esta garantía se aplican.
¿CUÁNTO DURA LA GARANTÍA?
El Período de Garantía dura por 90 (noventa) días a
partir de la fecha en que compró el Producto. La fecha
de compra se encuentra impresa en el recibo que recibió
con el Producto.
¿QUÉ ES LO QUE CUBRE ESTA GARANTÍA?
Durante el Período de Garantía, si un centro de
reparación autorizado de Insignia concluye que la
fabricación original del material o la mano de obra del
Producto se encuentran defectuosos, Insignia (cómo su
opción exclusiva): (1) reparará el Producto con
repuestos nuevos o reacondicionados; o (2)
reemplazará el Producto sin cargo con uno nuevo o con
uno reacondicionado con repuestos equivalentes. Los
Productos y repuestos reemplazados bajo esta garantía
se volverán propiedad de Insignia y no se le regresarán
a usted. Si se requiere la reparación de Productos o
partes después de que se vence el Período de Garantía,
usted deberá pagar todos los costos de mano de obra y
de repuestos. Esta garantía estará vigente con tal que
usted sea el dueño de su Producto Insignia durante el
periodo de garantía. El alcance de la garantía se termina
si usted vende o transfiere el Producto.
¿CÓMO SE OBTIENE LA REPARACIÓN DE GARANTÍA?
Si ha comprado el Producto en una tienda de ventas,
lleve su recibo original y el Producto a la tienda en
donde lo compró. Asegúrese de que vuelva a colocar el
Producto en su empaque original o en un empaque que
provea la misma protección que el original. Si compró el
Producto en un sitio Web, envíe por correo su recibo
original y el Producto a la dirección postal listada en el
sitio Web. Asegúrese de colocar el Producto en su
empaque original o en un empaque que provea la
misma protección que el original.
Para obtener el servicio de garantía a domicilio para un
televisor con pantalla de 25” o más, llame al
1-888-BESTBUY. El soporte técnico diagnosticará y
corregirá el problema por teléfono o enviará un técnico
certificado por Insignia a su casa.
¿EN DÓNDE ES VÁLIDA LA GARANTÍA?
Esta garantía sólo es válida al comprador original del
Producto en los Estados Unidos y en Canadá.
¿QUÉ ES LO QUE NO CUBRE LA GARANTÍA?
Esta garantía no cubre:
• Formación del cliente
• Instalación
• Ajuste de configuración
• Daños cosméticos
• Daños debido a actos de la naturaleza, tal cómo
rayos
• Accidentes
• Mal uso
• Abuso
• Negligencia
• Uso comercial
• Modificación de alguna parte del Producto,
incluyendo la antena
• Un panel de pantalla de plasma dañado por la
persistencia de imágenes estáticas (sin
movimiento), mostradas por periodos de tiempo
extendido (efecto “burn-in”).
Esta garantía tampoco cubre:
• Daño debido al uso o mantenimiento incorrecto
• La conexión a una fuente de voltaje incorrecta
• El intento de reparación por alguien que no sea una
compañía autorizada por Insignia para reparar el
Producto
• Productos vendidos tal cual (en el estado en que se
encuentran) o con todas sus fallas
• Productos consumibles, tal cómo fusibles o
baterías
• Productos en los cuales el número de serie
asignado en la fábrica ha sido alterado o removido.
LA REPARACIÓN O REEMPLAZO SEGÚN LO
PROVISTO BAJO ESTA GARANTÍA ES SU ÚNICO
RECURSO. INSIGNIA NO SERÁ RESPONSABLE POR
DAÑOS INCIDENTALES O CONSECUENTES DEBIDO
AL INCUMPLIMIENTO DE CUALQUIER GARANTÍA
EXPRESA O IMPLÍCITA RELACIONADA CON ESTE
PRODUCTO, INCLUYENDO, PERO SIN LIMITARSE A
ELLO, PÉRDIDA DE DATOS, IMPOSIBILIDAD DE USO
DE SU PRODUCTO, PÉRDIDA DE NEGOCIO O
LUCRO CESANTE. INSIGNIA NO CONCEDE
NINGUNA OTRA GARANTÍA EXPRESA CON
RESPECTO AL PRODUCTO; TODAS LAS GARANTÍAS
EXPRESAS E IMPLÍCITAS DE ESTE PRODUCTO,
INCLUYENDO PERO SIN LIMITARSE A, CUALQUIER
GARANTÍA IMPLÍCITA DE O CONDICIONES DE
COMERCIALIZACIÓN O IDONEIDAD PARA UN USO
PARTICULAR, ESTÁN LIMITADAS EN DURACIÓN AL
PERÍODO DE GARANTÍA DECLARADO
ANTERIORMENTE Y NINGUNA GARANTÍA YA SEA
EXPRESA O IMPLÍCITA SE APLICARÁ DESPUÉS DEL
PERÍODO DE GARANTÍA. ALGUNOS ESTADOS,
PROVINCIAS Y JURISDICCIONES NO PERMITEN
RESTRICCIONES EN CUANTO A LA DURACIÓN DE
UNA GARANTÍA IMPLÍCITA, ASÍ QUE LA
RESTRICCIÓN ANTERIOR PUEDE NO APLICARSE
EN SU CASO. ESTA GARANTÍA LE DA DERECHOS
LEGALES ESPECÍFICOS, Y USTED PUEDE POSEER
OTROS DERECHOS QUE VARÍAN DE ESTADO A
ESTADO, O PROVINCIA A PROVINCIA.
Comuníquese con Insignia:
Para servicio al cliente favor llamar al 1-877-467-4289
www.insignia-products.com
INSIGNIA™ es una marca comercial de Best Buy
Enterprise Services, Inc.
Distribuido por Best Buy Purchasing, LLC.
Insignia, 7601 Penn Avenue South, Richfield, Minnesota,
U.S.A.
www.insignia-products.com
59
Page 60

Reproductor de DVD Insignia NS-1UCDVD
60
www.insignia-products.com
Page 61

Reproductor de DVD Insignia NS-1UCDVD
www.insignia-products.com
61
Page 62

Distributed by Insignia™ Products
Distribué par Insignia™ Products
Distribuido por Insignia™ Products
7601 Penn Avenue South
Richfield, MN USA 55423-3645
www.Insignia-Products.com
© 2007 Insignia™ Products
All rights reserved. All other products and brand names are trademarks of their respective owners.
© 2007 produits Insignia™
Tous droits réservés. Tous les autres produits ou noms de marques sont des marques de commerce qui appartiennent à leurs propriétaires respectifs.
© 2007 productos Insignia™
Todos los derechos reservados. Todos los demás productos y marcas son marcas comerciales de sus respectivos dueños.
R1
 Loading...