


Dial-up
EFTPOS Merchant
Operating Guide

Phone Numbers
THE FOLLOWING HELP DESK’S AND AUTHORISATION CENTRE’S ARE AVAILABLE
TO YOU 24 HOURS A DAY, 7 DAYS A WEEK.
Bank of Melbourne Electronic Banking Service Centre
Service and Sales Support Help Desk
(including stationery orders).
Touch© Help Desk
For General Touch© Enquiries.
Authorisations - For Fall Back Purposes Only.
Cardlink Authorisation Centre
(credit cards only).
EFTPOS Help Desk (debit cards only). 1300 603 266
American Express® Authorisations 1300 363 614
Diners Club® Authorisations
1300 301 831
1800 331 112
JCB Authorisations 1300 363 614
Merchant details
Please complete the details below for your merchant facility.
Trading name:
Merchant number:
1300 603 266
1300 305 066
Terminal number(s):
American Express® is a registered trademark of American Express Company.
Diners Club® is the registered trademark of Diners Club International Limited.
© Copyright Touch Networks
Dial-up EFTPOS Merchant Operating Guide - May 2011

Contents page
1.0 Introduction 2
1.1 Merchant Responsibility
for Equipment and
Materials Provided 2
1.2 Cancellation of Facility
3
1.3 Damaged, Lost or Stolen
Equipment
1.4 Merchant Receipts
2.0 Getting Started
2.1 i5100 EFTPOS
2.2 Keyboard Layout
2.3 Connecting the Terminal
3
3
5
5
6
7
2.4 Printer and Paper Load
Function
3.0 Passwords and Codes
3.1 Refund password
3.2 Settlement password
3.3 Void password
3.4 Terminal password
3.5 User Management Code
4.0 Procedures
4.1 Inserting a Chip Card
9
10
10
10
10
10
11
12
12
4.2 Swiping a Magnetic
Stripe Card
4.3 Operating Training Mode
13
13
4.4 Locking/Unlocking
Terminal Keyboard
5.0 Transaction Procedures
5.1 How to Process a Sale
14
18
16
5.2 How to Process a Cash
Only Transaction
5.3 How to Process a Refund
5.4 How to Void a Transaction
22
22
24
5.5 How to Process a
Sale with Tip
26
5.6 How to Process a
Tip Adjustment
28
5.7 How to Process Multiple
Tip Adjustments
32
5.8 How to Process a Mail/
Telephone Order/
e-Commerce transaction
33
5.9 How to Process a
Pre-Authorisation
36
5.10 How to Process
a Checkout
38
6.0 How to Operate
User Management
(Shift) Function
41
6.1 How to Activate/
Deactivate User
Management (Shi) mode
6.2 How to Set User ID’s
6.3 How to Start Shift
6.4 How to End Shift
7.0 Reporting Functions
42
43
43
45
7.1 How to Print Sub
Totals Report
7.2 Terminal Settlement
45
47
7.3 How to Reprint
Last Settlement
7.4 Tip Reporting
49
49
7.5 How to Print Tip Report
7.6 How to Reprint
Last Transaction
52
7.7 How to do a
Transaction Scroll
53
7.8 How to View
Specific Transaction
54
7.9 How to Reprint
Specific Transaction
55
7.10 How to Print
Transaction Log
55
8.0 Fall Back
Sales Procedures
8.1 Electronic Fall Back
8.2 Manual Fall Back
9.0 Interfaced EFTPOS
10.0 Minimising Fraud
10.1 CCV Security Codes
11.0 Trouble Shooting
11.1 Hardware Faults
11.2 Response Codes
12.0 Glossary
67
57
57
58
59
60
60
62
62
63
41
50
Dial-up EFTPOS Merchant Operating Guide – May 2011
1

1.0 Introduction
The Ingenico EFTPOS terminal enables online transactions to be processed for
Debit Cards (Savings and Cheque accounts), Credit Cards (Visa and MasterCard®)
and Charge Cards (American Express®, Diners Club® and JCB). To accept Charge
Card transactions please contact the Charge Card provider.
The features of the EFTPOS terminal include:
Process Purchases
•
Process Refunds
•
Process Voids
•
Process Mail/Telephone Order Transactions
•
Process Cash Out Transactions for Debit Cards
•
Process Pre-Authorisation and Checkout Transactions
•
Process Tips
•
Shift Management and Reporting
•
Tip Management and Reporting
•
1.1 Merchant Responsibility for Equipment and Materials Provided
Imprinters, terminals, any other hardware or equipment and any unused
stationery and promotional materials supplied by the Bank, remain the property
of the Bank.
You must not sell, assign or in any way encumber them.
•
You shall not part with possession of them to a third party or give access
•
to a third party.
You must ensure that the terminals are covered by your business
•
or contents insurance.
Terminals must not be relocated without prior authorisation.
Terminals must be located where customers can use the pinpad without the risk
of other people seeing them key in their PIN.
MasterCard® is a registered trademark of MasterCard International Incorporated.
Dial-up EFTPOS Merchant Operating Guide – May 2011
2

1.2 Cancellation of Facility
If your merchant facility is cancelled for any reason, this equipment and
materials must be returned to us. To make arrangements for return call the
EFTPOS Helpdesk on 1300 603 266. You must ensure that all equipment and
materials are available to be returned within ive business days of our request.
Fees and charges will continue to be incurred until the equipment is returned to
the bank as instructed.
1.3 Damaged, Lost or Stolen Equipment
You are responsible for your equipment. If equipment is damaged, lost or stolen,
you will be charged for their replacement.
1.4 Merchant Receipts
You must retain all merchant receipts printed in a secure manner for
reconciliation and in case of terminal failure.
You must provide the customer with a receipt unless he or she
requests otherwise.
1.5 EFTPOS Stationery
All items of stationery relating to your EFTPOS terminal and fall back procedures
can be ordered by phone or online on the internet.
Please place your orders before running your stocks too low. Orders will
be delivered to you within ive business days.
There are no additional fees for stationery supplies.
Ordering Stationery Online
Log on to http://www.bankofmelbourne.com.au/business/payment-solutions
to order stationery online. Select ‘Order Merchant Stationery’ from the menu
on the left of the page, which will direct you to the stationery order page on the
Bank of Melbourne website and enter the following details:
* Merchant Number (MID)
* Trading Address Postcode
then:
* Select your stationery items and quantities and follow the prompts.
Dial-up EFTPOS Merchant Operating Guide – May 2011
3

Ordering Stationery By Phone
Call the EFTPOS Helpdesk on 1300 603 266 (available 24/7). Follow the prompts
and use your phone keypad to enter the following details:
* Select your stationery items and quantities
then:
* Merchant Number (MID)
* Trading Address Postcode
Dial-up EFTPOS Merchant Operating Guide – May 2011
4

2.0 Getting Started
2.1 i5100 EFTPOS
The i5100 EFTPOS terminal is a complete unit that includes a terminal, a detachable
power supply and a telephone cable. The terminal also operates as a PIN Pad for
the customer and has an internal thermal printer for fast, quiet printing.
Dial-up EFTPOS Merchant Operating Guide – May 2011
5

2.2 Keyboard Layout
3
def
6
mno
9
wxy
2
abc
5
jkl
8
tuv
1
Q Z
4
ghi
7
pqr
Cancel
Clear
E
N
T
E
R
0
Func
Feed
CHQSAV
CR
(Soft Function Keys)
CHQ/ SAV
CREDIT
(Soft Function Key)
Cancel Key
Clear Key
Enter Key
Paper Feed Key
Function key
Account keys: The CHQ (Cheque), SAV (Savings) and CR (Credit) keys (also
referred to as Soft Function Keys) allow the user to access the
particular account type required when prompted. These keys are
also used to access the terminal function menus.
Paper feed: The FEED key performs a 20mm paper feed.
Cancel key: The CANCEL key is used to cancel the current function and return
the terminal to the idle state.
Clear key: The CLEAR key is used to correct any invalid data entered. It is also
used to cycle backwards through the transaction steps if an error is
made.
Enter key: The ENTER key is used to conirm data entered or displayed, and to
cycle forwards through the menus. It is also used to Power on the
terminal.
Function Key: The FUNCTION key is used to access the terminal functions.
Dial-up EFTPOS Merchant Operating Guide – May 2011
6

2.3 Connecting the Terminal
Plug
It
Cable Management Clip
Telephone Line
(RJ12)
COM Port 1
(RJ12)
Power Socket
COM Port 2
(RJ12)
Ethernet Socket
(RJ45)
Dial-up EFTPOS Merchant Operating Guide – May 2011
7

1. Place the terminal on a clear, lat surface close to an electrical socket and
telephone socket. The connectors are located on the underneath of the terminal
as shown.
2. Plug the RJ12 phone connector on the curly end of the Y powered curly cord into
the socket marked
.
3. Plug the opposite end of the RJ12 curly cord into the telephone cable adaptor,
which inserts into the telephone wall socket.
4. Plug the DC connector on the curly end of the Y powered curly cord into the
terminal’s power socket.
5. Plug the opposite ends DC connector into the terminal power supply.
6. Connect the power cord to the terminal power supply and then into a mains
power outlet.
Y Powered Curly Cord
CAB321359b
Dial-up EFTPOS Merchant Operating Guide – May 2011
8
Terminal Connections
ALI0142
Power Cord
CAB0092
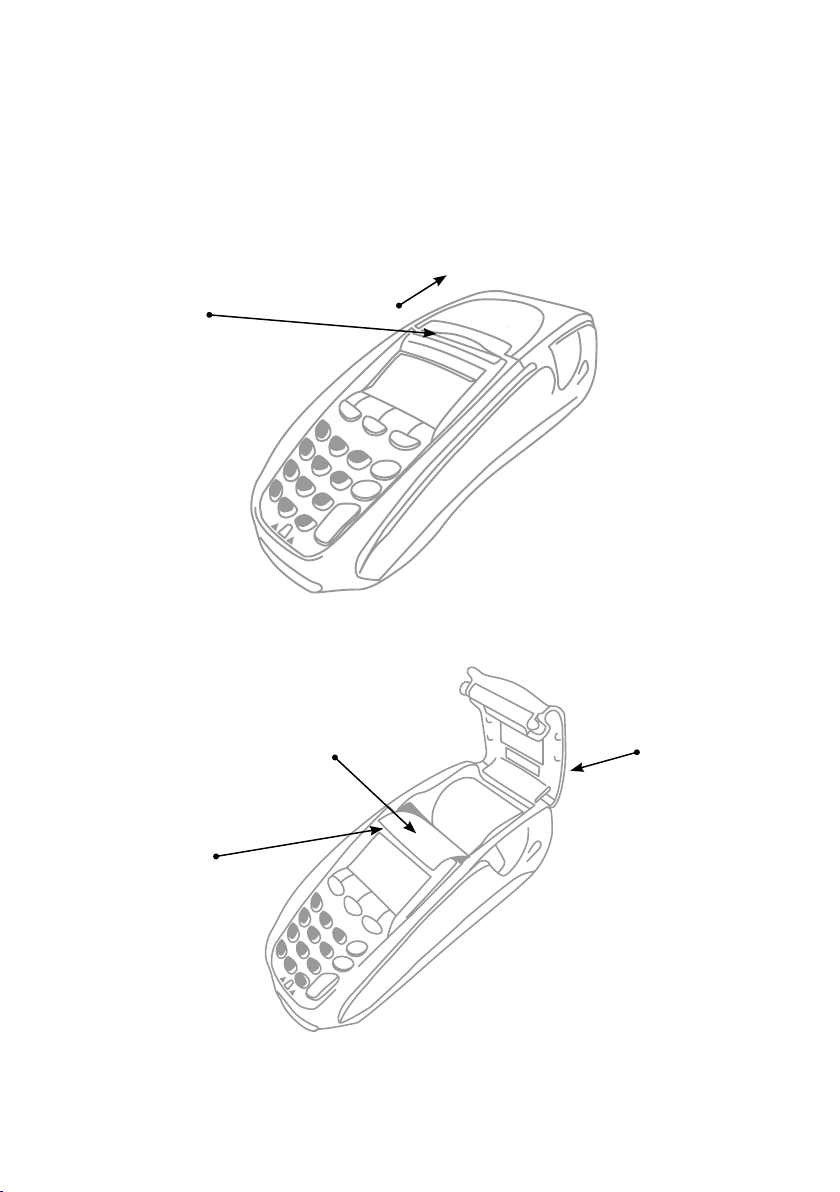
2.4 Printer and Paper Load Function
The i5100 EFTPOS terminal has an in-built thermal printer. To load paper:
a) Ensure the terminal is powered on.
b) Open the paper compartment cover by pressing the button located towards
the top of the terminal, above the metal blade, as shown below.
Press button in
Paper
compartment
button
this direction
c) Position the paper roll with the end of the roll protruding from underneath the roll.
Correct paper
position
Metal blade to
tear o paper
d) Pull the paper out slightly and close the cover.
e) Test the operation of the printer by pressing the paper FEED button.
Dial-up EFTPOS Merchant Operating Guide – May 2011
Paper
compartment
cover
9

3.0 Passwords and Codes
The following information describes the passwords and codes used in this guide.
Ensure that your passwords are changed regularly to prevent unauthorised use.
3.1 Refund Password
This password is a security measure to ensure only those personnel who are
authorised by you (as the authorised signatory) can process refunds through
your terminal.
You are responsible for protecting this password against unauthorised use.
Do not key in your password in a manner that enables customers or
unauthorised staf to observe the number
3.2 Settlement Password
This password is a general security password that allows you to restrict access to
the SETTLEMENT function. Automatic settlement does not require a password.
Access to the settlement function can be limited at your discretion.
3.3 Void Password
This password is a general security password that allows you to restrict access to
the VOID function. Access to the void function can be limited at your discretion.
3.4 Terminal Password
This password is a general security password that allows you to restrict access
to the following functions:
Checkout Function (User Guide section 5.10)
•
User Management Function
•
– Activating/Deactivating Shift Function (User Guide section 6.1)
– Setting User ID’s (User Guide section 6.2)
– Starting Shifts (User Guide section 6.3)
– Ending shifts (User Guide section 6.4)
Tip Adjustments (User Guide section 5.6 and 5.7)
•
Activating/Deactivating Tip Reporting (User Guide section 7.4)
•
Locking/Unlocking the terminal (User Guide section 4.5)
•
Training Mode (User Guide section 4.4)
•
Dial-up EFTPOS Merchant Operating Guide – May 2011
10

Access to these functions can be limited at your discretion.
You are responsible for protecting this password against unauthorised use.
You (as the authorised signatory) will need to contact the EFTPOS Helpdesk
to change your passwords on 1300 603 266.
Refund, Settlement, Void and Terminal passwords will have a default setting
(unless nominated by you at the time of application) when you receive
your terminal(s).
3.5 User Management Code
(See User Guide section 6.0).
The USER MANAGEMENT code is only used when the SHIFT feature is enabled
on the terminal. Each “user” must be assigned a “user ID”. The user cannot log
in or out of a shift without using the USER MANAGEMENT code. Up to 10 users
IDs can be programmed into the terminal.
The User Management code is selected by the user at a time the “user ID”
is being established on the terminal (generally at the start of the shift).
The code is a four digit number nominated by the user.
Dial-up EFTPOS Merchant Operating Guide – May 2011
11

4.0 Procedures
4.1 Inserting a Chip Card
When your terminal is enabled for chip card acceptance, chip cards are inserted
into the terminal and left there for the duration of the transaction.
The chip card reader is located at the bottom of the terminal below the keypad.
1. Check the terminal is displaying the message INSERT/SWIPE CARD.
2. Hold the card face-up with the chip towards the terminal.
3. Insert the card as far as it will go into the reader and continue processing
the transaction.
4. Leave the card in the terminal until prompted to remove.
Dial-up EFTPOS Merchant Operating Guide – May 2011
12

4.2 Swiping a Magnetic Stripe Card
The magnetic stripe reader is located on the right hand side of the terminal.
1. Check the terminal is displaying the message INSERT/SWIPE CARD.
2. Hold the card upside-down with the magnetic strip facing inwards.
3. Swipe the card smoothly through the card reader, in either direction. Ensure
the whole magnetic strip is swiped through the reader.
4. If there is no response from the terminal, or CARD ERROR message is
displayed, swipe the card again. You might need to swipe faster or slower.
4.3 Damaged Cards
If a credit card will not read, when inserted in the chip card reader or when
swiped, while performing a credit account transaction, the manual key process
should not be used.
Warning: Where the manual key process has been used to perform a credit
card transaction (contrary to the MOTO or ECOM instructions outlined in
section 5.8, How to Process a MOTO/ECOM Transaction), and that transaction
is subsequently disputed by the cardholder, the merchant will be liable for the
amount of the transaction.
A manual fall back voucher can be used to fulil the sale as per the instructions
outlined in section 8.2, Manual Fall Back.
The option of completing a manual voucher ONLY applies to credit account
transactions where the credit card will not read.
Dial-up EFTPOS Merchant Operating Guide – May 2011
13

In the following situations, the cardholder must be referred to their card issuer
and an alternative form of payment requested.
- Credit account transaction DECLINED
- Savings/Cheque account transaction DECLINED
- Credit/Debit card will NOT READ when performing a Savings/Cheque
account transaction.
Note: The non compliance to the above procedure will be considered a serious
breach of the merchant agreement and may result in termination of your
merchant facility.
4.4 Operating Training Mode
Training mode helps you train new staf members in the operation of the
terminal. Training mode can be initiated at any time during the day without
afecting live value totals. During training mode the terminal will not connect
to the host but will perform all transactions oline. Transactions performed
in training mode will not afect your settlement total.
This function will either start or end the training mode session.
Please Note:
Training mode cannot be used for chip cards. If attempted you will receive
•
the error message ‘CHIP CARDS NOT SUPPORTED IN TRAINING MODE’.
If training mode has been inactive for 2 minutes, it will revert back to
•
live mode.
In training mode, whole dollar amounts will generate an approved
•
transaction. Other amounts will result in a ‘response code’ corresponding
to the number of cents. For example an amount of $2.01 or $0.01 will result
in a response code of 01 Declined, Contact Bank.
Dial-up EFTPOS Merchant Operating Guide – May 2011
14

To start training mode:
TERMINAL DISPLAY PROCEDURE
22/05/2009 12.21
ENTER AMOUNT
FUNCTION? Key in 101 and press ENTER.
TRAINING MODE
PASSWORD?
22/05/2009 12.21
TRAINING MODE
ENTER AMOUNT
Press the Function (FUNC) button.
Key in the terminal password and press ENTER.
When the terminal runs in training mode the idle
screen is changed to display TRAINING MODE.
Process transactions as per procedures in Section 5.0. Receipts will display TRAINING
on them. After three minutes of inactivity the terminal will exit training mode and
return to the idle prompt.
To exit training mode:
TERMINAL DISPLAY PROCEDURE
22/05/2009 12.30
TRAINING MODE
ENTER AMOUNT
FUNCTION? Key in 101 and press ENTER.
TRAINING MODE
PASSWORD?
END TRAINING?
CORRECT? YES/NO
Press the Function (FUNC) button.
Key in the terminal password and press ENTER.
Press ENTER again to exit training mode.
Dial-up EFTPOS Merchant Operating Guide – May 2011
15
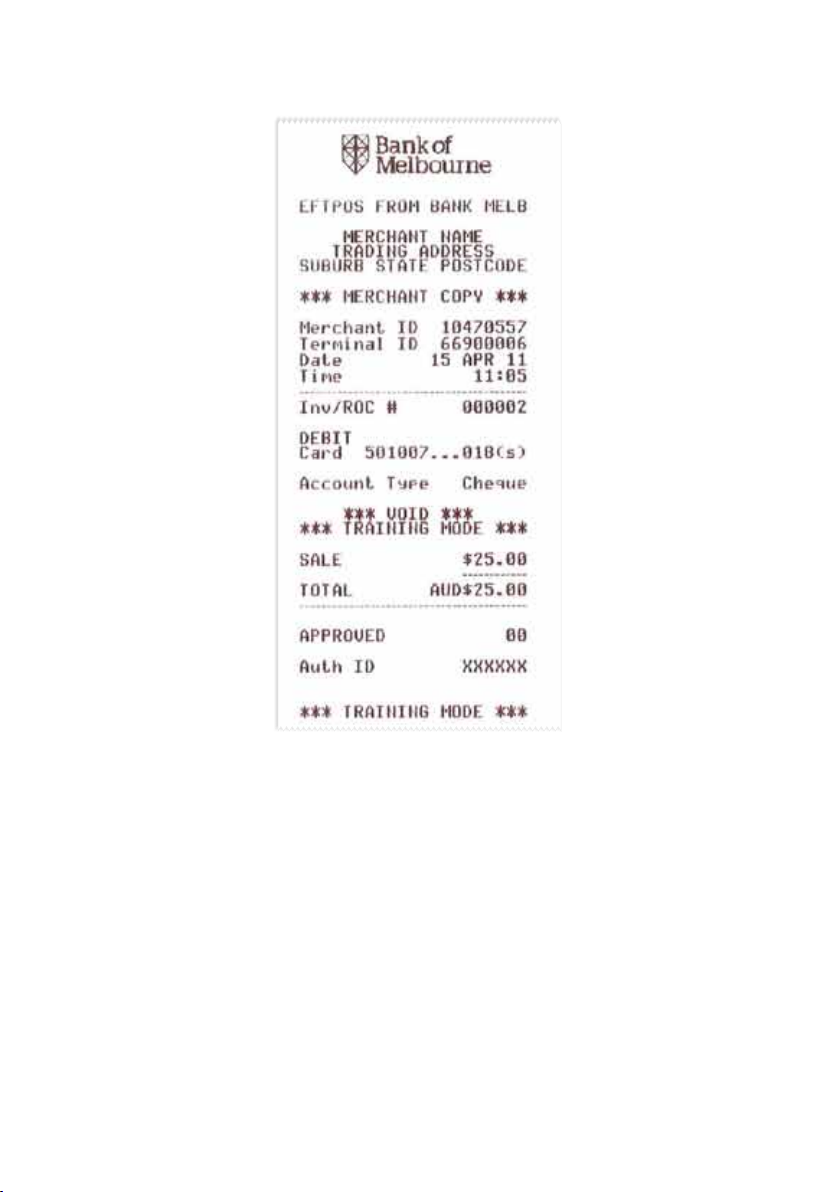
Receipt in Training Mode
At the end of training mode all tran sactions are res et and previous va lues are restored to
batch and RO C (Record of Charg e) number.
Dial-up EFTPOS Merchant Operating Guide – May 2011
16

4.5 Locking/Unlocking Terminal Keyboard
This function locks the terminal keyboard and prevents any unauthorised transactions
taking place. The terminal remains locked even if powered o and on.
TERMINAL DISPLAY PROCEDURE
22/05/2009 12.21
Press the Function (FUNC) button.
ENTER AMOUNT
FUNCTION? Key in 4 and press ENTER.
LOCK TERMINAL
Key in the terminal password and press ENTER
CORRECT? YES/NO
TERMINAL LOCKED
The terminal is now locked. To unlock press ENTER
UNLOCK?
PASSWORD? Key in the terminal password and press ENTER
Dial-up EFTPOS Merchant Operating Guide – May 2011
17

5.0 Transaction Procedures
5.1 How to Process a Sale
TERMINAL DISPLAY PROCEDURE
22/05/2009 12.28
ENTER AMOUNT
SALE $4.00
ADD CASH AMT
& / OR ENTER
SALE $4.00
INSERT / SWIPE CRD
SALE $4.00
SELECT ACCOUNT
HQ SAV CR
SALE $4.00
PIN & / OR ENTER
CREDIT SALE
PROCESSING
VERIFY SIGNATURE
CORRECT? YES/NO
**REMOVE CARD**
CUSTOMER COPY
PRESS ENTER
Key in the purchase amount and press ENTER.
If ‘Purchase with Cash’ transactions are enabled on
the terminal, you can enter a cash-out amount. The
cash-out amount may be left at $0.00.
If presented with a chip card, insert the customer’s
card into the chip card reader. Refer to Inserting a
Chip Card in section 4.1
OR:
If presented with a magnetic stripe card, swipe the
customer’s card through the card reader. Refer to
Swiping a Magnetic Stripe Card in section 4.2.
Press the soft key beneath the account type
needed.
Where prompted, have the cardholder key in their
PIN and press ENTER, or just press ENTER.
The terminal is connecting to the bank and
processing the sale.
2
1
If the card was inserted, remove the card from the
reader.
If signature is required: Have the customer sign the
receipt. If the signature matches the signature on
the card, press ENTER. Otherwise press CANCEL.
Press ENTER to print customer receipt.
Notes:
1. The entering of PIN on credit is opt ional. Allow the cardholder to enter t heir PIN
at the ter minal prompt. I f the cardholder by passes PIN entry a signat ure will
need to b e obtained to author ise the tran saction.
2. If the terminal reads ‘OVER EF B LIMIT ’, please refer to Section 8 .2.
Before completi ng the sale, check that the transaction was approved. If the t ransaction is
decline d, the termi nal will di splay an error me ssage giving the reason. A n explanation of
the error code is available i n Chapter 11. 2, Response Codes.
Dial-up EFTPOS Merchant Operating Guide – May 2011
18
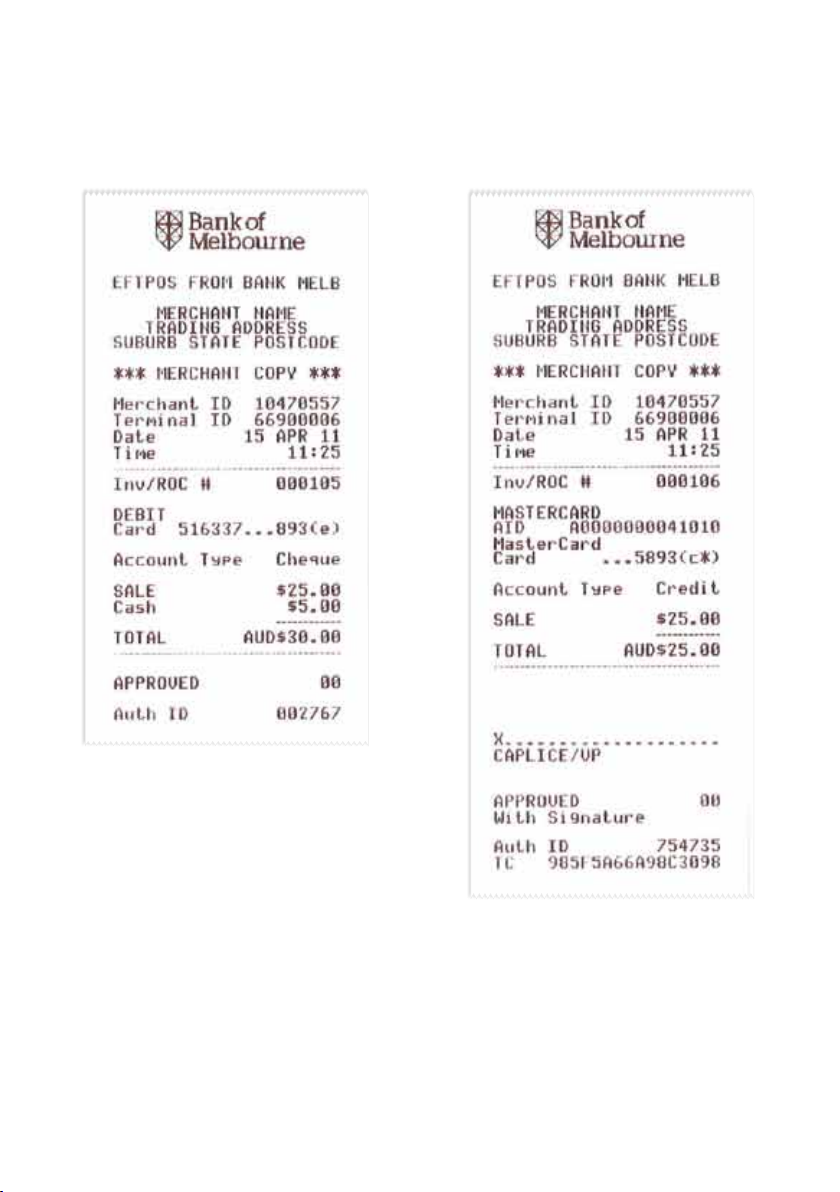
Approved Receipt (approved with
PIN, no signature required)
Approved Credit Card Receipt
(signature required)
Remember to a lways che ck the
receipt to ver ify if a tran saction
has be en approved.
Dial-up EFTPOS Merchant Operating Guide – May 2011
19

5.2 How to Process a Cash Only Transaction
If ‘Cash’ is enabled on the terminal, customers can be given cash out. Cash is available
from cheque and savings accounts only.
TERMINAL DISPLAY PROCEDURE
22/05/2009 12.30
Press ENTER until CASH is displayed on the screen.
ENTER AMOUNT
22/05/2009 12.30
Press the select key beneath CASH.
PRCH CASH RFND
ENTER CASH AMT Key in the cash amount and press ENTER.
CASH $10.00
INSERT/SWIPE CRD
Insert the customer’s chip card into the chip card
reader.
Or:
Swipe the customer’s card through the card reader.
CASH $10.00
SELECT ACCOUNT
Select either CHQ or SAV .
Note: CR is not an option.
CHQ SAV
CASH $10.00
PIN & ENTER
DEBIT CASH
PROCESSING
CUSTOMER COPY
PRESS ENTER
**REMOVE CARD**
Before completi ng the sale, check that the transaction was approved. Hand the customer
their copy of the transac tion record and the ir card. If t he transaction is declined, the
termin al will di splay an error me ssage givin g the reason. An explanatio n of the error co de
is availa ble in Chapter 11 .2, Respon se Codes.
When prompted, have the cardholder key in their
PIN and press ENTER.
The terminal is connecting to the bank and
processing the transaction.
Press ENTER to print customer’s receipt.
If the card was inserted, remove the card from the
reader.
Dial-up EFTPOS Merchant Operating Guide – May 2011
20
 Loading...