

Page 1

FLEX iPP320
PAYMENT TERMINAL INSTALLATION GUIDE
Prepared by : Frédérick Matte
Technical Support Advisor
Bell Canada
Created : January 24th, 2012
Revised : July 11th, 2014
Page 2

2
Frédérick Matte
Version: 1.0
January 24th, 2012
Original version
Frédérick Matte
Version: 1.10
October 29th, 2012
Minor adjustments
Frédérick Matte
Version: 1.20
April 18th, 2013
Cosmetic changes
from Desjardins
Frédérick Matte
Version: 1.30
June 14th, 2013
Modifications for
application release 5.xx
Frédérick Matte
Version 1.40
April 4th, 2014
Modifications for
application release 6.1x
Frédérick Matte
Version 1.50
July 10th, 2014
Modifications for
application release 7.0x
History of updates
AUTHOR VERSION DATE COMMENTS
following comments
FLEX iPP320 - Installation Guide_v1.50.docx
Page 3

3
Table of Contents
FLEX IPP320 PIN pad installation ........................................................................................................... 4
I. Required hardware ............................................................................................................................ 5
II. Connecting the terminal .................................................................................................................... 6
1. Connect the communication cable(s) (based on the installation type) ......................................... 6
o Serial connection to the Point-of-sale System .......................................................................... 6
o IP connection to Point-of-sale System ...................................................................................... 7
2. Connect the power supply ............................................................................................................. 8
III. Starting up the terminal ................................................................................................................. 9
1. Checking the PIN pad configuration ............................................................................................. 9
o Check the terminal identification (terminal number)................................................................ 9
o Check the host communication mode ....................................................................................... 9
o Check the communication mode to the Point-of-sale System ................................................ 10
2. Initializing the PIN pad ............................................................................................................... 10
3. Download .................................................................................................................................... 11
4. Registering the Point-of-sale System’s IP address ..................................................................... 11
IV. Training ....................................................................................................................................... 13
Chip cards ....................................................................................................................................... 13
The terminal .................................................................................................................................... 13
Configuration and troubleshooting mode ....................................................................................... 13
Procedures to be used in the event of a failure ............................................................................... 14
Problem closing a batch .................................................................................................................. 14
V. Completing the installation ............................................................................................................. 15
Appendix A – Config. report .................................................................................................................. 16
Appendix B – Configuration ................................................................................................................... 19
1. Host communication mode configuration ................................................................................... 19
o IP communication mode configuration ................................................................................... 19
2. Configuration of communication mode to Point-of-sale System ............................................... 21
o Configuration of serial communication mode ........................................................................ 21
o Configuration of IP communication mode ............................................................................. 21
3. Terminal number configuration .................................................................................................. 22
Appendix C – IP status ........................................................................................................................... 24
Appendix D - Troubleshooting ............................................................................................................... 27
1. Between the Payment Terminal and the Desjardins host............................................................ 27
2. Between the PIN pad and the Point-of-sale System ................................................................... 29
Appendix E – Quick start ........................................................................................................................ 32
Table 1 - List of FLEX Payment Terminal return codes ........................................................................ 30
FLEX iPP320 - Installation Guide_v1.50.docx
Page 4

4
FLEX IPP320 PIN pad installation
This guide is intended for the distributor mandated by the merchant to install the Desjardins iPP320
PIN p a d terminals requ ir ed for use with the FLEX integrated pa yment solution in the store. It provides
details of all the steps the installer must complete to prepare, start up and present the terminal to the
merchant.
The steps are, in order:
- Install the terminal
o Connect the communication cable
o Connect to the Point-of-sale System
o Plug in the power supply
- Start up the terminal
o Check the terminal configuration
o Initialize
o Download
o Register the Point-of-sale System’s IP address
- Train the user
The following sections describe each of these steps in detail.
1
2
IMPORTANT – INSTALLATION PREREQUISITE
Check the equipment configuration before going to the merchant location, to make
sure you have the correct equipment with you – i.e. that which has been
preconfigured for this specific merchant. To do this, follow the
pad configuration” procedure on page 9 of this document.
1
For Serial communication between the terminal and Point-of-sale Syste m
2
Required only for IP communication between the terminal and Point-of-sale System.
FLEX iPP320 - Installation Guide_v1.50.docx
“Checking the PIN
Page 5

5
INSTALLATION TYPE
IP connection to Host +
System
IP connection to Host +
System
Terminal
supply)
- Network cable (3 m)
part no. DB9-M/FSPEC-10)
- User guide
- “Introduction to the chip card” brochure
- Credit test card (magnetic stripe)
I. Required hardware
(includes power
Cables
Documentation
Cards
IP connection to Point-of-sale
iPP320 PIN pad with Bell’s payment
application
- iPP320 Ethernet cable (2 meters,
part no. 296106335)
- Credit test card (chip)
- Debit test card (magnetic stripe)
- Debit test card (chip)
serial connection to Point-of-sale
iPP320 PIN pad with Bell’s payment
application
- « Magicbox » adaptor for IPP320 (2
meters, part no. 296121027)
- « null modem » serial cable (2 meters,
FLEX iPP320 - Installation Guide_v1.50.docx
Page 6

6
II. Connecting the terminal
This section describes the different connections required for the device to operate correctly.
1. Connect the communicati on cabl e (s) (ba s e d on t he installation type)
A single connection is needed at the back of the FLEX PIN pad, regardless of the
communication mode used to the Point-of-sale System and to the Desjardins host. The type of
cable used, however, differs depending on the context.
N.B. The FLEX PIN pad permits only IP connection to the Desjardins host.
o Serial connection to the Point-of-sale System
• The PIN pad must first be connected to a special adaptor called “Magic box”
(part number 296121027). This adaptor has sever al interfaces, t hus allowing for
different types of connection to the Point-of-sale System and to the host.
FLEX iPP320 - Installation Guide_v1.50.docx
Page 7

7
• A Category 5 networkin g cable will be used to att ach the "Magic Box" adaptor
to the Local Area Network (LAN) for communication with the host.
• A serial "null modem" cable (pa rt number DB9-M/FSPEC-10) will connect the
"Magic Box " adaptor cable to the Point-of-sale System.
o IP connection to Point-of-sale System
• The connection to the Point-of-sale S ystem in IP mode uses th e same interface
and cable as for IP communication to the Desjardins host – Ethernet iPP320
cable (part no 296106335). No additional connection is required. (Note that the
“Magic box” adaptor with a category 5 networking cable could also be used)
FLEX iPP320 - Installation Guide_v1.50.docx
Page 8
8
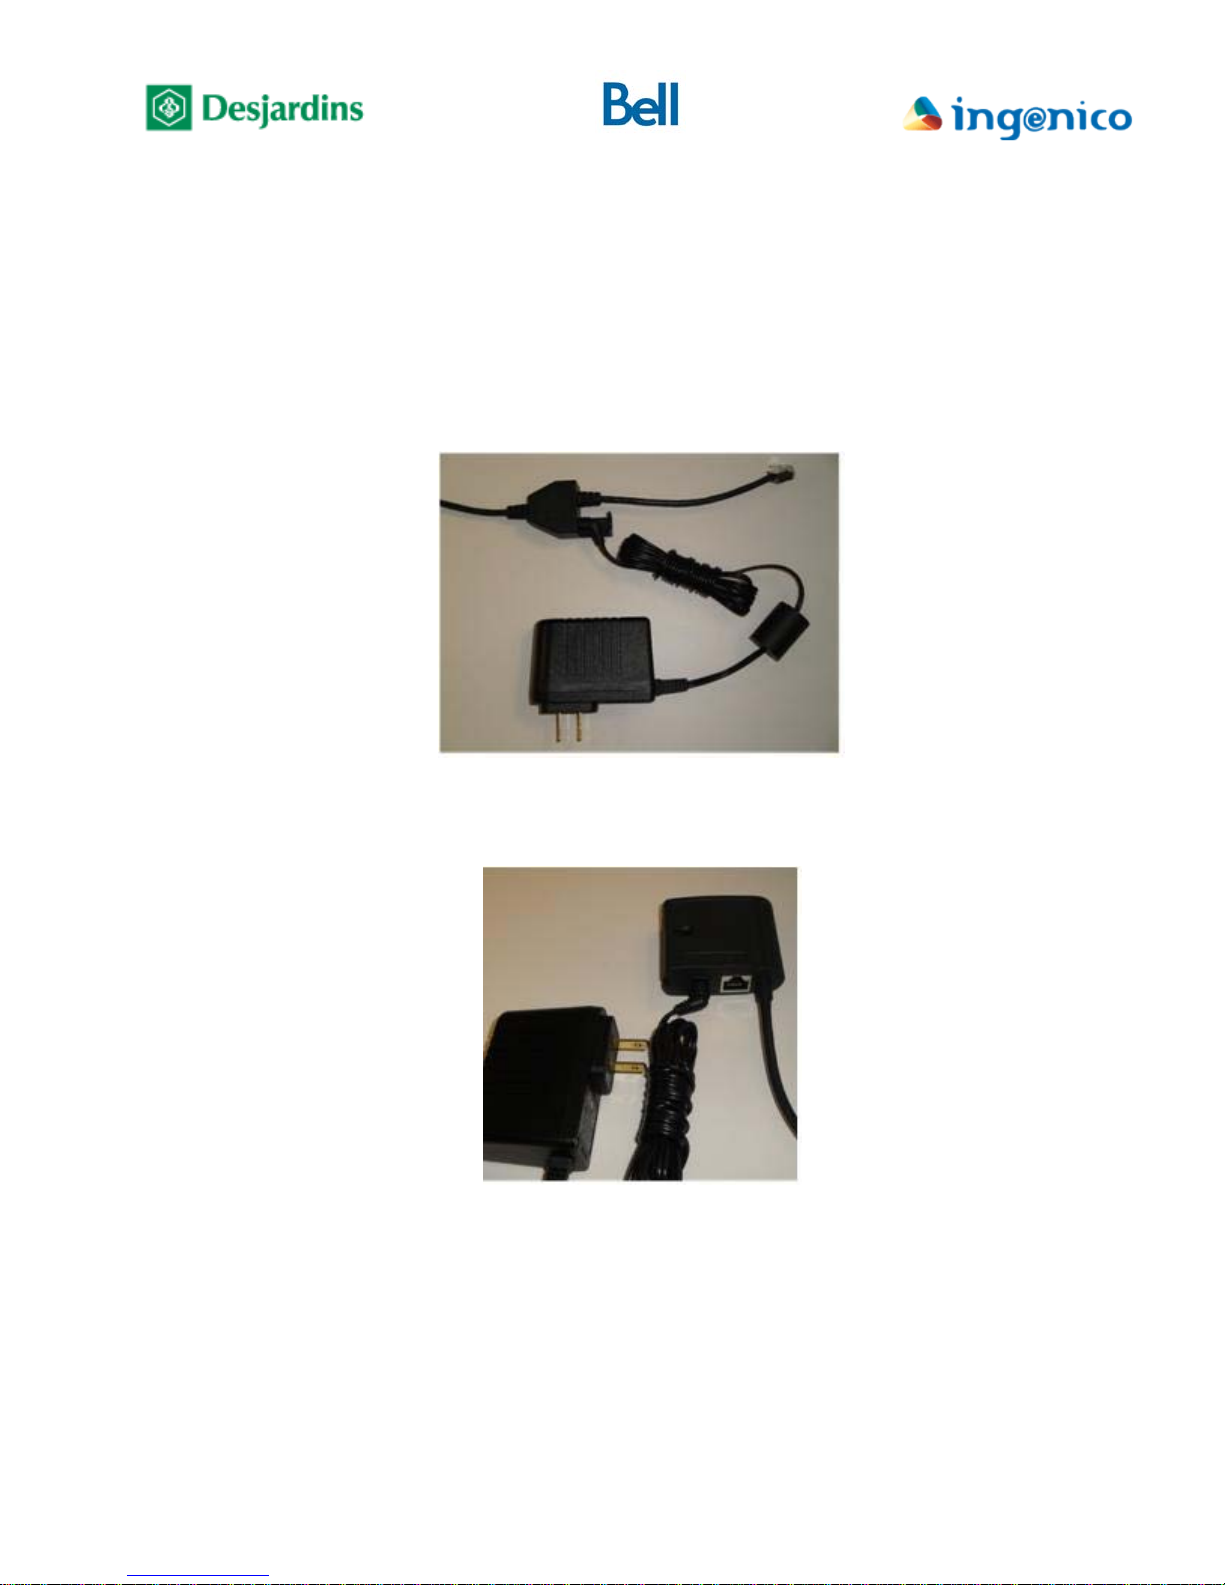
2. Connect the power supply
o The power supply must be connected to the cable that links the Payment Terminal to the
Point-of-sale System or to the network.
Connection of power supply for an IP link to Point-of-sale System
Connection of power supply for a serial link to Point-of-sale System
N.B. The power supply cable must be the last one connected in order to ensure that the PIN pad
detects and initializes the appropriate interfaces during start-up.
FLEX iPP320 - Installation Guide_v1.50.docx
Page 9

9
III. Starting up the terminal
This section describes the steps for starting up the FLEX IPP320 PIN pad. It contains the procedure for
validating the device configuration and initializing the Payment Terminal as well as for downloading
and activating the required application.
1. Checking the PIN pad configuration
These steps allow you to confirm the terminal preconfiguration for communication mode (to
the host and to the Point-of-sale System) and for identification to the Desjardins host.
o Check the terminal identification (terminal number)
• On the idle screen, if «MENU» is not displayed above the F1 key, press the
yellow key followed by the “0” key to unlock the terminal menus.
• Press F1, the terminal displays (Main menu) screen.
• Select (Configuration) then press the green key, the terminal displays
(Configuration) screen.
• Using F2 or F3 to navigate, select (Config. report) and press the green key.
• Select (Merchant Info ) and press the green key.
• The terminal displays configuration data related to the merchant’s
identification. To validate the PIN pad’s configured terminal number, look at
the line that starts with RETLRxxxxxxyy (it may be necessary to scroll down
using the F2 key in order to see this line). See Appendix A for details.
o Check the host communication mode
• On the idle screen, if «MENU» is not displayed above the F1 key, press the
yellow key followed by the “0” key to unlock the terminal menus.
• Press F1, the terminal displays (Main menu) screen.
• Select (Configuration) then press the green key, the terminal displays
(Configuration) screen.
• Using F2 or F3 to navigate, select (Config. report) and press the green key.
• Select (Modem & Network) then press the green key.
• The terminal displays the current host communication parameters (scrolling
with F2 key might be necessary; see Appendix A for details).
FLEX iPP320 - Installation Guide_v1.50.docx
Page 10

10
o Check the communication mode to the Point-of-sale System
• On the idle screen, if «MENU» is not displayed above the F1 key, press the
yellow key followed by the “0” key to unlock the terminal menus.
• Press F1, the terminal displays (Main menu) screen.
• Select (Configuration) then press the green key, the terminal displays
(Configuration) screen.
• Using F2 or F3 to navigate, select (Config. report) and press the green key.
• Select (POS Comm.) then press the green key.
• The terminal displays the current settings for communication to the Point-of-
sale System (scrolling with F2 key might be necessary in order to see the
pertinent information; see Appendix A for details).
2. Initializing the PIN pad
Initializing the PIN pad associates it with its configuration at the Desjardins host. Transactions
cannot be performed by the PIN pad until it has been initialized. Initialization involves three
steps: keys initialization, terminal initialization and public keys initialization.
IMPORTANT: The termin al must be activated at t he Desjardins host before you can proceed
with initialization. To have the terminal activated:
Call 514-281-2880 (toll-free 1-800-363-3514), select 9 for English, than option 1 and
option 4.
Once the terminal has been activated at the Desjardins host:
o On the idle screen, if «MENU» is not displayed above the F1 key, press the yellow key
followed by the “0” key to unlock the terminal menus.
o Press F1, the terminal displays (Main menu) screen.
o Select (Configuration) then press the green key, the terminal enters (Configuration)
screen.
o Using F2 or F3 to navigate, select (Initialize) and press the green key.
o Select (Initialize POS) then press the green key.
o The terminal displays (Please wait). The three required initialization types will launch
automatically:
• Keys initialization
• Terminal initialization
• Public keys initialisation
o During the entire initialization process the terminal displays (Please wait).
FLEX iPP320 - Installation Guide_v1.50.docx
Page 11

11
o Depending on the result, the PIN pad will display either (Completed), or an error
message.
3. Download
Downloading during installation is essential so that the terminal identifies itself to the
download system in order to subsequentl y allow a mass deployment of application patches or
new versions.
o On the idle screen, if «MENU» is not displayed above the F1 key, press the yellow key
followed by the “0” key to unlock the terminal menus.
o Press F1, the terminal displays (Main menu) screen.
o Select (Configuration) then press the green key, the terminal displays (Configuration)
screen.
o Using F2 or F3 to navigate, select (Initialize) and press the green key.
o Select (Download) then press the green key.
The terminal will connect to Desjardins download server and if required will start
downloading the application. Please note that the terminal will restart following completion
of the download process.
4. Registering the Point-of-sale System’s IP address
3
The registration of the Point-of-sale System’s IP address associates it with the Payment
Terminal. This step ensures that a FLEX PIN pad will respond only to requests received from a
specific Point-of-s ale S ystem . An y trans actio nal r equest receiv ed fro m an IP address ot her th an
the one registered will be ignored by the terminal.
Please note that it is recommended for the Point-of-sale System to use a static IP address, to
prevent a possible automatic change of address – which would cause a loss of communication
with the FLEX PIN pad.
o On the idle screen, if «MENU» is not displayed above the F1 key, press the yellow key
followed by the “0” key to unlock the terminal menus.
3
Required only for IP communication between the Payment Terminal and the Point-of-sale System.
FLEX iPP320 - Installation Guide_v1.50.docx
Page 12

12
o Press F1, the terminal displays (Main menu) screen.
o Select (Configuration) then press the green key, the terminal displays (Configuration)
screen.
o Using F2 or F3 to navigate, select (Term config) and press the green key.
o Select (POS comm) and press the green key.
o Select (Registration) and press the green key.
o The terminal displays (Waiting for POS communication).
o From the Point-of-sale S ys tem that you wish to be associated with the Payment
Terminal, initiate a service request while the terminal is displaying (Waiting for POS
communication). Upon receipt of the request, the terminal will display the IP address of
the Point-of-sale System that sent the request, along with the message (Accept?).
o Press F4 to accept the association or F1 to clear the current association and return the
terminal to wait mode.
FLEX iPP320 - Installation Guide_v1.50.docx
Page 13

13
IV. Training
This section summarizes the minimum set of topics to be covered during merchant training.
Chip cards
• Show how to differentiate between magnetic stripe cards and chip cards.
• Information on chip cards:
o Chip is a micro-computer
o More secure than t he magnetic stripe because it requires keys to access
the chip
o Requires a PIN for both credit and debit
o The PIN is stored on the chip and is validated locally at the terminal
o Can support more than one payment method on the same card
o Except in the case of certain specific technical problems, the magnetic
stripe cannot be used to perform transactions on a terminal that supports
the chip.
• You may refer the merchant to the User Guide for additional details.
The terminal
• Show the locations of the chip card reader, the magnetic stripe reader and
Contactless reader
o Emphasize that the chip card must remain in the reader until the terminal
asks for it to be removed
Configuration and troubleshooting mode
• This procedure could be requested by technical support when troubleshooting a
problem.
• To unlock the Payment Terminal’s configuration and troubleshooting menus, the
user must press the Yellow key followed by the “0” key.
• The FLEX PIN pad will automatically return to locked FLEX mode when a
service request is received from the m erchant’s Point-of-sale S ystem. The user
must repeat the unlock procedure as needed to come back to the configuration
and troubleshooting mode.
FLEX iPP320 - Installation Guide_v1.50.docx
Page 14

14
• Show how to navigate the menus (once the configuration/troubleshooting mode
is unlocked)
o F2 to move the cursor down
o F3 to move the cursor up
o F1 / F2 / F3 / F4 to select the option displayed above the corresponding
F-key
o Green key to select / accept the entry
o Red key to cancel/return to the previous menu
o Yellow key to correct a data entry
Procedures to be used in the event of a failure
• Advise the merchant to carefully read sections 3 and 4 of the User Guide,
because it describes merchant responsibilities in detail.
• Summary of the procedure to be followed in the event of a failure:
o Credit failure
Call the authorization centre to obtain an authorization number
If the Point-of-sale System and the FLEX terminal are
operational, perform the transaction offline using the
authorization number obtained (the cardholder may be asked to
sign the receipt)
Otherwise, complete a manual credit slip and enter the
transactions offline when the terminal is operational again.
The manual slip must be signed by the cardholder.
o Debit failure
Ask the customer to use another payment method
Problem closing a batch
• Advise t he merchant that, if unable to obtain the batch closing report due to a
technical problem, the TPV100 report can be requested from Business Customer
Services.
FLEX iPP320 - Installation Guide_v1.50.docx
Page 15

15
V. C om pleti ng the installation
• Perform a test transaction to ensure that the terminal is working correctly.
• Verify the business name and address on the merchant’s transaction receipt.
• Leave the documentation and test cards with the merchant.
o User Guide
o Debit and credit chip test cards
o Debit and credit magnetic stripe test cards
• Provide the merchant with the telephone numbers for technical and customer
support services.
Web site
www.desjardins.com/merchants
Business Customer Service
Montreal: 514 397-4450 Toll free: 1-888-285-0015
Accord D Desjardins Financing Service
Montreal: 514 397-4737 Toll free: 1-888-378-8472
Technical support for payment terminals
Montreal: 514 281-2880 Toll free: 1-800-363-3514
Authorization centre
Montreal: 514 875-8750 Toll free: 1-800-361-8120
FLEX iPP320 - Installation Guide_v1.50.docx
Page 16

16
Appendix A – Config. report
The different screens grouped under the (Config report) menu allow you to consult the current terminal
settings: merchant related parameters, permitted cards, functions and services, communication mode
parameters, among others.
To access the report:
• On the idle screen, if «MENU» is not displayed above the F1 key, press the
yellow key followed by the “0” key to unlock the terminal menus.
• Press F1, the terminal displays (Main menu) screen.
• Select (Configuration) then press the green key, the terminal displays
(Configuration) screen.
• Using F2 or F3 to navigate, select (Config. report) and press the green key.
• Select the appropriate submenu for the desired information:
Select (Merchant Info) submenu and press the green key to show the
merchant-related parameters.
--------------- | Merchant Info | indicates that more info is available on other screen(s)
|TELECOM TPV TEST| merchant na me
|1 CARR A GRAHAM | merchant address
|VERDUN |
|QC |
---------------- press F2 / F3 to navigate between screens
| Merchant Info |
|POS84000723 |
|RETLR24372586 |
| |
| |
----------------
« Transactions » submenu: shows the supported transaction types
« Services » submenu: shows the activated services
« Cards and AID » submenu: shows supported cards and permitted
reading method for each (chip or magnetic stripe)
« Modem & Network » submenu: shows configuration parameters for
authorization host communication.
terminal number
FLEX iPP320 - Installation Guide_v1.50.docx
Page 17

17
----------------
|Modem & Network|
|Modem |
|Active NO |
|Network |
|Active YES | IP mode activated
----------------
|Modem & Network| press F2 / F3 to navigate between screens
|Physical Address|
|0003-81E4-DA07 | physical (MAC) address of FLEX PIN pad
|DHCP NO | dynamic IP configuration activated or not
|IP Address |
----------------
|Modem & Network|
|192.168.12.166 | IP address of FLEX PIN pad
|Subnet Mask |
|255.255.255.0 | subnet mask used
|Gateway |
----------------
|Modem & Network|
|192.168.12.1 | gateway used
|DNS1 |
|8.8.8.8 |
primary DNS server used
|DNS2 |
----------------
|Modem & Network|
|8.8.4.4 | secondary DNS server used
| |
| |
| |
----------------
« POS Comm. » submenu: shows configuration parameters for
communication with the Point-of-sale System.
Serial connection:
----------------
| POS COMM |
|Active YES| comm. wit h Point-of-sale System activated or not
|Comm. modeSerial| communication mode with Point-of-sale System
|BaudRate 9600BPS| serial port speed
|Settings 8,N,1 | serial port settings
----------------
FLEX iPP320 - Installation Guide_v1.50.docx
Page 18

18
IP connection:
----------------
| POS COMM |
|Active YES| comm. wit h Point-of-sale System activated or not
|Comm. mode IP| communication mode with Point-of-sale System
|Port 2200 | TCP port used for Point-of-sale System communication.
|POS IP address |
----------------
| POS COMM |
|192.168.12.24 | IP address of associated Point-of-sale System
| |
| |
| |
----------------
FLEX iPP320 - Installation Guide_v1.50.docx
Page 19

19
Appendix B – Configuration
Although the terminal is normally preconfigured before shipping, a situation may occur that causes its
configuration to be incorrect.
To assist you in correcting such a situation, this appendix describes the steps required to customize the
FLEX IPP320 PIN pad configuration. It contains the detailed procedure to configure the required
communication information – both with the host and with the Poi nt-of-sale System – and to ass ign the
terminal number to the device.
1. Host communication mode configuration
o IP communication mode configuration
• On the idle screen, if «MENU» is not displayed above the F1 key, press the
yellow key followed by the “0” key to unlock the terminal menus.
• Press F1, the terminal displays (Main menu) screen.
• Select (Configuration) then press the green key, the terminal displays
(Configuration) screen.
• Using F2 or F3 to navigate, select (Term config) and press the green key.
• Select (Communications) then press the green key.
• Select (IP) then press the green key.
• Select (Configuration) then press the green key, terminal will display
(DHCP= XXXX).
For a dynamically assigned IP address:
1. Press F4. The terminal displays (Please wait) then reboots to activate
the setting.
Important: If the current communication with the Point-of-sale System is
IP, choosing dynamically assigned IP address deactivates FLEX mode, the
PIN pad will display (POS communication deactivated). Only a manually
assigned IP address is permitted when communication with the Point-of-sale
System is IP.
For a manually assigned IP address (recommended):
1. Press F1, the terminal displays its current IP address
2. On the (IP Address) screen, press the yellow key to clear the IP
address from memory, enter the IP address of the terminal then press
the green key.
To enter “ . ”, press the “ .,#* ” key (just to the right of the “0”
key).
3. On the (Subnet mask) screen, enter the network mask and press the
green key.
FLEX iPP320 - Installation Guide_v1.50.docx
Page 20

20
4. On the (Gateway) screen, enter the terminal IP gateway and press the
green key.
5. On the (DNS server 1) screen, enter the primary DNS server IP
address and press the green key.
6. On the (DNS server 2) screen, enter the secondary DNS server IP
address and press the green key.
7. The terminal then reboots to activate the settings.
• As needed, press the red key to return to the idle screen.
• On the idle screen, if «MENU» is not displayed above the F1 key, press the
yellow key followed by the “0” key to unlock the terminal menus.
• Press F1, the terminal displays (Main menu) screen.
• Select (Configuration) then press the green key, the terminal displays
(Configuration) screen.
• Using F2 or F3 to navigate, select (Initialize) and press the green key.
• Select (RMI host) then press the green key.
• Select (IP) then press the green key.
• The terminal displays the IP address of the Desjardins host that it has in
memory.
• If the address differs from 142.195.251.53,
Press the yellow key to clear the IP address from memory and enter the
IP address of the Desjardins host (142.195.251.53).
• Press the green key to confirm the entry.
• Press the red key until the terminal returns to the (Initialize) screen.
• Select (Download host) then press the green key.
• Select (IP) then press the green key.
• The terminal displays the IP address of the Desjardins download centre that it
has in memory.
• If the address differs from 142.195.251.54,
Press the yellow key to clear the IP address from memory and enter the
IP address of the Desjardins download centre (142.195.251.54).
• Press the green key to confirm the entry.
It is then recommended to validate communication with the host using the IP Status:
• On the idle screen, if «MENU» is not displayed above the F1 key, press the
yellow key followed by the “0” key to unlock the terminal menus.
• Press F1, the terminal displays (Main menu) screen.
• Select (Configuration) then press the green key, the terminal displays
(Configuration) screen.
• Using F2 or F3 to navigate, select (Diagnostic) and press the green key.
• Select (IP Status) then press the green key.
• Select (DESJARDINS) then press the green key.
• Select (Status) then press the green key.
FLEX iPP320 - Installation Guide_v1.50.docx
Page 21

21
• The terminal conducts a test of its IP connectivity and displays the result on
the screen (see Appendix C for details).
2. Configuration of communi c a t ion mode to Point-of-sale System
o Configuration of serial communication mode
• On the idle screen, if «MENU» is not displayed above the F1 key, press the
yellow key followed by the “0” key to unlock the terminal menus.
• Press F1, the terminal displays (Main menu) screen.
• Select (Configuration) then press the green key, the terminal displays
(Configuration) screen.
• Using F2 or F3 to navigate, select (Term config) and press the green key.
• Select (POS comm) then press the green key.
• Select (Configuration) then press the green key.
• Select (RS232) then press the green key.
• Select required baud rate (9600 Bps recommended) then press the green key.
• The terminal displays (RS232 activated).
o Configuration of IP communication mode
• On the idle screen, if «MENU» is not displayed above the F1 key, press the
yellow key followed by the “0” key to unlock the terminal menus.
• Press F1, the terminal displays (Main menu) screen.
• Select (Configuration) then press the green key, the terminal displays
(Configuration) screen.
• Using F2 or F3 to navigate, select (Term config) and press the green key.
• Select (POS comm) then press the green key.
• Select (Configuration) then press the green key.
• Select (IP) then press the green key.
• The terminal displays (IP activated).
Next, the IP address of the Point-of-sale System from which transactions will be
sent must be registered on the FLEX terminal
FLEX iPP320 - Installation Guide_v1.50.docx
Page 22

22
• On the idle screen, if «MENU» is not displayed above the F1 key, press the
yellow key followed by the “0” key to unlock the terminal menus.
• Press F1, the terminal displays (Main menu) screen.
• Select (Configuration) then press the green key, the terminal displays
(Configuration) screen.
• Using F2 or F3 to navigate, select (Term config) and press the green key.
• Select (POS comm) then press the green key.
• Select (Registration) and press the green key.
• The terminal displays (Waiting for POS communication).
• From the Point-of-sale System that you wish to associate with the Payment
Terminal, initiate a service request while the terminal is displaying (Waiting
for POS communication).
• Upon receipt of the request, the terminal will display the IP address of the
Point-of-sale System that sent the request, along with the message (Accept?).
• Press F4 to accept the association or F1 to clear the current association and
press the green key to put the terminal back in waiting mode.
3. Terminal number configuration
IMPORTANT: The terminal number will be given to you by Desjardins Installation Support.
To obtain the terminal number(s) associated with this merchant:
Call (514) 281-7148 (or toll-free 1-866-333-1210)
o On the idle scre en, if «MENU» is not displayed above the F1 key, press the yellow ke y
followed by the “0” key to unlock the terminal menus.
o Press F1, the terminal displays (Main menu) screen.
o Select (Configuration) then press the green key, the terminal displays (Configuration)
screen.
o Using F2 or F3 to navigate, select (Technician) and press the green key, the terminal
displays (Password) screen.
o Enter the password CDTC and press the green key, the terminal displays (Technician)
screen.
• To enter a letter, press the corresponding number then the F key until the desired
letter is displayed.
o Select (Terminal ID) then press the green key.
o The terminal displays the terminal number that is currently in memory.
o Press the yellow key to clear the number from memory and enter the terminal number in
MMMMMMSS format, where:
• MMMMMM = merchant number
FLEX iPP320 - Installation Guide_v1.50.docx
Page 23

23
• SS = terminal sequence number
o Press the green key to confirm the entry.
FLEX iPP320 - Installation Guide_v1.50.docx
Page 24

24
Appendix C – IP status
The IP status function is used to diagnose connection problems with the Desjardins authorization host
for a Payment Terminal using IP communication mode. It allows for determination of the probable
cause of the communication failure.
To access it:
o On the idle screen, if «MENU» is not displayed above the F1 key, press the yellow key
followed by the “0” key to unlock the terminal menus.
o Press F1, the terminal displays (Main menu) screen.
o Select (Configuration) then press the green key, the terminal displays (Configuration)
screen.
o Using F2 or F3 to navigate, select (Diagnostic) and press the green key.
o Select (IP Status) then press the green key.
o Select (DESJARDINS) then press the green key.
o Select (Status) then press the green key.
o The terminal conducts a test of its IP connectivity and displays the result on the screen.
--------------- | Status | indicates that more info is available on other screen(s)
|Physical link | type of test
|00-Success |
|SSL | type of test
|00-Success | result
----------------
| Status |
|Connectivity | type of test
|00-Success | result
| |
| |
----------------
The result data is broken down as follows:
The first section “Physical Link” provides information on network
detection.
result
press F2 / F3 to navigate between screens
FLEX iPP320 - Installation Guide_v1.50.docx
Page 25

25
Code
Message
IP parameters section
00
Successful
01
Network not initialized
02
Cable disconnected
03
DHCP error
04
Other initialization error
SSL section
00
Successful
20
Initialization error
21
Invalid CA certificate
22
Invalid POS certificate
Connectivity section
00
Successful
40
DNS error
41
Gateway error
The next section “SSL” checks the SSL encryption service on the
Payment Terminal.
The last section “Connectivity” conducts a basic diagnosis of the
network by trying to reach the www.desjardins.com address.
Connectivity test and result interpretation:
The most frequently encountered status codes are:
FLEX iPP320 - Installation Guide_v1.50.docx
Page 26

26
42
Internet error
43
Unconfigured DNS
44
Cable disconnected
Connection errors section
60
Disconnected cable
61
Connection error
62
Revoked POS certificate
63
Invalid data centre certificate
64
Other SSL error
FLEX iPP320 - Installation Guide_v1.50.docx
Page 27

27
No communication
Communication mode
No action required if state
Communication
Unknown.
Failure during
the host.
Unknown.
Perform IP status test (see
Premature closing of
-Error linked to
character received.
None.
Connection could
-Network error.
Perform IP status test (see
Appendix D - Troubleshooting
This section is intended as a guideline for diagnosing communication problems that may arise when
using FLEX IPP320 PIN pad Terminals. These preliminary checks can be done before contacting
Technical support for payment terminals. Note that the Technical Support agent might ask to
check the same items to support their own troubleshooting.
1. Between the Payment Terminal and the Desja rdins host
To facilitate troubleshooting of this type of communication error, explicit codes are displayed on the
screen and/or printed on transaction receipts.
Codes are returned in “PxSxDx” format, where:
P = Primary IP link
S = Secondary IP link
D = “Dialup” (or “dial backup“) link
x = Corresponding error code. Please refer to the ta b le be low for error code
explanations.
Code
Description
Protocol
IP Dialup
Potential cause
Proposed action
attempt on this link.
1
2
failed for unknown
reason.
establishment of
3
communication with
Establishment of
communication with
4
the host failed.
communication.
5
Error during closing
6
of connection.
7
FLEX iPP320 - Installation Guide_v1.50.docx
associated with the type of
link not activated.
-Invalid TCP port used.
-Connection blocked by
merchant’s firewall.
-Problem at the Host.
communication protocol.
-Unexpected “EOT”
Internal error. None.
matches desired
configuration.
Otherwise activate
appropriate link.
Appendix C).
Check merchant’s firewall
rules. If problem persists call
technical support to check if
Host is responding normally.
Page 28

28
not be established
-Host unavailable.
Appendix C).
Failure to transmit
data.
Internal error.
Reboot terminal if problem
persists.
configured timeouts.
Host is responding normally.
No data received
Error related to
If problem persists call
configured timeouts.
DNS resolution
-Network cable
Check physical connections.
No tone detected on
- Telephone cable
Check physical connections.
No carrier tone
Modem could not establish
If problem persists call
“Busy” tone on line.
Telephone line is busy.
Make sure dialup line is
Host rejected
Error related to
character received.
None.
Code
inside configured
timeouts.
8
Data could not be
sent inside
9
Failed to receive
A
data.
B
inside configured
timeouts.
Data could not be
C
sent inside
Network error
D
detected.
Description
Protocol
IP Dialup
Potential cause
Error related to
communication protocol.
Proposed action
If problem persists call
technical support to check if
Internal error. Reboot terminal if problem
persists.
communication protocol.
technical support to check if
Host is responding normally.
-Network cable
disconnected.
-Network not ready.
-Network cable
disconnected.
-Network not ready.
Check physical connections.
Perform IP status test (see
Appendix C).
Check physical connections.
Perform IP status test (see
Appendix C).
failed.
E
F
line.
G
detected on line.
H
No answer from
I
Host.
Error during closing
J
of connection.
Connection
K
establishment
aborted by user.
disconnected.
-DNS failure.
-Host’s IP address unknown
Make sure DNS server
responds normally and
knows Host’s address.
from DNS
disconnected
-Defective outlet or line
connection (line was not
busy).
technical support to check if
Host is responding normally.
available and working
normally.
Host’s modem did not
answer.
If problem persists call
technical support to check if
Host is responding normally.
Internal error. Reboot terminal if problem
persists.
None.
request received
L
from terminal.
FLEX iPP320 - Installation Guide_v1.50.docx
communication protocol:
unexpected “NAK”
Page 29

29
Host’s response
Error related to
If problem persists call
Terminal rejected
Error during data integrity
If problem persists call
Host did not
Host exceeded allowed
If problem persists call
No “ENQ” character
Error related to
If problem persists call
Establishment of
failed.
Unknown.
If problem persists check if
Code
M
N
O
P
Q
Description
exceeds maximum
size.
Host’s response.
complete dialogue
with terminal.
received from Host.
communication to
cellular network
Protocol
IP Dialup
Potential cause
communication protocol.
control.
number of transmission
retries.
communication protocol.
Proposed action
technical support to check if
Host is responding normally.
technical support to check if
Host is responding normally.
technical support to check if
Host is responding normally.
technical support to check if
Host is responding normally.
cellular network is
responding normally.
2. Between the PIN pa d and the Point-of-sale System
Two types of communication errors between the FLEX terminal and the Point-of-sale System
are possible: pure communication errors and protocol errors.
o Communication errors
In the event of connection loss between the Point-of-sale System and the FLEX Entourage
Payment Terminal, the following steps can help restoring the connection:
• Confirm that FLEX mode is activated.
• Check that communication mode with the Point-of-sale System is correct – IP or
serial.
• Confirm that all cables are properly connected – disconnect then reconn ect each end
of each cable (ending with power cable).
• Serial mode:
o Confirm that the Point-of-sale System and IPP320 PIN pad baud rates are
identical.
o Confirm that the Point-of-sale System serial port is set to: eight (8) data bits, one
(1) stop bit, no parity.
• IP mode:
o Confirm that the IP address registered in the terminal corresponds to the Point-
of-sale System IP address.
o Confirm that the Point-of-sale System permits communications on TCP port
2200.
• Disconnect then reconnect the terminal’s power cord.
FLEX iPP320 - Installation Guide_v1.50.docx
Page 30

30
o Processing errors
The most common processing errors are:
Desjardins host return code.
These codes are returned in numeric format and indicate the authorization host’s
response.
FLEX return code.
These codes are returned in “Lxx” format and indicate the Entourage Payment
Terminal’s response to a service request received from the Point-of-sale System.
Possible values are described in Table 1 - List of FLEX Payment Terminal
return codes.
Table 1 - List of FLEX Payment Terminal return codes
SPSI_RESPONSE_CODE Description
L20 Specified transaction has already been cancelled.
L21 An error occurred during batch transmission.
L22 Specified transaction does not exist in current batch.
L23 Batch is full.
L24 An error occurred during terminal init iali za ti on.
L26 Batch close mandatory.
L27 An error occurred during batch close.
L28 Empty batch.
L29 Manual entry required.
L30 Unauthorized use.
L31 Transaction cancelled by user or timed out during user entry.
L32 Call card issuer (referral).
L33 Card not supported.
L34 Communication error to the Host.
L35 Host not available.
L36 Transaction not authorized.
L37 Transaction not allowed.
FLEX iPP320 - Installation Guide_v1.50.docx
Page 31

31
The card caracteristics do not match to a card type defined in the
card profile file.
SPSI_RESPONSE_CODE Description
L38 Transaction not supported.
L39 Card declined.
L40 Different card.
L41 Card error.
L42 Specified transaction cannot be cancelled.
L43 Terminal does not have a printer.
L45 Preauthorization unk nown. Terminal does not have inform ation
on original preauthorization.
L75 Internal problem during accumulator update.
L77 Card profile file cannot be authenticated.
L78 Card removed prematurely from chip reader.
L79 Card refused transaction.
L81 No service request in process. Returned on a continuation
request while no processing is in progress.
L82 Message received from Point-of-sale System relates to a different
service request than the one being processed by terminal.
L83 Inconsistent AccordD financing data. (Ex : grace period specified
for EPF)
L84 Transaction rejected by terminal due to invalid security code.
L85 Transaction not processable.
L86 Transaction not completed.
L87 The autorization number format is invalid for this type of card.
L88 Read Card service not allowed, as no card profile is loaded.
L89
L90 No new transaction processed in Partial Mobile mode.
L92 Invoice ID submitted by Point-of-sale System in FLEX service
request does not match ID submitted by terminal in bill payment
request.
L93 Version number of communication protocol not supported.
L94 Other error (general error).
L95 Processing of requested FLEX service not allowed in current
context.
L96 Transaction not allowed.
L97 Terminal busy. Terminal cannot process new transaction at the
moment.
L98 SPSI_SERVICE_REQ_NUM assigned to service request already
used in previous request.
FLEX iPP320 - Installation Guide_v1.50.docx
Page 32

32
Appendix E – Quick start
This section is intended as a summary of the main steps to go through to get going with the FLEX
IPP320 solution.
1. Validation of the terminal’s configuration.
2. Initialization and download of the terminal
3. Registering of the Point-of-sale System
4. Test transaction
5. Explanation of the terminal’s basics to the merchant.
4
4
Required only for IP communication between the Payment Terminal and the Point-of-sale System
FLEX iPP320 - Installation Guide_v1.50.docx
 Loading...