

Page 1

M ASSAGE CHAIR
72 Start Road, Seabrook, NH 03874
603-910-5000
www.infinitymassagechairs.com
User Manual
DYNASTY
Page 2

Thank you for purchasing this product. Please read this user manual
carefully before using to ensure proper installation and operation.
Below Form Shows the Name and Content of Hazardous Substance for this Product
Please keep this USER MANUAL for further reference.
CONTENTS
SAFETY PRECAUTIONS
NAME AND FUNCTION OF EACH COMPONENT
External Structure
Internal Structure
Remote Control
Remote Control Instructions
Display Screen Menu Instructions
FEATURES
APP DOWNLOAD AND INSTALLATION
PRELIMINARY CHECKS
Installation Site
Floor Protection
Grounding Instructions
Initial Assembly
Moving Methods
Connect to Power
Inspections Before Sitting
After Use
CARE AND MAINTENANCE
TROUBLE SHOOTING
TECHNICAL SPECIFICATION
1
3
3
3
4
5
7
16
18
19
19
20
20
21
24
24
25
25
26
27
28
Restricted Substances
Parts Name
Pb Hg Cd Cr PBB PBDE
Outer Panels
Circuit Board
Assembly
Metal Work
Rubber Piece
Power Cable/
Power
Inner Signal
Connecting Cable
Upholstery
This form is made under the regulation of SJ/T 11364
Notes of environment-friendly lifetime
Lifetime of this electrical and electronic produts, if operated as set forth in the manual, with the
hazardous substance or element not to emit, neither to pollute the environment nor to cause
harm to person or property, is limited to 10 years.
Adapter
Curcuit Board Assemblies include the spare parts which make up a whole PCB, such
as resistor, capacitor, integrated circuit, connectors, etc.
Indicates that the concentration of the hazardous substance in all homogeneous
materials in the parts is below the relevant threshold of the GB/T26572 standard.
Indicates that the concentration of the hazardous substance of at least one of all
homogeneous materials in the parts is above the relevant threshold of the
GB/T26572 standard.
Page 3
TECHNICAL SPECIFICATION
Model Number
Rated Voltage
Rated Frequency
Rated Power
Safety Design
Maximum User Weight
Chair Weight
USB Charging Port
Dynasty
:
: 110-120V~
: 50/60Hz
: 220W
: Class Ⅰ
: 300 LBS
: 303.6 LBS
: 1.5A
SAFETY PRECAUTIONS
Precautions listed below will help to ensure proper use of this appliance.
The hazard that may cause by incorrect use are classified into “WARNING” and “ CAUTION”, please ensure that
you read all instructions before using the massage chair.
WARNING
CAUTION
Not Suitable For Below Persons
We recommend that those with any of the following conditions should consult your physician before using.
WARNING
Control Buttons Precautions
CAUTION
Cautions Regarding the Adapters and Cord
CAUTION
Improper operation may cause severe personal injury or substantial property damage.
Improper operation may cause personal injury or product damage.
Prohibited No Disassemble
Those who are using electronic medical instrument embedded in the body, such as cardiac pacemaker.
Those undergoing treatment, especially those who are not feeling well.
Those with malignant tumors or malignant abscesses.(Need to be supervised)
Women who are pregnant.
Those with osteoporosis or fracture spine.
Those with skin disease or those whose skins are injured.
Those with high fever.
Close supervision is necessary when this product is used by, on, or near children, invalids, or disabled persons
The appliance has a heated surface. Persons insensitive to heat must be careful when using the appliance.
This appliance can be used by children aged from 8 years and above and persons with reduced physical,
sensory or mental capabilities or lack of experience and knowledge if they have been given supervision or
instruction concerning use of the appliance in a safe way and understand the hazards involved.
Children shall not play with the appliance.
Cleaning and user maintenance shall not be made by children without supervision.
Do not operate the control buttons with wet hands.
Do not spill water or other liquid onto the control buttons to avoid fault.
Always unplug this appliance from the electrical outlet immediately after using and before cleaning.
An appliance should never be left unattended when plugged in. Unplug from outlet when not in use.
Unplug from outlet during thunder or lightening storms, and before putting on or taking off parts.
Never operate this appliance if it has a damaged cord or plug, if it is not working properly,if it has been
dropped or damaged,or dropped into water. Return the appliance to a service center for examination
and repair.
Check that the power voltage stated on the rating label corresponds to your local electricity supply.
Do not use a damp hand to unplug the cord to avoid electric shock.
Do not drag the cord,reach to the front plastic end to unplug it.
Do not squeeze,over bend , pull hard, twist the cord.
Keep the cord away from heated surfaces.
Do not carry this appliance by supply cord or use cord as a handle.
To disconnect, turn all controls to the off position, then remove plug from outlet.
The appliance is only to be used with the power supply unit provided with the appliance.
It must only be supplied at safety extra low voltage corresponding to the marking on the appliance.
If the supply cord is damaged, it must be replaced by the manufacturer or its service agent or a similarly
qualified person in order to avoid a hazard.
28
Page 4
TROUBLE SHOOTINGSAFETY PRECAUTIONS
Best Circumstances
Do not operate under blanket or pillow. Excessive heating can occur and cause fire,electric shock,
or injury to persons.
Do not use this appliance where temperature is over 40 C.
Do not use this appliance in humid or dusty environment, or when any part of the body is in
contact with plumbing or any similar ground.
Never operate the appliance with the air openings blocked. Keep the air openings free of lint, hair,
CAUTION
and the like.
Do not use outdoors.
Do not operate where aerosol (spray) products are being used or where oxygen is being administered.
Please place the product on the flat level floor.
Do not store near heat or open flame.
Connect this unit to a properly grounded outlet only. See Grounding Instructions.
Best Practices For Safe Use
Only for users weighs below 300 lbs.
Use this product only for its intended use as described in this manual.Do not use attachments not
recommended by the manufacturer.
Appliance should only be used by one person,do not use by two or more persons at the same
time to avoid damage to the products.
Do not use the product right after meal, it may cause discomfort.
Remove the accessories from the arms and empty the pockets while use the massage services.
Check the upholstery under the cushions and other spots, if any damages are present, do not
use it and refer to a qualified service professional for servicing.
If you feel any abnormal discomfort during the operation of this product, turn off the power
CAUTION
PROHIBITED
NO DISASSEMBLY
immediately and do not use the product.
Use the appliance for 20 minutes each time is highly recommended
Make sure there is no obstacles behind the chair and there is enough clearance before adjusting
the backrest or legrest angle.
Make sure no other excessive load pressed on the backrest or legrest besides the user.
Make sure there is no children,pets or other objects under the backrest or legrest.
Please be seated properly while using the appliance.
Do not drag or push the chair or roll on its caster on wood floor or carpet to avoid damage.
Do not stand on or stack heavy objects on the footrest.
Do not fall asleep while the product is operating.
Avoid using the product under the influence of alcohol.
Never drop or insert any object into any openings.
If there is any smoke or unusual smell while using,stop using immediately, unplug the power cord
Do not disassemble this product yourself to avoid failure.
Do not dismantle, fix or modify the yourself, Please contact authorized dealer or service agent.
No.
Symptoms Possible Causes Possible Solutions
These noises are normal and
Noise is heard while
1
in use
arise from friction between the
massage rollers and the leather
.
cover
The power cord is not secured
into the socket
No need to take any
measures
Insert the power plug
properly into the power
socket
Turn on the switch found
Massage Chair does
2
not start
Not switched on
The fuse is blown
on chair side. Then push
power button on remote.
Replace only with a fuse
of same type and rating
Adjust the speaker
No music comes from
3
the speaker
The volume is turned to the
lowest
volume from the mobile
devices. Make sure
Bluetooth setting in chair
and phone are both on.
Backrest or footrest
can not raise or
4
recline
Airbag malfunction
5
Nature sounds are
6
not playing
Excessive load has been
pressed on the backrest or
legrest
The air hose is blocked
Bluetooth is OFF
Reduce the load and
try again
Straight the air hose and
clear out the blockage
Make sure Bluetooth is
set to ON
If problem remains, please contact the Infinity for maintenance.
.
Tips: Do not attempt to repair this product yourself,our company shall not be liable for
the injury or damage caused by any servicing without authorization. Thank you for your
cooperation.
27
Page 5
CARE AND MAINTENANCE
NAME AND FUNCTION OF EACH COMPONENT
Care and Maintenance Instructions
To treat stains on back panel, armrest, footrest , plastic parts or air hose, spot clean
with mild detergent foam,then wipe it with a dry cleaning cloth.
To treat stains on controller, power box, spot clean with a dry cleaning cloth.
To treat stains on back cushion or pillows, use a water-based upholstery cleaner
only, wipe it with moist cloth, then air dry.
To clean the foot/calf unit covers, remove from the chair, hand wash with a mild
detergent, then line dry.
CAUTION
Unplug cord before performing care and maintenance.
To avoid electrical shock or injury, do not touch the power cord with wet hands.
Make sure no detergent enter into the power box while cleaning.
Do not use benzene, thinner or other solvents on your product, it may cause
fading or damage to the product.
Do not iron the upholstery
Storage Methods
Keep the product free from dust. Cover the product with a dust-free cloth to prevent
collection of dust if not in use of a long period of time.
CAUTION
Do not leave this product exposed to direct sunlight for long periods of time.
This may cause fading or damage
Warm Tips
During daily use, please check for the following symptoms:
Burnt smell
The product experiences unusual power ON/OFF when touching the power cord.
Hot power cord
Other abnormal symptoms
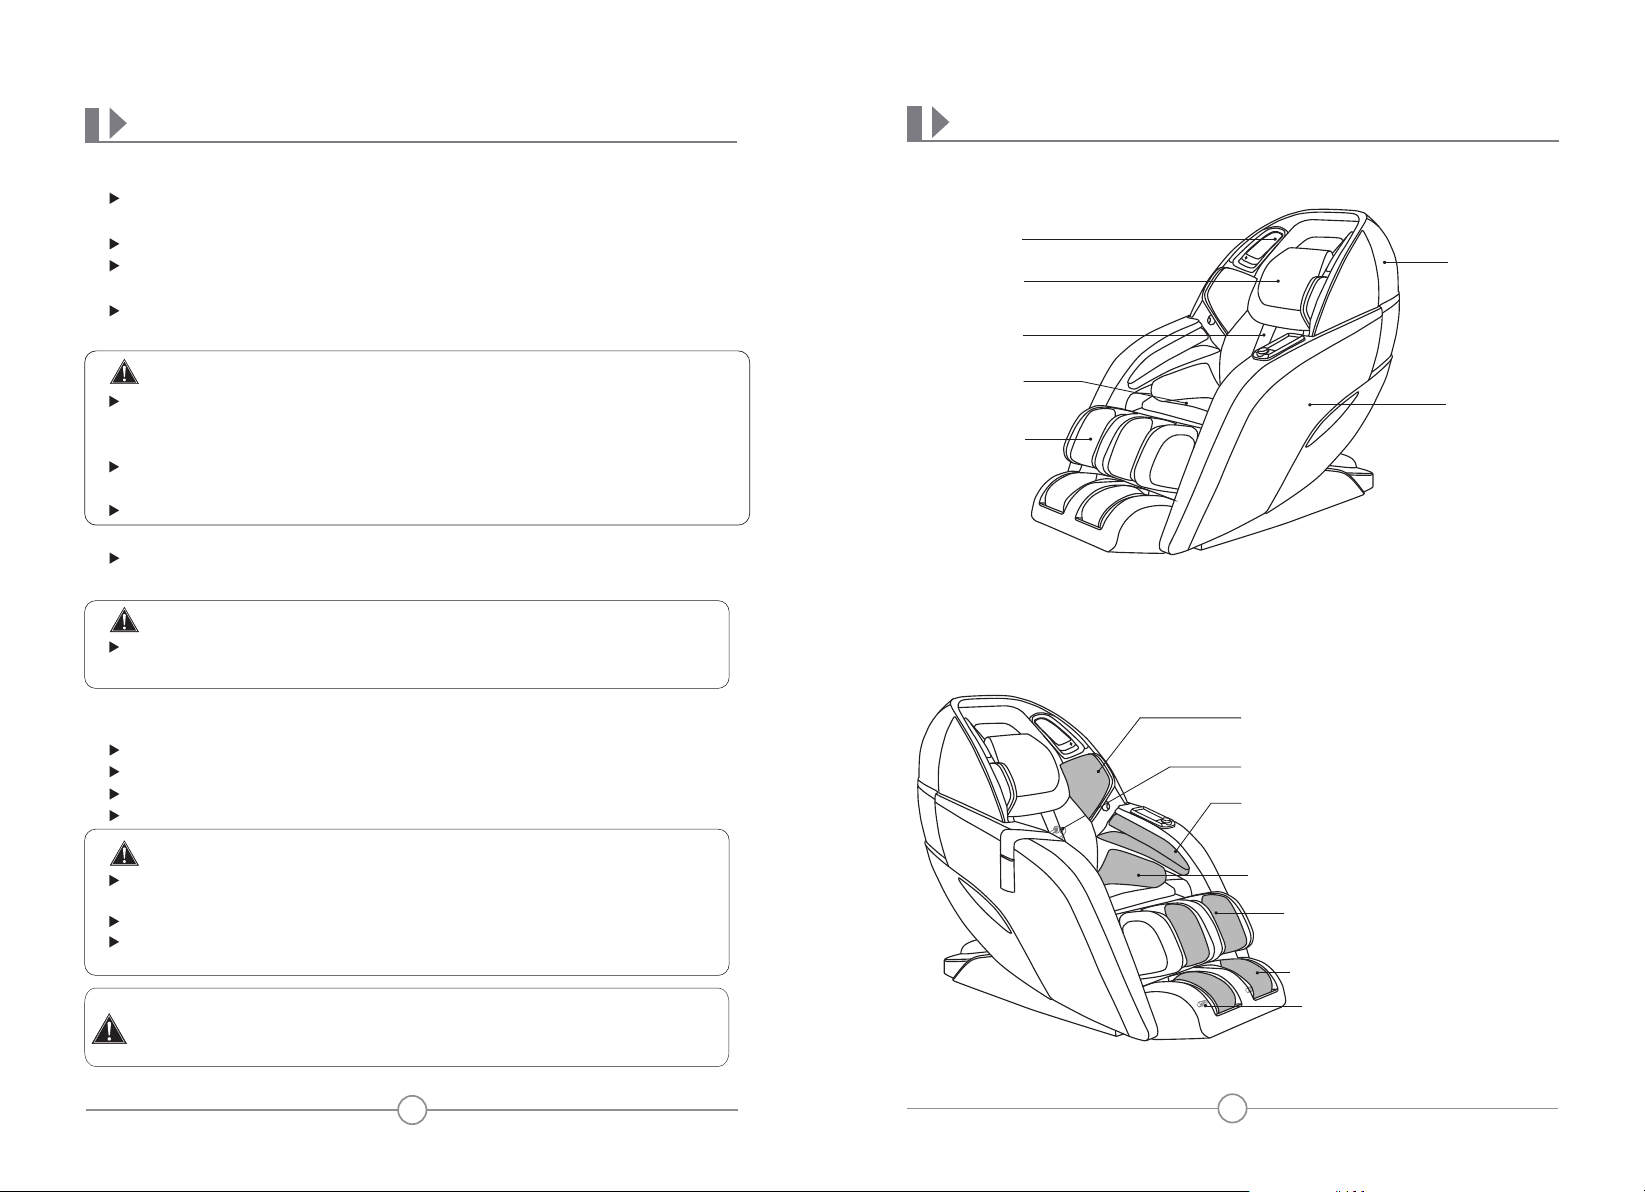
External Structure
Speaker
Back cover
Pillow
Back cushion
Seat cushion
Armrest
Legrest
Internal Structure
Air pressure massage unit for shoulder
Massage mechanism
Air pressure massage unit for arms
CAUTION
Please stop using the product to avoid breakdowns or accidents if any above
symptom spotted
Switch off the power button and disconnect the plug, contact Infinity for repair.
All other servicing except above care and maintenance should be serviced by
an authorized dealer or service center.
WARNING
.
Pull out the power cord from the power before care and maintenance.
To avoid electrical shock or injury, do not handle the tpower cord with wet
hands. Do not try to dismantle or repair the product yourself, please send
your massage chair to the authorized service center
.
26
Air pressure massage unit for buttocks
Air pressure massage unit for calf
Air pressure massage unit for feet
Roller massage unit for sole
3
Page 6

NAME AND FUNCTION OF EACH COMPONENT
PRELIMINARY CHECKS
Remote Control
Display screen
Power on/off
Home
Up
Left
Foot roller
Zero gravity positions
Feet up
Feet down
Footrest retracts
HOME
Pause
Auto massage program
Confirm
Right
Down
Shoulder position adjust
4D massage program
Back up
Back down
Footrest extends
Inspections Before Sitting
Use the remote control to recline the backrest to its lowest position,
raise and extend the footrest to its top position, make sure there is enough
clearance before commissioning.
Return the backrest and footrest back to its default position and turn off
the power switch.
Ensure the footrest is well assembled before sitting on the massage chair.
Ensure the massage chair is returned to its original position before sitting
on it. If there is any part not in default position, please turn off the massage
chair to allow it to restore.
CAUTION
Do not take seat while the footrest is lifted.
Do not put excessive load on the footrest to avoid damage.
After Use
Always unplug the massage chair from the electrical outlet immediately
after use.
Turn off the power switch and unplug the massage chair from the
electrical outlet while not in use to avoid children power on the massage
chair accidentally.
When not in use for a long period of time, we recommend that the chair
be covered, the power cord be coiled and that the unit be placed in an
environment free of dust and moisture.
4
25
Page 7

PRELIMINARY CHECKS
NAME AND FUNCTION OF EACH COMPONENTS
Move Methods
Turn off the power switch and unplug the appliance from the electrical outlet.
Using two people, push down on the backrest and lift up on the front side by
grabbing the moving Holder located to the front bottom of the armrest), roll the
chair on its casters to the desired location (check the sketch for reference).
Roll the chair on its casters to the desired location.
Slowly incline the backrest to upright position.
Casters
CAUTION
Do not move the chair when there is user inside.
To carry this product, do not lift by the footrest or armrest, hold the chassis
and steady the backrest (have 4 or more people to carry the product).
Connect to Power
Connect this appliance to a 3-wire properly grounded outlet.
Turn on the main power switch by the right hand side of the massage chair.
Remote Control Instructions
Power on/off:Press this button to power on/off the controller.
Press this button while connected to power to show the Home
display, the display screen lights up,use the up/down/left/right
buttons to navigate the screen, press OK to select.
Press this button again to turn off the product
Home
Display the AUTO program,MANUAL program, AIRBAG,
IONIZER, HEAT, TIME, SOUNDS, LIGHTS and SETTING function.
(Check the Display Menu for detailed information)
Pause
Press to pause massage chair function, press this button again to
continue.
Auto Program
When massage chair is operating, press AUTO button to enter Auto
Program Menu. Choose from SPORTS REFRESH, EXTENSION,
REST & SLEEP, WORKING RELIEF, NECK & SHOULDER,
WAIST & SPINE, DEEP SHIATSU, HEALTHY BREATH,
MASSAGE EXTEND, RELAXATION, ALL AIR,DEMO
Navigation
Use the up/down/left/right buttons to navigate the
display screen, press OK to select.
While massage program is running, press UP/DOWN
button to change the Mechanism massage speed; press
LEFT/RIGHT button to change the Airbag massage intensity.
.
CAUTION
Please verify that there is no damage to the supply cord before switching on
the massage chair.
Please verify that the main power switch is turned off before connecting
to power.
24
Zero Gravity Position
Press to position the chair in Zero Gravity Position 1, press again to
position the chair in Zero Gravity Position 2, press for the third time
to restore to default recline position.
Foot Roller
Press to turn on foot rollers; press again to turn off foot rollers.
5
Page 8

NAME AND FUNCTION OF EACH COMPONENTS
PRELIMINARY CHECKS
Shoulder Position Adjust (Moves mechanism up and down)
Press and hold on Position UP/DOWN button to adjust the
rollers to the desired position while under manual program
point zone mode
Press and hold on Position UP/DOWN button to adjust the
rollers to the desired position while under the body scan
procedure.
.
Feet Up
Press and hold to raise the Legrest, release the button to stop
Feet Down
Press and hold to lower the Legrest, release the button to stop.
Back Up
Press and hold to raise the backrest, release the button to stop
Back Down
Press and hold to lower the backrest, release the button to stop.
4D Massage
While massage program is running, press this button to change
the 4D protruding intensity.
Footrest Extends
Press and hold to extend the footrest, release the button to
stop. (Make sure there is no obstruction in advance)
Footrest Retracts
Press and hold to retract the footrest, release the button to
s
top.
Step 4: Install the remote control unit
Connect the remote control cable to the massage chair’s port found in the side
of the seat, being careful to line up the pins. Do not force. Then tighten the
cap clockwise to secure the connector in place.
screw
(Check the illustration below for reference
Port for controller line
.
.
)
Screw
cap
Connector of controller line
Step 5: Other Accessories
Connect the power cord to the power box of the product.
Plug the power into a grounded three prong socket, switch on the power,
use the remote control to start operation
.
.
CAUTION
The remote control will give a single short beep sounds when press
the buttons.
The remote control will give short beeps to indicate that limit
position is reached when incline or recline the backrest.
Please do not play with the backrest incline/recline button to
avoid fault.
6
Power Box
Power Cord
Grounded Wall Outlet
Power on/off
23
Page 9

PRELIMINARY CHECKS
NAME AND FUNCTION OF EACH COMPONENTS
Step 3: Install the Legrest
Lift the legrest unit, fit the Hook of the footrest unit into the Coupling Shaft
located at the Seat base (Keep the hook leveled with the coupling shaft),
connect one side first then the other.
Coupling
Hook
Connect the footrest unit with the Coupling Shaft, fit the DK Circlip to the end
of the shaft and lock it by pushing down firmly (check the illustration below).
DK circlip
Raise the legrest unit. Thread the air hose into the air nozzle and fit legrest drive
wire connectors into the drive wire ports. Fit the air connector plug into the air
valve port.Make sure they are well secured (Check the illustration below for
reference).
Zip up the cover and cushion.
Shaft
DK circlip
Coupling Shaft
Air nozzle
Legrest drive
connector port
Legrest power
connector port
Legrest air
connector port
Air hose
Legrest drive
connector plug
Legrest power
connector plug
Legrest air valve
connector plug
Display Screen Instructions
Auto Massage Program
Press to display the Auto Program, select among 12 Auto Programs:
When massage chair is operating, press AUTO button to enter Auto Program Menu.
Choose from SPORTS REFRESH, EXTENSION, REST & SLEEP, WORKING RELIEF,
NECK & SHOULDER, WAIST & SPINE, DEEP SHIATSU, HEALTHY BREATH,
MASSAGE EXTEND, RELAXATION,ALL AIR and DEMO. Press OK to enter the
program you desire.Selected program will show on the home screen.
HOME
Sports Refresh: This is designed to soothe muscles after sports
activities and exercise. It can relax muscles and speed up recovery
time after intense exercise by promoting circulation.
Extension: This program is inspired by Thai massage. The strong
kneading and stretching functions effectively decompresses the
entire body. This program is the best choice to relax tired muscles
and increase physical vigor.
Rest & Sleep: This mild massage is great for your lunch break or
before sleeping. It kneads the entire body with heavy and light
intensity ma
ssage to relieve tired muscles gradually.
Working Relief: This is a great program for people who work at
a desk or travel a lot. It performs a strong massage to ease muscles
and recuperate the body.
Neck & Shoulder: This program relieves neck and shoulder pain, as 80% of the
massage time focuses on the neck and shoulders. The curved design of the chair backrest
allows the massage rollers to completely touch the shoulder and neck. This function
effectively relieves fatigue in these areas.
Waist & Spine: To relieve the pain of the lower back, 80% of this massage focuses on
the lumbar vertebra and the rollers will conduct targeted massage to relieve tension in this
area.
HOME
AUTO
AUTO
22
7
Page 10

NAME AND FUNCTION OF EACH COMPONENTS
PRELIMINARY CHECKS
Deep Shiatsu: Deep shiatsu on the back for 10 minutes.
Healthy Breath: Rhythmic five-minute massage to aid with deep breathing.
Massage Extend: Designed for morning or midday relaxing, it helps to boost
the viability of muscles.
Relaxation: Selected neck & shoulder massage techniques to soothing
pain and tension in the neck and shoulders.
All Air: Full-body airbag-only massage.
Demo: A quick show of massage chair’s features and functions.
Manual Programs
Press Manual from Home display, press UP or DOWN button to navigate among:
MODE, PART, WIDTH, SPEED and ROLLER.
HOME
Massage Mode: Press MODE from MANUAL display, press RIGHT button then press
UP or DOWN button to navigate among: Kneading,Tapping, Knocking, Shiatsu, Sync
and 4D Shiatsu massage techniques. Press OK button to enter the setting you desire.
Selected mode will show on the home screen.
Back Mechanism Massage Part: Press PART from MANUAL display, press RIGHT
button then press UP or DOWN button to navigate among: Whole, Partial and
Point massage regions. Press OK button t
MANUAL
o enter the setting you desire.
MANUAL
Initial Assembly
Step 1: Take all massage chair parts out of the cartons
Before beginning installation, please verify you received 3 boxes; chair body,
arms and foot.
Unpack the cartons: take out all upholsteries and accessories out of the cartons.
Step 2:Install Armrest Unit
Connect the Air Hose of the Seat Base Unit with the Air Nozzle of the Armrest Unit.
Hook the armrest onto the chair base, line up theRear Hook connector with the
Rod Connector and press the armrest unit by force to fit into place.
Fit the screw into the Screw Socket.
Fix a second screw into the front of seat base.
(Repeat installation method with the other side)
Massage Chair Seat Base
Screw
Rear Hook
Rod Connector
Screw socket
MANUAL
MANUAL
8
MANUAL
Rod Connector
Air Nozzle Air Hose
21
Page 11

PRELIMINARY CHECKS
NAME AND FUNCTION OF EACH COMPONENTS
Floor Protection
We recommend to place a piece of thin carpet or soft mat
underneath it to avoid damaging the floor.
Massage chair
Floor
Carpet
Best Circumstances
Do not use the massage chair in high moisture environment such as
near swimming pool or bathroom to prevent electric shock accident.
Please keep the massage chair away from heated surfaces to prevent
fire hazard or damage to the product.
WARNING
Do not use the massage chair in high moisture environment such as
near swimming pool or bathroom to prevent electric shock accident.
Please keep the massage chair away from heated surfaces to prevent
fire hazard or damage to the product.
Grounding Instructions
This product must be grounded. If it should malfunction or breakdown,
grounding provides a path of least resistance for electric current to reduce
the risk of electric shock. This product is equipped with a cord having an
equipment-grounding conductor and a grounding plug. The plug must be
plugged into an appropriate outlet that is properly installed and grounded
in accordance with all local codes and ordinances.
Back Mechanism Massage Width: Press WIDTH from MANUAL display, press
RIGHT button then press UP or DOWN button to navigate among: Wide, Medium and
Narrow mechanism roller width. Press OK button to enter the setting you desire. Selected
width will show on the in-use screen. (Back Mechanism Massage Width can’t adjust when
under Kneading, Sync Manual mode)
Mechanism Massage Speed: Press Speed from MANUAL display, press RIGHT
button then press UP or DOWN button to navigate among: level 1, 2, 3, 4, 5, 6 Mechanism
massage speed.Press OK button to enter the speed level you desire. (Back Mechanism
Massage Speed can’t adjust when under Shiatsu, 3D Shiatsu Manual mode)
Foot Roller Speed: Press ROLLER from MANUAL display,press RIGHT
button then press UP or DOWN button to navigate among: foot roller speed level 1, 2, 3,
or OFF (deactivate foot roller). Press OK but
ton to enter the speed level you desire.
Air Pressure Massage Airbag
HOME
AIRBAG
Part-Air pressure region: Press PART from AIRBAG display, press RIGHT button
then press UP or DOWN button to navigate among: Full, Arm & Shoulder, Back & Waist,
Leg & Foot, Buttock airbag positions. Press OK button to enter the airbag position you
desire.
Force-Air pressure intensity: Press FORCE from AIRBAG display, press RIGHT
button then press UP or DOWN button to navigate among: level 1, 2, 3, 4, 5 airbag
intensity,
airbag setting you desire.
or OFF (deactivate airbag intensity function), Press OK button to enter the
AIRBAG
This product must be grounded, the plug must be plugged into an
appropriate 3-wire grounded outlet that is properly installed and
grounded in accordance with all local codes and ordinances to reduce
risk of electrical shock.
20
9
Page 12

NAME AND FUNCTION OF EACH COMPONENTS
PRELIMINARY CHECKS
Ionizer-Negative Ions
Press IONIZER from Home
display, press RIGHT button,
then press UP or DOWN button
to turn on or off ionizer.
Back Heat
Press HEAT from Home display,
press RIGHT button, then press
UP or DOWN button to navigate
among: 1, 2, 3 heat level ,or OFF
(deactivate heat function),
Press OK button to enter the
heat setting you desire.
Time
Press TIME from Home to show
available timer: 10 mins, 20 mins,
30 mins, press RIGHT button,
then press UP or DOWN button
to navigate, press OK button to
enter the timer you desire.
HOME
HOME
HOME
IONIZER
HEAT
TIME
Installation Site
Clearance space for the massage chair:
Ensure there is an adequate clearance for the installation:It needs 4” clearance for the
recline of the backrest; It needs 24” clearance space for the extension of footrest and
sliding forward of the chair.
Keep it 3 feet away from the TV, radio or other audio & video appliance to avoid signal
interference.
4 inches
24 inches
CAUTION
Keep the distance between the power socket and power switch within
60” to avoid damage of power cord while massage chair sliding
forward.
Straighten the power cord while in use to avoid tangle or damage.
When the massage chair sliding forwards or back, please check to make
sure there is no children, pets or other obstacles around to avoid accident.
10
19
Page 13

APP DOWNLOAD AND INSTALLATION
NAME AND FUNCTION OF EACH COMPONENTS
Apple iOS: (iPhone or iPad devices)
Open the App Store . At the top right corner, search for keywords like “Infinity
Massage Chair, Dynasty, or massage chair” to find the Apple app. Click “Get” at the
top right corner to download and install the software.
In your device settings, open Bluetooth and connect it to the massage chair.
Please note: Only Apple equipment compatible with Bluetooth 4.0 can connect to
the chair’s Bluetooth.
Android System Software (Android System V2.2 or later)
Download the Android app from the Infinity Massage Chairs Google Play store.
Install Dynasty APK, then press Settings button on your computer or Android
device > press Wireless and Web Setting > Bluetooth > Scan Bluetooth device >
Dynasty, then pair.
Start the APK, press Settings menu > Bluetooth > and pair with the Dynasty to
link the APK
Bluetooth Connection Method
Bluetooth-Enabled Audio Devices
This product has Bluetooth compatibility to connect with audio devices.
Open Bluetooth from audio device and pair with Dynasty to play music.
Sounds
Press SOUNDS from Home display, press RIGHT button then press UP or DOWN button
to navigate among: SOUND,VOLUME, BEEP, and DEMO VOICE press OK button to
enter the sounds setting you desire to control.
HOME
Sound: Press SOUND from SOUNDS display,press RIGHT button then press UP or
DOWN button to navigate among: White Noise, Ocean Surf, Crickets, Rain, Nature,
Air Plane, Car Ride, Fireplace,Thunder Storm, Windy Night press OK button to enter
the sound setting you desire.
NNoottee:: Bluetooth must be ON for Sounds to work.
SOUNDS
SOUNDS
SOUNDSSOUNDS
SOUNDS
CAUTION
When connecting your Bluetooth-enabled device, please make sure the chair
and Bluetooth setting is turned on, otherwise it will not find the chair
18
Volume: Press VOLUME from SOUNDS display, press RIGHT button then press UP
or DOWN button to navigate among: 1, 2, 3, 4, 5 volume settings, press OK button to
enter the volume setting you desire.
Beep: Press BEEP from SOUNDS display, press RIGHT button then press UP or
DOWN button to turn on or off remote control beep.
DEMO Voice: Press DEMO VOICE from SOUNDS display, press RIGHT button then
press UP or DOWN button to turn on or off DEMO voice. Voice demo only works
on the DEMO program.
11
Page 14

NAME AND FUNCTION OF EACH COMPONENTS
Lights
Press LIGHTS from Home display to go into lights settings: THEMES,COLORS,
BRIGHTNESS, press RIGHT button then press UP or DOWN button to navigate,
press OK button to enter the option you desire.
HOME
HOME
THEMES: Press THEMES from LIGHTS display, press RIGHT button then press UP or
DOWN button to navigate among: Solid, Breathe, Wake Up, Wind Down, Multi Wave
and Multi Rotate, press OK button to enter the setting you desire
LIGHTS
SOUNDSLIGHTS
LIGHTS
NOTE:
Lights on chair side
and lights on
speakers cannot
be controlled
independently
LIGHTS
FEATURES
9.
CALF MASSAGE
Calf-rubbing airbags surround each side of the lower legs while massager rollers
knead the calves for extreme relaxation
10.
JOYSTICK CONTROL & WIRELESS CHARGING
Button
Dial
USB Charging Port
Button: Press to turn on chair. Press again to cycle through each auto program.
The program name is announced through the speakers and starts immediately.
Press and hold to turn chair OFF.
Dial: Use dial to recline and upright the Dynasty massage chair.
Wireless Charging
Colors: Press COLORS from LIGHTS display, press RIGHT button then press UP or
DOWN button to navigate among: White, Red, Orange,Yellow, Green, Cyan, Blue
and Purple, press OK button to enter the setting you desire. You may only choose
colors in Solid and Breathe themes.
Brightness: Press BRIGHTNESS from LIGHTS display, press RIGHT button then press
UP or DOWN button to navigate among: 1, 2, 3, 4,
setting you desire. 1 is the lowest setting, 5 is the brightest.
5, press OK button to enter the
Turn lights off completely: From the home menu, navigate to LIGHTS and press
OK. In the LIGHTS menu select THEMES and then select the theme program that is
currently running and hit OK. This will turn the lights off.
12
Wireless Charging Pad: Place any wireless charging-enabled phone directly
on pad to charge.
17
Page 15

FEATURES
1.
SPACE-SAVING ZERO-WALL FUNCTION
The Dynasty massage chair has the ability to move forward before performing
a massage. This allows it to be placed closer to the wall than a standard
massage chair. Keep this in mind when positioning the chair.
2.
ZERO GRAVITY
Zero gravity creates a completely relaxing, naturally comfortable massage
position. This design places the back, buttocks, and legs in the same angle
that astronauts experience in space. Zero gravity provides a sense
of weightlessness and promotes circulation and a stead heart rate.
3.
4D MASSAGE MECHANISM
New design of 4D mechanism and movement allow users to adjust the
depth of their massage intensity.
4.
AUTO/MANUAL LEGREST EXTENSION
Legrest can extend 3 in. to accommodate different leg lengths in both Auto
and Manual Modes.
5.
AIRBAG MASSAGE
Airbags are located throughout the chair in order to massage the arms,
back, waist, shoulders, buttock, legs an feet.
6.
FOOT MASSAGE ROLLERS
Three massage rollers in each foot unit conduct an all-over shiatsu massage
on the sole.
7.
DIVERSIFIED MASSAGE TECHNIQUES
Massage techniques include: knocking, kneading, tapping, kneading/knocking,
combination, shiatsu, and kneading on the leg, which imitates a professional
massage therapist.
8.
BLUETOOTH AUDIO
The massage chair includes Bluetooth compatibility. Easily play music by
connecting your Android or Apple device.
16
NAME AND FUNCTION OF EACH COMPONENTS
Setting
Press MENU button, then choose SETTING. Use the up or down button to toggle
language, voice, brightness, buttons, beep, bluetooth, or sleep mode settings.
HOME
SETTING
LANGUAGE: Under SETTING > LANGUAGE function, press right button, then press
up or down button to set CHINESE , ENGLISH, JAPANESE or KOREAN.
VOICE: Under SETTING > VOICE function, press right button, then press up or down
button to turn on or off the voice control function. Touch the button on the left
speaker or say “Switch to voice mode” to activate the voice control function.
Spoken Commands
Switch to voice mode
Power On
Switch Off
Activate Massage
Sports Refresh
Extension
Rest & Sleep
Working Relief
Neck & Shoulder
Waist & Spine
Deep Shiatsu
Healthy Breath
Massage Extend
Relaxation
Air Bag Massage
Demo
Zero Gravity
Start Heat
Heat Off
13
SETTING
Page 16

NAME AND FUNCTION OF EACH COMPONENTS
NAME AND FUNCTION OF EACH COMPONENTS
SETTING
SETTING
SETTING
BRIGHTNESS: Under SETTING > BRIGHTNESS function, press the right button
then press up or down to select display screen brightness. Press ok to set.
BUTTONS: Under SETTING > BUTTONS function, press the right button
then press ON or OFF to control remote key backlight setting.
BEEP: Under SETTING > BEEP function, press up or down button to START or
STOP remote Beep sound.
BLUETOOTH: Under
SETTING > BLUETOOTH
SETTING
SETTING
function, press up or down
button to turn on or
turn off Bluetooth.
SLEEP MODE: Under
SETTING > SLEEP MODE
function press the right
button then select ON to
stop the chair in the reclined
position after Auto Programs. Select OFF to have the chair return fully upright
after each Auto Program.
Note:
Under both Auto Mode and Manual mode, the remote will return to In-Use
page as shown below if it remains idle for 10 seconds.
AUTO
In-Use page in Manual Mode
In-Use page in Auto Mode
Note:
Please do not spill water or other liquids on the controller in order to
avoid key malfunctions and error codes.
Please do not place heavy objects on the controller or power cord.
14
15
 Loading...