

Indesit WME 12 X Instruction For Use & Installation Instructions

M
Washing machine
Instructions for installation and use
Waschvollautomat
Installations- und Bedienungsanleitungen
Lavadora
Instrucciones para la instalación y uso
Máquina de lavar roupa
Instruções para a instalação e a utilização
WME 12 X

Washing machine 1
Instructions for installation and use
Waschvollautomat 15
Installations- und Bedienungsanleitungen
Lavadora 29
Instrucciones para la instalación y uso
Máquina de lavar roupa 45
Instruções para a instalação e a utilização
D
GB
E
P
Here are the 1 1 topics explained in this manual. Read, learn and
have fun: you will discover many secret ways to get a better
wash, more easily and making your washing machine last longer .
Quick guide
1.
Installation and removal (p. 10)
Installation, after delivery or transport, is the most important operation
for the correct functioning of your washing machine. Always check:
1. That the electric system conforms to regulations;
2. That the inlet and draining pipes are connected correctly .
Never use pipes that have already been used;
3. That the washing machine is levelled properly; something
worth checking to aid the performance of your
washing machine;
4. That the drum's fixing screws have been removed from
the back of the washing machine.
2. What goes in your washing machine and how
to start it (p. 2)
A correct distribution of your laundry is vital to the successful
outcome of the wash and the life of the washing machine. Learn all
the tips and secrets to dividing your linen: colour , type of fabric.
3.
Guide to understanding labels (p. 5)
The symbols on the labels of your garments are easy to understand
and equally important for the success of your wash. The guide
includes simple instructions to help you choose the right temperature, wash cycles and ironing methods.
4.
Useful tips to avoid mistakes (p. 6)
Years back, our grandmothers were the ones who ga v e us good
advice - and in those days synthetic fibres did not exist: washing
was easy . Today, your washing machine offers y ou helpful advice
allowing you to wash wool e ven better than an expert laundress
would by hand.
5.
The detergent dispenser (p. 7)
How to use the detergent dispenser and the bleach compartment.
6.
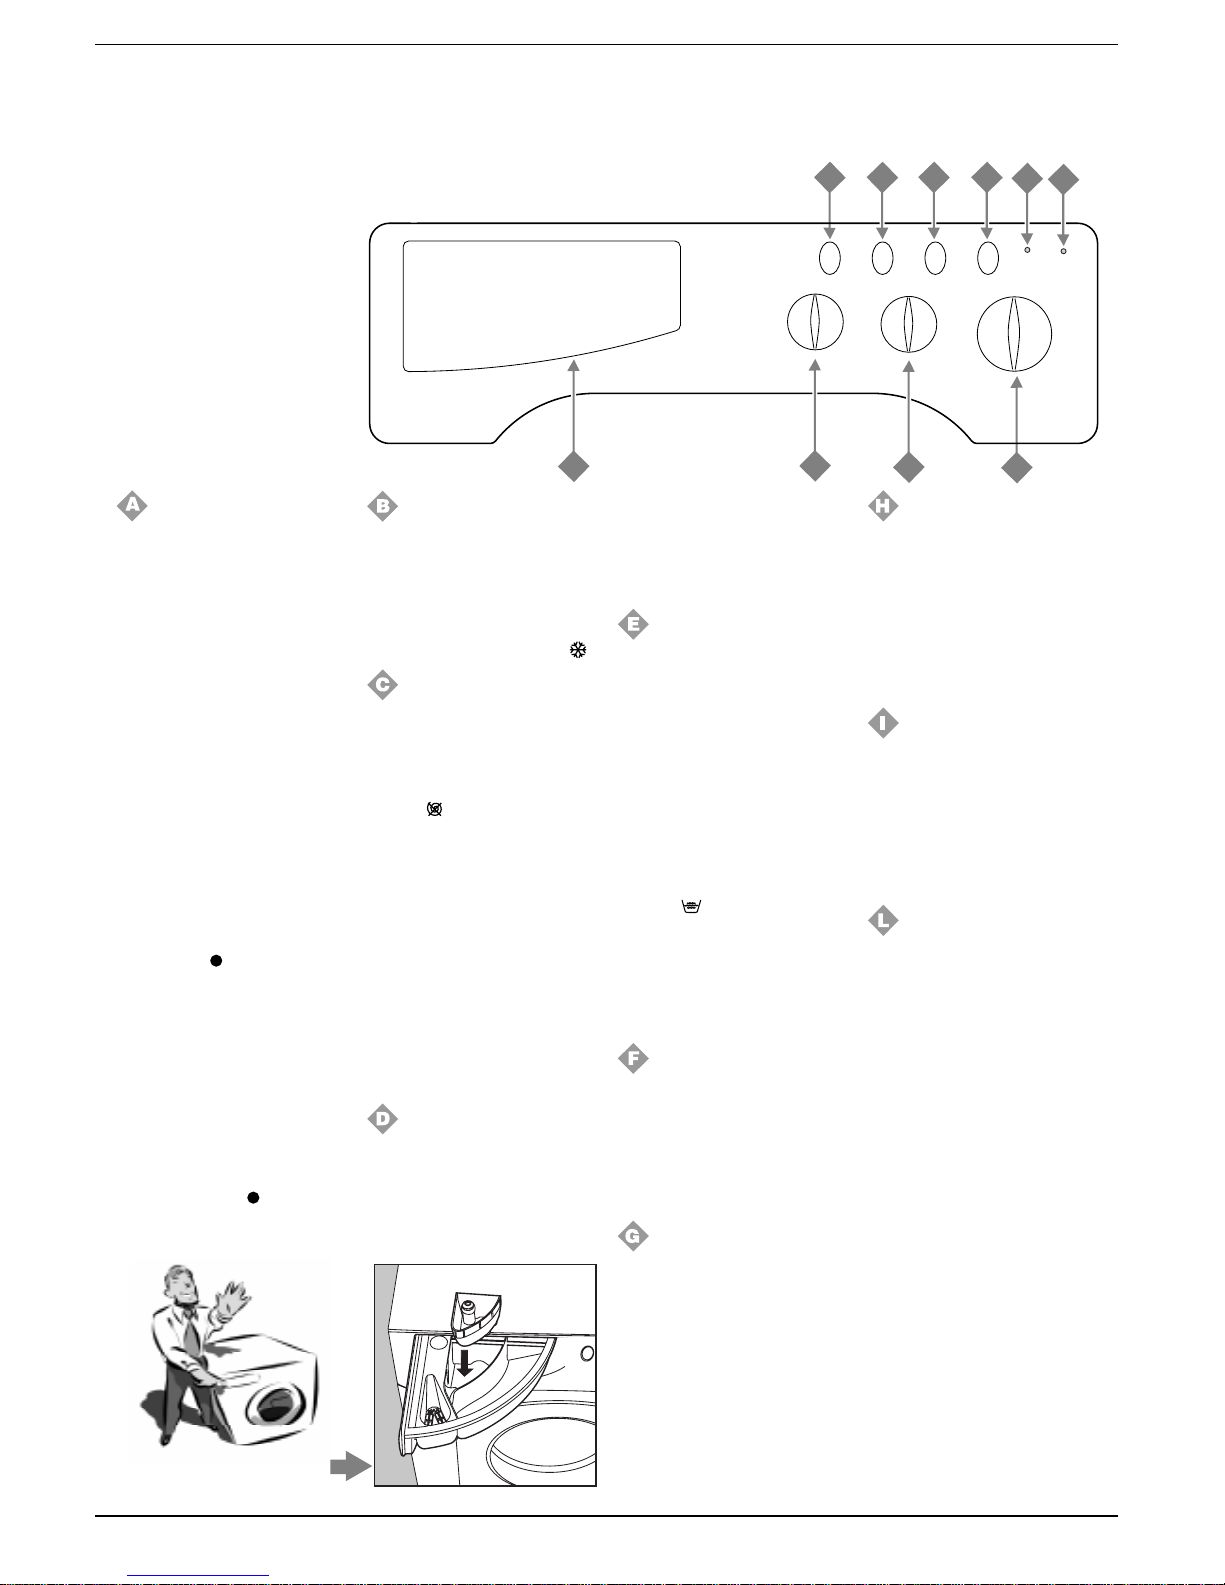
Understanding the control panel (p. 3)
Washing machine’ s control panel is very simple. It has only a f ew
essential buttons to help you choose any type of wash cycle,
ranging from the most energetic, capable of cleaning a mechanic’ s
overalls, to the most delicate f or wool. F amiliarising yourself with it
will help you get the best out of your wash while helping your
washing machine last longer. It’s easy.
7. Guide to the wash programmes (p. 4)
Herein is an easy table to help you choose the right programme,
temperature, detergents and possible additives. Choose the right
programme and you will get better results with your wash while
saving time, water and energy, day after da y.
8. Care and maintenance (p. 13)
With just a bit of care, it will repay you with loyalty and devotion.
With the necessary upkeep, it will wash for years and years to
come.
9.
Problems and solutions (p. 8 and 9)
Before calling a technician, read these pages: immediate solutions
may be found for a number of problems. If the problem persists,
call your local Indesit customer services who will be pleased to
help. Any f ailure will be repaired, as soon as possib le.
10.
Technical characteristics (p. 9)
Herein are the technical features of your washing machine: model
type number, electric and water specifications, size, capacity,
speed of the spin cycle and compliance with Italian and European
regulations.
1 1. Safety for you and your family (p. 14)
Here you will find the necessary safety guidelines, and it is
important for you to read this section carefully.
1
Instructions for installation and use
What goes in your washer?
Before washing, you can do a great deal to ensure better results. Divide your garments
according to fabric and colour. Read the labels, follow their guidelines.
Before washing.
Divide your washing according
to the type of fabric and colour
fastness.
Empty all pockets (coins, paper ,
money and small obejects) and
ensure all loose buttons are
repaired or removed prior to
loading.
How to eliminate the most common stains
Ink and biro Dab with a wad of cotton soaked in methyl alcohol or alcohol at 90°.
Tar Dab with fresh butter, rub in turpentine then wash immediately.
Wax Scrape away, then run a hot iron between two sheets of absorbent paper. Then rub in cotton with turpentine or
methyl alcohol.
Chewing gum Rub in nail polish remover and wipe with a clean rag.
Mold Cotton and white linen should be placed in a solution of 5 parts water, one bleach and a spoon of vinegar, then
washed immediately. For other white fabrics, use hydrogen peroxide at 10 volumes and wash immediately.
Lipstick Dab with ether on wool or cotton. Use tricloroetilene for silk.
Nail polish Place a sheet of absorbent paper on the side of the stain, wet it with nail polish remover, shifting the
garment as the sheet gradually changes colour.
Grass Dab with a wad of cotton soaked in methyl alcohol.
Starting the washer
Starting your washing machine
in the right way is important for
the quality of your wash, to help
prevent future problems and
enhance life expectancy of your
appliance. Once you have
loaded your washing machine
and added the detergent
together with any fabric
conditioner, alwa ys check that:
1. The door is closed correctly.
2. The plug is secured in the
socket.
3. The water supply is turned
on.
4. Selector knob A is positioned
on one of the symbols
(Stop/
Reset).
Choose the desired programme
The programme is selected
according to the type of garments
that need to be washed. T o choose
a programme, refer to the table on
page 4. Turn knob A until the
selected programme is aligned
with the mark on the knob, turn
knob B to the desired temperatu-
re settings, check that knob C is
in the desired position, if
necessary use buttons E, F and
G, and lastly , press on/off button
H (I position).
After installing your new washing machine, start a wash
cycle by setting programme "1" at 90 degrees.
For more delicate
garments:
protect underwear, tights
and stockings and delicate
items by placing them in a
canvas pouch
Dividing your garments
according to fabric and
colour, is very important
for good results
At the end of the wash cycle...
The L lamp to extinguish: it will
take about three minutes.
Then turn the washing machine
off by pressing on-off button H
(O position). You can now open
the washing machine door
safely . After having remo ved the
freshly cleaned washing, leave
the door open to allow air
circulation inside the drum.
Always disconnect electricity at
the socket and turn off the water
supply .
Remember that, in the event
of a power failure, or should
the washing machine switch
itself off, the programme
chosen will remain in its
memory.
The labels say it all.
Always look at the labels: they
tell you everything about your
garment and how to wash it in
the best possible way.
The table on page 5 shows all
meanings behind these
symbols. Their recommendations are important to
achieve better wash results.
Instructions for installation and use
2
M
Big and small happily
together.
This washing machine has a
special electronic control device
for even distribution: before the
spin cycle starts, this device
allows the garments to positions
themselves, to minimise noise
and vibrations during the spin
cycle.
E
A
B
C
D
F
G
H
I
L
The washing machine is
equipped with an extra
compartment 4 (provided as an
accessory) for the bleach, to be
inserted in compartment 1.
Easy iron
This function allows your
washing to come out of the
machine without creases,
making it much easier to iron.
You can use it with programmes
3-4 (Cotton), 5-6 (Synthetics)
and 8-9 (Delicates).
Press this button in
programmes 5-6-8-9 and the
wash cycle will come to a stop
on symbol
. Y ou can comple-
te it by pressing button E again.
Important: this function should
not be used when button G (Stain
removal) has been pressed.
Rapid wash
This button reduces the length
of the wash programme by
about 30%. It cannot be used
with special programmes (see
page 4) or those for wool and
silk.
Stain removal (see page 7)
Thanks to this command, the
washing machine will carry out
a more intensive wash that
optimises the effectiveness of the
liquid additives, thus allowing
more resistant stains to be
removed. When you press the
stain removal button, you cannot
activate the pre-wash.
Here I’m in command
Understanding the control panel
Making the right choice is important. And it’s easy.
Programme selector knob
Use this knob to select the wash
programme.
T urn this knob clockwise onl y .
To select a programme, you
should turn the knob so that the
symbol/number of the desired
programme is in line with the
pointer on the knob.
Now press on/off button H
(position I), pilot lamp I will start
flashing.
After 5", the setting will be
accepted, pilot lamp I will stop
flashing (staying lit) and the wash
cycle will begin.
Should you wish to interrupt the
programme in progress or set a
new one, select one of the
symbols
(Stop/Reset) and wait
5" : when the cancellation has
been accepted, pilot lamp I
flashes, and you can then turn the
appliance off.
After the wash cycle has been set
and accepted by the washing
machine, turning the knob will
have no effect (except for when
it is on position
Stop/Reset).
T emperature control knob
It is used to set the wash temperature in the recommended
programme table on pag. 4. It also
allows you to reduce the temperature recommended for the
selected programme, and even to
set a cold wash cycle (
).
Spin exclusion knob
It is used to exclude the spin
cycle (by choosing symbol
)
or to reduce the spin speed of
the selected programme. The
maximum speed for the four
types of fabric are:
Fabric Speed
Cotton 1200 rpm
Synthetics 800 rpm
Wool 600 rpm
Silk no
Note: distribution phase will be
carried out at low speed.
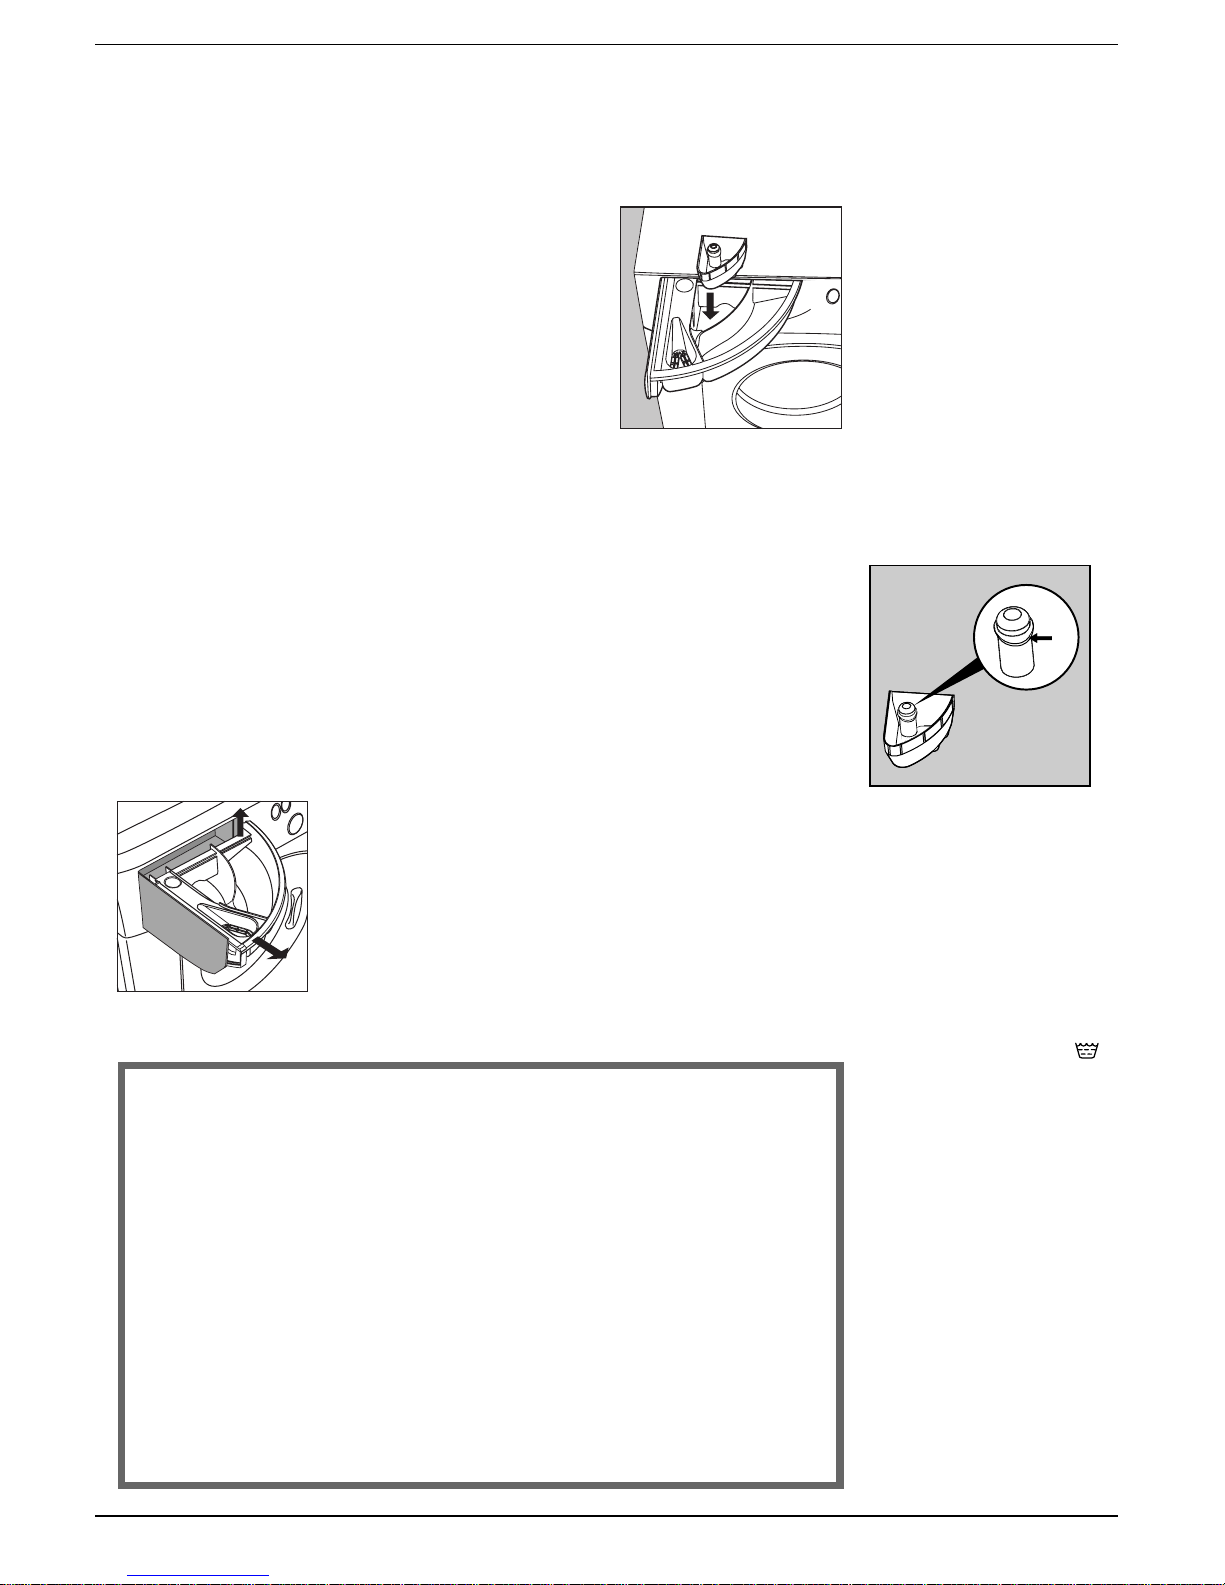
Detergent dispenser
It is divided into three
compartments:
1.Detergent for pre-wash;
2.Detergent for the main cycle
wash;
3. Fabric conditioner .
The detergent dispenser with the
additional bleach compartment
is here.
3
Instructions for installation and use
On-off
When button H is pressed, the
washing machine is switched
on, when it is not the machine
is switched off.
Turning the appliance off
does not cancel the selected
programme.
The on-off lamp
Lamp I flashes when the
appliance is switched on and
awaiting a programme to be set.
A steady light means the
appliance has accepted the
selected programme.
The door block lamp
The safety lamp indicates that the
washing machine door is locked
to prevent it from being opened
accidentally. To avoid any
damages to lock mechanism,
you must wait for the lamp to
extinguish, before attempting to
open the door which takes around
three minutes.
MAX
1
2
4
3
Type of fabric and degree of soil Programme
knob
Temperature
knob
Detergent
for wash
Fabric
softener
Stain rem.
button/
Bleach
Length of
the cycle
(minutes)
Description of wash cycle
COTTON
Exceptionally soiled whites (sheets,
tablecloths, etc.)
1 90°C
◆◆
165
Prewash cycle, wash cycle at 90°C, rinse
cycles, intermediate and fin al spin cycle s
Exceptionally soiled whites (sheets,
tablecloths, etc.)
2 90°C
◆◆
Del./Trad.
145
Wash cycle at 90°C, rinse cycles,
intermediate and fina l sp in c ycles
Heavily soiled whites and fast colours
3 60°C
◆◆
Del./Trad.
130
Wash cycle at 60°C, rinse cycles,
intermediate and fina l sp in c ycles
Slightly soiled whites and deli cate
colours (shirts, jumpers, etc. )
4 40° C
◆◆
Del./Trad.
95
Wash cycle at 40°C, rinse cycles,
intermediate and fina l sp in c ycles
Rinse cycles/Bleach
◆
Del./Trad.
Rinse cycles, intermediate and final spin cycles
Spin cycle Draining and final spin cycle
Stop/Reset
Interrupts/Cancels the selected programme
SYNTHETICS
Heavily soiled fast colour synth etics
(baby linen, etc.)
5 60°C
◆◆
Delicate
100
Wash cycle at 60°C, rinse cycles, anticrease or delicate spin cycle
Delicate colour synthetics
(all types of slightly soiled garments)
6 40°C
◆◆
Delicate
70
Wash cycle at 40°C, rinse cycles, anticrease or delicate spin cycle
Delicate colour synthetics (all types of
slightly soiled garments)
7 30°C
◆◆
30
Wash cycle at 30°C, rinse cycles and
delicate spin cycle
Rinse cycles/Bleach
◆
Delicate
Rinse cycles, anti-crease or deli cate spi n
cycel
Fabric softener
◆
Rinse cycles with automatic introdu ctio n of
softener, anti-crea se or d eli ca te spin cycle
Spin cycle Draining and delicate spin cycle
Stop/Reset
Interrupts/Cancels the selected programme
DELICATES
Hand wash
8 40°C
◆◆
60
Wash cycle at 40°C, rinse cycles and
delicate spin cycle
Particularly delicate garments and
fabrics (curtains, silk, viscose, etc.)
9 30°C
◆◆
50
Wash cycle at 30°C, rinse cycles, anticrease or draining
Rinse cycles
◆
Rinse cycles, anti- cre ase o r dr ai n ing
Spin cycle Draining and delicate spin cycle
Draining Draining
Stop/Reset
Interrupts/Cancels the selected programme
A programme for all seasons
What are you washing today?
Instructions for installation and use
4
Daily wash Y our washer has a programme available for the washing of lightly soiled garments in a short amount of time.
By setting programme 7 at a temperature of 30°C, you can wash different types of fabrics together (except for wool and silk), with a
maximum load of 3 kg. This programmes allows you to save on both time and energy as it only lasts around 30 minutes.
WE RECOMMEND THE USE LIQUID DETERGENT.
Important: to cancel the wash programme you have just set, select one of the symbols (Stop/Reset) and wait for at least 5 seconds.
Special programme
The data found in the table is purely indicative, and can vary according to the quantity and type of washing, the water system temperature and
the room temperature.
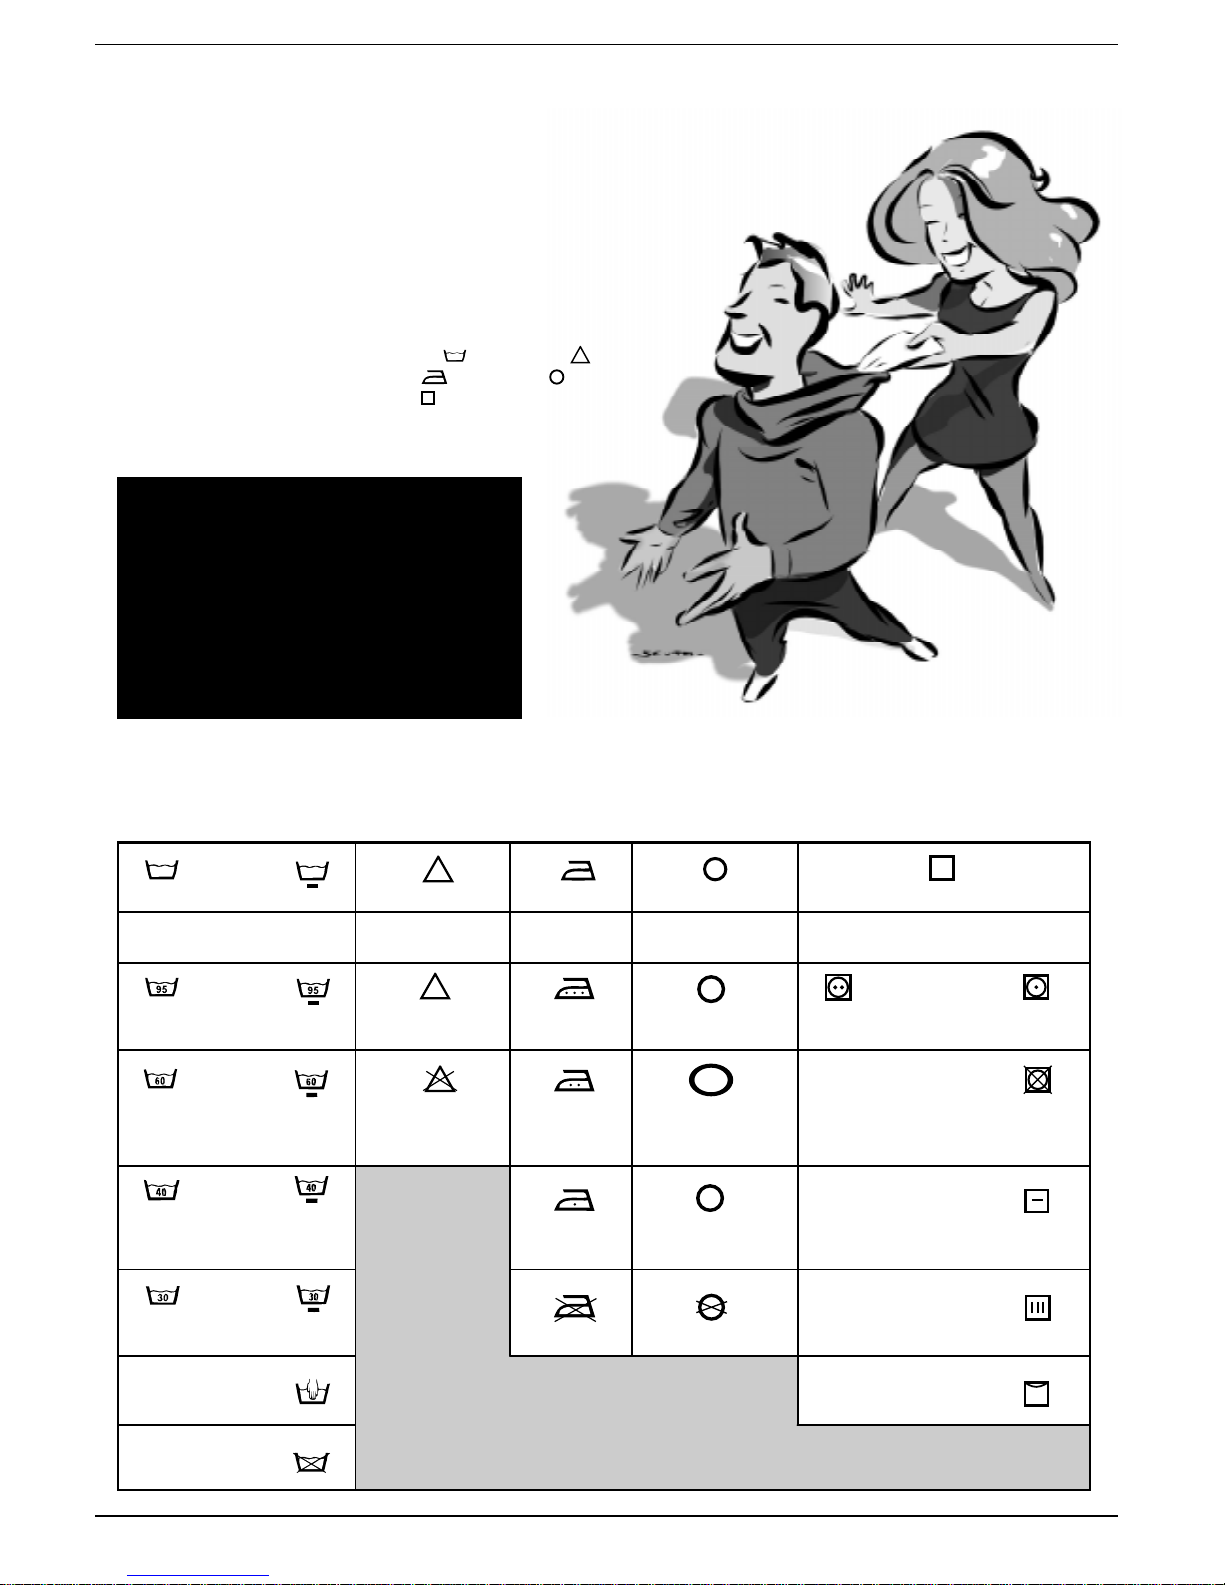
Wash Bleaching Ironing Dry cleaning Drying
Strong
action
Delicate
action
High
Temp.
Low
Temperat.
Wash at
95°C
Bleaching only in
cold water
Hot iron at max
200°C
Dry clean with any
solvent Machine dryable
Wash at
60°C Do not bleach
Medium hot
ironing at
max 150°C
Dry clean only with
perchloride, benzine
av., pure alcohol,
R111 and R113
Do not machine
dry
Wash at
40°C
Iron at max
110°C
Dry clean with av.
benzine, pure alcohol
and R113 Sprea d to dry
Wash at
30°C Not ironable Do not dry clean
Hang to dry
without s p in
drying
Hand wash
Dry on clothes
hanger
Not
washable in
water
Understanding labels
Learn the meaning of these symbols and you will get better
results, your garments will last longer resulting in an
improved wash.
All over Europe, garment labels
contain messages expressed in
small yet important symbols.
Understanding them is very
important if you want to get
better results and treat your
garments the way they deserve
to be treated.
These symbols are divided in
five different categories and
shapes:
washing
, bleaching ,
ironing
, dry cleaning and
drying
.
Consult and learn the symbols in this table: they will help you
obtain a better wash, treat your clothes properly, and get a
better performance out of your washing machine.
Useful tips
Turn shirts inside out to get better results
and make them last longer.
Always empty pockets of their contents.
Look at the label: it will always give you useful
advice.
When loading your washing, try to have a mixture
of large to small items.
Make sure you select the right
temperature!
5
Instructions for installation and use
l
c
A
P
F
Useful tips
Never use your washing
machine to wash... torn, fraying
or non-hemmed linen. If it is
absolutely neccessary , place it in
a bag for protection. Do not wash
coloured linen with whites.
Watch the weight!
For best results, do not exceed
the weight limits stated below
(figures show weight of dry
garments):
- Resistant fabrics:
5 kg maximum
- Synthetic fabrics:
2.5 kg maximum
- Delicate fabrics:
2 kg maximum
- Pure new wool:
1 kg maximum
How to wash almost anything
Curtains.
Curtains tend to crease a great
deal. A useful tip to reduce
creasing: fold the curtains and
place them in a pillow case or
mesh bag. Do not load anything
else inside the appliance, this
will ensure that the overall
weight does not exceed the half
load. Remember to use the
specific programme 9 which
automatically excludes the spin
cycle.
T rainers .
Once you have removed mud
and dirt from trainers, you can
even wash them with jeans or
any other tough garments. Do
not wash trainers with whites.
Quilted coats and anorak.
You can wash quilted coats and
wind-cheaters, too, if they are
padded with goose or duck
down. Do not load more than
2-3 kg and never load 5 kg.
Repeat rinse once or twice
using the gentle spin.
How much does it weigh?
1 sheet 400-500 gr.
1 pillow case 150-200 gr .
1 tablecloth 400-500 gr .
1 bathrobe 900-1,200 gr.
1 towel 150-250 gr .
Coloured T-shirts, printed
ones and shirts last longer if
turned inside out before washing.
Printed T-shirts and sweatshirts
should always be ironed inside out.
Dungaree alert.
Ver y popular “salopette” type
overalls have straps with hooks
that can damage the drum of your
washing machine or other
garments during the wash. To
minimise the risk, place hooks in
the pocket and fasten with safety
pins.
Holidays: unplug the
appliance.
It is recommended that you
should unplug the machine from
the socket and turn off the water
supply. Leave the door ajar to
allow air circulation to the draw
and the door gasket area. This will
prevent unpleasant odours.
Instructions for installation and use
6
For best results, we
recommend you use a
specific detergent, taking
care not to wash more than
1 kg of laundry .
WOOL CYCLE
You must follow the dosage
recommendations provided by
the manufacturers when adding
detergent or fabric conditioner.
Doses will vary according to the
wash load, the water hardness
and how soiled the washing is.
Experience will help you select
the right dosage almost
automatically: it will become your
secret.
Before adding detergent for prewashing in compartment 1,
make sure that the extra
compartment for bleach 4 has
not been inserted.
Ensure no overfilling when
adding fabric conditioner in
compartment 3.
The washing machine automatically adds the softener to the
wash in each programme.
Liquid detergent is poured into
compartment 2 just a few
seconds before starting the
wash cycle.
In compartment 1:
Detergent for pre-washing (powder)
In compartment 2:
Detergent for washing
(powder or liquid)
In compartment 3:
Additives (softeners, perfumes, etc.)
In compartment 4:
Bleach and delicate bleach.
Useful tips about the detergent dispenser
It’ s important for a good wash
The first secret is the easiest: the detergent dispenser is
opened by rotating it outwards.
Remember that liquid detergent
is only designed for wash
cycles of up to 60 degrees on
non pre-wash items.
Special containers are sold with
liquid or powder detergents for
placing inside the washing
machine drum, these are
positioned according to the
instructions found in the
detergent box
Never use hand wash
detergent, because it may form
too much foam, which could
damage the washing machine.
Detergents that are specifically
formulated for both hand and
machine wash are an
exception.
One last secret: when washing
with cold water, alw a ys reduce
the amount of detergent you use:
it dissolves less easily in cold
water than in hot water , so part
of it would be wasted.
Cutting costs efficiently
A guide to environmentally
friendly and economic use
of your appliance.
MAXIMISE THE LOAD SIZE
Achieve the best use of energy, water, detergent and time by using the recommended
maximum load size.
SAVE up to 50% energy by washing a full load instead of 2 half loads.
DO YOU NEED TO PRE-WASH?
For heavily soiled laundry only!
SAVE detergent, time, water and between 5 to 15% energy consumption by NOT
selecting Prewash for slight to normally soiled laundry.
IS A HOT W ASH REQUIRED?
Pretreat stains with stain remover or soak dried in stains in water before washing to
reduce the necessity of a hot wash programme.
SAVE up to 50% energy by using a 60°C wash programme.
BEFORE USING A DRYING PROGRAMME ...
SAVE energy and time by selecting the highest suitable spin speed to reduce the water
content in laundry before using a drying programme.
The detergent dispenser can be
removed and cleaned: pull it outwards,
as indicated in the figure. Then leave it
under running water for a few minutes.
7
Instructions for installation and use
Bleach cycle and stain remover
button
If bleaching is necessary, the
extra case 4 (provided) must be
inserted into compartment 1 of
the detergent dispenser.
When pouring in the bleach, be
careful not to exceed the "max"
level indicated o n the central
pivot (see illustration).
The use of the additional bleach
container excludes the
possibility of using the pre-wash
cycle. Traditional bleach can
only be used on sturdy white
fabrics, whereas delicate
bleach can be used for
coloured fabrics, synthetics
and for wool.
You cannot bleach with the
“Silk” programme and with the
“special programmes” (see
page 4).
Use the stain removal button
every time you want to bleach.
Should you want to do it
separately you must pour the
bleach into the additional
container 4, press button G
(stain removal), start the
washing machine, then select
one of the symbols
according to the type of fabric.
When you bleach during a
normal wash cycle, pour the
detergent and any additives in
the special compartments,
press button G (stain removal),
set the programme you desire
and turn the washing machine
on.
1
2
MAX
1
2
4
3
MAX
MAX
The washing machine
fails to fill with water .
Is the hose correctly
connected to the tap?
Is there a water shortage ?
There could be work in
progress in your building or
street.
Is there sufficient water
pressure? The autoclave
may be malfunctioning.
Is the tap filter clean? If the
water is very calcareous, or
if work has recently been
carried out on the water
piping, the tap filter could be
clogged with particles and
debris.
Is the rubber hose kinked?
The tract of the rubber hose
bringing water to washing
machine must be as straight
as possible. Make sure it is
not squashed or kinked.
The programme selector
knob keeps turning?
Wait a few minutes for the
drain pump to empty the
tub, switch the washer off,
select one of the symbols
stop/reset
, then switch it
back on. If the knob continues
to turn, call for assistance
because it is showing an
anomaly.
The washing machine
continuously fills and
drains water.
Is the drain hose positioned
too low? It must be installed
at a height ranging from 60 to
100 cm.
Is the end of the hose
immersed in water?
Does the wall drainage
system have a breather
pipe? If the problem persists
even after these checks, turn
the water supply off the
machine and call for
assistance.
If you live on an upper floor of
your building, there may be a
problem with your drain tr ap.
To solve this problem, a
special valve must be
installed.
Before calling, read the f ollowing
Troubleshooting
In most cases, when your washing machine fails to work, the problems arising
can be easily solved without having to call for a technician. Before calling for
assistance, always check these points.
The washing machine
fails to start.
Is the plug correctly inserted
into the socket? It could have
been moved whilst cleaning.
Is there electricity in the
house?
A circuit breaker may have
switched off as a result of too
many electrical appliances
working at the same time. Or
maybe due to a general failure
in your entire area.
Is the washing machine
door closed properly?
For safety reasons, the
washing machine cannot work
if the door is open or not shut
properly.
Is the On/Off button
pressed?
If it is, then a programmed start
has been set.
Is the programmed start
knob, in the correct position
for those models
concerned?
Is the water supply turned
on? For safety reasons, if the
washing machine does not
load water, it cannot start a
wash cycle.
RIGHT WR ONG
Turn off the water
supply after use.
This will eliminate
the possibility of
leakage.
Always leave the
appliance door ajar
to avoid bad odours.
Clean the
appliance’s
exteriors gently.
To clean the
exteriors and the
rubber parts of the
appliance, always
use a soft cloth
dipped in warm and
soapy water.
Leave the washing
machine plugged in while
cleaning.
Even during maintenance,
the appliance should
always be unplugged.
Use solvents and
aggressive abrasives.
Never use solvents or
abrasives to clean the
external and rubber parts
of the washing machine.
Neglect the detergent
dispenser.
It is removable and can
easily be cleaned by
leaving it under running
water.
Go on holiday without
thinking about her.
Before leaving, always
make sure that the
washing machine is
unplugged and that the
water supply is turned off.
Instructions for installation and us
e
8
Simple: with the new Indesit technology, you need less than
half of it, to get good results on twice as much!
This is why you cannot see the water through the door:
because there is little, very little of it, to respect the
environment yet without renouncing maximum cleanliness.
And, on top of that, you are also saving electricity.
But where did all the water go?
Model
WME 12 X
Dimensions
width 59,5 cm
height 81,5 cm
depth 54 cm
Capacity
from 1 to 5 kg
Electrical
connections
voltage 220/230 Volt 50 Hz
maximum absorbed power 1850 W
Water connections
maximum pressure 1 MPa (10 bar)
minimum pressure 0,05 MPa (0,5 bar)
drum capacity 46 litre
Spinning speed
up to 1200 rpm
Control programs in
compliance with
IEC regulation 456
programme 3; temperature 60°C; carried out with 5 kg load.
This appliance conforms with the following E.E.C. direct ives:
- 73/23/EEC of 19/02/73 (Low Voltage) and subsequent modifications
- 89/336/EEC of 03/05/89 (Electromagnetic Compatibility) and subsequent modifications
Too much foam.
Is the detergent appropriate
for machine washing?
Check whether the definition
on its label reads “for machine
wash” or “hand and machine
wash”, or any other similar
wording.
Is the correct amount being
used? An excessive amount
of detergent, besides
producing too much foam,
does not guarantee a more
effective wash, and causes
scaling in the internal parts of
the appliance.
If, despite all checks, the
washing machine fails to
function and the problem
persists, call your nearest
authorised Customer Service
Centre, providing the following
information:
- the nature of malfunction
- the model type no. (Mod. ....)
- the serial number (S/N ....)
This information can be found on
the data plate situated at the
back of the washing machine.
Is there space between the
machine and adjacent
units? If it is not a built-in
model, the washing machine
will oscillate a bit during the
spin cycle. A few cm of space
should therefore be left
around it.
The washing machine
leaks.
Is the metal ring of the inlet
hose properly attached?
Turn off the water supply,
unplug the appliance and try
tightening its attachment
without forcing it.
Is the detergent dispenser
obstructed? Remove and
wash it under tap water .
Is the drain hose well
attached? Turn off the water
supply , unplug the appliance
and try tightening its
attachment.
Is the washing machine’s
drain duct clogged? Is there
an extension of the drain
hose? If so, is it positioned
incorrectly, blocking the
water flow?
Excessive vibration
during the spin cycle.
Have all transit screws been
removed durind installation? See the following
page on installation
procedures.
Has the washing machine
been levelled correctly? The
levelling of the appliance
should be checked
periodically. Adjust the feet
and check them with a level.
The washing machine
does not drain or spin.
Does the selected
programme incorporates
water draining? Some
programmes stop at the end
of the wash cycles and
draining will have to be
selected manually .
Is the “Easy iron" function
-where provided - enabled?
This function requires manual
selection for draining.
Is the drain hose kinked?
The tract of the drain hose
must be as straight as
possible. Make sure the drain
hose is not squashed or
kinked.
Technical characteristics
Always get
assistance from
authorised
technicians and
always insist on
original spare parts.
9
Instructions for installation and use
When the new
washer arrives
Installation and removal
Whether new or just transported to a new house,
installation is extremely important for the correct
functioning of your washing machine.
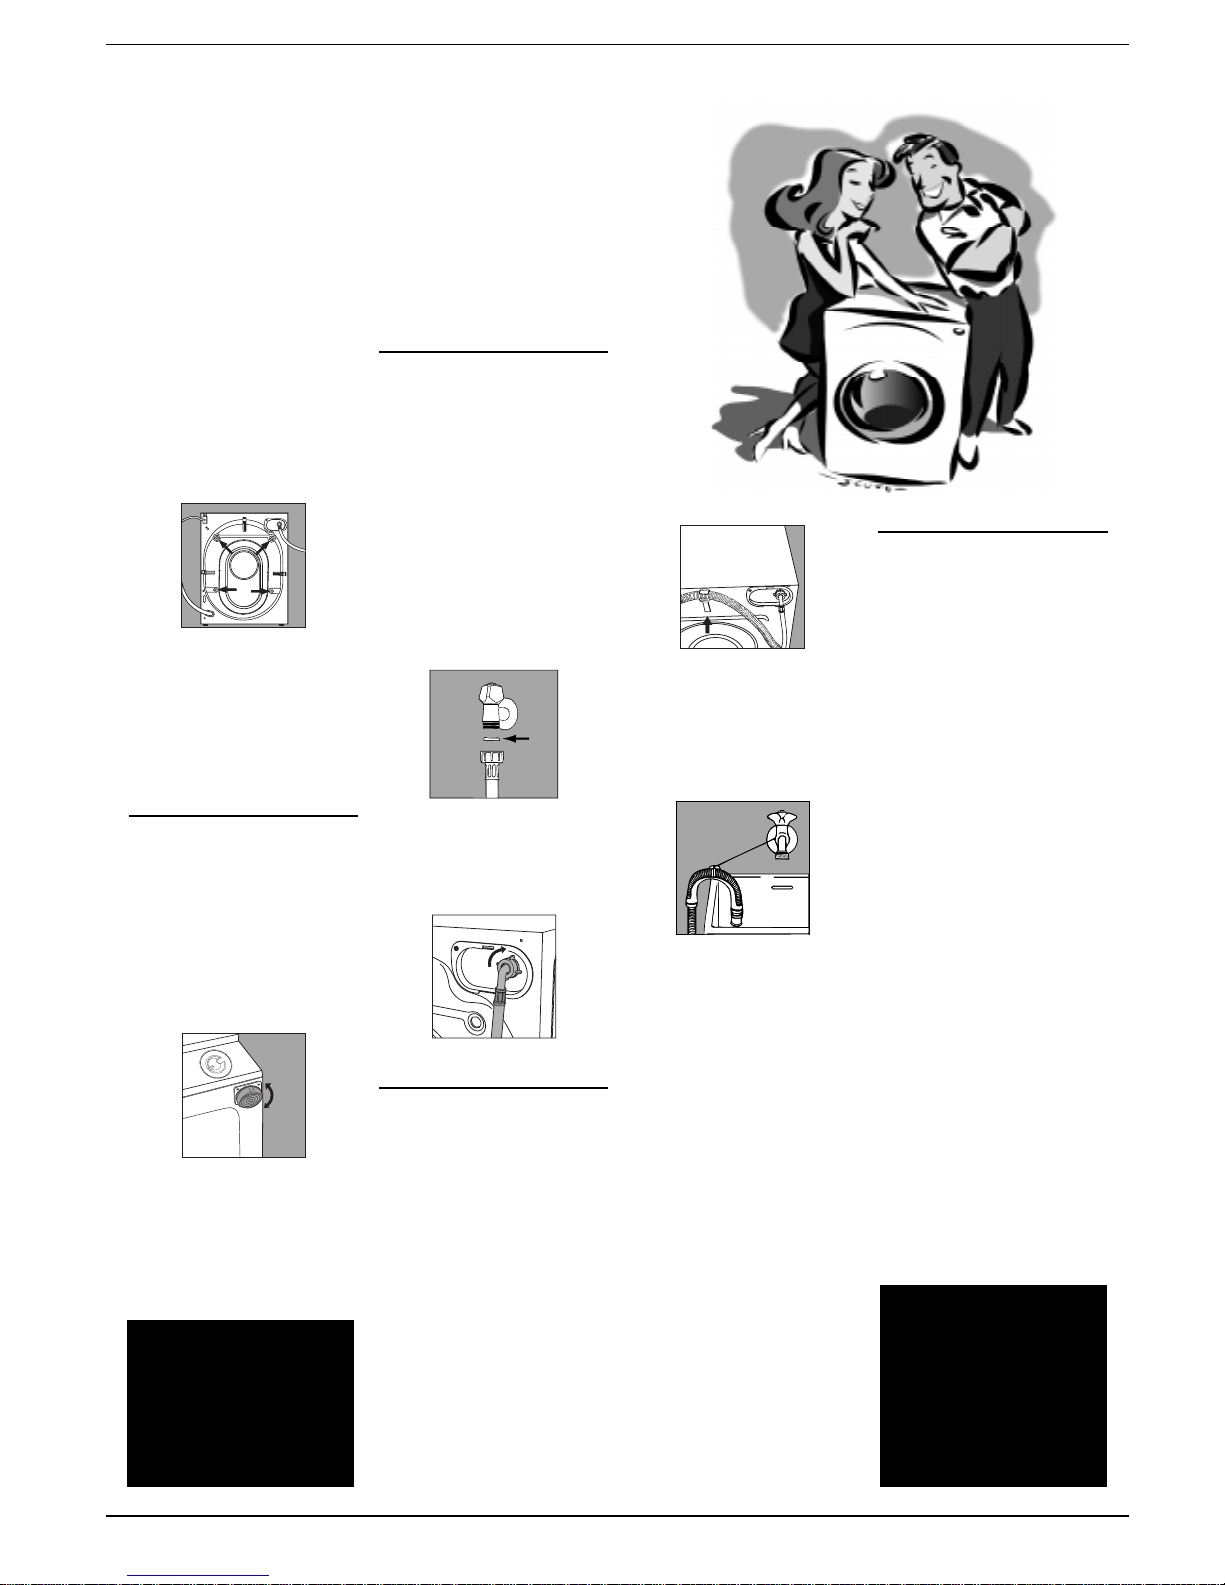
The hook to be used in case the
drain hose ends at a height below
60 cm.
If the drains hose empties into
a tub or sink then fit the plastic
guide and secure it to the tap.
The guide for draining into tubs and
sinks.
The end of the drain hose must
be positioned so that it cannot
become submerged.
Extensions are unadvisable. In
case of absolute need, the
extension must have the same
diameter as the original hose and
must not exceed 150 cm. In case
of wall draining pipes, their
efficiency must be checked by
a qualified technician. If the
dwelling is on one of the upper
floors of a building, there may be
drain trap problems causing the
washing machine to load and
unload water continuously .
In order to avoid such an
inconvenience, special anti-drain
trap valves are available in
shops.
After removing the appliance
from its packaging, check that it
is intact. If in doubt, contact a
qualified technician immediately .
The inside of the machine is
supported, for transportation, by
4 screws on the back panel.
Before using the washing
machine, remove the screws,
remove the spacers together
with the rubber tubes attached
to them (keeping all the parts)
and use the plastic plugs
provided to fill in the holes.
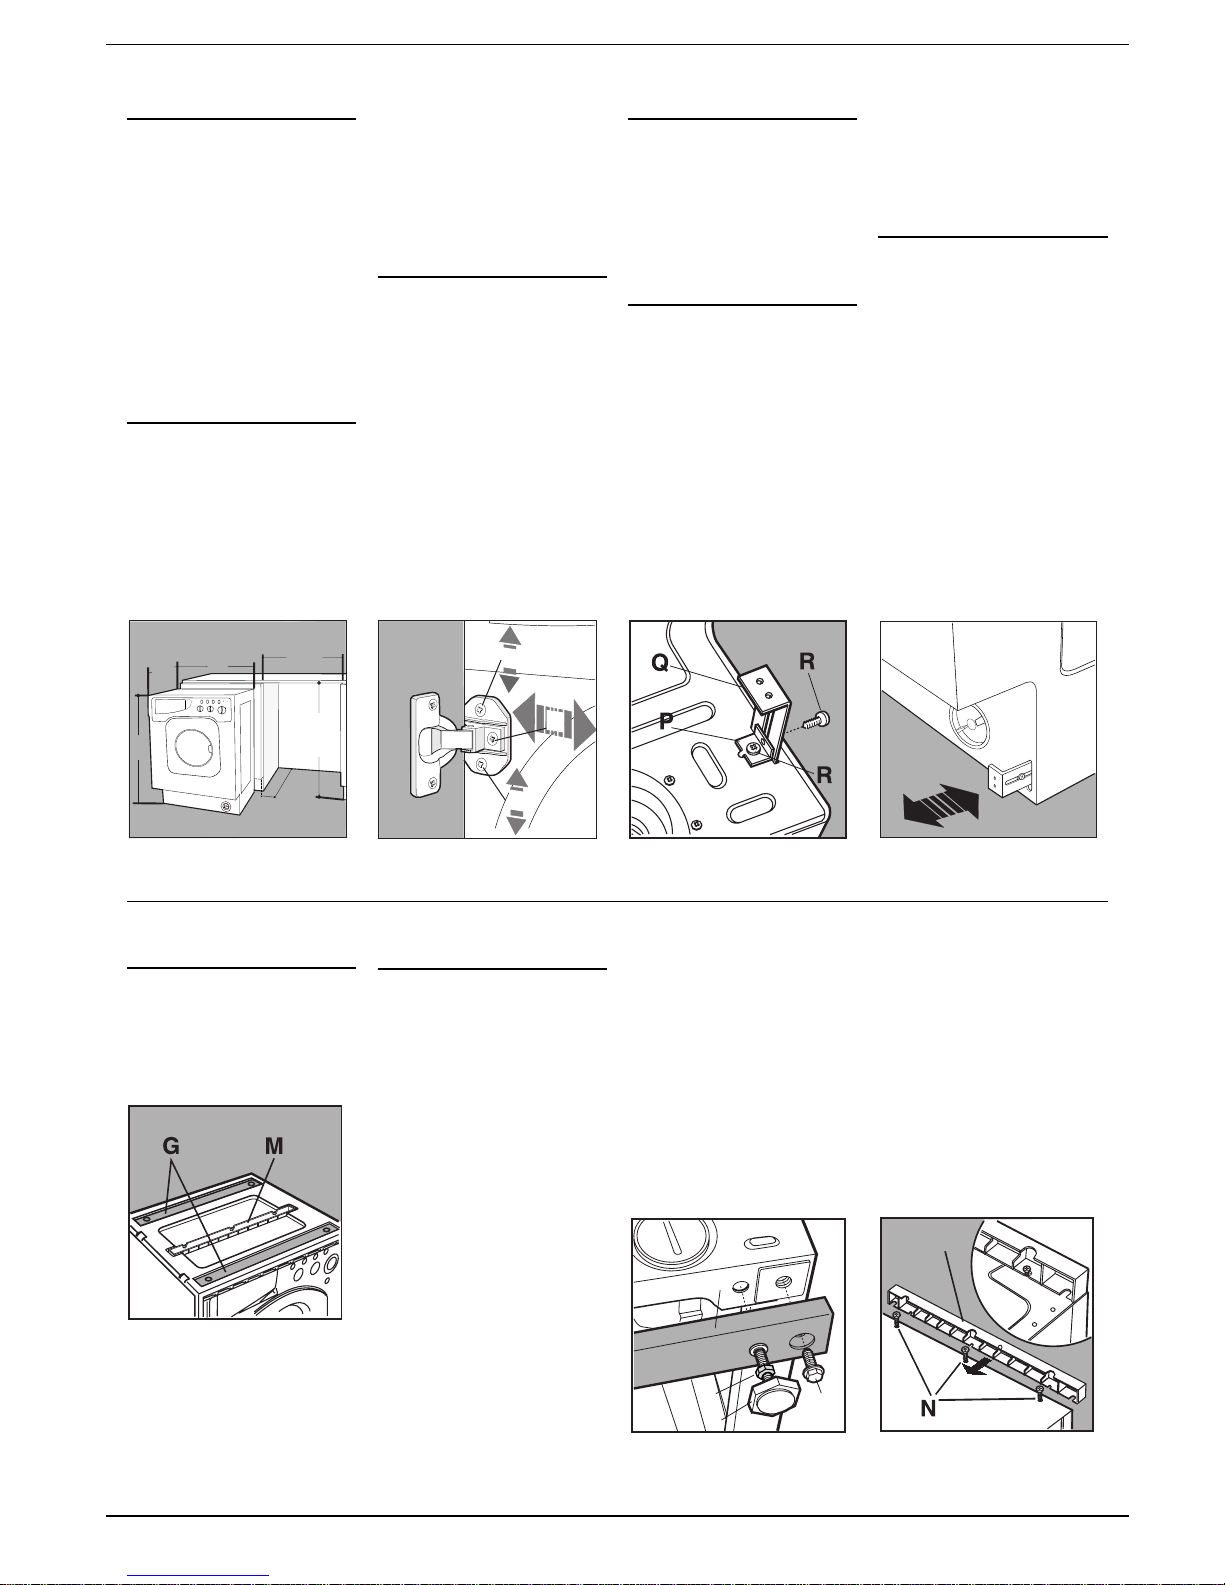
Levelling
The washing machine must be
levelled appropriatey in order to
guarantee its correct functioning.
T o lev el the appliance, the front feet
must be adjusted; the angle of
inclination, measured according to
the worktop, must not e xceed 2°.
When placed on carpet, make
sure the ventilation is not reduced.
The front feet are adjustable.
Connection to the water
mains
Water pressure must range within
the values indicated on the data
plate on the rear of your washing
machine. If the water pipes are
new or left unused, then before
connecting the machine run the
water until clear to remove debris.
Connect the inlet hose to a cold
water tap having a ¾ “ BSP thread.
Ensure that the rubber sealing
washers are fitted at each end of
the inlet hose, with the fitter washer
at the tap end.
A
The rubber gasket.
Connect the inlet hose to the
threaded connector on the
machine rear.
Water pipe inlet at the top right.
Connecting the drain hose
There are two hooks (right or left)
on the rear of your washing
machine to which the drain hose
is to be fixed. Insert the other end
in a stand pipe or place it on the
edge of a sink or tub avoiding
excessive kinks and bending. It
should be placed at a height
ranging from 60 to 100 cm. If it is
necessary to fix the end of the
hose at a height below 60 cm
from the ground, it must be fixed
in the appropriate hook placed on
the upper part of the back panel.
Warning!
The company denies all
liability if and when these
norms are not respected.
Plastic bags, expanded
styrofoam, nails and other
packaging parts are not
children’s toys, and are
potentially dangerous.
Retain the transit screws,
spacers and washers.
Should you move house
then these should be
replaced to support the
inside of the machine to
prevent damage when
transporting the machine.
Instructions for installation and use
10
Electric connection
Before connecting the appliance
to the electric socket, be sure that:
1) the electric socket is able to
sustain the appliance’s
maximum power load
indicated on the data plate
and in compliance with the
law;
2) the supply voltage is
included within the values
indicated on the data plate;
3) the socket is compatible with
the appliance’s plug. If not, do
not use adapters, but replace
either the socket or the plug;
4) electric household appliances
must be equipped with an
“earthing” system.
11
Instructions for installation and use
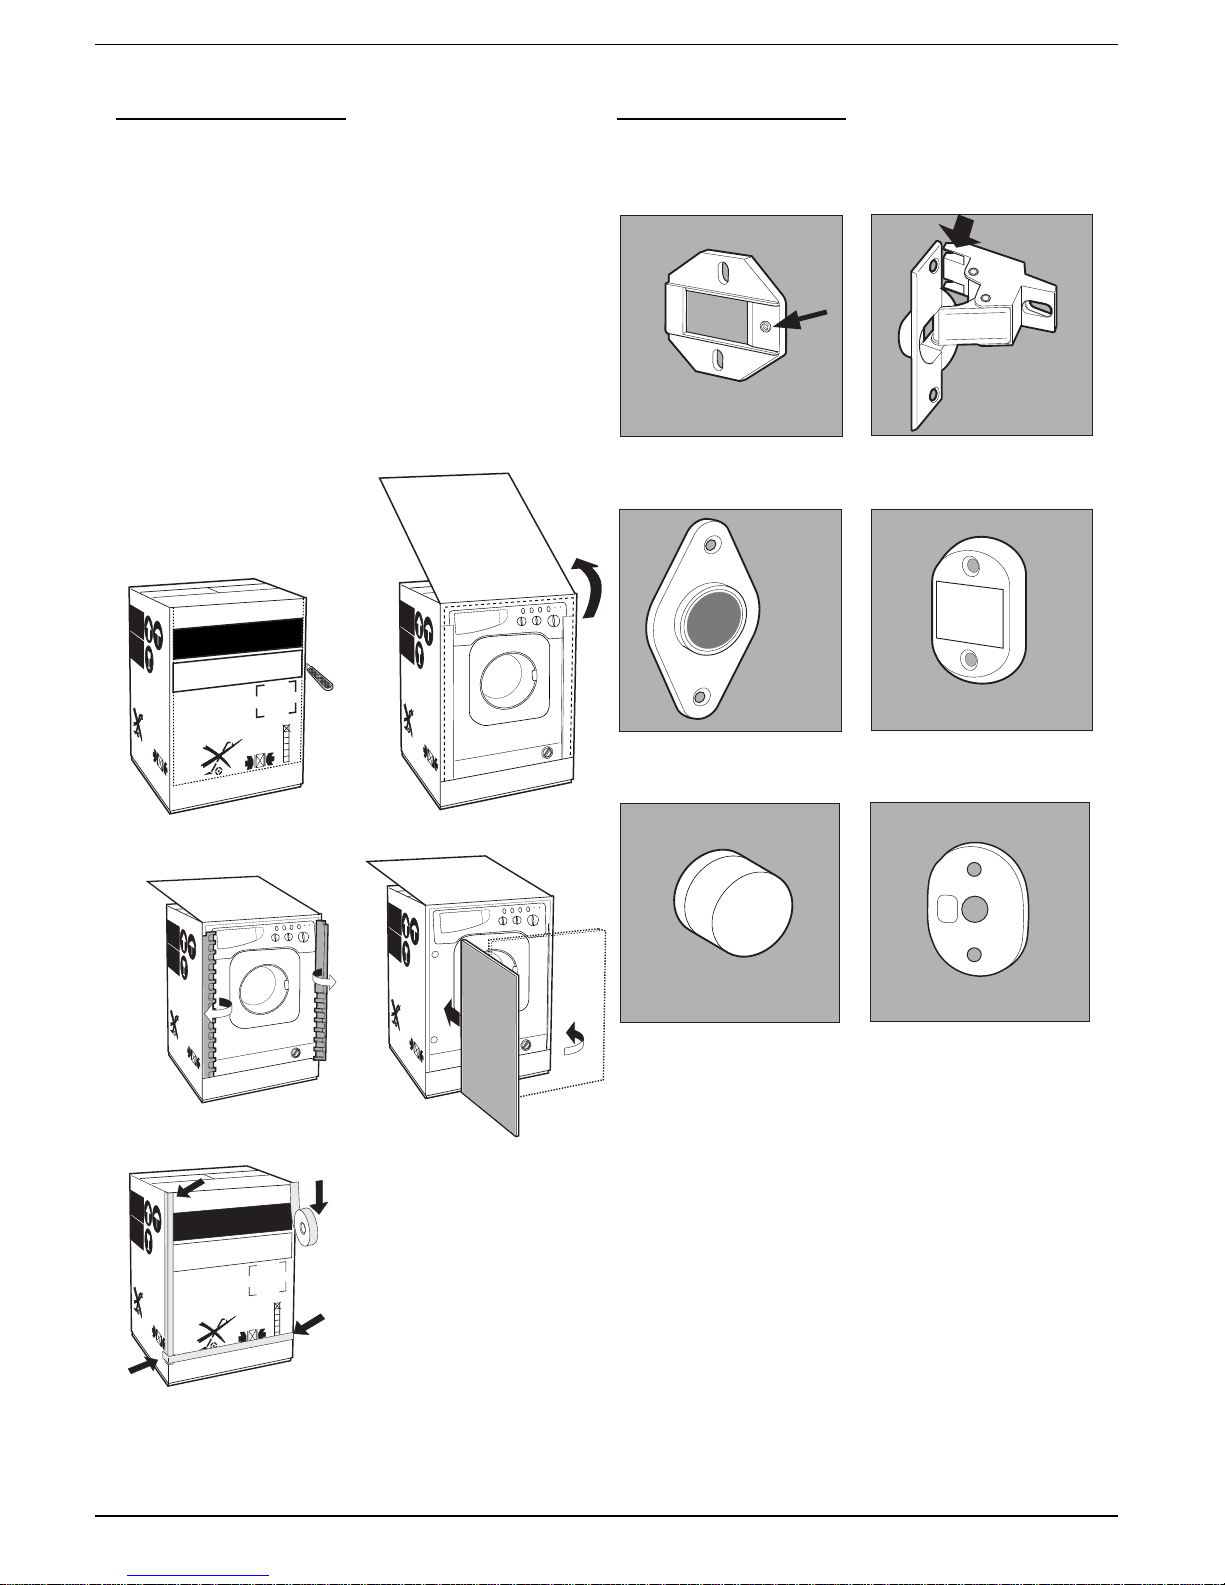
Mounting the wooden panel
onto the door and inserting
the machine into cabinets:
In the case where the machine
must be shipped for final
installation after the wooden
panel has been mounted, we
suggest leaving it in its original
packaging. The packaging was
designed to make it possible to
mount the wooden panel onto
the machine without removing it
completely (see figures
below).
The wooden panel that covers
the face of the machine must not
be less than 18 mm in
thickness and can be hinged on
either the right or left. For the
sake of practicality when using
the machine, we recommend
that the panel be hinged on the
same side as the door for the
machine itself - the left.
Door Mounting Accessories
(Fig. 1-2-3-4-5)
- No. 6 type A self-threading
screws, l =13 mm.
- No. 2 type B metric,
countersunk screws, l =25; for
fastening the magnet plate to the
cabinet.
- No. 4 type C metric screws,
l =15 mm; for mounting the hinge
supports to the cabinet.
- No. 4 type D metric screws,
l =7 mm; for mounting the hinges
on the supports.
Fig. 1
Fig. 2
Fig. 3
Fig. 4
Fig. 5
N° 2 Hinges
N° 1 Magnet
N° 1 Magnet plate
N° 1 Rubber plug
N° 2 Hinge Supports
Instructions for the fitter
A
B
C
D
E
1
2
3
4
5
6
lavabiancheria
washing machine
machine laver
waschmaschine
Lato porta
Door side
Cote porte
Tur seite
1
2
3
4
5
6
lavabiancheria
washing machine
machine laver
waschmaschine
Lato porta
Door side
Cote porte
Tur seite
Fig. 4/B
N° 1 Spacer
Instructions for installation and use
12
Mounting the Parts onto the
Face of the Machine
- Mount the hinge supports onto
the face of the machine,
positioning the hole indicated by
the arrow in fig. 1 towards the
inside of the face and using the
type C screws.
- Mount the magnetic plate on
the opposite side, at the top,
using the two type B screws.
- Place the spacer illustrated in
fig. 4/B between the appliance
front and the magnet receiver.
Using the Drilling T emplate
- To trace the positions of the
holes on the left-hand side of the
panel, align the drilling template
to the top left side of the panel
using the lines traced on the
extremities as a reference.
- To trace the positions of the
holes on the right-hand side of
the panel, align the drilling
template to the top right side of
the panel.
- Use an appropriately sized
router to mill the holes for the two
hinges, the rubber plug and the
magnet.
Mounding the Parts onto the
Wooden P anel (Door)
- Insert the hinges into the holes
(the movable part of the hinge
must be positioned facing away
from the panel) and fasten them
with the 4 type A screws.
- Insert the magnet into the top
hole on the opposite side of the
hinges and fasten it with the two
type B screws.
- Insert the rubber plug into the
bottom hole.
The panel is now ready to be
mounted onto the machine.
Mounting the Panel into the
machine
Insert the nib of the hinge
(indicated by the arrow in fig. 2)
into the hole for the hinge and
push the panel towards the front
of the machine. F asten the two
hinges with the type D screws.
Fastening the plinth guide
If the machine is installed at the
end of a set of modular cabinets,
mount either one or both of the
guides for the base molding (as
shown in fig. 8). Adjust them for
depth based on the position of
the base molding, and, if
necessary, fasten the base to
the guides (fig. 9).
This is how to assemble the
plinth guide (fig.8):
Fig. 6 Fig. 7 Fig. 9
D
C
C
Adjusting the appliance height
The height of the appliance can
be adjusted (from 815 mm to
835 mm), by turning the 4 feet.
Should you require the
appliance to be placed higher
than the above height, you need
to use the following accessories
to raise it to up to 870 mm:
- the two crossbars (G)
- the 4 feet (H)
- the 4 screws (I)
- the 4 nuts (L)
then perform the following
operations (fig. 11):
remove the 4 original feet, place
a crossbar G at the front of the
appliance, fastening it in place
using screws I (screwing them
in where the original feet were)
then insert the new feet H.
Repeat the same operation at
the back of the appliance.
Now adjust feet H to raise or
lower the appliance from 835
mm to 870 mm.
Once you have reached the
desired height, lock nuts L onto
crossbar G.
Fig. 11
L
I
H
G
To adjust the appliance to a
height between 870 mm and 900
mm, you need to mount strip M,
adjusting feet H to the required
height.
Insert the strip as follows:
loosen the three screws N
situated at the front of the Top
cover of the appliance, insert
strip M as shown in fig. 12, then
fasten screws N.
Accessories provided for the
height adjustment
The following can be found inside
the polystyrene lid (fig. 10):
2 crossbars (G),
1 strip (M)
the following can be found inside
the appliance drum:
4 additional feet (H),
4 screws (I),
4 screws (R),
4 nuts (L),
2 plinth guides (Q)
Fasten angle P using scre w R,
insert plinth guide Q into the
special slot and once it is in the
desired position, lock it in place
using angle P and screw R.
Inserting the machine into the
Cabinet
- Push the machine into the
opening, aligning it with the
cabinets (fig. 6).
- Regulate the adjustable feet to
raise the machine to the
appropriate height.
- To adjust the position of the
wooden panel in both the
vertical and horizontal
directions, use the C and D
screws, as shown in fig. 7.
Important: close the lower part
of the appliance front by
ensuring that the plinth rests
against the floor.
Fig. 10
Fig. 12
Fig. 8
M
570
min
815
540
595
820 ÷ 900
600 min

T reat your machine well and it will provide
many years of troub le free service
Easy Care and Maintenance
Your washing machine is a reliable companion in life and on the job. It is just as important for you to keep it
in shape.
Your washing machine is
designed to provide reliable
service over many years. A few
simple steps will help to prolong
its life and avoid problems. It is
advisable, to turn off water taps
when the machine is not to be
used, this protects the hoses,
etc.
If the water in your area is too
hard, use a deliming product
(water is hard if it often leaves
whitish stains around taps or
drains, especially of bath tubs.
For more accurate information as
to the type of water in your
system, call the local water
works or a local plumber).
Pockets must always be
emptied removing even pins,
badges and any other hard
object.
The washing machine exterior
should be cleaned with a rag
dipped in lukewarm water and
soap.
Never exaggerate with doses.
Normal detergents already
contain deliming agents. Only if
the water is particularly hard,
that is, rich in lime content, do
we recommend the use of a
specific product at every wash.
A periodical wash cycle with a
dose of a deliming product,
without detergents or washing,
may prove useful.
Never use too much detergent
or additives because this could
cause an excess amount of
foam, scaling and possible
damage to the component parts
of your washing machine.
When in need, check the pump and the rubber hose.
The washer comes equipped with a self-cleaning pump that does not require any cleaning or maintenance.
The water inlet hose
Check the rubber hose at least once a year. If you see any cracks, replace it immediately. When you use your washing
machine, water pressure is very strong and a cracked tube could easily split open.
It is important to wash
the detergent dispenser
regularly.
T o prevent dried washing
powder from
accumulating, place the
dispenser under running
water for a few minutes.
Do not forget to empty all pockets: small objects can
cause damage to your washer.
13
Instructions for installation and use
Instructions for installation and use
14
Your safety and that of
your family
Important for the safe use of your washing machine
Your washer has been built in compliance with
the strictest international safety regulations. To
protect you and all your family.
Read these instructions and all
the information in this manual
carefully: the y are an important
source, not only of numerous
useful tips, but also of vital
information on safety, use and
maintenance.
1. the machine should not be
installed in an outdoor
environment, not even
when a roof shelters the
area, because it may be very
dangerous to leave it
exposed to rain and
thunderstorms.
2. It must only be used by
adults and exclusively for
washing clothes following
the instructions provided in
this manual.
3. Should it have to be moved,
proceed with the help of two
or three people and handle
it with the utmost care.
Never try to do this alone,
because the appliance is
very heavy.
4. Before loading the washing
machine, make sure the
drum is empty .
5. Never touch the washing
machine when barefoot or
with wet or damp hands
or feet.
6. Never use extensions or
multiple plugs, which are
particularly dangerous in
humid environments. The
power supply cable must
never be bent or
dangerously compressed.
7. Never open the detergent
dispenser while the
appliance is functioning;
do not use hand wash
detergent because the
abundance of foam could
damage its internal parts.
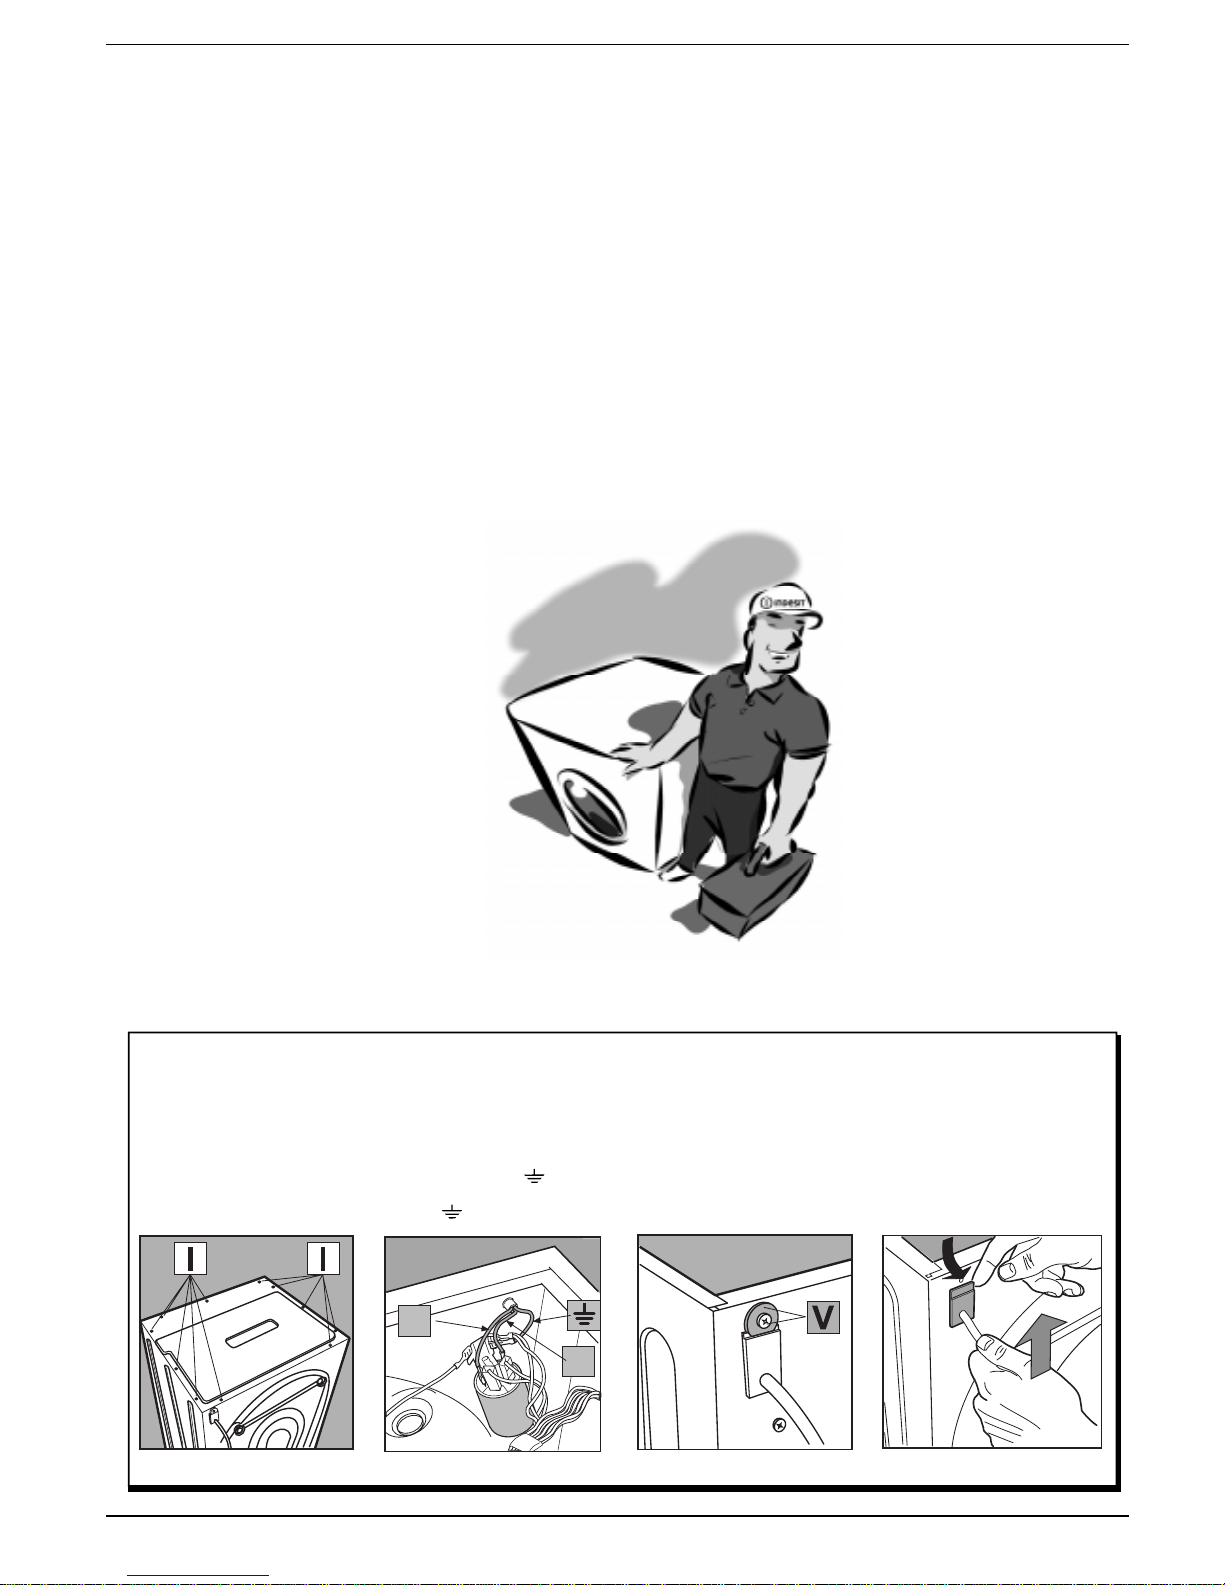
How to change the power supply cable
The washing machine
power supply cable is
special and can be purchased
exclusively from authorised
Technical Service Centres.
To replace the cable:
1. Make sure that the machine
is switched off and unplugged.
2. Remove the cover by
unscrewing screws I [fig 13].
3. Disconnect the wires from
the radio interference
suppressor F [fig. 14] noting as
to their position (Blue=N wire;
Brown=L wire) leaving the
earth wire until last
.
N.B.: letters L, N and the
symbol
are indicated on the
radio interference suppressor.
4. Remove the screw and
washer V [fig. 15], which act as
a stop for the cable passageway.
5. Remove the upper part of the
cable slightly from the back
panel of the appliance, pull the
power supply cable upwards and
take it out [fig. 16].
To connect the new power
supply cable, reverse the procedure.
It is important for your
safety that you reassemble
all parts and screws used.
8. Never pull on the supply
cable or the washing
machine to disconnect it
from the wall socket: it is
extremely dangerous.
9. While the appliance is
functioning, do not touch
the drain water as it could
reach very high
temperatures. The
appliance door, during
wash cycles, tends to
become hot; ensure that
children do no touch it.
Never force the washing
machine door because
this could damage the
safety lock which prevents
accidental opening when the
nachine is working. Allow a
few minutes at the end of the
program for the lock to
release.
10. In case of malfunctioning,
first close the water tap
and unplug the appliance
from the wall socket; do not
under any circumstances
touch internal parts in order
to attempt repairs.
I only want an authorised
specialised technician with
original Indesit spare parts!
Fig. 13 Fig. 14 Fig. 15 Fig. 16
N
L
F
Erkunden Sie hier die 11 Argumente, die auf
nachfolgenden Seiten dieses Handbuches näher erklärt
werden. Lesen Sie diese, merken Sie sich diese und haben
Sie viel Spaß dabei; Sie werden viele kleine Geheimnisse
entdecken, die Ihnen dazu verhelfen, besser und müheloser
zu waschen und Ihren Waschvollautomaten länger zu
erhalten.
Kurzanleitung
15
Installations- und Bedienungsanleitungen
1.
Installation und Umzug (Seite 24)
Die Installation, sei es die eines neuen Gerätes oder die nach einem
Umzug, ist die wichtigste Voraussetzung für die optimale Betriebsweise Ihrer W aschmaschine. In jedem Falle ist sicherzustellen:
1. dass die Elektroanlage den einschlägigen V orschriften entspricht;
2. dass V ersorgungs- und Ab laufschläuche vorschriftsmäßig
angeschlossen wurden. V erwenden Sie niemals bereits
gebrauchte Schläuche.
3. dass der W aschvollautomat eben aufgestellt wurde. Es macht
sich belohnt: durch längere Lebensdauer und beste Wasch
wirkung;
4. dass die auf der Rückwand des W aschvollautomaten befindlichen
T rommel-Bef estigungsschrauben abgenommen wurden.
2.
Was kann im W aschvollautomaten ge waschen
werden und wie wird er in Betrieb gesetzt? (Seite 16)
Ein korrektes Sortieren Ihrer Wäsche ist nicht nur für ein optimales
Waschergebnis von äußerster Wichtigk eit, sondern auch für die
Lebensdauer des Gerätes. Lernen Sie die wichtigen Kniffe und
Tips, die beim Wäschesortieren zu beachten sind: Farben,
Gewebeart, Neigung zu Flusenbildung sind die wichtigsten
Kriterien.
3.
Leitfaden zur Verdeutlichung der Etiketten (Seite 19)
Die auf den in jedem Kleidungs- bzw. Wäschestück befindlichen
Etiketten abgebildeten Symbole sind leicht verständlich und
äußerst wichtig für ein optimales Waschergebnis. In diesem
Abschnitt erhalten Sie einige Tips zu den empfohlenen
T emper aturen, der Art der Behandlung, der Bügelweise.
4.
Praktische Ratschläge um Fehler zu
vermeiden (Seite 20)
Einmal waren es unsere Großmütter, die uns mit guten Ratschlägen
zur Seite standen, außerdem gab es damals noch keine Kunstfasern:
Heute ist es nicht mehr so einfach. Aber es gibt Waschmaschine,
die Ihnen mit guten Ratschlägen zur Seite steht. Sie können sogar
Wollwäsche bedenkenlos in der Maschine waschen.
5.
Die Waschmittelschublade (Seite 21)
Wo und wie werden Reiniger und eventuelle Zusätze eingefüllt?
6.
Machen Sie sich mit der Schalterblende
vertraut (Seite 17)
Die Schalterblende Ihrer W aschmaschine ist klar und übersichtlich. Rasch übersehen Sie , welches W aschprogramm zu wählen
ist und wie es abgerufen werden kann, vom energischsten Vollwaschprogramm bis hin zum Schonprogramm für Wolle. Sie
werden sehen, es wird ganz leicht sein.
7.
Leitfaden zur Wahl der Programme Ihrer
Waschmaschine (Seite 18)
Eine einfache, praktische, übersichtliche Tabelle hilft Ihnen bei der
Wahl der Temperaturen, des geeigneten Waschmittels und ev entueller Zusätze. Eine korrekte W ahl dieser Komponenten, eine angemessene Dosierung des Waschmittels sind eine Garantie für
optimale Waschergebnisse . Sie sparen Zeit, Wasser und Strom,
T ag für Tag.
8.
Reinigung und Pflege (Seite 27)
Waschmaschine ist Ihre Freundin: Sie verlangt nur einige kleine
Aufmerksamkeiten und dankt Ihnen dafür mit Treue und
Zuverlässigkeit.
Pflegen Sie sie, und Sie werden noch lange Freude an Ihrer
Maschine haben.
9.
Probleme und Lösungen (Seite 22 und 23)
Bevor Sie den Einsatz eines Technikers anfordern, lesen Sie diesen
Abschnitt: Für vieles findet sich eine einf ache , sof ortige Lösung.
Sollten Sie jedoch keine geeignete Lösung finden, dann fordern
Sie den Indesit-Kundendienst an, der für eine sofortige Behebung
einer jeden Betriebsstörung sorgen wird.
10.
Te chnische Eigenschaften (Seite 23)
Hier finden Sie die technischen Daten Ihres Vollwaschautomaten:
Modellkennzeichen, Daten für den Elektro- und Wasseranschluss ,
Abmessungen, Kapazität, Schleudertouren und Übereinstimmungserklärung mit den italienischen und europäischen
Richtlinien und V orschriften.
11.
Ihre Sicherheit und die Ihrer Kinder (Seite 28)
Hier finden Sie unentbehrliche Ratschläge für Ihre Sicherheit und
die Ihrer Familie. Die wichtigste Voraussetzung!
Installations- und Bedienungsanleitungen
16
M
Was darf in die Waschmaschine?
Sie können viel dazu beitragen, dass Ihre Wäsche besonders rein wird, noch bevor der W aschvorgang
beginnt. Trennen Sie die Wäsche nach Farben und Material. Kontrollieren Sie die Wäscheetiketten
und befolgen Sie die dort aufgezeichneten Waschanleitungen. Geben Sie abwechselnd kleine und
große Wäschestücke in die Wäschetrommel.
V or dem W aschen.
Trennen Sie die Wäsche nach
Material und nach Farbfestigkeit:
strapazierfähige Stoffe sollten nicht
gemeinsam mit Feinwäsche
gewaschen werden.
Helle Farben müssen stets von
dunklen getrennt gewaschen
werden.
Entleeren Sie alle Taschen (Kleingeld, Papier, Geldscheine und
Kleingegenstände) und kontrollieren Sie auch die Knöpfe. Wenn ein
Knopf lose ist, nehmen Sie ihn ab
oder nähen Sie ihn fest, denn er
könnte beim Waschen abspringen.
So können Sie die gängigsten Flecken entfernen:
Tinte und Kugelschreiber: Betupfen Sie den Fleck mit einem Wattebausch, den Sie mit Methylalkohol oder mit 90°igem Alkohol
getränkt haben.
T eer: Betupfen Sie den Fleck mit frischer Butter, danach fahren Sie mit Terpentin darüber und waschen das Ganze dann sofort aus.
Wachs: Schaben Sie erst das feste Wachs ab und legen Sie dann den Fleck zwischen zwei Löschblätter: nun bügeln Sie mit dem heißen
Bügeleisen darüber. Daraufhin wischen Sie den Fleck noch mit einem Wattebausch mit Farblösungsmittel oder mit Methylalkohol ab.
Kaugummi: Reiben Sie den Kaugummi mit Nagellackentferner ab und trocknen Sie das Ganze dann mit einem sauberen Lappen nach.
Schimmel: Baumwolle und weißes Leinengewebe geben Sie in eine Lösung von 5 Teilen Wasser, einem Teil Bleichmittel und einem
Esslöffel Essig, danach sofort auswaschen. Für alle übrigen weißen Gewebe verwenden Sie Wasserstoffperoxyd (1:10) und waschen
daraufhin sofort das Gewebe aus.
Lippenstift: Reiben Sie den Fleck mit Äther ab, wenn es sich um Wolle oder Baumwolle handelt. Bei Seide verwenden Sie
Trichloräthylen.
Nagellack: Legen Sie das Gewebe mit dem Fleck nach unten auf ein Löschblatt, tränken Sie das Ganze mit Nagellackentferner und
verschieben Sie den Fleck stets, wenn sich das Löschpapier färbt.
Gras: Betupfen Sie den Fleck mit einem Wattebausch, den Sie mit Methylalkohol getränkt haben.
Wie setzen Sie Ihre
Waschmaschine in Betrieb?
Es ist wichtig, dass Sie Ihre
Waschmaschine richtig in Betrieb
nehmen, und zwar nicht nur, um
eine gute Waschqualität zu
garantieren, sondern auch um
Probleme am Gerät zu vermeiden
und somit seine Lebensdauer zu
verlängern. Nachdem Sie die
Wäsche, das Waschpulver und
eventuelle Zusätze in den
Waschvollautomaten gegeben
haben, kontrollieren Sie stets, ob
1. die Tür gut geschlossen ist.
2. der Stecker in der Steckdose
ist.
3. der W asserhahn auf ist.
4. sich der Schalter A auf einem
der Zeichen
(Stop/Reset)
befindet.
Das Programm auswählen
Das Programm wird nach dem
Wäschetyp, dem Schmutzgrad und
der Menge ausgewählt. Um das richtige
Programm auszuwählen, siehe T abelle
auf Seite 1 8. Drehen Sie den
Programmwähler A bis das gewählte
Programm mit dem auf dem oberen
Rand des Drehknopfs befindlichen
Zeiger übereinstimmt, stellen Sie mit
der Programmierscheibe B die
T emperatur ein, stellen Sie sicher, dass
sich der Schalter C auf der von Ihnen
gewünschten Einstellung befindet,
drücken Sie gegebenenfalls die T asten
E, F, und G, und drücken Sie daraufhin
die EIN/AUS-T aste H (Einstellung I).
Nachdem Sie den Waschvollautomaten installiert haben, führen Sie den ersten
Waschvorgang mit Programm "1" und bei 90° C durch.
Für Feinwäsche: Geben
Sie Ihre Unterwäsche,
Damenstrümpfe und
andere Feinwäsche in ein
Stoffsäckchen, um sie zu
schützen.
Die Wäschestücke nach
Gewebe, Farbe und
Flusenbildung zu trennen,
ist ein wichtiger Schritt,
um gute Waschergebnisse
zu erzielen.
Am Ende des Waschganges
Warten Sie, bis die
Anzeigeleuchte L erlischt: das
dauert ca. drei Minuten lang.
Dann schalten Sie Ihre
Waschmaschine aus, indem Sie
die EIN/AUS-Taste H drücken,
so dass sie auf O steht. Nun
können Sie die Tür ohne Gef ahr
öffnen. Lassen Sie die Tür immer
einen Spalt weit offen stehen,
nachdem Sie die Wäsche
herausgenommen haben, so
dass die Feuchtigkeit, die sich
Die Wäscheetiketten
verraten Ihnen alles.
Kontrollieren Sie stets die
Wäscheetiketten: hieraus
gehen alle Informationen zum
Wäsche- oder Kleidungsstück
hervor, auch wie es am besten
gewaschen wird.
Auf Seite 19 wird die „Geheimsprache" aller Wäscheetik etten
entschlüsselt. Die Angaben, die
Sie dort finden, sind überaus
nützlich, um Ihre Wäsche materialgerecht zu waschen und
lange Ihre Freude daran zu
haben.
Gleichmäßige
Gewichtsverteilung.
Dieser W aschvollautomat ist mit
einer speziellen elektronisch
gesteuerten Vorrichtung ausgestattet, wodurch das Gewicht
der Wäsche stets gleichmäßig
verteilt wird: vor dem
Schleudern sorgt diese
Vorrichtung dafür, dass die
Wäsche so gleichmäßig wie
möglich in der Wäschetrommel
angeordnet wird, natürlich
immer so weit es der Wäschetyp und die anfängliche Lage gestatten. Dies ist auch der Grund
dafür, weshalb diese Waschmaschine auch bei höchster Drehzahl nicht vibriert und somit äußerst geräuscharm ist.
angesammelt hat, verdunsten
kann.
Schließen Sie stets den
Wasserhahn.
Hinweis: Falls es zu einem
Stromausfall kommt oder die
Waschmaschine während des
Waschganges abgeschaltet
wird, bleibt das ausgewählte
Programm gespeichert.
E
A
B
C
D
F
G
H
I
L
Der W aschvollautomat ist außerdem mit einer zusätzlichen Kammer 4 (als Beipack) für Bleichmittel ausgestattet, die in die Kammer
1 eingesetzt werden kann.
Bügelfreundlich
Wird diese Funktion abgerufen,
wird Ihre Wäsche knitterfrei
gewaschen, und ist somit
einfacher zu bügeln.
Diese Funktion kann zu den
Programmen 3-4 (Baumwolle),
5-6 (Kunstfasern) und 8-9
(Feinwäsche) hinzugeschaltet
werden.
Wird sie zu den Programmen
5-6-8-9 hinzugeschaltet, wird das
Waschprogramm auf dem
Symbol
angehalten, durch
erneutes Drücken der Taste E
wird das Programm fortgesetzt.
Wichtig: Diese Funktion darf
nicht eingestellt bzw. abgerufen
werden, wenn die FleckenstoppT aste G gedrückt ist.
Kurzwäsche
Diese ermöglicht Ihnen, für die
kurze Wäsche zwischendurch, die
Dauer des W aschprogramms um
30% zu kürzen. Dies gilt nicht für
die Spezialprogramme (siehe Seite
18) und die für Wolle und Seide .
Fleckenstopp (s. Seite 21)
Wird diese Funktion abgerufen,
wäscht Ihre Waschmaschine
ganz besonders intensiv , zur Optimierung der Wirkung der flüssigen
Zusätze, wodurch auch die hartnäckigsten Flecken beseitigt werden. Wird die Fleck enstopp-Taste
gedrückt, kann die Funktion
V orwäsche nicht aktiviert werden.
Hier bestimmen Sie
Machen Sie sich mit der Schalterblende vertraut
Die Wahl des geeigneten Programms ist absolut wichtig und leicht.
Programmierscheibe
Mit diesem wählen Sie das
Waschprogramm.
Drehen Sie diesen Knebel bitte
nur im Uhrzeigersinn.
Zur W ahl der Progr amme ist der
auf dem Drehknopf befindliche
Zeiger mit dem Symbol bzw. der
Nummer des entsprechenden,
gewünschten Programmes in
Übereinstimmung zu bringen.
Drücken Sie daraufhin die EIN/
AUS-Taste H (Einstellung I), die
Anzeigeleuchte I blinkt. Nach
5"(sec.), d.h. nachdem die
Einstellung akzeptiert wurde, stellt
die Anzeigeleuchte I ihr Blinken ein
(sie bleibt jedoch eingeschaltet)
und der Waschgang star tet.
Möchten Sie das laufende
Programm unterbrechen oder ein
neues einstellen, wählen Sie eines
der Symbole
(Stop/Reset) und
warten Sie bitte 5"(sec.): Das
Blinken der Kontrolleuchte I ist ein
Zeichen dafür, dass das Löschen
des Programms akzeptiert wurde,
nun können Sie Ihren
Waschvollautomaten ausschalten.
Im Anschluss einer Waschprogramm-Wahl und entsprechender Annahme seitens des W aschvollautomaten hat jegliches Drehen dieses Knopfes (mit Ausnahme der Einstellung
Stop/Reset)
keinen Einfluss mehr auf das
Waschprogramm.
TemperaturProgrammierscheibe
Mit dieser werden die entsprechenden, in der Programm-T abelle empfohlenen Waschtemperaturen (auch ein Kaltwaschprogramm) eingestellt (
).
SchleudertourenProgrammierscheibe
Mit dieser kann die Schleuder ganz
ausgeschlossen werden (wählen
Sie hierzu das entsprechende
Symbol
), oder die Schleudertouren für ein gewähltes Programm
herabgesetzt werden. Die für die 4
Gewebearten vorgesehenen
Spitzenschleudertouren sind
folgende:
Gewebe Schleudertouren
Baumwolle 1200 U/min
Kunstfaser 800 U/min
Wolle 600 U/min
Seide nicht schleudern
Ein Sanftanlauf und eine
Unwuchtüberwachung sorgen
dafür, dass die Wäsche dabei
ganz pflegeleicht behandelt wird.
Waschmittelschublade
Diese ist in 3 Kammern unterteilt:
1.Waschmittel für die V orwäsche;
2.Waschmittel für den Haupt-
waschgang;
3. Weichspüler .
Der Reinigerbehälter mit der
Kammer für Bleichmittelzusätze
befindet sich hier.
17
Installations- und Bedienungsanleitungen
EIN/A US
Befindet sich die Taste H eingedrückt, ist Ihr Waschv ollautomat
eingeschaltet, ist diese nicht gedrückt, ist Ihr Waschv ollautomat
ausgeschaltet.
Ein Ausschalten des Geräts
bewirkt kein Löschen des gewählten Programms.
EIN/AUS-Anzeigeleuchte
Bei eingeschaltetem Gerät
blinkt die Anzeigeleuchte I, und
wartet auf Eingabe eines Programmes. Ein Umschalten auf
feststehendes Licht bedeutet,
dass das eingegebene Programm akzeptiert wurde.
Türsicherungs-Anzeigeleuchte
Durch Leuchten dieser Led-Anzeige meldet das Gerät, dass die Tür
blockiert ist, um ein versehentliches Öffnen zu vermeiden. Warten
Sie bitte, dass diese Leuchte erlischt (ungefähr 3 Minuten), bevor
Sie die Tür öffnen, um Schäden an
dieser Vorrichtung auszuschließen.
MAX
1
2
4
3
 Loading...