

Page 1
Istruzioni per l’uso
IT
Italiano, 1
RS
GB
English, 12
NL
FR
Français, 22
DE
CUCINA E FORNO
IT
Sommario
Installazione, 2-3
Posizionamento e livellamento
Collegamento elettrico
Tabella caratteristiche
Русский, 32
KN6C61A/NL
Nederlands,43
Deutsch, 53
Descrizione dell’apparecchio, 4
Vista d’insieme
Pannello di controllo
Avvio e utilizzo, 5-7
Avviare il forno
Programmi di cottura
Consigli pratici di cottura
Tabella cottura in forno
Utilizzo del piano cottura vetroceramica,
8
Accendere e spegnere le zone di cottura
Le zone di cottura
Precauzioni e consigli, 9
Sicurezza generale
Smaltimento
Risparmiare e rispettare l’ambiente
Manutenzione e cura, 10
Escludere la corrente elettrica
Pulire l’apparecchio
Sostituire la lampadina di illuminazione del forno
Pulire il piano cottura vetroceramica
Assistenza, 11
Assistenza attiva 7 giorni su 7
Page 2
Installazione
IT
! È importante conservare questo libretto per poterlo
consultare in ogni momento. In caso di vendita, di
cessione o di trasloco, assicurarsi che resti insieme
all’apparecchio.
! Leggere attentamente le istruzioni: ci sono importanti
informazioni sull’installazione, sull’uso e sulla sicurezza.
! L’installazione dell’apparecchio va effettuata
secondo queste istruzioni da personale qualificato.
! Qualsiasi intervento di regolazione o manutenzione
deve essere eseguito con la cucina disinserita
dall’impianto elettrico.
Posizionamento e livellamento
! È possibile installare l’apparecchio di fianco a mobili
che non superino in altezza il piano di lavoro.
! Assicurarsi che la parete a contatto con il retro
dell’apparecchio sia di materiale non infiammabile e
resistente al calore (T 90°C).
Per una corretta installazione:
• porre l’apparecchio in cucina, in sala da pranzo o
in un monolocale (non in bagno);
• se il piano della cucina è più alto di quello dei
mobili, essi devono essere posti ad almeno 600 mm
dall’apparecchio;
• se la cucina viene
HOOD
Min. mm.
600
mm.
420
Min.
420
Min. mm.
a meno di 200 mm dai suoi lati;
• eventuali cappe devono essere installate secondo
le indicazioni del relativo libretto di istruzione.
installata sotto un pensile,
esso dovrà mantenere
una distanza minima dal
piano di 420 mm.
Tale distanza deve
700 mm. without hood
essere di 700 mm se i
min. 650 mm. with hood
min.
pensili sono infiammabili
(
vedi figura
);
• non posizionare
tende dietro la cucina o
Le gambe* si montano a
incastro sotto la base della
cucina.
Collegamento elettrico
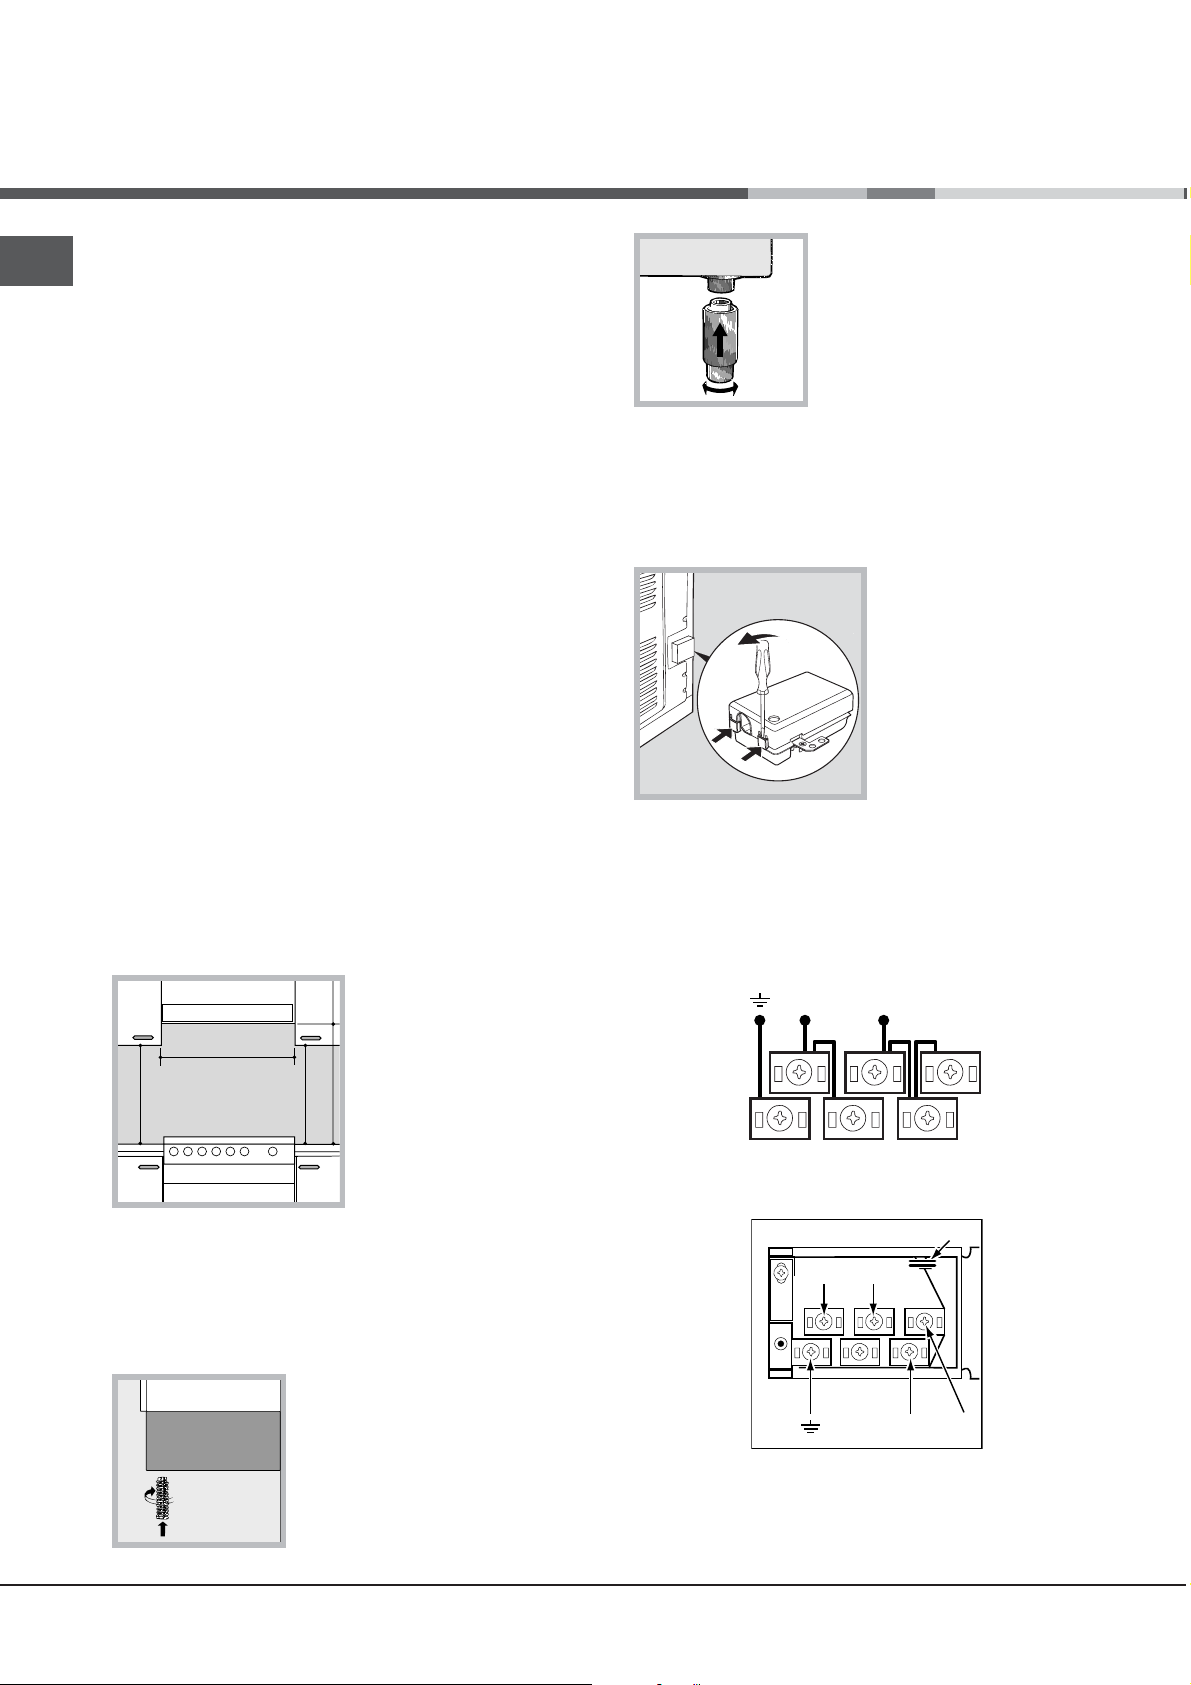
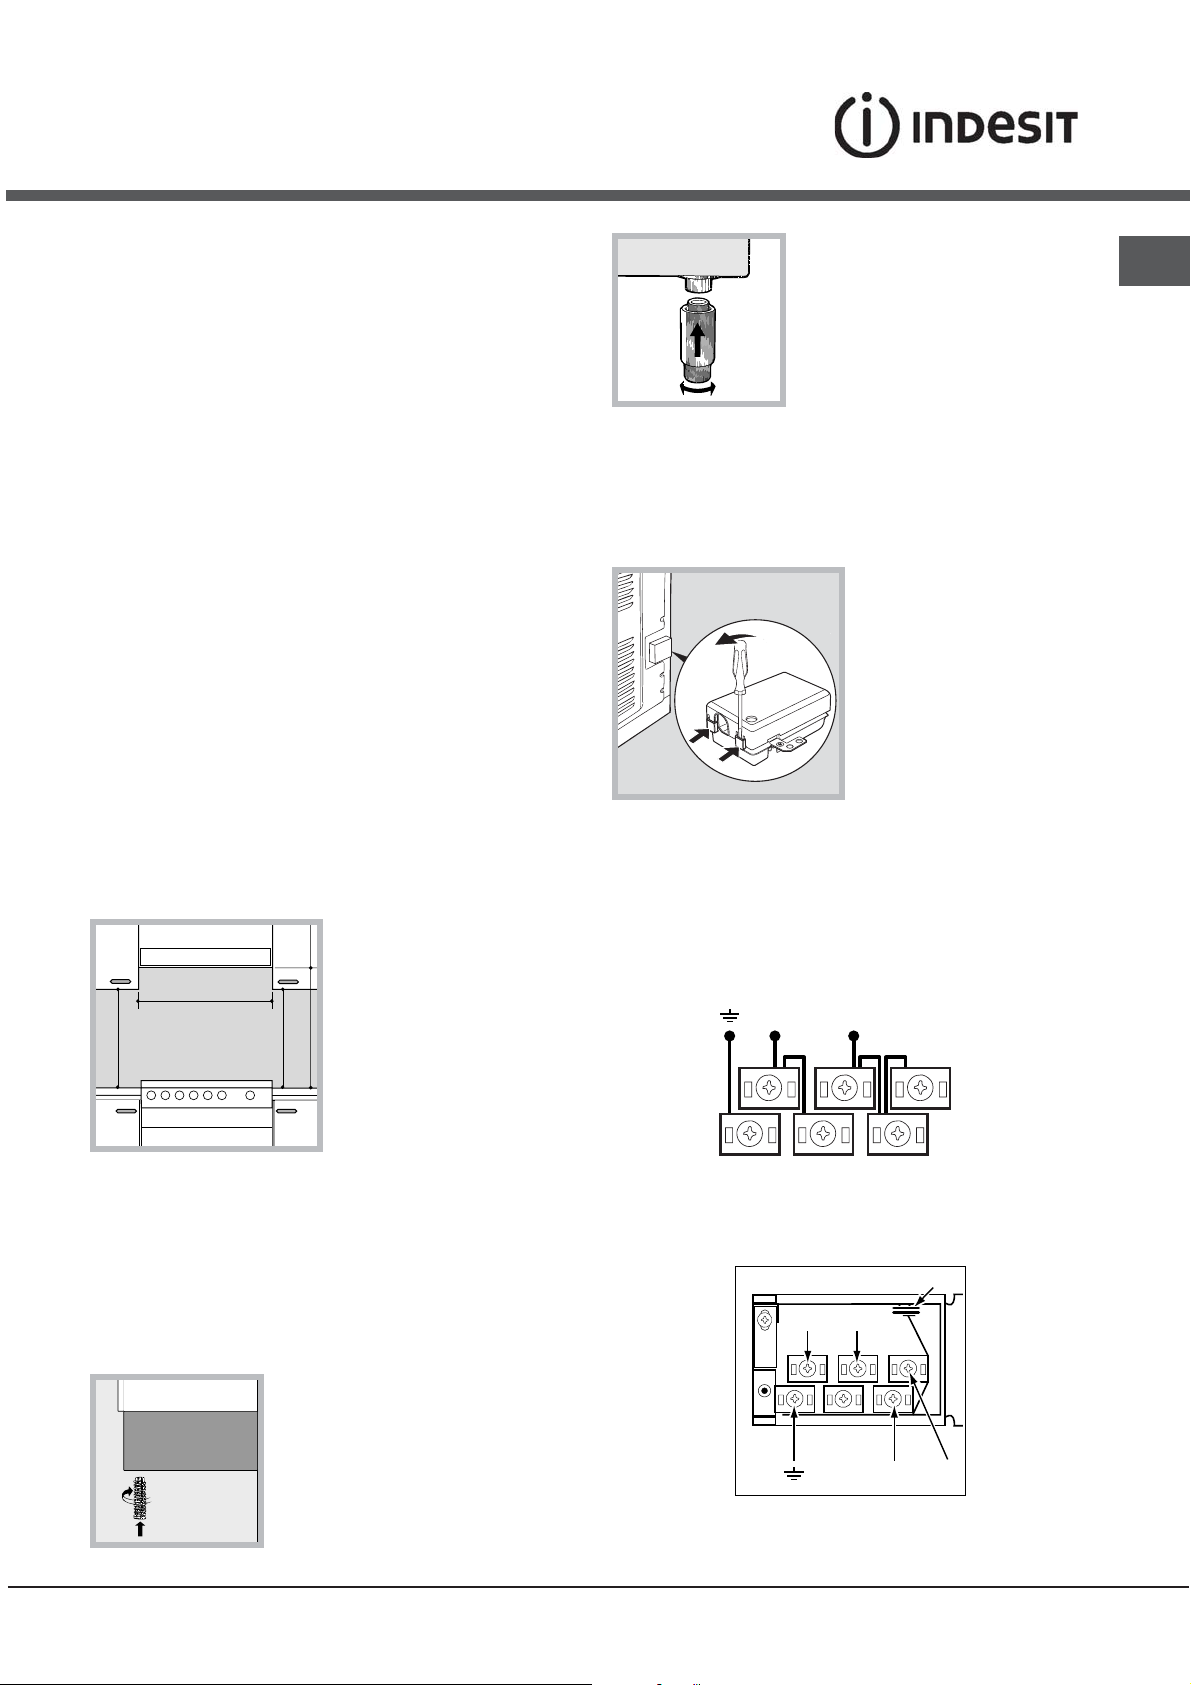
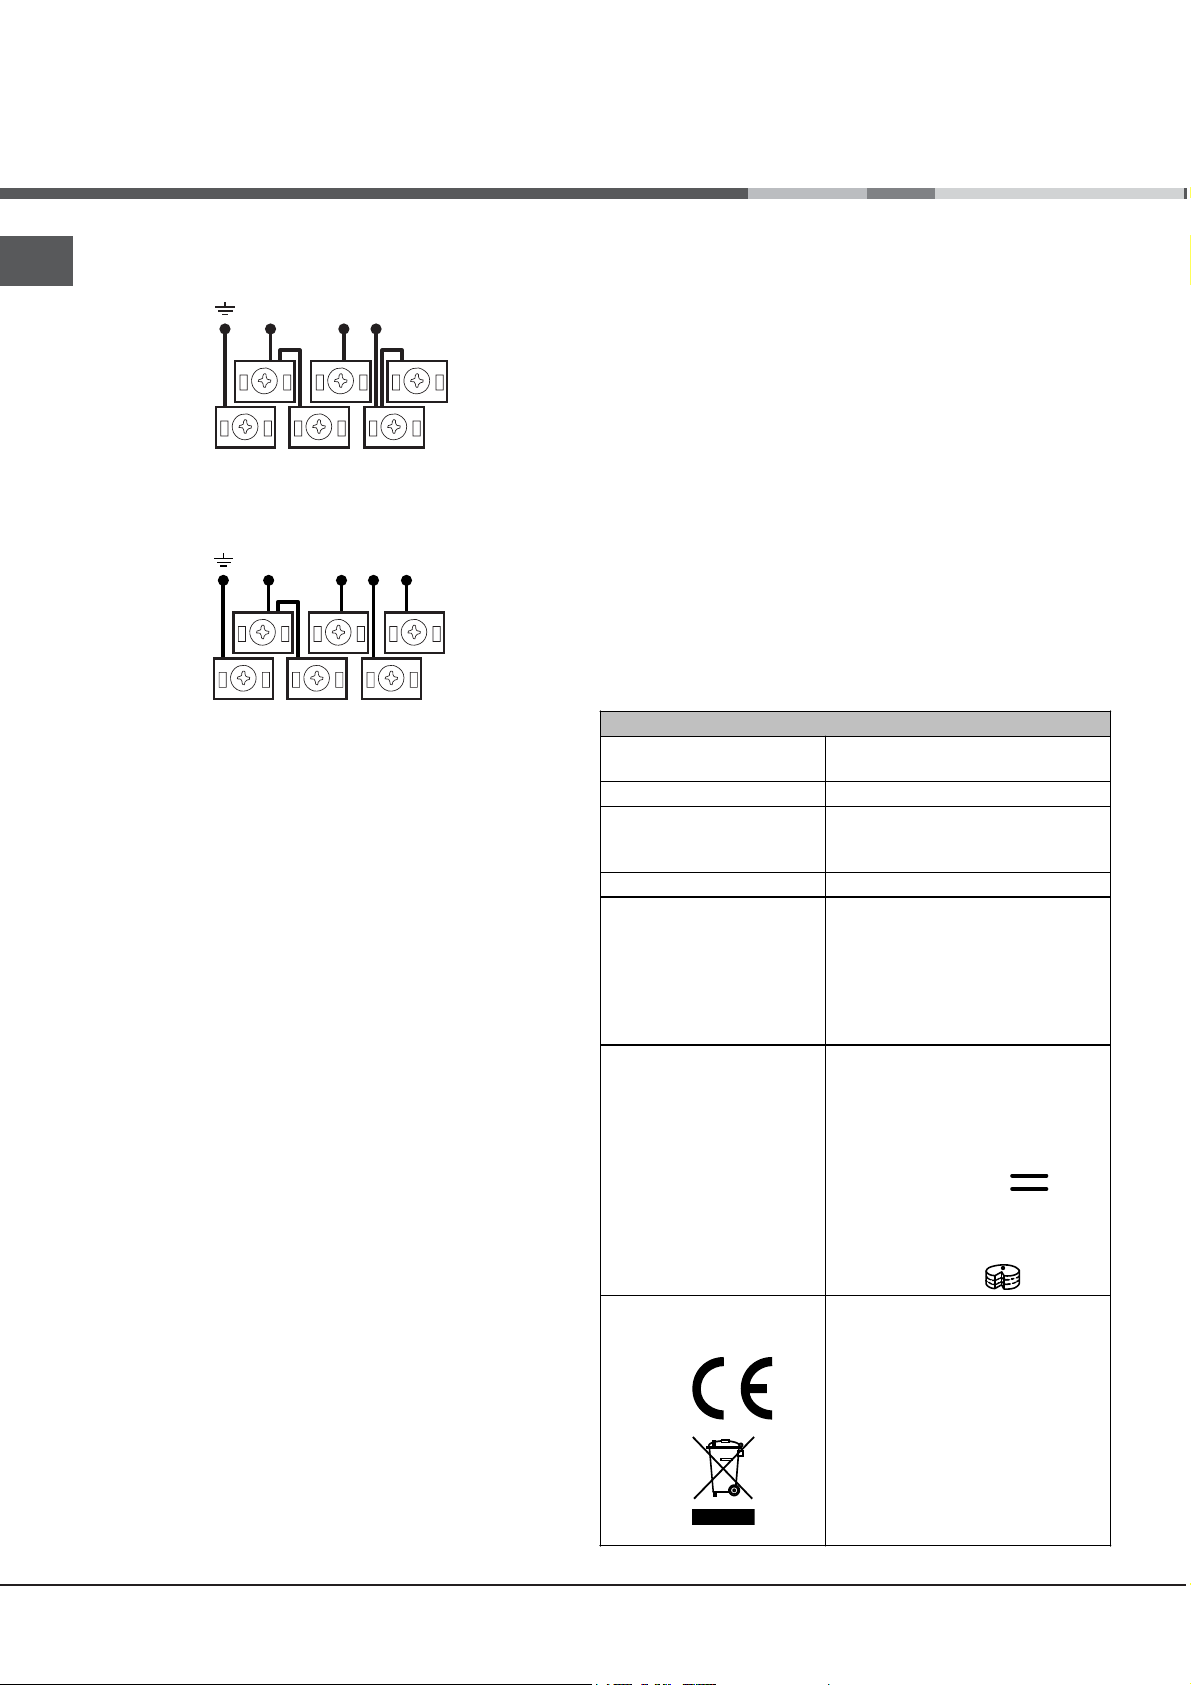
Montaggio cavo di alimentazione
Apertura morsettiera:
• Servendosi di un cacciavite, fare leva sulle linguette
laterali del coperchio della morsettiera;
• Tirare ed aprire il
coperchio della
morsettiera.
Per la messa in opera del cavo eseguire le seguenti
operazioni:
• svitare la vite del serracavo e le viti dei contatti
! I ponticelli vengono predisposti dalla Fabbrica per il
collegamento a 230V monofase (
vedi figura
).
230V ~
H05RR-F 3x4 CEI-UNEL 35363
NL
5
3
4
• per effettuare i collegamenti elettrici delle figure,
utilizzare i due ponticelli alloggiati dentro la scatola
(
vedi figura
- riferimento "
PP
P")
PP
1
2
P
NL2L1
Livellamento
Se è necessario livellare l’apparecchio, avvitare i
piedini di regolazione forniti in
dotazione nelle apposite sedi
poste negli angoli alla base
della cucina (
2
vedi figura
L3
).
Presente solo su alcuni modelli.
*
Page 3
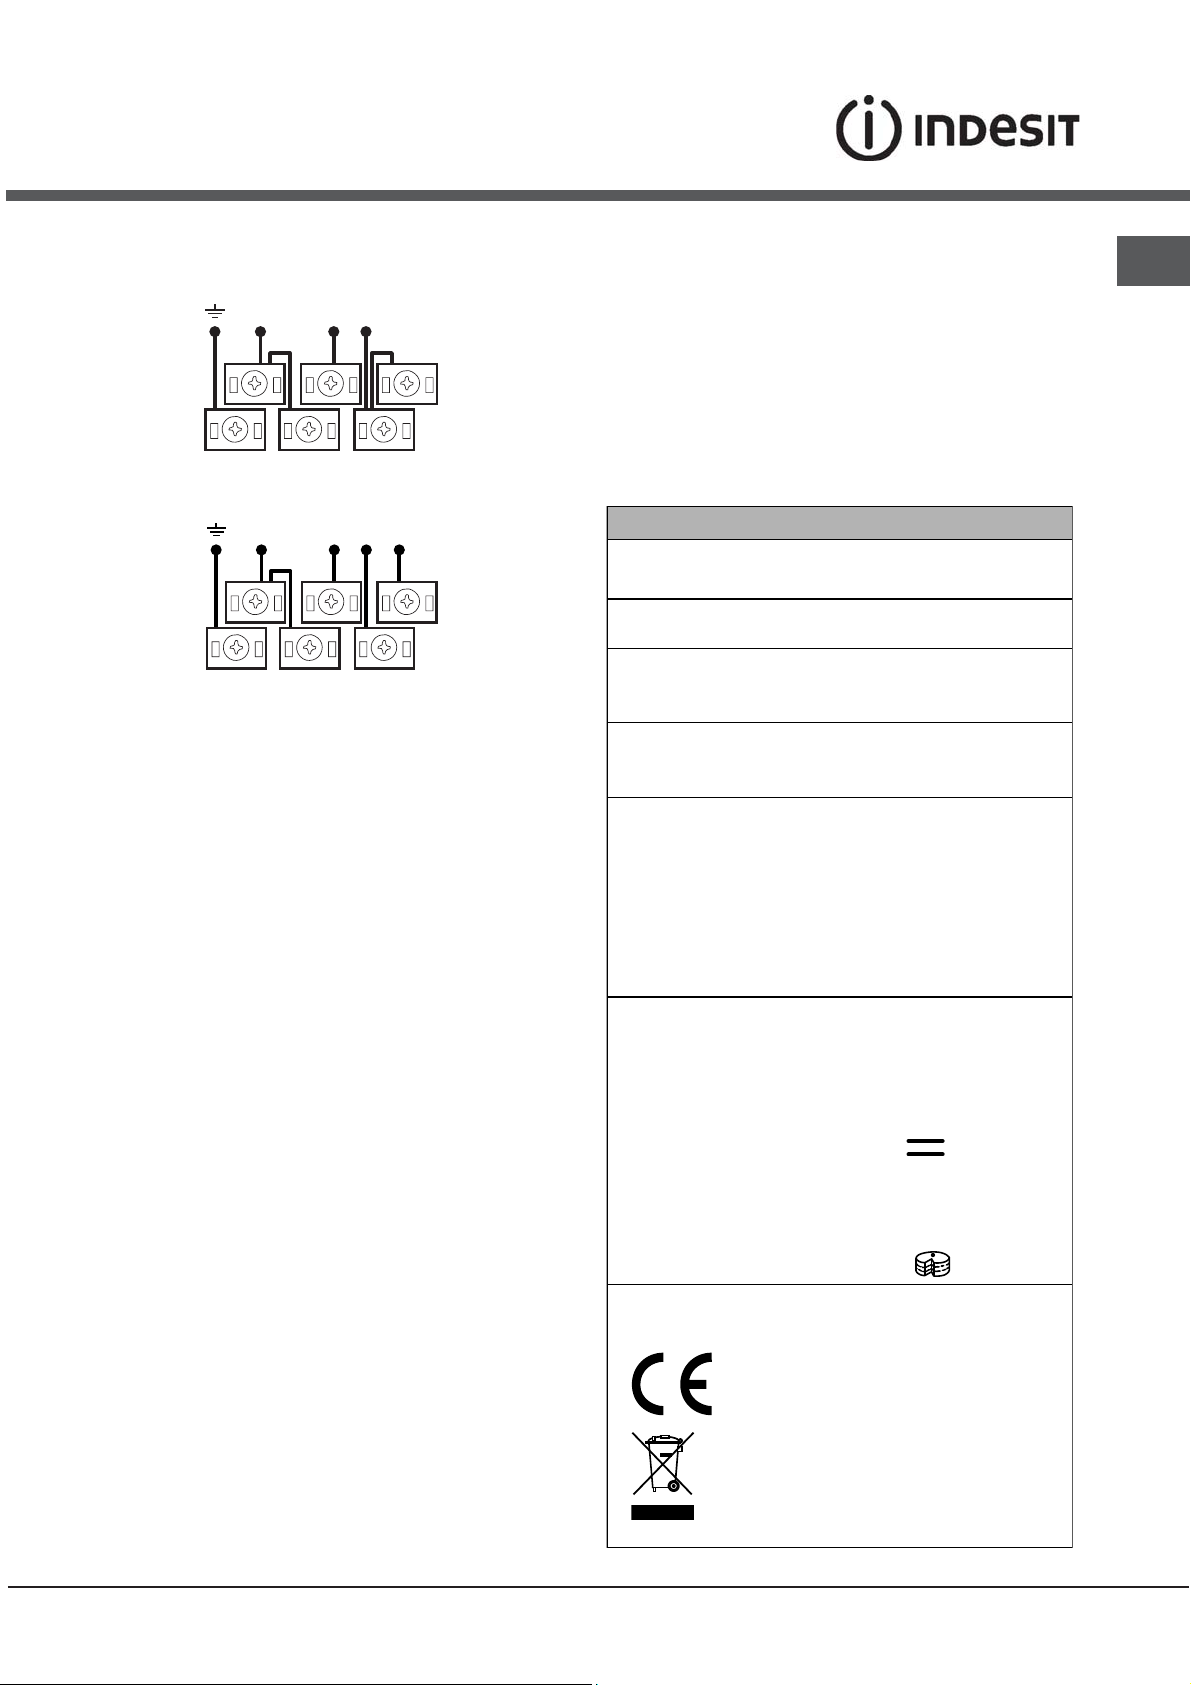
400V 2N~
H05RR-F 4x4 CEI-UNEL 35363
NL2L1
5
3
4
1
2
! Ad apparecchio installato, il cavo elettrico e la
presa della corrente devono essere facilmente
raggiungibili.
! Il cavo non deve subire piegature o compressioni.
! Il cavo deve essere controllato periodicamente e
sostituito solo da tecnici autorizzati.
IT
400V 3N~
H05RR-F 5x2.5 CEI-UNEL 35363
NL3L1L2
5
3
4
• fissare il cavo di alimentazione nell’apposito
fermacavo e chiudere il coperchio.
Collegamento del cavo di alimentazione alla rete
Montare sul cavo una spina normalizzata per il carico
indicato nella targhetta caratteristiche posta
sull’apparecchio (
vedi tabella Dati tecnici
In caso di collegamento diretto alla rete è necessario
interporre tra l’apparecchio e la rete un interruttore
onnipolare con apertura minima fra i contatti di 3 mm,
dimensionato al carico e rispondente alle norme
nazionali in vigore (il filo di terra non deve essere
interrotto dall’interruttore). Il cavo di alimentazione
deve essere posizionato in modo tale che in nessun
punto superi di 50°C la temperatura ambiente.
Prima di effettuare l’allacciamento accertarsi che:
• la presa abbia la messa a terra e sia a norma di legge;
• la presa sia in grado di sopportare il carico
massimo di potenza della macchina, indicato della
targhetta caratteristiche;
• la tensione di alimentazione sia compresa nei valori
nella targhetta caratteristiche;
• la presa sia compatibile con la spina
dell’apparecchio. In caso contrario sostituire la
presa o la spina; non usare prolunghe e multiple.
1
2
).
! L’azienda declina ogni responsabilità qualora
queste norme non vengano rispettate.
TARGHETTA CARATTERISTICHE
Dimensioni
Forno HxLxP
Volume
Dimensioni utili
del cassetto
scaldavivande
Tensione e
frequenza
d'alimentazione
Piano di cottura
in ceramica
Anteriore sx
Posteriore sx
Posteriore dx
Anteriore dx
Assorbimento
piani di cottura
in ceramica Max
ENERGY
LABEL
32x43,5x40 cm
lt. 56
larghezza cm 42
profondità cm 44
altezza cm 8,5
vedi targhetta caratteristiche
1700 W
1200 W
2100 W
1200 W
6200 W
Direttiva 2002/40/CE
sull’etichetta dei forni elettrici.
Norma EN 50304
Consumo energia convezione
Naturale – funzione di
riscaldamento:
Consumo energia dichiarazione
Classe convezione Forzata -
funzione di
riscaldamento:
Questa apparecchiatura è
conforme alle seguenti Direttive
Comunitarie: 2006/95/EC del
12/12/06 (Bassa Tensione) e
successive modificazioni 2004/108/EC del 15/12/04
(Compatibilità Elettromagnetica)
e successive modificazioni -
93/68/EEC del 22/07/93 e
successive modificazioni.
2002/96/EC
1275/2008 (Stand-by/Off mode)
Tradizionale;
Pasticceria.
3
Page 4
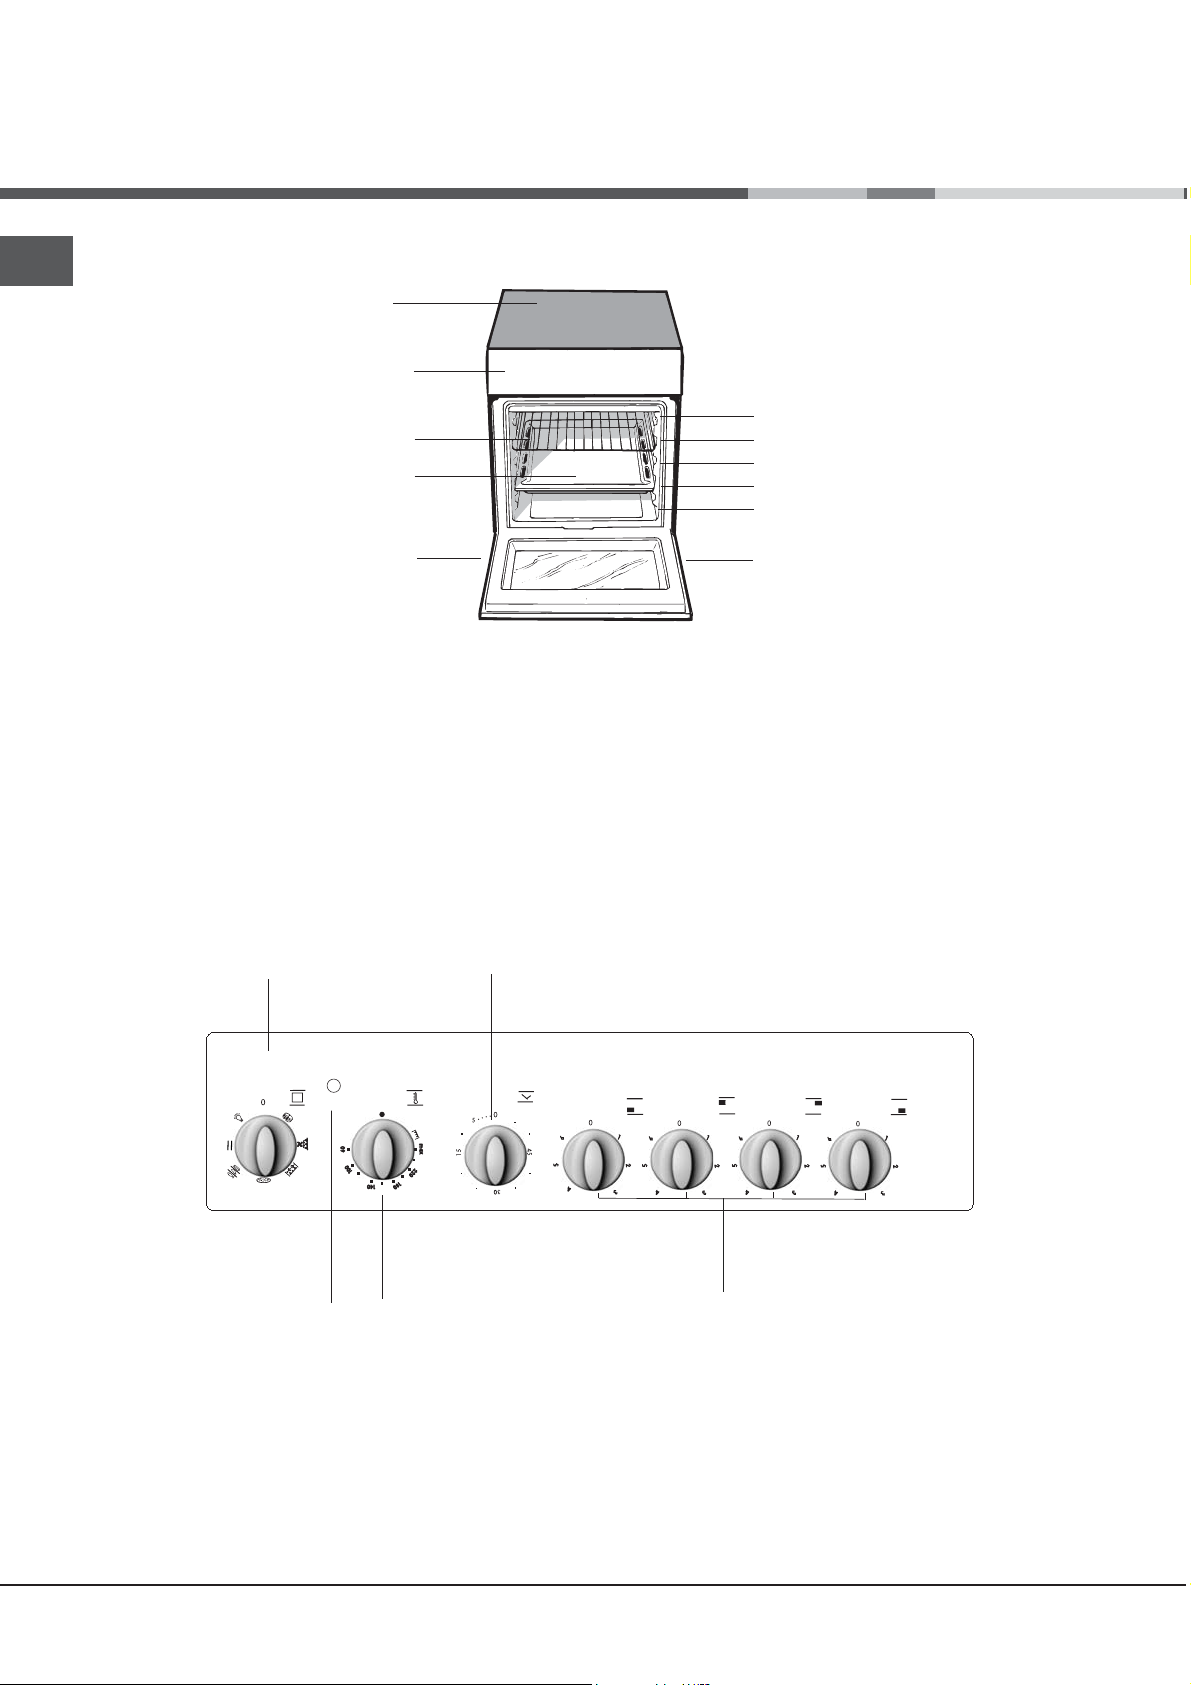
Descrizione
dell’apparecchio
IT
Vista d’insieme
Piano cottura
vetroceramica
Pannello di controllo
Ripiano GRIGLIA
Ripiano LECCARDA
Piedino di regolazione
GUIDE
di scorrimento dei ripiani
posizione 5
posizione 4
posizione 3
posizione 2
posizione 1
Piedino di regolazione
Pannello di controllo
Manopola
PROGRAMMI
Spia
TERMOSTATO
Manopola
CONTAMINUTI
Manopola
TERMOSTATO
Manopole piastre
ELETTRICHE
4
Page 5
Avvio e utilizzo
! Alla prima accensione fare funzionare il forno a
vuoto per almeno un’ora con il termostato al
massimo e a porta chiusa. Poi spegnere, aprire la
porta del forno e aerare il locale. L’odore che si
avverte è dovuto all’evaporazione delle sostanze
usate per proteggere il forno.
Avviare il forno
1. Selezionare il programma di cottura desiderato
ruotando la manopola PROGRAMMI.
2. Scegliere la temperatura consigliata per il
programma o quella desiderata ruotando la
manopola TERMOSTATO.
Una lista con le cotture e le relative temperature
consigliate è consultabile nell’apposita tabella (
Tabella cottura in forno
Durante la cottura è sempre possibile:
• modificare il programma di cottura agendo sulla
manopola PROGRAMMI;
• modificare la temperatura agendo sulla manopola
TERMOSTATO;
• pianificare la durata e l’ora di fine della cottura
(
vedi sotto
• interrompere la cottura riportando la manopola
PROGRAMMI in posizione “0”.
! Non appoggiare mai oggetti sul fondo del forno
perché si rischiano danni allo smalto. Utilizzate la
posizione 1 del forno solo in caso di cotture con il
girarrosto.
! Prima dell'uso, togliere tassativamente le pellicole
in plastica poste ai lati dell'apparecchio
);
).
vedi
Programmi di cottura
! Per tutti i programmi è impostabile una temperatura
tra 50°C e MAX, tranne:
• GRILL (si consiglia di impostare solo su MAX);
• GRATIN (si consiglia di non superare la
temperatura di 200°C).
Programma FORNO TRADIZIONALE
Si attivano i due elementi riscaldanti inferiore e
superiore. Con questa cottura tradizionale è meglio
utilizzare un solo ripiano: con più ripiani si ha una
cattiva distribuzione della temperatura.
Programma
Si attiva l’elemento riscaldante posteriore ed entra in
funzione la ventola, garantendo un calore delicato e
uniforme all’interno del forno. Questo programma è
indicato per la cottura dei cibi delicati (ad es. dolci
che necessitano di lievitazione) e preparazioni
“mignon” su tre ripiani contemporaneamente.
Programma MULTICOTTURA
Si attivano tutti gli elementi riscaldanti (superiore,
inferiore e circolare) ed entra in funzione la ventola.
Poiché il calore è costante in tutto il forno, l’aria
cuoce e rosola il cibo in modo uniforme. È possibile
utilizzare fino a un massimo di due ripiani
contemporaneamente.
FORNO PASTICCERIA
IT
! Porre sempre i recipienti di cottura sulla griglia in
dotazione.
Spia TERMOSTATO
La sua accensione segnala che il forno sta
producendo calore. Si spegne quando all’interno
viene raggiunta la temperatura selezionata. A questo
punto la spia si accende e si spegne
alternativamente, indicando che il termostato è in
funzione e mantiene costante la temperatura.
Luce del forno
Si accende ruotando la manopola PROGRAMMI in
qualsiasi posizione diversa da “0” e resta accesa
finché il forno è in funzione. Selezionando
manopola, la luce si accende senza attivare alcun
elemento riscaldante.
con la
88
8
88
Programma
Si attivano gli elementi riscaldanti inferiore e
circolare ed entra in funzione la ventola. Questa
combinazione consente un rapido riscaldamento del
forno, con un forte apporto di calore in prevalenza
dal basso. Nel caso si utilizzi più di un ripiano alla
volta, è necessario cambiarli di posizione tra loro a
metà cottura.
FORNO PIZZAFORNO PIZZA
FORNO PIZZA
FORNO PIZZAFORNO PIZZA
5
Page 6
IT
Programma GRILL
Si attiva la parte centrale dell’elemento riscaldante
superiore e il girarrosto (ove presente). La
temperatura elevata e diretta del grill è consigliata
per gli alimenti che necessitano di un’alta
temperatura superficiale (bistecche di vitello e di
manzo, filetto, entrecote). È un programma dai
consumi contenuti, ideale per grigliare piatti di ridotte
dimensioni. Posizionare il cibo al centro della griglia,
poiché negli angoli non viene cotto.
Consigli pratici di cottura
! Nelle cotture ventilate non utilizzare le posizioni dei
ripiani 1 e 5: sono investite direttamente dall’aria
calda, che potrebbe provocare bruciature sui cibi
delicati.
MULTICOTTURA
• Utilizzare le posizioni dei ripiani 2 e 4, mettendo alla
2 i cibi che richiedono maggior calore.
• Disporre la leccarda in basso e la griglia in alto.
Programma
Si attiva l’elemento riscaldante superiore ed entrano
in funzione la ventola e il girarrosto (ove presente).
Unisce all’irradiazione termica unidirezionale, la
circolazione forzata dell’aria all’interno del forno. Ciò
impedisce la bruciatura superficiale degli alimenti
aumentando il potere di penetrazione del calore.
! Le cotture GRILL e GRATIN debbono essere
effettuate a porta chiusa.
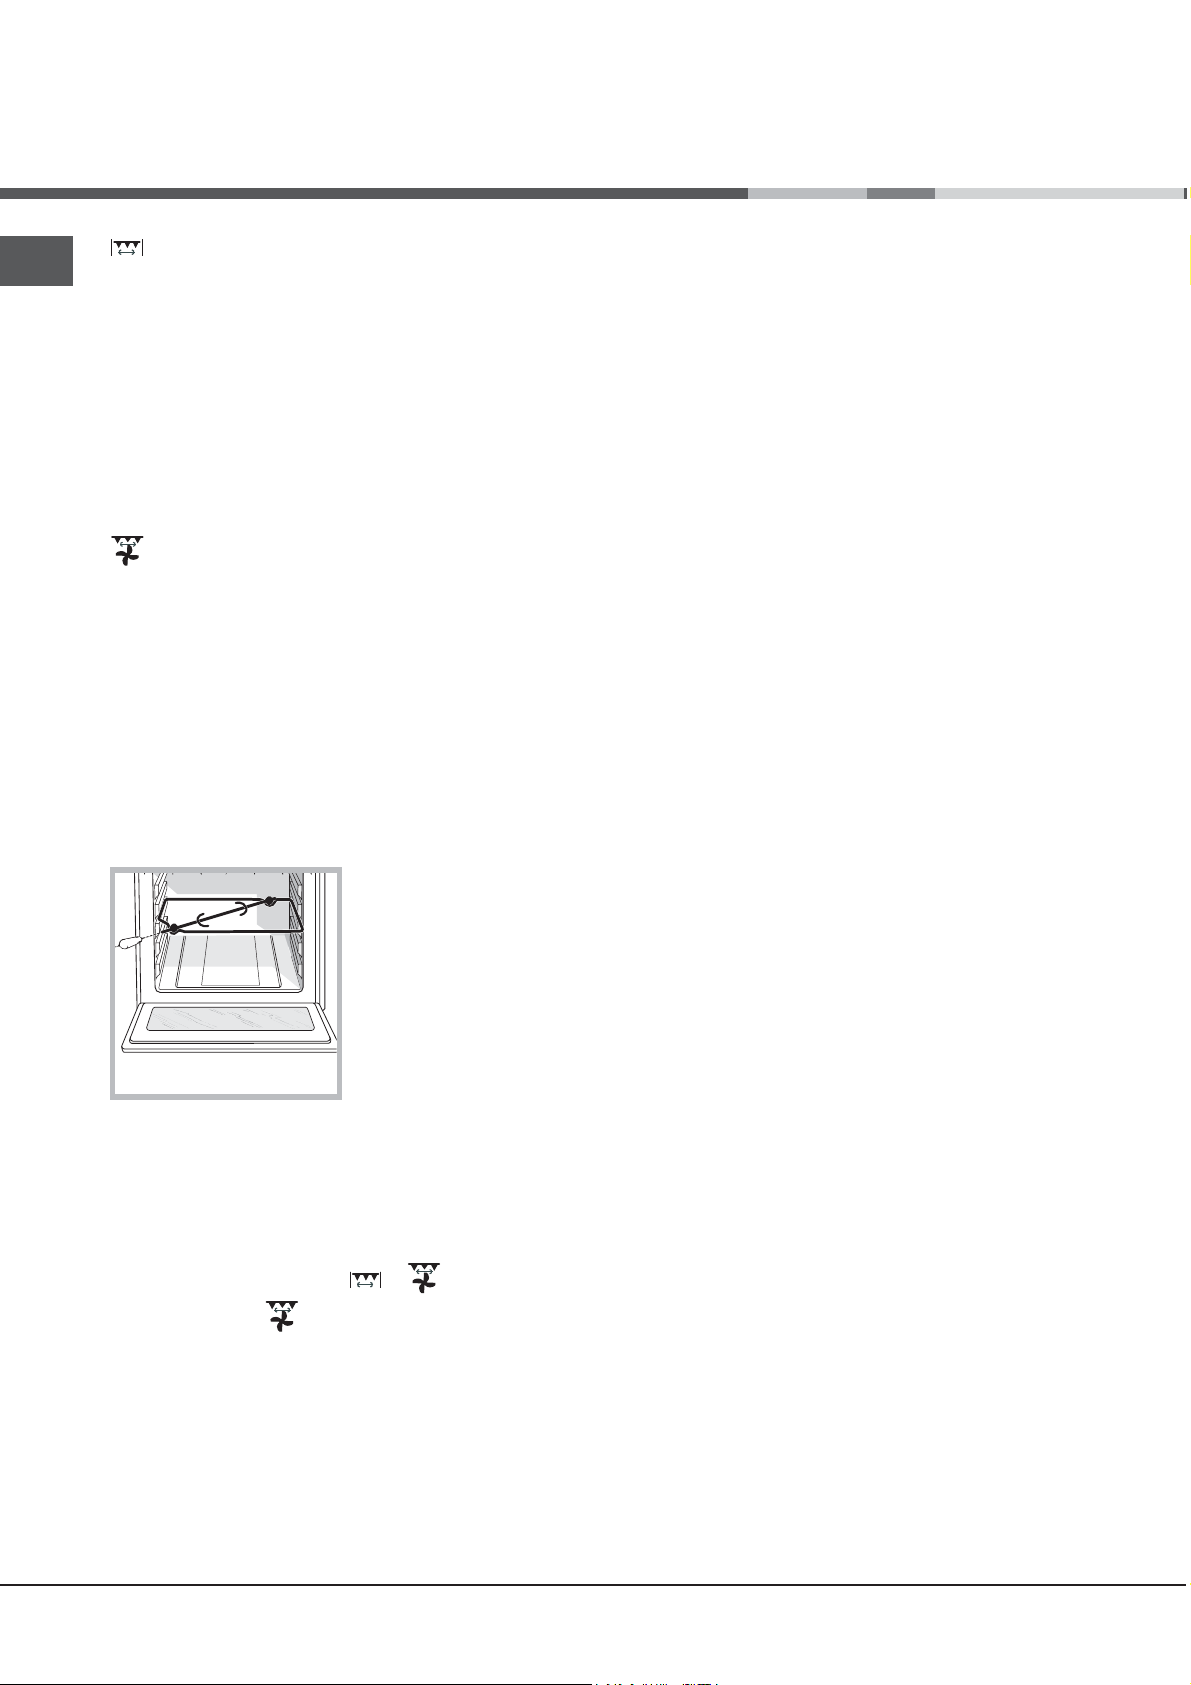
Girarrosto (solo in alcuni modelli)
1. mettere la leccarda in posizione 1;
2. mettere il sostegno del girarrosto in posizione 3 e
inserire lo spiedo nell’apposito foro posto sulla
parete posteriore del forno;
3. azionare il girarrosto selezionando con la
manopola PROGRAMMI
GRATINGRATIN
GRATIN
GRATINGRATIN
Per azionare il girarrosto
(
vedi figura
come segue:
o ;
) procedere
GRILL
• Nelle cotture GRILL mettere la griglia in posizione 5
e la leccarda in posizione 1 per raccogliere i residui
di cottura (sughi e/o grassi). Nella cottura GRATIN
mettere la griglia in posizione 2 o 3 e la leccarda in
posizione 1 per raccogliere i residui di cottura.
• Si consiglia di impostare il livello di energia al
massimo. Non allarmarsi se la resistenza superiore
non resta costantemente accesa: il suo
funzionamento è controllato da un termostato.
FORNO PIZZA
• Utilizzare una teglia in alluminio leggero,
appoggiandola sulla griglia in dotazione.
Con la leccarda si allungano i tempi di cottura
e difficilmente si ottiene una pizza croccante.
• Nel caso di pizze molto farcite è consigliabile
inserire la mozzarella a metà cottura.
Timer
Per azionare il Timer (Contaminuti) procedere come
segue:
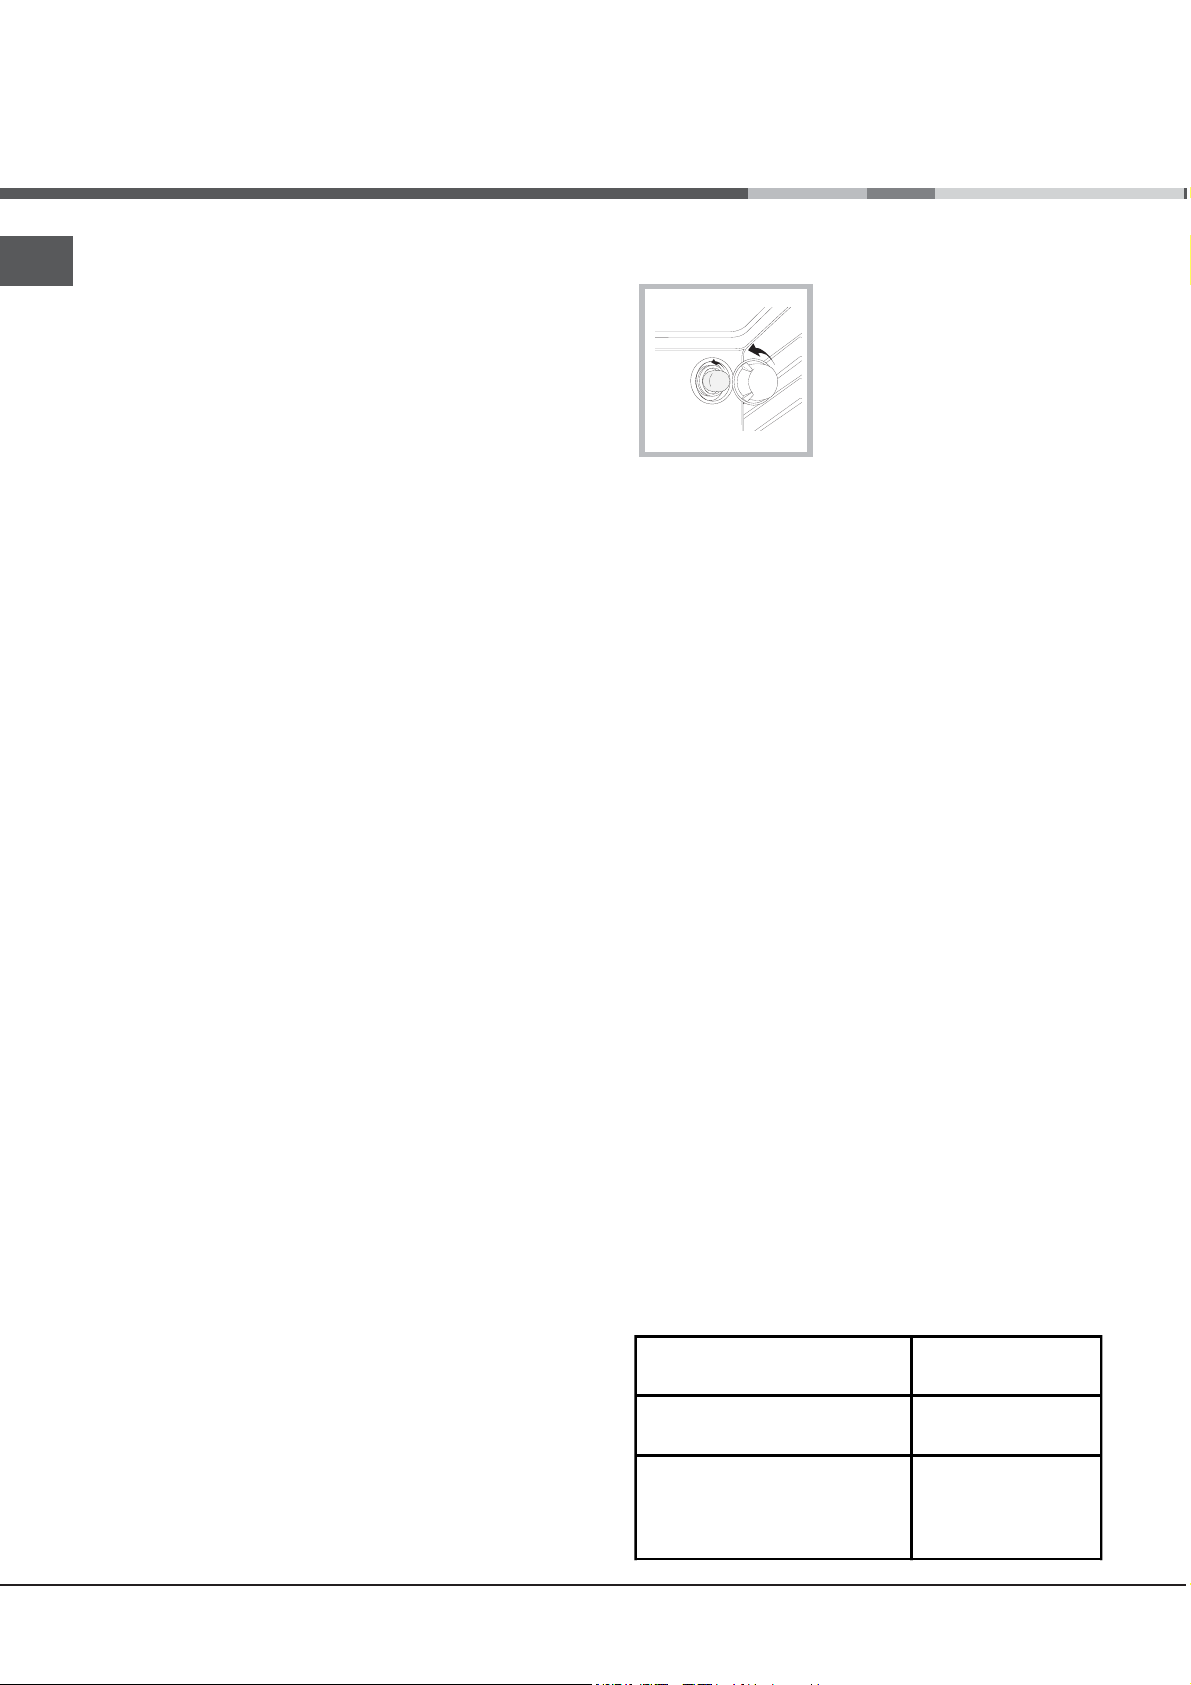
1. ruotare in senso orario 4 la manopola TIMER di
un giro quasi completo per caricare la suoneria;
2. ruotare in senso antiorario 5 la manopola TIMER
impostando il tempo desiderato.
! Col programma
girarrosto si arresta.
6
avviato, se si apre la porta il
Page 7
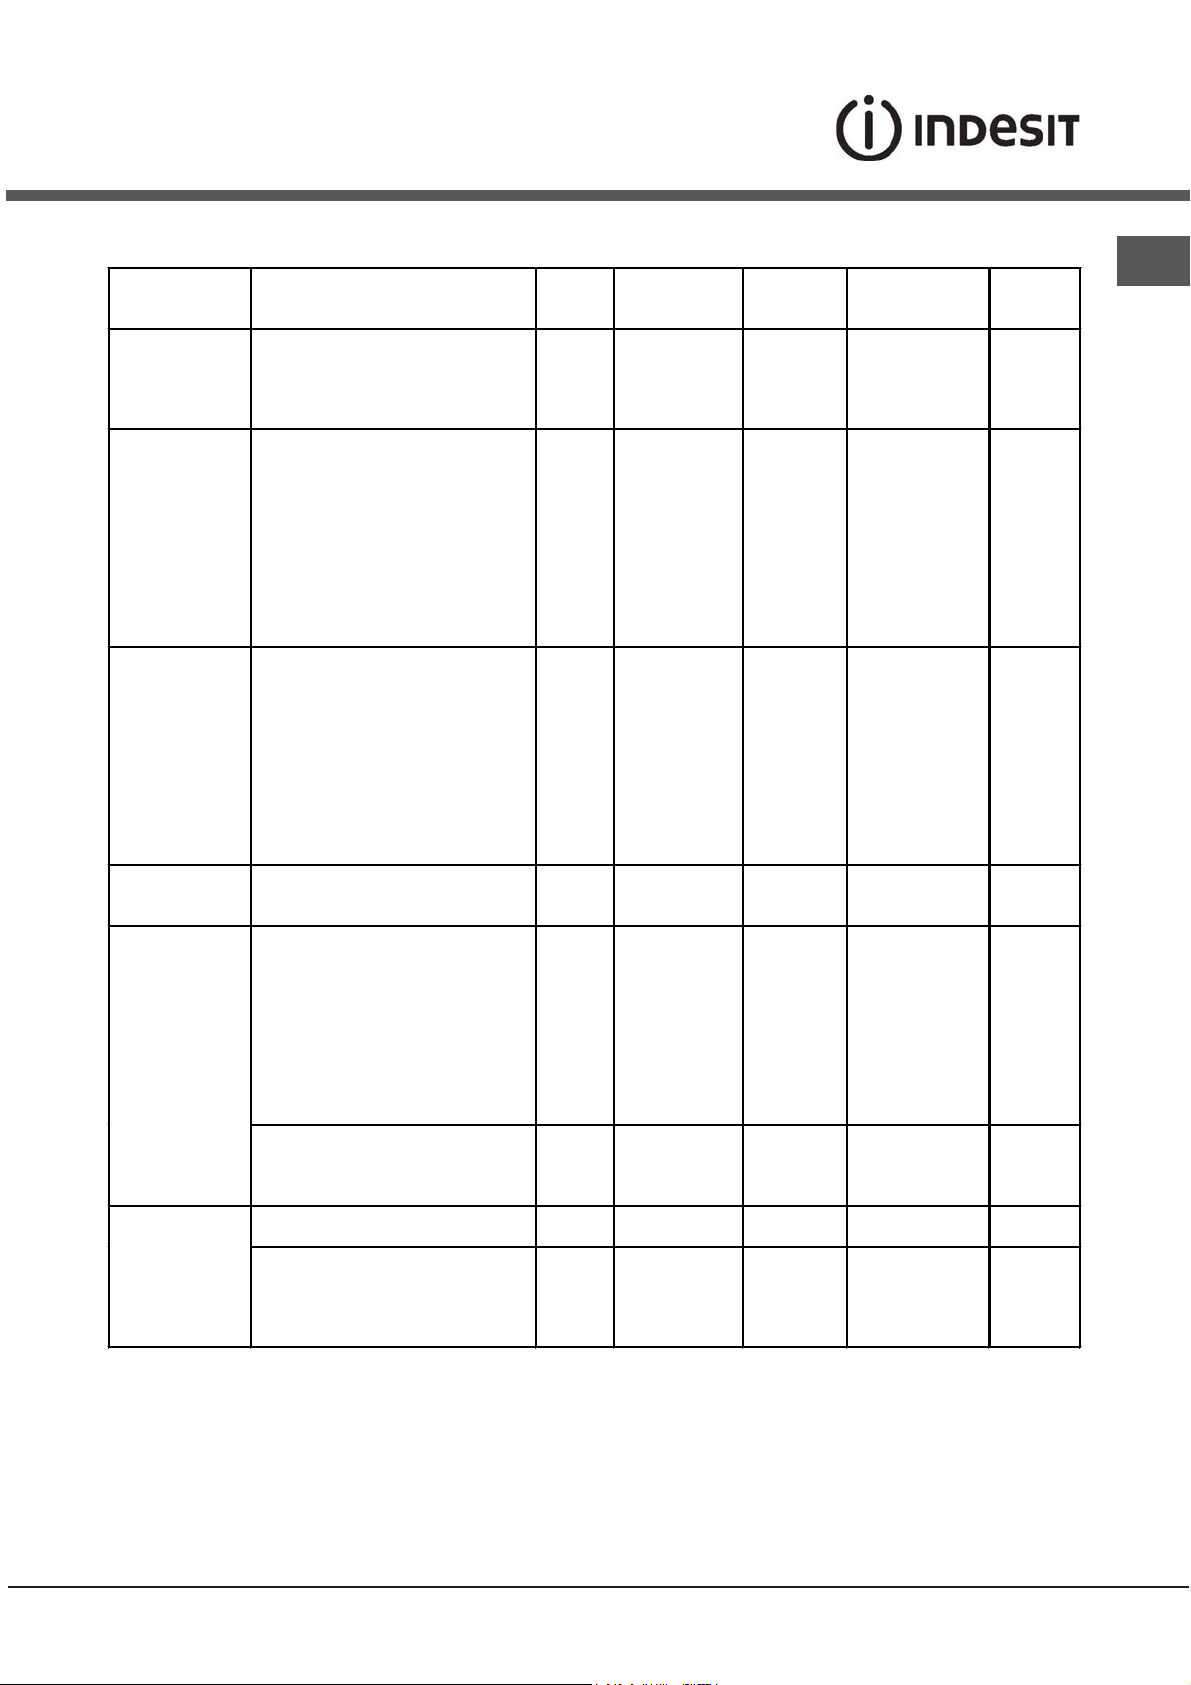
Tabella cottura in forno
Programmi Alimenti Peso
Anatra
Forno
Tradizionale
Forno
Pasticceria
Multicottura
Forno Pizza
Grill
Gratin
Arrosto di vitello o manzo
Arrosto di maiale
Biscotti (di frolla)
Crostate
Crostate
Torta di frutta
Plum cake
Pan di spagna
Crêpes farcite (su 2 ripiani)
Cake piccoli (su 2 ripiani)
Salatini di sfoglia al formaggio (su 2
ripiani)
Bignè (su 3 ripiani)
Biscotti (su 3 ripiani)
Meringhe (su 3 ripiani)
Pizza (su 2 ripiani)
Lasagne
Agnello
Pollo arrosto + patate
Sgombro
Plum cake
Bignè (su 2 ripiani)
Biscotti(su 2 ripiani)
Pan di spagna (su 1 ripiano)
Pan di spagna(su 2 ripiani)
Torte salate
Pizza
Arrosto di vitello o manzo
Pollo
Sogliole e seppie
Spiedini di calamari e gamberi
Seppie
Filetto di merluzzo
Verdure alla griglia
Bistecca di vitello
Salsicce
Hamburger
Sgombri
Toast (o pane tostato)
Con girarrosto (ove presente)
Vitello allo spiedo
Pollo allo spiedo
Agnello allo spiedo
Pollo alla griglia
Seppie
Con girarrosto (ove presente)
Vitello allo spiedo
Agnello allo spiedo
Pollo (allo spiedo) + patate (sulla
leccarda)
(Kg)
1
1
1
-
1
0.5
1
0.7
0.5
1.2
0.6
0.4
0.7
0.7
0.5
1
1
1
1+1
1
1
0.5
0.5
0.5
1
1.5
0.5
1
1
0.7
0.6
0.6
0.8
0.4
0.8
0.6
0.6
1
4 and 6
1.0
1.5
1.0
1.5
1.5
1.5
1.5
1.5
-
Posizione dei
ripiani
3
3
3
3
3
3
2 or 3
3
3
2 and 4
2 and 4
2 and 4
1 and 3 and 5
1 and 3 and 5
1 and 3 and 5
2 and 4
3
2
2 and 4
2
2
2 and 4
2 and 4
2
2 and 4
3
3
2
2 or 3
4
4
4
4
3 or 4
4
4
4
4
4
-
-
2
2
2
2
2
Preriscalda
mento
(minuti)
15
15
15
15
15
15
15
15
15
15
15
15
15
15
15
15
10
10
15
10
10
10
10
10
10
15
15
10
10
-
-
-
-
-
-
-
-
-
-
5
5
5
10
10
5
5
5
5
Temperatura
consigliata
200
200
200
180
180
180
180
180
160
200
190
210
180
180
90
230
180
180
200
180
170
190
180
170
170
200
220
220
180
Max
Max
Max
Max
Max
Max
Max
Max
Max
Max
Max
Max
Max
200
200
200
200
200
200
Durata
IT
cottura
(minuti)
65-75
70-75
70-80
15-20
30-35
20-30
40-45
40-50
25-30
30-35
20-25
15-20
20-25
20-25
180
15-20
30-35
40-45
60-70
30-35
40-50
20-25
10-15
15-20
20-25
25-30
15-20
25-30
60-70
10-12
8-10
10-15
10-15
15-20
15-20
15-20
10-12
15-20
3-5
80-90
70-80
70-80
55-60
30-35
70-80
70-80
70-75
70-75
7
Page 8
Utilizzo del piano cottura
vetroceramica
IT
! La colla applicata sulle guarnizioni lascia alcune
tracce di grasso sul vetro. Prima di utilizzare
l’apparecchio, si raccomanda di eliminarle con un
prodotto specifico per la manutenzione non abrasivo.
Durante le prime ore di funzionamento è possibile
avvertire un odore di gomma, che comunque
scomparirà presto.
Accendere e spegnere le zone di cottura
Per accendere una zona di cottura ruotare in senso
orario la manopola corrispondente.
Per spegnere, ruotare la manopola in senso antiorario
fino allo “0”.
L’accensione della spia FUNZIONAMENTO PIASTRE
segnala che almeno una piastra del piano cottura è in
funzione.
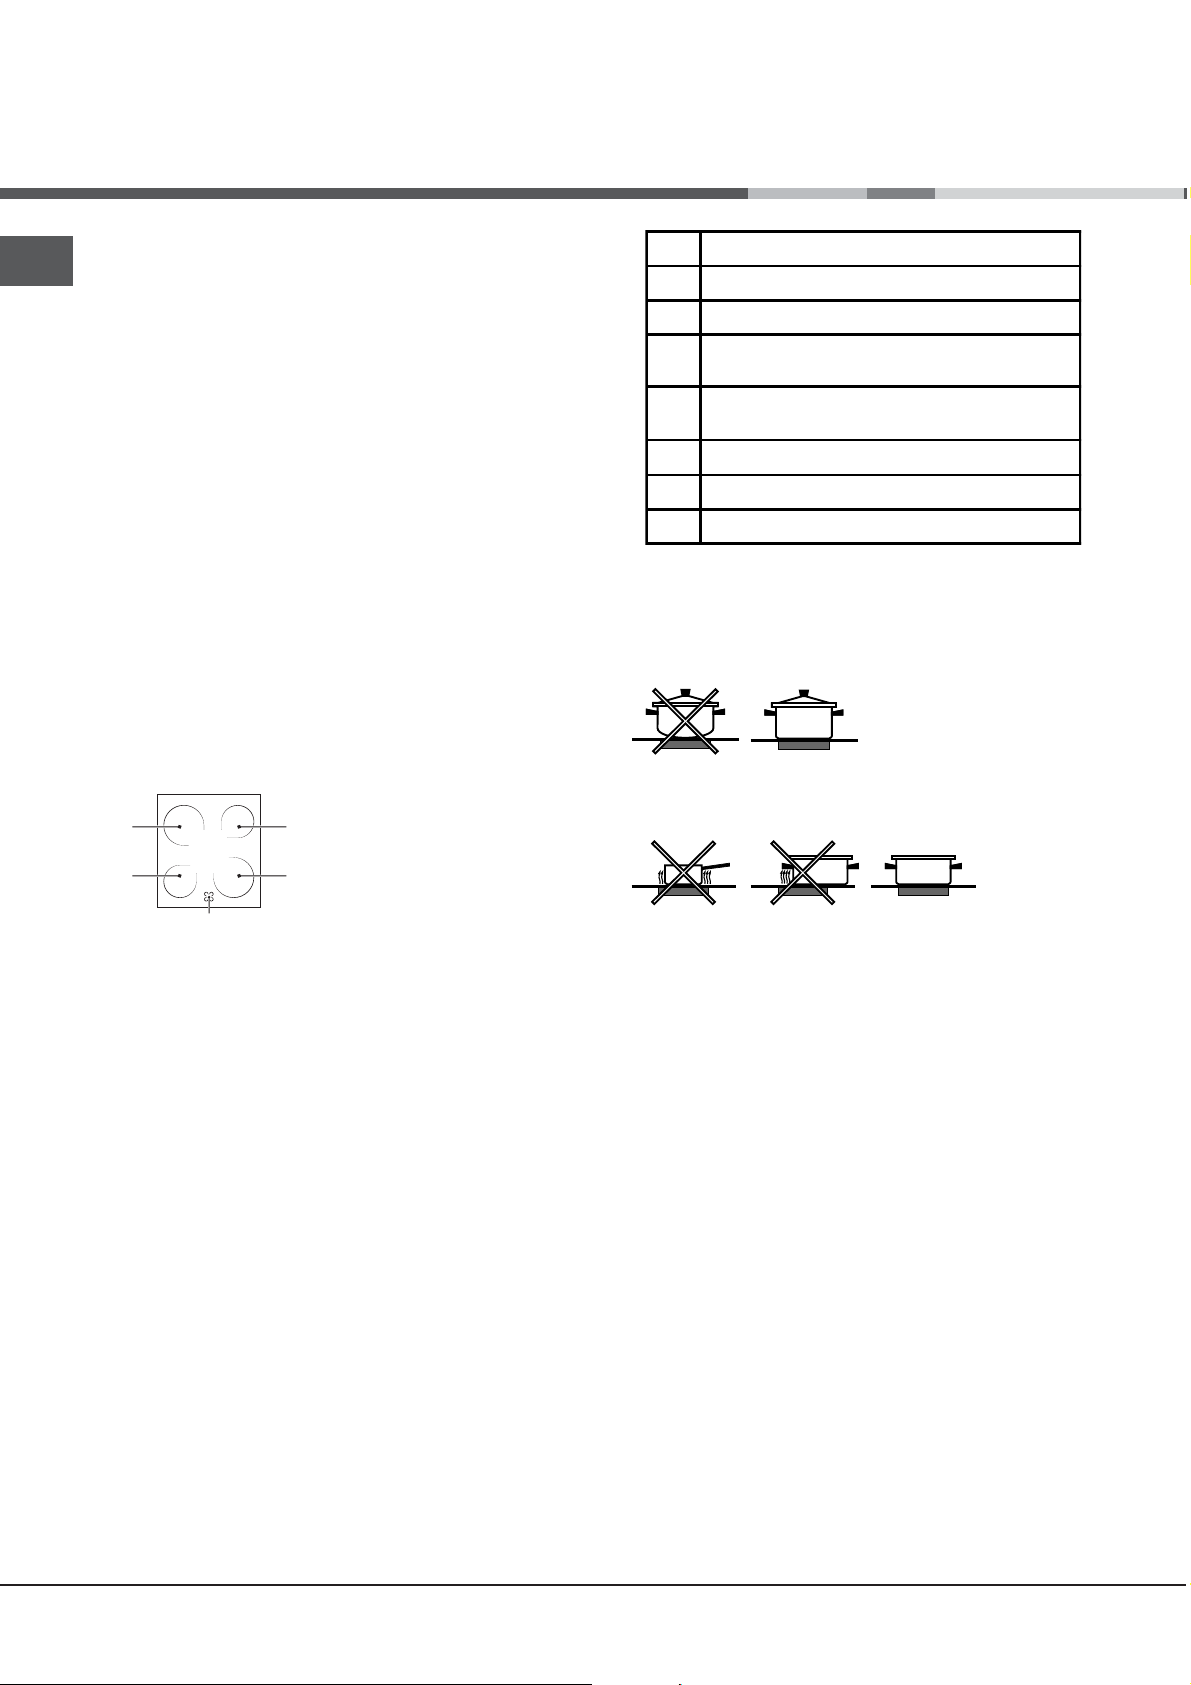
Le zone di cottura
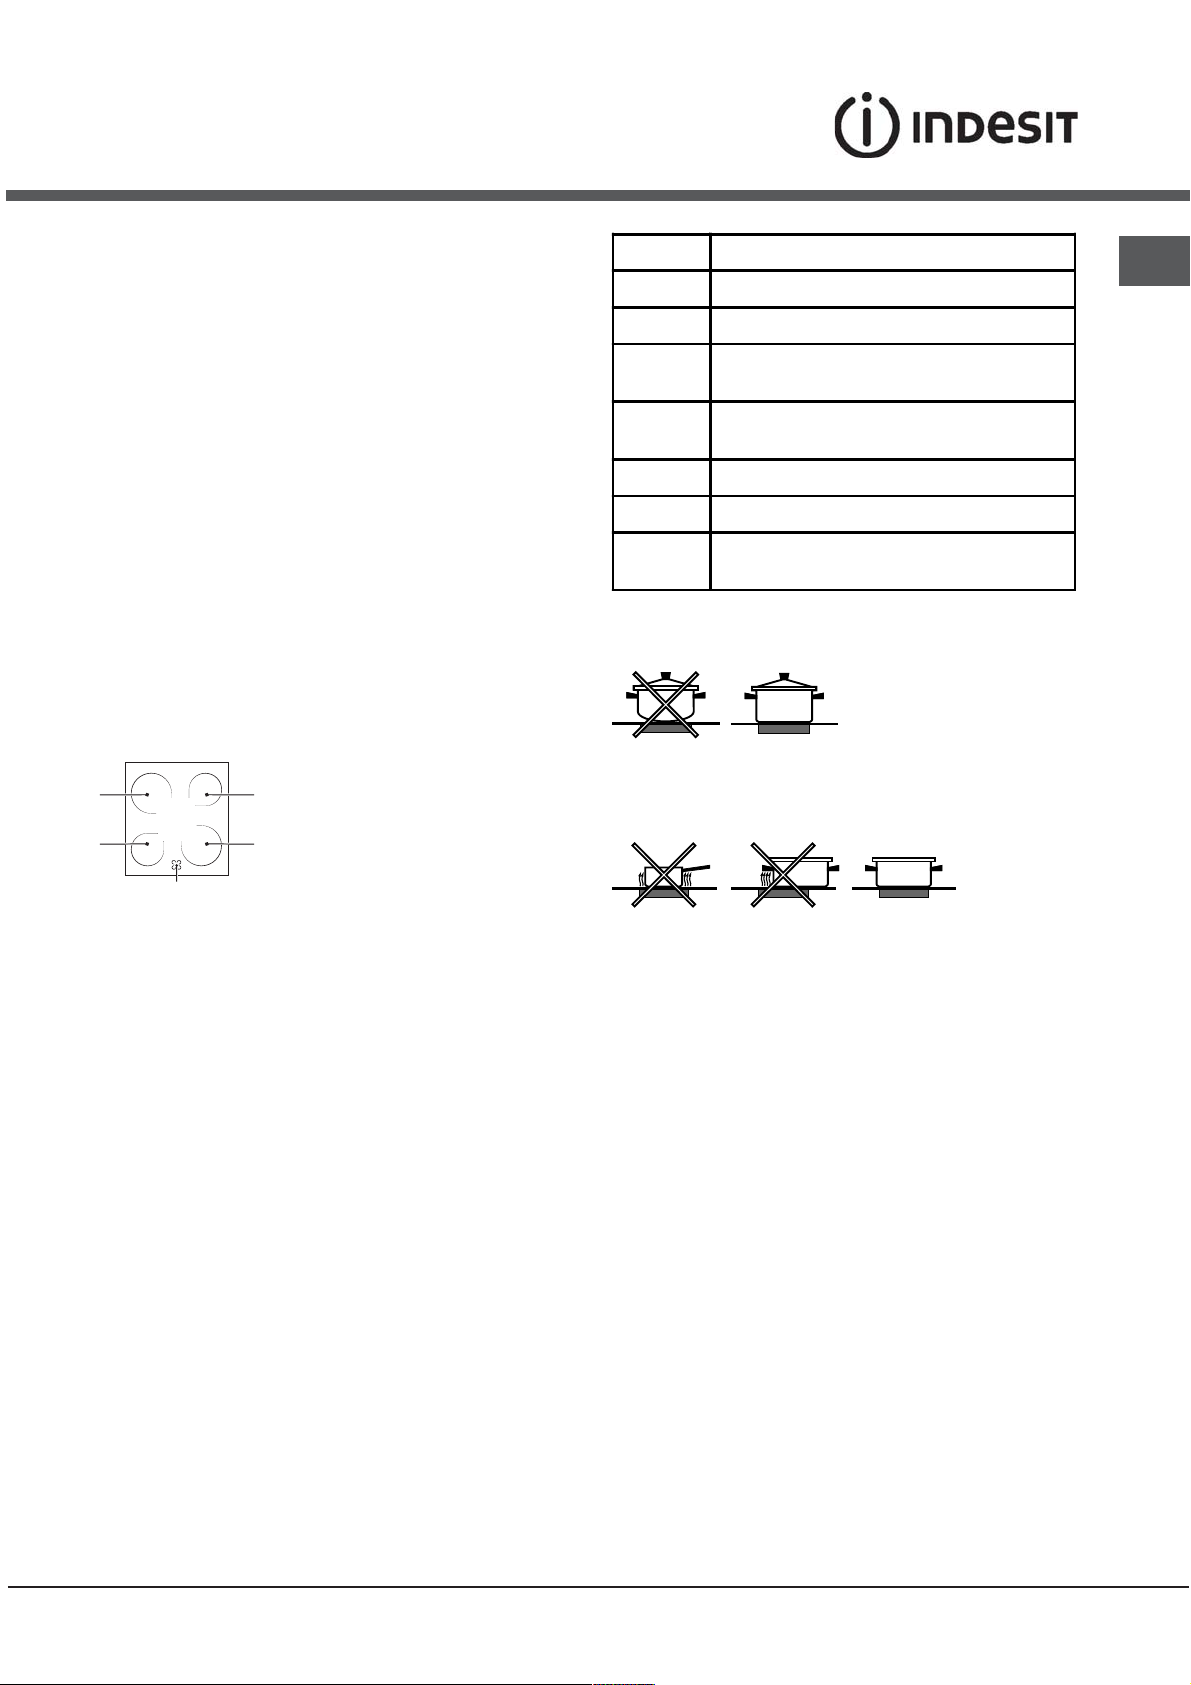
Sul piano cottura ci sono elementi riscaldanti elettrici
hilite. Durante il funzionamento diventano di colore
rosso:
A.Zona di cottura con
A
A
B
l’elemento sia spento ma ancora caldo.
Descrizione degli elementi riscaldanti
Gli elementi riscaldanti radianti sono costituiti da
elementi riscaldanti circolari, che diventano rossi
soltanto dopo 10-20 secondi dall'accensione.
Gli elementi riscaldanti hilite sono costituiti da
elementi riscaldanti circolari che garantiscono una
distribuzione uniforme della temperatura, oltre ai
vantaggi caratteristici degli elementi riscaldanti
hilite.
Gli elementi hilite emettono istantaneamente
un'elevata quantità di luce e calore con i
conseguenti vantaggi pratici:
· rapido riscaldamento (rispetto ad un bruciatore a
gas)
· rapido raffreddamento
· temperatura uniforme sull'intera superficie (grazie
agli elementi riscaldanti circolari)
elementi radianti.
A
B. Spia di calore: segnala
che la temperatura della
A
zona di cottura
corrispondente è superiore a
60°C, anche nel caso in cui
Spento
Cottura di verdure, pesci
Cottura di patate (a vapore) minestre, ceci,
fagioli
Proseguimento di cottura di grandi quantità di
cibi, minestroni
Arrostire (medio)
Arrostire (forte)
Rosolare o raggiungere bollitura in poco tempo
Consigli pratici per l’uso del piano cottura
• Adoperare pentole con fondo piatto e di elevato
spessore, per essere certi che aderiscano
perfettamente alla zona riscaldante;
• adoperare pentole di diametro sufficiente a coprire
completamente la zona riscaldante, in modo da
garantire lo sfruttamento di tutto il calore;
• accertarsi che il fondo delle pentole sia sempre
perfettamente asciutto e pulito: l’aderenza alle zone
di cottura sarà così ottimale e sia le pentole sia il
piano cottura dureranno più a lungo;
• evitare di utilizzare le stesse pentole utilizzate
sui bruciatori a gas: la concentrazione di calore sui
bruciatori a gas può deformare il fondo della
pentola, che perde aderenza;
• non lasciare mai una zona di cottura accesa senza
pentola poiché potrebbe danneggiarsi.
8
Page 9
Precauzioni e consigli
! L’apparecchio è stato progettato e costruito in conformità alle
norme internazionali di sicurezza.
Queste avvertenze sono fornite per ragioni di sicurezza e devono
essere lette attentamente.
Sicurezza generale
Queste istruzioni sono valide solo per i paesi diQueste istruzioni sono valide solo per i paesi di
•
Queste istruzioni sono valide solo per i paesi di
Queste istruzioni sono valide solo per i paesi diQueste istruzioni sono valide solo per i paesi di
destinazione i cui simboli figurano sul libretto edestinazione i cui simboli figurano sul libretto e
destinazione i cui simboli figurano sul libretto e
destinazione i cui simboli figurano sul libretto edestinazione i cui simboli figurano sul libretto e
sulla targa matricola dell’apparecchio.sulla targa matricola dell’apparecchio.
sulla targa matricola dell’apparecchio.
sulla targa matricola dell’apparecchio.sulla targa matricola dell’apparecchio.
• L’apparecchio è stato concepito per un uso di tipo non
professionale all’interno dell’abitazione.
• L’apparecchio non va installato all’aperto, nemmeno se lo
spazio è riparato, perché è molto pericoloso lasciarlo esposto
a pioggia e temporali.
• Non toccare la macchina a piedi nudi o con le mani o con i
piedi bagnati o umidi.
• L’apparecchio deve essere usato per cuocere alimenti, solo
da persone adulte e secondo le istruzioni riportate in questo
libretto. Ogni altro uso (ad esempio: riscaldamento di ambienti)
è da considerarsi improprio e quindi pericoloso. Il costruttore
non può essere considerato responsabile per eventuali danni
derivanti da usi impropri, erronei ed irragionevoli.
• Il libretto riguarda un apparecchio di classe 1 (isolato) o classe
2 – sottoclasse 1 (incassato tra due mobili).
• Durante l'uso dell'apparecchio gli elementi riscaldanti e alcune
parti della porta forno diventano molto calde. Fare attenzione
a non toccarle e tenere i bambimi a distanza.
• Evitare che il cavo di alimentazione di altri elettrodomestici
entri in contatto con parti calde dell’apparecchio.
• Non ostruire le aperture di ventilazione e di smaltimento di
calore.
• Sulle piastre non debbono essere poste pentole instabili o
deformate onde evitare incidenti per rovesciamento.
Posizionatele sul piano di cottura in modo che i manici siano
rivolti verso l’interno, per evitare urti accidentali.
• Utilizzare sempre guanti da forno per inserire o estrarre
recipienti.
• Non utilizzare liquidi infiammabili (alcol, benzina, ecc.) in
prossimità dell’apparecchio quando esso è in uso.
• Non riporre materiale infiammabile nel vano inferiore di
deposito o nel forno: se l’apparecchio viene messo
inavvertitamente in funzione potrebbe incendiarsi.
• Quando l’apparecchio non è utilizzato, assicurarsi sempre che
le manopole siano nella posizione •.
• Non staccare la spina dalla presa della corrente tirando il
cavo, bensì afferrando la spina.
• Non fare pulizia o manutenzione senza aver prima staccato la
spina dalla rete elettrica.
• In caso di guasto, in nessun caso accedere ai meccanismi
interni per tentare una riparazione. Contattare l’Assistenza.
• Non appoggiare oggetti pesanti sulla porta del forno aperta.
• Le superfici interne del cassetto (se presente) possono
diventare calde.
• Il piano in vetroceramica è resistente agli urti meccanici,
tuttavia può incrinarsi (o eventualmente frantumarsi) se colpito
con un oggetto appuntito, quale un utensile. In questi casi,
scollegare immediatamente l’apparecchio dalla rete di
alimentazione e rivolgersi all’Assistenza.
• Se la superficie del piano è incrinata, spegnere l'apparecchio
per evitare la possibilità di scosse elettriche.
• Non dimenticare che la temperatura delle zone di cottura
rimane piuttosto elevata per almeno trenta minuti dopo lo
spegnimento.
• Tenere a debita distanza dal piano cottura qualsiasi oggetto
che potrebbe fondere, ad esempio oggetti in plastica, in
alluminio o prodotti con un elevato contenuto di zucchero.
Fare particolare attenzione a imballaggi e pellicole in plastica
o alluminio: se dimenticati sulle superfici ancora calde o
tiepide possono causare un grave danno al piano.
• Non posare oggetti metallici (coltelli, cucchiai, coperchi, ecc.)
sul piano perchè possono diventare caldi.
• Non è previsto che l'apparecchio venga utilizzato da persone
(bambini compresi) con ridotte capacità fisiche, sensoriali o
mentali, da persone inesperte o che non abbiano familiarità
con il prodotto, a meno che non vengano sorvegliate da una
persona responsabile della loro sicurezza o non abbiano
ricevuto istruzioni preliminari sull'uso dell'apparecchio.
• Evitare che i bambini giochino con l'apparecchio.
Smaltimento
• Smaltimento del materiale di imballaggio: attenersi alle norme
locali, così gli imballaggi potranno essere riutilizzati.
• La direttiva Europea 2002/96/CE sui rifiuti di apparecchiature
elettriche ed elettroniche (RAEE), prevede che gli
elettrodomestici non debbano essere smaltiti nel normale
flusso dei rifiuti solidi urbani. Gli apparecchi dismessi devono
essere raccolti separatamente per ottimizzare il tasso di
recupero e riciclaggio dei materiali che li compongono ed
impedire potenziali danni per la salute e l’ambiente. Il simbolo
del cestino barrato è riportato su tutti i prodotti per ricordare gli
obblighi di raccolta separata.
Per ulteriori informazioni, sulla corretta dismissione degli
elettrodomestici, i detentori potranno rivolgersi al servizio
pubblico preposto o ai rivenditori.
Risparmiare e rispettare l’ambiente
• Azionando il forno negli orari che vanno dal tardo pomeriggio
fino alle prime ore del mattino si collabora a ridurre il carico di
assorbimento delle aziende elettriche.
• Si raccomanda di effettuare sempre le cotture GRILL e
GRATIN a porta chiusa: sia per ottenere migliori risultati che
per un sensibile risparmio di energia (10% circa).
• Mantenere efficienti e pulite le guarnizioni, in modo che
aderiscano bene alla porta e non procurino dispersioni di
calore.
IT
9
Page 10
Manutenzione e cura
IT
• Questo prodotto soddisfa i requisiti imposti dalla nuova
Direttiva Europea sulla limitazione dei consumi energetici in
standby.
Se non si eseguono operazioni per 2 minuti, l’apparecchio si
dispone automaticamente in modalità standby.
La modalità standby è visualizzata con “Icona Orologio” in alta
luminosità.
Non appena si interagisce nuovamente con l’apparecchio, il
sistema ritorna in modalità operativa.
Escludere la corrente elettrica
Prima di ogni operazione isolare l’apparecchio dalla
rete di alimentazione elettrica.
Pulire il forno
! Non utilizzare mai pulitori a vapore o ad alta
pressione per la pulizia dell’apparecchio.
• Pulire il vetro della porta con spugne e prodotti non
abrasivi e asciugare con un panno morbido; non
usare materiali ruvidi abrasivi o raschietti metallici
affilati che possono graffiare la superficie e causare
la frantumazione del vetro.
• Le parti esterne smaltate o inox e le guarnizioni in
gomma possono essere pulite con una spugnetta
imbevuta di acqua tiepida e sapone neutro. Se le
macchie sono difficili da asportare usare prodotti
specifici. Si consiglia di sciacquare abbondantemente
e di asciugare dopo la pulizia. Non usare polveri
abrasive o sostanze corrosive.
• L’interno del forno va pulito preferibilmente ogni volta
dopo l’uso, quando è ancora tiepido. Usare acqua
calda e detersivo, risciaquare e asciugare con un
panno morbido. Evitare gli abrasivi.
• Gli accessori possono essere lavati come normali
stoviglie, anche in lavastoviglie.
• Il pannello di controllo va pulito da sporco e grassi
con una spugna non abrasiva o con un panno
morbido.
L’acciaio inossidabile può macchiarsi se lasciato
•
parecchio tempo a contatto con un’acqua molto
calcarea o con prodotti di pulizia contenenti
fosforo. Si consiglia di sciacquare
abbondantemente e asciugare con cura.
Controllare le guarnizioni del forno
Controllare periodicamente lo stato della guarnizione
attorno alla porta del forno. In caso risulti danneggiata
rivolgersi al Centro Assistenza più vicino. È consigliabile
non usare il forno fino all’avvenuta riparazione.
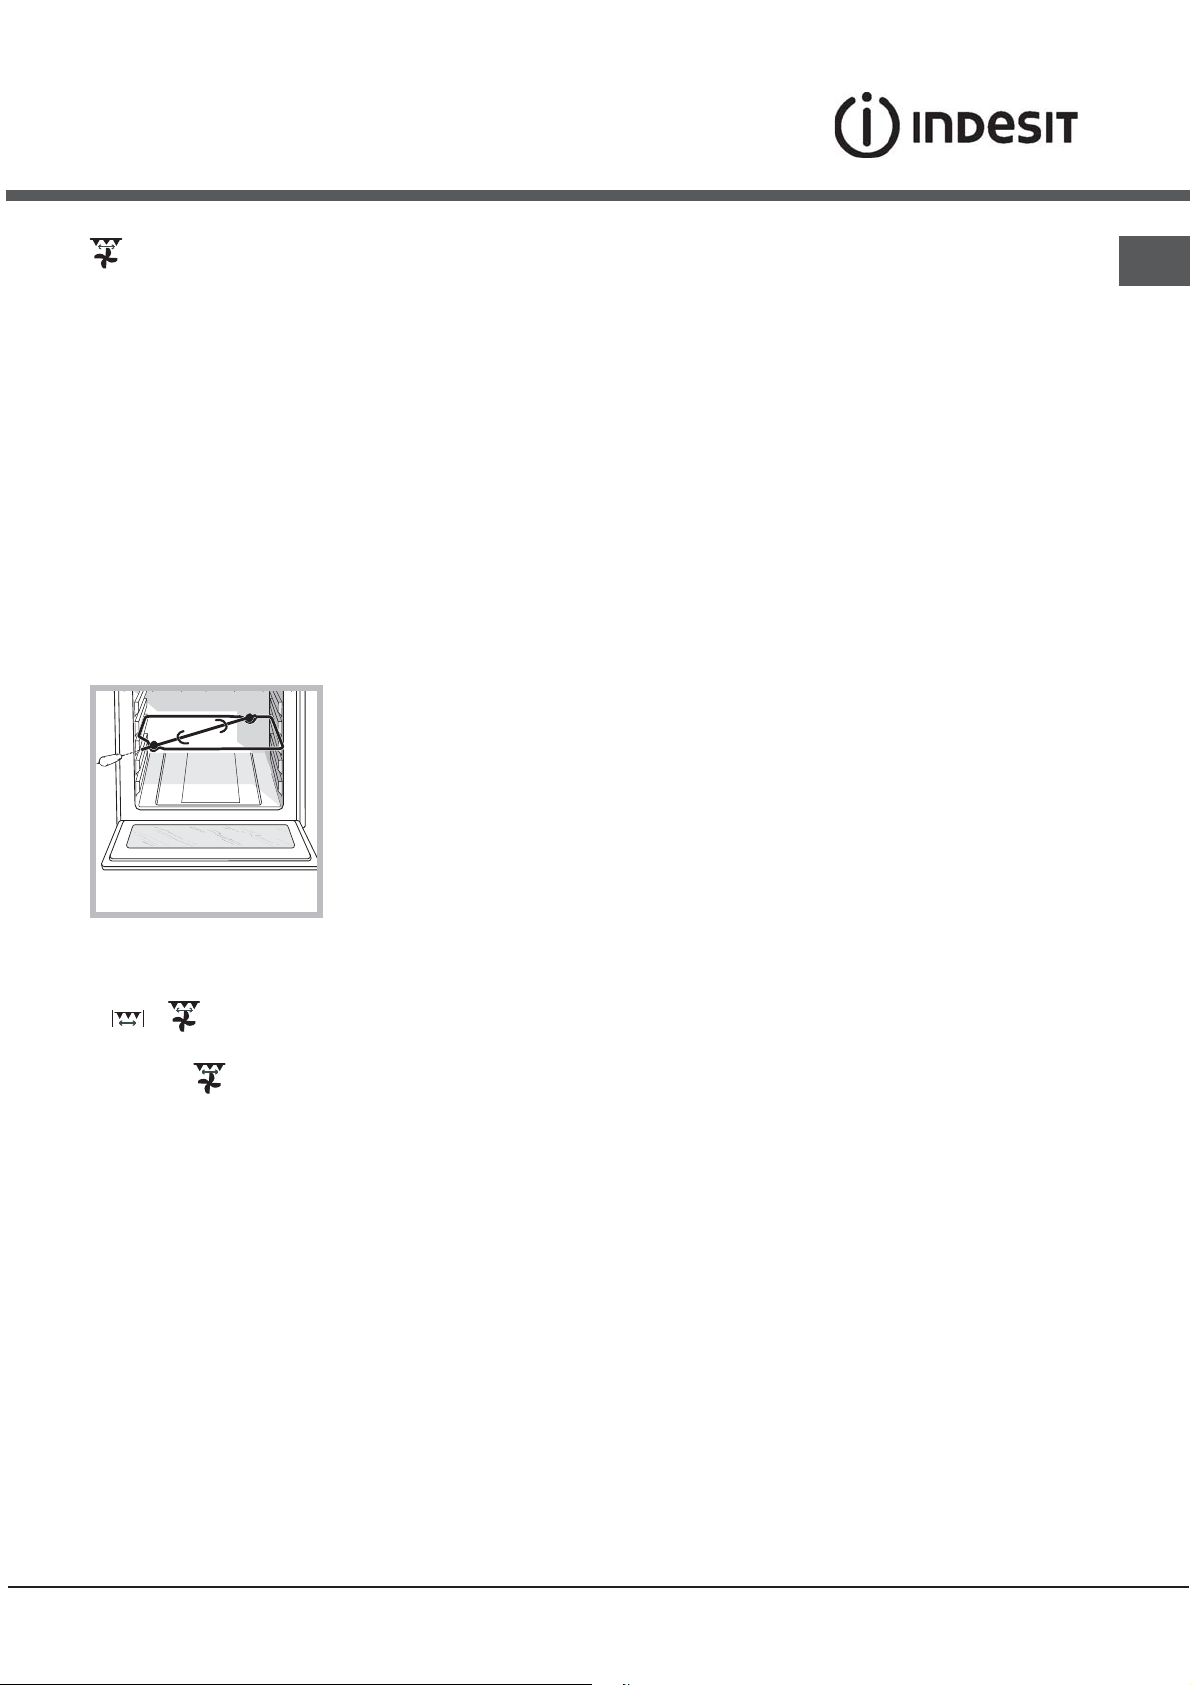
Sostituire la lampadina di illuminazione
del forno
1. Dopo aver disinserito il forno
dalla rete elettrica, togliere il
coperchio in vetro del
portalampada (
2. Svitare la lampadina e
sostituirla con una analoga:
tensione 230V, potenza 25 W,
attacco E 14.
3. Rimontare il coperchio e
ricollegare il forno alla rete elettrica.
Pulire il piano cottura vetroceramicaPulire il piano cottura vetroceramica
Pulire il piano cottura vetroceramica
Pulire il piano cottura vetroceramicaPulire il piano cottura vetroceramica
! Evitare l’uso di detergenti abrasivi o corrosivi, quali i
prodotti in bombolette spray per barbecue e forni,
smacchiatori e prodotti antiruggine, i detersivi in polvere
e le spugne con superficie abrasiva: possono graffiare
irrimediabilmente la superficie.
• Per una manutenzione ordinaria, è sufficiente lavare il
piano con una spugna umida, asciugando quindi con
una carta assorbente per cucina.
• Se il piano è particolarmente sporco, strofinare con un
prodotto specifico per la pulizia delle superfici in
vetroceramica, sciacquare e asciugare.
• Per rimuovere gli accumuli di sporco più consistenti
servirsi di un apposito raschietto (non fornito in
dotazione). Intervenire non appena possibile, senza
attendere che l’apparecchio si sia raffreddato, per
evitare l’incrostazione dei residui. Eccellenti risultati si
possono ottenere usando una spugnetta in filo
d’acciaio inossidabile – specifica per piani in
vetroceramica – imbevuta di acqua e sapone.
• In caso sul piano cottura si fossero accidentalmente
fusi oggetti o materiali quali plastica o zucchero,
rimuoverli con il raschietto immediatamente, finchè la
superficie è ancora calda.
• Una volta pulito, il piano può essere trattato con un
prodotto specifico per la manutenzione e la
protezione: la pellicola invisibile lasciata da questo
prodotto protegge la superficie in caso di scolamenti
durante la cottura. Si raccomanda di eseguire queste
operazioni con l’apparecchio tiepido o freddo.
• Ricordarsi sempre di risciacquare con acqua pulita e
asciugare accuratamente il piano: i residui di prodotti
potrebbero infatti incrostarsi durante la successiva
cottura.
Prodotti sp ecifici per la pu lizia
del vetroceramica
Raschietto a lametta e Lamette
di ricambi
vedi figura
Dove acquistarli
Hobbistica e
Ferramenta
).
10
Stahl-Fix
SWISSCLEANER
WK TOP
Altri prodotti per vetroceramica
Casalinghi
Fai-Da-Te
Ferramenta
Supermercati
Page 11
Assistenza
! Non ricorrere mai a tecnici non autorizzati.
Comunicare:
• Il tipo di anomalia;
• Il modello della macchina (Mod.)
• Il numero di serie (S/N)
Queste ultime informazioni si trovano sulla targhetta caratteristiche posta sull’apparecchio
Assistenza attiva 7 giorni su 7
In caso di necessità d’intervento chiamare il Numero Unico Nazionale 199.199.199*.
Un operatore sarà a completa disposizione per fissare un appuntamento con il Centro Assistenza Tecnico
Autorizzato più vicino al luogo da cui si chiama.
È attivo 7 giorni su 7, sabato e domenica compresi, e non lascia mai inascoltata una richiesta.
IT
*Al costo di 14,26 centesimi di Euro al minuto(iva inclusa) dal Lun. al Ven. dalle 08:00 alle 18:30, il Sab. dalle 08:00 alle
13:00 e di 5,58 centesimi di Euro al minuto (iva inclusa) dal Lun. al Ven. dalle 18:30 alle 08:00, il Sab. dalle 13:00 alle
08:00 e i giorni festivi, per chi chiama da telefono fisso.
Per chi chiama da radiomobile le tariffe sono legate al piano tariffario dell’operatore telefonico utilizzato.
Le suddette tariffe potrebbero essere soggette a variazione da parte dell’operatore telefonico; per maggiori informazioni
consultare il sito www.aristonchannel.com.
11
Page 12
Operating Instructions
COOKER AND OVEN
GB
IT
Italiano, 1
RS
Русский,32
KN6C61A/NL
GB
English,12
NL
Nederlands,43
FR
Français,22
DE
Deutsch,53
Contents
Installation, 13-14
Positioning and levelling
Electrical connection
Table of characteristics
Description of the appliance, 15
Overall view
Control panel
Start-up and use, 16-18
Starting the oven
Cooking modes
Practical cooking advice
Oven cooking advice table
Using the glass ceramic hob, 19
Switching the cooking zones on and off
Cooking zones
Precautions and tips, 20
General safety
Disposal
Respecting and conserving the environment
Care and maintenance, 21
Switching the appliance off
Cleaning the appliance
Replacing the oven light bulb
Cleaning the glass ceramic hob
Assistance
Page 13
Installation
! Before operating your new appliance please read
this instruction booklet carefully. It contains important
information concerning the safe installation and
operation of the appliance.
! Please keep these operating instructions for future
reference. Make sure that the instructions are kept with
the appliance if it is sold, given away or moved.
! The appliance must be installed by a qualified
professional in accordance with the instructions
provided.
! Any necessary adjustment or maintenance must be
performed after the cooker has been disconnected
from the electricity supply.
Positioning and levelling
! It is possible to install the appliance alongside
cupboards whose height does not exceed that of the
hob surface.
! Make sure that the wall in contact with the back of
the appliance is made from a non-flammable, heatresistant material (T 90°C).
To install the appliance correctly:
• Place it in the kitchen, the dining room or the bedsit (not in the bathroom).
• If the top of the hob
is higher than the
HOOD
Min. mm.
600
mm.
420
Min.
420
Min. mm.
cabinet and the top of the hob.
This distance should be increased to 700 mm if the
wall cabinets are flammable (
• Do not position blinds behind the cooker or less
than 200 mm away from its sides.
• Any hoods must be installed according to the
instructions listed in the relevant operating manual.
cupboards, the
appliance must be
installed at least 600
mm away from them.
• If the cooker is
700 mm. without hood
min. 650 mm. with hood
installed underneath a
min.
wall cabinet, there must
be a minimum distance
of 420 mm between this
see figure
).
The legs* fit into the slots on
the underside of the base of
the cooker.
Electrical connection
Fitting the power supply cable
To open the terminal board:
• Insert a screwdriver into the side tabs of the
terminal board cover.
• Pull the cover to
open it.
To install the cable, follow the instructions below:
• Loosen the cable clamp screw and the wire contact
screws.
! The jumpers are pre-set at the Factory for 230 V
single-phase connection (
see figure
).
230V ~
H05RR-F 3x4 CEI-UNEL 35363
NL
5
3
4
• To carry out the electrical connections as shown in
the figures, use the two jumpers inside the box (
- labelled “P”).
figure
1
2
see
P
NL2L1
GB
Levelling
If it is necessary to level the
appliance, screw the
adjustable feet into the places
provided on each corner of the
base of the cooker (
see figure
).
Only available in certain models.
*
L3
13
Page 14
GB
400V 2N~
H05RR-F 4x4 CEI-UNEL 35363
NL2L1
5
3
4
1
2
400V 3N~
H05RR-F 5x2.5 CEI-UNEL 35363
NL3L1L2
! Once the appliance has been installed, the power
supply cable and the electrical socket must be easily
accessible.
! The cable must not be bent or compressed.
! The cable must be checked regularly and
replaced by authorised technicians only.
! The manufacturer declines any liability should
these safety measures not be observed.
5
3
4
1
2
• Secure the power supply cable by fastening the
cable clamp screw then put the cover back on.
Connecting the supply cable to the electricity
mains
Install a standardised plug corresponding to the load
indicated on the appliance data plate (
data table
).
see Technical
The appliance must be directly connected to the
mains using an omnipolar switch with a minimum
contact opening of 3 mm installed between the
appliance and the mains. The switch must be suitable
for the charge indicated and must comply with current
electrical regulations (the earthing wire must not be
interrupted by the switch). The supply cable must be
positioned so that it does not come into contact with
temperatures higher than 50°C at any point.
Before connecting the appliance to the power supply,
make sure that:
• The appliance is earthed and the plug is compliant with
the law.
• The socket can withstand the maximum power of
the appliance, which is indicated by the data plate.
• The voltage is in the range between the values
indicated on the data plate.
• The socket is compatible with the plug of the
appliance. If the socket is incompatible with the
plug, ask an authorised technician to replace it. Do
not use extension cords or multiple sockets.
TABLE OF CHARACTERISTICS
Oven dimensions
(HxWxD)
Volume
Useful measurements
relating to the oven
compartment
Voltage and fr equency
Ceramic hob
Front Left
Back Left
Back Right
Front Right
Max. ceramic hob
consumption
ENERGY LABEL
This appliance conforms to the
32x43.5x40 cm
56 l
width 42 cm
depth 44 cm
height 8.5 cm
see data plate
1700 W
1200 W
2100 W
1200 W
6200 W
Directive 2002/40/EC on the
label of electric ovens.
Standard EN 50304
Energy consumption for Natural
convection – heating mode:
Traditional mode
Declared energy consumption for
Forced convection Class –
heating mode:
Baking.
following European Economic
Community directives:
2006/95/EC dated 12/12/06 (Low
Voltage) and subsequent
amendments - 2004/108/EC
dated 15/12/04 (Electromagnetic
Compatibility) and subsequent
amendments - 93/68/EEC dated
22/07/93 and subsequent
amendments. 2002/96/EC
1275/2008 (Stand-by/Off mode)
14
Page 15
Description
of the appliance
Overall view
Control panel
Glass
ceramic hob
Control panel
GRILL rack
DRIPPING pan
Adjustable foot
GB
GUIDE RAILS
for the sliding racks
position 5
position 4
position 3
position 2
position 1
Adjustable foot
PROGRAMMER
knob
THERMOSTAT
indicator light
TIMER
THERMOSTAT
knob
ACTIVE HOTPLATE
knobs
15
Page 16

Start-up and use
GB
! The first time you use your appliance, heat the
empty oven with its door closed at its maximum
temperature for at least half an hour. Ensure that the
room is well ventilated before switching the oven off
and opening the oven door. The appliance may emit
a slightly unpleasant odour caused by protective
substances used during the manufacturing process
burning away.
! Before operating the product, remove all plastic
film from the sides of the appliance.
Starting the oven
1. Select the desired cooking mode by turning the
SELECTOR knob.
2. Select the recommended temperature for the
cooking mode or the desired temperature by turning
the THERMOSTAT knob.
A list detailing cooking modes and suggested
cooking temperatures can be found in the relevant
table (
see Oven cooking advice table
During cooking it is always possible to:
• Change the cooking mode by turning the
SELECTOR knob.
• Change the temperature by turning the
THERMOSTAT knob.
• Set the total cooking time and the cooking end
time (
see below
• Stop cooking by turning the SELECTOR knob to
the “0” position.
).
).
Cooking modes
! A temperature value between 50°C and MAX can be
set for all cooking modes except the following:
• GRILL (recommended: set only to MAX power level)
• GRATIN (recommended: do not exceed 200°C).
TRADITIONAL OVEN mode
Both the top and bottom heating elements will be
activated. When using this traditional cooking mode, it
is best to use one cooking rack only. If more than one
rack is used, the heat will be distributed in an uneven
manner.
OVEN BAKING mode
The rear heating element and the fan are switched on,
thus guaranteeing the distribution of heat in a delicate
and uniform manner throughout the entire oven. This
mode is ideal for baking and cooking temperature
sensitive foods (such as cakes that need to rise) and
for the preparation of pastries on 3 shelves
simultaneously.
MULTILEVEL mode
All the heating elements (top, bottom and circular), as
well as the fan, will be activated. Since the heat
remains constant throughout the oven, the air cooks
and browns food in a uniform manner. A maximum of
two racks may be used at the same time.
! Never put objects directly on the bottom of the
oven; this will prevent the enamel coating from being
damaged. Only use position 1 in the oven when
cooking with the rotisserie spit.
! Always place cookware on the rack(s) provided.
THERMOSTAT indicator light
When this is illuminated, the oven is generating
heat. It switches off when the inside of the oven
reaches the selected temperature. At this point the
light illuminates and switches off alternately,
indicating that the thermostat is working and is
maintaining the temperature at a constant level.
Oven light
This is switched on by turning the SELECTOR knob
to any position other than “0”. It remains lit as long
as the oven is operating. By selecting
knob, the light is switched on without any of the
heating elements being activated.
with the
88
8
88
PIZZA OVEN mode
The circular heating elements and the elements at the
bottom of the oven are switched on and the fan is
activated. This combination heats the oven rapidly by
producing a considerable amount of heat, particularly
from the element at the bottom. If you use more than
one rack at a time, switch the position of the dishes
halfway through the cooking process.
GRILL mode
The central part of the top heating element and the
rotisserie spit (where present) are activated. The
high and direct temperature of the grill is
recommended for food that requires a high surface
temperature (veal and beef steaks, fillet steak and
entrecôte). This cooking mode uses a limited
amount of energy and is ideal for grilling small
dishes. Place the food in the centre of the rack, as it
will not be cooked properly if it is placed in the
corners.
16
Page 17
GRATIN mode
The top heating element and the rotisserie (where
present) are activated and the fan begins to operate.
This combination of features increases the
effectiveness of the unidirectional thermal radiation
provided by the heating elements through forced
circulation of the air throughout the oven. This helps
prevent food from burning on the surface and allows
the heat to penetrate right into the food.
! The GRILL and GRATIN cooking modes must be
performed with the oven door shut.
Spit roast (only available in certain models)
To operate the spit roast function (
as follows:
and insert the spit in the hole provided on the
back panel of the oven.
3. Start the rotisserie using the knob to select MODE
or .
! When the
if the door is opened.
mode is activated, the spit will stop
see diagram
1. Place the dripping
pan in position 1.
2. Place the rotisserie
support in position 3
) proceed
Practical cooking advice
GB
! Do not place racks in position 1 or 5 during fanassisted cooking. Excessive direct heat can burn
temperature sensitive foods.
MULTILEVEL
• Use positions 2 and 4, placing the food which
requires more heat on the rack in position 2.
• Place the dripping pan on the bottom and the rack
on top.
GRILL
• When using the GRILL cooking mode, place the
rack in position 5 and the dripping pan in position
1 to collect cooking residues (fat and/or grease).
When using the GRATIN cooking mode, place the
rack in position 2 or 3 and the dripping pan in
position 1 to collect cooking residues.
• We recommend that the power level is set to
maximum. The top heating element is regulated
by a thermostat and may not always operate
constantly.
PIZZA OVEN
• Use a light aluminium pizza pan. Place it on the
rack provided.
For a crispy crust, do not use the dripping pan as
it prevents the crust from forming by extending
the total cooking time.
• If the pizza has a lot of toppings, we recommend
adding the mozzarella cheese on top of the pizza
halfway through the cooking process.
Timer
To activate the Timer proceed as follows:
1. Turn the TIMER knob in a clockwise direction 4
for almost one complete revolution to set the buzzer.
2. Turn the TIMER knob in an anticlockwise direction
5 to set the desired length of time.
17
Page 18
GB
Oven cooking advice table
Cooking
modes
Traditional
Oven
Baking
Mode
Multi-
cooking
Pizza Mode
Barbecue
Gratin
Foods Weight
(in kg)
Rack Position Pre-heating
time
(minutes)
Duck
Roast veal or beef
Pork roast
Biscuits (short pastry)
Tarts
Tarts
Fruit cakes
Plum cake
Sponge cake
Stuffed pancakes (on 2 racks)
Small cakes (on 2 racks)
Cheese puffs (on 2 racks)
Cream puffs (on 3 racks)
Biscuits (on 3 racks)
Meringues (on 3 racks)
Pizza (on 2 racks)
Lasagne
Lamb
Roast chicken + potatoes
Mackerel
Plum cake
Cream puffs (on 2 racks)
Biscuits (on 2 racks)
Sponge cake (on 1 rack)
Sponge cake (on 2 racks)
Savoury pies
Pizza
Roast veal or beef
Chicken
Soles and cuttlefish
Squid and prawn kebabs
Cuttlefish
Cod filet
Grilled vegetables
Veal steak
Sausages
Hamburgers
Mackerels
Toasted sandwiches (or toast)
With rotisserie
Veal on the spit
Chicken on the spit
Lamb on the spit
Grilled chicken
Cuttlefish
With rotisserie
Veal on the spit
Lamb on the spit
Chicken (on the spit) +
potatoes (roasted)
(where present)
(where present)
1
1
1
-
1
0.5
1
0.7
0.5
1.2
0.6
0.4
0.7
0.7
0.5
1
1
1
1+1
1
1
0.5
0.5
0.5
1
1.5
0.5
1
1
0.7
0.6
0.6
0.8
0.4
0.8
0.6
0.6
1
4 and 6
1.0
1.5
1.0
1.5
1.5
1.5
1.5
1.5
-
3
3
3
3
3
3
2 or 3
3
3
2 and 4
2 and 4
2 and 4
1 and 3 and 5
1 and 3 and 5
1 and 3 and 5
2 and 4
3
2
2 and 4
2
2
2 and 4
2 and 4
2
2 and 4
3
3
2
2 or 3
4
4
4
4
3 or 4
4
4
4
4
4
-
-
-
2
2
2
2
2
15
15
15
15
15
15
15
15
15
15
15
15
15
15
15
15
10
10
15
10
10
10
10
10
10
15
15
10
10
-
-
-
-
-
-
-
-
-
-
5
5
5
10
10
5
5
5
5
Recommended
temperature
200
200
200
180
180
180
180
180
160
200
190
210
180
180
90
230
180
180
200
180
170
190
180
170
170
200
220
220
180
Max
Max
Max
Max
Max
Max
Max
Max
Max
Max
Max
Max
Max
200
200
200
200
200
200
Cooking
time
(minutes)
65-75
70-75
70-80
15-20
30-35
20-30
40-45
40-50
25-30
30-35
20-25
15-20
20-25
20-25
180
15-20
30-35
40-45
60-70
30-35
40-50
20-25
10-15
15-20
20-25
25-30
15-20
25-30
60-70
10-12
8-10
10-15
10-15
15-20
15-20
15-20
10-12
15-20
3-5
80-90
70-80
70-80
55-60
30-35
70-80
70-80
70-75
70-75
18
Page 19
Using the glass ceramic hob
! The glue applied on the gaskets leaves traces of
grease on the glass. Before using the appliance, we
recommend you remove these with a special nonabrasive cleaning product. During the first few hours
of use there may be a smell of rubber which will
disappear very quickly.
Switching the cooking zones on and off
To switch on a cooking zone, turn the corresponding
knob in a clockwise direction.
To switch it off again, turn the knob in an
anticlockwise direction until it is in the “0” position.
If the COOKING ZONE ON indicator light is lit, this
shows that at least one pf the cooking zones on the
hob is switched on.
Cooking zones
The hob is equipped with electric hilite heating
elements. When they are in use the following items
on the hob become red.
A. The cooking zone with
A
A
B
is greater than 60°C, even when the heating element
has been switched off but is still hot.
Description of the heating elements
The circular radiant heating elements become red 10 20 seconds after they have been switched on.
The circular hilite heating elements guarantee even
heat distribution in addition to the usual advantages
that hilite heating elements bring.
Hilite elements emit high levels of heat and light as
soon as they are switched on, offering the following
practical advantages:
· rapid heating (in relation to a gas burner)
· rapid cooling
· even temperature across the whole surface (due to
the circular heating elements)
radiant heating elements.
A
B. The residual heat indicator
light: this indicates that the
A
temperature of the
corresponding cooking zone
Setting Normal or Fast Plate
Off
0
1 Cooking vegetables, fish
Cooking potatoes (using steam) soups,
2
chickpeas, beans.
Continuing the cooking of large quantities of
3
food, minestrone
For roasting (average)
4
5 For roasting (above average)
For browning and reaching a boil in a short
6
time.
Practical advice on using the hob
• Use pans with a thick, flat base to ensure that
they adhere perfectly to the cooking zone.
• Always use pans with a diameter that is large
enough to cover the hotplate fully, in order to use
all the heat produced.
• Always make sure that the base of the pan is
completely clean and dry: this ensures that the
pans adhere perfectly to the cooking zones and
that both the pans and the hob remain effective for
a longer period of time.
• Avoid using the same cookware that is used on gas
burners: the heat concentration on gas burners may
have warped the base of the pan, causing it not to
adhere to the surface correctly.
• Never leave a cooking zone switched on without a
pan on top of it, as doing so may cause the zone to
become damaged.
GB
19
Page 20

Precautions and tips
GB
! This appliance has been designed and manufactured in
compliance with international safety standards. The following
warnings are provided for safety reasons and must be read
carefully.
General safety
• These instructions are only valid for the countries whose symbols
appear in the manual and on the serial number plate located on the
appliance.
• The appliance was designed for domestic use inside the home and is not
intended for commercial or industrial use.
• The appliance must not be installed outdoors, even in covered areas.
It is extremely dangerous to leave the appliance exposed to rain and
storms.
• Do not touch the appliance with bare feet or with wet or damp hands
and feet.
• The appliance must be used by adults only for the
preparation of food, in accordance with the
instructions outlined in this booklet. Any other use
of the appliance (e.g. for heating the room)
constitutes improper use and is dangerous. The
manufacturer may not be held liable for any
damage resulting from improper, incorrect and
unreasonable use of the appliance.
• The instruction booklet accompanies a class 1 (insulated) or class 2 subclass 1 (recessed between 2 cupboards) appliance.
• Do not touch the heating elements or certain parts
of the oven door when the appliance is in use;
these parts become extremely hot. Keep children
well away from the appliance.
• Make sure that the power supply cables of other electrical appliances
do not come into contact with the hot parts of the oven.
• The openings used for the ventilation and dispersion of heat must
never be covered.
• Do not use unstable or misshapen pans on the cooking zones; this
will help to avoid accidental spills. Make sure pan handles are turned
towards the centre of the hob in order to avoid accidental burns.
• Always use oven gloves when placing cookware in the oven or when
removing it.
• Do not use flammable liquids (alcohol, petrol, etc...) near the
appliance while it is in use.
• Do not place flammable material in the lower storage compartment or
in the oven itself. If the appliance is switched on accidentally, it could
catch fire.
• Always make sure the knobs are in the • position when the appliance
is not in use.
• When unplugging the appliance, always pull the plug from the mains
socket; do not pull on the cable.
• Never perform any cleaning or maintenance work without having
disconnected the appliance from the electricity mains.
• If the appliance breaks down, under no circumstances should you
attempt to perform the repairs yourself. Repairs carried out by
inexperienced persons may cause injury or further malfunctioning of
the appliance. Contact Assistance.
• Do not rest heavy objects on the open oven door.
• The internal surfaces of the compartment (where present) may
become hot.
• The glass ceramic hob is resistant to mechanical shocks, but it may crack (or
even break) if hit with a sharp object such as a tool. If this happens,
disconnect the appliance from the electricity mains immediately and contact a
Service Centre.
• If the surface of the hob is cracked, switch off the appliance to
prevent electric shocks from occurring.
• Remember that the cooking zones remain relatively hot for at least thirty
minutes after they have been switched off.
• Keep any object which could melt away from the hob, for example
plastic and aluminium objects, or products with a high sugar content.
Be especially careful when using plastic film and aluminium foil or
packaging: if placed on surfaces that are still hot, they may cause
serious damage to the hob.
• Do not place metal objects (knives, spoons, pan lids, etc.) on the hob
as they may become hot.\
• The appliance should not be operated by people (including children) with
reduced physical, sensory or mental capacities, by inexperienced
individuals or by anyone who is not familiar with the product. These
individuals should, at the very least, be supervised by someone who
assumes responsibility for their safety or receive preliminary instructions
relating to the operation of the appliance.
• Do not let children play with the appliance.
Disposal
• When disposing of packaging material: observe local legislation so
that the packaging may be reused.
• The European Directive 2002/96/EC relating to Waste Electrical and
Electronic Equipment (WEEE) states that household appliances should
not be disposed of using the normal solid urban waste cycle.
Exhausted appliances should be collected separately in order to
optimise the cost of re-using and recycling the materials inside the
machine, while preventing potential damage to the atmosphere and to
public health. The crossed-out dustbin is marked on all products to
remind the owner of their obligations regarding separated waste
collection.
For further information relating to the correct disposal of exhausted
household appliances, owners may contact the public service
provided or their local dealer.
Respecting and conserving the
environment
• You can help to reduce the peak load of the electricity supply network
companies by using the oven in the hours between late afternoon and the
early hours of the morning.
• Always keep the oven door closed when using the GRILL and GRATIN
modes: This will achieve improved results while saving energy
(approximately 10%).
• Check the door seals regularly and wipe them clean to ensure they
are free of debris so that they adhere properly to the door, thus
avoiding heat dispersion.
20
Page 21

Care and maintenance
Switching the appliance off
Disconnect your appliance from the electricity supply
before carrying out any work on it.
Cleaning the oven
! Never use steam cleaners or pressure cleaners on
the appliance.
• Clean the glass part of the oven door using a
sponge and a non-abrasive cleaning product, then
dry thoroughly with a soft cloth. Do not use rough
abrasive material or sharp metal scrapers as these
could scratch the surface and cause the glass to
crack.
• The stainless steel or enamel-coated external parts
and the rubber seals may be cleaned using a sponge
which has been soaked in lukewarm water and neutral
soap. Use specialised products for the removal of
stubborn stains. After cleaning, rinse and dry
thoroughly. Do not use abrasive powders or corrosive
substances.
• The inside of the oven should ideally be cleaned after
each use, while it is still lukewarm. Use hot water and
detergent, then rinse well and dry with a soft cloth. Do
not use abrasive products.
• The accessories can be washed like everyday
crockery, and are even dishwasher safe.
• Dirt and grease should be removed from the control
panel using a non-abrasive sponge or a soft cloth.
Stainless steel can be marked by hard water that
•
has been left on the surface for a long time, or by
aggressive detergents that contain phosphorus. We
recommend that the steel surfaces are rinsed well
then dried thoroughly.
Inspecting the oven seals
Check the door seals around the oven regularly. If the
seals are damaged, please contact your nearest Aftersales Service Centre. We recommend that the oven is
not used until the seals have been replaced.
Replacing the oven light bulb
1. After disconnecting the oven
from the electricity mains,
remove the glass lid covering
the lamp socket (
2. Unscrew the light bulb and
replace it with a similar one:
voltage 230 V, wattage 25 W,
cap E 14.
3. Replace the lid and reconnect
the oven to the electricity supply.
see figure
).
Cleaning the glass ceramic hob
! Do not use abrasive or corrosive detergents (for
example, products in spray cans for cleaning barbecues
and ovens), stain removers, anti-rust products, powder
detergents or sponges with abrasive surfaces: these
may scratch the surface beyond repair.
• It is usually sufficient simply to wash the hob using a
damp sponge and dry it with absorbent kitchen roll.
• If the hob is particularly dirty, rub it with a special
glass ceramic cleaning product, then rinse well and
dry thoroughly.
• To remove more stubborn dirt, use a suitable scraper
(this is not supplied with the appliance). Remove
spills as soon as possible, without waiting for the
appliance to cool, to avoid residues forming crusty
deposits. You can obtain excellent results by using a
rustproof steel wire sponge - specifically designed for
glass ceramic surfaces - soaked in soapy water.
• If plastic or sugary substances have accidentally
been melted on the hob, remove them immediately
with the scraper, while the surface is still hot.
• Once it is clean, the hob may be treated with a special
protective maintenance product: the invisible film left
by this product protects the surface from drips during
cooking. This maintenance should be carried out
while the appliance is warm (not hot) or cold.
• Always remember to rinse the appliance well with
clean water and dry it thoroughly: residues can
become encrusted during subsequent cooking
processes.
Glass ceramic hob
cleane rs
Window scraper Razor blade
scrapers
Replacement blades DIY Stores,
COLLO luneta
HOB BRITE
Hob Clean
SWISSCLEANER
Available from
DIY Stores
supermarkets,
chemists
Boots, Co-op stores,
department stores, Regional
Electricity Company shops,
supermarkets
Assistance
! Never use the services of an unauthorised
technician.
Please have the following information to hand:
• The type of problem encountered.
• The appliance model (Mod.).
• The serial number (S/N).
The latter two pieces of information can be found on
the data plate located on the appliance.
GB
21
Page 22

Mode d’emploi
CUISINIERE ET FOUR
FR
IT
Italiano, 1
RS
Русский,32
KN6C61A/NL
GB
English, 12
NL
FR
Français, 22
DE
Deutsch, 53Nederlands,43
Sommaire
Installation, 23-24
Positionnement et nivellement
Raccordement électrique
Tableau des caractéristiques
Description de l’appareil, 25
Vue d’ensemble
Tableau de bord
Mise en marche et utilisation, 26-28
Mise en marche du four
Programmes de cuisson
Conseils de cuisson
Tableau de cuisson au four
Utilisation du plan vitrocéramique, 29
Allumer et éteindre les foyers
Les foyers
Précautions et conseils, 30
Sécurité générale
Mise au rebut
Economies et respect de l’environnement
Nettoyage et entretien, 31
Mise hors tension
Nettoyage de l’appareil
Remplacement de l’ampoule d’éclairage du four
Nettoyage du plan de cuisson vitrocéramique
Assistance
Page 23

Installation
! Conserver ce mode d’emploi pour pouvoir le
consulter à tout moment. En cas de vente, de cession
ou de déménagement, veiller à ce qu’il suive
l’appareil.
! Lire attentivement les instructions : elles contiennent
des conseils importants sur l’installation, l’utilisation et
la sécurité de l’appareil
! L’installation de l’appareil doit être effectuée par un
professionnel du secteur conformément aux
instructions du fabricant.
! N’importe quelle opération de réglage, d’entretien ou
autre, doit être effectuée après avoir débranché la
prise de la cuisinière.
Positionnement et nivellement
! L’appareil peut être installé à côté de meubles dont
la hauteur ne dépasse pas celle du plan de cuisson.
! S’assurer que le mur en contact avec la paroi arrière
de l’appareil est réalisé en matériel ignifuge résistant
à la chaleur (T 90°C).
Pour une installation correcte :
• installer cet appareil dans une cuisine, une salle à
manger ou un studio (jamais dans une salle de
bains);
• si le plan de cuisson de la cuisinière dépasse le
plan de travail des meubles, il faut que ces derniers
soient placés à au moins 600 mm de l’appareil.
• si la cuisinière est installée sous un élément suspendu, il
faut que ce dernier soit placé à au moins 420 mm de
distance du plan.
Il faut prévoir une distance de 700 mm si les éléments
suspendus sont
Min. mm.
mm.
420
Min.
Nivellement
HOOD
600
inflammables (
• ne pas placer de
rideaux derrière ou sur
les côtés de la
cuisinière à moins de
mm. with hood
420
mm. without hood
650
700
Min. mm.
200 mm de distance.
min.
min.
• pour l’installation de
hottes, se conformer
aux instructions de leur
notice d’emploi.
Pour mettre l’appareil bien à
plat, visser les pieds de
réglage fournis aux
emplacements prévus aux
coins à la base de la cuisinière
(
voir figure
).
voir figure
Montage des pieds* par
encastrement sous la base.
FR
Raccordement électrique
Montage du cordon d’alimentation
Ouverture du bornier :
• Faire pression à l’aide d’un tournevis sur les
languettes latérales du couvercle du bornier ;
• Tirer et ouvrir le
couvercle du bornier.
Pour monter le câble d’alimentation, procéder comme
suit :
• dévisser la vis du serre-câble de même que les vis
des contacts
!Les pontets sont montés en usine pour raccordement
à 230V monophasé (
voir figure
).
230V ~
H05RR-F 3x4 CEI-UNEL 35363
NL
);
5
3
4
• pour effectuer les raccordements électriques
illustrés, utiliser les deux pontets placés dans le
boîtier (
voir figure
- référence “
PP
P”)
PP
1
2
P
NL2L1
L3
N’existe que sur certains modèles
*
23
Page 24

FR
400V 2N~
H05RR-F 4x4 CEI-UNEL 35363
NL2L1
5
3
1
! Après installation de l’appareil, le câble électrique et
la prise de courant doivent être facilement
accessibles
! Le câble ne doit être ni plié ni excessivement
écrasé.
4
2
400V 3N~
H05RR-F 5x2.5 CEI-UNEL 35363
NL3L1L2
5
3
4
• fixer le câble d’alimentation dans le serre-câble
correspondant et fermer le couvercle.
Raccordement du câble d’alimentation au réseau
électrique
Monter sur le câble une prise normalisée pour la
charge indiquée sur l’étiquette des caractéristiques
(
voir tableau des caractéristiques techniques
En cas de raccordement direct au réseau, il faut
intercaler entre l’appareil et le réseau un interrupteur à
coupure omnipolaire ayant au moins 3 mm
d’écartement entre les contacts, dimensionné à la
charge et conforme aux normes en vigueur dans le
pays (le fil de terre ne doit pas être interrompu par
l’interrupteur). Le câble d’alimentation ne doit
atteindre, en aucun point, une température dépassant
de 50°C la température ambiante.
Avant de procéder au branchement, s’assurer que :
• la prise est bien munie d’une terre conforme à la loi;
• la prise est bien apte à supporter la puissance
maximale de l’appareil, indiquée sur la plaque
signalétique;
• la tension d’alimentation est bien comprise entre les
valeurs indiquées sur la plaque signalétique;
• la prise est bien compatible avec la fiche de
l’appareil. Si ce n’est pas le cas, remplacer la prise
ou la fiche, ne pas utiliser de rallonges ni de prises
multiples.
1
2
).
! Le câble doit être contrôlé périodiquement et ne
peut être remplacé que par un technicien agréé.
! Nous déclinons toute responsabilité en cas de
non respect des normes énumérées ci-dessus.
PLAQUE SIGNALETIQUE
Dime ns ions du four
HxLxP
Volume
Dime ns ions util es du
tiroir cha u ffe -p la ts
Tension et fréquenc e
d’alimentation
Plan de cuisson
vitrocéramique
Avant gauche
Arrière gauche
Arrière droit
Avant droit
Absorption Max. plans de
cuisson vitrocéramique
ETIQUETTE ENERGIE
Cet appareil est conforme aux
32x43,5x40 cm
l 56
largeur 42 cm
profondeur 44 cm
hauteur 8,5 cm
voir plaque signalétique
1700 W
1200 W
2100 W
1200 W
6200 W
Directive 2002/40/CE sur
l'étiquette des fours électriques
Norme EN 50304
Consommation énergie
convection Naturelle – fonction
four :
Traditionnel ;
Consommation énergie
déclaration Classe convection
Forcée – fonction four :
Pâtisserie.
Directives Communautaires
suivantes : 2006/95/EC du
12/12/06 (Basse Tension) et
modifications successives 2004/108/EC du 15/12/04
(Compatibilité
Electromagnétique) et
modifications successives 93/68/EEC du 22/07/93 et
modifications successives. 2002/
96/EC
1275/2008 (Stand-by/Off mode)
24
Page 25

Description de l’appareil
Vue d’ensemble
Tableau de bord
FR
Bouton
PROGRAMMES
Voyant
THERMOSTAT
MINUTEUR
Bouton
THERMOSTAT
Bouton foyer
ELECTRIQUE
25
Page 26

Mise en marche et utilisation
FR
! Lors de son premier allumage, faire fonctionner le
four à vide, porte fermée, pendant au moins une
heure en réglant la température à son maximum.
Puis éteindre le four, ouvrir la porte et aérer la pièce.
L’odeur qui se dégage est due à l’évaporation des
produits utilisés pour protéger le four.
! Avant toute utilisation, vous devez impérativement
enlever les films plastiques situés sur les côtés de
l’appareil
Mise en marche du four
1. Pour sélectionner le programme de cuisson
souhaité, tourner le bouton PROGRAMMES.
2. Choisir la température conseillée pour ce
programme ou celle qu’on préfère à l’aide du bouton
THERMOSTAT.
Un tableau de cuisson sert de guide et indique
notamment les températures conseillées pour
plusieurs préparations culinaires (
cuisson au four
! Avant toute utilisation, vous devez impérativement
enlever les films plastiques situés sur les côtés de
l’appareil
En cours de cuisson, il est possible à tout moment
de :
• modifier le programme de cuisson à l’aide du
bouton PROGRAMMES;
• modifier la température à l’aide du bouton
THERMOSTAT ;
• programmer la durée et l’heure de fin de cuisson
(
voir ci-dessous
• interrompre la cuisson en ramenant le bouton
PROGRAMMES sur “0”.
! Ne jamais poser d’objets à même la sole du four,
l’émail risque de s’abîmer. N’utiliser la position 1 du
four qu’en cas de cuissons au tournebroche.
! Il faut toujours enfourner les plats sur la grille
fournie avec l’appareil.
Voyant THERMOSTAT
Allumé, il signale la montée en chaleur du four. Il
s’éteint dès que la température sélectionnée est
atteinte. Le voyant s’allume et s’éteint tour à tour
pour indiquer que le thermostat fonctionne et
maintient la température au degré près.
Eclairage du four
Pour l’allumer, amener le bouton PROGRAMMES sur
une position autre que la position “0”. Il reste allumé
tant que le four est en marche. Si le bouton est
amené sur
aucune résistance.
).
);
, la lampe s’allume sans activer
88
8
88
voir tableau
Programmes de cuisson
! Pour tous les programmes, il est possible de
sélectionner une température comprise entre 50°C et
MAX., sauf pour :
• GRIL (il est conseillé dans ce cas de sélectionner
MAX.);
• GRATIN (il est conseillé de ne pas dépasser
200°C).
Programme FOUR TRADITION
Mise en marche des résistances de voûte et de sole.
Pour cette cuisson traditionnelle mieux vaut cuire sur
un seul niveau : la cuisson sur plusieurs niveaux
entraînerait une mauvaise distribution de la chaleur.
Programme
Mise en marche de la résistance arrière et du
ventilateur pour obtenir une chaleur douce et uniforme
à l’intérieur du four. Ce programme est
particulièrement indiqué pour la cuisson de mets
délicats (comme des gâteaux levés par ex.) et
certains petits-fours sur trois niveaux en même temps.
Programme MULTICUISSON
Mise en marche de toutes les résistances (sole, voûte
et circulaire) ainsi que de la turbine. La chaleur est
constante et bien répartie à l’intérieur du four, l’air cuit
et dore de façon uniforme en tous points. Il est
possible de cuire au maximum sur deux niveaux en
même temps.
Programme FOUR PIZZA
Mise en marche de la résistance de sole et de la
résistance circulaire ainsi que du ventilateur. Cette
combinaison permet une montée en température
rapide avec un fort apport de chaleur provenant
surtout de la sole. En cas de cuisson sur plusieurs
niveaux, ne pas oublier de les changer de place à
mi-cuisson.
Programme GRIL
Mise en marche de la partie centrale de la
résistance de voûte et du tournebroche (si l’appareil
en est équipé). La température élevée et directe du
gril est conseillée pour tous les aliments qui exigent
une haute température en surface (steak de veau et
de bœuf, filet, entrecôte). Ce programme, idéal pour
griller de petites préparations, permet de réduire la
consommation d’électricité. Attention à bien placer
FOUR PATISSERIE
26
Page 27

le plat au milieu de la grille car, dans les coins, la
chaleur ne suffit pas à le cuire.
Programme GRATIN
Mise en marche de la résistance de voûte, de la
turbine et du tournebroche (si l’appareil en est
équipé). L’irradiation thermique unidirectionnelle
s’ajoute au brassage de l’air pour une répartition
uniforme de la chaleur dans l’enceinte du four. Plus
de risque de brûler les aliments en surface et plus
grande pénétration de la chaleur.
GRIL
• En cas de cuisson en mode GRIL, placer la grille
au gradin 5 et la lèchefrite au gradin 1 pour
récupérer les jus de cuisson. En cas de cuisson
en mode GRATIN, placer la grille au gradin 2 ou 3
et la lèchefrite au gradin 1 pour récupérer les jus
de cuisson.
• Nous conseillons de sélectionner le niveau
d’énergie maximum. Ne pas s’inquiéter si la
résistance de voûte n’est pas allumée en
permanence: son fonctionnement est contrôlé par
un thermostat.
FR
!Les cuissons GRIL et GRATIN doivent avoir lieu
porte fermée.
Tournebroche (n’existe que sur certains modèles)
Pour actionner le
tournebroche (
procéder comme suit :
1. placer la lèchefrite au gradin 1;
2. placer le berceau au gradin 3 et encastrer le bout
arrière de la broche dans le trou situé au fond de
l’enceinte;
3. brancher le tournebroche en amenant le sélecteur
PROGRAMMES sur
! Quand le programme
tournebroche s’arrête dès ouverture de la porte du
four.
ou ;
est lancé, le
voir figure
FOUR PIZZA
• Utiliser un plat en aluminium léger et l’enfourner
sur la grille du four.
En cas d’utilisation du plateau émaillé, le temps
de cuisson sera plus long et la pizza beaucoup
)
moins croustillante.
• Si les pizzas sont bien garnies, n’ajouter la
mozzarelle qu’à mi-cuisson.
Minuteur
Pour actionner le Minuteur procéder comme suit :
1. tourner le bouton MINUTEUR et faire un tour
presque complet dans le sens des aiguilles d’une
montre 4 pour remonter la sonnerie;
2. tourner le bouton MINUTEUR dans les sens
inverse des aiguilles d’une montre 5 pour
sélectionner la durée désirée.
Conseils de cuisson
! Pour les cuissons ventilées ne pas utiliser les
gradins 1et 5: ils sont directement frappés par l’air
chaud qui pourrait brûler les préparations délicates.
MULTICUISSON
• Utiliser les gradins 2 et 4 et placer au 2 les plats
qui exigent davantage de chaleur.
• Placer la lèchefrite en bas et la grille en haut.
27
Page 28

FR
Tableau de cuisson au four
Programmes Aliments Poids (Kg) Niveau
Four Tr a dition
Four Pâ t isserie
Multicuisson
Four Pizza
Gril
Gratin
Canard
Rôti de veau ou de bœuf
Rôti de porc
Biscuits (pâte brisée)
Tartes
Tartes
Tarte aux fruits
Cake aux fruits
Génoise
Crêpes farcies (sur 2 niveaux)
Petits gâteaux (sur 2 niveaux)
Friands au fromage (sur 2 niveaux)
Choux (sur 3 niveaux)
Biscuits (sur 3 niveaux)
Meringues (sur 3 niveaux)
Pizza (sur 2 niveaux)
Lasagnes
Agneau
Poulet rôti + pommes de terre
Maquereau
Cake aux fruits
Choux (sur 2 niveaux)
Biscuits (sur 2 niveaux)
Génoise (sur 1 niveau)
Génoise (sur 2 niveaux)
Tartes salées
Pizza
Rôti de veau ou de bœuf
Poulet
Soles et seiches
Brochettes de calmars et crevettes
Seiches
Tranches de colin
Légumes grillés
Côte de veau
Saucisses
Hamburgers
Maquereaux
Croque-monsieur ou toasts
Avec tournebroche (si votre appareil en est équipé)
Veau à la broche
Poulet à la broche
Agneau à la broche
Poulet grillé
Seiches
Avec tournebroche (si votre appareil en est équipé)
Veau à la broche
Agneau à la broche
Poulet (à la broche) + pommes de terre (dans
lèchefrite)
1
1
1
-
1
0.5
1
0.7
0.5
1.2
0.6
0.4
0.7
0.7
0.5
1
1
1
1+1
1
1
0.5
0.5
0.5
1
1.5
0.5
1
1
0.7
0.6
0.6
0.8
0.4
0.8
0.6
0.6
1
4 et 6
1.0
1.5
1.0
1.5
1.5
1.5
1.5
1.5
-
enfournement
3
3
3
3
3
3
2 ou 3
3
3
2 et 4
2 et 4
2 et 4
1, 3 et 5
1, 3 et 5
1, 3 et 5
2 et 4
3
2
2 et 4
2
2
2 et 4
2 et 4
2
2 et 4
3
3
2
2 ou 3
4
4
4
4
3 ou 4
4
4
4
4
4
-
-
2
2
2
2
2
Préchauffage
(minutes)
15
15
15
15
15
15
15
15
15
15
15
15
15
15
15
15
10
10
15
10
10
10
10
10
10
15
15
10
10
-
-
-
-
-
-
-
-
-
-
5
5
5
10
10
5
5
5
5
Température
préconisée
200
200
200
180
180
180
180
180
160
200
190
210
180
180
90
230
180
180
200
180
170
190
180
170
170
200
220
220
180
Max.
Max.
Max.
Max.
Max.
Max.
Max.
Max.
Max.
Max.
Max.
Max.
Max.
200
200
200
200
200
200
Durée
cuisson
(minutes)
65-75
70-75
70-80
15-20
30-35
20-30
40-45
40-50
25-30
30-35
20-25
15-20
20-25
20-25
180
15-20
30-35
40-45
60-70
30-35
40-50
20-25
10-15
15-20
20-25
25-30
15-20
25-30
60-70
10-12
8-10
10-15
10-15
15-20
15-20
15-20
10-12
15-20
3-5
80-90
70-80
70-80
55-60
30-35
70-80
70-80
70-75
70-75
28
Page 29

Utilisation du plan de cuisson
vitrocéramique
! La colle utilisée pour les joints laisse des traces de
graisse sur le verre. Nous conseillons de les éliminer
avant d’utiliser l’appareil à l’aide d’un produit
d’entretien non abrasif. Une odeur de caoutchouc
peut se dégager au cours des premières heures
d’utilisation, elle disparaîtra très vite.
Allumer et éteindre les foyers
Pour allumer un foyer, tourner le bouton
correspondant dans le sens des aiguilles d’une
montre.
Pour l’éteindre, tourner le bouton dans le sens
inverse des aiguilles d’une montre jusqu’à “0”.
L’allumage du voyant FONCTIONNEMENT FOYERS
signale qu’au moins un foyer du plan de cuisson est
allumé.
Les foyers
Le plan de cuisson est équipé d’éléments
chauffants électriques hilite. Ils deviennent rouges
pendant leur fonctionnement :
A. Foyers radiants
A
A
B
dernier.
B. Voyant de chaleur
A
résiduelle : il signale une
température supérieure à 60°C
A
du foyer correspondant et ce
même après extinction de ce
Position Plaque normale ou rapide
0 Eteint
1
2
3
4 Rôtir (moyen)
5
6
Conseils d’utilisation du plan de cuisson
• Utiliser des casseroles à fond plat et de forte
épaisseur pour qu’elles adhèrent parfaitement à la
zone de chauffe;
• utiliser des casseroles dont le diamètre couvre
complètement la zone de chauffe de façon à
exploiter au mieux toute la chaleur disponible;
Cuisson de légumes verts, poissons
Cuisson de pommes de terre (à la
vapeur) soupes, pois chiches, haricots
Pour continuer la cuisson de grandes
quantités d'aliments, minestrone
Rôtir (fort)
Rissoler ou rej oindre l'ébullition en peu
de temps
FR
Description des éléments chauffants
Les résistances circulaires des foyers radiants
deviennent rouges 10-20 secondes à peine après
allumage.
Les résistances circulaires des foyers hilite
garantissent une distribution uniforme de la
température en plus de tous les autres avantages
propres aux foyers hilite .
Les lampes hilite produisent instantanément une
quantité de lumière et de chaleur très élevée avec
tous les avantages pratiques qui s’ensuivent :
· montée rapide en température (par rapport à un
brûleur à gaz)
· refroidissement rapide
· température uniforme sur toute la surface (grâce
aux éléments chauffants circulaires
• s’assurer que le fond des casseroles est
parfaitement sec et propre: l’adhérence aux foyers
sera ainsi optimale et tant les casseroles que le
plan de cuisson dureront plus longtemps;
• éviter d’utiliser des casseroles qui sont aussi
utilisées sur les brûleurs à gaz: la concentration de
chaleur des brûleurs à gaz peut déformer le fond
de la casserole qui perd son adhérence;
• ne jamais laisser un foyer allumé sans casserole, il
risque de s’endommager.
29
Page 30

Précautions et conseils
FR
! Cet appareil a été conçu et fabriqué conformément aux normes
internationales de sécurité.
Ces consignes de sécurité sont très importantes et doivent être
lues attentivement.
Sécurité générale
• Ces instructions ne sont valables que pour les pays
dont les symboles figurent dans la notice et sur la
plaquette d’immatriculation de l’appareil.
• Cet appareil a été conçu pour un usage familial, de type non
professionnel.
• Cet appareil ne doit pas être installé en extérieur, même dans un endroit
abrité, il est en effet très dangereux de le laisser exposé à la pluie et aux
orages.
• Ne pas toucher l’appareil avec les mains mouillées ou humides ou si l’on
est pieds nus.
• Cet appareil qui sert à cuire des aliments ne doit
être utilisé que par des adultes conformément aux
instructions du mode d'emploi. Toute autre
utilisation (comme par exemple le chauffage d'une
pièce) est impropre et donc dangereux. Le
fabricant décline toute responsabilité en cas de
dommages provoqués par un usage impropre ou
erroné.
• Cette notice concerne un appareil classe 1 (libre pose) ou classe 2 sous-classe 1 (encastré entre deux meubles).
• En cours de fonctionnement, les éléments chauffants
et certaines parties de la porte peuvent devenir très
chauds. Attention à ne pas les toucher et à garder les
enfants à distance.
• Eviter que le cordon d’alimentation d’autres petits électroménagers touche
à des parties chaudes de l’appareil.
• Les orifices ou les fentes d’aération ou d’évacuation de la chaleur ne
doivent pas être bouchés
• Ne pas poser de casseroles instables ou déformées sur les foyers pour
éviter tout risque de renversement. Placer les casseroles sur le plan de
cuisson, manches tournés vers l’intérieur, pour éviter de les heurter par
mégarde.
• Utiliser toujours des gants de protection pour enfourner ou sortir des plats
du four.
• Ne pas utiliser de solutions inflammables (alcool, essence..) à proximité
de l’appareil lorsqu’il est en marche.
• Ne pas stocker de matériel inflammable dans la niche de rangement du
bas ou dans le four : si l’appareil était par inadvertance mis en marche, il
pourrait prendre feu.
• Quand l’appareil n’est pas utilisé, s’assurer que les boutons sont bien sur
la position •.
• Ne pas tirer sur le câble pour débrancher la fiche de la prise de courant.
• N’effectuer aucune opération de nettoyage ou d’entretien sans avoir
auparavant débranché la fiche de la prise de courant.
• En cas de panne, n’essayer en aucun cas d’accéder aux mécanismes
internes pour tenter de réparer l’appareil. Faire appel au service
d’assistance.
• Ne pas poser d’objets lourds sur la porte du four ouverte.
• Les surfaces intérieures du tiroir (s’il y en a un) peuvent devenir chaudes.
• Le plan vitrocéramique résiste aux chocs mécaniques, il peut toutefois se
fendre (ou même se briser) sous l’effet d’un choc provoqué par un objet
pointu, tel qu’un ustensile par exemple. Dans ce cas, débrancher
immédiatement l’appareil du réseau électrique et s’adresser à un centre
d’assistance technique.
• Si la surface de la table est fêlée, éteindre l’appareil pour éviter tout risque
d’électrocution.
• Ne pas oublier que la température des foyers reste assez élevée pendant
trente minutes au moins après leur extinction.
• Garder à bonne distance de la table de cuisson tout objet qui pourrait
fondre, des objets en plastique ou en aluminium par exemple, ou des
produits à haute teneur en sucre. Faire très attention aux emballages, au
film plastique et au papier aluminium : au contact des surfaces encore
chaudes ou tièdes, ils risquent d’endommager gravement la table.
• Ne pas poser d’objets métalliques (couteaux, cuillères, couvercles, etc.)
sur la table, ils risquent de devenir brûlants.
• Cet appareil n’est pas prévu pour être utilisé par des
personnes (y compris les enfants) dont les capacités
physiques, sensorielles ou mentales sont réduites, ou des
personnes dénuées d’expérience ou de connaissance, sauf si
elles ont pu bénéficier, par l’intermédiaire d’une personne
responsable de leur sécurité, d’une surveillance ou
d’instructions préalables concernant d’utilisation de l’appareil.
• S'assurer que les enfants ne jouent pas avec l'appareil.
Mise au rebut
• Mise au rebut du matériel d’emballage : se conformer aux
réglementations locales, les emballages pourront ainsi être recyclés.
• La directive européenne 2002/96/CE relative aux déchets
d’équipements électriques et électroniques (DEEE), prévoit que les
électroménagers ne peuvent pas être traités comme des déchets
solides urbains courants. Les appareils usagés doivent faire l’objet
d’une collecte séparée pour optimiser le taux de récupération et de
recyclage des matériaux qui les composent et empêcher tout danger
pour la santé et pour l’environnement. Le symbole de la poubelle
barrée est appliqué sur tous les produits pour rappeler qu’ils font
l’objet d’une collecte sélective.
Pour de plus amples renseignements sur la mise au rebut des
électroménagers, les possesseurs peuvent s’adresser au service
public prévu à cet effet ou aux commerçants.
Economies et respect de
l’environnement
• Pour faire des économies d’électricité, utiliser autant que possible le
four pendant les heures creuses.
• Pour les cuissons au GRIL et GRATIN, nous recommandons de garder
la porte du four fermée : les résultats obtenus sont meilleurs et la
consommation d’énergie est moindre (environ 10% d’économie).
• Garder les joints propres et en bon état pour qu’ils adhèrent bien à la
porte et ne causent pas de déperdition de chaleur.
30
Page 31

Nettoyage et entretien
Mise hors tension
Avant toute opération de nettoyage ou d’entretien
couper l’alimentation électrique de l’appareil.
Nettoyage du four
! Ne jamais nettoyer l’appareil avec des nettoyeurs
vapeur ou haute pression.
• Nettoyer la vitre de la porte avec des produits non
abrasifs et des éponges non grattantes, essuyer
ensuite avec un chiffon doux. Ne pas utiliser de
matériaux abrasifs ou de racloirs métalliques
aiguisés qui risquent de rayer la surface et de
briser le verre.
• Nettoyer l’extérieur émaillé ou inox et les joints en
caoutchouc à l’aide d’une éponge imbibée d’eau
tiède additionnée de savon neutre. Si les taches sont
difficiles à enlever, utiliser des produits spéciaux. Il
est conseillé de rincer abondamment et d’essuyer
après le nettoyage. Ne pas utiliser de poudres
abrasives ni de produits corrosifs.
• Nettoyer l’enceinte après toute utilisation, quand le
four est encore tiède. Utiliser de l’eau chaude et du
détergent, rincer et essuyer avec un chiffon doux.
Eviter tout produit abrasif.
• Les accessoires peuvent être lavés comme de la
vaisselle courante y compris en lave-vaisselle.
• Pour éliminer la graisse et la saleté du tableau de
bord, le nettoyer avec une éponge non abrasive ou
avec un chiffon doux.
•
Des taches peuvent se former sur l’acier inox si ce
dernier reste trop longtemps au contact d’une eau
très calcaire ou de détergents agressifs contenant
du phosphore. Nous conseillons de rincer
abondamment et de bien essuyer.
Contrôler les joints du four
Contrôler périodiquement l’état du joint autour de la
porte du four. S’il est abîmé, s’adresser au service
après-vente le plus proche de son domicile. Mieux vaut
ne pas utiliser le four tant qu’il n’est pas réparé.
Remplacement de l’ampoule d’éclairage
du four
1. Débrancher le four, enlever le
couvercle en verre du logement
de la lampe (
2. Dévisser l’ampoule et la
remplacer par une autre de
même type : tension 230 V,
puissance 25 W, culot E 14.
3. Remonter le couvercle et
rebrancher le four au réseau
électrique.
voir figure
).
Nettoyage du plan de cuisson
vitrocéramique
! Ne jamais utiliser de détergents abrasifs ou corrosifs,
tels que des bombes aérosols pour grilloirs et fours, des
détacheurs et dérouilleurs, des poudres à récurer ou
des éponges à surface abrasive : ils risquent de rayer
irrémédiablement la surface.
• Pour un entretien courant, passer une éponge humide
sur la surface de la table et essuyer avec du papier
essuie-tout.
• Si la table est sale, frotter avec un produit d’entretien
adapté au verre vitrocéramique, rincer et essuyer.
• Pour enlever les salissures en relief, utiliser un grattoir
spécial (pas fourni avec l’appareil). Intervenir dès que
possible, ne pas attendre que l’appareil ait refroidi
afin d’éviter toute incrustation des salissures.
L’utilisation d’une éponge en fil d’acier inoxydable,
spéciale verre vitrocéramique, imprégnée d’eau
savonneuse donne d’excellents résultats.
• Tout objet, matière plastique ou sucre ayant
accidentellement fondu sur la table de cuisson doit
être aussitôt enlevé à l’aide du grattoir tant que la
surface est encore chaude.
• Une fois que la table est propre, elle peut être traitée
avec un produit d’entretien et de protection spécial :
celui-ci forme un film invisible qui protège la surface
en cas de débordement accidentel. Opérer de
préférence quand l’appareil est tiède ou froid.
• Prendre soin de toujours bien rincer à l’eau claire et
d’essuyer la table : les résidus des produits
pourraient en effet s’incruster lors d’une prochaine
cuisson.
Produits de nettoyage
spéciaux pour
vitrocéramique
Raclette à lames et lames de
rechange
Stahl-Fix
SWISSCLEANER
WK TOP
Autres produits pour
vitrocéramique
Où les acheter
Bricolage et
quincaillerie
Articles ménagers
Bricolage
Quincaillerie
Supermarchés
Assistance
! Ne jamais faire appel à des techniciens non agréés.
Indiquer :
• le type d’anomalie;
• le modèle de l’appareil (Mod.)
• son numéro de série (S/N)
Ces informations figurent sur la plaquette signalétique
apposée sur l’appareil
FR
31
Page 32

RS
Руководство по эксплуатации
КУХОННАЯ ПЛИТА С ДУХОВЫМ ШКАФОМ
IT
Italiano, 1
RS
Русский,32
KN6C61A/NL
GB
English,12
NL
Nederlands,43
FR
Franзais, 22
DE
Deutsch,53
Содержание
Монтаж, 33-34
Расположение и нивелировка
Электрическое подсоединение
Таблица характеристик
Описание изделия, 35
Общий вид
Панель управления
Включение и эксплуатация, 36-38
Включение духового шкафа
Программы приготовления
Программирование приготовления при помощи
аналогового устройства программирования
Таблица приготовления в духовом шкафу
Стеклокерамическая варочная
панель, 39
Включение и выключение нагревательных зон
Нагревательные зоны
Предосторожности и рекомендации, 40
Общие требования к безопасности
Утилизация
Экономия электроэнергии и охрана окружающей
среды
Техническое обслуживание и уход,
41-42
Отключение электропитания
Чистка изделия
Замена лампочки в духовом шкафу
Чистка стеклокерамической варочной панели
Техническое обслуживание
Page 33

Монтаж
! Важно сохранить данное руководство для его
последующих консультаций. В случае продажи,
передачи или переезда проверьте, чтобы данное
руководство сопровождало изделие.
! Внимательно прочитайте инструкции: в них
содержатся важные сведения об установке,
эксплуатации и безопасности изделия.
! Установка изделия производится в соответствии с
данными инструкциями квалифицированными
специалистами.
! Любая операция по регуляции или
техническому
обслуживанию должна производиться только после
отсоединения кухонной плиты от сети электропитания.
Расположение и нивелировка
! Изделие может быть установлено рядом с
кухонными элементами, высота которых не
превышает поверхность варочной панели.
! Проверьте, чтобы стена, к которой прилегает задняя
часть изделия, была из невозгораемого материала и
устойчивой к теплу (Т 90°C).
Правильный порядок монтажа:
• изделие может быть установлено на кухне, в
столовой или в однокомнатной квартире (не в
ванной
• если варочная панель кухонной плиты выше
кухонных элементов, необходимо отодвинуть их от
плиты на расстояние не менее 600 мм.
mm.
420
Min.
• не заправляйте занавески
приближайте их на расстояние меньше 200 мм.
• возможная кухонная вытяжка должна быть
установлена в соответствии с инструкциями,
приведенными в техническом руководстве к
вытяжке.
Нивелировка
При необходимости выровнять изделие вкрутите в
специальные отверстия по углам в основании
кухонной плиты прилагающиеся нивелировочные
ножки (см. рисунок).
комнате);
HOOD
Min. mm.
600
• если кухонная плита
устанавливается под
навесным шкафом, он
должен располагаться
на высоте не менее 420
мм от поверхности
420
Min. mm.
варочной панели.
Это расстояние должно
700 mm. without hood
min. 650 mm. with hood
быть 700 мм, если
min.
навесные шкафы
выполнены из
возгораемого материала
(см. рисунок);
за кухонную плиту и не
Ножки* вставляются под
основание кухонной плиты.
Электрическое подсоединение
Подсоединение сетевого шнура
Порядок открывания зажимной коробки:
• При помощи отвертки приподнимите боковые
шпонки крышки зажимной коробки;
• Потяните и откройте
крышку зажимной
коробки.
Подсоедините сетевой шнур следующим образом:
• отвинтите винт кабельного зажима и винты
контактов
!фабричная установка перемычек соответствует
монофазному соединению 230 В (см. схему).
230V ~
H05RR-F 3x4 CEI-UNEL 35363
NL
5
3
4
• для осуществления электрических соединений,
показанных на схемах, используйте две перемычки,
расположенные
внутри соединительной коробки
(см. схему - ссылка “P”).
1
2
P
NL2L1
RS
Имеется только в некоторых моделях.
*
L3
33
Page 34

RS
400V 2N~
H05RR-F 4x4 CEI-UNEL 35363
NL2L1
5
3
4
1
2
400V 3N~
H05RR-F 5x2.5 CEI-UNEL 35363
NL3L1L2
! Изделие должно быть установлено таким образом,
чтобы сетевой шнур и сетевая розетка были легко
доступны.
! Сетевой шнур изделия
не должен быть согнут или
сжат.
! Регулярно проверяйте состояние сетевого шнура и
при необходимости поручайте его замену только
уполномоченным техникам.
! Производитель не несет ответственности за
последствия несоблюдения перечисленных выше
требований.
5
3
4
1
2
• зафиксируйте сетевой шнур в специальном
кабельном зажиме и закройте крышку.
Подсоединение сетевого шнура к сети
электропитания
Установите на сетевой шнур нормализованную
штепсельную вилку, расчитанную на нагрузку,
указанную на паспортной табличке изделия (см.
табличку с техническими данными).
В случае прямого подключения к сети электропитания
между кухонной плитой и сетью необходимо
установить мультиполярный выключатель с
минимальным расстоянием между контактами 3 мм,
расчитанный на данную нагрузку и соответствующий
действующим нормативам (выключатель не должен
размыкать
провод заземления). Сетевой шнур должен
быть расположен таким образом, чтобы ни в одной
точке его температура не превышала температуру
помещения более чем на 50°C.
Перед подсоединением сетевого шнура проверьте
следующее:
• сетевая розетка должна быть соединена с
заземлением и соответствовать нормативам;
• сетевая розетка должна быть рассчитана на
максимальную потребляемую мощность изделия,
указанную на паспортной
табличке;
• напряжение и частота тока сети должны
соответствовать электрическим данным изделия;
• сетевая розетка должна быть совместима со
штепсельной вилкой изделия. В противном случае
замените розетку или вилку; не используйте
удлинители или тройники.
ПАСПОРТНАЯ ТАБЛИЧКА
Габаритные размеры
духового шкаф а
ВхШхГ
Объем л 56
Рабочие размеры
ящика для
разогревания пищи
Напряжение и
частота
электропитания
Керамическая
варочная панель
Передняя левая
Задняя левая
Задняя правая
Передняя правая
Макс. поглощаемая
мощность
керамическими
варочными панелями
МАРКИРОВКА
ПОТРЕБЛЕНИЯ
ЭЛЕКТРОЭНЕРГИИ
Данное изделие соответствует
32x43,5x40 cm
ширина 42 см.
глубина 44 см.
высота 8,5 см.
см. табличку с техническими
характеристиками
1700 Вт
1200 Вт
2100 Вт
1200 Вт
6200 Вт
Директива 2002/40/СЕ об
этикетках электрических духовых
шкафов.
Норматив EN 50304
Расход электроэнергии
Натуральная конвекция –
функция нагревания:
Традициональная:
Заявление о расходе
электроэнергии класса
принудительной конвекции функция нагревания:
Кондитерская выпечка
следующим Директивам
Европейского Сообщества:
2006/95/EC от 12/12/06 (Низкое
напряжение) с последующими
изменениями – 2004/108/EC от
15/12/04 (Электромагнитная
совместимость) с
последующими изменениями –
93/68/ЕЕC от 22/07/93 с
последующими изменениями.
2002/96/ЕC
1275/2008 (Stand-by/Off mode)
34
Page 35

Описание изделия
Общий вид
Стеклокерамическая
варочная панель
Панель управления
Регулируемая ножка
ПРОТИВЕНЬ
Панель управления
RS
НАПРАВЛЯЮЩИЕ
для противеней и решеток
положение 5
РЕШЕТКА
положение 4
положение 3
положение 2
положение 1
Регулируемая ножка
TANMEP
35
Page 36

Включение и эксплуатация
RS
Эксплуатация духового шкафа
! При первом включении духового шкафа
рекомендуем прокалить его примерно в течение
часа при максимальнои температуре с закрытои
дверцеи. Затем выключите духовои шкаф, откроите
дверцу и проветрите помещение. Запах, которыи вы
можете почувствовать, вызван испарением веществ,
использованных для предохранения духового шкафа.
! Перед началом эксплуатации необходимо снять
пленку, наклеенную с боков изделия.
! Никогда
духового шкафа, так как они могут повредить
эмалированное покрытие.
1. Выберите нужную программу приготовления при
помощи рукоятки ПРОГРАММЫ.
2. Выберите температуру, рекомендуемую для
даннои программы или нужную вам температуру при
помощи рукоятки ТЕРМОСТАТ.
В специальнои таблице приводится перечень типов
приготовления с соответствующими рекомендуемыми
температурами (см. Таблицу режимов
приготовления в
В процессе приготовления в любои момент можно:
• изменить программу приготовления при помощи
• изменить температуру при помощи регулятора
• прервать приготовление, повернув рукоятку
! Всегда ставьте посуду на прилагающуюся решетку.
Индикатор Т ЕРМ ОСТАТА
Включение этого индикатора означает, что духовои
шкаф включен. Индикатор гаснет, когда внутри
духового шкафа будет достигнута заданная
температура. На данном этапе индикатор то
загорается, то гаснет, показывая, что термостат
включен и поддерживает температуру неизменнои.
не ставьте никаких предметов на дно
духового шкафу).
рукоятки ПРОГРАММЫ;
ТЕРМОСТАТ;
ПРОГРАММЫ в положение 0;
Программы приготовления
! Для всех программ можно задать температуру от
50°C до МАКС кроме:
• ГРИЛЬ (рекомендуется устанавливать только
МАКС. температуру);
• ПОДРУМЯНИВАНИЕ (рекомендуется не превышать
температуру 200°C).
Программа ТРАДИЦИОНАЛЬНАЯ ДУХОВКА
Включаются два нагревательных элемента: нижний и
верхний. В режиме традиционального приготовления
рекомендуется использовать только один уровень:
при использовании нескольких уровней
распределение температуры будет неоптимальным. .
Программа КОНДИТЕРСКАЯ ВЫПЕЧКА
Включается задний нагревательный элемент и
вентилятор, обеспечивая умеренный и однородный
жар внутри духовки. Данная функция рекомендуется
для приготовления деликатных блюд (например,
кондитерских изделий, требующих подъема теста) и
мелкой выпечки одновременно на трех уровнях.
Программа ОДНОВРЕМЕННОЕ
ПРИГОТОВЛЕНИЕ
Включаются все нагревательные элементы (верхний,
нижний и круглый) и вентилятор. Так как жар является
постоянным во всем духовом шкафу, воздух
обеспечивает однородное приготовление и
подрумянивание продукта. Одновременно можно
использовать не более двух уровней духового шкафа.
Программа ПИЦЦА
Включаются нижний и круглый нагревательные
элементы и вентилятор. Так ое сочетание позволяет
быстро разогреть духовку с более сильным
выделением жара снизу. Если используются
несколько уровней одновременно, необходимо менять
местами блюда в середине их приготовления.
Освещение духового шкафа
Освещение духового шкафа включается при повороте
рукоятки ПРОГРАММЫ в любое положение кроме
«0». Освещение остается включенным до тех пор,
пока будет включен духовои шкаф. При выборе
88
положения
включается без подключения нагревательных
элементов.
8 при помощи рукоятки освещение
88
Таимер*
Порядок включения Таимера (часов):
1. поверните по часовои стрелке 4 рукоятку ТАИМЕР
почти на один полныи поворот для завода звонка;
2. поверните против часовои стрелки 5 рукоятку
ТАИМЕР, выбрав нужное время.
36
Программа ГРИЛЬ
Включается верхний нагревательный элемент и
вертел (если он имеется). Высокая температура и жар
прямого действия гриля рекомендуется для
приготовления продуктов, нуждающихся в высокой
поверхностной температуре (телячий и говяжих
бифштексов, вырезки, антрекотов). Это программа не
требует большого расхода энергии, идеально
подходит для приготовления на гриле небольших
порций. Поместите продукт в центр решетки, так как
не распространяется по углам.
жар
Page 37

; Программа ПОДРУМЯНИВАНИЕ
Включается верхний нагревательный элемент, вертел
и вентилятор (если он имеется). Сочетает
однонаправленное выделение жара с
принудительной циркуляцией воздуха внутри духового
шкафа. Это препятствует обгоранию поверхности
продуктов, повышая проникающую способность
жара.
Практические советы по
приготовлению
! В режиме вентилируемого приготовления не
используйте 1-ый и 5-ый уровни: они подвергаются
прямому воздействию горячего воздуха, который
может сжечь деликатные продукты.
ОДНОВРЕМЕННОЕ ПРИГОТОВЛЕНИЕ
RS
! Для приготовления в режимах ГРИЛЬ и
ПОДРУМЯНИВАНИЕ дверца духового шкафа должна
быть закрыта.
Вертел (имеется только в некоторых моделях)
Для включения вертела
(см. рисунок)
выполните следующие
операции:
1. установите противень на 1-ый уровень;
2. установите держатель вертела на 3-ый уровень и
вставьте вертел в специальное отверстие в задней
стенке духового шкафа;
3. включите вертел, повернув рукоятку ПРОГРАММЫ
на
или ;
! После начала выполнения программы
открывании дверцы духовки вертел останавливается.
; при
• Используются 2-ой и 4-ый уровни, на 2-ой
помещаются продукты, требующие более
интенсивного жара.
• Установите проитвень снизу, а решетку сверху.
ГРИЛЬ
• При использовании ГРИЛЯ установите решетку на
5-ый уровень и
на 1-ый. При использовании режима GRATIN
(Подрумянивание) установите решетку на 2-ой или
3-ий уровень, а противень на 1-ый для сбора
соков.
• Рекомендуется выбрать максимальную мощность
духовки. Не беспокойтесь, если верхний элемент не
остается постоянно включенным: его работа
управляется термостатом.
ПИЦЦА
• Используйте противень из легкого алюминия,
устанавливая его
При использовании противеня время выпечки
удлиняется, что затрудняет получение хрустящей
пиццы.
• В случае выпечки пиццы с обильной начинкой
рекомендуется положить на пиццу сыр моццарелла
в середине выпечки.
противень для сбора соков (жира)
на прилагающуюся решетку.
37
Page 38

RS
Таблица приготовления в духовом шкафу
Программы
Традициональн
ая духовка
Кондитерская
выпечка
Одновременно
приготовление
(Подрумяниван
е
Пицца
Гриль
Gratin
ие)
Утка
Жаркое из телятины или го вядины
Жаркое из свинины
Печенье (песочное)
Песочный торт с начинкой
Песочный торт с начинкой
Фруктовый торт
Кекс
Бисквит
Блины с начи нкой (на 2-х уровнях)
Мелкие кексы ( на 2-х уровнях)
Печенья из слоеного теста с
сыром (на 2-ух уровнях)
Эклеры (на 3-х уровнях)
Печенье (на 3-х уровнях)
Безе (на 3-х уровнях)
Пицца (на 2-х уровнях)
Лазанья
Баранина
Жареная курица с картошкой
Скумбрия
Кекс
Эклеры (на 2-х уровнях)
Печенье (на 2-х уровнях)
Бисквит (на 1-ом уровне)
Бисквит (на 2-ух уровнях)
Несладкие торты
Пицца
Жаркое из телятины или го вядины
Курица
Камбала и каракатицы
Кальмары и креветки на шампурах
Каракатицы
Филе трески
Овощи-гриль
Телячий бифштекс
Колбаски-шпикачки
Гамбургер
Скумбрия
Фаршированый горячий бутерброт
(или обжаренный хлеб)
На вертеле (если имеется)
Телятина на вертеле
Курица на вертеле
Баранина на вертеле
Курица-гриль
Каракатицы
На вертеле (если имеется)
Телятина на вертеле
Баранина на вертеле
Курица (на вертеле) + картошка
(на противене)
Продукты
Вес (кг) Уровень
1
1
1
1
0.5
1
0.7
0.5
1.2
0.6
0.4
0.7
0.7
0.5
1
1
1
1+1
1
1
0.5
0.5
0.5
1
1.5
0.5
1
1
0.7
0.6
0.6
0.8
0.4
0.8
0.6
0.6
1
4 и 6
1.0
1.5
1.0
1.5
1.5
1.5
1.5
1.5
-
3
3
3
3
3
3
2 или 3
3
3
2 и 4
2 и 4
2 и 4
1 и 3 и 5
1 и 3 и 5
1 и 3 и 5
2 и 4
3
2
2 и 4
2
2
2 и 4
2 и 4
2
2 и 4
3
3
2
2 или 3
4
4
4
4
3 или 4
4
4
4
4
4
-
-
2
2
2
2
2
Время
нагревани
я (мин.)
15
15
15
15
15
15
15
15
15
15
15
15
15
15
15
15
10
10
15
10
10
10
10
10
10
15
15
10
10
-
-
-
-
-
-
-
-
-
-
5
5
5
10
10
5
5
5
5
Рекомендуемая
температура
200
200
200
180
180
180
180
180
160
200
190
210
180
180
90
230
180
180
200
180
170
190
180
170
170
200
220
220
180
Макс.
Макс.
Макс.
Макс.
Макс.
Макс.
Макс.
Макс.
Макс.
Макс.
Макс.
Макс.
Макс.
200
200
200
200
200
200
Продолж
ит-ть
приготов
ления
(минуты)
65-75
70-75
70-80
15-20
30-35
20-30
40-45
40-50
25-30
30-35
20-25
15-20
20-25
20-25
180
15-20
30-35
40-45
60-70
30-35
40-50
20-25
10-15
15-20
20-25
25-30
15-20
25-30
60-70
10-12
8-10
10-15
10-15
15-20
15-20
15-20
10-12
15-20
3-5
80-90
70-80
70-80
55-60
30-35
70-80
70-80
70-75
70-75
38
Page 39

Стеклокерамическая
варочная панель
! На стеклянной поверхности варочной панели могут
быть видны сальные следы от клея, нанесенного на
прокладки Перед началом эксплуатации изделия
следует удалить следы клея при помощи
специального неабразивного моющего средства. В
первые часы работы вы можете почувствовать запах
жженой резины, который быстро пропадает.
Включение и выключение
нагревательных зон
Для включения нагревательной зоны поверните по
часовой стрелке соответствующий регулятор.
Для выключения поверните регулятор против
часовой стрелки на “0”.
Включение индикатора ЗОНЫ ВКЛЮЧЕНЫ
показывает, что какая-то из нагревательных зон на
варочной панели включена.
Нагревательные зоны
На варочной панели находятся электрические
галогенные нагревательные элементы. В рабочем
режиме они раскалаются до красна:
A. Нагревательная зона со
A
A
B
случае, если элемент выключен, но еще не остыл.
Описание нагревательных элементов
Спиральные элементы накаливания состоят из
круглых сопротивлений, которые раскаляются до
красна за только 10 – 20 секунд после их включения.
Галогенные нагревательные элементы состоят из
круглых сопротивлений, которые обеспечивают
однородное распределение температуры, помимо
характерных преимуществ галогенных
нагревательных элементов.
Галогенные лампы мгновенно излучают большое
количество света и тепла, что имеет следующие
практические преимущества:
· быстрый нагрев (по сравнению с
конфоркой)
· быстрое охлаждение
· однородная температура по всей поверхности
(благодаря нагревательным элементам круглой
формы)
! Не следует долго смотреть на включенные галогенные
элементы.
спиралями накаливания.
A
B. Индикатор нагрева:
показывает, что температура в
A
соответствующей
нагревательной зоне
превышает 60°C, также в
газовой
Позиция Обычнаяяилиябыстраяяконфорка
0 Выключено
1 Ïðè ã îòîâ ëåíè å î â îù åéè ðûáû
2
3
При готовлени е к а р тоф е л на п а ру и
супови фасоли
Приготовление и выдерживание
больши х к оли чес тв пи щи
4 Жаренье (среднее)
5 Жаренье (уси ленное)
6 Жаренье до корочки и ки п чени е
Практические рекомендации по
использованию варочной панели
• Используйте посуду с плоским толстым дном,
идеально прилегающим к зоне нагревания;
• Используйте кастрюли с дном такого диаметра,
чтобы полностью закрыть зону нагревания для
оптимального использования всего выделяемого
тепла;
• проверьте, чтобы дно кастрюль было всегда сухим
и чистым: таким образом гарантируется
оптимальное прилегание к нагревательным зонам,
а также продлевает срок службы варочной
и кастрюль;
• не следует использовать ту же посуду,
использованную на газовых конфорках:
концентрация тепла на газовых конфорках может
деформировать дно посуды и нарушить прилегание
к нагревательной зоне;
• никогда не оставляйте нагревательные зоны
включенными без посуды, так как это может
повредить их.
панели
RS
39
Page 40

Предосторожности и
рекомендации
RS
! Изделие спроектировано и изготовлено в соответствии с
международными нормативами по безопасности.
Необходимо внимательно прочитать настоящие
предупреждения, составленные в целях вашей безопасности.
Общие требования к безопасности
• Данные инструкции относятся только к странам,
обозначения которых приведены в руководстве и на
паспортной табличке изделия.
• Данное изделие предназначается для
непрофессионального использования в домашних
условиях.
• Запрещается устанавливать изделие на улице, даже под
навесом, так как воздействие на него дождя и грозы
является чрезвычайно опасным.
• Не прикасайтесь к изделию влажными руками, босиком
или с мокрыми ногами.
Изделие предназначено для приготовления пищевых
•
продуктов, может быть использовано только взрослыми
лицами в соответствии с инструкциями, приведенными в
данном техническом руководстве. Любое другое его
использование (например: отопление помещения) считается
ненадлежащим и следовательно опасным. Производитель не
несет ответственности за возможный ущерб, вызванный
ненадлежащим, неправильным и неразумным использованием
.
изделия
• Данное техническое руководство относится к бытовому
электроприбору класса 1 (отдельное изделие) или класса
2 – подгруппа 1 (встроенное между 2 кухонными
элементами).
• В процессе эксплуатации изделия нагревательные
элементы и некоторые части дверцы духового шкафа
сильно нагреваются. Необходимо проявлять острожность
во избежание контактов с этими частями и не разрешать
детям приближаться к духовке.
• Избегайте контактов проводов электропитания других
бытовых
• Не закрывайте вентиляционные решетки и отверстия
рассеивания тепла.
• Не ставьте на конфорки деформированную или
неустойчивую посуду во избежание ее опрокидывания.
Ставьте посуду на варочную панель так, чтобы случайно
не задеть за рукоятки кастрюль и не опрокинуть их.
• Всегда надевайте кухонные варежки, когда ставите или
вынимаете блюда
• Не используйте горючие жидкости (спирт, бензин и т.д.)
рядом с работающей кухонной плитой.
• Не кладите возгораемые материалы в нижний отсек или в
духовой шкаф: при случайном включении изделия такие
материалы могут загореться.
• Когда изделие не используется, всегда проверяйте, чтобы
регуляторы находились в положении .
• Не тяните за сетевой
изделия из сетевой розетки, возьмитесь за вилку рукой.
• Перед началом чистки или технического обслуживания
изделия всегда вынимайте штепсельную вилку из сетевой
розетки.
• В случае неисправности категорически запрещается
открывать внутренние механизмы изделия с целью их
самостоятельного ремонта. Обратитесь в центр
технического обслуживания.
электроприборов с горячими частями изделия.
из духовки.
шнур для отсоединения вилки
• Не ставьте тяжелые предметы на открытую дверцу
духового шкафа
• Внутренняя поверхность ящика (если он имеется) может
сильно нагреться.
• Стеклокерамическая варочная панель устойчива к
механическим ударам, тем не менее она может треснуть
(или даже разбиться) при ударе острым предметом или
инструментом. В этом случае незамедлительно
отсоедините изделие от сети электропитания и
обратитесь в Центр технического обслуживания.
• Если поверхность варочной панели
ее во избежание ударов током.
• Помните, что температура конфорок остается очень
высокой в течение тридцати минут после их выключения.
• Держите на безопасном расстоянии от варочной панели
любые предметы, которые могут расплавиться, например,
пластмасса, алюминий или изделия из сахара. Обращайте
особое внимание на упаковочные материалы,
полиэтиленовую или алюминиевую пленку: если оставить
эти материалы на еще горячей или теплой поверхности,
они могут серьезно повердить варочую панель.
• Не кладите металлические предметы ( ножи, ложки, крышки
и т.д.) на варочную панель, так как они могут сильно
нагреться.
• Не допускается эксплуатация изделия лицами с
ограниченными физическими, сенсориальными или
умственными способностями ( включая детей), неопытными
лицами или лицами, необученными обращению с
изделием без контроля со стороны лица, ответственного
за их безопасность или после надлежащего обучения
обращению с изделием.
• Не разрешайте детям играть с бытовым электроприбором.
треснула, выключите
Утилизация
• Уничтожение упаковочных материалов: соблюдайте
местные нормативы по утилизации упаковочных
материалов.
• Согласно Европейской Директиве 2002/96/СЕ касательно
утилизации электронных и электрических
электроприборов электроприборы не должны
выбрасываться вместе с обычным городским мусором.
Выведенные из строя приборы должны собираться
отдельно для оптимизации их утилизации и рекуперации
составляющих их материалов, а также для безопасности
окружающей среды и здоровья. Символ
мусорная корзинка, имеющийся на всех приборах, служит
напоминанием об их отдельной утилизации.
За более подробной информацией о правильной
утилизации бытовых электроприборов пользователи могут
обратитьсяi в специальную государственную организацию
или в магазин.
зачеркнутая
Экономия электроэнергии и охрана
окружающей среды
• Если вы будете пользоваться духовым шкафом вечером и
до раннего утра, это поможет сократить нагрузку
потребления электроэнергии электростанциями.
• Рекомендуется всегда готовить в режиме ГРИЛЬ и
ПОДРУМЯНИВАНИЕ с закрытой дверцей: это необходимо
для значительной экономии электроэнергии (примерно
10%), а также для лучших результатов приготовления.
• Содержите уплотнения в исправном и чистом состоянии,
проверяйте, чтобы
пропускали утечек тепла.
они плотно прилегали к дверце и не
40
Page 41

Техническое обслуживание
и уход
Отключение электропитания
Перед началом какой-либо операции по
обслуживанию или чистке отсоедините изделие от
сети электропитания.
Чистка духового шкафа
! Не используйте паровые чистящие агрегаты или
агрегаты под высоким давлением для чистки изделия.
• Для чистки стекла дверцы используйте
неабразивные губки и чистящие средства, затем
вытрите насухо мягкой тряпкой. Не используйте
твердые абразивные материалы или острые
металлические скребки, которые могут поцарапать
поверхность и разбить стекло.
• Наружные эмалированные элементы или детали из
нержавеющей стали,
уплотнения можно протирать губкой, смоченной в
теплой воде или в растворе нейтрального моющего
средства. Для удаления особо трудных пятен
используйте специальные чистящие средства,
имеющиеся в продаже. После чистки
рекомендуется тщательно удалить остатки
моющего средства влажной тряпкой и высушить
духовку. Не используйте абразивные порошки или
коррозийные вещества.
• Следует производить внутреннюю чистку духового
шкафа
после каждого его использования, не
дожидаясь его полного охлаждения. Используйте
теплую воду и моющее средство, ополосните и
протрите мягкой тряпкой. Избегайте использования
абразивных средств.
• Съемные детали можно легко вымыть как любую
другую посуду, также в посудомоечной машине.
• Панель с рукоятками необходимо очищать от пятен
и жира при помощи мягкой губки или тряпки.
• На деталях из нержавеющей стали могут появиться
пятна, если на них в течение длительного времени
воздействует вода с высоким содержанием извести
или чистящие средства содержащие фосфор.
Рекомендуется обильно ополоснуть изделие и
тщательно высушить.
Проверяйте уплотнения духового шкафа.
Регулярно проверяйте состояние уплотнения вокруг
дверцы духового шкафа. В случае повреждения
уплотнения обращайтесь в ближайший Центр
Технического Обслуживания. Не рекомендуется
пользоваться духовкой с поврежденным уплотнением.
Порядок замены лампочки в духовом шкафу
1. Отключите духовой шкаф от сети электропитания,
снимите стеклянную защитную крышку лампы (см.
а также резиновые
рисунок).
2. Выкрутите лампочку и
замените ее на новую так ого
типа: напряжение 230 В,
же
мощность 25 Вт, резьба Е 14.
3. Восстановите на место
крышку и вновь подключите
духовой шкаф к сети
электропитания.
Чистка стеклокерамической варочной
панели
! Не следует пользоваться абразивными или
коррозивными чистящими средствами такими как
спрай для чистки духовок и мангалов,
пятновыводители или средства для удаления
ржавчины, порошковыми чистящими средствами или
абразивными губками: они могут необратимо
поцарапать поверхность изделия.
• В качестве регулярного ухода достаточно вымыть
варочную панель влажной губкой и затем протереть
насухо кухонным бумажным полотенцем.
• Если
• Для удаления сильных загрязнений используйте
• Если на варочной панели случайно расплавились
• По завершении чистки варочная панель может быть
• Следует всегда ополаскивать варочную панель
Чистящие средства для
кер амичес кой
поверхности
Скребки
Сменные лезвия
COLLO luneta
HOB BRITE
Hob Clean
SWISSCLEANER
варочная панель сильно загрязнена,
используйте специальное чистящее средство для
стеклокерамических поверхностей, ополосните
водой и протрите насухо.
специальный скребок (не прилагается к изделию).
Удаляйте загрязнения незамедлительно, не
дожидаясь охлаждения изделия, во избежание
затвердевания остатков пищи. Очень удобна для
чистки мочалка из проволоки из нержавеющей
стали, специально для стеклокерамических
поверхностей , смоченная
какие-либо предметы или пластиковые материалы
или сахар, незамедлительно удалите их скребком с
еще горячей поверхности.
обработана специальным защитным средством для
ухода за стеклокерамическими поверхностями. Это
средство образует на поверхности варочной панели
невидимую защитную пленку, предохраняющую
поверхность в
приготовления. Рекомендуется производить чистку,
когда варочная панель едва теплая или холодная.
чистой водой и насухо вытирать: возможные
остатки чистящих средств могут затвердеть при
последующей готовке.
случае утечек пище в процессе
в мыльном растворе.
Где можно приобрести
Фирменные магазины,
универмаги, супермаркеты.
магазины электробытовой
техники, хозяйственные
магазины.
Техническое обслуживание
! Никогда не обращайтесь к неуполномоченным
техникам.
При обращении в Центр Технического
Обслуживания необходимо сообщить:
• Тип неисправности;
• Модель изделия (Мод.)
• Номер тех. паспорта (серийный №)
Эти данные вы найдете на паспортной табличке,
расположенной на изделии.
RS
41
Page 42

RS
Мы заботимся о своих покупателях и стараемся
сделать сервисное обслуживание наиболее
качественным. Мы постоянно совершенствуем наши
продукты, чтобы сделать Ваше общение с техникой
простым и приятным.
Уход за техникой
Продлите срок эксплуатации и снизьте вероятность
поломки техники.
Воспользуйтесь профессиональными средствами для
ухода за техникой от Indesit Professional для наиболее
простого, эффективного и легкого ухода за Вашей
бытовой
Продукты Indesit Professional производятся в Италии с
соблюдением высоких европейских стандартов в
области качества, экологии и безопасности
использования и созданы с учетом многолетнего
опыта производителя техники. Узнайте подробнее на
сайте www.indesit.com в разделе «Сервис» и
спрашивайте в магазинах Вашего города.
Авторизованные сервисные центры
Чтобы быть ближе к нашим потребителям, мы создали
широкую сервисную сеть, особенностью которой
является
честность сервисных мастеров. На сегодняшний день
она насчитывает около 350 сервисных центров на
территории России и СНГ.
Их контакты Вы можете найти в сервисном
сертификате и на сайте www.indesit.com в разделе
«Сервис».
техникой.
высокая подготовка, профессионализм и
Если вам надо обратиться в сервисный центр:
Внимание! При ремонте требуйте использования
оригинальных запасных частей.
Другую полезную информацию и
найти на сайте www.indesit.com в разделе «Сервис».
новости Вы можете
42
Page 43

Gebruiksaanwijzing
IT
RS
Русский,32
GB
English,12Italiano, 1
NL
Nederlands,43
FR
Français, 22
DE
Deutsch, 53
FORNUIS EN OVEN
NL
Inhoud
Installatie, 44-45
Plaatsen en waterpas zetten
Elektrische aansluiting
Tabel eigenschappen
Beschrijving van het apparaat, 46
Aanzichttekening
Bedieningspaneel
Starten en gebruik, 47-49
De oven starten
Kookprogramma’s
Praktische kooktips
Kooktabel oven
KN6C61A/NL
Gebruik van de glaskeramische
kookplaat, 50
De kookzones in- en uitschakelen
De kookzones
Voorzorgsmaatregelen en advies, 51
Algemene veiligheid
Afvalverwijdering
Energiebesparing en milieubehoud
Onderhoud en verzorging, 52
De elektrische stroom afsluiten
Reinigen van het apparaat
Vervangen van het ovenlampje
Reinigen van de glaskeramische kookplaat
Service
Page 44

Installatie
NL
! Bewaar dit instructieboekje zorgvuldig voor eventuele
raadpleging in de toekomst. In het geval u het
apparaat verkoopt, weggeeft of wanneer u verhuist,
moet het boekje bij het apparaat bewaard worden.
! Lees de instructies aandachtig door: er staat
belangrijke informatie in over installatie, gebruik en
veiligheid.
! De installatie van het apparaat moet volgens deze
instructies worden uitgevoerd door een bevoegde
installateur.
! Sluit altijd eerst de elektrische stroom af voordat u
tot onderhoud of regeling van het fornuis overgaat.
Plaatsen en waterpas zetten
! Het apparaat kan naast meubels worden geplaatst
die niet hoger zijn dan het werkvlak.
! Controleer dat de wand die in contact komt met de
achterkant van het apparaat van niet ontvlambaar
materiaal is gemaakt en bestand is tegen hoge
temperaturen (T 90°C).
Voor een correcte installatie:
• plaats het apparaat in de keuken, in de eetkamer
of in een eenkamerappartement (niet in de
badkamer);
• als het kookvlak hoger is dan de meubels, moeten
zij op minstens 600 mm van het apparaat vandaan
worden geplaatst;
• als het fornuis onder een keukenkastje wordt
geïnstalleerd, moet de afstand tussen de twee
minstens 420 mm zijn.
Deze afstand moet 700
HOOD
Min. mm.
600
mm.
420
Min.
420
Min. mm.
afzuigkappen moeten volgens de instructies van
hun eigen gebruiksaanwijzing worden
geïnstalleerd.
Waterpas zetten
mm worden als de
keukenkastjes zijn
vervaardigd uit
ontvlambaar materiaal
(
zie afbeelding
• hang geen gordijnen
700 mm. without hood
min. 650 mm. with hood
min.
achter het fornuis, of op
);
minder dan 200 mm
van de zijkanten;
• eventuele
Indien het nodig is het
apparaat te nivelleren, kunnen
de bijgeleverde stelvoetjes in
de daarvoor geschikte
openingen in de hoeken van
het onderstuk van het fornuis
worden geschroefd (
afbeelding
).
zie
De poten* moeten aan het
onderstuk van het fornuis
worden vastgeklemd.
Elektrische aansluiting
Monteren voedingskabel
Openen klemmenstrook:
• Licht de lipjes aan de zijkant van het deksel van
de klemmenstrook op met een schroevendraaier;
• Trek het deksel van
de klemmenstrook
open.
Voor het aansluiten van de kabel moet u de
volgende handelingen uitvoeren:
• draai de schroef van de kabelklem en de
schroeven van de contacten los
! De jumpers zijn door de fabriek voorbestemd voor
aansluiting op eenfase 230V (
zie afbeelding
).
230V ~
H05RR-F 3x4 CEI-UNEL 35363
NL
5
3
4
• voor het uitvoeren van de elektrische
aansluitingen van de afbeeldingen worden de
twee jumpers gebruikt die zich in de doos
bevinden (
zie afbeelding
– referentie “
1
2
PP
P”)
PP
P
NL2L1
L3
Slechts op enkele modellen aanwezig.
*
44
Page 45

400V 2N~
H05RR-F 4x4 CEI-UNEL 35363
NL2L1
5
3
1
! De kabel mag niet gebogen of samengedrukt
worden.
! De kabel moet van tijd tot tijd worden
gecontroleerd en mag alleen door erkende monteurs
worden vervangen.
NL
4
2
400V 3N~
H05RR-F 5x2.5 CEI-UNEL 35363
NL3L1L2
5
3
4
• zet de kabel vast in de speciale kabelklem en
sluit het deksel.
Het aansluiten van de voedingskabel aan het net
Gebruik voor de voedingskabel een stekker die
genormaliseerd is voor de lading aangegeven op het
typeplaatje(
zie tabel Technische gegevens
Wanneer het apparaat rechtstreeks op het
elektrische net wordt aangesloten, moet u tussen het
apparaat en het net een meerpolige schakelaar
aanbrengen met een afstand tussen de contacten
van minstens 3 mm, aangepast aan het elektrische
vermogen en voldoend aan de geldende nationale
normen (de aarding mag niet worden onderbroken
door de schakelaar). De voedingskabel moet
zodanig worden geplaatst dat hij nergens een
temperatuur bereikt van 50°C hoger dan de
kamertemperatuur.
Vóór het aansluiten moet u controleren dat:
• de contactdoos geaard is en voldoet aan de
geldende normen;
• de contactdoos in staat is het maximale
vermogen van het apparaat te dragen, zoals
aangegeven op het typeplaatje;
• de spanning zich bevindt tussen de waarden die
staan aangegeven op het typeplaatje;
• de contactdoos en de stekker overeenkomen. Als
dat niet zo is, dient u ofwel de stekker ofwel de
contactdoos te vervangen; gebruik geen
verlengsnoeren of dubbelstekkers.
! Wanneer het apparaat geïnstalleerd is, moeten de
elektrische kabel en de contactdoos gemakkelijk te
bereiken zijn.
1
2
).
! De fabrikant kan nergens aansprakelijk voor
worden gesteld als deze normen niet worden
nageleefd.
TYPEPLAATJE
Afmetingen Ov en
HxBxD
Inhoud
Afmetingen van de
verwarmingslade
32x43,5x40 cm
liter 56
breedte 42 cm
diepte 44 cm
hoogte 8,5 cm
Spanning en
frequentie van de
zie typeplaatje
elektrische voeding
Keramiekp laat
Links voor
Links achter
Rechts achter
Rechts voor
Maximum vermogen
keramiekplaten
1700 W
1200 W
2100 W
1200 W
6200 W
Richtlijn 2002/40/EG op het etiket
van elektrische ovens.
Norm EN 50304
Energieverbruik convectie
ENERGY LA BEL
Natuurlijk - verwarmingsfunctie:
Traditioneel;
Energieverbruikverklaring Klasse
geforceerde convectie verwarmingsfunctie:
Gebak.
Deze apparatuur voldoet aan de
volgende EU voorschriften:
2006/95/EG van 12/12/06
(Laagspanning) en daaropvolgende
wijzigingen - 2004/108/EG van
15/12/04 (Elektromagnetische
Compatibiliteit) en daaropvolgende
wijzigingen - 93/68/EEG van
22/07/93 en daaropvolgende
wijzigingen.
2002/96/EG
1275/2008 (Stand-by/Off mode)
45
Page 46

Beschrijving van het apparaat
NL
Aanzichttekening
Glaskeramische
kookplaat
Bedieningspaneel
Rooster GRILL
Rooster LEKPLAAT
Bedieningspaneel
Stelvoetje
GELEIDERS
van de roosters
stand 5
stand 4
stand 3
stand 2
stand 1
Stelvoetje
PROGRAMMAKNOP
Controlelampje
THERMOSTAAT
TIMERKNOP
THERMOSTAATKNOP
Knoppen
elektrisch kookplaten
46
Page 47

Starten en gebruik
Gebruik van de oven
! Wij raden u aan bij het eerste gebruik de oven
minstens een uur leeg te laten functioneren, op
maximum temperatuur en met de deur dicht. Nadat
u de oven heeft uitgeschakeld, opent u de ovendeur
en lucht u het vertrek. De lucht die u ruikt komt door
het verdampen van de middelen die worden
gebruikt om de oven te beschermen.
! Vóór gebruik is het absoluut noodzakelijk het
plastic folie aan de zijkanten van het apparaat te
verwijderen.
! Zet nooit voorwerpen op de bodem van de oven; u
riskeert hiermee het email te beschadigen.
1. Selecteer het gewenste kookprogramma door aan
de PROGRAMMAKNOP te draaien.
2. Kies de aangeraden temperatuur voor het
betreffende programma of de door u gewenste
temperatuur door aan de THERMOSTAATKNOP te
draaien.
Een lijst met kooktijden en aanbevolen
kooktemperaturen kunt u terugvinden in de speciale
tabel (
zie Kooktabel oven
).
Timer
NL
Voor het activeren van de Timer gaat u als volgt te
werk:
1. draai de TIMERKNOP bijna 360° rechtsom 4 om
de wekker op te laden;
2. draai de TIMERKNOP linksom 5 en stel de
gewenste tijd in.
Kookprogramma’s
! U kunt voor alle programma’s een temperatuur
tussen de 50°C en MAX instellen, behalve:
• GRILL (hierbij is het aanbevolen alleen MAX te
gebruiken);
• GRATINEREN (hierbij is het aanbevolen niet meer
dan 200°C in te stellen).
Programma TRADITIONELE OVEN
De onderste en bovenste verwarmingselementen
gaan aan. Met deze traditionele kookwijze is het
beter een enkel rooster te gebruiken: met meerdere
roosters riskeert u een slechte
temperatuursverspreiding te veroorzaken.
Tijdens het koken kunt u nog altijd:
• het kookprogramma veranderen met behulp van
de PROGRAMMAKNOP;
• de temperatuur veranderen met behulp van de
THERMOSTAATKNOP;
• het koken onderbreken door de knop
PROGRAMMA’S weer op stand 0 te zetten;
! Plaats de ovenschalen altijd op bijgeleverde
roosters.
Controlelampje THERMOSTAAT
Het oplichten van dit lampje geeft aan dat de oven
in werking is. Het licht gaat uit als de geselecteerde
temperatuur is bereikt. Vanaf dit moment gaat het
controlelampje aan en uit, hetgeen aangeeft dat de
thermostaat werkt en de temperatuur in de oven
constant houdt.
Ovenverlichting
Dit licht gaat aan als u de PROGRAMMAKNOP op
een stand zet die niet “0” is. Hij blijft aan totdat de
oven in werking is. Door met de knop
selecteren gaat het licht aan zonder dat de
verwarming wordt ingeschakeld.
88
8 te
88
Programma
Het achterste verwarmingselement gaat aan en de
ventilator gaat werken zodat een gelijkmatige,
zachte warmte wordt gecreëerd. Deze functie is
aanbevolen voor het bakken van fijne gerechten
(bijvoorbeeld taarten die moeten rijzen) en kleine
gerechten die u op 3 roosters tegelijkertijd wilt
koken.
Programma MULTIKOKEN
Alle verwarmingselementen gaan aan (onder, boven
en cirkelvormig) en de ventilator gaat draaien.
Aangezien de warmte in de hele oven constant is,
zorgt de lucht dat de gerechten op gelijkmatige
wijze gekookt en gebakken worden. Het is mogelijk
maximaal twee roosters tegelijk te gebruiken.
Programma PIZZA OVEN
De onderste en cirkelvormige verwarmingselementen
gaan aan en de ventilator gaat draaien. Met deze
combinatie wordt de oven snel warm dankzij het
aanzienlijke vermogen dat voornamelijk van onderaf
komt. Indien u meerdere roosters gebruikt moet u de
gerechten halverwege de kooktijd omwisselen.
GEBAK OVEN
47
Page 48

NL
Programma GRILL
Het centrale gedeelte van het bovenste
verwarmingselement gaat aan en het draaispit (waar
aanwezig) begint te draaien. Het koken onder de
grill is vooral aan te raden voor gerechten die een
hoge en directe temperatuur aan de buitenkant
nodig hebben (kalfs- en runderbiefstuk, biefstuk van
de haas, entrecote). Dit programma heeft een
beperkt energieverbruik en is ideaal voor het grillen
van kleine hoeveelheden etenswaren. Plaats het
voedsel in het midden van de grill, omdat het in de
hoeken niet gaar zal worden.
Programma GRATINEREN
Het bovenste verwarmingselement gaat aan en de
ventilator en het braadspit (waar aanwezig) gaan
draaien. Hiermee wordt de rechtstreekse bovenhitte
van de grill gecombineerd met de circulatie van de
lucht in de oven. Eventueel verbranden van de
buitenkant wordt zo vermeden; de warmte dringt
gemakkelijker door naar de binnenkant.
! Bij GRILL en GRATINEREN moet de ovendeur
dicht zijn.
Draaispit (slechts op
enkele modellen
aanwezig)
Voor het activeren van het
draaispit (
gaat u als volgt te werk:
zie afbeelding
Praktische kooktips
! Gebruik voor het koken met de heteluchtoven nooit
de standen 1 en 5: de hete lucht zou fijne gerechten
kunnen verbranden.
MULTIKOKEN
• Gebruik de roosterstanden 2 en 4, en plaats de
gerechten die de meeste warmte nodig hebben
op stand 2.
• Plaats de lekplaat op de onderste stand en het
rooster op de hoogste.
GRILL
• Bij de functie GRILL raden wij u aan het rooster op
stand 5 te zetten en de lekplaat op stand 1 om
eventueel vet of jus op te vangen. Bij de functie
GRATINEREN raden wij u aan het rooster op
stand 2 of 3 te zetten en de lekplaat op stand 1
om eventueel vet of jus op te vangen.
• We raden u aan het vermogen op de maximale
stand te zetten. Het is normaal dat het bovenste
verwarmingselement niet constant aan blijft: zijn
werking wordt geregeld door een thermostaat.
PIZZA OVEN
• Gebruik een lichte aluminium ovenschaal en zet
hem op het bijgeleverde ovenrooster.
Bij gebruik van de lekplaat is de bereidingstijd
langer en krijgt u waarschijnlijk geen krokante
pizza.
• Bij zeer gevulde pizza’s raden wij aan de
mozzarella of andere kaas pas halverwege de
)
kooktijd toe te voegen.
1. plaats de lekplaat in stand 1;
2. zet de steun van het draaispit op de 3e stand en
steek de vleespen in de speciale opening
achterin de oven;
3. activeer het braadspit door de
PROGRAMMAKNOP op stand
zetten;
! Bij het programma
met draaien wanneer u de ovendeur opent.
48
zal het draaispit stoppen
of te
Page 49

Kooktabel oven
Programma's
Eend
Tr a ditionele
oven
Gebak o ven
M u lt ik o ken
Pizza oven
G rill
Gratineren
Gebraden kalfs- of rundvl ees
Gebraden varkensvlees
Koekjes (kruimeldeeg)
Taarten
Taarten
Vruchtentaart
Plumcake
Cak e
Gevulde flensjes (op 2 roosters)
Kleine cakej es (op 2 roost ers)
Kaaskoekjes (op 2 roost ers)
Soesjes (op 3 roost ers)
Koekjes (op 3 roost ers)
Meringues (op 3 roosters)
Pizza (op 2 roosters)
Lasagne
Lamsvlees
Gebraden kip + aardappels
Makreel
Plumcake
Soesjes (op 2 roost ers)
Koekjes (op 2 roost ers)
Cake (op 1 rooster)
Cake (op 2 roosters)
Hartige taarten
Piz za
Gebraden kalfs- of rundvl ees
Kip
Tong en inktvis
Calamari- en garnalenspiesjes
Inkt vis
Kabeljauwfilet
Gegrilde groenten
Kalfsbiefstuk
Sauci j zen
Hamburgers
Makreel
Tosti ( of geroosterd brood)
Met braadsp it (waar aanwezig)
Kalfsvl ees aan het spi t
Kip aan het spit
Lamsvlees aan het spit
Gegrilde kip
Inkt vis
Met braadsp it (waar aanwezig)
Kalfsvl ees aan het spi t
Lamsvlees aan het spit
Kip (aan het spi t) + aardappelen (op
de lekplaat)
Gerechten
Gewicht
(kg)
1
1
1
1
0.5
1
0.7
0.5
1.2
0.6
0.4
0.7
0.7
0.5
1
1
1
1+1
1
1
0.5
0.5
0.5
1
1.5
0.5
1
1
0.7
0.6
0.6
0.8
0.4
0.8
0.6
0.6
1
4 en 6
1.0
1.5
1.0
1.5
1.5
1.5
1.5
1.5
-
R o oste rs tand e n
3
3
3
3
3
3
2 of 3
3
3
2 en 4
2 en 4
2 en 4
1 en 3 en 5
1 en 3 en 5
1 en 3 en 5
2 en 4
3
2
2 en 4
2
2
2 en 4
2 en 4
2
2 en 4
3
3
2
2 of 3
4
4
4
4
3 of 4
4
4
4
4
4
-
-
-
2
2
2
2
2
Voorverwarming
(min ute n)
15
15
15
15
15
15
15
15
15
15
15
15
15
15
15
15
10
10
15
10
10
10
10
10
10
15
15
10
10
-
-
-
-
-
-
-
-
-
-
5
5
5
10
10
5
5
5
5
Aanb evolen
temperatuur
200
200
200
180
180
180
180
180
160
200
190
210
180
180
90
230
180
180
200
180
170
190
180
170
170
200
220
220
180
Ma x
Ma x
Ma x
Ma x
Ma x
Ma x
Ma x
Ma x
Ma x
Ma x
Ma x
Ma x
Ma x
200
200
200
200
200
200
NL
Duur bereiding
(min ute n)
65-75
70-75
70-80
15-20
30-35
20-30
40-45
40-50
25-30
30-35
20-25
15-20
20-25
20-25
180
15-20
30-35
40-45
60-70
30-35
40-50
20-25
10-15
15-20
20-25
25-30
15-20
25-30
60-70
10-12
8- 10
10-15
10-15
15-20
15-20
15-20
10-12
15-20
3-5
80-90
70-80
70-80
55-60
30-35
70-80
70-80
70-75
70-75
49
Page 50

Gebruik van de glaskeramische
kookplaat
NL
! De lijm die gebruikt is voor de afdichtingen laat wat
vetvlekjes achter op het glas. Voordat u het
apparaat gebruikt raden wij u aan de vlekken te
verwijderen met een speciaal niet-schurend
schoonmaakmiddel. Gedurende de eerste paar uur
dat u het apparaat gebruikt kan het zijn dat u een
rubbergeur ruikt. Deze zal echter snel wegtrekken.
De kookzones in- en uitschakelen
Voor het inschakelen van een kookzone drukt u de
bijbehorende knop rechtsom.
Om hem uit te schakelen draait u de knop linksom
tot aan de “0”.
Het aangaan van het controlelampje WERKING
KOOKPLATEN geeft aan dat minstens één
kookplaat aan is.
De kookzones
Op de kookplaat bevinden zich hilite
stralingselementen. Tijdens de werking worden deze
rood.
A. Kookzone met
A
A
B
stralingselement uit staat maar nog warm is.
Beschrijving van de verwarmingselementen
De stralingselementen zijn ronde
verwarmingselementen die na 10-20 seconden na
het aansteken rood worden.
De hilite verwarmingselementen bestaan uit ronde
verwarmingselementen die een gelijkmatige
verspreiding van de temperatuur verzekeren, naast
de kenmerken waarover de hilite elementen in het
algemeen al beschikken.
Hilite elementen verspreiden onmiddellijk een grote
hoeveelheid licht en warmte met de daaruit
voortkomende praktische voordelen:
· snelle verwarming (ten opzichte van een
gasbrander)
· snelle afkoeling
· gelijkmatige temperatuur over het gehele
oppervlak (dankzij de ronde
verwarmingselementen)
stralingselementen.
A
B. Controlelampje van de
warmte: dit geeft aan dat de
A
temperatuur in de betreffende
kookzone hoger is dan 60°C,
ook in het geval het
Positie Normale of snelle plaat
Uit
0
Groenten en vis
1
Aardappelen (gestoomd), soep, capucijners,
2
bonen
Doorkoken van grote hoevelheeden,
3
minestroni enz.
4 Braden (medium)
5 Braden (hard)
Bruin bakken of snel aan de kook brengen
6
Praktische tips voor het gebruik van de kookplaat
• Gebruik alleen pannen met een dikke, platte
bodem zodat ze perfect aansluiten op het
verwarmingsvlak;
• gebruik pannen die groot genoeg zijn om de
kookplaat geheel te bedekken zodat alle hitte
wordt benut;
• controleer dat de bodem van de pannen altijd
goed schoon en droog is: de pannen zullen zo
optimaal op het kookgedeelte aansluiten waardoor
zowel pannen als kookvlak langer mee zullen
gaan;
• vermijd dezelfde pannen te gebruiken die u ook
op een gasfornuis gebruikt: de
warmteconcentratie van gasbranders kan de
bodem van pannen vervormen, waardoor ze niet
goed meer aansluiten;
• laat nooit een kookzone zonder pan erop
aanstaan, het zou kapot kunnen gaan.
50
Page 51

Voorzorgsmaatregelen en
advies
! Dit apparaat is ontworpen en vervaardigd volgens de geldende
internationale veiligheidsvoorschriften. Deze aanwijzingen zijn
geschreven voor uw veiligheid en u dient ze derhalve goed door te
nemen.
Algemene veiligheid
• Deze instructies zijn alleen geldig voor de
landen waarvan de symbolen voorkomen in de
handleiding en op het typeplaatje van het
apparaat.
• Dit apparaat is vervaardigd voor niet-professioneel gebruik
binnenshuis.
• Het apparaat dient niet buitenshuis te worden geplaatst, ook
niet in overdekte toestand. Het is erg gevaarlijk als het in
aanraking komt met regen of als het onweert.
• Raak het apparaat niet aan als u blootsvoets bent of met natte
of vochtige handen of voeten.
• Het apparaat dient gebruikt te worden om
voedsel te bereiden. Het mag uitsluitend door
volwassenen worden gebruikt en alleen
volgens de instructies die in deze handleiding
beschreven staan. Elk ander gebruik (bv.:
verwarming van ruimten) is als oneigenlijk te
beschouwen en dus gevaarlijk. De fabrikant
kan niet aansprakelijk worden gesteld voor
eventuele schade die te wijten is aan onjuist,
verkeerd of onredelijk gebruik.
• Deze handleiding betreft een apparaat van klasse 1
(losstaand) of klasse 2 - subklasse 1 (ingebouwd tussen 2
meubels).
• Tijdens het gebruik van de oven worden de
verwarmingselementen en enkele delen van de
ovendeur zeer heet. Raak ze niet aan en houd
kinderen op een afstand.
• Voorkom dat elektrische snoeren van andere kleine
keukenapparaten op warme delen van het apparaat
terechtkomen.
• Laat de ventilatieopeningen en warmteafvoer vrij.
• Op de platen mogen geen wankele of vervormde pannen
worden gezet om omvallen te vermijden. Zorg dat de
handvatten naar het midden van het fornuis zijn gericht zodat
u er niet tegenaan kunt stoten.
• Gebruik altijd ovenwanten om gerechten in de oven te zetten
en eruit te halen.
• Gebruik geen ontvlambare vloeistoffen (alcohol, benzine enz.)
in de buurt van het apparaat als het in gebruik is.
• Plaats geen brandbaar materiaal in de onderste opberglade of
in de oven: als de oven plotseling aan zou worden gezet zou
dit materiaal vlam kunnen vatten.
• Controleer altijd dat de knoppen in de stand • staan als het
apparaat niet wordt gebruikt.
• Trek nooit de stekker aan het snoer uit het stopcontact, maar
pak altijd de stekker direct beet.
• Maak het apparaat niet schoon of voer geen onderhoud uit als
de stekker nog in het stopcontact zit.
• Probeer in geval van storingen nooit zelf de interne
mechanismen van het apparaat te repareren. Neem contact op
met de Technische Dienst.
• Plaats geen zware voorwerpen op de open ovendeur.
• De interne oppervlakken van de lade (indien aanwezig)
kunnen warm worden.
• Het glaskeramische kookvlak is bestand tegen mechanische
stoten. Het kan echter worden beschadigd (of barsten) als het
wordt geraakt door een puntig object, bijvoorbeeld door
gereedschap. Als dit gebeurt moet u onmiddellijk het apparaat
afsluiten van de elektrische stroom en contact opnemen met
de Technische Dienst.
• Als het oppervlak van de kookplaat gebarsten is moet u het
apparaat uitschakelen om te voorkomen dat u een elektrische
schok krijgt.
• Vergeet niet dat de temperatuur in het kookgedeelte
aanzienlijk hoog blijft tot minstens 30 minuten nadat u het
uitschakelt.
• Houd voorwerpen die kunnen smelten op afstand van de
kookplaat, zoals bv. plastic, aluminium of suikerhoudende
etenswaren. Let vooral op plastic of aluminium verpakkingen
en folie: als u ze op het nog warme of lauwe kookvlak
neerlegt, kunt u zware schade aanrichten.
• Plaats geen metalen voorwerpen (messen, lepels, deksels
enz.) op de kookplaat aangezien zij heet kunnen worden.
• Dit apparaat mag niet worden gebruikt door personen
(kinderen inbegrepen) met een beperkt lichamelijk, sensorieel
of geestelijk vermogen of personen die niet de nodige ervaring
of kennis hebben met het apparaat, tenzij onder toezicht van
een persoon die verantwoordelijk is voor hun veiligheid of
nadat hun is uitgelegd hoe het apparaat werkt.
• Voorkom dat kinderen met het apparaat spelen.
Afvalverwijdering
• Het verwijderen van het verpakkingsmateriaal: houdt u aan de
plaatselijke normen zodat het materiaal hergebruikt kan
worden.
• De Europese richtlijn 2002/96/EG, betreffende afgedankte
elektrische en elektronische apparatuur (AEEA), voorziet dat
huishoudelijke apparatuur niet met het normale afval mag
worden meegegeven. De verwijderde apparaten moeten apart
worden opgehaald om het terugwinnen en recyclen van de
materialen waaruit ze bestaan te optimaliseren en te
voorkomen dat er eventuele schade voortvloeit voor de
gezondheid en het milieu. Het symbool van de afvalemmer met
een kruis staat op alle producten om de consument eraan te
herinneren dat dit gescheiden afval is.
Om meer informatie te verkrijgen betreffende een juiste
verwijdering van huishoudapparaten kan de consument zich
richten tot de gemeentelijke reinigingsdienst of de verkopers.
Energiebesparing en milieubehoud
• Door de oven te gebruiken vanaf het late middaguur tot aan
de vroege ochtend zorgt u ervoor dat de elektriciteitscentrales
minder worden belast tijdens het ‘spitsuur’.
• Houd bij de functies GRILL en GRATINEREN altijd de ovendeur
dicht: u bereikt betere kookresultaten en een aanzienlijke
energiebesparing (circa 10%).
• Houd de afdichtingen altijd schoon zodat ze goed aansluiten op de
deur en er geen hitte vrij kan komen.
NL
51
Page 52

Onderhoud en verzorging
NL
De elektrische stroom afsluiten
Sluit altijd eerst de stroom af voordat u tot enige
handeling overgaat.
Het reinigen van de oven
! Gebruik nooit stoom- of hogedrukreinigers voor het
reinigen van het apparaat.
• Reinig het glas van de deur met een spons en
niet schurende producten. Droog met een zachte
doek. Gebruik geen ruwe schurende materialen of
scherpe schrapertjes die het oppervlak zouden
kunnen krassen waardoor als gevolg het glas zou
kunnen barsten.
• De buitenkant, dus zowel het email en het roestvrij
staal als de rubberen afdichtingen, kunnen met een
spons en een sopje worden afgenomen. Als de
vlekken moeilijk te verwijderen zijn, kunt u een
speciaal reinigingsmiddel gebruiken. Na het reinigen
dient u alles goed af te spoelen en te drogen. Gebruik
geen schuurmiddelen of bijtende producten.
• De binnenkant van de oven kunt u het beste direct na
gebruik schoonmaken, als hij nog lauw is. Gebruik
warm water en een schoonmaakmiddel, spoel
vervolgens af en droog met een zachte doek. Gebruik
geen schuurmiddelen.
• De accessoires kunnen gewoon worden afgewassen
(eventueel ook in de vaatwasser).
• Het bedieningspaneel moet worden gereinigd met
een niet schurende spons of een zachte doek.
•
Roestvrij staal kan vlekken vertonen als er langere
tijd kalkhoudend water of fosforhoudende
schoonmaakmiddelen op hebben gelegen. We
raden u dus aan alles goed af te spoelen en te
drogen.
Reinigen van de glaskeramischeReinigen van de glaskeramische
Reinigen van de glaskeramische
Reinigen van de glaskeramischeReinigen van de glaskeramische
kookplaatkookplaat
kookplaat
kookplaatkookplaat
! Vermijd het gebruik van schuurmiddelen of bijtende
middelen, zoals sprays voor barbecues en ovens,
vlekkenmiddelen, roestverwijderende producten,
schoonmaakmiddelen in poedervorm of schuursponzen:
deze kunnen het oppervlak onherstelbaar krassen.
• Voor normaal onderhoud moet u de kookplaat met
een vochtige spons reinigen en afdrogen met
keukenpapier.
• Als de plaat erg vuil is moet hij worden
schoongemaakt met een speciaal middel voor
keramiekplaten. Daarna moet u hem afspoelen en
afdrogen.
• Voor het verwijderen van hardnekkig vuil gebruikt u
een speciaal schrapertje (niet bijgeleverd). Doe dit zo
snel mogelijk voordat het apparaat afkoelt, zodat de
etensresten niet aankoeken. Uitstekende resultaten
kunnen ook worden bereikt met een speciaal roestvrij
staalwolsponsje voor keramiekplaten dat u in een
sopje doopt.
• Als er op de kookplaat onverhoopt voorwerpen of
plastic materiaal of suiker zouden smelten, moet u ze
onmiddellijk met het schrapertje verwijderen zolang
het oppervlak nog warm is.
• Voor het verwijderen van hardnekkig vuil gebruikt u
een speciaal schrapertje (niet bijgeleverd). het
onzichtbare laagje dat dit product achterlaat
beschermt de plaat in het geval er iets overkookt. We
raden u aan deze handelingen alleen uit te voeren
als het apparaat lauw of koud is.
• Vergeet niet de kookplaat altijd met schoon water af te
spoelen en goed af te drogen: restjes
schoonmaakmiddel kunnen de volgende keer dat u
kookt aankoeken.
Het controleren van de afdichtingen van de oven
Controleer regelmatig de staat van de afdichtingen
rondom de ovendeur. In het geval de afdichting
beschadigd is, dient u zich tot de dichtstbijzijnde
Servicedienst te wenden. Gebruik de oven niet voordat
de reparatie is uitgevoerd.
Vervangen van het ovenlampje
1. Nadat u de oven heeft
losgekoppeld van het
elektrische net, verwijdert u het
glazen deksel van de
lamphouder (
2. Schroef het lampje los en
vervang het met eenzelfde soort
lampje: spanning 230 V,
vermogen 25 W, fitting E 14.
3. Doe het deksel weer op zijn plaats en sluit de oven
weer aan op het elektriciteitsnet.
52
zie afbeelding
).
Speciale producten voor het
reinigen van keramisch glas
Radeermesje of scheerm esje Hobby-shop en
Stahl-Fix
SWISSCLEA NER
WK TOP
Andere producten voor
keramisch glas
Waar het te
krijgen is
Ijzerhandel
Huishoudwinkel
Doe-het-zelf winkel
Ijzerhandel
Supermar kt
Service
! Wendt u nooit tot niet erkende monteurs.
Dit dient u door te geven:
• Het soort storing;
• Het model apparaat (Mod.)
• Het serienummer (S/N)
Deze informatie bevindt zich op het typeplaatje op
het apparaat.
Page 53

Bedienungsanleitung
HERD UND BACKOFEN
IT
Italiano, 1
RS
Русский,32
GB
English,12
NL
FR
Français,22
DE
Deutsch,53Nederlands,43
Inhaltsverzeichnis
Installation, 54-55
Aufstellung und Ausrichtung
Elektroanschluss
Merkmal-Tabelle
Beschreibung des Gerätes, 56
Geräteansicht
Bedienfeld
Inbetriebsetzung und Gebrauch, 57-59
Backofen in Betrieb setzen
Garprogramme
Praktische Tipps
Tabelle Garen im Backofen
Gebrauch des Glaskeramik-Kochfelds,60
Ein- und Ausschalten der Kochzonen
Die Kochzonen
Vorsichtsmaßregeln und Hinweise, 61
Allgemeine Sicherheit
Entsorgung
Energie sparen und Umwelt schonen
Reinigung und Pflege, 62
Stromversorgung trennen
Reinigung des Gerätes
Austausch der Backofenlampe
Reinigen des Glaskeramik-Kochfelds
Kundendienst
Page 54

Installation
DE
! Bewahren Sie diese Bedienungsanleitung bitte
sorgfältig auf, damit Sie sie jederzeit zu Rate ziehen
können. Sorgen Sie dafür, dass sie im Falle eines
Verkaufs, einer Übergabe oder eines Umzugs das
Gerät stets begleitet.
! Lesen Sie bitte die nachfolgenden Hinweise
aufmerksam durch: sie liefern wichtige Informationen
hinsichtlich der Installation, des Gebrauchs und der
Sicherheit.
! Die Installation des Gerätes ist gemäß den vorliegenden
Anweisungen von Fachpersonal durchzuführen.
! Jeder beliebige Eingriff zur Einstellung oder Wartung
darf nur dann vorgenommen werden, wenn der Herd
zuvor von der Stromversorgung getrennt wurde.
Aufstellung und Ausrichtung
! Das Gerät kann neben Schränken installiert
werden, deren Höhe die der Kochfläche nicht
überschreitet.
! Vergewissern Sie sich, dass die mit der Rückwand
des Herdes in Berührung kommende Wand aus
nicht entzündbarem Material beschaffen und
wärmeresistent ist (T 90°C).
Beachten Sie Folgendes zur korrekten Installation
des Gerätes:
• Das Gerät kann in der Küche, im Esszimmer oder
in einer Einzimmerwohnung (jedoch nicht im Bad)
installiert werden.
• Ist die Kochfläche des Herdes höher als die der
Schränke, sind diese in einem Mindestabstand von
600 mm vom Gerät aufzustellen.
• Sollte der Herd unter
HOOD
Min. mm.
600
mm.
420
Min.
420
Min. mm.
der Abstand 700 mm betragen (
• Bringen Sie keine Vorhänge hinter dem Herd oder in
einem Seitenabstand von weniger als 200 mm an.
• Eventuelle Dunstabzugshauben sind gemäß den
in den Bedienungsanleitungen der
Dunstabzugshaube aufgeführten Anweisungen zu
installieren.
Nivellieren
einem Hängeschrank
installiert werden, ist
letzterer in einem
Mindestabstand von
420 mm von der
mm. with hood
Arbeitsfläche
mm. without hood
650
700
anzubringen.
min.
min.
Sollten die
Hängeschränke aus
entzündbarem Material
geschaffen sein, muss
siehe Abbildung
Muss das Gerät ausgerichtet
werden, schrauben Sie die
mitgelieferten,
höhenverstellbaren Stellfüße
an den dafür in den Ecken
des Herdbodens
vorgesehenen Stellen ein
(
siehe Abbildung
).
).
Die Stellfüße* werden unter
dem Herdboden eingesteckt.
Elektroanschluss
Montage des Netzkabels
Öffnen des Klemmengehäuses:
• Heben Sie unter Zuhilfenahme eines
Schraubenziehers die seitlichen Zungen des
Klemmengehäusedeckels an.
• Ziehen Sie den
Deckel des
Klemmengehäuses ab.
Schließen Sie nun das Versorgungskabel wie folgt
an:
• Schrauben Sie die Schraube der Kabelklemme
sowie die der Kontakte aus.
! Die Brücken sind werkseitig für einen 230VEinphasenstrom-Anschluss vorgesehen. (
).
Abb.
siehe
230V ~
H05RR-F 3x4 CEI-UNEL 35363
NL
5
3
4
• Für den elektrischen Anschluss gemäß der
Abbildungen verwenden Sie die im Gehäuse
befindlichen Brücken (
siehe Abb. - Bezug “
1
2
PP
P
”)
PP
P
NL2L1
L3
Nur bei einigen Modellen.
*
54
Page 55

400V 2N~
H05RR-F 4x4 CEI-UNEL 35363
NL2L1
5
3
4
1
2
400V 3N~
H05RR-F 5x2.5 CEI-UNEL 35363
NL3L1L2
! Das Netzkabel darf nicht gebogen oder
eingeklemmt werden.
! Das Netzkabel muss regelmäßig kontrolliert werden
und darf nur durch autorisiertes Fachpersonal
ausgetauscht werden.
! Der Hersteller lehnt jede Verantwortung ab, falls
diese Vorschriften nicht eingehalten werden
sollten.
DE
5
3
4
1
2
• Befestigen Sie das Versorgungskabel in der
entsprechenden Kabelklemme und schließen Sie
den Deckel.
Anschluss des Versorgungskabels an das
Stromnetz
Versehen Sie das Kabel mit einem Normstecker für
die auf dem am Gerät angebrachten Typenschild
angegebene Belastung (
).
Daten
siehe Tabelle Technische
Wird das Gerät direkt an das Stromnetz
angeschlossen, ist zwischen Stromnetz und Gerät
ein allpoliger, der Last und den inländischen
Vorschriften entsprechender Schalter mit einer
Mindestöffnung der Kontakte von 3 mm
zwischenzuschalten. (Der Erdleiter darf vom Schalter
nicht unterbrochen werden.) Das Versorgungskabel
muss so verlegt werden, dass es an keiner Stelle
einer Temperatur ausgesetzt ist, die 50 °C über der
Raumtemperatur liegt.
Vor dem Anschluss stellen Sie bitte sicher, dass:
• die Netzsteckdose geerdet ist und den gesetzlichen
Bestimmungen entspricht.
• die Netzsteckdose für die auf dem Typenschild
angegebene maximale Leistungsaufnahme des
Gerätes ausgelegt ist;
• die Netzspannung im Bereich der auf dem
Typenschild angegebenen Werte liegt;
• die Steckdose mit dem Netzstecker kompatibel
ist. Die Steckdose oder den Netzstecker
anderenfalls austauschen. Keine Verlängerungen
und Mehrfachsteckdosen verwenden.
! Das Netzkabel und die Steckdose müssen bei
installiertem Gerät leicht zugänglich sein.
TYPENSCHILD
BackofenAbmessungen (HxBxT):
Nutzvolumen
Nutzabmessu ngen des
Geschirrwagens:
Versorgungsspannung
und -frequenz:
Glaskeramik-Kochfeld
Vorne links
Hinten links
Hinten rechts
Vorne rechts
Bedarfsspitze der
Glaskeramik-Kochfelder
Max.
ENERGY LABEL
32x43,5x40 cm
Liter 56
Breite 42 cm
Tiefe 44 cm
Höhe 8,5 cm
siehe Typenschild
1700 W
1200 W
2100 W
1200 W
6200 W
Richtlinie 2002/40/EG
Energieetikettierung für
Elektrobacköfen
Norm EN 50304
Energieverbrauch natürliche
Konvektion – Heizfunktion:
Ober/Unterhitze
Energieverbrauch Umluft –
Heizfunktion:
BACKEN
Dieses Gerät entspricht den
folgenden EG-Richtlinien:
2006/95/EWG vom 12.12.2006
(Niederspannung) und
nachfolgende Änderungen –
2004/108/EG vom 15.12.04
(Elektromagnetische
Verträglichkeit) und
nachfolgende Änderungen –
93/68/EG vom 22.07.93 und
nachfolgende Änderungen.
2002/96/EG.
1275/2008 (Stand-by/Off
mode)
55
Page 56

Beschreibung des Gerätes
DE
Geräteansicht
Glaskeramik-Kochfeld
Einschub BACKOFENROST
Einschub FETTPFANNE
Höhenverstellbarer Stellfuß
Bedienfeld
Bedienfeld
GLEITFÜHRUNGEN
für die Einschübe
Position 5
Position 4
Position 3
Position 2
Position 1
Höhenverstellbarer Stellfuß
Drehschalter
PROGRAMME
Kontrollleuchte
THERMOSTAT
Drehschalter
TIMER
Drehschalter
THERMOSTAT
Platten-Schalterknöpfe
56
Page 57

Inbetriebsetzung und
Gebrauch
Gebrauch des Backofens
! Bei erstmaliger Inbetriebnahme sollte der leere
Backofen für etwa eine Stunde bei Höchsttemperatur
und geschlossener Backofentür in Betrieb genommen
werden. Schalten Sie das Gerät dann aus, öffnen Sie
die Backofentür und lüften Sie die Küche. Der bei
diesem Vorgang entstehende Geruch wird durch das
Verdunsten der zum Schutz des Backofens
aufgetragenen Stoffe verursacht.
! Vor Gebrauch müssen unbedingt die seitlich am
Gerät angebrachten Kunststofffilme abgenommen
werden.
! Stellen Sie niemals Kochgeschirr auf dem
Backofenboden ab, da dadurch das Email
beschädigt werden könnte.
1. Wählen Sie das gewünschte Garprogramm durch
Drehen des Knopfes PROGRAMME aus.
2. Wählen Sie die für das Programm empfohlene oder
die gewünschte Temperatur an; drehen Sie hierzu den
Reglerknopf THERMOSTAT.
Eine Liste von Garprogrammen nebst der
empfohlenen Temperaturen kann in der
entsprechenden Tabelle eingesehen werden (
Tabelle Garen im Backofen
Während des Garvorgangs sind folgende
Einstellungen jederzeit möglich:
• Änderung des Garprogramms durch Betätigen des
Reglerknopfes PROGRAMME;
• Änderung der Temperatur mit Hilfe des
Reglerknopfes THERMOSTAT;
• Unterbrechung des Garvorgangs durch Drehen des
Reglerknopfes PROGRAMME auf die Position “0“.
! Stellen Sie Ihr Kochgeschirr stets auf den mit dem
Gerät gelieferten Backofenrost.
Kontrollleuchte THERMOSTAT
Die eingeschaltete Kontrollleuchte zeigt an, dass der Backofen
Wärme produziert. Die Kontrollleuchte erlischt, wenn im Inneren des
Backofens die gewünschte Temperatur erreicht wurde. Das nun
abwechselnde Aufleuchten und Erlöschen der Kontrollleuchte zeigt
an, daß der Thermostat korrekt arbeitet, und die
Backofentemperatur konstant gehalten wird.
Kontrollleuchte BACKOFENBETRIEB
Die eingeschaltete Kontrollleuchte zeigt an, dass der Backofen in
Betrieb gesetzt wurde.
Backofenbeleuchtung
Durch Drehen des Reglerknopfes PROGRAMME schaltet sich das
Backofenlicht ein und bleibt solange eingeschaltet, wie der
Backofen aktiviert ist (ausgeschaltet nur auf Position “0”). Wählen
Sie über den Reglerknopf die Position
ein, die Heizelemente werden jedoch nicht aktiviert.
).
an, schaltet sich das Licht
88
8
88
siehe
Timer
Zur Einstellung des Timers (des Kurzzeitweckers) gehen Sie wie folgt
vor:
1. Ziehen Sie durch eine fast komplette Umdrehung des Drehknopfes
TIMER nach rechts 4 das Läutewerk auf.
2. Stellen Sie die gewünschte Zeit durch Drehen des Knopfes TIMER
nach links 5 ein.
Garprogramme
! Für alle Programme kann eine Gartemperatur von
50° bis MAX. eingestellt werden, mit Ausnahme der
Programme:
• GRILL (hier empfiehlt sich die Einstellung MAX.)
• ÜBERBACKEN (es empfiehlt sich, die Temperatur
von 200°C nicht zu überschreiten).
Programm OBER-UNTERHITZE
Es setzen sich die beiden Heizelemente, das untere
und das obere, in Betrieb. Bei dieser Garart ist es
empfehlenswert, nur einen Backofenrost zu
verwenden, da ansonsten keine gleichmäßige
Hitzeverteilung gewährleistet werden kann.
Programm
Das hintere Heizelement schaltet sich ein, und das
Gebläse wird in Betrieb genommen, wodurch eine
äußerst schonende, im Backofen gleichmäßig
verteilte Wärme gewährleistet wird. Dieses
Programm eignet sich zum Garen empfindlicher
Speisen (z.B. zum Backen von Hefeteigen) sowie
zur Zubereitung von Kleingebäck auf drei Ebenen
gleichzeitig.
Programma ECHTE HEISSLUFT
Es schalten sich alle Heizelemente (oberes, unteres
und rundes Heizelement) ein, und das Gebläse wird
in Betrieb genommen. Da die Hitze im gesamten
Backofen konstant ist, werden die Speisen sehr
gleichmäßig gegart und gebräunt. Es ist möglich,
maximal zwei Backofenroste gleichzeitig zu
verwenden.
Programm PIZZA
Das untere und das runde Heizelement schalten sich
ein und das Gebläse wird in Betrieb genommen.
Durch diese Kombination wird der Backofen mit
einer hauptsächlich von unten aufsteigenden,
starken Hitzezufuhr sehr schnell erhitzt. Wenn
mehrere Backofenroste gleichzeitig verwendet
werden, die jeweilige Position nach dem halben
Garvorgang umtauschen.
BACKEN
DE
57
Page 58

DE
Programm GRILL
Der mittlere Bereich des oberen Heizelements
schaltet sich ein, und der Drehspieß (falls
vorhanden) wird in Betrieb gesetzt. Die sehr hohe
Temperatur und die direkt auf das Grillgut gerichtete
Hitze empfiehlt sich für Lebensmittel, die zur
optimalen Garung einer hohen Temperatur auf der
Oberseite bedürfen (Rinder- und Kalbssteaks,
Fleischfilet, Entrecôte). Es handelt sich um ein
Energiesparprogramm, welches sich hervorragend
zum Grillen kleiner Gerichte eignet. Positionieren Sie
das Grillgut in der Mitte des Grills, da es in den
Eckzonen nicht gar wird.
Programm ÜBERBACKEN
Das obere Heizelement schaltet sich ein, und das
Gebläse sowie der Drehspieß (falls vorhanden)
werden in Betrieb gesetzt. Zusätzlich zu der
einseitigen Strahlungshitze zirkuliert Heißluft im
Innern des Backofens. Hierdurch wird ein
Verbrennen der Speiseoberflächen verhindert und
die Hitze dringt tiefer in die Speisen ein.
! Die Garprogramme GRILL und ÜBERBACKEN sind
bei geschlossener Gerätetür durchzuführen.
Praktische Tipps
! Verwenden Sie beim Heißluftgaren nicht die
Einschubhöhen 1 und 5: Sie sind zu direkt der
Heißluft ausgesetzt, wodurch empfindliche Gerichte
leicht verbrennen könnten.
ECHTE HEISSLUFT
• Verwenden Sie die Einschubhöhen 2 und 4, wobei
die 2. Ebene für die Speisen verwendet werden
sollte, die mehr Hitze verlangen.
• Die Fettpfanne in die untere und den Rost in die
obere Führung einführen.
GRILL
• Setzen Sie bei Einsatz des Garprogramms GRILL
den Grillrost auf Einschubhöhe 5 und die
Fettpfanne zum Auffangen von abtropfendem Fett
oder Fleischsaft auf Einschubhöhe 1 ein. Für das
Programm ÜBERBACKEN schieben Sie den
Grillrost auf Einschubhöhe 2 oder 3 ein und die
Fettpfanne zum Auffangen von abtropfendem
Speiseresten und Einschubhöhe 1 ein.
• Es empfiehlt sich, die höchste Energiestufe zu
verwenden. Im Übrigen ist es bei dieser Funktion
völlig normal, dass das obere Heizelement nicht
ständig rot glüht: Es wird durch einen
Thermostaten gesteuert.
Drehspieß (nur bei einigen Modellen)
Zur Inbetriebnahme des
Drehspießes (
Abbildung
wie folgt:
1. Schieben Sie die Fettpfanne auf Einschubhöhe 1
ein;
2. Schieben Sie die Drehspießhalterung auf
Einschubhöhe 3 ein und stecken Sie den Spieß in
die entsprechende Öffnung der
Backofenrückwand;
3. Setzen Sie den Drehspieß in Betrieb, indem Sie
den Knopf PROGRAMME auf
stellen.
! Ist das Programm
Drehspieß, wenn die Tür geöffnet wird.
eingeschaltet, stoppt der
siehe
) verfahren Sie
oder
PIZZA
• Eine Leichtmetallform verwenden und diese direkt
auf dem mitgelieferten Rost positionieren.
Die Fettpfanne verlängert die Garzeit. Deren
Verwendung vermeiden, wenn knusprige Pizzas
erzielt werden sollen.
• Bei reich belegten Pizzas ist es empfehlenswert,
den Mozzarella-Käse erst nach halber Backzeit
hinzuzugeben.
58
Page 59

Tabelle Garen im Backofen
Programme
Ober-/Unterhitze
Echte Heißluft
Gebäck
Pizza
Grill
Überbacken
Ente
Kalbs- oder Rinderbraten
Schweinebraten
Mürbeteiggebäck
Kuchen
Kuchen
Obstkuchen
Plum Cake
Biskuitböden
Gefüllte Crêpes (auf 2 Ebenen)
Kleingebäck (auf 2 Ebenen)
Mit Käse gefülltes Blätterteiggebäck
(auf 2 Ebenen)
Windbeutel (auf 3 Ebenen)
Gebäck (auf 3 Ebenen)
Baisers (auf 3 Ebenen)
Pizza (auf 2 Ebenen)
Lasagne
Lamm
Brathähnchen + Kartoffeln
Makrelen
Plum Cake
Windbeutel (auf 2 Ebenen)
Gebäck (auf 2 Ebenen)
Biskuitböden (auf 1 Ebene)
Biskuitböden (auf 2 Ebenen)
Quiche
Pizza
Kalbs- oder Rinderbraten
Hähnchen
Seezungen und Tintenfische
Tintenfisch- und Krebsspieße
Tintenfische
Kabeljaufilet
Gegrillte Gemüse
Kalbssteaks
Würste
Hamburger
Makrelen
Toast (oder getoastetes Brot)
Mit Drehspieß
Kalbfleisch am Spieß
Hähnchen am Spieß
Lamm am Spieß
Gegrilltes Hähnchen
Tintenfische
Mit Drehspieß
Kalbfleisch am Spieß
Lamm am Spieß
Hähnchen (am Spieß) + Röstkartoffeln
(auf dem Backblech)
Speisen
(falls vorhanden)
(falls vorhanden)
Gew.
(kg)
1
1
1
-
1
0.5
1
0.7
0.5
1.2
0.6
0.4
0.7
0.7
0.5
1
1
1
1+1
1
1
0.5
0.5
0.5
1
1.5
0.5
1
1
0.7
0.6
0.6
0.8
0.4
0.8
0.6
0.6
1
4 und 6
1.0
1.5
1.0
1.5
1.5
1.5
1.5
1.5
-
Einschubhöhe
3
3
3
3
3
3
2 oder 3
3
3
2 und 4
2 und 4
2 und 4
1 und 3 und 5
1 und 3 und 5
1 und 3 und 5
2 und 4
3
2
2 und 4
2
2
2 und 4
2 und 4
2
2 und 4
3
3
2
2 oder 3
4
4
4
4
3 oder 4
4
4
4
4
4
-
-
-
2
2
2
2
2
Vorheizzeit
(Minuten)
15
15
15
15
15
15
15
15
15
15
15
15
15
15
15
15
10
10
15
10
10
10
10
10
10
15
15
10
10
-
-
-
-
-
-
-
-
-
-
5
5
5
10
10
5
5
5
5
Empfohlene
Temperatur
200
200
200
180
180
180
180
180
160
200
190
210
180
180
90
230
180
180
200
180
170
190
180
170
170
200
220
220
180
Max
Max
Max
Max
Max
Max
Max
Max
Max
Max
Max
Max
Max
200
200
200
200
200
200
DE
Garzeit
(Minuten)
65-75
70-75
70-80
15-20
30-35
20-30
40-45
40-50
25-30
30-35
20-25
15-20
20-25
20-25
180
15-20
30-35
40-45
60-70
30-35
40-50
20-25
10-15
15-20
20-25
25-30
15-20
25-30
60-70
10-12
8-10
10-15
10-15
15-20
15-20
15-20
10-12
15-20
3-5
80-90
70-80
70-80
55-60
30-35
70-80
70-80
70-75
70-75
59
Page 60

Nutzung des Glaskeramik-Kochfeldes
DE
! Der auf die Dichtungen aufgetragene Leim
hinterlässt Fettspuren auf dem Glas. Wir empfehlen
Ihnen, diese vor Einsatz des Gerätes mit einem
herkömmlichen Reinigungsmittel (einer nicht
scheuernden Poliercreme) zu entfernen. Während
der ersten Betriebsstunden kann der Geruch
verbrannten Gummis wahrzunehmen sein. Dies wird
sich nach kurzer Zeit geben.
Ein- und Ausschalten der Kochzonen
Zum Einschalten einer Kochzone drehen Sie den
entsprechenden Drehschalter nach rechts.
Zum Ausschalten drehen Sie den Drehschalter nach
links bis auf “0”.
Das Einschalten der Kontrollleuchte KOCHZONEN
zeigt an, dass mindestens eine Kochzone des
Kochfeldes in Betrieb ist.
Die Kochzonen
Auf dem Kochfeld befinden sich elektrische
Hilitebeheizungselemente. Diese werden während
des Betriebs rot:
A. Kochzone mit
A
A
B
Element ausgeschaltet aber noch warm ist.
Strahlungsbeheizung:
A
B. Wärmeanzeige: zeigt an,
A
dass die Temperatur der
entsprechenden Kochzone
über 60°C liegt, auch wenn das
Einstellung Normal- oder Schnellkochplatte
0
1
2
3
4
5
6
Praktische Hinweise zum Gebrauch des
Kochfeldes
• Verwenden Sie Kochgeschirr mit dickem und
ebenem Boden, um sicher zu sein, dass dieser
perfekt auf der Kochzone aufliegt;
• Benutzen Sie stets nur Kochgeschirr, dessen
Durchmesser mit dem der Kochzone
übereinstimmt, d.h. dessen Boden die Kochzone
ganz bedeckt, und somit die gesamte Wärme
nutzt.
Beschreibung der Heizelemente
Bei den Strahlerelementen handelt es sich um runde
Heizstrahler, die innerhalb von nur 10-20 Sekunden
nach dem Einschalten rot aufglühen.
Die Hilitebeheizung erfolgt mittels runder
Heizelemente, die, außer den bezeichnenden
Vorteilen, die Hilitebeheizungselemente bieten, auch
eine gleichmäßige Wärmeverteilung gewährleisten.
Die Hiliteelementen erzeugen unmittelbar eine
äußerst hohe Licht- und Wärmemenge, und bieten
Ihnen demzufolge praktische Vorteile:
· schnelle Hitzeerzeugung (im Vergleich zu
Gasbrennern)
· schnelles Abkühlen
· gleichmäßige Wärmeverteilung auf der gesamten
Fläche (dank der runden Heizelemente)
• Stellen Sie sicher, dass der Topfboden immer gut
trocken und sauber ist: die Haftung auf den
Kochzonen ist dann optimal und sowohl die Töpfe
als auch das Kochfeld halten länger;
• Vermeiden Sie den Einsatz von Kochgeschirr, das
auch auf Gasflammen verwendet wird: Die äußerst
hohe Hitzekonzentration der Gasbrenner könnte
die Topfböden leicht verformen und demnach die
korrekte Auflage beeinträchtigen.
• lassen Sie nie eine Kochzone eingeschaltet, ohne
einen Topf darauf zu stellen, da sie sich
beschädigen könnte.
60
Page 61

Vorsichtsmaßregeln und
Hinweise
! Das Gerät wurde entsprechend den internationalen
Sicherheitsvorschriften entworfen und gebaut. Die im Folgenden
aus Sicherheitsgründen wiedergegebenen Hinweise sollten
aufmerksam gelesen werden.
Allgemeine Sicherheit
• Nachfolgende Anleitungen gelten nur für die
Bestimmungsländer, deren Symbole im
Handbuch und auf dem Typenschild des
Gerätes abgebildet sind.
• Dieses Gerät ist für den nicht professionellen Einsatz in
privaten Haushalten bestimmt.
• Das Gerät darf nicht im Freien aufgestellt werden, auch nicht,
wenn es sich um einen geschützten Platz handelt. Es ist hoch
gefährlich, das Gerät Regen und Gewittern auszusetzen.
• Berühren Sie das Gerät nicht mit nassen oder feuchten
Händen oder Füßen und auch nicht, wenn Sie barfuss sind.
• Das Gerät darf nur von Erwachsenen und
gemäß den Hinweisen der vorliegenden
Bedienungsanleitung zur Zubereitung von
Lebensmitteln verwendet werden. Jeder andere
Einsatz (zum Beispiel: zum Beheizen von
Räumen) ist als unsachgemäß und gefährlich
anzusehen. Der Hersteller haftet nicht für
eventuelle, durch unsachgemäßen, falschen
oder unangemessenen Gebrauch verursachte
Schäden.
• Dieses Handbuch bezieht sich auf ein Gerät der Klasse 1
(isoliert), oder der Klasse 2 - Unterklasse 1 (Einbau zwischen
zwei Unterschränke).
• Wenn das Gerät in Betrieb ist, werden die
Heizelemente und einige Ofentürteile sehr
heiß. Berühren Sie sie nicht und halten Sie
Kinder vom Ofen fern.
• Vermeiden Sie, dass die Netzkabel anderer Elektrogeräte in
Kontakt mit heißen Backofenteilen gelangen.
• Die zur Belüftung und Wärmeableitung vorgesehenen
Öffnungen dürfen nicht zugestellt bzw. abgedeckt werden.
• Stellen Sie keine unstabilen oder verformten Töpfe auf die
Kochzonen, um Unfälle durch Umkippen der Töpfe zu
vermeiden. Stellen Sie Stieltöpfe so auf das Kochfeld, dass ein
unbeabsichtigtes Anstoßen vermieden wird.
• Verwenden Sie stets Backofenhandschuhe.
• Benutzen Sie keine brennbaren Flüssigkeiten (Alkohol, Benzin
usw.) in der Nähe des eingeschalteten Gerätes.
• Geben Sie keine entflammbaren Materialien in das untere
Aufbewahrungsfach oder in den Backofen: Sie könnten
entflammen, wenn das Gerät versehentlich eingeschaltet wird.
• Vergewissern Sie sich stets, daß sich die Reglerknöpfe auf
Position • befinden, wenn das Gerät nicht in Gebrauch ist.
• Ziehen Sie den Netzstecker nicht am Netzkabel aus der
Steckdose, sondern nur am Netzstecker selbst.
• Ziehen Sie vor der Reinigung oder vor Wartungsmaßnahmen
stets den Netzstecker aus der Steckdose.
• Versuchen Sie bei etwaigen Störungen bitte keinesfalls,
Innenteile selbst zu reparieren. Wenden Sie sich an den
Kundendienst.
• Stellen Sie bitte keine schweren Gegenstände auf der
geöffneten Backofentür ab.
• Die internen Flächen des Geschirrwagens (falls vorhanden)
können äußerst heiß werden.
• Das Glaskeramikkochfeld ist stoßfest; dennoch kann es durch Stöße
bzw. Aufprall von spitzen Gegenständen springen (oder sogar
zerbrechen), Schalten Sie das Kochfeld in einem solchen Fall vom
Stromnetz und wenden Sie sich an die Kundendienststelle.
• Sollte die Kochfeldoberfläche gesprungen sein, schalten Sie
das Gerät aus, um so mögliche Stromschläge zu vermeiden.
• Bitte berücksichtigen Sie, dass die Kochzonen noch für ca. 30
Minuten nach dem Ausschalten sehr heiß bleiben.
• Halten Sie sämtliche Gegenstände, die schmelzen könnten,
wie Plastikteile oder Kunststoffe sowie Zucker oder stark
zuckerhaltige Speisen von dem Kochfeld fern. Achten Sie
besonders auf Verpackungsmaterial, Frischhaltefolie und
Alufolie: Wird derartiges Material auf den noch heißen oder
warmen Oberflächen belassen, können sie das Kochfeld
dauerhaft beschädigen.
• Legen Sie bitte keine Metallgegenstände (Messer, Löffel,
Deckel usw.) auf das Kochfeld; sie könnten sehr heiß werden.
• Das Gerät ist nicht zur Verwendung durch Personen
(einschließlich Kinder) mit eingeschränkten körperlichen oder
geistigen Fähigkeiten oder Wahrnehmungsstörungen oder
aber ohne ausreichende Erfahrung und Produktkenntnis
geeignet, sofern sie nicht durch eine für ihre Sicherheit
verantwortliche Person beaufsichtigt werden oder zuvor
Anleitungen zum Gerätegebrauch erhalten haben.
• Dieses Gerät ist kein Spielzeug für Kinder.
Entsorgung
• Das Verpackungsmaterial entsprechend den lokalen
Vorschriften entsorgen. Verpackungsmaterial kann
wiederverwertet werden.
• Die europäische Richtlinie 2002/96/EG über Elektro- und ElektronikAltgeräte (WEEE) sieht vor, dass Haushaltsgeräte nicht mit dem
normalen Hausmüll entsorgt werden dürfen. Die Altgeräte müssen
getrennt gesammelt werden, um die Rückführung und das
Recycling der Materialen zu optimieren, aus denen die Geräte
hergestellt sind, und um mögliche Belastungen der Gesundheit und
der Umwelt zu verhindern. Das Mülleimersymbol ist auf allen
Produkten dargestellt, um an die Verpflichtung zur getrennten
Abfallsammlung zu erinnern. Für weitere Informationen zur
korrekten Entsorgung können sich die Besitzer von elektrischen
Haushaltsgeräten an die übergeordnete öffentliche Einrichtung
oder an ihren Händler wenden.
Energie sparen und Umwelt schonen
• Für einen sparsamen Energieverbrauch den Backofen in den
Stunden zwischen dem späten Nachmittag und dem frühen
Morgen verwenden.
• Es empfiehlt sich, die Programme GRILL und ÜBERBACKEN
stets bei geschlossener Backofentür zu verwenden: Dadurch
werden nicht nur optimale Ergebnisse erzielt, sondern auch
Energie gespart (ca. 10 %).
• Halten Sie die Dichtungen sauber und in einwandfreiem
Zustand, so dass sie gut an der Tür anliegen und keine
Wärmeverluste verursachen.
DE
61
Page 62

Reinigung und Pflege
DE
Gerät vom Stromnetz trennen
Vor jeder Reinigung und Pflege ist das Gerät vom
Stromnetz zu trennen.
Backofen reinigen.
! Verwenden Sie zur Reinigung des Kochfeldes
keine Dampf- oder Hochdruckreinigungsgeräte.
• Reinigen Sie die Backofentür aus Glas bitte nur
mit einem weichen Schwamm und mildem
Spülmittel und trocknen Sie sie abschließend mit
einem weichen Tuch. Verwenden Sie keine rauen,
scheuernden Materialien oder scharfkantige,
metallische Schaber, da diese Kratzer auf ihrer
Oberfläche hinterlassen und das Zerbrechen des
Glases zur Folge haben können.
• Die emaillierten oder aus Edelstahl gefertigten
Außenteile des Gerätes sowie die Gummidichtungen
können mit einem mit lauwarmem Wasser und einem
neutralen Reinigungsmittel getränkten Schwamm
gereinigt werden. Bei hartnäckigen Flecken spezielle
Reinigungsmittel verwenden. Es wird empfohlen, die
Teile nach der Reinigung gut nachzuspülen und zu
trocknen. Auf keinen Fall Scheuermittel oder sonstige
scharfe Reinigungsmittel verwenden.
• Der Backofen sollte möglichst nach jedem Gebrauch,
solange er noch etwas warm ist, gereinigt werden.
Hierzu warmes Wasser und ein Reinigungsmittel
verwenden. Mit Wasser nachspülen und mit einem
weichen Tuch trocken. Scheuermittel vermeiden.
• Das Zubehör lässt sich wie normales Geschirr
reinigen (spülmaschinenfest).
• Das Bedienfeld wird mit einem weichen Schwamm
von Fett und Schmutz befreit.
• Sollte stark kalkhaltiges Wasser oder ein scharfes
phosphorhaltiges Spülmittel für längere Zeit darauf
stehen bleiben, können auf den Edelstahlteilen
Flecken zurückbleiben. Es ist ratsam, diese Teile
nach der Reinigung gut nachzuspülen und trocken zu
reiben.
Kontrolle der Backofendichtungen
Den Zustand der Dichtung an der Backofentür in
regelmäßigen Abständen prüfen. Wenden Sie sich im
Falle einer Beschädigung dieser Dichtung an Ihre
nächstgelegene Kundendienststelle. Es empfiehlt sich,
den Backofen bis zur erfolgten Reparatur nicht zu
verwenden.
Austausch der Backofenlampe
1. Nachdem Sie den Backofen
von der Stromversorgung
abgenommen haben, entfernen
Sie die Glasabdeckung der
Lampenhalterung (
Abbildung
2. Die Lampe ausschrauben
und durch eine neue Lampe
desselben Typs ersetzen:
Spannung 230V, Leistung 25 W, Sockel E 14.
3. Setzen Sie die Abdeckung wieder ein und schließen
Sie den Backofen erneut an die Stromversorgung an.
).
siehe
Reinigen des Glaskeramik-KochfeldsReinigen des Glaskeramik-Kochfelds
Reinigen des Glaskeramik-Kochfelds
Reinigen des Glaskeramik-KochfeldsReinigen des Glaskeramik-Kochfelds
! Die Verwendung von Scheuermitteln oder scharfen
oder chemischen Reinigungsmitteln wie
Backofensprays, Fleckenentferner,
Rostentfernungsmittel, Reiniger in Pulverform und
Scheuerschwämme ist zu vermeiden: sie können die
Oberfläche des Kochfeldes dauerhaft beschädigen.
• Zur täglichen Pflege genügt es, das Kochfeld mit
einem feuchten Schwamm abzuwischen und mit
Küchenpapier abzutrocknen.
• Bei besonders starker Verschmutzung sollte ein
spezielles Reinigungsmittel für Glaskeramik
verwendet werden. Das Kochfeld anschließend mit
Wasser abspülen und sorgfältig trocknen.
• Starke Verschmutzungen lassen sich mit einem
zweckmäßigen Schaber entfernen (nicht im
Lieferumfang enthalten). Verschmutzungen sollten so
schnell wie möglich - und nicht erst nach Abkühlen des
Kochfeldes - entfernt werden, um zu vermeiden, dass
sich die Verschmutzungen festsetzen. Gute Ergebnisse
lassen sich auch mit einem für Glaskeramik geeigneten
Spezialschwamm aus Edelstahlwolle und einer
einfachen Spüllauge erzielen.
• Auf dem Kochfeld versehentlich geschmolzene
Alufolie, Plastikteile oder Kunststoffe, sowie
Zuckerreste müssen umgehend mit einem Schaber
von der noch warmen Oberfläche entfernt werden.
• Nach der Reinigung kann das Kochfeld mit einem
Pflegeprodukt nachbehandelt werden: Der
unsichtbare Schutzfilm, den ein solches Produkt
hinterlässt, schützt die Oberfläche vor eventuell
überkochenden Speisen. Es empfiehlt sich, diese
Nachbehandlung bei lauwarmem oder abgekühltem
Gerät vorzunehmen.
• Achten Sie darauf, das Kochfeld nach der Reinigung
stets mit klarem Wasser abzuspülen und
anschließend abzutrocknen.
Reinigungsmittelrückstände könnten sich nämlich
bei der nächsten Benutzung des Kochfeldes
ihrerseits festsetzen.
Spezialreinigungsmittel für
Glaskeramik-Kochfelder
Wo sind diese
erhältlich ?
Kundendienst
! Wenden Sie sich nur an autorisierte Techniker.
Geben Sie bitte Folgendes an:
• die genaue Beschreibung des Fehlers
• das Gerätemodell (Mod.)
• die Seriennummer (S/N).
Letztere Informationen können dem Typenschild,
das sich auf dem Gerät befindet, entnommen
werden.
62
Page 63

DE
63
Page 64

DE
03/2011 - 195087485.00
XEROX FABRIANO
64
 Loading...