

Page 1
KN3G2S/UA
KN3G20/UA
English
GB
EnglishEnglish
Operating Instructions
COOKER AND OVEN
Contents
Operating Instructions,1
Description of the appliance-Overall view,2
Description of the appliance-Control Panel,3
Installation,4
Start-up and use,8
Cooking modes,9
Precautions and tips,11
Care and maintenance,12
Assistance,12
RomânãRomânã
RO
InstrucĠiuni de folosire
InstrucĠiuni de folosire
InstrucĠiuni de folosire
ARAGAZ ùI CUPTOR
ARAGAZ ùI CUPTOR
ARAGAZ ùI CUPTOR
Sumar
Sumar
Sumar
InstrucĠiuni de folosire,1
Descrierea aparatului- Vedere de ansamblu,2
Descrierea aparatului-Panoul de control,3
Instalare,13
Pornire úi utilizare, 17
Utilizarea cuptorului,18
PrecauĠii úi sfaturi,20
ÎntreĠinere úi curăĠire,21
AsistenĠă,21
HU
Használati útmutató
Használati útmutató
Használati útmutató
tĦzhely és a sütĘ
tĦzhely és a sütĘ
tĦzhely és a sütĘ
Tartalomjegyzék
Tartalomjegyzék
Tartalomjegyzék
Használati útmutató,1
A készülék leírása- A készülék áttekintése,2
A készülék leírása- KezelĘpanel,3
Üzembe helyezés,22
Bekapcsolás és használat,27
A fĘzĘlap használata,28
Óvintézkedések és tanácsok,30
Karbantartás és ápolás,31
Szerviz,31
CZ
Pokyny pro použití
Pokyny pro použití
Pokyny pro použití
SPORÁK S TROUBOU
SPORÁK S TROUBOU
SPORÁK S TROUBOU
Obsah
Obsah
Obsah
Pokyny pro použití,1
Popis zarízení-Celkový pohled,2
Popis zarízení-Ovládací panel,3
Instalace,32
Spuštení a použití, 36
Použití trouby,37
Opatrení a rady,38
Údržba a péce,39
Servisní služba,39
Românã
MagyarMagyar
Magyar
Cesky
BG
ɂɧɫɬɪɭɤɰɢɢ ɡɚ ɭɩɨɬɪɟɛɚ
ɂɧɫɬɪɭɤɰɢɢ ɡɚ ɭɩɨɬɪɟɛɚ
ɂɧɫɬɪɭɤɰɢɢ ɡɚ ɭɩɨɬɪɟɛɚ
ȿɅȿɄɌɊɂɑȿɋɄȺ ɉȿɑɄȺ ɂ ɎɍɊɇȺ
ȿɅȿɄɌɊɂɑȿɋɄȺ ɉȿɑɄȺ ɂ ɎɍɊɇȺ
ȿɅȿɄɌɊɂɑȿɋɄȺ ɉȿɑɄȺ ɂ ɎɍɊɇȺ
Ɋɟɡɸɦɟ
Ɋɟɡɸɦɟ
Ɋɟɡɸɦɟ
ɂɧɫɬɪɭɤɰɢɢ ɡɚ ɭɩɨɬɪɟɛɚ,1
Ɉɩɢɫɚɧɢɟ ɧɚ ɭɪɟɞɚ-Ɉɛɳ ɩɪɟɝɥɟɞ,2
Ɉɩɢɫɚɧɢɟ ɧɚ ɭɪɟɞɚ- ɍɩɪɚɜɥɹɜɚɳ ɩɚɧɟɥ,3
ɂɧɫɬɚɥɢɪɚɧɟ,40
ɉɭɫɤ ɢ ɟɤɫɩɥɨɚɬɚɰɢɹ, 45
ɂɡɩɨɥɡɜɚɧɟ ɧɚ ɮɭɪɧɚɬɚ,46
ɉɪɟɞɩɚɡɧɢ ɦɟɪɤɢ ɢ ɩɪɟɩɨɪɴɤɢ,47
ɉɨɞɞɪɴɠɤɚ ɢ ɩɨɱɢɫɬɜɚɧɟ,48
Ɍɟɯɧɢɱɟɫɤɨ ɨɛɫɥɭɠɜɚɧɟ,48
ɛɴɥɝɚɪɫɤɢ
UA
ɍɤɪɚɿɧɫɶɤɚUAȱɧɫɬɪɭɤɰɿɿ ɡ ɟɤɫɩɥɭɚɬɚɰɿɿ
ɍɤɪɚɿɧɫɶɤɚUAȱɧɫɬɪɭɤɰɿɿ ɡ ɟɤɫɩɥɭɚɬɚɰɿɿ
ɍɤɪɚɿɧɫɶɤɚUAȱɧɫɬɪɭɤɰɿɿ ɡ ɟɤɫɩɥɭɚɬɚɰɿɿ
Ʉɍɏɇə
Ʉɍɏɇə
Ʉɍɏɇə
Ɂɦɿɫɬ
Ɂɦɿɫɬ
Ɂɦɿɫɬ
ȱɧɫɬɪɭɤɰɿɿ ɡ ɟɤɫɩɥɭɚɬɚɰɿɿ,1
Ɉɩɢɫ ɭɫɬɚɧɨɜɤɢ-Ɂɚɝɚɥɶɧɢɢ ɜɢɝɥɹɞ,3
Ɉɩɢɫ ɭɫɬɚɧɨɜɤɢ-ɉɚɧɟɥɶ ɭɩɪɚɜɥɿɧɧɹ,5
ȼɫɬɚɧɨɜɥɟɧɧɹ,49
ȼɤɥɸɱɟɧɧɹ ɿ
Ʉɨɪɢɫɬɭɜɚɧɧɹ ɪɨɛɨɱɨɸ ɩɨɜɟɪɯɧɟɸ,53
Ɂɚɩɨɛɿɠɧɿ ɡɚɫɨɛɢ ɿ ɩɨɪɚɞɢ,56
Ⱦɨɝɥɹɞ i ɬɟɯɧɿɱɧɟ ɨɛɫɥɭɝɨɜɭɜɚɧɧɹ,57
Ⱦɨɩɨɦɨɝɚ,58
RS
Ɋɭɤɨɜɨɞɫɬɜɨ ɩɨ ɷɤɫɩɥɭɚɬɚɰɢɢ
Ɋɭɤɨɜɨɞɫɬɜɨ ɩɨ ɷɤɫɩɥɭɚɬɚɰɢɢ
Ɋɭɤɨɜɨɞɫɬɜɨ ɩɨ ɷɤɫɩɥɭɚɬɚɰɢɢ
ɄɍɏɈɇɇȺə ɉɅɂɌȺ ɋ ȾɍɏɈȼɕɆ ɒɄȺɎɈɆ
ɄɍɏɈɇɇȺə ɉɅɂɌȺ ɋ ȾɍɏɈȼɕɆ ɒɄȺɎɈɆ
ɄɍɏɈɇɇȺə ɉɅɂɌȺ ɋ ȾɍɏɈȼɕɆ ɒɄȺɎɈɆ
ɋɨɞɟɪɠɚɧɢɟ
ɋɨɞɟɪɠɚɧɢɟ
ɋɨɞɟɪɠɚɧɢɟ
Ɋɭɤɨɜɨɞɫɬɜɨ ɩɨ ɷɤɫɩɥɭɚɬɚɰɢɢ,1
Ɉɩɢɫɚɧɢɟ ɢɡɞɟɥɢɹ-Ɉɛɳɢɣ ɜɢɞ,2
Ɉɩɢɫɚɧɢɟ ɢɡɞɟɥɢɹ-ɉɚɧɟɥɶ ɭɩɪɚɜɥɟɧɢɹ,3
Ɇɨɧɬɚɠ
ȼɤɥɸɱɟɧɢɟ ɢ ɷɤɫɩɥɭɚɬɚɰɢɹ
Bɚɪɨɱɧɚɹ ɩɚɧɟɥɶ
ɉɪɟɞɨɫɬɨɪɨɠɧɨɫɬɢ ɢ ɪɟɤɨɦɟɧɞɚɰɢɢ
Ɍɟɯɧɢɱɟɫɤɨɟ ɨɛɫɥɭɠɢɜɚɧɢɟ ɢ ɭɯɨɞ
KZKZ
ɉɚɣɞɚɥɚɧɭɧԝɫԕɚɭɥɵԑɵ
ɉɅɂɌȺɉɅɂɌȺ
Ɇɚɡɦԝɧɵ
ɉɚɣɞɚɥɚɧɭɧԝɫԕɚɭɥɵԑɵ
Ԕԝɪɵɥԑɵɫɢɩɚɬɬɚɦɚɫɵ
Ԕԝɪɵɥԑɵɫɢɩɚɬɬɚɦɚɫɵ
Ɉɪɧɚɬɭ
Ԕɨɫɭɠԥɧɟɩɚɣɞɚɥɚɧɭ
ɋɚԕɬɚɧɞɵɪɭɥɚɪ
Ʉԛɬɿɦɠԥɧɟɬɟɯɧɢɤɚɥɵԕ
Ʉԧɦɟɤ
ɜɢɤɨɪɢɫɬɚɧɧɹ,53
Ɋɭɫɫɤɢɣ
ɊɭɫɫɤɢɣɊɭɫɫɤɢɣ
,59
ҚазақшаҚазақша
ҚазақшаҚазақша
,69
ɦɟɧɤɟԙɟɫɬɟɪ
,77
,64
,67
1
Жалпы шолу
Басқару тақтасы
,73
,76
ԕɵɡɦɟɬɤԧɪɫɟɬɭ
,67
,68
2
3
,77
Page 2
14
GB
Description of the appliance
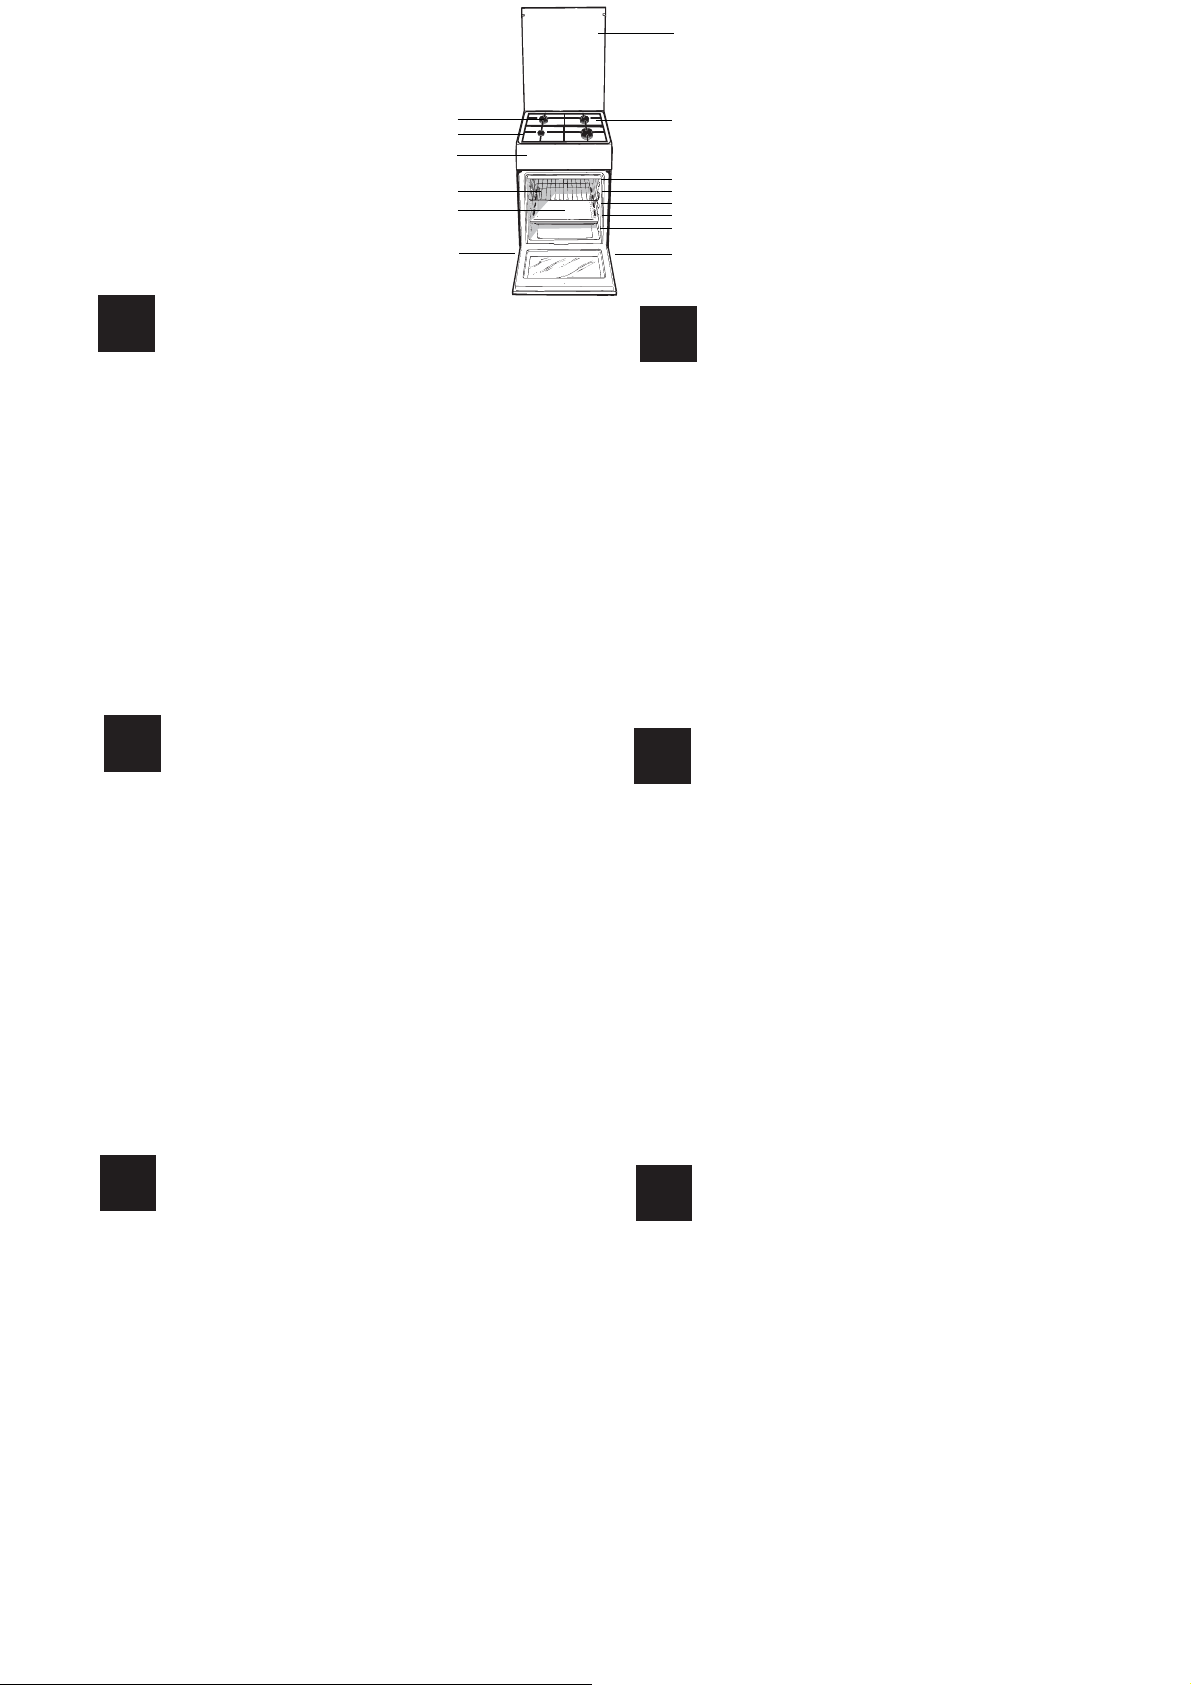
Overall view
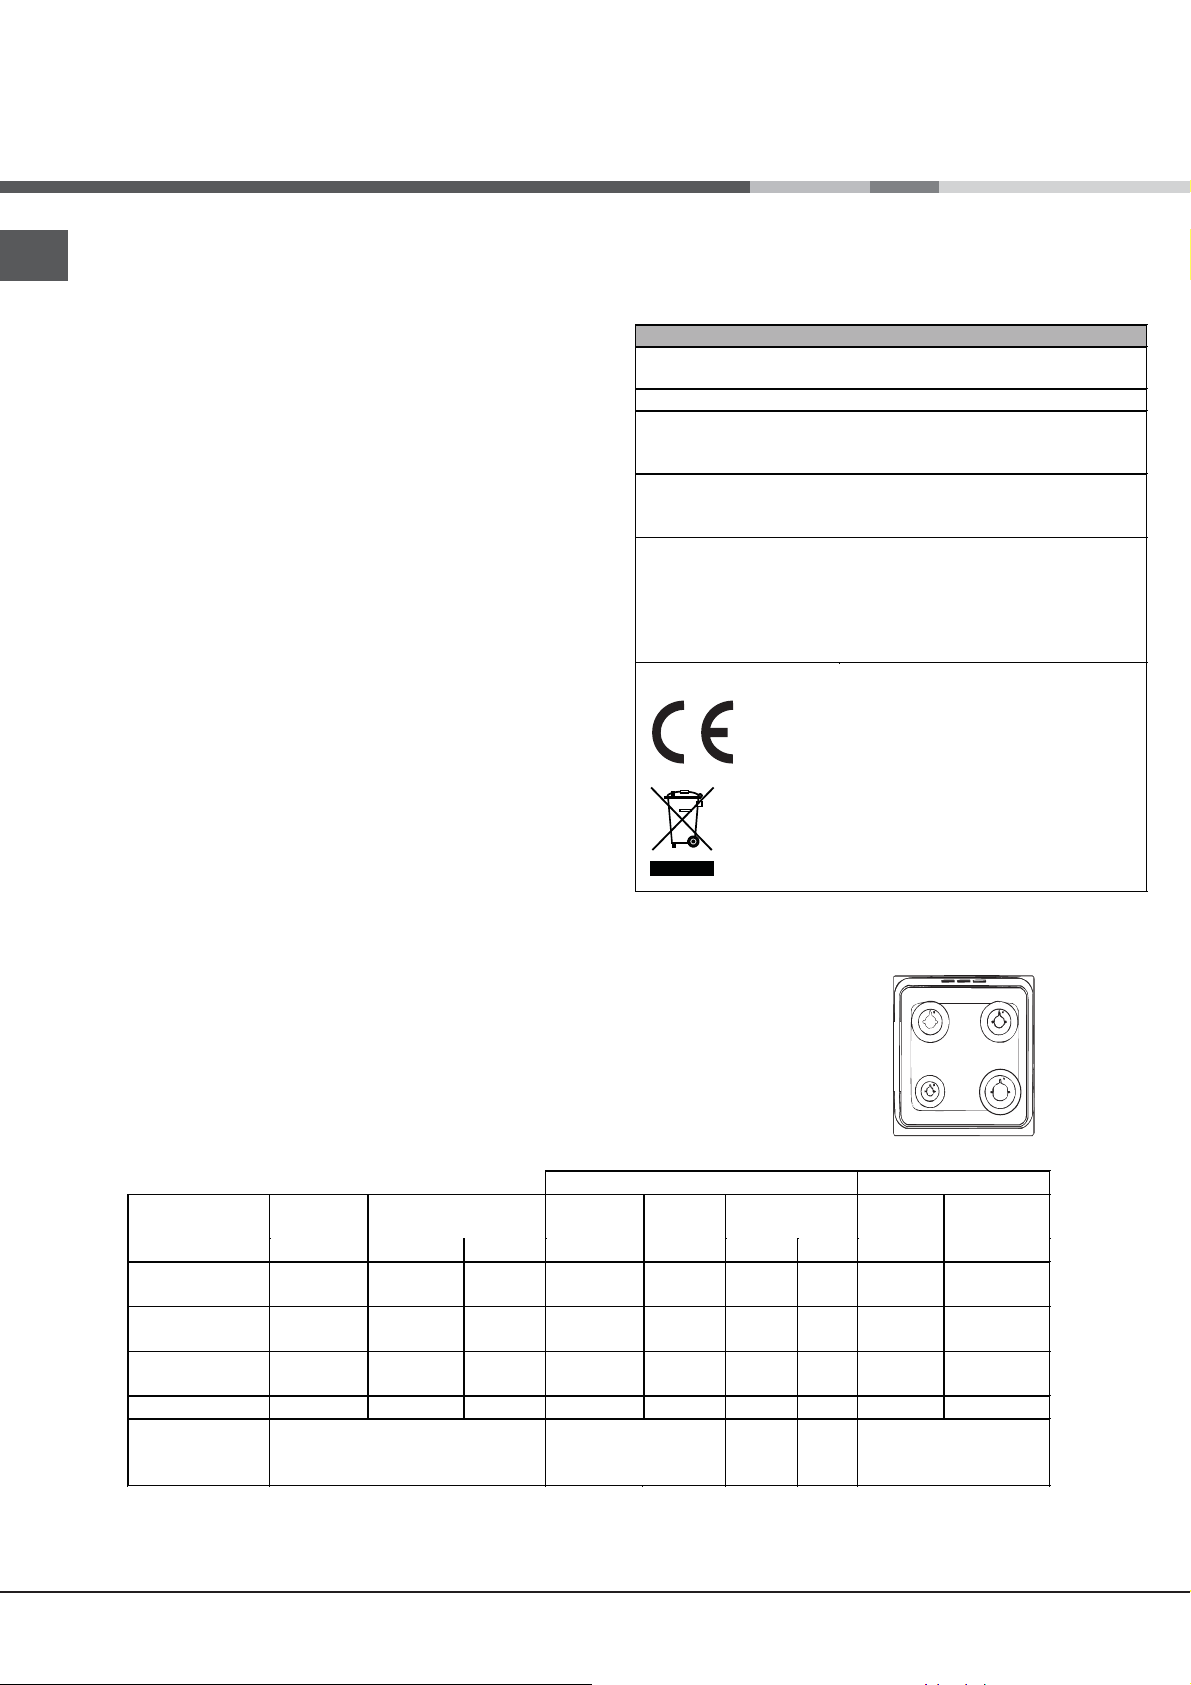
1 Hob burner
2 Hob Grid
3.Control panel
4.Sliding grill rack
5.DRIPPING pan
6.Adjustable foot
7.Containment surface for spills
8.GUIDE RAILS for the sliding racks
9.position 5
10.position 4
11.position 3
12.position 2
13.position 1
14.Glass Cover
RO
Descriere aparatului
Vedere de ansamblu
1.Arzătoare pe gaz
2 .Grătare plită
3 .Panou frontal de control
4 .Grătarul cuptorului
5 .Tavă de coacere
6 .Picioare reglabile
7.Plită
8.GHIDAJE alunecare rafturi
9. nivelul 5
10.nivelul 4
11.nivelul 3
12. nivelul 2
13.nivelul 1
14. Capacul din sticlă
1
2
3
4
5
6
7
8
9
10
11
12
13
6
Popis zarízení
CZ
Celkový pohled
1.Plynový hoĜák
2. Rošt na varné desce
3. Ovládací panel
4. Peþící rošt
5. Peþící plech nebo plech zachycující odkapávající
6. Nastavitelné nohy omastek
7. Záchytný žlábek
8. Vodicí LIŠTY jednotlivých úrovní
9. poloha 5
10. poloha 4
11. poloha 3
12.poloha 2
13.poloha 1
14. Skleny kryt
BG
1. Ƚɚɡɨɜɢ ɝɨɪɟɥɤɢ
2. Ƚɨɪɧɚ ɪɟɲɟɬɤɚ
3. Ʉɨɦɚɧɞɧɨ ɬɚɛɥɨ
4. Ɋɟɲɟɬɤɚ
5. Ɍɚɜɚ
6. Ɋɟɝɭɥɢɪɭɟɦɢ ɤɪɚɱɟɬɚ
7. ɉɥɨɬ
8. BOȾAɑɂ ɡɚ ɞɜɚɬɚ
9. ɉɨɥɨɠɟɧɢɟ 5
10. ɉɨɥɨɠɟɧɢɟ 4
11.ɉɨɥɨɠɟɧɢɟ 3
12. ɉɨɥɨɠɟɧɢɟ 2
13.ɉɨɥɨɠɟɧɢɟ 1
14.3a6paHa
Ɉɩɢɫɚɧɢɟ ɧɚ ɭɪɟɞɚ
Ɉɛɳ ɩɪɟɝɥɟɞ
Ɉɩɢɫɚɧɢɟ ɢɡɞɟɥɢɹ
Ɉɩɢɫɚɧɢɟ ɢɡɞɟɥɢɹ
Ɉɩɢɫɚɧɢɟ ɢɡɞɟɥɢɹ
RS
Ɉɛɳɢɣ ɜɢɞ
Ɉɛɳɢɣ ɜɢɞ
Ɉɛɳɢɣ ɜɢɞ
1. Ƚɚɡɨɜɵɟ ɝɨɪɟɥɤɢ
2. Ɋɚɛɨɱɚɹ ɩɨɜɟɪɯɧɨɫɬɶ
3.ɗɥɟɤɬɪɢɱɟɫɤɢɟ ɤɨɧɮɨɪɤɢ
4.ɉɚɧɟɥɶ ɭɩɪɚɜɥɟɧɢɹ
5.Ɋɟɲɟɬɤɚ ɞɭɯɨɜɤɢ
6.ɉɪɨɬɢɜɟɧɶ ɢɥɢ ɠɚɪɨɱɧɵɣ ɥɢɫɬ
7.Ɋɟɝɭɥɢɪɭɟɦɵɟ ɧɨɠɤɢ
8.HAɉPABɅəɘɓɂE ɞɥɹ ɩɪɨɬɢɜɟɧɟɣ ɪɟɲɟɬɨɤ
9. ɉɨɥɨɠɟɧɢɟ 1
10. ɉɨɥɨɠɟɧɢɟ 2
11.ɉɨɥɨɠɟɧɢɟ 3
12.ɉɨɥɨɠɟɧɢɟ 4
13.ɉɨɥɨɠɟɧɢɟ 5
14.Cɬɟɤɥɹɧɧɚɹ ɤɪɵɲɤɚ
(ɂɦɟɟɬɫɹ ɬɨɥɶɤɨ ɜ ɧɟɤɨɬɨɪɵɯ ɦɨɞɟɥɹɯ.)
2
Құрылғы
KZ
1
2.
3.
4.
5.
6.
7.
8.
9.
10.
11.
12.
13.
14.
ɀɚɥɩɵɲɨɥɭ
Газ оттығы
Плита торы
Төгілген сұйықтықтарды ұстайтын
Басқару тақтасы
ГРИЛЬ
ТҰТҚАЛЫ ТАБА
Реттелетін аяқ
Сырғымалы тартпаларға арналған
БАҒЫТТАУШЫ ЖОЛДАР
5-позиция
4-позиция
3-позиция
2-позиция
1-позиция
Шыны қақпақ
сипаттамасы
(Тек белгілі үлгілерде болады).
бет
Page 3
HU
A készülék leírása
A készülék áttekintése
UA
Ɉɩɢɫ ɩɥɢɬɢ
Ɂɚɝɚɥɶɧɢɢ ɜɢɝɥɹɞ
1. Gáz égõ
2.Edénytartó rács
3. Kapcsoló tábla
4.Sütõ rács
5.Serpenyõ vagy sütõtepsi
6. Állítható lábacska vagy láb
7.Zsírfelfogó borítólap
8.TÁLCASíNEK
9.helyzet 5
10.helyzet 4
11.helyzet 3
12. helyzet 2
13.helyzet 1
14.Ha felmelegedik
1.Ƚɚɡɨɜɢɣ ɩɚɥɶɧɢɤ
2.ɉɿɞɞɨɧ ɧɚ ɜɢɩɚɞɨɤ ɩɟɪɟɥɢɜɚɧɶ
3.ɉoɜɟɪɯɧɹ ɞɥɹ ɡɛɢɪɚɧɧɹ ɡɛiɝɥoʀ piɞɢɧɢ
4.ɉɚɧɟɥɶ ɭɩɪɚɜɥɿɧɧɹ
5.ɉɨɥɤɚ ɊȿɒȱɌKɂ
6.ɉɨɥɤɚ ȾEɄɈ
7.Ʌɚɩɤɚ ɞɥɹ ɧɚɥɚɲɬɭɜɚɧɧɹ
8.HAɉPABɅəɘɑȱ ɞɥɹ ɩɨɥɢɰɶ
9.ɩɨɥɨɠɟɧɧɹ 5
10.ɩɨɥɨɠɟɧɧɹ 4
11.ɩɨɥɨɠɟɧɧɹ 3
12.ɩɨɥɨɠɟɧɧɹ 2
13.ɩɨɥɨɠɟɧɧɹ 1
14.ɋɤɥɹɧɚ ɤɪɢɲɤɚ (ȯ ɥɢɲɟ ɜ ɞɟɹɤɢɯ ɦɨɞɟɥɹɯ.)
1
GB
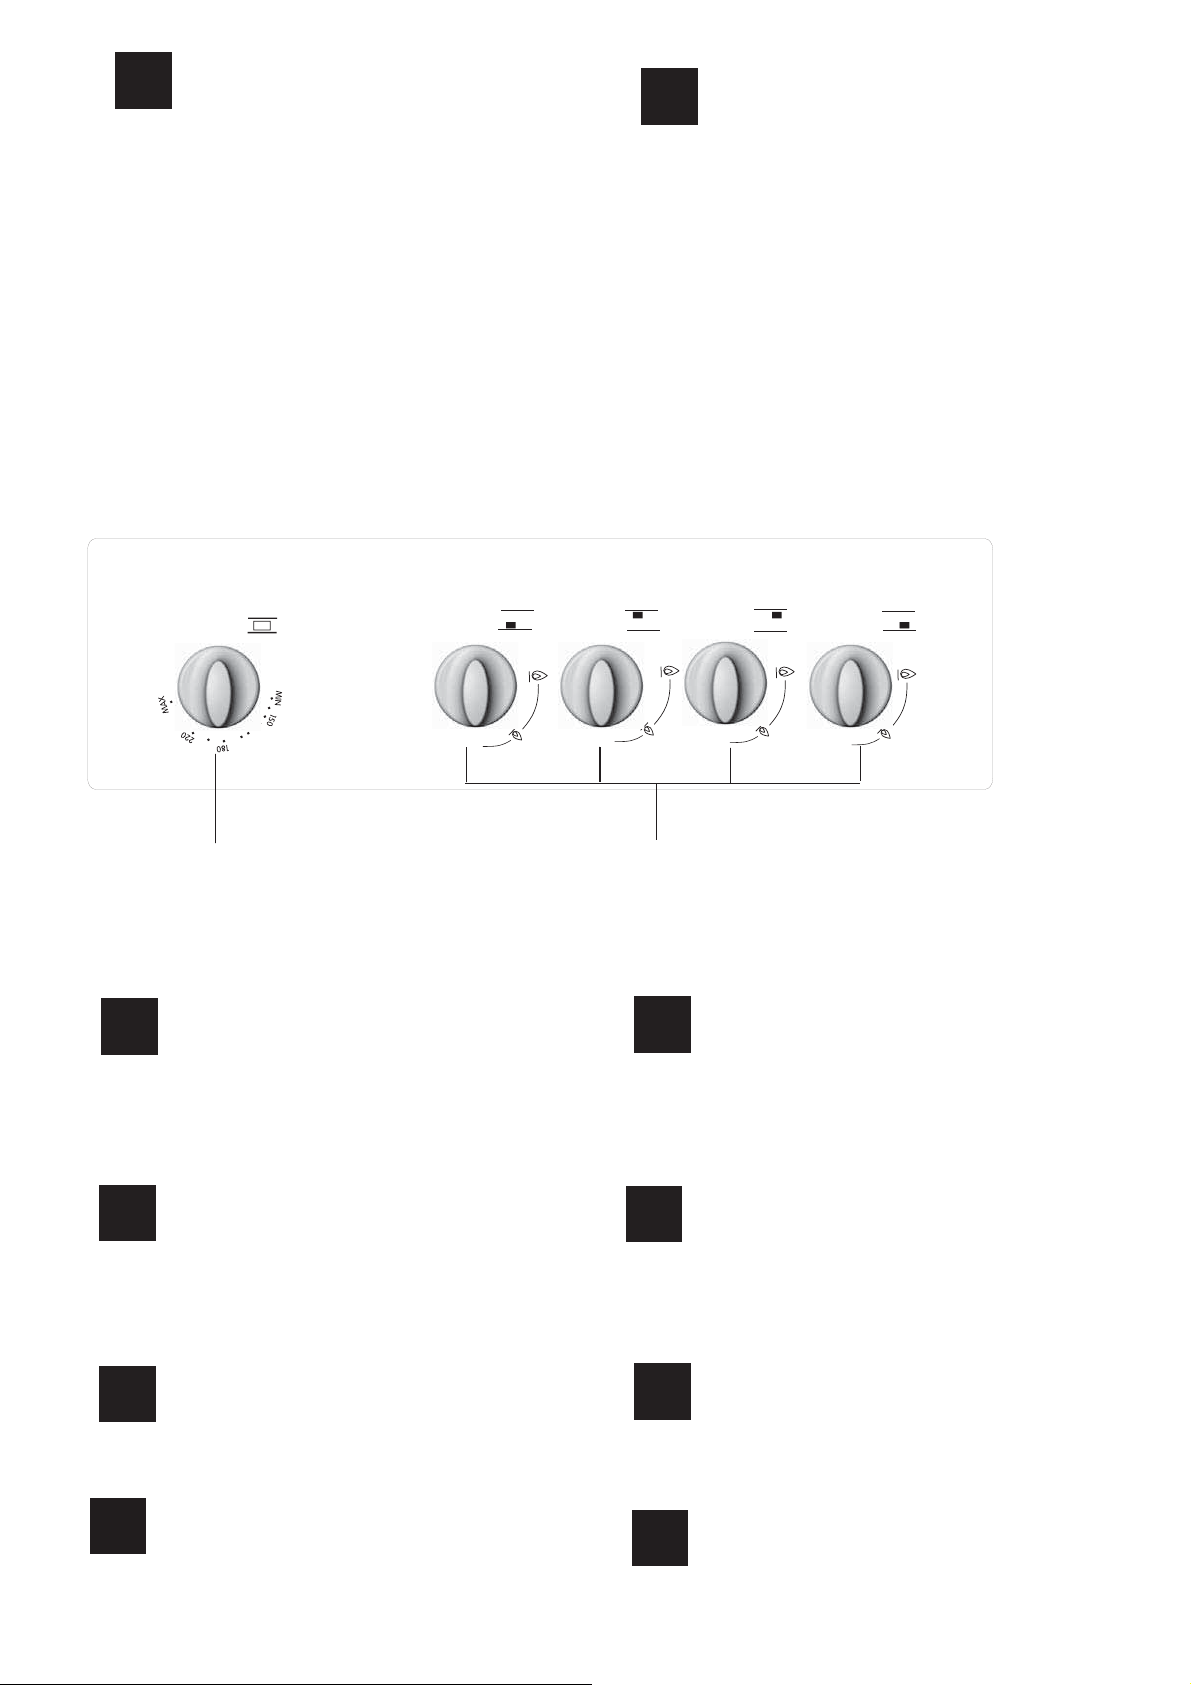
1.OVEN CONTROL knob
2.Hob BURNER control knob
RO
1.Buton de comanda pentru cuptor
2.Butoane comandi ochiuri aragaz
HU
Description of the appliance
Control panel
Descriere aparatului
Panoul de control
A készülék leírása
KezelĘpanel
2
BG
1.CONTROL ɤɨɩɱɟɬɨ ɡɚ ɫɤɚɪɚ
2. Ʉɨɩɱɟɬɨ ɡɚ ɭɩɪɚɜɥɟɧɢɟ ɧɚ Ʉɨɬɥɨɧ ɝɨɪɟɥɤɚɬɚ
Ɉɩɢɫɚɧɢɟ ɧɚ ɭɪɟɞɚ
ɍɩɪɚɜɥɹɜɚɳ ɩɚɧɟɥ
Ɉɩɢɫ ɩɥɢɬɢ
UA
1.. Ɋɭɱɤɚ ȾɍɏɈȼɄȺ
2.Ɋɭɱɤɢ ɞɥɹ ɤɟɪɭɜɚɧɧɹ ɝɚɡɨɜɢɦɢ
ɩɚɥɶɧɢɤɚɦɢ ɧɚ ɜɚɪɢɥɶɧɿɣ ɩɨɜɟɪɯɧɿ
ɉɚɧɟɥɶ ɭɩɪɚɜɥɿɧɧɹ
Popis zarízení
CZ
Ovládací panel
1.SütĘ és gomb
2.A tĦzhely gázégĘinek vezérlĘ gombjai
Ɉɩɢɫɚɧɢɟ ɢɡɞɟɥɢɹ
RS
ɉɚɧɟɥɶ ɭɩɪɚɜɥɟɧɢɹ
1.Ɋɭɤɨɹɬɤɚ ɭɩɪɚɜɥɟɧɢɹ ɞɭɯɨɜɤɨɣ
2. Ɋɭɤɨɹɬɤɢ ɜɤɥɸɱɟɧɢɹ ɝɚɡɨɜɵɯ ɤɨɧɮɨɪɨɤ
ɜɚɪɨɱɧɨɣ ɩɚɧɟɥɢ
1.KnoÀ ík trouby
2.Regulaþní knoÀ íky pro ovládání hoĜákĤ varné desky
Құрылғы
KZ
Басқару тақтасы
Пеш пен
1.
Плитадағы газ оттықтарын
2.
грильді
сипаттамасы
басқару тұтқалары
3
Page 4
Installation
GB
! Before operating your new appliance please read
this instruction booklet carefully. It contains important
information concerning the safe installation and
operation of the appliance.
! Please keep these operating instructions for future
reference. Make sure that the instructions are kept with
the appliance if it is sold, given away or moved.
! The appliance must be installed by a qualified
professional according to the instructions provided.
! Any necessary adjustment or maintenance must be
performed after the cooker has been disconnected
from the electricity supply.
! We recommend cleaning the oven before using it for
the first time, following the instructions provided in the
„Care and maintenance” section.
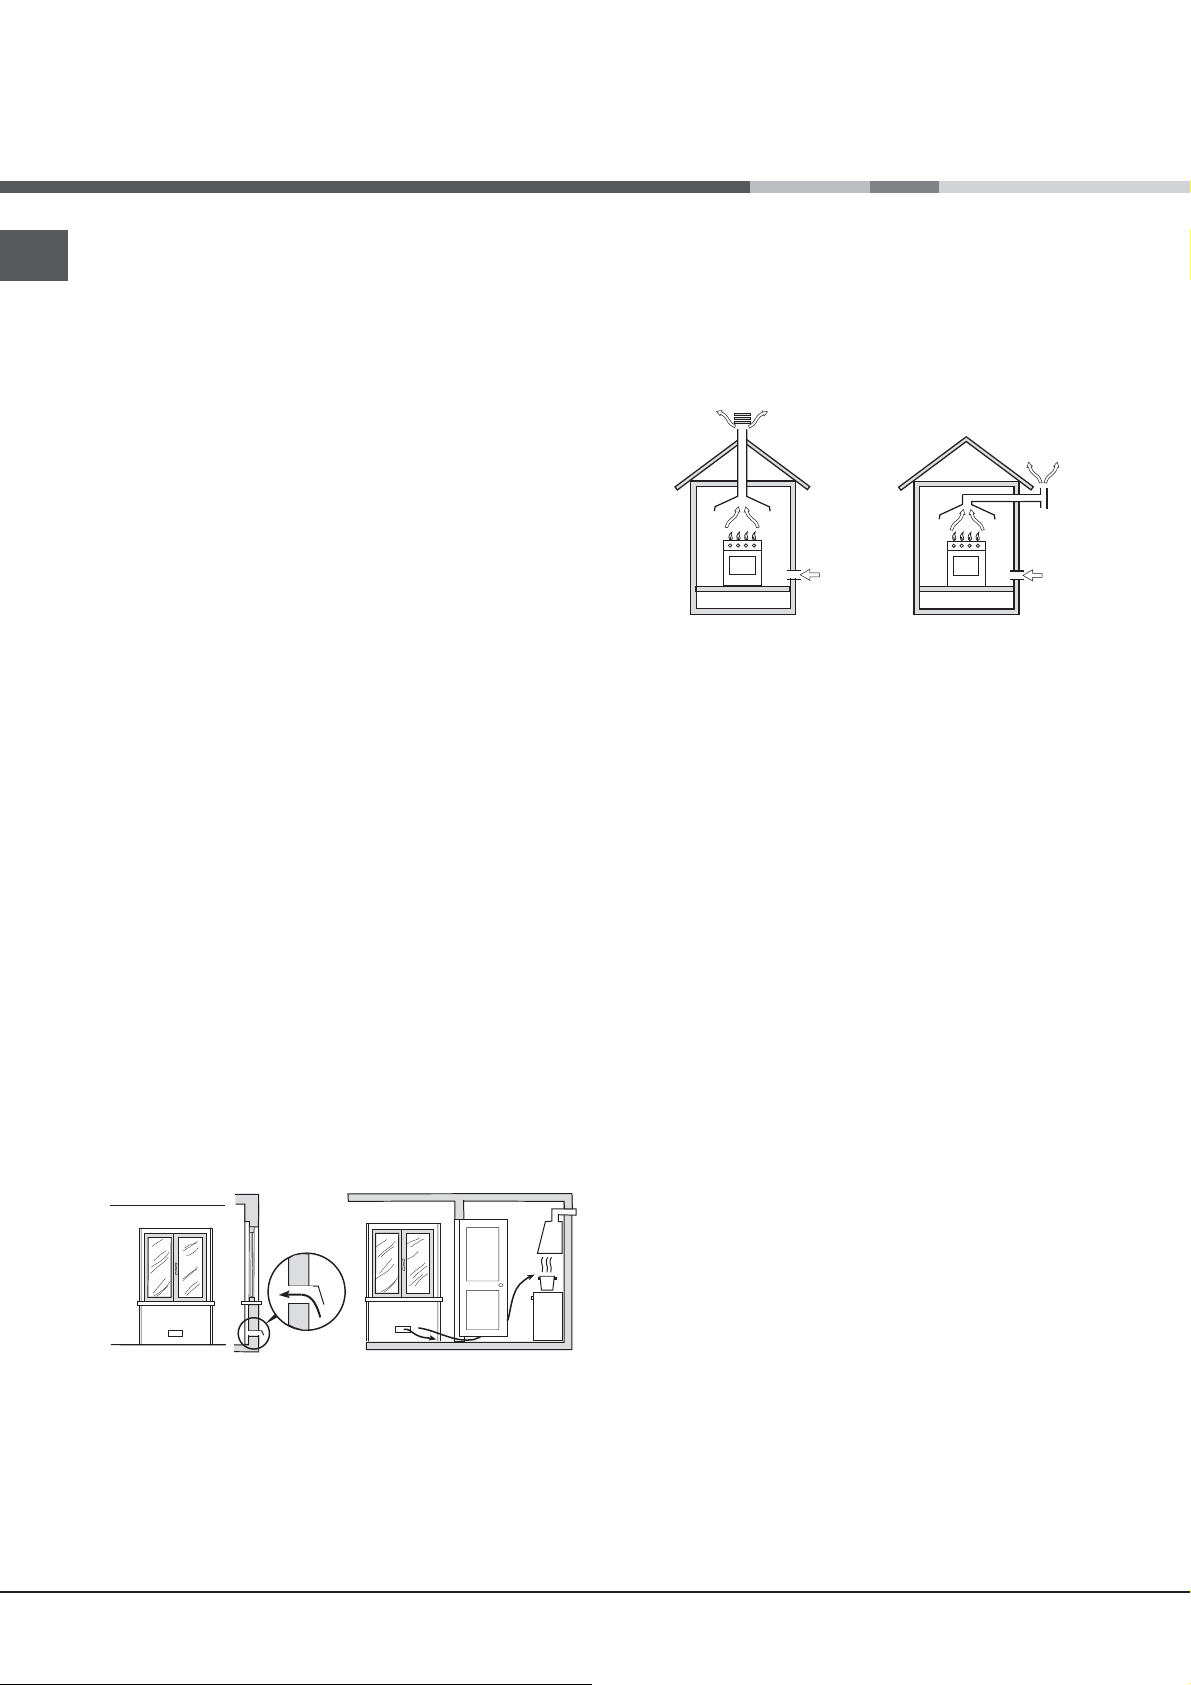
Room ventilation
The appliance may only be installed in permanentlyventilated rooms, according to current national
legislation. The room in which the appliance is installed
must be ventilated adequately so as to provide as
much air as is needed by the normal gas combustion
3
process (the flow of air must not be lower than 2 m
/h
per kW of installed power).
The air inlets, protected by grilles, should have a duct
2
with an inner cross section of at least 100 cm
and
should be positioned so that they are not liable to even
partial obstruction (see gure A).
These inlets should be enlarged by 100% - with a
2
minimum of 200 cm
- whenever the surface of the
hob is not equipped with a flame failure safety device.
When the flow of air is provided in an indirect manner
from adjacent rooms (see gure B), provided that these
are not communal parts of a building, areas with
increased fire hazards or bedrooms, the inlets should
be fitted with a ventilation duct leading outside as
described above.
A B
Adjacent room Room requiring
ventilation
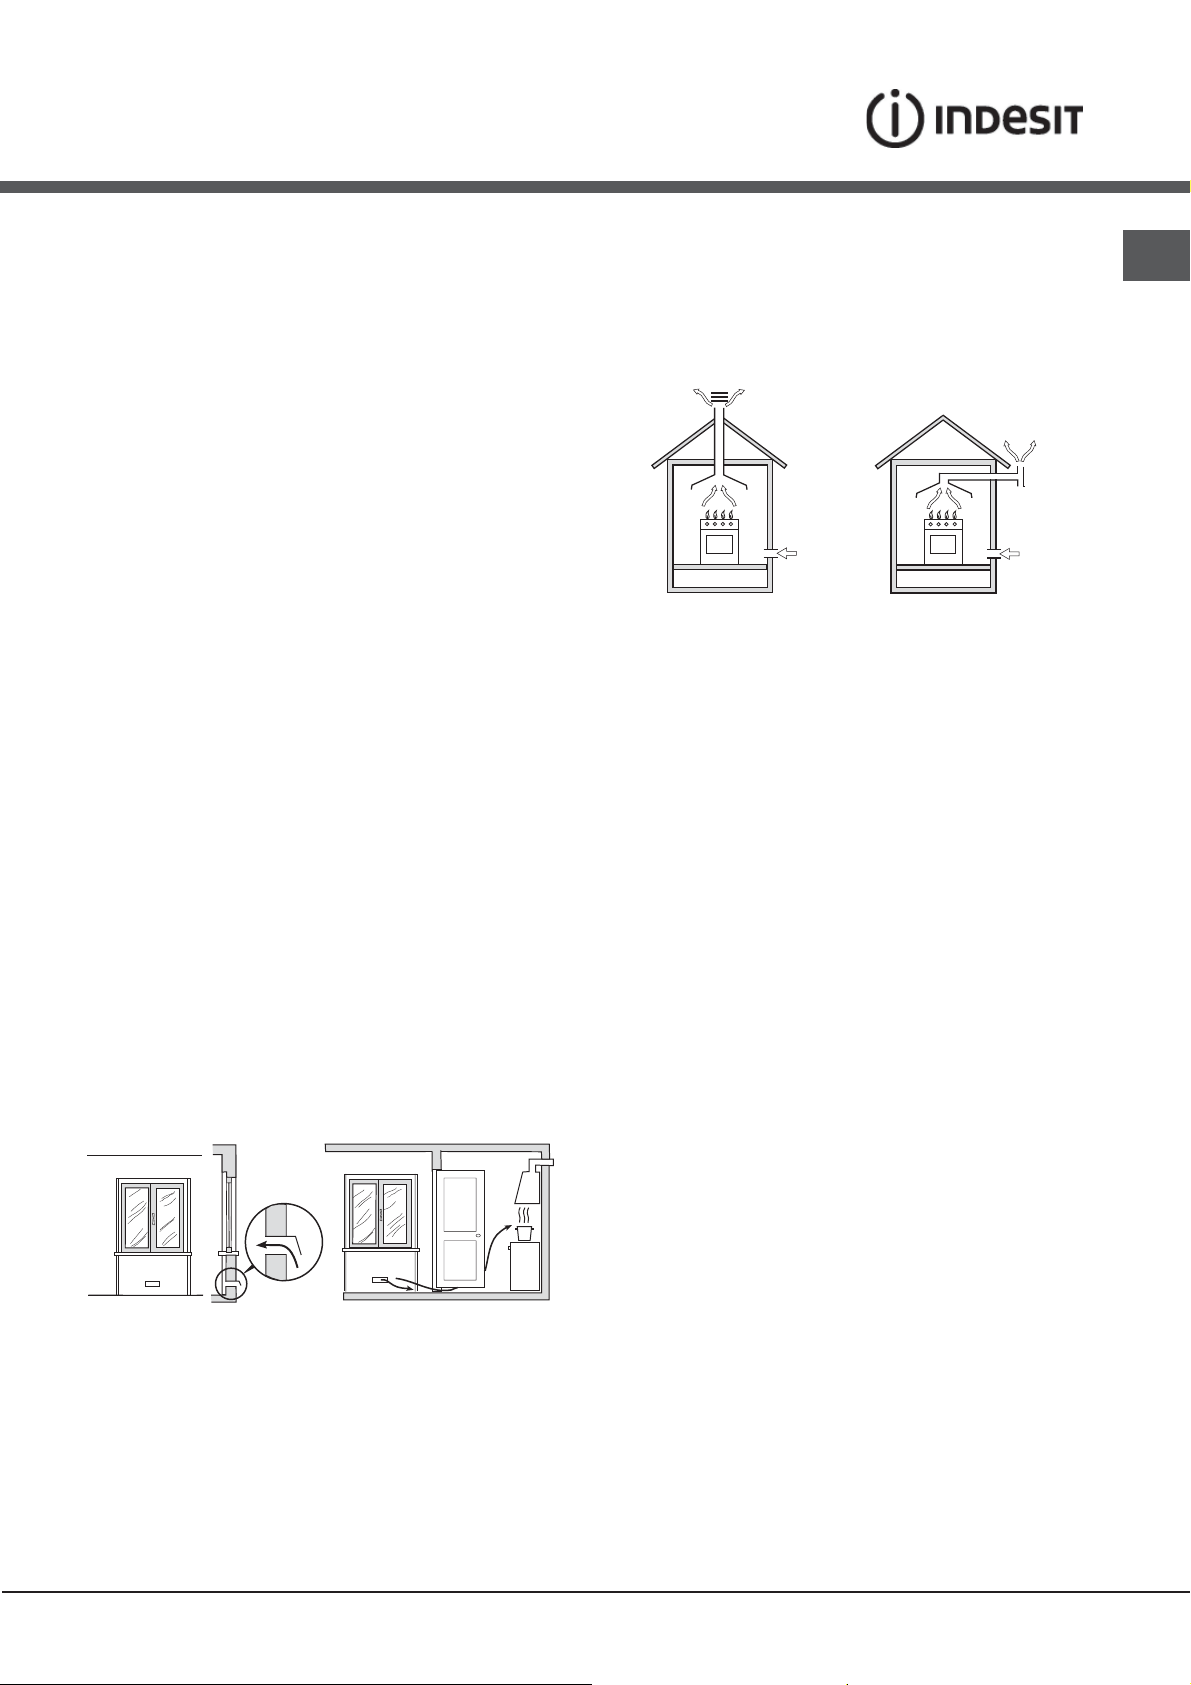
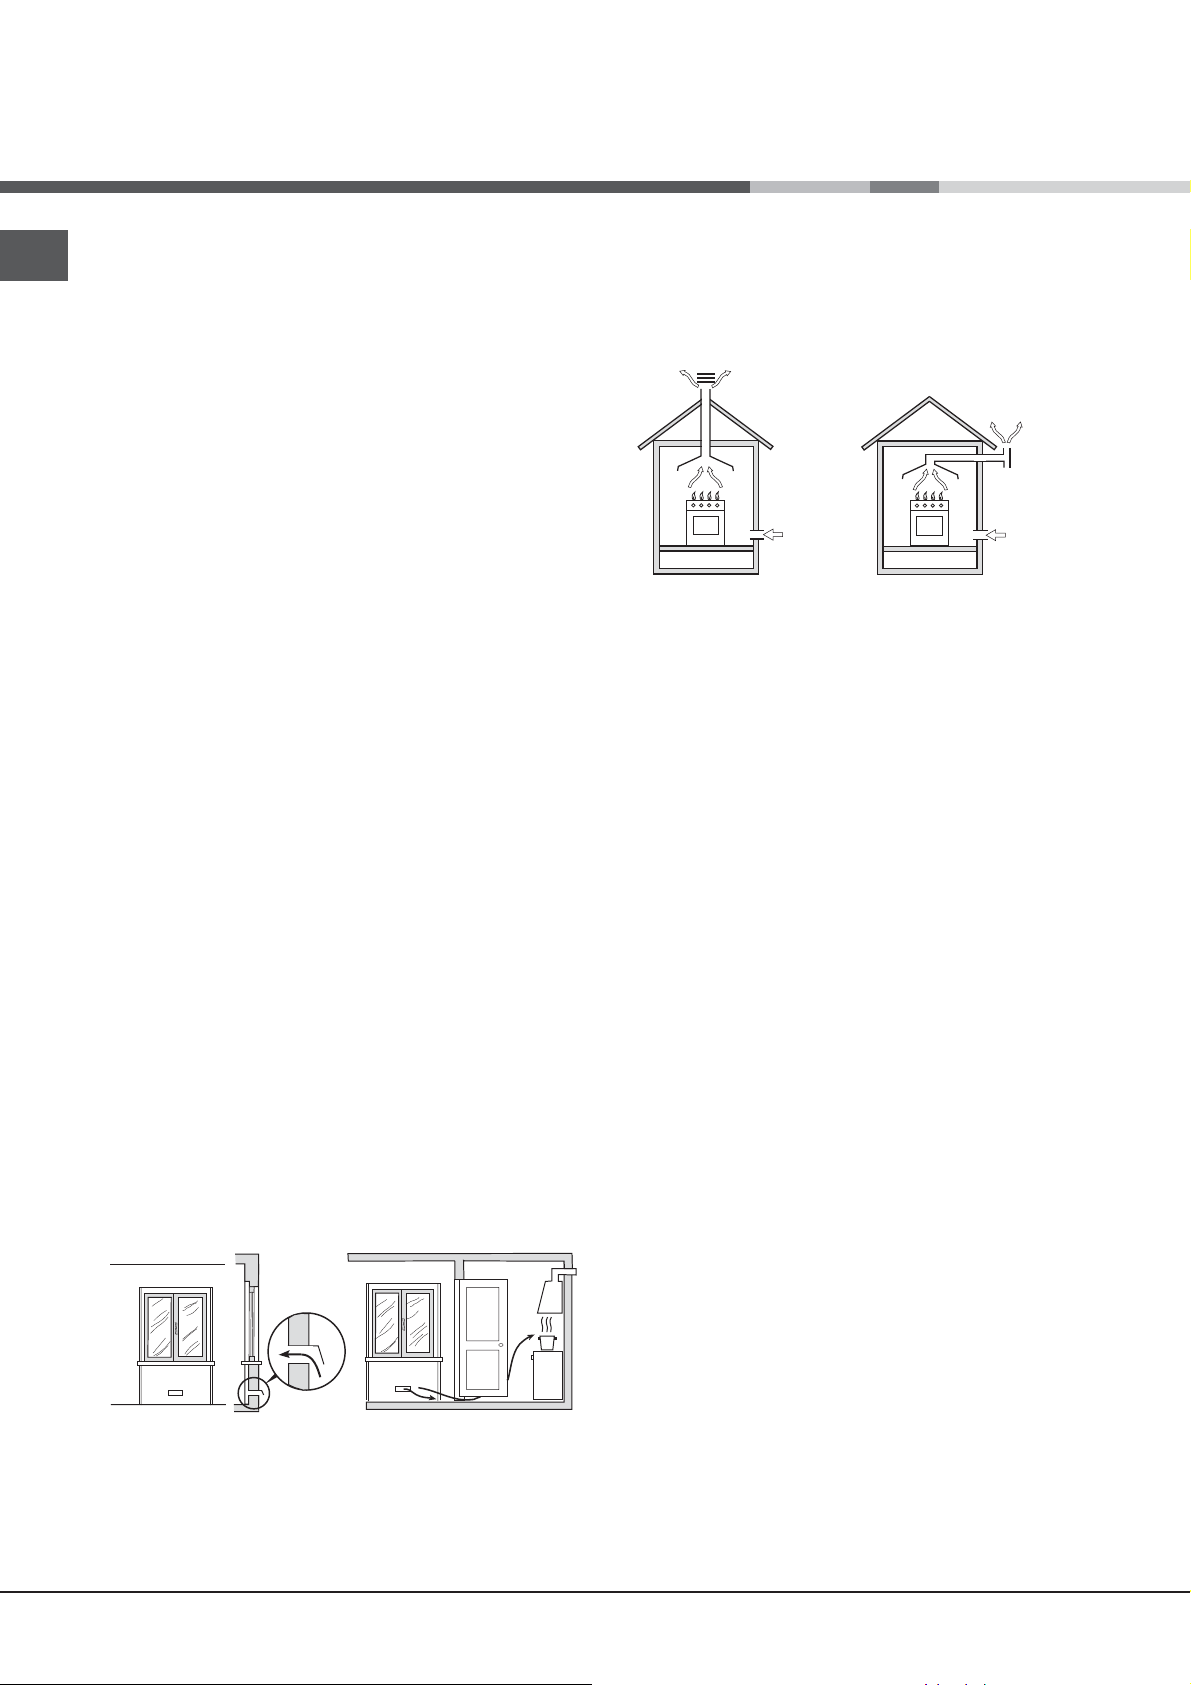
Disposing of combustion fumes
The disposal of combustion fumes should be
guaranteed using a hood connected to a safe and
efficient natural suction chimney, or using an electric
fan that begins to operate automatically every time the
appliance is switched on (see gure).
Fumes channelled
straight outside
Fumes channelled through
a chimney or branched
flue system reserved for
cooking appliances)
! The liquefied petroleum gases are heavier than air
and collect by the floor, therefore all rooms containing
LPG cylinders must have openings leading outside so
that any leaked gas can escape easily.
LPG cylinders, therefore, whether partially or
completely full, must not be installed or stored in rooms
or storage areas that are below ground level (cellars,
etc.). Only the
cylinder being used should be stored in the room; this
should also be kept well away from sources
of heat (ovens, chimneys, stoves) that may cause
the temperature of the cylinder to rise above 50°C.
Positioning and levelling
! It is possible to install the appliance alongside
cupboards whose height does not exceed that of the
hob surface.
! Make sure that the wall in contact with the back of
the appliance is made from a non-flammable, heatresistant material (T 90°C).
A
Ventilation opening for
comburent air
Increase in the gap between
the door and the flooring
! After prolonged use of the appliance, it is advisable to
open a window or increase the speed of any fans used.
4
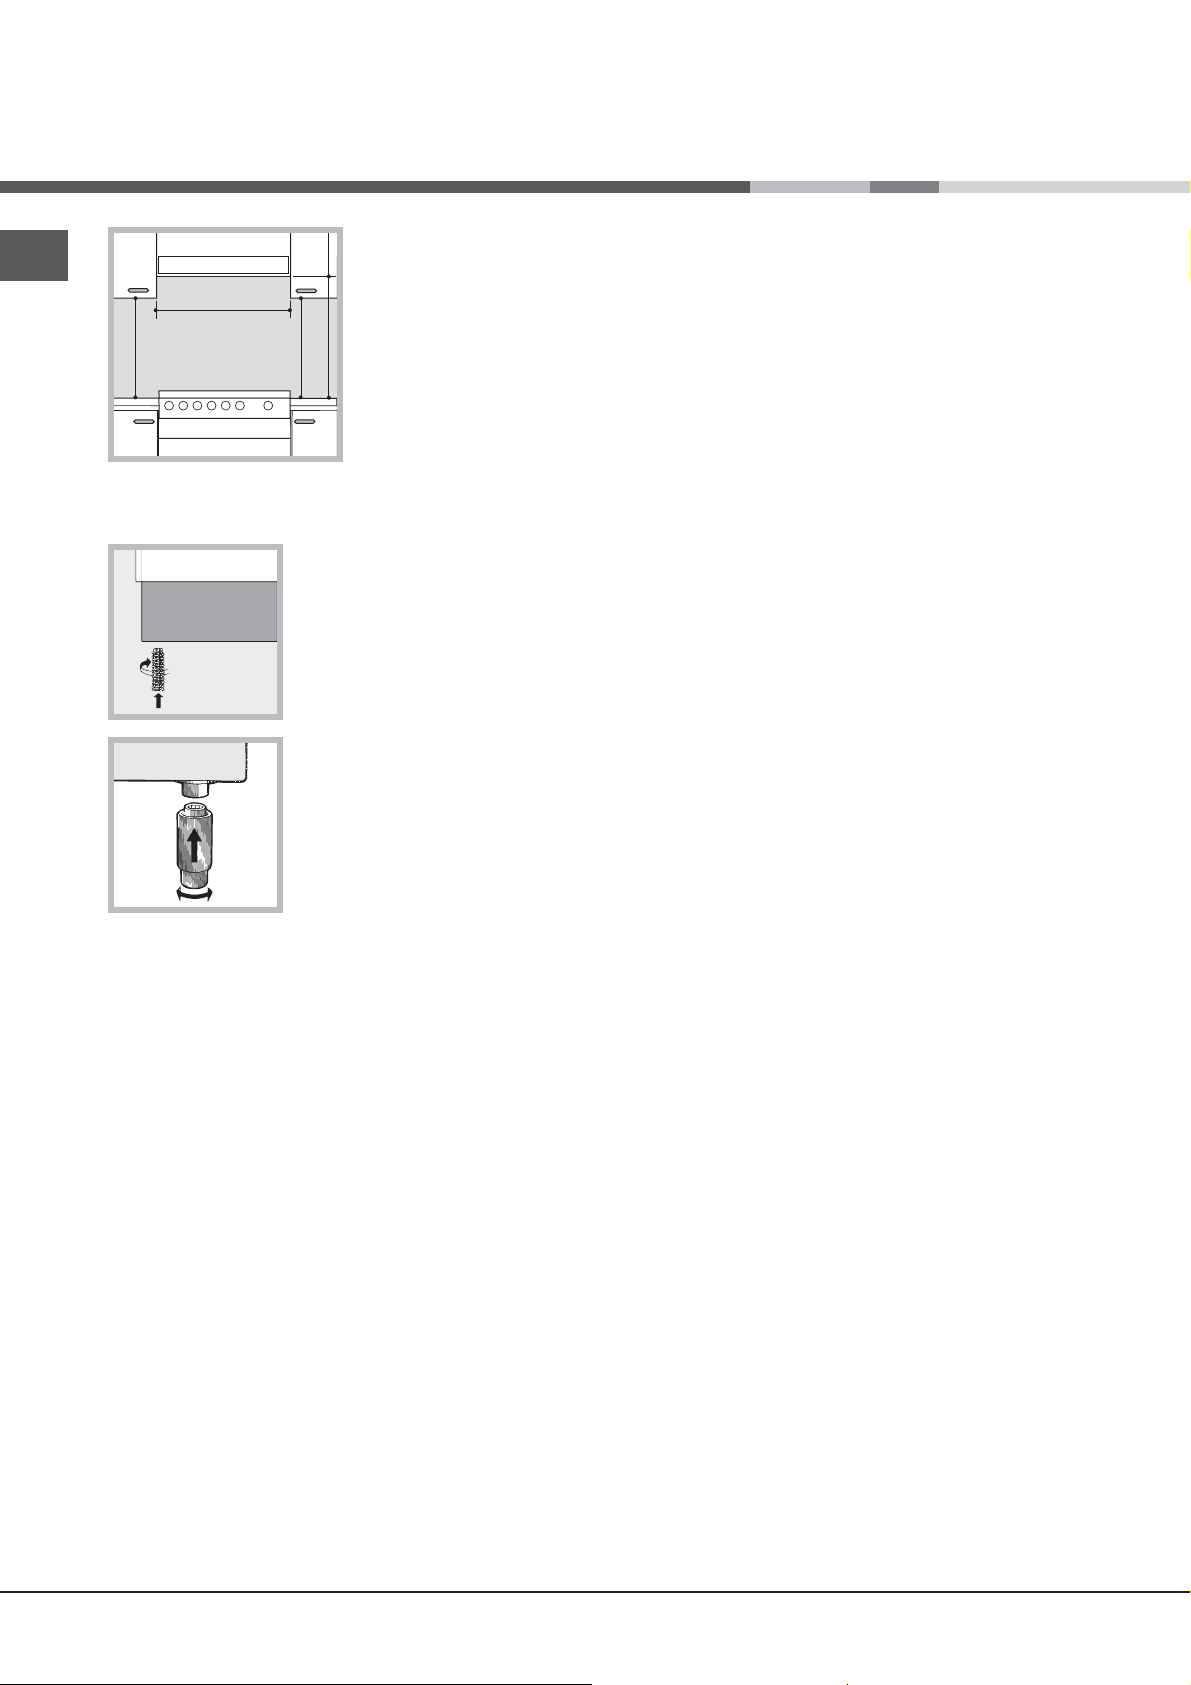
To install the appliance correctly:
• Place it in the kitchen, dining room or the bed-sit (not
in the bathroom).
• If the top of the hob is higher than the cupboards,
the appliance must be installed at least 200 mm away
from them.
• If the cooker is installed underneath a wall cabinet,
there must be a minimum distance of 420 mm
between this cabinet and the top of the hob.
This distance should be increased to 700 mm if the
wall cabinets are flammable (see gure).
• Do not position blinds behind the cooker or less than
Page 5

200 mm away from its
HOOD
420
Min.
min.
650
mm. with hood
min.
700
mm. without hood
mm.
600
Min. mm.
420
Min. mm.
sides.
• Any hoods must be
installed according to
the instructions listed in
the relevant operating
manual.
! The cable must not be bent or compressed.
GB
! The cable must be checked regularly and replaced
by authorised technicians only.
! The manufacturer declines any liability should
these safety measures not be observed.
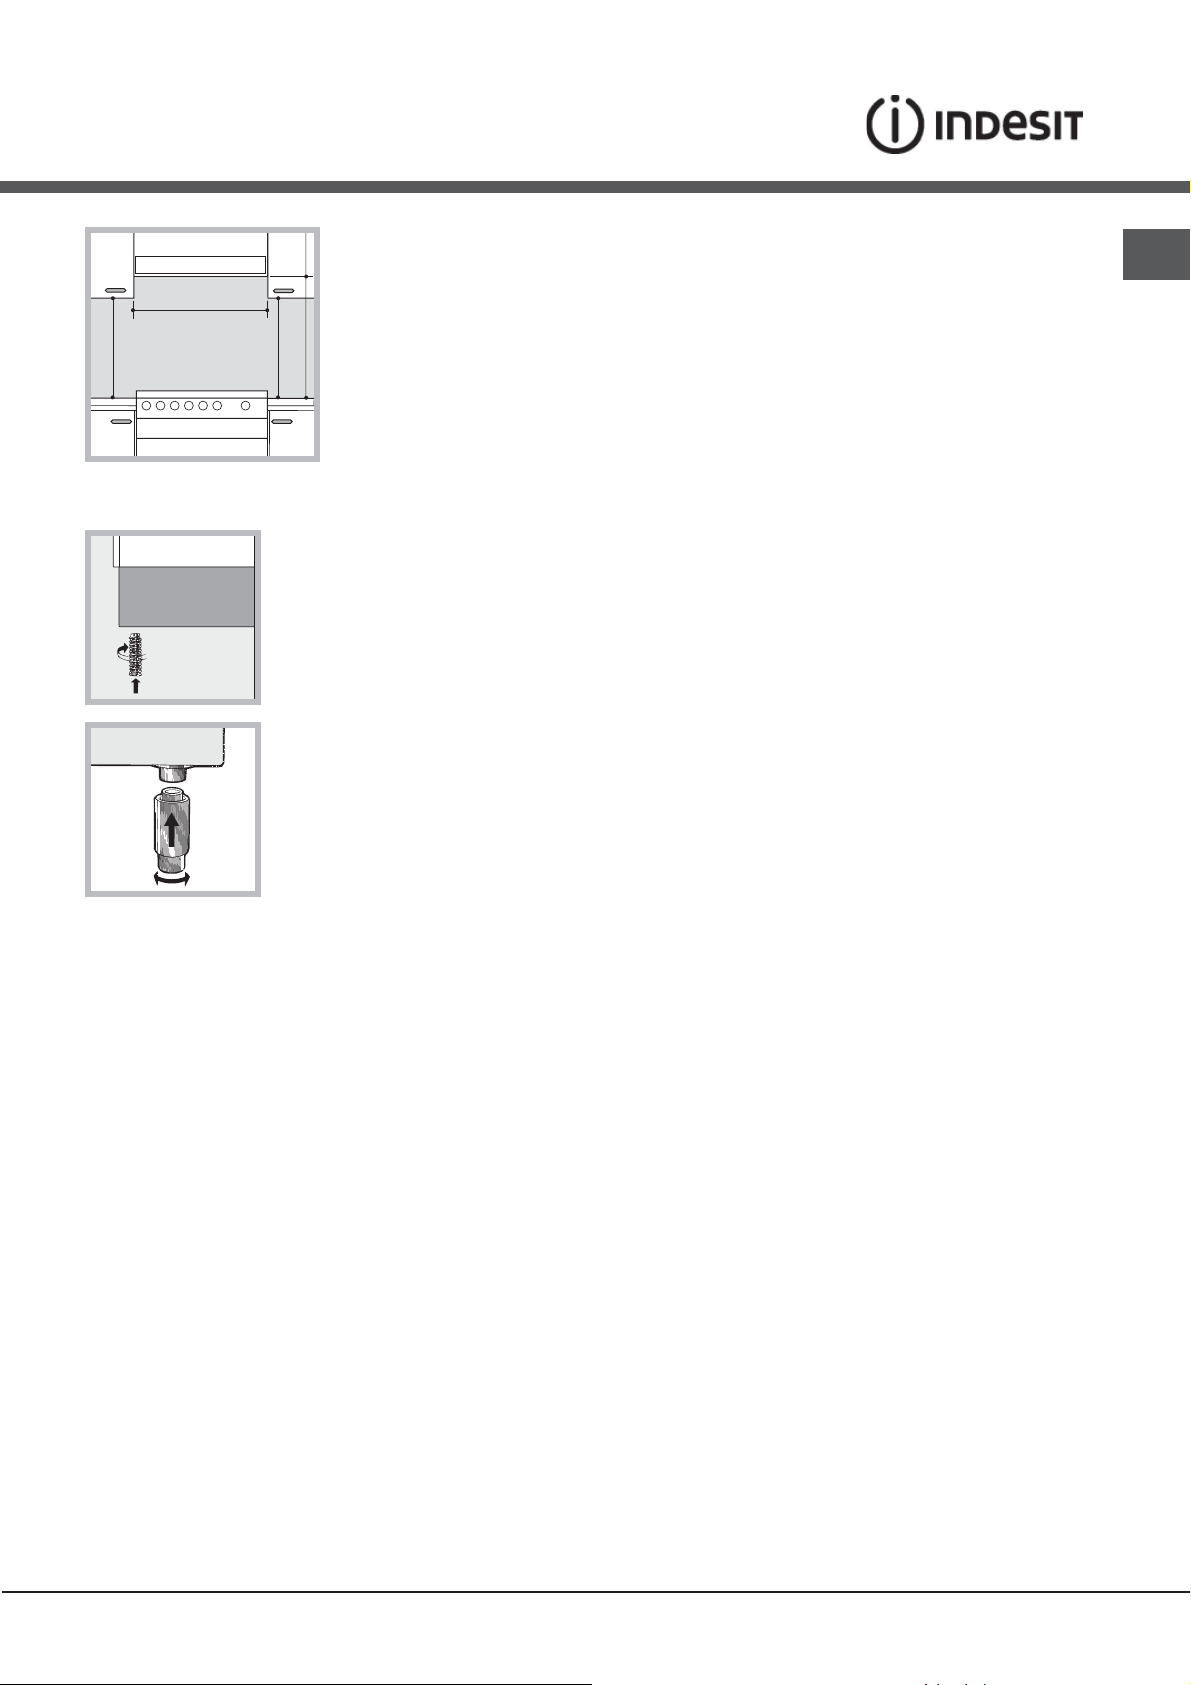
Levelling
If it is necessary to level
the appliance, screw the adjustable feet into the places
provided on each corner of the base of the cooker (see
gure).
The legs* fit into the slots on the
underside of the base of the
cooker.
Electrical connection
Install a standardised plug
corresponding to the load
indicated on the appliance data
plate (see Technical data table).
The appliance must be directly connected to the mains
using an omnipolar circuit-breaker with a minimum contact
opening of 3 mm installed between the appliance and the
mains. The circuit-breaker must be suitable for the charge
indicated and must comply with NFC 15-100 regulations
(the earthing wire must not be interrupted by the circuitbreaker). The supply cable must be positioned so that it
does not come into contact with temperatures higher than
50°C at any point.
Before connecting the appliance to the power supply,
make sure that:
• The appliance is earthed and the plug is compliant with
the law.
• The socket can withstand the maximum power of the
appliance, which is indicated by the data plate.
• The voltage is in the range between the values
indicated on the data plate.
• The socket is compatible with the plug of the
appliance. If the socket is incompatible with the
plug, ask an authorised technician to replace it. Do
not use extension cords or multiple sockets.
! Once the appliance has been installed, the power
supply cable and the electrical socket must be easily
accessible.
* Only available in certain models
Gas connection
Connection to the gas network or to the gas cylinder
may be carried out using a flexible rubber or steel hose,
in accordance with current national legislation and after
making sure that the appliance is suited to the type of gas
with which it will be supplied (see the rating sticker on
the cover: if this is not the case see below). When using
liquid gas from a cylinder, install a pressure regulator
which complies with current national regulations. To
make connection easier, the gas supply may be turned
sideways*: reverse the position of the hose holder with
that of the cap and replace the gasket that is supplied
with the appliance.
! Check that the pressure of the gas supply is
consistent with the values indicated in the Table
of burner and nozzle specifications (see below).
This will ensure the safe operation and durability of
your appliance while maintaining efficient energy
consumption.
Gas connection using a flexible rubber hose
Make sure that the hose complies with current national
legislation. The internal diameter of the hose must
measure: 8 mm for liquid gas supply; 13 mm for
methane gas supply.
Once the connection has been performed, make sure
that the hose:
• Does not come into contact with any parts that reach
temperatures of over 50°C.
• Is not subject to any pulling or twisting forces and
that it is not kinked or bent.
• Does not come into contact with blades, sharp
corners or moving parts and that it is not
compressed.
• Is easy to inspect along its whole length so that its
condition may be checked.
• Is shorter than 1500 mm.
• Fits firmly into place at both ends, where it will
be fixed using clamps that comply with current
regulations.
! If one or more of these conditions is not fulfilled
or if the cooker must be installed according to the
conditions listed for class 2 - subclass 1 appliances
(installed between two cupboards), the flexible steel
5
Page 6

GB
A
V
hose must be used instead (see below).
Connecting a flexible jointless stainless steel pipe to
a threaded attachment
! The hob burners do not require primary air
adjustment.
Adapting the oven
Make sure that the hose and gaskets comply with
current national legislation.
To begin using the hose, remove the hose holder on the
appliance (the gas supply inlet on the appliance is a
cylindrical threaded 1/2 gas male attachment).
! Perform the connection in such a way that the hose
length does not exceed a maximum of 2 metres,
making sure that the hose is not compressed and does
not come into contact with moving parts.
Checking the connection for leaks
When the installation process is complete, check the
hose fittings for leaks using a soapy solution. Never
use a flame.
Adapting to different types of gas
It is possible to adapt the appliance to a type of gas
other than the default type (this is indicated on the
rating label on the cover).
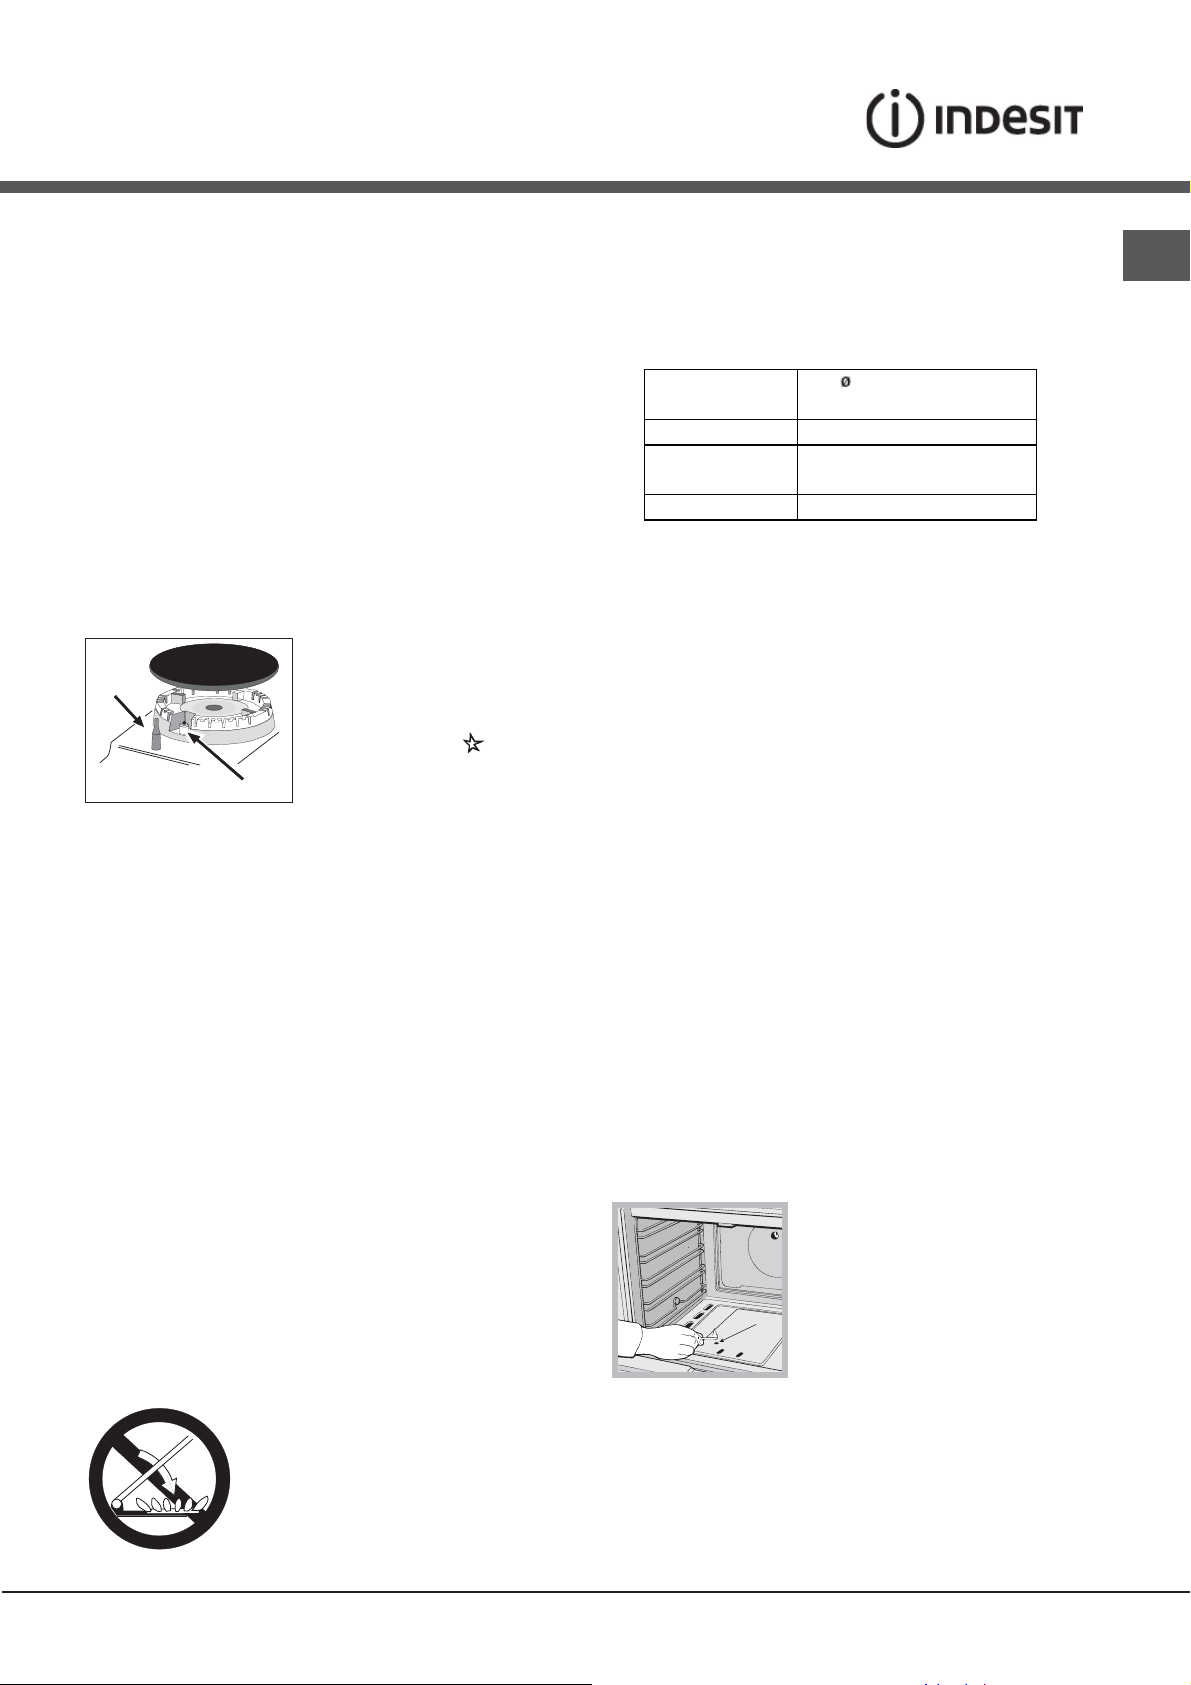
Adapting the hob
Replacing the nozzles for the hob burners:
1. Remove the hob grids and slide the burners off their
seats.
2. Unscrew the nozzles using a 7 mm socket spanner
(see gure), and replace them with nozzles suited to
the new type of gas(see Burner and nozzle speci cations
table).
3. Replace all the components
by following the above
instructions in reverse.
Adjusting the hob burners’
minimum setting:
1. Turn the tap to the minimum
position.
2. Remove the knob and adjust the regulatory screw,
which is positioned inside or next to the tap pin, until
the flame is small but steady.
! If the appliance is connected to a liquid gas supply,
the regulatory screw must be fastened as tightly as
possible.
3. While the burner is alight, quickly change the position of
the knob from minimum to maximum and vice versa several
times, checking that the flame is not extinguished.
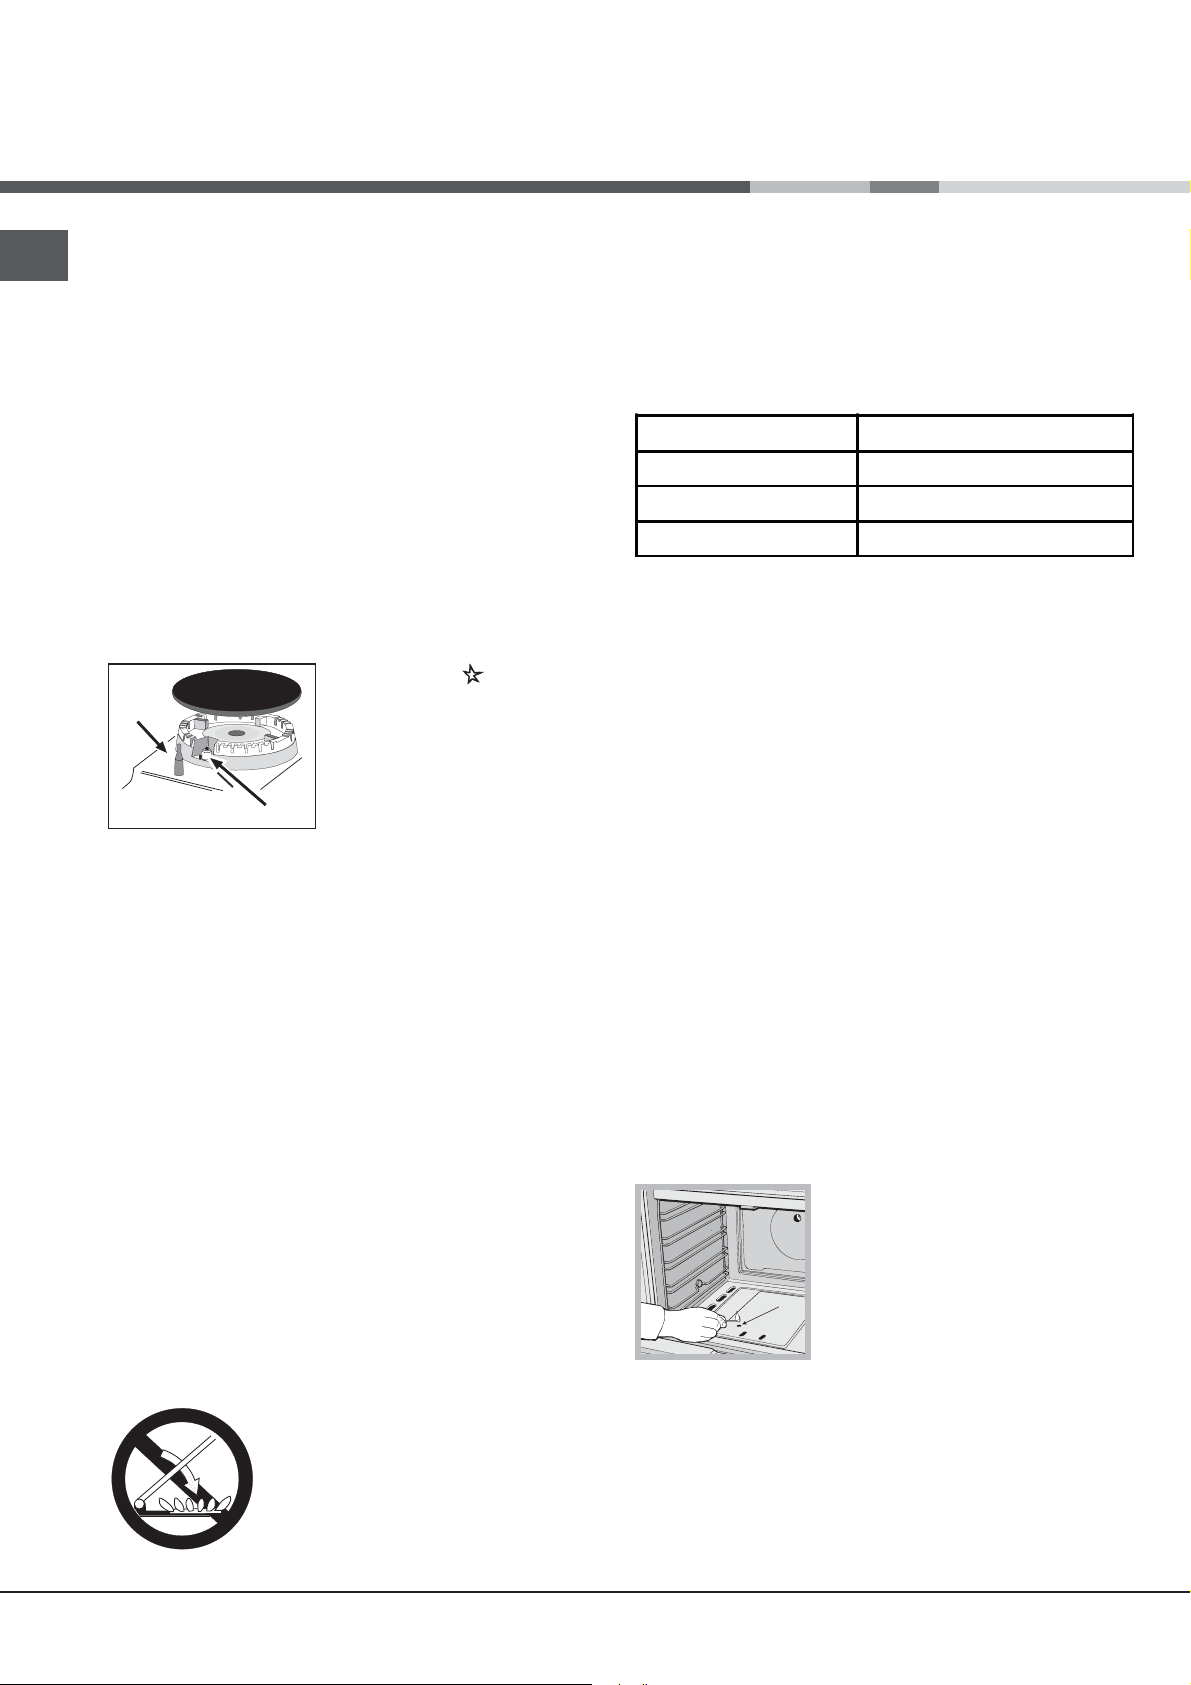
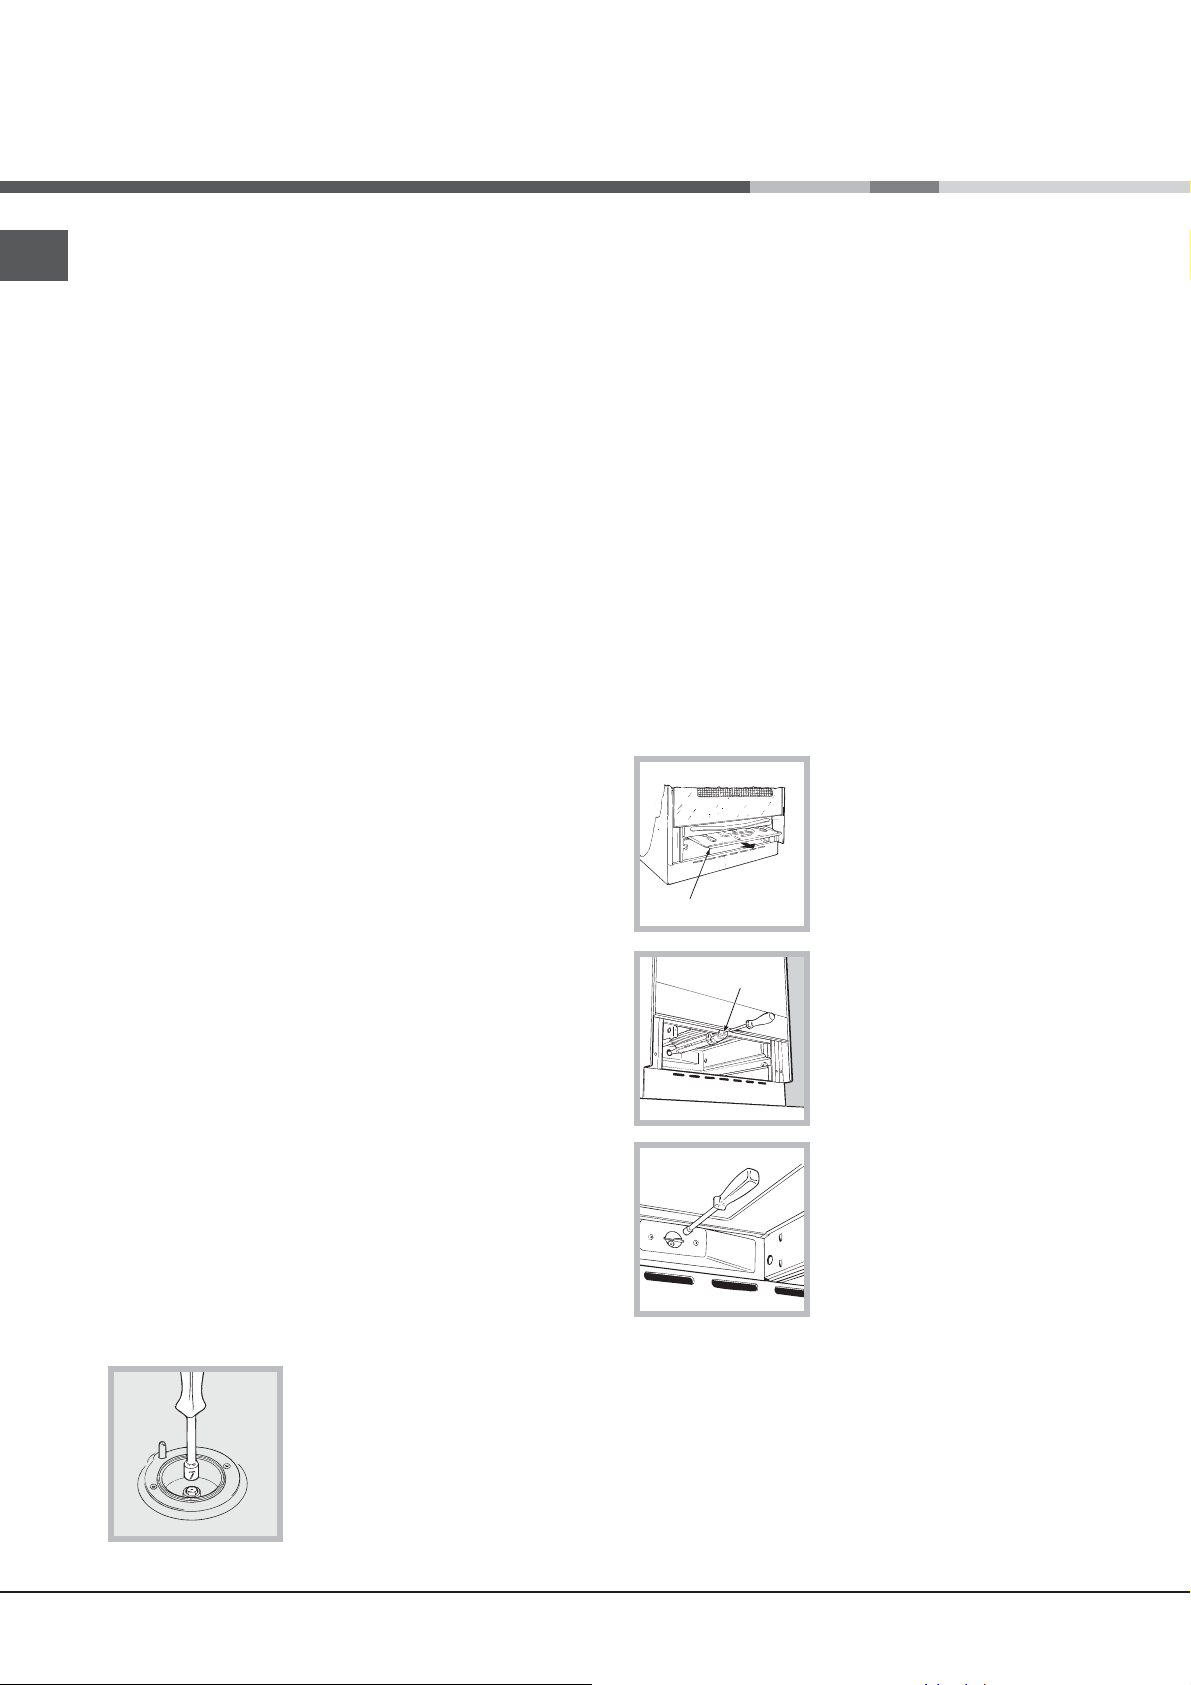
Replacing the oven burner nozzle:
1. Remove the oven compartment.
2. Slide out the protection panel A
(see diagram).
3. Remove the oven burner
after unscrewing the screws V
(see gure).
The whole operation will be
made easier if the oven door is
removed.
4. Unscrew the nozzle using a
special nozzle socket spanner
(see gure) or with a 7 mm
socket spanner, and replace it
with a new nozzle that is suited
to the new type of gas (see
Burner and nozzle speci cations
table).
Adjusting the gas oven
burner’s minimum setting:
1. Light the burner (see Start-up
and Use).
2. Turn the knob to the minimum position (MIN)
after it has been in the maximum position (MAX) for
approximately 10 minutes.
3. Remove the knob.
4. Tighten or loosen the adjustment screws on the
outside of the thermostat pin (see gure) until the flame
is small but steady.
! If the appliance is connected to liquid gas, the
adjustment screw must be fastened as tightly as
possible.
5. Turn the knob from the MAX position to the MIN
position quickly or open and shut the oven door,
making sure that the burner is not extinguished.
6
Page 7

S
S
R
A
KN3G2S/UA
KN3G20/UA
We recommend cleaning the oven before using it for the
first time, following the instructions provided in the „Care
and maintenance” section.
TECHNICAL DATA
Oven dimensions
(HxWxD)
Volume 58 l
Useful
measurements
relating to the oven
compartment
Power supply voltage
and frequency
Burners
34x39x44 cm
width 42 cm
depth 44 cm
height 17 cm
see data plate
may be adapted for use with any
type of gas shown on the data
plate, which is located inside the
flap or, after the oven
compartment has been opened,
on the left-hand wall inside the
oven.
EC Directives: 2006/95/EC dated
12/12/06 (Low Voltage) and
subsequent amendments 2004/108/EC dated 15/12/04
(Electromagnetic Compatibility)
and subsequent amendments 2009/142/EC dated 30/11/09
(Gas) and subsequent
amendments - 93/68/EEC dated
22/07/93 and subsequent
amendments - 2002/96/EC.
1275/2008 (Stand-by/ Off mode)
GB
Table of burner and nozzle specifications
Table 1 Liqui d Ga s N a t ura l G a s
Burner Diameter
(mm)
Fast
(Large)(R)
Semi Fast
(Mediu m)(S)
Auxiliary
(Small)(A )
100 3.00 0.7 41 87 218 214 128 286 143 286
75 1.90 0.4 30 70 138 136 104 181 118 181
51 1.00 0.4 30 52 73 71 76 95 80 95
Oven - 2.80 1.0 46 80 204 200 119 267 132 257
Supply
Pressures
Th e rma l Pow er
kW (p.c.s.*)
By-Pass
1/100
Nozzle
1/100
Flow*
g/h
Nozzle
1/100
Flow*
l/h
Nomi nal R educed (mm) (mm) *** ** (mm) (mm)
Nominal (mbar)
M inimu m ( mbar )
M a x imum (mbar )
28-30
20
35
37
25
45
20
17
25
Nozzle
1/100
Flow*
l/h
13
6,5
18
7
Page 8
Start-up and use
F
X
C
GB
Using the hob
Lighting the burners
For each BURNER knob there is a complete ring showing
the strength of the flame for the relevant burner.
To light one of the burners on the hob:
1. Bring a flame or gas lighter close to the burner.
2. Press the BURNER knob and turn it in an
anticlockwise direction so that it is pointing to the
maximum flame setting (.
3. Adjust the intensity of the flame to the desired level
by turning the BURNER knob in an anticlockwise
direction. This may be the minimum setting &, the
maximum setting ( or any position in between the two.
If the appliance is fitted with an electronic lighting
device* (see gure), press the ignition button, marked
with the symbol
hold the BURNER knob down
and turn it in an anticlockwise
direction, towards the
maximum flame setting, until
the burner is lit.
Several models are equipped
with an ignition device
which is built into the knob; in this case the electronic
ignition device* is present (C) but the ignition button
is not. Simply press the BURNER knob and turn it
in an anticlockwise direction so that it is pointing
to the maximum flame setting, until the burner is lit.
The burner may be extinguished when the knob is
released. If this occurs, repeat the operation, holding
the knob down for a longer period of time.
! If the flame is accidentally extinguished, switch off the
burner and wait for at least 1 minute before attempting
to relight it.
If the appliance is equipped with a flame failure safety
device*(X), press and hold the BURNER knob for
approximately 2-3 seconds to keep the flame alight
and to activate the device.
To switch the burner off, turn the knob until it reaches
the stop position •.
, then
Practical advice on using the burners
For the burners to work in the most efficient way
possible and to save on the amount of gas consumed,
it is recommended that only pans that have a lid and
a flat base are used. They should also be suited to the
size of the burner.
Burner Ĝ Cookware diameter (cm)
Fast (R) 24 - 26
Semi Fast (S) 16 - 20
Auxiliary (A) 10 - 14
To identify the type of burner, please refer to the
diagrams contained in the “Burner and nozzle
specifications”.
Using the oven
! The first time you use your appliance, heat the empty
oven with its door closed at its maximum temperature
for at least half an hour. Ensure that the room is well
ventilated before switching the oven off and opening
the oven door. The appliance may emit a slightly
unpleasant odour caused by protective substances
used during the manufacturing process burning away.
! Before operating the product, remove all plastic film
from the sides of the appliance.
! Never put objects directly on the bottom of the oven;
this will avoid the enamel coating being damaged.
Only use position 1 in the oven when cooking with the
rotisserie spit.
Lighting the oven
To light the oven burner, bring a flame or gas lighter
close to opening F (see gure)
and press the OVEN control
knob while turning it in an
anticlockwise direction until it
reaches the MAX position.
If, after 15 seconds, the burner
is still not alight, release the
knob, open the oven door and wait for at least 1 minute
WARNING! The glass lid can break
in if it is heated up. Turn off all the
burners and the electric plates before
closing the lid. *Applies to the models
with glass cover only.
8
before trying to light it again.
! The oven is fitted with a safety device and it is
therefore necessary to hold the OVEN control knob
down for approximately 6 seconds.
Page 9

! If the flame is accidentally extinguished, switch off the
burner and wait for at least 1 minute before attempting
to relight the oven.
Adjusting the temperature
To set the desired cooking temperature, turn the
OVEN control knob in an anticlockwise direction.
Temperatures are displayed on the control panel and
may vary between MIN (140°C) and MAX (250°C).
Once the set temperature has been reached, the oven
will keep it constant by using its thermostat.
In gas cooker models, there is
a sliding protection layer A that
shields the lower compartment
from the heat generated by the
A
protection remove the screw S (see gure). To replace
S
Lower compartment*
burner (see gure).
To remove the sliding
it, lock it in place with the screw
S.
! Before using the oven make
sure that the sliding protection
is fixed correctly.
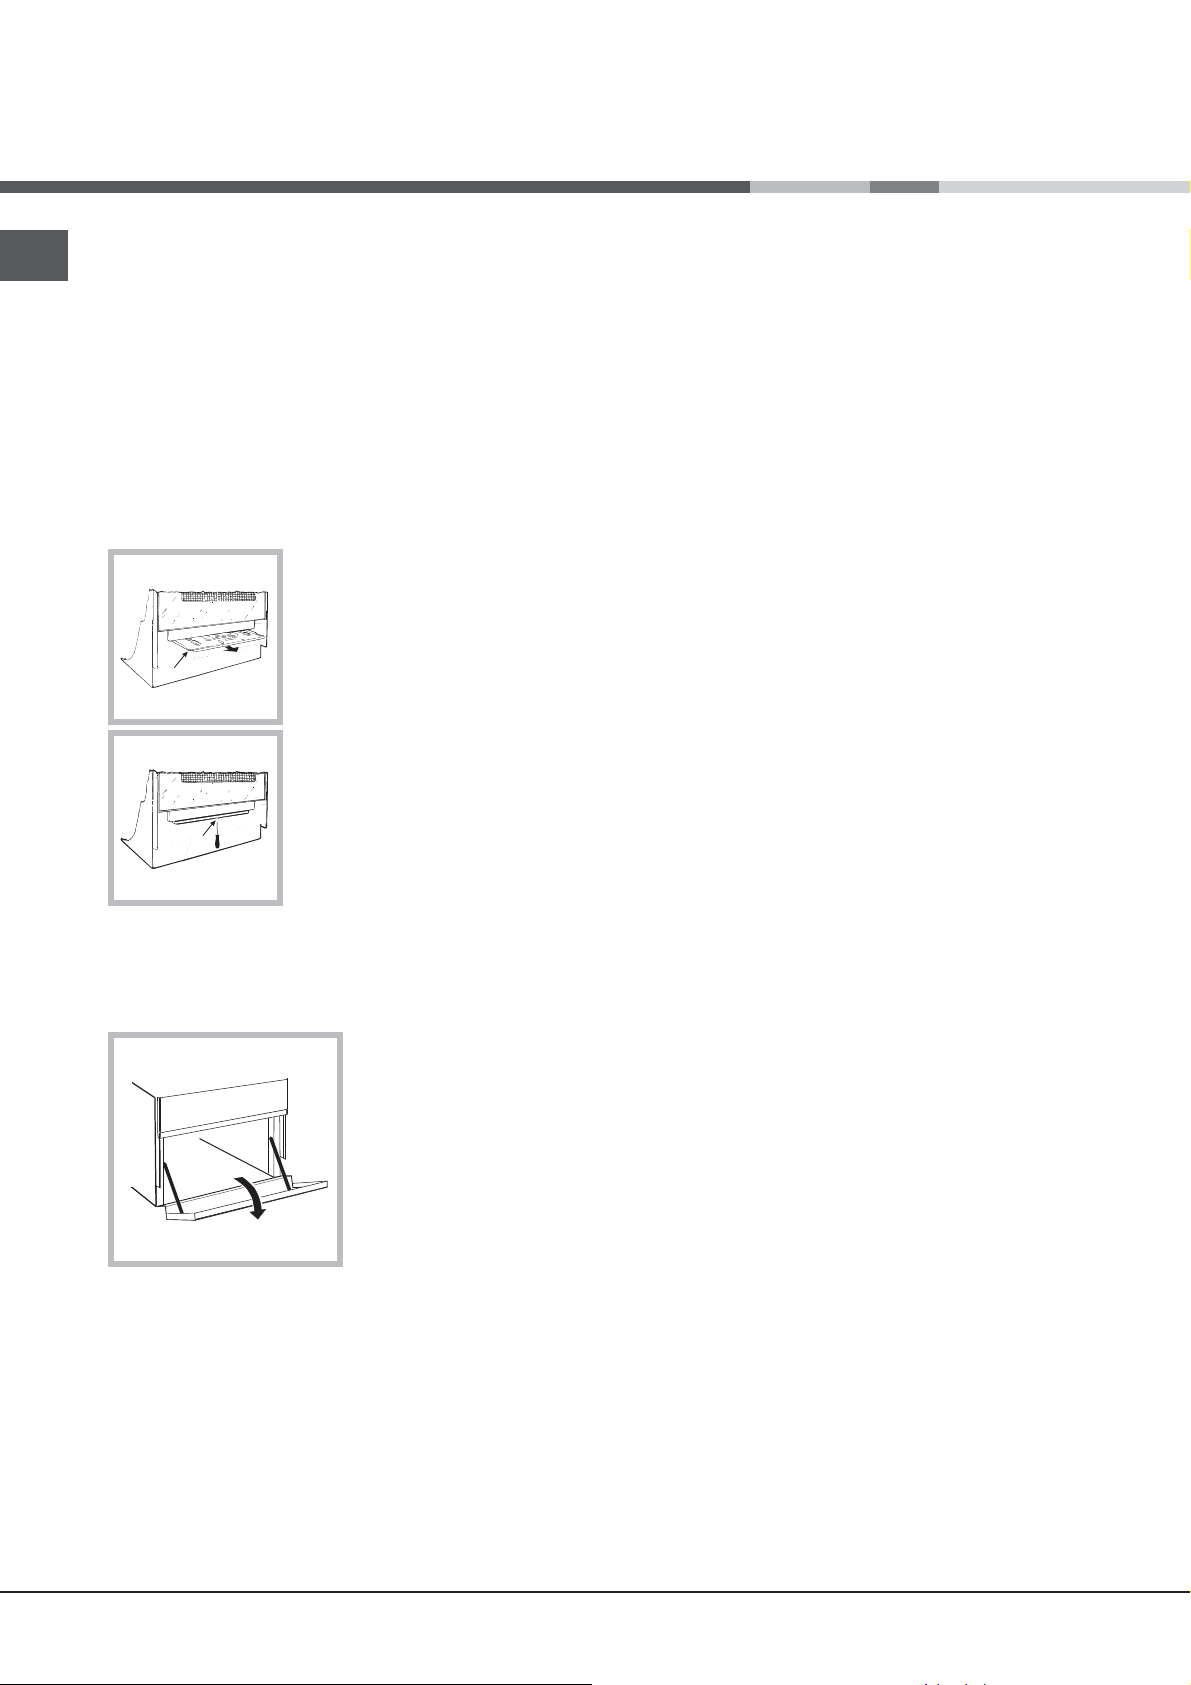
There is a compartment
underneath the oven
that may be used to
store oven accessories
or deep dishes. To
open the door pull it
downwards (see gure).
GB
! The internal surfaces
of the compartment (where present) may become
hot.
! Do not place flammable materials in the lower oven
compartment.
9
Page 10

GB
Oven cooking advice table
Food to be cooke d
Pasta
Lasagne
Cannelloni
Pasta bakes au gratin
Meat
Veal
Chicken
Duck
Rabbit
Pork
Lamb
Fish
Mackerel
Dentex
Trout baked in paper
Pizza
Napolitan 1.0 4 210-220 15 20-25
Cake
Biscuits
Tarts
S a vo ur y p ie
Raised C a k e s
Wt.
(Kg)
2.5
2.5
2.5
1.5
1.5
1.8
2.0
2.1
1.8
1.1
1.5
1.0
0.5
1.1
1.0
1.0
Cooking position of
shelve s from bottom
4
4
4
3
3
3
3
3
3
3
3
3
4
4
4
4
Temperature
(°C)
200-210
200
200
200-210
210-220
200
200
200
200
180-200
180-200
180-200
180
180
180
170
Pre-heating time (min)
10
10
10
10
10
10
10
10
10
10
10
10
15
15
15
15
Cooking time
(min.)
75-85
50-60
50-60
95-100
90-100
100-110
70-80
70-80
100-105
45-50
45-55
45-50
25-35
40-45
50-55
40-45
NB: cooking times are approximate and may vary according to personal taste. When cooking using the grill, t he dr ippin g- p a n mu s t
always be placed on the 1st oven rack from the bottom.
10
Page 11
Precautions and tips
! This appliance has been designed and manufactured in
compliance with international safety standards.
The following warnings are provided for safety reasons and
must be read carefully.
General safety
• These instructions are only valid for the countries
whose symbols appear in the manual and on the serial
number plate.• The appliance was designed for domestic
use inside the home and is not intended for commercial or
industrial use.
• The appliance must not be installed outdoors, even in
covered areas. It is extremely dangerous to leave the
appliance exposed to rain and storms.
• Do not touch the appliance with bare feet or with wet or
damp hands and feet.
• The appliance must be used by adults only for
the preparation of food, in accordance with the
instructions outlined in this booklet. Any other
use of the appliance (e.g. for heating the room)
constitutes improper use and is dangerous.
The manufacturer may not be held liable for any
damage resulting from improper, incorrect and
unreasonable use of the appliance.
• The instruction booklet accompanies a class 1 (insulated)
or class 2 - subclass 1 (recessed between 2 cupboards)
appliance.
• Keep children away from the oven.
• Make sure that the power supply cables of other electrical
appliances do not come into contact with the hot parts of
the oven.
• The openings used for the ventilation and dispersion of
heat must never be covered.
• Do not close the glass hob cover (selected models only)
when the burners are alight or when they are still hot.
• If the appliance breaks down, under no circumstances
should you attempt to repair the appliance yourself.
Repairs carried out by inexperienced persons may cause
injury or further malfunctioning of the appliance. Contact
Assistance.
• Do not rest heavy objects on the open oven door.
• The appliance should not be operated by people
(including children) with reduced physical, sensory
or mental capacities, by inexperienced individuals
or by anyone who is not familiar with the product.
These individuals should, at the very least, be
supervised by someone who assumes responsibility
for their safety or receive preliminary instructions
relating to the operation of the appliance.
• Do not let children play with the appliance.
Disposal
• When disposing of packaging material: observe local
legislation so that the packaging may be reused.
• The European Directive 2002/96/EC relating to Waste
Electrical and Electronic Equipment (WEEE) states that
household appliances should not be disposed of using
the normal solid urban waste cycle. Exhausted appliances
should be collected separately in order to optimise
the cost of re-using and recycling the materials inside
the machine, while preventing potential damage to the
atmosphere and to public health. The crossed-out dustbin
is marked on all products to remind the owner of their
obligations regarding separated waste collection.
Exhausted appliances may be collected by the public
waste collection service, taken to suitable collection areas
in the area or, if permitted by current national legislation,
they may be returned to the dealers as part of an
exchange deal for a new equivalent product.
All major manufacturers of household appliances
participate in the creation and organisation of systems for
the collection and disposal of old and disused appliances.
GB
• Always use oven gloves when placing cookware in the
oven or when removing it.
• Do not use flammable liquids (alcohol, petrol, etc...) near
the appliance while it is in use.
• Do not place flammable material in the lower storage
compartment or in the oven itself. If the appliance is
switched on accidentally, it could catch fire.
• Always make sure the knobs are in the • position and that
the gas tap is closed when the appliance is not in use.
• When unplugging the appliance, always pull the plug from
the mains socket; do not pull on the cable.
• Never perform any cleaning or maintenance work without
having disconnected the appliance from the electricity
mains.
Respecting and conserving the environment
• You can help to reduce the peak load of the electricity
supply network companies by using the oven in the hours
between late afternoon and the early hours of the morning.
• Check the door seals regularly and wipe them clean to
ensure they are free of debris so that they adhere properly
to the door, thus avoiding
heat dispersion.
11
Page 12

Care and maintenance
Switching the appliance off
GB
Disconnect your appliance from the electricity supply
before carrying out any work on it.
Cleaning the appliance
! Do not use abrasive or corrosive detergents such as
stain removers, anti-rust products, powder detergents
or sponges with abrasive surfaces: these may scratch
the surface beyond repair.
! Never use steam cleaners or pressure cleaners on
the appliance.
• It is usually sufficient simply to wash the hob using a
damp sponge and dry it with absorbent kitchen roll.
• The stainless steel or enamel-coated external parts
and the rubber seals may be cleaned using a
sponge that has been soaked in lukewarm water
and neutral soap. Use specialised products for the
removal of stubborn stains. After cleaning, rinse well
and dry thoroughly. Do not use abrasive powders or
corrosive substances.
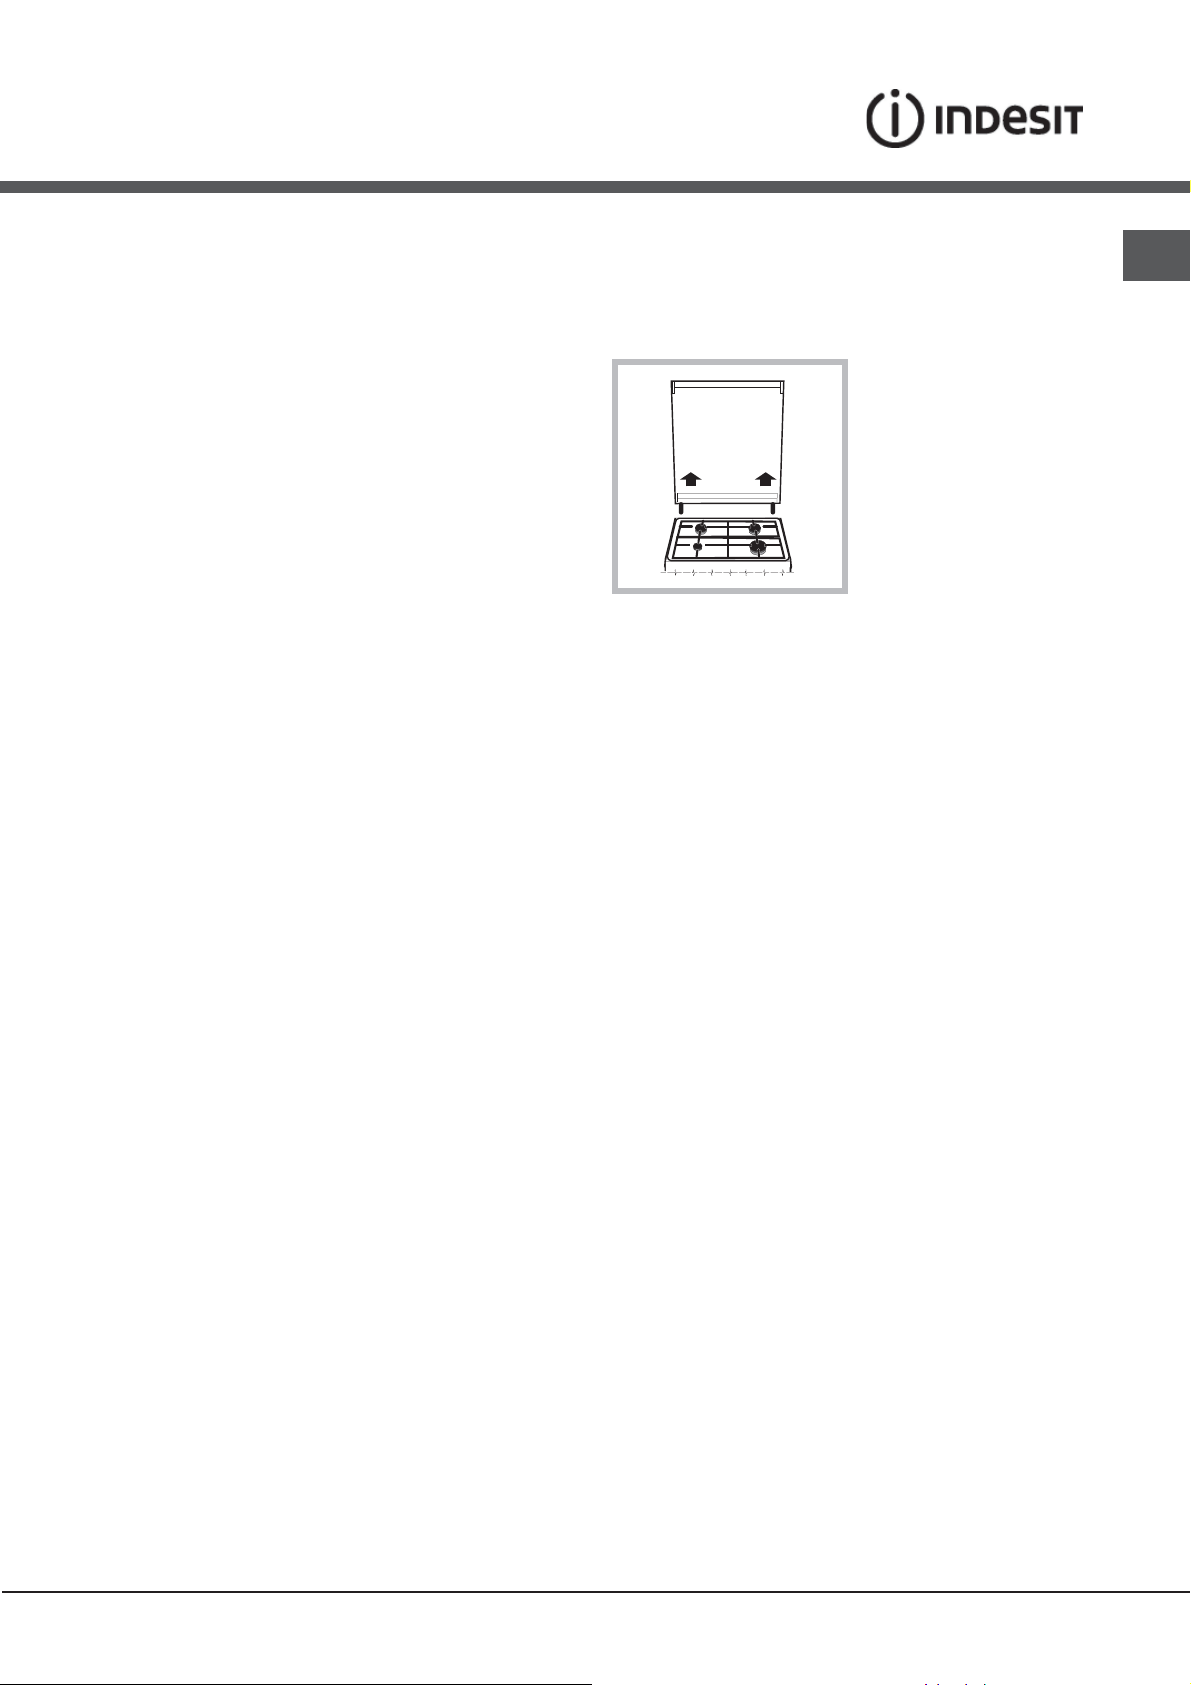
The cover
If the cooker is fitted with
a glass cover, this cover
should be cleaned using
lukewarm water. Do not
use abrasive products.
It is possible to remove
the cover in order to make
cleaning the area behind
the hob easier. Open
the cover fully and pull it
upwards (see gure).
! Do not close the cover when the burners are alight or
when they are still hot.
Inspecting the oven seals
Check the door seals around the oven periodically. If
the seals are damaged, please contact your nearest
Authorised After-sales Service Centre. We recommend
that the oven is not used until the seals have been
replaced.
• The hob grids, burner caps, flame spreader rings
and the hob burners can be removed
to make cleaning easier; wash them in hot water and
non-abrasive detergent, making sure all burnt-on
residue is removed before drying them thoroughly.
• For hobs with electronic ignition, the terminal part of
the electronic lighting devices should be cleaned
frequently and the gas outlet holes should be
checked for blockages.
• The inside of the oven should ideally be cleaned
after each use, while it is still lukewarm. Use hot
water and detergent, then rinse well and dry with a
soft cloth. Do not use abrasive products.
Clean the glass part of the oven door using a
•
sponge and a non-abrasive cleaning product, then
dry thoroughly with a soft cloth. Do not use rough
abrasive material or sharp metal scrapers as these
could scratch the surface and cause the glass to
crack.
• The accessories can be washed like everyday
crockery, and are even dishwasher safe.
Gas tap maintenance
Over time, the taps may become jammed or difficult to
turn. If this occurs, the tap must be replaced.
! This procedure must be performed by a qualified
technician who has been authorised by the
manufacturer.
Assistance
Please have the following information handy:
• The appliance model (Mod.).
• The serial number (S/N).
This information can be found on the data plate located
on the appliance and/or on the packaging.
• Stainless steel can be marked by hard water that
has been left on the surface for a long time, or by
aggressive detergents containing phosphorus.
After cleaning, rinse well and dry thoroughly. Any
remaining drops of water should also be dried.
12
Page 13
Instalare
! Este important să păstraĠi acest manual pentru a-l
putea consulta în orice moment. În caz de vânzare,
cedare sau mutare, asiguraĠi-vă că acesta rămâne cu
aparatul.
! CitiĠi cu atenĠie instrucĠiunile: veĠi găsi informaĠii
importante cu privire la instalare, la folosire úi la
siguranĠă.
! Instalarea aparatului se va face conform acestor
instrucĠiuni, de către persoanele cali¿ cate profesional.
! Orice intervenĠie de reglare, întreĠinere, etc., trebuie
efectuată cu aragazul deconectat de la reĠea.
! Vă recomandăm să curăĠaĠi cuptorul înainte de
prima folosire, potrivit indicaĠiilor cuprinse în capitolul
“ÎntreĠinerea úi îngrijirea”.
Aerisirea încăperilor
Acest aparat poate ¿ instalat úi poate funcĠiona doar
în încăperi aerisite în permanenĠă, conform Normelor
NaĠionale în vigoare. Încăperea în care va ¿ montat
¿ e alimentată cu o cantitate de aer
aragazul trebuie s
ă
su¿ cientă pentru a asigura arderea gazelor (debitul
3
de aer nu poate ¿ mai mic de 2 m
/h pe kW de putere
instalată).
Prizele de aer, protejate de grătare, trebuie să aibă o
2
secĠiune a conductei de cel puĠin 100 cm
úi trebuie să
¿ e amplasate astfel încât să nu ¿ e acoperite, nici măcar
parĠial (vezi ¿ gura A).
Acestea trebuie să ¿ e mărite 100% - minim cu 200
2
– dacă aragazul nu este dotat cu dispozitivul de
cm
siguranĠă împotriva scăpărilor de gaz sau dacă aerul
necesar arderii este tras dintr-o încăpere alăturată
(vezi ¿ gura B), care oricum nu poate ¿ o parte comună
a imobilului, o încăpere cu pericol de incendiu sau un
dormitor. Prizele de aer trebuie să aibă o conductă de
comunicare cu exteriorul, după descrierea de mai sus.
A B
Încăpere
adiacentă
Încăperea de
aerisit
Evacuarea gazelor de ardere
Evacuarea gazelor de ardere trebuie să ¿ e asigurată de
o hotă legată la un coú cu tiraj natural, e¿ cient, sau de un
ventilator electric care să intre în funcĠiune automat, la
¿ ecare aprindere a aragazului (vezi ¿ gurile).
Evacuarea la exterior
Evacuarea gazelor prin
úemineu sau
coú de fum rami¿ cat
(numai pentru aparatele
de coacere)
! Gazele de petrol liche¿ ate, mai grele ca aerul,
stagnează în partea de jos a încăperii ; de aceea,
încăperea unde este amplasat aragazul - dacă folosiĠi
butelii cu GPL – trebuie să aibă fante de aerisire spre
exterior, împotriva eventualelor scăpări de gaz.
Buteliile GPL, atât goale cât úi umplute parĠial, nu
trebuie instalate sau depozitate în încăperi sau camere
situate sub nivelul solului (pivniĠe, etc.). PăstraĠi în
încăperea cu aragazul numai butelia pe care o utilizaĠi,
amplasată departe de sursele de căldură (cuptoare,
sobe), care ar putea încălzi butelia la peste 50°C.
PoziĠionarea úi punerea la nivel
! Este posibil să instalaĠi aparatul între alte piese
de mobilier, dacă înălĠimea acestora nu depăúeúte
înălĠimea aragazului.
! AsiguraĠi-vă că peretele din spatele aragazului este
făcut dintr-un material neinÀ amabil, rezistent la căldură
(t 90°C).
RO
A
Canale de aerisire pentru
aerul necesar arderii
Major area spaĠiului dintre
uúă úi podea
! După folosirea îndelungată a aparatului, se
recomandă să deschideĠi fereastra sau să măriĠi viteza
de rotaĠie a ventilatoarelor.
Pentru o instalare corectă:
• amplasaĠi aparatul în bucătărie, în sala de masă
sau într-o garsonieră fără pereĠi despărĠitori, dar
niciodată în baie.
• dacă aragazul este mai înalt decât celelalte piese de
mobilier, acestea trebuie să ¿ e distanĠate cu 200 mm
de aparat ;
• dacă aragazul se instalează sub un raft, acesta din
urmă va trebui să ¿ e montat la o distanĠă de minim
420 mm de blatul de lucru.
a trebuie să ¿ e
Dacă rafturile sunt inÀ amabile, distan
Ġ
de 700 mm (vezi ¿ gura);
13
Page 14
RO
HOOD
420
Min.
min.
650
mm. with hood
min.
700
mm. without hood
mm.
600
Min. mm.
420
Min. mm.
Punerea la nivel
• perdelele nu trebuie
să ¿ e montate în spatele
aragazului úi nici la mai
puĠin de 200 mm de
À ancurile acestuia;
• eventualele hote
trebuie să ¿ e instalate
conform indicaĠiilor
conĠinute în manualul de
instrucĠiuni ale acestora.
! După instalarea aparatului, cablul de alimentare úi
priza de curent trebuie să ¿ e uúor accesibile.
! Cablul nu trebuie să ¿ e îndoit sau comprimat.
! Cablul trebuie să ¿ e controlat periodic úi înlocuit de
electricieni autorizaĠi.
! Firma îúi declină orice responsabilitate în cazul în
care aceste norme nu se respectă.
Dacă este necesar să puneĠi
la nivel aparatul, înúurubaĠi
úuruburile de reglare - din
dotare – în locaúurile speciale
de sub aragaz (vezi ¿ gura).
Picioarele* vor ¿ introduse în
ori¿ ciile de sub aragaz.
Conectarea electrică
MontaĠi pe cablu un útecăr normalizat, capabil să suporte
sarcina indicată pe plăcuĠa cu caracteristici a aparatului
(vezi tabelul cu Date tehnice).
În cazul efectuării legăturii directe la reĠea, este necesar
să se monteze între aparat úi reĠea un întrerupător
omnipolar cu deschiderea minimă a contactelor de 3
mm, dimensionat la sarcină, conform normelor NFC
15-100 (¿ rul de împământare nu trebuie să ¿ e întrerupt
de întrerupător). Cablul de alimentare trebuie să ¿ e
poziĠionat astfel încât să nu atingă în nici un punct
o temperatură cu 50°C peste temperatura mediului
ambiant.
Înainte de a efectua legătura, asiguraĠivă că:
• priza să ¿ e cu împământare úi conform prevederilor de
lege;
• priza să poată suporta sarcina maximă de putere a
maúinii, indicată pe plăcu
• tensiunea de alimentare să ¿ e cuprinsă în valorile
indicate pe plăcuĠa cu caracteristici;
• priza să ¿ e compatibilă cu útecărul aparatului. În
caz contrar înlocuiĠi priza sau útecărul; nu folosiĠi
prelungitoare sau prize multiple.
*doar pe anumite modele.
14
Ġa de caracteristici;
Racordarea la gaze
Racordarea la gaze sau la butelie poate ¿ efectuată cu
un furtun À exibil din cauciuc sau oĠel, conform normelor
naĠionale în vigoare, numai după ce aĠi veri¿ cat că
aparatul este reglat pentru tipul de gaz pe care îl veĠi
folosi (vezi eticheta de pe capac: în caz contrar vezi mai
jos). În caz de alimentare cu gaz liche¿ at, de la butelie,
folosiĠi regulatoare de presiune care să ¿ e conforme
cu normele naĠionale în vigoare. Pentru a facilita
racordarea, alimentarea aragazului se poate orienta
lateral*: închideĠi racordul pe care se ¿ xează furtunul cu
capacul respectiv úi înlocuiĠi garnitura de etanúare (din
dotarea aparatului).
! Pentru o funcĠionare sigură, pentru o folosire adecvată
a energiei úi o durabilitate sporită a aparaturii, asiguraĠivă
că presiunea de alimentare respectă valorile indicate în
tabelul cu „Caracteristicile arzătoarelor úi duzelor” (vezi
mai jos).
Racordarea la gaze cu furtun din cauciuc
Veri¿ caĠi ca furtunul să corespundă normelor naĠionale
în vigoare. Diametrul intern al tubului de utilizat trebuie
e de: 8 mm pentru alimentarea cu gaz liche¿ at úi 13
¿
să
mm pentru alimentarea cu gaz metan.
După racordare, asiguraĠi-vă că furtunul:
• nu atinge nici o componentă susceptibilă de a depăúi
50°C;
• nu este supus nici unui fel de forĠe, de tracĠiune úi de
torsiune, úi nu este curbat excesiv sau îngustat;
• nu intră în contact cu obiecte sau colĠuri ascuĠite,
părĠi mobile úi că nu este presat;
• este uúor accesibil, pe tot traseul său, cu scopul de
al putea controla;
• are o lungime sub 1500 mm;
• este bine introdus la capete úi ¿ xat cu coliere de
strângere, conform normelor naĠionale în vigoare.
! Dacă una sau mai multe din aceste condiĠii nu sunt
respectate sau dacă aragazul este încastrat între două
Page 15

A
V
piese de mobilier – condiĠii clasa a 2a, subcategoria 1 –
va trebui să utilizaĠi pentru racordare un tub À exibil din
oĠel (vezi mai jos).
Racordarea la gaze cu tub À exibil din oĠel
inoxidabil, pe perete, cu cuplări ¿ letate
Veri¿ caĠi ca tubul úi garniturile să corespundă normelor
naĠionale în vigoare.
Pentru a monta tubul, este necesar să îndepărtaĠi mufa
furtunului de pe aragaz (robinetul de alimentare cu gaz este
„tată”, de 1/2, ¿ letat, cilindric).
! EfectuaĠi legătura astfel încât lungimea tubului să nu
depăúească 2 m (la întinderea maximă); asiguraĠi-vă că
acesta nu atinge nici o componentă mobilă úi nu este
strivit.
Controlul etanúeităĠii
După terminarea instalării, controlaĠi perfecta
etanúeitate a tuturor racordurilor folosind o soluĠie de
săpun, însă
niciodată o À acără.
Adaptarea la diferite tipuri de gaz
Aragazul poate ¿ adaptat úi la alte tipuri de gaz, în afara
celui pentru care a fost predispus (indicat pe eticheta
de pe capac).
Adaptarea blatului de lucru
Înlocuirea duzelor arzătoarelor:
1. înlăturaĠi grătarul úi extrageĠi arzătoarele din sediul lor;
2. deúurubaĠi duzele, folosind o cheie tubulară de 7 mm
(vezi ¿ gura), úi înlocuiĠile cu cele adecvate pentru noul
tip de gaz (vezi tabelul cu “Caracteristicile arzătoarelor
úi duzelor”); .
3. montaĠi la loc toate
componentele efectuând
aceleaúi operaĠii ca la
demontare, dar în sens invers.
Reglarea arzătoarelor
aragazului la minim:
1. rotiĠi buúonul la minim;
2. scoateĠi buúonul úi rotiĠi úurubul de reglare (din
interiorul sau de lângă tija centrală) până când obĠineĠi
o À acără mică, constantă;
urubul de reglare trebuie
! În cazul unui gaz liche
să ¿ e înúurubat complet.
3. veri¿ caĠi apoi ca, rotind rapid buúonul aragazului, de
la maxim la minim, să nu se stingă ochiul.
¿ at, ú
! Arzătoarele blatului nu au nevoie de reglarea aerului
primar.
Adaptarea cuptorului
Înlocuirea duzei arzătorului din cuptor:
1. scoateĠi sertarul pentru încălzit alimente
2. scoateĠi protecĠia glisantă “A” (vezi ¿ gura);
3. extrageĠi arzătorul cuptorului
după ce aĠi scos úurubul V (vezi
¿ gura);
OperaĠia va ¿ facilitată dacă
demontaĠi uúa cuptorului.
4. deúurubaĠi duza arzătorului
folosind o cheie tubulară pentru
duze (vezi ¿ gura) sau o cheie
tubulară de 7 mm úi înlocuiĠi-o
cu cea adecvată
, în funcĠie de
tipul de gaz (vezi tabelul cu
Caracteristicile arzătoarelor úi
duzelor).
Reglarea arzătoarelor
cuptorului la minim:
1. aprindeĠi arzătorul (vezi
Pornire úi utilizare);
2. rotiĠi buúonul la minim (MIN) după ce aĠi lăsat arzătorul
să funcĠioneze cam 10 minute la maxim (MAX);
3. scoateĠi buúonul;
4. rotiĠi úurubul de reglare de lângă tija termostatului
(vezi ¿ gurile) până când obĠineĠi o À acără mică,
constantă;
! În cazul unui gaz liche¿ at, úurubul de reglare trebuie
să ¿ e înúurubat complet;
5. veri¿ caĠi dacă, rotind repede buúonul de la MAX
la MIN sau dac
ă închideĠ
i úi deschideĠi repede uúa
RO
15
Page 16
RO
S
S
R
A
cuptorului, À acăra rămâne aprinsă.
Vă recomandăm să curăĠaĠi cuptorul înainte de prima
folosire, potrivit indicaĠiilor cuprinse în capitolul “ÎntreĠinerea
úi îngrijirea”.
DATE TEHNICE
Dimensiuni cuptor H
x L x P
Volum
Dimensiunile utile ale
sertarului de păstrare
a alimentelor la cald
Tensiunea úi
frecvenĠa de
alimentare
Arzătoare
34x39x44 cm
l 58
lăĠime42 cm
profunzime 44 cm
înălĠime 17cm
a se vedea plăcuĠa de caracteristici
se pot adapta la toate tipurile de gaz
indicate pe plăcuĠa cu caracteristici,
lipită pe partea internă a uúii
rabatabile sau, după deschiderea
sertarului de sub cuptor, pe peretele
interior din stânga.
Directive Comunitare: 2006/95/EC
din 12/12/06 (Tensiune Joasă) úi
modificările succesive 2004/108/EC din 15/12/04
(Compatibilitate Electromagnetică)
úi modificările succesive 2009/142/EC din 30/11/09 (Gaze)
úi modificările succesive -93/68/CEE
din 22/07/93 úi modificările
succesive - 2002/96/EC.
1275/2008 (Stand-by/ Off mode)
.
KN3G2S/UA
KN3G20/UA
Tabelul cu caracteristicile arzătoarelor úi
duzelor
Tabelul 1 Gaz lichefiat Gaz natural
Arzător Diametru
(mm)
Putere termică
kW (p.c.s.*)
By Pass
1/100
duză
1/100
debit*
g/h
duză
1/100
debit*
l/h
Nominală Redusă (mm) (mm) *** ** (mm)
Rapid (mare)
(R)
Semirapid
(mediu) (S)
Auxiliar (mic)
(A)
100 3.00 0.7 41 87 218 214 128 286
75 1.90 0.4 30 70 138 136 104 181
51 1.00 0.4 30 52 73 71 76 95
Cuptor - 2.80 1.0 46 80 204 200 119 267
Presiuni de
alimentare
Nominală (mbar)
Minimă (mbar)
Maximă (mbar)
28-30
20
35
37
25
45
20
17
25
* La 15°C 1013 mbar-gaz uscat *** Butan P.C.S. = 49,47 MJ/Kg
** Propan P.C.S. = 50,37 MJ/Kg Gaze naturale P.C.S. = 37,78 MJ/Kg
16
Page 17
Pornire úi utilizare
F
X
C
Utilizarea aragazului
Aprinderea arzătoarelor
Fiecare buúon al aragazului are, în dreptul său, schiĠa
arzătoarelor; ARZĂTORUL comandat de buúon este
reprezentat cu un cerc evidenĠiat.
Pentru a aprinde un arzător al aragazului:
1. apropiaĠi de arzător o À acără sau o brichetă de aragaz;
2. apăsaĠi úi, în acelaúi timp, rotiĠi buúonul arzătorului
în sens contrar acelor de ceasornic, până în poziĠia
maxim (.
3. reglaĠi intensitatea À ăcării, după dorinĠă, rotind
în sens contrar acelor de ceasornic buúonul
ARZĂTORULUI: la minim &, la maxim ( sau într-o
poziĠie intermediară.
Dacă aparatul este dotat cu
un dispozitiv electronic de
aprindere* (C), apăsaĠi mai
întâi butonul de aprindere,
indicat cu simbolul
apoi apăsaĠi úi rotiĠi buúonul
ARZĂTORULUI în sens
contrar acelor de ceasornic,
până când reperul ajunge în dreptul poziĠiei maxim;
aúteptaĠi aprinderea À ăcării.
Anumite modele sunt dotate cu un dispozitiv de
aprindere integrat în buúon; în acest caz, veĠi observa
numai dispozitivul de aprindere electronic* (vezi ¿ gura)
dar nu úi butonul de aprindere. Este su¿ cient să apăsaĠi
úi, în acelaúi timp, să rotiĠi buúonul ARZĂTORULUI
în sens contrar acelor de ceasornic, până în poziĠia
maxim úi să aúteptaĠi aprinderea À ăcării. În momentul în
care lăsaĠi buúonul, se poate întâmpla ca À acăra să se
. În acest caz, repeta
stingă
apăsat mai mult timp.
! Dacă À acăra se stinge accidental, opriĠi arzătorul úi
aúteptaĠi minim 1 minut înainte să încercaĠi din nou.
Dacă aparatul este dotat cu un dispozitiv de
siguranĠă*(X) împotriva scăpării d e gaz, ĠineĠi apăsat
buúonul ARZĂTORULUI timp de 2-3- secunde, pentru a
menĠine À acăra aprinsă úi a activa dispozitivul.
Pentru a stinge arzătorul, rotiĠi buúonul până la •.
Ġi operaĠiile, Ġinând buúonul
,
Sfaturi practice pentru utilizarea arzătoarelor
Pentru a obĠine un randament maxim al arzătoarelor,
precum úi a economisi gazul, utilizaĠi numai recipiente
cu fundul plat, acoperite cu capac, de dimensiuni
proporĠionale cu ale arzătoarelor:
Arzător Diametru
recipienĠi (cm)
Rapid (R) 24-26
Semi-rapid
16-20
(S)
Auxiliar (A) 10-14
Pentru a identi¿ ca tipul arzătorului faceĠi referire la
desenele din paragraful „Caracteristicile arzătoarelor úi
duzelor”.
Utilizarea cuptorului
! La prima aprindere, vă recomandăm să lăsaĠi cuptorul
să funcĠioneze în gol timp de aproximativ 1 oră, cu
termostatul la maxim úi uúa închisă. StingeĠi apoi
cuptorul, deschideĠi uúa úi aerisiĠi camera. Mirosul care
se degajă este datorat evaporării substanĠelor utilizate
pentru a proteja cuptorul.
! Înainte de utilizare, este strict necesar să dezlipiĠi folia
de plastic de pe laturile aparatului!
! Nu aúezaĠi niciodată obiecte pe fundul cuptorului,
pentru că riscaĠi să deterioraĠi smalĠul. UtilizaĠi primul
nivel al cuptorului numai când folosiĠi rotisorul.
Aprinderea cuptorului
Pentru a aprinde arzătorul cuptorului, apropiaĠi de
ori¿ ciul F (vezi ¿ gura) o À acără sau o brichetă úi, în
i timp, apăsaĠi úi rotiĠi în sens antiorar buúonul
acelaú
CUPTORULUI până la poziĠia MAX.
Dacă, după 15 secunde,
arzătorul nu se aprinde,
lăsaĠi buúonul, deschideĠi uúa
cuptorului úi aúteptaĠi cel puĠin
1 minut înainte de a încerca din
nou să-l aprindeĠi.
RO
ATENğIE! Capacul din sticlă se
poate sparge dacă este încălzit.
StingeĠi toate arzătoarele sau
eventualele plite electrice înainte
de a-l închide.*Se referă numai la
modelele cu capac de sticlă
! Cuptorul este dotat cu un dispozitiv de siguranĠă;
de aceea este necesar să ĠineĠi apăsat buúonul
CUPTORULUI timp de 6 secunde circa.
17
Page 18
RO
! Dacă À acăra se stinge accidental, opriĠi arzătorul úi
aúteptaĠi minim 1 minut înainte să încercaĠi din nou.
Reglarea temperaturii
Pentru a obĠine temperatura ideală coacerii alimentelor,
rotiĠi buúonul CUPTORULUI în sens contrar acelor de
ceasornic. Temperaturile sunt indicate pe panoul de
control úi variază de la MIN (140°C) la MAX (250°C).
După obĠinerea temperaturii dorite, cuptorul o va
menĠine constantă, graĠie termostatului.
Pentru a scoate protecĠia
culisantă, deúurubaĠi úurubul S
(vezi ¿ gura). Pentru a o monta
A
la loc, blocaĠi-o cu úurubul S.
! Înainte de a utiliza cuptorul,
veri¿ caĠi dacă protecĠia
culisantă este ¿ xată corect.
S
Sertarul inferior*
Sub cuptor este un
sertar care poate
¿ utilizat pentru a
păstra accesoriile sau
vasele de bucătărie.
Pentru a deschide uúa
compartimentului, rotiĠi-o
în jos (vezi ¿ gura).
! SuprafeĠele interne
ale sertarului (dacă este
prezent)
se pot încălzi.
! Nu depozitaĠi materiale inÀ amabile în sertarul de sub
cuptor.
18
Page 19

Tabelul cu recomandări pt coacerea în cuptor
RO
Alimente de pregătit Greutate
Paste făinoase
Lasagne (Foi de aluat dispuse în
straturi, umplute)
Cannelloni (macaroane groase
umplute)
Paste gratinate
Carne
ViĠel
Pui
RaĠă
Iepure
Porc
Miel
Peúte
Scrumbie
Dentex dentex
Păstrăv în folie de aluminiu
Pizza
Napoletana
Tort
BiscuiĠi
Tarte
Tarte sărate
Dulciuri din aluat dospit
:
(Kg)
2.5
2.5
2.5
1.5
1.5
1.8
2.0
2.1
1.8
1.1
1.5
1.0
1.0
0.5
1.1
1.0
1.0
PoziĠia
rafturilor, de
jos în sus
4
4
4
3
3
3
3
3
3
3
3
3
4
4
4
4
4
Temperatură
(°C)
200-210
200
200
200-210
210-220
200
200
200
200
180-200
180-200
180-200
210-220
180
190
180
170
Preîncălzire
(minute)
10
10
10
10
10
10
10
10
10
10
10
10
15
15
15
15
15
Timp
coacere
(minute)
75-85
50-60
50-60
95-100
90-100
100-110
70-80
70-80
100-105
45-50
45-55
45-50
20-25
25-35
40-45
50-55
40-45
NB: timpul de coacere este indicativ úi poate fi modificat în baza exigenĠelor personale. La gril, tava va trebui aúezată
întotdeauna pe 1 raft/grătar de jos.
19
Page 20

PrecauĠii úi sfaturi
RO
!Aparatul a fost proiectat úi construit conform normelor
internaĠionale de siguranĠă.
Aceste avertizări sunt furnizate din motive de siguranĠă
úi trebuie să ¿ e citite cu atenĠie.
Norme de protecĠie úi siguranĠă generale
• Aceste instrucĠiuni sunt valabile doar pentru
Ġările ale căror simboluri apar în manualul
de instrucĠiuni úi pe tăbliĠa de identi¿ care a
aparatului.
• Acest aparat de uz casnic fost conceput pentru a ¿
folosit numai în interiorul locuinĠelor.
• Aparatul nu trebuie instalat în aer liber, nici chiar
în cazul în care spaĠiul este adăpostit, deoarece
expunerea acestuia la ploi úi furtuni este foarte
periculoasă.
• Nu atingeĠi maúina când sunteĠi desculĠi sau cu
mâinile sau picioarele ude sau umede.
• Aparatul trebuie sa fie utilizat numai pentru
coacerea alimentelor si numai de persoane
adulte, conform instructiunilor din manual. Orice
alta utilizare (de exemplu: încalzirea locuintei)
este considerata improprie si deci periculoasa.
Fabricantul nu va putea fi considerat responsabil
pentru eventuale daune provenite din utilizarea
improprie, gresita sau irationala a aparatului.
• Acest manual face parte din aparatele de clasa 1
(izolat) sau 2 – subcategoria 1 (¿ xat între două piese
de mobilier).
• ÎndepărtaĠi copiii de aparat.
• EvitaĠi ca úi cablurile de alimentare ale altor aparate
electrocasnice să atingă părĠile încălzite ale
aparatului.
• Nu obstrucĠionaĠi fantele de aerisire sau de ieúire a
căldurii.
• EvitaĠi să închideĠi capacul din sticlă
(numai pe anumite modele) dacă
aprinse sau calde.
• UtilizaĠi întotdeauna mănuúi speciale pentru a băga
sau scoate recipientele din cuptor.
• Nu utilizaĠi lichide inÀ amabile (alcool, benzină) în
apropierea aparatului, când acesta este în funcĠiune.
al aragazului
arzătoarele sunt
întreĠinere înainte de a ¿ scos útecărul din priză.
• În caz de defecĠiune, nu umblaĠi în nici un caz la
mecanismele din interior úi nu încercaĠi să o repara
singuri. Apela
• Nu aúezaĠi obiecte grele pe uúa cuptorului, când este
deschisă.
• Este interzisă utilizarea aparatului de persoanele
(inclusiv copiii) care au o redusă capacitate ¿ zică
sau senzorială sau mentală, precum úi de cele fără
experienĠă sau care nu s-au familiarizat cu produsul,
dacă nu sunt supravegheate de un responsabil sau
dacă nu au primit în prealabil instrucĠiuni asupra
modului de folosire a aparaturii.
• Nu lăsaĠi copiii să se joace cu aparatul.
Ġi la serviciul de asistenĠă.
Ġi
Scoaterea aparatului din uz
• Eliminarea ambalajelor: respectaĠi normele locale, în
acest fel ambalajele vor putea ¿ utilizate din nou.
• Directiva Europeană 2002/96/CE cu privire la
deúeurile care provin de la aparatura electrică
sau electronică (RAEE) prevede ca aparatele
electrocasnice să nu ¿ e colectate împreună cu
deúeurile urbane solide, obiúnuite. Aparatele
scoase din uz trebuie să ¿ e colectate separat atât
pentru a optimiza rata de recuperare úi de reciclare
a materialelor componente cât úi pentru a evita
pericolele care pot duce la dăunarea sănătăĠii
omului sau poluarea mediului înconjurător. Simbolul
tomberonului tăiat care apare pe toate produsele vă
aminteúte tocmai obligaĠia de a le colecta separat.
Aparatele electrocasnice scoase din uz pot ¿ trimise
unui centru public de colectare, centrelor orăúeneúti
sau, dacă legea naĠională prevede, ele pot ¿
returnate vânzătorului, în momentul achiziĠionării
unor noi produse, echivalente.
ToĠi producătorii importanĠi de aparatură
electrocasnică úi-au unit eforturile pentru a crea
sisteme speciale de gestionare, care se ocupă cu
colectarea úi scoaterea din uz a aparatelor vechi.
Economisirea energiei úi protecĠia
mediului înconjurător
• Utilizând aragazul între orele serale úi primele
ore ale dimineĠii, colaboraĠi la reducerea sarcinii
întreprinderilor electrice.
• Nu depozitaĠi materiale inÀ amabile în sertarul de
sub cuptor: dacă cuptorul se aprinde din greúeală,
materialele depozitate pot lua foc.
• Când aparatul nu este utilizat, veri¿ caĠi ca buúoanele
să ¿ e în poziĠia • úi că robinetul de gaz este închis.
• Nu scoateĠi útecărul din priză trăgând de cablu.
• Nu executaĠi nici o operaĠie de curăĠire sau
20
• AsiguraĠi-vă că garniturile sunt curate, e¿ ciente, că
aderă bine pe uúa cuptorului úi nu provoacă
dispersii de căldură.
Page 21
ÎntreĠinere úi curăĠire
Decuplarea electrică
Înainte de orice operaĠie, debranúaĠi aparatul de la
reĠeaua de alimentare cu curent electric.
CurăĠarea aparatului
! EvitaĠi utilizarea de detergenĠi abrazivi sau corosivi,
ca de ex. soluĠiile de scos pete sau produsele împotriva
ruginii, detergenĠii praf sau bureĠii care au o suprafaĠă
rugoasă: ele pot zgâria iremediabil suprafaĠa aparatului.
! Nu utilizaĠi niciodată produse pe bază de vapori sau
cu presiune ridicată în vederea curăĠării aparatelor.
• Pentru operaĠiile de întreĠinere curente, este su¿ cient
să spălaĠi aragazul cu un burete umed, după care
să-l útergeĠi cu hârtie absorbantă de bucătărie.
• PărĠile externe, smălĠuite sau din inox, precum úi
garniturile din cauciuc pot ¿ curăĠate cu un burete
îmbibat în apă călduĠă úi săpun neutru. Dacă petele
sunt persistente, folosiĠi produse speciale. ClătiĠi cu
multă ap
abrazive sau substanĠe corosive.
• Grătarele, plitele de deasupra ochiurilor, coroanele
de separat À acăra
úi arzătoarele aragazului sunt detaúabile,
pentru a facilita curăĠarea lor: spălaĠi-le cu apă caldă
úi detergent delicat, având grijă să scoateĠi orice
depunere. Apoi aúteptaĠi până când sunt perfect
uscate.
ă úi útergeĠi, după curăĠire. Nu folosiĠi prafuri
contact cu apa, mai ales dacă are un conĠinut mare de
calcar, sau cu detergenĠii agresivi (care conĠin fosfor).
După ¿ ecare spălare, se recomandă să îl clătiĠi bine úi
să îl útergeĠi. Este oportun în acelaúi timp să útergeĠi
úi eventualele urme de apă.
Capacul
Modelele dotate cu capac
din sticlă se vor spăla
cu apă călduĠă. EvitaĠi
substanĠele abrazive.
PuteĠi demonta capacul
pentru a facilita operaĠiile
de curăĠare, mai ales
în spatele aragazului:
pentru aceasta, deschideĠi
capacul úi ridicaĠi-l (vezi ¿ gura).
! EvitaĠi să închideĠi capacul aragazului când
arzătoarele sunt calde sau aprinse.
ControlaĠi garniturile cuptorului.
i periodic garnitura din jurul uúii cuptorului.
Controla
Dacă este deteriorată, apelaĠi la cel mai apropiat
Centru de AsistenĠă Autorizat. Se recomandă să nu
folosiĠi cuptorul până la înlocuirea garniturii.
Ġ
ÎntreĠinerea robinetelor de gaz
Cu timpul, se poate întâmpla ca buúoanele să se
blocheze sau să se rotească mai greu; în acest caz,
este necesar să le înlocuiĠi.
RO
• Dacă aparatul dvs are aprindere electronică, este
necesar să îl curăĠaĠi cât mai des - în special capătul
dispozitivelor de aprindere instantanee – úi să
veri¿ caĠi dacă ori¿ ciile prin care iese gazul nu sunt
înfundate.
• Interiorul cuptorului se va spăla, de preferinĠă, după
¿ ecare utilizare, când este cald. UtilizaĠi apă cald
detergent; clătiĠi bine úi útergeĠi cu o lavetă moale.
EvitaĠi substanĠele abrazive.
• CurăĠaĠi geamul uúii cu un burete; nu utilizaĠi produse
abrazive; útergeĠi cu o lavetă moale; nu folosiĠi
articole abrazive sau răzuitoare din metal, ascuĠite,
deoarece acestea pot deteriora suprafaĠa geamului
sau îl pot sparge.
• Accesoriile pot ¿ spălate ca orice alt vas, chiar úi în
maúina de spălat vase.
• OĠelul inox poate rămâne pătat dacă intră des în
ă úi
! Această operaĠie trebuie să ¿ e executată numai de
un instalator autorizat de fabricant.
Î
AsistenĠă
ComunicaĠi:
• modelul aparatului (Mod.);
• numărul de serie (S/N).
Aceste informaĠii se găsesc pe tăbliĠa cu caracteristici
lipită pe aparat úi/sau pe ambalaj.
21
Page 22
HU
Üzembe helyezés
! Fontos, hogy megtartsa ezt a kézikönyvet, hogy
szükség esetén bármikor belenézhessen. Ha a
készüléket eladja, elajándékozza vagy áthelyezi,
gyĘzĘdjön meg róla, hogy a kézikönyvet is átadja vele!
! Olvassa el ¿ gyelmesen az utasításokat: fontos
információkat tartalmaznak az üzembe helyezésrĘl, a
használatról és a biztonságról.
! A készülék üzembe helyezését szakembernek kell
elvégeznie az itt található utasításoknak megfelelĘen.
! Bármilyen beállítási, karbantartási, stb. munkálatot
áramtalanított készüléken kell elvégezni.
! Javasoljuk, hogy az elsĘ használat elĘtt tisztítsa ki a
sütĘt a „Karbantartás és ápolás” címĦ részben leírtak
szerint.
A helyiségek szellĘzése
A készülék, az érvényben lévĘ nemzeti szabványoknak
megfelelĘen, kizárólag folyamatos szellĘzéssel ellátott
helyiségekben helyezhetĘ üzembe. A helyiségnek,
melyben a készüléket üzembe kívánja helyezni, annyi
levegĘt kell tudnia biztosítani, amennyi a gáz tökéletes
égéséhez szükséges (a levegĘáram az üzembe
helyezett teljesítmény 1 kW-jára vetítve nem lehet
kevesebb 2 m
A levegĘ utánpótlását biztosító, ráccsal ellátott
szellĘzĘnyílásnak 100 cm
kell rendelkeznie és úgy kell kialakítani, hogy még
részben se tömĘdhessen el (lásd A. ábra).
Amennyiben a készülék munkalapja nincs
égésbiztosítóval ellátva, vagy a levegĘ közvetetten, a
fent leírtak szerint kialakított külsĘ szellĘzéssel ellátott
szomszédos helyiségekbĘl érkezik (lásd B. ábra) –
feltéve, hogy azok az ingatlannak nem közös részei,
környezetük nem tĦzveszélyes, vagy nem hálószobák
– a szellĘzĘnyílások méretét 100 %-os ráhagyással kell
kialakítani – legalább 200 cm
3
/h-nál).
2
hasznos keresztmetszettel
2
.
Füstgázelvezetés
A füstgázelvezetést hatékony, természetes
huzatú kéménybe kötött kürtĘvel, vagy a készülék
bekapcsolásával automatikusan mĦködésbe lépĘ
elektromos ventilátorral kell biztosítani (lásd ábra).
Közvetlenül a szabadba
történĘ füstgázelvezetés
Kéményen vagy (tĦzhelyekhez
való) elágazó füstgázelvezetĘ
csövön keresztül történĘ
füstgázelvezetés
! A levegĘnél nehezebb cseppfolyósított gázok
megülnek a padlószinten, ezért a cseppfolyósítottgáztartályok tárolására szolgáló helyiségeknek, az
esetleges gázszivárgások elvezetésére, a padlószinten
rendelkezniük kell szabadba kivezetĘ szellĘzĘnyílással.
Az üres vagy részben teli cseppfolyósítottgáztartályokat tilos a padló szintjénél lejjebb lévĘ
helyiségekben (pince, stb.) üzembe helyezni vagy
tárolni! A helyiségben kizárólag a használatban lévĘ
tartályt tárolja, távol azoktól a hĘforrásoktól (tĦzhely,
kandalló, kályha), melyek 50 °C fölé képesek azt
melegíteni!
Elhelyezés és vízszintezés
! A készülék beépíthetĘ bútorok mellé is, ha azok
magassága nem haladja meg a munkalap szintjét.
A
A
Az ajtó és padló közti rés
növelése
B
Szomszédos
helyiség
SzellĘztetendĘ
helyiség
Az égést tápláló levegĘ
szellĘzĘnyílása
! Amennyiben hosszú ideig használja a készüléket,
tanácsos kinyitni az ablakot, illetve megnövelni a
ventilátorok sebességét.
22
! Bizonyosodjon meg arról, hogy a készülék
hátoldalával érintkezĘ fal nincs gyúlékony anyagból, és
ellenáll a hĘnek (T 90 °C)!
A készülék megfelelĘ beszerelése érdekében:
• helyezze a készüléket a konyhába, az étkezĘbe vagy
a garzonba (ne a fürdĘszobába);
• amennyiben a tĦzhely szintje magasabb a
bútorokénál, azokat a készüléktĘl legalább 600 mm-re
kell elhelyezni;
• amennyiben a tĦzhelyet fali bútor alá szereli be, a
fali bútorok és a munkalap között legalább 420 mm
távolságot kell hagyni.
Ez a távolság akár 700 mm is lehet, ha a fali bútor nem
gyúlékony (lásd ábra);
• ne tegyen függönyt a tĦzhely mögé, illetve a tĦzhely
Page 23
200 mm-es körzetébe;
HOOD
420
Min.
min.
650
mm. with hood
min.
700
mm. without hood
mm.
600
Min. mm.
420
Min. mm.
• az esetleges
kürtĘket a felhasználói
kézikönyv utasításainak
megfelelĘen kell
kialakítani.
Vízszintezés
Amennyiben szükséges,
állítsa vízszintbe a készüléket, csavarja be a mellékelt
állítható lábazatot a tĦzhely aljának sarkain található
megfelelĘ furatokba (lásd ábra)!
A lábakat* nyomja a tĦzhely
alján található illesztékbe!
Elektromos csatlakoztatás
• az aljzat kompatíbilis a készülék
csatlakozódugójával! Ha nem, cserélje ki az aljzatot
vagy a dugót; ne használjon hosszabbítót vagy
elosztót!
! A beszerelt készülék elektromos kábelének és a fali
csatlakozónak könnyen hozzáférhetĘnek kell lennie.
! A kábel nem hajolhat meg és nem lehet összenyomva!
! A kábelt rendszeresen ellenĘrizni kell, és cseréjét
kizárólag engedéllyel rendelkezĘ szakember végezheti
el.
! A fenti elõírások be nem tartása esetén a gyártó
elhárít minden felelõsséget.
Gázbekötés
A hálózathoz, illetve a gázpalackhoz történĘ
csatlakoztatáshoz, az érvényben lévĘ nemzeti
szabványoknak megfelelĘen, À exibilis gumicsĘ vagy
acélcsĘ használtató. A gázbekötés után gyĘzĘdjön meg
arról, hogy a készülék a szolgáltatott gáz típusára lett
állítva (lásd a tetĘn elhelyezett gázkalibrálási címkét):
ellenkezĘ esetbenlásd alább)! Abban az esetben, ha a
készüléket cseppfolyósított gázzal, palackról mĦködteti,
használjon az érvényben lévĘ nemzeti szabványoknak
megfelelĘ nyomásszabályozót! A csatlakoztatás
megkönnyítése érdekében a használandó gáz a
készülékhez mindkét oldala* felĘl hozzávezethetĘ:
cserélje le a csatlakozó csonkot a záródugóra, és a régi
tömítést a mellékelt tömítésre!
HU
Szereljen a kábelre a készüléken elhelyezett adattáblán
feltüntetett terhelésnek megfelelĘ szabványos
csatlakozó dugót (lásd MĦszaki adatok táblázat)!
Amennyiben a kábelt közvetlenül a hálózathoz
kívánja csatlakoztatni, úgy a készülék és a hálózat
közé a terhelésnek és az érvényben lévĘ nemzeti
szabványoknak megfelelĘ legalább 3 mm-es
omnipoláris kapcsolót kell beszerelni (a föld huzalt
nem kell megszakítóval ellátni). A hálózati kábelt
úgy kell elhelyezni, hogy sehol se melegedhessen
a szobahĘmérsékletnél 50 °C-kal magasabb
hĘmérsékletre!
A csatlakoztatás elĘtt gyĘzĘdjön meg arról, hogy:
• az aljzat rendelkezzen földeléssel és feleljen meg a
szabványnak;
• az aljzat képes legyen elviselni a készülék
adattábláján feltüntetett maximális teljesítmény
terhelését;
• a tápfeszültség feleljen meg az adattáblán feltüntetett
értékeknek;
! A biztonságos mĦködés, az energiatakarékos
használat és a készülék hosszú élettartama érdekében,
bizonyosodjon meg arról, hogy a tápnyomás megfelel a
GázégĘk és a fúvókák jellemzĘ adatai címĦ táblázatban
közölt értékeknek (lásd alább)!
Gázbekötés À exibilis gumicsĘvel
EllenĘrizze, hogy a csĘ megfelel-e az érvényben lévĘ
nemzeti szabványoknak! Cseppfolyósított gázzal
történĘ üzemeltetés esetén a csĘ belsĘ átmérĘjének
8 cm-esnek kell lennie, metánnal történĘ üzemeltetés
esetén 13 cm-esnek.
A bekötés elvégeztével bizonyosodjon meg arról, hogy
a csĘ:
• egyik pontja se érintkezik olyan elemmel, melynek a
hĘmérséklete 50 °C fölé emelkedhet;
• nincs kitéve húzásnak és csavarásnak, valamint,
hogy nincsen megtörve, illetve nincsen benne
szĦkület;
23
Page 24
HU
A
V
• nem érintkezik vágófelülettel, éles szélekkel, mozgó
elemekkel és nincs összenyomva;
• állapotának ellenĘrzése végett a teljes
nyomvonalában jól hozzáférhetĘ;
• hossza meghaladja az 1500 mm-t;
• két végén, az érvényben lévĘ nemzeti
szabványoknak megfelelĘen, csĘbilinccsel jól fel van
rögzítve!
! Amennyiben a fenti feltételek közül egy vagy több
feltétel nem teljesülhet, vagy ha a tĦzhelyet a 2.
osztály – 1. alosztály elĘírásai szerint helyezi üzembe
(a készülék két bútor közé kerül), a bekötést À exibilis
acélcsĘvel kell megoldani (lásd alább).
Gázbekötés nem oxidálódó, folyamatos falú,
menetes végĦ, À exibilis acélcsĘvel
EllenĘrizze, hogy a csĘ és a tömítések megfelelnek-e
az érvényben lévĘ nemzeti szabványoknak!
A csĘ bekötéséhez távolítsa el a készüléken található
csonkot (a készülék gázbemeneti csatlakozása 1/2”-os
anyamenettel van ellátva)!
! Kösse be a csövet olyan módon, hogy a csĘ hossza
ne haladja meg a maximálisan megengedett 2 métert,
és bizonyosodjon meg arról, hogy a csĘ nem érintkezik
mozgó elemekkel, és nincs összenyomva!
3. helyezze vissza a helyére az összes elemet a
fentiekben leírt mĦveletek fordított sorrendjében!
A fĘzĘlapon található gázégĘk takarékfokozatának
beállítása:
1. csavarja a gázégĘ szabályozó csapját minimumra;
2. húzza le a tekerĘgombot, és csavarja a
tekerĘgomb tengelyében vagy amellett elhelyezett
szabályozócsavart addig, míg szabályos kis lángot nem
kap!
! Földgáz esetén a szabályozócsavart órairánnyal
ellentétesen kell kicsavarni;
3. ellenĘrizze, hogy ha a tekerĘgombot a maximum
állásból gyorsan a minimum állásba tekeri, a gázégĘ
nem alszik-e ki!
! A fĘzĘlap gázégĘi nem igénylik a primer levegĘ
beszabályozását.
A sütĘ átállítása
A sütĘgázégĘ fúvókájának cseréje:
1. nyissa ki teljesen a sütĘajtót;
2. vegye ki a sütĘ gördíthetĘ
alját (lásd ábra);
A tömítés ellenĘrzése
A bekötés végeztével szappanos vízzel – semmiképp
se lánggal – ellenĘrizze, hogy valamennyi csatlakozás
tömítése tökéletesen zár-e!
Átállítás más gáztípusra
A készülék átállítható az eredetileg beállítottól – a
tĦzhely tetején található gázkalibrálási címkén jelzett
gáztól – eltérĘ gáztípusra is.
A fĘzĘlap átállítása
A fĘzĘlapon található gázégĘk fúvókáinak cseréje:
1. vegye le a rácsokat, és csavarozza ki helyükrĘl a
gázégĘket;
2. 7 mm-es csĘkulcs
segítségével csavarozza
ki a fúvókákat ( lásd ábra),
és cserélje le Ęket az új
gáztípushoz való fúvókákra (lásd
gázégĘk és a fúvókák jellemzĘ
adatai);
3. csavarja ki az égĘfej
rögzítĘcsavarját, és a V csavar
eltávolítása után vegye ki a
sütĘbĘl az égĘfejet;
4. a megfelelĘ
fúvókacsĘkulccsal (lásd ábra)
vagy egy 7 mm-es csĘkulccsal
csavarja ki az égĘfej fúvókáját,
és cserélje ki az új gáztípusnak
megfelelĘre (lásd A gázégĘk
és a fúvókák jellemzĘ
adatai
táblázatot)!
ĘgázégĘ takarékfokozatának beállítása:
A süt
1. gyújtsa meg az égĘt (lásd Bekapcsolás és
használat);
2. csavarja a tekerĘgombot minimumra (MIN), majd 10
perc elteltével csavarja a maximumra (MAX);
24
Page 25

3. húzza ki a tekerĘgombot;
4. csavarja a tekerĘgomb tengelyén kívül található
szabályozócsavart addig (lásd ábra), míg szabályos kis
lángot nem kap!
! Földgáz esetén a szabályozócsavart órairánnyal
ellentétesen kell kicsavarni.
5. ellenĘrizze, hogy ha a tekerĘgombot a MAX állásból
gyorsan a MIN állásba tekeri, illetve ha gyorsan kinyitja
a sütĘajtót, a gázégĘ nem alszik-e ki!
HU
MĥSZAKI ADATOK
A sütĘ méretei
magasság x szélesség
x mélység.
Térfogat
Az ételmelegítĘ rész
hasznos méretei
A hálózati áram
feszültsége és
frekvenciája
ÉgĘfejek
2006/95/EC (12/12/2006)
34 x 39x 44cm
58 liter
szélesség: 44 cm
mélység: 42 cm
magasság: 17cm
lásd az adattáblán
az adattáblán jelzett
valamennyi gáztípusra
átállítható
alacsonyfeszültségi irányelv és
késĘbbi módosításai – Az
elektromos összeférhetĘségrĘl
szóló 2004/108/EC
(15/12/2004)irányelv és
késĘbbi módosításai – A
gázüzemĦ berendezésekrĘl
szóló 1990. június 29-i
2009/142/EC irányelv és
késĘbbi módosításai – Az
30.11.09-i 93/68/EEC irányelv
és késĘbbi módosításai – Az
2002/96/EC irányelv.
1275/2008 (Stand-by/ Off
mode)
25
Page 26

HU
S
S
R
A
1. táblázat
GázégĘ
Gyors (R)
Fél-gyors (S)
KisegítĘ (A)
SütĘ
Hálózati
nyomás
g
A gázégĘk és a fúvókák jellemzĘ adatai
15°C-on és 1013 mbar-nál
P.C.S. G20 37,78 MJ/m
P.C.S. G30 49,47 MJ/k
ÁtmérĘ
(mm)
100 41 0.80 128 3.30 314 87 3.00 218
75 30 0.50 104 2.10 200 70 1.90 138
51 30 0.50 76 1.15 109 52 1.00 73
Gyújtóláng,
1/100 (mm)
- 46 1.00 119 3.20 305 80 2.80 204
KN3G2S/UA
KN3G20/UA
Nom.
Min.
Max
3
Csökkent
ett
hĘenergia
, kW
Fúvóka,
1/100
(mm)
G 20 G 30
Névleges
hĘenergia,
kW
25
20
30
Átáramlás*
l/h
Fúvóka,
1/100
(mm)
Névleges
hĘenergia,
kW
30
25
35
Átáramlás*
g/h
FIGYELEM! Ha felmelegedik, az
üvegtetĘ széttörhet.MielĘtt lehajtaná,
kapcsolja ki az összes égĘfejet,
illetve az esetleges elektromos
fĘzĘlapokat.*Csak az üvegtetĘs
modellek esetén
26
Page 27

Bekapcsolás és használat
F
X
C
A fĘzĘlap használata
Az égĘfej meggyújtása
A GÁZÉGė tekerĘgombok esetében a gombhoz tartozó
gázégĘt tele kör jelzi.
A fĘzĘlap tetszĘleges gázégĘjének meggyújtása:
1. közelítsen egy gyufát vagy gázgyújtót a gázégĘhöz;
2. nyomja be, és ezzel egyidejĦleg csavarja a GÁZÉGė
tekerĘgombját órairánnyal ellentétesen a nagy láng
szimbólumra (;
3. a láng kívánt erĘsségének beállításához csavarja
a GÁZÉGė tekerĘgombját órairánnyal ellentétesen
takarékra &, nagy lángra ( vagy egy köztes állásba!
Ha a készülék rendelkezik elektromos gyújtással*
szimbólumot viselĘ gyújtás gomb
(C), a
nyomva tartását követĘen
nyomja be a GÁZÉGė
tekerĘgombját ütközésig, és
ezzel egyidejĦleg forgassa
órairánnyal ellentétesen
a nagy láng szimbólumra,
míg az égĘ ki nem gyullad!
ElĘfordulhat, hogy a gázégĘ
kialszik, ha a gombot elengedi. Ilyenkor ismételje meg a
fenti mĦveletet úgy, hogy a tekerĘgombot hosszabb ideig
tartja benyomva!
! Abban az esetben, ha a láng véletlenül kialudna, zárja
el a gázégĘt, és mielĘtt újra meggyújtaná, várjon 1
percet!
HU
A gázégĘk típusának megállapításához tekintse meg a
„A gázégĘk és a fúvókák jellemzĘ adatai” fejezet rajzait.
! A kis edénytartó ráccsal rendelkezĘ modelleknél a
rács kizárólag a kiegészítĘ gázégĘhöz használható, és
12 cm-nél kisebb átmérĘjĦ edények melegíthetĘk rajta.
A sütĘ használata
!ElsĘ bekapcsoláskor legalább egy óra hosszat
mĦködtesse üresen a sütĘt maximum hĘmérsékleti
fokozaton és csukott ajtó mellett! Ezután kapcsolja
ki a sütĘt, nyissa ki az ajtaját, és szellĘztesse ki a
helyiséget! A keletkezett szag a sütĘ védelmére
használt anyagok elpárolgásából származik.
! Soha ne támasszon semmit a sütĘ aljának, mert a
zománc megsérülhet! A sütĘ 1-es szintjét csak nyárson
sütéskor használja!
! Használatbavétel elĘtt gondosan húzza le a készülék
oldalaira felragasztott mĦanyag ¿ lmrétegeket!
A sütĘ begyújtása
A sütĘgázégĘ begyújtásához közelítsen egy gyufát
vagy egy öngyújtót az „F” nyíláshoz (lásd ábra),
egyidejĦleg nyomja be teljesen, és forgassa az
óramutató járásával ellentétes irányba a SÜTė
tekerĘgombot a MAX helyzetig!
Ha a készülék rendelkezik elektromos gyújtással*,
Amennyiben a készülék égésbiztosítóval* (X)
rendelkezik, tartsa a GÁZÉGė tekerĘgombját nagyjából
2–3 másodpercre lenyomva annak érdekében, hogy a
láng égve maradjon és az égésbiztosító bekapcsoljon!
A gázégĘ kikapcsolásához csavarja a tekerĘgombot
ütközésig a
A gázégĘk használatával kapcsolatos praktikus
tanácsok
A gázégĘk optimális teljesítménye és az alacsony
gázfogyasztás érdekében a gázégĘ méretéhez illĘ,
fedĘvel ellátott lapos fenekĦ edényeket érdemes
használni.
• jelig!
ÉgĘ
Az edény átmérĘje (cm)
másodperc elteltével az égĘ még mindig nem gyulladt
meg, engedje el a tekerĘgombot, nyissa ki a sütĘajtót,
és az újabb begyújtási kísérlet elĘtt várjon legalább 1
percet! Áramkimaradás esetén a gázégĘ a fent leírtak
szerint gyufával vagy gázgyújtóval is begyújtható.
szimbólumot viselĘ
a
gyújtás gomb nyomva tartását
követĘen nyomja be a SÜTė
tekerĘgombot ütközésig, és
ezzel egyidejĦleg forgassa
órairánnyal ellentétesen a
MAX helyzetbe, míg az égĘ ki
nem gyullad! Amennyiben 15
Gyors égĘ (R) 24-26
Közepes égĘ (S) 16-20
Segéd égĘ (A) 10-14
27
Page 28

HU
! A sütĘ biztonsági szerkezettel rendelkezik, melynek
bekapcsolásához a SÜTė tekerĘgombot legalább 6
másodpercig lenyomva kell tartani.
! Abban az esetben, ha a láng véletlenül kialudna, zárja
el a gázégĘt, és mielĘtt a sütĘt újra begyújtaná, várjon
1 percet!
A hĘmérséklet beállítása
A kívánt sütési hĘmérséklet beállításához forgassa
a SÜTė tekerĘgombot órairánnyal ellentétesen! A
hĘmérsékletértékek a kezelĘpanelrĘl olvashatók le,
és a MIN értéktĘl (140 °C) a MAX értékig (250 °C)
terjedhetnek. A hĘmérséklet elérését követĘen, a
hĘfokszabályozó segítségével a sütĘ folyamatosan
állandó értéken tartja a hĘmérsékletet.
Ęt, és mielĘtt a grillt újra begyújtaná, várjon 1 percet!
Alsó tárolótér
A sütĘ alatt van egy
tárolótér, melyben
kiegészítĘk, illetve
fazekak tárolhatók. A
sütĘajtó kinyitásához
az ajtót forgassa el
lefelé (lásd ábra).
! Az alsó tárolótérbe
ne tegyen gyúlékony anyagot:
! A ¿ ók (ha van) belsĘ felületei felmelegedhetnek
28
Page 29

FIGYELEM
g
Az „A” védĘelem eltávolitásához csavarja ki az „S”
csavart, ezután távolitsa el az „A” védĘelemet, majd
helyezze vissza a megfelelĘ helyzetbe és rögzítse az
„S” csavar segítségével.
A sütĘ használata elĘtt bizonyosodjon meg arról , hogy
az „A” védĘelem helyesen van-e rögzítve.
Sütési táblázat
HU
Az étel fajtája Súly (kg) A sütĘ aljától
számított magassági
HĘmérséklet
qC)
(q
ElĘmelegítési idĘ
(perc)
Sütési idĘ (perc)
szint
Tészták
Lasagne 2,5 4 200-210 10 75-85
Cannelloni 2,5 4 200 10 50-60
Sült tészta 2,5 4 200 10 50-60
Húsok
Borjú 1,5 3 200-210 10 95-100
Csirke 1,5 3 210-220 10 90-100
Kacsa 1,8 3 200 10 100-110
Nyúl 2,0 3 200 10 70-80
Sertés 2,1 3 200 10 70-80
Bárány 1,8 3 200 10 100-105
Halak
Makréla 1,1 3 180-200 10 45-50
Fogas 1,5 3 180-200 10 45-55
Pisztráng papírban sütve 1,0 3 180-200 10 40-45
Pizza
Nápolyi pizza 1,0 4 210-220 15 20-25
Sütemények
Keksz 0,5 4 180 15 25-35
Gyümölcstorta 1,1 4 180 15 40-45
Csokoládé torta 1,0 4 180 15 50-55
Kelt tészta 1,0 4 170 15 40-45
Megjegyzés: A megadott sütési idĘk tájékoztató jellegĦek és az egyéni ízléstĘl függĘen eltérhetnek. Amennyiben a grill
használatával süt, a zsírfelfo
ó serpenyĘt mindig az alsó magassági szintre helyezze be!
29
Page 30

Óvintézkedések és tanácsok
HU
! A készülék a nemzetközi biztonsági szabványokkal
összhangban lett tervezve és gyártva.
Ezen ¿ gyelmeztetéseket biztonsági megfontolásból
közöljük, kérjük olvassa el Ęket ¿ gyelmesen!
Általános biztonság
• A készüléket otthoni, háztartási használtra szánták.
• A sütĘ nem helyezhetĘ üzembe nyitott térben, még
akkor sem, ha a terület védett helyen van, mivel
rendkívül veszélyes a készüléket esĘnek, viharnak
kitenni!
• Ne érjen a készülékhez mezítláb, illetve vizes vagy
nedves kézzel vagy lábbal!
• A készüléket kizárólag felnĘttek
használhatják ételek sütésére a kézikönyvben
található útmutatásoknak megfelelĘen. Minden
más használatra (például: helyiségek fĦtésére)
alkalmatlan és ezért veszélyes. A gyártó nem
vonható felelĘsségre olyan károkért, amelyek
szakszerĦtlen, hibás, vagy nem rendeltetésszerĦ
használatból adódnak
• A kézikönyv 1. (izolált) vagy 2. osztályú – 1.
alosztályú (két szekrény közé beépített) készülékre
vonatkozik.
• A készülék használata közben a felmelegedĘ részek
és a sütĘ ajtajának néhány része felforrósodik.
Ügyeljen rá, hogy ezekhez ne érjen, és a
gyermekeket tartsa tĘlük távol!
• Kerülje el, hogy más elektromos háztartási
készülékek vezetéke hozzáérjen a sütĘ meleg
részeihez!
• Ne takarja el a szellĘzésre és a hĘ elosztására
szolgáló nyílásokat!
• Az edények behelyezéséhez vagy kivételéhez mindig
használjon sütĘkesztyĦt!
• A készülék mĦködése közben ne használjon a
közelben gyúlékony folyadékokat (alkohol, benzin,
stb.)!
• Ne tegyen gyúlékony anyagot az alsó tárolótérbe,
illetve a sütĘbe: meggyulladhat, ha a készülék
véletlenül mĦködni kezd!
• A ¿ ók (amennyiben van ilyen) belsĘ felületei
felmelegedhetnek.
• Ha a készüléket nem használja, mindig ellenĘrizze,
hogy a gombok a • állásban legyenek!
• A csatlakozót az elektromos hálózatból ne a
kábelnél, hanem a csatlakozódugónál fogva húzza
ki!
• A készülék tisztítását vagy karbantartását azután
kezdje el, hogy kihúzta a csatlakozódugót az
elektromos hálózatból!
• Meghibásodás esetén semmilyen körülmények
között ne próbálja megjavítani a belsĘ szerkezeteket!
Forduljon a szervizhez!
• Ne tegyen nehéz tárgyakat a nyitott sütĘajtóra!
• A készüléket testileg, érzékszervileg vagy szellemileg
korlátozott, nem hozzáértĘ
ismerĘ személyek – a gyerekeket is ideértve – csak
a biztonságukért felelĘ
mellett, illetve a készülék használatával kapcsolatos
alapvetĘ utasítások ismeretében használhatják.
• Ne engedje a gyerekeket játszani a készülékkel.
, illetve a terméket nem
s személyek felügyelete
Hulladékkezelés
• A csomagolóanyag megsemmisítése: tartsa be
a helyi elĘírásokat, így a csomagolóanyag újra
felhasználásra kerülhet!
• Az Európai Parlament és Tanács, elektromos és
elektronikus berendezések hulladékairól (WEEE)
szóló 2002/96/EK irányelve elĘírja, hogy ezen
hulladékok nem kezelhetĘk háztartási hulladékként.
A forgalomból kivont berendezéseket – az azokat
alkotó anyagok hatékonyabb visszanyerése, illetve
újrahasznosítása, valamint az emberi egészség
és a környezet védelme érdekében – szelektíven
kell gyĦjteni. Az összes terméken megtalálható
áthúzott szemetes szimbólum a szelektív gyĦjtési
kötelezettségre emlékeztet.
A tulajdonosok, háztartási készülékük forgalomból
történĘ helyes kivonásával kapcsolatban, további
információért a megfelelĘ közszolgálathoz, illetve a
forgalmazóhoz is fordulhatnak.
Takarékosság és környezetvédelem
• Ha a sütĘt késĘ esti vagy a kora reggeli órákban
mĦködteti, hozzájárul az elektromos mĦvek
terheltségének csökkentéséhez.
• A tömítéseket tartsa tisztán és Ęrizze meg
hatékonyságukat oly módon, hogy jól illeszkedjenek
az ajtóhoz és ne engedjék kijutni a hĘt!
30
Page 31

Karbantartás és ápolás
A fedĘ eltávolítása
Áramtalanítás
Minden mĦvelet elĘtt áramtalanítsa a készüléket!
A készülék tisztítása
! A készülék tisztításához soha ne használjon
gĘztisztítót vagy nagynyomású tisztítót!
A tisztítás
megkönnyítése
érdekében fedĘ
levehetĘ.
A fedĘ levételéhez
elĘször nyissa ki teljesen
majd húzza felfelé (ld. az
ábrát)!
HU
• A külsĘ zománc vagy inox alkatrészek és a
gumitömítések tisztíthatók langyos vízzel átitatott
szivaccsal és semleges szappannal. Ha a
foltokat nehéz eltávolítani, használjon speciális
tisztítószereket! Tisztítás után bĘ vízzel öblítse le, és
szárítsa meg Ęket! Ne használjon súrolóport vagy
maró anyagot!
• A könnyebb tisztíthatóság érdekében a fĘzĘlap
rácsai, égĘfedelei, lángelosztó rózsái és gázégĘi
levehetĘk; mossa el Ęket meleg, nem súroló hatású
mosószeres vízben, ügyelve arra, hogy minden
lerakódást eltávolítson, majd várja meg, hogy
tökéletesen megszáradjanak!
• Rendszeresen tisztítsa meg az égésbiztosítók*
végét!
• A sütĘ belsejét lehetĘleg minden használat után,
még langyos állapotban tisztítsa meg! Használjon
meleg vizet és mosogatószert, öblítse le, és puha
ruhával törölje szárazra! Kerülje a súrolószerek
használatát!
Gázcsapok
karbantartása
A gázcsapoknál elĘfordulhat, hogy idĘvel beragadnak,
vagy elforgatásuk nehézkessé válik. Ilyenkor a
gázcsapot újra kell cserélni.
! Ezt a mûveletet csak a gyártó által felhatalmazott
szakember végezheti.
Szerviz
! Sohase hívjon engedéllyel nem rendelkezĘ
szakembert!
Adja meg az alábbiakat:
• az anomália típusát;
• a készülék modelljét (Mod.)
• a készülék sorozatszámát (S/N)
Az utóbbi információk a készüléken elhelyezett
adattáblán találhatók.
• Az ajtóüveget szivaccsal és nem súrolóhatású
mosószerrel tisztítsa le, majd puha ruhával törölje
szárazra; ne használjon durva, dörzsanyagot
vagy éles, fém kaparókést, mely megkarcolhatja
a felületét, vagy akár az üvegfelület széttörését is
eredményezheti!
• A tartozékok a normál edényekhez hasonlóan, akár
mosogatógépben is elmoshatók.
• Ne hajtsa le a fĘzĘlap tetejét, ha még ég valamelyik
gázégĘ, vagy még meleg!
A sütĘ tömítéseinek ellenĘrzése
Rendszeresen ellenĘrizze a sütĘajtó körüli tömítések
állapotát! Ha sérülést vesz észre, forduljon a
legközelebbi hivatalos szakszervizhez! Javasoljuk, hogy
ne használja a sütĘt, amíg a javítást nem végzik el!
31
Page 32

Instalace
CZ
! Je velice duležité tento návod uschovat, aby mohl
být kdykoli konzultován. V prípade prodeje, odevzdání
nebo stehování se ujistete, že zustane spolu se
zarízením.
! Pozorne si prectete uvedené pokyny: Jsou zdrojem
duležitých informací, týkajících se instalace, použití a
bezpecnosti.
! Instalace zarízení musí být provedena odborne
kvali¿ kovaným personálem podle uvedených pokynu.
! Jakýkoli zásah v rámci regulace nebo údržby musí
být proveden pri vypnutém sporáku, odpojeném od
elektrického rozvodu.
Vyvetrání místností
Zarízení muže být nainstalováno pouze v trvale vetraných
místnostech, v souladu s národne platnými normami.
V místnosti, ve které bude zarízení nainstalováno, musí být
možný prívod takového množství vzduchu, které vyžaduje
pravidelné spalování plynu (prutok vzduchu nesmí být nižší
3
než 2 m
/h na kW nainstalovaného výkonu).
Otvory pro prívod vzduchu, chránené mrížkami, musí
2
mít potrubí s užitkovým prurezem nejméne 100 cm
a
musí být umísteny tak, aby se nemohly ucpat, a to ani
cástecne (viz obrázek A).
Tyto otvory musí být o 100% vetší – s minimální
2
hodnotou 200 cm
– v prípade, že varná deska zarízení
není vybavena bezpecnostním zarízením pro detekci
neprítomnosti plamene a když je prívod vzduchu
zabezpecen neprímo z prilehlých místností (viz obrázek
B) – za predpokladu, že se nejedná o spolecné
místnosti budovy, prostredí s nebezpecím požáru nebo
ložnice – vybaveny ventilacním potrubím vedoucím ven
v souladu s výše uvedeným popisem.
Prilehlá místnost Místnost, která má
být vetrána
A B
Odvádení koure ze spalování
Odvádení koure vznikající pri spalování musí být zajišteno
prostrednictvím odsavace pripojeného ke komínu
s prirozeným tahem urcité úcinnosti nebo prostrednictvím
elektroventilátoru, který vstoupí do cinnosti automaticky pri
každém zapnutí zarízení (viz obrázky).
Odvádení koure prímo ven Odvádení koure
prostrednictvím komínu
nebo rozvetvené kourové
trubky (vyhrazené pro
zarízení na pecení)
! Plyny z kapalné ropy, které jsou težší než vzduch, se
zdržují dole, proto místnosti, v nichž jsou uložené sudy
s GPL, musí být vybaveny otvory vedoucími ven kvuli
odvádení prípadných unikajících plynu zespodu.
Prázdné nebo cástecne plné sudy s GPL se nesmí
instalovat ani umístit do místností nebo prostoru
nacházejících se pod úrovní terénu (pivnice atd.).
V místnosti nechávejte pouze používaný sud, a to
v dostatecné vzdálenosti od zdroju tepla (trouby, krby,
kachle), které jej mohou ohrát na teplotu vyšší než
50°C.
Ustavení a vyrovnání do vodorovné polohy
! Zarízení lze nainstalovat vedle nábytku za
predpokladu, že jeho výška nepresahuje výšku varné
desky.
! Ujistete se, že stena dotýkající se zadní strany
zarízení je z nehorlavého materiálu, odolného vuci teplu
(T 90°C).
A
Ventilacní otvor pro Zvetšení spáry mezi
vzduch podporující horení dvermi a podlahou
! Po dlouhodobejším používání zarízení se doporucuje
otevrít okno nebo zvýšit rychlost prípadných ventilátoru.
32
V rámci správné instalace je treba:
• Uložit zarízení do kuchyne, do jídelny nebo do
pokoje v jednopokojovém byte (ne do koupelny);
• když je varná deska vyšší než nábytek, tento se
Page 33

musí nacházet ve
HOOD
420
Min.
min.
650
mm. with hood
min.
700
mm. without hood
mm.
600
Min. mm.
420
Min. mm.
vzdálenosti nejméne
600 mm od zarízení;
• když bude sporák
nainstalován pod
zavešenou horní
skrínku kuchynské
linky, musí být
dodržena minimální
vzdálenost varné
desky od skrínky: 420
mm .
Tato vzdálenost musí být 700 mm v prípade, že je
materiál skrínky horlavý (viz obrázek);
• neumístujte za sporák ani do prostoru do 200 mm
od jeho sten závesy;
• Prípadné odsavace musí být nainstalovány podle
pokynu uvedených v príslušném návodu.
Vyrovnání do vodorovné
polohy
predpisum;
• je zásuvka schopna snášet proudový odber
odpovídající maximálnímu výkonu zarízení,
uvedenému na štítku s jmenovitými údaji;
• se napájecí napetí pohybuje v rozmezí uvedeném
na štítku s jmenovitými údaji;
• je zásuvka kompatibilní se zástrckou zarízení.
V opacném prípade vymente zásuvku nebo
zástrcku; nepoužívejte prodlužovací kabely ani
rozvodky.
! Po ukoncení instalace zarízení musí zustat elektrický
kabel a elektrická zásuvka snadno prístupné.
! Kabel se nesmí ohýbat ani stlacovat.
! Kabel musí být pravidelne kontrolován a dle potreby
vymenen výhradne autorizovanými techniky.
! Firma neponese žádnou odpovednost za
nedodržení techto predpisu.
CZ
Je-li treba vyrovnat zarízení do
vodorovné polohy, zašroubujte
dodané nožky do príslušných
uložení v rozích spodní cásti
sporáku (viz obrázek).
Nohy* se zacvaknou pod spodní
cást sporáku.
Elektrické zapojení
Na kabel namontujte normalizovanou zástrcku,
vhodnou pro proudový odber, který je uveden na štítku
s jmenovitými údaji (viz tabulka Technické údaje).
V prípade prímého zapojení do elektrického rozvodu
je treba mezi zarízení a sít zapojit omnipolární stykac
s minimální rozpínací vzdáleností kontaktu 3 mm,
vhodný pro daný proudový odber a vyhovující platným
národním normám (zemnicí vodic nesmí být stykacem
prerušen). Napájecí kabel musí být umísten tak, aby
teplota žádné jeho cásti nepresáhla teplotu prostredí o
50 °C.
Pred zapojením se ujistete, že:
• Je zásuvka rádne uzemnena a odpovídá zákonným
Pripojení k rozvodu plynu
Pripojení k rozvodu plynu nebo k tlakové láhvi s plynem
muže být zrealizováno gumovou nebo ocelovou hadicí
v souladu s platnými národními normami poté, co se
ujistíte, že bylo zarízení nastaveno pro druh plynu, kterým
bude napájeno (viz cejchovací štítek na víku: v opacném
prípade viz níže). V prípade napájení tekutým plynem
z tlakové láhve použijte regulátory tlaku odpovídající
platným národním normám. Prívod plynu lze nastavit
bocne* kvuli ulehcení jeho pripojení: Vymente vzájemne
hadicovou spojku s uzáverem a vymente tesnení za
tesnení dodané v príslušenství.
! Kvuli zajištení bezpecné cinnosti, kvuli realizaci
vhodného zpusobu použití energie a kvuli zajištení delší
životnosti zarízení se ujistete, že prívodní tlak odpovídá
hodnotám uvedeným v tabulce s Údaji horáku a trysek
(viz níže).
Pripojení plynu s použitím gumové hadice
Zkontrolujte, zda hadice odpovídá platným národním
normám. Vnitrní prumer hadice musí být: 8 mm pro
napájení tekutým plynem; 13 mm pro napájení metanem.
Po provedení pripojení se ujistete, že hadice:
• se v žádném míste nedotýká soucástí
dosahujících vyšší teploty než 50°C;
• není vystavena žádné námaze v tahu nebo zkrutu
a nevykazuje ohnutí ani priškrcení;
• nemuže prijít do styku s ostrými predmety,
* Je soucástí pouze nekterých modelu.
33
Page 34

CZ
A
V
ostrými hranami, cástmi nábytku a že nemuže být
stlacena;
• je snadno dostupná po celé délce za úcelem
kontroly jejího stavu;
• není delší než 1500 mm;
• je rádne upevnena obou koncích prostrednictvím
stahovacích pásek odpovídajících platným
národním normám.
! V prípade, že nelze dodržet jednu nebo více
uvedených podmínek nebo když bude sporák
nainstalován podle podmínek trídy 2 – podtrídy 1
(zarízení vestavené mezi dva kusy nábytku), je treba
použít ocelovou hadici (viz níže).
Pripojení k rozvodu plynu prostrednictvím hadice
z jednolité nerezavející oceli s úchyty se závity
Zkontrolujte, zda hadice a tesnení odpovídají platným
národním normám.
Pri montáži hadice odstrante hadicovou spojku
prítomnou na zarízení (spojka pro vstup plynu do
zarízení má válcový závit 1/2“ samec).
! Pripojení zrealizujte tak, aby maximální délka hadice
nepresahovala 2 metry, a ujistete se, že hadice
neprichází do styku s nábytkem a že nedochází k jejímu
stlacování.
Kontrola tesnosti
Po ukoncení instalace zkontrolujte dokonalou tesnost
všech spoju s použitím mýdlového roztoku. Nikdy
nepoužívejte k tomuto úcelu plamen.
Prizpusobení ruzným druhum plynu
Zarízení lze prizpusobit jinému druhu plynu, než pro
který bylo uzpusobeno (je uveden na cejchovacím
štítku na víku).
Prizpusobení varné desky
Serízení minimálního prutoku plynu v horácích varné
desky:
1. Pretocte otocný ovladac do polohy odpovídající
minimu;
2. sejmete knoÀ ík otocného ovladace a prostrednictvím
šroubu umísteného uvnitr nebo na boku dríku otocného
ovladace seridte prutok až do dosažení pravidelného
malého plamene.
! V prípade tekutých plynu musí být serizovací šroub
zašroubován až na doraz;
3.
zkontrolujte, zda pri rychlém pretocení otocného
ovladace z polohy odpovídající maximu do polohy
odpovídající minimu nedojde ke zhasnutí horáku.
! Horáky varné desky nevyžadují regulaci primárního
vzduchu.
! Po regulaci s plynem odlišným od plynu, se kterým
bylo zarízení zkolaudováno, provedte výmenu
cejchovacího štítku za štítek odpovídající novému
druhu plynu; štítek je dostupný ve Strediscích
autorizované servisní služby.
! Když se tlak plynu liší (nebo mení) ve srovnání
s predepsanou hodnotou, je treba nainstalovat na
vstupní potrubí regulátor tlaku v souladu s platnými
národními normami pro „regulátory pro kanalizované
plyny“.
PĜizpĤsobení trouby
VýmČna trysky hoĜáku trouby:
1. úplnČ otevĜete dvíĜka trouby;
2. vytáhnČte posuvné dno
trouby (viz obrázek);
Výmena trysek horáku varné
desky:
1. Odložte mrížky a vytáhnete
horáky z jejich uložení;
2. odšroubujte trysky s použitím
3. odšroubujte upevĖovací
šroub hoĜáku a po odšroubování
šroubu V odmotujte hoĜák trouby;
klíce nástrckového klíce o
velikosti 7 mm (viz obrázek) a
vymente je zaty, které jsou vhodné pro nový druh plynu
(viz tabulka s Údaji horáku a trysek);
3. vratte všechny soucásti do puvodní polohy; toho
docílíte provedením operací výše uvedeného postupu
v opacném poradí.
34
nahraćte jej tryskou vhodnou pro nový druh plynu (viz
tabulka Údaje hoĜákĤ a trysek).
4. odšroubujte trysku hoĜáku
pĜíslušným trubkovým klíþem
pro trysky (viz obrázek) nebo
trubkovým klíþem 7 mm a
Page 35

! V pĜípadČ, že plyn používaný
S
S
R
A
ply
tlak je rĤzný (nebo mírnČ lišit)
od doporuþený tlak, musí být
vhodný regulátor tlaku musí
být umístČno na pĜívodní
hadici v souladu s platnými
vnitrostátními pĜedpisy
vztahující se k “regulaþních smČrovány plyn”.
TECHNICKÉ
ÚDAJE
RozmČry Trouby
VxŠxH
Objem
Užitkové rozmČry
zásuvky na ohĜev
pokrmĤ
HoĜáky
Napájecí napČtí a
frekvence
34x39x44 cm
l 58
šíĜka cm 42
hloubka cm 44
výška cm 17
Lze je pĜizpĤsobit všem druhĤm
plynĤ, uvedeným na štítku s
jmenovitými údaji
viz štítek s jmenovitými údaji
SmČrnice Evropského
hospodáĜského spoleþenství:
2006/95/EC z 12.12.06 (Nízké
napČtí) ve smyslu následných úprav
– 2004/108/EC z 15.12.04
(Elektromagnetická kompatibilita)
ve smyslu následných úprav –
2009/142/EC z 30.11.09 (plyn)
1275/2008 (Stand-by/ Off mode)
CZ
KN3G2S/UA
KN3G20/UA
Tabulka s údaji horáku a trysek
Tabulka 1
HoĜák PrĤmČ
Rychlý (Velký) (R) 100 3.00 0.7 41 87 218 214 128 286
Polorychlý
(StĜední) (S)
Pomocný (Malý) (A) 51 1.00 0.4 30 52 73 71 76 95
Trouba - 2.80 1.0 46 80 204 200 119 267
PĜívodní tlak
* PĜi 15°C 1013 mbar-suchý plyn
** Propan P.C.S. = 50,37 MJ/kg
*** Butan P.C.S. = 49,47 MJ/kg
PĜírodní
Tekutý plyn PĜírodní plyn
Tepelný výkon
r (mm)
Jmenovitý Snížený (mm) (mm) *** ** (mm)
75 1.90 0.4 30 70 138 136 104 181
n P.C.S. = 37,78 MJ/m³
kW (p.c.s.*)
Jmenovitý (mbar)
Minimální (mbar)
Maximální (mbar)
Obtok
1/100
tryska
1/100
prĤtok*
28-30
20
35
g/h
tryska
1/100
37
25
45
prĤtok*
l/h
20
17
25
35
Page 36

CZ
X
C
F
Spuštení a použití
Použití varné desky
Zapálení horáku
blízkosti každého otocného ovladace HORÁKU je uvedeno plné
V
kolecko oznacující príslušný horák.
Zapálení horáku varné desky:
1. Približte k horáku plamen nebo zapalovac plynu;
2. stisknete a soucasne otocte proti smeru hodinových rucicek
otocný ovladac HORÁKU do polohy oznacené symbolem
maximálního plamene (.
3. Nastavte požadovaný výkon plamene otácením otocného
ovladace HORÁKU proti smeru hodinových rucicek: do polohy
odpovídající minimu &, do polohy odpovídající maximu ( nebo do
libovolné polohy mezi obema mezními hodnotami.
Když je zarízení vybaveno elektronickým zapalováním* (C), stací
stisknout a soucasne otácet proti
smeru hodinových rucicek otocný
ovladac HORÁKU do polohy
oznacené symbolem minimálního
plamene až do samotného
zapálení. Muže se stát, že horák
pri uvolnení otocného ovládace
zhasne. V takovém prípade
zopakujte uvedenou operaci a pridržte otocný ovladac stisknutý
déle.
! V prípade náhodného zhasnutí plamenu vypnete horák a pred
opetovným pokusem o jeho zapálení vyckejte alespon 1 minutu.
Když je zarízení vybaveno bezpecnostním zarízením(X)* pro detekci
neprítomnosti plamene, držte otocný ovladac HORÁKU stisknutý
približne na 2-3 sekundy, aby se plamen udržel zapálený a aby se
zarízení aktivovalo.
Zhasnutí horáku se provádí otocením otocného ovladace do
polohy • odpovídající jeho zhasnutí.
Praktické rady pro použití horáku
Za úcelem dosažení vyšší úcinnosti horáku a nižší
spotreby plynu je treba použít nádoby s plochým dnem
vybavené poklickou a úmerné velikosti horáku:
Pri identi¿ kaci horáku se ridte dle odvolávek na obrázky
uvedené v odstavci „Údaje horáku a trysek“.
! U modelu vybavených redukcní mrížkou musí být
tato použita pouze pro pomocný horák, a to pri použití
nádob s prumerem menším než 12 cm.
Použití trouby
! Pri prvním zapnutí vám doporucujeme, abyste nechali
troubu bežet naprázdno približne na pul hodiny s termostatem
nastaveným na maximu a se zavrenými dvírky. Poté vypnete
troubu, zavrete dvírka trouby a vyvetrejte místnost. Zápach,
který ucítíte, je zpusoben vyparováním látek použitých na
ochranu trouby.
! Nikdy nepokládejte na dno trouby žádné predmety,
protože by mohlo dojít k poškození smaltu.
Zapálení trouby
Pro zapálení hoĜáku trouby
pĜibližte k otvoru F (viz obrázek)
plamen nebo zapalovaþ plynu,
stisknČte a souþasnČ otoþte proti
smČru hodinových ruþiþek otoþný
ovladaþ TROUBY až do polohy
MAX .
Když po uplynutí 15 sekund
nedošlo k zapálení hoĜáku, povolte otoþný ovladaþ,
otevĜete dvíĜka trouby a pĜed dalším pokusem o
zapálení vyþkejte alespoĖ 1 minutu.
Pro dosažení požadované teploty peþení otáþejte
otoþným ovladaþem TROUBY. Polohy MAX (250’C)
a MIN (140’C) jsou uvedeny na ovládacím panelu.
Teplota je uvedena na teplomČru.
! Trouba je vybavena bezpeþnostním zaĜízením, a
proto je nutné držet ovládací knoÀ ík TROUBA
dolĤ po dobu pĜibližnČ 6 sekund. ! Je-li plamen
náhodnČ zhasne, vypnČte hoĜák a poþkejte
nejménČ 1 minutu, než se pokusíte znovu zapálit
trouby.
Nastavení teploty
Chcete-li nastavit požadovanou teplotu pe
troubu ovládací knoÀ ík proti smČru hodinových
ruþiþek. Teploty jsou zobrazovány na ovládacím
panelu a mohou se lišit od MIN (150 ° C) a MAX
(250 ° C). Jakmile je nastavená teplota byla
dosažena, trouba udržet stálou pomocí jeho
termostatu.
þení,
HoĜák ø PrĤmČry nádob (cm)
Rychlý (R) 24 - 26
Polorychlý (S) 16 - 20
Pomocný (A) 10 - 14
36
Page 37

Tabulka pecení v troube
CZ
PĜipravované jídlo Hmotnost
(kg)
Poloha pro
peþení
poþínaje
Teplota
(°C)
Doba
pĜedehĜevu
(minuty)
Doba peþení
(minuty)
zespodu
TČstoviny
Lasagne
Cannelloni
Gratinované tČstoviny
Maso
Telecí
KuĜe
Kachna
Králík
VepĜové
JehnČþí
Ryby
Makrely
Zubatec
Pstruh v alobalu
Pizza
Neapolská
Dorty
Sušenky
Ovocný koláþ
Slané dorty
Kynuté koláþe
2.5
2.5
2.5
1.5
1.5
1.8
2.0
2.1
1.8
1.1
1.5
1.0
1.0
0.5
1.1
1.0
1.0
4
4
4
3
3
3
3
3
3
3
3
3
4
4
4
4
4
200-210
200
200
200-210
210-220
200
200
200
200
180-200
180-200
180-200
210-220
180
190
180
170
10
10
10
10
10
10
10
10
10
10
10
10
15
15
15
15
15
75-80
50-60
50-60
95-100
90-100
100-110
70-80
70-80
100-105
45-50
45-55
45-50
20-25
25-35
40-45
50-55
40-45
POZN.: Uvedené doby peþení mají pouze orientaþní charakter a mohou být zmČnČny dle osobního pĜání.
PĜi použití grilu nebo ventilovaného grilu je tĜeba vždy umístit sbČrnou nádobu do 1.úrovnČ zespodu.
37
Page 38

Opatrení a rady
CZ
! Zarízení bylo navrženo a vyrobeno v souladu
s mezinárodními bezpecnostními normami.
Tato upozornení jsou uvádena z bezpecnostních
duvodu a je treba si je pozorne precíst.
Základní bezpecnost
• Toto zarízení bylo navrženo pro neprofesionální
použití uvnitr bytu/domu.
• Zarízení nesmí být nainstalováno v exteriéru,
a to ani v prípade, kdy se jedná o chránený
prostor, protože jeho vystavení dešti nebo bouri je
mimorádne nebezpecné.
• Nedotýkejte se zarízení bosýma nohama ani
mokrýma nebo vlhkýma rukama ci nohama.
• ZaĜízení se musí používat k peþení potravin
dospČlými osobami, a to dle pokynĤ
uvedených v tomto návodu. Každé jiné použití
(napĜíklad: ohĜev prostĜedí) je považováno
za nesprávné, a tedy nebezpeþné. Výrobce
nemĤže být považován za odpovČdného za
pĜípadné škody vyplývající z nesprávného,
chybného nebo neracionálního použití.•
Toto zarízení patrí do trídy 1 (izolované) nebo
do trídy 2 – podtrídy 1 (vestavené mezi 2 kusy
nábytku).
• Behem použití zarízení se topné clánky a nekteré
cásti dvírek trouby zahrívají na vysokou teplotu.
Dávejte pozor, abyste se jich nedotkli, a udržujte
v dostatecné vzdálenosti deti.
• Zabrante tomu, aby se napájecí kabely dalších
elektrospotrebicu dostaly do styku s teplými
soucástmi zarízení.
• Nezakrývejte ventilacní otvory a otvory pro únik
tepla.
• Pri vkládání nebo vyjímání nádob používejte
pokaždé ochranné rukavice urcené k použití pri
pecení.
• Behem cinnosti zarízení nepoužívejte v jeho
blízkosti horlavé tekutiny (alkohol, benzin atd.).
• Nevkládejte horlavý materiál do spodního
odkládacího prostoru ani do trouby: V prípade
náhodného uvedení zarízení do cinnosti by se
mohl zapálit.
• Vnitrní povrchy zásuvky (je-li soucástí) by se
mohly ohrát na vysokou teplotu.
• Když se zarízení nepoužívá, pokaždé se ujistete,
že se otocné ovladace nacházejí v poloze
• Nevytahujte zástrcku ze zásuvky taháním za
kabel, ale tak, že uchopíte zástrcku.
• Necistete troubu ani neprovádejte údržbu dríve,
než vytáhnete zástrcku z elektrického rozvodu.
• V prípade poruchy se v žádném prípade
nepokoušejte dostat k vnitrním cástem ve snaze
•.
je opravit. Obratte se na Servisní službu.
• Nepokládejte na otevrená dvírka trouby težké
predmety.
• Nepoþítá se s použitím zaĜízení osobami (vþetnČ
dČtí) se sníženými fyzickými, senzorickými nebo
duševními schopnostmi, neznalými osobami nebo
osobami, které nemají zkušenosti s výrobkem,
jestliže nejsou pod dohledem osoby zodpovČdné
za jejich bezpeþnost nebo pokud nepĜijaly
pĜedbČžné pokyny o použití zaĜízení.
• ZabraĖte tomu, aby si dČti hrály se zaĜízením.
Likvidace
• Likvidace obalového materiálu: Obaly zlikvidujte
v souladu s místními predpisy za úcelem jejich
recyklace.
• Evropská smernice 2002/96/ES o odpadních
elektrických a elektronických zarízeních
(RAEE) predpisuje, aby elektrospotrebice
nebyly likvidovány v rámci bežného pevného
domovního odpadu. Vyrazená zarízení musí
být sesbírána oddelene za úcelem optimalizace
stupne opetovného použití a recyklace materiálu,
ze kterých se skládají, a za úcelem zamezení
možných škod na zdraví a na životním prostredí.
Symbol preškrtnutého košíku na všech výrobcích
pripomíná povinnost separovaného sberu.
Podrobnejší informace týkající se správného
postupu pri vyrazování elektrospotrebicu
z provozu mohou jejich majitelé získat tak, že
se obrátí na príslušnou verejnou službu nebo na
prodejce.
Úspora energie a ohled na životní prostredí
• Pri použití trouby v období od pozdního odpoledne
až do casných ranních hodin se podílíte na
optimalizaci spotreby elektrické energie.
• Pri GRILOVÁNÍ a GRATINOVÁNÍ doporucujeme
péct pokaždé pri zavrených dvírkách: Výsledkem
je krome lepšího upecení také významná úspora
energie (približne 10%).
• Udržujte tesnení v cistém a funkcním stavu, aby
dokonale priléhala k dvírkum a nezpusobovala
únik tepla.
POZOR! Náh lým zahĜátím
mĤže sklo krytu prasknout!
VypnČte a zkontrolujte všechny
hoĜáky a varné plotýnky pĜed
uzavĜením sklenČného krytu.
38
Page 39

Údržba a péce
Vypnutí elektrického proudu
Pred jakoukoli operací odpojte zarízení ze síte
elektrického napájení.
Cištení zarízení
! Nikdy nepoužívejte k cištení zarízení parní cisticí
zarízení s vysokým tlakem.
• Vnejší smaltované nebo nerezové cásti a pryžová
tesnení je možné cistit houbou namocenou ve
vlažné vode a neutrálním mýdlem. V prípade
odstranování úporných skvrn použijte speci¿ cké
cisticí prostredky. Po vycištení jednotlivé soucásti
dokonale opláchnete a osušte. Nepoužívejte
abrazivní práškové prostredky ani korozivní látky.
• Mrížky, víka, vence na distribuci plamene a horáky
varné desky je možné za úcelem jejich vycištení
vytáhnout; umyjte je v teplé vode s neabrazivním
cisticím prostredkem; dbejte pritom na dokonalé
odstranení veškerých nánosu a dokonalé osušení.
• Pravidelne cistete koncovou cást bezpecnostních
zarízení* na detekci neprítomnosti plamene.
• Vnitrek trouby je treba vycistit po každém
použití, když je ješte vlažný. Používejte teplou
vodu a cisticí prostredek a na záver osušte
jemným hadrem. Vyhnete se použití abrazivních
prostredku.
• Dvírka trouby cistete houbou a neabrazivními
prostredky a osušte je jemným hadríkem;
nepoužívejte drsné abrazivní materiály ani
zahrocené kovové škrabky, které by mohly
poškrábat povrch a zpusobit prasknutí skla.
• Príslušenství se muže umývat jako bežné nádobí i
v mycce nádobí.
• Nezavírejte kryt pri zapnutých nebo ješte teplých
horácích.
Kontrola tesnení trouby
Pravidelne kontrolujte stav tesnení po obvodu dverí
trouby. V prípade jeho poškození se obratte na nejbližší
Servisní autorizované stredisko. Doporucuje se
nepoužívat troubu až do uskutecnení opravy.
Údržba plynových kohoutku
Casem se muže stát, že se nekterý otocný ovladac
zablokuje nebo bude vykazovat potíže pri otácení.
V takovém prípade je treba provést jeho výmenu.
! Tato operace musí být provedena technikem
autorizovaným výrobcem.
OdstranČní víka
Aby bylo þištČní varné desky
snazší, mĤžete víko varné desky
odstranit. Nejprve jej zcela
otevĜete a poté jej zvednČte (viz
obrázek).
U modelu* plynový sporák, je posuvná ochranná vrstva,
která chrání spodní prostor na teplo z hor(áku (viz
obrázek).
Chcete-li odstranit
posuvné ochranu
odstran(te šroub S (viz
A
obrázek). Nahradit,
zajiste(te ho na míste(
pomocí šroubu S.
CZ
! Pr(ed použitím trouby
se ujiste(te, že posuvné
ochrane(, je správne(
S
Servisní služba
! Nikdy se neobracejte na neautorizované techniky
Uvedte:
• Druh poruchy;
• Model zarízení (Mod.)
• Výrobní císlo (S/N)
Tyto informace se nacházejí na štítku s jmenovitými
údaji, umísteném na zarízení
39
Page 40

ɂɧɫɬɚɥɢɪɚɧɟ
BG
! ȼɚɠɧɨ ɟ ɞɚ ɫɴɯɪɚɧɹɜɚɬɟ ɬɚɡɢ ɤɧɢɠɤɚ, ɡɚ ɞɚ ɦɨɠɟ
ɞɚ ɹ ɢɡɩɨɥɡɜɚɬɟ ɡɚ ɫɩɪɚɜɤɚ ɜɴɜ ɜɫɟɤɢ ɦɨɦɟɧɬ.
ɉɪɢ ɩɪɨɞɚɠɛɚ ɧɚ ɭɪɟɞɚ, ɩɪɢ ɩɪɟɤɪɚɬɹɜɚɧɟ ɧɚ
ɢɡɩɨɥɡɜɚɧɟɬɨ ɦɭ ɢɥɢ ɩɪɢ ɩɪɟɦɟɫɬɜɚɧɟ ɫɟ ɭɜɟɪɟɬɟ,
ɱɟ ɤɧɢɠɤɚɬɚ ɫ ɢɧɫɬɪɭɤɰɢɢɬɟ ɟ ɡɚɟɞɧɨ ɫ ɧɟɝɨ.
! ɉɪɨɱɟɬɟɬɟ ɜɧɢɦɚɬɟɥɧɨ ɢɧɫɬɪɭɤɰɢɢɬɟ: ɜ ɬɹɯ ɢɦɚ
ɜɚɠɧɢ ɫɜɟɞɟɧɢɹ ɡɚ ɢɧɫɬɚɥɢɪɚɧɟɬɨ, ɢɡɩɨɥɡɜɚɧɟɬɨ
ɢ
ɛɟɡɨɩɚɫɧɨɫɬɬɚ ɩɪɢ ɪɚɛɨɬɚ ɫ ɭɪɟɞɚ.
! ɂɧɫɬɚɥɢɪɚɧɟɬɨ ɧɚ ɭɪɟɞɚ ɬɪɹɛɜɚ ɞɚ ɫɟ ɢɡɜɴɪɲɢ ɨɬ
ɤɜɚɥɢɮɢɰɢɪɚɧ ɫɩɟɰɢɚɥɢɫɬ ɫɴɝɥɚɫɧɨ ɧɚɫɬɨɹɳɢɬɟ
ɢɧɫɬɪɭɤɰɢɢ.
! ȼɫɹɤɚ ɨɩɟɪɚɰɢɹ ɩɨ ɧɚɫɬɪɨɢɤɚ ɢɥɢ ɩɨɞɞɪɴɠɤɚ
ɬɪɹɛɜɚ ɞɚ ɫɟ ɢɡɜɴɪɲɜɚ, ɤɨɝɚɬɨ ɩɟɱɤɚɬɚ ɟ ɢɡɤɥɸɱɟɧɚ
ɨɬ ɟɥɟɤɬɪɢɱɟɫɤɨɬɨ ɡɚɯɪɚɧɜɚɧɟ.
ɋɥɟɞɜɚɳɢɬɟ ɢɧɫɬɪɭɤɰɢɢ ɫɟ ɨɬɧɚɫɹɬ ɡɚ
ɤɜɚɥɢɮɢɰɢɪɚɧ ɢɧɫɬɚɥɚɬɨɪ, ɤɨɢɬɨ ɳɟ ɢɡɜɴɪɲɢ
ɦɨɧɬɚɠɚ, ɧɚɫɬɪɨɢɤɚɬɚ ɢ
ɬɟɯɧɢɱɟɫɤɚɬɚ ɩɨɞɞɪɴɠɤɚ ɩɨ
ɧɚɢ-ɬɨɱɧɢɹ ɧɚɱɢɧ ɢ ɫɴɝɥɚɫɧɨ ɞɟɢɫɬɜɚɳɢɬɟ ɧɨɪɦɢ.
ȼɚɠɧɨ: ȼɫɹɤɚ ɧɚɫɬɪɨɢɤɚ, ɩɨɞɞɪɴɠɤɚ ɢ ɬ.ɧ. ɬɪɹɛɜɚ
ɞɚ ɫɟ ɢɡɜɴɪɲɜɚ, ɤɨɝɚɬɨ ɩɟɱɤɚɬɚ ɟ ɢɡɤɥɸɱɟɧɚ ɨɬ
ɟɥɟɤɬɪɢɱɟɫɤɨɬɨ ɡɚɯɪɚɧɜɚɧɟ.
Ɇɟɫɬɨɩɨɥɨɠɟɧɢɟ
ȼɚɠɧɨ: Ɍɚɡɢ ɝɨɬɜɚɪɫɤɚ ɩɟɱɤɚ ɦɨɠɟ ɞɚ ɫɟ ɦɨɧɬɢɪɚ
ɢ ɞɚ ɪɚɛɨɬɢ ɫɚɦɨ ɜ ɩɨɦɟɳɟɧɢɹ ɫ ɩɨɫɬɨɹɧɧɚ
ɜɟɧɬɢɥɚɰɢɹ ɫɴɝɥɚɫɧɨ ɩɪɟɞɩɢɫɚɧɢɹɬɚ ɜ ɞɟɢɫɬɜɚɳɢɬɟ
ɧɨɪɦɢ. ɇɟɨɛɯɨɞɢɦɨ ɟ ɞɚ ɫɟ ɫɩɚɡɜɚɬ ɫɥɟɞɧɢɬɟ
ɢɡɢɫɤɜɚɧɢɹ:
• ɉɨɦɟɳɟɧɢɟɬɨ ɬɪɹɛɜɚ ɞɚ ɢɦɚ ɫɢɫɬɟɦɚ ɡɚ
ɞɢɦɨɨɬɜɟɠɞɚɧɟ ɧɚɜɴɧ, ɤɨɹɬɨ ɞɚ ɫɟ ɫɴɫɬɨɢ ɨɬ
ɚɫɩɢɪɚɬɨɪ ɢɥɢ ɟɥ. ɜɟɧɬɢɥɚɬɨɪ, ɤɨɢɬɨ ɫɟ ɜɤɥɸɱɜɚ
ɚɜɬɨɦɚɬɢɱɧɨ
ɜɫɟɤɢ ɩɴɬ, ɤɨɝɚɬɨ ɩɟɱɤɚɬɚ ɫɟ ɡɚɩɚɥɢ.
ɪɢɬɨɤ ɧɚ ɜɴɡɞɭɯ, ɧɟɨɛɯɨɞɢɦ ɡɚ ɩɨɫɬɨɹɧɧɢɹ ɩɪɨɰɟɫ
ɧɚ ɝɨɪɟɧɟɬɨ. Ⱦɟɛɢɬɴɬ ɧɚ ɜɴɡɞɭɯɚ ɡɚ ɝɨɪɟɧɟ
3
ɧɟ ɬɪɹɛɜɚ ɞɚ ɛɴɞɟ ɩɨ-ɦɚɥɴɤ ɨɬ 2 m
/h ɡɚ kW
ɧɨɦɢɧɚɥɧɚ ɬɨɩɥɢɧɧɚ ɦɨɳɧɨɫɬ. ɋɢɫɬɟɦɚɬɚ
ɦɨɠɟ ɞɚ ɫɟ ɨɫɴɳɟɫɬɜɢ ɫ ɜɡɟɦɚɧɟ ɧɚ ɜɴɡɞɭɯ
2
ɧɚɩɪɚɜɨ ɨɬɜɴɧ ɱɪɟɡ ɬɪɴɛɚ ɫ ɩɨɧɟ 100 cm
ɩɨɥɟɡɧɨ ɫɟɱɟɧɢɟ ɢ ɬɚɤɚɜɚ, ɱɟ ɞɚ ɧɟ ɦɨɠɟ ɞɚ
ɛɴɞɟ ɡɚɩɭɲɟɧɚ ɫɥɭɱɚɢɧɨ. Ɂɚ ɭɪɟɞɢ, ɤɨɢɬɨ ɫɚ
ɛɟɡ ɩɪɢɛɨɪ ɡɚ ɡɚɳɢɬɚ ɩɪɢ ɨɬɫɴɫɬɜɢɟ ɧɚ ɩɥɚɦɴɤ,
ɨɬɜɨɪɢɬɟ ɡɚ ɜɟɧɬɢɥɚɰɢɹ ɬɪɹɛɜɚ ɞɚ ɛɴɞɚɬ
2
ɭɜɟɥɢɱɟɧɢ 100%, ɫ ɦɢɧɢɦɭɦ ɨɬ 200 cm
(Ɏɢɝ.
Ⱥ). ɂɥɢ ɢɧɞɢɪɟɤɬɧɨ, ɩɪɟɡ ɫɴɫɟɞɧɢ ɩɨɦɟɳɟɧɢɹ,
ɤɨɢɬɨ ɢɦɚɬ ɜɟɧɬɢɥɚɰɢɨɧɧɚ ɬɪɴɛɚ ɫ ɨɬɜɨɪ ɧɚɜɴɧ
ɤɚɬɨ ɨɩɢɫɚɧɢɹ ɩɨ-ɝɨɪɟ ɢ ɧɟ ɫɚ ɨɛɳɢ ɱɚɫɬɢ ɨɬ
ɧɟɞɜɢɠɢɦɢɹ ɢɦɨɬ, ɩɨɦɟɳɟɧɢɹ ɫ ɨɩɚɫɧɨɫɬ ɨɬ
ɡɚɩɚɥɜɚɧɟ ɢɥɢ ɫɩɚɥɧɢ ɩɨɦɟɳɟɧɢɹ (Ɏɢɝ. ȼ).
ɉɨɦɟɳɟɧɢɟ ɡɚ
ɜɟɧɬɢɥɚɰɢɹ
ȿɥɟɦɟɧɬ A
A
ɉɪɢɦɟɪɢ ɡɚ ɜɟɧɬɢɥɚɰɢɨɧɧɢ
ɨɬɜɨɪɢ ɡɚ ɜɴɡɞɭɯɚ ɡɚ ɝɨɪɟɧɟ
ɉɨɦɟɳɟɧɢɟ
ɫɴɫɟɞɧɨ
ɍɜɟɥɢɱɚɜɚɧɟ ɧɚ ɩɪɨɰɟɩɚ ɦɟɠɞɭ ɜɪɚɬɚɬɚ ɢ ɩɨɞɚ
Ɏɢɝ. Ⱥ Ɏɢɝ. B
• ɍɫɢɥɟɧɨɬɨ ɢ ɩɪɨɞɴɥɠɢɬɟɥɧɨ ɢɡɩɨɥɡɜɚɧɟ ɧɚ
ɩɟɱɤɚɬɚ ɦɨɠɟ ɞɚ ɞɨɜɟɞɟ ɞɨ ɧɟɨɛɯɨɞɢɦɨɫɬ
ɨɬ ɞɨɩɴɥɧɢɬɟɥɧɨ ɩɪɨɜɟɬɪɹɜɚɧɟ
ɫ ɨɬɜɚɪɹɧɟ
ɧɚ ɩɪɨɡɨɪɟɰ ɢɥɢ ɞɨɩɴɥɧɢɬɟɥɧɚ ɜɟɧɬɢɥɚɰɢɹ
ɫ ɭɜɟɥɢɱɚɜɚɧɟ ɫɦɭɤɚɬɟɥɧɚɬɚ ɦɨɳɧɨɫɬ ɧɚ
ɟɥɟɤɬɪɢɱɟɫɤɢɹ ɜɟɧɬɢɥɚɬɨɪ, ɚɤɨ ɢɦɚ ɬɚɤɴɜ.
ȼ ɤɨɦɢɧ ɢɥɢ ɪɚɡɤɥɨɧɟɧɚ ɞɢɦɨɨɬɜɟɠɞɚɳɚ ɬɪɴɛɚ (ɩɪɟɞɧɚɡɧɚɱɟɧɚ ɫɚɦɨ ɡɚ
ɝɨɬɜɚɪɫɤɢ ɩɟɱɤɢ)
40
! ȼɬɟɱɧɟɧɢɬɟ ɝɚɡɨɜɟ ɫɚ ɩɨ-ɬɟɠɤɢ ɨɬ ɜɴɡɞɭɯɚ ɢ ɫɟ
ɭɬɚɹɜɚɬ (ɩɚɞɚɬ) ɧɚɞɨɥɭ. ȿɬɨ ɡɚɳɨ ɜ ɩɨɦɟɳɟɧɢɹɬɚ
ɫ ɝɚɡɨɜɢ ɛɭɬɢɥɤɢ ɡɚ ɩɪɨɩɚɧ-ɛɭɬɚɧ ɬɪɹɛɜɚ ɞɚ ɫɟ
ɩɪɟɞɜɢɞɹɬ ɨɬɜɨɪɢ ɧɚɜɴɧ ɡɚ ɨɬɜɟɠɞɚɧɟ ɨɬɞɨɥɭ
ɧɚ ɟɜɟɧɬɭɚɥɧɨ
ɢɡɬɟɤɥɢɬɟ ɝɚɡɨɜɟ. Ɉɫɜɟɧ ɬɨɜɚ
ɛɭɬɢɥɤɢɬɟ ɡɚ ɩɪɨɩɚɧ-ɛɭɬɚɧ, ɛɢɥɢ ɬɟ ɩɪɚɡɧɢ ɢɥɢ
ɱɚɫɬɢɱɧɨ ɩɴɥɧɢ, ɧɟ ɬɪɹɛɜɚ ɞɚ ɫɟ ɦɨɧɬɢɪɚɬ ɢɥɢ
ɫɤɥɚɞɢɪɚɬ ɜ ɩɨɦɟɳɟɧɢɹ ɢɥɢ ɧɢɲɢ ɩɨɞ ɤɨɬɚ ɧɭɥɚ
(ɩɨɞ ɧɢɜɨɬɨ ɧɚ ɡɟɦɹɬɚ) (ɦɚɡɟɬɚ ɢ ɬ.ɧ.). ɍɦɟɫɬɧɨ ɟ
ɞɚ ɞɴɪɠɢɬɟ ɜ ɩɨɦɟɳɟɧɢɟɬɨ ɫɚɦɨ ɢɡɩɨɥɡɜɚɧɚɬɚ
ɛɭɬɢɥɤɚ, ɫɜɴɪɡɚɧɚ ɞɚɥɟɱ ɨɬ ɢɡɬɨɱɧɢɰɢ ɧɚ
ɬɨɩɥɢɧɚ
(ɮɭɪɧɢ, ɤɚɦɢɧɢ, ɨɬɨɩɥɢɬɟɥɧɢ ɩɟɱɤɢ ɢ ɬ.ɧ.), ɤɨɢɬɨ
ɦɨɝɚɬ ɞɚ ɹ ɞɨɜɟɞɚɬ ɞɨ ɬɟɦɩɟɪɚɬɭɪɚ, ɩɨ-ɜɢɫɨɤɚ ɨɬ
50°C.
Page 41

ɂɧɫɬɚɥɢɪɚɧɟ
HOOD
420
Min.
min.
650
mm. with hood
min.
700
mm. without hood
mm.
600
Min. mm.
420
Min. mm.
Ɍɨɡɢ ɭɪɟɞ ɦɨɠɟ ɞɚ ɛɴɞɟ ɦɨɧɬɢɪɚɧ ɜ ɫɴɫɟɞɫɬɜɨ ɫ
ɞɪɭɝɢ ɤɭɯɧɟɧɫɤɢ ɦɟɛɟɥɢ ɧɟ ɩɨ-ɜɢɫɨɤɢ ɨɬ ɫɚɦɚɬɚ
ɩɟɱɤɚ. Ɂɚ ɩɪɚɜɢɥɧɨɬɨ ɪɚɡɩɨɥɚɝɚɧɟ ɧɚ ɩɟɱɤɚɬɚ ɬɪɹɛɜɚ
ɞɚ ɢɦɚɬɟ ɩɪɟɞɜɢɞ ɫɥɟɞɧɨɬɨ:
• ɲɤɚɮɨɜɟ,
ɪɚɡɩɨɥɨɠɟɧɢ ɨɬɫɬɪɚɧɢ
ɤɨɢɬɨ ɧɚɞɜɢɲɚɜɚɬ
ɪɚɛɨɬɧɢɹ ɩɥɨɬ ɬɪɹɛɜɚ
ɞɚ ɨɬɫɬɨɹɬ ɨɬ ɧɟɝɨ ɧɚ
ɩɨɧɟ 200 ɦɦ;
• Ⱥɛɫɨɪɛɚɬɨɪɢɬɟ ɞɚ
ɫɟ ɦɨɧɬɢɪɚɬ ɫɩɨɪɟɞ
ɢɧɫɬɪɭɤɰɢɢɬɟ ɧɚ
ɩɪɨɢɡɜɨɞɢɬɟɥɹ, ɧɚ
ɜɢɫɨɱɢɧɚ ɦɢɧɢɦɭɦ
650ɦɦ.
• ɉɪɢɥɟɠɚɳɢɬɟ ɧɚ ɚɛɫɨɪɛɚɬɨɪɚ ɲɤɚɮɨɜɟ ɬɪɹɛɜɚ
ɞɚ ɫɚ ɧɚ ɪɚɡɫɬɨɹɧɢɟ ɦɢɧɢɦɭɦ 420ɦɦ. ɨɬ
ɧɚɝɪɹɜɚɳɢɬɟ ɫɟ ɩɥɨɱɢ.(ɜɢɠ ɮɢɝɭɪɚɬɚ)
• Ⱥɤɨ ɩɟɱɤɚɬɚ ɫɟ ɦɨɧɬɢɪɚ ɩɨɞ ɜɝɪɚɞɟɧ ɚɛɫɨɪɛɚɬɨɪ,
ɬɨɣ ɬɪɹɛɜɚ ɞɚ ɟ ɧɚ ɪɚɡɫɬɨɹɧɢɟ ɩɨɧɟ 700ɦɦ ɨɬ
ɩɥɨɬɚ ɢ.
• ɇɢɲɚɬɚ ɩɪɟɞɧɚɡɧɚɱɟɧɚ ɡɚ ɩɟɱɤɚɬɚ ɬɪɹɛɜɚ ɞɚ ɟ ɫ
ɪɚɡɦɟɪɢɬɟ ɩɨɤɚɡɚɧɢ ɩɨ-ɞɨɥɭ ɧɚ ɮɢɝɭɪɚɬɚ.
ɇɢɜɟɥɢɪɚɧɟ
Ⱥɤɨ ɭɪɟɞɴɬ ɬɪɹɛɜɚ ɞɚ
ɛɴɞɟ ɧɢɜɟɥɢɪɚɧ, ɡɚɜɢɢɬɟ
ɪɟɝɭɥɚɰɢɨɧɧɢɬɟ ɤɪɚɱɟɬɚ,
ɤɨɢɬɨ ɫɟ ɞɨɫɬɚɜɹɬ ɜ ɤɨɦɩɥɟɤɬ,
ɜ ɩɪɟɞɧɚɡɧɚɱɟɧɢɬɟ ɡɚ ɬɹɯ
ɥɟɝɥɚ, ɪɚɡɩɨɥɨɠɟɧɢ ɜ ɴɝɥɢɬɟ
ɜ ɨɫɧɨɜɚɬɚ ɧɚ ɩɟɱɤɚɬɚ (ɜɢɠ
ɮɢɝɭɪɚ).
Ʉɪɚɱɟɬɚɬɚ* ɫɟ ɦɨɧɬɢɪɚɬ ɜ
ɫɝɥɨɛɤɚ ɩɨɞ ɨɫɧɨɜɚɬɚ ɧɚ
ɩɟɱɤɚɬɚ.
ɉɪɟɞɢ ɞɚ ɢɡɜɴɪɲɢɬɟ ɫɜɴɪɡɜɚɧɟɬɨ, ɭɜɟɪɟɬɟ ɫɟ,
ɱɟ:
• ɤɨɧɬɚɤɬɴɬ ɟ ɡɚɡɟɦɟɧ ɢ ɟ ɜ ɫɴɨɬɜɟɬɫɬɜɢɟ ɫɴɫ
ɡɚɤɨɧɨɜɢɬɟ ɪɚɡɩɨɪɟɞɛɢ;
• ɤɨɧɬɚɤɬɴɬ ɦɨɠɟ ɞɚ ɢɡɞɴɪɠɢ ɦɚɤɫɢɦɚɥɧɨɬɨ
ɧɚɬɨɜɚɪɜɚɧɟ ɧɚ ɦɨɳɧɨɫɬɬɚ ɧɚ ɦɚɲɢɧɚɬɚ,
ɨɡɧɚɱɟɧɨ ɧɚ ɬɚɛɟɥɤɚɬɚ ɫ ɯɚɪɚɤɬɟɪɢɫɬɢɤɢɬɟ;
• ɡɚɯɪɚɧɜɚɳɨɬɨ ɧɚɩɪɟɠɟɧɢɟ ɟ ɜ ɝɪɚɧɢɰɢɬɟ
ɧɚ ɫɬɨɢɧɨɫɬɢɬɟ, ɨɡɧɚɱɟɧɢ ɧɚ ɬɚɛɟɥɤɚɬɚ ɫ
ɯɚɪɚɤɬɟɪɢɫɬɢɤɢɬɟ;
• ɤɨɧɬɚɤɬɴɬ ɟ ɫɴɜɦɟɫɬɢɦ ɫ ɳɟɩɫɟɥɚ ɧɚ ɭɪɟɞɚ. Ⱥɤɨ
ɤɨɧɬɚɤɬɴɬ ɧɟ ɟ ɫɴɜɦɟɫɬɢɦ
ɫ ɳɟɩɫɟɥɚ, ɨɛɴɪɧɟɬɟ ɫɟ
ɤɴɦ ɨɬɨɪɢɡɢɪɚɧ ɫɩɟɰɢɚɥɢɫɬ ɡɚ ɩɨɞɦɹɧɚɬɚ ɦɭ. ɇɟ
ɢɡɩɨɥɡɜɚɢɬɟ ɭɞɴɥɠɢɬɟɥɢ ɢ ɪɚɡɤɥɨɧɢɬɟɥɢ.
! ɍɪɟɞɴɬ ɬɪɹɛɜɚ ɞɚ ɛɴɞɟ ɢɧɫɬɚɥɢɪɚɧ ɬɚɤɚ, ɱɟ
ɤɚɛɟɥɴɬ ɢ ɤɨɧɬɚɤɬɴɬ ɡɚ ɟɥɟɤɬɪɢɱɟɫɤɢ ɬɨɤ ɞɚ ɫɚ ɥɟɫɧɨ
ɞɨɫɬɴɩɧɢ.
! Ʉɚɛɟɥɴɬ ɧɟ ɬɪɹɛɜɚ ɞɚ ɛɴɞɟ ɩɪɟɝɴɜɚɧ ɢɥɢ
ɩɪɢɬɢɫɤɚɧ.
! Ʉɚɛɟɥɴɬ ɬɪɹɛɜɚ ɩɟɪɢɨɞɢɱɧɨ ɞɚ ɫɟ ɩɪɨɜɟɪɹɜɚ ɢ
ɩɨɞɦɟɧɹ ɨɬ
ɨɬɨɪɢɡɢɪɚɧɢ ɫɩɟɰɢɚɥɢɫɬɢ.
! ɉɪɟɞɩɪɢɹɬɢɟɬɨ-ɩɪɨɢɡɜɨɞɢɬɟɥ ɧɟ ɧɨɫɢ ɧɢɤɚɤɜɚ
ɨɬɝɨɜɨɪɧɨɫɬ ɩɪɢ ɧɟɫɩɚɡɜɚɧɟ ɧɚ ɩɨɫɨɱɟɧɢɬɟ
ɧɨɪɦɢ.
ɋɜɴɪɡɜɚɧɟ ɧɚ ɝɚɡɬɚ
ɍɪɟɞɴɬ ɬɪɹɛɜɚ ɞɚ ɟ ɫɜɴɪɡɚɧ ɫ ɰɟɧɬɪɚɥɧɨɬɨ
ɡɚɯɪɚɧɜɚɧɟ ɢɥɢ ɝɚɡɨɜɚɬɚ ɛɭɬɢɥɤɚ ɫɴɝɥɚɫɧɨ
ɫɥɟɞɧɢɬɟ ɢɧɫɬɪɭɤɰɢɢ. ɉɪɟɞɢ ɞɚ ɫɜɴɪɠɟɬɟ ɩɟɱɤɚɬɚ
ɩɪɨɜɟɪɟɬɟ ɞɚɥɢ ɟ ɪɟɝɭɥɢɪɚɧɚ ɡɚ ɝɚɡɬɚ, ɤɨɹɬɨ
ɢɡɩɨɥɡɜɚɬɟ. Ⱥɤɨ ɧɟ ɟ ɫɥɟɞɜɚɣɬɟ ɢɧɫɬɪɭɤɰɢɢɬɟ ɜ
ɩɚɪɚɝɪɚɮɚ “ɇɚɫɬɪɨɣɜɚɧɟ ɡɚ ɪɚɡɥɢɱɧɢɬɟ ɜɢɞɨɜɟ
ɝɚɡ”. ɉɪɢ ɧɹɤɨɢ ɦɨɞɟɥɢ ɫɜɴɪɡɜɚɧɟɬɨ ɧɚ ɝɚɡɬɚ ɦɨɠɟ
ɞɚ ɫɟ ɧɚɩɪɚɜɢ ɨɬɞɹɫɧɨ ɢɥɢ ɨɬɥɹɜɨ
. Ɂɚ ɞɚ ɫɦɟɧɢɬɟ
ɫɜɴɪɡɜɚɧɟɬɨ, ɨɛɴɪɧɟɬɟ ɩɨɫɨɤɚɬɚ ɧɚ ɧɚɤɪɚɣɧɢɤɚ
ɧɚ ɦɚɪɤɭɱɚ ɢ ɩɨɞɦɟɧɟɬɟ ɜɪɴɡɤɚɬɚ (ɬɹ ɟ ɞɨɫɬɚɜɟɧɚ
ɫ ɭɪɟɞɚ). ɉɪɢ ɢɡɩɨɥɡɜɚɧɟ ɧɚ ɬɟɱɟɧ ɝɚɡ ɨɬ ɛɭɬɢɥɤɚ,
ɦɨɧɬɢɪɚɣɬɟ ɪɟɝɭɥɚɬɨɪ ɡɚ ɧɚɥɹɝɚɧɟɬɨ.
! ɭɜɟɪɟɬɟ ɫɟ, ɱɟ ɜɯɨɞɹɳɨɬɨ ɧɚɥɹɝɚɧɟ ɫɴɜɩɚɞɚ ɫ
ɩɚɪɚɦɟɬɪɢɬɟ ɩɨɫɨɱɟɧɢ ɜ ɬɚɛɥɢɰɚ “ɏɚɪɚɤɬɟɪɢɚɬɢɤɢ
ɧɚ ɝɨɪɟɥɤɢɬɟ ɢ ɜɟɧɬɢɥɢɬɟ”. Ɍɨɜɚ ɳɟ ȼɢ ɝɚɪɚɧɬɢɪɚ
ɛɟɡɨɩɚɫɧɚ
ɪɚɛɨɬɚ, ɧɨɪɦɚɥɧɚ ɤɨɧɫɭɦɚɰɢɹ ɢ
ɞɴɥɝɨɬɪɚɟɧ ɠɢɜɨɬ ɧɚ ɭɪɟɞɚ.
BG
ȿɥɟɤɬɪɢɱɟɫɤɨ ɫɜɴɪɡɜɚɧɟ
ɋɜɴɪɠɟɬɟ ɭɪɟɞɚ ɞɢɪɟɤɬɧɨ ɤɴɦ ɦɪɟɠɚɬɚ, ɤɚɬɨ ɡɚ
ɰɟɥɬɚ ɢɡɩɨɥɡɜɚɢɬɟ ɦɧɨɝɨɩɨɥɸɫɟɧ ɩɪɟɤɴɫɜɚɱ ɫ
ɦɢɧɢɦɚɥɧɨ ɨɬɜɚɪɹɧɟ ɦɟɠɞɭ ɤɨɧɬɚɤɬɢɬɟ ɨɬ 3 mm,
ɩɨɫɬɚɜɟɧ ɦɟɠɞɭ ɭɪɟɞɚ ɢ ɦɪɟɠɚɬɚ. Ɇɧɨɝɨɩɨɥɸɫɧɢɹɬ
ɩɪɟɤɴɫɜɚɱ ɬɪɹɛɜɚ ɞɚ ɛɴɞɟ ɨɪɚɡɦɟɪɟɧ ɡɚ ɩɨɫɨɱɟɧɨɬɨ
ɧɚɬɨɜɚɪɜɚɧɟ ɢ ɞɚ ɨɬɝɨɜɚɪɹ ɧɚ ɧɨɪɦɢɬɟ NFC 15-100
(ɡɚɡɟɦɢɬɟɥɧɢɹɬ ɤɚɛɟɥ ɧɟ ɬɪɹɛɜɚ ɞɚ ɫɟ ɢɡɤɥɸɱɜɚ ɨɬ
ɩɪɟɤɴɫɜɚɱɚ). Ɂɚɯɪɚɧɜɚɳɢɹɬ ɤɚɛɟɥ ɬɪɹɛɜɚ ɞɚ ɛɴɞɟ
ɪɚɡɩɨɥɨɠɟɧ ɬɚɤɚ, ɱɟ ɜ ɧɢɬɨ ɟɞɧɚ ɬɨɱɤɚ ɞɚ ɧɟ ɜɥɢɡɚ ɜ
ɤɨɧɬɚɤɬ ɫ ɬɟɦɩɟɪɚɬɭɪɚ, ɩɨ-ɜɢɫɨɤɚ ɨɬ 50°C.
ɋɜɴɪɡɜɚɧɟ ɤɴɦ ɦɚɪɤɭɱɚ
ɇɚɩɪɚɜɟɬɟ ɫɜɴɪɡɜɚɧɟɬɨ ɫ ɦɚɪɤɭɱ ɨɬɝɨɜɚɪɹɳ ɧɚ
ɫɥɟɞɜɚɳɢɬɟ ɩɨ-ɞɨɥɭ ɢɧɫɬɪɭɤɰɢɢ. ȼɴɬɪɟɲɧɢɹɬ
ɞɢɚɦɟɬɴɪ ɧɚ ɢɡɩɨɥɡɜɚɧɚɬɚ ɬɪɴɛɚ ɟ ɫɥɟɞɧɢɹ:
- 8ɦɦ ɡɚ ɬɟɱɧɚ ɝɚɡ;
- 13ɦɦ ɡɚ ɦɟɬɚɧ ɝɚɡ.
ɉɪɢ ɩɨɫɬɚɜɹɧɟ ɧɚ ɦɚɪɤɭɱɚ ɜɧɢɦɚɜɚɣɬɟ ɡɚ ɫɥɟɞɧɨɬɨ:
• Ɇɚɪɤɭɱɚɴɬ ɧɟ ɬɪɹɞɜɚ ɞɚ ɫɟ ɞɨɤɨɫɜɚ ɞɨ ɱɚɫɬɢ
ɧɚɞɜɢɲɚɜɚɳɢ ɬɟɦɩɟɪɚɬɭɪɚ ɨɬ 50°C;
• Ⱦɴɥɠɢɧɚɬɚ ɧɚ ɦɚɪɤɭɱɚ ɧɟ ɬɪɹɛɜɚ ɞɚ
ɟ ɧɚɞ 1500 ɦɦ;
• ɦɚɪɤɭɱɴɬ ɧɟ ɬɪɹɛɜɚ ɞɚ ɟ ɩɨɞɥɨɠɟɧ ɧɚ ɭɫɭɤɜɚɧɟ ɢɥɢ
ɨɩɴɜɚɧɟ ɢ ɧɟ ɬɪɹɛɜɚ ɞɚ ɟ ɩɪɟɝɴɧɚɬ.
*ɫɚɦɨ ɩɪɢ ɧɹɤɨɢ ɨɬ ɦɨɞɟɥɢɬɟ
41
Page 42

BG
• Ɇɚɪɤɭɱɴɬ ɧɟ ɬɪɹɛɜɚ ɞɚ ɫɟ ɞɨɩɢɪɚ ɞɨ ɨɫɬɪɢ ɢɥɢ
ɩɨɞɜɢɠɧɢ ɱɚɫɬɢ. Ɍɨɣ
• ɐɹɥɨɬɨ ɩɪɨɞɴɥɠɟɧɢɟ ɧɚ ɦɚɪɤɭɱɚ ɬɪɹɛɜɚ ɞɚ ɟ ɥɟɫɧɨ
ɞɨɫɬɴɩɧɨ ɫ ɰɟɥ ɩɪɨɜɟɪɤɚ ɧɚ ɫɴɫɬɨɹɧɢɟɬɨ ɦɭ;
ɍɜɟɪɟɬɟ ɫɟ, ɱɟ ɦɚɪɤɭɱɴɬ ɟ ɞɨɛɪɟ ɫɜɴɪɡɚɧ ɜ ɞɜɚɬɚ
ɫɢ ɤɪɚɹ ɢ ɝɨ ɫɬɟɝɧɟɬɟ ɫ ɩɨɞɯɨɞɹɳɢ ɫɤɨɛɢ. Ⱥɤɨ ɧɹɤɨɹ
ɨɬ ɝɨɪɧɢɬɟ ɩɪɟɩɨɪɴɤɢ ɧɟ ɦɨɠɟ ɞɚ ɛɴɞɟ ɢɡɩɴɥɧɟɧɚ,
ɢɡɩɨɥɡɜɚɣɬɟ ɝɴɜɤɚɜɚ ɦɟɬɚɥɚɧɚ ɬɪɴɛɚ.
Ⱥɤɨ ɩɟɱɤɚɬɚ ɬɪɹɛɜɚ ɞɚ ɫɟ ɢɧɫɬɚɥɢɪɚ ɫɴɝɥɚɫɧɨ
ɭɫɥɨɜɢɹɬɚ ɨɬ Ʉɥɚɫ 2, ɩɨɞɪɚɡɞɟɥɟɧɢɟ 1, ɡɚ ɫɜɴɪɡɜɚɧɟ
ɤɴɦ ɝɚɡɬɚ ɬɪɹɛɜɚ ɞɚ ɫɟ ɢɡɩɨɥɡɜɚ ɟɞɢɧɫɬɜɟɧɨ ɝɴɜɤɚɜɚ
ɦɟɬɚɥɧɚ ɬɪɴɛɚ ɫɴɨɛɪɚɡɟɧɚ ɫ ɧɚɫɬɨɹɳɢɬɟ ɫɬɚɧɞɚɪɬɢ
ɡɚ ɛɟɡɨɩɚɫɧɨɫɬ.
ɬɪɹɛɜɚ ɞɚ ɟ ɡɞɪɚɜ;
ɋɜɴɪɡɜɚɧɟ ɧɚ ɝɴɜɤɚɜɚ ɧɟɪɴɠɞɚɟɦɚ
ɫɬɨɦɚɧɟɧɚ ɬɪɴɛɚ ɤɴɦ ɪɟɡɛɨɜɚɧɢɹ ɧɚɤɪɚɣɧɢɤ
Ɇɚɯɧɟɬɟ ɩɨɫɬɚɜɟɧɢɹ ɧɚ ɭɪɟɞɚ ɧɚɤɪɚɣɧɢɤ. ȼɥɢɡɚɳɢɹɬ
/ɡɚɯɪɚɧɜɚɳɢɹɬ/ ɧɚɤɪɚɣɧɢɤ ɡɚ ɭɪɟɞɚ ɢɦɚ ɰɢɥɢɧɞɪɢɱɟɧ
ɩɨɥɨɜɢɧ-ɰɨɥɨɜ “ɦɴɠɤɢ” ɦɭɧɞɳɭɤ ɡɚ ɝɚɡ ɧɚ ɪɟɡɛɚ.
ɂɡɩɨɥɡɜɚɣɬɟ ɫɚɦɨ ɬɪɴɛɢ, ɤɨɢɬɨ ɨɬɝɨɜɚɪɹɬ ɧɚ
ɢɡɢɫɤɜɚɧɢɹɬɚ ɧɚ ɫɟɝɚɲɧɢɬɟ ɧɚɪɟɞɛɢ . Ɍɟɡɢ ɬɪɴɛɢ
ɬɪɹɛɜɚ ɞɚ ɫɚ ɫ ɞɴɥɠɢɧɚ ɧɟ ɩɨɜɟɱɟ ɨɬ 2000ɦɦ
ɚɞɚɩɬɨɪɢ, ɬɴɣ ɤɚɬɨ ɬɨɜɚ ɦɨɠɟ ɞɚ ɞɨɜɟɞɟ ɞɨ ɩɪɟɝɪɹɜɚɧɟ
ɢɥɢ ɢɡɝɚɪɹɧɟ.
Ⱥɞɚɩɬɢɪɚɧɟ ɤɴɦ ɪɚɡɥɢɱɧɢɬɟ ɜɢɞɨɜɟ ɝɚɡ
Ɂɚ ɞɚ ɩɪɢɝɨɞɢɬɟ ɝɨɬɜɚɪɫɤɢɬɟ ɩɟɱɤɢ ɤɴɦ ɬɢɩɚ
ɝɚɡ, ɪɚɡɥɢɱɟɧ ɨɬ ɬɨɡɢ ɤɨɣɬɨ ɟ ɩɪɟɩɨɪɴɱɢɬɟɥɟɧ /
ɨɬɛɟɥɹɡɚɧ ɜɴɪɯɭ ɟɬɢɤɟɬɚ-ɬɚɥɨɧɱɟɬɨ, ɡɚɥɟɩɟɧ
ɧɚ ɝɴɪɛɚ ɧɚ ɭɪɟɞɚ ɢɥɢ ɜɴɪɯɭ ɨɩɚɤɨɜɤɚɬɚ ɦɭ/
ɩɪɨɰɟɞɢɪɚɣɬɟ ɤɚɤɬɨ ɫɥɟɞɜɚ:
a) ɉɨɞɦɟɧɟɬɟ ɞɸɡɢɬɟ ɧɚ ɝɨɪɟɥɤɢɬɟ ɧɚ ɩɥɨɬɚ:
• ɦɚɯɧɟɬɟ ɪɟɲɟɬɤɢɬɟ ɢ ɢɡɜɚɞɟɬɟ ɝɨɪɟɥɤɢɬɟ;
• ɪɚɡɜɢɣɬɟ ɞɸɡɢɬɟ ɤɚɬɨ ɢɡɩɨɥɡɜɚɬɟ 7 ɦɦ ɩɪɟɯɨɞɟɧ
ɝɚɟɱɟɧ ɤɥɸɱ
ɝɚɡ (ɜɢɠ ɬɚɛɥɢɰɚ 1 “ɏɚɪɚɤɬɟɪɢɫɬɢɤɢ ɧɚ ɝɨɪɟɥɤɢɬɟ
ɢ ɞɸɡɢɬɟ”).
• ɩɨɜɬɨɪɟɬɟ ɨɩɟɪɚɰɢɢɬɟ ɜ ɨɛɪɚɬɟɧ ɪɟɞ.
b) ɪɟɝɭɥɢɪɚɧɟ ɧɚ Ɇɢɧ. ɧɢɜɨ ɧɚ ɩɥɚɦɴɤɚ:
ɢ ɝɢ ɫɦɟɧɟɬɟ ɫ ɞɸɡɢɬɟ ɡɚ ɧɨɜɢɹ ɜɢɞ
Ʉɨɧɬɪɨɥ ɧɚ ɡɞɪɚɜɢɧɚɬɚ
!: ɫɥɟɞ ɢɧɫɬɚɥɢɪɚɧɟɬɨ ɩɪɨɜɟɪɟɬɟ ɜɪɴɡɤɢɬɟ ɡɚ ɬɟɱɨɜɟ
ɤɚɬɨ ɢɡɩɨɥɡɜɚɬɟ ɫɚɩɭɧɟɧɚ ɜɨɞɚ. ɇɢɤɨɝɚ ɧɟ ɢɡɩɨɥɡɜɚɣɬɟ
ɨɝɴɧ. ɋɥɟɞ ɫɜɴɪɡɜɚɧɟɬɨ ɫɟ ɭɜɟɪɟɬɟ,ɱɟ ɝɴɜɤɚɜɚɬɚ
ɦɟɬɚɥɧɚ ɬɪɴɛɚ ɧɟ ɞɨɤɨɫɜɚ ɞɜɢɠɟɳɢ ɫɟ ɱɚɫɬɢ ɢ ɧɟ ɟ
ɫɱɭɩɟɧɚ.
ɋɜɴɪ ɡ ɜɚ ɧɟ ɧɚ ɡɚɯ ɪɚɧ ɜɚ ɳɢɹ ɤɚ ɛɟɥ ɫ ɦɪɟ ɠɚ ɬɚ
ȿɥɟɤ ɬ ɪɢ ɱɟɫ ɤɚ ɬɚ ɩɟɱ ɤɚ ɢɦɚ ɬɚ ɛɟɥ ɤɚ, ɧɚ ɤɨ ɹɬɨ ɫɚ ɩɨ ɫɨ ɱɟɧɢ ɦɨɳ ɧɨɫ ɬ ɬɚ ɢ ɧɚɩ ɪɟ ɠɟ ɧɢ ɟɬɨ.Ɇɨɧ ɬɢ ɪɚɣ ɬɟ ɧɚ ɤɚ ɛɟ ɥɚ
ɧɨɪ ɦɚ ɥɟɧ ɳɟɩ ɫɟɥ ɫ ɩɨɞ ɯɨ ɞɹɳ ɤɚ ɩɚ ɰɢ ɬɟɬ. ȼ ɫɥɭ ɱɚɣ ɧɚ
ɞɢ ɪɟɤ ɬ ɧɨ ɫɜɴɪ ɡ ɜɚ ɧɟ ɤɴɦ ɦɪɟ ɠɚ ɬɚ ɟ ɧɟ ɨɛ ɯɨ ɞɢ ɦɨ ɞɚ
ɦɨɧ ɬɢ ɪɚ ɬɟ ɦɟɠ ɞɭ ɭɪɟ ɞɚ ɢ ɦɪɟ ɠɚ ɬɚ ɦɧɨ ɝɨ ɩɨ ɥɸ ɫɟɧ ɩɪɟɤɴɫ ɜɚɱ ɫ ɦɢɧ. ɨɬ ɜɨɪ ɦɟɠ ɞɭ ɤɥɟ ɦɢ ɬɟ ɨɬ 3 ɦɦ, ɫɴ ɨɛ ɪɚ ɡɟɧ
ɫ ɧɚ ɬɨ ɜɚɪ ɜɚ ɧɟ ɬɨ ɢ ɨɬ ɝɨ ɜɚ ɪɹɳ ɧɚ ɧɨɪ ɦɢ ɬɟ ɡɚ ɫɢ ɝɭɪ ɧɨɫɬ
(ɡɚ ɡɟ ɦɹ ɜɚ ɳɢ ɹɬ ɤɚ ɛɟɥ ɧɟ ɫɟ ɢɡ ɤ ɥɸɱ ɜɚ ɨɬ ɩɪɟ ɤɴɫ ɜɚ ɱɚ).
Ɂɚɯ ɪɚɧ ɜɚ ɳɢ ɹɬ ɤɚ ɛɟɥ
ɧɢ ɬɟɦ ɩɟ ɪɚ ɬɭ ɪɢ ɩɨ ɜɢ ɫɨ ɤɢ ɨɬ 75ɨ ɋ.ɉɪɟ ɞɢ ɞɚ ɢɡ ɜɴɪ ɲɢ ɬɟ
ɫɜɴɪ ɡ ɜɚ ɧɟ ɬɨ ɩɪɨ ɜɟɪɟɬɟ ɞɚɥɢ:
- ɩɪɟɞ ɩɚ ɡɢ ɬɟ ɥɹɬ ɢ ɞɨ ɦɚɲ ɧɚ ɬɚ ɢɧ ɫ ɬɚ ɥɚ ɰɢɹ ɦɨ ɝɚɬ
ɞɚ ɩɨ ɧɟ ɫɚɬ ɧɚ ɬɨ ɜɚɪ ɜɚ ɧɟ ɬɨ ɧɚ ɭɪɟ ɞɚ (ɜɢɠ ɬɟ ɬɚɛ ɥɢ ɰɚ ɬɚ
ɫ ɯɚ ɪɚɤ ɬɟ ɪɢɫ ɬɢ ɤɢ ɬɟ);
- ɡɚɯ ɪɚɧ ɜɚ ɳɚ ɬɚ ɢɧ ɫ ɬɚ ɥɚ ɰɢɹ ɟ ɧɚ ɞɟɠ ɞ ɧɨ ɡɚ ɡɟ ɦɟ ɧɚ
ɢ ɨɬ ɝɨ ɜɚ ɪɹ ɧɚ ɧɨɪ ɦɢ ɬɟ ɡɚ ɫɢ ɝɭɪ ɧɨɫɬ;
- ɤɨɧ ɬɚɤ ɬɴɬ ɢɥɢ ɦɧɨ ɝɨ ɩɨ ɥɸɫ ɧɢ ɹɬ ɩɪɟ ɤɴɫ ɜɚɱ ɫɚ ɜ
ɛɥɢ ɡɨɫɬ ɫ ɩɟɱ ɤɚ ɬɚ ɢ ɫɚ ɥɟɫɧɨ ɞɨɫɬɴɩɧɢ.
ȼɧɢɦɚɧɢɟ: ɧɟ ɢɡɩɨɥɡɜɚɣɬɟ ɪɚɡɤɥɨɧɢɬɟɥɢ ɢɥɢ
ɧɟ ɬɪɹɛ ɜɚ ɞɚ ɟ ɜ ɛɥɢ ɡɨɫɬ ɫ ɜɴɧɲ-
•
ɡɚɜɴɪɬɟɬɟ ɤɥɸɱɚ ɜ ɩɨɡɢɰɢɹ ɦɢɧɢɦɭɦ;
• ɫɜɚɥɟɬɟ ɤɥɸɱɚ ɢ ɜɴɪɬɟɬɟ ɧɚɫɬɪɨɣɜɚɳɢɹ ɜɢɧɬ
ɪɚɡɩɨɥɨɠɟɧ ɧɚ ɢɥɢ ɞɨ ɫɬɟɛɥɨɬɨ ɧɚ ɤɪɚɧɚ, ɞɨɤɚɬɨ
ɩɥɚɦɴɤɴɬ ɫɬɚɧɟ ɦɚɥɴɤ, ɧɨ ɫɬɚɛɢɥɟɧ.
ȼɚɠɧɨ: ɜ ɫɥɭɱɚɣ ɫ ɜɬɟɱɧɟɧɚ ɝɚɡ ɪɟɝɭɥɢɪɭɟɦɢɹɬ ɜɢɧɬ
ɬɪɹɛɜɚ ɞɚ ɟ ɧɚɩɴɥɧɨ ɡɚɬɟɝɧɚɬ.
• ɩɪɨɜɟɪɟɬɟ ɞɚɥɢ ɩɥɚɦɴɤɴɬ ɧɟ ɡɚɝɚɫɜɚ ɤɨɝɚɬɨ ɪɹɡɤɨ
ɡɚɜɴɪɬɢɬɟ ɨɬ ɦɚɤɫɢɦɭɦ ɧɚ ɦɢɧɢɦɭɦ.
c) Ɋɟɝɭɥɢɪɚɧɟ ɩɪɢɬɨɤɚ ɧɚ ɜɴɡɞɭɯ ɤɴɦ ɝɨɪɟɥɤɢɬɟ:
ɇɟ ɟ ɧɟɨɛɯɨɞɢɦɚ ɬɚɤɚɜɚ ɧɚɫɬɪɨɣɤɚ.
ȼɚɠɧɨ
ɉɪɢ ɡɚɜɴɪɲɜɚɧɟ ɧɚ ɨɩɟɪɚɰɢɹɬɚ ɫɦɟɧɬɟ ɢ ɥɟɩɟɧɤɚɬɚ
ɩɨɤɚɡɜɚɳɚ ɜɢɞɚ ɧɚ ɢɡɩɨɥɡɜɚɧɚɬɚ ɝɚɡ.
Ɂɚɛɟɥɟɠɤɚ
ȼ ɫɥɭɱɚɣ ɱɟ ɧɚɥɹɝɚɧɟɬɨ ɧɚ ɝɚɡɬɚ, ɤɨɹɬɨ
ɳɟ ɢɡɩɨɥɡɜɚɬɟ ɟ ɪɚɡɥɢɱɧɨ ɨɬ ɬɨɜɚ, ɤɨɟɬɨ
ɩɪɟɩɪɨɪɴɱɜɚɦɟ /ɢɥɢ ɜɚɪɢɪɚ/ ɬɪɹɛɜɚ ɞɚ ɫɟ
ɦɨɧɬɢɪɚ ɫɴɨɬɜɟɬɟɧ ɪɟɝɭɥɚɬɨɪ ɡɚ ɧɚɥɹɝɚɧɟ ɜɴɪɯɭ
ɜɯɨɞɹɳɚɬɚ ɬɪɴɛɚ ɫɴɝɥɚɫɧɨ ɫ ɨɛɳɨɩɪɢɟɬɢɬɟ ɜ
ɦɨɦɟɧɬɚ ɇɚɪɟɞɛɢ
42
Page 43

A
V
ɉɪɢɫɩɨɫɨɛɹɜɚɧɟ ɧɚ ɮɭɪɧɚɬɚ
ɋɦɹɧɚ ɧɚ ɞɸɡɚɬɚ ɧɚ ɝɨɪɟɥɤɚɬɚ ɧɚ ɮɭɪɧɚɬɚ:
1. ɨɬɜɨɪɟɬɟ ɧɚɩɴɥɧɨ
ɜɪɚɬɢɱɤɚɬɚ ɧɚ ɮɭɪɧɚɬɚ;
2. ɢɡɜɚɞɟɬɟ ɩɥɴɡɝɚɳɨɬɨ ɫɟ
ɞɴɧɨ ɧɚ ɮɭɪɧɚɬɚ (ɜɢɠɬɟ
ɮɢɝɭɪɚɬɚ);
3. ɨɬɜɢɣɬɟ ɮɢɤɫɢɪɚɳɢɹ ɜɢɧɬ
ɧɚ ɝɨɪɟɥɤɚɬɚ ɢ ɢɡɜɚɞɟɬɟ
ɝɨɪɟɥɤɚɬɚ ɨɬ ɮɭɪɧɚɬɚ, ɤɚɬɨ
ɩɪɟɞɢ ɬɨɜɚ ɫɬɟ ɫɜɚɥɢɥɢ ɜɢɧɬɚ
V;
4. ɨɬɜɢɣɬɟ ɞɸɡɚɬɚ ɧɚ ɝɨɪɟɥɤɚɬɚ
ɱɪɟɡ ɫɩɟɰɢɚɥɧɢɹ „ɝɥɭɯ“ ɤɥɸɱ ɡɚ
(ɜɢɠɬɟ ɮɢɝɭɪɚɬɚ) ɢɥɢ ɫ
ɞɸɡɢ
„ɝɥɭɯ“ 7 mm ɤɥɸɱ ɢ ɹ ɡɚɦɟɧɟɬɟ
ɫ ɩɨɞɯɨɞɹɳɚ ɡɚ ɧɨɜɢɹ ɜɢɞ ɝɚɡ
(ɜɢɠɬɟ ɬɚɛɥɢɰɚ ɏɚɪɚɤɬɟɪɢɫɬɢɤɢ
ɧɚ ɝɨɪɟɥɤɢ ɢ ɞɸɡɢ).
ȼɧɢɦɚɧɢɟ
ɋɥɟɞ ɤɚɬɨ ɡɚɜɴɪɲɢɬɟ ɧɚɫɬɪɨɢɤɚɬɚ, ɫɦɟɧɟɬɟ ɫɬɚɪɢɹ
ɫɬɢɤɟɪ ɫɴɫ ɫɴɨɬɜɟɬɫɬɜɚɳ ɧɚ ɧɨɜɢɹ ɬɢɩ ɢɡɩɨɥɡɜɚɧ
ɝɚɡ, ɤɨɢɬɨ ɦɨɠɟ ɞɚ ɩɨɥɭɱɢɬɟ ɜ ɧɚɲɢɬɟ ɬɟɯɧɢɱɟɫɤɢ
ɫɟɪɜɢɡɧɢ ɰɟɧɬɪɨɜɟ.
BG
ɩɪɨɜɟɪɟɬɟ ɞɚɥɢ ɫ ɛɴɪɡɨ ɡɚɜɴɪɬɚɧɟ ɧɚ
ɬɟɪɦɨɪɟɝɭɥɚɬɨɪɚ ɨɬ ɩɨɥɨɠɟɧɢɟ Max ɞɨ
ɩɨɥɨɠɟɧɢɟ Min ɢɥɢ ɫ ɛɴɪɡɨ ɨɬɜɚɪɹɧɟ ɢ ɡɚɬɜɚɪɹɧɟ
ɜɪɚɬɢɱɤɚɬɚ ɧɚ ɮɭɪɧɚɬɚ ɝɨɪɟɥɤɚɬɚ ɧɟ ɫɟ ɝɚɫɢ.
ɉɪɢɫɩɨɫɨɛɹɜɚɧɟ ɧɚ ɝɪɢɥɚ ɧɚ ɝɚɡ ɤɴɦ ɪɚɡɥɢɱɧɢ
ɜɢɞɨɜɟ ɝɚɡ
ɋɦɹɧɚ ɧɚ ɞɸɡɚɬɚ ɧɚ ɝɨɪɟɥɤɚɬɚ ɧɚ ɝɪɢɥɚ:
• ɫɜɚɥɟɬɟ ɝɨɪɟɥɤɚɬɚ ɧɚ ɝɪɢɥɚ, ɫɥɟɞ ɤɚɬɨ ɫɬɟ ɨɬɜɢɥɢ
ɜɢɧɬɚ “V” (ɜɢɠ Ɏɢɝ. ȿ)
• ɨɬɜɢɢɬɟ ɞɸɡɚɬɚ ɧɚ ɝɨɪɟɥɤɚɬɚ ɧɚ ɝɪɢɥɚ, ɤɚɬɨ
ɢɡɩɨɥɡɜɚɬɟ ɩɨɞɯɨɞɹɳ “ɝɥɭɯ” ɤɥɸɱ ɡɚ ɞɸɡɢ
(ɜɢɠ Ɏɢɝ. F), ɢɥɢ ɩɨ-ɬɨɱɧɨ “ɝɥɭɯ” ɤɥɸɱ 7 mm, ɢ
ɹ ɡɚɦɟɧɟɬɟ ɫ ɩɨɞɯɨɞɹɳɚ ɡɚ ɧɨɜɢɹ ɜɢɞ ɝɚɡ (ɜɢɠ
ɬɚɛɥɢɰɚ 1).
Ɋɟɝɭɥɢɪɚɧɟ ɩɪɢɬɨɤɚ ɧɚ ɜɴɡɞɭɯ ɡɚ ɝɨɪɟɥɤɚɬɚ ɧɚ
ɮɭɪɧɚɬɚ ɢ ɝɪɢɥɚ
Ƚɨɪɟɥɤɚɬɚ ɧɚ ɮɭɪɧɚɬɚ ɢ ɝɪɢɥɚ ɧɟ ɫɟ ɧɭɠɞɚɹɬ ɨɬ
ɪɟɝɭɥɢɪɚɧɟ ɧɚ ɜɴɡɞɭɯɚ.
ɌȺȻɅɂɐȺ ɋ ɏȺɊȺɄɌȿɊɂɋɌɂɄɂ
Ɋɚɡɦɟɪɢ
Ɉɛɟɦ
ɉɨɥɟɡɧɢ ɪɚɡɦɟɪɢ ɧɚ
ɱɟɤɦɟɞɠɟɬɨ ɡɚ
ɩɪɢɬɨɩɥɹɧɟ ɧɚ ɯɪɚɧɢ:
ɇɚɩɪɟɠɟɧɢɟ ɢ ɱɟɫɬɨɬɚ
ɧɚ ɟɥɟɤɬɪɢɱɟɫɤɨɬɨ
ɡɚɯɪɚɧɜɚɧɟ:
ɝɨɪɟɥɤɢ
Ɍɨɡɢ ɭɪɟɞ ɫɴɨɬɜɟɬɫɬɜɚ ɧɚ
ɞɴɥɠɢɧɚ 39 cm
ɜɢɫɨɱɢɧɚ 34 cm
ɞɴɥɛɨɱɢɧɚ 44cm
58 l
ɞɴɥɠɢɧɚ 42 cm
ɜɢɫɨɱɢɧɚ 17 cm
ɞɴɥɛɨɱɢɧɚ 44 cm
ɜɢɠ ɮɚɛɪɢɱɧɚɬɚ ɬɚɛɟɥɤɚ ɫ
ɬɟɯɧɢɱɟɫɤɢɬɟ ɯɚɪɚɤɬɟɪɢɫɬɢɤɢ
ɦɨɠɟ ɞɚ ɫɟ ɚɞɚɩɬɢɪɚ ɤɴɦ ɜɫɢɱɤɢ
ɜɢɞɨɜɟ ɝɚɡ , ɩɨɫɨɱɟɧɢ ɨɬ
ɯɚɪɚɤɬɟɪɢɫɬɢɤɢɬɟ , ɫɜɴɪɡɚɧɢ ɫ
ɜɴɬɪɟɲɧɚɬɚ ɫɬɪɚɧɚ ɧɚ ɜɪɚɬɚɬɚ ɫɝɴɜɚɧɟ
ɢɥɢ ɫɥɟɞ ɨɬɜɚɪɹɧɟ ɧɚ ɱɟɤɦɟɞɠɟ ɩɨɞ
ɮɭɪɧɚɬɚ , ɜɴɬɪɟɲɧɚɬɚ ɫɬɟɧɚ ɜ ɥɹɜɨ
ɫɥɟɞɧɢɬɟ ȿɜɪɨɩɟɣɫɤɢ ɞɢɪɟɤɬɢɜɢ:
2006/95/EC ɨɬ 12.12.06 (ɇɢɫɤɨ
ɧɚɩɪɟɠɟɧɢɟ) ɢ ɩɨɫɥɟɞɜɚɳɢɬɟ
ɢɡɦɟɧɟɧɢɹ - 04/108/EC ɨɬ 15/12/04
(ȿɥɟɤɬɪɨɦɚɝɧɢɬɧɚ ɫɴɜɦɟɫɬɢɦɨɫɬ) ɢ
ɩɨɫɥɟɞɜɚɳɢɬɟ ɢɡɦɟɧɟɧɢɹ 93/68/EEC ɨɬ 22/07/93 ɢ
ɩɨɫɥɟɞɜɚɳɢɬɟ ɢɡɦɟɧɟɧɢɹ.
2002/96/EC
– 2009/142/ȿC ɨɬ 30/11/09 (Ƚɚɡ)
43
Page 44

BG
S
S
R
A
Ɍɚɛɥɢɰɚ 1
Ȼɴɪɡ (ɝɨɥɹɦ) (R)
ɉɨɥɭɛɴɪɡ (ɫɪɟɞɟɧ)
(S)
ɉɨɦɨɳɟɧ (ɦɚɥɴɤ) (A)
Ɏɭɪɧɚ
Ɍɚɛɥɢɰɚ ɫ ɯɚɪɚɤɬɟɪɢɫɬɢɤɢ ɧɚ ɤɨɬɥɨɧɢɬɟ ɢ ɞɸɡɢɬɟ
ȼɬɟɱɧɟɧ ɝɚɡ ɉɪɢɪɨɞɟɧ ɝɚɡ
Ƚɨɪɟɥɤɚ
ɇɚɥɹɝɚɧɟ ɧɚ
ɡɚɯɪɚɧɜɚɧɟ
Ɍɨɩɥɢɧɧɚ ɦɨɳɧɨɫɬ
Ⱦɢɚɦɟɬɴɪ
(ɜ mm)
100 3,00 0,7 41 87 218 214 128 286
75 1,90 0,4 30 70 138 136 104 181
51 1,00 0,4 30 52 73 71 76 95
- 2,80 1,0 46 80 204 200 119 267
ɇɨɦɢɧɚɥɧɨ (mbar)
Ɇɢɧɢɦɚɥɧɨ (mbar)
Ɇɚɤɫɢɦɚɥɧɨ (mbar)
kW (p.c.s.*)
ɇɨɦɢɧɚɥɧɚ Ɋɟɞɭɰ. **** **
Ȼɚɣɩɚɫ
1/100
(mm)
28-30
20
35
Ɋɚɡɯɨɞ*
g/h
37
25
45
Ⱦɸɡɚ
1/100
(mm)
Ⱦɸɡɚ
1/100
(mm)
Ɋɚɡɯɨɞ*
l/h
20
17
25
* ɉɪɢ 15 °C ɢ 1013 mbar-ɫɭɯ ɝɚɡ
** ɉɪɨɩɚɧ ɬɨɩɥɢɧɚ ɧɚ ɢɡɝɚɪɹɧɟ = 50,37 MJ/Kg
*** Ȼɭɬɚɧ ɬɨɩɥɢɧɚ ɧɚ ɢɡɝɚɪɹɧɟ = 49,47 MJ/Kg
ɉɪɢɪɨɞɟɧ ɝɚɡ ɬɨɩɥɢɧɚ ɧɚ ɢɡɝɚɪɹɧɟ = 37,78 MJ/m
3
KN3G2S/UA
KN3G20/UA
44
Page 45

K
ɉɭɫɤ ɢ ɟɤɫɩɥɨɚɬɚɰɢɹ
ɂɡɛɢɪɚɧɟɬɨ ɧɚ ɪɚɡɥɢɱɧɢɬɟ ɮɭɧɤɰɢɢ ɧɚ ɝɨɬɜɚɪɫɤɚɬɚ
ɩɟɱɤɚ ɫɟ ɢɡɜɴɪɲɜɚ ɫ ɩɪɢɛɨɪɢɬɟ ɡɚ ɭɩɪɚɜɥɟɧɢɟ,
ɪɚɡɩɨɥɨɠɟɧɢ ɧɚ ɩɚɧɟɥɚ ɡɚ ɭɩɪɚɜɥɟɧɢɟ.
Ʉɥɸɱɨɜɟ ɡɚ ɪɟɝɭɥɢɪɚɧɟ ɝɚɡɬɚ ɧɚ ɤɨɬɥɨɧɢɬɟ
Ɂɚ ɜɫɟɤɢ ɤɥɸɱ ɟ ɨɬɛɟɥɹɡɚɧɨ ɫɴɫ ɡɚɩɴɥɧɟɧɨ ɤɪɴɝɱɟ
ɤɨɢ ɝɚɡɨɜ ɤɨɬɥɨɧ ɭɩɪɚɜɥɹɜɚ. Ɂɚ ɞɚ ɡɚɩɚɥɢɬɟ ɟɞɢɧ
ɨɬ ɤɨɬɥɨɧɢɬɟ, ɩɪɢɛɥɢɠɟɬɟ ɤɴɦ ɧɟɝɨ ɩɥɚɦɴɤ ɢɥɢ
ɡɚɩɚɥɤɚ.
ɇɚɬɢɫɧɟɬɟ ɧɚɩɪɟɞ ɞɨ
ɤɥɸɱ ɜ ɩɨɫɨɤɚ, ɨɛɪɚɬɧɚ ɧɚ ɱɚɫɨɜɧɢɤɨɜɚɬɚ ɫɬɪɟɥɤɚ
ɞɨ ɩɨɥɨɠɟɧɢɟ ɦɚɤɫɢɦɚɥɧɨ (. ȼɫɟɤɢ ɝɚɡɨɜ ɤɨɬɥɨɧ
ɦɨɠɟ ɞɚ ɪɚɛɨɬɢ ɧɚ ɦɚɤɫɢɦɚɥɧɚ, ɦɢɧɢɦɚɥɧɚ ɢɥɢ
ɧɚ ɦɟɠɞɢɧɧɚ ɦɨɳɧɨɫɬ. ȼ ɫɴɨɬɜɟɬɫɬɜɢɟ ɫ ɬɟɡɢ
ɪɚɡɥɢɱɧɢ ɪɚɛɨɬɧɢ ɩɚɪɚɦɟɬɪɢ, ɧɚ ɤɥɸɱɚ ɡɚ ɝɚɡ
ɨɫɜɟɧ ɩɨɥɨɠɟɧɢɟ ɢɡɤɥɸɱɟɧ, ɭɤɚɡɚɧɨ ɫɴɫ ɫɢɦɜɨɥɚ
,, ɤɨɝɚɬɨ ɦɚɪɤɢɪɨɜɤɚɬɚ ɧɚ ɤɥɸɱɚ ɫɴɜɩɚɞɚ
ɭɤɚɡɚɬɟɥɧɚɬɚ ɱɟɪɬɚ, ɫɚ ɭɤɚɡɚɧɢ ɢ ɩɨɥɨɠɟɧɢɟɬɨ ɡɚ
ɦɚɤɫɢɦɭɦ (. ɢ ɡɚ ɦɢɧɢɦɭɦ &.
Ɍɟ ɫɟ ɡɚɞɚɜɚɬ ɫɴɫ ɡɚɜɴɪɬɚɧɟ ɧɚ ɤɥɸɱɚ ɜ ɩɨɫɨɤɚ,
ɨɛɪɚɬɧɚ ɧɚ ɱɚɫɨɜɧɢɤɨɜɚɬɚ ɫɬɪɟɥɤɚ ɨɬ ɩɨɥɨɠɟɧɢɟ
“ɢɡɤɥɸɱɟɧ”. Ɂɚ ɢɡɤɥɸɱɜɚɧɟ ɧɚ ɤɨɬɥɨɧɚ ɟ
ɧɟɨɛɯɨɞɢɦɨ ɞɚ ɡɚɜɴɪɬɢɬɟ ɤɥɸɱɚ ɡɚ ɝɚɡ ɜ ɩɨɫɨɤɚ
ɧɚ ɱɚɫɨɜɧɢɤɨɜɚɬɚ ɫɬɪɟɥɤɚ ɞɨɤɪɚɢ (ɫɴɨɬɜɟɬɫɬɜɚɳ
ɨɬɧɨɜɨ ɧɚ ɡɧɚɤɚ ).
ɭɩɨɪ ɢ ɡɚɜɴɪɬɟɬɟ ɫɴɨɬɜɟɬɧɢɹ
ɫ
ɉɪɚɤɬɢɱɟɫɤɢ ɫɴɜɟɬɢ ɩɪɢ ɢɡɩɨɥɡɜɚɧɟ ɧɚ ɝɚɡɨɜɢɬɟ
ɤɨɬɥɨɧɢ
Ɂɚ ɩɨɞɨɛɪɹɜɚɧɟ ɪɚɛɨɬɚɬɚ ɧɚ ɤɨɬɥɨɧɚ ɢ ɦɢɧɢɦɚɥɟɧ
ɪɚɡɯɨɞ ɧɚ ɝɚɡ ɟ ɧɟɨɛɯɨɞɢɦɨ ɞɚ ɫɟ ɢɡɩɨɥɡɜɚɬ
ɝɨɬɜɚɪɫɤɢ ɫɴɞɨɜɟ ɫ ɪɚɜɧɨ ɞɴɧɨ, ɫ ɤɚɩɚɤ ɢ ɫ ɪɚɡɦɟɪɢ,
ɩɪɨɩɨɪɰɢɨɧɚɥɧɢ ɧɚ ɝɚɡɨɜɢɹ ɤɨɬɥɨɧ:
Ƚ
ɨɪɟɥɤɚ Ʉɭɯɧɟɧɫɤɢ ɞɢɚɦɟɬɴɪ
ɛɴɪɡɨ (R) 24 - 26
ɉɨɥɭ ɛɴɪɡɨ (S) 16 - 20
Cɩɨɦɚɝɚɬɟɥɟɧ (A) 10 - 14
ɚ ɞɚ ɢɞɟɧɬɢɮɢɰɢɪɚɬɟ ɜɢɞɚ ɧɚ ɤɨɬɥɨɧɚ, ɧɚɩɪɚɜɟɬɟ
ɫɩɪɚɜɤɚ ɫ ɱɟɪɬɟɠɢɬɟ ɜ ɩɚɪɚɝɪɚɮ „ɏɚɪɚɤɬɟɪɢɫɬɢɤɢ ɧɚ
ɤɨɬɥɨɧɢɬɟ
! ɉɨ
ɢɡɥɢɡɚɬ ɢɡɜɴɧ ɝɨɬɜɚɪɫɤɢɹ ɩɥɨɬ.
! Ɂɚ ɦɨɞɟɥɢ, ɫɧɚɛɞɟɧɢ ɫ ɩɪɟɯɨɞɧɚ ɪɟɲɟɬɤɚ,
ɩɨɫɥɟɞɧɚɬɚ ɬɪɹɛɜɚ ɞɚ ɫɟ ɢɡɩɨɥɡɜɚ ɫɚɦɨ ɡɚ ɦɚɥɤɢɹ
ɤɨɬɥɨɧ, ɤɨɝɚɬɨ ɫɟ ɢɡɩɨɥɡɜɚɬ ɫɴɞɨɜɟ ɫ ɞɢɚɦɟɬɴɪ, ɩɨɦɚɥɴɤ ɨɬ 12 ɦɦ.
ɢ ɞɸɡɢɬɟ“.
ɜɪɟɦɟ ɧɚ ɝɨɬɜɟɧɟ ɬɟɧɞɠɟɪɢɬɟ ɧɟ ɬɪɹɛɜɚ ɞɚ
BG
ȿɥɟɤɬɪɨɧɧɨ ɡɚɩɚɥɜɚɧɟ ɧɚ ɝɚɡɨɜɢɬɟ ɝɨɪɟɥɤɢ
ɍɪɟɞɴɬ ɟ ɫɧɚɛɞɟɧ ɫ ɟɥɟɤɬɪɨɧɧɨ ɡɚɩɚɥɜɚɧɟ, ɜɝɪɚɞɟɧɨ
ɜ ɩɪɟɜɤɥɸɱɜɚɬɟɥɹ(J) . Ɂɚ
ɡɚɩɚɥɜɚɧɟ ɧɚ ɢɡɛɪɚɧɢɹ
ɤɨɬɥɨɧ ɟ ɞɨɫɬɚɬɴɱɧɨ ɞɚ
ɫɟ ɡɚɜɴɪɬɢ ɫɴɨɬɜɟɬɧɢɹɬ
ɩɪɟɜɤɥɸɱɜɚɬɟɥ ɜ ɩɨɫɨɤɚ,
ɨɛɪɚɬɧɚ ɧɚ ɱɚɫɨɜɧɢɤɨɜɚɬɚ
ɫɬɪɟɥɤɚ ɞɨ ɫɢɦɜɨɥɚ ɡɚ
ɝɨɥɹɦ ɩɥɚɦɴɤ, ɞɚ ɫɟ
ɧɚɬɢɫɧɟ ɞɨɤɪɚɣ, ɡɚ ɞɚ ɫɟ
ɡɚɞɟɣɫɬɜɚ ɟɥɟɤɬɪɨɧɧɨɬɨ
ɡɚɩɚɥɜɚɧɟ, ɢ ɞɚ ɫɟ ɡɚɞɴɪɠɢ ɧɚɬɢɫɧɚɬ ɞɨ ɡɚɩɚɥɜɚɧɟ.
ȼɴɡɦɨɠɧɨ ɟ
ɫɟ ɩɭɫɧɟ ɩɪɟɜɤɥɸɱɜɚɬɟɥɹɬ. ȼ ɬɚɤɴɜ ɫɥɭɱɚɣ ɩɨɜɬɨɪɟɬɟ
ɨɩɟɪɚɰɢɹɬɚ, ɤɚɬɨ ɡɚɞɴɪɠɢɬɟ ɩɪɟɜɤɥɸɱɜɚɬɟɥɹ
ɧɚɬɢɫɧɚɬ ɡɚ ɩɨ-ɞɴɥɝɨ ɜɪɟɦɟ.
! ȼ ɫɥɭɱɚɣ ɧɚ ɜɧɟɡɚɩɧɨ ɢɡɝɚɫɜɚɧɟ ɧɚ ɩɥɚɦɴɤɚ
ɢɡɝɚɫɟɬɟ ɤɨɬɥɨɧɚ ɢ ɢɡɱɚɤɚɣɬɟ ɩɨɧɟ 1 ɦɢɧɭɬɚ, ɩɪɟɞɢ
ɞɚ ɫɟ ɨɩɢɬɚɬɟ ɞɚ ɝɨ ɡɚɩɚɥɢɬɟ ɨɬɧɨɜɨ.
ɍɪɟɞɴɬ ɟ ɫɧɚɛɞɟɧ ɫɴɫ ɡɚɳɢɬɟɧ ɦɟɯɚɧɢɡɴɦ
ɧɚ ɩɥɚɦɴɤ, ɡɚɞɪɴɠɬɟ ɧɚɬɢɫɧɚɬ ɩɪɟɜɤɥɸɱɜɚɬɟɥɹ
ɄɈɌɅɈɇ ɡɚ ɨɤɨɥɨ 2-3 ɫɟɤɭɧɞɢ, ɡɚ ɞɚ ɨɫɬɚɧɟ ɡɚɩɚɥɟɧ
ɩɥɚɦɴɤɴɬ ɢ ɞɚ ɚɤɬɢɜɢɪɚɬɟ ɦɟɯɚɧɢɡɦɚ (K).
ɤɨɬɥɨɧɴɬ ɞɚ ɢɡɝɚɫɧɟ ɜ ɦɨɦɟɧɬɚ, ɜ ɤɨɣɬɨ
ɩɪɢ ɥɢɩɫɚ
ȼɇɂɆȺɇɂȿ! ɋɬɴɤɥɟɧɢɹɬ ɤɚɩɚɤ
ɦɨɠɟ ɞɚ ɫɟ ɫɱɭɩɢ, ɚɤɨ ɫɟ ɧɚɝɪɟɟ.
ɂɡɤɥɸɱɟɬɟ ɜɫɢɱɤɢ ɝɚɡɨɜɢ ɢɥɢ
ɟɥɟɤɬɪɢɱɟɫɤɢ ɤɨɬɥɨɧɢ, ɩɪɟɞɢ ɞɚ
ɝɨ ɡɚɬɜɨɪɢɬɟ.
ȼɧɢɦɚɧɢɟ: ɉɪɟɩɨɪɴɱɜɚɦɟ ɩɪɢ
ɩɴɪɜɨɬɨ ɡɚɩɚɥɜɚɧɟ ɞɚ ɨɫɬɚɜɢɬɟ ɮɭɪɧɚɬɚ ɞɚ ɪɚɛɨɬɢ
ɩɪɚɡɧɚ ɡɚ ɨɤɨɥɨ ɩɨɥɨɜɢɧ ɱɚɫ ɫ ɬɟɪɦɨɪɟɝɭɥɚɬɨɪ ɧɚ
ɦɚɤɫɢɦɭɦ ɢ ɡɚɬɜɨɪɟɧɚ ɜɪɚɬɢɱɤɚ. ɋɥɟɞ ɢɡɬɢɱɚɧɟɬɨ
ɧɚ ɬɨɜɚ ɜɪɟɦɟ ɹ ɭɝɚɫɟɬɟ, ɨɬɜɨɪɟɬɟ ɜɪɚɬɢɱɤɚɬɚ ɢ
ɩɪɨɜɟɬɪɟɬɟ ɩɨɦɟɳɟɧɢɟɬɨ. Ɇɢɪɢɡɦɚɬɚ, ɤɨɹɬɨ ɫɟ
ɭɫɟɳɚ ɜ ɫɥɭɱɚɹ, ɟ ɩɪɢɱɢɧɟɧɚ ɨɬ ɢɡɩɚɪɟɧɢɟɬɨ ɧɚ
ɫɴɫɬɚɜɤɢɬɟ, ɢɡɩɨɥɡɜɚɧɢ ɡɚ ɡɚɳɢɬɚ ɧɚ ɮɭɪɧɚɬɚ ɡɚ
ɜɪɟɦɟɬɨ ɦɟɠɞɭ ɩɪɨɢɡɜɨɞɫɬɜɨɬɨ ɢ ɦɨɧɬɢɪɚɧɟɬɨ ɧɚ
ɩɟɱɤɚɬɚ.
ȼɧɢɦɚɧɢɟ: ɂɡɩɨɥɡɜɚɢɬɟ ɩɴɪɜɨɬɨ ɧɢɜɨ ɨɬɞɨɥɭ ɫɚɦɨ
ɡɚ ɩɟɱɟɧɟ ɧɚ ɝɪɢɥ (ɚɤɨ ɢɦɚ ɬɚɤɴɜ). Ɂɚ ɞɪɭɝ ɜɢɞ
ɩɟɱɟɧɟ ɧɢɤɨɝɚ ɧɟ ɢɡɩɨɥɡɜɚɢɬɟ ɩɴɪɜɨɬɨ ɧɢɜɨ ɨɬɞɨɥɭ
ɢ ɧɢɤɨɝɚ ɧɟ ɩɨɫɬɚɜɹɢɬɟ ɩɪɟɞɦɟɬɢ ɧɚ ɞɴɧɨɬɨ ɧɚ
ɮɭɪɧɚɬɚ, ɞɨɤɚɬɨ ɩɟɱɟɬɟ,ɬɴɢ ɤɚɬɨ ɦɨɠɟ ɞɚ ɩɨɜɪɟɞɢɬɟ
ɟɦɚɢɥɚ. ȼɢɧɚɝɢ ɪɚɡɩɨɥɚɝɚɢɬɟ ɜɚɲɢɬɟ ɝɨɬɜɚɪɫɤɢ
ɫɴɞɨɜɟ (ɢɟɧɫɤɨ ɫɬɴɤɥɨ, ɚɥɭɦɢɧɢɟɜɨ ɮɨɥɢɨ, ɢ
ɬ.ɧ.) ɜɴɪɯɭ ɪɟɲɟɬɤɚɬɚ, ɤɨɹɬɨ ɫɟ ɞɨɫɬɚɜɹ ɫ ɩɟɱɤɚɬɚ,
ɩɨɫɬɚɜɟɧɚ ɧɚ ɩɨɞɯɨɞɹɳɨ ɧɢɜɨ ɜɴɜ ɜɨɞɚɱɢɬɟ ɧɚ
ɮɭɪɧɚɬɚ.
Ɂɚ ɞɚ ɢɡɝɚɫɢɬɟ ɤɨɬɥɨɧɚ, ɡɚɜɴɪɬɟɬɟ ɩɪɟɜɤɥɸɱɜɚɬɟɥɹ
ɞɨ ɫɩɢɪɚɧɟ
•.
*ɫɚɦɨ ɩɪɢ ɧɹɤɨɢ ɨɬ ɦɨɞɟɥɢɬɟ
45
Page 46

BG
F
ɪ
Ɍɟɪɦɨɪɟɝɭɥɚɬɨɪ ɧɚ ɮɭɪɧɚɬɚ ɢ ɝɪɢɥɚ
Ɍɨɜɚ ɟ ɩɪɢɛɨɪɴɬ, ɫ ɤɨɢɬɨ ɫɟ ɢɡɛɢɪɚɬ ɪɚɡɥɢɱɧɢɬɟ ɮɭɧɤɰɢɢ ɧɚ ɮɭɪɧɚɬɚ
Max.
Ɍɴɢ ɤɚɬɨ ɮɭɪɧɚɬɚ ɟ ɨɛɨɪɭɞɜɚɧɚ ɫ ɩɪɢɛɨɪ ɡɚ ɛɟɡɨɩɚɫɧɨɫɬ, ɟ
ɧɟɨɛɯɨɞɢɦɨ ɞɚ ɡɚɞɴɪɠɢɬɟ ɤɥɸɱɚ ɧɚɬɢɫɧɚɬ ɡɚ 4 ɫɟɤɭɧɞɢ, ɡɚ
ɞɚ ɩɨɞɚɞɟɬɟ ɝɚɡ. (Ɂɚ ɦɨɞɟɥɢɬɟ ɫ ɟɥɟɤɬɪɨɧɧɨ ɡɚɩɚɥɜɚɧɟ ɜɢɠ
ɫɴɨɬɜɟɬɧɢɹ ɪɚɡɞɟɥ).
ɂɡɛɨɪɴɬ ɧɚ ɬɟɦɩɟɪɚɬɭɪɚɬɚ ɡɚ ɩɟɱɟɧɟ ɫɬɚɜɚ, ɤɚɬɨ ɡɚɜɴɪɬɟɬɟ ɤɥɸɱɚ
ɢ ɠɟɥɚɧɚɬɚ ɫɬɨɢɧɨɫɬ ɫɨɱɢ ɭɤɚɡɚɬɟɥɧɚɬɚ ɱɟɪɬɚ ɜɴɪɯɭ ɬɚɛɥɨɬɨ ɡɚ
ɭɩɪɚɜɥɟɧɢɟ. ȼɫɢɱɤɢ ɬɟɦɩɟɪɚɬɭɪɢ, ɤɨɢɬɨ ɦɨɝɚɬ ɞɚ ɫɟ ɞɨɫɬɢɝɧɚɬ, ɟ
ɩɨɤɚɡɚɧɚ ɬɭɤ ɩɨ-ɞɨɥɭ.
Ɂɚɞɚɞɟɧɚɬɚ ɬɟɦɩɟɪɚɬɭɪɚ ɚɜɬɨɦɚɬɢɱɧɨ ɫɟ ɞɨɫɬɢɝɚ ɢ ɩɨɞɞɴɪɠɚ
ɩɨɫɬɨɹɧɧɚ ɨɬ ɤɨɧɬɪɨɥɧɢɹ ɩɪɢɛɨɪ (ɬɟɪɦɨɪɟɝɭɥɚɬɨɪɚ), ɭɩɪɚɜɥɹɜɚɧ
ɫ ɤɥɸɱɚ.
Ʉɚɬɨ ɧɚɬɢɫɧɟɬɟ ɧɚɩɪɟɞ
ɝɪɢɥɴɬ ɳɟ ɡɚɩɨɱɧɟ ɞɚ ɪɚɛɨɬɢ ɫ ɢɧɮɪɚɱɟɪɜɟɧɢ ɥɴɱɢ, ɤɨɢɬɨ ɩɪɢɞɚɜɚɬ
ɡɥɚɬɢɫɬɢɹ ɰɜɹɬ ɧɚ ɩɟɱɢɜɚɬɚ (ɩɪɟɩɨɪɴɱɜɚ ɫɟ ɡɚ ɩɟɱɟɧɟ ɧɚ ɦɟɫɨ -
ɪɟɛɴɪɰɚ, ɧɚɞɟɧɢɱɤɢ, ɩɴɪɠɨɥɢ).
ɢ ɫɟ ɢɡɛɢɪɚ ɬɟɦɩɟɪɚɬɭɪɚɬɚ ɧɚ ɩɟɱɟɧɟ,
ɤɨɹɬɨ ɟ ɧɚɢ-ɩɨɞɯɨɞɹɳɚ ɡɚ ɩɟɱɟɧɟ ɧɚ
ɹɫɬɢɟɬɨ ɢɡɦɟɠɞɭ ɭɤɚɡɚɧɢɬɟ ɧɚ ɫɚɦɢɹ
ɤɥɸɱ (ɜɤɥɸɱɟɧɢ ɦɟɠɞɭ Min ɢ Max).
Ɂɚ ɞɚ ɡɚɩɚɥɢɬɟ ɝɨɪɟɥɤɚɬɚ ɧɚ ɮɭɪɧɚɬɚ,
ɩɪɢɛɥɢɠɟɬɟ ɤɴɦ ɨɬɜɨɪɚ “F” ɩɥɚɦɴɤ
ɢɥɢ ɡɚɩɚɥɤɚ, ɟɞɧɨɜɪɟɦɟɧɧɨ ɫ ɬɨɜɚ
ɧɚɬɢɫɧɟɬɟ ɧɚɩɪɟɞ ɞɨ ɭɩɨɪ ɢ ɡɚɜɴɪɬɟɬɟ
ɤɥɸɱɚ ɧɚ ɮɭɪɧɚɬɚ ɜ ɩɨɫɨɤɚ, ɨɛɪɚɬɧɚ ɧɚ
ɱɚɫɨɜɧɢɤɨɜɚɬɚ ɫɬɪɟɥɤɚ ɞɨ ɩɨɥɨɠɟɧɢɟ
ɞɨ ɭɩɨɪ ɢ ɡɚɜɴɪɬɢɬɟ ɤɥɸɱɚ ɞɨ ɩɨɡɢɰɢɹ ,
Ɍɚɛɥɢɰɚ ɡɚ ɩɟɱɟɧɟ ɜɴɜ ɮɭɪɧɚ
ȿɥɟɤɬɪɨɧɧɨ ɡɚɩɚɥɜɚɧɟ ɧɚ ɝɨɪɟɥɤɚɬɚ ɧɚ ɮɭɪɧɚɬɚ ɢ ɧɚ ɝɪɢɥɚ
(ɫɚɦɨ ɩɪɢ ɧɹɤɨɢ ɨɬ ɦɨɞɟɥɢɬɟ)
Ɂɚ ɡɚɩɚɥɜɚɧɟ ɝɨɪɟɥɤɚɬɚ ɧɚ ɮɭɪɧɚɬɚ ɧɚɬɢɫɧɟɬɟ ɛɭɬɨɧɚ, ɨɛɨɡɧɚɱɟɧ ɫɴɫ
ɫɢɦɜɨɥɚ 1, ɟɞɧɨɜɪɟɦɟɧɧɨ ɫ ɬɨɜɚ ɧɚɬɢɫɧɟɬɟ ɧɚɩɪɟɞ ɞɨ ɭɩɨɪ ɢ ɡɚɜɴɪɬɟɬɟ
ɤɥɸɱɚ ɧɚ ɮɭɪɧɚɬɚ ɜ ɩɨɫɨɤɚ, ɨɛɪɚɬɧɚ ɧɚ ɱɚɫɨɜɧɢɤɨɜɚɬɚ ɫɬɪɟɥɤɚ ɞɨ
ɩɨɡɢɰɢɹ Max.
ɇɟɨɛɯɨɞɢɦɨ ɟ ɞɚ ɡɚɞɴɪɠɢɬɟ ɤɥɸɱɚ ɧɚɬɢɫɧɚɬ ɡɚ ɨɤɨɥɨ 4 ɫɟɤɭɧɞɢ,
ɡɚ ɞɚ ɩɨɞɚɞɟɬɟ ɞɨɫɬɚɬɴɱɧɨ ɝɚɡ.
Ɂɚ ɡɚɩɚɥɜɚɧɟ ɝɨɪɟɥɤɚɬɚ ɧɚ ɝɪɢɥɚ ɧɚɬɢɫɧɟɬɟ ɛɭɬɨɧɚ, ɨɡɧɚɱɟɧ ɫɴɫ
ɫɢɦɜɨɥɚ 1, ɧɚɬɢɫɧɟɬɟ ɧɚɩɪɟɞ ɞɨ ɭɩɨɪ ɢ ɡɚɜɴɪɬɟɬɟ ɤɥɸɱɚ ɧɚ ɮɭɪɧɚɬɚ
ɜ ɩɨɫɨɤɚ ɧɚ ɱɚɫɨɜɧɢɤɨɜɚɬɚ ɫɬɪɟɥɤɚ (ɝɪɢɥ).
ɇɟɨɛɯɨɞɢɦɨ ɟ ɞɚ ɞɴɪɠɢɬɟ ɤɥɸɱɚ ɧɚɬɢɫɧɚɬ ɡɚ ɨɤɨɥɨ 4 ɫɟɤɭɧɞɢ, ɡɚ
ɞɚ ɩɨɞɚɞɟɬɟ ɞɨɫɬɚɬɴɱɧɨ ɝɚɡ.
ɉɪɢ ɥɢɩɫɚ ɧɚ ɟɥ. ɡɚɯɪɚɧɜɚɧɟ ɦɨɠɟ ɞɚ ɡɚɩɚɥɢɬɟ ɪɴɱɧɨ ɮɭɪɧɚɬɚ ɢɥɢ
ɝɪɢɥɚ, ɤɚɬɨ ɫɥɟɞɜɚɬɟ ɢɧɫɬɪɭɤɰɢɢɬɟ, ɞɚɞɟɧɢ ɜ ɪɚɡɞɟɥɚ “Ɍɟɪɦɨɪɟɝɭɥɚɬɨɪ
ɧɚ ɮɭɪɧɚɬɚ”.
Ȼɭɬɨɧ ɡɚ ɜɤɥɸɱɜɚɧɟ ɧɚ ɨɫɜɟɬɥɟɧɢɟɬɨ ɧɚ ɮɭɪɧɚɬɚ
ɍɤɚɡɚɧ ɟ ɫɴɫ ɫɢɦɜɨɥɚI ɢ ɞɚɜɚ ɜɴɡɦɨɠɧɨɫɬ
ɜɴɜ ɮɭɪɧɚɬɚ ɞɚ ɫɟ ɩɪɨɫɥɟɞɢ ɯɨɞɴɬ ɧɚ ɩɟɱɟɧɟ, ɛɟɡ ɞɚ ɫɟ ɨɬɜɚɪɹ
ɜɪɚɬɢɱɤɚɬɚ.
Ⱦɨɥɧɨ ɨɬɞɟɥɟɧɢɟ
ɉɨɞ ɮɭɪɧɚɬɚ ɫɟ ɧɚɦɢɪɚ ɨɬɞɟɥɟɧɢɟ, ɤɨɟɬɨ ɦɨɠɟ ɞɚ ɛɴɞɟ ɢɡɩɨɥɡɜɚɧɨ
ɡɚ ɫɴɯɪɚɧɟɧɢɟ ɧɚ ɚɤɫɟɫɨɚɪɢ ɢɥɢ ɬɟɧɞɠɟɪɢ.
ɫɴɫ ɡɚɩɚɥɜɚɧɟɬɨ ɧɚ ɥɚɦɩɚɬɚ
əɫɬɢɹ ɡɚ ɝɨɬɜɟɧɟ Ɍɟɝɥɨ
(Kg)
ɉɚɫɬɚ (ɦɚɤɚɪɨɧɟɧɢ ɹɫɬɢɹ)
Ʌɚɡɚɧɹ
Ʉɚɧɟɥɨɧɢ
Ɍɚɥɹɬɟɥɟ
Ɇɟɫɨ
Ɍɟɥɟɲɤɨ
ɉɢɥɟ
ɉɚɬɢɰɚ
Ɂɚɟɤ
ɋɜɢɧɫɤɨ
Ⱥɝɧɟɲɤɨ
Ɋɢɛɚ
ɋɤɭɦɪɢɹ
Ɇɨɪɫɤɚ ɪɢɛɚ
ɉɴɫɬɴɪɜɚ ɜ ɯɚɪɬɢɹ ɡɚ ɩɟɱɟɧɟ
ɉɢɰɚ
ɇɚɩɨɥɢɬɚɧɚ
Ɍɨɪɬɢ
Ȼɢɫɤɜɢɬɢ
Ɋɨɧɥɢɜɚ ɬɨɪɬɚ
ɒɨɤɨɥɚɞɨɜɚ ɬɨɪɬɚ
Ɍɨɪɬɚ ɫ ɧɚɛɭɯɜɚɬɟɥɢ
2.5
2.5
2.5
1.5
1.5
1.8
2
2.1
1.8
1.1
1.5
1
1
0.5
1.1
1
1
ɇɢɜɨ ɧɚ
ɩɟɱɟɧɟ
ɨɬɞɨɥɭ
4
4
4
3
3
3
3
3
3
3
3
3
4
4
4
4
4
Ɍɟɦɩɟɪɚɬɭɪɚ
(° C)
10
10
10
10
10
10
10
10
10
10
10
10
15
15
15
15
15
ȼɪɟɦɟ ɡɚ
ɩɨɞɝɪɹɜɚɧɟ
(ɦɢɧɭɬɢ)
200-210
200
200
200-210
210-220
200
200
200
200
180-200
180-200
180-200
210-220
180
180
180
170
ȼɪɟɦɟ ɡɚ
ɩɟɱɟɧɟ
(ɦɢɧɭɬɢ)
75-85
50-60
50-60
95-100
90-100
100-110
70-80
70-80
100-105
45-50
45-55
45-50
20-25
25-35
40-45
50-55
40-45
ȻȿɅȿɀɄȺ: ȼɪɟɦɟɬɨ ɡɚ ɩɟɱɟɧɟ ɟ ɩɪɟɩɨɪɴɱɢɬɟɥɧɨ ɢ ɦɨɠɟ ɞɚ ɫɟ ɩɪɨɦɟɧɹ ɫɴɨɛɪɚɡɧɨ ɥɢɱɧɢɹ ɜɤɭɫ. ɉɪɢ ɩɟɱɟɧɟɬɨ
ɧɚ ɫɤɚ
ɚ ɬɚɜɢɱɤɚɬɚ ɡɚ ɫɴɛɢɪɚɧɟ ɧɚ ɦɚɡɧɢɧɢɬɟ ɬɪɹɛɜɚ ɜɢɧɚɝɢ ɞɚ ɫɟ ɩɨɫɬɚɜɹ ɧɚ 1ɨ ɧɢɜɨ ɨɬɞɨɥɭ.
46
Page 47

ɉɪɟɞɩɚɡɧɢ ɦɟɪɤɢ ɢ ɩɪɟɩɨɪɴɤɢ
! Ɍɨɡɢ ɭɪɟɞ ɟ ɩɪɨɢɡɜɟɞɟɧ ɜ ɫɴɨɬɜɟɬɫɬɜɢɟ ɫ
ɦɟɠɞɭɧɚɪɨɞɧɢɬɟ ɧɨɪɦɢ ɡɚ ɛɟɡɨɩɚɫɧɨɫɬ ɩɪɢ ɪɚɛɨɬɚ.
Ɍɟɡɢ ɩɪɟɞɭɩɪɟɠɞɟɧɢɹ ɫɚ ɞɚɞɟɧɢ ɨɬ ɫɴɨɛɪɚɠɟɧɢɹ
ɡɚ ɛɟɡɨɩɚɫɧɨɫɬ ɢ ɬɪɹɛɜɚ ɞɚ ɛɴɞɚɬ ɩɪɨɱɟɬɟɧɢ
ɜɧɢɦɚɬɟɥɧɨ.
Ɉɛɳɢ ɩɪɚɜɢɥɚ ɡɚ ɛɟɡɨɩɚɫɧɨɫɬ
• Ƚɨɬɜɚɪɫɤɢɹɬ ɩɥɨɬ ɨɬ ɫɬɴɤɥɨɤɟɪɚɦɢɤɚ ɟ ɭɫɬɨɢɱɢɜ
ɧɚ ɬɟɦɩɟɪɚɬɭɪɧɢ ɤɨɥɟɛɚɧɢɹ ɢ ɧɚ ɭɞɚɪɢ. ȼɫɟ
ɩɚɤ, ɬɪɹɛɜɚ ɞɚ ɫɟ ɢɦɚ ɩɪɟɞɜɢɞ, ɱɟ ɨɫɬɪɢɟɬɚ
ɢɥɢ ɡɚɬɨɱɟɧɢ ɤɭɯɧɟɧɫɤɢ ɩɪɢɛɨɪɢ ɦɨɝɚɬ ɞɚ
ɫɱɭɩɹɬ ɝɨɬɜɚɪɫɤɢɹ ɩɥɨɬ. Ⱥɤɨ ɬɨɜɚ ɫɟ ɫɥɭɱɢ,
ɧɟɡɚɛɚɜɧɨ ɢɡɤɥɸɱɟɬɟ ɳɟɩɫɟɥɚ ɧɚ ɩɟɱɤɚɬɚ ɨɬ
ɦɪɟɠɚɬɚ ɢ ɫɟ ɨɛɴɪɧɟɬɟ ɫɚɦɨ ɤɴɦ ɨɬɨɪɢɡɢɪɚɧ
ɬɟɯɧɢɱɟɫɤɢ ɫɟɪɜɢɡ, ɤɚɬɨ
ɧɚ ɨɪɢɝɢɧɚɥɧɢ ɪɟɡɟɪɜɧɢ ɱɚɫɬɢ. ɇɟɫɩɚɡɜɚɧɟɬɨ
ɧɚ ɝɨɪɟɢɡɥɨɠɟɧɨɬɨ ɦɨɠɟ ɞɚ ɫɟ ɨɬɪɚɡɢ ɧɚ
ɛɟɡɨɩɚɫɧɨɫɬɬɚ ɧɚ ɭɪɟɞɚ.
• ɍɪɟɞɴɬ ɟ ɪɚɡɪɚɛɨɬɟɧ ɡɚ ɧɟɩɪɨɮɟɫɢɨɧɚɥɧɚ
ɭɩɨɬɪɟɛɚ ɜ ɠɢɥɢɳɧɢ ɫɝɪɚɞɢ.
• ɍɪɟɞɴɬ ɧɟ ɬɪɹɛɜɚ ɞɚ ɫɟ ɢɧɫɬɚɥɢɪɚ ɧɚ ɨɬɤɪɢɬɨ,
ɞɨɪɢ ɤɨɝɚɬɨ ɟ ɧɚ ɡɚɳɢɬɟɧɨ ɦɹɫɬɨ. Ɇɧɨɝɨ ɟ ɨɩɚɫɧɨ
ɭɪɟɞɴɬ ɞɚ ɫɟ ɨɫɬɚɜɹ ɢɡɥɨɠɟɧ ɧɚ ɜɴɡɞɟɢɫɬɜɢɟ
ɞɴɠɞ ɢ ɛɭɪɹ.
• ɍɪɟɞɴɬ ɧɟ ɬɪɹɛɜɚ ɞɚ ɫɟ ɞɨɤɨɫɜɚ, ɤɨɝɚɬɨ ɫɬɟ ɫ ɛɨɫɢ
ɤɪɚɤɚ ɢɥɢ ɩɴɤ ɫ ɦɨɤɪɢ ɢɥɢ ɜɥɚɠɧɢ ɪɴɰɟ ɢ ɤɪɚɤɚ.
• ɍɪɟɞɴɬ ɬɪɹɛɜɚ ɞɚ ɫɟ ɢɡɩɨɥɡɜɚ ɡɚ ɩɪɢɝɨɬɜɹɧɟ
ɧɚ ɹɫɬɢɹ ɫɚɦɨ ɨɬ ɜɴɡɪɚɫɬɧɢ ɢ ɫɴɝɥɚɫɧɨ
ɢɧɫɬɪɭɤɰɢɢɬɟ, ɩɪɢɜɟɞɟɧɢ ɜ ɬɚɡɢ ɤɧɢɠɤɚ.
ȼɫɹɤɚ ɞɪɭɝɚ ɭɩɨɬɪɟɛɚ (ɧɚɩɪɢɦɟɪ ɡɚ ɨɬɨɩɥɟɧɢɟ
ɧɚ ɩɨɦɟɳɟɧɢɹ) ɫɟ ɫɱɢɬɚ ɡɚ ɧɟɩɨɞɯɨɞɹɳɚ ɢ
ɫɥɟɞɨɜɚɬɟɥɧɨ ɡɚ ɨɩɚɫɧɚ. ɉɪɨɢɡɜɨɞɢɬɟɥɹɬ
ɧɟ ɧɨɫɢ ɨɬɝɨɜɨɪɧɨɫɬ ɡɚ ɜɴɡɦɨɠɧɢ ɳɟɬɢ,
ɩɪɨɢɡɬɢɱɚɳɢ ɨɬ ɧɟɩɨɞɯɨɞɹɳɚ, ɧɟɩɪɚɜɢɥɧɚ ɢ
ɧɟɪɚɡɭɦɧɚ ɭɩɨɬɪɟɛɚ.
• Ɍɚɡɢ ɢɧɫɬɪɭɤɰɢɹ ɫɟ ɨɬɧɚɫɹ ɡɚ ɭɪɟɞɢ ɨɬ ɤɥɚɫ
1 (ɦɨɧɬɢɪɚɧɢ ɫɚɦɨɫɬɨɹɬɟɥɧɨ) ɢɥɢ ɨɬ ɤɥɚɫ 2 -
ɩɨɞɤɥɚɫ 1 (ɜɝɪɚɞɟɧɢ ɦɟɠɞɭ ɞɜɚ ɦɟɛɟɥɚ).
• Ⱦɟɰɚɬɚ ɞɚ ɫɟ ɞɴɪɠɚɬ ɧɚɫɬɪɚɧɚ ɨɬ ɭɪɟɞɚ.
• Ⱦɚ ɫɟ ɜɧɢɦɚɜɚ ɝɨɪɟɳɢɬɟ ɱɚɫɬɢ ɧɚ ɭɪɟɞɚ ɞɚ ɧɟ
ɜɥɢɡɚɬ ɜ ɤɨɧɬɚɤɬ ɫɴɫ ɡɚɯɪɚɧɜɚɳɢɬɟ ɤɚɛɟɥɢ ɧɚ
ɞɪɭɝɢ ɟɥɟɤɬɪɨɞɨɦɚɤɢɧɫɤɢ ɭɪɟɞɢ.
• ɇɟ ɡɚɩɭɲɜɚɢɬɟ ɨɬɜɨɪɢɬɟ ɡɚ ɜɟɧɬɢɥɚɰɢɹ ɢ
ɨɬɜɟɠɞɚɧɟ ɧɚ ɬɨɩɥɢɧɚɬɚ.
• ȼɢɧɚɝɢ ɢɡɩɨɥɡɜɚɢɬɟ ɪɴɤɚɜɢɰɢ ɡɚ ɮɭɪɧɚ ɩɪɢ
ɩɨɫɬɚɜɹɧɟ ɢɥɢ ɨɬɫɬɪɚɧɹɜɚɧɟ ɧɚ ɫɴɞɨɜɟ.
• ɇɟ ɢɡɩɨɥɡɜɚɢɬɟ ɡɚɩɚɥɢɬɟɥɧɢ ɬɟɱɧɨɫɬɢ (ɚɥɤɨɯɨɥ,
ɛɟɧɡɢɧ ɢ ɬ.ɧ.) ɜ
• ɇɟ ɩɨɫɬɚɜɹɢɬɟ ɡɚɩɚɥɢɦ ɦɚɬɟɪɢɚɥ ɜ ɞɨɥɧɨɬɨ
ɨɬɞɟɥɟɧɢɟ ɢɥɢ ɜɴɜ ɮɭɪɧɚɬɚ: ɚɤɨ ɭɪɟɞɴɬ
ɧɟɨɱɚɤɜɚɧɨ ɡɚɪɚɛɨɬɢ, ɦɨɠɟ ɞɚ ɫɟ ɡɚɩɚɥɢ.
• Ʉɨɝɚɬɨ ɭɪɟɞɴɬ ɧɟ ɫɟ ɢɡɩɨɥɡɜɚ, ɜɢɧɚɝɢ
ɩɪɨɜɟɪɹɜɚɢɬɟ ɩɪɟɜɤɥɸɱɜɚɬɟɥɢɬɟ ɞɚ ɛɴɞɚɬ ɜ
ɩɨɥɨɠɟɧɢɟ
• ɇɟ ɢɡɜɚɠɞɚɢɬɟ ɳɟɩɫɟɥɚ ɨɬ ɤɨɧɬɚɤɬɚ ɡɚ
ɟɥɟɤɬɪɢɱɟɫɤɢ ɬɨɤ, ɤɚɬɨ ɞɴɪɩɚɬɟ ɤɚɛɟɥɚ; ɜɦɟɫɬɨ
ɬɨɜɚ ɯɜɚɧɟɬɟ ɫɚɦɢɹ ɳɟɩɫɟɥ.
• ɇɟ ɢɡɜɴɪɲɜɚɢɬɟ ɨɩɟɪɚɰɢɢ ɩɨ ɩɨɱɢɫɬɜɚɧɟ ɢɥɢ
ɩɨɞɞɪɴɠɤɚ, ɛɟɡ ɩɪɟɞɢ ɬɨɜɚ ɞɚ ɫɬɟ ɢɡɤɥɸɱɢɥɢ
ɳɟɩɫɟɥɚ ɨɬ ɟɥɟɤɬɪɢɱɟɫɤɚɬɚ ɦɪɟɠɚ.
ɛɥɢɡɨɫɬ ɞɨ ɪɚɛɨɬɟɳɢɹ ɭɪɟɞ.
•.
ɢɡɢɫɤɚɬɟ ɢɡɩɨɥɡɜɚɧɟɬɨ
ɧɚ
• Ⱥɤɨ ɭɪɟɞɴɬ ɫɟ ɩɨɜɪɟɞɢ, ɧɢɤɨɝɚ ɧɟ ɫɟ ɨɩɢɬɜɚɢɬɟ
ɞɚ ɝɨ ɩɨɩɪɚɜɢɬɟ ɫɚɦɢ. Ɋɟɦɨɧɬɴɬ, ɢɡɜɴɪɲɟɧ ɨɬ
ɧɟɤɜɚɥɢɮɢɰɢɪɚɧɢ
ɢɥɢ ɩɨɫɥɟɞɜɚɳɚ ɧɟɩɪɚɜɢɥɧɚ ɪɚɛɨɬɚ ɧɚ ɭɪɟɞɚ.
ɋɜɴɪɠɟɬɟ ɫɟ ɫɴɫ ɋɟɪɜɢɡɚ ɡɚ ɬɟɯɧɢɱɟɫɤɨ ɨɛɫɥɭɠɜɚɧɟ ɢ
ɪɟɦɨɧɬ.
• ɇɟ ɨɩɢɪɚɢɬɟ ɬɟɠɤɢ ɩɪɟɞɦɟɬɢ ɧɚ ɨɬɜɨɪɟɧɚɬɚ ɜɪɚɬɚ ɧɚ
ɮɭɪɧɚɬɚ.
• ɇɟ ɩɨɡɜɨɥɹɜɚɢɬɟ ɞɟɰɚ ɢɥɢ ɧɟɨɩɢɬɧɢ ɥɢɰɚ ɞɚ
ɢɡɩɨɥɡɜɚɬ ɩɟɱɤɚɬɚ ɛɟɡ ɧɚɛɥɸɞɟɧɢɟ.
ɥɢɰɚ, ɦɨɠɟ ɞɚ ɩɪɢɱɢɧɢ ɩɨɜɪɟɞɢ
ɉɪɟɪɚɛɨɬɜɚɧɟ ɧɚ ɨɬɩɚɞɴɰɢ
• ɉɪɟɪɚɛɨɬɜɚɧɟ ɡɚ ɨɬɩɚɞɴɰɢ ɧɚ ɨɩɚɤɨɜɴɱɧɢɹ ɦɚɬɟɪɢɚɥ:
ɩɪɢɞɴɪɠɚɢɬɟ ɫɟ ɤɴɦ ɦɟɫɬɧɢɬɟ ɧɨɪɦɢ, ɩɨ ɬɨɡɢ ɧɚɱɢɧ
ɨɩɚɤɨɜɤɢɬɟ ɳɟ ɦɨɝɚɬ ɞɚ ɫɟ ɢɡɩɨɥɡɜɚɬ ɩɨɜɬɨɪɧɨ.
• ȿɜɪɨɩɟɢɫɤɚɬɚ ɞɢɪɟɤɬɢɜɚ 2002/96/ȿɈ ɨɬɧɨɫɧɨ
ɨɬɩɚɞɴɰɢ ɨɬ ɟɥɟɤɬɪɢɱɟɫɤɨ ɢ ɟɥɟɤɬɪɨɧɧɨ ɨɛɨɪɭɞɜɚɧɟ
(ɈȿȿɈ) ɩɪɟɞɜɢɠɞɚ, ɱɟ ɟɥɟɤɬɪɨɞɨɦɚɤɢɧɫɤɢɬɟ ɭɪɟɞɢ ɧɟ
ɬɪɹɛɜɚ ɞɚ ɫɟ ɩɪɟɪɚɛɨɬɜɚɬ ɫ ɨɛɢɤɧɨɜɟɧɢɹ ɩɨɬɨɤ ɬɜɴɪɞɢ
ɨɬɩɚɞɴɰɢ. ɂɡɜɚɞɟɧɢɬɟ ɨɬ ɭɩɨɬɪɟɛɚ
ɛɴɞɚɬ ɫɴɛɢɪɚɧɢ ɨɬɞɟɥɧɨ, ɡɚ ɞɚ ɫɟ ɨɩɬɢɦɢɡɢɪɚ ɞɟɥɴɬ
ɧɚ ɩɨɜɬɨɪɧɚ ɭɩɨɬɪɟɛɚ ɢ ɪɟɰɢɤɥɢɪɚɧɟ ɧɚ ɫɴɫɬɚɜɹɳɢɬɟ
ɝɢ ɦɚɬɟɪɢɚɥɢ ɢ ɞɚ ɫɟ ɩɪɟɞɨɬɜɪɚɬɹɬ ɩɨɬɟɧɰɢɚɥɧɢɬɟ
ɳɟɬɢ ɧɚ ɡɞɪɚɜɟɬɨ ɧɚ ɯɨɪɚɬɚ ɢ ɨɤɨɥɧɚɬɚ ɫɪɟɞɚ. ȼɫɢɱɤɢ
ɭɪɟɞɢ ɫɚ ɨɡɧɚɱɟɧɢ ɫɴɫ ɡɧɚɤ ɡɚɞɪɚɫɤɚɧ ɤɨɧɬɟɢɧɟɪ ɡɚ
ɛɨɤɥɭɤ, ɤɨɢɬɨ ɧɚɩɨɦɧɹ ɡɚɞɴɥɠɟɧɢɟɬɨ ɡɚ ɪɚɡɞɟɥɧɨ
ɫɴɛɢɪɚɧɟ ɧɚ ɨɬɩɚɞɴɰɢɬɟ
ɂɡɜɚɞɟɧɢɬɟ ɨɬ ɭɩɨɬɪɟɛɚ ɟɥɟɤɬɪɨɞɨɦɚɤɢɧɫɤɢ
ɭɪɟɞɢ ɦɨɝɚɬ ɞɚ ɫɟ ɩɪɟɞɚɞɚɬ ɧɚ ɨɛɳɟɫɬɜɟɧɚ
ɫɥɭɠɛɚ ɡɚ ɫɴɛɢɪɚɧɟ ɧɚ ɨɬɩɚɞɴɰɢɬɟ, ɦɨɝɚɬ ɞɚ ɫɟ
ɡɚɧɟɫɚɬ ɜ ɫɩɟɰɢɚɥɧɨ ɩɪɟɞɧɚɡɧɚɱɟɧɢɬɟ ɡɚ ɬɨɜɚ
ɨɬ ɨɛɳɢɧɚɬɚ ɡɨɧɢ, ɢɥɢ ɚɤɨ ɬɨɜɚ ɟ ɩɪɟɞɜɢɞɟɧɨ ɨɬ
ɡɚɤɨɧɚ ɧɚ ɫɴɨɬɜɟɬɧɚɬɚ ɞɴɪɠɚɜɚ, ɞɚ ɫɟ ɜɴɪɧɚɬ ɧɚ
ɞɢɫɬɪɢɛɭɬɨɪɢɬɟ, ɡɚɤɭɩɭɜɚɢɤɢ ɫɴɳɟɜɪɟɦɟɧɧɨ ɧɨɜɨ
ɢɡɞɟɥɢɟ ɨɬ ɫɴɳɢɹ ɜɢɞ
ȼɫɢɱɤɢ ɨɫɧɨɜɧɢ ɩɪɨɢɡɜɨɞɢɬɟɥɢ ɧɚ ɟɥɟɤɬɪɨɞɨɦɚɤɢɧɫɤɢ
ɭɪɟɞɢ ɪɚɛɨɬɹɬ ɚɤɬɢɜɧɨ ɩɨ ɫɴɡɞɚɜɚɧɟɬɨ ɢ ɭɩɪɚɜɥɟɧɢɟɬɨ
ɧɚ ɫɢɫɬɟɦɢ ɡɚ ɫɴɛɢɪɚɧɟ ɢ ɩɪɟɪɚɛɨɬɜɚɧɟ ɧɚ
ɢɡɜɚɞɟɧɢɬɟ ɨɬ ɭɩɨɬɪɟɛɚ ɭɪɟɞɢ.
.
.
ɭɪɟɞɢ ɬɪɹɛɜɚ ɞɚ
ɉɟɫɬɟɧɟ ɢ ɨɩɚɡɜɚɧɟ ɧɚ ɨɤɨɥɧɚɬɚ ɫɪɟɞɚ
• Ʉɨɝɚɬɨ ɢɡɩɨɥɡɜɚɬɟ ɮɭɪɧɚɬɚ ɜ ɢɧɬɟɪɜɚɥɢɬɟ ɨɬ ɜɪɟɦɟ
ɨɬ ɤɴɫɧɢɹ ɫɥɟɞɨɛɟɞ ɞɨ ɪɚɧɧɢɬɟ ɫɭɬɪɟɲɧɢ ɱɚɫɨɜɟ,
ɫɴɞɟɢɫɬɜɚɬɟ ɡɚ ɧɚɦɚɥɹɜɚɧɟ ɧɚ ɧɚɬɨɜɚɪɜɚɧɟɬɨ ɧɚ
ɩɨɬɪɟɛɥɟɧɢɟ ɧɚ ɟɥɟɤɬɪɢɱɟɫɤɢɬɟ ɤɨɦɩɚɧɢɢ.
• ɉɪɟɩɨɪɴɱɜɚ ɫɟ ɩɟɱɟɧɟɬɨ ɧɚ ɩɪɨɝɪɚɦɚ ȽɊɂɅ ɞɚ ɫɟ
ɢɡɜɴɪɲɜɚ ɜɢɧɚɝɢ ɩɪɢ ɡɚɬɜɨɪɟɧɚ ɜɪɚɬɚ ɧɚ ɮɭɪɧɚɬɚ:
ɤɚɤɬɨ ɡɚ ɩɨɫɬɢɝɚɧɟ ɧɚ ɜɴɡɦɨɠɧɨ ɧɚɢ-ɞɨɛɪɢ ɪɟɡɭɥɬɚɬɢ,
ɬɚɤɚ ɢ ɡɚ
%).
• ɍɩɥɴɬɧɟɧɢɹɬɚ ɬɪɹɛɜɚ ɞɚ ɫɟ ɩɨɞɞɴɪɠɚɬ ɜɢɧɚɝɢ
ɟɮɢɤɚɫɧɨ ɞɟɢɫɬɜɚɳɢ ɢ ɱɢɫɬɢ, ɡɚ ɞɚ ɩɪɢɥɟɩɜɚɬ ɩɥɴɬɧɨ
ɤɴɦ ɜɪɚɬɚɬɚ ɢ ɞɚ ɧɟ ɜɨɞɹɬ ɞɨ ɡɚɝɭɛɚ ɧɚ ɬɨɩɥɢɧɚ.
ɱɭɜɫɬɜɢɬɟɥɧɚ ɢɤɨɧɨɦɢɹ ɧɚ ɟɧɟɪɝɢɹ (ɨɤɨɥɨ 10
BG
47
Page 48

ɉɨɞɞɪɴɠɤɚ ɢ ɩɨɱɢɫɬɜɚɧɟ
S
A
BG
ɂɡɤɥɸɱɟɬɟ ɭɪɟɞɚ
ɉɪɟɞɢ ɞɚ ɢɡɜɴɪɲɢɬɟ ɨɩɟɪɚɰɢɢ ɩɨ ɭɪɟɞɚ, ɬɨɢ ɬɪɹɛɜɚ
ɞɚ ɛɴɞɟ ɢɡɤɥɸɱɟɧ ɨɬ ɦɪɟɠɚɬɚ ɡɚ ɟɥɟɤɬɪɢɱɟɫɤɨ
ɡɚɯɪɚɧɜɚɧɟ.
ɉɨɱɢɫɬɜɚɧɟ ɧɚ ɮɭɪɧɚɬɚ
! ɇɟ ɢɡɩɨɥɡɜɚɢɬɟ ɩɚɪɧɚ ɫɬɪɭɹ ɡɚ ɩɨɱɢɫɬɜɚɧɟ.
• ȼɴɬɪɟɲɧɢɬɟ ɟɦɚɢɥɢɪɚɧɢ ɢɥɢ ɢɡɪɚɛɨɬɟɧɢ
ɨɬ ɧɟɪɴɠɞɚɟɦɚ ɫɬɨɦɚɧɚ ɱɚɫɬɢ ɢ ɝɭɦɟɧɢɬɟ
ɭɩɥɴɬɧɟɧɢɹ ɦɨɝɚɬ ɞɚ ɫɟ ɩɨɱɢɫɬɜɚɬ ɫ ɝɴɛɚ, ɧɚɩɨɟɧɚ
ɫ ɯɥɚɞɤɚ ɜɨɞɚ ɢ ɧɟɭɬɪɚɥɟɧ ɫɚɩɭɧ. Ⱥɤɨ ɩɟɬɧɚɬɚ
ɫɚ ɬɪɭɞɧɨ ɨɬɫɬɪɚɧɢɦɢ, ɢɡɩɨɥɡɜɚɢɬɟ ɫɩɟɰɢɮɢɱɧɢ
ɩɪɨɞɭɤɬɢ ɡɚ ɩɨɱɢɫɬɜɚɧɟ. ɉɪɟɩɨɪɴɱɜɚ ɫɟ ɨɛɢɥɧɨ
ɢɡɩɥɚɤɜɚɧɟ ɢ ɩɨɞɫɭɲɚɜɚɧɟ ɫɥɟɞ ɩɨɱɢɫɬɜɚɧɟ. ɇɟ
ɢɡɩɨɥɡɜɚɢɬɟ
ɫɴɫɬɚɜɤɢ.
• ɉɪɟɩɨɪɴɱɢɬɟɥɧɨ ɟ ɞɚ ɩɨɱɢɫɬɜɚɬɟ ɮɭɪɧɚɬɚ
ɨɬɜɴɬɪɟ ɫɥɟɞ ɜɫɹɤɨ ɢɡɩɨɥɡɜɚɧɟ, ɞɨɤɚɬɨ ɟ ɨɳɟ
ɥɟɤɨ ɬɨɩɥɚ. ɂɡɩɨɥɡɜɚɢɬɟ ɬɨɩɥɚ ɜɨɞɚ ɢ ɩɨɱɢɫɬɜɚɳ
ɩɪɟɩɚɪɚɬ, ɢɡɩɥɚɤɧɟɬɟ ɢ ɢɡɫɭɲɟɬɟ ɫ ɜɥɚɠɧɨ ɩɚɪɱɟ
ɩɥɚɬ. ɂɡɛɹɝɜɚɢɬɟ ɢɡɩɨɥɡɜɚɧɟɬɨ ɧɚ ɚɛɪɚɡɢɜɧɢ
ɜɟɳɟɫɬɜɚ.
• ɋɬɴɤɥɨɬɨ ɧɚ ɜɪɚɬɚɬɚ ɧɚ ɮɭɪɧɚɬɚ ɫɟ ɩɨɱɢɫɬɜɚ ɫ
ɧɟɚɛɪɚɡɢɜɧɚ ɝɴɛɚ ɢ ɩɪɟɩɚɪɚɬɢ
ɦɟɤɨ ɩɚɪɱɟ ɩɥɚɬ. ɇɟ ɢɡɩɨɥɡɜɚɢɬɟ ɝɪɭɛɢ ɚɛɪɚɡɢɜɧɢ
ɦɚɬɟɪɢɚɥɢ ɢɥɢ ɡɚɬɨɱɟɧɢ ɦɟɬɚɥɧɢ ɩɪɢɫɩɨɫɨɛɥɟɧɢɹ
ɡɚ ɢɡɫɬɴɪɝɜɚɧɟ, ɡɚɳɨɬɨ ɬɟ ɦɨɝɚɬ ɞɚ ɢɡɞɪɚɫɤɚɬ
ɩɨɜɴɪɯɧɨɫɬɬɚ ɢ ɞɚ ɧɚɪɭɲɚɬ ɰɟɥɨɫɬɬɚ ɧɚ ɫɬɴɤɥɨɬɨ.
• Ⱥɤɫɟɫɨɚɪɢɬɟ ɦɨɝɚɬ ɞɚ ɫɟ ɦɢɹɬ ɤɚɬɨ ɨɛɢɤɧɨɜɟɧɢ
ɫɴɞɨɜɟ, ɞɨɪɢ ɢ ɜ ɦɢɹɥɧɚ ɦɚɲɢɧɚ.
• ɉɚɧɟɥɴɬ ɡɚ ɭɩɪɚɜɥɟɧɢɟ ɫɟ ɩɨɱɢɫɬɜɚ ɨɬ
ɧɟɱɢɫɬɨɬɢɢɬɟ
ɢɥɢ ɫ ɦɟɤɨ ɩɚɪɱɟ ɩɥɚɬ.
ɉɪɨɜɟɪɤɚ ɧɚ ɭɩɥɴɬɧɟɧɢɹɬɚ ɧɚ ɮɭɪɧɚɬɚ
ɉɪɨɜɟɪɹɜɚɢɬɟ ɩɟɪɢɨɞɢɱɧɨ ɫɴɫɬɨɹɧɢɟɬɨ ɧɚ
ɭɩɥɴɬɧɟɧɢɟɬɨ ɨɤɨɥɨ ɜɪɚɬɚɬɚ ɧɚ ɮɭɪɧɚɬɚ. ȼ ɫɥɭɱɚɢ,
ɱɟ ɬɨ ɫɟ ɨɤɚɠɟ ɩɨɜɪɟɞɟɧɨ, ɨɛɴɪɧɟɬɟ ɫɟ ɤɴɦ ɋɟɪɜɢɡɚ
ɡɚ ɬɟɯɧɢɱɟɫɤɨ ɨɛɫɥɭɠɜɚɧɟ ɢ ɪɟɦɨɧɬ. ɉɪɟɩɨɪɴɱɜɚ
ɫɟ ɮɭɪɧɚɬɚ ɞɚ ɧɟ ɫɟ ɢɡɩɨɥɡɜɚ, ɞɨɤɚɬɨ ɧɟ ɛɴɞɟ
ɪɟɦɨɧɬɢɪɚɧɚ
ɉɨɱɢɫɬɜɚɧɟ ɧɚ ɧɟɪɴɠɞɚɟɦɚɬɚ ɫɬɨɦɚɧɚ
ɇɟɪɴɠɞɚɟɦɚɬɚ ɫɬɨɦɚɧɚ ɦɨɠɟ ɞɚ ɫɬɚɧɟ ɧɚ ɩɟɬɧɚ,
ɚɤɨ ɩɪɨɞɴɥɠɢɬɟɥɧɨ ɜɪɟɦɟ ɟ ɜ ɤɨɧɬɚɤɬ ɫɴɫ ɫɢɥɧɨ
ɜɚɪɨɜɢɬɚ ɜɨɞɚ ɢɥɢ ɫ ɩɪɟɩɚɪɚɬɢ ɡɚ ɩɨɱɢɫɬɜɚɧɟ,
ɫɴɞɴɪɠɚɳɢ ɮɨɫɮɨɪ. ɉɪɟɩɨɪɴɱɜɚ ɫɟ ɞɚ ɫɟ ɢɡɩɥɚɤɜɚ
ɨɛɢɥɧɨ ɢ ɜɧɢɦɚɬɟɥɧɨ ɞɚ ɫɟ ɢɡɫɭɲɚɜɚ.
ɚɛɪɚɡɢɜɧɢ ɩɪɚɯɨɜɟ ɢɥɢ ɤɨɪɨɡɢɪɚɳɢ
ɢ ɫɟ ɢɡɫɭɲɚɜɚ ɫ
ɢ ɦɚɡɧɢɧɢɬɟ ɫ ɧɟɚɛɪɚɡɢɜɧɚ ɝɴɛɚ
.
Ʉɚɩɚɤɴɬ ɧɚ ɩɟɱɤɚɬɚ ɦɨɠɟ ɞɚ ɛɴɞɟ ɞɟɦɨɧɬɢɪɚɧ ɡɚ
ɩɨ-ɥɟɫɧɨ ɩɨɱɢɫɬɜɚɧɟ.
Ɂɚ ɞɚ ɞɟɦɨɧɬɢɪɚɬɟ
ɤɚɩɚɤɚ, ɩɴɪɜɨ ɝɨ
ɨɬɜɨɪɟɬɟ ɧɚɩɴɥɧɨ
ɢ ɫɥɟɞ ɬɨɜɚ ɝɨ
ɢɡɞɴɪɩɚɣɬɟ ɧɚɝɨɪɟ.
(ȼɢɠ ɮɢɝɭɪɚɬɚ)
Ɍɟɯɧɢɱɟɫɤɨ
ɨɛɫɥɭɠɜɚɧɟ
ɋɴɨɛɳɟɬɟ:
• Ɇɨɞɟɥɚ ɧɚ ɦɚɲɢɧɚɬɚ (Mod.)
• ɋɟɪɢɢɧɢɹ ɧɨɦɟɪ (S/N)
Ɍɟɡɢ ɩɨɫɥɟɞɧɢ ɫɜɟɞɟɧɢɹ ɫɟ ɧɚɦɢɪɚɬ ɜ ɬɚɛɟɥɤɚɬɚ
ɫ ɯɚɪɚɤɬɟɪɢɫɬɢɤɢɬɟ, ɩɨɫɬɚɜɟɧɚ ɜɴɪɯɭ ɭɪɟɞɚ ɢ/ɢɥɢ
ɜɴɪɯɭ ɨɩɚɤɨɜɤɚɬɚ.
ɉɨɱɢɫɬɜɚɧɟ ɧɚ ɧɟɪɴɠɞɚɟɦɚɬɚ ɫɬɨɦɚɧɚ
ɇɟɪɴɠɞɚɟɦɚɬɚ ɫɬɨɦɚɧɚ ɦɨɠɟ ɞɚ ɫɬɚɧɟ ɧɚ ɩɟɬɧɚ,
ɚɤɨ ɩɪɨɞɴɥɠɢɬɟɥɧɨ ɜɪɟɦɟ ɟ ɜ ɤɨɧɬɚɤɬ ɫɴɫ ɫɢɥɧɨ
ɜɚɪɨɜɢɬɚ ɜɨɞɚ ɢɥɢ ɫ ɩɪɟɩɚɪɚɬɢ ɡɚ ɩɨɱɢɫɬɜɚɧɟ,
ɫɴɞɴɪɠɚɳɢ ɮɨɫɮɨɪ. ɉɪɟɩɨɪɴɱɜɚ ɫɟ ɞɚ ɫɟ ɢɡɩɥɚɤɜɚ
ɨɛɢɥɧɨ ɢ ɜɧɢɦɚɬɟɥɧɨ ɞɚ ɫɟ ɢɡɫɭɲɚɜɚ.
ȼɧɢɦɚɧɢɟ!
Ɂɚ ɞɚ ɦɚɯɧɟɬɟ ɩɪɴɡɝɚɳɢɹɬ ɫɟ
ɩɪɟɞɩɚɡɢɬɟɥ ”Ⱥ”, ɪɚɡɜɢɣɬɟ ɛɨɥɬ
”S”. ɋɥɟɞ ɤɚɬɨ ɩɪɢɤɥɸɱɢɬɟ,
ɩɪɟɦɟɫɬɟɬɟ ɩɪɟɞɩɚɡɢɬɟɥɹ ɢ ɝɨ
ɡɚɤɥɸɱɟɬɟ ɫ ɛɨɥɬ ”S”.
ɉɪɟɞɢ ɞɚ ɢɡɩɨɥɡɜɚɬɟ ɮɭɪɧɚɬɚ
ɫɟ ɭɜɟɪɟɬɟ, ɱɟ ɩɪɟɞɩɚɡɢɬɟɥɹ ”Ⱥ”
ɟ ɧɚ ɬɨɱɧɨɬɨ ɦɹɫɬɨ.
Ⱦɟɦɨɧɬɢɪɚɧɟ ɧɚ ɤɚɩɚɤɚ
Ⱦɨɥɧɨ ɨɬɞɟɥɟɧɢɟ*
ɉɨɞ ɮɭɪɧɚɬɚ ɫɟ ɧɚɦɢɪɚ
ɨɬɞɟɥɟɧɢɟ, ɤɨɟɬɨ ɦɨɠɟ ɞɚ ɛɴɞɟ
ɢɡɩɨɥɡɜɚɧɨ ɡɚ ɫɴɯɪɚɧɟɧɢɟ ɧɚ
ɚɤɫɟɫɨɚɪɢ ɢɥɢ ɬɟɧɞɠɟɪɢ.. Ɂɚ ɞɚ
ɨɬɜɨɪɢɬɟ ɜɪɚɬɢɱɤɚɬɚ ɦɭ, ɬɪɹɛɜɚ
ɞɚ ɹ ɡɚɜɴɪɬɢɬɟ ɧɚɞɨɥɭ (ɜɢɠ
ɮɢɝɭɪɚ).
* ɋɴɳɟɫɬɜɭɜɚ ɫɚɦɨ ɩɪɢ ɧɹɤɨɢ ɦɨɞɟɥɢ.
48
Page 49

ȼɫɬɚɧɨɜɥɟɧɧɹ
! ȼɚɠɥɢɜɨ ɡɛɟɪɟɝɬɢ ɰɸ ɛɪɨɲɭɪɭ, ɳɨɛ ɦɨɠɧɚ ɛɭɥɨ
ɞɨ ɧɟɿ ɡɜɟɪɧɭɬɢɫɹ ɩɪɢ ɧɟɨɛɯɿɞɧɨɫɬɿ ɭ ɛɭɞɶ-ɹɤɨɦɭ
ɜɢɩɚɞɤɭ. ɍ ɪɚɡɿ ɩɪɨɞɚɠɭ, ɩɟɪɟɞɚɱi iɧɲiɢ ɨɫɨɛi
ɚɛɨ ɩɟɪɟɿɡɞɭ, ɩɟɪɟɤɨɧɚɢɬɟɫɹ ɜ ɬɨɦɭ, ɳɨ ɜɨɧɚ
ɡɚɥɢɲɚɽɬɶɫɹ ɪɚɡɨɦ ɡ ɜɢɪɨɛɨɦ.
! ɍɜɚɠɧɨ ɩɪɨɱɢɬɚɢɬɟ ɿɧɫɬɪɭɤɰɿɿ: ɿɧɮɨɪɦɚɰɿɹ ɩɪɨ
ɨɛɥɚɞɧɚɧɧɹ, ɜɢɤɨɪɢɫɬɚɧɧɹ ɢ ɛɟɡɩɟɤɭ ɝɪɚɽ ɞɭɠɟ
ɜɚɠɥɢɜɭ ɪɨɥɶ.
! ɍɫɬɚɧɨɜɤɚ
ɜɢɪɨɛɚ ɦɚɽ ɜɢɤɨɧɭɜɚɬɢɫɹ ɡɝɿɞɧɨ ɞɚɧɨɿ
ɿɧɫɬɪɭɤɰɿɿ ɤɜɚɥɿɮɿɤɨɜɚɧɢɦ ɩɟɪɫɨɧɚɥɨɦ.
! Ȼɭɞɶ-ɹɤɟ ɜɬɪɭɱɚɧɧɹ ɜ ɪɟɝɭɥɸɜɚɧɧɹ ɚɛɨ ɬɟɯɧɿɱɧɟ
ɨɛɫɥɭɝɨɜɭɜɚɧɧɹ ɦɚɽ ɜɢɤɨɧɭɜɚɬɢɫɹ ɧɚ ɩɥɢɬɿ,
ɜɿɞɤɥɸɱɟɧɿɢ ɜɿɞ ɟɥɟɤɬɪɨɠɢɜɥɟɧɧɹ.
ȼɟɧɬɢɥɹɰɿɹ ɩɪɢɦɿɳɟɧɶ
Ɉɛɥɚɞɧɚɧɧɹ ɦɨɠɟ ɛɭɬɢ ɜɫɬɚɧɨɜɥɟɧɟ ɬɿɥɶɤɢ ɭ
ɩɨɫɬɿɢɧɨ ɜɟɧɬɢɥɶɨɜɚɧɢɯ ɩɪɢɦɿɳɟɧɧɹɯ, ɡɝɿɞɧɨ ɞɿɸɱɢɦ
ɧɨɪɦɚɦ ɜ ɤɪɚɿɧi, ɞɟ ɜɢɪɨɛ ɛɭɞɟ ɜɢɤɨɪɢɫɨɜɚɧɨ. ɍ
ɩɪɢɦɿɳɟɧɧɿ, ɜ ɹɤɨɦɭ ɜɫɬɚɧɨɜɥɟɧɨ ɨɛɥɚɞɧɚɧɧɹ, ɦɚɽ
ɜɿɞɛɭɜɚɬɢɫɹ ɡɦɿɧɚ ɩɨɜɿɬɪɹ, ɭ ɫɬɭɩɟɧɿ, ɧɟɨɛɯɿɞɧɨɦɭ
ɞɥɹ ɧɨɪɦɚɥɶɧɨɝɨ ɝɨɪɿɧɧɹ ɝɚɡɭ (ɲɜɢɞɤɿɫɬɶ ɡɦɿɧɢ
3
ɩɨɜɿɬɪɹ ɧɟ ɦɚɽ ɛɭɬɢ ɦɟɧɲɨɸ 2ɦ
/ɝɨɞ ɧɚ ɤɨɠɧɢɢ ɤȼɬ
ɜɫɬɚɧɨɜɥɟɧɨɿ ɩɨɬɭɠɧɨɫɬɿ).
ȼɯɿɞ ɩɪɢɬɨɱɧɨɿ ɜɟɧɬɢɥɹɰɿɿ, ɡɚɯɢɳɟɧɢɢ ʉɪɚɬɤɨɸ, ɩɨɜɢɧɟɧ
2
ɦɚɬɢ ɤɨɪɢɫɧɭ ɩɥɨɳɭ ɧɟ ɦɟɧɲɟ 100 ɫɦ
ɤɨɪɢɫɧɨɝɨ
ɩɟɪɟɬɢɧɭ ɿ ɦɚɽ ɛɭɬɢ ɪɨɡɦɿɳɟɧɢɢ ɬɚɤ, ɳɨɛ ɜɿɧ ɧɟ ɦɿɝ
ɡɚɛɢɬɢɫɹ, ɧɚɜɿɬɶ ɱɚɫɬɤɨɜɨ ( ɞɢɜ. ɦɚɥɸɧɨɤ A).
Ɍɚɤɢɢ ɜɯɿɞ ɩɨɜɢɧɟɧ ɛɭɬɢ ɡɛɿɥɶɲɟɧɢɢ ɧɚ 100%, ɬɨɛɬɨ
2
ɦɿɧɿɦɭɦ 200 ɫɦ
– ɹɤɳɨ ɪɨɛɨɱɚ ɩɨɜɟɪɯɧɹ ɩɥɢɬɢ ɧɟ
ɦɚɽ ɩɪɢɫɬɪɨɸ ɛɟɡɩɟɤɢ ɭ ɪɚɡɿ ɡɧɢɤɧɟɧɧɹ ɩɨɥɭɦ’ɹ, ɿ
ɤɨɥɢ ɦɨɠɥɢɜɢɢ ɧɟɩɪɹɦɢɢ ɩɨɬɿɤ ɩɨɜɿɬɪɹ ɿɡ ɩɪɢɥɟɝɥɢɯ
ɩɪɢɦɿɳɟɧɶ (ɞɢɜ.ɦɚɥɸɧɨɤ B) – ɹɤɳɨ ɰɟ ɧɟ ɫɩɿɥɶɧɿ
ɱɚɫɬɢɧɢ ɛɭɞɿɜɥɿ, ɩɨɠɟɠɨɧɟɛɟɡɩɟɱɧɟ ɩɪɢɦɿɳɟɧɧɹ
ɚɛɨ ɫɩɚɥɶɧɿ ɤɿɦɧɚɬɢ, ɨɛɥɚɞɧɚɧɿ ɜɟɧɬɢɥɹɰɿɢɧɢɦ
ɬɪɭɛɨɩɪɨɜɨɞɨɦ ɧɚɡɨɜɧɿ, ɹɤ ɨɩɢɫɚɧɨ ɜɢɳɟ.
B
ɉɪɢɥɟɝɥɿ
ɩɪɢɦɿɳɟɧɧɹ
A
ȼɟɧɬɢɥɶɨɜɚɧɿ
ɩɪɢɦɿɳɟɧɧɹ
A
ȼɟɧɬɢɥɹɰɿɢɧɢɢ ɨɬɜɿɪ ɞɥɹ
ɜɿɞɩɪɚɰɶɨɜɚɧɨɝɨ ɩɨɜɿɬɪɹ
Ɂɛɿɥɶɲɟɧɧɹ ɳɿɥɢɧɢ ɦɿɠ
ɞɜɟɪɢɦɚ ɿ ɩɿɞɥɨɝɨɸ
! ɉɿɫɥɹ ɬɪɢɜɚɥɨɝɨ ɜɢɤɨɪɢɫɬɚɧɧɹ ɩɥɢɬɢ, ɞɨɰɿɥɶɧɨ
ɜɿɞɤɪɢɬɢ
ɜɿɤɧɨ ɚɛɨ ɡɛɿɥɶɲɢɬɢ ɲɜɢɞɤɿɫɬɶ
ɜɟɧɬɢɥɹɬɨɪɿɜ.
ȼɿɞɜɟɞɟɧɧɹ ɩɪɨɞɭɤɬɿɜ ɡɝɨɪɚɧɧɹ
ɡɚɛɟɡɩɟɱɟɧɟ ɱɟɪɟɡ ɜɢɬɹɠɤɭ, ɩɿɞɤɥɸɱɟɧɭ ɞɨ ɤɚɧɚɥɭ ɡ
ɩɪɢɪɨɞɧɨɸ ɬɹɝɨɸ ɡ ɧɚɥɟɠɧɨɸ ɟɮɟɤɬɢɜɧɿɫɬɸ, ɚɛɨ ɡɚ
ɞɨɩɨɦɨɝɨɸ ɟɥɟɤɬɪɨɜɟɧɬɢɥɹɬɨɪɚ, ɹɤɢɢ ɛɢ ɜɤɥɸɱɚɜɫɹ
ɚɜɬɨɦɚɬɢɱɧɨ ɤɨɠɧɨɝɨ ɪɚɡɭ ɩɪɢ ɜɤɥɸɱɟɧɧɿ ɩɥɢɬɢ (ɞɢɜ.
ɦɚɥɸɧɤɢ).
ȼɿɞɜɟɞɟɧɧɹ
ɛɟɡɩɨɫɟɪɟɞɧɶɨ
ɧɚɡɨɜɧɿ
ȼɿɞɜɟɞɟɧɧɹ ɱɟɪɟɡ ɤɚɧɚɥ ɚɛɨ
ɪɨɡɝɚɥɭɠɟɧɢɢ ɞɢɦɚɪ
(ɡɚɪɟɡɟɪɜɨɜɚɧɢɢ ɞɥɹ
ɤɭɯɨɧɧɨɝɨ ɭɫɬɚɬɤɭɜɚɧɧɹ)
! Ɂɪɿɞɠɟɧɿ ɧɚɮɬɨɜɿ ɝɚɡɢ, ɜɚɠɱɿ ɡɚ ɩɨɜɿɬɪɹ, ɛɢɪɚɸɬɶɫɹ
ɜɧɢɡɭ, ɬɨɦɭ ɩɪɢɦɿɳɟɧɧɹ
, ɞɟ ɡɧɚɯɨɞɹɬɶɫɹ ɛɚɥɨɧɢ ɡ
ɝɚɡɨɦ, ɩɨɜɢɧɧɿ ɛɭɬɢ ɨɛɥɚɞɧɚɧɿ ɜɢɬɹɠɧɢɦɢ ɨɬɜɨɪɚɦɢ,
ɳɨ ɜɢɯɨɞɹɬɶ ɧɚɡɨɜɧɿ ɞɥɹ ɟɜɚɤɭɚɰɿɿ ɡɧɢɡɭ ɩɪɢ
ɦɨɠɥɢɜɨɦɭ ɜɢɬɨɤɭ ɝɚɡɭ.
Ȼɚɥɨɧɢ ɿɡ ɡɪɿɞɠɟɧɢɦ ɧɚɮɬɨɜɢɦ ɝɚɡɨɦ, ɩɨɪɨɠɧɿ ɚɛɨ
ɱɚɫɬɤɨɜɨ ɩɨɜɧɿ, ɧɟ ɩɨɜɢɧɧɿ ɛɭɬɢ ɜɫɬɚɧɨɜɥɟɧɿ ɚɛɨ
ɛɟɪɿɝɚɬɢɫɹ ɜ ɩɪɢɦɿɳɟɧɧɹɯ ɧɢɠɱɟ ɡɚ ɪɿɜɟɧɶ ɝɪɭɧɬɭ
(ɥɶɨɯɢ ɿ ɬ.ɩ.). ɍ ɩɪɢɦɿɳɟɧɧɿ ɦɨɠɧɚ ɬɪɢɦɚɬɢ ɬɿɥɶɤɢ
ɜɢɤɨɪɢɫɬɨɜɭɜɚɧɢɢ ɛɚɥɨɧ, ɞɚɥɟɤɨ ɜɿɞ ɞɠɟɪɟɥ ɬɟɩɥɚ
(ɩɟɱɿ, ɤɚɦɿɧɢ, ɨɛɿɝɪɿɜɚɱɿ), ɹɤɿ ɧɚɝɪɿɜɚɸɬɶɫɹ ɜɢɳɟ ɜɿɞ
50°C.
Ɋɨɡɦɿɳɟɧɧɹ ɿ ɜɢɪɿɜɧɸɜɚɧɧɹ
! Ɇɨɠɧɚ ɜɫɬɚɧɨɜɥɸɜɚɬɢ ɩɥɢɬɭ ɡɛɨɤɭ ɜɿɞ ɦɟɛɥɿɜ, ɹɤɿ
ɧɟ ɜɢɳɿ ɡɚ ɪɨɛɨɱɭ ɩɨɜɟɪɯɧɸ.
! ɉɟɪɟɤɨɧɚɢɬɟɫɹ ɜ ɬɨɦɭ, ɳɨ ɩɨɜɟɪɯɧɹ ɫɬɿɧɢ, ɹɤɚ
ɤɨɧɬɚɤɬɭɽ ɿɡ ɡɚɞɧɶɨɸ ɱɚɫɬɢɧɨɸ ɩɥɢɬɢ, ɜɢɝɨɬɨɜɥɟɧɚ
ɡ ɧɟɝɨɪɸɱɨɝɨ ɬɚ ɬɟɩɥɨɫɬɿɢɤɨɝɨ ɦɚɬɟɪɿɚɥɭ ɿ ɜɢɬɪɢɦɭɽ
ɧɚɝɪɿɜɚɧɧɹ (90°C).
Ⱦɥɹ ɩɪɚɜɢɥɶɧɨɝɨ ɜɫɬɚɧɨɜɥɟɧɧɹ
• ɪɨɡɦɿɳɭɢɬɟ ɩɥɢɬɭ ɜ ɤɭɯɧɿ, ɨɛɿɞɧɿɢ ɡɚɥɿ ɚɛɨ ɜ
ɨɞɧɨɤɿɦɧɚɬɧɿɢ ɤɜɚɪɬɢɪɿ-ɫɬɭɞɿɿ (ɧɟ
• ɹɤɳɨ ɩɨɜɟɪɯɧɹ ɩɥɢɬɢ ɽ ɬɪɨɯɢ ɜɢɳɨɸ, ɧɿɠ
ɩɨɜɟɪɯɧɹ ɦɟɛɥɿɜ, ɦɟɛɥɿ ɩɨɜɢɧɧɿ ɡɧɚɯɨɞɢɬɢɫɹ ɧɟ
ɛɥɢɠɱɟ ɧɿɠ 200 ɦɦ ɜɿɞ ɩɥɢɬɢ;
• ɹɤɳɨ ɩɥɢɬɚ ɛɭɞɟ ɜɫɬɚɧɨɜɥɟɧɚ ɩɿɞ ɫɟɤɰɿɽɸ ɧɚɜɿɫɧɢɯ
ɦɟɛɥɿɜ, esso ɜɿɞɫɬɚɧɶ ɞɨ ɿɿ ɩɨɜɟɪɯɧɿ ɧɟ ɩɨɜɢɧɧɚ
ɛɭɬɢ ɦɟɧɲɨɸ ɡɚ 420 ɦɦ.
Ɍɚɤɚ ɜɿɞɫɬɚɧɶ ɩɨɜɢɧɧɚ ɫɤɥɚɞɚɬɢ 700 ɦɦ, ɹɤɳɨ
ɫɟɤɰɿɹ ɧɚɜɿɫɧɢɯ ɦɟɛɥɿɜ ɡɪɨɛɥɟɧɚ ɡ
ɦɚɬɟɪɿɚɥɭ (ɞɢɜ. ɦɚɥɸɧɨɤ);
• ɧɟ ɪɨɡɦɿɳɭɢɬɟ ɡɚɧɚɜɿɫɨɤ ɩɨɡɚɞɭ ɩɥɢɬɢ ɚɛɨ ɛɥɢɠɱɟ
ɭ ɜɚɧɧɿ);
ɝɨɪɸɱɨɝɨ
UA
ȼɿɞɜɟɞɟɧɧɹ ɩɪɨɞɭɤɬɿɜ ɡɝɨɪɚɧɧɹ ɦɚɽ ɛɭɬɢ
49
Page 50

HOOD
420
Min.
min.
650
mm. with hood
min.
700
mm. without hood
mm.
600
Min. mm.
420
Min. mm.
UA
ɧɿɠ 200 ɦɦ ɜɿɞ ɿɿ ɫɬɨɪɿɧ;
• ɜɢɬɹɠɤɢ ɩɨɜɢɧɧɿ
ɜɫɬɚɧɨɜɥɸɜɚɬɢɫɹ ɡɝɿɞɧɨ
ɜɤɚɡɿɜɤɚɦ ɜɿɞɩɨɜɿɞɧɨɿ
ɿɧɫɬɪɭɤɰɿɿ.
ȼɢɪɿɜɧɸɜɚɧɧɹ
əɤɳɨ ɧɟɨɛɯɿɞɧɨ
ɜɢɪɿɜɧɹɬɢ ɩɥɢɬɭ,
ɜɤɪɭɬɿɬɶ ɪɟɝɭɥɸɸɱɿ ɧɿɠɤɢ, ɳɨ ɜɯɨɞɹɬɶ ɞɨ ɤɨɦɩɥɟɤɬɭ
ɩɨɫɬɚɱɚɧɧɹ, ɭ ɫɩɟɰɿɚɥɶɧɿ
ɦɿɫɰɹ, ɳɨ ɡɧɚɯɨɞɹɬɶɫɹ ɭ
ɤɭɬɤɚɯ ɨɫɧɨɜɢ (ɞɢɜ. ɦɚɥɸɧɨɤ).
ɇɿɠɤɢ* ɜɦɨɧɬɨɜɭɸɬɶɫɹ ɭ ɝɧɿɡɞɚ
ɩɿɞ ɨɫɧɨɜɨɸ ɩɥɢɬɢ.
ɉɿɞɤɥɸɱɟɧɧɹ
ɟɥɟɤɬɪɨɟɧɟɪɝɿɿ
ȼɫɬɚɧɨɜɿɬɶ ɧɚ ɤɚɛɟɥɿ
ɜɢɥɤɭ, ɪɨɡɪɚɯɨɜɚɧɭ ɧɚ
ɧɚɜɚɧɬɚɠɟɧɧɹ, ɜɤɚɡɚɧɟ ɧɚ ɬɚɛɥɢɱɰɿ ɡ ɬɟɯɧɿɱɧɢɦɢ
ɯɚɪɚɤɬɟɪɢɫɬɢɤɚɦɢ, ɪɨɡɦɿɳɟɧɿɢ ɧɚ ɩɥɢɬɿ (ɞɢɜ.
ɬɚɛɥɢɰɸ Ɍɟɯɧɿɱɧɢɯ Ⱦɚɧɢɯ).
ɍ ɪɚɡɿ ɩɪɹɦɨɝɨ ɩɿɞɤɥɸɱɟɧɧɹ ɞɨ ɦɟɪɟɠɿ ɧɟɨɛɯɿɞɧɨ
ɩɨɦɿɫɬɢɬɢ ɦɿɠ ɩɥɢɬɨɸ ɿ ɦɟɪɟɠɟɸ ɜɫɟɩɨɥɹɪɧɢɢ
ɜɢɦɢɤɚɱ ɡ ɦɿɧɿɦɚɥɶɧɨɸ ɜɿɞɫɬɚɧɧɸ ɦɿɠ ɤɨɧɬɚɤɬɚɦɢ 3
ɦɦ, ɪɨɡɪɚɯɨɜɚɧɢɢ ɧɚ ɜɤɚɡɚɧɟ ɧɚɜɚɧɬɚɠɟɧɧɹ ɿ ɬɚɤɢɢ,
ɳɨ ɜɿɞɩɨɜɿɞɚɽ ɧɨɪɦɿ NFC 15-100 (ɞɪɿɬ ɡɚɡɟɦɥɟɧɧɹ
ɩɨɜɢɧɟɧ ɩɟɪɟɪɢɜɚɬɢɫɹ ɜɢɦɢɤɚɱɟɦ). Ʉɚɛɟɥɶ ɠɢɜɥɟɧɧɹ
ɩɨɜɢɧɟɧ ɛɭɬɢ ɪɨɡɬɚɲɨɜɚɧɢɢ ɬɚɤ, ɳɨɛ ɠɨɞɧɚ ɡ ɢɨɝɨ
ɱɚɫɬɢɧ ɧɟ ɩɿɞɞɚɜɚɥɚɫɹ ɧɚɝɪɿɜɚɧɧɸ ɜɢɳɟ, ɧɿɠ ɧɚ 50°C
ɜɿɞ ɬɟɦɩɟɪɚɬɭɪɢ ɞɨɜɤɿɥɥɹ.
Ⱦɨ ɜɢɤɨɧɚɧɧɹ ɩɿɞɤɥɸɱɟɧɧɹ ɩɟɪɟɤɨɧɚɢɬɟɫɹ, ɳɨ:
• ɪɨɡɟɬɤɚ ɦɚɽ ɡɚɡɟɦɥɟɧɧɹ, ɜɿɞɩɨɜɿɞɧɨ ɞɨ ɜɫɬɚɧɨɜɥɟɧɢɯ
ɧɨɪɦ;
• ɪɨɡɟɬɤɚ ɜɢɬɪɢɦɭɽ ɦɚɤɫɢɦɚɥɶɧɟ ɧɚɜɚɧɬɚɠɟɧɧɹ
ɩɨɬɭɠɧɨɫɬɿ ɨɛɥɚɞɧɚɧɧɹ, ɜɤɚɡɚɧɟ ɧɚ ɬɚɛɥɢɱɰɿ ɡ
ɯɚɪɚɤɬɟɪɢɫɬɢɤɚɦɢ;
• ɧɚɩɪɭɝɚ ɠɢɜɥɟɧɧɹ
ɜɤɚɡɚɧɢɯ ɧɚ ɬɚɛɥɢɱɰɿ;
• ɪɨɡɟɬɤɚ ɫɭɦɿɫɧɚ ɡ ɜɢɥɤɨɸ ɩɥɢɬɢ. ȼ ɿɧɲɨɦɭ ɜɢɩɚɞɤɭ
ɡɚɦɿɧɿɬɶ ɪɨɡɟɬɤɭ ɚɛɨ ɜɢɥɤɭ; ɧɟ ɜɢɤɨɪɢɫɬɨɜɭɢɬɟ
ɩɨɞɨɜɠɭɜɚɱɿ ɢ ɬɪɿɢɧɢɤɢ.
! ɍ ɜɫɬɚɧɨɜɥɟɧɿɢ ɩɥɢɬɿ, ɦɚɽ ɛɭɬɢ ɡɚɛɟɡɩɟɱɟɧɢɢ
ɥɟɝɤɢɢ ɞɨɫɬɭɩ ɞɨ ɟɥɟɤɬɪɢɱɧɨɝɨ ɤɚɛɟɥɸ ɿ ɪɨɡɟɬɤɢ.
* ȯ ɥɢɲɟ ɜ ɞɟɹɤɢɯ ɦɨɞɟɥɹɯ.
50
ɡɧɚɯɨɞɢɬɶɫɹ ɜ ɦɟɠɚɯ ɡɧɚɱɟɧɶ,
ɧɟ
! Ʉɚɛɟɥɶ ɧɟ ɩɨɜɢɧɟɧ ɦɚɬɢ ɩɟɪɟɝɢɧɿɜ ɚɛɨ ɛɭɬɢ
ɫɬɢɫɧɭɬɢɦ.
! Ʉɚɛɟɥɶ ɦɚɽ ɩɟɪɿɨɞɢɱɧɨ ɩɟɪɟɜɿɪɹɬɢɫɹ ɿ ɦɿɧɹɬɢɫɹ
ɬɿɥɶɤɢ ɮɚɯɿɜɰɹɦɢ.
! ɉɿɞɩɪɢɽɦɫɬɜɨ ɧɟ ɧɟɫɟ ɛɭɞɶ-ɹɤɨɿ
ɜɿɞɩɨɜɿɞɚɥɶɧɨɫɬɿ, ɹɤɳɨ ɰɿ ɧɨɪɦɢ ɧɟ
ɞɨɬɪɢɦɭɜɚɬɢɦɭɬɶɫɹ.
ɉɿɞɤɥɸɱɟɧɧɹ ɝɚɡɭ
ɉɿɞɤɥɸɱɟɧɧɹ ɞɨ ɝɚɡɨɜɨɿ ɦɟɪɟɠɿ ɚɛɨ ɛɚɥɨɧɚ ɦɨɠɟ
ɜɢɤɨɧɭɜɚɬɢɫɹ ɡɚ ɞɨɩɨɦɨɝɨɸ ɝɧɭɱɤɨɝɨ ɝɭɦɨɜɨɝɨ ɲɥɚɧɝɚ
ɚɛɨ ɲɥɚɧɝɚ ɜ ɫɬɚɥɟɜɨɦɭ ɨɛɩɥɟɬɟɧɧɿ, ɡɝɿɞɧɨ ɞɿɸɱɢɦ
ɧɚɰɿɨɧɚɥɶɧɢɦ ɧɨɪɦɚɦ ɿ ɩɿɫɥɹ ɬɨɝɨ, ɹɤ ɜɫɬɚɧɨɜɥɟɧɨ,
ɳɨ ɩɥɢɬɚ ɛɭɥɚ ɧɚɥɚɲɬɨɜɚɧɚ ɧɚ ɬɢɩ ɝɚɡɭ, ɧɚ ɹɤɨɦɭ
ɜɨɧɚ ɩɪɚɰɸɜɚɬɢɦɟ (ɞɢɜ. Ʉɚɥɿɛɪɭɜɚɥɶɧɚ ɛɢɪɤɚ ɧɚ
ɤɪɢɲɰɿ: ɜ ɿɧɲɨɦɭ ɜɢɩɚɞɤɭ ɞɢɜ. ɧɢɠɱɟ). ɍ ɪɚɡɿ
ɩɥɢɬɢ ɜɿɞ ɛɚɥɨɧɚ ɿɡ ɡɪɿɞɠɟɧɢɦ ɝɚɡɨɦ, ɜɢɤɨɪɢɫɬɨɜɭɢɬɟ
ɪɟɞɭɤɬɨɪɢ ɜɿɞɩɨɜɿɞɧɨ ɞɨ ɞɿɸɱɢɯ ɧɨɪɦ ɭ ɫɬɪɚɧi,
ɞɟ ɛɭɞɟ ɜɢɤɨɪɢɫɬɨɜɚɧɨ ɜɢɪɨɛ. ɓɨɛ ɩɨɥɟɝɲɢɬɢ
ɩɿɞɤɥɸɱɟɧɧɹ, ɠɢɜɥɟɧɧɹ ɝɚɡɭ ɦɨɠɟ ɩɨɞɚɜɚɬɢɫɹ
ɡɛɨɤɭ *: ɩɟɪɟɫɬɚɜɬɟ ɜ ɨɛɪɚɬɧɨɦɭ ɧɚɩɪɹɦi ɭɬɪɢɦɭɜɚɱ
ɝɭɦɤɢ ɞɥɹ ɩɿɞɤɥɸɱɟɧɧɹ ɡɚɦɢɤɚɸɱɨɿ ɩɪɨɛɤɢ ɿ ɡɚɦɿɧɿɬɶ
ɭɳɿɥɶɧɸɜɚɱ, ɳɨ ɜɯɨɞɢɬɶ ɭ ɤɨɦɩɥɟɤɬ ɩɨɫɬɚɱɚɧɧɹ.
! Ⱦɥɹ ɛɟɡɩɟɪɟɛɿɢɧɨɿ ɪɨɛɨɬɢ, ɞɥɹ
ɚɞɟɤɜɚɬɧɨɝɨ
ɜɢɤɨɪɢɫɬɚɧɧɹ ɟɧɟɪɝɿɿ ɿ ɞɥɹ ɛɿɥɶɲɨɝɨ ɬɟɪɦɿɧɭ ɫɥɭɠɛɢ
ɩɥɢɬɢ, ɡɚɛɟɡɩɟɱɬɟ ɬɢɫɤ ɩɨɞɚɱɿ ɝɚɡɭ ɜ ɦɟɠɚɯ ɡɧɚɱɟɧɶ,
ɜɤɚɡɚɧɢɯ ɜ ɬɚɛɥɢɰɿ ɏɚɪɚɤɬɟɪɢɫɬɢɤ ɩɚɥɶɧɢɤɿɜ ɿ
ɮɨɪɫɭɧɨɤ (ɞɢɜ. ɧɢɠɱɟ).
ɉɿɞɤɥɸɱɟɧɧɹ ɝɚɡɭ ɡɚ ɞɨɩɨɦɨɝɨɸ ɝɧɭɱɤɨɝɨ
ɝɭɦɨɜɨɝɨ ɲɥɚɧɝɚ
ɉɟɪɟɜɿɪɬɟ, ɳɨɛ ɲɥɚɧɝ ɜɿɞɩɨɜɿɞɚɜ ɞɿɸɱɢɦ ɞɟɪɠɚɜɧɢɦ
ɧɨɪɦɚɦ. ȼɧɭɬɪɿɲɧɿɢ ɞɿɚɦɟɬɪ ɲɥɚɧɝɚ ɩɨɜɢɧɟɧ ɛɭɬɢ: 8
ɦɦ ɞɥɹ ɡɪɿɞɠɟɧɨɝɨ ɝɚɡɭ; 13 ɦɦ ɞɥɹ ɦɟɬɚɧɭ.
ȼɢɤɨɧɚɜɲɢ ɡ’ɽɞɧɚɧɧɹ, ɩɟɪɟɤɨɧɚɢɬɟɫɹ ɜ ɬɨɦɭ, ɳɨ
ɲɥɚɧɝ:
• ɧɟ ɬɨɪɤɚɽɬɶɫɹ ɱɚɫɬɢɧ, ɹɤɿ ɧɚɝɪɿɜɚɸɬɶɫɹ ɜɢɳɟ
ɬɟɦɩɟɪɚɬɭɪɢ ɜ 50ɨC;
• ɧɟ ɦɚɽ ɛɭɞɶ-ɹɤɨɝɨ ɧɚɬɹɝɧɟɧɧɹ ɚɛɨ ɫɤɪɭɱɭɜɚɧɧɹ, ɧɟ
ɦɚɽ ɡɝɢɧɿɜ ɚɛɨ ɫɬɢɫɤɚɧɶ;
• ɧɟ ɬɨɪɤɚɽɬɶɫɹ ɝɨɫɬɪɢɯ ɩɪɟɞɦɟɬɿɜ, ɤɪɚɿɜ, ɪɭɯɨɦɢɯ
ɱɚɫɬɢɧ ɿ ɧɟ ɡɞɚɜɥɟɧɢɢ;
• ɦɨɠɟ ɛɭɬɢ ɥɟɝɤɨ ɨɝɥɹɧɭɬɢɢ ɩɨ ɜɫɿɢ ɞɨɜɠɢɧɿ ɞɥɹ
ɤɨɧɬɪɨɥɸ ɢɨɝɨ
ɫɬɚɧɭ;
• ɦɚɽ ɞɨɜɠɢɧɭ ɦɟɧɲɭ ɧɿɠ 1500 ɦɦ;
• ɞɨɛɪɟ ɡɚɤɪɿɩɥɟɧɢɢ ɧɚ ɨɛɨɯ ɤɿɧɰɹɯ ɡɚ ɞɨɩɨɦɨɝɨɸ
ɯɨɦɭɬɿɜ, ɜɿɞɩɨɜɿɞɧɨ ɞɨ ɞɿɸɱɢɯ ɞɟɪɠɚɜɧɢɯ ɧɨɪɦ.
! əɤɳɨ ɨɞɧɚ ɚɛɨ ɛɿɥɶɲɟ ɡ ɰɢɯ ɭɦɨɜ ɧɟ ɛɭɞɭɬɶ
ɞɨɬɪɢɦɚɧɿ, ɚɛɨ ɹɤɳɨ ɩɥɢɬɚ ɜɫɬɚɧɨɜɥɟɧɚ ɡɝɿɞɧɨ
ɭɦɨɜɚɦ ɤɥɚɫɭ 2 - ɩɿɞɤɥɚɫ 1 (ɩɥɢɬɚ, ɜɫɬɚɧɨɜɥɟɧɚ ɦɿɠ
ɞɜɨɦɚ ɲɚɮɚɦɢ), ɧɟɨɛɯɿɞɧɨ ɜɢɤɨɪɢɫɬɨɜɭɜɚɬɢ ɝɧɭɱɤɢɢ
ɪɨɛɨɬɢ
Page 51

A
V
ɲɥɚɧɝ ɜ ɫɬɚɥɟɜɨɦɭ ɨɛɩɥɟɬɟɧɧɿ (ɞɢɜ. ɧɢɠɱɟ).
ɉɿɞɤɥɸɱɟɧɧɹ ɝɚɡɭ ɡɚ ɞɨɩɨɦɨɝɨɸ ɝɧɭɱɤɨɝɨ ɲɥɚɧɝɚ
ɜ ɨɛɩɥɟɬɟɧɧɿ ɡ ɧɟɿɪɠɚɜɿɸɱɨɿ ɫɬɚɥɿ ɞɨ ɛɟɡɩɟɪɟɪɜɧɨɿ
ɫɬɿɧɢ ɡɚ ɞɨɩɨɦɨɝɨɸ ɩɚɬɪɨɧɿɜ ɿɡ ɪɿɡɶɛɨɸ
ɉɟɪɟɜɿɪɬɟ, ɳɨɛ ɲɥɚɧɝ ɿ ɨɛɩɥɟɬɟɧɧɹ ɜɿɞɩɨɜɿɞɚɥɢ
ɞɿɸɱɢɦ ɞɟɪɠɚɜɧɢɦ ɧɨɪɦɚɦ.
ɓɨɛ ɩɿɞɤɥɸɱɢɬɢ ɲɥɚɧɝ, ɜɢɞɚɥɿɬɶ ɭɬɪɢɦɭɜɚɱ ɝɭɦɤɢ, ɳɨ
ɦɿɫɬɢɬɶɫɹ ɜ ɩɥɢɬɿ (ɦɿɫɰɟ ɩɿɞɤɥɸɱɟɧɧɹ ɝɚɡɭ ɞɨ ɩɥɢɬɢ ɦɚɽ
ɰɢɥiɧɞɪɢɱɧɨɿ ɬɪɭɛɤɢ ɡ ɪɿɡɶɛɨɸ ɩɚɩɚ 1/2 ɞɸɢɦɚ)
ɜɢɝɥɹɞ
! ȼɢɤɨɧɚɢɬɟ ɡ’ɽɞɧɚɧɧɹ ɬɚɤ, ɳɨɛ ɞɨɜɠɢɧɚ
ɬɪɭɛɨɩɪɨɜɨɞɭ ɧɟ ɩɟɪɟɜɢɳɭɜɚɥɚ 2 ɦɟɬɪɿɜ, ɩɪɢ
ɰɶɨɦɭ ɧɟ ɞɨɩɭɫɤɚɢɬɟ ɤɨɧɬɚɤɬɭ ɲɥɚɧɝɚ ɡ ɪɭɯɨɦɢɦɢ
ɱɚɫɬɢɧɚɦɢ ɬɚ ɢɨɝɨ ɫɬɢɫɧɟɧɧɹ.
Ʉɨɧɬɪɨɥɶ ɝɟɪɦɟɬɢɱɧɨɫɬɿ
ɉɿɫɥɹ ɩɨɜɧɨɝɨ ɜɫɬɚɧɨɜɥɟɧɧɹ ɩɟɪɟɜɿɪɬɟ ɝɟɪɦɟɬɢɱɧɿɫɬɶ
ɜɫɿɯ ɡ’ɽɞɧɚɧɶ, ɜɢɤɨɪɢɫɬɨɜɭɸɱɢ ɬɿɥɶɤɢ ɦɢɥɶɧɢɢ
ɪɨɡɱɢɧ ɿ ɭ ɠɨɞɧɨɦɭ ɜɢɩɚɞɤɭ ɫɿɪɧɢɤ.
Ⱥɞɚɩɬɚɰɿɹ ɞɨ ɪɿɡɧɢɯ ɬɢɩɿɜ ɝɚɡɭ
ȯ ɦɨɠɥɢɜɿɫɬɶ ɧɚɥɚɲɬɭɜɚɧɧɹ ɩɥɢɬɢ ɩɿɞ ɬɢɩ ɝɚɡɭ,
ɜɿɞɦɿɧɧɢɢ ɜɿɞ ɬɢɩɭ, ɧɚ ɹɤɢɢ ɜɨɧɚ ɛɭɥɚ ɧɚɥɚɲɬɨɜɚɧɚ
ɩɿɞɩɪɢɽɦɫɬɜɨɦ-ɜɢɪɨɛɧɢɤɨɦ (ɜɤɚɡɚɧɢɢ ɧɚ
ɤɚɥɿɛɪɭɜɚɥɶɧɿɢ ɛɢɪɰɿ ɧɚ ɤɪɢɲɰɿ).
! ɉɚɥɶɧɢɤɢ ɪɨɛɨɱɨɿ ɩɨɜɟɪɯɧɿ ɧɟ ɩɨɬɪɟɛɭɸɬɶ
ɪɟɝɭɥɸɜɚɧɧɹ ɩɟɪɜɢɧɧɨɝɨ ɩɨɜɿɬɪɹ.
ɇɚɥɚɲɬɭɜɚɧɧɹ ɞɭɯɨɜɤɢ
Ɂɚɦɿɧɚ ɮɨɪɫɭɧɤɢ ɩɚɥɶɧɢɤɚ ɞɭɯɨɜɤɢ:
1. ɜɢɬɹɝɧɿɬɶ ɤɨɪɨɛɤɭ ɞɭɯɨɜɤɢ;
ɜɢɬɹɝɧɿɬɶ ɜɢɫɭɜɧɢɢ ɡɚɯɢɫɬ A (ɞɢɜ. ɦɚɥɸɧɨɤ);
2.
3. ɜɢɞɚɥɿɬɶ ɩɚɥɶɧɢɤ ɞɭɯɨɜɤɢ
ɩɿɫɥɹ ɬɨɝɨ, ɹɤ ɜɿɞɤɪɭɬɢɬɟ ɝɜɢɧɬɢ
V (ɞɢɜ. ɦɚɥɸɧɨɤ);
ɩɪɨɰɟɞɭɪɭ ɜɢɤɨɧɚɬɢ ɥɟɝɲɟ,
ɹɤɳɨ ɡɧɹɬɢ ɞɜɟɪɰɹɬɚ ɞɭɯɨɜɤɢ.
4. ɜɿɞɝɜɢɧɬɿɬɶ ɮɨɪɫɭɧɤɭ ɩɚɥɶɧɢɤɚ
ɫɩɟɰɿɚɥɶɧɢɦ ɬɪɭɛɧɢɦ ɤɥɸɱɟɦ
ɞɥɹ ɮɨɪɫɭɧɨɤ (ɞɢɜ. ɦɚɥɸɧɨɤ)
ɚɛɨ ɬɪɭɛɧɢɦ ɤɥɸɱɟɦ 7 ɦɦ
ɿ ɡɚɦɿɧɿɬɶ ɿɿ ɮɨɪɫɭɧɤɨɸ, ɳɨ
ɜɿɞɩɨɜɿɞɚɽ ɧɨɜɨɦɭ ɬɢɩɭ ɝɚɡɭ
(ɞɢɜ. ɬɚɛɥɢɰɸ ɏɚɪɚɤɬɟɪɢɫɬɢɤɢ
ɩɚɥɶɧɢɤɿɜ ɿ ɮɨɪɫɭɧɨɤ).
UA
ɇɚɥɚɲɬɭɜɚɧɧɹ ɪɨɛɨɱɨɿ ɩɨɜɟɪɯɧɿ
Ɂɚɦɿɧɚ ɮɨɪɫɭɧɨɤ ɩɚɥɶɧɢɤɿɜ ɩɨɜɟɪɯɧɿ:
1. Ɂɧɿɦɿɬɶ ʉɪɚɬɤɢ ɢ ɩɚɥɶɧɢɤɢ ɡ ɿɯ ɩɨɫɚɞɨɱɧɢɯ ɦɿɫɰɶ;
2. ȼɿɞɝɜɢɧɬɿɬɶ ɮɨɪɫɭɧɤɢ, ɤɨɪɢɫɬɭɸɱɢɫɶ ɬɪɭɛɧɢɦ
ɤɥɸɱɟɦ 7 ɦɦ (ɞɢɜ. ɦɚɥɸɧɨɤ), ɿ ɡɚɦɿɧɿɬɶ ɿɯ
ɮɨɪɫɭɧɤɚɦɢ,
ɳɨ ɜɿɞɩɨɜɿɞɚɸɬɶ ɧɨɜɨɦɭ ɬɢɩɭ ɝɚɡɭ (ɞɢɜ.
ɬɚɛɥɢɰɸ ɏɚɪɚɤɬɟɪɢɫɬɢɤɢ ɩɚɥɶɧɢɤɿɜ ɿ ɮɨɪɫɭɧɨɤ);
3. ȼɫɬɚɧɨɜɿɬɶ ɧɚ ɦɿɫɰɟ ɜɫɿ ɤɨɦɩɨɧɟɧɬɢ, ɜɢɤɨɧɚɜɲɢ
ɜɤɚɡɚɧɿ ɜɢɳɟ ɨɩɟɪɚɰɿɿ ɭ
ɡɜɨɪɨɬɧɿɢ ɩɨɫɥɿɞɨɜɧɨɫɬɿ.
ɇɚɥɚɲɬɭɜɚɧɧɹ ɦɿɧɿɦɚɥɶɧɨɝɨ
ɪɿɜɧɹ ɩɚɥɶɧɢɤɿɜ ɩɨɜɟɪɯɧɿ:
1. ɜɫɬɚɧɨɜɿɬɶ ɤɪɚɧ ɭ
ɦɿɧɿɦɚɥɶɧɟ ɩɨɥɨɠɟɧɧɹ;
2. ɡɧɿɦɿɬɶ ɪɭɤɨɹɬɤɭ ɿ
ɤɨɪɢɫɬɭɸɱɢɫɶ ɪɟɝɭɥɸɜɚɥɶɧɢɦ ɝɜɢɧɬɨɦ, ɳɨ
ɡɧɚɯɨɞɢɬɶɫɹ ɧɚ ɜɧɭɬɪɿɲɧɿɢ ɱɚɫɬɢɧɿ ɚɛɨ ɡɛɨɤɭ ɧɚ
ɫɬɪɢɠɧɿ ɤɪɚɧɚ
, ɞɨɛɢɢɬɟɫɹ ɦɚɥɟɧɶɤɨɝɨ ɫɬɚɛɿɥɶɧɨɝɨ
ɩɨɥɭɦ’ɹ.
! ɍ ɪɚɡɿ ɡɪɿɞɠɟɧɢɯ ɝɚɡɿɜ, ɪɟɝɭɥɸɜɚɥɶɧɢɢ ɝɜɢɧɬ
ɩɨɜɢɧɟɧ ɛɭɬɢ ɜɤɪɭɱɟɧɢɢ ɞɨ ɭɩɨɪɭ;
3. ɩɟɪɟɜɿɪɬɟ, ɳɨɛ ɩɪɢ ɲɜɢɞɤɨɦɭ ɨɛɟɪɬɚɧɧɿ ɤɪɚɧɚ ɡ
ɦɚɤɫɢɦɚɥɶɧɨɝɨ ɜ ɦɿɧɿɦɚɥɶɧɟ ɩɨɥɨɠɟɧɧɹ, ɩɚɥɶɧɢɤ ɧɟ
ɝɚɫɧɭɜ.
ɇɚɥɚɲɬɭɜɚɧɧɹ ɦɿɧɿɦɚɥɶɧɨɝɨ
ɪɿɜɧɹ ɩɨɞɚɱɿ ɝɚɡɭ ɜ ɩɚɥɶɧɢɤ
ɞɭɯɨɜɤɢ:
1. ɡɚɩɚɥɿɬɶ ɩɚɥɶɧɢɤ (ɞɢɜ.
ȼɤɥɸɱɟɧɧɹ ɿ ȼɢɤɨɪɢɫɬɚɧɧɹ);
2. ɜɫɬɚɧɨɜɿɬɶ ɪɭɤɨɹɬɤɭ ɭ
ɩɨɥɨɠɟɧɧɹ ɦɿɧɿɦɭɦɭ (Ɇȱɇ) ɩɿɫɥɹ ɬɨɝɨ, ɹɤ ɜɨɧɚ
ɡɚɥɢɲɚɥɚɫɹ ɩɪɢɛɥɢɡɧɨ ɩɪɨɬɹɝɨɦ 10 ɯɜɢɥɢɧ ɭ
ɦɚɤɫɢɦɚɥɶɧɨɦɭ ɩɨɥɨɠɟɧɧɿ (MAɄɋ);
3. ɡɧɿɦɿɬɶ ɪɭɤɨɹɬɤɭ;
4. ɤɨɪɢɫɬɭɸɱɢɫɶ ɪɟɝɭɥɸɜɚɥɶɧɢɦ ɝɜɢɧɬɨɦ ɧɚ
ɡɨɜɧɿɲɧɿɢ ɫɬɨɪɨɧɿ ɫɬɪɢɠɧɹ ɬɟɪɦɨɫɬɚɬɚ (ɞɢɜ.
ɦɚɥɸɧɤɢ), ɞɨɛɢɢɬɟɫɹ
ɦɚɥɟɧɶɤɨɝɨ ɫɬɿɢɤɨɝɨ ɩɨɥɭɦ’ɹ.
! ɍ ɪɚɡɿ ɡɪɿɞɠɟɧɢɯ ɝɚɡɿɜ, ɪɟɝɭɥɸɜɚɥɶɧɢɢ ɝɜɢɧɬ
ɩɨɜɢɧɟɧ ɛɭɬɢ ɜɤɪɭɱɟɧɢɢ ɞɨ ɭɩɨɪɭ;
5. ɉɟɪɟɜɿɪɬɟ, ɳɨɛ, ɩɪɢ ɲɜɢɞɤɨɦɭ ɨɛɟɪɬɚɧɧɿ
ɪɭɤɨɹɬɤɢ ɡ ɩɨɥɨɠɟɧɧɹ MAɄɋ ɭ ɩɨɥɨɠɟɧɧɹ Ɇȱɇ ɚɛɨ
ɩɪɢ ɲɜɢɞɤɨɦɭ ɜɿɞɤɪɢɬɬɿ ɿ ɡɚɤɪɢɬɿ ɞɜɟɪɰɹɬ ɞɭɯɨɜɤɢ
ɩɚɥɶɧɢɤ ɧɟ ɝɚɫɧɭɜ.
51
Page 52

UA
S
S
R
A
Ɍȿɏɇȱɑɇȱ ȾȺɇȱ
Ɋɨɡɦɿɪɢ Ⱦɭɯɨɜɤɢ
ȼxɒxȽ
Ɉɛ'ɽɦ
Ʉɨɪɢɫɧɿ
ɪɨɡɦɿɪɢ
ɤɨɪɨɛɤɢ
ɞɭɯɨɜɤɢ
ɇɚɩɪɭɝɚ ɬɚ
ɱɚɫɬɨɬɚ
ɠɢɜɥɟɧɧɹ
ɉɚɥɶɧɢɤɢ
34x39x44 ɫɦ
58
ɥɿɬɪiɜ
ɲɢɪɢɧɚ ɫɦ 42
ɝɥɢɛɢɧɚ ɫɦ 44
ɜɢɫɨɬɚ ɫɦ 17
Ⱦɢɜ. ɧɚ ɬɚɛɥɢɱɰɿ ɡ ɞɚɧɢɦɢ
ɇɚɥɚɲɬɨɜɭɸɬɶɫɹ ɧɚ ɜɫɿ ɬɢɩɢ
ɝɚɡɭ, ɜɤɚɡɚɧɿ ɧɚ ɬɚɛɥɢɱɰɿ ɡ
ɞɚɧɢɦɢ, ɪɨɡɬɚɲɨɜɚɧɿɣ ɜ
ɫɟɪɟɞɢɧɿ ɜɢɫɬɭɩɭ, ɚɛɨ, ɤɨɥɢ
ɜɿɞɤɪɢɜɚɽɬɶɫɹ ɞɭɯɨɜɤɚ, ɧɚ
ɜɧɭɬɪɿɲɧɿɣ ɥɿɜɿɣ ɫɬɿɧɰɿ.
Ⱦɢɪɟɤɬɢɜɢ ȯɋ: 2006/95/EC ɜɿɞ
12/`2/06 (ɇɢɡɶɤɚ ɇɚɩɪɭɝɚ) ɬɚ
ɩɨɞɚɥɶɲɿ ɡɦɿɧɢ - 2004/108/EC
ɜɿɞ 15/12/04 (ȿɥɟɤɬɪɨɦɚɝɧɿɬɧɚ
ɫɭɦɿɫɧɿɫɬɶ) ɬɚ ɩɨɞɚɥɶɲɿ ɡɦɿɧɢ -
2009/142/EC ɜɿɞ 30/11/09
(Gas) ɬɚ ɩɨɞɚɥɶɲɿ ɡɦɿɧɢ -
93/68/EEC ɜɿɞ 22/07/93 ɬɚ
ɩɨɞɚɥɶɲɿ ɡɦɿɧɢ - 2002/96/EC.
1275/2008 (Stand-by/ Off mode)
KN3G2S/UA
KN3G20/UA
Ɍɚɛɥɢɰɹ ɯɚɪɚɤɬɟɪɢɫɬɢɤ ɩɚɥɶɧɢɤɿɜ ɿ ɮɨɪɫɭɧɨɤ
Ɍɚɛɥɢɰɹ 1 Ɂɪɿɞɠɟɧɢɣ ɝɚɡ ɉɪɢɪɨɞɧɢɣ ɝɚɡ
ɉɚɥɶɧɢɤ Ⱦɿɚɦɟɬɪ
ɒɜɢɞɤɢɣ
(ɜɟɥɢɤɢɣ) (R)
ɇɚɩɿɜɲɜɢɞɤɢɣ
(ɋɟɪɟɞɧɿɣ) (S)
Ⱦɨɩɨɦɿɠɧɢɣ
(Ɇɚɥɟɧɶɤɢɣ) (A)
Ⱦɭɯɨɜɤɚ
Ɍɢɫɤ, ɳɨ
ɩɨɞɚɽɬɶɫɹ
* ɞɥɹ 15°C 1013 ɦɛɚɪ-ɫɭɯɢɣ ɝɚɡ *** Ȼɭɬɚɧ P.C.S. = 49,47 ɆȾɠ/ɤɝ
** ɉɪɨɩɚɧ P.C.S. = 50,37 ɆȾɠ/ɤɝ ɉɪɢɪɨɞɧɢɣ ɝɚɡ P.C.S. = 37,78 ɆȾɠ/ɦ³
p.c.s.* - ɧɚɣɜɢɳɚ ɬɟɩɥɨɬɚ ɡɝɨɪɚɧɧɹ
(ɦɦ)
100 3.00 0.7 41 87 218 214 128 286 143 286
Ɍɟɩɥɨɜɚ ɟɮɟɤɬɢɜɧɿɫɬɶ
ɤȼɬ (p.c.s.*)
ɇɨɦɿɧɚɥɶɧɚ Ɂɦɟɧɲɟɧɚ
75 1.90 0.4 30 70 138 136 104 181 118 181
51 1.00 0.4 30 52 73 71 76 95 80 95
- 2.80 1.0 46 80 204 200 119 267 132 257
ɇɨɦɿɧɚɥɶɧɢɣ (ɦɛɚɪ)
Ɇɿɧɿɦɚɥɶɧɢɣ (ɦɛɚɪ)
Ɇɚɤɫɢɦɚɥɶɧɢɣ (ɦɛɚɪ)
Ʉɚɧɚɥ
1/100
(ɦɦ) (ɦɦ) *** ** (ɦɦ) (ɦɦ)
Ɏɨɪɫɭɧɤɚ
1/100
ɉɪɨɩɭɫɤɧɚ
ɡɞɚɬɧɿɫɬɶ*
28-30
20
35
ɝ/ɝɨɞ
37
25
45
Ɏɨɪɫɭɧɤɚ
1/100
ɉɪɨɩɭɫɤɧɚ
ɡɞɚɬɧɿɫɬɶ*
ɥ/ɝɨɞ
20
17
25
Ɏɨɪɫɭɧɤ
ɚ
1/100
ɉɪɨɩɭɫɤɧɚ
ɡɞɚɬɧɿɫɬɶ*
ɥ/ɝɨɞ
13
6,5
18
52
Page 53

ȼɤɥɸɱɟɧɧɹ ɿ ɜɢɤɨɪɢɫɬɚɧɧɹ
F
X
C
Ʉɨɪɢɫɬɭɜɚɧɧɹ ɪɨɛɨɱɨɸ ɩɨɜɟɪɯɧɟɸ
ȼɤɥɸɱɟɧɧɹ ɩɚɥɶɧɢɤɿɜ
ɍ ɤɨɠɧɨɿ ɪɭɤɨɹɬɤɢ ɉȺɅɖɇɂɄ, ɳɨ ɜɿɞɧɨɫɢɬɶɫɹ ɞɨ ɧɟɿ,
ɩɨɤɚɡɚɧɢɢ ɭ ɜɢɝɥɹɞɿ ɤɪɭɝɚ.
ɓɨɛ ɡɚɩɚɥɢɬɢ ɩɚɥɶɧɢɤ ɪɨɛɨɱɨɿ ɩɨɜɟɪɯɧɿ:
1. ɩɿɞɧɟɫɿɬɶ ɞɨ ɩɚɥɶɧɢɤɚ ɫɿɪɧɢɤ ɚɛɨ ɟɥɟɤɬɪɨɡɚɩɚɥɶɧɢɱɤɭ;
2. ɧɚɬɢɫɧɿɬɶ ɿ ɨɞɧɨɱɚɫɧɨ ɨɛɟɪɬɚɢɬɟ ɩɪɨɬɢ
ɝɨɞɢɧɧɢɤɨɜɨɿ ɫɬɪɿɥɤɢ ɪɭɤɨɹɬɤɭ ɉȺɅɖɇɂɄȺ ɞɨ
ɩɨɡɧɚɱɤɢ ɦɚɤɫɢɦɚɥɶɧɨɝɨ ɩɨɥɭɦ’ɹ (.
3. ɜɿɞɪɟɝɭɥɸɢɬɟ ɫɢɥɭ ɛɚɠɚɧɨɝɨ ɩɨɥɭɦ’ɹ, ɨɛɟɪɬɚɸɱɢ
ɩɪɨɬɢ ɝɨɞɢɧɧɢɤɨɜɨɿ ɫɬɪɿɥɤɢ ɪɭɤɨɹɬɤɭ
ɦɿɧɿɦɭɦ &, ɧɚ ɦɚɤɫɢɦɭɦ ( ɚɛɨ ɜ ɩɪɨɦɿɠɧɟ ɩɨɥɨɠɟɧɧɹ.
əɤɳɨ ɩɥɢɬɚ ɨɛɥɚɞɧɚɧɚ ɟɥɟɤɬɪɨɪɨɡɩɚɥɸɜɚɧɧɹɦ*
(C), ɫɩɨɱɚɬɤɭ ɧɚɬɢɫɧɿɬɶ ɧɚ ɤɧɨɩɤɭ ɜɤɥɸɱɟɧɧɹ,
ɜɿɞɦɿɱɟɧɭ ɫɢɦɜɨɥɨɦ
, ɩɨɬɿɦ ɧɚɬɢɫɧɿɬɶ ɞɨ ɭɩɨɪɭ
ɿ ɨɞɧɨɱɚɫɧɨ ɨɛɟɪɬɚɢɬɟ
ɩɪɨɬɢ ɝɨɞɢɧɧɢɤɨɜɨɿ ɫɬɪɿɥɤɢ
ɪɭɤɨɹɬɤɭ ɉȺɅɖɇɂɄȺ ɞɨ
ɩɨɡɧɚɱɤɢ ɦɚɤɫɢɦɚɥɶɧɨɝɨ
ɩɨɥɭɦ’ɹ, ɚɠ ɞɨɤɢ ɧɟ ɡ’ɜɢɬɶɫɹ
ɩɨɥɭɦ’ɹ.
Ⱦɟɹɤɿ ɦɨɞɟɥɿ ɨɛɥɚɞɧɚɧɿ ɫɢɫɬɟɦɨɸ
ɟɥɟɤɬɪɨɪɨɡɩɚɥɸɜɚɧɧɹɦ, ɜɛɭɞɨɜɚɧɨɸ ɜ ɪɭɤɨɹɬɤɢ, ɭ
ɰɶɨɦɭ ɜɢɩɚɞɤɭ ɽ ɩɪɢɫɬɪɿɢ ɟɥɟɤɬɪɨɪɨɡɩɚɥɸɜɚɧɧɹɦ*
(ɞɢɜ. ɦɚɥɸɧɨɤ), ɧɟ ɦɚɽ ɤɧɨɩɤɢ. Ⱦɨɫɢɬɶ ɧɚɬɢɫɧɭɬɢ
ɢ ɨɞɧɨɱɚɫɧɨ ɩɨɜɟɪɧɭɬɢ ɩɪɨɬɢ
ɪɭɤɨɹɬɤɭ ɉȺɅɖɇɂɄȺ ɞɨ ɩɨɡɧɚɱɤɢ ɦɚɤɫɢɦɚɥɶɧɨɝɨ
ɩɨɥɭɦ’ɹ, ɳɨɛ ɡɚɩɚɥɢɬɢ ɝɚɡ. Ɇɨɠɟ ɬɪɚɩɢɬɢɫɹ ɬɚɤ,
ɳɨ ɩɚɥɶɧɢɤ ɡɝɚɫɧɟ ɭ ɦɨɦɟɧɬ ɜɿɞɩɭɫɤɚɧɧɹ ɪɭɤɨɹɬɤɢ.
ɍ ɰɶɨɦɭ ɜɢɩɚɞɤɭ ɩɨɜɬɨɪɿɬɶ ɨɩɟɪɚɰɿɸ, ɭɬɪɢɦɭɸɱɢ
ɪɭɤɨɹɬɤɭ ɧɚɬɢɫɧɭɬɨɸ ɧɚ ɩɪɨɬɹɡɿ ɞɨɜɲɨɝɨ ɱɚɫɭ.
! ɍ ɪɚɡɿ ɜɢɩɚɞɤɨɜɨɝɨ ɡɝɚɫɚɧɧɹ ɩɨɥɭɦ’ɹ, ɜɢɦɤɧɿɬɶ
ɩɚɥɶɧɢɤ ɿ ɩɨɱɟɤɚɢɬɟ ɩɪɢɧɚɢɦɧɿ 1 ɯɜɢɥɢɧɭ, ɩɟɪɲ ɧɿɠ
ɩɨɜɬɨɪɧɨ ɫɩɪɨɛɭɜɚɬɢ
əɤɳɨ ɩɥɢɬɚ ɨɛɥɚɞɧɚɧɚ ɩɪɢɫɬɪɨɽɦ ɛɟɡɩɟɤɢ*(X) ɡɚ
ɜɿɞɫɭɬɧɨɫɬɿ ɩɨɥɭɦ’ɹ, ɭɬɪɢɦɭɢɬɟ ɧɚɬɢɫɧɭɬɨɸ ɪɭɤɨɹɬɤɭ
ɉȺɅɖɇɂɄȺ ɛɥɢɡɶɤɨ 2-3 ɫɟɤɭɧɞ, ɳɨɛ ɩɿɞɬɪɢɦɚɬɢ
ɝɨɪɿɧɧɹ ɿ ɚɤɬɢɜɿɡɭɜɚɬɢ ɩɥɢɬɭ.
ɓɨɛ ɩɨɝɚɫɢɬɢ ɩɚɥɶɧɢɤ ɨɛɟɪɬɚɢɬɟ ɪɭɤɨɹɬɤɭ ɞɨ ɭɩɨɪɭ
•.
ɜɤɥɸɱɟɧɧɹ.
ȼɇɂɆȺɇɂȿ! ɉɪɢ ɧɚɝɪɟɜɟ
ɫɬɟɤɥɹɧɧɚɹ ɤɪɵɲɤɚ ɦɨɠɟɬ
ɥɨɩɧɭɬɶ. ɉɪɟɠɞɟ ɱɟɦ
ɡɚɤɪɵɬɶ ɟɟ, ɜɵɤɥɸɱɢɬɶ ɜɫɟ
ɤɨɧɮɨɪɤɢ ɢɥɢ ɷɥɟɤɬɪɢɱɟɫɤɢɟ
ɝɨɪɟɥɤɢ.*Ɍɨɥɶɤɨ ɞɥɹ ɦɨɞɟɥɟɣ
ɫɨ ɫɬɟɤɥɹɧɧɨɣ ɤɪɵɲɤɨɣ
ɉȺɅɖɇɂɄȺ: ɧɚ
ɝɨɞɢɧɧɢɤɨɜɨɿ ɫɬɪɿɥɤɢ
ɉɪɚɤɬɢɱɧɿ ɩɨɪɚɞɢ ɡ ɜɢɤɨɪɢɫɬɚɧɧɹ ɩɚɥɶɧɢɤɿɜ
Ⱦɥɹ ɤɪɚɳɨɿ ɩɪɨɞɭɤɬɢɜɧɨɫɬɿ ɩɚɥɶɧɢɤɿɜ ɿ ɦɿɧɿɦɚɥɶɧɨɝɨ
ɫɩɨɠɢɜɚɧɧɹ ɝɚɡɭ ɧɟɨɛɯɿɞɧɨ ɜɢɤɨɪɢɫɬɨɜɭɜɚɬɢ ɩɨɫɭɞ ɡ
ɩɥɨɫɤɢɦ ɞɧɨɦ, ɧɚɤɪɢɬɢɢ ɤɪɢɲɤɨɸ, ɿ ɹɤɢɢ ɜɿɞɩɨɜɿɞɚɽ
ɡɚ ɪɨɡɦɿɪɨɦ ɩɚɥɶɧɢɤɭ:
ɉɚɥɶɧɢɤ ø Ⱦiɚɦɟɬɪ ɦiɫɬɤɨɫɬɟɣ (ɫɦ)
ɒɜɢɞɤɢɣ (R) 24 – 26
ɇɚɩɿɜɲɜɢɞɤɢɣ (S) 16 – 20
Ⱦɨɩɨɦɿɠɧɢɣ (A) 10 – 14
ɓɨɛ ɜɢɡɧɚɱɢɬɢ ɬɢɩ ɩɚɥɶɧɢɤɚ, ɡɜɟɪɧɿɬɶɫɹ ɞɨ
ɦɚɥɸɧɤɿɜ ɭ ɩɚɪɚɝɪɚɮɿ “ɏɚɪɚɤɬɟɪɢɫɬɢɤɢ ɩɚɥɶɧɢɤɿɜ ɿ
ɮɨɪɫɭɧɨɤ”.
Ʉɨɪɢɫɬɭɜɚɧɧɹ ɞɭɯɨɜɤɨɸ
! ɉɪɢ ɩɟɪɲɨɦɭ ɜɤɥɸɱɟɧɧɿ ɡɚɩɭɫɬɿɬɶ ɞɭɯɨɜɤɭ ɭ
ɯɨɥɨɫɬɨɦɭ ɪɟɠɢɦɿ ɧɟ ɦɟɧɲɟ, ɧɿɠ ɧɚ ɨɞɧɭ ɝɨɞɢɧɭ
ɡ ɦɚɤɫɢɦɚɥɶɧɢɦ ɩɨɥɨɠɟɧɧɹɦ ɬɟɪɦɨɫɬɚɬɚ ɬɚ ɡ
ɡɚɤɪɢɬɢɦɢ ɞɜɟɪɰɹɬɚɦɢ. ɉɨɬɿɦ ɜɢɦɤɧɿɬɶ, ɜɿɞɤɪɢɢɬɟ
ɞɜɟɪɰɹɬɚ ɞɭɯɨɜɤɢ ɢ ɩɪɨɜɿɬɪɿɬɶ ɩɪɢɦɿɳɟɧɧɹ. Ɂɚɩɚɯ,
ɳɨ ɡ’ɹɜɢɜɫɹ, ɽ ɪɟɡɭɥɶɬɚɬɨɦ ɜɢɩɚɪɨɜɭɜɚɧɧɹ ɪɟɱɨɜɢɧ,
ɧɟɨɛɯɿɞɧɢɯ ɞɥɹ ɡɚɯɢɫɬɭ ɞɭɯɨɜɤɢ.
! ɇɿɤɨɥɢ ɧɿɱɨɝɨ ɧɟ ɤɥɚɞɿɬɶ ɧɚ ɞɧɨ ɞɭɯɨɜɤɢ
ɜɢ ɪɢɡɢɤɭɽɬɟ ɩɨɲɤɨɞɢɬɢ ɟɦɚɥɶ. ȼɢɤɨɪɢɫɬɨɜɭɢɬɟ
ɩɨɥɨɠɟɧɧɹ 1 ɞɭɯɨɜɤɢ ɬɿɥɶɤɢ ɭ ɪɚɡɿ ɜɢɤɨɪɢɫɬɚɧɧɹ
ɪɨɠɧɚ.
ȼɤɥɸɱɟɧɧɹ ɞɭɯɨɜɤɢ
ɓɨɛ ɜɤɥɸɱɢɬɢ ɩɚɥɶɧɢɤ ɞɭɯɨɜɤɢ ɩɿɞɧɟɫɿɬɶ ɞɨ ɨɬɜɨɪɭ
F (ɞɢɜ. ɦɚɥɸɧɨɤ) ɫɿɪɧɢɤ ɚɛɨ ɟɥɟɤɬɪɨɡɚɩɚɥɶɧɢɱɤɭ,
ɧɚɬɢɫɧɿɬɶ ɿ ɨɞɧɨɱɚɫɧɨ ɨɛɟɪɬɚɢɬɟ ɩɪɨɬɢ ɝɨɞɢɧɧɢɤɨɜɨɿ
ɫɬɪɿɥɤɢ ɪɭɤɨɹɬɤɭ ȾɍɏɈȼɄȺ ɞɨ ɩɨɥɨɠɟɧɧɹ ɆȺɄɋ.
əɤɳɨ ɩɪɨɬɹɝɨɦ 15 ɫɟɤɭɧɞ
ɩɚɥɶɧɢɤ ɧɟ ɡɚɝɨɪɿɜɫɹ,
ɜɿɞɩɭɫɬɿɬɶ ɪɭɤɨɹɬɤɭ, ɜɿɞɤɪɢɢɬɟ
ɞɜɟɪɰɹɬɚ ɞɭɯɨɜɤɢ
ɧɟ ɦɟɧɲɟ 1 ɯɜɢɥɢɧɢ, ɩɟɪɲ
ɧɿɠ ɩɨɜɬɨɪɧɨ ɫɩɪɨɛɭɜɚɬɢ
ɜɤɥɸɱɟɧɧɹ.
! Ⱦɭɯɨɜɤɚ ɨɛɥɚɞɧɚɧɚ ɩɪɢɫɬɪɨɽɦ ɛɟɡɩɟɤɢ, ɞɥɹ
ɹɤɨɝɨ ɧɟɨɛɯɿɞɧɨ ɭɬɪɢɦɭɜɚɬɢ ɧɚɬɢɫɧɭɬɨɸ ɪɭɤɨɹɬɤɭ
ȾɍɏɈȼɄȺ ɩɪɢɛɥɢɡɧɨ 6 ɫɟɤɭɧɞ.
! ɍ ɪɚɡɿ ɜɢɩɚɞɤɨɜɨɝɨ ɡɝɚɫɚɧɧɹ ɩɨɥɭɦ’ɹ, ɜɢɦɤɧɿɬɶ
ɩɚɥɶɧɢɤ ɿ ɩɨɱɟɤɚɢɬɟ ɩɪɢɧɚɢɦɧɿ 1 ɯɜɢɥɢɧɭ, ɩɟɪɲ ɧɿɠ
ɩɨɜɬɨɪɧɨ ɫɩɪɨɛɭɜɚɬɢ ɜɤɥɸɱɟɧɧɹ ɞɭɯɨɜɤɢ.
, ɨɫɤɿɥɶɤɢ
ɿ ɩɨɱɟɤɚɢɬɟ
* ȯ ɥɢɲɟ ɜ ɞɟɹɤɢɯ ɦɨɞɟɥɹɯ.
UA
53
Page 54

UA
S
Ɋɟɝɭɥɸɜɚɧɧɹ ɬɟɦɩɟɪɚɬɭɪɢ
ɓɨɛ ɨɞɟɪɠɚɬɢ ɛɚɠɚɧɭ ɬɟɦɩɟɪɚɬɭɪɭ ɩɪɢɝɨɬɭɜɚɧɧɹ ɿɠɿ,
ɨɛɟɪɬɚɢɬɟ ɪɭɤɨɹɬɤɭ ȾɍɏɈȼɄȺ ɩɪɨɬɢ ɝɨɞɢɧɧɢɤɨɜɨɿ
ɫɬɪɿɥɤɢ. Ɂɧɚɱɟɧɧɹ ɬɟɦɩɟɪɚɬɭɪɢ ɩɨɤɚɡɚɧɿ ɧɚ ɩɚɧɟɥɿ
ɭɩɪɚɜɥɿɧɧɹ ɿ ɩɨɱɢɧɚɸɬɶɫɹ ɡ Ɇȱɇ (140ɨC) ɞɨ MAɄɋ
(250ɨC). Ⱦɨɫɹɝɧɭɜɲɢ ɡɚɞɚɧɨɿ ɬɟɦɩɟɪɚɬɭɪɢ, ɞɭɯɨɜɤɚ
ɩɿɞɬɪɢɦɭɜɚɬɢɦɟ ɿɿ ɩɨɫɬɿɢɧɨɸ ɡɚɜɞɹɤɢ ɬɟɪɦɨɫɬɚɬɭ.
.
Ɉɫɜɿɬɥɟɧɧɹ ɞɭɯɨɜɤɢ
Ʌɚɦɩɨɱɤɚ ɦɨɠɟ ɛɭɬɢ ɜɤɥɸɱɟɧɚ ɭ ɛɭɞɶ-ɹɤɢɢ ɦɨɦɟɧɬ,
ɹɤɳɨ ɧɚɬɢɫɧɭɬɢ ɧɚ ɤɧɨɩɤɭ ɈɋȼȱɌɅȿɇɇə ȾɍɏɈȼɄɂ.
ɇɢɠɧɿɢ ɜɿɞɫɿɤ*
ɉɿɞ ɞɭɯɨɜɤɨɸ ɽ ɜɿɞɫɿɤ, ɹɤɢɢ ɦɨɠɟ ɜɢɤɨɪɢɫɬɨɜɭɜɚɬɢɫɹ
ɞɥɹ ɡɛɟɪɿɝɚɧɧɹ ɪɟɱɟɢ ɚɛɨ ɩɨɫɭɞɭ. ɓɨɛ ɜɿɞɤɪɢɬɢ
ɞɜɟɪɰɹɬɚ, ɩɨɜɟɪɧɿɬɶ ɿɯ
ɞɨɧɢɡɭ (ɞɢɜ. ɦɚɥɸɧɨɤ).
! ɇɟ ɤɥɚɞɿɬɶ ɝɨɪɸɱɿ
ɦɚɬɟɪɿɚɥɢ ɜ ɧɢɠɧɿɢ
ɜɿɞɫɿɤ.
! ȼɧɭɬɪɿɲɧɿ ɩɨɜɟɪɯɧɿ
ɥɨɬɤɚ (ɩɪɢ
ɧɚɹɜɧɨɫɬɿ) ɦɨɠɭɬɶ ɫɬɚɬɢ ɝɚɪɹɱɢɦɢ.
ɓɨɛ ɜɢɞɚɥɢɬɢ ɜɢɫɭɜɧɢɢ ɡɚɯɢɫɬ ɜɿɞɝɜɢɧɬɿɬɶ ɝɜɢɧɬ S
(ɞɢɜ. ɦɚɥɸɧɨɤ). Ⱦɥɹ ɦɨɧɬɚɠɭ
ɡɚɛɥɨɤɭɢɬɟ ɢɨɝɨ ɡɚ ɞɨɩɨɦɨɝɨɸ
ɝɜɢɧɬɚ S.
ɣɨɝɨ
A
! Ⱦɨ ɜɢɤɨɪɢɫɬɚɧɧɹ ɞɭɯɨɜɤɢ
ɩɟɪɟɜɿɪɬɟ, ɳɨɛ ɜɢɫɭɜɧɢɢ
ɡɚɯɢɫɬ ɛɭɜ ɩɪɚɜɢɥɶɧɨ
ɡɚɤɪɿɩɥɟɧɢɢ.
* ȯ ɥɢɲɟ ɜ ɞɟɹɤɢɯ ɦɨɞɟɥɹɯ.
54
Page 55

Ɍɚɛɥɢɰɹ ɩɪɢɝɨɬɭɜɚɧɧɹ ɜ ɞɭɯɨɜɰɿ
UA
ɉɪɨɞɭɤɬɢ ɞɥɹ ɝɨɬɭɜɚɧɧɹ
ɉɚɫɬɚ (ɦɚɤɚɪɨɧɧɿ
ɜɢɪɨɛɢ)
Ʌɚɡɚɧ'ɹ
Ʉɚɧɧɟɥɥɨɧɿ
Ɂɚɩɟɱɟɧɚ ɩɚɫɬɚ
Ɇ’ɹɫɨ
Ɍɟɥɹɬɢɧɚ
Ʉɭɪɤɚ
Ʉɚɱɤɚ
Ʉɪɿɥɶ
ɋɜɢɧɢɧɚ
Ɇɨɥɨɞɚ ɛɚɪɚɧɢɧɚ
Ɋɢɛɚ
ɋɤɭɦɛɪɿɹ
Ɂɭɛɚɬɤɚ
Ɏɨɪɟɥɶ ɭ ɮɨɥɿʀ
ɉɿɰɰɚ
ɇɟɚɩɨɥɢɬɚɧɫɶɤɚ
Ɍɨɪɬɢ
ɉɟɱɢɜɨ
ɉɢɪiɝ
ɇɟɫɨɥɨɞɤɿ ɩɢɪɿɝɢ
Ⱦɪɿɠɞɠɨɜɟ ɬɿɫɬɨ
ɉɪɢɦ.: ɭ ɬɚɛɥɢɰɿ ɧɚɜɟɞɟɧɨ ɩɪɢɛɥɢɡɧɢɣ ɱɚɫ ɝɨɬɭɜɚɧɧɹ, ɹɤɢɣ ɦɨɠɟ ɡɦɿɧɸɜɚɬɢɫɹ ɜɿɞɩɨɜɿɞɧɨ ɞɨ ɜɥɚɫɧɨɝɨ ɫɦɚɤɭ.
ɉɪɢ ɝɨɬɭɜɚɧɧɹ ɧɚ ɝɪɢɥɿ ɞɟɤɨ ɦɚɽ ɡɚɜɠɞɢ ɡɚɣɦɚɬɢ 1-ɣ ɪɿɜɟɧɶ, ɜɿɞɪɚɯɨɜɭɸɱɢ ɡɧɢɡɭ.
ȼɚɝɚ
(ɤɝ)
2.5
2.5
2.5
1.5
1.5
1.8
2.0
2.1
1.8
1.1
1.5
1.0
1.0
0.5
1.1
1.0
1.0
Ɋɿɜɟɧɶ,
ɜɿɞɪɚɯɨɜɭɸɱɢ
ɡɧɢɡɭ
4
4
4
3
3
3
3
3
3
3
3
3
4
4
4
4
4
Ɍɟɦɩɟɪɚɬɭɪɚ
(°C)
200-210
200
200
200-210
210-220
200
200
200
200
180-200
180-200
180-200
210-220
180
180
180
170
ɑɚɫ ɩɨɩɟɪɟɞɧɶɨɝɨ
ɧɚɝɪɿɜɚɧɧɹ
(ɯɜɢɥɢɧɢ)
10
10
10
10
10
10
10
10
10
10
10
10
15
15
15
15
15
ɝɨɬɭɜɚɧɧɹ
(ɯɜɢɥɢɧɢ)
ɑɚɫ
75-85
50-60
50-60
95-100
90-100
100-110
70-80
70-80
100-105
45-50
45-55
45-50
20-25
25-35
40-45
50-55
40-45
55
Page 56

Ɂɚɩɨɛɿɠɧɿ ɡɚɫɨɛɢ ɢ ɩɨɪɚɞɢ
UA
! Ƚɚɡɨɜɚ ɩɥɢɬɚ ɛɭɥɚ ɪɨɡɪɨɛɥɟɧɚ ɿ ɫɤɨɧɫɬɪɭɢɨɜɚɧɚ
ɜɿɞɩɨɜɿɞɧɨ ɞɨ ɦɿɠɧɚɪɨɞɧɢɯ ɧɨɪɦ ɛɟɡɩɟɤɢ.
Ⱦɚɧɿ ɜɤɚɡɿɜɤɢ ɨɛɭɦɨɜɥɟɧɿ ɜɢɦɨɝɚɦɢ ɛɟɡɩɟɤɢ ɿ ɩɨɜɢɧɧɿ ɛɭɬɢ
ɭɜɚɠɧɨ ɜɢɜɱɟɧɿ.
Ɂɚɝɚɥɶɧɚ ɛɟɡɩɟɤɚ
• Ⱦɚɧɿ ɜɤɚɡɿɜɤɢ ɞɿɢɫɧɿ ɬɿɥɶɤɢ ɞɥɹ ɤɪɚɿɧ ɩɪɢɡɧɚɱɟɧɧɹ,
ɱɢɿ ɫɢɦɜɨɥɢ ɡɨɛɪɚɠɟɧɿ ɧɚ ɛɪɨɲɭɪɿ ɢ ɧɚ ɫɟɪiɢɧiɢ
ɬɚɛɥɢɱɰi.
• Ƚɚɡɨɜɚ ɩɥɢɬɚ ɩɪɢɡɧɚɱɟɧɚ ɞɥɹ ɧɟɩɪɨɮɟɫɿɢɧɨɝɨ
ɜɢɤɨɪɢɫɬɚɧɧɹ ɜɫɟɪɟɞɢɧɿ ɠɢɬɥɨɜɢɯ ɩɪɢɦɿɳɟɧɶ
• Ƚɚɡɨɜɭ ɩɥɢɬɭ ɧɟ ɦɨɠɧɚ ɜɫɬɚɧɨɜɥɸɜɚɬɢ ɩɨɡɚ
ɩɪɢɦɿɳɟɧɧɹɦɢ, ɧɚɜɿɬɶ, ɭ ɪɚɡɿ ɡɚɯɢɳɟɧɨɝɨ ɩɪɨɫɬɨɪɭ, ɬɨɦɭ
ɳɨ ɞɭɠɟ ɧɟɛɟɡɩɟɱɧɨ ɩɿɞɞɚɜɚɬɢ ɿɿ ɞɿɿ ɞɨɳɭ ɿ ɝɪɨɡɢ.
ɇɟ ɬɨɪɤɚɬɢɫɹ ɩɥɢɬɢ ɦɨɤɪɢɦɢ ɚɛɨ ɜɨɥɨɝɢɦɢ ɧɨɝɚɦɢ ɚɛɨ
•
ɪɭɤɚɦɢ.
• ɉɪɢɥɚɞ ɦɚɽ ɜɢɤɨɪɢɫɬɨɜɭɜɚɬɢɫɹ ɞɥɹ ɩɪɢɝɨɬɭɜɚɧɧɹ
ʀɠɿ, ɬɿɥɶɤɢ ɞɨɪɨɫɥɢɦɢ ɨɫɨɛɚɦɢ ɿ ɡɝɿɞɧɨ
ɿɧɫɬɪɭɤɰɿɹɦ, ɜɤɚɡɚɧɢɦ ɭ ɰɿɣ ɛɪɨɲɭɪɿ. Ȼɭɞɶ-ɹɤɟ
ɿɧɲɟ ɜɢɤɨɪɢɫɬɚɧɧɹ (ɧɚɩɪɢɤɥɚɞ: ɞɥɹ ɨɛɿɝɪɿɜɭ
ɩɪɢɦɿɳɟɧɶ) ɜɜɚɠɚɬɢɦɟɬɶɫɹ ɧɟ ɡɚ ɩɪɢɡɧɚɱɟɧɧɹɦ ɿ,
ɬɨɛɬɨ, ɧɟɤɨɪɟɤɬɧɢɦ. ȼɢɪɨɛɧɢɤ ɜɿɞɯɢɥɹɽ ɛɭɞɶ-ɹɤɭ
ɜɿɞɩɨɜɿɞɚɥɶɧɿɫɬɶ ɡɚ ɦɨɠɥɢɜɿ ɡɛɢɬɤɢ ɜɧɚɫɥɿɞɨɤ
ɜɢɤɨɪɢɫɬɚɧɧɹ
ɚɛɨ ɧɟɪɨɡɭɦɧɨɝɨ ɡɚɫɬɨɫɭɜɚɧɧɹ.
• Ȼɪɨɲɭɪɚ ɜɿɞɧɨɫɢɬɶɫɹ ɞɨ ɭɫɬɚɬɤɭɜɚɧɧɹ ɤɥɚɫɭ 1
(ɿɡɨɥɶɨɜɚɧɟ) ɚɛɨ ɤɥɚɫɭ 2 - ɩɿɞɤɥɚɫ 1 (ɜɫɬɚɧɨɜɥɟɧɟ ɦɿɠ
ɞɜɨɦɚ ɟɥɟɦɟɧɬɚɦɢ ɦɟɛɥɿɜ).
• Ȼɟɪɟɝɬɢ ɜɿɞ ɞɿɬɟɢ.
• ɍɧɢɤɚɢɬɟ ɤɨɧɬɚɤɬɭ ɤɚɛɟɥɿɜ ɠɢɜɥɟɧɧɹ ɿɧɲɢɯ ɩɨɛɭɬɨɜɢɯ
ɟɥɟɤɬɪɨɩɪɢɥɚɞɿɜ ɡ ɝɚɪɹɱɢɦɢ ɱɚɫɬɢɧɚɦɢ ɩɥɢɬɢ.
• ɇɟ ɡɚɤɪɢɜɚɢɬɟ ɜɟɧɬɢɥɹɰɿɢɧɿ ɨɬɜɨɪɢ ɢ ɨɬɜɨɪɢ ɞɥɹ
ɜɿɞɜɟɞɟɧɧɹ ɬɟɩɥɚ.
• ɇɟ ɧɚɤɪɢɜɚɢɬɟ ɫɤɥɹɧɨɸ
ɧɚ ɞɟɹɤɢɯ ɦɨɞɟɥɹɯ), ɤɨɥɢ ɩɚɥɶɧɢɤɢ ɜɤɥɸɱɟɧɿ ɚɛɨ ɳɟ
ɝɚɪɹɱɿ.
• Ɂɚɜɠɞɢ ɜɢɤɨɪɢɫɬɨɜɭɢɬɟ ɪɭɤɚɜɢɰɿ ɞɥɹ ɡɚɜɚɧɬɚɠɟɧɧɹ ɚɛɨ
ɜɢɬɹɝɚɧɧɹ ɦɿɫɬɤɨɫɬɟɢ ɞɥɹ ɿɠɿ.
• ɇɟ ɤɨɪɢɫɬɭɢɬɟɫɹ ɪɿɞɤɢɦɢ ɝɨɪɸɱɢɦɢ ɡɚɫɨɛɚɦɢ (ɫɩɢɪɬ,
ɛɟɧɡɢɧ ɿ ɬ.ɩ.) ɩɨɛɥɢɡɭ ɜɿɞ ɩɥɢɬɢ, ɤɨɥɢ ɜɨɧɚ ɜɤɥɸɱɟɧɚ.
• ɇɟ ɤɥɚɞɿɬɶ ɝɨɪɸɱɿ ɦɚɬɟɪɿɚɥɢ ɜ ɧɢɠɧɿɢ ɜɿɞɫɿɤ ɚɛɨ ɜ ɫɚɦɭ
ɞɭɯɨɜɤɭ: ɩɪɢ ɜɤɥɸɱɟɧɧɿ ɩɥɢɬɢ ɜɨɧɢ ɦɨɠɭɬɶ ɡɚɝɨɪɿɬɢɫɹ.
• əɤɳɨ ɩɥɢɬɨɸ ɧɟ ɤɨɪɢɫɬɭɸɬɶɫɹ, ɫɬɟɠɬɟ ɡɚ ɬɢɦ, ɳɨɛ
ɪɭɤɨɹɬɤɢ ɛɭɥɢ ɜ ɩɨɥɨɠɟɧɧɿ • ɿ ɝɚɡɨɜɢɢ ɤɪɚɧ ɛɭɜ ɡɚɤɪɢɬɢɢ.
• ɇɟ ɜɢɢɦɚɢɬɟ ɜɢɥɤɭ ɡ ɪɨɡɟɬɤɢ, ɩɨɬɹɝɧɭɜɲɢ ɡɚ ɤɚɛɟɥɶ,
ɬɹɝɧɿɬɶ ɬɿɥɶɤɢ ɡɚ ɫɚɦɭ ɜɢɥɤɭ.
ɧɟ ɡɚ ɩɪɢɡɧɚɱɟɧɧɹɦ, ɩɨɦɢɥɤɨɜɨɝɨ
ɤɪɢɲɤɨɸ ɪɨɛɨɱɭ ɩɨɜɟɪɯɧɸ (ɽ
• ɇɟ ɜɢɤɨɧɭɢɬɟ ɱɢɳɟɧɧɹ ɚɛɨ ɬɟɯɧɿɱɧɟ ɨɛɫɥɭɝɨɜɭɜɚɧɧɹ,
ɩɟɪɲ ɧɿɠ ɜɢɬɹɝɬɢ ɜɢɥɤɭ ɡ ɟɥɟɤɬɪɢɱɧɨɿ
• ɍ ɪɚɡɿ ɩɨɲɤɨɞɠɟɧɧɹ, ɜ ɠɨɞɧɨɦɭ ɜɢɩɚɞɤɭ ɧɟ ɧɚɦɚɝɚɢɬɟɫɹ
ɫɚɦɨɫɬɿɢɧɨ ɩɨɥɚɝɨɞɢɬɢ ɜɧɭɬɪɿɲɧɿ ɦɟɯɚɧɿɡɦɢ. Ɂɜ’ɹɠɿɬɶɫɹ
ɿɡ ɋɟɪɜiɫɧɨɸ ɫɥɭɠɛɨɸ.
• ɇɟ ɫɬɚɜɬɟ ɜɚɠɤɿ ɩɪɟɞɦɟɬɢ ɧɚ ɜɿɞɤɪɢɬɿ ɞɜɟɪɰɹɬɚ ɞɭɯɨɜɤɢ.
ɇɟ ɩɟɪɟɞɛɚɱɚɽɬɶɫɹ ɜɢɤɨɪɢɫɬɚɧɧɹ ɩɪɢɫɬɪɨɸ ɨɫɨɛɚɦɢ
•
(ɜɤɥɸɱɚɸɱɢ ɞɿɬɟɣ) ɡ ɨɛɦɟɠɟɧɢɦɢ ɮɿɡɢɱɧɢɦɢ,
ɫɟɧɫɨɪɧɢɦɢ ɚɛɨ ɪɨɡɭɦɨɜɢɦɢ ɡɞɿɛɧɨɫɬɹɦɢ,
ɧɟɞɨɫɜɿɞɱɟɧɢɦɢ ɨɫɨɛɚɦɢ ɚɛɨ ɬɚɤɢɦɢ, ɳɨ ɧɟ
ɨɡɧɚɣɨɦɢɥɢɫɹ ɡ ɜɢɪɨɛɨɦ, ɡɚ ɜɢɤɥɸɱɟɧɧɹɦ ɜɢɩɚɞɤɿɜ
ɧɚɝɥɹɞɭ ɡ ɛɨɤɭ ɨɫɨɛɢ, ɜɿɞɩɨɜɿɞɚɥɶɧɨʀ ɡɚ ʀɯɧɸ ɛɟɡɩɟɤɭ;
ɧɟ ɩɟɪɟɞɛɚɱɚɽɬɶɫɹ ɜɢɤɨɪɢɫɬɚɧɧɹ ɩɪɢɫɬɪɨɸ ɨɫɨɛɚɦɢ,
ɹɤi ɧɟ ɨɬɪɢɦɚɥɢ ɩɨɩɟɪɟɞɧɿɯ ɜɤɚɡɿɜɨɤ ɳɨɞɨ ɜɢɤɨɪɢɫɬɚɧɧɹ
ɩɪɢɫɬɪɨɸ.
ɪɨɡɟɬɤɢ.
ɍɬɢɥɿɡɚɰɿɹ
• ɍɬɢɥɿɡɚɰɿɹ ɦɚɬɟɪɿɚɥɭ ɩɚɤɭɜɚɧɧɹ: ɞɨɬɪɢɦɭɢɬɟɫɶ
ɦɿɫɰɟɜɢɯ ɧɨɪɦ, ɬɚɤ ɹɤ ɩɚɤɭɜɚɧɧɹ ɦɨɠɟ ɛɭɬɢ ɩɨɜɬɨɪɧɨ
ɜɢɤɨɪɢɫɬɚɧɟ.
• ȯɜɪɨɩɟɢɫɶɤɚ ɞɢɪɟɤɬɢɜɚ 2002/96/CE ɡ ɜɿɞɯɨɞɿɜ
ɜɿɞ ɟɥɟɤɬɪɢɱɧɨɿ ɢ ɟɥɟɤɬɪɨɧɧɨɿ ɚɩɚɪɚɬɭɪɢ (RAEE),
ɩɟɪɟɞɛɚɱɚɽ, ɳɨ ɩɨɛɭɬɨɜɿ ɟɥɟɤɬɪɨɩɪɢɥɚɞɢ ɧɟ ɦɨɠɭɬɶ
ɩɟɪɟɪɨɛɥɹɬɢɫɹ ɭ ɡɜɢɱɚɢɧɨɦɭ ɩɨɪɹɞɤɭ ɞɥɹ ɬɜɟɪɞɢɯ
ɦɿɫɶɤɢɯ ɜɿɞɯɨɞɿɜ. Ɂɧɹɬɿ ɡ ɟɤɫɩɥɭɚɬɚɰɿɿ ɩɨɛɭɬɨɜɿ ɩɪɢɥɚɞɢ
ɦɚɸɬɶ ɛɭɬɢ ɡɿɛɪɚɧɿ ɨɤɪɟɦɨ ɞɥɹ ɨɩɬɢɦɿɡɚɰɿɿ ɫɬɭɩɟɧɸ
ɜɿɞɧɨɜɥɟɧɧɹ ɢ
ɞɨ ɿɯɧɶɨɝɨ ɫɤɥɚɞɭ ɿ ɡ ɦɟɬɨɸ ɭɫɭɧɟɧɧɹ ɩɨɬɟɧɰɿɢɧɨɿ ɲɤɨɞɢ
ɞɥɹ ɡɞɨɪɨɜ’ɹ ɬɚ ɫɟɪɟɞɨɜɢɳɚ. ɋɢɦɜɨɥ ɡɚɤɪɟɫɥɟɧɨɿ
ɤɨɪɡɢɧɢ, ɡɨɛɪɚɠɟɧɿɢ ɧɚ ɜɫɿɯ ɜɢɪɨɛɚɯ, ɧɚɝɚɞɭɽ ɩɪɨ
ɧɟɨɛɯɿɞɧɿɫɬɶ ɨɤɪɟɦɨɿ ɭɬɢɥɿɡɚɰɿɿ
ȼɿɞɩɪɚɰɶɨɜɚɧɿ ɩɨɛɭɬɨɜɿ ɟɥɟɤɬɪɨɩɪɢɥɚɞɢ ɦɨɠɭɬɶ
ɩɟɪɟɞɚɜɚɬɢɫɹ ɜ ɞɟɪɠɚɜɧɭ ɫɥɭɠɛɭ ɩɨ ɡɛɨɪɭ, ɧɚ
ɫɩɟɰɿɚɥɶɧɿ ɤɨɦɭɧɚɥɶɧɿ ɬɟɪɢɬɨɪɿɿ ɚɛɨ, ɹɤɳɨ ɰɟ
ɩɟɪɟɞɛɚɱɟɧɨ ɞɿɸɱɢɦ ɧɚɰɿɨɧɚɥɶɧɢɦ
ɩɟɪɟɞɚɜɚɬɢɫɹ ɩɨɫɬɚɱɚɥɶɧɢɤɚɦ ɞɥɹ ɨɞɧɨɱɚɫɧɨɝɨ ɨɛɦɿɧɭ
ɡ ɞɨɩɥɚɬɨɸ ɧɚ ɧɨɜɿ ɜɢɪɨɛɢ ɜɿɞɩɨɜɿɞɧɨɝɨ ɬɢɩɚ.
ȼɫɿ ɨɫɧɨɜɧɿ ɜɢɪɨɛɧɢɤɢ ɩɨɛɭɬɨɜɢɯ ɟɥɟɤɬɪɨɩɪɢɥɚɞɿɜ
ɛɟɪɭɬɶ ɭɱɚɫɬɶ ɭ ɫɬɜɨɪɟɧɧɿ ɬɚ ɭɩɪɚɜɥɿɧɧɿ ɫɢɫɬɟɦɚɦɢ
ɡɛɨɪɭ ɿ ɩɟɪɟɪɨɛɤɢ ɜɿɞɩɪɚɰɶɨɜɚɧɨɿ ɬɟɯɧɿɤɢ.
ɪɟɰɢɤɥɸɜɚɧɧɹ ɦɚɬɟɪɿɚɥɿɜ, ɳɨ ɜɯɨɞɹɬɶ
ɡɚɤɨɧɨɦ,
Ɉɯɨɪɨɧɚ ɿ ɞɛɚɢɥɢɜɟ ɜɿɞɧɨɲɟɧɧɹ ɞɨ
ɞɨɜɤɿɥɥɹ
• ȼɤɥɸɱɟɧɧɹ ɞɭɯɨɜɤɢ ɜ ɩɪɨɦɿɠɤɭ ɡ ɩɿɡɧɶɨɝɨ
ɩiɫɥɹɨɛiɞɟɧɧɨɝɨ ɱɚɫɭ ɞɨ ɪɚɧɧɶɨɝɨ ɪɚɧɤɭ ɞɨɡɜɨɥɢɬɶ
ɡɦɟɧɲɢɬɢ ɧɚɜɚɧɬɚɠɟɧɧɹ ɧɚ ɩɿɞɩɪɢɽɦɫɬɜɚ ɜɢɪɨɛɧɢɤɢ
ɟɥɟɤɬɪɨɟɧɟɪɝɿɿ.
• ɉɿɞɬɪɢɦɭɢɬɟ ɜ ɪɨɛɨɱɨɦɭ ɫɬɚɧɿ ɿ ɦɢɢɬɟ ɭɳɿɥɶɧɸɜɚɱɿ ɬɚɤ,
ɳɨɛ ɜɨɧɢ ɞɨɛɪɟ ɩɪɢɥɹɝɚɥɢ ɞɨ ɞɜɟɪɰɹɬ ɿ ɧɟ ɞɨɡɜɨɥɹɥɢ ɛ
ɜɢɧɢɤɚɬɢ
ɜɬɪɚɬɚɦ ɬɟɩɥɚ.
56
Page 57

Ⱦɨɝɥɹɞ i ɬɟɯɧɿɱɧɟ
ɨɛɫɥɭɝɨɜɭɜɚɧɧɹ
ȼɿɞɤɥɸɱɿɬɶ ɟɥɟɤɬɪɢɱɧɟ ɠɢɜɥɟɧɧɹ
Ⱦɨ ɩɨɱɚɬɤɭ ɜɫɿɯ ɪɨɛɿɬ ɿɡɨɥɸɢɬɟ ɩɪɢɥɚɞ ɜɿɞ ɦɟɪɟɠɿ
ɟɥɟɤɬɪɢɱɧɨɝɨ ɠɢɜɥɟɧɧɹ.
ɑɢɳɟɧɧɹ ɜɢɪɨɛɚ
! ɍɧɢɤɚɢɬɟ ɜɢɤɨɪɢɫɬɚɧɧɹ ɚɛɪɚɡɢɜɧɢɯ ɚɛɨ ɪɨɡ’ɿɞɚɸɱɢɯ
ɱɢɫɬɹɱɢɯ ɡɚɫɨɛɿɜ, ɬɚɤɢɯ ɹɤ ɡɚɫɨɛɢ ɞɥɹ ɜɢɜɟɞɟɧɧɹ ɩɥɹɦ ɿ
ɩɪɨɞɭɤɬɢ ɞɥɹ ɚɧɬɢɤɨɪɨɡɿɢɧɨɿ ɨɛɪɨɛɤɢ, ɦɢɸɱɢɯ ɡɚɫɨɛɿɜ ɭ
ɩɨɪɨɲɤɭ ɿ ɝɭɛɨɤ ɡ ɚɛɪɚɡɢɜɧɨɸ ɩɨɜɟɪɯɧɟɸ: ɜɨɧɢ ɦɨɠɭɬɶ
ɩɨɞɪɹɩɚɬɢ ɩɨɜɟɪɯɧɸ ɛɟɡ ɦɨɠɥɢɜɨɫɬɿ ɜɿɞɧɨɜɥɟɧɧɹ.
! ɇɿɤɨɥɢ ɧɟ ɜɢɤɨɪɢɫɬɨɜɭɢɬɟ ɩɪɢɥɚɞɢ ɞɥɹ ɦɢɬɬɹ ɩɚɪɨɸ ɚɛɨ
ɜɢɫɨɤɢɦ ɬɢɫɤɨɦ.
• Ⱦɥɹ ɡɜɢɱɚɢɧɨɝɨ ɬɟɯɧɿɱɧɨɝɨ
ɜɢɦɢɬɢ ɩɨɜɟɪɯɧɸ ɜɨɥɨɝɨɸ ɝɭɛɤɨɸ ɿ ɜɢɫɭɲɢɬɢ ɤɭɯɨɧɧɢɦ
ɩɚɩɟɪɨɜɢɦ ɪɭɲɧɢɤɨɦ.
• Ɂɨɜɧɿɲɧɿ ɟɦɚɥɶɨɜɚɧɿ ɚɛɨ ɧɟɿɪɠɚɜɿɸɱɿ ɞɟɬɚɥɿ ɢ ɝɭɦɨɜɿ
ɭɳɿɥɶɧɸɜɚɱɿ ɦɨɠɭɬɶ ɛɭɬɢ ɨɱɢɳɟɧɿ ɝɭɛɤɨɸ, ɩɪɨɫɨɱɟɧɨɸ
ɬɟɩɥɨɸ ɜɨɞɨɸ ɿ ɧɟɢɬɪɚɥɶɧɢɦ ɦɢɥɨɦ. əɤɳɨ ɩɥɹɦɢ
ɽ ɬɚɤɢɦɢ, ɳɨ ɜɚɠɤɨ ɜɢɜɨɞɹɬɶɫɹ, ɜɢɤɨɪɢɫɬɨɜɭɢɬɟ
ɫɩɟɰɿɚɥɶɧɿ ɡɚɫɨɛɢ. Ⱦɨɛɪɟ ɩɪɨɦɢɢɬɟ ɜɨɞɨɸ ɿ ɜɢɫɭɲɿɬɶ
ɩɿɫɥɹ ɦɢɬɬɹ. ɇɟ ɜɢɤɨɪɢɫɬɨɜɭɢɬɟ ɚɛɪɚɡɢɜɧɿ ɩɨɪɨɲɤɢ
ɿɞɤɿ ɪɟɱɨɜɢɧɢ.
ɨɛɫɥɭɝɨɜɭɜɚɧɧɹ ɞɨɫɢɬɶ
ɚɛɨ
ȱ, ɤɪɿɦ ɬɨɝɨ, ɜɚɪɬɨ ɜɢɫɭɲɢɬɢ ɦɨɠɥɢɜɿ ɦɿɫɰɹ ɩɪɨɥɢɬɬɹ
ɜɨɞɢ.
Ʉɪɢɲɤɚ
ɍ ɦɨɞɟɥɹɯ ɡɿ ɫɤɥɹɧɨɸ
ɤɪɢɲɤɨɸ ɨɱɢɳɟɧɧɹ
ɡɞɿɢɫɧɸɽɬɶɫɹ ɡɚ
ɞɨɩɨɦɨɝɨɸ ɬɟɩɥɨɿ ɜɨɞɢ.
ɍɧɢɤɚɢɬɟ ɚɛɪɚɡɢɜɿ.
Ɇɨɠɧɚ ɡɧɹɬɢ ɤɪɢɲɤɭ ɞɥɹ
ɩɨɥɟɝɲɟɧɧɹ ɨɱɢɳɟɧɧɹ
ɩɨɡɚɞɭ ɪɨɛɨɱɨɿ ɩɨɜɟɪɯɧɿ:
ɩɨɜɧɿɫɬɸ ɜɿɞɤɪɢɬɢ ɿɿ ɢ
! ɍɧɢɤɚɬɢ ɡɚɤɪɢɜɚɧɧɹ ɤɪɢɲɤɢ, ɤɨɥɢ ɩɚɥɶɧɢɤɢ ɜɤɥɸɱɟɧɿ ɚɛɨ
ɳɟ ɝɚɪɹɱɿ.
Ʉɨɧɬɪɨɥɶ ɭɳɿɥɶɧɟɧɶ ɞɭɯɨɜɤɢ
Ɋɟɝɭɥɹɪɧɨ ɩɟɪɟɜɿɪɹɢɬɟ ɫɬɚɧ ɭɳɿɥɶɧɟɧɧɹ ɧɚɜɤɨɥɨ
ɞɜɟɪɰɹɬ ɞɭɯɨɜɤɢ. ɍ ɪɚɡɿ ɢɨɝɨ ɩɨɲɤɨɞɠɟɧɧɹ, ɡɜɟɪɧɿɬɶɫɹ
ɜ ɧɚɢɛɥɢɠɱɢɢ ɚɜɬɨɪɢɡɨɜɚɧɢɢ ɋɟɪɜiɫɧɢɢ ɰɟɧɬɪ. ɇɟ
ɪɟɤɨɦɟɧɞɭɽɬɶɫɹ ɜɢɤɨɪɢɫɬɨɜɭɜɚɬɢ ɞɭɯɨɜɤɭ ɞɨ ɡɚɜɟɪɲɟɧɧɹ
ɪɟɦɨɧɬɭ.
ɩɨɬɹɝɧɭɬɢ ɧɚɜɟɪɯ (ɞɢɜ. ɦɚɥɸɧɨɤ).
Ɍɟɯɧɿɱɧɟ ɨɛɫɥɭɝɨɜɭɜɚɧɧɹ ɝɚɡɨɜɢɯ ɤɪɚɧɿɜ
UA
• ʈɪɚɬɤɢ, ɤɨɜɩɚɱɤɢ, ɪɨɡɫɿɤɚɱɿ ɩɨɥɭɦ’ɹ
ɿ ɩɚɥɶɧɢɤɢ ɪɨɛɨɱɨɿ ɩɨɜɟɪɯɧɿ ɥɟɝɤɨ ɡɧɿɦɚɸɬɶɫɹ,
ɳɨɛ ɩɨɥɟɝɲɢɬɢ ɦɢɬɬɹ ɩɥɢɬɢ; ɦɢɢɬɟ ɿɯ ɜ ɝɚɪɹɱɿɢ ɜɨɞɿ ɡ
ɧɟɚɛɪɚɡɢɜɧɢɦ ɦɢɸɱɢɦ ɡɚɫɨɛɨɦ, ɪɟɬɟɥɶɧɨ ɜɢɞɚɥɹɸɱɢ
ɧɚɤɢɩ ɿ ɩɨɜɧɿɫɬɸ ɜɢɫɭɲɢɜɲɢ ɩɟɪɟɞ ɜɫɬɚɧɨɜɥɟɧɧɹɦ ɧɚ
ɦɿɫɰɟ.
• Ⱦɥɹ ɩɥɢɬ, ɳɨ ɦɚɸɬɶ ɟɥɟɤɬɪɨɪɨɡɩɚɥɸɜɚɧɧɹ, ɧɟɨɛɯɿɞɧɨ
ɪɟɝɭɥɹɪɧɨ ɜɢɤɨɧɭɜɚɬɢ ɚɤɭɪɚɬɧɟ ɱɢɳɟɧɧɹ ɤɿɧɰɟɜɢɯ
ɩɪɢɫɬɪɨɸ ɟɥɟɤɬɪɨɪɨɡɩɚɥɸɜɚɧɧɹ ɢ ɩɟɪɟɜɿɪɹɬɢ,
ɱɚɫɬɢɧ
ɳɨɛ ɨɬɜɨɪɢ ɞɥɹ ɜɢɯɨɞɭ ɝɚɡɭ ɧɟ ɛɭɥɢ ɡɚɛɢɬɿ.
• ȼɧɭɬɪɿɲɧɸ ɱɚɫɬɢɧɭ ɞɭɯɨɜɤɢ ɛɚɠɚɧɨ ɦɢɬɢ ɤɨɠɧɨɝɨ
ɪɚɡɭ ɩɿɫɥɹ ɿɿ ɜɢɤɨɪɢɫɬɚɧɧɹ, ɤɨɥɢ ɜɨɧɚ ɳɟ ɬɟɩɥɚ.
ȼɢɤɨɪɢɫɬɨɜɭɢɬɟ ɝɚɪɹɱɭ ɜɨɞɭ ɿ ɦɢɸɱɢɢ ɡɚɫɿɛ, ɞɨɛɪɟ
ɩɪɨɦɢɢɬɟ ɿ ɜɢɬɪɿɬɶ ɦ’ɹɤɨɸ ɬɤɚɧɢɧɨɸ. ɍɧɢɤɚɢɬɟ ɚɛɪɚɡɢɜɿ.
• Ɉɱɢɳɚɣɬɟ ɫɤɥɨ ɞɜɟɪɰɹɬ ɡɚ ɞɨɩɨɦɨɝɨɸ ɦ’ɹɤɨʀ ɝɭɛɤɢ ɿ
ɧɟɚɛɪɚɡɢɜɧɢɯ ɡɚɫɨɛɿɜ , ɩɿɫɥɹ ɱɨɝɨ ɜɢɫɭɲɿɬɶ ɣɨɝɨ ɦ’ɹɤɨɸ
ɬɤɚɧɢɧɨɸ; ɡɚɛɨɪɨɧɹɽɬɶɫɹ ɜɢɤɨɪɢɫɬɨɜɭɜɚɬɢ ɲɨɪɫɬɤɭɜɚɬɿ
ɚɛɪɚɡɢɜɧɿ ɦɚɬɟɪɿɚɥɢ ɱɢ ɡɚɝɨɫɬɪɟɧɿ ɦɟɬɚɥɟɜɿ ɲɤɪɟɛɤɢ:
ɜɨɧɢ ɦɨɠɭɬɶ ɩɨɞɪɹɩɚɬɢ ɩɨɜɟɪɯɧɸ ɿ ɜɢɤɥɢɤɚɬɢ ɪɨɡɤɨɥ
ɫɤɥɚ.
• Ⱥɤɫɟɫɭɚɪɢ ɦɨɠɭɬɶ ɦɢɬɢɫɹ ɹɤ ɡɜɢɱɚɢɧɢɢ ɩɨɫɭɞ, ɡɨɤɪɟɦɚ
ɜ ɩɨɫɭɞɨɦɢɢɧɿɢ ɦɚɲɢɧɿ.
Ɂ ɱɚɫɨɦ ɦɨɠɟ ɬɪɚɩɢɬɢɫɹ ɬɚɤ, ɳɨ ɤɪɚɧ ɛɭɞɟ ɡɚɛɥɨɤɨɜɚɧɢɢ
ɚɛɨ ɢɨɝɨ ɛɭɞɟ ɜɚɠɤɨ ɨɛɟɪɬɚɬɢ, ɬɨɦɭ ɛɭɞɟ ɧɟɨɛɯɿɞɧɨ
ɩɨɞɭɦɚɬɢ ɩɪɨ ɡɚɦɿɧɭ ɫɚɦɨɝɨ ɤɪɚɧɚ.
! ɐɹ ɨɩɟɪɚɰɿɹ ɦɚɽ ɜɢɤɨɧɭɜɚɬɢɫɹ ɮɚɯɿɜɰɟɦ,
ɭɩɨɜɧɨɜɚɠɟɧɢɦ ɜɢɪɨɛɧɢɤɨɦ.
Ⱦɨɩɨɦɨɝɚ
ɉɨɜiɞɨɦɬɟ:
• ɦɨɞɟɥɶ ɩɥɢɬɢ (ɦɨɞɟɥɶ)
• ɫɟɪɿɢɧɢɢ ɧɨɦɟɪ (S/N)
Ⱦɚɧɚ ɿɧɮɨɪɦɚɰɿɹ ɦɿɫɬɢɬɶɫɹ ɧɚ ɬɚɛɥɢɱɰɿ ɡ
ɯɚɪɚɤɬɟɪɢɫɬɢɤɚɦɢ, ɩɪɢɤɪɿɩɥɟɧɿɢ ɞɨ ɩɥɢɬɢ ɿ / ɚɛɨ ɧɚ
ɭɩɚɤɨɜɰɿ.
• ɇɟɿɪɠɚɜɿɸɱɚ ɫɬɚɥɶ ɦɨɠɟ ɦɚɬɢ ɩɥɹɦɢ, ɹɤɳɨ ɡɧɚɯɨɞɢɥɚɫɹ
ɜ ɬɪɢɜɚɥɨɦɭ ɤɨɧɬɚɤɬɿ ɡ ɜɚɩɧɹɧɨɸ ɜɨɞɨɸ
ɚɝɪɟɫɢɜɧɢɦɢ ɱɢɫɬɹɱɢɦɢ ɡɚɫɨɛɚɦɢ (ɳɨ ɦɿɫɬɹɬɶ ɮɨɫɮɨɪ).
Ɋɟɤɨɦɟɧɞɭɽɬɶɫɹ ɞɨɛɪɟ ɩɪɨɦɢɬɢ ɿ ɜɢɫɭɲɢɬɢ ɩɿɫɥɹ ɦɢɬɬɹ.
ɚɛɨ ɡ
57
Page 58

ɂɧɮɨɪɦɚɰɢɹ ɞɥɹ ɩɨɬɪɟɛɢɬɟɥɹ
ɂɡɞɟɥɢɟ: Ʉɨɦɛɢɧɢɪɨɜɚɧɧɚɹ (ɝɚɡɨɜɚɹ) ɩɥɢɬɚ
Ɍɨɪɝɨɜɚɹ ɦɚɪɤɚ:
Ɍɨɪɝɨɜɵɣ ɡɧɚɤ ɢɡɝɨɬɨɜɢɬɟɥɹ:
Ɇɨɞɟɥɢ:
ɂɡɝɨɬɨɜɢɬɟɥɶ: Indesit Company
ɋɬɪɚɧɚ-ɢɡɝɨɬɨɜɢɬɟɥɶ: ɉɨɥɶɲɚ
ɇɨɦɢɧɚɥɶɧɨɟ ɡɧɚɱɟɧɢɟ ɧɚɩɪɹɠɟɧɢɹ ɷɥɟɤɬɪɨɩɢɬɚɧɢɹ
ɢɥɢ ɞɢɚɩɚɡɨɧ ɧɚɩɪɹɠɟɧɢɹ
ɍɫɥɨɜɧɨɟ ɨɛɨɡɧɚɱɟɧɢɟ ɪɨɞɚ ɷɥɟɤɬɪɢɱɟɫɤɨɝɨ ɬɨɤɚ
ɢɥɢ ɧɨɦɢɧɚɥɶɧɚɹ ɱɚɫɬɨɬɚ ɩɟɪɟɦɟɧɧɨɝɨ ɬɨɤɚ
Ʉɥɚɫɫ ɡɚɳɢɬɵ ɨɬ ɩɨɪɚɠɟɧɢɹ ɷɥɟɤɬɪɢɱɟɫɤɢɦ ɬɨɤɨɦ Ʉɥɚɫɫ ɡɚɳɢɬɵ I
Ɉɛɴɟɦ ɞɭɯɨɜɨɝɨ ɲɤɚɮɚ 58 ɥ
Ɇɚɤɫ. ɩɨɝɥɨɳɚɟɦɚɹ ɦɨɳɧɨɫɬɶ (ɝɚɡɨɜɚɹ ɞɭɯɨɜɤɚ) 3100 ȼɬ
ȼ ɫɥɭɱɚɟ ɧɟɨɛɯɨɞɢɦɨɫɬɢ ɩɨɥɭɱɟɧɢɹ ɢɧɮɨɪɦɚɰɢɢ
ɩɨ ɫɟɪɬɢɮɢɤɚɬɚɦ ɫɨɨɬɜɟɬɫɬɜɢɹ
ɫɟɪɬɢɮɢɤɚɬɨɜ ɫɨɨɬɜɟɬɫɬɜɢɹ ɧɚ ɞɚɧɧɭɸ ɬɟɯɧɢɤɭ, ȼɵ
ɦɨɠɟɬɟ ɨɬɩɪɚɜɢɬɶ ɡɚɩɪɨɫ ɩɨ ɷɥɟɤɬɪɨɧɧɨɦɭ ɚɞɪɟɫɭ
cert.rus@indesit.com.
Ⱦɚɬɭ ɩɪɨɢɡɜɨɞɫɬɜɚ ɞɚɧɧɨɣ ɬɟɯɧɢɤɢ ɦɨɠɧɨ
ɩɨɥɭɱɢɬɶ ɢɡ ɫɟɪɢɣɧɨɝɨ ɧɨɦɟɪɚ, ɪɚɫɩɨɥɨɠɟɧɧɨɝɨ
ɩɨɞ ɲɬɪɢɯ-ɤɨɞɨɦ
(S/N XXXXXXXXX * XXXXXXXXXXX),
ɫɥɟɞɭɸɳɢɦ ɨɛɪɚɡɨɦ:
ɉɪɨɢɡɜɨɞɢɬɟɥɶ ɨɫɬɚɜɥɹɟɬ ɡɚ ɫɨɛɨɣ ɩɪɚɜɨ ɛɟɡ ɩɪɟɞɭɩɪɟɠɞɟɧɢɹ ɜɧɨɫɢɬɶ
ɥɟɤɬɚɰɢɸ, ɧɟ ɭɯɭɞɲɚɸɳɢɟ ɷɮɮɟɤɬɢɜɧɨɫɬɶ ɪɚɛɨɬɵ ɨɛɨɪɭɞɨɜɚɧɢɹ. ɇɟɤɨɬɨɪɵɟ ɩɚɪɚɦɟɬɪɵ, ɩɪɢɜɟɞɟɧɧɵɟ
ɜ ɷɬɨɣ ɢɧɫɬɪɭɤɰɢɢ, ɹɜɥɹɸɬɫɹ ɩɪɢɛɥɢɡɢɬɟɥɶɧɵɦɢ. ɉɪɨɢɡɜɨɞɢɬɟɥɶ ɧɟ ɧɟɫɟɬ ɨɬɜɟɬɫɬɜɟɧɧɨɫɬɢ ɡɚ ɧɟɡɧɚɱɢɬɟɥɶɧɵɟ ɨɬɤɥɨɧɟɧɢɹ ɨɬ ɭɤɚɡɚɧɧɵɯ ɜɟɥɢɱɢɧ. ɂɡɝɨɬɨɜɢɬɟɥɶ ɧɟ ɧɟɫɟɬ ɨɬɜɟɬɫɬɜɟɧɧɨɫɬɢ ɡɚ ɜɨɡɦɨɠɧɵɟ ɧɟɬɨɱɧɨɫɬɢ
ɜ ɷɬɨɣ ɛɪɨɲɸɪɟ ɢɡ-ɡɚ ɩɟɱɚɬɢ ɢɥɢ ɤɨɩɢɪɨɜɚɧɢɹ ɨɲɢɛɨɤ.
ɢɥɢ ɩɨɥɭɱɟɧɢɹ ɤɨɩɢɣ
KN3G2S/UA KN3G20/UA
220–240 ȼ ~
50/60 Ƚɰ
- 1-ɹ ɰɢɮɪɚ ɜ S/N ɫɨɨɬɜɟɬɫɬɜɭɟɬ ɩɨɫɥɟɞɧɟɣ ɰɢɮɪɟ
ɝɨɞɚ;
- 2-ɹ ɢ 3-ɹ ɰɢɮɪɵ ɜ S/N — ɩɨɪɹɞɤɨɜɨɦɭ ɧɨɦɟɪɭ
ɦɟɫɹɰɚ ɝɨɞɚ,
- 4-ɹ ɢ 5-ɹ ɰɢɮɪɵ ɜ S/N — ɱɢɫɥɭ ɨɩɪɟɞɟɥɟɧɧɨɝɨ
ɦɟɫɹɰɚ ɢ ɝɨɞɚ.
ɢɡɦɟɧɟɧɢɹ ɜ ɤɨɧɫɬɪɭɤɰɢɸ ɢ ɤɨɦɩ-
RS
ɉɪɨɢɡɜɨɞɢɬɟɥɶ: Indesit Company S.p.A.
ȼɢɚɥɟ Ⱥ. Ɇɟɪɥɨɧɢ 47, 60044, Ɏɚɛɪɢɚɧɨ (Ⱥɇ), ɂɬɚɥɢɹ
ɂɦɩɨɪɬɟɪ: ɈɈɈ «ɂɧɞɟɡɢɬ Ɋɍɋ»
ɋ ɜɨɩɪɨɫɚɦɢ (ɜ Ɋɨɫɫɢɢ) ɨɛɪɚɳɚɬɶɫɹ ɩɨ ɚɞɪɟɫɭ: Ɋɨɫɫɢɹ, 127018, Ɇɨɫɤɜɚ, ɭɥ. Ⱦɜɢɧɰɟɜ, ɞɨɦ 12, ɤɨɪɩ. 1
58
Page 59

ɍɫɬɚɧɨɜɤɚ
RS
! ɉɟɪɟɞ ɭɫɬɚɧɨɜɤɨɣ ɢ ɩɨɞɤɥɸɱɟɧɢɟɦ ɜɚɲɟɝɨ ɧɨɜɨɝɨ
ɨɛɨɪɭɞɨɜɚɧɢɹ ɜɧɢɦɚɬɟɥɶɧɨ ɩɪɨɱɢɬɚɣɬɟ ɞɚɧɧɨɟ ɪɭɤɨɜɨɞɫɬɜɨ: ɜ ɧɟɦ ɫɨɞɟɪɠɚɬɫɹ ɜɚɠɧɵɟ ɫɜɟɞɟɧɢɹ ɩɨ
ɭɫɬɚɧɨɜɤɟ, ɛɟɡɨɩɚɫɧɨɣ ɷɤɫɩɥɭɚɬɚɰɢɢ ɢ ɨɛɫɥɭɠɢɜɚɧɢɸ
ɨɛɨɪɭɞɨɜɚɧɢɹ.
! ɋɨɯɪɚɧɢɬɟ ɪɭɤɨɜɨɞɫɬɜɨ ɤɚɤ ɢɫɬɨɱɧɢɤ ɫɩɪɚɜɨɱɧɨɣ
ɢɧɮɨɪɦɚɰɢɢ ɩɨ ɨɛɨɪɭɞɨɜɚɧɢɸ ɢ ɞɥɹ ɩɟɪɟɞɚɱɢ ɜɨɡɦɨɠɧɵɦ ɧɨɜɵɦ ɜɥɚɞɟɥɶɰɚɦ.
! ɍɫɬɚɧɨɜɤɚ ɨɛɨɪɭɞɨɜɚɧɢɹ ɞɨɥɠɧɚ ɩɪɨɢɡɜɨɞɢɬɶɫɹ
ɤɜɚɥɢɮɢɰɢɪɨɜɚɧɧɵɦ ɩɟɪɫɨɧɚɥɨɦ ɜ ɫɨɨɬɜɟɬɫɬɜɢɢ
ɫ ɩɪɢɜɨɞɢɦɵɦɢ
ɢɧɫɬɪɭɤɰɢɹɦɢ.
! ɉɟɪɟɞ ɪɟɝɭɥɢɪɨɜɤɨɣ ɢɥɢ ɨɛɫɥɭɠɢɜɚɧɢɟɦ ɨɛɨɪɭɞɨɜɚɧɢɹ ɟɝɨ ɫɥɟɞɭɟɬ ɨɬɤɥɸɱɢɬɶ ɨɬ ɷɥɟɤɬɪɨɫɟɬɢ.
ȼɟɧɬɢɥɹɰɢɹ ɩɨɦɟɳɟɧɢɹ
ȼ ɫɨɨɬɜɟɬɫɬɜɢɢ ɫ ɞɟɣɫɬɜɭɸɳɢɦɢ ɫɬɚɧɞɚɪɬɚɦɢ ɩɨ
ɭɫɬɚɧɨɜɤɟ ɝɚɡɨɜɨɝɨ ɨɛɨɪɭɞɨɜɚɧɢɹ ɩɥɢɬɚ ɦɨɠɟɬ ɛɵɬɶ
ɭɫɬɚɧɨɜɥɟɧɚ ɬɨɥɶɤɨ ɜ ɩɨɦɟɳɟɧɢɹɯ ɫ ɩɨɫɬɨɹɧɧɨɣ ɜɟɧɬɢɥɹɰɢɟɣ. ɉɨɦɟɳɟɧɢɟ ɞɨɥɠɧɨ ɢɦɟɬɶ ɜɟɧɬɢɥɹɰɢɨɧɧɭɸ
ɫɢɫɬɟɦɭ, ɨɛɟɫɩɟɱɢɜɚɸɳɭɸ ɭɞɚɥɟɧɢɟ ɩɪɨɞɭɤɬɨɜ ɫɝɨɪɚɧɢɹ (ɩɪɢɬɨɤ ɜɨɡɞɭɯɚ ɞɨɥɠɟɧ ɫɨɫɬɚɜɥɹɬɶ ɧɟ ɦɟɧɟɟ
3
/ɱ ɧɚ ɤɚɠɞɵɣ ɤɢɥɨɜɚɬɬ ɦɨɳ ɧɨɫɬɢ ɭɫɬɚɧɚɜɥɢɜɚ-
2 ɦ
ɟɦɨɝɨ ɨɛɨɪɭɞɨɜɚɧɢɹ). Ɍɪɭɛɚ, ɢɞɭɳɚɹ ɤ ɜɯɨɞɧɨɦɭ
ɜɟɧɬɢɥɹɰɢɨɧɧɨɦɭ ɨɬɜɟɪɫɬɢɸ, ɡɚɳɢɳɟɧɧɨɦɭ ɪɟɲɟɬɤɨɣ, ɞɨɥɠɧɚ ɢɦɟɬɶ ɜɧɭɬɪɟɧɧɟɟ ɩɨɩɟɪɟɱɧɨɟ ɫɟɱɟɧɢɟ
100 ɫɦ2 ɢ ɩɪɨɥɨɠɟɧɚ ɬɚɤ, ɱɬɨɛɵ ɢɫɤɥɸɱɢɬɶ ɡɚɫɨɪɟɧɢɟ
ɜ ɥɸɛɨɣ ɟɟ ɱɚɫɬɢ (ɪɢɫ. A).
ȿɫɥɢ ɪɚɛɨɱɚɹ ɩɨɜɟɪɯɧɨɫɬɶ ɩɥɢɬɵ ɧɟ ɨɫɧɚɳɟɧɚ ɭɫɬɪɨɣɫɬɜɨɦ ɛɟɡɨɩɚɫɧɨɫɬɢ, ɜɯɨɞɧɨɟ ɜɟɧɬɢɥɹɰɢɨɧɧɨɟ
ɨɬɜɟɪɫɬɢɟ ɞɨɥɠɧɨ ɛɵɬɶ ɭɜɟɥɢɱɟɧɨ ɧɚ 100% (ɫ ɦɢɧɢɦɚɥɶɧɵɦ ɩɨɩɟɪɟɱɧɵɦ ɫɟɱɟɧɢɟɦ ɬɪɭɛɵ 200 ɫɦ2).
Ʉɨɝɞɚ ɩɨɬɨɤ ɜɨɡɞɭɯɚ ɩɨɫɬɭɩɚɟɬ ɢɡ ɫɦɟɠɧɵɯ ɩɨɦɟɳɟɧɢɣ
(ɩɪɢ ɭɫɥɨɜɢɢ, ɱɬɨ ɨɧɢ ɧɟ ɹɜɥɹɸɬɫɹ ɤɨɦɦɭɧɚɥɶɧɵɦɢ
ɱɚɫɬɹɦɢ ɡɞɚɧɢɹ, ɩɨɠɚɪɨɨɩɚɫɧɵɦɢ ɩɨɦɟɳɟɧɢɹɦɢ ɢɥɢ
ɫɩɚɥɶɧɹɦɢ), ɢɯ ɜɯɨɞɧɵɟ ɜɟɧɬɢɥɹɰɢɨɧɧɵɟ ɨɬɜɟɪɫɬɢɹ
ɬɚɤɠɟ ɞɨɥɠɧɵ ɛɵɬɶ ɨɫɧɚɳɟɧɵ ɧɚɪɭɠɧɨɣ ɜɨɡɞɭɯɨɨɬɜɨɞɧɨɣ ɬɪɭɛɨɣ, ɤɚɤ ɨɩɢɫɚɧɨ ɜɵɲɟ (ɪɢɫ. B).
AB
ɉɨɦɟɳɟɧɢɟ,
ɬɪɟɛɭɸ ɳɟɟ
ɜɟɧɬɢɥɹɰɢɢ
ɉɪɢɦɟɪ ɨɛɟɫɩɟɱɟɧɢɹ
ɩɪɢɬɨɤɚ ɜɨɡɞɭɯɚ
ɋɦɟɠɧɨɟ
ɩɨɦɟɳɟɧɢɟ
ɍɜɟɥɢɱɟɧɢɟ ɡɚɡɨɪɚ
ɦɟɠɞɭ ɞɜɟɪɶɸ ɢ ɩɨɥɨɦ
ɞɥɹ ɫɜɨɛɨɞɧɨɝɨ ɩɪɨɯɨɞɚ
ɩɪɢɬɨɱɧɨɝɨ ɜɨɡɞɭɯɚ
! ɉɨɫɥɟ ɩɪɨɞɨɥɠɢɬɟɥɶɧɨɝɨ ɢɫɩɨɥɶɡɨɜɚɧɢɹ ɨɛɨɪɭɞɨɜɚɧɢɹ ɠɟɥɚɬɟɥɶɧɨ ɨɬɤɪɵɬɶ ɨɤɧɨ ɢɥɢ ɭɜɟɥɢɱɢɬɶ ɫɤɨɪɨɫɬɶ
ɪɚɛɨɬɚɸɳɟɝɨ ɜɟɧɬɢɥɹɬɨɪɚ.
Ɉɬɜɨɞ ɨɬɪɚɛɨɬɚɧɧɨɝɨ ɜɨɡɞɭɯɚ
ɗɮɮɟɤɬɢɜɧɨɟ ɭɞɚɥɟɧɢɟ ɩɪɨɞɭɤɬɨɜ ɫɝɨɪɚɧɢɹ ɛɭɞɟɬ
ɨɛɟɫɩɟɱɟɧɨ ɩɪɢ ɢɫɩɨɥɶɡɨɜɚɧɢɢ ɜɵɬɹɠɤɢ, ɩɨɞɤɥɸɱɟɧ-
ɤ ɧɚɪɭɠɧɨɦɭ ɞɵɦɨɨɬɜɨɞɭ, ɢɥɢ ɷɥɟɤɬɪɢɱɟɫɤɨɝɨ
ɧɨɣ
ɜɟɧɬɢɥɹɬɨɪɚ, ɚɜɬɨɦɚɬɢɱɟɫɤɢ ɜɤɥɸɱɚɸɳɟɝɨɫɹ ɤɚɠɞɵɣ
ɪɚɡ, ɤɨɝɞɚ ɨɛɨɪɭɞɨɜɚɧɢɟ ɪɚɛɨɬɚɟɬ (cɦ. ɪɢɫ.).
ɉɪɹɦɚɹ ɜɵɬɹɠɤɚ ɧɚɪɭɠɭ
!
ɋɠɢɠɟɧɧɵɣ ɝɚɡ ɬɹɠɟɥɟɟ ɜɨɡɞɭɯɚ, ɢ ɩɨɷɬɨɦɭ ɫɤɚɩɥɢ-
ȼɵɬɹɠɤɚ ɩɪɢ ɧɚɥɢɱɢɢ
ɞɵɦɨɯɨɞɚ (ɬɨɥɶɤɨ
ɞɥɹ ɤɭɯɨɧɧɨɝɨ ɨɛɨɪɭɞɨɜɚɧɢɹ)
ɜɚɟɬɫɹ ɜɧɢɡɭ. ɉɨɦɟɳɟɧɢɹ, ɜ ɤɨɬɨɪɵɯ ɭɫɬɚɧɚɜɥɢɜɚɸɬɫɹ
ɛɚɥɥɨɧɵ ɫɨ ɫɠɢɠɟɧɧɵɦ ɝɚɡɨɦ, ɞɨɥɠɧɵ ɛɵɬɶ ɨɫɧɚɳɟɧɵ ɧɚɪɭɠɧɨɣ ɜɟɧɬɢɥɹɰɢɟɣ, ɱɬɨɛɵ ɱɟɪɟɡ ɧɟɟ ɦɨɝ
ɭɯɨɞɢɬɶ ɝɚɡ ɜ ɫɥɭɱɚɟ ɭɬɟɱɤɢ. ɇɟɥɶɡɹ ɭɫɬɚɧɚɜɥɢɜɚɬɶ ɢ
ɯɪɚɧɢɬɶ ɛɚɥɥɨɧɵ ɫ ɝɚɡɨɦ ɜ ɩɨɦɟɳɟɧɢɹɯ, ɪɚɫɩɨɥɨɠɟɧɧɵɯ ɧɢɠɟ ɭɪɨɜɧɹ ɩɨɥɚ (ɜ ɩɨɞɜɚɥɚɯ ɢ ɩɨɥɭɩɨɞɜɚɥɚɯ).
Ɋɟɤɨɦɟɧɞɭɟɦ ɞɟɪɠɚɬɶ ɜ ɤɭɯɧɟ ɬɨɥɶɤɨ ɢɫɩɨɥɶɡɭɟɦɵɣ
ɛɚɥɥɨɧ ɢ ɭɫɬɚɧɚɜɥɢɜɚɬɶ ɟɝɨ ɩɨɞɚɥɶɲɟ ɨɬ ɢɫɬɨɱɧɢɤɨɜ
ɬɟɩɥɚ (ɞɭɯɨɜɨɤ, ɤɚɦɢɧɨɜ, ɩɟɱɟɣ ɢ ɬ.ɩ.), ɫɩɨɫɨɛɧɵɯ
ɧɚɝɪɟɬɶ ɛɚɥɥɨɧ ɞɨ ɬɟɦɩɟɪɚɬɭɪɵ ɜɵɲɟ 50°ɋ.
Ɋɚɡɦɟɳɟɧɢɟ ɢ ɜɵɪɚɜɧɢɜɚɧɢɟ
!
ɉɥɢɬɚ ɦɨɠɟɬ ɛɵɬɶ ɭɫɬɚɧɨɜɥɟɧɚ ɪɹɞɨɦ ɫ ɥɸɛɨɣ
ɤɭɯɨɧɧɨɣ ɦɟɛɟɥɶɸ, ɧɟ ɩɪɟɜɵɲɚɸɳɟɣ ɨɛɨɪɭɞɨɜɚɧɢɟ
ɩɨ ɜɵɫɨɬɟ.
!
ɋɬɟɧɚ, ɫɨɩɪɢɤɚɫɚɸɳɚɹɫɹ ɫ ɡɚɞɧɟɣ ɱɚɫɬɶɸ ɨɛɨɪɭɞɨ-
ɜɚɧɢɹ, ɞɨɥɠɧɚ ɛɵɬɶ ɫɞɟɥɚɧɚ ɢɡ ɧɟɜɨɫɩɥɚɦɟɧɹɸɳɢɯɫɹ, ɬɟɪɦɨɫɬɨɣɤɢɯ ɦɚɬɟɪɢɚɥɨɜ (ɜɵɞɟɪɠɢɜɚɬɶ ɧɚɝɪɟɜ
ɞɨ 90 °C).
Ⱦɥɹ ɩɪɚɜɢɥɶɧɨɣ ɭɫɬɚɧɨɜɤɢ:
Ɋɚɡɦɟɫɬɢɬɟ ɨɛɨɪɭɞɨɜɚɧɢɟ ɜ ɤɭɯɧɟ, ɫɬɨɥɨɜɨɣ, ɧɨ ɧɟ
x
ɜ ɜɚɧɧɨɣ ɤɨɦɧɚɬɟ.
ȿɫɥɢ ɪɚɛɨɱɚɹ ɩɨɜɟɪɯɧɨɫɬɶ ɩɥɢɬɵ ɜɵɲɟ ɪɹɞɨɦ
x
ɫɬɨɹɳɟɣ ɤɭɯɨɧɧɨɣ ɦɟɛɟɥɢ, ɩɨɫɥɟɞɧɹɹ ɞɨɥɠɧɚ ɧɚɯɨɞɢɬɶɫɹ ɧɚ ɪɚɫɫɬɨɹɧɢɢ
ɧɟ ɦɟɧɟɟ 200 ɦɦ ɨɬ
ɨɛɨɪɭɞɨɜɚɧɢɹ.
Ɇɢɧɢɦɚɥɶɧɨɟ ɪɚɫɫɬɨɹ-
x
ɧɢɟ ɦɟɠɞɭ ɪɚɛɨɱɟɣ
ɩɨɜɟɪɯ ɧɨɫɬɶɸ ɩɥɢɬɵ
ɢ ɧɚɜɟɫɧɵɦɢ ɲɤɚɮɚɦɢ (ɩɨɥɤɚɦɢ) ɞɨɥɠɧɨ
ɫɨɫɬɚɜɥɹɬɶ 420 ɦɦ.
ɗɬɨ ɪɚɫɫɬɨɹɧɢɟ ɫɥɟ-
59
Page 60

ɞɭɟɬ ɭɜɟɥɢɱɢɬɶ ɞɨ 700 ɦɦ, ɟɫɥɢ ɧɚɜɟɫɧɵɟ ɲɤɚɮɵ
ɫɞɟɥɚɧɵ ɢɡ ɝɨɪɸɱɢɯ ɦɚ ɬɟ ɪɢɚɥɨɜ (ɫɦ. ɪɢɫ.).
x
ɒɬɨɪɵ / ɠɚɥɸɡɢ ɧɟ ɞɨɥɠɧɵ ɧɚɯɨɞɢɬɶɫɹ ɩɨɡɚɞɢ
ɩɥɢɬɵ ɢɥɢ ɧɚ ɪɚɫɫɬɨɹɧɢɢ ɦɟɧɟɟ 200 ɦɦ ɨɬ ɟɟ ɛɨɤɨɜɵɯ ɫɬɨɪɨɧ.
x
ȼɵɬɹɠɤɢ ɭɫɬɚɧɚɜɥɢɜɚɸɬɫɹ ɫɨɝɥɚɫɧɨ ɢɯ ɢɧɫɬɪɭɤɰɢɹɦ ɩɨ ɭɫɬɚɧɨɜɤɟ.
ȼɵɪɚɜɧɢɜɚɧɢɟ
ɉɥɢɬɚ ɫɧɚɛɠɟɧɚ ɪɟɝɭɥɢɪɭɟɦɵɦɢ
ɧɨɠɤɚɦɢ, ɤɨɬɨɪɵɟ ɫɥɭɠɚɬ ɞɥɹ
ɟɟ ɜɵɪɚɜɧɢɜɚɧɢɹ. ɉɪɢ ɧɟɨɛɯɨɞɢɦɨɫɬɢ, ɧɨɠɤɢ ɜɤɪɭɱɢ ɜɚɸɬɫɹ
ɜ ɨɬɜɟɪɫɬɢɹ ɩɨ ɭɝɥɚɦ ɨɫɧɨɜɚɧɢɹ
ɩɥɢɬɵ (ɫɦ. ɪɢɫ.).
ɉɥɢɬɚ ɤɨɦɩɥɟɤɬɭɟɬɫɹ ɧɚɞɫɬɚɜɧɵɦɢ ɨɩɨɪɚɦɢ*, ɤɨɬɨɪɵɟ ɭɫɬɚɧɚɜɥɢɜɚɸɬɫɹ ɜ ɨɬɜɟɪɫɬɢɹ ɩɨɞ
ɨɫɧɨɜɚɧɢɟɦ ɩɥɢɬɵ.
ɉɨɞɤɥɸɱɟɧɢɟ ɤ ɷɥɟɤɬɪɨɫɟɬɢ
Ɉɫɧɚɫɬɢɬɟ ɩɢɬɚɸɳɢɣ ɤɚɛɟɥɶ ɫɬɚɧɞɚɪɬɧɨɣ ɜɢɥɤɨɣ,
ɫɨɨɬɜɟɬɫɬɜɭɸɳɟɣ ɧɚɝɪɭɡɤɟ, ɭɤɚɡɚɧɧɨɣ ɜ ɬɚɛɥɢɱɤɟ
ɬɟɯɧɢɱɟɫɤɢɯ ɞɚɧɧɵɯ ɨɛɨɪɭɞɨɜɚɧɢɹ.
Ɉɛɨɪɭɞɨɜɚɧɢɟ ɦɨɠɟɬ ɧɚɩɪɹɦɭɸ ɩɨɞɫɨɟɞɢɧɹɬɶɫɹ
ɤ ɫɟɬɢ ɫ ɢɫɩɨɥɶɡɨɜɚɧɢɟɦ ɦɧɨɝɨɥɢɧɟɣɧɨɝɨ ɚɜɬɨɦɚɬɢɱɟɫɤɨɝɨ ɜɵɤɥɸɱɚɬɟɥɹ (ɫɨɨɬɜɟɬɫɬɜɭɸɳɟɝɨ ɬɟɯɧɢɱɟɫɤɢɦ
ɧɨɪɦɚɦ ɢ ɧɚɝɪɭɡɤɟ ɨɛɨɪɭɞɨɜɚɧɢɹ), ɪɚɫɫɬɨɹ ɧɢɟ ɦɟɠɞɭ
ɪɚɡɜɟɞɟɧɧɵɦɢ ɤɨɧɬɚɤɬɚɦɢ ɤɨɬɨɪɨɝɨ ɧɟ ɦɟɧɟɟ 3 ɦɦ,
ɥɢɧɢɹ ɡɚɡɟɦɥɟɧɢɹ ɧɟ ɞɨɥɠɧɚ ɩɪɟɪɵɜɚɬɶɫɹ ɜɵɤɥɸɱɚɬɟɥɟɦ. ɉɢɬɚɸɳɢɣ ɤɚɛɟɥɶ ɫɥɟɞɭɟɬ ɪɚɫɩɨɥɨɠɢɬɶ ɬɚɤ,
ɱɬɨɛɵ ɩɨ ɜɫɟɣ ɞɥɢɧɟ ɨɧ ɧɢɤɨɝɞɚ ɧɟ ɧɚɝɪɟɜɚɥɫɹ ɞɨ
ɬɟɦɩɟɪɚɬɭɪɵ, ɩɪɟɜɵɲɚɸɳɟɣ ɧɚ 50 °ɋ ɬɟɦɩɟɪɚɬɭɪɭ
ɜ ɩɨɦɟɳɟɧɢɢ.
ɉɟɪɟɞ ɩɨɞɫɨɟɞɢɧɟɧɢɟɦ ɩɪɨɜɟɪɶɬɟ, ɱɬɨ:
x Ɉɛɨɪɭɞɨɜɚɧɢɟ ɡɚɡɟɦɥɟɧɨ ɢ ɜɢɥɤɚ ɫɨɨɬɜɟɬɫɬɜɭɟɬ
ɫɬɚɧɞɚɪɬɚɦ.
x Ɋɨɡɟɬɤɚ ɦɨɠɟɬ ɜɵɞɟɪɠɚɬɶ ɦɚɤɫɢɦɚɥɶɧɭɸ ɧɚɝɪɭɡɤɭ
ɨɬ ɭɫɬɚɧɚɜɥɢɜɚɟɦɨɝɨ ɨɛɨɪɭɞɨɜɚɧɢɹ (ɫɦ. ɬɚɛɥɢɱɤɭ
ɬɟɯɧɢɱɟɫɤɢɯ ɞɚɧɧɵɯ ɨɛɨɪɭɞɨɜɚɧɢɹ).
x ɗɥɟɤɬɪɢɱɟɫɤɨɟ ɧɚɩɪɹɠɟɧɢɟ ɫɨɨɬɜɟɬɫɬɜɭɟɬ ɞɢɚɩɚ-
ɡɨɧɭ ɡɧɚɱɟɧɢɣ, ɭɤɚɡɚɧɧɵɯ ɜ
ɞɚɧɧɵɯ ɨɛɨɪɭɞɨɜɚɧɢɹ.
x Ɋɨɡɟɬɤɚ ɩɨɞɯɨɞɢɬ ɤ ɜɢɥɤɟ ɨɛɨɪɭɞɨɜɚɧɢɹ, ɜ ɩɪɨɬɢɜ-
ɧɨɦ ɫɥɭɱɚɟ — ɨɛɪɚɬɢɬɟɫɶ ɤ ɤɜɚɥɢɮɢɰɢɪɨɜɚɧɧɨɦɭ
ɫɩɟɰɢɚɥɢɫɬɭ ɞɥɹ ɡɚɦɟɧɵ ɪɨɡɟɬɤɢ. ɇɟ ɢɫɩɨɥɶɡɭɣɬɟ
ɭɞɥɢɧɢɬɟɥɢ ɢ ɦɧɨɝɨɝɧɟɡɞɨɜɵɟ ɪɨɡɟɬɤɢ.
ɬɚɛɥɢɱɤɟ ɬɟɯɧɢɱɟɫɤɢɯ
! ɉɨɫɥɟ ɭɫɬɚɧɨɜɤɢ ɨɛɨɪɭɞɨɜɚɧɢɹ ɞɨɥɠɟɧ ɛɵɬɶ ɨɛɟɫɩɟɱɟɧ ɫɜɨɛɨɞɧɵɣ ɞɨɫɬɭɩ ɤ ɩɢɬɚɸɳɟɦɭ ɤɚɛɟɥɸ ɢ ɪɨɡɟɬɤɟ.
! Ʉɚɛɟɥɶ ɧɟ ɞɨɥɠɟɧ ɛɵɬɶ ɩɟɪɟɤɪɭɱɟɧ ɢɥɢ ɩɟɪɟɠɚɬ.
! Ʉɚɛɟɥɶ ɫɥɟɞɭɟɬ ɪɟɝɭɥɹɪɧɨ ɩɪɨɜɟɪɹɬɶ, ɟɝɨ ɡɚɦɟɧɚ
ɞɨɥɠɧɚ ɩɪɨɢɡɜɨɞɢɬɶɫɹ ɬɨɥɶɤɨ ɫɩɟɰɢɚɥɢɫɬɚɦɢ ɫɟɪɜɢɫɧɨɝɨ ɰɟɧɬɪɚ.
ɉɪɨɢɡɜɨɞɢɬɟɥɶ ɧɟ ɧɟɫɟɬ ɨɬɜɟɬɫɬɜɟɧɧɨɫɬɢ
ɜ ɫɥɭɱɚɟ ɧɟɫɨɛɥɸɞɟɧɢɹ ɭɤɚɡɚɧɧɵɯ ɦɟɪ ɛɟɡɨɩɚɫɧɨɫɬɢ.
ɉɨɞɤɥɸɱɟɧɢɟ ɤ ɝɚɡɭ
ɉɨɞɤɥɸɱɟɧɢɟ ɞɚɧɧɨɝɨ ɨɛɨɪɭɞɨɜɚɧɢɹ ɤ ɝɚɡɨɜɨɣ ɫɟɬɢ
ɢɥɢ ɛɚɥɥɨɧɭ ɫ ɝɚɡɨɦ ɦɨɠɟɬ ɛɵɬɶ ɜɵɩɨɥɧɟɧɨ ɩɪɢ ɩɨɦɨɳɢ ɝɢɛɤɨɝɨ ɪɟɡɢɧɨɜɨɝɨ ɢɥɢ ɫɬɚɥɶɧɨɝɨ ɲɥɚɧɝɚ, ɫɨɝɥɚɫɧɨ
ɞɟɣɫɬɜɭɸɳɢɦ ɧɨɪɦɚɦ ɩɨɞɤɥɸɱɟɧɢɹ ɢ ɩɨɫɥɟ ɩɪɨɜɟɪɤɢ
ɫɨɨɬɜɟɬɫɬɜɢɹ ɬɢɩɚ ɩɨɞɤɥɸɱɚɟɦɨɝɨ ɝɚɡɚ ɬɨɦɭ, ɧɚ ɤɨɬɨɪɵɣ
ɧɚɫɬɪɨɟɧɨ ɨɛɨɪɭɞɨɜɚɧɢɟ (ɫɦ. ɦɚɪɤɢɪɨɜɤɭ ɧɚ ɤɨɪɩɭɫɟ
ɨɛɨɪɭɞɨɜɚɧɢɹ): ɜ ɢɧɨɦ ɫɥɭɱɚɟ ɫɥɟɞɭɣɬɟ ɢɧɫɬɪɭɤɰɢɹɦ
§ «ɇɚɫɬɪɨɣɤɚ ɧɚ ɪɚɡɥɢɱɧɵɟ
ɩɨɞɫɨɟɞɢɧɹɟɬɫɹ ɤ ɛɚɥɥɨɧɭ ɫɨ ɫɠɢɠɟɧɧɵɦ ɝɚɡɨɦ, ɧɚ
ɛɚɥɥɨɧ ɫ ɝɚɡɨɦ ɧɟɨɛɯɨɞɢɦɨ ɭɫɬɚɧɨɜɢɬɶ ɪɟɝɭɥɹɬɨɪ
ɞɚɜɥɟɧɢɹ (ɪɟɞɭɤɬɨɪ), ɨɬɜɟɱɚɸɳɢɣ ɞɟɣɫɬɜɭɸɳɢɦ ɫɬɚɧɞɚɪɬɨɦ ɩɨɞɤɥɸɱɟɧɢɹ ɝɚɡɨɜɨɝɨ ɨɛɨɪɭɞɨɜɚɧɢɹ.
ɑɬɨɛɵ ɨɛɥɟɝɱɢɬɶ ɩɨɞɤɥɸɱɟɧɢɟ, ɩɨɞɜɨɞ ɝɚɡɚ ɦɨɠɟɬ
ɛɵɬɶ ɨɫɭɳɟɫɬɜɥɟɧ ɫ ɨɛɟɢɯ ɫɬɨɪɨɧ ɨɛɨɪɭɞɨɜɚɧɢɹ*:
ɩɨɦɟɧɹɣɬɟ ɩɨɥɨɠɟɧɢɟ ɞɟɪɠɚɬɟɥɹ ɲɥɚɧɝɚ ɢ ɡɚ ɝɥɭɲɤɢ
ɢ ɡɚɦɟɧɢɬɟ ɭɩɥɨɬɧɢɬɟɥɶɧɭɸ ɩɪɨɤɥɚɞɤɭ (ɩɨɫɬɚɜɥɹɟɬɫɹ
ɫ ɨɛɨɪɭɞɨɜɚɧɢɟɦ).
! ɍɛɟɞɢɬɟɫɶ, ɱɬɨ ɞɚɜɥɟɧɢɟ ɝɚɡɚ ɫɨɨɬɜɟɬɫɬɜɭɟɬ ɡɧɚɱɟ-
ɧɢɹɦ, ɭɤɚɡɚɧɧɵɦ ɜ ɬɚɛɥɢɰɟ «ɏɚɪɚɤɬɟɪɢɫɬɢɤɢ ɝɨɪɟɥɨɤ
ɢ ɠɢɤɥɟɪɨɜ». ɗɬɨ ɨɛɟɫɩɟɱɢɬ ɛɟɡɨɩɚɫɧɭɸ ɪɚɛɨɬɭ ɢ ɞɨɥɝɢɣ ɫɪɨɤ ɫɥɭɠɛɵ ɨɛɨɪɭɞɨɜɚɧɢɹ ɩɪɢ ɷɮɮɟɤɬɢɜɧɨɦ
ɷɧɟɪɝɨɩɨɬɪɟɛɥɟɧɢɢ.
ɉɨɞɤɥɸɱɟɧɢɟ ɝɢɛɤɢɦ ɪɟɡɢɧɨɜɵɦ ɲɥɚɧɝɨɦ
ɉɨɞɫɨɟɞɢɧɢɬɟ ɝɚɡɨɜɵɣ ɲɥɚɧɝ, ɯɚɪɚɤɬɟɪɢɫɬɢɤɢ ɤɨɬɨɪɨɝɨ ɨɬɜɟɱɚɸɬ ɞɟɣɫɬɜɭɸɳɢɦ ɫɬɚɧɞɚɪɬɚɦ. ȼɧɭɬɪɟɧɧɢɣ
ɞɢɚɦɟɬɪ ɲɥɚɧɝɚ ɞɨɥɠɟɧ ɫɨɫɬɚɜɥɹɬɶ: 8 ɦɦ — ɞɥɹ
ɫɠɢɠɟɧɧɨɝɨ ɝɚɡɚ
ɉɨɫɥɟ ɩɨɞɤɥɸɱɟɧɢɹ ɭɞɨɫɬɨɜɟɪɶɬɟɫɶ, ɱɬɨ ɲɥɚɧɝ:
ɩɨ ɜɫɟɣ ɞɥɢɧɟ ɧɟ ɤɚɫɚɟɬɫɹ ɱɚɫɬɟɣ ɩɥɢɬɵ, ɤɨɬɨɪɵɟ
x
ɦɨɝɭɬ ɧɚɝɪɟɜɚɬɶɫɹ ɞɨ ɬɟɦɩɟɪɚɬɭɪɵ ɜɵɲɟ 50 °ɋ;
ɧɟ ɧɚɬɹɧɭɬ, ɧɟ ɩɟɪɟɤɪɭɱɟɧ, ɧɟ ɨɛɪɚɡɭɟɬ ɩɟɬɟɥɶ
x
ɢ ɢɡɝɢɛɨɜ, ɧɟ ɩɟɪɟɠɚɬ;
ɧɟ ɤɚɫɚɟɬɫɹ ɩɨɞɜɢɠɧɵɯ ɨɛɴɟɤɬɨɜ ɢ ɩɪɟɞɦɟɬɨɜ
x
ɫ ɨɫɬɪɵɦɢ ɭɝɥɚɦɢ;
ɩɨ ɜɫɟɣ ɞɥɢɧɟ ɞɨɫɬɭɩɟɧ ɞɥɹ ɨɫɦɨɬɪɚ ɢ ɤɨɧɬɪɨɥɹ
x
ɟɝɨ ɫɨɫɬɨɹɧɢɹ;
ɞɥɢɧɨɣ ɦɟɧɟɟ 1500 ɦɦ;
x
ɩɪɨɱɧɨ ɡɚɮɢɤɫɢɪɨɜɚɧ ɧɚ ɦɟɫɬɟ ɫ ɨɛɨɢɯ ɤɨɧɰɨɜ ɡɚ-
x
ɠɢɦɚɦɢ, ɫɨɨɬɜɟɬɫɬɜɭɸɳɢɦɢ ɧɨɪɦɚɦ ɩɨɞɤɥɸɱɟɧɢɹ
ɝɚɡɨɜɨɝɨ ɨɛɨɪɭɞɨɜɚɧɢɹ.
; 13 ɦɦ— ɞɥɹ ɦɟɬɚɧɚ
ɬɢɩɵ ɝɚɡɚ». ȿɫɥɢ ɩɥɢɬɚ
RS
* Ɍɨɥɶɤɨ ɞɥɹ ɧɟɤɨɬɨɪɵɯ ɦɨɞɢɮɢɤɚɰɢɣ ɦɨɞɟɥɟɣ.
60
Page 61

RS
! ȿɫɥɢ ɯɨɬɹ ɛɵ ɨɞɧɨ ɢɡ ɩɪɢɜɟɞɟɧɧɵɯ ɜɵɲɟ ɬɪɟɛɨɜɚɧɢɣ
ɧɟ ɭɞɚɟɬɫɹ ɜɵɩɨɥɧɢɬɶ, ɢɥɢ, ɟɫɥɢ ɩɥɢɬɚ ɞɨɥɠɧɚ ɭɫɬɚɧɚɜɥɢɜɚɬɶɫɹ ɩɨ ɩɪɚɜɢɥɚɦ, ɨɬɧɨɫɹɳɢɦɫɹ ɤ ɛɵɬɨɜɵɦ
ɩɪɢɛɨɪɚɦ ɤɥɚɫɫɚ 2 ɩɨɞɤɥɚɫɫɚ 1 (ɭɫɬɚɧɨɜɤɚ ɦɟɠɞɭ ɞɜɭɦɹ ɲɤɚɮɚɦɢ), ɬɨ ɫɨɝɥɚɫɧɨ ɞɟɣɫɬɜɭɸɳɢɦ ɫɬɚɧɞɚɪɬɚɦ
ɞɥɹ ɩɨɞɤɥɸɱɟɧɢɹ ɝɚɡɚ ɞɨɥɠɧɵ ɢɫɩɨɥɶɡɨɜɚɬɶɫɹ ɬɨɥɶɤɨ
ɝɢɛɤɢɟ ɦɟɬɚɥɥɢɡɢɪɨɜɚɧɧɵɟ ɬɪɭɛɵ.
ɉɨɞɫɨɟɞɢɧɟɧɢɟ ɝɢɛɤɨɣ ɛɟɫɲɨɜɧɨɣ
ɫɬɚɥɶɧɨɣ ɬɪɭɛɵ ɤ ɪɟɡɶɛɨɜɨɦɭ
Ɍɪɭɛɚ ɢ ɩɪɨɤɥɚɞɤɢ ɞɨɥɠɧɵ ɨɬɜɟɱɚɬɶ ɞɟɣɫɬɜɭɸɳɢɦ
ɫɬɚɧɞɚɪɬɚɦ.
ɍɞɚɥɢɬɟ ɞɟɪɠɚɬɟɥɶ ɲɥɚɧɝɚ ɫ ɨɛɨɪɭɞɨɜɚɧɢɹ. Ƚɢɛɤɚɹ
ɫɬɚɥɶɧɚɹ ɬɪɭɛɚ ɩɪɢɫɨɟɞɢɧɹɟɬɫɹ ɤ ɬɨɦɭ ɠɟ ɜɵɜɨɞɭ
ɫ ɧɚɪɭɠɧɨɣ ɪɟɡɶɛɨɣ 1/2 ɞɸɣɦɚ.
! Ɇɚɤɫɢɦɚɥɶɧɚɹ ɞɥɢɧɚ ɬɪɭɛɵ ɧɟ ɞɨɥɠɧɚ ɛɵɬɶ ɛɨɥɟɟ
2 ɦ. ɉɨɫɥɟ ɩɨɞɤɥɸɱɟɧɢɹ ɩɪɨɜɟɪɶɬɟ, ɱɬɨ ɬɪɭɛɚ ɧɟ ɩɪɢ-
ɠɚɬɚ ɢ ɧɟ ɫɨɩɪɢɤɚɫɚɟɬɫɹ ɫ ɩɨɞɜɢɠɧɵɦɢ ɞɟɬɚɥɹɦɢ.
Ʉɨɧɬɪɨɥɶ ɩɥɨɬɧɨɫɬɢ
ȼɵɩɨɥɧɢɜ ɩɨɞɤɥɸɱɟɧɢɟ ɤ ɝɚɡɭ, ɩɪɨɜɟɪɶɬɟ ɧɚɥɢɱɢɟ
ɟɝɨ ɭɬɟɱɟɤ, ɢɫɩɨɥɶɡɭɹ ɦɵɥɶɧɵɣ ɪɚɫɬɜɨɪ. ɇɢɤɨɝɞɚ ɧɟ
ɢɫɩɨɥɶɡɭɣɬɟ ɞɥɹ ɩɪɨɜɟɪɤɢ ɩɥɚɦɹ.
ɩɨɞɫɨɟɞɢɧɟɧɢɹ
ɫɨɟɞɢɧɟɧɢɸ
ɇɚɫɬɪɨɣɤɚ ɧɚ ɪɚɡɥɢɱɧɵɟ ɬɢɩɵ ɝɚɡɚ
ȼɨɡɦɨɠɧɨ ɧɚɫɬɪɨɢɬɶ ɨɛɨɪɭɞɨɜɚɧɢɟ ɧɚ ɞɪɭɝɨɣ ɬɢɩ ɝɚɡɚ,
ɨɬɥɢɱɧɵɣ ɨɬ ɡɚɜɨɞ ɫɤɨɣ ɧɚɫɬɪɨɣɤɢ (ɫɦ. ɦɚɪɤɢɪɨɜɤɭ ɧɚ
ɤɨɪɩɭɫɟ ɨɛɨɪɭɞɨɜɚɧɢɹ).
ɇɚɫɬɪɨɣɤɚ ɪɚɛɨɱɟɣ ɩɨɜɟɪɯɧɨɫɬɢ
Ɂɚɦɟɧɚ ɠɢɤɥɟɪɨɜ ɤɨɧɮɨɪɨɤ ɪɚɛɨɱɟɣ ɩɨɜɟɪɯɧɨɫɬɢ:
1) ɫɧɢɦɢɬɟ ɩɨɞɞɟɪɠɢɜɚɸɳɢɟ
ɪɟɲɟɬɤɢ ɞɥɹ ɩɨɫɭɞɵ ɢ ɜɵɧɶɬɟ ɤɨɧɮɨɪɤɢ ɢɡ ɝɧɟɡɞ;
2) ɜɵɜɟɪɧɢɬɟ ɠɢɤɥɟɪɵ 7 ɦɦ
ɬɨɪɰɟɜɵɦ ɤɥɸɱɨɦ (ɫɦ. ɪɢɫ.)
ɢ ɡɚɦɟɧɢɬɟ ɢɯ ɩɨɞɯɨɞɹɳɢɦɢ
ɞɥɹ ɧɨɜɨɝɨ ɬɢɩɚ ɝɚɡɚ (ɫɦ.
ɬɚɛɥ. «ɏɚɪɚɤɬɟɪɢɫɬɢɤɢ
ɝɨɪɟɥɨɤ ɢ ɠɢɤɥɟɪɨɜ»);
3) ɫɨɛɟɪɢɬɟ ɜɫɟ ɤɨɦɩɨɧɟɧɬɵ, ɜɵɩɨɥɧɹɹ ɞɟɣɫɬɜɢɹ
ɜ ɨɛɪɚɬɧɨɦ ɩɨɪɹɞɤɟ.
! Ⱦɥɹ ɤɨɧɮɨɪɨɤ ɪɚɛɨɱɟɣ ɩɨɜɟɪɯɧɨɫɬɢ ɧɟ ɬɪɟɛɭɟɬɫɹ
ɪɟɝɭɥɢɪɨɜɤɚ ɩɨɫɬɭɩɥɟɧɢɹ ɜɨɡɞɭɯɚ.
ɇɚɫɬɪɨɣɤɚ ɝɚɡɨɜɨɣ ɞɭɯɨɜɤɢ ɧɚ ɞɪɭɝɨɣ ɬɢɩ ɝɚɡɚ
Ɂɚɦɟɧɚ ɠɢɤɥɟɪɚ ɝɨɪɟɥɤɢ ɞɭɯɨɜɤɢ:
1) ɜɵɧɶɬɟ ɨɬɞɟɥɟɧɢɟ (ɹɳɢɤ) ɞɥɹ
ɯɪɚɧɟɧɢɹ ɩɨɫɭɞɵ ɢ ɩɨɞɨɝɪɟɜɚ
ɛɥɸɞ;
2) ɜɵ ɞɜɢɧɶɬɟ ɢ ɭɞɚɥɢɬɟ ɡɚɳɢɬɧɭɸ ɩɚɧɟɥɶ «Ⱥ» (ɫɦ. ɪɢɫ.);
3) ɨɬɜɟɪɧɢɬɟ ɜɢɧɬ «V» ɢ ɫɧɢɦɢɬɟ ɝɨɪɟɥɤɭ (ɫɦ. ɪɢɫ.) — ɞɥɹ
ɨɛɥɟɝɱɟɧɢɹ
ɩɪɟɞɜɚɪɢɬɟɥɶɧɨ ɫɧɢɦɢɬɟ ɞɜɟɪɰɭ ɞɭɯɨɜɤɢ;
4) ɫɩɟɰɢɚɥɶɧɵɦ ɬɨɪɰɟɜɵɦ
ɤɥɸɱɨɦ ɞɥɹ ɠɢɤɥɟɪɨɜ ɢɥɢ
7 ɦɦ ɬɨɪɰɟɜɵɦ ɤɥɸɱɨɦ (ɫɦ.
ɪɢɫ.) ɨɬɜɢɧɬɢɬɟ ɠɢɤɥɟɪ ɝɨɪɟɥɤɢ ɞɭɯɨɜɤɢ ɢ ɡɚɦɟɧɢɬɟ ɟɝɨ ɩɨɞɯɨɞɹɳɢɦ ɞɥɹ ɧɨɜɨɝɨ ɬɢɩɚ ɝɚɡɚ
(ɫɦ. ɬɚɛɥ. ɏɚɪɚɤɬɟɪɢɫɬɢɤɢ
ɝɨɪɟɥɨɤ ɢ ɠɢɤɥɟɪɨɜ).
Ɋɟɝɭɥɢɪɨɜɤɚ ɦɢɧɢɦɭɦɚ ɞɥɹ ɝɨɪɟɥɤɢ ɞɭɯɨɜɤɢ
1. Ɂɚɠɝɢɬɟ ɝɨɪɟɥɤɭ (ɫɦ. ȼɤɥɸɱɟɧɢɟ ɢ
ɧɢɟ).
2. ɉɨɜɟɪɧɢɬɟ ɪɭɤɨɹɬɤɭ ɢ ɭɫɬɚɧɨɜɢɬɟ ɟɟ ɩɪɢɛɥɢɡɢɬɟɥɶɧɨ ɧɚ 10 ɦɢɧɭɬ ɜ ɦɚɤɫɢɦɚɥɶɧɨɟ (MAX), ɚ ɡɚɬɟɦ —
ɜ ɦɢɧɢɦɚɥɶɧɨɟ (MIN) ɩɨɥɨɠɟɧɢɟ.
3. ɋɧɢɦɢɬɟ ɪɭɤɨɹɬɤɭ.
4. ȼɢɧɬɨɦ, ɪɚɫɩɨɥɨɠɟɧɧɵɦ ɫ ɜɧɟɲɧɟɣ ɫɬɨɪɨɧɵ ɫɬɟɪɠ -
ɧɹ ɪɟɝɭɥɹɬɨɪɚ, ɨɬ ɪɟɝɭɥɢɪɭɣɬɟ ɩɥɚɦɹ ɞɨ ɦɚɥɨɝɨ, ɧɨ
ɭɫɬɨɣɱɢɜɨɝɨ ɩɨɥɨɠɟɧɢɹ.
ɷɬɨɣ ɩɪɨɰɟɞɭɪɵ
ɢɫɩɨɥɶɡɨɜɚ-
Ɋɟɝɭɥɢɪɨɜɤɚ ɦɢɧɢɦɚɥɶɧɨɝɨ ɩɥɚɦɟɧɢ
ɤɨɧɮɨɪɨɤ ɧɚ ɪɚɛɨɱɟɣ ɩɨɜɟɪɯɧɨɫɬɢ
1. ɉɨɜɟɪɧɢɬɟ ɪɭɤɨɹɬɤɭ ɤ ɦɢɧɢɦɚɥɶɧɨɦɭ ɩɨɥɨɠɟɧɢɸ
ɩɥɚɦɟɧɢ.
2. ɋɧɢɦɢɬɟ ɪɭɤɨɹɬɤɭ ɢ ɜɪɚɳɚɣɬɟ ɟɟ ɪɟɝɭɥɢɪɨɜɨɱɧɵɣ
ɜɢɧɬ (ɪɚɫɩɨɥɨɠɟɧ ɫɛɨɤɭ ɢɥɢ ɜɧɭɬɪɢ ɫɬɟɪɠɧɹ ɪɟɝɭɥɹɬɨɪɚ), ɩɨɤɚ ɩɥɚɦɹ ɧɟ ɫɬɚɧɟɬ ɦɚɥɵɦ, ɧɨ ɭɫɬɨɣɱɢɜɵɦ.
! ɉɪɢ ɢɫɩɨɥɶɡɨɜɚɧɢɢ ɫɠɢɠɟɧɧɨɝɨ ɝɚɡɚ ɪɟɝɭɥɢɪɨɜɨɱɧɵɣ ɜɢɧɬ ɫɥɟɞɭɟɬ ɡɚɬɹɧɭɬɶ ɩɨɥɧɨɫɬɶɸ.
3. ɉɪɢ ɝɨɪɹɳɟɦ ɩɥɚɦɟɧɢ ɧɟɫɤɨɥɶɤɨ ɪɚɡ ɛɵɫɬɪɨ ɩɨɜɟɪɧɢɬɟ
ɧɨɟ ɩɨɥɨɠɟɧɢɟ ɢ ɧɚɨɛɨɪɨɬ, ɩɪɨɜɟɪɹɹ, ɱɬɨ ɩɥɚɦɹ
ɧɟ ɝɚɫɧɟɬ.
61
ɪɭɤɨɹɬɤɭ ɢɡ ɦɢɧɢɦɚɥɶɧɨɝɨ ɜ ɦɚɤɫɢɦɚɥɶ-
! ȼ ɫɥɭɱɚɟ ɢɫɩɨɥɶɡɨɜɚɧɢɹ ɫɠɢɠɟɧɧɨɝɨ ɝɚɡɚ ɪɟɝɭɥɢɪɨɜɨɱɧɵɣ ɜɢɧɬ ɫɥɟɞɭɟɬ ɡɚɬɹɧɭɬɶ ɞɨ ɭɩɨɪɚ.
5. ɍɞɨɫɬɨɜɟɪɶɬɟɫɶ, ɱɬɨ ɩɪɢ ɛɵɫɬɪɨɦ ɩɨɜɨɪɨɬɟ ɪɭɤɨɹɬɤɢ ɨɬ ɩɨɥɨɠɟɧɢɹ «MAX» ɤ «MIN» ɢ ɩɪɢ ɨɬɤɪɵɜɚɧɢɢ
ɢ ɡɚ ɤɪɵɜɚɧɢɢ ɞɜɟɪɰɵ ɩɥɚɦɹ ɧɟ ɝɚɫɧɟɬ.
Page 62

ɌȿɏɇɂɑȿɋɄɂȿ ɏȺɊȺɄɌȿɊɂɋɌɂɄɂ
ɜɵɫɨɬɚ 34 ɫɦ;
Ɋɚɡɦɟɪɵ ɞɭɯɨɜɤɢ
Ɉɛɴɟɦ 58 ɥ
ɲɢɪɢɧɚ 39 ɫɦ;
ɝɥɭɛɢɧɚ 44 ɫɦ
RS
ȼɧɭɬɪɟɧɧɢɟ ɪɚɡɦɟɪɵ
ɨɬɞɟɥɟɧɢɹ ɩɨɞ ɞɭɯɨɜɤɨɣ
ɗɥɟɤɬɪɢɱɟɫɤɢɟ ɩɚɪɚɦɟɬɪɵ
Ƚɚɡɨɜɵɟ ɝɨɪɟɥɤɢ
ɜɵɫɨɬɚ 17 ɫɦ;
ɲɢɪɢɧɚ 42 ɫɦ;
ɝɥɭɛɢɧɚ 44 ɫɦ
ɫɦ. ɬɚɛɥɢɱɤɭ ɬɟɯ. ɯɚɪɚɤɬɟɪɢɫɬɢɤ ɧɚ ɨɛɨɪɭɞɨɜɚɧɢɢ
ɦɨɝɭɬ ɛɵɬɶ ɚɞɚɩɬɢɪɨɜɚɧɵ
ɞɥɹ ɥɸɛɨɝɨ ɬɢɩɚ ɝɚɡɚ, ɭɤɚɡɚɧɧɨɝɨ ɜ ɬɚɛɥɢɱɤɟ ɬɟɯ. ɯɚɪɚɤɬɟɪɢɫɬɢɤ
Ⱦɢɪɟɤɬɢɜɚ ȿɋ 2006/95/ȿɋ
ɨɬ 12.12.06 («ɇɢɡɤɨɟ ɧɚɩɪɹɠɟɧɢɟ») ɢ ɩɨɫɥɟɞɭɸɳɢɟ
ɦɨɞɢɮɢɤɚɰɢɢ;
2004/108/EC ɨɬ 15.12.04
(«ɗɥɟɤɬɪɨɦɚɝɧɢɬɧɚɹ ɫɨɜɦɟɫ-
ɬɢɦɨɫɬɶ» ɢ ɩɨɫɥɟɞɭɸɳɢɟ
ɦɨɞɢɮɢɤɚɰɢɢ;
2009/142/EC ɨɬ 30.11.09
(«Ƚɚɡ») ɢ ɩɨɫɥɟɞɭɸɳɢɟ
ɦɨɞɢɮɢɤɚɰɢɢ;
93/68/EEC ɨɬ 22.07.93 ɢ ɩɨ-
ɫɥɟɞɭɸɳɢɟ ɦɨɞɢɮɢɤɚɰɢɢ –
2002/96/EC;
1275/2008 (ɪɟɠɢɦ ɨɠɢɞɚɧɢɹ
Stand-by / ȼɵɤɥ.).
62
Page 63

RS
S
S
R
A
ɏɚɪɚɤɬɟɪɢɫɬɢɤɢ ɝɨɪɟɥɨɤ ɢ ɠɢɤɥɟɪɨɜ
ɋɠɢɠɟɧɧɵɣ ɝɚɡ ɉɪɢɪɨɞɧɵɣ ɝɚɡ
Ɇɨɳɧɨɫɬɶ
Ƚɨɪɟɥɤɢ
Ȼɵɫɬɪɚɹ (ɛɨɥɶɲɚɹ) (R) 100 3,00 0,7 41 87 218 214 128 286 143 286
ɉɨɥɭɛɵɫɬɪɚɹ (ɫɪɟɞɧɹɹ) (S) 75 1,90 0,4 30 70 138 136 104 181 118 181
ȼɫɩɨɦɨɝɚɬɟɥɶɧɚɹ
(ɦɚɥɟɧɶɤɚɹ) (A)
Ⱦɭɯɨɜɤɚ - 2,80 1,0 46 80 204 200 119 267 132 257
Ⱦɢɚɦɟɬɪ,
ɦɦ
51 1,00 0,4 30 52 73 71 76 95 80 95
ɧɚɝɪɟɜɚ,
ɤȼɬ (p.c.s.*)
ɧɨɦɢɧ. ɭɦɟɧɶɲ ɦɦ ɦɦ
ɨɬɜɟɪɫɬɢɟ
1/100
ɠɢɤɥɟɪ
1/100
ɩɨɬɨɤ*
ɝ/ɱ
*** **
ɠɢɤɥɟɪ
1/100
ɩɨɬɨɤ*
ɥ/ɱ
ɦɦ ɦɦ
ɠɢɤɥɟɪ
1/100
ɩɨɬɨɤ*
ɥ/ɱ
Ⱦɚɜɥɟɧɢɟ
* ɋɭɯɨɣ ɝɚɡ ɩɪɢ 15 °ɋ ɢ ɞɚɜɥɟɧɢɢ 1013 ɦɛɚɪ
** ɉɪɨɩɚɧ P.C.S. = 50,37 MȾɠ/ɤɝ
*** Ȼɭɬɚɧ P.C.S. = 49,47 MȾɠ/ɤɝ
ɉɪɢɪɨɞɧɵɣ ɝɚɡ P.C.S. = 37,78 MȾɠ/ɦ
ɇɨɦɢɧɚɥɶɧɨɟ (ɦɛɚɪ)
Ɇɢɧɢɦɚɥɶɧɨɟ (ɦɛɚɪ)
Ɇɚɤɫɢɦɚɥɶɧɨɟ (ɦɛɚɪ)
3
ɉɪɟɞɭɩɪɟɠɞɟɧɢɟ! ɋɬɟɤɥɹɧɧɚɹ
ɤɪɵɲɤɚ ɩɥɢɬɵ ɦɨɠɟɬ ɬɪɟɫɧɭɬɶ
ɨɬ ɧɚɝɪɟɜɚ. ɉɪɟɠɞɟ ɱɟɦ ɡɚɤɪɵɬɶ
ɤɪɵɲɤɭ, ɨɛɹɡɚɬɟɥɶɧɨ ɜɵɤɥɸɱɢɬɟ
ɜɫɟ ɝɨɪɟɥɤɢ.*
28-30
20
35
37
25
45
KN3G2S/UA
KN3G20/UA
20
17
25
13
6,5
18
* Ɍɨɥɶɤɨ ɞɥɹ ɦɨɞɟɥɟɣ ɫɨ ɫɬɟɤɥɹɧɧɨɣ ɤɪɵɲɤɨɣ.
63
Page 64

ȼɤɥɸɱɟɧɢɟ ɢ ɢɫɩɨɥɶɡɨɜɚɧɢɟ
ɂɫɩɨɥɶɡɨɜɚɧɢɟ ɪɚɛɨɱɟɣ ɩɨɜɟɪɯɧɨɫɬɢ
Ɂɚɠɢɝɚɧɢɟ ɝɚɡɨɜɵɯ ɝɨɪɟɥɨɤ
ȼɨɤɪɭɝ ɤɚɠɞɨɣ ɪɭɤɨɹɬɤɢ ɭɩɪɚɜɥɟɧɢɹ ɝɨɪɟɥɤɨɣ ɭɤɚɡɚɧɵ
ɫɢɦɜɨɥɵ, ɨɛɨɡɧɚɱɚɸɳɢɟ ɫɢɥɭ ɩɥɚɦɟɧɢ ɫɨɨɬɜɟɬɫɬɜɭɸɳɟɣ ɝɨɪɟɥɤɢ.
ɑɬɨɛɵ ɡɚɠɟɱɶ ɨɞɧɭ ɢɡ ɝɨɪɟɥɨɤ ɧɚ ɪɚɛɨɱɟɣ ɩɨɜɟɪɯɧɨɫɬɢ ɩɥɢɬɵ:
1. ɉɨɞɧɟɫɢɬɟ ɡɚɠɠɟɧɧɭɸ ɫɩɢɱɤɭ ɢɥɢ ɡɚɠɢɝɚɥɤɭ
ɤ ɝɨɪɟɥɤɟ.
2. ɇɚɠɦɢɬɟ ɪɭɤɨɹɬɤɭ ɝɨɪɟɥɤɢ, ɩɨɜɟɪɧɢɬɟ ɟɟ ɩɪɨɬɢɜ
ɱɚɫɨɜɨɣ ɫɬɪɟɥɤɢ ɢ ɭɫɬɚɧɨɜɢɬɟ ɜ ɩɨɡɢɰɢɸ ɦɚɤɫɢɦɚɥɶɧɨɝɨ ɩɥɚɦɟɧɢ
3. Ɉɬɪɟɝɭɥɢɪɭɣɬɟ ɢɧɬɟɧɫɢɜɧɨɫɬɶ ɩɥɚɦɟɧɢ, ɭɫɬɚɧɨɜɢɜ ɟɝɨ ɠɟɥɚɟɦɵɣ ɭɪɨɜɟɧɶ ɜɪɚɳɟɧɢɟɦ ɪɭɤɨɹɬɤɢ
ɩɪɨɬɢɜ ɱɚɫɨɜɨɣ ɫɬɪɟɥɤɢ. Ɋɭɤɨɹɬɤɭ ɦɨɠɧɨ ɭɫɬɚɧɚɜɥɢɜɚɬɶ ɜ ɩɨɡɢɰɢɢ: — ɦɢɧɢɦɚɥɶɧɨɟ ɩɥɚɦɹ,
— ɦɚɤɫɢɦɚɥɶɧɨɟ ɩɥɚɦɹ ɢɥɢ ɜ ɥɸɛɨɟ ɩɨɥɨɠɟɧɢɟ
ɦɟɠɞɭ ɭɤɚɡɚɧɧɵɦɢ ɩɨɡɢɰɢɹɦɢ.
ɤ ɩɨɡɢɰɢɢ ɦɚɤɫɢɦɚɥɶɧɨɝɨ ɩɥɚɦɟɧɢ, ɭɞɟɪɠɢɜɚɣɬɟ ɪɭɤɨɹɬɤɭ ɧɚɠɚɬɨɣ, ɩɨɤɚ ɩɥɚɦɹ ɧɟ ɡɚɝɨɪɢɬɫɹ.
ɇɟɤɨɬɨɪɵɟ ɦɨɞɟɥɢ ɨɫɧɚɳɟɧɵ ɭɫɬɪɨɣɫɬɜɨɦ ɷɥɟɤɬɪɨɧɧɨɝɨ ɡɚɠɢɝɚɧɢɹ, ɜɫɬɪɨɟɧɧɵɦ ɜ ɪɭɤɨɹɬɤɭ ɭɩɪɚɜɥɟɧɢɹ
ɝɨɪɟɥɤɨɣ, — ɜ ɷɬɨɦ ɫɥɭɱɚɟ ɩɪɢɫɭɬɫɬɜɭɟɬ ɭɫɬɪɨɣɫɬɜɨ
ɷɥɟɤɬɪɨɧɧɨɝɨ ɡɚɠɢɝɚɧɢɹ* (ɫɦ. ɪɢɫ.), ɧɨ ɧɟɬ ɤɧɨɩɤɢ
ɷɥɟɤɬɪɨɩɨɞɠɢɝɚ. ɉɪɨɫɬɨ ɧɚɠɦɢɬɟ ɪɭɤɨɹɬɤɭ ɝɨɪɟɥɤɢ ɢ
ɜɪɚɳɚɣɬɟ ɟɟ ɩɪɨɬɢɜ ɱɚɫɨɜɨɣ ɫɬɪɟɥɤɢ ɤ ɩɨɡɢɰɢɢ ɦɚɤɫɢɦɚɥɶɧɨɝɨ ɩɥɚɦɟɧɢ, ɩɨɤɚ ɩɥɚɦɹ ɧɟ ɡɚɝɨɪɢɬɫɹ.
ɉɪɢ ɨɬɩɭɫɤɚɧɢɢ ɪɭɤɨɹɬɤɢ ɩɥɚɦɹ ɦɨɠɟɬ ɩɨɝɚɫɧɭɬɶ.
ȼ ɷɬɨɦ ɫɥɭɱɚɟ ɩɨɜɬɨɪɢɬɟ ɞɟɣɫɬɜɢɹ, ɭɞɟɪɠɢɜɚɹ ɪɭɤɨɹɬɤɭ ɞɨɥɶɲɟ ɧɚɠɚɬɨɣ.
! ȿɫɥɢ ɩɥɚɦɹ ɫɥɭɱɚɣɧɨ ɩɨɝɚɫɥɨ, ɜɵɤɥɸɱɢɬɟ ɝɨɪɟɥɤɭ
ɢ ɩɨɞɨɠɞɢɬɟ ɧɟ ɦɟɧɟɟ 1 ɦɢɧɭɬɵ, ɩɪɟɠɞɟ ɱɟɦ ɫɧɨɜɚ
ɡɚɠɟɱɶ ɟɟ.
ȼ ɦɨɞɟɥɹɯ, ɨɫɧɚɳɟɧɧɵɯ
ɩɥɚɦɟɧɢ (ɏ)*, ɧɚɠɦɢɬɟ ɢ ɞɟɪɠɢɬɟ ɪɭɤɨɹɬɤɭ ɝɨɪɟɥɤɢ
ɧɚɠɚɬɨɣ ɩɪɢɦɟɪɧɨ 2–3 ɫɟɤɭɧɞɵ, ɱɬɨɛɵ ɭɞɟɪɠɚɬɶ
ɝɨɪɟɧɢɟ ɩɥɚɦɟɧɢ ɢ ɚɤɬɢɜɢɪɨɜɚɬɶ ɭɫɬɪɨɣɫɬɜɨ.
ɑɬɨɛɵ ɜɵɤɥɸɱɢɬɶ ɝɨɪɟɥɤɭ, ɩɨɜɟɪɧɢɬɟ ɟɟ ɪɭɤɨɹɬɤɭ ɞɨ
ɭɩɨɪɚ ɢ ɭɫɬɚɧɨɜɢɬɟ ɜ ɩɨɥɨɠɟɧɢɟ «z» — ɜɵɤɥɸɱɟɧɨ.
.
ȼ ɦɨɞɟɥɹɯ, ɢɦɟɸɳɢɯ ɭɫ-
ɬɪɨɣɫɬɜɨ ɷɥɟɤɬɪɨɧɧɨɝɨ
ɡɚɠɢɝɚɧɢɹ*(ɋ), ɧɚɠɦɢɬɟ
ɤɧɨɩɤɭ ɷɥɟɤɬɪɨɩɨɞɠɢɝɚ,
ɨɛɨɡɧɚɱɟɧɧɭɸ ɫɢɦɜɨ-
ɥɨɦ , ɡɚɬɟɦ ɧɚɠɦɢɬɟ ɢ ɩɨɜɟɪɧɢɬɟ ɪɭɤɨɹɬɤɭ
ɩɪɨɬɢɜ ɱɚɫɨɜɨɣ ɫɬɪɟɥɤɢ
ɭɫɬɪɨɣɫɬɜɨɦ ɛɟɡɨɩɚɫɧɨɝɨ
ɉɪɚɤɬɢɱɟɫɤɢɟ ɪɟɤɨɦɟɧɞɚɰɢɢ ɩɨ ɢɫɩɨɥɶɡɨɜɚɧɢɸ
ɝɚɡɨɜɵɯ ɝɨɪɟɥɨɤ
Ⱦɥɹ ɧɚɢɛɨɥɟɟ ɷɮɮɟɤɬɢɜɧɨɣ ɪɚɛɨɬɵ ɝɚɡɨɜɵɯ ɝɨɪɟɥɨɤ
ɢ ɷɤɨɧɨɦɧɨɝɨ ɩɨɬɪɟɛɥɟɧɢɹ ɝɚɡɚ ɢɫɩɨɥɶɡɭɣɬɟ ɬɨɥɶɤɨ
ɩɨɫɭɞɭ ɫ ɤɪɵɲɤɚɦɢ ɢ ɩɥɨɫɤɢɦ ɞɧɨɦ. Ɍɚɤɠɟ ɩɨɫɭɞɚ
ɞɨɥɠɧɚ ɩɨɞɯɨɞɢɬɶ ɩɨ ɪɚɡɦɟɪɭ ɤ ɝɨɪɟɥɤɟ.
Ƚɨɪɟɥɤɚ Ⱦɢɚɦɟɬɪ ɞɧɚ ɩɨɫɭɞɵ, ɫɦ
Ȼɵɫɬɪɚɹ (R) 24–26
ɉɨɥɭɛɵɫɬɪɚɹ (S) 16–20
ȼɫɩɨɦɨɝɚɬɟɥɶɧɚɹ (Ⱥ) 10–14
ɑɬɨɛɵ ɨɩɪɟɞɟɥɢɬɶ ɬɢɩ ɝɨɪɟɥɤɢ, ɨɛɪɚɬɢɬɟɫɶ ɤ ɬɚɛɥ.
«ɏɚɪɚɤɬɟɪɢɫɬɢɤɢ ɝɨɪɟɥɨɤ ɢ ɠɢɤɥɟɪɨɜ».
ɂɫɩɨɥɶɡɨɜɚɧɢɟ ɞɭɯɨɜɤɢ
! ɉɟɪɟɞ ɩɟɪɜɵɦ ɢɫɩɨɥɶɡɨɜɚɧɢɟɦ ɜ ɬɟɱɟɧɢɟ ɩɨɥɭɱɚ-
ɫɚ ɩɪɨɤɚɥɢɬɟ ɩɭɫɬɭɸ ɞɭɯɨɜɤɭ ɫ ɡɚɤɪɵɬɨɣ ɞɜɟɪɰɟɣ
ɩɪɢ ɦɚɤɫɢɦɚɥɶɧɨɣ ɬɟɦɩɟɪɚɬɭɪɟ. ɉɪɟɠɞɟ ɱɟɦ ɜɵɤɥɸɱɢɬɶ ɨɛɨɪɭɞɨɜɚɧɢɟ ɢ ɨɬɤɪɵɬɶ ɞɜɟɪɰɭ, ɭɞɨɫɬɨɜɟɪɶɬɟɫɶ ɜ ɧɚɥɢɱɢɢ ɯɨɪɨɲɟɣ ɜɟɧɬɢɥɹɰɢɢ ɜ ɩɨɦɟɳɟɧɢɢ.
ɉɨɹɜɢɜɲɢɣɫɹ ɜɨ ɜɪɟɦɹ ɩɪɨɤɚɥɢɜɚɧɢɹ ɧɟɩɪɢɹɬɧɵɣ
ɡɚɩɚɯ ɜɵɡɜɚɧ ɫɝɨɪɚɧɢɟɦ ɡɚɳɢɬɧɵɯ ɜɟɳɟɫɬɜ, ɢɫɩɨɥɶɡɭɟɦɵɯ ɜɨ ɜɪɟɦɹ ɩɪɨɢɡɜɨɞɫɬɜɚ ɨɛɨɪɭɞɨɜɚɧɢɹ.
! ɉɪɟɠɞɟ ɱɟɦ
ɫ ɟɝɨ ɛɨɤɨɜɵɯ ɫɬɨɪɨɧ ɩɥɚɫɬɢɤɨɜɭɸ ɩɥɟɧɤɭ.
! ɇɢɱɟɝɨ ɧɟ ɤɥɚɞɢɬɟ ɧɚ ɞɧɨ ɞɭɯɨɜɤɢ — ɷɬɨ ɦɨɠɟɬ
ɩɨɜɪɟɞɢɬɶ ɟɝɨ ɷɦɚɥɟɜɨɟ ɩɨɤɪɵɬɢɟ. ɂɫɩɨɥɶɡɭɣɬɟ 1-ɣ
ɭɪɨɜɟɧɶ ɞɭɯɨɜɤɢ ɬɨɥɶɤɨ ɩɪɢ ɝɨɬɨɜɤɟ ɧɚ ɜɟɪɬɟɥɟ (ɩɪɢ
ɟɝɨ ɧɚɥɢɱɢɢ).
ȼɤɥɸɱɟɧɢɟ ɞɭɯɨɜɤɢ
ȿɫɥɢ ɫɩɭɫɬɹ 15 ɫɟɤɭɧɞ ɩɥɚɦɹ ɧɟ ɡɚɝɨɪɢɬɫɹ, ɨɬɩɭɫɬɢɬɟ
ɪɭɤɨɹɬɤɭ, ɨɬɤɪɨɣɬɟ ɞɜɟɪɰɭ ɞɭɯɨɜɤɢ ɢ ɩɨɞɨɠɞɢɬɟ ɧɟ
ɦɟɧɟɟ 1 ɦɢɧɭɬɵ, ɩɪɟɠɞɟ ɱɟɦ ɫɧɨɜɚ ɡɚɠɢɝɚɬɶ ɩɥɚɦɹ.
! Ⱦɭɯɨɜɤɚ ɨɫɧɚɳɟɧɚ ɭɫɬɪɨɣɫɬɜɨɦ ɛɟɡɨɩɚɫɧɨɫɬɢ — ɞɥɹ
ɟɝɨ ɫɪɚɛɚɬɵɜɚɧɢɹ ɪɭɤɨɹɬɤɭ ɭɩɪɚɜɥɟɧɢɹ ɞɭɯɨɜɤɨɣ ɫɥɟɞɭɟɬ ɞɟɪɠɚɬɶ ɧɚɠɚɬɨɣ ɧɟ ɦɟɧɟɟ 6 ɫɟɤɭɧɞ.
! ȿɫɥɢ ɩɥɚɦɹ ɧɟɨɠɢɞɚɧɧɨ ɩɨɝɚɫɧɟɬ, ɜɵɤɥɸɱɢɬɟ ɝɨɪɟɥɤɭ ɢ ɩɨɞɨɠɞɢɬɟ ɧɟ ɦɟɧɟɟ 1 ɦɢɧɭɬɵ, ɩɪɟɠɞɟ ɱɟɦ
ɫɧɨɜɚ ɡɚɠɢɝɚɬɶ ɟɟ.
ɢɫɩɨɥɶɡɨɜɚɬɶ ɨɛɨɪɭɞɨɜɚɧɢɟ, ɭɞɚɥɢɬɟ
ɑɬɨɛɵ ɡɚɠɟɱɶ ɝɨɪɟɥɤɭ ɞɭɯɨɜɤɢ, ɩɨɞɧɟɫɢɬɟ ɝɨɪɹɳɭɸ ɫɩɢɱɤɭ
ɢɥɢ ɡɚɠɢɝɚɥɤɭ ɤ ɨɬɜɟɪɫɬɢɸ «F»
(ɫɦ. ɪɢɫ.),
ɪɭɤɨɹɬɤɭ ɭɩɪɚɜɥɟɧɢɹ ɞɭɯɨɜɤɨɣ
ɩɪɨɬɢɜ ɱɚɫɨɜɨɣ ɫɬɪɟɥɤɢ ɜ ɩɨɥɨɠɟɧɢɟ Max.
ɧɚɠɦɢɬɟ ɢ ɩɨɜɟɪɧɢɬɟ
RS
* Ɍɨɥɶɤɨ ɞɥɹ ɧɟɤɨɬɨɪɵɯ ɦɨɞɢɮɢɤɚɰɢɣ ɦɨɞɟɥɟɣ.
64
Page 65

RS
Ɋɟɝɭɥɢɪɨɜɤɚ ɬɟɦɩɟɪɚɬɭɪɵ
ɑɬɨɛɵ ɭɫɬɚɧɨɜɢɬɶ ɠɟɥɚɟɦɭɸ ɬɟɦɩɟɪɚɬɭɪɭ, ɜɪɚɳɚɣɬɟ ɪɭɤɨɹɬɤɭ ɭɩɪɚɜɥɟɧɢɹ ɞɭɯɨɜɤɨɣ ɩɪɨɬɢɜ ɱɚɫɨɜɨɣ
ɫɬɪɟɥɤɢ. Ɂɧɚɱɟɧɢɹ ɬɟɦɩɟɪɚɬɭɪɵ ɩɨɤɚɡɚɧɵ ɧɚ ɩɚɧɟɥɢ
ɭɩɪɚɜɥɟɧɢɹ ɢ ɦɨɝɭɬ ɜɚɪɶɢɪɨɜɚɬɶɫɹ ɜ ɞɢɚɩɚɡɨɧɟ ɨɬ
140 °ɋ (MIN) ɞɨ 250 °ɋ (MAX).
ɉɪɢ ɞɨɫɬɢɠɟɧɢɢ ɡɚɞɚɧɧɨɣ ɬɟɦɩɟɪɚɬɭɪɵ ɬɟɪɦɨɫɬɚɬ
ɞɭɯɨɜɤɢ ɛɭɞɟɬ ɩɨɞɞɟɪɠɢɜɚɬɶ ɟɟ ɧɚ ɩɨɫɬɨɹɧɧɨɦ
ɭɪɨɜɧɟ.
ɇɢɠɧɟɟ ɨɬɞɟɥɟɧɢɟ*
ȼ ɧɢɠɧɟɦ ɨɬɞɟɥɟɧɢɢ
ɞɭɯɨɜɤɢ ɦɨɠɧɨ ɞɟɪɠɚɬɶ ɫɤɨɜɨɪɨɞɵ ɢ ɩɪɢɧɚɞɥɟɠɧɨɫɬɢ ɞɭɯɨɜɤɢ.
Ⱦɜɟɪɰɚ ɨɬɤɪɵɜɚɟɬɫɹ
ɜɧɢɡ.
! ȼɧɭɬɪɟɧɧɢɟ ɩɨɜɟɪɯɧɨɫɬɢ ɨɬɞɟɥɟɧɢɹ ɦɨɝɭɬ ɧɚɝɪɟɜɚɬɶɫɹ ɜɨ ɜɪɟɦɹ ɪɚɛɨɬɵ ɞɭɯɨɜɤɢ.
! ɇɟ ɩɨɦɟɳɚɣɬɟ ɜ ɧɢɠɧɟɟ ɨɬɞɟɥɟɧɢɟ ɜɨɫɩɥɚɦɟɧɹɸ-
ɳɢɟɫɹ ɦɚɬɟɪɢɚɥɵ.
65
* Ɍɨɥɶɤɨ ɞɥɹ ɧɟɤɨɬɨɪɵɯ ɦɨɞɢɮɢɤɚɰɢɣ ɦɨɞɟɥɟɣ.
Page 66

ȼɫɩɨɦɨɝɚɬɟɥɶɧɚɹ ɬɚɛɥɢɰɚ ɩɨ ɩɪɢɝɨɬɨɜɥɟɧɢɸ ɜ ɞɭɯɨɜɤɟ
ȼɪɟɦɹ ɪɚɡɨɝɪɟɜɚ
ɞɭɯɨɜɤɢ,
ɦɢɧ.
Ȼɥɸɞɨ
ȼɟɫ,
ɤɝ
ɍɪɨɜɟɧɶ
ɞɭɯɨɜɤɢ ɫɧɢɡɭ
Ɍɟɦɩɟɪɚɬɭɪɚ,
°C
Ɇɚɤɚɪɨɧɧɵɟ ɢɡɞɟɥɢɹ
Ʌɚɡɚɧɶɹ 2,5 4 200-210 10 75-85
Ʉɚɧɧɟɥɨɧɢ 2,5 4 200 10 50-60
Ɂɚɩɟɤɚɧɤɚ ɢɡ ɥɚɩɲɢ 2,5 4 200 10 50-60
Ɇɹɫɨ
Ɍɟɥɹɬɢɧɚ 1,5 3 200-210 10 95-100
ɐɵɩɥɟɧɨɤ 1,5 3 210-220 10 90-100
ɍɬɤɚ 1,8 3 200 10 100-110
Ʉɪɨɥɢɤ 2,0 3 200 10 70-80
ɋɜɢɧɢɧɚ 2,1 3 200 10 70-80
Ȼɚɪɚɧɢɧɚ 1,8 3 200 10 100-105
Ɋɵɛɚ
ɋɤɭɦɛɪɢɹ 1,1 3 180-200 10 45-50
Ɂɭɛɚɬɤɚ 1,5 3 180-200 10 45-55
Ɏɨɪɟɥɶ ɜ ɮɨɥɶɝɟ 1,0 3 180-200 10 45-50
ɉɢɰɰɚ
ɇɟɚɩɨɥɢɬɚɧɫɤɚɹ ɩɢɰɰɚ 1,0 4 210-220 15 20-25
ɉɢɪɨɝɢ
Ȼɢɫɤɜɢɬɵ / ɩɟɱɟɧɶɟ 0,5 4 180 15 25-35
Ɍɨɪɬɵ 1,1 4 180 15 40-45
ɇɟɫɥɚɞɤɢɟ ɩɢɪɨɝɢ 1,0 4 180 15 50-55
Ⱦɪɨɠɠɟɜɵɟ ɩɢɪɨɝɢ 1,0 4 170 15 40-45
ȼɪɟɦɹ
ɩɪɢɝɨɬɨɜɥɟɧɢɹ,
ɦɢɧ
RS
ɉɪɢɦɟɱɚɧɢɟ. ɉɪɢɜɟɞɟɧɧɨɟ ɜɪɟɦɹ ɩɪɢɝɨɬɨɜɥɟɧɢɹ ɹɜɥɹɟɬɫɹ ɩɪɢɛɥɢɡɢɬɟɥɶɧɵɦ ɢ ɦɨɠɟɬ ɢɡɦɟɧɹɬɶɫɹ ɩɨ ȼɚɲɟɦɭ ɭɫɦɨɬɪɟɧɢɸ. ɉɪɢ ɢɫɩɨɥɶɡɨɜɚɧɢɢ ɝɪɢɥɹ ɨɛɹɡɚɬɟɥɶɧɨ ɩɨɦɟɫɬɢɬɟ ɩɨɞɞɨɧ ɧɚ 1-ɣ (ɧɢɠɧɢɣ) ɭɪɨɜɟɧɶ ɞɭɯɨɜɤɢ.
* Ɍɨɥɶɤɨ ɞɥɹ ɧɟɤɨɬɨɪɵɯ ɦɨɞɢɮɢɤɚɰɢɣ ɦɨɞɟɥɟɣ.
66
Page 67

ɉɪɟɞɭɩɪɟɠɞɟɧɢɹ ɢ ɪɟɤɨɦɟɧɞɚɰɢɢ
RS
! Ɉɛɨɪɭɞɨɜɚɧɢɟ ɪɚɡɪɚɛɨɬɚɧɨ ɢ ɢɡɝɨɬɨɜɥɟɧɨ ɜ ɫɨɨɬɜɟɬ ɫɬɜɢɢ
ɫ ɦɟɠɞɭɧɚɪɨɞɧɵɦɢ ɧɨɪɦɚɦɢ ɛɟɡɨɩɚɫɧɨɫɬɢ. ȼɧɢɦɚɬɟɥɶɧɨ
ɩɪɨɱɢɬɚɣɬɟ ɧɚɫɬɨɹɳɢɟ ɩɪɟɞɭɩɪɟɠɞɟɧɢɹ, ɩɪɢɜɨɞɢɦɵɟ ɜ
ɰɟɥɹɯ ɜɚɲɟɣ ɛɟɡɨɩɚɫɧɨɫɬɢ.
Ɉɫɧɨɜɧɵɟ ɩɪɚɜɢɥɚ ɛɟɡɨɩɚɫɧɨɫɬɢ
Ⱦɚɧɧɵɟ ɭɤɚɡɚɧɢɹ ɤɚɫɚɸɬɫɹ ɬɨɥɶɤɨ ɫɬɪɚɧ, ɭɤɚɡɚɧɧɵɯ
x
ɜ ɪɭɤɨɜɨɞɫɬɜɟ ɢ ɬɚɛɥɢɱɤɟ ɬɟɯɧɢɱɟɫɤɢɯ ɯɚɪɚɤɬɟɪɢɫɬɢɤ,
ɪɚɫɩɨɥɨɠɟɧɧɨɣ ɧɚ ɨɛɨɪɭɞɨɜɚɧɢɢ.
Ɉɛɨɪɭɞɨɜɚɧɢɟ ɪɚɡɪɚɛɨɬɚɧɨ ɞɥɹ ɛɵɬɨɜɨɝɨ ɢɫɩɨɥɶ-
x
ɡɨɜɚɧɢɹ ɜ ɞɨɦɚɲɧɢɯ ɭɫɥɨɜɢɹɯ ɢ ɧɟ ɩɪɟɞɧɚɡɧɚɱɟɧɨ
ɞɥɹ ɩɪɢɦɟɧɟɧɢɹ ɧɚ ɩɪɟɞɩɪɢɹɬɢɹɯ ɩɪɨɦɵɲɥɟɧɧɨɫɬɢ
ɢ ɬɨɪɝɨɜɥɢ.
Ɉɛɨɪɭɞɨɜɚɧɢɟ ɧɟ ɞɨɥɠɧɨ ɭɫɬɚɧɚɜɥɢɜɚɬɶɫɹ ɧɚ ɨɬ-
x
ɤɪɵɬɨɦ ɜɨɡɞɭɯɟ (ɞɚɠɟ ɩɨɞ ɧɚɜɟɫɨɦ). ɑɪɟɡɜɵɱɚɣɧɨ
ɨɩɚɫɧɨ ɨɫɬɚɜɥɹɬɶ ɨɛɨɪɭɞɨɜɚɧɢɟ ɩɨɞ ɜɨɡɞɟɣɫɬɜɢɟɦ
ɞɨɠɞɹ / ɝɪɨɡɵ.
x
ɇɟ ɤɚɫɚɣɬɟɫɶ ɨɛɨɪɭɞɨɜɚɧɢɹ, ɟɫɥɢ ɜɚɲɢ ɧɨɝɢ / ɪɭɤɢ
ɦɨɤɪɵɟ; ɧɟ ɩɨɥɶɡɭɣɬɟɫɶ ɨɛɨɪɭɞɨɜɚɧɢɟɦ, ɤɨɝɞɚ ȼɵ
ɛɨɫɢɤɨɦ.
x
Ɉɛɨɪɭɞɨɜɚɧɢɟ ɞɨɥɠɧɨ ɢɫɩɨɥɶɡɨɜɚɬɶɫɹ ɬɨɥɶɤɨ
ɜɡɪɨɫɥɵɦɢ ɥɢɰɚɦɢ ɞɥɹ ɩɪɢɝɨɬɨɜɥɟɧɢɹ ɩɢɳɢ ɢ ɜ
ɫɨɨɬɜɟɬɫɬɜɢɢ ɫ ɢɧɫɬɪɭɤɰɢɹɦɢ ɞɚɧɧɨɝɨ ɪɭɤɨɜɨɞɫɬɜɚ. Ʌɸɛɨɟ ɞɪɭɝɨɟ ɢɫɩɨɥɶɡɨɜɚɧɢɟ ɨɛɨɪɭɞɨɜɚɧɢɹ
(ɧɚɩɪ., ɞɥɹ ɨɛɨɝɪɟɜɚ ɩɨɦɟɳɟɧɢɹ) ɹɜɥɹɟɬɫɹ ɧɟɩɪɚɜɢɥɶɧɵɦ ɢ ɨɩɚɫɧɵɦ. ɉɪɨɢɡɜɨɞɢɬɟɥɶ ɧɟ ɧɟɫɟɬ
ɨɬɜɟɬɫɬɜɟɧɧɨɫɬɢ
ɜ ɪɟɡɭɥɶɬɚɬɟ ɟɝɨ ɧɟɩɪɚɜɢɥɶɧɨɝɨ, ɧɟɰɟɥɟɜɨɝɨ ɢɫɩɨɥɶɡɨɜɚɧɢɹ.
ɂɧɫɬɪɭɤɰɢɢ ɪɭɤɨɜɨɞɫɬɜɚ ɨɬɧɨɫɹɬɫɹ ɤ ɨɛɨɪɭɞɨɜɚɧɢɸ
x
ɤɥɚɫɫɚ 1 (ɫɜɨɛɨɞɧɚɹ ɭɫɬɚɧɨɜɤɚ) ɢɥɢ ɤɥɚɫɫɚ 2 ɩɨɞɤɥɚɫɫɚ 1 (ɭɫɬɚɧɨɜɤɚ ɦɟɠɞɭ ɞɜɭɦɹ ɲɤɚɮɚɦɢ).
ɇɟ ɩɨɞɩɭɫɤɚɣɬɟ ɞɟɬɟɣ ɤ ɨɛɨɪɭɞɨɜɚɧɢɸ.
x
ɍɞɨɫɬɨɜɟɪɶɬɟɫɶ, ɱɬɨ ɩɢɬɚɸɳɢɟ ɤɚɛɟɥɢ ɞɪɭɝɢɯ ɷɥɟɤɬ-
x
ɪɨɩɪɢɛɨɪɨɜ ɧɟ ɫɨɩɪɢɤɚɫɚɸɬɫɹ ɫ ɝɨɪɹɱɢɦɢ ɱɚɫ ɬɹɦɢ
ɨɛɨɪɭɞɨɜɚɧɢɹ.
ɇɟ ɩɟɪɟɝɨɪɚɠɢɜɚɣɬɟ ɨɬɜɟɪɫɬɢɹ, ɩɪɟɞɧɚɡɧɚɱɟɧɧɵɟ ɞɥɹ
x
ɜɟɧɬɢɥɹɰɢɢ ɢ ɨɬɜɨɞɚ ɬɟɩɥɚ.
ɇɟ ɡɚɤɪɵɜɚɣɬɟ ɫɬɟɤɥɹɧɧɭɸ ɤɪɵɲɤɭ ɩɥɢɬɵ*, ɤɨɝɞɚ
x
ɤɨɧɮɨɪɤɢ ɜɤɥɸɱɟɧɵ ɢɥɢ ɟɳɟ ɧɟ ɨɫɬɵɥɢ.
ɉɨɥɶɡɭɣɬɟɫɶ ɤɭɯɨɧɧɵɦɢ ɪɭɤɚɜɢɰɚɦɢ / ɩɪɢɯɜɚɬɤɚɦɢ,
x
ɩɨɦɟɳɚɹ ɢ ɜɵɧɢɦɚɹ ɩɨɫɭɞɭ ɢɡ ɞɭɯɨɜɤɢ.
ɇɟ ɢɫɩɨɥɶɡɭɣɬɟ ɜɨɫɩɥɚɦɟɧɹɸɳɢɟɫɹ ɠɢɞɤɨɫɬɢ (ɫɩɢɪɬ,
x
ɛɟɧɡɢɧ ɢ ɬ.ɩ.) ɪɹɞɨɦ ɫ ɜɤɥɸɱɟɧɧɵɦ ɨɛɨɪɭɞɨɜɚɧɢɟɦ.
ɇɟ ɩɨɦɟɳɚɣɬɟ ɜ ɧɢɠɧɟɟ ɨɬɞɟɥɟɧɢɟ ɞɭɯɨɜɤɢ ɝɨɪɸɱɢɟ
x
ɦɚɬɟɪɢɚɥɵ: ɫɥɭɱɚɣɧɨɟ ɜɤɥɸɱɟɧɢɟ ɨɛɨɪɭɞɨɜɚɧɢɹ ɦɨ
ɠɟɬ ɩɪɢɜɟɫɬɢ ɤ ɜɨɡɝɨɪɚɧɢɸ.
ȼɫɟɝɞɚ ɩɪɨɜɟɪɹɣɬɟ, ɱɬɨ ɪɭɤɨɹɬɤɢ ɭɩɪɚɜɥɟɧɢɹ ɧɚɯɨ-
x
ɞɹɬɫɹ ɜ ɩɨɡɢɰɢɢ «z», ɤɨɝɞɚ ɨɛɨɪɭɞɨɜɚɧɢɟ ɧɟ ɢɫɩɨɥɶɡɭɟɬɫɹ.
Ɉɬɤɥɸɱɚɹ ɨɛɨɪɭɞɨɜɚɧɢɟ ɨɬ ɷɥɟɤɬɪɨɫɟɬɢ, ɧɟ ɬɹɧɢɬɟ
x
ɡɚ ɩɢɬɚɸɳɢɣ ɤɚɛɟɥɶ, ɱɬɨɛɵ ɜɵɧɭɬɶ ɜɢɥɤɭ ɢɡ ɪɨɡɟɬɤɢ:
ɛɟɪɢɬɟɫɶ ɡɚ ɜɢɥɤɭ.
ɉɟɪɟɞ ɥɸɛɵɦɢ ɪɚɛɨɬɚɦɢ ɩɨ ɱɢɫɬɤɟ ɢ ɨɛɫɥɭɠɢɜɚ-
x
ɧɢɸ ɨɛɨɪɭɞɨɜɚɧɢɹ ɨɛɹɡɚɬɟɥɶɧɨ ɨɬɤɥɸɱɢɬɟ ɟɝɨ ɨɬ
ɷɥɟɤɬɪɨɫɟɬɢ, ɜɵɧɭɜ ɜɢɥɤɭ ɢɡ ɪɨɡɟɬɤɢ.
ɡɚ ɩɨ ɜɪɟɠɞɟɧɢɟ ɨɛɨɪɭɞɨɜɚɧɢɹ
x
ȼ ɫɥɭɱɚɟ ɧɟɢɫɩɪɚɜɧɨɫɬɢ, ɧɢ ɩɪɢ ɤɚɤɢɯ ɨɛɫɬɨɹɬɟɥɶɫɬɜɚɯ
ɧɟ ɩɵɬɚɣɬɟɫɶ ɩɨɱɢɧɢɬɶ ɨɛɨɪɭɞɨɜɚɧɢɟ ɫɚɦɨɫɬɨɹɬɟɥɶɧɨ.
Ɋɟɦɨɧɬ, ɜɵɩɨɥɧɟɧɧɵɣ ɧɟɤɜɚɥɢɮɢɰɢɪɨɜɚɧɧɵɦɢ ɥɢɰɚɦɢ, ɦɨɠɟɬ ɛɟɡɜɨɡɜɪɚɬɧɨ ɩɨɜɪɟɞɢɬɶ ɨɛɨɪɭɞɨɜɚɧɢɟ ɢɥɢ
ɫɬɚɬɶ ɩɪɢɱɢɧɨɣ ɟɝɨ ɧɟɩɪɚɜɢɥɶɧɨɝɨ ɮɭɧɤɰɢɨɧɢɪɨɜɚɧɢɹ.
Ɉɛɪɚɬɢɬɟɫɶ ɡɚ ɩɨɦɨɳɶɸ ɜ Ⱥɜɬɨɪɢɡɨɜɚɧɧɵɣ ɫɟɪɜɢɫɧɵɣ
ɰɟɧɬɪ.
x
ɇɟ ɤɥɚɞɢɬɟ ɬɹɠɟɥɵɟ ɩɪɟɞɦɟɬɵ ɧɚ ɨɬɤɪɵɬɭɸ ɞɜɟɪɰɭ
ɞɭɯɨɜɤɢ.
x
Ɉɛɨɪɭɞɨɜɚɧɢɟɦ ɧɟ ɞɨɥɠɧɵ ɩɨɥɶɡɨɜɚɬɶɫɹ ɥɢɰɚ (ɜɤɥɸɱɚɹ ɞɟɬɟɣ) ɫɨ
ɢɥɢ ɭɦɫɬɜɟɧɧɵɦɢ ɫɩɨɫɨɛɧɨɫɬɹɦɢ, ɚ ɬɚɤɠɟ ɧɟ ɡɧɚɤɨɦɵɟ
ɫ ɢɧɫɬɪɭɤɰɢɹɦɢ ɞɚɧɧɨɝɨ ɪɭɤɨɜɨɞɫɬɜɚ. ɂɫɩɨɥɶɡɨɜɚɧɢɟ
ɢɦɢ ɨɛɨɪɭɞɨɜɚɧɢɹ ɞɨɩɭɫɤɚɟɬɫɹ ɬɨɥɶɤɨ ɩɨɞ ɤɨɧɬɪɨɥɟɦ
ɥɢɰ, ɨɬɜɟɬɫɬɜɟɧɧɵɯ ɡɚ ɢɯ ɛɟɡɨɩɚɫɧɨɫɬɶ ɢɥɢ ɩɨɫɥɟ
ɩɨɥɭɱɟɧɢɹ ɢɧɫɬɪɭɤɰɢɣ ɩɨ ɪɚɛɨɬɟ ɨɛɨɪɭɞɨɜɚɧɢɹ.
x
ȼɇɂɆȺɇɂȿ! Ⱦɨɫɬɭɩɧɵɟ ɱɚɫɬɢ ɨɛɨɪɭɞɨɜɚɧɢɹ ɞɨɫɬɢɝɚɸɬ ɜɵɫɨɤɨɣ ɬɟɦɩɟɪɚɬɭɪɵ ɩɪɢ ɪɚɛɨɬɟ ɝɪɢɥɹ. ɇɟ
ɩɨɞɩɭɫɤɚɣɬɟ ɞɟɬɟɣ ɛɥɢɡɤɨ ɤ ɩɥɢɬɟ.
ɫɧɢɠɟɧɧɵɦɢ ɮɢɡɢɱɟɫɤɢɦɢ, ɫɟɧɫɨɪɧɵɦɢ
ɍɬɢɥɢɡɚɰɢɹ
ɉɪɢ ɭɧɢɱɬɨɠɟɧɢɢ ɭɩɚɤɨɜɨɱɧɨɝɨ ɦɚɬɟɪɢɚɥɚ ɢ ɜ ɫɥɭɱɚɟ
x
ɢɡɛɚɜɥɟɧɢɹ ɨɬ ɫɬɚɪɨɝɨ ɨɛɨɪɭɞɨɜɚɧɢɹ ɫɨɛɥɸɞɚɣɬɟ
ɞɟɣɫɬɜɭɸɳɢɟ ɬɪɟɛɨɜɚɧɢɹ ɩɨ ɢɯ ɭɬɢɥɢɡɚɰɢɢ.
ɋɨɝɥɚɫɧɨ ȿɜɪɨɩɟɣɫɤɨɣ ɞɢɪɟɤɬɢɜɟ 2002/96/EC ɩɨ
x
ɭɬɢɥɢɡɚɰɢɢ ɷɥɟɤɬɪɢɱɟɫɤɨɝɨ ɢ ɷɥɟɤɬɪɨɧɧɨɝɨ ɨɛɨɪɭɞɨɜɚɧɢɹ (WEEE) ɫɬɚɪɵɟ ɷɥɟɤɬɪɨɛɵɬɨɜɵɟ ɩɪɢɛɨɪɵ ɧɟ ɞɨɥɠɧɵ ɩɨɦɟɳɚɬɶɫɹ ɜ ɨɛɳɢɣ ɝɨɪɨɞɫɤɨɣ
ɧɟɨɬɫɨɪɬɢɪɨɜɚɧɧɵɣ ɩɨɬɨɤ ɨɬɯɨɞɨɜ: ɨɧɢ ɞɨɥɠɧɵ
ɫɨɛɢɪɚɬɶɫɹ ɨɬɞɟɥɶɧɨ, ɱɬɨɛɵ ɨɩɬɢɦɢɡɢɪɨɜɚɬɶ ɜɨɫɫɬɚɧɨɜɥɟɧɢɟ ɢ ɩɟɪɟɪɚɛɨɬɤɭ ɢɯ
ɧɟɝɚɬɢɜɧɨɟ ɜɨɡɞɟɣɫɬɜɢɟ ɧɚ ɡɞɨɪɨɜɶɟ ɱɟɥɨɜɟɤɚ ɢ ɷɤɨɥɨɝɢɸ. ɍɤɚɡɚɧɧɵɣ ɧɚ ɢɡɞɟɥɢɢ ɫɢɦɜɨɥ ɩɟɪɟɱɟɪɤɧɭɬɨɝɨ
ɜɟɞɪɚ ɧɚ ɤɨɥɟɫɚɯ ɧɚɩɨɦɢɧɚɟɬ, ɱɬɨ ɩɪɢ ɭɬɢɥɢɡɚɰɢɢ ɷɬɨ
ɨɛɨɪɭɞɨɜɚɧɢɟ ɫɥɟɞɭɟɬ ɩɨɦɟɫɬɢɬɶ ɨɬɞɟɥɶɧɨ.
Ⱦɥɹ ɩɨɥɭɱɟɧɢɹ ɢɧɮɨɪɦɚɰɢɢ ɨ ɩɪɚɜɢɥɶɧɨɣ ɭɬɢɥɢɡɚɰɢɢ
ɫɬɚɪɨɝɨ ɨɛɨɪɭɞɨɜɚɧɢɹ ɩɨɬɪɟɛɢɬɟɥɢ ɞɨɥɠɧɵ ɨɛɪɚɬɢɬɶɫɹ ɜ ɦɟɫɬɧɵɟ ɨɪɝɚɧɵ ɭɩɪɚɜɥɟɧɢɹ ɢɥɢ ɜ ɮɢɪɦɭɩɨɫɬɚɜɳɢɤ.
ɦɚɬɟɪɢɚɥɨɜ ɢ ɭɦɟɧɶɲɢɬɶ
ɗɤɨɧɨɦɢɹ ɷɧɟɪɝɢɢ ɢ ɨɯɪɚɧɚ ɨɤɪɭɠɚɸɳɟɣ
ɫɪɟɞɵ
x
ɂɫɩɨɥɶɡɨɜɚɧɢɟ ɨɛɨɪɭɞɨɜɚɧɢɹ ɭɬɪɨɦ ɢɥɢ ɜɟɱɟɪɨɦ
ɩɨɡɜɨɥɹɟɬ ɫɧɢɡɢɬɶ ɩɢɤɨɜɭɸ ɧɚɝɪɭɡɤɭ ɧɚ ɷɥɟɤɬɪɨɫɟɬɶ
ɢ ɫɷɤɨɧɨɦɢɬɶ ɩɨɬɪɟɛɥɟɧɢɟ ɷɧɟɪɝɢɢ.
x
-
Ɋɟɝɭɥɹɪɧɨ ɩɪɨɜɟɪɹɣɬɟ ɭɩɥɨɬɧɢɬɟɥɢ ɞɜɟɪɰɵ ɢ ɩɪɨɬɢɪɚɣɬɟ ɢɯ, ɨɱɢɳɚɹ ɨɬ ɥɸɛɨɣ ɝɪɹɡɢ ɢ ɫɨɪɚ: ɜɨ ɢɡɛɟɠɚɧɢɟ
ɭɬɟɱɤɢ ɬɟɩɥɚ ɭɩɥɨɬɧɢɬɟɥɢ ɞɨɥɠɧɵ ɩɥɨɬɧɨ ɩɪɢɥɟɝɚɬɶ
ɤ ɞɜɟɪɰɟ ɞɭɯɨɜɤɢ.
* Ɍɨɥɶɤɨ ɜ ɧɟɤɨɬɨɪɵɯ ɦɨɞɢɮɢɤɚɰɢɹɯ ɦɨɞɟɥɟɣ.
67
Page 68

Ɉɛɫɥɭɠɢɜɚɧɢɟ ɢ ɭɯɨɞ
Ɉɬɤɥɸɱɟɧɢɟ ɨɛɨɪɭɞɨɜɚɧɢɹ
! ɉɟɪɟɞ ɥɸɛɵɦɢ ɪɚɛɨɬɚɦɢ ɩɨ ɨɛɫɥɭɠɢɜɚɧɢɸ ɨɛɨɪɭ-
ɞɨɜɚɧɢɹ ɨɬɤɥɸɱɚɣɬɟ ɟɝɨ ɨɬ ɷɥɟɤɬɪɨɫɟɬɢ.
ɑɢɫɬɤɚ ɨɛɨɪɭɞɨɜɚɧɢɹ
! ɇɟ ɢɫɩɨɥɶɡɭɣɬɟ ɞɥɹ ɱɢɫɬɤɢ ɨɛɨɪɭɞɨɜɚɧɢɹ ɚɛɪɚɡɢɜ-
ɧɵɟ ɢɥɢ ɚɝɪɟɫɫɢɜɧɵɟ ɫɪɟɞɫɬɜɚ (ɩɹɬɧɨɜɵɜɨɞɢɬɟɥɢ,
ɫɪɟɞɫɬɜɚ ɞɥɹ ɭɞɚɥɟɧɢɹ ɪɠɚɜɱɢɧɵ, ɚɛɪɚɡɢɜɧɵɟ ɝɭɛɤɢ): ɨɧɢ ɦɨɝɭɬ ɧɟɨɛɪɚɬɢɦɨ ɩɨɜɪɟɞɢɬɶ ɩɨɜɟɪɯɧɨɫɬɶ
ɨɛɨɪɭɞɨɜɚɧɢɹ.
! ɇɢɤɨɝɞɚ ɧɟ ɢɫɩɨɥɶɡɭɣɬɟ ɞɥɹ ɱɢɫɬɤɢ ɞɭɯɨɜɤɢ ɩɚɪɨ-
ɨɱɢɫɬɢɬɟɥɢ ɢ ɚɷɪɨɡɨɥɢ.
x
ɉɨɫɥɟ ɤɚɠɞɨɣ ɝɨɬɨɜɤɟ ɩɪɨɬɢɪɚɣɬɟ ɪɚɛɨɱɭɸ ɩɨɜɟɪɯɧɨɫɬɶ ɩɥɢɬɵ ɜɥɚɠɧɨɣ ɝɭɛɤɨɣ, ɡɚɬɟɦ ɜɵɫɭɲɢɬɟ
ɤɭɯɨɧɧɵɦ ɛɭɦɚɠɧɵɦ ɩɨɥɨɬɟɧɰɟɦ.
x
ɗɦɚɥɢɪɨɜɚɧɧɵɟ
ɬɢ ɢɡ ɧɟɪɠɚɜɟɸɳɟɣ ɫɬɚɥɢ, ɚ ɬɚɤɠɟ ɪɟɡɢɧɨɜɵɟ
ɭɩɥɨɬɧɢɬɟɥɢ ɨɱɢɳɚɣɬɟ ɝɭɛɤɨɣ, ɫɦɨɱɟɧɧɨɣ ɜ ɪɚɫɬɜɨɪɟ ɬɟɩɥɨɣ ɜɨɞɵ ɫ ɧɟɣɬɪɚɥɶɧɵɦ ɦɵɥɨɦ, ɡɚɬɟɦ
ɨɩɨɥɨɫɧɢɬɟ ɢ ɬɳɚɬɟɥɶɧɨ ɜɵɬɪɢɬɟ. Ⱦɥɹ ɭɞɚɥɟɧɢɹ
ɭɫɬɨɣɱɢɜɵɯ ɡɚɝɪɹɡɧɟɧɢɣ ɢɫɩɨɥɶɡɭɣɬɟ ɫɩɟɰɢɚɥɶɧɵɟ
ɫɪɟɞɫɬɜɚ. ɉɨɫɥɟ ɨɱɢɫɬɤɢ ɨɩɨɥɨɫɧɢɬɟ ɢ ɜɵɬɪɢɬɟ
ɧɚɫɭɯɨ. ɇɟ ɩɪɢɦɟɧɹɣɬɟ ɚɛɪɚɡɢɜɧɵɟ ɩɨɪɨɲɤɢ ɢɥɢ
ɫɪɟɞɫɬɜɚ, ɫɨɞɟɪɠɚɳɢɟ ɚɝɪɟɫɫɢɜɧɵɟ ɜɟɳɟɫɬɜɚ.
x
Ɋɟɲɟɬɤɢ ɪɚɛɨɱɟɣ ɩɨɜɟɪɯɧɨɫɬɢ, ɤɪɵɲɤɢ ɝɨɪɟɥɨɤ,
ɩɥɚɦɹɪɚɫɫɟɤɚɬɟɥɢ ɢ ɜɟɪɯɧɢɟ ɝɨɪɟɥɤɢ ɞɥɹ ɨɛɥɟɝɱɟɧɢɹ ɱɢɫɬɤɢ ɦɨɠɧɨ ɫɧɹɬɶ; ɩɪɨɦɨɣɬɟ ɢɯ ɬɟɩɥɨɣ ɜɨɞɨɣ
ɫ ɧɟɚɛɪɚɡɢɜɧɵɦ ɦɨɸɳɢɦ ɫɪɟɞɫɬɜɨɦ, ɭɞɚɥɹɹ ɧɚɝɚɪ,
ɡɚɬɟɦ ɜɵɫɭɲɢɬɟ.
x
Ɋɟɝɭɥɹɪɧɨ ɫɥɟɞɭɟɬ ɨɱɢɳɚɬɶ ɧɚɤɨɧɟɱɧɢɤɢ ɭɫɬɪɨɣɫɬɜ
ɛɟɡɨɩɚɫɧɨɫɬɢ ɢ ɩɪɨɜɟɪɹɬɶ, ɧɟ ɡɚɫɨɪɟɧɵ ɥɢ ɝɚɡɨɜɵɟ
ɨɬɜɟɪɫɬɢɹ ɝɨɪɟɥɨɤ.
x
Ⱦɭɯɨɜɤɭ ɢɞɟɚɥɶɧɨ ɨɱɢɳɚɬɶ ɢɡɧɭɬɪɢ ɩɨɫɥɟ ɤɚɠɞɨɝɨ
ɢɫɩɨɥɶɡɨɜɚɧɢɹ, ɩɨɤɚ ɨɧɚ ɧɟ
ɝɨɪɹɱɭɸ ɜɨɞɭ ɢ ɧɟɣɬɪɚɥɶɧɨɟ ɦɨɸɳɟɟ ɫɪɟɞɫɬɜɨ,
ɡɚɬɟɦ ɯɨɪɨɲɨ ɨɩɨɥɨɫɧɢɬɟ ɢ ɜɵɬɪɢɬɟ ɦɹɝɤɨɣ ɬɤɚɧɶɸ.
ɇɟ ɢɫɩɨɥɶɡɭɣɬɟ ɚɛɪɚɡɢɜɧɵɟ ɱɢɫɬɹɳɢɟ ɫɪɟɞɫɬɜɚ.
ɋɬɟɤɥɨ ɞɜɟɪɰɵ ɞɭɯɨɜɤɢ ɨɱɢɳɚɣɬɟ ɫ ɩɨɦɨɳɶɸ
x
ɝɭɛɤɢ ɢ ɧɟɚɛɪɚɡɢɜɧɨɝɨ ɱɢɫɬɹɳɟɝɨ ɫɪɟɞɫɬɜɚ, ɡɚɬɟɦ
ɜɵɬɪɢɬɟ ɧɚɫɭɯɨ ɦɹɝɤɨɣ ɬɤɚɧɶɸ. ɇɟ ɢɫɩɨɥɶɡɭɣɬɟ
ɚɛɪɚɡɢɜɧɵɟ ɫɪɟɞɫɬɜɚ ɢɥɢ ɦɟɬɚɥɥɢɱɟɫɤɢɟ ɫɤɪɟɛɤɢ,
ɤɨɬɨɪɵɟ ɦɨɝɭɬ ɩɨɜɪɟɞɢɬɶ ɩɨɜɟɪɯɧɨɫɬɶ ɢ ɩɪɢɜɟɫɬɢ
ɨɛɪɚɡɨɜɚɧɢɸ ɬɪɟɳɢɧ ɧɚ ɫɬɟɤɥɟ.
ɤ
ɉɪɢɧɚɞɥɟɠɧɨɫɬɢ ɨɛɨɪɭɞɨɜɚɧɢɹ ɦɨɠɧɨ ɦɵɬɶ, ɤɚɤ
x
ɢ ɨɛɵɱɧɭɸ ɩɨɫɭɞɭ (ɞɚɠɟ ɜ ɩɨɫɭɞɨɦɨɟɱɧɨɣ ɦɚɲɢɧɟ).
ɇɚ ɷɥɟɦɟɧɬɚɯ ɢɡ ɧɟɪɠɚɜɟɸɳɟɣ ɫɬɚɥɢ ɦɨɝɭɬ ɨɫɬɚ-
x
ɜɚɬɶɫɹ ɩɹɬɧɚ ɩɨɫɥɟ ɞɥɢɬɟɥɶɧɨɝɨ ɤɨɧɬɚɤɬɚ ɫ ɠɟɫɬɤɨɣ
ɜɨɞɨɣ ɢɥɢ ɚɝɪɟɫɫɢɜɧɵɦɢ ɱɢɫɬɹɳɢɦɢ ɫɪɟɞɫɬɜɚɦɢ,
ɫɨɞɟɪɠɚɳɢɦɢ ɮɨɫɮɨɪ. Ⱦɥɹ ɨɱɢɫɬɤɢ ɤɨɦɩɨɧɟɧɬɨɜ
ɢɡ ɧɟɪɠɚɜɟɸɳɟɣ ɫɬɚɥɢ ɢɫɩɨɥɶɡɭɣɬɟ ɫɩɟɰɢɚɥɶɧɵɟ
ɱɢɫɬɹɳɢɟ ɫɪɟɞɫɬɜɚ, ɡɚɬɟɦ ɬɳɚɬɟɥɶɧɨ ɨɩɨɥɨɫɧɢɬɟ
ɢ ɜɵɬɪɢɬɟ ɧɚɫɭɯɨ.
ɜɧɟɲɧɢɟ ɱɚɫɬɢ ɢɥɢ ɩɨɜɟɪɯɧɨɫ-
ɨɫɬɵɥɚ. ɂɫɩɨɥɶɡɭɣɬɟ
ɍɯɨɞ ɡɚ ɤɪɵɲɤɨɣ ɩɥɢɬɵ
ȿɫɥɢ ɩɥɢɬɚ ɨɫɧɚɳɟɧɚ
ɫɬɟɤɥɹɧɧɨɣ ɤɪɵɲɤɨɣ*,
ɨɱɢɳɚɣɬɟ ɟɟ ɫ ɩɨɦɨɳɶɸ
ɬɟɩɥɨɣ ɜɨɞɵ, ɧɟ ɢɫɩɨɥɶɡɭɣɬɟ ɚɛɪɚɡɢɜɧɵɟ ɫɪɟɞɫɬɜɚ. ɑɬɨɛɵ ɨɱɢɫɬɢɬɶ ɩɥɨɳɚɞɶ ɡɚ ɪɚɛɨɱɟɣ ɩɨɜɟɪɯɧɨɫɬɶɸ ɩɥɢɬɵ, ɫɧɢɦɢɬɟ
ɤɪɵɲɤɭ — ɨɬɤɪɨɣɬɟ ɟɟ
ɩɨɥɧɨɫɬɶɸ ɢ ɩɨɬɹɧɢɬɟ
ɜɜɟɪɯ (ɫɦ. ɪɢɫ.).
! ɇɟ ɡɚɤɪɵɜɚɣɬɟ ɤɪɵɲɤɭ ɩɥɢɬɵ, ɟɫɥɢ ɤɨɧɮɨɪɤɢ ɜɤɥɸɱɟɧɵ ɢɥɢ ɟɳɟ
ɉɪɨɜɟɪɤɚ ɭɩɥɨɬɧɢɬɟɥɟɣ
Ɋɟɝɭɥɹɪɧɨ ɩɪɨɜɟɪɹɣɬɟ ɭɩɥɨɬɧɢɬɟɥɢ ɞɜɟɪɰɵ ɩɨ ɜɫɟɦɭ
ɩɟɪɢɦɟɬɪɭ. ȼ ɫɥɭɱɚɟ ɢɯ ɩɨɜɪɟɠɞɟɧɢɹ ɨɛɪɚɬɢɬɟɫɶ
ɜ Ⱥɜɬɨɪɢɡɨɜɚɧɧɵɣ ɫɟɪɜɢɫɧɵɣ ɰɟɧɬɪ. ɇɟ ɩɨɥɶɡɭɣɬɟɫɶ
ɞɭɯɨɜɤɨɣ, ɩɨɤɚ ɭɩɥɨɬɧɢɬɟɥɢ ɧɟ ɛɭɞɭɬ ɡɚɦɟɧɟɧɵ.
ɧɟ ɨɫɬɵɥɢ.
ɍɯɨɞ ɡɚ ɜɟɧɬɢɥɹɦɢ ɪɭɤɨɹɬɨɤ
ɋɨ ɜɪɟɦɟɧɟɦ ɝɚɡɨɜɵɟ ɜɟɧɬɢɥɢ (ɤɪɚɧɵ) ɪɭɤɨɹɬɨɤ ɦɨɝɭɬ
ɧɚɱɚɬɶ ɡɚɫɬɪɟɜɚɬɶ ɢɥɢ ɫ ɬɪɭɞɨɦ ɩɪɨɜɨɪɚɱɢɜɚɬɶɫɹ.
ȼ ɷɬɨɦ ɫɥɭɱɚɟ ɢɯ ɧɭɠɧɨ ɡɚɦɟɧɢɬɶ.
! ɗɬɚ ɩɪɨɰɟɞɭɪɚ ɞɨɥɠɧɚ ɜɵɩɨɥɧɹɬɶɫɹ ɤɜɚɥɢɮɢɰɢɪɨ-
ɜɚɧɧɵɦ ɬɟɯɧɢɱɟɫɤɢɦ ɩɟɪɫɨɧɚɥɨɦ ɫɟɪɜɢɫɧɨɝɨ ɰɟɧɬɪɚ.
ɉɨɦɨɳɶ
! ɇɟ ɩɨɥɶɡɭɣɬɟɫɶ ɭɫɥɭɝɚɦɢ ɥɢɰ, ɧɟ ɭɩɨɥɧɨɦɨɱɟɧɧɵɯ
ɉɪɨɢɡɜɨɞɢɬɟɥɟɦ. ɉɪɢ ɪɟɦɨɧɬɟ ɬɪɟɛɭɣɬɟ ɢɫɩɨɥɶɡɨɜɚɧɢɹ ɨɪɢɝɢɧɚɥɶɧɵɯ ɡɚɩɚɫɧɵɯ ɱɚɫɬɟɣ.
ɋɨɨɛɳɢɬɟ ɜ Ⱥɜɬɨɪɢɡɨɜɚɧɧɵɣ ɫɟɪɜɢɫɧɵɣ ɰɟɧɬɪ:
ɧɨɦɟɪ ɝɚɪɚɧɬɢɣɧɨɝɨ ɞɨɤɭɦɟɧɬɚ (ɫɟɪɜɢɫɧɨɣ ɤɧɢɠɤɢ,
x
ɫɟɪɜɢɫɧɨɝɨ ɫɟɪɬɢɮɢɤɚɬɚ ɢ ɬ.ɩ.);
ɦɨɞɟɥɶ ɩɥɢɬɵ (Ɇɨɞ.) ɢ ɫɟɪɢɣɧɵɣ ɧɨɦɟɪ (S/N),
x
ɭɤɚɡɚɧɧɵɟ ɜ ɢɧɮɨɪɦɚɰɢɨɧɧɨɣ ɬɚɛɥɢɱɤɟ, ɪɚɫɩɨɥɨɠɟɧɧɨɣ ɧɚ ɨɛɨɪɭɞɨɜɚɧɢɢ, ɧɚ ɭɩɚɤɨɜɤɟ ɢɥɢ
ɜ ɝɚɪɚɧɬɢɣɧɨɦ ɞɨɤɭɦɟɧɬɟ
.
RS
* Ⱦɥɹ ɧɟɤɨɬɨɪɵɯ ɦɨɞɢɮɢɤɚɰɢɣ ɦɨɞɟɥɢ.
68
Page 69

Ɉɪɧɚɬɭ
KZ
! ɀɚԙɚ ԕԝɪɵɥԑɵɧɵ ɿɫɤɟ ԕɨɫɩɚɫ ɛԝɪɵɧ ɧԝɫԕɚɭɥɵԕ
ɤɿɬɚɩɲɚɫɵɧ ɦԝԕɢɹɬ ɨԕɵɩ ɲɵԑɵԙɵɡ. Ɇԝɧɞɚ
ԕԝɪɵɥԑɵɧɵ ԕɚɭɿɩɫɿɡ ɨɪɧɚɬɭ ɠԥɧɟ ɨɧɵ ɩɚɣɞɚɥɚɧɭ
ɬɭɪɚɥɵ ɦɚԙɵɡɞɵ ɚԕɩɚɪɚɬɬɚɪ ԕɚɦɬɵɥԑɚɧ.
! Ʉɟɥɟɲɟɤɬɟ ɚɧɵԕɬɚɦɚ ɪɟɬɿɧɞɟ ԕɚɪɚɭ ԛɲɿɧ ɩɚɣɞɚɥɚɧɭ
ɧԝɫԕɚɭɥɵԑɵɧ ɫɚԕɬɚɩ ԕɨɣɵԙɵɡ. Ԕԝɪɵɥԑɵ ɫɚɬɵɥɫɚ,
ɛɿɪɟɭɝɟ ɛɟɪɿɥɫɟ ɧɟɦɟɫɟ ɠɵɥɠɵɬɵɥɫɚ, ɧԝɫԕɚɭɥɚɪ
ɨɧɵɦɟɧ ɛɿɪɝɟ ɛɨɥɚɬɵɧɵɧ ԕɚɦɬɚɦɚɫɵɡ ɟɬɿԙɿɡ.
! Ԕԝɪɵɥԑɵɧɵ ɧԝɫԕɚɭɥɚɪԑɚ ɫԥɣɤɟɫ ɚɪɧɚɣɵ ɛɿɥɿɤɬɿɥɿɝɿ
ɛɚɪ
ɦɚɦɚɧ ɨɪɧɚɬɭԑɚ ɬɢɿɫ.
! Ʉɟɡ ɤɟɥɝɟɧ ɬԛɪɞɟ ɪɟɬɬɟɭ ɧɟɦɟɫɟ ԕɵɡɦɟɬ ɤԧɪɫɟɬɭ
ԕɚɠɟɬ ɛɨɥɫɚ, ɨɧɵ ɩɥɢɬɚɧɵ ɬɨɤɬɚɧ ɚɠɵɪɚɬԕɚɧɧɚɧ
ɤɟɣɿɧ ɨɪɵɧɞɚɭ ɤɟɪɟɤ.
Ȼԧɥɦɟɧɿԙ ɠɟɥɞɟɬɿɥɭɿ
Ⱥԑɵɦɞɚԑɵ ɦɟɦɥɟɤɟɬɬɿɤ ɡɚԙɞɚɪԑɚ ɫԥɣɤɟɫ ԕԝɪɵɥԑɵɧɵ
ɬɟɤ ԛɡɞɿɤɫɿɡ ɠɟɥɞɟɬɿɥɟɬɿɧ ɛԧɥɦɟɥɟɪɝɟ ɨɪɧɚɬɭ ԕɚɠɟɬ.
Ԕԝɪɵɥԑɵ ɨɪɧɚɬɵɥԑɚɧ ɛԧɥɦɟ ɬɢɿɫɬɿ ɬԛɪɞɟ ɠɟɥɞɟɬɿɥɭɿ ɬɢɿɫ,
ɹԑɧɢ ԥɞɟɬɬɟɝɿ ɝɚɡ ɠɚɧɭ ɩɪɨɰɟɫɫɿɧɟ ԕɚɠɟɬɬɿ ɚɭɚ ɦԧɥɲɟɪɿ
ԕɚɦɬɚɦɚɫɵɡ ɟɬɿɥɭɿ ɤɟɪɟɤ
ԥɪɛɿɪ ɤȼɬ-ɧɚ 2 ɦ
3
/ɫɚԑ. ɦԥɧɿɧɟɧ ɚɡ ɛɨɥɦɚɭɵ ɬɢɿɫ).
(ɚɭɚ ɚԑɵɧɵ ɨɪɧɚɬɵɥԑɚɧ ԕɭɚɬɬɵԙ
Ɍɨɪɥɚɪɦɟɧ ԕɨɪԑɚɥԑɚɧ ɚɭɚ ɤɿɪɟɬɿɧ ɫɚԙɵɥɚɭɥɚɪɞɚ ɿɲɤɿ
ɤԧɥɞɟɧɟԙ ԕɢɦɚɫɵ ɤɟɦ ɞɟɝɟɧɞɟ 100 ɫɦ
2
ɬԛɬɿɤ ɛɨɥɭɵ ԕɚɠɟɬ
ɠԥɧɟ ɨɥɚɪ ɬɿɩɬɿ ɠɚɪɬɵɥɚɣ ɠɚɛɵɥɵɩ ԕɚɥɦɚɣɬɵɧɞɚɣ
ɨɪɧɚɥɚɫԕɚɧ ɛɨɥɭɵ ɬɢɿɫ (A ɫɭɪɟɬɿɧ Ωɚɪɚέɵɡ).
ɉɥɢɬɚ ɛɟɬɿ ɠɚɥɵɧɧɵԙ ԧɲɿɩ ԕɚɥɭɵɧɚ ԕɚɪɫɵ
ɫɚԕɬɚɧɞɵɪԑɵɲɩɟɧ ɠɚɛɞɵԕɬɚɥɦɚԑɚɧ ɛɨɥɫɚ, ɛԝɥ ɤɿɪɿɫ
ɫɚԙɵɥɚɭɥɚɪɵɧ 100%-ԑɚ ɤɟԙɟɣɬɭ ԕɚɠɟɬ, ɹԑɧɢ ɤԧɥɞɟɧɟԙ
ԕɢɦɚɫɵ ɤɟɦ ɞɟɝɟɧɞɟ 200 ɫɦ
2
ɛɨɥɭɵ ɬɢɿɫ. Ⱥɭɚ ɚԑɵɧɵ
ԑɢɦɚɪɚɬɬɵԙ ɨɪɬɚԕ ɛԧɥɿɤɬɟɪɿ, ԧɪɬ ԕɚɭɩɿ ɠɨԑɚɪɵ ɚɣɦɚԕɬɚɪ
ɧɟɦɟɫɟ ɠɚɬɚɬɵɧ ɛԧɥɦɟɥɟɪɞɿ ԕɨɫɩɚԑɚɧɞɚ, ɠɚԕɵɧɞɚԑɵ
ɛԧɥɦɟɥɟɪɞɟɧ ɠɚɧɚɦɚ ɬԛɪɞɟ ɛɟɪɿɥɟɬɿɧ ɛɨɥɫɚ (B ɫɭɪɟɬɿɧ
Ωɚɪɚέɵɡ), ɤɿɪɿɫ ɫɚԙɵɥɚɭɥɚɪɵɧɚ ɠɨԑɚɪɵɞɚ ɚɣɬɵɥԑɚɧɞɚɣ
ɫɵɪɬԕɚ ɲɵԑɚɪɚɬɵɧ ɠɟɥɞɟɬɭ ɬԛɬɿɤɬɟɪɿɧ ɨɪɧɚɬɭ ɤɟɪɟɤ.
A B
ɀɚɩɫɚɪɥɚɫ
ɛԧɥɦɟ
ɀɟɥɞɟɬɭɞɿ ԕɚɠɟɬ
ɟɬɟɬɿɧ ɛԧɥɦɟ
ɀɚɧɭ ɬԛɬɿɧɞɟɪɿɧ ɲɵԑɚɪɭ
Ԕɚɭɿɩɫɿɡ ԥɪɿ ɬɢɿɦɞɿ ԥɞɟɬɬɟɝɿ ɦԝɪɲɚԑɚ ԕɨɫɵɥԑɚɧ
ԕɚɥԕɚɧɵԙ ɧɟɦɟɫɟ ԕԝɪɵɥԑɵ ԕɨɫɵɥԑɚɧ ɤɟɡɞɟ
ɚɜɬɨɦɚɬɬɵ ɬԛɪɞɟ ԕɨɫɵɥɚɬɵɧ ɷɥɟɤɬɪ ɠɟɥɞɟɬɤɿɲɬɿԙ
ɤԧɦɟɝɿɦɟɧ ɠɚɧɭ ɬԛɬɿɧɞɟɪɿɧ ɲɵԑɚɪɭ ԕɚɦɬɚɦɚɫɵɡ ɟɬɿɥɭɿ
ɤɟɪɟɤ (ɫɭɪɟɬɬɿ Ωɚɪɚέɵɡ).
Ɍԛɬɿɧɞɟɪ ɬɿɤɟɥɟɣ
ɫɵɪɬԕɚ ɲɵԑɚɪɵɥɚɞɵ
Ɍԛɬɿɧɞɟɪ ɦԝɪɲɚ ɧɟɦɟɫɟ ɬɚԑɚɦ
ɩɿɫɿɪɭ ԕԝɪɵɥԑɵɥɚɪɵɧɚ ɚɪɧɚɥԑɚɧ
ɬɚɪɦɚԕɬɵ ɬԛɬɿɧ ɲɵԑɚɪɭ ɠԛɣɟɫɿ
ɚɪԕɵɥɵ ɲɵԑɚɪɵɥɚɞɵ)
! ɋԝɣɵɬɵɥԑɚɧ ɝɚɡɞɚɪ ɚɭɚɞɚɧ ɚɭɵɪ ɛɨɥɚɞɵ ɠԥɧɟ
ɟɞɟɧɞɟ ɠɢɧɚɥɚɞɵ, ɫɨɧɞɵԕɬɚɧ ɫԝɣɵɬɵɥԑɚɧ ɝɚɡ
ɛɚɥɥɨɧɞɚɪɵ ԕɨɣɵɥԑɚɧ ɛɚɪɥɵԕ ɛԧɥɦɟɥɟɪɞɟ
ɛɚɥɥɨɧɧɚɧ ɲɵԕԕɚɧ ɝɚɡ ɨԙɚɣ ɲɵԑɵɩ ɤɟɬɭɿ ԛɲɿɧ
ɫɵɪɬԕɚ
ɲɵԑɚɬɵɧ ɬɟɫɿɤɬɟɪ ɛɨɥɭɵ ɬɢɿɫ.
ɋɨɥ ɫɟɛɟɩɬɿ, ɫԝɣɵɬɵɥԑɚɧ ɝɚɡ ɛɚɥɥɨɧɞɚɪɵ, ɠɚɪɬɵɥɚɣ
ɧɟɦɟɫɟ ɬɨɥɵԕ ɛɨɥɫɚ ɞɚ, ɠɟɪ ɞɟԙɝɟɣɿɧɟɧ ɬԧɦɟɧ
ɛԧɥɦɟɥɟɪɞɟ ɧɟ ɫɚԕɬɚɭ ɚɭɦɚԕɬɚɪɵɧɞɚ (ɬԧɥɟ ɠԥɧɟ
ɬ.ɛ.) ɨɪɧɚɬɵɥɦɚɭɵ ɧɟɦɟɫɟ ɫɚԕɬɚɥɦɚɭɵ ɬɢɿɫ. Ɍɟɤ
ԕɨɥɞɚɧɵɫɬɚԑɵ ɛɚɥɥɨɧ ɛԧɥɦɟɞɟ ɫɚԕɬɚɥɭɵ ɤɟɪɟɤ; ɚɥ
ɨɧɵ ɛɚɥɥɨɧɧɵԙ ɬɟɦɩɟɪɚɬɭɪɚɫɵɧ 50°C-ɬɚɧ
ɠɨԑɚɪɵ ɤԧɬɟɪɿɩ ɠɿɛɟɪɭɿ ɦԛɦɤɿɧ ԕɵɡɭ ɤԧɡɞɟɪɿɧɟɧ
(ɩɟɲɬɟɪ, ɦԝɪɲɚɥɚɪ, ɤɚɦɢɧɞɟɪ) ɚɥɲɚԕ
ɠɟɪɞɟ ԝɫɬɚɭ
ԕɚɠɟɬ.
Ɉɪɧɚɥɚɫɬɵɪɭ ɠԥɧɟ ɬԛɡɭɥɟɭ
! Ԕԝɪɵɥԑɵɧɵ ɛɢɿɤɬɿɝɿ ɩɥɢɬɚɧɵԙ ɛɢɿɤɬɿɝɿɧɟɧ ɚɫɩɚɣɬɵɧ
ɲɤɚɮɬɚɪɞɵԙ ԕɚɫɵɧɚ ɨɪɧɚɬɭԑɚ ɛɨɥɚɞɵ.
A
ɀɚɧɭԑɚ ԕɚɠɟɬɬɿ ɚɭɚԑɚ
ɚɪɧɚɥԑɚɧ ɠɟɥɞɟɬɭ ɬɟɫɿɝɿ
ȿɫɿɤ ɩɟɧ ɟɞɟɧ ɚɪɚɫɵɧɞɚԑɵ
ɚɪɚɥɵԕɬɵ ԛɥɤɟɣɬɭ
! Ԕԝɪɵɥԑɵɧɵ ԝɡɚԕ ɭɚԕɵɬ ɩɚɣɞɚɥɚɧԑɚɧɧɚɧ ɤɟɣɿɧ
ɬɟɪɟɡɟɧɿ ɚɲɭ ɧɟɦɟɫɟ ԕɨɥɞɚɧɵɥɚɬɵɧ ɤɟɡ ɤɟɥɝɟɧ
ɠɟɥɞɟɬɤɿɲɬɟɪɞɿԙ ɠɵɥɞɚɦɞɵԑɵɧ ɚɪɬɬɵɪɭ ɠԧɧ
69
.
! Ԕԝɪɵɥԑɵɧɵԙ ɚɪɬԕɵ ɠɚԑɵɧɚ ɬɢɿɩ ɬԝɪɚɬɵɧ ԕɚɛɵɪԑɚ
ɠɚɧԑɵɲ ɟɦɟɫ, ԕɵɡɭԑɚ ɬԧɡɿɦɞɿ ɦɚɬɟɪɢɚɥɞɚɧ (T 90°C)
ɠɚɫɚɥԑɚɧɵɧɚ ɤԧɡ ɠɟɬɤɿɡɿԙɿɡ.
Ԕԝɪɵɥԑɵɧɵ ɞԝɪɵɫ ɨɪɧɚɬɭ ԛɲɿɧ:
• Ɉɧɵ ɚɫ ԛɣɝɟ, ɡɚɥԑɚ ɧɟɦɟɫɟ ɬԝɪԑɵɧ ԛɣɝɟ ԕɨɣɵԙɵɡ
(ɜɚɧɧɚԑɚ ԕɨɣɦɚԙɵɡ).
• ɉɥɢɬɚ ɲɤɚɮɬɚɪɞɚɧ ɛɢɿɤ ɛɨɥɫɚ, ԕԝɪɵɥԑɵɧɵ ɨɥɚɪɞɚɧ
ɤɟɦ ɞɟɝɟɧɞɟ 200 ɦɦ ԕɚɲɵԕ
ɨɪɧɚɬɭ ԕɚɠɟɬ.
• ɉɥɢɬɚ ԕɚɛɵɪԑɚԑɚ ɿɥɿɧɟɬɿɧ ɲɤɚɮɬɵԙ ɚɫɬɵɧɚ
ɨɪɧɚɬɵɥɫɚ, ɨɫɵ ɲɤɚɮ ɩɟɧ ɩɥɢɬɚ ԛɫɬɿɧɿԙ ɚɪɚɫɵɧɞɚ
ɤɟɦ ɞɟɝɟɧɞɟ 420 ɦɦ ɚɪɚɥɵԕ ɛɨɥɭɵ ɬɢɿɫ.
Ԕɚɛɵɪԑɚԑɚ ɿɥɿɧɟɬɿɧ ɲɤɚɮɬɚɪ ɠɚɧԑɵɲ ɦɚɬɟɪɢɚɥɞɚɧ
ɠɚɫɚɥԑɚɧ ɛɨɥɫɚ, ɛԝɥ ɚɪɚɥɵԕɬɵ 700 ɦɦ-ɝɟ ɞɟɣɿɧ
ɠɟɬɤɿɡɭ ɤɟɪɟɤ (ɫɭɪɟɬɬɿ Ωɚɪɚέɵɡ).
Page 70

Ɍԛɡɭɥɟɭ
• ɉɥɢɬɚ ɚɪɬɵɧɚ
ɧɟɦɟɫɟ ɨɧɵԙ ɲɟɬɬɟɪɿɧɟ
200 ɦɦ-ɞɟɧ ɠɚԕɵɧ
ɠɟɪɝɟ ɩɟɪɞɟ ɿɥɦɟԙɿɡ.
• Ԕɚɥԕɚɥɚɪ
ԕɚɬɵɫɬɵ ɩɚɣɞɚɥɚɧɭ
ɧԝɫԕɚɭɥɵԑɵɧɞɚԑɵ
ɧԝɫԕɚɭɥɚɪԑɚ ɫԥɣɤɟɫ
ɨɪɧɚɬɵɥɭɵ ɬɢɿɫ.
Ԕԝɪɵɥԑɵɧɵ ɬԛɡɭɥɟɭ ԕɚɠɟɬ
ɛɨɥɫɚ, ɩɥɢɬɚ ɬԛɛɿɧɿԙ ԥɪɛɿɪ
ɛԝɪɵɲɵɧɞɚԑɵ ɨɪɵɧɞɚɪɵɧɚ
ɪɟɬɬɟɥɟɬɿɧ ɚɹԕɬɚɪɵɧ ɛԝɪɚԙɵɡ
(ɫɭɪɟɬɬɿ Ωɚɪɚέɵɡ).
Ⱥɹԕɬɚɪ ɩɥɢɬɚ ɬԛɛɿɧɿԙ ɚɫɬɵɧԑɵ
ɠɚԑɵɧɞɚԑɵ ɬɟɫɿɤɬɟɪɝɟ
ɤɢɝɿɡɿɥɟɞɿ.
! Ԕԝɪɵɥԑɵ ɨɪɧɚɬɵɥԑɚɧɧɚɧ ɤɟɣɿɧ ɷɥɟɤɬɪ ɤɚɛɟɥɿ ɦɟɧ
ɪɨɡɟɬɤɚ ɠɚԕɵɧ ɠɟɪɞɟ ɛɨɥɭɵ ԕɚɠɟɬ.
! Ʉɚɛɟɥɶ ɢɿɥɦɟɭɿ ɧɟɦɟɫɟ ԕɵɫɵɥɦɚɭɵ ԕɚɠɟɬ.
! Ʉɚɛɟɥɶ ɠɢɿ ɬɟɤɫɟɪɿɥɿɩ, ɬɟɤ ԧɤɿɥɟɬɬɿ ɦɚɦɚɧɧɵԙ
ɤԧɦɟɝɿɦɟɧ ԑɚɧɚ ɚɥɦɚɫɬɵɪɵɥɭɵ ɬɢɿɫ.
! Ɉɫɵ ԕɚɭɿɩɫɿɡɞɿɤ ɲɚɪɚɥɚɪɵ ɫɚԕɬɚɥɦɚԑɚɧ ɠɚԑɞɚɣɞɚ
ԧɧɞɿɪɭɲɿ ɠɚɭɚɩɤɟɪɲɿɥɿɤɬɿ ԧɡ ɦɨɣɧɵɧɚ ɚɥɭɞɚɧ ɛɚɫ
ɬɚɪɬɚɞɵ.
Ƚɚɡɞɵ ɠɚɥԑɚɭ
Ⱥԑɵɦɞɚԑɵ ԝɥɬɬɵԕ ɡɚԙɞɚɪԑɚ ɫԥɣɤɟɫ ɠԥɧɟ ɛɟɪɿɥɟɬɿɧ
ɝɚɡ ɬԛɪɿɦɟɧ ԕԝɪɵɥԑɵ ɠԝɦɵɫ ɿɫɬɟɣ ɚɥɚɬɵɧɵɧɚ ɤԧɡ
ɠɟɬɤɿɡɝɟɧɧɟɧ ɤɟɣɿɧ ɝɚɡ ɠɟɥɿɫɿɧɟ ɧɟɦɟɫɟ ɝɚɡ ɛɚɥɥɨɧɵɧɚ
ɦɚɣɵɫԕɚԕ ɪɟɡɟԙɤɟ ɧɟ ɛɨɥɚɬ ɬԛɬɿɤɩɟɧ ԕɨɫɵɥɭԑɚ ɛɨɥɚɞɵ
(ԕɚԕɩɚԕɬɚԑɵ ɫɢɩɚɬɬɚɦɚ ɠɚɩɫɵɪɦɚɫɵɧ ԕɚɪɚԙɵɡ: ɨɥɚɣ
ɛɨɥɦɚɫɚ, ɬλɦɟɧɞɟɝɿ ɦιɬɿɧɞɿ Ωɚɪɚέɵɡ). Ȼɚɥɥɨɧɧɚɧ
ɫԝɣɵԕ ɝɚɡɞɵ ɩɚɣɞɚɥɚɧԑɚɧɞɚ, ɚԑɵɦɞɚԑɵ ԝɥɬɬɵԕ
ɡɚԙɧɚɦɚɥɚɪԑɚ ɫԥɣɤɟɫ ɤɟɥɟɬɿɧ ԕɵɫɵɦ ɪɟɬɬɟɝɿɲɿɧ
ɨɪɧɚɬɵԙɵɡ. Ԕɨɫɵɥɵɦɞɵ ɠɟԙɿɥɞɟɬɭ
ɲɟɬɤɟ ԕɚɪɚɣ ɛԝɪɭ ɤɟɪɟɤ*: ɬԛɬɿɤ ɬԝɬԕɵɲɵɧ ԕɚԕɩɚԕԕɚ
ԕɚɪɚɦɚ-ԕɚɪɫɵ ԕɨɣɵԙɵɡ ɠԥɧɟ ԕԝɪɵɥԑɵɦɟɧ ɛɿɪɝɟ
ɛɟɪɿɥɟɬɿɧ ɚɪɚɥɵԕ ԕɚɛɚɬɬɵ ɨɪɧɵɧɚ ԕɨɣɵԙɵɡ.
ԛɲɿɧ ɝɚɡ ɬԛɬɿɝɿɧ
KZ
Ɍɨɤԕɚ ɠɚɥԑɚɭ
Ԕԝɪɵɥԑɵɧɵԙ ɧɟɝɿɡɝɿ ɞɟɪɟɤɬɟɪ ɤɟɫɬɟɫɿɧɞɟ ɤԧɪɫɟɬɿɥɝɟɧ
ɠԛɤɬɟɦɟɝɟ ɫԥɣɤɟɫ ɫɬɚɧɞɚɪɬɬɵ ɲɬɟɩɫɟɥɶɞɿɤ ԝɲɬɵ
ɨɪɧɚɬɵԙɵɡ (ɌɟɯɧɢɤɚɥɵΩ ɞɟɪɟɤɬɟɪ ɤɟɫɬɟɫɿɧ Ωɚɪɚέɵɡ).
Ԕԝɪɵɥԑɵ ɬɿɤɟɥɟɣ ɷɥɟɤɬɪ ɠɟɥɿɫɿɧɟ ԕԝɪɵɥԑɵ ɦɟɧ ɷɥɟɤɬɪ ɠɟɥɿɫɿ
ɚɪɚɫɵɧɞɚ ɨɪɧɚɬɵɥԑɚɧ 3 ɦɦ ɚɲɵԕ ɤɿɲɤɟɧɟ ɛɚɣɥɚɧɵɫ ɛɚɪ
ɛɿɪɧɟɲɟ ɤɚɧɚɥɞɵ ɚɣɵɪɵɩ-ԕɨɫԕɵɲ ɚɪԕɵɥɵ ԕɨɫɵɥɭɵ ԕɚɠɟɬ.
Ⱥɣɵɪɵɩ-ԕɨɫԕɵɲ ɤԧɪɫɟɬɿɥɝɟɧ ɠԛɤɬɟɦɟɝɟ ɥɚɣɵԕɬɵ ɠԥɧɟ NFC
15-100 ɫɬɚɧɞɚɪɬɵɧɚ ɫԥɣɤɟɫ ɛɨɥɭɵ ԕɚɠɟɬ (ɠɟɪɝɟ ԕɨɫɵɥԑɚɧ
ɚɣɵɪɵɩ-ԕɨɫԕɵɲ ɚɠɵɪɚɬɩɚɭɵ ɬɢɿɫ). ɗɥɟɤɬɪ ɤɚɛɟɥɿɧ
ɫɵɦɞɵ
ɤɟɡ ɤɟɥɝɟɧ ɧԛɤɬɟɫɿ 50°C-ɬɚɧ ɠɨԑɚɪɵ ɬɟɦɩɟɪɚɬɭɪɚɦɟɧ
ɛɚɣɥɚɧɵɫɩɚɣɬɵɧɞɚɣ ɟɬɿɩ ɨɪɧɚɥɚɫɬɵɪɭ ԕɚɠɟɬ.
Ԕԝɪɵɥԑɵɧɵ ɬɨɤԕɚ ԕɨɫɩɚɫɬɚɧ ɛԝɪɵɧ ɬԧɦɟɧɞɟɝɿɥɟɪɞɿ
ɬɟɤɫɟɪɿԙɿɡ:
• Ԕԝɪɵɥԑɵ ɠɟɪɝɟ ԕɨɫɵɥԑɚɧ ɠԥɧɟ ɲɬɟɩɫɟɥɶɞɿɤ ԝɲ ɡɚԙԑɚ
ɫԥɣɤɟɫ ɛɨɥɵɩ ɬɚɛɵɥɚɞɵ.
• Ɋɨɡɟɬɤɚ ɧɟɝɿɡɝɿ ɞɟɪɟɤɬɟɪ ɤɟɫɬɟɫɿɧɞɟ ɤԧɪɫɟɬɿɥɝɟɧ
ԕԝɪɵɥԑɵɧɵԙ ɟԙ ɠɨԑɚɪԑɵ ɤԛɲɿɧɟ ɬԧɡɿɦɞɿ.
• Ʉɟɪɧɟɭ ɞɟɪɟɤɬɟɪ ɤɟɫɬɟɫɿɧɞɟ ɤԧɪɫɟɬɿɥɝɟɧ ɦԥɧ
ɚɪɚɥɵԑɵ ɚɭɦɚԑɵɧɞɚ
• Ɋɨɡɟɬɤɚ ԕԝɪɵɥԑɵɧɵԙ ɲɬɟɩɫɟɥɶɞɿɤ ԝɲɵɧɚ ɫԥɣɤɟɫ ɤɟɥɟɞɿ.
Ɋɨɡɟɬɤɚ ɲɬɟɩɫɟɥɶɞɿɤ ԝɲԕɚ ɫԥɣɤɟɫ ɛɨɥɦɚɫɚ, ԧɤɿɥɟɬɬɿ
ɦɚɦɚɧɧɚɧ ɨɧɵ ɚɭɵɫɬɵɪɵɩ ɛɟɪɭɞɿ ԧɬɿɧɿԙɿɡ. Ȼɿɪɧɟɲɟ
ɪɨɡɟɬɤɚɥɚɪ ɦɟɧ ԝɡɚɪɬԕɵɲ ɫɵɦɞɚɪɵɧ ɩɚɣɞɚɥɚɧɛɚԙɵɡ.
* Ɍɟɤ ɛɟɥɝɿɥɿ ɦɨɞɟɥɶɞɟɪɞɟ ɛɨɥɚɞɵ
ɛɨɥɚɞɵ.
! Ƚɚɡ ɛɟɪɭ ԕɵɫɵɦɵ Ɉɬɬɵԕ ɩɟɧ ɮɨɪɫɭɧɤɚɥɚɪ
ɫɢɩɚɬɬɚɪɵɧɵԙ ɤɟɫɬɟɫɿɧɞɟ ɤԧɪɫɟɬɿɥɝɟɧ ɦԥɧɞɟɪɝɟ
ɫԥɣɤɟɫ ɤɟɥɟɬɿɧɿɧ ɬɟɤɫɟɪɿԙɿɡ (ɬλɦɟɧɞɟɝɿ ɦιɬɿɧɞɿ
Ωɚɪɚέɵɡ). Ȼԝɥ ԕԝɪɵɥԑɵɧɵԙ ԕɚɭɿɩɫɿɡ ɠԝɦɵɫ ɿɫɬɟɭɿɧ
ɠԥɧɟ ɬԧɡɿɦɞɿɥɿɝɿɧ ԕɚɦɬɚɦɚɫɵɡ ɟɬɟ ɨɬɵɪɵɩ, ԕɭɚɬɬɵԙ
ɬɢɿɦɞɿ ɠԝɦɫɚɥɭɵɧɚ
Ɇɚɣɵɫԕɚԕ ɪɟɡɟԙɤɟ ɬԛɬɿɤɩɟɧ ɝɚɡɞɵ ɠɚɥԑɚɭ
Ɍԛɬɿɤ ɚԑɵɦɞɚԑɵ ԝɥɬɬɵԕ ɡɚԙɞɚɪԑɚ ɫԥɣɤɟɫ ɤɟɥɟɬɿɧɿɧɟ
ɤԧɡ ɠɟɬɤɿɡɿԙɿɡ. Ɍԛɬɿɤɬɿԙ ɿɲɤɿ ɞɢɚɦɟɬɪɿ ɦɵɧɚɞɚɣ ɛɨɥɭɵ
ɬɢɿɫ: ɫԝɣɵԕ ɝɚɡ ɛɟɪɭ ԛɲɿɧ 8 ɦɦ; ɦɟɬɚɧ ɝɚɡɵɧ ɛɟɪɭ
ԛɲɿɧ 13 ɦɦ.
Ԕɨɫɵɥɵɦ ɠɚɫɚɥԑɚɧɧɚɧ ɤɟɣɿɧ ɬԛɬɿɤɤɟ ɛɚɣɥɚɧɵɫɬɵ
ɤɟɥɟɫɿ ɠɚԑɞɚɣɥɚɪɞɵԙ ɨɪɵɧɞɚɥɭɵɧɚ ɤԧɡ ɠɟɬɤɿɡɿԙɿɡ:
• Ɍɟɦɩɟɪɚɬɭɪɚɫɵ 50°C-ɬɚɧ ɚɫɚɬɵɧ ɟɲɛɿɪ ɛԧɥɲɟɤɤɟ
ɬɢɦɟɣɞɿ.
• Ɉԑɚɧ ɟɲɛɿɪ ɬɚɪɬɭ
ԥɫɟɪ ɟɬɩɟɣɞɿ ɠԥɧɟ ɨɥ ɛԝɪɚɥɦɚԑɚɧ ɧɟ
ɦɚɣɵɫɬɵɪɵɥɦɚԑɚɧ.
• ɀԛɡɞɟɪɝɟ, ԛɲɤɿɪ ɛԝɪɵɲɬɚɪԑɚ ɧɟɦɟɫɟ ԕɨɡԑɚɥɦɚɥɵ
ɛԧɥɲɟɤɬɟɪɝɟ ɬɢɦɟɣɞɿ ɠԥɧɟ ԕɵɫɵɥɦɚԑɚɧ.
• ɀɚԑɞɚɣɵɧ ɬɟɤɫɟɪɭ ԛɲɿɧ ɛԛɤɿɥ ԝɡɵɧɞɵԑɵ ɛɨɣɵɧɲɚ
ɨԙɚɣ ԕɚɪɚɩ ɲɵԑɭԑɚ ɛɨɥɚɞɵ.
• 1500 ɦɦ-ɞɟɧ ԕɵɫԕɚ.
• Ⱥԑɵɦɞɚԑɵ ɡɚԙɞɚɪԑɚ ɫԥɣɤɟɫ ɤɟɥɟɬɿɧ ԕɵɫԕɵɲɬɚɪɦɟɧ
ɟɤɿ ɠɚԑɵɧɚɧ ɞɚ ɦɵԕɬɚɩ ɛɟɤɿɬɿɥɝɟɧ.
ɦԛɦɤɿɧɞɿɤ ɛɟɪɟɞɿ.
ɧɟɦɟɫɟ ɛԝɪɚɭ ɤԛɲɬɟɪɿ
70
Page 71

KZ
! Ɉɫɵ ɠɚԑɞɚɣɥɚɪɞɵԙ ɛɿɪɿ ɧɟɦɟɫɟ ɛɿɪɧɟɲɟɫɿ
ɨɪɵɧɞɚɥɦɚɫɚ ɧɟ ɩɥɢɬɚɧɵ 2-ɫɵɧɵɩ, 1-ɿɲɤɿ ɫɵɧɵɩ
ԕԝɪɵɥԑɵɥɚɪɵɧɚ (ɟɤɿ ɲɤɚɮ ɚɪɚɫɵɧɚ ɨɪɧɚɬɵɥɚɬɵɧ)
ԕɨɥɞɚɧɵɥɚɬɵɧ ɠɚԑɞɚɣɥɚɪԑɚ ɫԥɣɤɟɫ ɨɪɧɚɬɭ ԕɚɠɟɬ
ɛɨɥɫɚ, ɪɟɡɟԙɤɟ ɬԛɬɿɤ ɨɪɧɵɧɚ ɦɚɣɵɫԕɚԕ ɛɨɥɚɬ ɬԛɬɿɤ
ԕɨɥɞɚɧɵɥɭɵ ԕɚɠɟɬ (ɬλɦɟɧɞɟɝɿ ɦιɬɿɧɞɿ Ωɚɪɚέɵɡ).
Ɇɚɣɵɫԕɚԕ ɛɭɵɧɫɵɡ ɬɨɬ ɛɚɫɩɚɣɬɵɧ ɛɨɥɚɬɬɚɧ
ɠɚɫɚɥԑɚɧ ɬԛɬɿɤɬɿ ɨɣɦɚɫɵ ɛɚɪ ɠɚɥԑɚɭԑɚ ԕɨɫɭ
Ɍԛɬɿɤ ɩɟɧ ԕɵɫԕɵɲɬɚɪ ɚԑɵɦɞɚԑɵ ԝɥɬɬɵԕ ɡɚԙɞɚɪԑɚ
ɫԥɣɤɟɫ ɤɟɥɟɬɿɧɿɧɟ ɤԧɡ ɠɟɬɤɿɡɿԙɿɡ.
Ɍԛɬɿɤɬɿ ɩɚɣɞɚɥɚɧɚ ɛɚɫɬɚɭ ԛɲɿɧ ԕԝɪɵɥԑɵɞɚԑɵ ɬԛɬɿɤ
ɬԝɬԕɵɲɵɧ ɲɟɲɿɩ ɚɥɵԙɵɡ (ԕԝɪɵɥԑɵɞɚԑɵ ɝɚɡ ɛɟɪɭ ɤɿɪɿɫ
ɬɟɫɿɝɿ ɰɢɥɢɧɞɪ ɩɿɲɿɦɿɧɞɟɝɿ ɨɣɦɚɥɵ 1/2 ɝɚɡɞɵԕ ɟɪɤɟɤ
ɠɚɥԑɚɭ ɛɨɥɵɩ ɬɚɛɵɥɚɞɵ).
! Ɍԛɬɿɤ ԕɵɫɵɥɦɚԑɚɧɵɧ ɠԥɧɟ ԕɨɡԑɚɥɦɚɥɵ ɛԧɥɿɤɬɟɪɝɟ
ɬɢɦɟɣɬɿɧɿɧ ԕɚɦɬɚɦɚɫɵɡ ɟɬɟ ɨɬɵɪɵɩ, ɨɧɵԙ ԝɡɵɧɞɵԑɵ
ɤԧɛɿ 2 ɦ-ɞɟɧ ɚɫɩɚɣɬɵɧɞɚɣ ԕɵɥɵɩ ԕɨɫɵԙɵɡ.
ɟԙ
Ԕɨɫɵɥɵɦ ɝɚɡ ɠɿɛɟɪɦɟɣɬɿɧɿɧ ɬɟɤɫɟɪɭ
Ɉɪɧɚɬɭ ɚɹԕɬɚɥԑɚɧɧɚɧ ɤɟɣɿɧ, ɫɚɛɵɧɞɵ ɫɭɦɟɧ ɬԛɬɿɤ
ɮɢɬɢɧɝɬɟɪɿɧɞɟ ɬɟɫɿɤɬɟɪɞɿԙ ɛɚɪ ɧɟ ɠɨԕ ɟɤɟɧɿɧ
ɬɟɤɫɟɪɿԙɿɡ. ȿɲԕɚɲɚɧɞɚ ɚɥɚɭɞɵ ԕɨɥɞɚɧɭɲɵ ɛɨɥɦɚԙɵɡ.
Ƚɚɡ ɬԛɪɥɟɪɿɧɟ ɫԥɣɤɟɫɬɟɧɞɿɪɭ
Ԕԝɪɵɥԑɵɧɵ ԥɞɟɩɤɿ ɝɚɡ ɬԛɪɿɧɟɧ (ɨɥ ԕɚԕɩɚԕɬɚԑɵ
ɫɢɩɚɬɬɚɦɚ ɠɚɩɫɵɪɦɚɫɵɧɞɚ ɤԧɪɫɟɬɿɥɝɟɧ) ɛɚɫԕɚ ɬԛɪɝɟ
ɫԥɣɤɟɫɬɟɧɞɿɪɭɝɟ ɛɨɥɚɞɵ.
ɉɥɢɬɚɧɵ ɫԥɣɤɟɫɬɟɧɞɿɪɭ
ɉɥɢɬɚ ɨɬɬɵԕɬɚɪɵɧɵԙ ɮɨɪɫɭɧɤɚɥɚɪɵɧ ɚɭɵɫɬɵɪɭ:
1. ɉɥɢɬɚ ɬɨɪɥɚɪɵɧ ɚɥɵɩ, ɨɬɬɵԕɬɚɪɞɵ ɬɿɪɟɤɬɟɪɿɧɟɧ
ɫɵɪԑɵɬɵɩ ɲɵԑɚɪɵԙɵɡ.
2. Ɏɨɪɫɭɧɤɚɥɚɪɞɵ 7 ɦɦ ɝɚɣɤɚ
ɤɿɥɬɿɦɟɧ (ɫɭɪɟɬɬɿ Ωɚɪɚέɵɡ)
ɛɨɫɚɬɵɩ, ɲɵԑɚɪɵɩ ɚɥɵԙɵɡ
ɞɚ, ɝɚɡɞɵԙ ɛɚɫԕɚ ɬԛɪɿɧɟ
ɚɪɧɚɥԑɚɧ ɮɨɪɫɭɧɤɚɥɚɪɦɟɧ
ɚɥɦɚɫɬɵɪɵԙɵɡ(ɈɬɬɵΩ ɩɟɧ
ɮɨɪɫɭɧɤɚɥɚɪ ɫɢɩɚɬɬɚɪɵɧɵέ
ɤɟɫɬɟɫɿɧ Ωɚɪɚέɵɡ).
3. Ȼɚɪɥɵԕ ԕԝɪɚɦɞɚɫ
ɤɟɪɿɫɿɧɲɟ ɨɪɵɧɞɚɭ ɚɪԕɵɥɵ ɚɥɦɚɫɬɵɪɵԙɵɡ.
ɉɥɢɬɚ ɨɬɬɵԕɬɚɪɵɧɵԙ ɟԙ ɬԧɦɟɧɝɿ ɩɚɪɚɦɟɬɪɿɧ ɪɟɬɬɟɭ:
1. Ɍԝɬԕɚɧɵ ɟԙ ɬԧɦɟɧɝɿ ɩɨɡɢɰɢɹԑɚ ɛԝɪɵԙɵɡ.
2. Ɍԝɬԕɚ ɲɟɲɿɩ ɚɥɵɩ, ɬԝɬԕɚ ɲɟɝɟɫɿɧɿԙ ɿɲɿɧɞɟ ɧɟɦɟɫɟ
ɨɧɵԙ ɠɚɧɵɧɞɚ ɨɪɧɚɥɚɫԕɚɧ ɪɟɬɬɟɭ ɛԝɪɚɧɞɚɫɵɧ
ɠɚɥɵɧ ɤɿɲɿ ɛɿɪɚԕ ɬԝɪɚԕɬɵ ɛɨɥԑɚɧɲɚ ɪɟɬɬɟԙɿɡ.
! Ԕԝɪɵɥԑɵ ɫԝɣɵԕ ɝɚɡ ɤԧɡɿɧɟ ɠɚɥԑɚɧԑɚɧ ɛɨɥɫɚ, ɪɟɬɬɟɭ
ɛԝɪɚɧɞɚɫɵ ɦԛɦɤɿɧ ɛɨɥԑɚɧɲɚ ɦɵԕɬɵ ɛɟɤɿɬɿɥɭɿ
ɛԧɥɿɤɬɟɪɞɿ ɠɨԑɚɪɵɞɚԑɵ ɧԝɫԕɚɭɥɚɪɞɵ
ɤɟɪɟɤ.
3. Ɉɬɬɵԕ ɠɚɧɵɩ ɬԝɪԑɚɧɞɚ ɬԝɬԕɚ ɩɨɡɢɰɢɹɫɵɧ ɛɿɪɧɟɲɟ ɦԥɪɬɟ
ɟԙ ɬԧɦɟɧɝɿɞɟɧ ɟԙ ɠɨԑɚɪɵԑɚ ɠԥɧɟ ԕɚɪɚɦɚ-ԕɚɪɫɵ ɠɵɥɞɚɦ
ɚɭɵɫɬɵɪɵɩ, ɠɚɥɵɧ ԧɲɿɩ ԕɚɥɦɚɣɬɵɧɵɧ ɬɟɤɫɟɪɿԙɿɡ.
! ɉɥɢɬɚ ɨɬɬɵԕɬɚɪɵ ԛɲɿɧ ɧɟɝɿɡɝɿ ɚɭɚɧɵ ɪɟɬɬɟɭ ԕɚɠɟɬ ɟɦɟɫ.
ɉɟɲɬɿ ɛɚɩɬɚɧɞɵɪɭ
ɉɟɲɬɿԙ ɨɬɬɵԑɵɧɵԙ ɮɨɪɫɭɧɤɚɫɵɧ ɚɭɵɫɬɵɪɭ:
1. ɉɟɲ ɛԧɥɿɝɿɧ ɲɟɲɿɩ ɚɥɵԙɵɡ.
2. «Ⱥ» ԕɨɪԑɚɭɲɵ ɬɚԕɬɚɫɵɧ
ɫɵɪԑɵɬɵɩ ɲɵԑɚɪɵɩ ɚɥɵԙɵɡ
(ɫɵɡɛɚɧɵ Ωɚɪɚέɵɡ).
A
3. «V» ɛԝɪɚɧɞɚɥɚɪɵɧ
V
ɛɨɫɚɬԕɚɧɧɚɧ
ɤɟɣɿɧ
ɩɟɲ
ɨɬɬɵԑɵɧ ɲɟɲɿɩ ɚɥɵԙɵɡ
(ɫɭɪɟɬɬɿ Ωɚɪɚέɵɡ).
ɉɟɲ ɟɫɿɝɿɧ ɲɟɲɿɩ ɚɥɫɚԙɵɡ,
ɛԝɥ ԥɪɟɤɟɬɬɟɪɞɿ ɨɪɵɧɞɚɭ
ɠɟԙɿɥɿɪɟɤ ɛɨɥɚɞɵ.
4. Ɏɨɪɫɭɧɤɚɧɵ ɚɪɧɚɣɵ
ɮɨɪɫɭɧɤɚ ɤɟɫɩɟɥɬɟɤ ɤɿɥɬɿɦɟɧ
(ɫɭɪɟɬɬɿ Ωɚɪɚέɵɡ) ɧɟɦɟɫɟ 7
ɦɦ ɤɟɫɩɟɥɬɟɤ ɤɿɥɬɿɦɟɧ ɛԝɪɚɩ
ɲɟɲɿɩ ɚɥɵԙɵɡ ɠԥɧɟ ɨɧɵ ɠɚԙɚ
ɝɚɡ ɬԛɪɿɧɟ ɫԥɣɤɟɫ ɤɟɥɟɬɿɧ ɠɚԙɚ
ɮɨɪɫɭɧɤɚɦɟɧ ɚɭɵɫɬɵɪɵԙɵɡ
(Ωɚɪɚέɵɡ ɈɬɬɵΩ ɩɟɧ
ɮɨɪɫɭɧɤɚɥɚɪ ɫɢɩɚɬɬɚɪɵɧɵέ ɤɟɫɬɟɫɿ).
Ƚɚɡ ɩɟɲɿɧɿԙ ɨɬɬɵԑɵɧɵԙ
ɟԙ ɬԧɦɟɧ ɩɚɪɚɦɟɬɪɿɧ ɪɟɬɬɟɭ:
1. Ɉɬɬɵԕɬɵ ɠɚԑɵԙɵɡ («Ψɨɫɭ ɠιɧɟ ɩɚɣɞɚɥɚɧɭ» ɛλɥɿɦɿɧ
Ωɚɪɚέɵɡ).
2. Ɍԝɬԕɚɧɵ ɟԙ ɠɨԑɚɪԑɵ ɩɨɡɢɰɢɹɞɚ (ȿԙ ɠɨԑɚɪɵ) ɲɚɦɚɦɟɧ
10 ɦɢɧɭɬ ԝɫɬɚԑɚɧɧɚɧ ɤɟɣɿɧ ɟԙ ɬԧɦɟɧɝɿ ɩɨɡɢɰɢɹԑɚ (ȿԙ ɬԧɦɟɧ)
ɛԝɪɵԙɵɡ.
3. Ɍԝɬԕɚɧɵ ɚɥɵɩ ɬɚɫɬɚԙɵɡ.
4. Ɍɟɪɦɨɫɬɚɬ ɲɟɝɟɫɿɧɿԙ ɫɵɪɬԕɵ ɠɚԑɵɧɞɚԑɵ ɪɟɬɬɟɭ
ɛԝɪɚɧɞɚɥɚɪɵɧ (ɫɭɪɟɬɬɿ Ωɚɪɚέɵɡ) ɠɚɥɵɧ ɤɿɲɿ ɛɿɪɚԕ
ɬԝɪɚԕɬɵ ɛɨɥԑɚɧɲɚ ԕɚɬɚɣɬɵԙɵɡ ɧɟɦɟɫɟ ɛɨɫɚɬɵԙɵɡ.
!
Ԕԝɪɵɥԑɵ
ɫԝɣɵԕ ɝɚɡԑɚ ɠɚɥԑɚɧԑɚɧ ɛɨɥɫɚ, ɪɟɬɬɟɭ
ɛԝɪɚɧɞɚɫɵ ɦԛɦɤɿɧ ɛɨɥԑɚɧɲɚ ɦɵԕɬɵ ɛɟɤɿɬɿɥɭɿ ɤɟɪɟɤ.
71
Page 72

5. Ɍԝɬԕɚɧɵ «ȿԙ ɠɨԑɚɪɵ» ɩɨɡɢɰɢɹɞɚɧ «ȿԙ ɬԧɦɟɧ»
S
S
R
A
ɩɨɡɢɰɢɹԑɚ ɬɟɡ ɛԝɪɵԙɵɡ ɧɟɦɟɫɟ ɩɟɲ ɟɫɿɝɿɧ ɚɲɵɩ,
ɠɚɛɵԙɵɡ, ɛɿɪɚԕ ɨɬɬɵԕ ԧɲɿɩ ԕɚɥɦɚɣɬɵɧɵɧɚ ɤԧɡ
ɠɟɬɤɿɡɿԙɿɡ.
ɉɟɲɬɿ ɚɥԑɚɲ ɪɟɬ ԕɨɥɞɚɧɛɚɫ ɛԝɪɵɧ «Ʉԛɬɿɦ ɠԥɧɟ
ɬɟɯɧɢɤɚɥɵԕ ԕɵɡɦɟɬ ɤԧɪɫɟɬɭ» ɛԧɥɿɦɿɧɞɟ ɛɟɪɿɥɝɟɧ
ɧԝɫԕɚɭɥɚɪԑɚ ɫԥɣɤɟɫ ɨɧɵ ɬɚɡɚɥɚɩ ɚɥԑɚɧ ɠԧɧ.
KN3G2S/UA
KN3G20/UA
ɌȿɏɇɂɄȺɅɕԔ ȾȿɊȿɄɌȿɊ
ɉɟɲ ԧɥɲɟɦɞɟɪɿ
(ȻɯȿɯɌ)
34x39x44 ɫɦ
Ʉԧɥɟɦɿ 58 ɥ
ɉɟɲ ɛԧɥɿɝɿɧɟ
ԕɚɬɵɫɬɵ ɩɚɣɞɚɥɵ
ԧɥɲɟɦɞɟɪ
Ɍɨɤ ɤɟɪɧɟɭɿ ɦɟɧ
ɠɢɿɥɿɝɿ
ɟɧɿ 42 ɫɦ
ɬɟɪɟԙɞɿɝɿ 44 ɫɦ
ɛɢɿɤɬɿɝɿ 17 ɫɦ
ɞɟɪɟɤɬɟɪ ɤɟɫɬɟɫɿɧ ԕɚɪɚԙɵɡ
ԕɚɣɵɪɦɚ ɿɲɿɧɞɟ ɧɟɦɟɫɟ ɩɟɲ
ɛԧɥɿɝɿɧ ɚɲԕɚɧɞɚ ɩɟɲɬɿԙ ɿɲɿɧɞɟɝɿ
Ɉɬɬɵԕɬɚɪ
ɫɨɥ ɠɚԕ ԕɚɛɵɪԑɚɞɚ ɨɪɧɚɥɚɫԕɚɧ
ɞɟɪɟɤɬɟɪ ɤɟɫɬɟɫɿɧɞɟ ɤԧɪɫɟɬɿɥɝɟɧ
ɤɟɡ ɤɟɥɝɟɧ ɝɚɡ ɬԛɪɿɦɟɧ ԕɨɥɞɚɧɭ
ԛɲɿɧ ɛɚɩɬɚɧɞɵɪɭԑɚ ɛɨɥɚɞɵ
ȿԔ Ⱦɢɪɟɤɬɢɜɚɥɚɪɵ: 12.12.2006
ɠɵɥԑɵ 2006/95/EC (ɬԧɦɟɧ
ɤɟɪɧɟɭ) ɠԥɧɟ ɤɟɣɿɧɝɿ ԧɡɝɟɪɬɭɥɟɪɿ
– 15.12.04 ɠɵɥԑɵ 2004/108/EC
(ɗɥɟɤɬɪɨɦɚɝɧɢɬɬɿ ԛɣɥɟɫɿɦɞɿɥɿɤ)
ɠԥɧɟ ɤɟɣɿɧɝɿ ԧɡɝɟɪɬɭɥɟɪɿ –
30.1 1 .2009 ɠɵɥԑɵ 2009/142/EC
(Ƚɚɡ) ɠԥɧɟ ɤɟɣɿɧɝɿ ԧɡɝɟɪɬɭɥɟɪ
– 22.07.1993 ɠɵɥԑɵ 93/68/
EEC ɠԥɧɟ ɤɟɣɿɧɝɿ ԧɡɝɟɪɬɭɥɟɪɿ –
2002/96/EC.
1275/2008 (Ʉԛɬɭ/ԧɲɿɪɭɥɿ ɪɟɠɢɦ)
KZ
Ɉɬɬɵԕ ɩɟɧ ɮɨɪɫɭɧɤɚɥɚɪ ɫɢɩɚɬɬɚɪɵɧɵԙ ɤɟɫɬɟɫɿ
1-ɤɟɫɬɟ ɋԝɣɵԕ ɝɚɡ Ɍɚɛɢԑɢ ɝɚɡ
Ɉɬɬɵԕ Ⱦɢɚɦɟɬɪ
ɀɵɥɞɚɦ
(ԛɥɤɟɧ)(R)
ɀɚɪɬɵɥɚɣ
ɠɵɥɞɚɦ
(ɨɪɬɚɲɚ)(S)
Ԕɨɫɵɦɲɚ
(ɤɿɲɿ)(A)
ɉɟɲ - 1.0 46 80 204 200 119 267 132 257
ɀɟɬɤɿɡɭ
ԕɵɫɵɦɞɚɪɵ
(ɦɦ)
100
75 1.90 0.4 30 70
51 1.00 0.4 30 52 73 71 76 95
* 15°C ɠԥɧɟ 1013 ɦɛɚɪɪ ɠɚԑɞɚɣɵɧɞɚ –
ԕԝɪԑɚԕ ɝɚɡ
** ɉɪɨɩɚɧ P.C.S. = 50,37 ɆȾɠ/ɤɝ
*** Ȼɭɬɚɧ P.C.S. = 49,47 ɆȾɠ/ɤɝ
Ɍɚɛɢԑɢ P.C.S. = 37,78 ɆȾɠ/ɦ
ɀɵɥɭ ԕɭɚɬɵ, ɤȼɬ (p.c.s.*) Ⱥɣɧɚɥɵɩ
ɇɨɦɢɧɚɥɞɵ Ⱥɡɚɣɬɵɥԑɚɧ (ɦɦ)(ɦɦ)
3.00
2,80
ɇɨɦɢɧɚɥɞɵ (ɦɛɚɪ)
ȿԙ ɬԧɦɟɧ (ɦɛɚɪ)
ȿԙ ɠɨԑɚɪɵ
(ɦɛɚɪ)
0.7 41 87 218 214 128 286
ԧɬɭ 1/100
3
Ɏɨɪɫɭɧɤɚ
1/100
Ⱥԑɵɦ* ɝ/ɫɚԑ Ɏɨɪɫɭɧɤɚ
***
138 136
30
28-
20
35
37
25
45
1/100
(ɦɦ)(ɦɦ)
**
104 181
20
17
25
Ⱥԑɵɦ*
ɥ/ɫɚԑ
Ɏɨɪɫɭɧɤɚ
1/100
143 286
118 181
80 95
13
6,5
18
Ⱥԑɵɦ*
ɥ/ɫɚԑ
72
Page 73

Ԕɨɫɭ ɠԥɧɟ ɩɚɣɞɚɥɚɧɭ
ɉɥɢɬɚɧɵ ԕɨɥɞɚɧɭ
KZ
Ɉɬɬɵԕɬɚɪɞɵ ɠɚԑɭ
Ԥɪɛɿɪ ɈɌɌɕԔ ɬԝɬԕɚɫɵɧɞɚ ԕɚɬɵɫɬɵ ɨɬɬɵԕ
ɠɚɥɵɧɵɧɵԙ ɤԛɲɿɧ ɤԧɪɫɟɬɟɬɿɧ ɬɨɥɵԕ ɲɟԙɛɟɪ ɛɚɪ.
ɉɥɢɬɚɞɚԑɵ ɨɬɬɵԕɬɚɪɞɵԙ ɛɿɪɿɧ ɠɚԑɭ ԛɲɿɧ:
1. Ɉɬɬɵԕԕɚ ɠɚɥɵɧɞɵ ɧɟɦɟɫɟ ɝɚɡ ɠɚԕɩɚԑɵɧ
ɠɚԕɵɧɞɚɬɵԙɵɡ.
2. ɈɌɌɕԔ ɬԝɬԕɚɫɵɧ ɛɚɫɵɩ, ɨɥ ɟԙ ɠɨԑɚɪԑɵ ɠɚɥɵɧ
ɩɚɪɚɦɟɬɪɿɧɟ ( ɛɚԑɵɬɬɚɥԑɚɧɲɚ, ɫɚԑɚɬ ɬɿɥɿɧɟ ԕɚɪɫɵ
ɛɚԑɵɬɬɚ ɛԝɪɵԙɵɡ.
3. ɈɌɌɕԔ ɬԝɬԕɚɫɵɧ ɫɚԑɚɬ ɬɿɥɿɧɟ ԕɚɪɫɵ ɛɚԑɵɬɬɚ ɛԝɪɭ
ɚɪԕɵɥɵ ɠɚɥɵɧ ɤԛɲɿɧ ԕɚɠɟɬɬɿ
Ɉɥ ɟԙ ɬԧɦɟɧɝɿ ɩɚɪɚɦɟɬɪ &, ɟԙ ɠɨԑɚɪԑɵ ɩɚɪɚɦɟɬɪ (
ɧɟɦɟɫɟ ɟɤɟɭɿɧɿԙ ɚɪɚɫɵɧɞɚԑɵ ɤɟɡ ɤɟɥɝɟɧ ɩɨɡɢɰɢɹ
ɛɨɥɭɵ ɦԛɦɤɿɧ.
ɟԙ ɠɨԑɚɪԑɵ ɠɚɥɵɧ ɩɚɪɚɦɟɬɪɿɧɟ ԕɚɪɚɣ, ɫɚԑɚɬ ɬɿɥɿɧɟ
ԕɚɪɫɵ ɛɚԑɵɬɬɚ ɛԝɪɵԙɵɡ. Ɍԝɬԕɚ ɛɨɫɚɬɵɥԑɚɧɞɚ ɨɬɬɵԕ
ԧɲɿɩ ԕɚɥɭɵ ɦԛɦɤɿɧ. Ȼԝɥ ɨɪɵɧ ɚɥɫɚ, ɬԝɬԕɚɧɵ ԝɡɚԑɵɪɚԕ
ԝɫɬɚɩ, ԥɪɟɤɟɬɬɿ ԕɚɣɬɚɥɚԙɵɡ.
ɞɟԙɝɟɣɝɟ ɪɟɬɬɟԙɿɡ.
Ԕԝɪɵɥԑɵ ɷɥɟɤɬɪɨɧɞɵԕ
ɠɚԑɭ ԕԝɪɚɥɵɦɟɧ* (C)
ɠɚɛɞɵԕɬɚɥԑɚɧ ɛɨɥɫɚ,
ɬɚԙɛɚɫɵɦɟɧ ɛɟɥɝɿɥɟɧɝɟɧ
ɬԝɬɚɬɭ ɬԛɣɦɟɫɿɧ ɛɚɫɵԙɵɡ,
ɨɞɚɧ ɤɟɣɿɧ ɈɌɌɕԔ ɬԝɬԕɚɫɵɧ
ɛɚɫɵɩ, ɨɧɵ ɨɬɬɵԕ ɠɚɧԑɚɧɲɚ
Ɉɬɬɵԕ ø ɕɞɵɫ ɞɢɚɦɟɬɪɿ (ɫɦ)
ɀɵɥɞɚɦ (R) 24 - 26
ɀɚɪɬɵɥɚɣ ɠɵɥɞɚɦ
(S)
16 - 20
Ԕɨɫɵɦɲɚ (A) 10 - 14
Ɉɬɬɵԕ ɬԛɪɿɧ ɚɧɵԕɬɚɭ ԛɲɿɧ «Ɉɬɬɵԕ ɩɟɧ
ɮɨɪɫɭɧɤɚɥɚɪɞɵԙ ɫɢɩɚɬɬɚɪɵ» ɿɲɿɧɞɟɝɿ ɫɵɡɛɚɥɚɪɞɵ
ԕɚɪɚԙɵɡ.
! Ɍԧɦɟɧɞɟɬɤɿɲ ɫԧɪɟɦɟɧ ɠɚɛɞɵԕɬɚɥԑɚɧ ԛɥɝɿɥɟɪɞɟ
ɞɢɚɦɟɬɪɿ 12 ɫɦ-ɞɟɧ ɚɡ ɤɿɲɿ ɬɚɛɚԕɬɚɪɞɵ ԕɨɥɞɚɧԑɚɧ
ɤɟɡɞɟ ɨɧɵ ɬɟɤ ԕɨɫɵɦɲɚ ɨɬɬɵԕɬɚ ԑɚɧɚ ɩɚɣɞɚɥɚɧɭԑɚ
ɛɨɥɚɬɵɧɵɧ ɟɫɿԙɿɡɞɟ ɛɨɥɫɵɧ.
ɉɟɲɬɿ ԕɨɥɞɚɧɭ
! Ԕԝɪɵɥԑɵɧɵ ɚɥԑɚɲ ɪɟɬ ɩɚɣɞɚɥɚɧԑɚɧɞɚ ɨɧɵ ɛɨɫ
ɤԛɣɿɧɞɟ ɟɫɿɝɿɧ ɠɚɭɵɩ, ɟԙ ɠɨԑɚɪԑɵ ɬɟɦɩɟɪɚɬɭɪɚɞɚ
ɤɟɦɿɧɞɟ ɠɚɪɬɵ ɫɚԑɚɬɬɚɣ ԕɵɡɞɵɪɵԙɵɡ. ɉɟɲɬɿ
ԧɲɿɪɿɩ, ɨɧɵԙ ɟɫɿɝɿɧ ɚɲɩɚɫɬɚɧ ɛԝɪɵɧ ɛԧɥɦɟɧɿԙ
ɠɚԕɫɵ ɠɟɥɞɟɬɿɥɝɟɧɿɧ ɬɟɤɫɟɪɿԙɿɡ. Ԧɧɞɿɪɭ ɤɟɡɿɧɞɟ
ԕɨɥɞɚɧɵɥԑɚɧ ԕɨɪԑɚԑɵɲ ɡɚɬɬɚɪɞɵԙ ɠɚɧɵɩ ɤɟɬɭɿɧɟ
ɛɚɣɥɚɧɵɫɬɵ ɠɟԙɿɥ ɠɚԑɵɦɫɵɡ ɢɿɫ ɲɵԑɭɵ ɦԛɦɤɿɧ.
! Ԧɧɿɦɞɿ ɩɚɣɞɚɥɚɧɛɚɫ ɛԝɪɵɧ ԕԝɪɵɥԑɵɧɵԙ
ɛԛɣɿɪɥɟɪɿɧɞɟɝɿ ɛɚɪɥɵԕ ɩɥɚɫɬɢɤɚɥɵԕ ԛɥɞɿɪɥɟɪɞɿ ɚɥɵɩ
ɬɚɫɬɚԙɵɡ
.
! ɀɚɥɵɧ ɛɚɣԕɚɭɫɵɡ ԧɲɿɪɿɥɫɟ, ɨɬɬɵԕɬɵ ԧɲɿɪɿԙɿɡ ɞɟ,
ɨɧɵ ԕɚɣɬɚɞɚɧ ɠɚԕɩɚɫ ɛԝɪɵɧ ɤɟɦ ɞɟɝɟɧɞɟ 1
ɤԛɬɿԙɿɡ.
Ԕԝɪɵɥԑɵ ɠɚɥɵɧɧɵԙ ԧɲɿɩ ԕɚɥɭɵɧɚ ԕɚɪɫɵ
ɫɚԕɬɚɧɞɵɪԑɵɲɩɟɧ (X)* ɠɚɛɞɵԕɬɚɥԑɚɧ ɛɨɥɫɚ, ɠɚɥɵɧɧɵԙ
ɠɚɧɵɩ ɬԝɪɭɵ ɠԥɧɟ ԕԝɪɚɥɞɵ ɿɫɤɟ ԕɨɫɭ ԛɲɿɧ ɈɌɌɕԔ
ɬԝɬԕɚɫɵɧ ɲɚɦɚɦɟɧ 2-3 ɫɟɤɭɧɞ ɛɚɫɵɩ, ԝɫɬɚɩ ɬԝɪɵԙɵɡ.
Ɉɬɬɵԕɬɵ ԧɲɿɪɭ ԛɲɿɧ ɬԝɬԕɚɧɵ ɬɨԕɬɚɭ ɩɨɡɢɰɢɹɫɵɧɚ
ɠɟɬɤɟɧɲɟ ɛԝɪɵԙɵɡ.
Ɉɬɬɵԕɬɚɪɞɵ ɩɚɣɞɚɥɚɧɭ ɛɨɣɵɧɲɚ ɤɟԙɟɫɬɟɪ
Ɉɬɬɵԕɬɚɪ ɟԙ ɬɢɿɦɞɿ ɬԛɪɞɟ ɠԝɦɵɫ ɿɫɬɟɭɿ ɠԥɧɟ
ɬԝɬɵɧɵɥɚɬɵɧ ɝɚɡ ɦԧɥɲɟɪɿɧ ԛɧɟɦɞɟɭɿ ԛɲɿɧ ԕɚԕɩɚԑɵ
ɛɚɪ ɠԥɧɟ ɚɫɬɵ ɬɟɝɿɫ ɬɚɛɚɥɚɪɞɵ ԑɚɧɚ ԕɨɥɞɚɧԑɚɧ ɠԧɧ.
ɋɨɧɞɚɣ-ɚԕ, ɨɥɚɪ ɨɬɬɵԕɬɵԙ ԧɥɲɟɦɿɧɟ ɫԥɣɤɟɫ ɤɟɥɭɿ
ɬɢɿɫ.
ȿɋɄȿɊɌɍ! ɒɵɧɵ ԕɚԕɩɚԕ ԕɵɡɫɚ
ɫɵɧɵɩ ɤɟɬɭɿ ɦԛɦɤɿɧ. Ԕɚԕɩɚԕɬɵ
ɠɚɩɩɚɫ ɛԝɪɵɧ ɛɚɪɥɵԕ ɨɬɬɵԕɬɚɪ
ɦɟɧ ɷɥɟɤɬɪ ɤɨɧɮɨɪɤɚɥɚɪɞɵ
ԧɲɿɪɿԙɿɡ. *Ɍɟɤ ɲɵɧɵ ԕɚԕɩɚԑɵ ɛɚɪ
ɦɨɞɟɥɶɞɟɪ ԛɲɿɧ ԕɨɥɞɚɧɵɥɚɞɵ.
ɦɢɧɭɬ
•
! ȿɲԕɚɲɚɧ ɩɟɲɬɿԙ ɚɫɬɵԙԑɵ ɠɚԑɵɧɚ ɡɚɬ ԕɨɣɦɚԙɵɡ;
ɛԝɥ ɷɦɚɥɶɞɿ ԕɚɛɚɬɬɵ ɡɚԕɵɦɞɚɣɞɵ. Ƚɪɢɥɶ-ɛɚɪ
ɿɫɬɿɝɿɦɟɧ ɩɿɫɿɪɝɟɧ ɤɟɡɞɟ ɩɟɲɬɟ ɬɟɤ 1-ɩɨɡɢɰɢɹɧɵ
ԕɨɥɞɚɧɵԙɵɡ.
ɉɟɲɬɿ ɠɚԑɭ
ɉɟɲ ɨɬɬɵԑɵɧ ɠɚԑɭ ԛɲɿɧ ɠɚɥɵɧɞɵ
ɧɟɦɟɫɟ ɝɚɡ ɲɚԕɩɚԑɵɧ «F» ɬɟɫɿɝɿɧɟ
ɠɚԕɵɧɞɚɬɵԙɵɡ (ɫɭɪɟɬɬɿ ԕɚɪɚԙɵɡ),
ɨɞɚɧ ɤɟɣɿɧ ɉȿɒɌȱ ɛɚɫԕɚɪɭ
ɬԝɬԕɚɫɵɧ ɛɚɫɵɩ, ɨɧɵ «ȿԙ ɠɨԑɚɪɵ»
ɩɨɡɢɰɢɹԑɚ ɠɟɬɤɟɧɲɟ ɫɚԑɚɬ ɬɿɥɿɧɟ
ԕɚɪɫɵ ɛɚԑɵɬɬɚ ɛԝɪɵԙɵɡ.
ȿɝɟɪ, 15 ɫɟɤɭɧɞɬɚɧ ɤɟɣɿɧ ɨɬɬɵԕ ɠɚɧɛɚɫɚ, ɬԝɬԕɚɧɵ ɠɿɛɟɪɿɩ,
ɩɟɲ ɟɫɿɝɿɧ ɚɲɵԙɵɡ ɞɚ, ԕɚɣɬɚɞɚɧ ɠɚԑɭԑɚ ԥɪɟɤɟɬ ɟɬɩɟɫ ɛԝɪɵɧ
ɤɟɦ ɞɟɝɟɧɞɟ 1 ɦɢɧɭɬ ɤԛɬɿԙɿɡ.
! ɉɟɲ ɫɚԕɬɚɧɞɵɪԑɵɲɩɟɧ
ɉȿɒɌȱ ɛɚɫԕɚɪɭ ɬԝɬԕɚɫɵɧ ɲɚɦɚɦɟɧ 6 ɫɟɤɭɧɞ ɛɚɫɵɩ,
ԝɫɬɚɩ ɬԝɪɭ ɤɟɪɟɤ.
Ɍɟɤ ɛɟɥɝɿɥɿ ԛɥɝɿɥɟɪɞɟ ɛɨɥɚɞɵ.
*
ɠɚɛɞɵԕɬɚɥԑɚɧ, ɫɨɧɞɵԕɬɚɧ
73
Page 74

! ɀɚɥɵɧ ɛɚɣԕɚɭɫɵɡ ԧɲɿɪɿɥɫɟ, ɨɬɬɵԕɬɵ ԧɲɿɪɿԙɿɡ ɞɟ, ɩɟɲɬɿ
ԕɚɣɬɚɞɚɧ ɠɚԕɩɚɫ ɛԝɪɵɧ ɤɟɦ ɞɟɝɟɧɞɟ 1 ɦɢɧɭɬ ɤԛɬɿԙɿɡ.
Ɍɟɦɩɟɪɚɬɭɪɚɧɵ ɪɟɬɬɟɭ
Ԕɚɠɟɬɬɿ ɩɿɫɿɪɭ ɬɟɦɩɟɪɚɬɭɪɚɫɵɧ ɨɪɧɚɬɭ ԛɲɿɧ ɉȿɒɌȱ
ɛɚɫԕɚɪɭ ɬԝɬԕɚɫɵɧ ɫɚԑɚɬ ɬɿɥɿɧɟ ԕɚɪɫɵ ɛɚԑɵɬɬɚ ɛԝɪɵԙɵɡ.
Ɍɟɦɩɟɪɚɬɭɪɚɥɚɪ ɛɚɫԕɚɪɭ ɬɚԕɬɚɫɵɧɞɚ ɤԧɪɫɟɬɿɥɟɞɿ ɠԥɧɟ «ȿԙ
ɬԧɦɟɧ» (140°C) ɦɟɧ «ȿԙ ɠɨԑɚɪɵ» (250°C) ɚɪɚɫɵɧɞɚ ɛɨɥɭɵ
ɦԛɦɤɿɧ. Ɉɪɧɚɬɵɥԑɚɧ ɬɟɦɩɟɪɚɬɭɪɚԑɚ ɠɟɬɤɟɧɧɟɧ ɤɟɣɿɧ ɩɟɲ
ɬɟɪɦɨɫɬɚɬɬɵԙ ɤԧɦɟɝɿɦɟɧ ɨɧɵ
Гриль
Ƚɪɢɥɶɞɿ ɠɚԑɭ ԛɲɿɧ ɠɚɥɵɧɞɵ ɧɟɦɟɫɟ ɝɚɡ ɲɚԕɩɚԑɵɧ ɨɬɬɵԕԕɚ
ɠɚԕɵɧɞɚɬɵԙɵɡ, ɨɞɚɧ ɤɟɣɿɧ ɉȿɒɌȱ ɛɚɫԕɚɪɭ ɬԝɬԕɚɫɵɧ ɛɚɫɵɩ,
ɨɧɵG ɩɨɡɢɰɢɹɫɵɧɚ ɠɟɬɤɟɧɲɟ ɫɚԑɚɬ ɬɿɥɿɧɟ ԕɚɪɫɵ ɛɚԑɵɬɬɚ
ɛԝɪɵԙɵɡ. Ƚɪɢɥɶ ɬɚԑɚɦɧɵԙ ɛɟɬɿɧ ɛɿɪɤɟɥɤɿ ԕɵɡɚɪɬɭԑɚ ɦԛɦɤɿɧɞɿɤ
ɛɟɪɟɞɿ ɠԥɧɟ ԥɫɿɪɟɫɟ ԕɭɵɪɵɥԑɚɧ ɬɚԑɚɦɞɚɪ, ɲɧɢɰɟɥɶ ɦɟɧ
ɫɨɫɢɫɤɚɥɚɪ ԛɲɿɧ ԕɨɥɚɣɥɵ. Ɍɚɪɬɩɚɧɵ 4- ɧɟɦɟɫɟ 5-ɩɨɡɢɰɢɹԑɚ
ԕɨɣɵԙɵɡ ɠԥɧɟ ɦɚɣɞɵ ɠɢɧɚɭ ԥɪɿ
ԛɲɿɧ 1-ɩɨɡɢɰɢɹԑɚ ɬԝɬԕɚɥɵ ɬɚɛɚɧɵ ԕɨɣɵԙɵɡ.
! Ƚɪɢɥɶ ɫɚԕɬɚɧɞɵɪԑɵɲɩɟɧ ɠɚɛɞɵԕɬɚɥԑɚɧ, ɫɨɧɞɵԕɬɚɧ
ɉȿɒɌȱ ɛɚɫԕɚɪɭ ɬԝɬԕɚɫɵɧ ɲɚɦɚɦɟɧ 6 ɫɟɤɭɧɞ ɛɚɫɵɩ,
ԝɫɬɚɩ ɬԝɪɭ ɤɟɪɟɤ.
ɛɿɪ ԕɚɥɵɩɬɚ ԝɫɬɚɣɞɵ.
ɬԛɬɿɧ ɬԛɡɿɥɭɿɧ ɛɨɥɞɵɪɦɚɭ
Ɍԧɦɟɧɝɿ
! Ȼԧɥɿɦɧɿԙ (ɛɚɪ ɛɨɥԑɚɧ ɠɚԑɞɚɣɞɚ) ɿɲɤɿ ɛɟɬɬɟɪɿ ԕɵɡɭɵ
ɦԛɦɤɿɧ.
! ɉɟɲ ɚɫɬɵɧɞɚԑɵ ɛԧɥɿɦɝɟ ɠɚɧԑɵɲ ɡɚɬɬɚɪɞɵ
ԕɨɣɦɚԙɵɡ.
ɛԧɥɿɦ*
ɉɟɲɬɿԙ
ɤɟɪɟɤ-ɠɚɪɚԕɬɚɪɵ ɦɟɧ
ɬɟɪɟԙ ɵɞɵɫɬɚɪɞɵ
ɫɚԕɬɚɭ ԛɲɿɧ ԕɨɥɞɚɧɭԑɚ
ɛɨɥɚɬɵɧ ɛԧɥɿɦ ɛɚɪ.
ȿɫɿɤɬɿ ɚɲɭ ԛɲɿɧ ɨɧɵ
ɬԧɦɟɧ ԕɚɪɚɣ ɬɚɪɬɵԙɵɡ
(ɫɭɪɟɬɬɿ Ωɚɪɚέɵɡ).
ɚɫɬɵɧɞɚ ɩɟɲɬɿԙ
KZ
! ɀɚɥɵɧ ɛɚɣԕɚɭɫɵɡ ԧɲɿɪɿɥɫɟ, ɨɬɬɵԕɬɵ ԧɲɿɪɿԙɿɡ ɞɟ, ɝɪɢɥɶɞɿ
ԕɚɣɬɚɞɚɧ ɠɚԕɩɚɫ ɛԝɪɵɧ ɤɟɦ ɞɟɝɟɧɞɟ 1 ɦɢɧɭɬ ɤԛɬɿԙɿɡ.
! Ƚɪɢɥɶɞɿ ɩɚɣɞɚɥɚɧԑɚɧ ɤɟɡɞɟ ɬԝɬԕɚɥɚɪ ԕɵɡɵɩ ɤɟɬɩɟɭɿ ԛɲɿɧ
ɟɫɿɤ ɩɟɧ ɛɚɫԕɚɪɭ ɬɚԕɬɚɫɵɧɵԙ ɚɪɚɫɵɧɚ (
«D» ɲɚԑɵɥɞɵɪԑɵɲɵɧ ɫɚɥɵɩ, ɟɫɿɤɬɿ ɫԥɥ ɚɲɵɩ ԕɨɸ ɤɟɪɟɤ.
Ƚɚɡ ɩɟɲ ɦɨɞɟɥɶɞɟɪɿɧɞɟ
ɬԧɦɟɧɝɿ ɛԧɥɿɦɞɿ ɨɬɬɵԕ
ɲɵԑɚɪԑɚɧ ԕɵɡɭɞɚɧ ԕɨɪԑɚɣɬɵɧ
ɫɵɪԑɵɬɩɚɥɵ «Ⱥ» ԕɨɪԑɚɭ
A
S
! ɉɟɲɬɿ ɩɚɣɞɚɥɚɧɛɚɫ ɛԝɪɵɧ ɫɵɪԑɵɬɩɚɥɵ ԕɨɪԑɚɭ
ɞԝɪɵɫ ɛɟɤɿɬɿɥɝɟɧɿɧɟ ɤԧɡ ɠɟɬɤɿɡɿԙɿɡ.
ԕɚɛɚɬɵ ɛɚɪ (ɫɭɪɟɬɬɿ
Ωɚɪɚέɵɡ).
ɋɵɪԑɵɬɩɚɥɵ ԕɨɪԑɚɭɞɵ ɚɥɵɩ
ɬɚɫɬɚɭ ԛɲɿɧ «S» ɛԝɪɚɧɞɚɫɵɧ
ɲɟɲɿɩ ɚɥɵԙɵɡ (ɫɭɪɟɬɬɿ
Ωɚɪɚέɵɡ). Ɉɧɵ ɨɪɧɵɧɚ ԕɨɸ
ԛɲɿɧ «S» ɛԝɪɚɧɞɚɫɵɧɵԙ
ɤԧɦɟɝɿɦɟɧ ɨɪɧɵɧɚ ɛɟɤɿɬɿԙɿɡ.
ɫɭɪɟɬɬɿ Ωɚɪɚέɵɡ)
Ɍɟɤ ɛɟɥɝɿɥɿ ԛɥɝɿɥɟɪɞɟ ɛɨɥɚɞɵ.
*
74
Page 75

KZ
ɉɟɲɬɟ ɬɚԑɚɦ ɩɿɫɿɪɭ ɛɨɣɵɧɲɚ ɤɟԙɟɫɬɟɪ ɤɟɫɬɟɫɿ
Ⱦɚɣɵɧɞɚɥɚɬɵɧ ɬɚԑɚɦ ɋɚɥɦɚԑɵ (ɤɝ) Ɍԧɦɟɧɧɟɧ
ɉɚɫɬɚ
Ʌɚɡɚɧɶɹ
ȿɬ ԕɨɫɵɥԑɚɧ ԕɚɦɵɪ ɬԛɬɿɤɬɟɪɿ
Ƚɪɚɬɢɧ ɩɚɫɬɚ ɩɿɫɿɪɦɟɥɟɪɿ
ȿɬ
Ȼԝɡɚɭ ɟɬɿ
Ɍɚɭɵԕ
Ԛɣɪɟɤ
Ԕɨɹɧ
ɒɨɲԕɚ ɟɬɿ
ɀɚɫ ԕɨɣ ɟɬɿ
Ȼɚɥɵԕ
Ɇɚɤɪɟɥɶ
Ɂɭɛɚɧ
Ԕɚԑɚɡɞɚ ɩɿɫɿɪɿɥɝɟɧ ɛɚԕɬɚԕ
ɉɢɰɰɚ
ɇɚɩɨɥɢɬɚɧɚ 1.0 4 210-220 15 20-25
Ʉɟɤɫ
ɉɟɱɟɧɶɟɥɟɪ
Ȼԥɥɿɲ
ɏɨɲ ɢɿɫɬɿ ɛԥɥɿɲ
Ʉԧɬɟɪɿɥɝɟɧ ɬɨɪɬɬɚɪ
ȿɫɤɟɪɬɩɟ: ɩɿɫɿɪɭ ɭɚԕɵɬɬɚɪɵ ɲɚɦɚɥɚɩ ɛɟɪɿɥɝɟɧ ɠԥɧɟ ɨɥɚɪɞɵ ɠɟɤɟ ԕɚɥɚɭԑɚ ԕɚɪɚɣ ԧɡɝɟɪɬɭɝɟ ɛɨɥɚɞɵ. Ƚɪɢ ɥɶɞɿ ɩɚɣɞɚɥɚɧɵɩ ɬɚԑɚɦ
ɞɚɣɵɧɞɚԑɚɧ ɤɟɡɞɟ, ɬԝɬԕɚɥɵ ɬɚɛɚ ɩɟɲɬɿԙ ɬԛɛɿɧɟɧ ɫɚɧɚԑɚɧɞɚ ɛɿɪɿɧɲɿ ɬɚɪɬɩɚɞɚ ɨɪɧɚɥɚɫɬɵɪɵɥɭɵ ɬɢɿɫ.
2.5
2.5
2.5
1.5
1.5
1.8
2.0
2.1
1.8
1.1
1.5
1.0
0.5
1.1
1.0
1.0
ɫɚɧɚԑɚɧɞɚ
ɫԧɪɟɥɟɪɞɿԙ
ɩɿɫɿɪɭ
ɩɨɡɢɰɢɹɫɵ
4
4
4
3
3
3
3
3
3
3
3
3
4
4
4
4
Ɍɟɦɩɟɪɚɬɭɪɚ
(°C)
200-210
200
200
200-210
210-220
200
200
200
200
180-200
180-200
180-200
180
180
180
170
Ⱥɥɞɵɧ ɚɥɚ
ԕɵɡɞɵɪɭ
ɭɚԕɵɬɵ
(ɦɢɧ)
10
10
10
10
10
10
10
10
10
10
10
10
15
15
15
15
ɉɿɫɿɪɭ
ɭɚԕɵɬɵ
(ɦɢɧ)
75-85
50-60
50-60
95-100
90-100
100-110
70-80
70-80
100-105
45-50
45-55
45-50
25-35
40-45
50-55
40-45
Ɍɟɤ ɛɟɥɝɿɥɿ ԛɥɝɿɥɟɪɞɟ ɛɨɥɚɞɵ.
*
75
Page 76

ɋɚԕɬɚɧɞɵɪɭɥɚɪ
ɦɟɧ ɤɟԙɟɫɬɟɪ
! Ȼԝɥ ԕԝɪɵɥԑɵ ɯɚɥɵԕɚɪɚɥɵԕ ԕɚɭɿɩɫɿɡɞɿɤ ɫɬɚɧɞɚɪɬɬɚɪɵɧɚ
ɫɚɣ ɠɚɫɚԕɬɚɥɵɩ, ɞɚɣɵɧɞɚɥԑɚɧ.
Ɍԧɦɟɧɞɟɝɿ ɟɫɤɟɪɬɭɥɟɪ ԕɚɭɿɩɫɿɡɞɿɤ ɟɪɟɠɟɥɟɪɿɧ ɟɫɤɟɪɬɭ
ɦɚԕɫɚɬɵɧɞɚ ɛɟɪɿɥɝɟɧ ɠԥɧɟ ɨɧɵ ɦԝԕɢɹɬ ɨԕɵɩ ɲɵԑɭ ԕɚɠɟɬ.
ɀɚɥɩɵ ԕɚɭɿɩɫɿɡɞɿɤ
• Ȼԝɥ ɧԝɫԕɚɭɥɚɪ ɬɟɤ ɧԝɫԕɚɭɥɵԕ ɩɟɧ ɫɟɪɢɹɥɵԕ ɧԧɦɿɪ
ɬɿɥɿɦɲɟɫɿɧɞɟ ɬɚԙɛɚɥɚɪɵ ɤԧɪɫɟɬɿɥɝɟɧ ɟɥɞɟɪ ԛɲɿɧ
ɠɚɪɚɦɞɵ.
• Ԕԝɪɵɥԑɵ ԛɣɞɟ ԕɨɥɞɚɧɭԑɚ ɚɪɧɚɥԑɚɧ, ɨɧɵ ɤɨɦɦɟɪɰɢɹɥɵԕ
ɧɟɦɟɫɟ ԧɧɞɿɪɿɫɬɿɤ ɬԝɪԑɵɞɚ ԕɨɥɞɚɧɭԑɚ ɛɨɥɦɚɣɞɵ.
• ɀɚɛɵԕ ɠɟɪ ɛɨɥɫɚ ɞɚ, ԕԝɪɵɥԑɵɧɵ ɫɵɪɬɬɚ ԕɨɥɞɚɧɛɚɭ
ԕɚɠɟɬ. Ԕԝɪɵɥԑɵɧɵ ԕɨɪԑɚɭɫɵɡ ɠɚԙɛɵɪ ɦɟɧ ɛɨɪɚɧɞɚ
ԕɚɥɞɵɪɭ ɚɫɚ ԕɚɭɿɩɬɿ.
• Ԕԝɪɵɥԑɵɧɵ ɠɚɥɚԙ ɚɹԕ ɧɟɦɟɫɟ ɵɥԑɚɥ ɧɟ ɞɵɦԕɵɥ
ԕɨɥɦɟɧ, ɚɹԕɩɟɧ
• Ԕԝɪɵɥԑɵɧɵ ɤɿɬɚɩɲɚɞɚ ɛɟɪɿɥɝɟɧ ɧԝɫԕɚɭɥɚɪԑɚ
ɫɚɣ, ɬɟɤ ɟɪɟɫɟɤ ɚɞɚɦɞɚɪ ԑɚɧɚ ɬɚԑɚɦ ɞɚɣɵɧɞɚɭ
ɦɚԕɫɚɬɵɧɞɚ ɩɚɣɞɚɥɚɧɭɵ ɬɢɿɫ. Ԕԝɪɵɥԑɵɧɵ
ɛɚɫԕɚ ɬԛɪɞɟ ɩɚɣɞɚɥɚɧɭ (ɦɵɫɚɥɵ, ɛԧɥɦɟɧɿ
ɠɵɥɵɬɭ ԛɲɿɧ) ɞԝɪɵɫ ɟɦɟɫ ԥɪɿ ԕɚɭɿɩɬɿ.
Ԕԝɪɵɥԑɵɧɵ ɬɢɿɫɬɿ, ɞԝɪɵɫ ɠԥɧɟ ɫɚɧɚɥɵ ɬԛɪɞɟ
ɩɚɣɞɚɥɚɧɛɚɭ ɧԥɬɢɠɟɫɿɧɞɟ ɩɚɣɞɚ ɛɨɥԑɚɧ ɤɟɡ
ɤɟɥɝɟɧ ɡɚԕɵɦԑɚ ԧɧɞɿɪɭɲɿ ɠɚɭɚɩɬɵ ɛɨɥɦɚɣɞɵ.
• ɇԝɫԕɚɭɥɵԕ ɤɿɬɚɩɲɚɫɵ 1-ɫɵɧɵɩ (ɨԕɲɚɭɥɚɧԑɚɧ)
ɧɟɦɟɫɟ 2-ɫɵɧɵɩ - 1-ɿɲɤɿ ɫɵɧɵɩ (2 ɲɤɚɮ ɚɪɚɫɵɧɚ
ɨɪɧɚɥɚɫɬɵɪɵɥԑɚɧ) ԕԝɪɵɥԑɵɦɟɧ ɛɿɪɝɟ ɛɟɪɿɥɟɞɿ.
• Ȼɚɥɚɥɚɪɞɵ ɩɟɲɬɟɧ ɚɭɥɚԕ ԝɫɬɚԙɵɡ.
• Ȼɚɫԕɚ ɷɥɟɤɬɪ ԕԝɪɵɥԑɵɥɚɪɵɧɵԙ ɤɚɛɟɥɶɞɟɪɿ ɩɟɲɬɿԙ
ɵɫɬɵԕ ɛԧɥɿɤɬɟɪɿɧɟ ɬɢɦɟɣɬɿɧɿɧ ɬɟɤɫɟɪɿԙɿɡ.
• ɀɟɥɞɟɬɭ ɠԥɧɟ ɵɫɬɵԕɬɵ ɫɚɥԕɵɧɞɚɬɭԑɚ ɚɪɧɚɥԑɚɧ ɚɲɵԕ
ɠɟɪɥɟɪɞɿ ɟɲԕɚɲɚɧ ɠɚɩɩɚɭ ɤɟɪɟɤ.
• Ɉɬɬɵԕɬɚɪ ɠɚɧɵɩ ɬԝɪԑɚɧ ɤɟɡɞɟ ɧɟɦɟɫɟ ԥɥɿ ɵɫɬɵԕ
ɛɨɥԑɚɧɞɚ ɩɥɢɬɚɧɵԙ ɲɵɧɵ ԕɚԕɩɚԑɵɧ (
ɦɨɞɟɥɶɞɟɪɞɟ) ɠɚɩɩɚԙɵɡ.
• ɉɟɲɤɟ ɚɫɯɚɧɚɥɵԕ ɵɞɵɫɬɵ ԕɨɹɪɞɚ ɧɟɦɟɫɟ ɨɧɵ ɚɥԑɚɧ
ɤɟɡɞɟ ԥɪɞɚɣɵɦ ɩɟɲ ԕɨɥԑɚɩɬɚɪɵɧ ɩɚɣɞɚɥɚɧɵԙɵɡ.
• Ԕԝɪɵɥԑɵɧɵ ԕɨɥɞɚɧԑɚɧ ɤɟɡɞɟ ɨɧɵ ɦɚԙɵɧɚ ɠɚɧԑɵɲ
ɫԝɣɵԕɬɵԕɬɚɪ (ɫɩɢɪɬ, ɛɟɧɡɢɧ ɠԥɧɟ ɬ.ɛ.) ԕɨɣɦɚԙɵɡ.
• Ɍԧɦɟɧɝɿ ɫɚԕɬɚɭ ɛԧɥɿɦɿɧɟ ɧɟɦɟɫɟ ɩɟɲɬɿԙ ԧɡɿɧɟ ɠɚɧԑɵɲ
ɡɚɬɬɚɪ ɫɚɥɦɚԙɵɡ. ȿɝɟɪ ɛɚɣԕɚɭɫɵɡɞɚ ԕԝɪɵɥԑɵ ԕɨɫɵɥɫɚ,
ɛԝɥ ɡɚɬɬɚɪɞɵԙ ɠɚɧɭɵ ɦԛɦɤɿɧ.
• Ԕԝɪɵɥԑɵɧɵ ԕɨɥɞɚɧɛɚԑɚɧ ɤɟɡɞɟ ɬԝɬԕɚɥɚɪ • ɩɨɡɢɰɢɹɫɵɧɞɚ
ɟɤɟɧɿɧ ɠԥɧɟ ɝɚɡ ɲԛɦɟɝɿ ɠɚɛɵɥԑɚɧɵɧ ɬɟɤɫɟɪɿԙɿɡ.
• Ԕԝɪɵɥԑɵɧɵ ԧɲɿɪɝɟɧɞɟ ɪɨɡɟɬɤɚɞɚɧ ԥɪɞɚɣɵɦ ɚɣɵɪԑɵɲɬɵ
ԝɫɬɚɩ ɬɚɪɬɵԙɵɡ, ɤɚɛɟɥɶɞɟɧ ɬɚɪɬɵɩ ɫɭɵɪɦɚԙɵɡ.
• Ԕԝɪɵɥԑɵɧɵ ɷɥɟɤɬɪ ɠɟɥɿɫɿɧɟɧ ɚɠɵɪɚɬɩɚɣ ɟɲԕɚɲɚɧ
ɬɚɡɚɥɚɭ ɧɟɦɟɫɟ ɤԛɬɿɦ ɤԧɪɫɟɬɭ ɠԝɦɵɫɬɚɪɵɧ ɠɚɫɚɦɚԙɵɡ.
ɬԛɪɬɩɟԙɿɡ.
ɬɟɤ ɤɟɣɛɿɪ
• ȿɝɟɪ ԕԝɪɵɥԑɵ ɿɫɬɟɧ ɲɵԕԕɚɧ ɛɨɥɫɚ, ɨɧɵ ɟɲɛɿɪ
ɠɚԑɞɚɣɞɚ ԧɡɿԙɿɡ ɠԧɧɞɟɭɝɟ ɬɵɪɵɫɩɚԙɵɡ. Ɍԥɠɿɪɢɛɟɫɿɡ
ɚɞɚɦ ɬɚɪɚɩɵɧɚɧ ɠɚɫɚɥԑɚɧ ɠԧɧɞɟɭ ɠԝɦɵɫɬɚɪɵɧɚɧ
ԕԝɪɵɥԑɵɧɵԙ ɿɫɬɟɧ ɲɵԑɭɵ
ԕɚɥɭɵ ɦԛɦɤɿɧ. Ʉԧɦɟɤ ɤԧɪɫɟɬɭ ԕɵɡɦɟɬɿɧɟ ɯɚɛɚɪɥɚɫɵԙɵɡ.
• Ⱥɲɵԕ ɩɟɲɬɿԙ ɟɫɿɝɿɧɟ ɚɭɵɪ ɡɚɬɬɚɪɞɵ ԕɨɣɦɚԙɵɡ.
• Ԕԝɪɵɥԑɵɧɵ ɮɢɡɢɤɚɥɵԕ, ɫɟɡɿɦɬɚɥɞɵԕ ɠԥɧɟ
ɩɫɢɯɢɤɚɥɵԕ ԕɚɛɿɥɟɬɬɟɪɿ ɬԧɦɟɧ ɚɞɚɦɞɚɪ (ɛɚɥɚɥɚɪ
ɞɚ ɤɿɪɟɞɿ), ɬԥɠɿɪɢɛɟɫɿɡ ɧɟɦɟɫɟ ԧɧɿɦɧɟɧ ɯɚɛɚɪɵ
ɠɨԕ ɤɟɡ ɤɟɥɝɟɧ ɚɞɚɦɧɵԙ ԕɨɥɞɚɧɛɚɭɵ ɬɢɿɫ.
Ɇԝɧɞɚɣ ɚɞɚɦɞɚɪԑɚ, ɤɟɦ ɞɟɝɟɧɞɟ, ԕɚɭɿɩɫɿɡɞɿɤɬɟɪɿɧ
ԕɚɦɬɚɦɚɫɵɡ ɟɬɟɬɿɧ ɛɿɪɟɭɥɟɪ ɠɟɬɟɤɲɿ ɛɨɥɭɵ ɤɟɪɟɤ
ɧɟɦɟɫɟ ԕԝɪɵɥԑɵɧɵԙ ɠԝɦɵɫɵɧɚ ԕɚɬɵɫɬɵ ɤɿɪɿɫɩɟ
ɧԝɫԕɚɭɥɚɪɵ ɛɟɪɿɥɭɿ ɬɢɿɫ.
• Ȼɚɥɚɥɚɪԑɚ ԕԝɪɵɥԑɵɦɟɧ ɨɣɧɚɭԑɚ ɪԝԕɫɚɬ ɟɬɩɟԙɿɡ.
ɧɟɦɟɫɟ ɠɚɪɚɦɫɵɡ ɛɨɥɵɩ
Ԕɨԕɵɫԕɚ ɬɚɫɬɚɭ
• Ɉɪɚɭ ɦɚɬɟɪɢɚɥɞɚɪɵɧ ɬɚɫɬɚԑɚɧ ɤɟɡɞɟ: ɨɪɚɦɚɧɵԙ ԕɚɣɬɚ
ɩɚɣɞɚɥɚɧɵɥɭɵ ɦԛɦɤɿɧ ɛɨɥɚɬɵɧɞɚɣ ɠɟɪɝɿɥɿɤɬɿ ɡɚԙɞɵ
ԕɚɞɚԑɚɥɚԙɵɡ.
• ɗɥɟɤɬɪ ɠԥɧɟ ɷɥɟɤɬɪɨɧɢɤɚɥɵԕ ԕԝɪɚɥɞɚɪɞɵԙ
ԕɚɥɞɵԕɬɚɪɵɧɚ (WEEE) ԕɚɬɵɫɬɵ 2002/96/EC ȿɭɪɨɩɚ
ɡɚԙɧɚɦɚɫɵɧɚ ɫԥɣɤɟɫ ԛɣ ԕԝɪɵɥԑɵɥɚɪɵ ԕɚɥɵɩɬɵ ԕɚɬɬɵ
ԕɚɥɚɥɵԕ ԕɚɥɞɵԕ ɚɣɧɚɥɵɦɵɧ ɩɚɣɞɚɥɚɧɵɩ ɠɨɣɵɥɦɚɭɵ
ɬɢɿɫ. Ԕɨɪɲɚԑɚɧ ɨɪɬɚ ɦɟɧ ɯɚɥɵԕ ɞɟɧɫɚɭɥɵԑɵɧɚ ɬɢɟɬɿɧ
ɡɢɹɧɧɵԙ ɚɥɞɵɧ ɚɥɚ ɨɬɵɪɵɩ, ɠɚɪɚɦɫɵɡ ԕԝɪɵɥԑɵɥɚɪ
ԕɚɣɬɚ ɩɚɣɞɚɥɚɧɭ ɦɟɧ ɦɚɲɢɧɚ ɿɲɿɧɞɟɝɿ ɦɚɬɟɪɢɚɥɞɚɪɞɵ
ԧԙɞɟɭ
ԕԝɧɵɧ ɨԙɬɚɣɥɚɧɞɵɪɭ ɦɚԕɫɚɬɵɧɞɚ ɛԧɥɟɤ ɠɢɧɚɥɭɵ
ɤɟɪɟɤ. Ȼɚɪɥɵԕ ԧɧɿɦɞɟɪɞɟɝɿ ɫɵɡɵɥԑɚɧ ԕɨԕɵɫ ɠԥɲɿɝɿ ԧɧɿɦ
ɢɟɫɿɧɿԙ ɛԧɥɟɤɬɟɥɝɟɧ ԕɨԕɵɫ ɠɢɧɚɭԑɚ ԕɚɬɵɫɬɵ ɦɿɧɞɟɬɿɧ
ɟɫɤɟ ɫɚɥɚɞɵ.
Ԕɨɥɞɚɧɵɥԑɚɧ ԕԝɪɵɥԑɵɥɚɪɞɵ ԕɨԑɚɦɞɵԕ ԕɨԕɵɫ ɠɢɧɚɭ
ԕɵɡɦɟɬɿɧɟ ɬɚɩɫɵɪɭԑɚ, ɚɣɧɚɥɚɞɚԑɵ ɬɢɿɫɬɿ ɠɢɧɚɭ
ɨɪɵɧɞɚɪɵɧɚ ɚɩɚɪɭԑɚ ɧɟɦɟɫɟ, ɚԑɵɦɞɚԑɵ ԝɥɬɬɵԕ
ɡɚԙɞɚɪ ɪԝԕɫɚɬ ɛɟɪɫɟ, ɠɚԙɚ ԝԕɫɚɫ ԧɧɿɦɝɟ ɚɭɵɫɬɵɪɭ
ԛɲɿɧ ɫɚɬɭɲɵԑɚ ɚɭɵɫɬɵɪɭ ԝɫɵɧɵɫɵ ɛɨɣɵɧɲɚ ԕɚɣɬɚɪɭԑɚ
ɛɨɥɚɞɵ.
Ԛɣ ԕԝɪɵɥԑɵɥɚɪɵɧɵԙ ɛɚɪɥɵԕ ɧɟɝɿɡɝɿ ԧɧɞɿɪɭɲɿɥɟɪɿ ɟɫɤɿ
ɠԥɧɟ ԕɨɥɞɚɧɵɫɬɚɧ ɲɵԕԕɚɧ ԕԝɪɵɥԑɵɥɚɪɞɵ ɠɢɧɚɭ
ɠԥɧɟ ɬɚɫɬɚɭ ɠԛɣɟɥɟɪɿɧ ɠɚɫɚɭԑɚ ɠԥɧɟ ԝɣɵɦɞɚɫɬɵɪɭԑɚ
ԕɚɬɵɫɚɞɵ.
Ԕɨɪɲɚԑɚɧ ɨɪɬɚɧɵ ɫɚԕɬɚɭ ɠԥɧɟ ԕɨɪԑɚɭ
• ɉɟɲɬɿ ɬɚԙɟɪɬɟԙ ɟɪɬɟ ɧɟɦɟɫɟ ɬԛɫɬɟɧ ɤɟɣɿɧ ɤɟɲɿɪɟɤ
ɩɚɣɞɚɥɚɧɭ ɚɪԕɵɥɵ ɷɥɟɤɬɪ ԕɭɚɬɵɧ ԕɚɦɬɚɦɚɫɵɡ ɟɬɭɲɿ
ɠɟɥɿɥɿɤ ɤɨɦɩɚɧɢɹɥɚɪɞɵԙ ɟԙ ɠɨԑɚɪɵ ɠԛɤɬɟɦɟɫɿɧ
ɚɡɚɣɬɭԑɚ ɤԧɦɟɤɬɟɫɟ ɚɥɚɫɵɡ.
• ȿɫɿɤ ɬɵԑɵɡɞɚԑɵɲɬɚɪɵɧ ɠɢɿ ɬɟɤɫɟɪɿԙɿɡ, ɨɥɚɪ ɟɫɿɤɤɟ
ɬɵԑɵɡ ɤɟɥɟɬɿɧɞɟɣ ɟɬɿɩ, ԕɚɥɞɵԕ ɛɨɥɦɚɭɵ ԛɲɿɧ ɬɚɡɚɥɚɩ
ɫԛɪɬɿɩ ɬԝɪɵԙɵɡ, ɨɫɵɥɚɣɲɚ ɵɫɬɵԕɬɵԙ ɫɵɪɬԕɚ ɲɵԑɭɵɧ
ɛɨɥɞɵɪɦɚɣɫɵɡ.
KZ
76
Page 77

Ʉԛɬɿɦ ɠԥɧɟ ɬɟɯɧɢɤɚɥɵԕ
ԕɵɡɦɟɬ ɤԧɪɫɟɬɭ
KZ
Ԕԝɪɵɥԑɵɧɵ ԧɲɿɪɭ
Ʉɟɡ ɤɟɥɝɟɧ ɛɿɪ ɠԝɦɵɫɬɵ ɛɚɫɬɚɦɚɫɬɚɧ ɛԝɪɵɧ ԕԝɪɵɥԑɵɧɵ
ɬɨԕɬɚɧ ɚɠɵɪɚɬɵԙɵɡ.
Ԕԝɪɵɥԑɵɧɵ ɬɚɡɚɥɚɭ
! Ⱦɚԕ ɤɟɬɿɪɝɿɲɬɟɪ, ɬɚɬ ɤɟɬɿɪɝɿɲɬɟɪ, ԝɧɬɚԕ ɬɚɡɚɪɬԕɵɲ
ɡɚɬɬɚɪ ɧɟɦɟɫɟ ԕɵɪԑɵɲ ɛɟɬɬɟɪɿ ɛɚɪ ɝɭɛɤɚɥɚɪ ɫɢɹԕɬɵ
ԕɵɪԑɵɲ ɧɟɦɟɫɟ ɬɚɬɬɚɧɞɵɪɚɬɵɧ ɬɚɡɚɪɬԕɵɲ ɡɚɬɬɚɪɞɵ
ɩɚɣɞɚɥɚɧɛɚԙɵɡ. ɨɥɚɪ ԕԝɪɵɥԑɵ ɛɟɬɬɟɪɿɧ ɛɿɪɠɨɥɚ
ɫɵɡɵɩ ɬɚɫɬɚɭɵ ɦԛɦɤɿɧ.
! Ԕԝɪɵɥԑɵɧɵ ɟɲԕɚɲɚɧ ɛɭ ɬɚɡɚɪɬԕɵɲɵɦɟɧ ɧɟɦɟɫɟ
ɲɚԙɫɨɪԑɵɲɩɟɧ ɬɚɡɚɥɚɦɚԙɵɡ.
• Ԥɞɟɬɬɟ, ɩɥɢɬɚɧɵ ɞɵɦԕɵɥ ɝɭɛɤɚɦɟɧ ɠɭɵɩ, ɫɨɪԑɵɲ
ɚɫ ԛɣ ɫԛɥɝɿɫɿɦɟɧ ԕԝɪԑɚɬɭ ɠɟɬɤɿɥɿɤɬɿ.
• Ɍɨɬ ɛɚɫɩɚɣɬɵɧ ɛɨɥɚɬ ɧɟɦɟɫɟ
ɛԧɥɿɤɬɟɪ ɠԥɧɟ ɪɟɡɟԙɤɟ ɬɵԑɵɡɞɚԑɵɲɬɚɪ ɠɵɥɵ ɫɭԑɚ
ɦɚɥɵɧɵɩ, ɬԛɫɫɿɡ ɫɚɛɵɧ ɠɚԑɵɥԑɚɧ ɝɭɛɤɚɦɟɧ ɬɚɡɚɪɬɵɥɚɞɵ.
Ԕɢɵɧ ɞɚԕɬɚɪɞɵ ɤɟɬɿɪɭ ԛɲɿɧ ɚɪɧɚɣɵ ԧɧɿɦɞɟɪɞɿ
ɩɚɣɞɚɥɚɧɵԙɵɡ. ɀɭɵɩ ɛɨɥԑɚɧ ɫɨԙ ɨɧɵ ɠɚԕɫɵɥɚɩ
ɲɚɣɵɩ, ɦԝԕɢɹɬ ԕԝɪԑɚɬɵԙɵɡ. Ԕɚɬɬɵ ԝɧɬɚԕɬɚɪɞɵ ɧɟɦɟɫɟ
ɬɚɬɬɚɧɞɵɪɚɬɵɧ ɡɚɬɬɚɪɞɵ ɩɚɣɞɚɥɚɧɛɚԙɵɡ.
• ɉɥɢɬɚɧɵԙ ɬɨɪɥɚɪɵɧ, ɨɬɬɵԕ ԕɚԕɩɚԕɬɚɪɵɧ, ɠɚɥɵɧ
ԕɚԕ ɠɚɪԑɵɲ ɫɚԕɢɧɚɥɚɪɵɧ ɲɟɲɿɩ ɚɥɵɩ ɬɚɡɚɥɚɭɞɵ
ɠɟԙɿɥɞɟɬɭɝɟ ɛɨɥɚɞɵ; ɨɥɚɪɞɵ ɵɫɬɵԕ
ɬɚɡɚɪɬԕɵɲ ɡɚɬɬɚ ɠɭɵԙɵɡ ɞɚ, ɠɚԕɫɵɥɚɩ ɤɟɩɬɿɪɟɪ ɛԝɪɵɧ
ԕɚɬɵɩ ԕɚɥԑɚɧ ԕɚɥɞɵԕɬɚɪɞɵ ɤɟɬɿɪɝɟɧɿԙɿɡɝɟ ɤԧɡ ɠɟɬɤɿɡɿԙɿɡ.
• ɗɥɟɤɬɪɨɧɞɵԕ ɬԝɬɚɬɭ ɮɭɧɤɰɢɹɫɵ ɛɚɪ ɩɥɢɬɚɥɚɪɞɚ
ɷɥɟɤɬɪɨɧɞɵԕ ɬԝɬɚɬɭ ԕԝɪɚɥɵɧɵԙ ԝɲɵɧ ɠɢɿ ɬɚɡɚɥɚɩ,
ɝɚɡ ɲɵԑɚɬɵɧ ɬɟɫɿɤɬɟɪɞɿԙ ɛɿɬɟɥɿɩ ԕɚɥɦɚɭɵɧ ɬɟɤɫɟɪɿɩ
ɨɬɵɪɭ ԕɚɠɟɬ.
ɷɦɚɥɶɞɚɧԑɚɧ ɫɵɪɬԕɵ
ɫɭ ɦɟɧ ԕɵɪԑɵɲ ɟɦɟɫ
Ԕɚԕɩɚԕ
! Ɉɬɬɵԕɬɚɪ ɠɚɧɵɩ ɬԝɪԑɚɧ ɤɟɡɞɟ ɧɟɦɟɫɟ ԥɥɿ ɵɫɬɵԕ
ɛɨɥԑɚɧɞɚ ԕɚԕɩɚԕɬɵ ɠɚɩɩɚԙɵɡ.
ɉɟɲ ɬɵԑɵɡɞɚԑɵɲɬɚɪɵɧ ɬɟɤɫɟɪɭ
ɉɟɲɬɟɝɿ ɟɫɿɤ ɬɵԑɵɡɞɚԑɵɲɬɚɪɵɧ ɠɢɿ ɬɟɤɫɟɪɿɩ ɬԝɪɵԙɵɡ.
ɬɵԑɵɡɞɚԑɵɲɬɚɪ ɡɚԕɵɦɞɚɥԑɚɧ ɛɨɥɫɚ, ɠɚԕɵɧ ɠɟɪɞɟɝɿ
ȿɝɟɪ
Ԧɤɿɥɟɬɬɿ ɫɚɬɭɞɚɧ ɤɟɣɿɧ ԕɵɡɦɟɬ ɤԧɪɫɟɬɭ ɨɪɬɚɥɵԑɵɧɚ
ɯɚɛɚɪɥɚɫɵԙɵɡ. Ɍɵԑɵɡɞɚԑɵɲɬɚɪ ɚɭɵɫɬɵɪɵɥԑɚɧԑɚ ɞɟɣɿɧ
ɩɟɲɬɿ ɩɚɣɞɚɥɚɧɛɚɭɞɵ ԝɫɵɧɚɦɵɡ.
ɉɟɲ ɲɵɧɵ ԕɚԕɩɚԕɩɟɧ
ɠɚɛɞɵԕɬɚɥԑɚɧ ɛɨɥɫɚ, ɛԝɥ
ԕɚԕɩɚԕɬɵ ɠɵɥɵ ɫɭɦɟɧ
ɬɚɡɚɥɚɭ ɤɟɪɟɤ. Ԕɵɪԑɵɲ
ɡɚɬɬɚɪɞɵ ɩɚɣɞɚɥɚɧɛɚԙɵɡ.
ɉɥɢɬɚɧɵԙ ɚɪɬԕɵ ɠɚԑɵɧ
ɬɚɡɚɥɚɭɞɵ ɠɟԙɿɥɞɟɬɭ
ԛɲɿɧ ԕɚԕɩɚԕɬɵ ɲɟɲɿɩ
ɚɥɭԑɚ ɛɨɥɚɞɵ. Ԕɚԕɩɚԕɬɵ
ɬɨɥɵԑɵɦɟɧ ɚɲɵɩ, ɨɧɵ
ɠɨԑɚɪɵ ԕɚɪɚɣ ɬɚɪɬɵԙɵɡ
(ɫɭɪɟɬɬɿ Ωɚɪɚέɵɡ).
Ƚɚɡ ɲԛɦɟɝɿɧɟ ɬɟɯɧɢɤɚɥɵԕ ԕɵɡɦɟɬ ɤԧɪɫɟɬɭ
ɍɚԕɵɬ ԧɬɟ, ɲԛɦɟɤɬɟɪ ɬɵԑɵɡɞɚɧɭɵ ɧɟɦɟɫɟ ɨɥɚɪɞɵ
ɛԝɪɭ ԕɢɵɧɞɚɭɵ ɦԛɦɤɿɧ. Ȼԝɥ ɠɚԑɞɚɣ ɨɪɵɧ ɚɥɫɚ,
ɲԛɦɟɤɬɿ ɚɭɵɫɬɵɪɭ ԕɚɠɟɬ.
! Ȼԝɥ ɩɪɨɰɟɞɭɪɚɧɵ ԧɧɞɿɪɭɲɿ ԧɤɿɥɟɬ ɛɟɪɝɟɧ ɛɿɥɿɤɬɿ
ɦɚɦɚɧ ɨɪɵɧɞɚɭɵ ɬɢɿɫ.
• ɉɟɲɬɿԙ ɿɲɿ ԥɪɛɿɪ ԕɨɥɞɚɧԑɚɧɧɚɧ ɤɟɣɿɧ ɠɵɥɵ
ɤɟɡɿɧɞɟ ɦԝԕɢɹɬ ɬɚɡɚɥɚɧɭɵ ɬɢɿɫ. ɕɫɬɵԕ ɫɭ ɦɟɧ
ɬɚɡɚɪɬԕɵɲɬɵ ɩɚɣɞɚɥɚɧɵԙɵɡ, ɨɞɚɧ ɤɟɣɿɧ ɲɚɣɵɩ,
ɠԝɦɫɚԕ ɲԛɛɟɪɟɤɩɟɧ ԕԝɪԑɚɬɵɩ ɫԛɪɬɿԙɿɡ. Ԕɵɪԑɵɲ
ɡɚɬɬɚɪɞɵ ɩɚɣɞɚɥɚɧɛɚԙɵɡ.
• ɉɟɲ ɟɫɿɝɿɧɿԙ ԥɣɧɟɝɿɧ ɵɫԕɵɲɩɟɧ ɠԥɧɟ ԕɵɪԑɵɲ ɟɦɟɫ
ɬɚɡɚɪɬԕɵɲ ԕԝɪɚɥɞɚɪɦɟɧ ɬɚɡɚɥɚɩ, ɠԝɦɫɚԕ ɲԛɛɟɪɟɤɩɟɧ
ɦԝԕɢɹɬ ԕԝɪԑɚɬɵԙɵɡ. Ԕɚɬɬɵ ԕɵɪԑɵɲ ɡɚɬɬɵ ɧɟɦɟɫɟ ԧɬɤɿɪ
ɬɟɦɿɪ ԕɵɪԑɵɲɬɚɪɞɵ ɩɚɣɞɚɥɚɧɛɚԙɵɡ, ɫɟɛɟɛɿ ɨɥɚɪ
ԥɣɧɟɤ ɛɟɬɿɧ ɬɵɪɧɚɩ, ɨɧɵԙ ɫɵɧɭɵɧɚ ԥɤɟɥɭɿ ɦԛɦɤɿɧ.
• Ʉɟɪɟɤ-ɠɚɪɚԕɬɚɪ ɤԛɧɞɟɥɿɤɬɿ ɵɞɵɫɬɚɪ ɫɢɹԕɬɵ ɠɭɵɥɭɵ
, ɬɿɩɬɿ ɨɥɚɪɞɵ ɵɞɵɫ ɠɭԑɵɲ ɦɚɲɢɧɚԑɚ ɠɭɭԑɚ
ɦԛɦɤɿɧ
ɛɨɥɚɞɵ.
• Ɍɨɬ ɛɚɫɩɚɣɬɵɧ ɛɨɥɚɬԕɚ ɨɧɵԙ ɛɟɬɿɧɞɟ ԝɡɚԕ ɭɚԕɵɬ
ɬԝɪԑɚɧ ԕɚɬɬɵɥɵԑɵ ɠɨԑɚɪɵ ɫɭ ɧɟɦɟɫɟ ԕԝɪɚɦɵɧɞɚ
ɮɨɫɮɨɪ ɛɚɪ ɤԛɲɬɿ ɬɚɡɚɪɬԕɵɲ ɡɚɬɬɚɪ ɞɚԕ ɬԛɫɿɪɭɿ
ɦԛɦɤɿɧ. ɀɭɵɩ ɛɨɥԑɚɧ ɫɨԙ ɨɧɵ ɠɚԕɫɵɥɚɩ ɲɚɣɵɩ,
ɦԝԕɢɹɬ ԕԝɪԑɚɬɵԙɵɡ. ɋɨɧɞɚɣ-ɚԕ, ԕɚɥɵɩ ԕɨɣԑɚɧ ɛɚɪɥɵԕ
ɫɭ ɬɚɦɲɵɥɚɪɵɧ ɫԛɪɬɿɩ ɚɥɭ ԕɚɠɟɬ.
77
Ʉԧɦɟɤ
Ʉɟɥɟɫɿ ɦԥɥɿɦɟɬɬɟɪɞɿ ɨԙɚɣ ɠɟɪɞɟ ԝɫɬɚԙɵɡ:
• Ԕԝɪɵɥԑɵɧɵԙ ɦɨɞɟɥɿ (Ɇɨɞ.).
• ɋɟɪɢɹɥɵԕ ɧԧɦɿɪɿ (ɋ/ɧ).
Ȼԝɥ ɚԕɩɚɪɚɬ ԕԝɪɵɥԑɵɞɚ ɨɪɧɚɬɵɥԑɚɧ ɞɟɪɟɤɬɟɦɟ
ɤɟɫɬɟɫɿɧɞɟ ɧɟɦɟɫɟ ɨɪɚɦɚɞɚɧ ɬɚɛɵɥɭɵ ɦԛɦɤɿɧ.
Page 78

78
Page 79

79
Page 80

02/2013 - 195096988.04
XEROX FABRIANO
80
 Loading...