


Cooker
Installation and use
Ko n yhabútor
Beépítés és használat
sporák
instalace a pouití
K 342 M/EU
K 342 MS/EU
K 343 M/EU

Cooker with electric multifunction oven
5 programms
Instructions for installation and use 3
Elektromos multifunkciós tûzhely 5 sütési programmal
Használati útmutató 15
Sporák s multifunkèní troubou
Návod k instalaci a pouití 27
CZ

3
Important
1 This appliance is intended for nonprofessional use
within the home.
2 These instructions are only for those countries
whose symbols appear in the booklet and on the
serial no. plate of the appliance.
3 This owner’s manual is for a class 1 appliance (in-
stalled independently) or class 2, subclass 1 appliances (installed between two cabinets).
4 Before using your appliance, read the instructions in this
owner’s manual carefully since it provides all the information you need to ensure safe installation, use and maintenance. Always keep this o wner’s manual close to hand
since you may need to ref er to it in the future.
5 When you hav e removed the packing, chec k that the ap-
pliance is not damaged. If you have any doubts, do not
use the appliance and contact your nearest Ariston Service Centre. Never leav e the packing components (plastic
bags, polystyrene foam, nails, etc.) within the reach of
children since they are a source of potential danger .
6 The appliance must be installed only by a qualified tech-
nician in compliance with the instructions provided. The
manufacturer declines all liability for improper installation,
which may result in personal injury and damage to property.
7 The electrical safety of this appliance can only be guar-
anteed if it is correctly and efficiently earthed, in compliance with regulations on electrical safety . Alwa ys ensure
that the earthing is efficient. If you hav e any doubts, contact a qualified technician to check the system. The manufacturer declines all liability for damage resulting from a
system which has not been earthed.
8 Before plugging the appliance into the mains, check that
the specifications indicated on the date plate (on the appliance and/or packaging) correspond with those of the
electrical and gas systems in your home.
9 Check that the electrical capacity of the system and sock-
ets will support the maximum power of the appliance, as
indicated on the data plate. If you ha ve any doubts , contact a qualified technician.
10 An omnipolar switch with a contact opening of at least 3
mm or more is required for installation.
11 If the socket and appliance plug are not compatib le, have
the socket replaced with a suitable model b y a qualified
technician, who should also check that the cross-section
of the socket cable is sufficient for the power absorbed
by the appliance. The use of adaptors, multiple sockets
and/or extensions, is not recommended. If their use cannot be avoided, remember to use only single or multiple
adapters and extensions which comply with current safety
regulations. In these cases, ne ver e xceed the maximum
current capacity indicated on the individual adaptor or
extension and the maximum power indicated on the m ultiple adapter.
12 Do not leave the appliance plugged in if it is not in use.
Switch off the main switch and gas supply when you are
not using the appliance.
13 The openings and slots used for ventilation and heat
dispersion must never be covered.
14 The user must not replace the supply cable of this appli-
ance. Alw ays contact an after-sales service centre which
has been authorised by the manufacturer if the cable has
been damaged or needs replacement.
15 This appliance must be used for the purpose for which it
was expressly designed. Any other use (e.g. heating
rooms) is considered to be improper and consequently
dangerous. The manufacturer declines all liability f or damage resulting from improper and irresponsible use.
16 A number of fundamental rules must be followed when
using electrical appliances. The following are of particular importance:
• Do not touch the appliance when your hands or feet
are wet
• Do not use the appliance barefooted.
• Do not use extensions, but if the y are necessary, caution must be ex ercised.
• Never pull the po wer supply cable or the appliance to
unplug the appliance plug from the mains.
• Never leave the appliance exposed to atmospheric
agents (rain, sun etc.).
• Do not allow children or persons who are not familiar
with the appliance to use it, without supervision.
17 Always unplug the appliance from the mains or s witch off
the main switch before cleaning or carrying out maintenance.
18 If you are no longer using an appliance of this type, re-
member to make it unserviceable by unplugging the appliance from the mains and cutting the supply cable. Also
make all potentially dangerous parts of the appliance safe,
above all for children who could pla y with the appliance.
19 To avoid accidental spillage do not use cookware with
uneven or deformed bottoms on the burners. Turn the
handles of pots and pans inwards to avoid knoc king them
over accidentally.
20 When the appliance is in use, the heating elements and
some parts of the oven door become extremely hot. Make
sure you don't touch them and keep children well aw a y.
21 Never use flammab le liquids such as alcohol or gasoline,
etc. near the appliance when it is in use .
22 When using small electric appliances near the hob, keep
the supply cord awa y from the hot parts.
23 Make sure the knobs are in the “•”/”o” position when the
appliance is not in use.
24 Remember to keep children awa y from the appliance
when you use the grill or oven, since these parts become very hot.
25 Gas appliances require regular air exchange to en-
sure trouble-free performance. When installing the
cooker, follo w the instructions pro vided in the paragraph on “P ositioning” the appliance.
26 Warning: never place hot containers or items and
flammable materials inside the dishwarmer drawer .
27 If the cooker is placed on a pedestal, take the necessary
precautions to prevent the same from sliding off the
pedestal itself.
To maintain the EFFICIENCY and SAFETY of this appliance, we recommend:
• call only the Service Centers authorized by the manufacturer
• always use original Spare P arts

4
Installation
All instruction on the following pages must be carried out
by a competent person (corgi registered) in compliance
with gas safety (installation and use) regulation 1984.
Important: disconnect the cooker from the electrycity
and gas supply when any adjustment, etc.
Positioning your appliance
Important: this appliance may be installed and used only
in permanently ventilated rooms in compliance with current
directives. The following precautions should be taken:
a) The room must be provided with an external exhaust
system obtained with a hood or with an electric
ventilator that goes on automatically each time the unit
is switched on.
In the case of chimneys or flues Directly to the
with branches (for cookers) exterior
b) The room m ust be provided with a system for air inflo w
which is necessary for a regular combustion. The air
flow necessary for the combustion should be at least 2
m3/h for kW of installed power. The system may be
realized by drawing the air directly from outside the
building through a pipe that has at least a 100 cm
2
useable section and which must not be accidently
obstructed (Fig. A). And further it may be realized
indirectly from other adjacent rooms which are provided
with a ventilation pipe for the e xpulsion of the fumes to
the outside of the building as foresaid, and which must
not be part of the building in common use or rooms
with risk of fire, or bedrooms (Fig. B).
Detail A Adjacent Room to
room be ventilated
A
Fig. A Fig. B
Examples of ventilation openings Increased opening between
for the comburent air the door and and floor
c) During prolonged use of the appliance you may
consider it necessary to open a window to the outside
to improve ventilation.
d) The liquefied petroleum gases , which are heavier than
air, stagnate tow ards the ground. Theref ore, the rooms
containing LPG cans must have openings to wards the
outside in order to allow the venting from the ground of
eventual gas leak. Thus, the LPG cans must not be
installed or settled in rooms that are below the ground
level, (cellar, etc.) whether the cans are empty or
partially full. It is advisable to keep in the room only the
can which is being used, and it must be placed away
from direct heat sources (ovens, fireplaces, stoves,
etc.) that could make the can reach temperatures
higher than 50°C.
Levelling your appliance (only on a fe w models)
Y our cook er is supplied with feet for le velling the appliance.
If necessary , these feet can be screwed into the housings
in the corners of the cooker base.
Mounting the legs (only on a few models)
Press-fit legs are supplied which fit under the base of your
cooker.
Installation of the cooker
The appliance can be installed next to furniture units which
are no taller than the top of the cooker hob. The wall in
direct contact with the back panel of the cooker must be
made of non-flammable material. During operation the
back panel of the cooker could reach a temperature of
50°C above room temperature. For proper installation of
the cooker, the following precautions must be taken:
a) The appliance can be placed in a kitchen, dining room
or bedsit, but not in a bathroom.
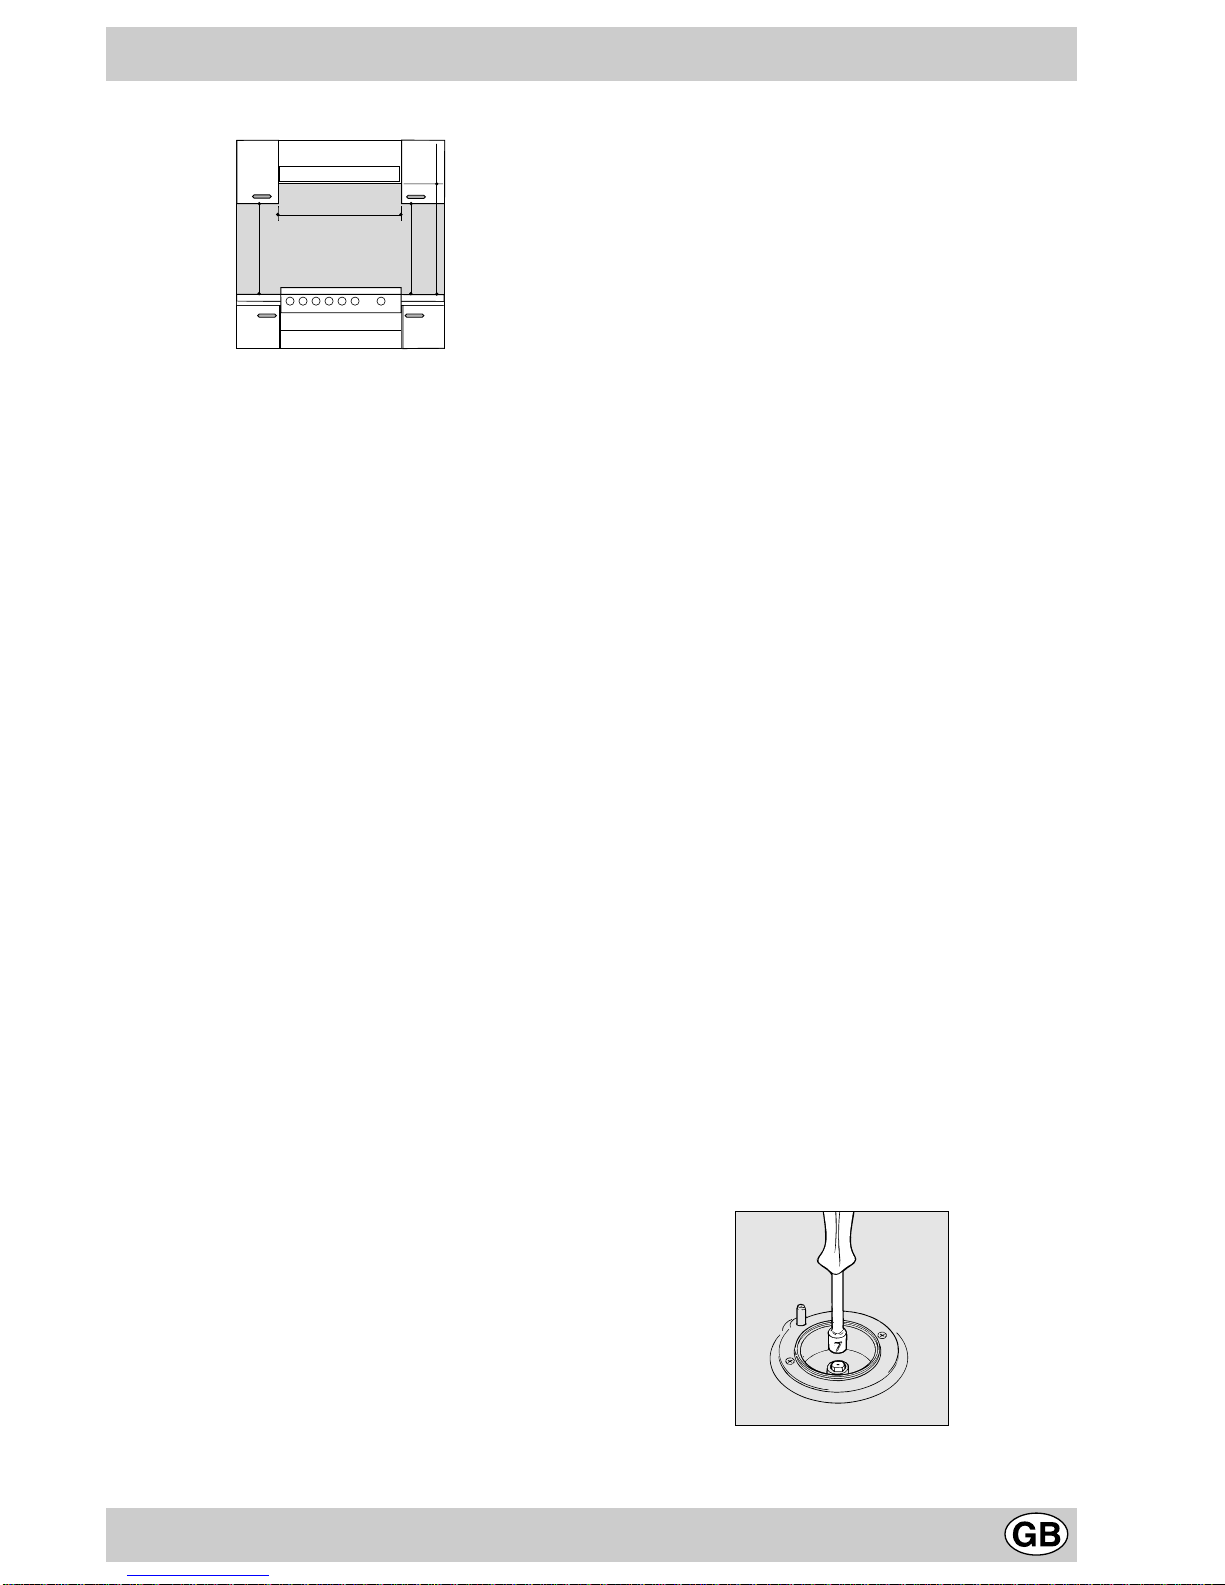
b) All furniture around the appliance must be placed at
least 200 mm from the top of the cooker, should the
surface of the appliance be higher than the worktop of
this furniture. Curtains should not be placed behind
the cooker or less than 200 mm away from the sides
of the appliance.
c) Any hoods must be installed according to the require-
ments in the installation manual for the hoods themselves.
d) If the cooker is installed beneath a wall cabinet, the
latter must be situated at a minimum of 420 mm above
the hob. The minimum distance between the worktop
and kitchen units made of combustible material is 700
mm.
e) The wall in direct contact with the back panel of the
cooker must be made of non-flammable materials.
5
HOOD
420
Min.
min.
650
mm. with hood
min.
700
mm. without hood
mm.
600
Min. mm.
420
Min. mm.
Connecting the gas
The appliance should be connected to the mains or to a
gas cylinder in compliance with current directives. Bef ore
making the connection, check that the cooker is regulated
for the gas supply you are using. If not, follow the
instructions indicated in the paragraph “Adapting to
different types of gas”. On some models the gas supply
can be connected on the left or on the right, as necessary;
to change the connection, reverse the position of the hose
holder with that of the cap and replace replace the gasket
(supplied with the appliance). When using liquid gas from
a cylinder, install a pressure regulator which complies with
current directive.
Important: check that the supply pressure complies with
the values indicated in table 1 “Characteristics of the
burners and nozzles” since this will ensure safe oper ation,
correct consumption and ensure a longer life to your
appliance.
Connection with hose
Make the connection using a gas hose complying with
the the characteristics provided in current directive. The
internal diameter of the pipe used is as follows:
- 8mm for liquid gas;
- 13mm for methane gas.
When installing the hose, remember to take the following
precautions:
• No part of the hose should touch parts whose tempe-
rature exceeds 50°C;
• The length of the hose should be less than 1500 mm;
• The hose should not be subject to twisting or pulling,
and should not have bends or kinks.
• The hose should not touch objects with sharp edges,
any moving parts, and it should not be crushed;
• The full length of the hose should be easy to inspect in
order to check its condition;
Check that the hose fits firmly into place at the two ends
and fix it with clamps complying to current directive.If any
of the above recommendations can not be adopted, fle xible
metal pipes should be used.
Should the cooker be installed according to the conditions
of Class 2, subdivision 1, only a flexible metal pipe which
is in compliance with current safety standards should be
used to make the connection to the gas mains.
Connecting a flexible jointless stainless steel pipe
to a threaded attachment
Remove the hose holder fitted on the appliance. The gas
supply pipe fitting is a threaded 1/2 gas cylindrical male
attachment. Only pipes and gask ets complying with current
directives. The full length of the pipe must not exceed 2000
mm.
Tight control
Important: when installation has been completed, check
the pipe fitting for leaks with a soapy solution. Nev er use a
flame. Once the connection has been made, ensure that
the flexible metal tube does not touch any moving par ts
and is not crushed.
Connecting the supply cable to the mains
Install a normalised plug corresponding to the load
indicated on the data plate. When connecting the cable
directly to the mains, install an omnipolar circuit-breaker
with a minimum contact opening of 3 mm between the
appliance and the mains. The omnipolar circuit breaker
should be sized according to the load and should comply
with current regulations (the earth wire should not be
interrupted by the circuit breaker).
The supply cable should be positioned so that it does not
reach a temperature of more than 50°C with respect to
the room temperature, along its length. Before making the
connection, check that:
• the limiter valve and the home system can support the
appliance load (see data plate);
• the mains is properly earthed in compliance with
current directives and regulations;
• there is easy access to the socket and omnipolar circuit
breaker , once the hob has been installed.
N.B: never use reducers, adaptors or shunts since they
can cause heating or burning.
Adapting the cooker to different types of gas
In order to adapt the cooker to a different type of gas with
respect to the gas for which it was produced (indicated on
the label attached to the lid), follow these steps:
a) replace the hose holder mounted on the appliance with
that supplied in the bag of “cooker accessories”.
Important: the hose holder f or liquid gas is marked 8, the
hose holder for methane gas is marked 13. Alwa ys fit the
sealing gasket.
b) Replacing the burner nozzles on the hob:
• remove the grids and slide the burners from their
housings;
• unscrew the nozzles using a 7 mm socket spanner,
and replace them with nozzles for the new type of gas
(see table 1 “Burner and nozzle characteristics”).
• replace all the components by repeating the steps in
reverse order.
c) Minimum regulation of the hob burners:
•
turn the tap to minimum;
6
• remove the knob and adjust the regulation scre w, which
is positioned in or next to the tap pin, until the flame is
small but steady.
N.B.: in the case of liquid gas, the regulation screw
must be screwed in to the bottom.
• check that the flame does not turn off when you turn
the tap quickly from high to low.
d Regulating the primary air of the burners:
The primary air of the burners requires no regulation.
Important
On completion of the operation, replace the old rating
sticker with one indicating the new type of gas used. This
sticker is av ailab le from our Service Centres.
Note
Should the pressure of the gas used be different (or vary)
from the recommended pressure, it is necessary to fit a
suitable pressure regulator onto the inlet pipe in
compliance with current National Regulations relative to
“regulators for channelled gas”.
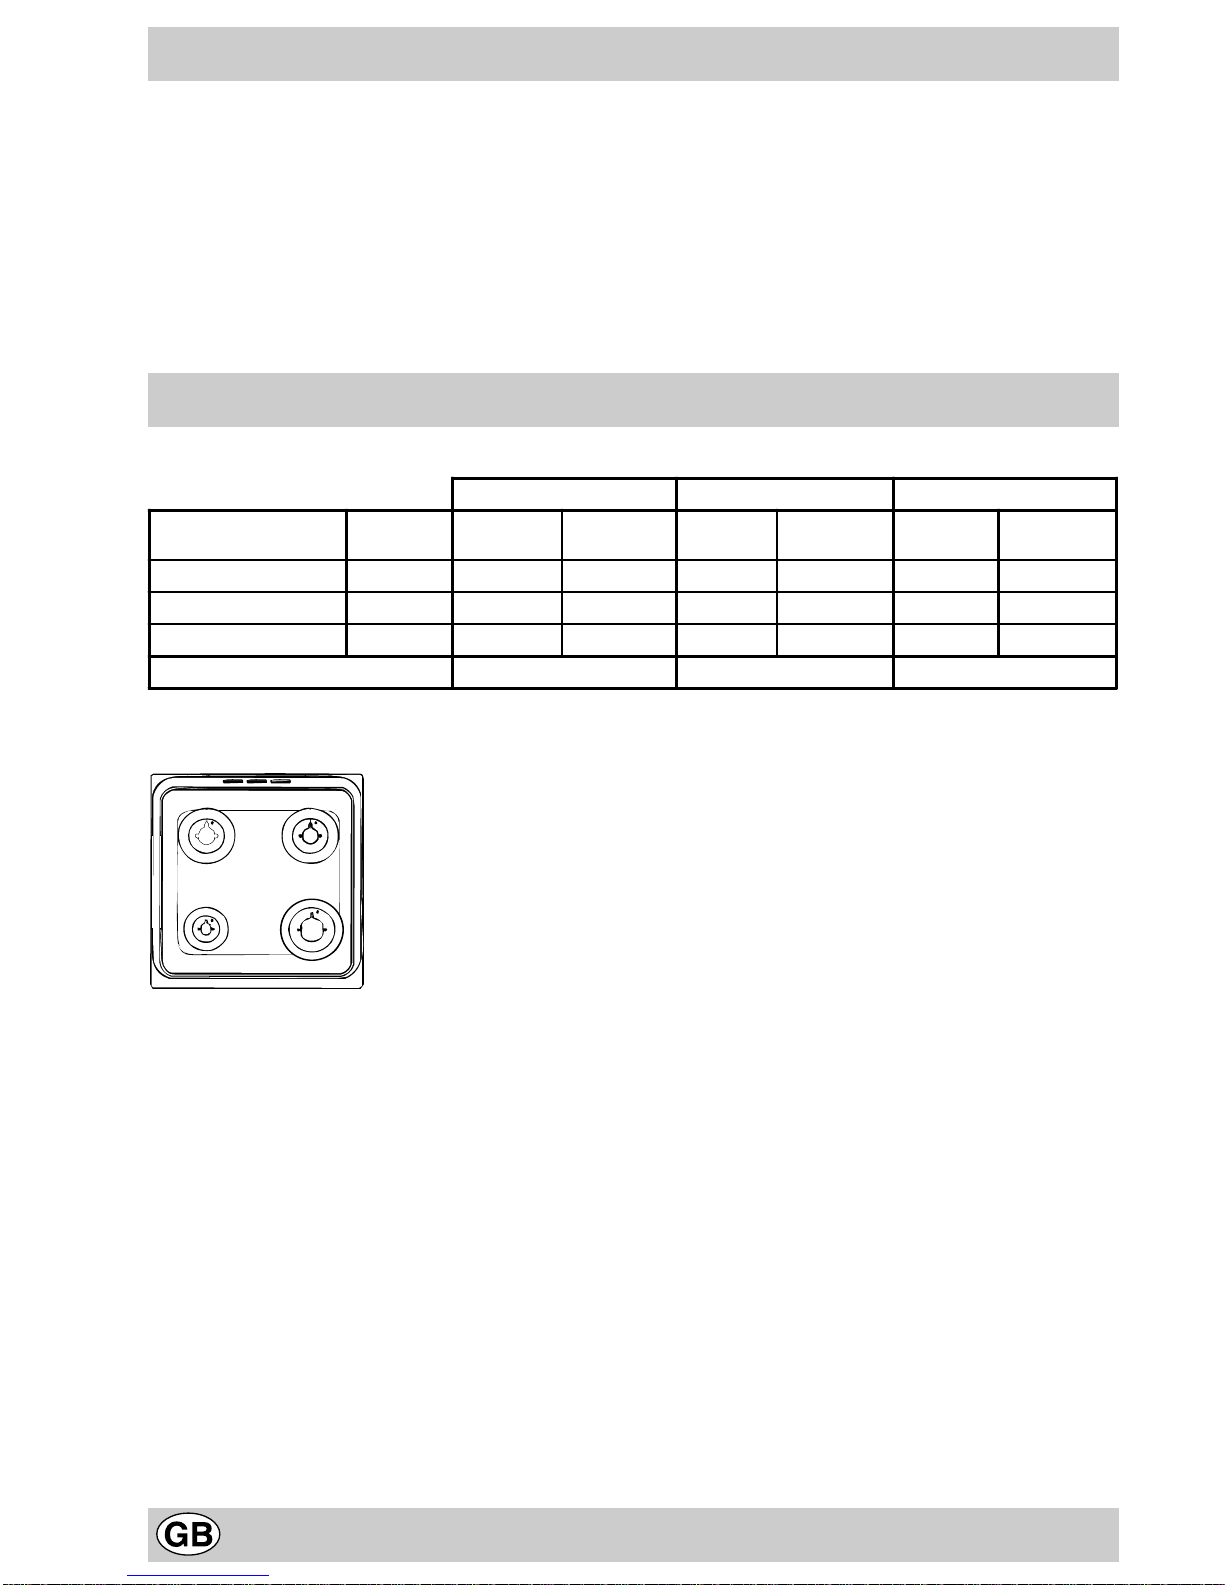
Burner and Nozzle Specifications
Table1 (For Hungary)
G 20 G 25.1 G 30
Burner By-pass
1/100 (mm)
Thermal
power kW
Nozzle
1/100 (mm)
Thermal
power kW
Nozzle
1/100 (mm)
Thermal
power kW
Nozzle
1/100 (mm)
Fast (R) 41 3,30 116 2,60 116 2,60 86
Semi Fast (S) 30 2,10 106 1,70 106 1,70 70
Auxiliary (A) 30 1,15 79 0,90 79 0,90 50
Supply pressures 25 mbar 25 mbar 30 mbar
At 15°C and 1013 mbar-dry ga s
P.C.I. G20 37,780 MJ/m
3
P.C.I. G30 122,8 MJ/m
3
P.C.I. G25.1 32,510 MJ/m
3
S
S
R
A
K 342 M/EU
K 342 MS/EU
K 343 M/EU

7
Technical Specifications
Inner dimensions of the oven:
Width: 39 cm
Depth: 41 cm
Height: 34 cm
Inner Volume of the Oven:
54 lt
Maximum absorber power:
2100 W
Inner Dimensions of the Food Warmer:
Width: 42 cm
Depth: 44 cm
Height: 23 cm
Voltage and Frequency of Power Supply:
see data plate
Burners:
adaptable for use with all the types of gas indicated on
the data plate situated inside the flap or, once the
dishwarmer drawer has been opened, on the inside wall
of the left-hand side panel.
This appliance conforms with the following Eur opean
Economic Community directives:
- 73/23/EEC of 19/02/73 (Low V oltage) and subsequent
modifications;
- 89/336/EEC of 03/05/89 (Electromagnetic
Compatibility) and subsequent modifications;
- 90/396/EEC of 29/06/90 (Gas) and subsequent
modifications;
- 93/68/EEC of 22/07/93 and subsequent modifications.
104
60
50
85/90
8
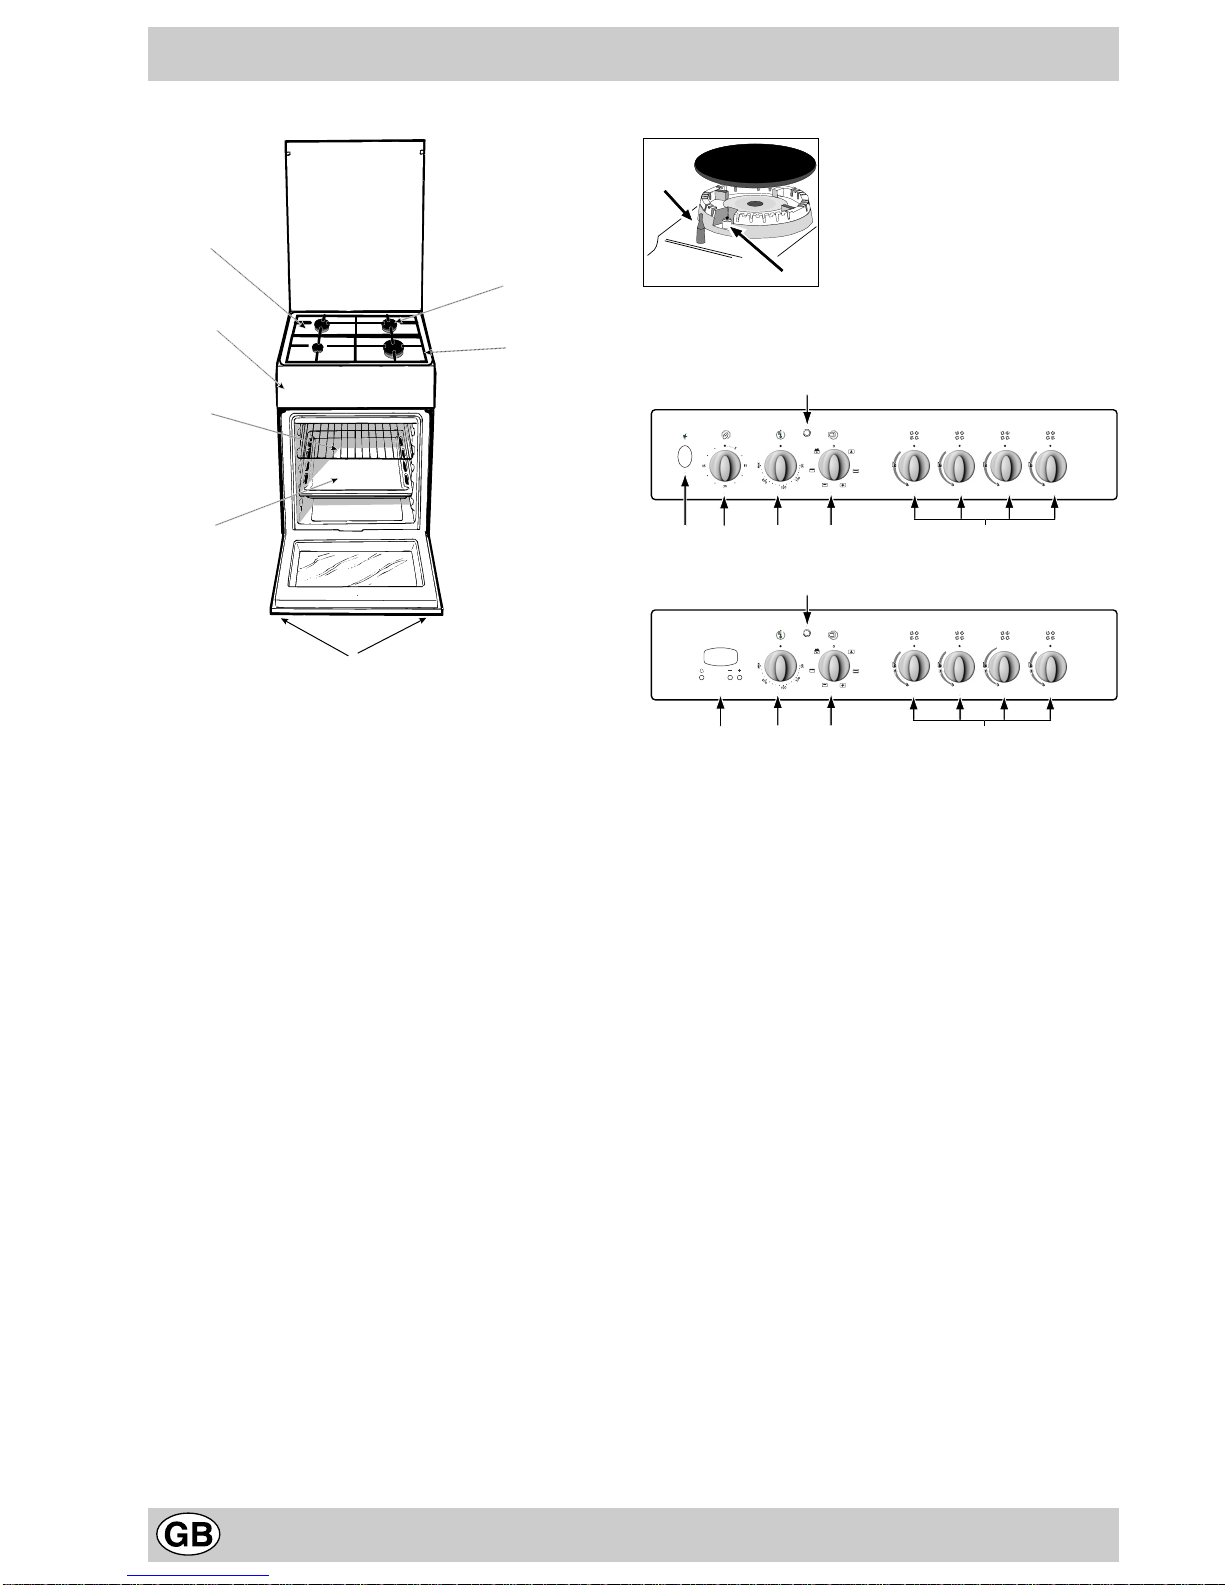
A Tray for Catching Ov erflo ws
B Gas Burner
C Electronic Lighting Device (only a fe w models)
D Top Grate
E Control Panel
F Adjustable Feet or Legs
G Dripping P an or Baking Sheet
J Flame failure device of the cook-top gas burners
(only a few models)
K Oven Rack
L Selector Knob
M Thermostat Knob
N Control Knobs for Gas Burners on Hob
O Thermostat Light
P Electronic timer (only a few models)
S Timer Knob (only a few models)
T Electronic Ignition for the Gas Cooktop (only a few
models)
Cooker with Multifunction Oven
F
A
E
K
G
D
B
H
C
J
C
LTN
O
M
S
L
O
M
P
N

9
How T o Use Y our Appliance
The various features of cooker are controlled through the knobs
and buttons located on the control panel.
Control Knobs for the Gas Burners on the Hob (N)
The position of the gas burner controlled by each one of the
knobs is shown by a solid ring •. T o light one of the burners, hold
a lighted match or lighter near the burner and, at the same time,
press down and turn the corresponding knob counter clockwise
to the maximum setting. Each burner can be operated at its
maximum, minimum or intermediate power. Shown on the knob
are the different symbols for off • (the knob is on this setting
when the symbol corresponds with the reference mark on the
control panel), for maximum and minimum .
To obtain these settings, turn the knob counter clockwise with
respect to the off position. T o turn off the burner , turn the knob
clockwise until it stops (corresponding again with the • symbol).
Electronic Ignition for the Gas Hob
Some of the models are provided with instant electronic lighting of the hob gas burners; these models are identified by
the presence of a lighting device (see detail C). This device
operates when a slight pressure is applied to the “T” button
marked with symbol. To light a specific burner just press
the button labelled “T” while pushing the corresponding knob
all the way in and turning it counter-clockwise until it lights.
For immediate lighting, first press the button and then
turn the knob. Some models come equipped with an elec-
tric starter built into the knob, in which case the lighting device labelled “C” is present while the button labelled “T” is
not. T o light a specific burner push the corresponding knob
all the way in and turn it counter-clockwise to maximum
keeping it pressed down until the burner lights.
Important: Should the burner flames accidentally go
out, turn off the control knob and wait at least 1 minute
before trying to relight.
Models with Hob Gas Burner Safety Devices to Prevent
Leaks
These models can be identified by the presence of the device
itself (see detail J).
Important: Since the hob burners are equipped with a safety
device, y ou must hold the control knob in for about 6 seconds
after the burner has been lighted to allow the gas to pass until
the safety thermocouple has heated.
Attention: The first time you use the o ven we recommend that
you set the thermostat on the highest setting and leave the ov en
on for about a half of an hour with nothing in it. Then, open the
oven door and let the room air . The odour that is often detected
during this initial use is due to the evaporation of substances
used to protect the oven during storage and until it is installed.
Attention: Only use the bottom shelf of the oven when using
the rotisserie to cook (where present). For all other types of
cooking, never use the bottom shelf and ne v er place an ything
on the bottom of the oven when it is in operation because this
could damage the enamel. Always place your cookware (dishes,
aluminium foil, etc. etc.) on the grate provided with the appliance
inserted especially along the oven guides.
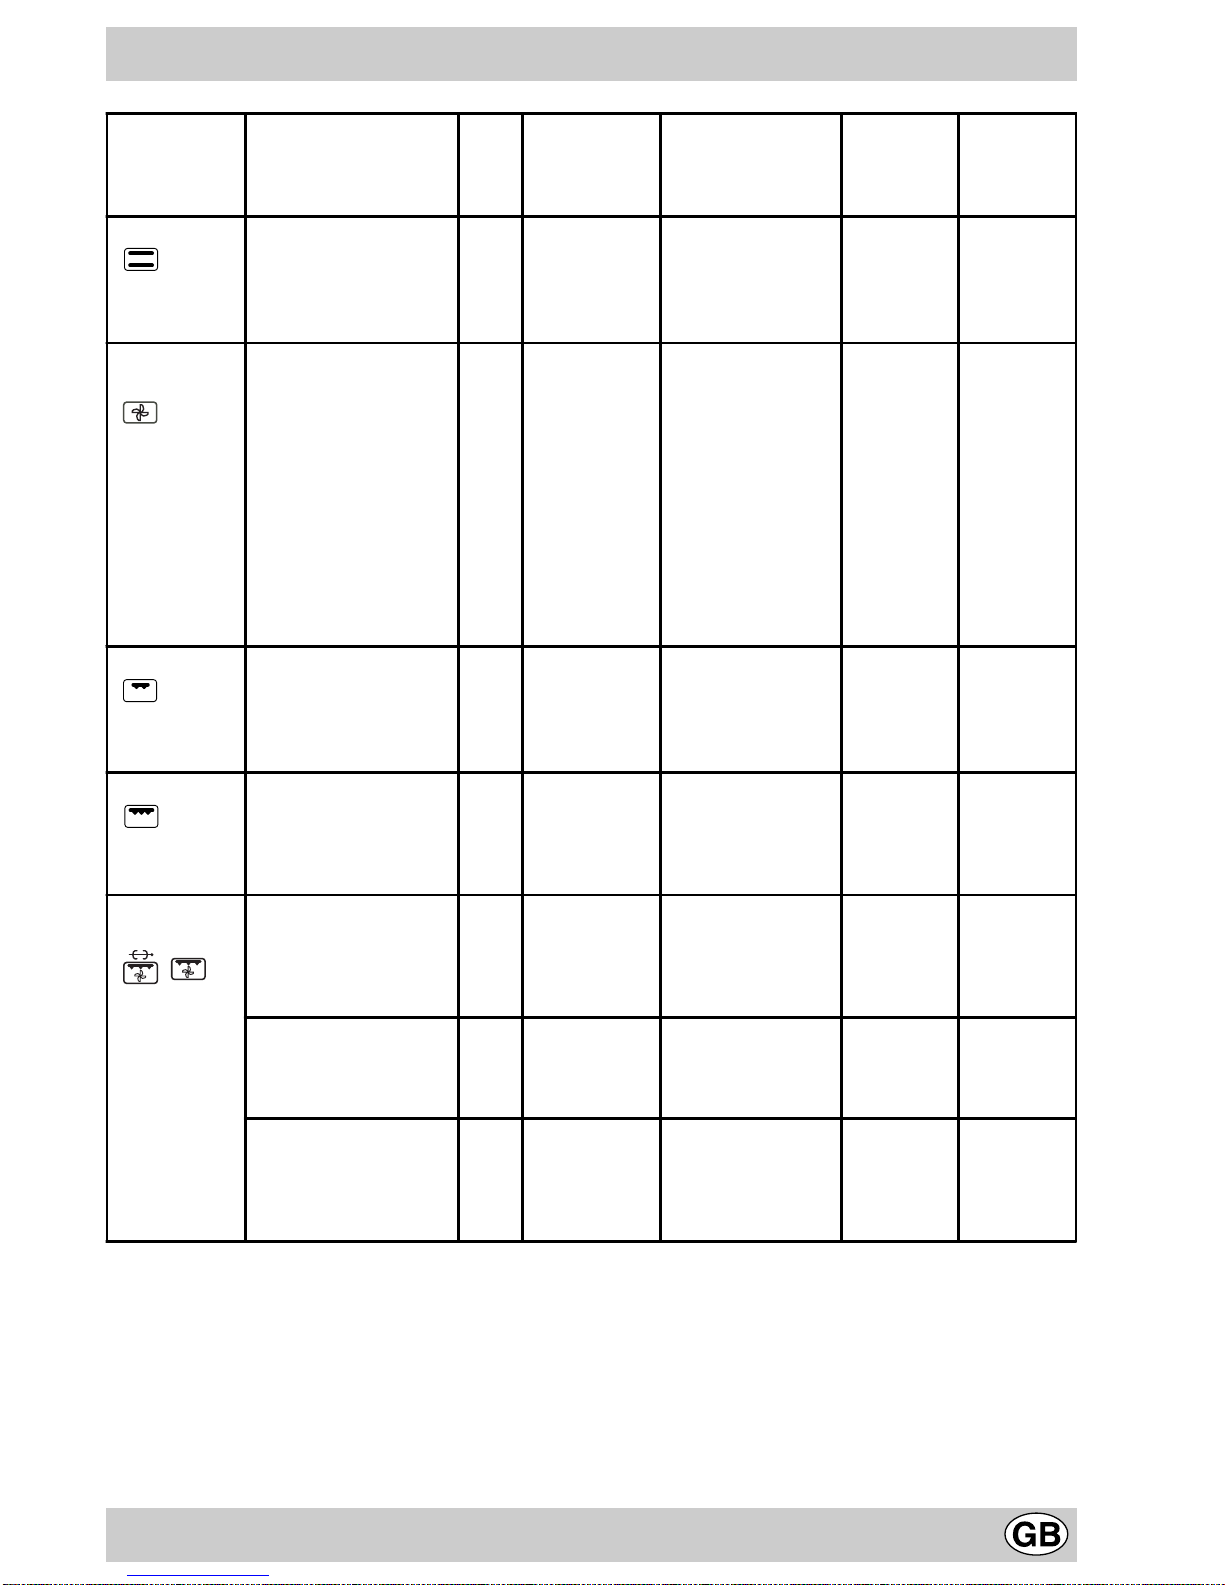
The Oven Control Knobs
The “5 Programms” oven combines all the advantages of
traditional “static” ovens with those of modern “v entilated” ones.
The”5 Programms” oven is extremely versatile and offers 5
different but sure and easy w a ys of cooking. Use the knobs to
select the different cooking functions available on the
“5 Programms” oven:
L - selector knob (identified by the symbol);
M - thermostat knob (identified by the symbol).
When the selector knob is on any other setting than that identified by the “o”, the o ven light turns on. The setting identified by
the symbol makes it possible to turn the oven light on without having any of the ov en heating elements on. When the o ven
light is on, it means that the oven is in use, and it will remain on
for the entire time the ov en is being used.
1.Convection Mode
- Position of the “L” knob:
- Position of the “M” knob: between 50°C and Max
On this setting, the light comes on and the top and bottom heating elements are activated. This is the classic, traditional type
oven which has perf ected, with exceptional heat distribution and
reduced energy consumption. The convection oven is still unequalled when it comes to cooking dishes made up of severa l
ingredients, e.g. cabbage with ribs, stews, etc. Excellent results
are achieved when preparing meat-based dishes as well (braised
meats, stew , goulash, wild game, ham etc.) which need to cook
slowly and require basting or the addition of liquid. It still remains
the best system for cooking pastries and fruit in general and
when using specific covered containers f or oven cooking. When
cooking in convection mode, only use one dripping-pan or cooking rack at a time, otherwise the heat distribution will be une ven.
Select from among the various rack heights based on whether
the dish needs more or less heat from the top or bottom.
2. V entilation Mode
- Position of the “L” knob:
- Position of the “M” knob: between 50°C and Max
Since the heat remains constant and uniform throughout the
oven due to the fan at the behind, the air cooks and bro wns food
uniformly over its entire surface. With this mode, you can also
cook various dishes at the same time, as long as their respective cooking temperatures are the same. A maximum of 2 rack
levels can be used at the same time, f ollowing the instructions in
the section entitled, "Cooking On More Than One Rac k". This
cooking mode is ideal for au gratin dishes or those which require
an extended cooking time like lasagne , macaroni bake, chicken
and roast potatoes, etc...
Moreover, the excellent heat distribution makes it possible to
use lower temperatures when cooking roasts. This results in
less loss of juices, meat which is more tender and a decrease in
the loss of weight for the roast. The v entilated mode is especially
suited for cooking fish, which can be prepared with the addition
of a limited amount of condiments, thus maintaining their flavour
and appearance. Excellent results can also be attained when
cooking vegetable like courgettes, aubergines , peppers, tomatoes, etc.
Desserts: leavened cak es are also perfect for the ventilated mode .
Moreover, this mode can also be used to thaw meat, fish and
bread by setting the temperature to 80°-100°C. To thaw more
10
delicate foods, set the thermostat to 50°C or use only the cold
air circulation feature by setting the thermostat to 0°C.
3. Grill
- Position of the “L” knob:
- Position of the “M” knob: Max
The extremely high and direct temperature of the grill makes it
possible to brown the surf ace of meats and roasts while locking
in the juices to keep them tender . The grill is also highly recommended for dishes that require high temperature on the surface:
beef steaks, veal, entrecôte, filets, hamb urger etc...
4. The "Double Grill"
- Position of the “L” knob:
- Position of the “M” knob: Max
This oversized grill has a completely new design, increasing
cooking efficiency by 50%. The double grill also eliminates pockets of unheated air in the corners of the oven.
Important: Always leave the o ven door closed when using
the grill setting n order to achieve the best results and sa ve on
energy (about 10%).
When using the grill, place the rack at the top rack heights (see
cooking table) and place the dripping-pan beneath the oven r ack
to prevent g rease from falling onto the bottom of the ov en.
5. V entilated Double Grill
- Position of the “L” knob: /
- Position of the “M” knob: between 50 and 200°C
This combination of features increases the effectiv eness of the
unidirectional thermal radiation of the heating elements through
forced air circulation of the air throughout the oven. This helps
prevents f oods from burning on the surface, allowing the heat to
penetrate into the food. Excellent results are achieved with kebabs made with meats and vegetables, sausages, ribs, lamb
chops, chicken, quail, pork chops, etc. This mode is also ideal
for cooking fish steaks, lik e swordfish, tuna, grouper etc.
In this function, the rotisserie motor will also turn on (where
present). Cooking with this function is especially recommended
for meat dishes such as loins, poultry , etc….
Note: When using the grill (features 3, 4, 5), the o ven door
must be closed.
Thermostat Light (O)
This light indicates that the oven is heating. When it turns off, the
temperature inside the oven has reached the setting made with
the thermostat knob. At this point, the light will turn on and off as
the oven maintains the temperature at a constant le vel.
Timer Knob (only a few models)
T o use the timer, the ringer "S" must be w ound up by turning the
knob one full turn clockwise ; then tur n it back , to the
desired time so that the number of minutes on the knob matches
the reference mark on the panel.
Attention
Avoid the children touch the oven door because it is very hot
during the cooking.
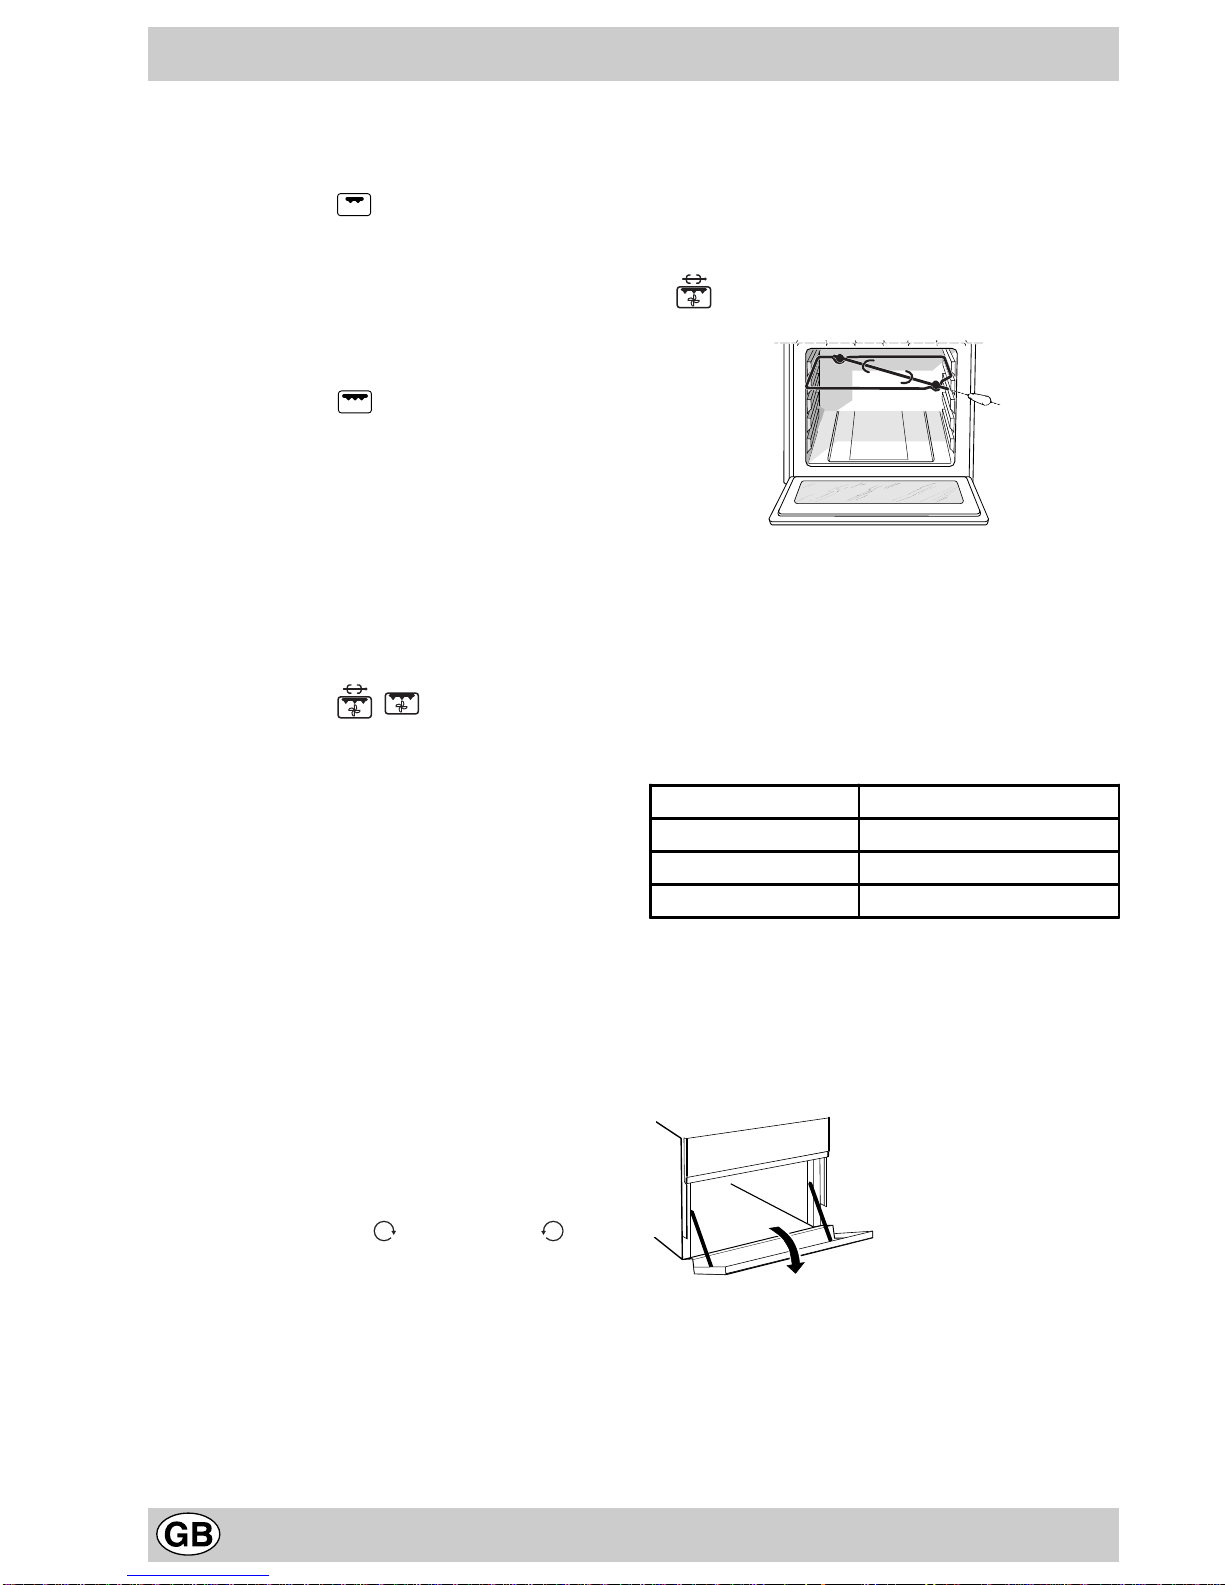
The rotisserie (only a few models)
T o operate the rotisserie, proceed as f ollows:
a) place the dripping-pan on the 1st rac k;
b) inser t the special rotisserie support on the 4th rack and
position the spit by inserting it through the special hole into
the rotisserie at the back of the oven;
c) to start the spit, set the oven selection knob (L) on setting
Practical Advice on Using the Burners
In order to obtain the best performance, keep in mind the f ollowing:
• Use the appropr iate cookware for each burner (see table)
so that the flames do not extend beyond the bottom of the
cookware.
• Only flat bottom cookware should be used.
• At the boiling point, turn the knob to low.
• Always use a lid with the cookware.
Burner ø Cookware diameter (cm)
Fast (R) 24 - 26
Semi Fast (S) 16 - 20
Auxiliary (A) 10 - 14
Storage recess below the oven (only a fe w models)
Below the oven a recess can be used to contain cooking pans
and cooker accessories. Moreover, during oven operation, it ma y
be used to keep food warm.To open the storage is necessary
turn it downwards.
Caution: this storage recess must not be used to store
inflammable materials.
Oven door kit
In order to further decrease the temperature of the oven door
and reduce energy consumption, a supplemental kit has been
made available . This kit should be installed if the oven is used in
the presence of small children. To install the protective glass f or
the oven door (code 076650), contact your nearest Merloni
Eletrodomestici Service Centre indicated on the list provided
with the appliance.

11
Electronic timer
The electronic timer displays the time and the timer
function with countdown.
Note: all the functions are operative approximately 7
seconds after they are stet.
How to reset the clock
After the appliance has been connected to the power
supply , or when the power has gone out, the cloc k display
will automatically reset to 0:00 and begin to blink. 0 00
• Press the button, and then use the and
buttons to set the correct time. To move the time
forward quickly, keep the buttons pressed.
Whenever the time must be reset, f ollow this same
procedure.
Timer Feature
Press the button to access this function. The symbol
" " will appear on the display . Each time you press button
, the time will increase by 10 seconds until 99 minutes
and 50 seconds. If you continue to press it, the time will
increase from minute to minute up to a maximum of 10
hours.
Use button to go backwards.
After setting the desired time, start the countdown. When
the time has elapsed, the buzzer will sound, and it can be
interrupted by pressing any of the buttons.
Y ou can displa y the time by pressing button , and symbol
" " indicates the timer function has been set. After
approximately 7 seconds, the displa y automatically goes
back to indicating the timer.
T o cancel a pre vious setting
Press button up until 0 • 00.
12
Practical Cooking Advice
The oven off ers a wide range of alternatives which allow you
to cook any type of food in the best possible w a y. With time
you will learn to make the best use of this versatile cooking
appliance and the following directions are only a guideline
which may be varied according to your own personal
experience.
Baking cakes
The oven should always be warm before putting in cakes
wait till the end of preheating (about 10-15 min.). Cake-baking
temperatures are normally around 160°C/200°C. Do not open
the oven door during the baking process as this could cause
the cake to sink.In general:
Pastry is too dry
Increase the temperature by 10°C and reduce the
cooking time.
Pastry dropped
Use less liquid or lower the temperature by 10°C.
Pastry is too dark on t op
Place it on a lower rack, lower the temperature, and
increase the cooking ti me.
Cooked well on the inside but sticky on the outside
Use less liquid, lower the temperature, and i ncrease the
cooking time.
The pastry sticks to the pan
Grease the pan well and sprinkle i t with a dust ing of
flour or use greaseproof paper.
I used more than one l eve l (i n t he f unct i on
"ventilated oven") and they are not all at the same
cooking point
Use a lower temperature setting. It is not necessary to
remove the food from all the racks at the same time.
Cooking fish and meat
When cooking white meat, fowl and fish use low temperatures .
(150°C-175°C). When red meat must be superficially wellcooked but succulent inside, it is advisable to star t with a
high temperature (200-220°C) for a short time, and then to
reduce it at a later point. Generally speaking, the more meat
there is, the lower the temperature and the longer the cooking
time should be.Place the meat in the centre of the grid and
put a spill-tray underneath to catch grease drips. Insert the
grid so that it is in the middle of the oven. If more heat from
below is required, use the 1° bottom shelf.
Cooking on More Than One Rack
Should you need to use two grids, use only function 2
“ventilated oven” which is the only solution f or this process.
· The oven has 5 different rack heights . When cooking with
the ventilated mode, use only the two centre rac k heights:
the bottom and topmost rack heights directly receive hot
air and this could result in more delicate dishes being
burned.
· In general, use levels 2 and 4 from the bottom, placing
the food requiring more heat at level no . 2. For e xample,
when cooking a roast together with other food, place the
roast at level 2 and the more delicate dishes at le v el 4.
· When cooking foods requiring different cooking times and
temperatures, make sure that the temperature is set between the two recommended temperatures and put the
more delicate dishes at level no. 4. Finally, remove the
dish with the shorter cooking time first.
· Use the dripping pan at the bottommost rack height and
the grill at the top.
· When cooking pizza on more than one rack with the temperature set at 220°C. Remember to preheat the oven
for at least 15 minutes. In general the 4th rack height
cooks a little slower , so remov e the pizza on the second
rack height first and leave the other one in the o ven f or a
few minutes.
Using the Grill
The oven allows you to use tw o diff erent grilling methods.
Use the no. 3 setting “Grill” for small portions. Energy
consumption for this feature is only 1200 W; however, it is
ideal for grilling small dishes or portions, e.g. toast, frankfurters, etc.
Place the food in the centre of the grill, as onl y the centre of the heating element is turned on. Food in the corners of the oven will not be cooked.
The no. 4 setting “Double Grill” allows you to grill along
the entire surface area of the grill itself. Use this feature when
you have f ood distributed uniformly beneath the grill and you
want it to be browned ev enly.
Important: Always lea ve the oven door closed when using the grill setting n order to achieve the best results and
save on energy (about 10%).
When using the grill settings, it is recommended that the
thermostat be set to maximum, as this is the optimal setting
for the grill, which utilizes radiation produced by infrared r ays.
Howeve r, this does not mean that lower temperature settings cannot be used when necessary by simply turning the
control knob.
When using the grill, place the rack at the 4 rack heights
(see cooking table) and place the dripping-pan beneath the
oven rack to prevent grease from falling onto the bottom of
the oven.
Setting 5 “Ventilated Double Grill”, is extremely useful for grilling foods rapidly, as the distribution of heat makes
it possible not only to brown the surface , but also to cook the
bottom part. It can also be used to grill large pieces of meat
or fowl. Moreover, it can also be used f or browning f oods at
the end of the cooking process.
When using this function, place the grid on the 2nd or 3rd
oven rac k from the bottom (see cooking table) then, to prevent fat and grease from dripping onto the bottom of the
oven and thus smoke from f orming, place a dripping-pan on
the 1st rack from the bottom. When using this function together with the spit (only on some models), you can also
cook dishes on the dripping-pan situated on the 1st rack, for
example: potatoes , etc…….
13
Practical Cooking Advice
Selection
knob
Food to be cooked Wt.
(Kg)
Cooking
position f rom
bottom
Heating time
(min.)
Thermostat
knob
Cooking
time
(min.)
1 Static
Duck
Roast beef
Roast pork
Biscuits
Tarts
1
1
1
1
3
3
3
3
3
15
15
15
15
15
200
200
200
180
180
65-75
70-75
70-80
15-20
30-35
2 Fan oven
cooking
Pizza
(on 2 racks)
Lasagne
Lamb
Chicken + potatoes
Mackerel
Red porgy
Plum cake
Cream puffs (o n 2 r acks)
Biscuits (on 2 racks)
Sponge cake (on 1 rack)
Sponge cake (on 2
racks)
Savoury pies
1
1
1
1
1
1.5
1
0.5
0.5
0.5
1.0
1.5
2-4
3
2
2-4
2
2
2
2-4
2-4
3
2-4
3
15
10
10
10
10
10
10
10
10
10
10
15
220
200
180
180
180
180
170
190
180
165
165
200
20-35
30-35
50-60
60-75
50-55
55-60
40-50
25-35
10-15
25-30
25-30
25-30
3 Grill
Sole and cuttle fish
Squid and shrimp on
spits
Cod fillets
Grilled vegetables
1
1
1
1
4
4
4
3/4
5
5
5
5
Max
Max
Max
Max
8
4
10
8-10
4 Double Grill
Veal s teaks
Cutlets
Hamburger s
Caballas
Toasted sandwiches
1
1.5
1
1
n.° 4
4
4
3
4
4
5
5
5
5
5
Max
Max
Max
Max
Max
15-20
20
7
15-20
5
5 Ventilated
Double Grill
Grilled chicken
Cuttle fish
Chicken (inserted on the
spit) + potatoes (on the
dripping-pan)
1.5
1.5
1.5
-
2
2
-
2
5
5
5
5
200
200
200
200
55-60
30-35
70-75
70-75
With rotisserie
Veal on t he spit
Chicken on the spit
Lamb on the spit
1.5
1.5
1.5
-
-
-
5
5
5
200
200
200
70-80
70-80
70-80
With multi-skewer
rotisserie (only a few
models)
Meat kebabs
Vegetable kebabs
1.0
0.8
-
-
5
5
Max
Max
40-45
25-30
NB: cooking times are approximate and may vary according to personal taste.When cooking using the gr ill or double
grill or ventilated double grill, the dripping-pan must always be placed on the 1st oven rack from the bottom.
14
Routine Maintenance and Cleaning
Before each operation, disconnect the cooker from
the electrical supply. To ensure that the appliance lasts
a long time, it must be thoroughly cleaned frequently , keeping in mind that:
• The enamelled parts and the self-cleaning panels are
washed with warm water without using any abrasive
powders or corrosive substances which could ruin
them;
• The inside of the oven should be cleaned fair ly often
while it is still warm, using warm water and detergent
followed by careful rinsing and drying;
• The flame spreaders should be washed frequently with
hot water and detergent, taking care to eliminate any
scale;
• In cookers equipped with automatic lighting, the termi-
nal part of the electronic instant lighting devices should
be cleaned frequently and the gas outlet holes on the
flame spreaders should be checked to make sure the y
are free of any obstructions;
• Stainless steel may become marked if it comes into
contact with very hard water or harsh detergents (containing phosphorous) for long periods of time. After
cleaning, it is advisable to rinse thoroughly and dry. It
is also recommended that drops of water be dried.
NB.: Avoid closing the cover while the gas burners
are still warm. Remo ve any liquid from the lid before
opening it.
Important: Periodically check the wear of the gas hose
and substitute it if there are any defects; we recommended
changing it every year.
Replacing the Oven Lamp
• Disconnect the oven from the pow er supply by means
of the omnipolar switch used to connect the appliance
to the electrical mains; or disconnect the plug if it is
accessible;
• Remove the glass cov er of the lamp-holder;
• Remove the lamp and replace with a lamp resistant to
high temperatures (300°C) with the following specifications:
- V oltage 230V
- Wattage 25W
- T ype E14
• Replace the glass cover and connect the oven to the
mains.
Greasing the Taps
The taps may jam in time or they ma y become difficult to
turn. If so, the y must be cleaned internally and the grease
replaced.
NB.: This operation must be performed by a technician authorised by the manufacturer .
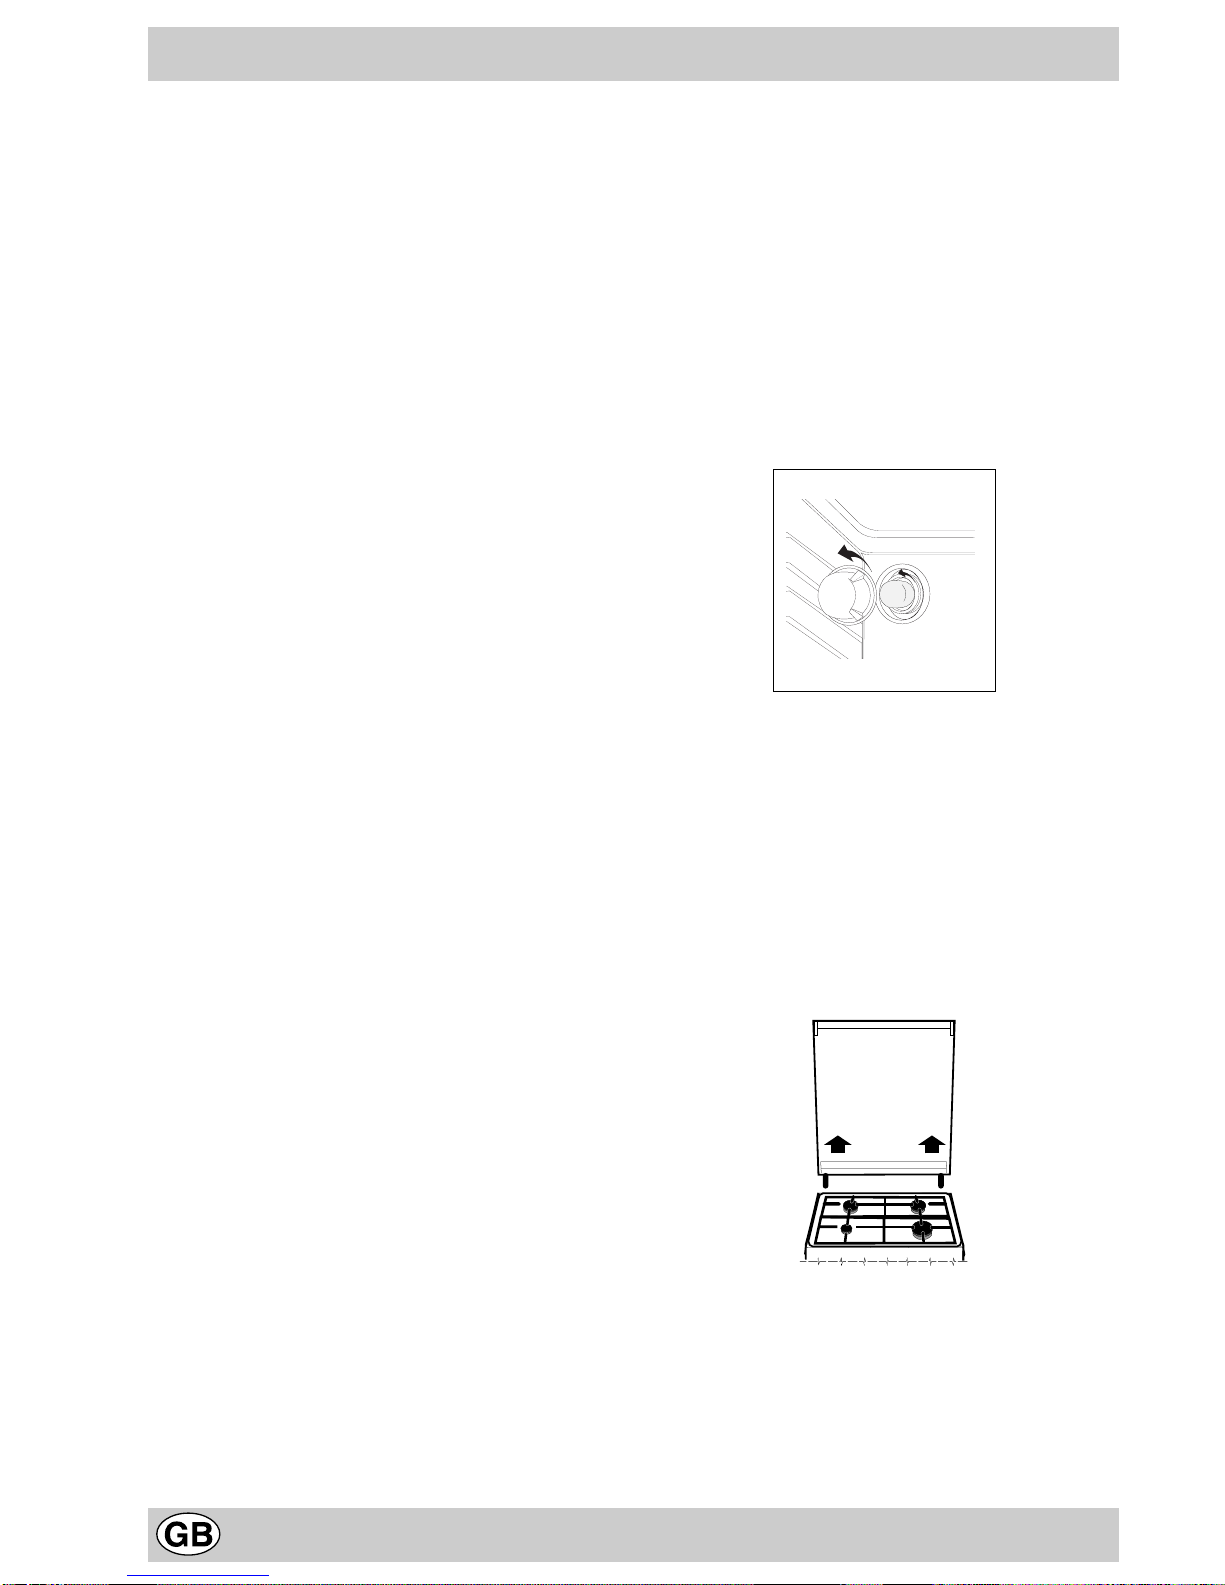
Removing the lid
The cooker lid can be removed to f acilitate cleaning. To
remove the lid, first open it completely and pull it
upwards (see figure)
 Loading...