

Indesit IWE71082 Operating Instructions

Instructions for use
WASHING MACHINE
GB
English,1
TR
Türkçe,37
Polski,13
CSI
Русский,49
IWE 71082 S
PL
UK
Українська,25
Contents
Installation, 2-3
Unpacking and levelling
Connecting the electricity and water supplies
The first wash cycle
Technical data
Care and maintenance, 4
Cutting off the water or electricity supply
Cleaning the washing machine
Cleaning the detergent dispenser drawer
Caring for the door and drum of your appliance
Cleaning the pump
Checking the water inlet hose
Precautions and tips, 5
General safety
Disposal
Description of the washing machine, 6-7
Control panel
Display
Running a wash cycle, 8
GB
Wash cycles and options, 9
Table of wash cycles
Wash options
Detergents and laundry, 10
Detergent dispenser drawer
Preparing the laundry
Special wash cycles
Load balancing system
Troubleshooting, 11
Service, 12
1

Installation
GB
! This instruction manual should be kept in a safe
place for future reference. If the washing machine is sold, transferred or moved, make sure that
the instruction manual remains with the machine
so that the new owner is able to familiarise himself/herself with its operation and features.
! Read these instructions carefully: they contain vital information relating to the safe installation and operation of the appliance.
Unpacking and levelling
Unpacking
1. Remove the washing machine from its
packaging.
2. Make sure that the washing machine has
not been damaged during the transportation
process. If it has been damaged, contact the
retailer and do not proceed any further with
the installation process.
3. Remove the 4 protective screws (used
during transportation)
and the rubber washer with the corresponding spacer,
located on the rear
part of the appliance
(see figure).
4. Close off the holes using the plastic plugs
provided.
5. Keep all the parts in a safe place: you will
need them again if the washing machine needs to be moved to another location.
Levelling the machine correctly will provide
it with stability, help to avoid vibrations and
excessive noise and prevent it from shifting
while it is operating. If it is placed on carpet or
a rug, adjust the feet in such a way as to allow
a sufficient ventilation space underneath the
washing machine.
Connecting the electricity and
water supplies
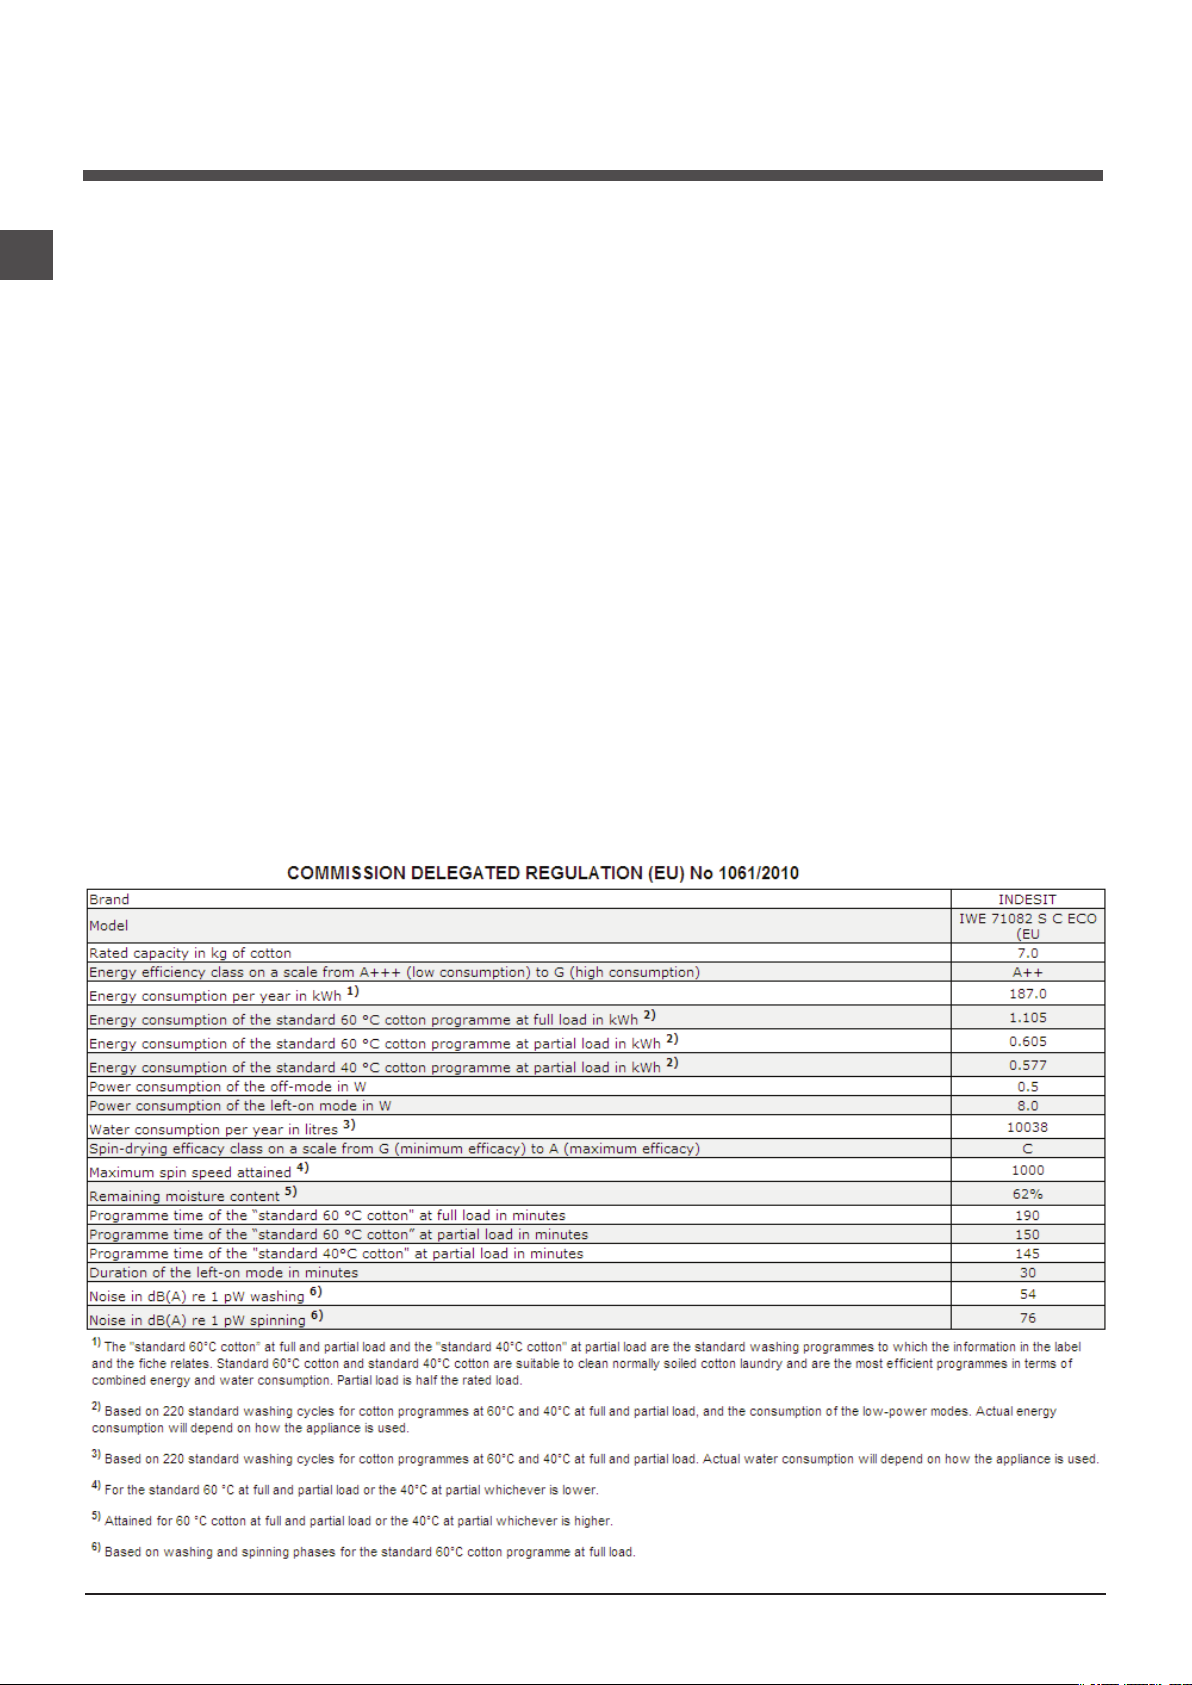
Connecting the water inlet hose
1. Connect the supply pipe by screwing
it to a cold water tab
using a ¾ gas threaded connection (see
figure).
Before performing the
connection, allow the
water to run freely until it is perfectly clear.
2. Connect the inlet
hose to the washing
machine by screwing
it onto the corresponding water inlet of the
appliance, which is
situated on the top
right-hand side of the
rear part of the appliance (see figure).
! Packaging materials should not be used as
toys for children.
Levelling
1. Install the washing machine on a flat sturdy
floor, without resting it up against walls, furniture cabinets or anything else.
2. If the floor is not
perfectly level, compensate for any unevenness by tightening
or loosening the
adjustable front feet
(see figure); the angle
of inclination, measured in relation to the
worktop, must not
exceed 2°.
2
3. Make sure that the hose is not folded over
or bent.
! The water pressure at the tap must fall within
the values indicated in the Technical details
table (see next page).
! If the inlet hose is not long enough, contact a
specialised shop or an authorised technician.
! Never use second-hand hoses.
! Use the ones supplied with the machine.

data plate fixed to the machine
65 - 100 cm
Connecting the drain hose
Connect the drain
hose, without bending
it, to a drainage duct
or a wall drain located
at a height between
65 and 100 cm from
the floor;
! Do not use extension cords or multiple sockets.
! The cable should not be bent or compressed.
! The power supply cable must only be repla-
ced by authorised technicians.
Warning! The company shall not be held
responsible in the event that these regulations
are not respected.
The first wash cycle
GB
alternatively, rest it on
the side of a washbasin or bathtub, fastening the duct supplied to the tap (see
figure). The free end
of the hose should
not be underwater.
! We advise against the use of hose extensions; if it is absolutely necessary, the extension must have the same diameter as the
original hose and must not exceed 150 cm in
length.
Electrical connections
Before plugging the appliance into the electricity socket, make sure that:
• the socket is earthed and complies with all
applicable laws;
• the socket is able to withstand the maximum
power load of the appliance as indicated in
the Technical data table (see opposite);
• the power supply voltage falls within the
values indicated in the Technical data table
(see opposite);
• the socket is compatible with the plug of
the washing machine. If this is not the case,
replace the socket or the plug.
! The washing machine must not be installed
outdoors, even in covered areas. It is extremely dangerous to leave the appliance exposed
to rain, storms and other weather conditions.
! When the washing machine has been installed, the electricity socket must be within easy
reach.
Once the appliance has been installed, and
before you use it for the first time, run a wash
cycle with detergent and no laundry, using the
wash cycle 2.
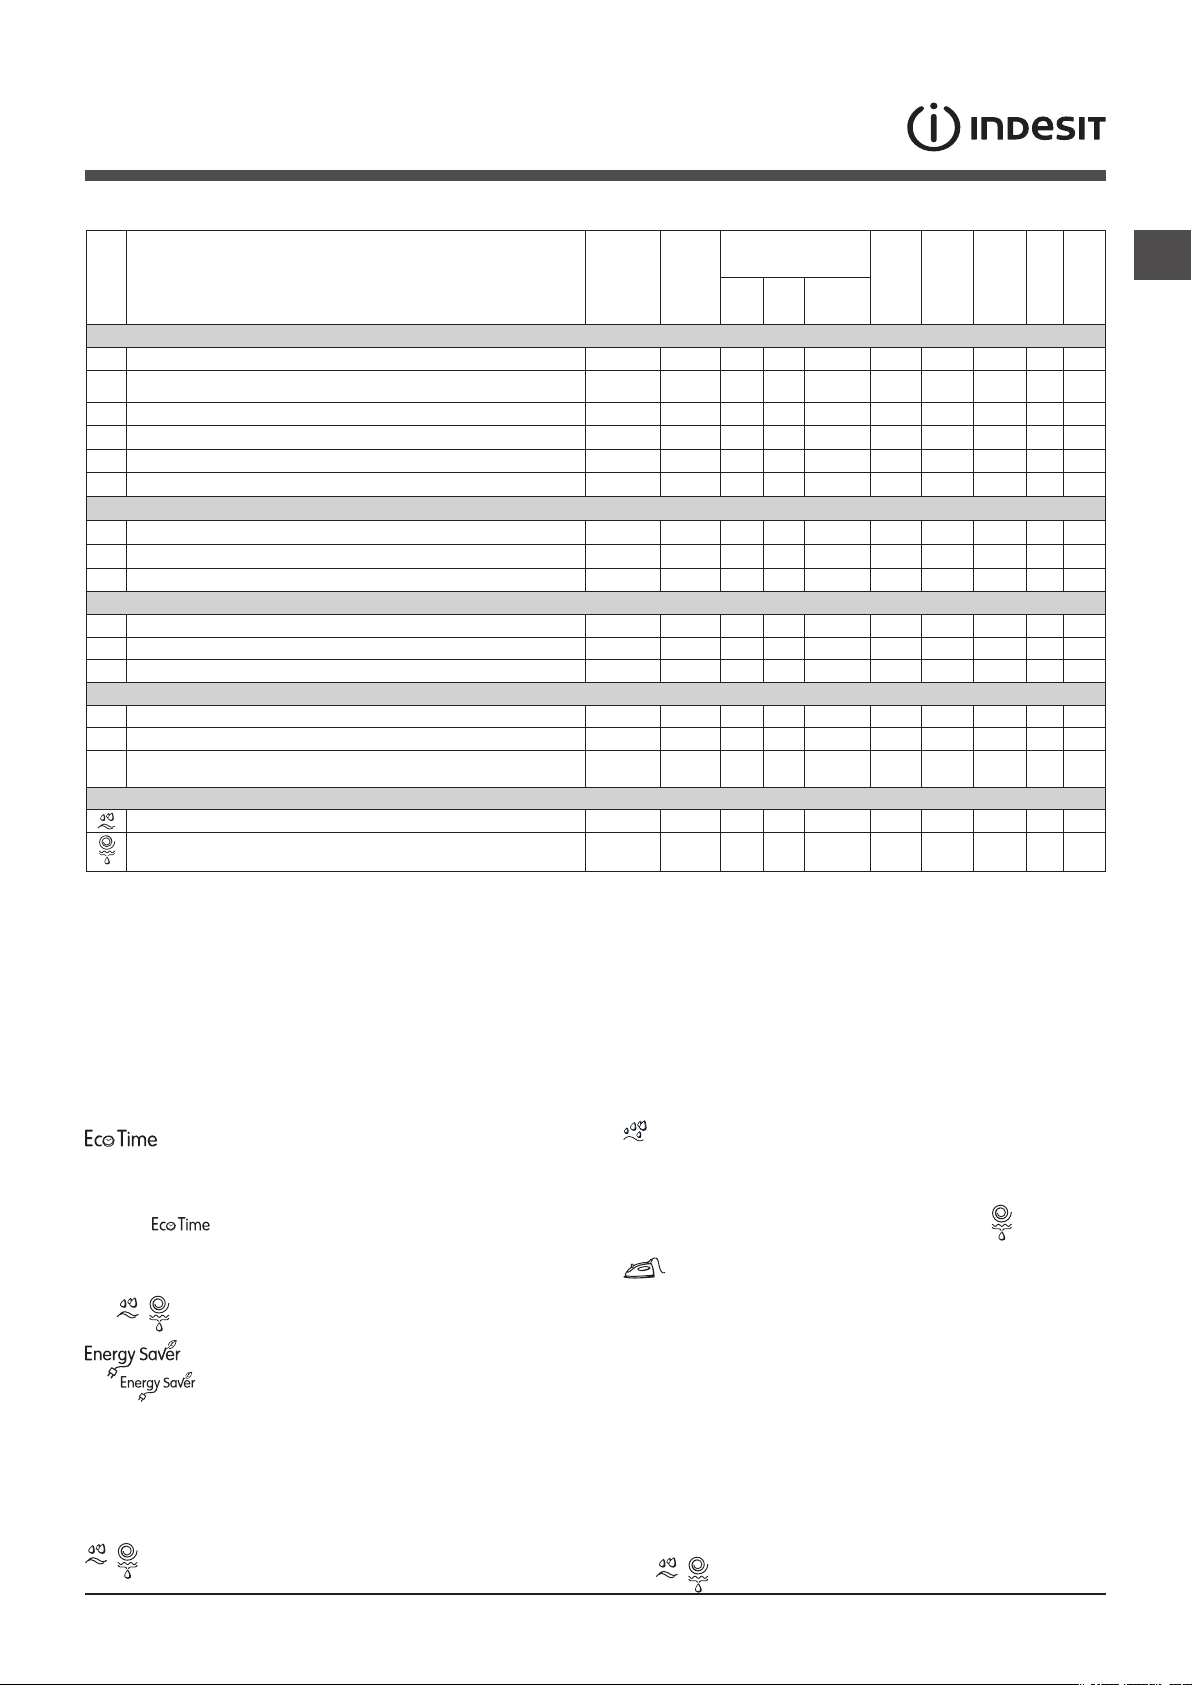
Technical data
Model
Dimensions
Capacity
Electrical
connections
Water
connection
Spin speed
Test wash
cycles in
accordance with
directives
1061/2010
and
1015/2010
IWE 71082 S
width 59.5 cm
height 85 cm
depth 53,5 cm
from 1 to 7 kg
please refer to the technical
maximum pressure
1 MPa (10 bar)
minimum pressure
0.05 MPa (0.5 bar)
drum capacity 52 litres
up to 1000 rotations per
minute
Programme 2:
Cotton standard 60°C.
Programme 3:
Cotton standard 40°C.
This appliance conforms to
the following EC Directives:
- 2004/108/EC dated
03/05/89 (Electromagnetic
Compatibility)
- 2012/19/EU
- 2006/95/EC Low Voltage)
3
Care and maintenance
GB
Cutting off the water and electricity supplies
• Turn off the water tap after every wash cycle.
This will limit wear on the hydraulic system
inside the washing machine and help to prevent leaks.
• Unplug the washing machine when cleaning
it and during all maintenance work.
Cleaning the washing machine
The outer parts and rubber components of the
appliance can be cleaned using a soft cloth
soaked in lukewarm soapy water. Do not use
solvents or abrasives.
Cleaning the detergent dispenser
drawer
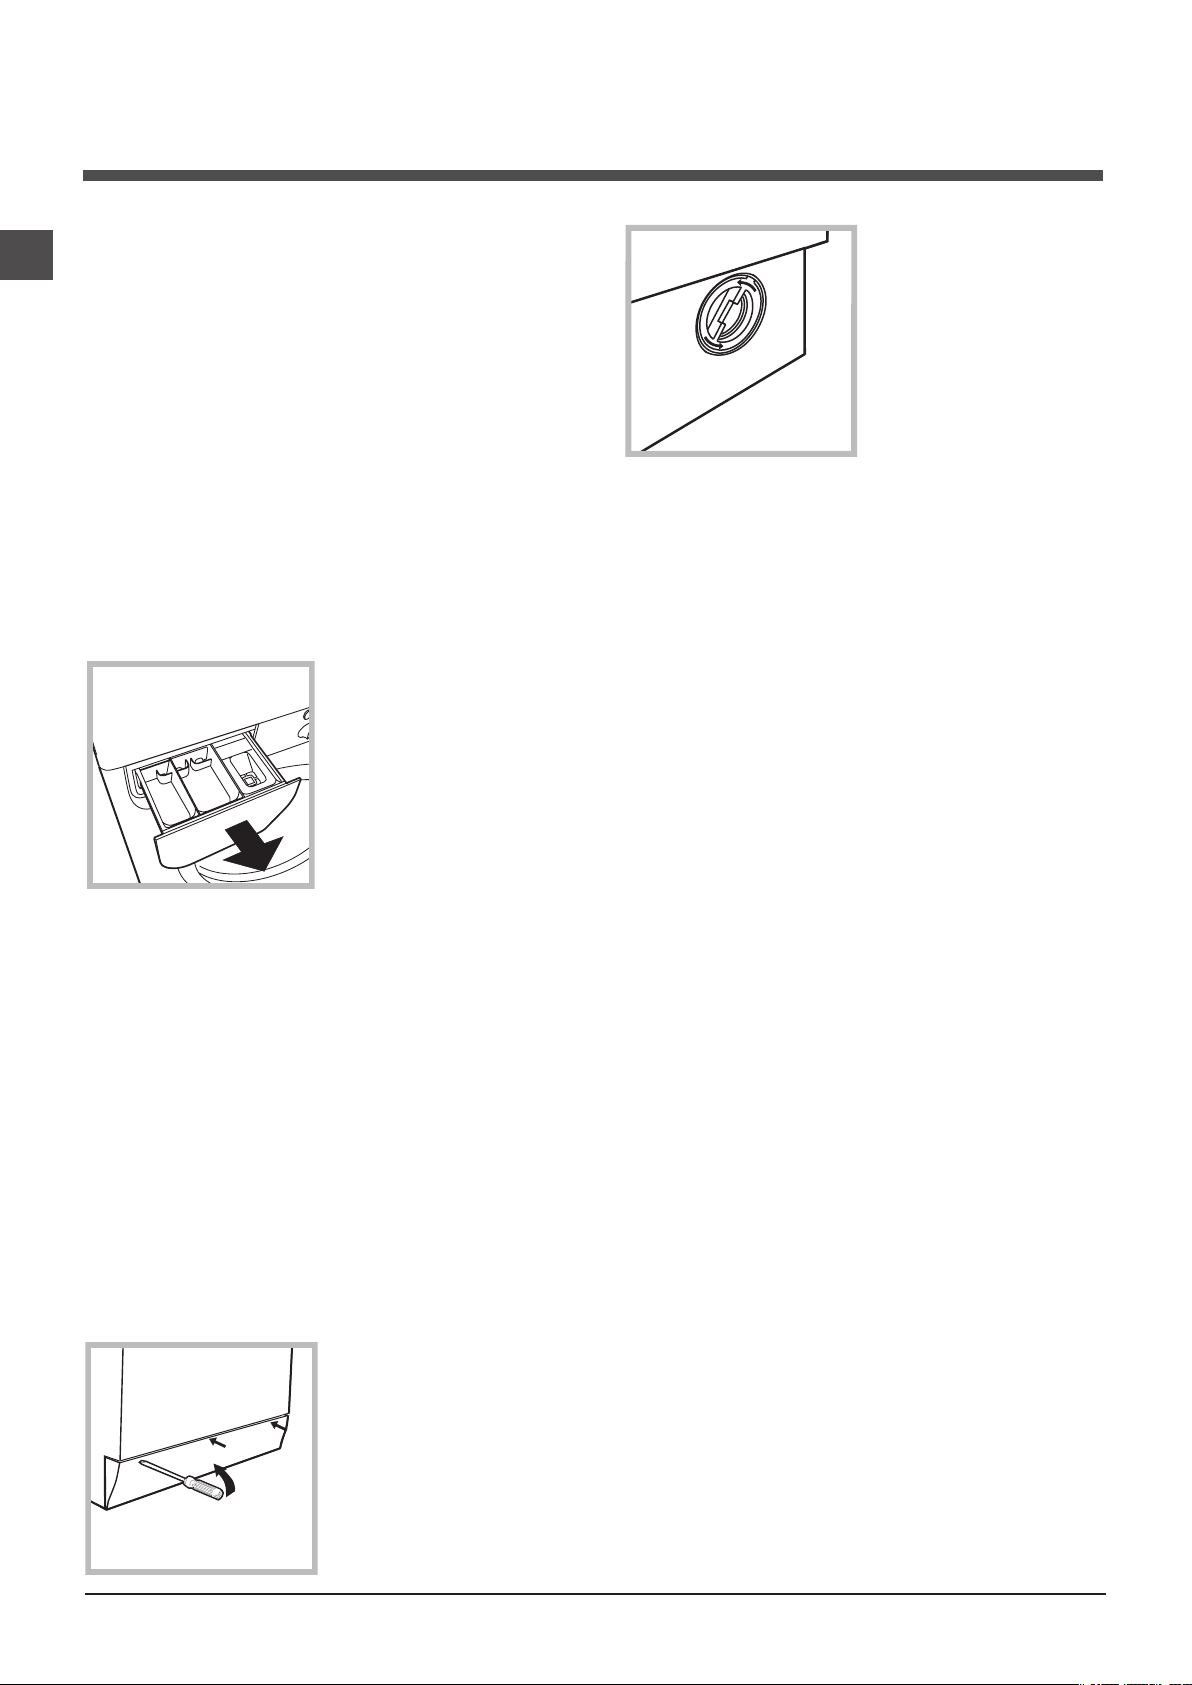
Remove the dispenser
by raising it and pulling it out (see figure).
Wash it under running
water; this operation
should be repeated
frequently.
2. unscrew the lid
by rotating it anticlockwise (see figu-
re): a little water may
trickle out. This is
perfectly normal;
3. clean the inside thoroughly;
4. screw the lid back on;
5. reposition the panel, making sure the hooks
are securely in place before you push it onto
the appliance.
Checking the water inlet hose
Check the inlet hose at least once a year. If
there are any cracks, it should be replaced
immediately: during the wash cycles, water
pressure is very strong and a cracked hose
could easily split open.
! Never use second-hand hoses.
Caring for the door and drum of
your appliance
• Always leave the porthole door ajar in order
to prevent unpleasant odours from forming.
Cleaning the pump
The washing machine is fitted with a self-cleaning pump which does not require any maintenance. Sometimes, small items (such as
coins or buttons) may fall into the pre-chamber
which protects the pump, situated in its bottom part.
! Make sure the wash cycle has finished and
unplug the appliance.
To access the pre-chamber:
1. using a screwdriver, remove the cover
panel on the lower
front part of the washing machine (see
figure);
4

Precautions and tips
! This washing machine was designed and constructed in
accordance with international safety regulations. The following information is provided for safety reasons and must
therefore be read carefully.
General safety
• This appliance was designed for domestic use only.
•
This appliance can be used by children aged
from 8 years and above and persons with reduced physical, sensory or mental capabilities
or lack of experience and knowledge if they
have been given supervision or instruction
concerning use of the appliance in a safe way
and understand the hazards involved. Children shall not play with the appliance. Cleaning and user maintenance shall not be made
by children without supervision.
• Do not touch the machine when barefoot or with wet or
damp hands or feet.
• Do not pull on the power supply cable when unplugging
the appliance from the electricity socket. Hold the plug
and pull.
• Do not open the detergent dispenser drawer while the
machine is in operation.
• Do not touch the drained water as it may reach extremely high temperatures.
• Never force the porthole door. This could damage the
safety lock mechanism designed to prevent accidental
opening.
• If the appliance breaks down, do not under any circumstances access the internal mechanisms in an attempt
to repair it yourself.
• Always keep children well away from the appliance while
it is operating.
• The door can become quite hot during the wash cycle.
• If the appliance has to be moved, work in a group of two
or three people and handle it with the utmost care. Never
try to do this alone, because the appliance is very heavy.
• Before loading laundry into the washing machine, make
sure the drum is empty.
Consumers should contact their local authority or
retailer for information concerning the correct
disposal of their old appliance.
GB
Disposal
• Disposing of the packaging materials: observe local
regulations so that the packaging may be re-used.
• The European Directive 2012/19/EU on Waste
Electrical and Electronic Equipment, requires that
old household electrical appliances must not be
disposed of in the normal unsorted municipal waste
stream. Old appliances must be collected separately
in order to optimise the recovery and recycling of the
materials they contain and reduce the impact on human
health and the environment. The crossed out “wheeled
bin” symbol on the product reminds you of your obliga tion, that when you dispose of the appliance it must be
separately collected.
5

GB
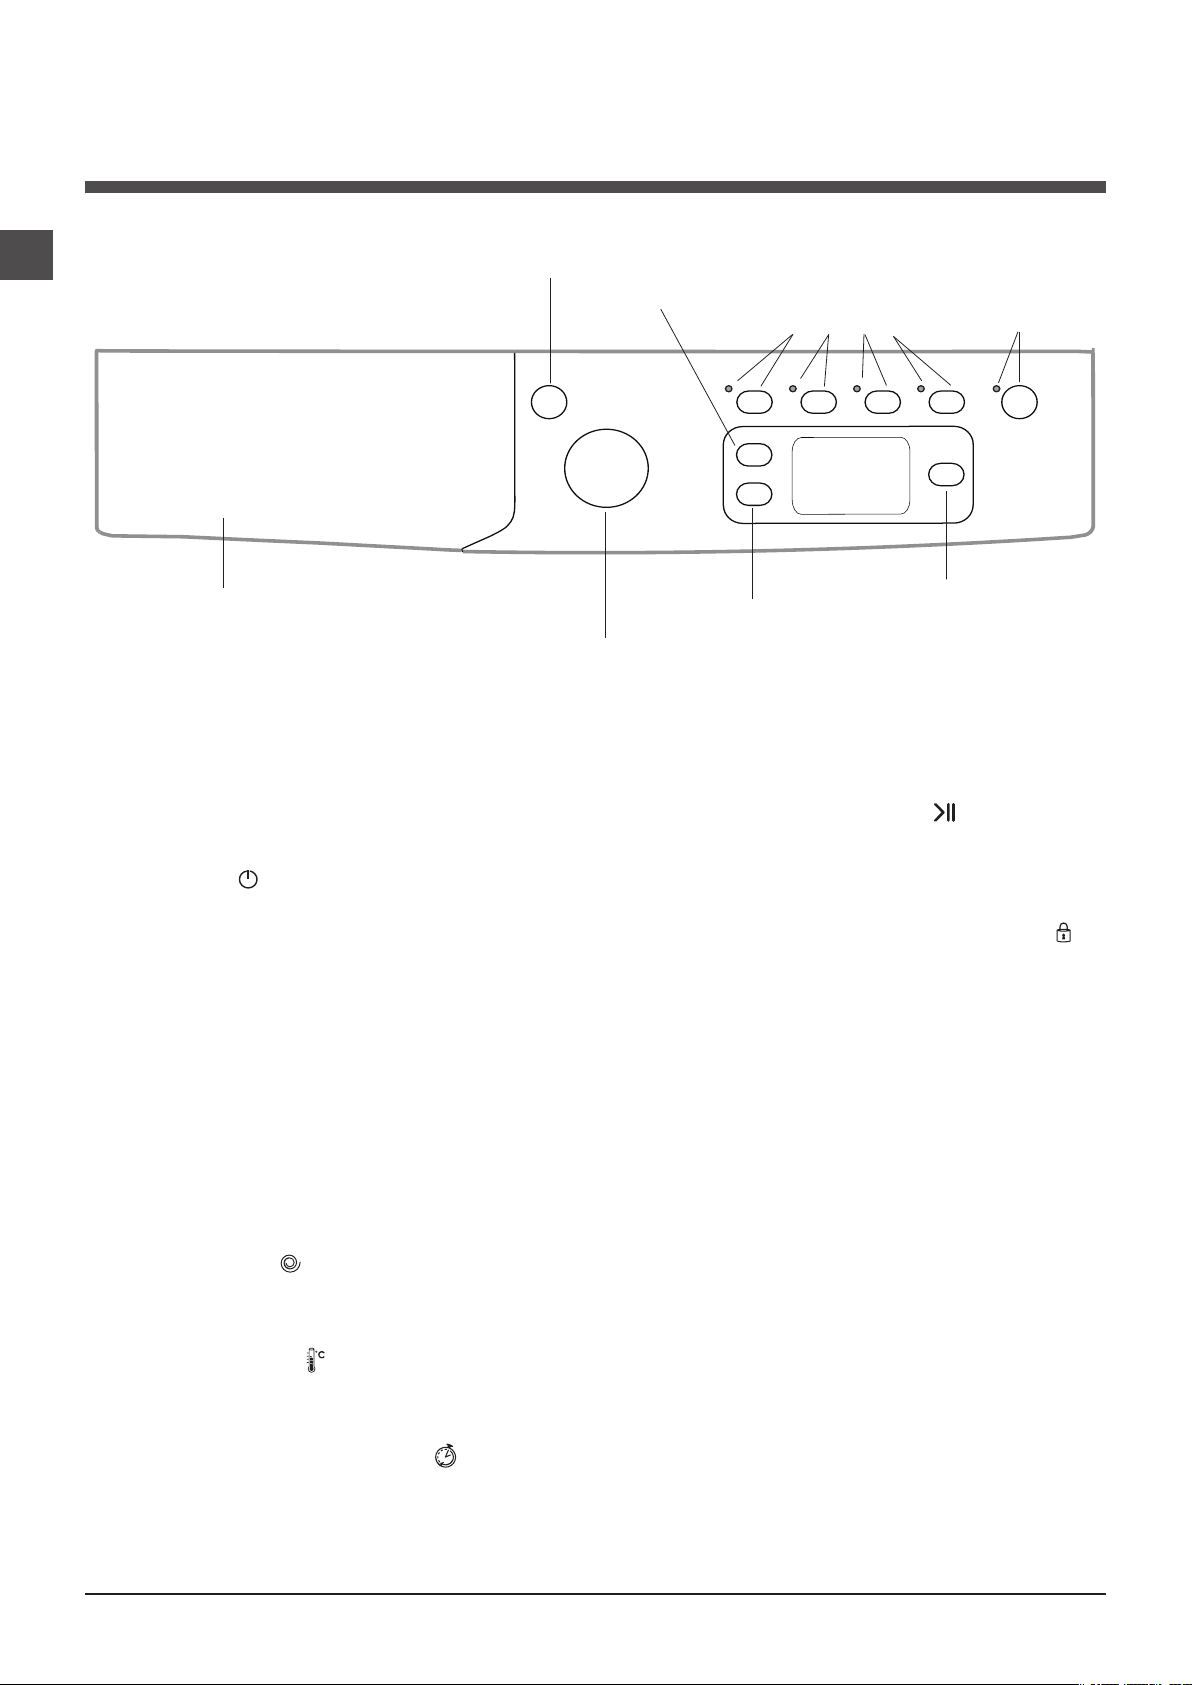
Description of the washing
machine
Control panel
OPTION
buttons with
indicator lights
DISPLAY
Detergent dispenser drawer
ON/OFF
button
WASH CYCLE
knob
TEMPERATURE
Button
SPIN SPEED
Button
START/PAUSE
button with indicator light
DELAYED
START
Button
Detergent dispenser drawer: used to dispense
detergents and washing additives (see “Detergents and
laundry”).
ON/OFF button
chine on or off. The START/PAUSE indicator light, which
flashes slowly in a green colour shows that the machine is
switched on. To switch off the washing machine during the
wash cycle, press and hold the button for approximately 2
seconds; if the button is pressed briefly or accidentally the
machine will not switch off. If the machine is switched off
during a wash cycle, this wash cycle will be cancelled.
WASH CYCLE knob: used to set the desired wash cycle
(see “Table of wash cycles”).
OPTION buttons with indicator light: used to select the
available options. The indicator light corresponding to the
selected option will remain lit.
SPIN button
the spin cycle - the value is indicated on the display.
TEMPERATURE button
tely exclude the temperature: the value will be shown on
the display.
: press this briefly to switch the ma-
: press to reduce or completely exclude
: press to decrease or comple-
START/PAUSE button
green indicator light flashes slowly, press the button to
start a wash cycle. Once the cycle has begun the indicator
light will remain lit in a fixed manner. To pause the wash
cycle, press the button again; the indicator light will flash
in an orange colour. If the symbol
door may be opened (wait approximately 3 minutes). To
start the wash cycle from the point at which it was interrupted, press the button again.
Standby mode
This washing machine, in compliance with new energy saving regulations, is fitted with an automatic standby system
which is enabled after about 30 minutes if no activity is
detected. Press the ON-OFF button briefly and wait for the
machine to start up again.
with indicator light: when the
is not illuminated, the
DELAYED START button
time for the selected wash cycle. The delay time will be
shown on the display.
6
: press to set a delayed start

Display
GB
B
A
The display is useful when programming the machine and provides a great deal of information.
The duration of the available programmes and the remaining time of a running cycle appear in section A; if the DELAY START
option has been set, the countdown to the start of the selected programme will appear. Pressing the relative button, the
machine automatically displays the maximum temperature and spin speed values set for the selected cycle, or the most
recently-used settings if they are compatible with the selected cycle.
The “programme phases” relative to the selected programme and the “programme phase” of the running programme appear
in section B:
Wash
Rinse
Spin
Drain
The icons corresponding to “temperature”
If the
When a “delayed start” has been set, the
If the
symbol lights up, the display will visualise the set “temperature” value.
symbol lights up, the display will visualise the set “spin” value.
, “Programmed start” and “spin” appear in section C from top to bottom:
symbol lights up.
C
Door locked symbol
The lit symbol indicates that the door is locked. To prevent any damage, wait until the symbol turns off before opening the
door (wait approximately 3 minutes).
To open the door while a cycle is in progress, press the START/PAUSE button; if the DOOR LOCKED
off the door may be opened (wait approximately 3 minutes).
symbol is switched
7

Running a wash cycle
GB
1. SWITCH THE MACHINE ON. Press the button;
the START/PAUSE indicator light will flash slowly in a
green colour.
2. LOAD THE LAUNDRY. Open the porthole door.
Load the laundry, making sure you do not exceed
the maximum load value indicated in the table of
programmes on the following page.
3. MEASURE OUT THE DETERGENT. Pull out the
detergent dispenser drawer and pour the detergent into
the relevant compartments as described in “Detergents
and laundry”.
4. CLOSE THE DOOR.
5. SELECT THE WASH CYCLE. Set the WASH CYCLE
knob to the desired programme; a temperature and spin
speed is set for each wash cycle; these may be adjusted.
The duration of the cycle will appear on the display.
6. CUSTOMISE THE WASH CYCLE. Use the relevant
buttons:
Modifying the temperature and/or spin
speed. The machine automatically displays the
maximum temperature and spin speed values set for
the selected cycle, or the most recently-used settings
if they are compatible with the selected cycle. The
temperature can be decreased by pressing the
button, until the cold wash “OFF” setting is reached.
The spin speed may be progressively reduced by
pressing the
(the “OFF” setting). If these buttons are pressed again,
the maximum values are restored.
button, until it is completely excluded
! Exception: if the 2 programme is selected, the
temperature can be increased up to a value of 90°C.
! The options may affect the recommended load value
and/or the duration of the cycle.
7. START THE PROGRAMME. Press the START/
PAUSE button. The corresponding indicator light will
become green, remaining lit in a fixed manner, and the
door will be locked (the DOOR LOCKED symbol
be on). To change a wash cycle while it is in progress,
pause the washing machine using the START/PAUSE
button (the START/PAUSE indicator light will flash
slowly in an orange colour); then select the desired
cycle and press the START/PAUSE button again.
To open the door while a cycle is in progress, press
the START/PAUSE button; if the DOOR LOCKED
symbol is switched off the door may be opened (wait
approximately 3 minutes). Press the START/PAUSE
button again to restart the wash cycle from the point at
which it was interrupted.
8. THE END OF THE WASH CYCLE. This will be
indicated by the text “END” on the display; when the
DOOR LOCKED
opened (wait approximately 3 minutes). Open the door,
unload the laundry and switch off the machine.
symbol switches off the door may be
will
! If you wish to cancel a cycle which has already begun,
press and hold the
and the machine will switch off.
button. The cycle will be stopped
Setting a delayed start.
To set a delayed start for the selected programme,
press the corresponding button repeatedly until the
required delay period has been reached. When this
option is enabled, the
display. To remove the delayed start option press the
button until the text “OFF” appears on the display.
Modifying the cycle settings.
• Press the button to enable the option; the indicator
light corresponding to the button will switch on.
• Press the button again to disable the option; the
indicator light will switch off.
symbol lights up on the
! If the selected option is not compatible with the
programmed wash cycle, the indicator light will flash
and the option will not be activated.
! If the selected option is not compatible with another
option which has been selected previously, the indicator
light corresponding to the first option selected will flash
and only the second option will be activated; the indicator
light corresponding to the enabled option will remain lit.
8
Wash cycles and options
Table of wash cycles
Description of the wash cycle
Wash cycles
Daily
1
Cotton + Prewash: extremely soiled whites. 90° 1000
2
Cotton Standard 60° (1): heavily soiled whites and resistant colours.
3
Cotton Standard 40° (2): lightly soiled whites and delicate colours. 40° 1000 -
4
Synthetics: heavily soiled resistant colours. 60° 800 -
4
Synthetics (3): lightly soiled resistant colours. 40° 800 -
5
Mix Colored: lightly soiled whites and delicate colours. 40° 1000 -
20° Zone
6
Cotton Standard 20°: lightly soiled whites and delicate colours.
7 Mix Light
8 20’ Refresh
Special
9
Silk/Curtains: for garments in silk and viscose, lingerie.
10
Wool: for wool, cashmere, etc.
11 Jeans
Sport
12 Sport Intensive
13 Sport Light
14 Special Shoes
Partial wash cycles
Rinse - 1000 - -
Spin + Drain - 1000 - - - 7 - - - 16’
The length of cycle shown on the display or in this booklet is an estimation only and is calculated assuming standard working conditions. The actual duration can vary according to factors such as
water temperature and pressure, the amount of detergent used, the amount and type of load inserted, load balancing and any wash options selected.
1) Test wash cycle in compliance with directive 1061/2010: set wash cycle 2 with a temperature of 60°C.
This cycle is designed for cotton loads with a normal soil level and is the most efficient in terms of both electricity and water consumption; it should be used for garments
which can be washed at 60°C. The actual washing temperature may differ from the indicated value.
2) Test wash cycle in compliance with directive 1061/2010: set wash cycle 3 with a temperature of 40°C.
This cycle is designed for cotton loads with a normal soil level and is the most efficient in terms of both electricity and water consumption; it should be used for garments
which can be washed at 40°C. The actual washing temperature may differ from the indicated value.
For all Test Institutes:
2) Long wash cycle for cottons: set wash cycle 3 with a temperature of 40°C.
3) Synthetic program along: set wash cycle 4 with a temperature of 40°C.
Max.
temp.
(°C)
60°
(Max. 90°)
20°
20° 800
20° 800
30° 0
40° 800
40° 800
30° 600 -
30° 600 -
30° 600 -
Max.
speed
(rpm)
1000 -
1000 -
Detergents
Pre-
Wash
wash
-
-
-
-
-
Fabric
softener
Max.
7 62 2,21 78 170’
7 62 1,10 52,5 190’
7 62 0,99 82 185’
3 44 0,93 47 110’
3 44 0,57 46 95’
7 62 0,66 54 90’
7 - - - 170’
7 - - - 120’
1,5 - - - 20’
1 - - - 55’
1,5 - - - 70’
3 - - - 70’
2,5 - - - 85’
2,5 - - - 60’
Max. 2
pairs
7 - - - 36’
%
load (kg)
Energy
Residual
- - - 60’
consum-
dampness
ption kWh
Total water lt
Cycle
duration
GB
Wash options
Selecting this option enables you to suitably adjust drum
rotation, temperature and water to a reduced load of lightly
soiled cotton and synthetic fabrics (refer to the “Programme
table”). “
saving water and electricity. We suggest using a liquid
detergent suitably measured out to the load quantity.
! It cannot be used with the 1, 6, 7, 8, 9, 10, 11, 12, 13,
14,
, programmes.
The function saves energy by not heating the
water used to wash your laundry - an advantage both to
the environment and to your energy bill. Instead, intensified
wash action and water optimisation ensure great wash
results in the same average time of a standard cycle.
For the best washing results we recommend the usage of
a liquid detergent.
! It cannot be used with the 1, 6, 7, 8, 9, 10, 12, 13, 14,
, programmes.
” enables you to wash in less time thereby
Extra Rinse
By selecting this option, the efficiency of the rinse is
increased and optimal detergent removal is guaranteed. It
is particularly useful for sensitive skin.
! It cannot be used in conjunction with the 8,
programmes.
Easy Iron
By selecting this function, the wash and spin cycles will be
modified in order to reduce the formation of creases. At the
end of the cycle the washing machine will perform slow rotations of the drum; the indicator lights for the EASY IRON
and START/PAUSE options will flash (the first one green,
the second orange). To end the cycle, press the START/
PAUSE button or the EASY IRON button. For the 9 wash
cycle, the machine will end the cycle while the laundry is
soaking and the EASY IRON and START/PAUSE indicator
lights will flash. To drain the water so that the laundry may
be removed, press the START/PAUSE button or the EASY
IRON button.
! It cannot be used in conjunction with the 8, 10, 12, 13,
14,
, programmes.
9

Detergents and laundry
1
2
3
GB
Detergent dispenser drawer
Good washing results also depend on the correct dose of
detergent: adding too much detergent will not necessarily
result in a more efficient wash, and may in fact cause build
up on the inside of your appliance and contribute to environmental pollution.
! Do not use hand washing detergents because these create
too much foam.
! Use powder detergent for white cotton garments, for pre-
washing, and for washing at temperatures over 60°C.
! Follow the instructions given on the detergent packaging.
Open the detergent dispenser drawer and pour in the
detergent or washing additive, as follows.
compartment 1: Pre-wash detergent (powder)
compartment 2: Detergent for the wash cycle
(powder or liquid)
Liquid detergent should only be poured in immediately
prior to the start of the wash cycle.
compartment 3: Additives (fabric softeners, etc.)
The fabric softener should not overflow the grid.
Preparing the laundry
• Divide the laundry according to:
- the type of fabric/the symbol on the label
- the colours: separate coloured garments from whites.
• Empty all garment pockets and check the buttons.
• Do not exceed the values listed in the “Table of wash
cycles”, which refer to the weight of the laundry when dry.
How much does your laundry weigh?
1 sheet 400-500 g
1 pillow case 150-200 g
1 tablecloth 400-500 g
1 bathrobe 900-1200 g
1 towel 150-250 g
Sport Intensive (programma 12): is for washing heavily
soiled sports clothing fabrics (tracksuits, shorts, etc.); for
best results, we recommend not exceeding the maximum
load indicated in the “Programme table”.
Sport Light (programma 13): is for washing lightly soiled
sports clothing fabrics (tracksuits, shorts, etc.); for best
results, we recommend not exceeding the maximum load
indicated in the “Programme table”. We recommend using
a liquid detergent and dosage suitable for a half-load.
Special Shoes (programma 14): is for washing sports
shoes; for best results, do not wash more than 2 pairs simultaneously.
The 20° wash cycles (20° Zone) offer effective washing
performance at low temperatures, reducing electricity
usage and expenditure while benefitting the environment.
The 20° wash cycles meet all requirements:
Cotton Standard 20° (programme 6) ideal for lightly
soiled cotton loads. The effective performance levels
achieved at cold temperatures, which are comparable to
washing at 40°, are guaranteed by a mechanical action
which operates at varying speed, with repeated and
frequent peaks.
Mix Light (programme 7) ideal for mixed loads (cotton
and synthetics) with a normal soil level. The effective
performance levels achieved at cold temperatures are
guaranteed by a mechanical action which operates at
varying speed, across set average intervals.
20’ Refresh (programme 8) ideal for refreshing and
washing lightly soiled garments in a few minutes. It lasts
just 20 minutes and therefore saves both time and energy.
It can be used to wash different types of fabrics together
(except for wool and silk), with a maximum load of 1.5 kg.
Load balancing system
Before every spin cycle, to avoid excessive vibrations and
to distribute the load in a uniform manner, the drum rotates
continuously at a speed which is slightly greater than the
washing rotation speed. If, after several attempts, the load
is not balanced correctly, the machine spins at a reduced
spin speed. If the load is excessively unbalanced, the
washing machine performs the distribution process instead
of spinning. To encourage improved load distribution and
balance, we recommend small and large garments are
mixed in the load.
Special wash cycles
Silk: use special wash cycle 9 to wash all silk garments.
We recommend the use of special detergent which has
been designed to wash delicate clothes.
Curtains: fold curtains and place them in a pillow case or
mesh bag. Use wash cycle 9.
Wool: all wool garments can be washed using programme
10, even those carrying the “hand-wash only”
best results, use special detergents and do not exceed 1,5
kg of laundry.
Jeans: Turn garments inside-out before washing and use
a liquid detergent. Use programme 11.
label. For
10

Troubleshooting
Your washing machine could fail to work. Before contacting the Technical Assistance Centre (see “Assistance”), make sure
that the problem cannot be solved easily using the following list.
Problem:
The washing machine does not
switch on.
The wash cycle does not start.
The washing machine does not
take in water (“H2O” will flash on
the display).
The washing machine continuously
takes in and
drains water.
Possible causes / Solutions:
• The appliance is not plugged into the socket fully, or is not making contact.
• There is no power in the house.
• The washing machine door is not closed properly.
• The ON/OFF button has not been pressed.
• The START/PAUSE button has not been pressed.
• The water tap has not been opened.
• A delayed start has been set..
• The water inlet hose is not connected to the tap.
• The hose is bent.
• The water tap has not been opened.
• There is no water supply in the house.
• The pressure is too low.
• The START/PAUSE button has not been pressed.
• The drain hose is not fitted at a height between 65 and 100 cm from the floor
(see “Installation”).
• The free end of the hose is under water (see “Installation”).
• The wall drainage system is not fitted with a breather pipe.
If the problem persists even after these checks, turn off the water tap, switch
the appliance off and contact the Assistance Service. If the dwelling is on one of
the upper floors of a building, there may be problems relating to water drainage,
causing the washing machine to fill with water and drain continuously. Special
anti-draining valves are available in shops and help to avoid this inconvenience.
GB
The washing machine does not
drain or spin.
The washing machine vibrates a lot
during the spin cycle.
The washing machine leaks.
The “option” indicator lights and the
“start/pause” indicator light flash and
an error code appears on the display
(e.g.: F-01, F-..).
There is too much foam.
• The wash cycle does not include draining: some wash cycles require the drain
phase to be started manually.
• The “Easy iron” option has been activated: To complete the wash cycle, press
the START/PAUSE button (see “Wash cycles and options”).
• The drain hose is bent (see “Installation”).
• The drainage duct is clogged.
• The drum was not unlocked correctly during installation (see “Installation”).
• The washing machine is not level (see “Installation”).
• The washing machine is trapped between cabinets and walls (see “Installation”).
• The water inlet hose is not screwed on properly (see “Installation”).
• The detergent dispenser drawer is blocked (for cleaning instructions, see “Care
and maintenance”).
• The drain hose is not fixed properly (see “Installation”).
• Switch off the machine and unplug it, wait for approximately 1 minute and then
switch it back on again.
If the problem persists, contact the Technical Assistance Service.
• The detergent is not suitable for machine washing (it should display the text
“for washing machines” or “hand and machine wash”, or the like).
• Too much detergent was used.
11
Service
GB
Before calling for Assistance:
• Check whether you can solve the problem alone (see “Troubleshooting”);
• Restart the programme to check whether the problem has been solved;
• If this is not the case, contact an authorised Technical Assistance Centre using the telephone number provided on the
guarantee certificate.
! Always request the assistance of authorised technicians.
Have the following information to hand:
• the type of problem;
• the appliance model (Mod.);
• the serial number (S/N).
This information can be found on the data plate applied to the rear of the washing machine, and can also be found on the
front of the appliance by opening the door.
12

Instrukcja obsługi
PRALKA
PL
Polski
IWE 71082 S
Spis treści
Instalacja, 14-15
Rozpakowanie i wypoziomowanie
Podłączenia hydrauliczne i elektryczne
Pierwszy cykl prania
Dane techniczne
Utrzymanie i konserwacja, 16
Odłączenie wody i prądu elektrycznego
Czyszczenie pralki
Czyszczenie szuadki na środki piorące
Konserwacja okrągłych drzwiczek i bębna
Czyszczenie pompy
Kontrola przewodu doprowadzającego wodę
Zalecenia i środki ostrożności, 17
Ogólne zasady bezpieczeństwa
Utylizacja
Opis pralki, 18-19
Panel sterowania
Wyświetlacz
W jaki sposób wykonać cykl prania, 20
PL
Programy i funkcje, 21
Tabela programów
Funkcje prania
Środki piorące i bielizna, 22
Szuadka na środki piorące
Przygotowanie bielizny
Programy specjalne
System równoważenia ładunku
Nieprawidłowości w działaniu i sposoby
ich usuwania, 23
Serwis Techniczny, 24
13

Instalacja
PL
! Należy zachować niniejszą książeczkę, aby
móc z niej skorzystać w każdej chwili. W przypadku sprzedaży, odstąpienia lub przeniesienia pralki w inne miejsce należy zadbać o przekazanie instrukcji wraz z maszyną, aby nowy
właściciel mógł zapoznać się z działaniem
urządzenia i z dotyczącymi go ostrzeżeniami.
! Należy uważnie przeczytać instrukcję obsługi:
zawiera ona ważne informacje dotyczące
instalacji oraz właściwego i bezpiecznego
użytkowania pralki.
Rozpakowanie i wypoziomowanie
Rozpakowanie
1. Rozpakować pralkę.
2. Sprawdzić, czy nie doznała ona uszkodzeń
w czasie transportu. W przypadku stwierdzenia
uszkodzeń nie podłączać jej i skontaktować się
ze sprzedawcą.
3. Odkręcić 4 śruby
z a b e z p i e c z a j ą c e
maszyn ę na czas
transportu oraz zdjąć
gumowy element z
podkładką, znajdujący
się w tylnej części
pralki (patrz rysunek).
4. Zatkać otwory przy pomocy plastikowych
zaślepek, znajdujących się w wyposażeniu
maszyny.
5. Zachować wszystkie części: w razie
konieczności przewiezienia pralki w inne
miejsce, powinny one zostać ponownie zamontowane.
! Części opakowania nie są zabawkami dla
dzieci.
Poziomowanie
1. Ustawić pralkę na płaskiej i twardej podłodze,
nie opierając jej o ściany, meble itp.
2. Jeśli podłoga nie
jest idealnie pozioma,
należy skompensować
n i e r ó w n o ś c i ,
o d k r ę c a j ą c l u b
dokręcając przednie
nóżki (patrz rysunek);
kąt nachylenia, zmierzony na górnym blacie
pralki nie powinien przekraczać 2°.
Staranne wypoziomowanie pralki zapewnia
jej stabilność i zapobiega wibracjom, hałasowi
oraz przesuwaniu się maszyny w czasie pracy.
W razie ustawienia na dywanie lub wykładzinie
dywanowej należy tak wyregulować nóżki,
aby pod pralką pozostawała wolna przestrzeń
niezbędna dla wentylacji.
Podłączenia hydrauliczne i elektryczne
Podłączenie przewodu doprowadzającego
wodę
1. Podłączyć przewód
z a s i l a j ą c y p o p r zez przykręcenie do
zaworu wody zimnej z
końcówką gwintowaną
¾ gas (patrz rysunek).
Przed podłączeniem
spuszczać wodę do
momentu, aż stanie
się ona całkowicie pr-
zezroczysta.
2. P od ł ąc z yć d o
maszyny przewód
d o p r ow a dz a ją c y
wodę, przykręcając
go do odpowiedniego
otworu dopływowego,
znajdującego się w
tylnej części pralki, z
prawej strony u góry
(patrz rysunek).
3. Zwrócić uwagę, aby na przewodzie nie było
zagięć ani zwężeń.
! Ciśnienie wody w kurku powinno mieścić się
w przedziale podanym w tabeli Danych technicznych (patrz strona obok).
! Jeśli długość przewodu doprowadzającego
wodę jest niewystarczająca, należy zwrócić się
do specjalistycznego sklepu lub do autoryzowanego technika.
! Nigdy nie instalować już używanych przewo-
dów.
14
! Stosować przewody znajdujące się w
wyposażeniu maszyny.
65 - 100 cm
Podłączenie przewodu odpływowego
następującymi przepisami CE:
- 2006/95/CE (o Niskim Napięciu)
Podłączyć przewód
o d pł y w o w y , n i e
zginając go, do rury
ściekowej lub do otworu odpływowego w
ścianie, które powinny znajdować się na
wysokości od 65 do
100 cm od podłogi;
ewentualnie oprzeć go
na brzegu zlewu lub
wanny, przymocowując
do kranu prowadnik, znajdujący się w
wyposażeniu (patrz ry-
sunek). Wolny koniec przewodu odpływowego
nie powinien być zanurzony w wodzie.
! Odradza się stosowanie przewodów
przedłużających; jeśli to konieczne, przewód
przedłużający powinien mieć taką samą
średnicę jak oryginalny, a jego długość nie
może przekraczać 150 cm.
Podłączenie elektryczne
Przed włożeniem wtyczki do gniazdka elektrycznego należy się upewnić, czy:
• gniazdko posiada uziemienie i jest zgodne z
obowiązującymi przepisami;
• gniazdko jest w stanie wytrzymać maksymalne obciążenie mocy maszyny, wskazane w
tabeli Danych technicznych (patrz obok);
• napięcie zasilania mieści się w wartościach wskazanych w tabeli Danych technicznych (patrz obok);
• gniazdko pasuje do wtyczki pralki. W przeciwnym
razie należy wymienić gniazdko lub wtyczkę.
! Nie należy instalować pralki na otwartym
powietrzu, nawet w osłoniętym miejscu, gdyż
wystawienie urządzenia na działanie deszczu
i burz jest bardzo niebezpieczne.
! Przewód zasilania elektrycznego może być wymieniany wyłącznie przez autoryzowanych techników.
Uwaga! Producent nie ponosi żadnej
odpowiedzialności w przypadku nieprzestrzegania powyższych zasad.
Pierwszy cykl prania
Po zainstalowaniu pralki, przed przystąpieniem
do jej użytkowania, należy wykonać jeden cykl
prania ze środkiem piorącym, ale bez wsadu,
nastawiając program 2.
Dane techniczne
Model IWE 71082 S
szerokość cm 59,5
Wymiary
Pojemność od 1 do 7 kg
Dane prądu
elektrycznego
Dane sieci
wodociągowej
Szybkość
wirowania
Programy testowe zgodnie
z dyrektywami
1061/2010 i
1015/2010
wysokość cm 85
głębokość cm 53,5
dane techniczne umieszczone są na tabliczce na
maszynie
Maksymalne ciśnienie
1 MPa (10 barów)
ciśnienie minimalne
0,05 MPa (0,5 barów)
pojemność bębna 52 litrów
do 1000 obrotów na minutę
Program 2: standardowy
program prania tkanin
bawełnianych w 60 °C;
Program 3: standardowy
program prania tkanin
bawełnianych w 40 °C.
Urządzenie to zostało wyprodukowane zgodnie z
- 2004/108/CE (o
Kompatybilności Elektromagnetycznej)
- 2012/19/EU
PL
! Po zainstalowaniu pralki gniazdko elektryczne
powinno być łatwo dostępne.
! Nie używać przedłużaczy ani rozgałęźników.
! Przewód nie powinien być pozginany ani
przygnieciony.
15

Utrzymanie i konserwacja
PL
Odłączenie wody i prądu elektrycznego
• Zamknąć kurek dopływu wody po każdym
praniu. W ten sposób zmniejsza się zużycie
instalacji hydraulicznej pralki oraz eliminuje
się niebezpieczeństwo wycieków.
• Przed przystąpieniem do czyszczenia pralki
oraz do czynności konserwacyjnych wyjąć
wtyczkę z gniazdka.
Czyszczenie pralki
Obudowę zewnętrzną i gumowe części pralki
można myć ściereczką zmoczoną w letniej wodzie z mydłem. Nie stosować rozpuszczalników
ani ściernych środków czyszczących.
Czyszczenie szufladki na środki
piorące
Wysunąć szufladkę,
unosząc ją lekko ku
górze i wyciągając
na zewnątrz (patrz
rysunek).
Wypłukać szufladkę
pod bieżącą wodą.
Czynność tę należy
wykonywać stosunkowo często.
Konserwacja okrągłych drzwiczek i
bębna
• Drzwiczki pralki należy zawsze pozostawiać
uchylone, aby zapobiec tworzeniu się nieprzyjemnych zapachów.
Czyszczenie pompy
P r a l k a w y p o s a ż o n a j e s t w p o m pę
samoczyszczącą, która nie wymaga zabiegów
konserwacyjnych. Może się jednak zdarzyć, że
drobne przedmioty (monety, guziki) wpadną
do komory wstępnej zabezpieczającej pompę,
która znajduje się w jej dolnej części.
! Należy się upewnić, że cykl prania został
zakończony i wyjąć wtyczkę z gniazdka.
1. zdjąć panel pokrywy z przedniej strony pralki przy pomocy
śrubokrętu (patrz rysunek);
2. odkręcić pokrywę,
obracając ją w kierunku przeciwnym do
ruchu wskazówek zegara (patrz rysunek):
wypłynięcie niewielkiej ilości wody jest
normalnym zjawiskiem;
3. dokładnie wyczyścić wnętrze;
4. ponownie przykręcić pokrywę;
5. ponownie założyć panel upewniwszy się,
przed dociśnięciem go do maszyny, czy zatrzaski zostały umieszczone w odpowiednich
otworach.
Kontrola przewodu doprowadzającego
wodę
Przynajmniej raz w roku należy sprawdzić przewód doprowadzający wodę. Jeśli widoczne
są na nim pęknięcia i rysy, należy go wymienić:
w trakcie prania duże ciśnienie może bowiem
spowodować jego nagłe rozerwanie.
! Nigdy nie instalować już używanych przewo-
dów.
Aby dostać się do komory wstępnej:
16

Zalecenia i środki
ostrożności
! Pralka została zaprojektowana i wyprodukowana zgodnie
z międzynarodowymi normami bezpieczeństwa. Niniejsze ostrzeżenia zostały tu zamieszczone ze względów
bezpieczeństwa i należy je uważnie przeczytać.
Ogólne zasady bezpieczeństwa
• Urządzenie to zostało zaprojektowane wyłącznie do
użytkowania w warunkach domowych.
• Z niniejszego urządzenia mogą korzystać
dzieci powyżej 8 roku życia i osoby o
ograniczonych zdolnościach fizycznych,
zmysłowych bądź umysłowych, jak również
osoby nieposiadające doświadczenia lub
znajomości urządzenia, jeśli znajdują się one
pod nadzorem innych osób lub jeśli zostały
pouczone na temat bezpiecznego sposobu
użycia urządzenia oraz zdają sobie sprawę
ze związanych z nim zagrożeń. Dzieci nie
powinny bawić się urządzeniem. Prace
związane z czyszczeniem i konserwacją nie
mogą być wykonywane przez dzieci, jeśli nie
są one nadzorowane.
• Nie dotykać pralki, stojąc przy niej boso lub mając mokre
lub wilgotne ręce albo stopy.
• Nie wyjmować wtyczki z gniazdka, ciągnąc za kabel, lecz
trzymając za wtyczkę.
• W trakcie pracy maszyny nie otwierać szuadki na środki
piorące.
• Nie dotykać odprowadzanej wody, gdyż może ona
osiągać wysokie temperatury.
• W żadnym wypadku nie otwierać okrągłych drzwiczek
pralki na siłę: grozi to uszkodzeniem mechanizmu
zabezpieczającego drzwiczki przed przypadkowym
otwarciem.
• W razie wystąpienia usterki nie należy w żadnym wypadku próbować dostać się do wewnętrznych części pralki z
zamiarem samodzielnego dokonania naprawy.
• Zawsze uważać, aby dzieci nie zbliżały się do pracującej
pralki.
• W czasie prania okrągłe drzwiczki pralki nagrzewają się.
• Jeśli trzeba przenieść pralkę w inne miejsce, należy to robić
bardzo ostrożnie, w dwie lub trzy osoby. Nigdy nie przenosić
pralki samodzielnie, gdyż jest ona bardzo ciężka.
• Przed włożeniem bielizny sprawdzić, czy bęben jest pusty.
Przekreślony symbol „kosza” umieszczony na produkcie
przypomina klientowi o obowiązku specjalnego sortowania.
Konsumenci powinni kontaktować się z władzami lokalnymi
lub sprzedawcą w celu uzyskania informacji dotyczących
postępowania z ich zużytymi urządzeniami gospodarstwa
domowego.
PL
Utylizacja
• Utylizacja opakowania: stosować się do lokalnych przepisów, dzięki temu opakowanie będzie mogło zostać ponownie wykorzystane.
• Europejska Dyrektywa 2012/19/EU dotycząca Zużytych
Elektrycznych i Elektronicznych Urządzeń zakłada zakaz
pozbywania się starych urządzeń domowego użytku jako
nieposortowanych śmieci komunalnych. Zużyte urządzenia
muszą być osobno zbierane i sortowane w celu zoptymalizowania odzyskania oraz ponownego przetworzenia pewnych
komponentów i materiałów. Pozwala to ograniczyć zanieczyszczenie środowiska i pozytywnie wpływa na ludzkie zdrowie.
17
Opis pralki
PL
Panel sterowania
Przycisk
ON/OFF
Szuadka na środki piorące
Szuadka na środki piorące: do dozowania środków
piorących i dodatków (patrz „Środki piorące i bielizna”).
Przycisk ON/OFF
włączenia lub wyłączenia maszyny. Kontrolka START/
PAUSE, która pulsuje powoli w kolorze zielonym wskazuje, że maszyna jest włączona. W celu wyłączenia pralki
podczas prania konieczne jest dłuższe przytrzymanie
naciśniętego przycisku, przez około 2 sek.; krótkie lub
przypadkowe naciśnięcie nie wystarczy do wyłączenia
maszyny. Wyłączenie maszyny podczas trwającego
prania anuluje program prania.
Pokrętło PROGRAMÓW: do ustawiania programów. W
czasie trwania programu pokrętło pozostaje nieruchome.
Przyciski z kontrolkami FUNKCJI: do wyboru dostępnych
funkcji. Kontrolka wybranej funkcji pozostaje zaświecona.
: nacisnąć krótko przycisk w celu
Pokrętło
PROGRAMÓW
Przycisk
TEMPERATURY
Przycisk
WIROWANIA
Przycisk z kontrolką START/PAUSE
na kontrolka pulsuje powoli, nacisnąć przycisk w celu
uruchomienia prania. Po uruchomieniu cyklu kontrolka
świeci w sposób ciągły. W celu wybrania pauzy w praniu
należy nacisnąć ponownie przycisk, kontrolka zacznie
pulsować w kolorze pomarańczowym. Jeśli symbol
świeci się, można otworzyć drzwiczki (odczekać około
3 minuty). W celu ponownego uruchomienia prania od
miejsca, w którym zostało przerwane, należy ponownie
nacisnąć przycisk.
Funkcja stand by
Pralka ta, w myśl nowych norm europejskich związanych
z oszczędnością elektryczną, posiada system auto
wyłączenia (stand by), który włącza się po 30 minutach
nie użytkowania. Ponownie lekko wcisnąć przycisk ON/
OFF i poczekać, aż pralka ponownie włączy się.
Przyciski z
kontrolkami
FUNKCJI
Wyświetlacz
Przycisk
URUCHOMIENIE
OPÓŹNIONE
Przycisk z
kontrolką
START/PAUSE
: kiedy zielo-
nie
Przycisk WIROWANIA
lub całkowitego wyłączenia wirówki – wartość ukazana
zostanie na wyświetlaczu.
Przycisk TEMPERATURY
zenia lub całkowitego wyłączenia temperatury; wartość
zostanie wskazana na wyświetlaczu.
Przycisk URUCHOMIENIE OPÓZNIONE
celu ustawienia opóźnionego uruchomienia wybranego
programu. Opóźnienie wyświetlone zostanie na ekranie.
18
: nacisnąć w celu zmniejszenia
: nacisnąć w celu zmniejs-
: nacisnąc w
 Loading...