

Page 1

Instructions for use
WASHING MACHINE
GB
English,1
GR
ЕЛЛЗНЙКБ,37
IWE 8128
UK
Укра¿нська,13
TR
Türkçe,25
Contents
GB
Installation, 2-3
Unpacking and levelling
Connecting the electricity and water supplies
The first wash cycle
Technical data
Description of the washing machine, 4-5
Control panel
Display
Running a wash cycle, 6
Wash cycles and options, 7
Table of wash cycles
Wash options
Detergents and laundry, 8
Detergent dispenser drawer
Preparing the laundry
Special wash cycles
Load balancing system
Precautions and tips, 9
General safety
Disposal
Opening the porthole door manually
Care and maintenance, 10
Cutting off the water or electricity supply
Cleaning the washing machine
Cleaning the detergent dispenser drawer
Caring for the door and drum of your appliance
Cleaning the pump
Checking the water inlet hose
Troubleshooting, 11
Service, 12
1
Page 2
Installation
GB
This instruction manual should be kept in a safe
place for future reference. If the washing machine is
sold, transferred or moved, make sure that the
instruction manual remains with the machine so that
the new owner is able to familiarise himself/herself
with its operation and features.
Read these instructions carefully: they contain vital
information relating to the safe installation and
operation of the appliance.
Unpacking and levelling
Unpacking
1. Remove the washing machine from its packaging.
2. Make sure that the washing machine has not been
damaged during the transportation process. If it has
been damaged, contact the retailer and do not
proceed any further with the installation process.
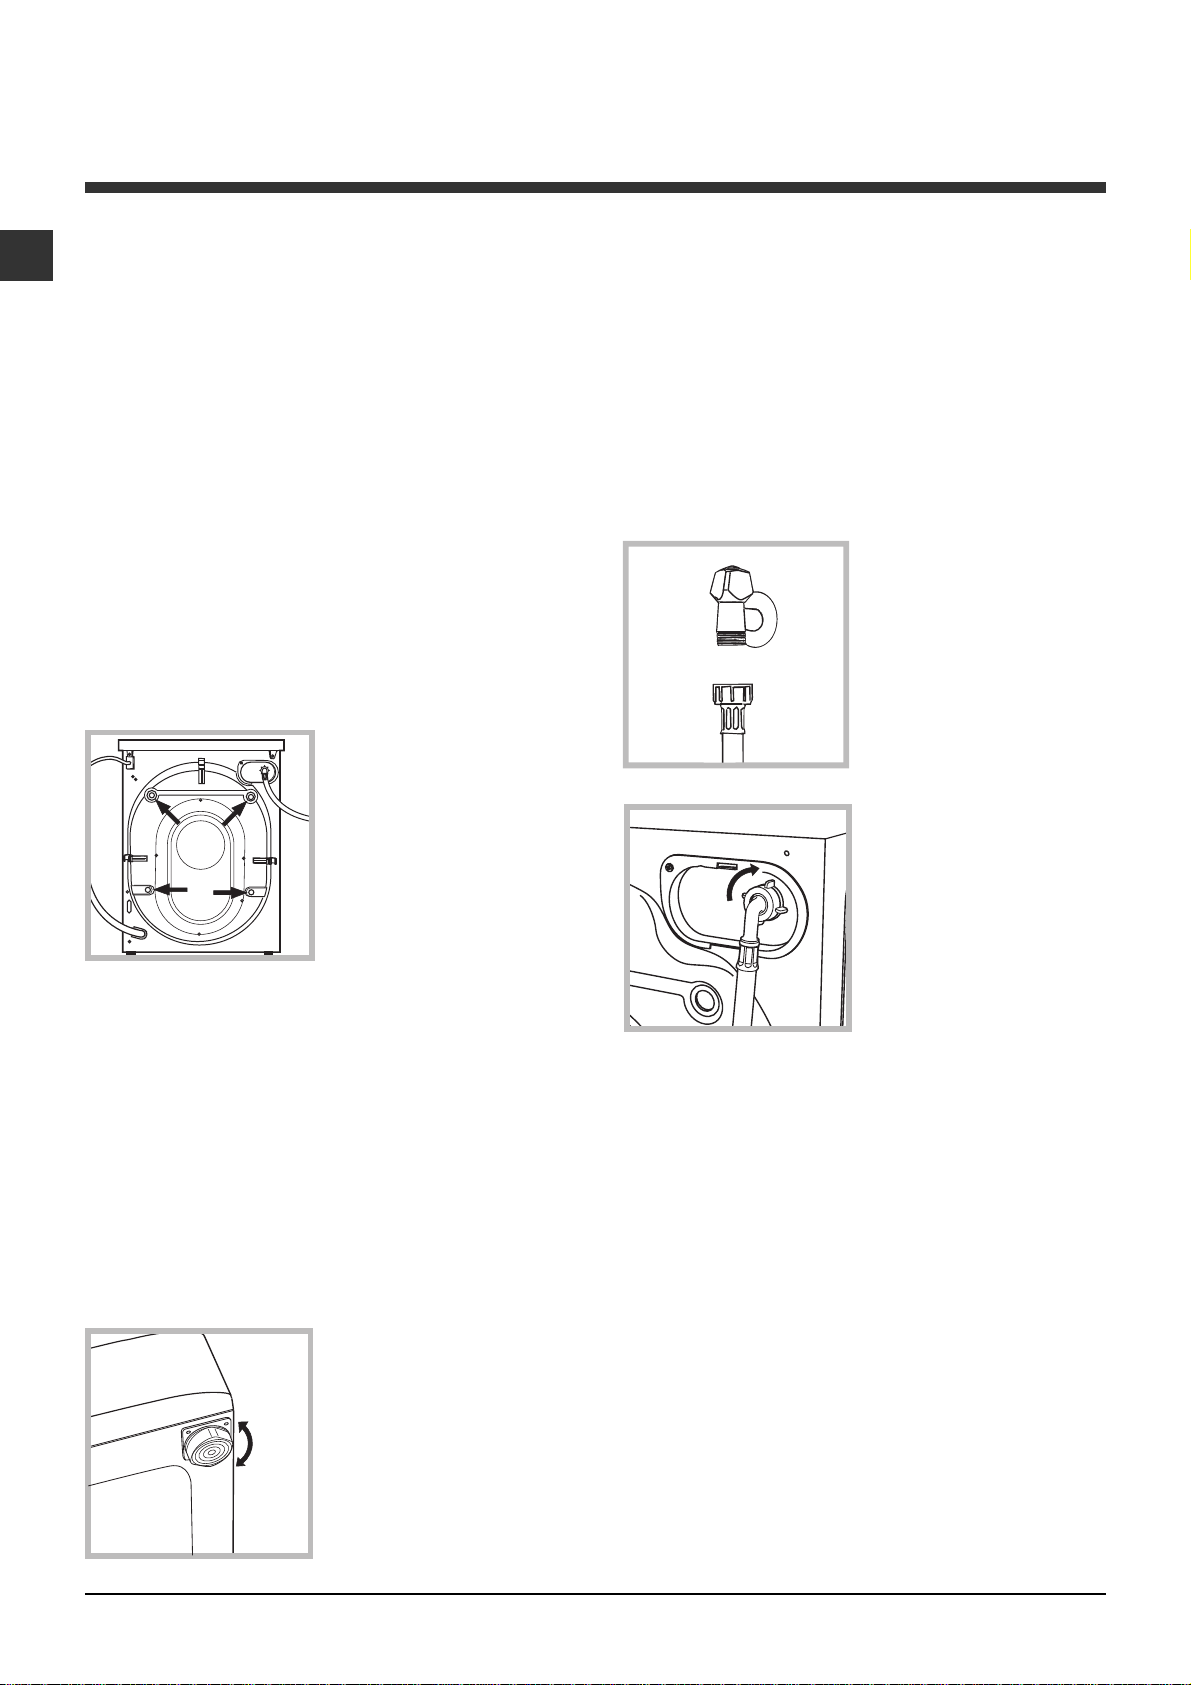
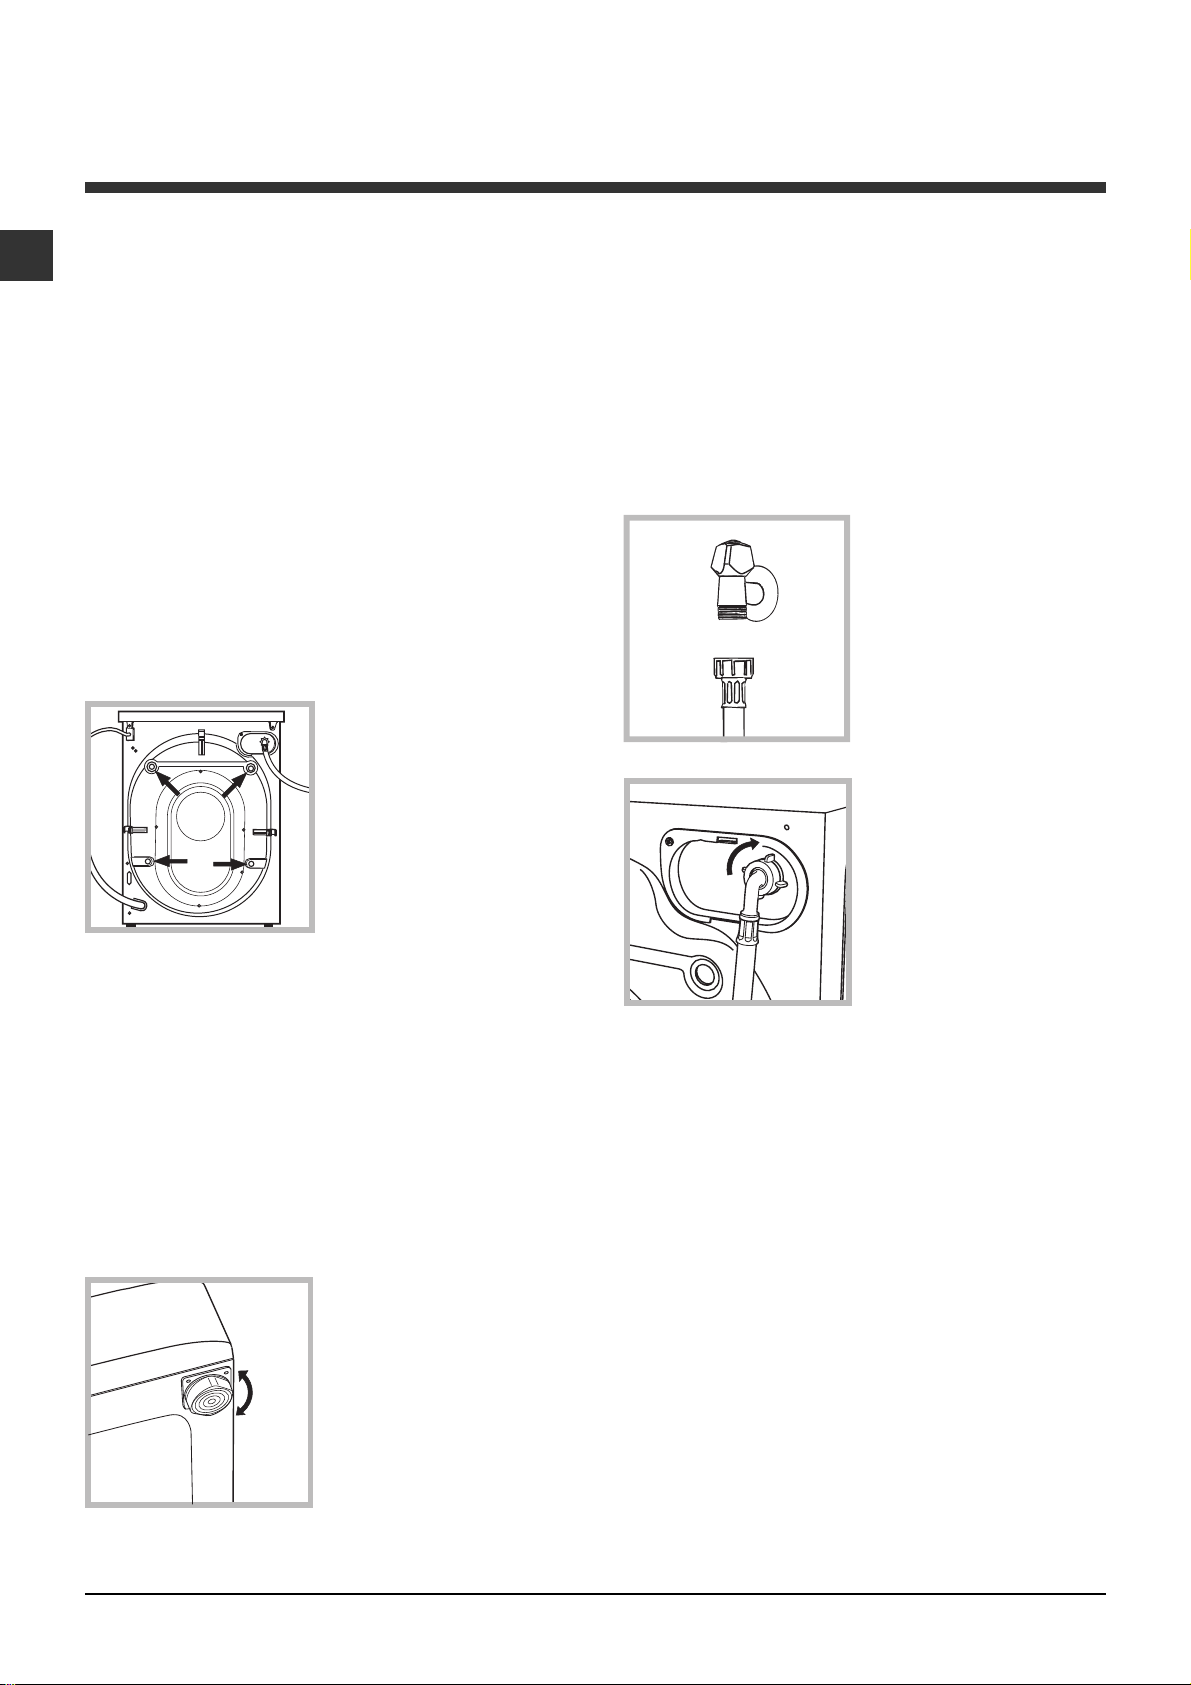
3. Remove the 4
protective screws (used
during transportation) and
the rubber washer with
the corresponding
spacer, located on the
rear part of the appliance
(see figure).
4. Close off the holes using the plastic plugs provided.
5. Keep all the parts in a safe place: you will need
them again if the washing machine needs to be
moved to another location.
Levelling the machine correctly will provide it with
stability, help to avoid vibrations and excessive noise
and prevent it from shifting while it is operating. If it is
placed on carpet or a rug, adjust the feet in such a
way as to allow a sufficient ventilation space
underneath the washing machine.
Connecting the electricity and water
supplies
Connecting the water inlet hose
1. Connect the supply
pipe by screwing it to a
cold water tab using a 3/4
gas threaded connection
(see figure).
Before performing the
connection, allow the
water to run freely until it
is perfectly clear.
2. Connect the inlet hose
to the washing machine
by screwing it onto the
corresponding water inlet
of the appliance, which is
situated on the top righthand side of the rear part
of the appliance (see
figure).
3. Make sure that the hose is not folded over or bent.
Packaging materials should not be used as toys for
children.
Levelling
1. Install the washing machine on a flat sturdy floor,
without resting it up against walls, furniture cabinets
or anything else.
2. If the floor is not
perfectly level, compensate for any unevenness
by tightening or loosening
the adjustable front feet
(see figure); the angle of
inclination, measured in
relation to the worktop,
must not exceed 2°.
2
The water pressure at the tap must fall within the
values indicated in the Technical details table (see
next page).
If the inlet hose is not long enough, contact a
specialised shop or an authorised technician.
Never use second-hand hoses.
Use the ones supplied with the machine.
Page 3
Connecting the drain hose
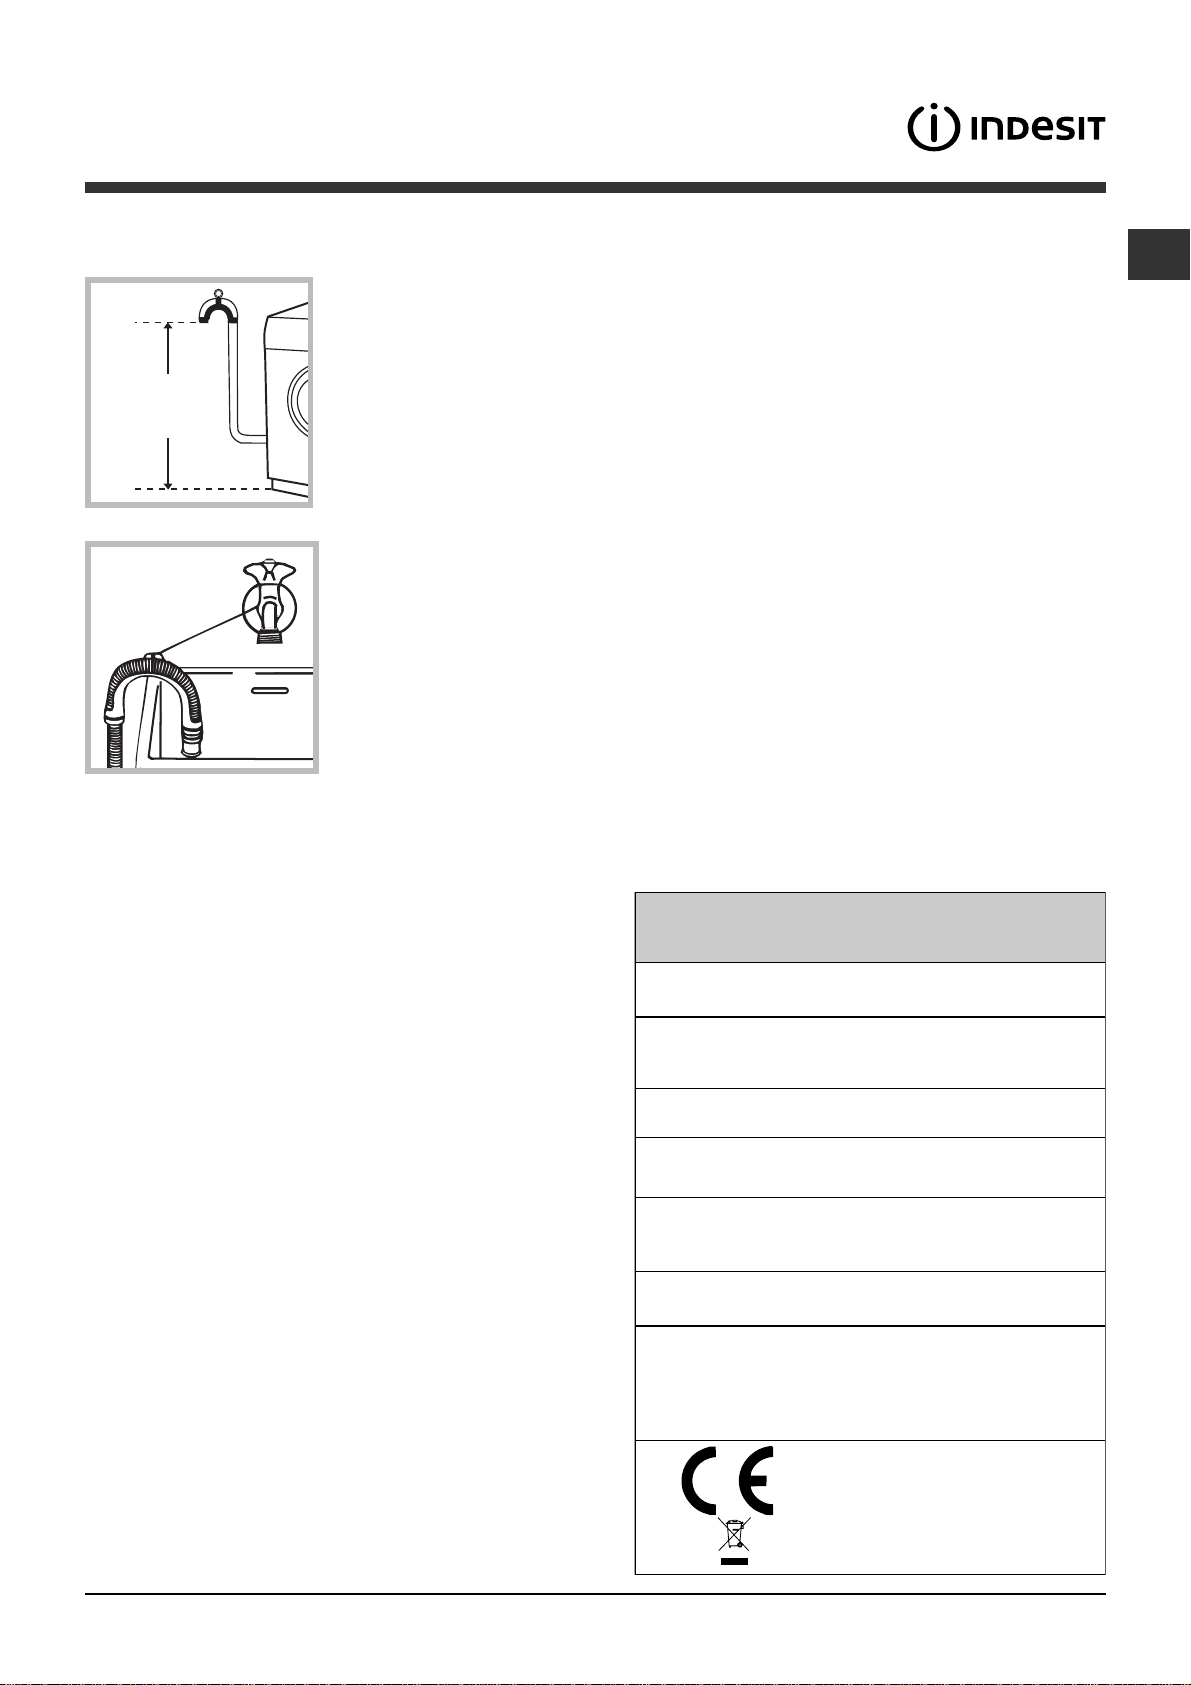
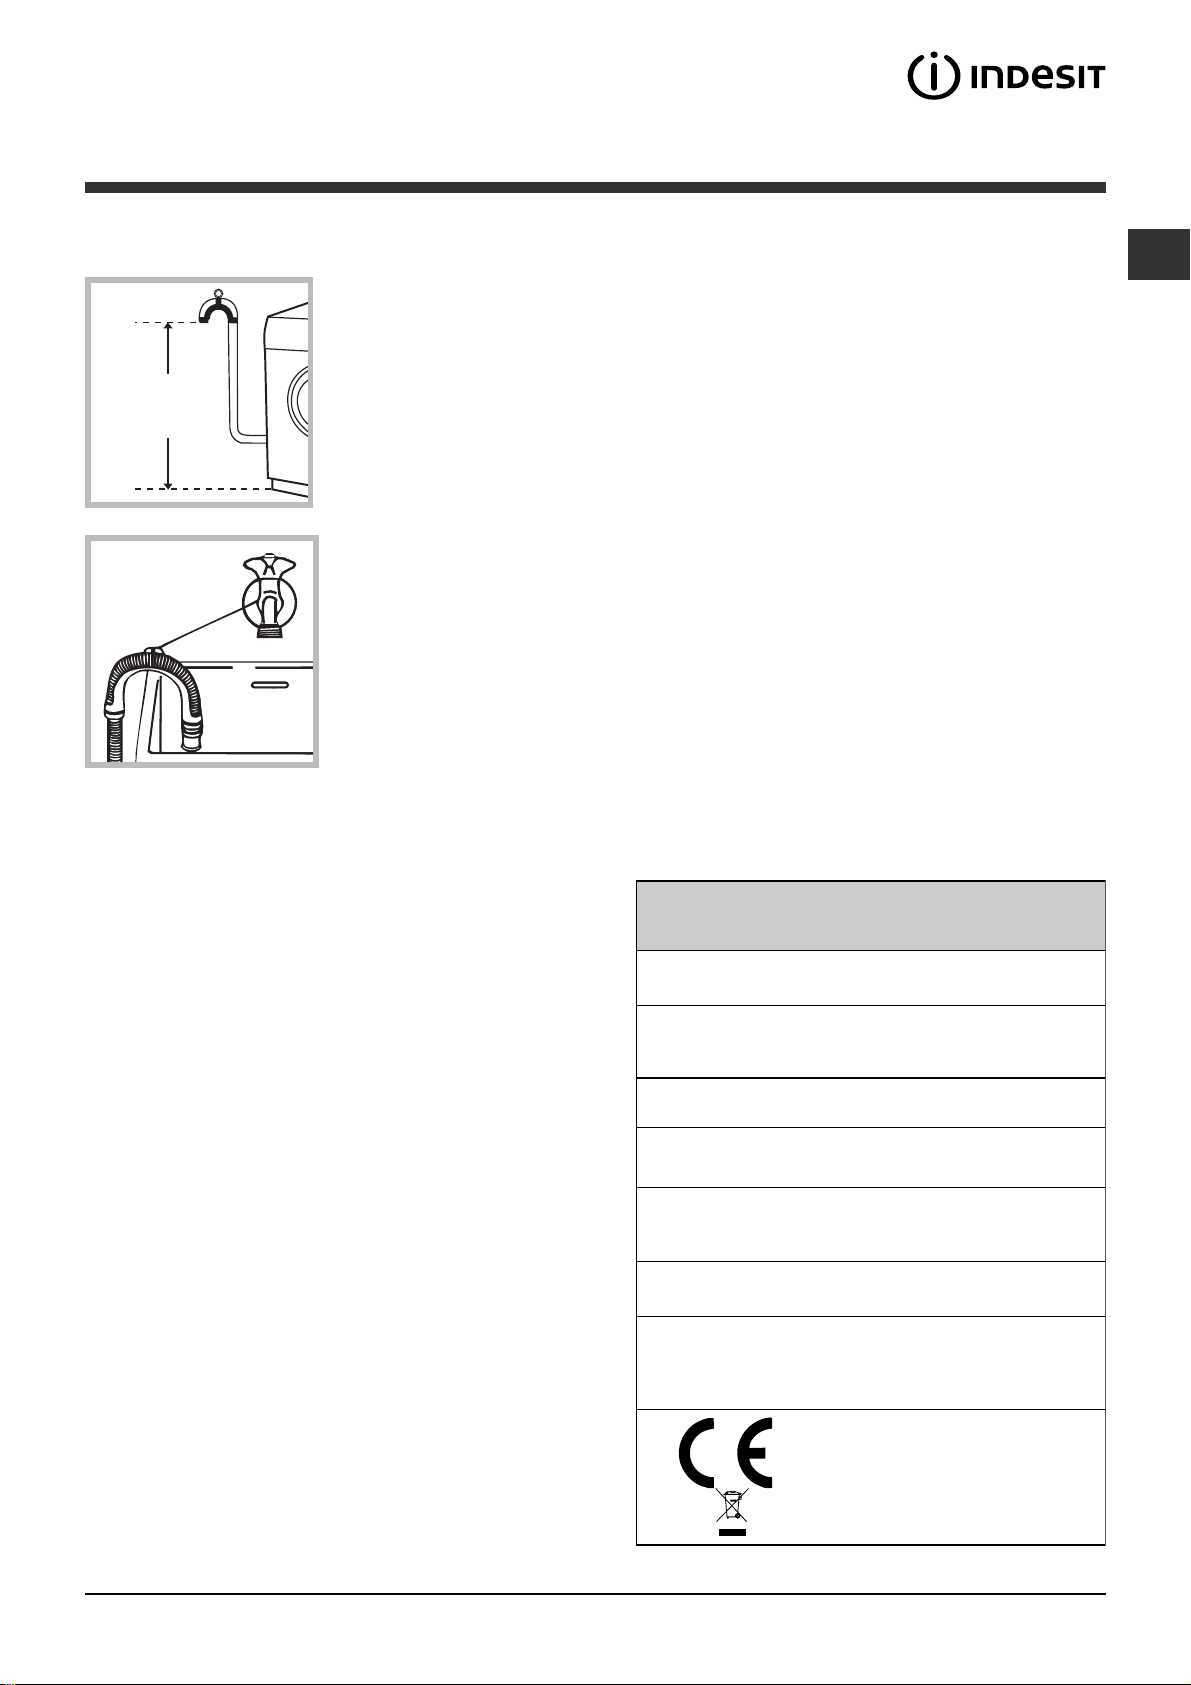
65 - 100 cm
Connect the drain hose,
without bending it, to a
drainage duct or a wall
drain located at a height
between 65 and 100 cm
from the floor;
Do not use extension cords or multiple sockets.
GB
The cable should not be bent or compressed.
The power supply cable must only be replaced by
authorised technicians.
Warning! The company shall not be held responsible
in the event that these regulations are not respected.
The first wash cycle
alternatively, rest it on
the side of a washbasin
or bathtub, fastening the
duct supplied to the tap
(see figure). The free end
of the hose should not
be underwater.
We advise against the use of hose extensions; if it is
absolutely necessary, the extension must have the
same diameter as the original hose and must not
exceed 150 cm in length.
Electrical connections
Before plugging the appliance into the electricity
socket, make sure that:
the socket is earthed and complies with all
applicable laws;
Once the appliance has been installed, and before
you use it for the first time, run a wash cycle with
detergent and no laundry, using the wash cycle 2.
Technical data
Model
Dimensions
Capacity
IWE 8128
width 59.5 cm
height 85 cm
depth 60 cm
from 1 to 8 kg
the socket is able to withstand the maximum power
load of the appliance as indicated in the Technical
data table (see opposite);
the power supply voltage falls within the values
indicated in the Technical data table (see opposite);
the socket is compatible with the plug of the
washing machine. If this is not the case, replace
the socket or the plug.
The washing machine must not be installed
outdoors, even in covered areas. It is extremely
dangerous to leave the appliance exposed to rain,
storms and other weather conditions.
When the washing machine has been installed, the
electricity socket must be within easy reach.
Electrical
connections
Water connections
Spin speed
Energy rated
programmes
according to
regulation
EN 60456
please refer to the techn ical data
plate fixed to the machine
maximum pressure 1 MPa (10 bar)
minimum pressure 0.05 MPa (0.5 bar)
drum capacity 62 lit res
up to 1200 rotations per minute
programme 2 ; temperature 60°C;
using a load of 8 kg.
This appliance conforms to the
following EC Directives:
- 2004/108/EC (Electromagnetic
Compatibility)
- 2002/96/EC
- 2006/95/EC (Low Voltage)
3
Page 4
Description of the washing
machine
GB
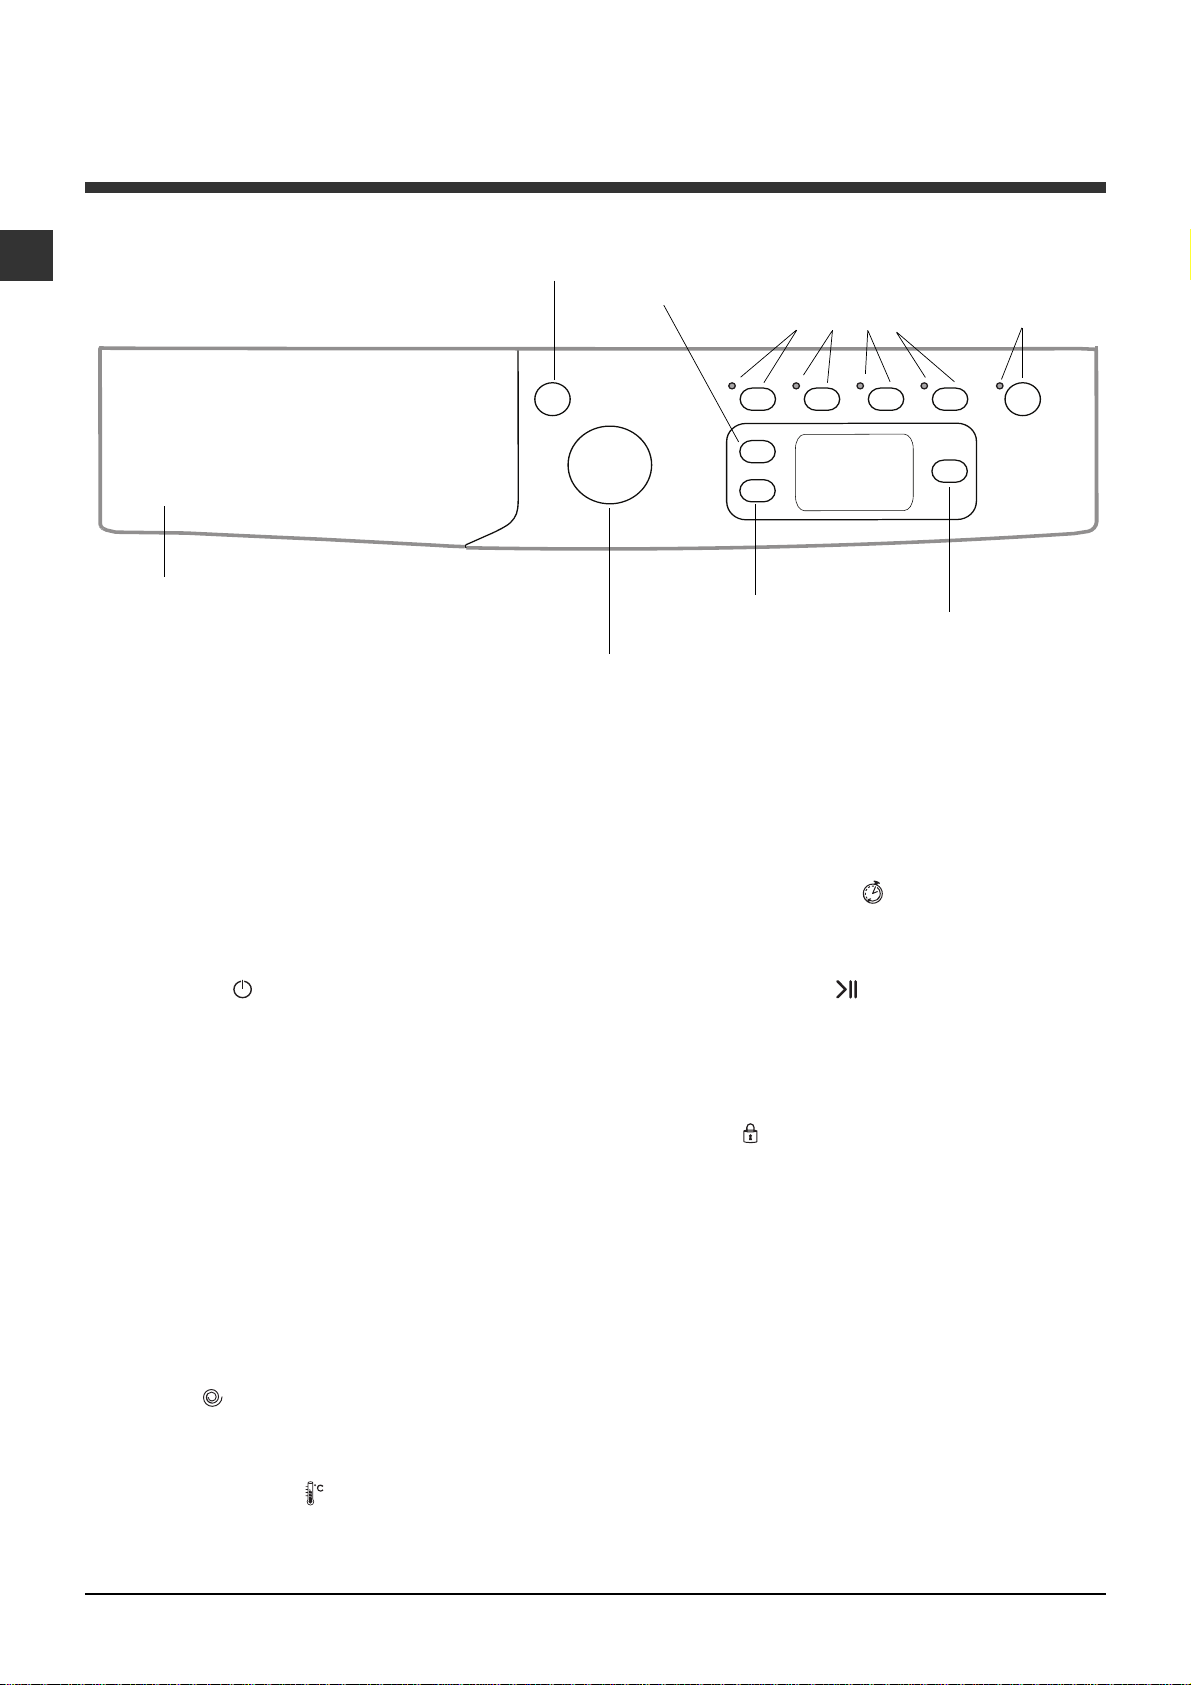
Control panel
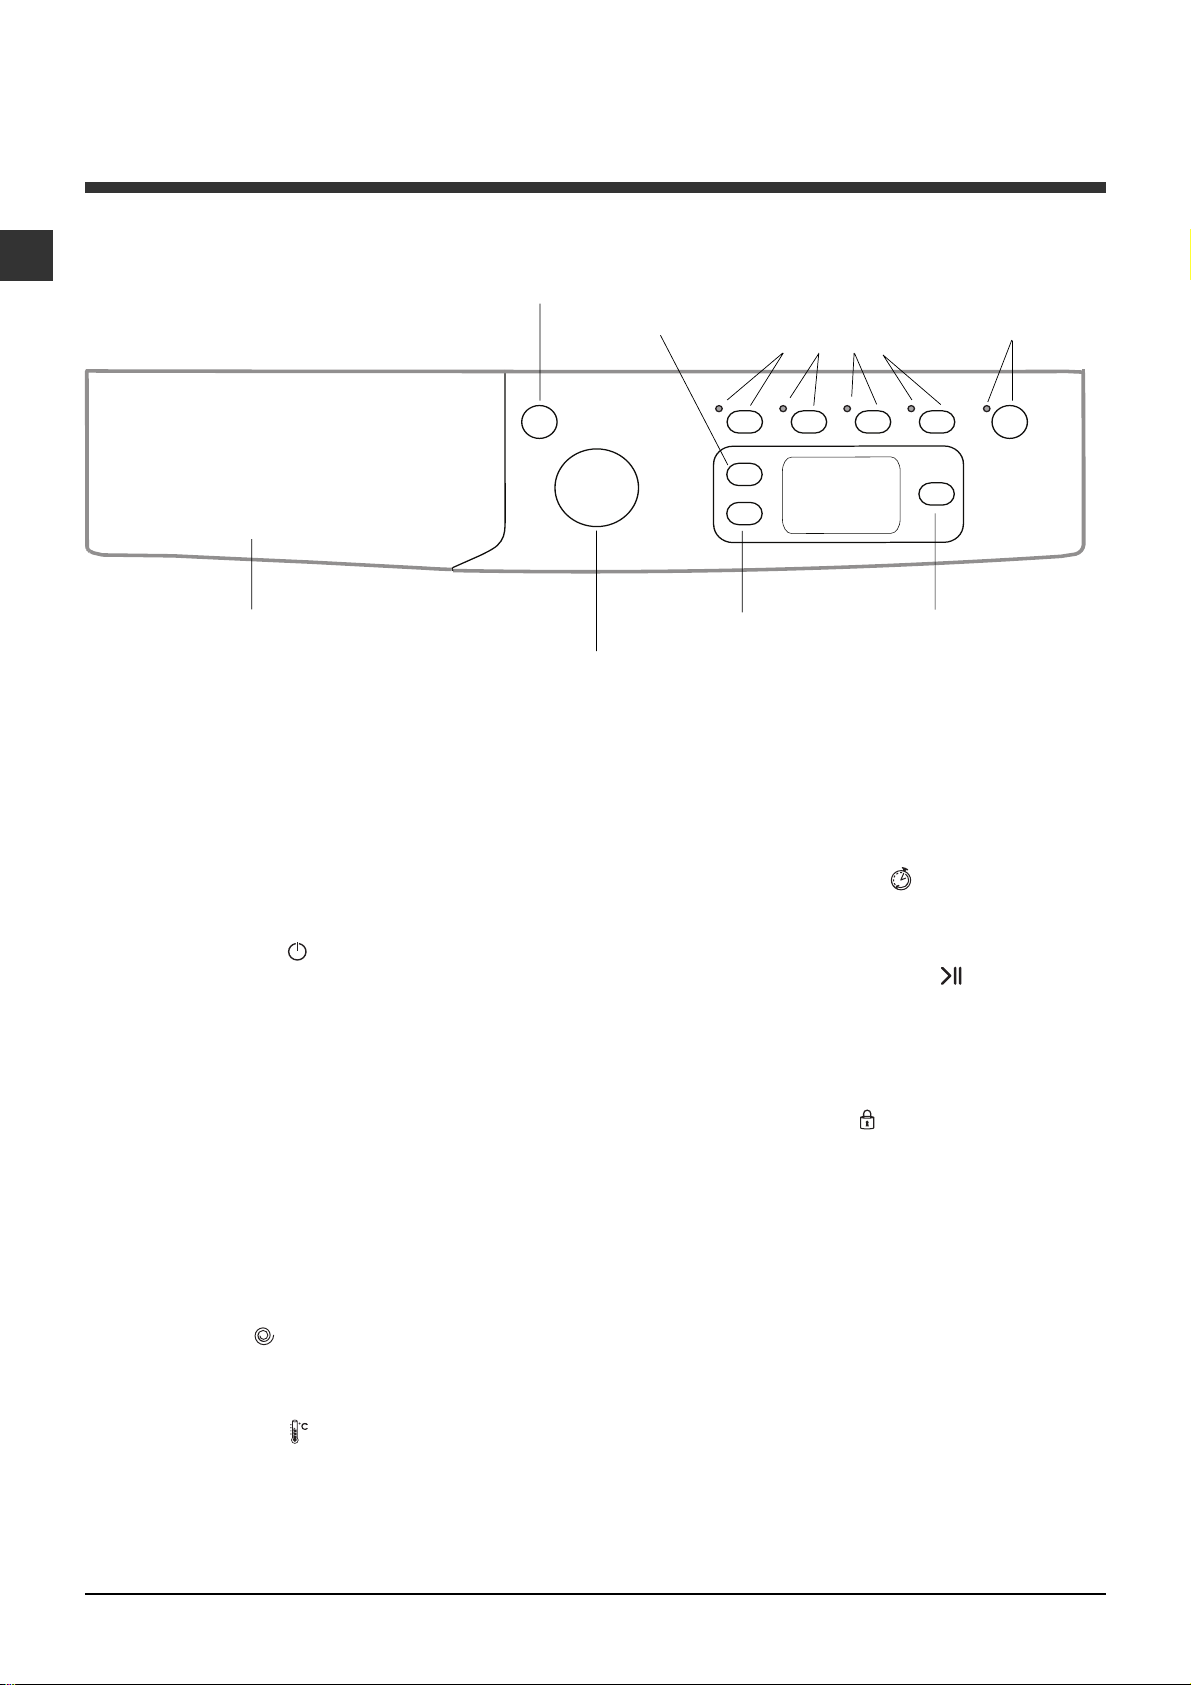
Detergent dispenser drawer
ON/OFF
button
WASH CYCLE
knob
TEMPERATURE
Button
SPIN SPEED
Button
OPTION
buttons with
indicator lights
DISPLAY
START/PAUSE
button with indicator light
DELAYED
START
Button
Detergent dispenser drawer: used to dispense
detergents and washing additives (see Detergents
and laundry).
ON/OFF button
machine on or off. The START/PAUSE indicator light,
which flashes slowly in a green colour shows that the
machine is switched on. To switch off the washing
machine during the wash cycle, press and hold the
button for approximately 3 seconds; if the button is
pressed briefly or accidentally the machine will not
switch off. If the machine is switched off during a
wash cycle, this wash cycle will be cancelled.
WASH CYCLE knob: used to set the desired wash
cycle (see "Table of wash cycles").
OPTION buttons with indicator light: used to select
the available options. The indicator light corresponding
to the selected option will remain lit.
SPIN button
exclude the spin cycle - the value is indicated on the
display.
: press this briefly to switch the
: press to reduce or completely
DELAYED START button
start time for the selected wash cycle. The delay time
will be shown on the display.
START/PAUSE button
the green indicator light flashes slowly, press the
button to start a wash cycle. Once the cycle has
begun the indicator light will remain lit in a fixed
manner. To pause the wash cycle, press the button
again; the indicator light will flash in an orange colour.
If the symbol
opened. To start the wash cycle from the point at
which it was interrupted, press the button again.
Standby mode
This washing machine, in compliance with new
energy saving regulations, is fitted with an automatic
standby system which is enabled after about 30
minutes if no activity is detected. Press the ON-OFF
button briefly and wait for the machine to start up
again.
is not illuminated, the door may be
: press to set a delayed
with indicator light: when
TEMPERATURE button
completely exclude the temperature: the value will be
shown on the display.
4
: press to decrease or
Page 5
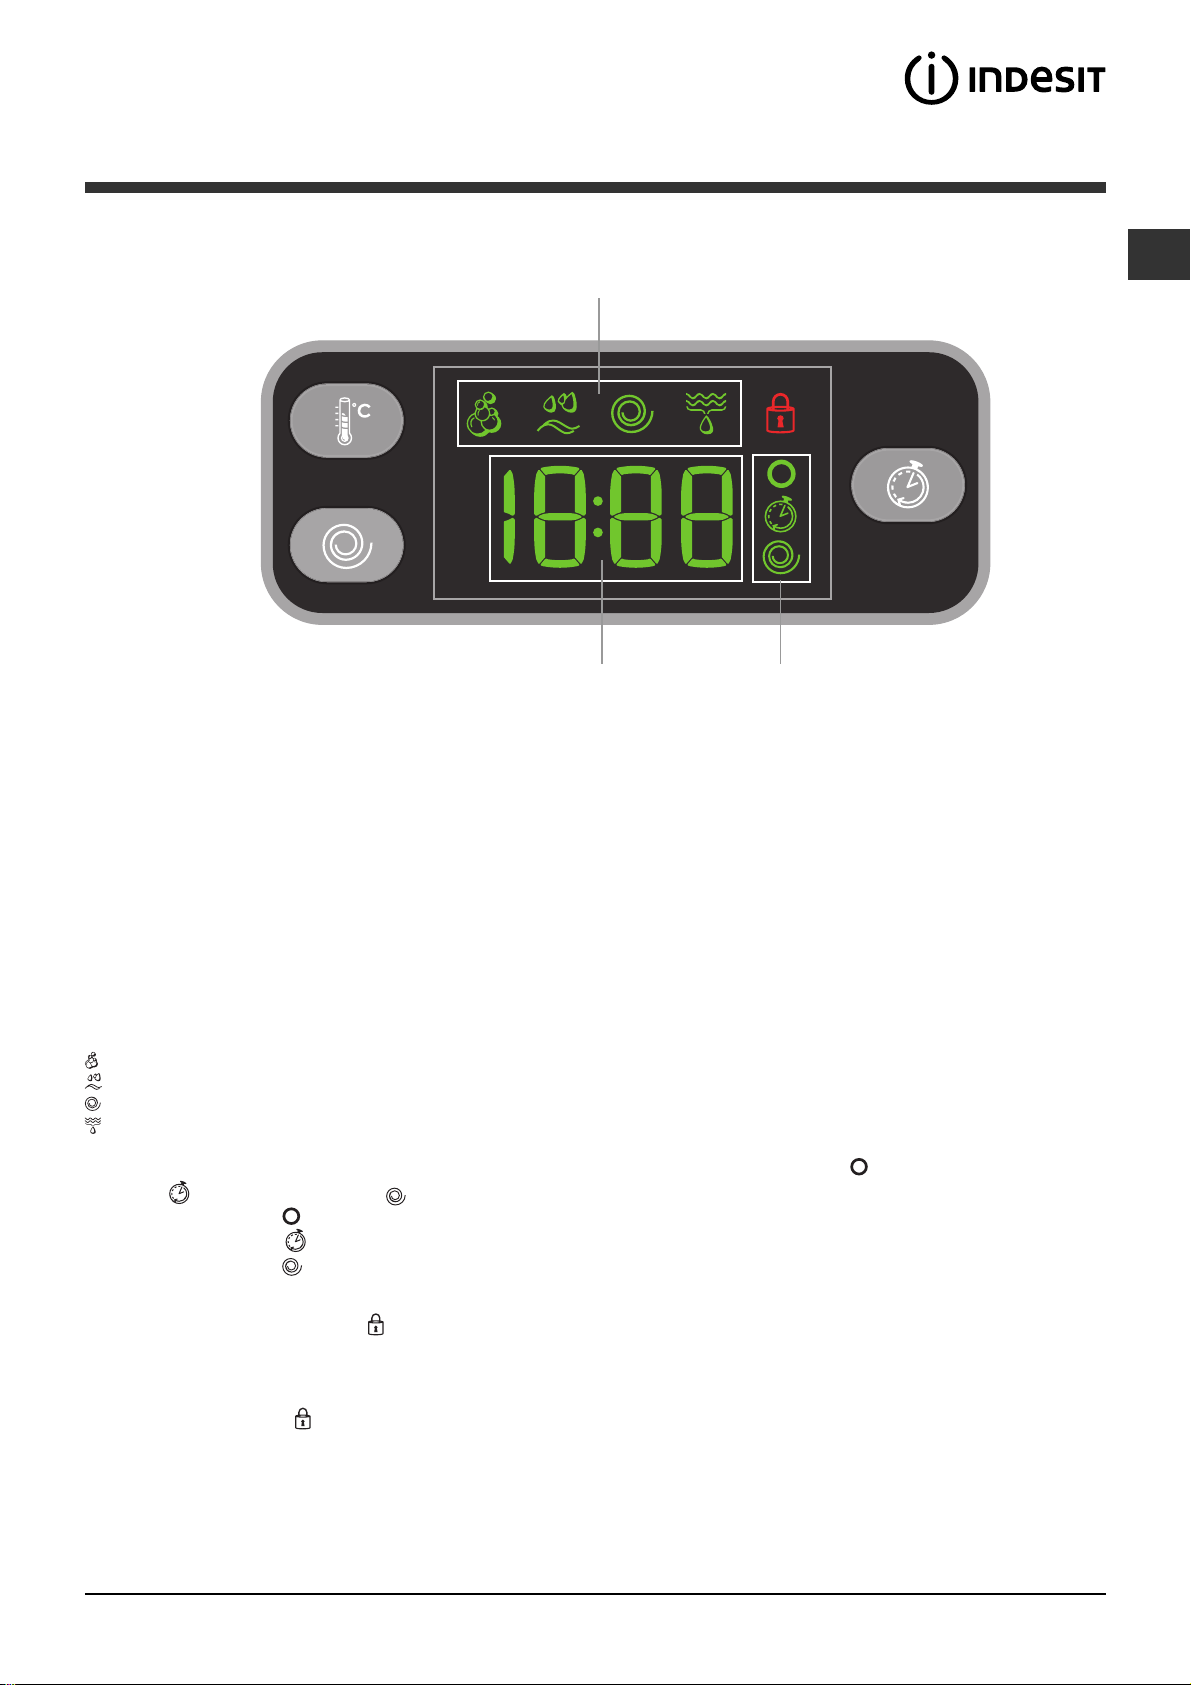
Display
GB
B
A
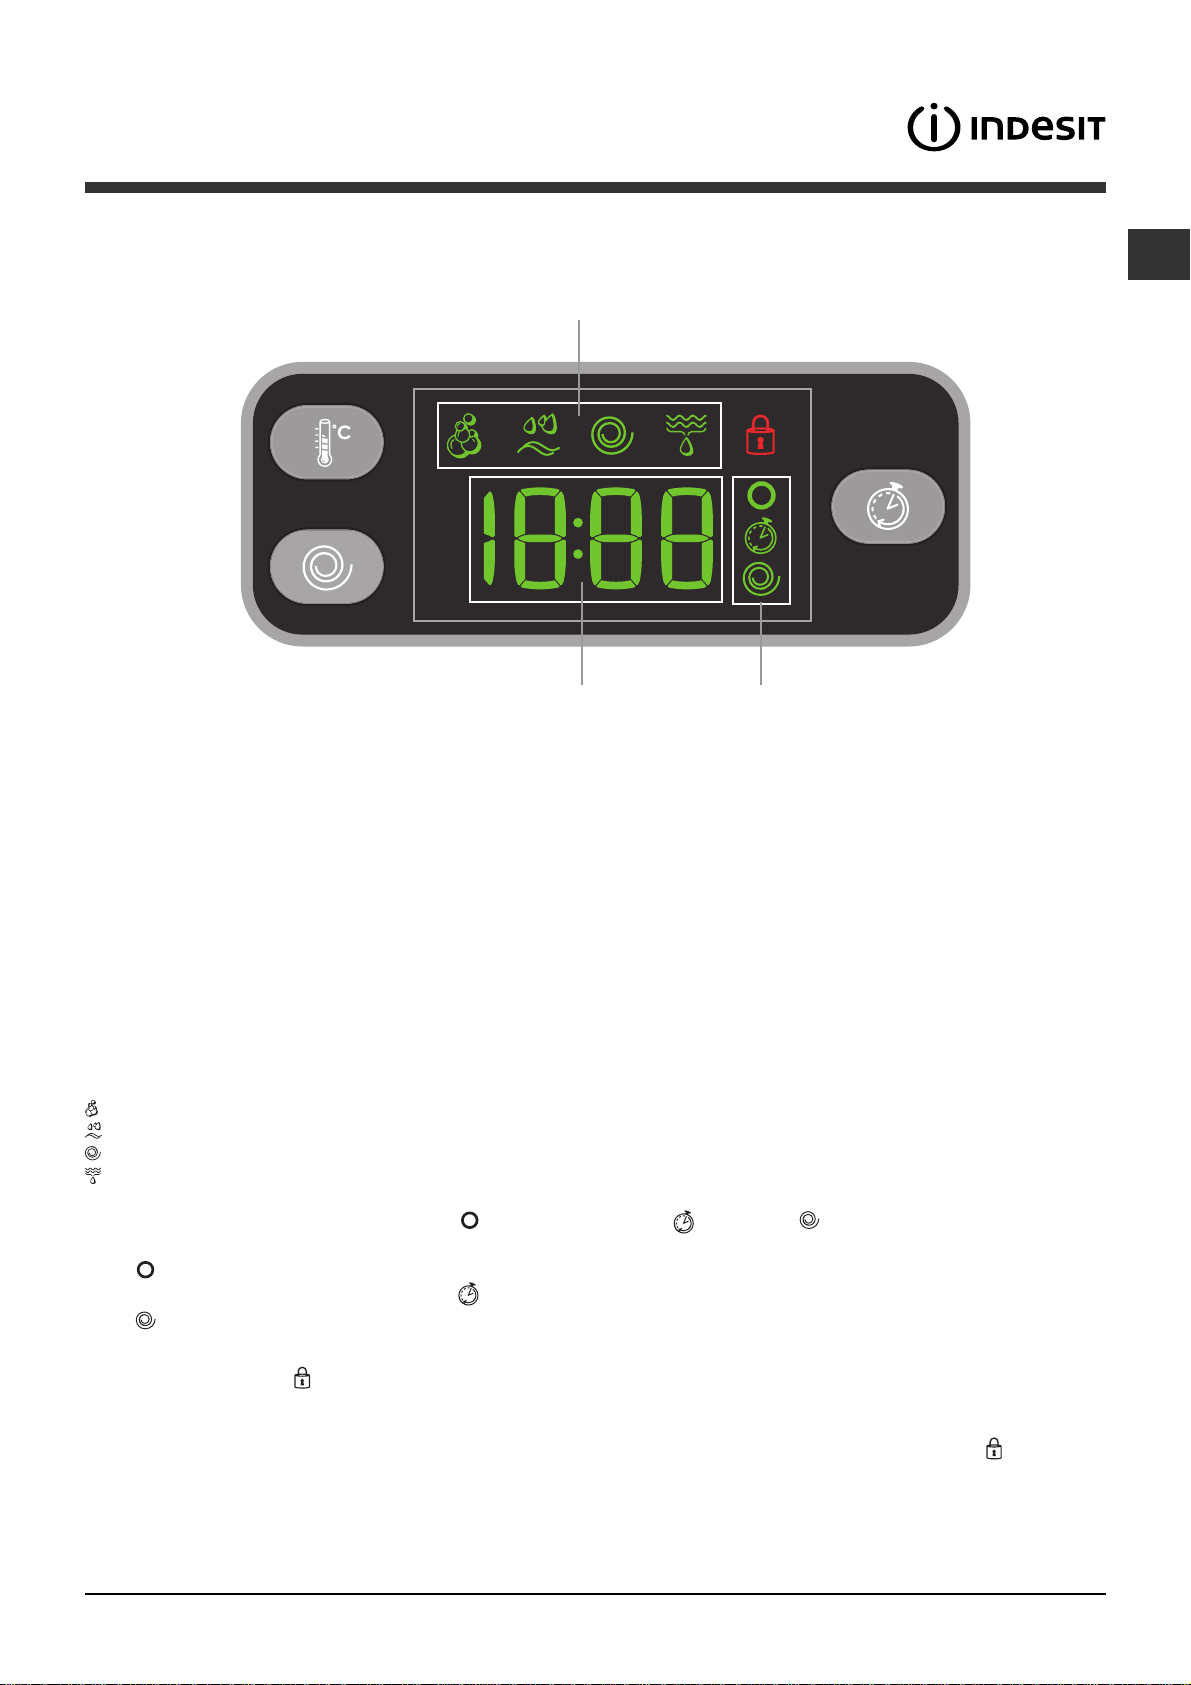
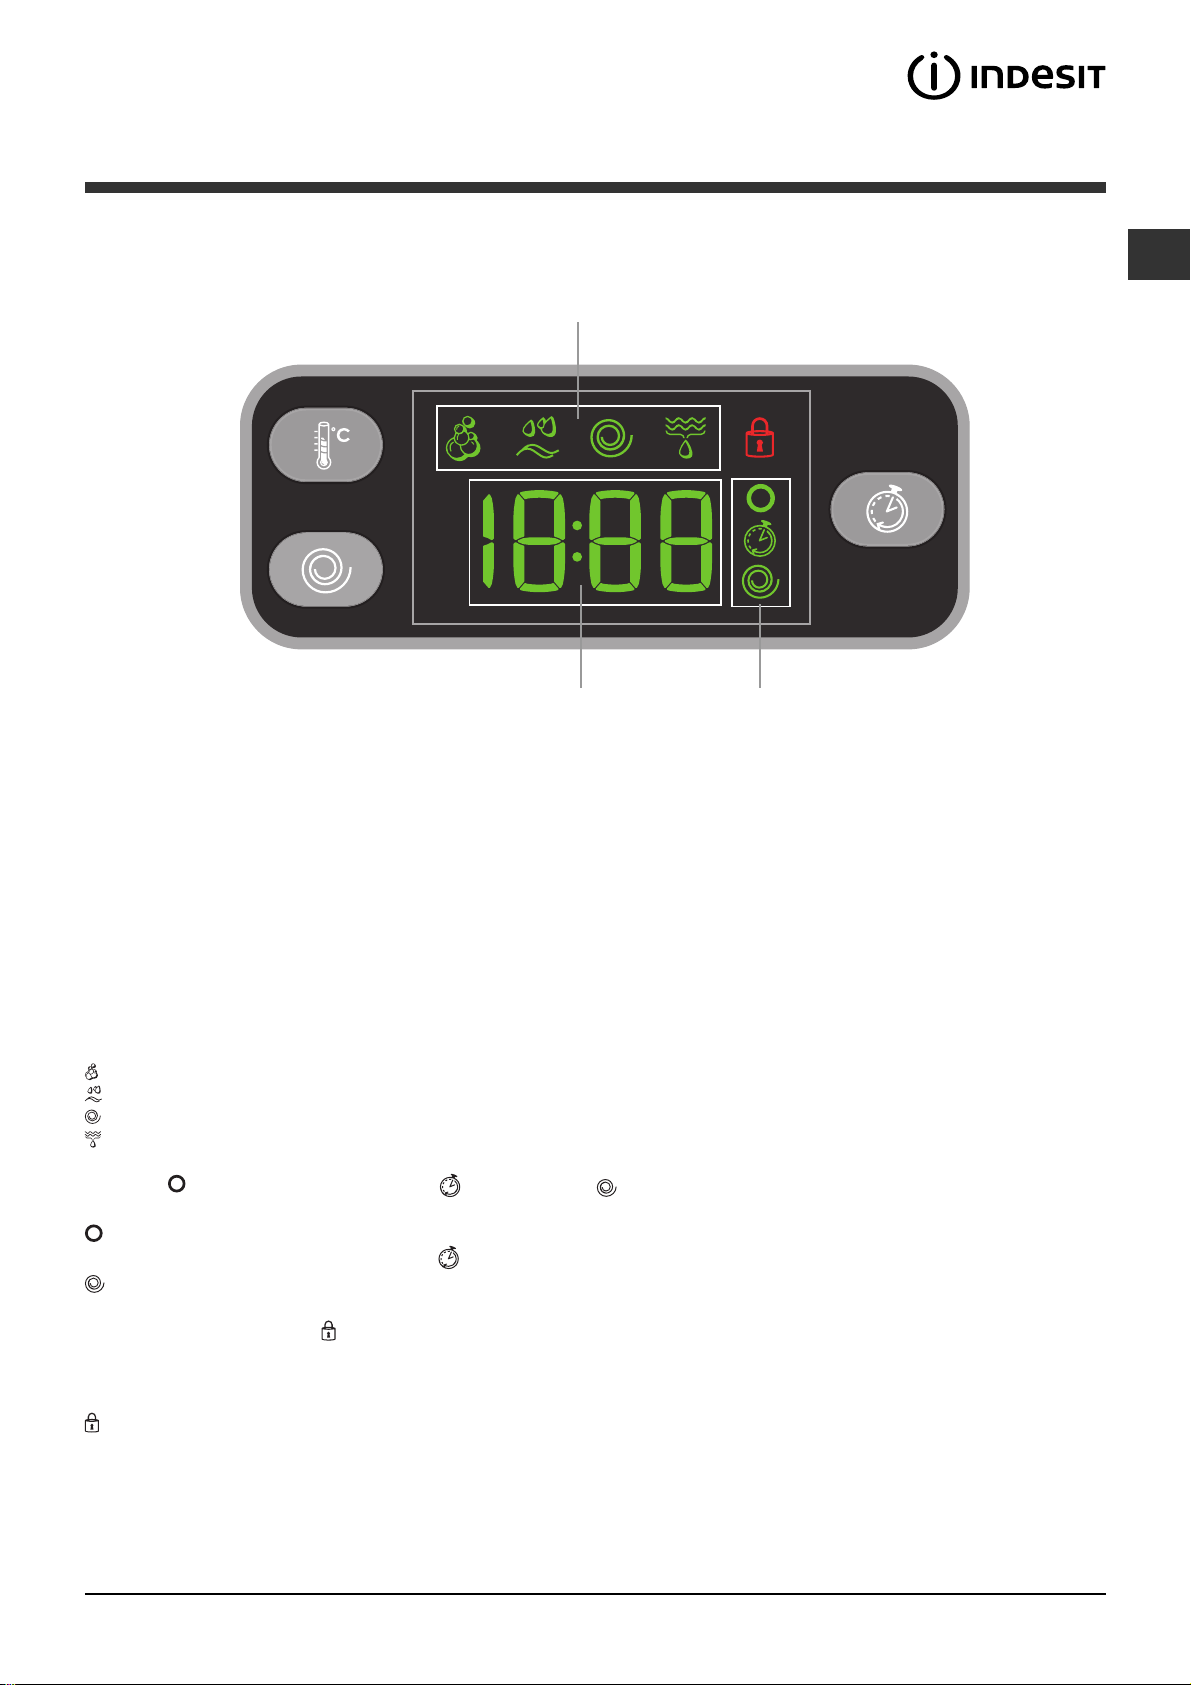
The display is useful when programming the machine and provides a great deal of information.
The duration of the available programmes and the remaining time of a running cycle appear in section A; if the
DELAY START option has been set, the countdown to the start of the selected programme will appear. Pressing
the relative button, the machine automatically displays the maximum temperature and spin speed values set for
the selected cycle, or the most recently-used settings if they are compatible with the selected cycle.
The "programme phases" relative to the selected programme and the "programme phase" of the running
programme appear in section B:
Wash
Rinse
Spin
Drain
The icons corresponding to "temperature"
to bottom:
If the
When a delayed start has been set, the
If the
symbol lights up, the display will visualise the set "temperature" value.
symbol lights up, the display will visualise the set "spin" value.
, "Programmed start" and "spin" appear in section C from top
symbol lights up.
C
Door locked symbol
The lit symbol indicates that the door is locked. To prevent any damage, wait until the symbol turns off before
opening the door.
To open the door while a cycle is in progress, press the START/PAUSE button; if the DOOR LOCKED
switched off the door may be opened.
symbol is
5
Page 6
Running a wash cycle
GB
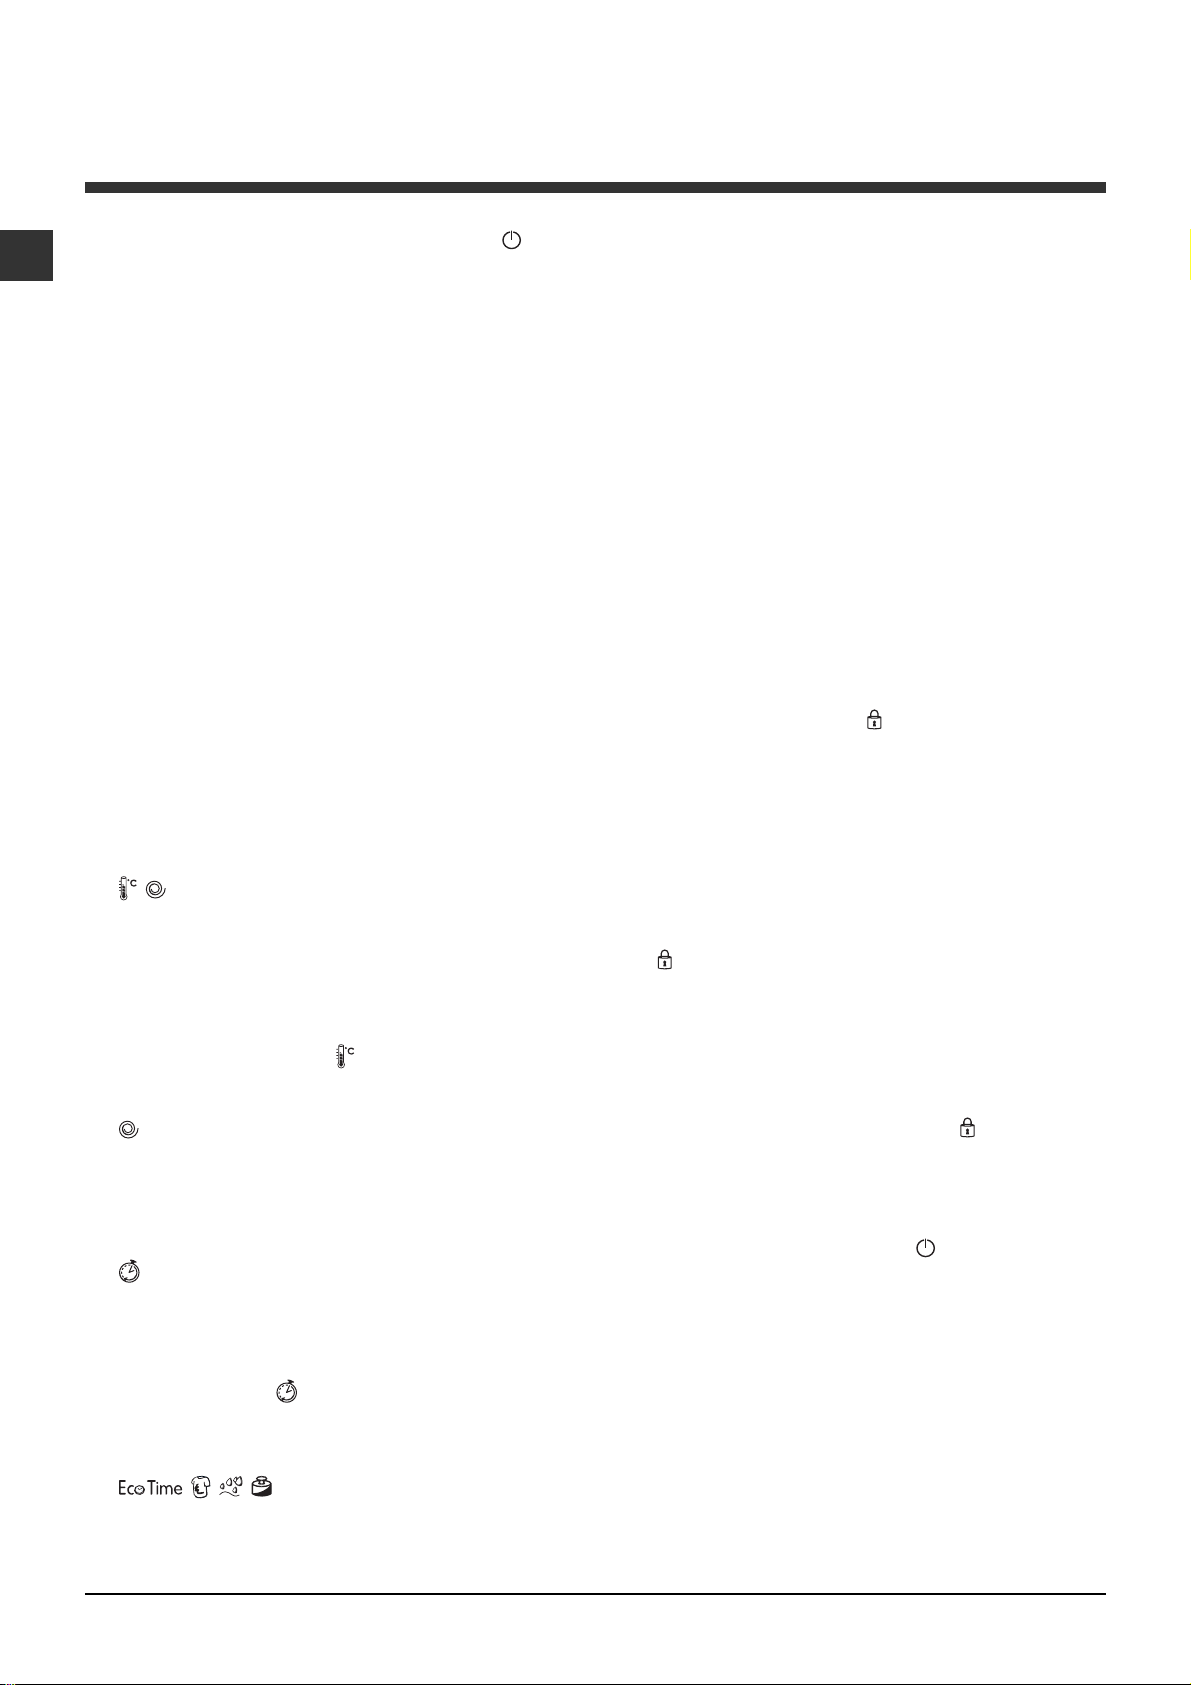
1. SWITCH THE MACHINE ON. Press the
button; the START/PAUSE indicator light will flash
slowly in a green colour.
2. LOAD THE LAUNDRY. Open the porthole door.
Load the laundry, making sure you do not exceed
the maximum load value indicated in the table of
programmes on the following page.
3. MEASURE OUT THE DETERGENT. Pull out the
detergent dispenser drawer and pour the detergent
into the relevant compartments as described in
"Detergents and laundry".
4. CLOSE THE DOOR.
5. SELECT THE WASH CYCLE. Set the WASH
CYCLE knob to the desired programme; a
temperature and spin speed is set for each wash
cycle; these may be adjusted. The duration of the
cycle will appear on the display.
6. CUSTOMISE THE WASH CYCLE. Use the
relevant buttons:
Modifying the temperature and/or spin
speed. The machine automatically displays the
maximum temperature and spin speed values set
for the selected cycle, or the most recently-used
settings if they are compatible with the selected
cycle. The temperature can be decreased by
pressing the
setting is reached. The spin speed may be
progressively reduced by pressing the
until it is completely excluded (the "OFF" setting). If
these buttons are pressed again, the maximum
values are restored.
button, until the cold wash "OFF"
button,
selected will flash and only the second option will be
activated; the indicator light corresponding to the
enabled option will remain lit.
The options may affect the recommended load
value and/or the duration of the cycle.
7. START THE PROGRAMME. Press the START/
PAUSE button. The corresponding indicator light will
become green, remaining lit in a fixed manner, and
the door will be locked (the DOOR LOCKED
symbol
it is in progress, pause the washing machine using
the START/PAUSE button (the START/PAUSE
indicator light will flash slowly in an orange colour);
then select the desired cycle and press the START/
PAUSE button again.
To open the door while a cycle is in progress, press
the START/PAUSE button; if the DOOR LOCKED
symbol is switched off the door may be opened.
Press the START/PAUSE button again to restart the
wash cycle from the point at which it was
interrupted.
8. THE END OF THE WASH CYCLE. This will be
indicated by the text "END" on the display; when
the DOOR LOCKED
may be opened. Open the door, unload the laundry
and switch off the machine.
will be on). To change a wash cycle while
symbol switches off the door
If you wish to cancel a cycle which has already
begun, press and hold the button. The cycle will be
stopped and the machine will switch off.
Setting a delayed start.
To set a delayed start for the selected programme,
press the corresponding button repeatedly until the
required delay period has been reached. When this
option is enabled, the
display. To remove the delayed start option press
the button until the text "OFF" appears on the
display.
Modifying the cycle settings.
Press the button to enable the option; the
indicator light corresponding to the button will
switch on.
Press the button again to disable the option; the
indicator light will switch off.
symbol lights up on the
If the selected option is not compatible with the
programmed wash cycle, the indicator light will
flash and the option will not be activated.
If the selected option is not compatible with
another option which has been selected previously,
the indicator light corresponding to the first option
6
Page 7
Wash cycles and options
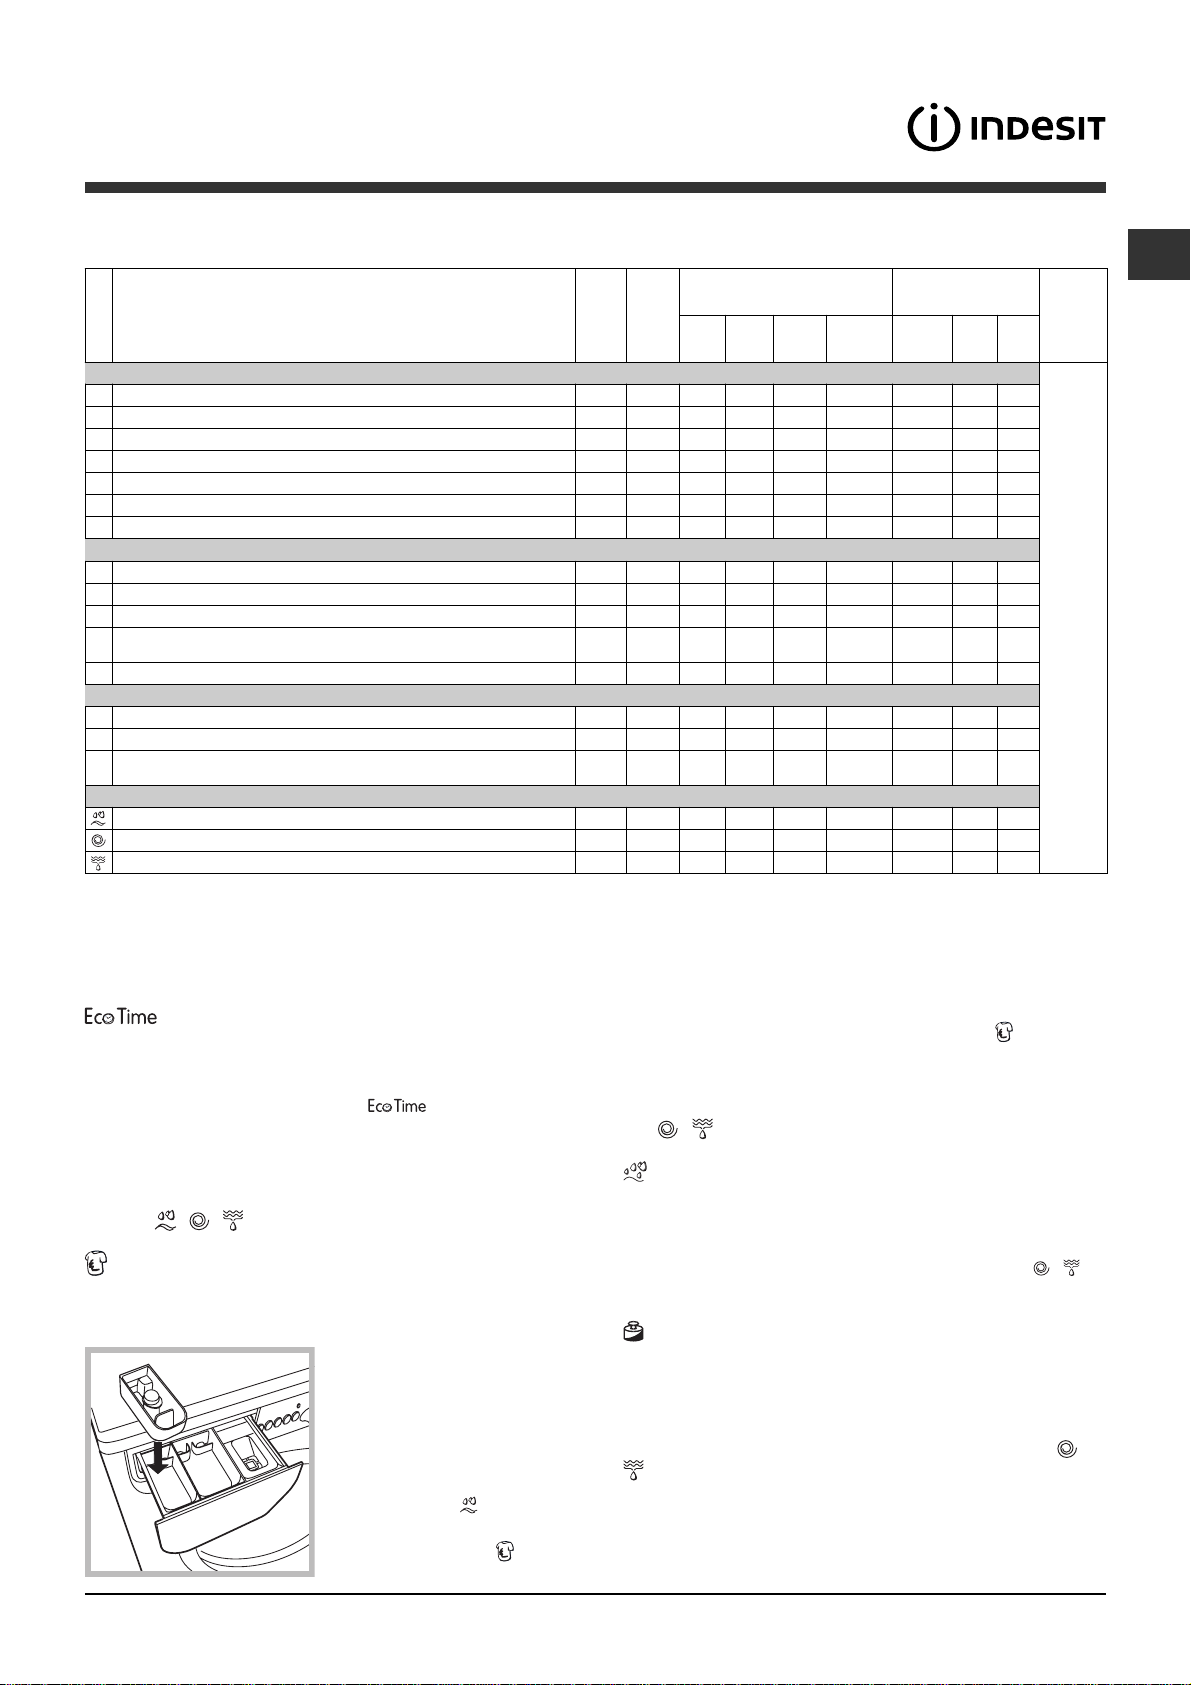
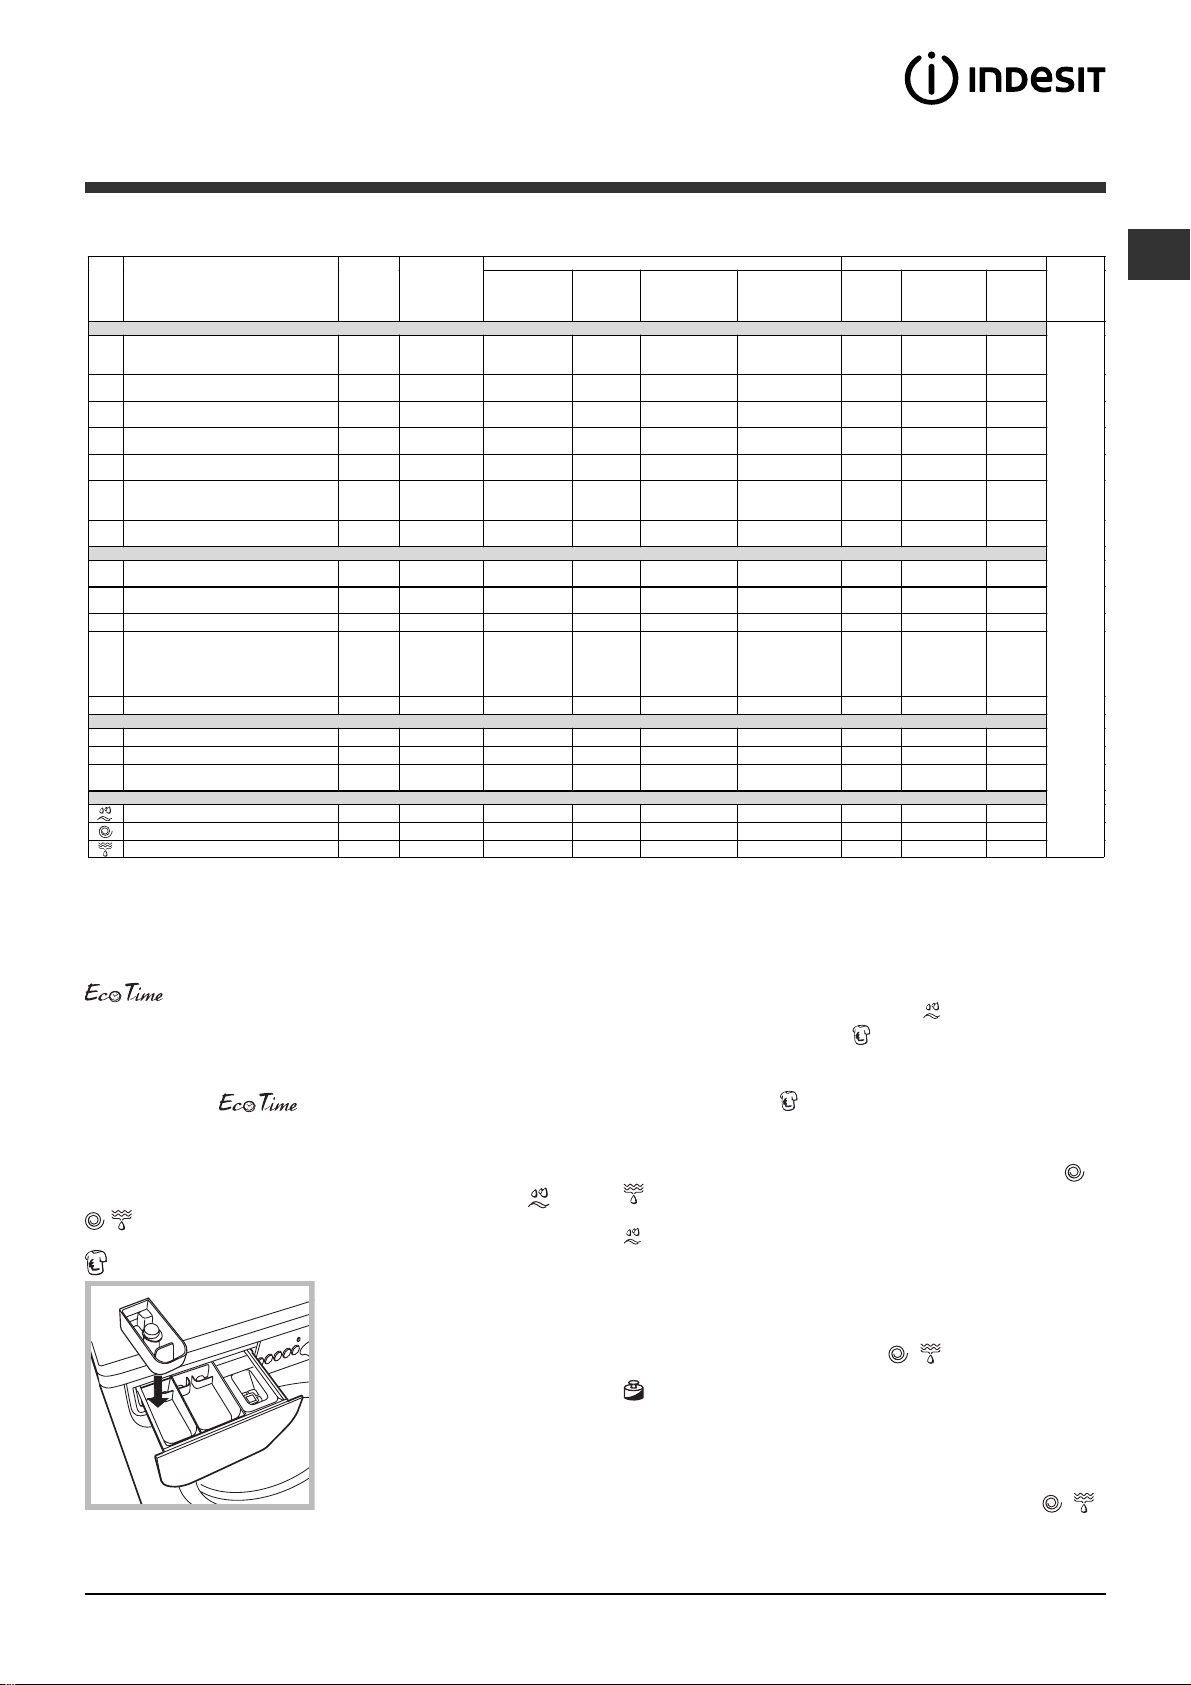
Table of wash cycles
.
Max
Description of the wash cycle
Wash
cycles
Daily
1
Cotton with prewash:
2
Cotton:
extremely s oiled whites.
2
Cotton (1):
2
Cotton (2):
3
Cotton:
4
Coloured Cottons (3):
5
Synthetics:
Special
6
Wool:
7
Silk/Curtains:
8
Jeans
Express:
9
for wool, silk and clothes which require washing by hand).
10
Outwear
Sport
11
Sport Intensive
12
Sport Light
13
Sport Shoes
Partial wash cycles
Rinse
Spin
Drain
For all Test Institutes:
1) Test wash cycle in compliance with regulation EN 60456: set wash cycle 2 with a temperature of 60°C.
2) Long wash cycle for cottons: set wash cycle 2 with a temperature of 40°C.
3) Short wash cycle for cottons: set wash cycle 4 with a temperature of 40°C.
heavily soiled whites and resistant colours.
ligh tly soiled w hit es and delicate colours
heavily soiled whites and resistant colours.
ligh tly soiled resistant colours.
for wool, cashmere, etc.
for garments in silk and viscose, lingerie.
to refresh lightly soiled garments quickly (not suitable
extremely s oiled whites.
lightly soiled whites and delicate colours.
Max.
temp.
spee d
(°C)
(rpm)
90° 1200
90° 1200
60° 1200
40° 1200
60° 1200
40° 1200
60° 800
40° 600
30° 0
40° 800
30° 800
30° 400
30° 600
30° 600
30° 600
1200
-
1200
-
-
Pre-
wash
0
The information contained in the table is intended as a guide only.
De ter gents Max. load (kg)
Wash Bleach
ll
ll l
-
ll l
-
ll l
-
ll l
-
ll l
-
ll l
-
l
-
l
-
l
-
l
-
l
-
l
-
l
-
l
-
- -
- - - -
- - - -
Fabr ic
softener
l
-
l
-
l
-
l
-
l
-
- -
l
-
l
-
l
-
ll
Mini
Load
-
-
-
- -
- -
-
-
-
Eco
Time
Normal
84
84
84
84
844
844
3,5 1,5 2,5
21
21
4
1,5
2,5
4
4
Max. 2
pairs
84
8
8
-
-
-
-
-
-
-
-
-
-
-
-
-
GB
Cycle
duration
The duration of the wash cycles can be checked
on the display.
Wash options
Selecting this option enables you to suitably adjust
drum rotation, temperature and water to a reduced
load of lightly soiled cotton and synthetic fabrics (refer
to the "Table of wash cycles").
to wash in less time thereby saving water and
electricity. We suggest using a liquid detergent
suitably measured out to the load quantity.
It cannot be used with the 1, 2, 6, 7, 8, 9, 10, 11,
12, 13,
Stain removal
This option is particularly useful for the removal of
stubborn stains. Place extra compartment 4 (supplied)
into compartment 1.
, , programmes.
4
3
2
1
When pouring in the bleach,
be careful not to exceed
the "max" level marked on
the central pivot (see figure).
To run the bleach cycle on
its own, pour the bleach
into extra compartment 4,
set the "Rinse"
programme and activate
the "Stain removal"
option.
enables you
To bleach during a wash cycle, pour in the detergent
and any fabric softener you wish to use, set the desired
wash cycle and enable the "Stain removal"
option.
The use of extra compartment 4 excludes the Prewash option.
It cannot be used with the 1, 6, 7, 8, 9, 10, 11, 12,
13,
, programmes.
Extra rinse
By selecting this option, the efficiency of the rinse is
increased and optimal detergent removal is
guaranteed. It is particularly useful for sensitive skin.
It cannot be used in conjunction with the 9, ,
programmes.
Mini load
This option is recommended for when the load of
laundry is equal to half, or less than half, of the
maximum recommended load (see Table of wash
cycles).
It cannot be used with the 8, 9, 10, 11, 12, 13, ,
programmes.
7
Page 8
Detergents and laundry
GB
Detergent dispenser drawer
Good washing results also depend on the correct
dose of detergent: adding too much detergent will not
necessarily result in a more efficient wash, and may in
fact cause build up on the inside of your appliance
and contribute to environmental pollution.
Do not use hand washing detergents because these
create too much foam.
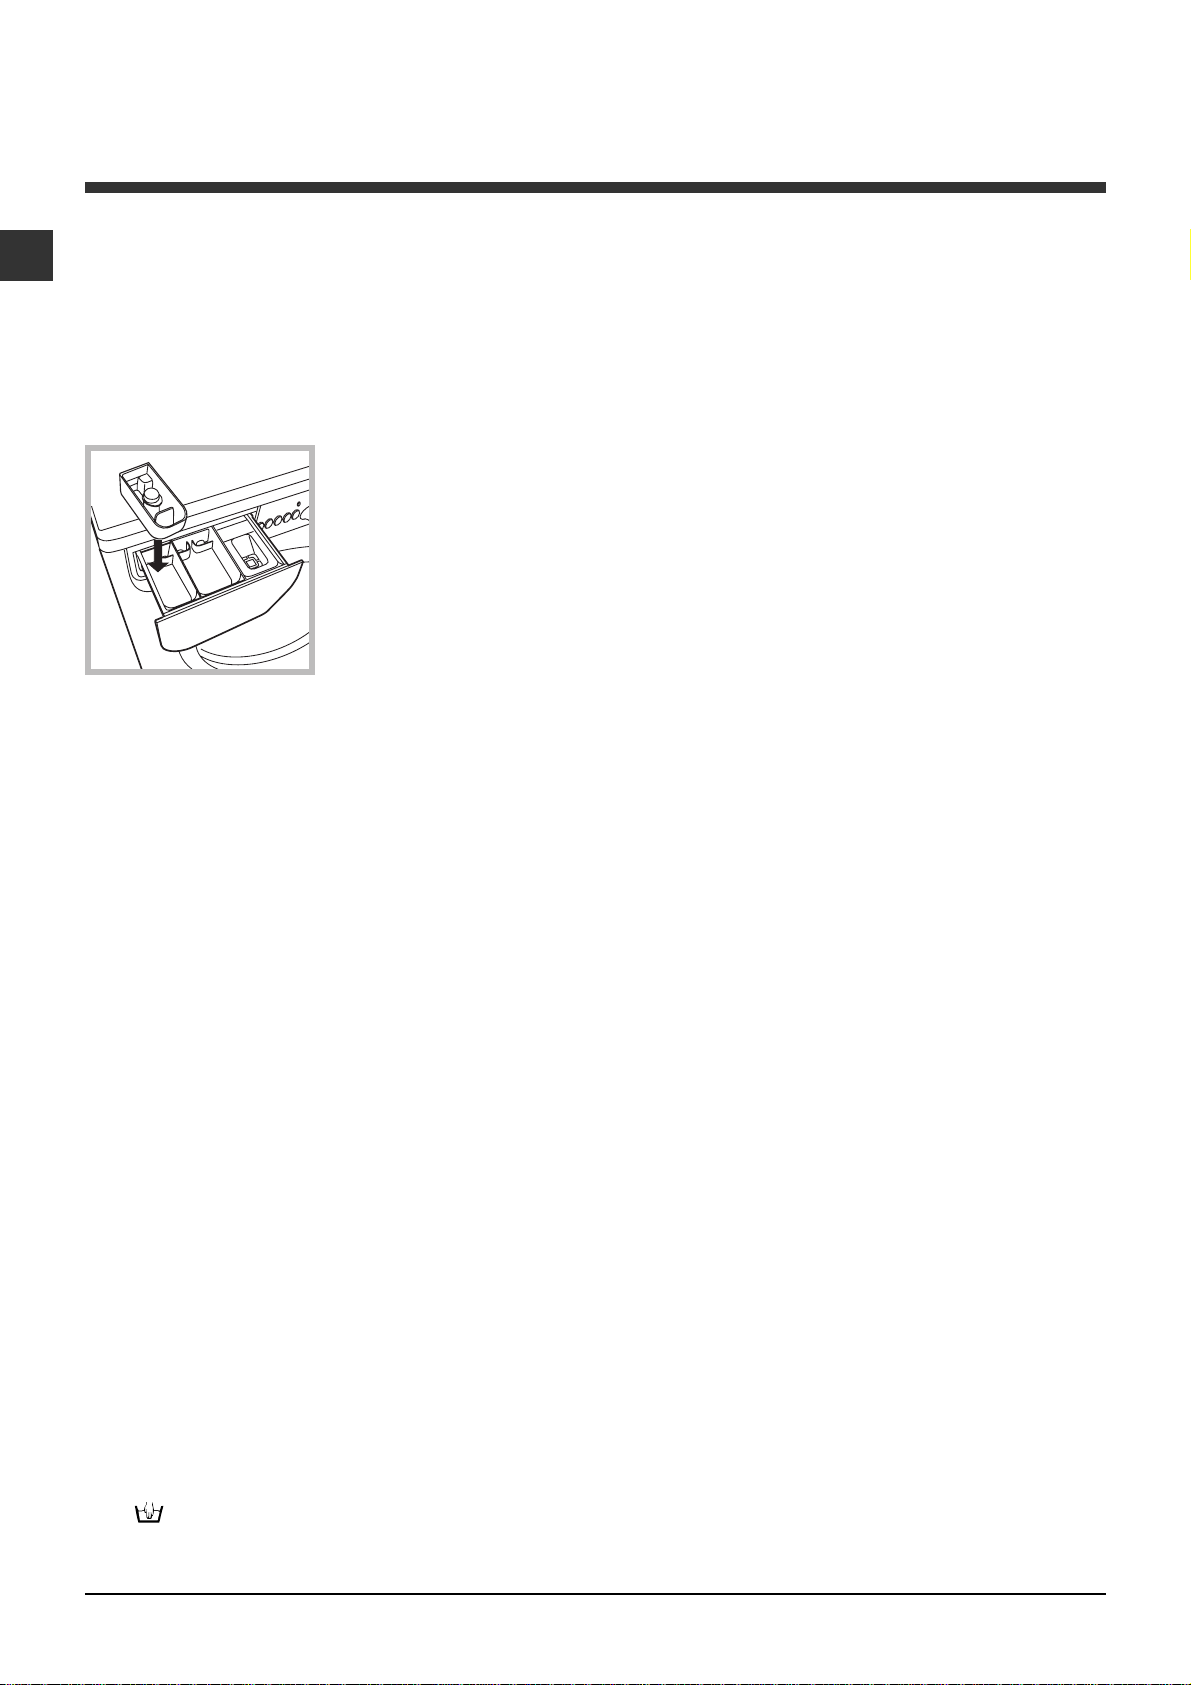
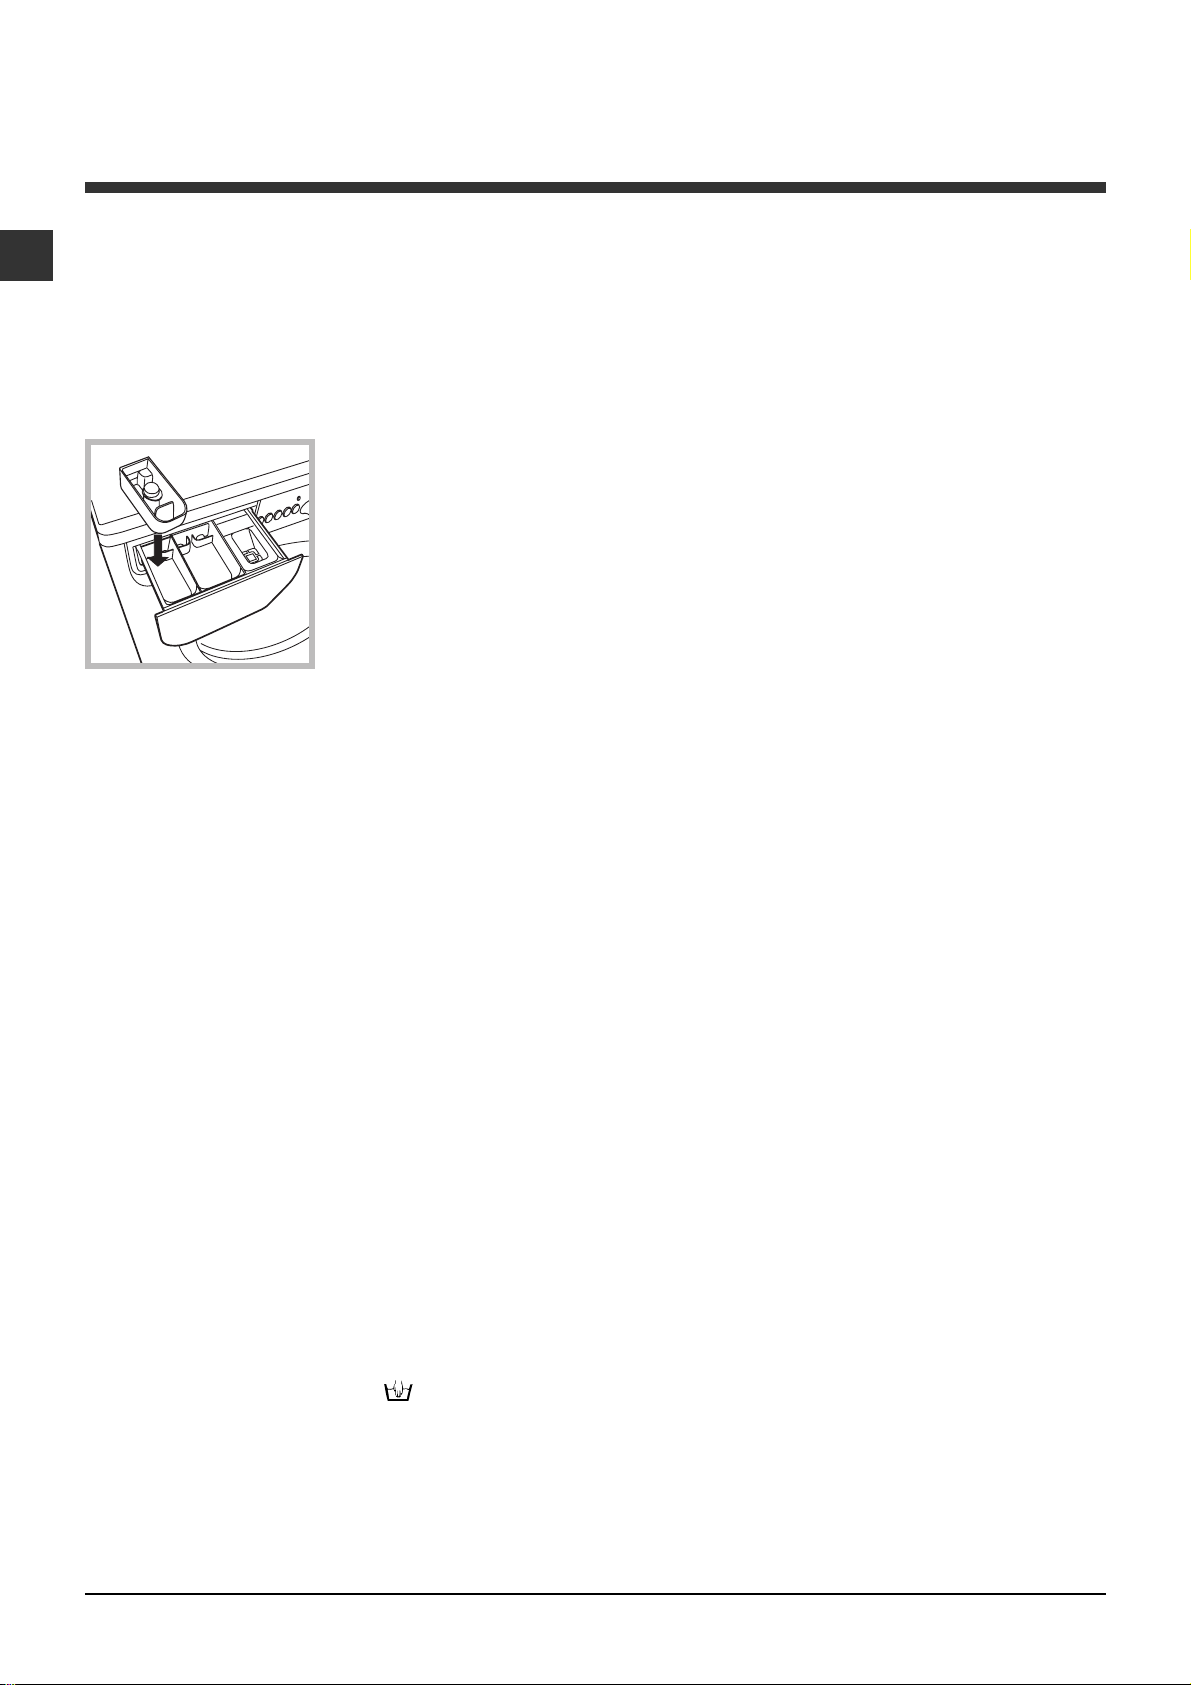
Open the detergent
4
3
dispenser drawer and
pour in the detergent or
washing additive, as
follows.
2
1
compartment 1: Pre-wash detergent (powder)
Before pouring in the detergent, make sure that extra
compartment 4 has been removed.
compartment 2: Detergent for the wash cycle
(powder or liquid)
Liquid detergent should only be poured in immediately
prior to the start of the wash cycle.
compartment 3: Additives (fabric softeners, etc.)
The fabric softener should not overflow the grid.
extra compartment 4: Bleach
Preparing the laundry
Divide the laundry according to:
- the type of fabric/the symbol on the label
- the colours: separate coloured garments from whites.
Empty all garment pockets and check the buttons.
Do not exceed the listed values, which refer to the
weight of the laundry when dry:
Durable fabrics: max. 8 kg
Synthetic fabrics: max. 3,5 kg
Delicate fabrics: max. 2 kg
Wool: max. 2 kg
Silk: max. 2 kg
How much does your laundry weigh?
1 sheet 400-500 g
1 pillow case 150-200 g
1 tablecloth 400-500 g
1 bathrobe 900-1200 g
1 towel 150-250 g
Silk: use special wash cycle 7 to wash all silk
garments. We recommend the use of special
detergent which has been designed to wash delicate
clothes.
Curtains: fold curtains and place them in a pillow
case or mesh bag. Use wash cycle 7.
Jeans: Turn garments inside-out before washing and
use a liquid detergent. Use programme 8.
Express: this wash cycle was designed to wash
lightly soiled garments quickly: it lasts just 15 minutes
and therefore saves both energy and time. By
9
selecting this wash cycle (
wash different fabrics together (except for wool and
silk items), with a maximum load of 1.5 kg.
Outwear (
water-repellent fabrics and winter jackets (e.g. GoreTex, polyester, nylon); for best results, use a liquid
detergent and dosage suitable for a half-load; pretreat necks, cuffs and stains if necessary; do not use
softeners or detergents containing softeners. Stuffed
duvets cannot be washed with this programme.
Sport Intensive (
heavily soiled sports clothing fabrics (tracksuits,
shorts, etc.); for best results, we recommend not
exceeding the maximum load indicated in the "Table
of wash cycles".
Sport Light (
soiled sports clothing fabrics (tracksuits, shorts, etc.);
for best results, we recommend not exceeding the
maximum load indicated in the "Table of wash
cycles". We recommend using a liquid detergent and
dosage suitable for a half-load.
Sport Shoes (
shoes; for best results, do not wash more than 2 pairs
simultaneously.
wash cycle
wash cycle
wash cycle
wash cycle
at 30°C), it is possible to
10): is studied for washing
11): is for washing
12): is for washing lightly
13): is for washing sports
Load balancing system
Before every spin cycle, to avoid excessive vibrations
and to distribute the load in a uniform manner, the
drum rotates continuously at a speed which is slightly
greater than the washing rotation speed. If, after
several attempts, the load is not balanced correctly,
the machine spins at a reduced spin speed. If the
load is excessively unbalanced, the washing machine
performs the distribution process instead of spinning.
To encourage improved load distribution and balance,
we recommend small and large garments are mixed
in the load.
Special wash cycles
Wool: All wool garments can be washed using
programme 6, even those carrying the "hand-wash
only"
detergents and do not exceed 2 kg of laundry.
8
label. For best results, use special
Page 9
Precautions and tips
This washing machine was designed and
constructed in accordance with international safety
regulations. The following information is provided for
safety reasons and must therefore be read carefully.
General safety
This appliance was designed for domestic use only.
This appliance is not intended for use by persons
(including children) with reduced physical, sensory or
mental capabilities, or lack of experience and
knowledge, unless they have been given supervision or
instruction concerning use of the appliance by a person
responsible for their safety. Children should be supervised
to ensure that they do not play with the appliance.
Do not touch the machine when barefoot or with
wet or damp hands or feet.
Do not pull on the power supply cable when
unplugging the appliance from the electricity
socket. Hold the plug and pull.
Do not open the detergent dispenser drawer while
the machine is in operation.
Do not touch the drained water as it may reach
extremely high temperatures.
Never force the porthole door. This could damage
the safety lock mechanism designed to prevent
accidental opening.
If the appliance breaks down, do not under any
circumstances access the internal mechanisms in
an attempt to repair it yourself.
Always keep children well away from the appliance
while it is operating.
The door can become quite hot during the wash cycle.
If the appliance has to be moved, work in a group
of two or three people and handle it with the utmost
care. Never try to do this alone, because the
appliance is very heavy.
Before loading laundry into the washing machine,
make sure the drum is empty.
you dispose of the appliance it must be separately
collected.
Consumers should contact their local authority or
retailer for information concerning the correct
disposal of their old appliance.
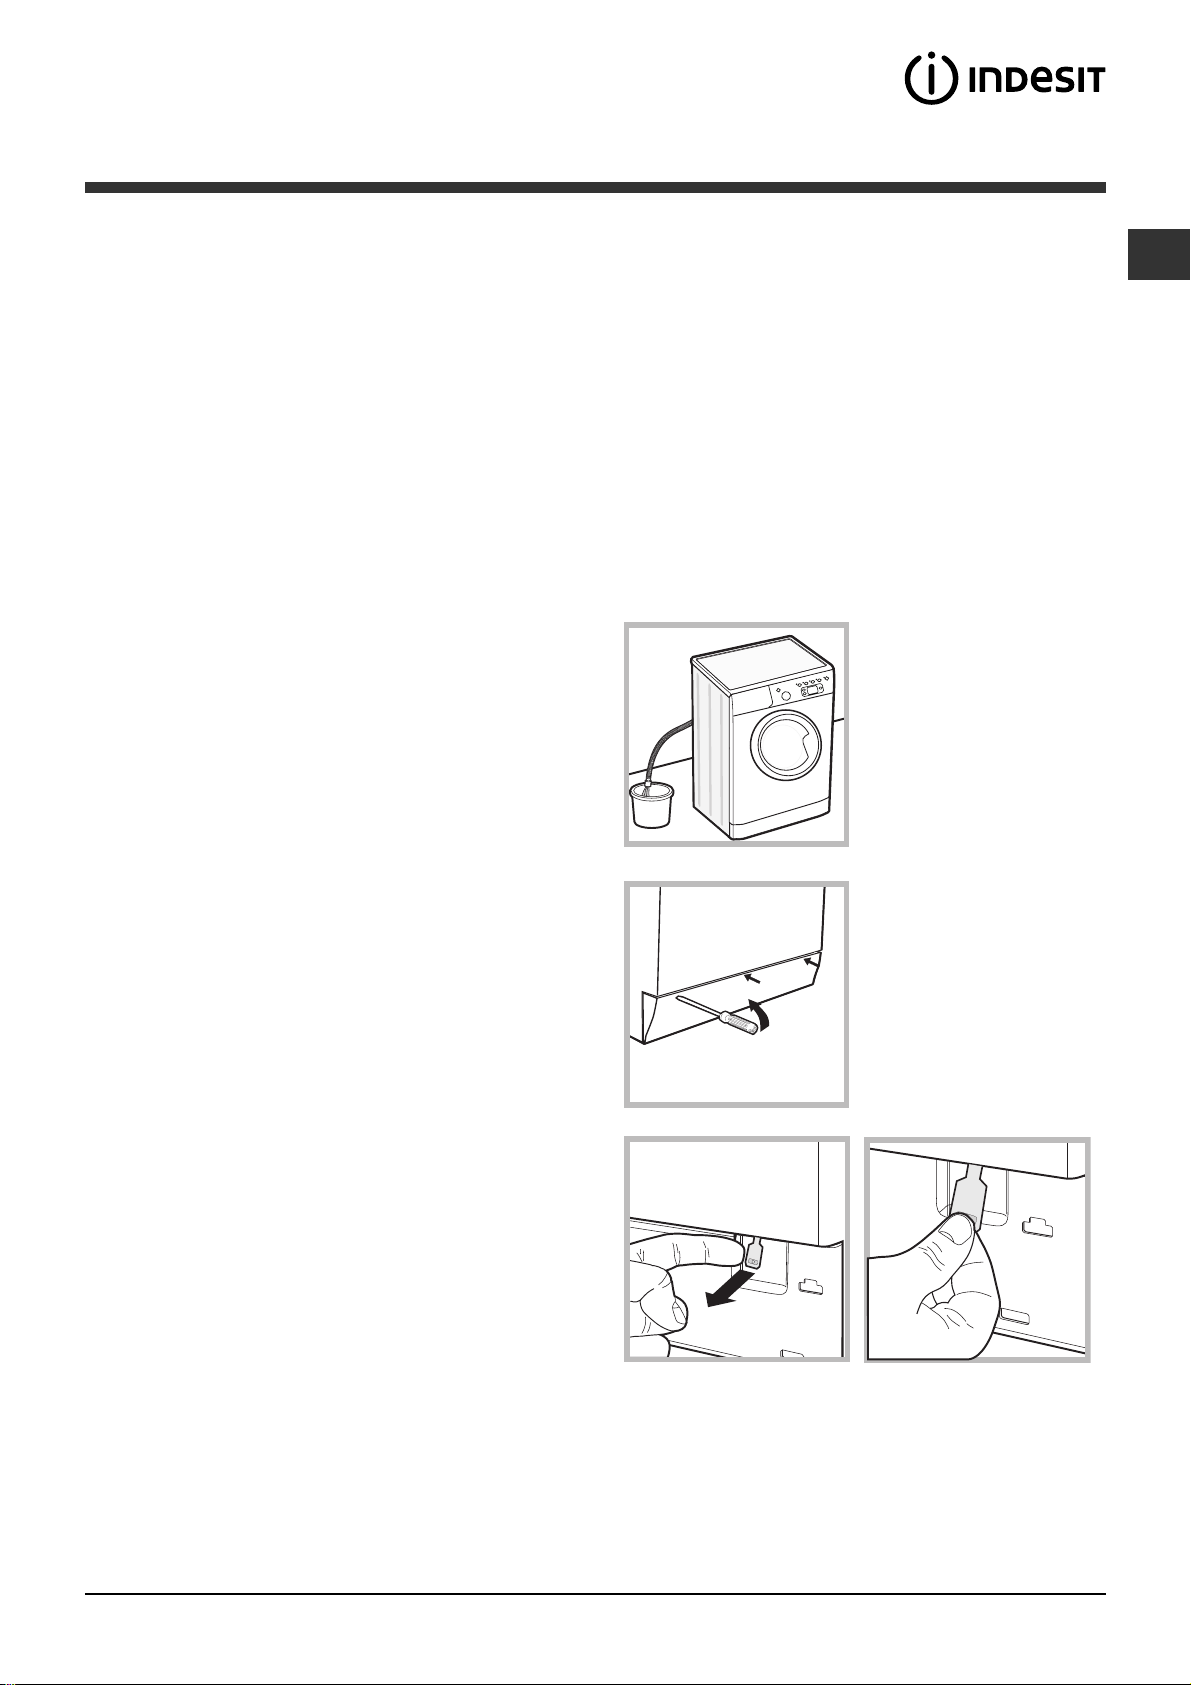
Opening the porthole door manually
In the event that it is not possible to open the
porthole door due to a powercut, and if you wish to
remove the laundry, proceed as follows:
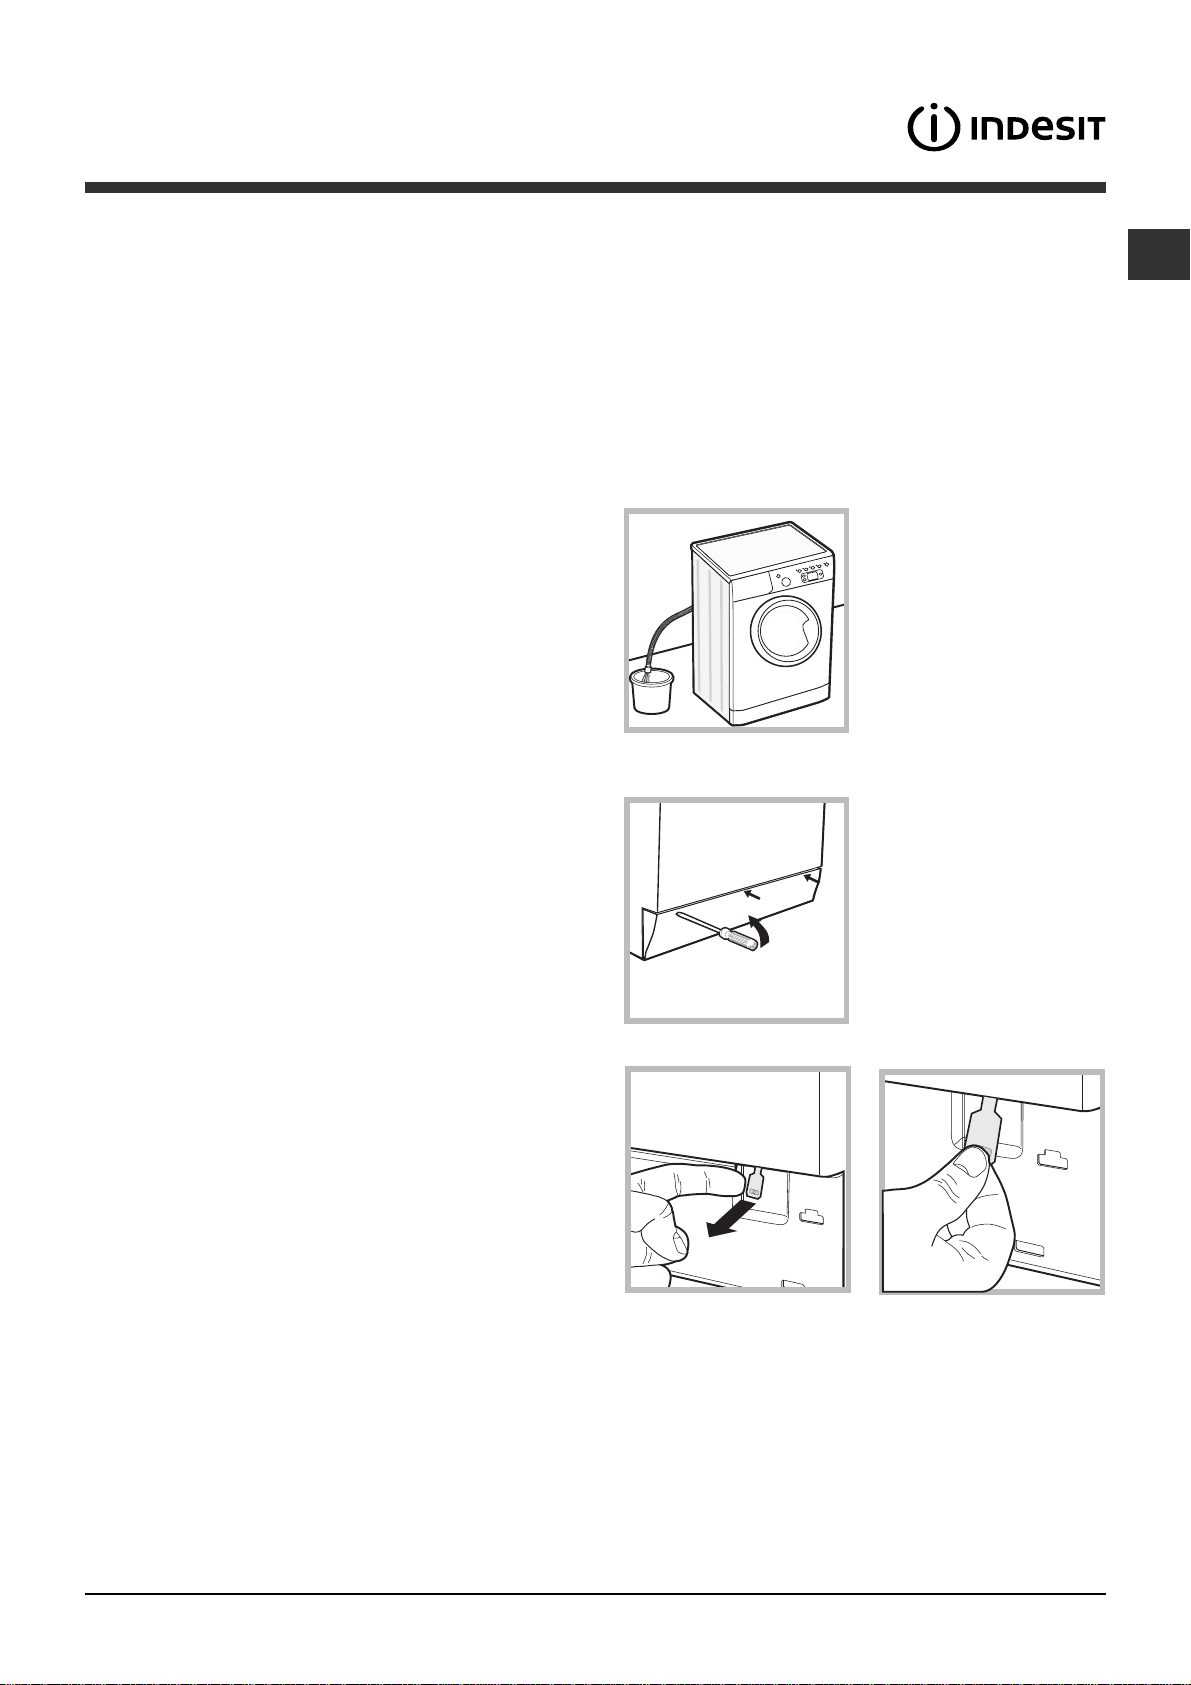
1. remove the plug from
the electrical socket.
2. make sure the water
level inside the machine is
20
lower than the door
opening; if it is not, remove
excess water using the
drain hose, collecting it in a
bucket as indicated in the
figure.
3. using a screwdriver,
remove the cover panel on
the lower front part of the
washing machine (see
figure).
GB
Disposal
Disposing of the packaging materials: observe local
regulations so that the packaging may be re-used.
The European Directive 2002/96/EC on Waste
Electrical and Electronic Equipment, requires that
old household electrical appliances must not be
disposed of in the normal unsorted municipal waste
stream. Old appliances must be collected
separately in order to optimise the recovery and
recycling of the materials they contain and reduce
the impact on human health and the environment.
The crossed out "wheeled bin" symbol on the
product reminds you of your obligation, that when
4. pull outwards using the tab as indicated in the
figure, until the plastic tie-rod is freed from its stop
position; pull downwards and open the door at the
same time.
5. reposition the panel, making sure the hooks are
securely in place before you push it onto the
appliance.
9
Page 10
Care and maintenance
GB
Cutting off the water and electricity
supplies
Turn off the water tap after every wash cycle. This
will limit wear on the hydraulic system inside the
washing machine and help to prevent leaks.
Unplug the washing machine when cleaning it and
during all maintenance work.
Cleaning the washing machine
The outer parts and rubber components of the
appliance can be cleaned using a soft cloth soaked
in lukewarm soapy water. Do not use solvents or
abrasives.
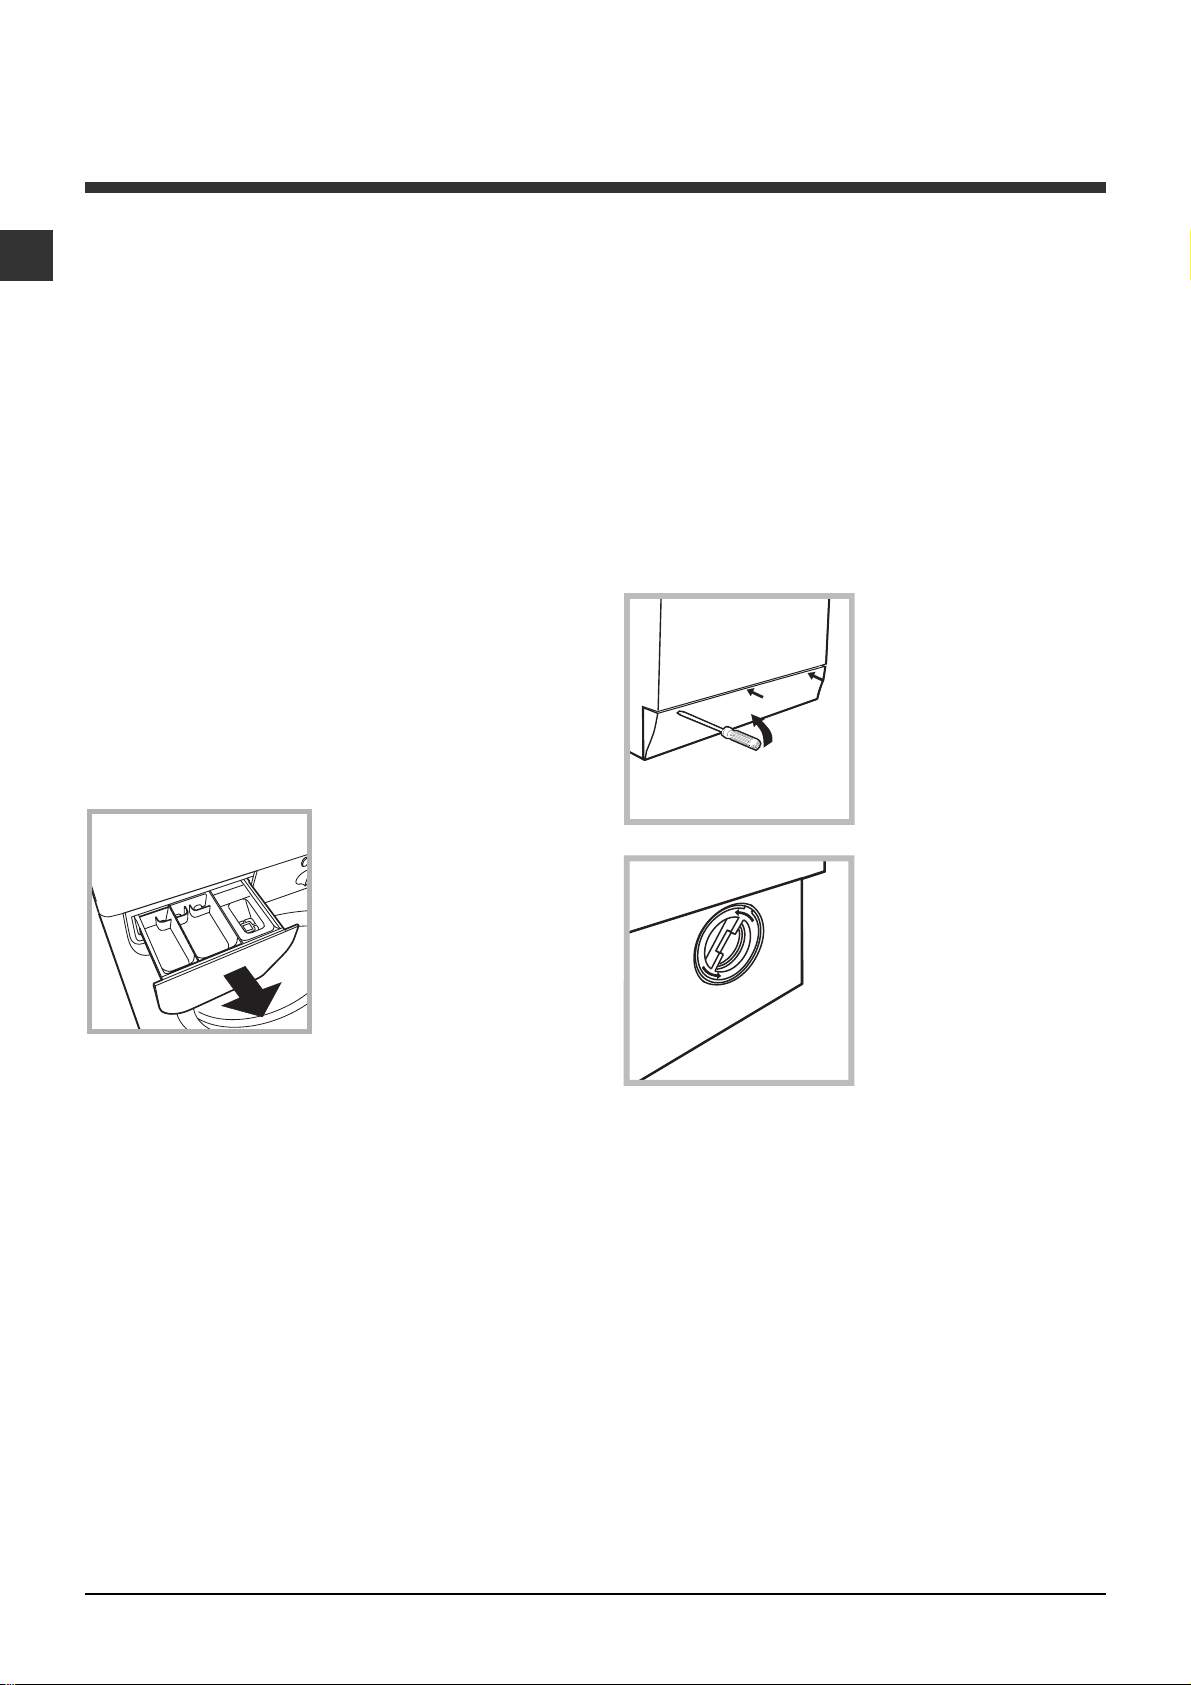
Cleaning the detergent dispenser
drawer
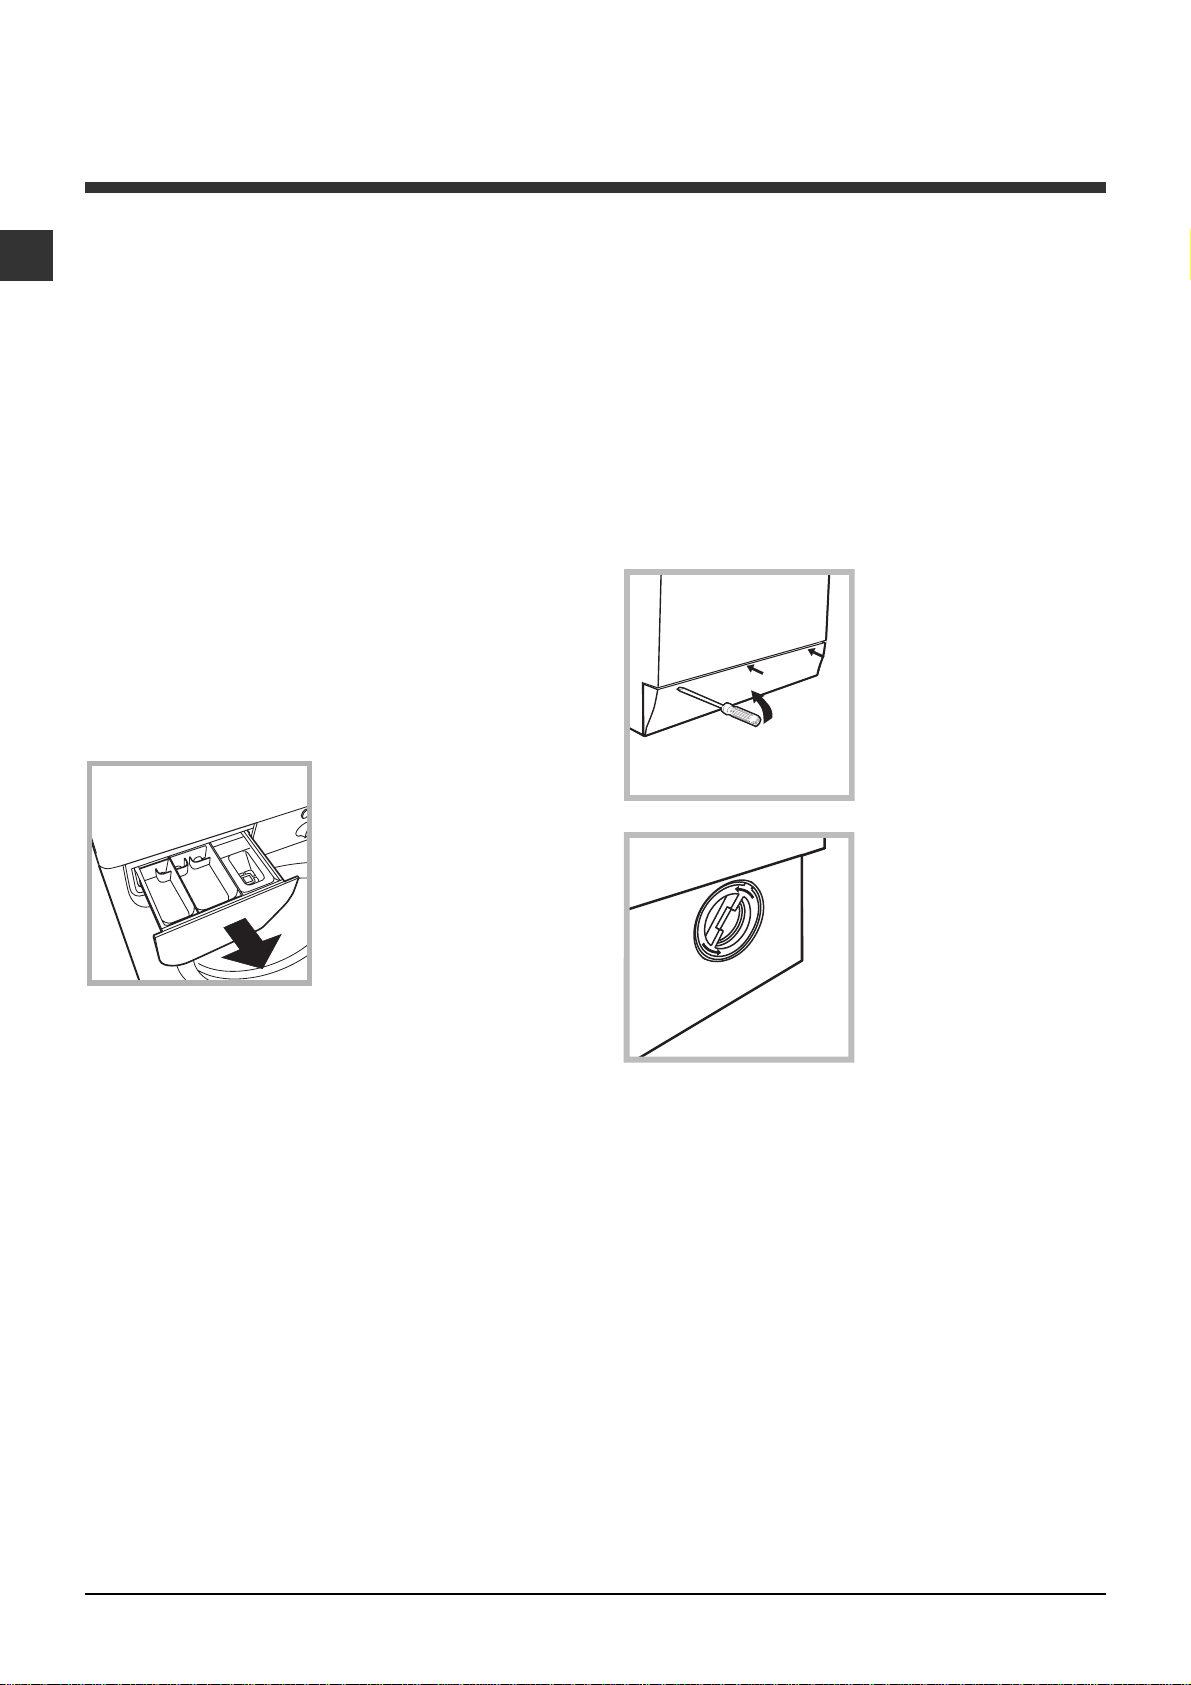
Remove the dispenser
by raising it and pulling it
out (see figure).
Wash it under running
water; this operation
should be repeated
frequently.
Cleaning the pump
The washing machine is fitted with a self-cleaning
pump which does not require any maintenance.
Sometimes, small items (such as coins or buttons)
may fall into the pre-chamber which protects the
pump, situated in its bottom part.
Make sure the wash cycle has finished and unplug
the appliance.
To access the pre-chamber:
1. using a screwdriver,
remove the cover panel
on the lower front part of
the washing machine
(see figure);
2. unscrew the lid by
rotating it anti-clockwise
(see figure): a little water
may trickle out. This is
perfectly normal;
Caring for the door and drum of your
appliance
Always leave the porthole door ajar in order to
prevent unpleasant odours from forming.
3. clean the inside thoroughly;
4. screw the lid back on;
5. reposition the panel, making sure the hooks are
securely in place before you push it onto the
appliance.
Checking the water inlet hose
Check the inlet hose at least once a year. If there are
any cracks, it should be replaced immediately: during
the wash cycles, water pressure is very strong and a
cracked hose could easily split open.
Never use second-hand hoses.
10
Page 11

Troubleshooting
Your washing machine could fail to work. Before contacting the Technical Assistance Centre (see Assistance),
make sure that the problem cannot be not solved easily using the following list.
Problem:
The washing machine does not
switch on.
The wash cycle does not start.
The washing machine does not
take in water ("H2O" will flash
on the display).
The washing machine
continuously takes in and
drains water.
Possible causes / Solutions:
The appliance is not plugged into the socket fully, or is not making contact.
There is no power in the house.
The washing machine door is not closed properly.
The ON/OFF button has not been pressed.
The START/PAUSE button has not been pressed.
The water tap has not been opened.
A delayed start has been set (see Running a wash cycle).
The water inlet hose is not connected to the tap.
The hose is bent.
The water tap has not been opened.
There is no water supply in the house.
The pressure is too low.
The START/PAUSE button has not been pressed.
The drain hose is not fitted at a height between 65 and 100 cm from
the floor (see Installation).
The free end of the hose is under water (see Installation).
The wall drainage system is not fitted with a breather pipe.
If the problem persists even after these checks, turn off the water tap,
switch the appliance off and contact the Assistance Service. If the
dwelling is on one of the upper floors of a building, there may be problems
relating to water drainage, causing the washing machine to fill with water
and drain continuously. Special anti-draining valves are available in shops
and help to avoid this inconvenience.
GB
The washing machine does not
drain or spin.
The washing machine vibrates a
lot during the spin cycle.
The washing machine leaks.
The "option" indicator lights and the
"start/pause" indicator light flash
and an error code appears on the
display (e.g.: F-01, F-..).
There is too much foam.
The wash cycle does not include draining: some wash cycles require the
drain phase to be started manually.
The drain hose is bent (see Installation).
The drainage duct is clogged.
The drum was not unlocked correctly during installation (see Installation).
The washing machine is not level (see Installation).
The washing machine is trapped between cabinets and walls (see Installation).
The water inlet hose is not screwed on properly (see Installation).
The detergent dispenser drawer is blocked (for cleaning instructions, see Care
and maintenance).
The drain hose is not fixed properly (see Installation).
Switch off the machine and unplug it, wait for approximately 1 minute
and then switch it back on again.
If the problem persists, contact the Technical Assistance Service.
The detergent is not suitable for machine washing (it should display the
text for washing machines or hand and machine wash, or the like).
Too much detergent was used.
11
Page 12

Service
GB
Before calling for Assistance:
Check whether you can solve the problem alone (see Troubleshooting);
Restart the programme to check whether the problem has been solved;
If this is not the case, contact an authorised Technical Assistance Centre using the telephone number
provided on the guarantee certificate.
Always request the assistance of authorised technicians.
Have the following information to hand:
the type of problem;
the appliance model (Mod.);
the serial number (S/N).
This information can be found on the data plate applied to the rear of the washing machine, and can also
be found on the front of the appliance by opening the door.
12
Page 13

Iнструкцiя з експлуатацi¿
ПРАЛЬНА МАШИНА
UK
Укра¿нська
IWE 8128
Çì³ñò
UK
Встановлення, 14-15
Розпакування ³ вир³внювання
П³дключення води й електроенерг³¿
Перший цикл прання
Технiчнi данi
Опис прально¿ машини, 16-17
Панель керування
Дисплей
Як зд³йснювати цикл прання, 18
Програми й опц³¿, 19
Таблиця програм
Опц³¿ прання
Пральнi засоби та б³лизна, 20
Касета з пральним засобом
П³дготовка б³лизни
Спецiальнi програми
Система балансування завантаження
Заходи безпеки та поради, 21
Загальна безпека
Утилiзацiя
Ручне в³дкривання люку
Догляд та очищення, 22
В³дключення води й електричного живлення
Миття прально¿ машини
Чистка касети для пральних засоб³в
Догляд за люком та барабаном
Чищення насосу
Контроль труби подач³ води
Несправност³ та засоби ¿х усунення, 23
Допомога, 24
13
Page 14
Встановлення
UK
Необх³дно збер³гати дану брошуру, щоб мати
нагоду звернутися до не¿ у будь-який момент. У
раз продажу, передач³ ³нш³й особ³ або пере¿зду
переконайтеся, що ³нструкц³я перебуваº разом ³з
пральною машиною й новий власник може
ознайомитися з ¿¿ принципами роботи й
в³дпов³дними запоб³жний заходами.
Уважно вивч³ть ³нструкц³ю: в н³й м³ститься
важлива ³нформац³я про встановлення,
використання та безпеку.
Розпакування та вир³внювання
Розпакування
1. Розпакування прально¿ машини
2. Вдоскональтеся, що машина не зазнала
ушкоджень пiд час транспортування. Якщо вона
маº пошкодження, не виконуйте нiяких
пiдключень та негайно зверн³ться до
постачальника.
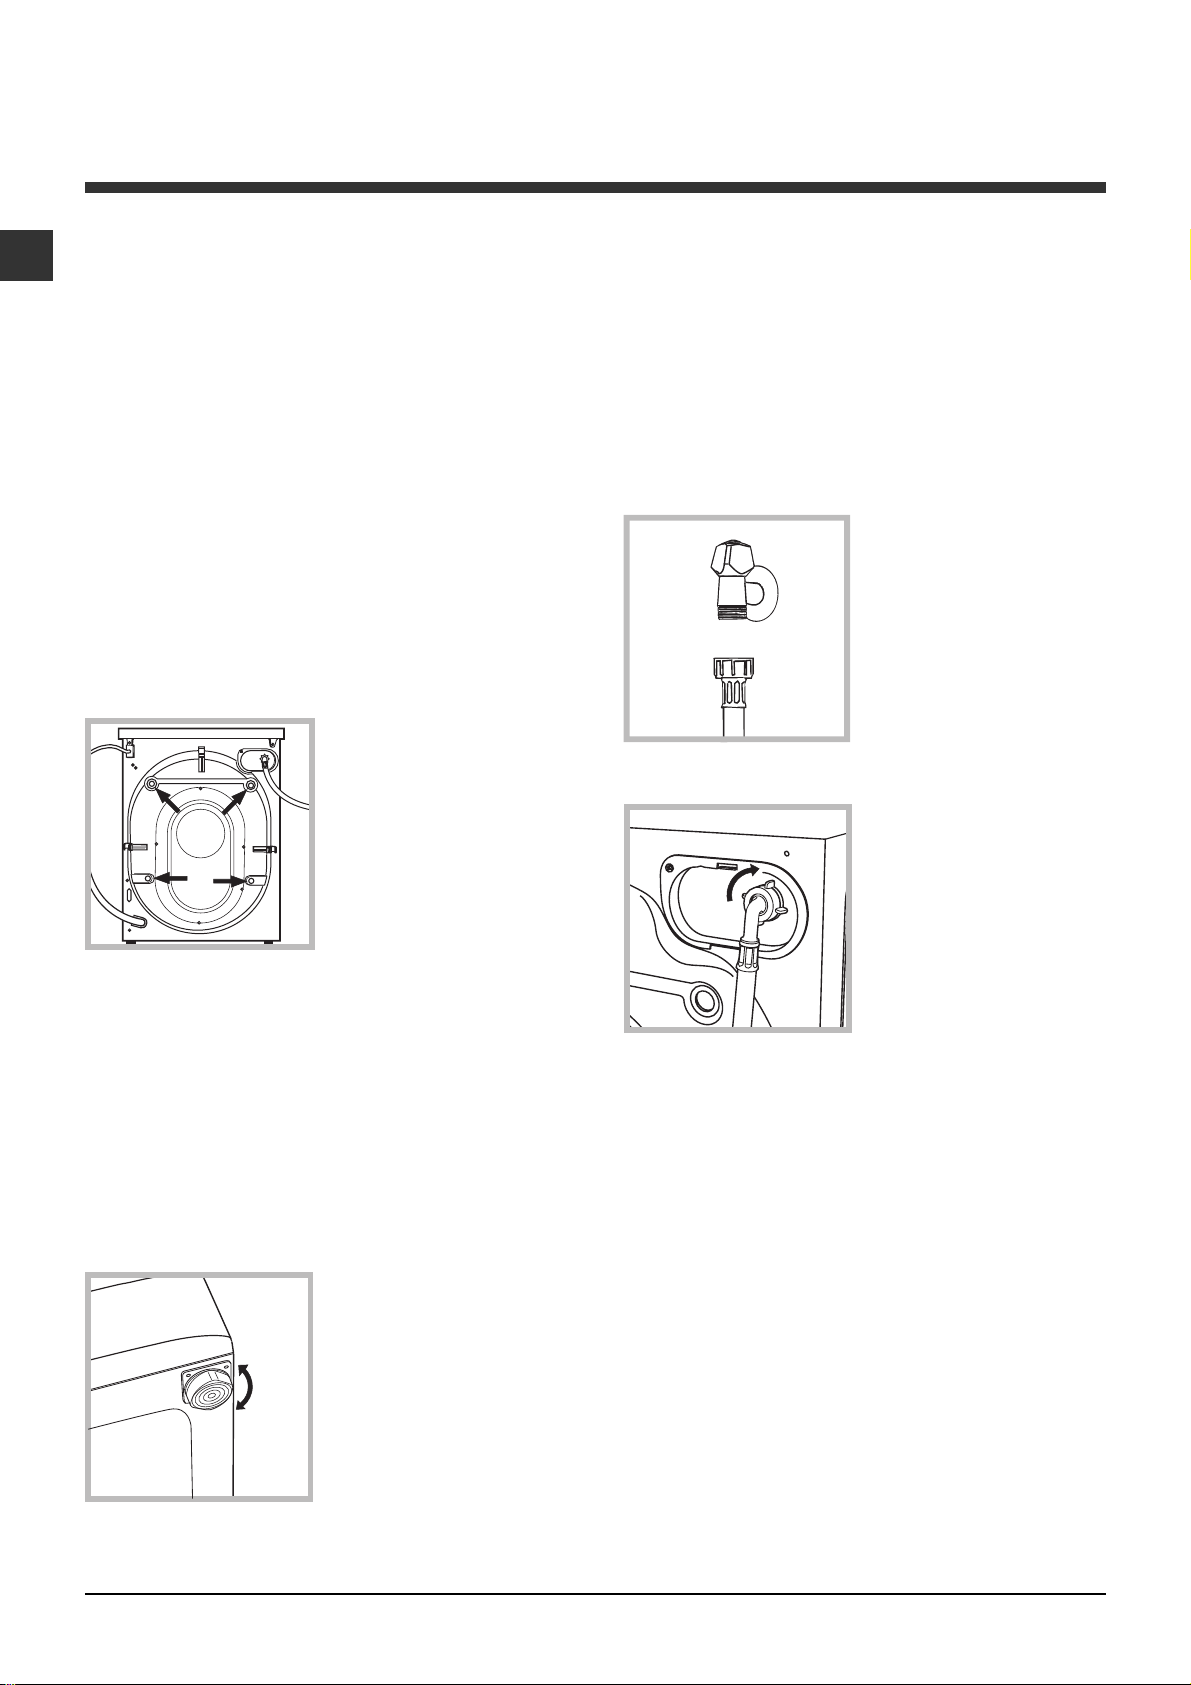
3. Видал³ть 4 гвинти
для захисту п³д час
транспортування та
гумову шайбу з
в³дпов³дною
прокладкою, що
знаходяться у задн³й
частин³ (див. малюнок).
4. Закрийте отвори пластиковими заглушками з
комплекту постачання.
5. Збереж³ть ус³ детал³: якщо пральна машина
маº перевозитися, ¿х потр³бно встановити знову.
Належне вирiвнювання надаº стаб³льн³сть машин³
та запоб³гаº в³брац³¿, шуму та пересуванню п³д
час роботи. При встановленнi машини на
килимовому покритт³ або килимi в³дрегулюйте
н³жки таким чином, щоб залишити п³д пральною
машиною достатн³й прост³р для вентиляц³¿.
П³дключення води й електроенерг³¿
Пiдºднання труби подач³ води
1. П³дключити живлячий
трубопров³д,
прикрутивши його до
крану холодно¿ води за
допомогою штуцеру з
газовою р³зьбою 3/4
(див. малюнок).
Перед пiдключенням
спустiть воду, доки вона
не стане прозорою.
2. П³дключ³ть трубу
подач³ води до
прально¿ машини,
прикрутивши ¿¿ до
розºму для води, який
знаходиться угор³
праворуч на задньому
боцi машини (äèâ.
малюнок).
Забороняйте дiтям гратися з упаковками.
Вир³внювання
1. Встанов³ть пральну машину на рiвн³й та тверд³й
п³длоз³, не притуляючи ¿¿ до ст³н, мебл³в, тощо.
2. Якщо пiдлога не º
iдеально
горизонтальною,
компенсуйте нерiвностi
за допомогою переднiх
нiжок (див. малюнок)
розкручуючи чи
закручуючи ¿х; êóò
нахилу вiдносно робочо¿
поверхнi не повинен
перевищувати 2°.
14
3. Зверн³ть увагу, щоб труба не мала згин³в та
утиск³в.
Тиск води в кран³ маº в³дпов³дати значенням у
таблиц³ Техн³чних даних (див. стор³нку поруч).
Якщо довжини труби подачi води не вистачаº,
зверн³ться у спец³ал³зовану крамницю або до
уповноваженого фах³вця.
Не використовуйте н³коли труби, що вже були у
користуванн³.
Використовуйте труби з комплекту постачання
до машини.
Page 15
П³дключення зливного шланга
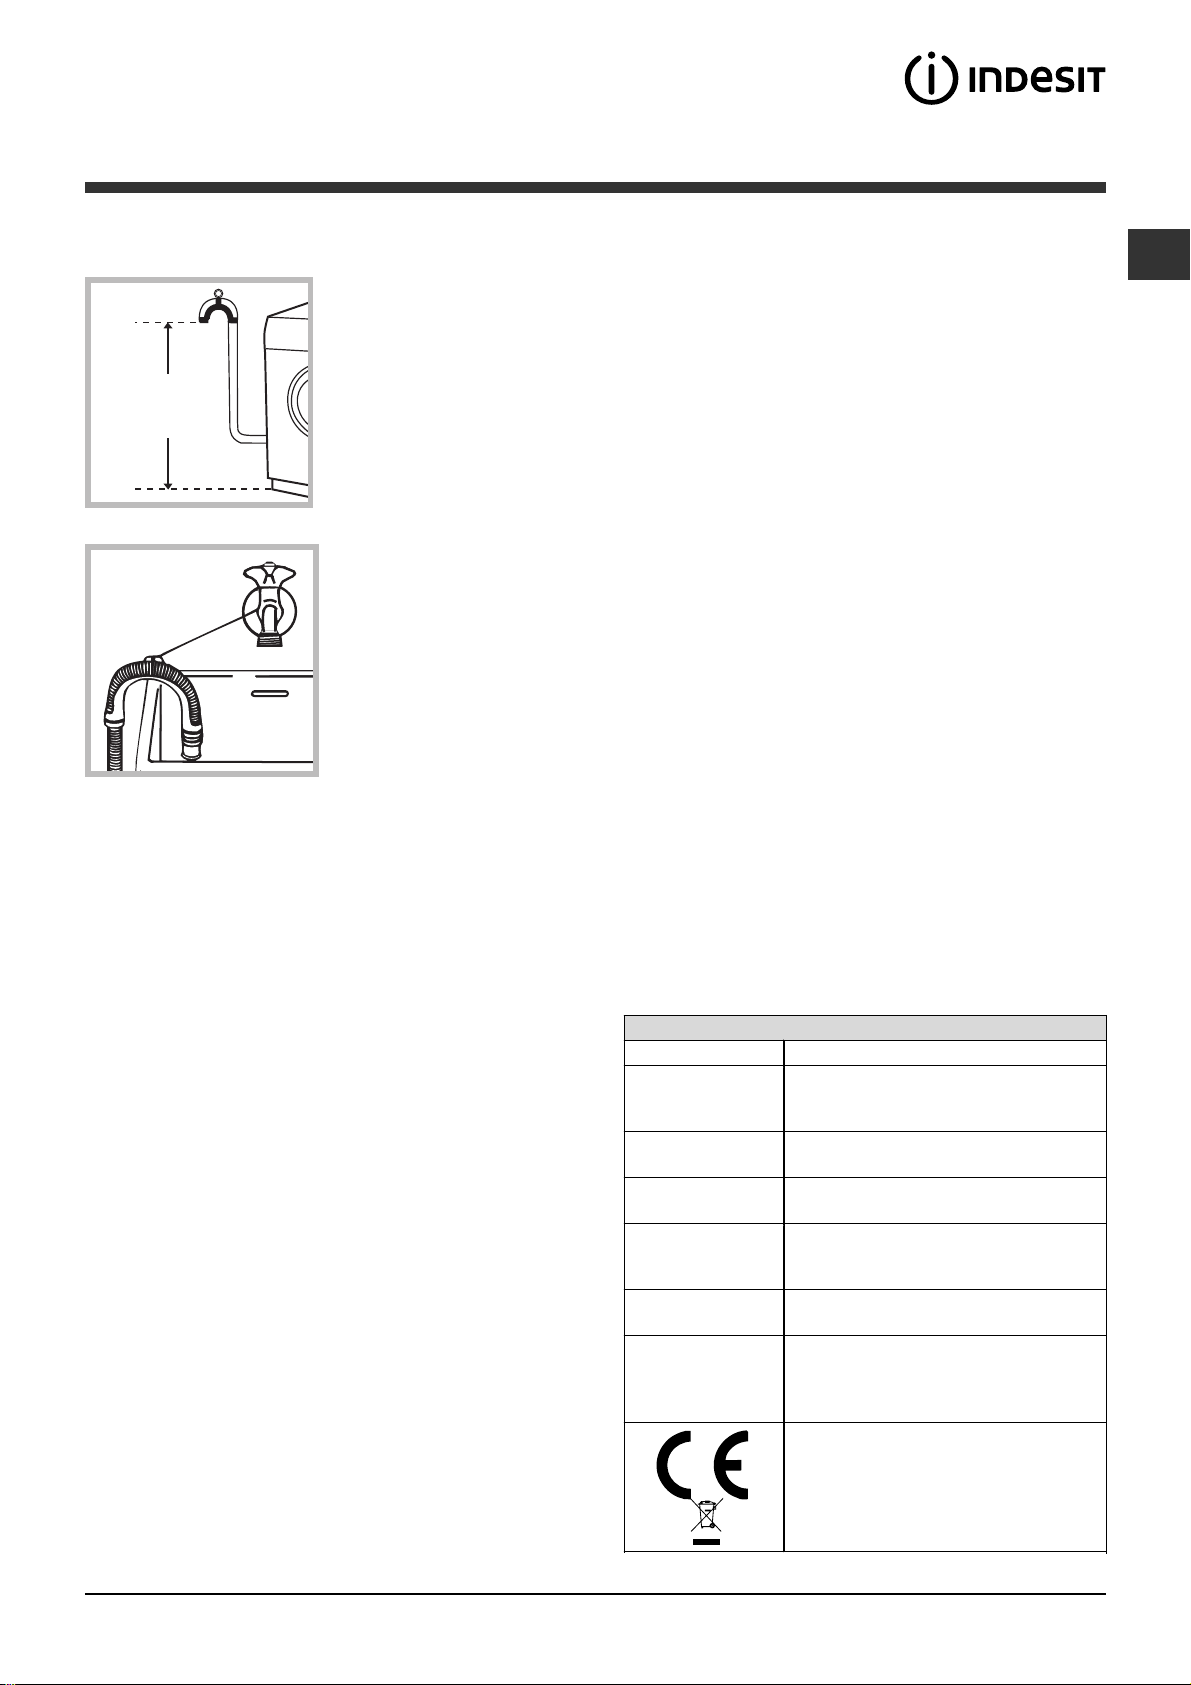
П³дключ³ть зливний
шланг, не згинаючи
його, до
канал³зац³йного каналу
або до входу до такого
65 - 100 cm
каналу на ст³н³, на
в³дстан³ в³д 65 до 100
см в³д п³длоги;
або поклад³ть його на
край вмивальника або
ванни, поºднавши
направляючу, яка
входить до комплекту
постачання, до крану
(див.малюнок). Не
залишайте в³льний
к³нець зливного шланга
зануреним у воду.
Використання подовжувача шланга не
рекомендоване. В разi необхiдностi використання
подовжувача шлангу, переконайтеся у тому, що
в³н маº той самий д³аметр та його довжина не
перевищуº 150 см.
Коли машину вже встановлено, забезпечте
в³льний доступ до електрично¿ розетки.
Не використовуйте подовжувач³ й тр³йники.
Шнур живлення не повинен мати згин³в або
утиск³в.
Проводити замiну шнуру живлення можуть
тiльки вповноваженi фахiвцi.
Увага! Компан³я зн³маº з себе в³дпов³дальн³сть за
умови недотримання вказаних норм.
Перший цикл прання
Пiсля встановлення та перш нiж розпочати
використання машини, виконайте цикл прання з
пральним засобом але не завантажуючи бiлизну,
встановивши програму .
UK
Електричн³ п³дключення
Перш нiж вставити вилку в електричну розетку,
переконайтеся, що:
розетка маº заземлення у в³дпов³дност³ до
встановлених норм;
розетка розрахована на максимальне
навантаження у межах потужност³ машини,
зазначене у таблиц³ Техн³чних даних (див.
малюнок поруч);
напруга живлення перебуваº у межах,
зазначених у таблиц³ Техн³чних даних (див.
малюнок поруч);
розетка п³дходить до вилки прально¿ машини. В
³ншому випадку зам³н³ть розетку або вилку.
Машину не можна встановлювати поза
прим³щенням, нав³ть в захищених мiсцях, тому
що дуже небезпечно п³ддавати ¿¿ впливу дощу ³
грози.
Òåõí³÷í³ äàí³
Модель
Ðîçìiðè
Кiлькiсть
бiлизни
Електричн³
п³дключення
Водопровднi
пiдключення
Швидкiсть
центрифуги
Програми
контролю згiдно
з нормою
EN 60456
Цей прилад вiдповiдаº таким
IWE 8128
ширина 59,5 см
висота 85 см
глибина 60 см
âiä 1 äî 8 êã
див. шильд³к з технiчними даними на
машинi
максимальний тиск 1 мПа (10 бар)
мiнiмальний тиск 0,05 мПа (0,5 бар)
Обºм баку – 62 лiтри
до 1200 обертiв на хвилину
програма 2; температура 60°C;
виконуºться з завантаженням у 8 кг.
ºвропейським директивам:
- 2004/108/CE (Електромагн³тна
сумiснiсть)
- 2002/96/CE
- 2006/95/CE (Низька напруга)
15
Page 16
Опис прально¿ машини
UK
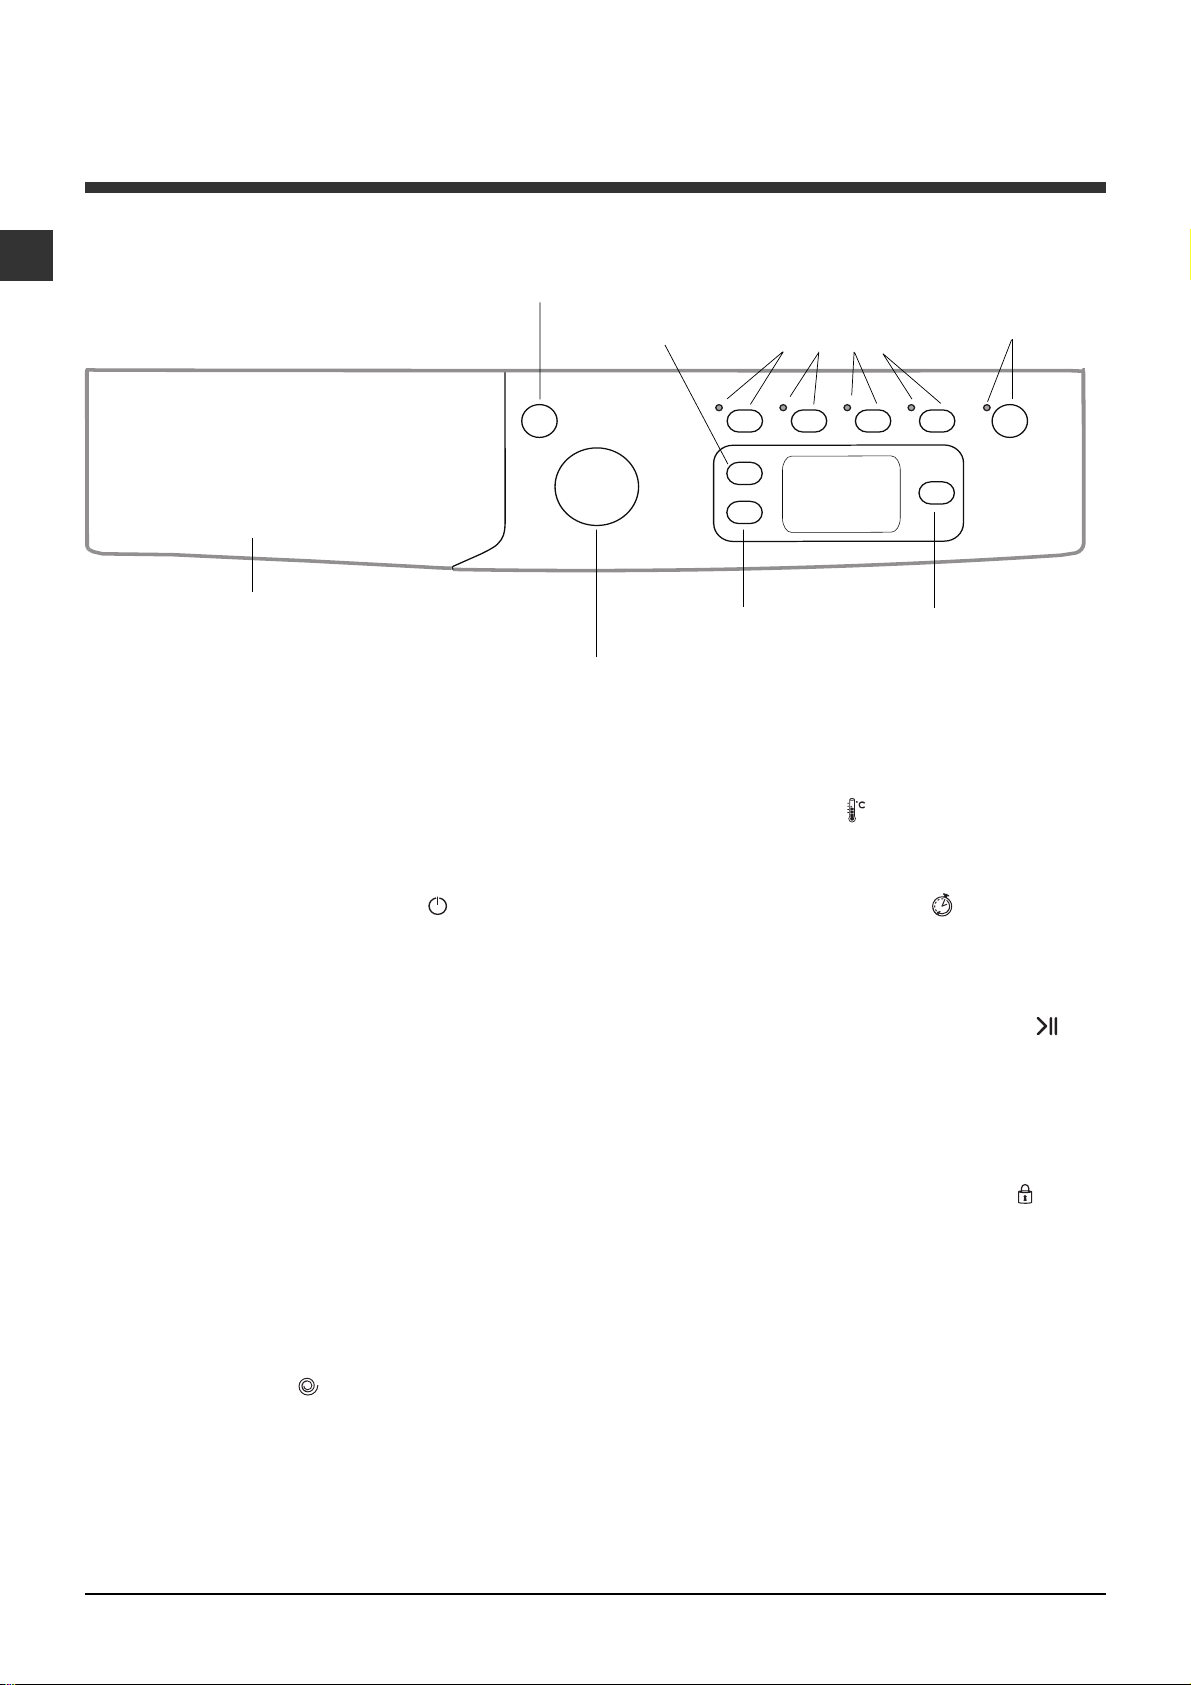
Панель керування
Кнопка
УВIМКНЕННЯ/
ВИМКНЕННЯ
Касета для пральних засобiв
РУЧКА
ПРОГРАМ
Касета з пральним засобом: для завантаження
пральних засобiв та засобiв догляду (äèâ.
Пральнi засоби та бiлизна).
Кнопка
ТЕМПЕРАТУРА
Кнопка
ЦЕНТРИФУГА
Кнопка ТЕМПЕРАТУРА
зменшення обертiв або виключення нагрiву;
значення вiдображаºться на диспле¿.
Кнопки з
iндикаторними
лампами ÎÏÖIß
ДИСПЛЕЙ
Кнопка
ВIДСТРОЧЕНОГО ПУСКУ
: натискання викликаº
Кнопка та
iндикаторна лампа
ПУСК/ПАУЗА
Кнопка УВIМКНЕННЯ/ВИМКНЕННЯ
натисн³ть ³ в³дпуст³ть кнопку для увiмкнення або
вимикання машини. Iндикаторна лампа ПУСК/
ПАУЗА блимаº зеленим свiтлом з пов³льними
³нтервалами, вказуючи на те, що машину
ввiмкнено. Для вимикання прально¿ машини п³д
час прання необх³дно утримувати кнопку
натиснутою довше, близько 3 сек.; короткочасне
або випадкове натискання не дозволить вимкнути
машину.
Вимикання машини п³д час прання скасовуº саме
прання.
РУЧКА ПРОГРАМИ: для задання бажано¿
програми (див. Таблиця програм).
Кнопки та ³ндикаторн³ лампи ÎÏÖ²ß: для вибору
наявних опц³й. Iндикаторна лампа обрано¿ опцi¿
залишаºться увiмкненою.
Кнопка ЦЕНТРИФУГА
зменшення обертiв або виключення вiджиму
взагалi; значення вiдображаºться на диспле¿.
: натискання викликаº
: швидко
Кнопка В²ДКЛАДЕНИЙ ЗАПУСК
викликаº вiдкладений запуск вибрано¿ програми;
значення в³дстрочення вiдображаºться на
диспле¿.
Кнопка та ³ндикаторна лампа ПУСК/ПАУЗА
коли зелена ³ндикаторна лампа блимаº з
пов³льними ³нтервалами, натисн³ть на кнопку для
запуску прання. Якщо цикл розпочався,
³ндикаторна лампа горить пост³йно. Щоб ув³йти в
режим паузи п³д час прання, знову натисн³ть на
кнопку; ³ндикаторна лампа почне гор³ти
помаранчевим кольором. Якщо позначка
свiтиться, ви можете вiдкрити люк. Щоб
продовжити прання з м³сця, де воно було
перерване, знову натисн³ть на кнопку.
Режим очiкування
Вiдповiдно до норм, повязаних з заощадження
енергi¿, цю пральну машину оснащено системою
автовимкнення (stand by), яка активуºться через
30 секунд вiдсутностi роботи з боку машини.
Швидко натиснiть кнопку УВIМКНЕННЯ/
ВИМКНЕННЯ та зачекайте вiдновлення роботи
машини.
: натискання
:
íå
16
Page 17
Дисплей
UK
B
A
Дисплей º зручним для програмування машини; вiн надаº рiзноманiтну iнформацiю.
У зон³ ) в³дображаºться тривал³сть р³зних наявних програм та, при запущеному цикл³, час, що залишився
до його зак³нчення; при ув³мкненому В²ДСТРОЧЕНОМУ ЗАПУСКУ там в³дображатиметься час, що
залишився до запуску вибрано¿ програми.
Кр³м того, на диспле¿ автоматично вiдображаºться максимальна температура i швидкiсть центрифуги,
передбаченi для задано¿ програми. Або останнi заданi параметри, якщо вони º сумiсними з вибраною
програмою.
Ó çîí³ * в³дображаються фази прання, якi передбачен³ у вибраному цикл³ та для запущено¿ програми поточна фаза прання:
Прання
Полоскання
Вiджимання
Злив
Ó çîí³ + представлен³, зверху вниз, символи, що в³дносяться до температури
запуску
Пiдсвiчена позначка
Пiдсвiчена позначка
Пiдсвiчена позначка
та до вiджимання .
означаº, що на диспле¿ виведене значення задано¿ температури.
означаº, що вв³мкнений В³дстрочений запуск.
означаº, що на диспле¿ виведене значення задано¿ к³лькост³ оберт³в центрифуги.
C
, до Вiдстроченого
Позначка Люк заблоковано
Пiдсвiчена позначка означаº, що люк заблоковано. З метою запобiгання ушкоджень, перш нiж вiдкрити
люк, вдоскональтеся, що позначка не горить.
Щоб в³дкрити дверцята люку п³д час виконання циклу, натисн³ть на кнопку ПУСК/ПАУЗА; якщо позначка
ЛЮК ЗАБЛОКОВАНО
згасне, це означаº, що люк можна в³дкрити.
17
Page 18
Як зд³йснювати цикл прання
UK
1. ВВ²МКН²ТЬ МАШИНУ. Натисн³ть кнопку ;
³ндикаторна лампа ПУСК/ПАУЗА блимаº з
повiльними iнтервалами зеленим кольором.
2. ЗАВАНТАЖТЕ Б²ЛИЗНУ. В³дкрийте люк.
Завантажте б³лизну, звертаючи увагу, щоб не
перевищити норму завантаження, зазначену в
таблиц³ програм на наступн³й стор³нц³. .
3. ДОДАЙТЕ НАЛЕЖНУ К²ЛЬК²СТЬ ПРАЛЬНОГО
ЗАСОБУ. Витягн³ть касету ³ додайте пральний
зас³б у в³дпов³дн³ ванночки, як вказано в
роздiлi Пральнi засоби та бiлизна.
4. ЗАКРИЙТЕ ЛЮК.
5. ВИБЕР²ТЬ ПРОГРАМУ. Вибер³ть за
допомогою рукоятки ПРОГРАМИ бажану
програму ; з нею повязана температура та
швидк³сть центрифуги, як³ можуть бути
зм³нен³. На диспле¿ зявиться тривалiсть
циклу.
6. НАЛАШТУЙТЕ ЦИКЛУ ПРАННЯ ПIД ВЛАСНI
ПОТРЕБИ. Скористайтеся в³дпов³дними
кнопками:
Зм³нити температуру та/або
швидк³сть центрифуги. На диспле¿
автоматично вiдображаºться максимальна
температура i швидкiсть центрифуги,
передбаченi для задано¿ програми. Або
останнi заданi параметри, якщо вони º
сумiсними з вибраною програмою.
Натискаючи на кнопку
зменшують температуру прання аж до прання
у холодн³й вод³ OFF. Натискаючи на кнопку
, поступово зменшують швидк³сть
центрифуги, аж до ¿¿ вимикання OFF.
Подальше натискання на кнопки призводить
до повернення до максимальних
передбачених значень.
Встановити вiдстрочений пуск.
Для встановлення вiдстроченого пуску
обрано¿ програми натискайте на вiдповiдну
кнопку, доки не зявиться потрiбний час
вiдстрочки. Коли ця опц³я активна, на диспле¿
горить позначка
пуск, натисн³ть кнопку , аж поки на диспле¿ не
зявиться напис OFF.
, поступово
. Щоб вимкнути в³дкладений
Натисн³ть знову цю ж кнопку, для вимикання
опц³¿; ³ндикаторна лампа згасне.
Якщо вибрана опц³я º несум³сною ³з
заданою програмою, ³ндикаторна лампа почне
блимати та опц³я не буде активована.
Якщо вибрана опц³я не º сум³сною з ³ншою
попередньо вибраною, ³ндикаторна лампа ,
що в³дноситься до першо¿ вибрано¿ функц³¿,
заблимаº та буде активована т³льки одну
секунду, ³ндикаторна лампа опц³¿
свiтитиметься.
Опцi¿можутьзмiнювати рекомендоване
завантаження та/або тривалiсть циклу.
7. ЗАПУСТ²ТЬ ПРОГРАМУ. Натисн³ть кнопку
ПУСК/ПАУЗА. Вiдповiдна iндикаторна лампа
засвiтиться зеленим свiтлом, при цьому люк
буде заблоковано (свiтитиметься позначка
ЛЮК ЗАБЛОКОВАНО
пiд час виконання циклу виведiть машину в
режим паузи, натиснувши на ПУСК/ПАУЗА
(iндикаторна лампа ПУСК/ПАУЗА блиматиме
помаранчевим кольором з повiльними
iнтервалами); виберiть бажаний цикл та знову
натиснiть кнопку ПУСК/ПАУЗА.
Щоб в³дкрити дверцята люку п³д час
виконання циклу натисн³ть на кнопку ПУСК/
ПАУЗА; якщо позначка ЛЮК ЗАБЛОКОВАНО
згасне, це означаº, що люк можна в³дкрити.
Знову натисн³ть на кнопку ПУСК/ПАУЗА, щоб
запустити програму з того мiсця, де ¿¿ було
перервано.
8. ЗАВЕРШЕННЯ ПРОГРАМИ. На це
вказуºнадпис END на диспле¿; коли згасне
позначка ЛЮК ЗАБЛОКОВАНО
вiдкрити. В³дкрийте люк, витягн³ть б³лизну й
вимкн³ть машину.
) Для змiни програми
, люк можна
Якщо необх³дно в³дм³нити вже розпочатий цикл,
натисн³ть та утримуйте кнопку
перервано, та машина зупиниться.
. Öèêë áóäå
Модифiкацiя характеристик
циклу.
Натиснiть кнопку для активацi¿ опцi¿;
увiмкнеться вiдповiдна iндикаторна лампа.
18
Page 19
Програми й опц³¿
Таблиця програм
Ìàêñ.
швидкiс ть
(обертiв
çà
хвилину)
Попереднº
прання
• • - •
- • • •
- • • •
- • • •
- • • •
- • • •
- • • •
- • - •
- • - •
- • - •
- • - •
- • - -
- • - •
- • - •
- • - •
- - • •
- - - -
- - - -
Опис програми
Програми
Щоденнi ( D a i ly)
1
2
2
2
3
4
5
Ñïåöiàëüíi (Special)
6
7
8 Jeans
9
10
Спорт (Sport)
11
12
13
Неповнi
Для всiх установ з проведення випробувань:
1) Програма контроля згiдно до норми EN 60456: встановiть програму 2 з температурою 60°C.
2) Довга програма бавовна: задайте програму 2 з температурою 40°C.
3) Коротка програма бавовна: задайте програму 4 з температурою 40°C.
Бавовна з попередн³м
: б³л³ надзвичайно
пранням
забруднен³.
: б³л³ надзвичайно
Бавовна
забруднен³.
бавовна (1)
м³цн³ сильно забрудненi.
Бавовна (2)
забруднен³ та кольоров³ дел³катн³.
Бавовна
сильно забруднен³.
Бавовна кольоровi (3)
слабо забруднен³ та кольоров³
дел³катн³.
Синтетичн³
слабо забрудненi
Вовна
òîùî.
Шовк/Штори
âiñêîç è, íèæí üî¿ áiëè çíè.
Express
злегка забруднених речей (не
рекомендоване для вовняних,
шовкових речей та речей для
ручного прання)
Outwear
Sport Intensive
Sport Light
Sport Shoes
Полоскання - 1200
Вiджимання - 1200
Зливання - -
: бiлi та кольоровi
: б³л³ слабо
: б³л³ та кольоров³ м³цн³
: кольоровi мiцнi
: Для вовни, кашемiру,
: Для речей з шовку,
: Для швидого освiження
: á³ë³
Ìàêñ.
òåìï .
(°C)
90° 1200
90° 1200
60° 1200
40° 1200
60° 1200
40° 1200
60° 800
40° 600
30° 0
40° 800
30° 800
30° 400
30° 600
30° 600
30° 600
Пральний зас³б
Прання В³дб³лювач Помякшувач
Опц³¿ прання
Макс.завантаження (кг)
Íîðì
альне
Ìàêñ 2
ïàðè
Неповне
завантаже
ííÿ
8 4 -
8 4 -
8 4 -
8 4 -
8 4 4
8 4 4
3,5 1,5 2,5
2 1 -
2 1 -
4 - -
1,5 - -
2,5 - -
4 - -
4 - -
- -
8 4 -
8 - -
8 - -
Åêî
Òàéì
Трива
ëiñòü
циклу
Тривал³сть програми прання на в³дображено на диспле¿.
Дан³, наведен³ в таблиц³, º суто вказiвними.
UK
При вибор³ ц³º¿ опц³¿ механ³чний рух, температура та
вода оптим³зуються п³д неповне завантаження слабко
забруднених бавовни та синтетичних тканин (див.
Таблицю програм).
За допомогою
можна зд³йснити прання у
скорочений час, заощаджуючи воду та енерг³ю.
Рекомендуºться застосовувати р³дкий зас³б для
прання, дозуючи його залежно в³д завантаження.
Не працюº з програмами 1, 2, 6, 7, 8, 9, 10, 11, 12, 13, ,
, .
Видалення плям
Ця функцiя º корисною
4
3
2
1
(див. малюнок). Якщо ви бажаºте тiльки вiдбiлити
бiлизну, додайте вiдбiлювач у додаткову ванночку 4,
для видалення стiйких
плям. Вставте додаткову
ванночку 4 з комплекту
постачання у ванночку 1.
Пiд час дозування
вiдбiлювача не
перевищуйте
максимальний рiвень
max, зазначений на
центральному стрижн³
встановiть програму Полоскання та активуйте
функцiю Видалення плям
. Для вiдбiлювання пiд час
прання додайте пральний засiб та засоби догляду,
встановiть бажану програму та активуйте опцiю
Видалення плям
.
Використання додатково¿ ванночки 4 виключаº
попереднº прання.
Не працюº з програмами 1, 6, 7, 8, 9, 10, 11, 12, 13, ,
.
Додаткове полоскання
При вибор³ дано¿ опц³¿ зб³льшуºться ефективн³сть
полоскання й гарантуºться максимальне видалення
прального засобу. Вона º зручною для ос³б ³з дуже
чутливою шк³рою.
Не працюº з програмами 9, , .
Неповне завантаження
Рекомендуºться використання ц³º¿ функц³¿, коли
б³лизна, яку необх³дно випрати, маº вагу, яка дор³внюº
або нижче половини максимального рекомендованого
завантаження (див. Таблицю програм).
Не працюº з програмами 8, 9, 10, 11, 12, 13, , .
19
Page 20
Пральн³ засоби та б³лизна
UK
Касета з пральним засобом
Добрий результат прання залежить також вiд
правильного дозування прального засобу: перевищення
не даº ефективного прання та призводить до налипання
прального засобу на внутр³шн³ детал³ прально¿ машини
та забруднюº довк³лля.
Не використовуйте засоби для ручного прання,
тому що вони утворюють надто багато п³ни.
Витягнiть касету для
4
3
2
1
щоб не була вставлена додаткова ванночка 4.
ванночка 2: Пральний засiб (порошковий чи рiдкий)
Рiдкий прпльний засiб наливайте безпосередньо
перед пуском машини.
ванночка 3: Засоби з догляду (помякшувач, тощо)
Помякшувач не маº вит³кати з реш³тки.
додаткова ванночка 4: В³дб³лювач
пральних засобiв та
додайте пральнi засоби
або засоби з догляду,
як вказано нижче.
ванночка 1: Засiб для
попереднього прання
(порошковий)
Перш нiж додати
пральний зас³б, перев³рте,
П³дготовка б³лизни
Роздiлiть бiлизну, враховуючи:
- тип тканини / позначку на етикетцi.
- кольори: вiдокремте кольоровi речi вiд бiлих.
Перев³рте кишен³ й ´удзики.
Не перевищуйте вказанi значення щодо ваги сухо¿ бiлизни:
Мiцнi тканини: макс 8 кг
Синтетичнi тканини: макс 3,5 кг
Делiкатнi тканини: макс. 2 кг
Вовна: макс. 2 кг
Шовк: макс. 2 кг
Ск³льки важить б³лизна?
1 простирадло 400-500 г
1 наволочка 150-200 г
1 скатертина 400-500 г
1 махровий халат 900-1200 г
1 рушник 150-250 г
Спецiальнi програми
Вовна: за допомогою програми 6 можна прати у
пральн³й машин³ вс³ вироби ³з вовни, нав³ть т³, що
мають ярлик т³льки ручне прання
кращ³ результати, використовуйте спец³альний
пральний зас³б та не перевищуйте завантаження в 2 кг.
Øîâê: використовуйте спец³альну програму 7 для прання
вс³х вироб³в ³з шовку. Рекомендуºться використання
спец³ального прального засобу для дел³катних вироб³в.
Штори: рекомендуºться скласти й покласти у наволочку
або м³шечок з с³тки. Скористайтеся програмою 7.
. Щоб отримати
Jeans: виверн³ть навивор³т речi ще до
завантаження та скористайтеся р³дким засобом для
прання. Скористайтеся програмою 8.
Express: призначена для прання злегка
забруднених речей за малий пром³жок часу: ¿¿
тривалiсть складаº лише 15 хвилин, що заощаджуº
енергоспоживання та час. За допомогою програмим
(9 при 30°C) можна випрати разом тканини рiзноман¿
структури (за вийнятком вовни та шовку) при
максимальному завантаженнi у 1,5 кг.
Outwear (програма 10) розрахована для прання
непромокальних тканин та жакетiв (напр., горетекс,
полiефiр, нейлон); для отримання найкращих
результатiв використовуйте рiдкий пральний засiб та
в³дм³рте дозу для половинного завантаження;
заздалег³дь обробiть манжети, ком³рцi та плями; не
використовуйте помякшувачi або пральнi засбои з
помякшувачами. Використовуючи цю программу,
не можна прати набивнi пуховики.
Sport Intensive (програма 11) розрахована для
прання сильно забрудненого спортивного одягу
(спортивнi костюми, шкарпетки, тощо); для отримання
найкращих результатiв не перевищуйте максимальне
завантаження, зазначене у Таблицi програм.
Sport Light (програма 12) розрахована для прання не
дуже забрудненого спортивного одягу (спортивнi
костюми, шкарпетки, тощо); для отримання
найкращих результатiв не перевищуйте максимальне
завантаження, зазначене у Таблицi програм.
Використовуйте рiдкий пральний засiб та в³дм³ряйте
дозу для половинного завантаження.
Sport Shoes (програма 13) розрахована для прання
спортивного взуття; для отримання найкращих
результатiв не завантажуйте бiльше 2 пар взуття.
Система балансування завантаження
До кожного в³джиму у центрифуз³, для запоб³гання
надм³рн³й в³брац³¿ та для р³вном³рного розпод³лу
завантаження, барабан зд³йснюº оберти на дещо
б³льш³й швидкост³, н³ж швидк³сть прання. Якщо по
зак³нченн³ дек³лькох спроб завантажен³ реч³ ще не
були правильно в³дбалансован³, машина запустить
центрифугу на швидкост³, менш³й за передбачену.
У випадку надм³рно¿ незбалансованост³ пральна
машина зд³йснюº розпод³л зам³сть в³джиму. З
метою оптимального розпод³лу завантаження та
його правильного балансування рекомендуºться
одночасне прання великих ³ малих речей.
20
Page 21
Запоб³жн³ заходи та
поради
Пральну машину була спроектовано ³ вироблено
у в³дпов³дност³ з м³жнародними нормами безпеки.
Це попередження надаються задля вашо¿
безпеки, ³ тому ¿х треба уважно прочитати.
Загальна безпека
Даний прилад спроектований виключно для
побутового використання.
Цей апарат не маº використовуватися д³тьми
або особами з обмеженими ф³зичними,
сенсорними чи розумовими можливостями, або
якщо ¿м бракуº досв³ду та необх³дних знань.
Винятки складають ситуац³¿, коли користування
в³дбуваºться п³д наглядом або за вказ³вками
ос³б, в³дпов³дальних за ¿хню безпеку. Доросл³
мають стежити, щоб д³ти не гралися з апаратом.
Не торкайтеся до машини голими ногами або
мокрими чи вологими руками й ногами.
Не виймайте штепсель з електрично¿ розетки,
витягуючи його за шнур, тримайтеся т³льки за
самий штепсель.
Не вiдкривайте касету з пральними засобами
пiд час роботи машини.
Не торкайтеся води, що зливаºться, вона може
мати п³двищену температуру.
У жодному випадку не докладайте надм³рних
зусиль до люку: це може ушкодити запобiжний
механiзм проти випадкових вiдкривань.
Якщо машина не працюº у разi поломки, у
жодному випадку не роб³ть спроб самост³йно
виконати ремонт внутр³шн³х механ³зм³в.
Завжди слiдкуйте, щоб дiти не наближалися до
працюючо¿ машини.
Пiд час прання люк нагрiватиметься.
Пересування машини маº здiйснюватися двома
або трьома особами за умови надзвичайно¿
обережностi. Н³коли не перем³щуйте машину
самотужки, тому що вона дуже важка.
Перш н³ж завантажити б³лизну, перев³рте, щоб
барабан був порожн³й.
що входять до ¿хнього складу, та з метою
усунення потенц³йно¿ шкоди для здоровя та
довк³лля. Символ перекресленого кошика,
зображений на вс³х виробах, нагадуº про
необх³дн³сть окремо¿ утил³зац³¿.
Для подальшо¿ ³нформац³¿ щодо правильно¿
утил³зац³¿ побутово¿ техн³ки, ¿хн³ власники можуть
звернутися до вiдповiдних мiських служб або до
постачальника.
Ручне в³дкривання люку
У випадку, якщо неможливо в³дкрити дверцята
люку через в³дключення електрично¿ енерг³¿, та
коли ви бажаºте витягти б³лизну, треба д³яти
таким чином:
1. витягн³ть штепсель з
електрично¿ розетки.
2. Перев³рте, щоб р³вень
води усередин³ машини не
20
досягав р³вня вiдкриття
люку; якщо це не так,
злийте надлишок води
через зливний шланг,
збираючи ¿¿ у в³др³, як
показано на малюнку.
3. зн³м³ть зовн³шню
панель на передньому
боц³ прально¿ машини за
допомогою викрутки
(див. малюнок).
UK
Óòèë³çàö³ÿ
Утил³зац³я пакувального матер³алу:
додержуйтесь м³сцевих норм, так як пакування
може бути використане повторно.
ªвропейська директива 2002/96/CE з в³дход³в
електрично¿ й електронно¿ апаратури
передбачаº, що побутов³ електроприлади не
можуть перероблятися у звичайному порядку
для твердих м³ських в³дход³в. В³дпрацьован³
побутов³ прилади мають збиратися окремо для
оптим³зац³¿ в³дновлення та рециклу матер³ал³в,
4. За допомогою вказаного на малюнку язичка
тягнiть пластмасову тягу з упору назовнi, аж доки
¿¿ не буде звiльнено; потiм протягнiть ¿¿ донизу,
одночасно вiдкриваючи дверцята.
5. встанов³ть панель на м³сце, пересв³дч³ться у
тому, що гачки були вставлен³ у в³дповiдн³ петл³,
пiсля чого притиснiть ¿¿ до машини.
21
Page 22
Догляд та очищення
UK
В³дключення води й електричного
живлення
Закривайте водопров³дний кран п³сля кожного
прання. У такий спос³б зменшуºться знос
г³дравл³чно¿ частини машини й усуваºться
небезпека прот³кання.
Виймайте штепсель з розетки п³д час миття
машини та п³д час роб³т з техн³чного
обслуговування.
Миття прально¿ машини
Зовн³шня частина ³ гумов³ детал³ можуть митися
тканиною, змоченою у тепл³й вод³ й мил³. Не
використовуйте розчинники або абразивнi
засоби.
Чищення касети для пральних
засоб³в
Виймiть касету,
пiднявши ¿¿ та
витягнувши назовнi
(див. малюнок).
Промийте ¿¿ п³д
проточною водою; ця
процедура маº
проводитися
регулярно.
Чищення насосу
Пральну машину обладнано насосом, який
здатний сам очищатися та не вимагаº техн³чного
обслуговування. Може трапитися так, що др³бн³
речi (монети, ´удзики) потраплять до попередньо¿
камери, яка захищаº насос та розташована в
його нижн³й частин³.
Переконайтеся у тому, що цикл прання
зак³нчено, ³ витягн³ть штепсель з розетки.
Як д³статися до попередньо¿ камери:
1. зн³м³ть зовн³шню
панель на передньому
боц³ прально¿ машини
за допомогою викрутки
(див. малюнок);
2. розгвинт³ть кришку,
обертаючи ¿¿ проти
годинниково¿ стр³лки
(äèâ. малюнок):
вит³кання незначно¿
кiлькостi води º
нормальним;
Догляд за люком та барабаном
Завжди залишайте люк напiвв³дкритим для
запоб³гання утворенню неприºмних запах³в.
22
3. акуратно очист³ть всереденi;
4. знову накрут³ть кришку;
5. встанов³ть панель на м³сце, пересв³дч³ться у
тому, що гачки були вставлен³ у в³дповiдн³ петл³,
пiсля чого притиснiть ¿¿ до машини.
Контроль труби подач³ води
Перев³ряйте трубу подач³ води не менше одного
разу на р³к. Якщо на н³й º тр³щини та щ³лини,
вона п³длягаº зам³н³: п³д час прання сильний тиск
може викликати непередбачен³ розриви.
Н³коли не використовуйте уживан³ труби.
Page 23

Несправност³ та засоби ¿х
усунення
Може так статися, що пральна машина не працюватиме. Перш н³ж зателефонувати до служби Допомоги
(див. Допомога), перев³рте можлив³сть легкого усунення проблеми за допомогою наступного списку.
UK
Несправностi:
Пральна машина не вмикаºться.
Цикл прання не розпочинаºться.
В пральну машину не потрапляº
вода (на диспле¿ зявляºться
позначка H2O, що блимаº).
Пральна машина безперервно
завантажуº та зливаº воду.
Можлив³ причини/Р³шення:
Штепсель не вставлений у розетку, або в³дсутн³й контакт.
У будинку немаº електроенерг³¿.
Люк погано закрито.
Кнопку УВIМКНЕННЯ/ВИМКНЕННЯ не було натиснуто.
Кнопку ПУСК/ПАУЗА не було натиснуто.
Водопров³дний кран закритий.
Якщо вiдстрочення задане на час запуску (ВIДСТРОЧЕНИЙ ПУСК,
див. Як виконати цикл прання).
Трубу подач³ води не п³дºднано до водопровiдного крану.
Перегин у трубi.
Водопров³дний кран закритий.
У водопровод³ немаº води.
Недостатн³й тиск.
Кнопку ПУСК/ПАУЗА не було натиснуто.
Зливний шланг не знаходиться на в³дстан³ в³д 65 до 100 см в³д
п³длоги (див. Встановлення).
К³нець зливного шланга занурений у воду (див. Встановлення).
Стiнний каналiзацiйний злив не маº в³ддушини для виходу пов³тря (вантуза).
Якщо п³сля таких перев³рок проблема залишаºться, закрийте
водопров³дний кран, вимкн³ть машину ³ зателефонуйте до служби
Допомоги. Якщо квартира знаходиться на верхн³х поверхах
будинку, можливо, в³дбуваºться сифонний ефект, при якому
машина безперервно завантажуº й зливаº воду. Щоб його
л³кв³дувати, ³снують спец³альн³ антисифонн³ клапани, як³ можна
придбати у торговельн³й мереж³.
Пральна машина не зливаº воду
або не вмикаº центрифугу.
Пральна машина дуже вiбруº п³д
час роботи центрифуги.
З прально¿ машини вит³каº вода.
Свiтлодiоди oпцiй та пуск/
паузи блимають, та на диспле¿
виводиться код аномал³¿ (напр.: F01, F-..).
Утворюºться занадто багато п³ни.
Програма не передбачаº зливання води: у деяких програмах це
потр³бно зробити вручну.
Перегин зливного шланга (див. Встановлення).
Засм³тився зливний шланг.
Барабан, у момент встановлення, не був правильно розблокований
(див. Встановлення).
Машина сто¿ть не на р³вн³й поверхн³ (див. Встановлення).
Машину затиснуто м³ж меблями ³ ст³ною (див. Встановлення).
Погано пригвинчено трубу подач³ води (див. Встановлення).
Забруднена касета для пральних засоб³в (як вимитидив. Догляд та
очищення).
Погано закр³плений зливний шланг (див. Встановлення).
Вимкн³ть машину й витягн³ть штепсель з розетки, зачекайте
близько 1 хвилини й ув³мкн³ть ¿¿ повторно.
Якщо несправн³сть не усунено, зателефонуйте до служби
Допомоги.
Пральний засiб не п³дходить до прально¿ машини (повинен мати напис
для машинного прання, для ручного та машинного прання або под³бн³).
Перевищена доза прального засобу.
23
Page 24

Допомога
UK
Перш н³ж звернутися по Допомогу:
Перев³рте, чи можна самост³йно вир³шити проблему (див. Несправност³ ³ засоби ¿х усунення);
Перезапуст³ть програму, щоб перев³рити, чи усунено несправн³сть;
У протилежному випадку, зверн³ться до авторизовано¿ служби техн³чно¿ Допомоги за телефонним
номером, вказаним на гарант³йному сертиф³кат³.
Звертайтеся виключно до уповноважених фах³вц³в.
Треба пов³домити:
тип несправност³;
модель машини (Мод.);
сер³йний номер (S/N).
Цю iнформацiю ви знайдете на шильдику на задн³й сторон³ прально¿ машини та на передн³й сторон³, якщо
вiдкрити люк.
24
Page 25

Kullanma Kýlavuzu
ÇAMAÞIR MAKÝNESÝ
TR
Türkçe
IWE 8128
Ýçindekiler
TR
Montaj, 26-27
Ambalajýn çýkartýlmasý ve seviye ayarý getirilmesi
Su ve elektrik baðlantýlarý
Ýlk yýkama
Teknik veriler
Çamaþýr makinesinin tanýmý, 28-29
Kontrol paneli
Ekran
Bir yýkama devri nasýl yapýlýr, 30
Programlar ve iþlevler, 31
Program tablosu
Yýkama iþlevleri
Deterjan ve çamaþýr, 32
Deterjan haznesi
Çamaþýrýn hazýrlanmasý
Özel programlar
Yük dengeleme sistemi
Önlemler ve öneriler, 33
Genel güvenlik uyarýlarý
Atýklarýn tasfiye edilmesi
Cam kapaðýn açýlmasý
Bakým ve özen, 34
Su ve elektrik kesilmesi
Çamaþýr makinesin temizlenmesi
Deterjan haznesinin temizlenmesi
Kapak ve hazne bakýmý
Pompanýn temizlenmesi
Su besleme hortumunun kontrol edilmesi
Arýzalar ve onarýmlar, 35
Teknik Servis, 36
#
Page 26
Montaj
TR
Bu kitapçýðý gerektiði her an danýþabilmeniz için
özenle saklayýnýz. Çamaþýr makinesinin satýlmasý,
devri veya nakli durumlarýnda da, yeni sahibinin
faydalanabilmesi için bu kýlavuz makineyle beraber
saklanmalýdýr.
Talimatlarý dikkatlice okuyunuz; montaj, kullaným
ve güvenliðe iliþkin önemli bilgiler içermektedir.
Ambalajýn çýkartýlmasý ve ayný seviyeye
getirilmesi
Ambalajdan çýkartýlmasý
1. Çamaþýr makinesinin ambalajdan çýkartýlmasý.
2. Çamaþýr makinesinin taþýma esnasýnda hasar
görmemiþ olduðunu kontrol ediniz. Hasar görmüþ ise
monte etmeyiniz. Satýcýya baþvurunuz.
3. Taþýma sýrasýnda arka
tarafta bulunan 4 adet
koruyucu vidayý ve ara
parçasýyla birlikte
buradaki lastiði de
çýkartýnýz (bakýnýz þekil).
Saðlýklý bir dengeleme, çamaþýr makinesine saðlam
bir duruþ kazandýracaðý gibi, çalýþmasý esnasýndaki
sarsýntý, gürültü ve hareketlilikleri de önleyecektir.
Zeminde moket veya halý olmasý halinde, ayarý
makinenin altýnda havalandýrma olabilecek þekilde
yapýnýz .
Su ve elektrik baðlantýlarý
Su besleme hortumunun takýlmasý
1. Tedarik borusunu 3/4
gaz vidali baglanti
kullanarak bir soguk su
musluguna baglayin
(bkz. þekil).
Baðlantý öncesinde
berrak su gelene kadar
suyu akýtýnýz.
2. Besleme hortumunu
arka kýsýmda üst sað
köþedeki su giriþine
vidalayarak çamaþýr
makinesine takýnýz (bkz.
þekil).
4. Delikleri ambalajda bulacaðýnýz plastik kapaklarla
kapayýnýz.
5. Tüm parçalarý muhafaza ediniz: çamaþýr
makinesinin nakli gerektiði takdirde takýlmalarý
gerekmektedir.
Ambalajlar çocuk oyuncaðý deðildir.
Cihazýn ayný seviyeye getirilmesi
1. çamaþýr makinesini düz ve sert bir zemine
yerleþtiriniz, duvar veya mobilyalara dayamayýnýz.
2. Yerleþtirilecek zemin
tam düz deðilse çamaþýr
makinesinin vidalý ön
ayaklarýný sýkarak veya
gevþeterek dengeyi
saðlayýnýz (bkz. þekil);
eðim açýsý, makinenin
üst tezgahýna göre 2°
den fazla olmamalýdýr.
3. Hortumda katlanma ve ezilme olmamasýna dikkat
ediniz.
Musluðun su basýncýnýn Teknik Veriler tabelasýnda
belirtildiði gibi olmasý gerekir (bkz. yan sayfa).
Besleme hortumunun boyu yetersizse yetkili bir
satýcý maðaza veya teknisyene baþvurunuz.
Kesinlikle daha önceden kullanýlmýþ hortum
kullanmayýnýz.
Makine ile birlikte verilen hortumlarý kullanýnýz.
$
Page 27
Tahliye hortumunun takýlmasý
65 - 100 cm
Tahliye hortumunu,
katlanmasýný önleyerek,
zemindeki veya yerden
65 ile 100 cm yükseklik
arasýndaki bir duvar
tahliyesine takýnýz
Uzatma kablosu ile çoklu prizler kullanmayýnýz.
TR
Kablonun ezilmemesi ve katlanmamasý gerekir.
Beslenme kablosunun yalnýzca yetkili teknisyenler
tarafýndan deðiþtirilmelidir.
Dikkat! Bu kurallara uyulmamasý halinde firma hiç bir
sorumluluk kabul etmemektedir.
Ýlk yýkama
veya mevcut olan
kýlavuzu çeþmeye
baðlayarak lavabo ya da
küvet kenarýna
yaslayýnýz (bkz. þekil).
Tahliye hortumunun
serbest ucunun suya
girmemesi gerekir.
Tahliye hortumu için ilave uzatma kullanýlmamasý
tavsiye olunur; aksi mümkün deðilse, uzatma
hortumunun çapýnýn da ayný olmasý ve 150 cm. den
uzun olmamasý gerekir.
Elektrik baðlantýsý
Fiþi prize takmadan evvel aþaðýdaki hususlara dikkat
ediniz:
prizin topraklamasýnýn yürürlükteki normlara uygun
olmasýna;
prizin, makinenin Teknik Veriler tabelasýnda
belirtilen, azami gücünü taþýyabilecek olmasýna
(bkz. yan taraf);
þebeke geriliminin, Teknik Veriler tabelasýnda
belirtilen deðerlere uygun olmasýna (bkz. yan
taraf);
prizin çamaþýr makinesinin fiþiyle uyumlu
olmasýna. Aksi takdirde fiþi veya prizi deðiþtiriniz.
Çamaþýr makinesi, muhafazalý olsa bile açýk
alanda monte edilemez, çünkü rüzgara ve yaðmura
maruz kalmasý çok tehlikelidir.
Monte edilen çamaþýr makinesinin fiþinin kolaylýkla
eriþilebilir olmasý gerekir.
Montajdan sonra, çamaþýr koymaksýzýn deterjanla 2.
programý ayarlayarak yýkama yapýnýz.
Teknik bilgiler
Model
Ölçüler
Kapasite
Elektrik baðlantýlarý
Su baðlantýlarý
Sýkma hýzý
EN 60456
standartlarý
uyarýnca kontrol
programlarý
IWE 8128
geniþlik 59,5 cm
yükseklik 85 cm
derinlik 60 cm
1 - 8 kg
makine üstünde takýlý olan teknik
veriler plakasýna bakýnýz.
max. su basýncý 1 MPa (10 bar)
min. su basýncý 0,05 MPa (0,5 bar)
tambur kapasitesi 62 litre
maksimum dakikada 1200 devire
kadar
program 2; 60°C sýcaklýkta;
8 kg çamaþýrla.
Bu makina aþaðýda belirtilen AB
normlarýna uygundur:
- 2004/108/CE (Elektromanyetik
Uyum)
- 2002/96/CE
- 2006/95/CE (Alçak gerilim)
%
Page 28
Çamaþýr makinesinin tanýmý
TR
Kontrol paneli
Deterjan Bölmesi
AÇMA/KAPAMA
tuþu
PROGRAMLAR
düðmesi
SÝCAKLÝK AYARÝ
tuþu
SANTRÜFÜJ
tuþu
FONKSÝYON
uyarý lambalý tuþlarý
Ekran
GECIKMELI BAÞLAMA
tuþu
BAÞLA/BEKLE
uyarý lambalý tuþu
Deterjan Bölmesi: ve diðer katkýlarý koyunuz
(Deterjanlar bölümüne bakýnýz).
AÇMA/KAPAMA tuþu
kapatmak için bu tuþa kýsa süreli basýnýz. Yeþil
renkte yanýp sönen BAÞLA/BEKLE uyarý lambasý
makinenin açýk olduðunu gösterir. Makineyi çalýþýr
vaziyetteyken kapatmak için tuþu daha uzun,
yaklaþýk 3 saniye, basýlý tutmanýz gerekir;hafifçe ya
da yanlýþlýkla basýldýðýnda makine kapanmaz.
Makinenin çalýþýr vaziyetteyken kapatýlmasý devrede
olan yýkama programýný iptal eder.
PROGRAMLAR
ayarlamak için (bkz. Program tablosu).
FONKSÝYON uyarý lambalý tuþlarý: þlev seçimi için.
Seçilen iþlev düðmesinde ýþýklý gösterge yanýk kalýr.
SANTRÜFÜJ tuþu
devre dýþý býrakmak için basýnýz deðeri ekranda
görüntülenir.
SÝCAKLÝK AYARÝ tuþu
tamamen çýkarmak için basýnýz deðer ekranda
görünür.
düðmesi
: makineyi açmak ya da
: istenilen programý
: santrifüjü azaltmak ya da
: sýcaklýðý azaltmak veya
GECIKMELI BAÞLAMA tuþu
geciktirmeli çalýþtýrmak için basýnýz. Gecikme
ekranda belirtilecektir.
BAÞLA/BEKLE uyarý lambalý tuþu
yavaþça yanýp sönünce istediðiniz yýkama
programýný baþlatmak için tuþa basýnýz. Yýkama
programý baþladýktan sonra uyarý lambasý yanýk kalýr.
Seçilen bir programýn beklemeye alýnmasý için ayný
tuþa tekrar basýnýz; uyarý lambasý turuncu renkte
yanýp sönecektir. Sembol
kapaðý açýlabilir. Yýkama programýnýn kaldýðý yerden
devam etmesi için ayný tuþa tekrar basýnýz.
Bekleme modu
Yeni enerji tasarrufu düzenlemeleri ile uyumlu bu
çamasir makinesine herhangi bir faaliyet
algilanmadiginda 30 dakika içinde devreye sokulan
otomatik bekleme sistemi yerlestirilmistir. ON-OFF
(AÇMA-KAPAMA) dügmesine bir süre basin ve
makinenin tekrar çalismasini bekleyin.
: seçilen programý
: yeþil lamba
yanýk deðilse makine
&
Page 29
Ekran
TR
B
A
Makineyi programlamak için yararlý bir gereç olmasýnýn yaný sýra ekranda deðiþik bilgiler verilmektedir.
Mevcut programlarýn süresi ve çalýþan devrin kalan süresi bölüm Ada görünür; GECIKMELI BAÞLAMA seçeneði
ayarlanmýþsa, seçili programýn baþlangýcý için geri sayým görünecektir. Ýlgili butona basarak, makine, seçilen
çevrimle uyumlu ise maksimum sicakligi, seçilen çevrim için ayarli dönüs hizi degerlerini veya en son
kullanilan ayarlari otomatik olarak görüntüler.
Seçili programla ilgili program safhalarý ve çalýþan programýn program safhasý bölüm Bde görünür.
Yýkama
Durulama
Santrufüj
Su boþaltma
Sicaklik"
görünür:
sembolü yanarsa, ekran ayarlanan "sicaklik" degerini gösterir.
Gecikmeli bir baslangiç ayarlanmissa,
sembolü yanarsa, ekran ayarlanan "santrüfüj" degerini gösterir.
, "Programlanan baslangiç" ve "santrüfüj" ile ilgili simgeler yukaridan asagiya C bölümünde
sembolü yanar.
C
KAPAK KILITLI sembolü
Yanan sembol kapaðýn kilitli olduðunu gösterir. Makinenin hasar görmesini önlemek için, kapaðý açmadan önce
sembol sönene kadar bekleyiniz.
Yýkama esnasýnda makine kapaðýný açmak için BAÞLAT/BEKLE düðmesine basýnýz; MAKINE KAPAÐI KILITLI
sembolü kapalý ise, kapak açýlabilecektir.
'
Page 30
Bir yýkama devri nasýl yapýlýr
TR
1. MAKINENIN ÇALIÞTIRILMASI. tuþuna
bastýktan ve BAÞLA/BEKLE uyarý lambasý yeþil
renkte yanýp sönmeye baþlayacaktýr.
2. MAKÝNANIN DOLDURULMASI. Kapaðý açýnýz.
Sonraki sayfada bulunan program tabelasýnda
belirtilen yük miktarýný geçmeyecek þekilde
tamburu çamaþýrlarýnýzla doldurunuz.
3. DETERJAN KONULMASI. Deterjan haznesini
açýnýz ve deterjaný Deterjan ve çamaþýr
bölümünde açýklandýðý gibi koyunuz.
4. MAKINE KAPAÐININ KAPATILMASI.
5. PROGRAMIN SEÇILMESI. PROGRAM
düðmesiyle istenen programý seçiniz, seçilen
programa baðlý deðiþtirilemeyecek sýcaklýk
derecesi ve sýkma devir hýzý vardýr. Ekranda
program süresi görüntülenecektir.
6. YIKAMA DEVRININ KIÞISEL AYARLARINI
mevcut olan tuþlarý kullanarak yapýnýz:
Sýcaklýk derecesi ve/ya santrifüjün
deðiþtirilmesi. Makine, seçilen çevrimle uyumlu
ise maksimum sicakligi, seçilen çevrim için ayarli
dönüs hizi degerlerini veya en son kullanilan
ayarlari otomatik olarak görüntüler.
basýldýðýnda OFF soðuk yýkama programýndaki
sýcaklýk derecesine ulaþýncaya kadar sýcaklýk
derecesi düþer.
devreden çýkýncaya kadar sýkma devri gittikçe
azalýr. Tuþlara bir daha basýldýðýnda fabrika
deðerlerine dönülecektir.
düðmesine basýldýðýnda OFF
tuþuna
Fonksiyonlar önerilen yük seviyesi ve yýkama
süresini deðiþtirebilirler.
7. PROGRAMIN ÇALIÞTIRILMASI. BAÞLAT/BEKLE
tuþuna basýnýz. Ýlgili uyarý lambasý yeþil renkte
sabit yanacak ve makinenin kapaðý kilitlenecektir
(MAKINE KAPAÐI KILITLI
Devrede olan bir programý deðiþtirmek için
BAÞLA/BEKLE tuþuna basarak çamaþýr
makinesini beklemeye alýnýz (BAÞLA/BEKLE
uyarý lambasý turuncu renkte yavaþça yanmaya
baþlayacaktýr), istenilen programý seçiniz ve
BAÞLA/BEKLE tuþuna tekrar basýnýz.
Yýkama esnasýnda makine kapaðýný açmak için
BAÞLAT/BEKLE düðmesine basýnýz; MAKINE
KAPAÐI KILITLI
açýlabilecektir. Yýkama programýnýn kaldýðý yerden
devam etmesi için BAÞLA/BEKLE tuþuna tekrar
basýnýz.
8. PROGRAMIN BITMESI. END yazýsýyla belirtilir.
MAKINE KAPAÐI KILITLI
açýlabilir hale geldiðini belirtmek için söner.
Makine kapaðýný açtýktan sonra çamaþýrlarý
boþaltýp makineyi kapatýnýz.
sembolü kapalý ise, kapak
uyarý lambasý açýktýr).
uyarý lambasý kapaðýn
Devrede olan bir programý iptal etmek için
tuþunu uzun süre basýlý tutunuz. Program bitirilecek
ve makine kapanacaktýr.
Gecikmeli baþlatma ayarý.
Seçilmiþ olan programýn gecikmeli baþlamasýný
ayarlamak için istenilen gecikme süresi
ayarlanýncaya kadar tuþa basýnýz. Bu opsiyon
açýk olduðunda ekranda
görüntülenecektir. Gecikmeli baþlatmayý iptal
etmek için ekranda OFF yazýsý görüntüleninceye
kadar tuþa basýnýz.
Yýkama özelliklerinin
deðiþtirilmesi.
Fonksiyonu çalýþtýrmak için tuþa basýnýz; ilgili
uyarý lambasý yanacaktýr.
Ýþlevi kapatmak için ayný tuþa tekrar basýnýz;
ilgili uyarý lambasý sönecektir.
sembolü
Seçilen iþlem yürütülen programla uyumlu
olmadýðý takdirde, uyarý lambasý yanýp sönecek ve
iþlem baþlamayacaktýr.
Seçilen fonksiyon ayarlanmýþ olan programla
uyumlu olmadýðý takdirde, ilk iþlevle ilgili uyarý
lambasý yanýp sönecek ve etkinleþtirilmiþ iþlev
yanýp sönmesi sona erecektir.
!
Page 31
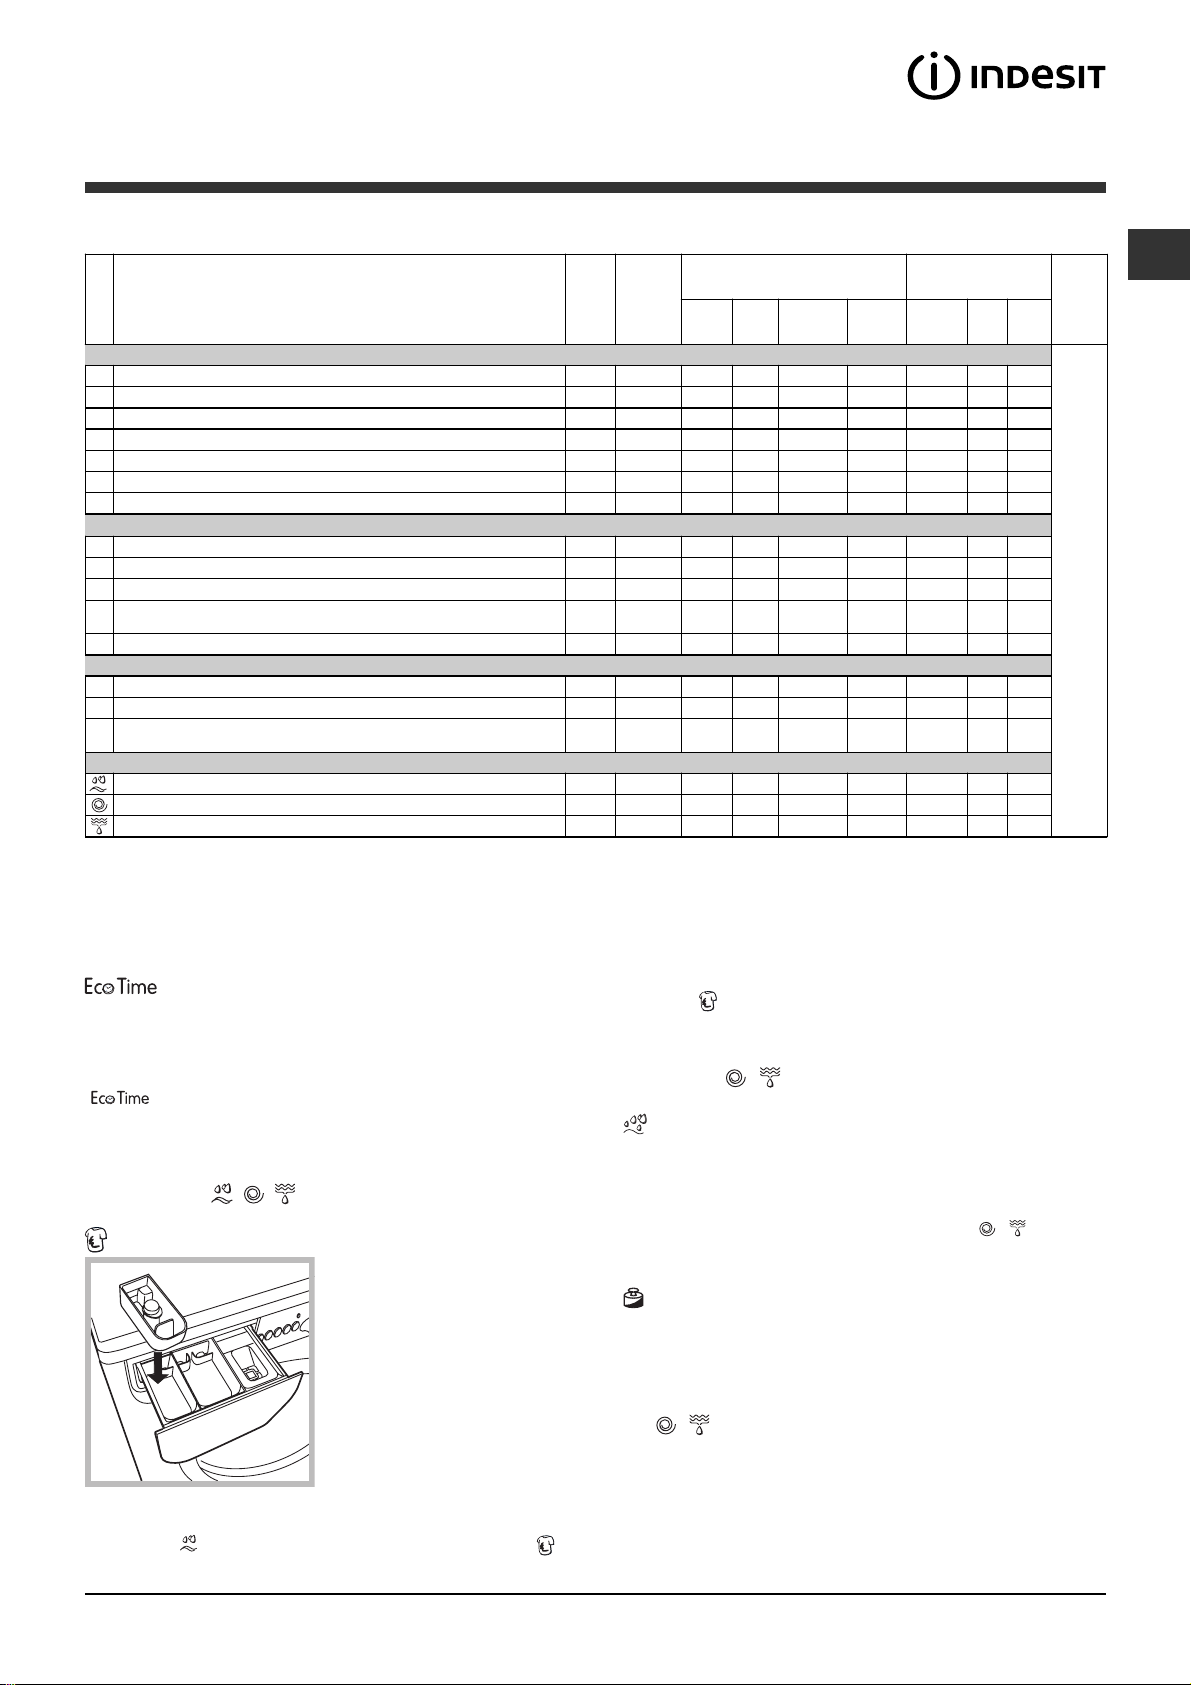
Programlar ve iþlevler
Program tablosu
Maks.
Program açýklamasý
Programlar
Günlü k prog ramla r (Da ily)
1
Pamuklular Önyýkama: aþýrý kirli beyazlar.
2
Pamuklular: aþýrý kirli beyazlar.
2
Pamuklular (1): çok kirli dayanýklý beyaz ve renkliler.
2
Pamuklular (2): az kirli beyazlar ve nazik renkliler.
3
Pamuklular: çok kirli dayanýklý beyaz ve renkliler.
4
Renklý Pa muklula r (3): az kirli beyazlar ve nazik renkliler.
5
Sentetik ler: çok kirli dayanýklý renkli çamaþýrlar.
Özel programlar (Special)
6
Yünlüler: yün ve kaþmir için kullanýlýr.
7
Ýpe klile r/Perd eler: ýpekli, viskoz ve iç çamaþýrlar için kullanýlýr.
8
Jeans
Express: az kirli çamaþýrlarý kýsa sürede yýkamak üzere kullanýlýr
9
(yünlü, ipekli, ve elde yýkanacak çamaþýrlara uygun deðildir).
10
Outwear
Sport
11
Sport Intensive
12
Sport Light
13
Sport Shoes
Ek Programlar
Durulama
Santrufüj
Su Boþaltma
Tüm Test Enstitüleri için:
1) EN60456 standartlarý uyarýnca kontrol programlarý 60°C ye ve 2. programa ayarlayýnýz
2) Pamuklu uzun programý; 2 programda 40°Cye ayarlayýnýz.
3) Pamuklu kýsa programý; 4 programda 40°Cye ayarlayýnýz.
Yýkama iþlevleri
Bu seçeneði seçerek hafif lekeli pamuklu ve sentetik
kumaþlarýn (Program tablosuna bakýnýz) yükünü
azaltmak için tambur yönünü, sýcaklýk ve suyu uygun bir
þekilde ayarlayabilirsiniz.
daha kýsa sürede yýkamanýzý ve dolayýsýyla su
ve elektrikten tasarruf etmenizi saðlar. Yük miktarýna
göre ölçülmüþ sývý deterjan kullanmanýz tavsiye edilir.
Sonraki programlarda uygulanamaz: 1, 2, 6, 7, 8, 9,
10, 11, 12, 13, , , programlarý.
Leke önleyici
Bu fonksiyon en inatçý
4
3
2
1
için 4. kaba beyazlatýcýyý (çamaþýr suyunu) koyunuz,
Durulama
fonksiyonunu etkin hale getiriniz.
programýný ayarlayýnýz ve Leke Önleyici
lekeleri çýkarmak için
kullanýlýr.
4 numaralý ilave hazneyi 1
numaralý hazneye
yerleþtiriniz.
Çamaþýr suyu dozajýný
ayarlarken orta mildeki
max iþaretini geçmeyiniz
(bkz. þekil).
Sadece beyazlatma
iþlemini gerçekleþtirmek
Maks
Isý
dere-
cesi
(°C)
Hýz
(Da kik-
ada
devir)
90° 1200
90° 1200
60° 1200
40° 1200
60° 1200
40° 1200
60° 800
40° 600
30° 0
40° 800
30° 800
30° 400
30° 600
30° 600
30° 600
-
1200
-
1200
-
0
Yýkama esnasýnda beyazlatma yapmak için deterjan ve
diðer katkýlarý koyunuz, istenilen programý ayarlayýp Leke
Önleyici
4 nolu kabýn kullanýlmasý ön yýkamayý devre dýþý býrakýr.
Sonraki programlarda uygulanamaz:
11, 12, 13,
Ekstra Durulama
Bu opsiyon seçildiðinde durulamanýn verimliliði daha
yüksek olur ve deterjandan tamamen temizlenmesi
saðlanýr. Hassas ciltler için uygundur.
Sonraki programlarda uygulanamaz:
programlarý.
Mini yük
Bu iþlev, yýkanacak çamaþýr miktarý tavsiye edilen
maksimum yükün (miktarýn) yarýsýna eþit yada yarýsýndan
az olduðunda kullanýnýz (bkz. Programlar tablosu).
Sonraki programlarda uygulanamaz:
13,
Deterjanlar Maks yük (Kg)
Önyý-
Yýka-maÇamaþýr
kama
ll
-
-
-
-
-
-
-
-
-
-
-
-
-
-
- -
- - - -
- - - -
suyu
ll l
ll l
ll l
ll l
ll l
ll l
l
l
l
l
l
l
l
l
iþlevini devreye alýnýz.
, programlarý.
, programlarý.
Yumu-
Normal
þatýcý
-
-
-
-
-
- -
-
-
-
ll
l
l
l
l
l
l
l
En fazla
l
2 çift
Çizelgede belirtilen veriler takribidir.
Mini
Eco
Time
yük
84848484844
844
3,5 1,5 2,5
21214--
1,5 - -
2,5 - -
4-4--
--
848-8--
1, 6, 7, 8, 9, 10,
9, ,
8, 9, 10, 11, 12,
TR
Devir
süresi
Yýkama programalarýnýn süresi ekrandan kontrol edilebilir.
!
Page 32
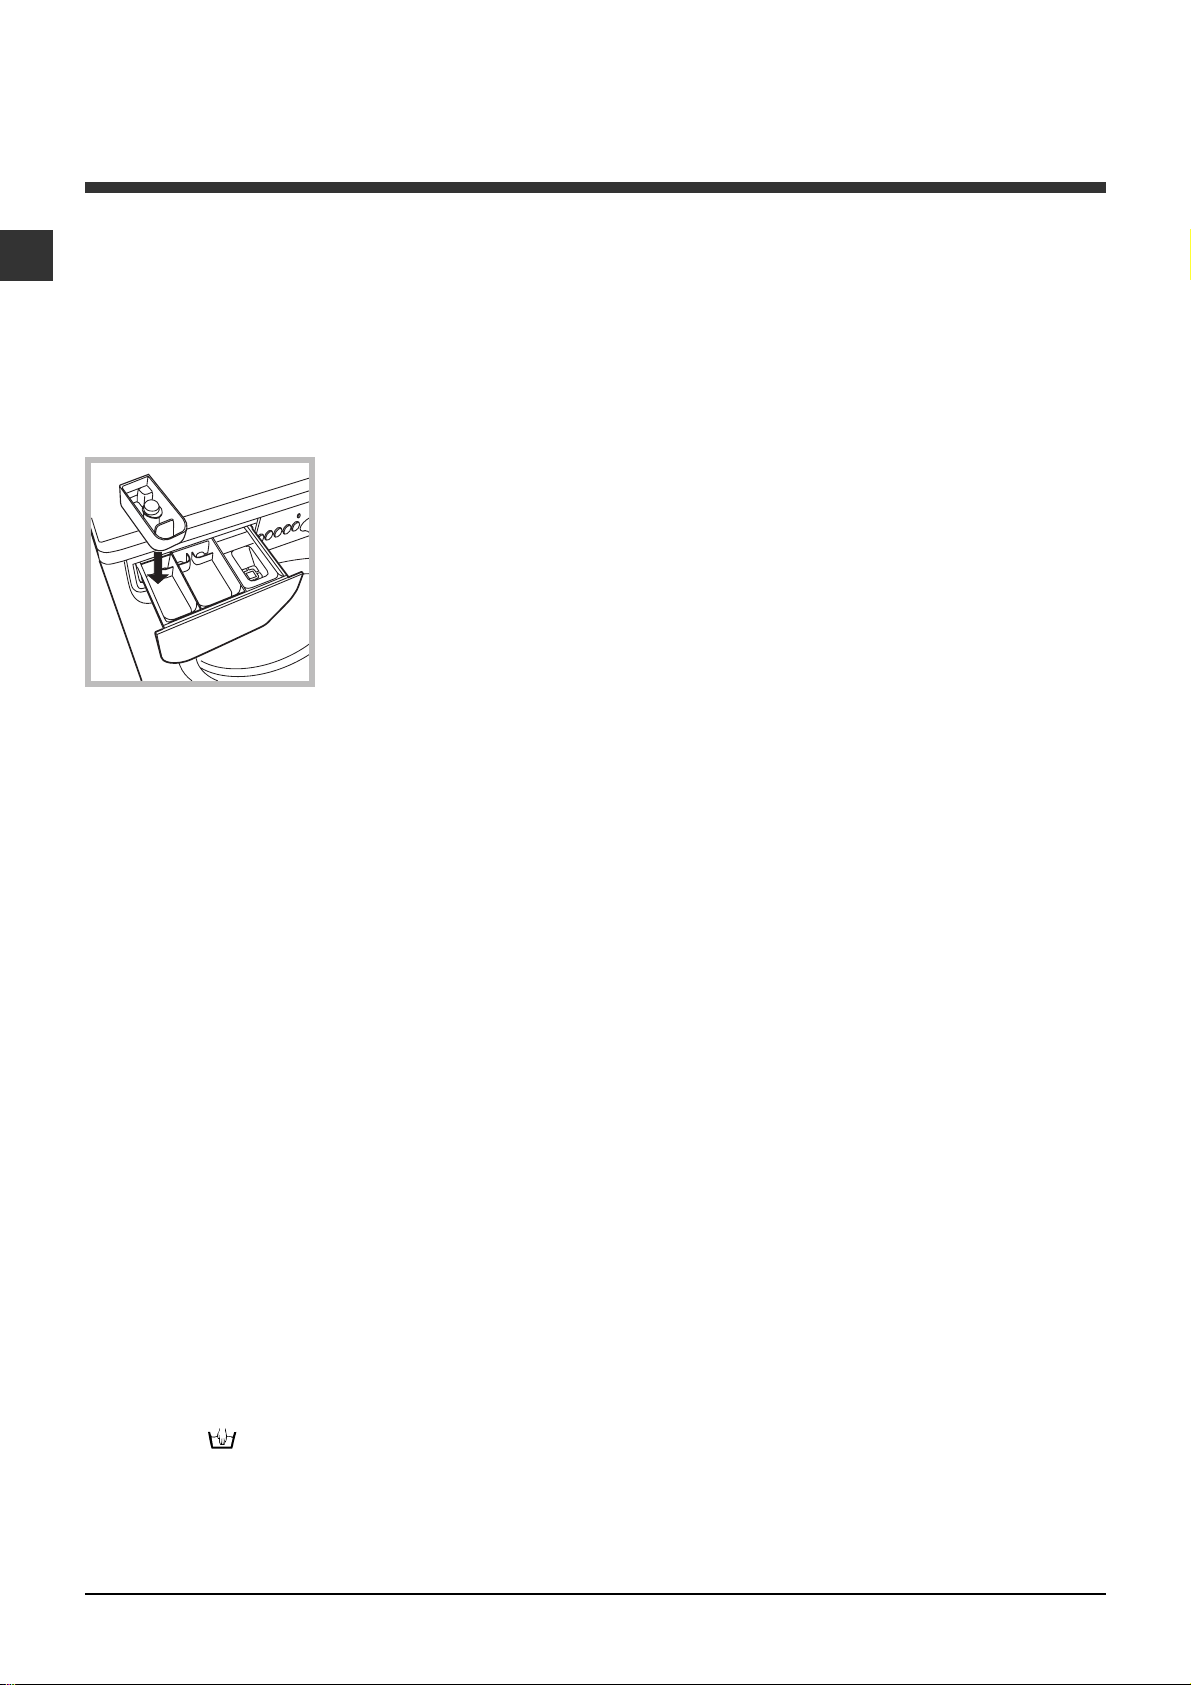
Deterjanlar ve çamaþýr
TR
Deterjan haznesi
Yýkamanýn iyi sonuç vermesi doðru dozda deterjan
kullanýlmasýna da baðlýdýr: aþýrý deterjan kullanmak
suretiyle daha temiz çamaþýrlar elde edilemeyeceði
gibi makinenin aksamýna zarar verilerek, çevre
kirliliðine sebebiyet verilir.
Elde yýkama deterjanlarý kullanmayýnýz, çünkü aþýrý
köpük yaparlar.
Deterjan haznesini açýnýz
4
3
2
1
hazne 2: Yýkama için deterjan (toz veya likit)
Sývý deterjan, yalnýzca, makine çalýþtýrýlmadan
konulabilir.
hazne 3: Katký maddeleri (yumuþatýcý, vs.)
Yumuþatýcý ýzgara seviyesini aþmamalýdýr.
ilave hazne 4: Çamaþýr suyu
ve deterjan ile katký
maddelerini aþaðýdaki
þekilde koyunuz.
hazne 1: Ön yýkama
için deterjan (toz)
Deterjaný koymadan
önce 4 numaralý ilave
haznenin takýlý
olmadýðýný kontrol edin.
Çamaþýr hazýrlanmasý
Çamaþýrlarý aþaðýdaki gibi ayýrýnýz:
- kumaþ tipi / etiketteki iþaret.
- renkler: renkli çamaþýrlarý beyazlardan ayýrýnýz.
Ceplerini boþaltýnýz ve düðmeleri kontrol ediniz.
Çamaþýrýn kuru aðýrlýðýný esas alan deðerlerin
dýþýna çýkmayýnýz:
Dayanýklý kumaþlar: max 8 kg
Sentetik kumaþlar: max 3,5 kg
Hassas kumaþlar: max 2 kg
Yünlüler: max 2 kg
Ýpekliler: max 2 kg
Çamaþýrlarýn aðýrlýðý nedir?
1 çarþaf 400-500 gr.
1 yastýk kýlýfý 150-200 gr.
1 masa örtüsü 400-500 gr.
1 bornoz 900-1.200 gr.
1 havlu 150-250 gr.
Perdeler: katlayarak mevcut olan poþetin içine
yerleþtiriniz. 7. programýn kullanýlmasý önerilir.
Jeans: Yýkamadan önce kýyafetleri ters çeviriniz ve sývý
deterjan kullanýnýz. program 8i kullanýnýz.
Express: az kirli çamaþýrlarý kýsa sürede yýkamak
üzere hazýrlanmýþtýr: sadece 15 dakika sürer ve
böylece zaman ve enerji tasarrufu saðlar 9.
programýn 30°C ye ayarlanmasýyla, azami 1,5 kg.
olmak üzere muhtelif kumaþlardaki (yün ve ipek
hariç) çamaþýrlarý yýkamak mümkündür.
Outwear (program 10): su geçirmez kumaþlar ve kýþ
ceketleri için (örn. Gore-Tex, polyester, naylon)
yýkama için kullanýlýr; en iyi sonuçlar için, sývý
deterjan ve yarým yük doz kullanýnýz; gömlek
yakalarýný, manþetlerini ve lekeleri ön iþlemden
geçiriniz; yumuþatýcý veya yumuþatýcý içeren
deterjan kullanmayýnýz. Doldurulmuþ yorganlar bu
programla yýkanamaz.
Sport Intensive (program 11) aðýr lekeli spor
kýyafetlerinin kumaþlarý (eþofman, þort, vb.) için
kullanýlýr; en iyi sonuçlar için, Program tablosunda
gösterilen maksimum yükü geçmemeniz tavsiye
edilir.
Sport Light (program 12): hafif lekeli spor kýyafetlerinin
kumaþlarý (eþofman, þort, vb.) için kullanýlýr; en iyi
sonuçlar için, Program tablosu nda gösterilen
maksimum yükü geçmemeniz tavsiye edilir. Sývý
deterjan ve yarým yük doz kullanmanýz tavsiye edilir.
Sport Shoes (program 13) spor ayakkabýlarýný
yýkamak için kullanýlýr; en iyi sonuçlar için, ayný
anda 2 çiftten fazla yýkamayýnýz.
Yük dengeleme sistemi
Aþýrý titremenin engellenmesi ve yükün düzenli
daðýlmasý için her sýkma devrinden önce iç sepet
normal yýkama hýzýndan biraz daha hýzlý döner. Farklý
þekillerde çamaþýrlarý makineye doldurduktan sonra
yük dengeli hale gelmediyse makine daha yavaþ bir
sýkma devrini uygular. Yük çok dengesiz ise çamaþýr
makinesi sýkma devrini gerçekleþtirmeden
çamaþýrlarý daðýtýr. Yükün daha iyi yerleþtirilmesi ve
dengeli olmasý için küçük giysilerle büyük giysileri
karýþtýrýnýz.
Özel programlar
Yünlüler: Tüm yünlü kýyafetler üzerinde yalnýzca
elde yýkayýn
kullanýlarak yýkanabilir. En iyi sonuçlar için, özel
deterjanlar kullanýnýz ve 2 kg çamaþýrý geçmeyiniz.
Ýpekliler: ipekli tüm dokumalar için tasarlanmýþ olan
7. programýn kullanýlmasý tavsiye edilir. Hassas
dokumalar için özel bir deterjan kullanýlmasý önerilir.
!
etiketi olsa bile program 6
Page 33
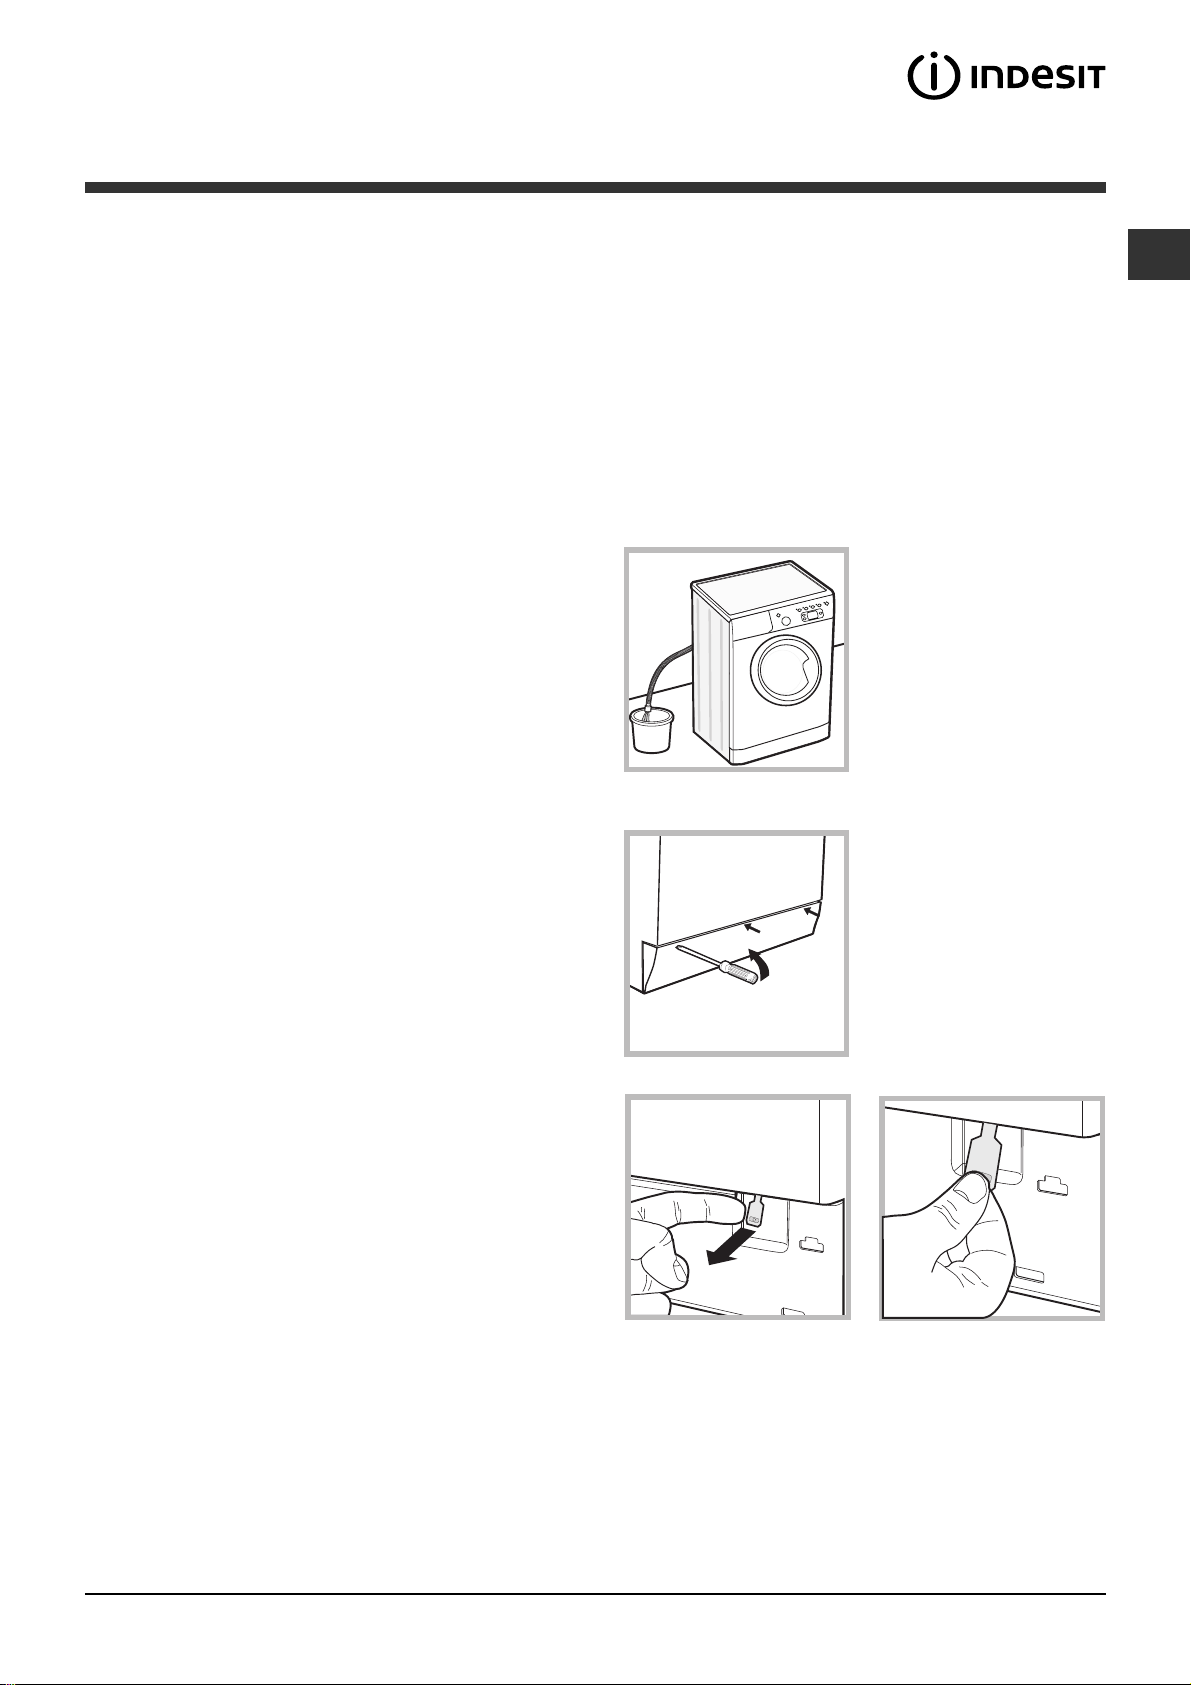
Önlemler ve öneriler
Çamaþýr makinesi uluslararasý güvenlik
standartlarýna uygun olarak projelendirilmiþ ve
üretilmiþtir. Bu uyarýlar güvenlik amaçlý olup
dikkatlice okunmalýdýr.
Genel güvenlik uyarýlarý
Makine meskenlerde kullanýlmak üzere
tasarlanmýþ olup profesyonel kullaným amaçlý
deðildir.
Kullaným güvenliklerinden sorumlu bir kiþinin
komutlarý ve denetimi altýnda gerçekleþmediði
sürece, cihaz, fiziksel kapasitesi yetersiz
(çocuklar dahil), iþitsel veya zihinsel olarak yeterli
olamayan kiþiler ile yetersiz bilgi ve deneyime
sahip olan kiþiler tarafýndan kullanýlmamalýdýr.
Cihazla oynamamalarýný garanti etmek için
çocuklarýn kontrol altýnda olmalarý
gerekmektedir.
Cihaza ayaklarýnýz çýplakken yada elleriniz veya
ayaklarýnýz ýslak yada nemliyken dokunmayýnýz.
Fiþi prizden çekerken kablosundan deðil fiþin
kendisinden tutarak çekiniz.
Makine çalýþýrken deterjan haznesini açmayýnýz.
Tahliye suyuna el sürmeyiniz, yüksek ýsýda olabilir.
Kapaðý, hiçbir þekilde zorlamayýnýz: istenmedik
açýlmalara karþý olan güvenlik mekanizmasý arýza
yapabilir.
Arýza halinde onarmak amacýyla iç mekanizmalarý
kurcalamayýnýz.
Çocuklarýn çalýþýr vaziyetteki makineye
yaklaþmalarýna mani olunuz.
Çalýþma esnasýnda kapak ýsýnabilir.
Taþýnmasý gerektiðinde, bu iþlemin, iki veya üç kiþi
tarafýndan, azami dikkatle yapýlmasý gerekir.
Kesinlikle tek baþýnýza yapmayýnýz, çünkü makine
çok aðýrdýr.
Çamaþýrlarý yerleþtirmeden evvel, sepetin boþ
olduðundan emin olunuz.
Tüm ürünlerin üzerinde; ayrý toplama hükümlerini
hatýrlatmak amacýyla üstünde çarpý iþareti olan
sepet sembolü verilmiþtir.
Cihazlarýn tasfiye edilmesi konusunda daha geniþ
bilgi almak için cihaz sahiplerinin mevcut müþteri
hizmetine veya satýþ noktalarýna baþvurulmasý
gerekir.
Cam kapaðýn açýlmasý
Elektrik kesildiðinde makine kapaðýný açamadýðýnýz
zaman çamaþýrlarý çýkarýp asmak istediðinizde
aþaðýdaki gibi yapýnýz:
1. fiþi prizden çekiniz.
2. makinenin içindeki su
seviyesinin makine
kapaðýndan daha alçak
20
olmasýný saðlayýnýz, aksi
takdirde A þeklinde
gösterildiði gibi bir kapta
toplanacak þekilde
boþaltma hortumu
vasýtasýyla içindeki suyu
gideriniz.
3. çamaþýr makinesinin ön
panelini, bir tornavida
vasýtasýyla, çýkartýnýz
(bkz. þekil).
TR
Atýklarýn tasfiye edilmesi
Ambalaj malzemelerinin tasfiye edilmesi: yerel
yasalara uyunuz, bu þekilde ambalajlarýn geri
dönüþümü mümkün olur.
Elektrik ve elektronik cihazlarýn atýklarýný
deðerlendirme 2002/96/CE sayýlý Avrupa Konseyi
direktifinde; beyaz eþyalarýn kentsel katý atýk
genel yöntemi ile tasfiye edilmemesi
öngörülmüþtür. Kullanýlmayan cihazlarýn, madde
geri kazaným ve geri dönüþüm oranýný en yüksek
seviyeye yükseltmek, çevre ve insan saðlýðýna
olasý zararlarý engellemek için ayrý ayrý toplanmasý
gerekir.
4. þekilde gösterilen dilciðinden tutarak blokajýndan
çýkýncaya kadar dýþarýya doðru çekiniz; ayný anda
aºaðý doðru çekerek kapýyý açýnýz.
5. paneli takarken, tam yerleþtirmeden evvel,
kancalarýn yuvalara gelip gelmediðini kontrol ediniz.
!!
Page 34
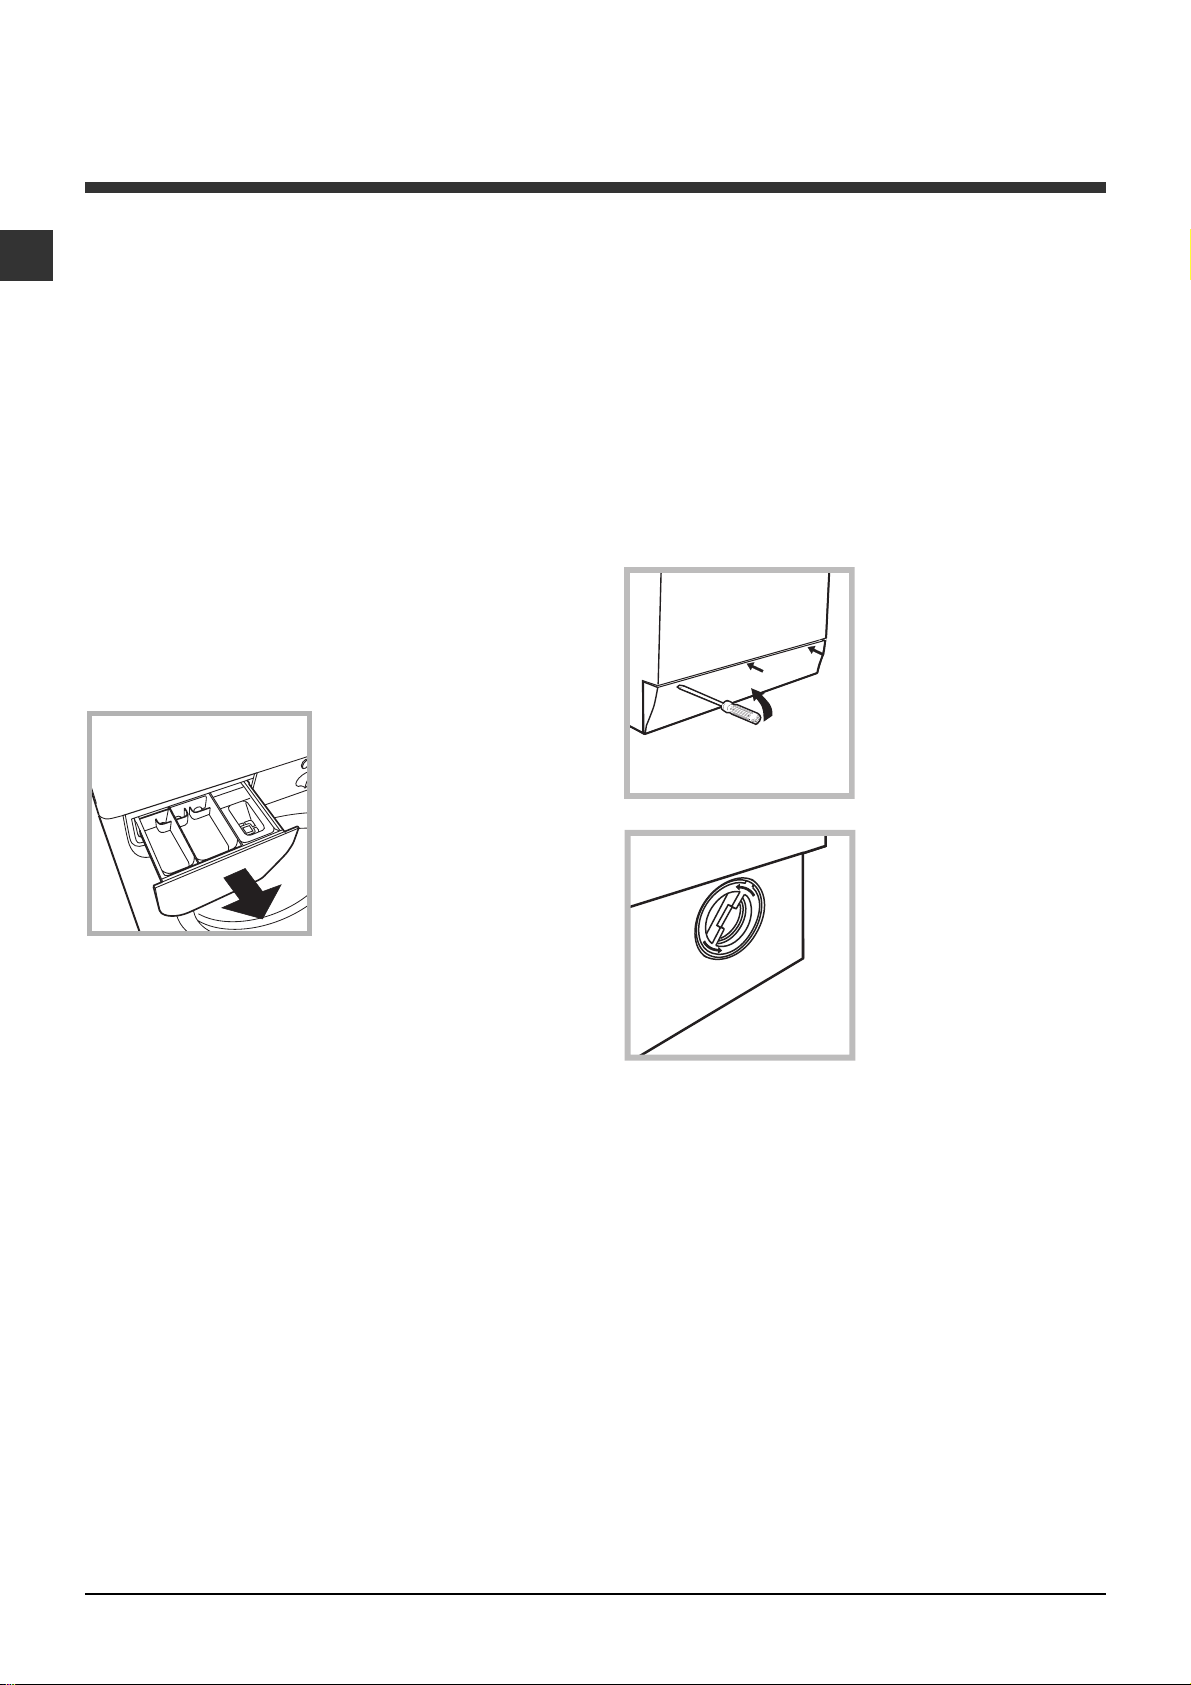
Bakým ve özen
TR
Su ve elektrik kesilmesi
Su musluðunu her yýkamadan sonra kapatýnýz.
Böylece çamaþýr makinesinin su tesisatýnýn
eskimesi engellenir, su kaçaðý tehlikesi ortadan
kalkar.
Bakým ve temizlik iþlemleri esnasýnda çamaþýr
makinesinin fiþini çekiniz.
Çamaþýr makinesinin temizlenmesi
Dýþ gövde ve plastik aksam ýlýk su ve sabunla
ýslatýlmýþ bir bez vasýtasýyla temizlenebilir. Çözücü
ve aþýndýrýcý maddeler kullanmayýnýz.
Deterjan haznesinin temizlenmesi
Hazneyi kaldýrarak,
dýþarýya doðru çekmek
suretiyle çýkartýnýz
(bkz. þekil).
Akar su altýnda
yýkayýnýz, bu
çekmecenin temizliði
sýk sýk yapýlmalýdýr.
Pompanýn temizlenmesi
Çamaþýr makinesinin pompasý kendini temizleyen bir
özelliðe sahip olup, ayrýca temizlik gerektirmez.
Ancak, bazý küçük cisimler (madeni para, düðme)
pompanýn alt kýsmýndaki koruyucu bölmeye
düþebilirler.
Yýkama devresinin bitmiþ olup olmadýðýný kontrol
ediniz ve fiþini çekiniz.
Pompa koruyucu bölgesine eriþebilmek için:
1. çamaþýr makinesinin
ön kapama panelini, bir
tornavida vasýtasýyla
çýkartýnýz (bkz. þekil);
2. makine kapaðýný
saatin ters yönünde
çevirerek sökünüz (bkz.
þekil). bir miktar su
gelmesi normaldir;
Kapak ve hazne bakýmý
Kötü kokularýn oluþmasýný engellemek için
kapaðý daima aralýk býrakýnýz.
3. içini dikkatlice temizleyiniz;
4. kapaðý vidalayýnýz;
5. paneli takarken, tam yerleþtirmeden evvel,
kancalarýn yuvalara gelip gelmediðini kontrol ediniz.
Su besleme hortumunun kontrol
edilmesi
Su besleme hortumunu, en azýndan senede bir defa
kontrol ediniz. Yarýk veya çatlaklar varsa deðiþtiriniz:
yýkama esnasýndaki yüksek basýnçlar ani
patlamalara yol açabilirler.
Kesinlikle daha önceden kullanýlmýþ hortum
kullanmayýnýz.
!"
Page 35

Arýzalar ve onarýmlar
Çamaþýr makinesi çalýþmýyor olabilir. Teknik Servise baþvurmadan önce (Teknik Servis bölümüne bakýnýz)
aþaðýdaki liste yardýmýyla kolay çözülebilecek bir problem olup olmadýðýný kontrol ediniz.
Arýzalar:
Çamaþýr makinesi çalýþmýyor.
Yýkama iþlemi baþlamýyor.
Çamaþýr makinesi su almýyor
(Ekranda H2O ibaresi yanýp
söner).
Çamaþýr makinesi devamlý su alýp
veriyor.
Olasý nedenler / Çözümler:
Fiþ prize takýlý deðil veya tam temas etmiyor.
Evde elektrik yok.
Makinanýn kapaðý tam kapanmamýþ.
AÇMA/KAPAMA düðmesine basýlmamýþ.
BAÞLA/BEKLE düðmesine basýlmamýþ.
Su musluðu açýk deðil.
Gecikmeli baþlatmada bir gecikme süresi ayarlanmýþ (bkz. Bir
yýkama devri nasýl yapýlýr).
Su besleme hortumu musluða takýlý deðil.
Hortum bükülmüþ.
Su musluðu açýk deðil.
Evde su kesik.
Basýnç yetersiz.
BAÞLA/BEKLE düðmesine basýlmamýþ.
Tahliye hortumu yerden 65 ile 100 cm arasýnda yerleþtirilmemiþ (bkz.
Montaj).
Tahliye hortumunun baþý suya girmiþ (bkz. Montaj).
Duvardaki tahliyenin hava boþluðu yok.
Bu kontrollerden sonra olumlu sonuç alýnamazsa, musluðu ve kapatýp,
çamaþýr makinesini durdurarak Servise haber veriniz. Daire, binanýn üst
katlarýndaysa, sifon olayý meydana gelerek çamaþýr makinesi devamlý
su alýp, veriyor olabilir. Bu sorunun çözümü için piyasada sifon önleyici
valflar satýlmaktadýr.
TR
Çamaþýr makinesi su boþaltmýyor
veya santrifüj yapmýyor.
Çamaþýr makinesi santrifüj
esnasýnda aþýrý sarsýlýyor.
Çamaþýr makinesi su kaçýrýyor.
"option" (seçenek) göstergesi yanar
ve "Baþla/Bekle" göstergesi yanip
söner ve ekranda bir hata kodu
görünür (örn.: F-01, F-..).
Aþýrý köpük oluþuyor.
Program su boþaltmayý öngörmüyor: bazý programlarda su boþaltma
iþlemini elle müdahale ederek baþlatmak gerekir.
Tahliye hortumu bükülmüþ (bkz. Montaj).
Tahliye kanalý týkalý.
Hazne, çamaþýr makinesinin montajý esnasýnda düzgün çözülmemiþ
(bkz. Montaj).
Çamaþýr makinesinin bulunduðu zemin düz deðil (bkz. Montaj).
Çamaþýr makinesi mobilyalarla duvar arasýnda sýkýþmýþ (bkz. Montaj).
Su giriþ hortumu tam sýkýlmamýþ (bkz. Montaj).
Deterjan haznesi týkanmýþ (temizlemek için bkz. Bakým ve özen).
Tahliye hortumu düzgün takýlmamýº (bkz. Montaj).
Makineyi kapatýnýz, prizden fiþi çekiniz ve 1 dakika sonra tekrar
açýnýz.
Arýza çözülmüyorsa Teknik Servisine baþvurunuz.
Deterjan çamaþýr makinesi için uygun deðil (çamaþýr makinesi için,
elde yýkama ve çamaþýr makinesi için veya benzer ibareler olmalýdýr).
Aþýrý doz kullanýldý.
!#
Page 36

Teknik Servis
TR
Servise baþvurmadan önce:
Servise baþvurmadan çözülebilecek bir ariza olup olmadýðýný kontrol ediniz (Arýzalar ve onarýmlar
bölümüne bakýnýz);
Programý tekrar baþlatarak, sorunun çözülüp çözülmediðini görünüz;
Aksi takdirde, garanti belgesinde belirtilen telefon numaralarýndan teknik servisi arayýnýz.
Kesinlikle, yetkili olmayan tamircilere müracaat etmeyiniz.
Þunlarý bildiriniz:
arýza tipini;
cihazýn modeli (Mod.);
seri numarasý (S/N).
Bu bilgiler, çamaþýr makinesinin arkasýndaki plakada bulunurlar.
Cihazýn ömrü 10 yýldýr.
!$
Page 37

ПдзгЯет чсЮузт
РЛХНФЗСЙП СПХЧЩН
GR
ЕллзнйкЬ
IWE 8128
Ресйечьменб
GR
ЕгкбфЬуфбуз, 38-39
БрпухукехбуЯб кбй псйжпнфЯщуз
ХдсбхлйкЭт кбй злекфсйкЭт ухндЭуейт
Рсюфпт кэклпт рлхуЯмбфпт
ФечнйкЬ уфпйчеЯб
РесйгсбцЮ фпх рлхнфзсЯпх, 40-41
РЯнбкбт елЭгчпх
Пиьнз
Рщт дйенесгеЯфбй Энбт кэклпт рлхуЯмбфпт, 42
РспгсЬммбфб кбй лейфпхсгЯет, 43
РЯнбкбт фщн РспгсбммЬфщн
ЛейфпхсгЯет рлхуЯмбфпт
БрпссхрбнфйкЬ кбй мрпхгЬдб, 44
ИЮкз брпссхрбнфйкюн
РспефпймбуЯб фзт мрпхгЬдбт
ЕйдйкЬ рспгсЬммбфб
Уэуфзмб йупуфЬимйузт фпх цпсфЯпх
РспцхлЬоейт кбй ухмвпхлЭт, 45
ГенйкЮ буцЬлейб
ДйЬиеуз
Чейспнбкфйкь Ьнпйгмб фзт рьсфбт
УхнфЮсзуз кбй цспнфЯдб, 46
Брпклейумьт неспэ кбй злекфсйкпэ сеэмбфпт
Кбибсйумьт фпх рлхнфзсЯпх
Кбибсйумьт фпх ухсфбсйпэ брпссхрбнфйкюн
ЦспнфЯдб фзт рьсфбт кбй фпх кЬдпх
Кбибсйумьт фзт бнфлЯбт
¸легчпт фпх ущлЮнб фспцпдпуЯбт фпх неспэ
БнщмблЯет кбй лэуейт, 47
ХрпуфЮсйоз, 48
37
Page 38
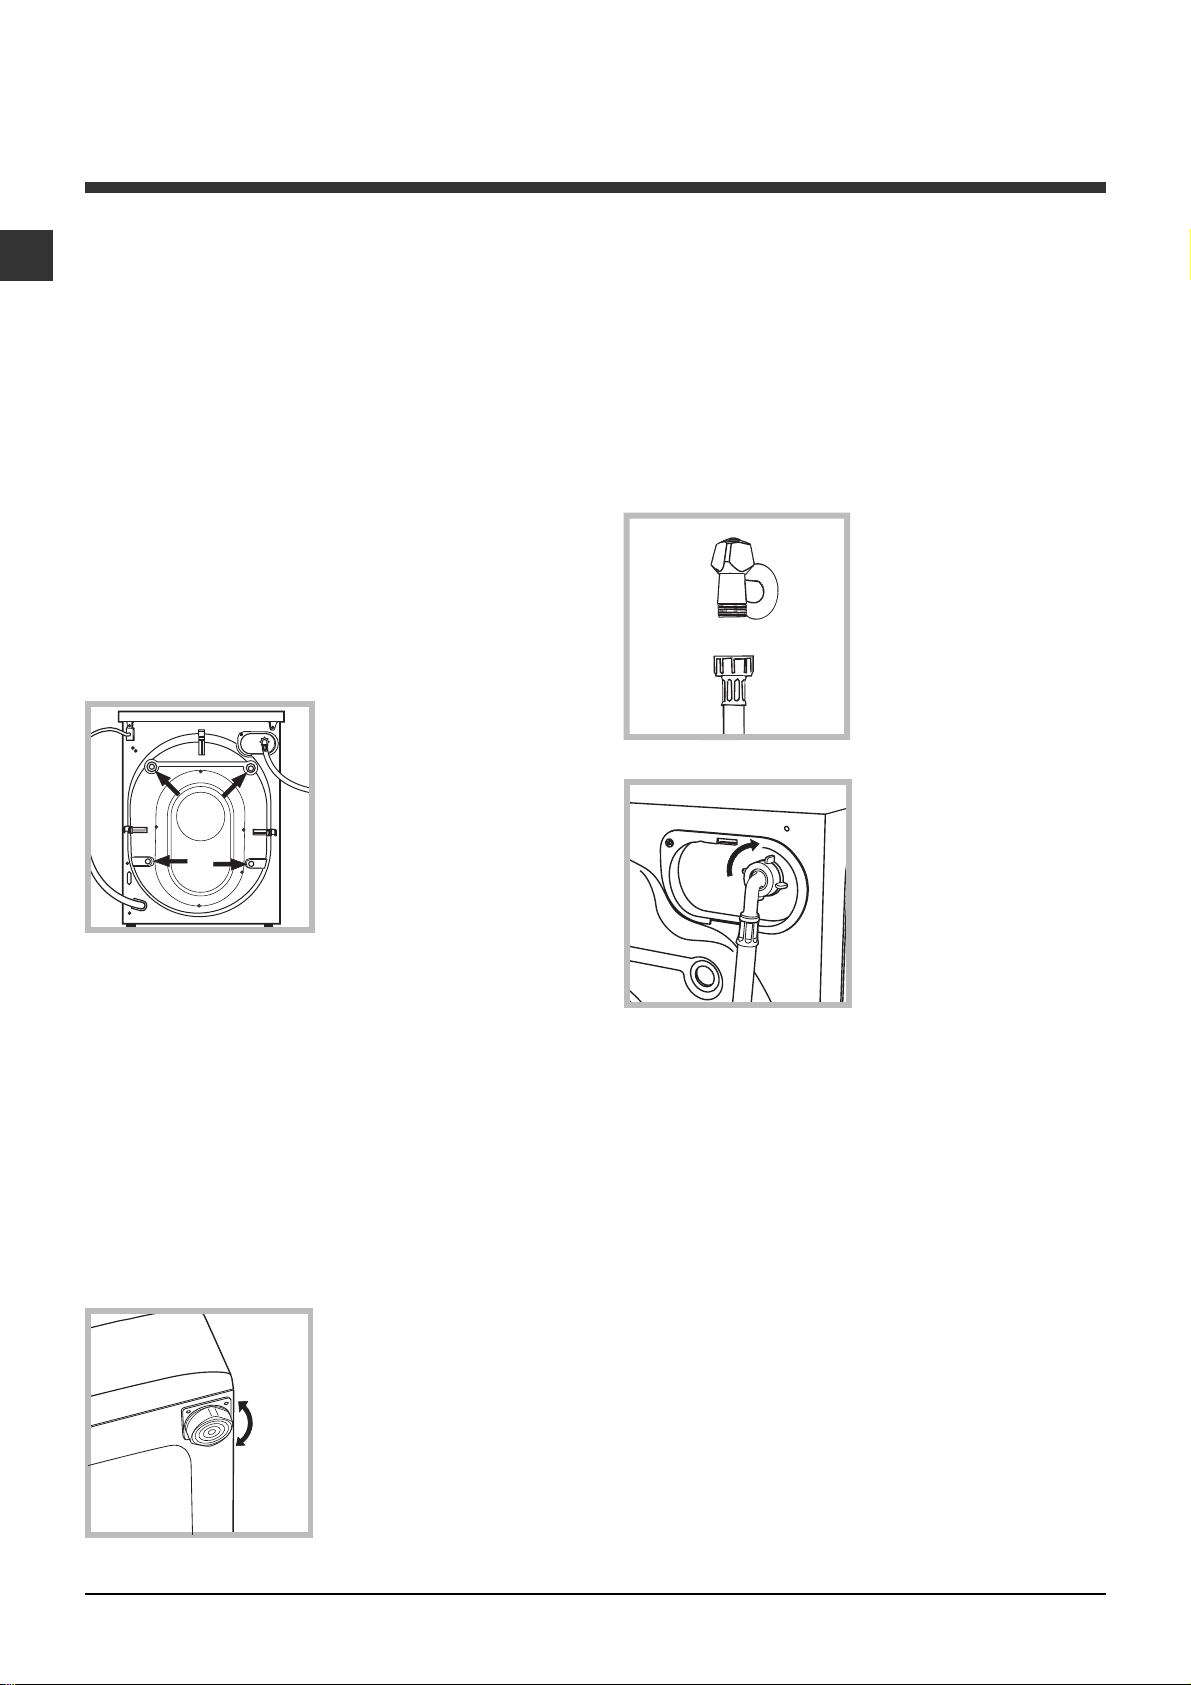
ЕгкбфЬуфбуз
GR
ЕЯнбй узмбнфйкь нб дйбфзсЮуефе фп егчейсЯдйп бхфь
гйб нб мрпсеЯфе нб фп ухмвпхлеэеуфе прпйбдЮрпфе
уфйгмЮ. Уе ресЯрфщуз рюлзузт, рбсбчюсзузт Ю
мефбкьмйузт, вевбйщиеЯфе ьфй рбсбмЭней мбжЯ ме фп
рлхнфЮсйп гйб нб рлзспцпсеЯ фпн нЭп йдйпкфЮфз гйб
фз лейфпхсгЯб кбй фйт учефйкЭт рспейдпрпйЮуейт.
ДйбвЬуфе рспуекфйкЬ фйт пдзгЯет: хрЬсчпхн
узмбнфйкЭт рлзспцпсЯет гйб фзн егкбфЬуфбуз, фз
чсЮуз кбй фзн буцЬлейб.
БрпухукехбуЯб кбй псйжпнфЯщуз
БрпухукехбуЯб
1. БрпухукехЬуфе фп рлхнфЮсйп.
2. ЕлЭгофе бн фп рлхнфЮсйп Эчей хрпуфеЯ жзмйЭт кбфЬ
фз мефбцпсЬ. Бн Эчей хрпуфеЯ жзмйЭт мзн фп
ухндЭефе кбй ерйкпйнщнЮуфе ме фпн мефбрщлзфЮ.
3. БцбйсЭуфе фйт 4 вЯдет
рспуфбуЯбт гйб фз
мефбцпсЬ кбй фп
лбуфйчЬкй ме фп учефйкь
дйбчщсйуфйкь, рпх
всЯукпнфбй уфп рЯущ
мЭспт (влЭре ейкьнб).
Мйб цспнфйумЭнз псйжпнфЯщуз рспудЯдей уфбиесьфзфб
уфз мзчбнЮ кбй брпупвеЯ дпнЮуейт, ипсэвпхт кбй
мефбфпрЯуейт кбфЬ фз лейфпхсгЯб. Уе ресЯрфщуз
мпкЭфбт Ю фЬрзфб, схимЯуфе фб рпдбсЬкйб Эфуй юуфе
нб хцЯуфбфбй кЬфщ брь фп рлхнфЮсйп бскефьт чюспт
гйб фпн бесйумь.
ХдсбхлйкЭт кбй злекфсйкЭт ухндЭуейт
Уэндеуз фпх ущлЮнб фспцпдпуЯбт фпх неспэ
1. УхндЭуфе фп ущлЮнб
фспцпдпуЯбт вйдюнпнфЬт
фпн уе Энб кспхнь ксэпх
неспэ ме уфьмйп
урейсюмбфпт 3/4 gas
(влЭре ейкьнб).
Рсйн фз уэндеуз, бцЮуфе
нб фсЭоей фп несь мЭчсй нб
гЯней дйбхгЭт.
2. УхндЭуфе фп ущлЮнб
фспцпдпуЯбт уфп
рлхнфЮсйп вйдюнпнфЬт фпн
уфзн бнфЯуфпйчз еЯупдп
неспэ, уфп рЯущ мЭспт
ерЬнщ деойЬ (влЭре
ейкьнб).
4. КлеЯуфе фйт прЭт ме фб рлбуфйкЬ рюмбфб рпх убт
рбсЭчпнфбй.
5. ДйбфзсеЯуфе кбй фб фсЯб фемЬчйб: бн фп рлхнфЮсйп
чсейбуфеЯ нб мефбцесиеЯ, иб рсЭрей нб
обнбмпнфбсйуфпэн.
Пй ухукехбуЯет ден еЯнбй рбйчнЯдйб гйб мйксЬ
рбйдйЬ.
ЕхихгсЬммйуз
1. ЕгкбфбуфЮуфе фп рлхнфЮсйп уе Энб дЬредп
ерЯредп кбй бниекфйкь, чщсЯт нб фп бкпхмрЮуефе уе
фпЯчпхт, Эрйрлб Ю Ьллп.
2. Бн фп дЬредп ден еЯнбй
брьлхфб псйжпнфйщмЭнп,
бнфйуфбимЯуфе фйт
бнщмблЯет вйдюнпнфбт Ю
оевйдюнпнфбт фб рсьуийб
рпдбсЬкйб (влЭре
ейкьнб). З гщнЯб клЯузт,
мефсзмЭнз уфзн
ерйцЬнейб есгбуЯбт, ден
рсЭрей нб оереснЬей фйт
2°.
3. РспуЭофе юуфе уфп ущлЮнб нб мзн хрЬсчпхн пэфе
рфхчюуейт, пэфе уфенюуейт.
З рЯеуз неспэ фпх кспхнпэ рсЭрей нб кхмбЯнефбй
мефбоэ фщн фймюн фпх рЯнбкб ФечнйкЬ уфпйчеЯб
(влЭре уелЯдб дЯрлб).
Бн фп мЮкпт фпх ущлЮнб фспцпдпуЯбт ден
ербскеЯ, брехихниеЯфе уе Энб ейдйкехмЭнп
кбфЬуфзмб Ю уе Энб еопхуйпдпфзмЭнп фечнйкь.
Мз чсзуймпрпйеЯфе рпфЭ чсзуймпрпйзмЭнпхт
ущлЮнет.
ЧсзуймпрпйеЯфе екеЯнпхт рпх убт рбсЭчпнфбй ме
фз мзчбнЮ.
38
Page 39
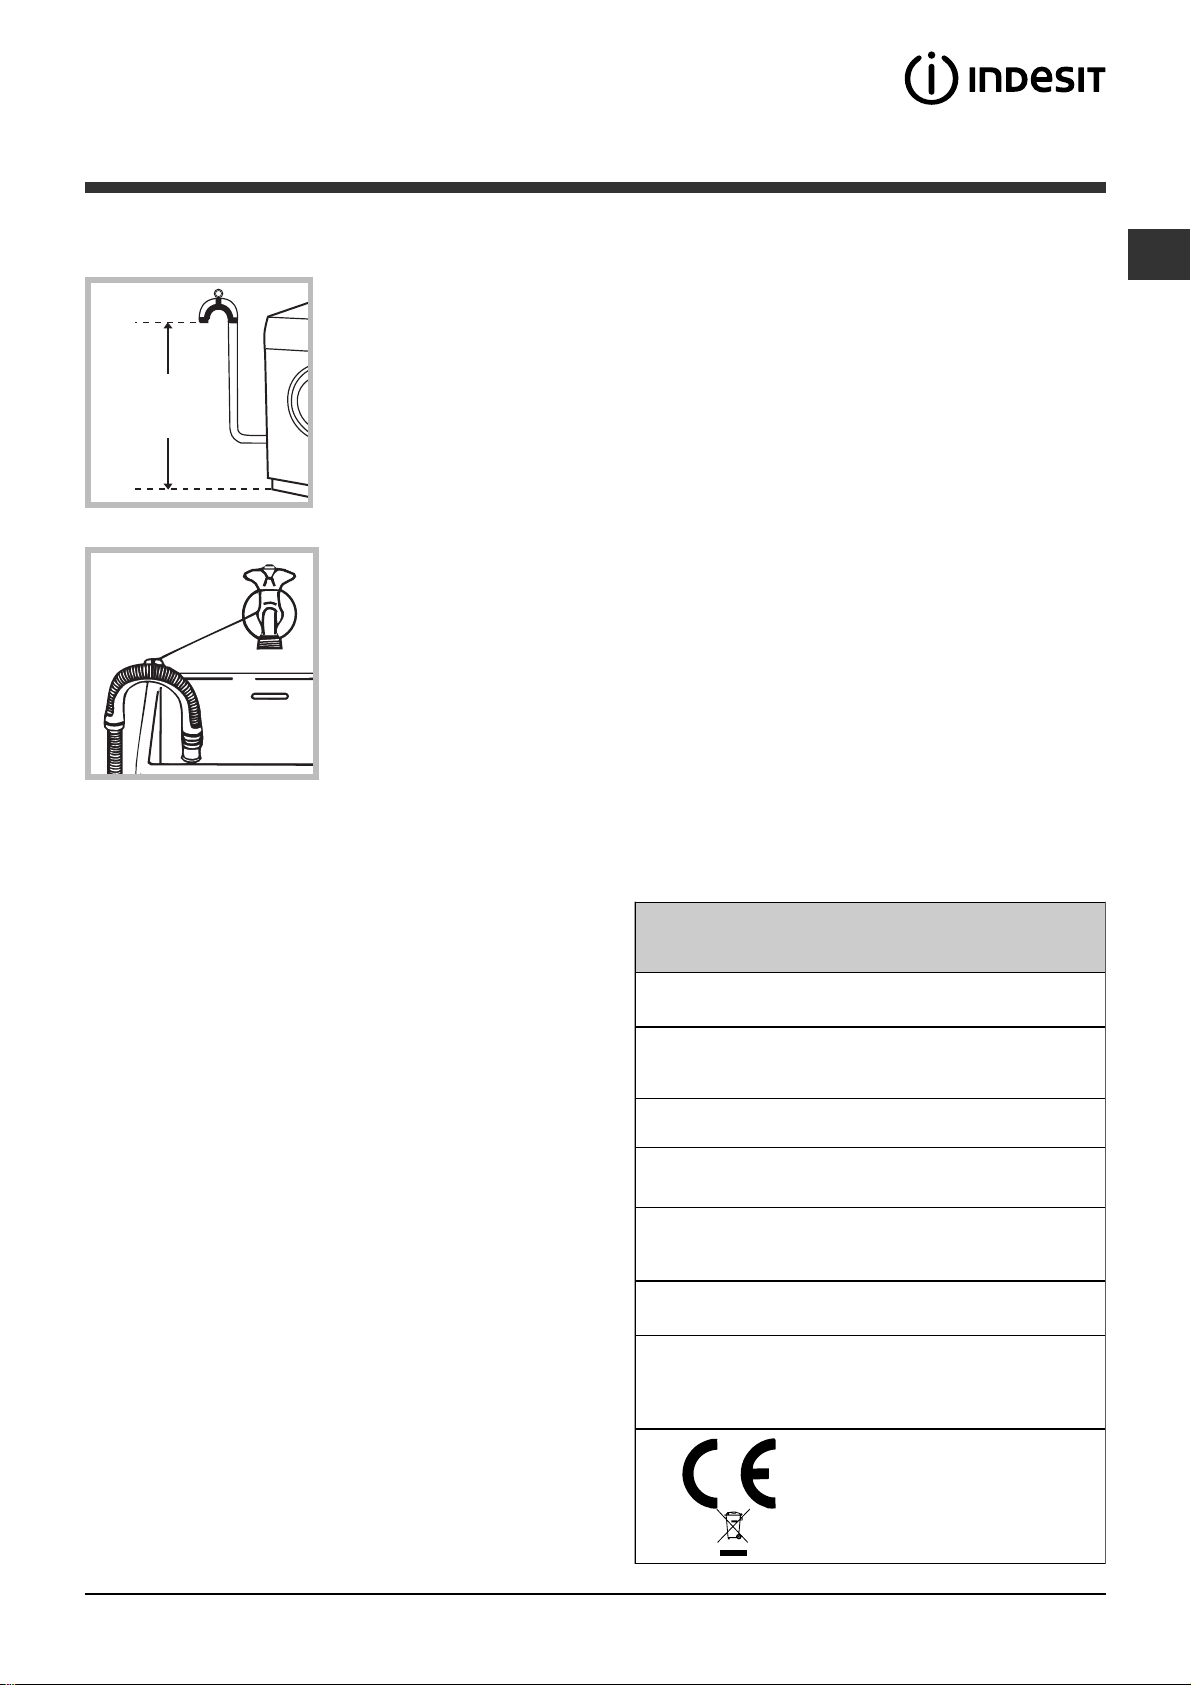
Уэндеуз фпх ущлЮнб бдейЬумбфпт
УхндЭуфе бдейЬумбфпт,
чщсЯт нб фпн дйрлюуефе,
уе Энбн бгщгь
еккЭнщузт Ю уе мйб
ерйфпЯчйб брпчЭфехуз уе
65 - 100 cm
брьуфбуз брь 65 Эщт
100 cm брь фп Эдбцпт.
Мз чсзуймпрпйеЯфе рспекфЬуейт кбй рплэрсйжб.
GR
Фп кблюдйп ден рсЭрей нб цЭсей рфхчЭт Ю нб еЯнбй
ухмрйеумЭнп.
Фп кблюдйп фспцпдпуЯбт рсЭрей нб бнфйкбиЯуфбфбй
мьнп брь еопхуйпдпфзмЭнпхт фечнйкпэт.
РспупчЮ! З ерйчеЯсзуз брпрпйеЯфбй кЬие ехиэнзт
уе ресЯрфщуз рпх ден фзспэнфбй бхфпЯ пй кбньнет.
ДйбцпсефйкЬ брпиЭуфе
фпн уфп чеЯлпт еньт
нйрфЮсб Ю мйбт лекЬнзт,
дЭнпнфбт фпн пдзгь рпх
убт рбсЭчефбй
уфпнкспхнь (влЭре
ейкьнб). Фп елеэиесп
Ьксп фпх ущлЮнб
бдейЬумбфпт ден рсЭрей
нб рбсбмЭней
вхийумЭнп уфп несь.
Ден ухнйуфЬфбй з чсЮуз рспекфЬуещн ущлЮнщн.
Бн брбйфеЯфбй, з рспЭкфбуз рсЭрей нб Эчей фзн Ядйб
дйЬмефсп фпх бсчйкпэ ущлЮнб кбй нб мзн оереснЬей
фб 150 cm.
ЗлекфсйкЮ уэндеуз
Рсйн ейуЬгефе фп вэумб уфзн злекфсйкЮ рсЯжб,
вевбйщиеЯфе ьфй:
з рсЯжб дйбиЭфей геЯщуз кбй фзсеЯ фйт ек фпх ньмпх
рспдйбгсбцЭт.
З рсЯжб нб еЯнбй уе иЭуз нб хрпцЭсей фп мЭгйуфп
цпсфЯп йучэпт фзт мзчбнЮт, рпх бнбцЭсефбй уфпн
рЯнбкб Фечнйкюн уфпйчеЯщн (влЭре дЯрлб).
З фЬуз фспцпдпуЯбт нб кхмбЯнефбй мефбоэ фщн
фймюн рпх бнбцЭспнфбй уфпн рЯнбкб Фечнйкюн
уфпйчеЯщн (влЭре дЯрлб).
З рсЯжб нб еЯнбй ухмвбфЮ ме фп вэумб фпх
рлхнфзсЯпх. Уе бнфЯиефз ресЯрфщуз,
бнфйкбфбуфЮуфе фзн рсЯжб Ю фп вэумб.
Фп рлхнфЮсйп ден егкбиЯуфбфбй уе бнпйчфь чюсп,
бкьмз кбй бн п чюспт еЯнбй кблхммЭнпт, дйьфй еЯнбй
рплэ ерйкЯндхнп нб фп бцЮнефе екфеиеймЭнп уе
вспчЮ кбй кбкпкбйсЯб.
Ме фзн егкбфЬуфбуз фпх рлхнфзсЯпх, з рсЯжб
сеэмбфпт рсЭрей нб еЯнбй еэкплб рспувЬуймз.
Рсюфпт кэклпт рлхуЯмбфпт
МефЬ фзн егкбфЬуфбуз, рсйн фз чсЮуз, дйенесгЮуфе
Энб кэклп рлхуЯмбфпт ме брпссхрбнфйкь кбй чщсЯт
спэчб иЭфпнфбт фп рсьгсбммб 2.
ФечнйкЬ уфпйчеЯб
МпнфЭлп
ДйбуфЬуейт
Чщсзфйкьфзфб
ЗлекфсйкЭт
ухндЭуейт
УхндЭуейт неспэ
Фбчэфзфб
уфхшЯмбфпт
РспгсЬммбфб
елЭгчпх уэмцщнб
ме фпн кбнпнйумь
EN 60456
IWE 8128
рлЬфпт cm 59,5
эшпт cm 85
вЬипт cm 60
áðü 1 Ýùò 8 kg
ВлЭре фзн рйнбкЯдб
чбсбкфзсйуфйкюн ерЯ фзт мзчбнЮт
мЭгйуфз рЯеуз 1 MPa (10 bar)
ЕлЬчйуфз рЯеуз 0,05 MPa (0,5 bar)
чщсзфйкьфзфб фпх кЬдпх 62 лЯфсб
мЭчсй 1200 уфспцЭт фп лерфь
рсьгсбммб 2; иесмпксбуЯб 60°C;
екфелпэменп ме 8 kg мрпхгЬдбт.
З ухукехЮ бхфЮ еЯнбй уэмцщнз ме
фйт бкьлпхиет пйнпфйкЭт ПдзгЯет:
- 2004/108/CE (ЗлекфспмбгнзфйкЮ
Ухмвбфьфзфб)
- 2002/96/CE
- 2006/95/CE (ЧбмзлЮ ФЬуз)
39
Page 40
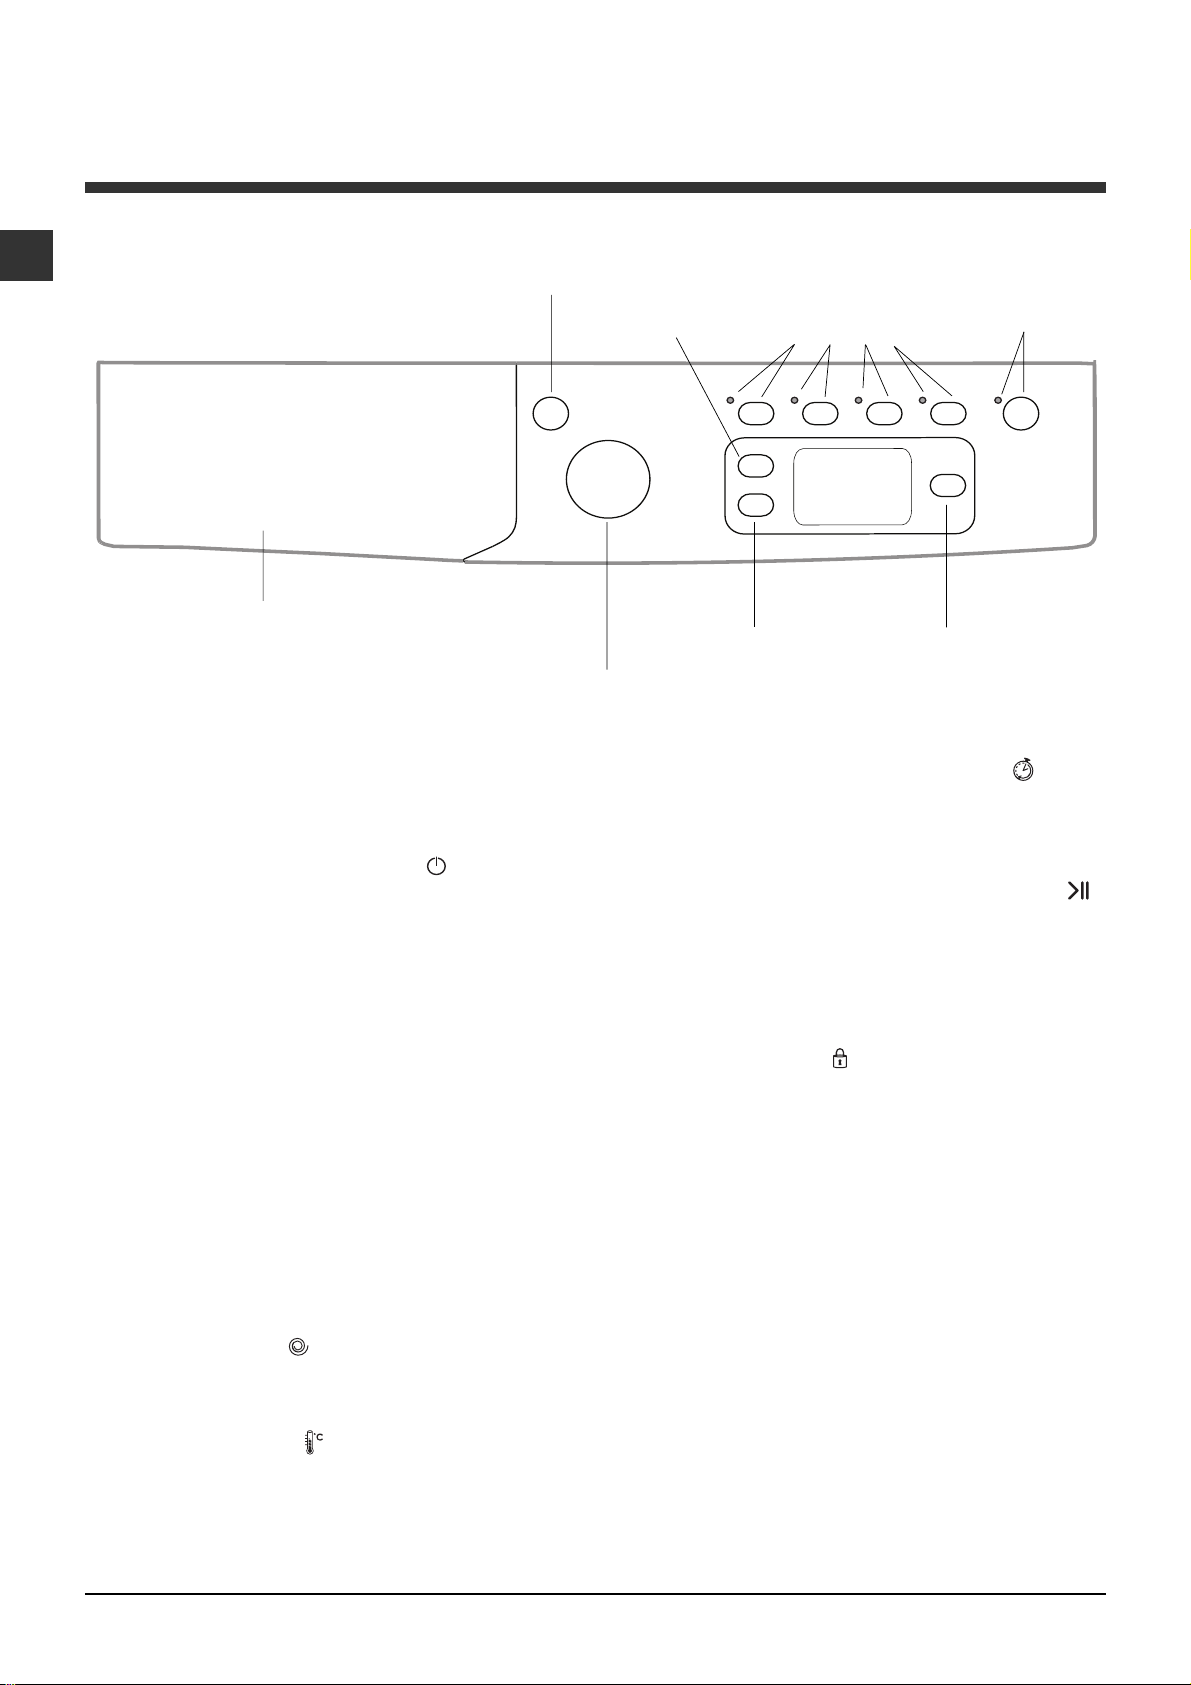
РесйгсбцЮ фпх рлхнфзсЯпх
GR
РЯнбкбт елЭгчпх
БНБММБФПУ/
УВЗУЙМБФПУ
ИЮкз брпссхрбнфйкюн
ИЮкз брпссхрбнфйкюн: гйб фзн рспуиЮкз
брпссхрбнфйкюн кбй рсьуиефщн (влЭре
«БрпссхрбнфйкЬ кбй мрпхгЬдб»).
КпхмрЯ БНБММБФПУ/УВЗУЙМБФПУ
лЯгп фп кпхмрЯ гйб нб бнЬшефе Ю нб увЮуефе фп
рлхнфЮсйп. Фп ендейкфйкь цщфЬкй ЕККЙНЗУЗ/РБХУЗ
рсЬуйнпх чсюмбфпт рпх бнбвпувЮней бсгЬ деЯчней
ьфй фп рлхнфЮсйп еЯнбй бнбммЭнз. Гйб нб увЮуефе фп
рлхнфЮсйп кбфЬ фп рлэуймп рсЭрей нб ксбфЬфе
рбфзмЭнп фп кпхмрЯ рйп рплэ, ресЯрпх 3 sec.
УфйгмйбЯп Ю фхчбЯп рЬфзмб ден ерйфсЭрей фп увЮуймп
фпх рлхнфзсЯпх. Фп увЮуймп фпх рлхнфзсЯпх кбфЬ фп
рлэуймп уе еоЭлйоз бкхсюней фп Ядйп фп рлэуймп
ЕрйлпгЭбт РСПГСБММБФЩН: гйб нб иЭуефе фб
рспгсЬммбфб. КбфЬ фз дйЬскейб фпх рспгсЬммбфпт п
ерйлпгЭбт рбсбмЭней бкЯнзфпт.
Кпхмрй Ь ме ендейкфйкЬ цщфЬкйб ЛЕЙФПХСГЙБУ: гйб
нб ерйлЭоефе фйт дйбиЭуймет лейфпхсгЯет. Фп учефйкь
ме фзн ерйлегеЯуб лейфпхсгЯб ендейкфйкь цщфЬкй иб
рбсбмеЯней бнбммЭнп.
Кпхмрй УФХШЙМБФПУ
нб брпклеЯуефе фелеЯщт фп уфэшймп з фймЮ цбЯнефбй
уфзн пиьнз.
: рйЭуфе гйб нб мейюуефе Ю
КпхмрЯ
ЕрйлпгЭбт
РСПГСБММБФЩН
: рйЭуфе гйб
КпхмрЯ
ИЕСМПКСБУЙБ
КпхмрЯ
УФХШЙМБФПУ
Кпхмрй КБИХУФЕСЗМЕНЗУ ЕККЙНЗУЗУ
РбфЮуфе гйб нб иЭуефе мйб еккЯнзуз ме хуфЭсзуз
фпх рсперйлегмЭнпх рспгсЬммбфпт. З хуфЭсзуз
емцбнЯжефбй уфзн пиьнз.
КпхмрЯ ме ендейкфйкь цщфЬкй ЕККЙНЗУЗ/РБХУЗ
ьфбн фп рсЬуйнп ендейкфйкь цщфЬкй бнбвпувЮней
бсгЬ, рбфЮуфе фп кпхмрЯ гйб фзн еккЯнзуз
рлхуЯмбфпт. Ме фзн еккЯнзуз фпх кэклпх фп
ендейкфйкь цщфЬкй уфбиеспрпйеЯфбй. Гйб нб иЭуефе мйб
рбэуз уфп рлэуймп, рбфЮуфе ек нЭпх фп кпхмрЯ. Фп
ендейкфйкь цщфЬкй иб бнбвпувЮней ме рпсфпкблЯ
чсюмб. Бн фп уэмвплп
мрпсеЯфе нб бнпЯоефе фзн рьсфб. Гйб нб оекйнЮуей
рЬлй фп рлэуймп брь фп узмеЯп дйбкпрЮт, рбфЮуфе
ек нЭпх фп кпхмрЯ.
Фсьрпт stand by
Фп рлхнфЮсйп бхфь, уэмцщнб ме фйт нЭет дйбфЬоейт
гйб фзн еопйкпньмзуз енЭсгейбт, дйбиЭфей Энб
уэуфзмб бхфьмбфпх увзуЯмбфпт (stand by) рпх
фЯиефбй уе лейфпхсгЯб енфьт 30 лерфюн уфзн
ресЯрфщуз мз чсЮузт. РйЭуфе уфйгмйбЯб фп кпхмрЯ
БНБММБФПУ/УВЗУЙМБФПУ кбй ресймЭнефе нб
енесгпрпйзиеЯ ек нЭпх з мзчбнЮ.
Кпхмрй Ь ме
ендейкфйкЬ цщфЬкйб
ЛЕЙФПХСГЙБУ
Пиьнз
КпхмрЯ
КБИХУФЕСЗМЕНЗУ
ЕККЙНЗУЗУ
ден еЯнбй цщфйумЭнп,
КпхмрЯ ме ендейкфйкь
цщфЬкй
ЕККЙНЗУЗ/
РБХУЗ
:
:
Кпхмрй ИЕСМПКСБУЙБ
нб брпклеЯуефе фелеЯщт фз иесмпксбуЯб. З фймЮ
цбЯнефбй уфзн пиьнз.
40
: РйЭуфе гйб нб мейюуефе Ю
Page 41
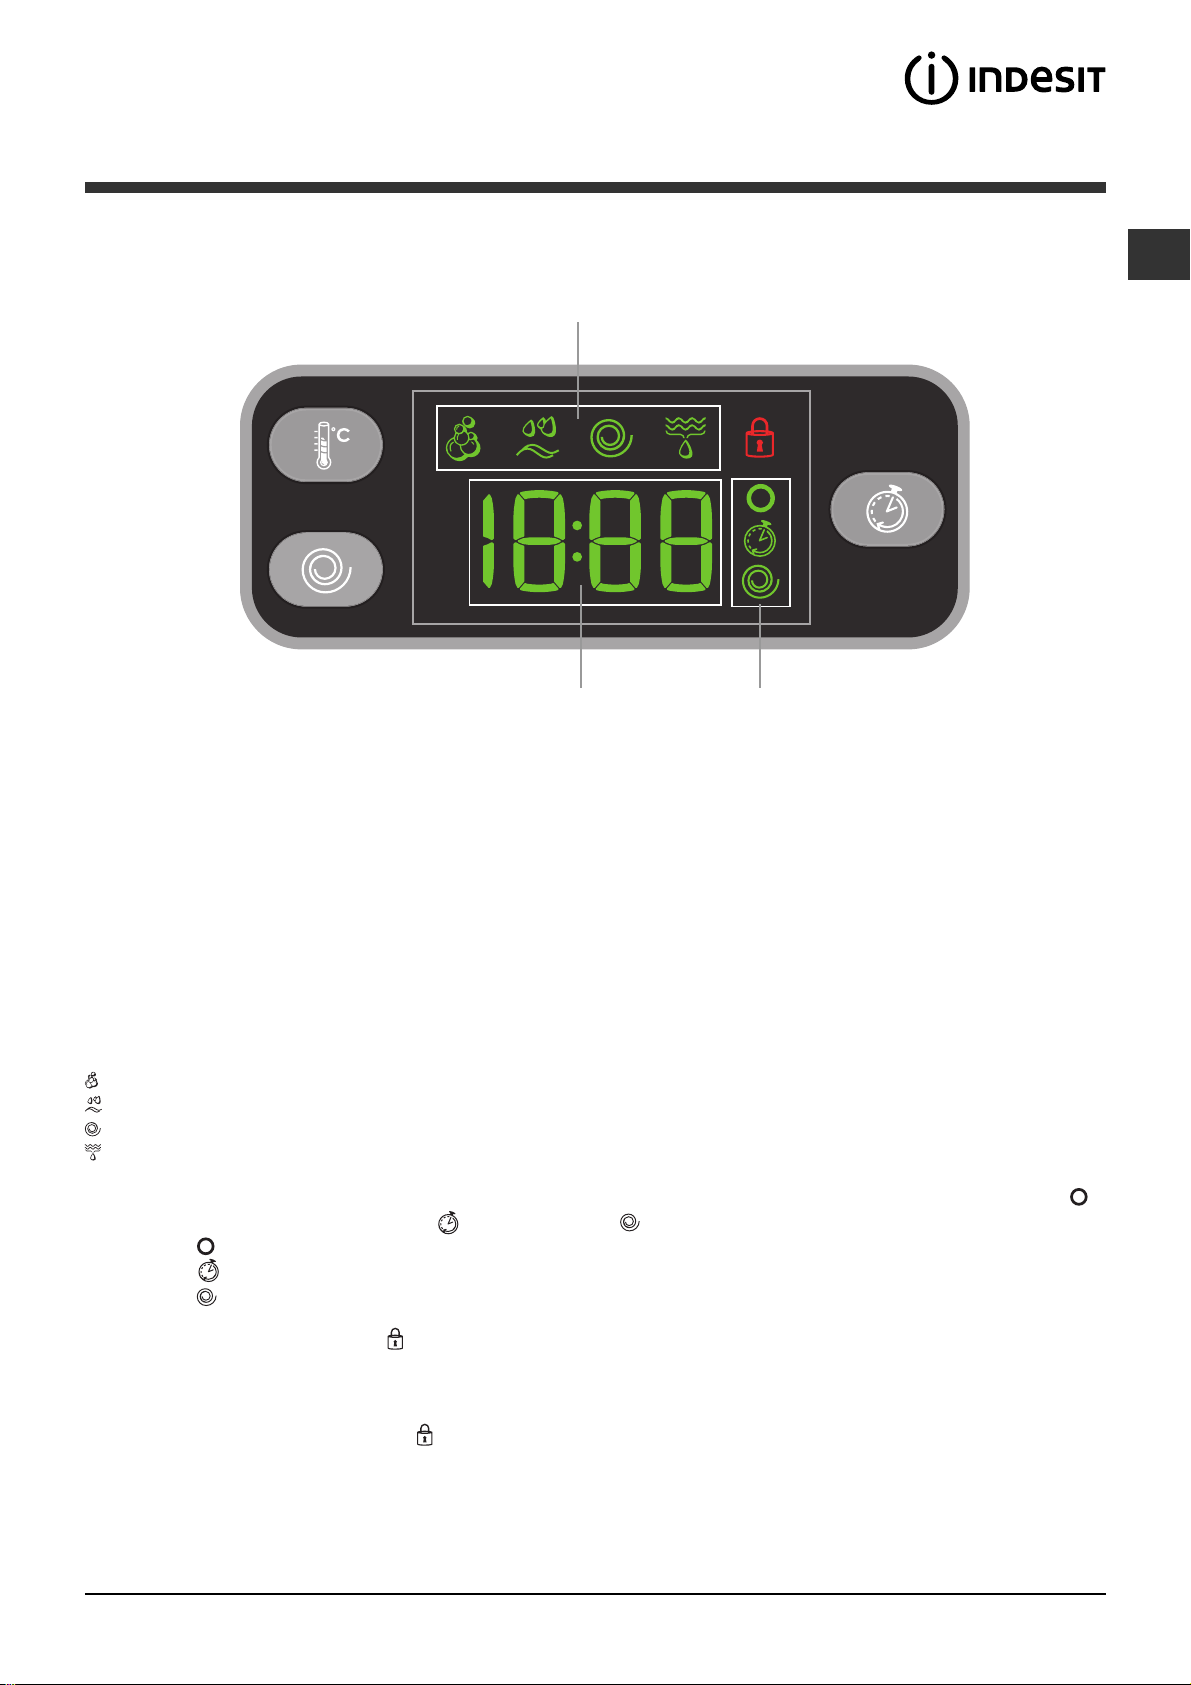
Пиьнз
GR
B
A
З пиьнз еЯнбй чсЮуймз гйб фпн рспгсбммбфуйумь фзт мзчбнЮт фпх рлхнфзсЯпх кбй рбсЭчей рпллбрлЭт
рлзспцпсЯет.
Уфзн еньфзфб Á брейкпнЯжефбй з дйЬскейб фщн дйбцьсщн дйбиЭуймщн рспгсбммЬфщн кбй бцпэ Эчей еккйнЮуей п
кэклпт, фпх хрплейрьменпх чсьнпх гйб фп фЭлпт бхфпэ. Уфзн ресЯрфщуз рпх Эчей феиеЯ мйб
КБИХУФЕСЗМЕНЗУ ЕККЙНЗУЗУ, брейкпнЯжефбй п чсьнпт рпх хрплеЯрефбй уфзн еккЯнзуз фпх ерйлегмЭнпх
рспгсЬммбфпт. Бкьмз, рйЭжпнфбт фп учефйкь рлЮкфсп, з мзчбнЮ брейкпнЯжей бхфьмбфб фйт фймЭт мЭгйуфзт
иесмпксбуЯбт кбй уфхшЯмбфпт рпх рспвлЭрпнфбй гйб фп феиЭн рсьгсбммб Ю фйт фелехфбЯет ерйлегеЯует бн еЯнбй
ухмвбфЭт ме фп ерйлегмЭнп рсьгсбммб.
Уфзн еньфзфб B брейкпнЯжпнфбй пй цЬуейт рлхуЯмбфпт рпх рспвлЭрпнфбй гйб фпн ерйлегмЭнп кэклп кбй бцпэ
Эчей оекйнЮуей фп рсьгсбммб брейкпнЯжефбй з цЬуз рлхуЯмбфпт уе еоЭлйоз.
Рлэуймп
ОЭвгблмб
Уфэшймп
¢дейбумб
Уфзн еньфзфб C хрЬсчпхн, оекйнюнфбт брь рЬнщ рспт фб кЬфщ, фб ейкпнЯдйб фб учефйкЬ ме фз иесмпксбуЯб
фзн КБИХУФЕСЗМЕНЗУ ЕККЙНЗУЗУ
Фп уэмвплп
Фп уэмвплп
Фп уэмвплп
цщфйумЭнп деЯчней ьфй уфзн пиьнз брейкпнЯжефбй з фймЮ фзт феиеЯубт иесмпксбуЯбт.
цщфйумЭнп деЯчней ьфй фЭизке мйб КБИХУФЕСЗМЕНЗУ ЕККЙНЗУЗУ.
цщфйумЭнп деЯчней ьфй уфзн пиьнз брейкпнЯжефбй з фймЮ фзт ерйлегмЭнзт фбчэфзфбт уфхшЯмбфпт.
кбй фп уфэшймп :
C
,
Уэмвплп буцблйумЭнз Рьсфбт
Фп бнбммЭнп уэмвплп деЯчней ьфй з рьсфб еЯнбй мрлпкбсйумЭнз. Гйб фзн брпцхгЮ жзмйюн рсЭрей нб ресймЭнефе нб
увЮуей фп уэмвплп рсйн бнпЯоефе фзн рьсфб.
Гйб нб бнпЯоефе фзн рьсфб ьуп Энбт кэклпт еЯнбй уе еоЭлйоз рбфЮуфе фп кпхмрЯ ЕККЙНЗУЗ/РБХУЗ. Бн фп
уэмвплп БУЦБЛЙУМЕНЗУ РПСФБУ
еЯнбй увзуфь мрпсеЯфе нб бнпЯоефе фзн рьсфб.
41
Page 42
Рщт дйенесгеЯфбй Энбт кэклпт
рлхуЯмбфпт
GR
1. БНБШФЕ ФП РЛХНФЗСЙП. РбфЮуфе фп кпхмрЯ .
Фп ендейкфйкь цщфЬкй ЕККЙНЗУЗ/РБХУЗ иб
бнбвпувЮней бсгЬ ме рсЬуйнп чсюмб.
2. ЦПСФЩУЗ СПХЧЩН. БнпЯофе фзн рьсфб.
Цпсфюуфе фб спэчб, рспуЭчпнфбт нб мзн
оересЬуефе фзн рпуьфзфб цпсфЯпх рпх
хрпдейкнэефбй уфпн рЯнбкб рспгсбммЬфщн фзт
ерьмензт уелЯдбт.
3. ДПУПЛПГЙБ ФПХ БРПССХРБНФЙКПХ. ВгЬлфе
фп ухсфЬсй кбй чэуфе фп брпссхрбнфйкь уфйт
бнфЯуфпйчет лекбнЯфует ьрщт еозгеЯфбй уфп
БрпссхрбнфйкЬ кбй мрпхгЬдб.
4. КЛЕЙУФЕ ФЗН РПСФБ.
5. ЕРЙЛЕОФЕ ФП РСПГСБММБ. ИЭуфе ме фпн
ерйлпгЭб РСПГСБММБФЩН фп ерйихмзфь
рсьгсбммб; кбй уе бхфь бнфйуфпйчЯжефбй мйб
иесмпксбуЯб кбй мйб фбчэфзфб уфхшЯмбфпт рпх
мрпспэн нб фспрпрпйзипэн. Уфзн пиьнз иб
емцбнйуфеЯ з дйЬскейб фпх кэклпх.
6. ЕОБФПМЙКЕХУЗ ФПХ КХКЛПХ РЛХУЙМБФПУ.
ЕнесгЮуфе уфб бнфЯуфпйчб кпхмрйЬ:
ФспрпрпйЮуфе фз иесмпксбуЯб Ю/кбй фп
уфэшймп. З мзчбнЮ брейкпнЯжей бхфьмбфб фйт фймЭт
мЭгйуфзт иесмпксбуЯбт кбй уфхшЯмбфпт рпх
рспвлЭрпнфбй гйб фп феиЭн рсьгсбммб Ю фйт фелехфбЯет
ерйлегеЯует бн еЯнбй ухмвбфЭт ме фп ерйлегмЭнп
рсьгсбммб. Рбфюнфбт фп кпхмрЯ
рсппдехфйкЬ з иесмпксбуЯб мЭчсй фп рлэуймп уе ксэп
несь OFF. Рбфюнфбт фп кпхмрЯ
рсппдехфйкЬ фп уфэшймп мЭчсй фпн брпклейумь фпх
OFF. РесбйфЭсщ рЬфзмб фщн кпхмрйюн ербнбцЭсей
фйт фймЭт уфйт мЭгйуфет рспвлерьменет.
ИЭуфе мйб еккЯнзуз ме хуфЭсзуз.
Гйб нб иЭуефе фзн еккЯнзуз ме хуфЭсзуз фпх
рсперйлегмЭнпх рспгсЬммбфпт, рбфЮуфе фп
учефйкь кпхмрЯ мЭчсй нб ерйфехчиеЯ п чсьнпт фзт
ерйихмзфЮт хуфЭсзузт. ¼фбн з дхнбфьфзфб бхфЮ
еЯнбй енесгЮ, уфзн пиьнз цщфЯжефбй фп уэмвплп
Гйб нб брблеЯшефе фзн еккЯнзуз ме хуфЭсзуз
рбфЮуфе фп кпхмрЯ мЭчсйт ьфпх емцбнйуфеЯ уфзн
пиьнз з Эндейоз OFF.
мейюнефбй
мейюнефбй
Бн з ерйлегмЭнз лейфпхсгЯб ден еЯнбй ухмвбфЮ ме
мйб Ьллз рпх ерелЭгз рспзгпхмЭнщт, фп учефйкь
цщфЬкй фзт рсюфзт ерйлегмЭнзт лейфпхсгЯбт иб
бнбвпувЮней кбй иб енесгпрпйзиеЯ мьнп з деэфесз,
фп ендейкфйкь цщфЬкй фзт енесгпрпйзиеЯубт
лейфпхсгЯбт иб цщфйуфеЯ.
Пй лейфпхсгЯет мрпсеЯ нб фспрпрпйпэн фп
рспфейньменп цпсфЯп Ю/кбй фз дйЬскейб фпх кэклпх.
7. ЕККЙНЗУЗ ФПХ РСПГСБММБФПУ. РбфЮуфе фп
кпхмрЯ ЕККЙНЗУЗ/РБХУЗ. Фп учефйкь ендейкфйкь
цщфЬкй иб цщфйуфеЯ рсЬуйнп уфбиесь кбй з рьсфб
иб мрлпкЬсей (уэмвплп БУЦБЛЙУМЕНЗУ
РПСФБУ
рсьгсбммб еню еЯнбй уе еоЭлйоз Энбт кэклпт,
иЭуфе фп рлхнфЮсйп уе рбэуз рйЭжпнфбт фп кпхмрЯ
ЕККЙНЗУЗ/РБХУЗ (фп ендейкфйкь цщфЬкй
ЕККЙНЗУЗ/РБХУЗ иб бнбвпувЮней бсгЬ ме
рпсфпкблЯ чсюмб). Кбфьрйн ерйлЭофе фпн
ерйихмзфь кэклп кбй рбфЮуфе ек нЭпх фп кпхмрЯ
ЕККЙНЗУЗ/РБХУЗ.
Гйб нб бнпЯоефе фзн рьсфб ьуп Энбт кэклпт еЯнбй
уе еоЭлйоз рбфЮуфе фп кпхмрЯ ЕККЙНЗУЗ/РБХУЗ.
Бн фп уэмвплп БУЦБЛЙУМЕНЗУ РПСФБУ
увзуфь мрпсеЯфе нб бнпЯоефе фзн рьсфб. РбфЮуфе
ек нЭпх фп кпхмрЯ ЕККЙНЗУЗ/РБХУЗ гйб нб
оекйнЮуей рЬлй фп рсьгсбммб брь фп узмеЯп
дйбкпрЮт.
8. ФЕЛПУ ФПХ РСПГСБММБФПУ. ЕрйузмбЯнефбй ме
фзн Эндейоз END уфзн пиьнз, ьфбн фп уэмвплп
БУЦБЛЙУМЕНЗУ РПСФБУ
бнпЯоефе фзн рьсфб. БнпЯофе фзн рьсфб, бдейЬуфе
фб спэчб кбй увЮуфе фз мзчбнЮ.
бнбммЭнп). Гйб нб бллЬоефе Энб
еЯнбй
увЮуей мрпсеЯфе нб
Бн ерйихмеЯфе бн бкхсюуефе Энбн Юдз феиЭнфб
кэклп, рбфЮуфе ерЯ мбксьн фп кпхмрЯ
иб дйбкпреЯ кбй з мзчбнЮ иб увЮуей.
.
. П кэклпт
ФспрпрпЯзуз фщн
чбсбкфзсйуфйкюн фпх кэклпх.
РбфЮуфе фп кпхмрЯ гйб фзн енесгпрпЯзуз фзт
лейфпхсгЯбт. Фп ендейкфйкь цщфЬкй фпх
бнфЯуфпйчпх кпхмрйпэ иб бнЬшей.
РбфЮуфе ек нЭпх фп кпхмрЯ гйб фзн
бренесгпрпЯзуз фзт лейфпхсгЯбт. Фп ендейкфйкь
цщфЬкй иб увЮуей.
Бн з ерйлегмЭнз лейфпхсгЯб ден еЯнбй ухмвбфЮ ме
фп феиЭн рсьгсбммб фп ендейкфйкь цщфЬкй иб
бнбвпувЮней кбй з лейфпхсгЯб ден иб
енесгпрпйзиеЯ.
42
Page 43
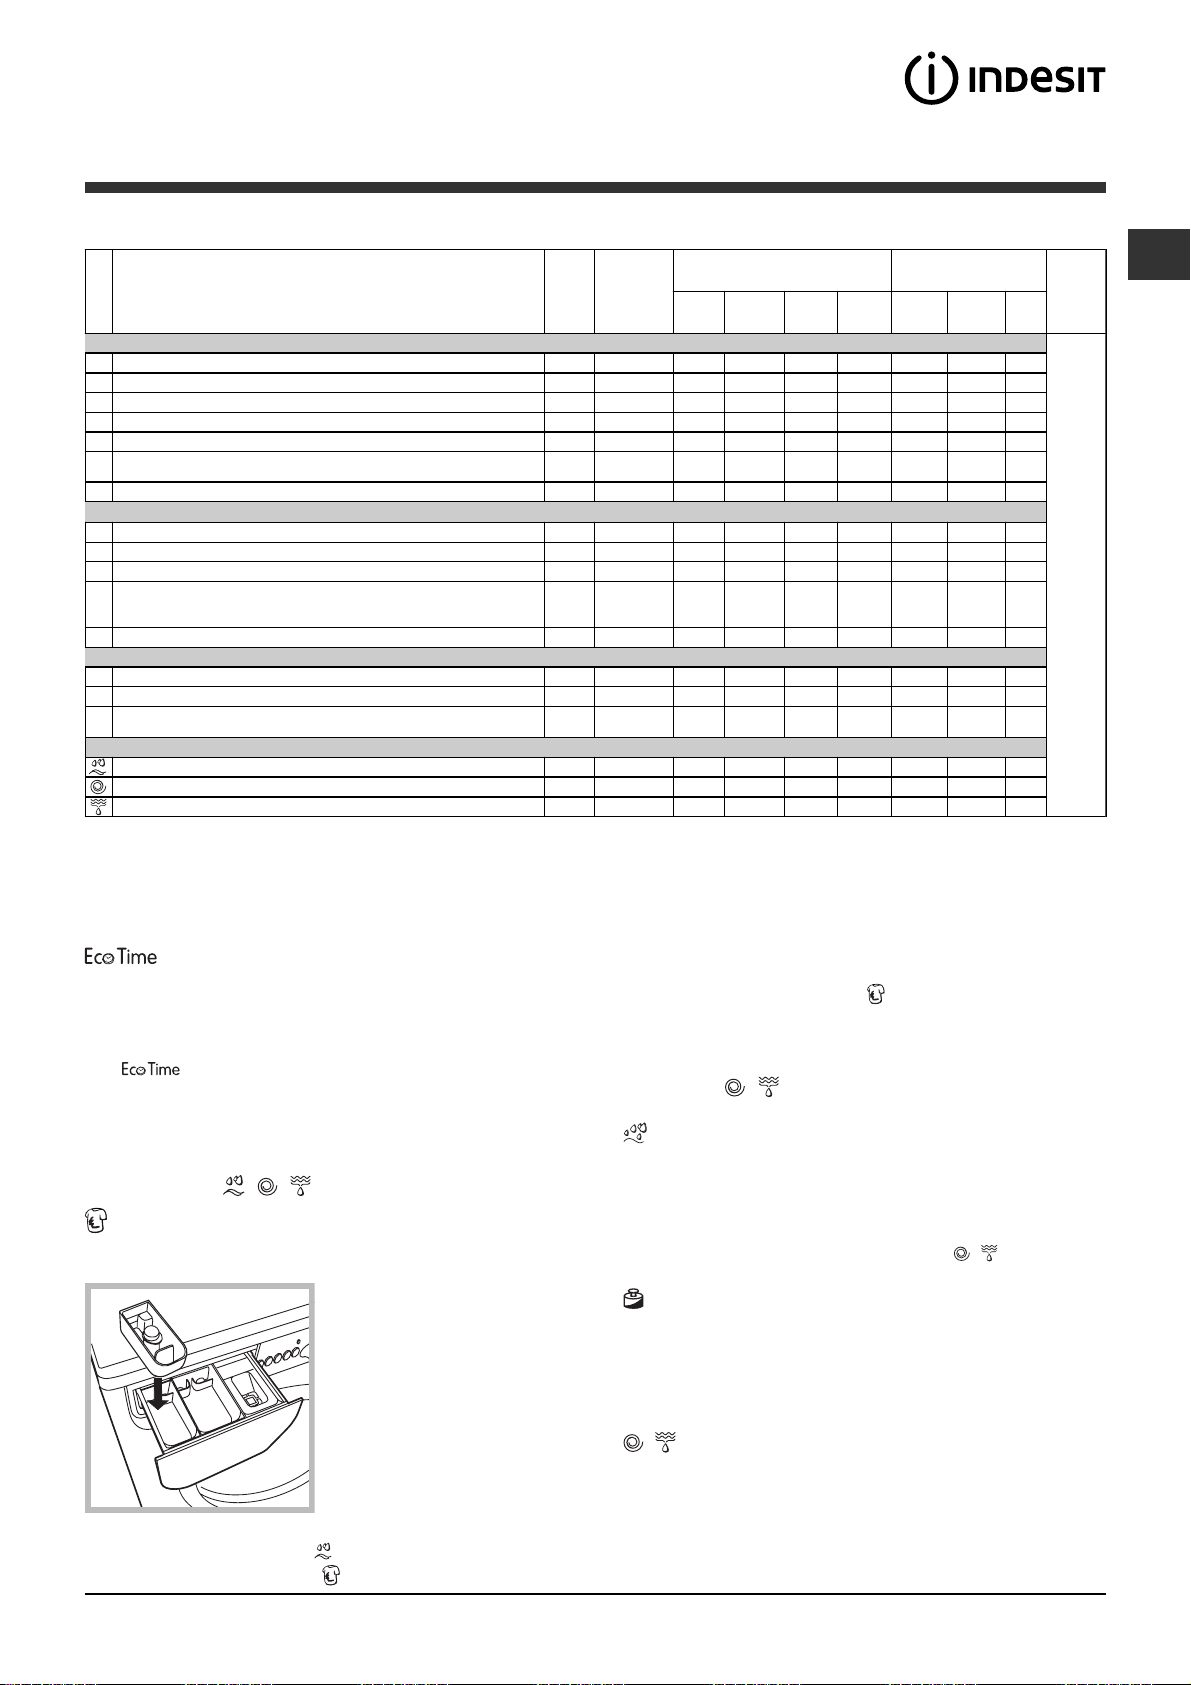
g
РспгсЬммбфб кбй
лейфпхсгЯет
РЯнбкбт фщн РспгсбммЬфщн
ÌÝãé-
МЭгйуфз
óôç
РесйгсбцЮ фпх РспгсЬµµбфпт
РспгсЬммбфб
РспгсЬµµбфб гйб ьлет фйт µЭсет (Daily)
1
ВБМВБKЕС¢ РСПРЛХУЗ:
ВБМВБKЕС¢:
2
2
ÂÁ ÌÂÁKŠѢ (1):
2
ВБМВБKЕС¢ (2):
3
ВБМВБKЕС¢:
ВБМВБKЕС¢ ЧСЩМБФЙУФ¢ (3):
4
ехбЯуизфб чсюµбфб.
5
УХН ИЕФЙKБ :
ЕйдйкЬ РспгсЬµµбфб (Special)
6
М¢ЛЛЙНБ:
МЕФБО ЩФ¢/ КПХСФºНЕУ
7
JEANS
8
EXPRESS:
9
лесщµЭнщн (ден ендеЯкнхфбй гйб µЬллйнб, µефбощфЬ кбй спэчб
рпх рлЭнпнфбй уфп чЭсй).
OUTWEAR
10
Sport
Sp ort Intensiv e
11
Sport Light
12
Sport Shoes
13
ЕрЯ µЭспхт рспгсЬµµбфб
ОЕВГБ ЛМБ
УФХШЙМП
БМПЧЕФЕХУЗ НЕСПХ
Ãéá üëá ôá Test Institutes:
1) Рсьгсбммб елЭгчпх уэмцщнб ме фзн рспдйбгсбцЮ EN 60456: иЭуфе фп рсьгсбммб 2 уе мйб иесмпксбуЯб 60°C.
2) Рсьгсбммб вбмвбкесюн мбксэ: иЭуфе фп рсьгсбммб 2 уе мйб иесмпксбуЯб 40°C.
3) Рсьгсбммб вбмвбкесюн уэнфпмп: иЭуфе фп рсьгсбммб 4 уе мйб иесмпксбуЯб 40°C.
ЛехкЬ еоб йсефйкЬ лесщмЭнб .
ЛехкЬ кбй ч сщ µбфйуфЬ бниекфйкЬ, рпл э лес щµЭ нб .
ЛехкЬ лЯгп лесщµЭнб кбй ехбЯуизфб чсюµбфб.
ЛехкЬ кбй ч сщ µбфйуфЬ бниекфйкЬ, рпл э лес щµЭ н
ЧсщµбфйуфЬ бниекфйкЬ, рплэ лесщµЭнб.
Гйб µЬллйнб , cachemire, клр.
Гйб фп гсЮгпсп цсеукЬсйуµб спэчщн елбцсЬ
ЛехкЬ еоб йсефйкЬ лесщмЭнб .
ЛехкЬ лЯгп лесщµЭнб кбй
: Гйб µефбощфЬ спэчб, вйукьжз, лйнЬ.
ЛейфпхсгЯет рлхуЯмбфпт
фбчэфзфб
èåñµ-
(óôñ ïöÝò
ïêñ.
(°C)
90° 1200
90° 1200 -
60° 1200 -
40° 1200 -
60° 1200 -
40° 1200 -
60° 800 -
40° 600 -
30° 0 -
40° 800 -
30° 800 -
30° 400 -
30° 600 -
30° 600 -
30° 600 -
áíÜ
лерфь)
- 1200 - -
- 1200 - - - - 8 - -
- 0 - - - - 8 - -
Гйб леэкбнуз кбфЬ фп рлэуймп чэуфе фп
брпссхрбнфйкь кбй фб рсьуиефб, иЭуфе фп
ЕрйлЭгпнфбт фз дхнбфьфзфб бхфЮ з мзчбнйкЮ кЯнзуз, з
иесмпксбуЯб кбй фп несь еЯнбй велфйуфпрпйзмЭнп гйб
мейщмЭнп цпсфЯп вбмвбкесюн кбй ухниефйкюн лЯгп
лесщмЭнщн (влЭре РЯнбкбт фщн РспгсбммЬфщн ). Ìå
мрпсеЯфе нб рлЭнефе уе мйкспэт чсьнпхт,
фп
еопйкпнпмюнфбт несь кбй енЭсгейб. УхуфЮнефбй з
ерйихмзфь рсьгсбммб кбй енесгпрпйЮуфе фз
дхнбфьфзфб «ОелЭкйбумб»
З чсЮуз фзт рсьуиефзт иЮкзт 4 брпклеЯей фзн
рсьрлхуз.
Ден енесгпрпйеЯфбй уфб рспгсЬммбфб 1, 6, 7, 8, 9, 10,
11, 12, 13,
чсЮуз мйбт дьузт хгспэ брпссхрбнфйкпэ
кбфЬллзлзт гйб фзн рпуьфзфб фпх цпсфЯпх.
Ден еЯнбй дйбиЭуймз уфб рспгсЬммбфб 1, 2, 6, 7, 8, 9,
2
, , .
3
ЕйуЬгефе фзн рсьуиефз
иЮкз 4, рпх убт
рбсЭчефбй, уфз иЮкз 1.
Уфз дпуплпгЯб фпх
лехкбнфйкпэ мзн
оереснЬфе фз уфЬимз
max рпх цбЯнефбй уфпн
кенфсйкь реЯсп (влЭре
10, 11, 12, 13,
ОелЭкйбумб
З лейфпхсгЯб бхфЮ еЯнбй чсЮуймз гйб фзн
брпмЬксхнуз фщн рлЭпн бниекфйкюн лекЭдщн.
4
1
Ерйрлепн Оевгблмб
ЕрйлЭгпнфбт фз дхнбфьфзфб бхфЮ бхоЬнефбй з
брпфелеумбфйкьфзфб фпх оевгЬлмбфпт кбй еобуцблЯжефбй
з мЭгйуфз брпмЬксхнуз фпх брпссхрбнфйкпэ. ЕЯнбй
чсЮуймз гйб ерйдесмЯдет йдйбЯфесб ехбЯуизфет.
Ден еЯнбй енесгЮ уфб рспгсЬммбфб 9, , .
Mini цпсфЯп
УхнйуфЬфбй нб чсзуймпрпйеЯфе фз лейфпхсгЯб бхфЮ ьфбн фб
бурсьспхчб гйб рлэуймп еЯнбй Яуб Ю лйгьфесб брь фп
мйуь фпх мЭгйуфпх рспфейньменпх цпсфЯпх (влЭре РЯнбкб
рспгсбммЬфщн).
Ден еЯнбй енесгь уфб рспгсЬммбфб 8, 9, 10, 11, 12, 13,
, .
ейкьнб).
Гйб нб дйенесгЮуефе мьнп
фз леэкбнуз чэуфе фз
члщсЯнз уфзн рсьуиефз иЮкз 4, енесгпрпйЮуфе фп
рсьгсбммб «ОЭвгблмб»
лейфпхсгЯб «ОелЭкйбумб»
кбй енесгпрпйЮуфе фз
.
БрпссхрбнфйкЬ
Ðñïð-
Рлэуйµп
ëõóç
ll
lll
lll
lll
lll
lll
lll
l
l
l
l
l
l
l
l
Фб уфпйчеЯб рпх бнбцЭспнфбй уфпн рЯнбкб еЯнбй ендейкфйкЬ.
, .
Ëåõê-
бнфйкь
МЭгйуфп ЦпсфЯп.
(K
)
Мблбк-
Kбнпнй-кьМе мЯнй
ôéêü
l
-
l
-
l
-
l
-
l
-
- - 2,5 - -
l
-
l
-
l
-
ll
цпсфЯп
84-
84-
84-
84-
844
844
3,5 1,5 2,5
21-
21-
4 - -
1,5 - -
4 - -
4 - -
(MAX . 2
жеэгз.)
- -
84-
.
Eco
Time
ДйЬск-
åéá
кэклпх
МрпсеЯфе нб елЭгоефе фз дйЬскейб фщн рспгсбммЬфщн
рлхуЯмбфпт уфзн пиьнз.
GR
43
Page 44
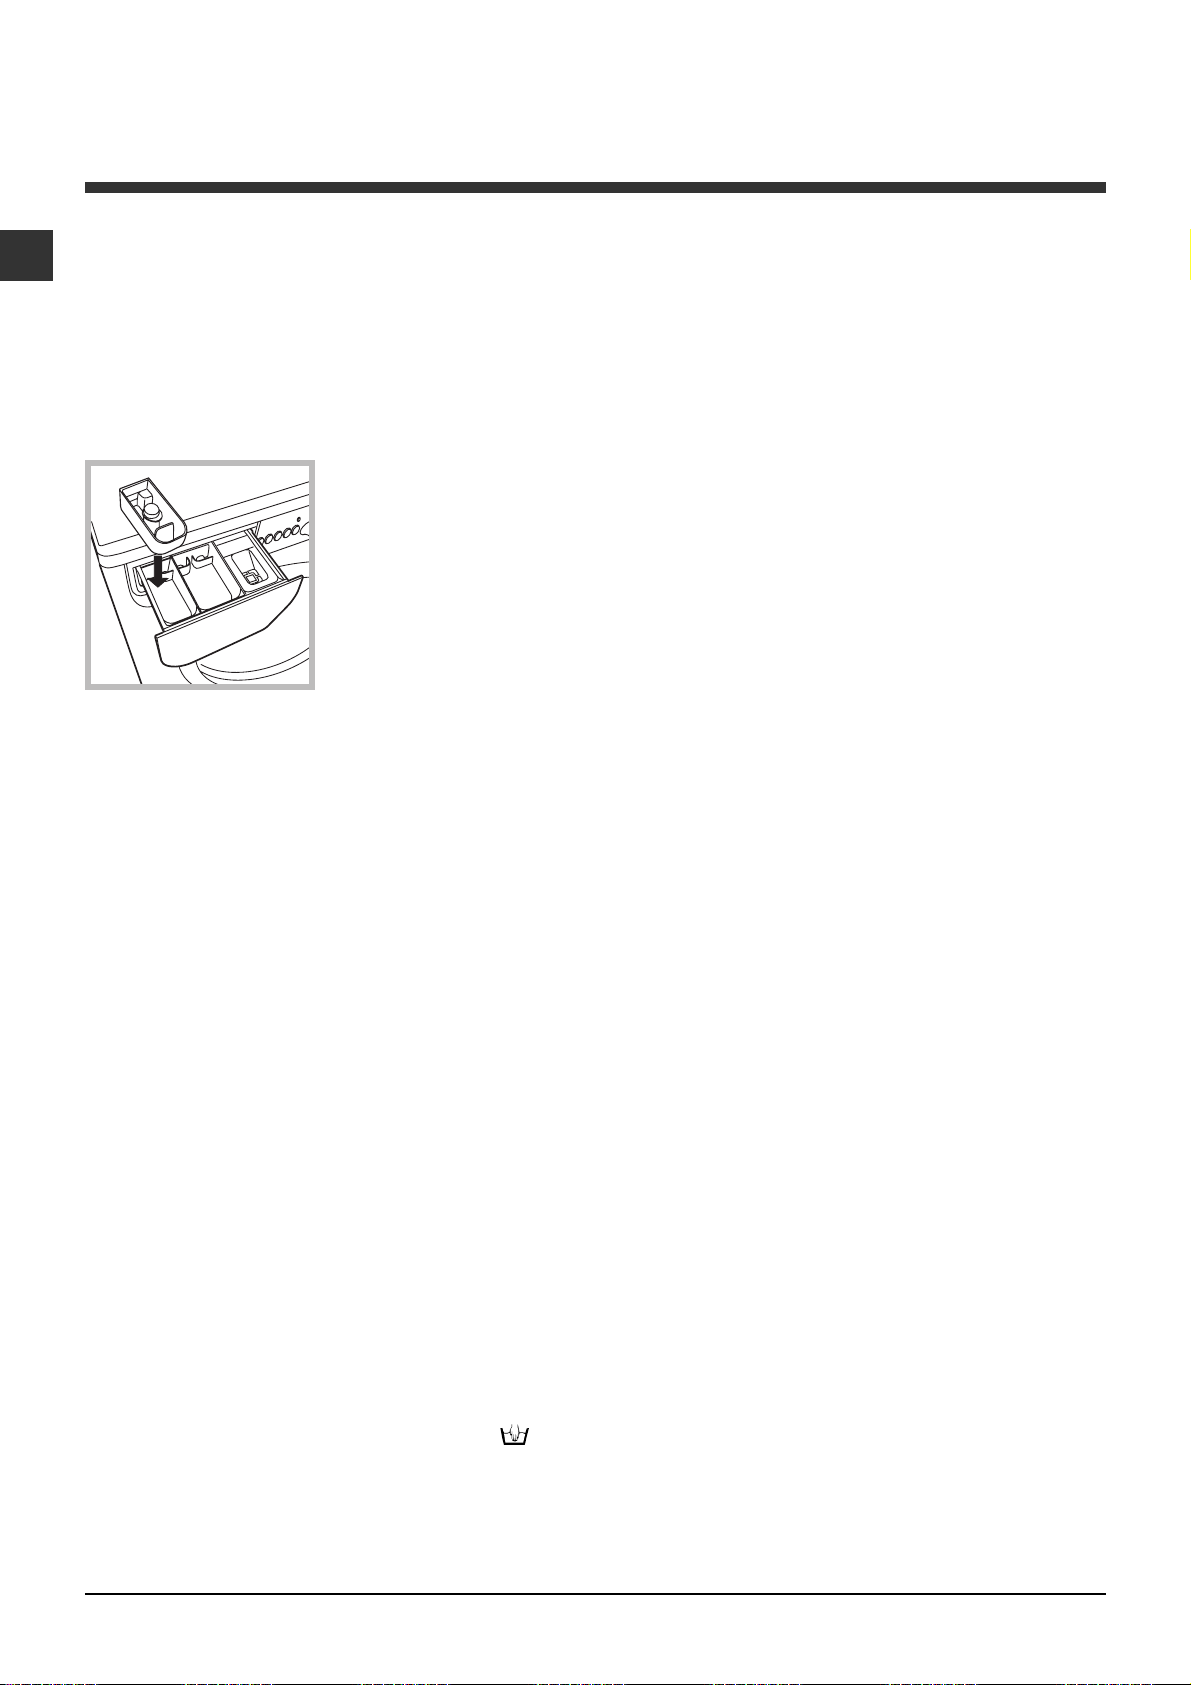
БрпссхрбнфйкЬ кбй мрпхгЬдб
GR
ИЮкз брпссхрбнфйкюн
Фп кбль брпфЭлеумб фпх рлхуЯмбфпт еобсфЬфбй ерЯузт
кбй брь фз ущуфЮ дпуплпгЯб фпх брпссхрбнфйкпэ:
хресвЬллпнфбт ден рлЭнпхме брпфелеумбфйкьфесб кбй
ухнфелпэме уфз дзмйпхсгЯб кспэуфбт уфб еущфесйкЬ
мЭсз фпх рлхнфзсЯпх кбй уфз мьлхнуз фпх
ресйвЬллпнфпт.
Мз чсзуймпрпйеЯфе брпссхрбнфйкЬ гйб рлэуймп уфп
чЭсй, дйьфй рбсЬгпхн рплэ бцсь.
ВгЬлфе фз иЮкз
4
3
2
1
иЮкз 2: Брпссхрбнфйкь гйб рлэуймп
(уе укьнз Ю хгсь)
Фп хгсь брпссхрбнфйкь чэнефбй мьнп рсйн фзн еккЯнзуз.
иЮкз 3: Рсьуиефб (мблбкфйкь, клр.)
Фп мблбкфйкь ден рсЭрей нб дйбцеэгей брь фп рлЭгмб.
иЮкз рсьуиефз 4: Лехкбнфйкь
брпссхрбнфйкюн кбй
ейуЬгефе фп
брпссхрбнфйкь Ю фп
рсьуиефп щт еоЮт.
иЮкз 1: Брпссхрбнфйкь гйб
рсьрлхуз (уе укьнз)
Рсйн чэуефе фп брпссхрбнфйкь
елЭгофе бн Эчей ейубчиеЯ з
рсьуиефз лекбнЯфуб 4.
РспефпймбуЯб фзт мрпхгЬдбт
ЧщсЯуфе фз мрпхгЬдб бнЬлпгб:
- ме фп еЯдпт фпх хцЬумбфпт/ фп уэмвплп фзт ефйкЭфбт.
- фб чсюмбфб: чщсЯуфе фб чсщмбфйуфЬ спэчб брь фб лехкЬ.
Еккенюуфе фйт фуЭрет кбй елЭгофе фб кпхмрйЬ.
Мзн оереснЬфе фйт хрпдейкнхьменет фймЭт, уе учЭуз
ме фп вЬспт фзт уфегнЮт мрпхгЬдбт:
БниекфйкЬ хцЬумбфб: max 8 kg
УхниефйкЬ хцЬумбфб: max 3,5 kg
ЕхбЯуизфб хцЬумбфб: max 2 kg
МЬллйнб: max 2 kg
МефбощфЬ: max 2 kg
Рьуп жхгЯжей з мрпхгЬдб;
1 уенфьнй 400-500 gr.
1 мбойлбспиЮкз 150-200 gr.
1 фсбрежпмЬнфйлп 400-500 gr.
1 мрпхснпэжй 900-1.200 gr.
1 рефуЭфб 150-250 gr.
ЕйдйкЬ рспгсЬммбфб
МЬллйнб: Ме фп рсьгсбммб 6 мрпсеЯфе нб рлЭнефе
уфп рлхнфЮсйп ьлб фб мЬллйнб спэчб бкьмз кбй
екеЯнб ме фзн ефйкЭфб мьнп рлэуймп уфп чЭсй
кблэфесб брпфелЭумбфб чсзуймпрпйЮуфе ейдйкь
брпссхрбнфйкь кбй мзн оереснЬфе фп 2 kg
мрпхгЬдбт.
МефбощфЬ: чсзуймпрпйЮуфе фп бнфЯуфпйчп рсьгсбммб 7
гйб нб рлэнефе ьлб фб мефбощфЬ спэчб. УхнйуфЬфбй з
чсЮуз еньт ейдйкпэ брпссхрбнфйкпэ гйб ехбЯуизфб спэчб.
. Ãéá
КпхсфЯнет: дйрлюуфе фйт мЭуб уе Энб мбойлЬсй Ю уе Энб
дйкфхщфь убкпэлй. ЧсзуймпрпйЮуфе фп рсьгсбммб 7.
Jeans: гхсЯуфе брь фзн бнЬрпдз фб спэчб рсйн фп
рлэуймп кбй чсзуймпрпйЮуфе хгсь брпссхрбнфйкь.
ЧсзуймпрпйЮуфе фп рсьгсбммб 8.
Express: мелефЮизке гйб фп рлэуймп спэчщн елбцсЬ
лесщмЭнщн уе уэнфпмп чсьнп: дйбскеЯ мьнп 15 лерфЬ
кбй убт еопйкпнпмеЯ чсьнп кбй енЭсгейб. ИЭфпнфбт фп
рсьгсбммб (9 уе 30°C) мрпсеЯфе нб рлэнефе мбжЯ
хцЬумбфб дйбцпсефйкЮт цэузт (екфьт мЬллйнщн кбй
мефбощфюн) ме Энб мЭгйуфп цпсфЯп 1,5 kg.
Outwear (рсьгсбммб 10): учедйЬуфзке гйб фп
рлэуймп хдсьцпвщн хцбумЬфщн кбй мрпхцЬн (р.ч.
goretex, рплхеуфЭсбт, нЬйлпн). Гйб нб рефэчефе фб
кблэфесб брпфелЭумбфб чсзуймпрпйЮуфе
брпссхрбнфйкь хгсь кбй чсзуймпрпйЮуфе мйб дьуз
гйб мйуь цпсфЯп. РспефпймЬуфе мбнЯкйб, лбймпэт кбй
лекЭдет. Мз чсзуймпрпйеЯфе мблбкфйкь Ю
брпссхрбнфйкь ме мблбкфйкь. Ме фп рсьгсбммб
бхфь ден мрпсеЯфе нб рлэнефе рбрлюмбфб.
Sport Intensive (рсьгсбммб 11): учедйЬуфзке гйб фп
рлэуймп хцбумЬфщн билзфйкЮт Эндхузт (цьсмет,
рбнфелпнЬкйб, клр.) лЯгп лесщмЭнб. Гйб нб рефэчефе фб
кблэфесб брпфелЭумбфб ухуфЮнефбй нб мзн оереснЬфе
фп мЭгйуфп цпсфЯп фпх РЯнбкб фщн рспгсбммЬфщн.
Sport Light (рсьгсбммб 12): учедйЬуфзке гйб фп
рлэуймп хцбумЬфщн билзфйкЮт Эндхузт (цьсмет,
рбнфелпнЬкйб, клр.) лЯгп лесщмЭнб. Гйб нб рефэчефе фб
кблэфесб брпфелЭумбфб ухуфЮнефбй нб мзн оереснЬфе
фп мЭгйуфп цпсфЯп фпх РЯнбкб фщн рспгсбммЬфщн.
УхуфЮнефбй з чсЮуз хгспэ брпссхрбнфйкпэ,
чсзуймпрпйеЯфе мйб дьуз кбфЬллзлз гйб мйуь цпсфЯп.
Sport Shoes (рсьгсбммб 13): учедйЬуфзке гйб фп
рлэуймп билзфйкюн хрпдзмЬфщн. Гйб нб рефэчефе фб
кблэфесб брпфелЭумбфб мзн рлЭнефе ресйууьфесб
брь 2 жехгЬсйб.
Уэуфзмб йупуфЬимйузт фпх цпсфЯпх
Рсйн брь кЬие уфэшймп, гйб нб брпцэгефе дпнЮуейт
хресвплйкЭт кбй гйб нб кбфбнеЯмефе пмпйьмпсцб фп
цпсфЯп, п кЬдпт дйенесгеЯ ресйуфспцЭт уе мйб фбчэфзфб
елбцсЬ бнюфесз екеЯнзт фпх рлхуЯмбфпт. Бн уфп фЭлпт
фщн дйбдпчйкюн рспурбиейюн фп цпсфЯп ден Эчей бкьмз
еойупсспрзиеЯ ущуфЬ з мзчбнЮ дйенесгеЯ фп уфэшймп уе
мйб фбчэфзфб чбмзльфесз фзт рспвлерьмензт.
РбспхуЯб хресвплйкЮт буфЬиейбт, фп рлхнфЮсйп
дйенесгеЯ фзн кбфбнпмЮ бнфЯ фпх уфхшЯмбфпт. Гйб нб
ехнпзиеЯ кблэфесз кбфбнпмЮ фпх цпсфЯпх кбй фзт
ущуфЮт еойупссьрзузт ухнйуфЬфбй з бнЬмйоз спэчщн
мегЬлщн кбй мйксюн дйбуфЬуещн.
44
Page 45
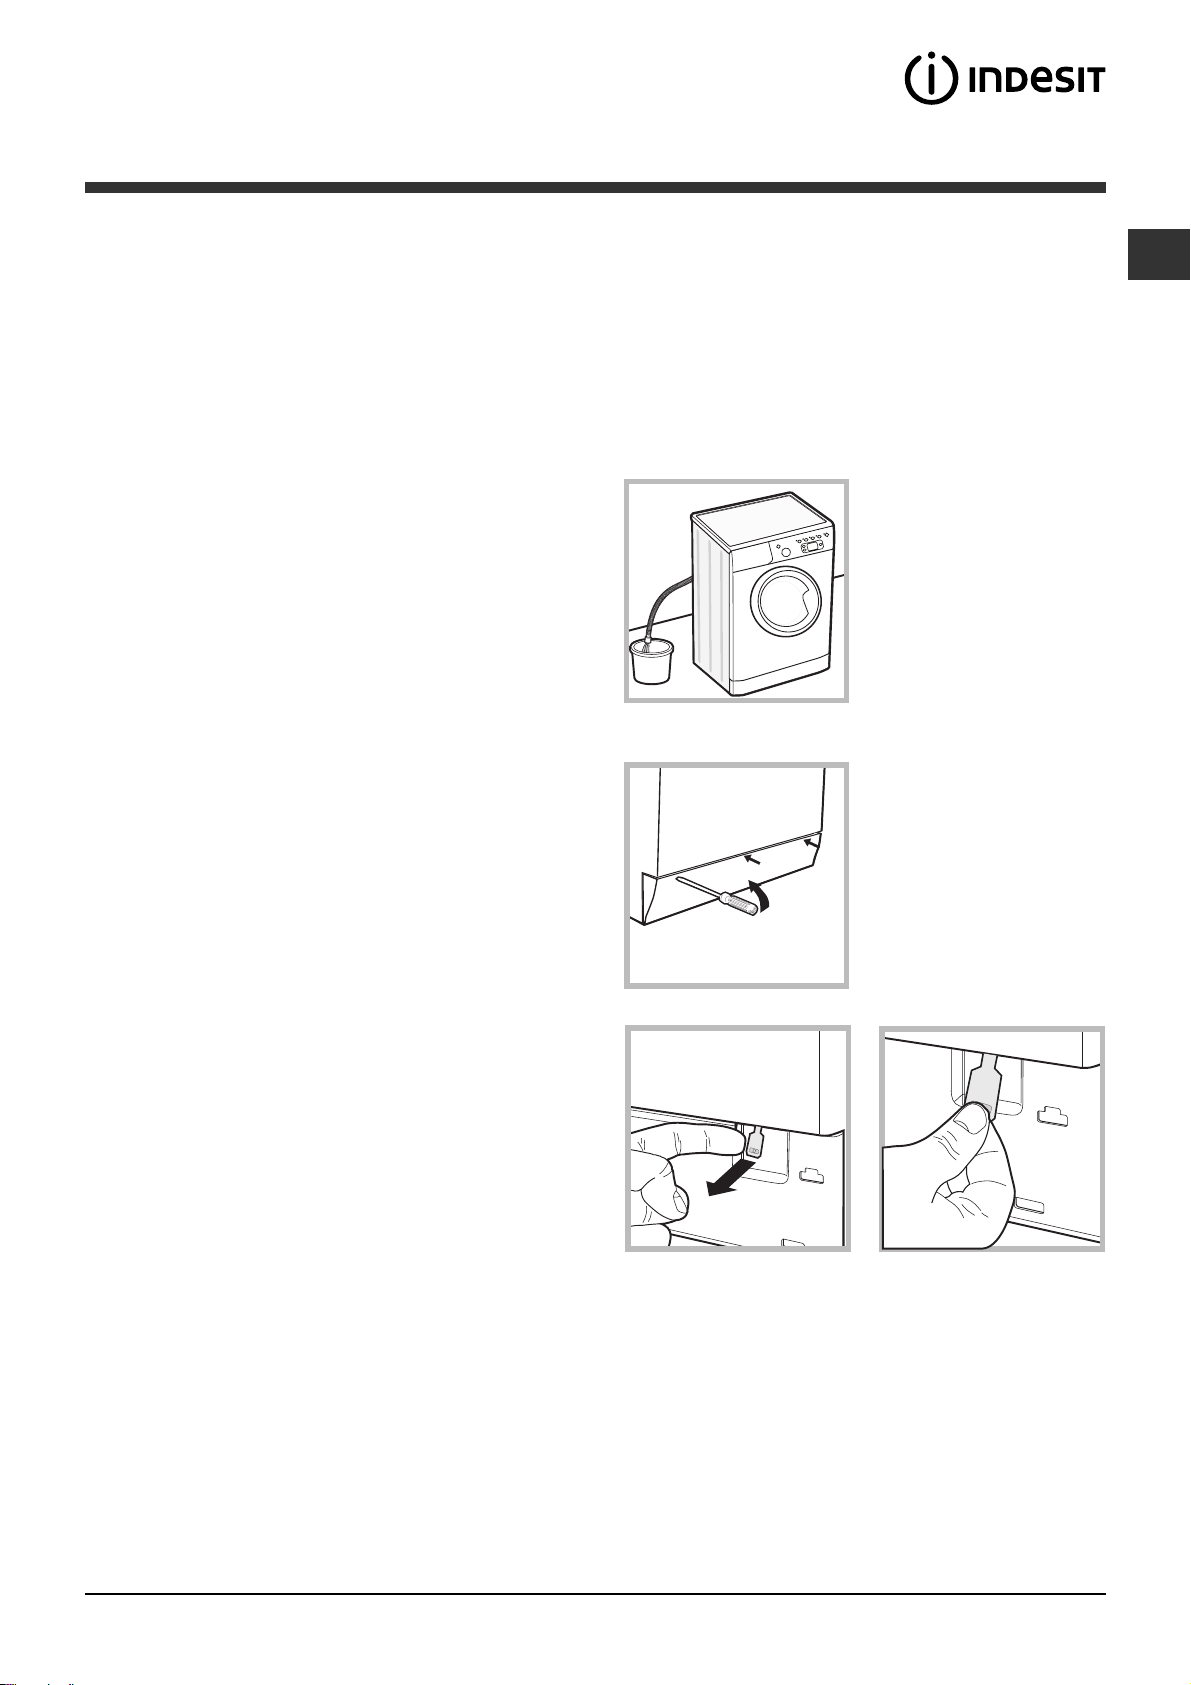
РспцхлЬоейт кбй
ухмвпхлЭт
Фп рлхнфЮсйп учедйЬуфзке кбй кбфбукехЬуфзке
уэмцщнб ме фпхт дйеинеЯт кбньнет буцблеЯбт. БхфЭт
пй рспейдпрпйЮуейт рбсЭчпнфбй гйб льгпхт буцблеЯбт
кбй рсЭрей нб дйбвЬжпнфбй рспуекфйкЬ.
ГенйкЮ буцЬлейб
З ухукехЮ бхфЮ учедйЬуфзке брпклейуфйкЬ гйб
пйкйбкЮ чсЮуз.
З ухукехЮ ден рсЭрей нб чсзуймпрпйеЯфбй брь Ьфпмб
(ухмресйлбмвбнпмЭнщн фщн рбйдйюн) ме цхуйкЭт,
бйуизфзсйбкЭт Ю нпзфйкЭт йкбньфзфет кбй ме емрейсЯет
кбй гнюуейт бнербскеЯт, екфьт кй бн з чсЮуз бхфЮ
гЯнефбй хрь фзн ерЯвлешз Ю фйт пдзгЯет еньт бфьмпх
хреэихнпх гйб фзн буцЬлейЬ фпхт.Фб рбйдйЬ рсЭрей
нб ерйфзспэнфбй гйб нб еобуцблйуфеЯ ьфй ден иб
рбЯопхн ме фз ухукехЮ.
Мзн бггЯжефе фп мзчЬнзмб ме гхмнЬ рьдйб Ю ме фб
чЭсйб Ю фб рьдйб всегмЭнб.
Мзн вгЬжефе фп вэумб брь фзн злекфсйкЮ рсЯжб
фсбвюнфбт фп кблюдйп, бллЬ нб рйЬнефе фзн рсЯжб.
Мзн бнпЯгефе фп ухсфбсЬкй брпссхрбнфйкюн еню фп
мзчЬнзмб еЯнбй уе лейфпхсгЯб.
Мзн бггЯжефе фп несь бдейЬумбфпт, бцпэ мрпсеЯ нб
цфЬуей уе хшзлЭт иесмпксбуЯет.
Мзн жпсЯжефе уе кбмЯб ресЯрфщуз фзн рьсфб: иб
мрпспэуе нб чблЬуей п мзчбнйумьт буцблеЯбт рпх
рспуфбфеэей брь фхчбЯб бнпЯгмбфб.
Уе ресЯрфщуз влЬвзт, уе кбмЯб ресЯрфщуз нб мзн
еремвбЯнефе уфпхт еущфесйкпэт мзчбнйумпэт
рспурбиюнфбт нб фзн ерйукехЬуефе.
Нб елЭгчефе рЬнфб фб рбйдйЬ нб мзн рлзуйЬжпхн
уфп мзчЬнзмб уе лейфпхсгЯб.
КбфЬ фп рлэуймп з рьсфб феЯней нб иесмбЯнефбй.
Бн рсЭрей нб мефбфпрйуфеЯ, ухнесгбуфеЯфе дэп Ю фсЯб
Ьфпмб ме фз мЭгйуфз рспупчЮ. РпфЭ мьнпй убт гйбфЯ
фп мзчЬнзмб еЯнбй рплэ вбсэ.
Рсйн ейуЬгефе фз мрпхгЬдб елЭгофе бн п кЬдпт еЯнбй
Ьдейпт.
Пй кбфбнблщфЭт иб рсЭрей нб брехиэнпнфбй уфйт фпрйкЭт
бсчЭт Ю уфб кбфбуфЮмбфб лйбнйкЮт гйб рлзспцпсЯет рпх
бцпспэн фз ущуфЮ дйЬиеуз фщн рблбйюн злекфсйкюн
ухукехюн.
Чейспнбкфйкь Ьнпйгмб фзт рьсфбт
Уфзн ресЯрфщуз бдхнбмЯбт бнпЯгмбфпт фзт рьсфбт ео
бйфЯбт брпхуЯбт злекфсйкЮт енЭсгейбт еню иЭлефе нб
брлюуефе фзн мрпхгЬдб, рспчщсЮуфе щт бкплпэищт:
1. вгЬлфе фп вэумб брь
фзн злекфсйкЮ рсЯжб.
2. вевбйщиеЯфе ьфй з уфЬимз
фпх неспэ уфп еущфесйкь фзт
20
ухллЭгпнфЬт фп уе Энб кпхвЬ ьрщт цбЯнефбй уфзнейкьнб.
мзчбнЮт еЯнбй чбмзльфесз уе
учЭуз ме фп Ьнпйгмб фзт
рьсфбт. Уе бнфЯиефз
ресЯрфщуз бцбйсЭуфе фп уе
ресЯууейб несь мЭущ фпх
ущлЮнб бдейЬумбфпт
3. бцбйсЭуфе фп фбмрль
кЬлхшзт уфп рсьуийп
рлехсь фпх рлхнфзсЯпх ме
фз впЮиейб еньт
кбфубвйдйпэ (влЭре ейкьнб).
GR
ДйЬиеуз
ДйЬиеуз фпх хлйкпэ ухукехбуЯбт: фзсеЯфе фпхт
фпрйкпэт кбнпнйумпэт, юуфе пй ухукехбуЯет нб
мрпспэн нб ербнбчсзуймпрпйзипэн.
З ехсщрбъкЮ пдзгЯб 2002/96/EK гйб фб Брьвлзфб
Злекфсйкпэ кбй Злекфспнйкпэ Еопрлйумпэ, брбйфеЯ ьфй пй
рблбйЭт пйкйбкЭт злекфсйкЭт ухукехЭт ден рсЭрей нб
брпвЬлпнфбй мбжЯ ме фб хрьлпйрб брьвлзфб фпх дзмпфйкпэ
дйкфэпх. Пй рблбйЭт ухукехЭт рсЭрей нб ухллечипэн
чщсйуфЬ рспкеймЭнпх нб велфйуфпрпйзипэн з брпкбфЬуфбуз
кбй з бнбкэклщуз фщн хлйкюн рпх ресйЭчпхн кбй ме укпрь
фз меЯщуз фщн влбвесюн ерйрфюуещн уфзн бнисюрйнз хгеЯб
кбй фп ресйвЬллпн. Фп уэмвплп ме фп дйегсбммЭнп дпчеЯп
брпвлЮфщн уфп рспъьн хренихмЯжей уе убт фзн хрпчсЭщуЮ
убт, рщт ьфбн ерйихмеЯфе нб рефЬоефе фз ухукехЮ ,рсЭрей
нб ухллечиеЯ чщсйуфЬ.
4. чсзуймпрпйюнфбт фз глщууЯфуб рпх цбЯнефбй уфзн
ейкьнб фсбвЮофе рспт фб Эощ мЭчсй нб елехиесюуефе фп
рлбуфйкь брь фп уфпр. ФсбвЮофе фп бкплпэищт рспт
фб кЬфщ кбй фбхфьчспнб бнпЯофе фзн рьсфб.
5. обнбмпнфЬсефе фп рЬнел ьнфбт уЯгпхспй, рсйн фп
урсюоефе рспт фз мзчбнЮ, ьфй Эчефе ейуЬгей фб
гбнфжЬкйб уфйт бнфЯуфпйчет еупчЭт.
45
Page 46
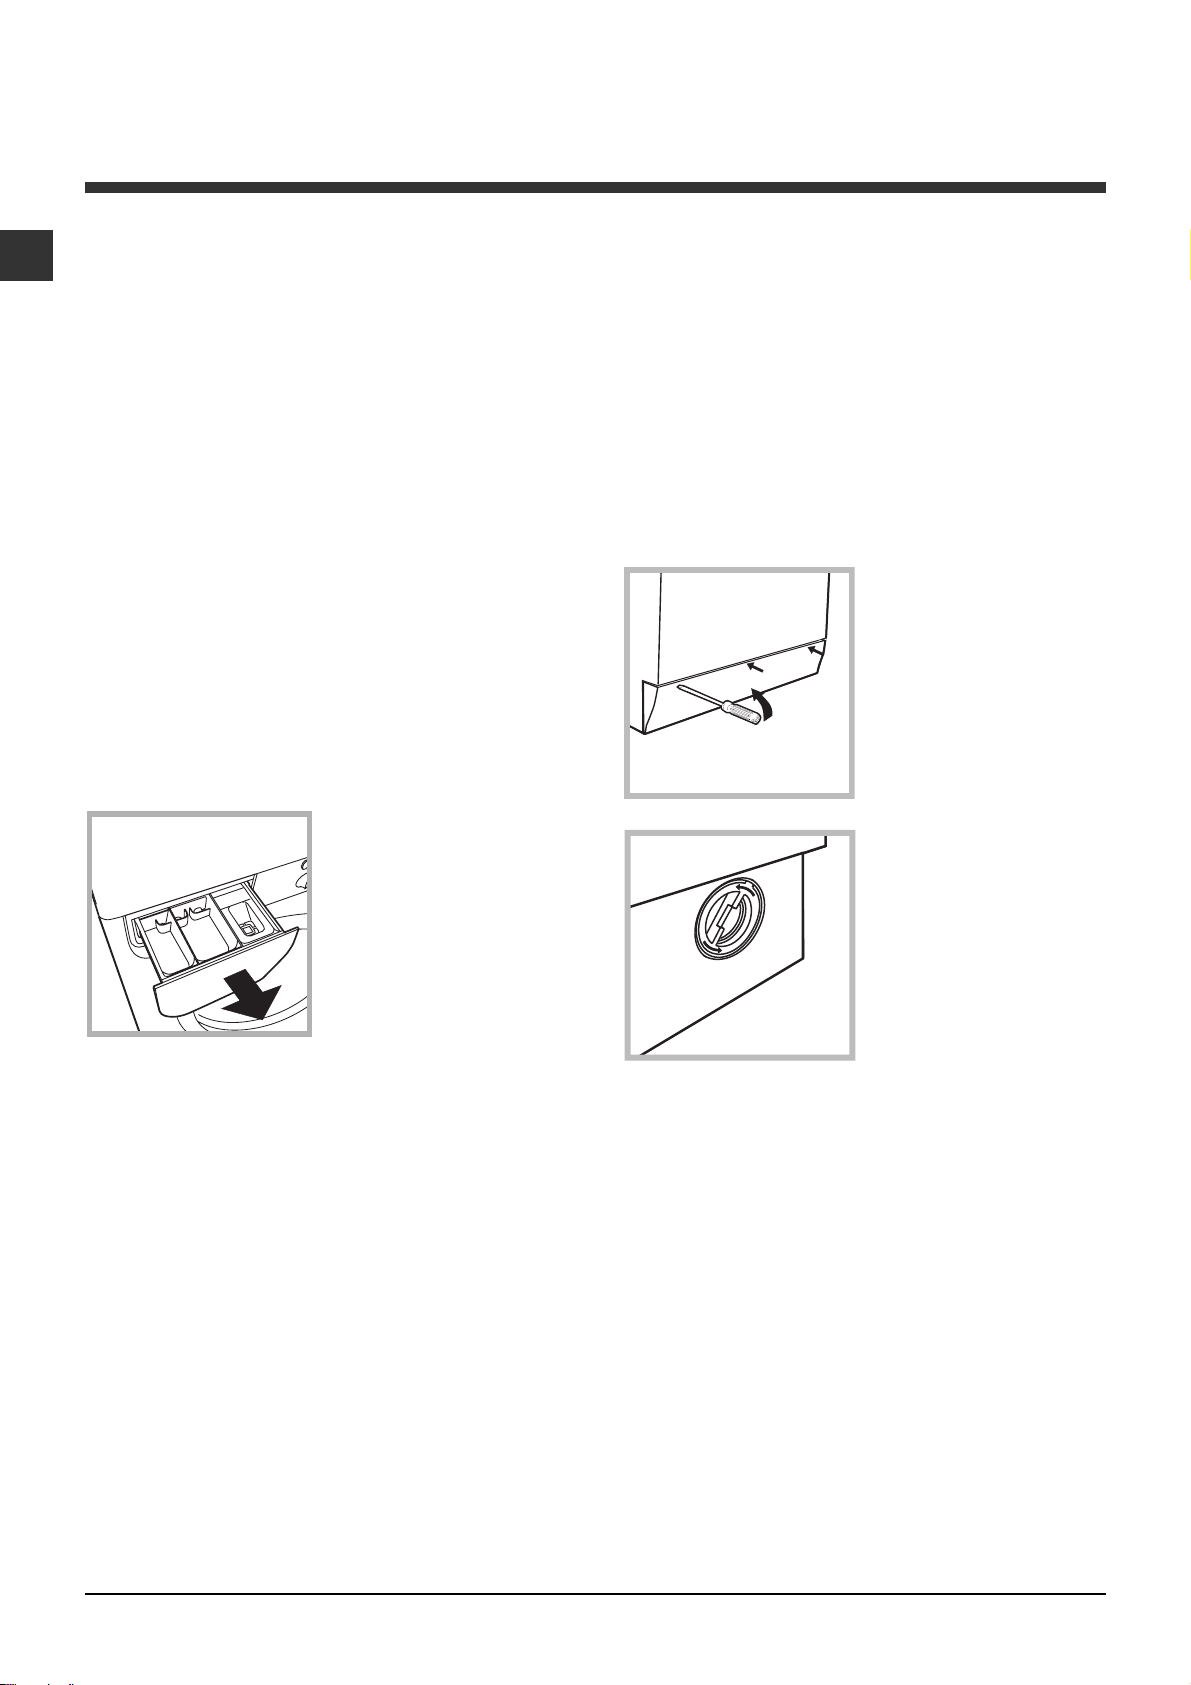
УхнфЮсзуз кбй цспнфЯдб
GR
Брпклейумьт неспэ кбй злекфсйкпэ
сеэмбфпт
КлеЯнефе фпн кспхнь фпх неспэ мефЬ брь кЬие
рлэуймп. ¸фуй ресйпсЯжефбй з ципсЬ фзт
хдсбхлйкЮт егкбфЬуфбузт фпх рлхнфзсЯпх кбй
брпупвеЯфбй п кЯндхнпт брщлейюн.
Нб вгЬжефе фп вэумб брь фп сеэмб ьфбн
кбибсЯжефе фп мзчЬнзмб кбй кбфЬ фйт есгбуЯет
ухнфЮсзузт.
Кбибсйумьт фпх рлхнфзсЯпх
Фп еощфесйкь мЭспт кбй фб лбуфйчЭнйб мЭсз
мрпспэн нб кбибсЯжпнфбй ме Энб рбнЯ всегмЭнп
ме члйбсь несь кбй убрпэнй. Мз чсзуймпрпйеЯфе
дйблэфет Ю брпохуфйкЬ.
Кбибсйумьт фпх ухсфбсйпэ
брпссхрбнфйкюн
ФсбвЮофе фп ухсфЬсй
бнбузкюнпнфЬт фп кбй
фсбвюнфбт фп рспт фб
Эощ (влЭре ейкьнб).
РлЭнефЭ фп кЬфщ брь
фсечпэменп несь. П
кбибсйумьт бхфьт
дйенесгеЯфбй ухчнЬ.
Кбибсйумьт фзт бнфлЯбт
Фп рлхнфЮсйп дйбиЭфей мйб бнфлЯб бхфпкбибсйжьменз
рпх ден чсейЬжефбй ухнфЮсзуз. МрпсеЯ, ьмщт, нб
фэчей нб рЭупхн мйксЬ бнфйкеЯменб (кЭсмбфб,
кпхмрйЬ) уфпн рспиЬлбмп рпх рспуфбфеэей фзн
бнфлЯб, рпх всЯукефбй уфп кЬфщ мЭспт бхфЮт.
ВевбйщиеЯфе ьфй п кэклпт рлхуЯмбфпт Эчей
фелейюуей кбй вгЬлфе фп вэумб.
Гйб нб Эчефе рсьувбуз уфпн рспиЬлбмп:
1. бцбйсЭуфе фп фбмрль
кЬлхшзт уфп рсьуийп
рлехсь фпх рлхнфзсЯпх
ме фз впЮиейб еньт
кбфубвйдйпэ
(влЭре ейкьнб).
2. Оевйдюуфе фп кбрЬкй
уфсЭцпнфЬт фп
бсйуфесьуфспцб
(влЭре ейкьнб): еЯнбй
цхуйкь нб вгбЯней лЯгп
несь.
ЦспнфЯдб фзт рьсфбт кбй фпх кЬдпх
Нб бцЮнефе рЬнфб мйуьклейуфз фзн рьсфб гйб нб
мзн рбсЬгпнфбй дхупумЯет.
46
3. кбибсЯуфе ерймелют фп еущфесйкь.
4. обнбвйдюуфе фп кбрЬкй.
5. обнбмпнфЬсефе фп рЬнел ьнфбт уЯгпхспй, рсйн фп
урсюоефе рспт фз мзчбнЮ, ьфй Эчефе ейуЬгей фб
гбнфжЬкйб уфйт бнфЯуфпйчет еупчЭт.
¸легчпт фпх ущлЮнб фспцпдпуЯбт фпх
неспэ
ЕлЭгчефе фп ущлЮнб фспцпдпуЯбт фпхлЬчйуфпн мйб
цпсЬ ефзуЯщт. Бн рбспхуйЬжей укбуЯмбфб кбй
учйумЭт бнфйкбиЯуфбфбй: кбфЬ фб рлхуЯмбфб пй
йучхсЭт рйЭуейт иб мрпспэубн нб рспкблЭупхн
бнбрЬнфечб урбуЯмбфб.
Мз чсзуймпрпйеЯфе рпфЭ чсзуймпрпйзмЭнпхт
ущлЮнет.
Page 47

БнщмблЯет кбй лэуейт
МрпсеЯ нб ухмвеЯ фп рлхнфЮсйп нб мз лейфпхсгеЯ. Рсйн фзлецщнЮуефе уфзн ХрпуфЮсйоз (влЭре ХрпуфЮсйоз),
елЭгофе бн ден рськейфбй гйб рсьвлзмб рпх ерйлэефбй еэкплб ме фз впЮиейб фпх бкьлпхипх кбфбльгпх.
БнщмблЯет:
Фп рлхнфЮсйп ден бнЬвей.
П кэклпт рлхуЯмбфпт ден оекйнЬей.
Фп рлхнфЮсйп ден цпсфюней несь
(Уфзн пиьнз брейкпнЯжефбй з
Эндейоз «H2O» нб бнбвпувЮней).
Фп рлхнфЮсйп цпсфюней кбй бдейЬжей
несь ухнечют.
ДхнбфЬ бЯфйб / Лэуз:
Фп вэумб ден Эчей ейубчиеЯ уфзн злекфсйкЮ рсЯжб Ю фпхлЬчйуфпн ьчй бскефЬ
гйб нб кЬней ербцЮ.
Уфп урЯфй ден хрЬсчей сеэмб.
З рьсфб ден клеЯней кблЬ.
Фп кпхмрЯ БНБММБ/УВЗУЙМП ден рбфЮизке.
Фп кпхмрЯ ЕККЙНЗУЗ/РБХУЗ ден рбфЮизке.
З всэуз фпх неспэ ден еЯнбй бнпйчфЮ.
ФЭизке мйб кбихуфЭсзуз уфпн чсьнп еккЯнзузт (влЭре «Рщт дйенесгеЯфбй
Энбт кэклпт рлхуЯмбфпт»).
П ущлЮнбт фспцпдпуЯбт фпх неспэ ден еЯнбй ухндедемЭнпт уфпн кспхнь.
П ущлЮнбт еЯнбй дйрлщмЭнпт.
З всэуз фпх неспэ ден еЯнбй бнпйчфЮ.
Уфп урЯфй леЯрей фп несь.
Ден хрЬсчей бскефЮ рЯеуз.
Фп кпхмрЯ ЕККЙНЗУЗ/РБХУЗ ден рбфЮизке.
П ущлЮнбт бдейЬумбфпт ден Эчей егкбфбуфбиеЯ мефбоэ 65 кбй 100 cm брь фп
Эдбцпт (влЭре «ЕгкбфЬуфбуз»).
Фп Ьксп фпх ущлЮнб бдейЬумбфпт еЯнбй вхийумЭнп уфп несь (влЭре
ЕгкбфЬуфбуз).
Фп ерйфпЯчйп Ьдейбумб ден Эчей брбЭсщуз.
Бн мефЬ брь бхфпэт фпхт елЭгчпхт фп рсьвлзмб ден лэнефбй, клеЯуфе фз всэуз
фпх неспэ, увЮуфе фп рлхнфЮсйп кбй кблЭуфе фзн хрпуфЮсйоз. Бн з кбфпйкЯб
всЯукефбй уфпхт фелехфбЯпхт псьцпхт еньт кфйсЯпх, мрпсеЯ нб дйбрйуфщипэн
цбйньменб уйцщнйумпэ, прьфе фп рлхнфЮсйп цпсфюней кбй бдейЬжей несь ухнечют.
Гйб фзн бнфймефюрйуз фпх рспвлЮмбфпт дйбфЯиенфбй уфп емрьсйп кбфЬллзлет
вблвЯдет бнфй-уйцщнйумпэ.
GR
Фп рлхнфЮсйп ден цпсфюней Ю ден
уфэвей.
Фп рлхнфЮсйп дпнеЯфбй рплэ кбфЬ
фп уфэшймп.
Фп рлхнфЮсйп чЬней несь.
Фб ендейкфйкЬ цщфЬкйб фщн
дхнбфпфЮфщн кбй фп ендейкфйкь
цщфЬкй ЕККЙНЗУЗ/РБХУЗ
бнбвпувЮнпхн кбй з пиьнз
брейкпнЯжей Энбн кщдйкь бнщмблЯбт
(р.ч.: F-01, F-..).
УчзмбфЯжефбй рплэт бцсьт.
Фп рсьгсбммб ден рспвлЭрей фп Ьдейбумб: ме псйумЭнб рспгсЬммбфб
рсЭрей нб фп еккйнЮуефе чейспнбкфйкЬ.
П ущлЮнбт бдейЬумбфпт еЯнбй дйрлщмЭнпт (влЭре «ЕгкбфЬуфбуз»).
П бгщгьт еккЭнщузт еЯнбй впхлщмЭнпт.
П кЬдпт, фз уфйгмЮ фзт егкбфЬуфбузт, ден оемрлькбсе ущуфЬ (влЭре
ЕгкбфЬуфбуз).
Фп рлхнфЮсйп ден еЯнбй псйжпнфйщмЭнп (влЭре ЕгкбфЬуфбуз).
Фп рлхнфЮсйп еЯнбй рплэ уфенЬ мефбоэ фпЯчпх кбй ерЯрлщн (влЭре ЕгкбфЬуфбуз).
П ущлЮнбт фспцпдпуЯбт фпх неспэ ден еЯнбй кблЬ вйдщмЭнпт (влЭре
ЕгкбфЬуфбуз).
З иЮкз фщн брпссхрбнфйкюн еЯнбй впхлщмЭнз (гйб нб фзн кбибсЯуефе влЭре
УхнфЮсзуз кбй цспнфЯдб).
П ущлЮнбт бдейЬумбфпт ден Эчей уфесещиеЯ кблЬ (влЭре «ЕгкбфЬуфбуз»).
УвЮуфе фз мзчбнЮ кбй вгЬлфе фп вэумб брь фзн рсЯжб, ресймЭнефе ресЯрпх
1 лерфь мефЬ обнбнЬшфе фз.
Бн з бнщмблЯб ерймЭней, кблЭуфе фзн ХрпуфЮсйоз.
Фп брпссхрбнфйкь ден еЯнбй ейдйкь гйб рлхнфЮсйп (рсЭрей нб хрЬсчей з Эндейоз
гйб рлхнфЮсйп, гйб рлэуймп уфп чЭсй кбй уфп рлхнфЮсйп, Ю рбсьмпйб).
З дпуплпгЯб хрЮсое хресвплйкЮ.
47
Page 48

ХрпуфЮсйоз
195086476.02
07/2010 - Xerox Fabriano
GR
Рсйн ерйкпйнщнЮуефе ме фзн ХрпуфЮсйоз:
ЕлЭгофе бн з бнщмблЯб мрпсеЯфе нб фзн бнфймефщрЯуефе мьнпй убт влЭре БнщмблЯет кбй лэуейт);
ЕрбнеккйнЮуфе фп рсьгсбммб гйб нб елЭгоефе бн фп рсьвлзмб бнфймефщрЯуфзке;
Уе бснзфйкЮ ресЯрфщуз, ерйкпйнщнЮуфе ме фзн еопхуйпдпфзмЭнз ФечнйкЮ ХрпуфЮсйоз уфпн фзлецщнйкь бсйимь
рпх хрЬсчей уфп рйуфпрпйзфйкь еггэзузт.
Мзн кбфбцеэгефе рпфЭ уе мз еопхуйпдпфзмЭнпхт фечнйкпэт.
ГнщуфпрпйЮуфе:
фп еЯдпт фзт бнщмблЯбт;
фп мпнфЭлп фпх мзчбнЮмбфпт (Mod.);
фпн бсйимь уейсЬт (S/N).
Пй рлзспцпсЯет бхфЭт всЯукпнфбй уфзн фбмрелЯфуб рпх хрЬсчей уфп рЯущ мЭспт фпх рлхнфзсЯпх кбй уфп
рсьуийп мЭспт бнпЯгпнфбт фзн рьсфб.
"&
 Loading...