

Indesit IDCE 8450 B H User Manual

Instruction manual
TUMBLE DRYER
EN
English,1
AR
Arabic, 17
IDCE 8450 B H
Contents
EN
Installation, 2
Where to install the tumble dryer
Ventilation
Electrical connections
Preliminary information
Warnings, 4
General safety
Saving energy and respecting the environment
Care and maintenance, 6
Disconnecting the power supply
Cleaning the filter after each cycle
Checking the drum after each cycle
Emptying the water container after each cycle
Cleaning the condenser unit
Cleaning the tumble dryer
Description of the tumble dryer, 8
Features
Control panel
How to carry out a drying cycle, 10
Starting and selecting a programme
www.indesit.com
! This symbol reminds you to read this
instruction manual.
! Keep this manual at hand for immediate reference whenever
necessary. Always store this manual close to the tumble dryer and
remember to pass it on to any new owners when selling or transferring the appliance, so they may familiarise with the warnings
and suggestions herein contained.
! Read these instructions carefully: the following pages contain
important information on installation and useful suggestions for
operating the appliance.
Programmes and options, 11
Programme chart
Special/Sport/Partial Programmes
Options
Opening the door
Laundry, 14
Sorting laundry
Care labels
Drying times
Troubleshooting, 15
Assistance, 16
Spare parts
Essential Contact Information
Information on recycling and disposal
1
1
2
2
1
Less than 1m
10 mm
15 mm
15 mm
Installation
EN
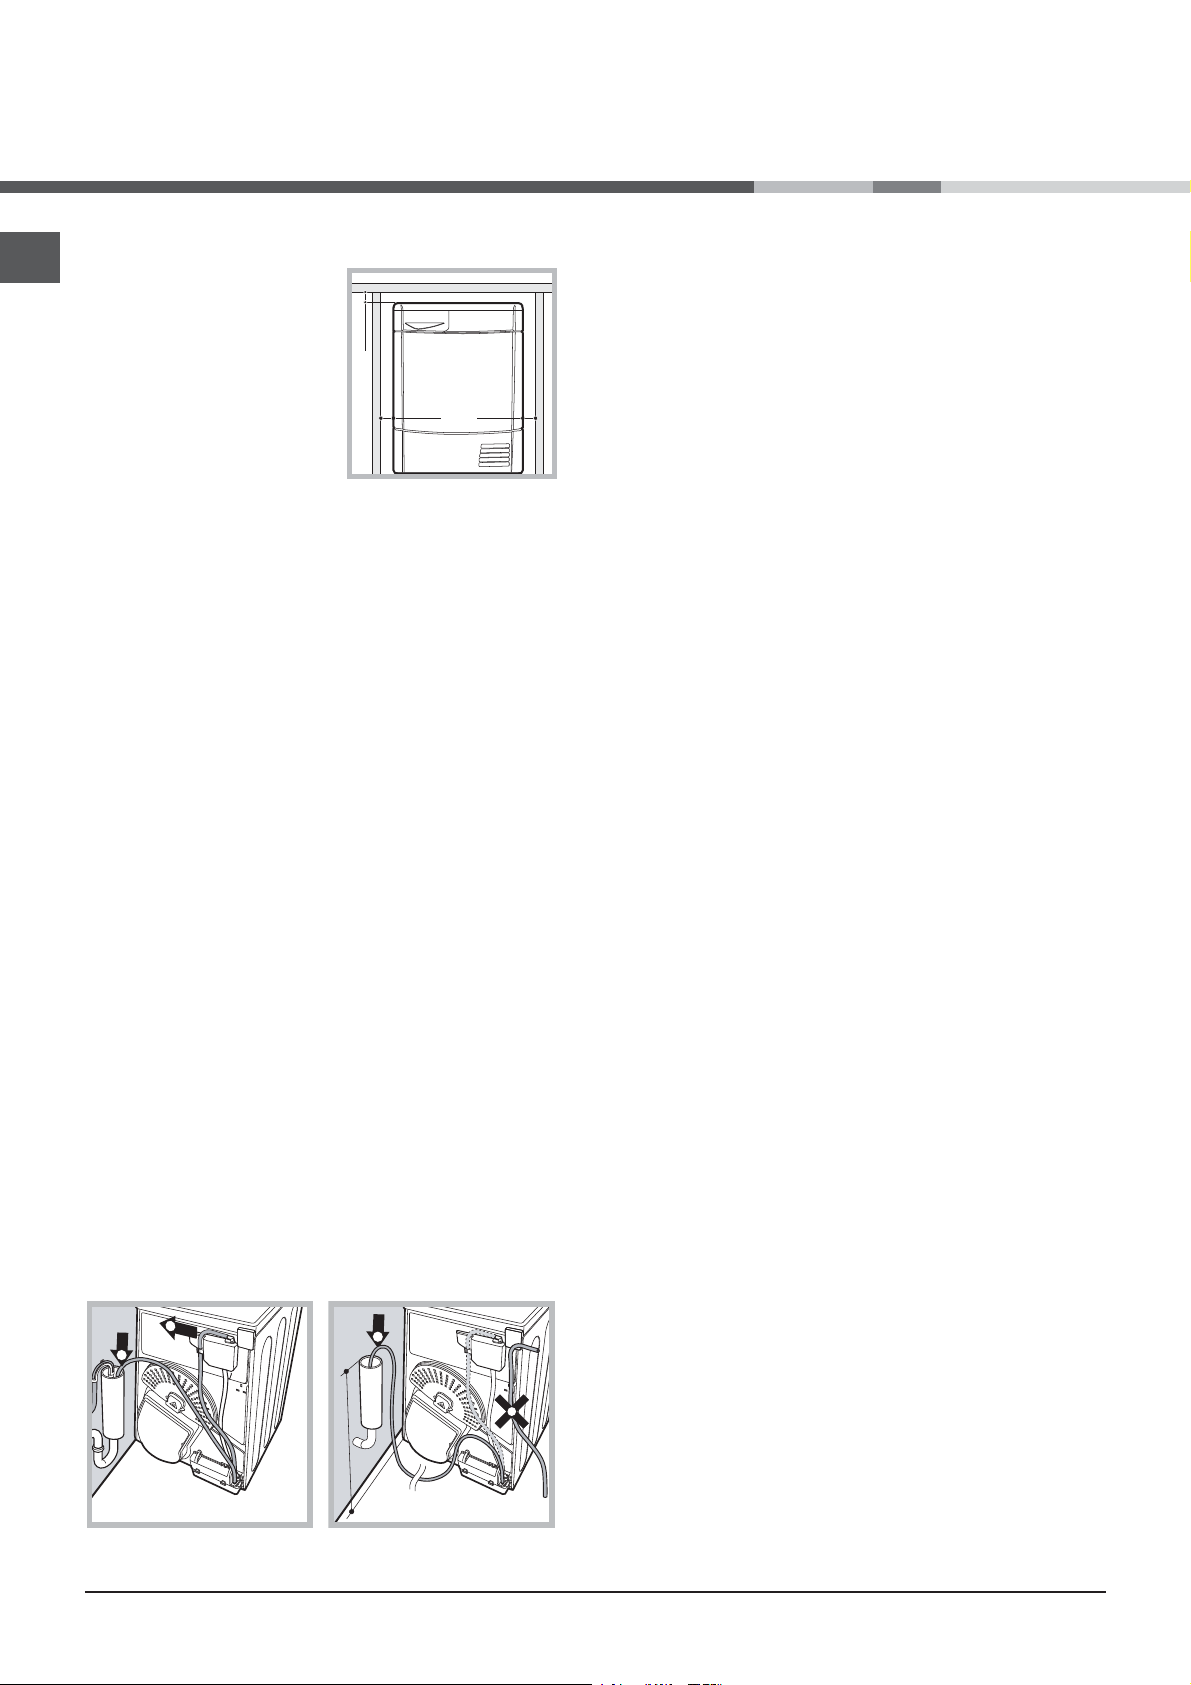
Where to install the tumble dryer
• Install the dryer far
from gas ranges, stoves,
radiators or hobs, as
flames may damage it.
If the dryer is installed
below a worktop,
ensure there are 10 mm
between the upper panel
of the dryer and any
objects above it, and 15
mm between the sides of the machine and
the walls or furniture units adjacent to it. This
ensures adequate air circulation.
The appliance must be installed with the rear
surface placed against a wall.
Ventilation
• The room must be adequately ventilated while the dryer is
running. Make sure that the dryer is installed in a room free
of humidity and with adequate air circulation. The flow of
air around the dryer is essential to allow water to condense
during drying; the dryer will not function properly if it is
placed in an enclosed space or inside a cabinet.
! Some condensation may form if the dryer is used in a small
or cold room.
!
We do not recommend that the dryer is
installed in a cupboard but the dryer must never
be installed behind a lockable door, a sliding
door or a door with a hinge on the opposite
side to that of the dryer door.
Water drain
If your dryer is installed next to a drain the water can be
plumbed into this drain. This does away with the need to
empty the water container. If the dryer is stacked onto or
installed next to a washing machine it can share the same
drain. The height of the drain must be less than 3’ (1 m) from
the bottom of the dryer.
Remove existing hose from position shown in picture A and fit
a suitable length of hose and connect as shown in picture B.
! The drain tube has to be below 1 m from the bottom of
the Dryer
! Make sure that the hose is not squashed or kinked
when the dryer is in its final location.
Electrical connections
Before plugging the appliance into the socket,
check the following:
• Make sure your hands are dry.
• The socket must have an earth connection.
• The socket must be able to withstand the
machine’s maximum power output as
indicated on the rating plate.
• The power supply voltage must fall within
the values indicated on the data plate.
• The socket must be compatible with the
dryer’s plug. Should this not be the case,
replace the plug or the socket.
! DO NOT USE EXTENSION CORDS.
! The dryer must not be installed outdoors,
even if the space is sheltered. It can be very
dangerous if exposed to rain or storms.
! Once installed, the dryer’s electrical wire
and plug must be within reach.
! The power cord must not be bent or
squashed.
! If the plug being replaced is a non-r ewirable
type, then the cut-off plug must be disposed of
safely. DO NOT leave it where it can be inserted
into a socket and create a shock hazard.
! The power must be regularly checked. If the
supply cord is damaged, it must be replaced
by the manufacturer, its service agent or
similarly qualified persons in order to avoid a
hazard. (see Assistance). New or longer
electric cords are supplied by authorised
dealers at a supplementary cost.
! The manufacturer denies any
responsibility should any of these rules
not be followed.
! If in doubt about any of the above
consult a qualified electrician.
Preliminary information
Once the tumble dryer is installed, clean the inside of the
drum before operating it and remove any dirt accumulated
during transportation.
Picture A Picture B
2

This household tumble drier is a Condenser
The weighted Annual Energy Consumption (AEc)* kWh 1) 559.8
This household tumble drier is a Automatic
Energy consumption full load; Edry - kWh 2) 4.77
Energy consumption partial load; Edry½ - kWh 2) 2.53
Power consumption: off-mode (Po) - Watts 0.14
Power consumption: left-on mode (Pl) - Watts 2.39
Prog. Time - weighted (Tt) full & partial load - minutes 3) 104
Full load (Tdry) - minutes 139
Partial load (Tdry½) - minutes 78
weighted (Ct) full & partial load 3) 81
full load (Cdry) 82
partial load (Cdry½) 80
Airborne acoustical noise emissions - dB(A) re 1 pW 68.0
Programme time in minute, for program “Synthetics” full load
65
Partial load for program “Synthetics” N/A
Average condensation efficiency - %
1) The "standard cotton” at full and partial load are the standard programmes to
which the information in the label and the fiche relates. The standard cotton
program is suitable to dry at cupboard level (0%) cotton laundry and is the most
efficient programme in terms of energy consumption. Partial load is half the rated
load.
2) based on 160 drying cycles of the standard cotton programme at full and partial
load, and the consumption of the low-power modes. Actual energy consumption
will depend on how the appliance is used.
3) Weighted average of 3 cycles at full load and 4 cycles at half load.
Regulation 932/2012.
Energy consumption in kWh, for program “Synthetics” full load
1.41
Energy efficiency class on a scale from A+++ (low consumption)
to D (high consumption)
B
Duration of the 'left-on mode' for power management system minutes
30
Condensation efficiency class on a scale from G (least efficient) to
A (most efficient)
B
Product Data - Re gulation 3 92/2012.
Brand
Indesit
Model
Rated capacity of cotton laundry for the "standard cotton
programme" at full load - kg
8.0
Maximum load sizes: maximum 8 kg
IDCE 8450 B H (UK)-(')&7,9/-(')&/,9/
EN
3

Warnings
EN
! This appliance has been designed and built
according to international safety standards.
These warnings are given for safety reasons
and must be followed carefully.
General safety
• This appliance can be used by children
aged from 8 years and above and
persons with reduced physical, sensory or
mental capabilities or lack of experience
and knowledge if they have been given
supervision or instruction concerning use of
the appliance in a safe way and understand
the hazards involved.
• This tumble dryer has been designed for
home, and not professional, use.
• Do not touch the appliance while barefoot
or with wet hands or feet.
• Unplug the machine by pulling on the plug,
not the cord.
• After using the dryer, turn it off and unplug
it. Keep the door closed to make sure that
children do not use it as a toy.
•Children should be supervised to ensure
that they do not play with the dryer.
• Cleaning and user maintenance shall not be
made by children without supervision.
•Children of less than 3 years should be
kept away from the appliance unless
continuously supervised.
• The appliance must be installed correctly
and have proper ventilation. The air intake
at the front of the dryer should never be
obstructed (see Installation).
• Never use the dryer on carpeting where the
pile height would prevent air from entering
the dryer from the base.
• Check to see if the dryer is empty before
loading it.
The back of the dryer could become
•
very hot. Never touch it while in use.
• Do not use the dryer unless the filter,
watercontainer and condenser are securely
in place (see Maintenance).
• Do not overload the dryer (see Laundry for
maximum loads).
• Do not load items that are dripping wet.
• Carefully check all instructions on clothing
labels (see Laundry).
• Do not tumble dry large, very bulky items.
• Do not tumble dry acrylic fibres at high
temperatures.
• Do not turn off the dryer when there are
still warm items inside.
• Clean the filter after each use (see
Maintenance).
• Empty the water container after each use
(see Maintenance).
• Clean the condenser unit at regular intervals
(see Maintenance).
• Do not allow lint to collect around the
dryer.
• Never climb on top of the dryer. It could
result in damage.
• Always follow electrical standards and
requirements (see Installation).
• Always buy original spare parts and
accessories (see Service).
To minimise the risk of fire
in your tumble dryer, the
following should be observed:
• Tumble dry items only if they have been
washed with detergent and water, rinsed
and been through the spin cycle. It is a fire
hazard to dry items that HAVE NOT been
washed with water.
• Do not dry garments that have been
treated with chemical products.
• Do not tumble dry items that have
been spotted or soaked with vegetable
or cooking oils, this constitutes a fire
hazard. Oil-affected items can ignite
spontaneously,especially when exposed
to heat sources such as a tumble dryer.
The items become warm, causing
an oxidisation reaction with the oil,
Oxidisation creates heat. If the heat
cannot escape, items can become hot
enough to catch fire. Piling, stacking or
storing oil-effected items can prevent
heat from escaping and so create a fire
hazard.If it is unavoidable that fabrics
containing vegetable or cooking oil or
those that have been contaminated with
hair care products be placed in a tumble
dryer they should first be washed with
extra detergent - this will reduce, but not
eliminate the hazard. They should not
be removed from the dryer and piled or
stacked while hot.
• Do not tumble dry items that have
previously been cleaned in or washed
in, soaked in or soiled with petrol/
gasoline, dry cleaning solvents or other
4

flammable or explosive substances. Highly
flammable substances commonly used in
domestic environments including cooking
oil, acetone, denatured alcohol, kerosene,
spot removers, turpentine, waxes and wax
removers. Ensure these items have been
washed in hot water with an extra amount
of detergent before being dried in the
tumble dryer.
• Do not tumble dry items containing foam
rubber (also known as latex foam), or
similarly textured rubber like materials.
Foam rubber materials can, when heated,
produce fire by spontaneous combustion.
• Fabric softener or similar products should
not be used in a tumble dryer to eliminate
the effects of static electricity unless the
practice is specifically recommended by the
manufacturer of the fabric softener product.
• Do not tumble dry undergarments that
contain metal reinforcements eg. bras
with metal reinforcing wires. Damage to
the tumble dryer can result if the metal
reinforcements come loose during drying.
• Do not tumble dry rubber, plastic articles
such as shower caps or babies waterproof
covers, polythene or paper.
• Do not tumble dry rubber backed articles,
clothes fitted with foam rubber pads,
pillows, galoshes and rubber coated tennis
shoes.
• Remove all objects from pockets such as
lighters and matches.
EN
! WARNING: Never stop the dryer before
the end of the drying cycle unless all
items are quickly removed and spread
out so that the heat is dissipated.
Save energy and respect the
environment
• Wring out all items to eliminate excess water
before tumble drying (if you use a washing
machine first, select a high spin cycle). Doing
this will save time and energy during drying.
• Always dry full loads - you save energy: single
items or small loads take longer to dry.
• Clean the filter after each use to contain energy
consumption costs (see Maintenance).
5
2
Care and maintenance
EN
Disconnecting the power supply
! Disconnect the dryer when not in use or
during cleaning and maintenance operations.
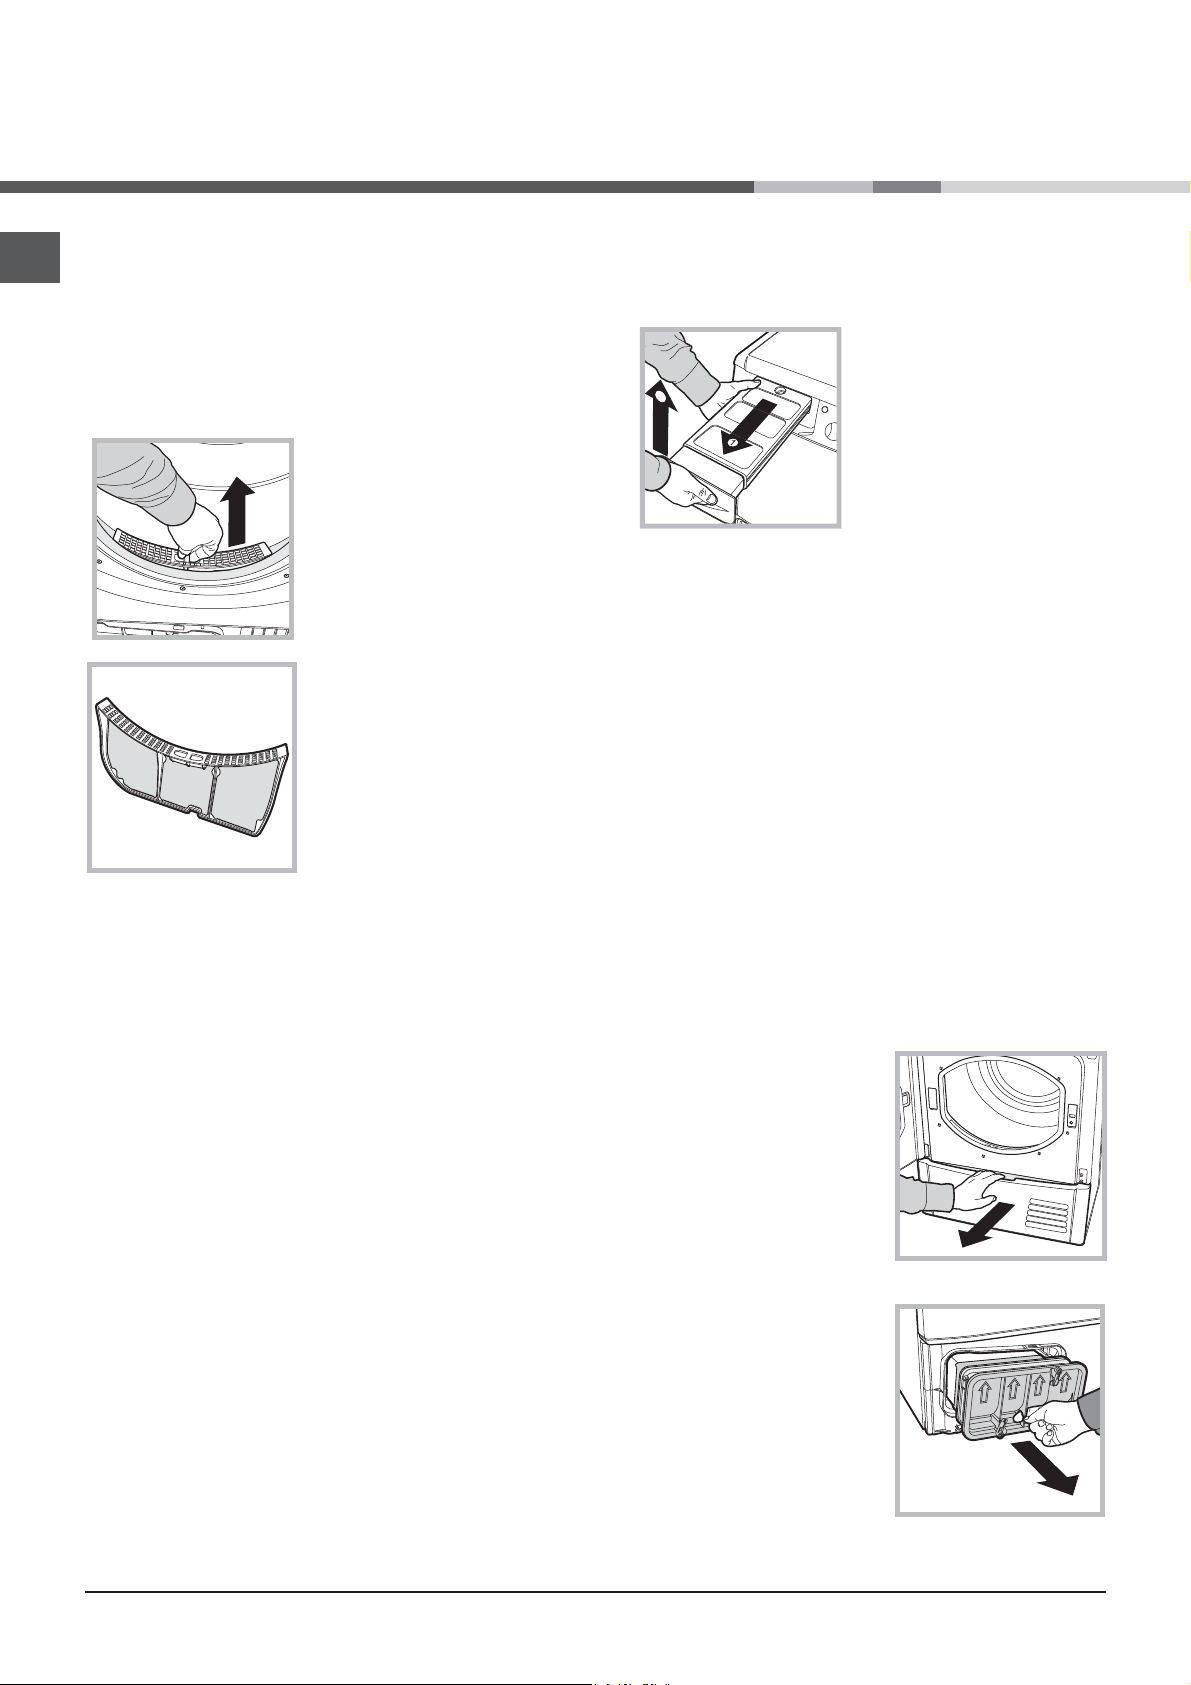
Cleaning the filter after each
cycle
The filter is a fundamental component of the
dryer: its function is to collect lint and fluff that
form during drying.
Clean the filter once
drying is completed, by
rinsing it under
running water or cleaning
it with a vacuum cleaner.
Should the filter become
clogged, the flow of air
inside the dryer will be
seriously hampered:
drying times becomes
longer and more energy
is consumed. Also, the
dryer may become
damaged.
The filter is located in
front of the dryer seal (see Picture).
Removing the filter:
1. Pull the filter’s plastic handle upwards (see
Picture).
2. Clean the fluff off the filter and replace it
correctly. Ensure that the filter is pushed fully
home.
! Do not use the dryer unless the filter has
been replaced in its holder.
Checking the drum after each cycle
Rotate the drum manually to remove smaller items
(handkerchiefs) that could have been left inside the dryer.
Cleaning the drum
! Avoid using abrasives, steel wool or stainless steel cleaning
agents to clean the drum. A coloured film may appear on the
stainless steel drum surface: it may be caused by a
combination of water and/or cleaning agents such as wash-
softeners. This coloured film does not affect the dryer’s
performance.
Emptying the water container after
each cycle
Remove the water container and
empty it into a sink or other
suitable drain outlet, then
replace it correctly.
Always check the water
container and empty it before
starting a new drying cycle.
-Failure to empty the water container may cause
the following:
- The dryer stops heating (so the load may still be
damp at the end of the drying cycle).
- The “Empty water container” LED activates to
show that the water container is full.
Priming the Water Collection System
When your dryer is new, the Water Container will
not collect Water until the system is primed, this
will take 1 or 2 drying cycles. Once primed it will
collect Water during every cycle.
Cleaning the condenser unit.
• Remove the condenser (see Picture
below) unit regularly (monthly) and clean off
any fluff deposits from the plates by rinsing it
with cold water running on the rear end of the
condenser.
Removing the condenser:
1. Disconnect the
dryer from the power
supply and open the
door.
2. Open the
condenser cover (see
Picture below), unlock the three catches by
turning them 90°
anti-clockwise, then pull
on the grip to remove
the condenser.
3. Clean the surface
of the seals and replace
the unit with the arrows
pointing upwards, whi-
6

2
le making sure that the catches are securely
fixed.
Cleaning the tumble dryer
• The external metal, plastic and rubber parts can be
cleaned with a damp cloth.
• Clean the front air intake grille regularly (every 6 months)
with a vacuum cleaner to remove any lint, fluff or dust
deposits. Furthermore, remove any lint deposits from the
front part of the condenser and from the filter area, using a
vacuum cleaner every so often.
! Do not use solvents or abrasives.
! Have the dryer checked regularly by authorised technical
personnel in order to ensure that the electrical and mechanical parts work safely (see Assistance).
Quick Tips
!Remember to clean your filter and
Condenser unit after each load.
! Remember to empty your water
container after each load.
! Doing this will keep your machine
working at its BEST!
EN
Rear
Condenser unit
Water container
Ta p
Condenser Unit
Catches
Handle
Rating plate
Filter
Condenser cover
Model & Serial
Numbers
Air intake
Front
7
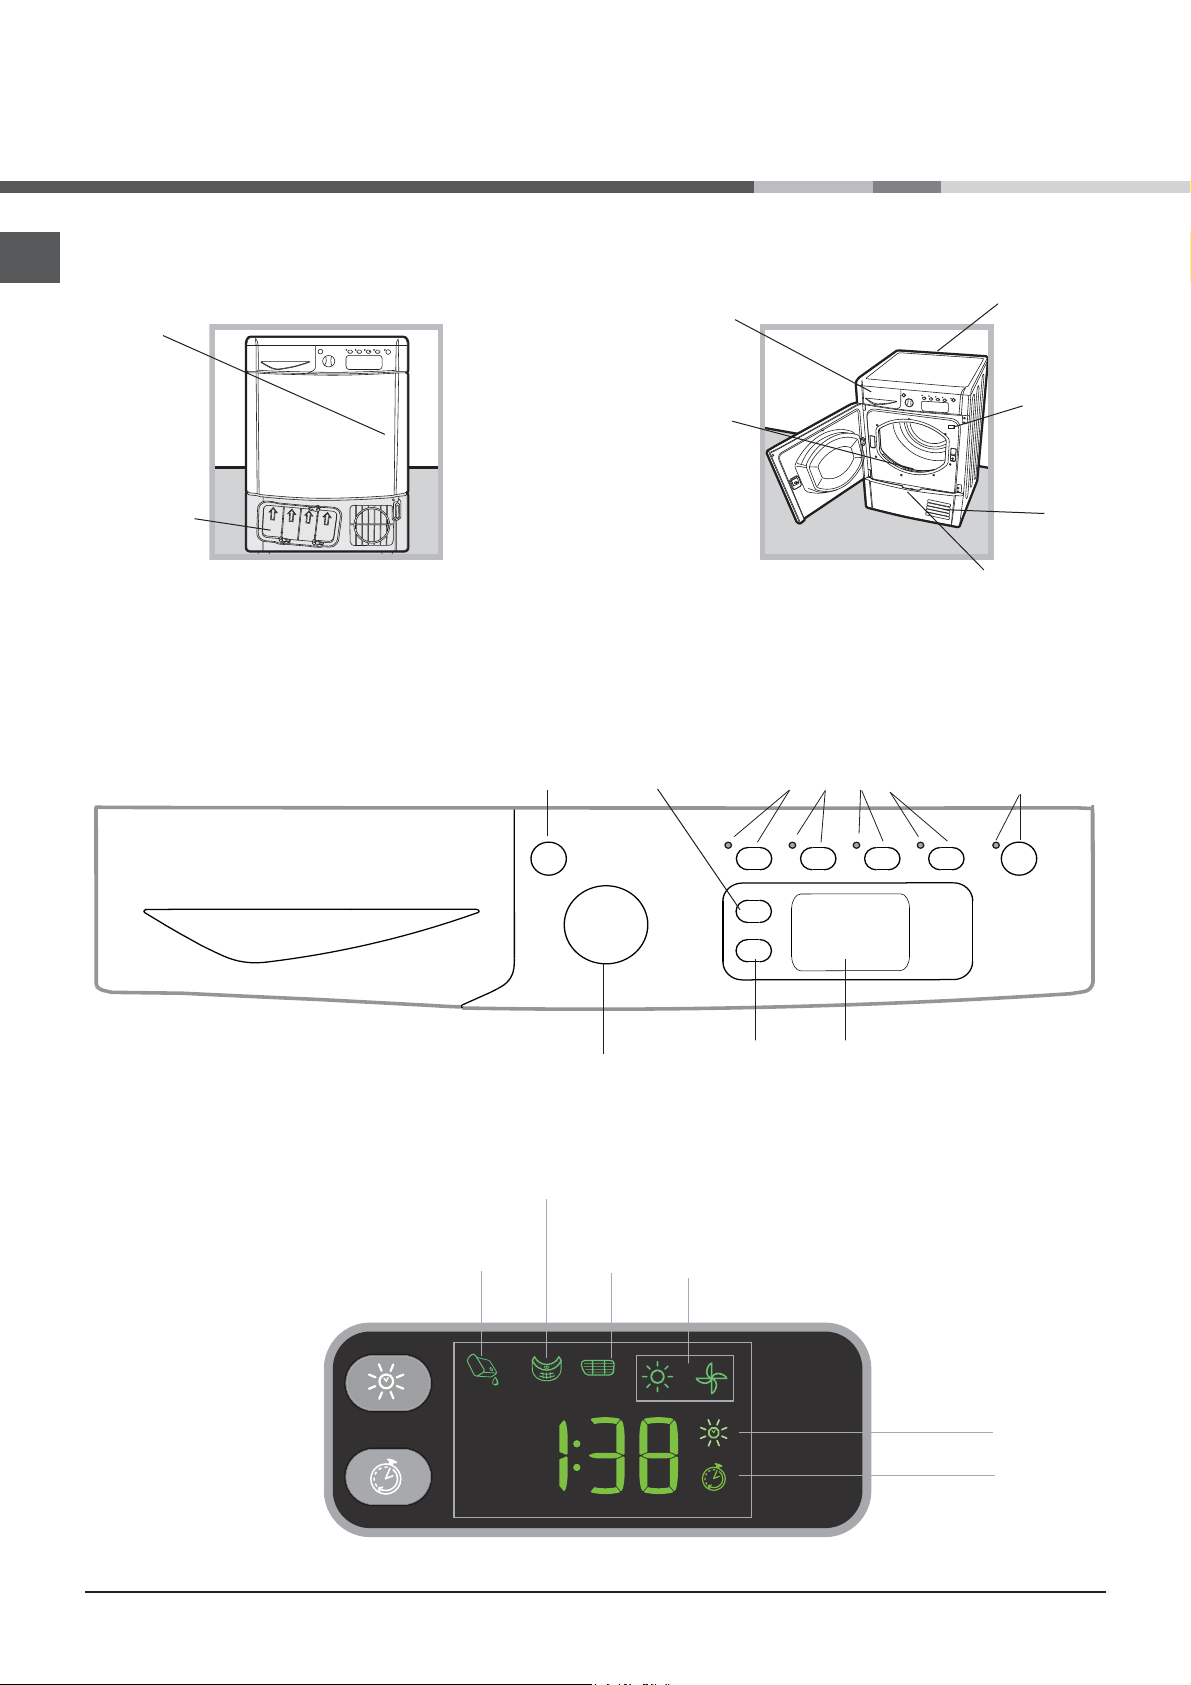
Description of the
tumble dryer
Opening the door
EN
Press
the door
Condenser unit
(cover open)
Control panel
Features
Water container
Filter
On/Off
button
Timed Drying
button
Options
buttons and
indicator lights
Rating plate
Model
& Serial
Numbers
Air
intake
grille
Condenser cover
handle (pull to open)
Start/Pause button
and indicator light
container
selection knob
Empty water
indicator light
Programme
Clean filter
indicator light
condenser unit
indicator light
Clean
Delay start
button
Cycle
phases
Display
Timed
drying
icon
Delay
start icon
8
ON/OFF/Reset button
Pressing the button normally will cause the machine to switch on or off. If the button is pressed for 3 seconds while the dryer is in use,
the machine will switch off and the running cycle will reset.
Programme selection knob
Allows for setting the programme: turn until the indicator points towards the desired programme (see Starting and selecting a programme).
Options buttons
Allows selection of the options available for the selected programme. The respective indicator lights turn on when the option has been
selected (see Programmes and options).
START/PAUSE button and indicator light
When the green light flashes slowly, press the button to start the programme. When the cycle is under way, the indicator light remains on. Press the button again to put the programme in the pause mode; the indicator light turns orange and starts flashing again.
Press the button again to resume the programme from the point it was interrupted (see Starting and selecting a programme).
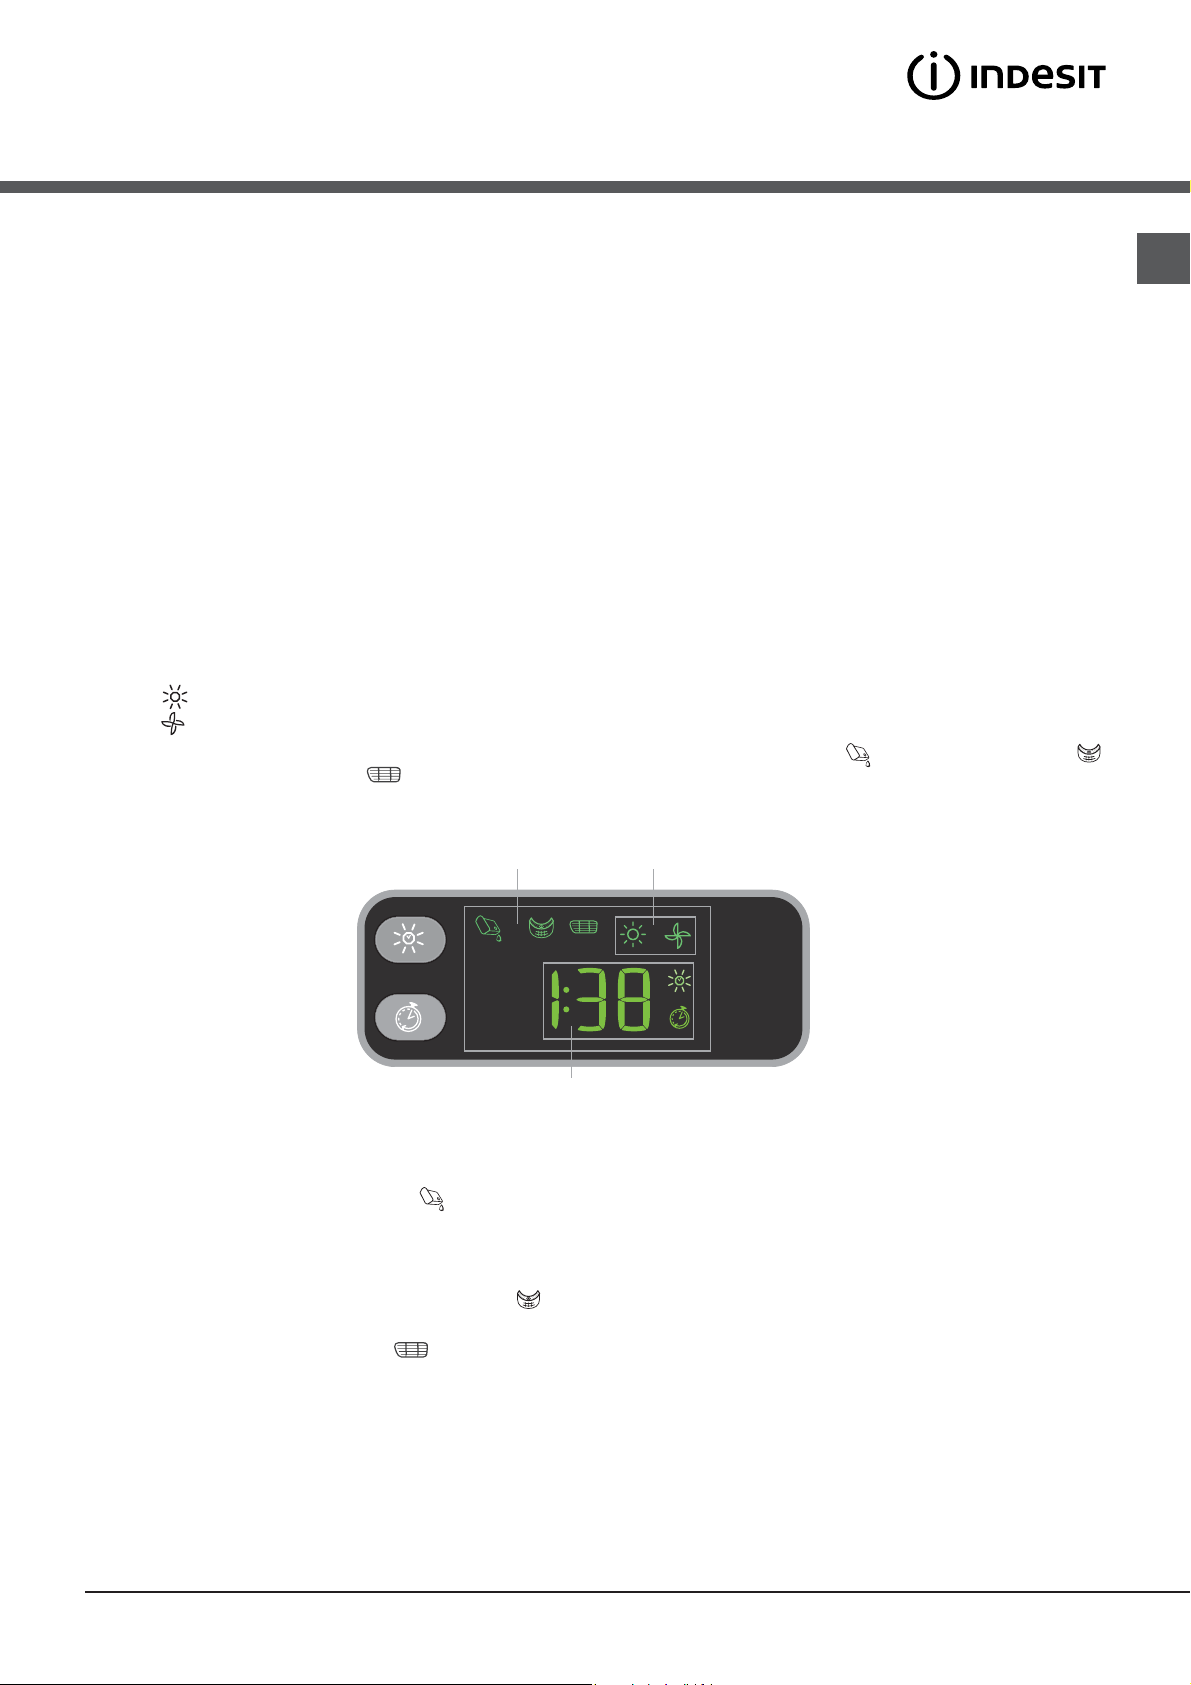
Display
In section A, the selected “Timed drying” value is displayed; if the “Delay start” function was set, the time remaining to the start of the
selected programme will appear.
The duration of the selected programme is also displayed in this section.
In section B, the phase of the running programme is displayed:
Sun icon
Fan icon
In section C, the maintenance indicator lights are displayed (Empty water container indicator light
Clean condenser unit indicator light)
: Drying cycle
: COOL air cycle
, Clean filter indicator light ,
, see Indicator lights.
EN
C
B
A
Indicator lights
The indicator lights provide important information. They indicate the following:
The “Empty water container” indicator light
If the water container fills during the course of the programme, the LED lights up. The dryer automatically starts a cool air cycle and
the START/PAUSE LED flashes orange. Press the START/PAUSE button to resume the cycle from the point it was interrupted.
In order to avoid this procedure, always empty the water container after using the tumble dryer (see Maintenance).
Before each programme, the “Clean filter” indicator light
(see Maintenance).
The “Clean condenser unit” indicator light signals the fundamental importance of cleaning the condenser regularly (see Maintenance).
signals that the water container must be emptied.
signals the fundamental importance of cleaning the filter before each load
9

EN
How to carry out a
drying cycle
Starting and selecting a programme
1. Plug the dryer into the power supply socket.
2. Select the programme according to the type of laundry (see Laundry).
3. Open the door, ensure that the filter is clean and securely placed and that the water container is empty and correctly slotted (see
Maintenance).
4. Load the machine, making sure that no piece of laundry gets between the door and the relative seal. Close the door.
5. Press the ON/OFF button to switch on the machine.
6. After consulting the programme chart and the indications for each type of fabric (see Laundry), turn the Programme selection
knob towards the programme corresponding to the type of laundry to be dried (see Programmes and options).
! Warning: If the position of the programme selection knob changes after pressing the START/PAUSE button, the selected programme will NOT be modified. To modify the programme, press the START/PAUSE button to put the programme in pause mode (the
indicator light flashes orange), then select a new programme and the relative options. Press the START/PAUSE button to start the
new programme.
7. Select the ”Timed Drying” function by pressing the timed drying button until the required time is dispayed (see Programmes and
options).
8. If necessary, set the time of the delayed start and any other options (see Programmes and options).
9. Press the ALARM
10. Press the START/PAUSE button to start the drying cycle. The display will show the approximate time remaining.
Laundry can be checked while the drying programme runs and any garments already dry can be removed, while drying continues
for the remaining items. After closing the door, press the START/PAUSE button to resume machine operation.
11. The final COOL TUMBLE phase (i.e. the fabrics are cooled) activates during the last few minutes of the drying programme;
always allow this phase to terminate.
12. At the end of the drying cycle the display shows END.
The buzzer will beep 3 times to let you know that your programme is complete. (Note: If the SOUND option was selected the buzzer
beeps 3 times every 30 seconds for 5 minutes).
Open the door, remove the laundry then clean the filter and replace it. Empty the water container and put it back in its slot (see
Maintenance).
If the clothes are not removed at the end of the cycle the automatic Anti Craese action will, on those programmes with this feature,
continue to rotate the drum intermittently for up to 10 hours to minimise creasing. Opening the door or pressing the OFF button will
stop the Anti Crease action.
13. Disconnect the dryer from the power supply.
Automatic pre-post Anti Crease
This is an automatic function which provides an anti crease treatment both before and after the drying programme. By periodically
rotating the drum before the start of the drying cycle, when a delayed start is selected, the formation of creases is prevented. On
certain programmes (see the programme table) the drum also rotates periodically at the end of the drying cycle on. This post crease
care action continues until either the door is opened or the OFF button is pressed.
button to sound a buzzer signalling the end of the programme.
Standby mode
This tumble dryer, in compliance with new energy saving regulations, is fitted with an automatic standby system which is enabled
after about 30 minutes if no activity is detected. Press and hold the ON/OFF button until the dryer reactivates.
10
 Loading...