


EN
1
Contents
Important information, 2-3
Installation, 4
Where to install the tumble dryer
Ventilation
Electrical connections
Preliminary information
Description of the tumble dryer, 5-6
Features
Control panel
How to carry out a drying cycle, 7
Starting and selecting a programme
Programmes and options, 8-9-10
Programme chart
Special programmes
Options
Opening the door
Laundry, 11-12
Sorting laundry
Care labels
Special items
Drying times
Warnings and suggestions, 13
General safety
Information on recycling and disposal
Saving energy and respecting the environment
Care and maintenance, 14
Disconnecting the power supply
Cleaning the filter after each cycle
Checking the drum after each cycle
Emptying the water container after each cycle
Cleaning the condenser unit
Cleaning the tumble dryer
Troubleshooting, 15
Assistance, 16
Spare parts
IDCA G35 S
Instruction manual
TUMBLE DRYER
English,1
EN
This symbol reminds you to read this instruction
manual.
Keep this manual at hand for immediate reference
whenever necessary. Always store this manual close to the
tumble dryer and remember to pass it on to any new owners
when selling or transferring the appliance, so they may
familiarise with the warnings and suggestions herein
contained.
Read these instructions carefully: the following pages
contain important information on installation and useful
suggestions for operating the appliance.
Português,33
PT
Español,17
ES
Deutsch,49
DE
2
EN
2
Important information
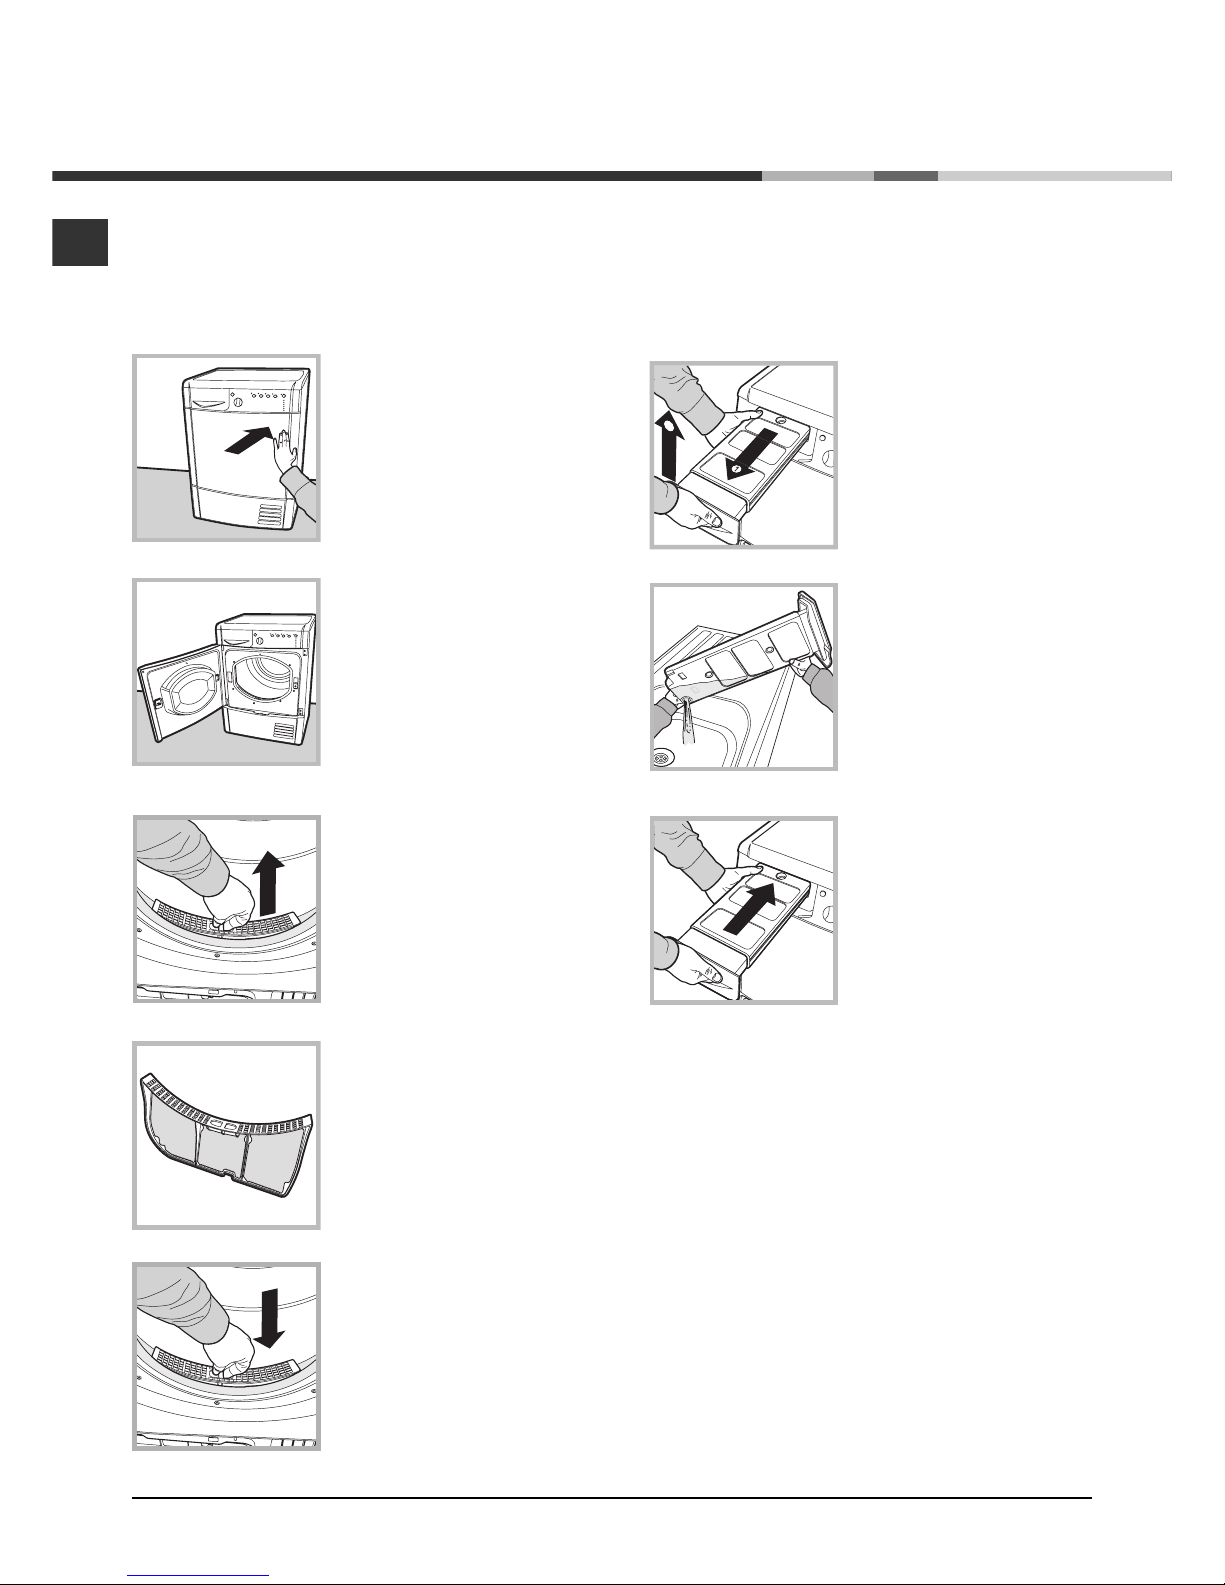
To ensure that the condenser dryer functions
efficiently, the following routine maintenance
procedures must be carried out:
Fluff filter CLEAN off any fluff build-up on the
filter after each drying cycle.
Step 1
Open the dryer door by pressing
it as shown in the picture.
Step 2
Pull out the filter (using two
fingers).
Step 3
Clean off any fluff build-up on the
internal surface of the filter net.
Step 4
Replace the filter never operate
the dryer without the filter in
place.
Failure to clean the filter after each drying cycle
can undermine drying performance as the
machine takes longer to dry and thus consumes
more energy.
Water container empty the water container after
each drying cycle.
Step 1
Pull the water container towards
you and remove it completely
from the dryer.
Step 2
Empty all the water in the water
container.
Step 3
Replace the water container
making sure that it is securely
fixed.
Failure to empty the water container may cause
the following:
- The dryer stops heating (thus the load may still
be damp at the end of the drying cycle).
- The Empty water container LED lights up to
signal that the water container is full.
Filling of the Water Container
When the dryer is first used water will not
immediately enter the water container as the
pump needs to be primed. This is done
automatically and will take a few minutes, during
this period the efficiency of the drying process is
not affected.

EN
3
Condenser unit - remove any fluff build-up
from the condenser on a monthly basis.
Step 1
Open the condenser cover
- grip the handle and pull
towards you.
Step 2
Remove the condenser by
turning the 3 catches, then pull
the condenser towards you. (It is
normal for some residual water
to be left in the tubes).
Step 3
Clean the condenser with running
water over the rear side to
remove any fluff deposits.
Step 4
Replace the condenser unit;
make sure that the unit is
securely in place, that all 3
catches are fixed and that the
position arrows on the front end
of the condenser are pointing
upwards.
Failure to clean the condenser unit may cause
premature faults to the dryer.
4
EN
Where to install the tumble dryer
Install the dryer far from gas
ranges, stoves, radiators or
hobs, as flames may damage it.
If the dryer is installed below a
worktop, ensure there are 10
mm between the upper panel of
the dryer and any objects
above it, and 15 mm between
the sides of the machine and
the walls or furniture units
adjacent to it. This ensures
adequate air circulation.
Ventilation
The room must be adequately ventilated while the dryer is
running. Make sure that the dryer is installed in a room free of
humidity and with adequate air circulation. The flow of air
around the dryer is essential to allow water to condense
during drying; the dryer will not function properly if it is placed
in an enclosed space or inside a cabinet.
Some condensation may form if the dryer is used in a small
or cold room.
We do not recommend installing the dryer in a cupboard;
moreover, never install the machine behind a lockable, sliding
or hinged door located on the opposite side of the dryer
door.
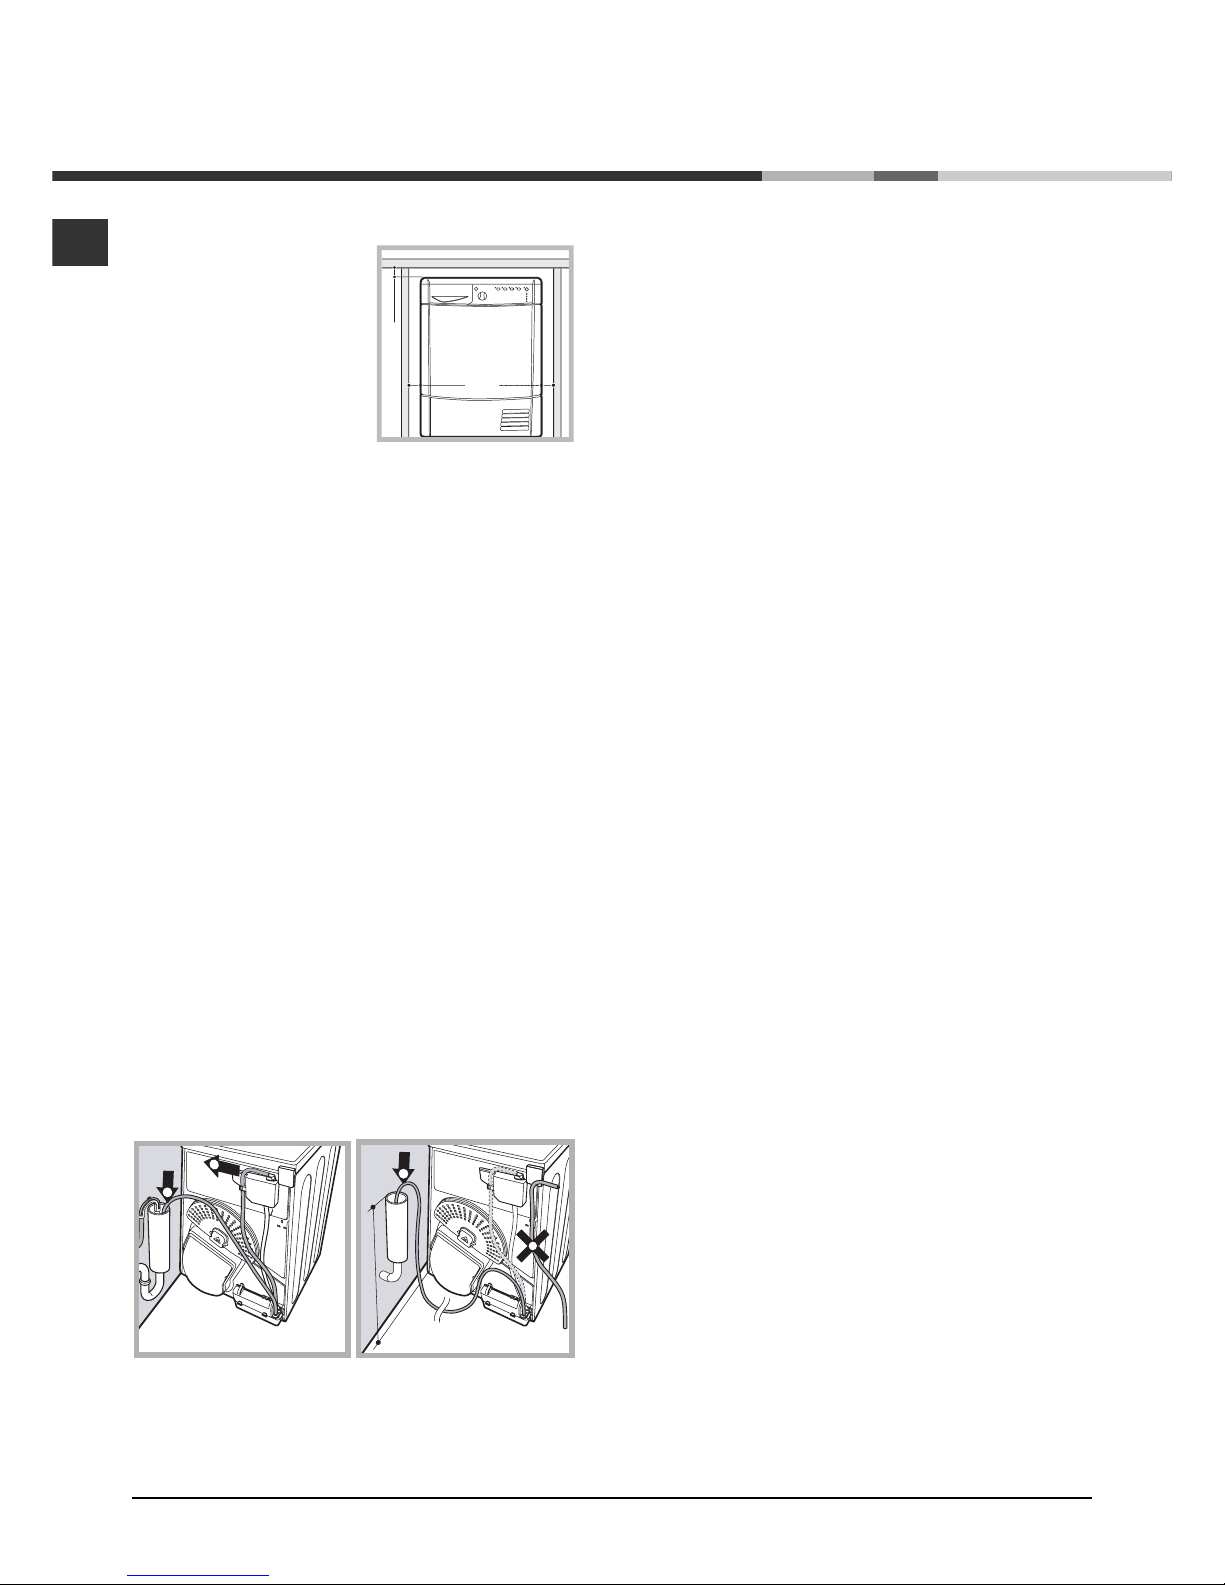
Water drainage
If your dryer is installed next to a drain the water can be
plumbed into this drain. This does away with the need to
empty the water container. If the dryer is stacked onto or
installed next to a washing machine it can share the same
drain. The height of the drain must be less than 3' (1 m)
from the bottom of the dryer.
Remove existing hose from position shown in picture A
and fit a suitable length of hose and connect as shown
in picture B.
Make sure that the hose is not squashed or kinked
when the dryer is in its final location.
1
0
m
Electrical connections
Before plugging the appliance into the socket, check the
following:
Make sure your hands are dry.
The socket must have an earth connection.
The socket must be able to withstand the machines
maximum power output as indicated on the data plate (see
Description of the tumble dryer).
The power supply voltage must fall within the values
indicated on the data plate (see Description of the tumble
dryer).
The socket must be compatible with the machines plug. If
not, either the socket or the plug must be replaced.
Do not use extension cords.
The tumble dryer must not be installed in outdoor spaces,
even if sheltered. It may be very dangerous to expose this
appliance to rain and thunderstorms.
Once dryer installation is complete, the electric cord and
plug must be at hand.
The electric cord must not be bent or crushed.
If the plug to be replaced is of the moulded-on type, it
must be disposed of in a safe way. DO NOT leave it where it
can be plugged into a socket and cause electric shocks.{}
The electric cord must be regularly checked and replaced
with a cord specifically designed for this dryer; it must then
be installed by an authorised technician only (see
Assistance). New or longer electric cords are supplied by
authorised dealers at a supplementary cost.
The manufacturer declines all responsibility for failure
to observe these instructions.
When in doubt about the above indications, contact a
qualified electrician.
Preliminary information
Once the tumble dryer is installed, clean the inside of the
drum before operating it and remove any dirt accumulated
during transportation.
1
2
2
1
Less than 1m
Picture A
Picture B
Installation
EN
5
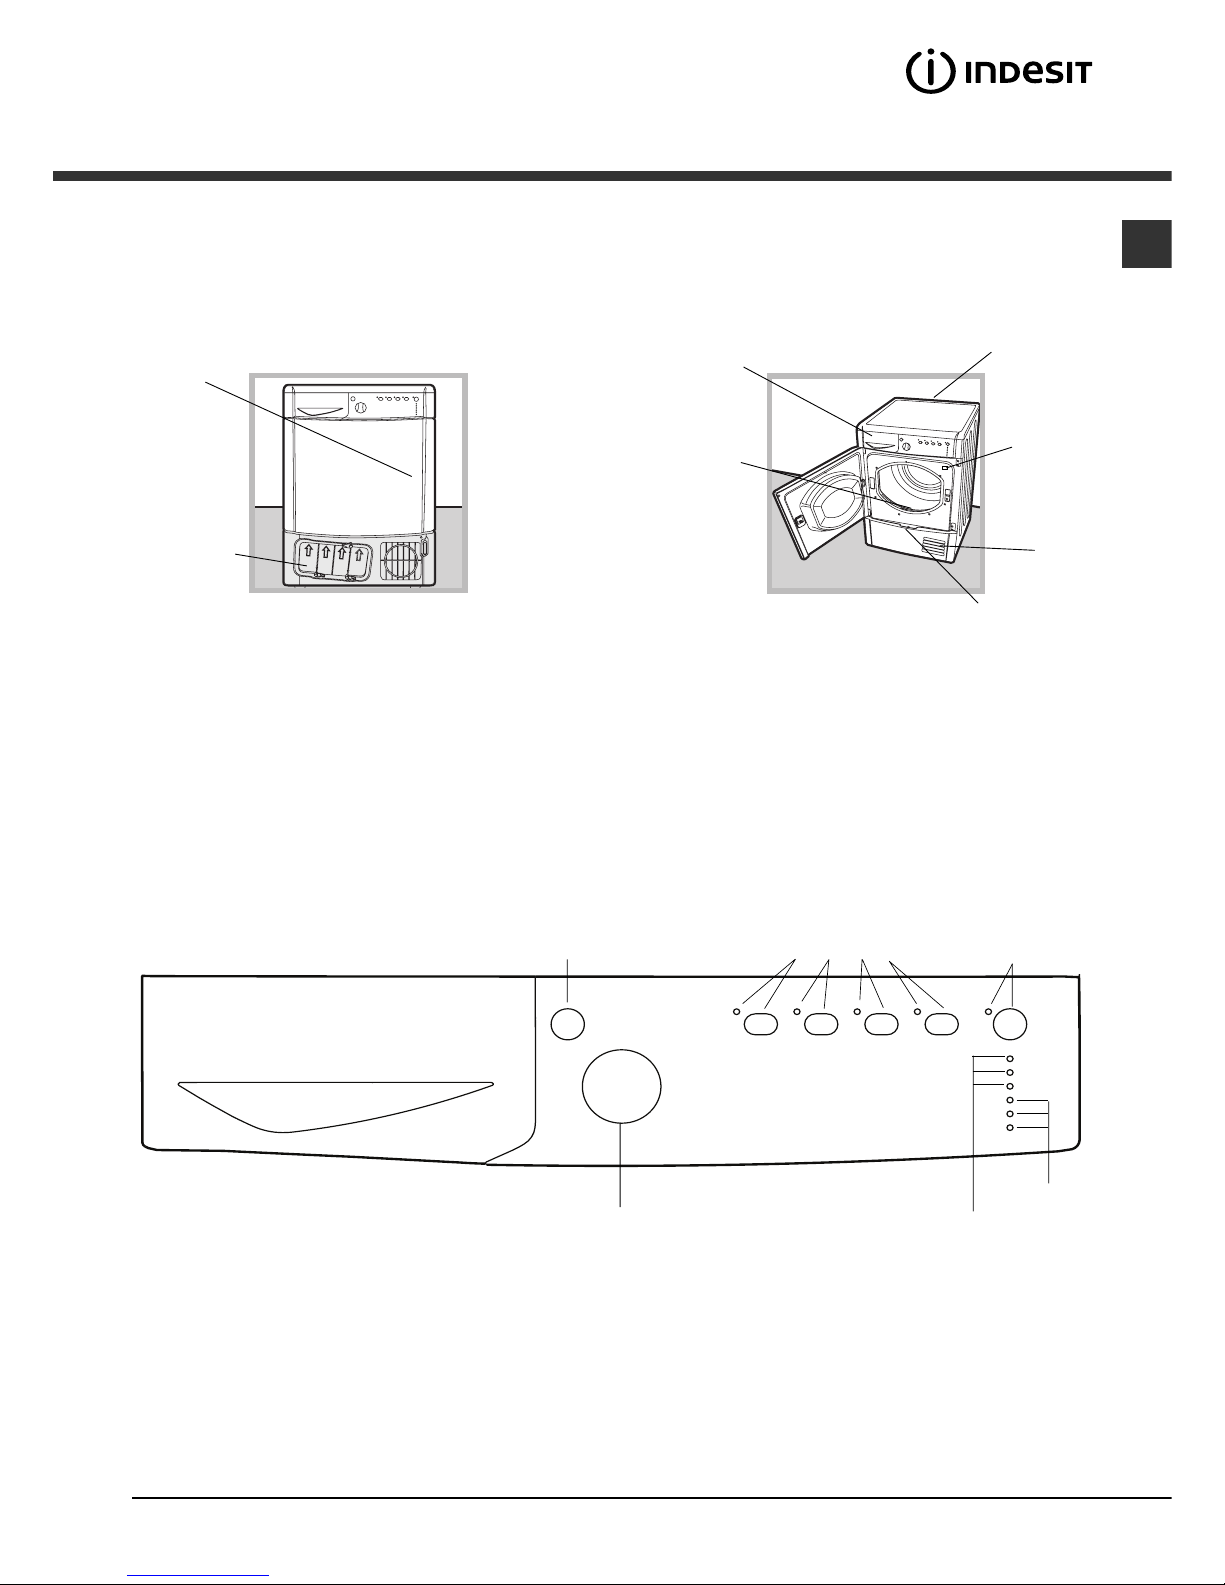
On/Off
button
Start/Pause
button
and indicator light
Programme
selection knob
Press the
door
Condenser
unit (cover
open)
Water container
Data plate
Condenser cover
handle (pull to
open)
Filter
Air
intake
grille
Description of
the tumble dryer
Opening the door
Control panel
Features
Options
buttons
and indicator
lights
Drying phase or
delay start
indicator lights
Maintenance
indicator lights
Model &
Serial
Numbers

6
EN
ON/OFF/Reset button
Pressing the button normally will cause the machine to switch on or off. If the button is pressed for 3 seconds while the dryer is in
function, the machine will switch off and the running cycle will reset.
Programme selection knob
Allows for setting the programme: turn until the indicator points towards the desired programme (see Starting and selecting a
programme).
Options buttons
Allow for selecting the options available for the selected programme. The relative indicator lights turn on when the option has been
selected (see Programmes and options).
START/PAUSE button and indicator light
When the green light flashes slowly, press the button to start the programme. When the cycle is under way, the indicator light remains
on. To put the programme into pause mode, press the button again; the indicator light will turn orange and start flashing again.
To resume the programme from the point it was interrupted, press the button again (see Start and programme selection).
Indicator lights
Maintenance indicator lights
The indicator lights provide important information. They indicate the following:
The Empty water container indicator light
signals that the water container must be emptied.
If the water container fills during the course of the programme, the LED lights up. The dryer automatically starts a cold air cycle and the
START/PAUSE LED flashes orange. Press the START/PAUSE button to resume the cycle from the point it was interrupted.
In order to avoid this procedure, always empty the water container after using the tumble dryer (see Care and maintenance).
Before each programme, the Clean filter indicator light
signals that it is essential to clean the filter each time before using the tumble
dryer (see Care and maintenance).
The Clean condenser unit indicator light signals that it is essential to clean the condenser regularly (see Care and maintenance).
Drying phases indicator lights
The indicator light signals that the drying phase is running.
The
indicator light signals that the cooling phase is running.
The END indicator light signals that the programme has ended.
Delay start indicator light
If the Delay start option has been activated (see Programmes and options), after the programme has started, the indicator
light corresponding to the chosen delay time will start flashing:
As time passes, the remaining delay will be displayed and the corresponding indicator light will flash:
Once the set delay time ends, the flashing LED will turn off and the set programme will start.

EN
7
Starting and selecting a programme
1. Plug the dryer into the power supply socket.
2. Select the programme according to the type of laundry (see Laundry).
3. Open the door, ensure that the filter is clean and securely placed and that the water container is empty and correctly slotted (see
Care and maintenance).
4. Load the machine, making sure that no piece of laundry gets between the door and the relative seal. Close the door.
5. Press the ON/OFF button to start the machine.
6. After consulting the programme chart and the indications for each type of fabric (see Laundry), turn the Programme selection
knob towards the programme corresponding to the type of laundry to be dried (see Programmes and options).
Warning: If the position of the programme selection knob changes after pressing the START/PAUSE button, the selected
programme will NOT be modified. To modify the programme, press the START/PAUSE button to put the programme in pause
mode (the indicator light flashes orange), then select a new programme and the relative options. Press the START/PAUSE button
to start the new programme.
7. If necessary, set the time of the delayed start and any other options (see Programmes and options).
8. Press the START/PAUSE button to start the drying cycle.
Laundry can be checked while the drying programme runs and any garments already dry can be removed, while drying continues
for the remaining items. After closing the door, press the START/PAUSE button to resume machine operation.
9. The final COLD DRYING phase (i.e. the fabrics are cooled) activates during the last few minutes of the drying programme; always
allow this phase to terminate.
10. When the END indicator light turns on, the programme has ended. Open the door, remove the laundry then clean the filter and
replace it. Empty the water container and put it back in its slot (see Care and maintenance).
If the Post anti-crease option was selected and laundry is not removed immediately, the drum will rotate garments at intervals for
10 hours or until the door is opened.
11. Disconnect the dryer from the power supply.
Standby mode
This tumble dryer, in compliance with new energy saving regulations, is fitted with an automatic standby system which is enabled
after about 30 minutes if no activity is detected. Press the ON-OFF button briefly and wait for the machine to start up again.
How to carry out
a drying cycle

8
EN
Programme chart
Special/Sport/Partial Programmes
Eco Time Programme
This programme is ideal for safely drying small loads in a short time, thereby optimising energy consumption. Suitable for loads of
up to 2 kg, it lasts about 60 minutes. The programme may last longer depending on the size and density of the load and on the
spin speed used during the wash cycle
We recommend checking whether garments are labelled with the
symbol and to turn them inside out before drying them.
Wool Programme
This programme is specific for items that withstand tumble drying and are labelled with the symbol. It is suitable for loads of up
to 1 kg (about 3 jerseys). We recommend turning the garments inside out before drying them. This programme lasts about 60
minutes, although it may last longer depending on the size and density of the load and on the spin speed used during the wash
cycle. Garments dried with this programme are usually ready to be worn, although the edges of heavier garments may be slightly
damp. Leave them to dry naturally, as an additional drying process may damage them.
Unlike other materials, the shrinking process in wool is irreversible, i.e. the garment does not resume its original dimension and
shape.
This programme is not suited for acrylic items.
Programmes and options
Programme
Max.
load
(kg)
Compatible options
Cycle
duration
Daily
1 Ready to wear
Max. Pre anti-crease – Post anti-crease – Delay start
160’
2
Cotton
Cupboard dry
Max. Pre anti-crease – Post anti-crease – Delay start
145’
3
Cotton
Iron dry
Max. Pre anti-crease – Post anti-crease – Delay start
108’
4
Synthetics
Cupboard dry
3 Pre anti-crease – Post anti-crease – Delay start
65’
5
Synthetics
Iron dry
3 Pre anti-crease – Post anti-crease – Delay start
55’
Special
6 Eco Time
2 Pre anti-crease – Post anti-crease – Delay start
60’
7 Wool
1 -
60’
Sport
8 Sport Intensive
4 Pre anti-crease – Post anti-crease – Delay start
80’
9 Sport Light
4 Pre anti-crease – Post anti-crease – Delay start
70’
10 Special Shoes
2 pairs -
100’
Partial
Refresh - -
20’
Timed drying
30 - 60 - 90 - 120 - 150 minutes - All option are available

EN
9
Sport Intensive Programme
This programme is designed for safely drying garments such as tracksuits and shorts bearing the symbol. It is ideal for clothes
which do not need to be dried fully. Suitable for loads of up to 4 kg, it lasts about 80 minutes, although it may last longer
depending on the size and density of the load and of the spin speed used during the wash cycle. We suggest turning garments
inside out before drying them.
Sport Light Programme
This programme is designed for safely drying garments such as tracksuits and shorts bearing the symbol. It is ideal for those
garments that do not need to be dried fully or which have to be ironed. Suitable for loads of up to 4 kg, it lasts about 70 minutes,
although it may last longer depending on the size and density of the load and of the spin speed used during the washing cycle. We
suggest turning garments inside out before drying them.
Sport Shoes Programme
This programme is specific for drying sports shoes of sizes 37-46. The shoes must have been previously washed and spun at a
minimum spin speed of 400 revolutions.
A specific shoe rack is provided and must be used, otherwise the dryer will be damaged if shoes are dried in the drum. Remove the
filter from its holder on the front part of the dryer and position the shoe rack.
Place shoelaces inside the shoes then load with the tips of the shoes facing downwards and the soles frontwards.
Drying times vary according to the shape and type of the shoe. If the shoes are not completely dry at the end of the programme,
restart the programme.
Do not dry shoes that have gel or flashing lights inside them. Only dry shoes made of synthetic material or rope. Once the
programme ends, remove the shoe rack and replace the filter into its holder.
Refresh
A short programme suitable for refreshing fibres and garments through the emission of cool air. It lasts about 20 minutes.
As this is not a drying programme, it is not to be used for garments that are still wet.
Timed drying cycle (30 - 60 - 90 - 120 - 150)
This programme can be used instead of the automatic programmes when you desire setting a time for the drying cycle. It is ideal
for drying damp laundry with the low heat setting or for small loads.
The duration of the timed drying cycle to be selected depends on the size of the load and on the fabric to be dried (see Table).
The cold drying cycle runs during the final 10 minutes of the programme.
For large loads, select the High Heat option if available.
Load
Fabric
1 kg 2 kg 3 kg 4 - 5 kg 6 – 8 kg
Cotton –
high heat
30 or 60
minutes
30 or 60
minutes
60 or 90
minutes
60 or 90
minutes
120 or 150
minutes
Synthetics –
low heat
30 or 60
minutes
30 or 60
minutes
60 or 90
minutes
- -
Acrylics –
low heat
30 or 60
minutes
60 or 90
minutes
- - -

10
EN
Options
The options allow for customising the selected programme according to ones own needs.
Delay start
The start of some programmes (see Programmes and options) may be delayed up to 9 hours. Press the button repeatedly to
enter the desired delay time. Before setting a delayed start, make sure that the water container is empty and that the filter is clean.
Post Anti-Crease
When this option is selected, the drum rotates garments at intervals after the cold drying cycle has ended, in order to avoid
creases forming on garments if they cannot be immediately removed at the end of the programme. During this phase, the indicator
light is turned on.
Pre Anti-Crease
When this option is selected in addition to the Delay start option, the drum rotates garments at intervals during the delay period
to avoid creases forming.
High Heat
When a drying time is selected, pressing this button sets high heat drying and the indicator light above the button lights up. The
timed programmes are pre-set to low heat.
Not all options are available on all programmes (see Programmes and options).
Opening the door
If the door is opened (or the START/PAUSE button is pressed) while a programme is running, the dryer stops and the following
may occur:
The START/PAUSE button flashes orange.
When a delayed start is running, the delay countdown continues. It is necessary to press the START/PAUSE button to resume
the Delay start programme. One of the Delay start indicator light flashes to signal the delay time entered.
It is necessary to press the START/PAUSE button to resume the programme. The progress indicator lights signal the running
phase and the START/PAUSE indicator light stops flashing and turns green.
During the post anti-crease phase, the programme ends. Pressing the START/PAUSE button reactivates a new programme from
the beginning.
By turning the Programme selection knob, a new programme is selected and the START/PAUSE indicator light flashes green.
This procedure can be used to select the Cold drying programme to cool garments if they are judged to be dry enough.
Press the START/PAUSE button to start the new programme.
Note: In the event of a power cut, turn the power switch off and remove the plug; when the electricity supply returns, press the
START/PAUSE button to resume the programme.
EN
11
Sorting laundry
Check the symbols on the care labels of the various
garments to verify whether the garments can be safely
tumble dried.
Sort laundry according to the type of fabric.
Empty all pockets and check for loose buttons.
Close zips and hooks and fasten belts and strings without
tightening them.
Wring out garments to remove the maximum amount of
water possible.
Do not load the dryer when garments are dripping wet.
Maximum load sizes
Do not overload the drum.
The following values indicate the weight of dry garments:
Natural fibres: maximum 8 kg
Synthetic fibres: maximum 3 kg
Do not overload the dryer as this may result is reduced
drying performance.
Typical weights
Note: 1 kg = 1000 g
When mixing synthetic fibres with cotton garments, the
latter may still be damp at the end of the drying cycle. If this
happens, simply put them through a short drying cycle.
Note: when setting the duration of the drying cycle,
remember that the cold drying phase runs during the last 10
minutes, during which the dryer does not dry the garments.
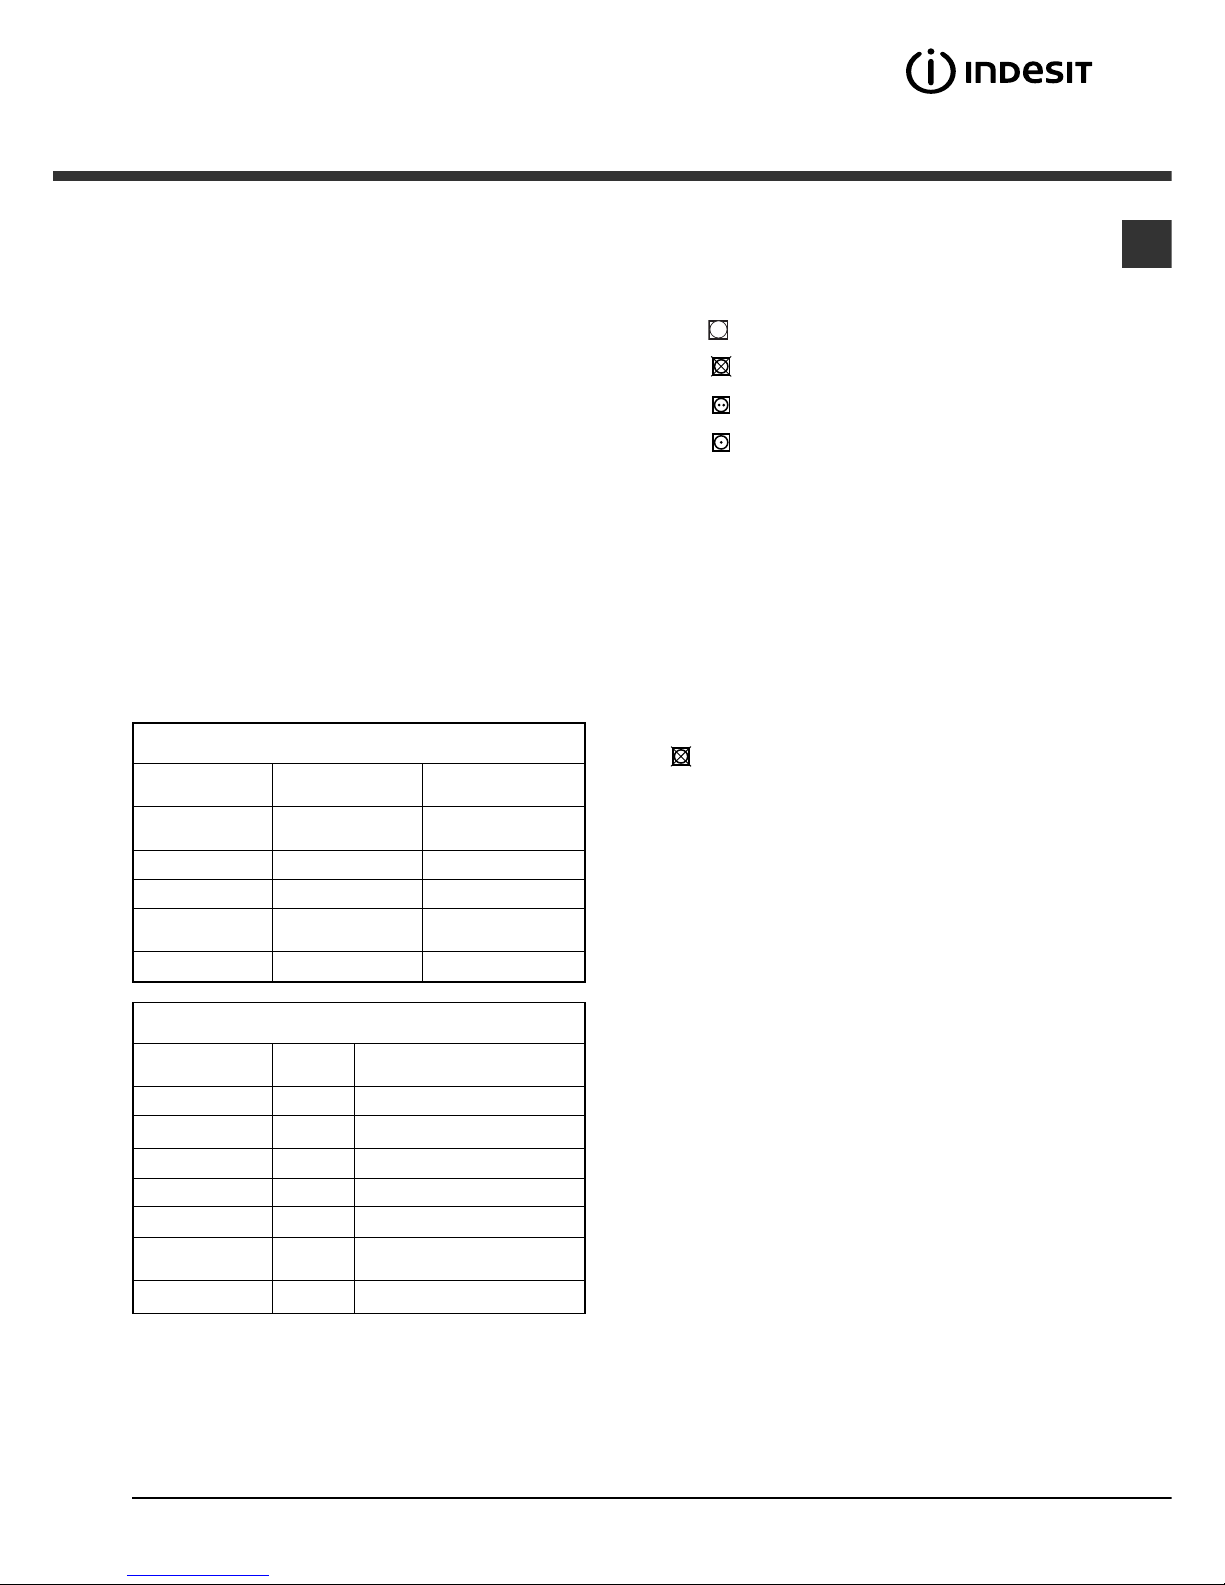
Care labels
Always check the care labels, especially when placing
garments in the tumble dryer for the first time. Below are the
most commonly used symbols:
May be tumble dried.
Do not tumble dry.
Tumble dry high heat.
Tumble dry low heat.
Items not suitable for tumble drying:
Items containing rubber parts or similar materials, or
plastic film covering (pillows, cushions or PVC sports
jackets), any type of inflammable object or objects
containing inflammable substances (used towels
containing hairspray).
Glass fibres (certain types of draperies).
Items which have been previously dry cleaned.
Items marked with the ITLC symbol (Special garments)
, which may be washed using special household
products. Follow instructions carefully.
Large bulky items (duvets, sleeping bags, pillows,
cushions, large bedcovers, etc.) that expand when dried
and hamper air circulation inside the tumble dryer.
Laundry
Garments
Blouse
Dress
Jeans
10 Nappie
Shirt
T-shirt
Cotton
Other
Cotton
Other
Cotton
Other
150 g
100 g
500 g
350 g
700 g
1,000 g
300 g
200 g
125 g
Household linen
Duvet cover
(double bed)
Large tablecloth
Small tablecloth
Tea cloth
Bath towel
Hand towel
Cotton
Other
1,500 g
1,000 g
700 g
250 g
100 g
700 g
350 g
Double bed
sheet
500 g
350 g
Single bed sheet
12
EN
Special items
Blankets and bedcovers: acrylic items (Acilian, Courtelle,
Orion, Dralon) must be dried with great care at low heat.
Avoid drying for long periods.
Creased or pleated garments: read the drying instructions
supplied by the manufacturer.
Starched garments: do not dry together with nonstarched items. Remove the maximum amount of starch
solution possible before placing these items in the dryer. Do
not over-dry: starch turns powdery leaving garments limp
this defeats its purpose.
Drying times
Drying times are approximate and may vary depending on
the following:
Amount of water retained by items after the spin cycle:
towels and delicate items retain a lot of water.
Fabrics: items of the same fabric, but with different texture
and thickness may have different drying times.
Amount of laundry: single items and small loads may take
longer to dry.
Drying: if items are to be ironed, they can be removed
from the dryer while still slightly damp. Items that require
complete drying can be left longer.
Heat setting.
Temperature of the room: the lower the temperature of
the room, the longer it will take for the dryer to dry
clothing.
Bulk: certain bulky items require special care during the
drying process. We suggest removing these items and
replacing them in the dryer once they have been shaken
out: repeat this procedure several times during the course
of the drying cycle.
Do not over-dry items.
All fabrics contain natural dampness which helps to keep
them soft and fluffy.
The drying times provided refer to the automatic Cupboard
dry programmes.
The weight refers to dry items.
Automatic drying times
Cotton
High heat
Drying times after 800-1000 rpm wash cycles
Half load Full load
1 kg 2 kg 3 kg 4 kg 5 kg 6 kg 7 kg 8 kg
30 - 40
minutes
40 - 55
minutes
55 - 70
minutes
70 - 80
minutes
80 - 90
minutes
95 - 120
minutes
120 - 140
minutes
130 - 150
minutes
Synthetics
Low heat
Drying times after wash cycles at lower speeds
Half load Full load
1 kg 2 kg 3 kg
40 - 50 minutes 50 - 70 minutes 70 - 90 minutes
Acrylics
Low heat
Drying times after wash cycles at lower speeds
Half load Full load
1 kg 2 kg
40 - 60 minutes 55 - 75 minutes

EN
13
This appliance was designed and manufactured in
compliance with current international safety standards. The
following information is provided for safety reasons and
must be read carefully.
General safety
The final part of a tumble dryer cycle occurs without heat
(cooling cycle) to ensure that the laundry is not damaged
due to excessive temperatures.
This tumble dryer must not be used by persons (including
children) with physical, sensory or mental impairments or
with little experience and knowledge of the appliance,
unless they are supervised or have been adequately
instructed on its use by the person responsible for their
safety.
This tumble dryer is designed for domestic and non-
professional use.
Do not touch the appliance while barefoot or with wet
hands or feet.
Unplug the appliance by pulling on the plug, not the cord.
Do not allow children near the appliance while it is in
function. After use, switch the appliance off and unplug it.
Keep the appliance door closed to prevent children using
it as a toy.
Children must be supervised to ensure that they do not
play with the appliance.
The appliance must be correctly installed and receive
adequate ventilation. The air intake on the front part of
the dryer and the air vents on the rear must never be
obstructed (see Installation).
Never use the dryer on carpeting with high pile as this
may prevent air from entering the dryer from the base.
Check whether the dryer is empty before loading it.
The rear part of the dryer may become very hot:
do not touch it while the appliance is in function.
Do not use the dryer unless the filter, water container and
condenser are properly positioned (see Maintenance).
Do not use liquid fabric softener in the dryer; add it to the
final rinse of the wash cycle.
Do not overload the dryer (see Laundry for the maximum
load sizes).
Do not add items that are dripping wet.
Tumble dry items only if they have been washed with
water and detergent, and have been rinsed and put
through a spin cycle. Drying items that have NOT been
washed with water may cause the risk of fire.
Always read the instructions on the care label carefully
(see Laundry).
Do not tumble dry items that have been treated with
chemical products.
Never tumble dry items that are contaminated with
inflammable substances (cooking oil, acetone, alcohol,
petrol, kerosene, stain removers, turpentine, waxes, wax
removers and hairspray), unless they have been washed
in hot water with an extra amount of detergent.
Do not tumble dry rubber, rubber-backed articles and
garments, cushions with foam rubber padding, latex
foam, rubber, plastic, shower caps, water-resistant
fabrics, nappy pants or liners, polyethylene and paper.
Remove all objects from pockets, particularly lighters
(risk of explosion).
Do not tumble dry large, excessively bulky items.
Do not tumble dry acrylic fibres at high temperatures.
Complete each programme with the relative cold drying
phase.
Do not switch the tumble dryer off if items that are still
warm are inside it.
Clean the filter after each use (see Care and maintenance).
Empty the water container and put it back in place after
each use (see Care and maintenance).
Clean the condenser unit regularly (see Care and maintenance).
Do not allow lint to build up around the tumble dryer.
Avoid climbing on the top of the dryer as this may
damage the appliance.
Always comply with electrical regulations and
requirements (see Installation).
Always purchase original accessories and spare parts
(see Assistance).
WARNING: Never stop the dryer before the end of the
drying cycle unless all items have been quickly removed and
hung in order to dispel heat.
Information on recycling
and disposal
As part of our continual commitment towards environmental
protection, we reserve the right to use recycled quality
components to reduce costs for our customers and to
minimise materials wastage.
Disposing of the packaging materials: follow local
regulations to allow for recycling of packaging materials.
In order to minimise the risk of injury to children, remove
the door and plug, then cut the power supply cord flush
with the appliance. Dispose of these parts separately to
prevent the appliance from being connected to a power
supply socket.
Disposal of old household appliances
European Directive 2002/96/EC concerning Waste
Electrical and Electronic Equipment (WEEE) states
that household appliances should not be disposed of
using the normal solid urban waste cycle. Exhausted
appliances should be collected separately in order to
optimise the cost of re-using and recycling materials
comprising the machine, while preventing potential damage
to public health and the environment. The crossed-out
wheeled bin symbol appears on all products to remind
owners of the obligations regarding separate waste
collection.
Owners should contact their local authorities or appliance
dealers for further information concerning the correct
disposal of household appliances.
Saving energy and respecting the
environment
Wring out items before tumble drying them to remove the
maximum amount of water possible (if they are previously
washed in a washing machine, select a spin cycle). This
ensures that energy is saved during tumble drying.
Always use the tumble dryer at full load to save energy:
single items and small loads may take longer to dry.
Clean the filter at the end of each cycle to reduce energy
consumption costs (see Maintenance).
Warnings
and suggestions
14
EN
Disconnecting the power supply
Disconnect the dryer when not in use or during cleaning
and maintenance operations.
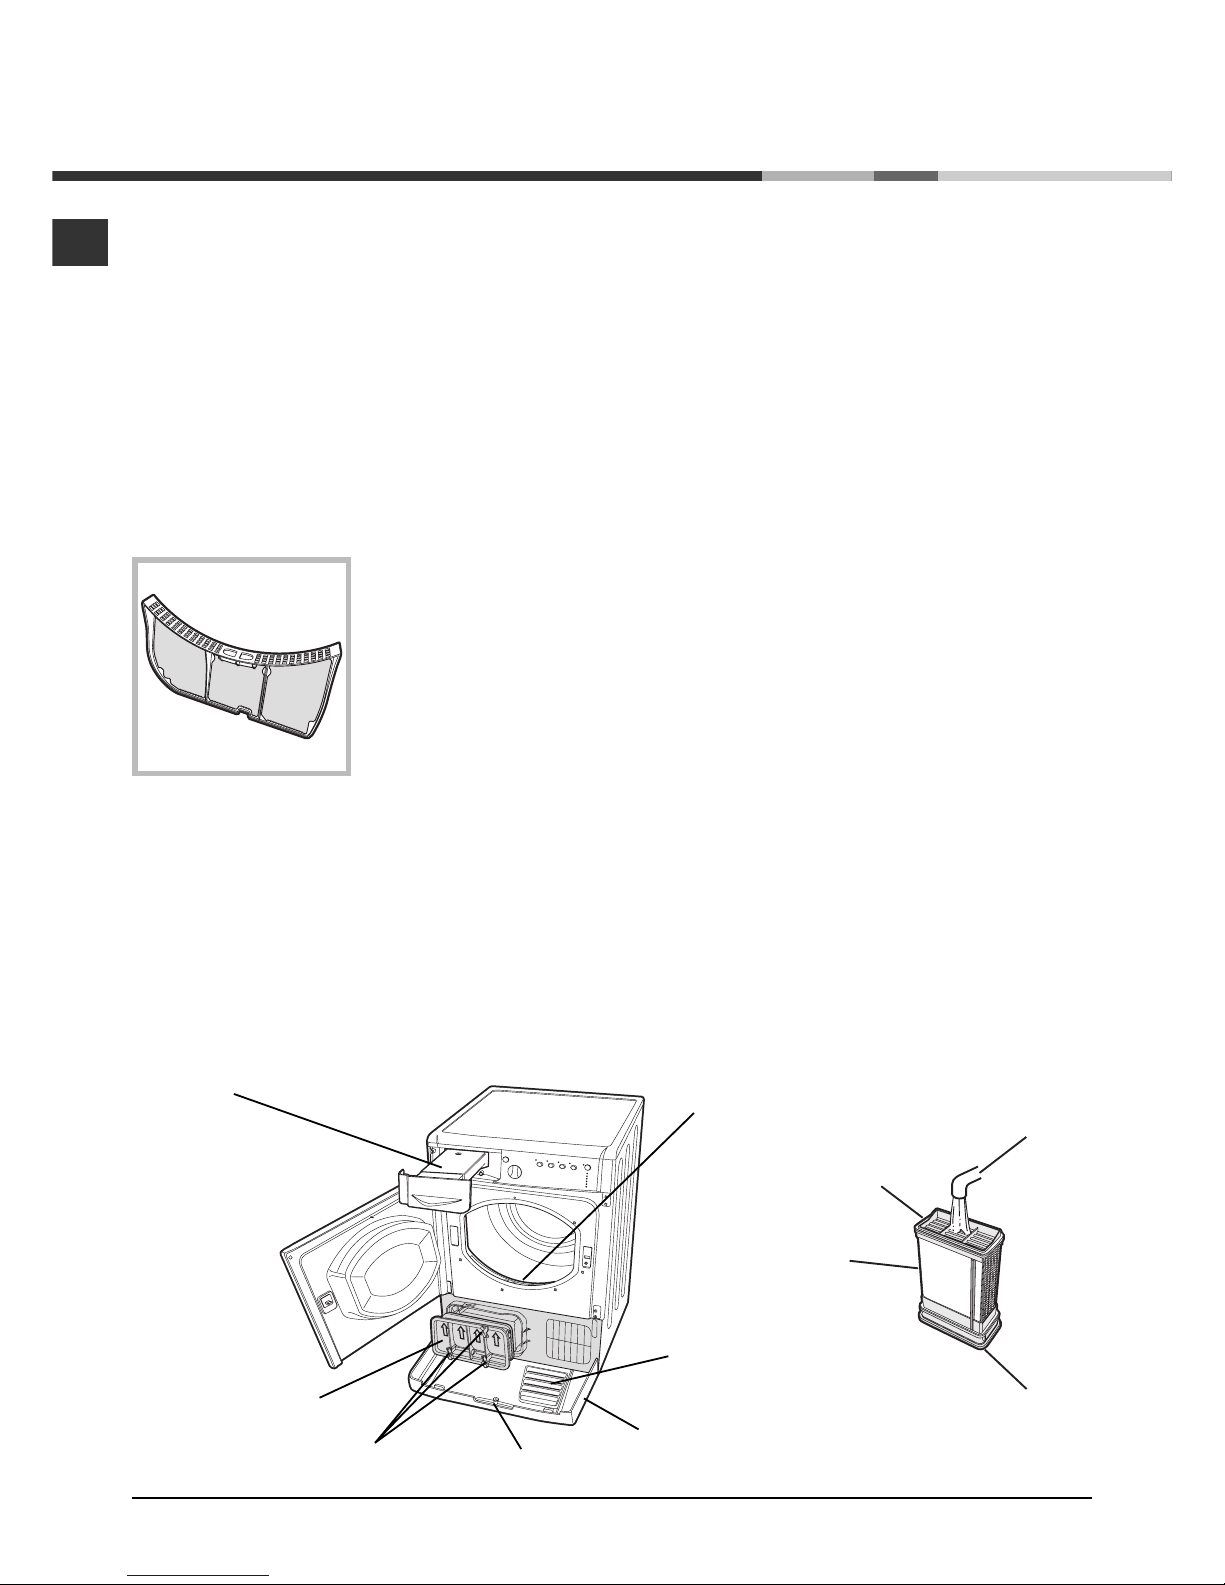
Cleaning the filter after each cycle
The filter is a fundamental component of the dryer: its
function is to collect lint and fluff that form during drying.
Clean the filter once drying is completed, by rinsing it under
running water or cleaning it with a vacuum cleaner. Should the
filter become clogged, the flow of air inside the dryer will be
seriously hampered: drying times becomes longer and more
energy is consumed. Moreover, the dryer may become
damaged.
The filter is located in front of the dryer seal (see Picture).
Removing the filter:
1. Pull the filters plastic
handle upwards (see
Picture).
2. Clean the fluff off the filter
and replace it correctly.
Ensure that the filter is
placed flush with the dryer
seal.
Do not use the dryer
unless the filter has been
replaced in its holder.
Checking the drum after each cycle
Rotate the drum manually to remove smaller items
(handkerchiefs) that could have been left inside the dryer.
Cleaning the drum
Avoid using abrasives, steel wool or stainless steel
cleaning agents to clean the drum.
A coloured film may appear on the stainless steel drum
surface: it may be caused by a combination of water and/or
cleaning agents such as wash-softeners. This coloured film
does not affect the dryers performance.
Emptying the water container after
each cycle
Remove the water container and empty it into a sink or
other suitable drain outlet, then replace it correctly.
Always check the water container and empty it before
starting a new drying cycle.
Cleaning the condenser unit
Remove the condenser unit regularly (monthly) and clean
off any fluff deposits from the plates by rinsing it with cold
water running on the rear end of the condenser.
Removing the condenser:
1. Disconnect the dryer from the power supply and open the
door.
2. Open the condenser cover (see Picture), unlock the three
catches by turning them 90° anti-clockwise, then pull on
the grip to remove the condenser.
3. Clean the surface of the seals and replace the unit with the
arrows pointing upwards, while making sure that the
catches are securely fixed.
Cleaning the tumble dryer
The external metal and plastic parts and the rubber parts
can be cleaned with the aid of a damp cloth.
Clean the front air intake grille regularly (every 6 months)
with a vacuum cleaner to remove any lint, fluff or dust
deposits. Furthermore, remove any lint deposits from the
front part of the condenser and from the filter area, using a
vacuum cleaner every so often.
Do not use solvents or abrasives.
The dryer uses ball bearing components that do not
require lubrication.
Have the dryer checked regularly by authorised technical
personnel in order to ensure that the electrical and
mechanical parts work safely (see Assistance).
Water
container
Condenser unit
Condenser cover
Catches
Filter
Handle
Air intake
Ta p
Rear
Front
Condenser unit
Care and maintenance

EN
15
Troubleshooting
Possible causes / Solutions:
The plug has not been inserted far enough into the socket to make contact.
There has been a power cut.
The fuse has burned out. Try connecting another appliance to the same socket.
If an extension cord is used, try connecting the dryer plug directly into the socket.
The door has not been closed properly.
The programme has not been set correctly (see How to carry out a drying cycle).
The
START/PAUSE button has not been pressed (see How to carry out a drying cycle).
A delayed start time has been set (see Programmes and options).
The
START/PAUSE button has been pressed; a short delay follows before the
dryer starts running. Wait for the drying cycle to start; do not press the START/
PAUSE
button otherwise the dryer switches to the pause mode and the drying
cycle will not start.
The filter has not been cleaned (see Care and maintenance).
The water container must be emptied? The Empty water container indicator light
flashes (see Care and maintenance).
The condenser needs to be cleaned (see Care and maintenance).
The heat setting is not suited to the type of fabric to be dried (see Programmes and
options).
An incorrect drying time was selected for the type of load (see Laundry).
The air intake grille or the rear air vents are clogged up (see Installation, and Care
and maintenance).
The items are too wet (see Laundry).
The dryer is overloaded (see Laundry).
The water container was probably not emptied before starting the programme. Do
not wait for the signal for emptying the water container, but always check and
empty it before starting a new drying programme (see Description of the tumble
dryer).
It is normal: the Empty water container indicator light flashes when the water
container is full. If the indicator light is on but is not flashing, it only signals that the
water container must be emptied (see Description of the tumble dryer).
For safety reasons, the dryer programmes last a maximum of 4 hours. If an
automatic programme has not detected the final dampness level required in this
interval, the dryer completes the programme and stops. Check the above points
and repeat the programme; if the items are still damp, contact the Technical
Assistance Centre (see Assistance).
Switch the appliance off and unplug it, then clean the filter and condenser (see Care
and Maintenance). Reinsert the plug, switch the appliance on and start another
programme.
If the problem persists, contact the Technical Assistance Service.
This is normal, especially if the dryer has not been used for a long time. If the noise
persists during the entire cycle, contact the Technical Assistance Centre.
If you feel that the dryer is not working properly, consult the following troubleshooting suggestions before contacting the Technical
Assistance Centre
(see Assistance).
Problem:
The dryer does not start.
The drying cycle does not start.
Drying times are too long.
The Empty water container
indicator light flashes, but the
dryer has been running for a short
time.
The Empty water container
indicator light is on but the water
container is not full.
The programme is finished but
the items are damper than
expected.
The Options and START/
PAUSE indicator lights flash and
one of the Maintenance or
Drying phases indicator lights
turns on without flashing.
The dryer is noisy during the first
few minutes of operation.

16
EN
Before contacting the Technical Assistance
Centre:
Follow the troubleshooting guide to check whether
problems can be solved personally (see Troubleshooting).
If not, switch the dryer off and contact the Technical
Assistance Centre closest to you.
Provide the following data when contacting the
Technical Assistance Centre:
name, address and postal code
telephone number
type of malfunction
date of purchase
the appliance model (Mod.)
the dryers serial number (S/N)
This information can be found on the data plate located
behind the door.
Spare parts
This dryer is a complex machine. Attempting to repair it
personally or with the aid unqualified personnel may put
the safety of people at risk, damage the machine or
invalidate the spare parts guarantee.
Always contact a qualified technician when experiencing
problems with this machine. The spare parts were
designed exclusively for this machine and should not be
used for any other purpose.
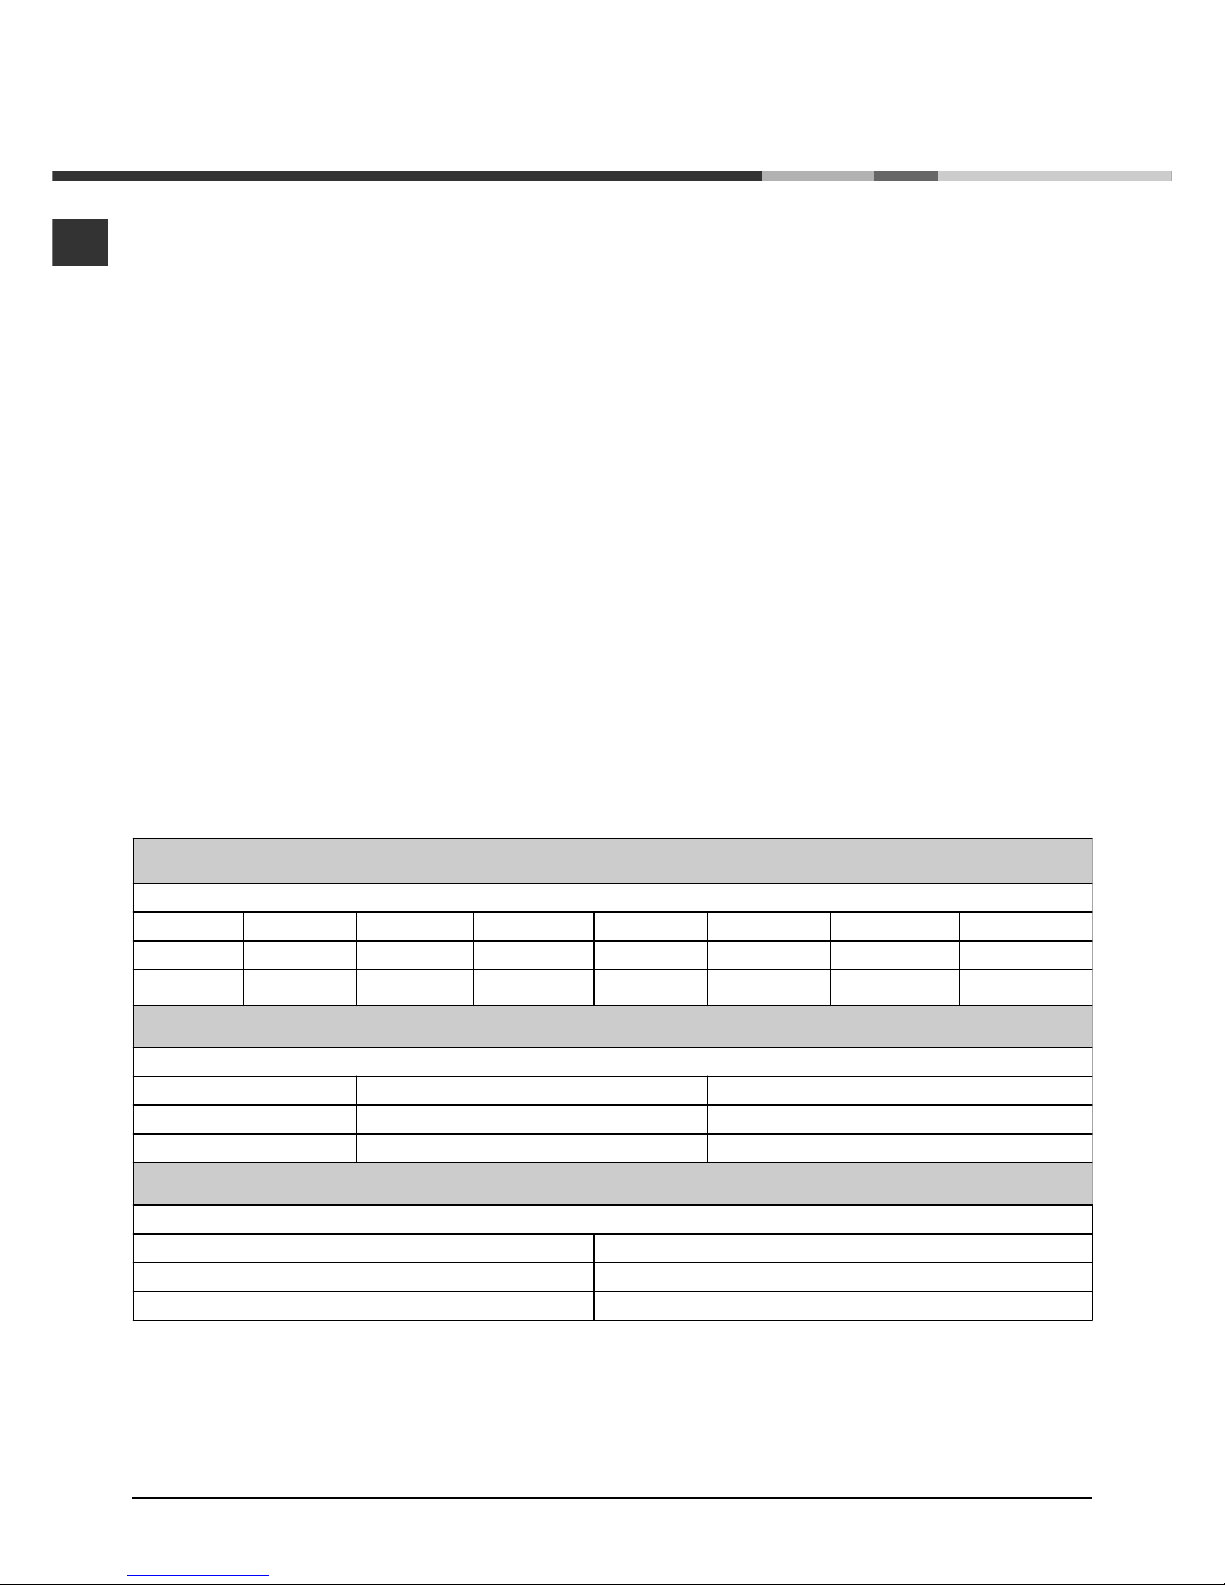
Comparative programmes
recommended programmes for the EN61121 comparative test.
Programme (EN61121) Programme to be selected Load size
Cotton drying cycle Cotton Cupboard dry 8 kg
Cotton drying ironing Cotton Iron dry 8 kg
Easy care fabric Synthetic Cupboard dry 3 kg
Note: this is not a complete list of the programme options.
This appliance conforms to the following EEC directives:
- 2006/95/EC (Low Voltage Directive)
- 89/336/EEC, 92/31/EEC, 93/68/EEC (Electromagnetic Compatibility Directive).
Assistance

ES
17
Español
Índice
Información importante, 18-19
Instalación, 20
Dónde instalar la secadora
Aireación
Conexión eléctrica
Información preliminar
Descripción de la secadora, 21-22
Características
Panel de control
Cómo realizar un secado, 23
Puesta en funcionamiento y selección del programa
Programas y opciones, 24-25-26
Tabla de programas
Programas especiales
Opciones
Abertura de la puerta
Ropa, 27-28
Subdivisión de la ropa
Etiquetas de mantenimiento
Prendas especiales
Tiempos de secado
Advertencias y sugerencias, 29
Seguridad general
Información para el reciclaje y el desguace
Ahorro energético y respeto del medio ambiente
Cuidados y mantenimiento, 30
Interrupción de la alimentación eléctrica
Limpieza del filtro después de cada ciclo
Control del cesto después de cada ciclo
Vaciado del contenedor de recolección del agua después
de cada ciclo
Limpieza de la unidad de condensación
Limpieza de la secadora
Problemas y soluciones, 31
Asistencia Técnica, 32
Repuestos
ES
IDCA G35 S
Manual de instrucciones
SECADORA
! Este símbolo te recuerda que debes leer este manual
de instrucciones.
! Mantenga al alcance de la mano el presente manual para
poder consultarlo fácilmente ante cualquier necesidad. El
manual siempre debe estar cerca de la secadora, si el
aparato es vendido o cedido a terceros, recuerde entregarlo
con su manual, de este modo se permitirá a los nuevos
propietarios conocer las advertencias y las sugerencias
sobre el uso de la secadora.
! Lea atentamente estas instrucciones: las páginas
siguientes contienen importante información sobre la
instalación y consejos útiles sobre el funcionamiento del
electrodoméstico.

18
ES
Información importante
Para el funcionamiento eficiente de la secadora
por condensación es necesario respetar el
esquema de mantenimiento ordinario indicado a
continuación:
Filtro para la pelusa ES NECESARIO quitar la
pelusa que se deposita en el filtro al finalizar
cada ciclo de secado.
Fase 1
Abra la puerta de la secadora
presionándola como se indica en
la figura.
Fase 2
Extraiga el filtro (utilizando dos
dedos).
Fase 3
Quite la pelusa de la superficie
interna de la red del filtro.
Fase 4
Vuelva a instalar el filtro No
active nunca la secadora si el
filtro no está colocado en su
posición.
La falta de limpieza del filtro después de cada
ciclo de secado influye sobre las prestaciones de
secado de la máquina, la cual necesita más
tiempo para secar y en consecuencia consume
más electricidad.
Contenedor para la recolección de agua Se debe
vaciar el contenedor para la recolección de agua
después de cada ciclo de secado.
Fase 1
Tire del contenedor de
recolección del agua hacia fuera
y extráigalo totalmente de la
secadora.
Fase 2
Vacíe totalmente el contenedor
de recolección de agua.
Fase 3
Vuelva a instalar el contenedor
de recolección del agua
asegurándose que esté
totalmente introducido en su
lugar.
Si el contenedor de recolección no se vacía, el
agua podría ocasionar que:
- Se detenga el calentamiento de la máquina (por
lo tanto la carga podría estar todavía húmeda al
finalizar el ciclo de secado).
- El led Vaciar cubeta se ilumine para advertir
que el contenedor está lleno.
Carga del sistema de recolección de agua
Cuando la secadora es nueva, el contenedor de
recolección de agua no recoge hasta que el
sistema no se carga. Esta operación puede
implicar 1 o 2 ciclos de secado. Una vez cargado,
el sistema recoge agua en cada ciclo.

ES
19
Unidad de condensación - Es necesario limpiar
la pelusa del condensador
cada mes.
Fase 1
Abra la tapa del condensador
- sostenga la manija y tire hacia
Ud.
Fase 2
Quite el condensador girando
los 3 ganchos y luego tire del
condensador hacia Ud. (Podría
haber agua en los tubos: esto es
normal).
Fase 3
Limpie el condensador con agua
haciéndola pasar por la parte
posterior para extraer posibles
depósitos de pelusa.
Fase 4
Vuelva a instalar la unidad de
condensación, controle que el
grupo esté totalmente
introducido en su lugar, que los
tres ganchos estén fijos y que las
flechas de posicionamiento en la
parte delantera del condensador
estén dirigidas hacia arriba.
La falta de limpieza del condensador podría
causar una avería anticipada en la secadora.

20
ES
Dónde instalar la secadora
Las llamas pueden averiar la
secadora, por lo tanto, debe
estar alejada de cocinas a gas,
estufas, radiadores o
encimeras.
Si el electrodoméstico debe
instalarse debajo de una
encimera, es necesario dejar un
espacio de 10 mm entre el
panel superior del
electrodoméstico y los otros
objetos dispuestos encima de
la misma, y un espacio de 15 mm entre los lados del
electrodoméstico y las paredes o las decoraciones
dispuestas al costado del mismo. De este modo se
garantiza una circulación de aire adecuada.
Aireación
Cuando la secadora está en funcionamiento debe haber
una aireación suficiente. Controle que se instale la secadora
en un ambiente que no sea húmedo y que esté dotado de
una adecuada circulación de aire. El flujo de aire alrededor de
la secadora es fundamental para permitir que se condense
el agua producida durante el lavado; la secadora no funciona
de forma correcta si se coloca en un espacio cerrado o
dentro de un mueble.
! Si la secadora se utiliza en una habitación pequeña o fría es
posible que se forme algo de condensación.
! No se aconseja instalar la secadora en un armario; el
electrodoméstico nunca debe instalarse detrás de una
puerta que se cierra con llave, una puerta corrediza o una
puerta con los goznes en el lado opuesto a la puerta de la
secadora.
Descarga de agua
Si la máquina se coloca cerca de un tubo de desagüe es
posible hacer salir el agua condensada directamente sin
tener que utilizar el contenedor de recolección de agua. En
este caso, ya no es necesario vaciar el contenedor de
recolección del agua después de cada ciclo.
Si la secadora se coloca encima o al costado de una
lavadora, ambas pueden compartir el desagüe. Basta
desconectar el tubo indicado en la figura A y conectarlo a al
desagüe.
Si el desagüe se encuentra más lejos que la longitud del
tubo, para alcanzarla es posible comprar y conectar un tubo
del mismo diámetro y del largo necesario.
Para instalar el tubo nuevo basta cambiar el tubo presente
como se indica en la figura B introduciéndolo en la misma
posición.
! El desagüe debe estar 1 m más abajo del fondo de la
secadora.
! Después de instalar la secadora asegurarse que el
tubo de desagüe no esté doblado ni torcido.
1
0
m
Conexión eléctrica
Antes de introducir el enchufe en la toma eléctrica compruebe
lo siguiente:
Asegurarse que las manos estén secas.
La toma debe poseer una conexión a tierra.
La toma debe ser capaz de tolerar la potencia máxima
prevista para la máquina, indicada en la placa de los datos
de funcionamiento (ver Descripción de la secadora).
La tensión de alimentación debe estar comprendida entre
los valores indicados en la placa de datos de
funcionamiento (ver Descripción de la secadora).
La toma debe ser compatible con el tipo de enchufe de la
secadora. Si no es así, sustituya la toma o el enchufe.
! No utilice prolongaciones.
! La secadora no puede instalarse en ambientes externos, ni
siquiera si están resguardados. En efecto, es posible que
sea muy peligroso exponer este electrodoméstico a la lluvia
o a las tormentas.
! Después de la instalación de la secadora el cable eléctrico
y el enchufe deben quedar a mano.
! El cable eléctrico no debe doblarse ni aplastarse.
! Si el enchufe a cambiar está incorporado, se debe eliminar
de forma segura. NUNCA lo deje para que pueda ser
conectado a una toma y provoque descargas eléctricas
! El cable eléctrico debe controlarse periódicamente y debe
cambiarse empleando un cable específico para esta
secadora que sólo puede ser instalado por técnicos
autorizados(ver Asistencia Técnica). Los cables eléctricos
nuevos o más largos son suministrados por los
revendedores autorizados con un costo adicional .
! El fabricante declina cualquier responsabilidad si no
cumplen estas reglas.
! Si existen dudas respecto a lo indicado, llame a un
electricista cualificado.
Información preliminar
Una vez instalada la secadora, antes de ponerla en
funcionamiento limpie dentro del cesto y elimine la suciedad
que puede haberse acumulado durante el transporte.
1
2
2
1
Less than 1m
Fig. A
Fig. B
Instalación
 Loading...