

Page 1

Instruction manual
TUMBLE DRYER
EN
English,1
DE
Deutsch,49
IDCA 735
F
Français,17
NL
Nederlands,65
I
Italiano,33
Contents
Important information, 2-3
Installation, 4
Where to install the tumble dryer
Ventilation
Electrical connections
Preliminary information
Description of the tumble dryer, 5-6
Features
Control panel
How to carry out a drying cycle, 7
Starting and selecting a programme
Programmes and options, 8-9-10
Programme chart
Special programmes
Options
Opening the door
Laundry, 11-12
Sorting laundry
Care labels
Special items
Drying times
EN
! This symbol reminds you to read this instruction manual.
! Keep this manual at hand for immediate reference whenever
necessary. Always store this manual close to the tumble dryer and
remember to pass it on to any new owners when selling or transferring the appliance, so they may familiarise with the warnings
and suggestions herein contained.
! Read these instructions carefully: the following pages contain
important information on installation and useful suggestions for
operating the appliance.
Warnings and suggestions, 13
General safety
Saving energy and respecting the environment
Care and maintenance, 14
Disconnecting the power supply
Cleaning the filter after each cycle
Checking the drum after each cycle
Emptying the water container after each cycle
Cleaning the condenser unit
Cleaning the tumble dryer
Troubleshooting, 15
Assistance, 16
Spare parts
Information on recycling and disposal
1
Page 2
2
Important information
EN
To ensure that the condenser dryer functions
efficiently, the following routine maintenance
procedures must be carried out:
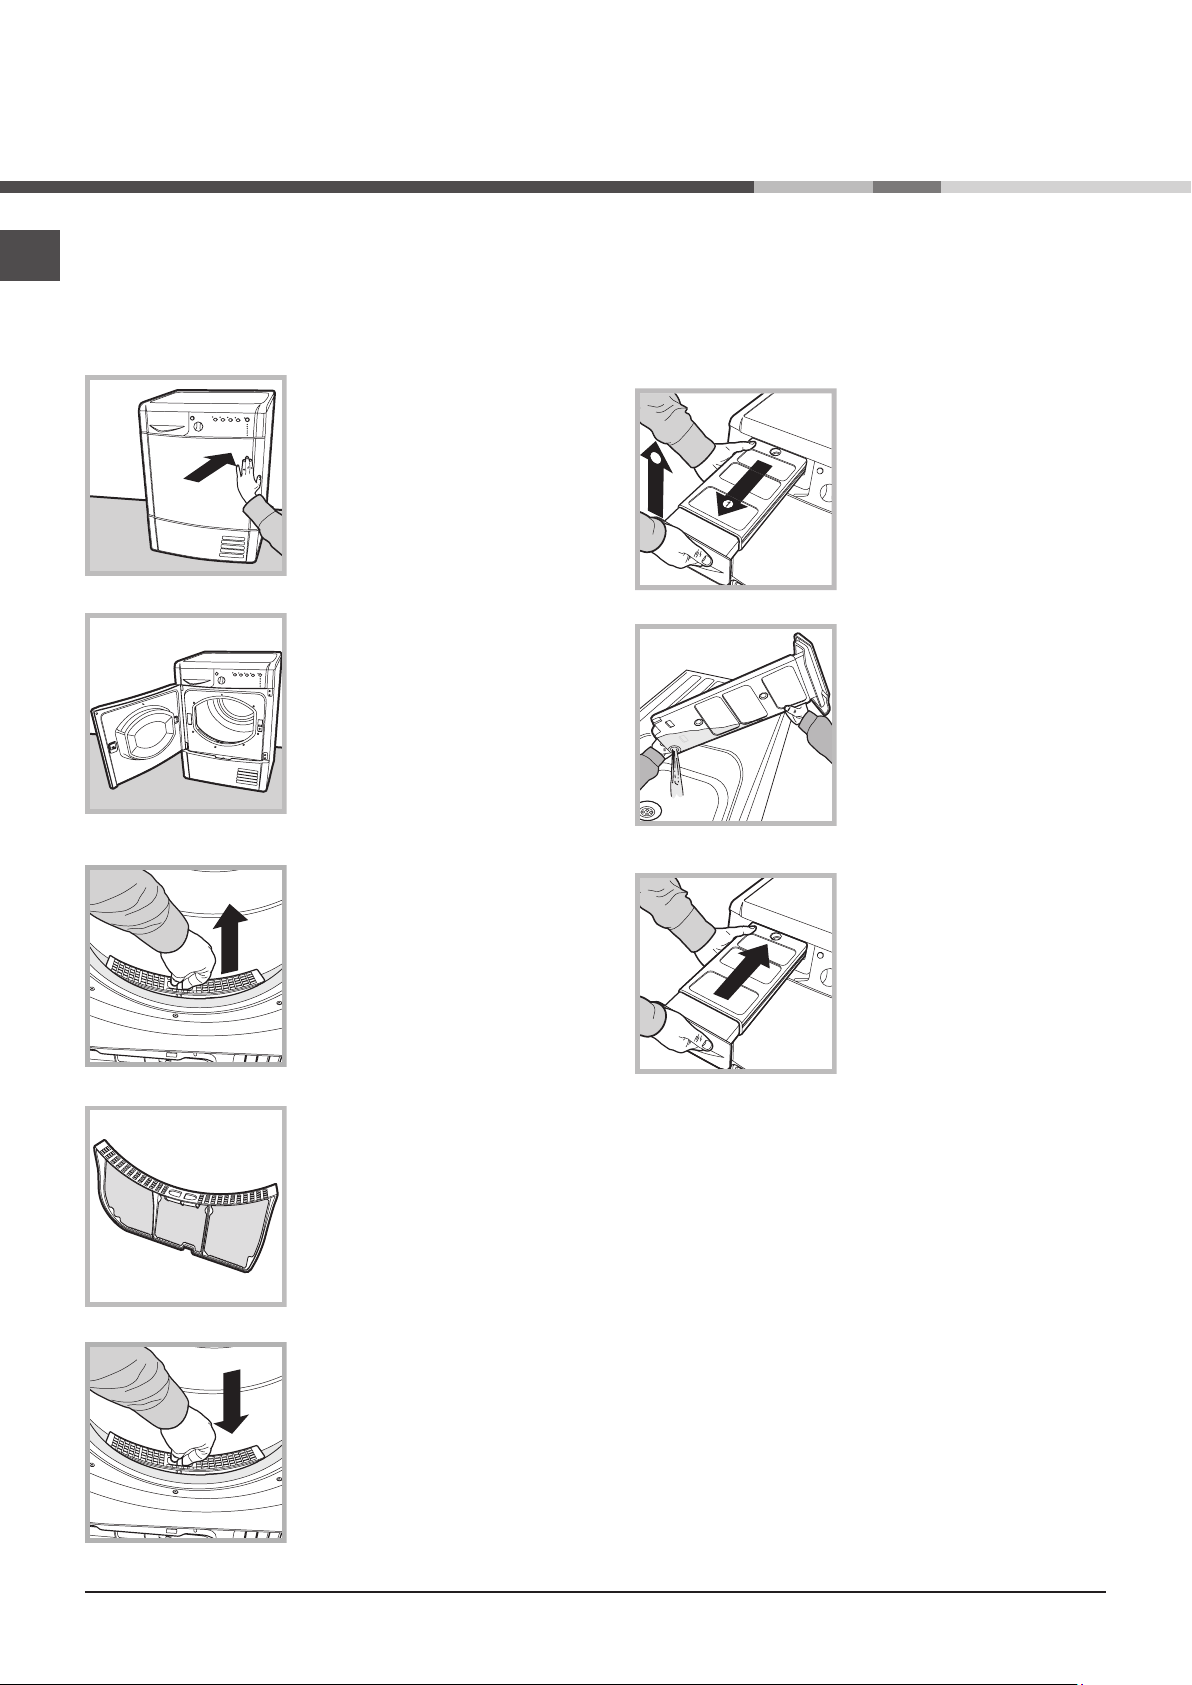
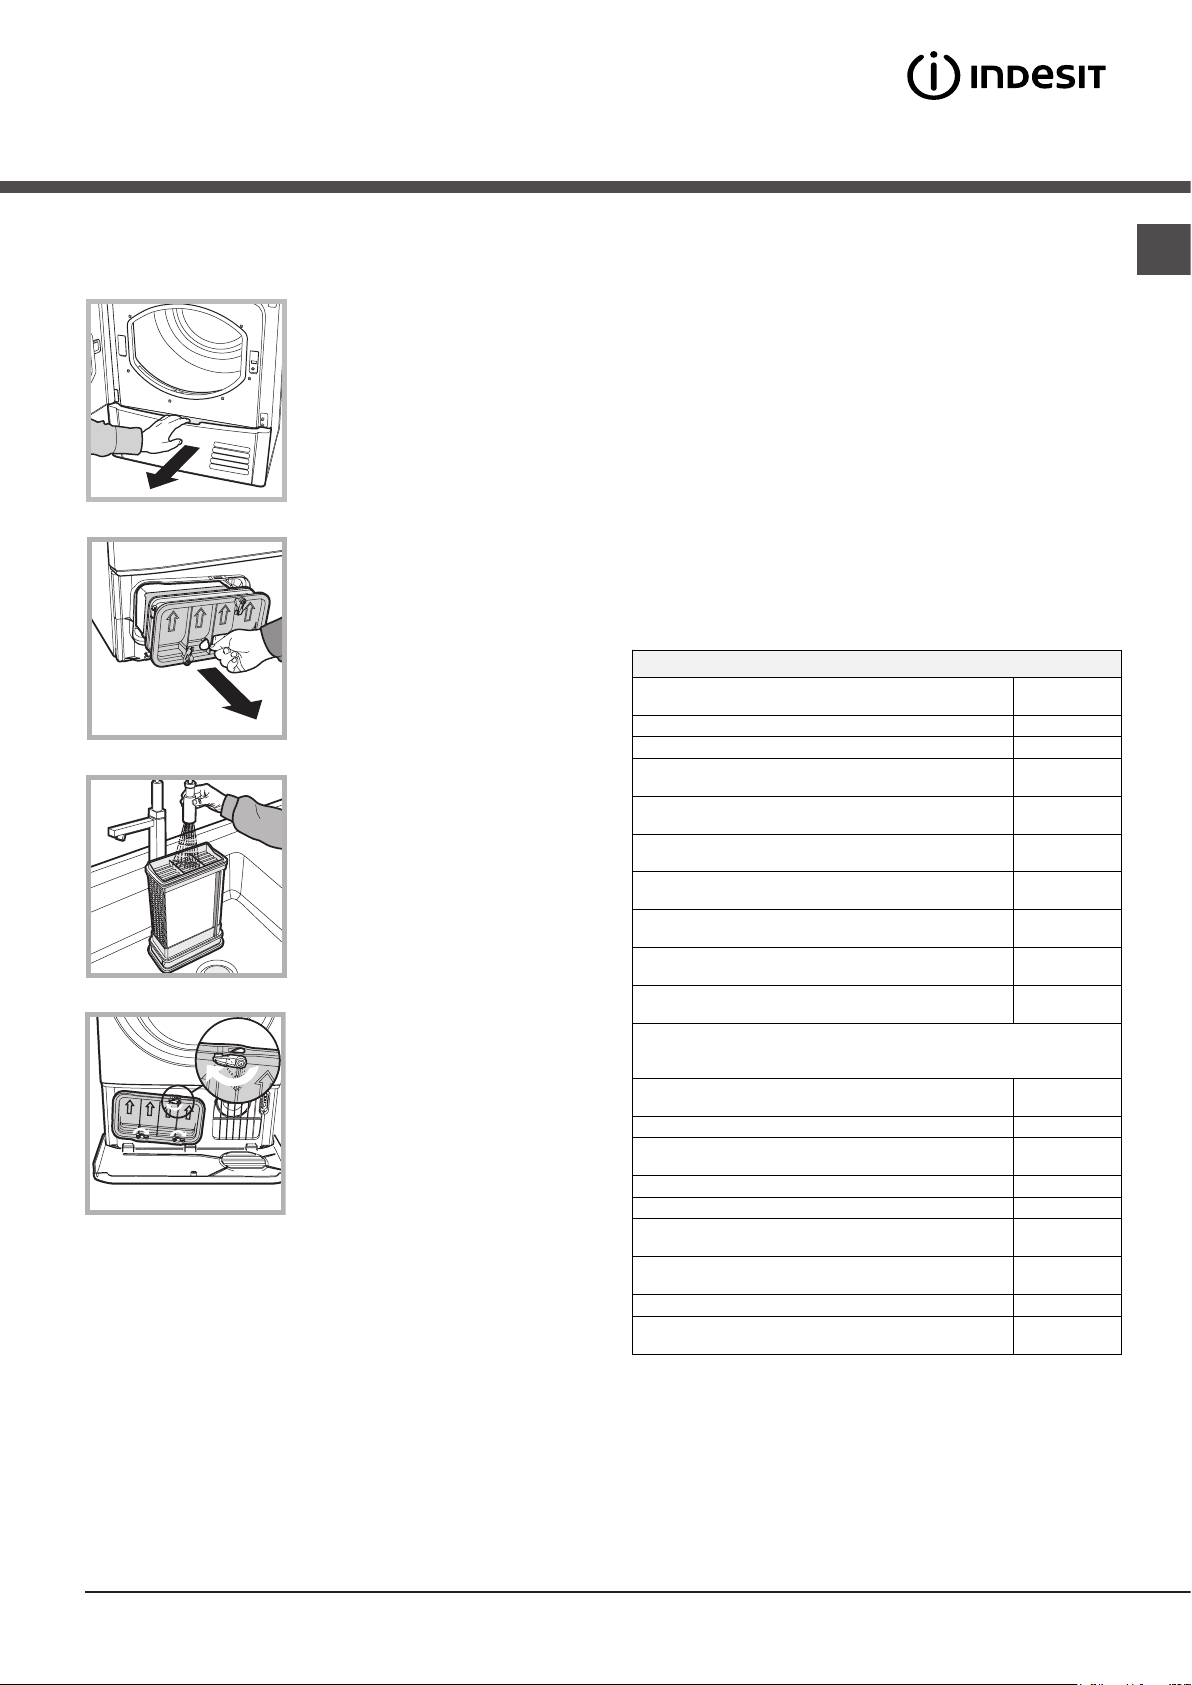
Fluff filter – CLEAN off any fluff build-up on the
filter after each drying cycle.
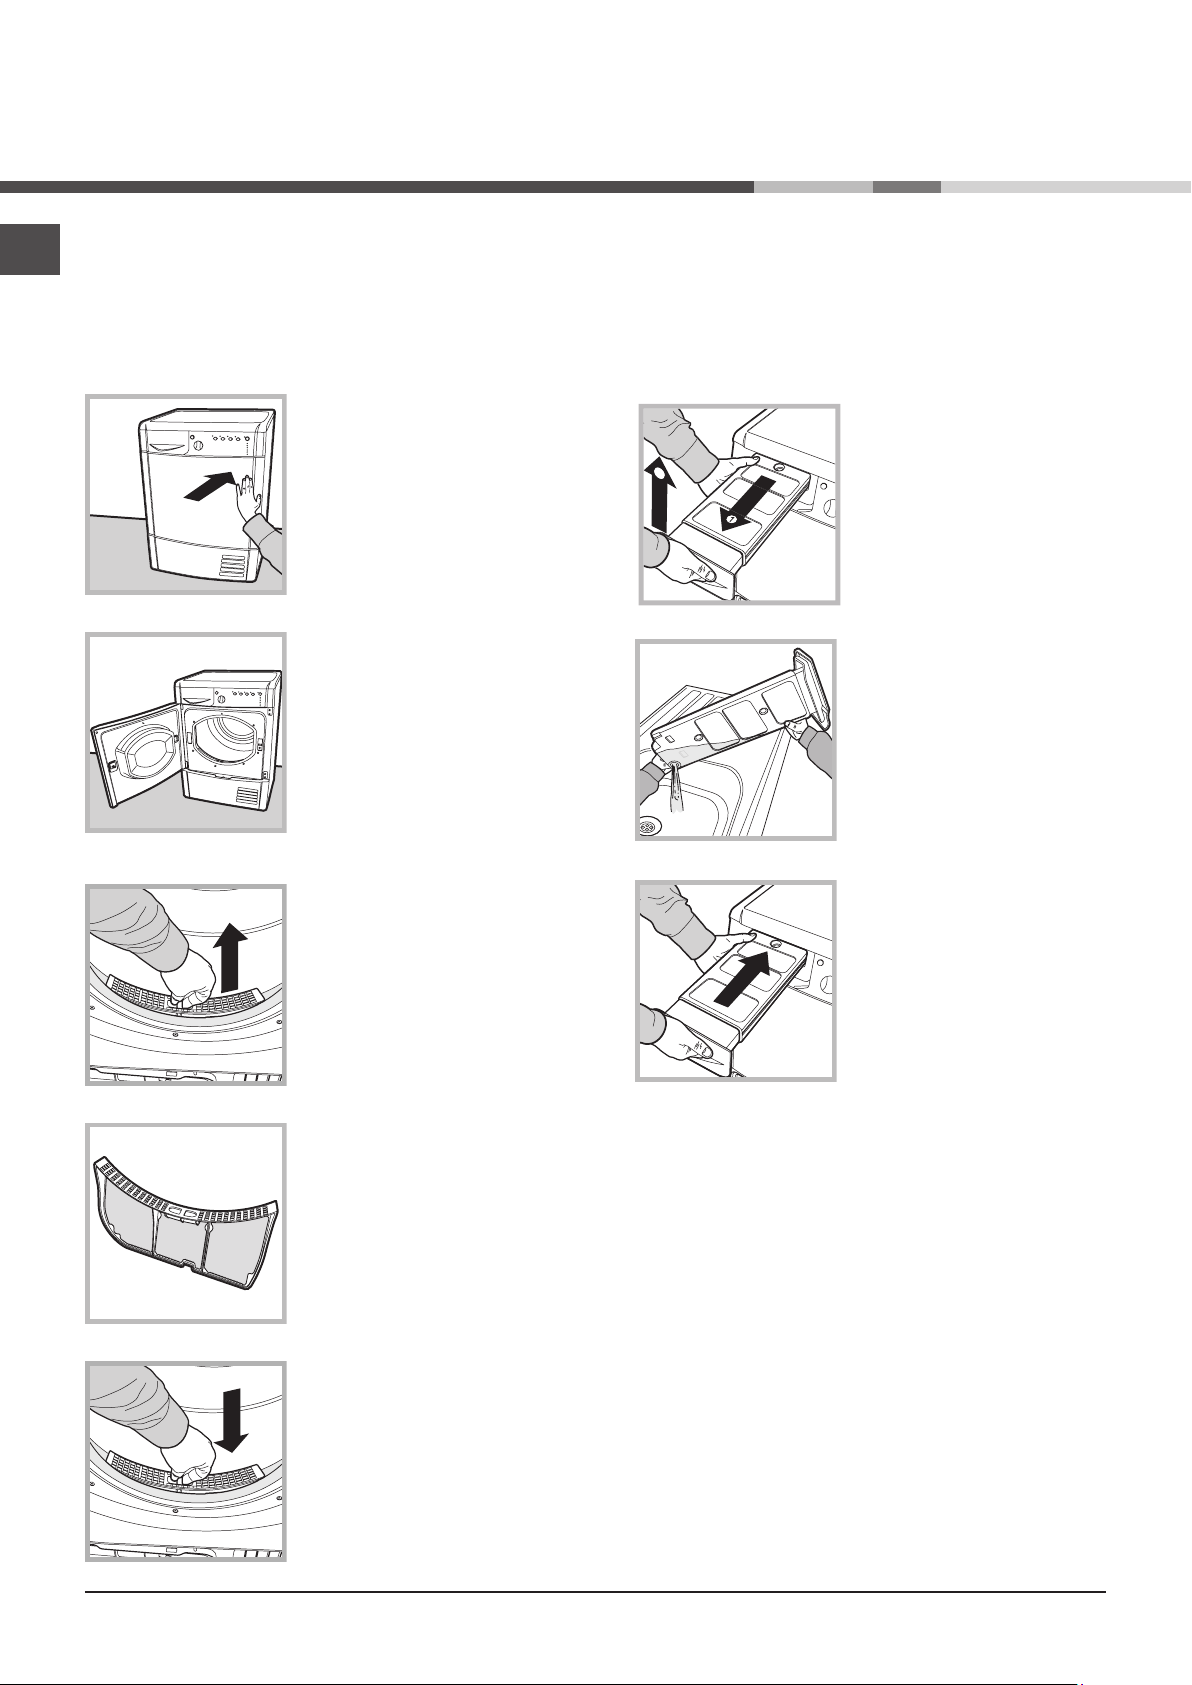
Step 1
Open the dryer door by pressing
it as shown in the picture.
Failure to clean the filter after each drying cycle
can undermine drying performance as the machine
takes longer to dry and thus consumes more
energy.
Water container – empty the water container after
each drying cycle.
Step 1
Pull the water container towards
you and remove it completely
from the dryer.
Step 2
Empty all the water in the water
container.
Step 2
Pull out the filter (using two
fingers).
Step 3
Clean off any fluff build-up on the
internal surface of the filter net.
Step 4
Replace the filter – never operate
the dryer without the filter in
place.
Step 3
Replace the water container
making sure that it is securely
fixed.
Failure to empty the water container may cause the
following:
- The dryer stops heating (thus the load may still be
damp at the end of the drying cycle).
- The “Empty water container” LED lights up to
signal that the water container is full.
Filling of the Water Container
When the dryer is first used water will not
immediately enter the water container as the pump
needs to be primed. This is done automatically
and will take a few minutes, during this period the
efficiency of the drying process is not affected.
2
Page 3
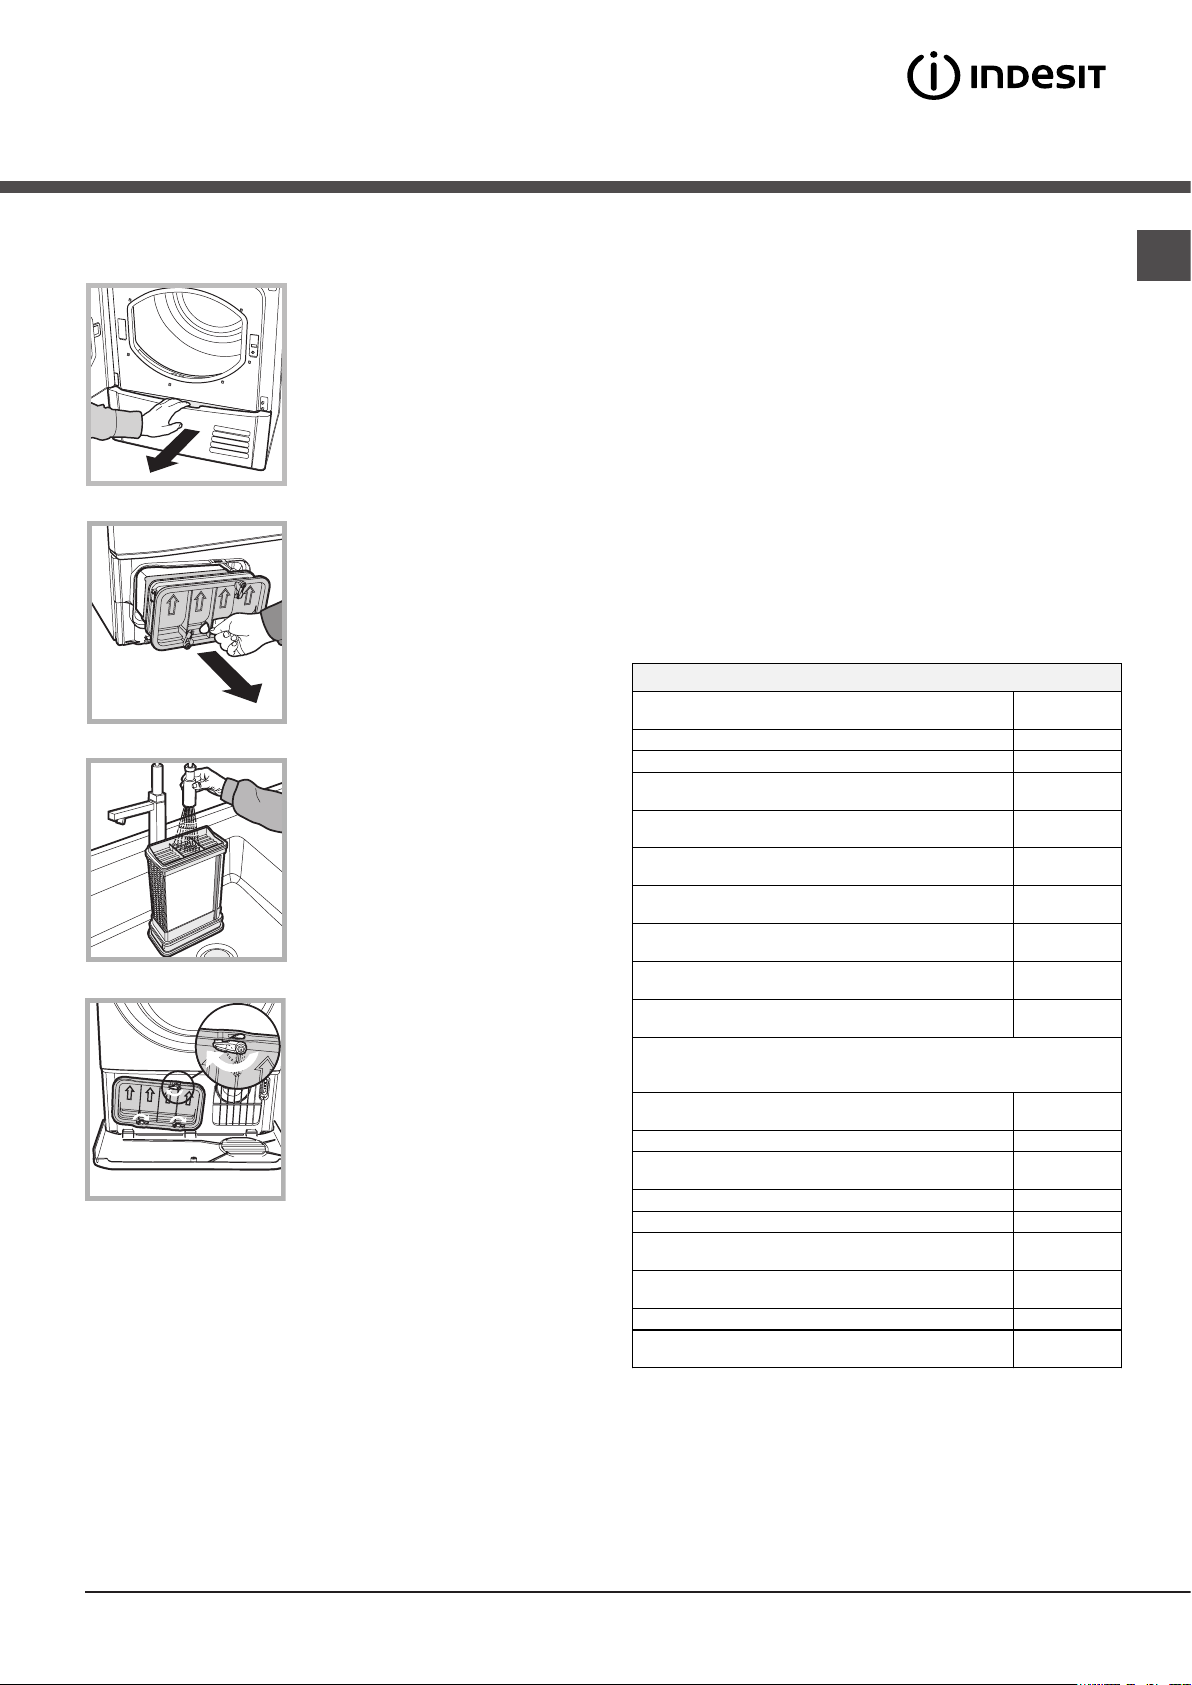
Condenser unit - remove any fluff build-up
is the most efficient programme in terms of energy consumption for cotton used at full
**The Standard Cotton Programme is Cottons Cupboard Dry
from the condenser on a monthly basis.
Step 1
Open the condenser cover
- grip the handle and pull
towards you.
Step 2
Remove the condenser by
turning the 3 catches, then pull
the condenser towards you. (It is
normal for some residual water
to be left in the tubes).
Step 3
Clean the condenser with
running water over the rear side
to remove any fluff deposits.
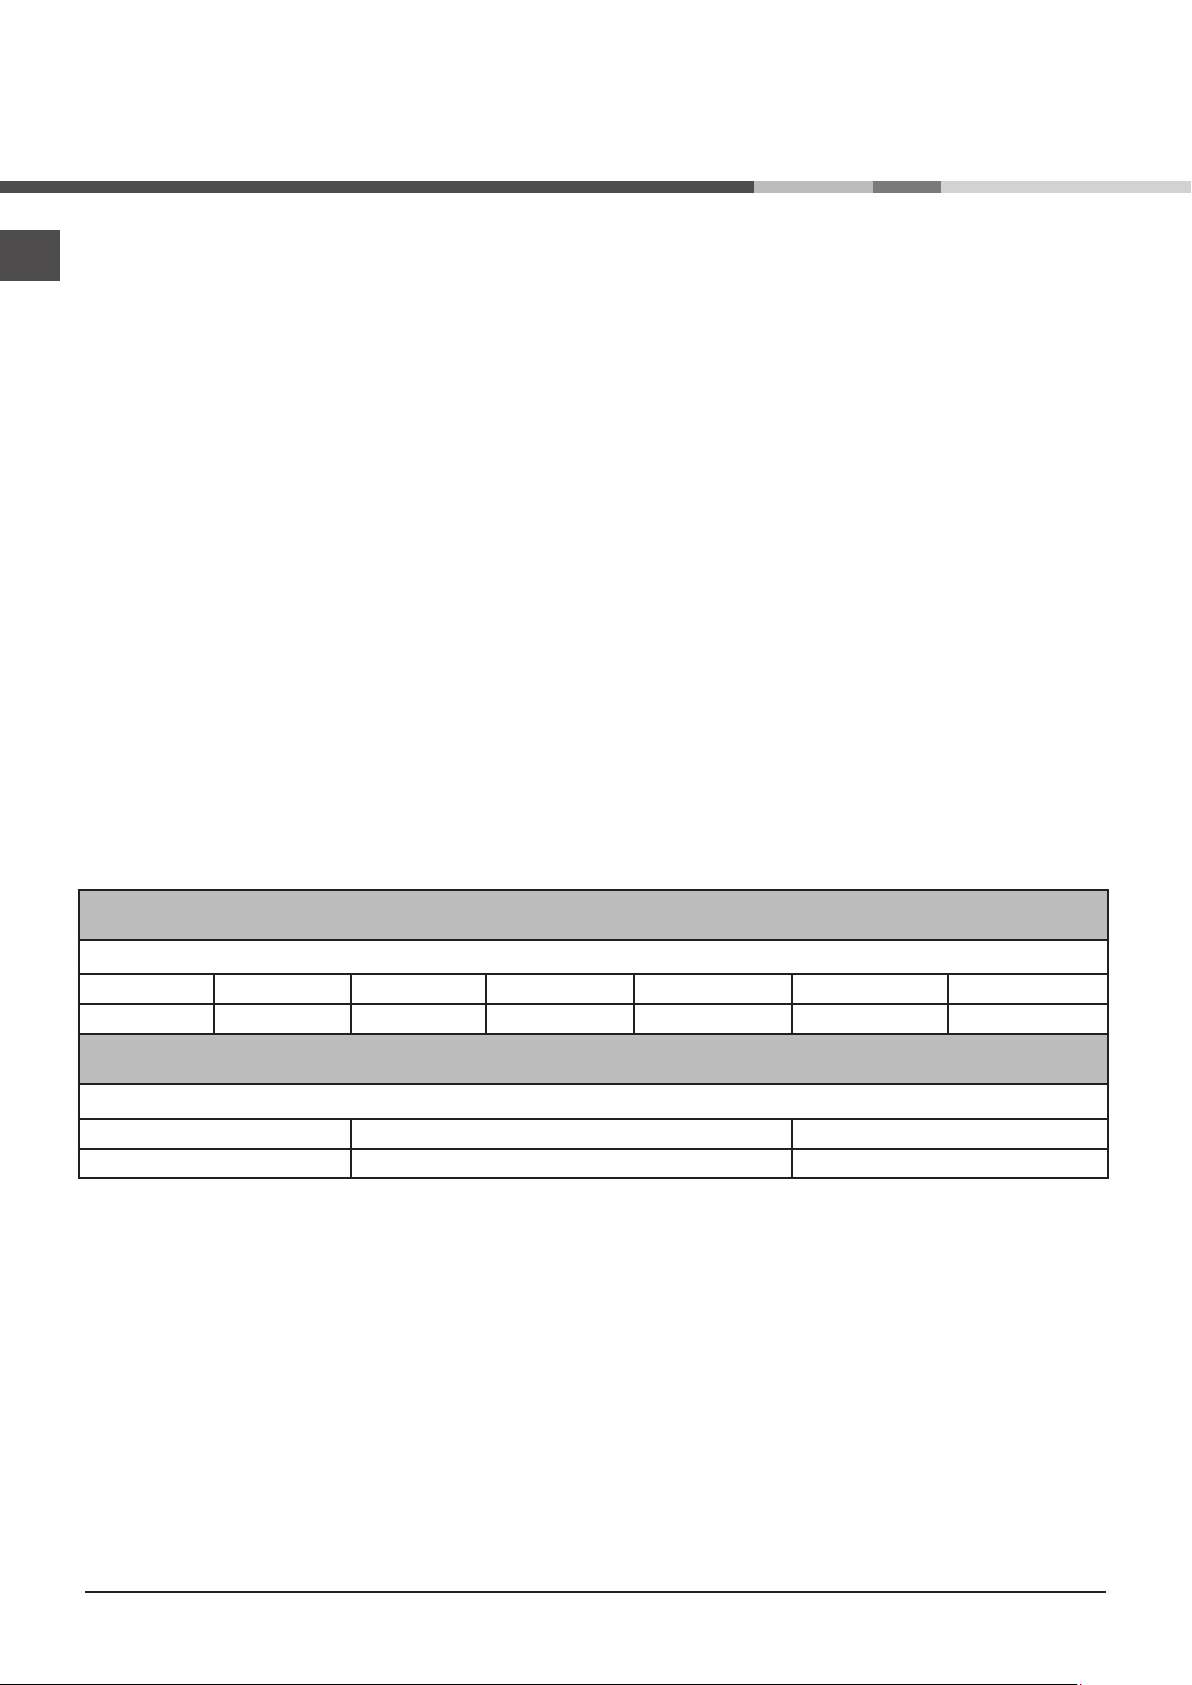
Product Data
Rated capacity of cotton laundry for the "standard cotton
programme" at full load - kg
Energy efficiency class B
The weighted Annual Energy Consumption (AEc)* kWh 503.7
This household tumble drier is a Automati c
This household tumble drier is a Condenser
7.0
EN
Step 4
Replace the condenser unit;
make sure that the unit is
securely in place, that all 3
catches are fixed and that the
position arrows on the front end
of the condenser are pointing
upwards.
Failure to clean the condenser unit may cause
premature faults to the dryer.
Energy consumpti on full load; E dry - k Wh 4.28
Energy consumption partial load; Edry½ - kWh 2.29
Power consumption: off-mode (Po) - Watts 0,14
Power consumption: left-on mode (Pl) - Watts 1,79
Duration of the 'left-on mode' for power management system minutes
The Standard Cotton Programme** suitable for drying normal wet cotton landry that it
and partial load.
Prog. Time - weighted (Tt) full & partial load - minutes 95
Full load (Tdry ) - minutes 128
Partial load (Tdry½) - minutes 70
Condensation efficiency class B
Average condensation efficiency - %
full load (Cdry) 83
partial load (Cdry½) 81
weighted (Ct) full & partial load 82
Airborne acoustical noise emissions - dB(A) re 1 pW 68
30
This is the test cycle in accordance with Regulation 392/2012.
See our website for all product fiche data:
http://www.indesit.com/indesit/.
*Consumption per year is based on 160 drying cycles of the
standard cotton programme at full and partial looad, and
the consumption of the low-power modes.
sumption per cycle will depend on how the appliance is used.
Actual energy con-
3
Page 4
m
2
1
Less than 1m
Installation
EN
Where to install the tumble dryer
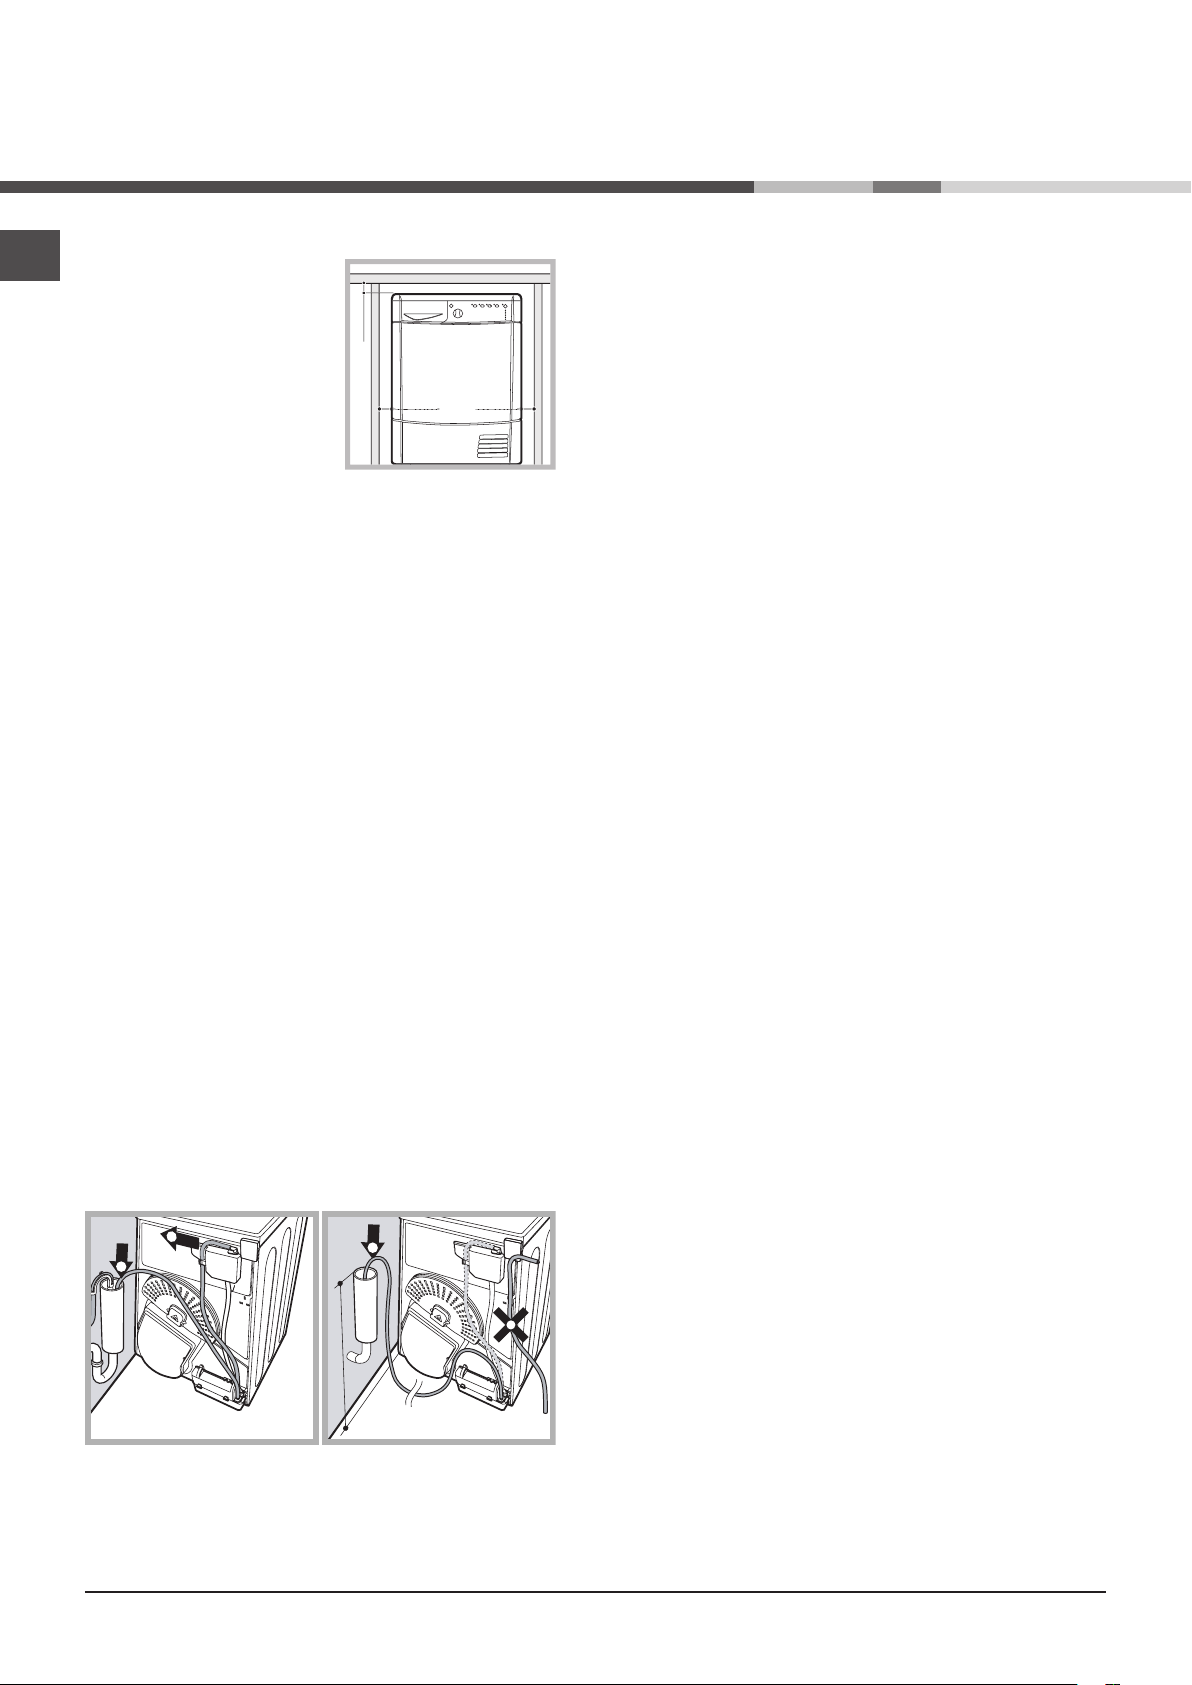
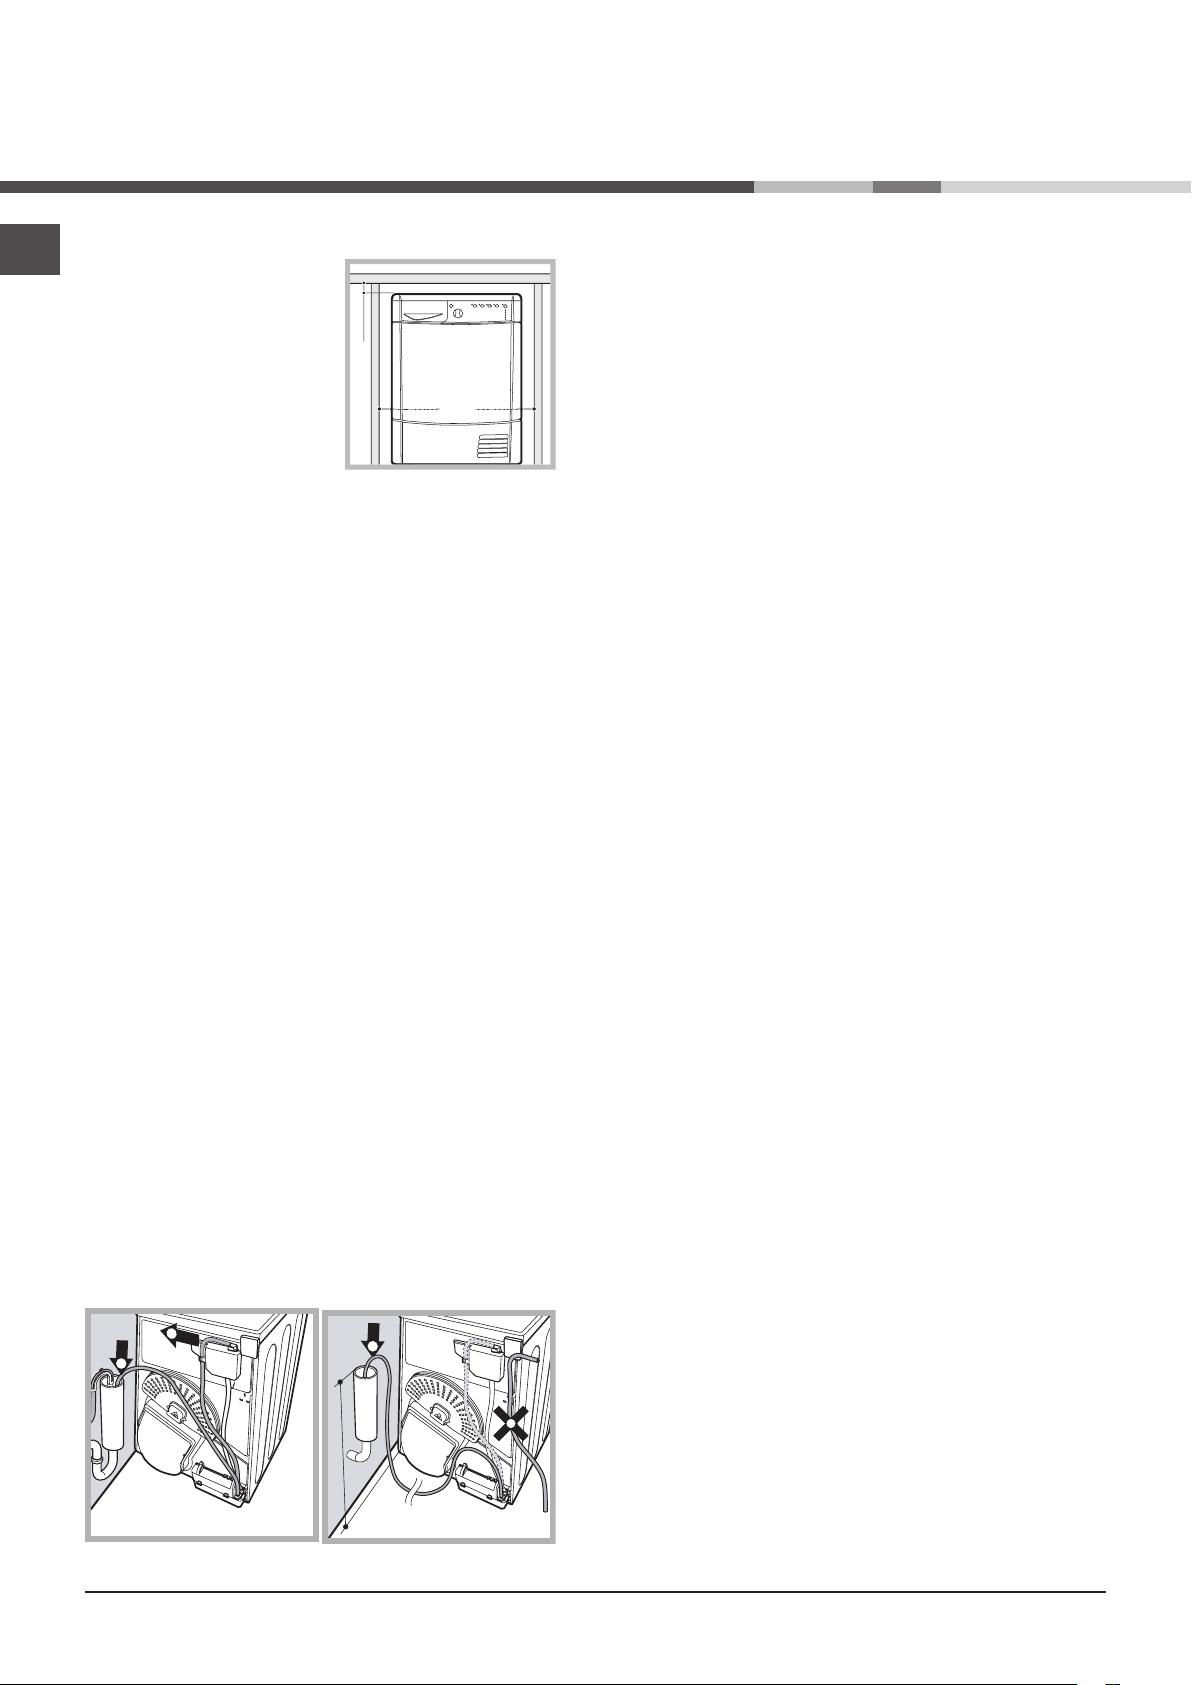
• Install the dryer far from gas
ranges, stoves, radiators or
hobs, as flames may damage it.
If the dryer is installed below a
worktop, ensure there are 10
mm between the upper panel of
the dryer and any objects above it, and 15 mm between the
sides of the machine and the
walls or furniture units adjacent
to it. This ensures adequate air
circulation.
Ventilation
• The room must be adequately ventilated while the dryer is
running. Make sure that the dryer is installed in a room free
of humidity and with adequate air circulation. The flow of
air around the dryer is essential to allow water to condense
during drying; the dryer will not function properly if it is placed
in an enclosed space or inside a cabinet.
! Some condensation may form if the dryer is used in a small
or cold room.
! We do not recommend installing the dryer in a cupboard;
moreover, never install the machine behind a lockable, sliding
or hinged door located on the opposite side of the dryer door.
Water drainage
If your dryer is installed next to a drain the water can be
plumbed into this drain. This does away with the need to
empty the water container. If the dryer is stacked onto or
installed next to a washing machine it can share the same
drain. The height of the drain must be less than 3’ (1 m)
from the bottom of the dryer.
Remove existing hose from position shown in picture A
and fit a suitable length of hose and connect as shown
in picture B.
Electrical connections
Before plugging the appliance into the socket, check the
following:
• Make sure your hands are dry.
• The socket must have an earth connection.
• The socket must be able to withstand the machine’s
maximum power output as indicated on the data plate (see
Description of the tumble dryer).
• The power supply voltage must fall within the values indicated on the data plate (see Description of the tumble dryer).
• The socket must be compatible with the machine’s plug. If
not, either the socket or the plug must be replaced.
! Do not use extension cords.
! The tumble dryer must not be installed in outdoor spaces,
even if sheltered. It may be very dangerous to expose this
appliance to rain and thunderstorms.
! Once dryer installation is complete, the electric cord and
plug must be at hand.
! The electric cord must not be bent or crushed.
! If the plug to be replaced is of the moulded-on type, it must
be disposed of in a safe way. DO NOT leave it where it can
be plugged into a socket and cause electric shocks.{}
! The electric cord must be regularly checked and replaced
with a cord specifically designed for this dryer; it must then
be installed by an authorised technician only (see Assistan-
ce). New or longer electric cords are supplied by authorised
dealers at a supplementary cost.
! The manufacturer declines all responsibility for failure
to observe these instructions.
! When in doubt about the above indications, contact a
qualified electrician.
Preliminary information
Once the tumble dryer is installed, clean the inside of the
drum before operating it and remove any dirt accumulated
during transportation.
! Make sure that the hose is not squashed or kinked
when the dryer is in its final location.
1
2
Picture A
4
Picture B
Page 5
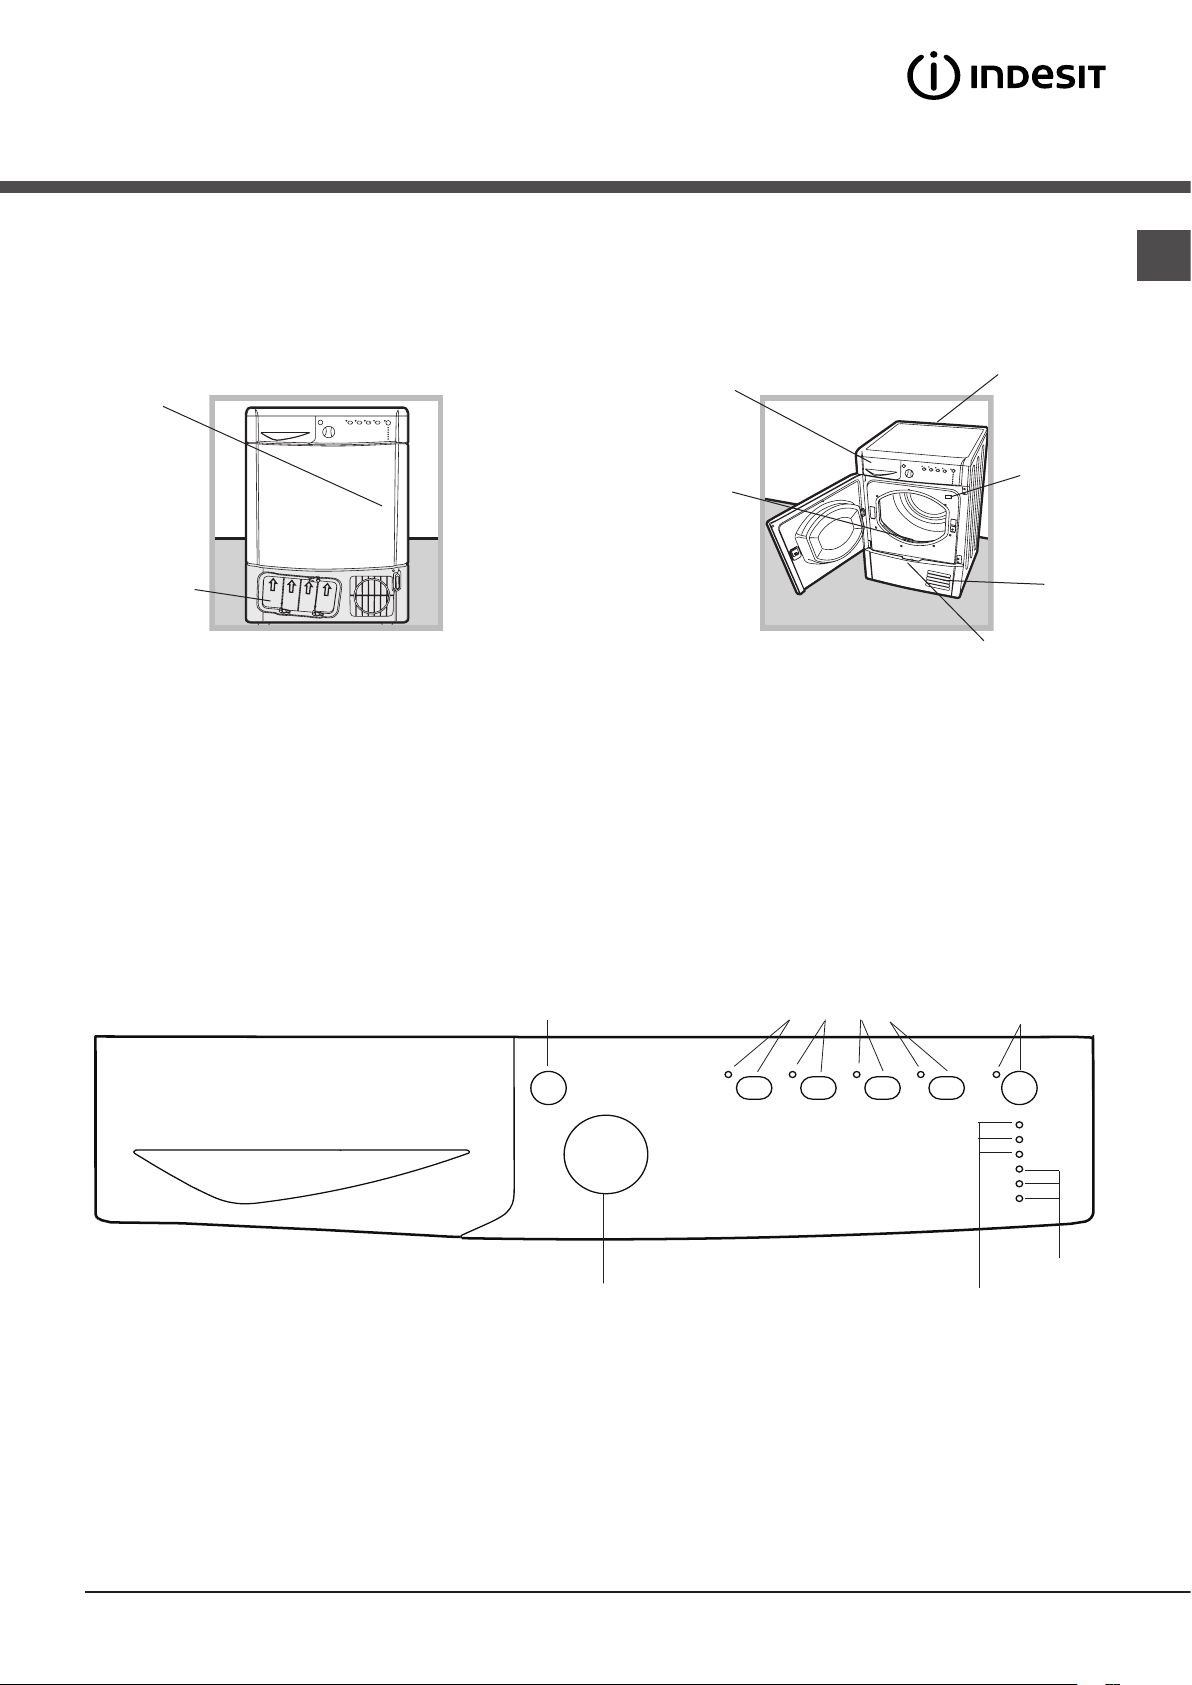
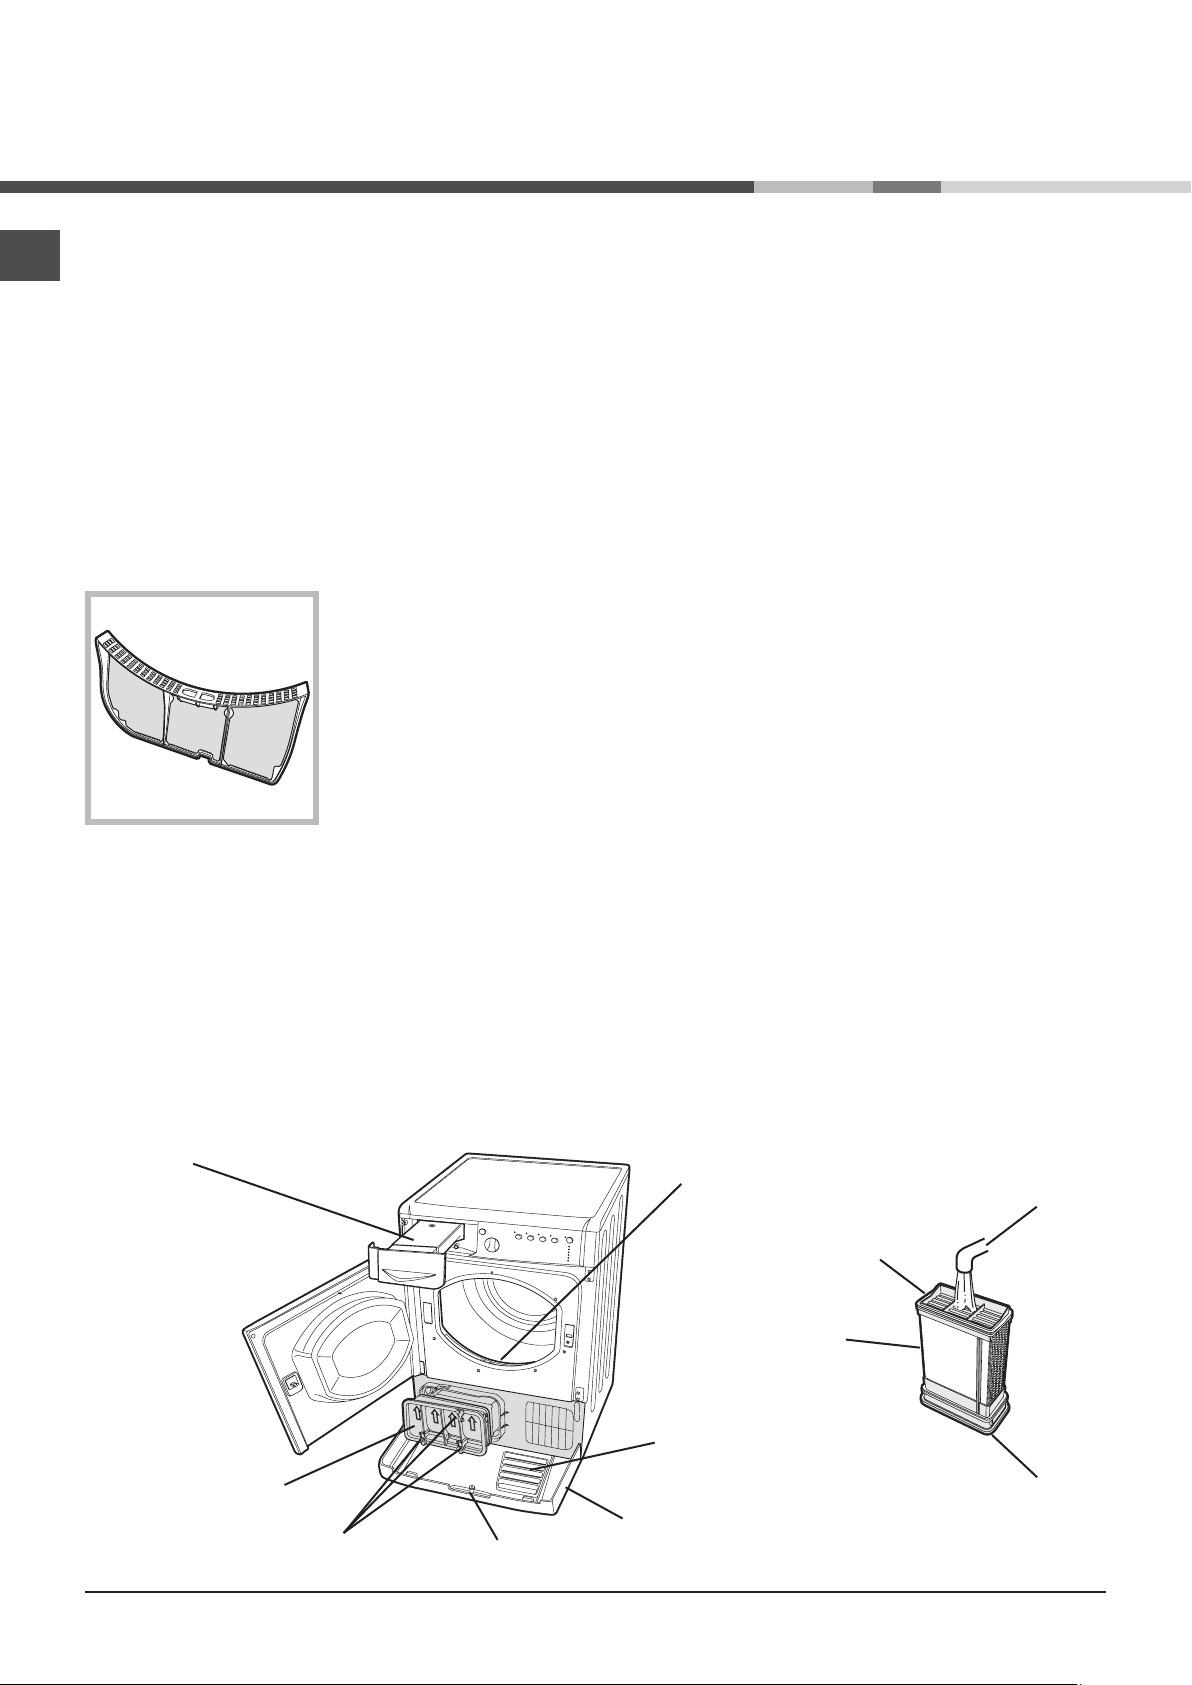
Description of
the tumble dryer
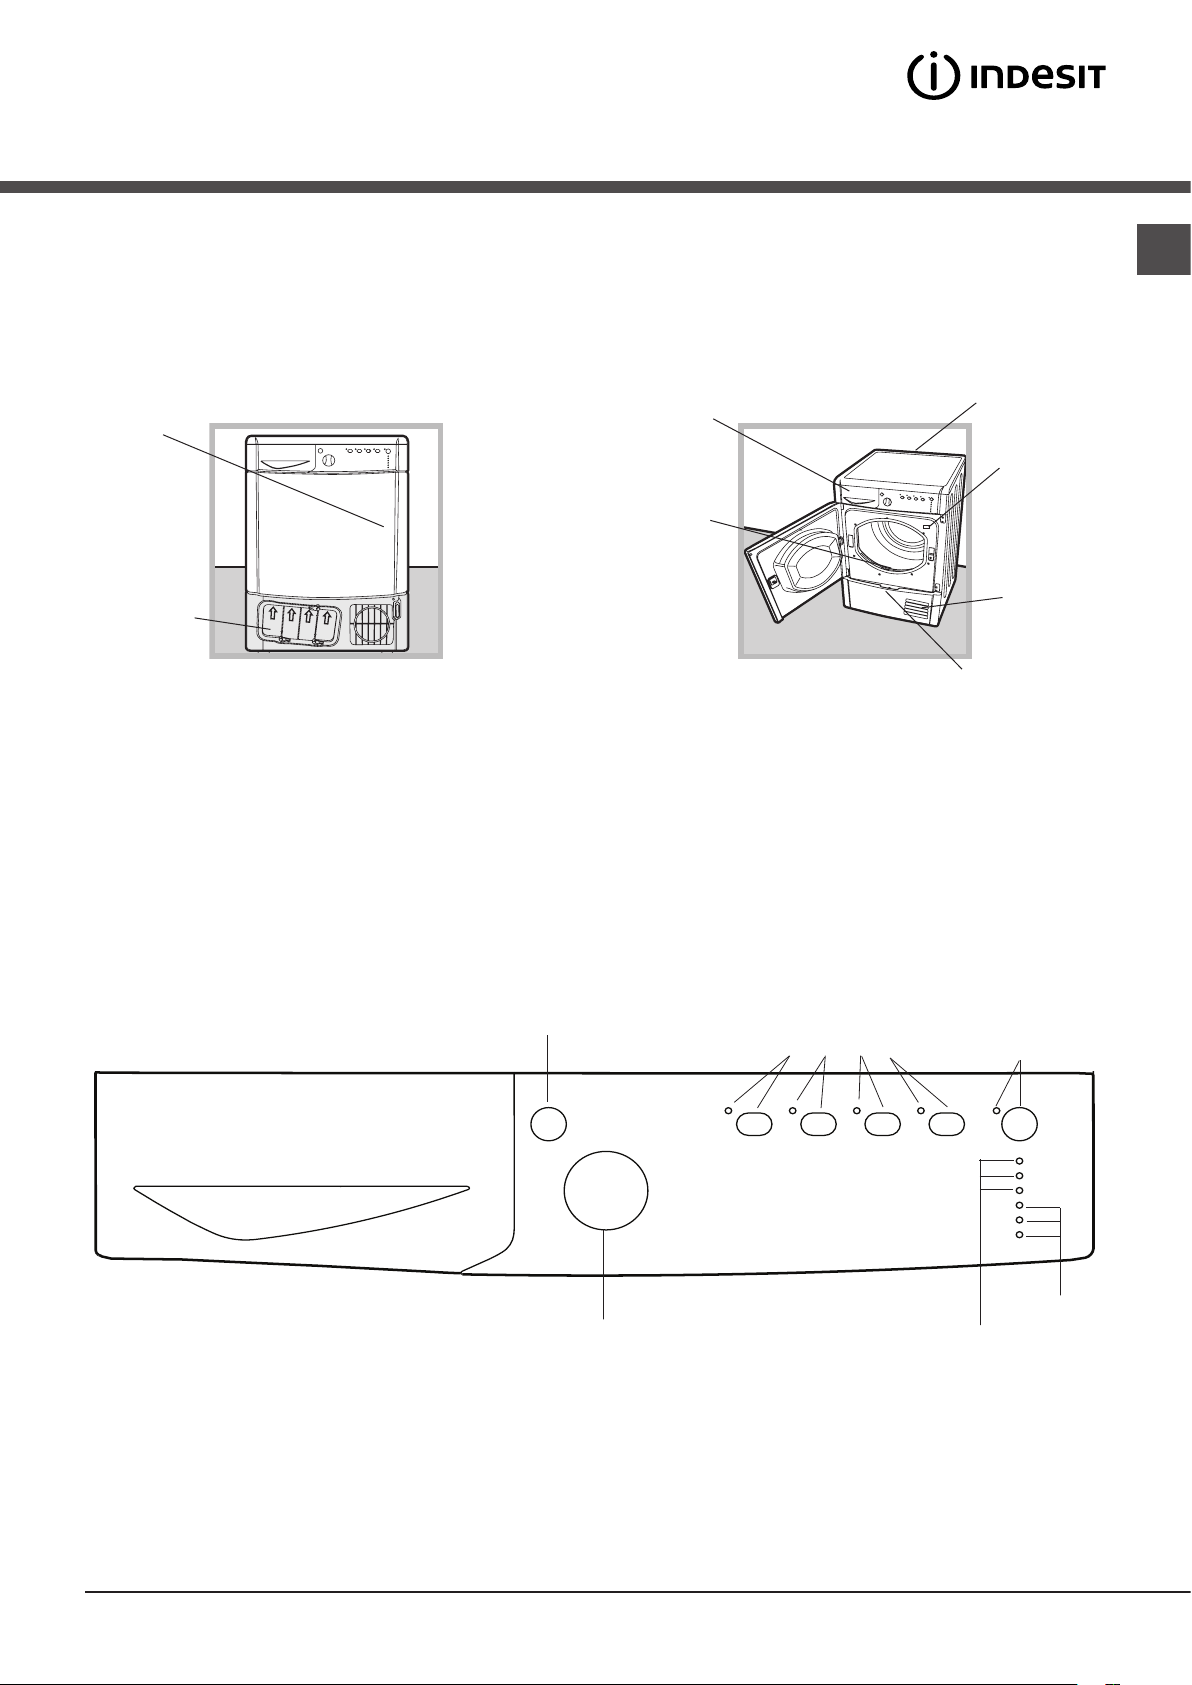
Opening the door
Press the
door
Condenser
unit (cover
open)
Features
Water container
Filter
EN
Data plate
Model
& Serial
Numbers
Air
intake
grille
Condenser cover
handle (pull to
open)
Control panel
On/Off
button
Programme
selection knob
Options
buttons and
indicator lights
Maintenance
indicator lights
Start/Pause button
and indicator light
Drying phase
or delay start
indicator lights
5
Page 6
EN
ON/OFF/Reset button
Pressing the button normally will cause the machine to switch on or off. If the button is pressed for 3 seconds while the dryer is in
function, the machine will switch off and the running cycle will reset.
Programme selection knob
Allows for setting the programme: turn until the indicator points towards the desired programme (see Starting and selecting a programme).
Options buttons
Allow for selecting the options available for the selected programme. The relative indicator lights turn on when the option has been
selected (see Programmes and options).
START/PAUSE button and indicator light
When the green light flashes slowly, press the button to start the programme. When the cycle is under way, the indicator light remains
on. To put the programme into pause mode, press the button again; the indicator light will turn orange and start flashing again.
To resume the programme from the point it was interrupted, press the button again (see Start and programme selection).
Indicator lights
“Maintenance” indicator lights
The indicator lights provide important information. They indicate the following:
The “Empty water container” indicator light signals that the water container must be emptied.
If the water container fills during the course of the programme, the LED lights up. The dryer automatically starts a COOL TUMBLE cycle
and the START/PAUSE LED flashes orange. Press the START/PAUSE button to resume the cycle from the point it was interrupted.
In order to avoid this procedure, always empty the water container after using the tumble dryer (see Care and maintenance).
Before each programme, the “Clean filter” indicator light signals that it is essential to clean the filter each time before using the
tumble dryer (see Care and maintenance).
The “Clean condenser unit” indicator light signals that it is essential to clean the condenser regularly (see Care and maintenance).
“Drying phases” indicator lights
The indicator light signals that the drying phase is running.
The indicator light signals that the cooling phase is running.
The END indicator light signals that the programme has ended.
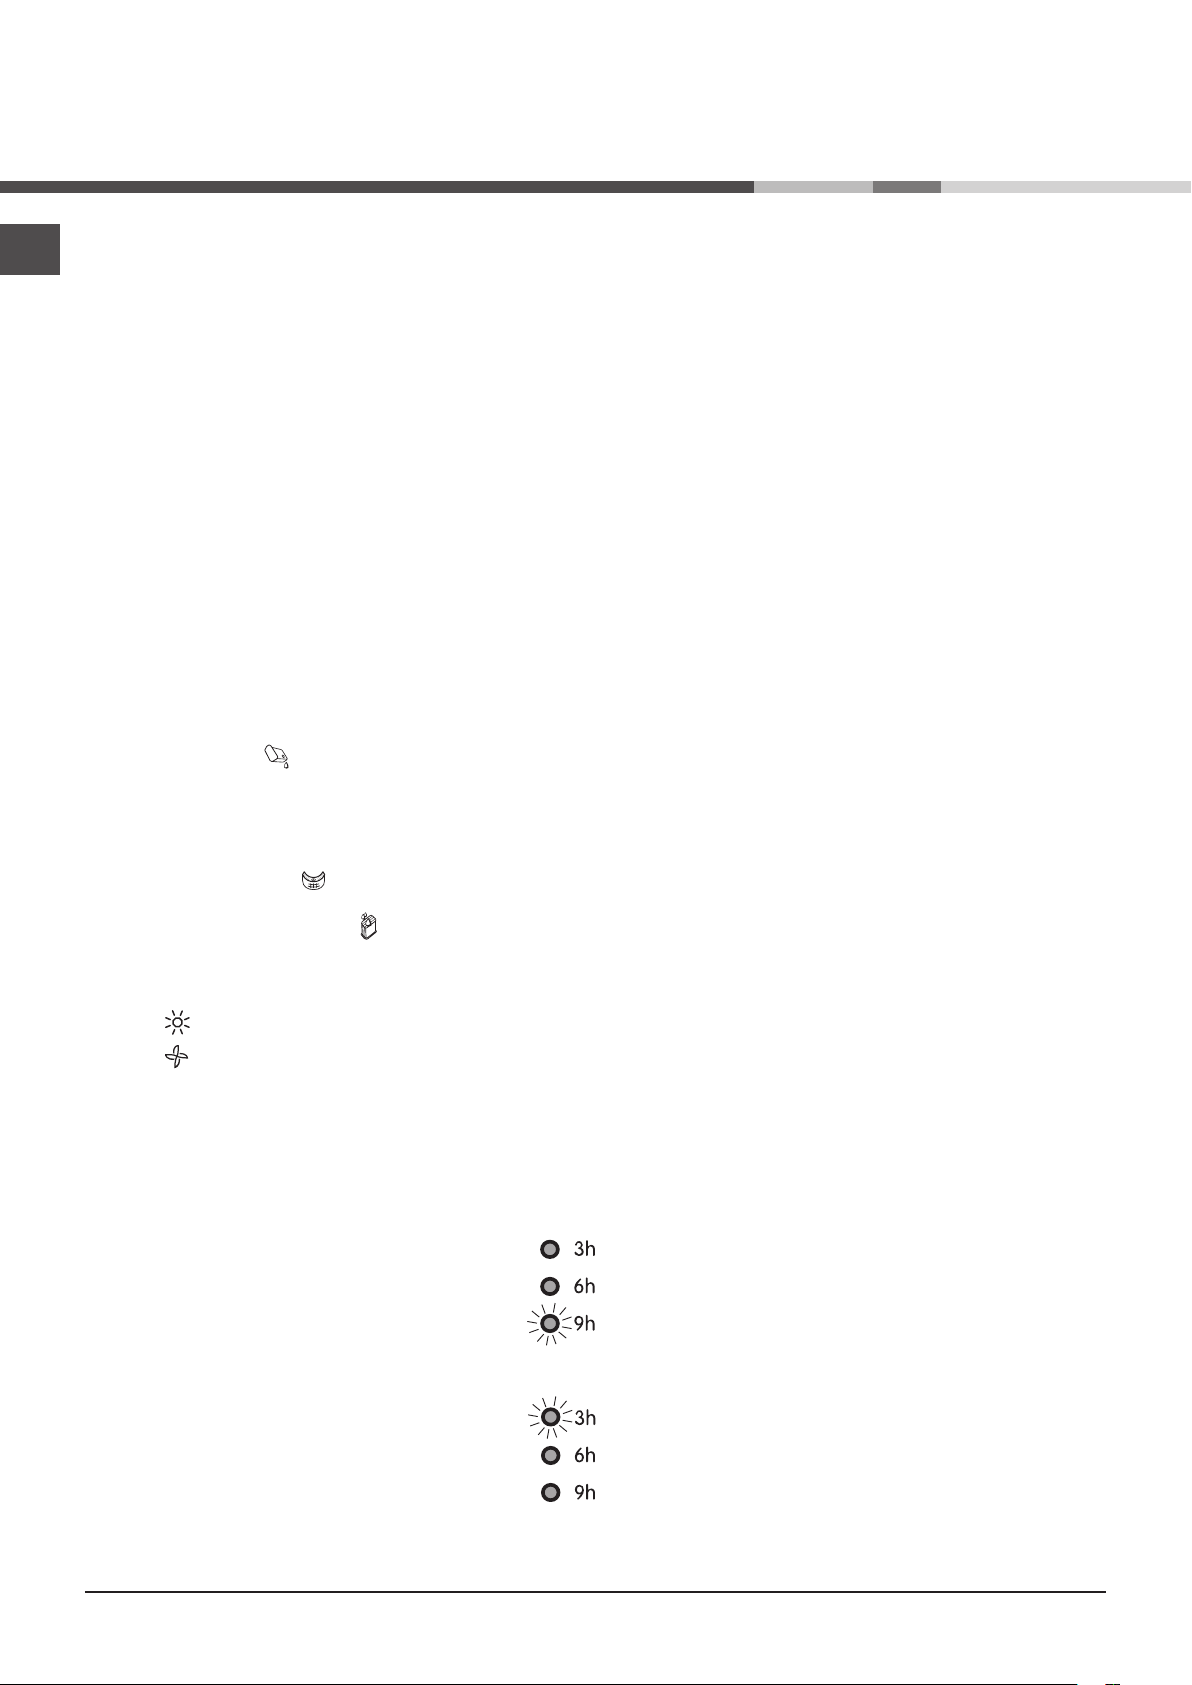
“Delay start” indicator light
If the ”Delay start” option has been activated (see “Programmes and options”), after the programme has started, the indicator light
corresponding to the chosen delay time will start flashing:
As time passes, the remaining delay will be displayed and the corresponding indicator light will flash:
Once the set delay time ends, the flashing LED will turn off and the set programme will start.
6
Page 7

How to carry out
a drying cycle
Starting and selecting a programme
1. Plug the dryer into the power supply socket.
2. Select the programme according to the type of laundry (see Laundry).
3. Open the door, ensure that the filter is clean and securely placed and that the water container is empty and correctly slotted (see
Care and maintenance).
4. Load the machine, making sure that no piece of laundry gets between the door and the relative seal. Close the door.
5. Press the ON/OFF button to start the machine.
6. After consulting the programme chart and the indications for each type of fabric (see Laundry), turn the Programme selection
knob towards the programme corresponding to the type of laundry to be dried (see Programmes and options).
! Warning: If the position of the programme selection knob changes after pressing the START/PAUSE button, the selected programme will NOT be modified. To modify the programme, press the START/PAUSE button to put the programme in pause mode (the
indicator light flashes orange), then select a new programme and the relative options. Press the START/PAUSE button to start the
new programme.
EN
7. If necessary, set the time of the delayed start and any other options (see Programmes and options).
8. Press the START/PAUSE button to start the drying cycle.
Laundry can be checked while the drying programme runs and any garments already dry can be removed, while drying continues
for the remaining items. After closing the door, press the START/PAUSE button to resume machine operation.
9. The final COOL TUMBLE phase (i.e. the fabrics are cooled) activates during the last few minutes of the drying programme; always
allow this phase to terminate.
10. When the END indicator light turns on, the programme has ended. The buzzer will beep 3 times to let you know that your
programme is complete. Open the door, remove the laundry then clean the filter and replace it. Empty the water container and put it
back in its slot (see Care and maintenance).
If the “Post Care” option was selected and laundry is not removed immediately, the drum will rotate garments at intervals for 10
hours or until the door is opened.
11. Disconnect the dryer from the power supply.
Standby mode
This tumble dryer, in compliance with new energy saving regulations, is fitted with an automatic standby system which is enabled
after about 30 minutes if no activity is detected. Press and hold the ON/OFF button until the dryer reactivates.
7
Page 8
EN
Programmes and options
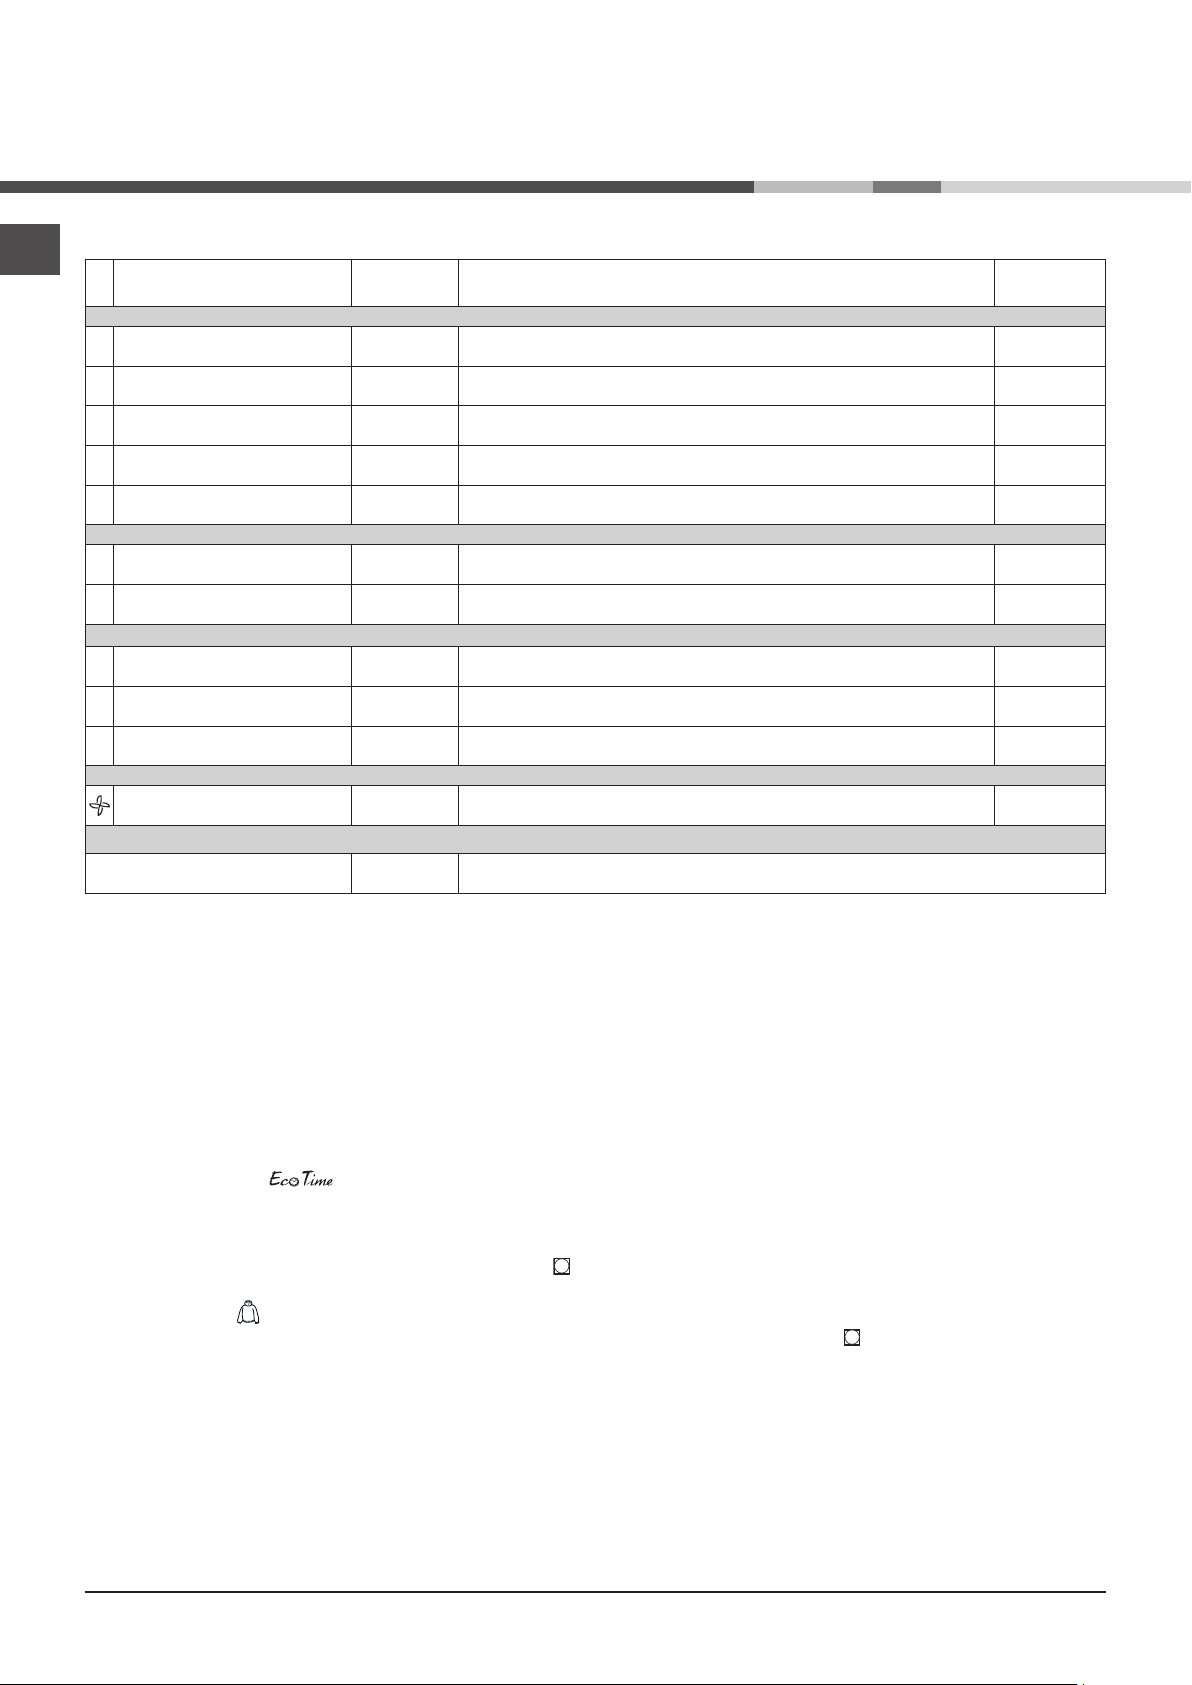
Programme chart
Programme
Daily
1 Ready to Wear
Max.
load
(kg)
Max. Pre Care – Post Care – Delay timer
Compatible options
Cycle
duration
150’
2
Cotton Cupboard Max. Pre Care – Post Care – Delay timer
3
Cotton Iron Max. Pre Care – Post Care – Delay timer
4
Synthetics Cupboard 3 Pre Care – Post Care – Delay timer
5
Synthetics Iron 3 Pre Care – Post Care – Delay timer
Special
6 Eco Time
7 Wool
Sport
8 Sport Intensive
9 Sport Light
10 Special Shoes
Partial
Refresh - -
Timed drying
30 - 60 - 90 - 120 - 150 minutes - All option are available
2 Pre Care – Post Care – Delay timer
1 -
4 Pre Care – Post Care – Delay timer
4 Pre Care – Post Care – Delay timer
1 pair -
140’
100’
65’
55’
60’
60’
80
70’
100’
20’
Special/Sport/Partial Programmes
Eco Time Programme
This programme is ideal for safely drying small cotton loads in a short time, thereby optimising energy consumption. Suitable for
loads of up to 2 kg.
We recommend checking whether garments are labelled with the symbol and to turn them inside out before drying them.
! The duration of this program will depend on the size of the load and the spin speed used in your washer.
Wool Programme
This programme is specific for items that withstand tumble drying and are labelled with the symbol. It is suitable for loads of up to
1 kg (about 3 jerseys). We recommend turning the garments inside out before drying them. This programme lasts about 60 minutes, although it may last longer depending on the size and density of the load and on the spin speed used during the wash cycle.
Garments dried with this programme are usually ready to be worn, although the edges of heavier garments may be slightly damp.
Leave them to dry naturally, as an additional drying process may damage them.
! Unlike other materials, the shrinking process in wool is irreversible, i.e. the garment does not resume its original dimension and
shape.
! This programme is not suited for acrylic items.
8
Page 9
Sport Intensive Programme
This programme is designed for safely drying garments such as tracksuits and shorts bearing the symbol. It is ideal for clothes
which do not need to be dried fully. We suggest turning garments inside out before drying them.
! The duration of this program will depend on the size of the load and the spin speed used in your washer.
Sport Light Programme
This programme is designed for safely drying garments such as tracksuits and shorts bearing the symbol. It is ideal for those
garments that do not need to be dried fully or which have to be ironed. We suggest turning garments inside out before drying them.
! The duration of this program will depend on the size of the load and the spin speed used in your washer.
Sport Shoes Programme
This programme is specific for drying sports shoes. The shoes must have been previously washed and spun at a minimum spin
speed of 400 revolutions.
A specific shoe rack is provided and must be used, otherwise the dryer will be damaged if shoes are dried in the drum. Remove the
filter from its holder on the front part of the dryer and position the shoe rack.
Place shoelaces inside the shoes then load with the tips of the shoes facing downwards and the soles frontwards.
Drying times vary according to the shape and type of the shoe. If the shoes are not completely dry at the end of the programme,
restart the programme.
! Do not dry shoes that have gel or flashing lights inside them. Only dry shoes made of synthetic material or rope. Once the programme ends, remove the shoe rack and replace the filter into its holder.
Refresh
A short programme suitable for refreshing fibres and garments through the emission of cool air. It lasts about 20 minutes.
! As this is not a drying programme, it is not to be used for garments that are still wet.
Timed drying cycle (30’ - 60’ - 90’ - 120’ - 150’)
This programme can be used instead of the automatic programmes when you desire setting a time for the drying cycle. It is ideal for
drying damp laundry with the low heat setting or for small loads.
The duration of the timed drying cycle to be selected depends on the size of the load, on the fabric to be dried (see Table) and the
spin speed used in your washer.
The COOL TUMBLE cycle runs during the final minutes of the programme.
EN
Fabric
Cotton – high heat 30 minutes
Synthetics – low heat
Acrylics – low heat 30 minutes 60 minutes - - -
1 kg 2 kg 3 kg 4 - 5 kg 6 – 7 kg
30 or 60
minutes
30 or 60
minutes
30 or 60
minutes
Load
60 or 90
minutes
60 or 90
minutes
60 or 90
minutes
- -
90 or 120 or
150 minutes
9
Page 10

EN
Options
The options allow for customising the selected programme according to one’s own needs.
Delay start
The start of some programmes (see Programmes and options) may be delayed up to 9 hours. Press the button repeatedly to enter
the desired delay time. Before setting a delayed start, make sure that the water container is empty and that the filter is clean.
Post Anti-Crease
When this option is selected, the drum rotates garments at intervals after the COOL TUMBLE cycle has ended, in order to avoid
creases forming on garments if they cannot be immediately removed at the end of the programme. During this phase, the indicator
light is turned on.
Pre Anti-Crease
When this option is selected in addition to the “Delay start” option, the drum rotates garments at intervals during the delay period to
avoid creases forming.
High Heat
When a drying time is selected, pressing this button sets high heat drying and the indicator light above the button lights up. The
timed programmes are pre-set to low heat.
! Not all options are available on all programmes (see Programmes and options).
Opening the door
If the door is opened (or the START/PAUSE button is pressed) while a programme is running, the dryer stops and the following may
occur:
• The START/PAUSE button flashes orange.
• When a delayed start is running, the delay countdown continues. It is necessary to press the START/PAUSE button to resume the
“Delay start” programme. One of the “Delay start” indicator light flashes to signal the delay time entered.
• It is necessary to press the START/PAUSE button to resume the programme. The progress indicator lights signal the running phase and the START/PAUSE indicator light stops flashing and turns green.
• During the post anti-crease phase, the programme ends. Pressing the START/PAUSE button reactivates a new programme from
the beginning.
• By turning the Programme selection knob, a new programme is selected and the START/PAUSE indicator light flashes green. This
procedure can be used to select the COOL TUMBLE programme to cool garments if they are judged to be dry enough.
Press the START/PAUSE button to start the new programme.
Note: If you have a power cut, switch off the power or remove the plug. When power is restored, plug in the machine, press and
hold the ON/OFF button until the dryer reactivates, then press Start/Pause button.
10
Page 11
Laundry
Sorting laundry
• Check the symbols on the care labels of the various garments to verify whether the garments can be safely tumble
dried.
• Sort laundry according to the type of fabric.
• Empty all pockets and check for loose buttons.
• Close zips and hooks and fasten belts and strings without
tightening them.
• Wring out garments to remove the maximum amount of
water possible.
! Do not load the dryer when garments are dripping wet.
Maximum load sizes
Do not overload the drum.
The following values indicate the weight of dry garments:
Natural fibres: maximum 7 kg
Synthetic fibres: maximum 3 kg
! Do not overload the dryer as this may result is reduced
drying performance.
Typical weights
Note: 1 kg = 1000 g
Garments
Blouse
Dress
Jeans
10 Nappie
Shirt
T-shirt
Cotton
Other
Cotton
Other
Cotton
Other
150 g
100 g
500 g
350 g
700 g
1,000 g
300 g
200 g
125 g
Care labels
Always check the care labels, especially when placing
garments in the tumble dryer for the first time. Below are the
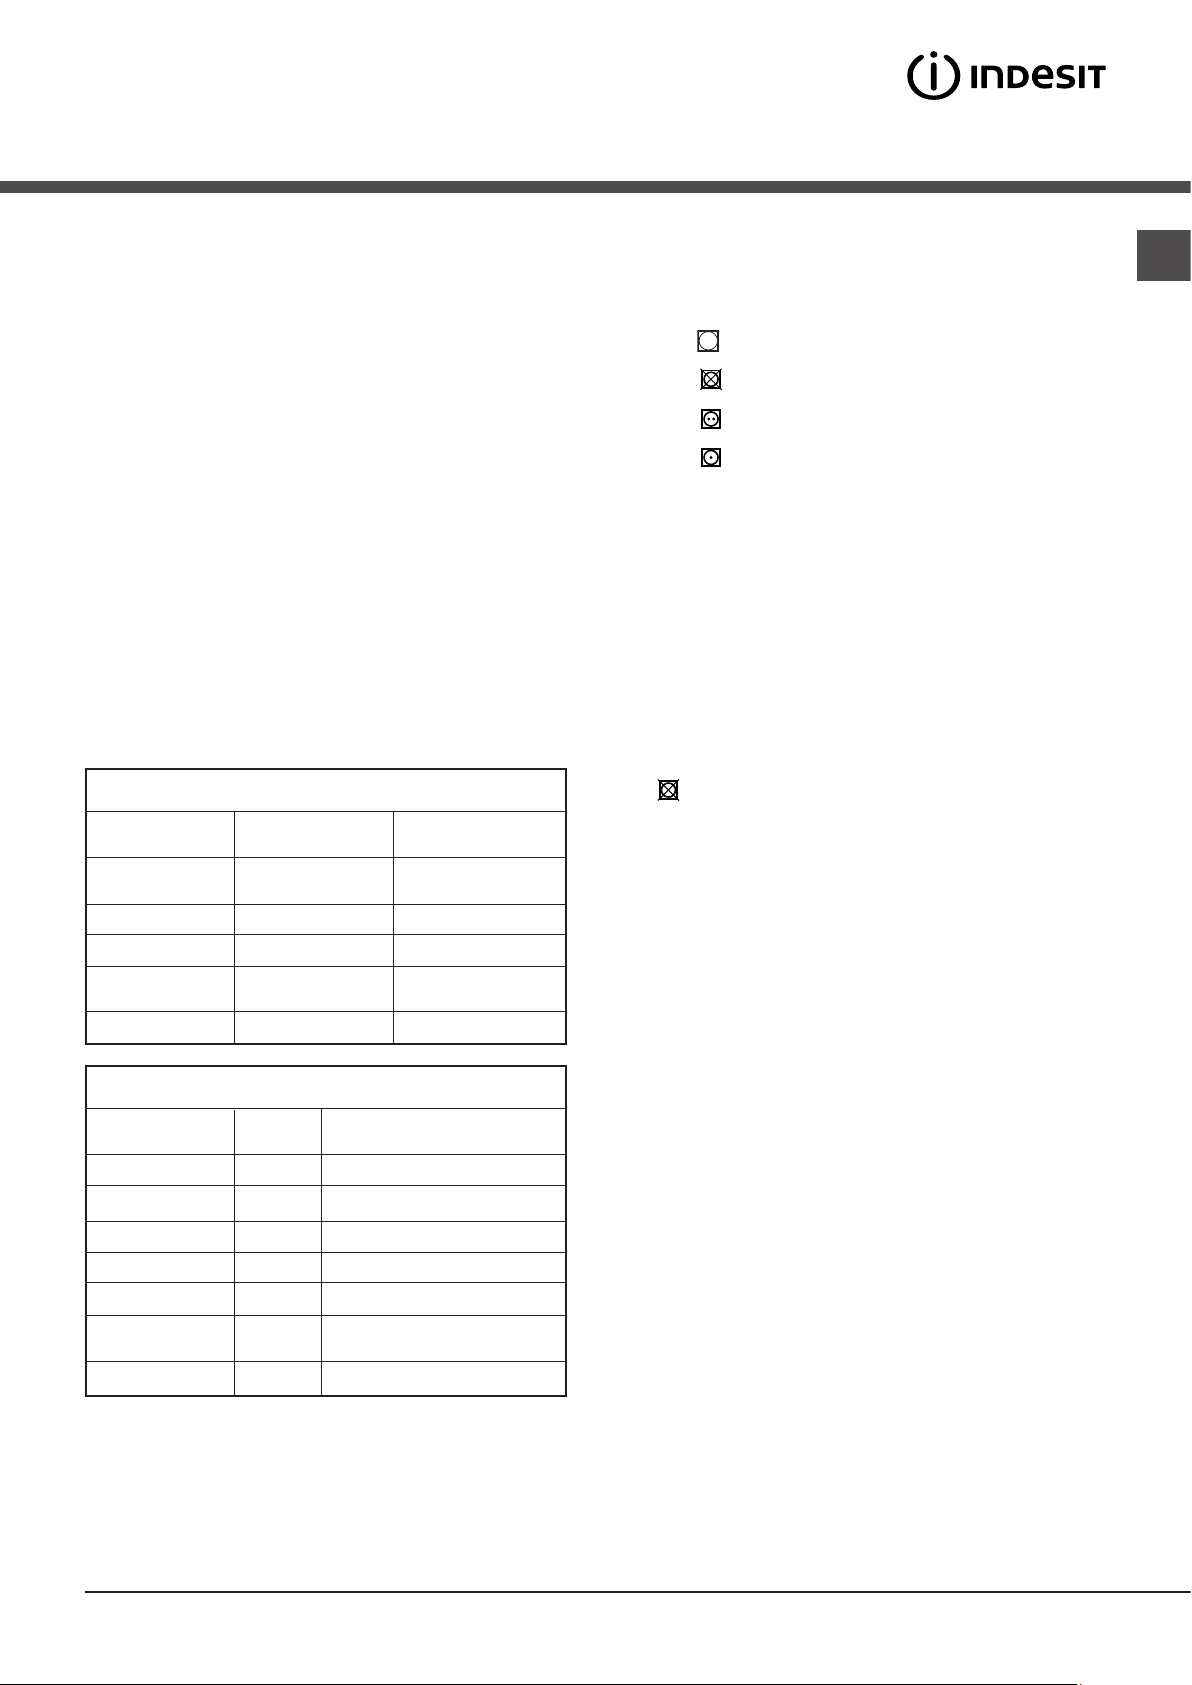
most commonly used symbols:
May be tumble dried.
Do not tumble dry.
Tumble dry – high heat.
Tumble dry – low heat.
Items not suitable for tumble drying:
• Items containing rubber parts or similar materials, or
plastic film covering (pillows, cushions or PVC sports
jackets), any type of inflammable object or objects containing inflammable substances (used towels containing
hairspray).
• Glass fibres (certain types of draperies).
• Items which have been previously dry cleaned.
• Items marked with the ITLC symbol (“Special garments”)
, which may be washed using special household pro-
ducts. Follow instructions carefully.
• Large bulky items (duvets, sleeping bags, pillows,
cushions, large bedcovers, etc.) that expand when dried
and hamper air circulation inside the tumble dryer.
EN
Household linen
Duvet cover (double
bed)
Large tablecloth
Small tablecloth
Tea cloth
Bath towel
Hand towel
Double bed
sheet
Single bed sheet
Cotton
Other
1,500 g
1,000 g
700 g
250 g
100 g
700 g
350 g
500 g
350 g
When mixing synthetic fibres with cotton garments, the latter
may still be damp at the end of the drying cycle. If this happens, simply put them through a short drying cycle.
11
Page 12
EN
Special items
Blankets and bedcovers: acrylic items (Acilian, Courtelle,
Orion, Dralon) must be dried with great care at low heat.
Avoid drying for long periods.
Creased or pleated garments: read the drying instructions
supplied by the manufacturer.
• Amount of laundry: single items and small loads may take
longer to dry.
• Drying: if items are to be ironed, they can be removed
from the dryer while still slightly damp. Items that require
complete drying can be left longer.
• Heat setting.
Starched garments: do not dry together with non-starched
items. Remove the maximum amount of starch solution possible before placing these items in the dryer. Do not over-dry:
starch turns powdery leaving garments limp – this defeats its
purpose.
Drying times
Drying times are approximate and may vary depending on
the following:
• Amount of water retained by items after the spin cycle:
towels and delicate items retain a lot of water.
• Fabrics: items of the same fabric, but with different texture
and thickness may have different drying times.
Automatic drying times
Cotton
High heat
Drying times after 800-1000 rpm wash cycles
1 kg
30 - 40 minutes
Synthetics
Low heat
1 kg
30 - 40 minutes 40 - 50 minutes 50 - 70 minutes
2 kg 3 kg 4 kg 5 kg 6 kg 7 kg
40 - 55 minutes 55 - 70 minutes 70 - 80 minutes 80 - 90 minutes 95 - 120 minutes 120 - 140 minutes
Drying times after wash cycles at lower speeds
• Temperature of the room: the lower the temperature of the
room, the longer it will take for the dryer to dry clothing.
• Bulk: certain bulky items require special care during the
drying process. We suggest removing these items and
replacing them in the dryer once they have been shaken
out: repeat this procedure several times during the course
of the drying cycle.
! Do not over-dry items.
All fabrics contain natural dampness which helps to keep
them soft and fluffy.
The drying times provided refer to the automatic Cupboard
dry programmes.
The weight refers to dry items.
2 kg 3 kg
12
Page 13

Warnings
and suggestions
! This appliance has been designed and built according to
international safety standards. These warnings are given for
safety reasons and must be followed carefully.
General safety
• This tumble dryer is not intended for use by persons
(including children) with reduced physical, sensory or
mental capabilities , or lack of experience and knowledge,
unless they have been given supervision or instruction
concerning use of the appliance by a person responsible
for there safety.
• This tumble dryer has been designed for home, and not
professional, use.
• Do not touch the appliance while barefoot or with wet
hands or feet.
• Unplug the machine by pulling on the plug, not the cord.
• Children must not be in proximity of the dryer when in use.
After using the dryer, turn it off and unplug it. Keep the door
closed to make sure that children do not use it as a toy.
• Children should be supervised to ensure that they do not
play with the dryer.
• The appliance must be installed correctly and have proper
ventilation. The air intake at the front of the dryer should
never be obstructed (see Installation).
• Never use the dryer on carpeting where the pile height
would prevent air from entering the dryer from the base.
• Check to see if the dryer is empty before loading it.
• The back of the dryer could become very hot.
Never touch it while in use.
• Do not use the dryer unless the filter, watercontainer and
condenser are securely in place (see Maintenance).
• Do not overload the dryer (see Laundry for maximum loads).
• Do not load items that are dripping wet.
• Carefully check all instructions on clothing labels (see
Laundry).
• Do not tumble dry large, very bulky items.
• Do not tumble dry acrylic fibres at high temperatures.
• Complete each programme with its Cool Tumble Phase.
• Do not turn off the dryer when there are still warm items
inside.
• Clean the filter after each use (see Maintenance).
• Empty the water container after each use (see Maintenance).
●• Clean the condenser unit at regular intervals (see Maintenance).
●• Do not allow lint to collect around the dryer.
• Never climb on top of the dryer. It could result in damage.
• Always follow electrical standards and requirements (see
Installation).
• Always buy original spare parts and accessories (see Service).
To minimise the risk of fire in your tumble dryer, the
following should be observed:
• Tumble dry items only if they have been washed with
detergent and water, rinsed and been through the spin
cycle. It is a fire hazard to dry items that HAVE NOT been
washed with water.
●• Do not dry garments that have been treated with chemical
products.
• Do not tumble dry items that have been spotted
or soaked with vegetable or cooking oils, this
constitutes a fire hazard. Oil-affected items can ignite
spontaneously,especially when exposed to heat sources
such as a tumble dryer. The items become warm, causing
an oxidisation reaction with the oil, Oxidisation creates
heat. If the heat cannot escape, items can become hot
enough to catch fire. Piling, stacking or storing oil-effected
items can prevent heat from escaping and so create a fire
hazard.If it is unavoidable that fabrics containing vegetable
or cooking oil or those that have been contaminated with
hair care products be placed in a tumble dryer they should
first be washed with extra detergent - this will reduce, but
not eliminate the hazard. The cool tumble phase should be
used to reduce the temperature of the items. They should
not be removed from the dryer and piled or stacked while
hot.
• Do not tumble dry items that have previously been cleaned
in or washed in, soaked in or soiled with petrol/gasoline,
dry cleaning solvents or other flammable or explosive
substances. Highly flammable substances commonly used
in domestic environments including cooking oil, acetone,
denatured alcohol, kerosene, spot removers, turpentine,
waxes and wax removers. Ensure these items have been
washed in hot water with an extra amount of detergent
before being dried in the tumble dryer.
●• Do not tumble dry items containing foam rubber (also
known as latex foam), or similarly textured rubber like
materials. Foam rubber materials can, when heated,
produce fire by spontaneous combustion.
●• Fabric softener or similar products should not be used in
a tumble dryer to eliminate the effects of static electricity
unless the practice is specifically recommended by the
manufacturer of the fabric softener product.
• Do not tumble dry undergarments that contain metal
reinforcements eg. bras with metal reinforcing wires.
Damage to the tumble dryer can result if the metal
reinforcements come loose during drying.
●• Do not tumble dry rubber, plastic articles such as shower
caps or babies waterproof covers, polythene or paper.
• Do not tumble dry rubber backed articles, clothes fitted
with foam rubber pads, pillows, galoshes and rubber
coated tennis shoes.
• Remove all objects from pockets, especially lighters.
! WARNING: Never stop the dryer before the end of the
drying cycle unless all items are quickly removed and
spread out so that the heat is dissipated.
Save energy and respect the environment
• Wring out all items to eliminate excess water before
tumble drying (if you use a washing machine first, select
a high spin cycle). Doing this will save time and energy
during drying.
• Always dry full loads - you save energy: single items or
small loads take longer to dry.
• Clean the filter after each use to contain energy
consumption costs (see Maintenance).
EN
13
Page 14
Care and maintenance
EN
Disconnecting the power supply
! Disconnect the dryer when not in use or during cleaning
and maintenance operations.
Cleaning the filter after each cycle
The filter is a fundamental component of the dryer: its function is to collect lint and fluff that form during drying.
Clean the filter once drying is completed, by rinsing it under
running water or cleaning it with a vacuum cleaner. Should
the filter become clogged, the flow of air inside the dryer will
be seriously hampered: drying times becomes longer and
more energy is consumed. Moreover, the dryer may become
damaged.
The filter is located in front of the dryer seal (see Picture).
Removing the filter:
1. Pull the filter’s plastic
handle upwards (see Picture).
2. Clean the fluff off the filter
and replace it correctly. Ensure that the filter is placed
flush with the dryer seal.
! Do not use the dryer unless
the filter has been replaced
in its holder.
Checking the
drum after each cycle
Rotate the drum manually to remove smaller items (handkerchiefs) that could have been left inside the dryer.
Cleaning the drum
! Avoid using abrasives, steel wool or stainless steel cleaning
agents to clean the drum.
A coloured film may appear on the stainless steel drum
surface: it may be caused by a combination of water and/or
cleaning agents such as wash-softeners. This coloured film
does not affect the dryer’s performance.
Emptying the water container after
each cycle
Remove the water container and empty it into a sink or other
suitable drain outlet, then replace it correctly.
Always check the water container and empty it before starting a new drying cycle.
Cleaning the condenser unit
• Remove the condenser unit regularly (monthly) and clean
off any fluff deposits from the plates by rinsing it with cool
water running on the rear end of the condenser.
Removing the condenser:
1. Disconnect the dryer from the power supply and open the
door.
2. Open the condenser cover (see Picture), unlock the three
catches by turning them 90° anti-clockwise, then pull on
the grip to remove the condenser.
3. Clean the surface of the seals and replace the unit with
the arrows pointing upwards, while making sure that the
catches are securely fixed.
Cleaning the tumble dryer
• The external metal and plastic parts and the rubber parts
can be cleaned with the aid of a damp cloth.
• Clean the front air intake grille regularly (every 6 months)
with a vacuum cleaner to remove any lint, fluff or dust
deposits. Furthermore, remove any lint deposits from the
front part of the condenser and from the filter area, using a
vacuum cleaner every so often.
! Do not use solvents or abrasives.
! The dryer uses ball bearing components that do not require
lubrication.
! Have the dryer checked regularly by authorised technical
personnel in order to ensure that the electrical and mechanical parts work safely (see Assistance).
14
Water container
Condenser unit
Catches
Filter
Tap
Rear
Condenser unit
Air intake
Front
Condenser cover
Handle
Page 15

Troubleshooting
If you feel that the dryer is not working properly, consult the following troubleshooting suggestions before contacting the Technical
Assistance Centre (see Assistance).
EN
Problem:
The dryer does not start.
The drying cycle does not start.
Drying times are too long.
Possible causes / Solutions:
• The plug has not been inserted far enough into the socket to make contact.
• There has been a power cut.
• The fuse has burned out. Try connecting another appliance to the same socket.
• If an extension cord is used, try connecting the dryer plug directly into the socket.
• The door has not been closed properly.
• The programme has not been set correctly (see How to carry out a drying cycle).
• The START/PAUSE button has not been pressed (see How to carry out a drying
cycle).
• A delayed start time has been set (see Programmes and options).
• The START/PAUSE button has been pressed; a short delay follows before the dryer
starts running. Wait for the drying cycle to start; do not press the START/PAUSE
button otherwise the dryer switches to the pause mode and the drying cycle will not
start.
• The filter has not been cleaned (see Care and maintenance).
• The water container must be emptied? The “Empty water container” indicator light
flashes (see Care and maintenance).
• The condenser needs to be cleaned (see Care and maintenance).
• The heat setting is not suited to the type of fabric to be dried (see Programmes and
options).
• An incorrect drying time was selected for the type of load (see Laundry).
• The air intake grille or the rear air vents are clogged up (see Installation, and Care
and maintenance).
• The items are too wet (see Laundry).
• The dryer is overloaded (see Laundry).
The “Empty water container” indicator light flashes.
The programme is finished but the
items are damper than expected.
The “Options” and “START/PAUSE” indicator lights flash and one
of the “Maintenance” or “Drying
phases” indicator lights turns on
without flashing.
The dryer is noisy during the first
few minutes of operation.
The lights on the dryer control
panel are off although the dryer is
switched on.
• The water bottle was not emptied before starting the programme. Always empty
it before starting a new drying programme (see Description of the tumble dryer) do not wait for the bottle full signal (buzzer beeps once every 5 seconds and the
indicator light flashes) before emptying the water container.
! For safety reasons, the dryer programmes last a maximum of 4 hours. If an
automatic programme has not detected the final dampness level required in this
interval, the dryer completes the programme and stops. Check the above points and
repeat the programme; if the items are still damp, contact the Technical Assistance
Centre (see Assistance).
• Switch the appliance off and unplug it, then clean the filter and condenser (see “Care
and Maintenance”). Reinsert the plug, switch the appliance on and start another
programme.
If the problem persists, contact the Technical Assistance Service.
• This is normal, especially if the dryer has not been used for a long time. If the noise
persists during the entire cycle, contact the Technical Assistance Centre.
The dryer has gone into standby mode to save power. This occurs if you have left the
dryer on or have had a power cut. It occurs after 30 minutes:
- if you leave the dryer without starting a programme;
- after your drying programme has finished.
Press and hold the ON/OFF button until the dryer reactivates
15
Page 16
Assistance
Before contacting the Technical Assistance Centre:
Spare parts
EN
• Follow the troubleshooting guide to check whether problems can be solved personally (see Troubleshooting).
• If not, switch the dryer off and contact the Technical Assistance Centre closest to you.
Provide the following data when contacting the
Technical Assistance Centre:
• name, address and postal code
• telephone number
• type of malfunction
• date of purchase
• the appliance model (Mod.)
• the dryer’s serial number (S/N)
This information can be found on the data plate located
behind the door.
This dryer is a complex machine. Attempting to repair it
personally or with the aid unqualified personnel may put the
safety of people at risk, damage the machine or invalidate
the spare parts guarantee.
Always contact a qualified technician when experiencing
problems with this machine.
Information on recycling and disposal
As part of our continual commitment towards environmental protection, we reserve the right to use recycled quality components to
reduce costs for our customers and to minimise materials wastage.
• Disposing of the packaging materials: follow local regulations to allow for recycling of packaging materials.
• In order to minimise the risk of injury to children, remove the door and plug, then cut the power supply cord flush with the applian-
ce. Dispose of these parts separately to prevent the appliance from being connected to a power supply socket.
Disposal of old household appliances
European Directive 2012/19/EC concerning Waste Electrical and Electronic Equipment (WEEE) states that household applian-
ces should not be disposed of using the normal solid urban waste cycle. Exhausted appliances should be collected separately in order to optimise the cost of re-using and recycling materials comprising the machine, while preventing potential
damage to public health and the environment. The crossed-out wheeled bin symbol appears on all products to remind
owners of the obligations regarding separate waste collection.
Owners should contact their local authorities or appliance dealers for further information concerning the correct disposal of household
appliances.
16
This appliance conforms to the following EC directives:
- 2006/95/EC (Low Voltage Directive)
- 2004/108/EC (Electromagnetic Compatibility Directive).
Page 17

Mode d’emploi
SÈCHE-LINGE
FR
Français
IDCA 735
Table des matières
Informations importantes, 18-19
Installation, 20
Où installer le sèche-linge
Ventilation
Raccordement électrique
Informations préliminaires
Description du sèche-linge, 21-22
Caractéristiques
Tableau de bord
Comment effectuer
un cycle de séchage, 23
Démarrage et choix du programme
Programmes et options, 24-25-26
Tableau des programmes
Programmes spéciaux
Options
Ouverture de la porte
Linge, 27-28
Tri du linge
Étiquettes d’entretien
Linge ou vêtements particuliers
Temps de séchage
FR
! Ce symbole vous rappelle de lire ce mode d’emploi.
! Conservez cette notice d’utilisation et d’installation à portée de
main de manière à pouvoir vous y référer si nécessaire. Conservez
cette notice toujours à côté du sèche-linge et si vous vendez cet
appareil ou que vous le donniez à un tiers, faites en sorte que
cette notice accompagne le sèche-linge de manière à ce que le
nouveau propriétaire soit informé des avertissements et des conseils concernant le fonctionnement de ce sèche-linge.
! Lisez attentivement ce mode d’emploi : les pages suivantes
contiennent des informations importantes concernant l’installation
et des conseils relatifs au fonctionnement de cet appareil.
Précautions et conseils, 29
Sécurité générale
Économie d’énergie et protection de l’environnement
Soin et entretien, 30
Interruption de l’alimentation électrique
Nettoyage du filtre après chaque cycle
Contrôle du tambour après chaque cycle
Vidange du réservoir d’eau après chaque cycle
Nettoyage du groupe condenseur
Nettoyage du sèche-linge
Problèmes et solutions, 31
Assistance, 32
Pièces détachées
Informations pour le recyclage et la mise au rebut
17
Page 18
Informations importantes
Pour assurer le bon fonctionnement du sèche-linge
à condensation il faut suivre le schéma d’entretien
FR
ordinaire indiqué ci-dessous :
Filtre à peluches – IL EST NÉCESSAIRE d’éliminer
les peluches qui s’accumulent sur le filtre après
chaque cycle de séchage.
Étape 1
Ouvrez la porte du sèche-linge
en appuyant comme illustré par
la figure.
Si le filtre n’est pas nettoyé après chaque cycle de
séchage, les performances de l’appareil en sont
affectées, car les temps de séchage deviennent
plus longs et, par conséquent, la consommation
d’électricité augmente pendant le séchage.
Réservoir d’eau – Il est nécessaire de vider le
réservoir d’eau après chaque cycle de séchage.
Étape 1
Tirez la poignée du réservoir
d’eau vers vous et sortez-le
complètement du sèche-linge.
Étape 2
Videz toute l’eau contenue dans
le réservoir.
Étape 2
Sortez le filtre (en utilisant deux
doigts).
Étape 3
Éliminez tout dépôt de peluches
sur la surface intérieure de la
maille du filtre.
Étape 4
Remettez le filtre en place – Ne
mettez jamais le sèche-linge en
marche sans avoir remis le filtre
en place.
Étape 3
Remettez le réservoir d’eau en
place et assurez-vous qu’il est
inséré à fond dans son logement.
Si le réservoir d’eau n’est pas vidé, les problèmes
suivants peuvent se vérifier :
- L’arrêt du chauffage de l’appareil (le linge pourrait
donc être encore humide à la fin du cycle de
séchage).
- La led « Vider l’eau » s’allume pour signaler que le
réservoir est plein.
Chargement du système de collecte de l’eau
Quand le sèche-linge est neuf, le réservoir d’eau
ne reçoit pas l’eau tant que le système n’est pas
chargé. Cette opération peut prendre 1 ou 2 cycles
de séchage. Une fois qu’il a été chargé, le système
commence à recevoir l’eau à chaque cycle.
18
Page 19
Groupe condenseur - Il est nécessaire d’éliminer
séchage pour le programme coton standard à pleine charge
faible puissance. La consommation réelle d’énergie par cycle
les peluches accumulées sur le condenseur tous
les mois.
Étape 1
Ouvrez le couvercle du
condenseur
- tirez la poignée vers vous.
Étape 2
Enlevez le condenseur en
tournant les 3 clips, ensuite
tirez le condenseur vers vous.
(Dans les tuyaux il pourrait y
avoir encore de l’eau : cela est
normal).
Étape 3
Nettoyez le condenseur sous
l’eau courante par la partie
arrière, de manière à éliminer tout
dépôt de peluches.
Données techniques
Capacité nominale de linge en coton pour le « programme coton
standard » à pleine charge - kg
Classe d'efficacité énergétique B
La consommation d’énergie annuelle (AEc)* pondérée Kwh 503.7
Ce sèche-linge domestique à tambour est un sèche-linge Automatique
Ce sèche-linge domestique à tambour est un sèche-linge À condens.
Consommation d'énergie à pleine charge ; Edry- kWh 4.28
Consommation d'énergie à demi-charge ; Edry½,- kWh 2.29
7.0
FR
Étape 4
Remettez le groupe condenseur
en place ; assurez vous que le
groupe est inséré à fond dans
son logement, que les 3 clips
sont fixées et que les flèches
de positionnement sur la partie
avant du condenseur sont
tournées vers le haut.
Si le condenseur n’est pas bien nettoyé, une
défaillance prématurée du sèche-linge pourrait
survenir.
Consommation d'électricité : mode arrêt (Po) - Watts 0,14
Consommation d'électricité : mode laissé sur marche (Pl) - Watts 1,79
Durée du mode laissé sur marche pour le système de gestion de
la consommation d’électricité - minutes
Le programme coton standard** adapté pour le séchage de textiles en coton
normalement humides constitue le programme le plus efficace en termes de
consommation d’énergie pour le coton à pleine charge et à demi-charge.
Durée du programme - pondérée (Tt) pour pleine et demi-charge minutes
Pleine charge (Tdry) - minutes 128
Demi-charge (Tdry½) - minutes 70
Classe de taux de condensation B
Taux de condensation moyen - %
charge pleine Cdr 83
demi-charge Cdry½ 81
pondéré (Ct) pleine et demi-charge 82
Niveau de bruit aérien - dB(A) re 1 pW 68
30
95
Il s’agit du cycle de lavage test conformément à la Réglementation 392/2012.Vous trouverez les fiches techniques de tous
nos produits sur notre site Internet
http://www.indesit.com/indesit/.
*La consommation annuelle est basée sur 160 cycles de
et à demi-charge, et sur la consommation des modes à
dépend des conditions d’utilisation de l’appareil.
**Le programme coton standard est “Coton à ranger”
19
Page 20
m
2
1
Less than 1m
Installation
Où installer le sèche-linge
FR
• Placez votre sèche-linge
à une certaine distance des
cuisinières, fourneaux, radiateurs, ou plaques de cuisson à
gaz, car les flammes peuvent
endommager cet appareil.
Si vous installez cet appareil
sous un plan de travail, faites
en sorte de laisser un espace
de 10 mm entre le dessus de
l’appareil et tout autre objet sur
ou au-dessus de celui-ci, et un
espace de 15 mm entre ses
côtés et les éléments d’ameublement ou les murs latéraux.
Ceci a pour objectif d’assurer une ventilation convenable.
Ventilation
• Lorsque le sèche-linge est en marche, une aération
adéquate est nécessaire. Faites en sorte d’installer votre
sèche-linge dans un environnement qui n’est pas humide et
qui est doté d’une bonne circulation d’air dans toute la pièce.
La circulation d’air autour du sèche linge est essentielle pour
condenser l’eau produite au cours du lavage ; le sèche linge
ne fonctionnera pas efficacement dans un espace clos ou
dans un placard.
! Si l’on utilise le sèche linge dans une pièce froide ou petite,
on rencontrera un certain degré de condensation.
! Nous vous déconseillons d’installer votre sèche-linge dans
un placard ; par ailleurs, le sèche-linge ne doit en aucun cas
être placé derrière une porte fermant à clé, une porte coulissante ou une porte montée sur des gonds du côté opposé
à la porte de chargement du sèche-linge.
Vidange de l’eau
Si votre sèche-linge est installé à proximité d’une évacuation,
l’eau peut être vidangée directement dans ce tuyau. Cela
évite d’utiliser et de vider le réservoir d’eau.
Si vous installez le sèche-linge au-dessus ou à côté d’un
lave-linge, il pourra partager la même vidange. Il suffit de
débrancher le tuyau indiqué par la figure A et de le brancher
à la vidange.
Si la vidange est plus loin que la longueur du tuyau, il possible
d’acheter et de brancher un tuyau ayant le même diamètre et
la longueur nécessaire.
Pour installer le nouveau il suffit de remplacer le tuyau existant
comme illustré par la figure B dans la même position.
! La hauteur de la vidange doit être inférieure à 1 m en
partant du bas du sèche-linge.
! Assurez-vous que le tuyau n’est pas écrasé ou plié une
fois le sèche-linge placé dans sa position définitive.
Raccordement électrique
Assurez-vous des points suivants avant de brancher la fiche
de l’appareil dans la prise de mains:
• Assurez-vous d’avoir les mains sèches.
• La prise de courant doit être reliée à la terre.
• La prise de courant doit pouvoir supporter la puissance
maximale de la machine, qui est indiquée sur la plaque
signalétique de l’appareil (voir Description du sèche-linge).
• La tension électrique doit appartenir à la gamme de
valeurs indiquée sur la plaque signalétique de l’appareil (voir
Description du sèche-linge).
• La prise de courant doit être compatible avec la fiche du
sèche-linge. Autrement, remplacez la prise ou la fiche.
! N’utilisez pas de rallonges.
! Le sèche-linge ne doit pas être utilisé à l’extérieur, même si
l’espace en question est abrité. Cela peut être dangereux si
l’appareil est exposé à la pluie ou à des orages.
! Une fois le sèche-linge installé, le cordon d’alimentation et
la fiche doivent être d’accès facile.
! Le cordon d’alimentation ne doit pas être courbé ou
écrasé.
! Si la fiche à remplacer est de type incorporée, il faut l’élimi-
ner conformément aux consignes de sécurité. Ne la laissez
jamais dans un endroit où elle peut être branchée à une
prise et provoquer ainsi un choc électrique.
! Le cordon d’alimentation électrique doit être vérifié pério-
diquement et remplacé par un cordon préparé spécialement pour ce sèche-linge, et installé uniquement par des
électriciens agréés (voir Service après-vente). Des cordons
d’alimentation neufs ou plus longs sont fournis par les revendeurs agréés contre un supplément..
! Le fabricant rejette toute responsabilité en cas de non-
respect de toutes ou partie de ces règles.
! En cas de doute au sujet des points précédents, con-
sultez un électricien qualifié.
Informations préliminaires
Une fois que vous avez installé votre sèche-linge, et avant
de l’utiliser, nettoyez l’intérieur du tambour pour retirer les
poussières qui pourraient s’y être accumulées pendant le
transport.
Fig. A
20
1
2
Fig. B
Page 21
Description
du sèche-linge
Ouverture de la porte
Appuyez
sur la porte
Groupe
condenseur
(couvercle
ouvert)
Caractéristiques
Réservoir d’eau
Filtre
FR
Plaque
signalétique de
l’appareil
Numéro de
série et
référence du
modèle
Grille
d’entrée
d’air
Poignée du couvercle du
condenseur (tirez pour ouvrir)
Tableau de bord
Touche
On/Off
Bouton
Programmes
Touches et
voyants
Options
Touche avec voyant
Start/Pause
Voyants
d’entretien
Voyants
des phases de
séchage ou de
départ différé
21
Page 22
Touche ON/OFF/Reset
Une pression normale sur cette touche fait allumer ou éteindre l’appareil. Si le sèche-linge est en marche, une pression prolongée
FR
d’au moins 3 secondes fait éteindre l’appareil et remettre à zéro le cycle en cours.
Bouton Programmes
Permet de sélectionner les programmes : tournez le bouton jusqu’à positionner l’indicateur sur le programme souhaité (voir Démarrage et choix du programme).
Touches options
Permettent de choisir les options disponibles pour le programme sélectionné. Les voyants correspondants s’allument pour indiquer
que les options ont été sélectionées (voir Programmes et options).
Touche avec voyant START/PAUSE
Quand le voyant vert clignote lentement, appuyer sur la touche pour démarrer le programme. Une fois que le cycle est démarré, le
voyant reste allumé. Pour activer une pause de programme, appuyer à nouveau sur la touche ; le voyant passe à l’orange et se met
à clignoter.
Pour faire redémarrer le programme exactement à l’endroit de l’arrêt, appuyez une nouvelle fois sur la touche (voir Démarrage et
choix du programme).
Voyants
Voyants “d’entretien”
Les voyants fournissent des informations importantes. Voilà ce qu’ils signalent :
Le voyant “Vider l’eau” indique qu’il est nécessaire de vider le réservoir d’eau.
Si ce réservoir se remplit complètement au cours du programme, la led s’allume. Le sèche-linge lance automatiquement le cycle
d’air froid et la led START/PAUSE commence à clignoter en ambre. Pour faire redémarrer le cycle là où il avait été interrompu, appuyez sur la touche START/PAUSE.
Pour éviter cette procédure, videz toujours le réservoir d’eau après chaque utilisation du sèche-linge (voir Entretien).
Le voyant “Filtre à nettoyer” avant chaque programme sert à rappeler qu’il est essentiel de nettoyer le filtre chaque fois avant
d’utiliser le sèche-linge (voir Entretien).
Le voyant “Condenseur à nettoyer” sert à rappeler qu’il est essentiel de nettoyer le condenseur périodiquement (voir Entretien).
Voyants “ Phases de séchage “
Le voyant indique que la phase de séchage est en cours.
Le voyant indique que la phase de refroidissement est en cours.
Le voyant END indique la fin du programme.
Voyants “Départ différé”
Si la fonction “Départ différé” a été activée (voir “Programmes et options”), le voyant correspondant au temps sélectionné se
mettra à clignoter, après avoir lancé le programme:
Au fur et à mesure que le temps passe, le temps restant est affiché avec clignotement du voyant correspondant.
Quand le retard sélectionné touche à sa fin le programme sélectionné démarre.
22
Page 23

Comment effectuer
un cycle de séchage
Démarrage et choix du programme
1. Branchez la fiche du sèche-linge dans la prise de courant électrique.
2. Sélectionnez le programme en fonction du type de linge (voir Linge).
3. Ouvrez la porte et assurez-vous que le filtre est propre et en place et que le réservoir d’eau est vide et en place (voir Entretien).
4. Chargez la machine en faisant attention à ce qu’aucun vêtement ne s’interpose entre la porte et le joint de la porte. Fermez la
porte.
5. Appuyez sur la touche ON/OFF pour mettre l’appareil en marche.
6. Tournez le bouton Programmes jusqu’à positionner l’indicateur sur le programme correspondant au type de linge à sécher, en
contrôlant le tableau des programmes (voir Programmes et options) et les indications pour chaque type de tissu (voir Linge).
! Attention : si la position du bouton change après avoir appuyé sur la touche START/PAUSE, la nouvelle position NE MODIFIE PAS
le programme sélectionné. Pour modifier le programme appuyez sur la touche START/PAUSE pour activer une pause de programme (le voyant se met à clignoter en orange), ensuite choisissez le nouveau programme et les options correspondantes. Appuyez sur
la touche START/PAUSE pour lancer le nouveau programme.
7. Si nécessaire, programmez le temps de départ différé et les autres options (voir Programmes et options).
8. Appuyer sur la touche START/PAUSE pour commencer.
Pendant le programme de séchage vous pouvez contrôler le linge et sortir les vêtements qui ont déjà séché, en laissant continuer
les autres. Après avoir refermé la porte, appuyez sur START/PAUSE pour remettre l’appareil en marche.
FR
9. Les dernières minutes avant que tout programme de séchage ne soit terminé, l’appareil entre dans la phase finale de SÉCHAGE
À FROID (les tissus sont refroidis), que vous devez toujours laisser se terminer.
10. L’allumage du voyant END indique que le programme est terminé. Pour vous informer que le programme est terminé, trois bips
retentissent. Ouvrez la porte, sortez votre linge, nettoyez le filtre et remettez-le en place. Videz le réservoir d’eau et replacez-le (voir
Entretien).
Si l’option « Anti-froissement fin » a été sélectionnée et que le linge n’est pas retiré immédiatement, les vêtements sont fait tourner
de temps en temps pendant 10 heures ou jusqu’à l’ouverture de la porte.
11. Débranchez le sèche-linge.
Standby
Ce sèche-linge, conformément aux nouvelles normes en vigueur dans le domaine de l’économie d’énergie, est équipée d’un
système d’extinction automatique (veille) activé après environ 30 minutes d’inutilisation. Appuyez sur le bouton ON/OFF et mainte-
nez-le enfoncé jusqu’à ce que le sèche-linge se remette en marche.
23
Page 24
Programmes et options
Tableau des programmes
FR
Programme
Quotidien
1
Coton intensif Max. Anti-froissement début – Anti-froissement fin et Départ différé.
Charge maxi
(Kg)
Options compatibles Durée cycle
150’
2
Coton à ranger Max. Anti-froissement début – Anti-froissement fin et Départ différé.
3
Coton à repasser Max. Anti-froissement début – Anti-froissement fin et Départ différé.
4
Synthétique à ranger 3 Anti-froissement début – Anti-froissement fin et Départ différé.
5
Synthétique à repasser 3 Anti-froissement début – Anti-froissement fin et Départ différé.
Spécial
6 Eco Time
7 Laine
Sport
8 Sport Intensif
9 Sport Léger
10 Baskets
Partiaux
Refraichîssement - -
Temps de séchage automatique
30 - 60 - 90 - 120 - 150 minutes - Il est activé avec tous les options.
2 Anti-froissement début – Anti-froissement fin et Départ différé.
1 -
4 Anti-froissement début – Anti-froissement fin et Départ différé.
4 Anti-froissement début – Anti-froissement fin et Départ différé.
1 pair -
140’
100’
65’
55’
60’
60’
80
70’
100’
20’
Programmes Spécial/Sport/Partiaux
Programme Eco Time
Ce programme est idéal pour sécher en toute sécurité de petites charges de linge en peut de temps, ce qui permet d’optimiser la
consommation d’énergie. Le programme peut être utilisé pour les cotons pour des charges jusqu’à 2 kg.
! La durée de ce programme dépendra du poids de la charge de linge et de la vitesse d’essorage utilisée lors du lavage.
Il est conseillé de vérifier que les articles portent les symbole et de les retourner sur l’envers avant le séchage.
Programme Laine
C’est un programme réservé aux articles supportant le séchage au tambour et portant le symbole . Vous pouvez l’utiliser pour des
charges jusqu’à 1 kg (3 pull-overs environ). Il est conseillé de tourner les vêtements à l’envers avant de les charger dans le sèchelinge. Ce programme prend 60 minutes environ, mais parfois cette durée se prolonge, selon les dimensions de la charge, sa densité
et la vitesse d’essorage du lave-linge. Les charges séchées avec ce programme sont normalement prêtes à porter, mais parfois les
bords et les coutures des vêtements plus lourds peuvent s’avérer encore légèrement humides. Laissez-les sécher naturellement, car
un autre cycle de séchage à la machine pourrait les endommager.
! Contrairement à d’autres matériaux, la laine subit un processus de rétrécissement qui est irréversible, dans ce sens que le vêtement ne reprend plus sa taille et sa forme d’origine.
! Ce programme n’est pas indiqué pour les articles en acrylique.
24
Page 25

Programme Sport Intensif
Ce programme convient aux vêtements résistant au sèche-linge, comme les survêtements et les shorts portant le symbole . Idéal
pour le linge n’exigeant pas de séchage complet. Nous recommandons de retourner les vêtements sur l’envers avant de les sécher.
! La durée de ce programme dépendra du poids de la charge de linge et de la vitesse d’essorage utilisée lors du lavage.
Programme Sport Léger
Ce programme convient aux vêtements résistant au sèche-linge, comme les survêtements et les shorts portant le symbole . Idéal
pour le linge n’exigeant pas de séchage complet ou devant être ensuite repassé. Nous recommandons de retourner les vêtements
sur l’envers avant de les sécher.
! La durée de ce programme dépendra du poids de la charge de linge et de la vitesse d’essorage utilisée lors du lavage.
Programme Baskets
Ce programme permet de sécher une paire de chaussures de sport. Les chaussures doivent avoir été lavées et essorées à une
vitesse d’essorage d’au moins 400 tours/minute.
Vous devez utiliser le porte-chaussures fourni. Si vous séchez vos chaussures directement dans le tambour, cela va endommager
votre sèche-linge. Retirez le filtre de sa position à l’avant du sèche-linge et mettez le porte-chaussures en place.
Rentrez les lacets à l’intérieur des chaussures et chargez celles-ci avec les pointes vers le bas et les semelles vous faisant face.
Les temps de séchage varient en fonction de la taille et du style de chaussures. Si les chaussures ne sont pas entièrement sèches à
la fin du programme, redémarrez ce programme.
! Ne pas sécher de chaussures avec des inserts Gel ou des lumières clignotantes. Ne sécher que des chaussures en synthétique
ou en toile. Une fois que vous avez terminé, retirez le porte-chaussures et remettez le filtre en place.
Refraichîssement
Programme court qui sert à aérer les fibres et les vêtements avec de l’air frais. Il a une durée de 20 minutes environ.
! Ce n’est pas un programme de séchage et ne doit pas être utilisé pour des vêtements mouillés.
FR
Programme de séchage temporisé (30’ - 60’ - 90’ - 120’ - 150’)
Si vous souhaitez régler la durée de séchage, choisissez ce programme au lieu des programmes automatiques. Idéal pour sécher le
linge humide à basse température ou les petites charges.
La durée du programme de séchage temporisé dépend de la charge, du type de textile à sécher (voir tableau) et de la vitesse
d’essorage utilisée lors du lavage..
Les dernières minutes du programme correspondent au séchage à froid.
Tissus
Coton – Haute
température
Synthétique – Basse
température
Acrylique – Basse
température
1 kg 2 kg 3 kg 4 - 5 kg 6 – 7 kg
30 ou 60
minutes
30 ou 60
minutes
30 minutes 60 minutes - - -
30 ou 60
minutes
30 ou 60
minutes
Charge
60 ou 90
minutes
60 ou 90
minutes
60 ou 90
minutes
- -
90-120-150
minutes
25
Page 26

FR
Options
Les options permettent de personnaliser le programme sélectionné en fonction de vos exigences.
Départ différé
Le départ de certains programmes (voir Programmes et options) peut être retardé d’un délai pouvant aller jusqu’à 9 heures. Appuyez plusieurs fois de suite sur la touche jusqu’à ce que le retard désiré soit affiché. Avant de régler un départ différé, assurez-vous
que le réservoir d’eau et vide et que le filtre est propre.
Anti-froissement fin
Lorsque cette option est sélectionnée, les vêtements sont brassé de temps à autre une fois les cycles de séchage et de refroidissement achevés, pour aider à éviter que les vêtements ne se froissent au cas où vous ne pourriez pas les retirer de la machine
immédiatement en fin de programme. Le voyant est allumé pendant cette phase.
Anti-froissement début
Si un départ différé a été sélectionné avec cette option, le linge est occasionnellement brassé pendant la période de temporisation
pour éviter le développement du froissement du linge.
Haute température
Si un séchage temporisé est sélectionné, appuyez sur cette touche pour régler une Haute température. Le voyant au-dessus de la
touche s’allume. Les programmes minutés sont par défaut réglés sur une température douce.
! Les options ne sont pas toutes disponibles pour tous les programmes (voir Programmes et options).
Ouverture de la porte
En ouvrant la porte (ou appuyant sur la touche START/PAUSE) pendant le fonctionnement d’un programme, le sèche-linge s’arrête
et les conséquences suivantes se produisent :
• Le voyant START/PAUSE passe à l’orange et clignote.
• Pendant le départ différé, le retard continue d’être décompté. Il faut appuyer sur la touche de START/PAUSE pour reprendre le
programme de départ différé. Un des voyants de “ Départ différé “ clignote pour indiquer le retard courant programmé.
• Il faut appuyer sur la touche de START/PAUSE pour reprendre le programme. Les voyants d’avancement indiquent la phase en
cours et le voyant de START/PAUSE passe au vert et cesse de clignoter.
• Pendant la phase anti-froissement fin de séchage le programme sera interrompu. Appuyez sur la touche START/PAUSE pour
démarrer un nouveau programme dès le début.
• Tournez le bouton Programmes pour sélectionner un nouveau programme. Le voyant START/PAUSE passe au vert et commence
à clignoter. Suivez également cette procédure pour sélectionner le programme Séchage à froid pour refroidir les vêtements, si vous
estimez qu’ils sont suffisamment secs.
Appuyez sur la touche START/PAUSE pour commencer le nouveau programme.
Remarque : En cas de coupure de courant, coupez l’alimentation ou débranchez la prise. Une fois le courant rétabli, branchez la
machine, appuyez sur le bouton ON/OFF et maintenez-le enfoncé jusqu’à ce que le sèche-linge se remette en marche puis appuyez sur le bouton Départ/Pause
26
Page 27

Linge
Tri du linge
• Vérifiez les symboles sur les étiquettes des vêtements
pour vous assurer que les articles peuvent être passés au
sèche-linge.
• Triez votre linge par type de textile.
• Videz les poches et contrôlez les boutons.
• Fermez les fermetures éclair et les crochets et attachez les
ceintures et les cordons, sans serrer.
• Essorez chaque article de manière à éliminer autant d’eau
que possible.
! Ne chargez pas de vêtements mouillés qui gouttent dans le
sèche-linge.
Capacités maximales de chargement
Ne chargez pas plus que la capacité maximale.
Les chiffres suivants font référence au poids sec :
Fibres naturelles : maximum 7 kg
Fibres synthétiques : maximum 3 kg
! Pour éviter que le sèche-linge ne perde de son efficacité,
ne le surchargez pas.
Charge typique
Remarque : 1 kg = 1000 g
Articles
Chemisier
Robe
Jeans
10 couches
Chemise
T-shirt
Coton
Autre
Coton
Autre
Coton
Autre
150 g
100 g
500 g
350 g
700 g
1.000 g
300 g
200 g
125 g
Étiquettes d’entretien
Regardez les étiquettes sur vos vêtements, en particulier
lorsque vous les séchez pour la première fois au sèche-linge.
Les symboles suivants sont les plus courants :
Séchage en machine.
Pas de séchage en machine.
Séchage à haute température.
Séchage à basse température.
Linge ne supportant pas le séchage au tambour :
• Les articles qui contiennent du caoutchouc ou des
matériaux similaires au caoutchouc ou ceux qui contiennent un film plastique (oreillers, coussins, ou vêtements de
pluie en PVC), tous autres articles ou objets inflammables
ou contenant des substances inflammables (serviettes
éponge imprégnées de laque à cheveux).
• Fibres de verre (certain types de tentures).
• Vêtements précédemment nettoyés à sec.
• Articles portant le Code ITCL (« Vêtements spéciaux »)
. Ces derniers peuvent être nettoyés avec des produits
spéciaux de nettoyage à domicile. Suivez attentivement le
mode d’emploi.
• Les gros articles volumineux (couettes, sacs de couchage,
oreillers, coussins, grands dessus de lits etc.). Ceux-ci augmentent de volume lorsqu’ils sèchent et cela empêcherait l’air de circuler à travers le sèche-linge.
FR
Linge de maison
Housse de couette
en coton (double)
Grande nappe
Petite nappe
Nappe à thé
Drap de bain
Serviette éponge
Draps doubles
Draps 1 personne
Coton
Autre
1.500 g
1.000 g
700 g
250 g
100 g
700 g
350 g
500 g
350 g
À la fin d’un cycle de séchage, il se peut que les cotons
soient toujours humides si vous les avez regroupés avec les
synthétiques. Si cela se produit, faites-leur simplement subir
une petite période de séchage supplémentaire.
27
Page 28

Linge ou vêtements particuliers
FR
Couvertures et dessus de lits : les articles en acrylique
(Acilan, Courtelle, Orion, Dralon) doivent être séchés avec
des précautions particulières, à basse température. Évitez
de les sécher pendant une durée prolongée.
Vêtements plissés ou froissés : lisez les instructions de
séchage du fabricant figurant sur le vêtement.
Articles amidonnés : ne séchez pas ces derniers avec des
articles non amidonnés. Faites en sorte de retirer autant de
solution d’amidonnage que possible de la charge avant de
placer celle-ci dans le sèche-linge. Ne séchez pas de façon
excessive : l’amidon pourrait devenir poudreux et laisser
vos vêtements sans tenue, ce qui irait à l’encontre du but
recherché.
Temps de séchage
• La quantité de linge : les articles uniques ou les petites
charges peuvent prendre plus longtemps à sécher.
• Séchage : si vous avez l’intention de repasser certains de
vos vêtements, vous pouvez les sortir de la machine alors
qu’ils sont encore un peu humides. Les autres vêtements
peuvent y rester plus longtemps si vous voulez qu’ils en
sortent entièrement secs.
• Le réglage de la température.
• La température ambiante : si la pièce dans laquelle
le sèche-linge est installé est froide, cela prendra plus
longtemps à l’appareil pour sécher vos vêtements.
• Le volume : certains articles volumineux peuvent être
séchés en machine avec quelques précautions. Nous
vous suggérons de retirer plusieurs fois ces articles de la
machine, de les secouer et de les remettre dans le sèchelinge jusqu’à ce que celui-ci ait terminé de les sécher.
Ces temps sont approximatifs et peuvent varier en fonction
des paramètres suivants :
• La quantité d’eau retenue dans les vêtements après le
cycle d’essorage : les serviettes éponge et les textiles
délicats retiennent une quantité importante d’eau.
• Les textiles : des articles qui sont constitué par le même
type de textile mais qui ont des textures et des épaisseurs
différentes peuvent ne pas avoir le même temps de séchage.
Temps de séchage automatique
Coton
Haute température
Temps de séchage après 800-1000 trs/mn dans la machine à laver
1 kg
30 - 40 minutes
Synthétique
Basse température
1 kg
30 - 40 minutes 40 - 50 minutes 50 - 70 minutes
2 kg 3 kg 4 kg 5 kg 6 kg 7 kg
40 - 55 minutes 55 - 70 minutes 70 - 80 minutes 80 - 90 minutes 95 - 120 minutes 120 - 140 minutes
Temps de séchage après essorage réduit dans la machine à laver
! Ne séchez pas excessivement vos vêtements.
Tous les issus contiennent une certaine quantité d’humidité
naturelle, ce qui les rend doux et gonflants.
Les temps indiqués se réfèrent aux programmes automatiques Séchage armoire. Les poids font référence aux
vêtements secs.
2 kg 3 kg
28
Page 29

Précautions et conseils
! Cet électroménager a été conçu et réalisé conformément aux
normes internationales de sécurité. Ces consignes sont fournies
pour des raisons de sécurité, il faut les respecter scrupuleusement.
Sécurité générale
• Ce sèche-linge n’est pas destiné à être utilisé par des personnes (notamment des enfants) présentant des capacités
physiques, motrices ou mentales réduites, ou manquant
d’expérience et de connaissances, sans la surveillance d’une
personne responsable de leur sécurité ou sans instructions
concernant l’utilisation de l’appareil.
• Ce sèche-linge a été conçu pour un usage domestique, et non
professionnel.
• Ne touchez pas cet appareil lorsque vous êtes pieds nus ou
avec des mains ou des pieds humides.
• Débranchez cette machine en tirant sur la fiche et non sur le
cordon.
• Les enfants ne doivent pas se trouver à proximité du sèche-linge lorsque celui-ci est en marche. Après avoir utilisé ce sèchelinge, éteignez-le et débranchez-le. Tenez la porte fermée pour
assurer que les enfants ne jouent pas avec.
• Surveillez les enfants de façon à ne pas les laisser jouer avec le
sèche-linge.
• Cet appareil doit être installé correctement et avoir une ventilation convenable. L’arrivée d’air sur le devant du sèche-linge et
l’évent derrière le sèche-linge ne doivent jamais être obstrués
(voir Installation).
• N’utilisez jamais le sèche-linge sur de la moquette où la hauteur des poils empêcherait l’air d’entrer dans la sèche-linge à
partir de la base.
• Vérifiez que le sèche-linge est bien vide avant de le charger.
• L’arrière du sèche-linge peut devenir très chaud.
Ne le touchez jamais en cours d’utilisation.
• N’utilisez pas le sèche-linge si le filtre, le réservoir d’eau et le
condenseur ne sont pas bien en place (voir Entretien).
• Ne surchargez pas le sèche-linge (voir Linge pour les charges
maximales).
• Ne chargez pas d’articles qui dégouttent d’eau.
• Vérifiez avec soin toutes les instructions sur les étiquettes des
vêtements (voir Linge).
• Ne séchez pas d’articles de grande taille, très volumineux.
• Ne séchez pas de fibres acryliques à hautes températures.
• Terminez chaque programme avec sa Phase de Refroidisse-
ment.
• N’éteignez pas le sèche-linge s’il contient encore des articles
chauds.
• Nettoyez le filtre après chaque utilisation (voir Entretien).
• Videz le réservoir d’eau après chaque utilisation (voir Entretien).
• Nettoyez le groupe condenseur à intervalles réguliers(voir
Entretien).
• Ne laissez pas s’accumuler de peluches autour du sèchelinge.
• Ne montez jamais sur le sèche-linge. Cela pourrait l’endommager.
• Respectez toujours les normes et exigences électriques (voir
Installation).
• Achetez toujours des pièces de rechange et accessoires
d’origine (voir Service Après-vente).
! ATTENTION : N’arrêtez pas le sèche-linge avant la fin du cycle
de séchage si vous n’avez pas la possibilité de retirer rapidement
tous les articles et de les étendre pour évacuer la chaleur.
Vous devez observer les consigne suivantes pour réduire tout risque d’incendie dans votre sèche-linge :
• ●Ne séchez que des articles qui ont été lavés avec de l’eau et
un détergent, rincés et essorés. Le fait de sécher des articles
qui N’ONT PAS été lavés avec de l’eau constitue un danger
d’incendie.
• ●Ne séchez pas des vêtements qui ont été traités avec des
produits chimiques.
• ●Ne placez pas d’articles tachés ou imbibés d’huile végétale or de cuisson, ils risqueraient de provoquer un incendie.
Les articles contenant de l’huile peuvent prendre feu spontanément, particulièrement lorsqu’ils sont exposés à des
sources de chaleur comme un sèche-linge. En chauffant, les
articles provoquent une réaction d’oxydation avec l’huile
générant alors de la chaleur. Si la chaleur ainsi générée ne peut
pas être évacuée, les articles peuvent devenir suffisamment
chauds pour prendre feu. Le fait d’empiler, de superposer ou
de stocker des articles contenant de l’huile peut empêcher
la chaleur d’être évacuée et donc provoquer un incendie. Si
vous ne pouvez pas faire autrement que de placer des articles
contenant de l’huile végétale ou de l’huile de cuisson ou ayant
été en contact avec des produits coiffants dans le sèchelinge, il convient de les laver au préalable à l’aide d’une dose
supplémentaire de détergent. Cette précaution minimise, sans
toutefois l’éliminer, le risque d’incendie. La phase de séchage à froid doit être utilisée pour diminuer la température des
articles. Les articles ne doivent pas être retirés du sèche-linge
et empilés ou superposés lorsqu’ils sont chauds.
• ●Ne placez pas d’articles ayant été préalablement nettoyés
• ou lavés, imbibés ou tachés avec du pétrole/de l’essence, des
solvants de nettoyage à sec ou d’autres substances inflammables ou explosives. Les substances hautement inflammables
couramment utilisées dans l’environnement domestique sont
notamment l’huile de cuisson, l’acétone, l’alcool dénaturé,
la kérosène, les détachants, la térébenthine, les cires et les
produits permettant d’éliminer la cire. Assurez-vous que ces
articles ont été lavés à l’eau chaude à l’aide d’une dose supplémentaire de détergent avant de les mettre à sécher dans le
sèche-linge.
• Ne placez pas d’articles contenant du caoutchouc mousse
(également connu sous l’appellation mousse de latex) ou
des matériaux similaires renfermant du caoutchouc dans le
sèche-linge. Les matériaux contenant du caoutchouc mousse
peuvent, lorsqu’ils sont chauffés, s’enflammer par combustion
spontanée.
• ●Les produits assouplissants ou les produits similaires ne doivent pas être utilisés dans un sèche-linge en vue d’éliminer les
effets de l’électricité statique sauf si leur emploi est spécifiquement recommandé par le fabricant du produit assouplissant.
• Ne placez pas de sous-vêtements contenant des renforts en
métal comme les soutiens-gorge à armature dans le sèchelinge. Si les renforts en métal venaient à se détacher pendant
le séchage, ils pourraient endommager le sèche- linge.
• ●Ne placez pas d’articles en caoutchouc ou en plastiquedans le sèche-linge, comme des bonnets de douche ou des
couvertures étanches pour bébé, des articles en polyéthylène
ou en papier.
• Ne placez pas d’articles contenant des pièces de caoutchouc
plaquées, des vêtements présentant des pièces en mousse
de caoutchouc, des oreillers, des bottes en caoutchouc et
des tennis recouvertes de caoutchouc dans le sèche-linge.
• ●Videz les poches de tous les objets qu’elles contiennent,
notamment les briquets (risque d’explosion).
Économie d’énergie et protection de
l’environnement
• Essorez les articles pour éliminer l’eau en excès avant de les
passer au sèche-linge (si vous utilisez une machine à laver,
sélectionnez un cycle d’essorage à grande vitesse). Ceci vous
permettra d’économiser de l’énergie durant le séchage.
• Séchez toujours des charges complètes – vous économiserez
de l’énergie : les articles uniques ou les petites charges prennent plus longtemps à sécher.
• Nettoyez le filtre après chaque utilisation pour limiter les coûts
de consommation d’énergie (voir Entretien).
FR
29
Page 30

Soin et entretien
Interruption de l’alimentation électri-
FR
que
! Débranchez votre sèche-linge lorsque vous ne l’utilisez
pas, lorsque vous le nettoyez et durant toutes les opérations
d’entretien.
Nettoyage du filtre après chaque cycle
Le filtre est une pièce importante de votre sèche-linge : il
accumule des peluches qui se forment durant le séchage.
Par conséquent, une fois le séchage terminé, nettoyez le filtre
en le rinçant sous l’eau courante ou avec votre aspirateur. Si
le filtre devient bloqué, le flux d’air à l’intérieur du sèche-linge
est sérieusement compromis : les temps de séchage sont
allongés et vous consommez davantage d’énergie. Cela peut
aussi endommager votre sèche-linge.
Le filtre se trouve devant le joint du sèche-linge (voir figure).
Pour retirer le filtre :
1. Tirez la poignée en plastique du filtre vers le haut (voir
figure).
2. Nettoyez le filtre et
remettez-le correctement en
place. Assurez-vous que le
filtre soit bien inséré à fond
dans le joint du sèche-linge.
! N’utilisez pas le sèche-linge
sans avoir remis le filtre en
place.
Contrôle du tambour après chaque
cycle
Tournez le tambour à la main afin de retirer les petits articles
(mouchoirs) qui pourraient y avoir été oubliés.
Nettoyage du tambour
! Pour nettoyer le tambour, ne pas utiliser d’abrasifs, de laine
d’acier ni de produits de nettoyage pour acier inoxydable.
Un film coloré peut parfois apparaître à la surface du tam-
bour en acier inoxydable. Il peut être dû à une combinaison
de l’eau et/ou des produits de nettoyage (ex. adoucissant
textile provenant du lavage). Ce film coloré n’affecte pas la
performance du sèche-linge.
Vidange du réservoir d’eau après chaque cycle
Sortez le réservoir du sèche-linge et videz-le dans un évier
ou autre évacuation appropriée. Remettez le réservoir d’eau
bien en place.
Toujours vérifier et vider le réservoir avant de commencer un
nouveau programme de séchage.
Nettoyage du groupe condenseur
• Périodiquement (chaque mois) retirez le groupe conden-
seur et nettoyez toute accumulation de peluche entre les
plaques en le rinçant sous le robinet à l’eau froide.
Pour retirer le condenseur :
1. Débranchez le sèche-linge et ouvrez la porte.
2. Ouvrez le couvercle du condenseur (voir figure). Dégagez
les trois loquets en tournant à 90° dans le sens contraire
aux aiguilles d’une montre, puis tirez sur la poignée et
retirez-le du sèche-linge.
3. Nettoyez la surface des joints d’étanchéité et replacez le
groupe, les flèches tournées vers le haut, en vous assurant que les loquets ont été bien bloqués.
Nettoyage du sèche-linge
• Pour nettoyer l’extérieur en métal et en plastique et les
parties en caoutchouc, utiliser un chiffon humide.
• Périodiquement (tous les 6 mois), aspirez la grille d’entrée d’air de devant, ainsi que les évents à l’arrière du
sèche-linge pour retirer toute accumulation de peluche ou
de poussière. En outre, pour éliminer l’accumulation de
peluche de l’avant du condenseur et de la zone du filtre,
nettoyez occasionnellement à l’aide d’un aspirateur.
! N’utiliser ni solvants ni abrasifs.
! Votre sèche-linge utilise des roulements spéciaux qui n’ont
pas besoin d’être lubrifiés.
! Faites vérifier régulièrement votre sèche-linge par des tech-
niciens agréés pour assurer la sécurité électrique et mécanique (voir Service après-vente).
30
Réservoir
d’eau
Groupe condenseur
Loquets
Poignée
Filtre
Entrée
d’air
Couvercle du
condenseur
Arrière
Groupe condenseur
Robinet
Avant
Page 31

Problèmes et solutions
Si vous trouvez que le sèche-linge ne fonctionne pas correctement, avant de contacter le Service après-vente (voir Assistance),
consultez attentivement le tableau suivant afin de pouvoir résoudre les problèmes éventuels :
FR
Problème :
Le sèche-linge ne démarre pas.
Le cycle de séchage ne démarre
pas.
L’appareil met longtemps à sécher.
Le voyant « Vider l’eau » clignote.
Causes / Solutions possibles :
• La fiche n’est pas suffisamment insérée dans la prise murale pour qu’il y ait contact.
• Il y a une panne de courant.
• Le fusible a sauté. Essayez de brancher un autre appareil dans la même prise
électrique.
• Si vous utilisez une rallonge, essayez de brancher le cordon d’alimentation du
sèche-linge directement dans la prise.
• La porte n’est pas bien fermée.
• Le programme n’a pas été convenablement réglé (voir Comment effectuer un cycle de
séchage).
• La touche de START/PAUSE n’est pas enfoncée (voir Comment effectuer un cycle
de séchage).
• Un retard a été programmé (voir Programmes et options).
• La touche de START/PAUSE a été appuyée ; il faut attendre quelques instants
avant que le démarrage du sèche-linge. Attendez donc le début du séchage
sans appuyer à nouveau sur la touche de START/PAUSE : dans le cas contraire,
l’appareil en mode de pause et ne fait pas démarrer le séchage.
• Le filtre n’a pas été nettoyé (voir Entretien).
• Le réservoir d’eau a-t-il besoin d’être vidé ? Le voyant « Vider l’eau » clignote (voir
Entretien).
• Le condenseur a besoin d’être nettoyé (voir Entretien).
• La température choisie n’est pas idéale pour le type de textile que vous séchez
(voir Programmes et options).
• La durée de séchage correcte n’a pas été sélectionnée pour la charge (voir Linge).
• La grille d’entrée d’air ou les entrées d’air à l’arrière sont obstrués (Voir Installation et
Entretien).
• Les articles étaient trop mouillés (voir Linge).
• Le sèche-linge était surchargé (voir Linge).
• Le réservoir d’eau n’a probablement pas été vidé au début du programme.
N’attendez pas le signal de vidage d’eau (trois bips retentissent et le voyant « Vider
l’eau » clignote), mais vérifiez toujours et videz le récipient avant de commencer un
nouveau programme de séchage (voir Description du sèche-linge).
Le programme est terminé, mais le
linge est plus humide que prévu.
Les voyant des “ options “ et
le voyant de “ Start/Pause “ et
un des voyants d’” entretien “
s’allument au fixe.
Le sèche-linge est bruyant durant
les premières minutes d’utilisation.
Les voyants situés sur le panneau de commande du sèche-linge
sont éteints bien que celui-ci soit
allumé.
! par mesure de sécurité, le sèche-linge a un temps maximum de programme de 4
heures. Si un programme automatique n’a pas détecté l’humidité finale requise dans
le temps prévu, le sèche-linge terminera le programme et s’arrêtera. Vérifiez les
points ci-dessus et lancez le programme à nouveau, si le linge est encore humide,
contactez le Centre de service après-vente(voir Service après-vente).
• Éteignez l’appareil et débranchez la prise électrique. Nettoyez le filtre et le
condenseur (voir “ Soin et entretien “). Rebranchez la prise électrique, mettez le
sèche-linge en marche puis lancez un autre programme. Si l’anomalie persiste,
appeler le Service après-vente.
• Cela est normal, surtout si le sèche-linge n’a pas été utilisé pendant une période de
temps prolongée. Si le bruit persiste tout au long du cycle, appelez le SAV.
Le sèche-linge est passé en mode veille afin d’économiser de l’énergie. Cela se produit
lorsque vous laissez le sèche-linge allumé ou bien après une panne de courant. Cela
se produit au bout de 30 minutes :
- si vous laissez le sèche-linge allumé sans lancer de programme ;
- une fois que votre programme de séchage est terminé.
Appuyez sur le bouton ON/OFF et maintenez-le enfoncé jusqu’à ce que le sèche-linge
se remette en marche.
31
Page 32

Assistance
Avant d’appeler le Centre de Service après-vente :
Pièces détachées
FR
• Suivez le guide d’aide à la résolution des problèmes pour
voir si vous n’arrivez pas à résoudre le problème vous-même
(voir Problèmes et solutions).
• Dans le cas contraire, éteignez votre sèche-linge et contactez le Centre de Service après-vente le plus proche.
Informations à communiquer au Centre de Service
après-vente :
• Nom, adresse et code postal ;
• numéro de téléphone ;
• le type de panne ;
• la date d’achat ;
• le modèle de l’appareil (Mod.) ;
• le numéro de série (S/N) du sèche-linge.
Vous trouverez ces renseignements sur l’étiquette collée
derrière la porte.
Ce sèche-linge est un appareil complexe. Si vous tentez de
le réparer vous-même ou si vous confiez cette tâche à une
personne non qualifiée, vous risquez de mettre en danger la
sécurité des personnes, d’endommager l’appareil et d’annuler la garantie sur les pièces.
En cas de problème d’utilisation de cet appareil, contactez
toujours un technicien agréé.
Informations pour le recyclage et la mise au rebut
Dans le cadre de notre engagement envers la protection de l’environnement, nous nous réservons le droit d’utiliser des pièces
recyclées de qualité afin de réduire les coûts pour notre clientèle et de limiter les gaspillages de matières premières.
• Mise au rebut du matériel d’emballage : respectez les réglementations locales, de manière à ce que l’emballage puisse être
recyclé.
• Pour éviter que des enfants se blessent, ôtez la porte et la prise et puis coupez le câble secteur au ras de l’appareil. Jetez ces
pièces séparément de sorte que l’appareil ne puisse plus être branché sur une prise de secteur.
Mise au rebut des électroménagers usagés
La directive européenne 2012/19/CE sur les déchets d’équipements électriques et électroniques (DEEE), prévoit que les
électroménagers ne peuvent pas être traités comme des déchets solides urbains normaux. Les appareils usagés doivent faire
l’objet d’une collecte séparée pour optimiser le taux de récupération et de recyclage des matériaux qui les composent et
empêcher tout danger pour la santé et pour l’environnement. Le symbole de la poubelle barrée est appliqué sur tous les
produits pour rappeler qufils font lfobjet dfune collecte sélective.
Pour tout autre renseignement sur la collecte des électroménagers usés, prière de sfadresser au service public préposé ou au vendeur.
32
Cet appareil est conforme aux Directives Européennes suivantes :
- 2006/95/CE (Directives Basse Tension) ;
- 2004/108/CE (Compatibilité Électromagnétique).
Page 33

Istruzioni per l’uso
ASCIUGATRICE
IT
Italiano
IDCA 735
Indice
Informazioni importanti, 34-35
Installazione, 36
Dove installare l’asciugatrice
Aerazione
Collegamento elettrico
Informazioni preliminari
Descrizione dell’asciugatrice, 37-38
Caratteristiche
Pannello comandi
Come effettuare un’asciugatura, 39
Avvio e scelta del programma
Programmi e opzioni, 40-41-42
Tabella dei programmi
Programmi speciali
Opzioni
Apertura dello sportello
Bucato, 43-44
Suddivisione del bucato
Etichette di manutenzione
Capi particolari
Tempi di asciugatura
IT
! Questo simbolo ti ricorda di leggere questo libretto
istruzioni.
! Tenere a portata di mano il presente libretto così da poterlo
consultare facilmente a ogni evenienza. Tenere il libretto sempre
vicino all’asciugatrice; nel caso in cui l’apparecchio venga venduto
o ceduto ad altre persone, ricordarsi di consegnare loro questo
libretto, così da permettere anche ai nuovi possessori di conoscere
le avvertenze e i suggerimenti sull’utilizzo dell’asciugatrice.
! Leggere attentamente queste istruzioni: le pagine che seguono
contengono importanti informazioni sull’installazione e utili
suggerimenti sul funzionamento dell’elettrodomestico.
Avvertenze e suggerimenti, 45
Sicurezza generale
Risparmio energetico e rispetto dell’ambiente
Cura e manutenzione, 46
Interruzione dell’alimentazione elettrica
Pulizia del filtro dopo ogni ciclo
Controllo del cestello dopo ogni ciclo
Svuotamento del contenitore di raccolta dell’acqua dopo
ogni ciclo
Pulizia dell’unità di condensazione
Pulizia dell’asciugatrice
Problemi e soluzioni, 47
Assistenza, 48
Ricambi
Informazioni per riciclaggio e smaltimento
33
Page 34

Informazioni importanti
Per un funzionamento efficiente dell’asciugatrice a
condensazione è necessario seguire lo schema di
IT
manutenzione regolare indicato qui sotto:
Filtro per lanugine – È NECESSARIO pulire la
lanugine che si deposita sul filtro dopo ogni ciclo di
asciugatura.
Fase 1
Aprire lo sportello
dell’asciugatrice premendolo
come indicato nella figura.
La mancata pulizia del filtro dopo ogni ciclo
di asciugatura influisce sulle prestazioni di
asciugatura della macchina, che impiega più tempo
ad asciugare e, di conseguenza, consuma più
elettricità durante l’asciugatura.
Contenitore di raccolta dell’acqua – È necessario
svuotare il contenitore di raccolta dell’acqua dopo
ogni ciclo di asciugatura.
Fase 1
Tirare il contenitore di raccolta
dell’acqua verso di voi e
rimuoverlo completamente
dall’asciugatrice.
Fase 2
Svuotare tutta l’acqua raccolta
nel contenitore.
Fase 2
Estrarre il filtro (usando due dita).
Fase 3
Pulire eventuali depositi di
lanugine dalla superficie interna
della rete del filtro.
Fase 4
Reinstallare il filtro – Non attivare
mai l’asciugatrice senza il filtro
inserito in posizione.
Fase 3
Reinstallare il contenitore di
raccolta dell’acqua accertandosi
che sia inserito completamente
in sede.
Il mancato svuotamento del contenitore di raccolta
dell’acqua potrebbe causare:
- L’arresto del riscaldamento della macchina (quindi
il carico potrebbe essere ancora umido alla fine del
ciclo di asciugatura).
- Il led ”Svuotare vaschetta” si illumina per
avvertire che il contenitore è pieno.
Caricamento del sistema di raccolta dell’acqua
Quando l’asciugatrice è nuova, il contenitore
di raccolta dell’acqua non raccoglie finché il
sistema non viene caricato. Questa operazione
può impiegare 1 o 2 cicli di asciugatura. Una volta
caricato, il sistema raccoglie acqua a ogni ciclo.
34
Page 35

Unità di condensazione - È necessario pulire la
*Consumo annuo basato su 160 cicli di asciugatura del pro-
gramma “Cotone Standard“ a carico pieno e parziale e nella
modalità di basso consumo energetico. Consumo effettivo di
lanugine dal condensatore
La mancata pulizia del condensatore potrebbe
causare un guasto anticipato all’asciugatrice.
ogni mese.
Fase 1
Aprire il coperchio del
condensatore
- tenere la maniglia e tirare verso
di voi.
Fase 2
Rimuovere il condensatore
ruotando le 3 clip, quindi tirare
il condensatore verso di voi.
(Potrebbe essere presente acqua
nei tubi: ciò è normale).
Fase 3
Pulire il condensatore con acqua
facendola scorrere dalla parte
posteriore così da rimuovere
eventuali depositi di lanugine.
Fase 4
Reinstallare l’unità di
condensazione; assicurarsi che
il gruppo sia completamente
inserito in sede, che tutte e 3 le
clip siano fissate e che le frecce
di posizionamento sulla parte
anteriore del condensatore siano
dirette verso l’alto.
Scheda prodotto
Carico massimo in kg, "programma standard" per i tessuti di
cotone
Classe di efficienza energetica B
Consumo annuo ponderato di energia (AEc)* kWh 503.7
Asciugatrice Automatico
Asciugatrice Condens.
Consumo energetico in kWh del prog. standard pieno carico
(Edry)
Consumo energetico in kWh del prog. standard carico parziale
(Edry½)
Consumo di energia in Watts in modalità: spento a pieno carico
(Po)
Consumo di energia in Watts in modalità: lasciato acceso (Pl) 1,79
La durata dello stand-by se l'asciugatrice è dotata in un sistema di
gestione elettronico - minuti
Programma Standard per tessuti in Cotone** il ciclo più efficiente in termini di
consumo di energia per il cotone utilizzato a carico pieno e parziale.
Durata ponderata a pieno carico e carico parziale (Tt) - minuti 95
Durata per tessuti di cotone a pieno carico (Tdry) - minuti 128
Durata per tessuti di cotone a carico parziale (Tdry½) - minuti 70
Classe di efficienza apparecchio a condensazione B
Efficienza di condensazione - %
Percentuale di efficienza media di condensazione - pieno carico
(Cdry)
Percentuale di efficienza media di condensazione - carico parziale
(Cdry½)
Percentuale pieno carico e a carico parziale (Ct) 82
Livello di potenza sonora in dB(A) re 1 pW 68
7.0
4.28
2.29
0,14
30
83
81
IT
Dati in accordo con il Regolamento n. 392/2012.
Consulta il nostro sito per tutte le schede prodotto:
http://www.indesit.com/indesit/.
energia del ciclo dipenderà dall’utilizzo dell’apparecchio.
** Il programma “Cotone Standard” è Cotone Armadio.
35
Page 36

m
2
1
Less than 1m
Installazione
Dove installare l’asciugatrice
IT
• Le fiamme possono
danneggiare l’asciugatrice, che
deve pertanto essere installata
lontano da cucine a gas, stufe,
termosifoni o piani di cottura.
Se l’elettrodomestico deve
essere installato sotto un
banco da lavoro è necessario
lasciare uno spazio di 10
mm tra il pannello superiore
dell’elettrodomestico e altri
oggetti posti sopra di esso, e
uno spazio di 15 mm tra i lati
dell’elettrodomestico e le pareti o gli arredi accanto a esso. In
questo modo viene garantita una sufficiente circolazione d’aria.
Aerazione
• Quando l’asciugatrice è attiva deve essere presente una
sufficiente aerazione. Assicurarsi di installare l’asciugatrice in
un ambiente non umido e dotato di un’adeguata circolazione
d’aria. Il flusso d’aria attorno all’asciugatrice è fondamentale
per consentire la condensazione dell’acqua prodotta durante
il lavaggio; l’asciugatrice non funziona correttamente se
posizionata in uno spazio chiuso o all’interno di un mobile.
! Se l’asciugatrice viene utilizzata in una stanza piccola o
fredda è possibile che si generi un po’ di condensa.
! Non è consigliabile installare l’asciugatrice in un armadio;
l’elettrodomestico non deve mai essere installato dietro una
porta chiudibile a chiave, una porta scorrevole o una porta
con cardine sul lato opposto dello sportello dell’asciugatrice.
Scarico dell’acqua
Se la macchina viene collocata vicino a un tubo di scarico è
possibile far defluire l’acqua condensata direttamente senza
dover impiegare il contenitore di raccolta dell’acqua. In questo
caso non è più necessario svuotare il contenitore di raccolta
dell’acqua dopo ogni ciclo.
Se l’asciugatrice viene posizionata sopra o di fianco a una
lavatrice può condividere lo stesso scarico. È sufficiente
scollegare il tubo indicato alla figura A e collegarlo allo scarico.
Se lo scarico si trova più lontano della lunghezza del tubo,
per raggiungerlo è possibile acquistare e collegare un tubo di
diametro identico e della lunghezza necessaria.
Per installare il nuovo tubo è sufficiente sostituire quello
esistente come indicato alla figura B inserendolo nella stessa
posizione.
! Lo scarico deve trovarsi 1 m più in basso rispetto al
fondo dell’asciugatrice.
! Dopo avere installato l’asciugatrice accertarsi che il
tubo di scarico non sia piegato né contorto.
Collegamento elettrico
Prima di inserire la spina nella presa elettrica verificare
quanto segue:
• Accertarsi che le mani siano asciutte.
• La presa deve essere dotata di messa a terra.
• La presa deve essere in grado di supportare la potenza
massima prevista per la macchina, indicata sulla targhetta
dei dati di esercizio (vedi Descrizione dell’asciugatrice).
• La tensione di alimentazione deve essere compresa
nei valori indicati sulla targhetta dei dati di esercizio (vedi
Descrizione dell’asciugatrice).
• La presa deve essere compatibile con il tipo di spina
dell’asciugatrice. In caso contrario, provvedere alla
sostituzione della presa o della spina.
! Non utilizzare prolunghe.
! L’asciugatrice non può essere installata in ambienti esterni,
anche se riparati. Può essere infatti molto pericoloso esporre
questo elettrodomestico alla pioggia o a temporali.
! Dopo l’installazione dell’asciugatrice il cavo elettrico e la
spina devono rimanere a portata di mano.
! Il cavo elettrico non deve essere né piegato né schiacciato.
! Se la spina da sostituire è di tipo incorporato, è necessario
smaltirla in maniera sicura. NON lasciarla dove può essere
inserita in una presa e provocare scosse elettriche.
! Il cavo elettrico deve essere controllato periodicamente
e sostituito utilizzando un cavo specifico per questa
asciugatrice, che può essere installato unicamente da
tecnici autorizzati (vedi Assistenza). I cavi elettrici nuovi o più
lunghi vengono forniti dai rivenditori autorizzati a un costo
aggiuntivo.
! Il produttore declina qualsiasi responsabilità qualora
non ci si attenga a queste regole.
! In caso di dubbio su quanto sopra indicato, contattare
un elettricista qualificato.
Informazioni preliminari
Una volta installata l’asciugatrice, prima di metterla in
funzione pulire l’interno del cestello e rimuovere lo sporco
che può essersi accumulato durante il trasporto.
Fig. A
36
1
2
Fig. B
Page 37

Descrizione dell’asciugatrice
Apertura dello sportello
Premere sullo
sportello
Unità di
condensazione
(coperchio
aperto)
Caratteristiche
Contenitore di
raccolta dell’acqua
Filtro
IT
Targhetta dei dati
di esercizio
Modello
e Numero
di serie
Griglia
della presa
d’aria
Maniglia del
coperchio del
condensatore
(tirare per aprire)
Pannello comandi
Pulsante
On/Off
Manopola
Programmi
Pulsanti e spie
Opzioni
manutenzione
Pulsante e spia
Start/Pause
Spie di
Spie fasi di
asciugatura o
partenza ritardata
37
Page 38

Pulsante ON/OFF/Reset
Una pressione normale del pulsante fa accendere o spegnere il prodotto. Se l’asciugatrice è in funzione una pressione prolungata
IT
per circa 3 secondi fa spegnere il prodotto e resettare il ciclo in corso.
Manopola Programmi
Consente di impostare il programma: ruotare finché l’indicatore non è direzionato verso il programma desiderato (vedi Avvio e Scelta
del programma).
Pulsanti opzioni
Consentono di scegliere le opzioni disponibili per il programma selezionato. Le spie relative si accendono per indicare che l’opzione
è stata selezionata (vedi Programmi e opzioni).
Pulsante e spia START/PAUSE
Quando la spia verde lampeggia lentamente, premere il pulsante per avviare il programma. Quando il ciclo è avviato, la spia di
segnalazione resta sempre accesa. Per mettere il programma in pausa premere nuovamente il pulsante; la spia diventa di colore
arancione e inizia di nuovo a lampeggiare.
Per riavviare il programma dal punto in cui era stato interrotto, premere nuovamente il pulsante (vedi Avvio e Scelta del programma).
Spie
Spie “Manutenzione”
Le spie forniscono informazioni importanti. Ecco cosa dicono:
La Spia “svuotare vaschetta” indica che è necessario svuotare il contenitore di raccolta dell’acqua.
Se il contenitore si riempie nel corso del programma, il led si accende. L’asciugatrice automaticamente avvia il ciclo aria fredda e il
led START/PAUSE pulsa ambra. Per riavviare il ciclo dal punto in cui era stato interrotto premere il pulsante START/PAUSE.
Per evitare questo procedimento svuotare sempre il contenitore di raccolta dell’acqua ad ogni utilizzo dell’asciugatrice (vedi Cura e
manutenzione).
La Spia pulizia filtro prima di ogni programma ricorda che è fondamentale pulire il filtro ogni volta prima di utilizzare l’asciugatrice
(vedi Cura e manutenzione).
La Spia pulizia condensatore ricorda che è fondamentale pulire il condensatore periodicamente (vedi Cura e manutenzione).
Spie “Fasi di asciugatura”
La Spia indica che è in corso la fase di asciugatura.
La Spia indica che è in corso la fase di raffreddamento.
La Spia END indica la fine del programma.
Spie “Partenza ritardata”
se è stata attivata l’opzione “Partenza ritardata” (vedi “Opzioni”), dopo avere avviato il programma, inizierà a lampeggiare la
spia relativa al ritardo selezionato:
Col trascorrere del tempo verrà visualizzato il ritardo residuo con il lampeggio della spia relativa:
Trascorso il ritardo selezionato la spia lampeggiante si spengnerà e avrà inizio il programma impostato.
38
Page 39

Come effettuare
un’asciugatura
Avvio e scelta del programma
1. Inserire la spina dell’asciugatrice nella presa di alimentazione elettrica.
2. Selezionare il programma in base al tipo di bucato (vedi Bucato).
3. Aprire lo sportello e accertarsi che il filtro sia pulito e in posizione, e che il contenitore di raccolta dell’acqua sia vuoto e
posizionato correttamente (vedi Cura e manutenzione).
4. Caricare la macchina facendo attenzione che nessun capo si frapponga tra lo sportello e la relativa guarnizione. Chiudere lo
sportello.
5. Premere il pulsante ON/OFF per avviare la macchina.
6. Ruotare la manopola Programmi finché l’indicatore non è direzionato verso il programma corrispondente al tipo di tessuto da
asciugare, controllando la tabella dei programmi (vedi Programmi e opzioni) e le indicazioni per ciascun tipo di tessuto (vedi Bucato).
! Attenzione: se dopo avere premuto il pulsante di START/PAUSE la posizione della manopola dei programmi è cambiata, la nuova
posizione NON modifica il programma selezionato. Per modificare il programma premere il pulsante START/PAUSE per mettere in
pausa il programma (la spia lampeggia in color arancione), scegliere il nuovo programma e le relative opzioni. Premere il pulsante
START/PAUSE per avviare il nuovo programma.
IT
7. Se necessario impostare il tempo di partenza ritardata e le altre opzioni (vedi Programmi e opzioni).
8. Per iniziare premere il pulsante START/PAUSE.
Durante il programma di asciugatura è possibile controllare il bucato ed estrarre i capi che si sono asciugati lasciando continuare gli
altri. Dopo avere richiuso lo sportello, premere START/PAUSE per mettere di nuovo in funzione la macchina.
9. Durante gli ultimi minuti dei programmi di asciugatura prima del termine del programma viene avviata la fase finale di
ASCIUGATURA A FREDDO (i tessuti vengono raffreddati); è necessario lasciare sempre terminare questa fase.
10. L’accensione della spia END ed il segnale acustico suona 3 volte indicano che il programma è terminato. Aprire la porta,
estrarre il bucato, pulire il filtro e reinserirlo in sede. Svuotare il contenitore di raccolta dell’acqua e reinserirlo in posizione (vedi Cura
e manutenzione).
Se è stata selezionata l’opzione “Post antipiega” e non si rimuove il bucato immediatamente, i capi vengono fatti ruotare di tanto in
tanto per 10 ore o finché non viene aperto lo sportello.
11. Scollegare l’asciugatrice dalla rete elettrica.
Modalità stand by
Questo asciugatore, in conformità alle nuove normative legate al risparmio energetico, è dotata di un sistema di autospegnimento
(stand by) che entra in funzione dopo circa 30 minuti nel caso di non utilizzo. Tenere premuto il pulsante ON/OFF fino a quando
l’asciugatrice non riprende a funzionare
39
Page 40

Programmi e opzioni
Tabella dei programmi
IT
Programma
Giornalieri
1
Cotone Extra Max. Pre antipiega - Post antipiega - Partenza ritardata.
Carico max.
(kg)
Opzioni compatibili Durata ciclo
150’
2
Cotone Armadio Max. Pre antipiega - Post antipiega - Partenza ritardata.
3
Cotone Stiratura Max. Pre antipiega - Post antipiega - Partenza ritardata.
4
Sintetici Armadio 3 Pre antipiega - Post antipiega - Partenza ritardata.
5
Sintetici Stiratura 3 Pre antipiega - Post antipiega - Partenza ritardata.
Speciali
6 Eco Time
7 Lana
Sport
8 Sport Intensive
9 Sport Light
10 Sport Shoes
Parziali
Rinfresca - -
Asciugatura a tempo
30 - 60 - 90 - 120 - 150 minuti. - Tutte le opzioni sono compatibili.
2 Pre antipiega - Post antipiega - Partenza ritardata.
1 -
4 Pre antipiega - Post antipiega - Partenza ritardata.
4 Pre antipiega - Post antipiega - Partenza ritardata.
1 paio -
140’
110’
65’
55’
60’
60’
80
70’
100’
20’
Programmi speciali/Sport/Parziali
Programma Eco Time
Questo programma è ideale per asciugare in sicurezza piccoli carichi di cotone in poco tempo, ottimizzando l’uso dell’energia. Il
programma può essere usato per carichi fino a 2 kg.
! La durata di questo programma dipenderà; dalla dimensione del carico e dalla velocità di centrifuga utilizzato nel lavaggio.
Si consiglia di verificare che i capi siano contrassegnati con il simbolo e di rivoltarli prima dell’asciugatura.
Programma Lana
Questo è un programma dedicato ai capi che sopportano l’asciugatura a tamburo contrassegnati con il simbolo . Può essere
usato per carichi fino a 1 kg (circa 3 maglioni). Si consiglia di rivoltare i capi prima dell’asciugatura. Questo programma impiega
circa 60 minuti, ma può durare più tempo a seconda delle dimensioni e della densità del carico e della velocità di centrifuga usata
nella lavatrice. I carichi asciugati con questo programma sono solitamente pronti da indossare, ma in alcuni capi più pesanti i bordi
potrebbero essere leggermente umidi. Lasciarli asciugare naturalmente, poiché un ulteriore processo di asciugatura potrebbe
danneggiare i capi.
! Al contrario di altri materiali, il meccanismo di restringimento della lana è irreversibile, cioè il capo non ritorna alla dimensione e alla
forma originale.
! Questo programma non è indicato per i capi acrilici.
40
Page 41

Programma Sport Intensive
Questo è un programma per asciugare in sicurezza indumenti, come tute da ginnastica e calzoncini contrassegnati con il simbolo
. Ideale per quei capi che necessitano di un’asciugatura completa. Consigliamo di rivoltare gli indumenti prima dell’avvio
dell’asciugatura.
! La durata di questo programma dipenderà; dalla dimensione del carico e dalla velocità di centrifuga utilizzato nel lavaggio.
Programma Sport Light
Questo è un programma per asciugare in sicurezza indumenti, come tute da ginnastica e calzoncini contrassegnati con il simbolo .
Ideale per quei capi che non necessitano di un’asciugatura completa o che devono essere successivamente stirati. Consigliamo di
rivoltare gli indumenti prima dell’avvio dell’asciugatura.
! La durata di questo programma dipenderà; dalla dimensione del carico e dalla velocità di centrifuga utilizzato nel lavaggio.
Programma Sport Shoes
Questo è un programma per asciugare un paio di scarpe sportive. Le scarpe devono essere state lavate e centrifugate ad una
velocità di centrifuga minima di 400 giri.
Devono essere usate con l’apposita rastrelliera per scarpe fornita. Se si asciugano scarpe nel tamburo l’asciugatrice verrà
danneggiata. Rimuovere il filtro dalla sua posizione nella parte anteriore dell’asciugatrice e posizionare la rastrelliera.
Infilare i lacci all’interno delle scarpe e caricare le scarpe con le punte rivolte in basso e le suole davanti.
I tempi di asciugatura variano dal formato e dal tipo di scarpa. Se le scarpe non sono completamente asciutte alla fine del
programma, avviare nuovamente il programma.
! Non asciugare scarpe con gel all’interno o luci lampeggianti. Asciugare solo scarpe fatte di materiale sintetico o tela. Al termine del
programma rimuovere la rastrelliera per scarpe e riposizionare il filtro.
Rinfresca
Programma breve adatto a rinfrescare fibre e capi attraverso l’emissione di aria fresca. Dura circa 20 minuti.
! Questo non è un programma di asciugatura e non va quindi utilizzato con capi ancora bagnati.
IT
Programma di asciugatura a tempo (30’ - 60’ - 90’ - 120’ - 150’)
Se si desidera stabilire il tempo di asciugatura è possibile usare questo programma, invece dei programmi automatici. Ideale per
asciugare il bucato umido a bassa temperatura o piccolo carichi.
Il programma di asciugatura a tempo da impostare dipende dal carico e dal tessuto da asciugare (vedi tabella) e dalla velocità di
centrifuga utilizzato nel lavaggio..
Gli ultimi minuti del programma sono dedicati al ciclo a freddo.
Tessuto
Cotone alta
temperatura
Sintetici bassa
temperatura
Acrilici bassa
temperatura
1 kg 2 kg 3 kg 4 - 5 kg 6 - 7 kg
30 o 60 minuti 30 o 60 minuti
30 o 60 minuti 30 o 60 minuti
30 minuti 60 minuti - - -
Carico
60 o 90
minuti
60 o 90
minuti
60 o 90
minuti
- -
90 o120 o
150 minuti
41
Page 42

Opzioni
IT
Le opzioni consentono di personalizzare il programma selezionato in base alle proprie esigenze.
Partenza ritardata
L’avvio di alcuni programmi (vedi Programmi e opzioni) può essere ritardato fino a 9 ore. Premere più volte il pulsante fino a
raggiungere il ritardo desiderato. Prima di impostare una partenza ritardata accertarsi che il contenitore di raccolta dell’acqua sia
vuoto e che il filtro sia pulito.
Post antipiega
Quando selezionata, i capi vengono fatti ruotare occasionalmente dopo il termine dell’asciugatura e dell’asciugatura a freddo onde
evitare lo sviluppo di pieghe in caso si fosse impossibilitati a rimuovere immediatamente il carico al completamento del programma.
Durante questa fase la spia è accesa.
Pre antipiega
Quando vengono selezionate la partenza ritardata e questa opzione i capi sono fatti ruotare occasionalmente durante il periodo di
ritardo per aiutare a impedire lo sviluppo di pieghe.
Temperatura alta
Se viene selezionata un’asciugatura a tempo, premendo questo pulsante si seleziona una temperatura alta e la spia sopra ad esso
si accende. I programmi a tempo hanno preimpostata una temperatura bassa.
! Non tutte le opzioni sono disponibili per tutti i programmi (vedi Programmi e opzioni).
Apertura dello sportello
Aprendo lo sportello (o premendo il pulsante START/PAUSE) durante il funzionamento di un programma l’asciugatrice si arresta e si
hanno le seguenti conseguenze.
• La spia START/PAUSE lampeggia di colore arancione.
• Durante la partenza ritardata il ritardo continua a essere conteggiato. È necessario premere il pulsante di START/PAUSE per
riprendere il programma di partenza ritardata. Una delle spie della “Partenza ritardata” lampeggia per indicare l’impostazione di
ritardo corrente.
•È necessario premere il pulsante di START/PAUSE per riprendere il programma. Le spie di avanzamento indicano la fase corrente e
la spia START/PAUSE smette di lampeggiare e diventa di colore verde.
• Durante la fase di antipiega post asciugatura il programma termina. Premendo il pulsante START/PAUSE viene riavviato un nuovo
programma dall’inizio.
• Ruotando la manopola Programmi si seleziona un nuovo programma e la spia START/PAUSE lampeggia di colore verde. È
possibile utilizzare questa procedura per selezionare il programma Asciugatura a freddo per raffreddare i capi se si ritiene che siano
sufficientemente asciutti.
Premere il pulsante di START/PAUSE per avviare il nuovo programma.
Nota: In caso di interruzione dell’alimentazione elettrica, scollegare l’alimentazione o staccare la spina. Una volta ripristinata
l’alimentazione, collegare l’asciugatrice, premere e tenere premuto il pulsante ON/OFF fino a quando l’asciugatrice non riprende a
funzionare, quindi premere il tasto Start/Pause.
42
Page 43

Bucato
Suddivisione del bucato
• Controllare i simboli riportati sulle etichette dei vari capi
per verificare che i capi possano essere sottoposti ad
asciugatura a tamburo.
• Dividere il bucato in base al tipo di tessuto.
• Svuotare le tasche e controllare i bottoni.
• Chiudere le lampo e i ganci e allacciare cinture e lacci
senza stringere.
• Strizzare i capi per eliminare la maggior quantità di acqua
possibile.
! Non caricare l’asciugatrice con capi totalmente pieni
d’acqua.
Massime dimensioni di carico
Non caricare il cestello oltre la capacità massima.
I seguenti valori si riferiscono al peso dei capi asciutti:
Fibre naturali: massimo 7 kg
Fibre sintetiche: massimo 3 kg
! Per evitare un calo delle prestazioni dell’asciugatrice, non
sovraccaricarla.
Carico tipo
Nota: 1 kg = 1000 g
Capi
Camicetta
Abito
Jeans
10 pannolini
Camicia
T-shirt
Cotone
Altro
Cotone
Altro
Cotone
Altro
150 g
100 g
500 g
350 g
700 g
1.000 g
300 g
200 g
125 g
Etichette di manutenzione
Controllare le etichette dei capi, specialmente quando questi
vengono inseriti per la prima volta in asciugatrice. Di seguito
sono riportati i simboli più comuni:
Può essere inserito nell’asciugatrice.
Non asciugabile in asciugatrice
Asciugare ad alta temperatura.
Asciugare a bassa temperatura.
Capi non adatti all’asciugatura a tamburo:
• Capi che contengono parti in gomma o materiali simili
oppure rivestimenti in plastica (guanciali, cuscini o giacche
a vento in PVC) e qualsiasi tipo di oggetto infiammabile
o oggetti che contengono sostanze infiammabili
(asciugamani sporchi di lacca per capelli).
• Fibre di vetro (alcuni tipi di tendaggi).
• Capi precedentemente sottoposti a pulitura a secco.
• Capi contrassegnati con il codice ITLC (“Capi particolari”)
, che possono essere puliti con prodotti speciali di
pulizia domestica. Seguire attentamente le istruzioni.
• Capi troppo voluminosi (piumoni, sacchi a pelo, guanciali,
cuscini, copriletto grandi, ecc.), che si espandono durante
l’asciugatura e impediscono la circolazione dell’aria
nell’asciugatrice.
IT
Biancheria da casa
Copripiumone
(matrimoniale)
Tovaglia grande
Tovaglia piccola
Tovaglietta da tè
Telo da bagno
Asciugamano
Lenzuolo matrimoniale
Lenzuolo singolo
Cotone
Altro
1.500 g
1.000 g
700 g
250 g
100 g
700 g
350 g
500 g
350 g
Se si mischiano capi in tessuto sintetico con capi in cotone,
questi ultimi potrebbero risultare ancora umidi al termine del
ciclo di asciugatura. In questo caso, è sufficiente avviare un
ulteriore breve ciclo di asciugatura.
43
Page 44

Capi particolari
IT
Coperte e copriletto: i capi in acrilico (Acilian, Courtelle,
Orion, Dralon) devono essere asciugati con estrema cura
a temperatura bassa. Non impostare tempi di asciugatura
lunghi.
• Asciugatura: se i capi devono essere stirati possono
essere estratti dalla macchina quando sono ancora un po’
umidi. I capi che devono essere completamente asciutti
possono invece essere lasciati più a lungo.
• Temperatura impostata.
Capi con pieghe o plissettati: leggere le istruzioni di
asciugatura fornite dal produttore.
Capi inamidati: non asciugare questi capi con altri non
inamidati. Rimuovere la maggiore quantità di soluzione
inamidante prima di inserire i capi nell’asciugatrice. Non
asciugare eccessivamente: l’amido diventa polvere lasciando
i capi morbidi e venendo meno alla propria funzione.
Tempi di asciugatura
I tempi sono approssimativi e possono variare in base a:
• Quantità di acqua trattenuta dai capi dopo la centrifuga:
gli asciugamani e i capi delicati trattengono molta acqua.
• Tessuti: i capi dello stesso tessuto, ma con trama
e spessore differenti possono presentare tempi di
asciugatura diversi.
• Quantità di bucato: capi singoli e piccoli carichi possono
impiegare più tempo per asciugarsi.
Tempi di asciugatura automatica
Cotone
Alta temperatura
Tempi di asciugatura dopo lavaggi da 800-1000 giri al minuto
1 kg
30 - 40 minuti
Sintetici
Bassa temperatura
1 kg
30 - 40 minuti 40 - 50 minuti 50 - 70 minuti
2 kg 3 kg 4 kg 5 kg 6 kg 7 kg
40 - 55 minuti 55 - 70 minuti 70 - 80 minuti 80 - 90 minuti 95 - 120 minuti 120 - 140 minuti
Tempi di asciugatura dopo lavaggi a velocità inferiori
• Temperatura della stanza: più è bassa la temperatura
della stanza in cui si trova l’asciugatrice più tempo sarà
necessario per l’asciugatura dei capi.
• Volume: alcuni capi voluminosi richiedono particolare cura
nel processo di asciugatura. Si consiglia di estrarre questi
capi, scuoterli e inserirli nuovamente nell’asciugatrice:
questa operazione deve essere ripetuta più volte durante il
ciclo di asciugatura.
! Non asciugare troppo i capi.
Tutti i tessuti contengono umidità naturale che serve a
conservarne la morbidezza e la vaporosità.
I tempi forniti si riferiscono ai programmi automatici
Asciugatura armadio.
I pesi si riferiscono ai capi asciutti.
2 kg 3 kg
44
Page 45

Avvertenze e suggerimenti
! Questo elettrodomestico è stato progettato e realizzato nel
rispetto delle normative internazionali in materia di sicurezza.
Queste avvertenze vengono fornite per motivi di sicurezza e
devono essere osservate attentamente.
Sicurezza generale
• La presente asciugatrice non deve essere usata da persone
(compresi i bambini) con capacità fisiche, sensoriali o mentali
ridotte o senza esperienza e conoscenza, a meno che non
siano sottoposte a supervisione o ricevano istruzioni relative
all’uso del dispositivo da parte di una persona responsabile
della loro sicurezza.
• La presente asciugatrice è stata progettata per uso
domestico e non professionale.
• Non toccare l’elettrodomestico quando si è a piedi nudi
né con le mani o i piedi bagnati.
• Scollegare l’elettrodomestico dalla rete di alimentazione
tirando la spina e non il cavo.
• Non lasciare avvicinare i bambini all’elettrodomestico
in funzione. Dopo l’uso, spegnere l’asciugatrice e
scollegarla dalla rete di alimentazione. Tenere lo sportello
chiuso onde evitare che i bambini possano utilizzare
l’asciugatrice come un gioco.
• I bambini devono essere sorvegliati per assicurarsi che
non giochino con l’asciugatrice.
• L’elettrodomestico deve essere installato correttamente
e deve avere un’adeguata aerazione. La presa d’aria
sulla parte frontale dell’asciugatrice non deve mai essere
ostruita (vedi Installazione).
• Non utilizzare mai l’asciugatrice sulla moquette nel caso
in cui l’altezza del pelo sia tale da impedire l’ingresso
dell’aria attraverso la base dell’asciugatrice.
• Verificare che l’asciugatrice sia vuota prima di caricarla.
• La parte posteriore dell’asciugatrice può diventare
molto calda:
non toccarla mai quando la macchina è in funzione.
• Non utilizzare l’asciugatrice se il filtro, il contenitore di
raccolta dell’acqua e il condensatore non sono posizionati
correttamente (vedi Manutenzione).
• Non sovraccaricare l’asciugatrice (vedi Bucato per le
massime dimensioni di carico).
• Non inserire capi completamente bagnati.
• Seguire sempre con attenzione tutte le istruzioni riportate
sulle etichette per il lavaggio dei capi (vedi Bucato).
• Non caricare capi grandi, eccessivamente voluminosi.
• Non asciugare fibre acriliche ad alte temperature.
• Completare ogni programma con la relativa fase di
asciugatura a freddo.
• Non spegnere l’asciugatrice quando contiene ancora capi
caldi.
• Pulire il filtro dopo ogni uso (vedi Manutenzione).
• Svuotare il contenitore di raccolta dell’acqua dopo ogni
uso (vedi Manutenzione).
• Pulire regolarmente l’unità di condensazione (vedi
Manutenzione).
• Evitare l’accumulo di laniccio intorno all’asciugatrice.
• Non salire sul pannello superiore dell’asciugatrice, poiché
si potrebbe danneggiare la macchina.
• Rispettare sempre le norme e le caratteristiche elettriche
(vedi Installazione).
• Acquistare sempre accessori e ricambi originali (vedi
Assistenza).
Per ridurre il rischio di incendo dell’asciugatrice, è
necessario osservare i seguenti punti:
• Prima di essere caricati nell’asciugatrice, i capi devono essere
lavati con acqua e sapone, risciacquati e infine centrifugati.
L’asciugatura di capi che NON siano stati precedentemente
lavati con acqua, determina il pericolo di incendio.
• Non caricare nell’asciugatrice capi precedentemente
trattati con prodotti chimici.
• Non asciugare articoli macchiati o imbevuti di olio vegetale o
da cucina, ciò costituisce un rischio di incendio. Gli articoli
sporchi di olio possono infiammarsi spontaneamente,
specialmente quando vengono esposti a fonti di calore come
l’asciugatrice. Gli articoli possono diventare caldi, causando
una reazione di ossidazione con l’olio, l’ossidazione crea
calore. Se il calore non è in grado di fuoriuscire, gli articoli
possono scaldarsi tanto da prendere fuoco. L’accumulo,
l’impilamento o il deposito di capi sporchi/imbevuti di olio può
impedire la fuoriuscita del calore e causare un incendio.
Se non è possibile evitare di porre nell’asciugatrice articoli
sporchi/imbevuti di olio vegetale, olio da cucina o lacca, è
prima necessario lavarli con detergente supplementare, ciò
ridurrà, ma non eliminerà il rischio di incendio. E’ necessario
usare la fase di asciugatura a freddo per ridurre la temperatura
degli articoli, che non devono essere rimossi dall’asciugatrice
e impilati o ammucchiati quando sono ancora caldi.
• Non inserire nell’asciugatrice capi che sono stati
precedentemente lavati, puliti, imbevuti o lasciati in
ammollo in benzina, solventi a secco o altre sostanze
infiammabili o esplosive, le sostanze altamente
infiammabili usate comunenmente negli ambienti
domestici, compresi olio da cucina, acetone, alcol
denaturato, cherosene, sostanze antimacchia,
trementina, cere e sostanze di rimozione cere. Assicurarsi
che questi capi vengano lavati in acqua calda con una
quantità supplementare di detergente prima di essere
inseriti nell’asciugatrice.
• Non inserire nell’asciugatrice articoli contenenti schiuma di
gomma (detta anche schiuma di lattice), o materiali simili.
I materiali in schiuma di lattice quando vengono riscaldati
possono incendiarsi mediante la combustione spontanea.
• Non utillizzare ammorbidenti o prodotti simili
nell’asciugatrice per eiliminare gli effetti dell’elettricità
statica, se non consigliato espressamente dal produttore
dell’ammorbidente.
• Non inserire nell’asciugatrice indumenti intimi che
contengono rinforzi in metallo, es. reggiseni con ferretti in
metallo.
Se i ferretti si staccano durante l’asciugatura, possono
danneggiare l’asciugatrice.
• Non inserire nell’asciugatrice articoli in gomma solida, in
plastica, come cuffie per la doccia o teli impermeabili di
protezione per bambini, polietilene o carta.
• Non inserire nell’asciugatrice articoli foderati in gomma
solida, capi con imbottiture in schiuma di gomma, cuscini,
galosce e scarpe da tennis rivestite in gomma.
• Togliere tutti gli oggetti dalle tasche, specialmente gli
accendini (rischio di esplosione).
! ATTENZIONE: non arrestare mai l’asciugatrice prima della
fine del ciclo di asciugatura a meno che tutti i capi non siano
rimossi velocemente e stesi in modo da dissipare il calore.
Risparmio energetico e rispetto per l’ambiente
• Prima di asciugare i capi, strizzarli per eliminare la
maggiore quantità di acqua possibile (se viene prima
utilizzata una lavatrice impostare un ciclo di centrifuga). In
questo modo si risparmia energia durante l’asciugatura.
• Utilizzando sempre l’asciugatrice a pieno carico si
risparmia energia: capi singoli e piccoli carichi impiegano
più tempo per asciugarsi.
• Pulire il filtro alla fine di ogni ciclo in modo da contenere i
costi connessi al consumo energetico (vedi Manutenzione).
IT
45
Page 46

Cura e manutenzione
Interruzione dell’alimentazione
elettrica
IT
! Scollegare l’asciugatrice quando non è in funzione, nonché
durante le operazioni di pulizia e di manutenzione.
Pulizia del filtro dopo ogni ciclo
Il filtro è un componente fondamentale dell’asciugatura: la
sua funzione è quella di raccogliere il laniccio e la lanugine
che si formano durante l’asciugatura.
Al termine dell’asciugatura pulire quindi il filtro sciacquandolo
sotto acqua corrente o pulendolo con l’aspirapolvere. Nel
caso in cui il filtro si dovesse intasare il flusso d’aria all’interno
dell’asciugatrice verrebbe gravemente compromesso: i tempi
di asciugatura si allungano e si consuma più energia. Inoltre,
possono verificarsi danni all’asciugatrice.
Il filtro si trova davanti alla guarnizione dell’asciugatrice (vedi
figura).
Rimozione del filtro:
1. Tirare verso l’alto il manico
in plastica del filtro (vedi
figura).
2. Pulire il filtro dal laniccio e
riposizionarlo correttamente.
Assicurarsi che il filtro sia
inserito completamente
a filo con la guarnizione
dell’asciugatrice.
! Non utilizzare l’asciugatrice
senza avere prima reinserito
il filtro in sede.
Controllo del cestello dopo ogni ciclo
Ruotare il cestello manualmente per rimuovere i capi più
piccoli (fazzoletti) che potrebbero essere rimasti all’interno
dell’asciugatrice.
Pulizia del cestello
! Per la pulizia del cestello non usare abrasivi, lana di acciaio
o agenti di pulizia per acciaio inossidabile.
Potrebbe formarsi una patina colorata sul cestello in acciaio
inossidabile, fenomeno che potrebbe essere causato
da una combinazione di acqua e/o agenti di pulizia quali
l’ammorbidente del lavaggio. Questa patina colorata non ha
alcun effetto sulle prestazioni dell’asciugatrice.
Contenitore
di raccolta
dell’acqua
Svuotamento del contenitore di
raccolta dell’acqua dopo ogni ciclo
Estrarre il contenitore dall’asciugatrice e svuotarlo in un
lavandino o in altro scarico adatto, quindi riposizionarlo
correttamente.
Controllare sempre il contenitore di raccolta e svuotarlo
prima dell’avvio di un nuovo programma di asciugatura.
Pulizia dell’unità di condensazione
• Rimuovere periodicamente (ogni mese) l’unità di
condensazione e pulire l’eventuale accumulo di lanugine
dalle piastre sciacquandola sotto il rubinetto con acqua
fredda fatta scorrere sul lato posteriore del condensatore.
Rimozione del condensatore:
1. Scollegare l’asciugatrice dalla rete elettrica e aprire lo
sportello.
2. Aprire il coperchio del condensatore (vedi figura),
sbloccare i tre fermi ruotandoli di 90° in senso antiorario,
quindi estrarre il condensatore tirandolo per l’impugnatura.
3. Pulire la superficie delle guarnizioni e riposizionare l’unità
con le frecce dirette verso l’alto, accertandosi che i fermi
siano fissati saldamente.
Pulizia dell’asciugatrice
• Le parti esterne in metallo e in plastica e le parti in gomma
possono essere pulite con un panno umido.
• Periodicamente (ogni 6 mesi) pulire con l’aspirapolvere
la griglia della presa d’aria frontale e gli sfiati sul retro
dell’asciugatrice per rimuovere eventuali accumuli di
lanugine, laniccio e polvere. Inoltre, rimuovere gli accumuli
di lanugine dalla parte frontale del condensatore e delle
aree del filtro utilizzando occasionalmente l’aspirapolvere.
! Non usare solventi o abrasivi.
! L’asciugatrice utilizza componenti a sfera che non
necessitano di lubrificazione.
! Far controllare regolarmente l’asciugatrice da personale
tecnico autorizzato onde garantire la sicurezza delle parti
elettriche e meccaniche (vedi Assistenza).
Filtro
Rubinetto
46
Unità di condensazione
Fermi
Maniglia
Presa
d’aria
Coperchio del
condensatore
Posteriore
Unità di condensazione
Anteriore
Page 47

Problemi e soluzioni
Nel caso in cui si abbia la sensazione che l’asciugatrice non funzioni in modo corretto, prima di telefonare al Centro di assistenza
(vedi Assistenza) consultare attentamente i seguenti suggerimenti per la soluzione dei problemi.
IT
Problema:
L’asciugatrice non parte.
Il ciclo di asciugatura non si avvia.
I tempi di asciugatura sono lunghi.
Cause probabili / Soluzioni:
• La spina non è inserita nella presa di corrente a muro abbastanza a fondo per fare
contatto.
• C’è stata una interruzione di corrente.
• Il fusibile è bruciato. Provare a collegare un altro elettrodomestico alla stessa presa.
• Se si utilizza una prolunga provare a inserire la spina dell’asciugatrice direttamente
nella presa.
• Lo sportello non è stato chiuso correttamente.
• Il programma non è stato impostato correttamente (vedi Come effettuare
un’asciugatura).
•Non è stato premuto il pulsante AVVIO/PAUSA (vedi Come effettuare un’asciugatura).
• È stato impostato un tempo di ritardo (vedi Programmi e opzioni).
• È stato premuto il pulsante di AVVIO/PAUSA; prima dell’avvio dell’asciugatrice
è necessario attendere un breve ritardo. Attendere l’inizio dell’asciugatura, non
premere nuovamente il pulsante di AVVIO/PAUSA: in caso contrario l’asciugatrice
entra in modalità di pausa e non avvia l’asciugatura.
• Il filtro non è stato pulito (vedi Cura e manutenzione).
• Il contenitore di raccolta dell’acqua deve essere svuotato? La spia “Svuotare
vaschetta” lampeggia (vedi Manutenzione).
• Il condensatore deve essere pulito (vedi Cura e manutenzione).
• La temperatura impostata non è adatta al tipo di tessuto da asciugare (vedi
Programmi e opzioni).
• Non è stato selezionato il tempo di asciugatura corretto per questo carico (vedi
Bucato).
• La griglia della presa d’aria è ostruita (vedi Installazione, e Manutenzione).
• I capi sono troppo bagnati (vedi Bucato).
• L’asciugatrice è sovraccarica (vedi Bucato).
La spia “Svuotare vaschetta”
lampeggia.
Il programma termina e i capi sono
più umidi del previsto.
Le spie delle “opzioni” e la spia
di “avvio/pausa” lampeggiano e
una delle spie di “manutenzione”
o delle “fasi di asciugatura” si
accendono fisse.
L’asciugatore è rumoroso nei primi
minuti di funzionamento.
Le luci nel pannello di controllo
dell’asciugatrice sono spente,
sebbene sia accesa.
• Il contenitore di raccolta dell’acqua probabilmente non è stato svuotato all’avvio
del programma. Non attendere il segnale di svuotamento dell’acqua (Il segnalatore
acustico fa 3 beep e la spia è lampeggia).Controllare sempre il contenitore e
svuotarlo prima dell’avvio di un nuovo programma di asciugatura (vedi Descrizione
dell’asciugatrice).
! Per motivi di sicurezza i programmi dell’asciugatrice hanno una durata massima di
4 ore. Se un programma automatico non ha rilevato l’umidità finale richiesta entro
questo intervallo, l’asciugatrice completa il programma e si arresta. Controllare i punti
sopra indicato e ripetere il programma; se i capi risultano ancora umidi contattare il
Centro di assistenza (vedi Assistenza).
• Spegnere l’apparecchio e rimuovere la spina, pulire il filtro e il condensatore (vedi
“Cura e Manutenzione”). Quindi, riposizionare la spina, accendere l’elettrodomestico
e avviare un altro programma.
Se l’anomalia persiste, chiamare l’Assistenza.
• Questo è normale, soprattutto se l’asciugatore non è stato utilizzato per un certo
tempo. Se il rumore persiste durante tutto il ciclo, contattare il centro di assistenza.
L’asciugatrice è entrata in stand-by per risparmiare elettricità. Questo avviene quando
l’asciugatrice è stata lasciata accesa e si è verificata un’interruzione dell’alimentazione
elettrica. Avviene dopo 30 minuti:
- se l’asciugatrice è accesa ma non viene avviato alcun programma;
- in seguito al termine del programma di asciugatura.
Tenere premuto il pulsante ON/OFF fino a quando l’asciugatrice non riprende a
funzionare
47
Page 48

Assistenza
Prima di telefonare al Centro di assistenza:
IT
• Seguire la guida alla risoluzione dei problemi per vedere
se è possibile porre rimedio al guasto personalmente (vedi
Problemi e soluzioni).
• In caso contrario, spegnere l’asciugatrice e chiamare il più
vicino Centro di assistenza.
Dati da comunicare al Centro di assistenza:
• Nome, indirizzo e codice postale;
• numero di telefono;
• il tipo di guasto;
• la data di acquisto;
• il modello dell’apparecchio (Mod.);
• il numero di serie (S/N) dell’asciugatrice.
Queste informazioni si trovano sull’etichetta dati applicata
dietro l’oblò.
Assistenza Attiva 7 giorni su 7
In caso di necessità d’intervento chiamare il Numero Unico Nazionale 199.199.199*.
Un operatore sarà a completa disposizione per fissare un appuntamento con il Centro Assistenza Tecnico
Autorizzato più vicino al luogo da cui si chiama.
È attivo 7 giorni su 7, sabato e domenica compresi, e non lascia mai inascoltata una richiesta.
Ricambi
Questa asciugatrice è una macchina complessa. Tentando
di ripararla personalmente o affidandone la riparazione a
personale non qualificato si rischia di mettere a repentaglio
l’incolumità delle persone, di danneggiare la macchina e di
far decadere la garanzia sui ricambi.
In caso di problemi con l’utilizzo di questa macchina,
rivolgersi sempre a un tecnico autorizzato.
*
Informazioni per riciclaggio e smaltimento
Nell’ambito del nostro costante impegno in difesa dell’ambiente ci riserviamo il diritto di utilizzare componenti riciclati di qualità per
ridurre i costi del cliente e minimizzare lo spreco di materiali.
• Smaltimento dei materiali di imballaggio: seguire le normative locali, così da permettere di riciclare l’imballaggio.
• Per ridurre il rischio di incidenti ai bambini, rimuovere lo sportello e la spina, quindi tagliare il cavo di alimentazione a filo con
l’apparecchio. Smaltire queste parti separatamente per assicurarsi che l’elettrodomestico non possa più essere collegato a una
presa di corrente.
Smaltimento
La direttiva Europea 2012/19/CE sui rifiuti di apparecchiature elettriche ed elettroniche (RAEE), prevede che gli
elettrodomestici non debbano essere smaltiti nel normale flusso dei rifiuti solidi urbani. Gli apparecchi dismessi devono essere
raccolti separatamente per ottimizzare il tasso di recupero e riciclaggio dei materiali che li compongono ed impedire potenziali
danni per la salute e l’ambiente.
Questo asciugatore utilizza un Condensatore sigillato contenente gas fluorurati che devono essere recuperati e smaltiti.
Il simbolo del cestino barrato è riportato su tutti i prodotti per ricordare gli obblighi di raccolta separata.
Per ulteriori informazioni, sulla corretta dismissione degli elettrodomestici, i detentori potranno rivolgersi al servizio pubblico preposto
o ai rivenditori.
Il presente elettrodomestico è conforme alle seguenti direttive CE:
- 2006/95/CE (Direttiva bassa tensione);
- 2004/108/CE (Compatibilità elettromagnetica).
* Al costo di 14,25 centesimi di Euro al minuto (iva inclusa) dal Lun. al Ven. dalle 08:00 alle 18:30, il Sab. dalle 08:00 alle 13:00 e di 5,58 centesimi di Euro al
minuto (iva inclusa) dal Lun. al Ven. dalle 18:30 alle 08:00, il Sab. dalle 13:00 alle 08:00 e i giorni festivi, per chi chiama da telefono fisso.
Per chi chiama da radiomobile le tariffe sono legate al piano tariffario dell’operatore telefonico utilizzato. Le suddette tariffe potrebbero essere sogget-
te a variazione da parte dell’operatore telefonico; per maggiori informazioni consultare il sito http://www.indesit.com/indesit/.
48
Page 49

Bedienungsanleitungen
Inhaltsverzeichnis
Wichtige Informationen, 50-51
DE
Deutsch
IDCA 735
Aufstellung, 52
Aufstellungsort des Wäschetrockners
Belüftung
Elektroanschluss
Allgemeine Informationen
Beschreibung des Wäschetrockners, 53-54
Merkmale
Bedienblende
Durchführung eines Trockenprogramms, 55
Wahl und Start des Programms
Programme und Zusatzfunktionen, 56-57-58
Programmtabelle
Spezialprogramme
Optionen
Öffnung der Gerätetür
WÄSCHETROCKNER
DE
! Dieses Symbol erinnert Sie daran, das vorliegende
Handbuch zu lesen.
! Bewahren Sie diese Gebrauchsanweisung immer in Nähe
des Wäschetrockners auf, um sie bei jedem Bedarf leicht
konsultieren zu können. Falls das Gerät verkauft oder an andere Personen übergeben wird, händigen Sie auch dieses
Heft aus, um es so den neuen Besitzern zu ermöglichen,
von den Hinweisen zum Gebrauch des Wäschetrockners
Kenntnis zu nehmen.
! Lesen Sie bitte diese Hinweise aufmerksam durch: sie
enthalten wichtige Hinweise zu Aufstellung und Anschluss
und nützliche Empfehlungen zum Gerätebetrieb.
Wäsche, 59-60
Unterteilung der Wäsche
Etiketten mit Pflegehinweisen
Besondere Wäscheteile
Trockenzeiten
Hinweise und Empfehlungen, 61
Allgemeine Sicherheit
Energiesparender Betrieb und Umweltschutz
Wartung und Pflege, 62
Abschalten vom Stromnetz
Reinigung des Flusensiebs nach jedem Trockenzyklus
Prüfung der Trommel nach jedem Trockenzyklus
Entleeren des Wasserauffangbehälters nach jedem Trockenzyklus
Reinigung der Kondensatoreinheit
Reinigung des Wäschetrockners
Fehlersuche, 63
Kundendienst, 64
Ersatzteile
Informationen zu Recycling und Entsorgung
49
Page 50

Wichtige Informationen
DE
Für einwandfrei Funktion des
Kondensationstrockners ist das folgende Vorgehen
erforderlich:
Flusensieb – Flusen, die sich auf dem Sieb
absetzen, MÜSSEN UNBEDINGT nach jedem
Trockenzyklus entfernt werden.
Phase 1
Tür des Wäschetrockners durch
Drücken öffnen, wie in der
Abbildunggezeigt.
Die mangelnde Reinigung des Flusensiebs nach
jedem Trockenzyklus beeinflusst die Leistung
des Geräts, das mehr Zeit zum Trocknen benötigt
und somit während des Trocknens mehr Strom
verbraucht.
Wasserauffangbehälter - Der
Wasserauffangbehälter muss nach jedem
Trockenzyklus entleert werden.
Phase 1
Ziehen Sie den
Wasserauffangbehälter in Ihre
Richtung und entfernen Sie ihn
völlig aus dem Trockner.
Phase 2
Schütten Sie das gesamte, im
Behälter aufgefangene Wasser
aus.
Phase 2
Das Flusensieb mit zwei Fingern
herausziehen.
Phase 3
Eventuelle Flusenablagerungen
von der inneren Fläche des Siebs
entfernen.
Phase 4
Das Flusensieb erneut einbauen
– den Wäschetrocker auf keinen
Fall starten, ohne dass das Sieb
wieder eingefügt wurde.
Phase 3
Setzen Sie den
Wasserauffangbehälter wieder
ein; vergewissern Sie sich
anschließend, dass er sich
wieder vollständig in der
Aufnahme befindet.
Die ausbleibende Entleerung des
Wasserauffangbehälters verursacht:
- Die Deaktivierung der Heizung (die Wäschefüllung
könnte somit bei Beendigung des Trockenzyklus
noch feucht sein).
- Die LED „Wasser leeren“ leuchtet auf und
signalisiert, dass der Behälter voll ist.
Aufladen des Wasserauffangsystems
Wenn der Wäschetrockner neu ist, sammelt der
Wasserauffangbehälter kein Wasser, solange das
System nicht aufgeladen wird. Dieser Vorgang
kann 1 oder 2 Trockenzyklen beanspruchen. Wurde
das System aufgeladen, sammelt es bei jedem
Trockenzyklus Wasser.
50
Page 51

Kondensatoreinheit - Es ist notwendig, die
Flusen auf dem Kondensator
entfernen.
jeden Monat zu
Phase 1
Öffnen Sie den Deckel des
Kondensators
- halten Sie den Griff und ziehen
Sie ihn in Ihre Richtung.
Phase 2
Den Kondensator durch Drehen
der 3 Klipse entriegeln und
anschließend zu sich ziehen. (In
den Schläuchen könnte Wasser
verblieben sein: dies ist normal).
Phase 3
Den Kondensator unter
fließendem Wasser reinigen:
dabei die Flusen von der
Rückseite nach vorne ausspülen.
Produktdaten
Nennkapazität Baumwollwäsche für das "StandardBaumwollprogramm" bei vollständiger Befüllung - kg
Energieeffizienzklasse B
Der gewichtete jährliche Energieverbrauch (AEc)* Kwh 503.7
Dieser Haushaltswäschetrockner ist Automatisch
Dieser Haushaltswäschetrockner ist Ein Kondens.
Energieverbrauch bei vollständiger Befüllung; Edry- kWh 4.28
7.0
DE
Phase 4
Die Kondensatoreinheit wieder
einsetzen; Dabei sicherstellen,
richtig eingerastet ist, die
3 Klipse befestigt sind und
die Richtungspfeile auf der
Vorderseite nach oben zeigen.
Die ausbleibende Kondenser reinigen könnte eine
Beschädigung des Wäschetrockners verursachen.
Energieverbrauch bei Teilbefüllung; Edry- kWh 2.29
Leistungsaufnahme im Aus-Zustand (Po) - Watts 0,14
Leistungsaufnahme im unausgeschalteten Zustand (Pl) - Watts 1,79
Dauer des unausgeschalteten Zustandes für die
Leistungssteuerung - Minuten
Das "Standard-Baumwollprogramm"** ist bei vollständiger Befüllung und Teilbefüllung
das Standardtrocknungsprogramm, auf das sich die Informationen auf dem Etikett
und im Datenblatt beziehen, dass dieses Programm zum Trocknen normaler nasser
Baumwolltextilien geeignet und in Bezug auf den Energieverbrauch für Baumwolle am
effizientesten ist.
Gewichtete Programmdauer (Tt) bei vollständiger Befüllung und
Teilbefüllung i n Minuten
Vollständige Befüllung (Tdry) - Minuten 128
Teilbefüllung” (Tdry½) - Minuten 70
Kondensationseffizienzklasse B
Durchschnittliche Kondensationseffizienz - %
Vollständige Befüllung Cdr 83
Teilbefüllung C dry½ 81
Gewichtete (Ct) vollständige Befüllung und Teilbefüllung 82
Luftschallemissionen - dB(A) re 1 pW 68
30
95
Dies ist der Testwaschzyklus gemäß Vorschrift 392/2012.
Auf unserer Webseite http://www.indesit.com/indesit/
können Sie alle unsere Produktdatenblätter einsehen.
Jährlicher Energieverbrauch auf der Grundlage von 160
Trocknungszyklen für das Standard-Baumwollprogramm bei
vollständiger Befüllung und Teilbefüllung sowie des Verbrauchs der Betriebsarten mit geringer Leistungsaufnahme. Der
tatsächliche Energieverbrauch je Zyklus hängt von der Art
der Nutzung des Geräts ab.
**Das Standard-Baumwollprogramm ist Schranktrocken
51
Page 52

m
2
1
Less than 1m
Aufstellung
DE
Aufstellungsort des Wäschetrockners
Übermäßige Hitze kann den
Wäschetrockner schädigen;
deshalb im Abstand von
Gasherden, Öfen, Heizkörpern
oder Kochfeldern platzieren.
Falls das Haushaltsgerät unter
einem Arbeitstisch eingebaut
werden soll, muss ein Freiraum von 10 mm zwischen
der oberen Geräteplatte und
anderen, darüber befindlichen
Gegenständen vorgesehen
werden, sowie 15 mm Freiraum zwischen den Seitenwänden des Geräts und den Wänden bzw. den angrenzenden
Einrichtungsgegenständen. Nur auf diese Weise wird eine
ausreichende Luftzirkulation gewährleistet.
Belüftung
Während des Betriebs des Wäschetrockners muss eine
ausreichende Belüftung vorhanden sein. Vergewissern Sie
sich, dass der Trockner in einem trockenen, Raum aufgestellt
wird, der über eine ausreichende Luftzirkulation verfügt. Nur
eine ausreichnde Luftzirkulation gewährleistet die einwandfreie
Funktion des Trockners. Keinesfalls darf das Gerät in kleinen
verschlossenen Räumen auggestellt oder in Möbelteile integriert werden.
! Falls der Trockner in einem kleinen oder kalten Raum benutzt
wird könnte Wasser auf dem Gerät kondensieren.
! Wir raten davon ab, den Trockner in einem Schrank aufzu-
stellen; auf keinen Fall darf das Haushaltsgerät hinter einer
abschließbaren Tür, einer Schiebetür oder einer Tür mit
umgekehrtem Türanschlag platziert werden.
Wasserablauf
Falls das Gerät in der Nähe eines Ablaufschlauches aufgestellt wird, können Sie das Kondenswasser direkt abführen,
ohne den Wasserauffangbehälter zu verwenden. In diesem
Fall muss der Wasserauffangbehälter nicht nach jedem Trockenzyklus entleert werden.
Falls der Trockner über oder neben einer Waschmaschine positioniert wird, kann dieser Wasserablaug mitbenutzt werden.
Es reicht aus, den in Abbildung A gezeigten Schlauch abzutrennen und an den Ablauf anzuschließen.
Falls der Ablauf weiter entfernt ist als der Schlauch lang ist,
können Sie zur Überbrückung einen Schlauch mit gleichem
Durchmesser und der erforderlichen Länge kaufen und anschließen.
Dazu den neuen Schlauch wie in Abbildung B angegeben an
der Stelle des vorherigen montieren.
! Der Ablauf darf maximal einen Meter oberhalb des
trocknerbodens montiert werden.
! Nachdem der Wäschetrockner aufgestellt wurde, si-
cherstellen, dass der Ablaufschlauch nicht geknickt oder
gekrümmt ist.
1
2
Abb. A
Abb. B
Elektroanschluss
Bevor Sie den Stecker in die Steckdose stecken, folgende
Prüfungen ausführen:
• Vergewissern Sie sich, dass Ihre Hände trocken sind.
• Die Steckdose muss geerdet sein.
• Die Steckdose muss der maximalen Leistungsaufnahme
des Geräts entsprechen, die auf dem Typenschild mit den
Betriebsdaten angegeben ist (siehe Beschreibung des
Wäschetrockners).
• Die Netzspannung muss den Werten entsprechen, die auf
dem Typenschild mit den Betriebsdaten angegeben sind
(siehe Beschreibung des Wäschetrockners).
• Die Steckdose muss mit dem Stecker des Wäschetrockners kompatibel sein. Sollte dies nicht der Fall sein,
dann lassen Sie den Netzstecker oder die Steckdose
austauschen.
! Verwenden Sie keine Verlängerungen.
! Der Trockner kann nicht in Außenräumen aufgestellt
werden, auch wenn diese geschützt sind. Es können große
Gefahrensituationen entstehen, wenn dieses Haushaltsgerät
Regen oder Gewittern ausgesetzt wird.
! Nach der Aufstellung des Trockners müssen das Stromka-
bel und der Stecker zugänglich bleiben.
! Achten Sie darauf, dass das Stromkabel nicht geknickt
oder gequetscht ist.
! Änderungen am Kabel oder am Stecker dürfen nur durch
autorisiertes Fachpersonal vorgenommen werden.
! Das Stromkabel muss regelmäßig kontrolliert und darf
nur durch ein spezielles, für diesen Trockner vorgesehenes
Kabel ersetzt werden, das von einem autorisierten Techniker
angeschlossen wird (siehe Kundendienst). Neue oder längere Stromkabel werden von autorisierten Ersatzteilhändlern
kostenpflichtig zur Verfügung gestellt.
! Der Hersteller übernimmt keine Haftung, falls diese
Vorschriften nicht eingehalten werden.
! Bei Fragen zur Aufstellung oder dem Anschluss ziehen
Sie gegebenenfalls einen Elektrofachmann zu Rate.
Allgemeine Informationen
Reinigen Sie nach dem Aufstellen und vor der Inbetriebnahme des Trockners den Innenraum der Trommel, um
eventuelle Verschmutzungen zu entfernen, die sich während
des Transports angesammelt haben könnten.
52
Page 53

Beschreibung des
Wäschetrockners
Öffnung der Gerätetür
Gegen die
Gerätetür
drücken
Kondensatoreinheit
(offener Deckel)
Merkmale
Wasserauffangbehälter
Flusensieb
Typenschild mit
DE
Betriebsdaten
Modell und
Seriennummer
Gitter der
Belüftungsöffnung
Griff des Kondensatordeckels
(zum Öffnen ziehen)
Bedienblende
Taste
ON/OFF
Wählschalter
Programme
Tasten und
Kontrollleuchten
Zusatzfunktionen
Wartungs
kontrollleuchten
Taste und Kontrollleuchte
START/PAUSE
Kontrollleuchten
Trockenphasen
oder
Startzeitvorwahl
53
Page 54

DE
Taste ON/OFF/Reset
Mit einem normalen Druck der Taste wird das Gerät ein- oder ausgeschaltet. Läuft der Wäschetrockner, dann kann er durch längeres Drücken von etwa 3 Sekunden ausgeschaltet und der laufende Zyklus gelöscht werden.
Wählschalter Programme
Zur Einstellung der Programme: drehen Sie den Schalter, bis die Anzeige auf das gewünschte Programm zeigt (siehe Start und
Programmwahl).
Tasten für Zusatzfunktionen
ermöglichen es, die verfügbaren Zusatzfunktionen für das gewählte Programm zu wählen. Die Kontrollleuchten schalten sich ein, um
anzuzeigen, dass die Zusatzfunktion gewählt wurde (siehe Programme und Zusatzprogramme).
Taste und Kontrollleuchte START/PAUSE
Sobald die grüne Kontrollleuchte langsam blinkt, Start/Pause drücken, um das Programm zu beginnen. Nach dem Start des Trockenprogramms leuchtet diese Anzeige dauerhaft. Um das Programm zu unterbrechen, erneut die Taste drücken; die Kontrolllampe
blinkt orangefarbig.
Um das Programm an dieser Stelle wieder fortzusetzen erneut die Taste drücken (siehe Start und Programmwahl).
Kontrollleuchten
Wartungskontrollleuchten
Die Kontrollleuchten signalisieren:
Die Kontrollleuchte “Wasser leeren” zeigt an, dass der Wasserauffangbehälter geleert werden muss.
Wenn der Behälter sich im Laufe des Programms füllt, schaltet sich die LED ein. Der Trockner startet automatisch den Kaltluftzyklus
und die LED START/PAUSE blinkt bernsteinfarben. Um den Zyklus an der Stelle, an der er unterbrochen wurde, wieder zu starten,
die Taste START/PAUSE drücken.
Deshalb, den Wasserauffangbehälter immer, nach jeder Nutzung des Trockners, entleeren (siehe Wartung).
Die Kontrollleuchte Filter reinigen erinnert Sie vor jedem neuen Programm daran, dass das Flusensieb unbedingt bei jeder neuen
Nutzung des Trockners gesäubert werden muss (siehe Wartung und Pflege).
Die Kontrollleuchte Kondenser reinigen erinnert daran, dass der Kondensator unbedingt in regelmäßigen Abständen gereinigt
werden muss (siehe Wartung und Pflege).
Kontrollleuchten “Trockenphasen”
Die Kontrollleuchte zeigt die laufende Trockenphase an.
Die Kontrollleuchte zeigt die laufende Abkühlphase an.
Die Kontrollleuchte END zeigt das Programmende an.
Kontrollleuchten “Startzeitvorwahl”
Wurde die Funktion „Startzeitvorwahl” (siehe „Programme und Zusatzfunktionen“) aktiviert, und das Programm in Gang gesetzt,
schaltet die Kontrollleuchte, die der eingestellten Zeitverschiebung entspricht, auf Blinklicht:
Nach und nach wird die bis zum effektiven Start noch verbleibende Zeit eingeblendet, die entsprechende Kontrollleuchte
blinkt:
Nach Ablauf der eingestellten Verzögerungszeit startet das ausgewählte Programm.
54
Page 55

Durchführung eines
Trockenprogramms
Wahl und Start des Programms
1. Stecken Sie den Stecker des Wäschetrockners in die Netzsteckdose.
2.Wählen Sie die Wäscheart aus (siehe Wäsche).
3.Öffnen Sie die Gerätetür und vergewissern Sie sich, dass das Flusensieb sauber und korrekt positioniert ist; der Wasserauffan-
gbehälter muss leer sein und sich an seiner vorgesehenen Stelle befinden (siehe Wartung).
4.Füllen Sie das Gerät und achten Sie darauf, dass sich kein Kleidungsstück zwischen die Gerätetür und Dichtung gelangt.
Schließen Sie die Tür.
5. Drücken Sie die Taste ON/OFF um das Gerät zu starten.
6.Drehen Sie den Programmwählschalter bis die Anzeige auf die gewünschte Stoffart anzeigt, nachdem Sie die Programmtabelle
(siehe Programme und Zusatzprogramme) und die Angaben für jeden Stofftyp überprüft haben (siehe Wäsche).
! Achtung: Falls sich nach dem Drücken der Taste START/PAUSE die Position des Programmwählschalters verändert hat, ändert
die neue Position NICHT das gewählte Programm. Zur Änderung des Programms drücken Sie die Taste START/PAUSE, um das
Programm anzuhalten (die Kontrollleuchte blinkt orangefarben), wählen Sie das neue Programm und die entsprechenden Zusatzprogramme. Drücken Sie die Taste START/PAUSE, um das neue Trockenprogramm zu starten.
DE
7. Falls erwünscht, geben Sie die Vorwahlzeit und die anderen Zusatzfunktionen ein (siehe Programme und Zusatzprogramme).
8. Zur Inbetriebnahme drücken Sie die Taste START/PAUSE.
Während des Trockenprogramms können Sie die Wäsche überprüfen und Kleidungsstücke entfernen, die bereits trocken sind,
während die anderen weiter getrocknet werden. Nachdem Sie die Tür geschlossen haben, drücken Sie START/PAUSE, um die
Maschine erneut in Betrieb zu setzen.
9. Während der letzten Minuten des Trockenprogramms, vor dem Programmende, geht das Gerät in die KALTTROCKENPHASE
über (die Stoffe werden abgekühlt); es ist wichtig, dass diese Programmphase immer beendet wird.
10. Das Einschalten der Kontrollleuchte END zeigt an, dass das Programm beendet ist. Um Sie wissen zu lassen, dass Ihr Programm beendet ist, gibt der Buzzer 3 Beep-Töne. Öffnen Sie die Tür, entnehmen Sie die Wäsche, reinigen Sie das Flusensieb und
setzen Sie es wieder ein. Entleeren Sie den Wasserauffangbehälter nach jedem Gebrauch und setzen Sie ihn wieder ein (siehe
Wartung).
Falls Sie die Option Knitterschutz “Post-Care” gewählt haben und die Wäsche nicht sofort entfernt wird, werden die Kleidungsstücke - bis zu 10 Stunden oder bis die Gerätetür geöffnet wird - in regelmäßigen Abständen aufgelockert.
11. Trennen Sie den Trockner vom Stromnetz.
Funktion Standby
Zur Erfüllung der neuen Richtlinien zum Energieverbrauch ist diese Waschetrockner mit einem automatischen Ausschaltsystem
(Standby) ausgestattet, das nach 30 Minuten des Nichtgebrauchs in Funktion tritt.
Drücken Sie die ON/OFF-Taste und halten Sie diese, bis der Trockner wieder aktiviert ist.
55
Page 56

DE
Programme und
Zusatzfunktionen
Programmtabelle
Programm
Standard
1
Baumwolle Extra Trocken Max. Knitterschutz (Pre-Care) – Knitterschutz (Post-Care) und Startzeitvorwahl.
Max. Beladungs-
menge (kg)
Kompatible Optionen
Pro-
grammdauer
150’
2
Baumwolle Schranktrocken Max. Knitterschutz (Pre-Care) – Knitterschutz (Post-Care) und Startzeitvorwahl.
3
Baumwolle Bügeltrocken Max. Knitterschutz (Pre-Care) – Knitterschutz (Post-Care) und Startzeitvorwahl.
4
Synthetik Schranktrocken 3 Knitterschutz (Pre-Care) – Knitterschutz (Post-Care) und Startzeitvorwahl.
5
Synthetik Bügelntrocken 3 Knitterschutz (Pre-Care) – Knitterschutz (Post-Care) und Startzeitvorwahl.
Spezial
6 Eco Time
7 Wolle
Sport
8 Sport Intensiv
9 Sport Light
10 Spezial Schuhe
Teilprogramme
Auffrischen - -
Automatische Trockenzeiten
30 - 60 - 90 - 120 - 150 minuten. -
2 Knitterschutz (Pre-Care) – Knitterschutz (Post-Care) und Startzeitvorwahl.
1 -
4 Knitterschutz (Pre-Care) – Knitterschutz (Post-Care) und Startzeitvorwahl.
4 Knitterschutz (Pre-Care) – Knitterschutz (Post-Care) und Startzeitvorwahl.
1 Paar -
Knitterschutz (Pre-Care) – Knitterschutz (Post-Care) – Hohe Temperatur und
Startzeitvorwahl.
140’
100’
65’
55’
60’
60’
80
70’
100’
20’
Spezial-/Sport-/Teilprogramme
Programm Eco Time
Dieses Programm ist ideal zur schonenden Trocknung kleiner Wäschemengen in kurzer Zeit und optimiertem Energieverbrauch. Das
Programm dient zur Trockung von Wäschemengen bis 2 kg (Baumwolle).
! Die Programmdauer hängt von der Füllmenge und der Schleuderdrehzahl Ihrer Waschmaschine ab.
Prüfen Sie, dass die Wäschestücke mit dem Symbol gekennzeichnet sind und wenden Sie sie vor dem Trocknen auf links.
Programm Wolle
Dies ist ein Programm für Kleidungsstücke, die sich für das Trocknen in der Trommel eignen und mit dem Symbol gekennzeichnet sind. Es kann für Füllungen bis zu 1 kg verwendet werden (etwa 3 Pullover). Wir empfehlen, die Teile vor dem Trocknen
auf links zu ziehen. Dieses Programm braucht etwa 60 Minuten, , abhängig von Füllmenge, Gewebeart und vorheriger Schleuderleistung. Die mit diesem Programm getrockneten Teile können im Allgemeinen sofort getragen werden; bei einigen, etwas schwereren Kleidungsstücken könnten die Ränder jedoch noch leicht feucht sein. Lassen Sie diese natürlich trocknen, da ein weiterer
Trocknungsvorgang die Teile beschädigen könnte.
! Im Gegensatz zu anderen Stoffen kann das Einlaufen von Wolle nicht rückgängig gemacht werden; somit nimmt das Kleidungsstück nicht wieder die ursprüngliche Größe und Form an.
! Dieses Programm eignet sich nicht für Teile aus Kunstfasern.
56
Page 57

Programm Sport Intensiv
Dieses Programm dient zur schonenden Trocknung von Wäschestücken wie Trainingsanzüge und –hosen, die mit dem Symbol
gekennzeichnet sind. Ideal für Kleidungsstücke, die nicht komplett trocken zu sein müssen.
Wir empfehlen, die Teile vor dem Trocknen auf links zu ziehen.
! Die Programmdauer hängt von der Füllmenge und der Schleuderdrehzahl Ihrer Waschmaschine ab.
Programm Sport Light
Dieses Programm dient zur schonenden Trocknung von Wäschestücken wie Trainingsanzüge und –hosen, die mit dem Symbol
gekennzeichnet sind. Ideal für Kleidungsstücke, die nicht komplett trocken zu sein müssen oder hinterher nicht gebügelt werden sollen.
Wir empfehlen, die Teile vor dem Trocknen auf links zu ziehen.
! Die Programmdauer hängt von der Füllmenge und der Schleuderdrehzahl Ihrer Waschmaschine ab.
Programm Spezial Schuhe
Dieses Programm dient zum Trocknen eine Schuhpaares. Die Schuhe müssen gewaschen und bei einer Mindestgeschwindigkeit
von 400 Umdrehungen geschleudert worden sein
Sie müssen mit der speziellen, mitgelieferten Schuhhalterung in das Gerät gelegt werden. Trocknet man Schuhe einfach lose in der
Trommel, wird das Gerät beschädigt. Entfernen Sie das Flusensieb aus dem vorderen Bereich des Trockners und setzen Sie hier die
Schuhhalterung ein.
Stecken Sie die Schuhbänder in die Schuhe und setzen Sie sie mit der Spitze nach unten und der Sohle nach vorne auf die Halterung.
Die Trockenzeiten hängen von Schuhform und –typ ab. Sollten die Schuhe bei Ablauf des Programms nicht ganz trocken sein, dann
starten Sie es erneut.
! Trocknen Sie keine Schuhe mit Gelfüllung oder Blinklichtern. Trockenen Sie nur Schuhe aus synthetischem Material oder Stoff. Am
Ende des Programms nehmen Sie die Schuhhalterung heraus und setzen das Flusensieb wieder ein.
Auffrischen
Kurzprogramm zur Auffrischung der Fasern und Wäscheteile durch einen Frischluftstrom. Es dauert etwa 20 Minuten.
! Es ist kein Trockenprogramm und kann somit nicht für nasse Kleidungsstücke verwendet werden.
DE
Zeitgesteuertes Trockenprogramm (30’ - 60’ - 90’ - 120’ - 150’)
Wenn die Trockendauer festgelegt werden soll, kann dieses Programm an Stelle der Automatikprogramme verwendet werden. Ideal
für das Trocknen von feuchter Wäsche bei niedriger Temperatur oder kleinen Lademengen.
Das auszuwählende, zeitgesteuerte Trockenprogramm hängt von der Menge, von dem Stofftyp ab (siehe Tabelle) und der
Schleuderdrehzahl Ihrer Waschmaschine ab..
Die letzten Minuten des Programms läuft der Kaltzyklus.
Gewebeart
Baumwolle –
hohe Temperatur
Synthetik –
niedriger Temperatur
Kunstfasern –
niedriger Temperatur
1 kg 2 kg 3 kg 4 - 5 kg 6 - 7 kg
30 oder 60
minuten
30 oder 60
minuten
30 minuten 60 minuten - - -
Max. Beladungsmenge
30 oder 60
minuten
30 oder 60
minuten
60 oder 90
minuten
60 oder 90
minuten
60 oder 90
minuten
- -
90 120 150
minuten
57
Page 58

DE
Optionen
Diese Zusatzfunktionen werden benutzt, um das gewählte Programm auf Ihre persönlichen Erfordernisse abzustimmen.
Startzeitvorwahl
Der Start von einigen Programmen (siehe Start und Programme) kann bis zu 9 Stunden vorgewählt werden. Die entsprechende
Taste mehrfach drücken, bis die gewünschte Startzeit erreicht ist. Bevor Sie die Startvorwahl ausführen, sich vergewissern, dass der
Wasserauffangbehälter leer und das Flusensieb sauber ist.
Knitterschutz (Post-Care)
Wird dieses Zusatzfunktion gewählt, werden die Wäscheteile gelegentlich nach Beendigung der Warm- und Kalttrockenphasen
gedreht, um so - falls die Beladung nicht sofort bei Programmende entfernt werden kann - das Entstehen von Falten zu vermeiden.
Während dieser Programmphase ist die Kontrollleuchte eingeschaltet.
Knitterschutz (Pre-Care)
Falls Sie Startvorwahl und diese Zusatzfunktion wählen, werden die Wäscheteile gelegentlich während der Vorwahlzeit gedreht, um
das Entstehen von Knittern zu vermindern.
Hohe Temperatur
Wenn ein zeitgesteuertes Trocknen gewählt wurde, dann kann man mit dieser Taste eine hohe Temperatur wählen und die darüber
liegenden Kontrollleuchte schaltet sich ein. Die zeitgesteuerten Programme arbeiten sonst mit voreingestellter niedriger Temperatur.
! Nicht alle Zusatzfunktionen sind für alle Programme verfügbar (siehe Programme und Zusatzprogramme).
Öffnung der Gerätetür
Wird die Gerätetür bei Programmablauf geöffnet (oder die Taste START/PAUSE gedrückt), schaltet sich der Trockner aus.
• Die Kontrollleuchte START/PAUSE blinkt orangefarben auf.
• Während der Startvorwahl wird die Vorwahlzeit weitergezählt. Es ist notwendig, die Taste START/PAUSE zu drücken, um
das Startvorwahlprogramm wieder aufzunehmen. Eine der Kontrollleuchten der “Startzeitvorwahl” blinkt auf, um die laufende
Vorwahleinstellung anzuzeigen.
• Es ist notwendig, die Taste START/PAUSE zu drücken, um das Programm wieder aufzunehmen. Die Anzeigenleuchten zeigen den
Programmablauf an und die Kontrollleuchte START/PAUSE blinkt nicht sondern leuchtet grün.
• Während der Trocknungsphase Knitterschutz Post-Care wird das Programm beendet. Durch Drücken der Taste START/PAUSE
wird ein neues Programm von Anfang an gestartet.
• Durch Drehen des Programmwählschalters wird ein neues Programm gewählt und die Kontrollleuchte START/PAUSE blinkt grün.
Es ist beispielsweise möglich das Programm Kalttrocknung zu wählen, um die Kleidungsstücke abzukühlen.
Drücken Sie die Taste START/PAUSE, um das neue Trockenprogramm zu starten.
Hinweis: Im Fall eines Stromausfalls schalten Sie das Gerät aus oder ziehen Sie den Stecker. Wenn wieder Strom vorhanden ist,
stecken Sie das Gerät ein, drücken Sie die ON/OFF-Taste und halten Sie diese gedrückt, bis der Trockner wieder aktiviert ist, und
drücken Sie anschließend die Start/Pause-Taste.
58
Page 59

Wäsche
Unterteilung der Wäsche
• Kontrollieren Sie die auf den Etiketten der verschiedenen
Wäscheteile angeführten Symbole, um sicherzustellen,
dass die Teile für einen Trommeltrockner geeignet sind.
• Die Wäsche nach Art der Stoffe unterteilen.
• Entleeren Sie alle Taschen und kontrollieren Sie die Knöpfe.
• Schließen Sie Reißverschlüsse und Haken und ziehen Sie
Gürtel und Schnürriemen zu, ohne sie jedoch zu straffen.
• Wringen sie die Wäscheteile aus, um die größtmögliche
Menge Wasser zu entfernen.
! Beladen Sie den Wäschetrockner nicht mit Teilen, die völlig
voller Wasser sind.
Maximale Lademengen
Die Trommel nicht über das maximale Fassungsvermögen
füllen.
Die folgenden Werte beziehen sich auf das Gewicht der
trockenen Kleidungsstücke:
Naturfasern: max. 7 kg
Kunstfasern: max. 3 kg
! Um die Leistungsfähigkeit des Wäschetrockners nicht zu
beeinträchtigen, nicht überladen.
Typische Beladung
Hinweis: 1 kg = 1000 g
Wäschestücke
Bluse
Kleid
Jeans
10 Windeln
Oberhemd
T-Shirt
Baumwolle
Anderes
Baumwolle
Anderes
Baumwolle
Anderes
150 g
100 g
500 g
350 g
700 g
1.000 g
300 g
200 g
125 g
Etiketten mit Pflegehinweisen
Kontrollieren Sie die Etiketten der Kleidungsstücke, besonders wenn Sie diese zum ersten Mal in den Wäschetrockner
geben. Nachfolgend führen wir die gebräuchlichsten Symbole an:
Kann im Wäschetrockner getrocknet werden.
Nicht im Wäschetrockner trockenbar.
Bei hoher Temperatur trocknen.
Bei niedriger Temperatur trocknen.
Wäschestücke, die sich nicht für die Trommeltrocknung
eignen:
• Kleidungsstücke, die Teile aus Gummi oder ähnlichen
Materialien enthalten oder mit Kunststoff beschichtet
sind (Kopfkissen, Kissen oder Anoraks aus PVC); ferner
alle Arten von brennbaren Gegenständen und solche, die
entzündliche Stoffe enthalten (mit Haarspray belastete
Hand- oder Frotteetücher).
• Glasfaser (einige Gardinenarten).
• Kleidungsstücke, die bereits chemisch gereinigt wurden.
• Mit dem Code ITLC („Besondere Wäscheteile“) gekenn-
zeichnete Kleidungsstücke , die mit speziellen Produkten zur häuslichen Reinigung gesäubert werden
können. Befolgen Sie sorgfältig die Anweisungen.
• Großvolumige Teile (Federbetten, Schlafsäcke, Kopfkissen, Kissen sowie große Tages- oder Steppdecken), die
während des Trocknen an Volumen zunehmen und die
Luftzirkulation im Geräteinnern behindern.
DE
Heim- und Haustextilien
Bettbezüge (Doppelbett)
Große Tischdecke
Kleine Tischdecke
Platzdeckchen, Sets
Badetuch
Handtuch
Betttuch (Doppelbett)
Betttuch (Einzelbett)
Baumwolle
Anderes
1.500 g
1.000 g
700 g
250 g
100 g
700 g
350 g
500 g
350 g
Falls Teile aus synthetischem Gewebe und Baumwolle
untereinander gemischt werden, könnten letztere bei Beendigung des Trockenzyklus noch feucht sein. In diesem Fall
ist es ausreichend, einen weiteren kurzen Trockenzyklus zu
starten.
59
Page 60

DE
Besondere Wäscheteile
Decken und Tagesdecken: Teile aus Kunstfaser (Acilian,
Courtelle, Orion, Dralon) müssen mit besonderer Aufmerksamkeit bei niedriger Temperatur getrocknet werden. Keine
langen Trockenzeiten einstellen.
Teile mit Falten oder Plissees: Lesen Sie die vom Hersteller gelieferten Trockenhinweise.
• Waschmenge: einzelne Teile und kleine Füllmengen kön-
nen mehr Zeit zum Trocknen benötigen.
• Trocknen: Kleidungsstücke, die gebügelt werden müssen,
können aus dem Gerät genommen werden, wenn sie
noch etwas feucht sind. Teile, die vollkommen trocken sein
müssen, können hingegen länger im Trockner bleiben.
• Eingestellte Temperatur.
Gestärkte Teile: Diese Kleidungsstücke nicht mit anderen,
nicht gestärkten Teilen trocknen. Entfernen Sie den größten
Anteil der Stärkelösung, bevor Sie die Teile in den Wäschetrockner geben. Nicht übermäßig trocknen: die Stärke wird
zu feinem Staub und macht die Kleidungsstücke weich,
wodurch sie ihren ursprünglichen Zweck einbüßt.
Trockenzeiten
Die angegebenen Zeiten sind lediglich Richtwerte und können auf der Basis folgender Faktoren variieren:
• In den Kleidungsstücken nach dem Schleudern verbliebene Wassermenge: Handtücher und Feinwäsche nehmen
viel Wasser auf.
• Stoffe: Teile aus dem gleichen Stoff, aber mit verschiedener Stärke können unterschiedliche Trockenzeiten benötigen.
Automatische Trockenzeiten
Baumwolle
Hohe Temperatur
Trockenzeiten nach Waschvorgängen bei 800-1000 U/min
1 kg
30 - 40 minuten
Kunstfasern
Niedriger Temperatur
1 kg
30 - 40 minuten 40 - 50 minuten 50 - 70 minuten
2 kg 3 kg 4 kg 5 kg 6 kg 7 kg
40 - 55 minuten 55 - 70 minuten 70 - 80 minuten 80 - 90 minuten 95 - 120 minuten 120 - 140 minuten
Trockenzeiten nach Waschgängen bei geringeren Geschwindigkeiten
• Raumtemperatur: je niedriger die Temperatur des Raums
ist, indem sich der Wäschetrockner befindet, umso mehr
Zeit wird zum Trocknen der Kleidungsstücke benötigt.
• Volumen: Großvolumige Teile erfordern eine besondere Behandlung während des Trockenvorgangs. Wir
empfehlen, diese Teile herauszunehmen, zu schütteln und
erneut in den Wäschetrockner zu geben: dieser Vorgang
muss mehrmals während des Trockenzyklus wiederholt
werden.
! Die Teile nicht übermäßig trocknen.
Alle Stoffe enthalten natürliche Feuchtigkeit, die dazu dient,
sie weich und luftig zu erhalten.
Die folgenden Trockenzeiten beziehen sich auf die automatischen Programme mit der Option „Schranktrocken“.
Die Gewichte beziehen sich auf die trockenen Wäscheteile.
2 kg 3 kg
60
Page 61

Hinweise und
Empfehlungen
! Dieses Haushaltsgerät wurde unter Beachtung der inter-
nationalen Sicherheitsnormen geplant und hergestellt. Die
nachfolgenden Hinweise werden aus Sicherheitsgründen
geliefert und sind aufmerksam zu beachten.
Allgemeine Sicherheit
• Dieses Gerät ist nicht zur Verwendung durch Personen
(einschließlich Kinder) mit eingeschränkten körperlichen,
geistigen oder sensorialen Fähigkeiten oder ohne ausreichende Erfahrung und Kenntnis geeignet, es sei denn,
sie werden durch eine für ihre Sicherheit verantwortliche
Person beaufsichtigt und eingewiesen.
• Dieser Trockner wurde nur zum häuslichen Gebrauch und
nicht für gewerbliche Zwecke geplant.
• Berühren Sie das Gerät nicht barfuß oder mit nassen
Händen oder Füßen.
• Trennen Sie das Haushaltsgerät vom Stromnetz, indem
Sie den Stecker und nicht das Kabel ziehen.
• Lassen Sie keine Kinder in Reichweite des Geräts, wenn dieses in Betrieb ist. Schalten Sie den Wäschetrockner nach
dem Gebrauch aus und trennen Sie ihn vom Stromnetz ab.
Halten Sie die Gerätetür geschlossen, um zu vermeiden,
dass Kinder sie zum Spielen benutzen können.
• Kinder müssen beaufsichtigt werden, um sicherzustellen,
dass sie nicht mit dem Wäschetrockner spielen.
• Das Haushaltsgerät muss ordnungsgemäß aufgestellt
werden und über eine angemessene Lüftung verfügen.
Die Belüftungsöffnung auf der Vorderseite des Wäschetrockners und die Luftabzüge auf der Rückseite dürfen
nicht verstopft sein (siehe Aufstellung).
• Benutzen Sie den Wäschetrockner nie auf einem Teppichboden, dessen Florhöhe die Luftzufuhr über die
Unterseite des Geräts verhindert.
• Prüfen Sie, dass der Trockner leer ist, bevor Sie ihn füllen.
• Die Rückseite des Wäschetrockners kann sehr
warm werden: berühren Sie sie nie, wenn sich das
Gerät in Betrieb befindet.
• Benutzen Sie den Wäschetrockner nicht, wenn das Flusensieb, der Wasserauffangbehälter und der Kondensator
nicht korrekt positioniert sind (siehe Wartung).
• Überladen Sie den Trockner nicht (siehe Wäsche, maximale Füllmenge).
• Geben Sie keine völlig nassen Kleidungsstücke in das Gerät.
• Befolgen Sie aufmerksam alle auf den Etiketten der Klei-
dungsstücke angegebenen Hinweise zum Waschen der
Teile (siehe Wäsche).
• Entfernen Sie alle Gegenstände aus den Taschen, besonders Feuerzeuge (Explosionsgefahr).
• Geben Sie keine besonders großvolumigen Teile in den Trockner.
• Trocknen Sie keine Kunstfasern bei hohen Temperaturen.
• Vervollständigen Sie jedes Programm mit der jeweiligen
Kalttrockenphase.
• Schalten Sie den Wäschetrockner nicht aus, wenn er
noch warme Kleidungsstücke enthält.
• Reinigen Sie das Flusensieb nach jedem Gebrauch (siehe
Wartung).
• Entleeren Sie den Wasserauffangbehälter nach jedem
Gebrauch (siehe Wartung).
• Reinigen Sie regelmäßig die Kondensatoreinheit (siehe
Wartung).
• Vermeiden Sie die Ansammlung von Flusen im Trockner.
• Steigen Sie nicht auf die obere Platte des Wäschetrockners,
da das Gerät beschädigt werden könnte.
• Beachten Sie immer die Vorschriften und die elektrischen
Eigenschaften des Geräts (siehe Aufstellung).
• Kaufen Sie immer Originalersatzteile und -zubehör (siehe
Kundendienst).
Hinweise zur Minimierung des Brandrisikos im
Wäschetrockner:
• Nur solche Artikel in den Trockner legen, die mit Waschmittel und Wasser gewaschen und danach gründlich
gespült und geschleudert wurden. Artikel, die NICHT mit
Wasser gewaschen wurden, stellen ein Brandrisiko dar.
• Keine Wäsche trocknen, die mit Chemikalien behandelt wurde.
●• Keine Wäsche trocknen, die mit Gemüse- oder Speiseöl
verschmutzt oder vollgesogen ist, da dies ein Brandrisiko
darstellt. Mit Öl verschmutzte Wäschestücke können sich
selbst entzünden, besonders, wenn sie einer Wärmequelle wie einem Wäschetrockner ausgesetzt werden. Die
Wäschestücke werden erwärmt, was zu einer Oxidationsreaktion mit dem Öl führt wobei die Oxidation weitere Hitze
erzeugt. Wenn die Hitze nicht entweichen kann, können
die Wäschestücke so heiß werden, dass si sich entzünden.
Durch Aufschichten, Stapeln oder Übereinanderliegen von
ölverschmutzten Wäschestücken kann die Wärme nicht
entweichen und dies führt zu einem Brandrisiko.
Wenn unbedingt Wäsche, die mit Gemüse- oder Speiseöl oder mit Haarpflegeprodukten verunreinigt ist, im
Wäschetrockner getrocknet werden muss, dann sollte sie
zunächst mit besonders viel Waschmittel gewaschen wer
den - dies reduziert das Risiko, beseitigt es aber nicht.
Das Kühlprogramm des Wäschetrockners sollte verwen
det werden, um die Temperatur der Wäsche zu ver ringern. Sie sollte nicht aus dem Trockner entnommen und
in heißem Zustand gestapelt bzw. übereinandergelegt
werden.
●• Keine Wäsche trocknen, die zuvor mit Benzin, cheschen
Lösungsmitteln oder anderen brennbaren oder explosiven
Substanzen gereinigt, gewaschen, eingeweicht oder ver
schmutzt worden ist. Leichtentzündliche Stoffe, die häufig
im häuslichen Umfeld verwendet werden sind: Speiseöl,
Aceton, Spiritus, Petroleum, Fleckenentferner, Terpentin,
Wachse und Wachs-Entferner. Stellen Sie sicher, dass
solche Wäschestücke in heißem Wasser mit einer zusät
zlichen Menge an Waschmittel gewaschen worden sind,
bevor sie im Trockner getrocknet werden.
• Im Trockner darf keine Wäsche getrocknet werden, die
Schaumgummi (auch Latex-Schaum genannt) oder
ähnlich strukturierte gummiartige Materialien enthalten.
Schaumstoff-Materialien können, wenn sie erhitzt werden,
durch Selbstentzündung Brände auslösen.
• Weichspüler oder ähnliche antistatische Produkte dürfen
nicht in einem Wäschetrockner benutzt werden, es
sei denn, die Verwendung ist vom Hersteller des Weichspüler-Produktes ausdrücklich empfohlen.
• Keine Unterwäsche trocknen, die Metallverstärkungen enthält z.B. BHs, die mit Metalldrähten verstärkt
sind. Dies kann Schäden am Wäschetrockner verursachen, wenn die Metallverstärkungen sich während des
Trocknens lockern sollten.
●• Keine Artikel aus Gummi, Kunststoff (z.B. Duschhauben
oder Wickelunterlagen), Polyethylen oder Papier trocknen.
• Keine gummibeschichteten Artikel, Kleidung mit
Schaumgummi-Pads, Kissen, Galoschen oder GummiTurn/Tennisschuhe trocknen.
• Sämtliche Gegenstände aus den Taschen nehmen.
Besonders auf Feuerzeuge achten (Explosionsgefahr).
! ACHTUNG: Schalten Sie den Trockner nie vor Beendigung
des Trockenzyklus aus, es sei denn, die Teile werden schnell
entfernt und aufgehängt, sodass sich die Wärme verteilen kann.
Energiesparender Betrieb und Umweltschutz
• Bevor Sie die Teile trocknen, diese auswringen, um soviel
Wasser wie möglich zu entfernen (falls Sie zuvor die Waschmaschine benutzen, einen Schleuderzyklus wählen). Auf diese Weise wird Energie während des Trocknens eingespart.
• Wird der Wäschetrockner immer mit voller Wäschefüllung
benutzt, wird ebenso Energie eingespart: einzelne Teile
und kleine Füllmengen benötigen mehr Zeit zum Trocknen.
• Reinigen Sie das Flusensieb am Ende eines jeden Trockenzyklus, um die mit dem Energieverbrauch verbundenen Kosten gering zu halten (siehe Wartung).
DE
61
Page 62

Wartung und Pflege
DE
Abschalten vom Stromnetz
! Trennen Sie den Wäschetrockner von der Stromversor-
gung, wenn er nicht in Betrieb ist sowie während Reinigungs- und Wartungsarbeiten.
Reinigung des Flusensiebs nach jedem
Trockenzyklus
Das Flusensieb ist ein äußerst wichtiger Bestandteil des
Trockners: seine Aufgabe besteht darin, Flocken und Flusen,
die während des Trocknens entstehen, aufzusammeln.
Bei Beendigung des Trockenvorgangs das Flusensieb immer
unter fließendem Wasser spülen oder es mit dem Staubsauger reinigen. Falls das Flusensieb verstopft, wird der Luftstrom
im Trockner stark beeinträchtigt: die Trockenzeiten verlängern
sich und es wird mehr Energie verbraucht. Außerdem kann
der Wäschetrockner beschädigt werden.
Das Flusensieb befindet sich vor der Dichtung des Trockners
(siehe Abbildung)
Entfernung des Flusensiebs:
1. Ziehen Sie den Kunststoffgriff des Flusensiebs
nach oben (siehe Abbildung).
2. Reinigen Sie das Sieb von
Flusen und setzen Sie es
wieder ordnungsgemäß ein.
Vergewissern Sie sich, dass
das Sieb flächenbündig mit
der Dichtung des Trockners
eingefügt wird.
! Benutzen Sie den Trockner
nicht, bevor Sie nicht das
Flusensieb wieder in die Aufnahme gesteckt haben.
Prüfung der Trommel nach jedem
Trockenzyklus
Drehen Sie die Trommel per Hand, um kleine Teile wie
Taschentücher zu entfernen, die im Trockner geblieben sein
könnten.
Reinigung der Trommel
! Zur Reinigung der Trommel keine Scheuermittel, Stahlwolle
oder Reinigungsmittel für Edelstahl verwenden.
Es könnte sich ein farbiger Belag auf der Edelstahltrommel
bilden, verursacht durch eine Kombination von Wasser und
Reinigungsstoffen wie Wäscheweichmacher. Dieser farbige Belag hat keine Auswirkungen auf die Leistungen des
Wäschetrockners.
Entleeren des Wasserauffangbehälters
nach jedem Trockenzyklus
Nehmen Sie den Behälter aus dem Trockner und entleeren
Sie ihn in einem Waschbecken oder einem anderen geeigneten Wasserabfluss; diesen anschließend wieder korrekt
einsetzen.
Prüfen Sie immer den Wasserauffangbehälter und entleeren
Sie diesen, bevor Sie ein neues Trockenprogramm starten.
Reinigung der Kondensatoreinheit
• Entfernen Sie in regelmäßigen Abständen (jeden Mo-
nat) die Kondensatoreinheit und reinigen Sie eventuelle
Flusenansammlungen auf den Platten; dazu den hinteren
Teil des Kondensators unter dem Hahn mit kaltem Wasser
abspülen.
Entfernung des Kondensators:
1. Den Trockner vom Stromnetz trennen und die Gerätetür
öffnen.
2. Öffnen Sie den Kondensatordeckel (siehe Abbildung),
lösen Sie die drei Haltevorrichtungen, indem Sie sie um
90° gegen den Uhrzeigersinn drehen und entnehmen Sie
den Kondensator, indem Sie ihn am Griff ziehen.
3. Die Oberflächen der Dichtungen säubern und die Kon-
densatoreinheit mit nach oben zeigenden Pfeilen wieder
einsetzen; vergewissern Sie sich dabei, dass die Haltevorrichtungen gut befestigt wurden.
Reinigung des Wäschetrockners
• Die äußeren Metall- und Kunststoffteile sowie die Gummi-
teile können mit einem feuchten Tuch gereinigt werden.
• Periodisch (alle 6 Monate) mit dem Staubsauger das
Gitter der Belüftungsöffnung auf der Vorderseite und die
Luftabzüge auf der Rückseite reinigen, um eventuelle
Flusen-, Flocken- und Staubansammlungen zu entfernen.
Außerdem Flusenansammlungen auf der Vorderseite des
Kondensators und den Flächen des Flusensiebs entfernen; dazu gelegentlich den Staubsauger benutzen.
! Vermeiden Sie den Einsatz von Löse- und Scheuermitteln.
! Im Trockner werden Bauteile verwendet, die keine Schmie-
rung benötigen.
! Lassen Sie den Trockner regelmäßig von autorisierten
Technikern überprüfen, um die Sicherheit der elektrischen
und mechanischen Teile zu gewährleisten (siehe Kunden-
dienst).
62
Wasserauffangbehälter
Kondensatoreinheit
Haltevorrichtungen
Griff
Flusensieb
Kondensatoreinheit
Belüftungsöffnung
Kondensatordeckel
Hahn
Hinten
Vorne
Page 63

Fehlersuche
Sollten Sie das Gefühl haben, dass Ihr Wäschetrockner nicht vorschriftsmäßig arbeitet, dann konsultieren Sie bitte die nachfolgende
Tabelle, bevor Sie sich an ein Kundendienstzentrum (siehe Kundendienst) wenden.
DE
Störung:
Der Wäschetrockner setzt sich nicht
in Betrieb.
Der Trockenzyklus startet nicht.
Die Trockenzeiten sind lang.
Mögliche Ursachen / Abhilfen:
• Der Netzstecker steckt nicht fest genug in der Steckdose, um den Kontakt herzustellen.
• Es besteht ein Stromausfall.
• Die Sicherung ist durchgebrannt. Versuchen Sie, ein anderes Haushaltsgerät an die
gleiche Steckdose anzuschließen.
• Versuchen Sie, falls Sie eine Verlängerung benutzen, den Stecker des Wäschetrockners
direkt in die Steckdose zu stecken.
• Die Gerätetür wurde nicht korrekt geschlossen.
• Das Programm wurde nicht korrekt eingestellt (siehe Durchführung eines
Trockenprogramms).
• Die Taste START/PAUSE wurde nicht gedrückt (siehe Durchführung eines
Trockenprogramms).
• Es wurde eine Startvorwahl eingegeben (siehe Programme und Zusatzprogramme).
• Es wurde die Taste START/PAUSE gedrückt; vor dem effektiven Start des Trockners
muss jedoch eine kurze Verzögerung abgewartet werden. Warten Sie den Anfang des
Trockenzyklus ab und drücken Sie nicht erneut die Taste START/PAUSE: im gegenteiligen
Fall geht der Trockner in den Pause- Modus über und startet den Trockenvorgang nicht.
• Das Flusensieb wurde nicht gereinigt (siehe Wartung).
• Muss der Wasserauffangbehälter entleert werden? Die Kontrollleuchte blinkt auf (siehe
Wartung).
• Der Kondensator muss gereinigt werden (siehe Wartung).
• Die eingestellte Temperatur eignet sich nicht für den zu trocknenden Stofftyp (siehe
Programme und Zusatzprogramme).
• Es wurde nicht die korrekte Trockenzeit für diese Füllmenge gewählt (siehe Wäsche).
• Die Kleidungsstücke sind zu nass (siehe Wäsche).
• Der Trockner wurde überfüllt (siehe Wäsche).
Die Kontrollleuchte “Wasser leeren”
blinkt auf.
Bei Programmende sind die Kleidungsstücke feuchter als erwartet.
Die Kontrollleuchten der
“Zusatzprogramme” und die
Kontrollleuchte “Start/Pause” blinken
und eine der Kontrollleuchten
“Wartung” oder “Trockenphasen”
schalten sich dauerhaft ein.
Der Trockner erzeugt im Verlauf der
ersten Betriebsminuten Geräusche.
Die Leuchten auf dem Steuerpaneel
des Trockners sind aus, obwohl der
Trockner eingeschaltet ist.
• Der Wasseraufffangbehälter wurde wahrscheinlich nicht vor dem Programmstart geleert.
Warten Sie nicht das Signal zur Wasserentleerung ab (Gibt der Buzzer 3 Beep-Töne, Die
Kontrollleuchte “Wasser leeren” blinkt auf), sondern kontrollieren Sie immer den Behälter
und entleeren Sie ihn, bevor Sie ein neues Trockenprogramm starten (siehe Beschreibung
des Wäschetrockners).
! Aus Sicherheitsgründen haben die Programme des Trockners eine maximale Dauer
von 4 Stunden. Falls ein Automatikprogramm nicht die verlangte Feuchtigkeit in diesem
Intervall ermitteln konnte, beendet der Trockner das Programm und schaltet sich aus.
Prüfen Sie die oben angegebenen Punkte und wiederholen Sie das Programm; falls die
Kleidungsstücke noch feucht sind, den Kundendienst kontaktieren (siehe Kundendienst).
• Das Gerät ausschalten, den Stecker entfernen und das Flusensieb und den Kondensator
reinigen (siehe “Wartung und Pflege”). Anschließend den Stecker wieder einstecken, das
Gerät einschalten und ein anderes Programm starten.
Bleibt die Störung bestehen, kontaktieren Sie bitte den Kundendienst.
• Dies ist normal, vor allem, wenn der Trockner für eine gewisse Zeit nicht verwendet
wurde. Sich mit dem Kundendienst in Verbindung setzen, wenn die Geräusche während
des gesamten Zyklus auftreten.
Der Trockner befindet sich im Standby-Modus, um Strom zu sparen. Dies tritt ein, wenn Sie den
Trockner laufen ließen oder wenn es einen Stromausfall gab. Dies tritt nach 30 Minuten ein,
- wenn Sie den Trockner einschalten, ohne ein Programm zu starten;
- nachdem Ihr Trockenprogramm beendet ist.
Drücken Sie die ON/OFF-Taste und halten Sie diese, bis der Trockner wieder aktiviert ist.
63
Page 64

Kundendienst
DE
Bevor Sie den Kundendienst anfordern:
• Ziehen Sie bitte die Tabelle Fehlersuche zu Rate, um zu
sehen, ob es sich nicht um eine Kleinigkeit handelt, die Sie
selbst beheben kön´nen (siehe Fehlersuche).
• Ist dies nicht der Fall, dann schalten Sie das Gerät ab und
wenden Sie sich an das nächstgelegene Kundendienstzentrum.
Geben Sie hierbei folgende Daten an:
• Name, Adresse und Postleitzahl;
• Telefonnummer;
• Art der Störung;
• das Kaufdatum;
• das Gerätemodell (Mod.);
• die Seriennummer (S/N) des Wäschetrockners.
Entnehmen Sie diese Daten bitte dem hinter der Gerätetür
angebrachten Typenschild.
Informationen zu Recycling und Entsorgung
Im Rahmen unseres beständigen Einsatzes zum Umweltschutz verwenden wir recycelte Qualitätskomponenten, um die Kosten für
den Kunden zu reduzieren und die Materialverschwendung auf ein Minimum zu reduzieren.
• Entsorgung der Verpackungsmaterialien: befolgen Sie die örtlichen Vorschriften, um das Recycling der Verpackung zu ermögli-
chen.
• Um die Unfallgefahr für Kinder zu reduzieren, die Gerätetür und den Stecker entfernen, anschließend das Stomkabel direkt am
Gerät abschneiden. Entsorgen Sie diese Teile getrennt, um sicherzustellen, dass das Haushaltsgerät nicht mehr an eine Steckdose angeschlossen werden kann.
Ersatzteile
Bei Ihrem Wäschetrockner handelt es sich um ein komplexes
Gerät. Eigenhändig oder durch unqualifiziertes Personal durchgeführte Reparaturen kann die Sicherheit von Personen
gefährden, das Gerät beschädigen und den Verlust sämtlicher Ansprüche auf Ersatzteilgarantie bewirken.
Wenden Sie sich demnach im Falle etwaiger Betriebsstörungen bitte stets an einen autorisierten Techniker.
Entsorgung
Die europäische Richtlinie 2012/19/EG über Elektro- und Elektronik-Altgeräte (WEEE) schreibt vor, dass Hauhaltsgeräte
Dieser Trockner ist mit einer dichten Wärmepumpe ausgestattet. Das enthaltene Kühlmittel muss getrennt entsorgt werden.
Abfalleimersymbol, das sich auf allen Produkten befindet, weist darauf hin, dass eine getrennte Entsorgung vorgeschrieben ist.
Für weitere Informationen hinsichtlich der ordnungsgemäßen Entsorgung von Haushaltsgeräten wenden Sie sich bitte an Ihren
Händler oder an die zuständige kommunale Stelle.
nicht mit dem normalen Müll zu entsorgen sind. Altgeräte sind zwecks Optimierung der Rückgewinnungs- und Recyclingrate der Gerätematerialien einer gesonderten Sammelstelle zuzuführen, um Schäden für die Gesundheit und die Umwelt zu
verhüten. Das durchgestrichene
64
Dieses Haushaltsgerät stimmt mit den folgenden EG-Richtlinien überein:
- 2006/95/EG (Niederspannungsrichtlinie);
- 2004/108/EG (elektromagnetische Verträglichkeit).
Page 65

Gebruiksaanwijzing
WASDROGER
NL
Nederlands
IDCA 735
Inhoudsopgave
Belangrijke informatie, 66-67
Installatie, 68
Waar men de wasdroger moet installeren
Ventilatie
Electrische aansluiting
Informatie vooraf
Beschrijving van de wasdroger, 69-70
Eigenschappen
Bedieningspaneel
Hoe men de machine laat drogen, 71
Starten en kiezen van het programma
Programma’s en opties, 72-73-74
Tabel van de programma’s
Speciale programma’s
Opties
Openen van het deurtje
De Was, 75-76
Sorteren van de was
Wasetiketten
Bijzondere kledingsstukken
Droogtijden
NL
! Dit symbool herinnert u eraan om deze gebruikshandleiding
te lezen.
! Houd het boekje altijd bij de hand, om het gemakkelijk te kunnen
raadplegen zovaak als nodig is.
Houd het boekje altijd dicht bij de wasdroger; als men het
apparaat verkoopt of weggeeft, moet men zich herinneren om
dit boekje ook erbij te geven, zodat de nieuwe bezitters kennis
kunnen nemen van de waarschuwingen en hints voor het gebruik
van de wasdroger.
! Lees zorgvuldig deze aanwijzingen: op de volgende pagina’s
vindt men belangrijk informatie over de installatie en nuttige wenken voor de werking van het toestel.
Waarschuwingen en raad, 77
Algemene veiligheid
Energiebesparing en milieurespect
Zorg en onderhoud, 78
Onderbreking van de electrische voeding
Reiniging van het filter na elke cyclus
Controle van het mandje na elke cyclus
Legen van het watervat na elke cyclus
Reiniging van de condensatie-eenheid
Reiniging van de wasdroger
Problemen en oplossingen, 79
Service, 80
Reserveonderdelen
Informatie voor het hergebruik en ontzorging
65
Page 66

Belangrijke informatie
Voor een efficiënte werking van de condensdroger
is het noodzakelijk het schema van regelmatig
NL
onderhoud te volgen dat hieronder staat
aangegeven:
Stoffilter – het is NOODZAKELIJK om na elke
droogcyclus de stof uit het filter te halen.
Fase 1
Open het deurtje van de
wasdroger door ertegen te
drukken, zoals aangegeven in de
afbeelding.
Maakt men het filter niet na elke droogcyclus
schoon, dan zal dit merkbaar zijn aan de
droogprestaties van de machine: deze doet er
langer over en verbruikt dus ook meer energie.
Waterreservoir – Het is noodzakelijk om het
waterverzamelvat na elke droogcyclus te legen.
Fase 1
Trek het watervat naar u toe en
verwijder het helemaal uit de
wasdroger.
Fase 2
Giet al het water uit het vat.
Fase 2
Trek het filter met twee vingers
eruit.
Fase 3
Reinig eventuele stofafzettingen
aan de binnenkant van het
stofrooster.
Fase 4
Zet het filter weer op zijn plaats
– Nooit moet men de wasdroger
inschakelen als het filter niet op
zijn plaats is
Fase 3
Zet het vat weer terug en
controleer dat deze goed op zijn
plaats zit.
Het gevolg van het niet legen van het watervat kan
zijn:
- De uitschakeling van de verwarming van de
machine (de was kan nog vochtig zijn aan het einde
van de droogcyclus).
- De led “Vaatje legen” zal aangaan, om aan te
geven dat dit vaatje vol is.
Vullen van het verzamelsysteem voor water
Wanneer de wasdroger nog nieuw is, zal het
watervaatje geen water verzamelen, omdat
deze eerst gevuld moet worden. Deze handeling
kan nodig zijn voor 1 of 2 droogcycli. Als het
eenmaal vol is, zal het systeem elke cyclus water
verzamelen.
66
Page 67

Condensor - Het is noodzakelijk het stof uit de
condensor te halen doe dit elke week.
Fase 1
Open het deksel van de
condensator
- pak de handgreep en trek deze
naar u toe.
Fase 2
Verwijder de condensator door
de drie clips te draaien, trek de
condensator dan naar u toe.
Het is normaal als u water in de
leidingen vindt.
Fase 3
Reinig de condensator met
water, laat dit vanaf de bovenkant
stromen, om eventuele stofresten
te verwijderen.
Productgegevens
Geschatte capaciteit voor katoenen wasgoed voor het "standaard
katoenprogramma" bij volle lading - kg
Energie-efficiëntieklasse B
Gemiddeld jaarlijks energieverbruik (AEc)* Kwh 503.7
Deze huishoudelijke droger is Automatisch
Deze huishoudelijke droger is een Condens.
Energieverbruik bij volle lading: Edry-kWh 4.28
7.0
NL
Fase 4
Zet de condensatieeenheid weer
op zijn plaats; controleer dat de
eenheid goed op zijn plaats zit,
dat alle drie clips vast zitten en
dat de pijlen op de bovenkant
van de condensator naar boven
wijzen.
Als men de condensator niet reinigt, dan kan dit
leiden tot een vroegtijdig van de wasdroger.
Energieverbruik bij gedeeltelijke lading: Edry1/2,-kWh 2.29
Stroomverbruik: off modus (Po) - Watts 0,14
Stroomverbruik: modus aan (PI)- Watts 1,79
Duur van de 'modus aan' voor stroommanagementsysteem minuten
Het Standaard Katoenprogramma** is geschikt voor het drogen van normaal vochtige
katoenen was. Dit is het meest efficiënte programma v.w.b. het energieverbruik voor
katoen bij een volle en gedeeltelijke lading.
Progr. Tijd - gemiddeld (Tt) volle en gedeeltelijke lading - minuten 95
Volle lading (Tdry) - minuten 128
Gedeeltelijke lading (Tdry1/2) - minuten 70
Condensatie efficiëntieklasse B
Gemiddelde condensatie efficiëntie - %
volle lading Cdr 83
gedeeltelijke lading Cdry1/2 81
gemiddelde (Ct) volle en gedeeltelijke lading 82
Luchtgedragen akoestische geluidsemissies - dB(A) re 1 pW 68
30
Dit is de wascyclustest overeenkomstig het Voorschrift
392/2012. Zie onze website voor alle productgegevens
http://www.indesit.com/indesit/.
*Verbruik per jaar is gebaseerd op 160 droogcycli van het
standaard katoenprogramma bij volle en gedeeltelijke lading,
en het verbruik bij laagstroom modus. Daadwerkelijk energieverbruik per cyclus zal afhangen van hoe het apparaat
wordt gebruikt.
**Het Standaard Katoenprogramma is
Katoen Kast droog
67
Page 68

m
2
1
Less than 1m
Installatie
Waar men de wasdroger moet installeren
NL
• Vlammen kunnen de wasdro-
ger beschadigen, zet deze dus
ver af van kookplaten, kachels,
verwarmingen en dergelijke.
Indien het toestel geïnstalleerd
moet worden onder een bank,
is het noodzakelijk om een
ruimte van 10 mm vrij te laten
tussen het bovenste paneel
van het apparaat en andere
voorwerpen hierboven, ook
moet er 15 mm vrije ruimte zijn tussen de zijkanten van het
apparaat en de wanden of meubels ernaast. Op deze manier
is men er zeker van dat er voldoende luchtcirculatie is.
Ventilatie
• Wanneer de wasdroger is ingeschakeld, moet er voldoende luchtventilatie zijn. Zorg ervoor dat de wasdroger niet in
een vochtige omgeving wordt gezet en dat de lucht hierin
voldoende wordt ververst. Het is van fundamenteel belang
dat de lucht rondom de wasdroger kan bewegen, anders
kan het water tijdens het drogen niet condenseren; de
wasdroger doet het dus niet goed in een gesloten ruimte, of
binnenin een meubel.
! Indien de wasdroger in een kleine of koude kamer wordt
gebruikt is het mogelijk dat zich condens vormt.
! Het is niet aan te raden om de wasdroger in een kast
te installeren; het toestel mag nooit worden geïnstalleerd
achter een deur die met sleutel kan worden gesloten, een
schuifdeur of een deur met de scharnieren aan de andere
kant ten opzichte van het deurtje van de wasdroger.
Afvoer van het water
Indien de machine dichtbij een afvoerleiding wordt geplaatst,
kan men het condenswater hierdoor afvoeren en hoeft men
het watervat niet te gebruiken. In dit geval hoeft men dit
watervat dus niet na elke cyclus te legen.
Indien de wasdroger boven of naast een wasmachine staat,
kunnen ze dezelfde afvoer gebruiken. Het is voldoende als
men de slang in afbeelding A losmaakt en op de afvoer
aansluit.
Indien de slang niet bij de afvoer komt, kan men een slang
met dezelfde diameter aanschaffen om de afstand te
overbruggen.
Om deze nieuwe slang te installeren is het voldoende om de
bestaande te vervangen, zoals aangegeven in de afbeelding
B en deze op dezelfde plaats in te steken.
! De afvoer moet zich 1 m lager bevinden dan de bodem
van de wasdroger.
! Na dat men de wasdroger heeft geïnstalleerd, moet
men controleren dat de afvoerslang niet gevouwen of
vervormd is.
1
2
Fig. A
Fig. B
Electrische aansluiting
Voordat men de steker in de electrische contactdoos steekt
moet men het volgende controleren:
• Dat uw handen droog zijn.
• De steker is voorzien van een aardaansluiting.
• De contactdoos moet het maximale vermogen van de
machine kunnen verdragen, men vindt deze aanwijzing op
het typeplaatje met de technische gegevens (zie Beschrijving
van de wasdroger).
• De voedingsspanning moet in het bereik liggen, dat is
aangegeven op het typeplaatje met de technische gegevens
(zie Beschrijving van de wasdroger).
• De contactdoos moet geschikt zijn voor het type steker
van de wasdroger. Anders moet men de contactdoos of de
steker vervangen.
! Gebruik geen verlengsnoeren.
! De wasdroger mag niet buiten worden geïnstalleerd, zelfs
als deze afgedekt is. Het kan inderdaad zeer gevaarlijk zijn
om deze huishoudelijke apparaten bloot te stellen aan regen
en onweer.
! Na installatie van de wasdroger moeten de electrische
kabel en de steker onder handbereik blijven.
! De electrische kabel mag niet gevouwen of platgedrukt
worden.
! Als de te vervangen steker aan het snoer gegoten is, moet
men deze op een veilige manier onbruikbaar maken en
ontzorgen. Laat hem dus NIET achter, anders zou iemand
hem in een contactdoos kunnen steken en een electrische
schok veroorzaken.
! De electrische kabel moet regelmatig worden gecontroleerd en eventueel worden vervangen met een speciaal voor
deze wasdroger geschikte kabel, deze montage mag alleen
door bevoegde technici worden uitgevoerd (zie Service). De
nieuwe of langere electrische kabels worden door bevoegde
dealers geleverde tegen betaling.
! De fabrikant aanvaardt geen enkele aansprakelijkheid
indien men zich niet aan deze regels houdt.
! In geval van twijfel over het bovenstaande wordt men
verzocht contact op te nemen met een gekwalificeerde
electricien.
Informatie vooraf
Heeft men de wasdroger geïnstalleerd, dan moet men hem
eerst schoonmaken (vanwege het transport), de droogtrommel van binnen reinigen en dan pas in gebruik nemen.
68
Page 69

Beschrijving van
de wasdroger
Openen van het deurtje
Druk op
het deurtje
Condensatieeenheid
(deksel open)
Eigenschappen
Waterverzamelvaatje
Filter
NL
Typeplaatje met
bedrijfgegevens
Serienummer en
modelnummer
Luchtrooster
Handgreep van het deksel van de
condensator (trekken om te openen)
Bedieningspaneel
Knop
On/Off
Programma
knop
Knoppen en
controlelampen
Opties
Onderhoudslampjes
Knop en controlelamp
START/PAUSE
Lampjes voor
het drogen of de
vertraagde start
69
Page 70

Knop ON/OFF/Reset
Drukt men normaal op de knop, dan zal het apparaat aan of uit gaan. Indien de wasdroger in bedrijf is, dan zal een langere druk van
NL
ongeveer 3 seconden het apparaat uitzetten en de huidig cyclus resetten.
Handknop Programma’s
Hiermee kan men het programma kiezen: draai aan de knop totdat de indicator op het gewenste programma staat (Zie Opstarten
en programmakeuze).
Knoppen voor de opties
Maken het mogelijk om de opties te kiezen, die beschikbaar zijn voor het gekozen programma. De betreffende controlelampen gaan
aan om aan te geven dat de optie is gekozen (zie Programma’s en opties).
Knop en controlelamp START/PAUSE
Wanneer de groene controlelamp langzaam knippert, druk dan op de knop om het programma te starten. Wanneer de cyclus
is opgestart zal de controlelamp altijd aan blijven. Om het programma in pauze te zetten drukt men opnieuw op de knop; de
controlelamp wordt oranje en begint opnieuw te knipperen.
Om het programma opnieuw te starten vanaf het punt waar deze onderbroken werd, moet men opnieuw de knop indrukken (Zie
Opstarten en programmakeuze).
Controlelampen
Onderhoudslampjes
De controlelampen geven belangrijke informatie. Ziehier wat ze betekenen:
De controlelamp “Vaatje leegmaken” betekent dat het noodzakelijk is om het waterverzamelvaatje leeg te maken.
Indien het vaatje tijdens het programma volraakt, zal de led aangaan. De wasdroger zal automatisch de cyclus met koude lucht
starten en de led START/PAUSE zal geel knipperen. Om de cyclus opnieuw te starten vanaf het punt waar deze onderbroken werd,
moet men op de knop START/PAUSE indrukken
Om dit te voorkomen is het dus beter om het vaatje altijd, na elk gebruik van de wasdroger te legen (zie Onderhoud).
Controlelamp Reiniging filter voordat men enig programma start moet men zich herinnneren dat het van fundamenteel belang is
om het filter te reinigen, elke keer dat men de wasdroger wil gebruiken (zie Onderhoud).
Controlelamp Reiniging condensator denk eraan dat het van fundamenteel belang is om regelmatig de condensator te reinigen
(zie Onderhoud).
Lampjes “Droogfasen”
Het lampje betekent dat de droogfase aan de gang is.
Het lampje betekent dat de koelfase aan de gang is.
Het lampje END geeft het einde van het programma aan.
Lampjes voor Uitgestelde start
Als de functie “Uitgestelde Start” is geactiveerd
(zie “Programma’s en opties”) zal, nadat het programma is gestart, het controlelampje dat bij de uitgestelde start hoort gaan knipperen:
Naar gelang de tijd verloopt wordt de resterende wachttijd getoond, met het knipperen van het betreffende controlelampje:
Als de geselecteerde vertraging is verlopen zal het ingestelde programma van start gaan.
70
Page 71

Hoe men de machine laat
drogen
Starten en kiezen van het programma
1. Steek de steker van de wasdroger in de contactdoos van de electrische voeding.
2. Kies het programma op basis van het type was (zie Was).
3. Open het deurtje en controleer dat het filter schoon is en in de goede positie zit. Ook moet het waterverzamelvaatje leeg zijn in de
goede positie zitten (zie Onderhoud).
4. Doe de was in de machine en let erop dat er geen kleding tussen het deurtje en de betreffende afdichting blijft zitten. Sluit het
deurtje.
5. Druk op de knop ON/OFF om de machine te starten.
6. Draai aan de handknop Programma’s totdat de indicator naar het programma wijst, dat overeenkomt met het type weefsel
dat men wil drogen, controleer dit op de tabel van de programma’s (zie Programma’s en opties) en de aanwijzingen voor elk type
weefsel (zie Witte was).
! Opgelet: indien de positie van de handknop van de programma’s veranderd is na de knop START/PAUSE ingedrukt te hebben,
zal de nieuwe positie het gekozen programma NIET wijzigen. Om het programma te wijzigen drukt men op de knop START/PAUSE
om het programma in pauze te zetten. De controlelamp zal met een oranje kleure knipperen. Kies nu het nieuwe programma en de
betreffende opties.
Druk op de knop START/PAUSE om het nieuwe programma te starten.
NL
7. Indien noodzakelijk kan men de vertraagde starttijd en de andere opties instellen (zie Programma’s en opties).
8. Om te starten drukt men op de knop START/PAUSE.
Tijdens het droogprogramma kan men de was controleren en de reeds droge kleren eruit halen terwijl men de rest verder laat drogen. Na het weer sluiten van het deurtje, moet men op START/PAUSE drukken om de machine weer in bedrijf te brengen.
9. Tijdens de laatste minuten van de droogprogramma’s zal de laatste fase (KOUDE DROGING) worden opgestart, om de was af te
koelen; men moet de machine deze fase altijd laten afmaken.
10. Als het lampje END aangaat, is het programma afgelopen. Um Sie wissen zu lassen, dass Ihr Programm beendet ist, gibt der
Buzzer 3 Beep-Töne. Open het deurtje, haal de was eruit, reinig het filter en steek deze weer erin. Leeg ook het waterverzamelvaatje
en doe ook deze weer terug op zijn plaats (zie Onderhoud).
Indien men de optie “Post antikreukel” gekozen had en de was er niet onmiddelijk uithaalt, dan zal deze af en toe worden rondgedraaid, voor 10 uren of tot men het deurtje opent.
11. Haal de wasdroger van het electrische net af.
Stand- by modus
Deze droger beschikt, in overeenkomst met de nieuwe normen betreffende de energiebesparing, over een systeem wat het
apparaat automatisch na 30 minuten uitschakelt (stand-by) indien men het niet gebruikt.
Druk op de ON/OFF toets en houdt de toets ingedrukt totdat de droger weer in werking treedt.
71
Page 72

Programma’s en opties
Tabel van de Programma’s
NL
Programma
Dagelijks
1
Katoen Extra droog Max. Vóór antikreukel - Na antikreukel en Uitgestelde start.
Maximale
lading (Kg)
Passende opties
Tijdsduur
cyclus
150’
2
Katoen Kast droog Max. Vóór antikreukel - Na antikreukel en Uitgestelde start.
3
Katoen Strijk droog Max. Vóór antikreukel - Na antikreukel en Uitgestelde start.
4
Syntetisch Kast 3 Vóór antikreukel - Na antikreukel en Uitgestelde start.
5
Syntetisch Strijken 3 Vóór antikreukel - Na antikreukel en Uitgestelde start.
Speciaal
6 Eco Time
7 Wol
Sport
8 Sport Intensive
9 Sport Light
10 Sport Schoenen
Gedeeltelijk
Verfrissing - -
Tijden voor de automatische droging
30’ – 60’ – 90’ – 120’ – 150’ - Vóór antikreukel - Na antikreukel – Hoge temperatuur en Uitgestelde start.
2 Vóór antikreukel - Na antikreukel en Uitgestelde start.
1 -
4 Vóór antikreukel - Na antikreukel en Uitgestelde start.
4 Vóór antikreukel - Na antikreukel en Uitgestelde start.
1 paar -
140’
100’
65’
55’
60’
60’
80
70’
100’
20’
Speciale programma’s/Sport/Gedeeltelijk
Programma Eco Time
Dit programma is ideaal voor het veilig drogen van kleine hoeveelheden was in korte tijd, met een optimaal gebruik van de energie.
Het programma kan worden gebruikt voor ladingen tot 2 kg (programma voor katoenen wasgoed).
! De duur van dit programma hangt af van de omvang van de lading en het centrifugetoerental van uw wasmachine.
Er wordt aangeraden om te controleren dat de kledingstukken een symbool hebben en om deze binnenste buiten te keren voordat men ze droogt.
Wolprogramma
Dit is een speciaal programma voor kledingstukken, die tegen trommeldrogers kunnen en het symbool dragen. Het programma
kan worden gebruikt voor ladingen tot 1 kg (ongeveer 3 truien). Er wordt aangeraden de kledingstukken binnenste buiten te keren
voordat men ze droogt. Dit programma duurt ongeveer 60 minuten maar kan langer duren, afhankelijk van de afmetingen en de
dichtheid van de lading en de snelheid van de centrifuge, die in de wasmachine werd gebruikt. De met dit programma gedroogde
kledingstukken kunnen normaal gesproken meteen worden aangetrokken, maar enkele zwaardere kledingstukken hebben moge-
lijk enigszins vochtige randen. Laat deze op natuurlijke manier verder drogen, als men ze terug in de wasdroger doet, kan men ze
beschadigen.
! In tegenstelling tot andere materialen zal wol na het krimpen niet meer terugkeren naar de oorspronkelijke afmetingen.
! Dit programma is niet geschikt voor acryl.
72
Page 73

Programma Sport Intensive
Dit is een programma voor het veilig drogen van kleding zoals bijvoorbeeld gymnastiekpakken en kousen met het symbool . Ideaal
voor kledingstukken, die een complete droging nodig hebben.
We raden aan om de kledingstukken binnenste buiten te keren voordat men ze begint te drogen.
! De duur van dit programma hangt af van de omvang van de lading en het centrifugetoerental van uw wasmachine.
Programma Sport Light
Dit is een programma voor het veilig drogen van kleding zoals bijvoorbeeld gymnastiekpakken en kousen met het symbool . Ideaal
voor kledingstukken, die geen complete droging nodig hebben, of die daarna gestreken moeten worden.
We raden aan om de kledingstukken binnenste buiten te keren voordat men ze begint te drogen.
! De duur van dit programma hangt af van de omvang van de lading en het centrifugetoerental van uw wasmachine.
Programma Sport Shoes
Met dit programma kan men een paar sportschoenen drogen. De schoenen moeten zijn gewassen en gecentrifugeerd met een
minimale snelheid van 400 omwentelingen/min.
Men moet het speciale bijgeleverde rek voor schoenen gebruiken. Indien men de schoenen gewoon in de trommel legt zal de wa-
sdroger worden beschadigd. Verwijder het filter aan de voorkant van de wasdroger en zet er het rek in.
Doe de veters in de schoenen en leg deze met de punten naar onder en de zolen aan de voorkant.
De droogtijd is afhankelijk van de vorm en het type schoen. Indien de schoenen niet helemaal droog zijn na het programma, laat het
dan nogmaals draaien.
! Droog geen schoenen met gel erin of voorzien van knipperlichten. Droog alleen schoenen van syntetisch materiaal of zeildoek.
Na afloop van het programma moet men het schoenenrek weer verwijderen en het filter weer erin zetten.
Verfrissing
Kort programma, geschikt voor het verfrissen van weefsels en kledingstukken met verse lucht. Het duurt ongeveer 20 minuten.
! Dit is geen droogprogramma en moet dus niet worden gebruikt met natte kleren.
NL
Programma voor Droging met tijdsfunctie (30’ - 60’ - 90’ - 120’ - 150’)
Indien men over de droogtijd wil beslissen, kan met dit programma gebruiken in plaats van de automatische programma’s. Het is
ideaal voor het op lage temperatuur drogen van vochtige was of van kleine ladingen.
Het in te stellen programma voor de Droging met tijdsfunctie is afhankelijk van de lading of van het te drogen weefsel (zie tabel) en
het centrifugetoerental van uw wasmachine..
De laatste minuten van het programma zijn voor de koude cyclus.
Weefsels
Katoen – Hoge
temperatuur
Syntetisch – Lage
temperatuur
Acryl – Lage
temperatuur
1 kg 2 kg 3 kg 4 - 5 kg 6 – 7 kg
30 of 60
minuten
30 of 60
minuten
30 minuten 60 minuten - - -
30 of 60
minuten
30 of 60
minuten
Lading
60 of 90
minuten
60 of 90
minuten
60 of 90
minuten
- -
90 of 120 of
150minuten
73
Page 74

Opties
NL
Met de opties kan men het gekozen programma aanpassen aan de eigen wensen.
Uitgestelde start
Het starten van bepaalde programma’s (zie Programma’s en opties) kan worden vertraagd tot 9 uur. Druk meerdere malen op de
knop totdat men de gewenste vertraging heeft bereikt. Voordat men een vertraagde start in gaat stellen, moet men controleren dat
het waterverzamelvaatje leeg en het filter schoon is.
Na antikreukel
Wanneer men dit kiest, zullen de kleren na het drogen (ook na het koel drogen) af en toe rond worden gedraaid om het vormen van
kreukels tegen te gaan. Dit is nuttig als er niemand is die de kleren meteen na het programma eruit kan halen. Tijdens deze fase is
de controlelamp aan.
Vóór antikreukel
Wanneer de vertraagde start samen met deze optie wordt gekozen, zullen de kleren tijdens de wachttijd af en toe worden gedraaid,
om het vormen van kreukels tegen te gaan.
Hoge temperatuur
Indien een Droging met tijdsfunctie wordt geactiveerd en men deze knop indrukt, zal een hoge temperatuur worden gebruikt en de
betreffende controlelamp aan gaan. De normale instelling voor een Droging met tijdsfunctie is de lage temperatuur.
! Niet alle opties zijn beschikbaar voor alle programma’s (zie Programma’s en opties).
Openen van het deurtje
Opent men tijdens een programma het deurtje (of men drukt op de knop START/PAUSE) dan zal de droger tot stilstand komen en:
• het lampje START/PAUSE met oranje kleur knipperen.
• La spia AVVIO/PAUSA lampeggia di colore arancione.
• Tijdens het Uitgestelde starten zal de timer door blijven tellen. Men moet op de knop START/PAUSE drukken om het vertraagde
programma weer opnieuw te laten beginnen. Een van de lampjes van de “Vertraagde start” knippert om de huidige instelling van de
vertraging aan te geven.
• Men moet op de knop START/PAUSE drukken om het programma weer opnieuw te laten beginnen. De controlelampen voor de
voortgang geven de huidige fase aan terwijl de controlelamp START/PAUSE ophoudt met knipperen en groen wordt.
• Tijdens de antikreukel-fase na het drogen zal het programma eindigen. Drukt men op de knop START/PAUSE, dan zal een nieuw
programma vanaf het begin worden gestart.
• Draait men aan de handknop van de programma’s, dan zal men een nieuw programma kiezen en de controlelamp START/PAUSE
met groene kleur knipperen. Men kan deze procedure gebruiken voor het kiezen van het programma Koud drogen, om de kledingstukken af te koelen als men vindt dat ze droog genoeg zijn.
Druk op de knop START/PAUSE om het nieuwe programma te starten.
Opmerking: In het geval van een stroomstoring, de stroom uitschakelen of de stekker verwijderen. Als de stroom weer hersteld is, de
ON/OFF-toets indrukken en ingedrukt houden tot de droger weer in werking treedt, en vervolgens op de Start/Pauze-toets drukken.
74
Page 75

De was
Sorteren van de was
• Controleer de symbolen op de etiketten van alle kledingstukken om te zien of ze met de trommel gedroogd
mogen worden.
• Sorteer de was afhankelijk van het type weefsel.
• Haal alles uit de zakken en controleer de knopen.
• Sluit ritsen en haakjes, en maak riemen en lussen vast
zonder ze aan te trekken.
• Wring de kledingstukken uit om zoveel mogelijk water eruit
te verwijderen.
! Vul de droger niet met drijfnatte kledingstukken.
Maximale afmetingen van de lading
Laadt de droogtrommel niet meer dan is toegestaan.
De volgende waarden hebben betrekking op het gewicht van
de droge kledingstukken:
Natuurlijke weefsels: maximaal 7 kg
Syntetische weefsels: maximaal 3 kg
! Om een daling van de prestaties te vermijden moet men
niet teveel in de wasdroger stoppen.
Typische lading
Opmerking: 1 kg = 1000 g
Kledingsstukken
Hemd
Jas
Jeans
10 luiers
Hemd
T-shirt
Katoen
Overig
Katoen
Overig
Katoen
Overig
150 g
100 g
500 g
350 g
700 g
1.000 g
300 g
200 g
125 g
Wasetiketten
Controleer de wasetiketten, vooral als de kledingstukken
voor het eerst in de wasdroger worden gedaan. Hieronder
worden de meest voorkomende symbolen gegeven:
Mag in de wasdroger.
Kan niet in de wasdroger worden gedroogd
Drogen bij hoge temperatuur.
Drogen bij lage temperatuur.
Kledingstukken niet geschikt voor drogen in trommel:
• Kledingstukken met delen van rubber of dergelijke materialen, of afwerkingen in plastic (kussens of windjacks
van PVC) en enig ander type ontvlambare voorwerpen, of
voorwerpen met ontvlambare bestanddelen (handdoeken
met haarlak erin).
• Glasvezels (enkele typen gordijnen).
• Kledingstukken die van te voren chemisch zijn gereinigd.
• Kledingstukken met de code ITLC (“Bijzondere kle-
dingsstukken”) , die gereinigd kunnen worden met
speciale huishoudelijke producten voor de schoonmaak.
Volg zorgvuldig de aanwijzingen.
• Was met grote afmetingen (dekbedden, slaapzakken,
kussens, grote beddespreien, enz), die tijdens het drogen
meer ruimte innemen en daardoor de circulatie van lucht
in de wasdroger verhinderen.
NL
Witte huishoudelijke was
Tweepersoons
dekbed
Groot tafelkleed
Klein tafelkleed
Theedoekje
Badhandoek
Handdoek
Tweepersoons
laken
Eenpersoons laken
Katoen
Overig
1.500 g
1.000 g
700 g
250 g
100 g
700 g
350 g
500 g
350 g
Indien men kledingstukken met syntetische weefsel mengt
met katoenen kleding, dan is deze laatste mogelijk nog
vochtig aan het einde van de droogcyclus. In dit geval hoeft
men alleen nog een korte extra droogcyclus uit te voeren.
75
Page 76

Bijzondere kledingsstukken
NL
Dekens en beddespreien: acryl (Acilian, Courtelle, Orion,
Dralon) moet bijzonder zorgvuldig en bij lage temperatuur
worden gedroogd. Stel geen lange droogtijden in.
• Droogte: als de kledingsstukken nog gestreken moeten
worden kunnen ze eerder uit de machine worden gehaald, als ze nog wat vochtig zijn. De kledingsstukken die
helemaal droog moeten zijn kunnen daarentegen langer in
de machine blijven.
Kledingsstukken met vouwen: lees de droogaanwijzingen
die door de fabrikant worden gegeven.
Kledingsstukken met stijfsel: niet samen met kledingsstukken zonder stijfsel drogen. Verwijder het grootste
gedeelte van de stijfseloplossing, voordat men de kledingsstukken in de wasdroger doet. Droog niet te lang: het
stijfsel wordt poeder en de kledingsstukken worden dus
weer flexibel.
Droogtijden
De tijden zijn bij benadering aangegeven en kunnen varieren
afhankelijk van:
• Hoeveelheid water in de was na de centrifuge: handdoeken en delicate was bevat nog veel water.
• Weefsels: kledingsstukken met hetzelfde weefsel maar
met andere weefpatronen en dikte kan een andere droogtijd hebben.
• Hoeveelheid was: afzonderlijke kledingsstukken en kleine
ladingen kunnen meer droogtijd nodig hebben.
Tijden voor de automatische droging
• Ingestelde temperatuur
• Temperatuur van de kamer: hoe lager de temperatuur van
de kamer is waarin de wasdroger staat, hoe langer men
op droge kleding moet wachten.
• Volume: enkele omvangrijke kledingsstukken hebben veel
aandacht nodig bij het droogproces. We raden aan om
deze uit de machine te halen, te schudden en opnieuw
in de droger te stoppen: doe dit herhaaldelijk tijdens de
droogcyclus.
! Droog de kledingsstukken niet te veel.
Alle weefsels hebben een natuurlijke vochtigheid, die ervoor
dient om de zachtheid en de luchtigheid ervan te handhaven.
De gegeven tijden hebben betrekking op de automatische
programma’s. De gewichten hebben betrekking op droge
kledingsstukken.
Katoen
Hoge temperatuur
1 kg
30 - 40 minuten
Syntetisch
Lage temperatuur
1 kg
30 - 40 minuten 40 - 50 minuten 50 - 70 minuten
Droogtijden na wasbeurten met 800-1000 omwentelingen per minuut
2 kg 3 kg 4 kg 5 kg 6 kg 7 kg
40 - 55 minuten
55 - 70
minuten
Droogtijden na wasbeurten met lagere snelheden
70 - 80 minuten 80 - 90 minuten 95 - 120 minuten 120 - 140 minuten
2 kg 3 kg
76
Page 77

Waarschuwingen
en raad
! Dit apparaat is ontworpen en uitgevoerd volgens de gel-
dende internationale veiligheidsnormen. Deze aanwijzingen
zijn voor uw eigen veiligheid geschreven en moeten aandachtig worden doorgenomen.
Algemene veiligheid
• Deze droger mag niet worden gebruikt door personen
(incl. kinderen) met een beperkt lichamelijk, sensorieel of
geestelijk vermogen of personen zonder ervaring of kennis, behalve als deze worden gecontroleerd of instructies
krijgen betreffende het gebruik van het apparaat door een
persoon die verantwoordelijk is voor hun veiligheid.
• Deze droger is ontwikkeld voor niet professioneel hui-
shoudelijk gebruik.
• Raak het apparaat niet aan als u blootsvoets bent of met
natte handen of voeten.
• Schakel het apparaat los van het elektriciteitsnet door aan
de stekker zelf te trekken en niet aan de kabel.
• Laat kinderen niet dichtbij het werkende apparaat komen.
Doe de droger na het gebruik uit en schakel hem los van
het elektriciteitsnet. Houd de deur dicht om te voorkomen
dat kinderen met de droger spelen.
• Let goed op kinderen om te voorkomen dat ze met de
droger spelen.
• Het apparaat moet juist geïnstalleerd worden en moet
goed geventileerd zijn. De luchttoevoer op de voorzijde
van de droger en de luchtroosters aan de achterzijde
mogen nooit worden bedekt (zie Installatie).
• Gebruik de droger nooit op een vloerbedekking als de
hoogte van de haren belemmert dat er lucht wordt toegevoerd via de onderzijde van de droger.
• Controleer of de droger leeg is voordat u hem inlaadt.
• De achterzijde van de droger kan erg heet worden:
raak hem nooit aan als het apparaat in werking is.
• Gebruik de droger niet als het filter, het waterreservoir en de
Warmtepomp niet goed op hun plaats zitten (zie Onderhoud).
• Doe niet teveel wasgoed in de droger ( zie Wasgoed voor
maximaal laadvermogen).
• Doe geen drijfnatte was in de droger.
• Volg altijd aandachtig de was- en drooginstructies op de
etiketten van de kledingstukken (zie Wasgoed).
• Doe geen overmatig grote kledingstukken in de droger.
• Droog geen acrylvezels op hoge temperatuur.
• Beëindig elk programma met de bijhorende koude droogfase.
• Schakel de droger niet uit als er nog warm wasgoed in zit.
• Reinig het filter na elk gebruik (zie Onderhoud en verzorging).
• Leeg het waterreservoir na elk gebruik (zie Onderhoud).
• Reinig regelmatig de Warmtepomp (zie Onderhoud) .
• Vermijd het ophopen van pluis rondom de droger.
• Ga niet op het bovenpaneel van de droger staan omdat u
het apparaat zou kunnen beschadigen.
• Respecteer altijd de normen en de elektrische eigen-
schappen (zie Installatie) .
• Koop altijd originele accessoires en reserveonderdelen
(zie Service).
• Stop geen items in de droogautomaat die zijn bemorst of
doordrenkt met plantaardige olie of slaolie, aangezien dit
risico’s op brandontwikkeling teweegbrengt. Oliebevattende items kunnen spontaan ontbranden, in het bijzonder
wanneer ze worden blootgesteld aan hittebronnen zoals
een droogautomaat. De items worden warm, wat een
oxidatiereactie met de olie veroorzaakt. Door oxidatie
ontstaat hitte. Als de hitte niet kan ontsnappen, kunnen
de items zo warm worden dat ze vuur vatten. Het opeenstapelen of opbergen van oliebevattende items kan ertoe
leiden dat de hitte niet kan ontsnappen waardoor er een
risico op brandontwikkeling ontstaat. Als het onvermijdelijk is dat stoffen die plantaardige olie of slaolie bevatten
of die vervuild zijn met haarverzorgingsproducten, in
een droogautomaat worden geplaatst, moeten ze eerst
worden gewassen met extra wasmiddel – dit zal het risico
verminderen maar niet volledig elimineren. De koelfase
moet worden gebruikt om de temperatuur van de items
te verlagen. De items mogen niet uit de droogautomaat
worden gehaald en opeengestapeld wanneer ze nog
warm zijn.
●• Droog geen items die voordien zijn gereinigd in, zijn
gewassen in, zijn doordrenkt met of zijn vervuild met
petrolium/benzine, solventen voor chemische reiniging
of andere ontvlambare of explosieve substanties. Erg
ontvlambare stoffen die vaak worden gebruikt in huishoudelijke omgevingen, waaronder slaolie, aceton, gedenatureerde alcohol, kerosine, vlekverwijderaars ,terpentijn,
was en wasverwijderaars. Zorg ervoor dat deze items
zijn gewassen in warm water met een extra hoeveelheid
wasmiddel alvorens ze worden gedroogd in de droogautomaat.
●• Droog geen items die schuimrubber of gelijkaardige
rubberachtige materialen met dezelfde structuur bevatten.
Schuimrubbermaterialen kunnen, wanneer ze worden
verwarmd, vuur produceren door spontante ontbranding.
●• Wasverzachter of gelijkaardige producten mogen niet
worden gebruikt in een droogautomaat om statische
elektriciteit te voorkomen, tenzij de praktijk specifiek
wordt aanbevolen door de fabrikant van de wasverzachter.
• Droog geen ondergoed dat metalen verstevigingen bevat,
zoals beha’s met metalen beugels. Wanneer de metalen
beugels loskomen tijdens het drogen, kan de droogautomaat worden beschadigd.
• Droog geen rubber, plastic items zoals douchekapjes of
waterdichte hoezen voor babies, polyethyleen of papier.
• Droog geen items met een rubberen achterkant, kledij
met schuimrubberen vulkussentjes, kussens, overschoenen en tennisschoenen met rubberen coating.
• Haal de zakken leeg, met name aanstekers zijn gevaarlijk
(explosiegevaar).
! BELANGRIJK: stop de droger nooit voor het einde van de
droogcyclus, tenzij u alle kledingstukken snel verwijdert en
ophangt zodat de warmte wordt verdreven.
NL
Om het risico op brandontwikkeling in uw droogautomaat
te minimaliseren, moeten de volgende instructies in acht
worden genomen:
• Droog alleen artikelen in de droogautomaat die gewassen
zijn met wasmiddel en water en die vervolgens zijn afgespoeld en gecentrifugeerd. Het drogen van artikelen die
NIET met water zijn gewassen kan brandgevaar opleveren.
●• Droog geen kleding die behandeld is met chemische
middelen.
Energiebesparing en respect voor het milieu
• Voor u de kledingstukken droogt kunt u ze beter goed uitwringen om zoveel mogelijk water te verwijderen (als het wasgoed
uit de wasautomaat komt kunt u de centrifuge gebruiken). Op
deze manier bespaart u energie tijdens het drogen.
• Als u de droger altijd met volle lading gebruikt bespaart u
energie: enkele kledingstukken en kleine ladingen doen er
langer over om te drogen.
• Reinig het filter aan het einde van elke cyclus zodat de kosten van energie kunnen worden beperkt (zie Onderhoud) .
77
Page 78

Zorg en onderhoud
Onderbreking van de electrische
voeding
NL
! Maak de wasdroger los van het net als deze niet werkt of
als men bezig is met de reiniging of het onderhoud.
Reiniging van het filter na elke cyclus
Het filter is van fundamentele betekenis bij het drogen: het
dient voor het verzamelen van de stof, dat zich vormt tijdens
het drogen.
Na afloop van de droging moet men het filter dus reinigen
door het onder stromend water af te spoelen, of met een
stofzuiger. Een vol filter belemmert de luchtstroming in de
wasdroger met ernstige gevolgen voor: de droogtijd en het
energieverbruik. Ook kan de wasdroger schade oplopen
Het filter bevindt zich vóór de afdichting van de wasdroger
(zie afbeelding).
Verwijdering van het filter:
1. Trek het filter aan de plastic handgreep omhoog (zie
afbeelding).
2. Reinig het filter en zet het
op de juiste manier weer terug. Controleer dat het filter
helemaal erin zit: het moet
opgelijnd zijn met de afdichting van de wasdroger.
! Gebruik de wasdroger niet
zonder eerst het filter op
zijn plaats te hebben terug
gezet.
Controle van het mandje na elke cyclus
Draai met de hand de trommel rond om te controleren of er
nog (kleine) stukken inzitten, zoals zakdoeken.
Reiniging van de trommel
! Voor de reiniging van de trommel mag men geen schuur-
middelen, staalwol of schoonmaakmiddelen voor inox
gebruiken.
Anders kan er zich een gekleurd laagje op de trommel
vormen, dit kan komen door een reactie tussen water en/of
reinigingsmiddelen, zoals wasverzachter. Dit gekleurde laagje
heeft geen enkele invloed op de prestaties van de wasdroger.
Legen van het watervat na elke cyclus
Haal het waterverzamelvaatje uit de wasdroger en leeg het in
een wasbak of iets dergelijks, daarna moet men het weer op
de juiste manier terugzetten.
Controleer altijd dit vaatje en leeg het voordat men een
nieuw droogprogramma opstart.
Reiniging van de condensatie-eenheid
• Verwijder regelmatig (elke maand) de condensatie-eenheid
en reinig eventuele stof van de platen door de achterkant
van de condensator onder een kraan met koud water af
te spoelen.
Verwijderen van de condensator:
1. Haal de wasdroger van het electrische net af en open het
deurtje.
2. Open het deksel van de condensator (zie afbeelding),
maak de drie hendels los door ze 90° tegen de klok in te
draaien, daarna de condensator aan de handgreep eruit
trekken.
3. Reinig het oppervlak van de afdichtingen en zet de een-
heid met de pijlen naar boven, controleer dat de hendeltjes weer goed zijn vastgemaakt.
Reiniging van de wasdroger
• De externe metalen, rubber en plastic delen kunnen met
een vochtige doek worden schoongemaakt.
• Elke 6 maanden moet men met een stofzuiger het luch-
tinlaatrooster aan de voorkant en de luchtuitlaten aan
de achterkant van de wasdroger schoonmaken om stof
te verwijderen. Bovendien moet men met een stofzuiger
de stof aan de voorkant van de condensator en het filter
verwijderen.
! Gebruik geen oplosmiddelen of schuurmiddelen
! De wasdroger heeft kogellagers, die geen smering nodig
hebben.
! Laat de wasdroger regelmatig controleren door bevoegd
technisch personeel, zodat de veiligheid van de electrische
en mechanische onderdelen kan worden gegarandeerd (zie
Service).
Waterverzamelvaatje
Condensatie-eenheid
78
Hendeltjes
Handgreep
Luchtinlaat
Deksel van de
condensator
Filter
Kraan
Achterkant
Condensatie-eenheid
Voorkant
Page 79

Problemen
en oplossingen
In het geval dat men de indruk heeft dat de wasdroger niet goed werkt, moet men, voordat men naar het servicecentrum belt,
(zie Service) zorgvuldig de volgende hints raadplegen voor het zelf oplossen van problemen.
NL
Probleem:
De wasdroger start niet.
De droogcyclus start niet.
Er zijn lange droogtijden.
Het lampje “Vaatje leegmaken”
knippert.
Waarschijnlijke oorzaken / oplossingen:
• De steker zit niet goed in de contactdoos en maakt geen contact.
• De spanning is uitgevallen.
• De zekering is doorgebrand. Probeer een ander toestel op dezelfde contactdoos
aan te sluiten.
• Indien men een verlengsnoer gebruikt kan men proberen om de wasdroger meteen
in de contactdoos te steken.
• Het deurtje zit niet goed dicht
• Het programma is niet op de juiste manier ingesteld (zie Hoe men de was droogt).
• Niet goed gedrukt op de knop START/PAUSE (zie Hoe men de was droogt).
• Men heeft een vertraging ingesteld (zie Programma’s en opties).
• Men heeft gedrukt op START/PAUSE; vóór de start van de wasdroger is er een
korte vertraging. Wacht tot het drogen begint, druk niet opnieuw op START/PAUSE:
anders gaat de wasdroger in pauze en zal niet beginnen met drogen.
• Het filter werd niet schoon gemaakt (zie Onderhoud).
• Is het vaatje met water leeg? Het lampje “Vaatje leegmaken” knippert
(zie Onderhoud).
• De condensator moet schoon worden gemaakt (zie Onderhoud).
• De ingestelde temperatuur is niet geschikt voor het type te drogen weefsel (zie
Programma’s en opties).
• Men heeft niet de juiste droogtijd gekozen voor deze was (zie Was).
• De luchtinlaat of de luchtuitlaten achter zijn verstopt (zie Installatie en Onderhoud).
• De kleding is te nat (zie Was).
• Er zit teveel was in de wasdroger (zie Was).
• Waarschijnlijk heeft men het waterverzamelvaatje niet geleegd aan het begin van het
programma. Wacht niet op het signaal voor het legen van het vaatje maar controleer
(Zult u 3 piepsignalen horen, het lampje “Vaatje leegmaken” knippert) altijd zelf dit
vaatje en leeg het voordat men een nieuw droogprogramma opstart (zie Beschrijving
van de wasdroger).
Het programma stopt maar de
kledingsstukken zijn vochtiger dan
verwacht.
De lampjes van de “opties”
en het lampje voor “start/
pauze” knipperen en een van de
onderhoudslampjes of van de
“droogfasen” zullen continu gaan
branden.
De wasdroger maakt lawaai tijdens
de eerste minuten.
Hoewel de droger ingeschakeld
is, zijn de lampjes van het bedieningspaneel van de droger uit.
! Vanwege de veiligheid hebben de droogprogramma’s een maximale tijdsduur van 4
uur.. Indien een automatisch programma niet de gevraagde vochtigheid detecteert
binnen deze tijd, zal het toch ermee ophouden. Controleer de boven aangegeven
punten en herhaal het programma; als de kleding toch nog vochtig is neem dan
contact op met het servicecentrum (zie Service).
• Men moet het apparaat uitzetten en de steker eruit trekken. Reinig dan het filter en
de condensator (zie “Zorg en Onderhoud). Daarna steekt men de steker er weer in
zet het apparaat aan en start een ander programma. Indien de storing blijft, moet
men de Servicedienst bellen.
• Het komt vooral voor als de droger voor een bepaalde tijd niet is gebruikt. Indien
het lawaai tijdens het drogen niet vermindert, moet men contact opnemen met het
servicecentrum.
De droger is in de standby-modus gegaan om energie te besparen. Dit gebeurt als u de
droger aangelaten heft of als er een stroomstoring geweest is. Dit gebeurt na 30 minuten.
- Als u de droger achterlaat zonder een programma te starten;
- nadat een droogprogramma geëindigd is.
Druk op de ON/OFF toets en houdt de toets ingedrukt totdat de droger weer in
werking treedt.
79
Page 80

Service
12/2012 - Xerox Fabriano
Voordat men het servicecentrum belt:
NL
• Volg de leidraad voor het oplossen van de problemen om
te kijken of men het zelf kan oplossen (zie Problemen en
oplossingen).
• Anders moet men de wasdroger uitzetten en het
dichtstbijzijnde servicecentrum bellen.
Gegevens, die men moet melden aan het servicecentrum:
• Naam, adres, en postcode;
• telefoonnummer;
• het type defect;
• de datum van de aanschaf;
• het model van het apparaat (Mod.);
• het serienummer (S/N) van de wasdroger.
Deze informatie vindt men op het gegevensetiket achter het
kijkglas.
Informatie betreffende recycling en afvalverwijdering
Met het oog op onze constante inzet het milieu te sparen behouden wij ons het recht voor gerecyclede kwaliteitsmaterialen te gebruiken teneinde de kosten voor de eindgebruiker te beperken en een verspilling van materialen tot het minimum terug te dringen.
• Verwijdering van het verpakkingsmateriaal: volg de plaatselijke normen zodat het verpakkingsmateriaal hergebruikt kan worden.
• Om het risico van ongelukken met kinderen te vermijden verwijdert u de deur en de stekker en snijdt u het snoer vlakbij het appa-
raat door. Verwijder deze delen op afzonderlijke wijze om u ervan te verzekeren dat het apparaat niet meer aan een stopcontact
kan worden bevestigd.
Reserveonderdelen
Deze droger is een complexe machine. Als men haar zelf
probeert te repareren of hiervoor niet gekwalificeerd personeel voor inroept, riskeert men de veiligheid van personen,
schade aan de machine en het vervallen van de garantie op
reserveonderdelen.
In geval van problemen met deze machine moet men altijd
contact opnemen met een bevoegde technicus.
Het verwijderen van oude huishoudelijke apparatuur
De Europese richtlijn 2012/19/EG betreffende afgedankte elektrische en elektronische apparatuur (AEEA) voorziet dat huishoudelijke apparatuur niet met het normale afval kan worden meegegeven. De afgedankte apparatuur moet apart worden
opgehaald om het wedergebruik van materialen waarvan hij is gemaakt te optimaliseren en om potentiële schade aan de
gezondheid en het milieu te voorkomen.
Deze droger gebruikt een verzegelde warmtepomp waarin zich gefluoreerde gassen bevinden die moeten worden gerecycled.
Het symbool van de afvalemmer met een kruis staat op elk product, om aan te geven dat het apart moet worden weggegooid.
Voor verdere informatie betreffende het correcte verwijderen van huishoudelijke apparatuur kunnen de gebruikers zich wenden tot
de gemeentelijke reinigingsdienst of de verkoper.
80
Dit toestel is in overeenstemming met de volgende CE richtlijnen:
- 2006/95/CE (Bepalingen voor laagspanning);
- 2044/108/CE (Electromagnetische compatibiliteit).
 Loading...