


Instruction Manual
FD2005 USB3.0 Dual SATA HDD Docking Station
With Offline Clone Function
English · Deutsch · · Français · Italiano · Español

English
Introduction
This Inateck docking station is a versatile storage device for duplicating hard drives as well as a high capacity USB 3.0 storage. The simple docking design offers quick access and removal of your hard drives for storage or data offline clone. With USB 3.0 the dock ensures high-bandwidth transfer speeds up to 5 Gbps and it also supports full SATA III bandwidth of 6 Gbps. Reverse compatible with USB 2.0 and 1.1, this enclosure is a perfect solution for data transfers or data backup.
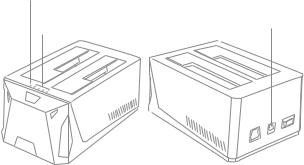
Overview
Power LED Indicator
Power Adapter Port
Status LED indicator
|
|
|
|
|
|
|
|
|
|
|
|
|
|
|
|
|
|
|
|
|
|
|
|
|
Hard Drive LED Indicator |
|
Power Switch |
||
|
|
|
|
|
|
Offline Clone Button |
USB 3.0 Port |
||||
|
|
|
|||
1
How to Use
1.Connect the external power adapter from the hard drive dock to an electrical outlet.
2.Connect the included USB 3.0 cable from the hard drive dock to an available USB port on the computer system.
3.Insert a 2.5” or 3.5” hard drive into the top loading slot.
4.Press the power button. A pop-up bubble in the task bar at the bottom-right of your screen notifying you once your hard drive has been recognized. You may also find the hard drive in Disk Management.
Note:
a.To remove the hard drive, make sure it is currently not being accessed by the computer then unmount or uninstall the disk drive from the operating system. Never remove the docking station while the hard drive is in use. Doing so may corrupt the data on the hard drive or damage the hard drive, docking station, or computer.
b.When connected via USB, the dock will automatically go into sleep mode if the connection is left idle for more than 30 minutes. The power LED indicator will flash every 3 seconds. Accessing the hard drive will automatically cancel sleep mode and power the drive back up. The hard drive LED indicator will flash and the power LED indicator will be constantly on.
c.Please do not remove your hard drive or insert a new one while the other hard drive is being accessed, as doing so the other drive temporarily disconnects and this could damage your hard drive and result in data loss.
Hard Drive Offline Clone
1.Make sure there are no connection on the USB.
2.Insert the drives straight down until the connection is secured. Offline clone is from HDD A to HDD B. Make sure your Main Drive is in HDD A and slave in HDD B. The capacity of HDD B must be equal or bigger than HDD A.
3.Press and hold the offline clone button for 3 seconds, the LED indicator will light up. Then quickly press the offline clone button and the offline clone operation will start. Each LED represents 25% completion. It is only when every 25% of HDD A is offline clone to HDD B that such LED will remain constantly on. When offline clone operation is fully completed, all LEDs will constant on until the device is power off.
2

Technical Specifications
Product Name |
USB3.0 Dual SATA HDD Docking Station with Offline Clone Function |
|
|
Model Number |
Inateck FD2005 |
|
|
Weight |
294 |
|
|
Color |
Black |
|
|
Drive Size |
2.5”/3.5” SATA I/II/III HDD/SSD |
|
|
Interface |
USB3.0 up to 5Gbps |
|
|
Material |
ABS plastic |
|
|
Hot Plug, Plug & Play |
Supported |
|
|
Licenses |
CE, FCC |
|
|
Dimensions |
158mm length × 100mm width × 68mm height |
|
|
Environmental |
Storage: -20 to 70 ° C; Operating: 5 to 40 ° C |
|
|
Operating Systems |
Windows XP/7/8/8.1/10, Mac OS 9.0 and higher |
|
|
Tool free |
Yes |
|
|
Driver |
No software or drivers required |
|
|
Package Contents
FD2005 Docking Station × 1
USB 3.0 Data Cable × 1
DC Power Adapter × 1
Instruction Manual × 1
Troubleshooting/FAQ
Q: Unable to clone.
A: Please check if the capacity of Disk B is larger or equivalent to that of Disk A. Here the capacity means the actual capacity that can be used, instead of the one marked on the product. For example, the actual capacity of a disk marked 500GB might be 480GB only. The actual capacity of disks with the same marked capacity differs if they are produced by different producers. To ensure two disks of the same marked capacity have the same actual capacity, they should be produced by the same producer in the
same batch with the same model number. |
3 |
|
Q: LED indicator turns off during offline offline clone.
A:Hard drive with bad sectors might not be directly cloned. It is advised to repair the bad sectors first or simply replace it with a new hard drive.
Q: I cannot see the capacity remaining in HDD B after the offline clone.
A:If the capacity for HDD B is bigger than HDD A, the capacity remaining in HDD B upon completion of the offline clone should be formulated to a new partition. Go to Control Panel and select Administrative Tools. From there, choose Computer Management. On the left panel, select Disk Management. Windows should now give you the option to initialize the disk.
Q: Why can I not read more than 2TB?
A:The MBR is an old style which has limitations that allowing only partition sizes less than 2TB and only four primary partitions. You need to convert MBR to GPT if you want to make your partition size larger than 2TB.
Q: Can I recover my data in HDD B?
A:All data in HDD B will be deleted once offline clone starts. Before you attempt to clone your hard drive, we highly recommend backing up all your data first.
Q: How come my hard drives are not showing up?
A:Disconnect the FD2005 from your computer. Wait a few moments and then reconnect the device; Connect the FD2005 to another USB port. If the problem still exists, the hard drive might need to be reformatted. If needed open up Disk Management which can initiate / format / partition hard drives. You can also use third-party software such as Fdisk, DM or PQ Magic to do this.
Support
For any inquiries or comments concerning our products, please send an email to support@inateck.com, and we will respond to you as soon as possible.
4
Deutsch
Einführung
Diese Inateck-Dockingstation ist eine vielseitige Speichererweiterungslösung zum Duplizieren von HDD-Datenstrukturen und Zugriff auf hochkapazitative USB 3.0 Speicherlösungen. Die Konstruktion ermöglicht ein schnelles und bequemes Wechseln von Datenträgern zwecks Datenzugriff und Duplikation. Mit dem integrierten USB 3.0 sind theoretische Maximalgeschwindigkeiten von 5 Gb/s möglich, mit zusätzlicher Unterstützung der theoretischen SATA-III-Bandbreite von 6 Gb/s. Mit einer Abwärtskompatibilität zu USB 2.0 und USB 1.1 ist diese Dockingstation die ideale Lösung für schnellen Datenzugriff und bequemes Klonen.
Produktübersicht
Status-LED Netz
Netzeingang Gleichstrom
Allgemeiner Status-LED
|
|
|
|
|
|
|
|
|
|
|
|
|
|
|
|
|
|
|
|
|
|
|
|
|
Status-LED HDD-Betrieb |
|
Netzschalter |
||
|
|
|
|
|
|
Duplikationsknopf |
USB 3.0 Schnittstelle |
||||
|
|
|
|||
5
Betrieb und Verwendung
1.Verbinden Sie das Netzteil mit der Steckdose und den Gleichstromstecker mit der Netzbuchse an der Station.
2.Verbinden Sie das USB 3.0 Kabel mit den entsprechenden Anschlüssen an Station und Rechner.
3.Setzen Sie ein Laufwerk in einen der Einschübe an dere Oberseite ein.
4.Betätigen Sie den Netzschaltewr. Eine Systemmitteilung in der Statusleiste des Systems teilt Ihnen zeitnah mit, wenn der Treiber installiert wurde und der Datenträger zwecks Zugriff verfügbar ist. Außerdem kann der Datenträger in der Datenträgerverwaltung aufgefunden und eventuell noch einmal initialisiert werden.
Bitte beachten:
a.Um Laufwerke sicher zu entfernen, achten Sie bitte darauf, das skein Zugriff auf den Datenträger erfolgt. Werfen Sie den Datenträger nun über das System aus. Bitte das Laufwerk nicht entfernen, während es in Betrieb ist, um Datenverlust und Beschädigungen zu vermeiden.
b.Im USB-Modus geht die Dockingstation automatisch nach 30 Minuten in den Ruhezustand über, wenn kein Zugriff erfolgt. In diesem Zustand blinkt die Netz-LED alle drei Sekunden. Bei erneutem systemseitigen Zugriff fährt das Laufwerk automatisch hoch. Die Betriebs-LED blinkt dann, während die Netz-LED permanent leuchtet.
c.Laufwerke sollten niemals während des laufenden Betriebs gewechselt oder entnommen werden, da sonst schwere Beschädigungen und Datenverlust auftreten können.
Duplikation von Datenträgern
1.Stellen Sie sicher, dass die USB-Verbindung zum Rechner getrennt ist.
2.Setzen Sie die Laufwerke in die Schächte, bis diese fest in den SATA-Schnittstellen sitzen. Die Duplikation geschieht von Schacht A auf Schacht B. Das Quelllaufwerk muss daher in Schacht A und das Ziellaufwerk in Schacht B stecken. Die Kapazität des Ziellaufwerks muss gleich groß oder größer als die des Quelllaufwerks sein.
3.Schalten Sie die Station ein und halten den Duplikationsknopf für ca. drei Sekunden gedrückt. Die allgemeine Status-LED sollte anfangen zu leuchten. Drücken Sie nun schnell den Duplikationsknopf für noch einmal drei Sekunden, um die Duplikation zu starten. Jede blinkende Status-LED repräsentiert einen Duplikationsfortschritt von jeweils 25%. Sind je 25% Duplikation abgeschlossen, leuchtet die entsprechende Status-LED permanent. Nach erfolgter Duplikation blinken alle LED regelmäßig, bis die Station ausgeschaltet wird.
6

Technische Daten
Produktname |
USB3.0 Dual SATA HDD Docking Station mit Offline Klonfunktion |
|
|
Typenbezeichnung |
Inateck FD2005 |
|
|
Gewicht |
294 Gramm |
|
|
Farbe |
Schwarz |
|
|
Unterstützte Laufwerke |
2.5”/3.5” SATA I/II/III HDD/SSD |
|
|
Schnittstelle |
USB 3.0 mit theoretisch bis zu 5 Gb/s |
|
|
Material |
ABS-Kunststoff |
|
|
Hot Plug, Plug & Play |
Unterstützt |
|
|
Zertifikanzen |
CE, FCC |
|
|
Maße |
158 mm Länge × 100 mm Tiefe × 68 mm Höhe |
|
|
Umgebungsbedingungen |
Lagerung: -20 bis 70 ° C; Betrieb: 5 bis 40 ° C |
|
|
Kompatible Betriebssysteme |
Windows XP/7/8/8.1/10, Mac OS 9.0 und höher |
|
|
Werkzeuglos |
Ja |
|
|
Treiber |
Keine gesonderten Treiber oder Programme nötig |
|
|
Lieferumfang
FD2005 Dockingstation × 1
USB 3.0 Datenkabel × 1
Netzteil AC/DC × 1
Bedienungsanleitung × 1
Lösungsansätze und Antworten
F: Kann nicht geklont werden.
A:Bitte überprüfen Sie, ob die reale physikalische Kapazität von Laufwerk B größer oder gleich groß der von Laufwerk A ist. Die reale Kapazität ist die, die auf dem Laufwerk wirklich genutzt werden kann, erkennbar an der Sektorenanzahl, anstatt der auf dem Etikett angegebenen theoretischen Kapazität. Zum Beispiel kann ein Datenträger mit 500GB Kapazität ausgewiesen sein, verfügt jedoch real nur über eine reale Kapazität von 48 0GB. In der Regel verfügen Laufwerke von verschiedenen Herstellern über unterschiedliche Kapazitäten, auch wenn auf dem Etikett die gleiche Kapazität
angegeben ist. Um wirklich sicher zu gehen, daß deklarierte und reale Kapazität zumindest gleich groß sind, empfiehlt sich ein Rückgriff auf Laufwerke mit der gleichen
Typenund Chargenbezeichnung des gleichen Herstellers. |
7 |
 Loading...