

Page 1
사용 설명서
说明手册
0,/.
MANUALE DI ISTRUZIONI - INSTRUCTION MANUAL
MANUEL D’UTILISATION - BEDIENUNGSANLEITUNG
MANUAL DE INSTRUCCIONES - MANUAL DE INSTRUÇÕES
HANDLEIDING - BRUGSANVISNING - ΕΓΧΕΙΡΙΔΙΟ ΟΔΗΓΙΩΝ ΧΡΗΣΗΣ - РУКОВОДСТВО ПО ЭКСПЛУАТАЦИИ 사용 설명서 -
说明手册 -
Page 2

REGOLE GENERALI PER L’USO DELLA MACCHINA DATI TECNICI
Leggere attentamente il libretto di istruzioni e le limitazioni sulla garanzia.
La macchina deve essere allacciata ad una regolare presa di corrente fornita di messa a terra. La macchina
deve essere mantenuta pulita lavando frequentemente il poggia tazze, la vaschetta raccogli gocce, la
vaschetta di raccolta delle capsule usate, il serbatoio dell’acqua ed il piano poggia tazze in vetro. La
manutenzione va eseguita a macchina spenta.
IMPORTANTE: mai immergere la macchina o le sue componenti rimovibili in acqua o introdurla in
lavastoviglie.
L’acqua contenuta nel serbatoio deve essere regolarmente sostituita. Non usare la macchina senza acqua
nel serbatoio. Si consiglia di utilizzare almeno ogni 2 mesi un prodotto per la rimozione del
calcare appositamente studiato per le macchine per espresso secondo le indicazioni del
capitolo decalci cazione.
SCOPRI E ACQUISTA LE CAPSULE ILLY IPERESPRESSO SU SHOP.ILLY.COM, NEI BAR ILLY RIVENDITORI AUTORIZZATI O TELEFONA AL NUMERO VERDE 800821021 SOLO DALL’ITALIA
Materiale macchina: Alluminio e vetro temperato
Materiale scambiatore termico: Acciaio inox
Serbatoio acqua: 0,9 litri
Serbatoio latte: 0,5 litri
Capacità vaschetta capsule usate: 10 capsule
Pompe: ca è 19 bar - latte 2.5 bar
Peso: 5 kg
Voltaggio: 220-240 V , 50/60 Hz (EU); 120 V, 60 Hz (USA)
Potenza: 1.200 W (EU-USA) - Con funzionalità “Power Save”
Dimensioni (L x P x A) (mm): 215 x 285 x 245
Il produttore si riserva il diritto d’apportare modi che o miglioramenti senza preavviso.
GENERAL MACHINE OPERATING RULES TECHNICAL SPECIFICATIONS
Carefully read the instruction manual and warranty limitations.
The appliance must be connected to a properly earthed power socket. The machine must be kept clean by
frequently washing the cup holder. the drip tray, the used capsule tray, the water tank and the glass cup
holder surface. Any maintenance operation shall be carried out when the machine is o .
IMPORTANT: never immerse the machine or its removable components in water or put it in the dishwasher.
The water in the tank must be replaced regularly. Do not use the co ee machine without water in the tank.
The use of a descaling product especially designed for espresso co ee machines is recommended
at least every 2 months as described in the Descaling chapter.
Machine material: Aluminium and tempered glass
Heat exchanger material: Stainless Steel
Water Tank: 0.9 litres /30oz.
Milk Tank: 0.5 litres/ 16.9oz.
Used capsule tray capacity: 10 capsules
Pumps: co ee 19 bar - milk 2.5 bar
Weight: 5 kg /176oz.
Voltage: 220-240 V , 50/60 Hz (EU); 120 V, 60 Hz (USA)
Power: 1,200 W (EU-USA) - With "Power Save" function
Size (W x D x H) : 215 x 285 x 245 (mm) / 8.5 x 11.2 x 9.6 (inch)
DISCOVER AND BUY ILLY IPERESPRESSO CAPSULES AT WWW.SHOP.ILLY.COM OR AT OUR FINEST RETAILERS.
2
The manufacturer reserves the right to make changes or improvements without prior notice.
Page 3

SOMMARIO
REGOLE GENERALI PER L’USO DELLA MACCHINA .......................................... 2
DATI TECNICI ............................................................................................. 2
PARTI DELLA MACCHINA ............................................................................ 4
IMPORTANTI MISURE DI SICUREZZA ........................................................... 5
INSTALLAZIONE E MESSA IN FUNZIONE DELLA MACCHINA ...........................11
PREPARAZIONE DEL CAFFÈ ........................................................................13
RACCOMANDAZIONI ..................................................................................14
REGOLAZIONE QUANTITÀ DI CAFFÈ IN TAZZA ..............................................15
UTILIZZO DEL SERBATOIO ED EROGATORE LATTE .........................................16
PREPARAZIONE DEL CAPPUCCINO ..............................................................18
PREPARAZIONE DEL LATTE MACCHIATO ......................................................20
CONTENTS
PREPARAZIONE DEL LATTE CALDO SCHIUMATO ...........................................22
REGOLAZIONE QUANTITÀ DI LATTE CALDO SCHIUMATO ...............................23
EROGAZIONE ACQUA CALDA .......................................................................24
REGOLAZIONE QUANTITÀ DI ACQUA CALDA EROGATA ...................................24
PULIZIA E MANUTENZIONE ........................................................................25
DECALCIFICAZIONE ...................................................................................29
LIMITAZIONI SULLA GARANZIA ..................................................................32
SEGNALAZIONI STATO MACCHINA ............................................................33
PROBLEMA CAUSA SOLUZIONE ...............................................................35
SMALTIMENTO..........................................................................................39
IT
EN
GENERAL MACHINE OPERATING RULES........................................................ 2
TECHNICAL SPECIFICATIONS ....................................................................... 2
MACHINE PARTS ........................................................................................ 4
IMPORTANT WARNINGS ............................................................................ 5
INSTALLATION AND STARTUP OF THE MACHINE .........................................11
PREPARING COFFEE ..................................................................................13
RECOMMENDATIONS .................................................................................14
ADJUSTING COFFEE QUANTITY IN THE CUP .................................................15
USING THE MILK TANK AND THE MILK DISPENSING SPOUT ..........................16
PREPARING CAPPUCCINO ..........................................................................18
PREPARING LATTE MACCHIATO ..................................................................20
PREPARING HOT FOAMED MILK .................................................................22
ADJUSTING HOT FOAMED MILK QUANTITY ..................................................23
DISPENSING HOT WATER ...........................................................................24
ADJUSTING DISPENSED HOT WATER QUANTITY ...........................................24
CLEANING AND MAINTENANCE ..................................................................25
DESCALING ..............................................................................................29
WARRANTY LIMITATIONS ..........................................................................32
WARNINGS MACHINE STATUS ..................................................................33
PROBLEM CAUSE SOLUTION ...................................................................37
DISPOSAL ................................................................................................39
3
Page 4
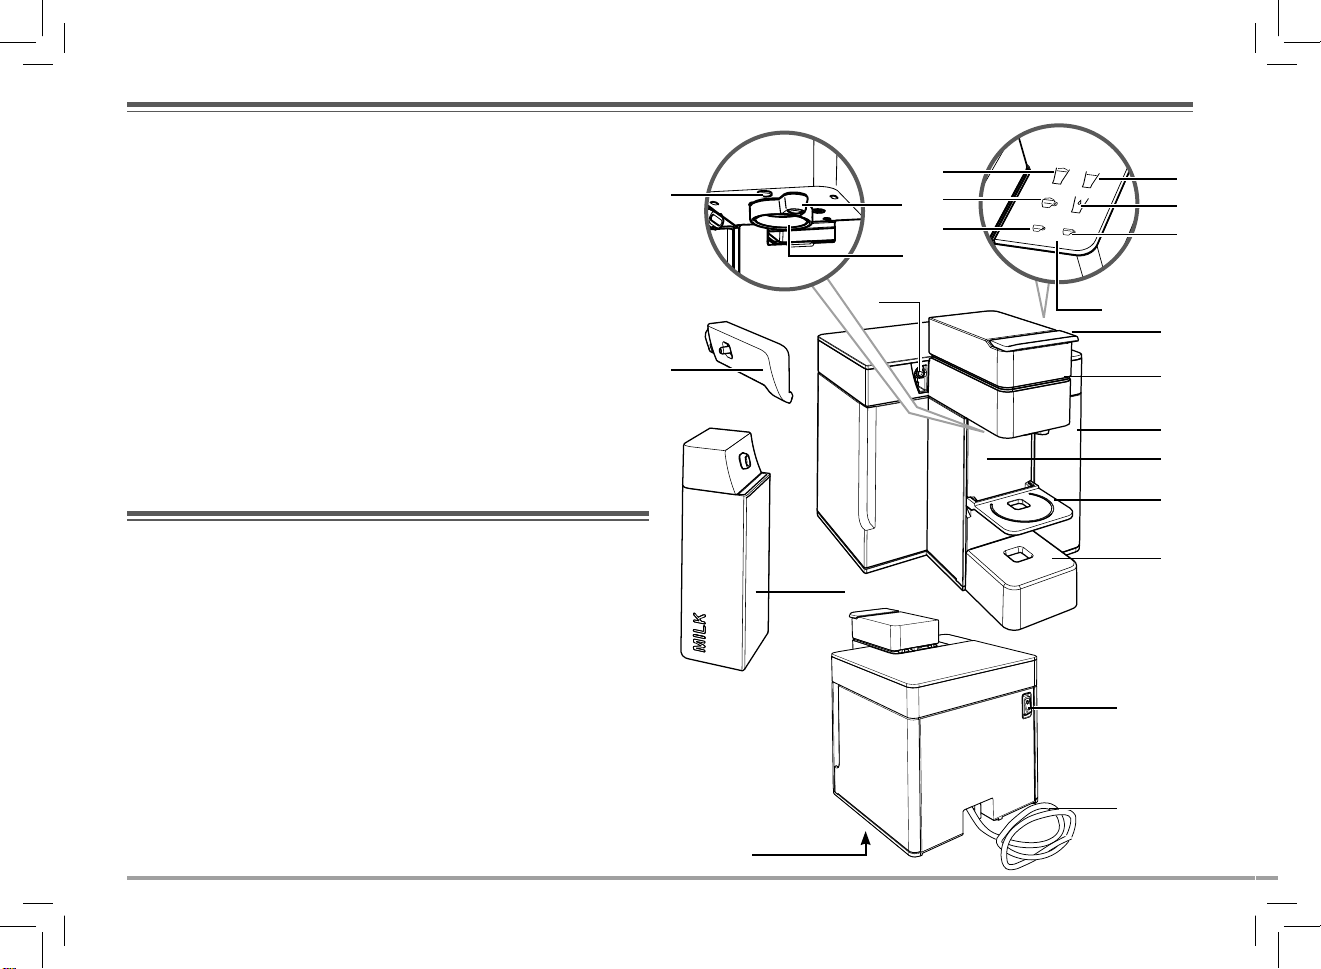
PARTI DELLA MACCHINA
A LED ILLUMINAZIONE
B EROGATORE ACQUA CALDA
C EROGATORE CAFFÈ
D INNESTO EROGATORE LATTE
E EROGATORE LATTE
F SERBATOIO LATTE
G PANNELLO COMANDI
G1 LATTE MACCHIATO
G2 CAPPUCCINO
G3 CAFFÈ ESPRESSO
G4 LATTE CALDO SCHIUMATO
G5 ACQUA CALDA
G6 CAFFÈ LUNGO
MACHINE PARTS
A ILLUMINATION LIGHT
B HOT WATER DISPENSING SPOUT
C COFFEE DISPENSING SPOUT
D MILK DISPENSING SPOUT CONNECTOR
E MILK DISPENSING SPOUT
F MILK TANK
G CONTROL PANEL
G1 LATTE MACCHIATO
G2 CAPPUCCINO
G3 ESPRESSO COFFEE
G4 HOT FOAMED MILK
G5 HOT WATER
G6 LONG COFFEE
4
H LEVA APERTURA/CHIUSURA SCOMPAR
TIMENTO CAPSULE
I SCOMPARTIMENTO CAPSULE
interno
L SERBATOIO ACQUA
M VASCHETTA RACCOLTA CAPSULE USATE
e residui liquidi di ne erogazione
N PIANO POGGIA TAZZINA ESPRESSO
O PIANO POGGIA TAZZA MUG
P INTERRUTTORE GENERALE
Q CAVO ALIMENTAZIONE
R TARGA DATI (sotto la base)
H CAPSULE COMPARTMENT OPENING/
CLOSING LEVER
I CAPSULE COMPARTMENT internal
L WATER TANK
M USED CAPSULE and post-brewing liquid
residues TRAY
N ESPRESSO CUP HOLDER SURFACE
O MUG HOLDER SURFACE
P POWER BUTTON
Q POWER CORD
R DATA PLATE on the bottom
G1
A
B
G2
G3
G4
G5
G6
C
D
G
H
E
I
L
M
N
O
F
P
Q
R
Page 5

IMPORTANTI MISURE DI SICUREZZA
Nell’utilizzo di apparecchiature elettriche devono essere sempre
osservate le seguenti misure di sicurezza.
Utilizzo dell’apparecchio
- Leggere tutte le istruzioni.
- Questa macchina è costruita per “fare il ca è espresso e per
erogare bevande con latte”: fare attenzione a non scottarsi con
getti d’acqua o con uso improprio della stessa.
- L’apparecchiatura è intesa per uso domestico e per applicazioni
simili, quali:
• cucine per il personale di negozi, u ci ed altri ambienti lavo-
rativi;
IMPORTANT WARNINGS
IT
EN
• agriturismo;
• clienti in alberghi, motel ed altri alloggi di tipo residenziale;
• ambienti tipo bed & breakfast.
- Utilizzare l’apparecchio solo per l’uso a cui è destinato. Ogni altro
uso è vietato e da considerarsi improprio e quindi pericoloso.
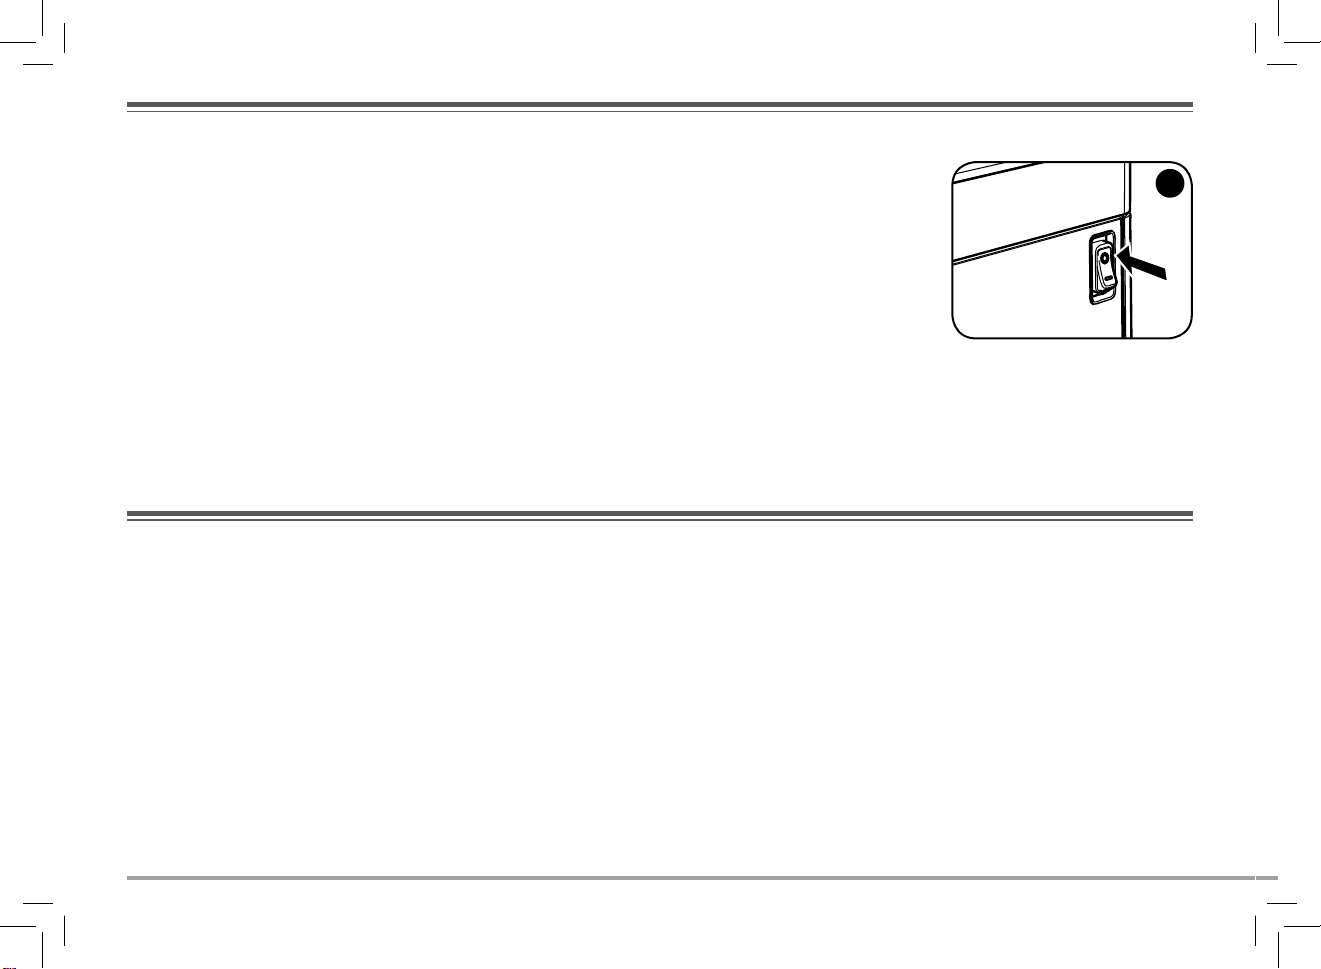
- L’apparecchio va acceso esclusivamente per il solo tempo necessario al suo utilizzo, dopodiché va spento portando l’interruttore
generale su “0” (Fig.1) e la spina va staccata dalla presa di corrente.
- Non toccare mai una super cie calda. Le erogazioni di acqua/
ca è della macchina possono causare ustioni.
- L’apparecchio non è destinato ad essere utilizzato da persone (compresi i bambini) con ridotte capacità siche, mentali o sensoriali
When using electrical appliances always follow the safety precautions
below.
Using the espresso machine
- Read all Instructions.
- This machine is manufactured to make espresso co ee and dispense
milk-based beverages: use care to prevent scalding due to water
jets or any improper use of the machine.
- This appliance is intended to be used in household and similar
applications such as:
• sta kitchen areas in shops, o ces and other working envi-
ronments;
• farm houses;
• hotels, motels and other residential type environments;
• bed and breakfast type environments.
- This machine is intended for household use only. Any other use is
considered improper and therefore dangerous.
- The machine must be turned on only when being used. After use,
it must be turned o by moving the main on/o switch to the “0”
position (Fig.1) and disconnecting the plug from the power outlet
- Do not touch hot surfaces. The water/co ee dispensed from the
machine may cause burns.
- The machine is not designed to be used by people (including children)
5
Page 6
IMPORTANTI MISURE DI SICUREZZA
o con esperienza e/o competenze insu cienti, a meno che non
siano sotto la supervisione di una persona responsabile della loro
sicurezza o non vengano da essa istruite sull’uso dell’apparecchio.
- Tenere i bambini sotto supervisione, per evitare che giochino con
l’apparecchio.
- Le operazioni di pulizia e manutenzione non devono essere
eseguite da bambini, a meno che non abbiano un’età superiore
agli 8 anni e siano supervisionati. Tenere l’apparecchio e il relativo
cavo fuori dalla portata dei bambini di età inferiore a 8 anni.
- Utilizzare l’apparecchio esclusivamente in luoghi chiusi e protetti
da agenti atmosferici esterni. Non utilizzare all’aperto.
- Per proteggersi dal fuoco, scosse elettriche o lesioni non immer-
IMPORTANT WARNINGS
with limited physical, mental or sensory abilities or insu cient
experience and/or skills, unless they are supervised by a person
responsible for their safety, who provides instructions on how to
use the appliance.
- Children must be kept under supervision to prevent them from
playing with the appliance.
- Cleaning and user maintenance shall not be made by children unless
they are older than 8 and supervised. Keep the appliance and its
cord out of reach of children aged less than 8 years.
- Use the machine only indoors, protected from weather. Do not use
outdoors.
6
gere il cavo, la spina ed il corpo
1
della macchina in acqua o altro
liquido.
- Non appoggiare l’apparecchio su
fornelli elettrici o a gas, o dentro
un forno caldo.
- L’utilizzo di accessori non raccomandati dal produttore può
provocare incendi, scosse elettriche o lesioni alle persone.
- Prima di disinserire la spina accertarsi che l’interruttore generale
sia sulla posizione “0” (Fig.1).
- To protect against re, electric shock or personal injury do not
immerse the cord, plug or the body of the machine in water or any
other liquid.
- Do not place the machine on, or near, electrical or gas burners or
inside a hot oven.
- Using attachments not recommended by the manufacturer may
result in re, electric shocks or personal injury.
- Before unplugging the machine make sure that the ON/OFF switch
is in the “0” position (Fig.1).
- Do not pull the plug out by the cord and never touch it with wet
hands.
Page 7

IMPORTANTI MISURE DI SICUREZZA
- Non estrarre la spina tirandola per il cavo e non toccarla con le
mani bagnate.
- Non portare o tirare la macchina per ca è tenendola per il cavo.
- Per ridurre il pericolo di ferite, non lasciare penzolare il cavo da
tavoli o banconi in quanto i bambini potrebbero tirarlo o inciampare involontariamente.
- In caso d’incendio utilizzare estintori ad anidride carbonica (CO2).
Non utilizzare acqua o estintori a polvere.
- Non bloccare mai le griglie di aerazione poste sulla base dell’apparecchio.
IMPORTANT WARNINGS
IT
EN
Installazione dell’apparecchio
- Leggere attentamente le istruzioni.
- Non installare mai la macchina in un ambiente che può rag-
giungere una temperatura inferiore o uguale a 0°C (se l’acqua si
ghiaccia, l’apparecchio può danneggiarsi) o superiore a 40°C.
- Veri care che la tensione della rete elettrica corrisponda a quella
indicata nella targa dati dell’apparecchio. Collegare l’apparecchio
solo ad una presa di corrente avente una portata minima di 6 A
per i modelli alimentati a 230 Vac e 15 A per i modelli a 120 Vac
e dotati di un’e ciente messa a terra.
- In caso di incompatibilità tra la presa di corrente e la spina dell’apparecchio, fare sostituire la spina con un’altra di tipo adatto, da
- Do not carry or pull the co ee machine by the cord.
- To reduce the risk of injury, do not drape cord over the counter top
or table top where it can be pulled on by children or tripped over
unintentionally.
- In case of re, extinguish with carbon dioxide (CO2). Do not use
water or powder extinguishers.
Never obstruct the vents on the base of the machine.
Installation of the espresso machine
- Read the instructions carefully.
- Do not install the machine in an area where the temperature may
reach 0°C/32°F or lower (if water freezes, the appliance may be
damaged) or higher than 40°C/104°F.
- Check that the mains electric voltage corresponds to the requirements
indicated on the machine data plate. Connect the machine only to
a properly grounded power outlet with a minimum rating of 6A
for models powered at 230Vac, and 15A for models powered at
120Vac.
7
Page 8

IMPORTANTI MISURE DI SICUREZZA
centro assistenza autorizzato.
- Posizionare l’apparecchio sopra un piano di lavoro lontano da
rubinetti dell’acqua e lavelli.
- Dopo aver tolto l’imballaggio, assicurarsi dell’integrità dell’apparecchio prima della sua installazione.
- Non lasciare alla portata dei bambini i materiali utilizzati per
imballare la macchina.
IMPORTANT WARNINGS
- If the plug and the outlet are not compatible, have the plug replaced
with a proper one by an authorized service center.
- Place the machine on a countertop away from water taps and sinks.
- After removing the packaging, check that the appliance is in perfect
condition before installation.
- Do not leave the packaging materials within children’s reach.
Pulizia dell’apparecchio
- Disinserire la spina dall’impianto elettrico quando si esegue la
pulizia.
- Lasciare ra reddare l’apparecchio prima della pulizia.
- Estrarre il serbatoio dell’acqua tirandolo leggermente verso l’alto
e poi verso l’esterno.
- Pulire la carrozzeria e gli accessori con un panno umido ed asciugare successivamente con un panno asciutto non abrasivo. È
sconsigliato l’uso di detergenti.
- Non sottoporre l’apparecchio ad abbondanti getti d’acqua o ad
immersioni parziali o totali.
Cleaning the espresso machine
- Unplug the machine before cleaning.
- Wait until the machine is cool before cleaning.
- Remove the water tank by pulling it up slightly and then outward.
- Clean the body and attachments with a wet cloth and then wipe
with a non-abrasive dry cloth. Do not use detergents.
- Do not expose the machine to extended jets of water or immerse
it in water, partially or fully.
8
Page 9

IMPORTANTI MISURE DI SICUREZZA
In caso di guasto dell’apparecchio
Non utilizzare l’apparecchio nel caso in cui il cavo o la spina siano
danneggiati, dopo un malfunzionamento della macchina o dopo
un danno di qualunque natura. Portare l’apparecchio al più vicino
centro di assistenza autorizzato per un controllo, riparazione o una
veri ca sul corretto funzionamento.
Se il cavo d’alimentazione è danneggiato, deve essere cambiato dal
produttore o dal suo servizio assistenza.
In caso di guasto o di cattivo funzionamento dell’apparecchio, spegnerlo e non manometterlo.
Per eventuali riparazioni, rivolgersi solamente ad un Centro di Assistenza Tecnica autorizzato dal costruttore e richiedere l’utilizzo di
IMPORTANT WARNINGS
IT
EN
ricambi originali. Il mancato rispetto di quanto sopra può compromettere la sicurezza dell’apparecchio e fare perdere il diritto alla
garanzia.
Uso improprio dell’apparecchio
- Il costruttore non può essere considerato responsabile per eventuali incidenti causati dalla mancanza o dalla non conformità alle
leggi vigenti dell’impianto di messa a terra.
- Il costruttore non può essere considerato responsabile per eventuali danni derivanti da usi impropri, erronei ed irragionevoli.
In case of malfunctioning
Do not use the appliance if the cord or plug are damaged or if the
appliance shows signs of malfunctioning or has been damaged in
any way. Take the machine to the nearest authorized service center
for checks or repairs.
If the power cord is damaged it must be replaced by the manufacturer
or an authorized service center.
In case of damage or malfunction, turn o the appliance and do not
tamper with it. For repairs contact a service center authorised by the
manufacturer and request the use of original spare parts only. Failure
to comply with these instructions may compromise the safe operation
of the machine and will result in the forfeiture of warranty rights.
Improper use of the appliance
- The manufacturer is not liable for accidents caused by non-compliance with existing legislation on electrical grounding systems.
- The manufacturer is not liable for possible damage caused by
improper, incorrect or unreasonable use.
9
Page 10

Istruzioni per il cavo di alimentazione
a) Utilizzare un cavo di alimentazione corto per evitare di rimanere
impigliati o inciampare su un cavo più lungo.
b) È possibile utilizzare prolunghe a condizione che si presti parti-
colare attenzione durante l’uso.
c) Qualora venga utilizzata una prolunga:
1) Veri care che la potenza elettrica della prolunga sia almeno
pari a quella dell’apparecchio;
2) Se l’apparecchio è del tipo con messa a terra, veri care che la
prolunga sia a tre li e provvista di messa a terra;
ATTENZIONE: CONSERVARE QUESTE ISTRUZIONI.
3) Posizionare il cavo più lungo in modo tale che non penda dal
piano di lavoro o dal tavolo per evitare che i bambini lo tirino
o inciampino.
Power-supply cord instructions
a) A short power-supply cord is to be provided to reduce risks resulting
from becoming entangled in or tripping over a longer cord.
b) Extension cords are available and may be used if care is exercised
in their use.
c) If extension cord is used:
1) The marked electrical rating of extension cord should be at least
as great as the electrical rating of the appliance;
IMPORTANT: SAVE THESE INSTRUCTIONS.
10
2) If the appliance is of the grounded type, the extension cord should
be a grounding-type 3-wire cord; and
3) The longer cord should arranged so that it will not drape over
the counter top or table top where it can be pulled on by children
or tripped over.
Page 11
INSTALLAZIONE E MESSA IN FUNZIONE DELLA MACCHINA
INSTALLATION AND STARTUP OF THE MACHINE
IT
EN
321
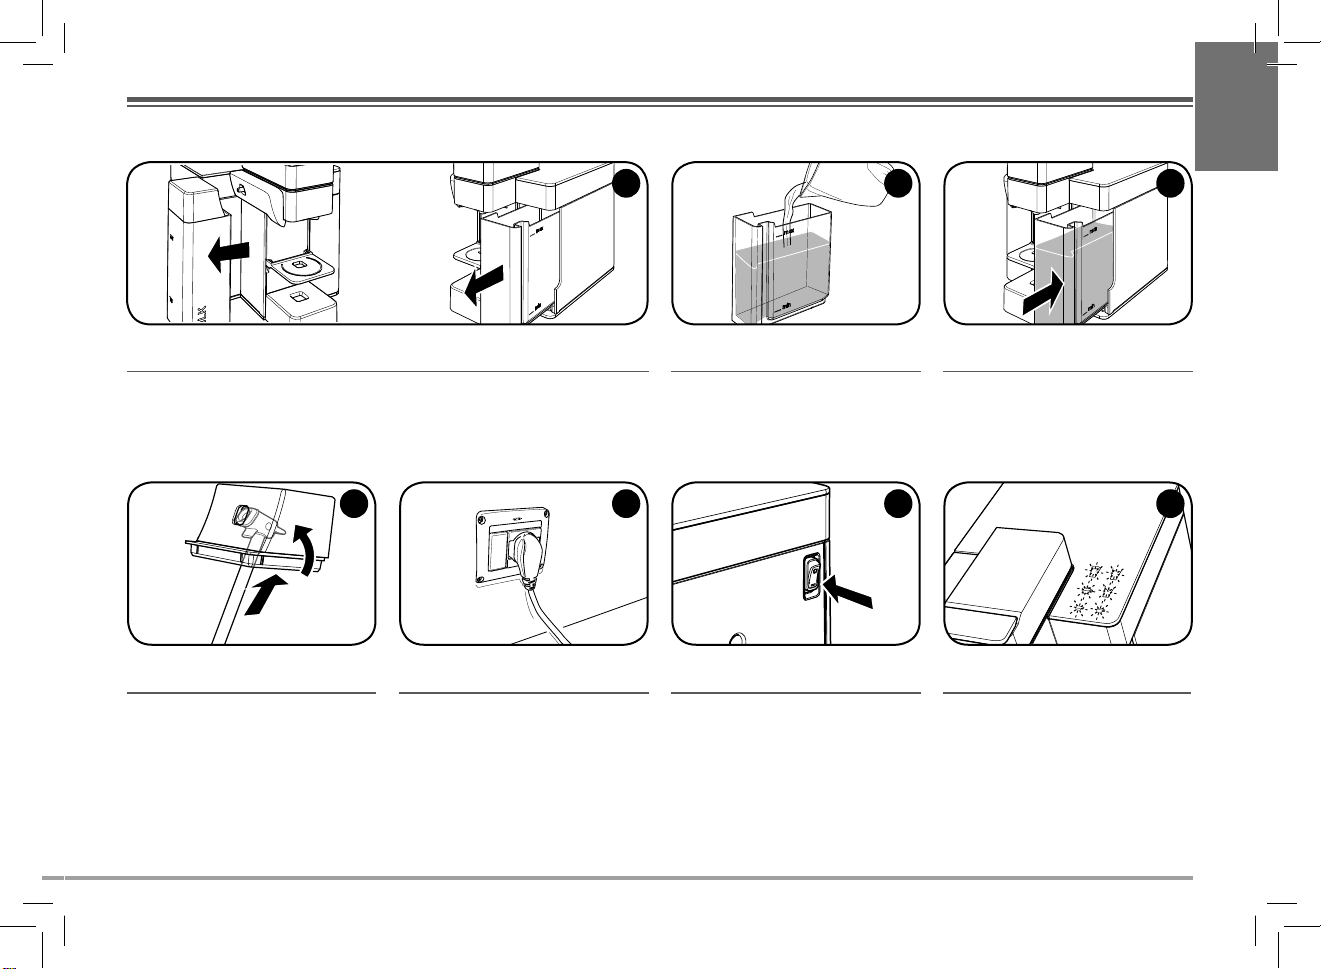
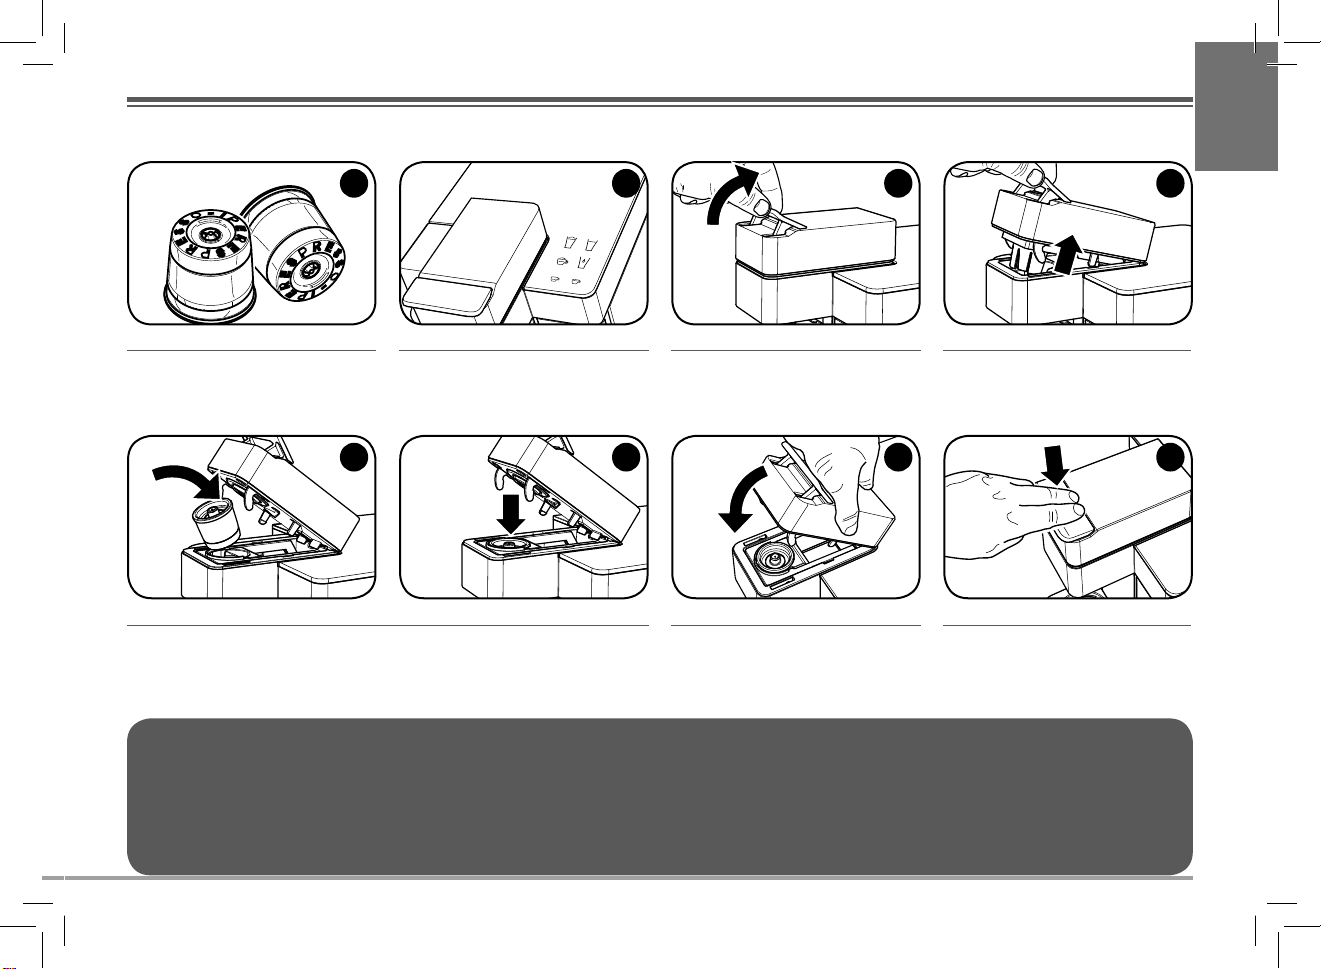
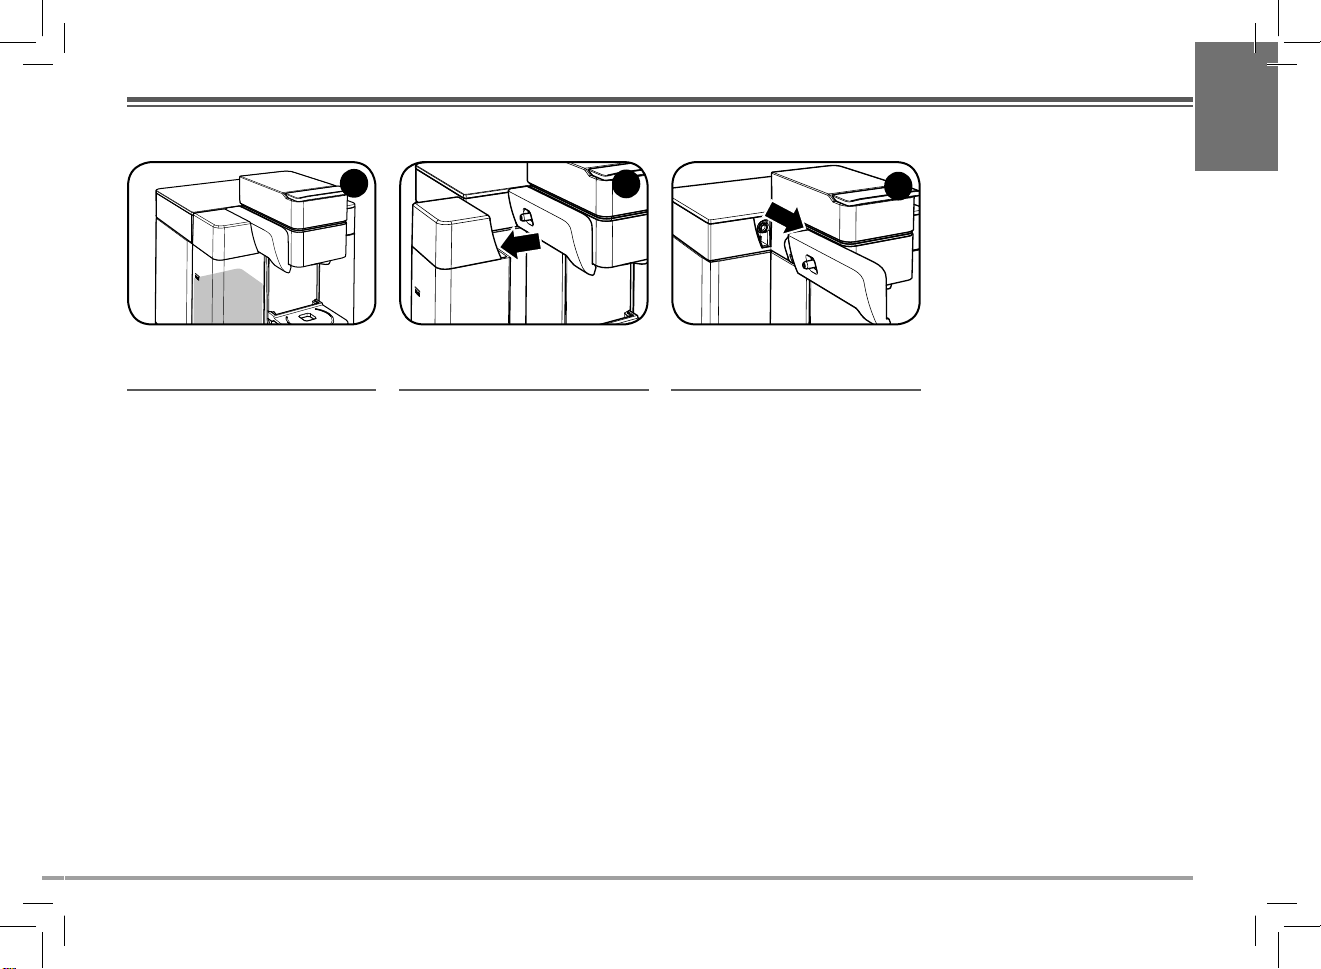
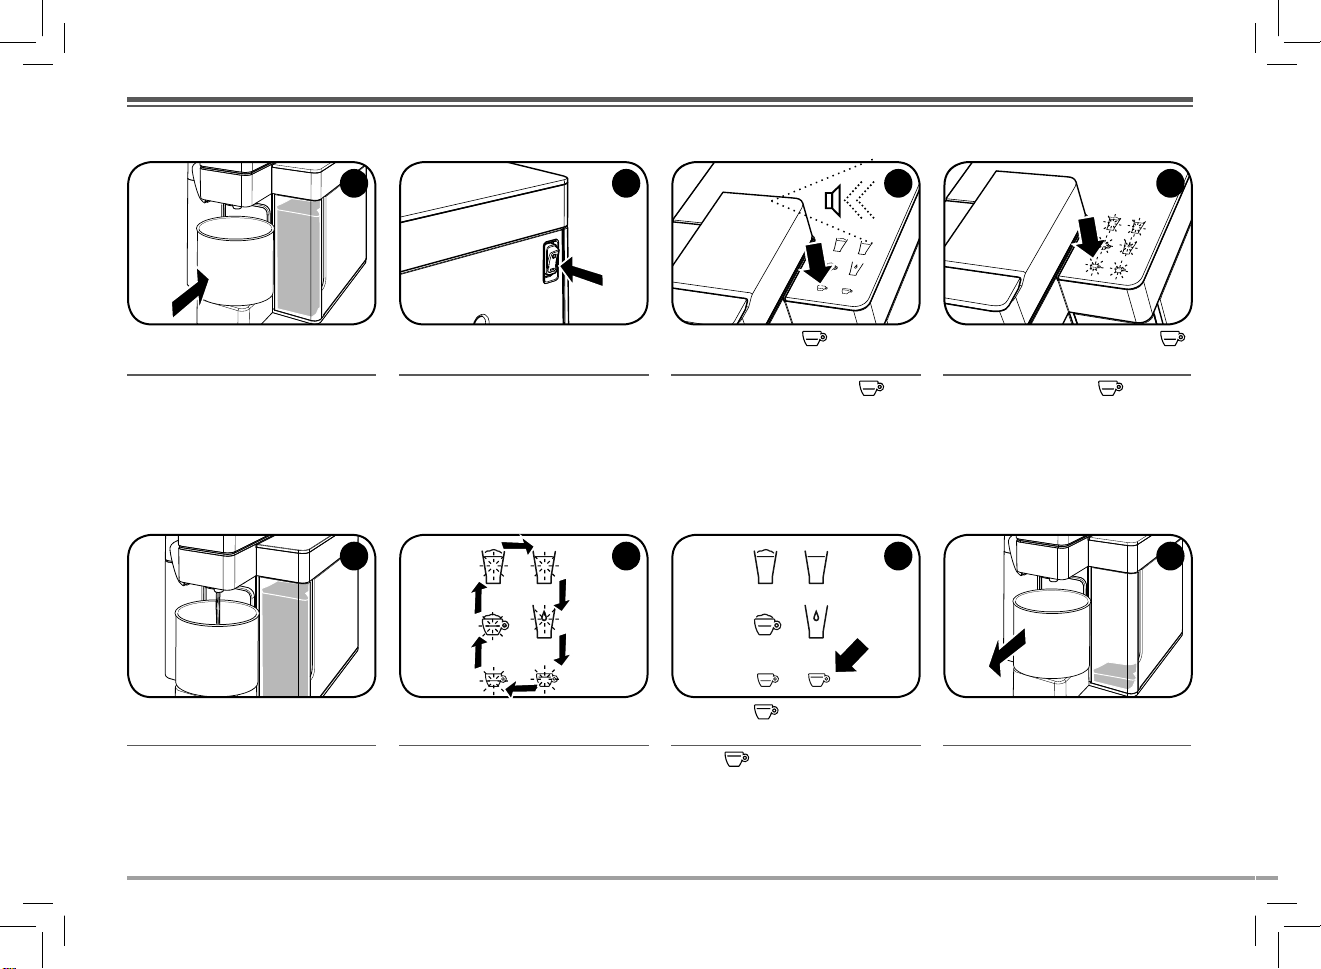
Estrarre i serbatoi dell’acqua e del latte e lavarli accuratamente prima dell’utilizzo. Riempire il serbatoio dell’acqua con acqua fresca
potabile no al livello MAX.
Remove the milk and water tanks and wash them thoroughly before use.
Assicurarsi che il beccuccio d’erogazione sia ben
inserito nel coperchio del serbatoio del latte.
Make sure that the dispensing spout is fully inserted
into the milk tank lid.
Inserire la spina nella presa.
Insert the power cord into the socket.
Fill the water tank with fresh drinking water up
to the MAX level.
54
Portare l’interruttore su “I” per accendere la
macchina.
Switch the power button to “I” to turn on the
machine.
Inserire completamente il serbatoio nella macchina.
Insert the water tank completely into the machine.
76
Tutti i tasti lampeggiano: fase di riscaldamento.
All buttons blink: warm-up phase.
11
Page 12

INSTALLAZIONE E MESSA IN FUNZIONE DELLA MACCHINA
INSTALLATION AND STARTUP OF THE MACHINE
8
Dopo 10 minuti d’inutilizzo la macchina entra automaticamente in modalità Power S ave.
Il tasto lampeggia lentamente. Per riattivare la macchina s orare uno dei tasti.
The machine automatically enters Power Save mode after 10 minutes of inactivity.
The
Quando tutti i tasti sono accesi ssi, un segnale
acustico segnala che la macchina è pronta.
When all buttons are steady on, an acoustic signal
indicates that the machine is ready.
button blinks slowly. Touch any button to turn on the machine again.
Attenzione: assicurarsi che lo scompartimento capsule sia chiuso correttamente prima di erogare ca è. Non aprirlo mai durante l’erogazione di ca è.
Nota: alla prima accensione e nel caso di inattività per più giorni, dopo aver posizionato un contenitore di capacità adeguata sotto l’erogatore, si suggerisce di erogare almeno
mezzo serbatoio d’acqua con la macchina priva di capsule. La stessa operazione va svolta riempiendo d’acqua il serbatoio del latte e premendo il tasto
Warning: make sure that the capsule compartment is correctly closed before brewing co ee. Never open it during co ee brewing.
Note: At rst start-up and in case of several days of inactivity, it is recommended to dispense at least half a tank of water without putting any capsules in the machine, after placing a suit-
ably sized container under the dispensing spout. The same operation must be repeated by lling the milk tank with water and pressing the
12
button.
.
Page 13
PREPARAZIONE DEL CAFFÈ
PREPARING COFFEE
IT
EN
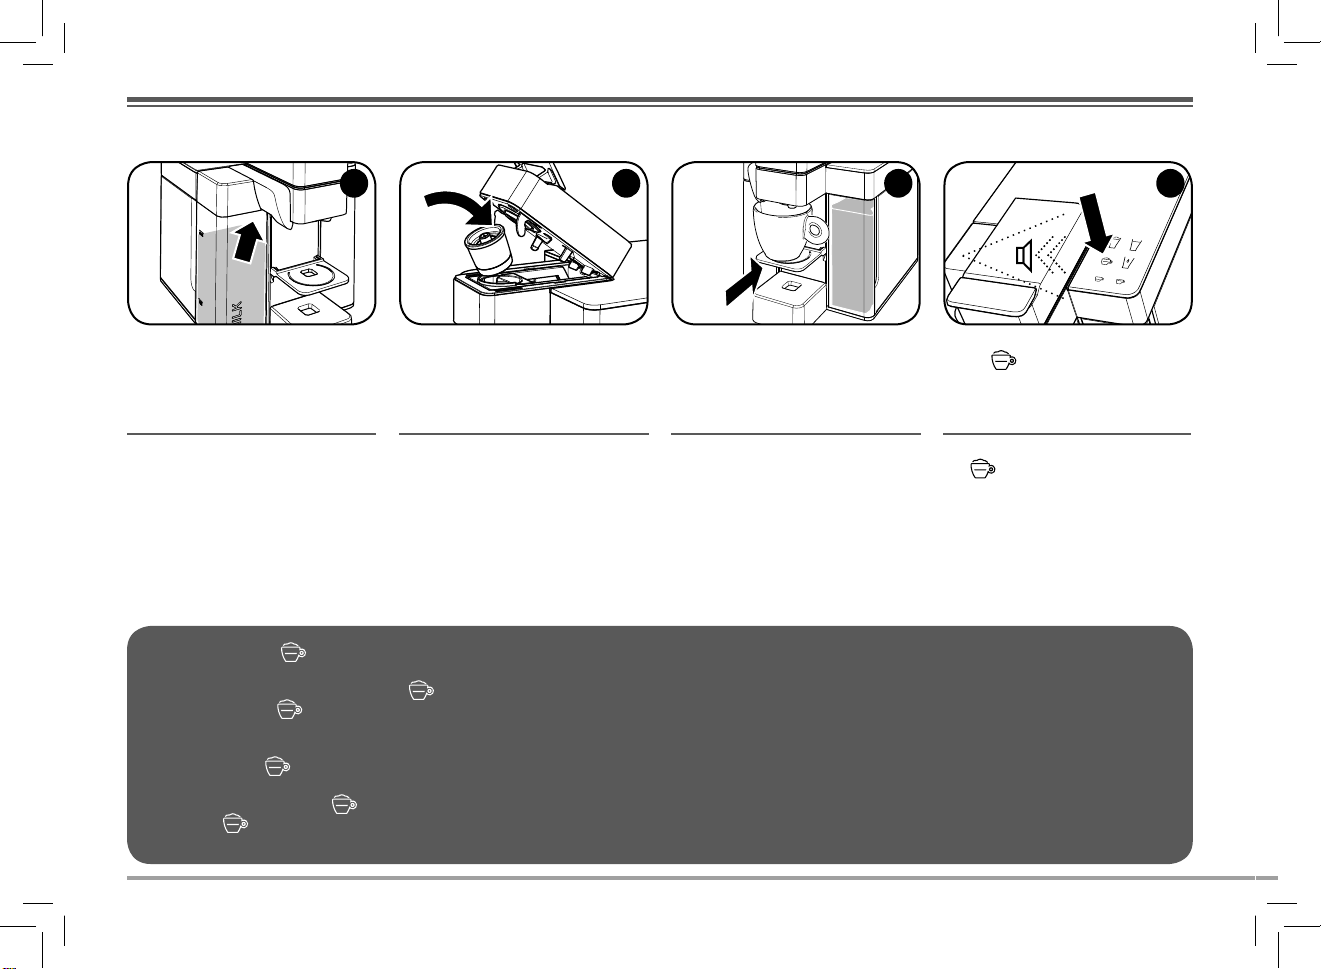
4321
Usare solo capsule Iperespresso per uso domestico.
Use only Iperespresso capsules for domestic use. All buttons are steady on. Disengage the lever. Lift the lever.
Inserire la capsula. Abbassare la parte mobile. Bloccare abbassando la leva.
Insert the capsule. Lower the moving part. Lock into place by lowering the lever.
Non possono essere usati altri tipi di capsule perchè potrebbero danneggiare la macchina.
Nota: se è presente una capsula nello scompartimento, verrà automaticamente rimossa all’apertura dello scompartimento stesso. La capsula deve entrare nello scompartimento
facilmente; in caso contrario estrarla e riposizionarla correttamente.
Never use other types of capsules as they may damage the machine.
Note: If there is a capsule in the compartment it will be automatically removed when opening the compartment. The capsule should t into the compartment easily, otherwise remove
and reposition it correctly.
Tutti i tasti sono accesi ssi. Sganciare la leva. Sollevare la leva.
8765
13
Page 14
PREPARAZIONE DEL CAFFÈ
PREPARING COFFEE
9
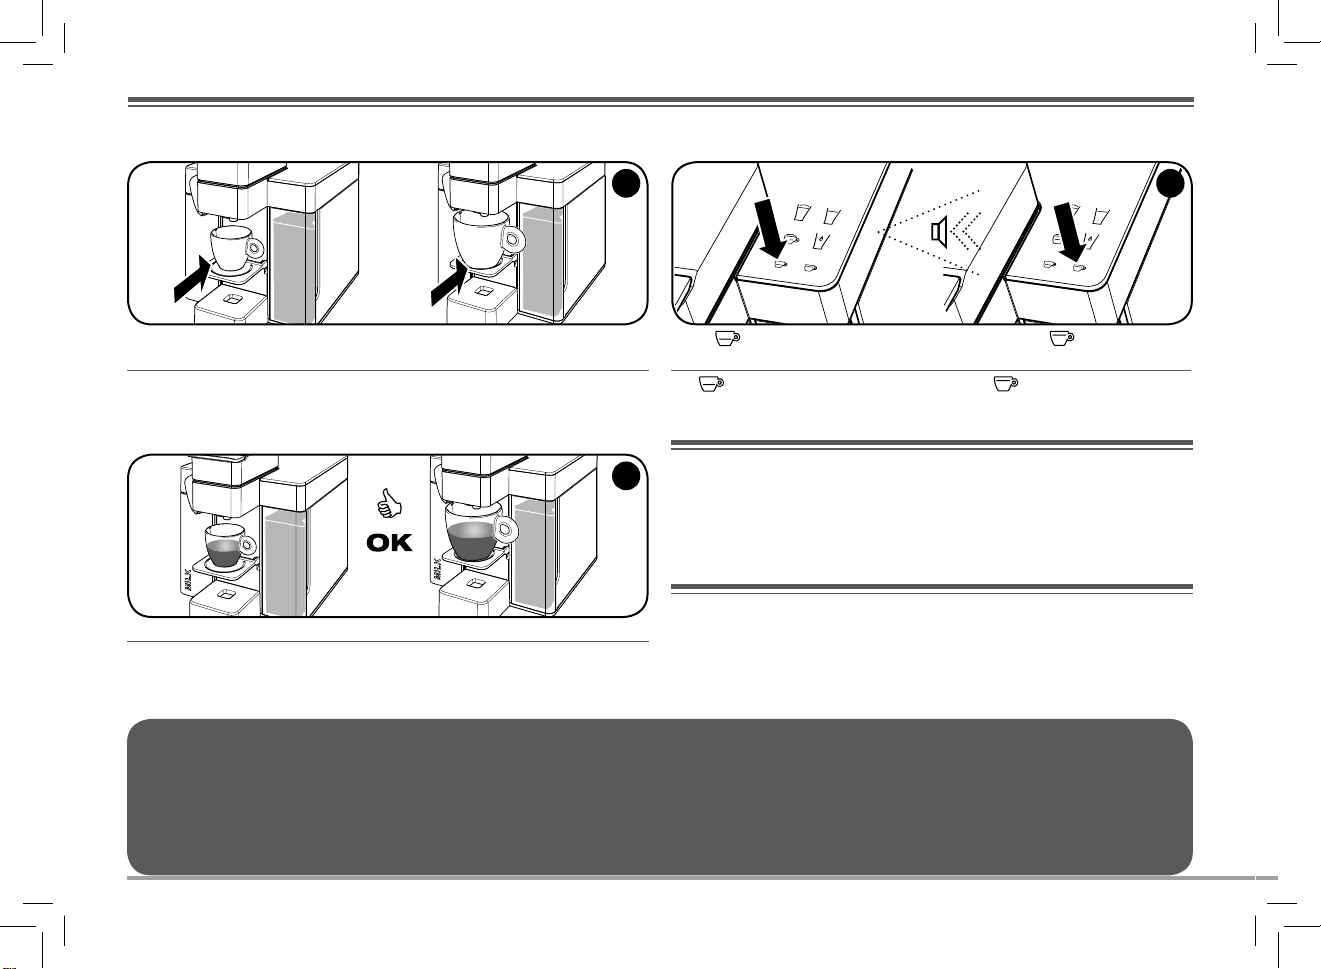
Posizionare la tazzina espresso...
Place the espresso cup in position... ...or a cappuccino cup by lifting the holder.
...oppure posizionare una tazza cappuccino sollevando il supporto.
11
Premere per erogare un espresso, la macchina
emette un segnale acustico...
Press to brew an espresso co ee, the machine
gives out an acoustic signal...
... oppure premere per erogare un ca è
lungo, la macchina emette un segnale acustico.
...or press to brew a long co ee, the machine
gives out an acoustic signal.
RACCOMANDAZIONI
Per gustare un espresso di elevata qualità ricordare di:
- Cambiare giornalmente l’acqua nel serbatoio.
- Usare preferibilmente acqua con durezza totale inferiore a 12 gradi francesi per ridurre i depositi
all’interno della macchina.
- Utilizzare tazzine calde.
RECOMMENDATIONS
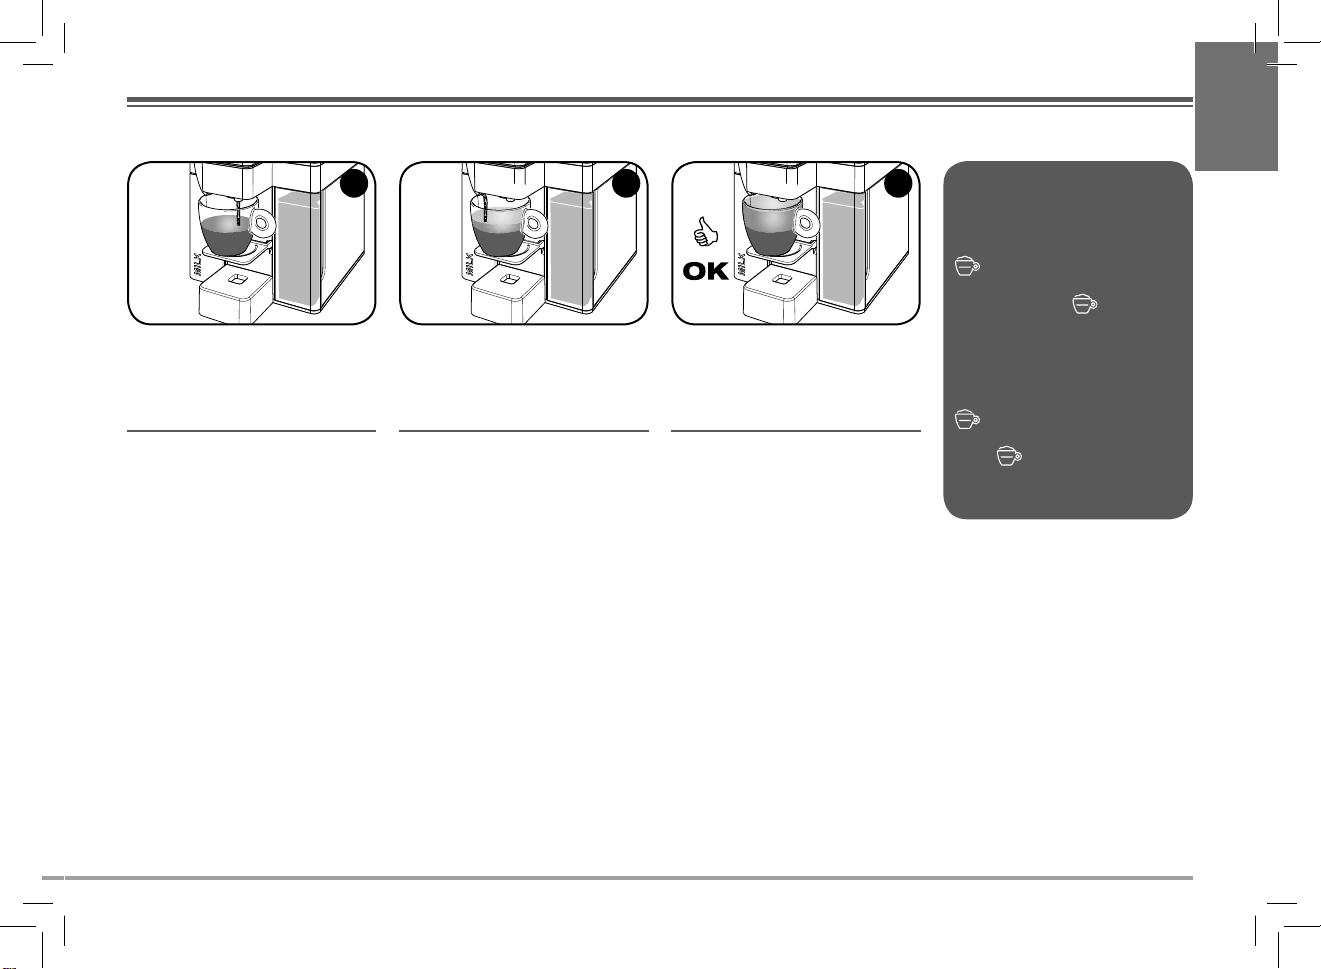
L’erogazione termina automaticamente.
Brewing will stop automatically.
E’ possibile interrompere l’erogazione prima dell’arresto automatico premendo il tasto appena selezionato.
Attenzione: in ogni caso l’erogazione terminerà automaticamente dopo circa 70 secondi, ma in questo caso potrebbe veri carsi la fuoriuscita del ca è dalla tazzina. Nota: l’erogazione di un espresso lungo potrebbe provocare fuoriuscita di ca è dalla tazzina se questa non è abbastanza capiente.
To enjoy a high quality espresso, remember to:
- Change the water in the tank daily.
- If possible, use water with a hardness of less than 12 French degrees to reduce the deposits inside
the machine.
- Use warmed cups.
10
The brewing process can be interrupted before the automatic stop by pressing the same button.
Warning: Brewing will always stop automatically after about 70 seconds, but in this case co ee may ow out of the cup. Note: When brewing a long espresso, co ee may ow out of the
cup if this is not large enough.
14
Page 15
REGOLAZIONE QUANTITÀ DI CAFFÈ IN TAZZA
ADJUSTING COFFEE QUANTITY IN THE CUP
IT
EN
321
4
Inserire la capsula. Bloccare abbassando la leva. Mantenere premuto per tutta la durata dell’ero-
gazione il tasto , per memorizzare il volume
in tazza.
Insert the capsule. Lock into place by lowering the lever.
Press and hold the
brewing process to store the amount of co ee in
the cup.
button during the whole
Rilasciare il tasto al raggiungimento della quantità
di ca è desiderata.
Release the button when the desired quantity of
co ee is reached.
5
La macchina consente di regolare la quantità di ca è desiderato in tazza per entrambi i tasti d’erogazione
Nota: per semplicità sarà mostrato come programmare il solo tasto
grammare il tasto
The machine allows you to adjust the desired quantity of co ee in the cup for both
and
Il livello è memorizzato. La macchina è ora programmata; alla prossima pressione del tasto verrà
erogata la quantità di ca è appena memorizzata.
This level is stored. The machine is now programmed. The next time the
quantity of co ee will be brewed.
Le impostazioni di fabbrica tengono conto di precisi parametri che garantiscono la preparazione delle migliori ricette illy: ca è espresso 20-25 ml / ca è lungo: 30-35 ml / cappuccino: 95-100 ml / latte macchiato: 155-160 ml / latte caldo schiumato: 135-140 ml / acqua calda: 195 ml.
Nota: per la preparazione di ca è lungo si consiglia di usare le capsule Iperespresso di colore blu, premendo il tasto
The machine has been preset in the factory with set parameters suitable to prepare the best illy recipes: espresso co ee: 20-25 ml / long co ee: 30-35 ml / cappuccino: 95-100 ml / latte
macchiato: 155-160 ml / frothed hot milk: 135-140 ml / hot water: 195 ml.
Note: For long co ees, we recommend using the blue “Iperespresso” capsules, pressing the
button is pressed, the saved
brew buttons.
Note: For simplicity it will be shown how to program the
button perform the same procedure by pressing .
button with a 30 sec. maximum extracting time.
e .
; per pro-
eseguire la medesima procedura premendo .
button only. To program the
, con un tempo di estrazione massimo di 30 sec.
15
Page 16
UTILIZZO DEL SERBATOIO ED EROGATORE LATTE
USING THE MILK TANK AND THE MILK DISPENSING SPOUT
4321
Rimuovere il coperchio del serbatoio del latte.
Remove the milk tank lid. Fill the tank with milk up to the MAX level.
Attenzione! Lavare il serbatoio e tutte le componenti dell’erogatore latte al primo utilizzo e sempre dopo averli utilizzati. Il latte è un prodotto altamente deperibile. Utilizzare solo
latte fresco ed entro la data di scadenza indicata sulla confezione originale. Lasciare il latte nel serbatoio solo per il tempo necessario alla preparazione delle bevande, poi riporlo
in frigorifero. In caso di dubbio sull’integrità del latte nel serbatoio, svuotarlo e lavarlo accuratamente.
Per preparare le migliori ricette illy a base latte, si consiglia di utilizzare latte fresco intero a temperatura di frigorifero.
NOTA: in ogni caso la macchina garantisce la riuscita di tutte le preparazioni anche con altri tipi di latte.
Warning! Wash the tank and all the components of the milk dispensing spout before rst use and after each use. Milk is a highly perishable product. Use only fresh milk and by the expiration date printed on the original packaging. Leave the milk in the tank only for the time needed to prepare the beverages, then store it in the refrigerator. If in doubt about the freshness
of the milk in the tank, empty the tank and wash it thoroughly.
To prepare the best illy milk-based recipes, always use fresh whole milk at fridge temperature.
NOTE: Anyhow, the machine also guarantees successful beverage preparation with other t ypes of milk.
16
Riempire il serbatoio con il latte no al livello MAX.
E’ necessario riempire sempre il serbatoio
del latte no al livello MIN per evitare il surriscaldamento della macchina e consentire
la riuscita delle preparazioni.
Always ll the milk tank up to the MIN level
to prevent the machine from overheating and
to ensure successful beverage preparation.
Agganciare l’erogatore latte all’innesto della macchina no a perfetto incastro.
Attach the milk dispensing spout to the machine
connector until it locks into place.
Agganciare il serbatoio all’erogatore latte no a
perfetto incastro.
Attach the tank to the milk dispensing spout until
it locks into place.
Page 17
UTILIZZO DEL SERBATOIO ED EROGATORE LATTE
USING THE MILK TANK AND THE MILK DISPENSING SPOUT
5
IT
EN
6
7
Quando il serbatoio è agganciato è possibile preparare le bevande a base latte.
When the tank is attached, milk-based beverages
can be dispensed.
Se al termine delle preparazioni rimane del latte
all’interno del serbatoio, sganciarlo e riporlo coperto in frigorifero.
If there is any leftover milk in the tank after preparing the beverages, remove the milk tank and store
it covered in the refrigerator.
Sganciare l’erogatore latte e risciacquarlo come
illustrato nel capitolo “PULIZIA E MANUTENZIONE”.
Remove the milk dispensing spout and rinse it as
shown in “CLEANING AND MAINTENANCE” chapter.
17
Page 18
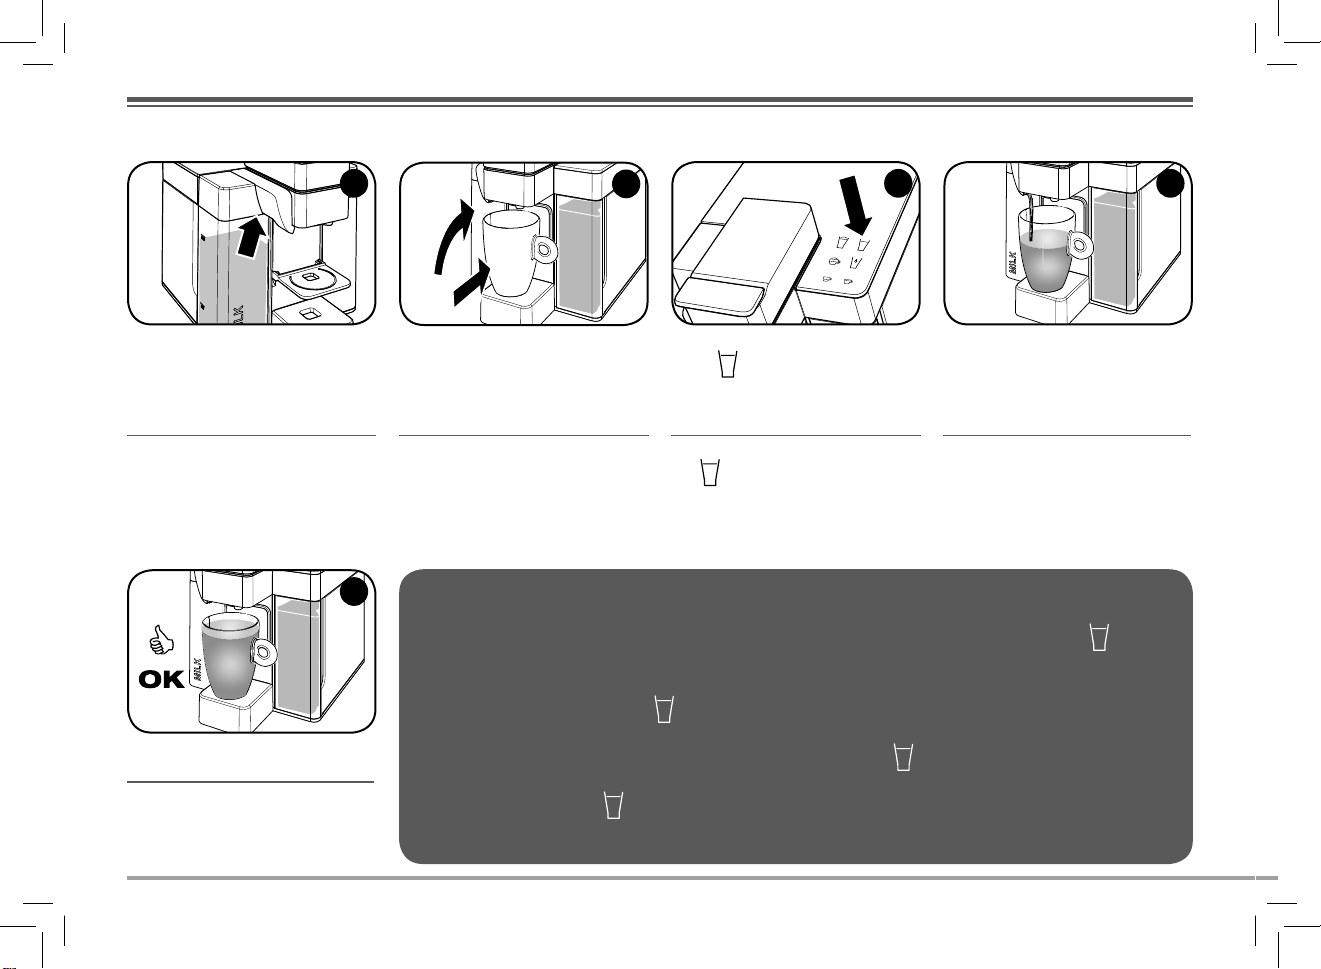
PREPARAZIONE DEL CAPPUCCINO
PREPARING CAPPUCCINO
1 2 3
Agganciare l’erogatore ed il serbatoio latte come
mostrato nel capitolo UTILIZZO DEL SERBATOIO ED
EROGATORE LATTE.
Riempire il serbatoio del latte no al livello
minimo.
Attach the milk dispensing spout and milk tank as
shown in the “USING THE MILK TANK AND THE MILK
DISPENSING SPOUT” chapter.
Fill the milk tank up to the minimum level.
NOTA: prima di premere veri c are che l’erogatore latte ricada all’interno del diametro della tazza per evitare fuoriuscite durante l’erogazione.
L’impostazione di fabbric a della preparazione
Per realizzare la ricetta
l’erogazione di ca è e latte secondo i volumi desiderati.
con volumi di ca è e latte diversi da quelli preimpostati di fabbrica, basta utilizzare le funzioni ca è e latte caldo schiumato fermando manualmente
Inserire la capsula. Scegliere la posizione del supporto a seconda del
tipo di tazza utilizzato.
Insert the capsule.
è di 95-100 ml.
Choose the holder position according to the cup type.
Veri care che tutti i tasti siano accesi in modo sso.
Premere per preparare un cappuccino. La
macchina emette un segnale acustico.
Check that all buttons are steady on.
Press to brew a cappucc ino. The machine gives
out an acoustic signal.
4
NOTE: Before pressing
The default factory setting for the
To prepare the
volume is reached.
18
, check that the milk dispensing spout falls within the diameter of the cup to prevent spills during dispensing.
preparation is 95-100 ml.
recipe with di erent co ee and milk volumes, use the co ee and frothed hot milk functions and manually stop co ee brewing and milk dispensing when the desired
Page 19
PREPARAZIONE DEL CAPPUCCINO
PREPARING CAPPUCCINO
5
La macchina inizia ad erogare il ca è nella tazza.
The machine starts brewing co ee into the cup. Once co ee has been brewed, frothed milk dispen-
Terminata l’erogazione del ca è, dopo alcuni
secondi inizierà automaticamente l’erogazione
del latte montato. Veri care che l’erogatore latte
ricada all’interno della tazza per evitare fuoriuscite
durante l’erogazione.
sing will automatically start after a few seconds.
Check that the milk dispensing spout falls within the
cup to prevent spills during dispensing.
L’erogazione termina automaticamente.
Brewing will stop automatically.
IT
EN
76
La preparazione del cappuccino può
essere interrotta in qualsiasi momento, premendo nuovamente il tasto
. Se viene interrotta durante
l’erogazione del latte caldo, dopo la
pressione del tasto
nuerà a fuoriuscire ancora per qualche
secondo.
The preparation of cappuccino can be
interrupted at any time by pressing the
button again. If it is interrupted
during hot milk dispensing, after pressing the
be dispensed for a few seconds.
button milk will continue to
il latte conti-
19
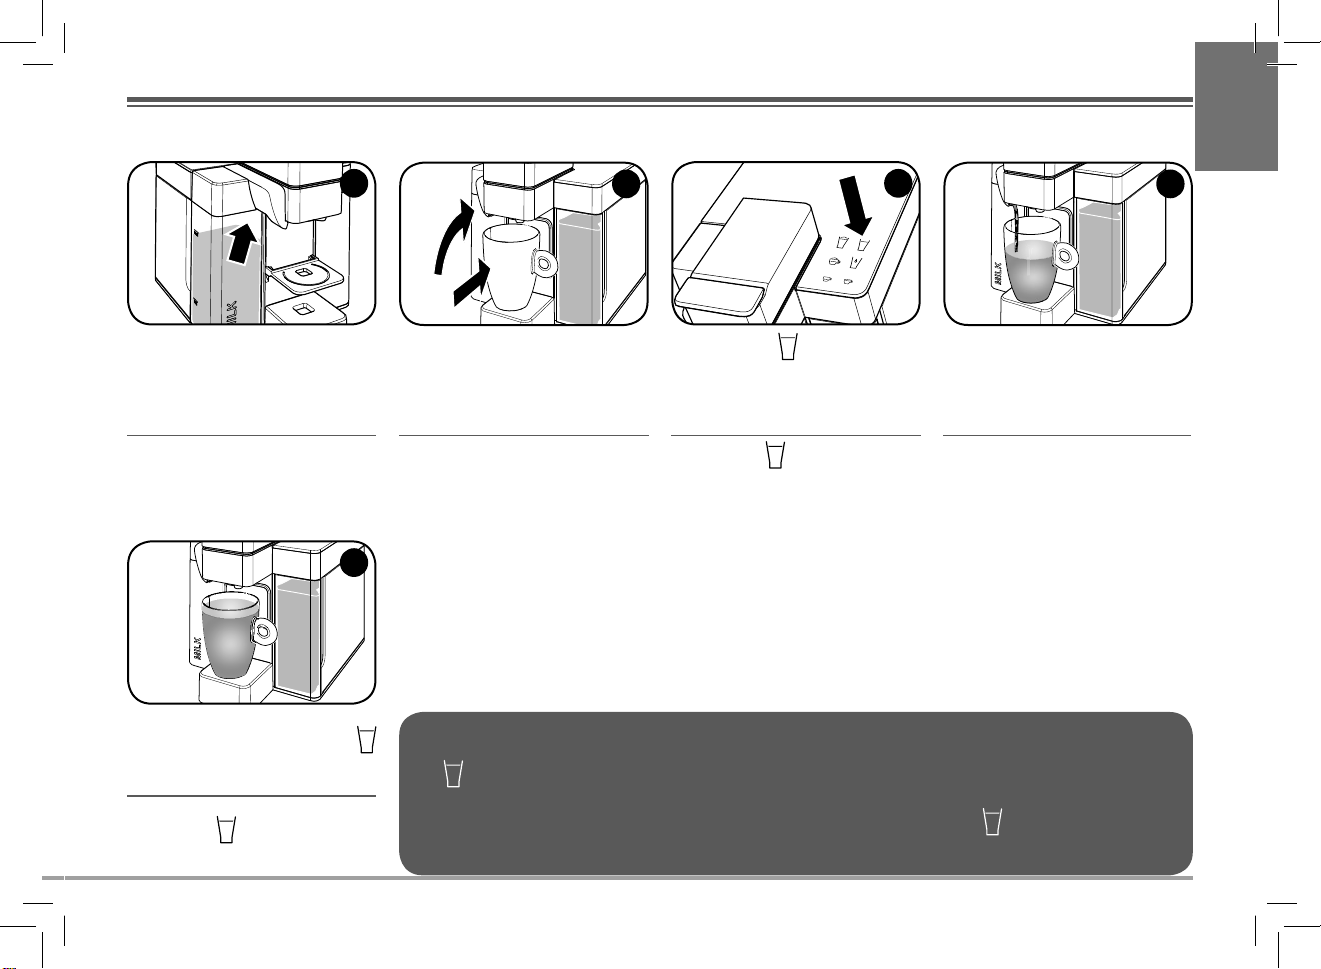
Page 20
PREPARAZIONE DEL LATTE MACCHIATO
PREPARING LATTE MACCHIATO
1
Agganciare l’erogatore ed il serbatoio latte come
mostrato nel capitolo UTILIZZO DEL SERBATOIO ED
EROGATORE LATTE.
Riempire il serbatoio del latte no al livello
minimo.
Attach the milk dispensing spout and milk tank as
shown in the “USING THE MILK TANK AND THE MILK
DISPENSING SPOUT” chapter.
Fill the milk tank up to the minimum level.
NOTA: prima di premere veri c are che l’erogatore latte ricada all’interno del diametro della tazza per evitare fuoriuscite durante l’erogazione.
L’impostazione di fabbric a della funzione
Per realizzare la ricetta
l’erogazione di ca è e latte secondo i volumi desiderati.
NOTE: Before pressing
con volumi di ca è e latte diversi da quelli preimpostati di fabbrica, basta utilizzare le funzioni ca è e latte caldo schiumato fermando manualmente
, check that the milk dispensing spout falls within the diameter of the cup to prevent spills during dispensing.
Inserire la capsula.
Insert the capsule. Lift the holder and position a mug. Check that all buttons are steady on.
è di 155-160 ml.
2 3
Sollevare il supporto e posizionare una tazza
grande o mug.
Veri care che tutti i tasti siano accesi in modo sso.
Premere per preparare un latte macchiato
Press
4
to prepare a latte macchiato
The default factory setting for the
To prepare the
volume is reached.
20
function is 155-160 ml.
recipe with di erent co ee and milk volumes, use the co ee and frothed hot milk functions and manually stop co ee brewing and milk dispensing when the desired
Page 21

PREPARAZIONE DEL LATTE MACCHIATO
PREPARING LATTE MACCHIATO
5
La macchina dopo qualche secondo inizia ad
erogare il latte caldo nella tazza.
Veri care che l’erogatore latte ricada all’interno
della tazza per evitare fuoriuscite durante l’erogazione.
After a few seconds the machine begins to dispense
hot milk in the cup.
Check that the milk dispensing spout falls within the
cup to prevent spills during dispensing.
Terminata l’erogazione del latte, la macchina inizia
automaticamente l’erogazione del ca è.
Once milk has been dispensed, the machine will
automatically start brewing co ee.
6
L’erogazione termina automaticamente.
Brewing will stop automatically.
IT
EN
7
La preparazione del latte macchiato può essere interrotta in qualsiasi
momento, premendo nuovamente il
tasto
. Se viene interrotta durante
l’erogazione del latte caldo, dopo la
pressione del tasto
nuerà a fuoriuscire ancora per qualche
secondo.
The preparation of latte macchiato can
be interrupted at any time by pressing
the
button again. If it is interrupted
during hot milk dispensing, after pressing the
be dispensed for a few seconds.
button milk will continue to
il latte conti-
21
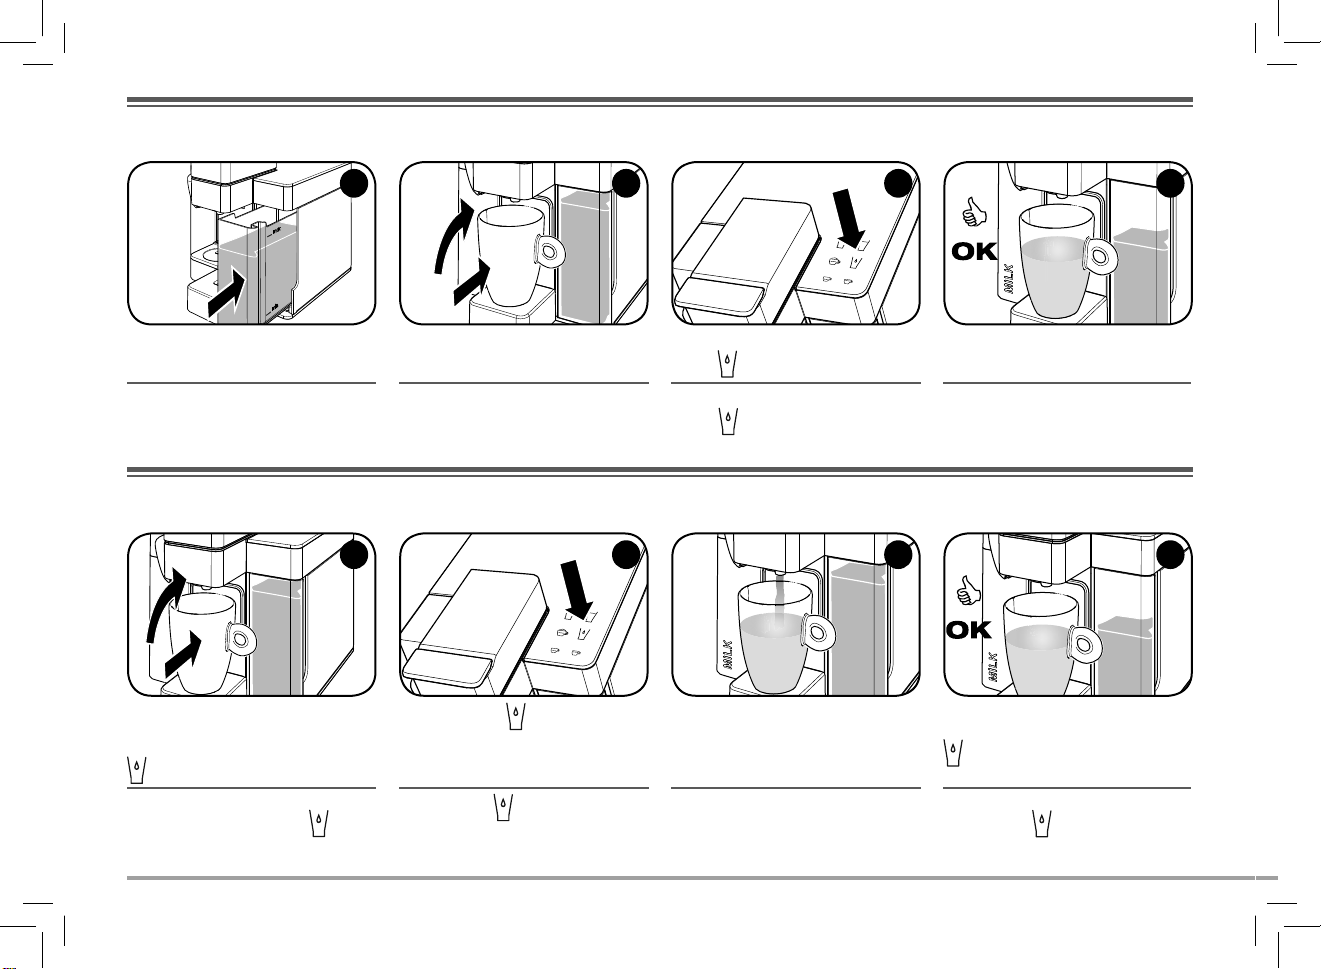
Page 22
PREPARAZIONE DEL LATTE CALDO SCHIUMATO
PREPARING HOT FOAMED MILK
Agganciare l’erogatore ed il serbatoio latte come
mostrato nel capitolo UTILIZZO DEL SERBATOIO ED
EROGATORE LATTE.
Riempire il serbatoio del latte no al livello
minimo.
Attach the milk dispensing spout and milk tank as
shown in the “USING THE MILK TANK AND THE MILK
DISPENSING SPOUT” chapter.
Fill the milk tank up to the minimum level.
5
L’erogazione termina automaticamente.
Brewing will stop automatically.
2
Sollevare il supporto e posizionare una tazza
grande o mug.
Lift the holder and position a mug. Check that all buttons are steady on.
La preparazione del latte caldo schiumato può essere interrotta in qualsiasi momento. Dopo la pressione del tasto il latte con-
tinuerà a fuoriuscire per qualche secondo. É possibile erogare il latte schiumato direttamente in una lattiera da portare in tavola e
dosare a piacimento.
L’impostazione di fabbric a della funzione
The preparation of foamed hot milk can be interrupted at any time. After pressing the
few seconds. You can dispense frothed milk directly into a milk jug to serve and add to taste.
The default factory setting for the
Veri care che tutti i tasti siano accesi in modo sso.
Premere per preparare un latte caldo schiu-
mato (senza ca è).
Press
to prepare a hot foamed milk (without
co ee).
è di 135-140 ml.
function is 135-140 ml.
3
La macchina dopo qualche secondo inizia ad
erogare il latte caldo nella tazza.
Veri care che l’erogatore latte ricada all’interno della tazza per evitare fuoriuscite durante
l’erogazione.
After a few seconds, the machine begins to dispense
hot milk in the cup.
Check that the milk dispensing spout falls within the
cup to prevent spills during dispensing.
button, milk will continue to be dispensed for a
41
22
Page 23
REGOLAZIONE QUANTITÀ DI LATTE CALDO SCHIUMATO
ADJUSTING HOT FOAMED MILK QUANTITY
1
IT
EN
2
3
4
Agganciare l’erogatore ed il serbatoio latte come
mostrato nel capitolo UTILIZZO DEL SERBATOIO ED
EROGATORE LATTE.
Riempire il serbatoio del latte no al livello
minimo.
Attach the milk dispensing spout and milk tank as
shown in the “USING THE MILK TANK AND THE MILK
DISPENSING SPOUT” chapter.
Fill the milk tank up to the minimum level.
5
Il livello è memorizzato. La macchina è ora programmata; alla prossima pressione del tasto
verrà erogata la quantità di latte caldo appena
memorizzata.
This level is stored. The machine is now programmed.
The next time the button is pressed, the saved
quantity of hot milk will be dispensed.
Sollevare il supporto e posizionare una tazza
grande o mug.
Lift the holder and position a mug.
Durante la programmazione della quantità di latte caldo nella tazza si consiglia di tenere in considerazione che dopo la pressione del
il latte continuerà a fuoriuscire ancora per qualche secondo.
tasto
While programming the hot milk quantity in the cup you should keep in mind that after pressing the
dispensed for a few seconds.
Mantenere premuto
Press and hold the
.
button.
Rilasciare il tasto al raggiungimento della quantità di latte caldo desiderato.
Release the button when the desired quantity of
hot milk is reached.
button milk will continue to be
23
Page 24
EROGAZIONE ACQUA CALDA
DISPENSING HOT WATER
1
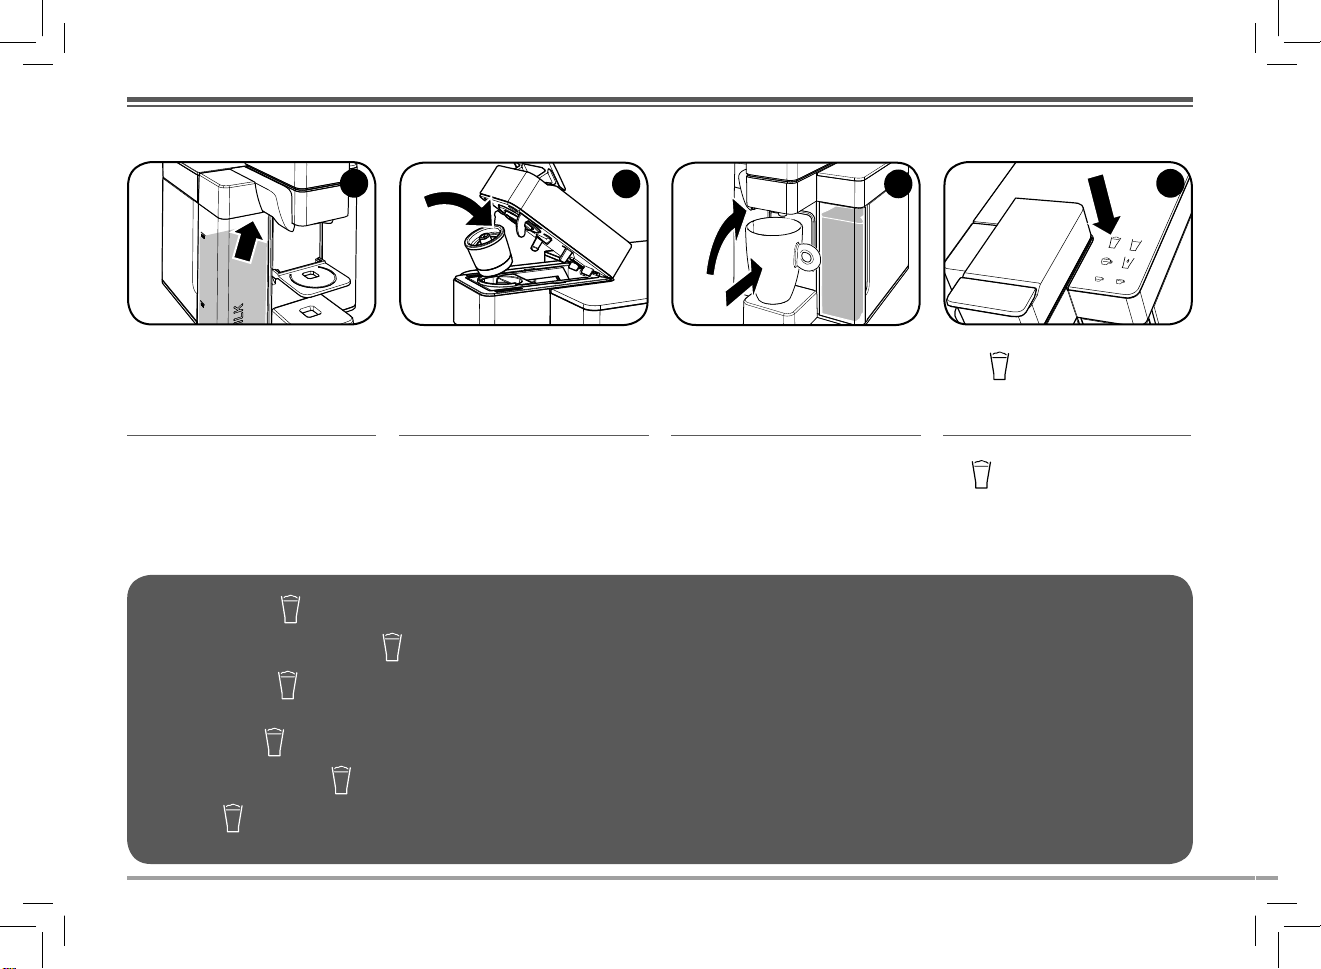
Veri care che vi sia abbastanza acqua nel serbatoio.
Make sure there is enough water in the tank. Lift the holder and position a mug. Check that all buttons are steady on.
Sollevare il supporto e posizionare una tazza
grande o mug.
2
Veri care che tutti i tasti siano accesi in modo sso.
Premere per erogare acqua calda.
Press the
button to dispense hot water.
REGOLAZIONE QUANTITÀ DI ACQUA CALDA EROGATA
ADJUSTING DISPENSED HOT WATER QUANTITY
2
Rilasciare il tasto al raggiungimento della quantità
di acqua calda desiderata.
Release the button when the desired quantity of
hot water is reached.
Sollevare il supporto e posizionare una tazza
grande o mug.
L’impostazione di fabbrica per la funzione
è di circa 195 ml.
Lift the holder and position a mug.
The default factory setting for the function
is approximately 195 ml.
24
1 4
Mantenere premuto .
Press and hold the
button.
3
Raggiunta la quantità memorizzata l’erogazione
termina automaticamente.
When the saved quantity is reached dispensing will
stop automatically.
3
Il livello è memorizzato. La macchina è ora programmata; alla prossima pressione del tasto
verrà erogata la quantità di acqua appena
memorizzata.
This level is stored. The machine is now programmed.
The next time the button is pressed, the saved
quantity of water will be dispensed.
4
Page 25
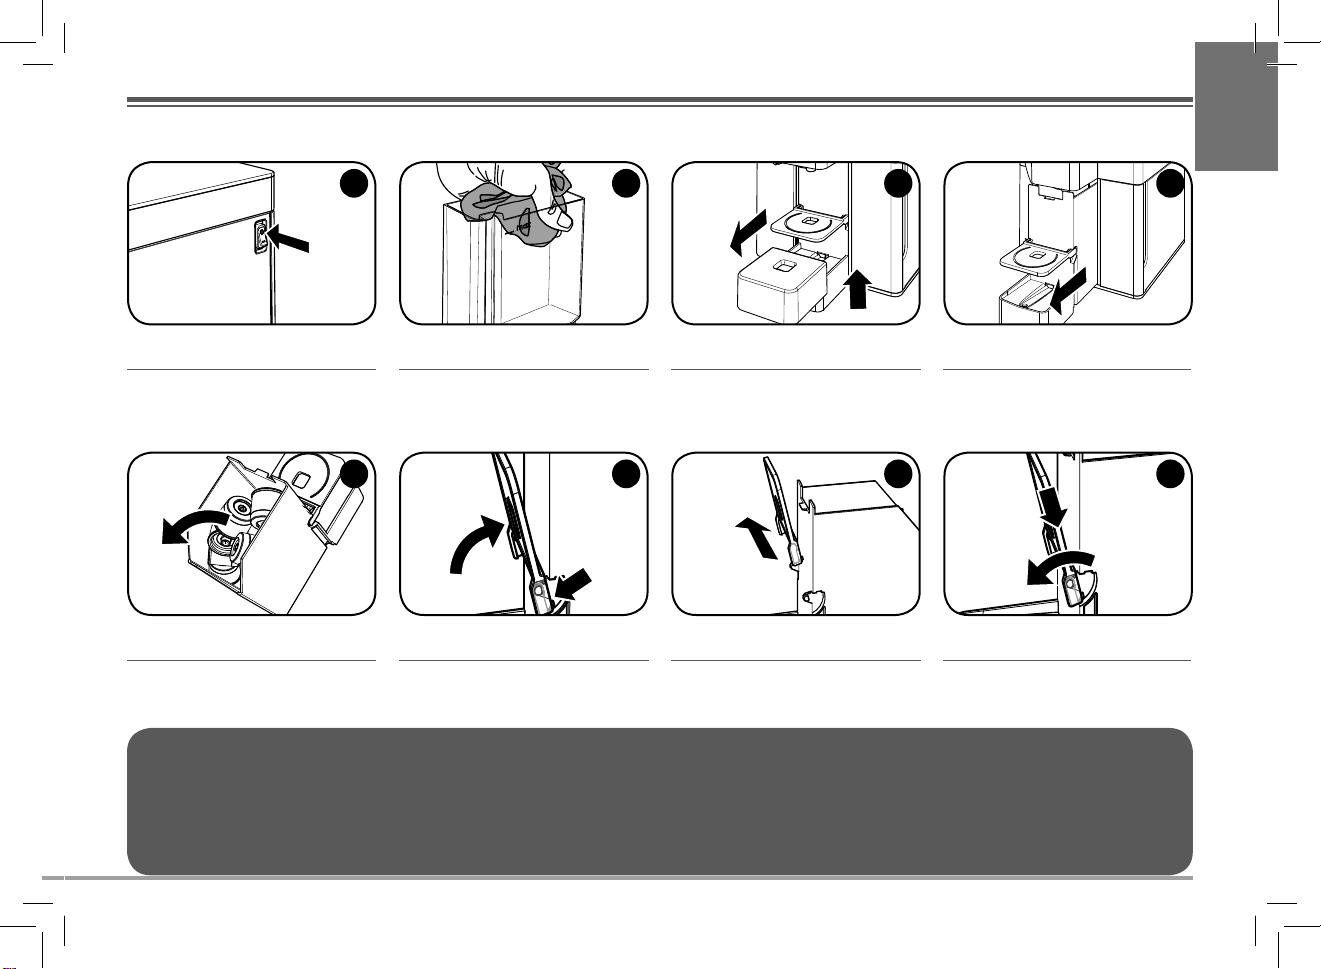
PULIZIA E MANUTENZIONE
CLEANING AND MAINTENANCE
IT
EN
1
2
3
4
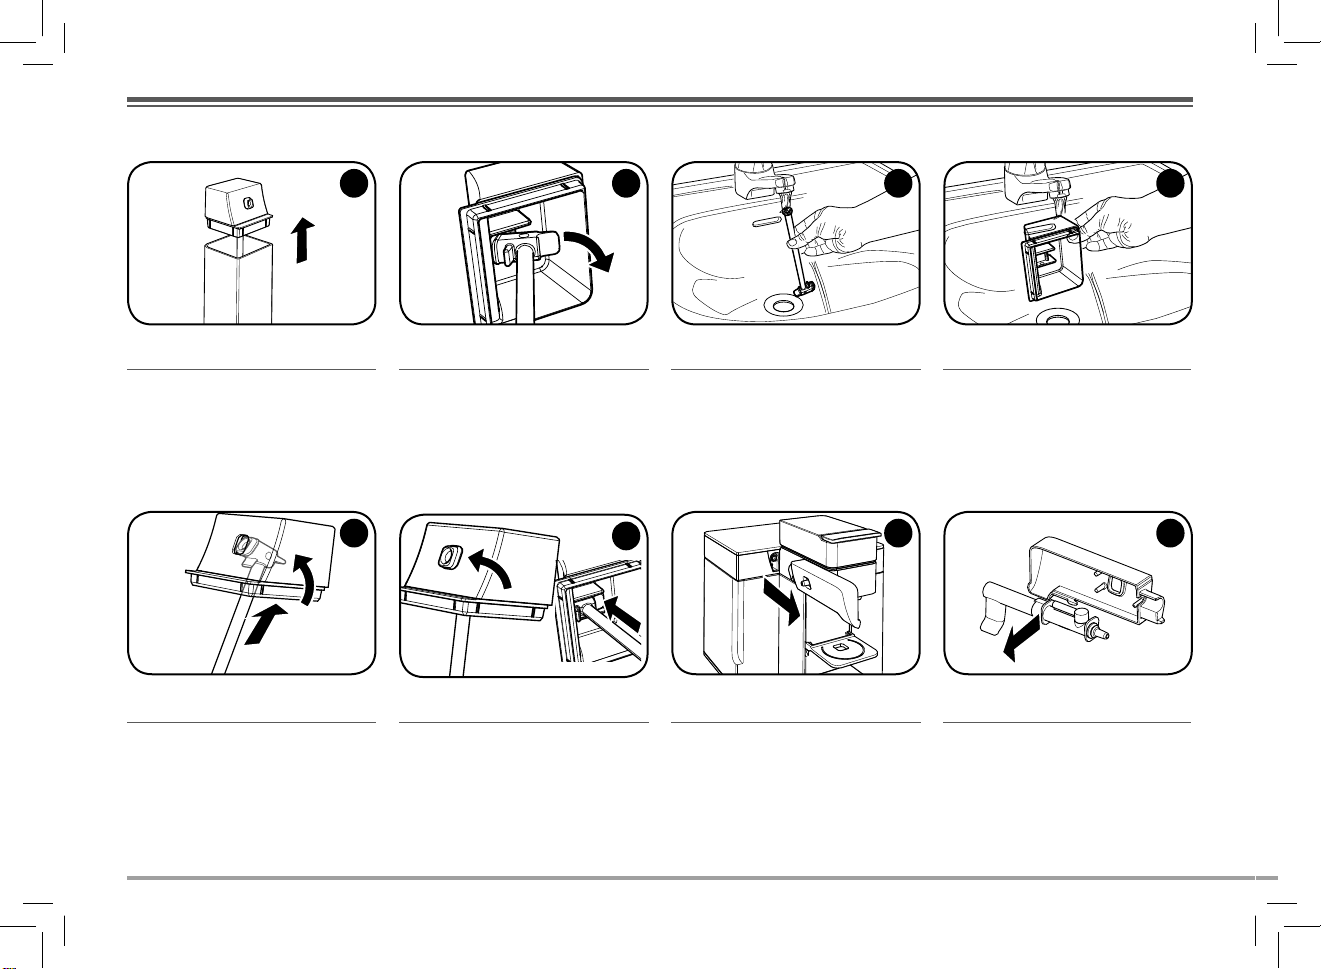
Spegnere la macchina e staccare la spina. Estrarre e lavare il serbatoio dell’acqua.
Turn o the machine and unplug it. Remove and wash the water tank.
5
Vuotare la vaschetta dai residui (capsule usate/
ca è) e lavarla.
Empty the tray from any residues (used capsules/
co ee) and wash it.
Non utilizzare l’acqua che resta ferma nel serbatoio per più di 7 giorni. Si consiglia di lavare e riempire il serbatoio con acqua potabile fresca ogni giorno. La pulizia della macchina
e dei suoi componenti deve essere eseguita almeno una volta alla settimana. Non utilizzare alcool etilico, solventi, spugne abrasive e/o agenti chimici aggressivi. Non asciugare la
macchina e/o i suoi componenti in un forno a microonde e/o un forno convenzionale. La macchina ed i suoi componenti non si possono lavare in lavastoviglie.
Do not use water that has been in the tank for more than 7 days. It is recommended to wash the water tank and ll it with fresh drinking water daily. Cleaning of the machine and its
components should be performed at least weekly. Do not use ethyl alcohol, solvents, abrasive sponges and / or aggressive chemicals. Do not dr y the machine and / or its components in a
microwave and / or conventional oven. The machine and its components cannot be put in the dishwasher.
Ruotare il piano poggia tazzine no ad allinearlo.
Rotate the cup holder surface until it is aligned. Remove the cup holder surface and wash it. Insert the cup holder surface and lower it.
Sollevare ed estrarre il piano appoggia tazze e
lavarlo.
Lift and remove the cup holder surface and wash it.
6
S lare il piano poggia tazzine e lavarlo. Inserire il piano poggia tazzine ed abbassarlo.
Estrarre la vaschetta raccogli capsule usate.
Remove the used capsule tray.
7
8
25
Page 26
PULIZIA E MANUTENZIONE
CLEANING AND MAINTENANCE
1211109
Rimuovere il coperchio del serbatoio del latte e
svuotare l’eventuale contenuto.
Remove the milk tank lid and empty its contents,
if any.
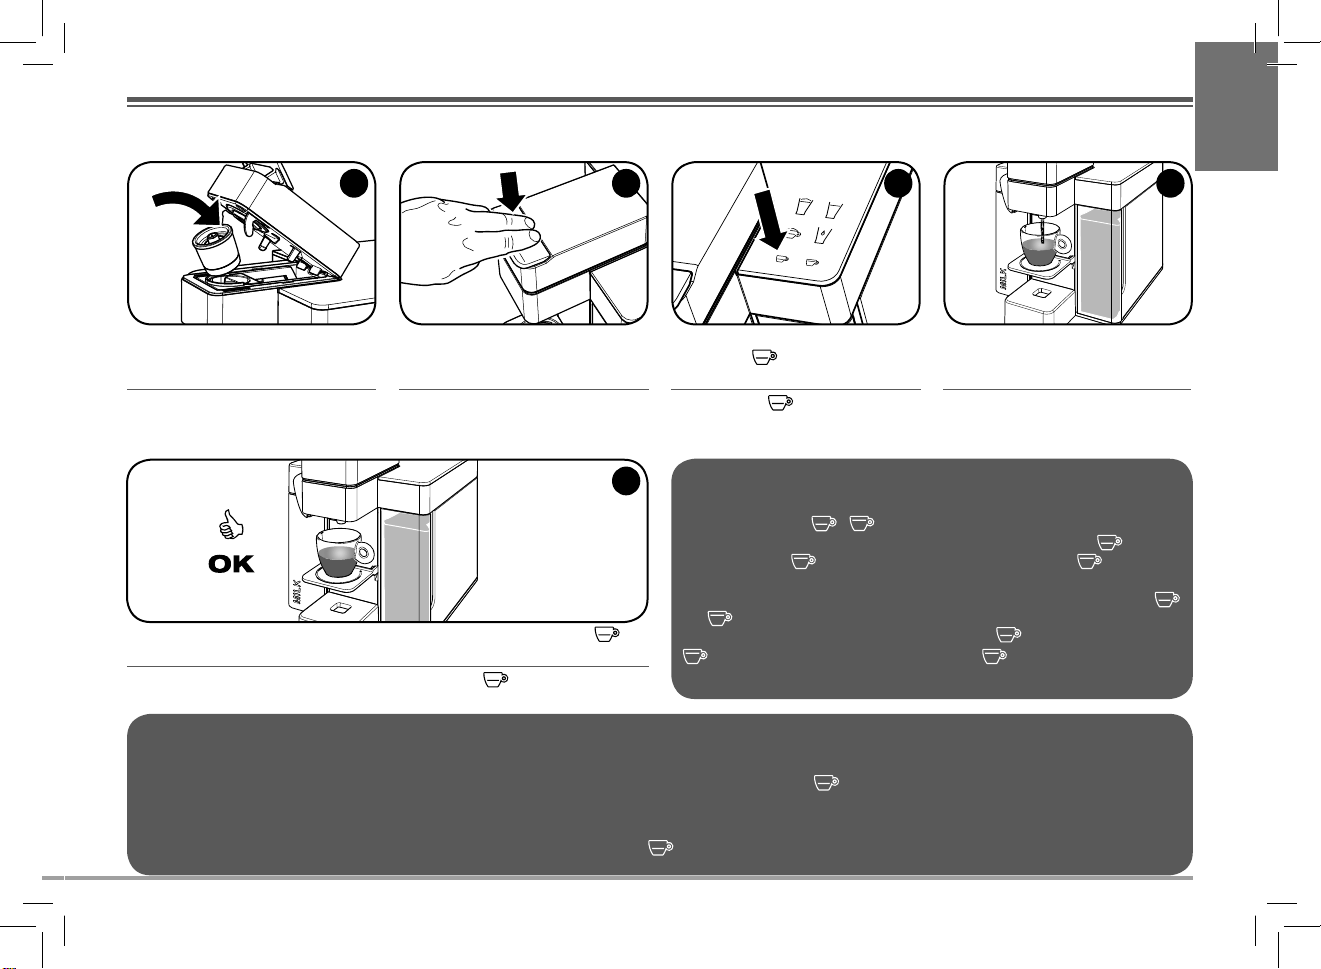
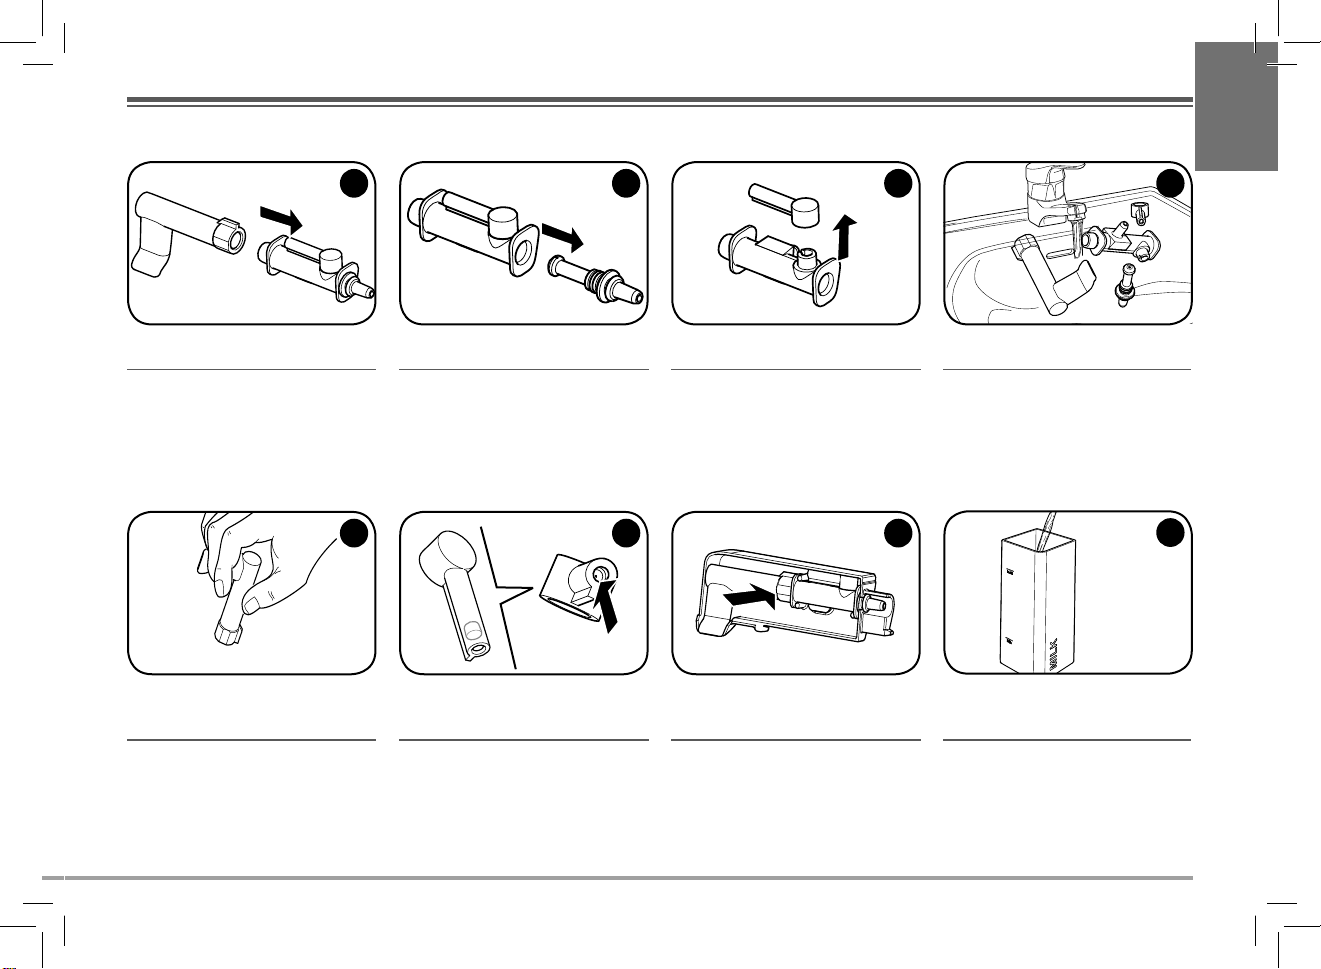
Inserire il beccuccio d’erogazione nel coperchio.
Insert the dispensing spout in the lid. Rotate the spout until it engages in its place. Remove the milk dispensing spout. Remove the milk dispensing spout components.
26
S lare il beccuccio d’erogazione. Prendere la linguetta e ruotarla.
Remove the dispensing spout. Hold the tab and
rotate it.
13
Ruotare il beccuccio no ad agganciarlo nella
sua sede.
Lavare con acqua calda il beccuccio d’erogazione.
Wash the dispensing spout with hot water. Wash the milk tank lid with hot water.
14
Rimuovere l’erogatore latte. Rimuovere i componenti dell’erogatore latte.
Lavare con acqua calda il coperchio del serbatoio
latte.
15 16
Page 27
acqua calda
PULIZIA E MANUTENZIONE
CLEANING AND MAINTENANCE
IT
EN
20191817
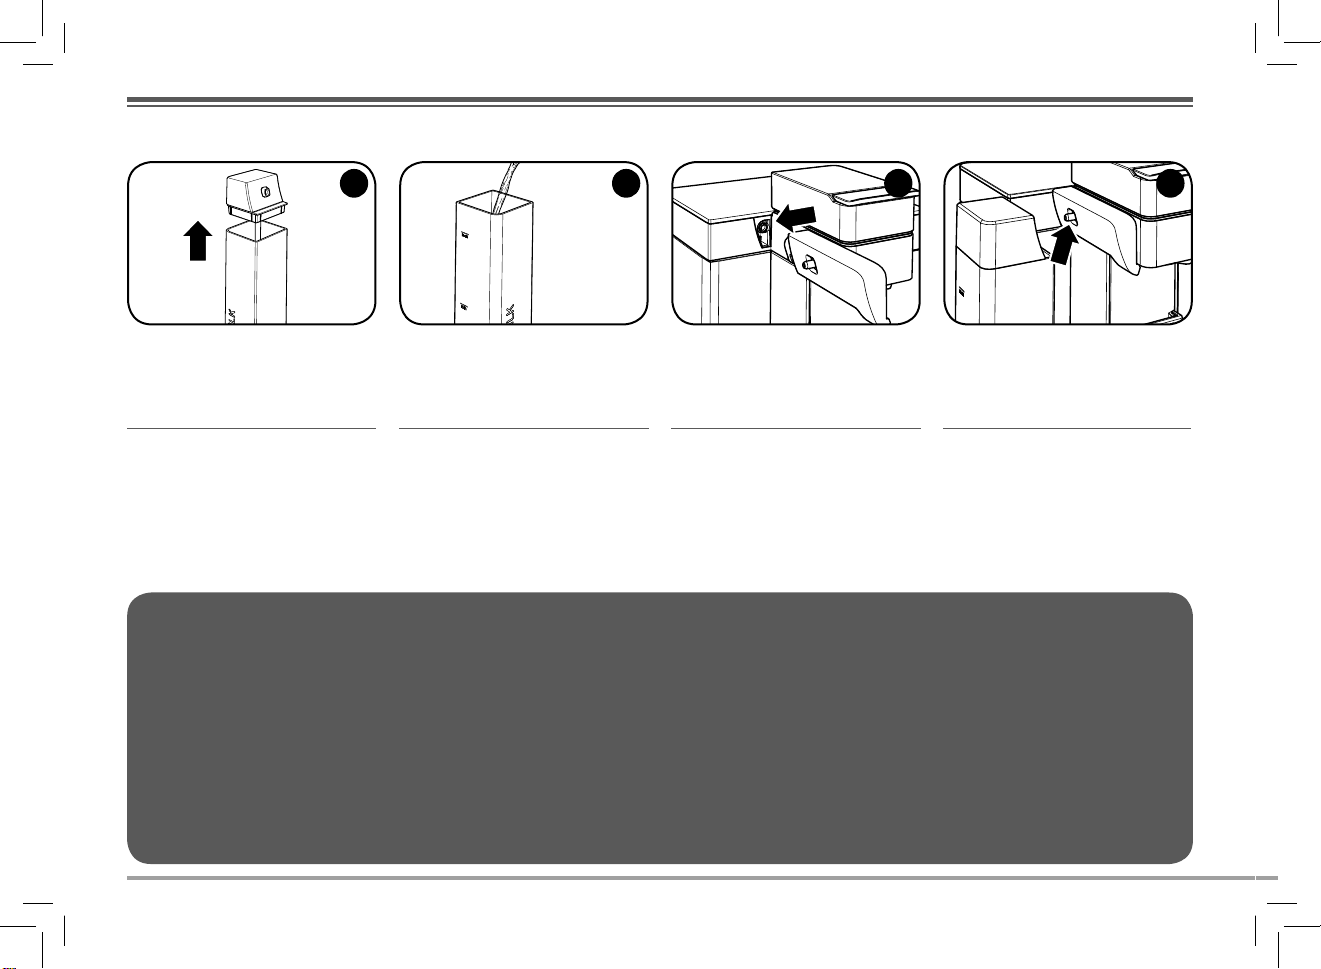
Rimuovere il raccordo nale. Rimuovere l’estremità che va inserita nella mac-
china.
Remove the nal connector. Remove the end that must be inserted in the ma-
chine.
Svuotare il tubo trasparente dall’acqua e da eventuali residui esercitando una leggera pressione
con le dita.
Empty any water or residues out of the transparent
pipe by gently pressing it with your ngers.
Per garantire il corretto montaggio del latte, veri care sempre che il microforo presente all’interno
del tubo superiore non sia ostruito.
In order to ensure correct milk frothing, always
check that the microhole inside the upper pipe is
not clogged.
Rimuovere il tubo superiore. Lavare tutti i componenti con
Remove the upper pipe. Wash all components with hot water.
2321 22
Asciugare i componenti e inserirli nell’erogatore
latte.
Dry all components and insert them into the milk
dispensing spout.
Riempire il serbatoio del latte con acqua fresca
potabile e riposizionare il coperchio.
Fill the milk tank with fresh drinking water and
re t the lid.
acqua calda.
24
27
Page 28
PULIZIA E MANUTENZIONE
CLEANING AND MAINTENANCE
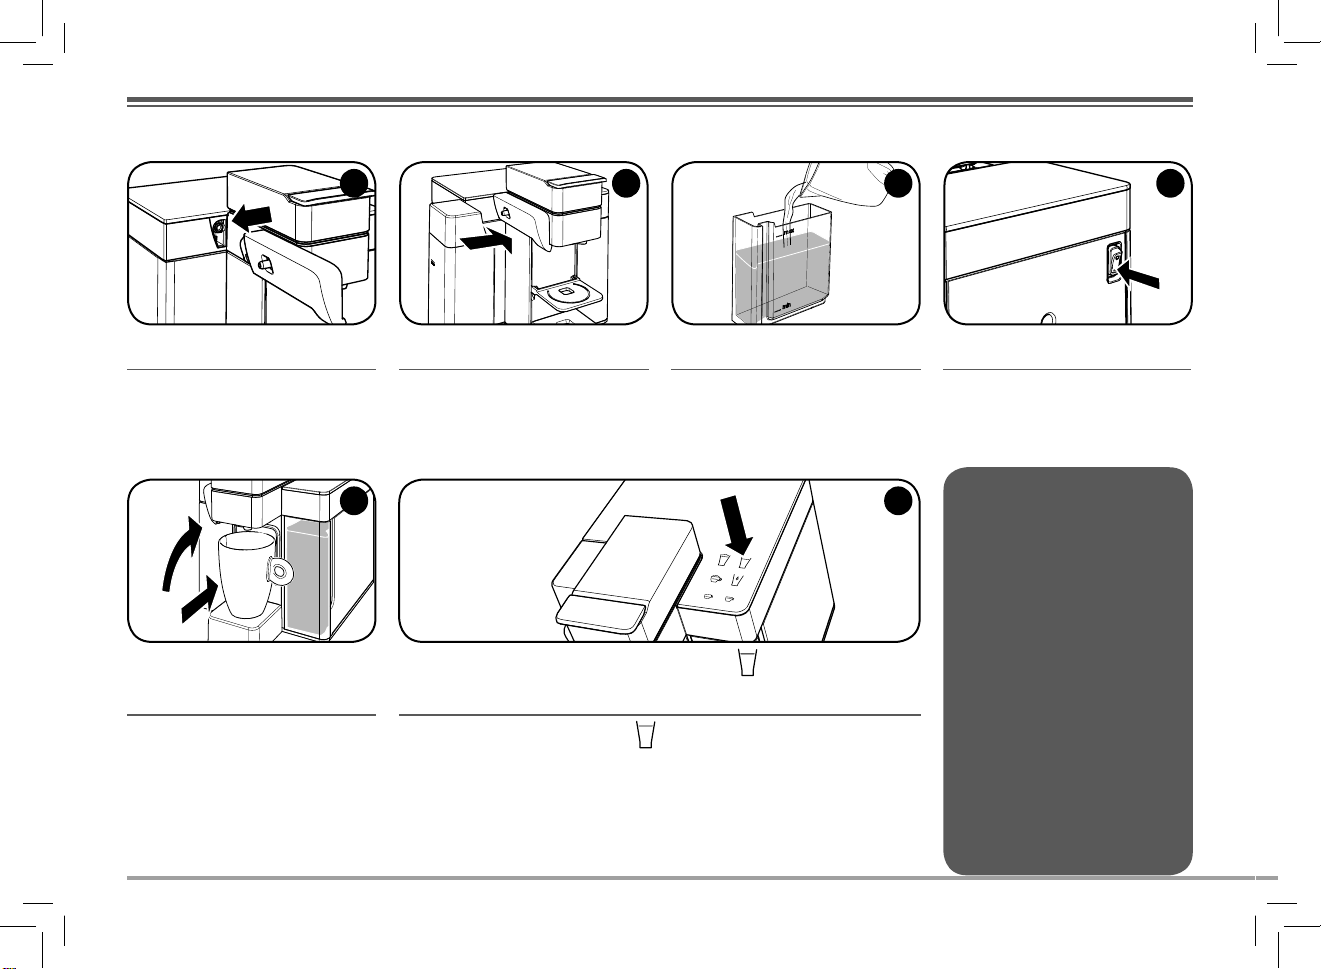
Agganciare l’erogatore latte all’innesto della macchina no a perfetto incastro.
Attach the milk dispensing spout to the machine
connector until it locks into place.
Sollevare il supporto e posizionare una tazza
grande o mug.
Lift the holder and position a mug.
2625
Agganciare il serbatoio all’erogatore latte no a
perfetto incastro.
Attach the tank to the milk dispensing spout until
it locks into place.
Riempire il serbatoio con acqua fresca potabile no
al livello MAX. Inserire il serbatoio nella macchina.
Fill the tank with fresh drinking water up to the
MAX level. Insert the wate tank into the machine.
3029
Veri care che tutti i tasti siano accesi in modo sso. Premere il tasto come per erogare un latte caldo.
L’operazione è necessaria per completare il ciclo di pulizia. Al termine svuotare la tazza e i serbatoi. Il
ciclo di pulizia è terminato e la macchina è pronta per essere utilizzata.
Check that all buttons are steady on. Press the
to complete the cleaning cycle. When nished, empty the cup and the tanks. The cleaning cycle has been
completed and the machine is ready to be used.
button as if to dispense a hot milk. This is necessary
2827
Accendere la macchina.
Turn on the machine.
Attenzione! La macchina non è provvista di un sistema automatico di pulizia
che possa garantire l’abbattimento
della carica batterica presente nel latte residuo.
Per la pulizia si consiglia di utilizzare
prodotti speci ci.
Warning! The machine is not equipped
with an automatic cleaning system that
can ensure elimination of the bacterial
charge in the milk residues.
It is recommended to use speci c products for cleaning.
28
Page 29
DECALCIFICAZIONE
DESCALING
Leggere attentamente tutte le istruzioni prima di avviare il ciclo di decalci cazione. Durata: circa 20 minuti. La formazione di calcare è la
naturale conseguenza dell’utilizzo della macchina. La decalci cazione consente di ottimizzare la pulizia e di rimuovere i residui di calcare dal
suo interno. La macchina segnala automaticamente quando necessita decalci cazione facendo lampeggiare in modo alternato
Si consiglia di decalci care la macchina ogni 2 mesi, con un prodotto speci co per macchine da ca è.
Read all instructions carefully before performing the descaling cycle. Duration: about 20 minutes. Limescale normally builds up with the use of
the machine. Descaling allows to optimise cleaning and to remove limescale deposits from the inside.
ing alternately when the machine needs to be descaled. It is recommended to descale the machine every 2 months by using a descaling product
especially designed for co ee machines.
and will automatically start blink-
e .
IT
EN
321
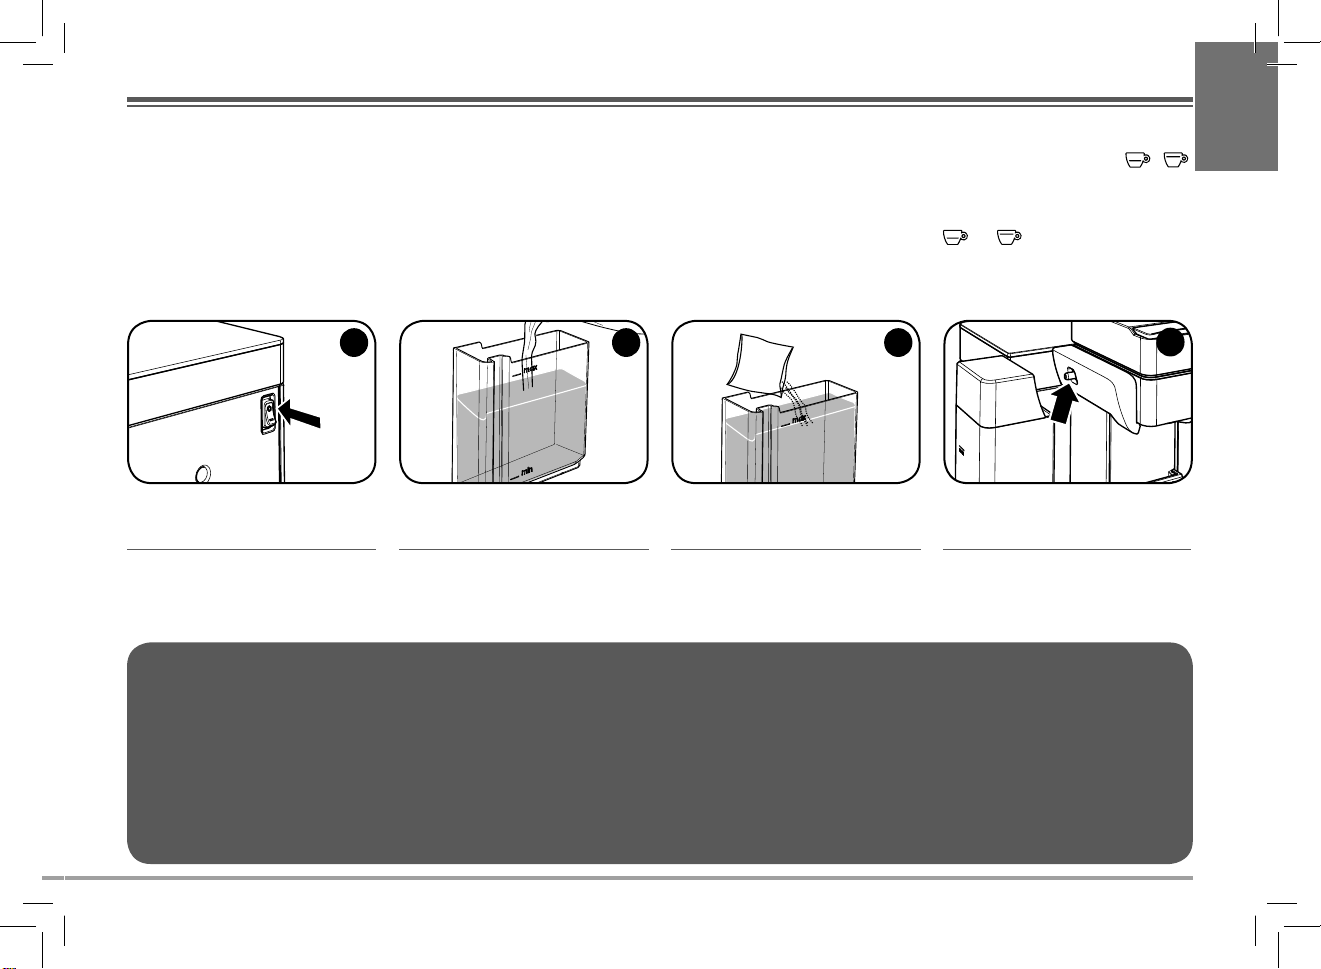
Spegnere la macchina.
Turn o the machine. Remove and ll the water tank with fresh drinking
NOTA: Se le operazioni non vengono eseguite nei tempi indicati, la macchina non avvia il processo di decalci cazione: è necessario, quindi, spegnere la macchina e ripetere le
operazioni dal punto 5 al punto 9.
Se il ciclo di decalci cazione viene interrotto per mancanza di corrente elettrica o perchè la macchina viene spenta erroneamente, si deve ripetere l’intera operazione prima di
poter utilizzare la macchina.
NOTE: If the operations are not carried out according to the indicated time, the machine will not start the descaling process. In this case, turn o the machine and repeat steps from 5 to 9.
If the descaling cycle is interrupted by a power failure or because the machine was turned o incorrectly, you must repeat the entire procedure before you can use the machine.
Estrarre e riempire il serbatoio dell’acqua con
acqua fresca potabile no al livello MAX.
water up to the MAX level.
Aggiungere 1 bustina di decalci cante e mescolare
per scioglierlo.
Add 1 descaling bag and mix until dissolved. Check that the milk dispensing spout and the milk
Veri care che l’erogatore latte e il serbatoio latte
siano agganciati alla macchina. Il serbatoio latte
deve rimanere vuoto.
tank are attached. The milk tank must be empty.
4
29
Page 30
1 Litro
1 Liter
1 Litro
1 Liter
1 Litro
1 Liter
DECALCIFICAZIONE
DESCALING
5
Posizionare un contenitore di almeno 1 litro di
capacità sotto l’erogatore di ca è.
Place a container of at least 1 litre capacity under
the co ee dispensing spout.
9
Il ciclo si avvia.
The cycle starts.
6
Accendere la macchina.
Turn on the machine.
10 11
I tasti lampeggiano in modo sequenziale in senso
orario.
The buttons blink sequentially in a clockwise direction.
Entro 15 secondi premere e tenerlo premuto
per 7 secondi no al segnale acustico.
Within 15 seconds press and hold the
for 7 seconds until you hear the acoustic signal.
Quando il tasto si accende in modo sso la
macchina ha terminato il ciclo.
When the button is steady on, the machine
has completed the cycle.
button
87
Tutti i tasti lampeggiano. Premere il tasto .
All the buttons blink. Press the button.
12
Svuotare l’acqua e soluzione decalci cante dal
contenitore e dal serbatoio acqua.
Empty the water and descaling solution out of the
container and the water tank.
30
Page 31

1 Litro
1 Liter
DECALCIFICAZIONE
DESCALING
13
14
IT
EN
15 16
Lavare bene il serbatoio e riempirlo con acqua
fresca no al livello MAX.
Wash the tank and ll it with fresh drinking water
up to the MAX level.
17
Terminato il ciclo, quando i tasti si accendono in
modo sso, la macchina è pronta all’uso.
At the end of the cycle, when the buttons are steady
on, the machine is ready.
Riposizionare il contenitore.
Place the container back in position.
Premere : la macchina inizia il risciacquo
erogando acqua ad intervalli regolari.
Press : The machine begins the rinse cycle
dispensing water at regular intervals.
I tasti lampeggiano in modo sequenziale in senso
antiorario.
The buttons blink sequentially in a anticlockwise
direction.
31
Page 32

LIMITAZIONI SULLA GARANZIA
ATTENZIONE: Se la decalci cazione non viene eseguita regolarmente come indicato, il calcare può provocare difetti di funzionamento non coperti da garanzia. Per la
prima decalci cazione, si consiglia di usare il prodotto per la decalci cazione fornito
con la macchina.
Non usare aceto, lisciva, sale, acido formico poiché danneggiano la macchina.
Usare solo prodotti decalci canti idonei per le macchine da ca è. La soluzione decalci cante deve essere smaltita secondo quanto previsto dalle norme in vigore. Non
bere il liquido erogato durante il processo di decalci cazione; la macchina può essere
utilizzata per erogare ca è solo quando il processo di decalci cazione è terminato.
La garanzia non copre guasti causati da:
- una non periodica decalci cazione.
- funzionamento con voltaggio diverso da quello prescritto sulla targa dati (vedi capitolo “parti
della macchina”).
WARRANTY LIMITATIONS
- uso improprio o non conforme alle istruzioni
- uso improprio o non conforme alle istruzioni
- modi che apportate internamente
- modi che apportate internamente
La garanzia non copre i costi di riparazione su macchine manipolate da centri d’assistenza non autorizzati.
La garanzia non copre i costi di riparazione su macchine manipolate da centri d’assistenza non autorizzati.
Tali costi saranno totalmente a carico del cliente. Si consiglia di:
Tali costi saranno totalmente a carico del cliente. Si consiglia di:
- non lavare i componenti della macchina in lavastoviglie;
- non lavare i componenti della macchina in lavastoviglie;
- mantenere pulite le vaschette di raccolta.
- mantenere pulite le vaschette di raccolta.
La mancata osservazione di questi punti potrebbe creare dei problemi alla macchina non coperti da
La mancata osservazione di questi punti potrebbe creare dei problemi alla macchina non coperti da
garanzia.
garanzia.
ATTENZIONE:
ATTENZIONE:
Si consiglia di conservare l’imballo originale (almeno per il periodo di garanzia ) per
Si consiglia di conservare l’imballo originale (almeno per il periodo di garanzia ) per
l’eventuale invio della macchina a centri di assistenza autorizzati. Gli eventuali danni
l’eventuale invio della macchina a centri di assistenza autorizzati. Gli eventuali danni
dovuti ad un trasporto senza imballo adeguato non sono coperti da garanzia.
dovuti ad un trasporto senza imballo adeguato non sono coperti da garanzia.
WARNING: Not performing descaling periodically as indicated can cause malfunctions
not covered by warranty.
Use the descaling product supplied with the machine to descale for the rst time.
Do not use vinegar, lye, salt or formic acid because they may damage the machine.
Use only descaling agents suitable for co ee machines.
The descaling solution must be disposed of in accordance with the applicable laws and
regulations. Do not drink the liquid dispensed during the descaling process; the machine
can be used to make co ee when the descaling process is nished.
The warranty does not cover damage or malfunctions caused by:
- Failure to carry out periodic descaling.
- Operation with a voltage that di ers from the rating shown on the data plate “M” (see “machine
parts”).
32
- Improper use or use that is not compliant with the instructions.
- Internal modi cations.
The warranty does not cover repair costs on machines that have been tampered with by unauthorized
service centres. In this case all costs are paid by the client. We suggest:
- Not to wash the machine parts in the dishwasher;
- To keep the recovery trays clean.
Failure to observe these instructions may cause damage to the machine which is not covered by the warranty.
WARNING:
It is advisable to keep the original packaging (at least for the duration of the warranty
period) in order to ship the machine to a service center for repair if necessary. Any damage
caused by transport without adequate packaging will not be covered by the warranty.
Page 33

SEGNALAZIONE - STATO MACCHINA
WARNINGS MACHINE STATUS
Lampeggiano
La macchina è stata accesa ed è in fase di riscaldamento.
IT
EN
Il tasto acqua calda lampeggia
La macchina sta erogando acqua calda.
Blink
The machine has been turned on and is in warm-up phase.
Accesi
La macchina ha raggiunto la temperatura corretta per l’erogazione.
Steady on
When the machine reaches the right temperature for brewing.
Il tasto ca è espresso lampeggia
La macchina sta erogando un espresso.
The espresso co ee button blinks
The machine is brewing one cup of espresso co ee.
Il tasto ca è lungo lampeggia
La macchina sta erogando un ca è lungo.
The long co ee button blinks
The machine is brewing a long co ee.
Il tasto cappuccino lampeggia
La macchina sta erogando un cappuccino.
The cappuccino button blinks
The machine is brewing one cup of cappuccino.
The hot water button blinks
The machine is dispensing hot water.
Il tasto latte macchiato lampeggia
La macchina sta erogando un latte macchiato.
The latte macchiato button blinks
The machine is dispensing a latte macchiato.
Il tasto latte caldo schiumato lampeggia
La macchina sta erogando un latte caldo.
The hot foamed milk button blinks
The machine is dispensing a hot milk.
Il tasto ca è espresso lampeggia lentamente
La macchina è in fase di Power Save. La macchina attiva il Power Save
dopo 10 minuti di inutilizzo. Per riattivare la macchina s orare un tasto
qualsiasi.
The espresso co ee button blinks slowly
The machine is in Power Save phase. The machine activates the Power
Save function after 10 minutes of inactivity. Touch any button to turn
on the machine again.
I tasti ca è espresso e ca è lungo si accendono e si spengono
in modo alternato
La macchina necessita di essere decalci cata.
The espresso co ee and long co ee buttons turn on and o alternately
The machine needs to be descaled.
33
Page 34

SEGNALAZIONE - STATO MACCHINA
WARNINGS MACHINE STATUS
Lampeggiano
La macchina indica che è stata selezionata la procedura di decalci cazione. In questo stato il serbatoio dell’acqua deve contenere la soluzione
decalci cante.
Blink
The machine indicates that the descaling process ha s been selected. In this
status the tank must contain descaling solution.
Lampeggiano in modo sequenziale in senso orario.
La macchina indica che è in esecuzione la prima parte della decalci cazione. La macchina sta erogando la soluzione decalci cante. Lampeggia
in modo progressivo solo il tasto ca è espresso.
Blink sequentially in a clockwise direction.
The machine indicates that the rst part of the descaling cycle is being
performed. The machine is dispensing the descaling solution. Only the
espresso co ee button blinks progressively.
Il tasto ca è lungo acceso sso
La macchina indica che è terminata la prima fase della decalci cazione.
Si deve risciacquare e riempire il serbatoio con acqua fresca potabile.
The long co ee button is steady on
The machine indicates that the rst part of the descaling cycle is complete.
Rinse the water tank with fresh drinking water and ll it again.
Lampeggiano in modo sequenziale in senso antiorario.
La macchina indica che è in esecuzione la seconda parte della decalci cazione. La macchina sta erogando l’acqua per il risciacquo del circuito.
Lampeggia in modo progressivo solo il tasto ca è lungo.
Blink sequentially in an anticlockwise direction.
The machine indicates that the second part of the descaling cycle is being
performed. The machine is dispensing water for rinsing the circuit. The
long co ee button only blinks progressively.
Lampeggiano velocemente
La macchina ha un malfunzionamento. Spegnere e riaccendere dopo
30 secondi. Se il problema si ripresenta, contattare un centro assistenza
autorizzato.
Blink quickly
There is a machine malfunction. Turn o the machine, wait for 30 seconds
and then turn it on again. If the problem persists, contact an authorised
service centre.
Le due colonne di tasti si accendono in modo alternato
Si è veri cato un errore nel funzionamento della macchina. Spegnere
e riaccendere dopo 30 secondi. Se il problema si ripresenta, contattare
un centro assistenza autorizzato.
The two button columns light up alternately
There was an error in the operation of the machine. Turn o the machine
and then turn it on again after 30 seconds. If the problem persists, contact
an authorized service center.
34
Page 35

PROBLEMA - CAUSA - SOLUZIONE
PROBLEMA CAUSA SOLUZIONE
La macchina non si accende.
La macchina non eroga
ca è.
Perdita acqua.
Cavo d’alimentazione non collegato alla
presa di corrente.
Interruttore generale posizionato su “0”.
Macchina in stato Power Save.
Manca acqua nel serbatoio. Riempire d’acqua il serbatoio.
Capsula non inserita nello scompartimento capsule.
La capsula inserita non eroga ca è.
Chiusura incompleta della parte mobile
della testa della macchina.
Mancata attivazione del tasto
o .
Innesto non corretto del serbatoio
d’acqua.
Componenti interni con presenza di
calcare.
Mancato innesco della pompa. Provare ad erogare acqua senza la capsula inserita nello scompartimento .
Tipologia capsula errata.
Serbatoio acqua inserito in modo errato
e/o insu ciente.
Kit latte inserito in modo errato e/o
insu ciente.
Collegare la spina ad una presa di corrente conforme ai dati tecnici indicati nella targa dati sotto la base della macchina.
Posizionare l’interruttore generale su “I”.
Attivare la macchina s orando uno dei due tasti
S orare nuovamente il tasto
Inserire una capsula nello scompartimento capsule .
Rimuovere la capsula sganciando e sollevando la leva e recuperarla dalla vaschetta raccogli capsule. Chiudere lo scompartimento capsule ed erogare una piccola quantità d’acqua. Reinserire la capsula ed avviare l’erogazione.
Sollevare la leva e veri care di aver inserito correttamente la capsula. Abbassare la parte mobile e bloccare abbassando
la leva . Premere o per erogare ca è.
S orare nuovamente il tasto
Veri care che il serbatoio sia completamente inserito.
Decalcicare la macchina come descritto nel paragrafo dedicato.
Veri care di aver utilizzato una capsula “Iperespresso” per utilizzo domestico, identi cabili dalla dicitura “Capsule
monodose di ca è macinato per uso domestico” presente sulla confezione.
Veri care che il serbatoio dell’acqua sia stato inserito completamente no a battuta.
Veri care che tutti i componenti del kit siano stati montati ed inseriti correttamente.
o per iniziare l’erogazione.
o .
o .
IT
EN
Permanenza del
problema
Contattare
un centro
assistenza
autorizzato.
35
Page 36

PROBLEMA - CAUSA - SOLUZIONE
PROBLEMA CAUSA SOLUZIONE
La macchina non eroga
latte montato.
La macchina non eroga
latte montato.
La macchina non monta
il latte.
Le 3 icone delle preparazioni a base latte non si
illuminano.
Tipo di latte non idoneo a questa preparazione.
Erogatore latte sporco od ostruito di
latte da precedenti erogazioni.
Insu ciente quantità di latte nel serbatoio.
Beccuccio d’erogazione non inserito
correttamente nel coperchio del serbatoio latte.
Kit latte non assemblato correttamente.
Erogatore latte non inserito correttamente nella macchina.
Serbatoio latte non agganciato correttamente nella macchina.
Il tubo superiore del kit latte è ostruito.
il kit latte non è inserito o inserito male.
Utilizzare latte intero freddo.
Lavare il circuito di erogazione del latte.
Riempire il serbatoio del latte no al livello MIN.
Assicurarsi che sia ben inserito nel foro presente sul coperchio del serbatoio latte.
Assicurarsi che tutti i componenti siano montati correttamente (far riferimento al capitolo PULIZIA E MANUTENZIONE).
Assicurarsi di inserire l’erogatore latte no a perfetto incastro.
Assicurarsi di agganciare il serbatoio del latte alla macchina no a perfetto incastro.
(Riferimento al capitolo PULIZIA E MANUTENZIONE) Smontare il kit latte, rimuovere il tubo superiore e pulirlo accuratamente
come descritto al punto 22. Dopo aver rimontato il kit latte seguire le istruzioni di pulizia indicate dal punto 25 al punto 30.
Inserire il kit latte nella macchina no a per fetto incastro.
Permanenza del
problema
Contattare
un centro
assistenza
autorizzato.
36
Page 37

PROBLEM CAUSE SOLUTION
PROBLEM CAUSE SOLUTION
The machine does not
switch on.
The machine does not brew
co ee.
Water leak.
Power cord not connected to a power
socket.
Power button switched to "0". Switch the power button to "I".
Machine in power save status.
No water in the tank. Fill the tank with water.
Capsule not inserted in the capsule
compartment.
The capsule inserted does not brew
co ee.
Incomplete closure of the moving part of
the machine head.
or button not activated. Touch the or button again.
Water tank not engaged correc tly. Make sure the tank is fully inserted.
Limescale on internal components. Descale the machine as described in the relevant section.
Failure to start the pump. Try to dispense water with no capsule in the compartment.
Wrong capsule type.
The water tank is not correctly and/or
not completely inserted.
The milk kit is not correctly and/or not
completely inserted.
Connect the plug to a socket conforming to the technical data indicated in the data plate under the base of the machine.
Turn on the machine by touching the
Touch the
Insert a capsule into the capsule compartment.
Remove the capsule by disengaging and lifting the lever and retrieve it from the used capsule tray. Close the capsule
compartment and dispense a small quantity of water. Re t the capsule and start brewing.
Lift the lever and insert the capsule properly. Lower the moving part and lock it by lowering the lever. Press
to brew co ee.
Make sure that you have used an "Iperespresso" capsule for domestic use, identi ed by the wording "Single-dose ground
co ee capsules for domestic use" on the packaging.
Make sure that the water tank is completely inserted.
Make sure that all the milk kit components have been correctly a ssembled and inserted.
or button again to start brewing.
or button.
or
IT
EN
Persistence of the
problem
Contact an
authorised
service centre.
37
Page 38

PROBLEM CAUSE SOLUTION
PROBLEM CAUSE SOLUTION
The machine does not dispense frothed milk.
The machine does not
dispense frothed milk.
The machine does not
froth the milk.
The 3 milk-based beverage icons do not light up.
Milk type not suitable for this preparation.
Milk dispensing spout dirty or clogged by
milk from previous dispensing.
Not enough milk in the tank. Fill the milk tank up to the MIN level.
The dispensing spout is not correctly
inserted into the milk tank lid.
The milk kit is not correctly assembled.
The milk dispensing spout is not correctly inserted in the machine.
The milk tank is not correctly attached
to the machine.
The milk kit upper pipe is clogged.
The milk kit is not inserted or not correctly inserted.
Use cold whole milk.
Wash the milk dispensing circuit.
Make sure that it is fully inserted into the hole on the milk tank lid.
Make sure that all the components have been correctly assembled (refer to the CLEANING AND MAINTENANCE chapter).
Make sure to insert the milk dispensing spout until it locks into place.
Make sure to attach the milk tank to the machine until it locks into place.
(Refer to the CLEANING AND MAINTENANCE chapter) Disassemble the milk kit, remove the upper pipe and thoroughly
clean it as described in step 22. After reassembling the milk kit, follow the cleaning instructions from step 25 to 30.
Insert the milk kit in the machine until it locks into place.
Persistence of the
problem
Contact an
authorised
service centre.
38
Page 39

SMALTIMENTO
Smaltimento di apparecchiature elettriche ed elettroniche usate, da parte di privati nell’Unione Europea.
Il simbolo RAEE utilizzato per questo prodotto indica che quest’ultimo non deve essere smaltito assieme
agli altri ri uti domestici, ma deve essere oggetto di “raccolta separata”. L’utente privato ha la possibilità
di riconsegnare gratuitamente al distributore, in ragione di uno contro uno, l’apparecchiatura usata
all’atto dell’acquisto di una nuova.
Per ulteriori informazioni sui punti di raccolta delle apparecchiature da rottamare, si consiglia di contattare il proprio comune di residenza, il servizio di smaltimento dei ri uti locale o il negozio presso il
quale è stato acquistato il prodotto. È responsabilità dell’utente provvedere allo smaltimento secondo
le normative vigenti, ed il non rispetto delle disposizioni di legge può essere sanzionato.
Lo smaltimento corretto di questo prodotto contribuirà a proteggere l’ambiente, le risorse naturali e
la salute umana.
DISPOSAL
Disposal of end-of-life electric and electronic equipment by private households in the European Union.
The WEEE symbol used on this product means that it must not be disposed of together with other domestic
waste and should be collected separately. Consumers have the opportunity to hand in their used appliance
to distributors free of charge on a 1:1 basis when they purchase a new product.
For further information about the collection of appliances to be scrapped, please contact the local authority
in your town of residence, the local waste disposal service or the retailer where the product was purchased.
Consumers are responsible for disposing of end-of-life appliances in accordance with the current provisions
of law and noncompliance therewith may be subject to nes and criminal sanctions.
The correct disposal of this product will contribute to protecting the environment, natural resources and
human health.
IT
EN
39
Page 40

RÈGLES GÉNÉRALES POUR L'UTILISATION DE LA MACHINE DONNÉES TECHNIQUES
Lire attentivement le mode d'emploi et les limitations de garantie.
La machine doit être branchée à une prise de courant régulière équipée d'une mise à la terre. Maintenir
la machine propre en lavant fréquemment le plateau repose tasses, le bac d'égouttement, le bac de
collecte des capsules usagées, le réservoir à eau et le plateau repose tasses en verre. L'entretien doit
être e ec tué lorsque la machine est éteinte.
IMPORTANT : ne jamais immerger la machine ou ses composants amovibles dans l'eau ni l'introduire
au lave-vaisselle.
L'eau contenue dans le réservoir doit être changée régulièrement. Ne pas utiliser la machine s'il n'y a
pas d'eau dans le réservoir. Il est conseillé d'utiliser au moins tous les 2 mois un produit pour
l'enlèvement du calcaire formulé spéci quement pour les machines à c afé expresso selon
les indications décrites au chapitre détartrage.
DÉCOUVREZ ET ACHETEZ LES CAPSULES ILLY IPERESPRESSO SUR SHOP.ILLY.COM OU AUPRÈS DE NOS REVENDEURS IPERESPRESSO.
Matériau de la machine: Aluminium et verre trempé
Matériau échangeur thermique: Acier inox
Réservoir à eau: 0,9 litres
Réservoir à lait : 0,5 litres
Capacité du bac de collecte des capsules usagées: 10 capsules
Pompes:café 19 bars - lait 2,5 bars
Poids : 5 kg
Voltage: 220-240 V , 50/60 Hz (EU); 120 V, 60 Hz (USA)
Puissance: 1.200 W (EU-USA) - Avec option «Power Save»
Dimensions (L x P x H) (mm): 215 x 285 x 245
Le producteur se réserve le droit d'apporter des modi cations ou des améliorations sans aucun préavis.
ALLGEMEINE HINWEISE ZUR BEDIENUNG DES GERÄTS TECHNISCHE DATEN
Die Bedienungsanleitung und die Garantieeinschränkungen sorgfältig durchlesen.
Das Gerät muss an eine ordnungsgemäße Steckdose mit Erdung angeschlossen sein. Das Gerät sollte
sauber gehalten werden, indem die Tassenabstell äche, die Abtropfschale, der Kapselau angbehälter,
der Wassertank und die Tassenabstell äche aus Glas häu g gereinigt werden. Die Wartung wird bei
ausgeschaltetem Gerät vorgenommen.
WICHTIG: Das Gerät und dessen abnehmbare Bestandteile keinesfalls in Wasser eintauchen oder in die
Spülmaschine stellen.
Das im Wassertank enthaltene Wasser muss regelmäßig gewechselt werden. Das Gerät darf nicht benutzt
werden, wenn sich kein Wasser im Tank be ndet. Es wird empfohlen, mindestens alle 2 Monate ein
spezi sches Produkt für die Entfernung des Kalks für Espressomaschinen zu verwenden. Dabei
sind die Hinweise im Kapitel Entkalken zu beachten.
Material des Geräts: Aluminium und Hartglas
Material des Wärmeaustauschers: Rostfreier Edelstahl
Wassertank: 0,9 Liter
Milchtank: 0,5 Liter
Fassungsvermögen Behälter leere Kapseln: 10 Kapseln
Pumpen: mit 19 bar für Ka ee - mit 2,5 bar für Milch
Gewicht: 5 kg
Netzspannung: 220-240 V , 50/60 Hz (EU); 120 V, 60 Hz (USA)
Leistung: 1.200 W (EU-USA) - Mit “Power Save”-Funktion
Abmessungen (L x T x H) (mm): 215 x 285 x 245
Der Hersteller behält sich das Recht vor, Änderungen oder Verbesserungen am Produkt ohne Vorankündigung vorzunehmen.
ENTEDECKEN UND DIE ILLY IPERESPRESSOKAPSELN ÜBER SHOP.ILLY.COM ODER BEI UNSEREN EINZELHÄNDLERN KAUFEN.
40
Page 41

SOMMAIRE
RÈGLES GÉNÉRALES POUR L'UTILISATION DE LA MACHINE ...........................40
DONNÉES TECHNIQUES .............................................................................40
PARTIES DE LA MACHINE ...........................................................................42
MESURES IMPORTANTES DE SÉCURITÉ .......................................................43
INSTALLATION ET MISE EN MARCHE DE LA MACHINE ...................................49
PRÉPARATION DU CAFÉ .............................................................................51
RECOMMANDATIONS ................................................................................52
RÉGLAGE DE LA QUANTITÉ DE CAFÉ DANS LA TASSE .....................................53
UTILISATION DU RÉSERVOIR ET DE LA BUSE DE DISTRIBUTION DU LAIT ........54
PRÉPARATION DU CAPPUCCINO .................................................................56
PRÉPARATION DU LAIT NOISETTE ..............................................................58
INHALT
PRÉPARATION DU LAIT CHAUD MOUSSEUX .................................................60
RÉGLAGE DE LA QUANTITÉ DE LAIT CHAUD MOUSSEUX ................................61
DISTRIBUTION D'EAU CHAUDE ...................................................................62
RÉGLAGE DE LA QUANTITÉ D'EAU CHAUDE DISTRIBUÉE ...............................62
NETTOYAGE ET ENTRETIEN ........................................................................63
DÉTART RAGE ............................................................................................67
LIMITATIONS DE LA GARANTIE ...................................................................70
SIGNALISATIONS ÉTAT DE LA MACHINE .....................................................71
PROBLÈME CAUSE SOLUTION .................................................................73
ÉLIMINATION ...........................................................................................77
FR
DE
ALLGEMEINE HINWEISE ZUR BEDIENUNG DES GERÄTS ................................40
TECHNISCHE DATEN ..................................................................................40
TEILE DER MASCHINE ................................................................................42
WICHTIGE SICHERHEITSVORSCHRIFTEN ....................................................43
INSTALLATION UND INBETRIEBNAHME DES GERÄTS ....................................49
KAFFEEZUBEREITUNG ...............................................................................51
EMPFEHLUNGEN.......................................................................................52
EINSTELLUNG DER KAFFEEMENGE IN DER TASSE .........................................53
VERWENDUNG DES MILCHTANKS UND MILCHAUSLAUFS ..............................54
ZUBEREITUNG EINES CAPPUCCINOS ...........................................................56
ZUBEREITUNG VON LATTE MACCHIATO .......................................................58
ZUBEREITUNG VON HEISSER AUFGESCHÄUMTER MILCH ..............................60
EINSTELLUNG DER MENGE AN HEISSER AUFGESCHÄUMTER MILCH ...............61
AUSGABE VON HEISSWASSER ....................................................................62
EINSTELLUNG DER MENGE AN AUSGEGEBENEM HEISSWASSER ....................62
REINIGUNG UND WARTUNG .......................................................................63
ENTKALKEN..............................................................................................67
GARANTIEEINSCHRÄNKUNGEN ..................................................................70
ANZEIGEN GERÄTESTATUS .......................................................................71
PROBLEM URSACHE ABHILFE .................................................................75
ENTSORGUNG ...........................................................................................77
41
Page 42

PARTIES DE LA MACHINE
A DEL ÉCLAIRAGE
B BUSE DE DISTRIBUTION D'EAU CHAUDE
C BUSE DE DISTRIBUTION DU CAFÉ
D ENCLENCHEMENT DE LA BUSE DE
DISTRIBUTION DU LAIT
E BUSE DE DISTRIBUTION DU LAIT
F RÉSERVOIR À LAIT
G BANDEAU DE COMMANDE
G1 LAIT NOISETTE
G2 CAPPUCCINO
G3 CAFÉ EXPRESSO
G4 LAIT CHAUD MOUSSEUX
G5 EAU CHAUDE
G6 CAFÉ ALLONGÉ
TEILE DER MASCHINE
A LED BELEUCHTUNG
B HEISSWASSERAUSLAUF
C KAFFEEAUSLAUF
D STECKVERBINDUNG FÜR MILCHAUSLAUF
E MILCHAUSLAUF
F MILCHTANK
G BEDIENFELD
G1 LATTE MACCHIATO
G2 CAPPUCCINO
G3 ESPRESSO
G4 HEISSE AUFGESCHÄUMTE MILCH
G5 HEISSES WASSER
G6 GROSSER KAFFEE
42
H LEVIER OUVERTURE/FERMETURE
LOGEMENT À CAPSULES
I LOGEMENT À CAPSULESinterne
L RÉSERVOIR À EAU
D BAC DE COLLECTE DES CAPSULES
USAGÉES et résidus liquides de n de
distribution
N PLATEAU REPOSE PETITES TASSES À
CAFÉ EXPRESSO
O PLATEAU REPOSE TASSES MUG
P INTERRUPTEUR GÉNÉRAL
Q CÂBLE D'ALIMENTATION
R PLAQUE SIGNALÉTIQUE (sous la base)
H HEBEL ZUM ÖFFNEN/SCHLIESSEN DES
KAPSELFACHS
I KAPSELFACH innen
L WASSERTANK
M AUFFANGBEHÄLTER FÜR LEERE
KAPSELN und Flüssigkeitsreste bei Ende
der Ausgabe
N ESPRESSOTASSENABSTELLFLÄCHE
O KAFFEEBECHERABSTELLFLÄCHE
P HAUPTSCHALTER
Q NETZKABEL
R DATENSCHILD (auf der Maschinen-Un-
terseite)
G1
A
B
G2
G3
G4
G5
G6
C
D
G
H
E
I
L
M
N
O
F
P
Q
R
Page 43

MESURES IMPORTANTES DE SÉCURITÉ
Lors de l’utilisation d’appareils électriques, il est nécessaire de
toujours respecter les mesures de sécurité suivantes.
Utilisation de l’appareil
- Lire intégralement les instructions.
- Cette machine est conçue pour « faire du café espresso et distribuer
des boissons à base de lait » : faire attention à ne pas se brûler avec
les jets d’eau, ou en utilisant la machine de façon inappropriée.
- L’appareil est conçu pour les usages domestiques et similaires.
Par exemple :
• cuisines du personnel de points de vente, bureaux et autres
environnements de travail
WICHTIGE SICHERHEITSVORSCHRIFTEN
FR
DE
• tourisme à la ferme
• clientèle d’hôtels, de motels et autres logements de type
résidentiel
• logements de type Bed & Breakfast.
- Ne pas utiliser l’appareil pour des usages di érents de ceux
prévus. Tout autre usage est considéré comme inapproprié et
par conséquent dangereux.
- Cet appareil ne doit être allumé que pendant le temps nécessaire
à son utilisation, après quoi il doit être éteint en remettant l’interrupteur général sur « 0 » (Fig.1) et la che doit être débranchée
de la prise de courant.
- Ne jamais toucher une surface chaude. Les distributions d’eau/café
Bei der Verwendung von Elektrogeräten sind folgende Sicherheitshinweise immer zu beachten.
Gerätebenutzung
- Alle Anleitungen durchlesen.
- Diese Maschine wurde entwickelt, um Espresso aufzubrühen und
Getränke mit Milch auszugeben: Vorsicht vor Verbrühungen durch
Heißwasserstrahlen oder durch unsachgemäßen Gebrauch.
- Dieses Gerät darf nur für den Hausgebrauch oder ähnliche Einsätze
verwendet werden:
• Personalküchen in Geschäften, Büros und ähnlichen Arbeitsum-
gebungen;
• Ferienwohnungen auf Bauernhöfen;
• Kunden in Hotels, Motels und anderen Ferienunterkünften;
• Ferienpensionen.
- Das Gerät darf nur für den bestimmungsgemäßen Gebrauch verwendet werden. Jede anderweitige Ver wendung gilt als unsachgemäß
und somit gefährlich.
- Das Gerät darf nur für die Zeit der Nutzung eingeschaltet werden.
Danach den Hauptschalter auf “0” (Abb. 1) stellen und den Netzstecker aus der Steckdose ziehen.
- Nie eine heiße Fläche berühren. Bei der Ausgabe von Wasser oder
43
Page 44

MESURES IMPORTANTES DE SÉCURITÉ
peuvent provoquer des brûlures.
- Cet appareil ne doit pas être utilisé par des personnes (y compris
les enfants) aux capacités physiques, sensorielles ou mentales
réduites ou par des personnes sans expérience et/ou sans les
compétences nécessaires, à moins qu’elles ne soient surveillées
par une personne responsable de leur sécurité qui leur apprenne
à utiliser l’appareil.
- Surveiller les enfants a n d’éviter qu’ils jouent avec l’appareil.
- Les opérations de nettoyage et d’entretien ne doivent pas être
e ectuées par des enfants sauf s’ils ont plus de 8 ans et qu’ils
agissent sous la supervision d’une personne adulte. Garder l’appareil ainsi que son câble d’alimentation hors de la portée des
WICHTIGE SICHERHEITSVORSCHRIFTEN
Ka ee aus der Maschine besteht Verbrühungsgefahr.
- Das Gerät ist nicht für den Gebrauch von Personen mit eingeschränkten physischen, geistigen oder sensoriellen Fähigkeiten
oder ungenügender Erfahrung bzw. Kompetenz (einschl. Kinder)
gedacht, außer wenn diese unter der Aufsicht einer für ihre Sicherheit
verantwortlichen Person stehen oder ausdrücklich von dieser über
den Gebrauch des Geräts informiert wurden.
- Kinder beaufsichtigen, damit sie nicht mit dem Gerät spielen.
- Die Reinigung und die P ege dürfen nur von Kindern über 8 Jahren
und unter Aufsicht ausgeführt werden. Das Gerät und das Kabel
müssen sich außerhalb der Reichweite von Kindern unter 8 Jahren
44
enfants de moins de 8 ans.
1
- Cet appareil ne doit être utilisé que
dans des endroits fermés et à l’abri
d’agents atmosphériques externes.
Ne pas utiliser en plein air.
- Pour se protéger du feu, de
toutes décharges électriques
ou lésions, ne pas immerger le
câble, la che et le corps de la machine dans l’eau ou tout autre
liquide.
- Ne pas poser l’appareil sur des réchauds électriques ou à gaz, ou
dans un four chaud.
be nden.
- Das Gerät ausschließlich in geschlossenen und vor Wetterein üssen
geschützten Räumen verwenden. Nicht im Freien betreiben.
- Zum Schutz vor Brand, Stromschlägen oder Verletzungen das Kabel,
den Stecker und das Maschinengehäuse nicht in Wasser oder in eine
andere Flüssigkeit tauchen.
- Das Gerät nicht auf Elektro- oder Gasherde oder in einen heißen
Ofen stellen.
Jedes vom Hersteller nicht empfohlene Zubehör kann zu Brand,
Stromschlägen oder Körperverletzungen führen.
- Vor dem Ziehen des Netzsteckers sicherstellen, dass der Haupt-
Page 45

MESURES IMPORTANTES DE SÉCURITÉ
- L’utilisation d’accessoires non recommandés par le fabricant peut
provoquer des incendies, des décharges électriques ou des lésions
aux personnes.
- Avant de débrancher l’appareil, s’assurer que l’interrupteur général
est sur « 0 » (Fig.1).
- Ne pas retirer la che en tirant sur le câble et ne pas la toucher
avec les mains si celles-ci sont mouillées.
- Ne pas déplacer ou tirer l’appareil en le tenant par le cordon.
- Pour prévenir le risque de blessures, ne pas laisser tomber le câble
du plan de travail ou de la table car les enfants pourraient le tirer
ou trébucher involontairement.
- En cas d’incendie, utiliser des extincteurs à anhydride carbonique
WICHTIGE SICHERHEITSVORSCHRIFTEN
FR
DE
(C02). Ne pas utiliser d’eau ou d’extincteurs à poudre.
- Ne jamais bloquer les grilles d’aération se trouvant sur la base
de l’appareil.
Installation de l’appareil
- Lire attentivement les instructions.
- Ne jamais installer la machine dans un milieu pouvant atteindre
une température inférieure ou égale à 0°C (si l’eau gèle, l’appareil
peut s’endommager) ou supérieure à 40°C.
- Véri er que la tension du réseau électrique corresponde bien
à celle indiquée sur la plaque signalétique de l’appareil. Ne
brancher l’appareil qu’à une prise de courant ayant un débit
schalter auf “0” (Abb. 1) steht.
- Zum Abziehen des Steckers nicht am Kabel ziehen und den Stecker
nicht mit nassen Händen anfassen.
- Die Ka eemaschine nicht mit dem Kabel anheben oder ziehen.
- Um die Gefahr von Verletzungen zu verringern, das Kabel nicht
von der Arbeitsplatte oder vom Tisch herunterhängen lassen, weil
Kinder daran ziehen oder darüber stolpern könnten.
- Im Brandfall einen Kohlensäurelöscher (CO2) benutzen. Kein Wasser
oder Pulverlöscher verwenden.
- Nie die Lüftungsgitter am Boden des Geräts zustellen.
Geräteinstallation
- Die Bedienungsanleitung aufmerksam lesen.
- Das Gerät niemals in Räumlichkeiten aufstellen, in denen die Tem-
peratur auf 0°C oder tiefer sinken (wenn das Wasser gefriert, kann
die Maschine beschädigt werden) oder auf über 40°C steigen kann.
- Überprüfen, ob die auf dem Kenndatenschild des Geräts angegebene
Netzspannung mit der Spannung des Stromnetzes übereinstimmt.
Das Gerät nur an eine Steckdose anschließen, die eine Mindeststromfestigkeit von 6 A (bei den Modellen mit 230 VAC) beziehungsweise
von 15 A (bei den Modellen mit 120 VAC) hat und eine wirksame
Erdung besitzt.
45
Page 46

MESURES IMPORTANTES DE SÉCURITÉ
minimal de 6 A pour les modèles alimentés à 230 Vca et 15 A
pour les modèles alimentés à 120 Vca et équipés d’un dispositif
e cace de mise à la terre.
- En cas d’incompatibilité entre la prise et la che de l’appareil,
s’adresser à un centre d’assistance autorisé pour remplacer la
che avec une autre de modèle approprié.
- Placer l’appareil sur un plan de travail loin de robinets d’eau et
d’éviers.
- Après avoir ôté l’emballage, s’assurer que l’appareil est intact
avant de l’installer.
- Ne pas laisser à la portée des enfants les matériaux d’emballage
de la machine.
WICHTIGE SICHERHEITSVORSCHRIFTEN
- Falls die Netzsteckdose und der Gerätestecker nicht kompatibel
sind, den Stecker von einem autorisierten Kundendienst durch
einen geeigneten ersetzen lassen.
- Das Gerät auf einer Arbeits äche fern von Wasserhähnen und
Spülbecken aufstellen.
- Vergewissern Sie sich nach dem Entfernen der Verpackung, dass
das Gerät und alle seine Teile in einwandfreiem Zustand sind. Erst
dann kann die Installation erfolgen.
- Die Verpackungsmaterialien des Geräts nicht in Reichweite von
Kindern lassen.
46
Nettoyage de l’appareil
- Débrancher la che de la prise de courant lorsqu’on e ectue le
nettoyage.
- Laisser refroidir l’appareil avant d’e ectuer le nettoyage.
- Extraire le réservoir à eau en le tirant légèrement vers le haut
puis vers l’extérieur.
- Nettoyer la carrosserie et les accessoires à l’aide d’un chi on
humide puis sécher soigneusement à l’aide d’un chi on sec non
abrasif. Ne pas utiliser de produits détergents.
- Ne pas exposer l’appareil à des jets d’eau abondants ni l’immerger
totalement ou partiellement dans l’eau.
Gerätereinigung
- Den Stecker von der Elektroanlage abziehen, bevor man die Reinigung durchführt.
- Vor der Reinigung das Gerät abkühlen lassen.
- Den Wassertank leicht anheben und dann nach außen abziehen.
- Das Gehäuse und die Zubehörteile mit einem feuchten Tuch reinigen und danach mit einem nicht scheuernden trockenen Tuch
trockenreiben. Von der Verwendung von Reinigungsmitteln wird
abgeraten.
- Das Gerät nicht unter einen Wasserstrahl stellen bzw. ganz oder
teilweise in Wasser eintauchen.
Page 47

MESURES IMPORTANTES DE SÉCURITÉ
En cas de panne de l’appareil
Ne pas utiliser l’appareil si le câble ou la che sont endommagés
ou si l’appareil ne fonctionne pas correctement ou s’il a subi un
quelconque dommage. Rapporter l’appareil au centre de service
après-vente agréé le plus proche pour le faire contrôler ou réparer.
Si le câble d’alimentation est endommagé, il doit être changé par
le fabricant ou par son centre de service après-vente.
En cas de panne ou de mauvais fonctionnement de l’appareil,
l’éteindre et ne pas le manipuler.
En cas d’éventuelles réparations, s’adresser exclusivement à un
centre de service après-vente agréé par le fabricant et exiger les
pièces détachées d’origine. Le non-respect de ce qui est indiqué
WICHTIGE SICHERHEITSVORSCHRIFTEN
FR
DE
ci-dessus peut compromettre la sécurité de l’appareil et faire perdre
le droit à la garantie.
Utilisation inappropriée de l’appareil
- Le fabricant ne peut pas être considéré comme responsable en
cas d’éventuels accidents provoqués par la non présence de l’installation électrique de la mise à la terre ou de sa non conformité
aux normes en vigueur.
- Le fabricant ne peut pas être considéré comme responsable en cas
d’éventuels dommages dérivant d’usages inappropriés, erronés
et non raisonnables.
Bei Störungen
Das Gerät nicht benutzen, wenn Kabel oder Stecker beschädigt sind
oder wenn es Anzeichen von schlechtem Funktionieren oder Schäden
aufweist. Das Gerät für Kontrollen oder Reparaturen zur nächsten
autorisierten Kundendienststelle bringen.
Beschädigte Versorgungskabel durch den Hersteller oder seinen Kundendienst auswechseln lassen.
Bei Schäden oder Störungen das Gerät ausschalten und nicht daran
manipulieren. Für eventuelle Reparaturen sich ausschließlich an eine
vom Hersteller autorisierte Kundendienststelle wenden und verlangen,
dass Originalersatzteile verwendet werden. Bei Nichteinhaltung dieser
Hinweise kann die Sicherheit des Geräts beeinträchtigt werden und
der Garantieanspruch entfallen.
Unsachgemäße Verwendung des Geräts
- Der Hersteller kann für eventuelle Unfälle aufgrund des Fehlens
der Erdungsanlage bzw. deren Nichtkonformität mit den geltenden
gesetzlichen Vorschriften nicht haftbar gemacht werden.
- Der Hersteller kann für eventuelle Schäden aufgrund unsachgemäßer, fehlerhafter oder unvernünftiger Verwendung nicht haftbar
gemacht werden.
47
Page 48

Instructions concernant le câble d’alimentation
a) Utiliser un câble d’alimentation court pour éviter de s’accrocher
ou de trébucher sur un câble plus long.
b) Faire attention lorsqu’on utilise une rallonge.
c) Si on utilise une rallonge, véri er que :
1) La tension indiquée sur la rallonge est au moins égale à celle
de l’appareil électroménager ;
ATTENTION : CONSERVER CES INSTRUCTIONS.
2) Si l’appareil électroménager est équipé de mise à la terre, la
rallonge doit être pourvue d’une che à trois broches avec
mise à la terre ;
3) Le câble le plus long doit être placé de sorte à ne pas pendre
du plan de travail ou de la table, a n d’empêcher les enfants
de le tirer ou de trébucher.
Hinweise für das Netzkabel
a) Um Gefahren durch das Hängenbleiben in oder das Stolpern über ein
längeres Kabel zu vermeiden, wird ein kurzes Netzkabel mitgeliefert.
b) Verlängerungskabel sind erhältlich und können verwendet werden,
wenn bei ihrer Verwendung vorsichtig vorgegangen wird.
c) Bei Verwendung eines Verlängerungskabels:
1) Die angegebene elektrische Leistung des Verlängerungskabels
sollte mindestens der elektrischen Leistung des Gerätes entsprechen;
ACHTUNG: DIESE BEDIENUNGSANLEITUNG AUFBEWAHREN.
48
2) Bei einem geerdeten Gerät sollte das Verlängerungskabel über
3 Leiter mit Masseanschluss verfügen;
3) Das längere Kabel sollte so angeordnet werden, dass es nicht
über die Arbeits- oder Tischplatte hängt. Auf diese Weise kann
es zur Stolperfalle oder von Kindern heruntergezogen werden.
Page 49

INSTALLATION ET MISE EN MARCHE DE LA MACHINE
INSTALLATION UND INBETRIEBNAHME DES GERÄTS
FR
DE
321
Extraire les réservoirs à eau et à lait et les laver soigneusement avant toute utilisation. Remplir le réservoir avec de l’eau fraîche potable
jusqu’au niveau MAX.
Den Wasser- und den Milchtank herausnehmen und vor deren Verwendung beide sorgfältig waschen.
S’assurer que le bec de distribution est bien inséré
dans le couvercle du réservoir à lait.
Sicherstellen, dass die Auslauftülle fest im Deckel
des Milchtanks eingesetzt ist.
Insérer la che dans la prise. Mettre l’interrupteur sur «I» pour mettre la ma-
Den Stecker in die Steckdose einstecken.
Den Wassertank bis zum Füllstand MAX mit frischem
Trinkwasser füllen.
54
chine en marche.
Den Schalter auf die Position “I” stellen, um die
Maschine einzuschalten.
Introduire complètement le réservoir dans la
machine.
Den Tank vollständig in das Gerät einsetzen.
76
Toutes les touches clignotent: phase de chau age.
Alle Tasten blinken: Aufheizphase.
49
Page 50

INSTALLATION ET MISE EN MARCHE DE LA MACHINE
INSTALLATION UND INBETRIEBNAHME DES GERÄTS
8
Après 10 minutes d'inactivité la machine entre automatiquement en mode Power Save.
La touche clignote lentement. Pour réactiver la machine, e eurer l'une des deux
touches.
Wenn das Gerät länger als 10 Minuten unbenutzt bleibt, tritt automatisch die Power-Sa-
Lorsque toutes les touches sont allumées xes,
un signal acoustique indique que la machine est
prête.
Wenn dann alle Tasten dauerhaft au euchten,
weist ein Tonsignal darauf hin, dass die Maschine
bereit ist.
Attention: s'assurer que le logement à capsules est fermé correctement avant de distribuer du café. Ne jamais l'ouvrir pendant la distribution du café.
Remarque: lors de la première mise en marche et en cas d'inactivité pendant plusieurs jours, après avoir placé un récipient su samment grand sous la buse de distribution, il
est conseillé de distribuer au moins la moitié d'un réservoir à eau sans capsules dans la machine. E ectuer la même opération en remplissant le réservoir à lait avec de l’eau et en
appuyant sur la touche
.
ve-Funktion in Betrieb.
Die Taste
lediglich irgendeine der Tasten leicht berührt.
blinkt mit langen Intervallen. Um die Maschine wieder zu aktivieren, wird
Achtung: Sicherstellen, dass das Kapselfach richtig geschlossen wurde, bevor Ka ee ausgegeben wird. Auf keinen Fall während der Ka eeausgabe ö nen.
Hinweis: Bei der ersten Inbetriebnahme oder im Fall, dass das Gerät mehrere Tage lang unbenutzt geblieben ist, emp ehlt es sich, einen größeren Behälter unter den Ka eeauslauf zu
stellen und mindestens den halben Wassertank ohne Kapseln im Gerät zu leeren. Der gleiche Vorgang erfolgt auch beim Milchtank, ihn mit Wasser füllen, dann die Taste
50
drücken.
Page 51

PRÉPARATION DU CAFÉ
KAFFEEZUBEREITUNG
FR
DE
4321
Utiliser uniquement les capsulesIperespressopour
usage domestique.
Nur Iperespresso Kapseln für den Haushaltsgebrauch
verwenden.
Insérer la capsule. Baisser la partie mobile. Bloquer en baissant le levier.
Die Kapsel einsetzen. Den beweglichen Teil absenken. Blockieren, indem der Hebel abgesenkt wird.
D'autres types de capsules ne peuvent pas être utilisés car ils pourraient endommager la machine.
Remarque: si une capsule est présente dans le logement, elle sera automatiquement enlevée lors de l'ouverture de ce même logement. La capsule doit entrer facilement dans le
logement ; dans le cas contraire, la retirer et la repositionner correctement.
Es dürfen keine anderen Kapseln verwendet werden, da sonst das Gerät beschädigt werden könnte.
Hinweis: Sollte im Fach noch eine Kapsel vorhanden sein, wird sie bei der Ö nung des Fachs automatisch entfernt. Die Kapsel muss leicht in das Fach eingesetzt werden können, wenn dies
nicht der Fall ist, Kapsel herausnehmen und richtig einsetzen.
Toutes les touches sont allumées xes. Décrocher le levier. Soulever le levier.
Alle Tasten leuchten dauerhaf t auf. Hebel lösen. Hebel anheben.
8765
51
Page 52

PRÉPARATION DU CAFÉ
KAFFEEZUBEREITUNG
9
10
Positionner la petite tasse à café expresso... ... ou placer une tasse à cappuccino en soulevant
le support.
Die Espresso-Tasse unter den Auslauf stellen...
... oder eine Cappuccino-Tasse darunterstellen,
wobei die Halterung angehoben wird.
Appuyer sur pour distribuer un café expresso,
la machine émet un signal acoustique...
Die Taste drücken, um einen Espresso auszugeben, die Maschine gibt ein Tonsignal ab...
... ou appuyer sur pour distribuer un café
allongé, la machine émet un signal acoustique.
...oder die Taste drücken, um einen großen
Ka ee auszugeben, die Maschine gibt ein Tonsignal ab.
RECOMMANDATIONS
11
Pour savourer un café expresso de grande qualité ne pas oublier de:
- Changer quotidiennement l'eau du réservoir.
- Utiliser de préférence de l'eau avec une dureté totale inférieure à 12 degrés français pour réduire
les dépôts à l'intérieur de la machine.
- Utiliser des petites tasses chaudes.
EMPFEHLUNGEN
Für die Zubereitung eines exzellenten Espressos emp ehlt es sich:
La distribution s'arrête automatiquement.
Die Ausgabe wird automatisch beendet.
Il est possible d'arrêter la distribution avant l'arrêt automatique en appuyant sur la touche sélectionnée.
Attention:en tout cas, la distribution s'arrêtera automatiquement après environ 70 secondes, mais en ce cas le café risque de déborder de la tasse. Remarque:la distribution d'un
expresso allongé peut provoquer le débordement du café de la tasse si celle-ci n'est pas su samment grande.
Die Ausgabe kann noch vor dem Automatik-Stopp unterbrochen werden, indem die soeben gewählte Taste gedrückt wird.
Achtung: Die Ausgabe wird nach ca. 70 Sekunden automatisch beendet, daher kann es sein, dass der Ka ee in der Tasse überläuft. Hinweis: Bei der Ausgabe eines großen Espressos kann
es sein, dass der Ka ee in der Tasse überläuft, wenn die Tasse nicht groß genug ist.
52
- das Wasser des Wasser tanks täglich zu wechseln.
- Vorzugsweise Wasser mit einer Wasserhärte unter 12 Grad (Wasserhärte französische Grad) zu
verwenden, um die Kalkablagerungen in der Maschine zu verringern.
- Vorgewärmte Tassen zu verwenden.
Page 53

RÉGLAGE DE LA QUANTITÉ DE CAFÉ DANS LA TASSE
EINSTELLUNG DER KAFFEEMENGE IN DER TASSE
FR
DE
321
4
Insérer la capsule. Bloquer en baissant le levier.
Die Kapsel einsetzen. Blockieren, indem der Hebel abgesenkt wird.
Le niveau est mémorisé. La machine est à présent programmée; lors de la prochaine pression de la
touche la quantité de café programmée sera distribuée.
Die Füllmenge ist nun gespeichert. Die Maschine ist nun programmiert; wenn das nächste Mal die Taste
gedrückt wird, wird die soeben gespeicherte Ka ee-Füllmenge ausgegeben.
Les réglages d’usine prévoient des paramètres spéci ques pour assurer la préparation de meilleures recettes illy : café expresso 20-25 ml / café allongé : 30-35 ml / cappuccino :
95-100 ml / lait noisette : 155-160 ml / lait chaud : 135-140 ml / eau chaude : 195 ml.
Remarque : pour la préparation d’un café allongé, il est conseillé d’utiliser les capsules Iperespresso de couleur bleue, en appuyant sur la touche
maximum de 30 secondes.
Die werksseitigen Einstellungen sehen genaue Parameter vor, welche die Zubereitung der besten illy-Rezepte garantieren: Espresso 20-25 ml / Großer Ka ee: 30-35 ml / Cappucc ino: 95100 ml / Latte Macchiato: 155-160 ml / heiße Milch: 135-140 ml / heißes Wasser: 195 ml.
Hinweis: Für die Zubereitung eines großen Ka ees wird empfohlen, die blauen Iperespresso Kapseln zu verwenden, dazu die Taste
Garder la touche enfoncée pendant toute
la distribution pour mémoriser le volume dans
la tasse.
Die Taste für die Dauer der gesamten Ausgabe
gedrückt halten, um die Ka eemenge in der jeweiligen Tasse zu speichern.
5
La machine permet de régler la quantité de café souhaité dans la tasse pour les deux
touches de distribution
Remarque: dans un souci de simplicité, seule la procédure de programmation de la
touche
dure en appuyant sur
Es besteht die Möglichkeit, die in der Tasse gewünschte Ka ee -Menge auf beiden Ausgabetasten
Hinweis: Der Einfachheit halber wird nur gezeigt, wie die Taste
zur Programmierung der Taste
drückt wird.
sera présentée; pour programmer la touche suivre la même procé-
und einzustellen.
et .
.
La relâcher lorsque la quantité de café souhaitée
a été atteinte.
Die Taste nach Erreichen der gewünschte Ka eemenge wieder loslassen.
programmiert wird;
wird genau gleich vorgegangen, indem ge-
, avec un temps d’extraction
drücken, mit einer Durchlaufdauer von max. 30 Sek.
53
Page 54

UTILISATION DU RÉSERVOIR ET DE LA BUSE DE DISTRIBUTION DU LAIT
VERWENDUNG DES MILCHTANKS UND MILCHAUSLAUFS
4321
Retirer le couvercle du réservoir à lait. Remplir le réservoir avec du lait jusqu’au niveau
MAX.
Il est nécessaire de remplir le réservoir à
lait jusqu’au niveau MIN pour éviter la surchau e de la machine et assurer la qualité
des préparations.
Den Deckel des Milchtanks abnehmen. Den Tank bis zum Füllstand MAX mit Milch füllen.
Der Milchtank muss immer bis zum MIN.
Füllstand aufgefüllt werden, um ein Über-
hitzen der Maschine zu vermeiden und ein
perfektes Gelingen der Zubereitungen zu
gewährleisten.
Attention ! Laver le réservoir et tous les composants de la buse de distribution du lait avant la première utilisation et après chaque utilisation. Le lait est un produit très périssable.
N’utiliser que du lait frais qui n’a pas dépassé la date d’échéance indiquée sur l’emballage original. Ne laisser le lait dans le réservoir que pendant le temps nécessaire à la préparation des boissons. Après, le placer à nouveau dans le réfrigérateur. En c as de doutes sur l’intégrité du lait qui se trouve dans le réservoir, vider le réservoir et le laver soigneusement.
Pour préparer les meilleures recettes illy à base de lait, il est conseillé d’utiliser du lait frais à température réfrigérée.
REMARQUE : la machine garantit la réussite de toutes les préparations même en utilisant d’autres types de lait.
Achtung! Den Milchtank und alle Bestandteile des Milchauslaufs vor der Erstbenutzung und nach jedem Gebrauch gut waschen. Milch ist ein sehr leicht verderbliches Lebensmittel. Nur
frische Milch verwenden, die innerhalb des auf der Originalverpackung angegebenem Mindesthaltbarkeitsdatums aufgebraucht werden muss. Die Milch nur für die Dauer der GetränkeZubereitung im Milchtank aufbewahren, danach in den Kühlschrank zurückstellen. Sollten Zweifel bezüglich der Haltbarkeit der Milch im Milchtank auftreten, muss dieser geleert und
sorgfältig gespült werden.
Für die Zubereitung der besten illy-Milchgetränk-Rezepte wird empfohlen, frische, im Kühlschrank gekühlte Vollmilch zu verwenden.
HINWEIS: Auf jeden Fall garantiert die Maschine das Gelingen aller Zubereitungen auch mit anderen Milch-Typen.
54
Accrocher la buse de distribution du lait à
l’enclenchement de la machine jusqu’à les emboîter complètement.
Den Milchauslauf an seiner Steckverbindung auf
der Maschine einsetzen, er muss perfekt einrasten.
Accrocher le réservoir à la buse de distribution du
lait jusqu’à les emboîter complètement.
Den Milchtank am Milchauslauf einhängen, er
muss perfekt einrasten.
Page 55

UTILISATION DU RÉSERVOIR ET DE LA BUSE DE DISTRIBUTION DU LAIT
VERWENDUNG DES MILCHTANKS UND MILCHAUSLAUFS
5
6
FR
DE
7
Lorsque le réservoir à lait est accroché, les boissons
à base de lait peuvent être distribuées.
Sobald der Tank eingehängt ist, kann die Zubereitung von Milchgetränken erfolgen.
À la n de la préparation, si le réservoir contient
encore du lait, le décrocher et le placer, couvert,
dans le réfrigérateur.
Sollte nach der Zubereitung noch Milch im Milchtank
vorhanden sein, muss dieser ausgehängt und verschlossen in den Kühlschrank zurückgestellt werden.
Décrocher la buse de distribution du lait et la
rincer comme indiqué au chapitre «NETTOYAGE
ET ENTRETIEN».
Den Milchauslauf abnehmen und ihn gut spülen,
siehe Darstellung im Kapitel „REINIGUNG UND
WARTUNG“.
55
Page 56

PRÉPARATION DU CAPPUCCINO
ZUBEREITUNG EINES CAPPUCCINOS
1
2 3
4
Accrocher la buse de distribution et le réservoir
à lait comme indiqué au chapitre UTILISATION
DU RÉSERVOIR ET DE LA BUSE DE DISTRIBUTION
DU LAIT.
Remplir le réservoir à lait jusqu’au niveau minimum.
Den Milchauslauf und den Milchtank einsetzen,
wie im Kapitel VERWENDUNG DES MILCHTANKS
UND MILCHAUSLAUFS dargestellt.
Den Milchtank bis zum Min. Füllstand au üllen.
REMARQUE : avant d’appuyer sur , s’assurer que la buse de distribution du lait se trouve au-dessus du diamètre de la tasse a n d’éviter tout débordement lors de la distribution.
Le réglage d’usine de la préparation
Pour réaliser la recette
manuellement la distribution au moment de l’obtention du volume souhaité.
HINWEIS: Bevor
vermeiden.
Die werksseitige Einstellung für die Zubereitung
Für die Zubereitung des Rezeptes
te Milch und stoppt die Ausgabe von Ka ee und Milch manuell, wenn man die gewünschte Getränkemenge erreicht hat.
56
avec des quantités de café et de lait di érentes de celles préréglées en usine, il su t d’utiliser les fonctions café et lait chaud mousseux en arrêtant
gedrückt wird, muss sichergestellt werden, dass sich der Milchauslauf innerhalb des Tassen-Durchmessers be ndet, um ein Auslaufen während der Ausgabe zu
Insérer la capsule.
Die Kapsel einsetzen.
est de 95-100 ml.
ist 95-100 ml.
mit Ka ee- und Milchmengen, die nicht den werksseitigen Einstellungen entsprechen, verwendet man die Funktion Ka ee und heiße aufgeschäum-
Choisir la position du support selon le type de
tasse utilisée.
Die Position der Halterung je nach verwendetem
Tassen-Typ auswählen.
Véri er que toutes les touches s’allument de
façon xe.
Appuyer sur
La machine émet un signal acoustique.
Sicherstellen, dass alle Tasten dauerhaft aufleuchten.
Taste
drücken. Die Maschine gibt ein Tonsignal ab.
pour préparer un cappuccino.
für die Zubereitung eines Cappuccinos
Page 57

PRÉPARATION DU CAPPUCCINO
ZUBEREITUNG EINES CAPPUCCINOS
5
La machine commence à distribuer du café dans
la tasse.
Die Maschine beginnt mit der Ausgabe des Ka ees
in die Tasse.
Une fois la distribution du café terminée, la distribution du lait émulsionné commencera automatiquement après quelques secondes.
Véri er que la buse de distribution du lait se trouve
au-dessus du diamètre de la tasse a n d’éviter tout
débordement lors de la distribution.
Wenn die Ka eeausgabe beendet ist, beginnt nach
einigen Sekunden automatisch die Ausgabe von
aufgeschäumter Milch.
Sicherstellen, dass sich der Milchauslauf innerhalb
der Tasse be ndet, um ein Auslaufen während der
Ausgabe zu vermeiden.
La distribution s’arrête automatiquement.
Die Ausgabe wird automatisch beendet.
FR
DE
76
La préparation du cappuccino peut être
interrompue à tout moment en appuyant à nouveau sur la touche
la préparation est interrompue pendant
la distribution du lait chaud, après avoir
appuyé sur la touche
nue à sortir pour quelques secondes.
Die Zubereitung des Cappuccinos kann
jederzeit unterbrochen werden, indem
erneut die Taste
Wenn man den Vorgang unterbricht,
während heiße Milch ausgegeben wird,
setzt nach Drücken der Taste
Ausgabe der Milch noch für einige Sekunden fort.
. Si
, le lait conti-
gedrückt wird.
die
57
Page 58

PRÉPARATION DU LAIT NOISETTE
ZUBEREITUNG VON LATTE MACCHIATO
1
2 3
4
Accrocher la buse de distribution et le réservoir
à lait comme indiqué au chapitre UTILISATION
DU RÉSERVOIR ET DE LA BUSE DE DISTRIBUTION
DU LAIT.
Remplir le réservoir à lait jusqu’au niveau minimum.
Den Milchauslauf und den Milchtank einsetzen,
wie im Kapitel VERWENDUNG DES MILCHTANKS
UND MILCHAUSLAUFS dargestellt.
Den Milchtank bis zum Min. Füllstand au üllen.
REMARQUE : avant d’appuyer sur , s’assurer que la buse de distribution du lait se trouve au-dessus du diamètre de la tasse a n d’éviter tout débordement lors de la distribution.
Le réglage d’usine de la fonction est de 155-160 ml.
Pour réaliser la recette
manuellement la distribution au moment de l’obtention du volume souhaité.
HINWEIS: Bevor
meiden.
Die werksseitige Einstellung für die Funktion
Für die Zubereitung des Rezeptes
Milch und stoppt die Ausgabe von Ka ee und Milch manuell, wenn man die gewünschte Getränkemenge erreicht hat.
58
avec des quantités de café et de lait di érentes de celles préréglées en usine, il su t d’utiliser les fonctions café et lait chaud mousseux en arrêtant
gedrückt wird, muss sichergestellt werden, dass sich der Milchauslauf innerhalb des Tassen-Durchmessers be ndet, um ein Auslaufen während der Ausgabe zu ver-
Insérer la capsule.
Die Kapsel einsetzen.
ist 155-160 ml.
mit Ka ee- und Milchmengen, die nicht den werksseitigen Einstellungen entsprechen, verwendet man die Funktion Ka ee und heiße aufgeschäumte
Soulever le support et positionner une grande
tasse ou tasse mug.
Die Halterung anheben und eine große Tasse/Becher
unter den Auslauf stellen.
Véri er que toutes les touches s’allument de
façon xe.
Appuyer sur
Sicherstellen, dass alle Tasten dauerhaft au euch-
ten. Taste für die Zubereitung eines Latte Macchiato drücken
pour préparer un lait noisette.
Page 59

PRÉPARATION DU LAIT NOISETTE
ZUBEREITUNG VON LATTE MACCHIATO
5
La machine commence à distribuer du lait chaud
dans la tasse après quelques secondes.
Véri er que la buse de distribution du lait se trouve
au-dessus du diamètre de la tasse a n d’éviter tout
débordement lors de la distribution.
Die Maschine beginnt nach einigen Sekunden mit
der Ausgabe von heißer Milch in die Ta sse.
Sicherstellen, dass sich der Milchauslauf innerhalb
der Tasse be ndet, um ein Auslaufen während der
Ausgabe zu vermeiden.
Une fois la distribution du lait terminée, la machine
commence automatiquement la distribution du
café.
Wenn die Milchausgabe beendet ist, beginnt die
Maschine automatisch mit der Ausgabe des Ka ees.
6
La distribution s’arrête automatiquement.
Die Ausgabe wird automatisch beendet.
FR
DE
7
La préparation du lait noisette peut
être interrompue à tout moment en appuyant à nouveau sur la touche
la préparation est interrompue pendant
la distribution du lait chaud, après avoir
appuyé sur la touche
nue à sortir pour quelques secondes.
Die Zubereitung des Latte Macchiato
kann jederzeit unterbrochen werden,
indem erneut die Taste
wird. Wenn man den Vorgang unterbricht, während heiße Milch ausgegeben wird, setzt nach Drücken der
Taste
die Ausgabe der Milch noch
für einige Sekunden fort.
, le lait conti-
. Si
gedrückt
59
Page 60
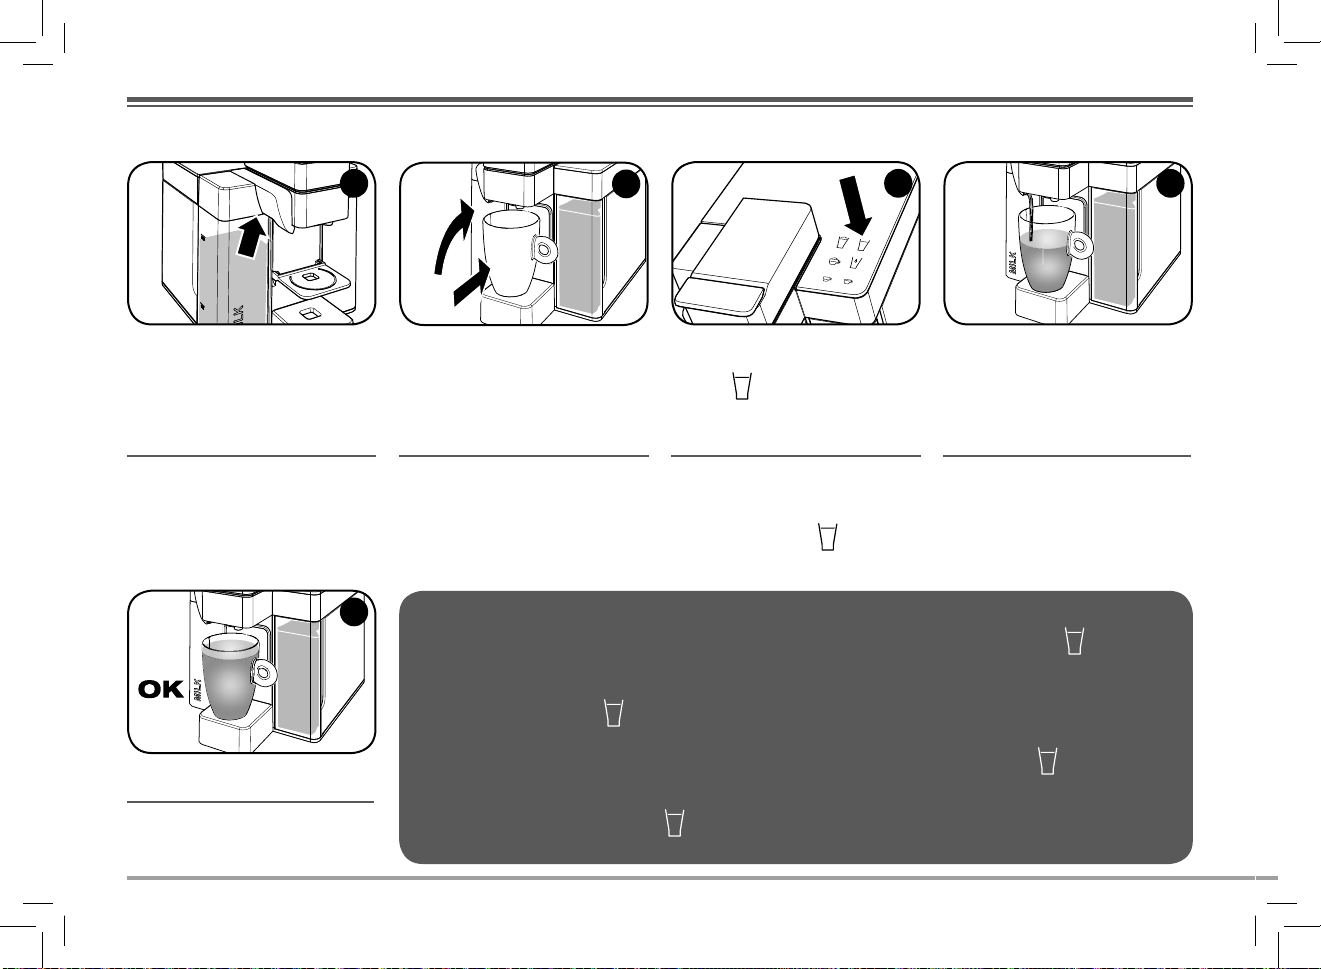
PRÉPARATION DU LAIT CHAUD MOUSSEUX
ZUBEREITUNG VON HEISSER AUFGESCHÄUMTER MILCH
2
3
41
Accrocher la buse de distribution et le réservoir
à lait comme indiqué au chapitre UTILISATION
DU RÉSERVOIR ET DE LA BUSE DE DISTRIBUTION
DU LAIT.
Remplir le réservoir à lait jusqu’au niveau minimum.
Den Milchauslauf und den Milchtank einsetzen,
wie im Kapitel VERWENDUNG DES MILCHTANKS
UND MILCHAUSLAUFS dargestellt.
Den Milchtank bis zum Min. Füllstand au üllen.
La distribution s’arrête automatiquement.
Die Ausgabe wird automatisch beendet.
60
Soulever le support et positionner une grande
tasse ou tasse mug.
Die Halterung anheben und eine große Tasse/Becher
unter den Auslauf stellen.
5
La préparation du lait chaud mousseux peut être interrompue à tout moment. Après avoir appuyé sur la touche , le lait continue
à sortir pour quelques secondes. Il est possible de distribuer le lait mousseux directement dans une carafe à lait a n de le présenter
à table et de le doser à votre gré.
Le réglage d’usine de la fonction
Die Zubereitung der heißen aufgeschäumten Milch kann jederzeit unterbrochen werden. Nach Drücken der Taste
Milch noch für einige Sekunden fort. Die Milch kann direkt in einer Milchkanne aufgeschäumt werden, diese kann dann serviert und die
Milch je nach Belieben dosiert werden.
Die werksseitige Einstellung für die Funktion
Véri er que toutes les touches s’allument de
façon xe.
Appuyer sur pour préparer du lait chaud mousseux (sans café).
Sicherstellen, dass alle Tasten dauerhaft au euchten.
Für die Zubereitung einer heißen aufgeschäumten
Milch (ohne Ka ee) die Taste
est de 135-140 ml.
ist 135-140 ml.
drücken.
Après quelques secondes, la machine commence
à distribuer du lait chaud dans la tasse.
Véri er que la buse de distribution du lait se trouve
au-dessus du diamètre de la tasse a n d’éviter tout
débordement lors de la distribution.
Die Maschine beginnt nach einigen Sekunden mit
der Ausgabe von heißer Milch in die Ta sse.
Sicherstellen, dass sich der Milchauslauf innerhalb
der Tasse be ndet, um ein Auslaufen während der
Ausgabe zu vermeiden.
setzt die Ausgabe von
Page 61

RÉGLAGE DE LA QUANTITÉ DE LAIT CHAUD MOUSSEUX
EINSTELLUNG DER MENGE AN HEISSER AUFGESCHÄUMTER MILCH
1
FR
DE
2
3
4
Accrocher la buse de distribution et le réservoir à
lait comme indiqué au chapitre UTILISATION DU
RÉSERVOIR ET DE LA BUSE DE DISTRIBUTION DU LAIT.
Remplir le réservoir à lait jusqu’au niveau minimum.
Den Milchauslauf und den Milchtank einsetzen,
wie im Kapitel VERWENDUNG DES MILCHTANKS
UND MILCHAUSLAUFS dargestellt.
Den Milchtank bis zum Min. Füllstand au üllen.
5
Le niveau est mémorisé. La machine est à présent
programmée; lors de la prochaine pression de la
touche la quantité de lait chaud programmée
sera distribuée.
Die Füllmenge ist nun gespeichert. Die Maschine ist
nun programmiert; wenn das nächste Mal die Taste
gedrückt wird, wird die soeben gespeicherte
Menge an heißer Milch ausgegeben.
Soulever le support et positionner une grande
tasse ou tasse mug.
Die Halterung anheben und eine große Tasse/Becher
unter den Auslauf stellen.
Pendant la programmation de la quantité de lait chaud dans la tasse, il faut considérer que après avoir appuyé sur la touche le
lait continue à sortir pour quelques secondes.
Bei der Programmierung der Menge an heißer Milch in der Tasse wird empfohlen, zu berücksichtigen dass nach dem Drücken der Taste
die Milchausgabe noch einige Sekunden lang fortsetzt.
Garder la touche
Die Taste
enfoncée.
gedrückt halten.
La relâcher lorsque la quantité de lait chaud
souhaité a été atteinte.
Die Taste nach Erreichen der gewünschten Menge
Milch wieder loslassen.
61
Page 62

DISTRIBUTION D’EAU CHAUDE
AUSGABE VON HEISSWASSER
1
Véri er s’il y a assez d’eau dans le réser voir.
Sicherstellen, dass ausreichend Wasser im Wassertank vorhanden ist.
Soulever le support et positionner une grande
tasse ou tasse mug.
Die Halterung anheben und eine große Tasse/Becher
unter den Auslauf stellen.
RÉGLAGE DE LA QUANTITÉ D'EAU CHAUDE DISTRIBUÉE
EINSTELLUNG DER MENGE AN AUSGEGEBENEM HEISSWASSER
1 4
Soulever le support et positionner une grande
tasse ou tasse mug.
Le réglage d’usine de la fonction
195 ml environ.
Die Halterung anheben und eine große Tasse/Becher
unter den Auslauf stellen.
Die werksseitige Einstellung für die Funktion
ist circa 195 ml.
62
est de
Garder la touche
Die Taste
gedrückt halten.
enfoncée.
2
Véri er que toutes les touches s’allument de
façon xe. Appuyer sur pour distribuer de
l’eau chaude.
Sicherstellen, dass alle Tasten dauerhaft au euchten. Taste drücken, um Heißwasser abzugeben.
2
La relâcher lorsque la quantité d’eau chaude
souhaitée a été atteinte.
Die Taste nach Erreichen der gewünschten Menge
Heißwasser wieder loslassen.
3
Une fois la quantité mémorisée atteinte, la distribution se termine automatiquement.
Wenn die gespeicherte Füllmenge erreicht ist, endet
die Ausgabe automatisch.
3
Le niveau est mémorisé. La machine est à présent
programmée; lors de la prochaine pression de la
touche la quantité d’eau programmée sera
distribuée.
Die Füllmenge ist nun gespeichert. Die Maschine ist
nun programmiert; wenn das nächste Mal die Taste
gedrückt wird, wird die soeben gespeicherte
Wasser-Füllmenge ausgegeben.
4
Page 63

NETTOYAGE ET ENTRETIEN
REINIGUNG UND WARTUNG
FR
DE
1
2
3
4
Éteindre la machine et débrancher la che. Retirer et laver le réservoir à eau. S oulever et retirer le plateau repose tasses et le
laver.
Das Gerät ausschalten und den Netzstecker ziehen.
Vider le bac des résidus (capsules usagées/café)
et le laver.
Den Kapselbehälter von den Rückständen (leere
Kapseln/Ka eesatz) befreien und waschen.
Ne pas utiliser l'eau qui est demeuré dans le réservoir pendant plus de 7 jours. Il est conseillé de laver et remplir le réservoir avec de l’eau fraîche potable tous les jours. Le nettoyage
de la machine et de ses composants doit être e ectué au moins une fois par semaine. Ne pas utiliser d’alcool éthylique, de solvants, d'éponges abrasives ni d’agents chimiques
agressifs. Ne pas sécher la machine et/ou ses composants dans un four à micro-ondes et/ou traditionnel. La machine et ses composants ne peuvent pas être lavés au lave-vaisselle.
Wenn das Wasser länger als 7 Tage im Wassertank verblieben ist, sollte es nicht mehr verwendet werden. Es wird empfohlen, den Wassertank täglich auszuspülen und mit frischem Trinkwasser aufzufüllen. Die Reinigung der Maschine und ihrer Bestandteile ist mindestens einmal wöchentlich vorzunehmen. Für die Reinigung sollten kein Äthylalkohol, Lösungsmittel,
Scheuerschwämme und/oder chemisch aggressive Produkte verwendet werden. Die Maschine und/oder deren Bestandteile nicht in der Mikrowelle oder in einem herkömmlichen Backofen
trocknen. Die Maschine und ihre Bestandteile dürfen nicht in der Spülmaschine gewaschen werden.
Den Wassertank herausnehmen und waschen.
5
Tourner le plateau repose tasses jusqu'à l'aligner.
Die Tassenabstell äche so weit drehen, bis sie perfekt ausgerichtet ist.
Tassenabstell äche anheben herausnehmen und
waschen.
6
Retirer le plateau repose tasses et le laver. Insérer le plateau repose tasses et le baisser.
Tassenabstell äche herausziehen und waschen.
Extraire le bac de collecte des capsules usagées.
Den Au angbehälter für leere Kapseln herausnehmen.
7
Tassenabstell äche wieder einsetzen und nach
unten stellen.
8
63
Page 64

NETTOYAGE ET ENTRETIEN
REINIGUNG UND WARTUNG
1211109
Retirer le couvercle du réservoir à lait et vider le
contenu éventuel.
Den Deckel des Milchtanks abnehmen und den
eventuell vorhandenen Inhalt ausleeren.
Introduire le bec de distribution dans le couvercle.
Auslauftülle in den Deckel einsetzen.
64
Enlever le bec de distribution. Tourner la languette.
Auslauftülle herausziehen. Die Lasche nehmen und
sie dann drehen.
13
Tourner le bec jusqu'à l'accrocher dans son logement.
Auslauftülle soweit drehen, bis sie in ihrem Sitz
eingerastet ist.
Laver le bec de distribution avec de l’eau chaude. Laver le couvercle du réservoir à lait avec de l’eau
chaude.
Die Auslauftülle mit heißem Wasser spülen.
14
Retirer la buse de distribution du lait.
Milchauslauf abnehmen. Die Bestandteile des Milchauslaufs abnehmen
Den Deckel des Milchtanks mit heißem Wasser
spülen.
15
Retirer les composants de la buse de distribution
du lait.
16
Page 65

NETTOYAGE ET ENTRETIEN
REINIGUNG UND WARTUNG
FR
DE
20191817
Retirer le raccord nal.
Den Endanschluss abnehmen.
Vider le tuyau transparent de l’eau et de tout
résidu éventuel en exerçant une légère pression
avec vos doigts.
Das durchsichtige Rohr von Wasser und eventuellen Rückständen befreien, indem man es leicht
zusammendrückt.
Retirer l'extrémité qui doit être introduite dans
la machine.
Das Endstück, das in die Maschine eingesetzt werden
muss, abnehmen.
A n de garantir une bonne émulsion du lait,
véri er toujours que le micro trou à l’intérieur du
tuyau supérieur n’est pas obstrué.
Um einen perfekten Milchschaum zu erhalten, immer sicherstellen, dass die kleine Ö nung im Inneren
des oberen Rohrs nicht verstopft ist.
Retirer le tuyau supérieur. Laver tous les composants avec de l’eau chaude.
Das obere Leitungsrohr abnehmen. Alle Bestandteile mit heißem Wasser spülen.
2321 22
Essuyer les composants et les insérer dans la buse
de distribution du lait.
Die Bestandteile trocknen und sie wieder in den
Milchauslauf einsetzen.
Remplir le réservoir à lait avec de l’eau fraîche
potable et repositionner le couvercle.
Den Milchtank mit frischem Trinkwasser füllen und
den Deckel anbringen.
24
65
Page 66

NETTOYAGE ET ENTRETIEN
REINIGUNG UND WARTUNG
Accrocher la buse de distribution du lait à l’enclenchement de la machine jusqu’à les emboîter
complètement.
Den Milchauslauf an seiner Steckverbindung auf
der Maschine einsetzen, er muss perfekt einrasten.
Soulever le support et positionner une grande
tasse ou tasse mug.
Die Halterung anheben und eine große Tasse/Becher
unter den Auslauf stellen.
2625
Accrocher le réservoir à la buse de distribution du
lait jusqu’à les emboîter complètement.
Den Milchtank am Milchauslauf einhängen, er muss
perfekt einrasten.
Remplir le réservoir avec de l’eau fraîche potable
jusqu’au niveau MAX. Introduire le réservoir dans
la machine.
Den Wassertank bis zum Füllstand MAX mit frischem Trinkwasser füllen. Den Tank in die Maschine
einsetzen.
3029
Véri er que toutes les touches sont allumées de façon xe. Appuyer sur la touche
un lait chaud. Cette opération est nécessaire pour compléter le cycle de nettoyage. Vider la tasse et
les réservoirs à la n de l’opération. Le cycle de nettoyage est terminé et la machine est prête pour la
distribution des produits.
Sicherstellen, dass alle Tasten dauerhaft au euchten. Taste wie für die Ausgabe einer heißen Milch
drücken. Dieser Vorgang ist erforderlich, damit der Reinigungszyklus abgeschlossen werden kann. Am Ende
die Tasse und die Behälter leeren. Der Reinigungszyklus ist nun abgeschlossen, die Maschine ist betriebsbereit.
pour distribuer
2827
Mettre en marche la machine.
Die Maschine einschalten.
Attention! La machine n’est pas équipée d’un système automatique de
nettoyage qui puisse garantir l’élimination des bactéries qui se trouvent
dans le lait résiduel.
Pour le nettoyage, il est conseillé
d’utiliser des produits spéci ques.
Achtung! Die Maschine verfügt über
kein automatisches Reinigungssystem,
welches die Beseitigung der in den
Milchrückständen vorhandenen Keimzahlen garantiert.
Für die Reinigung wird empfohlen spezi sche Reinigungsprodukte zu ver wenden.
66
Page 67

DÉTARTRAGE
ENTKALKEN
Lire attentivement toutes les instructions avant de démarrer le cycle de détartrage. Durée : 20 minutes environ. La formation du calcaire est
une conséquence naturelle de l’utilisation de la machine. Le détartrage permet d’optimiser le nettoyage et d’enlever les résidus de calcaire
de l’intérieur de la machine. La machine signale automatiquement la nécessité d’e ectuer le détartrage au moyen du clignotement alterné
de
et . Il est conseillé de détartrer la machine tous les 2 mois en utilisant un produit spéci que pour machines à café.
Bitte alle Anweisungen aufmerksam durchlesen bevor der Entkalkungszyklus gestartet wird. Dauer: ca. 20 Minuten. Die Bildung von Kalk ist eine
natürliche Folge des Betriebs des Geräts. Durch das Entkalken wird die Reinigung optimiert und die Kalkrückstände im Inneren werden entfernt. Die
Maschine zeigt automatisch an, wenn ein Entkalken erforderlich ist, diese Anzeige erfolgt durch abwechselndes Aufblinken von
wird empfohlen, die Maschine alle 2 Monate mit einem für Ka eemaschinen spezi schen Produkt zu entkalken.
und . Es
FR
DE
321
Éteindre la machine. Ex traire et remplir le réser voir à eau avec de l’eau
fraîche potable jusqu’au niveau MAX.
Das Gerät ausschalten. Den Wassertank herausnehmen und bis zum Füll-
stand MAX mit frischem Trinkwasser füllen.
REMARQUE : Si les opérations ne sont pas e ectuées dans les temps indiqués, la machine ne démarre pas le processus de détartrage : il est donc nécessaire d’éteindre la machine
et de répéter les opérations du point 5 au point 9.
Si le cycle de détartrage est interrompu par manque de courant électrique ou parce que la machine a été éteinte par erreur, il faut répéter toute l’opération avant de pouvoir utiliser
la machine.
HINWEIS: Werden die Vorgänge nicht innerhalb der vorgegebenen Zeiten durchgeführt, so startet die Maschine den Entkalkungsvorgang nicht, deshalb ist es notwendig, die Maschine
auszuschalten und die Vorgänge von Punkt 5 bis Punkt 9 zu wiederholen.
Wird der Entkalkungszyklus aufgrund eines Stromausfalls unterbrochen, oder die Maschine versehentlich ausgeschaltet, muss der gesamte Vorgang wiederholt werden, bevor die Maschine erneut verwendet werden kann.
Ajouter 1 sachet de détartrant et mélanger pour
le dissoudre.
1 Beutel Entkalkerlösung hinzufügen und mischen,
damit sie aufgelöst wird.
Véri er que la buse de distribution du lait et le
réservoir à lait soient accrochés à la machine. Le
réservoir à lait doit rester vide.
Überprüfen, ob der Milchauslauf und der Milchtank
an der Maschine eingehängt sind. Der Milchtank
muss leer bleiben.
4
67
Page 68

1 Litro
1 Liter
1 Litro
1 Liter
1 Litro
1 Liter
DÉTARTRAGE
ENTKALKEN
5
6
87
Placer un récipient avec une capacité minimum
de 1 litre sous la buse de distribution du café.
Ein mindestens 1-Liter fassendes Gefäß unter den
Ka eeauslauf stellen.
Le cycle démarre.
Der Zyklus wird gestartet. Die Tasten blinken im Uhrzeigersinn nacheinander
68
Mettre en marche la machine.
Die Maschine einschalten.
9
Les touches clignotent de façon séquentielle dans
le sens des aiguilles d’une montre.
auf.
Dans les 15 secondes appuyer sur la touche
et la garder enfoncée pendant 7 secondes jusqu’au
signal acoustique.
Innerhalb 15 Sekunden drücken und sie 7
Sekunden lang gedrückt halten, bis ein Akustiksignal ertönt.
10 11
Lorsque la touche
machine a terminé le cycle.
Wenn dauerhaft au euchtet, hat die Maschine
den Zyklus beendet.
s’allume de façon xe, la
Toutes les touches clignotent. Appuyer sur la
touche .
Alle Tasten blinken. Die Taste drücken.
Vider le récipient et le réservoir à eau de l’eau et
de la solution détartrante.
Wasser und Entkalkungsmittel aus dem Behälter
und aus dem Wassertank leeren.
12
Page 69

1 Litro
1 Liter
DÉTARTRAGE
ENTKALKEN
13
14
15
FR
DE
16
Laver soigneusement le réservoir et le remplir avec
de l’eau fraîche jusqu’au niveau MAX.
Den Wassertank sorgfältig auswaschen und bis
zum Füllstand MAX mit frischem Wasser füllen.
17
Une fois le cycle terminé, lorsque les touches
s'allument de façon xe, la machine est prête
pour être utilisée.
Wenn der Zyklus beendet ist und die Tasten dauerhaft au euchten ist die Maschine betriebsbereit.
Repositionner le récipient.
Den Behälter wieder positionieren.
Appuyer sur :la machine démarre le rinçage
en distribuant de l’eau à intervalles réguliers.
Die Taste drücken: Die Maschine startet die
Spülung und gibt Wasser in regelmäßigen Abständen aus.
Les touches clignotent de façon séquentielle dans
le sens inverse des aiguilles d’une montre.
Die Tasten blinken im Gegenuhrzeigersinn nacheinander auf.
69
Page 70

LIMITATIONS DE LA GARANTIE
ATTENTION: Si le détartrage n’est pas e ectué régulièrement comme indiqué, le
calcaire peut provoquer des mauvais fonctionnements qui ne sont pas couverts par
la garantie. Pour le premier détartrage il est conseillé d’utiliser le produit pour le détartrage fourni avec la machine. Ne pas utiliser de vinaigre, lessive, acide formique
puisqu'ils endommagent la machine.
Utiliser uniquement des produits détartrants adaptés aux machines à café. La solution détartrante doit être éliminée conformément à ce qui est prévu par les normes
en vigueur. Ne pas boire le liquide distribué pendant le processus de détartrage; la
machine peut être utilisée pour la distribution de café uniquement quand le proces-
sus de détartrage est terminé.
La garantie ne couvre pas les pannes causées par:
- un détartrage irrégulier.
- un fonctionnement avec un voltage di érent de celui indiqué sur la plaquette de données (voir
la section «parties de la machine»).
- une utilisation impropre ou non conforme aux instructions.
GARANTIEEINSCHRÄNKUNGEN
ACHTUNG: Wenn die Entkalkung nicht regelmäßig durchgeführt wird, so kann der Kalk
Betriebsschäden verursachen, die nicht durch die Garantie gedeckt werden. Für die erste
Entkalkung emp ehlt es sich, das mit der Maschine mitgelieferte Entkalkungsprodukt
zu verwenden. Auf keinen Fall Essig, Lauge, Salz, Ameisensäure verwenden, da diese die
Maschine beschädigen.
Ausschließlich für Ka eemaschinen zugelassene Entkalkungsprodukte verwenden. Die
Entsorgung der Entkalkerlösung muss gemäß den geltenden Vorschriften erfolgen. Auf
keinen Fall die während des Entkalkungszyklus ausgegebene Flüssigkeit trinken, die
Maschine kann für die Ka eeausgabe erst wieder verwendet werden, wenn der Entkal-
kungszyklus abgeschlossen ist.
Die Garantie deckt nicht die Schäden verursacht von:
- Enktalkung, die nicht in regelmäßigen Abständen erfolgt.
- Inbetriebnahme mit Spannungswerten, die nicht den auf dem Datenschild vorgeschriebenen Werten
entsprechen (siehe Kapitel "Teile der Maschine").
70
- des modi cations apportées à l'intérieur de la machine.
La garantie ne couvre pas les coûts des réparations sur des machines manipulées par des centres
d'assistance non agréés.
Ces coûts seront totalement à la charge du client. Il est conseillé de:
- ne pas laver les composants de la machine au lave-vaisselle;
- s'assurer que les bacs de collecte sont toujours propres.
La non observation de ces recommandations pourrait créer à la machine des problèmes non couverts
par la garantie.
ATTENTION:
Il est conseillé de conserver l'emballage original (au moins pendant la période de garantie) pour l'éventuel envoi de la machine aux centres d'assistance agréés. Les éventuels
dommages dus au transport sans un emballage approprié ne sont pas couverts par la
garantie.
- nicht vorschriftsmäßiger Gebrauch oder nicht den Anleitungen entsprechend
- an der Maschine vorgenommene Änderungen
Die Garantie deckt keine Reparaturkosten an Maschinen, die von nicht autorisierten Kundendienststellen
ausgeführt worden sind. Diese Kosten gehen zur Gänze zu Lasten des Kunden. Es emp ehlt sich:
- die Maschinen-Bestandteile nicht in der Spülmaschine zu waschen;
- die Au ang- und Abtropfbehälter sauber zu halten.
Eine Nichtbeachtung dieser Empfehlungen könnte Störungen an der Maschine hervorrufen, die nicht
durch die Garantie gedeckt sind.
ACHTUNG:
Es wird empfohlen, die Originalverpackung (zumindest für die Garantiedauer) aufzubewahren, im Fall dass die Maschine eventuell an eine autorisierte Kundendienststelle geschickt
werden muss. Allfällige Schäden, die auf den Transport ohne entsprechende Verpackung
zurückzuführen sind, werden nicht durch die Garantie gedeckt.
Page 71

SIGNALISATIONS - ÉTAT DE LA MACHINE
ANZEIGEN GERÄTESTATUS
Clignotent
La machine a été allumée et elle est en phase de chau age.
FR
DE
La touche eau chaude clignote
La machine est en train de distribuer de l'eau chaude.
Blinken
Das Gerät wurde eingeschaltet und be ndet sich in der Aufheizphase.
Allumées
La machine a atteint la bonne température pour la distribution.
Ein
Das Gerät hat die für die Ka eeausgabe korrekte Temperatur erreicht.
La touche café expresso clignote
La machine est en train de distribuer un café expresso.
Die Taste für Espresso blinkt
Das Gerät gibt einen Espresso aus.
La touche café allongé clignote
La machine est en train de distribuer un café allongé.
Die Taste für Großen Ka ee blinkt
Das Gerät gibt einen Großen Ka ee aus.
La touche cappuccino clignote
La machine est en train de distribuer un cappuccino.
Die Cappuccino-Taste blinkt
Das Gerät gibt einen Cappuccino aus.
Die Heißwassertaste blinkt
Das Gerät gibt Heißwasser aus.
La touche lait noisette clignote
La machine est en train de distribuer du lait noisette.
Die Taste für Latte Macchiato blinkt
Das Gerät gibt Latte Macchiato aus.
La touche lait chaud mousseux clignote
La machine est en train de distribuer du lait chaud.
Die Taste für heiße aufgeschäumte Milch blinkt
Das Gerät gibt eine heiße Milch aus.
La touche café expresso clignote lentement
La machine est en phase de Power Save. La machine active le Power
Save après 10 minutes d'inactivité. Pour réactiver la machine, e eurer
une touche quelconque.
Die Taste für Espresso blinkt mit langen Intervallen
Das Gerät be ndet sich in Power-Save-Phase. Das Gerät schaltet nach
einer Nichtbenutzung von 10 Minuten die Power-Save-Funktion ein. Um
die Maschine wieder zu aktivieren, wird lediglich eine beliebige Taste
leicht berührt.
Les touches café expresso et café allongé s’allument et s’éteignent de façon alterné
La machine doit être détartrée.
Die Tasten Espresso und Großer Ka ee schalten sich abwechselnd
ein und dann wieder aus
Das Gerät muss entkalkt werden.
71
Page 72

SIGNALISATION - ÉTAT DE LA MACHINE
ANZEIGEN GERÄTESTATUS
Clignotent
La machine indique que la procédure de détartrage a été sélectionnée.
À ce stade, le réservoir à eau doit contenir la solution détartrante.
Blinken
Das Gerät zeigt an, dass der Entkalkungsvorgang angewählt wurde. In
diesem Zustand muss der Wassertank die Entkalkerlösung enthalten.
Clignotent de façon séquentielle dans le sens des aiguilles
d’une montre.
La machine indique que la première partie du détartrage est en cours.
La machine est en train de distribuer la solution détartrante. Seule la
touche café expresso clignote de façon progressive.
Blinken im Uhrzeigersinn nacheinander auf.
Das Gerät zeigt an, dass der erste Teil des Entkalkungszyklus läuft. Das
Gerät gibt das Entkalkungsmittel aus. Nur die Taste für Espresso leuchtet
progressiv auf.
La touche café allongé est allumée xe
La machine indique que la première partie du détartrage est terminée. Il
faut rincer et remplir le réservoir avec de l’eau fraîche potable.
Die Taste für Großen Ka ee leuchtet dauerhaft auf
Das Gerät zeigt an, dass der erste Teil der Entkalkung beendet ist. Der Wassertank muss ausgespült und mit frischem Trinkwasser aufgefüllt werden.
Clignotent de façon séquentielle dans le sens inverse des aiguilles d’une montre.
La machine indique que la deuxième partie du détartrage est en cours.
La machine est en train de distribuer l'eau pour le rinçage du circuit.
Seule la touche café allongé clignote de façon progressive.
Blinken im Gegenuhrzeigersinn nacheinander auf.
Die Maschine zeigt an, dass der zweite Teil der Entkalkung im Gange ist.
Das Gerät gibt Wasser für den Spülzyklus des Systems aus. Nur die Taste
für Großen Ka ee leuchtet progressiv auf.
Clignotent rapidement
La machine présente un mauvais fonctionnement. Éteindre la machine
et la remettre en marche au bout de 30 secondes. Si le défaut se répète,
contacter un centre d’assistance agrée.
Leuchten schnell auf
Das Gerät weist eine Störung auf. Aus- und nach 30 Sekunden erneut
einschalten. Sollte sich das Problem wiederholen, wenden Sie sich an
eine autorisierte Kundendienststelle.
Les deux colonnes de touches s’allument de façon altérnée
Une erreur s’est produit dans le fonctionnement de la machine.
Éteindre la machine et la remettre en marche au bout de 30 secondes.
Si le défaut se répète, contacter un centre d’assistance agréé.
Die beiden Tastenreihen leuchten abwechselnd auf
Das Gerät weist eine Funktionsstörung auf. Aus- und nach 30 Sekunden
erneut einschalten. Sollte sich das Problem wiederholen, wenden Sie
sich an eine autorisierte Kundendienststelle.
72
Page 73

PROBLÈME - CAUSE - SOLUTION
PROBLÈME CAUSE SOLUTION
La machine ne se met pas
en marche.
La machine ne distribue
pas de café.
Perte d'eau.
Le câble d'alimentation n'est pas
connecté à la prise de courant.
Interrupteur général positionné sur
«0».
Machine en mode Power Save.
Manque d’eau dans le réservoir. Remplir le réservoir avec de l'eau.
La capsule n'est pas insérée dans le
logement à capsules.
La capsule insérée ne distribue pas de
café.
Fermeture incomplète de la partie mo-
bile de la tête de la machine.
Les touches ou n'ont pas été
activées.
Le réservoir à eau n'a pas été inséré
correctement.
Présence de calcaire sur les composants
internes.
La pompe n'a pas été activée. Essayer de distribuer de l'eau sans insérer de capsule dans le logement.
Mauvaise typologie de capsule.
Réservoir à eau inséré de façon incorrecte et/ou insu sante.
Kit lait inséré de façon incorrecte et/
ou insu sante.
Brancher la che à une prise de courant conforme aux données techniques indiquées sur la plaque signalétique placée
sous la base de la machine.
Mettre l'interrupteur général sur «I».
Activer la machine en e eurant l'une des deux touches
E eurer à nouveau les touches
Insérer une capsule dans le logement à capsules.
Enlever la capsule en décrochant et en soulevant le levier et la récupérer du bac de collecte des capsules usagées.
Fermer le logement à capsules et distribuer une petite quantité d'eau. Réinsérer la capsule et démarrer la distribution.
Soulever le levier et véri er que la capsule a été correctement insérée. Baisser la partie mobile et bloquer en baissant
le levier. Appuyer sur les touches ou pour distribuer du café.
E eurer à nouveau les touches ou .
Véri er que le réservoir est inséré complètement.
Détartrer la machine comme décrit dans le section dédiée.
Véri er qu'a bien été utilisée une capsule «Iperespresso» pour utilisation domestique, identi ée par la mention
«Capsules unidose de café moulu pour usage domestique» présente sur l'emballage.
Véri er que le réservoir à eau a été complètement inséré jusqu’à la butée.
Véri er que tous les composants du kit ont été montés et insérés correctement.
ou pour démarrer la distribution.
ou .
FR
DE
Le problème
persiste
Contacter
un centre
d'assistance
agréé.
73
Page 74

PROBLÈME - CAUSE - SOLUTION
PROBLÈME CAUSE SOLUTION
La machine ne distribue
pas de lait émulsionné.
La machine ne distribue
pas de lait émulsionné.
La machine n’émulsionne
pas le lait.
Les 3 icônes des préparations à base de lait ne
s’allument pas.
Type de lait qui n'est pas approprié à
cette préparation.
Buse de distribution du lait sale ou
obstrué par des distributions de lait
précédentes.
Quantité insu sante de lait dans le
réservoir.
Bec de distribution inséré incorrectement dans le couvercle du réservoir à
lait.
Kit lait assemblé incorrectement. S’assurer que tous les composants ont été montés correctement (se référer au chapitre NETTOYAGE ET ENTRETIEN).
Buse de distribution du lait inséré incor-
rectement dans la machine.
Réservoir à lait accroché incorrectement
dans la machine.
Le tuyau supérieur du kit lait est obstrué.
Le kit lait n’a pas été inséré ou a été
inséré incorrectement.
Utiliser du lait froid entier.
Laver le circuit de distribution du lait.
Remplir le réservoir à lait jusqu’au niveau MIN.
S’assurer qu’il est bien inséré dans le trou qui se trouve sur le couvercle du réservoir à lait.
S’assurer que la buse de distribution du lait est insérée jusqu’au complet emboîtement.
S’assurer que le réservoir à lait est accroché à la machine jusqu’au complet emboîtement.
(Référence au chapitre NETTOYAGE ET ENTRETIEN) Démonter le kit lait, enlever le tuyau supérieur et le nettoyer soigneusement comme décrit au point 22. Après avoir remonté le kit lait, suivre les instructions de nettoyage du point
25 au point 30.
Insérer le kit lait dans la machine jusqu’au complet emboîtement.
Le problème
persiste
Contacter
un centre
d’assistance
agréé.
74
Page 75

PROBLEM URSACHE ABHILFE
PROBLEM URSACHE ABHILFE
Die Maschine schaltet sich
nicht ein.
Die Maschine gibt keinen
Ka ee aus.
Wasser läuft aus.
Netzkabel nicht mit der Steckdose verbunden.
Hauptschalter in Position “0”. Den Hauptschalter auf „I” stellen.
Maschine im Power-Save-Zustand.
Wasser im Tank fehlt. Wassertank mit Wasser füllen.
Kapsel nicht im Kapselfach eingesetzt. Eine Kapsel in das Kapselfach einsetzen.
Die eingesetzte Kapsel gibt keinen Ka ee
aus.
Der bewegliche Teile des Maschinenkopfs
lässt sich nicht zur Gänze schließen.
Taste oder lässt sich nicht
betätigen.
Der Wassertank ist nicht korrekt eingerastet.
Innere Maschinenteile sind verkalkt. Die Maschine entkalken, siehe dazu den entsprechenden Abschnitt.
Pumpe wird nicht betätigt. Probieren Wasser auszugeben, ohne da ss die Kapsel im Fach eingelegt ist.
Falscher Kapsel-Typ.
Der Wassertank ist falsch und/oder nicht
ausreichend fest eingesetzt.
Der Milch-Einsatz ist falsch und/oder
nicht ausreichend fest eingesetzt.
Stecker an einer den auf dem Datenschild vorgeschriebenen technischen Werten entsprechenden Steckdose anschließen,
Datenschild be ndet sich an der Maschinen-Unterseite.
Die Maschine wieder aktivieren, indem lediglich eine der beiden Ta sten
Erneut die Taste
Kapsel entnehmen, indem der Hebel gelöst und angehoben wird, dann die Kapsel aus dem Kapselau angbehälter herausnehmen. Kapselfach schließen und eine geringe Menge Wasser ausgeben. Kapsel wieder einsetzen und die Ausgabe starten.
Hebel anheben und sicherstellen, dass die Kapsel richtig eingesetzt ist. Beweglichen Teil senken und blockieren, indem der
Hebel nach unten gestellt wird. Taste oder drücken, um Ka ee auszugeben.
Erneut Taste oder leicht berühren.
Überprüfen, ob der Wassertank korrekt eingesetzt wurde.
Sicherstellen, dass eine Kapsel "Iperespresso" für den Haushalts-Gebrauch verwendet wurde; dies erkennt man an der
Aufschrift "Portionskapsel gemahlener Ka ee für die Ver wendung im Haushalt" auf der Verpackung.
Sicherstellen, dass der Wassertank vollständig und bis zu seinem Anschlag eingesetzt ist.
Sicherstellen, dass alle Teile des Einsatzes vorschriftsmäßig montiert und richtig eingesetzt sind.
oder leicht berühren, um die Ausgabe zu starten.
FR
DE
Problem bleibt
bestehen
oder leicht berührt wird.
Kontaktieren Sie
eine autorisierte
Kundendienst-
Stelle.
75
Page 76

PROBLEM URSACHE ABHILFE
PROBLEM URSACHE ABHILFE
Die Maschine gibt keine
aufgeschäumte Milch aus.
Die Maschine gibt keine
aufgeschäumte Milch aus.
Die Maschine schäumt die
Milch nicht auf.
Die 3 Symbole für die
Zubereitung von Milchgetränken leuchten nicht auf.
Der Milch-Typ ist für diese Zubereitung
nicht geeignet.
Milchauslauf ist verschmutzt oder von
vorherigen Ausgaben verstopft.
Milchmenge im Tank ist unzureichend. Den Milchtank bis zum MIN. Füllstand au üllen.
Die Auslauftülle ist nicht richtig im Deckel
des Milchtanks eingesetzt.
Der Milch-Einsatz nicht vorschriftsmäßig
zusammengebaut.
Milchauslauf nicht vorschriftsmäßig in
der Maschine eingesetzt.
Der Milchtank ist nicht vorschriftsmäßig
in der Maschine eingehängt.
Das obere Rohr des Milch-Einsatzes ist
verstopft.
Der Milch-Einsatz ist gar nicht oder falsch
eingesetzt.
Kalte Vollmilch verwenden.
Das Milchausgabe-System reinigen.
Sicherstellen, dass sie fest in der auf dem Deckel des Milchtanks vorhandenen Ö nung eingesetzt ist.
Sicherstellen, dass alle Bestandteile richtig montiert sind (dazu bitte auf das Kapitel REINIGUNG UND WARTUNG B ezug nehmen).
Sicherstellen, dass der Milchauslauf durch perfektes Einrasten eingesetzt wird.
Sicherstellen, dass der Milchtank durch perfektes Einrasten eingehängt wird.
(Siehe unter Kapitel REINIGUNG UND WARTUNG) Milch-Einsatz abmontieren, oberes Rohr herausnehmen und es sorgfältig
reinigen, wie unter Punkt 22 beschrieben. Nachdem der Milch-Einsatz wieder montiert worden ist, bitte die von Punkt 25
bis Punkt 30 beschriebenen Reinigungsanweisungen befolgen.
Den Milch-Einsatz in die Maschine einsetzen, er muss perfekt einrasten.
Problem bleibt
bestehen
Kontaktieren Sie
eine autorisierte
Kundendienst-
Stelle.
76
Page 77

ÉLIMINATION
Élimination d'appareils électriques ou électroniques usagés par les particuliers dans l'Union Européenne.
Le symbole RAEE utilisé pour ce produit indique que celui-ci ne doit pas être éliminé avec les autres
déchets domestiques, mais doit faire l'objet d'une «collecte sélective». Le particulier peut rendre
gratuitement au distributeur un appareil usagé lors de l'achat d'un nouvel appareil.
Pour plus d'informations sur les points de collecte des appareils à éliminer, il est conseillé de contacter
votre commune de résidence, le service local d'élimination des déchets ou le magasin auprès duquel
l'appareil a été acheté. L'utilisateur est responsable de l'élimination selon les normes en vigueur, le
non respect des dispositions prévues par la loi peut faire l'objet de sanctions.
La correcte élimination de ce produit contribue à protéger l'environnement, les ressources naturelles
et la santé des personnes.
ENTSORGUNG
FR
DE
Entsorgung von Elektro- und Elektronikgeräten von privaten Haushalten in der EU.
Das für dieses Produkt verwendete Symbol RAEE weist darauf hin, dass dieses nicht den anderen Haus-
haltsabfällen zugeführt werden darf, sondern dass es getrennt entsorgt werden muss. Der Privatbenutzer
hat die Möglichkeit, das alte Gerät bei Kauf eines neuen Gerätes gratis abzugeben.
Für weitere Informationen bezüglich der Annahmestellen von zu entsorgenden Geräten, empfehlen
wir, sich an die jeweilige Stadtgemeinde, die lokale Abfallverwertungstelle oder das Geschäft, in dem
das Produkt gekauft wurde, zu wenden. Es liegt in der Verantwortung des Benutzers, sich um eine den
geltenden Normen entsprechende Entsorgung zu kümmern, die Nichtbeachtung der Gesetzesvorschriften
kann zu Bußgeldstrafen führen.
Eine vorschriftsmäßige Entsorgung dieses Produktes trägt dazu bei, die Umwelt und die Naturressourcen
zu schonen und die menschliche Gesundheit zu schützen.
77
Page 78

NORMAS GENERALES DE USO DE LA MÁQUINA DATOS TÉCNICOS
Leer atentamente el manual de instrucciones y las limitaciones de la garantía.
La máquina debe conectarse a una toma de corriente provista de puesta a tierra. Mantener limpia la
máquina, lavando con frecuencia la super cie apoyatazas, la bandeja de goteo, el cajón de recogida
cápsulas usadas, el depósito de agua y la super cie apoyatazas de vidrio. El mantenimiento debe
realizarse con la máquina apagada.
IMPORTANTE: no sumergir nunca la máquina o sus componentes extraíbles en agua ni introducirla
en el lavavajillas.
El agua contenida en el depósito debe ser cambiada con regularidad. No usar la máquina sin agua en
el depósito. Se aconseja utilizar al menos cada 2 meses un producto para la eliminación de
la cal especí camente formulado para máquinas de café exprés según las indicaciones del
capítulo descalci cación.
DESCUBRA Y ADQUIERA LAS CÁPSULAS ILLY IPERESPRESSO EN SHOP.ILLY.COM O EN NUESTROS MEJORES DISTRIBUIDORES AUTORIZADOS.
Material de la máquina: aluminio y vidrio templado
Material del intercambiador térmico: acero inoxidable
Depósito de agua: 0,9 litros
Depósito de leche: 0,5 litros
Capacidad del cajón de recogida de cápsulas usadas: 10 cápsulas
Bombas: café 19 bar - leche 2,5 bar
Peso: 5 kg
Voltaje: 220-240 V, 50/60 Hz (EU); 120 V, 60 Hz (USA)
Potencia: 1.200 W (EU-USA) - Con función “Power Save”
Dimensiones (L x P x A) (mm): 215 x 285 x 245
El fabricante se reserva el derecho a realizar modi caciones o mejoras sin previo aviso.
REGRAS GERAIS PARA O USO DA MÁQUINA DADOS TÉCNICOS
Leia atentamente o folheto de instruções e as limitações da garantia.
A máquina deve ser ligada a uma tomada de corrente normal equipada com ligação à terra. A máquina
deve ser mantida limpa ao lavar frequentemente a grelha de apoio para chávenas, a bandeja de limpeza,
a bandeja de recolha de cápsulas usadas, o reservatório de água e a superfície de apoio para chávenas
em vidro. A manutenção é efectuada com a máquina desligada.
IMPORTANTE: nunca mergulhe a máquina ou os seus componentes removíveis em água ou a introduza
na máquina de lavar louça.
A água contida no reservatório deve ser substituída com frequência. Não utilize a máquina sem água no
reservatório. É recomendável utilizar, pelo menos a cada 2 meses, um produto para a remoção do
calcário devidamente concebido para as máquinas de café expresso de acordo com as indicações
do capítulo de descalci cação.
Material da máquina: Alumínio e vidro temperado
Material do permutador térmico: Aço inoxidável
Reservatório de água: 0,9 litros
Reservatório de leite: 0,5 litros
Capacidade da bandeja das cápsulas usadas: 10 cápsulas
Bombas: café 19 bar - leite 2,5 bar
Peso: 5 kg
Voltagem: 220-240 V , 50/60 Hz (UE); 120 V, 60 Hz (EUA)
Potência: 1.200 W (UE-EUA) - Com funcionalidade “Power Save”
Dimensões (C x P x A) (mm): 215 x 285 x 245
O fabricante reserva-se o direito de efectuar alterações ou melhorias sem aviso prévio.
DESCUBRA E ADQUIRA AS CÁPSULAS ILLY IPERESPRESSO EM SHOP.ILLY.COM OU NOS NOSSOS MELHORES REVENDEDORES AUTORIZADOS.
78
Page 79

ÍNDICE DE CONTENIDOS
NORMAS GENERALES DE USO DE LA MÁQUINA ............................................78
DATOS TÉCNICOS .......................................................................................78
PARTES DE LA MÁQUINA............................................................................80
NORMAS DE SEGURIDAD IMPORTANTES ....................................................81
INSTALACIÓN Y PUESTA EN FUNCIONAMIENTO DE LA MÁQUINA ...................87
PREPARACIÓN DE CAFÉ .............................................................................89
RECOMENDACIONES ..................................................................................90
AJUSTE DE LA CANTIDAD DE CAFÉ EN TAZA .................................................91
USO DEL DEPÓSITO Y BOQUILLA DE LA LECHE..............................................92
PREPARACIÓN DE CAPUCHINO ...................................................................94
PREPARACIÓN DE LECHE MANCHADA .........................................................96
ÍNDICE
PREPARACIÓN DE LECHE CALIENTE ESPUMADA ...........................................98
AJUSTE DE LA CANTIDAD DE LECHE CALIENTE ESPUMADA ............................99
SUMINISTRO DE AGUA CALIENTE .............................................................100
AJUSTE DE LA CANTIDAD DE AGUA CALIENTE SUMINISTRADA .................... 100
LIMPIEZA Y MANTENIMIENTO ..................................................................101
DESCALCIFICACIÓN ................................................................................. 105
LIMITACIONES DE LA GARANTÍA ............................................................... 108
AVISOS ESTADO DE LA MÁQUINA ............................................................109
PROBLEMA CAUSA SOLUCIÓN ..............................................................111
ELIMINACIÓN ......................................................................................... 115
ES
PT
REGRAS GERAIS PARA O USO DA MÁQUINA .................................................78
DADOS TÉCNICOS ......................................................................................78
PEÇAS DA MÁQUINA ..................................................................................80
MEDIDAS DE SEGURANÇA IMPORTANTES ...................................................81
INSTALAÇÃO E COLOCAÇÃO EM FUNCIONAMENTO DA MÁQUINA ...................87
PREPARAÇÃO DE CAFÉ ...............................................................................89
RECOMENDAÇÕES .....................................................................................90
AJUSTE DA QUANTIDADE DE CAFÉ NA CHÁVENA ..........................................91
UTILIZAÇÃO DO RESERVATÓRIO E DISTRIBUIDOR DE LEITE ..........................92
PREPARAÇÃO DE CAPPUCCINO ...................................................................94
PREPARAÇÃO DE LEITE MACCHIATO ............................................................96
PREPARAÇÃO DE LEITE QUENTE COM ESPUMA ............................................98
AJUSTE DA QUANTIDADE DE LEITE QUENTE COM ESPUMA ............................99
DISTRIBUIÇÃO DE ÁGUA QUENTE .............................................................100
AJUSTE DA QUANTIDADE DE ÁGUA QUENTE DISTRIBUÍDA ..........................100
LIMPEZA E MANUTENÇÃO ........................................................................ 101
DESCALCIFICAÇÃO ..................................................................................105
LIMITAÇÕES DA GARANTIA ...................................................................... 108
SINALIZAÇÕES ESTADO DA MÁQUINA .....................................................109
PROBLEMA CAUSA SOLUÇÃO ................................................................113
ELIMINAÇÃO ..........................................................................................115
79
Page 80

PARTES DE LA MÁQUINA
A PILOTO LUMINOSO ILUMINACIÓN
B SALIDA DE AGUA CALIENTE
C SALIDA DE CAFÉ
D ACOPLAMIENTO DE LA BOQUILLA DE
LA LECHE
E BOQUILLA DE LA LECHE
F DEPÓSITO DE LA LECHE
G PANEL DE MANDOS
G1 LECHE MANCHADA
G2 CAPUCHINO
G3 CAFÉ EXPRÉS
G4 LECHE CALIENTE ESPUMADA
G5 AGUA CALIENTE
G6 CAFÉ LARGO
PEÇAS DA MÁQUINA
A INDICADOR LUMINOSO LED
B DISTRIBUIDOR DE ÁGUA QUENTE
C DISTRIBUIDOR DE CAFÉ
D ENGATE DO DISTRIBUIDOR DE LEITE
E DISTRIBUIDOR DE LEITE
F RESERVATÓRIO DE LEITE
G PAINEL DE COMANDOS
G1 LEITE MACCHIATO
G2 CAPPUCCINO
G3 CAFÉ EXPRESSO
G4 LEITE QUENTE COM ESPUMA
G5 ÁGUA QUENTE
G6 CAFÉ LONGO
80
H PALANCA DE APERTURA/CIERRE DEL
COMPARTIMENTO PARA CÁPSULAS
I COMPARTIMENTO PARA CÁPSULAS
interno
L DEPÓSITO DE AGUA
M CAJÓN DE RECOGIDA DE CÁPSULAS
USADAS y residuos líquidos de n de
suministro
N SUPERFICIE APOYATAZAS PEQUEÑAS
O SUPERFICIE APOYATAZAS GRANDES
P INTERRUPTOR GENERAL
Q CABLE DE ALIMENTACIÓN
R PLAC A DE DATOS (bajo la base)
H ALAVANCA DE ABERTURA/FECHO DO
COMPARTIMENTO DE CÁPSULAS
I COMPARTIMENTO DE CÁPSULAS
interno
L RESERVATÓRIO DE ÁGUA
M BANDEJA DE RECOLHA DE CÁPSULAS
USADAS e resíduos líquidos do nal da
distribuição
N SUPERFÍCIE DE APOIO PARA CHÁVENAS
EXPRESSO
O SUPERFÍCIE DE APOIO PARA CANECAS
P INTERRUPTOR GERAL
Q CABO DE ALIMENTAÇÃO
R PLACA DE DADOS (por baixo da base)
G1
A
B
G2
G3
G4
G5
G6
C
D
G
H
E
I
L
M
N
O
F
P
Q
R
Page 81

NORMAS DE SEGURIDAD IMPORTANTES
Al utilizar aparatos eléctricos deben observarse siempre las medidas
de seguridad que a continuación se indican:
Uso del aparato
- Leer todas las instrucciones.
- Esta máquina está fabricada para “preparar café exprés y suminis-
trar bebidas a base de leche”: es necesario prestar atención para
no quemarse con chorros de agua caliente o por uso impropio de
la máquina.
- La máquina está concebida para uso doméstico y para aplicaciones
similares como:
• cocinas para el personal de tiendas, o cinas y otros lugares
de trabajo
MEDIDAS DE SEGURANÇA IMPORTANTES
ES
PT
• turismo rural
• clientes de hoteles, albergues y otros alojamientos de tipo
residencial
• alojamientos bajo el concepto bed & breakfast.
- El aparato puede ser empleado sólo para el uso al que está destinado. Todo otro uso debe considerarse como impropio y, por lo
tanto, peligroso.
- La máquina debe permanecer encendida exclusivamente durante
el tiempo necesario para su uso, después del cual deberá ser
apagada, situando el interruptor general en “0” (Fig.1) y desenchufándola de la toma corriente.
- No tocar nunca la super cie caliente. Los suministros de agua/
Ao usar aparelhos eléctricos devem ser sempre obser vadas as seguintes
medidas de segurança.
Uso do aparelho
- Leia todas as instruções.
- Esta máquina foi fabricada para “preparar café expresso e para
distribuir bebidas com leite”: tenha cuidado para não se queimar
com jactos de água ou vapor, ou para não a usar de maneira inadequada.
- O aparelho é concebido para uso doméstico e para aplicações
similares, tais como:
• cozinhas para funcionários de lojas, escritórios e outros ambientes
de trabalho;
• locais de turismo rural;
• clientes de hotéis, motéis e outros alojamentos de tipo residencial;
• ambientes do tipo bed & breakfast
- Use o aparelho somente para os ns aos quais se destina. Todos
os demais usos devem ser considerados impróprios e, portanto,
perigosos.
- O aparelho deve ser ligado somente pelo tempo necessário para o
seu uso, depois do qual deve ser desligado, colocando o interruptor
geral em “0” (Fig.1) e desligando a cha da tomada eléctrica.
- Nunca toque uma superfície quente. O fornecimento de água ou
81
Page 82

NORMAS DE SEGURIDAD IMPORTANTES
café de la máquina pueden causar quemaduras.
- Esta máquina no está destinada a ser utilizada por personas
(incluidos niños) con reducidas capacidades físicas, mentales o
sensoriales o con experiencia y/o competencias insu cientes, a
menos que reciban capacitación sobre su uso o la utilicen bajo
supervisión de una persona responsable de su seguridad.
- Mantener a los niños bajo supervisión para evitar que jueguen
con la máquina.
- Las operaciones de limpieza y mantenimiento no deben ser
realizadas por niños, salvo que tengan una edad superior a 8
años y sean supervisados. Mantener el aparato y el cable fuera
del alcance de los niños de edad inferior a 8 años.
MEDIDAS DE SEGURANÇA IMPORTANTES
café da máquina pode causar queimaduras.
- Este aparelho não se destina a ser utilizado por pessoas (inclusive
crianças) com capacidades físicas, mentais ou sensoriais reduzidas,
ou com experiência e/ou competência insu cientes, excepto sob
supervisão de uma pessoa responsável pela segurança das mesmas
ou se tiverem sido instruídas por ela sobre como usar o aparelho.
- Mantenha as crianças sob supervisão, para evitar que brinquem
com o aparelho.
- As operações de limpeza e manutenção não devem ser efectuadas
por crianças, a não ser que tenham uma idade superior a 8 anos e
sejam supervisionadas. Mantenha o aparelho e o respectivo cabo
82
- Utilizar la máquina exclusiva-
1
mente en lugares cerrados y
protegidos contra los agentes
atmosféricos externos. No utilizar al aire libre.
- Para evitar fuego, cortocircuitos
e impedir lesiones, no sumergir
el cable, el enchufe ni el cuerpo
de la máquina en agua u otro líquido.
- No colocar la máquina sobre quemadores eléctricos o de gas ni
en el interior de un horno caliente.
- El uso de accesorios no recomendados por el fabricante puede
fora do alcance de crianças com idade inferior a 8 anos.
- Utilize este aparelho exclusivamente em lugares fechados e abrigados
contra os agentes atmosféricos exteriores. Não utilize ao ar livre.
- Para se proteger contra incêndios, choques eléctricos e lesões, não
mergulhe o cabo eléctrico, a cha nem o corpo da máquina na água
ou outro líquido.
- Não apoie o aparelho sobre fornos eléctricos, a gás ou dentro de
fornos quentes.
- O uso de acessórios não recomendados pelo fabricante pode provocar
incêndios, choques eléctricos ou lesões nas pessoas.
- Antes de desligar a cha, certi que-se de que o interruptor geral
Page 83

NORMAS DE SEGURIDAD IMPORTANTES
ser causa de incendios, cortocircuitos o lesiones.
- Antes de desenchufar la máquina veri car que el interruptor
general esté en posición “0” (Fig.1).
- No extraer el enchufe tirando del cable y no tocarlo con las manos
mojadas.
- No desplazar la máquina de café ni tirar de ella cogiéndola por
el cable.
- Para limitar el peligro de sufrir heridas, no dejar caer el cable
desde la encimera de la barra o desde la mesa, evitando que los
niños puedan tirar de él o tropezar con él involuntariamente.
- En caso de incendio utilizar extintores de anhídrido carbónico
(CO2). No utilizar agua ni extintores de polvo.
MEDIDAS DE SEGURANÇA IMPORTANTES
ES
PT
- No obstruir nunca las rejillas de ventilación de la base del aparato.
Instalación de la máquina
- Leer atentamente las instrucciones.
- No usar nunca la máquina en un ambiente que pueda alcanzar
una temperatura inferior o igual a 0 °C (la congelación del agua
puede dañar la máquina) ni superior a 40 °C.
- Veri car que la tensión de la red eléctrica corresponde a la indicada en la placa de datos del aparato. Conectar el aparato solo
a una toma de corriente de una capacidad mínima de 6 A para
los modelos alimentados a 230 Vac y 15 A para los modelos
alimentados a 120 Vac y dotados de una toma de tierra e ciente.
esteja na posição “0” (Fig.1).
- Não puxe o cabo para tirar a cha da tomada e não lhe toque com
as mãos molhadas.
- Não desloque ou puxe a máquina de café a segurar pelo cabo.
- Para reduzir o perigo de ferimentos, não deixe o cabo pendente
na prateleira ou na mesa, pois as crianças podem puxá-lo ou
enroscarem-se no mesmo, de forma involuntária.
- Em caso de incêndio, use extintores com gás carbónico (CO2). Não
utilize água ou extintores a pó.
- Nunca tape as grelhas de ventilação presentes na base do aparelho.
Instalação do aparelho
- Leia atentamente as instruções.
- Nunca instale a máquina num ambiente cuja temperatura possa
atingir 0°C ou menos (se a água congelar, o aparelho poderá sofrer
danos) ou subir além de 40°C.
- Veri que se a tensão da rede eléctrica corresponde à indicada na
placa de dados do aparelho. Ligue o aparelho somente a uma
tomada eléctrica com uma capacidade mínima de 6 A para os
modelos alimentados por 230 Vac e 15 A para os modelos a 120
Vac e com uma ligação à terra e ciente.
- Em caso de incompatibilidade entre a tomada eléctrica e a cha
83
Page 84

NORMAS DE SEGURIDAD IMPORTANTES
- En caso de incompatibilidad entre la toma y el enchufe de la
máquina, solicitar la intervención de un centro de asistencia
autorizado para sustituir el enchufe por otro de tipo adecuado.
- Colocar la máquina sobre una encimera de trabajo alejada de
grifos de agua y de fregaderos.
- Una vez retirado el embalaje, controlar la integridad de la máquina
antes de instalarla.
- No dejar al alcance de los niños los materiales del embalaje de
la máquina.
MEDIDAS DE SEGURANÇA IMPORTANTES
do aparelho, peça a um centro de assistência autorizado para que
troque a cha por outra mais adequada.
- Posicione este aparelho sobre uma bancada de trabalho longe das
torneiras de água e do lava-louças.
- Depois de retirar o aparelho da embalagem e antes de o instalar,
assegure-se que esteja em bom estado.
- Não permita que crianças brinquem com os materiais da embalagem
da máquina.
Limpieza de la máquina
- Desenchufarla de la toma eléctrica antes de efectuar la limpieza.
- Esperar a que la máquina se enfríe.
- Extraer el depósito de agua tirando suavemente hacia arriba y,
a continuación, hacia fuera.
- Limpiar la carcasa y los accesorios con un paño húmedo, secando
a continuación con un paño seco no abrasivo. Se desaconseja el
uso de detergentes.
- No someter la máquina a chorros de agua ni sumergirla total o
parcialmente.
Limpeza do aparelho
- Desligue a cha da tomada eléctrica quando for realizar a limpeza.
- Aguarde o aparelho arrefecer antes de o limpar.
- Extraia o reservatório de água, puxando-o um pouco para cima e
depois para fora.
- Limpe a parte externa e os acessórios com um pano húmido e enxugue em seguida com um pano seco. Não é aconselhável utilizar
detergentes.
- Não direccione jactos abundantes de água para o aparelho nem o
mergulhe em líquidos, mesmo parcialmente.
84
Page 85

NORMAS DE SEGURIDAD IMPORTANTES
En caso de avería de la máquina
No utilizarla si su cable o enchufe están dañados o si la máquina
misma da señales de mal funcionamiento o si ha sufrido algún daño.
Llevar la máquina al Centro de asistencia técnica autorizado más
próximo para efectuar controles o reparaciones.
El cable de alimentación dañado deberá ser sustituido por el fabricante o su Servicio de asistencia.
En caso de avería o mal funcionamiento de la máquina, apagarla y
no intervenir en ella. Para posibles reparaciones, dirigirse solamente
a un Centro de asistencia técnica autorizado por el fabricante y solicitar el uso de recambios originales. El no cumplimiento de estas
MEDIDAS DE SEGURANÇA IMPORTANTES
ES
PT
instrucciones puede comprometer la seguridad de la máquina y
provocar la invalidación de su garantía.
Uso impropio de la máquina
- El fabricante declinará toda responsabilidad por posibles accidentes que deriven de la ausencia del sistema de contacto de tierra
o de su falta de conformidad con lo establecido por las normas
vigentes.
- El fabricante declinará toda responsabilidad por posibles lesiones
o daños que deriven de usos impropios, erróneos o irrazonables.
Em caso de defeito do aparelho
Não utilize o aparelho se o cabo eléctrico ou cha estiverem dani cados,
se o aparelho estiver a funcionar mal ou se tiver sofrido danos. Leve
o aparelho ao centro de assistência técnica autorizado mais próximo
para veri cações ou reparações.
Se o cabo eléctrico estiver dani cado, deverá ser substituído pelo
fabricante ou pelo seu serviço de assistência técnica.
Em caso de defeito ou mal funcionamento do aparelho, desligue-o
e não mexa nele. Se for necessário repará-lo dirija-se somente a um
centro de assistência técnica autorizado pelo fabricante e solicite o uso
de peças de reposição originais. Caso contrário, poderá comprometer
a segurança e causar a perda do direito à garantia.
Uso impróprio do aparelho
- O fabricante não pode ser considerado responsável por acidentes
causados por falta de ligação à terra ou se a ligação não for conforme
a legislação em vigor.
- O fabricante não pode ser considerado responsável por eventuais
danos provocados pelo uso impróprio, errado ou inadequado.
85
Page 86

Instrucciones relativas al cable de alimentación
a) Utilizar un cable de alimentación corto para evitar engancharse
o tropezar sobre un cable más largo.
b) También se pueden utilizar alargadores, pero teniendo mucho
cuidado.
c) Si se utiliza un alargador:
1) Comprobar que la potencia eléctrica del alargador sea al menos
igual a la del aparato;
ATENCIÓN: CONSÉRVENSE ESTAS INSTRUCCIONES.
2) Si el aparato tiene puesta a tierra, comprobar que el alargador
tenga tres hilos y esté provisto de puesta a tierra;
3) El cable más largo debe ser colocado de modo que no cuelgue
de la super cie de trabajo o de la mesa para evitar que los
niños tiren de él o tropiecen.
Instruções para o cabo de alimentação
a) Deverá fornecer-se um cabo de alimentação curto para reduzir os
riscos resultantes do emaranhamento ou tropeçamento num cabo
mais longo.
b) Os cabos de extensão estão disponíveis e podem ser utilizados, caso
se tenha cuidado quando forem utilizados.
c) Se utilizar cabo de extensão:
1) A classi cação eléctrica marcada do cabo de extensão deve ser,
pelo menos, igual à classi cação eléctrica do aparelho;
ATENÇÃO: GUARDE ESTAS INSTRUÇÕES.
86
2) Se o aparelho for do tipo ligado à terra, o cabo de extensão deve
ser um cabo de 3 os com ligação à terra;
3) O cabo mais longo deve ser colocado de forma a não pender
sobre o balcão ou superfície da mesa, onde pode ser puxado
por crianças ou tropeçado.
Page 87

INSTALACIÓN Y PUESTA EN FUNCIONAMIENTO DE LA MÁQUINA
INSTALAÇÃO E COLOCAÇÃO EM FUNCIONAMENTO DA MÁQUINA
ES
PT
321
Extraer los depósitos de agua y de leche y lavarlos cuidadosamente antes de usar la máquina.
Extraia os reservatórios de água e do leite e lave-os devidamente antes da utilização.
Asegurarse de que la boquilla de suministro esté
bien introducida en la tapa del depósito de leche.
Certi que-se de que o bocal de distribuição está
bem inserido na tampa do reservatório de leite.
Introducir el enchufe en la toma. Poner el interruptor en “I” para encender la má-
Introduza a cha na tomada. Coloque o interruptor em “I” para ligar a máquina. Todas as teclas piscam: fase de aquecimento.
Llenar el depósito de agua con agua potable fresca
hasta el nivel MAX.
Encha o reservatório de água com água fresca
potável até ao nível MÁX.
54
quina.
Introducir completamente el depósito en la
máquina.
Introduza completamente o reservatório na máquina.
76
Todos los botones parpadean: fase de calentamiento.
87
Page 88

INSTALACIÓN Y PUESTA EN FUNCIONAMIENTO DE LA MÁQUINA
INSTALAÇÃO E COLOCAÇÃO EM FUNCIONAMENTO DA MÁQUINA
8
Tras 10 minutos sin utilizarse, la máquina entra automáticamente en modo Power Save.
El botón parpadea lentamente. Para reactivar la máquina, tocar uno de los botones.
Após 10 minutos de inutilização, a máquina entra automaticamente no modo Power Save.
Cuando todos los botones se encienden con luz ja,
una señal acústica indica que la máquina está lista.
Quando todas as teclas permanecerem acesas de
forma xa, um sinal sonoro assinala que a máquina
está pronta.
A tecla pisca lentamente. Para ligar novamente a máquina, pressione uma das teclas.
Atención: asegurarse de que el compartimento para cápsulas esté cerrado correctamente antes de suministrar café. No abrirlo nunca durante el suministro de café.
Nota: al encender la máquina por primera vez o en caso de no haberla utilizado durante varios días, tras colocar un recipiente de capacidad adecuada bajo la salida de café, se
aconseja suministrar al menos medio depósito de agua sin usar cápsulas. Llevar a cabo la misma operación con el depósito de leche llenándolo de agua y pulsando el botón
Atenção: certi que-se de que o compartimento de cápsulas está correctamente fechado antes de distribuir café. Nunca o abra durante a distribuição de café.
Obs.: da primeira vez que ligar a máquina e em caso de inactividade durante alguns dias, depois de colocar um recipiente com uma capacidade adequada debaixo do distribuidor, recomenda-se distribuir, pelo menos, meio reservatório de água com a máquina sem cápsulas. A mesma operação é realizada ao encher de água o reservatório de leite e ao pressionar a tecla
88
.
.
Page 89

PREPARACIÓN DE CAFÉ
PREPARAÇÃO DE CAFÉ
ES
PT
4321
Usar sólo cápsulas Iperespresso para uso doméstico.
Utilize apenas cápsulas Iperespresso para uso
doméstico.
Introducir la cápsula. Bajar la pieza móvil. Bloquear la palanca bajándola.
Introduza a cápsula. Baixe a parte móvel. Bloqueie, ao baixar a alavanca.
No pueden usarse otros tipos de cápsulas debido a que podrían dañar la máquina.
Nota: si hay una cápsula en el compartimento, será automáticamente eliminada al abrir dicho compartimento. La cápsula debe entrar en el compartimento fácilmente; en caso
contrario, extraerla y volver a posicionarla correctamente.
Não poderão ser utilizados outros tipos de cápsulas, pois poderiam dani car a máquina.
Obs.: se estiver presente uma cápsula no compartimento será automaticamente removida aquando da abertura do próprio compartimento. A cápsula deve entrar no compartimento
facilmente; caso contrário, retire-a e volte a colocar correctamente.
Todos los botones están encendidos con luz ja. Desbloquear la palanca. Levantar la palanca.
Todas as teclas estão acesas de modo xo. Desengate a alavanca. Levante a alavanca.
8765
89
Page 90

PREPARACIÓN DE CAFÉ
PREPARAÇÃO DE CAFÉ
9
Colocar una taza de café exprés...
Coloque a chávena para expresso...
... o bien colocar una taza de capuchino levantando
el soporte.
...ou coloque uma chávena para cappuccino ao
levantar o suporte.
11
Pulsar para suministrar un café exprés, la
máquina emite una señal acústica...
Pressione
quina emite um sinal sonoro...
para distribuir um expresso; a má-
... o pulsar para suministrar un café largo,
la máquina emite una señal acústica.
...ou pressione para distribuir um café longo;
a máquina emite um sinal sonoro.
RECOMENDACIONES
Para disfrutar de un café exprés de elevada calidad, no olvidarse de:
- cambiar diariamente el agua del depósito;
- usar preferiblemente agua con una dureza total inferior a 12 grados franceses para reducir los
depósitos en el interior de la máquina;
- utilizar tazas calientes.
RECOMENDAÇÕES
El suministro termina de forma automática.
A distribuição termina automaticamente.
Es posible detener el suministro antes de la parada automática pulsando el botón recién seleccionado.
Atención: en todo caso, el suministro terminará de forma automática tras unos 70 segundos, pero en este caso el café podría salirse de la taza. Nota: el suministro de un café exprés
largo podría hacer que el café se salga de la taza si ésta no es bastante grande.
Para saborear um expresso de elevada qualidade, lembre-se de:
- Mudar a água diariamente no reservatório.
- Utilizar de preferência água com uma dureza total inferior a 12 graus French para reduzir os depósitos
no interior da máquina.
- Utilizar chávenas quentes.
10
É possível interromper a distribuição antes da paragem automática, ao pressionar a tecla que acabou de seleccionar.
Atenção: em qualquer caso, a distribuição terminará automaticamente após cerca de 70 segundos, mas neste caso poderá veri car-se a saída de café da chávena. Obs.: a distribuição de
um expresso longo poderá provocar a saída de café da chávena, caso esta não tenha uma capacidade su c iente.
90
Page 91

AJUSTE DE LA CANTIDAD DE CAFÉ EN TAZA
AJUSTE DA QUANTIDADE DE CAFÉ NA CHÁVENA
ES
PT
321
4
Introducir la cápsula. Bloquear la palanca bajándola.
Introduza a cápsula. Bloqueie, ao baixar a alavanca.
Mantener el botón
suministro para memorizar la cantidad en la taza.
Mantenha pressionada a tecla durante toda a
distribuição para memorizar o volume na chávena.
pulsado durante todo el
Soltar el botón cuando se alcance la cantidad de
café deseada.
Liberte a tecla quando alcançar a quantidade de
café desejada.
5
La máquina permite ajustar la cantidad de café deseada en la taza para ambos botones de suministro
Nota: para simpli car, sólo se mostrará cómo programar el botón
mar el botón
A máquina permite ajustar a quantidade de café desejado na chávena para ambas as
El nivel ha quedado memorizado. La máquina ya está programada; cada vez que se pulse el botón
se suministrará la cantidad de café recién memorizada.
O nível é memorizado. A máquina está agora programada; da próxima vez que pressionar a tecla
distribuída a quantidade de café que acabou de memorizar.
La con guración de fábrica prevé parámetros especí cos que garantizan la preparación de las mejores recetas illy: café exprés: 20-25 ml / café largo: 30-35 ml / capuchino: 95-100
ml / leche manchada: 155-160 ml / leche caliente espumada: 135-140 ml / agua caliente: 195 ml.
Nota: para la preparación de un café largo, se aconseja el uso de cápsulas Iperespresso de color azul, pulsando el botón
As programações de fábrica têm em consideração parâmetros precisos que garantem a preparação das melhores receitas illy: café expresso 20-25 ml / café longo: 30-35 ml / cappuccino:
95-100 ml / leite macchiato: 155-160 ml / leite quente com espuma: 135-140 ml / água quente: 195 ml.
Obs.: para a preparação de café longo é recomendável utilizar as cápsulas Iperespresso azuis, ao pressionar a tecla
teclas de distribuição
Obs.: por questões de simplicidade, será apresentado como programar apenas a tecla
; para programar a tecla efec tue o mesmo procedimento ao pressionar .
, é
y .
; para progra-
realizar el mismo procedimiento pulsando .
e .
, con un tiempo de extracción máximo de 30 seg.
, com um tempo de extracção máximo de 30 seg.
91
Page 92

USO DEL DEPÓSITO Y DE LA BOQUILLA DE LA LECHE
UTILIZAÇÃO DO RESERVATÓRIO E DISTRIBUIDOR DE LEITE
4321
Quitar la tapa del depósito de la leche.
Remova a tampa do reservatório de leite. Encha o reservatório com o leite até ao nível MÁX.
¡Atención! Lavar el depósito y todos los componentes de la boquilla de la leche antes de usarlos por primera vez y siempre tras haberlos utilizado. L a leche es un producto altamente
perecedero. Utilizar sólo leche fresca dentro de la fecha de caducidad indicada en el envase original. Dejar la leche en el depósito sólo durante el tiempo necesario para la preparación de las bebidas, luego meterla en el frigorí co. En caso de duda sobre la integridad de la leche contenida en el depósito, vaciarlo y lavarlo cuidadosamente.
Para preparar las mejores recetas illy a base de leche, se aconseja utilizar leche fresca entera a temperatura de frigorí co.
NOTA: en cualquier caso, la máquina garantiza unas preparaciones satisfactorias también con otros tipos de leche.
Atenção! Lave o reservatório e todos os componentes do distribuidor de leite na primeira utilização e sempre depois de os utilizar. O leite é um produto altamente perecível. Utilize apenas
leite fresco e dentro da data de validade indicada na embalagem original. Deixe o leite no reservatório apenas durante o tempo necessário para a preparação das bebidas e, em seguida,
volte a colocá-lo no frigorí co. Em caso de dúvida quanto à integridade do leite no reservatório, esvazie-o e lave-o devidamente.
Para preparar as melhores receitas illy à base de leite, é recomendável utilizar leite fresco gordo à temperatura do frigorí co.
OBS.: em qualquer caso, a máquina garante o êxito de todas as preparações mesmo com outros tipos de leite.
92
Llenar el depósito con la leche hasta el nivel MAX.
Es necesario llenar siempre el depósito de
leche hasta el nivel MIN para evitar el sobrecalentamiento de la máquina y lograr unas
preparaciones satisfactorias.
É necessário encher sempre o reservatório de
leite até ao nível MÍN para evitar o sobreaquecimento da máquina e permitir êxito das
preparações.
Enganchar la boquilla de la leche al acoplamiento
de la máquina y comprobar que quede perfectamente acoplada.
Encaixe o distribuidor de leite no engate da máquina
até ao encaixe perfeito.
Enganchar el depósito a la boquilla de la leche y
comprobar que quede perfectamente acoplado.
Encaixe o reservatório no distribuidor de leite até
ao encaixe perfeito.
Page 93

USO DEL DEPÓSITO Y DE LA BOQUILLA DE LA LECHE
UTILIZAÇÃO DO RESERVATÓRIO E DISTRIBUIDOR DE LEITE
5
ES
PT
6
7
Una vez que el depósito esté enganchado, es posible preparar bebidas a base de leche.
Quando o reservatório estiver encaixado é possível
preparar as bebidas à base de leite.
Si tras realizar las preparaciones queda leche en el
interior del depósito, desengancharlo y colocarlo
tapado en el frigorí co.
Se no nal das preparações restar leite dentro do
reservatório, desengate-o e coloque-o tapado no
frigorí co.
Desenganchar la boquilla de la leche y enjuagarla como se muestra en el capítulo "LIMPIEZA Y
MANTENIMIENTO".
Desengate o distribuidor de leite e enxagúe-o
conforme ilustrado no capítulo “LIMPEZA E MANUTENÇÃO”.
93
Page 94

PREPARACIÓN DE CAPUCHINO
PREPARAÇÃO DE CAPPUCCINO
1 2 3
Enganchar la boquilla y el depósito de leche tal
como se muestra en el capítulo USO DEL DEPÓSITO
Y DE LA BOQUILLA DE LA LECHE.
Llenar el depósito de leche hasta el nivel mínimo.
Engate o distribuidor e o reservatório de leite
conforme apresentado no capítulo UTILIZAÇÃO DO
RESERVATÓRIO E DISTRIBUIDOR DE LEITE.
Encha o reservatório de leite até ao nível mínimo.
NOTA: antes de pulsar , comprobar que la boquilla de la leche c aiga en el interior del diámetro de la taza para evitar que la bebida se salga durante el suministro.
La con guración de fábrica de la preparación
Para realizar la receta
manualmente los suministros de café y de leche según las cantidades deseadas.
con cantidades de café y de leche distintas a las con guradas de fábrica, basta con utilizar las funciones café y leche caliente espumada deteniendo
Introducir la cápsula. Seleccionar la posición del soporte según el tipo
de taza utilizado.
Introduza a cápsula.
es de 95-100 ml.
Seleccione a posição do suporte dependente do tipo
de chávena utilizado.
Comprobar que todos los botones estén encendidos con luz ja.
Pulsar para suministrar un capuchino. La
máquina emite una señal acústica.
Certi que-se de que todas as teclas estão acesas
de modo xo.
Pressione para preparar um cappuccino. A
máquina emite um sinal sonoro.
4
OBS.: antes de pressionar a tecla
A programação de fábrica da preparação de
Para realizar a receita
distribuição de café e leite de acordo com os volumes pretendidos.
94
certi que-se de que o distribuidor de leite recai para dentro do diâmetro da chávena para evitar perdas durante a distribuição.
com volumes de café e leite diferentes dos prede nidos de fábrica, basta utilizar as funções de café e leite quente com espuma ao interromper manualmente a
é de 95-100 ml.
Page 95

PREPARACIÓN DE CAPUCHINO
PREPARAÇÃO DE CAPPUCCINO
5
La máquina comienza a suministrar café en la taza.
A máquina começa a distribuir o café na chávena.
Una vez nalizado el suministro de café, tras algunos segundos comenzará automáticamente el
suministro de la leche montada. Comprobar que
la boquilla de la leche caiga en el interior de la
taza para evitar que la bebida se salga durante
el suministro.
Concluída a distribuição do café, após alguns segundos começará automaticamente a distribuição
do leite batido. Certi que-se de que o distribuidor
de leite recai para dentro da chávena para evitar
perdas durante a distribuição.
El suministro termina de forma automática.
A distribuição termina automaticamente.
ES
PT
76
La preparación del capuchino puede
interrumpirse en cualquier momento,
pulsando de nuevo el botón
interrumpe durante el suministro de
la leche caliente, tras pulsar el botón
la leche continuará saliendo du-
rante algunos segundos.
A preparação de cappuccino pode ser
interrompida a qualquer momento ao
pressionar novamente a tecla
for interrompida durante a distribuição
de leite quente, depois de pressionar a
tecla
o leite continuará a sair du-
rante alguns segundos.
. Si se
. Se
95
Page 96

PREPARACIÓN DE LECHE MANCHADA
PREPARAÇÃO DE LEITE MACCHIATO
1
Enganchar la boquilla y el depósito de leche tal
como se muestra en el capítulo USO DEL DEPÓSITO
Y DE LA BOQUILLA DE LA LECHE.
Llenar el depósito de leche hasta el nivel mínimo.
Engate o distribuidor e o reservatório de leite
conforme apresentado no capítulo UTILIZAÇÃO DO
RESERVATÓRIO E DISTRIBUIDOR DE LEITE.
Encha o reservatório de leite até ao nível mínimo.
NOTA: antes de pulsar , comprobar que la boquilla de la leche c aiga en el interior del diámetro de la taza para evitar que la bebida se salga durante el suministro.
La con guración de fábrica de la función
Para realizar la receta
manualmente los suministros de café y de leche según las cantidades deseadas.
OBS.: antes de pressionar a tecla
con cantidades de café y de leche distintas a las con guradas de fábrica, basta con utilizar las funciones café y leche caliente espumada deteniendo
Introducir la cápsula.
Introduza a cápsula. Levante o suporte e coloque uma chávena grande
es de 155-160 ml.
certi que-se de que o distribuidor de leite recai para dentro do diâmetro da chávena para evitar perdas durante a distribuição.
2 3
Levantar el soporte y colocar una taza grande
o tazón.
ou caneca.
Comprobar que todos los botones estén encendidos con luz ja.
Pulsar
para suministrar la leche manchada.
Certi que-se de que todas as teclas estão acesas
de modo xo.
Pressione
para preparar um leite macchiato.
4
A programação de fábrica da função
Para realizar a receita
distribuição de café e leite de acordo com os volumes pretendidos.
96
com volumes de café e leite diferentes dos prede nidos de fábrica, basta utilizar as funções de café e leite quente com espuma ao interromper manualmente a
é de 155-160 ml.
Page 97

PREPARACIÓN DE LECHE MANCHADA
PREPARAÇÃO DE LEITE MACCHIATO
5
Tras unos segundos, la máquina comienza a suministrar la leche caliente en la taza.
Comprobar que la boquilla de la leche caiga en
el interior de la taza para evitar que la bebida se
salga durante el suministro.
Após alguns segundos, a máquina começa a distribuir o leite quente na chávena.
Certi que-se de que o distribuidor de leite recai
para dentro da chávena para evitar perdas durante
a distribuição.
6
Una vez nalizado el suministro de leche, la máquina comienza automáticamente el suministro
de café.
Concluída a distribuição do leite, a máquina começa
automaticamente a distribuição do café.
El suministro termina de forma automática.
A distribuição termina automaticamente.
ES
PT
7
La preparación de la leche manchada
puede interrumpirse en cualquier
momento, pulsando de nuevo el botón
. Si se interrumpe durante el suministro de la leche caliente, tras pulsar
el botón
do durante algunos segundos.
A preparação de leite macchiato pode
ser interrompida a qualquer momento
ao pressionar novamente a tecla
for interrompida durante a distribuição
de leite quente, depois de pressionar a
tecla
te alguns segundos.
la leche continuará salien-
. Se
o leite continuará a sair duran-
97
Page 98

PREPARACIÓN DE LECHE CALIENTE ESPUMADA
PREPARAÇÃO DE LEITE QUENTE COM ESPUMA
Enganchar la boquilla y el depósito de leche tal
como se muestra en el capítulo USO DEL DEPÓSITO
Y DE LA BOQUILLA DE LA LECHE.
Llenar el depósito de leche hasta el nivel mínimo.
Engate o distribuidor e o reservatório de leite
conforme apresentado no capítulo UTILIZAÇÃO DO
RESERVATÓRIO E DISTRIBUIDOR DE LEITE.
Encha o reservatório de leite até ao nível mínimo.
5
El suministro termina de forma automática.
A distribuição termina automaticamente.
2
Levantar el soporte y colocar una taza grande
o tazón.
Levante o suporte e coloque uma chávena grande
ou caneca.
La preparación de la leche caliente espumada puede interrumpirse en cualquier momento. Tras pulsar el botón la leche continuará saliendo durante algunos segundos. Es posible suministrar la leche espumada directamente en una jarra de mesa y dosi car
a placer.
La con guración de fábrica de la función
A preparação de leite quente com espuma pode ser interrompida a qualquer momento. Depois de pressionar a tecla
a sair durante alguns segundos. É possível distribuir o leite com espuma directamente para uma leiteira para levar para a mesa e dosear
conforme se pretende.
A programação de fábrica da função
Comprobar que todos los botones estén encendidos con luz ja.
Pulsar para preparar una leche caliente espumada (sin café).
Certi que-se de que todas as teclas estão acesas
de modo xo.
Pressione
espuma (sem café).
es de 135-140 ml.
é de 135-140 ml.
para preparar um leite quente com
3
Tras unos segundos, la máquina comienza a suministrar la leche caliente en la taza.
Comprobar que la boquilla de la leche caiga en
el interior de la taza para evitar que la bebida se
salga durante el suministro.
Após alguns segundos, a máquina começa a distribuir o leite quente na chávena.
Certi que-se de que o distribuidor de leite recai
para dentro da chávena para evitar perdas durante
a distribuição.
o leite continuará
41
98
Page 99

AJUSTE DE LA CANTIDAD DE LECHE CALIENTE ESPUMADA
AJUSTE DA QUANTIDADE DE LEITE QUENTE COM ESPUMA
1
ES
PT
2
3
4
Enganchar la boquilla y el depósito de leche tal
como se muestra en el capítulo USO DEL DEPÓSITO
Y DE LA BOQUILLA DE LA LECHE.
Llenar el depósito de leche hasta el nivel mínimo.
Engate o distribuidor e o reservatório de leite
conforme apresentado no capítulo UTILIZAÇÃO DO
RESERVATÓRIO E DISTRIBUIDOR DE LEITE.
Encha o reservatório de leite até ao nível mínimo.
5
El nivel ha quedado memorizado. La máquina ya
está programada; cada vez que se pulse el botón
se suministrará la cantidad de leche caliente
recién memorizada.
O nível é memorizado. A máquina está agora programada; da próxima vez que pressionar a tecla
, é distribuída a quantidade de leite quente
que acabou de memorizar.
Levantar el soporte y colocar una taza grande
o tazón.
Levante o suporte e coloque uma chávena grande
ou caneca.
Durante la programación de la cantidad de leche caliente en la taza, se aconseja considerar que tras pulsar el botón la leche
continuará saliendo durante algunos segundos.
Durante a programação da quantidade de leite quente na chávena é recomendável ter em consideração que depois de pressionar a tecla
o leite continuará a sair durante alguns segundos.
Mantener pulsado
Mantenha pressionada a tecla
.
.
Soltar el botón cuando se alcance la cantidad de
leche caliente deseada.
Liberte a tecla quando alcançar a quantidade de
leite quente desejada.
99
Page 100

SUMINISTRO DE AGUA CALIENTE
DISTRIBUIÇÃO DE ÁGUA QUENTE
1
Comprobar que haya bastante agua en el depósito.
Certi que-se de que o reservatório tem água su ciente.
Levantar el soporte y colocar una taza grande
o tazón.
Levante o suporte e coloque uma chávena grande
ou caneca.
AJUSTE DE LA CANTIDAD DE AGUA CALIENTE SUMINISTRADA
AJUSTE DA QUANTIDADE DE ÁGUA QUENTE DISTRIBUÍDA
1 4
Levantar el soporte y colocar una taza grande
o tazón.
La con guración de fábrica para la función
es de unos 195 ml.
Levante o suporte e coloque uma chávena grande
ou caneca.
A programação de fábrica para a função
é de cerca de 195 ml.
100
Mantener pulsado .
Mantenha pressionada a tecla
2
Comprobar que todos los botones estén encendidos con luz ja. Pulsar para suministrar
agua caliente.
Certi que-se de que todas as teclas estão acesas
de modo xo. Pressione para distribuir água
quente.
2
Soltar el botón cuando se alcance la cantidad de
agua caliente deseada.
.
Liberte a tecla quando alcançar a quantidade de
água quente desejada.
3
Una vez alcanzada la cantidad memorizada, el
suministro se acaba automáticamente.
Alcançada a quantidade memorizada, a distribuição
termina automaticamente.
3
El nivel ha quedado memorizado. La máquina
ya está programada; cada vez que se pulse el
botón se suministrará la cantidad de agua
recién memorizada.
O nível é memorizado. A máquina está agora programada; da próxima vez que pressionar a tecla ,
é distribuída a quantidade de água que acabou
de memorizar.
4
 Loading...