

Page 1
FOLKVÄNLIG
Design and Quality
IKEA of Sweden
Page 2

Page 3

ENGLISH 4
DEUTSCH 19
FRANÇAIS 34
NEDERLANDS 49
ÍSLENSKA 64
NORSK 79
SUOMI 94
SVENSKA 109
ESPAÑOL 124
PORTUGUÊS 139
Page 4

OPERATING INSTRUCTIONS FOR ELECTRIC BIKES
TABLE OF CONTENTS
1. IMPORTANT INFORMATION BEFORE YOU START BIKING 5
2. INTRODUCTION 6
3. INSPECTION AND SETTINGS BEFORE YOU START RIDING 7
4. YOUR FIRST RIDE 8
5. USING YOUR E-BIKE 9
6. BATTERY CHARGING INSTRUCTION 13
7. SAFETY INSTRUCTIONS FOR THE BATTERY AND CHARGER 14
8. TECHNICAL SPECIFICATIONS 15
9. CONTROLS SETTINGS 16
10. MAINTENANCE 17
4
Page 5

1. IMPORTANT INFORMATION BEFORE YOU START BIKING
• Before your rst ride, please read the operating instructions
carefully and check that all parts are in good condition.
• Please slow down in slippery conditions, e.g. in rain or snow,
and consider that you will need greater braking distances to
guarantee stopping safely.
• This e-bike works reliably under all weather conditions
although excessive water exposure could damage the
electronics and/or the electric motor.
• Never touch the electronics on the e-bike with wet hands and
never touch the plus and minus poles at the same time, as
the strong short-circuit current could cause injury.
• Never attempt to repair electronics on the e-bike yourself,
always ask a specialist retailer.
• The battery performance can vary depending on the
temperature. Temperatures below 0°C will decrease the
distance you can ride the e-bike without recharging. The
battery performs the best in temperatures above 0°C.
5
Page 6

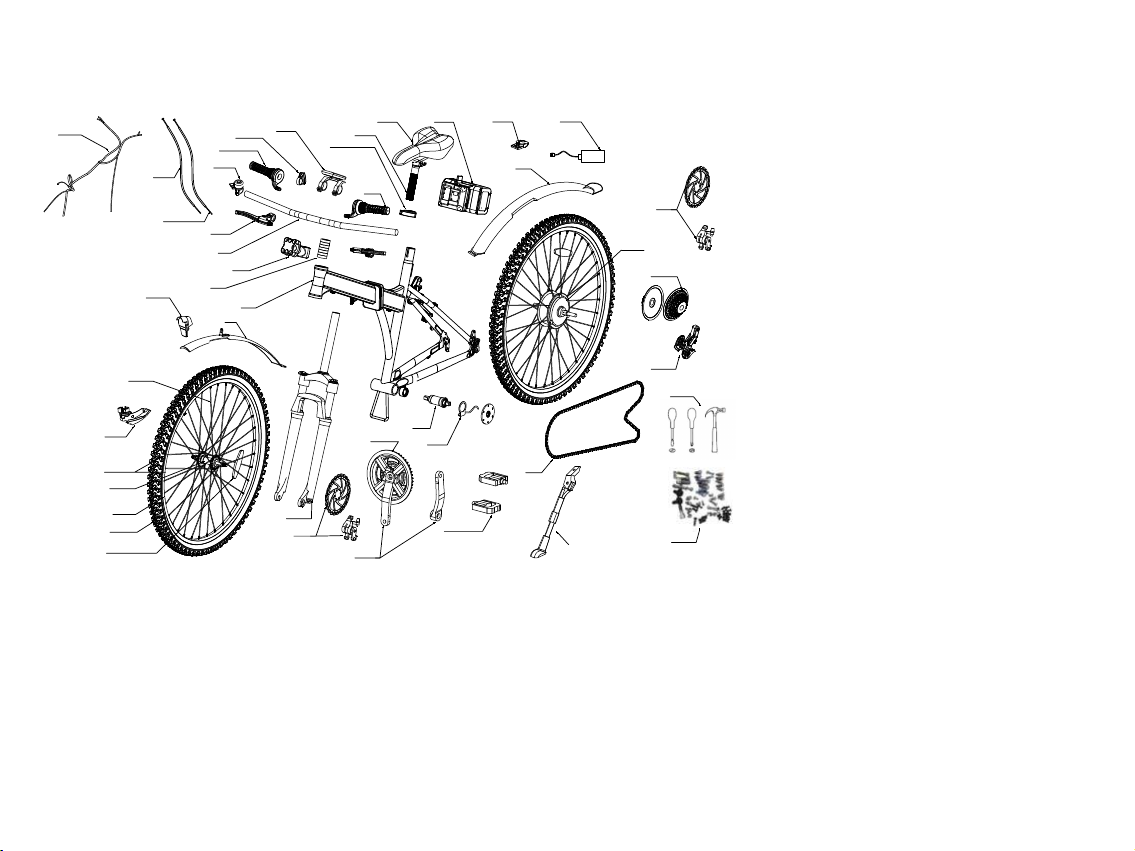
2. INTRODUCTION
26
40
41
36
29
14
31
33
32
30
39
1) Frame
2) Fork-
3) Seat post
4) Mudguard
5) Kick stand
6) Head set
7) Handle bar
8) Adjustable stem
9) Grip
10) Saddle
11) F.Disc brake
13
6
38
21
37
35
10
3
9
23
25
16
7
8
1
4
22
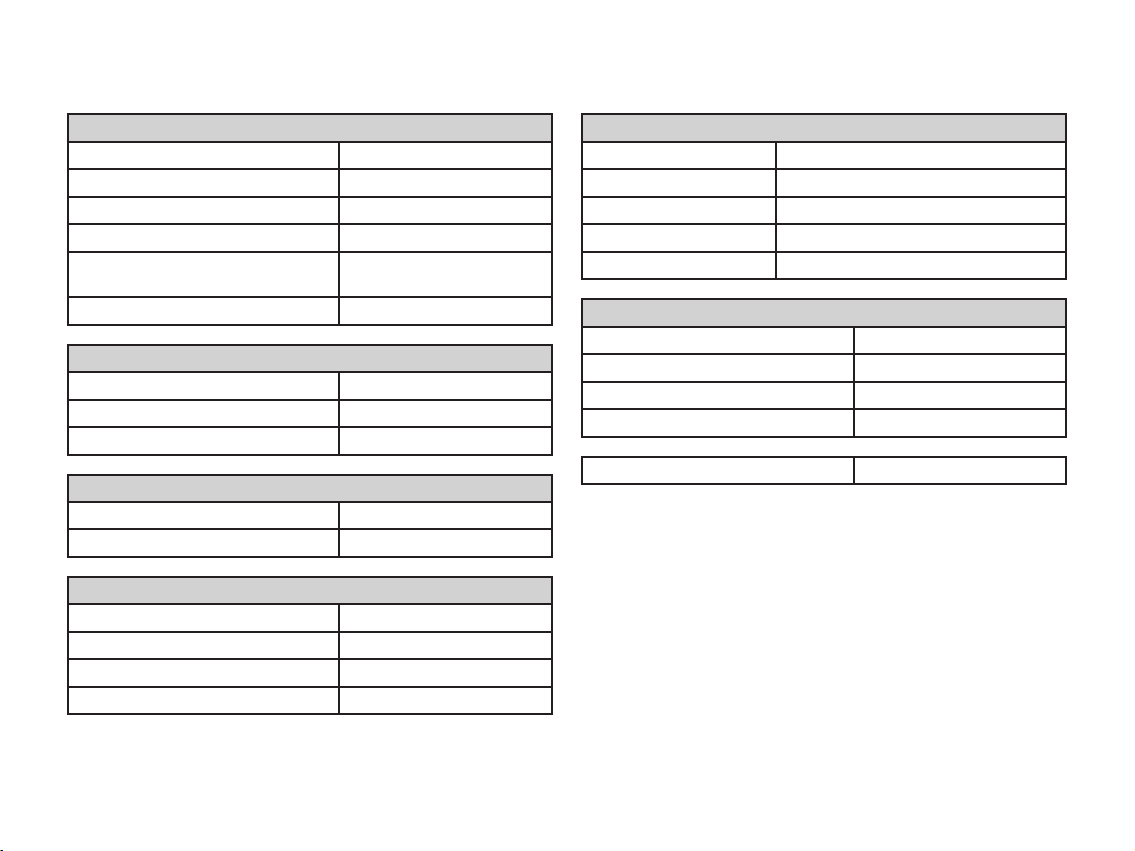
Frame material: Aluminum
Wheel size: 29"
4
12
27
34
Front fork: Steel with Suspension
Gears: 21 speed
Rims: Double-wall alloy
Brakes: Disc brakes
Motor: 36 Volts - 250 Watts
Assembly: 95 % (stem turned)
Gross weight: 30 kg.
Net weight of bicycle: 28 kg including
battery.
Battery weight: 1.90 kg
Battery dimensions: 170x100x80 mm
Battery power: 36V 8,7AH
Max load of the bike: 120 kg
34) Freewheel
35) Quick release
36) Front light
37) Rear light
38) Bell
39) Reector
40) Brake line
41) Derailleur line
42) Screws
43) Tool set
44) Crank cover
17
44
24
2
11
18
20
12) R.Disc brake
13) Brake lever
14) F.Derailleur
15) R.Derailleur
16) Shift lever
17) Bb parts (bottom bracket)
18) Chain wheel&crank
19) Chain
20) Pedal
21) Battery
22) Charger
19
5
23) Display
24) Sensor
25) Controller
26) Integrated line
27) Engine
28) Rim
29) Spoke
30) Tire
31) Inner tube
32) Rim tape
33) Front hub
15
43
42
6
Page 7

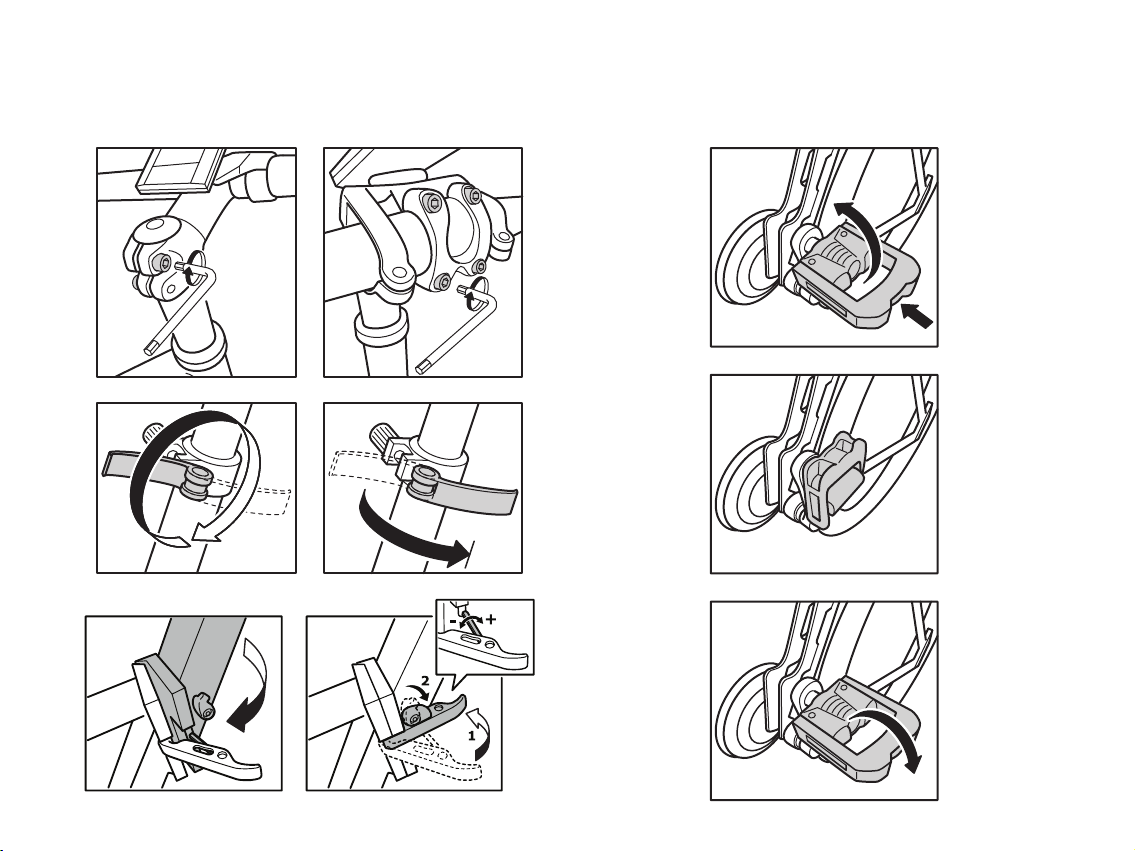
3. INSPECTION AND SETTINGS BEFORE YOU START RIDING
Tighten the screws:
7
Page 8

4. YOUR FIRST RIDE
• Be very careful the rst time you ride your e-bike! In power
mode, the e-bike is considerably faster than a normal bike!
• Take your rst ride on open land so you can get used to the
improved acceleration.
• The control unit has a low-voltage protection system which
automatically switches off the power assist if the battery
voltage falls below a certain level.
• Be careful when braking. Always brake with the rear wheel
brake rst, it is less aggressive than the front wheel brake.
• The power assist is deactivated at 25 km/h. It is
automatically switched back on again once the speed drops
below 25 km/h.
• Do not use power assist on slippery surfaces and gravel.
• Switch power assist off if the e-bike is not behaving normally
to avoid damaging electrical components.
8
Page 9
5. USING YOUR E-BIKE
• Start pedalling; the electric motor will only assist you while
you are pedalling.
• If you wish to change the assist level, press the plus or minus
buttons.
• The power assists stops when you use the brakes.
• The power assists stops when you reach 25km/h.
• If you leave the e-bike unattended, lock the battery with the
key, or take the battery with you.
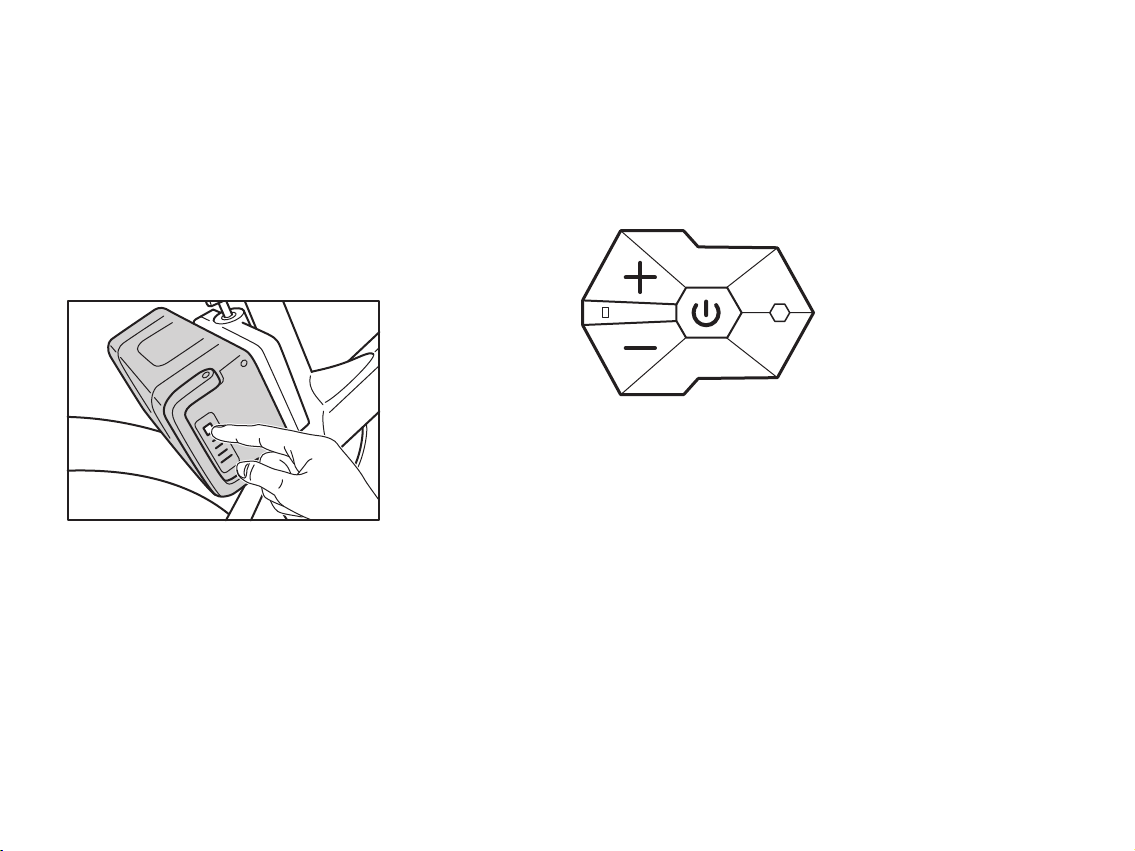
To start the battery, use the ON button.
Control panel:
The engine is controlled by the control panel on the handle bar.
There are six different speed levels. To reach optimal function
you should chose a low speed on the control panel and set the
gear switch in level 1 when you start pedalling.
ON/OFF:
Push and keep the ON/OFF button pressed for about 2 seconds.
The LCD display lights up. To shut the display down manually,
press the ON/OFF button for 2 seconds.
1. To start the display, use the ON/OFF button.
2. Keep the plus button down for a couple of second to turn on
the display light. Do the same thing to turn OFF the display
light.
3. The assistance levels are changed with the plus and minus
buttons. There are 6 levels available.
4. If you need support with leading your e-bike, keep the
minus button pressed down and your e-bike will reach 6
km/h.
9
Page 10
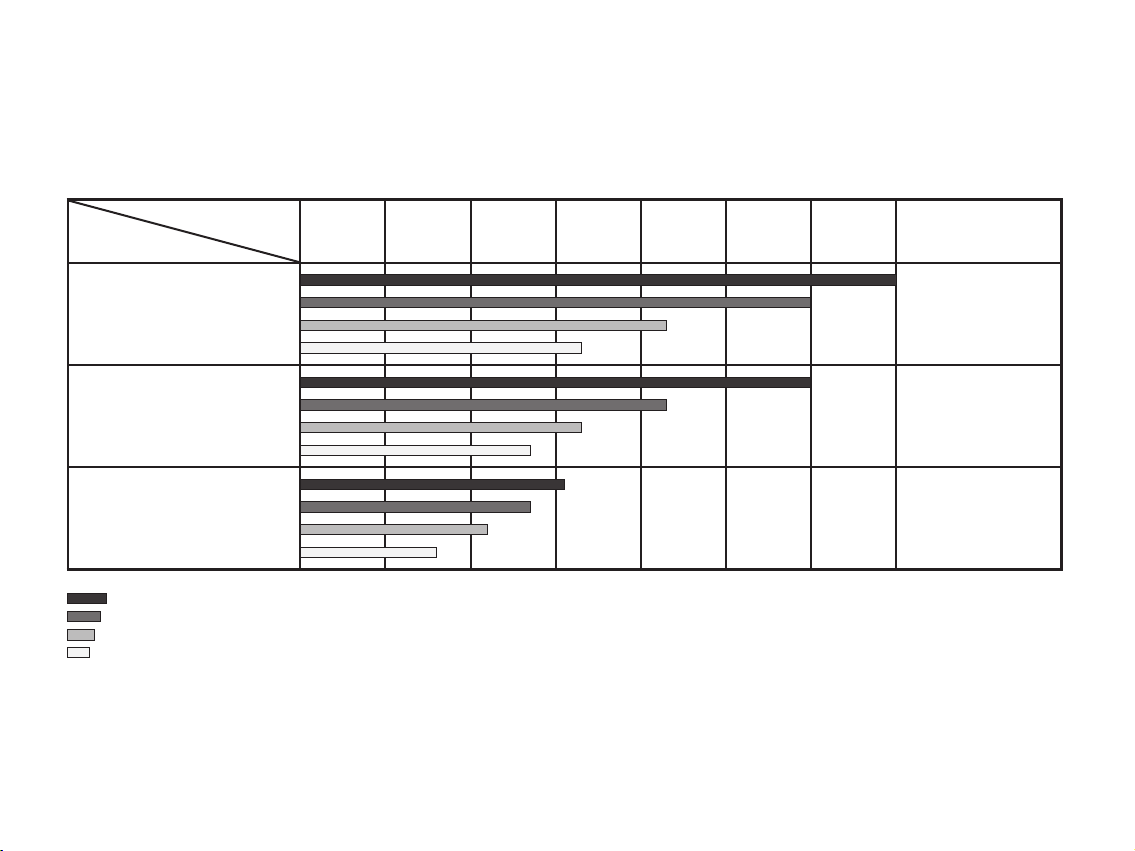
RANGE OVERVIEW
Condition: Battery is fully charged and new (313Wh, 36V, 8.7Ah)
Driver approximately 74 kg
Distance
10 km 20 km 30 km 40 km 50 km 60 km 70 km
Road conditions
Flat roads
Slightly hilly terrain
Strong hilly terrain
Medium assist - maximum help from own pedalling
Medium assist - low to medium help from own pedalling
Maximum assist - maximum help from own pedalling
Maximum assist - low to medium help from own pedalling
Light tailwind
28 degrees Celsius
Dry roads
Light tailwind
28 degrees Celsius
Dry roads
Light tailwind
28 degrees Celsius
Dry roads
10
Page 11

Please note the following reservations:
• The bike's tyres should be inated to the proper tyre
pressure.
• If the weather temperature drops - the range will be reduced.
• If the rider's weight increases - the range will be reduced.
• If the roads are wet or icy - the range will be reduced.
Maximising your range
Many factors inuence the performance of the battery which
has impact on your range.
• Charge the battery completely before a long ride.
• More energy is required on uneven roads and hilly conditions.
• Frequent speed changes use up more energy.
• Heavier loads use up more energy.
• Make sure your tyre pressure is OK and always keep the
e-bike clean and well lubricated, as this helps save energy.
• Make sure both wheels can move freely, it helps save energy
if brake linings are not sticking. Check brake linings regularly.
• Vigorous pedalling helps save the battery and increases your
range.
11
Page 12
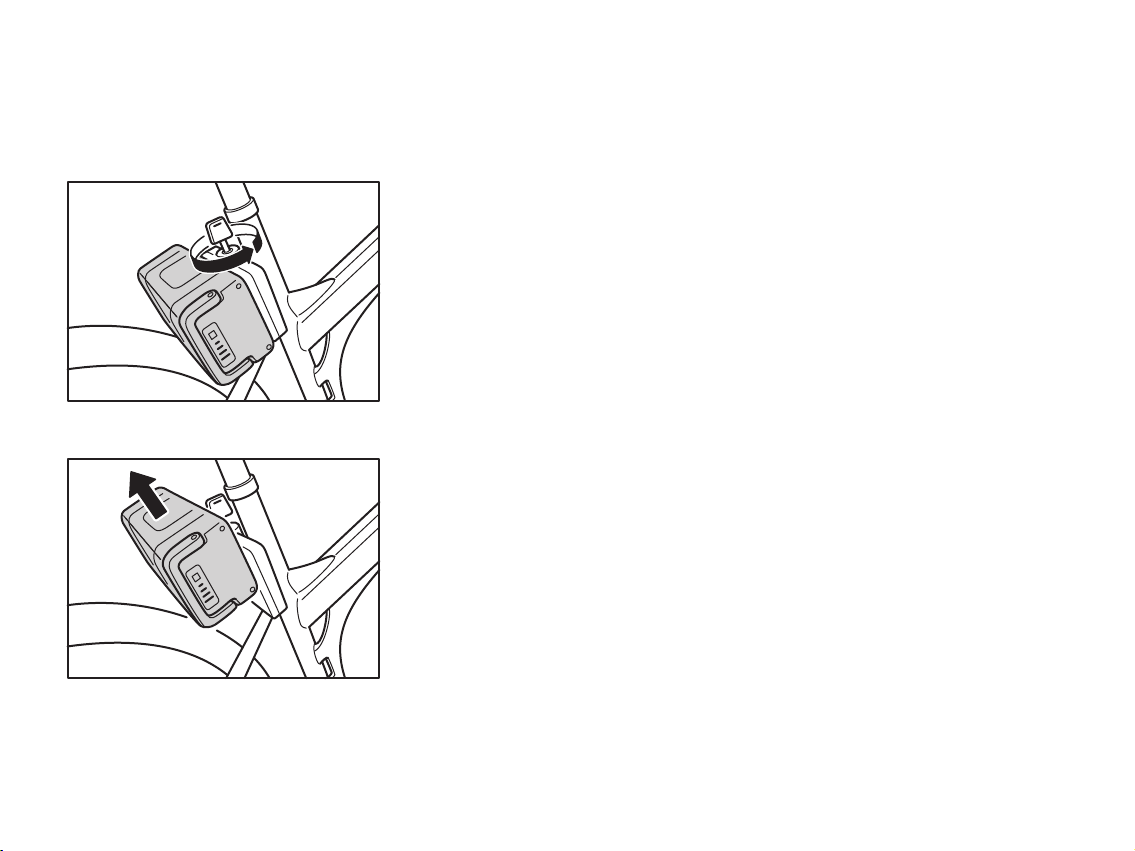
REMOVING AND REATTACHING THE BATTERY
1. Switch off the display.
2. Turn the key left to unlock the battery.
3. Lift the battery up out of the holder and remove it.
Parking
Gently press the ON/OFF button on the battery for 3-5 seconds
to turn it ON/OFF.
Battery diodes ON: Battery is ON
Battery diodes OFF: Battery is OFF
• Avoid leaving the e-bike unprotected in rain or snow.
• If the e-bike gets wet, dry it off with a dry towel at the end of
your ride.
• Don’t forget to turn off the front and rear lights separately.
• When the bike is used on salted road, clean the bike
with clean water immediately.
12
Page 13
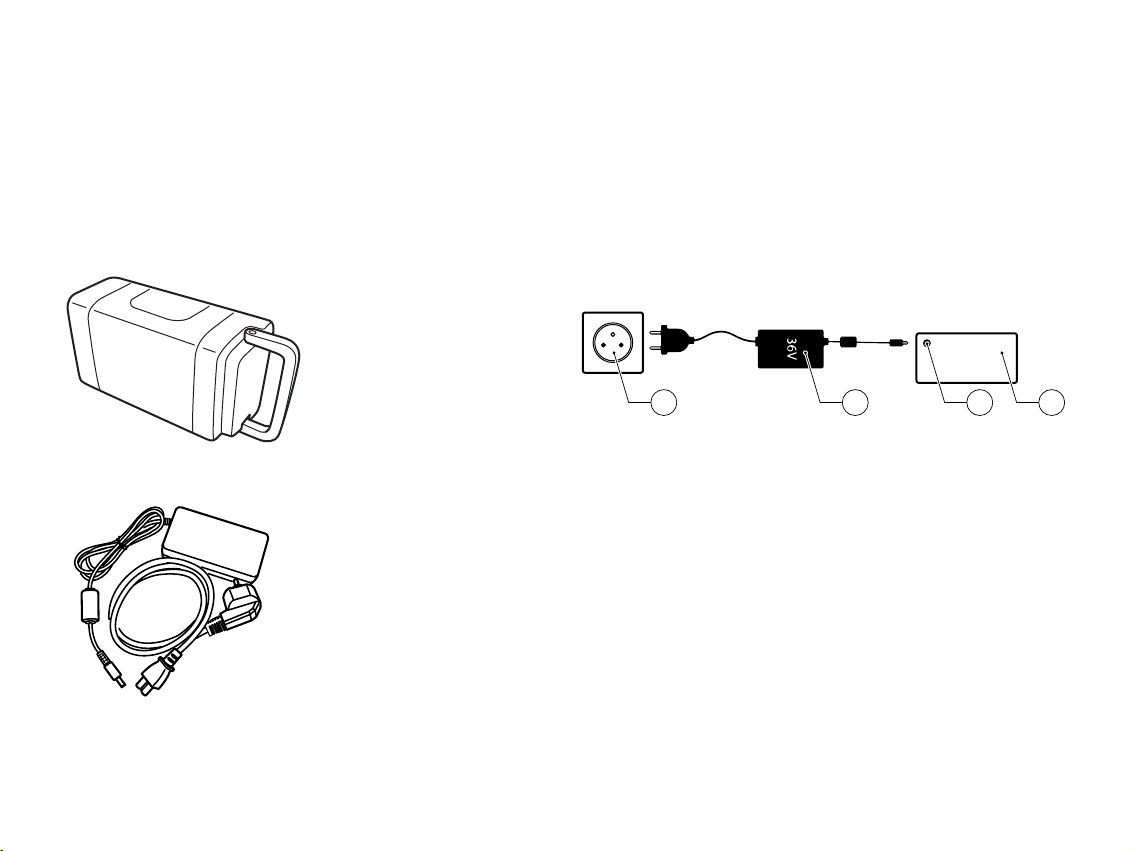
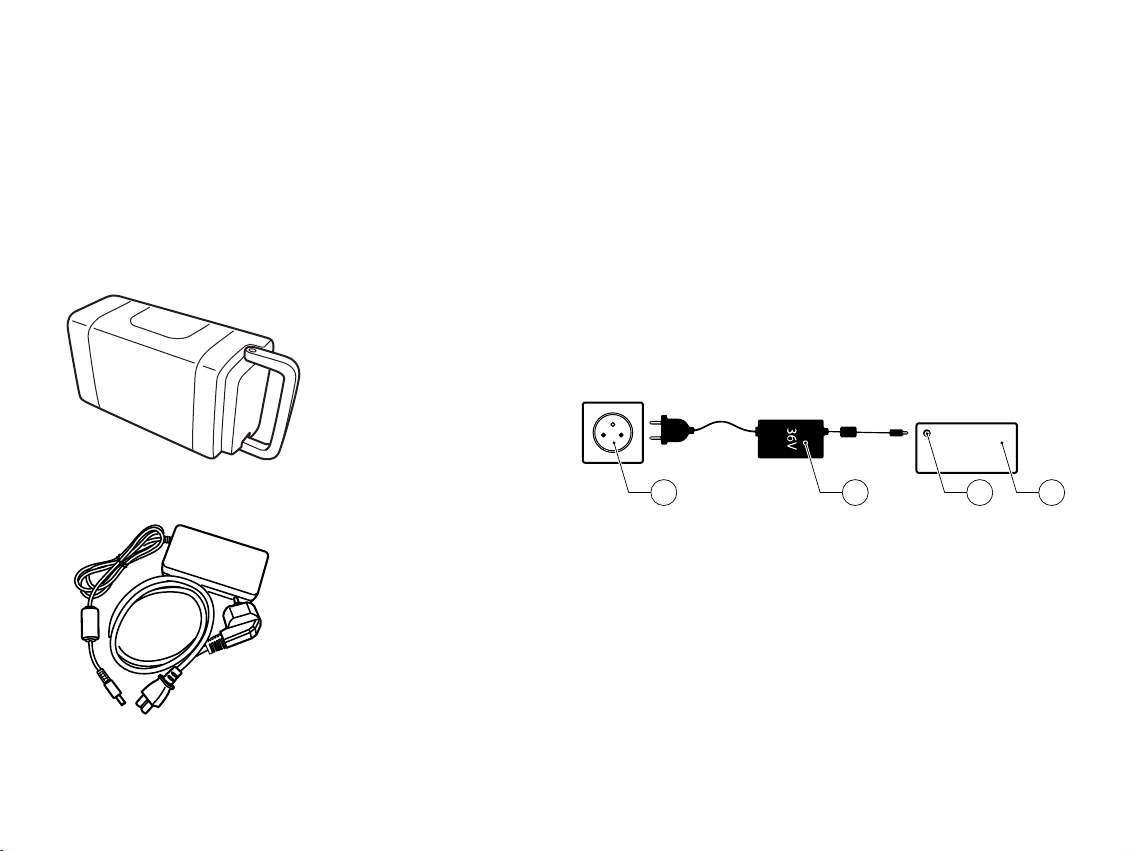
6. BATTERY CHARGING INSTRUCTION
• Always switch the battery off before charging it.
• The battery gets hot while charging. For safety reasons,
never cover the battery.
• Place the charger on an even surface.
• You can either charge the battery on the e-bike or removed it
from the e-bike.
Battery
1. Connect the charger to the battery and then plug in the
charger. A completely empty battery will take approximately
6 hours to fully charge.
2. When the battery is fully charged, the LED on the charger
switches from red to green. For safety reasons, unplug the
battery as soon it is fully charged.
3. Unplug the charger and then disconnect it from the battery.
24 3 1
1. Battery
2. Battery charging connector
3. Charger
4. 230V
Charger
13
Page 14

7. SAFETY INSTRUCTIONS FOR THE BATTERY AND CHARGER
Your e-bike has a lithium-ion battery. Never charge the battery
with a replacement charger which is not designed for this
purpose. Using an unsuitable charger on a lithium-ion battery
could lead to overheating, re or explosion. If your charger
gets lost or damaged, contact your local IKEA store to order a
replacement.
• The battery is half charged when new. The rst three times,
charge the battery for at least 12 hours.
• Please make sure that the charger voltage matches your
mains voltage.
• The charger must always be used indoors.
• Don’t open the charger, it is a high-voltage unit.
• Never touch the two battery electrodes at the same time as
this could cause an electric shock.
• Never take the battery out of the e-bike while it is charging.
• Please charge the battery for at least 2 hours every 3
months, otherwise we can accept no liability for the
battery guarantee.
• Never charge the battery with other chargers.
• Don’t allow liquids or metals to penetrate into the charger.
• Never charge the battery near infants and small children.
• Never use the charger in oily, dusty, dirty or damp
environments and avoid direct sunlight.
• Avoid using the charger in thunderstorms.
• Always use the charger in cool, well ventilated places.
• Do not hit the battery and avoid strong vibrations.
• The guarantee is voided if the battery is opened or damaged.
• Your e-bike is designed for normal road trafc and for a single
person. Never use your e-bike for extreme manoeuvers, such
as extreme off-road use, jumps or excess load. This could
damage the e-bike and cause serious injuries.
• Only to be used with charger model C060L1001E.001.
• As a road user you have to abide by the trafc regulations in
your country.
14
Page 15
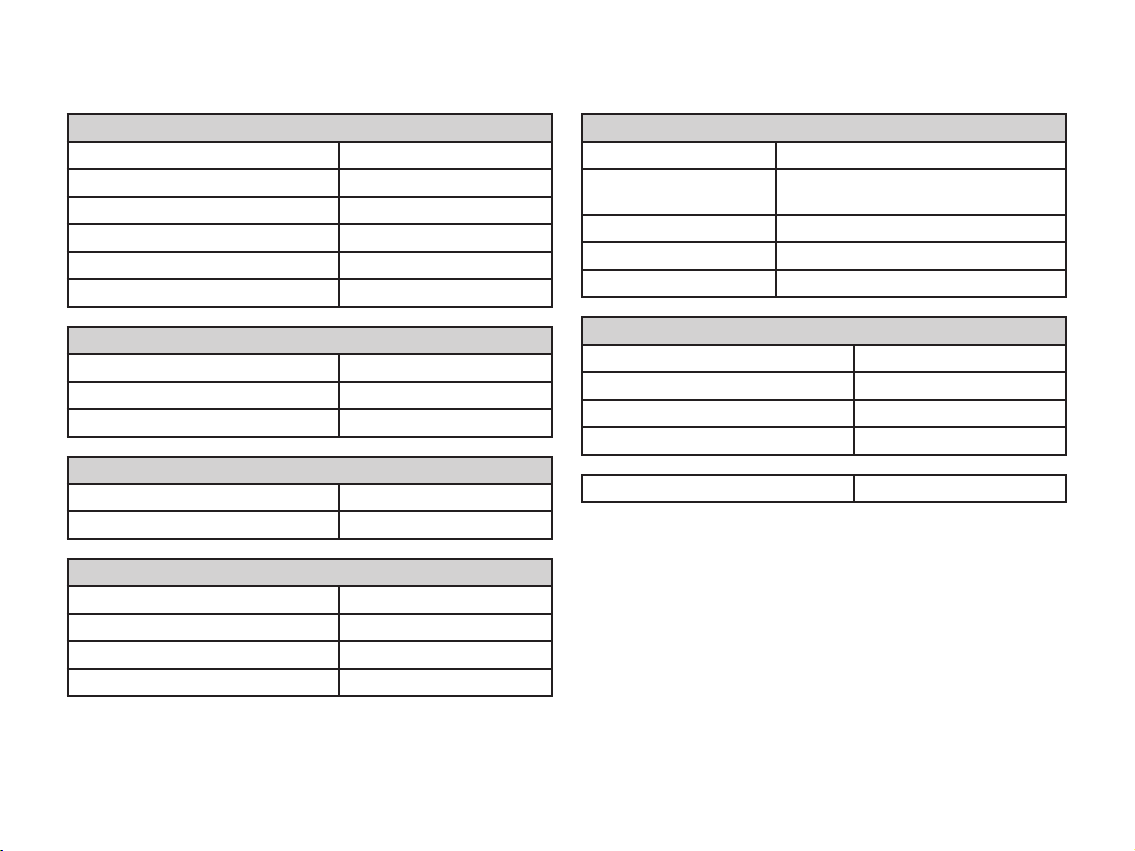
8. TECHNICAL SPECIFICATIONS
E-bike parameters
Dimensions (L × W × H) 1865 × 1140 × 630 mm
Weight ≤ 23 kg
Maximum speed 25 km/h
Maximum load ≤ 120 kg
Wheelbase between front/rear
wheel hubs
Power consumption per 1000 km 1.2 kW/h
Charger parameters
Full Charging time 6,3 hours
Input voltage 100 V - 240 V~50-60 Hz
Maximum performance 60 Watts
Control unit parameters
Low voltage protection 30 ± 0.5 Volts
Over-voltage protection 12 ± 1 Amperes
Battery parameters
Battery type Lithium-ion battery
Capacity 8.7 Ah
Battery voltage 36 Volts
Battery fuse 15Ax2 total 30A
1123 ± 5 mm
Motor parameters
Motor type Brushless permanent magnet motor
Rated output 250 Watts
Rated voltage 36 Volts
Rated torque 6.5 Nm/40 Nm
Motor effectiveness >78%
Torque moments
Stem 14-15 Nm
Handlebar 9-10 Nm
Seat clamp 7 Nm
Pedals 25 Nm
Maximum tire pressure 40-65 PSI / 2.8-4,.5 BAR
15
Page 16
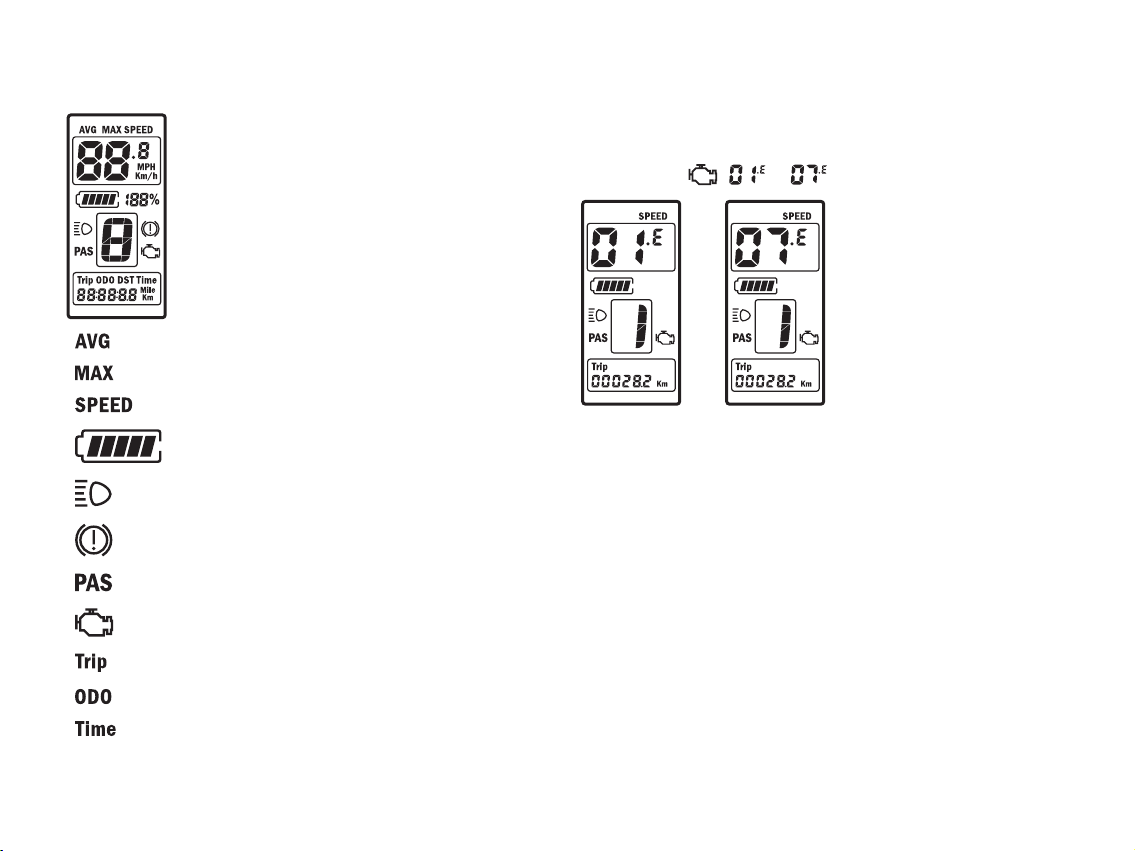
9. CONTROLS SETTINGS
Average speed
Max speed
Speed
Battery indication
Error codes
LCD800S will alarm when a problem occurs. Following error
codes will be visible in the display together with the symbol for
warning lamp : to .
If the warning lamp is turned on, together with an error code,
please contact an IKEA store, for control.
16
Backlight
Brake indication
PAS speed mode, 6 levels
Warning lamp
Tripmeter (kilometer/mile)
Total distance (not resettable)
Cycled time/round (h:s)
Remove the display if you want to turn the bike upside down for
maintenance.
Page 17
10. MAINTENANCE
Make sure you carry out the following safety checks before
riding you E-bike:
Brakes
• Check that the brakes are working properly.
• Visual inspection of the brake linings to check that they are
not worn and that they are aligned to the wheels.
• Make sure that the handbrake cables are attached properly
and that there is no evidence of wear.
Crank and pedals
• Check that the pedals and crank are seated correctly.
• Check that the crank arm is properly tted to the axle.
Other information
• Make sure that all reectors are properly tted and not
covered.
• Note that there is a small box inside main bike box which
includes the front light.
• Do not clean your e-bike with a pressure washer. Water could
penetrate into the motor, cause short circuits and damage
electrical components. Only ever use a damp cloth with a
neutral detergent to clean your e-bike. Do not use acidic
detergents as these could damage the e-bike.
• Do not over-lubricate. If oil gets onto the wheels or the brake
pads, it reduces the performance of the brakes and increases
braking distances.
• Never oil the tread of the pedals. Wash excess oil from the
wheels or brake pads with soapy water. Dry the e-bike before
using it again.
• When you fold the bike and put it in to your car trunk, make
sure you don't damage the front reector.
• The front and rear light has 2 modes; rm and blinking.
• We recommend you to use a helmet.
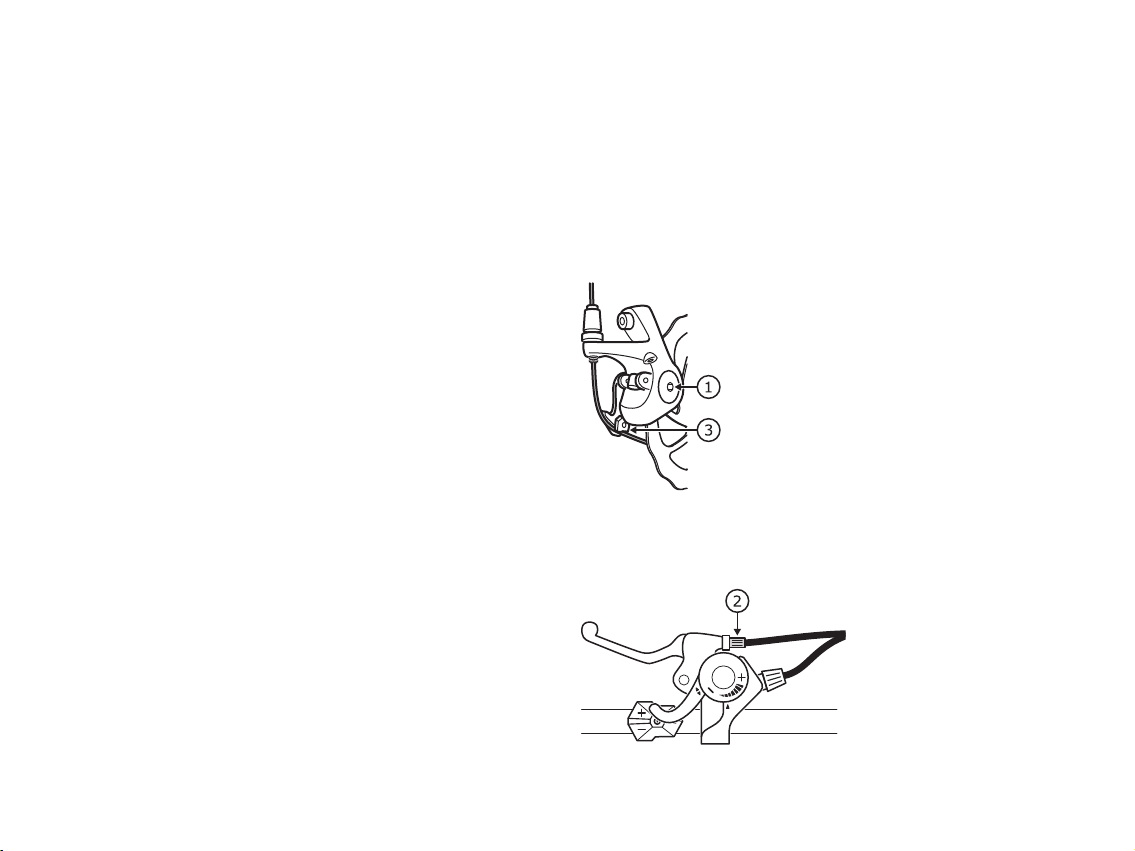
Adjustment of brakes
The following tools are required: Allen key 5 mm.
1. Make sure that the wheels are centred and tightened.
2. Loosen or tighten the screw (1) so that the brake pad on
the brake disc comes closer to the inside (more braking
power) - or further away (less braking power) of the brake
disc. A suitable distance is 0,3 mm.
3. The distance to the brake pad on the brake disc surface is
adjusted by tensioning or releasing the cable at the hub (3).
Fine adjustment of the brake lining is made by turning the
wire screw (2) on the handbrake lever. The distance should
be the same, about 0.3 mm.
4. Test the brakes before you start biking.
17
Page 18

The crossed-out wheeled bin symbol indicates that the item should
be disposed of separately from household waste. The item should
be handed in for recycling in accordance with local environmental
regulations for waste disposal. By separating a marked item from
household waste, you will help reduce the volume of waste sent to
incinerators or land-ll and minimize any potential negative impact
on human health and the environment. For more information, please
contact your IKEA store.
18
Page 19

GEBRAUCHSANLEITUNG ELEKTROFAHRRÄDER
INHALTSVERZEICHNIS
1. WICHTIGE INFORMATIONEN VOR DEM START 20
2. EINLEITUNG 21
3. DURCHSICHT UND EINSTELLUNGEN VOR DEM START 22
4. DIE ERSTE FAHRT 23
5. FAHREN MIT DEM ELEKTROFAHRRAD 24
6. ANLEITUNG ZUM AKKULADEN 28
7. SICHERHEITSHINWEISE ZU AKKU UND LADEGERÄT 29
8. TECHNISCHE DATEN 30
9. SYMBOLE UND FEHLERCODES 31
10. UNTERHALTSÜBERSICHT 32
19
Page 20

18
10
3
2
19
17
16
32
30
33
4
21
23
24
39
25
37
22
35
34
27
15
40
41
13
7
8
6
1
36
14
29
4
38
26
5
31
9
44
11
12
20
42
43
1. WICHTIGE INFORMATIONEN VOR DEM START
• Vor ersten Fahrt bitte unbedingt die Gebrauchsanleitung
sorgfältig durchlesen und sicherstellen, dass alle Teile im
besten Zustand sind
• Auf glatten Wegen, z. B. bei Regen oder Schnee langsam
fahren und damit rechnen, dass bei schlechter Weglage
sicheres Anhalten länger dauert.
• Dieses elektrounterstützte Fahrrad funktioniert bei allen
Wetterlagen.
• Doch wenn Wasser in den Elektromotor dringt, kann dies
die Elektronik und/oder den Elektromotor beschädigen.
20
Die Elektronik des Elektrofahrrads niemals mit feuchten
Händen berühren und auf keinen Fall den Plus- und Minuspol
gleichzeitig anfassen. Das kann zu Kurzschluss und damit zu
Personenschäden führen.
• Niemals versuchen, das Elektrofahrrad selbst zu reparieren.
Immer einen Spezialisten zu Rate ziehen.
• Die Akkuleistung wird von Kälte negativ beeinusst. Bei
Temperaturen unter 0°C vermindert sich die Reichweite
auch bei vollgeladenem Akku. Der Akku erreicht seine volle
Kapazität bei Temperaturen über 0°C.
Page 21
2. EINLEITUNG
26
40
36
29
14
31
33
32
30
39
41
16
38
13
7
6
1. Rahmen
2. Vorderradgabel
3. Sattelstütze
4. Schutzblech
5. Fahrradständer
6. Abstandshalter
7. Lenker
8. Steuerkopf, verstellbar
9. Griff
10. Sattel
11. Schiebenbremse vorn
21
37
35
10
3
9
23
25
8
1
4
22
Rahmenmaterial: Aluminium
Reifengröße: 29"
4
12
27
34
vordere Gabel: Stahl mit Federung
Schaltung: Shimano 21-Gang Revoshift
Felgen: Leichtmetall-Doppelwandfelgen
Bremsen: Scheibenbremsen
Motor: 36 Volt/250 Watt
Montage: 95% (Lenker gedreht)
Bruttogewicht: 30 kg
Nettogewicht Fahrrad: 28 kg inkl.
Akku
Akkugewicht: 1,9 kg
Akkumaße: 170 x 100 x 80 mm
Akkuleistung: 36V 8,7AH
Höchstbelastung des Fahrrads: 120 kg
34. Freilauf
35. Sattelklemme
36. Vorderscheinwerfer
37. Rücklicht
38. Klingel
39. Reektoren
40. Bremzug
41. Kabelführung
42. Beschläge
43. Werkzeugsatz
44. Kurbelschutz
17
44
24
2
11
18
12. hintere Scheibenbremse
13. Bremshebel
14. Kettenumwerfer vorn
15. Kettenumwerfer hinten
16. Schaltung
17. Tretlager
18. Kurbel & Pedalarm
19. Kette
20. Pedal
21. Akku
22. Ladegerät
20
19
5
23. Display
24. Sensor
25. Bedienfeld
26. integriertes Kabel
27. Motor
28. Felge
29. Speiche
30. Reifen
31. Schlauch
32. Felgenband
33. vordere Nabe
15
43
42
21
Page 22
3. DURCHSICHT UND EINSTELLUNGEN VOR DEM START
Alle Schrauben fest anziehen.
22
Page 23

4. DIE ERSTE FAHRT
• Bei der ersten Probefahrt mit dem Elektrofahrrad
bitte besonders vorsichtig sein. Mit aktivierter
Antriebsunterstützung ist das Rad bedeutend schneller als ein
normales Fahrrad.
• Die erste Fahrt sollte auf offenem Gelände stattnden, damit
man sich an die Beschleunigung gewöhnen kann, die der
Motor ermöglicht.
• Die Steuereinheit ist mit einem Niederspannungsschutz
versehen, der den Elektromotor abschaltet, wenn die
Akkuspannung einen bestimmten Wert unterschreitet.
• Bitte Vorsicht beim Bremsen. Wenn das Vorderrad blockiert,
besteht Sturzgefahr. Immer zuerst das Hinterrad abbremsen.
Die Hinterradbremse ist weniger aggressiv als die
Vorderradbremse.
• Bei einer Geschwindigkeit von 25 km/h schaltet die
Antriebsunterstützung ab. Sie aktiviert sich automatisch,
sobald die Geschwindigkeit unter 25 km/h sinkt.
• Auf glatter Fahrbahn und auf Schotterwegen ohne
Antriebsunterstützung fahren.
• Die Antriebsunterstützung abschalten, wenn das
Elektrofahrrad nicht normal reagiert, damit die Elektrik nicht
beschädigt wird.
23
Page 24

5. FAHREN MIT DEM ELEKTROFAHRRAD
• In die Pedale treten - nur dann unterstützt der Elektromotor.
• Zum Ändern der Antriebsunterstützung den Plus- oder
Minusknopf drücken.
• Sobald gebremst wird, stoppt die Antriebsunterstützung.
• Wenn eine Geschwindigkeit von 25 km/h erreicht ist, schaltet
die Antriebsunterstützung ab.
• Wenn man das Rad außer Sichtweite lässt, den Akku mit dem
Schlüssel abschließen oder den Akku mitnehmen.
Druck auf ON schaltet den Akku ein.
Bedienfeld:
Der Motor wird über das Bedienfeld am Lenker gesteuert. 6
Geschwindigkeitsstufen stehen zur Wahl. Für optimale Funktion
wählt man eine niedrige Geschwindigkeit auf dem Bedienfeld
ein und legt den 1. Gang ein, wenn man zum Losfahren in die
Pedale tritt.
ON/OFF:
Den ON-/OFF-Schalter am Bedienfeld ca. 2 Sek. lang
eindrücken. Das LCD-Display leuchtet auf. Zum manuellen
Abschalten des Displays den ON-/OFF-Schalter 2 Sek. gedrückt
halten.
1. Zum Starten des Displays den ON-/OFF-Schalter benutzen.
2. Zum Einschalten der Displaybeleuchtung den Plusschalter
(+) ein paar Sek. lang drücken.
3. Mit dem Plus- (+) und Minusknopf (-) wird die
Antriebsunterstützung reguliert. 6 Stufen stehen zur Wahl.
4. Wenn Unterstützung beim Bergaufschieben des Rads
benötigt wird, den Minusknopf (-) gedrückt halten. Dann
behält das Rad automatisch eine Geschwindigkeit von 6
km/h bei.
24
Page 25

ÜBERSICHT ÜBER DIE REICHWEITE
Voraussetzung: neuer, komplett aufgeladener Akku (313Wh, 36V, 8.7Ah)
Belastung: ca. 74 kg
Entfernung
10 km 20 km 30 km 40 km 50 km 60 km 70 km
Gelände
ebenes Gelände
leicht hügeliges Gelände
bergiges Gelände
Mittlere Motorunterstützung - maximaler Fahrereinsatz
Mittlere Motorunterstützung - niedriger bis mittlerer Fahrereinsatz
Maximale Motorunterstützung - maximaler Fahrereinsatz
Maximale Motorunterstützung - niedriger bis mittlerer Fahrereinsatz
leichter Gegenwind
28°C
trockene
Wegstrecke
leichter Gegenwind
28°C
trockene
Wegstrecke
leichter Gegenwind
28°C
trockene
Wegstrecke
25
Page 26

Bitte Folgendes beachten:
• Immer den empfohlenen Reifendruck einhalten.
• Bei Temperaturen unter 0°C vermindert sich die Reichweite.
• Bei höherer Belastung vermindert sich die Reichweite.
• Bei glatter und nasser Straßenlage vermindert sich die
Reichweite.
Die Reichweite optimieren
Die Leistungsstärke des Akkus und damit die Reichweite werden
von vielen Faktoren beeinusst.
• Den Akku für eine längere Fahrt vollständig auaden.
• Bei unebenen Wegen und bergigem Gelände wird mehr
Energie verbraucht.
• Häuger Wechsel der Geschwindigkeit erfordert ebenfalls
mehr Energie.
• Höheres Gewicht erhöht den Energieverbrauch.
• Korrekter Reifendruck und ein sauberes, gut geschmiertes
Rad spart Energie.
• Dafür sorgen, dass beide Räder sich ungehindert drehen.
Wenn die Bremsbacken nicht schleifen, spart auch das
Energie.
• Die Bremsanlage regelmäßig kontrollieren. Kräftiges Treten in
die Pedale schont den Akku und verlängert die Reichweite.
26
Page 27

AKKU HERAUSNEHMEN/EINSETZEN
1. Das Display abschalten.
2. Zum Lösen des Akkus den Schlüssel nach links drehen.
3. Den Akku aus dem Fach lösen und herausnehmen.
Parken
• Vorsichtig den "ON-/OFF-Schalter" des Akkus eindrücken, bis
die oberste Diode erlischt. Zum Zeichen dafür, dass der Akku
abgeschaltet ist, erlöschen auch die übrigen Dioden nach
einigen Sekunden.
• Das Abstellen/Parken des Fahrrads dort vermeiden, wo es
regnet oder schneit.
• Falls das Elektrorad nass geworden ist, sollte es nach der
Fahrt mit einem Handtuch trockengerieben werden.
• Bitte beachten, dass die Beleuchtung des Elektrofahrrads
immer separat ausgeschaltet werden muss.
• Wenn das Rad auf salzbestreuten Wegen benutzt
wurde, muss es umgehend mit sauberem Wasser
gereinigt werden.
27
Page 28
6. ANLEITUNG ZUM AKKULADEN
• Den Akku vor dem Laden immer abschalten.
• Der Akku erhitzt sich während des Ladevorgangs. Aus
Sicherheitsgründen darf er nicht abgedeckt werden.
• Das Ladegerät auf eine ebene Fläche stellen.
• Laden ist auf zweierlei Weise möglich: Der Akku kann zum
Laden im Fahrrad verbleiben oder für separates Laden vom
Rad abmontiert werden.
Batteri
1. Ladebeginn: Den Ladestecker des Ladegeräts in die
Ladebuchse am Akku stecken. Danach den 230-V-Stecker in
eine Steckdose stecken.
2. . Einen komplett entleerten Akku zu laden dauert ca. 6
Stunden.
3. Wenn der Akku vollständig geladen ist, wechselt die Farbe
der LED-Anzeige am Ladegerät von Rot auf Grün. Aus
Sicherheitsgründen den Akku vom Ladegerät abnehmen,
sobald er vollgeladen ist. Abschließen des Ladevorgangs:
zuerst den 230-V-Stecker aus der Steckdose ziehen und
danach den Stecker des Ladegeräts aus der Ladebuchse am
Akku ziehen.
24 3 1
1. Akku
2. Akkuladebuchse
3. Ladegerät
4. 230 V
Laddare
28
Page 29

7. SICHERHEITSHINWEISE FÜR AKKU UND LADEGERÄT
Der Akku im Elektrofahrrad ist ein Lithium-Ionen-Akku.
Der Akku darf auf keinen Fall mit einem Ladegerät geladen
werden, das nicht für genau diesen Akku geeignet ist. Werden
Ladegeräte benutzt, die nicht für Lithium-Ionen-Akkus geeignet
sind, führt dies zu Überhitzung mit dem Risiko von Brand- und/
oder Explosion. Bei Verlust oder Beschädigung des Ladegeräts
bitte mit einem IKEA Einrichtungshaus Kontakt aufnehmen und
dort ein neues Ladegerät bestellen.
• Ein neuer Akku ist zur Hälfte aufgeladen. Die ersten drei Male
sollte der Akku mindestens 12 Std. lang geladen werden.
• Prüfen, dass die Spannung des Ladegeräts mit der
Netzspannung der Steckdose übereinstimmt.
• Das Ladegerät darf nur in Innenräumen benutzt werden.
• Das Ladegerät ist ein Hochspannungsaggregat und darf daher
nicht geöffnet werden.
• Die beiden Elektroden des Akkus nicht berühren - es besteht
Stromschlaggefahr.
• Den Akku während des Ladevorgangs niemals aus dem
Fahrrad nehmen.
• Der Akku muss alle drei Monate mindestens zwei
Stunden geladen werden, damit die Akkugarantie in
Kraft treten kann.
• Den Akku nicht mit anderen Ladegeräten als dem
empfohlenen laden.
• Es dürfen keine Flüssigkeiten oder Metalle in das Ladegerät
gelangen.
• Den Akku nicht in der Nähe von Babys und Kleinkindern
laden.
• Das Ladegerät nicht in ölverschmutzten, staubigen,
schmutzigen und feuchten Räumen benutzen. Direkte
Sonnenbestrahlung vermeiden.
• Den Akku keinen Schlägen, Stößen und starken
Erschütterungen aussetzen.
• Das Ladegerät bei Gewitter nicht benutzen.
• Das Ladegerät nur in kühlen, gut belüfteten Räumen
benutzen.
• Den Akku nicht öffnen. Bei geöffnetem/beschädigten Akku
erlischt die Garantie. Das Elektrofahrrad ist für den normalen
Straßenverkehr und nur für eine Person ausgelegt.
• Das Elektrofahrrad nicht für extreme Manöver wie
Geländefahrten oder Sprünge benutzen und keiner
übertriebenen Belastung aussetzen. Das könnte das Fahrrad
beschädigen und zu ernsthaften Personenschäden führen
• Darf nur mit einem Ladegerät des Typs C060L1001 geladen
werden.
• Verkehrsteilnehmer müssen die Verkehrsregeln in dem Land
befolgen, in dem sie sich benden.
29
Page 30
8. TECHNISCHE DATEN
Parameter Elektrofahrrad
Maße (L × B × H) 1900 × 700 × 1180mm
Gewicht ≤ 25kg
Höchstgeschwindigkeit 25 km/h
Höchstbelastung ≤ 120kg
Radstand Vorder-/Hinterachse 1135 ± 5mm
Energieverbrauch per 1000 km 1.2 kW/h
Parameter Ladegerät
Ladezeit 6,22 timmar
Eingangsspannung 220V/60Hz
Maximale Ausgangsleistung 60 Watt
Parameter Steuereinheit
Unterspannungsschutz 31.5 ± 1 Volt
Überspannungsschutz 15 ± 1 Ampere
Akkuparameter
Akkutyp Lithium-Ionen-Akku
Kapazität 8.7 Ah
Akkuspannung 36 Volt
Akkussicherung 15Ax2 insgesamt 30A
Motorparameter
Motortyp bürstenloser Gleichstrommotor
Nominelle
Ausgangsleistung
Nominelle Spannung 36 Volt
Nominelle Drehzahl 7Nm/32Nm
Motorefzienz >75%
Drehzahl
Vorbau 12 Nm
Lenkstange 8 Nm
Sattelklemme 7 Nm
Pedale 20 Nm
max. Reifendruck 40-65 PSI / 2.8-4,.5 BAR
250 Watt
30
Page 31

9. DISPLAY - SYMBOLE UND FEHLERCODES
mittlere Geschwindigkeit
Höchstgeschwindigkeit
Geschwindigkeit
Akkuanzeige
Rücklicht
Bremsanzeige
PAS-Schaltung (Pedale Assist System),
6 Stufen
Warnleuchte
Fehlermeldungen
LCD800S alarmiert bei Störungen. Folgende Fehlermeldungen
erscheinen im Display zusammen mit dem Symbol einer
Warnleuchte : : bis .
Wenn die Warnleuchte mit einer Fehlermeldung erscheint, ist
der Besuch in einem IKEA Einrichtungshaus zwecks Kontrolle
ratsam.
Das Display immer abnehmen, wenn das Rad für Service oder
Wartung auf den Kopf gestellt wird.
Tageskilometerzähler (Kilometer/Meilen)
ODO = Gesamtstreckenzähler (nicht
rücksetzbar)
TIME = Zeit pro Runde (Std. : Sek.)
31
Page 32

10. UNTERHALTSÜBERSICHT
Vor jeder Fahrt müssen folgende Sicherheitskontrollen
durchgeführt werden:
Bremsen
• Kontrollieren, dass die Bremsen ordnungsgemäß
funktionieren.
• Kontrollieren, dass die Bremsbeläge nicht verschlissen sind
und ach auf den Felgen auiegen.
• Kontrollieren, dass die Handbremsleitungen fest sitzen und
nicht verschlissen sind.
Tretkurbeln und Pedale
• Kontrollieren, dass die Pedale ordnungsgemäß an den
Tretkurbeln aufsitzen.
• Kontrollieren, dass die Tretkurbeln ordnungsgemäß in den
Achsen sitzen.
Weitere Informationen
• Darauf achten, dass alle Reektoren ordnungsgemäß
montiert sind und nicht abgedeckt werden.
• Bitte beachten, dass sich im Paket noch eine kleinere
Verpackung bendet, die den Vorderscheinwerfer enthält.
• Zum Reinigen des Elektrofahrrads keinen Hochdruckreiniger
einsetzen. Wenn Wasser in den Motor eindringt, kann dies
zu Kurzschluss und Beschädigung der elektronischen Teile
führen. Ein feuchtes Tuch mit mildem Reinigungsmittel zum
Säubern des Fahrrads benutzen. Keine Reinigungsmittel mit
Säuren verwenden - sie könnten Schäden am Elektrorad
hervorrufen.
• Nicht zu viel Schmiermittel verwenden. Wenn Schmierstoff
auf die Reifen oder Bremsklötze gerät, mindert dies die
Bremskraft und der Bremsweg verlängert sich.
• Auf keinen Fall die Pedalbeläge einfetten. Überüssiges Öl/
Fett von Felgen und Bremsbacken mit Wasser und Seife
entfernen. Gut abtrocknen, bevor das Rad wieder benutzt
wird.
• Darauf achten, dass der Reektor am Vorderrad nicht
beschädigt wird, wenn das Rad - z. B. zum Transport -
zusammengeklappt wird.
• Vorderscheinwerfer und Rücklicht haben zwei Betriebsarten:
konstantes oder Blinklicht.
• Wir empfehlen, einen Helm zu tragen.
32
Page 33

Einstellung der Bremsen
Folgendes Werkzeug wird benötigt: Inbusschlüssel 5 mm.
1. Darauf achten, dass die Räder zentriert und festgezogen sind.
2. Die Inbusschraube (1) so lockern oder anziehen, dass die
Bremsbeläge näher an die Innenseite der Bremsscheibe
kommen (stärkere Bremswirkung) - oder weiter davon weg
(geringere Bremswirkung). Ein angemessener Abstand sind
0,3 mm.(geringere Bremswirkung).ringere Bremswirkung).
4. Die Bremsen vor dem Losfahren testen.
3. Der Abstand des Bremsbelags zur Außenseite der
Bremsscheibe wird grob eingestellt, indem man den
Bremszug an der Nabe (3) entweder spannt oder lockert.
Die Feineinstellung der Bremsbeläge erfolgt durch Drehen
der Seilschraube (2) am Bremsgriff. Der Abstand sollte
beidseitig gleich sein, ca. 0,3 mm.
Das Symbol mit der durchgestrichenen Abfalltonne bedeutet, dass
das Produkt getrennt vom Haushaltsabfall entsorgt werden muss.
Das Produkt muss gem. der örtlichen Entsorgungsvorschriften der
Wiederverwertung zugeführt werden. Durch separate Entsorgung
des Produkts trägst du zur Minderung des Verbrennungs- oder
Deponieabfalls bei und reduzierst eventuelle negative Einwirkungen
auf die menschliche Gesundheit und die Umwelt. Weitere
Informationen im IKEA Einrichtungshaus.
33
Page 34

MANUEL D’UTILISATION POUR VÉLOS ÉLECTRIQUES
TABLE DES MATIÈRES
1. INFORMATION IMPORTANTE À LIRE AVANT D’UTILISER LE VÉLO 35
2. INTRODUCTION 36
3. INSPECTION ET RÉGLAGES À EFFECTUER AVANT D’UTILISER 37
4. LE VÉLO PREMIÈRE UTILISATION 38
5. UTILISATION DU VÉLO ÉLECTRIQUE 39
6. INSTRUCTIONS RELATIVES AU CHARGEMENT DE LA BATTERIE 43
7. CONSIGNES DE SÉCURITÉ RELATIVES À LA BATTERIE ET AU CHARGEUR 44
8. CARACTÉRISTIQUES TECHNIQUES 45
9. RÉGLAGES DES COMMANDES 46
10. ENTRETIEN 47
34
Page 35

1. INFORMATION À LIRE AVANT D’UTILISER LE VÉLO
• Avant d’utiliser votre vélo pour la première fois, lire
attentivement les instructions d’utilisation et vérier que
toutes les pièces sont en bon état.
• Ralentir l'allure en cas de sol glissant, quand il pleut ou qu’il
neige par exemple, et penser que dans ces conditions les
distances de freinage sont plus longues pour un arrêt en
toute sécurité.
• Ce vélo électrique convient pour une utilisation par tous les
temps, mais un excès d’eau risque cependant d’endommager
l’équipement électronique et/ou le moteur électrique.
• Ne jamais toucher l’équipement électronique du vélo
électrique avec des mains mouillées et ne jamais toucher en
même temps les bornes plus et moins de la batterie, car la
puissance du courant du court-circuit pourrait vous blesser.
• Ne jamais tenter de réparer soi-même l’équipement
électronique du vélo électrique. Toujours s’adresser à un
détaillant spécialisé.
• La performance de la batterie varie suivant la température
extérieure. Les températures inférieures à 0°C réduisent
la distance qu'il est possible de parcourir avec le vélo
électrique sans recharger la batterie. Les meilleurs niveaux
de performance de la batterie nécessitent des températures
supérieures à 0°C.
35
Page 36

2. INTRODUCTION
26
40
41
36
29
14
31
33
32
30
39
13
6
38
25
16
7
8
1
4
1) Cadre
2) Fourche
3) Tige de selle
4) Garde-boue
5) Béquille
6) Entretoise de rehausse de direction
7) Guidon
8) Potence réglable
9) Poignée
10) Selle
11) Frein à disque avant
35
3
18
10
9
17
44
23
2
11
12) Frein à disque arrière
13) Levier de frein
14) Dérailleur avant
15) Dérailleur arrière
16) Manette vitesses
17) Pièces (axe pédalier)
18) Chaîne roue & pédalier
19) Chaîne
20) Pédale
21) Batterie
22) Chargeur
24
21
20
37
22
4
19
5
23) Écran
24) Capteur
25) Variateur
26) Câblage intégré
27) Moteur
28) Jante
29) Rayon
30) Pneu
31) Chambre à air
32) Bande adhésive
33) Moyeu avant
27
34
15
12
43
Matériau du cadre : aluminium
Taille roue : 29"
Fourche avant : acier avec suspension
Engrenage : 21 vitesses
Jante : alliage double paroi
Freins : freins à disque
Moteur : 36 Volts - 250 Watts
Montage : 95 % (potence à positionner)
Poids brut : 30 kg.
Poids net du vélo : 28 kg batterie
comprise.
Poids batterie : 1.90 kg
Dimensions batterie: 170x100x80 mm
Puissance batterie : 36V 8,7AH
Charge max. vélo : 120 kg
42
34) Roue libre
35) Attache rapide
36) Éclairage avant
37) Éclairage arrière
38) Sonnette
39) Réecteur
40) Câble de frein
41) Câble de dérailleur
42) Vis
43) Outils
44) Couvre-pédalier
36
Page 37

3. INSPECTION ET RÉGLAGES AVANT D’UTILISER LE VÉLO
Resserrer vis et boulons :
37
Page 38

4. PREMIÈRE UTILISATION
• Soyez très prudent lors de la première utilisation de votre
vélo électrique! Quand l’assistance électrique est active, le
vélo électrique est beaucoup plus rapide qu’un vélo classique!
• Choisissez un endroit dégagé pour une première utilisation
an de pouvoir vous habituer à l’entraînement par le moteur
• Le contrôleur électronique dispose d’un système de protection
basse tension qui coupe automatiquement l’assistance
électrique si la tension de la batterie descend en dessous d’un
certain niveau.
• Soyez prudent au moment du freinage. Commencez toujours
par freiner avec le frein de la roue arrière qui est moins
brusque que celui de la roue avant.
• L’assistance électrique est désactivée quand vous atteignez
25 km/h. Elle se réactive automatiquement dès que la vitesse
repasse en dessous de 25 km/h.
• Ne pas activer l’assistance électrique quand vous vous
trouvez sur des sols glissants ou des surfaces gravillonnées
• Désactivez l’assistance électrique quand le vélo ne
fonctionne pas correctement an d’éviter d’endommager des
composants électriques.
38
Page 39

5. UTILISATION DU VÉLO ÉLECTRIQUE
• Commencer à pédaler; l’entraînement par le moteur
électrique n’est activé que si vous pédalez
• Pour modier le niveau d’assistance, appuyer sur les boutons
plus (+) ou moins (-).
• L’assistance électrique se désactive en cas de freinage.
• L’assistance électrique se désactive dès 25km/h.
• Si le vélo électrique est laissé sans surveillance, verrouiller la
batterie avec la clé ou emporte la batterie.
Pour démarrer la batterie, utiliser le bouton ON.
Boîtier de commande:
Le moteur est commandé depuis le boîtier situé sur le guidon.
Le vélo dispose de six niveaux de vitesse différents. Pour un
fonctionnement optimal, choisir sur le boîtier de commande une
vitesse peu élevée et régler le changement de vitesse sur le
niveau 1 au début du pédalage.
ON/OFF:
Appuyer sur le bouton ON/OFF et le maintenir enfoncé
environ 2 secondes. Le cadran LCD s'allume. Pour éteindre
manuellement l'afchage, appuyer sur le bouton ON/OFF
pendant 2 secondes.
1. Pour démarrer l'afchage, utiliser le bouton ON/OFF.
2. Appuyer sur le bouton plus (+) quelques secondes pour
allumer le cadran. Faire de même pour éteindre le cadran.
3. Les niveaux d’assistance peuvent être modiés à l’aide des
boutons plus (+) et moins (-). Il y a 6 niveaux d’assistance
possible.
4. Pour être assisté en poussant le vélo à pied, maintenir le
bouton moins (-) enfoncé et le vélo avancera à 6 km/h.
39
Page 40

AUTONOMIE
Condition : batterie neuve et entièrement chargée (313Wh, 36V, 8,7Ah)
Chargement : utilisateur de 74 kg environ
Distance
10 km 20 km 30 km 40 km 50 km 60 km 70 km
Conditions de la route
Routes planes
Terrain légèrement vallonné
Terrain très vallonné
Assistance moyenne – entraînement maximum par le pédalage
Assistance moyenne – entraînement faible à moyen par le pédalage
Assistance maximum – entraînement maximum par le pédalage
Assistance maximum – entraînement faible à moyen par le pédalage
Léger vent arrière
28°C Routes
sèches
Léger vent arrière
28°C Routes
sèches
Léger vent arrière
28°C Routes
sèches
40
Page 41

Noter les réserves suivantes :
• Les pneus du vélo doivent être gonés selon la pression
requise.
• Si la température extérieure baisse, l’autonomie diminue.
• Si le poids de l’utilisateur est plus important, l’autonomie
diminue.
• Si la route est mouillée et verglacée, l’autonomie diminue.
Optimiser l’autonomie du vélo
De nombreux facteurs inuent sur la performance de la
batterie, ce qui a un impact sur l’autonomie du vélo.
• Charger complètement la batterie avant un long trajet.
• Un revêtement de route inégal et des côtes exigent
davantage d’énergie qu’un sol égal et une route plane
• Les changements de vitesse fréquents consomment plus
d’énergie. Les chargements lourds consomment plus
d’énergie.
• Vérier la pression des pneus, veiller à la propreté du vélo
et s'assurer qu’il est correctement graissé ; tout ceci permet
d’économiser de l’énergie.
• Vérier que les deux roues tournent librement et ne sont pas
gênées par le patin des freins, ce qui consomme aussi de
l’énergie.
• Vérier régulièrement les patins des freins.
• Pédaler vigoureusement permet d’économiser l’énergie de la
batterie et d’augmenter l'autonomie du vélo.
41
Page 42

RETIRER ET REPLACER LA BATTERIE
1. Éteindre le cadran.
2. Tourner la clé vers la gauche pour débloquer la batterie.
3. Retirer la batterie de son support en la tirant vers le haut.
Stationnement
Appuyer légèrement sur le bouton ON/OFF de la batterie
pendant 3 à 5 secondes pour l'allumer ou l'éteindre.
Diodes ON allumées : la batterie est allumée.
Diodes OFF allumées : la batterie est éteinte.
• Éviter de laisser le vélo électrique exposé sans protection à la
pluie et à la neige.
• Si le vélo électrique est mouillé, l'essuyer dès le retour à
l’aide d’une serviette sèche.
• Ne pas oublier d’éteindre séparément le feu avant et le feu
arrière.
• Si le vélo a été utilisé sur une route salée, rincer le vélo
à l'eau claire immédiatement.
42
Page 43

6. INSTRUCTIONS POUR LE CHARGEMENT DE LA BATTERIE
• Toujours éteindre la batterie avant son chargement.
• Le chargement provoque un échauffement de la batterie. Par
mesure de sécurité, ne jamais couvrir la batterie
• Placer le chargeur sur une surface plane.
• La batterie peut être rechargée qu’elle soit ou non installée
sur le vélo électrique.
Battery
1. Raccorder le chargeur à la batterie puis brancher le
chargeur à l’alimentation électrique. Il faut compter environ
6 heures pour recharger une batterie totalement.
2. Quand la batterie est complètement chargée, la LED sur le
chargeur passe du rouge au vert. Par mesure de sécurité,
débrancher la batterie dès qu’elle est complètement
chargée.
3. Pour cela, débrancher le chargeur de l’alimentation
électrique puis le déconnecter de la batterie.
24 3 1
1. Batterie
2. Câble de connexion pour chargement de la batterie
3. Chargeur
4. 230V
Charger
43
Page 44

7. CONSIGNES DE SÉCURITÉ, BATTERIE ET CHARGEUR
Le vélo électrique fonctionne avec une batterie Lithium-ion. Ne
jamais recharger la batterie avec un chargeur non prévu pour
cette utilisation. Le fait d’utiliser un chargeur non prévu pour
cette utilisation avec une batterie Lithium-ion peut entraîner
une surchauffe, déclencher un feu ou une explosion. En cas
de perte du chargeur, ou s’il est endommagé, contacter un
magasin IKEA pour s'en procurer un nouveau.
• Quand elle est neuve, la batterie est à moitié chargée. Les
trois premières fois, charger la batterie pendant au moins 12
heures.
• S'assurer que la tension du chargeur correspond à la tension
de l'alimentation générale.
• Le chargeur doit toujours être utilisé à l’intérieur.
• Ne jamais ouvrir le chargeur, il s’agit d’un équipement sous
haute tension.
• Ne jamais toucher les deux bornes de la batterie en même
temps car il y a un risque de choc électrique.
• Ne jamais retirer la batterie du vélo électrique pendant son
chargement
• Veiller à recharger la batterie pendant 2 heures
tous les 3 mois, faute de quoi nous déclinons toute
responsabilité et ne pouvons faire appliquer la garantie
de la batterie.
• Ne jamais recharger la batterie avec un autre chargeur que
celui qui a été fourni.
• Veiller à ce qu’aucun liquide ni aucun objet métallique ne
pénètre dans le chargeur.
• Ne jamais charger la batterie en présence d’un bébé ou d’un
jeune enfant.
• Ne jamais utiliser le chargeur dans un environnement
huileux, poussiéreux, sale ou humide, et éviter la lumière
directe du soleil.
• Éviter à la batterie tout choc et toutes vibrations importantes.
• Éviter d’utiliser le chargeur pendant un orage.
• Toujours utiliser le chargeur dans une pièce fraîche et bien
ventilée.
• La garantie ne s’applique plus si la batterie a été ouverte ou
endommagée.
• Le vélo électrique est conçu pour être utilisé par une seule
personne sur route dans des conditions normales. Ne jamais
utiliser ce vélo dans des conditions extrêmes : tout terrain,
sauts ou charges excessives. Ceci risque d’endommager le
vélo et de provoquer accidents et blessures.
• Utiliser uniquement avec le modèle de chargeur
C060L1001E.001.
• En tant qu'usager de la route, l’utilisateur du vélo est tenu de
respecter le Code de la route en vigueur dans son pays.
44
Page 45

8. CARACTÉRISTIQUES TECHNIQUES
Caractéristiques du vélo électrique
Dimensions (long × larg × haut) 1865 × 1140 × 630 mm
Poids ≤ 23 kg
Vitesse maximum 25 km/h
Charge maximum ≤ 120 kg
Écartement entre les moyeux des
roues avant et arrière
Consommation électrique pour
1000 km
Caractéristiques du chargeur
Durée pour le chargement
complet
Tension d’entrée 100 V - 240 V~50-60 Hz
Puissance maximum 60 Watts
Caractéristiques du variateur
Protection basse tension 30 ± 0.5 Volts
Protection haute tension 12 ± 1 Ampères
Caractéristiques de la batterie
Type de batterie Lithium-ion
Capacité 8.7 Ah
Tension électrique 36 Volts
Fusible batterie 15Ax2 total 30A
1123 ± 5 mm
1.2 kW/h
6,3 heures
Caractéristiques du moteur
Type de moteur
Puissance nominale 250 Watts
Tension nominale 36 Volts
Couple nominal 6.5 Nm/40 Nm
Rendement moteur >78%
Couples de serrage
Potence 14-15 Nm
Guidon 9-10 Nm
Collier de selle 7 Nm
Pédales 25 Nm
Pression maximum des pneus 40-65 PSI / 2.8-4,.5 BAR
Tension batterie 36 Volts
moteur sans balais à aimants
permanents
45
Page 46

9. RÉGLAGE DES COMMANDES
Vitesse moyenne
Vitesse maximum
Vitesse
Niveau batterie
Feu arrière
Signal freinage
Assistance au pédalage, 6 niveaux
Signal lumineux
Codes d'erreur
L’écran LCD800S signale tout problème. Les codes d’erreur
ci-dessous s’afchent en même temps que le pictogramme du
signal lumineux : à .
Si le signal lumineux est allumé, et qu’un code d’erreur s’afche
en même temps, se rendre dans un magasin IKEA pour faire
effectuer une vérication.
Retirer l’écran avant de retourner le vélo pour entretien.
46
Compteur distance partielle (kilomètre/mile)
Compteur distance totale (pas de remise
à zéro)
Durée trajet (h:sec)
Page 47

10. ENTRETIEN
Effectuer les vérications de sécurité suivantes avant d’utiliser
le vélo électrique:
Freins
• Vérier que les freins fonctionnent correctement.
• Examiner les patins de frein pour vérier qu’ils ne sont pas
usés et qu’ils sont dans l’alignement correct par rapport aux
roues.
• S'assurer que les câbles des leviers de frein sont
correctement xés et qu’ils ne présentent pas de signe
d’usure.
Manivelles et pédales
• Vérier que les manivelles et les pédales sont bien xées.
• Vérier que les manivelles sont correctement xées à l’axe.
Consignes supplémentaires
• S'assurer que tous les réecteurs sont bien xés et qu’ils ne
sont pas recouverts.
• Remarque : un petit boîtier est situé à l'intérieur du boîtier
principal renfermant le feu avant.
• Ne pas nettoyer le vélo à l’aide d’un nettoyeur haute
pression. De l’eau pourrait pénétrer dans le moteur,
provoquer des courts-circuits et endommager des
composants électriques. Utiliser uniquement un chiffon
humide et un détergent doux. Ne pas utiliser pas de
produits acides qui risquent d’endommager le vélo. Utiliser
uniquement un chiffon humide et un détergent doux.
• Éviter de trop lubrier le vélo. Si de l’huile atteint les roues
ou les patins des freins, l'efcacité des freins s’en trouve
réduite ce qui a pour effet d’augmenter les distances de
freinage.
• Ne jamais huiler le letage des pédales. Nettoyer l’excès
d’huile sur les roues ou les patins de frein à l’aide d’eau
savonneuse. Sécher le vélo avant toute nouvelle utilisation.
• Veiller à ne pas endommager le réecteur avant en pliant le
vélo, pour le mettre dans un coffre de voiture par exemple.
• Les feux avant et arrière fonctionnent sur deux modes : xe
ou clignotant.
• Le port du casque est recommandé.
47
Page 48

Réglage des freins
Outil nécessaire : clé Allen 5 mm.
1. S’assurer du bon centrage et serrage des roues.
2. Desserrer ou resserrer la vis (1) an que le patin de frein
sur le disque se rapproche plus de l’intérieur (plus de
puissance de freinage) – ou s’en écarte (moins de puissance
de freinage). La distance recommandée est de 0,3 mm.
3. La distance du patin de frein sur le disque de frein se
règle en tendant ou en relâchant le câble du moyeu (3).
Le réglage n de la plaquette de frein se fait en vissant la
molette de tension (2) sur le levier de frein. La distance
recommandée est identique, environ 0,3 mm.
Le pictogramme de la poubelle barrée indique que le produit
doit faire l'objet d'un tri. Il doit être recyclé conformément à la
réglementation environnementale locale en matière de déchets.
En triant les produits portant ce pictogramme, vous contribuez à
réduire le volume des déchets incinérés ou enfouis, et à diminuer
tout impact négatif sur la santé humaine et l'environnement. Pour
plus d'information, merci de contacter votre magasin IKEA.
4. Tester les freins avant d’utiliser le vélo.
48
Page 49

GEBRUIKSAANWIJZING E-BIKES
INHOUDSOPGAVE
1. BELANGRIJKE INFORMATIE VOOR HET FIETSEN 50
2. INLEIDING 51
3. INSPECTIE EN INSTELLINGEN VOOR HET FIETSEN 52
4. DE EERSTE FIETSRIT 53
5. GEBRUIK VAN DE E-BIKE 54
6. INSTRUCTIES VOOR HET OPLADEN VAN DE ACCU 58
7. VEILIGHEIDSINSTRUCTIES VOOR DE ACCU EN DE ACCULADER 59
8. TECHNISCHE SPECIFICATIES 60
9. DISPLAY - SYMBOLEN EN STORINGSCODES 61
10. ONDERHOUD 62
49
Page 50

18
10
3
2
19
17
16
32
30
33
4
21
23
24
39
25
37
22
35
34
27
15
40
41
13
7
8
6
1
36
14
29
4
38
26
5
31
9
44
11
12
20
42
43
1. BELANGRIJKE INFORMATIE VOOR HET FIETSEN
• Voordat je de ets voor het eerst in gebruik neemt, is het
belangrijk dat je de gebruiksaanwijzing goed doorleest en
controleert of alle onderdelen in goede staat zijn.
• Rij voorzichtig onder gladde omstandigheden, zoals regen of
sneeuw, en hou er rekening mee dat je remafstand langer is
om veilig tot stilstand te komen.
• De elektrische ets functioneert goed onder alle
weersomstandigheden, maar extreme blootstelling aan water
kan leiden tot schade aan de elektronica en/of elektromotor.
50
• Raak de elektronica van de e-bike niet met natte handen aan
en pak nooit tegelijkertijd de plus- en minpolen vast, omdat
de sterke kortsluitspanning in dat geval tot letsel kan leiden.
• Probeer niet om de elektronica van de e-bike zelf te
repareren, maar schakel altijd een vakman in. De
temperatuur heeft invloed op de accuprestaties.
• Bij temperaturen onder het vriespunt kan je met een volle
accu minder lange afstanden aeggen. De accu presteert het
best bij temperaturen boven 0 °C.
Page 51

2. INLEIDING
26
40
41
36
29
14
31
33
32
30
39
1. Frame
2. Voorvork
3. Zadelpen
4. Spatbord
5. Standaard
6. Naaf stuurstang
7. Stuur
8. Verstelbare stuurkop
9. Handvat
10. Zadel
11. Schijfrem voor
13
6
38
21
37
20
35
3
18
10
9
17
44
24
23
25
16
7
8
1
4
2
11
12. Schijfrem achter
13. Remhendel
14. Derailleur voor
15. Derailleur achter
16. Schakelhendel
17. Trapas
18. Kettingwiel & crank
19. Ketting
20. Trapper
21. Accu
22. Lader
22
4
19
5
23. Display
24. Sensor
25. Controlemechanisme
26. Geïntegreerde lijn
27. Motor
28. Velg
29. Spaak
30. Buitenband
31. Binnenband
32. Velglint
33. Voorste naaf
27
34
15
12
43
Materiaal van het frame: aluminium
Wielmaat: 29"
Voorvork: staal met demping
Versnellingen: Shimano Revoshift 21
versnellingen
Velgen: dubbelwandige legering
Remmen: schijfremmen
Motor: 36 volt - 250 watt
Montage: 95 % (stuurpen gedraaid)
Brutogewicht: 30 kg
Nettogewicht van de ets: 28 kg
inclusief accu.
Gewicht van de accu: 1,9 kg
Afmetingen van de accu: 170 x 100 x
80 mm
Accuvermogen: 36V 8,7AH
Max. belasting ets: 120 kg
42
34. Vrijwiel
35. Zadelklem
36. Voorlicht
37. Achterlicht
38. Bel
39. Reector
40. Remkabel
41. Kabel derailleur
42. Beslag
43. Gereedschap
44. Crankbeschermer
51
Page 52

3. INSPECTIE EN INSTELLINGEN VOOR HET FIETSEN
Draai de schroeven goed aan.
52
Page 53

4. DE EERSTE FIETSRIT
• Let goed op als je voor het eerst met je elektrische ets
gaat etsen. Als de accu is ingeschakeld, gaat de e-bike
aanzienlijk sneller dan een gewone ets.
• Maak je eerste rit op open terrein zodat je kan wennen aan
de verbeterde acceleratie.
• De bedieningsunit is voorzien van een
onderspanningsbeveiliging waardoor de trapondersteuning
automatisch wordt uitgeschakeld zodra de accuspanning
onder een bepaald niveau komt.
• Pas op bij het remmen. Gebruik altijd eerst de achterrem, die
remt minder abrupt dan de voorrem.
• De trapondersteuning wordt uitgeschakeld bij een snelheid
van 25 km/u. Hij wordt automatisch weer ingeschakeld zodra
de snelheid onder de 25 km/u zakt.
• Maak geen gebruik van trapondersteuning op gladde
oppervlakken en gravel.
• Schakel de trapondersteuning uit als je merkt dat de e-bike
afwijkend reageert en voorkom zo schade aan elektrische
onderdelen.
53
Page 54

5. GEBRUIK VAN DE E-BIKE
• Begin te trappen; de elektromotor biedt alleen
trapondersteuning tijdens het trappen.
• Je kan het ondersteuningsniveau aanpassen met de plus- en
minknoppen.
• De trapondersteuning valt weg zodra je remt.
• De trapondersteuning valt weg bij een snelheid van 25 km/u.
• Zet de e-bike op slot en haal de sleutel uit de accu als je de
e-bike onbeheerd achterlaat of neem de accu mee.
Om de accu te starten moet je de ON-knop aanzetten.
Bedieningspaneel:
De motor wordt gecontroleerd via het bedieningspaneel op
het stuur. Er zijn 6 verschillende snelheden. Voor een optimale
werking: kies een lage snelheid op het bedieningspaneel en zet
de versnelling in stand 1 wanneer je begint te trappen.
ON/OFF:
Druk de ON/OFF-knop op het bedieningspaneel in en houd deze
ca. 2 seconden ingedrukt. Het LCD-display gaat aan. Om het
display handmatig uit te zetten, de ON/OFF-knop 2 seconden
ingedrukt houden.
1. Om het display te starten, de ON/OFF-knop gebruiken.
2. Houd de plusknop een paar seconden ingedrukt om het licht
op het display aan te doen.
3. Het ondersteuningsniveau pas je aan met de plus- en
minknop. Er zijn 6 standen.
4. Als je hulp wilt bij het lopen met de e-bike tegen een heuvel
op, houd je de minknop ingedrukt, de e-bike houdt dan
automatisch een snelheid van 6 km/u aan.
54
Page 55

OVERZICHT ACTIERADIUS
Voorwaarde: nieuwe en volledig opgeladen accu (313Wh, 36V, 8.7Ah)
Belasting: ca. 74 kg
Afstand
10 km 20 km 30 km 40 km 50 km 60 km 70 km
Terrein
Vlak terrein
Licht heuvelachtig terrein
Heuvelachtig terrein
Gemiddelde ondersteuning – maximale bijdrage door zelf mee te trappen
Gemiddelde ondersteuning – lage tot gemiddelde bijdrage door zelf mee te trappen
Maximale ondersteuning – maximale bijdrage door zelf mee te trappen
Maximale ondersteuning – lage tot gemiddelde bijdrage door zelf mee te trappen
Lichte meewind
28 graden Celsius
Droge weg
Lichte meewind
28 graden Celsius
Droge weg
Lichte meewind
28 graden Celsius
Droge weg
55
Page 56

Let op:
• Zorg voor de juiste bandenspanning.
• Bij temperaturen onder 0 graden Celsius wordt de actieradius
minder.
• Wanneer de belasting toeneemt, vermindert de actieradius.
• Bij gladheid en nat wegdek neemt de actieradius af.
Je bereik maximaliseren
Er zijn allerlei factoren die van invloed zijn op de prestaties van
de accu en de totale actieradius beïnvloeden.
• Laad de accu voor een lange rit volledig op.
• Op oneffen wegen en heuvelachtig terrein heeft de e-bike
meer vermogen nodig.
• De e-bike verbruikt meer energie door veelvuldige
snelheidswisselingen.
• Hoe zwaarder de e-bike wordt belast, hoe hoger het
energiegebruik.
• Controleer de bandenspanning en hou de e-bike schoon en
goed gesmeerd: dat bespaart energie.
• Zorg dat beide wielen vrijuit kunnen draaien, het bespaart
energie als de remvoeringen niet blijven hangen.
• Controleer de remvoeringen regelmatig. Door krachtig te
trappen, spaar je de accu en vergroot je het bereik.
56
Page 57

DE ACCU UITNEMEN EN PLAATSEN
1. Schakel het display uit.
2. Draai de sleutel naar links om de accu te ontgrendelen.
3. Til de accu uit het vak omhoog en verwijder deze.
Parkeren
• Druk voorzichtig op de "ON/OFF-knop" van de accu totdat
het bovenste lampje uitgaat. Na een paar seconden gaan de
andere lampjes ook uit en is de accu volledig uitgeschakeld.
• Laat de e-bike niet onbeschermd in de regen of sneeuw
staan.
• Als de e-bike nat wordt, droog je hem na gebruik af met een
handdoek.
• Vergeet niet om zowel het voorlicht als het achterlicht uit te
schakelen.
• Wanneer de ets is gebruikt op een weg waar met zout
is gestrooid, de ets na aoop meteen schoonmaken
met schoon water.
57
Page 58

6. INSTRUCTIES VOOR HET OPLADEN VAN DE ACCU
• Schakel de accu altijd uit voordat je deze oplaadt.
• De accu wordt warm tijdens het opladen. Uit
veiligheidsoverwegingen mag je de accu nooit afdekken.
• Plaats de lader op een vlakke ondergrond.
• Je kan de accu tijdens het laden op de elektrische ets laten
zitten of deze verwijderen.
Accu
1. Opladen: Sluit de acculader aan op de accu en steek de
stekker van de 230V-acculader in het stopcontact.
2. Het volledig opladen van een lege accu duurt ongeveer 6
uur.
3. Als de accu volledig opgeladen is, is het led-lampje
van de acculader groen in plaats van rood. Uit
veiligheidsoverwegingen is het verstandig de accu los
te koppelen zodra deze volledig is opgeladen. Koppel de
230V-acculader los van het stroomnet en koppel daarna de
accu los.
24 3 1
1. Accu
2. Plug voor acculader
3. Acculader
4. 230 V
Lader
58
Page 59

7. VEILIGHEIDSINSTRUCTIES VOOR ACCU EN ACCULADER
De elektrische ets heeft een lithium-ion accu. Laad de accu
nooit op met een oplader die niet geschikt is voor dit type accu.
Bij het opladen van een lithium-ion accu met een ongeschikte
lader bestaat de kans op oververhitting, brand of een
ontplofng. Neem bij verlies of beschadiging van je acculader
contact op met een IKEA winkel bij jou in de buurt om een
nieuwe te bestellen.
• Een nieuwe accu is voor de helft opgeladen. De eerste drie
keer moet je de accu minimaal 12 uur opladen.
• Controleer of de spanning van de acculader overeenkomt met
de spanning van je stroomnet.
• De lader is alleen geschikt voor gebruik binnenshuis.
• Öpppna inte laddaren, eftersom det är en
högspänningsapparat.
• Maak de lader niet open; het is een hoogspanningsapparaat.
• Pak de twee elektroden van de accu nooit tegelijkertijd vast
omdat dat een elektrische schok tot gevolg kan hebben.
• Haal de accu nooit uit de e-bike tijdens het opladen.
• Laad de accu om de 3 maanden minimaal 2 uur op om
aanspraak te kunnen blijven maken op de garantie van
de accu.
• Gebruik geen andere opladers om de accu op te laden.
• Voorkom dat vloeistoffen of metalen in de acculader kunnen
dringen.
• Laad de accu niet op in de buurt van baby’s en kleine
kinderen.
• Gebruik de accu niet in vettige, stofge, vieze of vochtige
ruimtes en leg hem ook niet in de volle zon.
• Pas geen geweld toe op de accu en voorkom sterke trillingen.
• Gebruik de acculader niet bij onweer en bliksem.
• Gebruik de acculader altijd in koele, goed geventileerde
ruimtes.
• Maak de accu nooit open. Je kan geen aanspraak maken op
de garantie als de accu geopend of beschadigd is.
• Je e-bike is gemaakt voor normaal gebruik op de weg en
voor gebruik door één persoon. Gebruik de e-bike niet voor
buitensporige manoeuvres, zoals extreem off-road-gebruik,
sprongen of hele zware belastingen. Dat kan leiden tot
beschadiging van de e-bike en ernstig letsel.
• De e-bike mag alleen worden opgeladen met een lader van
het model C060L1001.
• Als weggebruiker ben je verplicht de verkeersregels te volgen
van het land waarin je je bevindt.
59
Page 60

8. TECHNISCHE SPECIFICATIES
Parameters van de e-bike
Afmetingen (L × B × H) 1900 × 700 × 1180mm
Gewicht ≤ 25kg
Maximumsnelheid 25 km/h
Maximumbelasting ≤ 120kg
Wielbasis tussen het voorste/
achterste wiel
Energieverbruik per 1000 km 1.2 kW/h
Parameters acculader
Tijdsduur volledig opladen 6,22 uur
Ingangsspanning 220V/60Hz
Maximaal uitgangsvermogen 60 Watt
Kontrollmodulpar
Onderspanningsbeveiliging 31.5 ± 1 Volt
Overspanningsbeveiliging 15 ± 1 Ampere
Parameters accu
Soort accu Lithium-ion accu
Capaciteit 8.7 Ah
Accuspanning 36 Volt
Batterisäkring 15Ax2 totalt 30A
1135 ± 5mm
Parameters motor
Motortype
Nominaal
uitgangsvermogen
Nominale spanning 36 Volt
Nominale torsie 7Nm/32Nm
Motorefciëntie >75%
Draaimomenten
Stuurpen 12 Nm
Stuur 8 Nm
Zadelklem 7 Nm
Trappers 20 Nm
Maximale bandenspanning 40-65 PSI / 2.8-4,.5 BAR
borstelloze permanente
magneetmotor
250 Watt
60
Page 61

9. DISPLAY – SYMBOLEN EN STORINGSCODES
Gemiddelde snelheid
Hoogste snelheid
Snelheid
Accu-indicator
Achtergrondverlichting
Remindicatie
PAS Snelheidsstand (Pedal Assist
System), 6 standen
Waarschuwingslampje
Storingscodes
LCD800S slaat alarm wanneer er problemen ontstaan. De
volgende storingscodes zijn zichtbaar in het display samen met
het symbool van het waarschuwingslampje
: aan .
Wanneer het waarschuwingslampje brandt, samen met een
storingscode, moet je bij een IKEA winkel langsgaan voor
controle.
Verwijder altijd het display wanneer de ets op zijn kop gezet
moet worden voor service en onderhoud.
Dagteller (kilometer/mile)
ODO=Totale afstand (kan niet worden
gereset)
TIME= Geetste tijd/ronde (h:sec)
61
Page 62

10. ONDERHOUD
Voer onderstaande veiligheidscontroles uit voordat je op je
e-bike stapt:
Remmen
• Controleer of de remmen goed werken.
• Controleer de remvoeringen om te kijken of ze niet versleten
zijn en of ze nog evenwijdig aan de velgen liggen.
• Zorg dat de handremkabels op de juiste manier bevestigd
zijn en geen tekenen van slijtage vertonen
Pedaalkrukken en trappers
• Controleer of de trappers goed vastzitten op de krukken.
• Controleer of de krukken op de juiste manier op de trapas
zijn bevestigd.
Andere informative
• Zorg dat alle reectoren op de juiste manier bevestigd zijn en
dat het zicht erop niet belemmerd wordt.
• Merk op dat er in een hoofdpakket een kleiner pakket zit met
daarin het voorlicht.
• Reinig de e-bike nooit met een hogedrukreiniger. Het water
kan in de motor dringen en dat kan leiden tot kortsluiting
en beschadiging van elektrische onderdelen. Gebruik alleen
een vochtige doek met een mild schoonmaakmiddel om
de e-bike schoon te maken. Gebruik geen zuurhoudende
schoonmaakmiddelen omdat gebruik daarvan kan leiden tot
beschadiging van de e-bike.
• Gebruik niet te veel smering. Olie op de wielen of remblokken
leidt tot verminderde prestaties van de remmen en verlengt
de remweg.
• Gebruik nooit olie op de schroefdraden van de trappers. Spoel
overtollige olie op de wielen of remblokken af met water en
een zeepoplossing. Maak de e-bike droog voordat je weer
gaat etsen.
• Zorg dat de voorste wielreectoren niet beschadigen wanneer
de ets wordt ingeklapt bij transport.
• Het voor- en achterlicht heeft twee standen: continu of
knipperlicht.
• Vergeet je helm niet!
Afstellen van de remmen
Je hebt het volgende gereedschap nodig: inbussleutel 5 mm
1. Zorg ervoor dat de wielen zijn gecentreerd en aangedraaid.
2. Maak de inbusschroef (1) los of span deze, zodat de
remvoering aan de binnenkant van de remschijf dichter
bij de remschijf (meer remvermogen) of er verder vanaf
(minder remvermogen) komt. Een geschikte afstand is 0,3
mm.
3. De afstand tussen de remvoering aan de buitenkant van de
remschijf kan grof worden afgesteld door de kabel bij de
naaf te spannen of losser te maken (3). Fijn afstellen van de
remvoering doe je door de kabelschroef (2) op de handrem
te draaien. De afstand moet hetzelfde zijn, ca 0,3 mm.
4. Probeer de remmen uit voordat je gaat etsen.
62
Page 63

Het symbool met de doorgestreepte vuilnisbak geeft aan dat het
product gescheiden van het huishoudelijk afval moet worden
aangeboden. Het product moet worden ingeleverd voor recycling
in overeenstemming met de plaatselijke milieuvoorschriften voor
afvalverwerking. Door producten met dit symbool te scheiden
van het huishoudelijk afval, help je de hoeveelheid afval naar
verbrandingsovens of stortplaatsen te verminderen en eventuele
negatieve invloeden op de volksgezondheid en het milieu te
minimaliseren. Voor meer informatie neem contact op met IKEA.
63
Page 64

NOTKUNARLEIÐBEININGAR FYRIR RAFHJÓL
EFNISYFIRLIT
1. MIKILVÆGAR UPPLÝSINGAR ÁÐUR EN ÞÚ STÍGUR FYRST Á HJÓLIÐ 65
2. INNGANGUR 66
3. SKOÐUN OG STILLINGAR ÁÐUR EN ÞÚ STÍGUR FYRST Á HJÓLIÐ 67
4. FYRSTA HJÓLAFERÐIN 68
5. NOTKUN RAFHJÓLSINS 69
6. SVONA Á AÐ HLAÐA RAFHLÖÐUNA 73
7. ÖRYGGISUPPLÝSINGAR FYRIR RAFHLÖÐUNA OG HLEÐSLUTÆKIÐ 74
8. TÆKNIUPPLÝSINGAR 75
9. STILLINGAR STJÓRNBÚNAÐAR 76
10. VIÐHALD 77
64
Page 65

1. MIKILVÆGAR UPPLÝSINGAR FYRIR FYRSTU FERÐINA
• Vinsamlega lestu allar leiðbeiningarnar vandlega og skoðaðu
hvort að öll atriði séu í góðu ástandi áður en þú stígur fyrst á
hjólið.
• Vinsamlega hægðu á þér í hálum aðstæðum, t.d.
þegar rignir eða snjóar, og athugaðu að þú þarft lengri
hemlunarvegalengd til að tryggja örugga stöðvun.
• Þetta rafhjól er áreiðanlegt í hvaða veðri sem er, en mikill
vökvi gæti skemmt rafbúnaðinn og/eða rafhreylinn.
• Snertu aldrei rafbúnaðinn á rafhjólinu ef þú ert með blautar
hendur og snertu aldrei plús og mínus skautin á sama tíma
þar sem skammhlaupsstraumurinn gæti valdið skaða.
• Ekki reyna að laga rafbúnaðinn á hjólinu sjálf/ur – leitaðu
alltaf til sérfræðings.
• Afkastageta rafhlöðunnar getur verið breytileg eftir
hitastiginu. Rafhjólið kemst styttri vegalengdir á einni hleðslu,
í hitastigi undir 0°C. Rafhlaðan virkar best í hitastigum yr
0°C.
65
Page 66

2. INNGANGUR
26
40
36
29
14
31
33
32
30
39
41
16
38
13
7
6
1) Grind
2) Gaffall
3) Sætisstöng
4) Bretti
5) Standari
6) Höfuðbúnaður
7) Stýri
8) Aðlaganleg höfuðlega
9) Grip
10) Hnakkur
11) Fremri diskabremsa
21
37
35
10
3
9
23
25
8
1
4
22
Efni umgjarðar: ál
Hjólastærð: 29“
4
12
27
34
Fremri gaffall: stál með fjöðrun
Gírar: 21
Gjarðir: Double-wall málmblanda
Bremsur: diskabremsur
Mótor: 36 volt – 250 vött
Uppistaða: 95% (snúinn stöngull)
Heildarþyngd: 30 kg.
Eigin þyngd á hjóli: 28 kg með
rafhlöðu.
Þyngd rafhlöðu: 1,90 kg
Stærð rafhlöðu: 170x100x80 mm
Styrkur rafhlöðu: 36V 8,7 AH
Burðarþol: 120 kg
34) Fríhjól
35) Hraðlosunarbúnaður
36) Framljós
37) Afturljós
38) Bjalla
39) Glitauga
40) Hemlaleiðsla
41) Gírabarki
42) Skrúfur
43) Tækjasett
44) Keðjuhlíf
17
44
2
11
18
12) Aftari diskabremsa
13) Bremsustöng
14) Fremri skiptir
15) Aftari skiptir
16) Skiptiarmur
17) Sveifalegusett
18) Sveifasett
19) Keðja
20) Fótstig
21) Rafhlaða
22) Hleðslutæki
24
20
19
5
23) Skjár
24) Skynjari
25) Stjórnborð
26) Innbyggð lína
27) Vél
28) Gjörð
29) Teinar
30) Dekk
31) Innri slanga
32) Gjarðarband
33) Fremri hjólnöf
15
43
42
66
Page 67

3. SKOÐUN OG STILLINGAR ÁÐUR EN ÞÚ STÍGUR FYRST Á HJÓLIÐ
Hertu skrúfurnar:
67
Page 68

4. FYRSTA HJÓLAFERÐIN
• Vertu mjög varkár í fyrstu hjólaferðinni! Rafhjólið er talsvert
hraðskreiðara en venjulegt hjól þegar kveikt er á hreyinum!
• Vertu á opnu svæði í fyrstu ferðinni svo þú getir vanist
hraðanum.
• Stjórnborðið er með lágspennuvarnarker sem slekkur
sjálfkrafa á astýringunni ef rafhlöðuspennan dettur niður
fyrir ákveðið stig.
• Vertu varkár þegar þú hemlar. Hemlaðu alltaf fyrst með
afturbremsunni, þar sem hún er ekki jafn kröftug og
frambremsan.
• Það slökknar á astýringunni við 25 km/klst. Það kviknar
sjálfkrafa á henni aftur þegar hraðinn fer niður fyrir 25 km/
klst.
• Notaðu ekki astýringuna á hálu yrborði eða möl.
• Slökktu á astýringunni ef rafhjólið hegðar sér ekki sem skildi
til að koma í veg fyrir skemmdir á rafbúnaðinum.
68
Page 69

5. NOTKUN RAFHJÓLSINS
• Byrjaðu að hjóla, mótorinn hjálpar einungis til á meðan þú
hjólar.
• Ef þú vilt breyta styrknum, ýttu þá á plús eða mínus takkann.
• Mótorinn stöðvast þegar þú hemlar.
• Mótorinn stöðvast þegar þú nærð 25 km/klst.
• Ef þú skilur rafhjólið eftir eftirlitslaust, læstu því og fjarlægðu
rafhlöðulykilinn eða taktu rafhlöðuna með þér.
Ýttu á ON til að kveikja á rafhlöðunni.
Stjórnborð
Vélinni er stjórnað með stjórnborðinu á stýrinu. Hjólið er með
sex hraðastillingar. Til að fá bestu virknina ættir þú að velja
lágan hraða og stilla gírana í fyrstu stillingu þegar þú byrjar að
hjóla.
ON/OFF
Ýttu á og haltu inni ON/OFF takkanum í u.þ.b. tvær sekúndur.
Þá kviknar ljós á LCD skjánum. Til að slökkva handvirkt á
skjánum skal ýta á ON/OFF takkann og halda inni í tvær
sekúndur.
1. Til að kveikja á skjánum skal nota ON/OFF takkann.
2. Haltu plústakkanum niðri í nokkrar sekúndur til að kveikja á
skjáljósinu. Gerðu það sama til að slökkva á skjáljósinu.
3. Stilltu aðstoðina með plús og mínus tökkunum. Hægt er að
velja á milli sex þrepa.
4. Ef þú þarft aðstoð þegar þú reiðir rafhjólið skaltu halda niðri
mínustakkanum til að rafhjólið nái 6 km/klst.
69
Page 70

VEGALENGDIR
Skilyrði: Rafhlaðan er fullhlaðin og ný (314Wh)
Ökumaður um það bil 74 kg
Vegalengd
10 km 20 km 30 km 40 km 50 km 60 km 70 km
Ástand vegar
Flatir vegir
Lítilsháttar brekkur
Miklar brekkur
Meðal astýring – full aðstoð frá eigin fótstigi
Meðal astýring – lág til meðal aðstoð frá eigin fótstigi
Full astýring – full aðstoð frá eigin fótstigi
Full astýring – lág til meðal hjálp frá eigin fótstigi
Vægur meðvindur
28°C
Þurrir vegir
Vægur meðvindur
28°C
Þurrir vegir
Vægur meðvindur
28°C
Þurrir vegir
70
Page 71

Vinsamlega athugaðu eftirfarandi fyrirvara:
• Dekkin ættu að vera uppblásin og með hælegan loftþrýsting.
• Ef lofthitinn lækkar þá dregur úr drægni.
• Ef þyngd hjólreiðamanns hækkar þá dregur úr drægni.
• Ef vegirnir eru blautir eða hálir þá dregur úr drægni.
Hámörkun vegalengdar
Margir þættir spila inn í afkastagetu rafhlöðunnar sem hafa áhrif
á þá eiginleika sem eru í boði.
• Vertu viss um að fullhlaða rafhlöðuna áður en farið er í langa
ferð.
• Ferðir um ójafna vegi og upp brekkur eyða meiri orku.
• Hjólið eyðir meiri orku þegar þú skiptir oft um gíra.
• Þyngri farmur eyðir meiri orku.
• Vertu viss um að þrýstingur í dekkjum sé í lagi og að halda
hjólinu hreinu og vel smurðu, en það getur sparað orku.
• Vertu viss um að bæði hjólin snúist frjálslega, en ef
hemlaborðarnir eru ekki að festast þá getur það sparað orku.
Athugaðu hemlaborðana reglulega.
• Kröftugt fótstig sparar rafhlöðuna og eykur vegalengdina.
71
Page 72

AÐ TAKA RAFHLÖÐUNA ÚR OG SETJA AFTUR Í
1. Slökktu á skjánum.
2. Snúðu lyklinum til vinstri til að aæsa rafhlöðunni.
3. Lyftu rafhlöðunni upp og úr festingunni og fjarlægðu hana.
Að leggja
Ýttu á rofann á rafhlöðunni í 3-5 sekúndur til að kveikja/
slökkva á henni. Rafhlöðudíóður ON: Kveikt er á rafhlöðunni.
Rafhlöðudíóður OFF: Slökkt er á rafhlöðunni.
• Forðastu að skilja rafhjólið eftir óvarið í rigningu eða snjó.
• Ef rafhjólið blotnar ætti að þurrka af því með þurru handklæði
að ferð lokinni.
• Ekki gleyma að slökkva á fram- og afturljósi.
• Þegar rafhjólið er notað á söltuðum vegi þarf að þrífa
hjólið með hreinu vatni strax eftir notkun.
72
Page 73

6. SVONA Á AÐ HLAÐA RAFHLÖÐUNA
• Slökktu alltaf á rafhlöðunni áður en þú hleður hana.
• Rafhlaðan hitnar á meðan hleðslu stendur. Öryggisins vegna
áttu aldrei að hylja rafhlöðuna.
• Hafðu hleðslutækið á jafnsléttu.
• Þú getur annað hvort hlaðið rafhlöðuna á meðan hún er í
rafhjólinu eða fjarlægt hana.
Rafhlaða
1. Tengdu hleðslutækið við rafhlöðuna og tengdu svo
hleðslutækið við innstungu. Það tekur u.þ.b. sex klukkutíma
að fullhlaða tóma rafhlöðu.
2. Þegar rafhlaðan er fullhlaðin mun LED ljósið breytast úr
rauðu yr í grænt. Af öryggisástæðum er mælt með að taka
rafhlöðuna úr sambandi um leið og hún er fullhlaðin.
3. Taktu hleðslutækið úr sambandi og aftengdu svo rafhlöðuna.
24 3 1
1. Rafhlaða
2. Hleðslutenging rafhlöðu
3. Hleðslutæki
4. 230V
Hleðslutæki
73
Page 74

7. ÖRYGGISUPPLÝSINGAR FYRIR RAFHLÖÐU OG HLEÐSLUTÆKI
Rafhjólið er með lithium-ion rafhlöðu. Notaðu aldrei önnur
hleðslutæki en þau sem eru hönnuð fyrir þessa rafhlöðu. Að
nota óviðeigandi hleðslutæki fyrir lithium-ion rafhlöðu gæti
valdið ofhitnun, eldsvoða eða sprengingu. Ef hleðslutækið
glatast eða skemmist, hafðu þá samband við næstu IKEA
verslun til að panta nýtt.
• Fyrstu þrjú skiptin sem þú hleður rafhlöðuna skaltu hlaða í að
lágmarki 12 klukkutíma.
• Vertu viss um að rafspenna hleðslutækisins sé sú sama og á
rafveitu þinni.
• Það á alltaf að nota hleðslutækið innandyra.
• Ekki opna hleðslutækið, þar sem það er háspennutæki.
• Snertu aldrei rafskautin tvö á sama tíma, þar sem það gæti
valdið raosti.
• Taktu aldrei rafhlöðuna úr rafhjólinu á meðan hleðslu stendur.
• Hafðu rafhlöðuna í hleðslu í að lágmarki tvær
klukkustundir á þriggja mánaða fresti, annars fellur
rafhlaðan ekki undir ábyrgðina okkar.
• Notaðu aldrei önnur hleðslutæki til að hlaða rafhlöðuna.
• Leyfðu ekki vökva eða málmi að komast inn í hleðslutækið.
• Vertu ekki með rafhlöðuna í hleðslu nálægt ungbörnum eða
litlum börnum.
• Notaðu aldrei hleðslutækið í rykugum, skítugum, rökum eða
olíukenndu umhver og forðastu beint sólarljós.
• Ekki slá á hleðslutækið og forðastu mikinn titring. Forðastu
að nota hleðslutækið í umhver.
• Notaðu hleðslutækið alltaf á svölum og loftræstum svæðum.
• Ábyrgðin fellur úr gildi ef rafhlaðan er opnuð eða skemmd.
• Rafhjólið þitt er hannað fyrir venjulega umferð og fyrir eina
manneskju. Notaðu aldrei rafhjólið fyrir öfgakennd tilþrif,
eins og utanvegaakstur, stökk eða þungan farm. Þetta gæti
skaðað rafhjólið og valdið alvarlegum meiðslum.
• Ætti aðeins að vera notað með hleðslutæki að gerð
C060L1001E.001.
• Sem vegfarandi þarft þú að fara eftir umferðareglum í þínu
landi.
74
Page 75

8. TÆKNIUPPLÝSINGAR
Fastar rafhjóls
Mál (L x B x H) 1865 × 1140 × 630 mm
Þyngd ≤ 23 kg
Hámarkshraði 25 km/klst
Hámarksbyrði ≤ 120 kg
Hjólahaf á milli þungamiðju fram-
og afturhjóls
Orkunotkun á hverja 1000 km 1,2 kW/h
Fastar hleðslutækis
Tími að fullri hleðslu 6,3 klukkutímar
Spenna inntaks 100 V - 240 V~50-60 Hz
Hámarksafköst 60 vött
Fastar stýribúnaðar
Lágspennuvörn 30 ± 0,5 volt
Yrspennuvörn 12 ± 1 amper
Fastar rafhlöðu
Tegund rafhlöðu Lithium-ion rafhlaða
Afkastageta 8,7 amperstund
Rafhlöðuspenna 36 volt
Öryggi rafhlöðu 15Ax2 samtals 30A
1123 ± 5 mm
Fleiri starfrækslumörk
Tegund hreyls Brushless permanent magnet motor
Nafnafköst 250 vött
Málspenna 36 volt
Snúningsvægi 6,5 Nm/40 Nm
Árangur hreyls >78%
Snúningsvægi
Stýrisstammi 14-15 Nm
Stýri 9-10 Nm
Sætisklemma 7 Nm
Fótstig 25 Nm
Hámarksloftþrýstingur í dekkjum 40-65 PSI / 2,8-4,5 BAR
75
Page 76

9. STJÓRNBORÐSSTILLINGAR
Meðalhraði
Hámarkshraði
Hraði
Staða hrafhlöðu
Villuskilaboð
LCD800S hljómar við vandamál. Eftirfarandi villuskilaboð sjást
á skjánum ásamt merkinu með varúðarljósinu :
to .
Hafðu vinsamlega samband við IKEA verslunina ef kveikt er á
varúðarljósinu og villuskilaboð sjást.
76
Baklýsing
Hemlunarmerki
PAS hraðastillingar, sex þrep
Varúðarlýsing
Ferðamælir (kílómetri/míla)
Heildarvegalengd (ekki hægt að
endurstilla)
Hjólreiðatími/lota (h:s)
Fjarlægðu skjáinn ef þú vilt snúa hjólinu á hvolf til að gera við
það.
Page 77

10. VIÐHALD
Vertu viss um að gera eftirfarandi öryggiseftirlit áður en þú
stígur á rafhjólið:
Bremsur
• Vertu viss um að bremsurnar virki sem skildi.
• Skoðaðu hemlaborðana til að passa að þeir séu ekki eyddir
og séu úttaðir við dekkin.
• Vertu viss um að handbremsukaplarnir séu festir almennilega
og séu ekki slitnir.
Sveif og fótstig
• Athugaðu hvort fótstig og sveifar séu fest almennilega.
• Athugaðu hvort sveifararmarnir séu festir almennilega við
öxulinn.
Aðrar upplýsingar
• Vertu viss um að glitaugun passi og séu ekki hulin.
• Athugaðu að það er lítill kassi innan aðalkassans með hjólinu,
sem inniheldur framljósið.
• Ekki þrífa rafhjólið með háþrýstidælu. Vatn gæti lekið inn
að hreyinum, sem gæti valdið skammhlaupi og skemmt
rafbúnaðinn. Notaðu rakan klút með mildri sápu til að þrífa
rafhjólið. Notaðu ekki sýrumyndandi hreinsiefni þar sem þau
gætu skemmt rafhjólið.
• Ekki smyrja of mikið. Ef olía kemst í hjólin eða
bremsupúðana getur það dregið úr virkni bremsanna og lengt
hemlunarvegalengdina.
• Aldrei nota olíu á fótstigin. Þvoðu umframolíu af hjólunum og
bremsupúðunum með sápuvatni. Þurrkaðu rafmagnshjólið
áður en þú notar það aftur.
• Vertu viss um að skemma ekki fremra glitljósið þegar hjólið
er brotið saman og sett í bílskott.
• Fram- og afturljósin eru með tvær stillingar: stöðugt og
blikkandi.
• Hjólreiðamenn eiga að vera með hjálm.
Stilling á bremsum
Það þarf eftirfarandi verkfæri: 5 mm sexkant
1. Vertu viss um að hjólin séu miðjuð og fest.
2. Losaðu eða hertu skrúfuna (1) þannig að bremsupúðinn
á bremsudisknum sé nær (meira hemlunara) - eða fjær
(minna hemlunara) á bremsudisknum. Hentug fjarlægð er
0,3 mm.
3. Fjarlægðin á milli bremsupúða og yrborðs bremsudisks er
stillt með því að herða eða losa snúruna við miðpunktinn
(3). Til að fínstilla innra byrði bremsunnar skal snúa
vírskrúfunni (2) á handbremsuhandfanginu. Fjarlægðin ætti
að vera sú sama, um 0,3 mm.
4. Prófaðu bremsurnar áður en þú byrjar að hjóla.
77
Page 78

Ruslatunnan sem strikað er yr táknar að þessari vöru má ekki
henda með almennu heimilissorpi. Það ætti að skila inn vörunni
í endurvinnslu í samræmi við reglur um sorphirðu. Með því að
aðgreina merktar vörur frá heimilissorpi hjálpar þú að minnka
það magn af rusli sem sent er í brennsluofna eða landfyllingar
og minnkar því hættuna á mengun sem hefur neikvæð áhrif á
umhverð og heilsuna. Hafðu vinsamlega samband við IKEA til að fá
nánari upplýsingar
78
Page 79

BRUKSANVISNING FOR ELEKTRISKE SYKLER
INNHOLD
1. VIKTIG INFORMASJON FØR DU GÅR I GANG 80
2. INTRODUKSJON 81
3. KONTROLLER OG TILPASS ELSYKKELEN FØR BRUK 82
4. DIN FØRSTE SYKKELTUR 83
5. SLIK BRUKER DU ELSYKKELEN 84
6. INSTRUKSER FOR LADING AV BATTERI 88
7. SIKKERHETSINSTRUKSER FOR BATTERI OG LADER 89
8. TEKNISKE SPESIFIKASJONER 90
9. INNSTILLINGER FOR KONTROLLPANEL 91
10. VEDLIKEHOLD 92
79
Page 80

18
10
3
2
19
17
16
32
30
33
4
21
23
24
39
25
37
22
35
34
27
15
40
41
13
7
8
6
1
36
14
29
4
38
26
5
31
9
44
11
12
20
42
43
1. VIKTIG INFORMASJON FØR DU GÅR I GANG
• Les bruksanvisningen nøye og kontroller at alle deler av
sykkelen er i god stand før du begynner å sykle.
• Det er viktig å senke farten ved nedbør, f.eks. regn og snø,
fordi underlaget kan være glatt og da blir bremselengden
lengre.
• Elsykkelen kan trygt brukes i all slags vær, men store
mengder vann kan skade elektronikken og/eller motoren.
• Du bør aldri ta på elektronikken på elsykkelen med våte
80
hender eller berøre pluss- og minuspolen samtidig, fordi den
sterke kortslutningsstrømmen kan forårsake skade.
• Spør alltid en spesialist om hjelp til å reparere elektronikken
på elsykkelen.
• Batteriets ytelse kan variere avhengig av temperatur.
Temperaturer under 0 °C reduserer den totale rekkevidden
du kan sykle uten å måtte lade opp batteriet. Batteriet har
best ytelse i temperaturer over 0 °C.
Page 81

2. INTRODUKSJON
26
40
36
29
14
31
33
32
30
39
41
16
38
13
7
6
1. Ramme
2. Gaffel
3. Setepinne
4. Skjerm
5. Sykkelstøtte
6. Styrelager
7. Styre
8. Justerbar styrestamme
9. Håndtak
10. Sete
11. Bremseskive foran
21
37
20
35
3
18
10
9
17
44
24
23
25
8
1
4
2
11
12. Bremseskive bak
13. Håndbrems
14. Gir foran
15. Gir bak
16. Girspake
17. Kranklager
18. Tannhjul og krank
19. Kjetting
20. Pedal
21. Batteri
22. Lader
22
4
19
5
23. Skjerm
24. Sensor
25. Kontroll
26. Integrert ledning
27. Motor
28. Felg
29. Eike
30. Dekk
31. Sykkelslange
32. Felgbånd
33. Navet foran
27
34
15
12
43
Rammemateriale: Aluminium
Hjulstørrelse: 29"
Forgaffel: Stål med demping
Gir: 21
Felger: Legering med doble vegger.
Bremser: Skivbremser
Motor: 36 volt - 250 watt
Montering: 95 % (styrestammen vris
på plass)
Bruttovekt: 30 kg
Nettovekt av sykkel: 28 kg inkludert
batteri
Batterivekt: 1,9 kg
Mål på batteri: 170 x 100 x 80 mm
Batteristrøm: 36V 8,7AH
Maks. belastning på sykkelen: 120 kg
42
34. Frihjul
35. Hurtigkobling
36. Lykt foran
37. Lykt bak
38. Ringeklokke
39. Reeks
40. Bremsewire
41. Girwire
42. Skruer
43. Verktøysett
44. Krankdeksel
81
Page 82

3. KONTROLLER OG TILPASS ELSYKKELEN FØR BRUK
Stram til skruene:
82
Page 83

4. DIN FØRSTE SYKKELTUR
• Vær forsiktig første gang du bruker elsykkelen. I strømmodus
er elsykkelen vesentlig raskere enn en vanlig sykkel.
• Det kan være lurt å gjennomføre den første sykkelturen på
en åpen slette, slik at du blir vant til framdriften.
• Batteriet har et beskyttelsessystem for lavspenning, som
automatisk slår av hjelpemotoren hvis batterispenningen
synker til under et gitt nivå.
• Vær forsiktig når du bremser. Bruk alltid bakbremsen først,
den gir en mykere nedbremsing enn forhjulsbremsen.
• Hjelpemotoren blir deaktivert når hastigheten er 25 km/t.
Den blir automatisk slått på igjen når hastigheten synker
under 25 km/t.
• Ikke bruk hjelpemotoren på grus eller glatte underlag.
• Hvis elsykkelen ikke fungerer som den skal, er det viktig å
slå av hjelpemotoren for å unngå at de elektriske delene blir
ødelagt.
83
Page 84

5. SLIK BRUKER DU ELSYKKELEN
• Begynn å tråkke; den elektriske motoren hjelper deg kun når
du tråkker på pedalene.
• Hvis du ønsker å regulere motorstyrken trykker på du plussog minusknappene.
• Hjelpemotoren stopper når du bremser.
• Hjelpemotoren stopper når hastigheten din er 25 km/t.
• Hvis du går fra elsykkelen uten tilsyn, bør du låse batteriet
med nøkkelen eller ta det med deg.
For å slå på batteriet, trykk på ON-knappen.
Kontrollpanel:
Motoren kontrolleres av kontrollpanelet på styret. Det er seks
ulike hastigheter. Sykkelen yter best om du velger lav hastighet
på kontrollpanelet og setter sykkelen i første gir når du
begynner å sykle.
ON/OFF:
Hold inne ON/OFF-knappen i omtrent to sekunder. LCDskjermen lyser opp. For å skru av skjermen manuelt, holder du
inne ON/OFF-knappen i to sekunder.
1. For å skru på skjermen, trykker du på ON/OFF-knappen.
2. Hold inne pluss-knappen i noen sekunder for å skru på lyset
på skjermen.
3. Gjør det samme for å skru lyset av. Motorstyrken reguleres
ved hjelp av pluss- og minusknappene. Det er 6 nivåer å
velge mellom.
4. Hvis du trenger hjelp til å trille elsykkelen, kan du holde
inne minusknappen og elsykkelen din vil justere farten til
laveste hastighet på 6 km/t.
84
Page 85

REKKEVIDDE
Tilstand: Batteriet er fulladet og nytt (313 Wh, 36 V, 8,7 Ah)
Med en syklist på cirka 74 kg.
Avstand
10 km 20 km 30 km 40 km 50 km 60 km 70 km
Veiforhold
Jevnt terreng
Lett kupert terreng
Sterkt kupert terreng
Middels assistanse – stor framdrift fra egne tråkk
Middels assistanse – liten til middels framdrift fra egne tråkk
Maksimal assistanse – stor framdrift fra egne tråkk
Maksimal assistanse – liten til middels framdrift fra egne tråkk
Lett medvind 28
grader celsius
Tørre veier
Lett medvind 28
grader celsius
Tørre veier
Lett medvind 28
grader celsius
Tørre veier
85
Page 86

Vennligst ta hensyn til følgende:
• Sykkeldekkene bør fylles til det angitte lufttrykket.
• Hvis temperaturen synker, blir batteriets rekkevidde redusert.
• Hvis førerens vekt øker, blir batteriets rekkevidde redusert.
• Hvis veiene er våte eller isete, blir batteriets rekkevidde
redusert.
Få mest mulig ut av batteriet
Det er mange faktorer som påvirker ytelsen til batteriet og hvor
langt det rekker:
• Lad batteriet helt fullt før du skal ut på langtur.
• Det krever mer batteri å sykle på ujevnt underlag og i kupert
terreng.
• Hyppige endringer av hastigheten krever mer batteri.
• Tyngre last krever mer batteri.
• Sørg for at lufttrykket i dekkene er i orden og hold elsykkelen
ren og velsmurt for å spare batteri.
• Sørg for at hjulene kan bevege seg fritt og at bremsene ikke
ligger for tett på. Dette kan også hjelpe deg med å spare
batteri.
• Sjekk bremsene regelmessig. Kraftfulle tråkk sparer batteri
og øker rekkevidden.
86
Page 87

FRAKOBLING OG TILKOBLING AV BATTERIET
1. Skru fra displayet.
2. Vri nøkkelen mot venstre for å låse opp batteriet.
3. Løft batteriet ut av holderen.
Parkering
• Hold inne ON/OFF-knappen på batteriet i 3–5 sekunder for
å skru det PÅ/AV. Batteri-dioder PÅ: Batteriet er PÅ. Batteridioder AV: Batteriet er AV.
• Unngå å la elsykkelen stå ubeskyttet i regn eller snø.
• Hvis elsykkelen blir våt, bør du tørke av den med et tørt
håndkle etter sykkelturen.
• Ikke glem å skru av både lykten foran og lykten bak.
• Når du har syklet på saltet vei, er det viktig å tørke
over sykkelen med rent vann med det samme du
kommer frem.
87
Page 88

6. INSTRUKSJONER FOR LADING AV BATTERI
• Slå alltid batteriet av før du lader det.
• Batteriet blir varmt mens det lades. Av sikkerhetsmessige
årsaker må batteriet aldri dekkes til.
• Sett laderen på en jevn overate.
• Du kan enten lade batteriet på elsykkelen eller ta det av
sykkelen før du lader det.
Batteri
1. Koble laderen til batteriet og koble laderen i stikkontakten.
2. Et helt tomt batteri vil ta omtrent seks timer å lade helt
opp.
3. Når batteriet er fulladet, vil LED-lyset på laderen skifte fra
rødt til grønt. Av sikkerhetsmessige årsaker må batteriet
kobles fra med det samme det er fulladet. Koble fra laderen
fra stikkontakten før du kobler den fra batteriet.
24 3 1
1. Batteri
2. Kobling fra lader til batteri
3. Lader
4. 230 V
Lader
88
Page 89

7. SIKKERHETSINSTRUKSER FOR BATTERI OG LADER
Elsykkelen har et litium-ion-batteri. Batteriet skal aldri lades
med en annen lader enn den som er designet for dette. Å bruke
en annen lader sammen med et litium-ion-batteri kan føre til
overoppheting, brann eller eksplosjon. Hvis laderen skulle bli
borte eller ødelagt, må du kontakte ditt lokale IKEA-varehus for
å bestille en erstatning.
• Batteriet er ladet halvveis opp når det er nytt. Batteriet bør
lades i minst 12 timer de tre første gangene.
• Vennligst sørg for at spenningen til laderen er den samme
som nettspenningen.
• Laderen må alltid brukes innendørs.
• Ikke åpne laderen, det er en høyspentenhet.
• Du må aldri ta å begge elektrodene på batteriet på samme
tid, da dette kan føre til elektrisk sjokk.
• Aldri ta batteriet ut av elsykkelen mens den lader.
• Du må lade batteriet i minst 2 timer hver tredje måned,
ellers kan vi ikke påta oss ansvar for batteriets garanti.
• Batteriet må aldri lades med andre ladere.
• Sørg for at ingen væsker eller metaller kommer inn i laderen.
• Batteriet må aldri lades i nærheten av spedbarn og små barn.
• Batteriet bør aldri brukes i oljete, støvete, skitne eller fuktige
omgivelser og bør ikke ligge i direkte sollys.
• Ikke slå batteriet og unngå sterke vibrasjoner.
• Unngå å bruke laderen i tordenvær.
• Sørg for å alltid bruke laderen i kjølige, godt ventilerte
omgivelser.
• Garantien bortfaller hvis batteriet er åpnet eller skadet.
• Elsykkelen er designet for bruk i vanlig trakk og for én
person. Sykkelen må aldri brukes til ekstreme manøvre som
ekstrem off-road-sykling, hopp eller ekstra tung belastning.
Dette kan skade elsykkelen og føre til alvorlige skader.
• Skal kun brukes sammen med lader av modell
C060L1001E.001.
• Når du sykler må du følge trakkreglene.
89
Page 90

8. TEKNISKE SPESIFIKASJONER
Parametre for elsykkel
Mål (L × B × H) 1900 × 700 × 1180mm
Vekt ≤ 25kg
Maks hastighet 25 km/t
Maks belastning ≤ 120kg
Akselavstand mellom hjulnavene
foran/bak
Strømforbruk per 1000 km 1.2 kW/t
Parametre for lader
Tidsbruk for fullading 6,3 timer
Inngangsspenning 100 V – 240 V~50-60 Hz
Maksimal ytelse 60 Watt
Parametre for kontrollenhet
Lavspenningsvern 30 ± 0,5 volt
Overspenningsvern 12 ± 1 ampere
Parametre for batteri
Batteritype Litium-ion-batteri
Kapasitet 8.7 Ah
Batterispenning 36 Volt
Batterisäkring 15Ax2 totalt 30A
1135 ± 5mm
Parametre for motor
Motortype børsteløs permanent magnetmotor
Merkemoment 250 Watt
Merkespenning 36 Volt
Dreiemoment 6,5 nm/40 nm
Motorns verkningsgrad >78%
Dreiemoment
Setestammen 14–15 Nm
Styre 9-10 Nm
Seteklemme 7 Nm
Pedaler 25 Nm
Maks dekktrykk 40-65 PSI / 2.8-4,.5 BAR
90
Page 91

9. INNSTILLINGER FOR KONTROLLPANEL
Gjennomsnittlig hastighet
Maksimal hastighet
Hastighet
Batteriindikator
Feilkoder
LCD800S varsler ved problemer. Dise feilkodene blir synlige i
kontrollpanelet sammen med symbolet for varsellampe
: til .
Hvis varsellampa er på, og skjermen viser en feilkode, må du
kontakte et IKEA-varehus for kontroll.
Baklykt
Bremseindikator
Fart ved å bevege pedalene, 6 trinn
Varsellampe
Avstandsmåler (kilometer/mile)
Total avstand (kan ikke tilbakestilles)
Syklet tid/gang (t:m)
Ta av skjermen hvis du vil snu sykkel opp-ned under
vedlikehold.
91
Page 92

10. VEDLIKEHOLD
Sørg for at du gjennomfører en slik sikkerhetssjekk før du tar i
bruk el-sykkelen:
Bremser
• Kontroller at bremsene virker som de skal. Se over
bremseskivene og sjekk at de ikke er slitt og at de er i riktig
og jevn avstand til hjulene.
• Sjekk at bremseklossene ikke er slitt.
• Sørg for at bremsewirene er festet ordentlig og at det ikke er
tegn på slitasje.
Krank og pedaler
• Sjekk at pedalene og kranken er i riktig posisjon.
• Sjekk at krankarmen er festet riktig til akselen.
Annen informasjon
• Sørg for at alle reeksene er festet ordentlig og ikke er
dekket til.
• Frontlykten ligger i en liten boks i den store
sykkelemballasjen.
• Dersom det kommer vann inn i motoren kan det føre til
kortslutning og gjøre skade på de elektriske komponentene.
Elsykkelen skal kun rengjøres med en fuktig klut med
et mildt rengjøringsmiddel. Unngå å bruke syrebaserte
rengjøringsmidler da disse kan skade sykkelen.
• Unngå å olje sykkelen for mye. Hvis oljen kommer inn i
hjulene eller på bremseklossene, vil det redusere ytelsen til
bremsene og øke bremselengden.
• Unngå oljesøl på pedalene. Vask bort overødig olje fra
hjulene eller bremseklossene med såpevann. Tørk over
elsykkelen før bruk.
• Når du bretter sammen sykkelen for å legge den i
bagasjerommet, er det viktig å sørge for at du ikke skader
reeksen foran.
• Sykkellyktene foran og bak har to innstillinger: jevnt eller
blinkende lys.
• Vi anbefaler at du bruker hjelm.
Justering av bremser
Dette verktøyet trenger du: 5 mm unbrakonøkkel.
1. Sørg for at hjulene er sentrerte og strammet.
2. Skruen (1) kan løsnes eller strammes for at bremseklossen
kommer nærmere (mer bremsekraft) – eller lenger bort fra
(mindre bremsekraft) – midten av bremseskiven. Passende
avstand er 0,3 mm.
3. Avstanden mellom bremseklossen og overaten på
bremseskiven justeres ved å stramme eller slakke wiren ved
festet (3). Du njusterer stillingen på bremseklossene ved
å vri på skruen som fester wiren på håndbremsen til styret.
Avstanden bør være den samme, omtrent 0,3 mm.
4. Test bremsene før du begynner å sykle.
92
Page 93

Symbolet med en søppeldunk med kryss over betyr at dette
produktet ikke må kastes i husholdningsavfallet, men leveres til
gjenvinning i henhold til gjeldende regler. HAR VI DET, SÅ TAR VI
DET! Elektriske produkter skal ikke kastes i søpla. Lever elektriske
IKEA-produkter, eller tilsvarende produkter, til oss for gjenvinning –
gratis. Husk at lyspærer og batterier også skal gjenvinnes.
93
Page 94

KÄYTTÖOHJEET SÄHKÖPOLKUPYÖRILLE
SISÄLLYSLUETTELO
1. TÄRKEÄÄ TIETOA ENNEN POLKUPYÖRÄN KÄYTTÖÖNOTTOA 95
2. TIETOJA POLKUPYÖRÄSTÄ 96
3. ENNEN ENSIMMÄISTÄ KÄYTTÖKERTAA 97
4. ENSIMMÄINEN KÄYTTÖKERTA 97
5. SÄHKÖPOLKUPYÖRÄN KÄYTTÖ 99
6. AKUN LATAAMINEN 103
7. AKUN JA LATURIN TURVALLISUUSOHJEITA 104
8. TEKNISET TIEDOT 105
9. ASETUKSET 106
10. PYÖRÄN HUOLTAMINEN 107
94
Page 95

1. TÄRKEÄÄ TIETOA ENNEN POLKUPYÖRÄN KÄYTTÖÖNOTTOA
• Ennen polkupyörän käyttöönottoa lue nämä käyttöohjeet
huolellisesti ja tarkista, että pyörän kaikki osat ovat
kunnossa.
• Ota sääolosuhteet huomioon ja pyöräillessäsi hidasta vauhtia
esim. sateella ja lumisilla teillä. Huomioi myös, että näillä
keleillä jarrutusmatkat voivat olla normaalia pidemmät.
• Tämä sähköpolkupyörä toimii kaikissa sääolosuhteissa, joskin
pyörän altistuminen suurille vesimäärille saattaa vahingoittaa
pyörän sähkökytkentöjä ja/tai sähkömoottoria.
• Älä koskaan koske pyörän sähköosiin märillä käsillä,
äläkä koskaan koske samanaikaisesti akun plus- ja
miinusnapoihin, sillä vahva oikosulkujännite saattaa aiheuttaa
loukkaantumisen.
• Älä koskaan yritä korjata pyörän sähkökytkentöjä itse, vaan
korjauta pyörä osaavassa pyöräkorjaamossa.
• Ulkoilman lämpötila vaikuttaa akun kestoon. Kun lämpötila
laskee nollan alapuolelle, akku tyhjenee suhteessa
nopeammin. Akku toimii parhaiten yli 0 °C:n lämpötilassa.
95
Page 96

2. TIETOJA POLKUPYÖRÄSTÄ
26
40
41
36
29
14
31
33
32
30
39
13
6
38
25
16
7
8
1
4
1. Runko
2. Haarukka-
3. Istuinkannatin
4. Lokasuoja
5. Seisontatuki
6. Ohjainlaakeri
7. Ohjaustanko
8. Säädettävä ohjainkannatin
9. Kädensija
10. Satula
11. Etulevyjarru
35
3
18
10
9
44
23
2
11
12. Takalevyjarru
13. Jarrukahva
14. Etuvaihtaja
15. Takavaihtaja
16. Vaihdekahva
17. Keskiön osat
18. Ketjupyörä & kampi
19. Ketjut
20. Poljin
21. Akku
22. Laturi
17
24
21
20
37
22
4
19
5
23. Näyttö
24. Sensori
25. Säädin
26. Integroitu johto
27. Moottori
28. Vanne
29. Pinna
30. Rengas
31. Sisäkumi
32. Vanneteippi
33. Etunapa
27
34
15
12
43
Rungon materiaali: alumiini
Rengaskoko: 29"
Etuhaarukka: terästä, jousitus
Vaihteisto: 21 vaihdetta
Vanteet: kaksoisseinämämetalliseos
Jarrut: levyjarrut
Moottori: 36 volttia - 250 W
Pyörästä koottu toimitettaessa: 95 %
(ohjaustanko käännetty)
Bruttopaino: 30 kg
Polkupyörän kokonaispaino: 28 kg
akun kanssa
Akun paino: 1,90 kg
Akun koko: 170 x 100 x 80 mm
Akun teho: 36 V 8,7 AH
Pyörän enimmäiskuormitus: 120 kg
42
34. Vapaaratas
35. Pikalinkku
36. Etuvalo
37. Takavalo
38. Soittokello
39. Heijastin
40. Jarruhihna
41. Vaihtajan hihna
42. Ruuvit
43. Työkalusetti
44. Kammen suojus
96
Page 97

3. ENNEN ENSIMMÄISTÄ KÄYTTÖKERTAA
Kiristä kuvissa näkyvät ruuvit:
97
Page 98

4. ENSIMMÄINEN KÄYTTÖKERTA
• Ole erityisen varovainen pyöräillessäsi ensimmäistä kertaa
sähköpolkupyörällä! Sähköavusteisena sähköpolkupyörä
kulkee huomattavasti nopeammin kuin normaali polkupyörä!
• Aloita pyörään totuttelu paikassa, jossa on reilusti tilaa
kokeilla, miltä pyörällä ajaminen sähköavusteisena tuntuu.
• Pyörässä on matalajännitesuoja, joka sammuttaa
sähköavustuksen automaattisesti, jos akun jännite laskee
tietyn raja-arvon alapuolelle.
• Jarruta varovaisesti. Jarruta aina ensimmäiseksi takajarrulla,
sillä se jarruttaa tasaisemmin kuin etujarru.
• Sähköavustus kytkeytyy pois päältä, kun polkupyörän nopeus
nousee 25 kilometriin tunnissa, ja kytkeytyy uudelleen päälle,
kun nopeus laskee alle 25 kilometriin tunnissa.
• Älä käytä sähköavustusta liukkaalla kelillä tai hiekka-/
soratiellä.
• Kytke sähköavustus pois päältä, jos pyörä käyttäytyy
epänormaalisti. Näin voidaan estää sähköosien
vahingoittuminen.
98
Page 99

5. SÄHKÖPOLKUPYÖRÄN KÄYTTÖ
• Aloita polkeminen. Sähköavustus toimii vain polkiessa.
• Sähköavustuksen tasoa on mahdollista säätää plus- ja
miinuspainikkeista.
• Jarruttaessa sähköavustus kytkeytyy pois päältä.
• Avustus kytkeytyy pois päältä, kun pyörän nopeus ylittää 25
km/h.
• Kun poistut pyörän luota, lukitse akku avaimella tai irrota se.
Akun virta kytketään päälle painamalla ON-painiketta.
Ohjauspaneeli
Moottoria ohjaillaan ohjaustangossa sijaitsevasta
ohjauspaneelista. Sähköavustuksen tasoja on yhteensä 6. Pyörä
toimii ihanteellisesti, kun valitset ohjauspaneelista matalan
nopeuden ja säädät vaihteen tasolle 1, kun aloitat polkemisen.
ON/OFF:
Paina ON/OFF-painiketta pohjassa noin 2 sekunnin ajan. LCDnäyttöön syttyy valo. Sammuttaaksesi näytön manuaalisesti,
paina ON/OFF-painiketta 2 sekunnin ajan.
1. Näyttö kytkeytyy päälle ON/OFF-painikkeesta.
2. Paina plus-painiketta muutaman sekunnin ajan, jolloin
näytön valo syttyy.
3. Näytön valo sammuu samalla tavalla. Sähköavustuksen
tasoa säädetään plus- ja miinuspainikkeista. Tasoja on
yhteensä 6.
4. Kun pidät miinuspainiketta pohjassa, sähköpolkupyörän
nopeus vaihtuu kuuteen kilometriin tunnissa.
99
Page 100

MATKATAULUKKO
Tila: akku on täyteen ladattu ja uusi (313 Wh, 36 V, 8,7 Ah)
Ajajan paino noin 74 kg
Etäisyys
10 km 20 km 30 km 40 km 50 km 60 km 70 km
Ajo-olosuhteet
Tasamaa
Hieman kumpuileva maasto
Vahvasti kumpuileva maasto
Keskitason avustus - mahdollisimman paljon polkemista
Keskitason avustus - vähän tai kohtalaisesti polkemista
Maksimitason avustus - mahdollisimman paljon polkemista
Maksimitason avustus - vähän tai kohtalaisesti polkemista
Kevyt myötätuuli
28 °C
Kuiva tie
Kevyt myötätuuli
28 °C
Kuiva tie
Kevyt myötätuuli
28 °C
Kuiva tie
100
 Loading...