

Page 1
instruction manual
iB969
Page 2

iB969
Introduction
Thank you for purchasing the iHome iB969, the dual dock charging station
for iPad, iPhone and iPod that allows you to charge an iPhone or iPod in half
the typical time, and to sync to a computer. There are two additional USB
ports that let you connect and charge two additional devices such as an
iPad, cellphones, PDAs,and eBook readers at the same time. Up to four
devices at once!
This instruction booklet explains the basic operation and care of the unit.
Please read it carefully and keep it for future reference.
Page 3

iB969
This product bears the selective sorting symbol for waste electrical and
electronic equipment (WEEE).
This means that this product must be handled pursuant to European
Directive 2002/96/EC in order to be recycled or dismantled to minimize its
impact on the environment.
For further information, please contact your local or regional authorities.
Electronic products not included in the selective sorting process are
potentially dangerous for the environment and human health due to the
presence of hazardous substances.
Page 4

Using the
iB969
Table of Contents
Meet Your iB969 ........................................................................ 1-2
Getting Started ..............................................................................3
Charging iPhone and iPod ............................................................ 4-5
Syncing iPhone or iPod to a Computer............................................... 5
Charging iPad and other Devices Using the USB Ports........................ 6-8
Consumer Safety and Product Maintenance.................................... 9-10
Troubleshooting............................................................................ 11
Warranty....................................................................................12
Page 5
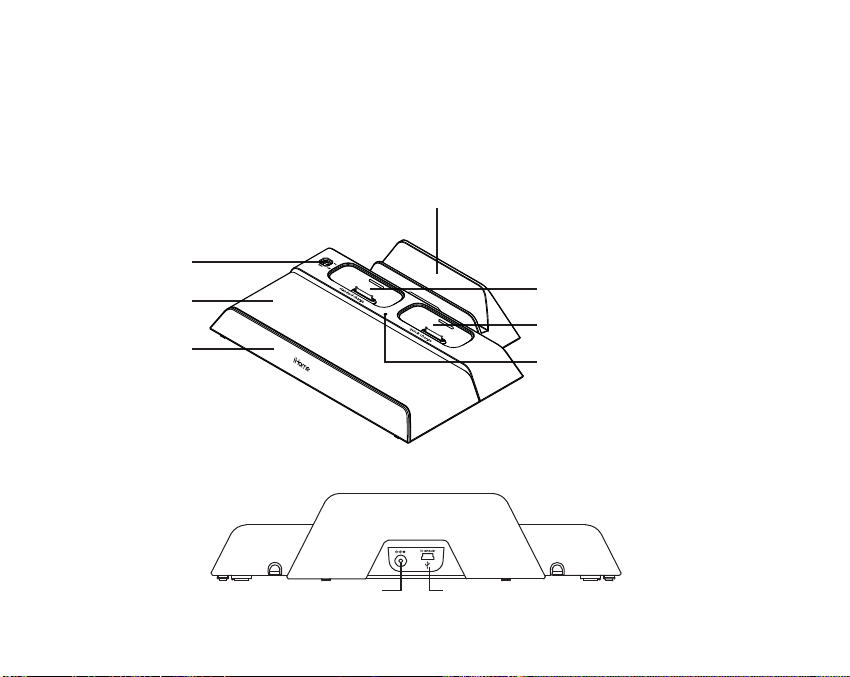
Meet Your iB969
Top
Sync Switch
Rubberized rest
Sliding Base
Rear
iB969
iPad rest
Standard Charge Syncing Dock
Quick Charge Dock (no sync)
Power Indicator
DC Jack
USB 2.0 syncing port
1
Page 6

iB969
Meet Your iB969
Cord Channels
Bottom
A – B Switch for Quick
Charge USB port
Quick Charge/iPad
USB port
quick charge
A – B Switch for
Standard Charge
USB port
standard charge
Standard Charge
USB port
Cord HoldersCord Holders
Included Cables Included Inserts
• 36 inch sync cable (to sync iPhone/iPod to computer)
• 12 inch USB to mini USB cable (to charge compatible devices)
• 12 inch USB to 4mm plug (to charge Sony eReader)
• 1 mini USB to micro USB adapter
• 2 iPhone inserts
2
Page 7

Getting Started
Using the
iB969
1.Plug the 100V - 240V universal
switching AC adapter into the DC
jack on the rear of the iB969 and
the other end into a working
outlet. A blue LED indicator will
light up, indicating the unit has
power and is ready to charge. If
the blue light does not appear, try
activating any wall switch that
controls the outlet, or try using
another outlet.
1
Folding Adapter
Blades
r
ute
p
m
o
c
to
RESET
RESET
TEST
TEST
3
Page 8

Charging iPhone and iPod
The iB969 has two universal docks for iPhone or iPod.
The left dock is a standard charging dock with sync
that will recharge your iPhone or iPod and and lets you
sync your iPhone or iPod to the iTunes library on your
computer if desired.
The right dock provides quick charging without sync.
The docks will charge your iPhone or iPod until
completely charged then stop charging. Use both docks
to charge two devices at once.
1. Make sure the unit is connected to a working power
source
2. Place the insert that came with your iPod into the
desired dock. If using an iPhone, use the iPhone insert
provided with the iB969.
iB969
4
Page 9

iB969
3.Gently dock an iPhone or iPod into the desired dock on top of the unit. Do not
force. Make sure your iPhone or iPod is not in a case or “skin”. Avoid using undue
pressure when placing and removing iPhone or iPod from dock(s). Your docked
iPhone or iPod will charge until fully charged.
Syncing iPhone and iPod to an iTunes Library on Your Computer
1.Connect the small end of the included Sync Cable to the Sync Jack on the rear
of the unit and the other end into a USB port on your computer.
2.Slide the Sync Switch located on the top left of the unit to the ON position.
Your iPhone or iPod will begin syncing with your computer.
DO NOT disconnect the Sync Cable or move the Sync Switch during
sync function. A notice should appear on your computer display when
sync is complete and it is safe to disconnect.
3.
Gently dock an iPhone or iPod into the left dock on top of the unit (see above)
4.Once sync is complete, return the Sync Switch to the OFF position.
NOTE: A docked iPhone/iPod will not charge if the sync cable is not connected
to a computer while the Sync Switch is in the ON position
5
.
Page 10

Using the
iB969
Charging iPad and other Devices Using the USB Ports
The iB969 has two additonal USB ports on the bottom of the unit, one
quick-charging USB port (left) for iPad and other devices and one standard charging
USB port (right) that can charge most USB-compatible devices such as Blackberries,
eBook readers, etc., allowing you to charge two additional devices at once. Each
port has a USB Mode Switch (A–B) to accomodate the different USB-powered
devices.
Charging Devices
A. position: Will charge iPad and most iPod and
iPhone models.
B. position: Will charge Sony Reader™, Amazon
Kindle™, Barnes & Noble Nook™, Border’s
kobo™, Blackberry and other devices.
If device does not charge, move USB Mode
Switch to A position to see if it charges.
If device still does not charge, try unplugging
the device from the USB port then reconnecting
it.
USB switch
Use this USB port to charge iPad
USB switch
6
Page 11

Using the
1.Make sure unit is connected to a working power source
2.Connect one end of a USB cable (two are included) to
either USB port on the bottom of the iB969 and the other
into the USB port on your device (see page 2 to match
cables with devices). If needed, use the included USB
converter tip to match your device’s port.
3.If needed, slide out the rubberized rest to fit your device.
4. Monitor your device’s battery indicator to confirm the
device is charging. If the device is NOT charging,
try moving the USB Mode Switch to a different position. If the device still does not charge, try unplugging
the device from the USB port then reconnecting it
iB969
Rest area for Blackberries
or other devices
For E-readers, extend
sliding rubberized rest
7
Page 12

Using the
To charge your iPad,
1. Connect your USB - 30 pin cable to the left USB
port and move the USB mode switch for that port to
the “A” position before placing your iPad in the
iPad rest.
2. Place your iPad in the iPad rest as shown.
3. Connect the 30-Pin plug to the 30-Pin jack on the
bottom of your iPad as shown.
iB969
Place iPad in iPad rest
Connect the 30-Pin plug
8
Page 13

Consumer Product Safety Guide
When used in the directed manner, this unit has been designed and manufactured to ensure your
personal safety. However, improper use can result in potential electrical shock or fire hazards. Please
read all safety and operating instructions carefully before installation and use, and keep these
instructions handy for future reference. Take special note of all warnings listed in these instructions
and on the unit.
1. Water and Moisture – The unit should not be used near water. For example: near a bathtub,
washbowl, kitchen sink, laundry tub, swimming pool or in a wet basement.
2. Ventilation – The unit should be situated so that its location or position does not interfere with
its proper ventilation. For example, it should not be situated on a bed, sofa, rug or similar surface
that may block ventilation openings. Also, it should not be placed in a built-in installation, such
as a bookcase or cabinet, which may impede the flow of air through the ventilation openings.
3. Heat – The unit should be situated away from heat sources such as radiators, heat registers,
stoves or other appliances (including amplifiers) that produce heat.
4. Power Sources – The unit should be connected to a power supply only of the type described
in the operating instructions or as marked on the appliance.
5. Power-Cable Protection – Power supply cables should be routed so that they are not likely
to be walked on or pinched by items placed upon or against them. It is always best to have a
clear area from where the cable exits the unit to where it is plugged into an AC socket.
6. Cleaning – The unit should be cleaned only using a warm damp cloth. Do not use solvents,
etc.
7. Objects and Liquid Entry – Care should be taken so that objects do not fall and liquids are
not spilled into any openings or vents located on the product.
9
Page 14

8. Attachments – Do not use attachments not recommended by the product manufacturer.
9. Lightning and Power Surge Protection – Unplug the unit from the wall socket and disconnect
the antenna or cable system during a lightning storm or when it is left unattended and unused
for long periods of time. This will prevent damage to the product due to lightning and power-line
surges.
10. Overloading – Do not overload wall sockets, extension cords, or integral convenience receptacles
as this can result in a risk of fire or electric shock.
11. Damage Requiring Service – The unit should be serviced by qualified service personnel
when:
A. the power supply cable or plug has been damaged.
B. objects have fallen into or liquid has been spilled into the enclosure.
C. the unit has been exposed to rain.
D. the unit has been dropped or the enclosure damaged.
E. the unit exhibits a marked change in performance or does not operate normally.
12. Periods of Nonuse – If the unit is to be left unused for an extended period of time, such as
a month or longer, the power cable should be unplugged from the unit to prevent damage or
corrosion.
13. Servicing – The user should not attempt to service the unit beyond those methods described
in the user’s operating instructions. Service methods not covered in the operating instructions
should be referred to qualified service personnel.
Questions? Visit www.ihomeintl.com
10
Page 15

Troubleshooting
Unit doesn’t respond (no power)
Make sure AC adaptor is connected to unit and is plugged into a working
outlet (plug another device into the same outlet to confirm outlet is working,
and make sure any associated power switch is ON).
iPhone/iPod/iPad does not charge
Make sure you have the latest firmware for your iPad, iPhone or iPod (update
via iTunes if needed). Make sure your device is working properly. Check your
iPhone or iPod manual for details. iPad must be connected to the quick
charge/iPad port on the bottom left of the unit to charge. Make sure the Sync
Switch is in OFF position when unit is not connected to a computer for
syncing
USB device won’t charge
1. Make sure all connections are proper and secure
2. Monitor charging indicator on your device.
3. Move the USB Mode Switch to a different postion.
4. Unplug device from USB port then reconnect it.
For further information, visit www.ihomeintl.com
11
Page 16

iB969 - 102010 - intl Eng - A ©SDI Technologies 2010 All rights Reserved Printed in China
 Loading...