

iCES IMP-100 User Manual
1
Model: IMP-100
USER MANUAL
Clip MP3 player with micro SD
cardslot
HANDLEIDING
MP3-speler met clip en
microSD-kaartsleuf
BENUTZERHANDBUCH
MP3-Player mit Clip und
microSD-Karteneinschub
MODE D'EMPLOI
Le
MANUAL DEL USUARIO
Reproductor de MP3 con clip y
ranura para tarjeta micro SD

2
Index
English .............................................................................................................................................................................................................................. 3
Nederlands ..................................................................................................................................................................................................................... 11
Deutsch .......................................................................................................................................................................................................................... 20
Français .......................................................................................................................................................................................................................... 29
Español ........................................................................................................................................................................................................................... 38
Version 1.0

3
English
Clip MP3 player with micro SD
cardslot
IMPORTANT: Read all instructions carefully before using this product. Retain this
owner’s manual for future reference.
Cautions
Do not place on or near naked flames, such as lit candles.
Do not place objects filled with liquids such as vases on or near the product.
Do not use or store this product in a place where it is subject to direct sunlight,
heat, excessive dust or vibration.
Do not use this product with wet hands.
Do not clean this product with water or other liquids.
Do not block or cover the slots and holes in the product.
Do not push foreign objects into the slots or holes in the product.
Do not attempt to open this product yourself. There are no user serviceable
parts inside.
Do not allow children access to the packaging including plastic bags.
Safety Warnings
Before using this product, read and follow all warnings and instructions.
This product is not intended for use by young children. Young children should
be properly supervised.
This product is intended for household use only and not for commercial or
industrial use.
Do not expose to dripping or splashing liquid.
No naked flame sources, such as lit candles, should be placed near the
product.
Ventilation should not be impeded by covering ventilation openings with
items such as newspapers, table cloths, curtains and the like.
Damage caused by using this product by failure to follow any other warning or
precaution contained within this user manual will not be covered by warranty.
Note: Dispose of this product responsibly.
WARNING: When Driving in the traffic listening to a personal music
player can make the listener less aware of potential dangers such as
approaching cars and emergency vehicles.
4
WARNING: To prevent possible hearing damage, do not listen at high
volume levels for long periods.
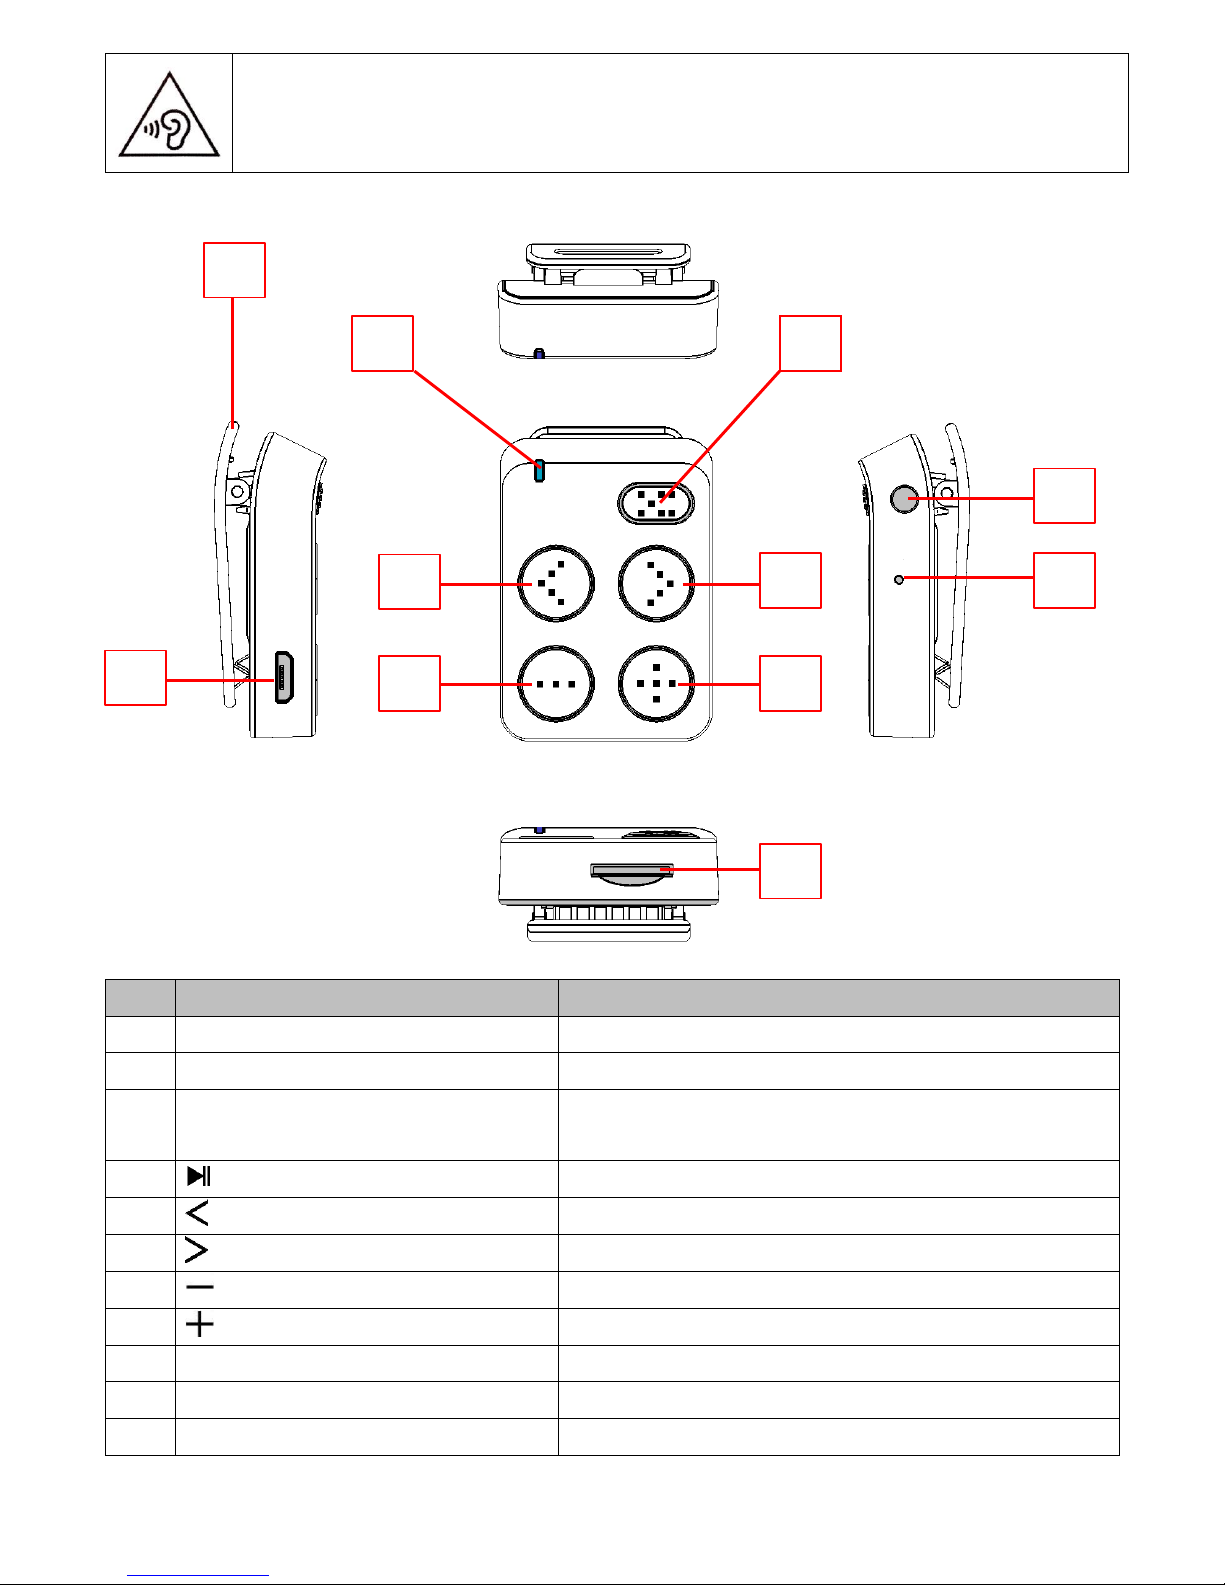
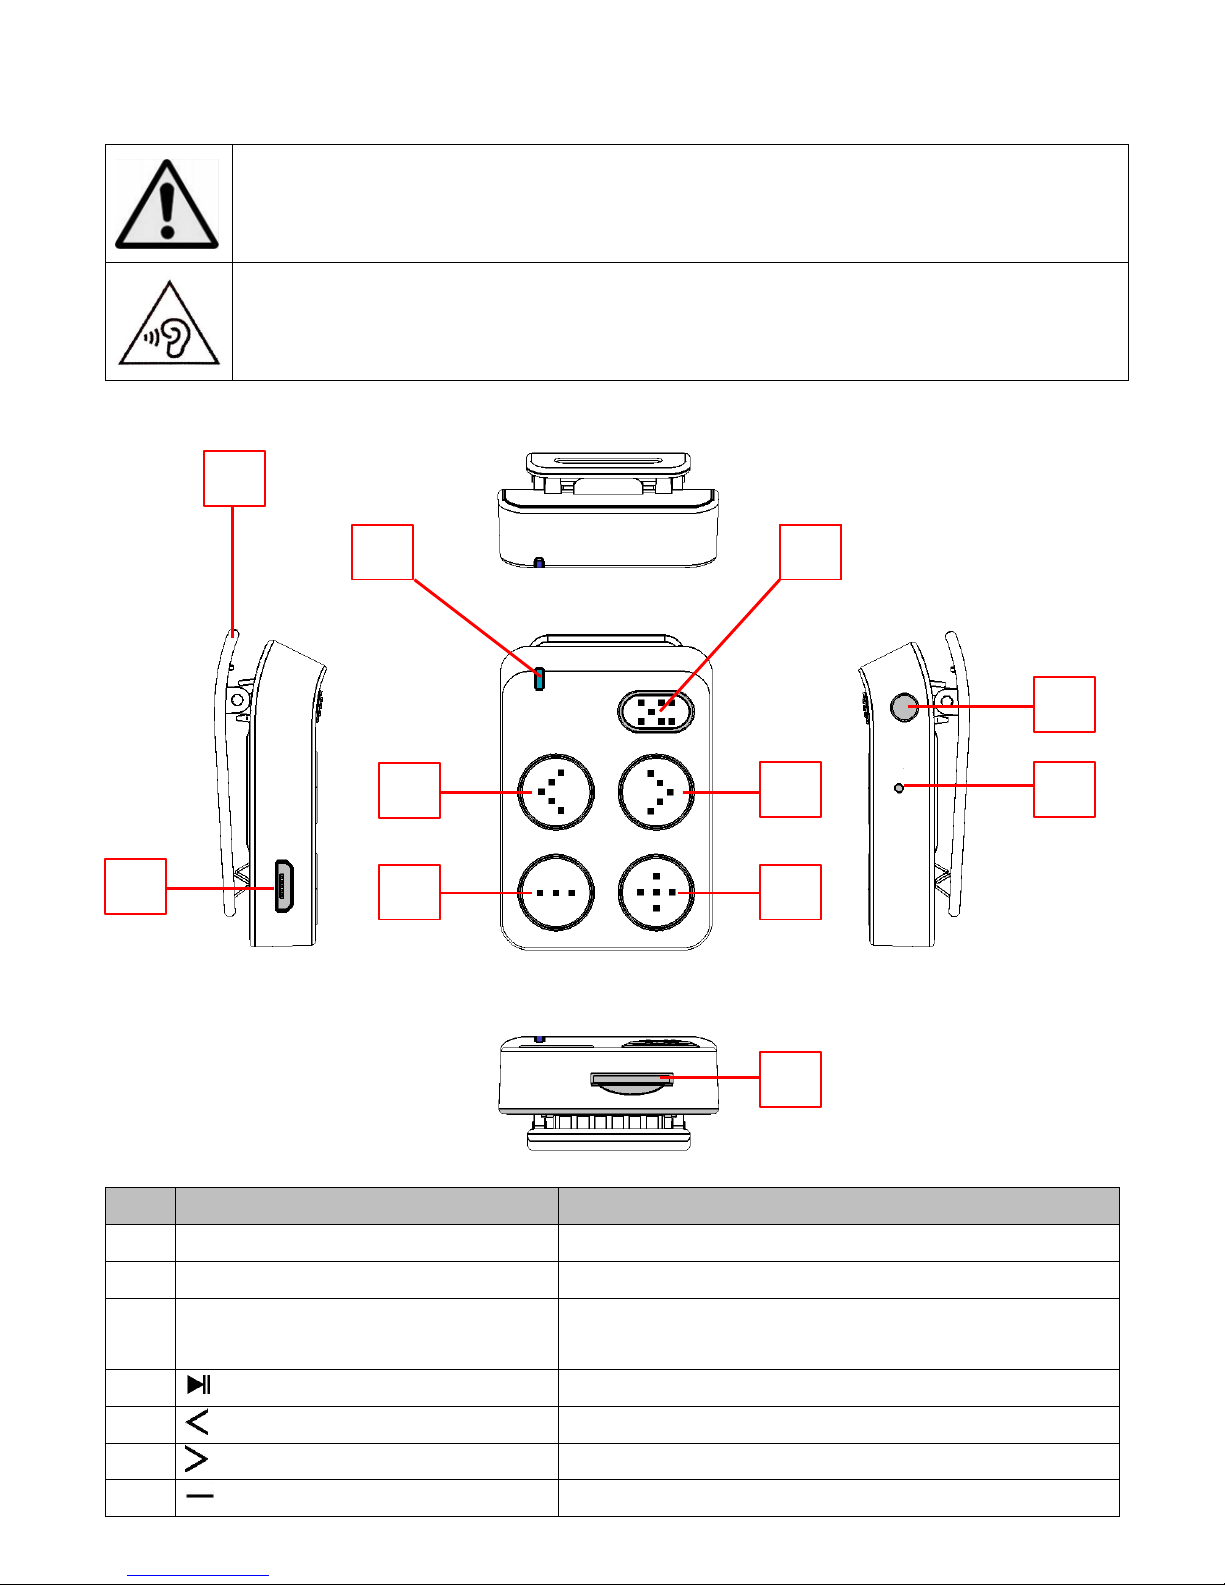
A. Key navigation and Connection
No.
Description
Function
1
Clip
2 Micro USB Port
For PC connection/Charge
3
Status LED Indicator
(Red and Blue)
For charging and play status
4
Button
On/Off, Play/Pause,
5
Button
Back Track/Fast-Backward
6
Button
Next Track/Fast-Forward
7
Button
Volume down
8
Button
Volume up
9
Earphone Output Jack
3.5mm earphone set connection
10
Reset (Bulit-in tact switch)
For hardware reset
11
Memory Card Slot
For external Micro SD Memory Card
1 2 3
5 6 7
8
9
10
11
4

5
B. 1
st
Time Use
The Player has an internal, non–user-replaceable rechargeable lithium battery. For
best results, the first time you use the player, let it charge for about 2 ~ 3 hours or
until the charging LED shows a constant red light.
Important: The player may continue to use battery power after it’s been turned to
standby off mode, if the unit isn’t used for a while it will need to be recharged. For
longevity of the lithium battery life, we recommended to recharge the battery at
least once per month.
C. Charging Mode
You can recharge the Player’s battery in two ways:
1. Connect the player to your computer. Or,
2. Use a USB power wall charger. (not included)
3. The Status LED will blink red when the USB power source is connected.
4. When the battery is fully charged, the Status LED will switch to a constant red
light.
D. PC Connection Mode
1. Connect the player to a computer
1.1 Connect the player to a Windows OS computer with the USB cable, then
“USB Mass Storage Device” is detected and the related driver is installed
by your computer. A removable disk drive will display in the “My
computer” folder where the user can operate Read and Write functions.
And the battery will charge in the background. (for Windows 2000/XP
System or above)
1.2 Or, connect the player with a MAC OS computer, then an “Untitled” icon
will display on the desktop indicating the player is a removable disk, the
user can operate Read and Write functions. And the battery is charging in
the background. (For Mac System 9.2 or above)
Note:
In USB power charger or PC connection mode, the player can play music if you
press the button.
The player may go into music playing mode automatically and can only pause
or play the music, not power off.
2. Remove the player from a computer:
Note: Please safely remove the player when connected to the computer, otherwise,
the data stored in the Player might be lost.
2.1 If you’re using a Windows OS PC, you can disconnect the player in My
Computer or by clicking the “Safely Remove Hardware” icon in the
Windows system tray.
6
2.2 If you’re using a Mac OS PC, you can also disconnect player by dragging
the player icon on the desktop to the Trash.
2.3 Once it is safe to disconnect the player with your computer, unplug the
USB connector from player and then your computer.
2.4 If you accidentally disconnect the player without disconnecting correctly,
reconnect it to your computer.
E. Getting Started
1. Power On/Off
1.1 Plug-in the earphone set into the player’s earphone output jack;
1.2 Press and hold the button, until the Status LED lights up in blue, to
power On the player.
1.3 The blue light will switch to blinking and then the music will play
automatically.
1.4 To turn Off the Player; press and hold the button until the status LED
light blinks fast and then the Player will switch Off a few seconds later.
Note: If any unsupported music files are added to the player’s memory; the status
indicator light will flash fast and then will go Off, and the player will turn Off
automatically a few seconds after.
2. Play/Pause Music
2.1 Press button to pause the playing music.
2.2 Press it again to resume playback.
2.3 If player is in a pause state for 3 minutes, it will turn to standby Off mode
automatically.
3. Adjusting the Volume
3.1 Pressing / button will increase or decrease the volume level one
step at a time.
3.2 Press and hold / button to increase or decrease volume level
continuously.
NOTE: For hearing protection; a beep warning will be heard from the
earphones every time you increase the volume level and reach the default
setting level which may exceed 85dB. Press button to accept the warning
and the user can continue to increase the volume level until the maximum level
is reached.
4. Play Next/Previous Music
From the playing mode;
4.1 Press button to play next track.
4.2 Press button to play previous track.
5. Play Fast-Forward/Fast-Backward
5.1 Press and hold button to enter fast-forward mode.
5.2 Press and hold button to enter fast-backward mode.

7
8
F. LED Light Function
Playing mode
: Blue light will flash once per second.
Pause mode
: Blue light will flash once every two seconds.
PC connecting mode
: Blue light will flash when data is transferring.
: Red light will flash once per second. (In charging)
In charging Mode
: Red light will flash once per second. (In charging)
Charging completed
: Red light constant.
Low battery < 20%
: Red light flashing.
G. Insert Micro SD Memory Card
This player allows you to play supported media files from a Micro SD memory card.
This will increase the mobile hard-disk memory capacity of the player if you use
this option.
Turn OFF the player and then insert the memory card into the player’s
memory card slot; make sure the memory card is firmly and correctly inserted.
Now you can turn ON the player, the player will read and search the supported
music files from the memory card/internal memory, once the music is found
the music will play automatically.
Before removing the memory card from the player, please turn OFF the player.
H. Resetting the Player
In some circumstances, the device may encounter technical issues during use. This
device has been designed with a built-in a mini tact switch through a hole which
located on the right side of the device..
To Reset:
Use a 0.8 ~ 1 mm stick or similar object (like a toothpick), and carefully insert
into the reset hole.
Apply a small bit of force and you will get a click sound and feeling from the
switch. The device is reset and will restart.
I. Troubleshooting
Player cannot turn ON
Check whether the battery has enough energy.
Charge the battery.
No sound is heard
Check whether the Volume is set to “minimum” and
connect the headphone plug firmly.
Check whether the headphone plug is dirty.
Corrupted WMA/MP3 files may make a static noise
and the sound may cut off. Make sure that the music
files are not corrupted.
Check whether music file formats are supported.
Upload/Download of
music files fail.
Check whether the player’s USB connector is
connected with the computer properly.
9
Check whether the driver is installed correctly.
Check whether the player’s memory is full.
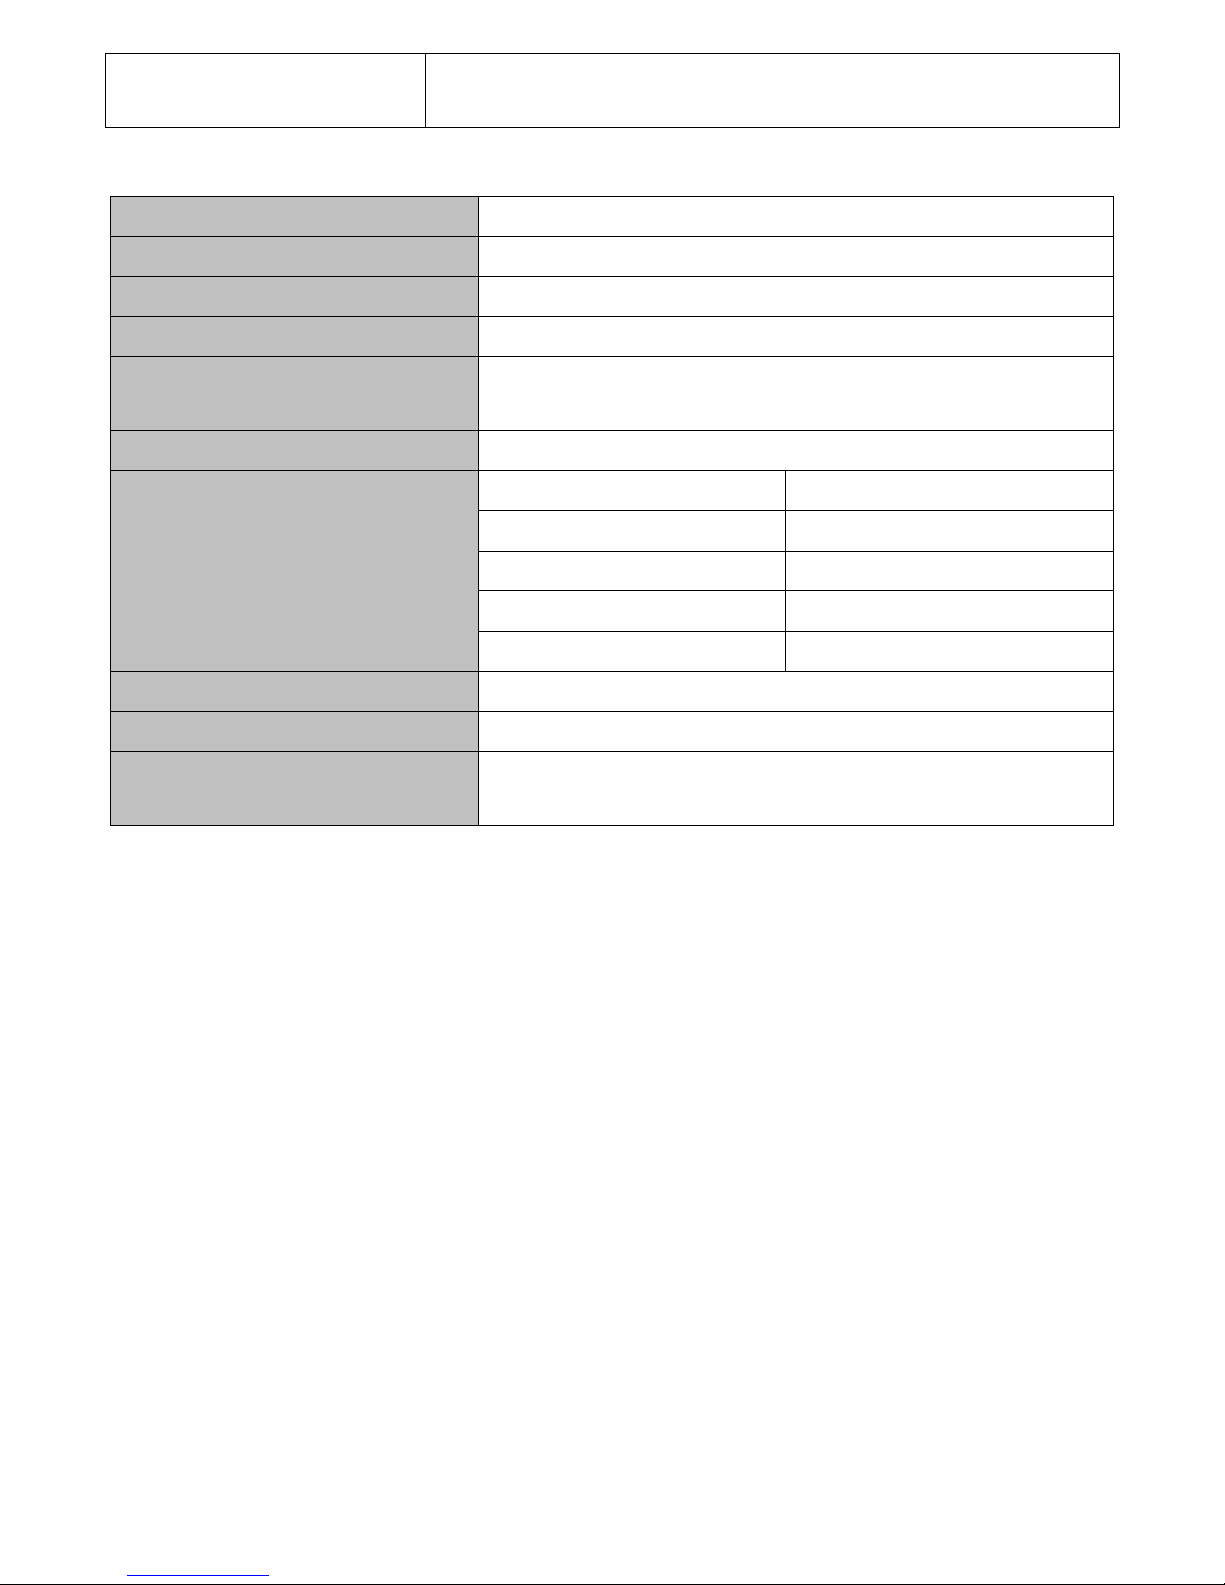
J. Technical Specifications
Unit Dimension
47.5mm (H) x 31.8 mm (W) x 17 mm (D) (approx.)
Unit Weight
14.8g (approx.)
Interface
USB 2.0 (High Speed)
Memory Capacity
NA
Memory Card Slot
For Micro SD Memory Card
(Support up to 16GB and 32GB possible)
Rechargeable Battery
Lithium 3.7V 110mAh (Play Time: 5.5~6.5 hours)
MP3, WMA
Earphone output
2 mW x 2 (at 32 Ohm)
MP3 Bitrate
32Kbps – 320Kbps
WMA Bitrate
32Kbps – 320Kbps
Frequency response
20Hz ~ 20KHz
SNR
80dB
Audio File Type
MP3, WMA
Operating Temperature
0 to 40°C
Computer Operation System
requirements
Windows 2000/XP/Vista/Win7/Win8/Win10, MAC
OS 9.2 or above
K. Guarantee
ICES offers service and warranty in accordance with the European law, which
means that in case of repairs (both during and after the warranty period) you
should contact your local dealer.
Important note: It is not possible to send products that need repairs to ICES
directly.
Important note: If this unit is opened or accessed by a non-official service center in
any way, the warranty expires.
This device is not suitable for professional use. In case of professional use, all
warranty obligations of the manufacturer will be voided.
L. Disclaimer
Updates to Firmware and/or hardware components are made regularly. Therefore
some of the instruction, specifications and pictures in this documentation may
differ slightly from your particular situation. All items described in this guide for
illustration purposes only and may not apply to particular situation. No legal right
or entitlements may be obtained from the description made in this manual.

10
M. Disposal of the Old Device
This symbol indicates that the relevant electrical product or battery
should not be disposed of as general household waste in Europe. To
ensure the correct waste treatment of the product and battery,
please dispose them in accordance to any applicable local laws of
requirement for disposal of electrical equipment or batteries. In so
doing, you will help to conserve natural resources and improve
standards of environmental protection in treatment and disposal of
electrical waste (Waste Electrical and Electronic Equipment
Directive).
N. CE Marking
Products with the CE marking comply with the EMC Directive
(2014/30/EU) and the Low Voltage Directive (2014/35/EU)
issued by the Commission of the European Community.
Hereby, Lenco Benelux BV, Thermiekstraat 1a, 6361 HB Nuth, The
Netherlands, declares that this product is in compliance with the essential
requirements and other relevant provisions of Directive 1999/5/EC.
The declaration of conformity may be consulted at www.ices-electronics.com
O. Service
For more information and helpdesk support, please visit
www.ices-electronics.com
Lenco Benelux BV, Thermiekstraat 1a, 6361 HB, The Netherlands.

11
Nederlands
MP3-speler met clip en
microSD-kaartsleuf
BELANGRIJK: Lees zorgvuldig alle instructies voordat u dit product in gebruik
neemt. Bewaar deze gebruikshandleiding als eventueel naslagwerk.
Waarschuwingen
Nooit op of in de buurt van open vlammen plaatsen, zoals brandende kaarsen.
Plaats geen voorwerpen gevuld met vloeistoffen, zoals vazen, op of bij het
product.
Dit product niet gebruiken of opslaan op plaatsen waar het wordt blootgesteld
aan direct zonlicht, hitte, buitensporig veel stof of trillingen.
Gebruik dit product niet met natte handen.
Reinig dit product niet met water of andere vloeistoffen.
Bedek of blokkeer de gleuven en de gaten in het product niet.
Stop geen vreemde voorwerpen in de gleuven of gaten van het product.
Probeer dit product niet zelf te openen. Er zitten geen door de gebruiker te
onderhouden onderdelen in.
Houd de verpakking, waaronder plastic zakjes, uit de buurt van kinderen.
Veiligheidswaarschuwingen
Lees voor het gebruik van dit product alle waarschuwingen en instructies en
volg ze op.
Dit product is niet bedoeld voor gebruik door jonge kinderen. Op jonge
kinderen moet goed toezicht worden gehouden.
Dit product is alleen voor huishoudelijk gebruik bedoeld en niet voor
commercieel of industrieel gebruik.
Nooit blootstellen aan druppelende of spetterende vloeistoffen.
Plaats geen bronnen met een open vlam, zoals brandende kaarsen, op of in de
buurt van het product.
De ventilatie mag niet worden belemmerd door het bedekken van de
ventilatieopeningen door bijvoorbeeld kranten, tafelkleden, gordijnen en
dergelijke.
Het niet in acht nemen van enigerlei waarschuwing of voorzorgsmaatregel in
deze gebruikshandleiding kan tot beschadiging leiden en wordt niet gedekt
door de garantie.
12
Opmerking: Dank dit product op verantwoordelijke wijze af.
WAARSCHUWING: Wanneer u tijdens het rijden in het verkeer naar
een persoonlijke muziekspeler luistert, kan dit uw aandacht afleiden
van mogelijke gevaren zoals naderende auto’s, ambulances, enz.
WAARSCHUWING: Luister nooit voor lange tijd op hoge
volumeniveaus, om mogelijke gehoorbeschadiging te voorkomen.
A. Toetsnavigatie en aansluiting
Nr.
Omschrijving
Functie
1
Klem
2 Micro USB-poort
Voor PC-aansluiting/opladen
3
Status LED-indicator
(rood en blauw)
Voor laad- en afspeelstatus
4
Toets
Aan/Uit, Start/Pauze,
5
Toets
Vorige track/Terugspoelen
6
Toets
Volgende track/Vooruitspoelen
7
Toets
Volume verlagen
1
2
3 5 6
7
8
9
10
11
4

13
8
Toets
Volume verhogen
9
Oortelefoonuitgang
3,5mm aansluiting voor oortelefoonset
10
Reset (ingebouwde
tactschakelaar)
Voor terugstelling van de hardware
11
Geheugenkaartsleuf
Voor externe MicroSD-geheugenkaart
B. 1e gebruik
De speler is voorzien van een interne, oplaadbare lithiumbatterij die de gebruiker
niet zelf kan vervangen. Voor het beste resultaat, dient u de speler bij
ingebruikname ongeveer 2 ~ 3 uur op te laden of totdat de laad-LED constant rood
blijft branden.
Belangrijk: De speler kan batterijvermogen blijven verbruiken nadat deze op
stand-by is geschakeld, het apparaat dient dus te worden opgeladen na een tijdje
niet gebruikt te zijn. Wij raden u aan de batterij minstens eenmaal per maand op te
laden om de levensduur ervan te verlengen.
C. Oplaadmodus
U kunt de batterij van de speler op twee manieren opladen:
1. De speler aansluiten op uw computer. Of,
2. Een USB-muurlader gebruiken. (niet inbegrepen)
3. De Status-LED zal rood knipperen wanneer de USB-voedingsbron is
aangesloten.
4. Wanneer de batterij volledig is opgeladen, zal de Status-LED constant rood
blijven branden.
D. PC -verbindingmodus
1. Sluit de speler aan op een computer
1.1 Sluit de speler aan op een Windows OS computer via de USB-kabel,
vervolgens wordt “USB Mass Storage Device” (USB-massaopslageenheid)
waargenomen en wordt de betreffende driver automatisch door uw
computer geïnstalleerd. Er zal een verwisselbare disk worden
weergegeven in de folder “My computer” (Mijn computer) waar u de
lees- en schrijffuncties kunt gebruiken. De batterij zal op de achtergrond
worden opgeladen. (voor Windows 2000/XP of hoger)
1.2 U kunt de speler ook op een MAC OS computer aansluiten, het icoontje
“Untitled” (Naamloos) zal vervolgens op het bureaublad verschijnen ter
indicatie dat de speler een verwisselbare disk is. U kunt hier de lees- en
schrijffuncties gebruiken. De batterij zal op de achtergrond worden
opgeladen. (Voor Mac 9.2 of hoger)
14
Opmerking:
De speler kan muziek afspelen als u op de toets drukt terwijl de speler is
aangesloten op de USB-lader of computer.
Het apparaat staat automatisch in de modes “muziek afspelen” en kan niet
volledig worden uitgeschakeld, het beschikt wel over een pauze modes.
2. De speler loskoppelen van een computer:
Opmerking: Verwijder de speler a.u.b. op veilige wijze wanneer aangesloten op de
computer, anders kunnen de gegevens opgeslagen in de speler verloren gaan.
2.1 Als u een Windows OS PC gebruikt, kunt u de speler loskoppelen in “My
Computer” (Mijn Computer) of door op het icoontje “Safely Remove
Hardware” (Hardware veilig verwijderen) op de Windows systeembalk te
klikken.
2.2 Als u een Mac OS PC gebruikt, dan kunt u de speler loskoppelen door het
spelericoontje naar de prullenbak op het bureaublad te slepen.
2.3 Zodra het veilig is de speler los te koppelen van uw computer, kunt u de
USB-kabel loskoppelen van de speler en vervolgens van uw computer.
2.4 Als u de speler per ongeluk incorrect loskoppelt, sluit deze dan opnieuw
aan op uw computer.
E. Aan de slag
1. In/uitschakelen
1.1 Steek de oortelefoonset in de oortelefoonuitgang van de speler;
1.2 Houd de toets totdat de Status-LED blauw oplicht om de speler in te
schakelen.
1.3 Het blauwe lampje zal beginnen te knipperen en de muziek zal vervolgens
automatisch worden afgespeeld.
1.4 Om de speler uit te schakelen, houd u de toets ingedrukt totdat de
Status-LED snel begint te knipperen; de speler zal vervolgens enkele
seconden later uitschakelen.
Opmerking: Als enigerlei muziekbestand aan het geheugen van de speler wordt
toegevoegd dat niet wordt ondersteund, dan zal de statusindicator snel beginnen
te knipperen en vervolgens uitschakelen. De speler zal enkele seconden later ook
uitschakelen.
2. Muziek afspelen/pauzeren
2.1 Druk op de toets om de afspelende muziek te pauzeren.
2.2 Druk nogmaals op de toets om het afspelen te hervatten.
2.3 Als de speler voor 3 minuten in pauzemodus blijft, wordt deze
automatisch op stand-by geschakeld.
3. Volumeregeling
3.1 Druk op de / toets om het volume stapsgewijs te verhogen of
verlagen.
3.2 Houd de / toets ingedrukt om het volumeniveau continu te
 Loading...